

Page 1
Panasonic
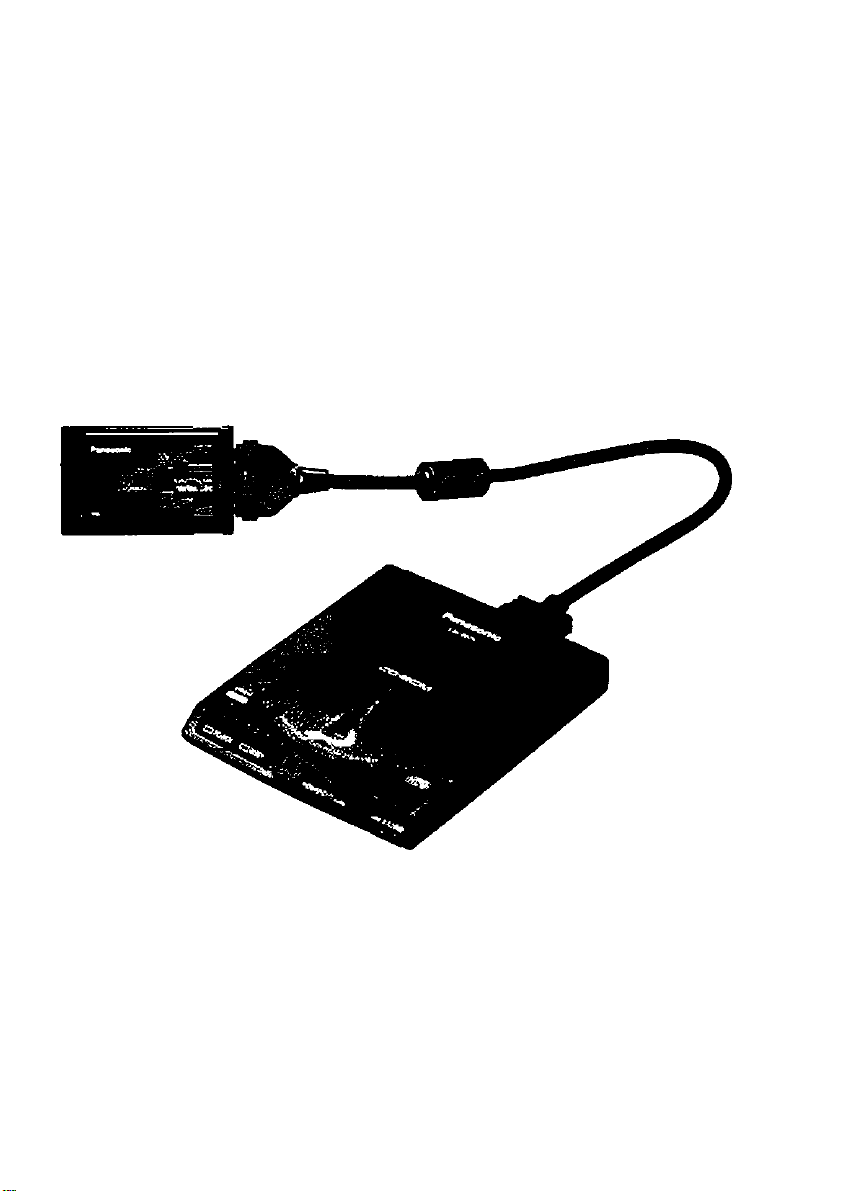
Portable CD-ROM Player
Operating Instructions
MoOo\ No. KXL-807A
This manual contains the information on handling the player. Please read this manual
first For the information on setting up the driver for use with your computer, please
read the Setup Manual enclosed with this manual.
Rease carefully read this manual and the enclosed Setup Manual
Keep these do<XBT>entation in a safe place for future reference.
Page 2

Thank you for purchasing the Panasonic Portable CD-ROM
Player KXL-807A.
WARNING
• The power source voltage of the AC adaptor is listed on the nameplate.
Plug the optional AC adaptor only Into an outlet with proper voltage.
• To prevent fire or shock hazard, do not expose this product to rain or any type of
moisture.
CAUTION
• When you operate this equipment with the optional AC adaptor, the mains
socket-outlet should be near the equipment and should be easily accessible.
• To prevent the Interface connector from static electricity damage, before you
touch it, discharge any static electricity from your hands by touching a grounded
metal surface, such as the screw on the plate cover of an electric outlet.
CAUTION FOR LASER
This product utilizes a laser.
Use of control, adjustment or performance of procedures other than those
specified herein may result in hazardous radiation exposure.
Do not open covers and do not repair yourself. Refer servicing to qualified
personnel.
Laser diode properties
Material AIGaAs
Laser output
Wave length
Emission duration Continuous
(This output is the value measured at the distance of 200 mm from the objective
lens surface.)
The serial number of this unit may be found on the label located at the bottom of
the unit. Write this number below and keep this book along with your proof of
purchase to serve as a permanent record of your purchase or for future reference.
For warranty service you may be required to show your purchase records.
MODEL NO. KXL-807A
SERIAL NO.
Less than 48.5 pW
785 nm
NAME OF DEALER
DATE OF PURCHASE
Page 3

FOR USERS IN UNITED STATES ONLY
This equipment has been tested and found to comply with the limits for a Class B
digital device, pursuant to Part 15 of FCC Rules. These limits are designed to
provide reasonable protection against harmful interference in a residential
installation. This equipment generates, uses and can radiate radio frequency
energy and, if not installed and used in accordance with the instructions, may
cause harmful interference to radio communications.
However, there is no guarantee that interference will not occur in a particular
installation. If this equipment does cause harmful interference to radio or television
reception, which can be determine by turning the equipment off and on, the user is
encouraged to try to correct the interference by one or more of the following
measures:
• Reorient or relocate the receiving antenna.
• Increase the separation between the equipment and receiver.
• Connect the equipment into an outlet on a circuit different from that to which the
receiver is connected.
• Consult the dealer or an experienced radioH'V technician for help.
The user may find the booklet “Something About Interference" available from FCC
local regional offices helpful.
FCC Warning: To assure continued FCC emission limit compliance, the user must
use only the recommended shield interfacing cable when connecting to a host
computer. Also, any unauthorized changes or modifications to this equipment
would void the user’s authority to operate this device.
* •
• Microsoft, MS-DOS, Windows and Windows NT are registered trademarks of
Microsoft Corporation in the United States and/or other countries.
• Photo CD is a registered trademark of Eastman Kodak Company.
All other brands and product names are trademarks or registered trademarks of their
respective companies.
Permission is granted from Microsoft Corporation to use Microsoft® Windows® Screen
Shots.
Specifications given in these Operating Instructions are subject to change without
notice.
© KYUSHU MATSUSHITA ELECTRIC CO., LTD. 1998
Page 4

\Features:
• Fast Performance - Ultra Compact Design
—20X (Max,)*^ performance portable CD-ROM player
—Weight less than 12 ounces (approx. 330 g)
—Slim design and lightweight - a truiy portable drive
• Easy Connection to a Notebook Computer with a PC Card Slot
(PCMCIA Type II)
—Includes Plug & Play PC card interface*^
• Power right from your PC Card Siot so it’s truiy piug & play
—Plug the AT API PC card into your Notebook computer and its ready to
use
—No need to carry power cables or batteries*^
—Optional AC adaptor (KX-WZ337) available
• Supports Various Operating Systems
—Drive supports DOS, Windows® 3.1, 3.1 T\ Windows® 95*® and
Windows NT® 3.51, 4.(7*®
—Includes E-Z installation Setup Disk
When used with optional AC adaptor.
And performance will vary depending on computer specifications.
The supplied ATARI PC card supports the Plug & Play function for Windows 95.
The ability to power the player from a PC card slot depends on power capability
of your notebook computer.
*“ Microsoft® Windows® operating system Version 3.1 or 3.11
(hereafter Windows 3.1,3.11)
Microsoft® Windows® 95 operating system (hereafter Windows 95)
Microsoft® Windows NT® Workstation operating system and
Microsoft® Windows NT® Server network operating system Version 3.51 or 4.0
(hereafter Windows NT 3.51,4.0)
The player cannot be shared on a network.
Important:
■ Please use CD-ROMs
with the marking below.
n COMPACT
(^ Dg ®
I Please use audio CDs
with the marking below.
DIGITAL AUDIO
Page 5
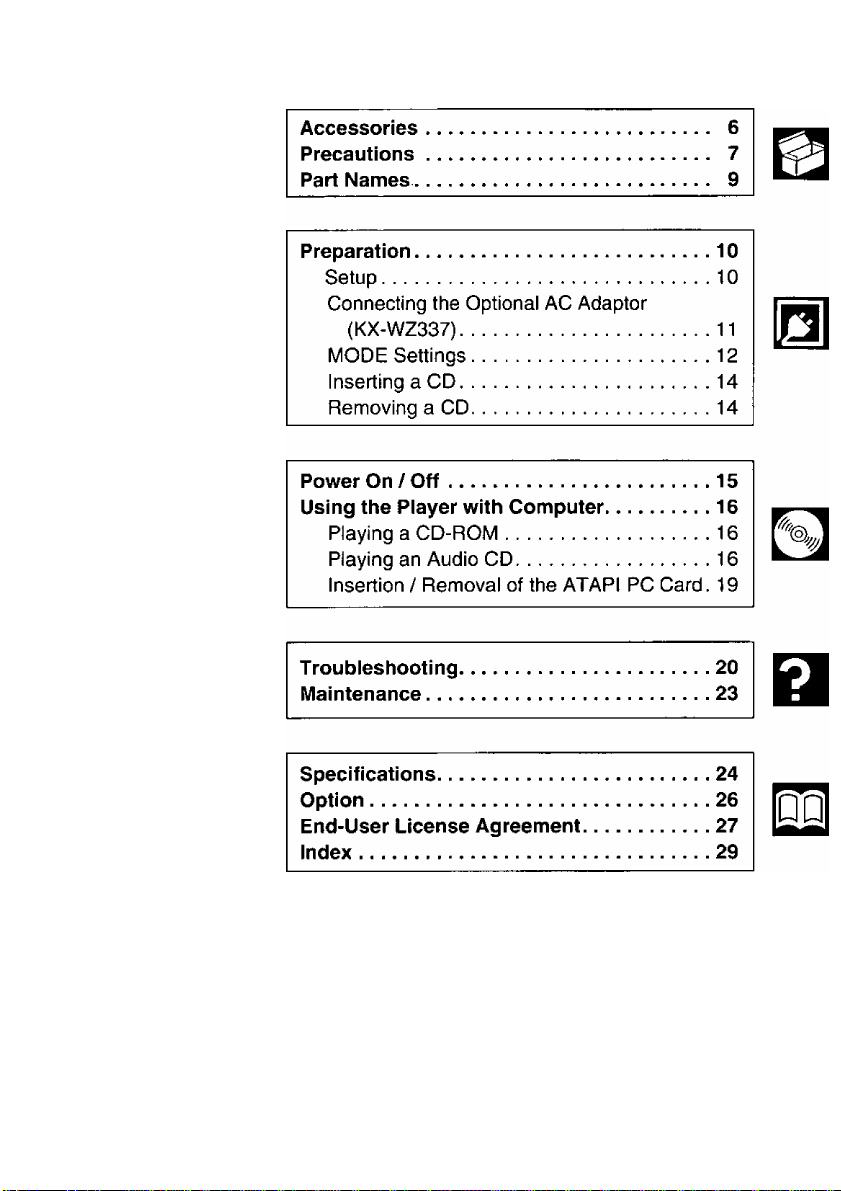
Table of Contents
Before Use
Preparation
Operation
Troubleshooting
& Maintenance
r
Appendix
Page 6
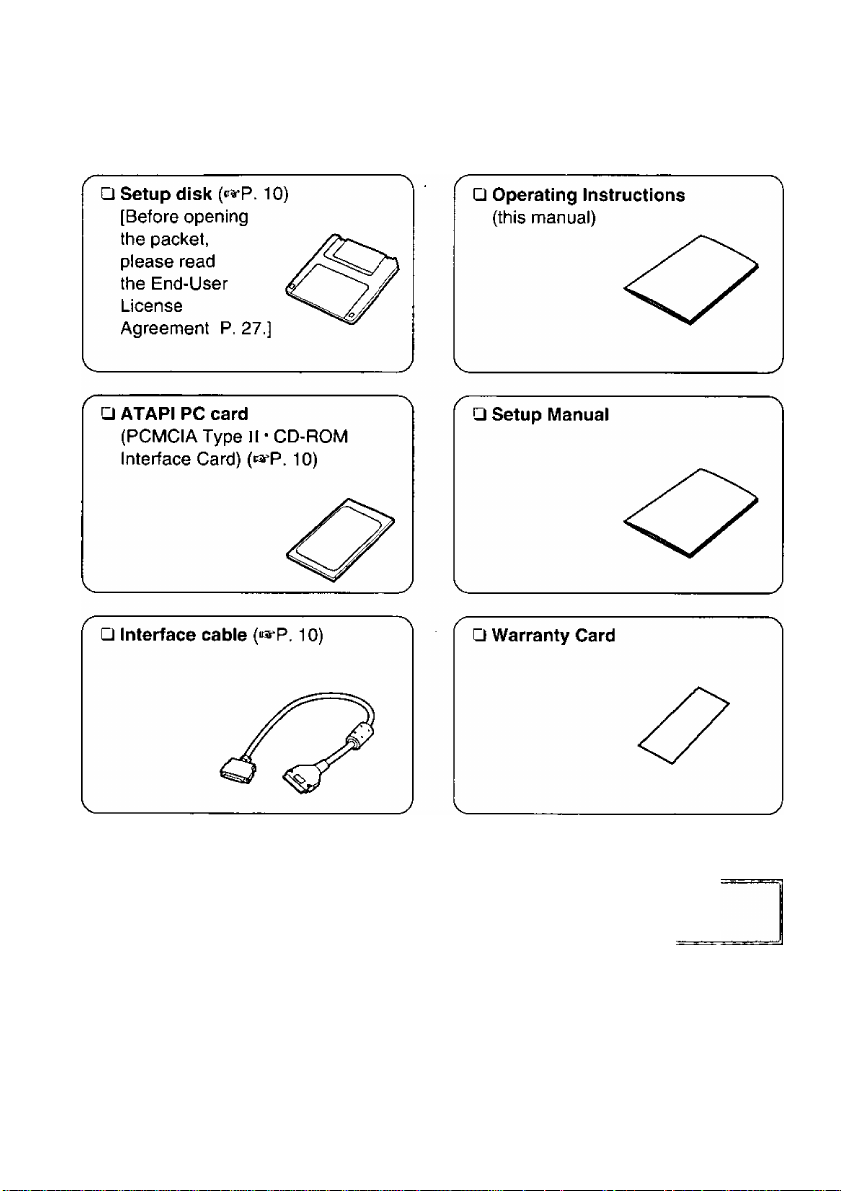
Accessories
Make sure that the following accessories are included with the player. If anything
is missing, contact your dealer immediately.
AC adaptor is not included. If you wish to purchase the optional AC adaptor
(KX-WZ337) (ra-p, 26), ask your dealer, or call Panasonic at 1-800-346-4768.
Page 7
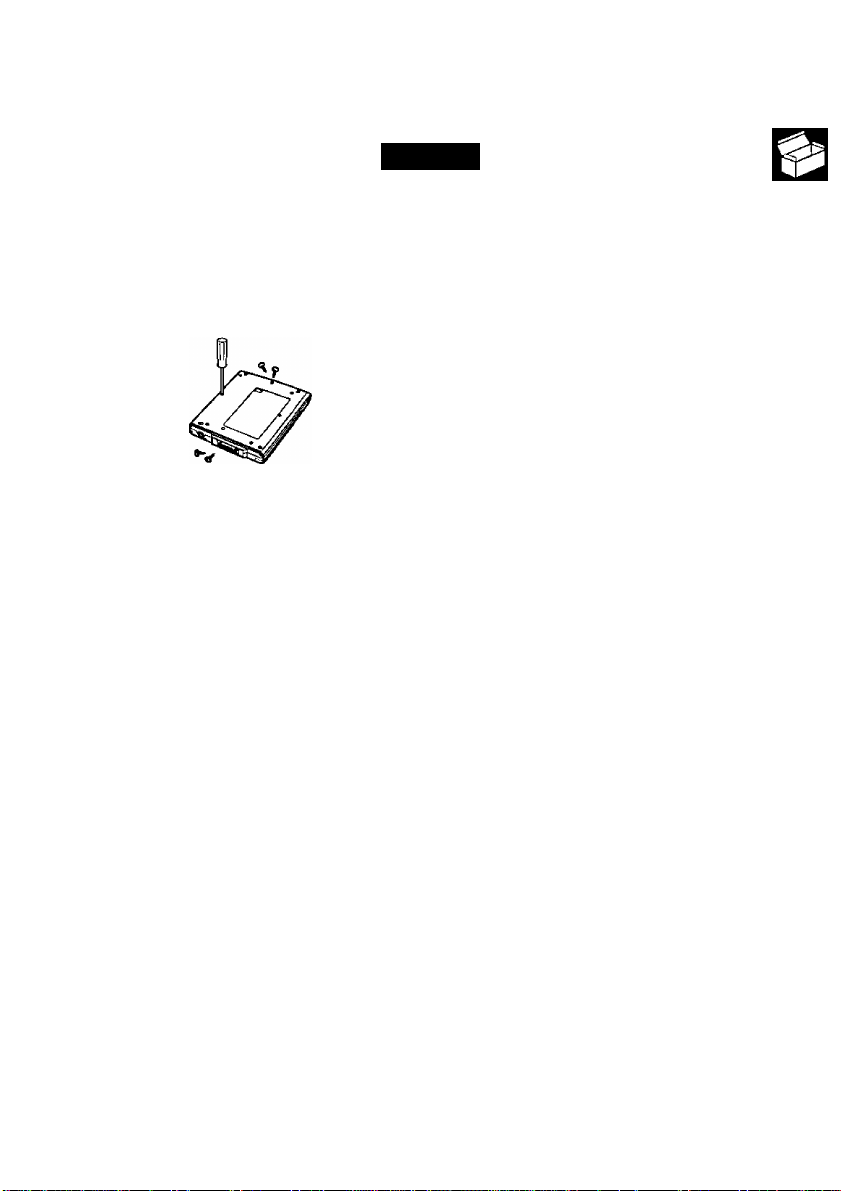
Precautions
Do not disassemble the player and
do not repair yourself, or it may
cause electrical shock hazard, or a
laser may damage your eyes.
General
When the player has been moved
from a cold place to warm place, it
may damp or moist. Leave the
player for about 1 hour before using.
the player.
Keep magnetic objects away from
>
o
o
<D
(0
(0
o
5'
cn
Do not store or use the player in a
dusty, humid, oily environment, or
under damp or moist conditions.
Do not turn up the volume too high,
when using the headphones.
Do not leave the player in direct
sunlight, near a heat source or
especially in a hot automobile.
Do not drop or jar the player.
Do not touch the pins/terminals of the
ATARI PC card and interface cable.
Do not insert any foreign metal
object inside the player.
Do not touch the lens.
If noise is heard from radio or TV,
move the player 2 m (about 6 ft.)
away from the radio or TV.
Do not use any other PC card with
the player, except the supplied
ATARI PC card.
Page 8

Precautions
AC Adaptor
Use only the optional AC adaptor {KX-WZ337) (fsrP. 26)
Do not scratch, smudge, write or
label both surfaces of CD.
Do not leave the CD in direct
sunlight, near a heat source or
especially In a hot automobile.
Do not throw or bend CD.
Do not touch the data side (the side
without the label) of CD.
Avoid finger prints and scratches
while holding it.
8
Page 9
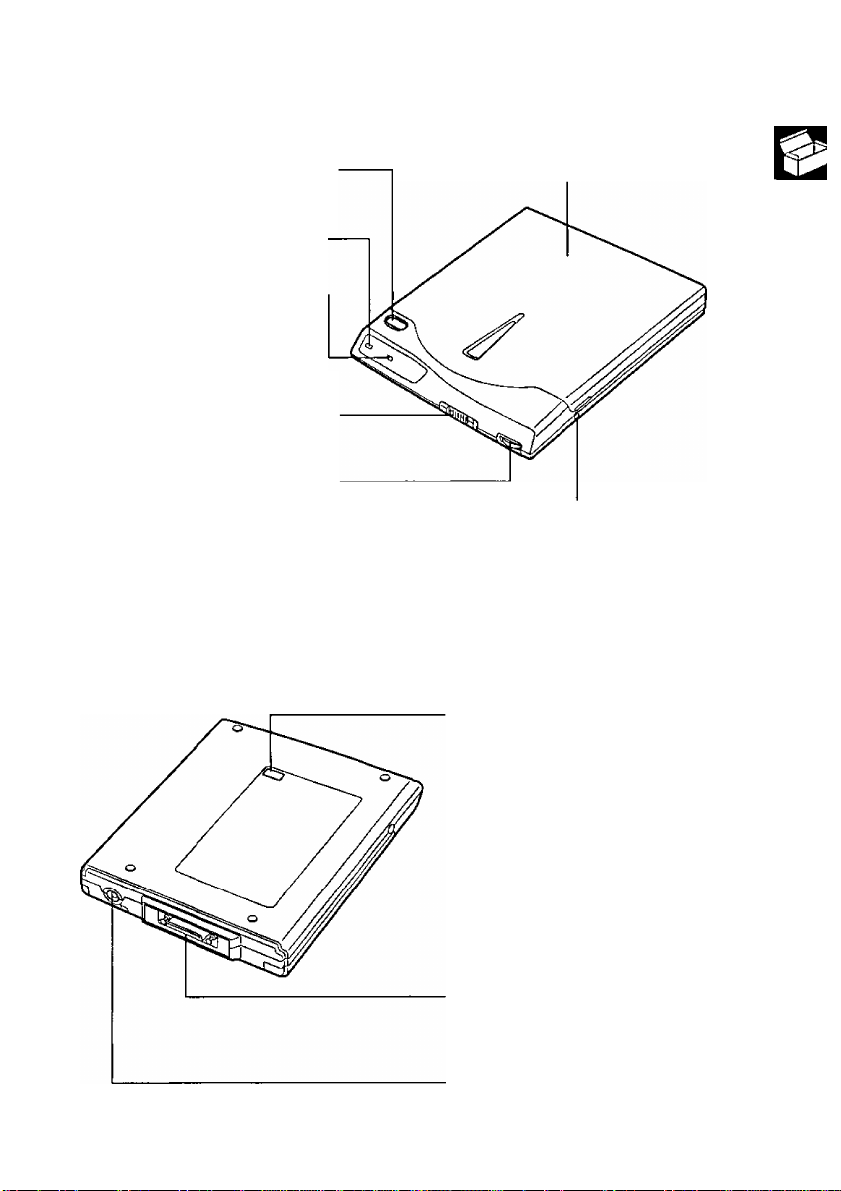
Part Names
Front / Right Side view
OPEN button [OPEN] (rpP. 14)
Opens the disc cover.
POWER indicator (green)
It lights when the player is on.
BUSY indicator (amber)
It lights or blinks when data is
being transferred between the
player and the computer.
POWER switch [POWER 0/1 1
(ra-p. 15)
VOLUME control
Adjusts the volume of the headphones/
external speaker system (not supplied)
attached to the PHONES jack (0-10).
------
Rear/Bottom view
Disc cover (ra*p. 14)
PHONES jack [M ] {«-p. 16)
Connects your headphones/
external speaker system (not
supplied).
MODE switch
Sets the following modes on/off
(■®-p. 12, 13)
• AC ADAPTOR ONLY mode
• POWER SAVE mode
(Power from a PC Card Slot)
• VIBRATION DETECTIVE mode
(D
o
Q>
C
5'
3
№
■D
0)
3.
z
0)
B
(D
V)
Interface connector [l/F] (cs-P. 10)
Connects the supplied interface
cable.
DC IN jack
[DC IN 13V <$--(5-^ ] (^P. 11)
Connects the optional AC adaptor.
Page 10
Preparation
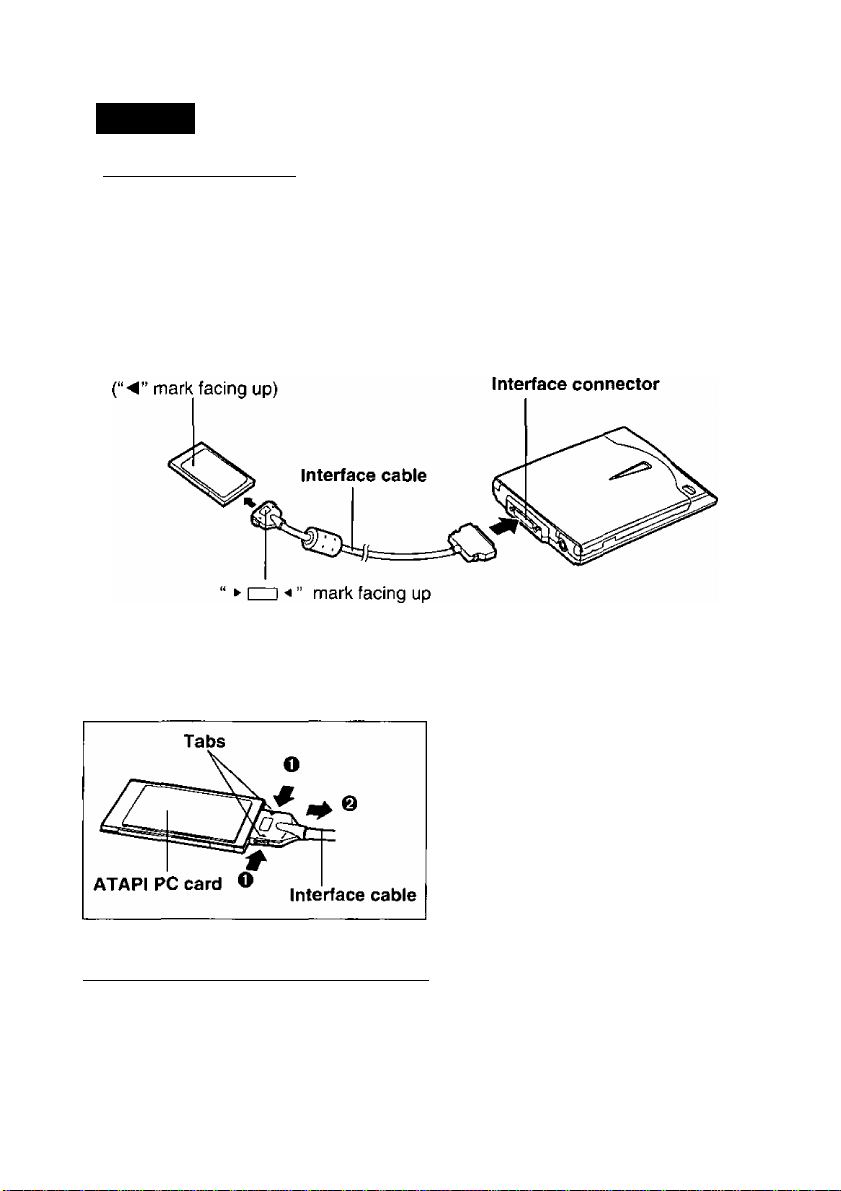
Setup
Step 1 Connection
Connect the supplied ATARI PC card, interface cable and the player. For the
connection with the computer, refer to the enclosed Setup Manual.
Note:
• Use only the supplied ATARI PC card and interface cable with this player. Other
ones could damage the player or computer.
ATARI PC card
\Disconnecting ATAPt PC card from interface cable:
While pressing the side tabs of it (0)>
pull the interface cable straight (0),
Caution:
• Do not force the interface cable
since this could damage the ATARI
PC card or interface cable.
I
Step 2 Setting up your computer
To use the player with a computer, you must install a device driver using the supplied
Setup disk.
Please refer to the enclosed Setup Manual.
10
Page 11

Preparation
Connecting the Optional AC Adaptor (KX-WZ337)
Please read "Precautions” in the Operating Instructions supplied with the AC
adaptor.
Power can also be supplied from a PC card slot. However, using AC adaptor provides
faster data transfer and shorter access time (‘^'P. 24).
If the power cannot be supplied to the player from a PC card slot due to the poor
performance of computer’s power supply, use the optional AC adaptor.
m
o
■D
0)
Notes:
• If the player is not going to be used for an extended period, unplug the AC
adaptor from the AC outlet to reduce power consumption. {Approximately 1 W of
power is consumed when the player is OFF and the AC adaptor is connected
with 120 V outlet.)
• The AC adaptor is universal voltage. However, it’s plug is designed for use only
in the country where it was purchased.
11
Page 12

Preparation
Mode Settings
Normally the player can be used without changing the mode settings.
However, if you wish to change a setting, after you confirm the mode setting’s
functions (t*" P. 13), set the switch (No. 1 to No. 3) to ON or OFF using a pointed
object like a pen.
Before changing a mode setting, make sure that a CD is not in the player.
(Bottom view)
12
Note:
• Switch No.4 is used for MAKER SERVICE mode. Make sure that you use the
player with this switch set to OFF.
Page 13

Preparation
Switch
No.
1
2
3
Mode
AC ADAPTOR
ONLY mode *'
POWER SAVE
mode *’ (Power
from a PC Card
Slot)
VIBRATION
DETECTIVE
mode*^
Setting Description
The player can be used only when using the
optional AC adaptor. The player cannot be
ON
turned on when using power from a PC card
slot.
The player can be used with the power from a
PC card slot. If the power can be supplied
from both the optional AC adaptor as well as
OFF
the PC card slot, the AC power has priority
over the power supply from a PC card slot.
The player functions with Power Consumption
Save mode (hereafter Power Save mode).
If the computer’s function is not stable with
Power Consumption Normal mode (hereafter
ON
Normal mode) or the computer is used for a
long time with battery, set this mode to ON.
(Data transfer rate is max. 6X.)
The player functions with Normal mode. (Data
OFF
transfer rate is max. 12X.)
Vibration detect function works while a CD is
spinning. It automatically slows down the spin
ON
speed of a CD when the CD vibrates a lot.
Vibration detect function does not work while
OFF
a CD is spinning.
(D
■o
D)
j I ; Default Setting
The player cannot be used with power from a PC card slot if the computer’s function
is not stable, even when the switch No. 2 is set to ON (Power Save mode). In this
case, connect the optional AC adaptor and set the switch No. 1 to ON.
This mode is effective only when using the optional AC adaptor. When the vibration
detect function works, the data transfer rate is slowed from max. 20X to max. 16X.
13
Page 14

Preparation
Inserting a CD
OP£H
®
Press CD to open the disc
cover and then raise it.
@ Place a CD onto the disc spindle.
Press on the center of a CD until it
locks onto the disc spindle.
Close the disc cover.
Press I
Caution:
• Insert a CD firmly until it locks onto the spindle and then close the disc cover, or
the CD may fall off the spindle and be damaged.
1
on the disc cover.
Removing a CD
Make sure that the BUSY indicator is off.
14
(T) Make sure that the CD is not
spinning.
OP6W
@
Press
CD
to open the disc
cover and then raise it.
Carefully remove the CD by
lifting it.
Press on the disc spindle, then lift the
CD by holding its edge.
@ Close the disc cover.
Page 15

Power On / Off
Power of the player is automatically turned on/off when the computer’s power is turned
on/off. Similarly, if the ATARI PC card can be Inserted/removed with the computer
turned on (ra- p. 19), the power of the player is automatically turned on/off when the
ATARI PC card is inserted/removed. [The POWER indicator (green) is lit when the
player is turned on.]
However, the player’s power may not be disconnected even when the computer is
turned off depending on the computer’s setting (Suspended, Resumed, etc.). In this
case, turn off the player by sliding its POWER switch.
POWER indicator
' It is recommended that you use the computer with AC power. If the player is
used with power from a PC card slot, the computer’s battery may be consumed
very quickly. When the computer indicates “Battery weak", immediately connect
the AC adaptor to the computer,
' When using power from a PC card slot, if the computer is on, the ATARI PC
card consumes approximately 0.1 W of power even if the player is turned off.
Also, some computers will supply power to the ATARI PC card even when they
are in Resume (Power Save) mode.
If the player is not going to be used for a long period, it is recommended to
remove the ATARI PC card to save power consumption. For insertion/removat of
the ATARI PC card, refer to page 19.
' When the ATARI PC card is inserted with the computer turned off, the player
may be automatically turned on depending on the computer’s setting (This is not
abnormal).
fl)
■a
0)
S
1-^
o'
TJ
o
€
(D
o
15
Page 16

Using the Player with Computer
Note:
• When the BUSY indicator (amber) is lit or blinking, observe the following
precautions since a data is being transferred between the player and the
computer.
—Do not open the disc cover.
—Do not disconnect the ATARI PC card.
—Do not slide the POWER switch of the player.
—Do not disconnect the AC adaptor if the optional AC adaptor is being used.
Otherwise, your computer may hang up. If this happens, restart your computer.
Playing a CD-ROM
To use a CD-ROM, refer to the manual or “README” file included with the
CD-ROM.
• Some types of CD-ROMs [game CD-ROM with audio track, CD-Extra, Portfolio
CD (Photo CD), etc.] ailow you to listen to the sound or music through the
headphones/external speaker system (not supplied) with the PHONES jack of
the piayer. Connect the headphones/external speaker system (not suppiied) with
the PHONES jack of the player. If the LINE IN jack is available on the sound
system of your computer, make a connection between the LINE IN jack of the
computer and PHONES jack of the player using an audio cable with 0 3.5 mm
mini stereo plug at both ends. The cable can be obtained at mass electronics
stores.
Playing an Audio CD
You can operate an audio CD on a computer using an audio CD control software.
Sound can be heard through the PHONES jack.
• To listen to the sound or music of an audio CD, connect the headphones/
external speaker system (not supplied) with the PHONES jack of the player. If
the LINE IN jack is available on the sound system of your computer, make a
connection between the LINE IN jack of the computer and PHONES jack of the
player using an audio cable with 0 3.5 mm mini stereo plug at both ends. The
cable can be obtained at mass electronics stores.
16
Page 17

Using the Player with Computer
SjpgjgjgGtiag^
Windows
e©®?
Wjndows
Cínr¿aj®
• Under Windows 95, an audio CD is automatically played after an audio CD is
inserted into the player. However, if an audio CD is not played automatically,
play it by referring to the following instructions.
You can use either of the following methods ® or ® ,
® Select “Multimedia” from the Accessories group of Program Menu to
start “CD Piayer”.
(Example)
[01)01:56
firtitt |^evwA:tiU
Irti JFjíwTÍí”
itottfr^Sn
ila(^PIvU3rKi '[riKl (CXni
Ml
<D_> d
<(It>
1. Select “Multimedia” from the Accessories group of Program Menu to
start “Media Piayer”.
2, Select “CD Audio” from the Device menu.
(Example)
LCD Audio Medía Ptayei (slopped)
F3e E(it Device Sede Help
ta
D>
(D
C
Í2.
3"
(P
2
0:02 5:00 10:00 20:OT 30:00 40:00 53:50
► U ± ÍM4 44 ►►' ►►i [D0'0S(min:seci
If an audio CD control software is not installed, install the software using “Add/Remove
Programs" in Control Panel. For detailed information, refer to the manual of
Windows 95A/Vtndows NT 4.0, or “Help” file for Windows 95 («¡-p. 7 in the Setup
Manual)/“README.TXT’ file for Windows NT 4.0 (<®'P. 17 in the Setup Manual).
O
o
3
■O
17
Page 18

Using the Player with Computer
[^]Daiajifeiagii^
Windows
Windows
RFSygi)
1. Start “Media Player” from the Accessories program group.
2. Select “CD Audio” from Device menu.
(Example)
File Edit Qevice Scaie Heip
.........
1 2 3 4 5 6 7 99 10 12131415 1617 132021 23 25
Media Player - CD Audio [stopped]
00:00 (minisec) _
If the “CD Audio” is not displayed, install the Windows device driver “[MIC] CD Audio”
from the Drivers in Control Panel. For detailed information, refer to the manual of
Windows 3.1, 3.11/Windows NT 3.51 or “README.TXT” file {^p.io, 14 in the Setup
Manual).
18
Page 19

Using the Player with Computer
Insertion / Removal of the ATARI PC Card
Wjndows
The supplied ATARI PC card supports the Hot Swapping (Plug & Play) function. With
the computer turned on, you can insert/remove the ATARI PC card without fear of
hardware damage. Before removing the ATARI PC card, perform the following steps.
660003?
1 Click PC Card icon in task bar.
Stop Panasoriic KXLODD5
2 Click “Stop Panasonic KXLC005”.
Panatanic KXLC00&
You may safely (emovc this device.
CD
3 Make sure that the message “You may safely remove this device” is
displayed, then click I OKI.
4 Remove the ATAPI PC card.
Windows
Sfc.'Ooa.tJtlcasa?
c
№
5’
(d
(D
Q>
'<
<D
With the computer turned on, you can insert/remove the ATAPI PC card, if a PC Card
Manager is installed on the computer (refer to your computer manual for details).
When you start running your computer, make sure that the ATARI PC card is inserted
into the PC card slot before turning on the computer. If your computer has more
than one slot, and if you want to re-insert the ATAPI PC card, you must insert it into the
same slot it was inserted when starting the computer.
Note:
• Do not remove the ATAPI PC card when the BUSY indicator (amber) is lit or
blinking, since data is being transferred between the computer and the player.
Windows
№l?
With the computer turned on, you cannot insert/remove the ATAPI PC card. Please
turn off your computer to insert/remove the ATAPI PC card.
KFcEa?
o
o
3
“D
19
Page 20

Troubleshooting
If trouble occurs, check the following points before returning the player for service.
Trouble
The player is not
turned on
automatically when
the computer is
turned on.
Your computer
does not recognize
the player.
The player or the
computer does not
function properly.
Possible Cause
MODE switch No. 1 is set to
ON.
The interface cable or ATARI
PC card is not connected to the
player or to the computer
properly.
The computer does not have
the CD-ROM player's device
drivers installed yet.
The connector of the interface
cable is bent or broken.
The interface cable or ATARI
PC card is not connected to the
player or to the computer
properly.
The connector of the interface
cable is bent or broken.
MODE switch No. 4 is set to
ON.
Solution
• When using power from a
PC card slot:
set the MODE switch No. 1
to OFF, then remove and
insert the ATARI PC card
for Windows 95 user or
restart the computer for the
other user.
• When using AC power
supply:
connect the optional AC
adaptor.
Properly connect the interface
cable or ATARI PC card
(«s-p. 10).
Set up the computer
{■a-p. 10).
Consult your dealer (or
contact Panasonic Service
Center at 1-800-PANA-SYS
for users in continental United
States).
Properly connect the interface
cable or ATARI PC card
(^P. 10).
Consult your dealer (or
contact Panasonic Service
Center at 1-800-PANA-SYS
for users in continental United
States).
Set the MODE switch No. 4 to
OFF (®-P. 12).
20
Page 21

Troubleshooting
Trouble
The player or the
computer does not
function properly.
The player
(especially disc
spindle), AC
adaptor (option) or
ATARI PC card is
warm.
Transmission
speed of data
slows down when
using AC adaptor
(option).
Sound skips, or
data can not be
read.
Possible Cause Solution
■When using power from a PC c
Computer’s battery is low.
Power cannot be supplied from
a PC card slot depending on
the performance of computer’s
power supply.
■When using AC adaptor (option
The optional AC adaptor is not
connected into the outlet or DC
IN jack properly.
The Auto Protect function of AC
adaptor is working.
The CD is warped and the
player is in the VIBRATION
DETECTIVE mode.
CD is placed with the label side
facing down.
“ iiEl
[OJD^Ê i^3rk is used.
DtCrTAl. AUDIO
ard slot:
It is recommended to use
computer with AC power.
Set the MODE switch No. 2 to
ON (isi-p. 12,13). If the player
still does not function,
connect the optional AC
adaptor and set the MODE
switch No. 1 to ON.
):
Connect the optional AC
adaptor properly (ca-p. 11).
Disconnect the optional AC
adaptor and connect it again
after 2-3 minutes.
This is not abnormal. If they
become abnormally hot,
consult your dealer.
Set the MODE switch No. 3
to OFF to deactivate the
VIBRATION DETECTIVE
mode (ra-p. 12,13).
However, if the CD is heavily
warped and has strong
vibration, the data may not be
read.
Place the CD with the label
side facing up (ca-P. 14).
Use the CD marked with
rilnal 0^ til KP-4).
nCfTALAUOtO
O
c
2
(D
W
3"
o
o
5'
(Q
CD or the lens of the player
may have become dirty.
CD is damaged.
Dust such as a hair lay on the
disc spindle.
Clean the CD or the lens of
the player (>®’P. 23).
Replace with another CD.
Clean the disc spindle.
21
Page 22

Troubleshooting
Trouble
Sound skips, or
data can not be
read.
Sound of audio CD
or CD-ROM cannot
be listened.
The player is not
turned off
automatically when
turning off the
computer.
The player cannot
be turned off by
sliding its POWER
switch.
Possible Cause Solution
The player or/and CD are damp
or moist, because the player
or/and CD may have been
moved from a cold place to a
warm place.
Connection to the PHONES
jack is not proper.
The player’s VOLUME control is
set to “0”.
■ When the computer's sound system and the player’s
PHONES jack is connected:
The volume is set to the lowest
level in the “Volume Control” or
“Mute” is selected on the
software control of the sound
device.
Depending on the computer’s
setting (Suspended, Resumed,
etc.), the player is not turned off
when the computer is turned
off. Refer to your computer’s
manual.
Remove the CD from the
player and do not use the
player and CD for about 1
hour.
Connect the headphones/
external speaker system (or
an audio cable) to the
PHONES jack firmly
(ra-P. 9, 16).
Set the player’s VOLUME
control to a higher level
(ra-p. 9).
Set the volume higher level,
or cancel the “Mute”
selection. For further
information refer to your
sound device manual.
Turn off the player by sliding
its POWER switch.
Remove the ATARI PC card
from the computer’s PC card
slot.
If using optional AC adaptor,
disconnect the AC adaptor.
22
Page 23

Maintenance
Caution:
• Do not use solvents such as benzine, thinner, alcohol, record cleaners or
anti-static spray.
I
When the outside of the player is dirty:
\When sound skips or data cannot be read:
(O
<D
(li
3"
o
o
r*
3'
23
Page 24

Specifications
Operating Environment
(under no damp or moist
conditions):
Storage Environment
(Non-condensing):
Dimensions:
Mass {Weight}:
Power Sources:
Interface: ATAPI (Interface card: PCMCIA 2.1)
Interface Connector: 50-pin
Buffer Size:
MPC: MPC level 2 (The capability differs depending on the
Data Transfer Rate*':
Access Time
(The information is based on
the test results measured 1/3
stroke by Panasonic test
software):
Temperature: 5°C {41 °F} to 35'’C {95°F}
Humidity: 20% to 85% RH
Temperature: -20°C M“F} to 55°C {13rF}
Humidity: 15% to 85 % RH
130 (W) X 162.8 (D) X 24.3 (H) mm
{5.12"x6.41"x0.96"}
Approx. 330 g (11.6 oz.}
(without ATAPi PC card and interface cable)
• Power from computer (uses power from a PC card
slot): DC5V
• Optional AC Adaptor (KX-WZ337): 100-240 V,
50/60 Hz
128 KB
computer or software.)
• With power from a PC card slot
• Normal mode: 800 KB/s (inner: 5.3X) to 1800
KB/S (outer: 12X)
• Power Save mode: 375 KB/s (inner: 2.5X) to
900 KB/s (outer: 6X)
• With optional AC adaptor
1275 KB/s (inner: 8.5X) to 3000 KB/s (outer: 20X)
[when the vibration detect function works, 1100
KB/s (inner: 7.3X) to 2400 KB/s (outer: 16X)]
• With power from a PC card slot
• Normal mode: 220 ms typical
• Power Save mode: 260 ms typical
• With optional AC adaptor
130 ms typical
*' Performance may vary based on computer specifications.
24
Page 25

Specifications
Power Consumption:
Compatible CD, CD-ROM
Format:
Error Rates:
Audio Performance
Phones Out (stereo):
ATAPI PC Card and
Interface Cable:
• With power from a PC card slot (DC 5 V)
• Normal mode
when playing CD-ROM: Approx. 4.2 W
when thé player is turned off: Approx. 0.1 W
• Power Save mode
when playing CD-ROM: Approx. 3.7 W
when the player is turned off; Approx. 0.1 W
• With optional AC adaptor
when playing CD-ROM: Approx. 9.5 W
when the player is turned off: Approx. 1.0 W
CD-DA (Audio CD )*\ CD-i*^ VIDEO CD*S
CD-ROM ( Mode 1 , Mode 2 Form 1 ),
CD-ROM XA ( Mode 2 Form 2 ),
Photo CD*^ (Multisession compatible),
CD Extra
Soft read errors Less than 10-®
Hard read errors Less than 10“'^
S/N More than 80 dB
(A Range)
Maximum output level 14mW(EIAJ)
(impedance 16 0)
Power source DC 5 V, approx. 20 mA
Card type PCMCIA Type II
Card dimensions 54 (W) x 85.6 (D) x 5 (H) mm
{2.13"x 3.37" X 0.20"}
Cable length Approx. 400 mm
(without connector)
Data transfer rate 3 MB/s (MAX.)
Mass {Weight} Approx. 110 g {3.9 oz.}
(with cable )
m
CO
■a
(D
O
Audio CD titles can only be played if the computer has an audio CD control software.
CD-i or VIDEO CD titles can only be viewed if the computer has software or
hardware MPEG decording capability.
Software required for viewing Photo CD titles is not included.
25
Page 26

Option
The following option is available through your local Panasonic authorized distributor.
Model Name
AC adaptor
To purchase the AC adaptor directly from Panasonic, ask your dealer, or call
Panasonic at 1-800-346-4768.
Model No.
KX-WZ337
r
If you use the optional AC adaptor, observe the following precautions.
I Do not plug-in or remove the AC
adaptor using wet hands.
I Make sure the AC outlet or cord for
the AC adaptor does not exceed the
limit of their electrical ratings.
I Make sure the prongs of AC adaptor
are fully inserted into the AC outlet.
I Periodically remove the dust from the
prongs of AC adaptor.
I Only use the AC adaptor indoors.
Do not damage the AC adaptor by
scratching of modifying, or bending
its prongs.
' Do not use the AC adaptor under the
following conditions.
—when it is damaged
—when there is smoke or strange
smell
—when an abnormal sound is heard
i Do not disassemble the AC adaptor.
26
Page 27

End-User License Agreement
THIS IS A LEGAL AGREEMENT BETWEEN YOU AND PANASONIC. CAREFULLY
READ ALL THE TERMS AND CONDITIONS OF THIS AGREEMENT PRIOR TO
OPENING THE PACKET OF SOFTWARE PROGRAM. OPENING THE PACKET
INDICATES YOUR ACCEPTANCE OF THESE TERMS AND CONDITIONS. If you do
not agree to these terms and conditions, return the unopened packet and the other
components of the Panasonic product to the place of purchase and your money will be
refunded. No refunds will be given for product that have an opened packet or missing
components.
1. COPYRIGHT:
Panasonic has the right to license or has been granted to license the enclosed
software program ("SOFTWARE”), developed and copyrighted by Kyushu
Matsushita Electric Co., Ltd. or its licensor (“Licensor”). You acknowledge that you
are receiving only a LIMITED LICENSE TO USE the SOFTWARE and related
documentation, and that you shall obtain no title, ownership nor any other rights in
or to the SOFTWARE and related documentation, all of which title and rights shall
remain with Licensor and Panasonic.
2. LICENSE:
(1) You have the non-exclusive right to use the one copy of the SOFTWARE on a
single computer used by single user. Installation of the SOFTWARE on a network
server for the purpose of distribution to one or more other computers shall not be
granted in this Agreement. (2) You may not copy, reproduce, or permit to be copied
or reproduced, the SOFTWARE or related documentation for any purpose, except
that your may either (a) make a reasonable quantity of copies of the SOFTWARE
solely for backup or archival purposes, or (b) transfer the SOFTWARE to a single
hard disk, provided that you keep the original solely for backup or archival purposes.
All other copies of the SOFTWARE are in violation of this Agreement. (3) You may
not rent or lease the SOFTWARE, but you may transfer your right under this
License Agreement on a permanent basis, provided that you transfer this
Agreement, all copies of the SOFTWARE, all related documentation and your
Panasonic product, and the recipient thereof agrees the terms of this Agreement.
(4) You may not reverse engineer, decompile or disassemble the SOFTWARE,
except that in European Union and European Free Trade Association, you may
have the limited right to reverse engineer, decompile or disassemble the
SOFTWARE solely to the extent specifically permitted by the terms and conditions
of Article 6 of the European Community’s Directive for the Legal Protection of
Computer Programs, OJL 122/42 (17 May 1991). (5) You may not use, copy,
modify, alter, or transfer the SOFTWARE, or any copy thereof, in whole or in part,
except as expressly provided in this Agreement.
3. TERM:
This license is effective until terminated. You may terminate this Agreement at any
time by destroying the SOFTWARE and related documentation and all copies
thereof. This license will also terminate if you fail to comply with any term or
condition of this Agreement. Upon such termination, you agree to destroy all copies
of the SOFTWARE and related documentation.
________
■o
<£3
o
m
3
Q.
O
(D
3
№
(D
>
(D
№
3
№
27
Page 28

End‘User License Agreement
4. LIMITED WARRANTY:
Within ninety (90) days of your receipt of the SOFTWARE, Panasonic warrants that
the storage media on which the SOFTWARE are furnished is free from defect in
materials and workmanship under normal use, and that it will repair or at its option
replace any defective media at no charge to you, provided that such defective
media is returned to Panasonic within such ninety (90) days period.
5. LIMITATION OF LIABILITY:
EXCEPT AS STATED ABOVE, NEITHER PANASONIC, PANASONIC’S SUPPLIER
MAKES OR PASSES ON TO YOU OR OTHER THIRD PARTY, ANY WARRANTY
OR REPRESENTATION INCLUDING, BUT NOT LIMITED TO, THE IMPLIED
WARRANTY OF MERCHANTABILITY AND FITNESS FOR A PARTICULAR
PURPOSE. WITHOUT LIMITING THE GENERALITY OF THE FOREGOING,
NEITHER PANASONIC NOR PANASONIC’S SUPPLIER WARRANTS THAT THE
SOFTWARE WILL BE ERROR-FREE OR THAT IT WILL MEET YOUR
REQUIREMENTS. NEITHER PANASONIC NOR PANASONIC’S SUPPLIER
SHALL BE LIABLE FOR ANY DAMAGE SUFFERED BY YOU INCLUDING, BUT
NOT LIMITED TO, CONSEQUENTIAL, INCIDENTAL SPECIAL OR PUNITIVE
DAMAGES. THE ABOVE LIMITATIONS SHALL APPLY REGARDLESS OF THE
FORM OF ACTION WHETHER IN CONTRACT, TORT (INCLUDING
NEGLIGENCE), STRICT PRODUCT LIABILITY OR OTHERWISE, EVEN IF SUCH
PARTY HAS BEEN ADVISED OF THE POSSIBILITY OF SUCH DAMAGES.
28
Page 29

Index
AC adaptor (option)
AC ADAPTOR ONLY mode
Accessories..........................................6
ATARI PC card
Audio CD control software
For Windows 3.1, 3.11 /
Windows NT 3.51
For Windows 95 / Windows NT 4.0 ..17
BUSY indicator
CD-ROM....................................4. 16,25
Connection ........................................10
Connecting AC adaptor (option)
...................
..............
..............................
................
.....................
....................
9, 14, 16, 19
9, 11,26
13
6,10
16
18
..........
0
DC IN jack.......................................9, 11
Disc cover
DOS
.......................................
..................................................
9, 14
19
LINE IN jack
Maintenance ......................................23
Mode settings ...............................12,13
MODE switch
OPEN button.........................................9, 14
Option.................................................26
Part Names
11
PHONES jack
Playing an audio CD
POWER indicator ............................9, 15
Power On/Off
POWER SAVE mode
POWER switch
Precautions..................................7, 8, 26
Preparation
........................................
............................
..........................................
.......................................
..........................
....................................
.....................
..............................
........................................
16
9,12,13
9
9, 16
16
15
9,13
9,15
10
End-User License Agreement
Features
Inserting a CD....................................14
Insertion / Removal of interface card .19
Interface cable........................... .6,10
Interface connector
...............................................
.........................
.............
9,10
27
Removing a CD
4
Setting up computer ............................10
Setup disk
Setup Manual ......................6, 10, 17, 18
Specification
Troubleshooting
...........................................
........................................
.......................................
..................................
6, 10
24
20
m
a.
14 »
o
(D
3
»
(D
>
(Q
O
(D
3
o
Q.
H
29
Page 30

Index
Using a CD-ROM
VIBRATION DETECTIVE mode . . .9, 13
VOLUME control
Windows 3.1,3.11.............
Windows 95......................
Windows NT 3.51
Windows NT 4.0
................................
....................................
............
...............
............
............
..................
..................
18. 19
17, 19
16
18
17
9
30
Page 31

Q.
(D
X
31
Page 32

FOR USERS IN CONTINENTAL UNITED STATES ONLY
Technical Support Calls
If you have read this manual and Setup Manual and tried the troubleshooting
procedures, and you are still having difficulty, please contact the store from which
the unit was purchased. Panasonic Computer Peripheral Company will repair this
product with new or refurbished parts free of charge for two (2) years from the date
of purchase.
You may also call the technical support telephone number (24 hour, 7 day/week
automated technical support. Live technical support M-F, 9 am-5 pm EST).
The technical support number is: 1-800-PANA-SYS
(1-800-726-2797)
Software drivers are sometimes updated. You can download the latest or new
setup disk via your modem.
Internet: http://www.panasonic.com
BBS:@ 201-863-7845
^ This product is designed for use only In the country where it was purchased. ^
Panasonic Computer Peripheral Company
Division of Panasonic Communications & Systems Company
A Unit of Matsushita Electric Corporation of America
Two Panasonic Way, Secaucus, New Jersey 07094
Panasonic Sales Company
Division of Matsushita Eiectric of Puerto Rico, Inc.
San Gabriel Industrial Park, 65th Infantry Avenue KM. 9.5
Carolina, Puerto Rico 00630
Matsushita Electric Industrial Co., Ltd.
Central P.O. BOX 288, Osaka 530-91, Japan
Printed in Japan
PJQMA0359ZA S0398T0
 Loading...