

Page 1
Multi-Function Plain Paper FAX
Model No.
KX-FM330E
Please read this manual before using PANA LINK software.
Initial Preparation PANA LINK Functions Assistance
PANA LINK
Software Guide
Page 2
2
Before Use
This manual describes the many useful features of PANA LINK, available to you after connecting your fax
machine to your computer.
The functions described are as follows:
Printer functions
●
Printing documents from Windows®95 or Windows 98 (p. 8)
●
Printing a selected file (p. 8)
Fax functions
●
Computerised directory for fax and phone numbers (p. 15)
●
Sending documents (p. 9 and 10)
●
Receiving faxes on your PC (p. 12)
●
Viewing faxes on your screen (p. 18)
●
Sending a document from the fax machine using the PC (p. 11)
Scanner functions
●
Using your fax machine as a scanner (p. 16)
Please read carefully before use to obtain maximum effectiveness from PANA LINK.
For other functions, such as telephone, facsimile, telephone answering device and copier, please read the
Operating Instructions.
Trademarks
IBM is a registered trademark of International Business Machines Corporation.
Microsoft and Windows are registered trademarks of Microsoft Corporation in the United States and/or other
countries.
All other trademarks identified herein are the property of their respective owners.
Copyright:
This manual is copyrighted by Kyushu Matsushita Electric Co., Ltd. (KME) and its licensee. Under the
copyright laws, this manual may not be reproduced in any form, in whole or part, without the prior written
consent of KME and its licensee.
©
Kyushu Matsushita Electric Co., Ltd. 1999
Page 3

3
Initial Preparation PANA LINK Functions Assistance
Table of Contents
Initial
Preparation
Setup
Connecting to a computer . . . . . . . . . . . . . . . . . . . . . . . . 4
Installing PANA LINK software . . . . . . . . . . . . . . . . . . . . . 5
Activating PANA LINK software . . . . . . . . . . . . . . . . . . . . 6
Setting up PANA LINK . . . . . . . . . . . . . . . . . . . . . . . . . . . 7
Setting user information . . . . . . . . . . . . . . . . . . . . . . . . . . 7
PANA LINK
Functions
Printer
PC Fax
PC Receiving
Phone Call
Address Book
Scanning
Copier
More Information
Printing documents created on the PC . . . . . . . . . . . . . . . 8
Sending documents created on the PC . . . . . . . . . . . . . . 9
Sending a document from the fax machine using the PC
. 11
Receiving faxes on your PC . . . . . . . . . . . . . . . . . . . . . 12
Making a phone call . . . . . . . . . . . . . . . . . . . . . . . . . . . 14
Computerised directory for fax and phone numbers . . . . 15
Using your fax machine as a scanner . . . . . . . . . . . . . . 16
PC based copying . . . . . . . . . . . . . . . . . . . . . . . . . . . . . 17
Communication Log . . . . . . . . . . . . . . . . . . . . . . . . . . . . 18
Viewer . . . . . . . . . . . . . . . . . . . . . . . . . . . . . . . . . . . . . . 18
PANA LINK Drivers Properties dialogue box
(The Fax driver and Printer driver) . . . . . . . . . . . . . . 19
PC LINK (turning PC related functions on/off) . . . . . . . . 20
Assistance
Troubleshooting
When a function does not work, check here
before requesting help . . . . . . . . . . . . . . . . . . . . . . . 21
Page 4
44
Setup
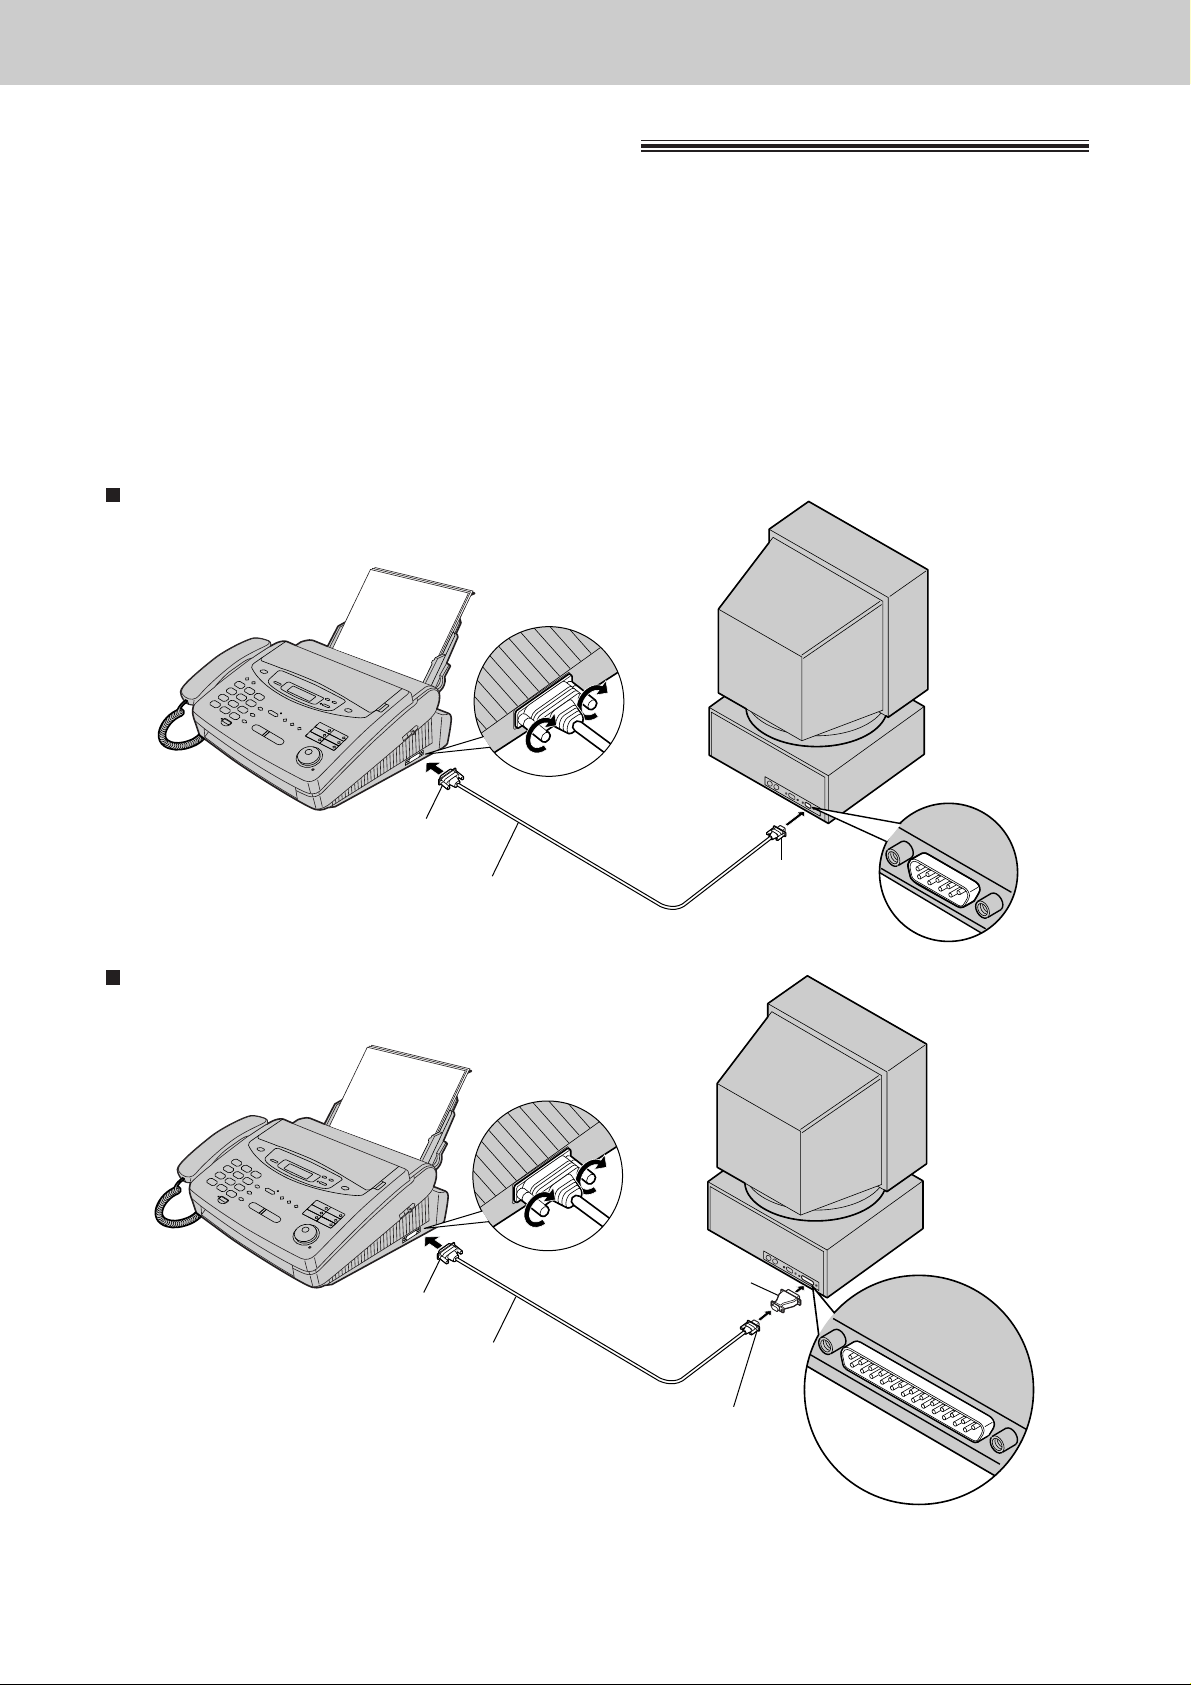
Connecting to a computer
Note:
●
A RS232C (DB9 Female/DB25 Male) serial cable less than 3 meters long can also be purchased at a
computer supply store.
If your PC has a 25 pin COM port:
To run Panasonic Multi-Function software (PANA LINK), you need the following software and hardware.
CPU: An IBM compatible personal computer with a 486 or higher processor (Pentium is
recommended.)
Basic software: Microsoft®Windows 95* or Windows 98**
Memory minimum: 16 MB (32 MB or more is recommended.)
Hard disk: More than 40 MB available space
Other: RS232C Serial Port, Panasonic Multi-Function fax machine
* Microsoft Windows 95 operating system (hereafter Windows 95)
**Microsoft Windows 98 operating system (hereafter Windows 98)
If your PC has a 9 pin COM port:
25 Pin Male
RS232C cable
(not included)
25 Pin Male
RS232C cable
(not included)
9 Pin COM port
9 Pin Female
25 Pin COM port
25 Pin Adaptor
(not included)
9 Pin Female
Page 5
5
Setup
Initial Preparation
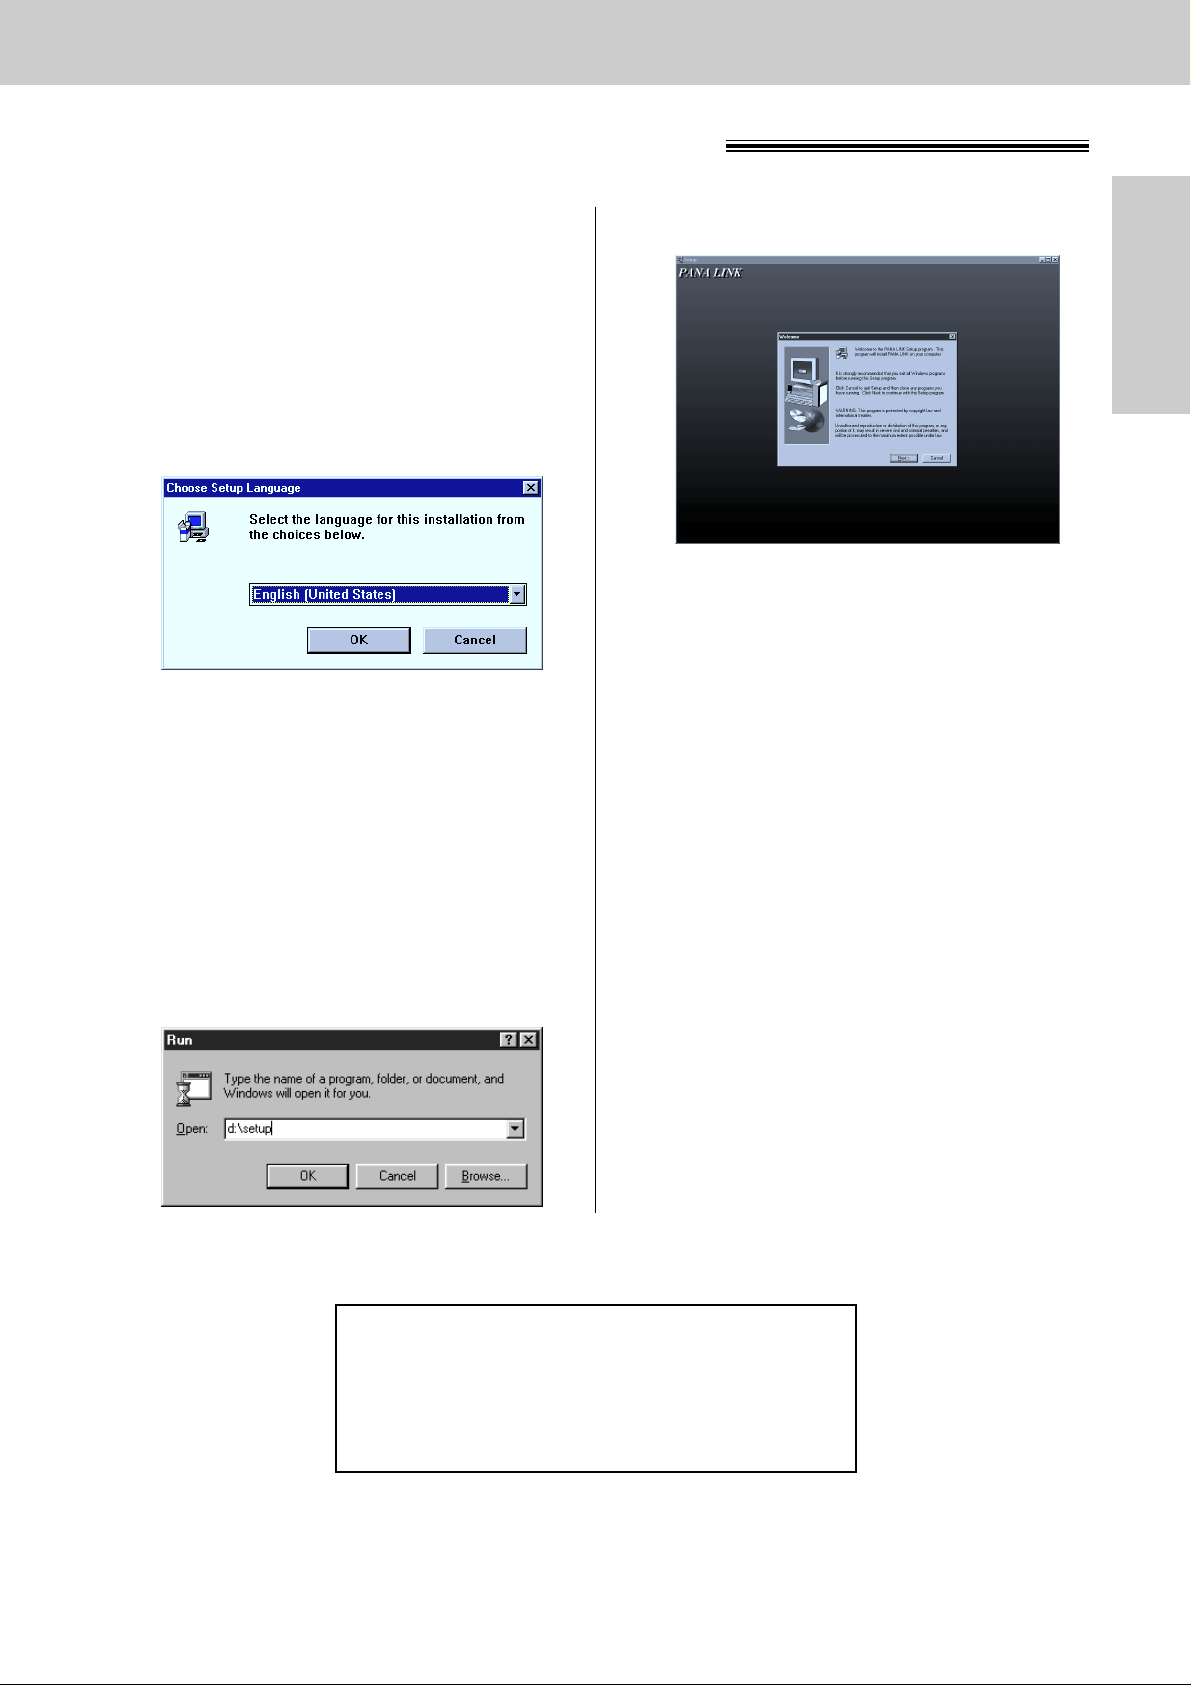
Installing PANA LINK software
1
Start Windows 95 or Windows 98 and close
all applications.
2
Insert the included CD into your CD-ROM
drive.
●
The [Choose Setup Language] dialogue
box will appear.
Select the desired language that you use
with this software from the pull-down menu.
Click [OK].
●
If [Choose Setup Language] dialogue box
does not appear:
The installation will automatically start.
●
If [Choose Setup Language] dialogue box
does not appear and the installation does
not start automatically:
Click
[Start], choose [Run...]. Type
“d:\setup” (where “d:” is the drive letter of
your CD-ROM drive). Click [OK].
(If you are not sure what the drive letter is
for your CD-ROM drive, please use
Windows Explorer and look for the
CD-ROM drive.)
3
The installation will automatically start.
4
Follow the instructions on the screen until all
files have been installed.
5
Be sure to read the [Readme] file for more
information.
●
The display illustrations may differ
slightly from the display of the actual
product.
●
The display details are subject to change
for improvement without notice.
Note:
●
For detailed instructions on PANA LINK software,
use the [Help] function.
●
The screens shown in these instructions are from
Windows 95.
Page 6

66
Setup
Activating PANA LINK software
1
Click [Start].
2
Point to [Programs], point to [PANA LINK] and click [PANA LINK].
●
The PANA LINK main panel will appear.
Send a fax
To send a file
created on the PC.
Dial keypad
Scan
To create an image
file by scanning the
document set in the
fax machine.
Main panel display
Copy
To make a copy of the
document set in the fax
machine.
To minimise.
To minimise to an icon.
Print
To print a file
created on the PC.
To exit PANA LINK.
To register or change data
in the one-touch memory.
To delete data in the onetouch memory.
To switch One-touch page.
One-Touch dial
Reception icon
Displays the number of
received documents which
have not yet been viewed.
To make a
phone call.
Redial
To redial the last
number dialled.
Pause
To insert a pause
in the telephone
number.
Add. book
To store and view
information in your
address book.
To delete one
figure of a
telephone
number.
To stop fax
transmission or
reception.
Comms. Log
To display the record of
transmitted/received fax
documents and manage
the documents waiting to
be sent.
To start fax
transmission or
reception.
To delete a
selected telephone
number.
Viewer
To display an image
sent or received with
PANA LINK.
Setup
To set PANA
LINK options.
Help
For detailed
instructions on
PANA LINK
software.
Page 7
7
Setup
Initial Preparation
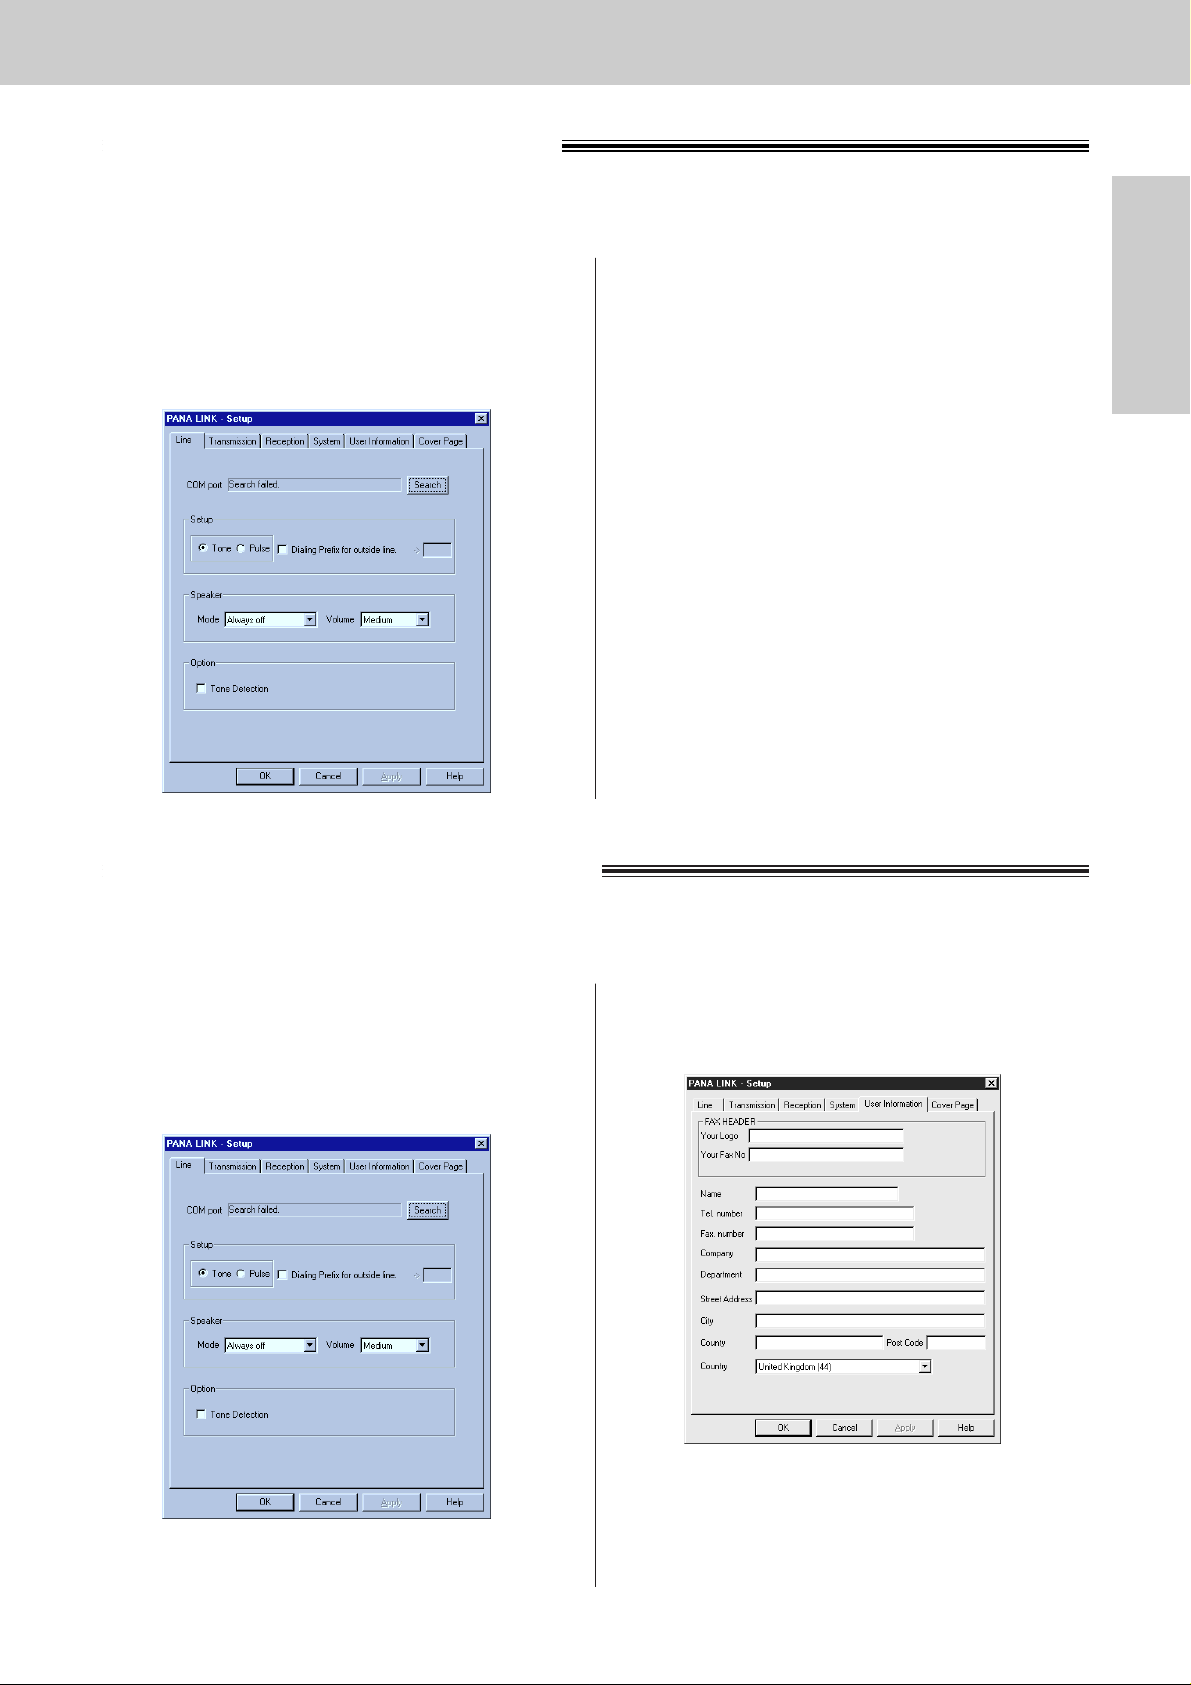
Setting up PANA LINK
1
Open the PANA LINK main panel.
2
Click [Setup] in the main panel.
●
The [Setup] dialogue box will appear.
3
Change the set value in the [Setup] dialogue
box.
●
To change the value without closing the
window, press [Apply].
4
Click [OK].
The items which can be set are [Line],[Transmission],[Reception],[System],[User Information] and
[
Cover Page].
Note:
● For further details, use the [Help] function.
Setting user information
1
Open the PANA LINK main panel.
2
Click [Setup] in the main panel.
●
The [Setup] dialogue box will appear.
3
Click [User Information] tab.
●
The [User Information] dialogue box will
appear.
The information set here is used for your cover page and the header that prints on the top of each page you
send from the PC.
4
Enter your details in each space.
5
Click [OK].
Page 8
88
Printer
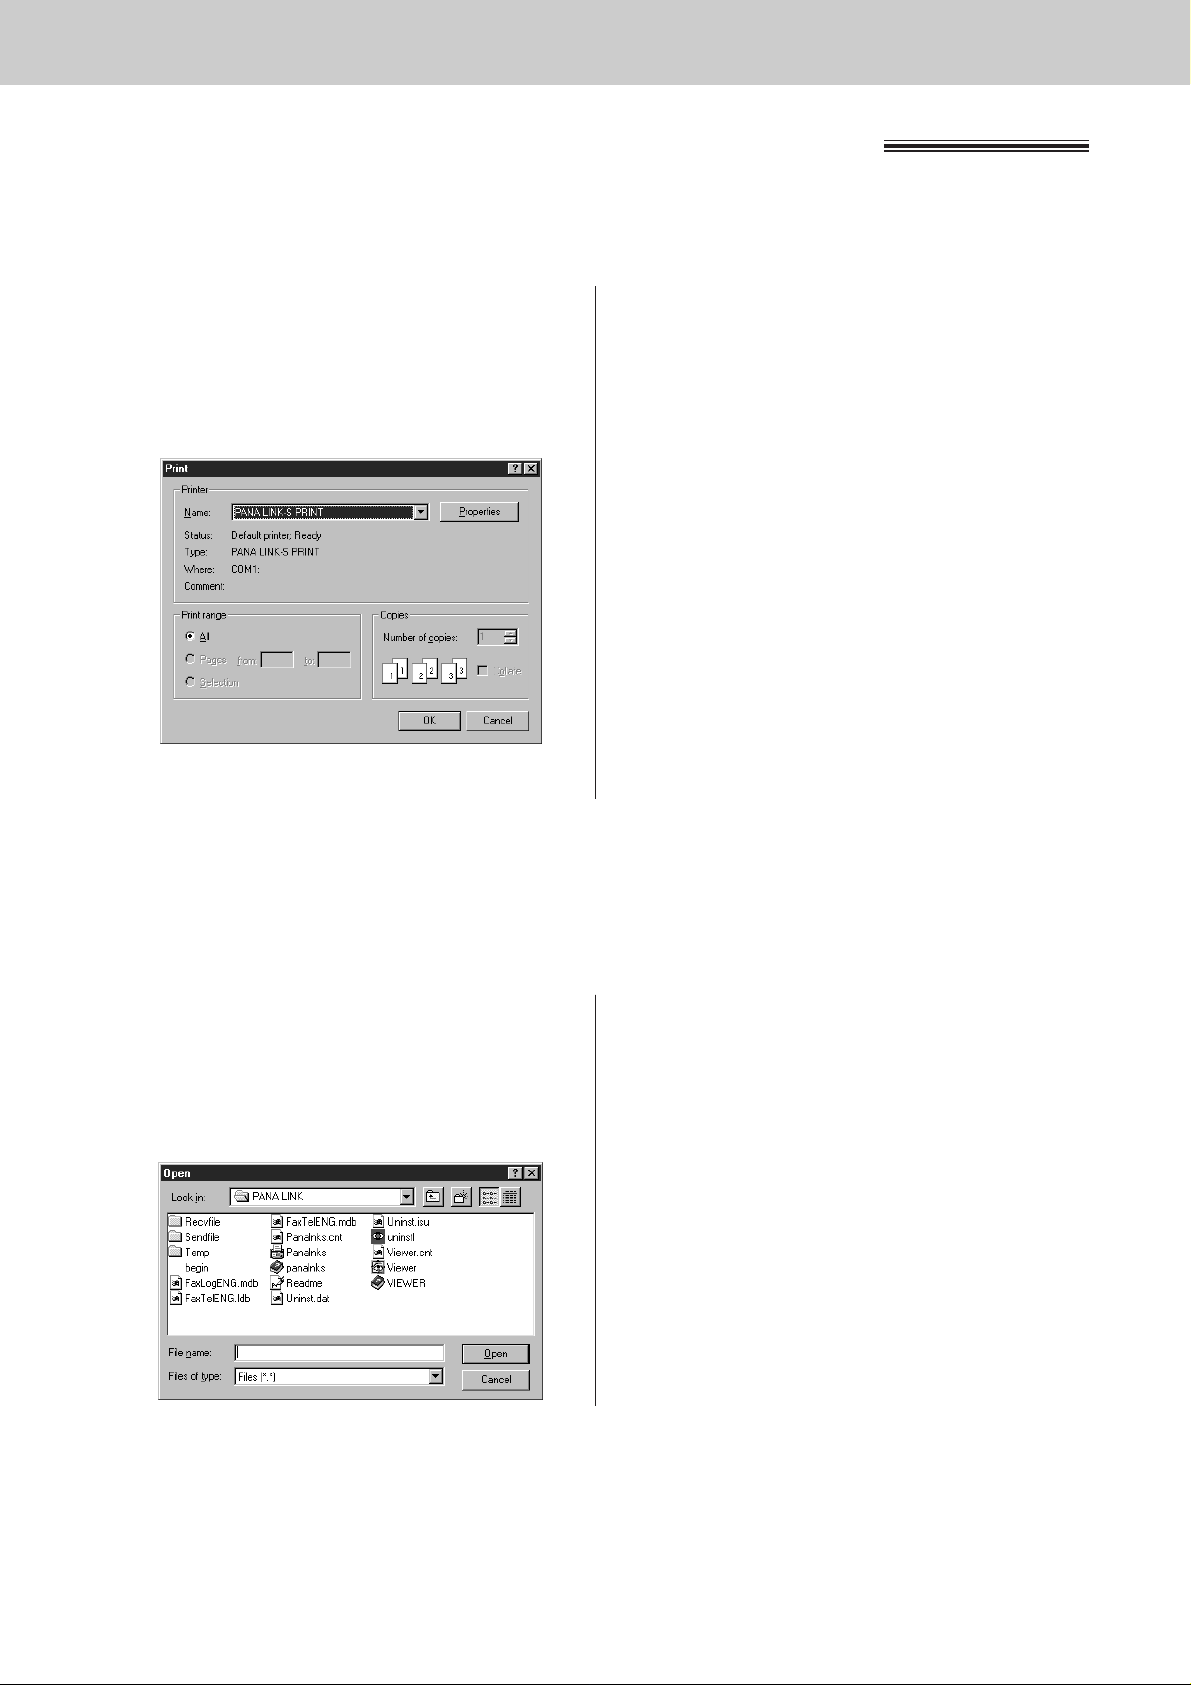
Printing documents created on the PC
1
Open the document you want to print.
2
Select [Print] from the [File] menu.
●
The [Print] dialogue box will appear.
3
Select
[PANA LINK-S PRINT]
as the active
printer from the pull-down menu.
●
If you want to change the printer setting,
click [Properties]. The [Properties]
dialogue box will appear.
You can change the following:
[Resolution], [Orientation] and [Paper
size].
For further details about the [Properties]
dialogue box, see page 19.
4
Set the [Print range].
5
Click [OK] in the [Print] dialogue box.
●
The unit will start printing.
Note:
●
For details about the printer driver, use the [Help]
function.
Printing from Windows applications
For example, to print from Microsoft Word, proceed as follows.
1
Open the PANA LINK main panel.
2
Click [Print] in the main panel.
●
The [Open] dialogue box will appear.
3
Select the file you want to print.
4
Click [Open] in the [Open] dialogue box.
●
The unit will start printing.
●
If an application which creates the file
starts, follow the instructions for the
application to print the file.
Printing a selected file
You can print a specific file created with an application.
Page 9

9
PC Fax
PANA LINK Functions
Sending documents created on the PC
1
Open the document you want to send.
2
Select [Print] from the [File] menu.
●
The [Print] dialogue box will appear.
●
For further details about the [Properties]
dialogue box, see page 19.
5
Set the fax number to which you want to send
the document.
●
To set the telephone number, you can use
[Dial keypad], [One-Touch dial] or [Add.
book].
Sending a document created by an application as a fax
message
You can access the fax function from a Windows application by using the [Print] command in the [File]menu.
Select [PANA LINK FAX] as the active printer.
For example, to send a document created from Microsoft Word, proceed as follows.
3
Select [PANA LINK FAX] as the active printer
from the pull-down menu.
4
Click [OK] in the [Print] dialogue box.
●
If PANA LINK application has not started, it
will start.
●
The document you opened in step 1 is
entered as a transmission document.
Dial keypad
One-Touch dial
6
Click [START] in the main panel.
●
The document will be sent.
Add. book
Note:
●
If the line is busy or there is no answer, PANA
LINK FAX will automatically redial the number.
Please see the operating instructions for fax auto
redial information.
●
To cancel transmission after dialling, click [STOP]
in the main panel.
●
When you click [START] to send the selected
file, any document set on the fax machine will
also be sent at the same time.
Page 10

1010
PC Fax
Sending a file from a PANA LINK window
1
Open the PANA LINK main panel.
2
Click [Send a fax] in the main panel.
4
Select the file you want to send, and click
[Open].
●
An image of the file will be displayed in the
preview window.
3
Click [Browse].
●
The [Open] dialogue box will appear.
5
Set the fax number to which you are going to
send the file.
●
To set the telephone number, you can use
[Dial keypad], [One-Touch dial] or [Add.
book].
Dial keypad
One-Touch dial
6
Click [START] in the main panel.
●
The document will be sent.
Note:
●
If the line is busy or there is no answer, PANA
LINK FAX will automatically redial the number.
Please see the operating instructions for fax auto
redial information.
●
To cancel transmission after dialling, click [STOP]
in the main panel.
●
When you click [START] to send the selected
file, any document set on the fax machine will
also be sent at the same time.
Add. book
Page 11

11
PC Fax
PANA LINK Functions
Sending a document from the fax machine
using the PC
1
Place the document on the fax machine.
4
Click [START].
●
The [Send from the fax] dialogue box will
appear.
2
Open the PANA LINK main panel.
3
Set the fax number to which you want to send
the document in the main panel.
●
To set the telephone number, you can use
[Dial keypad], [One-Touch dial] or [Add.
book].
5
Set the [Image Quality] and [Intensity], and
click [OK].
Dial keypad
Add. book One-Touch dial
FACE DOWN
Page 12

1212
PC Receiving
Receiving faxes on your PC
1
Open the PANA LINK main panel.
2
Click [START] in the main panel.
You can receive a fax on the computer.
The received fax document is saved as an image file (TIFF-G4 format) which you can view, print or send.
To receive manually
You can receive a fax manually during a telephone conversation.
To receive automatically
You can receive faxes on your PC automatically.
1
Set the fax machine to the AUTO ANSWER
mode by pressing .
AUTO ANSWER
2
Open or minimise the PANA LINK main
panel.
AUAUTO ANSWERTO ANSWER
TAD/FTAD/FAAX ONX ON
ON (RED)
Page 13

13
PC Receiving
PANA LINK Functions
To receive faxes directly to the fax
machine
If you do not want to be disturbed by incoming
faxes when using the PC, but want to receive faxes
directly to your fax machine, follow these steps.
1.Click [Setup] in the main panel.
●
The [Setup] dialogue box will appear.
2.Click the [Reception] tab in the dialogue box.
3.Click [Receive directly to facsimile unit].
4.Click [OK].
Confirming the result of reception
1
Open the PANA LINK main panel.
2
Click on [Reception icon (New doc.)] in the
main panel, or click on [Comms. Log] and
click [Received Log].
4
Click on [File] in the menu bar, then click on
[View], or click [View] in the toolbar.
●
The [Viewer] dialogue box will appear, and
the received fax will be displayed.
3
Select the item in [Received Log] which
have not yet been viewed ( icon).
Page 14

1414
Phone Call
Making a phone call
You can make a phone call using PANA LINK.
Use the handset on the fax machine to talk.
1
Open the PANA LINK main panel.
2
Enter the telephone number in the main
panel.
●
You can select the telephone numbers
using the following: [Dial Keypad], [One-
Touch dial], [Add. book] or [Redial].
●
The main panel display will show [Start
calling by pressing the <DIAL>.].
3
Click [DIAL].
●
The main panel display will show [Lift the
fax machine’s handset to talk.].
4
Lift the fax machine’s handset.
One-Touch dial
Dial keypad
Add. bookRedial
Handset
Page 15

15
Address Book
PANA LINK Functions
Computerised directory for fax and phone
numbers
1
Open the PANA LINK main panel.
2
Click [Add. Book] in the main panel.
●
The [Address Book] window will appear.
4
Enter personal information in each space.
●
The name is required.
5
Click [OK].
●
The registered information will be shown in
the list.
[Address Book] is your personal information database for fax and phone numbers.
3
Select [New entry] from the [Edit] menu or
click [New entry] in the toolbar.
●
A dialogue box to register personal
information will appear.
Broadcast function
●
When sending the same document to more than
one location, you can use the [Group] function in
[Address Book]. You may select as many
locations as you want from [Address Book].
Page 16

1616
Scanning
Using your fax machine as a scanner
Create an image file (TIFF-G4 format) by scanning the document which is set in the fax machine.
1
Set the document which you are going to
scan in the fax machine.
4
Enter the name of the file where the scanned
image is to be saved in the [File name] text
box, or select the file name by clicking on
[Browse].
●
If you do not specify a file, it will be saved
in the file shown in the [File name] text
box.
5
If necessary, change the setting of [EnlargeReduce], [Image Quality] and [Intensity].
6
Click [Start].
●
The scanned image will be displayed in the
[Viewer] dialogue box after scanning.
2
Open the PANA LINK main panel.
3
Click [Scan] in the main panel.
●
The [Scanner] dialogue box will appear.
FACE DOWN
Page 17

17
Copier
PANA LINK Functions
PC based copying
1
Set the document which you are going to
copy in the fax machine.
4
Enter the number of copies required in
[Number of copies].
5
If necessary, change the setting of [EnlargeReduce], [Image Quality] and [Intensity].
6
Click [Start].
2
Open the PANA LINK main panel.
3
Click [Copy] in the main panel.
●
The [Copier] dialogue box will appear.
FACE DOWN
Page 18

1818
More Information
Communication Log
It is possible to view a list of faxes sent or received from the PC, and to view their contents.
It is also possible to forward or resend these faxes.
3
Select an item from [Communication Log].
●
The contents of the log will be displayed.
1
Open the PANA LINK main panel.
2
Click [Comms. Log] in the main panel.
●
The [Communication Log] window will
appear.
Viewer
It is possible to display the images sent, received, or scanned with PANA LINK.
It is possible to move, copy and delete a file or page.
From [Viewer], it is also possible to send an image as a fax.
3
Click on [File] then [Open] in the menu bar,
or click [Open] in the tool bar.
●
The [Open this document.] dialogue box
will appear.
1
Open the PANA LINK main panel.
2
Click [Viewer] in the main panel.
●
The [Viewer] window will appear.
4
Select the file you want to view.
Note:
●
Text on the image cannot be edited.
Note:
●
As the transmitted image files will remain in the
hard disk, please check regularly that there is
enough free space.
Page 19

19
More Information
PANA LINK Functions
PANA LINK Drivers Properties dialogue box
●
Paper size
To choose the paper size, click one of the
following buttons.
A4: 210 mm x 297 mm
Letter: 216 mm x 279 mm
Legal: 216 mm x 356 mm
●
Orientation
Click these buttons to set the print orientation.
Portrait: Use this setting to print in tall
format.
Landscape:Use this setting to print in wide
format.
●
You cannot change [Paper source] and [Media
choice].
(The Fax driver and Printer driver)
Paper tab
●
Print quality
Specifies the text quality you want to use for your
printed document.
Device Options tab
●
Resolution
Specifies the resolution you want for graphic
images. Generally, higher resolution settings
produce higher quality printing; however, your
documents may take longer to print.
Select the desired resolution according to the
type of document.
Standard (200 x 100 dpi)*
Fine (200 x 200 dpi)
SuperFine (200 x 400 dpi)
*[PANA LINK FAX] only
●
Dithering
Specifies the type of dithering used in printing.
For color printing, dithering blends pure colors
into patterns to simulate a wider range of colors.
For example, orange is produced by blending red
and yellow. For non-color printing, dithering
produces gray shading in graphics.
None: Click this if you do not want any
dithering.
Coarse: Click this if your resolution setting is
300 dpi or higher.
Fine: Click this if your resolution setting is
200 dpi or less.
Line art: Click this if your graphics include
well-defined borders between black,
white and gray shadings.
Error
diffusion: Click this for printing photographs or
pictures that do not have sharp,
well-defined edges.
●
Intensity
Specifies how dark to print graphics in your
document.
Graphics tab
Page 20

2020
More Information
PC LINK
(turning PC related functions on/off)
The PC LINK feature is “ON” as a pre-selected setting.
If the AUTO ANSWER mode is turned on, all faxes will be received at your PC automatically.
If you do not want to be disturbed by incoming faxes when using the PC, but want to receive faxes directly to
your fax machine, do one of the following:
—Turn off the PC LINK on the fax machine.
—Select [Receive directly to facsimile unit] on the PC (p. 13).
To turn off the PC LINK on the fax machine
●
When this feature is off, operations from your PC, such as fax transmission/reception, scanning, printing or
copying are not possible.
1
Press .
Display:
2
Press , then .
3
Press .
4
Press or to select “OFF”.
●
To turn on the PC LINK on the fax machine,
select “ON”.
5
Press .
6
Press .
MENU
SETUP ITEM [ ]
START/SET/COPY
MODE=OFF
▼▲
MODE=ON
▼▲
START/SET/COPY
PC LINK
1 4
1.SYSTEM SET UP
MENU
/
MENU
START/SET/COPY
Page 21

21
Troubleshooting
Assistance
When a function does not work, check here
before requesting help
General
Problem Cause & Remedy
I cannot open a TIFF file.
I cannot send a fax from the PC at the
specified time.
The date and time that prints on the
top of each page sent from the PC is
incorrect.
I do not know how to move the PANA
LINK main panel, because there is no
title bar.
I do not know whether the PANA LINK
main panel is active or not.
A quick tip does not appear when I
hold the mouse pointer over a button in
the PANA LINK main panel, although I
have set to display this.
The telephone number set in the main
panel display disappears, and the
display shows
[For storing a phone
or fax number.] explanation of the
button and so on.
The PANA LINK main panel
disappears.
PANA LINK main panel disappears just
after initialising.
I want to delete all of the telephone
numbers set in the main panel display.
●
You must change the compression format of the file. For example,
to convert an image using WANG Imaging, proceed as follows:
1. Click on [Start], point to [Programs] — [Accessories], then
click [Imaging].
2. Open the TIFF file that you cannot open in [Viewer] of PANA
LINK.
3. Open the [Page] menu, and click [Convert].
—The [Convert] dialogue box appears.
4.
Click the [Compression] tab, then choose [CCITT Group 3
(1d)
Modified Huffman] from the Compression drop-down list.
5. Click [OK].
—The file’s compression format is changed.
●
The date and time of the PC may be set incorrectly. Adjust it.
If it cannot be set correctly, consult your PC supplier.
●
The date and time of the PC may be set incorrectly. Adjust it.
If it cannot be set correctly, consult your PC supplier.
●
Point to an area with no buttons and drag to the desired space.
●
The brightness of the main panel display shows you whether or
not the PANA LINK main panel is active.
<Active – bright, Non active – dark>
●
If the PANA LINK main panel is non-active, the quick tip does not
appear. Confirm again after making the PANA LINK main panel
active by clicking anywhere on it.
●
The quick tip is displayed. Move the mouse cursor out of the
PANA LINK main panel. If you do not need quick tips, open the
[Setup] dialogue and select [OFF] of [Quick Tip] in [System] tab.
●
Look in the task tray (in the task bar). If you do not find the PANA
LINK icon, it is closed. If you find the icon, the PANA LINK main
panel is just minimised or reduced to an icon.
Double-click the icon in the task tray or open the menu by rightclicking the fax icon and select [Restore].
●
The PANA LINK main panel is set to minimise when PANA LINK
starts. Double-click the icon in the task tray or open the menu by
right-clicking the fax icon, and select [Restore].
If you do not want this to happen each time you start PANA LINK,
click the [Setup] in the PANALINK main panel, and leave the
[Start minimized] check box blank in the [Program start-up
settings] in [System] tab.
●
Press [STOP] button.
(continued)
Page 22

2222
Troubleshooting
General (cont.)
Problem Cause & Remedy
I cannot recognise the last part of the
entry in the address list of the [Address
Book] or [Communication Log].
I do not want to send a cover page with
every fax.
I wanted to select a telephone number
from
[Address Book] onto the PANA
LINK main panel, but I selected a fax
number by mistake.
I cannot use the [DIAL] button, even
though I specified a telephone number.
When I exit PANA LINK, the
[Viewer]
does not close.
PANA LINK does not work properly.
●
Put the cursor on the line between the buttons, the cursor
changes shape and you can expand the area by dragging, or
double-clicking.
●
The setting of the cover page is [ON]. To deactivate the setting,
open [Setup] dialogue by clicking on the [Setup] in the main
panel, and check [Default Add Cover Page at every
Transmission] in the [Cover Page] tab.
●
You can change your selection in the PANA LINK main panel.
Double click on the number in the main panel display until the
telephone number appears. You can also right-click the entry to
select a specific number.
●
If there is transmission data or a document is set in the fax, you
can only use the fax transmission function. If you want to make a
phone call, delete the transmission data.
●
[Viewer] can be operated separately, so when PANA LINK is
closed, it remains open.
●
Click the button to exit PANALINK, and restart.
If PANA LINK still does not close, press the [Ctrl+Alt+Delete]
keys.
Transmission
Problem Cause & Remedy
[Sending a fax failed.]
message is
displayed.
[No response] message is displayed.
I cannot make an international
transmission.
The length of the transmitted image
differs slightly from the original.
●
Possible causes are as follows.
—Telephone circuit is not good.
—You received a call-waiting signal.
—The other party stopped reception.
—The other party ran out of recording paper.
Transmit again after checking with the other party.
●
The other party did not answer the call or the line was busy.
Transmit again after waiting a while.
●
The dialling mode setting (tone or pulse) is not correct.
Open the
[Setup] dialogue box and check the dialling mode
setup check box in [Line] tab.
●
Set the fax machine to the overseas transmission mode. See the
operating instructions.
●
Set the [Resolution] to [Fine] (200 x 200 dpi) and transmit again.
Reception
Problem Cause & Remedy
The fax machine receives a fax, but I
want to receive it on the PC.
●
You may have checked [Receive directly to facsimile unit] in
the [Reception] tab in the [Setup] dialogue box. If so, click this
check box to deactivate.
●
The setting of the PC LINK on the fax machine is off. Turn it on
(p. 20).
●
The PANALINK application is not operate. Start the PANALINK
application.
Page 23

23
Troubleshooting
Assistance
Reception (cont.)
Problem Cause & Remedy
The PC receives a fax, but I want to
receive it on the fax machine.
I want to print out the received fax with
another printer.
[Receiving a fax failed.] message is
displayed.
●
Open the [Setup] dialogue box, and check [Receive directly to
facsimile unit] in the [Reception] tab.
●
Print after selecting the desired printer from the [Print] dialogue
box.
●
Possible causes are as follows.
—The line condition was not good.
—The reception was interrupted by a call waiting signal.
Check with the other party and try again.
Scan and copy
Problem Cause & Remedy
I cannot scan.
The document is not pulled into the
document feeder.
A document is jammed.
The recording paper is jammed.
Even after clicking
[Stop], scanning
continues.
●
The fax machine may be in use. Try again after the other
operation is completed.
●
There may not be enough space on the hard disk. Try again after
deleting unnecessary files or closing unused applications.
●
There might not be enough RAM. Try again after closing some
applications.
●
Restart the PC, and try again.
●
Confirm that a maximum of 15 pages are set correctly.
●
You attempted to transmit a document longer than 600 mm.
Remove the jammed document and try again.
●
Remove the jammed recording paper, reinsert it, and try again.
●
Please wait. It may take a while for the cancel request to be
accepted.
Error message
Problem Cause & Remedy
[Initialization failed.]
is displayed.
●
Check the connection of the PC and the fax machine.
●
The setting of the PC LINK on the fax machine is off. Turn it on
(p. 20).
Print quality
Problem Cause & Remedy
The printing quality is poor.
The printing is faint.
A dirty pattern or a black line appears
on the printouts.
●
Some paper has instructions recommending which side to print
on. Try turning the paper over.
●
You may have used paper with a cotton and/or fiber content that
is over 20 %, such as letterhead or resume paper.
●
The glass or rollers are dirty. Clean them. See the operating
instructions.
ABC
Original
Copy
Page 24

Kyushu Matsushita Electric Co., Ltd.
1-62, 4-chome, Minoshima, Hakata-ku, Fukuoka 812-8531, Japan
PFQX1344ZA WM0799WN0
Printed in Malaysia
 Loading...