

Panasonic FV-30BW2H Installation And Operating Instructions Manual
INSTALLATION AND
OPERATING INSTRUCTIONS
安裝 使用 說明 書
Thermo Ventilator
浴室 換氣 暖風 機
CONTENTS
3 4
~
5 6
~
7 14
~
15
15
16
17
18
19
19
20
21
21
22 24
~
26 28
~
28 29
~
2
6
7
SAFETYINSTRUCTIONS
INSTALLATIONINSTRUCTIONS
INSTALLATIONREQUIREMENTS
SUPPLIED ACCESSORIES
PARTNAMESAND DIMENSIONS
HOW TO INSTALL
TEST RUN
FUNCTION OF REMOTE CONTROL
HOW TO USE TIMER FUNCTION
HOW TO USE AIR DIRECTION FUNCTION
HOW TO USE HEATING FUNCTION
HOW TO USE DRYING FUNCTION
HOW TO USE VENTILATION FUNCTION
CARE MODE:
HOW TO USE WARM BATH FUNCTION
HOW TO USE REFRESH FUNCTION
HOW TO USE 24HR VENT. FUNCTION
HOW TO USE DRY CLOTH FUNCTION
MODE BUTTON PANEL ON MAIN BODY
USE AND MAINTENANCE INSTRUCTIONS 使用及維 護 注意事項
ANTIBACTERIAL FUNCTION
TROUBLESHOOTING
WIRING DIAGRAM
SPECIFICATIONS BACK COVER
Thank you for purchasing this Panasonic product.
Please read these instructions carefully before attempting to install, operate or
service the Panasonic product. Please carefully read “INSTALLATION INSTRUCTIONS”
(P.3 4) of this instructions before installation. Failure to comply with instructions
~
could result in personal injury or property damage. Please explain to users how to
operate and maintain the product after installation, and this booklet should be
presented to users. Please carefully read “USE AND MAINTENANCE INSTRUCTIONS”
(P.26 28) of this instructions before operation.
~
Please retain this booklet for future reference.
感謝您選 用Panasonic產 品。
安裝、使 用 和保養Panasonic產品前 , 請仔細閱讀 本 安裝使用 說 明書。安裝 前 ,請務必先 閱 讀
“安裝注 意 事項”(第3 4頁)。不遵照 此 說明書進行 操 作有可能導 致 人員受傷 或 財產損失。 安 裝
完成後, 請 向顧客說明 如 何使用和維 護Panasonic產 品,並將 此 說明書交給 顧 客保管。使 用 前,
請務必先 閱 讀“使用及 維 護注意事項 ”(第26 28頁)。
請妥善保 管 好此說明書 以 備日後參考 。
~
~
型號:
目錄
安全指引
安裝注意 事 項
安裝要求
包裝附件 清 單
部件名稱 和 尺寸
安裝方法
試運轉
遙控器功 能
定時功能 的 使用方法
風向功能 的 使用方法
暖氣功能 的 使用方法
乾燥功能 的 使用方法
換氣功能 的 使用方法
貼心模式 :
溫暖沐浴 功 能的使用方 法
極速排氣 功 能的使用方 法
24小 時 換氣功能的 使 用方法
高效乾衣 功 能的使用方 法
機體模式 按 鈕面板
維護方法MAINTENANCE
抗菌功能
常見故障 的 識別與處理
電氣原理 圖
FV-30BW2H
3 4
~
5 6
~
7 14
~
15
15
16
17
18
19
19
20
21
21
22 24
~
2525
26 28
~
28 29
~
3030
3030
3131
末頁規格
2
6
7
SAFETYINSTRUCTIONS
安全指 引
Disconnect power supply before maintenance.
維護保養 前 先斷電。
This appliance is not intended for use by persons (including children) with reduced physical,
sensory or mental capabilities, or lack of experience and knowledge, unless they have been given
supervision or instruction concerning use of the appliance by a person responsible for their safety.
Children should be supervised to ensure that they do not play with the appliance.
本產品不 適 合有殘疾、 智 障或精神障 礙 的人士或 缺 乏經驗、常 識 者(包括兒 童 )維護使 用 ,除非
在負責他 們 安全的人士 的 看護或指導 下 使用。在 維 護保養期間 , 兒童應該有 人 進行看護 , 以 防
將產品當 作 玩具。
The following instructions should be strictly observed in order to prevent injury to the
users and other people, or damage to property.
為避免給 您 及其他人造 成 傷害,這裡 我 們列出了 以 下安全注意 事 項,請務必 遵 守,各種 標 誌 的
含意請參 見 以下內容。
The degrees of injury or damage that can occur when the instructions are ignored
and if the product is not used properly have been classified and described by the
following indications.
對無視表 示 內容,錯誤 地 使用時,會 引 起的危害 或 損傷的程度 , 用下列符號 進 行分類、 說 明 。
請務必遵 守
WARNING
警告
CAUTION
注意
Types of instructions that should be observed have been classified and described by
the following pictorial symbols.
對希望遵 守 的內容和種 類 ,用下列符 號 進行分類 、 說明。
This symbol indicates the item is “PROHIBITED” to do.
此標誌表 示 為禁止事項
This symbol indicates the “COMPULSORY” item that must be followed
without failure.
此標誌表 示 為強制事項
This symbol indicates the item is “CAUTION”.
此標誌表 示 為提示注意 事 項
This indication means: Must be treated seriously that this may
result in death or serious injury.
本標誌所 表 示內容為“ 不 遵守的話可 能 造成人員 死 亡或重傷” 。
This indication means: Must be treated seriously that this may
result in injury or physical damage.
本標誌所 表 示內容為“ 不 遵守的話可 能 造成人身 輕 傷或其他財 產
損害”。
2
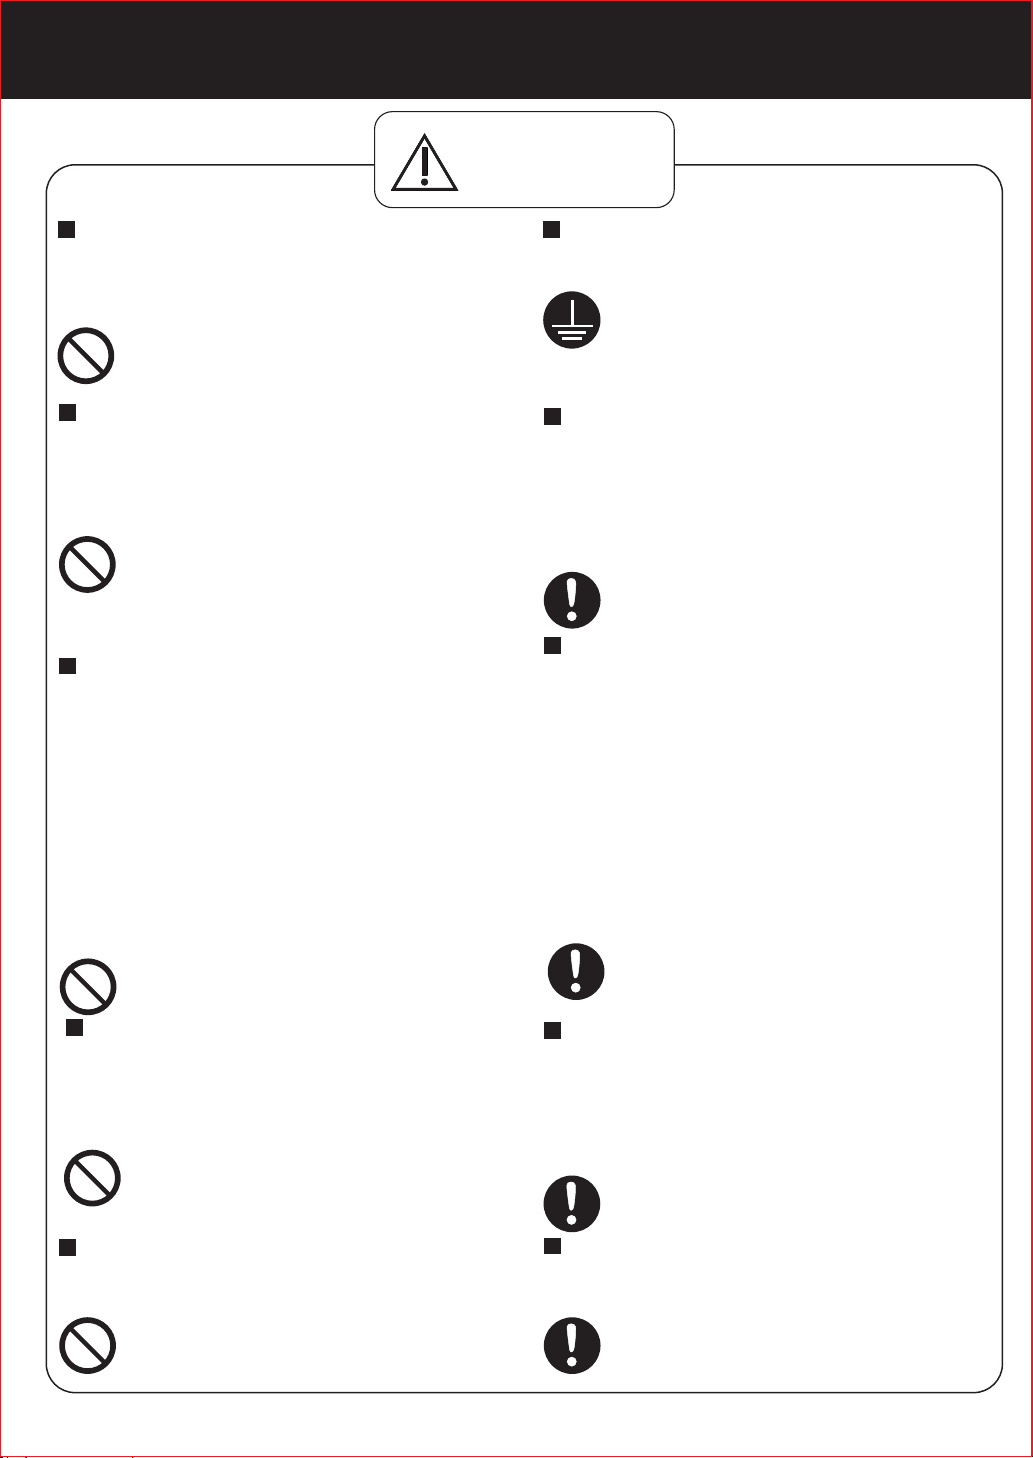
INSTALLATION INSTRUCTIONS
安裝注 意事 項
WARNING
警告
Do not close to curtains and other
flammable materials when install
the product.
禁止靠近窗簾 和 其 他 可燃材料安裝。
Otherwise, combustibles may be
inflamed.
否則可能會 引 燃 可燃物。
Do not install the product as the
method which is not approved in
the instruction.
禁止使用本說 明 書 指 定以外的方法
進行安裝。
Otherwise, unreliable installation
may be caused and thus the product
may fall off, resulting in injuries.
否則可能會 安 裝 不牢固,導 致 產 品
掉落受傷。
To avoid danger arising from
wrong resetting of the thermal
circuit breaker, the product can
not be powered by using an
external switch. For example, by
a timer or connecting to a circuit
that is connected/disconnected
through timing of a universal part.
為避免由熱斷 路 器 的 誤復位產生危險,
產品不能通過 外 部 開 關裝置供電。例如 ,
定時器或者連 接 到 由 通用部件定時進行
通、斷的電路 。
Otherwise, a fire may be caused.
否則可能會 導 致 火災。
Do not operate the product other
than the rated voltage
(220 V , 50 Hz) .
禁止使用額定 電 壓(220 V ,50 Hz)以
~
~
外的電壓。
Otherwise, it may cause damages
to the product or a fire.
否則可能會 損 壞 本產品或導 致 火 災。
The product can not be located just
below a power outlet socket.
禁止把本產品 安 放 在 電源插座下使用。
Otherwise, a fire may be caused.
否則可能會 導 致 火災。
The product must be grounded.
必須接地。
Otherwise, it may cause
electric shock when there is
any trouble or electric leakage.
當出現故障 或 漏 電時,可能 會 觸 電。
Doavoidtheback-flowofgasinto
theroomfromtheopenflueof
flammablegasorother open-fire
appliances.
必須避免易燃 氣 體 從 敞開的氣道或其他
燃燒燃料的設 備 回 流 進室內。
Otherwise, a fire may be caused.
否則可能會 導 致 火災。
Please install an all-pole switch which
the contact separation is more than
3 mm and the capacity more than
250 V 13 A to control the power
of the product. Please install the
all-pole switch out of the bathroom
where it is easily controlled.
~
安裝時,須在供電線路中安裝其觸點開距
不少於3 mm 的“電源全級開關” ,以用
於接通或斷開主機電源,其額定負載能力
不小於250 V ~ 13 A,且安裝在浴室外側
方便操作的地方。
Otherwise, it may cause a short
circuit, thus resulting a fire.
否則可能會 導 致 短路,導致火災。
Please select 60227 IEC 53 (RVV)
ordinary polyvinyl chloride sheathed
cord.Nominal cross-sectional area of
conductors is ²
3×1.5 mm .
電源線請選用60227 IEC 53(RVV)型 軟
線,導線的截 面 積 為3×1.5 mm 。
Otherwise, it may be on fire.
否則可能會 導 致 起火。
Make sure the power cord is
installed firmly.
2
2
確保電源線安 裝 到 位 。
Otherwise, a fire may be caused.
否則可能會 導 致 火災。
3
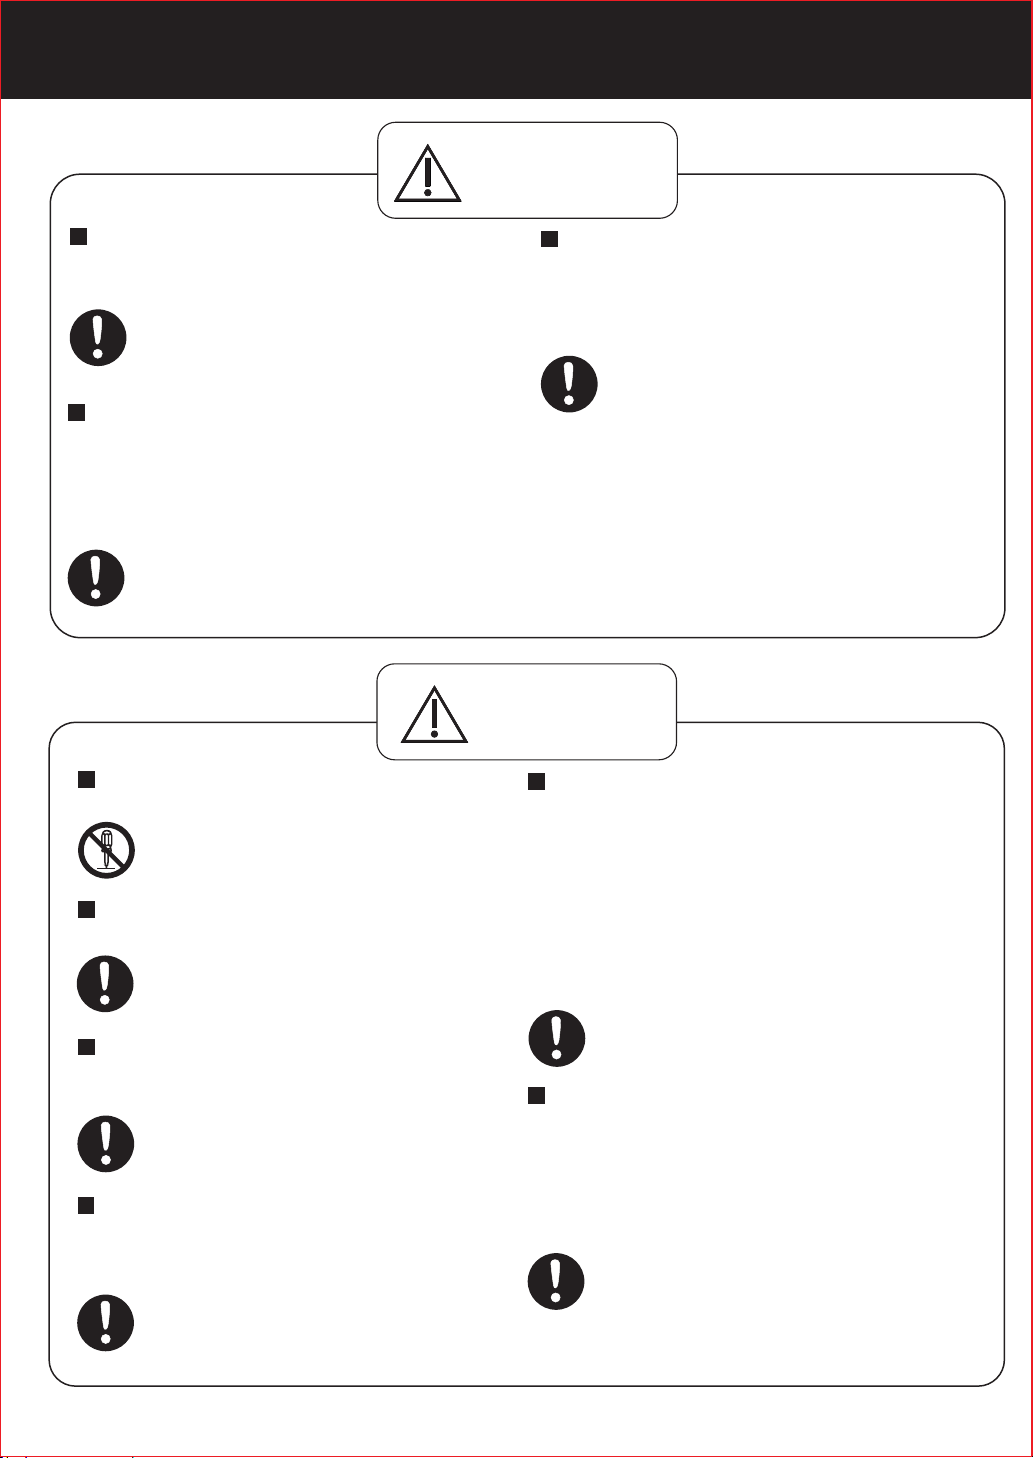
INSTALLATION INSTRUCTIONS
安裝注 意事 項
WARNING
警告
Disconnectpowersourcebefore
workingontheproduct.
安裝、維修保 養 時 必 須斷開電源。
Otherwise, anelectricshockmay
becaused.
否則可能會 導 致 觸電。
Installation and wiring should be
done by authorized person.(wiring
is required to follow the local wiring
regulations.)
安裝及電源佈 線 必 須 由專業人員完成。
(產品安裝必須 符 合 當 地的安全法規。)
Otherwise, a fire may be caused.
否則可能會 導 致 火災。
CAUTION
Do not reconstruct this product.
禁止對本產品 進 行 改 造。
Otherwise, it may cause damage to
the product.
否則可能會 導 致 產品損壞。
Do fix this product tightly.
機體安裝必須 牢 固 。
Otherwise, it may fall off or
cause personal injury.
否則可能會 掉 落 ,導致受傷 。
Components must be installed
tightly.
部品安裝必須 牢 固 。
Otherwise, it may fall off or
cause personal injury.
否則可能會 掉 落 ,導致受傷 。
It is recommended that two
persons perform the installation
of the product.
建議兩人進行 產 品 的 安裝作業。
Otherwise, it may cause the
product to fall off.
否則可能會 導 致 產品掉落。
The product is installed so that
switches cannot be touched by a
person in the bath or shower.
產品的安裝, 應 使 得 浴缸內或淋浴區的
人不能夠觸及 到 開 關 。
Otherwise, anelectricshockmay
becaused.
否則可能會 導 致 觸電。
注意
Do not install it on window without
sufficient strength. It must be
subject to 5 times the weight of the
product. If you cannot ensure the
installation strength, be sure to
adopt reinforcement measure.
產品必須安裝 在 強 度 足夠的窗體上,需 可
承受產品5倍的重 量 , 如 不能確保安裝強
度,請務必採 取 加 固 措施。
Otherwise, it may fallofforcause
personal injury.
否則可能會 掉 落 ,導致受傷 。
The special-purpose or dedicated
parts, such as mounting fixtures,
must be used if such parts are
provided.
有安裝五金件 等 專 用 零部件時,應使
用專用零部件 。
Otherwise, unreliable installation
may be caused and thus the
product may fall off.
否則可能會 安 裝 不牢固,導 致 產 品
掉落。
4
INSTALLATION REQUIREMENTS
安裝要 求
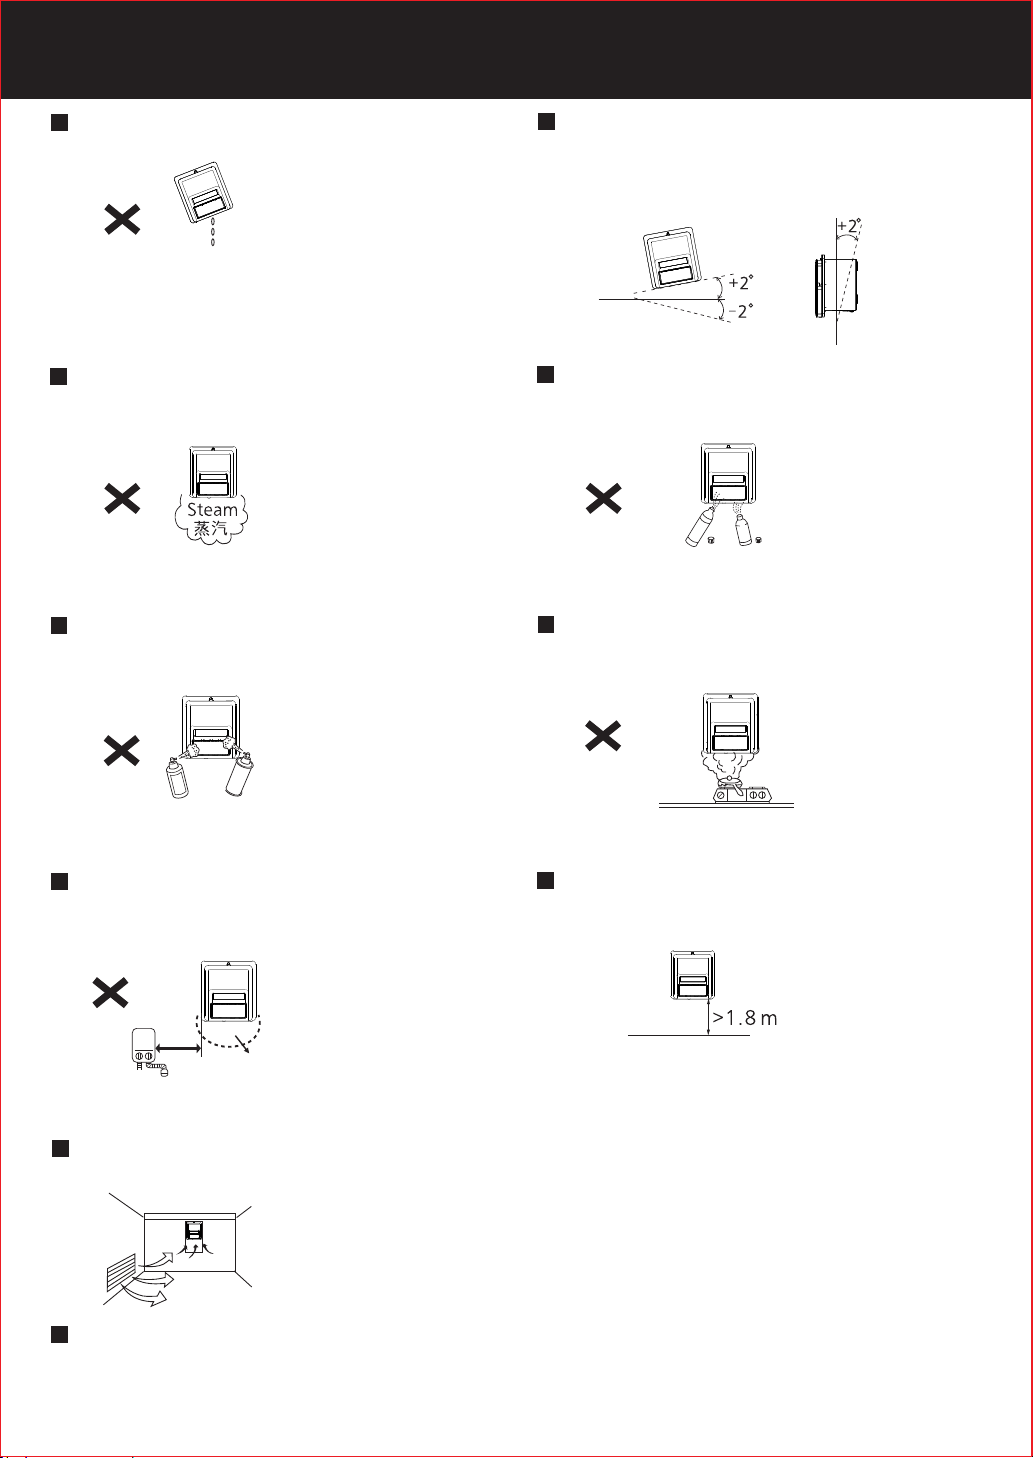
Do not install onto slanting window.
請勿安裝 在 傾斜的窗體 上 。
Prevent the water condensed
in the duct pipe flow back
into the body.
防止水倒 流 。
Do not install the product in steam
sauna bathroom.
請勿安裝 在 桑拿蒸氣浴 室 中。
Maybe it can cause breakdown.
可能會引 起 故障。
Do not install the product in the
places where the sprayer is used.
請勿安裝 在 使用噴霧器 的 場所。
Pleasemakesuretheproductinstalled
horizontallyandthedeviationangle
withintherangeasbelowfigure.
請確保整 機 水平安裝偏 差 角度在下圖 所 示
範圍內。
Do not install the product in the places
where the organic solvent is used.
請勿安裝 在 使用有機溶 劑 的場所。
Maybe it can cause breakdown.
可能會引 起 故障。
Do not install the product where it is
exposed to oil mist.
請勿安裝 在 油煙過多的 場 所。
Maybe it can cause breakdown.
可能會引 起 故障。
Do not install the product in places
with high temperature.
請勿安裝 在 高溫的環境 下 。
Within
50 cm
50 cm
以內
Ambient temperature
above 40 °C.
周圍 溫度 4 0 °C以上
Maybe it can cause breakdown.
可能會引 起 故障。
The product must be installed over
1.8 m above the floor.
產品安裝 高 度距地面必 須 大於1. 8 m。
Maybe it can cause breakdown.
可能會引 起 故障。
Please set ventilation holes.
請設置通 風 口。
The product is not provided with power cord, all-pole switch and leakage
protection switch. Please purchase them in market.
本產品沒 有 提供電源線 , 電源全極開 關 和漏電保 護 開關,需用 戶 另購。
5
INSTALLATION REQUIREMENTS
安裝要 求
Do not cover air outlet, maybe it can cause breakdown.
請勿覆蓋 產 品出風口, 否 則可能會引 起 機體故障 。
When you install plastic part, do not exert too much strength to fixing the screw,
otherwise, the product would be damaged.
安裝塑料 部 件時,為了 不 損壞產品, 鎖 螺絲時請 注 意不要用力 過 大。
Do not install this product in a public bath room.
請勿把本 產 品安裝在公 共 浴室。
Do not install this product in a wardrobes.
請勿把本 產 品安裝在衣 櫃 內。
In extreme weather condition(rainfall precipitation more than 240 mm/h. wind speed
higher than No.8 typhoon.), there may be water through frame into bathroom.
在極端惡 劣 的天氣條件 下(雨 量大於240 mm/h, 風速大於8號風 球), 可能會有 水 通過產品框 架
進入浴室 內 部。
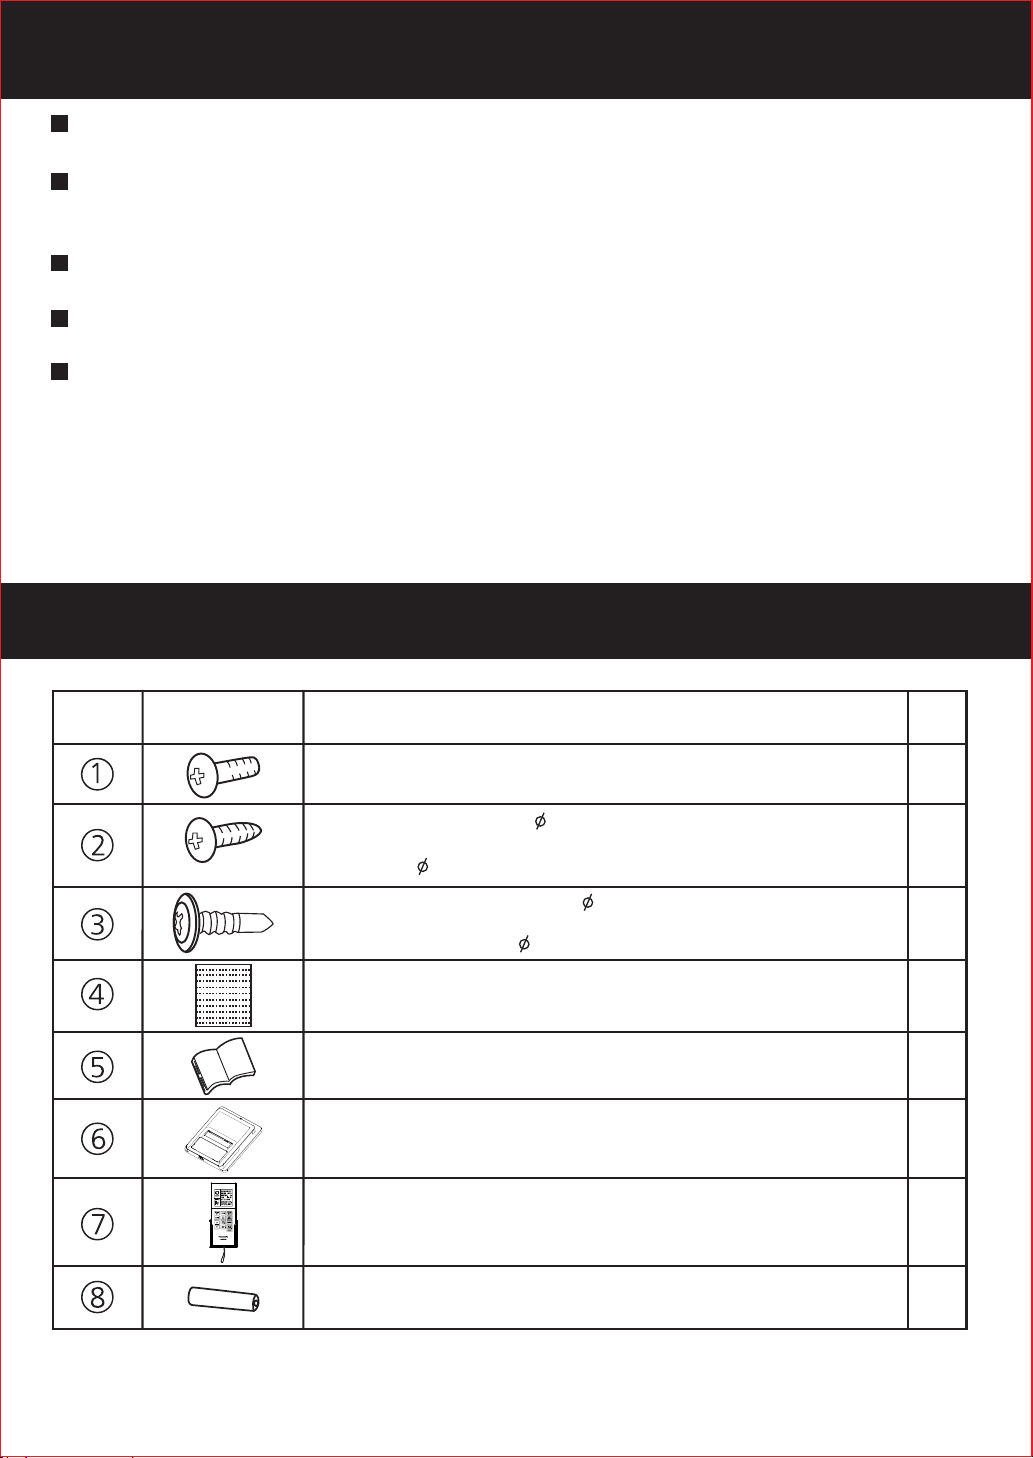
SUPPLIED ACCESSORIES
包裝附 件清 單
No.
代號
Drawing
圖樣
Machinescrew(M4×10,usedtoinstallthelouver assembly)
Self-tappingscrew( 4×16,usedtoinstallthecontroller
holder) (placed on the backside of controller holder)
自攻螺 絲( 4×16用於 遙 控器底 座安裝)(放 置於遙控 器底座背 面)
Self-tappingscrew( 4×25,usedtoinstallthe
mainbodyandthewindow)
Installationandoperatinginstructions
Nameandpurpose
名稱及 用 途
機械螺 絲( M4×10用於面 板組合安 裝)
自攻螺 絲( 4×25用於 機 體與窗 體的安裝)
Product warranty registration
產品保 修 登記
安裝使 用 說明書
Louver assembly
面板組 合
Qty
數量
1
2
4
1
1
1
Remote control assembly
遙控器 組 合
R03(AAA) Carbon battery
R03(AAA)碳 性電池
1
2
6
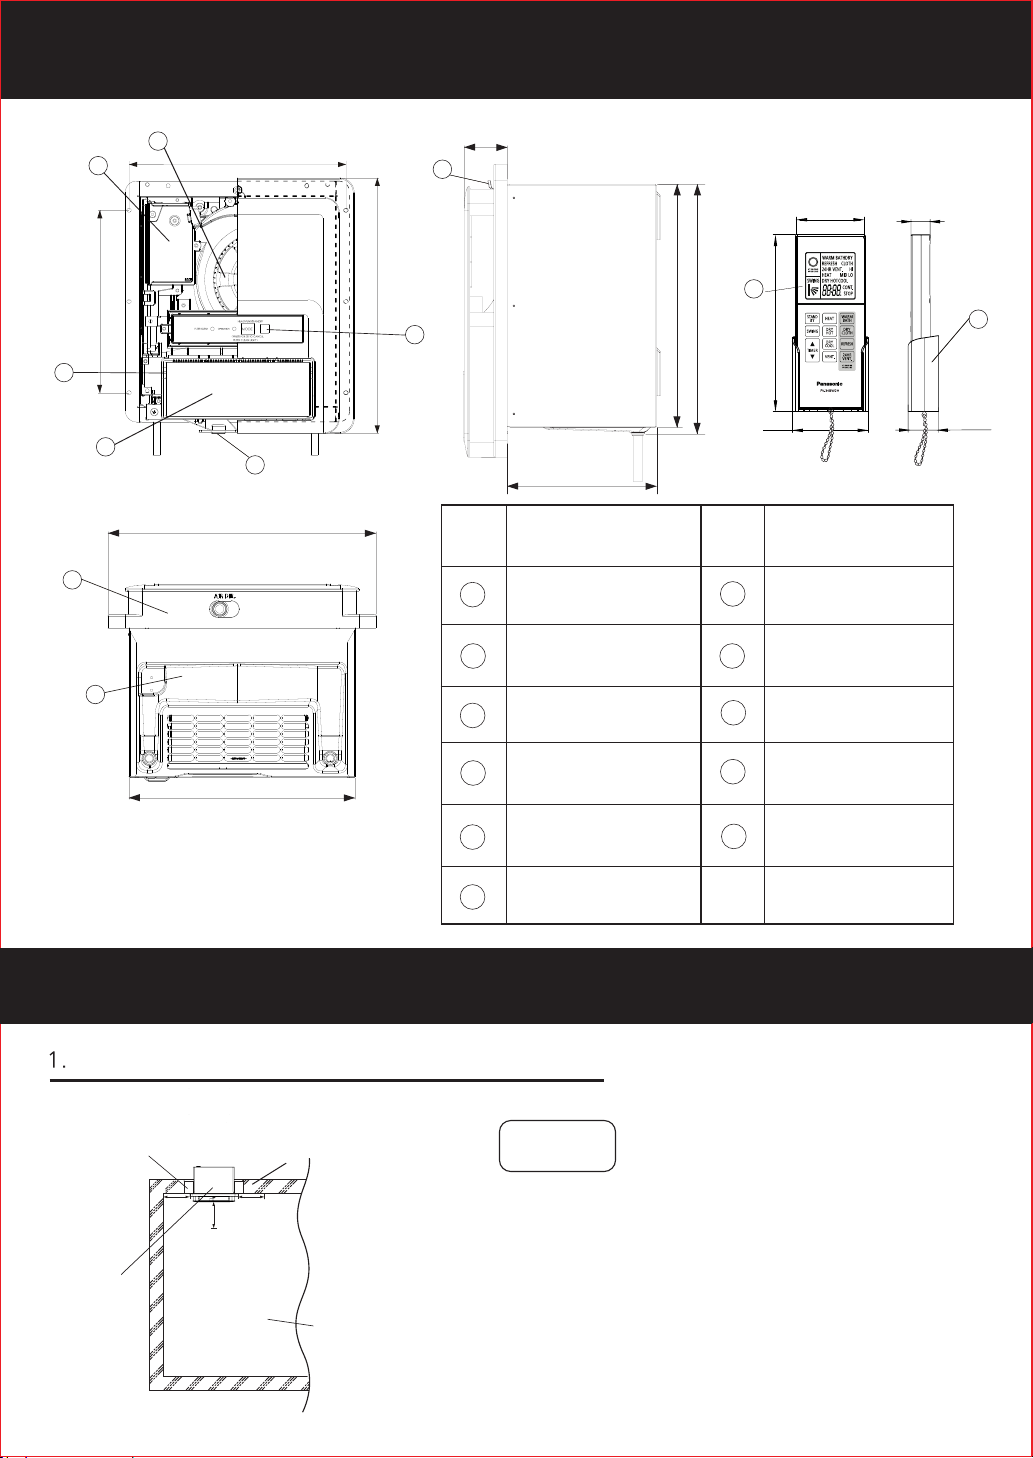
PART NAMES AND DIMENSIONS
部件名 稱和 尺 寸
Unit:mm
1
250
3
4
8
9
單位:mm
5
297.2
320
6
270
50
7
60
298
10
154
66
序號
7
部件名稱
Filter assembly
Louver assembly
8
9
10
面板組合
Main body
Remote control
過濾網
機體
遙控器
350
2
180
No . No .
序號
1
2
3
4
Part name Part name
部件名稱
Cord cover
接線蓋板
Signal receiver
信號接收 器
Heater assembly
加熱器組 合
Baffle plate
導風板
290
17
11
26.5
HOW TO INSTALL
安裝方 法
Installation diagram (Top View)
Window
窗
200 200
Product
產品
Wall
牆
200
Bathroom
浴室
安裝俯視 示 意圖
Unit:mm
單位:mm
5
AIRDIR. handle
6
風向調節 把 手
Fan
扇葉
Controller holder
11
遙控器底 座
Notice
提示事項
Install this product over 200 mm apart from
curtains or other flammable materials.
離窗簾和 其 他易燃材料 距 離200 mm以上 。
7
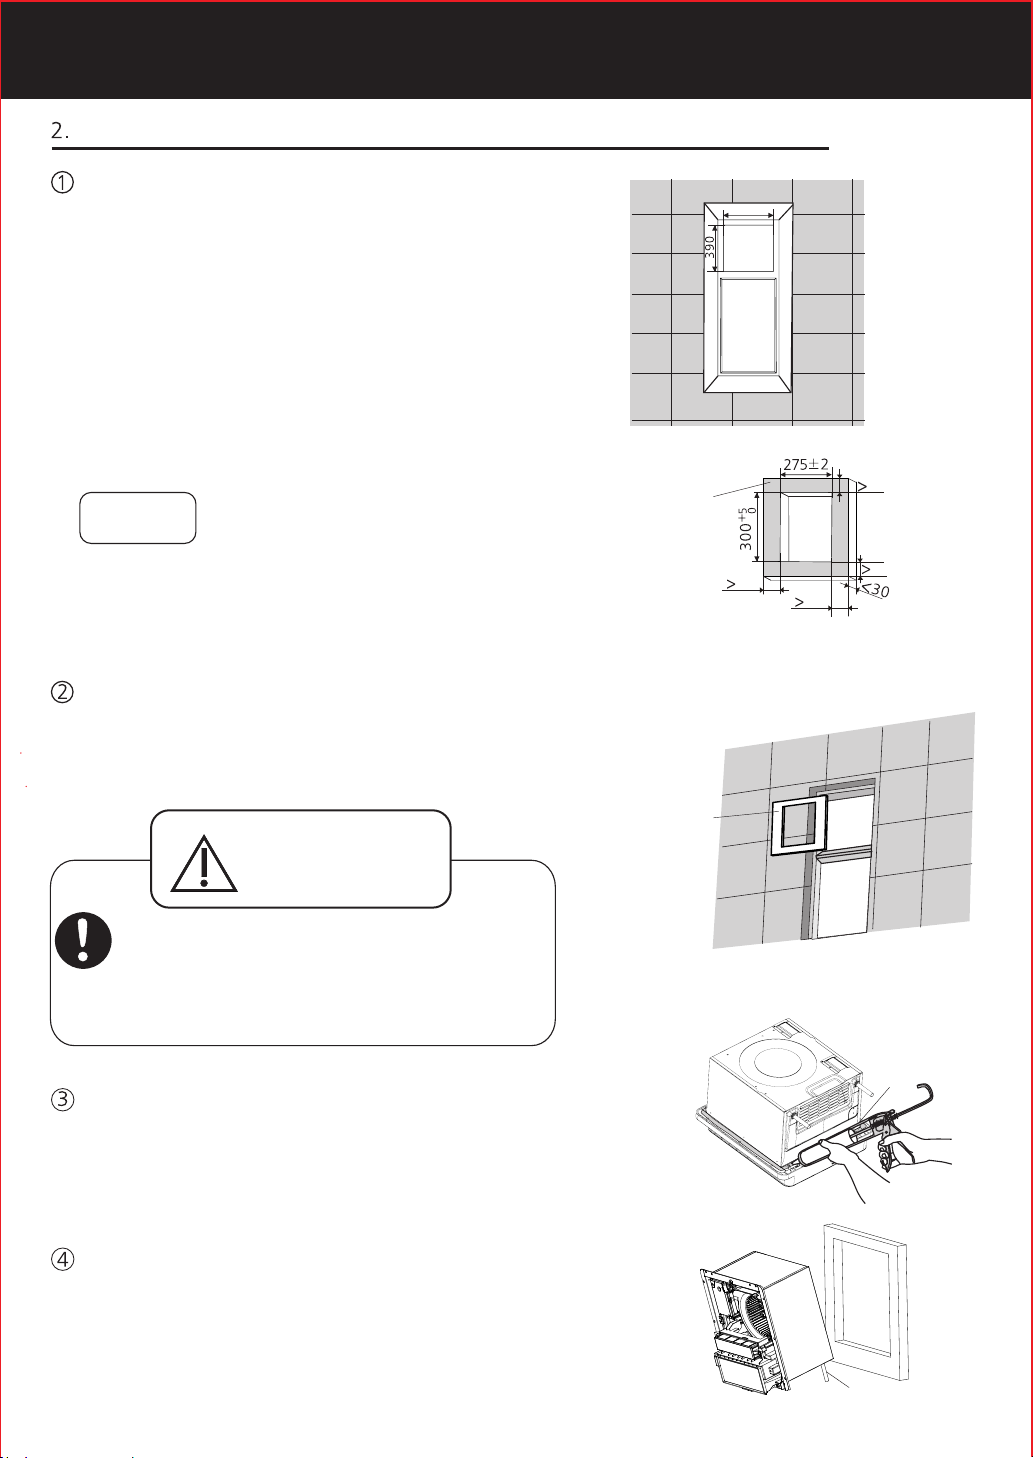
HOW TO INSTALL
安裝方 法
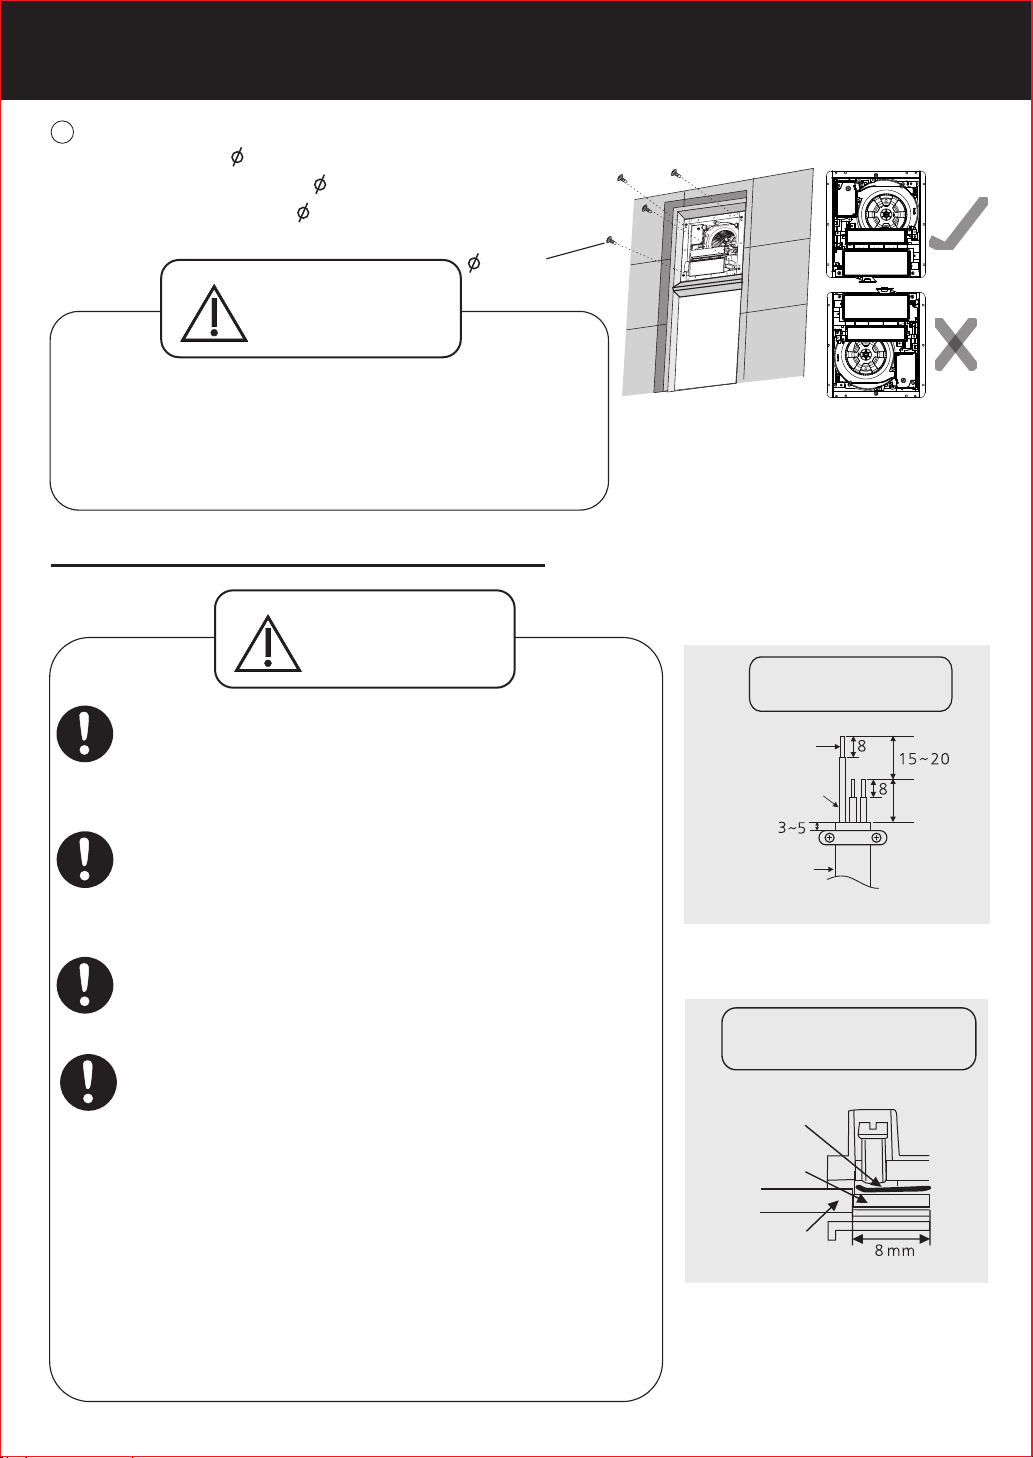
Recommended main body installation method
This product is suitable for the installation of the
form of the smallest size as shown in the right
figure. A window frame needs to be made
according to the window and main body
dimensions.
本產品適 用 於最小如右 圖 所示尺寸的 窗 體安裝,
請根據窗 體 結構及機體 尺 寸製作窗膽 。
Window frame material: recommend the use
of aluminum alloy.
窗膽材質 : 推薦使用鋁 合 金
Window frame thickness: less than 30 mm
窗膽厚度 : 小於30 mm
Notice
提示事項
It may be difficult to remove the filter if little
clearance between louver and ceiling.
產品與天 花 板之間要確 保 有足夠的空 間 ,否則
會導致產 品 過濾網拆卸 困 難。
Fix the window frame onto the original window.
(It must be can bear 5 times weight of the product.)
將窗膽用 可 靠方法固定 於 原有窗框上 。
(需能承受 產 品5倍的重量)
WARNING
Window frame
(Not included)
窗膽(另購)
Window frame
(Not included)
窗膽(另購)
建議的機 體 安裝方法
360
40
40
Unit: mm
單位:mm
Unit: mm
單位:mm
25
60
警告
Please be sure to take sufficient
protection measure to prevent from
high falling when install window frame.
安裝窗膽 時 ,請務必採 取 足夠的防護 措 施,
以防窗膽 高 空掉落。
Add silicone to seal around the flange of
product, to make sure that the silicone cover
the entire surface of sponge.
在產品法 蘭 邊周圍加玻 璃 膠,並確保 玻 璃膠覆蓋 整
個海綿表 面 。
Please put the lower part of the product into the
window sill first when it is installed, which to make
sure the drain does not fall off.
將機體安 裝 到窗膽時,先將 機 體下部放入 窗 膽并
確保排水 管 沒有脫落。
8
Silicone
玻璃膠
Drain
排水管
HOW TO INSTALL
安裝方 法
5
Fix the main body onto the window frame with the
supplied four 4×25 self- tapping screws.
使用附件 包 所提供的4顆 4×25的自攻螺絲 , 將機體
固定於窗 膽 。
4×25 self-tapping screws
自攻螺絲
4×25
WARNING
警告
Properly install the main body according to the
direction indicating label on the main body.
請按照機體上 的 方 向 指示標籤,正確安 裝 產 品 。
Otherwise, it may cause electric leakage.
否則可能會 導 致 漏電。
3. Connecting power cord
電源線的 連 接
WARNING
警告
Please select 60227 IEC 53(RVV)ordinary
polyvinyl chloride sheathed cord. Nominal
cross-sectional area of conductors is 3×1.5 mm .
電源線請 選 用60227 IEC 53(RVV)型 軟線,導 線 的 截
面積為3×1.5 mm 。
For the stripping length, please according to the
wiring sketch (refer to figure 1). If the stripping
length is too long, it may cause short circuit.
剝線長度 , 請按照剝線 示 意圖(右圖1)進 行剝線, 如 剝 線
過長,可 能 會導致產品 短 路。
Do not damage the sheath of the power cord,
otherwise an electric shock may be caused or
short circuit.
電源線的 絕 緣膠不能破 損 ,否則可能 會 導致觸電 或 短路。
Strand the core wire together after stripping,
then insert them into about 8 mm deep position
of the terminal block, ensuring that the part is
under the spring slice, and no copper core cord is
exposed outside. Make sure that the copper core
cords are fixed by screws reliably (the
recommended screw fixing torque is 0.49 N m)
(See Figure 2). Otherwise an electric shock may
be caused.
先將剝線 後 分散的銅芯 線 絞合在一起 , 然後伸入 到 端子
台約8 mm深 ,並確保其 在 彈簧片的下 方 ,切勿出 現 銅
線外露現 象 。螺釘擰緊 後 ,請確保銅 線 不易鬆脫(建 議
螺釘鎖緊 扭 矩為0.49 N m), 否 則 可能會導 致 觸電。
(右圖2)
2
.
.
2
Installation direction
安裝方 向
Wiring sketch
剝線示意 圖
Conductor
銅芯線
Earth
接地引 線
Power cord
電源線
Figure 1
(圖1)
Terminal cutaway view
接線柱剝 面 圖
Spring slice
彈簧片
Conductor
銅芯線
Insulation
絕緣膠
Figure 2
(圖2)
98±1
Unit:mm
單位:mm
9
HOW TO INSTALL
安裝方 法
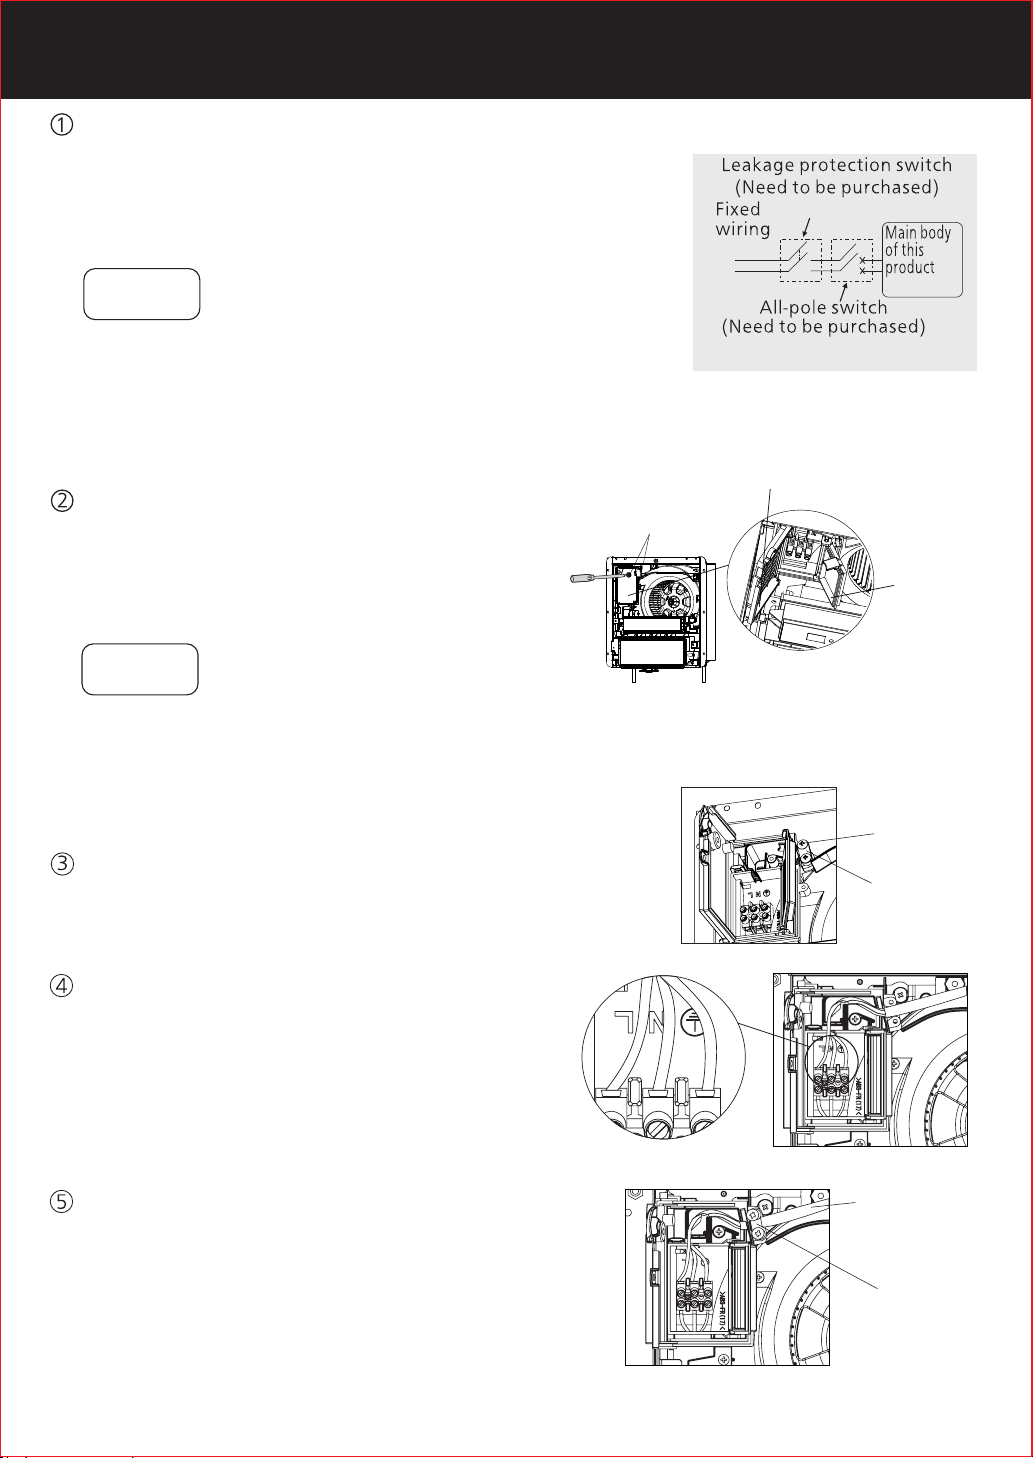
Install an all-pole switch with the contact separation
not less than 3 mm and a leakage protection switch
(with the leakage current lower than 30 mA)between
the fixed wring and the main body of this product.
請於固定 佈 線與本產品 主 機間安裝觸 點 開距不小 於3 mm的
“電源全 極 開關”及漏 電 保護開關(洩漏 電 流在30 mA以下)。
Notice
提示事項
Please select the suitable all-pole switch and leakage
protection switch according to locally relevant
Electricity and Wiring Regulations .
請根據當 地 相關的電力 線 路規範選擇 合 適的“電 源 全極開
關”和“ 漏 電保護開關 ” 。
Remove the screws (2 pcs) on the cord
cover, and open the cord cover and the
internal cord cover (by pushing the
clamping position outward).
取下接線 蓋 板上的螺絲( 2顆),
打開接線 蓋 板及內接線 蓋 板。
Notice
提示事項
Before opening the cord cover, Please read
the label content first, then remove the
warning label.
打開接線 蓋 板前,請先 閱 讀標籤內容 , 再把粘貼 在
其上方的 警 告標籤撕掉 。
Loosenthescrewsofthecordclip.
將固定電 源 線線夾的螺 絲 鬆脫。
Screws (2 pcs)
漏電保 護開關(另 購)
固定佈 線
本產品 主機
電源全 極開關
Cord cover
接線蓋 板
固定螺 絲( 2顆)
Internal
cord cover
內接線 蓋 板
Diagram with the cover removed
打開後 示 意圖
Screw
螺絲
Cord clip
線夾
Loosen the screws of the pillar terminal,
insert the power cord (not supplied)
connected to the indoor fixed wiring into
the pillar terminal, tighten the screw, and
guide the wire according to the right figure.
鬆開接線 柱 上的螺絲, 將 接入室內固 定 線路的電
源線(用戶自 購)插 入接線柱, 擰 緊接線柱螺 絲 ,
並按右圖 進 行理線。
Fix the power cord with the cord clip.
(The cord clip must pin the insulation
sheath of power cord.)
As shown in Figure 1 of P9
用電源線 線 夾將電源線 固 定。
(電源線線 夾 必須壓住電 源 線的絕緣護 套)
如第9頁圖1所示
10
Insulation
sheath
絕緣護 套
Cord clip
線夾
 Loading...