

Panasonic EY7840 User Manual [en, ru, de, es, fr, it]

Operating Instructions
Bedienungsanleitung
Instructions d’utilisation
Istruzioni per l’uso
Gebruiksaanwijzing
Manual de instrucciones
Brugsvejledning
Driftsföreskrifter
Bruksanvisning
Perceuse/Visseuse rotative à percussion sans fil
Trapano avvitatore a percussione rotante senza filo
Draadloze klopboormachine & schroevendraaier
Destornillador y martillo de taladro rotatorio sin cables
Käyttöohjeet
Инструкция по эксплуатации
Iнструкцiя з експлуатації
Before operating this unit, please read these instructions completely and save this manual for future use.
Vor Inbetriebnahme des Gerätes die Betriebsanleitung bitte gründlich durchlesen und diese Broschüre zum späteren Nachschlagen sorgfältig aufbewahren.
Lire entièrement les instructions suivantes avant de faire fonctionner l’appareil et conserver ce mode d’emploi à des fins de consultation ultérieure.
Prima di usare questo apparecchio, leggere completamente queste istruzioni e conservare il manuale per usi futuri.
Lees deze gebruiksaanwijzing aandachtig door voor u het apparaat in gebruik neemt en bewaar de gebruiksaanwijzing voor eventuele naslag.
Antes de usar este aparato por primera vez, lea todas las instrucciones de este manual y guarde el manual para poderlo consultar en el futuro.
Gennemlæs denne betjeningsvejledning før brugen og gem den til fremtidig brug.
Läs igenom hela bruksanvisningen innan produkten tas i bruk. Spara bruksanvisningen för senare användning.
Før enheten tas i bruk, vennligst les disse alle anvisningene og oppbevar bruksanvisningen for senere bruk.
Lue ohjeet huolella ennen laitteen käyttöönottoa ja säilytä tämä käyttöohje tallessa tulevaa tarvetta varten.
Перед эксплуатацией данного устройства, пожалуйста, полностью прочтите данную инструкцию и сохраните данное руководство для использования в будущем.
Перед екплуатацiєю даного пристрою, будь ласка, повнiстю прочитайте дану iнструкцiю i збережiть даний посiбник для використання у майбутньому.
Sladdlös borrhammare & skruvdragare med variabel hastighet
Комбинированный аккумуляторный перфоратор-шуруповерт
Комбінований акумуляторний перфоратор-шуруповерт
Ladattava poravasara & porakone/ruuvinväännin
Cordless Rotary Hammer Drill & Driver
Akku-Hammerbohren & Schrauber
Akku roterende hammerbor & skruertrækker
Ledningløs roterende slagdrill og skrutrekker
Model No: EY7840

Index/Index/Index/Indice/Index/Indice/Indeks/Index/Indeks/Hakemisto/Индекс/
Індекс
English: Page 5
Deutsch: Seite 17
Français: Page 30
Italiano: Pagina 42
Nederlands: Bladzijde 53
Español: Página 66
Dansk: Side 77
Svenska: Sid 88
Norsk: Side 99
Suomi: Sivu 110
Русский: Страница 121
Українська: Сторiнка 132
FUNCTIONAL DESCRIPTION
FUNKTIONSBESCHREIBUNG
DESCRIPTION DES FONCTIONS
DESCRIZIONE DELLE FUNZIONI
FUNCTIEBESCHRIJVING
DESCRIPCIÓN FUNCIONAL
BESKRIVELSE AF FUNKTIONERNE
FUNKTIONSBESKRIVNING
FUNKSJONSBESKRIVELSE
TOIMINTAKUVAUS
ФУНКЦИОНАЛЬНОЕ ОПИСАНИЕ
ФУНКЦIОНАЛЬНИЙ ОПИС
(A) (C)(B) (D)
(N)
(M)
(L)
(K)
(H)
(J)
(I)
(G)
(F)
(E)
(G)
(T)
(S)
(P)
Ni-MH
Ni-Cd
(O)
(Q)
(R)
- 2 -

Chuck
Futter
Mandrin
Mandrino
Boorkop
Portabroca
(A)
Borepatron
Chuck
Chuck
Kiinnityslaite
Зажимной патрон
Затискний патрон
Hammering/drilling switching lever
Zum Umschalten zwischen normalem Bohren und Schlagbohren
Commutateur martelage/perforation
Leva di commutazione martellatura/perforazione
Keuzehendel normaal boren/klopboren
Palanca de conmutación de martillo/taladro
(C)
Hamrings/borings omskiftningsgreb
Omkopplare mellan slagborr/vanlig borr
Slag/bor omskifter
Vasaran/poran kytkentävipu
Рычаг переключения долбления/сверления
Важіль перемикання довбання/свердління
Variable speed control trigger
Betriebsschalter
Gâchette de commande de vitesse
Grilletto di controllo velocità variable
Startschakelaar variabele snelheid
Disparador del control de velocided variable
(E)
Kontroludløser for variabel hastighed
Steglös varvtalsreglerare
Hovedbryter, trinnløs
Nopeudensäätökytkin
Переключатель регулировки переменной скорости
Перемикач регулювання змінної швидкості
Alignment marks
Ausrichtmarkierungen
Marques d’alignement
Marcature allineamento
Uitlijntekens
Marcas de alineación
(G)
Flugtemærker
Anpassningsmärken
Opprettingsmerke
Sovitusmerkit
Метки совмещения
Мітки вирівнювання
Overheat warning lamp (battery)
Überhitzungs-Warnlampe (Akku)
Témoin d’avertissement de surchauffe (batterie)
Spia avvertenza surriscaldamento (batteria)
Oververhitting-waarschuwingslampje (accu)
Luz de advertencia de sobrecalentamiento (batería)
(I)
Advarselslamp til overophedning (batteri)
Varningslampa för överhettning (batteri)
Varsellampe for overoppheting (batteri)
Ylikuumenemisen varoituslamppu (akku)
Предупреждающая лампочка перегрева (батареи)
Попереджувальна лампочка перегріву (батареї)
Battery low warning lamp
Akkuladungs-Warnlampe
Témoin d’avertissement de batterie basse
Spia avvertenza batteria scarica
Waarschuwingslampje voor lage accuspanning
Luz de aviso de baja carga de batería
(K)
Advarselslampes batterieffekt lav
Varningslampa för svagt batteri
Varsellampe for at batteriet er for lavt
Alhaisen akkujännitteen varoituslamppu
Предупреждающая лампочка низкого заряда батареи
Попереджувальна лампочка низького заряду батареї
Clutch handle
Kupplungsring
Poignée de l’embrayage
Impugnatura frizione
Koppelingshandgreep
Mango de embrague
(B)
Koblinghåndtag
Kopplingshandtag
Koblingshåndtak
Kytkimen kahva
Рукоятка муфты
Рукоятка муфти
Forward/Reverse lever
Rechts/Linkslauf Schalter
Levier d’inversion marche avant-marche arrière
Leva di avanzamento/inversione
Voorwaarts/achterwaarts-hendel
Palanca de avance/inversión
(D)
Greb til forlæns/baglæns retning
Riktningsomkopplare
Forover/Revers bryter
Eteenpäin/taaksepäin vipu
Рычаг переключения вперед/назад
Важіль перемикання вперед/назад
Battery pack (EY9L40/EY9L41)
Akku (EY9L40/EY9L41)
Batterie autonome (EY9L40/EY9L41)
Pacco batteria (EY9L40/EY9L41)
Accu (EY9L40/EY9L41)
Batería (EY9L40/EY9L41)
(F)
Batteripakning (EY9L40/EY9L41)
Batteri (EY9L40/EY9L41)
Batteripakke (EY9L40/EY9L41)
Akku (EY9L40/EY9L41)
Батарейный блок (EY9L40/EY9L41)
Батарейний блок (EY9L40/EY9L41)
Control panel
Bedienfeld
Panneau de commande
Pannello di controllo
Bedieningspaneel
Panel de controle
(H)
Kontrolpanel
Kontrollpanel
Kontrollpanel
Säätöpaneeli
Панель управления
Панель управління
LED light on/off button
LED-Leuchten-EIN/AUS-Taste
Bouton Marche/Arrêt de la lumière DEL
Tasto di accensione e spegnimento della luce LED
Aan/uit-toets (ON/OFF) voor LED-lampje
Botón ON/OFF de luz LED
(J)
TÆND/SLUK-knap til LED-lys
Strömbrytare för LED-ljus
PÅ/AV-knapp for LED-lys
LED-valon kytkin/katkaisupainike
Кнопка включения/выключения светодиодной подсветки
Кнопка ввімкнення/вимкнення світлодіодного підсвічування
Battery pack release button
Akku-Entriegelungsknopf
Bouton de libération de batterie autonome
Tasto di rilascio pacco batteria
Accu-ontgrendeltoets
Botón de liberación de batería
(L)
Udløserknap til batteripakning
Frigöringsknapp för batteri
Utløserknapp for batteripakke
Akkupaketin irrotuspainike
Кнопка освобождения батарейного блока
Кнопка вивільнення батарейного блоку
- 3 -

Bit adapter holder
Einsatzadapterhalter
Porte-adaptateur de mèche
Adattatore di portabit
Bitadapterhouder
Soporte de adaptador de broca
(M)
Boradapterholder
Hållare för verktygsspetsadapter
Holderstykke for bit-tilpasningsstykke
Terän sovittimen pidin
Отсек хранения адаптера для насадок
Відсік зберігання адаптера для насадок
Bit adapter (EY9HX403E)
Einsatzadapter (EY9HX403E)
Adaptateur de mèche (EY9HX403E)
Portabit (EY9HX403E)
Bitadapter (EY9HX403E)
Adaptador de broca (EY9HX403E)
(O)
Boradapter (EY9HX403E)
Verktygsspetsadapter (EY9HX403E)
Bitholderen (EY9HX403E)
Bitsi adapteri (EY9HX403E)
Адаптер для насадок(EY9HX403E)
Адаптер для насадок(EY9HX403E)
Battery charger (EY0L80)
Ladegerät (EY0L80)
Chargeur de batterie (EY0L80)
Caricabatterie (EY0L80)
Acculader (EY0L80)
Cargador de batería (EY0L80)
(Q)
Batterioplader (EY0L80)
Batteriladdare (EY0L80)
Batterilader (EY0L80)
Akkulaturi (EY0L80)
Зарядное устройство (EY0L80)
Зарядний пристрій (EY0L80)
Ni-MH/Ni-Cd battery pack dock
Ni-MH/Ni-Cd-Akkuladeschacht
Poste d’accueil de la batterie autonome Ni-MH/Ni-Cd
Spazio raccordo pacco batteria Ni-MH/Ni-Cd
Ni-MH/Ni-Cd accuhouder
Enchufe de carga de batería Ni-MH/Ni-Cd
Ni-MH/Ni-Cd batteripakningsdok
(S)
Docka för NiMH/NiCd-batteri
Dokk for Ni-MH/Ni-Cd-batteripakke
Ni-MH/Ni-Cd akun liitin
Углубление для установки никель-металлогидридного
батарейного блока/никель-кадмиевого батарейного блока
Заглиблення для встановлення нікель-метал-гідридного
батарейного блоку/нікель-кадмієвого батарейного блоку
LED light
LED-Leuchte
Lumière DEL
Luce LED
LED-lampje
Luz indicadora
(N)
LED-lys
LED-ljus
LED-lys
LED-valo
Светодиодная подсветка
Світлодіодне підсвічування
Shoulder strap
Schulterriemen
Dragonne
Cinghia da spalla
Schouderriem
Correa al hombro
(P)
Skulderrem
Axelrem
Skulderbelte
Olkahihna
Плечевой ремень
Плечовий ремінь
Pack cover
Akkuabdeckung
Couvercle de la batterie autonome
Coperchio pacco
Accudeksel
Cubierta de batería
(R)
Pakningsdæksel
Batteriskydd
Pakkedeksel
Akkukotelon kansi
Крышка блока
Кришка блоку
Li-ion battery pack dock
Li-Ion-Akkuladeschacht
Poste d’accueil de la batterie autonome Li-ion
Spazio raccordo pacco batteria Li-ion
Li-ion accuhouder
Enchufe de carga de batería Li-ión
Li-ion batteripakningsdok
(T)
Docka för litiumjonbatteri
Dokk for Li-ion-batteripakke
Li-ioniakun liitin
Углубление для установки литий-ионного
батарейного блока
Заглиблення для встановлення літій-іонного
батарейного блоку
- 4 -
I.INTENDED USE
This tool is a Rotary Hammer for
drilling in concrete. In addition, the tool
has a “rotation only mode” without
hammering. The mode is suitable for
drilling and screw-fastening.
Read “Safety Instructions” booklet and
the following before using.
II. ADDITIONAL
SAFETY RULES
1)
Wear ear protection.
noise can cause hearing loss.
2)
Use auxiliary handle (support
handle) supplied with the tool.
Loss of control can cause personal
injury.
3)
Hold power tools by insulated
gripping surfaces when
performing an operation where
the cutting tool may contact
hidden wiring;
“live” wire will make exposed
metal parts of the tool “live” and
shock the operator.
4) Wear a dust mask, if the work
causes dust.
5) Be aware that this tool is always
in an operating condition, since it
does not have to be plugged into
an electrical outlet.
6) If the bit becomes jammed,
immediately turn the main switch
off to prevent an overload which
can damage the battery pack or
motor. Use reverse motion to
loosen jammed bits.
7) Do not operate the Forward/Reverse
lever when the main switch is on. The
battery will discharge rapidly and
damage to the unit may occur.
8) Use only a dry, soft cloth for
wiping the unit. Do not use a damp
cloth, thinner, benzine, or other
volatile solvents for cleaning.
9) When storing or carrying the tool, set
Exposure to
contact with a
the Forward/Reverse lever to the
center position (switch lock).
10) Do not strain the tool by holding the
speed control trigger halfway (speed
control mode) so that the motor
stops. The protection circuit will
activate and may prevent speed
control operation. If this happens,
release the speed control trigger and
squeeze again for normal operation.
11) Be careful not to get dust inside the
chuck.
12) Do not touch the rotating parts to
avoid injury.
13) Do not continue to use the tool for
a long time. Stop using the tool
from time to time to avoid that the
temperature of the motor rises too
high.
14)Do not drop the tool.
15) Do not put the tool on the place
where the chuck is depressed. The
bit may come off from the chuck
and fall down when the chuck is
depressed. It may cause injuries.
Symbol meaning
V Volts
n0
-1
…min
Rotation only
Direct current
No load speed
Revolutions or
reciprocation per minutes
Rotation with hammering
- 5 -
WARNING:
• Do not use other than the
Panasonic battery packs that are
designed for use with this
rechargeable tool.
• Do not dispose of the battery pack
in a fire, or expose it to excessive
heat.
• Do not drive the likes of nails into
the battery pack, subject it to shocks,
dismantle it, or attempt to modify it.
• Do not allow metal objects to touch
the battery pack terminals.
• Do not carry or store the battery
pack in the same container as nails
or similar metal objects.
• Do not charge the battery pack in a
high-temperature location, such as
next to a fire or in direct sunlight.
Otherwise, the battery may overheat,
catch fire, or explode.
• Never use other than the dedicated
charger to charge the battery pack.
Otherwise, the battery may leak,
overheat, or explode.
• After removing the battery pack
from the tool or the charger, always
reattach the pack cover. Otherwise,
the battery contacts could be
shorted, leading to a risk of fire.
III. ASSEMBLY
CAUTION:
Use of a concrete drill bit larger than
the recommended size may cause
damage to the tool.
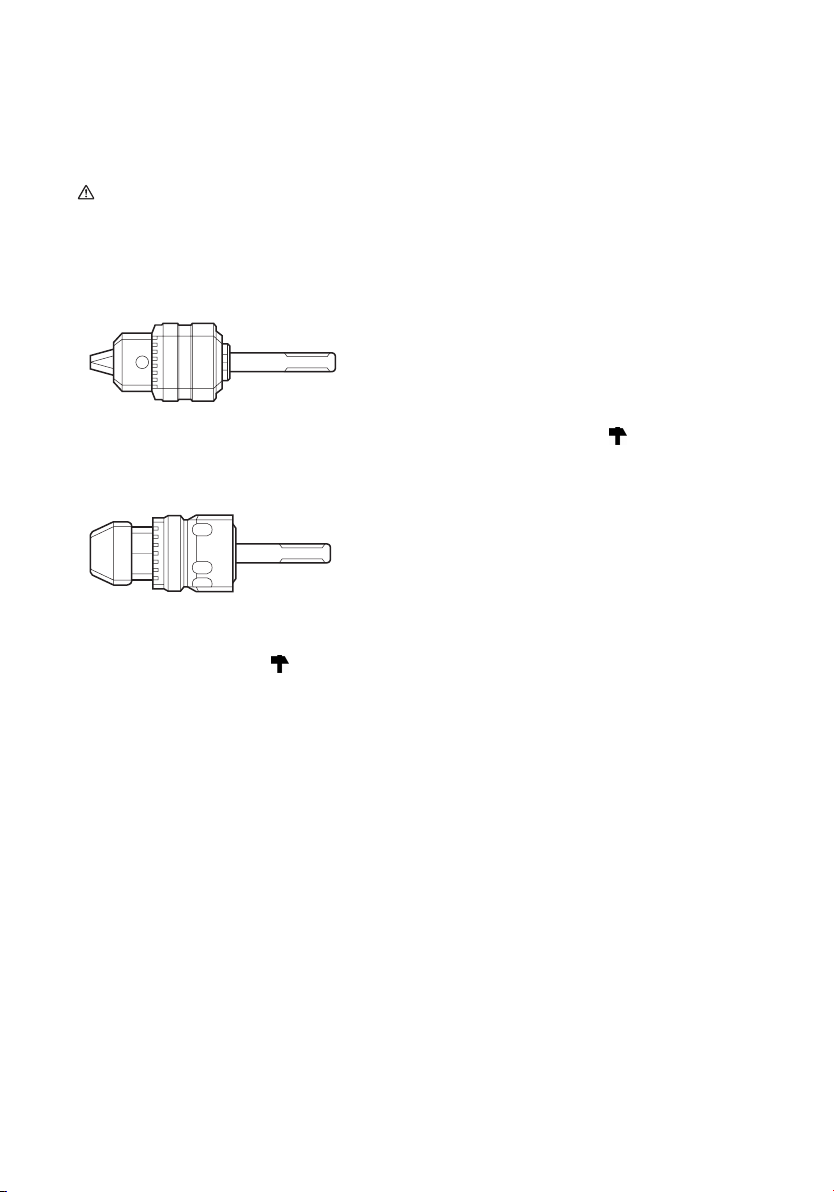
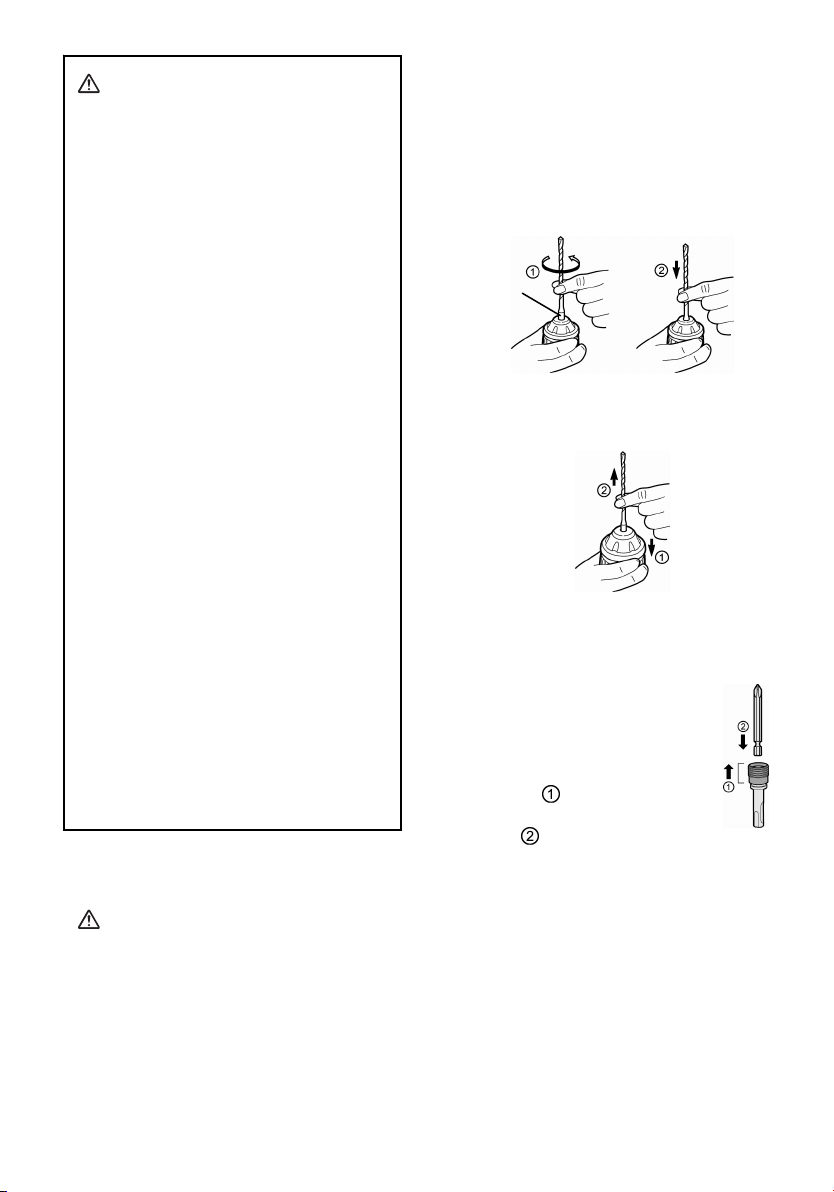
1. To insert the bit
1-1. Insert a bit into the mounting hole, and
turn it slightly to locate an engaged
position.
1-2. At the engaged position, push the bit
as far as it goes. Make sure that the
bit is fixed by pulling it.
SDS PLUS type
shank
2. To remove the bit
2-1. Depress the chuck and pull the bit.
Bit adapter
Use a bit adapter (O) and bit.
1. Remove the bit adapter from
the bit adapter holder on the
main unit.
2. Pull the bit holder. ( )
3. Insert the bit. (
4. Make sure the bit is inserted
firmly by pulling it lightly.
5. Insert the bit adapter into the
mounting hole and turn to
locate an engaged position.
6. At the engaged position, push in as
far as it goes.
• Make sure it does not move by
pulling it lightly.
)
Bit
holder
- 6 -

g
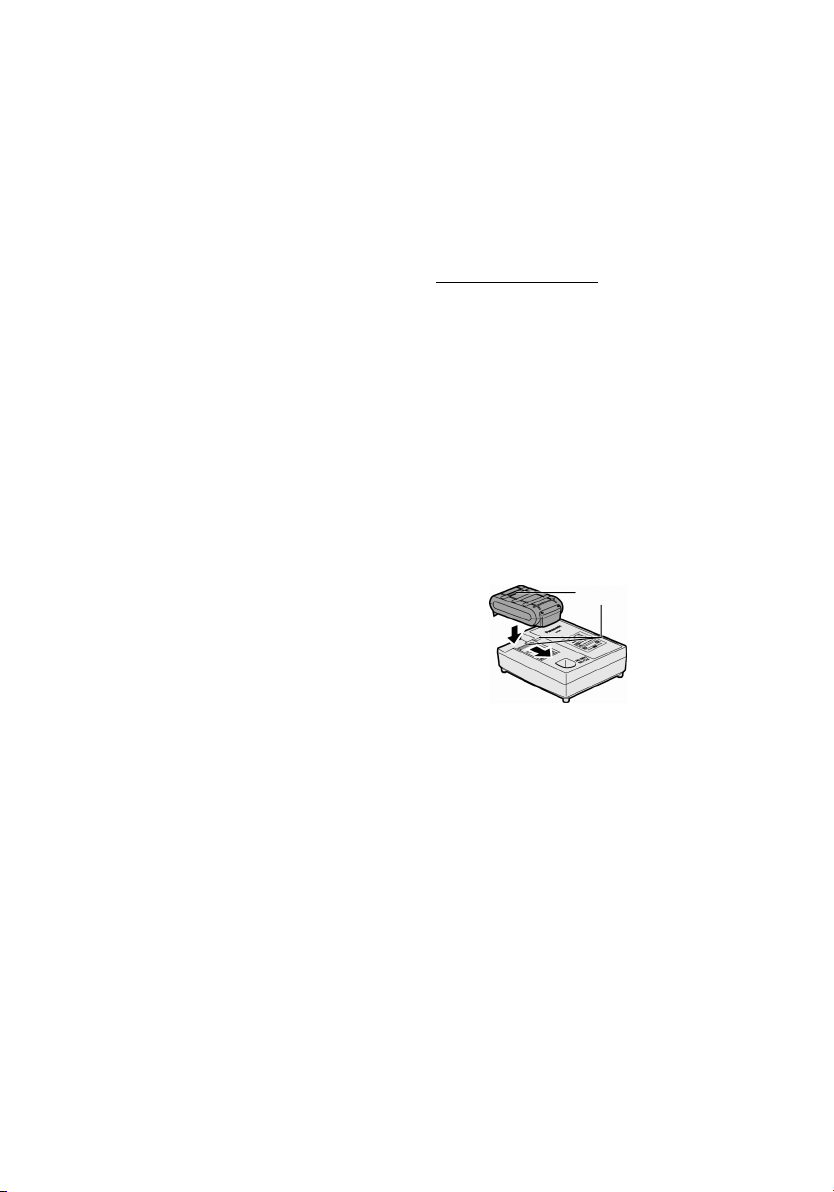
Attaching or Removing Battery Pack
1. To connect the battery pack:
Line up the alignment marks and
attach the battery pack.
• Slide the battery pack until it locks
into position.
Alignment marks
2. To remove the battery pack:
Push on the button from the front to
release the battery pack.
Button
IV. OPERATION
Forward/Reverse Lever
Forward Reverse
Lock
• Be sure to set the lever in the center
to lock it after use.
• Operate the Forward/Reverse lever
after the motor rotation is completely
stopped.
Hammering/Drilling Switching
Lever
NOTE: Operate the mode change after
the motor rotation is completely
stopped.
Position of
switching lever
Action mode Operation
Rotation with
hammering
Rotation only
Concrete
Drilling,
Block Drillin
Screw
Fastening,
Drilling
Clutch Torque Setting
Adjust the torque to one of the 5 clutch
settings or “
” position.
CAUTION:
Test the setting before actual operation.
Set the scale at this mark ( ).
Variable Speed Control Trigger
To set the center of a hole, pull the
trigger slightly to start the drill rotation
slowly.
The more the speed control trigger is
pulled, the higher the speed becomes.
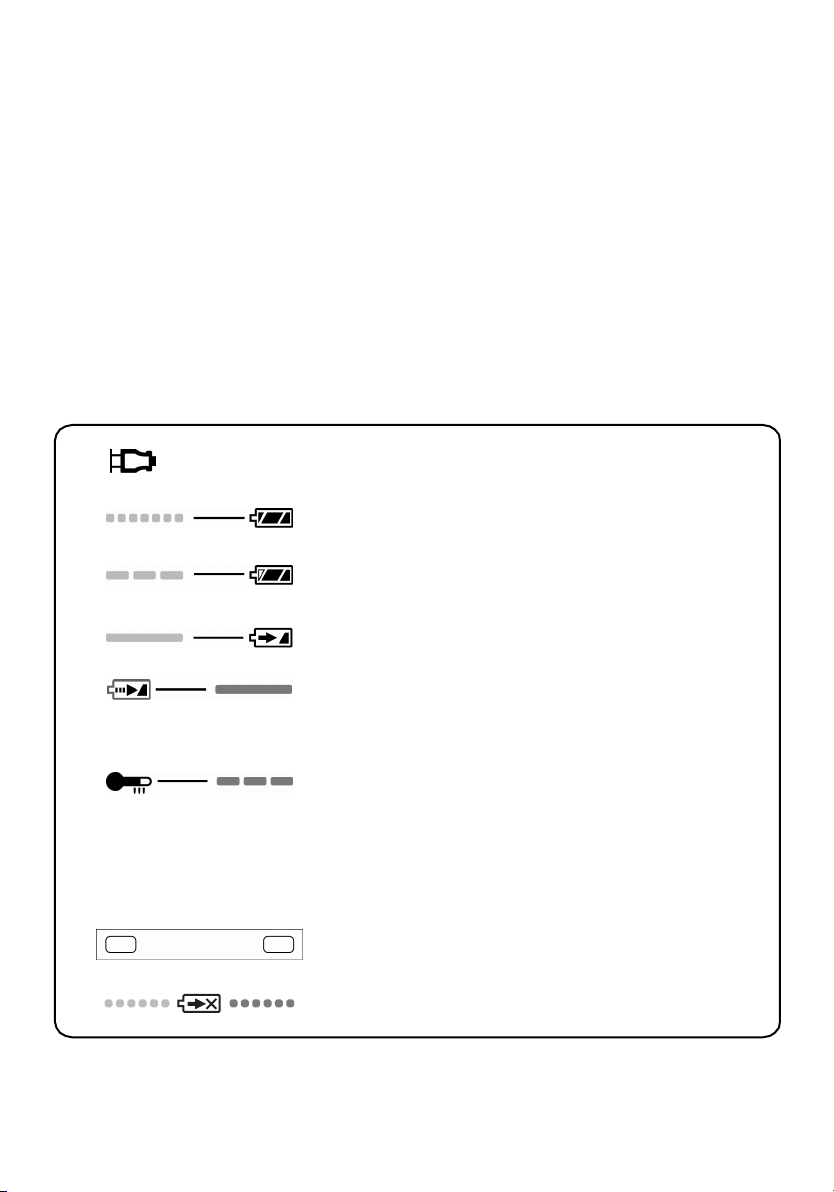
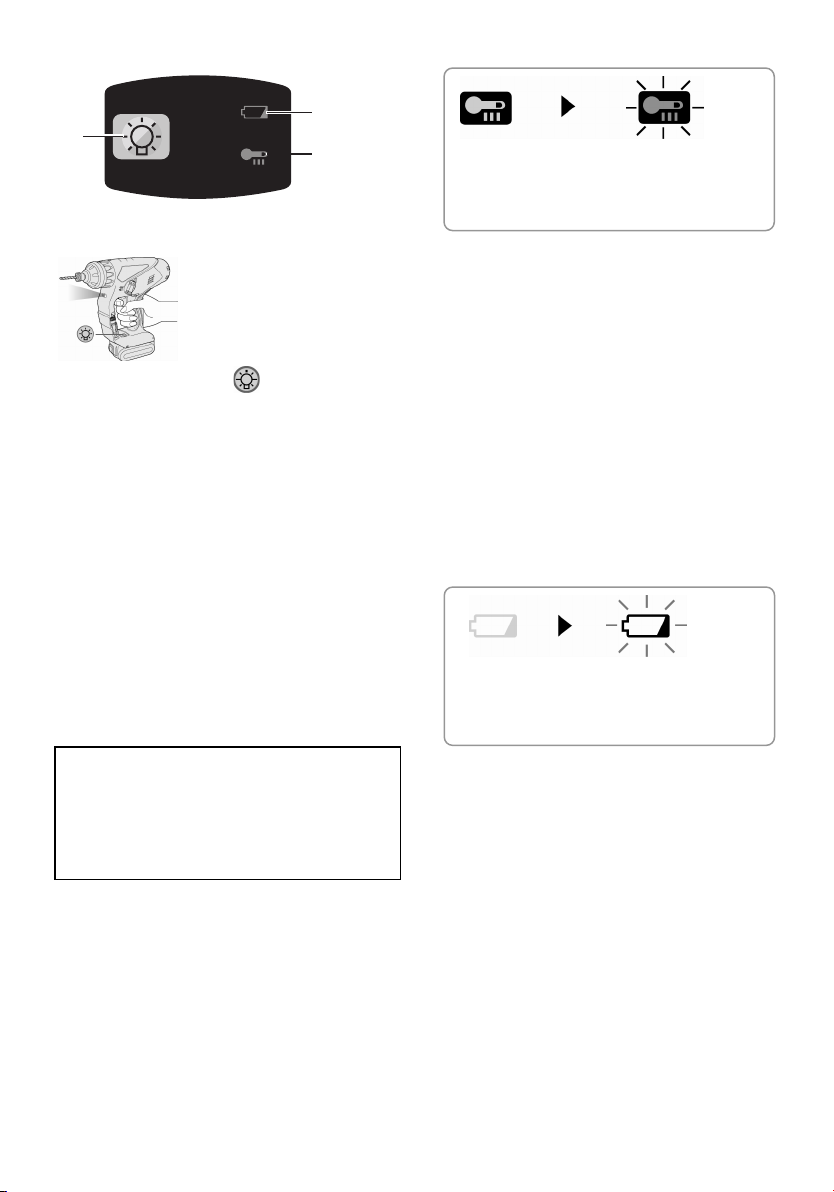
Control Panel
(3)
(1)
(2)
- 7 -
g
(1) LED light
Before the use of LED
light, always pull the
power switch once.
Press
the LED light
on button.
The light illuminates with
very low current, and it
does not adversely affect
the performance of the
tool during use or its
battery capacity.
CAUTION:
• The built-in LED light is designed to
illuminate the small work area
temporarily.
•
Do not use it as a substitute for a
regular flashlight, since it does not
have enough brightness.
•
LED light turns off when the tool has
not been used for 5 minutes.
Caution : DO NOT STARE INTO BEAM.
Use of controls or adjustments or performance
of procedures other than those specified herein
may result in hazardous radiation exposure.
(2) Overheat warning lamp
Off
(normal
operation)
Flashing: Overheat
Indicates operation has
been halted due to battery
overheatin
.
The overheating protection feature
halts tool operation to protect the
battery pack in the event of
overheating. The overheat warning
lamp on the control panel flashes
when this feature is active.
• If the overheating protection feature
activates, allow the tool to cool
thoroughly (at least 30 minutes). The
tool is ready for use when the
overheat warning lamp goes out.
• Avoid using the tool in a way that
causes the overheating protection
feature to activate repeatedly.
(3) Battery low warning lamp
Off
(normal
operation)
Flashing
(No charge)
Battery protection
feature active
The battery protection feature
activates immediately before the
battery loses its charge, causing the
battery low warning lamp to flash.
• If you notice the battery low warning
lamp flashing, charge the battery
pack immediately.
Installing the Shoulder Strap
CAUTION:
• Install the shoulder strap firmly to
the main unit of the tool and
check the length of the strap
before use.
•
Check the condition of the strap
and do not use if it is cut or torn
etc.
There is a risk of injury or damage
if used while improperly installed.
• Please wear the shoulder strap
securely on the shoulder.
There is a risk of injury or damage
if it is accidentally dropped.
1. Pass the strap through the strap
holders. (
2. Pass the strap through the buckles
and adjust the length. (
Shoulder pad
• The shoulder strap can be adjusted
)
)
- 8 -

according to the individual.
• Adjust the shoulder pad to the
shoulder.
• Pull the shoulder strap to make
sure it is firmly attached to the main
unit of the tool.
[Battery Pack]
For Appropriate Use of
Battery pack
Li-ion Battery pack (EY9L40/EY9L41)
• For optimum battery life, store the Li-
ion battery pack following use without
charging it.
• When charging the battery pack,
confirm that the terminals on the
battery charger are free of foreign
substances such as dust and water
etc. Clean the terminals before
charging the battery pack if any
foreign substances are found on the
terminals.
The life of the battery pack terminals
may be affected by foreign
substances such as dust and water
etc. during operation.
• When battery pack is not in use,
keep it away from other metal objects
like: paper clips, coins, keys, nails,
screws, or other small metal objects
that can make a connection from one
terminal to another.
Shorting the battery terminals together
may cause sparks, burns or a fire.
• When operating the battery pack,
make sure the work place is well
ventilated.
• When the battery pack is removed
from the main body of the tool, replace
the battery pack cover immediately in
order to prevent dust or dirt from
contaminating the battery terminals
and causing a short circuit.
Battery Pack Life
The rechargeable batteries have a
limited life. If the operation time becomes extremely short after recharging, replace the battery pack with a
new one.
Battery Recycling
ATTENTION:
For environmental protection and
recycling of materials, be sure that
it is disposed of at an officially
assigned location, if there is one in
your country.
[Battery Charger]
Charging
Cautions for the Li-ion Battery
Pack
• If the temperature of the battery pack
approximately below −10°C (14°F),
falls
charging will automatically stop to
prevent degradation of the battery.
Common Cautions for the Liion/Ni-MH/Ni-Cd Battery Pack
• The ambient temperature range is
between 0°C (32°F) and 40°C (104°F).
If the battery pack is used when the
battery temperature is below 0°C
(32°F), the tool may fail to function
properly.
• Use the charger at temperatures
between 0°C and 40°C, and charge
the battery at a temperature similar to
that of the battery itself. (There should
be no more than a 15°C difference
between the temperatures of the
battery and the charging location.)
• When charging a cool battery pack
(below 0°C (32°F)) in a warm place,
leave the battery pack at the place
and wait for more than one hour to
warm up the battery to the level of
the ambient temperature.
• Cool down the charger when charging
more than two battery packs
consecutively.
• Do not insert your fingers into contact
hole, when holding charger or any
other occasions.
- 9 -
A
CAUTION:
To prevent the risk of fire or damage
to the battery charger.
• Do not use power source from an
engine generator.
• Do not cover vent holes on the
charger and the battery pack.
• Unplug the charger when not in use.
Li-ion Battery Pack
NOTE:
Your battery pack is not fully
charged at the time of purchase. Be
sure to charge the battery before
use.
Battery charger (EY0L80)
1. Plug the charger into the AC outlet.
NOTE:
Sparks may be produced when the
plug is inserted into the AC power
supply, but this is not a problem in
terms of safety.
2. Insert the battery pack firmly into the
charger.
1 Line up the alignment marks and
place the battery onto the dock on
the charger.
2 Slide forward in the direction of the
arrow.
3. During charging, the charging lamp
will be lit.
When charging is completed, an
internal electronic switch will
automatically be triggered to
prevent overcharging.
• Charging will not start if the battery pack
is warm (for example, immediately after
heavy-duty operation).
The orange standby lamp will be
flashing until the battery cools down.
Charging will then begin automatically.
lignment marks
4. The charge lamp (green) will flash
slowly once the battery is approximately 80% charged.
5. When charging is completed, the
charging lamp will start flashing quickly in
green color.
6. If the temperature of the batter pack is
0°C or less, charging takes longer to
fully charge the battery pack than the
standard charging time.
Even when the battery is fully charged, it
will have approximately 50% of the
power of a fully charged battery at
normal operating temperature.
7. If the power lamp does not light
immediately after the charger is plugged
in, or if after the standard charging time
the charging lamp does not flash quickly
in green, consult an authorized dealer.
8. If a fully charged battery pack is
inserted into the charger again, the
charging lamp lights up. After several
minutes, the charging lamp may flash
quickly to indicate the charging is
completed.
Ni-MH/Ni-Cd Battery Pack
NOTE:
When you charge the battery pack
for the first time, or after prolonged
storage, charge it for about 24
hours to bring the battery up to full
capacity.
Battery charger (EY0L80)
1. Plug the charger into the AC outlet.
NOTE:
Sparks may be produced when the
plug is inserted into the AC power
supply, but this is not a problem in
terms of safety.
2. Insert the battery pack firmly into the
charger.
- 10 -
3. During charging, the charging lamp
will be lit.
When charging is completed, an internal
electronic switch will automatically be
triggered to prevent overcharging.
•
Charging will not start if the battery
pack is warm (for example,
immediately after heavy-duty
operation).
The orange standby lamp will be
flashing until the battery cools down.
Charging will then begin
automatically.
4. When charging is completed, the charging lamp will start flashing quickly in
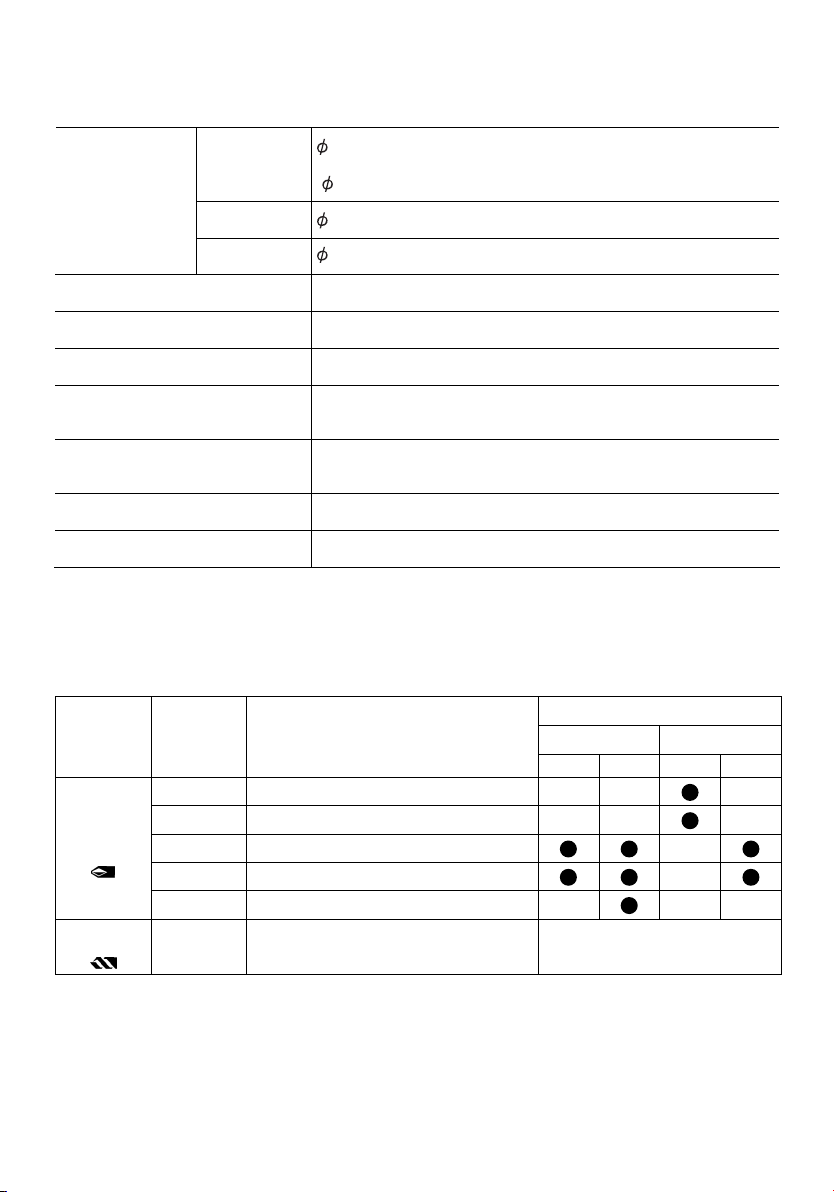
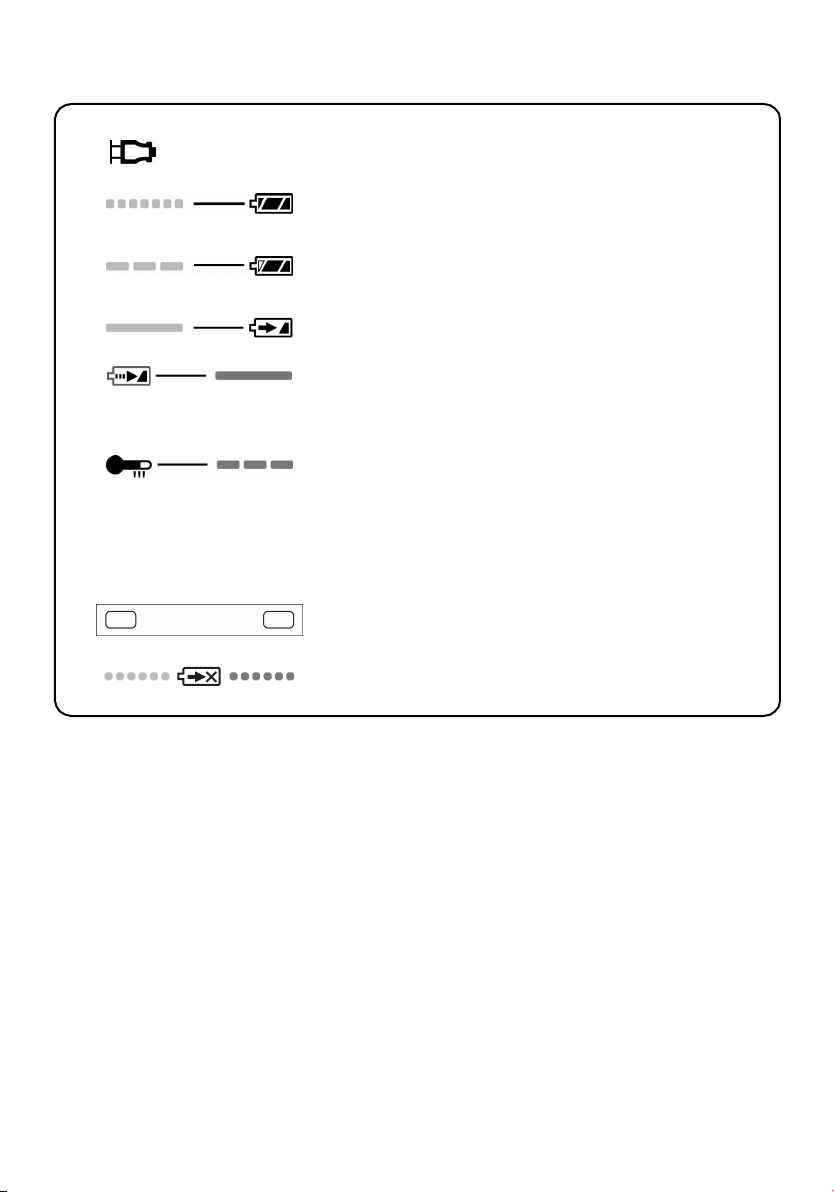
LAMP INDICATIONS
Green Lit
Charger is plugged into the AC outlet.
Ready to charge.
Green Flashing Quickly
Charging is completed. (Full charge.)
Green Flashing
Battery is approximately 80% charged. (Usable charge. Liion only)
Green Lit
Now charging.
Orange Lit
Battery pack is cool.
The battery pack is being charged slowly to reduce the load
on the battery. (Li-ion only)
Orange Flashing
Battery pack is warm. Charging will begin when temperature
of battery pack drops.
If the temperature of the battery pack is –10°C or less, the
charging status lamp (orange) will also start flashing. Charging
will begin when the temperature of the battery pack goes up (Liion only)
Charging Status Lamp
Left: green Right: orange will be displayed.
green color.
5. If the charging lamp does not light
immediately after the charger is
plugged in, or if after the standard
charging time the charging lamp does
not flash quickly in green, consult an
authorized dealer.
6. If a fully charged battery pack is inserted into the charger again, the
charging lamp lights up. After several
minutes, the charging lamp may flash
quickly to indicate the charging is
completed.
Both Orange and Green Flashing Quickly
Charging is not possible. Clogged with dust or malfunction of
the battery pack.
- 11 -

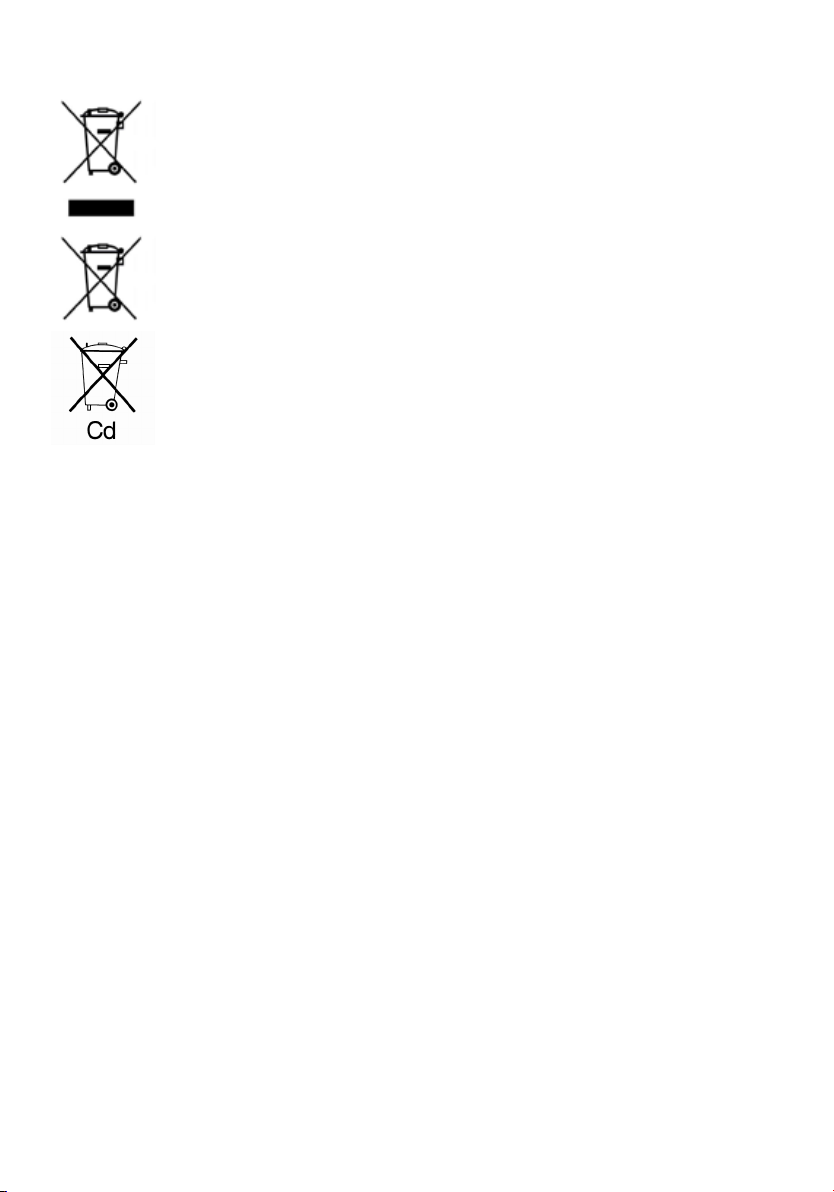
Information for Users on Collection and Disposal of Old
Equipment and used Batteries
These symbols on the products, packaging, and/or accompanying
documents mean that used electrical and electronic products and
batteries should not be mixed with general household waste.
For proper treatment, recovery and recycling of old products and used
batteries, please take them to applicable collection points, in accordance
with your national legislation and the Directives 2002/96/EC and
2006/66/EC.
By disposing of these products and batteries correctly, you will help to
save valuable resources and prevent any potential negative effects on
human health and the environment which could otherwise arise from
inappropriate waste handling.
For more information about collection and recycling of old products and
batteries, please contact your local municipality, your waste disposal
service or the point of sale where you purchased the items.
Penalties may be applicable for incorrect disposal of this waste, in
accordance with national legislation.
For business users in the European Union
If you wish to discard electrical and electronic equipment, please contact your
dealer or supplier for further information.
[Information on Disposal in other Countries outside the
European Union]
These symbols are only valid in the European Union. If you wish to discard these
items, please contact your local authorities or dealer and ask for the correct method
of disposal.
Note for the battery symbol (bottom two symbol examples):
This symbol might be used in combination with a chemical symbol. In this case it
complies with the requirement set by the Directive for the chemical involved.
- 12 -
V. MAINTENANCE
Use only a dry, soft cloth for wiping the unit. Do not use a damp cloth, thinner, benzine,
or other volatile solvents for cleaning.
VI. ACCESSORIES
CAUTION:
To prevent the risk of injury, only use accessory or attachment for its stated purpose.
Bit adapter (included)
•EY9HX403E
Drill chuck (Optional accessory)
•EY9HX400E
Use with wood drill bit or metal drill bit with shank of 1.5 mm to 13 mm diameter.
Do not use the drill chuck in “Rotation with hammering mode” (
with hammering mode" may cause break of chuck or bit and result in injury.
Hammer chuck (Optional accessory)
•EY9HX401E
Use with concrete drill bit, wood drill bit or metal drill bit with straight shank of 2.5 mm
to 13 mm diameter.
Do not use the hammer chuck with wood drill bit or metal drill bit in “Rotation with
hammering mode” ( ). Use in “Rotation with hammering mode” may cause break
of bit and result in injury.
If you need any assistance for more details regarding these accessories, ask your
local service center.
). Use in "Rotation
VII. USAGE SUGGESTION
1. If there isn’t enough force pushing down on the bit, the tool may not be able to
blow in hammering mode.
This is to prevent the hammering mode from operating with no load. Press down
harder on the bit to engage the tool and cause it to blow.
Always be sure to press down with enough force when working.
2. In winter or in other situations where the temperature of the unit is low (5°C (41°F)
or below), the blow of the hammering mode may be weaker than normal at the
beginning stage.
This is because the grease becomes stiffer in low temperatures, increasing
friction.
If this should happen, operating hammering mode with no load for approximately
30 seconds and repeat this 3 times. This will restore its blowing power.
- 13 -
VIII. SPECIFICATIONS
(
)
(
)
MAIN UNIT
Concrete
Maximum drilling
diameter
Motor voltage 14.4 V DC
Speed at no load (RPM) 0-1000 min-1 (rpm)
Blows rate per minute (BPM) 0-3800 min-1 (bpm)
Steel
Wood
16.5 mm (21/32")*
*For work that can be completed with one battery pack.
(
12.5 mm (15/32") - 16.5 mm (21/32"))
13 mm (1/2")
18 mm (23/32")
Weight
with battery pack: EY9L40
Weight
with battery pack: EY9L41
Overall length 249 mm (9-51/64")
Noise, Vibration See the included sheet
2.3 kg (5.1 lbs)
2.4 kg (5.3 lbs)
GUIDELINE TABLE
• Select the torque for fastening screws with the clutch handle.
• Guide for the selection of torque
Depending on the job, adjustments are possible in five levels by approximately 1 N·m (10
kgf-cm) increments.
Guide Depending on Material
Fastening
Screws
Drilling
Holes
(A) For fastening screws into plastic anchor which requires dia. 6.0 mm (1/4") prehole in the concrete.
(B) For directly fastening screws into concrete (like topcon) with dia. 3.5 mm (1/8") prehole.
NOTE: This is only a rough guide. Required torque is different depending on the
Setting Torque
1 Approximately 1.5 N·m (15 kgf-cm)
2 Approximately 2.5 N·m (25 kgf-cm)
3 Approximately 3.4 N·m (35 kgf-cm)
4 Approximately 4.4 N·m (45 kgf-cm)
g
5 Approximately 5.4 N·m (55 k
(Drill Mark) Approximately 10.5 N·m (107 k
f-cm)
g
f-cm)
shape, material, and application of the screws.
Set according to the work environment of the site.
Concrete Block
(A) (B) (A) (B)
Drilling holes in wood and metal
- 14 -

BATTERY PACK
Y
Model
Storage battery
Battery voltage
Capacity
EY9L40 EY9L41
Li-ion Battery
14.4 V DC (3.6 V x 4 cells)
3 Ah 3.3 Ah
BATTERY CHARGER
0.95 k
EY0L80
g
(2.1 lbs)
Model
Rating
Weight
See the rating plate on the bottom of the charger.
[Li-ion battery pack]
14.4 V 21.6 V 28.8 V
Charging time
Charging time
3 Ah
3.3 Ah
EY9L40 EY9L60 EY9L80
Usable: 55 min. Usable: 45 min.Usable: 35 min.
Full: 50 min. Full: 60 min. Full: 70 min.
14.4 V
EY9L41
Usable: 45 min.
Full: 60 min.
[Ni-Cd/Ni-MH battery pack]
7.2 V 9.6 V 12 V 15.6 V 18 V 24 V
Charging time
EY9065
1.2 Ah
1.7 Ah
2 Ah
3 Ah
3.5 Ah
EY9066
EY9168 EY9188
EY9080
EY9086
20 min.
EY9180
EY9182
EY9001
EY9101
E
25 min.
EY9106
EY9107
EY9108
30 min. 60 min.
EY9200 EY9230 EY9210
EY9201 EY9231 EY9251
9103
EY9136
45 min.
55 min. 65 min.
EY9116
EY9117
90 min.
NOTE: This chart may include models that are not available in your area.
Please refer to the latest general catalogue.
NOTE: For the dealer name and address, please see the included warranty card.
- 15 -
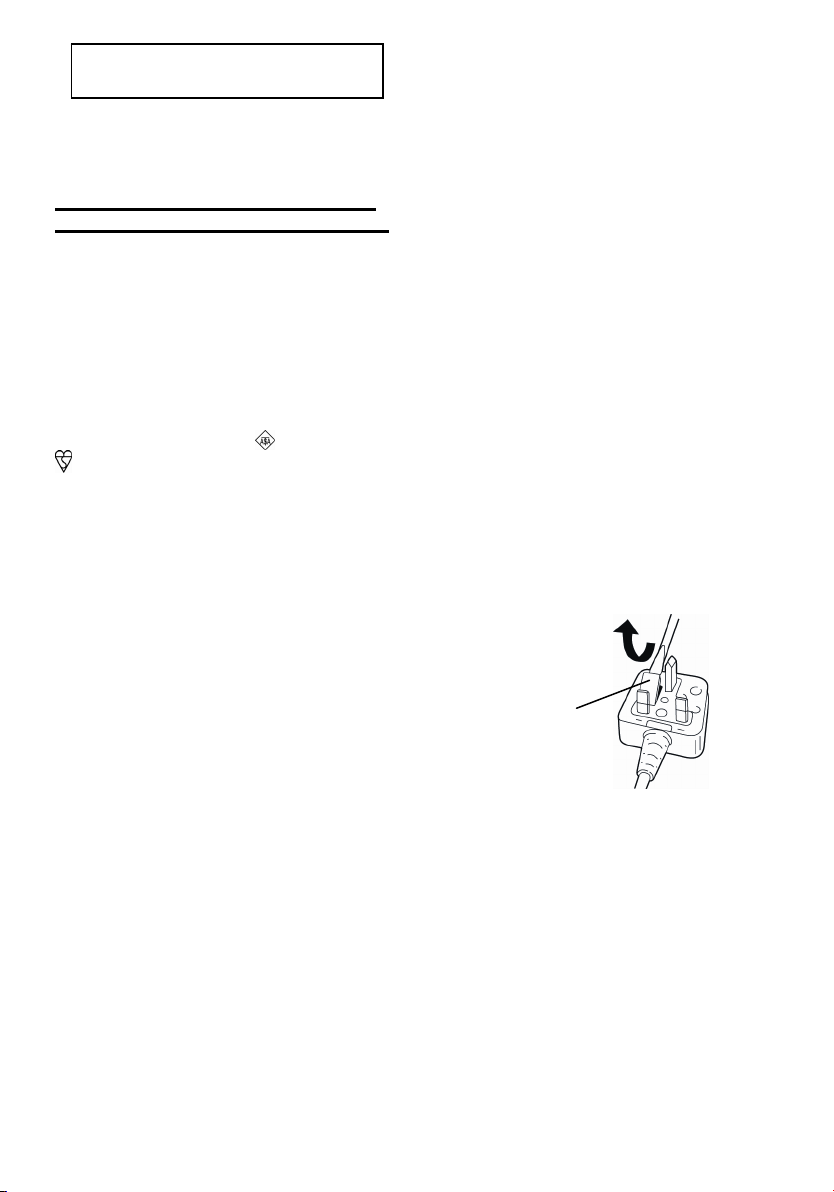
ONLY FOR U. K.
IX.
ELECTRICAL PLUG
INFORMATION
FOR YOUR SAFETY PLEASE READ
THE FOLLOWING TEXT CAREFULLY
This appliance is supplied with a moulded
three pin mains plug for your safety and
convenience.
A 5 amp fuse is fitted in this plug.
Should the fuse need to be replaced please
ensure that the replacement fuse has a rating of 5 amp and that it is approved by ASTA
or BSI to BS1362.
Check for the ASTA mark
on the body of the fuse.
If the plug contains a removable fuse cover
you must ensure that it is refitted when the
fuse is replaced.
If you lose the fuse cover the plug must not
be used until a replacement cover is obtained.
A replacement fuse cover can be purchased
from your local Panasonic Dealer.
IF THE FITTED MOULDED PLUG IS UNSUITABLE FOR THE SOCKET OUTLET IN
YOUR HOME THEN THE FUSE SHOULD
BE REMOVED AND THE PLUG CUT OFF
AND DISPOSED OF SAFELY.
THERE IS A DANGER OF SEVERE
ELECTRICAL SHOCK IF THE CUT OFF
PLUG IS INSERTED INTO ANY 13 AMP
SOCKET.
If a new plug is to be fitted please observe
the wiring code as shown below.
If in any doubt please consult a qualified
electrician.
or the BSI mark
IMPORTANT: The wires in this mains
lead are coloured in accordance with the following code:
Blue: Neutral
Brown: Live
As the colours of the wire in the mains lead
of this appliance may not correspond with
the coloured markings identifying the terminals in your plug, proceed as follows.
The wire which is coloured BLUE must be
connected to the terminal in the plug which
is marked with the letter N or coloured
BLACK.
The wire which is coloured BROWN must be
connected to the terminal in the plug which is
marked with the letter L or coloured RED.
Under no circumstances should either of
these wires be connected to the earth terminal of the three pin plug, marked with the
letter E or the Earth Symbol .
How to replace the fuse:
compartment with a screwdriver and replace
the fuse and fuse cover if it is removable.
Fuse Cover
Open the fuse
- 16 -

I. BESTIMMUNGSGEMÄßE
VERWENDUNG DER
MASCHINE
Dieses Gerät ist ein Bohrhammer für das
Bohren in Beton. Zusätzlich verfügt das
Gerät aber auch über einen “Nur-Bohren-Modus”, bei dem kein Schlagen erfolgt.
Dieser Modus eignet sich für das Bohren
und zum Befestigen von Schrauben.
Lesen Sie bitte vor der ersten Inbetriebnahme dieses Geräts das separate Handbuch “Sicherheitsmaßregeln” sorgfältig durch.
II.
WEITERE WICHTIGE
10) Das Gerät wird überbeansprucht,
SICHERHEITSREGELN
1)
Tragen Sie einen Gehörschutz.
Lärmeinwirkung kann zu Gehörverlust führen.
2)
Verwenden Sie den mit dem
Werkzeug gelieferten Zusatzgriff
(Haltegriff).
kann Verletzungen verursachen.
3)
Halten Sie Elektrowerkzeuge an
den isolierten Griffflächen, wenn
Sie eine Arbeit durchführen, bei
der die Maschine auf verborgene
Kabel treffen könnte;
mit stromführenden Kabeln werden
die freiliegenden Metallteile der
Maschine ebenfalls stromführend
und der Benutzer erleidet einen
elektrischen Schlag.
4) Tragen Sie eine Staubmaske, falls
bei der Arbeit Staub anfällt.
Denken Sie daran, dass das Werk-
5)
zeug ständig betriebsbereit ist, da
es nicht an die Steckdose angeschlossen werden muss.
6)
Wenn der Bohrer sich festfrisst, sofort den Auslösehebel freigeben, da
das Akkupack und der Motor bei
Überlastung der Maschine beschädigt werden können. Zum Lösen
des Bohrers auf Linkslauf schalten.
7) Betätigen Sie den Rechts/Linkslauf
Schalter nicht, wenn der Betriebsschalter eingeschaltet ist. Der Akku
entlädt sich sonst schnell, und das
Verlust der Kontrolle
bei Kontakt
11) Darauf achten, dass kein Staub in
12) Wegen Verletzungsgefahr bei lau-
13)
14) Die Maschine nicht fallenlassen!
15) ACHTUNG! Achten Sie darauf,
Gerät kann beschädigt werden.
8) Das Gerät nur mit einem trockenen, weichen Lappen abwischen.
Verwenden Sie zum Reinigen keine feuchten Lappen oder flüchtigen Lösungsmittel wie Farbverdünner oder Benzin.
9) Stellen Sie den Rechts/Linkslauf
Schalter zum Lagern oder Tragen
des Werkzeugs auf die Mittelstellung (Schaltersperre).
wenn Sie den Betriebsschalter in
halb eingeschobener Stellung halten (aktive Drehzahlregulierung)
und den Motor abwürgen.
Hierdurch spricht die Schutzschaltung an, die die Drehzahlregulierung
außer Funktion setzt. In solchen
Fällen den Betriebsschalter freigeben und erneut ziehen, damit das
Gerät wieder normal arbeitet.
das Futter gerät.
fender Maschine keine sich drehenden Teile berühren!
Die Maschine nicht über längere
Zeit ununterbrochen laufen lassen,
sondern von Zeit zu Zeit stoppen,
damit der Motor sich abkühlen kann.
dass Sie das SDS-Spannfutter
nicht versehentlich aufstützen. Das
SDS-Werkzeug wird dann vom
Futter gelöst und fällt nach unten
aus der Maschine. Dies kann Verletzungen zur Folge haben.
Symbol Bedeutung
V
n0
…min
Drehzahl ohne Last
Umdrehungen oder Hin- und
-1
Herbewegungen pro Minute
Volt
Gleichstrom
Schlagbohren
Drehbewegung
- 17 -
WARNUNG:
• Verwenden Sie nur die Panasonic-Akkus,
die für den Einsatz mit dieser
Akku-Maschine ausgelegt sind.
• Werfen Sie den Akku nicht ins
Feuer, und setzen Sie ihn auch
keiner übermäßigen Wärme aus.
• Unterlassen Sie das Einschlagen
von Nägeln in den Akku sowie
Erschüttern, Zerlegen oder
Abändern des Akkus.
• Achten Sie darauf, dass keine
Metallgegenstände mit den
Kontakten des Akkus in Berührung
kommen.
• Unterlassen Sie das Tragen oder
Aufbewahren des Akkus zusammen
mit Nägeln oder ähnlichen
Metallgegenständen im selben
Behälter.
• Laden Sie den Akku nicht an einem
heißen Ort, wie z. B. in der Nähe
eines Feuers oder in direktem
Sonnenlicht. Anderenfalls kann der
Akku überhitzen, Feuer fangen oder
explodieren.
• Verwenden Sie nur das zugehörige
Ladegerät zum Laden des Akkus.
Anderenfalls kann der Akku
auslaufen, überhitzen oder
explodieren.
• Nachdem Sie den Akku von der
Maschine oder dem Ladegerät
abgenommen haben, bringen Sie
stets die Akkuabdeckung wieder an.
Anderenfalls könnten die
Akkukontakte kurzgeschlossen
werden, was zu einem Brand führen
kann.
III. ZUSAMMENBAU
VORSICHT:
Die Verwendung eines Betonbohrers, der
größer als die empfohlene Größe ist,
kann eine Beschädigung des Geräts verursachen.
1. Einführen des Einsatzes
1-1. Stecken Sie einen Bohrer in die
Montageöffnung und drehen Sie ihn
leicht, um ihn in der Einrastposition zu
fixieren.
1-2. Drücken Sie den Bohrer in der Ein-
rastposition so tief wie möglich hinein.
Ziehen Sie am Bohrer und überzeugen Sie sich davon, dass er richtig
fest sitzt.
Schaft des Typs
SDS PLUS
2. Entfernen des Einsatzes
2-1. Drücken Sie auf das Spanfutter und
ziehen Sie am Bohrer.
Einsatzadapter
Verwenden Sie den Einsatzadapter
(O) und einen Einsatz.
1. Nehmen Sie den Einsatzadapter aus dem
Einsatzadapterhalter an
der Haupteinheit heraus.
2. Ziehen Sie am Einsatzhalter. ( )
3. Führen Sie den Einsatz
ein. ( )
4. Vergewissern Sie sich durch leichtes
Ziehen, dass der Einsatz fest sitzt.
5. Führen Sie das Futter in die Halterung
ein und drehen Sie es, um eine Einrastposition zu finden.
6. Drücken Sie den Einsatzadapter an
der Einrastposition bis zum Anschlag
hinein.
• Vergewissern Sie sich durch leichtes Ziehen, dass er sich nicht bewegt.
Einsatzhalter
- 18 -

Anbringen oder Abnehmen
des Akkus
1. Zum Anschließen des Akkus:
Die Ausrichtmarkierungen aufeinander
ausrichten, und den Akku anbringen.
• Den Akku einschieben, bis er ein-
rastet
.
Ausrichtmarkierungen
2. Zum Entfernen des Akkus:
Zum Abnehmen des Akkus den
Knopf an der Vorderseite drücken.
Knopf
IV. BETRIEB
Rechts/Linkslaufumschalter
Zum Umschalten zwischen
normalem Bohren und Hammerbohren
HINWEIS: Nehmen Sie den Be-
triebsartenwechsel erst
dann vor, wenn die
Motordrehung vollständig
zum Stillstand gekommen ist.
Position des
Umschalthebels
Betriebsart Operation
Schlagbohren
Bohren/
Schrauben
Betonbohren,
Blockbohren
Schraube
anziehen,
Bohren
Einstellung des
Kupplungsdrehmoments
Stellen Sie das Drehmoment auf eine
der 5 Kupplungsstufen oder die Position „
VORSICHT:
“ ein.
Prüfen Sie die Einstellung vor der
eigentli-chen Inbetriebnahme.
Stellen Sie die Skala auf diese
Markierung ( ) ein.
Rechtslauf Linkslauf
Verriegeln
• Den Hebel nach dem Gebrauch des
Werkzeugs unbedingt auf Mitte (Verriegelung) stellen.
• Betätigen Sie den Rechts/Links-
laufumschalter erst, wenn die Motordrehung vollständig zum Stillstand gekommen ist.
Elektronikschater
Um die Mitte eines Lochs anzubohren,
drücken Sie den Ein-Aus-Schalter leicht,
damit die Bohrdrehung langsam startet.
Je weiter der Elektronikschalter hineingedrückt wird, desto höher wird die Drehzahl.
- 19 -
A
A
A
g
Bedienfeld
(3)
(1)
(1) LED-Leuchte
Betätigen Sie vor der
Benutzung der
LEDLeuchte einmal den
Ein-Aus-Schalter.
Drücken Sie die
LED-Leuchten-Einschaltt
aste
Die Leuchte benötigt nur
sehr wenig Strom und
beeinträchtigt nicht die
Leistung der Maschine
oder die Akkukapazität
während der Benutzung.
VORSICHT:
• Die eingebaute LED dient zur
vorübergehenden Beleuchtung des
kleinen Arbeitsbereichs.
• Benutzen Sie sie nicht als Ersatz für
eine reguläre Taschenlampe, weil sie
nicht hell genug ist.
• Die LED-Leuchte schaltet sich aus,
wenn die Maschine 5 Minuten lang
nicht benutzt wird.
Vorsicht:
Die Benutzung von Bedienelementen oder
Einstellungen, oder die Durchführung von
Vorgängen, die hier nicht beschrieben sind,
kann zu gefährlicher Strahlungsfreisetzung
führen.
SEHEN SIE NICHT IN DEN STRAHL.
(2)
.
(2) Überhitzungs-Warnlampe
us
(normaler
Betrieb)
Blinken: Überhitzung
Zeigt an, dass der Betrieb
wegen Akku-Überhitzung
an
ehalten wurde.
Die Überhitzungs-Schutzfunktion hält
den Gerätebetrieb an, um den Akku im
Falle einer Überhitzung zu schützen.
Wenn diese Funktion aktiv ist, blinkt die
Überhitzungs-Warnlampe am Bedienfeld.
• Falls die Überhitzungs-Schutzfunktion aktiviert wird, lassen Sie das
Gerät gründlich abkühlen (mindestens 30 Minuten). Das Gerät ist
wieder einsatzbereit, wenn die Überhitzungs-Warnlampe erlischt.
• Vermeiden Sie Arbeitsgänge, die
dazu führen, dass der Überhitzungsschutz mehrfach aktiviert wird.
(3) Akkuladungs-Warnlampe
us
(normaler
Betrieb)
Blinken
(Keine Ladung)
kkuschutzfunktion
aktiv
Die Akkuschutzfunktion wird unmittelbar vor der Erschöpfung des Akkus
aktiviert und bewirkt Blinken der Akkuladungs-Warnlampe.
• Wenn Sie bemerken, dass die Ak-
kuladungs-Warnlampe blinkt, laden
Sie den Akku unverzüglich auf.
- 20 -

r
Anbringen des Schulterriemens
VORSICHT:
• Befestigen Sie den Schulterriemen
einwandfrei an der Haupteinheit des
Werkzeugs, und prüfen Sie seine
Länge vor der Benutzung.
• Prüfen Sie den Zustand des Riemens, und benutzen Sie ihn nicht,
wenn er Schnitte oder Risse usw.
aufweist.
Bei unsachgemäßer Anbringung
besteht die Gefahr von Verletzungen oder Sachbeschädigung.
• Bitte tragen Sie den Schulterriemen
sicher auf der Schulter.
Bei versehentlichem Herunterfallen
besteht die Gefahr von Verletzungen
oder Sachbeschädigung.
1. Führen Sie den Riemen durch die
Riemenhalter. ( )
2. Führen Sie den Riemen durch die
Schnallen, und stellen Sie seine
Länge ein. (
Schulterpolste
• Der Schulterriemen kann auf jede
Einzelperson eingestellt werden.
• Richten Sie das Schulterpolster auf
die Schulter aus.
• Ziehen Sie am Schulterriemen, um
sich zu vergewissern, dass er einwandfrei an der Haupteinheit des
Werkzeugs angebracht ist.
)
[Akku]
Für richtigen Gebrauch des
Akkus
Li-Ion-Akku (EY9L40/EY9L41)
• Um eine möglichst lange Lebensdauer
des Li-Ion-Akkus zu erzielen, lagern Sie
ihn nach dem Gebrauch, ohne ihn aufzuladen.
• Achten Sie beim Laden des Akkus
darauf, dass die Kontakte am Ladegerät
frei von Fremdstoffen, wie z. B. Staub
und Wasser usw., sind. Reinigen Sie die
Kontakte vor dem Laden des Akkus,
falls Fremdstoffe auf den Kontakten vorhanden sind.
Die Lebensdauer der Akkukontakte
kann durch Anhaften von Fremdstoffen,
wie z. B. Staub und Wasser usw., während des Betriebs beeinträchtigt werden.
• Wenn Sie den Akku nicht benutzen,
halten Sie ihn von Metallgegenständen
fern: Büroklammern, Münzen, Schlüssel,
Nägel, Schrauben oder andere kleine
Metallgegenstände können die Kontakte
kurzschließen.
Das Kurzschließen der Akkukontakte
kann Funken, Verbrennungen oder einen
Brand verursachen.
• Sorgen Sie bei Benutzung des Akkus für
ausreichende Belüftung des Arbeitsplatzes.
• Wenn der Akku vom Werkzeug-Haupt-teil
abgenommen wird, ist die Akkuabdeckung sofort anzubringen, um zu verhüten, dass die Akkukontakte durch Staub
oder Schmutz verunreinigt werden und
ein Kurzschluss verur-sacht wird.
Lebensdauer des Akkus
Der Akku hat nur eine begrenzte
Le-bensdauer. Wenn auch nach einer
ordnungsgemäßen Ladung die Betriebszeit extrem kurz ist, muss der
Akku erneuert werden.
- 21 -
A
Batterie-Recycling
ACHTUNG:
Um Umweltschutz und Materi-
al-Recycling
sen Sie die Batterie
Entsorgungsstelle bringen, falls
zu gewährleisten, müs-
zur örtlichen
eine
solche in Ihrem Land vorhanden ist.
[Ladegerät]
Laden
Vorsichtshinweise für den LiIon-Akku
• Falls die Temperatur des Akkus unter
etwa –10°C abfällt, wird der
Ladevorgang automatisch abgebrochen,
um eine Verschlechterung des Akkus zu
verhüten.
Allgemeine Vorsichtsmaßnahmen
für Li-Ion/Ni-MH/Ni-Cd-Akkus
• Der Umgebungstemperaturbereich liegt
zwischen 0°C und 40°C.
Wenn der Akku bei einer Akkutemperatur unter 0°C benutzt wird, funktioniert
die Maschine möglicherweise nicht einwandfrei.
• Verwenden Sie das Ladegerät bei Temperaturen zwischen 0°C und 40°C. Die
Temperatur während des Ladevorgangs
sollte in etwa der Temperatur des Akkus
selbst entsprechen. (Die Temperaturabweichung zwischen Akku und der
Ladeumgebung sollte nicht mehr als
15°C betragen.)
• Wenn ein kalter Akku (von etwa 0°C
oder weniger) in einem warmen Raum
aufgeladen werden soll, lassen Sie den
Akku für mindestens eine Stunde in dem
Raum und laden Sie ihn auf, wenn er
sich auf Raumtemperatur erwärmt hat.
•
Den Akku abkühlen lassen, wenn er mehr
als 2× hintereinander aufgeladen wurde.
• Stecken Sie Ihre Finger nicht in die Kontaktöffnung, um das Ladegerät festzuhalten oder bei anderen Gelegenheiten.
VORSICHT:
Um die Gefahr eines Brandes oder
Schadens am Ladegerät zu verhindern.
•
Keinen Motorgenerator als Spannungsquelle benutzen.
• Decken Sie die Entlüftungsöffnun-gen
des Ladegerätes und den Akku nicht
ab.
•
Trennen Sie das Ladegerät vom Stromnetz, wenn es nicht benutzt wird.
Li-Ion-Akku
HINWEIS:
Beim Kauf ist Ihr Akku nicht voll
auf-geladen. Laden Sie daher den
Akku vor Gebrauch auf.
Ladegerät (EY0L80)
1. Ladegerät an Wandsteckdose anschließen.
HINWEIS:
Beim Einführen des Steckers in
eine Netzsteckdose können Funken erzeugt werden, was jedoch in
Bezug auf die Sicherheit kein Problem darstellt.
2. Akku fest in das Ladegerät schieben.
1 Die Ausrichtmarkierungen ausrich-
ten, und den Akku in den Schacht
des Ladegerätes einsetzen.
In Pfeilrichtung nach vorn schie-ben.
2
usrichtmarkierungen
3. Während des Ladens leuchtet die
Lade-kontrolllampe.
Mit Erreichen der vollen Ladung
spricht automatisch eine interne, elektronische Schaltung an, die ein
Überladen verhindert.
• Das Laden beginnt nicht, solange der
Akku noch heiß ist (wie z.B. unmittelbar nach intensivem Gebrauch).
Die Bereitschaftslampe blinkt in Orange, bis der Akku abgekühlt ist.
Das Laden beginnt dann automatisch.
4. Die Ladekontrolllampe (grün) blinkt
langsam, wenn der Akku zu etwa 80%
aufgeladen ist.
5.
Wenn der Ladevorgang beendet ist,
beginnt die Ladekontrolllampe schnell
in Grün zu blinken.
6. Falls die Akkutemperatur 0°C oder
weniger beträgt, dauert der Ladevor-
- 22 -

gang bis zur vollen Aufladung des
Akkus länger als die normale Ladezeit.
Selbst wenn der Akku voll aufgeladen
ist, hat er nur etwa 50% der Leistung
eines voll aufgeladenen Akkus bei
normaler Betriebstemperatur.
7. Falls die Betriebslampe nicht unmittelbar nach dem Anschluss des Ladegeräts aufleuchtet oder die Ladekontrolllampe nach Ablauf der normalen Ladezeit nicht schnell in Grün
blinkt, konsultieren Sie einen Vertragshändler.
8. Wird ein voll aufgeladener Akku erneut in das Ladegerät eingesetzt,
leuchtet die Ladekontrolllampe auf.
Nach einigen Minuten beginnt die
Ladekontrolllampe rascher zu blinken
und zeigt an, dass der Ladevorgang
abgeschlossen ist.
Ni-MH/Ni-Cd-Akku
HINWEIS:
Beim ersten Aufladen der Akkus
oder beim Aufladen nach längerer
Ruhezeit die Akkus etwa 24 Stunden lang auf-laden, um die volle
Kapazität zu erreichen.
Ladegerät (EY0L80)
1. Ladegerät an Wandsteckdose anschließen.
HINWEIS:
Beim Einführen des Steckers in
eine Netzsteckdose können Funken erzeugt werden, was jedoch in
Bezug auf die Sicherheit kein Problem darstellt.
2.
Akku fest in das Ladegerät schieben.
Die Bereitschaftslampe blinkt in Orange, bis der Akku abgekühlt ist. Das
Laden beginnt dann automatisch.
4. Wenn der Ladevorgang beendet ist,
beginnt die Ladekontrolllampe schnell
in Grün zu blinken.
5. Wenn die Ladekontrolllampe nicht
unmittelbar nach dem Anschließen
des Netzkabels aufleuchtet oder nach
Ablauf der normalen Ladezeit nicht
erlischt, wenden Sie sich bitte an
einen autorisierten Fachhändler.
Wird ein voll aufgeladener Akku erneut
6.
in das Ladegerät eingesetzt, leuchtet
die Ladekontrolllampe auf. Nach einigen Minuten beginnt die Ladekontrolllampe rascher zu blinken und
zeigt an, dass der Ladevorgang abgeschlossen ist.
3. Während des Ladens leuchtet die
Lade-kontrolllampe.
Mit Erreichen der vollen Ladung spricht
auto-matisch eine interne, elektronische
Schaltung an, die ein Überladen verhindert.
• Das Laden beginnt nicht, solange der
Akku noch heiß ist (wie z.B. unmittelbar nach intensivem Gebrauch).
- 23 -
ANZEIGELAMPEN
Leuchten in Grün
Das Ladegerät ist an eine Netzsteckdose angeschlossen.
Ladebereitschaft hergestellt.
Schnelles Blinken in Grün
Ladevorgang ist abgeschlossen. (Volle Ladung)
Blinken in Grün
Der Akku ist zu etwa 80 % aufgeladen. (Nutzbare Ladung.
Nur Li-Ion)
Leuchten in Grün
Ladevorgang läuft.
Leuchten in Orange
Akku ist kalt.
Der Akku wird langsam geladen, um seine Belastung zu
reduzieren.
Blinken in Orange
Der Akku ist warm geworden. Der Ladevorgang beginnt
wieder, wenn dieTemperatur des Akku gefallen ist.
Beträgt die Temperatur des Akkus –10°C oder weniger,
beginnt die Ladekontrolllampe (orange) ebenfalls zu
blinken. Der Ladevorgang beginnt, wenn die Temperatur
des Akkus steigt (nur Li-Ion)
Ladezustandslampe
Links: Grün Rechts: Orange wird angezeigt.
Schnelles Blinken in Orange und Grün
Keine Ladung möglich.Verstaubt oder Defekt des Akkus.
- 24 -
Benutzerinformation zur Sammlung und Entsorgung von veralteten
Geräten und benutzten Batterien
Diese Symbole auf den Produkten, Verpackungen und/oder Begleitdokumenten bedeuten, dass benutzte elektrische und elektronische Produkte und
Batterien nicht in den allgemeinen Hausmüll gegeben werden sollen.
Bitte bringen Sie diese alten Produkte und Batterien zur Behandlung, Aufarbeitung bzw. zum Recycling gemäß Ihrer Landesgesetzgebung und den
Richtlinien 2002/96/EG und 2006/66/EG zu Ihren zuständigen Sammelpunkten.
Indem Sie diese Produkte und Batterien ordnungsgemäß entsorgen, helfen
Sie dabei, wertvolle Ressourcen zu schützen und eventuelle negative Auswirkungen auf die menschliche Gesundheit und die Umwelt zu vermeiden, die
anderenfalls durch eine unsachgemäße Abfallbehandlung auftreten können.
Wenn Sie ausführlichere Informationen zur Sammlung und zum Recycling
alter Produkte und Batterien wünschen, wenden Sie sich bitte an Ihre
örtlichen Verwaltungsbehörden, Ihren Abfallentsorgungsdienstleister oder an
die Verkaufseinrichtung, in der Sie die Gegenstände gekauft haben.
Gemäß Landesvorschriften können wegen nicht ordnungsgemäßer Entsorgung dieses Abfalls Strafgelder verhängt werden.
Für geschäftliche Nutzer in der Europäischen Union
Wenn Sie elektrische oder elektronische Geräte entsorgen möchten, wenden Sie sich
wegen genauerer Informationen bitte an Ihren Händler oder Lieferanten.
[Informationen zur Entsorgung in Ländern außerhalb der Europäischen
Union]
Diese Symbole gelten nur innerhalb der Europäischen Union. Wenn Sie solche Gegenstände entsorgen möchten, erfragen Sie bitte bei den örtlichen Behörden oder Ihrem
Händler, welches die ordnungsgemäße Entsorgungsmethode ist
Hinweis zum Batteriesymbol (unten zwei Symbolbeispiele):
Dieses Symbol kann in Kombination mit einem chemischen Symbol verwendet werden. In
diesem Fall erfüllt es die Anforderungen derjenigen Richtlinie, die für die betreffende Che-
mikalie erlassen wurde.
- 25 -

V. WARTUNG
Zum Abwischen der Einheit verwenden Sie ausschließlich ein trockenes, weiches
Tuch. Verwenden Sie kein feuchtes Tuch, Verdünner, Benzin oder andere flüchtige
Lösungsmittel zum Reinigen.
VI. ZUBEHÖR
VORSICHT:
Um Verletzungsgefahr vorzubeugen, verwenden Sie Zubehörteile oder Vorrichtungen nur für ihren angegebenen Zweck.
Einsatzadapter (mitgeliefert)
•EY9HX403E
Bohrfutter (Sonderzubehör)
•EY9HX400E
Aufnahmekapazität:
Zylinderschaftbohrer für Holz und Metall von 1,5 bis 13 mm Durchmesser.
Das Bohrfutter nicht im "Schlagbohrmodus" (
"Schlagbohrmodus" kann zu einem Bruch des Futters oder der Bohrer sowie zu
Verletzungen führen.
Hammerfutter (Sonderzubehör)
•EY9HX401E
) gebrauchen. Die Verwendung im
Eine Beton-, Holz- oder Metallbohrspitze mit einem Schaft von 2,5 bis 13 mm
Durchmesser verwenden.
Bei der Verwendung von Bohrern für Holz und Metall darf die Maschine nicht auf
"Schlagbohrmodus" (
Verletzungsgefahr.
Um Näheres über diese Zubehörteile zu erfahren, wenden Sie sich bitte an Ihre
örtliche Kundendienststelle.
) gestellt werden. Bohrer können brechen. Es besteht
- 26 -
(
)
(
)
VII. GEBRAUCHSEMPFEHLUNG
1. Wenn der Andruck auf die Maschine unzureichend ist, funktioniert das Gerät im
Schlagbohrmodus eventuell nicht.
Dadurch soll verhindert werden, dass das Werkzeug im Schlagbohrmodus ohne
Last läuft. Erhöhen Sie in diesem Fall den Andruck auf das Gerät.
Üben Sie bei der Arbeit stets ausreichende Andruckkraft aus.
2. Im Winter oder in anderen Situationen, wenn die Temperatur der Einheit niedrig
ist (5°C oder niedriger), ist die Schlagkraft im Schlagbohrmodus in der
Anfangsphase eventuell schwächer als normal.
Dies ist darauf zurückzuführen, dass das Fett bei niedrigen Temperaturen steifer wird, so dass sich die Reibung erhöht.
Sollte dies eintreten, betreiben Sie das Werkzeug etwa 30 Sekunden lang im
Schlagbohrmodus ohne Last, und wiederholen Sie diesen Vorgang 3-mal.
Dadurch wird die Schlagkraft wiederhergestellt.
VIII. TECHNISCHE DATEN
AKKU-BOHRHAMMER
16.5 mm (21/32")*
*Für Arbeiten, die mit einem Akku ausgeführt werden können.
(
12.5 mm (15/32") - 16.5 mm (21/32"))
Maximaler
Bohrdurchmesser
Beton
Stahl 13 mm (1/2")
Holz
Motorspannung 14.4-V-Gleichstrommotor
Leerlaufdrehzahl (RPM) 0-1000/min-1 (rpm)
Schlagzahl Pro Minute (BPM) 0-3800 min-1 (bpm)
Gewicht
einschließlich Akku: EY9L40
Gewicht
einschließlich Akku: EY9L41
Gesamtlänge 249 mm (9-51/64")
Geräusche, Vibration Siehe beiliegendes Blatt
18 mm (23/32")
2.3 kg (5.1 lbs)
2.4 kg (5.3 lbs)
- 27 -
RICHTLINIENTABELLE
• Wählen Sie das Drehmoment zum Anziehen von Schrauben mit dem Kupplungsring.
• Richtlinie für die Drehmomentwahl
Für unterschiedliche Anforderungen stehen fünf Positionen in Abstufungen zu ca. 1 N·m
(10 k
gf-cm) zur Verfügung.
Eignung je nach Material
Anziehen
von
Schrauben
Bohren von
Löchern
(A) Zum Anziehen von Schrauben in Kunststoffdübeln, die eine Vorbohrung von 6,0 mm Durchmesser
in Beton erfordern.
(B) Zum direkten Anziehen von Schrauben in Beton (wie Topcon) mit Vorbohrung von 3,5 mm
Durchmesser.
Position Drehmoment
1 ca. 1,5 N·m (15 kgf-cm)
2 ca. 2,5 N·m (25 kgf-cm)
3 ca. 3,4 N·m (35 kgf-cm)
4 ca. 4,4 N·m (45 kgf-cm)
5 ca. 5,4 N·m (55 k
(Bohrer
symbol)
ca. 10,5 N·m (107 kgf-cm)
g
f-cm)
Beton Block
(A) (B) (A) (B)
Bohren von Löchern in Holz und
Metall
HINWEIS: Dies ist nur eine grobe Richtlinie. Das erforderliche Drehmoment ist je nach
Form, Material und Anwendung der Schrauben unterschiedlich.
Nehmen Sie die Einstellung gemäß der Arbeitsumgebung der Baustelle vor.
AKKU
Modell
EY9L40 EY9L41
Akku
Nennspannung
Nennkapazität
AKKU-LADEGERÄT
Modell
Nennleistung
Gewicht
Li-Ion-Akku
14,4 V DC (3,6 V × 4 Zellen)
3 Ah 3.3 Ah
EY0L80
Siehe Leistungsschild auf der Unterseite des Ladegerätes.
g
0.95 k
(2.1 lbs)
- 28 -
[Li-Ion-Akku]
Ladezeit
3 Ah
Ladezeit 3.3 Ah
[Ni-MH/Ni-Cd-Akku]
7.2 V 9.6 V 12 V 15.6 V 18 V 24 V
EY9065
1.2 Ah
1.7 Ah
Ladezeit
2 Ah
3 Ah
3.5 Ah
EY9066
EY9168 EY9188
14.4 V 21.6 V 28.8 V
EY9L40 EY9L60 EY9L80
Nutzbar: 55 Min. Nutzbar: 45 Min.Nutzbar: 35 Min.
Voll: 70 Min.Voll: 60 Min.Voll: 50 Min.
14.4 V
EY9L41
Nutzbar: 45 Min.
Voll: 60 Min.
EY9080
EY9086
20 Min.
EY9180
EY9182
EY9001
EY9101
EY9103
25 Min.
EY9106
EY9107
EY9108
30 Min.
EY9200 EY9230 EY9210
EY9201
EY9136
45 Min.
EY9231
55 Min.
EY9251
65 Min.
EY9116
EY9117
60 Min.
90 Min.
HINWEIS: Diese Tabelle kann Modelle enthalten, die möglicherweise in Ihrem Wohnge
biet nicht angeboten werden.
Bitte nehmen Sie auf den neusten Generalkatalog Bezug.
HINWEIS: Name und Adresse des Händlers entnehmen Sie bitte der beiliegenden
Garantiekarte.
- 29 -
. USAGE PREVU
Cet outil est un marteau rotatif pour
perçage du béton. De plus, l’outil est
équipé d’un “mode rotation seulement”
sans percussion. Ce mode est adapté
au perçage et au serrage de vis.
Lire le livret “Instructions de sécurité”
et ce qui suit avant l’utilisation.
.
REGLES DE SECURITE
ADDITIONNELLES
1) Portez un casque antibruit. L’
exposition au bruit peut provoquer
une perte d'audition.
2) U t ilisez la man c he auxilia ire
(manche de support) fournie
avec l'outil.
Si vous perdez le contrôle de l'outil,
vous risquez de vous blesser.
3) Maintenez l’outil par ses sur-
faces de prise isolées si vous
exécutez un perçage au cours
duquel l’outil tranchant pourrait
entrer en contact avec un câble
encastré; le contact avec un câble
“sous tension” transmettra l’électricité aux parties métalliques et exposera l’opérateur à une décharge
électrique.
4) Portez un masque antipoussière si
les travaux produisent de la poussière.
5) N’oubliez pas que cet appareil est
toujours prêt à fonctionner, parce
qu’il ne doit pas être branché dans
une prise électrique.
6) Si le foret est coincé, coupez im
médiatement l’interrupteur principal
pour éviter toute surcharge susceptible d’endommager la batterie
ou le moteur. Mettez en marche
arrière pour décoincer le foret.
7) NE manœuvrez PAS le levier d’
inversion marche avant - marche
arrière lorsque le commutateur
principal est sur la position de marche. La batterie se déchargerait
rapidement et la perceuse serait
endommagée.
8) Utilisez seulement un chiffon doux
et sec pour essuyer l’appareil.
N'utilisez pas de tissu humide, dissolvant, benzine ou autres dissolvants volatiles pour le nettoyer.
9) Lorsque vous rangez ou transpor
tez l'outil, mettez le levier d'inversion marche avant - marche arrière
sur la position centrale (verrouillage de commutateur).
Ne fatiguez pas l’outil en maintenant
10)
la gâchette de contrôle de vitesse
enfoncée à moitié (mode de contrôle de la vitesse) de sorte que le moteur s’arrête. Le circuit de protection
s’activera et pourra empêcher le
contrôle de la vitesse. Dans ce cas,
relâchez la gâchette de contrôle de
vitesse, puis serrez-la à nouveau
pour le fonctionnement normal.
11) Evitez la pénétration de poussière
dans le mandrin.
12) Ne touchez pas les pièces rotati
ves pour éviter toute blessure.
13) N’utilisez pas l’outil trop longtemps.
Arrêtez le trav ail de te m ps en
temps pour que la température du
moteur n’augmente pas trop.
14) Ne laissez pas tomber l’outil.
Ne déposez pas l’outil si le mandrin
15)
est déverrouillé. Le foret pourrait
s'échapper du mandrin et tomber
si le mandrin est déverrouillé. Cela
peut provoquer des blessures.
Sym
bole Signication
V Volts
-
n
0
-1
… min
Courant continu
Vitesse sans charge
Rotations ou retour par
minute
Rotation avec martelage
Rotation seulement
-
-
-
30 -
 Loading...