

Panasonic ep3222 Operation Manual
®
Model/Modelo No. EP3222
Household
Massage Lounger
Sillón de Masaje Doméstico
Operating Instructions
Instrucciones de Uso
Before operating this unit, please read these instructions completely, and save for future reference.
Antes de utilizar esta unidad, lea completamente estas instrucciones y guárdelas para referencia futura.

See pages 1- 38
Ver página S1- S38
INDICE
Español
INDEX
English

1
IMPORTANT SAFETY INSTRUCTIONS
Basic precautions should always be followed when using an electrical unit, including the following.
Please ensure that you read all instructions before using the Household Massage Lounger.
DANGER – To reduce the risk of electric shock:
1. Always unplug the unit immediately after use.
2. Always unplug the unit before cleaning.
WARNING – To reduce the risk of burns, fire, electric shock, or injury to persons:
1. Always insert the power plug all the way into the outlet to reduce the risk of short-circuit and fire.
2. The unit should never be left unattended when plugged in. Always unplug the unit when not in use.
3. Close and continuous supervision is necessary when the unit is used by people who are limited in their ability to
move or communicate.
4. Only use the unit for the purpose described in these instructions.
5. Do not stand on the unit.
6. Do not use any accessories other than those recommended by the manufacturer.
7. This unit should not be used by children. Keep children away from the unit. Always return the seat to the
upright position and retract the legrest completely to avoid possible injury. Make sure that nothing is in the way
when retracting the legrest. Remove key when not in use and store out of reach of children.
8. Never operate the unit if it has a damaged power cord or plug. Return the unit to the nearest authorized service
center if it is not working properly, if it has been dropped or damaged, or if it has been immersed in water.
9. Always raise the back cushion to check that the fabric of the unit itself has not been ripped before using the unit.
Please also check other areas to ensure that the fabric has not been ripped. No matter how small the rip, if you
find one then immediately stop using the unit, unplug the power cord and have the unit repaired at an authorized
service center.
10. Keep power cords away from heated surfaces. Do not carry the unit by the power cord. Do not allow pins,
rubbish or moisture to come into contact with the plug.
11. Do not use the unit on top of heating appliances, such as electric carpets, etc. Do not operate the unit under
blanket or pillow. Excessive heating can occur and cause fire, electric shock, or injury to persons.
12. Never block the air openings during operation and make sure that all air openings are kept free of lint and hair, etc.
Do not drop or insert anything into any of the openings of the unit.
13. Do not use the unit in bathrooms or other damp or humid places as this may cause electric shock or cause the
unit to malfunction. Do not spill water, etc. onto the control panel.
14. Do not use the unit outdoors.
15. Do not use the unit in places where aerosol spray products are in use or where oxygen is being used.
16. When unplugging the unit, turn off all controls before removing the plug from power outlet. Do not use the unit
with a transformer as this may lead to malfunction or electric shock.
17. Connect this unit to a properly grounded outlet only. See Grounding Instructions.
18. To avoid electric shock or injury, do not attempt to open or disassemble any part of the unit as it contains no
user-serviceable parts.
SAVE THESE INSTRUCTIONS

2
SAFETY PRECAUTIONS
WARNING: To avoid the risk of injury:
1. Persons with any of the conditions listed below or who are undergoing medical treatment should consult with
their physicians before using the unit:
a) Pregnant women, people who are ill, in poor physical shape.
b) People suffering from back, neck, shoulder, or hip pain.
c) People who have a pacemaker, defibrillator, or other personal medical devices prone to electronic interference.
d) People suffering from heart disease.
e) People who are prohibited from receiving massage by a physician due to thrombosis or aneurism, acute
varicose veins, or other circulatory disorders.
f) People with irregular curvatures of the spine.
2. Sit down slowly after checking the position of the massage heads. Never put any part of your body between
the massage heads as the squeezing action of the massage heads may cause injury. Never put your fingers or
feet in the gap between the backrest and seat, the backrest and the armrest, the seat and cover under the
armrest, or the gap between the legrest and the footrest. Do not place your fingers or any part of your body in
the mechanism below the legrest, or between the legrest and footrest.
3. Do not use the unit against bare skin. While thin clothing may increase effectiveness, exposing the skin directly
to the massager may irritate the skin.
Do not use the unit while wearing anything hard on your head like a hair accessory, etc. Do not use the unit for
massaging the head, abdomen, front neck, elbows or knees.
Do not use excessively strong massage action on the back of the neck.
4. When using the body scanning function, always ensure that the shoulder position is correct. If the shoulder
position is not correct, use the Roller Position button to adjust it properly. You can adjust the shoulder position in
this way in the pre-programs, self program and Rolling in the manual operation. Failure to align the shoulder
position correctly can lead to injury.
5. Do not stretch the back muscles for more than approximately 15 minutes at a time. To avoid overstretching the
muscles which may result in discomfort, do not use the unit for more than 5 minutes when first using it. You can
gradually increase the duration and strength of the massage as you become used to it.
Do not massage any one point for more than 5 minutes at a time.
Excessive massaging can overstimulate the muscles and nerves and result in an adverse effect.
To prevent excessive massaging, do not use the massager for more than a total of 15 minutes each session.
After approximately 15 minutes, the massage heads will be retracted and stop moving.
The back cushion can be removed if you want to experience a stronger back massage. Exercise extreme care
when you use this mode in order to avoid back pain or injury. Use only for short periods of time (no more than
15 minutes). Reinstall the back cushion if you want to restore to normal massage intensity.
6. While using the massager, if you start feeling sick or if the massage seems painful, stop using it immediately.
While using the massager, if the pressure seems too strong, the movement of the massage heads can be
stopped at any time by pressing the Quick Stop button.
7. Do not go to sleep while using the unit. Do not use the unit after drinking alcohol.
8. When the seat back is in a reclined position, do not sit on it or sit with your legs resting on the headrest.
Do not sit on the legrest as the unit may fall over.
9. Do not allow children or pets to play on or around the unit, especially during operation.
10. Do not unplug the unit or turn it off during operation. Unplug the unit immediately if there is a power outage.
11. Be sure to start on the gentle massage program if using the massager for the first time. The shiatsu massage is
stronger and should be enjoyed after one has gotten accustomed to the chair.
12. Do not allow children to play on this mechanized furniture or operate the mechanism. Legrest folds down on
closing so that a child could possibly be injured. Always leave in an upright and closed position. Keep hands and
feet clear of mechanism. Only the occupant should operate it.
13. Empty pockets of hard objects when massaging the area of the seat or thighs.

3
OPERATING PRECAUTIONS
WARNING: To avoid damaging the chair, follow these precautions:
1. The chair is designed for a maximum user weight of 264 lbs (120 kg). Exceeding the maximum weight may
cause permanent damage to the massage mechanism and/or other components of the unit. Any such damage
is deemed to be user abuse and is not covered under the Limited Warranty.
2. Do not sit on or drop the control panel. Do not pull the control panel cord or the power cord. Be careful not to
catch the cord of the control panel between the armrest and the chair back.
3. Do not treat the chair roughly, such as turning the chair on its side, turning the chair over or standing on it.
4. Do not treat the covering roughly.
• Keep sharp or pointed objects away from the covering of the chair. Be careful not to drop lit ashes, lit
cigarettes or matches on the chair.
• Exposure to direct sunlight can cause fading or a change in color of the covering.
5. If the massager functions abnormally, immediately turn off the power and have the massager checked by an
authorized service center.
6. Do not attempt to repair the massager yourself.
7. Do not repeatedly operate any switch at short intervals. Such action may cause the switch to malfunction.
8. Some noise may be heard coming from the massager while in use. This is due to the structure of the massager
and is normal.
9. Make sure there are no obstacles behind the chair before reclining it. The chair can be reclined to a maximum
angle of 170°. If the back hits a wall or pillar, the chair may malfunction. Be sure to have ample space behind
the chair. Recline the chair slowly in order to avoid contact with an obstacle.
10. When excessive pressure is applied to the massage heads, they may stop moving for safety. When moving the
heads up from the lowered position, one’s body weight may stop the heads’ movement. In such a case, slightly
raise your body and allow the massage heads to move up.
11. After each massage, slide the power switch, which is located on the right side of the chair, to the “off” position
and turn its lock switch to the “lock” position.
12. Do not sit on the chair with wet body or hair.
13. The unit must not be used in “wet rooms” (sauna, swimming pool) or outdoors.
4
GROUNDED
OUTLET
GROUNDED
OUTLET BOX
GROUNDING PIN
Figure A
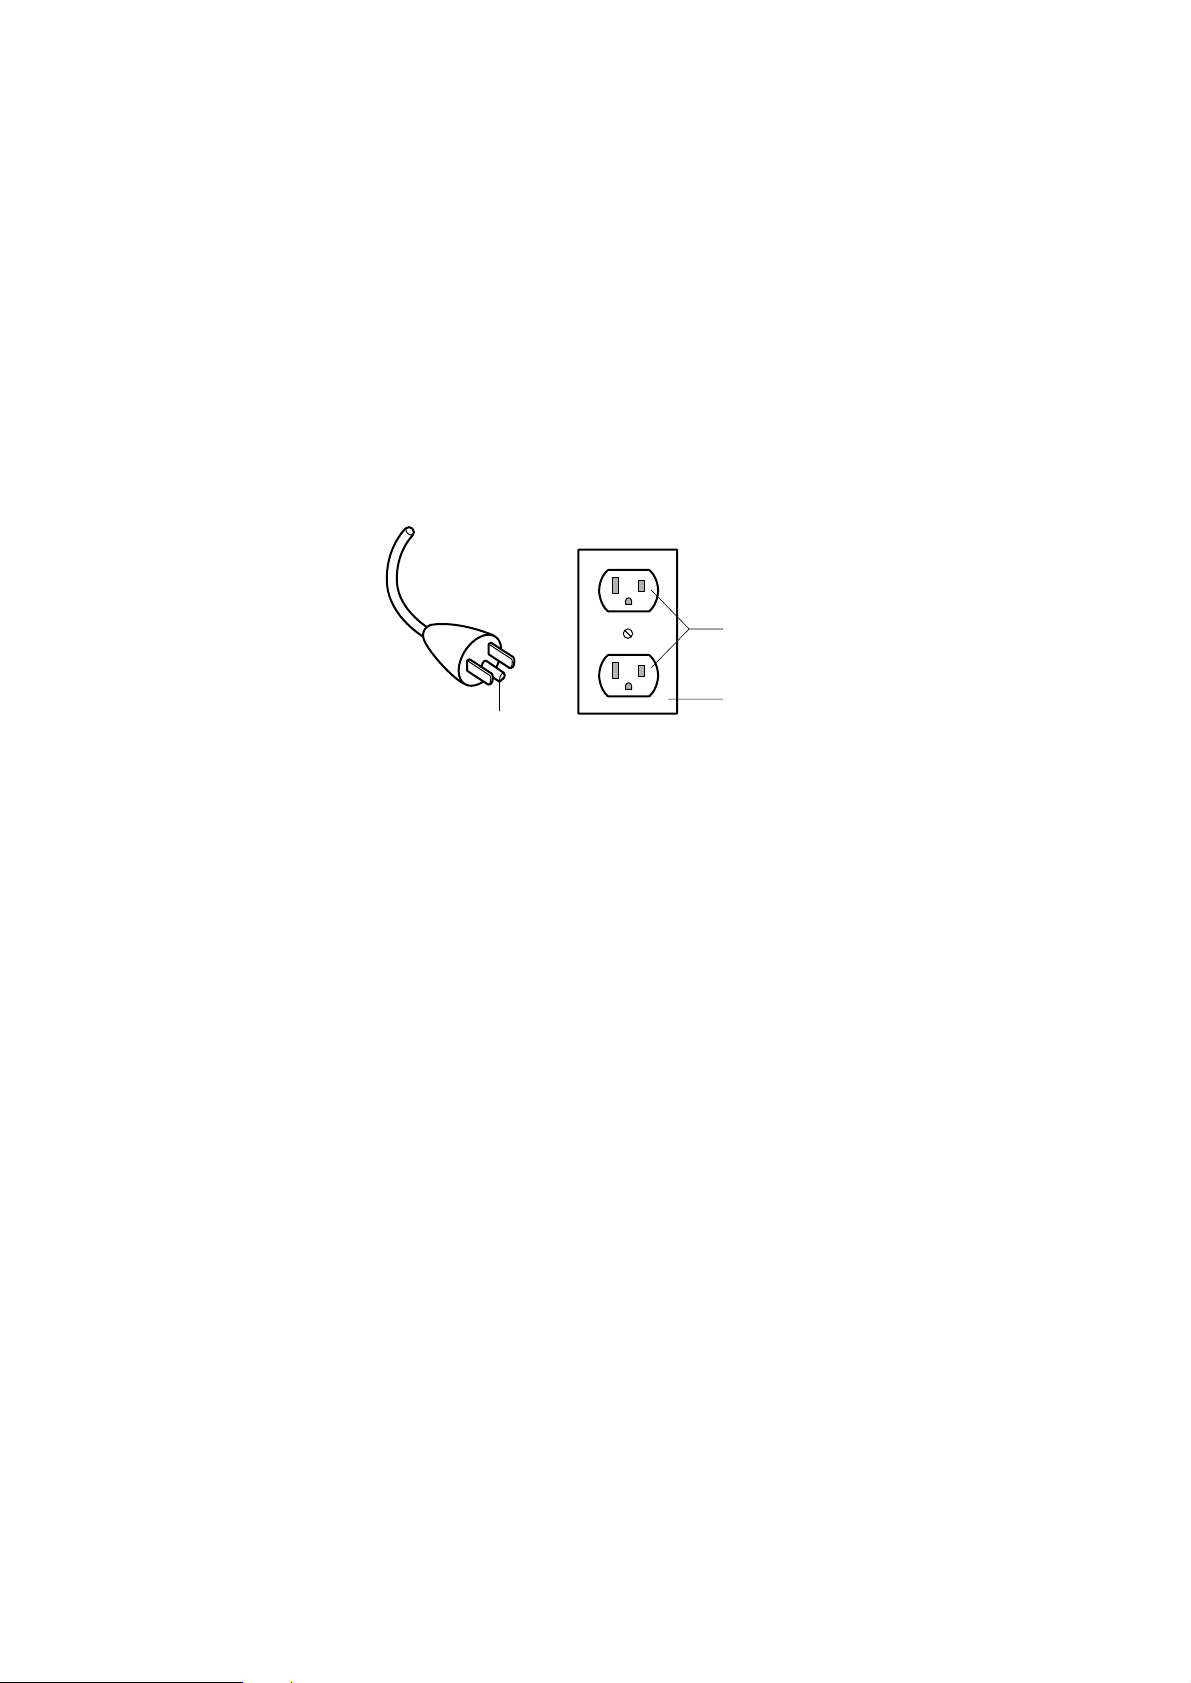
GROUNDING INSTRUCTIONS
This product must be grounded. If it should malfunction or break down, grounding provides a path of least
resistance for electric current to reduce the risk of electric shock. This product is equipped with a cord having an
equipment-grounding conductor and a grounding plug. The plug must be plugged into an appropriate outlet that is
properly installed and grounded in accordance with all local codes and ordinances.
DANGER
Improper connection of the equipment-grounding conductor can result in a risk of electric shock. Check with a qualified
electrician or serviceman if you are in doubt as to whether the product is properly grounded. Do not modify the plug
provided with the product – if it will not fit the outlet, have a proper outlet installed by a qualified electrician.
This product is for use on a nominal 120-volt circuit and has a grounding plug that looks like the plug illustrated in
Figure A. Make sure that the product is connected to an outlet having the same configuration as the plug.
No adapter should be used with this product.
5
• Includes integrated air massage
function.
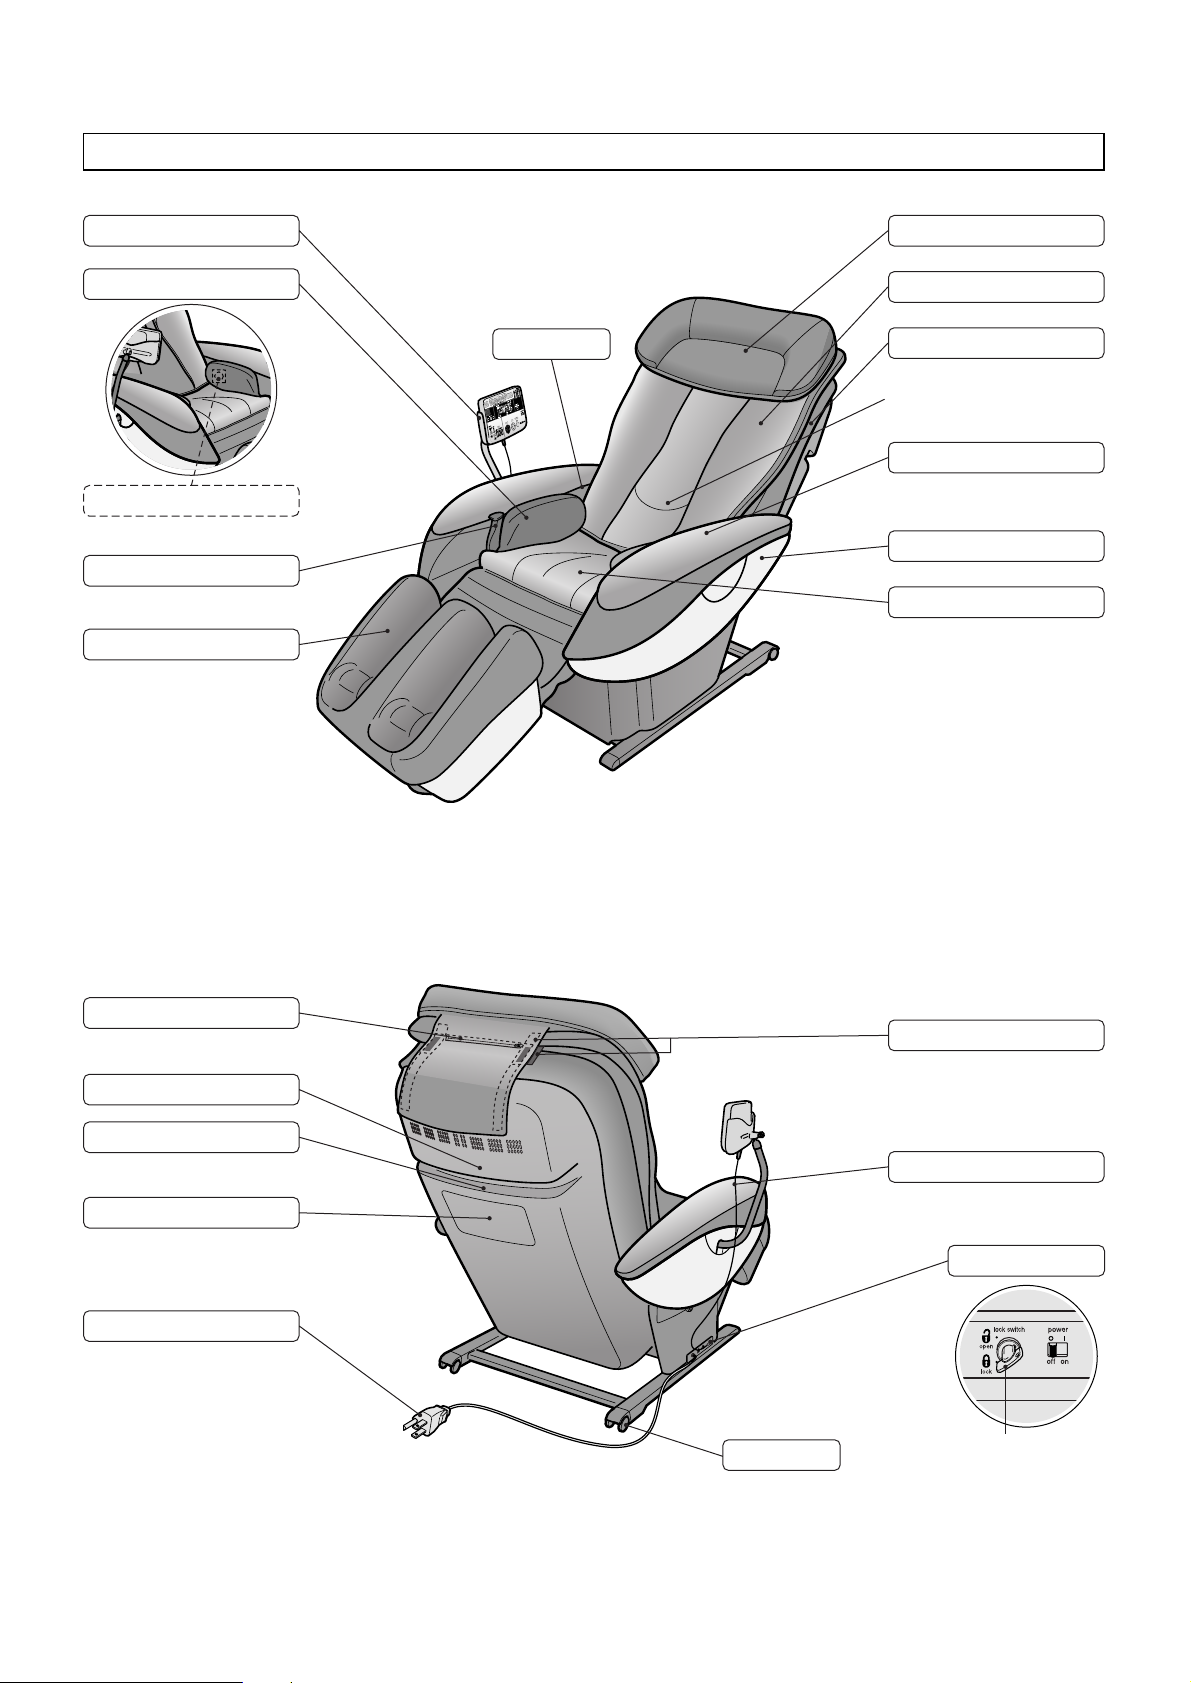
Seat
PART NAMES AND FUNCTIONS
MASSAGE LOUNGER
Control Panel Stand
• Retracted position of massage
heads
Seat/Thigh Side Airbag
Shiatsu Point in Hip Massage
• Sliding up/down possible.
Legrest
Legrest Slide Lever
• Includes integrated air massage
function.
• Extendable length of 9 in. (22 cm).
Back Cover
Handle
Safety Precaution Label
Power Cord
Back Cushion Zipper
Pillow
Back Cushion
Backrest
Armrest
Side Cover
Pillow Fastener
Child Safety Decal
Power Switch
Wheels
Caution Label
Front
Back
Lock Switch Key
self program
ottoman reclining
quick
stretch
self program
user
shiatsu deep swedish
time
pre-programs
upper bodylower body
intensity speed
intensity
voice
off/on
time remaining
openopen
intensity focus
upper
body
lower
body
leg stretch
off/on
neck / back
roller position
self program time input
manual controls
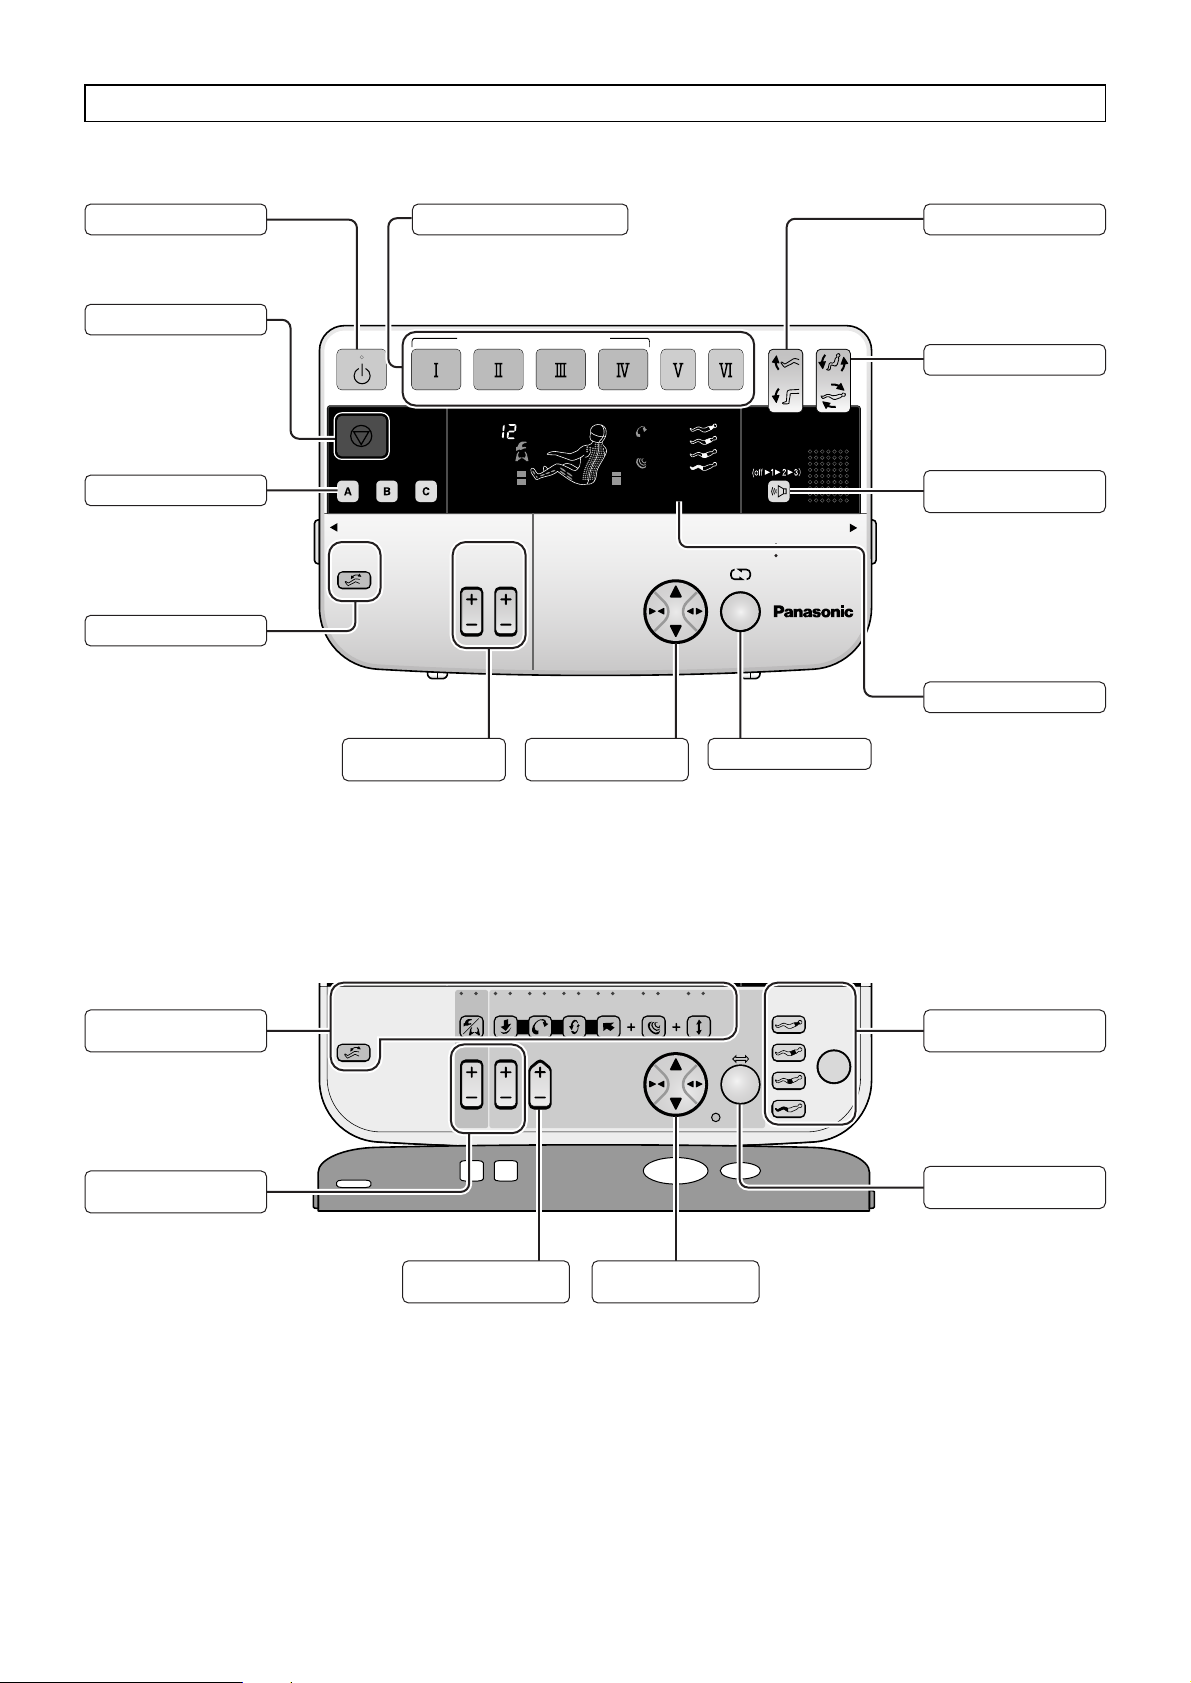
6
• Use this button to turn the
control panel power on and
off.
OFF/ON button
• Use these buttons to select one
of four pre-program massages or
the quick or self program massage.
Program Selection buttons
• Use these buttons for 3stage strength adjustment
during massage programs.
(See Page 18)
• Enables fine-tuning of
massage head position
during massage
programs. (See Page 27)
Roller Position
button
• Displays massage settings
and actions, etc.
(See Page 7)
Display
• Use this button to adjust
the angle of the legrest.
(See Page 13)
Ottoman button
• Use this button to adjust
the angle of the backrest
and legrest. (See Page 13)
Reclining button
• Use this button to adjust
the position of massage
heads for the upper body
in manual operation
mode. (See Page 29)
CONTROL PANEL
• Press this button to stop
the massage immediately.
Quick Stop button
• Use these buttons when
using the user memory
function. (See Page 24)
User Memory buttons
Cover Closed (Massage Programs Use)
Cover Open (Self Program Settings and Manual Operation Use)
• Use this button to turn leg
stretch function off/on
during massage programs.
(See Page 18)
Leg Stretch OFF/ON button
• Use these buttons to select
massage actions in manual
operation mode.
(See Page 28)
Manual Operation
Selection buttons
• Use these buttons to adjust
the massage strength in
manual operation mode.
(See Pages 29, 30, 32)
Massage Strength
buttons
• Use this button to adjust
upper-body massage
speed in manual operation
mode. (See Page 29)
Massage Speed
Adjustment button
• Use these buttons to indicate
how much time you want
the massage to spend in
each region. (See Page 20)
Self Program
Creation button
• Allows you to combine
lateral action with an upper
body massage in manual
operation mode.
(See Page 29)
Lateral Movement
button
Roller Position
button
• Use this button to repeat
a massage action during
massage programs.
(See Page 27)
Focus button
Program Strength
buttons
• Adjusts the volume of the
voice guidance function.
Each press of the button
progressively switches the
volume through low,
medium, high and off
settings. (See Page 14)
Voice Guidance
Volume button
leg stretch
kneadABshiatsuABkneadABswedishABcompressionABtapABroll
intensity intensity speed
upper
lower
body
body
position
full regional
self program time input
neck/shoulder
lateral
back
lower back
lower body
OK
7
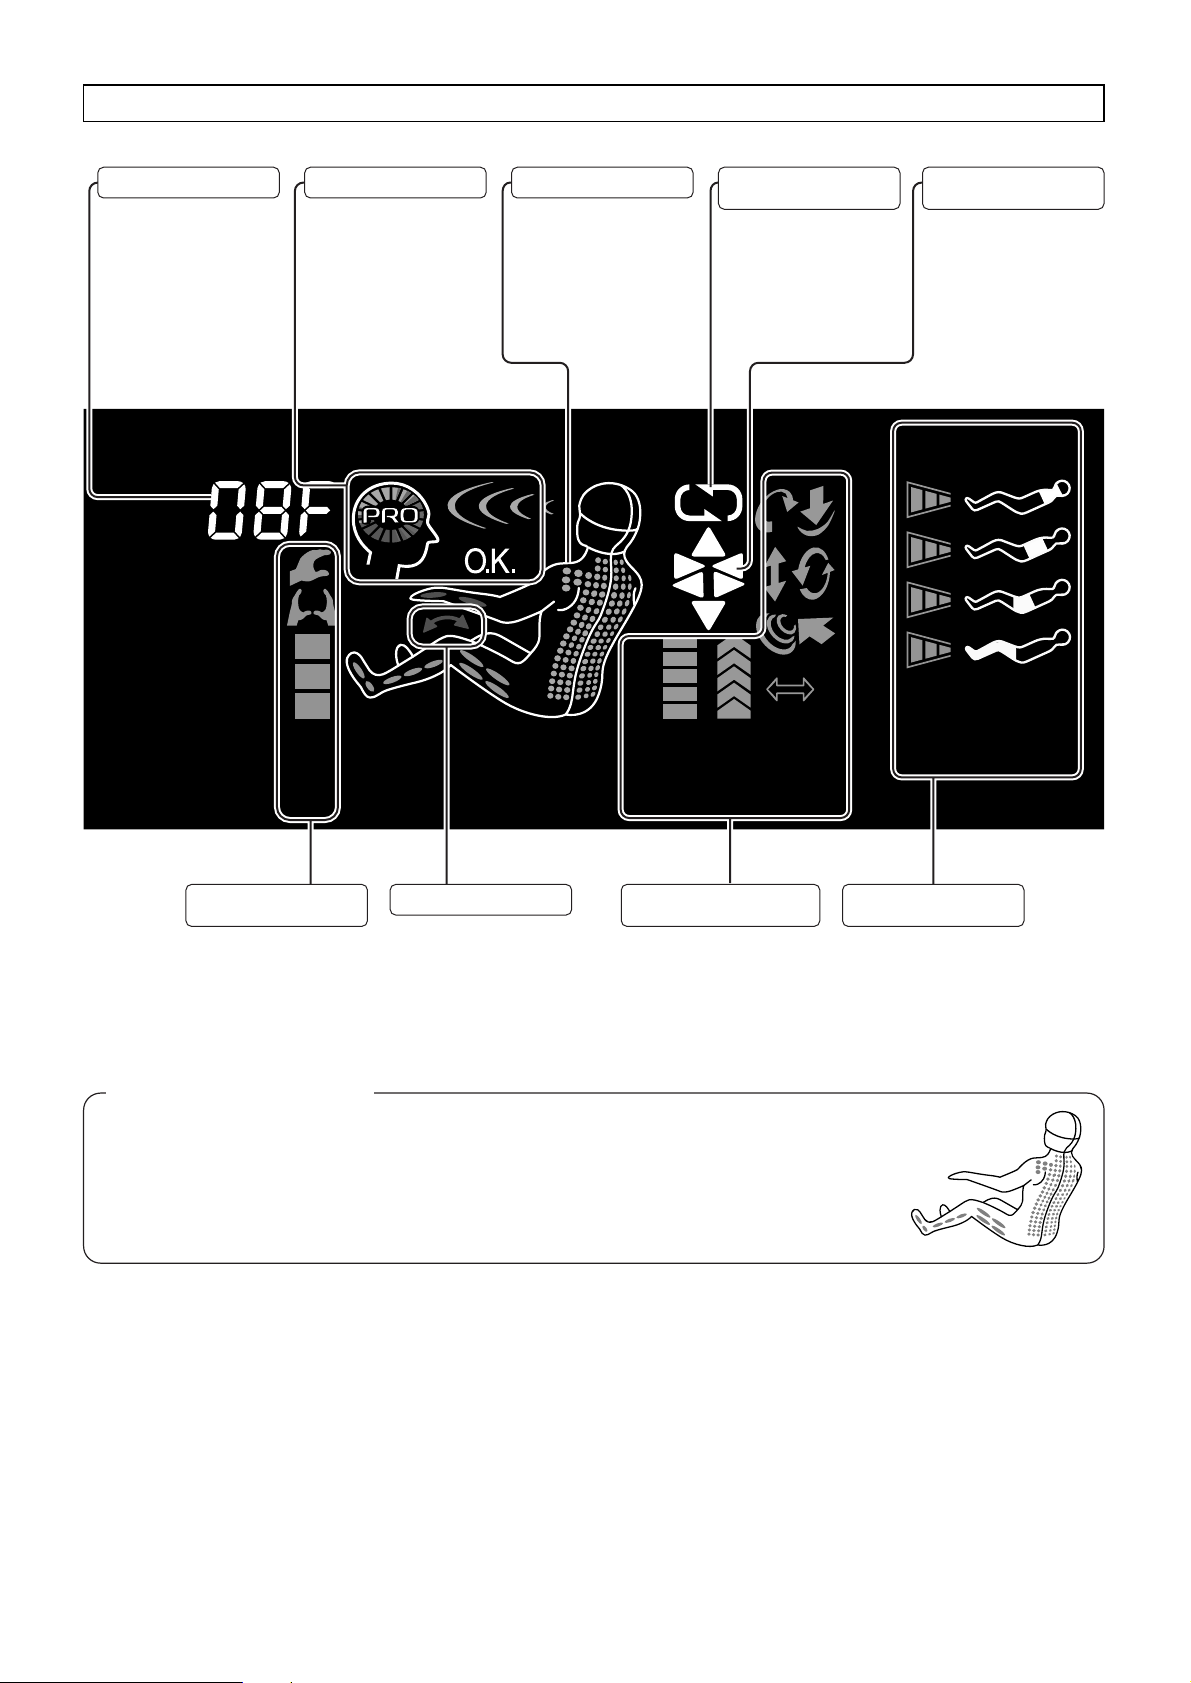
DISPLAY
• Lights up when the leg
stretch function is on.
• Flashes when the stretching
action is in progress.
Leg Stretch Display
• Displays degree of fatigue
levels in self program mode.
Self Program Degree
of Fatigue Display
• Displays upper body massage
action, strength and speed.
• Massage speed is not indicated
during massage programs.
• Displays time remaining
before the end of a massage
in minutes.
• “OFF” is shown as the
massage heads return to
the retracted position after
a massage.
Time Remaining Display
• Uses animation to indicate
when data is being
recorded to or recalled from
the user memory.
User Memory Display
• Flashes to indicate areas
currently being massaged.
(See “Additional
Information” below.)
Massage Area Display
• Flashes when the Focus
button has been pressed to
repeat a massage action.
• Flashes when a repeated
action is in progress during
a program recorded to the
user memory.
Focus and Repeat
Display
• Lights up when the
massage position is
adjusted during a massage.
Roller Position
Adjustment Display
• Displays lower-body
massage action and
strength.
Lower Body Massage
Display
Upper Body Massage
Display
About the Massage Area Display
The massage area display can only show an approximation of the massage area. The
area of massage shown by the massage area display may differ at times from the area
you can feel actually being massaged.
Additional Information
time remaining
intensity
intensity speed
self program
time
upper bodylower body
8
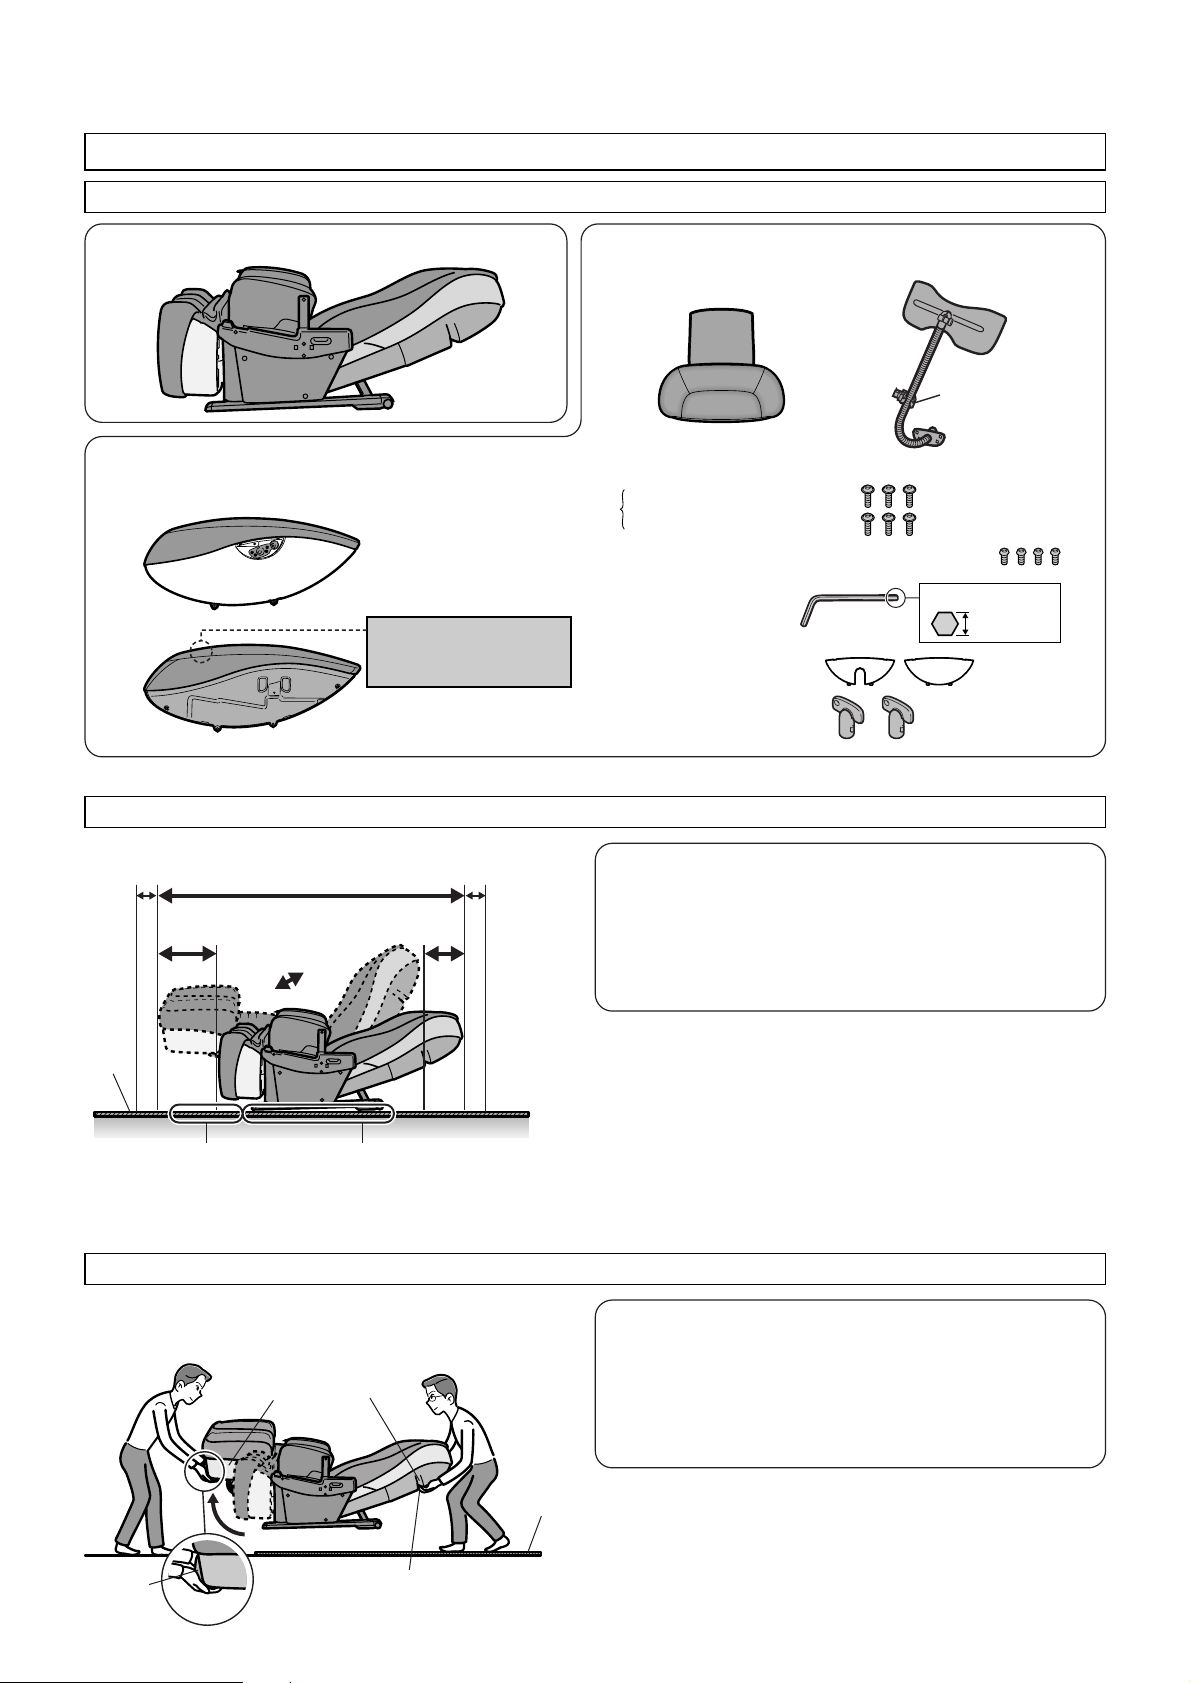
Ensure there is adequate space for reclining.
Mat
Handle
Place your fingers in the groove.
Legrest
Rubber
Section
Area where legrest
could touch floor.
Area where unit touches floor.
Keep at least
4" (10 cm)
away from
wall, etc.
Keep at least
4" (10 cm)
away from
wall, etc.
Mat
Approx. 14"
(35 cm)
Approx. 77" (195 cm)
Width approx. 27" (68 cm)
(approx. 33" (84 cm) with
armrests attached)
Approx. 12"
(30 cm)
Front Back
(Cross-section)
BEFORE USING THE UNIT
SETTING UP THE MASSAGE LOUNGER
After Removing Everything from the Box, You Should Have the Following
Where to Use the Unit
Armrests
Marks indicating left and right can be found
on the underside of each armrest.
Pillow
Control Panel Stand
Attachment Screws (M6#16) — 6
Left Armrest — 3
Right Armrest — 3
Control Panel Stand Attachment Screws (M6#10) — 4
Allen Key — 1
Control Panel Stand Covers
Lock Switch Keys — 2
Massage Lounger Accessories
Small holes on the inside
fabric are an intentional part
of the functional design.
CAUTION
• Do not use the unit in areas with high humidity,
such as the bathroom, etc. as this can lead to
electric shock or other accidents.
• Place the unit on a totally flat surface.
Failure to do so may result in the seat tipping over.
• Do not use the massage lounger in direct sunlight or in
places where it will be exposed to high temperatures,
such as in front of a heater, etc., as this can cause
discoloration or hardening of the synthetic leather.
• Place the unit on a mat to prevent floor damage.
• When placing a mat under the unit, the size of the mat
should be sufficient (at least 47#28 in. (120#70 cm)) to
cover the areas where the unit touches and the legrest
could touch the floor, as shown in the diagram on the left.
Move the chair by having one person hold onto the rubber
section on the underside of the legrest and another person
use the handle on the back of the backrest.
Carrying in the Unit
CAUTION
• Make certain the legrest has been retracted fully
to its original length.
Failure to observe this safeguard could result in injury
due to the legrest returning to its original length
when the unit is being moved.
• Use care to prevent pinching of hands or feet when letting
go of the legrest as its mechanism will cause it to slam shut.
• Use care to prevent lower back and other injuries that
could occur when lifting this heavy object (approx. 179
lbs (81 kg)).
0.2" (4 mm)
Clip
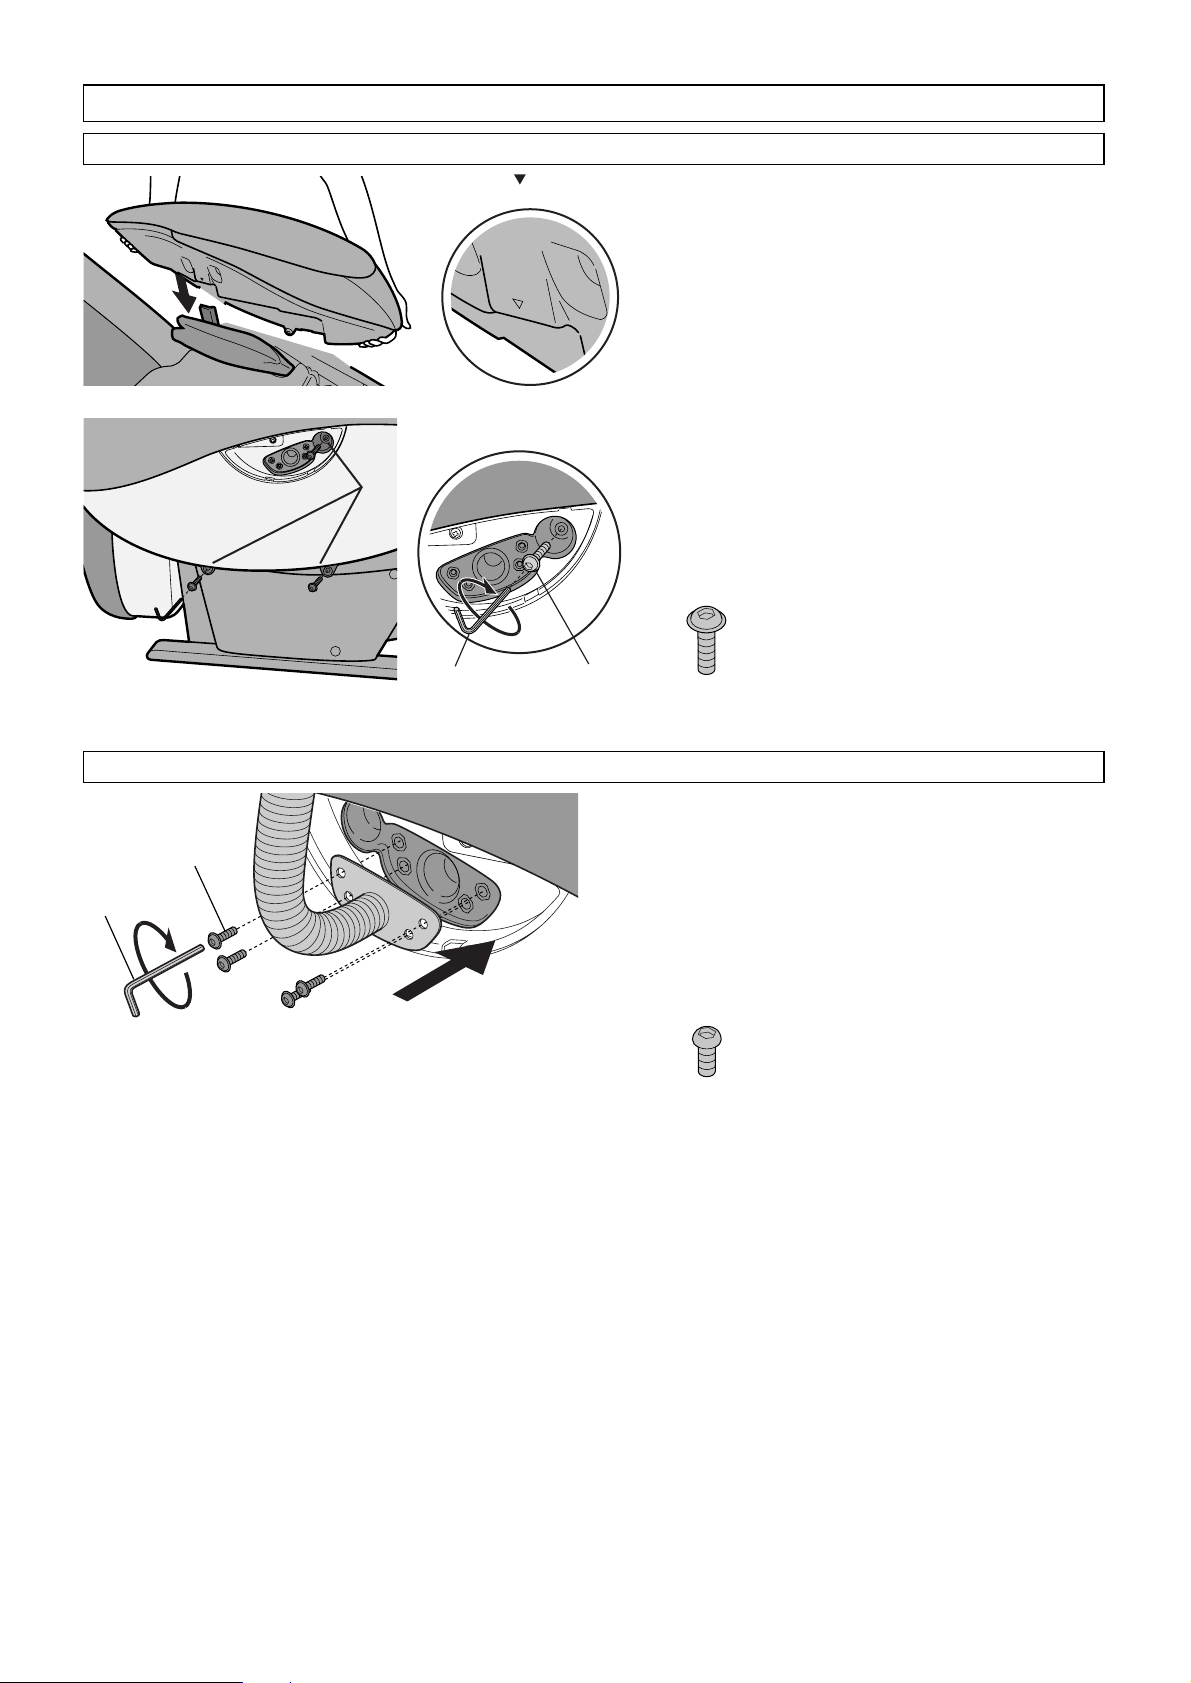
22
Attachment Screw
(M6#16)
Allen Key
9
Attachment Screw
(M6#10)
Allen Key
Use This Screw
#6
Use This Screw
#4
ASSEMBLY
Attaching the Armrests (On Both Right and Left Sides)
Attaching the Control Panel Stand to the Right or Left Armrest
1. Insert the armrest into the unit.
• Markings indicating left-hand and right-hand
sides can be found on the inside surface of
each armrest.
• Make sure the control panel cord does not
become pinched when fitting the right armrest
onto the unit.
2. Fasten the armrest with the
attachment screws.
• Set the three attachment screws in place first
and then tighten them firmly.
1. Decide which side to attach the
control panel stand to.
2. Fasten the control panel stand with
the attachment screws in four places.
• Set the four attachment screws in place first
and then tighten them firmly.
Use the mark as
a guide for insertion.
• Diagram shows attachment to right armrest.
Tu rn screws clockwise
to tighten.
1
2
11
10
12
Bottom
Tabs
Top Tabs
Notches
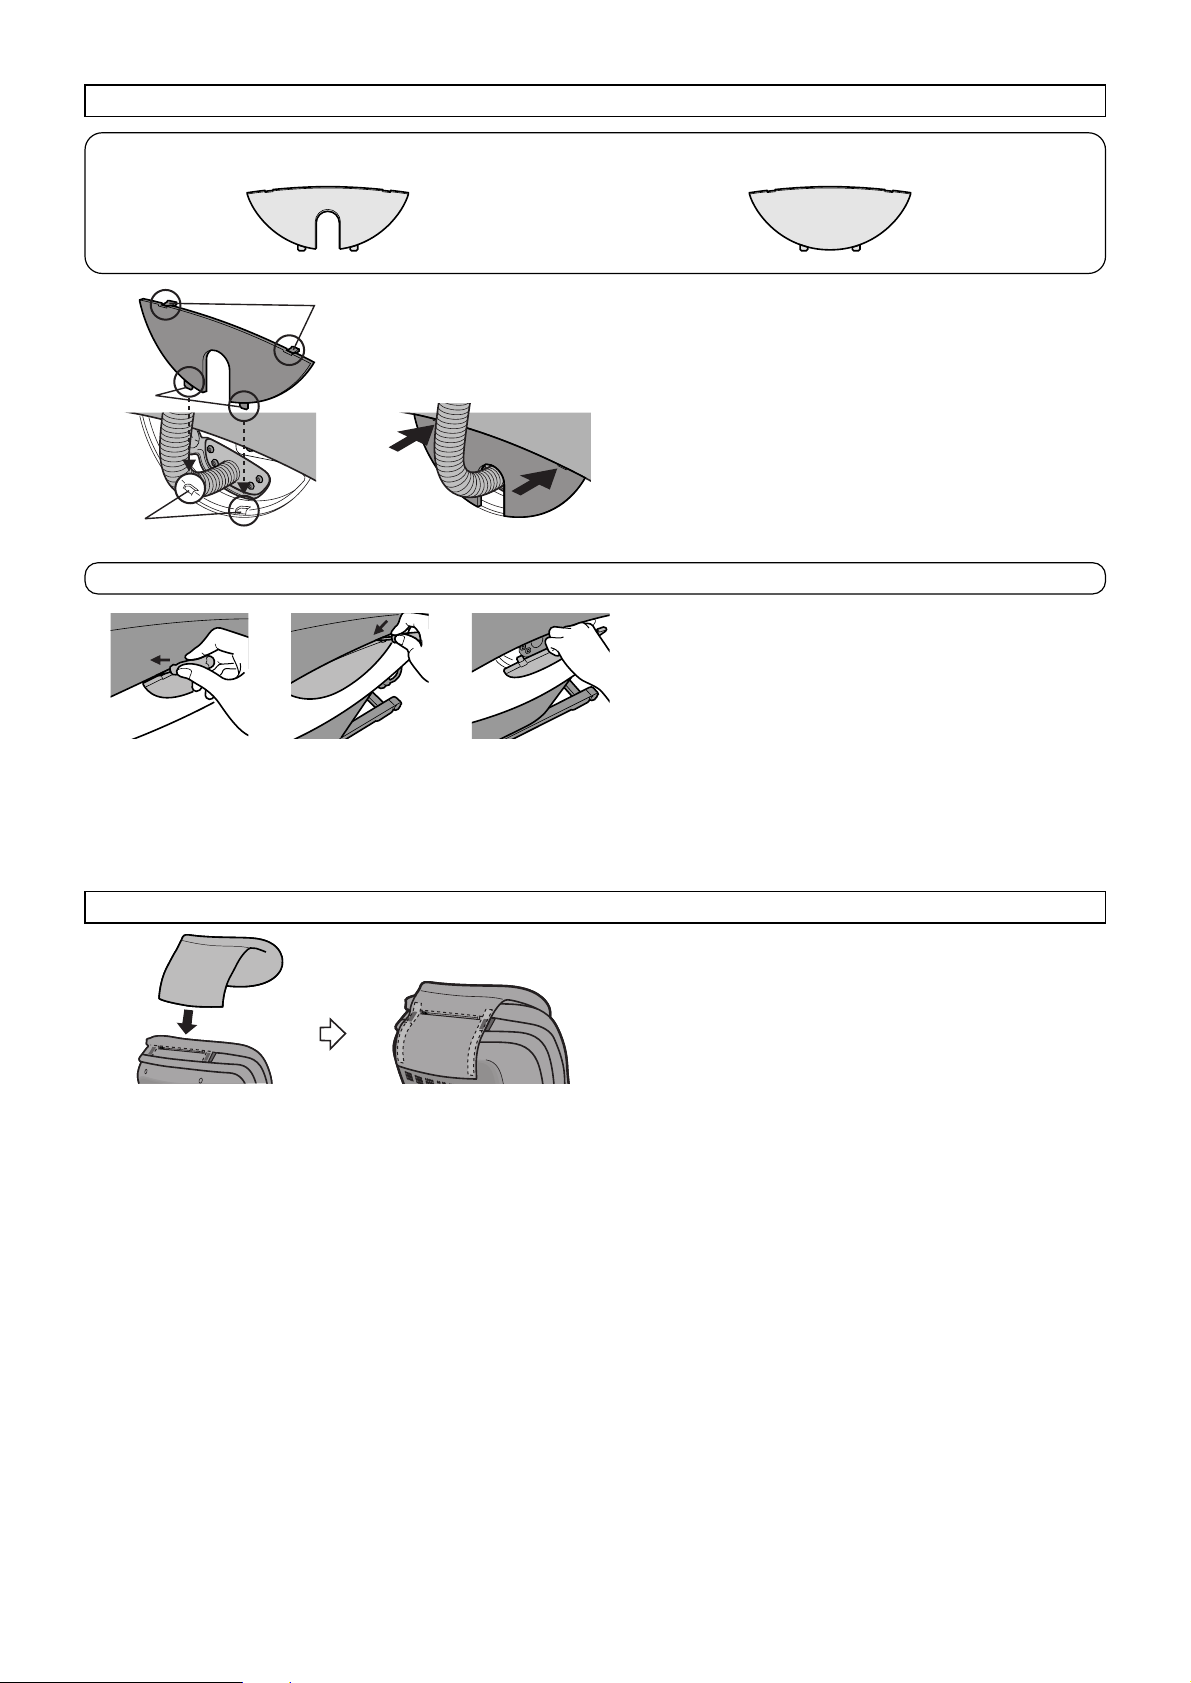
Attaching the Control Panel Stand Covers (On Both Right and Left Sides)
Attaching the Pillow
The method of attaching the covers is the same
for both sides.
• Diagram shows side attached with control
panel stand.
1. Insert the bottom tabs on the cover
into the notches on the armrest.
2. Insert the top tabs on the cover
into the notches on the armrest.
Use the pillow fasteners to attach the
pillow.
Cover for Side WITH Control Panel Stand Cover for Side WITHOUT Control Panel Stand
(1) Insert the head of a flat-tip screwdriver
between the top tabs of the cover.
• Performing this procedure with the Allen key
or a cross-point screwdriver could damage the
unit.
(2) Pull out the top tabs of the cover (two places)
using the flat-tip screwdriver.
(3) Pull up on the cover at an angle.
When Removing the Control Panel Stand Covers
(1) (2) (3)
11
3
1
·
2
1
3
2
4
3321
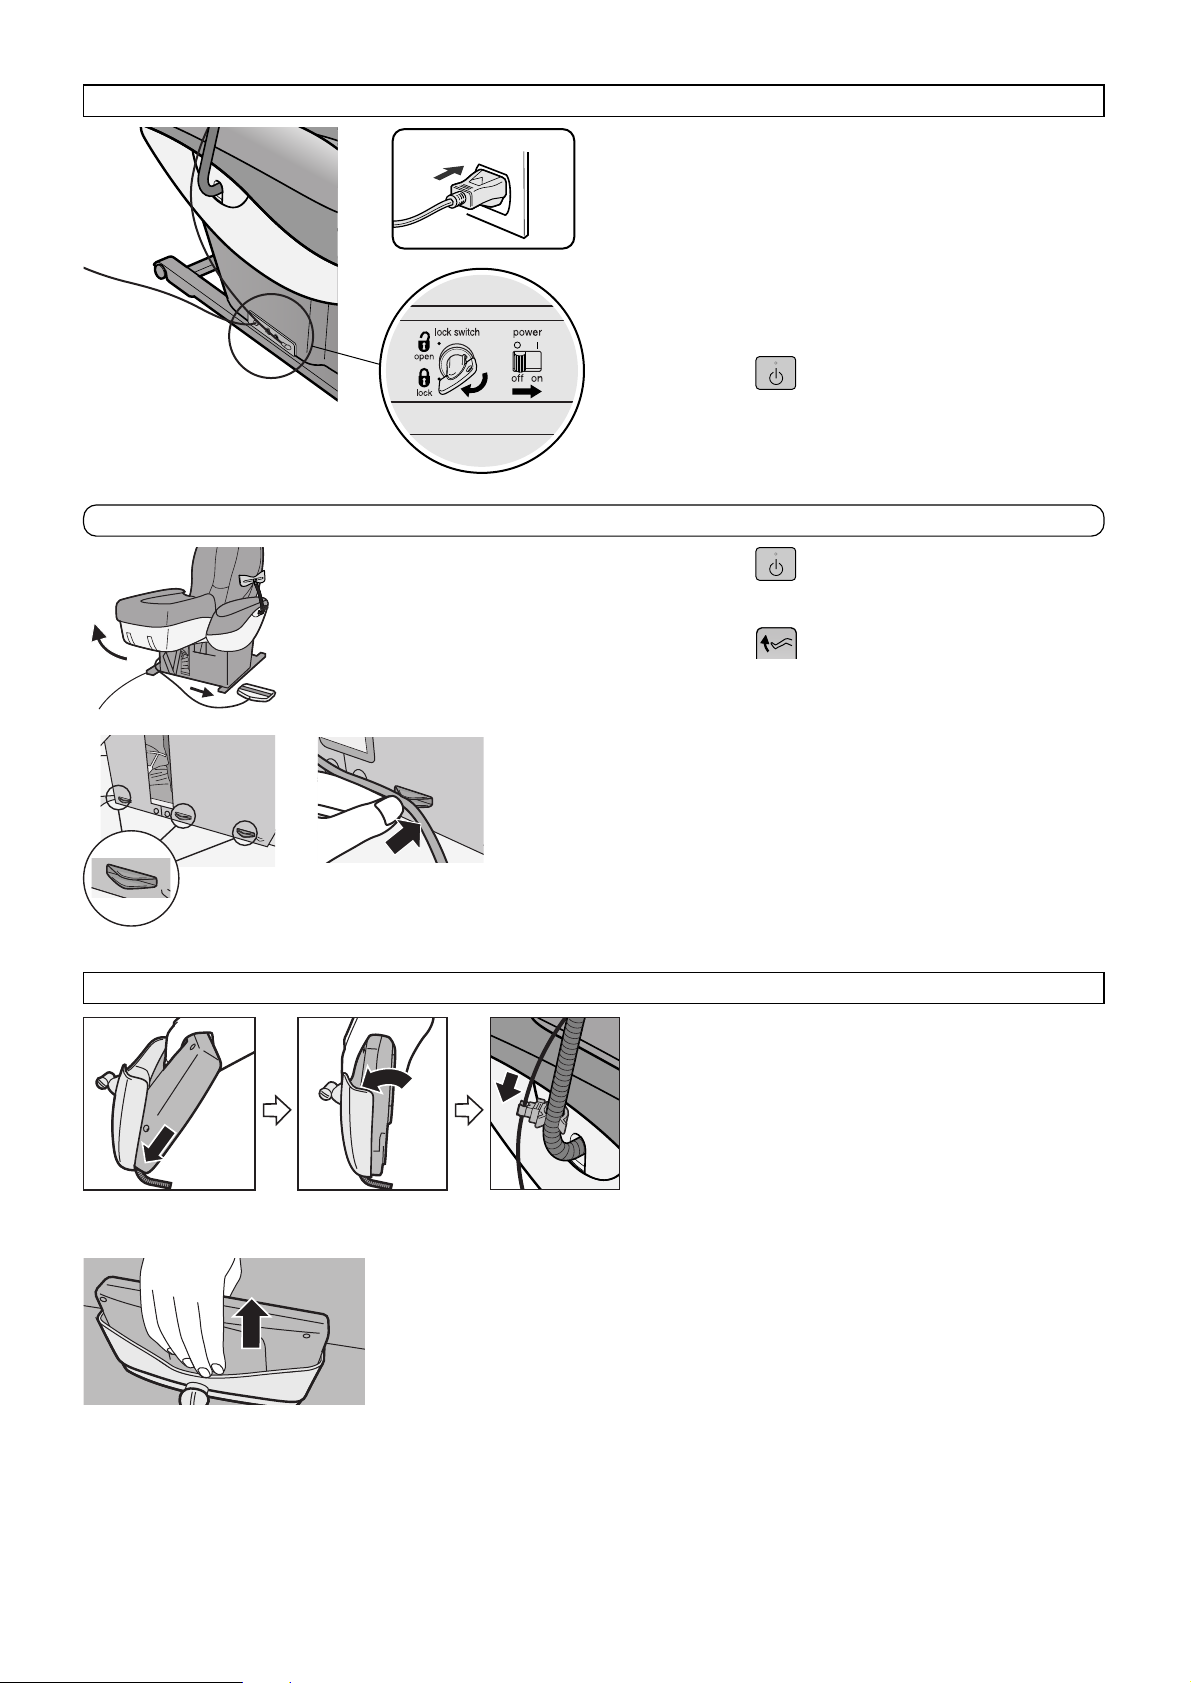
1. Insert the power plug into the
power outlet.
2. Insert the key and turn the key lock
to the “open” position.
3. Slide the power switch to the “on”
position.
4. Press on the control panel
twice.
• The backrest will rise to the upright position
automatically.
1. Press on the control panel to
turn on the power.
2. Press on the control panel and
hold until the legrest has risen as
far as it will go.
• Continue pressing until a “beep-beep-beep”
sound is heard.
3. Move the control panel cord under
the legrest to the left side.
4. Fasten the control panel cord at
three points.
Raising the Backrest to the Upright Position
Placing the Control Panel into the Control Panel Stand
Moving the Control Panel Cord to the Left Side (When Control Panel Stand is on Left Side)
1. Insert the control panel at an angle
into the tabs on the control panel
stand.
2. Push the control panel into the
control panel stand.
3. Fasten the control panel cord
using the clip.
For smooth removal of
the control panel, press
on the back of the unit
while sliding up.
To remove the control panel, slide it upwards.
Clips for Fastening
Control Panel Cord
ottoman
 Loading...