

Page 1
Digital Copier
Operating Instructions (For Copier)
Model No.
DP-150FP
Options
DA-DS150
DA-SM16B
Making CopiesOptionMaintenance Before OperationOthers
DA-DS150
(Option)
Before operating this copier, please read
these instructions completely and keep these
operating instructions for future reference .
English
4
Page 2
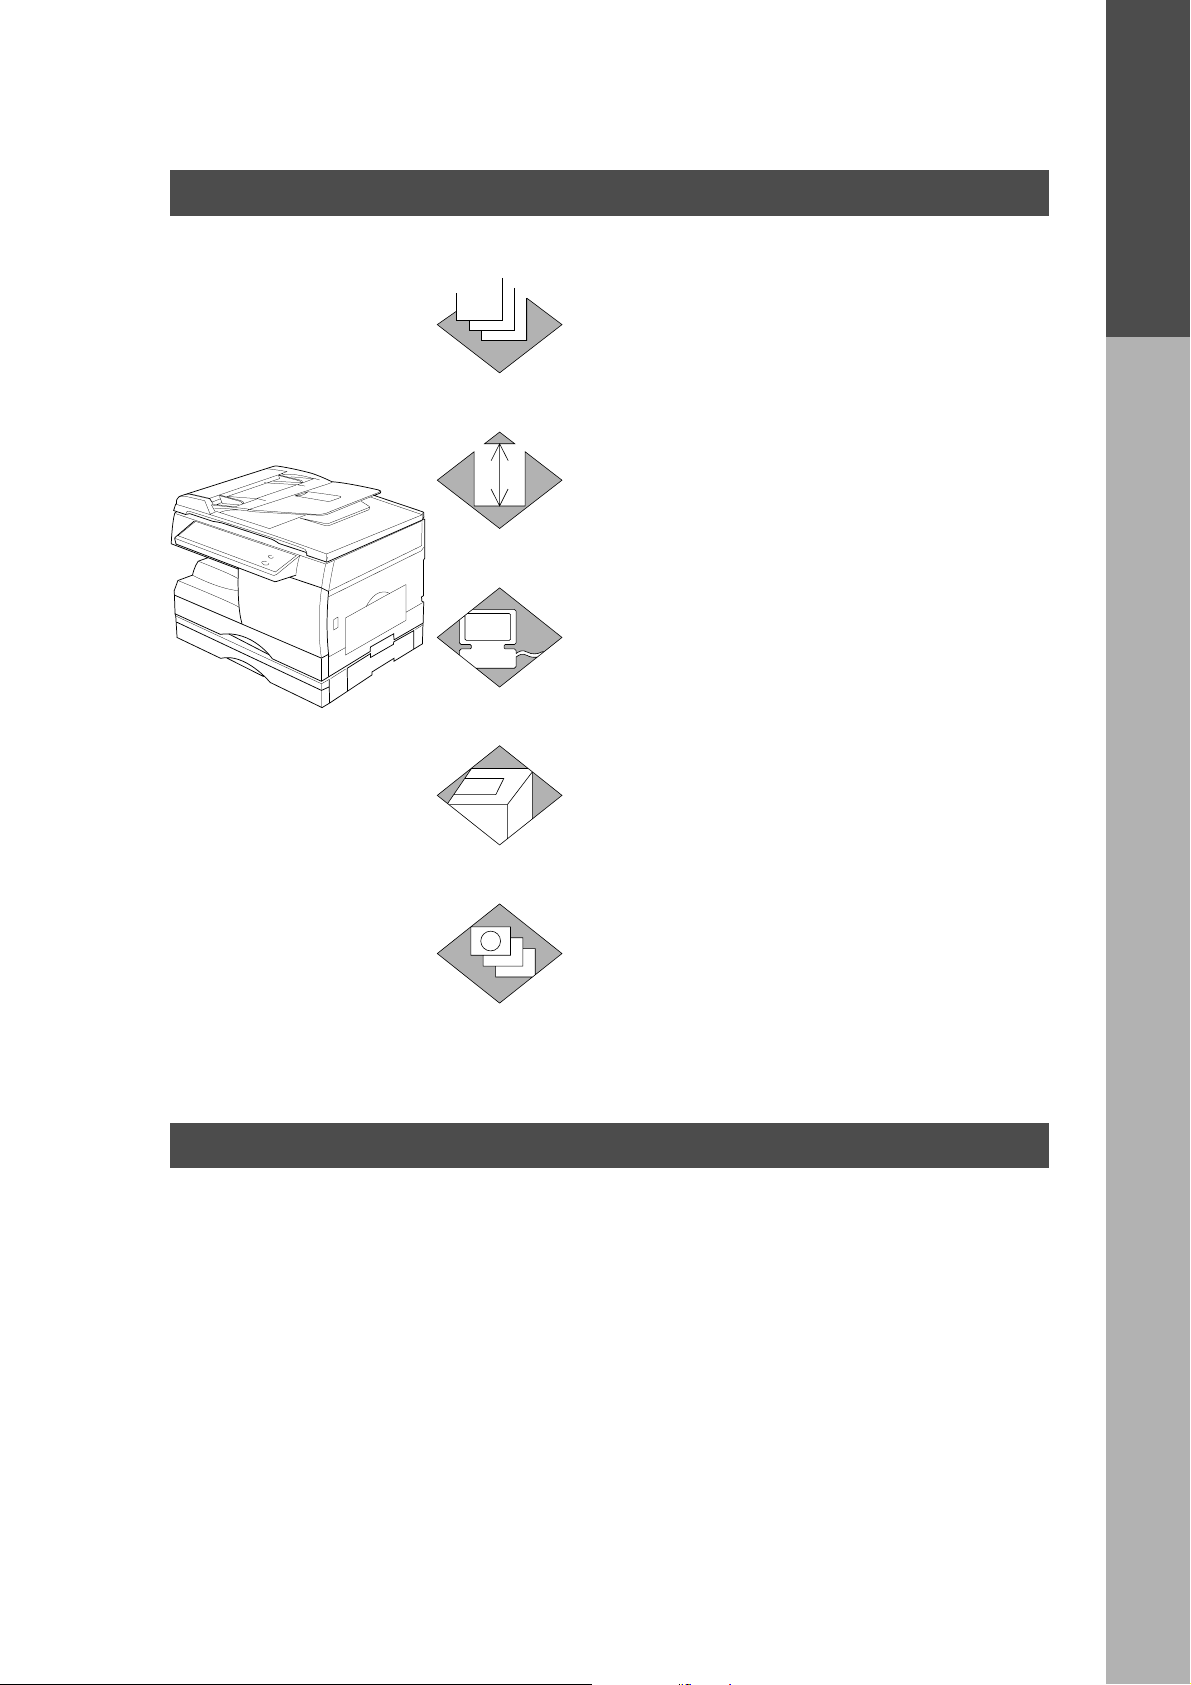
Operation Chart
Common features
■■
■ Full Size Copying
■■
100%
Automatic Document F eeder
Turn the Po wer
Switch ON.
(See page 9)
Load the paper
Position
original
C Face-Up
C Up to 30 originals
(See page 21)
1
Control Panel
COPY
FAX
ON LINE
2
Press the
Copy Key
(80 g/m2), size:
2SIDED
SORT PAUSE
2 in 1
PHOTO
SELECT FUNCTION
AUTO
DATA
DARKER
LIGHTER
PAPER TRAY
(3)
Select paper
tray
ZOOM
(50~200%)
abc..
DIRECTORY
SEARCH
+-
SET
REDIAL/
12
FLASH/
GHI JKL MNO
45
SUB-ADDR
PQRS
78
MONITOR
TONE
4
Number of
copies
(Up to 99)
ABC DEF
TUV
-/()
0
A5 - B4⋅FLS
■■
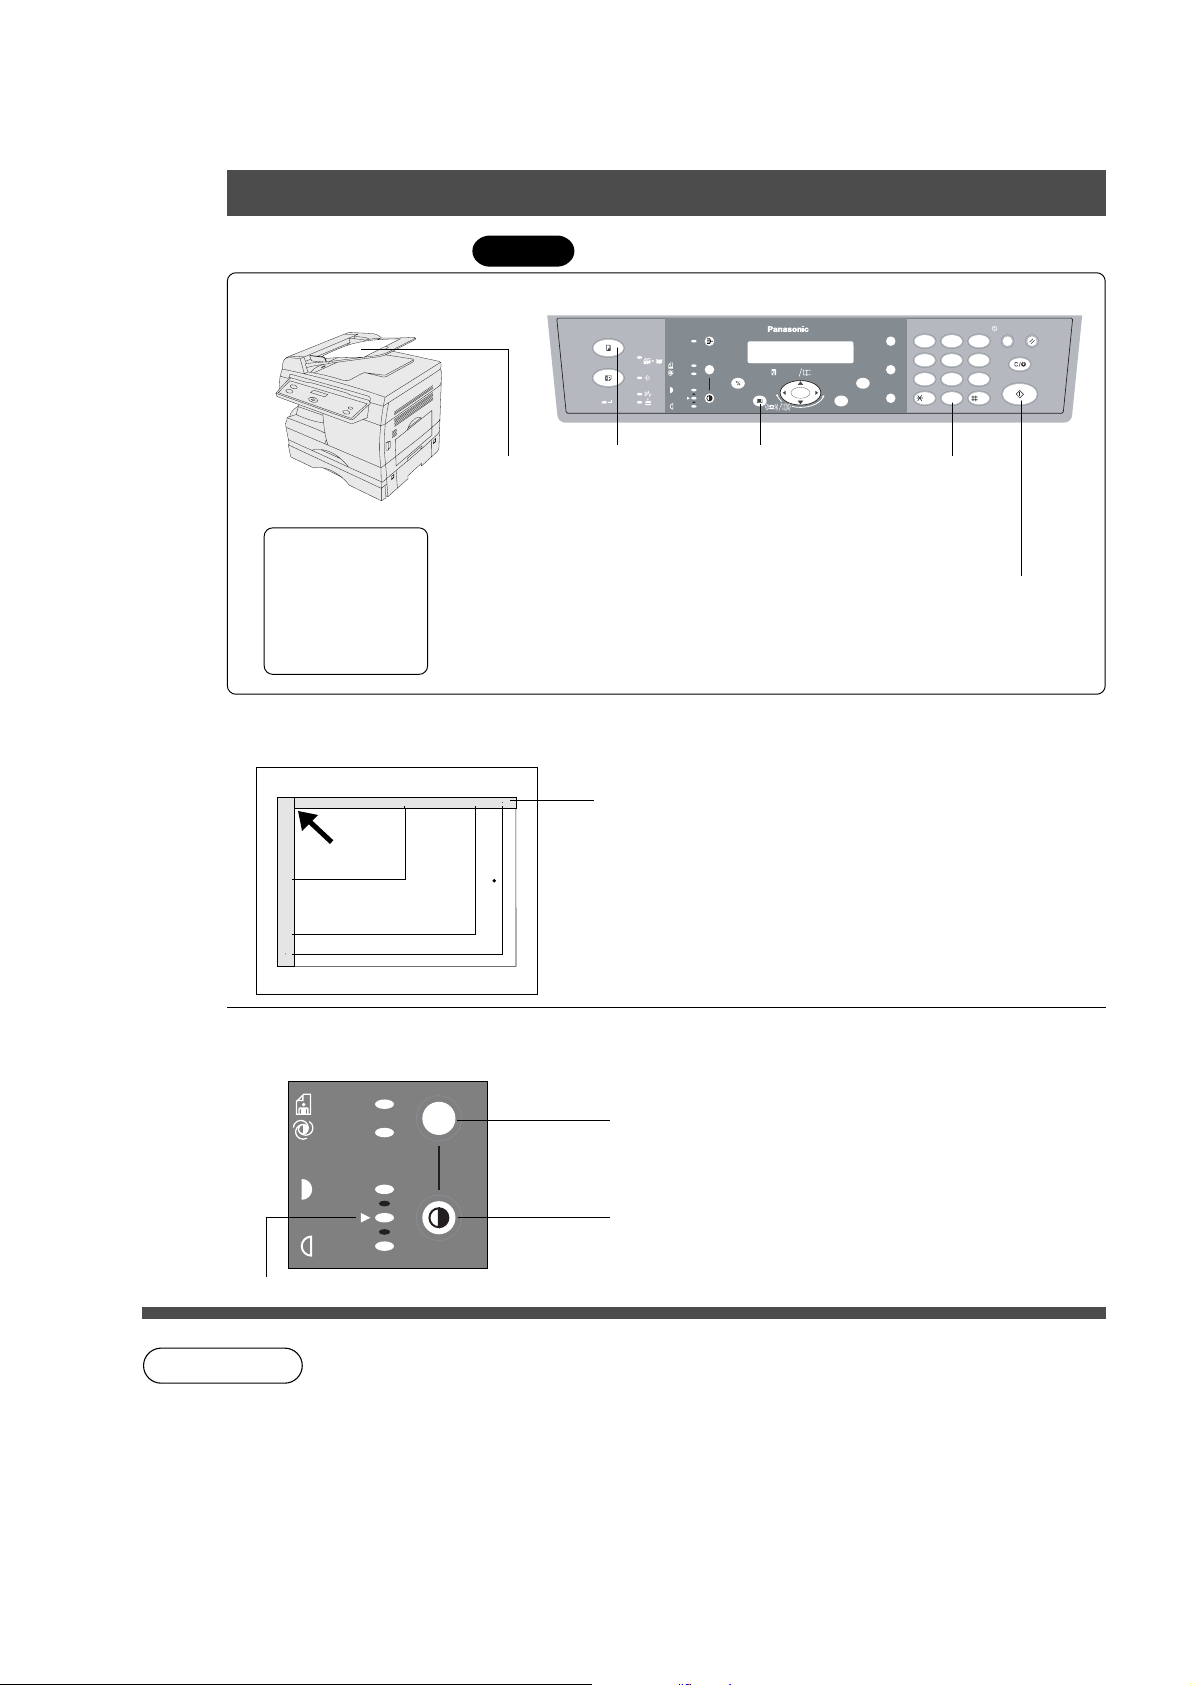
■ How to copy without using ADF (Automatic Document Feeder).
■■
Position of the original
A5R A4R
FLS B4
■■
■ Original Guide
■■
Place original against guide.
A5R
A5R
A4R
FLS B4
A4R
FLS B4
C
F ace DOWN on platen.
C
If the original is incorrectly placed on the platen glass,
part of the copy image may be missing.
ENERGY
SAVER
RESET
3
CLEAR/STOP
6
WXYZ
START
9
5
Press Start
■■
■ When manually selecting exposure control:
■■
C
The copier has auto exposure control and adjustments
are rarely required.
PHOTO
AUTO
DARKER
Select Photo to copy photos and halftones.
Select Auto to cop y with A uto exposure control.
Select Dark to copy light image originals.
LIGHTER
Select Light to copy colored backg round originals.
Normal Position
NOTE
Inappropriate originals
C
Paper with a smooth surface such as glossy and coated papers
C
Transparencies
C
Paste-ups
C
Originals with a lead edge that is creased, folded, punched or glued
C
Pressure sensitive paper or paper with carbon backing
C
Paper with excessive curl
C
Stapled originals
C
Originals with oil on them
C
Remove stac ked copies from the exit tray every 200 sheets.
2
Page 3
Overview
Useful for office, more than 4 functions
Copier
1
Facsimile
2
C Can copy up to B4 size .
C Av ailab le to cop y te xt/photos/
halftones originals.
C
Plain paper Super G3 compatible Fax.
C Available duplex printing of received
Faxes. Can be used as a regular
telephone with optional handset.
Operation Chart
Overview
3
4
5
Printer
C Digital printer controller standard,
printer resolution 300 dpi.
Scanner
C Black & White original scanner
standard, scan resolution 400 dpi.
Application Software
C Document Manager
C Document Viewer
C Document Scanner
C Utilities (Status Monitor , Phone
Book Editor, De vice Configuration
Editor)
DP-150FP Operating Instructions (Manual Overview)
This copier includes 3 operating instruction manuals, please use the correct manual when operator
intervention is necessary .
<Copier> Use the information provided in this manual whenev er a copier function
requires intervention. F or e xample: how to make copies , add paper,
replace the toner cartridge, etc..
<2nd bin for C> Use the information provided in the DP-150FP F acimile Operating
Instructions manual whenev er a f ax function requires intervention. For
example: how to send/receive a f ax, or when a troub le message appears ,
etc..
<Printer> Use the information provided on the enclosed CD for an explanation of
& how to use as a Printer , Scanner, Phone Book Editor, Device Settings,
<Other Advanced Functions>
Status Monitor, and/or Document Management System.
3
Page 4

Energy Star
The FP-150FP series copiers comply with Tier 2 of the Environmental Protection Agency’s
Energy Star Program. This voluntary program specifies certain energy consumption and usage
standards for copiers. These copiers will automatically “power down” after a specified period of
non-use. The use of these Energy Star compliant copiers will reduce energy consumption and
ultimately benefit the environment.
The default functions can be adjusted depending on your office requirements . Please see your
authorised Panasonic copier dealer for more details .
4
Page 5

Table of Contents
Before Operation
Overview ......................................................................................................................................... 3
Precautions .................................................................................................................................... 6
Components ■ External/Internal ...................................................................................9
■ Control Panel......................................................................................10
Mode Functions ........................................................................................................................... 12
Features ....................................................................................................................................... 13
Making Copies
Common features ■ Full Size Copying..................................................................................2
■ Reduction or Enlargement Copying ....................................................14
■ Zoom Copying ....................................................................................15
Creative Features
Option
■ Digital skyshot ....................................................................................16
■ 2 in 1 Copy .........................................................................................17
■ Sorting................................................................................................18
■ Using the Sheet Bypass .....................................................................19
Energy Star
Table of Contents
Option ........................................................................................................................................... 20
Maintenance
Handling ■ Adding Paper......................................................................................21
■ Changing paper size...........................................................................22
■ Changing T oner Cartridge...................................................................23
■ Changing Drum Unit ...........................................................................24
■ Removing a Paper Misfeed (Main Unit) ..............................................25
■ Removing an Original Misfeed (ADF) .................................................27
■ Removing a Misfed Paper (2nd Paper F eed Module)..........................28
Checking ■ Troub leshooting ..................................................................................29
Others
Specifications .............................................................................................................................. 32
Consumables List ........................................................................................................................ 33
5
Page 6
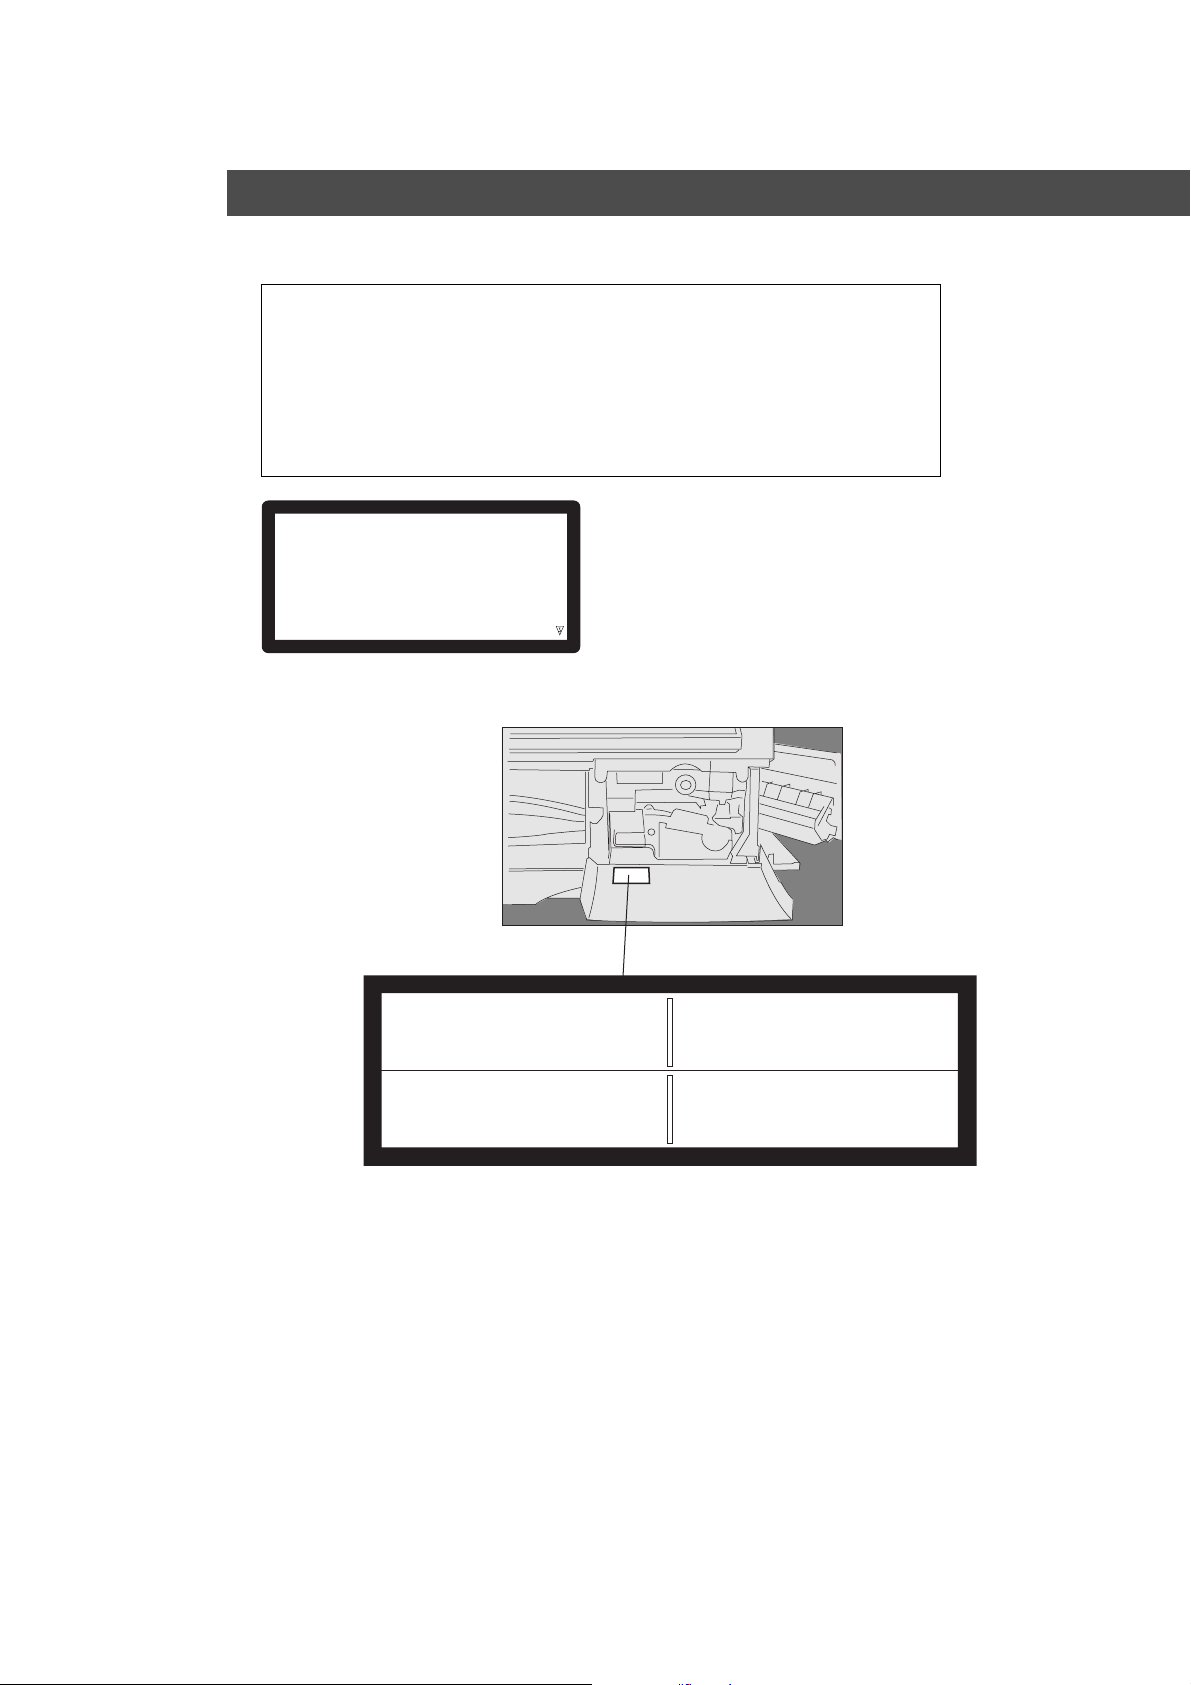
Precautions
For your safety
■■
■ Laser Safety
■■
LASER SAFETY
This unit employs a laser. Only qualified service personnel should
attempt to service this device due to possible ey e injury.
Caution
This product utilizes a laser .
Use of controls or adjustments or performance of procedures other than
those specified herein may result in hazardous radiation e xposure .
LASER KLASSE 1
LASER CLASSE 1
RANGO LASER 1
CLASS 1 LASER PRODUCT
(
)
TO IEC 825
■■
■ Caution Labels
■■
ATTENTION:
Rayonnement laser invisible
dangereux en cas d’ouverture et
lorsque la sécurité est neutralisée.
EXPOSITION DANGEREUSE AU FAISCEAU.
CAUTION:
Invisible laser radiation when
open and interlocks defeated.
AVOID EXPOSURE TO BEAM.
PELIGRO:
Cuando se abre y se invalida el bloqueo, se
producen radiaciones invisibles de láser.
EVÍTESE LA EXPOSICIÓN
DIRECTA A TALES RAYOS.
VORSICHT:
Unsichtbare Laserstrahlung, wenn
Abdeckung geöffnet und
Sicherheitsverriegelung überbrückt.
NICHT DEM STRAHL AUSSETZEN.
FFPTE2584
6
Page 7
Handling
Toner and Paper
Precautions
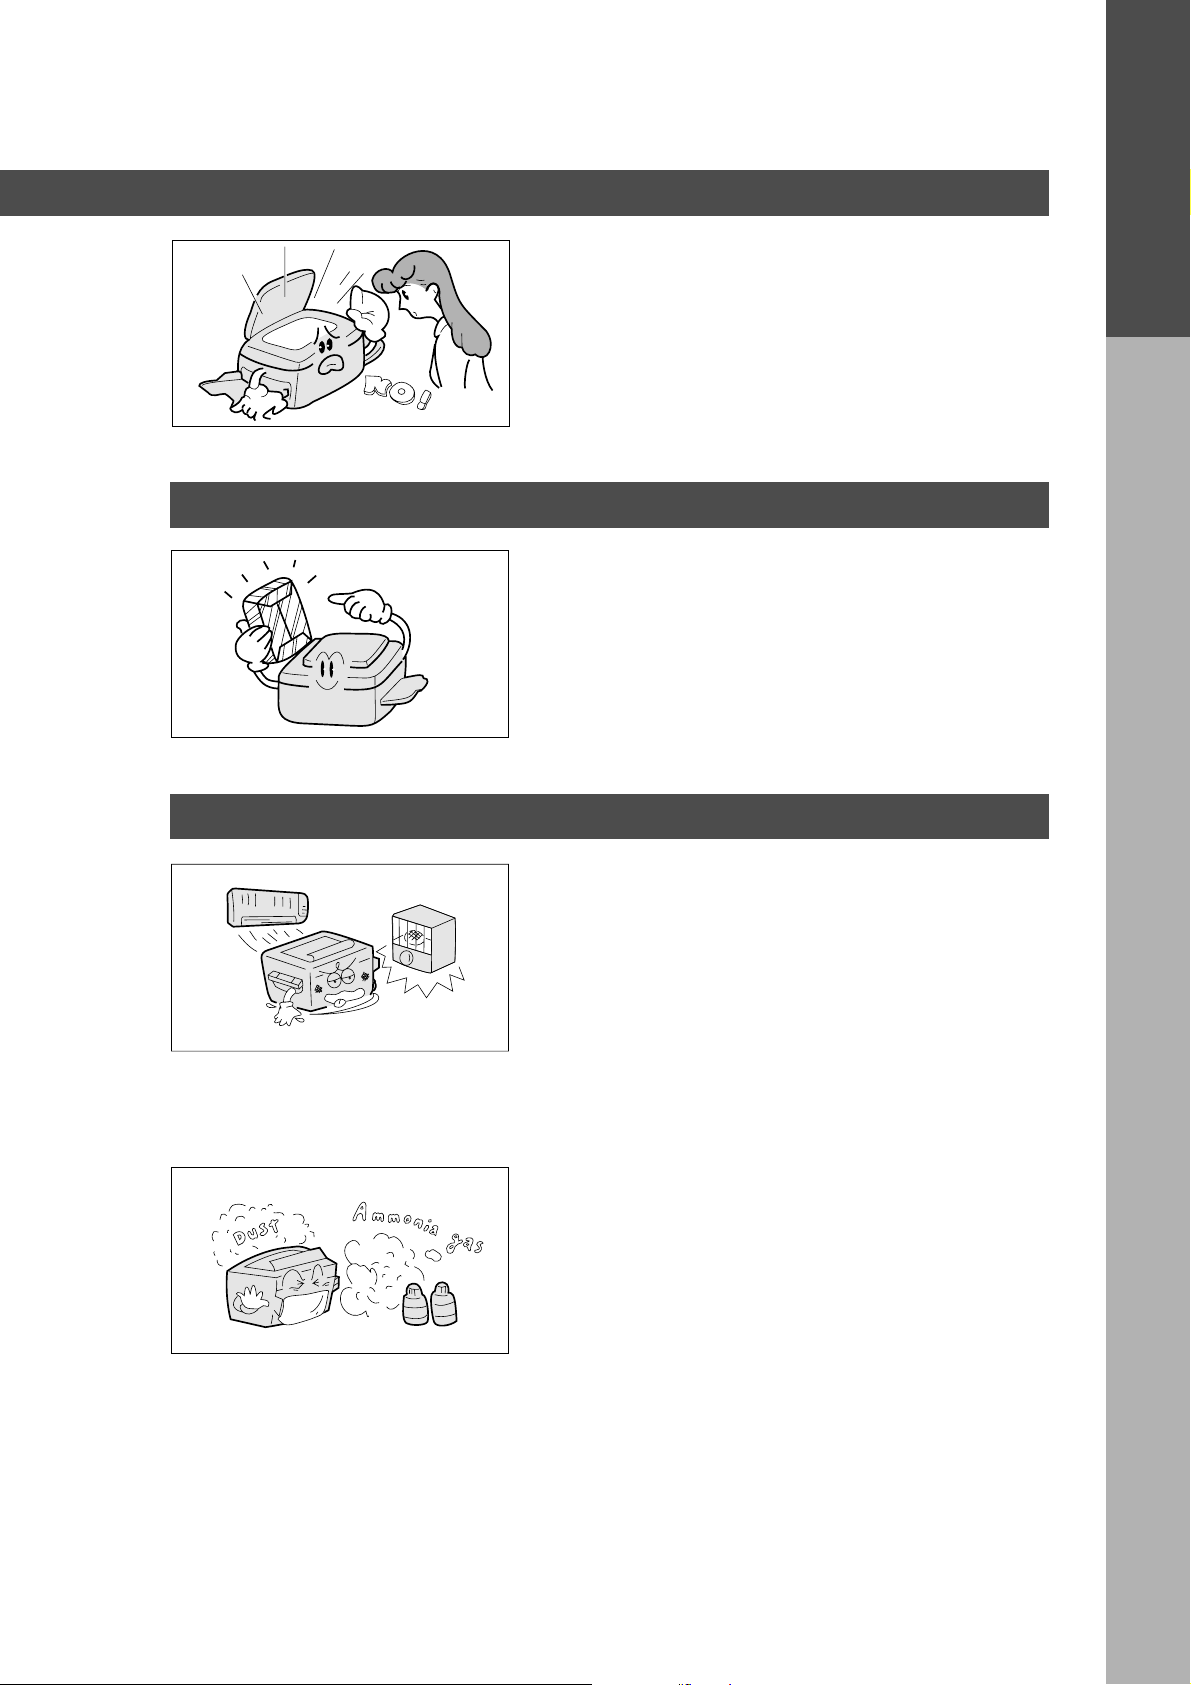
■ Do not look directly at exposure lamp when cop ying.
■ Do not turn the power switch off or open the front
panel during copying. (See page 9)
C
Do not drop paper clips or other metal objects into
the copier.
■ Store toner, de v eloper and paper in cool areas with
low humidity.
C
High quality paper of 60 – 90 g/m2 (55 – 130 g/m
via sheet bypass) may be used.
C
For optimum cop y quality, it is essential that
Panasonic Brand Toner is used in the copier.
2
Precautions
Installation
■ The copier should not be installed in areas with the
following conditions:
C
Extremely high or low temperature and humidity.
Ambient Conditions Temperature: 10°C – 30°C
Relative humidity: 30% – 80%
C
Where temperature and humidity can change
rapidly, causing condensation.
C
Direct exposure to sunlight.
C
Directly in air conditioning flow.
C
In areas of high dust concentration.
C
In areas of poor ventilation.
C
In areas with chemical fume concentration.
C
In areas with extreme vibration.
C
Unstable or une ven floors .
7
Page 8
Precautions
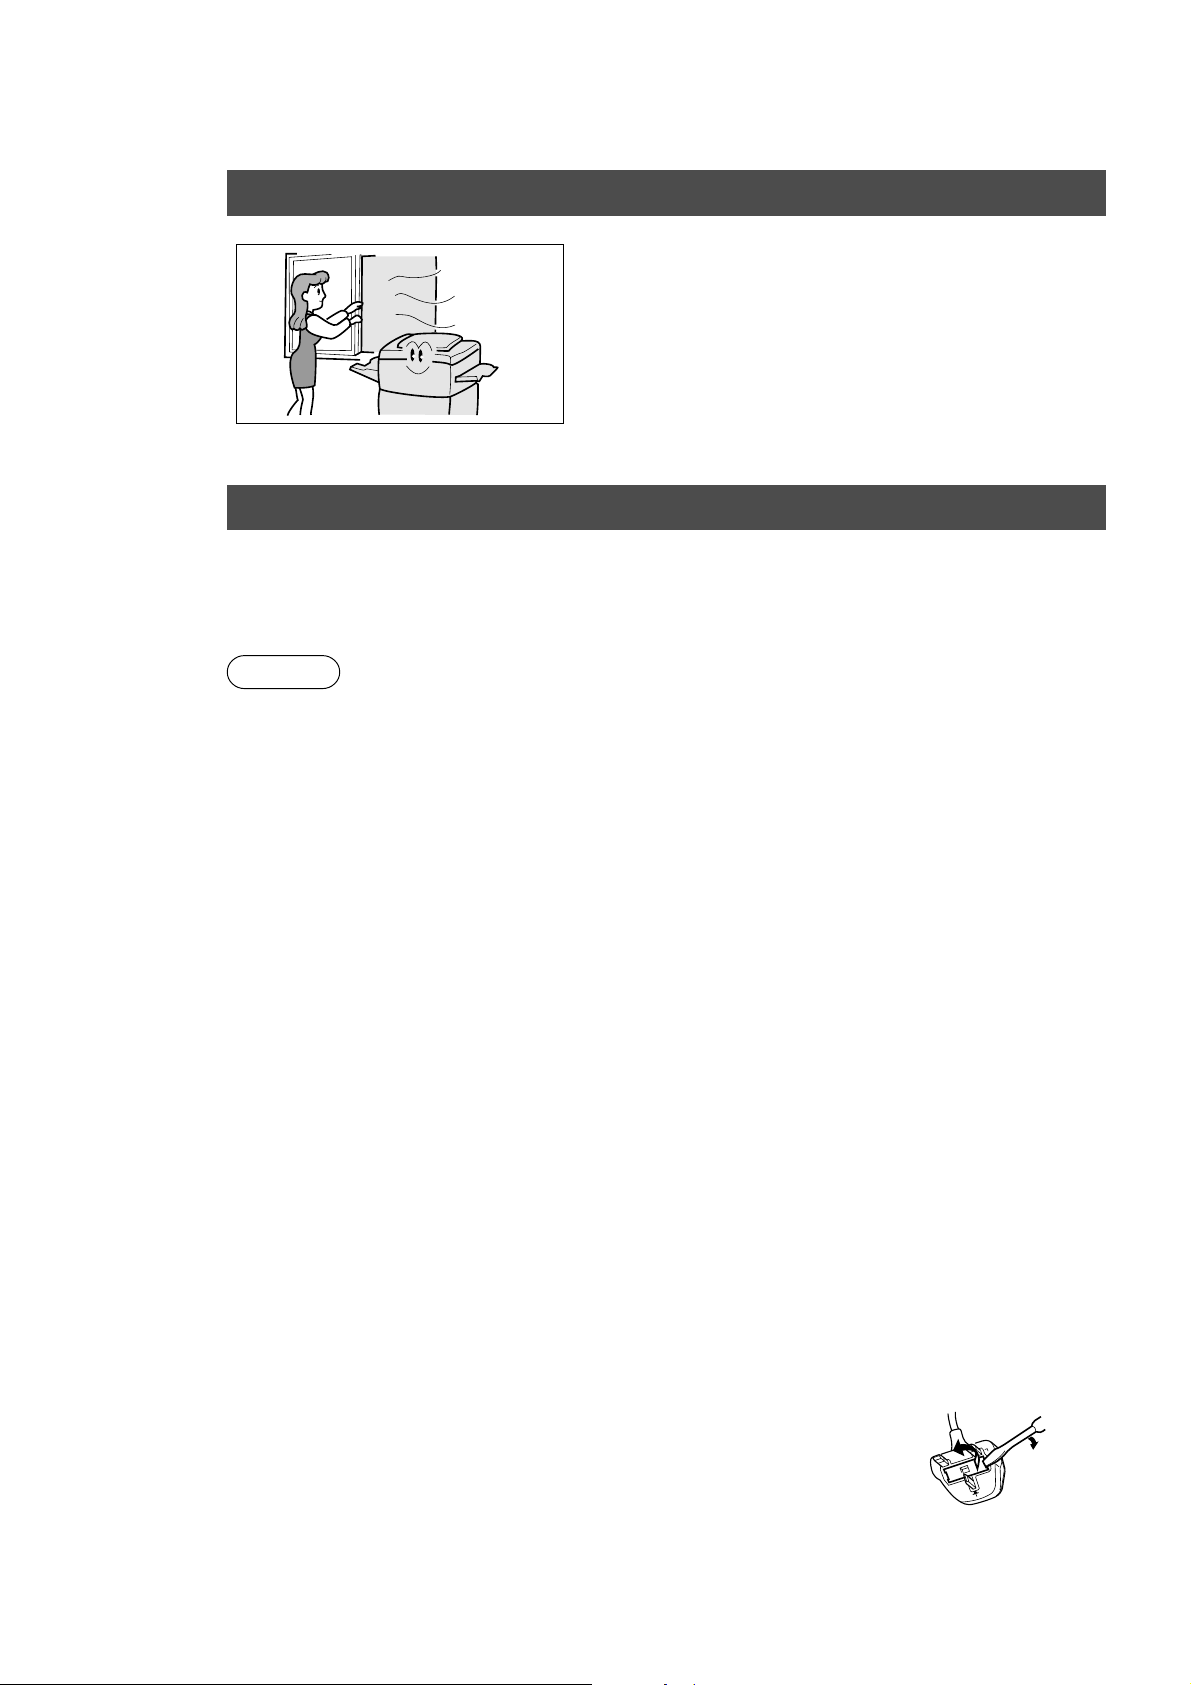
Ventilation
■ The copier should be installed in a well-ventilated
area to minimize the ozone density in the air .
FOR YOUR SAFETY
Caution Note: Disconnect from the mains supply before removing co v ers.
The mains plug on this equipment must be used to disconnect mains power . Please ensure that the
socket outlet is installed near the equipment and shall be easily accessib le .
For U.K.
This appliance is supplied with a moulded three pin mains plug for your saf ety and con venience.
A 13 amp fuse is fitted in this plug.
Should the fuse need to be replaced please ensure that the replacement fuse has a rating of 13
amps and that it is approved b y ASTA or BSI to BS1362
Check for the ASTA mark 7 or the BSI mark 6 on the body of the fuse.
If the plug contains a removab le fuse co v er you must ensure that it is refitted when the fuse is
replaced.
If you lose the fuse cov er the plug must not be used until a replacement co ver is obtained.
A replacement fuse cover can be purchased from y our local Panasonic Dealer.
IF THE FITTED MOULDED PLUG IS UNSUITABLE FOR THE SOCKET OUTLET IN YOUR
OFFICE THEN THE FUSE SHOULD BE REMOVED AND THE PLUG CUT OFF AND DISPOSED
OF SAFELY.
THERE IS A DANGER OF SEVERE ELECTRICAL SHOCK IF THE CUT OFF PLUG IS INSERTED
INTO ANY 13 AMP SOCKET.
If a new plug is to be fitted please observe the wiring code as shown below.
If in any doubt please consult a qualified electrician.
WARNING: THIS APPLIANCE MUST BE EARTHED.
IMPORTANT: The wires in this mains lead are coloured in accordance with the following code:
Green and Yellow: Earth
Blue : Neutral
Brown : Liv e
As the colours of the wires in the main lead of this appliance may not correspond with the coloured
markings identifying the terminals in your plug, proceed as follows:
The wire which is coloured GREEN-AND-YELLOW must be connected to the terminal in the plug
which is marked by letter E or by the safety Earth symbol “L” or coloured GREEN or GREEN-ANDYELLOW.
The wire which is coloured BLUE must be connected to the terminal in the plug which is marked
with the letter N or coloured BLACK.
The wire which is coloured BROWN m ust be connected to the terminal in the plug which is marked
with the letter L or coloured RED .
How to replace the fuse.
Open the fuse compartment with a screwdriver and replace the fuse.
N
8
Page 9
Components
Using the Sheet Bypass
■■
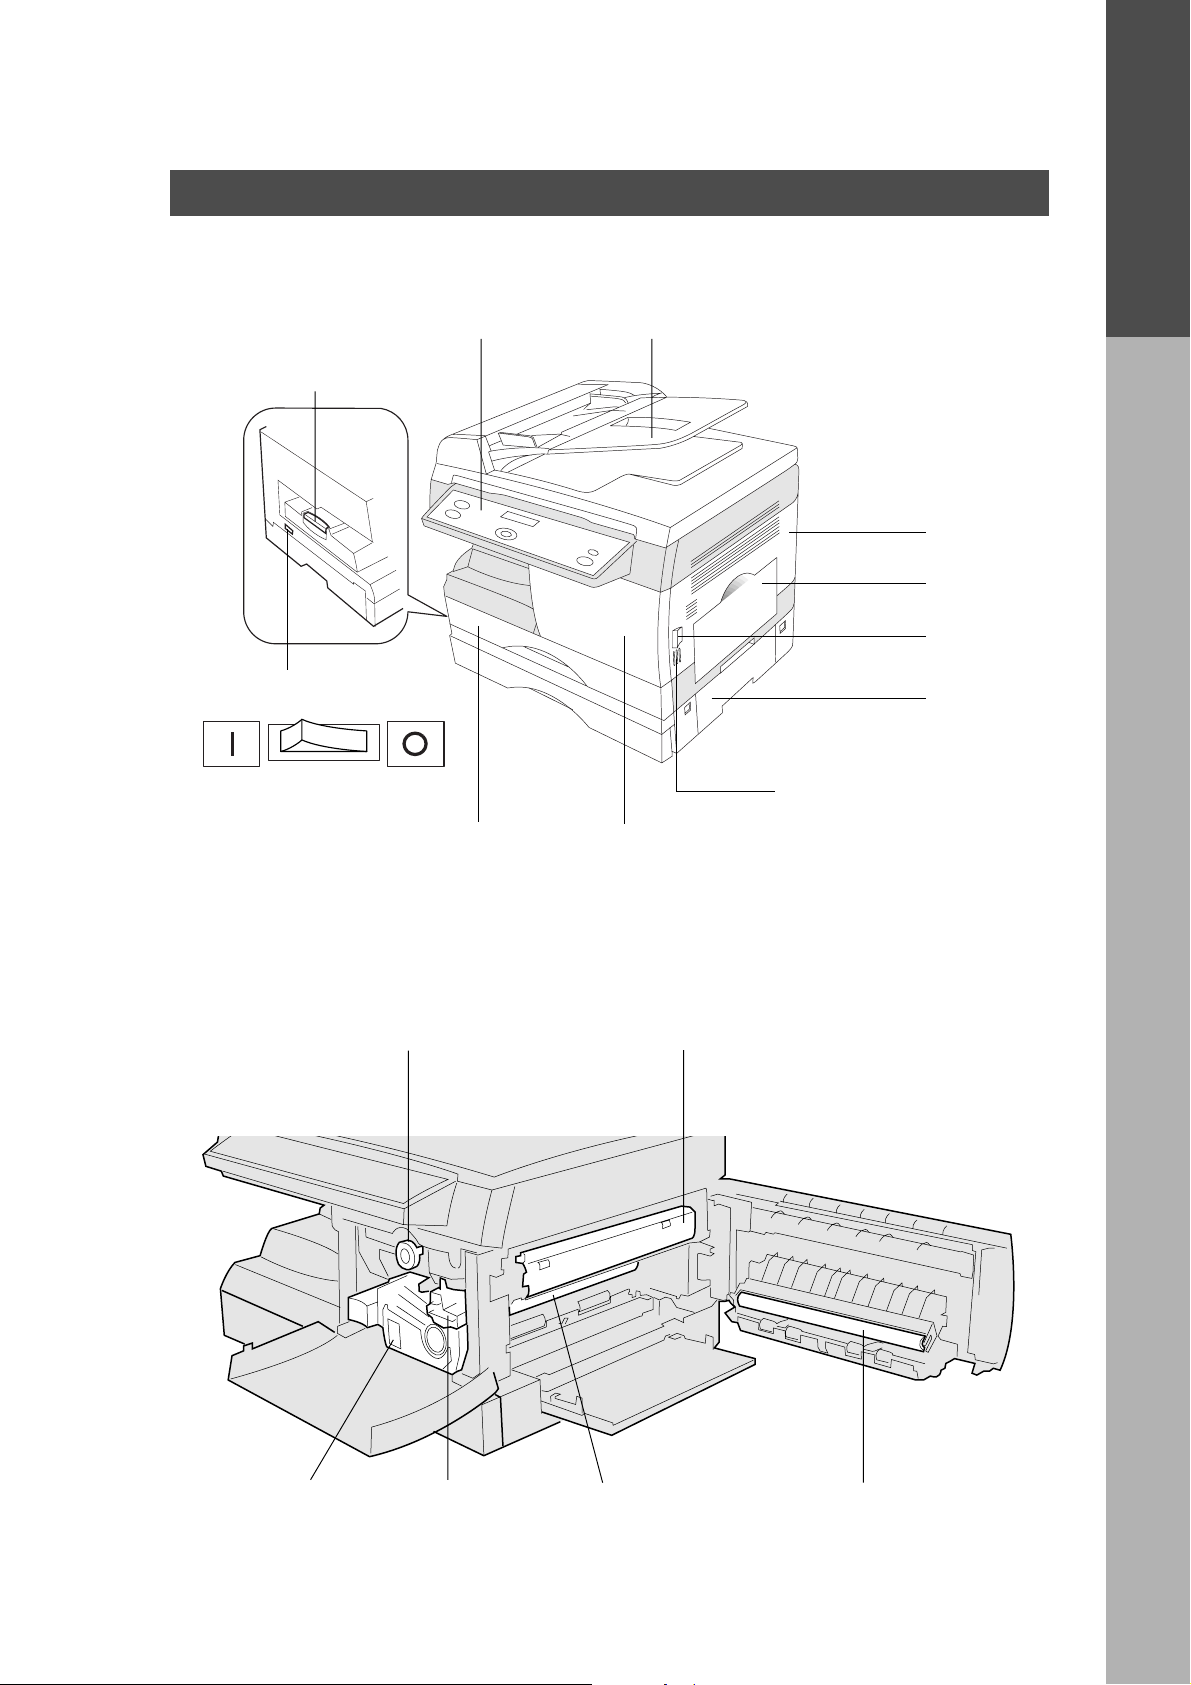
■ External
■■
Exit Tra y
Pull out the tray
when copying.
Control P anel ADF (Automatic Document F eeder)
Right Cover
Sheet Bypass
Button
Precautions
Components
Po wer Switch
ON OFF
■■
■ Internal
■■
Paper Tray
(See page 21, 22)
Knob
(See page 26)
2nd Paper
Feed Module
(Option)
Please push here when
closing Right Cover.
Front P anel
Fuser Cover
(See page 25)
Toner Cartridge
(See page 23)
Drum Unit
(See page 24)
Drum Surface
C
Do not touch it!
Transfer Roller
C
Do not touch it!
9
Page 10
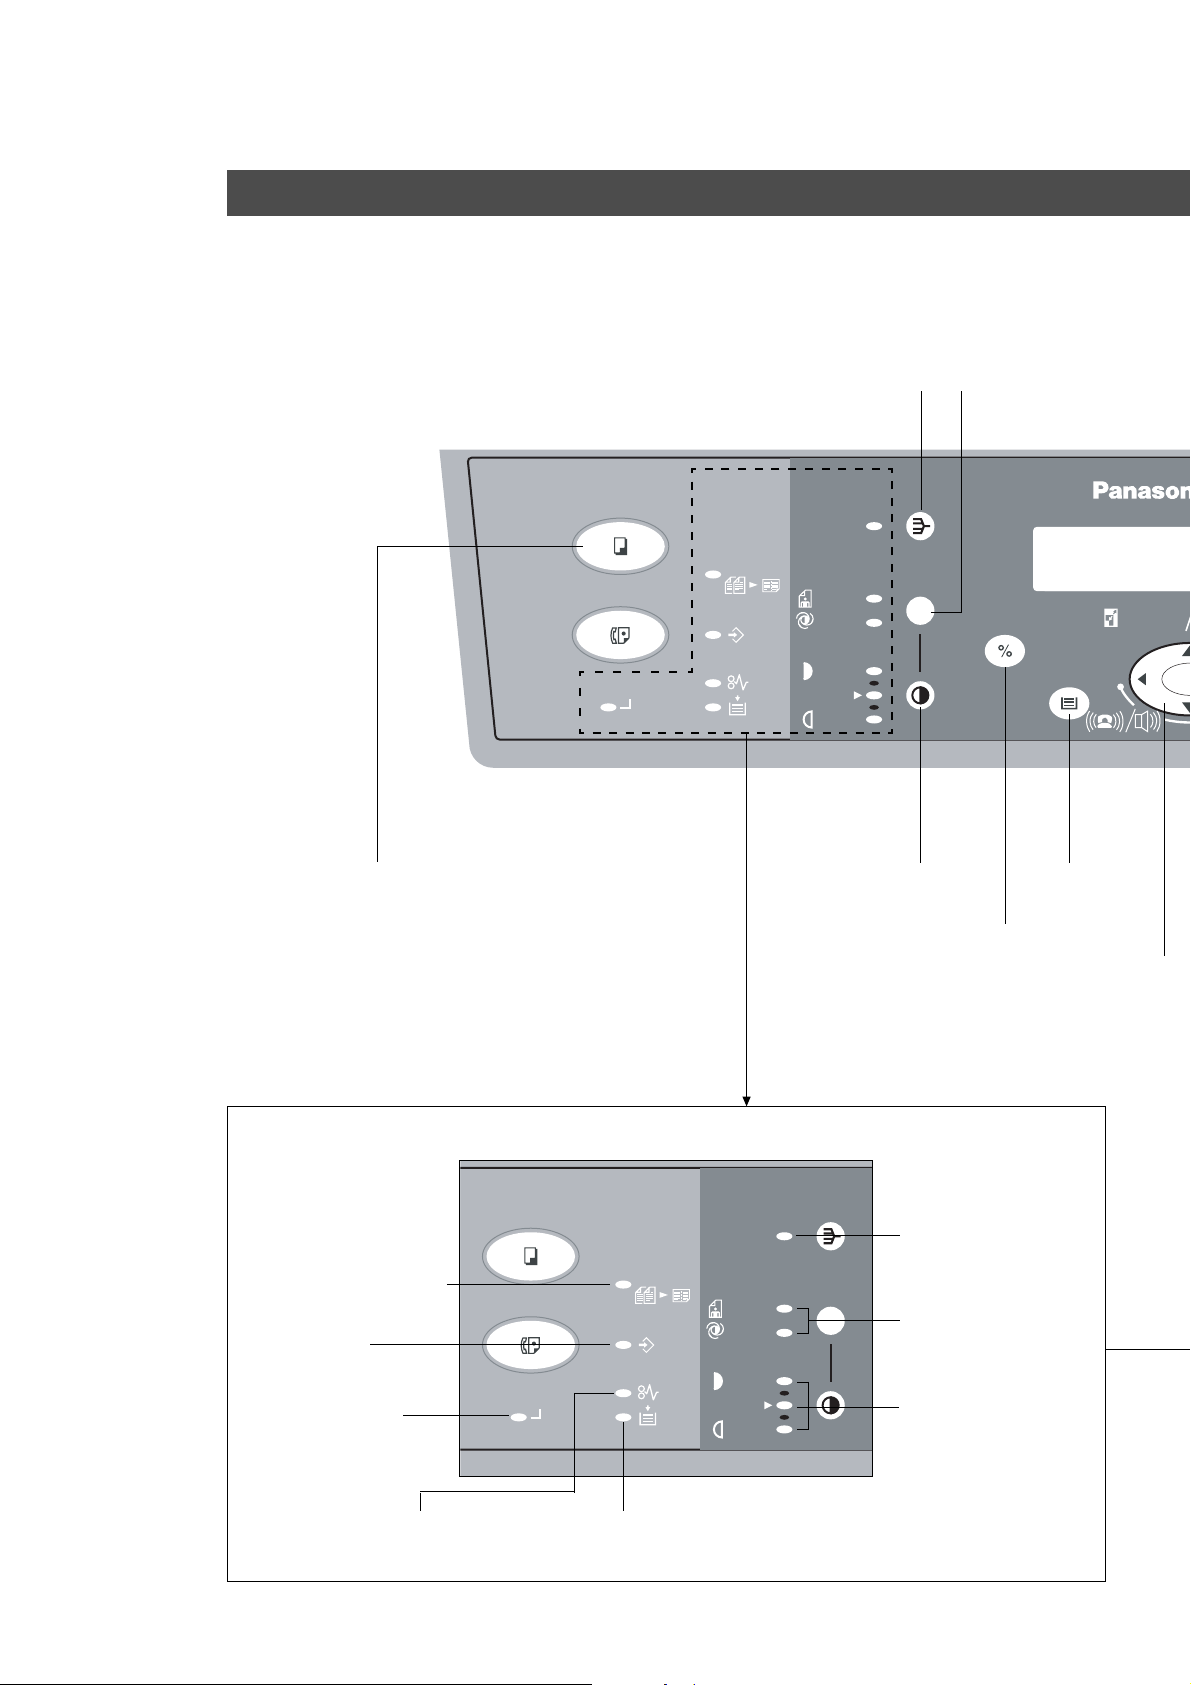
Components
Control Panel
■■
■ Function keys for making copies.
■■
(Function keys for fax, please see fax instruction.)
Copy Ke y
COPY
FAX
ON LINE
2SIDED
2 in 1
DATA
Sort Key
(See page 18)
SORT
PHOTO
AUTO
DARKER
LIGHTER
Exposure Control
Key
Auto/Photo Select Key
(See page 2)
SELECT
P APER TRAY
ZOOM
(50~200%)
-
Paper T ray Key
Communications Monitor
2 in 1 Copy Mode
Indicator (See page 17)
Data Indicator
ON LINE Indicator
COPY
FAX
ON LINE
2SIDED
2 in 1
DATA
% Select Key
Scroll Key
Note: Please chec k an y pages referring to this
key that k ey is called Scroll Key; and just
explain function of top , bottom, left, and/
or right button.
SORT
Sort Mode Indicator
(See page 18)
PHOTO
AUTO
DARKER
Auto/Photo Mode
Indicator (See page 2)
Exposure Indicator
LIGHTER
(See page 2)
10
Paper Misf eed Indicator
(See page 25-28)
Add Paper Indicator
(See page 21)
Page 11
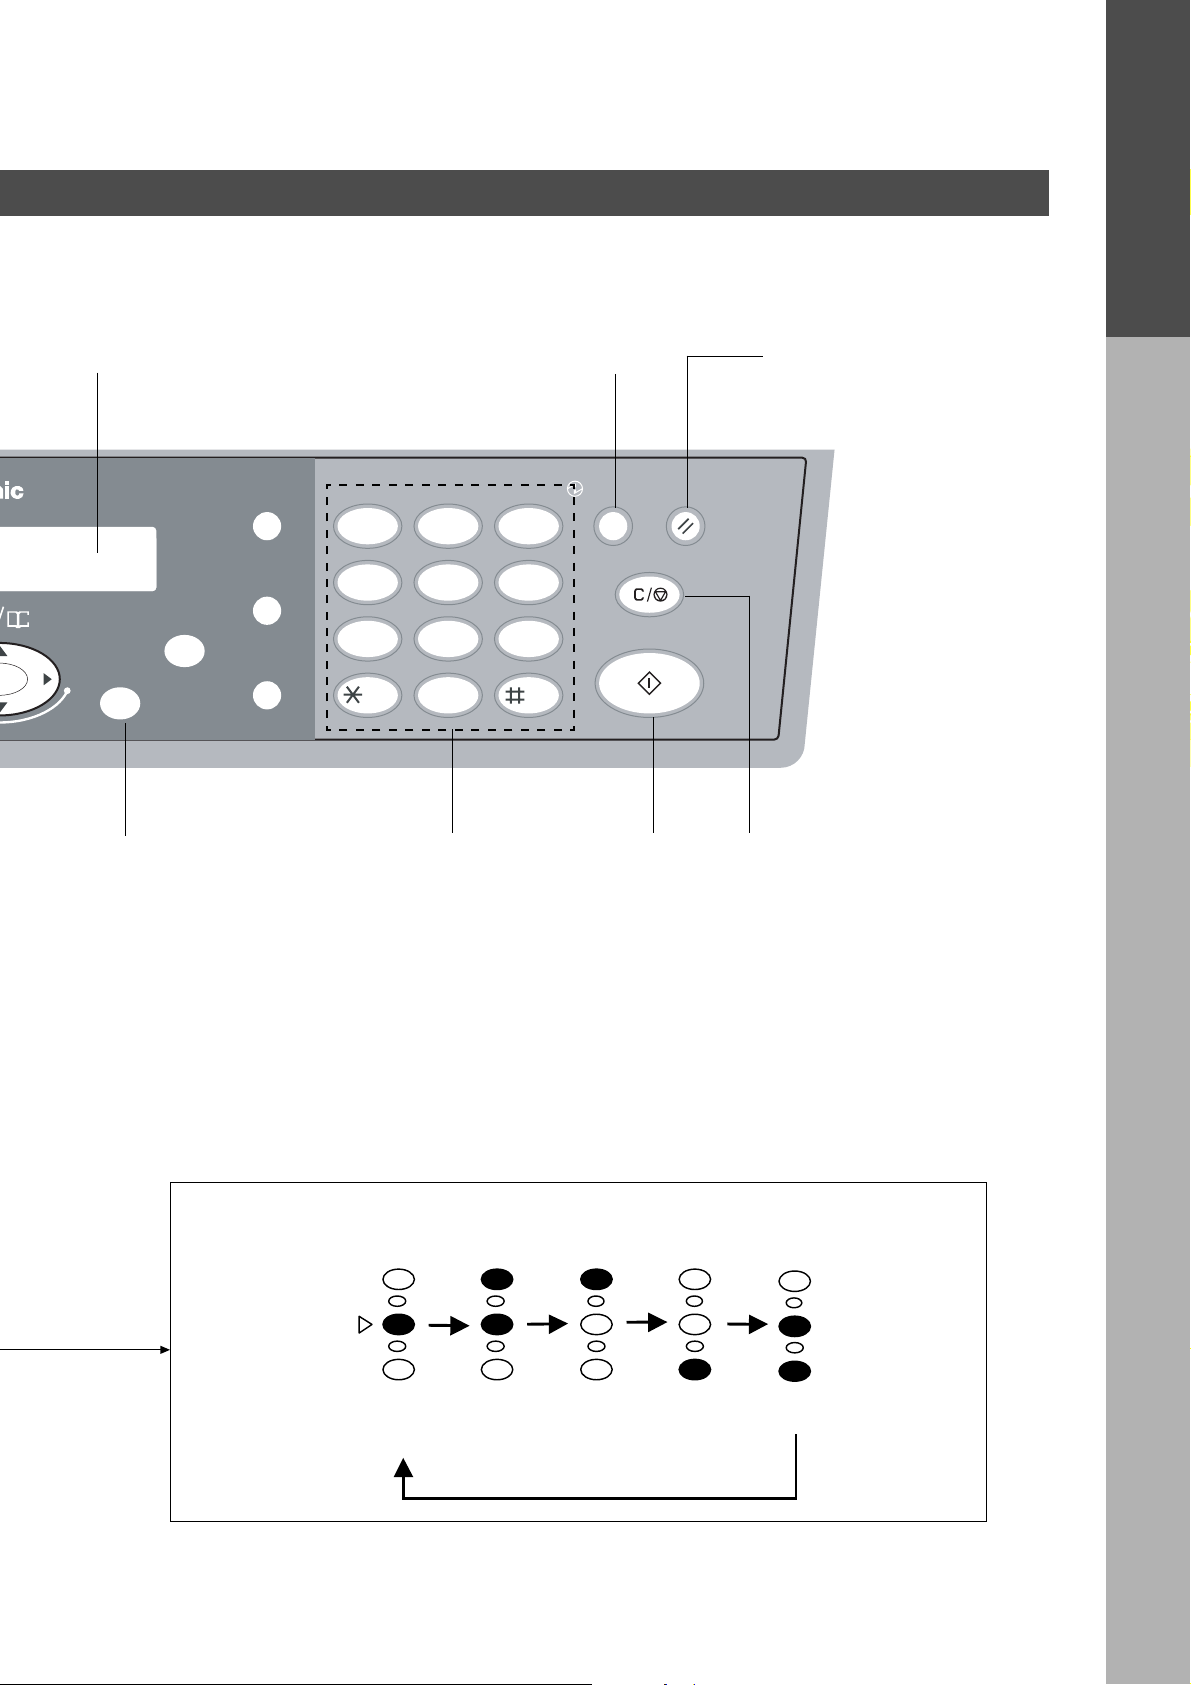
Message Display Energy Saver Ke y Reset Key
C
Press to reset all features to
initial power on status.
Components
DIRECTORY
abc..
SEARCH
REDIAL/
PAUSE
12
FLASH/
SUB-ADDR
FUNCTION
SET
+
MONITOR
GHI JKL MNO
45
PQRS
78
TONE
ABC DEF
TUV
-/()
0
3
6
WXYZ
9
ENERGY
SAVER
CLEAR/STOP
START
RESET
Set Key Keypad Start Key Clear/Stop Key
C
Press to stop copy run or to
clear copy count in displa y.
By pressing Exposure Control key, the Exposure Indicator will be indicated as
follows.
Darker
Lighter
Normal
DARK Darker Lighter LIGHT
Position
11
Page 12

Mode Functions
■■
■ Energy Saver Mode/Auto Off Mode
■■
Energy Saver Mode
# To enter this mode
Press Energy Saver k ey. The indicator will flash.
Automatically activ ates after 15 minutes from the last cop y.
$ To cancel this mode
Press Energy Saver k e y again.
Auto Off Mode
# Automatically activates after 30 minutes from the last copy.
P ower consumption will drop and the Energy Sa ver key indicator will light.
$ T o cancel this mode .
Press Energy Saver key.
If you wish to change the abov e settings or if y ou need more information, call your Panasonic
authorised dealer.
P ower Consumption Warm Up Time
Normal Operation Approximately 60 Wh None
Energy Saver Mode Approximately 35 W 5 seconds
Auto Off Mode Approximately 1.5 W 25 seconds
■■
■ Toner Saver Mode
■■
1) This only works when using copy mode. When printing out by Printer or Fax function, this
mode does not work.
2) The Toner Saving Mode is to save toner consumption by copying dark originals lighter.
The exposure indicator “LIGHT” flashes when Toner Sa ving Mode is on.
3) To enter this mode: # Press Copy Key
$ Press Function Key
% Press “4” ke y of Keypad
& Press Set Key .
( Select “TONER SAVER 2:V ALID”.
Press “2” key of Keypad
) Press Set Key.
To cancel this mode: # Press Copy Ke y
$ Press Function Key
% Press “4” ke y of Keypad
& Press Set Key
(
Select “TONER SA VER 1:INVALID”.
Press “1” key of Keypad
) Press Set Key.
■■
■ Copy Reservation Function
■■
While the copier is warming up, you may position your original on the copier, enter y our
copy job selections and press the Start key. The Wait indicator (Start key) will flash until the
warm up cycle is completed and the copy job will automatically start.
Note:Please enter your copy job, when “WARM UP, PLEASE WAIT SELECT COPY JOB”
appears in message display.
12
Page 13

Features
■■
■ Features List
■■
Reduction or Enlargement Cop ying (See page 14) Copying with preset ratios.
Zoom Copying (See page 15) Copying with v ariable z oom ratios.
Digital skyshot (See page 16) Copying from small originals without
dark areas around the image.
2 in 1 copy (See page 17) Copying from two 1-sided originals, side
by side, to 1-sided copies.
Sorting (See page 18) Multiple copies to be sorted
automatically.
Mode Functions
Features
1313
Page 14

Common features
100%
FLS⋅B4→A4
A4→A5
FLS⋅B4→A5
A5→A4
100%
82%
71%
58%
141%
Reduction or Enlargement Copying
■■
■ There are 3 preset reduction and 1 preset enlargement modes.
■■
1
Position
original
COPY
FAX
ON LINE
2
Press Copy
Key
SELECT
2SIDED
2 in 1
FUNCTION
REDIAL/
FLASH/
SUB-ADDR
MONITOR
ABC DEF
12
GHI JKL MNO
45
PQRS
TUV
78
TONE
-/()
0
SORT PAUSE
Message Display
PHOTO
AUTO
DATA
DARKER
LIGHTER
SELECT
PAPER TRA Y
ZOOM
DIRECTORY
abc..
(50~200%) SEARCH
+-
SET
3
6
WXYZ
9
ENERGY
SAVER
CLEAR/STOP
START
RESET
Select paper tray
or sheet bypass*
3
Select the copy
ratio/size
4
Number of
copies
5
Press Start
Select the copy ratio/size b y pressing
% Select Ke y
% Select Ke y
NOTE
Example: Reduction
Original size Copy size
B4 A4
The correct ratio is automatically selected.
To cancel reduction or enlargement cop y, press RESET
Key .
When copy size is different from paper size of paper tray, select sheet bypass by
∗
pressing Paper Tra y key and place the paper into the sheet bypass. (See page 19)
C
To change the paper size of the paper tray, see page 22.
14
Page 15

Common features
Zoom Copying
■■
■ A zoom ratio can be selected from 50% to 200% in 1% increments.
■■
1
Position
original
COPY
FAX
ON LINE
2
Press Copy
Key
ZOOM
(50~200%)
2SIDED
2 in 1
PHOTO
AUTO
DATA
DARKER
LIGHTER
Paper Tray Ke y*
DIRECTORY
abc..
SEARCH
FUNCTION
REDIAL/
FLASH/
SUB-ADDR
MONITOR
SORT PAUSE
Message Display
ZOOM
DIRECTORY
SELECT
PAPER TRA Y
abc..
(50~200%) SEARCH
+-
SET
3 4
Select zoom ratio.
Zoom Ratio: 50% – 200%
Press and hold the F key or G key.
For enlargement
ABC DEF
12
GHI JKL MNO
45
PQRS
TUV
78
TONE
-/()
0
Number of
copies
3
6
WXYZ
9
ENERGY
SAVER
RESET
CLEAR/STOP
START
5
Press Start
Common features
NOTE
For reduction
(Increase/decrease in 1% increments.)
To cancel Zoom Copying, press RESET
Key.
When copy size is different from paper size of paper tray, select sheet bypass
∗
by pressing Paper Tra y key and place the paper into the sheet bypass. (See
page 19)
C
To change the paper size of the paper tray, see page 24.
15
Page 16

Creative Features
Digital skyshot
■■
■ To copy from the platen with ADF open. Making copies from small
■■
originals without dark areas around the image.
The Digital Skyshot mode is normally set on. If the mode is not set, please
use the following procedure.
1
Set original
to the platen
DIGITAL SKYSHO T
1: INVALID
COPY
FAX
ON LINE
2
Press Copy
Key
2SIDED
2 in 1
FUNCTION
REDIAL/
ABC DEF
12
FLASH/
SUB-ADDR
MONITOR
GHI JKL MNO
45
PQRS
TUV
78
TONE
-/()
0
6
Select Skyshot
Mode
SORT PAUSE
PHOTO
AUTO
DATA
DARKER
LIGHTER
3
Press
Function Key
Message Display
ZOOM
DIRECTORY
SELECT
PAPER TRA Y
abc..
(50~200%) SEARCH
5A7
Press Set Key
If this message appears.
(Message Display)
SET
+-
3
6
WXYZ
9
ENERGY
SAVER
RESET
CLEAR/STOP
START
4
Press “5”
Key
8
Press
Start
NOTE
Press “2” Ke y
C
Incorrect output may occur if the copier cannot properly detect the edges of the original.
C
Incorrect output may occur if the copier is directly under and/or near an extremely bright
light source.
C
If the ADF(Automatic Document F eeder) is closed, the Digital Skyshot mode will not
operate.
To turn this mode off, use the procedure abov e (6).
DIGITAL SKYSHO T
2: VALID
16
Page 17

2 in 1 Copy
S
■■
■ For 2 in 1 copying.
■■
Creative Features
COPY
FAX
ON LINE
1
Set originals
in ADF tray
2
Press Copy
Key
How to set original to ADF
2SIDED
2 in 1
FUNCTION
REDIAL/
FLASH/
SUB-ADDR
MONITOR
ABC DEF
12
GHI JKL MNO
45
PQRS
TUV
78
TONE
-/()
0
SORT PAUSE
Message Display
PHOTO
AUTO
DATA
DARKER
LIGHTER
SELECT
PAPER TRA Y
ZOOM
DIRECTORY
abc..
(50~200%) SEARCH
+-
SET
3
6
WXYZ
9
ENERGY
SAVER
CLEAR/STOP
START
RESET
Paper Tray Ke y*
3 4
Select 2 in 1
Mode
Number
of copies
5
Press
Start
Creative Features
Face-Up
Press H key to
2SIDED
SORT
select the 2 Sided
Copy mode
1 time 2 in 1 mode
ON
2 times 2 in 1 mode
2 in 1
2 in 1
DATA
PHOTO
AUTO
DARKER
LIGHTER
SELECT
PAPER TRAY
ZOOM
(50~200%) SEARCH
OFF
% Select Ke y
C
When copying the 2 in 1 mode from A5 to A4 or from B4⋅FLS to A4, select the preset copy
ratio with the % Select Ke y.
C
ATTENTION
When copy size is diff erent from paper siz e of paper tray, select sheet
bypass by pressing Paper Tray key and place the paper into the sheet
bypass. (See page 19)
C
To change the paper size of the paper tray, see page 22.
C
2 in 1 will not work off the platen glass.
C
When copying the 2 in 1 mode with A5 size, copy image will be missing.
abc..
H keyI key
DIRECTORY
+-
17
Page 18

Creative Features
Sorting
■■
■ Multiple copies to be sorted automatically.
■■
COPY
FAX
ON LINE
When using ADF
1
Set originals
in ADF tray
When setting original to the platen
1
Set original
to the platen
2SIDED
2 in 1
DATA
2
Press Copy
Key
2
Press Copy
Key
6
When the copy of the first
original is finished, set the
next original
■■
■ Sorting is.
■■
Example: Copying 3 set from 3 originals.
SORT PAUSE
PHOTO
AUTO
DARKER
LIGHTER
3
Press Sort Key
C
3
Press Sort Key
C
7
Press
Start
Message Display
ZOOM
DIRECTORY
SELECT
PAPER TRA Y
The indicator flashes
The indicator flashes
abc..
(50~200%) SEARCH
+-
8
Continue procedure 6 and 7 until
the last original copying is
finished.Then press Sort Key.
C
The indicator flashes
SET
FUNCTION
REDIAL/
FLASH/
SUB-ADDR
MONITOR
ABC DEF
12
GHI JKL MNO
45
PQRS
TUV
78
TONE
-/()
0
4
Number of
copies
4
Number of
copies
3
6
WXYZ
9
ENERGY
SAVER
RESET
CLEAR/STOP
START
5
Press Start
5
Press Start
9
Press Start
Copying from
the 2nd set
will start.
18
ATTENTION
Original
1
1
2
3
With Sort mode, copies will be sorted as the same order
of the original.
C
Do not press Sort Key when number of cop y is one .
C
ADF’s(Automatic Document Feeder) scanning may stop in some cases when the
memory capacity has overflowed. This may occur especially when scanning halftone
originals. In this case, return from the original which did not scan and re-start scanning.
Follow the procedures indicated in the displa y.
1
Without Sort mode
1
1
2
3
With Sort mode
2
2
2
1
2
3
3
3
3
1
2
3
Page 19

Creative Features
Using the Sheet Bypass
■■
■ To copy on letterhead, mailing labels, transparencies and odd-size paper,
■■
etc., or to use bypass as an additional paper source.
Position original
Select copy ratio/size.
1
(See page 14)
Open the Sheet Bypass.
2
3
4
Tray
Side Guides
Open the tray.
Creative Features
# Place paper into the tray. (Up to
50 sheets)
Insert the paper until it stops.
Do not fill above
Copy side down for copying
on letterhead paper and
mailing labels.
$ Adjust the side guides to paper
width.
Incorrect adjustment may cause paper
to wrinkle, misfeed or sk e w.
5
NOTE
Select sheet bypass with Paper
Tray key.
C
When using double sided copies, do not set more than 25 (80 g/m2) sheets in
bypass.
C
Some types of mailing labels and transparency film may damage your
machine. Contact y our service provider f or advice regarding non-standard
paper types.
19
Page 20

Option
Option
■■
■ 2nd Paper Feed Module (DA-DS150)
■■
Available to add 250-sheet paper tray.
C
For installation, see the Installation Instructions provided.
C
For setting and changing paper size, see page 22.
The illustration is the
main unit with optional
2nd Paper F eed Module.
2nd Paper F eed Module
(DA-DS150)
20
Page 21

Handling
Adding Paper
■■
■ Use the following steps to add paper.
■■
1
2
Lift paper tray and pull out of the
copier until it stops.
Push the bottom plate down until it
locks.
3
4
5
Place paper into the tray.
How to place paper:
Place the paper copy side up .
Do not fill above
Make sure paper is not loaded
above overfill indicator located in
the paper tray.
Overfill Indicator
Single sided copy
Push paper tray back into copier.
OptionHandling
NOTE
C
Special papers, like glossy paper, mailing labels and transparencies cannot be
used in the paper tray. Use bypass for special paper.
C
When making double sided copies, use the sheet bypass .
C
If the paper tray is not closed completely, the Add Paper Indicator in the
control panel will light up. In that case, please close the paper tray completely.
21
Page 22

Handling
Changing paper size
■■
■
Following is the procedure to change paper size of paper tray from the control
■■
panel. This procedure is also same for optional 2nd Paper Feed Module.
COPY
FAX
ON LINE
2SIDED
2 in 1
FUNCTION
REDIAL/
FLASH/
SUB-ADDR
MONITOR
ABC DEF
12
GHI JKL MNO
45
PQRS
TUV
78
TONE
-/()
0
SORT PAUSE
PHOTO
AUTO
DATA
DARKER
LIGHTER
Message Display
PAPER TRA Y
ZOOM
(50~200%) SEARCH
SELECT
DIRECTORY
abc..
SET
+-
3
6
WXYZ
9
ENERGY
SAVER
CLEAR/STOP
STAR T
RESET
1
Press Copy
Key
Press “3” Ke y
3
Press “1” or “2” Ke y
5
Select paper size by
7
■■
■ After changing paper size from the control panel, change the paper size
■■
Ke ypad
2
Press
Function Key
4A6A83A5A7
Press Set Key
3: PAPER SIZE ?
PRESS SET TO SELECT
Press “1” to select standard 250-sheet paper tr a y
Press “2” to select optional 2nd Paper Feed Module*
1: A4 4: FLS (8″ × 13″) 7: LEGAL
2: B5 5: FLS (8.5″ × 13″) 8: INV OICE
3: A5 6: LETTER 0: NOT INSTALLED*
appears in the message
display.
9A10
2
of paper tray by following procedure.
# Lift paper tray and pull out of
the copier until it stops.
9
$ Move paper guide a to the
paper length required.
Paper Guide
aa
a
aa
1
22
10
ATTENTION
# Move paper guide b to the
paper width required.
Squeeze the stopper to move the paper
guide b to the desired paper size.
$ Push paper tray back into copier.
Stopper
C
Please change the paper size of 2nd Paper Feed Module by same procedure.
1 When the optional 2nd Paper Feed Module is not installed, set to “TRAY 2, to zero (0)
∗
not installed”.
2 “TRAY 2 0: NOT INSTALLED” is av ailab le to select only when optional 2nd Paper Feed
∗
Module is selected at the procedure 5.
Paper Guide
bb
b
bb
Page 23

Changing T oner Cartridge
■■
■
Message will appear in the message display when needs to add toner.
■■
Handling
1
2
3
4
Button
Right Cover
Sheet Bypass
Hook
# Open the sheet bypass.
$ Push the button.
% Open the right cover.
# Open the front panel.
The front panel can not be opened
until the right cover is open.
See procedure 1.
$ Pull the green hook of toner
cartridge.
Remove the toner cartridge.
# Shake the new toner cartridge
several times.
$
Take off the new toner cartridge
cover (white plastic) and discard.
Do not stand the toner cartridge on end!
5
ATTENTION
Do not touch the magnetic roller!
# Install new toner cartridge.
$
Push the green handle until it locks.
Handle
C
For optimum cop y quality use the recommended P anasonic toner cartridge.
Store toner cartridge in a cool dark place. Install toner cartridge immediately
after unsealing.
% Close the front panel.
&
Close the right cover. (See page 9)
( Close the sheet bypass.
Handling
23
Page 24

Handling
Changing Drum Unit
■■
■ Message will appear in the message display when needs to change drum
■■
unit.
# Open the sheet bypass.
$ Push the button and open the
1
right cover.
% Open the front panel.
& Remove the toner cartridge.
For detail procedure, see page 23.
(Procedure 1 to 3)
Remove the drum unit by pulling
the handle with green label.
2
3
4
5
Take out the new drum unit from
the plastic bag.
Replace new drum unit by aligning
the arrows on the drum unit with
those of the copier.
# Replace the toner cartridge.
(See page 23)
$ Close the front panel.
% Close the right cover.
(See page 9)
& Close the sheet bypass.
24
ATTENTION
C
For optimum cop y quality use the recommended Panasonic drum unit. Store
drum unit in a cool dark place. Do not unseal drum unit bef ore use . Use it as
fast as possib le after unsealing.
C
Do not touch or scratch the surface of the drum.
Page 25

M
0
Removing a Paper Misfeed (Main Unit)
■■
■ Paper transport and paper entry areas
■■
Handling
I
1
2
2SIDED
2 in 1
DATA
PHOTO
AUTO
DARKER
LIGHTER
Button
SORT
SELECT
PAPER TRAY
Right Cover
Sheet Bypass
Caution
heated
surface
-
ZOO
(50~2
When an original misfeed has
occurred
# Paper Misfeed Indicator will
light.
$ Paper misfeed message will
appear in the message display.
# Open the Sheet Bypass.
$ Push the button.
% Open the right cover.
Remove the misfed paper.
In case the jam is in fuser unit:
# Open the fuser cover.
$ Remove misfed paper.
Caution: This fuser area will be
hot.
3
4
ATTENTION
Close the right cover.
Close the sheet bypass.
Handling
C
Make sure that the misfeed indicator goes off after remo ving a paper misf eed.
The misfeed indicator will not go off if the paper is still jammed in the copier .
Check again and remove all misf ed paper.
C
Do not touch or scratch the surface of the drum.
25
Page 26

M
0
Handling
Removing a Paper Misfeed (Main Unit)
■■
■ Paper exit area
■■
I
1
2
2SIDED
2 in 1
DATA
PHOTO
AUTO
DARKER
LIGHTER
Button
SORT
SELECT
Right Cover
Sheet Bypass
PAPER TRAY
ZOO
(50~2
-
When an original misfeed has
occurred
# Paper Misfeed Indicator will light.
$ Paper misfeed message will
appear in the message display.
# Open the sheet bypass.
$ Push the button.
% Open the right cover.
Open the front panel.
The front panel can not be opened until
the right cover is open.
See procedure 1.
3
4
ATTENTION
# Turn the knob.
$ Remove the misfed paper.
Knob
# Close the front panel.
$
Close the right cover. (See page 9)
% Close the sheet bypass.
C
Make sure that the misfeed indicator goes off after remo ving a paper misfeed.
The misfeed indicator will not go off if the paper is still jammed in the copier. Chec k
again and remove all misf ed paper.
26
Page 27

M
0
Removing an Original Misfeed (ADF)
■■
■ ADF (Automatic Document Feeder) area
■■
Handling
I
1
2SIDED
2 in 1
DATA
PHOTO
AUTO
DARKER
LIGHTER
SORT
SELECT
PAPER TRAY
Paper Feed Co ver
ZOO
(50~2
-
When an original misfeed has
occurred
# Paper Misfeed Indicator will
light.
$ Paper misfeed message will
appear in the message display.
Paper Feed area:
Open paper feed cover of ADF.
Remove misfed paper and close
paper feed cover.
2
ATTENTION
Paper exit area:
Open paper feed cover of ADF.
Paper Feed Co ver
Remove misfed paper and close
paper feed cover.
C
Make sure that the misfeed indicator goes off after remo ving a paper misf eed.
The misfeed indicator will not go off if the paper is still jammed in the copier .
Check again and remove all misf ed paper.
Handling
27
Page 28

M
0
Handling
Removing a Misfed Paper (2nd Paper Feed Module)
■■
■ 2nd Paper Feed Module area
■■
I
1
2
2SIDED
2 in 1
DATA
PHOTO
AUTO
DARKER
LIGHTER
SORT
SELECT
PAPER TRAY
ZOO
(50~2
-
When an original misfeed has
occurred
# Paper Misfeed Indicator will
light.
$ Paper misfeed message will
appear in the message display.
Open paper feed cover.
Remove misfed paper.
28
3
4
ATTENTION
Close paper feed cover.
Right Cover
Button
Sheet Bypass
C
Make sure that the misfeed indicator goes off after
removing a paper misfeed.
The misfeed indicator will not go off if the paper is still
jammed in the copier. Check again and remov e all misfed
paper.
C
Do not open the rear cover of the 2nd Paper Feed module.
And do not touch to the gear area. Fingers might be
wedged between gears.
To clear the paper misfeed
indicator.
# Open the sheet bypass.
$
Push the button.
% Open the right cover.
& Close the right cover.
( Close the sheet bypass.
Page 29

Checking
Troubleshooting
Check Action
Unit does not operate
Does the display light?
Is Energy Saver k ey flashing? Press Energy saver k e y on control panel.
Does the Add Paper Indicator appear on
display? (J)
Does the Paper Misf eed Indicator appear
on display? (I)
Does “CLOSE RIGHT COVER” appear on
message display?
Does U19 appear on message display?
Does “CLOSE THE ADF” appear on
message display?
Does U40 appear on message display?
Does any of the E#-## appear on display?
Does “INFO . CODE=###” appear on
message display?
Check if the P o wer Switch is turned on and
if the power plug is inserted into the outlet.
Add paper. (See page 21) Or check if the
paper tray is closed completely.
When the 2nd paper feed module is not
installed, the paper size should be selected
“0: Not installed”. (See page 22)
Remove the misf ed paper.
(See page 25-28)
Right cover is open. Please close it.
Check if toner cartridge is installed
completely. (See page 23)
Close ADF (Automatic Document Feeder)
Add paper to the sheet bypass and press
Start.
Turn copier power switch off, then back on.
If error code comes back again, call your
Panasonic authorised dealer .
Refer to the Inf ormation Codes of the
Operating Instructions (For F acsimile) on
page 89.
Does “JAN-01-1999” appear on message
display?
Copies are marked
Is the copier platen glass or platen cover
dirty?
Is the corona dirty?
Is the back side of copies dirty?
Replace the Litium Battery , refer to operating
instructions (For F acsimile).
Clean the glass or platen cover.
(See page 30)
Need to clean corona. (See page 31)
Clean the roller. refer to operating
instructions (For F acsimile).
29
Handling
Checking
Page 30

Checking
Troubleshooting
Copies are light
Does the exposure indicator sa y “light”?
Does the add toner indicator appear?
Light image on the front side of copier
Copy Image Sample
Image towards
the front side of
copier is light.
Direction of paper exit
■ If the measures outlined above do not solv e the prob lem, call y our Service provider.
Press Auto/Photo Select K e y to choose the
auto mode. (See page 2)
Change toner cartridge. (See page 23)
Push the green handle of the toner cartridge
to right.
Cleaning
■■
■ As a rule, clean once a week.
■■
White Miller
# Gently wipe marks off with cloth and neutral
Platen Cover
detergent.
$ Gently wipe again with a dry cloth.
■■
■ As a rule, clean monthly.
■■
Paper Feed Co ver
ATTENTION
Platen
Scanning Area
<Paper F eed Roller>
# Open the Paper Feed cov er.
$ Wipe paper feed roller with cloth and neutral
detergent.
% Gently wipe again with a dry cloth.
Paper Feed Roller
C
Do not use benzine, thinners or other volatile cleaners .
30
Page 31

Checking
■■
■ When copies become unclear, clean the Corona by following procedure.
■■
Line images in the copy.
A B C D E F
(Sample)
1
2
3
Button
Sheet Bypass
Correct
Right Cover
# Open the sheet bypass.
$ Push the button.
% Open the right cover.
& Open the front panel.
( Pull the green hook of toner
cartridge.
# Remove the toner cartridge.
$ Remove the drum unit by pulling
the handle with green label.
# Slide corona cleaner (green)
back and forth one or two times.
$ Put the corona cleaner to
original position.
Corona Cleaner
(Original Position)
4
5
Wrong
Handle
Reinstall the drum unit.
# Re-install the toner cartr idge.
$
Push the green handle until it locks.
% Close the front panel.
&
Close the right cover. (See page 9)
( Close the sheet bypass.
Checking
31
Page 32

Specifications
Copier Functions
■■
■ Main unit
■■
Type: Desk Top
Copy/Print Process: Laser/Electrostatic photographic method
Process: Dry , Ne w Mgnefine High Definition Toner
Resolution: Max. 600 dpi
Multi-Copy Speed:
Maximum Copy Size: B4 (257 × 364 mm)
Copy Size: A4R – A5R via paper tray
Reduction Ratios: Preset: 82%, 71%, 58%
Enlargement Ratios:
Quantity Selector: 1 - 99, Automatic Repeat, A utomatic Reset to 1
Paper W eight: 60 – 90 g/m2 (Paper Tra y)
Exposure Control: Automatic/Manual plus Photo Mode
Dimensions: 496 (W) × 487 (D) × 383 (H) mm (with ADF)
Weight: 22.6 kg (including ADF)
Electrical Requirements: AC 220-240V, 50/60Hz, 4.5A
15 A4 size copies per minute
Void Area: max. 5.0 mm
A4R – A5R via sheet bypass
Variable: from 99% to 50% in 1% increments
Preset: 141%
Variable: from 101% to 200% in 1% increments
250 sheet paper tray plus 50 sheet b ypassPaper F eed:
55 – 130 g/m2 (Sheet Bypass)
32
■■
■ ADF (A utomatic Document Feeder)
■■
Original Capacity: 30 sheets (80 g/m2)
Paper Size: A5R, A4R, B4
Paper W eight: 50-105 g/m
Electrical Requirements: Supplied from copier
Dimensions:
■■
■ 2nd P aper Feed Module (DA-DS150) (Option)
■■
Paper Size: A5R, A4R, B4
Paper W eight: 60-90 g/m
Original Capacity: 250 sheets
Electrical Requirements: Supplied from copier
Dimensions:
Weight:
Note: To see total count of copies, press and hold % Select k e y, then press CLEAR/STOP key.
496 (W) × 487 (D) × 110 (H) mm
496 (W) × 487 (D) × 90 (H) mm
3.2 kg
2
2
Page 33

Consumables List
■■
■ Consumables List
■■
When ordering consumables, please use the correct part number as listed below.
Consumable Name Part Number Yield
Toner Cartridge DQ-UG15A Approx. 5,000 sheets*
Drum Unit DQ-UH32A Approx. 30,000 sheets
Based on copying a A4 size 6% image area original.
∗
Note: To see total count of copies, press and hold % Select k ey, then press CLEAR/STOP ke y.
To print total count of copies, press and hold % Select key, then press START k ey.
33
Others
Page 34

IMPORTANT INFORMATION
When requesting information, supplies or service always refer to the model and serial number of your
machine. The model and serial number plate (Main Name Plate) is located on the rear side of machine.
For your con venience, space is provided below to record information you may need in the future.
Model No.
Serial No.
Date of Purchase
Dealer
Address
Telephone Number
()
Supplies T elephone Number
()
Service T elephone Number
()
Matsushita Electric Industrial Co., Ltd.
Osaka 542-8588, Japan
FFPTD1025 S1000-0
October 2000
Printed in Japan
English
 Loading...