

Page 1
QUICK START GUIDE
DVD Recorder
Model No.
DMR-ES30VEB
How to use this Guide
Page
Connecting with 21-pin Scart cable 2
Connecting with AV cable / S Video cable 3
Auto-Setup with Q-Link 4
Auto-Setup without Q-Link
Connecting with RF cable (Aerial cable) 5
Auto-Setup with RF cable (Aerial cable)
Removing Interference / 6
Changing RF-output channel
Checking the Settings after Auto Setup 6
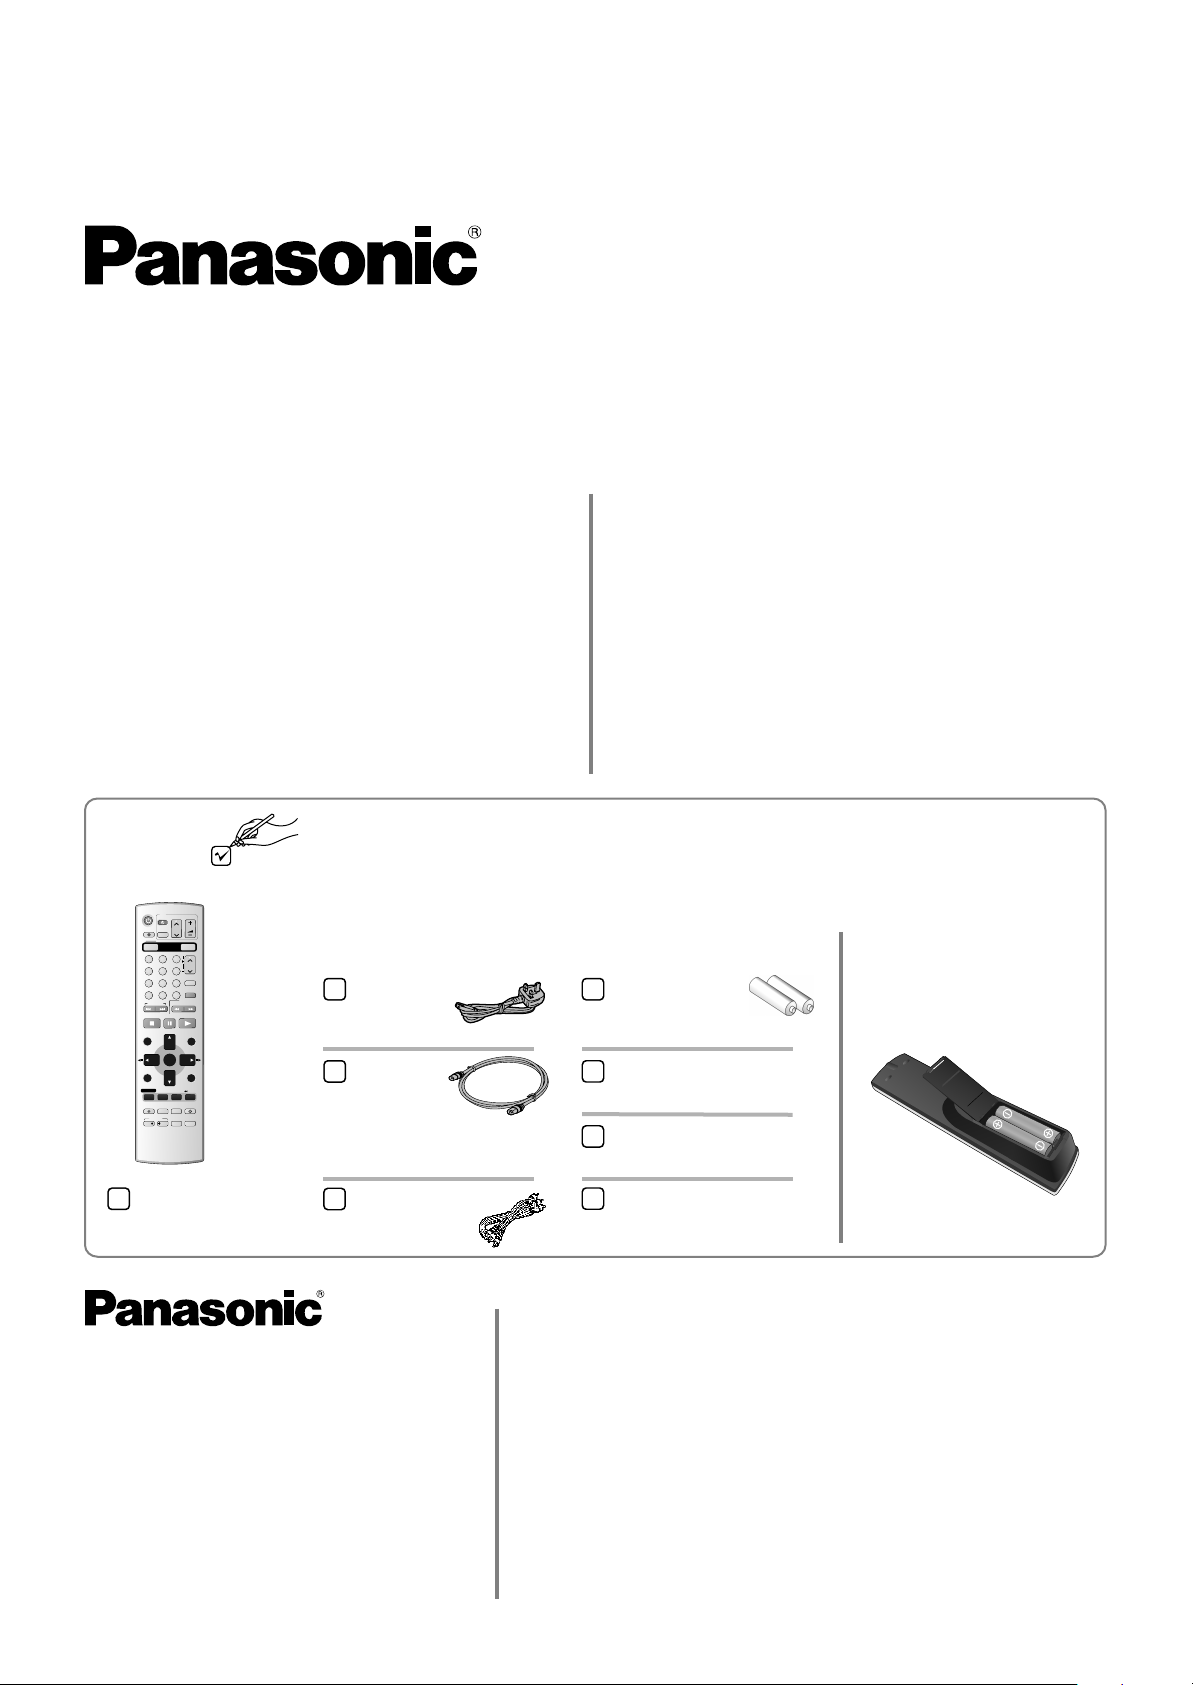
Check that you have the accessories and items shown
DVD/VHS
TV
DIRECT TV REC
AV
OPERATION
VHS
1
2
4
5
8
7
CANCEL/RESET
0
*
SKIP/INDEX
STOP
DIRECT NAVIGATOR
TOP MENU
SUB MENU
S
DISPLAY
PROG/CHECK
REC
REC MODE
DUBBING
VHS
DVD
B
A
Panasonic
DVD/TV
EUR7720KTO
A
Included
VOLUME
CH
DVD
SELECT
TRACKING/V-LOCK
3
ccessories
CH
6
AUDIO
9
INPUT SELECT
VIDEO Plus+
SLOW/
FF
SEARCH
REW
PAUSE
PLAY
FUNCTIONS
ENTER
RETURN
TIME SLIP
STATUS
JET REW
EXTLINK
TIMER
CREATE
DVD ERASE
CHAPTER
C
AC Mains Lead
RJA0044-3C
RF cable
K2KF2BA00001,
VJA0728-A or
K1TWACC00001
Dear Customer,
May we take this opportunity to thank you for
purchasing this Panasonic Recorder.
DVD
Please use this Quick Start Guide to help you set up
your DVD Recorder. We would also advise you to
carefully study the operating instructions and note the
listed precautions before use.
Condensation Precaution
This DVD Recorder is not fitted with a condensation
sensor. If you bring in the DVD Recorder from a cold
place, e.g. a car, into a warm house, dew may form
inside the DVD Recorder.
Do not switch it on for at least 1 hour.
Batteries for the
Remote Control
Fit the Batteries into the
Remote Control
R6 size
Operating Instructions
RQTD0159-B
Quick Start Guide
RQCAD0020
Remote control
EUR7720KT0
Audio/Video cable
K2KA6CA00001
Sales and Support Information
Customer Care Centre
!
For customers within the UK:
08705 357357
!
Visit our website for product information:
www.panasonic.co.uk
!
E-mail:
customer.care@panasonic.co.uk
RQCAD0020 F02C05-0
Guarantee Card
Direct Sales at Panasonic UK
!
Order accessory and consumable items for your product with
ease and confidence by telephoning our Customer Care Centre
Monday - Thursday 9:00am - 5:30pm, Friday 9:30am - 5:30 pm
(Excluding public holidays).
!
Or go on line through our Internet Accessory ordering
application at www.panasonic.co.uk
!
Most major credit and debit cards accepted.
!
All enquiries, transactions and distribution facilities are provided
directly by Panasonic UK Ltd.
!
It couldn´t be simpler!
!
Also available through our internet is direct shopping for a wide
range of finished products, take a browse on our website for
further details.
- 1 -
Page 2
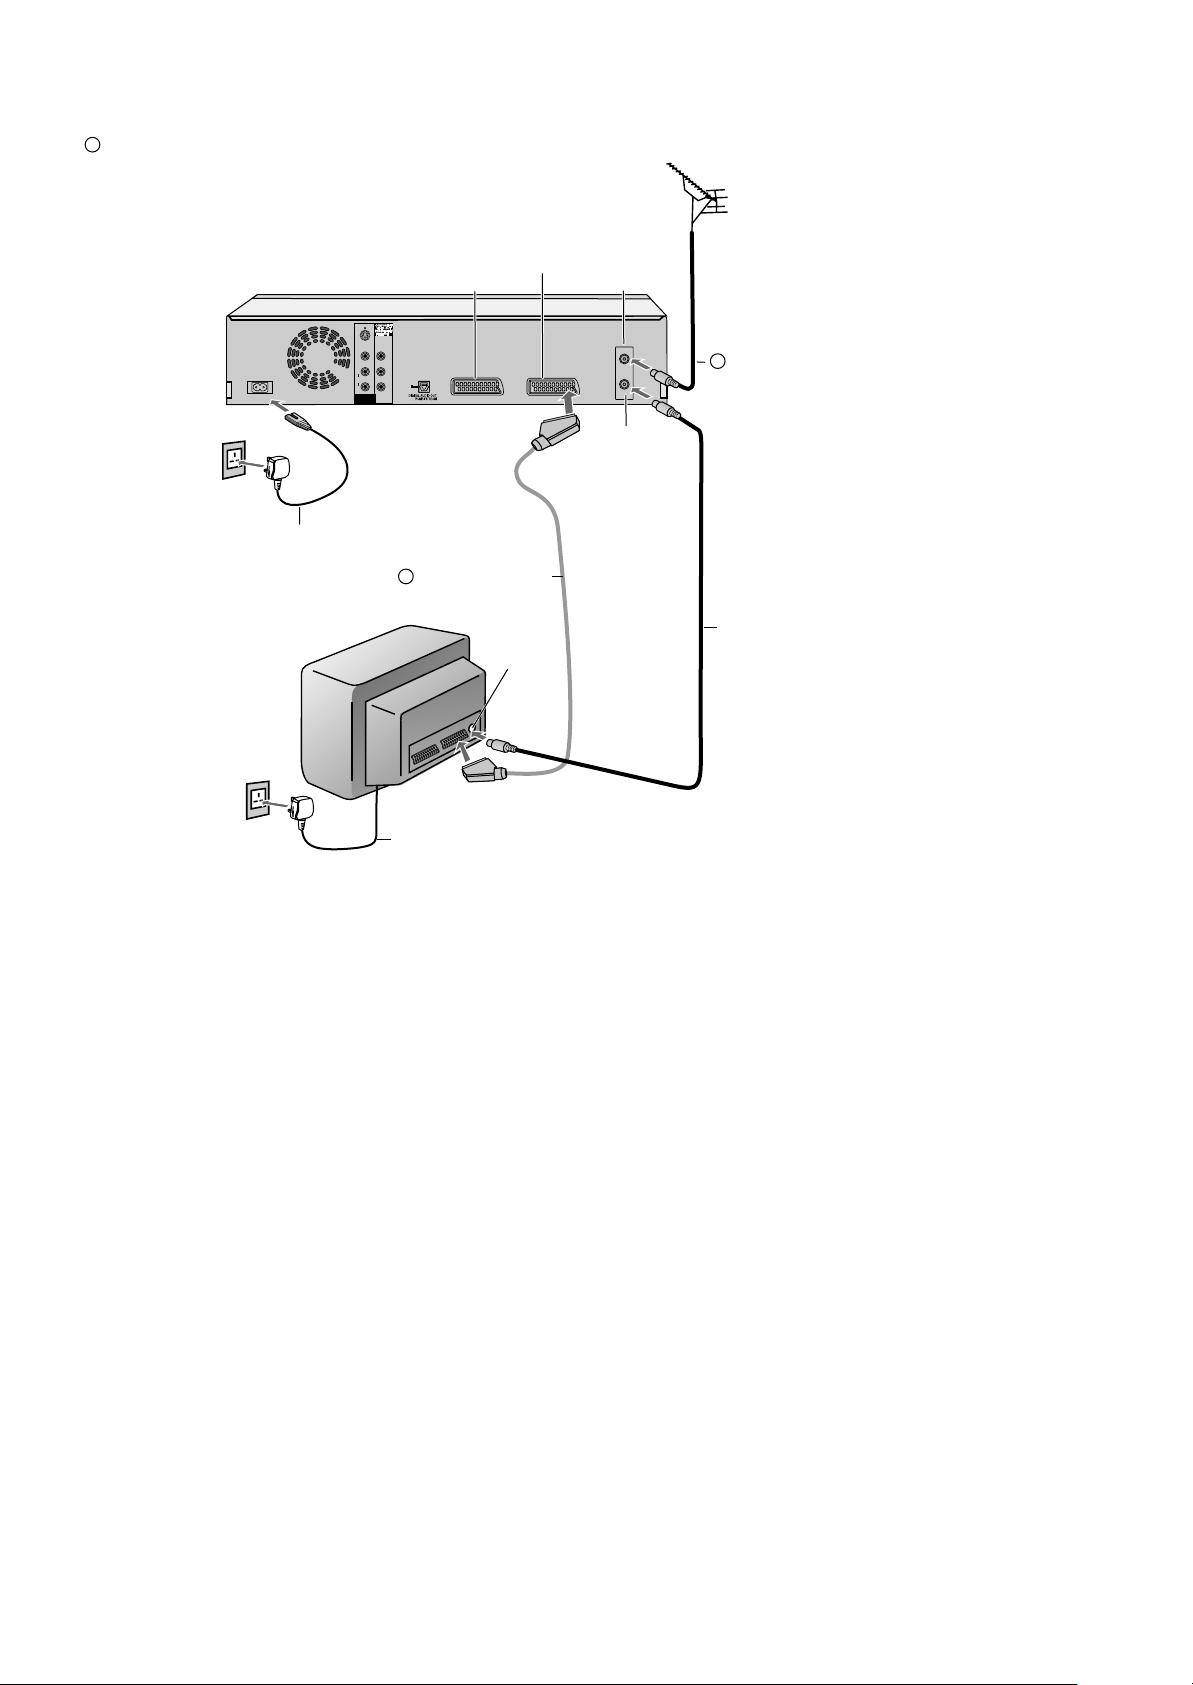
Connecting with 21-pin Scart cable
S
=Extra equipment for the connection shown:
RF cable (Aerial cable), 21-pin Scart cable
AV1 21-pin
Scart socket
AV2
AC IN~
AC IN~
DVD Recorder
AC mains lead
4
S VIDEO
VIDEO
Y
L
P
B
AUDIO
OPTICAL
R
P
R
DVD OUT
S
3
AV2 (EXT) AV1 (TV)
21-pin Scart cable
Necessary for TV with Q Link
TV
Aerial
input
RF IN
Aerial input
RF IN
RF OUT
RF OUT
Aerial output
Aerial
1
S
RF cable /
Aerial cable
RF cable /
2
Aerial cable
AC mains lead
4
Follow the steps below.
Disconnect the power of all units.
1 Connect the Aerial to the RF IN (Aerial input) of the
DVD Recorder.
2 Connect the RF OUT (Aerial output) of the DVD Recorder
to the Aerial input of the television set.
3 Connect the AV1 socket (21-pin Scart socket) of the DVD Recorder
to the Scart input of the television set.
4 Plug the DVD Recorder and the television set into
the AC mains socket.
If your television set supports Q-Link,
follow the steps for Auto-Setup with Q-Link on page 4.
If your television set does not support Q-Link,
follow the steps for Auto-Setup without Q-Link on page 4.
If your television supports Q-Link or RGB, connect it to the
DVD Recorder with a fully wired 21-pin Scart cable.
Change the AV2 Input setting to match the output from a
satellite receiver after tuning is completed.
SETUP - Connections - [AV1 Output]
- 2 -
Page 3

Connecting with Audio/Video cable / S Video cable
(only DVD)
S
= Extra equipment for the connection shown:
S VIDEO cable, RF cable (Aerial cable)
RF IN
AUDIO/VIDEO output
AC IN~
AC IN~
4
TV
S VIDEO
VIDEO
Y
L
P
B
AUDIO
R
P
R
DVD OUT
VIDEO
AUDIO
AC mains lead
3
DVD Recorder
OPTICAL
S VIDEO
L
R
AV2 (EXT) AV1 (TV)
Yellow (Video)
White (L)
Red (R)
Audio/Video cable
Aerial input
RF IN
RF OUT
RF OUT
Aerial output
3
S
S VIDEO cable
Aerial
1
S
RF cable /
Aerial cable
Audio/Video
AC mains lead
4
input
Aerial input
RF cable /
2
Aerial cable
Follow the steps below.
Disconnect the power of all units.
1 Connect the aerial to the RF IN (Aerial input) of the
DVD Recorder.
2 Connect the RF OUT (Aerial output) of the DVD Recorder to the
Aerial input of the television set.
3 Connect the DVD OUT (AUDIO L/R) of the DVD Recorder to the
input of the television set.
Connect the DVD OUT ( ) of the
DVD Recorder to the input of the television set.
VIDEO oder S VIDEO
4 Plug the DVD Recorder and the television set into the
AC mains socket.
Follow the steps for Auto-Setup without Q-Link on page 4.
- 3 -
Page 4

Setup with Q-Link
Download from TV
4
Pos
Download in progress, please wait.
RETURN: to abort
RETURN
Owner ID
PIN number
* * * *
Name
* * * * * * * * * * * * * *
House No.
* * * * * * * * * * *
Postcode
RETURN
* * * * * * * * * * *
RETURN : leave
Download from TV using
(Registered trademark of Panasonic)
You can download the tuning positions from the TV set. This unit Auto Clock
Setting function synchronizes the time when the TV channel that is broadcasting
time and date information is tuned.
Note that you must first perform a station search. If you have a Panasonic
television, [Download from TV] will be displayed automatically at the beginning of
the station transfer.
!
Switch your television on and select the AV channel.
!
Switch the device on using the Stand-by/on switch.
The unit starts the station transfer. The station transfer is complete when the menu
Owner ID appears.
Owner ID
You can complete the Owner ID now or skip this step and do it later. To do it
later, press the RETURN button. Your DVD Recorder is now ready to use.
!
To set the Owner ID now, use and press the Numeric buttons or to
enter a four-digit PIN number. Press , to correct the digit.
!
Make sure that you will remember the PIN number (make a note of it).
!
Press the ENTER button twice to confirm.
!
Enter the [Name], [House No] and [Postcode] in the same way, using .
!
Press the ENTER button to confirm each entry.
!
Press the RETURN button to leave the Owner ID screen.
!
You will now see the TV picture. Your DVD Recorder is now ready to use.
Clock
OffAutomatic
Time Date
CHANGE
ENTER
No
0
9
SELECT
RETURN
: : . .
0
00 00
Clock cannot be set automatically.
Please set the clock manually.
ENTER: store RETURN: leave
1 1
2005
Setup without Q-Link
(Automatic Tuning)
Auto-Setup
4
35
Ch
Suche Sender, bitte warten.
Auto-Setup in progress, please wait.
RETURN: abbrechen
RETURN: to abort
RETURN
Owner ID
PIN number
* * * *
Name
* * * * * * * * * * * * * *
House No.
* * * * * * * * * * *
Postcode
RETURN
* * * * * * * * * * *
RETURN : leave
If the clock setting menu appears
(Auto clock set was not possible due to a weak signal)
!
Press to set the correct time and date and press ENTER to finish this
setting.
Mind that a wrong date or time will influence the programmed recording of TV
programmes (don't forget to change summer time and winter time).
If Auto-Setup has previously been completed the DVD Recorder will not start AutoSetup automatically. In this case you can re-start Auto-Setup again. See page 72 of
Operating Instructions.
If you want to cancel Auto-Setup before it has finished, press the RETURN button.
You can restart Auto-Setup again. See page 72 of Operating Instructions.
Auto-Setup
The automatic setup saves all available TV stations. If the station also
broadcasts date and time, then the clock is also set automatically.
!
Switch on your television and select the AV channel.
!
With the Stand-by/on switch turn on the DVD Recorder.
Automatic tuning for all available TV stations begins.
Approximate duration is 5 minutes.
!
After Automatic tuning has finished, press RETURN.
The Owner ID screen will appear.
Owner ID
You can complete the Owner ID now or skip this step and do it later. To do it
later, press the RETURN button. Your DVD Recorder is now ready to use.
!
To set the Owner ID now, use and press the Numeric buttons or to
enter a four-digit PIN number. Press , to correct the digit.
!
Make sure that you will remember the PIN number (make a note of it).
!
Press the ENTER button twice to confirm.
!
Enter the [Name], [House No] and [Postcode] in the same way, using .
!
Press the ENTER button to confirm each entry.
!
Press the RETURN button to leave the Owner ID screen.
!
You will now see the TV picture. Your DVD Recorder is now ready to use.
CHANGE
ENTER
No
0
9
SELECT
RETURN
Clock
Time Date
: : . .
0
00 00
1 1
Clock cannot be set automatically.
Please set the clock manually.
ENTER: store RETURN: leave
2005
If the clock setting menu appears
OffAutomatic
(Auto clock set was not possible due to a weak signal)
!
Press to set the correct time and date and press ENTER to finish this
setting.
Mind that a wrong date or time will influence the programmed recording of TV
programmes (don't forget to change summer time and winter time).
If Auto-Setup has previously been completed the DVD Recorder will not start AutoSetup automatically. In this case you can re-start Auto-Setup again. See page 72 of
Operating Instructions.
If you want to cancel Auto-Setup before it has finished, press the RETURN button.
You can restart Auto-Setup again. See page 72 of Operating Instructions.
- 4 -
Page 5

Connecting with RF cable
S
=Extra equipment for the connection shown:
RF cable (Aerial cable)
DVD Recorder
S VIDEO
VIDEO
Y
L
P
B
AUDIO
OPTICAL
R
P
AC IN~
AC IN~
4
AC mains lead
R
DVD OUT
AC mains socket
1
AV2 (EXT) AV1 (TV)
TV
RF IN
Aerial
input
RF IN
RF OUT
RF OUT
Aerial
output
RF cable /
Aerial cable
Aerial input
3
Aerial
2
S
RF cable /
Aerial cable
You can connect the DVD Recorder to
your TV set by using a RF cable.
Follow the steps described below.
Ensure TV Power is disconnected
1
from AC mains socket.
2
Connect aerial to the RF IN (Aerial
input) connector of the DVD
Recorder.
Connect the DVD Recorder´s RF
3
OUT (Aerial output) to the TV set’s
Aerial in connector.
Connect DVD Recorder and TV set
4
to the AC mains socket.
DVD Display
Auto-Setup
Suche Sender, bitte warten.
Auto-Setup in progress, please wait.
RETURN: abbrechen
RETURN: to abort
RETURN
Owner ID
PIN number
* * * *
Name
* * * * * * * * * * * * * *
House No.
* * * * * * * * * * *
Postcode
RETURN
CHANGE
ENTER
No
0
9
RETURN
* * * * * * * * * * *
RETURN : leave
Clock
Time Date
: : . .
0
00 00
Clock cannot be set automatically.
Please set the clock manually.
SELECT
ENTER: store RETURN: leave
Follow the steps for Auto-Setup on
this page.
4 AC mains lead
Auto-Setup with RF cable (Aerial cable) (Automatic tuning)
!
Turn on your television set.
!
With the Stand-by/on switch turn on the DVD Recorder. Automatic tuning for
all available TV stations begins. Approximate duration is 5 minutes.
!
After Automatic tuning has finished, press RETURN. The Owner ID screen will
appear.
- While Auto-Setup is running the first digit of the DVD Recorder display will
flash. After a while it will stop flashing and the RF output channel number will
be displayed.
- Select an unused channel pre-set on your TV and tune it to the RF output
4
35
Ch
OffAutomatic
2005
1 1
channel number shown on the DVD Recorder display (or until you can clearly
see the Auto Setup screen). Store the new video playback channel (refer to
the instructions for your TV).
In some cases, the RF output channel may interfere with the TV stations transmitted in
your area. This may prevent you from seeing the On-Screen Display clearly. Please
see page 6 for removing the interference before restarting Auto-Setup (page 72 of
Operating Instructions).
Owner ID
You can complete the Owner ID now or skip this step and do it later. To do it
later, press the RETURN button. Your DVD Recorder is now ready to use.
!
To set the Owner ID now, use and press the Numeric buttons or to
enter a four-digit PIN number. Press , to correct the digit.
!
Make sure that you will remember the PIN number (make a note of it).
!
Press the ENTER button twice to confirm.
!
Enter the [Name], [House No] and [Postcode] in the same way, using .
!
Press the ENTER button to confirm each entry.
!
Press the RETURN button to leave the Owner ID screen.
!
You will now see the TV picture. Your DVD Recorder is now ready to use.
If the clock setting menu appears
(Auto clock set was not possible due to a weak signal)
!
Press to set the correct time and date and press ENTER to finish this
setting.
Mind that a wrong date or time will influence the programmed recording of TV
programmes (don't forget to change summer time and winter time).
- 5 -
Page 6

Removing Interference / Changing RF output channel
In some cases, interference (lines or patterning) or a very poor picture
may appear on the TV when the DVD Recorder is connected. If this
happens, follow the steps below to change the video playback channel
The picture with interference
TV screen
RF OUTPUT CHANNEL
ENTER
SELECT
DVD
21
CH:
RETURN
On-Screen Display
Test pattern indication
DVD display
Indication when the RF output
channel is 21 (example)
FUNCTIONS
TRACKING/V-LOCK
(RF output channel) to remove the interference.
!
Press the FUNCTIONS button for more than 5 seconds. The RF output
channel number is displayed on the DVD display.
!
Press the Numeric buttons or use the Channel (CH)
button to select a channel number, which differs by 2
or 3 from the present channel number. (For example, if
the original channel number was 28, enter 31.)
!
Retune your TV until you receive the Test pattern. It may be necessary
to repeat steps above until you can see the Test pattern clearly.
If using a Scart cable please see the note below.
!
Press ENTER to finish this setting.
3
1
2
4
6
5
9
8
7
0
Indication after changing the RF
output channel to 31 (example)
RF OUTPUT CHANNEL
ENTER
SELECT
DVD
31
CH:
RETURN
Test pattern indication
Set the RF output channel of the DVD Recorder to [- -] (RF OFF) if the DVD
Recorder is connected to the TV via the 21-pin Scart cable.
!
Press for about 5 seconds. The preset channel will be
FUNCTIONS
displayed on the DVD display.
!
Press channel select buttons CH or 0 to invoke [- -].
!
Confirm with ENTER.
The clear picture
Checking the Settings after Auto-Setup
FUNCTIONS
!
FUNCTIONS
ENTER
RETURN
SETUP
Tuning
Disc
Picture
Sound
Display
Connection
Others
DVD-RAM
SELECT
ENTER
Delete
DIRECT NAVIGATOR
TIMER RECORDING
VIDEO Plus+
DUBBING
To Others
Manual
Auto-Setup Restart
Download from TV
Pos
RETURN
10
Move
Add
A
B
C
Disc Protection Off
PLAYLISTS
FLEXIBLE REC
SETUP
DISC MANAGEMENT
Return
Manual Tuning
Name
1
BBC1
2
BBC2
3
ITV 24
4
CH4 25
5
CH5 26
6
* * * *
7
8
9
TV Reception Channels
Ch
Name
Pos
Ch
22
11
12
23
13
14
15
30
16
17
18
19
20
Press FUNCTIONS to display the FUNCTIONS Menu.
!
Press to select [To Others] and then press ENTER.
!
Press to select and then press ENTER.SETUP
!
Press to select Manual and then press ENTER to display the list of
tuned TV stations and confirm that all available TV stations have been
set correctly.
If station name is [ ]:
The asterisks indicate that a station was found during Auto-Setup but has not
been named (due to weak signal).
The stations in the list with asterisk will need to be named manually see page 71
of Operating Instructions.
If station name is [- - - -]:
The dashes represent unused channel positions.
The stations in the list with dashes will need to be set manually. See page 71
of Operating Instructions.
RETURN
!
Press RETURN to exit the On Screen Display.
When the station names and/or channel numbers have not been set
correctly, see page 71 of operating instructions for details.
When no station has been found, confirm all connections of the DVD
Recorder again and restart the Auto-Setup. See page 70 of Operating
Instructions for details.
...
21
(RF OFF)
68
- 6 -
 Loading...