

Panasonic DMR-ES15EB User Manual
Operating Instructions
DVD Recorder
Model No.
(Model suffix: “EB” for UK model, “EBL” for Ireland model)
DMR-ES15EB/EBL
Web Site: http://www.panasonic-europe.com
Region number supported by
this unit
Region numbers are allocated to DVD
players and DVD-Video according to
where they are sold.
• The region number of this unit is “2”.
• The unit will play DVD-Video marked
with labels containing “2” or “ALL”.
Example:
2
2
ALL
3
5
Dear customer
Thank you for purchasing this product. For
optimum performance and safety, please read
these instructions carefully.
Before connecting, operating or adjusting this
product, please read the instructions
completely.
Please keep this manual for future reference.
Note
“EB” on the packaging indicates the United
Kingdom.
EB EBL
RQT8320-1B
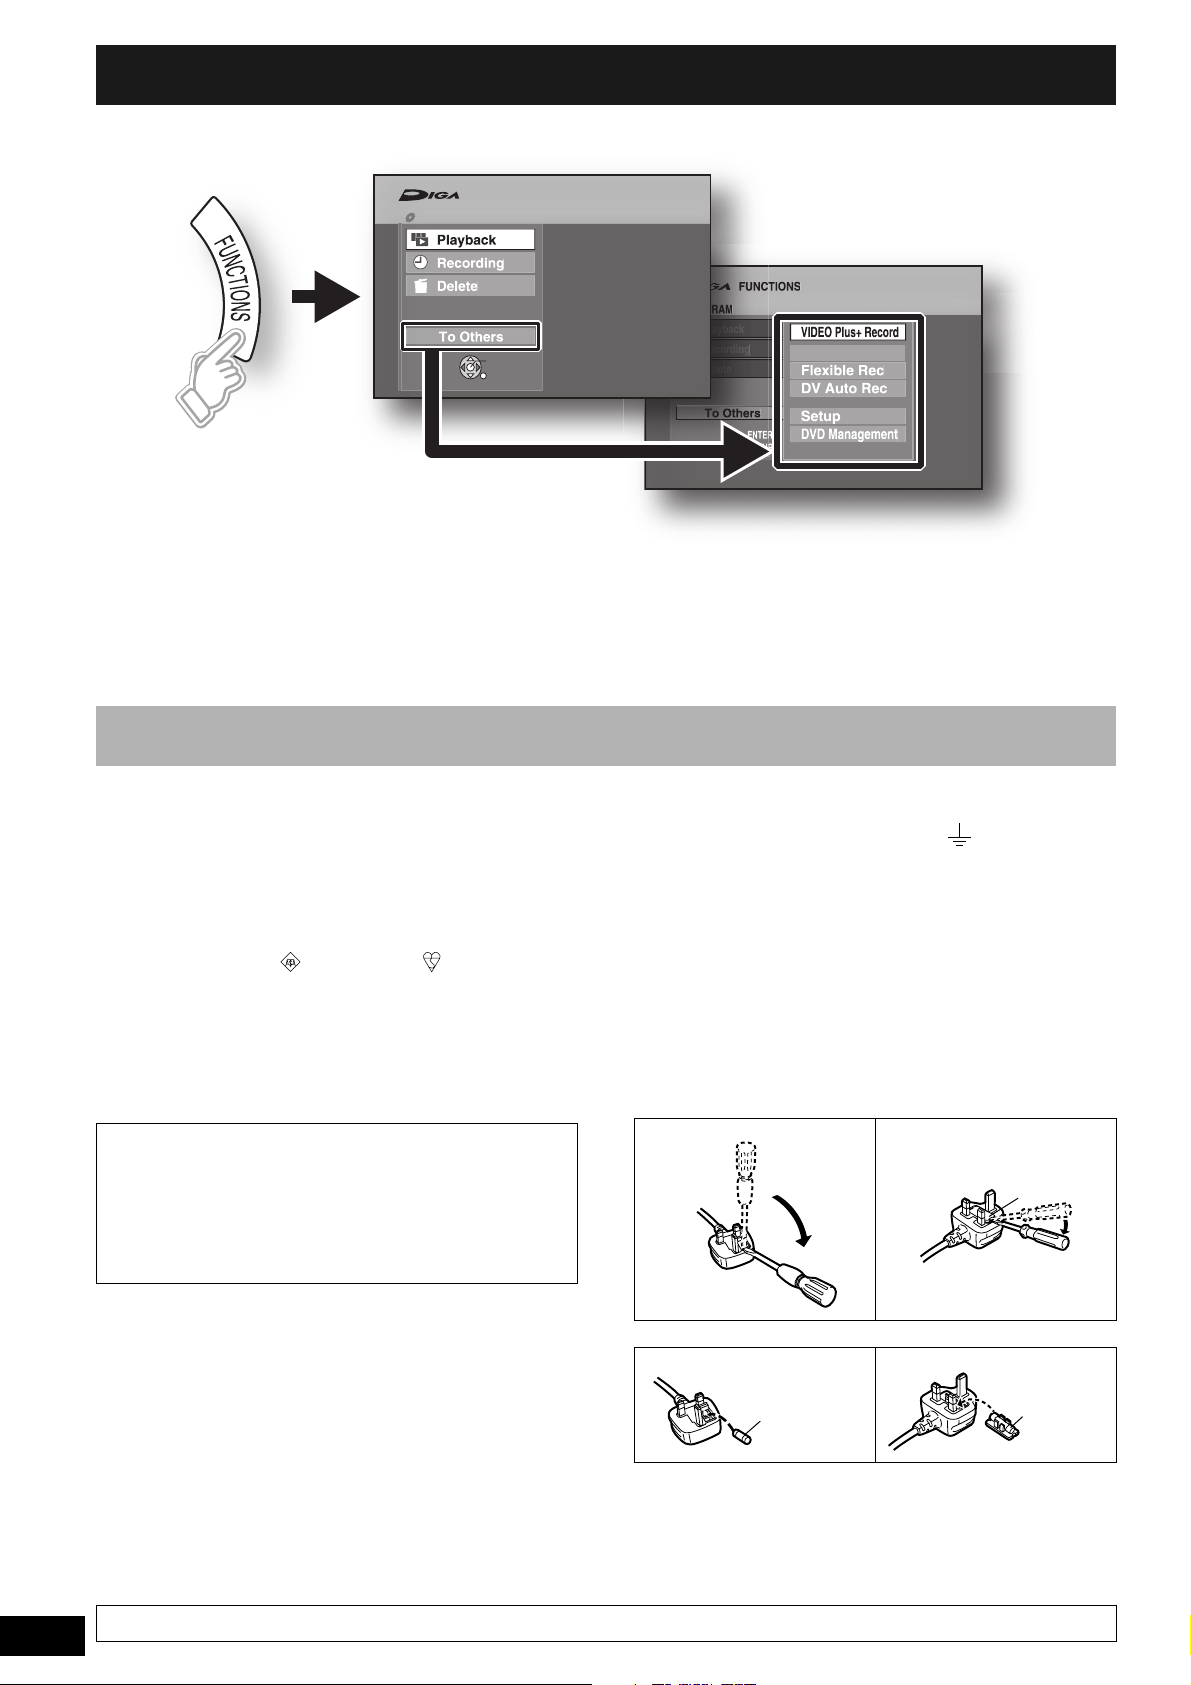
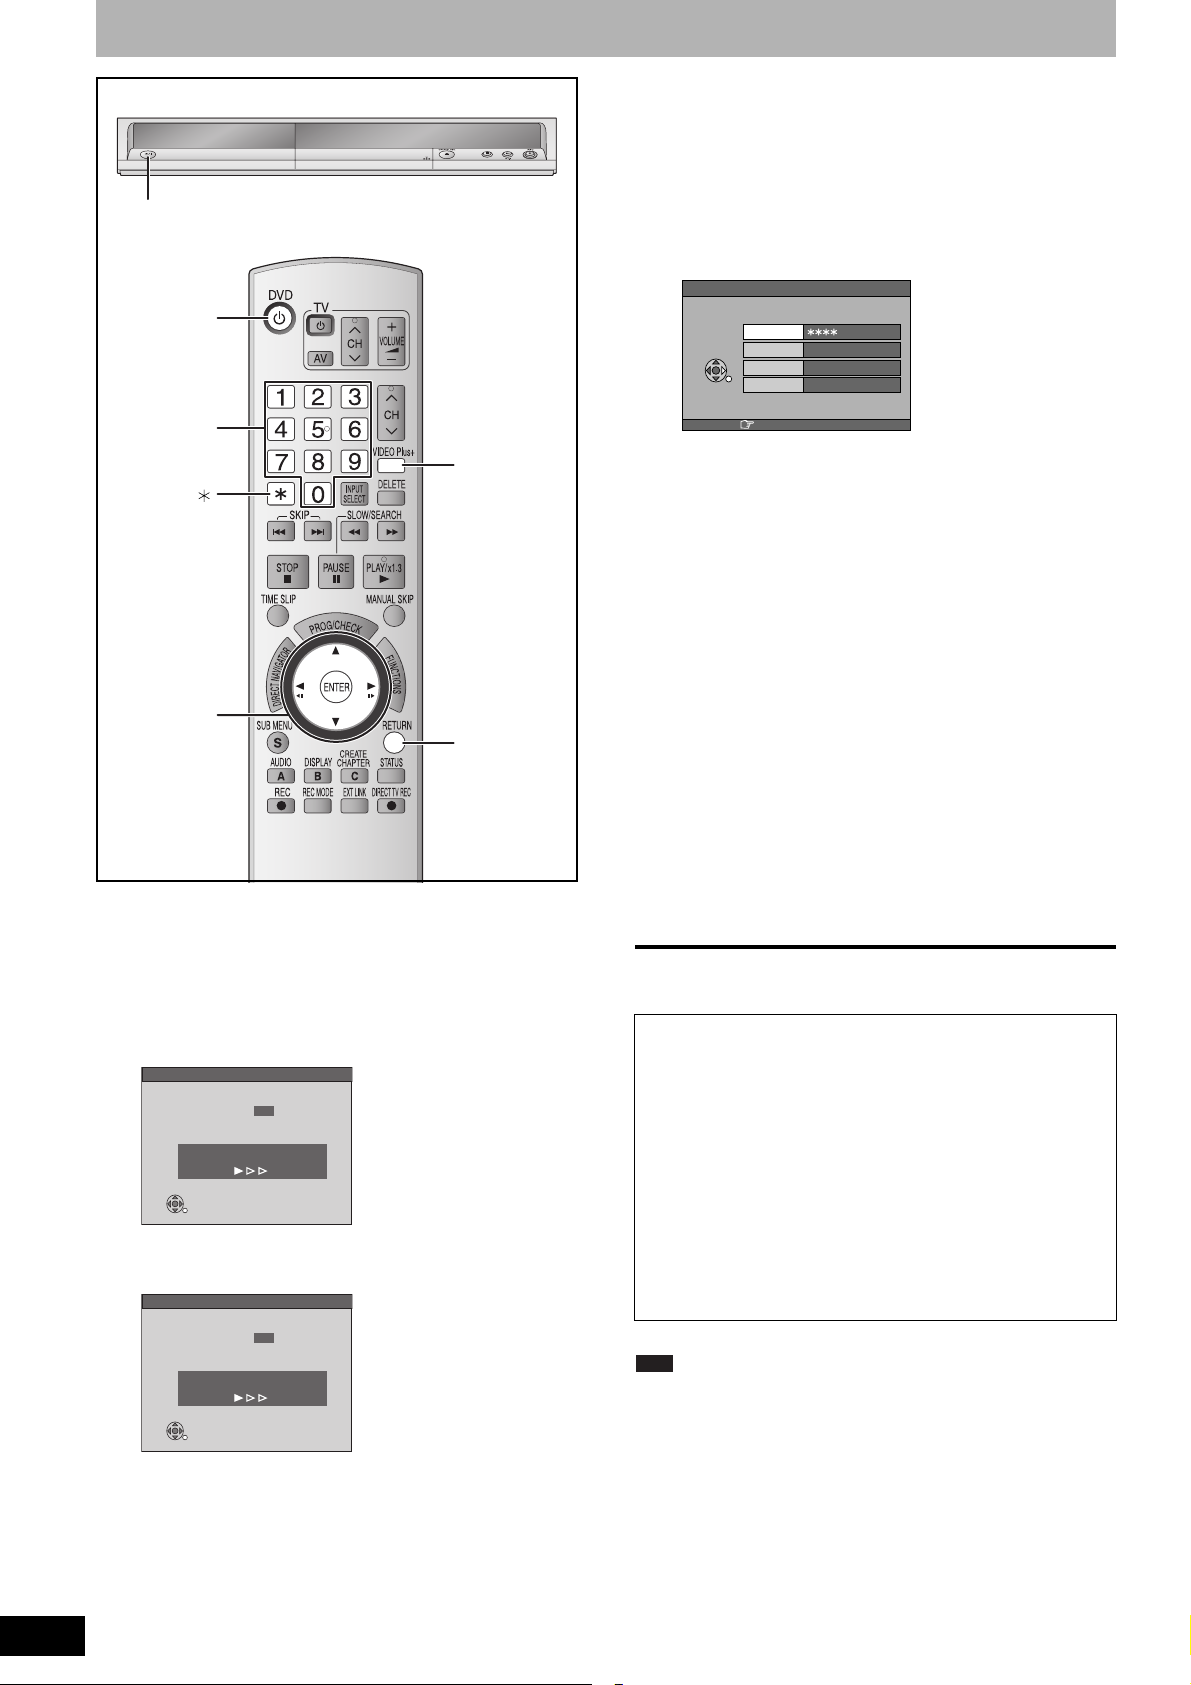
Quick access to a variety of useful functions–“FUNCTIONS” menu
Display the FUNCTIONS menu to view all functions on this unit and select function for timer recording etc.
FUNCTIONS
DVD-RAM
ENTER
RETURN
(on the remote control)
Select “To Others” to
view more functions.
Caution for AC Mains Lead
Cartridge Protection Off
Disc Protection Off
Cartridge Protection Off
Disc Protection Off
Playlists
(For United Kingdom and Republic of Ireland)
(“EB” and “EBL” area code model only)
For your safety, please read the following text carefully.
This appliance is supplied with a moulded three pin mains plug for
your safety and convenience.
A 5-ampere fuse is fitted in this plug.
Should the fuse need to be replaced please ensure that the
replacement fuse has a rating of 5-ampere and that it is approved by
ASTA or BSI to BS1362.
Check for the ASTA mark or the BSI mark on the body of the
fuse.
If the plug contains a removable fuse cover you must ensure that it is
refitted when the fuse is replaced.
If you lose the fuse cover the plug must not be used until a
replacement cover is obtained.
A replacement fuse cover can be purchased from your local dealer.
CAUTION!
IF THE FITTED MOULDED PLUG IS UNSUITABLE FOR THE
SOCKET OUTLET IN YOUR HOME THEN THE FUSE SHOULD
BE REMOVED AND THE PLUG CUT OFF AND DISPOSED OF
SAFELY.
THERE IS A DANGER OF SEVERE ELECTRICAL SHOCK IF
THE CUT OFF PLUG IS INSERTED INTO ANY 13-AMPERE
SOCKET.
If a new plug is to be fitted please observe the wiring code as stated
below.
If in any doubt please consult a qualified electrician.
IMPORTANT
The wires in this mains lead are coloured in accordance with the
following code:
Blue: Neutral, Brown: Live.
As these colours may not correspond with the coloured markings
identifying the terminals in your plug, proceed as follows:
The wire which is coloured Blue must be connected to the terminal
which is marked with the letter N or coloured Black or Blue.
The wire which is coloured Brown must be connected to the terminal
which is marked with the letter L or coloured Brown or Red.
WARNING: DO NOT CONNECT EITHER WIRE TO THE
EARTH TERMINAL WHICH IS MARKED WITH THE
LETTER E, BY THE EARTH SYMBOL
OR COLOURED
GREEN OR GREEN/YELLOW.
THIS PLUG IS NOT WATERPROOF—KEEP DRY.
Before use
Remove the connector cover.
How to replace the fuse
The location of the fuse differ according to the type of AC mains plug
(figures A and B). Confirm the AC mains plug fitted and follow the
instructions below.
Illustrations may differ from actual AC mains plug.
1. Open the fuse cover with a screwdriver.
Figure A Figure B
Fuse cover
2. Replace the fuse and close or attach the fuse cover.
Figure A Figure B
Fuse
(5 ampere)
Fuse
(5 ampere)
RQT8320
2
BE SURE TO READ THE CAUTION ON PAGE 51.

Table of contents
Getting started
Quick access to a variety of useful functions–
“FUNCTIONS” menu . . . . . . . . . . . . . . . . . . . . . . . . . . . .2
Caution for AC Mains Lead . . . . . . . . . . . . . . . . . . . . . . . .2
Safety precautions . . . . . . . . . . . . . . . . . . . . . . . . . . . . . . .3
Included accessories . . . . . . . . . . . . . . . . . . . . . . . . . . . . .4
Disc handling . . . . . . . . . . . . . . . . . . . . . . . . . . . . . . . . . . .4
Unit care . . . . . . . . . . . . . . . . . . . . . . . . . . . . . . . . . . . . . . .4
Control reference guide . . . . . . . . . . . . . . . . . . . . . . . . . . .5
Disc information . . . . . . . . . . . . . . . . . . . . . . . . . . . . . . . . .6
The remote control information. . . . . . . . . . . . . . . . . . . . .7
Connection . . . . . . . . . . . . . . . . . . . . . . . . . . . . . . . . . . . . .8
TV Tuning (Auto Setup) . . . . . . . . . . . . . . . . . . . . . . . . . .12
Set up to match your television and remote control. . .14
Recording
Important notes for recording . . . . . . . . . . . . . . . . . . . . .16
Recording modes and approximate recording times. . .17
Disc Insertion/Ejection . . . . . . . . . . . . . . . . . . . . . . . . .17
Recording television programmes . . . . . . . . . . . . . . . . .18
To specify a time to stop recording
–One Touch Recording . . . . . . . . . . . . . . . . . . . . . . . .19
Flexible Recording . . . . . . . . . . . . . . . . . . . . . . . . . . . .19
Playing while you are recording . . . . . . . . . . . . . . . . . .19
Timer recording . . . . . . . . . . . . . . . . . . . . . . . . . . . . . . . .20
Using VIDEO Plus+ system to make timer recordings .20
Manually programming timer recordings. . . . . . . . . . . .21
To cancel recording when recording has already
begun . . . . . . . . . . . . . . . . . . . . . . . . . . . . . . . . . . . . .21
To release the programme from recording standby . . .21
Notes on timer recording. . . . . . . . . . . . . . . . . . . . . . . .21
Check, change or delete a programme. . . . . . . . . . . . .22
Making timer recordings on the television. . . . . . . . . . .22
Recording from a satellite/digital terrestrial receiver . .23
Manual Recording. . . . . . . . . . . . . . . . . . . . . . . . . . . . .23
Linked timer recordings with external equipment (SKY
Digital STB/digital terrestrial receiver)–EXT LINK . . .23
Playing back
Playing discs. . . . . . . . . . . . . . . . . . . . . . . . . . . . . . . . . . .24
Changing audio during play . . . . . . . . . . . . . . . . . . . . .24
Operations during play . . . . . . . . . . . . . . . . . . . . . . . . .25
Using menus to play MP3 and
still pictures (JPEG/TIFF) . . . . . . . . . . . . . . . . . . . . . . .26
Playing MP3 . . . . . . . . . . . . . . . . . . . . . . . . . . . . . . . . .26
Playing still pictures (JPEG/TIFF). . . . . . . . . . . . . . . . .27
Useful functions during still picture play . . . . . . . . . . . .27
Using on-screen menus/FUNCTIONS window and Status
message. . . . . . . . . . . . . . . . . . . . . . . . . . . . . . . . . . . . .28
Using on-screen menus . . . . . . . . . . . . . . . . . . . . . . . .28
FUNCTIONS window . . . . . . . . . . . . . . . . . . . . . . . . . .29
Status message . . . . . . . . . . . . . . . . . . . . . . . . . . . . . .29
Editing
Editing titles/chapters . . . . . . . . . . . . . . . . . . . . . . . . . . 30
Editing titles/chapters and playing chapters . . . . . . . . 30
Title operations . . . . . . . . . . . . . . . . . . . . . . . . . . . . . . 31
Chapter operations . . . . . . . . . . . . . . . . . . . . . . . . . . . 31
Creating, editing and playing playlists . . . . . . . . . . . . . 32
Creating playlists . . . . . . . . . . . . . . . . . . . . . . . . . . . . . 32
Editing and playing playlists/chapters . . . . . . . . . . . . . 33
Playlist operations . . . . . . . . . . . . . . . . . . . . . . . . . . . . 33
Chapter operations . . . . . . . . . . . . . . . . . . . . . . . . . . . 33
Copying
Copying from a video cassette recorder . . . . . . . . . . . 34
DV automatic recording . . . . . . . . . . . . 34
Manual recording. . . . . . . . . . . . . . . . . . . . . . . . . . . . . 34
DV Auto Rec
Convenient functions
Deleting titles . . . . . . . . . . . . . . . . . . . . . . . . . . . . . . . . . 35
Using DELETE Navigator to delete titles. . . . . . . . . . . 35
Deleting titles during play . . . . . . . . . . . . . . . . . . . . . . 35
DVD Management . . . . . . . . . . . . . . . . . . . . . . . . . . . . . . 36
Common procedures. . . . . . . . . . . . . . . . . . . . . . . . . . 36
Providing a name for a disc. . . . . . . . . . . . . . . . . . . . . 36
Setting the protection . . . . . . . . . . . . . . . . . . . . . . . . . 36
Deleting all titles and playlists –Delete all titles. . . . . . 36
Deleting all the contents of a disc –Format Disc . . . . . 36
Selecting whether to show the Top Menu first
–Auto-Play Select . . . . . . . . . . . . . . . . . . . . . . . . . . . 37
Enabling discs to be played on other equipment
–Finalize . . . . . . . . . . . . . . . . . . . . . . . . . . . . . . . . . . 37
Creating Top Menu –Create Top Menu . . . . . . . . . . . . 37
Enabling the second layer on DL (dual- or double- layer
on single side) discs to be recordable
–Close First Layer . . . . . . . . . . . . . . . . . . . . . . . . . . . 37
Linked operations with the TV (Q Link) . . . . . . . . . . . . 38
Child Lock . . . . . . . . . . . . . . . . . . . . . . . . . . . . . . . . . . . . 38
Changing the unit’s settings . . . . . . . . . . . . . . . . . . . . . 39
Common procedures. . . . . . . . . . . . . . . . . . . . . . . . . . 39
Summary of settings . . . . . . . . . . . . . . . . . . . . . . . . . . 39
Set the clock manually . . . . . . . . . . . . . . . . . . . . . . . . . . 41
Resetting channel setting . . . . . . . . . . . . . . . . . . . . . . . 42
TV System . . . . . . . . . . . . . . . . . . . . . . . . . . . . . . . . . . . . 43
Entering text . . . . . . . . . . . . . . . . . . . . . . . . . . . . . . . . . . 43
Reference
Messages. . . . . . . . . . . . . . . . . . . . . . . . . . . . . . . . . . . . . 44
Frequently asked questions . . . . . . . . . . . . . . . . . . . . . 45
Troubleshooting guide . . . . . . . . . . . . . . . . . . . . . . . . . . 46
Glossary. . . . . . . . . . . . . . . . . . . . . . . . . . . . . . . . . . . . . . 49
Specifications . . . . . . . . . . . . . . . . . . . . . . . . . . . . . . . . . 50
Index. . . . . . . . . . . . . . . . . . . . . . . . . . . . . . . . . . Back cover
Getting startedRecordingPlaying backEditingCopyingConvenient
Safety precautions
Placement
Set the unit up on an even surface away from direct sunlight, high
temperatures, high humidity, and excessive vibration. These
conditions can damage the cabinet and other components, thereby
shortening the unit’s service life.
Do not place heavy items on the unit.
Vol ta ge
Do not use high voltage power sources. This can overload the unit
and cause a fire.
Do not use a DC power source. Check the source carefully when
setting the unit up on a ship or other place where DC is used.
AC mains lead protection
Ensure the AC mains lead is connected correctly and not
damaged. Poor connection and lead damage can cause fire or
electric shock. Do not pull, bend, or place heavy items on the lead.
Grasp the plug firmly when unplugging the lead. Pulling the AC
mains lead can cause electric shock.
Do not handle the plug with wet hands. This can cause electric
shock.
Foreign matter
Do not let metal objects fall inside the unit. This can cause electric
shock or malfunction.
Do not let liquids get into the unit. This can cause electric shock or
malfunction. If this occurs, immediately disconnect the unit from the
power supply and contact your dealer.
Do not spray insecticides onto or into the unit. They contain
flammable gases which can ignite if sprayed into the unit.
Service
Do not attempt to repair this unit by yourself. If sound is
interrupted, indicators fail to light, smoke appears, or any other
problem that is not covered in these instructions occurs, disconnect
the AC mains lead and contact your dealer or an authorized service
center. Electric shock or damage to the unit can occur if the unit is
repaired, disassembled or reconstructed by unqualified persons.
Extend operating life by disconnecting the unit from the power
source if it is not to be used for a long time.
functions
Reference
RQT8320
3

Included accessories
Please check and identify the supplied accessories. Use numbers when asking for replacement parts.
(Product numbers correct as of December 2005. These may be subject to change.)
To order accessories, refer to “Sales and Support Information” (Ô below).
1 Remote control
(EUR7659Y50)
1 AC mains lead
(RJA0044-3C)
• For use with this unit only.
Do not use it with other
equipment.
Also do not use the cords for other
equipment with this unit.
n Sales and Support Information
Customer Care Centre
• For customers within the UK: 08705 357357
• For customers within the Republic of Ireland: 01 289 8333
• Visit our website for product information
• E-mail: customer.care@panasonic.co.uk
Direct Sales at Panasonic UK
• Order accessory and consumable items for your product
with ease and confidence by phoning our Customer Care
Centre Monday-Thursday 9:00am-5:30pm, Friday 9:30am5:30pm (Excluding public holidays).
Disc handling
n How to hold a disc
Do not touch the recorded surface.
n Concerning non-cartridge discs
Be careful about scratches and dirt.
n If there is dirt or condensation on the disc
Wipe with a damp cloth and then wipe dry.
n Handling precautions
•
Do not attach labels or stickers to discs. (This may cause disc
warping and un-balanced rotation, rendering it unusable.)
• Write on the label side of the disc only with a soft, oil-based
felt pen. Do not use ballpoint pens or other hard writing
implements. (This may cause disc warping and unbalanced rotation, rendering it unusable.)
• Do not use record cleaning sprays, benzine, thinner, static
electricity prevention liquids or any other solvent.
• Do not use scratch-proof protectors or covers.
Do not drop stack, or impact discs. Do not place objects on them.
•
2 RF coaxial leads (black)
(K1TWACC00001)
2 Batteries
R6 Size
for remote control
• Or go on line through our Internet Accessory ordering
application at www.panasonic.co.uk
• Most major credit and debit cards accepted.
• All enquiries transactions and distribution facilities are
provided directly by Panasonic UK Ltd.
• It couldn’t be simpler!
• Also available through our Internet is direct shopping for a
wide range of finished products, take a browse on our
website for further details.
Interested in purchasing an extended guarantee?
Please call 0870 240 6284 or visit our website
www.panasonic.co.uk/guarantee
• Do not use the following discs:
–Discs with exposed adhesive from removed stickers or
labels (rental discs, etc.).
–Discs that are badly warped or cracked.
–Irregularly shaped discs,
such as heart shapes.
• Do not place in the following
areas:
–In direct sunlight.
–In very dusty or humid areas.
–Near a heater.
–Locations susceptible to significant difference in
temperature (condensation can occur).
–Where static electricity or electromagnetic waves occur.
• To protect discs from scratches and dirt, return them to their
cases or cartridges when you are not using them.
The manufacturer accepts no responsibility and offers
no compensation for loss of recorded or edited material
due to a problem with the unit or recordable media, and
accepts no responsibility and offers no compensation
for any subsequent damage caused by such loss.
Examples of causes of such losses are
• A disc recorded and edited with this unit is played in a
DVD Recorder or computer disc drive manufactured by
another company.
• A disc used as described above and then played again in
this unit.
• A disc recorded and edited with a DVD Recorder or
computer disc drive manufactured by another company is
played in this unit.
1 RF coaxial lead (grey)
(K1TWACA00001)
1 Audio/video cable
(K2KA6BA00003)
.
.
RQT8320
4
Unit care
The precision parts in this unit are readily affected by the
environment, especially temperature, humidity, and dust.
Cigarette smoke also can cause malfunction or
breakdown.
To clean this unit, wipe with a soft, dry cloth.
• Never use alcohol, paint thinner or benzine to clean this
unit.
• Before using chemically treated cloth, carefully read the
instructions that came with the cloth.
Observe the following points to ensure continued
listening and viewing pleasure.
Dust and dirt may adhere to the unit’s lens over time, making
it impossible to record or play discs.
Use the DVD lens cleaner (RP-CL720E) about once every
year, depending on frequency of use and the operating
environment. Carefully read the lens cleaner’s instructions
before use.
Before moving the unit, ensure the disc tray is empty.
Failure to do so will risk severely damaging the disc
and the unit.
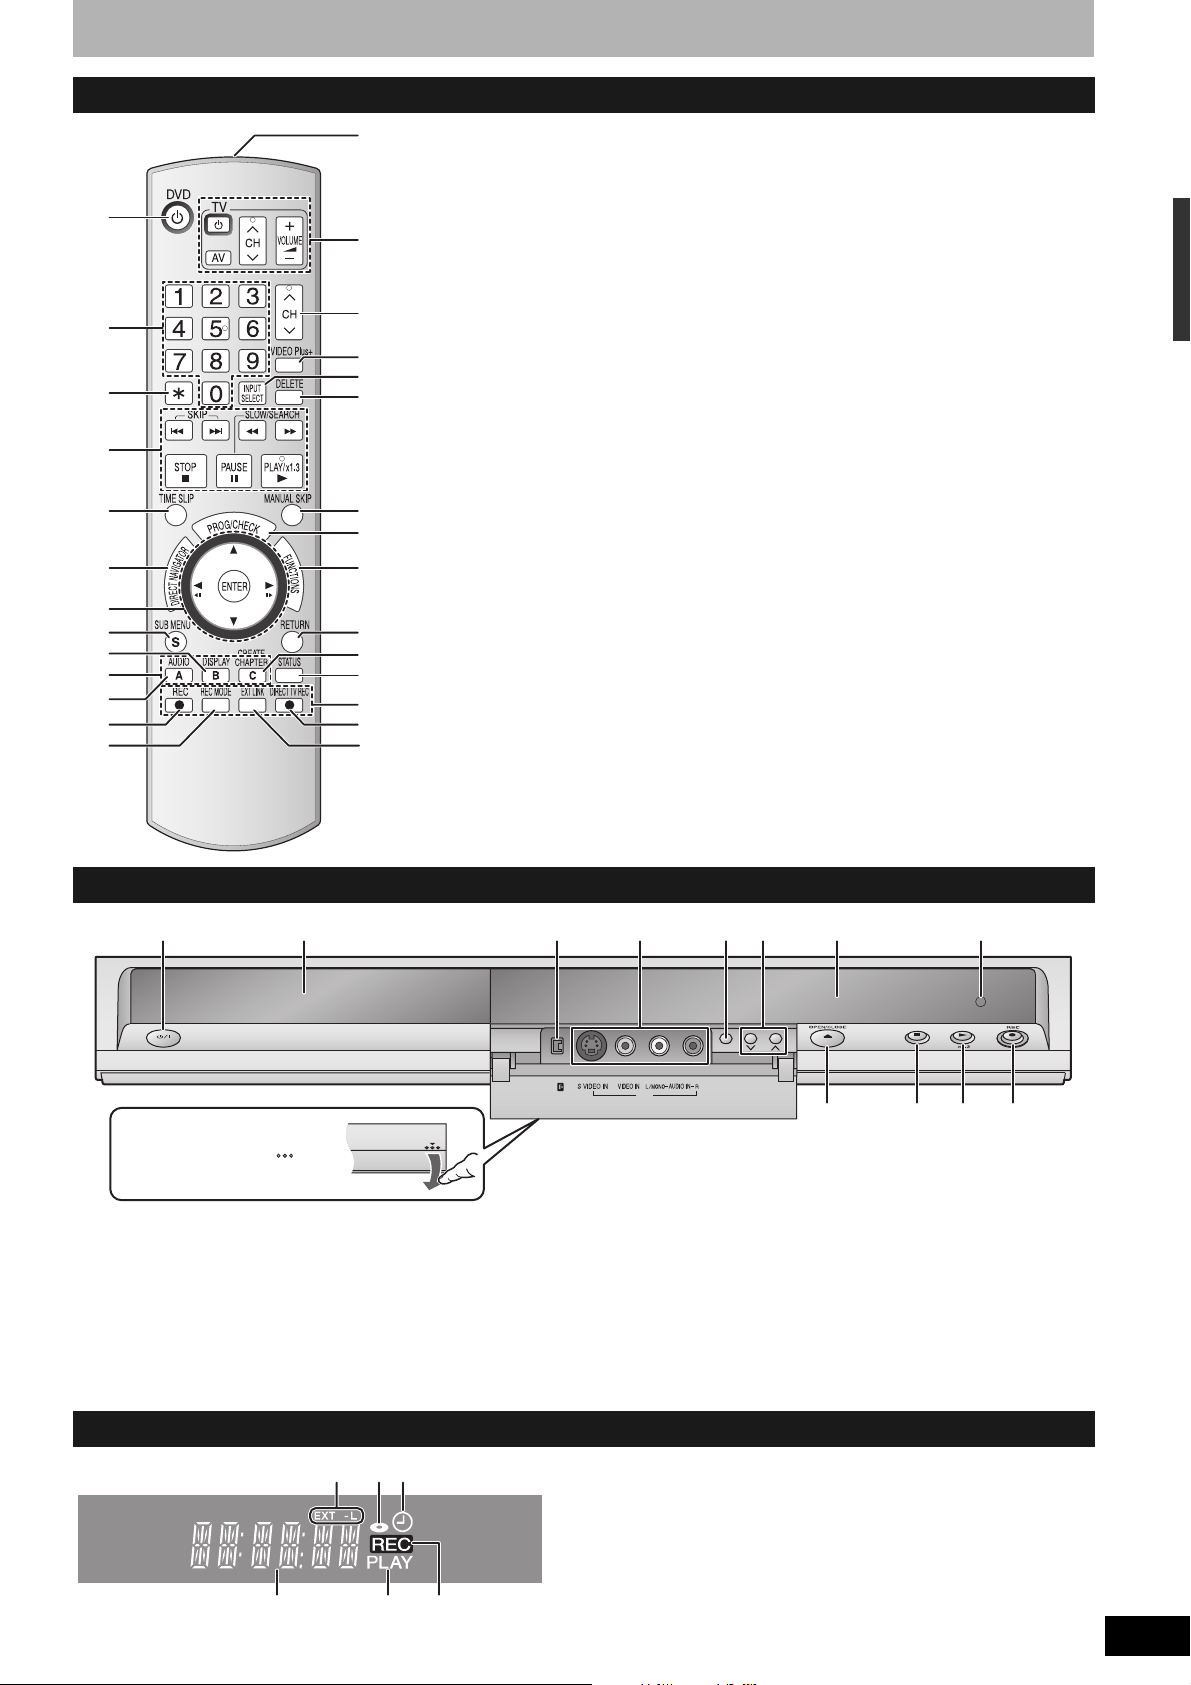
Control reference guide
Remote control
1
2
3
4
5
6
7
8
9
bk
bl
bm
bn
bo
bp
bq
br
bs
bt
ck
cl
cm
cn
co
cp
cq
cr
cs
1 Turn the unit on/off (Ô page 12)
2 Select channels and title numbers etc./Enter numbers
3 Cancel
4 Basic operations for recording and play
5 Skip the specified time (Ô page 25)
6 Show Direct Navigator/Top menu (Ô page 24, 26, 30)
7 Selection/Enter, Frame-by-frame (Ô page 12, 25)
8 Show sub menu (Ô page 27, 30, 33)
9 Show on-screen menu (Ô page 28)
bk Manual tuning operation (Ô page 42)
bl Select Audio (Ô page 24)
bm Start recording (Ô page 18)
bn Change recording mode (Ô page 18)
bo Transmit the remote control signal
bp Television operations (Ô page 15)
bq Channel select (Ô page 18)
br Show VIDEO Plus+ screen (Ô page 20)
bs Input select (AV1, AV2, AV3 or DV)
bt Delete items (Ô page 35)
ck Skip 30 seconds forward (Ô page 25)
cl Show timer recording programme screen (Ô page 21)
cm Show FUNCTIONS window (Ô page 2, 14, 29)
cn Return to previous screen
co Create chapter (Ô page 25)
cp Show status messages (Ô page 29)
cq Recording function
cr Direct TV recording (Ô page 38)
cs Linked timer recordings with external equipment (Ô page 23)
Main unit
13642 8 bl5
Opening the front panel
Press down on the part
with your finger.
1 Standby/on switch (8) (Ô page 12)
Press to switch the unit from on to standby mode or vice
versa. In standby mode, the unit is still consuming a small
amount of power.
2 Disc tray (Ô page 18)
3 Connection for digital video (DV) camcorder (Ô page 34)
4 Connection for camcorder etc. (Ô page 34)
5 Linked timer recordings with external equipment
(Ô page 23)
The unit’s display
EXT LINK
CH
DV IN
AV3
6 Channel select (Ô page 18)
7 Open/close disc tray (Ô page 18)
8 Display (Ô below)
9 Stop (Ô page 18, 25)
bk Start play (Ô page 24)
bl Remote control signal sensor
bm Start recording (Ô page 18)/
Specify the time to stop recording (Ô page 19)
Included accessories/Disc handling/Unit care/Control reference guide
7 9 bk bm
21
465
3
1 Linked timer recordings with external equipment
indicator
2 Disc indicator
• This indicator lights up when a disc that is supported by
this unit is inserted.
3 Timer recording indicator
4 Main display section
5 Playing indicator
6 Recording indicator
RQT8320
5
Disc information
Discs you can use for recording and play
Disc type DVD-RAM DVD-R
Indication in these
instructions by
RAM
Logo
Recording format
(Ô below)
Re-writable 3
What you can do on this unit
Recording
broadcasts that
allow one copy
Recording both
M1 and M2 of
bilingual
broadcasts
Recording 16:9
aspect picture
Creating playlists
Compatibility
Usable high
speed recording
disc type 5
Play on other
players
• We recommend using Panasonic discs. We also recommend using DVD-RAM discs with cartridges to protect them from scratches and dirt.
• You may not be able to record depending on the condition of the discs and you may not be able to play due to the condition of the recording.
• For the recording time, refer to “Recording modes and approximate recording times” on page 17.
• You cannot record programmes that allow “One time only recording” to CPRM compatible DVD-R and DVD-RW on this unit. You can record
other programmes as DVD-Video format.
1 You cannot continue a recording from the first layer to the second layer on dual- or double-layer discs. To record onto the second layer, you
must first close the first layer using the “Close First Layer” item in DVD Management (Ô page 37). You will no longer be able to record to the
first layer after you do this (Ô page 16).
When playing a title recorded on both layers, video and audio may momentarily cut out when the unit is switching layers.
2 You may not be able to use +R recorded on this unit in another Panasonic DVD recorder and vice versa. Once the disc is finalized, however,
it can be played in the other unit.
3 The amount of the recordable disc space doesn’t increase even if the programme is deleted when you use a one time recording disc.
4CPRM (Ô page 49) compatible discs only.
5 This unit can use the high-speed recording discs shown in the chart, but using them will not shorten the recording time.
6 You can play 8x recording speed discs recorded on another equipment.
7 Play on DVD-R DL compatible equipment.
8 Play on +R DL compatible equipment.
VR DVD-Video DVD-Video DVD-Video +VR +VR +VR
4
Up to 5x Up to 16x Up to 4x Up to 6x Up to 16x Up to 2.4x
Only on DVD-
RAM
compatible
players. (It is
not possible to
finalize the
disc.)
-R -R DL -RW(V) +R +R DL
Before
finalization
DVD-V DVD-V DVD-V DVD-V DVD-V
After
finalization
×× ××
ЧЧЧЧЧЧ
ЧЧЧЧЧЧ
ЧЧЧЧЧЧ
ЧЧЧЧЧЧ
DVD-R DL 1
(dual layer on
single side)
Before
finalization
After
finalization
78
Only on compatible players after finalizing the disc (Ô page 37)
DVD-RW
Before
finalization
After
finalization
+R 2 +R DL 1
Before
finalization
After
finalization
–––– –––– ––––
(double layer
on single side)
Before
finalization
After
finalization
Up to 4x 6
possible to
finalize the
: Can do, ×: Cannot do
+RW
+RW
(It is not
disc.)
RQT8320
6
Regarding recording format
VR (DVD Video Recording) format
This is a recording method which allows you to freely record and edit television broadcasts and so on.
• Digital broadcasts that allow “One time only recording” can be recorded to a CPRM compatible disc. You can record to CPRM compatible
DVD-RAM on this unit.
• Play is only possible on a compatible DVD player.
DVD-Video format
This recording method is the same as commercially available DVD-Video.
• Digital broadcasts that allow “One time only recording” cannot be recorded.
• You can play on compatible equipment such as DVD players after finalizing the disc on this unit.
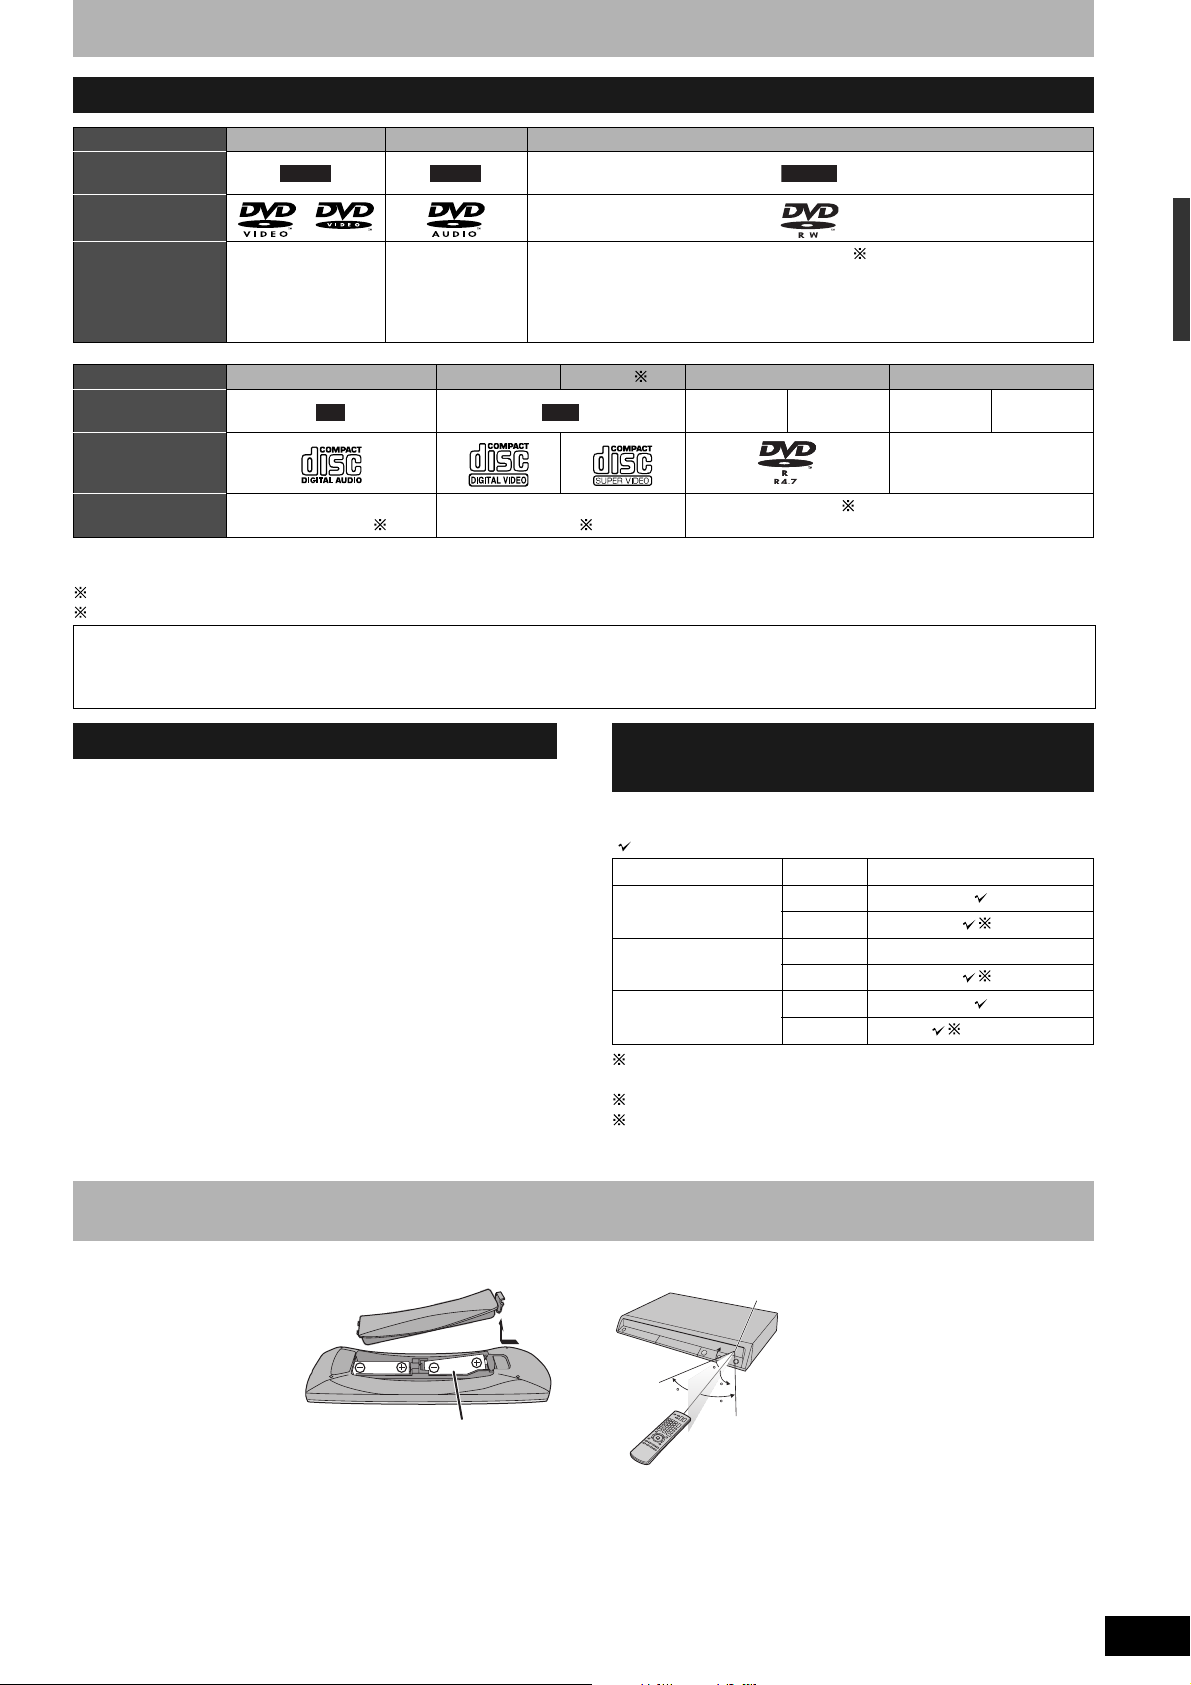
Play-only discs
Disc type DVD-Vi deo DVD-Audio DVD-RW (VR format)
Indication in these
instructions
Logo
DVD-V DVD-A -RW(VR)
Instructions High quality movie
Disc type Audio CD Video CD
Indication in these
instructions
Logo
Instructions Music and audio recorded
• The producer of the disc can control how discs are played. So you may not always be able to control play as described in these operating
instructions. Read the disc’s instructions carefully.
1 Close the session after recording. Play may be impossible on some discs due to the condition of the recording.
2 Conforming to IEC62107.
Regarding DVD-Audio
Some multi-channel DVD-Audio will prevent down-mixing (Ô page 49) of all or part of their contents if this is the manufacturer’s intention. Tracks
that are prevented from being down-mixed will not play properly on this unit (e.g. audio is played from the front two channels only). Refer to the
disc’s jacket for more information.
and music discs
CD
(including
CD-R/RW1)
High fidelity music
discs
• Played on this
unit in
2 channels.
Music and video recorded
(including CD-R/RW1)
DVD-RW recorded on another DVD Recorder 1
• You can play programmes that allow “One time only recording” if they have
been recorded to a CPRM compatible disc.
• By formatting (Ô page 36) the disc, you can record to it in DVD-Video format.
• It may be necessary to finalize the disc on the equipment used for recording.
SVCD 2
VCD
CD-R/RW and DVD-R
and TIFF)
DVD-R CD
MP3 JPEG MP3 JPEG
––––
1 with MP3/Still pictures (JPEG
Discs that cannot be played Types of disc for the type of
• 2.6 and 5.2 GB DVD-RAM, 12 cm
• 3.95 and 4.7 GB DVD-R for Authoring
• DVD-R recorded by VR format
• DVD-R (DVD-Video format), DVD-R DL, DVD-RW (DVD-Video
format), +R, +R DL recorded on another unit and not finalized
(Ô page 49).
• DVD-Video with a region number other than “2” or “ALL”
•Blu-ray
• DVD-ROM, +R (8 cm), CD-ROM, CDV, CD-G, Photo CD, CVD,
SACD, MV-Disc, PD, DivX Video Disc, “Chaoji VCD” available on
the market including CVD, DVCD and SVCD that do not conform to
IEC62107, etc.
connected TV
When you use the discs recorded either PAL or NTSC, refer to this
table.
( : Possible to view, ×: Impossible to view)
TV type Disc Yes/No
Multi-system TV
NTSC TV
PAL TV
3 If you select “NTSC” in “TV System” (
may be clearer.
4 Select “NTSC” in “TV System” (
5 If your television is not equipped to handle PAL 525/60 signals
the picture will not be shown correctly.
PA L
NTSC
PA L ×
NTSC
PA L
NTSC
5 (PAL60)
Ô page 43), the picture
Ô page 43).
3
4
Disc information/The remote control information
The remote control information
n Batteries
• Insert so the poles (+ and –)
match those in the remote
control.
• Do not use rechargeable type
batteries.
• Do not mix old and new
batteries.
• Do not use different types at
the same time.
• Do not heat or expose to flame.
• Do not take apart or short circuit.
• Do not attempt to recharge alkaline or manganese batteries.
• Do not use batteries if the covering has been peeled off.
Mishandling of batteries can cause electrolyte leakage which can
damage items the fluid contacts and may cause a fire.
Remove if the remote control is not going to be used for a long
period of time. Store in a cool, dark place.
R6/LR6, AA
n Use
Remote control signal sensor
20
20
30
30
7 m directly in front of the unit
RQT8320
7
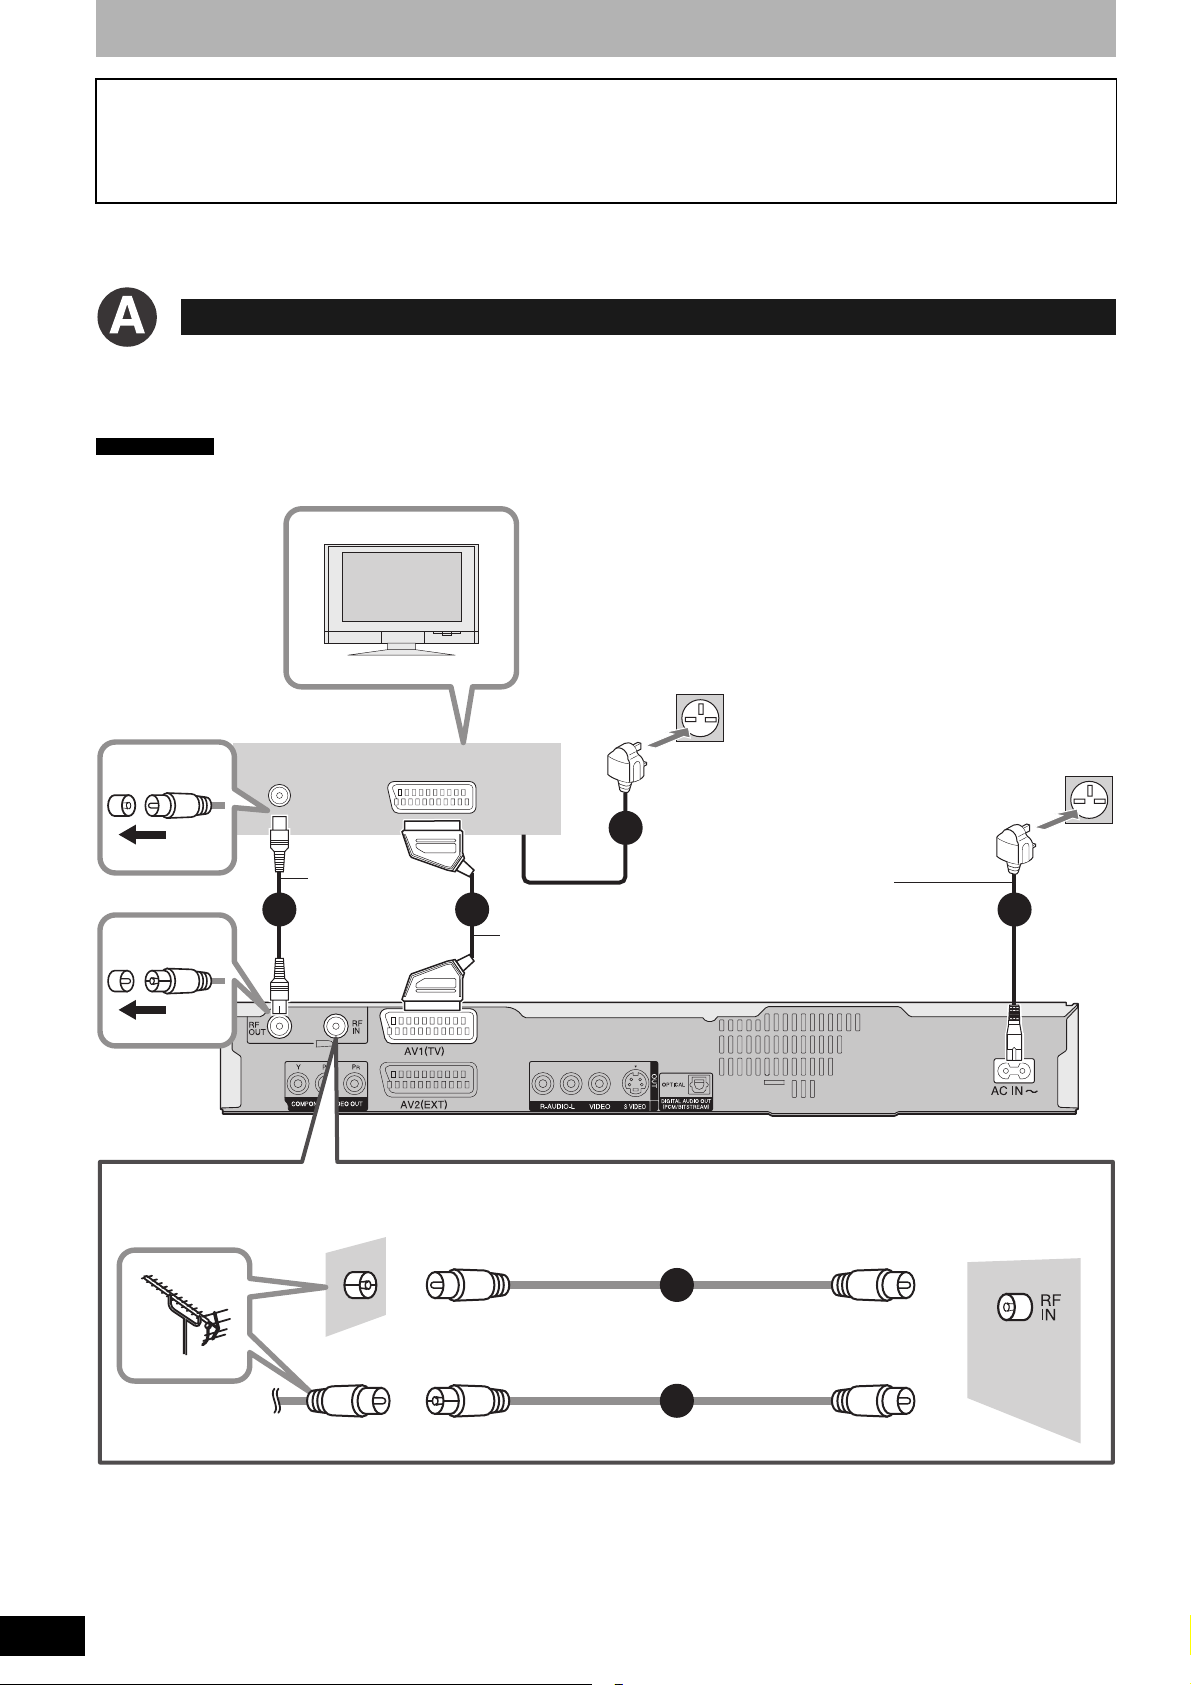
Connection
Use of the supplied RF coaxial leads
To prevent interference patterns from appearing on your TV, use only the supplied RF coaxial leads when you connect this unit
to your TV and aerial outlet or aerial lead, as shown in connection types A-C.
• Keep the RF coaxial leads as far away as possible from other leads.
• Do not roll up the RF coaxial leads.
• Before connection, turn off the mains for all connected equipment and read the appropriate operating instructions.
Be sure to read the Caution for AC Mains Lead on page 2.
• Choose from one of the connection types A-C that suits your requirement.
Connecting to a television only
Using a fully wired 21-pin Scart lead
• You can use a variety of Q Link functions by connecting the unit to a Q Link compatible television (Ô page 38).
• You can enjoy high-quality viewing by connecting the unit to an RGB compatible television.
Required setting
“AV1 Output” in the Setup menu (
Ô page 40)
To household mains socket
Television’s rear panel
VHF/UHF
RF IN
AV I N
To household mains socket
(AC 220 V to 240 V, 50 Hz)
4
RF coaxial lead
(included, black)
2
Use one of the RF coaxial lead (black or grey) to connect this unit’s RF IN terminal to your aerial socket or aerial lead.
To the aerial
3
Fully wired 21-pin
Scart lead
(For Q Link functions)
RF coaxial lead (included, grey)
AC mains lead
(included)
Connect only after all other
connections are complete.
This unit’s rear panel
4
This unit
RQT8320
8
1
or
RF coaxial lead (included, black)
1
Connecting a terminal other than the 21-pin Scart terminal (Ô page 11).
After completing the above connections, proceed to the TV Tuning (Ô page 12).
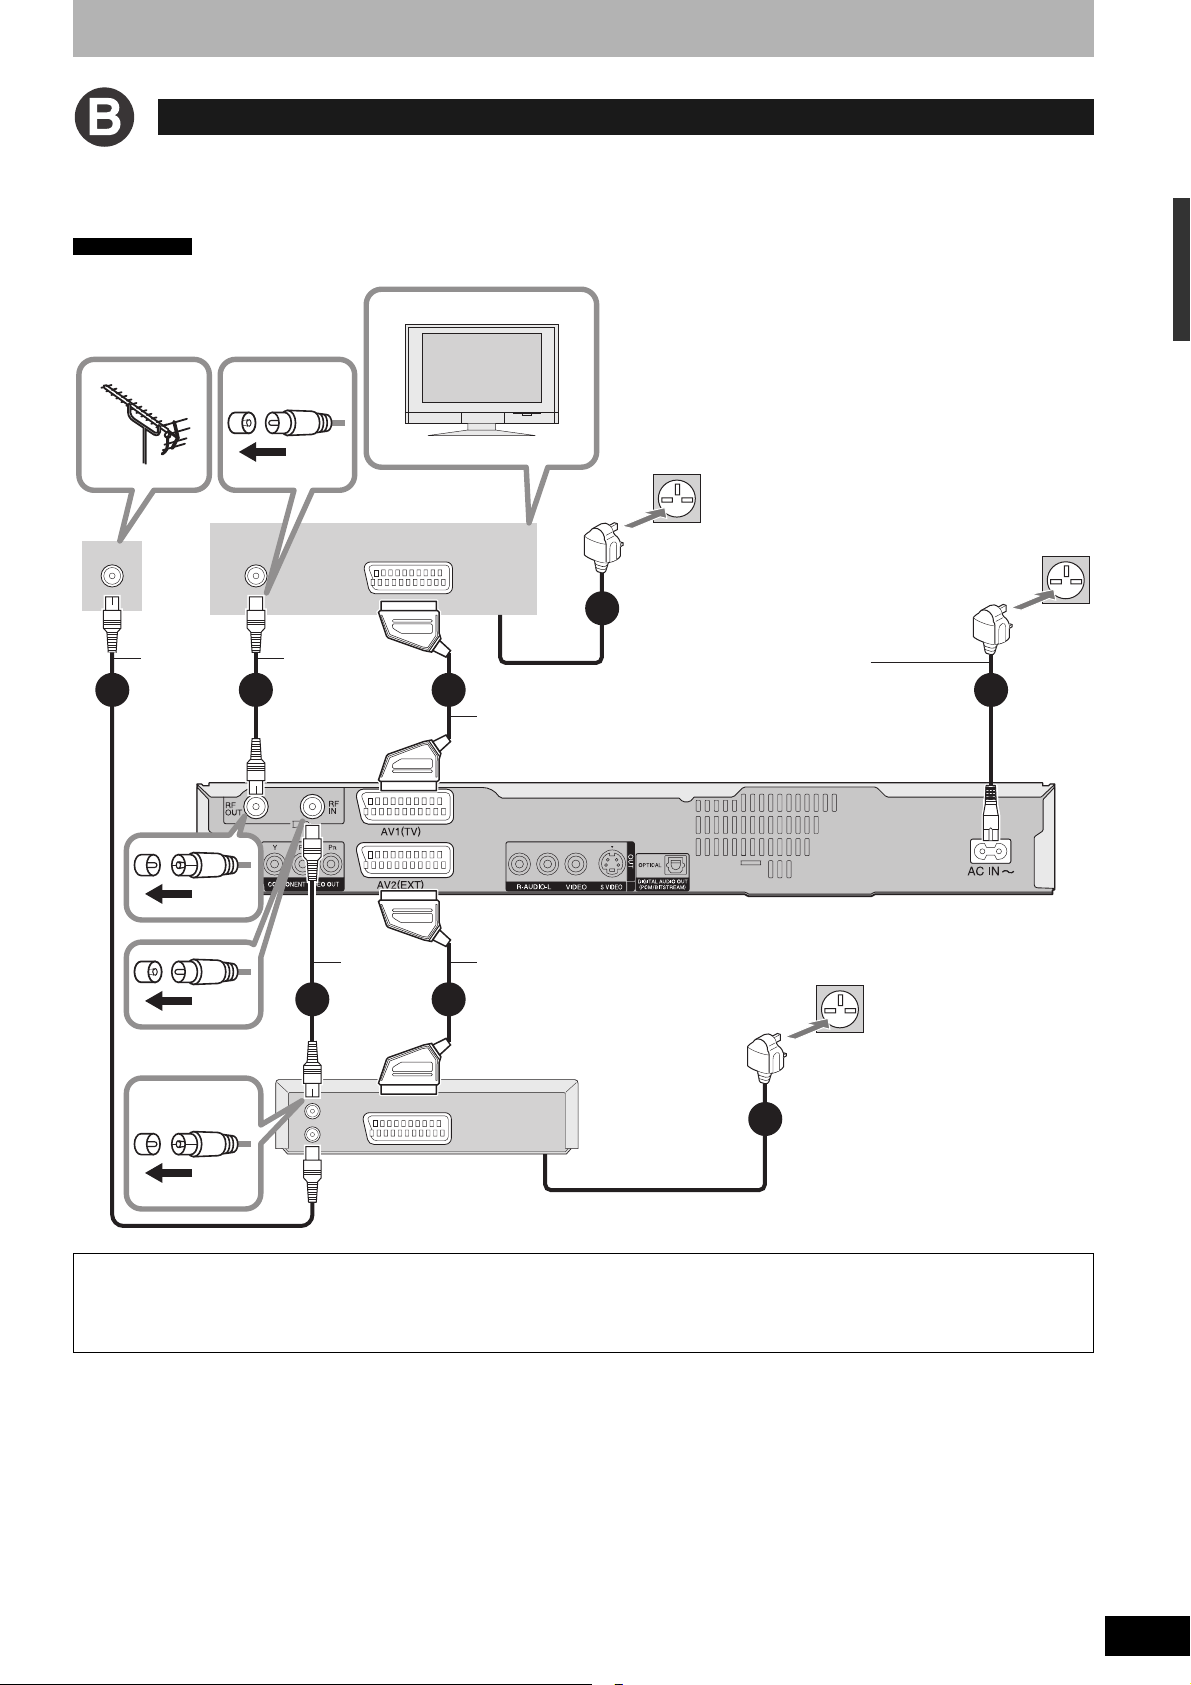
Connecting to a television and Satellite/Digital terrestrial receiver
Using a fully wired 21-pin Scart lead
• You can use a variety of Q Link functions by connecting the unit to a Q Link compatible television (Ô page 38).
• You can enjoy high-quality viewing by connecting the unit to an RGB compatible television.
Required setting
“AV1 Output” and “AV2 Input” in the Setup menu (Ô page 40–41)
To household mains socket
Television’s rear panel
To t he
aerial
VHF/UHF
RF IN
AV I N
To household mains socket
(AC 220 V to 240 V, 50 Hz)
6
Connection
1
RF coaxial
lead
RF coaxial lead
(included, black)
3
2
4
Fully wired 21-pin
Scart lead
(For Q Link functions)
RF coaxial
lead
(included,
black)
RF
OUT
RF
IN
AV OUT
Satellite/Digital terrestrial
receiver’s rear panel
Fully wired 21-pin Scart lead
(For External Link function)
5
AC mains lead
(included)
Connect only after all other
connections are complete.
This unit’s rear panel
To household mains socket
6
6
To view satellite/digital terrestrial programmes
Press [INPUT SELECT] to select the input channel “AV2” or put this unit in standby mode.
To record satellite/digital terrestrial programmes
Refer to “Recording from a satellite/digital terrestrial receiver” (Ô page 23).
Connecting a terminal other than the 21-pin Scart terminal (Ô page 11).
After completing the above connections, proceed to the TV Tuning (Ô page 12).
RQT8320
9

Connection
Connecting to a television and VCR
Using a fully wired 21-pin Scart lead
• You can use a variety of Q Link functions by connecting the unit to a Q Link compatible television (Ô page 38).
• You can enjoy high-quality viewing by connecting the unit to an RGB compatible television.
Required setting
“AV1 Output” and “AV2 Input” in the Setup menu (Ô page 40–41)
To household mains socket
Television’s rear panel
To t he
aerial
VHF/UHF
RF IN
AV I N
To household mains socket
(AC 220 V to 240 V, 50 Hz)
6
1
RF coaxial
lead
RF coaxial lead
(included, black)
3
2
RF coaxial
lead
(included,
black)
RF
OUT
RF
IN
AV OUT
VCR’s rear panel
4
Fully wired 21-pin
Scart lead
(For Q Link functions)
Fully wired 21-pin Scart lead
(For External Link function)
5
AC mains lead
(included)
Connect only after all other
connections are complete.
This unit’s rear panel
To household mains socket
Connect the unit directly to the television
Video signals fed through video cassette recorders will
6
be affected by copyright protection systems and the
picture will not be shown correctly on the television.
Television
6
Te l ev i s i o n
RQT8320
10
To copy from a VCR
Refer to “Copying from a video cassette recorder” (Ô page 34).
Connecting a terminal other than the 21-pin Scart terminal (Ô page 11).
After completing the above connections, proceed to the TV Tuning (Ô page 12).
This unit
VCR
VCR
This unit
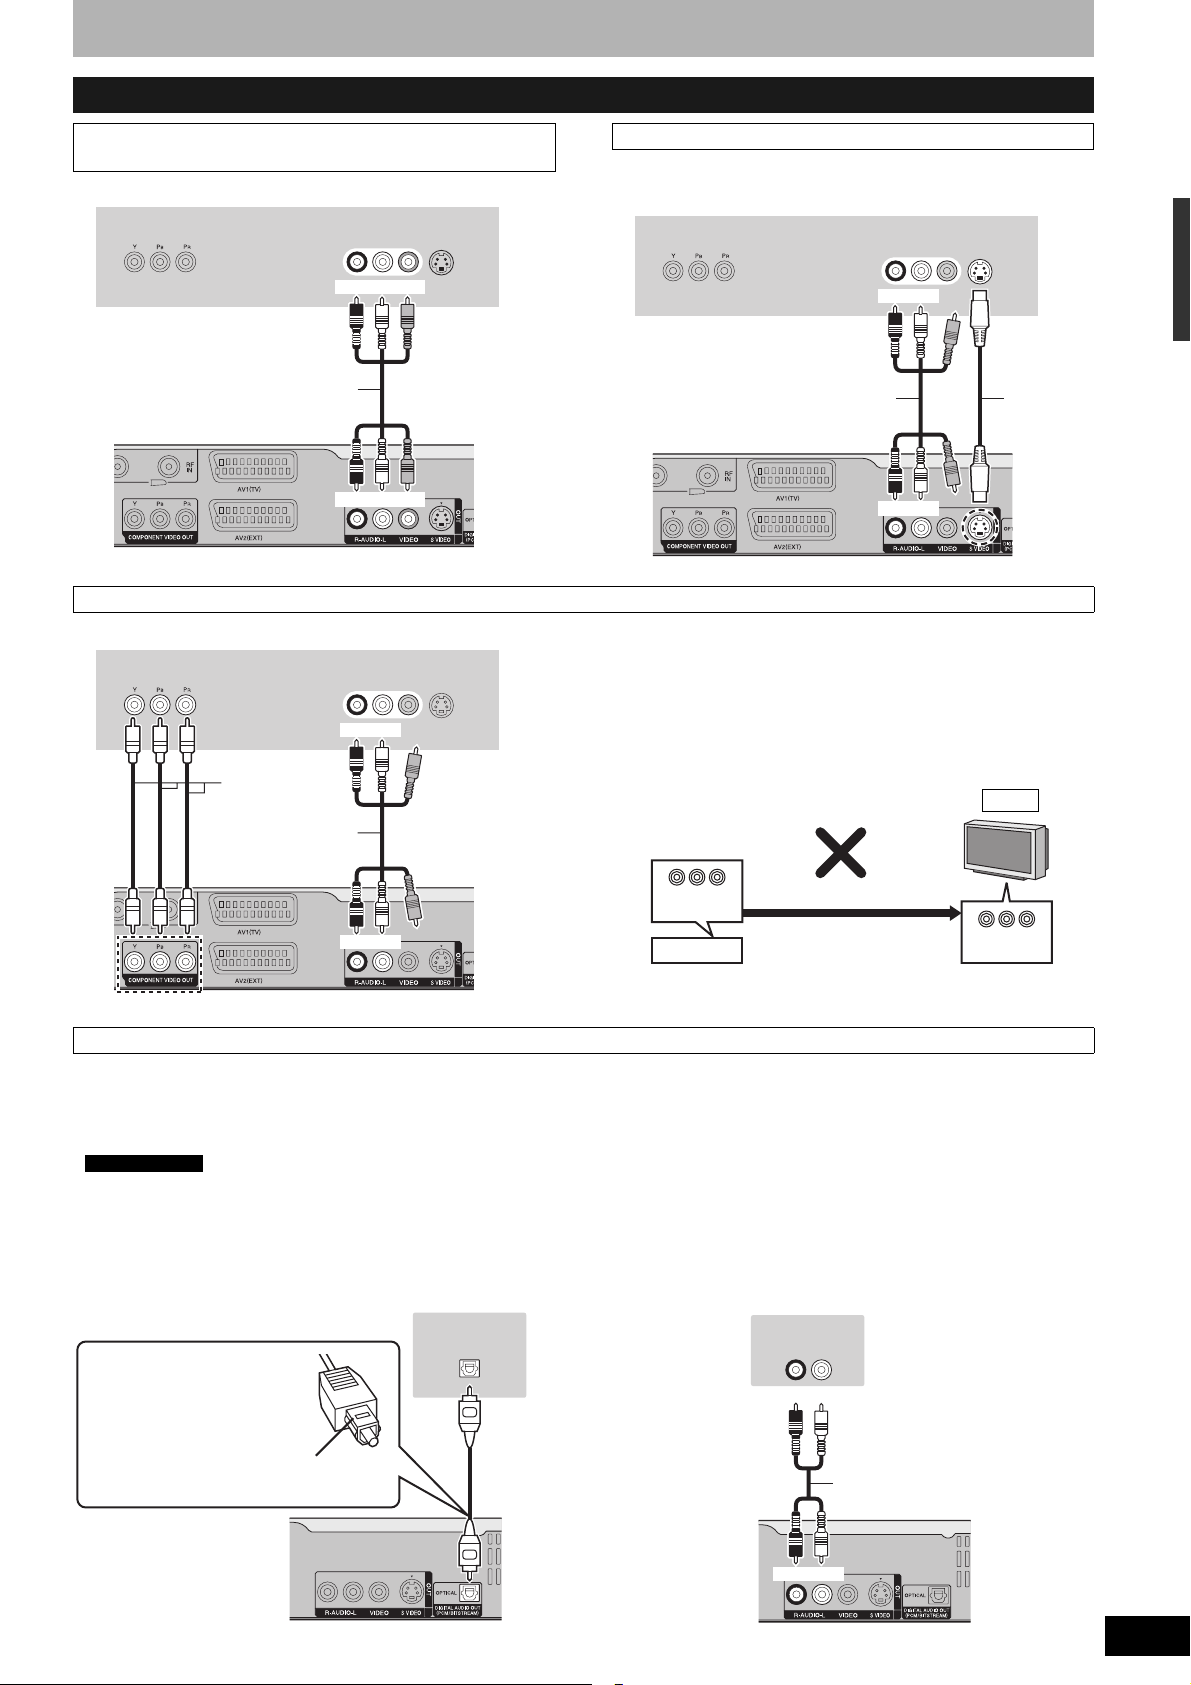
Other connections
Connecting to a television with AUDIO/VIDEO
terminals
Television’s rear panel
COMPONENT
VIDEO IN
Audio/video cable
This unit’s rear panel
(included)
AUDIO IN
VIDEO
R L
IN
Red White Yellow
Red White Yellow
S VIDEO
IN
The S VIDEO OUT terminal achieves a more vivid picture than the
VIDEO OUT terminal. (Actual results depend on the television.)
Connecting to a television with COMPONENT VIDEO terminals
Television’s rear panel
COMPONENT
VIDEO IN
Video cable
Audio/video cable
(included)
AUDIO IN
R L
Red White
VIDEO
IN
S VIDEO
IN
COMPONENT VIDEO terminals can be used for either interlace or
progressive output (Ô page 49) and provide a purer picture than the
S VIDEO OUT terminal.
• Connect to terminals of the same colour.
If you have a regular television (CRT : cathode ray tube)
Use component output with progressive “Off” (Factory setting,
Ô page 40), even if it is progressive compatible, because
progressive output can cause some flickering. This is the same for
multi system televisions using PAL mode.
Connecting to a television with S VIDEO terminals
Television’s rear panel
AUDIO IN
COMPONENT
VIDEO IN
Audio/video cable
This unit’s rear panel
(included)
R L
Red White
Red Whi te
VIDEO
IN
S VIDEO
IN
CRT
S Video
cable
Connection
Red White
This unit’s rear panel
Connecting to an amplifier or system component
n Connecting to an amplifier with a digital input
terminal
• To enjoy multi-channel surround sound DVD-Video, connect an
amplifier with Dolby Digital, DTS and MPEG decoders.
Required setting
“Digital Audio Output” in the Setup menu (Ô page 40)
• Before purchasing an optical digital audio cable, check the terminal
shape of the connected equipment.
• You cannot use DTS Digital Surround decoders not suited to DVD.
• Even if using this connection, output will be only 2 channels when
playing DVD-Audio.
Amplifier’s rear panel
OPTICAL IN
Optical digital audio cable
Do not bend this cable sharply.
Insert fully, with this side facing up.
COMPONENT
VIDEO OUT
Progressive output
This unit
n Connecting to a stereo amplifier
Amplifier’s rear panel
AUDIO IN
R L
Red Whi te
Audio cable
COMPONENT
VIDEO IN
This unit’s rear panel
Red Whi te
This unit’s rear panel
RQT8320
11
TV Tuning (Auto Setup)
8
^ DVD
3 When setup has completed, the confirmation
screen appears.
Press [ENTER].
4 The Owner ID settings screen appears.
Press [q] and press the numbered
buttons to enter your choice of a 4digit PIN number.
Owner ID
PIN number
Name
House No.
RETURN
Postcode
Numbered
buttons
e,r,w,q
ENTER
VIDEO Plus+
RETURN
1 Turn on the mains for the television
(and connected equipment) and select
the AV input for this unit.
2 Press [^ DVD] to turn the unit on.
•
If the TV is Q Link compatible, it will start to
download TV tuning information to this unit
Download from TV
2
Pos
.
RETURN : leave
Make a note of the PIN number (don’t forget), as it is
not possible to return to the factory preset.
5 Press [ENTER] to store the PIN
number.
6 Press [w,q] to select “Yes” and press
[ENTER].
The cursor moves to “Name”.
7 Press [q].
8 Press [e,r] to select a letter and then
press [q] to move to next character.
Repeat this to enter the name.
9 Press [ENTER] to store the name.
10 Press [r] and [q], and then repeat
steps 8, 9 to enter and store “House
No.” and “Postcode”.
11 Press [RETURN].
The Owner ID settings screen disappears.
To abort Auto Setup
Press [RETURN].
n If the clock setting menu appears
Set the clock manually (Ô page 41).
n To confirm that stations have been tuned
correctly (Ô page 42)
RQT8320
12
Download in progress. Please wait.
RETURN : to cancel
RETURN
• If the TV is not Q Link compatible, Auto Setup will
start to tune in all available TV stations. This may
take about 5 minutes.
Auto-Setup
21
Ch
Auto-Setup in progress. Please wait.
RETURN : to cancel
RETURN
n Resetting channel setting (Ô page 42)
n To enter the satellite station’s name
(Ô page 42)
The name of the satellite station may not be set
automatically.
(“––––” will appear under “Name” in the programme list.)
In this case, enter the name manually.
Note
If this unit is connected to a digital TV (Freeview), only the
analogue station’s tuning information will be downloaded.

Timer recording from satellite
receiver with VIDEO Plus+
This unit is not designed to control (turn on or change
channels on) your satellite receiver. However, you can use
VIDEO Plus+ Recording by making the satellite receiver’s
VIDEO Plus+ numbers available for recognition on this unit.
Take the following steps to make all satellite stations
available for recognition on this unit.
Through these steps, you can make timer recording from
satellite stations with VIDEO Plus+ constantly available as
the unit keeps the setting in memory.
Preparation
• Turn on the Satellite receiver(s).
• Select a correct station on the Satellite receiver(s).
1 Press [VIDEO Plus+].
CANCEL
Remain
8:12:34
0 9
--
1:57
Number
SP
7/ 5 SUN
VIDEO Plus+
Record
Input PlusCode Number 0-9, and press ENTER.
ENTER
S
SUB MENU
RETURN
2 Press the numbered buttons to enter
the VIDEO Plus+ number for a satellite
station (e.g. Sky One).
• To correct the number
Press [w] to correct any mistakes.
3 Press [ENTER].
“––––” will appear in the “Name” column.
CANCEL
Remain
8:14:56
Programme Name
0 9
--
1:57
Number
SP
7/ 5 SUN
Timer
Recording
Name Date Start Stop Mode
7/ 5 SUN 19:00 20:00 SP
Please select channel.
ENTER
S
SUB MENU
RETURN
TV Tuning (Auto Setup)
4 Press [e,r] to select the channel or
AV input that is to be used for
recording from the satellite station.
5 Press [ENTER].
Timer
Recording
ENTER
RETURN
NameNo. Date
7/ 5 SUN
AV201
S
SUB MENU
Remain
Start
Stop
19:00
20:00
New Timer Programme
A
Timer Off
CANCEL
1:57 SP
8:15:45 7/ 5 SUN
Drive
Mode
space
SP
OK
6 Press [e] to select the programme
that you have just set and press [ ] to
delete it from the timer recording list.
It is no longer needed.
Repeat the steps above until you have set dummy timer
recordings for each of the satellite stations that you will
make VIDEO Plus+ recordings from.
To exit the screen
Press [RETURN].
RQT8320
13
Set up to match your television and remote control
5 Press [e,r] to select “TV Aspect” and
press [ENTER].
6 Press [e,r] to select the TV aspect
; OPEN/CLOSE * REC
TV operation
buttons
Numbered
buttons
and press [ENTER].
Setup
Tuning
Disc
Picture
Sound
Display
Connection
Others
• 16:9: 16:9 widescreen television
• 4:3: 4:3 standard aspect television
RAM
DVD-V
• Letterbox: 4:3 standard aspect television
Widescreen picture is shown in the letterbox style
(Ô page 49).
TV Aspect
16:9 WIDE TV
16:9
4:3 TV
4:3
Letterbox
SELECT
ENTER
RETURN
Even if it records and plays, the aspect does
not change.
Video recorded for a widescreen is played as
Pan & Scan (unless prohibited by the producer
of the disc) (Ô page 49).
To enjoy progressive video
FUNCTIONS
e,r,w,q
ENTER
* REC
RETURN
Selecting television type and
aspect
Choose the setting to suit your television and preference.
1 While stopped
Press [FUNCTIONS].
2 Press [e,r] to select “To Others” and
press [ENTER].
FUNCTIONS No Disc
No Disc
Recording
To Others
ENTER
RETURN
VIDEO Plus+ Record
Setup
3 Press [e,r] to select “Setup” and
press [ENTER].
Setup
Manual
Auto-Setup Restart
Tuning
Disc
Picture
Sound
Display
Connection
Others
Download from TV
TAB
SELECT
RETURN
4 Press [e,r] to select “Connection”
and press [q].
You can enjoy progressive video by connecting this unit’s
COMPONENT VIDEO OUT terminals to an LCD/plasma
television or LCD projector compatible with progressive scan
(Ô page 49).
1 While stopped
Press [FUNCTIONS].
2 Press [e,r] to select “To Others” and
press [ENTER].
3 Press [e,r] to select “Setup” and
press [ENTER].
4 Press [e,r] to select “Connection”
and press [q].
5 Press [e,r] to select “AV1 Output”
and press [ENTER].
6 Press [e,r] to select “Video ( with
component )” or “S Video ( with
component )” and press [ENTER].
Set according to the signal and terminal of the
connected TV.
7 Press [e,r] to select “Progressive”
and press [ENTER].
8 Press [e,r] to select “On” and press
[ENTER].
Output becomes progressive.
Note
• When connected to a CRT (Cathode ray tube) television or
a multi system television using PAL mode, even if it is
progressive compatible, progressive output can cause
some flickering. Turn off “Progressive” if this occurs.
• Picture will not be displayed correctly if connected to an
incompatible television.
• There is no output from the COMPONENT VIDEO OUT
terminals if “AV1 Output” in the Setup menu is set to
“RGB 1 ( without component )” or “RGB 2 ( without
component )” (Ô page 40).
RQT8320
14
To exit the screen
Press [RETURN] several times.
To return to the previous screen
Press [RETURN].
Television operation
You can operate the TV through the unit’s remote control.
Turn TV on/off
Input Select
Point the remote control at the television
While pressing [^ TV], enter the code with
the numbered buttons.
e.g., 01: [0] Ô [1]
Manufacturer and Code No.
Brand Code Brand Code
Panasonic
AIWA 35 NORDMENDE 10
AKAI 27/30 ORION 37
BLAUPUNKT 09 PHILIPS 05/06
BRANDT 10/15 PHONOLA 31/33
BUSH 05/06 PIONEER 38
CURTIS 31 PYE 05/06
DESMET 05/31/33 RADIOLA 05/06
DUAL 05/06 SABA 10
ELEMIS 31 SALORA 26
FERGUSON 10 SAMSUNG 31/32/43
GOLDSTAR/LG 31 SANSUI 05/31/33
GOODMANS 05/06/31 SANYO 21
GRUNDIG 09 SBR 06
HITACHI
INNO HIT 34 SELECO 06/25
IRRADIO 30 SHARP 18
ITT 25 SIEMENS 09
JVC 17/39 SINUDYNE 05/06/33
LOEWE 07/46 SONY 08
METZ 28/31 TELEFUNKEN
MITSUBISHI 06/19/20 THOMSON 10/15/44
MIVAR 24 TOSHIBA 16
NEC 36
Test by turning on the television and changing channels.
Repeat the procedure until you find the code that allows
correct operation.
• If your television brand is not listed or if the code listed for
your television does not allow control of your television, this
remote control is not compatible with your television.
01/02/03/
04/45
22/23/31/
40/41/42
NOKIA 25/26/27
SCHNEIDER
WHITE
WESTINGHOUSE
Vol ume
Channel
Select
05/06/29/
30/31
10/11/12/
13/14
05/06
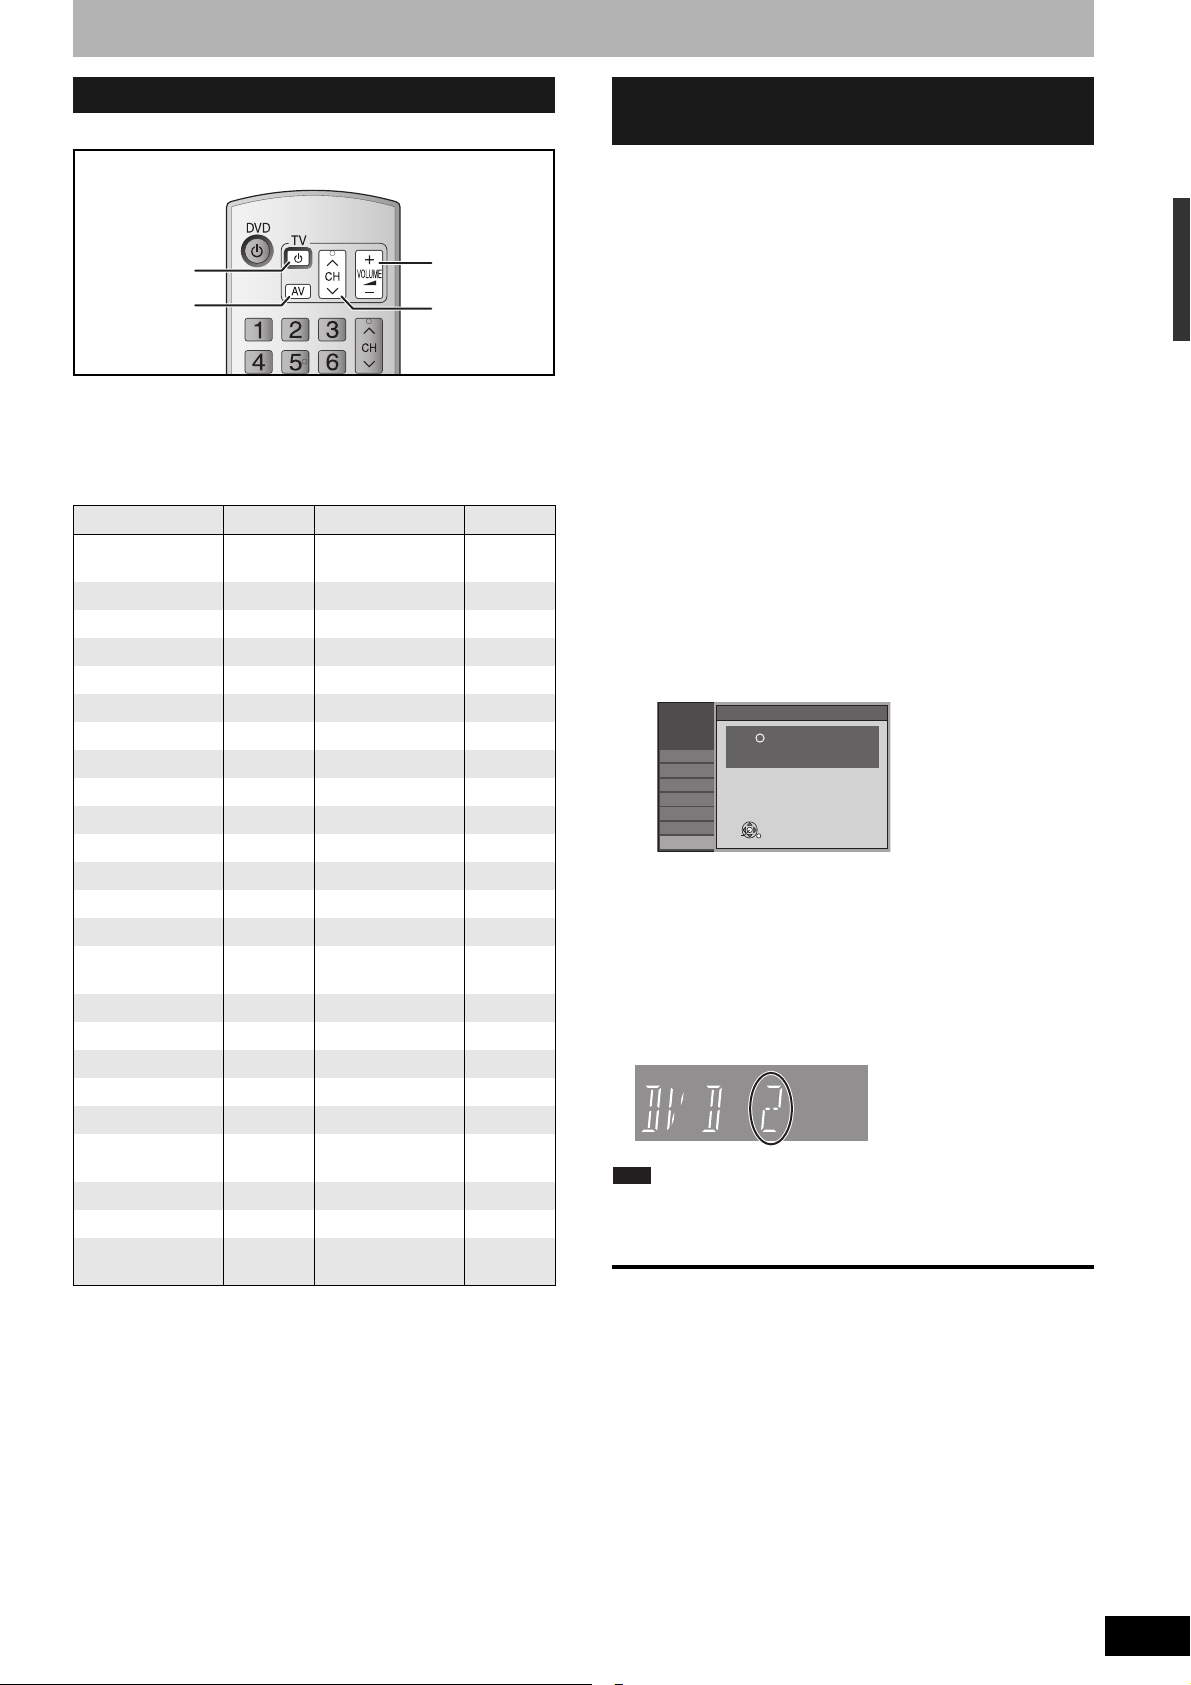
When other Panasonic products
respond to this remote control
When other Panasonic products placed nearby affect this
unit’s remote control, change the remote control code on the
main unit and the remote control (the two must match).
Under normal circumstances use the factor y set code
“DVD 1”.
To change the code on the main unit
1 While stopped
Press [FUNCTIONS].
2 Press [e,r] to select “To Others” and
press [ENTER].
3 Press [e,r] to select “Setup” and
press [ENTER].
4 Press [e,r] to select “Others” and
press [q].
5 Press [e,r] to select “Remote
Control” and press [ENTER].
6 Press [e,r] to select the code
(“DVD 1”, “DVD 2” or “DVD 3”) and
press [ENTER].
Setup
Tuning
Disc
Picture
Sound
Display
Connection
Others
To change the code on the remote control
Remote Control
Press " " and "ENTER" together
for more than 2 seconds on the remote
control.
ENTER
RETURN
7 While pressing [ENTER], press and
hold the numbered button ([1], [2] or
[3]) for more than 2 seconds.
8 Press [ENTER].
n When the following indicator appears on the
unit’s display
Press and hold [ENTER]
and the indicated number
button at the same time for
more than 2 seconds.
Note
Executing “Shipping Condition” in the Setup menu returns
the main unit code to “DVD 1”. Change the remote control
code to 1 (Ô step 7).
To exit the screen
Press [RETURN] several times.
To return to the previous screen
Press [RETURN].
Set up to match your television and remote control
RQT8320
15
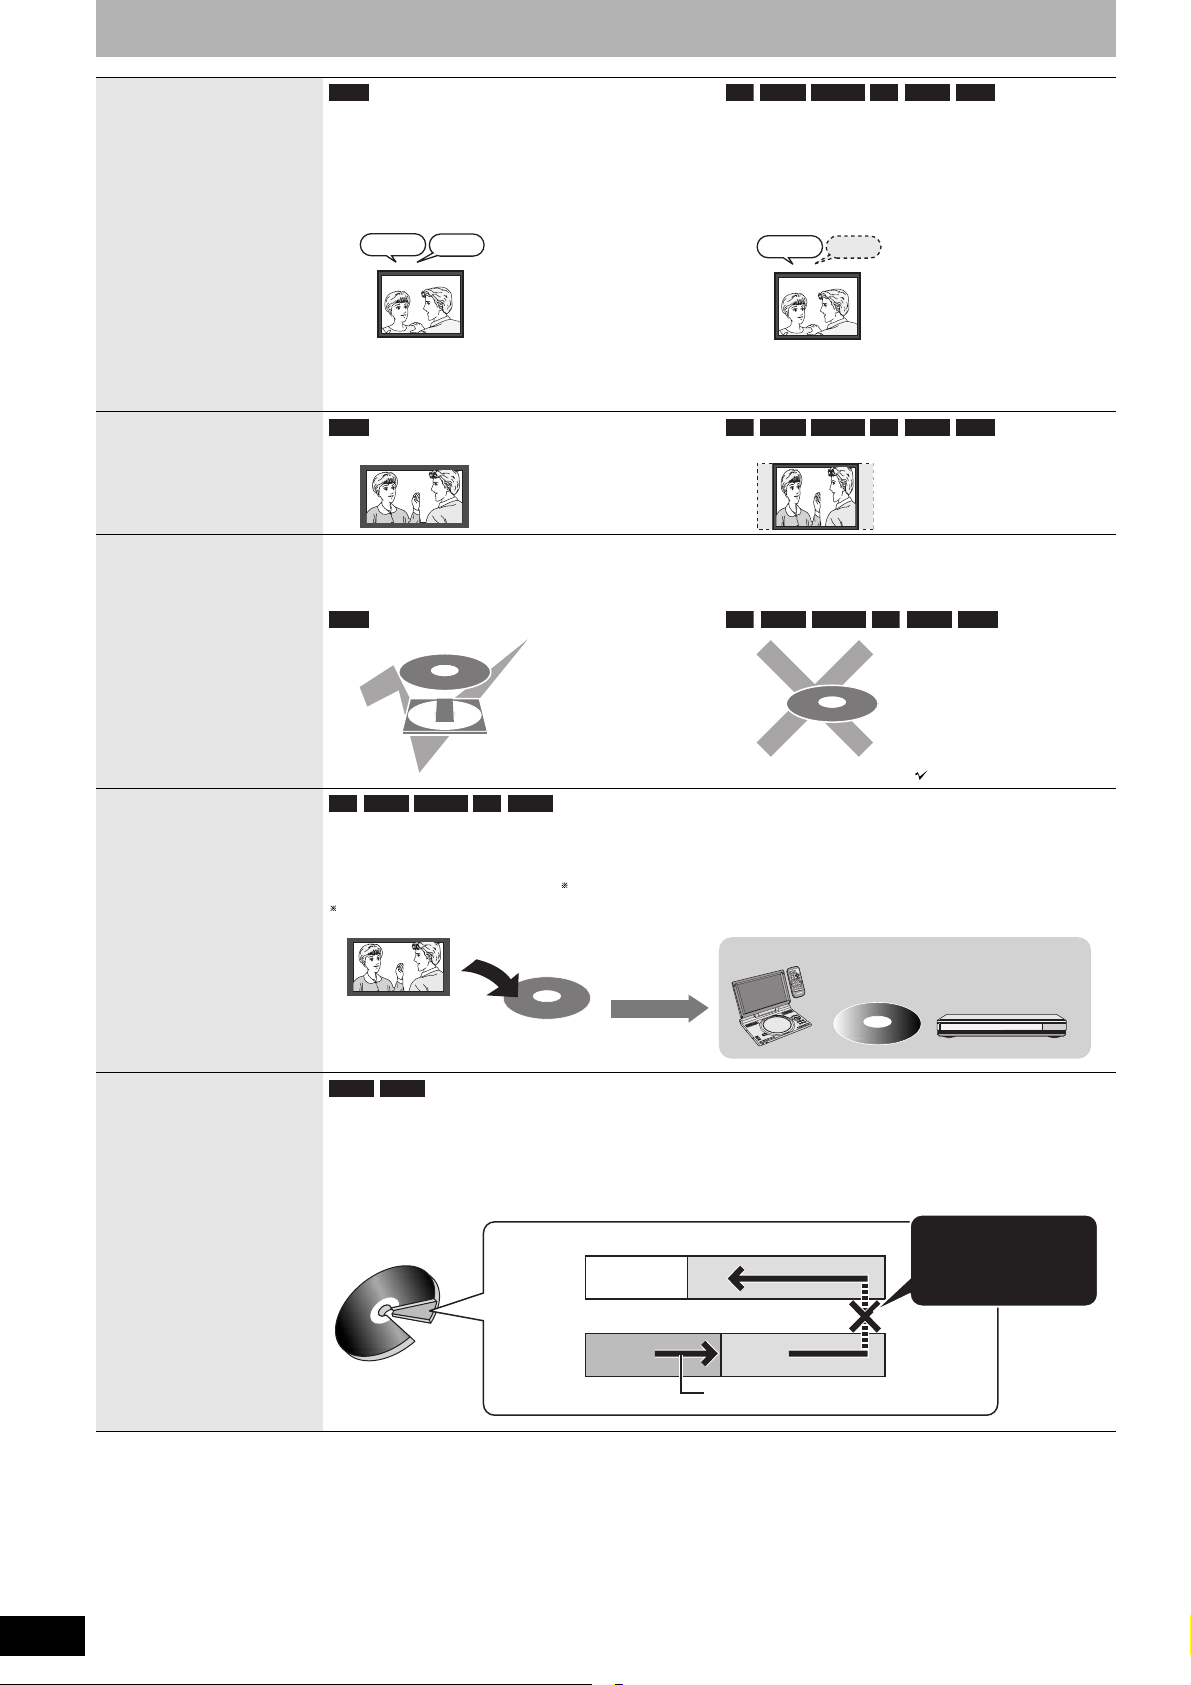
Important notes for recording
Recording of
bilingual
programme
Recording of
Widescreen
broadcasting
Recording of digital
broadcasting
RAM
Both main and secondary audio can be
recorded
You can change the audio during playback.
(Ô page 24, “Changing audio during play”)
M1
Hello Hallo
M2
If you record from external equipment
–Select both “M 1” and “M 2” on the external
equipment.
RAM -R -R DL -RW(V) +R +R DL +RW
16:9 aspect (Widescreen)
-R -R DL -RW(V) +R +R DL +RW
Select the main or secondary audio before
recording
(Ô page 40, “Bilingual Audio Selection”)
The selected audio only is recorded.
M1
Hello
If you record from external equipment
–Select “M 1” or “M 2” on the external
equipment.
Recorded in 4:3 aspect
It is not possible to record digital broadcasts that allow “One time only recording” onto DVD-R,
DVD-R DL, DVD-RW, +R, +R DL, +RW or 8 cm DVD-RAM discs. Use a CPRM (Ô page 49)
compatible DVD-RAM.
RAM -R -R DL -RW(V) +R +R DL +RW
(CPRM compatible disc only)
Playing the disc on
other DVD players
Recording to
DVD-R DL and
+R DL
: Can do, ×: Cannot do
-R -R DL -RW(V) +R +R DL
The disc must be finalized after recording (Ô page 37).
It is necessary to finalize DVD-R, etc. on this unit after recording or copying titles to them. You can
then play them as a commercially sold DVD-Video. However, the discs become play-only and you
can no longer record or copy.
You can record or copy again if you format DVD-RW.
-R DL +R DL
Recorded to DVD-R, etc.
Finalize
Play on other DVD equipment
E
D
O
M
Y
A
L
P
P
U
T
E
S
Y
A
L
P
S
I
D
U
EN
M
OP
T
N
R
U
B
T
U
E
S
R
U
E
N
L
E
T
I
M
T
E
L
G
N
A
O
I
D
U
A
D
N
U
O
R
L
R
E
U
C
S
.
N
A
A
C
3
2
1
0
1
6
5
4
0
9
8
7
E
M
U
VOL
GE
A
P
P
U
O
R
G
G
CH
H
C
R
A
E
S
R
E
T
N
E
L
O
V
Y
A
L
P
S
I
D
U
N
E
M
P
O
T
N
R
U
T
E
R
N
O
U
N
E
M
F
F
O
D
C
I
N
9
V
N
E
P
O
D
N
U
O
R
R
T
A
SU
.
E
A
P
E
E
R
OD
M
R
O
T
I
N
O
M
E
D
O
M
E
R
U
T
C
I
P
DVD-R DL and +R DL discs have two layers of recording surface on one side.
It is not possible to record continuously from the first layer to the second layer. Recording
stops when space on the first layer becomes full. You must close the first layer to start recording on
the second layer (Ô page 37, “Close First Layer”). Closing makes the first layer unavailable for
recording (editing is still available). You cannot cancel closing. Make certain before proceeding.
It is not possible to
record continuously
from the first layer
to the second layer.
(Disc outer
side)
(Disc inner
side)
The second layer
The available
space
The first layer
Title1 Title2
RQT8320
16
Recording/Playback direction
 Loading...