

Page 1

Owner’s Manual
for advanced features
Digital Camera
Model No. DMC-SZ7
Before connecting, operating or adjusting this product,
please read the instructions completely.
VQT3Z01
F1211MR0
Page 2

Contents
Before Use
Care of the camera ...................................4
Standard Accessories ...............................5
Names and Functions of Main Parts.........6
Preparation
Charging the Battery.................................8
• Inserting the Battery............................9
• Charging ...........................................10
• Approximate operating time and
number of recordable pictures..........12
Inserting and Removing the Card
(optional).................................................14
About the Built-in Memory/the Card........15
• Approximate number of recordable
pictures and available recording
time...................................................17
Setting Date/Time (Clock Set).................18
• Changing the Clock Setting ..............19
Tips for taking good pictures...................20
• Fit the strap and hold the camera
carefully............................................20
• Preventing jitter (camera shake).......20
Basic
Selecting the R e c o rd i n g Mo d e .............. ..2 1
Taking pictures using the automatic
function (Intelligent Auto Mode) ..............22
• Changing the settings .......................24
Taking pictures with your favorite
settings (Normal Picture Mode)...............26
Focusing..................................................27
Recording Motion Pictur e s......................29
• Recording still pictures while
recording motion pict u res.................31
Playing Back Pictures ([Normal Play]) ....32
• Selecting a picture ............................32
• Displaying Multiple Screens
(Multi Playback)................................33
• Using the Playback Zoom.................33
Playing Back Motion Pictures..................34
• Creating Still Pictures From a
Motion Picture...................................35
Deleting Pictures.....................................36
• To delete a single picture..................36
• To delete multiple pictures (up to 50)
or all the pictures.. .. ............ ........... .. ..37
Setting the Menu.....................................38
• Setting menu items ...........................38
• Using the Quick Menu.......................39
About the Setup Menu.............................40
Recording
About the LCD Monitor............................50
Using the Zoom.......................................51
• Using the Optical Zoom/Using the
Extended Optical Zoom (EZ)/
Using the Intelligent Zoom/
Using the Digital Zoom......................51
Taking Pictures Using the
Built-in Flash............................................53
• Switching to the appropriate flash
setting ...............................................53
Taking Close-up Pictures
([AF Ma c ro ]/[Macro Zoom]) .....................56
Taking Pictures with the Self-timer..........57
Compensating the Exposure...................58
Taking Pictures Using Auto Bracket........59
Record pictures that look like dioramas
(Miniature Effect Mode)....................... .... 60
Taking pictures that match the scene
being recorded (Scene Mode).................61
• [Portrait].............................................62
• [Soft Skin]..........................................62
• [Scenery]. ..........................................62
• [Panorama Shot]...............................63
• [Sports]..............................................65
• [Night Portrait]...................................65
• [Night Scenery]..................................65
• [Handheld Night Shot].......................65
• [Food]................................................66
• [Baby1]/[B a by 2 ].................. ...............66
• [Pet]...................................................67
• [Sunset].............................................67
• [High Sens.].......................................67
• [Glass Through].................................67
• [Photo Frame] ...................................67
Taking 3D pictures (3D Photo Mode)......68
- 2 -
Page 3

Taking a Picture with Face Recognition
Function..................................................69
• Face Settings....................................70
Entering Text...........................................73
Using the [Rec] Menu..............................74
• [Picture Size].....................................74
• [Quality].............................................75
• [Sensitivity]........................................76
• [White Balance].................................77
• [AF Mode] .........................................79
• [Quick AF].........................................81
• [Face Recog.]....................................81
• [i.Exposur e ] ............ ...........................81
• [Min. Shtr Speed] ..............................82
• [i.Resoluti o n ] .... .................................82
• [Digital Zoom]....................................82
• [Burst]................................................83
• [Color Mode] ..................................... 84
• [AF Assist Lamp]...............................84
• [Red-Eye Removal]...........................84
• [Stabilizer].........................................85
• [Date Stamp].....................................85
• [Clock Set].........................................85
Using the [Motion Picture] Menu.............86
• [Rec Mode]........................................86
• [Rec Quality] .....................................86
• [Continuous AF] ................................87
• [Wind Cut].........................................87
Connecting to other equipment
Playing Back Pictures on a TV
Screen ...................................................109
• Using VIERA Link (HDMI)...............111
Playing back 3D pictures.......................113
Saving the Recorded Still Pictures and
Motion Pictures............................... .......115
• Copy by inserting the SD card into
the recorder..................... ................115
• Copy the playback image using an
AV cable..........................................116
• Copying to a PC using
“PHOTOfunSTUDIO”......................117
Connecting to a PC ...............................118
• Acquiring of still pictures and [MP4]
motion pictures (other than
[AVCHD] motion pictures)...............119
• Uploading the images to sharing
sites.................................................121
Printing the Pictures..............................122
• Selecting a single picture and
printing it.........................................123
• Selecting multiple pictures and
printing them...................................123
• Print Settings...................................124
Playback/Editing
Various methods of playback..................88
• [Slide Show]................. .. ...................89
• [Filtering Play]...................................91
• [Calendar] .........................................92
Having Fun with Recorded Pictures........93
• [Auto Retouch]..................................93
• [Creative Retouch] ............................94
Using the [Playback] Menu .....................95
• [Upload Set]......................................95
• [Title Edit]..........................................97
• [Text Stamp]......................................98
• [Video Divide]..................................100
• [Resize]...........................................101
• [Cropping].......................................102
• [Favorite] .........................................103
• [Print Set]........................................104
• [Protect]...........................................106
• [Face Rec Edit] ...............................107
• [Copy]..............................................108
Others
Screen Display......................................127
Cautions for Use................................. ...129
Message Display...................................134
Troubleshooting.....................................136
- 3 -
Page 4
Before Use
Before Use
Care of the camera
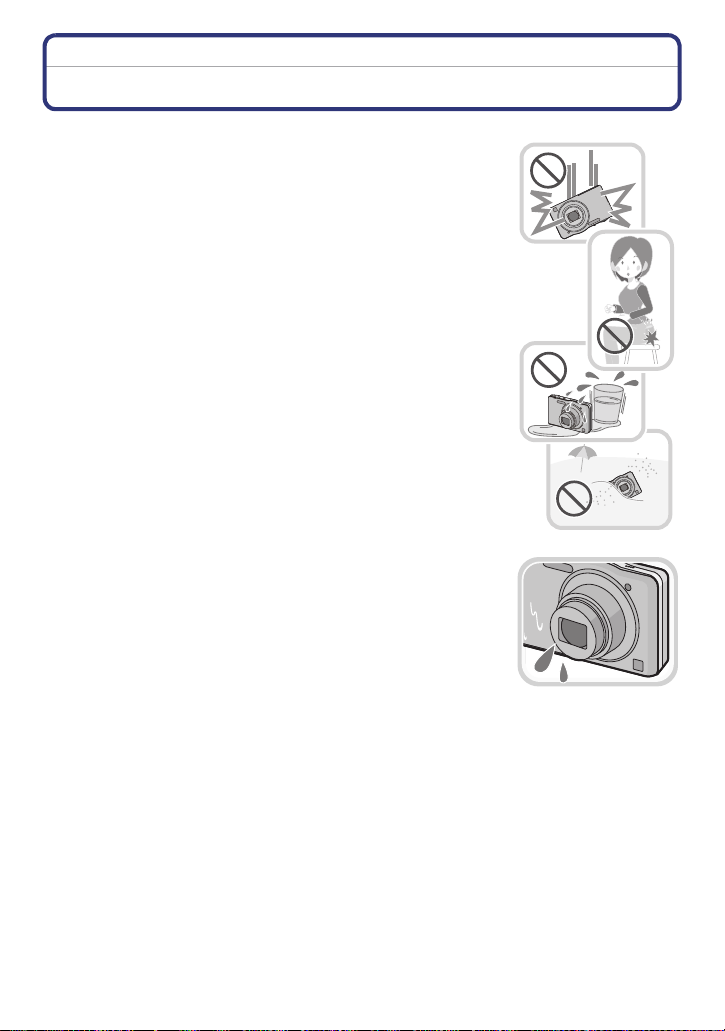
Do not subject to strong vibration, shock, or pressure.
•
The lens, LCD monitor , or extern al cas e may be damaged if used in
the following conditions.
It may also malfunction or image may not record if you:
–Drop or hit the camera.
–Sit down with the camera in your trousers pocket or forcefully
insert it into a full or tight bag, etc.
–Attach any items such as accessories to the strap attached to the
camera.
–Press hard on the lens or the LCD monitor.
This camera is not dust/splash/water proof.
Avoid using the camera in places with a lot of dust, water,
sand, etc.
•
Liquid, sand and other foreig n material may get into the space
around the lens, but to ns, et c. B e pa rt icularly caref ul sin ce it may not
just cause m al f unctions, bu t it m ay a ls o become irrepa r ab l e .
–Places with a lot of sand or dust.
–Places where water can come into contact with this unit, such as
when using it on a rainy day or at the beach.
∫ About Condensation (When the lens is fogged up)
•
Condensa ti on occurs when the ambient temperature or humidity
changes. Be careful of condensation since it causes lens stains,
fungus and camera malfunction.
•If condensation occurs, turn the camera off and leave it for about
2 hours. The fog will disappear naturally when the tempe rature of
the camera becomes close to the ambient temperature.
- 4 -
Page 5

Before Use
Standard Accessories
Check that all the accessories are supplied before using the camera.
•
The accessories and their sha pe will dif fe r de pending o n t he cou ntry or ar ea where t he camera
was purchased.
For details on the accessorie s, refer to Basic Owner’s Manual.
•Battery Pack is indicated as battery pack or battery in the text.
•SD Memory Card, SDHC Memory Card and SDXC Memory Car d are indicated as card in the
text.
•The card is optional.
You can record or play back pictures on the built-in memory when you are not using a
card.
•If any accessories are lost, customers in the USA and Puerto Rico should contact Panas onic’s
parts departme nt at 1-800- 833-9626 and cus tomers in Canada shou ld contac t 1-800-99- LUMIX
(1-800-995-8649) for further information about obtaining replacement pa rts.
- 5 -
Page 6

Before Use
76
4
10
98
11
5
Names and Functions of Main Parts
1Flash (P53)
2 Lens (P4, 130)
3 Self-timer indicator (P57)
AF Assist Lamp (P84)
4 LCD monitor (P50, 127, 130)
5 [MENU/SET] button (P38)
6 [DISP.] button (P50)
7 [Q.MENU] (P39)/
Cancel) button (P36)
8 [MODE] button (P21, 88)
9 REC/PLAY switch (P21, 32)
10 Charging lamp (P10)
11 Cursor buttons
A: 3/Exposure compensation (P58)
B: 4/Macro Mode (P56)
AF Tracking (P80)
C: 2/Self-timer (P57)
D: 1/Flash setting (P53)
In this Owner’s Manual, the cursor buttons are described as shown in the figure
below or described with 3/4/2/1.
e.g.: When you press the 4 (down) button
[] (Delete/
1 2 3
or Press 4
- 6 -
Page 7
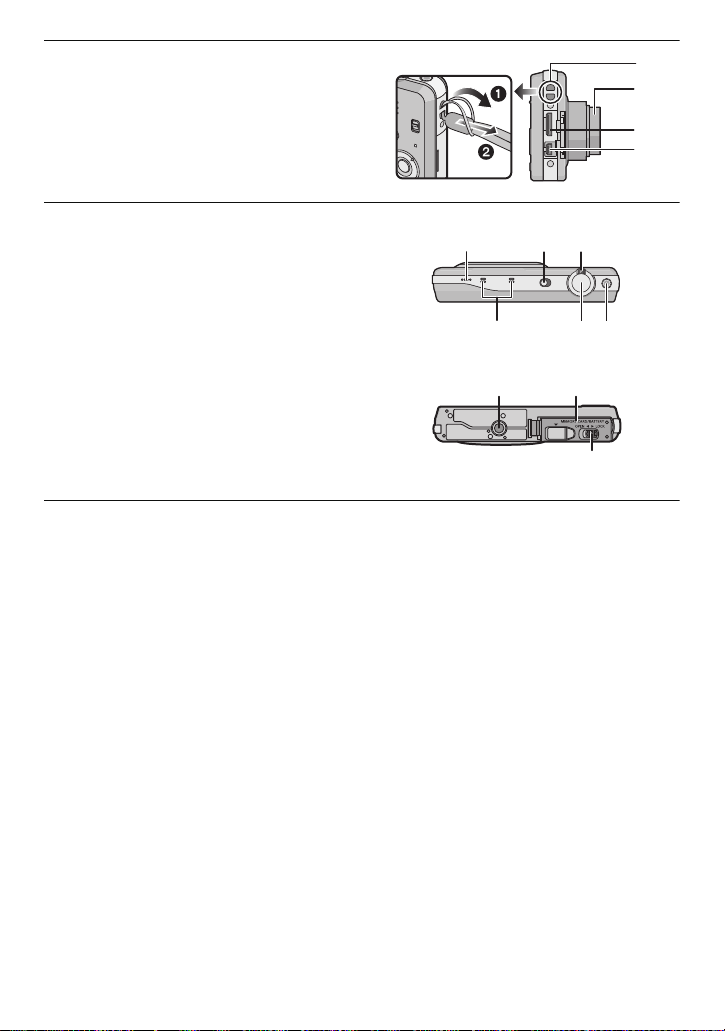
12 Strap eyelet
13
15
14
12
16 17 18
19 20 21
22 23
24
Be sure to attach the strap when using
•
the camera to ensure that you will not
drop it.
13 Lens barrel
14 [HDMI] socket (P109, 111)
15 [AV OUT/DIGITAL] socket (P10, 109,
119, 122)
16 Speaker (P42)
Be careful not to cover the speaker with
•
your finger. Doing so may make sound
difficult to hear.
17 Camera ON/OFF switch (P18)
18 Zoom lever (P51)
19 Microphone
20 Shutter button (P22, 26)
21 Motion picture button (P29)
22 Tripod receptacle
23 Card/Battery door (P9, 14)
24 Release lever (P9, 14)
Before Use
- 7 -
Page 8

Preparation
Preparation
Charging the Battery
Use the dedicated AC adaptor (supplied), USB connection cable (supplied) and
battery.
•
The battery is not charged when the camera is shipped. Charge the battery before use.
•Charge the battery only when it is inserted in the camera.
Camera conditions Charge
Power off (or [Sleep Mode] (P45) is
activated)
Power on —
¢ The camera can be suppli ed with power from a power outlet via the USB connec tion cable
(supplied) only during playback mode. (The battery is not charged.)
•When there is no remaining battery power, charging may be performed regardless of whether
the power switch is [ON] or [OFF].
•If no battery is inserted, no charging or power is supplied.
∫ About batteries that you can use with this unit
It has been found that counterfeit battery packs which look very similar to the
genuine product are made available for purchase in some markets. Some of
these battery packs are not adequately protected with internal protection to meet
the requirements of appropriate safety standards. There is a possibility that
these battery packs may lead to fire or explosion. Please be advised that we are
not liable for any accident or failure occurring as a result of use of a counterfeit
battery pack. To ensure that safe products are used. We recommend that a
genuine Panasonic battery pack is used.
≤
¢
- 8 -
Page 9
Preparation
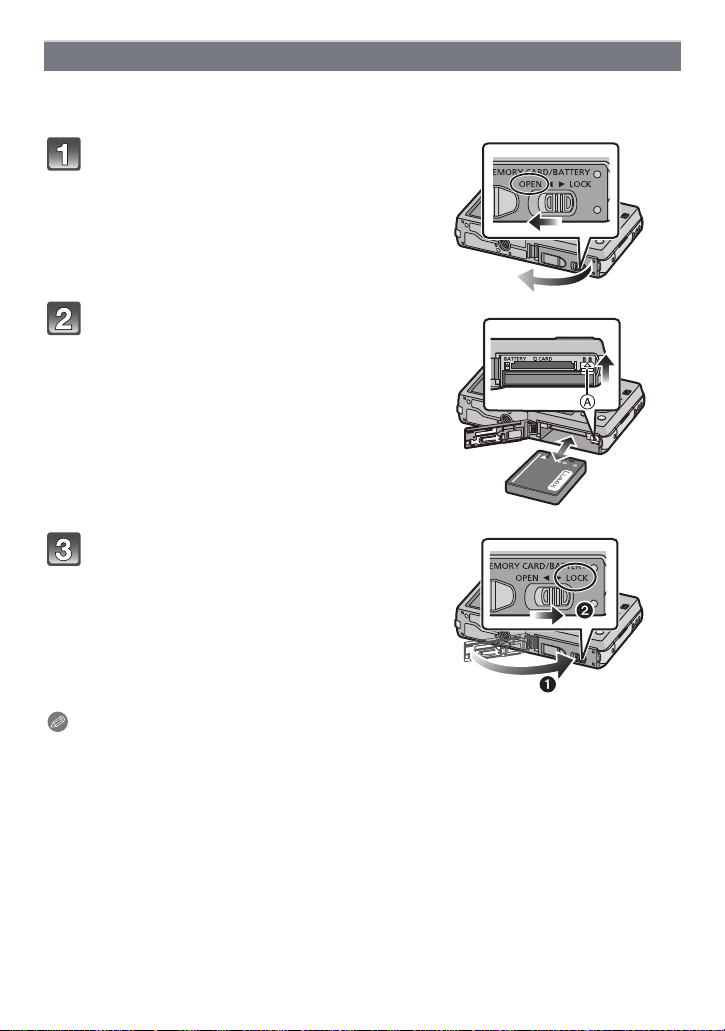
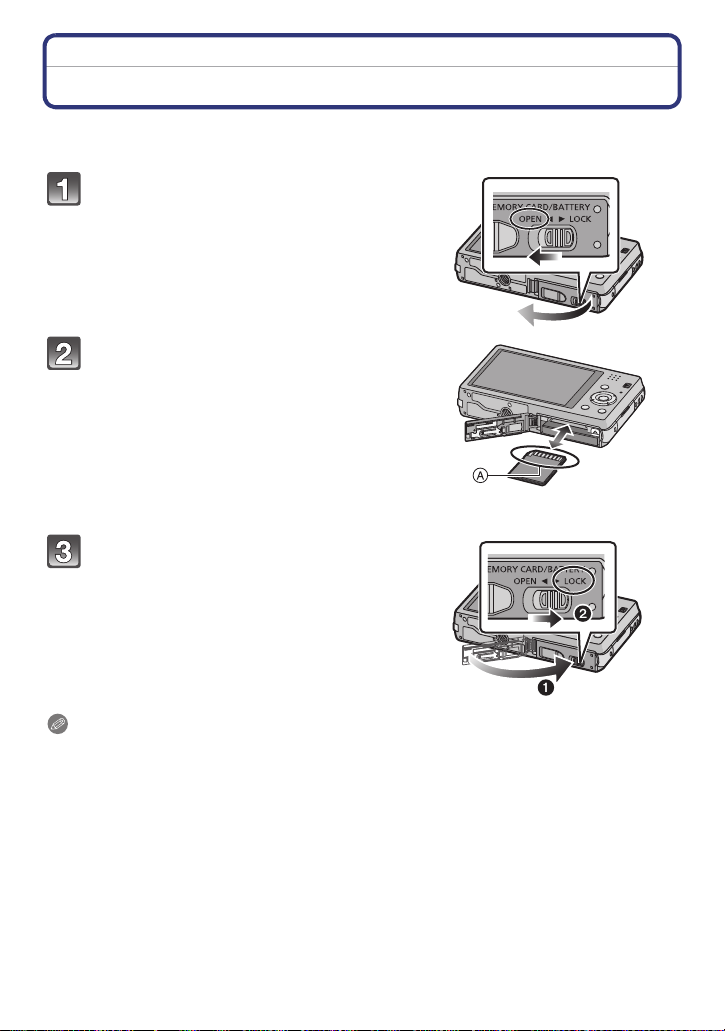
Inserting the Battery
Insert the battery into the camera to charge it.
•
Check that this unit is turned off.
Slide the release lever in the
direction of the arrow and open the
card/battery door.
• Always use genuine Panasonic batteries.
• If you use other batteries, we cannot
guarantee the quality of this product.
Being careful about the battery
orientation, insert all the way until
you hear a locking sound and then
check that it is locked by lever A.
Pull the lever A in the direction of
the arrow to remove the battery.
1:Close the card/battery door.
2:Slide the release lever in the
direction of the arrow.
Note
•
Turn the camera off and wait for the “LUMIX” display on the LCD monit or to clear before
removing the battery. (Otherwis e, this unit may no longer operate norma lly and the card itself
may be damaged or the recorded pic tures may be lost.)
- 9 -
Page 10
Preparation
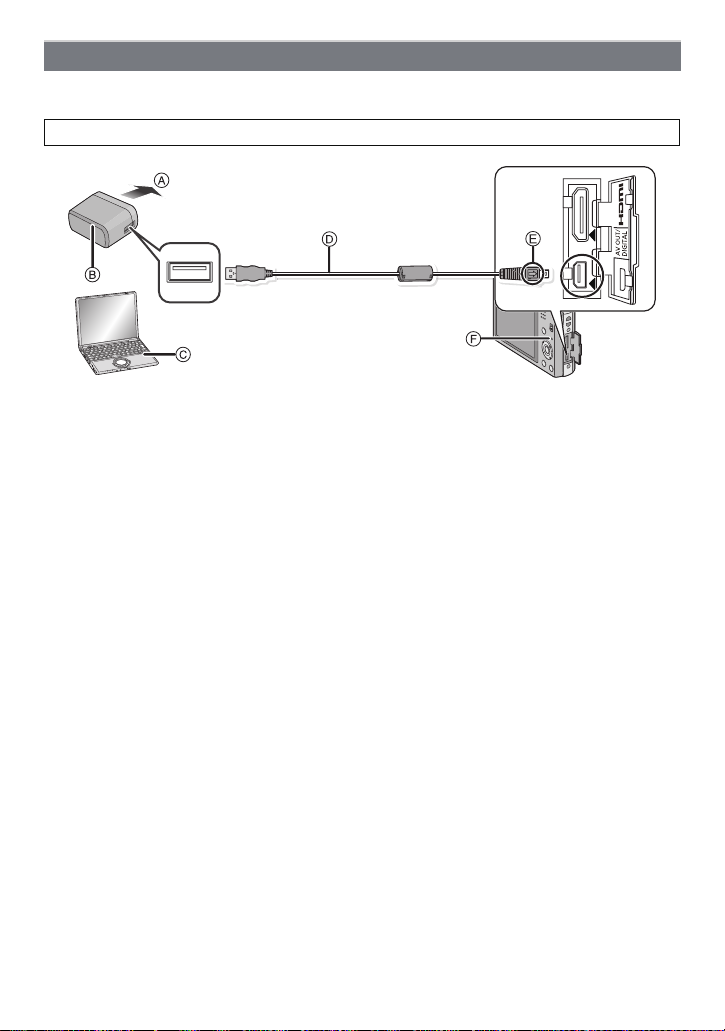
Charging
•Charge the batte ry in ar eas wit h an ambie nt tempe ratur e, bet ween 1 0 oC and 30oC (5 0 oF
and 86 oF) (same as the battery temperature), is recommended.
Check that this unit is turned off.
A To power outlet
B AC adaptor (supplied)
C PC (Turn the power on)
D USB connection cable (supplied)
•Check the direc tions of the connectors, and plug them straight in or unplug them st raight
out. (Otherwise the connectors may bend out of shape, which may cause malfunction.)
E Align the marks, and insert.
F Charging la mp
(Charging from the power outlet)
Connect the AC adaptor (supplied) and this camera with the USB
connection cable (supplied), and insert the AC adaptor (supplied) into the
power outlet.
•Use the AC adaptor (supplied) indoors.
(Charging from a computer)
Connect the computer and this camera with the USB connection cable
(supplied).
•Charging may not be possible depending on computer specifications.
•If the computer enters a suspended state while charg i ng the battery, charging will stop.
•Connecting th is camera to a notebook computer that is not connect ed to a power outlet will
cause the notebook computer battery to drain faster. Do not leave the camera connected for
extended periods of time.
•Be sure to always conne ct the camera t o a computer USB terminal. Do not connec t the camera
to a monitor, keyboard or printer USB termina l, or a USB hub.
- 10 -
Page 11

Preparation
∫ About the charging lamp
On: Charging.
Off: Charging has completed. (When charging is complete, disconnect the camera
from the power outlet or computer.)
∫ Charging time
When using the AC adaptor (supplied)
Charging time Approx. 180 min
•
The indicated charging ti me is for when the battery has been discharged completely.
The charging time may vary depending on how the battery has been used. The charging
time for the battery in hot/cold envi ronments or a battery that has not been used for a
long time may be longer than normal.
•The charging time when connected to the computer depends on the computer’s
performance.
∫ Battery indication
The battery indication is displayed on the LCD monitor.
The indication turns red an d blinks if the remaining battery power is low. Recharge the battery
•
or replace it with a fully charged battery.
Note
Do not leave any metal items (such as clips) near th e co ntact areas of the power plug.
•
Otherwise, a fire and/or electric shocks may be caused by short-circuiting or the
resulting heat generated.
•Do not use any other USB connection cables except the supplied one.
Use of cables other than the su pplied USB connection cable may cause malfunction.
•Do not use a USB exte nsion cable.
•The AC adaptor (supplied) and USB connection cable (supplied) are for this camera only. Do
not use them with other devic es.
•Remove the batt ery af ter use. (The bat tery will be ex hauste d if left for a lon g period of time af ter
being charged.)
•The battery bec omes warm after using and during and after charging. The camera also
becomes warm during use. This is not a malfunction.
•The battery can be recharged even when it s till has some power left, but it is not recommended
that the battery char ge be frequently topped up while the battery is fully charged. (Since
characteristic swelling may occur.)
•If a problem occurs in the power outlet, such as a power outage, charging may not be
completed normally. If this happens, disconnect the USB connection cable (sup plied) and
connect it again.
•If the charging lamp does not turn on or blinks when you connect the AC adaptor (supplied ) or
PC, this indicates that th e charging has been stopped becaus e the unit is not in a temperature
range suitable for char ging, and does not indicate a fault.
Reconnect the USB connection cable (supplied) in a location where the ambient temperature
(and the temperature of batt ery) is in a 10 oC to 30 oC (50 oF to 86 oF) range, and try charging
again.
- 11 -
Page 12

Preparation
Approximate operating time and number of recordable pictures
∫ Recording still pictures
Number of recordable
pictures
Recording time Approx. 110 min
Approx. 220 pictures
By CIPA standard in Normal
Picture Mode
Recording conditions by CIPA standard
CIPA is an abbreviation of [Camera & Imaging Products Association].
•
•Temperature: 23 oC (73.4 oF)/Humidity: 50%RH when LCD monitor is on.
•Using a Panasonic SD Memory Card (32 MB).
•Using the supplied battery.
•Starting recording 30seconds after the camera is turned on. (When the Optical Image
Stabilizer function is set to [ON].)
•Recording once every 30 seconds using full flash every second recording.
•Rotating the zoom lever from Tele to Wide or vice versa in every recording.
•Turning the camera off every 10reco rdings and leaving it until the temper ature of the battery
decreases.
The number of recordable pictures varies depending on the recording interval time.
As the recording interval time becomes longer, the number of recordable pictures
decreases. [For example, if you were to take one picture every two minutes, then the
number of pictures would be reduced to approximately one-quarter of the number
of pictures given above (based upon one picture taken every 30 seconds).]
∫ Recording motion pictures
(Recording with picture quality set
Recordable time Approx. 60 min Approx. 60 min
Actual recordable time Approx. 30 min Approx. 30 min
•
These times are for an ambient temperature of 23 oC (73.4 oF) and a humidity of 50%RH.
Please be aware that these times are approximate.
[AVCHD]
(Recording with pict ure quality set
to [FSH])
[MP4]
to [FHD])
•Actual reco rdable time is the time available for recording when repeating actions such as
switching the power supply [ON] /[OFF], starting/s topping recording, zoom operation, etc.
•Maximum time to rec ord mot ion pictu res c ontinu ously with [AVCHD] is 29minute s 59seconds.
(excluding when [SH] is set)
•Maximum time to record motion pictures continuously with [MP4] is 29 minutes 59 seconds.
Also, motion pictures recorded continuously in [MP4] is up to 4 GB. Given this constraint, the
maximum length of continuous recording in [FHD] is approximately 24 minutes 43 seconds.
The maximum available recording time continuously is displayed on the screen.
- 12 -
Page 13

Preparation
∫ Playback
Playback time Approx. 150 min
Note
The operating times and number of recordable pictures will differ according to the
•
environment and the operating conditions.
For example, in the following cases, the operating times will sh orten and the number of
recordable pictures is reduced:
–In low-temperature environments, such as on ski slopes.
–When using [LCD Mode].
–When ope rations such as flash and zoom are used repeatedly.
•When the operating time of the camera becomes extremely short even after properly charging
the battery, the life of the battery may have expired. Buy a new battery.
- 13 -
Page 14
Preparation
Inserting and Removing the Card (optional)
•Check that this unit is turned off.
•We recommend using a Panasonic card.
Slide the release lever in the
direction of the arrow and open the
card/battery door.
Push it securely all the way until you
hear a “click” while being careful
about the direction in which you
insert it.
To remove the card, push the card
until it clicks, then pull the card out
upright.
A:Do not touch the connection terminals of
the card.
1:Close the card/battery door.
2:Slide the release lever in the
direction of the arrow.
Note
Turn the camera off and wait for the “LUMIX” display on the LCD monit or to clear before
•
removing the card. (Otherwis e, this unit may no longer operat e normally and the card it self may
be damaged or the recorded pictures may be lost.)
- 14 -
Page 15
Preparation
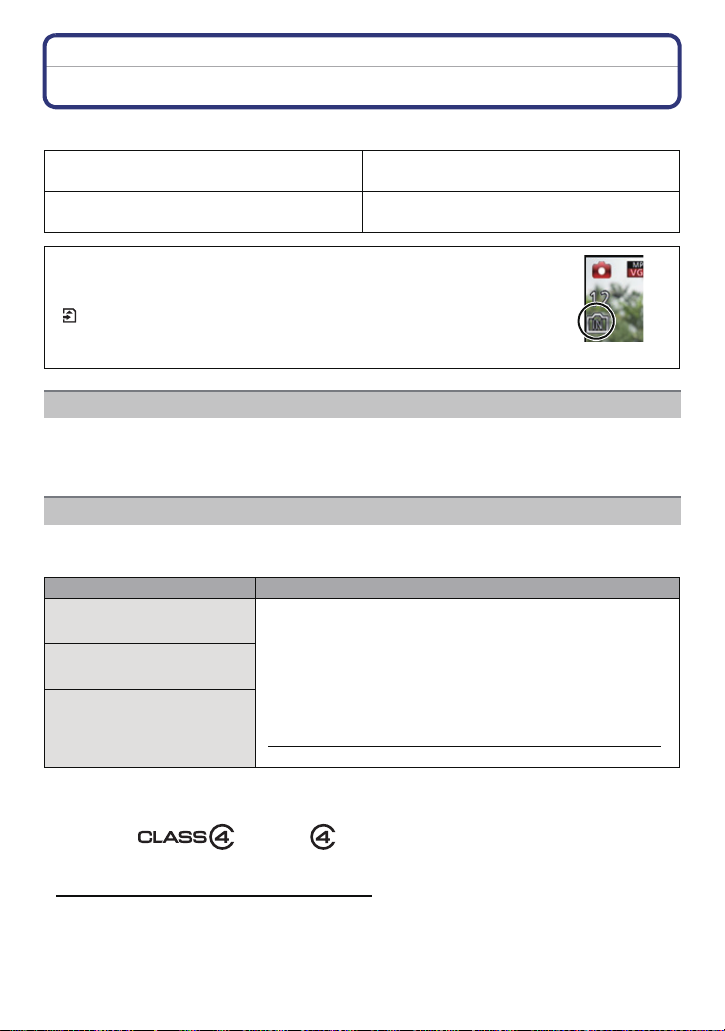
About the Built-in Memory/the Card
The following operations can be performed using this unit:
When a card has not been inserted
When a card has been inserted
Pictures can be recorded on the built-in
memory and played back.
Pictures can be recorded on the card and
played back.
•When using the built-in memory:
>ð (access indication
k
•When using the card:
(access indication
¢ The access indication is dis played in red when pictures are bei ng
recorded on the built-in memory (or the card).
¢
)
¢
)
Built-in Memory
•You can copy the recorded pictures to a card. (P108)
•Memory size: Approx. 70 MB
•The access time for the built-in memory may be longer tha n the access time for a card.
Card
The following cards, which conform to the SD video standard, can be used with this unit.
(These cards are indicated as card in the text.)
Remarks
SD Memory Card
(8 MB to 2 GB)
SDHC Memory Card
(4 GB to 32 GB)
SDXC Memory Card
(48 GB, 64 GB)
¢ SD Speed Class is the spee d st an dard r egarding cont inuo us writin g. Chec k via the la bel on
the card, etc.
•Use a card with SD Speed Class
higher when recording motion pictures.
•SDHC Memory Card can be used with SDHC Memory Card
or SDXC Memory Card compatible equipment.
•SDXC Memory Card can only be used with SDXC Memory
Card compatible equipment.
•Check t hat th e PC and othe r equip ment are comp atib le when
using the SDXC Memory Cards.
http://panasonic.net/avc/sdcard/information/SDXC.html
•Only the cards with capacity listed left can be used.
¢
with “Class 4” or
e.g.:
•Please confirm the latest information on the following website.
http://panasonic.jp/support/global/cs/dsc/
(This site is English only.)
- 15 -
Page 16

Preparation
2
A
Note
During access (image writing, reading and deleting, formatting etc.), do not turn off the
•
power, remove the battery, card or disconnect the AC adaptor (supplied). Furthermore,
do not subject the camera to vibration, impact or static electricity.
The card or the data on the card may be damaged, and this unit may no longer operate
normally.
If operation fails due to vibration, impact or static electricity, perform the operation
again.
•Write-Protect switch A provided (When this switch is set to the [LO C K] position,
no further data writing, dele tion o r format ting is possibl e. The ability t o wri te, delet e
and format data is restored when the switch is returned to its original position.)
•The data on the built-in memory or the card may be da maged or lost due to
electromagnetic waves, static electricity or breakdown of the came ra or the card.
We recommend storing important data on a PC etc.
•Do not format the c ard on your PC or other equipment. Format it on the camera
only to ensure proper operat ion. (P48)
•Keep the Memory Card out of reach of children to prev ent swallowing.
- 16 -
Page 17

Preparation
A
B
Approximate number of recordable pictures and available recording time
∫
About the display of the number of recordable pictures and available recording time
•To switch between the display of number of recordable pictures and available recording time,
press [DISP.] several times. (P50)
A Number of recordable pictures
B Available recording time
•The number of rec ordable pictures and the availab l e recording time are an approximation.
(These vary depending on the recording conditions and the type of card.)
•The number of rec ordable pictures and the availab l e recording time varies depending on the
subjects.
∫ Number of recordable pictures
•
[i99999] is displayed if there are more than 100,000 pictures remaining.
Quality [A]
Picture size
14M (4:3) 12 330 5490 10980
5M (4:3) 24 650 10620 21490
0.3M (4:3) 390 10050 162960 247150
∫ Available recording time (when recording motion pictures)
“h” is an abbreviation for hour, “m” for minute and “s” for second.
•
[AVCHD]
Recording quality
setting
FSH j 14m00s 4 h10m 8 h27m
SH j 14m00s 4 h10m 8 h27m
[MP4]
Recording quality
setting
FHD j 12m21s 3h23m17s 6h51m17s
HD j 23m36s 6h28m6s 13h5m11s
VGA 1m45s 51m57s 14h14m8s 28h48m4s
Built-in Memory
(Approx. 70 MB)
Built-in Memory
(Approx. 70 MB)
Built-in Memory
(Approx. 70 MB)
2GB 32 GB 64 GB
2GB 32 GB 64 GB
2GB 32 GB 64 GB
Note
Number of recordable pictures/available recording time for the card may decrease when
•
[Upload Set] is performed.
•Maximum time to rec ord mot ion pictu res c ontinu ously with [AVCHD] is 29minute s 59seconds.
(excluding when [SH] is set)
•Maximum time to record motion pictures continuously with [MP4] is 29 minutes 59 seconds.
Also, motion pictures recorded continuously in [MP4] is up to 4 GB.
maximum length of continuous recording in [FHD] is approximately 24 minutes 43 seconds.
The maximum available recording time continuously is displayed on the screen.
- 17 -
Given this constraint, the
Page 18

Preparation
Setting Date/Time (Clock Set)
•The clock is not set when the camera is shipped.
Slide the REC/PLAY switch to [!]
and then turn the camera on.
• If the language select screen is not displayed,
proceed to step
Press [MENU/SET].
Press 3/4 to select the language, and press [MENU/SET].
Press [MENU/SET].
4.
Press 2/1 to select the item s (year , month ,
day , hou r, minute, display s equenc e or time
display format), and press 3/4 to set.
A: Time at the home area
B: Time at the travel destination
•
You can cancel without setting the clock by pressing
[].
Press [MENU/SET] to set.
Press [MENU/SET].
- 18 -
Page 19

Preparation
Changing the Clock Setting
Select [Clock Set] in the [Rec] or [Setup] menu, and press [MENU/SET]. (P38)
The clock can be reset as shown in steps 5 and 6.
•
•The clock setting is maintained for 3 months using the built-in clock battery even
without the battery. (Leave the charged battery in the unit for 24 hours to charge the
built-in battery.)
Note
•
If the clock is not set, t he correct date cannot be printed when you order a photo studio to print
the picture, or when you stamp the date on the pictures with [Date Stamp] or [Text Stamp].
•If the cloc k i s set, the c orr ect dat e can be printed ev e n if t he date is not disp lay ed on th e s cree n
of the camera.
- 19 -
Page 20
Preparation
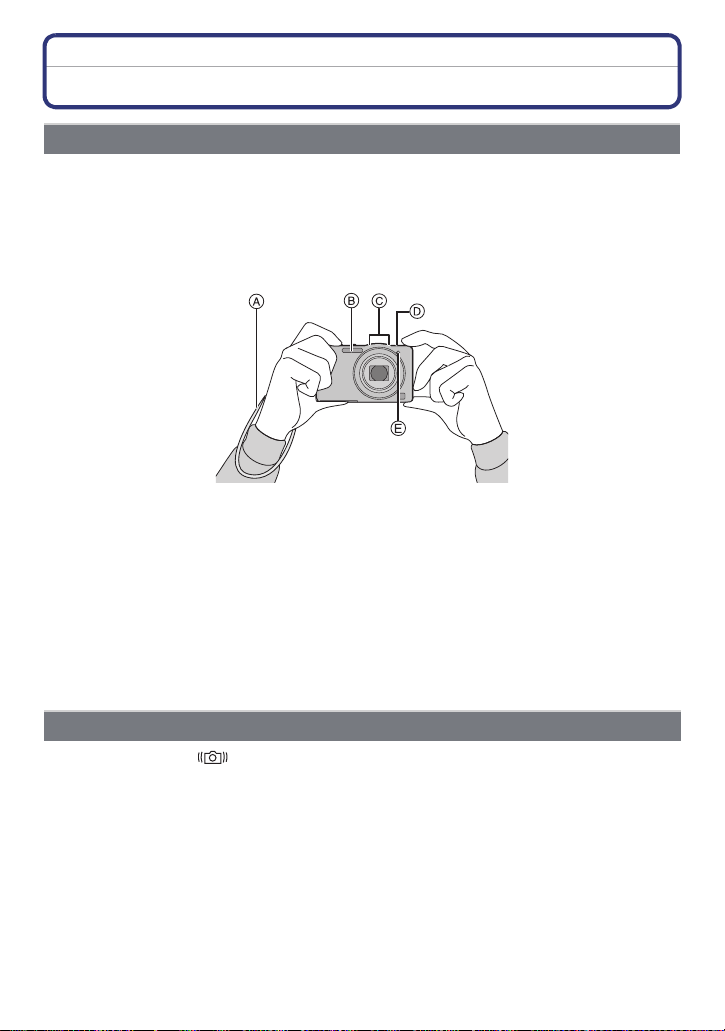
Tips for taking good pictures
Fit the strap and hold the camera carefully
Hold the camera gently with both hands, keep your arms still at your side
and stand with your feet slightly apart.
•To prevent dropping, be sure to attach the supplied strap and fit it to your wrist. (P7)
•Be careful not to move the camera when you press the shutter button.
•Be careful not to put your fingers on the flash, AF assist lamp, microphone, speaker or lens etc.
A Strap
B Flash
C Microphone
∫ Direction Detection Function ([Rotate Disp.])
Pictures recorded with the camera held vertically are played back vertically (rotated). (Only
when [Rotate Disp.] (P48) is set)
•When the camera is held v ertically and tilted up and down to record pic tures, the Direction
Detection function may not work correctly.
•Motion pictures taken with the camera held ve rtically are not displayed vertically.
D Speaker
E AF assist lamp
Preventing jitter (camera shake)
When the Jitter alert [ ] appears, use [Stabilizer] (P85), a tripod or the Self-timer (P57).
Shutter speed will be slower particularly in the following cases. Keep the ca mera still from the
•
moment the shutter button is pressed until the picture appears on the screen. We recommend
using a tripod .
–Slow sync./Red-Eye Reduction
–In [Night Portrait] or [NightScenery] in Scene Mode
–When th e shutter speed is slowed in [Min. Shtr Speed]
- 20 -
Page 21

Basic
Basic
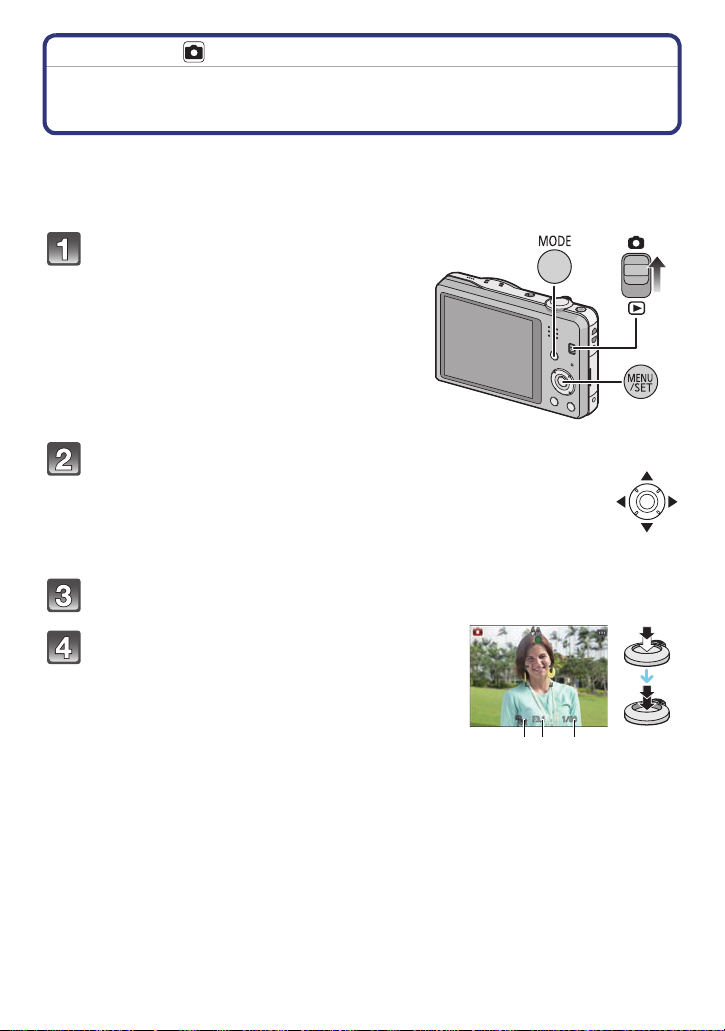
Selecting the Recording Mode
Slide the REC/PLAY switch to [!].
Press [MODE].
Press 3/4/2/1 to select the Recording
Mode.
Press [MENU/SET].
∫ List of Recording Modes
¦ Intelligent Auto Mode (P22)
The subjects are recorded using settings automatically selected by the camera.
! Normal Picture Mode (P26)
The subjects are recorded using your own settings.
Miniature Effect Mode ( P60)
This is an imaging effect which defocuses the surroundings to make it look like a
diorama. (also known as Tilt Shift Focus)
Û
Scene Mode (P61)
This allows you to take pictures that match the scene being recorded.
3D Photo Mode (P68)
Takes a 3D picture.
Note
When the mode has been switche d from Playb ack Mode to Rec ording Mode, the prev iously set
•
Recording Mode will be set.
- 21 -
Page 22
Basic
1
2
Recording Mode:
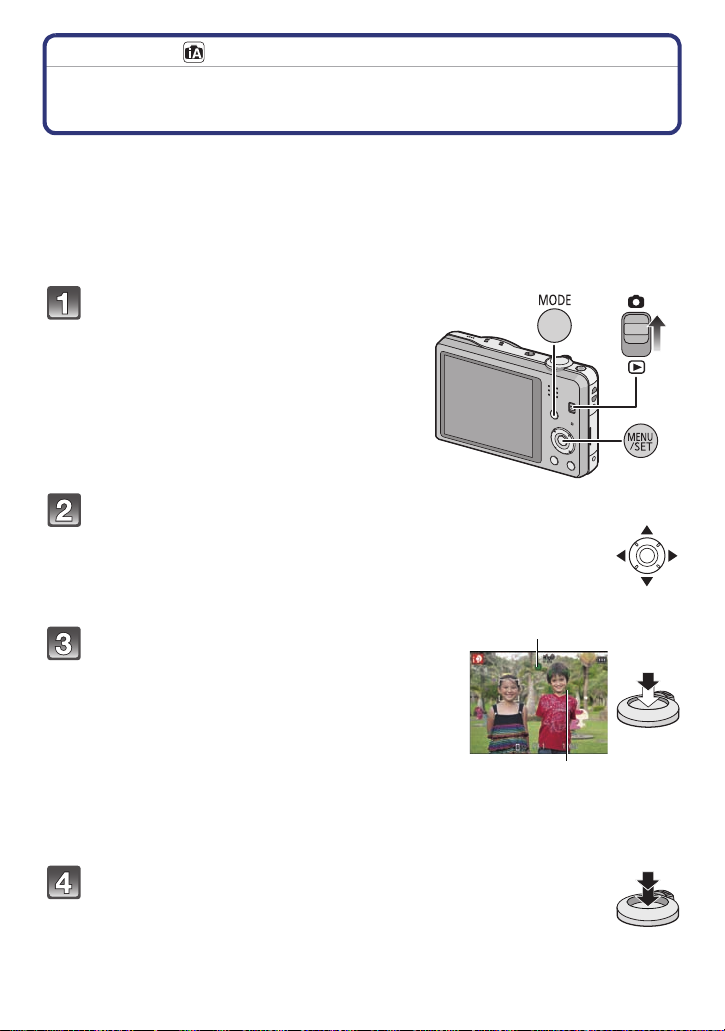
Taking pictures using the automatic function
(Intelligent Auto Mode)
The camera will set the most appropriate settings to match the subject and the recording
conditions so we recommend this mode for beginners or those who want to leave the
settings to the camera and take pictures easily.
•
The following functions are activated automatically.
–Scene Detection/Backlight Compensation/Intelligent ISO sensitivity contro l/Auto White
Balance/Face Detection/[Quick AF]/[i.Exposur e]/[i.Resolution]/ [i .ZOOM]/[AF Assist La m p] /
[Red-Eye Removal]/[Stabilizer]/[Continuous AF]/[Wind Cut]
•Image quality is fixed to [A].
Slide the REC/PLAY switch to [!],
and then press [MODE].
Press 3/4/2/1 to se lect [Inte lligent Auto],
and then press [MENU/SET].
Press the shutter button halfway to focus.
• The focus indication 1 (green) lights when the subject
is focused.
• The AF area 2 is displayed around the subject’s face
by the Face Detection function. In other cases, it is
displayed at the point on the subject which is in focus.
• The minimal distance (how close you can be to the
subject) will change depending on the zoom factor.
Please check with the recordable range display on
the screen.
• You ca n set th e AF trac king by pressing 3. For details,
refer to P80. (AF tracking is canceled by pressing 3
again)
Press the shutter button fully (push it in
(P27)
further), and take the picture.
- 22 -
Page 23
Basic
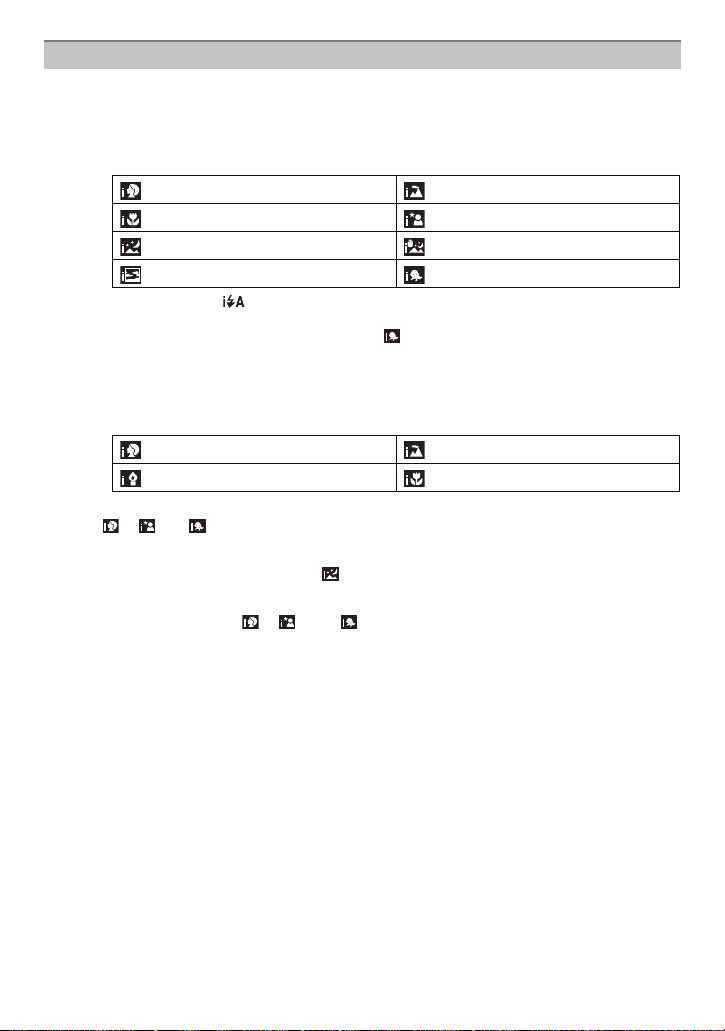
Scene Detection
When the camera identifies the optimum scene, the icon of the scene concerned is
displayed in blue for 2 seconds, after which its color changes to the usual red.
When taking pictures
¦
>
[i-Portrait] [i-Scenery]
1
[i-Macro] [i-Night Portrait]
[i-Night Scenery] [iHandheld Nite S hot]
[i-Sunset] [i-Baby]
¢1 Only when [ ] is selected.
¢2 Only displayed when [iHandheld Nite Shot] is set to [ON].
¢3 When [Face Recog.] is set to [ON], [ ] will be displayed for birthdays of
registered faces already set only when the face of a person 3 years old or
younger is detected.
¢
2
¢
3
¢
When recording motion pictures
¦ > [i-Portrait] [i-Scenery]
[i-Low Light] [i-Macro]
[¦] is set if none of the scenes are applic able, and the standard settings are set.
•
•When [ ], [ ] or [ ] is se lected, the camera automatically detects a person’s face, and it
will adjust the focus and exposure. (Face Detection)
•If a tripod is used, for ins t ance, an d the c amera has judged t hat camer a shake is minima l when
the Scene Mode has been identified as [ ], the shutter speed will be set to a maximum of
8 seconds. Take care not to move the camera while taking pictures.
•When [Face Recog.] is set to [ON], and the face similar to the registered face is detected, [R] is
displayed in the top right of [ ], [ ] and [ ].
•Due to conditions such as the ones below, a different scene may be identified for the same
subject.
–Subje ct conditions: When the face is bright or dark, the size of the subject, the color of the
subject, the dist ance to the subject, the contrast of the subject, when the subject is moving
–Recording conditions: Sunset, sunrise, under low brightness conditions, when the camera is
shaken, when zoom is used
•For the best results, it is recommended that you take pictures in the appropriat e Recording
Mode.
- 23 -
Page 24

Basic
Changing the settings
Following menus can be set.
Menu Item
[Rec] [Picture Size]¢/[Burst]¢/[Color Mode]¢/[Motion Deblur]/
[Motion Picture] [Rec Mode] /[Rec Quality]
[Setup] [Clock Set]/[World Time]/[Beep]
For the setting method of the menu, refer to P38.
•
¢ Settings may be different from other Recording Modes.
Menus specific to Intelligent Auto Mode
∫ [Burst] (P83)
[Burst] can be set in [ ]. In this setting, the burst speed is automatically adjusted based
on the movement of the subject.
∫ [Color Mode]
Color setting of [Happy] is available in [Color Mode]. It is possible to automatically take a
picture with a higher level of brilliance for the color brightness and vividness.
∫ [Motion Deblur]
When [Motion Deblur] is set to [ON], [ ] is displayed on the recording screen. The
camera automatically sets an optimal shutter speed according to the motion of the subject
to reduce blur on the subject. (In such a case, the number of pixels may be reduced.)
[iHandheld Nite Shot]/[iHDR]/[Face Recog.]
¢
/[Language]/[Stabilizer
Demo.]
- 24 -
Page 25

Basic
∫ [iHandheld Nite Shot]
When [iHandheld Nite Shot] is set to [ON] and [ ] is detected while taking handheld night
shots, pictures of the night scenery will be taken at a high burst speed and composed into
a single picture. This mode is useful if you want to take stunning night shots with minimal
jitter and noise, without using a tripod. If the camera is mounted on a tripod or other type of
stand, [ ] will not be detected.
∫ [iHDR] (Backlight Compensation)
When [iHDR] is set to [ON], multiple still pictures are recorded with differing exposures and
combined to create a single still picture rich in gradation.
When you record a moving subject, residual images may be recorded.
•
•When [ ]
automatically as required.
¢ Displayed when the camera has di st inguished a backlight. Backlighting is the term used to
¢
is displayed on the screen but not otherwise, the iHDR function will work
describe the darkening of a subject caused by recording against light from behind the
subject.
The actual backlighting conditions and [ ] may not always match.
•Even with [iHDR] set to [OFF], if the camera distinguishes a backlight, backlight compensation
will work automatically, brightening the recor ded image.
•In the following cases, a compensated picture is not created.
–When the zoom factor exceeds 10k.
–When recording in [Burst].
About the flash (P53)
•When [ ] is selected, [ ], [ ], [ ] or [ ] is set depending on the t ype of subject and
brightness.
•When [ ], [ ] is set, Digital Red-Eye Correction is enabled.
•Shutter speed will be slower during [ ] or [ ].
- 25 -
Page 26
Basic
A B C
Recording Mode:
Taking pictures with your favorite settings
(Normal Picture Mode)
The camera automatically sets the shutter speed and the aperture value according to the
brightness of the subject.
You can take pictures with greater freedom by changing various settings in the [Rec]
menu.
Slide the REC/PLAY switch to [!],
and then press [MODE].
Press 3/4/2/1 to select [Normal Picture],
and then press [MENU/SET].
Aim the AF area at the point you want to focus on.
Press the shutter button halfway to focus
and then press it fully to take the picture.
A ISO sensitivity
B Aperture value
C Shutter speed
• Aperture value and shutter speed is display ed in red
when correct exposure is no t achie ved. (E xclude when
using a flash)
- 26 -
Page 27

Basic
A
B
5 cm (0.16 feet)
T
W
2 m (6.6 feet)
9
1.5 m (4.9 feet)
Focusing
Aim the AF area at the subject, and then
press the shutter button halfway.
Focus
Focus indi ca t i on A On Blinks
AF area B White>Green White>Red
Sound B e eps 2 times Beeps 4 tim es
When the subject is focused When the subject is not
focused
•The AF area may be displayed larger for certain zoom magnifications and in dark places.
∫ About focus range
The focus range is displayed when operating the zoom.
•
The focus range is displayed in red when it is not focu sed af ter press ing
the shutter button halfway.
The focus range may change gradually depending on the zoom
position.
e.g.: Range of focus dur ing the Intelligent Auto Mode
- 27 -
Page 28

Basic
∫ When the subject is not in focus (such as when it is not in the center of the
composition of the picture you want to take)
1 Aim the AF area at the subject, and press
the shutter button halfway to fix the focus
and exposure.
2 Press and hold the shutter button
halfway while moving the camera as you
compose the picture.
You can repeatedly retry the actions in step 1 before pressing the shutter button fully.
•
∫ Subject and recording conditions which are difficult to focus in
•
Fast-moving subjects, extremely bright subjects or subjects without contrast
•When recording subjects through windows or near shiny objects
•When it is dark or when jitter occurs
•When the camera is too close to the subject or when taking a picture of both dista nt and near
subjects
- 28 -
Page 29
Basic
B
A C
Applicable modes:
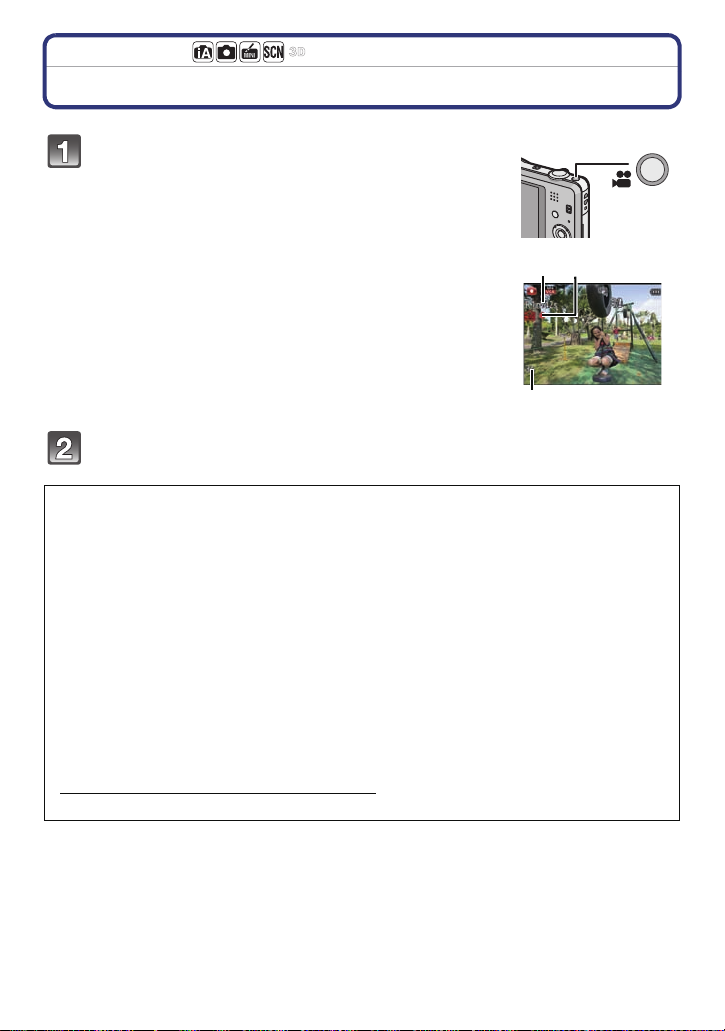
Recording Motion Pictures
Start recording by pressing the motion picture
button.
A Available recording time
B Elapsed recording time
• You can record motion pictures fitting each Recording Mode.
• Release the motion picture button right after you press it.
• The recording state indicator (r ed) C will flash while recording
motion pictures.
• For the setting of the [Rec Mode] and [Rec Quality], refer t o
P86.
Stop the recording by pressing the motion picture button again.
∫ About the recording format for recording motion pictures
This unit can record motion pictures in either AVCHD or MP4 formats.
AVCHD:
This is a format for precise, high-definition video. This format is best used when the video
will be displayed on a high-definition TV, or saved to a disc and watched on a computer.
MP4:
This is a simpler video format best used when extensive editing is needed, or when
uploading videos to the internet.
∫ About the compatibility of the recorded motion pictures
Motion pictures recorded in [AVCHD] or [MP4] may be played back with poor picture or
sound quality or playback may not be possible even when played back with equipment
compatible with these formats. Also, the recording information may not be displayed
properly. In this case, use this unit.
•
For details on MP4 compatible devices, refer to the support sites below.
http://panasonic.jp/support/global/cs/dsc/
(This Site is English only .)
- 29 -
Page 30

Basic
Note
When recording to the built-in memory, the [MP4] setting is fixed to [VGA].
•
•The available recording time displayed on the screen may not decrease regularly.
•Depending on the type of the card, the card access indication may appear for a while after
recording m otion picture s . This is not a malfun c t i on .
•The screen may be blacked out momentarily, or the unit may record noise due to static
electricity or electromagnetic waves, etc. depending on the environment of the motion picture
recording.
•Even if the aspect ratio setting is the same in still pictures and mot ion pictures, the angle of
view may change at the start of the motion picture recording.
When [Video Rec Area] (P44) is set to [O N], angle of view during motion pict ure recording is
displayed.
•About zooming while recording motion pictures
–If the Extended Optical Zoom was used before pressing the motion picture butto n, settings
will be canceled, and the recordable range will change drastically.
–If you operate the zoom, etc. while recording motion pictures, the sound of th e operat ion may
be recorded.
–The zoom speed will be slower than usual when recording motion pictures.
–Operating the zoom while recording motion pictures can t ake time for the image t o come in to
focus.
•If you end motion picture recording aft er a short time when using Miniature Effect Mode, the
camera may go on recording for a cert ain period. Continue to hold the camera until the
recording ends.
•It is recommended to use a fully charged battery when recording motion pictures.
•Motion pict ures cannot be recorded with [Panorama Shot] in Scene Mode.
•It will be recorded in following categories for certain Scene Modes. A motion picture recording
matching each scene will be performed for the ones not listed below.
Selected Scene Mode Scene Mode while recording motion picture
[Baby1]/[Baby2] Portrait Mode
[Night Portrait], [Night Scenery],
[Handheld Night Shot]
[Sports], [Pet], [Photo F r ame] Normal motion pict ur e
Low Light Mode
- 30 -
Page 31

Basic
Recording still pictures while recording motion pictures
Still pictures can be recorded even while recording a motion picture. (Simultaneous
recording)
During motion picture recording, press th e sh utter bu tton ful ly to re cord a
still picture.
Note
•
The picture is saved with the following conditions.
[AVCHD] Picture size [MP4] Picture size
[FSH]/[SH] 3.5 M (16:9) [ F HD]/ [HD] 3.5 M (16:9)
•You can record up to 2 pic tures per motion picture recording.
•Simulta neous recording is not possible when [VGA] in [MP4] is set.
•If you press the shutter button halfway to take a picture while recording a motion picture, the
camera will refocus and the refocus movement will be rec orded to the motion picture. To
prioritize the motion picture image, taking still pictures by fully pressing the shutter button is
recommended.
•Picture size and number of recordable pictures are displayed by pressing the shutter button
halfway.
•Recording of motion pict ure will continue after taking the still picture.
•In Miniature Effect Mode, recording will begin shortly after pressing the shutter button fully.
•Zooming may stop when a picture is recorded while zooming.
•Operation sound of the shutter button may be recorded when a picture is taken during motion
picture recording.
•The flash setting is fixed to [Œ].
- 31 -
Page 32

Basic
B
A
Playing Back Pictures ([Normal Play])
Slide the REC/PLAY switch to [(].
Note
This camera complies with the DCF standard “Design rule for Camera File system” established
•
by JEITA “Japan Electronics and Information Technology Industries Association” and with Exif
“Exchangeable Image File Format”. Files that do not comply with the DCF standard cannot be
played back.
•Pictures recorded with other camera may not be able to play back on this unit.
•The lens barrel retracts about 15 seconds after switching from Recording Mode to Playback
Mode.
Selecting a picture
Press 2 or 1.
2: Play back the previous picture
1: Play back the next picture
A File number
B Picture number
•If you press and hold 2/1, you can play back the
pictures in succession.
•Speed of picture Forwarding/Rewin ding changes depending on the playback status.
- 32 -
Page 33

Basic
A
B
Displaying Multiple Screens (Multi Playback)
Rotate the zoom lever towards [L] (W).
1 screen>12 screens>30 screens> Calendar screen
display
A Number of the selected picture and th e total number of
recorded pictures
•Rotate the zoom lever towards [Z] (T) to return to the
previous screen.
•Pictures displayed using [ ] cannot be played back.
∫ To return to normal playback
Press 3/4/2/1 to select a picture and then press [MENU/SET].
Using the Playback Zoom
Rotate the zoom lever towards [Z] (T).
1k>2k>4k>8k>16k
When you rotate the zoom lever towards [L] (W) after
•
enlarging the picture, the magnification becomes lower.
•When you change the magnification, the zoom position
indication B appears for about 2 seconds, and the position of
the enlarged section can be moved by pressing 3/4/2/1.
•The more a pictur e is en larged, the more its quality
deteriorates.
- 33 -
Page 34

Basic
A B
Playing Back Motion Pictures
This unit was designed to play motion pictures using the AVCHD, MP4 and QuickTime
Motion JPEG formats.
Press 2/1 to select a picture with a Motion
Picture icon (such as [ ]/[ ]), and then
press 3 to play back.
A Motion picture icon
B Motion picture recording ti me
•Afte r p laybac k st art s , the e l aps ed pl aybac k t ime is d is played
on the screen.
For example, 8 minutes and 30 seconds is displaye d as
[8m30s].
•Some information (recording informatio n, etc.) is not displayed for motion pic tures recorded in
[AVCHD].
∫ Operations performed during Motion Picture Playback
The cursor displayed during playback is the same as 3/4/2/1.
3 Play/Pause
Stop
4
Fast rewind¢/
2
Frame-by-frame rewind (while paus i ng)
Fast forward¢/
1
Frame-by-frame forward (while pausing)
[W] Reduce volume level
[T] Increase volume level
¢ The fast forward/rewind speed increases if you press 1/2 again.
Note
When using a high capacity card, it is possible that fast rewinding may be slower than usual.
•
•To play back the motion pictures recorded by this unit on a PC, use the “PHOTOfunSTUDIO”
software on the CD-ROM (supplied).
•Motion pictures recorded with other camera may not be able to play back on this unit.
•Be carefu l not to block the speaker of the camera during playback.
•Motion pictures recorded in Miniature Effect Mode play back at approx imately 10 times speed.
- 34 -
Page 35

Basic
Creating Still Pictures From a Motion Picture
You can create a single still picture from a recorded motion picture.
Press 3 to pause motion picture playback.
Press [MENU/SET].
• Confirmation screen is displayed. It is ex ecuted when [Yes] is selected.
Exit the menu after it is executed.
Note
The picture is saved with the following recordin g sizes .
•
[AVCHD] Picture size [MP4] Picture size
[FSH]/[SH] 2 M (16:9)
•You may not be able to save still pictures from a motion picture taken on other equipment.
•Still pictures created from a motion pic ture may be coarser than with normal picture quality.
[FHD]/[HD] 2 M (16:9)
[VGA] 0.3 M (4:3)
- 35 -
Page 36

Basic
Deleting Pictures
Once deleted, pictures cannot be recovered.
Pictures on the built-in memory or the card that are being played back will be delete d.
•
•Pictures t hat are not in the DCF standard or those that are protected cannot be deleted.
To delete a single picture
Select the picture to be deleted, and then
press [ ].
•Confirmatio n screen is displayed.
Picture is deleted by selecting [Ye s].
- 36 -
Page 37

Basic
To delete multiple pictures (up to 50) or all the pictures
Press [ ].
Press 3/4 to select [Delete Multi] or
[Delete All] and then press [MENU/SET].
• [Delete All] > Confirmation screen is displayed.
Pictures are deleted by selecting [Yes].
• It is possible to delete all pictures except the ones set
as favorite when [All Delete Except Fav orite] is
selected with the [Delete All] set.
(When [Delete Multi] is selected) Press 3/
4/2/1 to select the picture, a nd then press
[DISP.] to set. (Repeat this step.)
• [ ] appears on the selected pictures. If [DISP.] is
pressed again, the setting is canceled.
(When [Delete Multi] is selected) Press
[MENU/SET].
• Confirmation screen is displayed.
Pictures are deleted by selecting [Yes].
Note
Do not turn the camera off whi l e deleting. Use a battery with sufficient battery power.
•
•Depending on the number of pictures to be deleted, it may take some time to delete t hem.
- 37 -
Page 38

Basic
Setting the Menu
The camera comes with menus that allow you to choose the settings for taking pictures
and playing them back just as you like and menus that enable you to have more fun with
the camera and use it more easily.
In particular, the [Setup] menu contains some important settings relating to the camera’s
clock and power. Check the settings of this menu before proceeding to use the camera.
Setting menu items
Example: In the [Rec] menu, change [AF Mode] from [Ø] ([1-Area]) to [š] ([Face
Detection])
Press [MENU/SET].
Press 2/1 to select menu and then press
[MENU/SET].
Menu Description of settings
[Rec] (P74 to 85)
(Recording Mode only)
[Motion Picture] (P86 to 87)
(Recording Mode only)
[Playback] (P95 to 108)
(Playback Mode only)
[Setup] (P40 to 49)
The menu lets you set the Coloring, Sensitivity or Number of
pixels, etc. of pictures you are recording.
This menu lets you set the [Rec Mode], [Rec Quality], and
other aspects for motion picture recording.
This menu lets you set the Protection, Cropping or Print
Settings, etc. of recorded pictures.
This menu lets you perform the clock settings, beep tone
settings and other setti ngs which make it easier for you to
operate the camera.
- 38 -
Page 39

Basic
A
Press 3/4 to select the menu item and
then press [MENU/SET].
A Menu screen page
• It will switch to the next page when you reach the
bottom. (It will also switch by rotating the zoom lever)
Press 3/4 to select the setting and then
press [MENU/SET].
• Depending on the menu item, its setting may not
appear or it may be displayed in a different way.
∫ Close the menu
Press [ ] several times or press the shutter
button halfway.
Note
•
There are functions that c annot be set o r used dep ending o n
the modes or menu settings being us ed on the camera due
to the specifications.
Using the Quick Menu
By using the Quick Menu, some of the menu settings can be easily found.
The features that can be adjust ed using Quick Menu are determi ned by the mode or a display
•
style the camera is in.
Press [Q.MENU] when recording.
Press 3
/4/2/1 to select the menu item
and the setting and then press [M ENU/SET]
to close the menu.
- 39 -
Page 40

Basic
A
B
C
D
About the Setup Menu
[Clock Set], [Economy] and [Auto Review] are important items. Check their settings before
using them.
For details on how to select the [Setup] menu settings, refer to P38.
U [Clock Set]
•
Refer to P18 for details.
Setting Date/Time.
Set the time in your home area and travel destination.
You can display the local times at the travel destinations and
record them on the pictures you take.
After selecting [Destination] or [Home], press 2/1 to select
an area, and press [MENU/SET] to set.
•
Set [Home] first thing after purchasing. [Destination] can be set after
setting up [Home].
“ [Destination]:
[World Time]
Travel destination area
A Current time of the destination area
B Time difference from home area
– [Home]:
Your home area
C Current time
D Time differ ence fr om GMT (Greenwic h
Mean Time)
•Press 3 if you are using Summer T ime [ ]. (The time will move forward by 1 hour.) Press 3
once more to return to the normal time.
•If you cannot find the travel destination in the areas displayed on the screen, set by the time
difference from the home area.
- 40 -
Page 41

Basic
Departure date and return date of the travel as well as the name
of the travel destination can be set.
You can display the number of days that have passed when
playing back the pictures and stamp it on the recorded pictures
with [Text Stamp] (P98).
[Travel Setup]:
[SET]:
Departure date and return date are set. Elapsed days (how
many days after) of the travel are recorded.
[OFF]:
— [TravelDate]
Elapsed days are not recorded.
•
The travel date is automatically canceled if the current date is after
the return date. If the [Travel Setup] is set to [OF F ], [Location] will
also be set to [OFF].
[Location]:
[SET]:
Travel destination is recorded at the time of recording.
[OFF]
•
For details on how to enter characters, refer to “Entering Text” on
P73.
•The number of days that have passed since the departure date can be printed out using the
“PHOTOfunSTUDIO” bundled software on the CD-ROM (supplied).
•The travel date is calculated using the date in the clock setting and the departure date you set.
If you set [World Time] to the travel destinat ion, the travel date is calculat ed using the date in
the clock setting and the travel destination setting.
•The travel date setting is memorized even if the camera is turned off.
•The number of days that have passed since the departure date is not recorded before the
departure date.
•[Travel Date] cannot be set for motion pictures recorded with [AVCHD].
•[Location] cannot be recorded when ta king motion pictures.
•[Travel Date] cannot be set in the Intelligent Auto Mode. Setting of other Recording Mode will
be reflected.
- 41 -
Page 42

r [Beep]
123
123
Basic
This allows you to set the beep and shutter sound.
r [Beep Level]: [Shutter Vol.]:
[t]
([Low])
[u]
([High])
[s]
([OFF])
[Beep Tone]:
[]/[]/[]
[]
([Low])
[]
([High])
[]
([OFF])
[Shutter Tone]:
[]/[]/[]
u [Volume]
Adjust the volume of the speaker to any of the 7 levels.
•When you connec t the camera to a TV, the volume of the TV speakers does not change. Also,
when connected, no sound is output from the camera speakers.
Brightness, color, or red or blue tint of the LCD monitor is
adjusted.
[Brightness]:
Adjust the brightness.
[Contrast · Saturation]:
Adjust the contrast or clarity of colors.
[Red Tint]:
[LCD Display]
Adjust the red tint.
[Blue Tint]:
Adjust the blue tint.
1 Select the settings by pressing
3/4, and adjust with 2/1.
2 Press [MENU/SET] to set.
•Some subjects may appear differently from actuality on the LCD monitor. However, this does
not affect the recorded pictures.
•When [LCDMode] is set to [High Angle], [Brightness] and [ Contrast · Saturation] cannot be
adjusted.
- 42 -
Page 43

Basic
These menu settings make it easier to see the LCD monitor when
you are in bright places or when you are holding the camera high
above your head.
[„] ([Auto Power LCD])
¢
:
The brightness is adjusted automatically depending on how bright
it is around the camera.
[LCD Mode]
LCD
[…] ([Power LCD]):
The LCD monitor becomes brighter and easier to see even when
taking pictures outdoors.
[Å] ([High Angle])
¢
:
The LCD monitor is easier to see when taking pictures with the
camera held high above your head.
[OFF]
¢ Can be set only when Recording Mode is set.
•High Angle Mode is al so canceled if you turn the camera off or [Sleep Mode] is activa ted.
•The brightness of the pictures displayed on the LCD monitor is increased so some subjects
may appear different f r om real life on the LCD monitor. However, this does not affect the
recorded pictures.
•The LCD monitor automatically returns to normal brightness after 30 seconds when recording
in Power LCD Mode. Press any button to make the LCD monitor bright again.
•When [LCDMode] is set, the usage time is reduced.
Set the pattern of the guidelines displayed when taking pictures.
Y ou can also set whether or not to have the recording information
[Guide Line]
displayed when the guidelines are displayed.
[Rec. Info.]:
[ON]/[OFF]
[Pattern]:
[]/[]
•When you ali gn the subject on the horizontal and vertical guideline s o r the cross point of these
lines, you can take pictures with well-designed composition by viewin g the size, the slope and
the balance of the subject.
•The [Pattern] setting is fixed to [ ] in the Intelligent Auto Mode.
•In [Panora m a Shot] or [Photo Frame] in Scene Mode, the guideline is not displayed.
- 43 -
Page 44

Basic
This allows you to set either to display or not display the
histogram.
[ON]/[OFF]
A Histogram is a graph that displays brightness
[Histogram]
along the horizontal axis (black to white) and the
number of pixels at each brightness level on the
vertical axis.
It allows you to easily check a picture’s exposure.
A dark
B optimal
C bright
•When you t ake pictures with the flash or in da rk places, the Histogram is displayed in
orange because the recorded picture and the Histogram do not match each other.
•The Histogram is an approximation in the Recording Mode.
•The Histogram of a picture may not match in the Recording Mode and the Playback Mode.
•The Histogram displayed in this camera does not match Histo grams displayed by picture
editing software used in PCs etc.
•Histograms are not displayed in the following cases:
–Intellig ent Auto Mode
–Multi Playback
–When recording mo ti on pi c t ur e s
–Playback Zoom
–[Photo Frame] in Scene Mode
–When HDMI mini cable is connected
–Calendar
[Video Rec Are a]
•Motion picture recording area display is only an app roximation.
•Recording area dis play may disappear when zooming to Tele depending on the picture size
setting.
Angle of view for motion picture recording can be checked.
[ON]/[OFF]
•It will be fixed to [OFF] during the Int elligent Auto Mode.
- 44 -
Page 45

Basic
ECO
You can conserve the battery life by setting these menus.
Also, the battery life is conserved by dimming the LCD monitor.
p [Sleep Mode]:
The camera is automatically turned off if the camera has not been
used for the time selected on the setting.
q [Economy]
[2MIN.]/[5MIN.]/[10MIN.]/[OFF]
[LCD Power Save]:
Brightness of the LCD monitor is lowered. The battery life will be
conserved by lowering the image quality of the LCD monitor
further during the recording
¢ Excluding the Digital Zoom range.
¢
.
[ON]/[OFF]
•Press the shutter button halfway or turn the camera off and on to cancel [Sleep Mode].
•[Slee p Mode] is set to [5MIN.] in the Intelligent Auto Mode.
•Press any button to turn on the LCD monitor again.
•[Sleep Mode] does not work in the following cases.
–When connecting to the AC adaptor (supplied)
–When connecting to a PC or a printer
–When recording or playing back motion pictures
–During a slide show
–[Auto Demo]
•The effect of the [LCD Power Save] is lower in the Digital Zoom range co mpared to the Optical
Zoom range.
•The effect of the [LCD Power Save] will not affect the image being recorded.
•Setting of [LCD Mode] has priority over the setting of [ LCD Power Save] regarding the
brightness of the LCD monitor.
Set the length of time that the picture is displayed after taking the
still picture.
[1SEC]
o [Auto Review]
[2SEC]
[HOLD]:
The pictures are displayed until one of the buttons is pressed.
[OFF]
•[AutoReview] is activated regardless of its setting in the following cases.
–When using Auto Bracket.
–When using [Burst].
•In Intelligent Auto Mode or [Panorama Shot] and [Photo Frame] in Scene Mode, the Auto
Review function is fixed t o [2SEC].
•[AutoReview] does not work when recording motion pictures.
- 45 -
Page 46

Basic
v [No.Reset] Reset the file number of the next recording to 0001.
•The folder number is updated and the file number st arts from 0001.
•A folder number between 100 and 999 can be assigned.
When the folder number reaches 999, the number cannot be reset. We recommend formatting
the card (P48) after saving the data on a PC or elsewhere.
•To reset the folder number to 100, format th e built-in memory or the c ard first and then use this
function to reset the file number.
A reset screen for the folder number will then appear. Select [Yes] to reset the f older number.
w [Reset] The [Rec] or [Setup] menu settings are reset to the initial settings.
•When the [R eset] setting is selected during recording, the operation that resets the lens is also
performed at the same time. You wil l hear the sound of the le ns operat ing but t his is normal and
not indicative of malfuncti oning.
•When the [Rec] menu setting s are reset, data registered with [Face Recog.] will be also reset,
too.
•When [Setup] menu settings are reset, the following settings are also reset.
–The birthday and name se ttings for [Baby1]/[Baby2] and [Pet] in Scene Mode.
–The [Travel Date] setti ng . ( Departure date, ret ur n date, destina ti o n)
–The [World Time] setting.
•The folder number and the clock setting are not changed.
Select the USB communication system after or before connecting
the camera to your PC or your printer with the USB connection
cable (supplied).
[y] ([Select on connection]):
x [USB Mode]
Select either [PC] or [PictBridge(PTP)] if you connected the
camera to a PC or a printer supporting PictBridge.
[{] ([PictBridge(PTP)]):
Set after or before connecting to a printer supporting PictBridge.
[z] ([PC]):
Set after or before connecting to a PC.
- 46 -
Page 47

Basic
Set to match the type of TV.
[ ] ([TV Aspect]):
[W]:
| [Output]
When connecting to a 16:9 screen TV.
[X]:
When connecting to a 4:3 screen TV.
•
This will work when the AV cable (optional) is connected.
Setup so this unit can be controlled by the remote control of the
VIERA by automatically coupling this unit with the VIERA Link
compatible equipment using HDMI mini cable (optional).
[ON]: Remote control operation of the VIERA Link
[VIERA Link]
compatible equipment is enabled. (Not all operations
are possible)
The operations you can perform on the camera are
limited.
[OFF]: Operations will be on the camera only.
•This will work when the HDMI mini c able (optional) is connected.
•Refer to P111 for details.
Setup the output method for 3D pictures.
[]:Set when connecting to a 3D compatible television.
[3D Playback]
[]:Set when connecting to a television not compatible with
3D.
Set this when you would like to view pictures in 2D
(conventional image) on a 3D compatible television.
•This will work when the HDMI mini cable (optional) is connected.
•Refer to P113 for the method to playback 3D pictures in 3D.
- 47 -
Page 48

Basic
For Canadian assistance, please call:
1-800-99-LUMIX (1-800-995-8649) or
send e-mail to: lumixconcierge@ca.panasonic.com
For USA and Puerto Rico assistance, please call:
1-800-211-PANA(7262) or, contact us via the web at:
http://www.panasonic.com/contactinfo
This mode allows you to display pictures vertically if they were
recorded holding the camera vertically.
[]([On]):
M [Rotate Disp.]
[] ([External Only]):
Rotate pictures on a TV and the LCD
display so that they are displayed
vertically.
Rotate only the picture on a TV so
that it is displayed vertically.
[OFF]
•Refer to P32 for information about how to play back pictures.
•When you pla y back pictures on a PC, they cannot be displayed in the rotated direction unless
the OS or software is compatible with Exif. Exif is a file format for still pictures which allows
recording information etc . t o be added. It was established by “JEITA (Japan Electronics and
Information Technology Industries Association)”.
•It may not be possible to rotate pictures that have been recorded with other equipment.
•The display is not rotated during Multi Playback.
[Version Disp.]
It is possible to check which version of firmware is on the camera.
•Press [MENU/SET] on the version display screen to display information about the software on
the unit.
The built-in memory or card is formatted. Formatting
[Format]
irretrievably deletes all the data so check the data carefully
before formatting.
•Use a battery with sufficient battery power when formatting. Do not turn the camera off during
formatting.
•If a card has been ins erted, only the card is formatted. To format the built-in memory, remove
the card.
•If the card has been formatted on a PC or other equipment, format it on the camera again.
•It may take longer to format the built-in memory than the card.
•If the built -in memory or the card cannot be formatted, consult your nearest Serv ice Center.
~ [Language]
•If you set a different language by mist ake, select [~] from the menu icons to set the desired
language.
Set the language displayed on the screen.
- 48 -
Page 49

Basic
A B
Displays the amount of jitter the camera has detected. ([Stabilizer
Demo.])
The camera’s features are displayed as slide shows.
([Auto Demo])
[Stabilizer Demo.]:
A Amount of jitter
[Demo Mode]
DEMO
B Amount of jitter after correction
[Auto Demo]:
[ON]
[OFF]
•The Stabilizer function is switched between [On] and [Off] every time [MENU/SET] is pressed
during the [St abilizer Demo.].
•In Playback Mode, [Stabilizer Demo.] cannot be displayed.
•[Stabilizer Demo.] is an approximation.
•[AutoDemo] is not output to the televi sion.
- 49 -
Page 50

Recording
C
E
Recording
About the LCD Monitor
Press [DISP.] to change.
A LCD monitor
•When the men u screen a ppears, the [DI SP.] button is not
activated. During Playback Zoom, while playing back
motion pictures and during a slide show, you can only
“Normal display H” or “No display J”.
select
In Recording Mode
B Normal display
C Number of recordable pictures
D Normal display
E Available recording time
F No display
G No display (Recording guideline)
¢1
¢1
In Playback Mode
H Normal display
I Display with recording information
J No display
¢2
BD
¢1
GF
HI
¢1
J
¢1 If the [Histogram] in [Setup] menu is set to [ON], histogram will be displayed.
¢2 Name of the registered person in [Face Recog.] is displayed when [DISP.] is pressed.
- 50 -
Page 51

Recording
Applicable modes:
Using the Zoom
Using the Optical Zoom/Using the Extended Optical Zoom (EZ)/ Using the Intelligent Zoom/Using the Digital Zoom
You can zoom in to make people and objects appear closer or zoom out to record
landscapes in wide angle.
Setting the number of pixels to 10M or less will operate the Extended Optical Zoom to take
zoomed pictures without affecting quality.
To make subjects appear closer use (Tele)
Rotate the zoom lever towards Tele.
To make subjects appear further away use (Wide)
Rotate the zoom lever towards Wide.
∫ Types of zooms
Feature Optical Zoom Extended Optical Zoom (EZ)
Maximum
magnification
Picture
quality
Conditions None
¢1 This includes the optical zoom magnification. T he magnification level differs depending on
[Picture Size] setting.
10k 21.1k
No deterioration No deterioration
[Picture Size] with (P74) is
selected.
¢1
The zoom functions below can also be used to further increase the zoom magnification.
Feature Intelligent Zoom Digital Zoom
Maximum
magnification
Picture
quality
Conditions
¢2 This is 2k magnification when [i.Resolution] in [Rec] menu is set to [i.ZOOM].
Zoom in while limiting deterioration
[i.Resolution] (P82) on the [Rec] menu
is set to [i.ZOOM].
2k 4k
The higher the magnification lev el, the
greater the deterioration.
[Digital Zoom] (P82) on th e [Rec] menu
is set to [ON].
¢2
- 51 -
Page 52

Recording
∫ Screen display
A Extended Optical Zoom indication
B Optical Zoom range
C Intelligent Zoom range
D Digital Zoom range
E Zoom magnification
When using the Zoom function, an estimate of the focus range will appear in
•
conjunction with the zoom display bar. (Example: 0.5 m (1.6 ft.) –¶)
Note
The indicated zoom magnification is an approximation.
•
• “EZ” is an abbrev iation of “Extended Optical Zoom”. It is possible to take more magni fied
pictures with the optical zoom.
•The lens barrel extends or retracts acco rding to the zoom position. Be sure not to interrupt the
motion of the lens barrel while the zoom lev er is rotated.
•When using th e Digita l Zoom, we rec ommend us ing a tripo d and th e Self-t imer (P57) for taking
pictures.
•For details about using the zoom while recording motion pictures, refer to P30.
•The Extend ed Optical Zoom cannot be used in the following cases:
–In [MotionDeblur] in Intelligent Auto Mode
–In Macro Zoom Mode
–In [High Sens.] or [Photo Frame] in Scene Mode
–When [B urst] in the [Rec] menu is set to [ ]
–When recording mo ti on pi c t ur e s
•The Intelligent Zoom cannot be used in the following cases:
–In [MotionDeblur] in Intelligent Auto Mode
–In Macro Zoom Mode
–In [Handheld Night Shot] or [High Sens.] in Scene Mode
–When [B urst] in the [Rec] menu is set to [ ]
•[Digital Zoom] cannot be used in the following cases:
–In Intelligent Auto Mode
–In Miniatur e Effect Mode
–In [Handheld Night Shot], [High Sens.] and [PhotoFrame] in Scene Mode
–When [B urst] in the [Rec] menu is set to [ ]
- 52 -
Page 53

Recording
Applicable modes:
Taking Pictures Using the Built-in Flash
A Photo flash
Do not cover it with your fingers or other objects.
Switching to the appropriate flash setting
Set the flash to match the recording.
Press 1 [‰].
Press 3/4 to select the item and then press
[MENU/SET].
Item Description of settings
[‡] ([Auto]) The flash is automatically activ ated when the reco rding cond itions
[]([iAuto])
[]([Auto/Red-Eye])
[‰] ([Forced Flash On])
[]
[Œ] ( [F o r ce d Fl a sh Off]
¢1 This can be set only when Intelligent Auto Mode is set.
¢2 The flash is activated twice. The subject should not move until the second flash is
activated. Interval until the second flash depends on the brightness of the subject.
[Red-Eye Removal] (P84) on the [Rec] menu is set to [ON], [ ] appears on the flash
icon.
¢1
([Slow Sync ./
Red-Eye])
¢2
make it necessary.
The flash is automati cally acti vated when the re cording c onditi ons
make it necessary.
It is activated once before the actual record ing to reduce the
¢2
red-eye phenomenon (eyes of the subject appearing red in the
picture) and then activated again for the actual recording.
•Use this when you take pictures of people in low lighting
conditions.
The flash is activated ev ery time regardless of the recording
conditions.
•Use this when your subject is back- lit or under fluorescent
light.
If you take a picture with a dark back ground landscape, this
feature will slow the shutter speed when the flash is activated so
that the dark background wil l become bright. Simultaneously, it
reduces the red-eye phe nomenon.
•Use this when you take pictures of people in front of a dark
background.
The flash is not activated in any recording conditions.
)
•Use this wh en you take pictures in places where the use of
flash is not permitted.
- 53 -
Page 54

Recording
∫ Available Flash Settings in Recording Mode
The available flash settings depend on the Recording Mode.
(±: Available, —: Not available, ¥: Scene Mode initial setting)
‡ ‰ Œ
¢
±
±±±±±
———±
* + : ; ±¥±— ±
, / ï ————¥
.
¥ — ± — ±
———¥±
1 í 9 ± — ± — ¥
¥±±— ±
¢ [ ] is displayed.
•The flash setting may change if the Recording Mode is changed. Set the flash setting again if
necessary.
•The flash setting is memorized even if t he camera is turned of f. However, the Scene Mod e flash
setting is reset to the initial setting when the Scene Mode is changed.
•Flash will not be activa ted when recording motion picture.
∫ The available flash range
Wide Tele
[AUTO] in
[Sensitivity]
60 cm (2.0 feet) to 5.6 m (18 feet) 1.5 m (4.9 feet) to 2.9 m (9.5 feet)
- 54 -
Page 55

Recording
∫ Shutter speed for each flash setting
Flash setting Shutter speed (Sec.) Flash setting Shutter speed (Sec.)
‡
‰Œ
¢1 The shutter speed changes depending on the [Min. Shtr Speed] setting.
¢2 When [Min. Shtr Speed] is set to [AUTO].
¢3 When [ ] in [Sensitivity] is set.
1/60
¢1
to 1/1600
¢1
1
to 1/1600
1 or 1/8 to 1/1600
1 or 1/4 to 1/1600
¢2
¢2, 3
•¢2, 3: The shutt er speed becomes a maximum of 1 second in the fol l owing cases.
–When the Optic al Image Stabilizer is set to [OFF].
–When th e ca mera has determined that there is very littl e jitter when the Optical Image
Stabilizer is set to [ON].
•In Intelligent Auto Mode, shutter spee d changes depending on the identif ied scene.
•In Scene Mode, shutter speed will be diff erent from the above table.
Note
If you bring the Flash too close to an object, the object may be dis torted or discolored by the
•
heat or lighting from the Flas h.
•Recording a subject from too close , or wit hout sufficient flash will not provide the appropriate
level of exposure, and may result in a picture that is too white or dark.
•When the Flas h is be ing c har ged, the Flas h icon bli nks red, and you cann ot t ake a p ictur e e ven
when you press the shutter button fully.
•If recording a subject without sufficient flash, the White Balanc e may not be properly adjusted.
•The effects of the flash may not be adequately achieved under the following conditions.
–When [Burst] is set to [ ]
–When the shutter speed is too fast
•It may tak e time to charge the Flash if you repeatedly take pictures. Take a picture after the
access indication disappears.
•The Red-Eye Reduc tion effect differs between people. Also, if the subject is far away from the
camera or was not looking at the first Flash, the effect may not be evident.
- 55 -
Page 56

Recording
Applicable modes:
Taking Close-up Pictures ([AF Macro]/[Macro Zoom])
This mode allows you to take close-up pictures of a subject, e.g. when taking pictures of
flowers.
Press 4 [#].
Press 3/4 to select the item and then press [MENU/SET].
Item Description of settings
You can take pictures of a subject as close as 5 cm
[]([AF Macro])
[]([Macro Z oom])
[OFF]
Note
We recommend using a tripod and the Self-timer.
•
•We reco mme nd setting the flash to [Œ] when you take pictures at close range.
•If the distance between the camera and t he subject is beyond the focus range of the camera,
the picture may not be properly focused even if the focus indica tion lights up.
•When a subject is close to the camera, the effective focus range is significantly narrowed.
Therefore, if the dist anc e b etween t he camera a nd t he su bject is ch anged after focusing on the
subject, it may become difficult to focus on it again.
•Macro Mode gives priority to a subject cl ose to the camera. Therefore, if the distance between
the camera and the subject is f ar, it takes longer to focus on it.
•When you take pictures at close range, the resolution of the periphery of the picture may
decrease slightly. This is not a malfunct i on.
•[Macro Zoom] cannot be set in the following cases.
–When in Minia ture Effect Mode
–When [A FMode] is set to [ ]
–When [Burst] is set to [ ]
–In 3D Photo Mode
(0.16 feet) from the lens by rotating the zoom lever
completely to Wide (1k).
Use this setting to get close to the subject and then
further enlarge when taking the picture.
You can take a picture with the Digital Zoom up to 3k
while maintaining the distance to the subject for the
extreme Wide position [5 cm (0.16 feet)].
•
The image quality is poorer than during normal recording.
•Zoom range will be disp layed in blue. (Digital zoom range)
j
- 56 -
Page 57

Recording
Applicable modes:
Taking Pictures with the Self-timer
Press 2 [ë].
Press 3/4 to select the item and then press [MENU/SET].
Item Description of settings
[]([10sec.])
[]([2sec.])
[OFF]
Press the shutter button halfway to focus
and then press it fully to take the picture.
• The Self-timer indicator A blinks and the shutter is
activated after 10seconds (or 2 seconds).
Picture is taken 10 seconds after shutter is pressed.
Picture is taken 2 seconds after shutter is pressed.
When using a tripod, et c., th is se tting is a conven ient way t o
•
avoid the jitter caused by pressing the shutter button.
j
Note
When you press the shutter button once fully, the subject is automat ically focused just before
•
recording. In dark places, the Self-timer indicator will blink and then may turn on brightly,
operating as an AF Assist Lamp to allow the camera to focus on the subject.
•We recomme nd using a tripod when recording with the Self -timer.
•The Self- timer cannot be set when recording motion pictures.
- 57 -
Page 58

Recording
Applicable modes:
Compensating the Exposure
Use this function when you cannot achieve appropriate exposure due to the difference in
brightness between the subject and the background. Look at the following examples.
Underexposed Pro p erly exposed Overexposed
Compensate the exposure
towards positive.
Compensate the exposure
towards negative.
Press 3 [È] until [Exposure] appears.
Press 2/1 to compensate the exposure and then
press [MENU/SET].
• The exposure compensation value appears on the screen.
• Select [0 EV] to return to the original exposure.
Note
•
EV is an abbreviation of [Exposure Value], a unit indicating the amount of exposure. The EV
changes with the aperture value or the shutter speed.
•The set exposure v alue is memorized even if the camera is turned off.
•The compensati on range of the exposure will be limited dependin g on the brightness of the
subject.
- 58 -
Page 59

Recording
Applicable modes:
Taking Pictures Using Auto Bracket
In this mode, 3 pictures are automatically recorded in the selected exposure
compensation range each time the shutter button is pressed.
With Auto Bracket d1EV
1st picture 2nd picture 3rd picture
d0EV j1EV i1EV
Press 3 [È] several times until [Auto Bracket]
appears.
Press 2/1 to set the compensation range of the
exposure and then press [MENU/SET].
• When you do not use Auto Bracket, select [OFF] (0).
Note
•
When Auto Bracket is set, [ ] is displayed on the screen.
•When taking pictures using Auto Bracket after setting the exposure compensation range, the
pictures taken are based on the selected exposure compensation range.
When the exposure is compensated, the exposure compensation value appears on the lower
left of the screen.
•The exposure may not be compensated with Auto Bracket depending on the brightness of the
subject.
•[Œ] is set for the flash when Auto Bracket is set.
•Setting of the Auto Bracket cannot be performed in following conditions.
–In [Panorama Shot], [Handheld Night Shot] and [Photo Frame] in Scene Mode
–When recording mo ti on pi c t ur e s
- 59 -
Page 60

Recording
Recording Mode:
Record pictures that look like dioramas
(Miniature Effect Mode)
By creating areas that are blurred and areas that are not, the picture will look like that of a
miniature model. Motion pictures can also be recorded with diorama effects that appear to
be played back in fast forward.
Slide the REC/PLAY switch to [!], and then press [MODE].
Press 3/4/2/1 to select [Miniature Effect], and then press [MENU/
SET].
Note
•
Display of the recording screen will be delayed more than usual and the screen will look as if
frames are dropping.
•No sound is recor ded in motion pictures.
•Approximately 1/10 of the time period is recor ded. (If you record for 10minutes, the resulting
motion picture recording will be approxima tely 1 minute long.)
The displayed available recording time is app roximately 10 times . When switching to Recording
Mode, please check the available recording time.
•When t aking pict ure s of a large s ize, t he scre en may t urn b lack af te r t ak ing the pict ure beca use
of signal processing. This is not a malfunction.
- 60 -
Page 61

Recording
Recording Mode:
Taking pictures that match the scene being recorded (Scene Mode)
When you select a Scene Mode to match the subject and recording situation, the camera
sets the optimal exposure and hue to obtain the desired picture.
Slide the REC/PLAY switch to [!], and then press [MODE].
Press 3/4/2/1 to se lect [Scen e Mode], and then press [MENU/SET].
Press 3/4/2/1 to select the Scene Mode and
then press [MENU/SET].
Note
To change the Scene Mode , press [MENU/SET], select [Scene Mode] using 3/4/2/1, and
•
then press [MENU/SET].
•The following cannot be set in Scene Mode as the camera adjusts automatically.
–[Sensitivity]
–[i.Exposure]
–[Min. Shtr Speed]
–[i.Resolution]
–[ColorMode]
- 61 -
Page 62

Recording
[Portrait]
When taking pictures of people outdoors during the daytime, this mode allows you to
improve the appearance and make their skin tones look healthier.
∫ Technique for Portrait Mode
To make this mode more effective:
1 Rotate the zoom lever as far as possible to Tele.
2 Move close to the subject to make this mode more effective.
[Soft Skin]
When taking pictures of people outdoors during the daytime, this mode enables the texture
of their skin to appear even softer than with [Portrait]. (It is effective when taking pictures of
people from the chest up.)
∫ Technique for Soft Skin Mode
To make this mode more effective:
1 Rotate the zoom lever as far as possible to Tele.
2 Move close to the subject to make this mode more effective.
Note
If a part of the background etc. is a color close to skin color, this pa r t is also smoothed.
•
•This mode may not be effective when there is insufficient brightness.
[Scenery]
This allows you to take pictures of a wide landscape.
- 62 -
Page 63

Recording
[Panorama Shot]
Pictures are recorded continuously while moving the camera horizontally or vertically, and
are combined to make a single panorama picture.
1 Press 3/4 to select the recording direction and then press
[MENU/SET].
2 After confirming the recording direction, press [MENU/SET].
•
A horizontal/vertical guide is displayed.
3 Press the shutter button halfway to focus.
4 Press the shutter button fully and record a picture while moving the camera in a
small circle in the direction selected in Step
∫ Technique for Panorama Shot Mode
Recording from left to right
1.
Move the camera in a single panning
motion for about 8 seconds.
•
Move the camera at a constant speed.
Pictures may not be able to be r ecorded
properly if the camera is moved too fast
or too slow.
A 1 second
B 2 seconds
C 3 seconds
D Move the camera in the recording directio n without shaking it. If the camera shakes too
much, pictures may not be able to be recor ded, or the recorded pa noram a pictu re may
become narrower (smaller)
E Move the camera towards the edge of the range you wish to record. (The edge of the
range will not be recorded in the last frame)
5 Press the shutter button once again to end the still picture recording.
•
Recording can also be canceled by keeping the camera still while recording.
- 63 -
Page 64

Recording
Note
The zoom position is fixed to Wide.
•
•The focus, white balance, and exposure are fixed at the optimum values for the first picture. As
a result, if the focus or brightness changes substantially during recording, the entire panorama
picture may not be recorded at th e suitable focus or brightness.
•When multiple pictures are combined to create a single panorama picture, the subject may
appear distorted or the connec tion points may be noticeable in s ome cases.
•The number of recor ding pixels in th e ho rizont al and v er tical direct ions of th e p an orama pic ture
varies depending on the recording direction and the number of combined pictures. The
maximum number of pixels is shown below.
Recording direction Horizontal Resolution Vertical Resolution
Horizontal 8000 pixels 1080 pixels
Vertical 1440 pixels 8000 pixels
•A panorama picture may not be able to be created, or the pictures may not be combined
properly when recording the following subjects or under the recording conditions below.
–Subjects with a single, uniform color or repetitive pattern (such as the sky or a beach)
–Moving subjects (person, pet, car, waves, flow ers swaying in the breeze, etc.)
–Subje cts where the color or pattern s change in a short time (such as an image appearing on
a display)
–Dark plac es
–Locat i ons with flickering light sources such as fluorescent lights or candles
∫ About playback
Playback zoom can be performed even for pictures that were recorded using [Panorama
Shot].
Also, if 3 is pressed during playback, the screen will automatically scroll in the same
direction during recording.
The cursor displayed during playback is the same as 3/4/2/1.
3
Start/Pause
¢
Stop
4
¢ You can perform frame-by -frame forward/rewind by pressing 1/2 during a pause.
- 64 -
Page 65

Recording
[Sports]
Setting for when you want to take pictures of sports scenes or other fast-moving events.
Note
Shutter speed may slow dow n for up to 1 second .
•
•This mode is suitable for taking pictures of subj ects at distances of 5m (16 feet) or more.
[Night Portrait]
This allows you to take pictures of a person and the background with near real-life
brightness.
∫ Technique for Night Portrait Mode
•
Use the flash. (You can set to [ ].)
•Ask the subj ect not to move while taking a picture.
Note
We recommend using a tripod and the Self-timer for taking pictures.
•
•Shutter speed may s l ow do w n for up t o 8 seconds.
•The shutter may remain closed (max. about 8sec.) after taking the picture because of signal
processi ng . T h is is not a malfun ction.
•Noise may become visible when you take pictures in dark places.
[Night Scenery]
This allows you to take vivid pictures of the nightscape.
Note
We recommend using a tripod and the Self-timer for taking pictures.
•
•Shutter speed may s l ow do w n for up t o 8 seconds.
•The shutter may remain closed (max. about 8sec.) after taking the picture because of signal
processi ng . T h is is not a malfun ction.
•Noise may become visible when you take pictures in dark places.
[Handheld Night Shot]
This mode allows you to record multiple pictures of night scenes at high speed, which are
all combined to make a single picture. It will reduce the jitter and noise from the picture
even when recording with the camera in your hand.
Note
•
Do not move the camera while recording pict ures continuously.
•Noise may become vis ible when you take pictures in dark places or take pictures of movin g
subjects.
- 65 -
Page 66

Recording
[Food]
This mode allows you to take pictures of food with a natural hue without being affected by
the ambient light in restaurants, etc.
[Baby1]/[Baby2]
This takes pictures of a baby with a healthy complexion. When you use the flash, the light
from it is weaker than usual.
It is possible to set different birthdays and names for [Baby1] and [Baby2]. You can select
to have these appear at the time of playback, or have them stamped on the recorded
image using [Text Stamp] (P98).
∫ Birthday/Name setting
1 Press 3/4 to select [Age] or [Name] and then press [MENU/SET].
2 Press 3/4 to select [SET] and then press [MENU/SET].
3 Enter the birthday or na me.
Birthday: 2/1: Select the items (year/month/day)
Name: For details on how to enter characters, refer to “Entering Text” on P73.
•
When the birthday or name is set, [Age] or [Name] is automatically set to [ON].
• If [ON] is selected when the birthday or name has not been registered, the sett ing screen
appears automatically.
3/4: Setting
[MENU/SET]: Set
4 Press 4 to select [Exit] and then press [MENU/SET] to finish.
∫ To cancel [Age] and [Name]
Select the [OFF] setting in step
Note
The age and name can be printed o ut using the “PHOTOfunSTUDIO” bundled software on the
•
CD-ROM (supplied).
•If [Age] or [Name] is set to [OFF] even when the birthday or name has been set, the age or
name will not b e di s p l a y e d.
•Shutter speed may s l ow do w n for up t o 1 second.
2.
- 66 -
Page 67

Recording
[Pet]
Select this when you want to take pictures of a pet such as a dog or a cat.
You can set your pet’s birthday and name.
For information about [Age] or [Name], refer to [Baby1]/[Baby2] on P66.
[Sunset]
Select this when you want to take pictures of a sunset view. This allows you to take vivid
pictures of the red color of the sun.
[High Sens.]
This mode minimizes the jitter of the subjects, and enables you to take pictures of these
subjects in dimly lit rooms.
∫ Picture Size
Select the picture size of 3M (4:3), 2.5M (3:2), 2M (16:9) or 2.5M (1:1).
[Glass Through]
This mode is ideal for taking pictures of scenery and other landscapes through clear glass,
such as in vehicles or buildings.
Note
The camera may focus on the glass if it is dir ty or has dust on it.
•
•The pictur es taken may not look natural if the glass is colored. When this happens, change the
white balance settings.
(P77)
[Photo Frame]
Record the image with a frame around it.
∫ Setting the frame
Select from 6 types of frames.
Note
The picture size is fixed to 5M (4:3).
•
•The color of the frame displayed on the screen and the color of the frame around the act ual
image may differ, but this is not a malfunction .
- 67 -
Page 68

Recording
Recording Mode:
Taking 3D pictures (3D Photo Mode)
Pictures are recorded continuously while moving the camera horizontally , and t wo pictures
selected automatically are combined to make a single 3D picture.
To view 3D pictures, a television that supports 3D is required. (This unit will playback in
2D)
Refer to P113 for details about the playback method.
Slide the REC/PLAY switch to [!], and
then press [MODE].
Press 3/4/2/1 to select [3D Photo
Mode], and then press [MENU/SET].
• Description of recording method is displayed. To exit,
press [MENU/SET].
Start the recording and then slide the camera horizontally straight
from left to right.
• A guide is displayed while recording.
• Move the camera approximately 10 cm (0.33 feet) within approx imately 4 seconds
using the guid e.
∫ Te chnique for taki ng 3D pictures
–
Take a picture of a subject that is not moving
–Take a picture in a well -lit place, such as outdoors, etc .
–Fix the focus and exposure by pressing the shutter button halfway, then press the shutter
button fully and move the camera
–When you start recording with the subject slightly to the right of the center, the subject will
be close to the center in the final picture
Note
You cannot record 3D pictures in vertical orientation.
•
•The 3D pictures are saved in MPO format (3D).
•Zoom position i s f i xed to Wide.
•The picture size is fixed to [ 2M16:9].
•The ISO sensitivity is automatically adjusted. However , the ISO sensitivity is in creased to make
the shutter speed become high-speed.
•Motion pict ures cannot be recorded during 3D Pho to Mode.
•Recording may not be possible depending on the recording conditions for the following cas es.
You may not get a 3D effect or the picture may be war p ed ev e n if i t wa s possible to re co r d.
–W hen the subject is too dark/bri gh t
–When the brightness of the subject changes
–When the subject is moving
–Not enough contrast
- 68 -
Page 69

Recording
Applicable modes:
Recording
Taking a Picture with Face Recognition Function
Face Recognition is a function which finds a face resembling a registered face and
prioritizes focus and exposure automatically. Even if the person is located towards the
back or on the end of a line in a group photo, the camera can still take a clear picture.
[Face Recog.] is initially set to [OFF] on the camera.
[Face Recog.] will turn [ON] automatically when the face image is registered.
•
The following functions will also work with the Face Recognition
function.
In Recording Mode
–
Display of corresponding name when camera detects a registered
¢
face
(if name has been set for the registered face)
In Playback Mode
–
Display of name and age (if information has been registered)
–Selective playback of pictures chosen from pictures registered with Face Recognition
([Category Selection] (P91) in [Filtering Play]).
¢ Names of up to 3 people are displayed. Precedence for the names displayed when taking
pictures is determined according to the order of registration.
Note
During the Burst Mode, [Face Recog.] picture information can be attached to only the first
•
picture.
•[Face Recog.] will find a fa ce similar to the registered face, and does not guarantee secure
recognition of a person.
•Face Recognition may take more time to select and recogn ize distinctive facial features than
regular Face Detection.
•Even when Face Recognition information has been registered, pictures taken with [Name] set
to [OFF] will not be categorized by Face Recognition in [Category Selection] ([Filtering Play]).
•Even when Face Recognition information is changed (P72), Face Recognition
information for the pictures already taken will not be changed.
For instance, if the name is chang ed, pictures recorded before the change will not be
categorized by Face Recognition in [Category Selection] ([Filtering Play]).
•To change the name information of the picture s taken, perform the [REPLACE] in
[Face Rec Edit] (P107).
•[Face Recog.] cannot be used in the following cases.
–In [Panorama Shot], [Night Scenery], [Handheld Night Shot] and [Food] in Scene Mode
–When recording mo ti on pi c t ur e s
- 69 -
Page 70

Recording
Face Settings
You can register information such as names and birthdays for face images of up to 6
people.
Registration can be facilitated by taking multiple face images of each person. (up to 3
pictures/registration)
∫ Point of recording when registering the face images
•
Face front with eyes open and mouth closed, making sure th e
outline of the face, the eyes, or the eyebrows are not covered
with the hair when registering.
•Make sure there is no e xtr e m e s h ad i n g on th e face when
registering. (Flash will not flash during registration.)
∫ When it is not recognizing during recording
Register the face of same person indoors and outdoors, or with di fferent expression s or
•
angles. (P72)
•Additionally register at the location of recording.
•When a person who is registered is not recognized, correct by re-registering.
•Face Recognition may not be possible or may not recogniz e faces correctly even for
registered faces, depending on the facial expression and environment.
(Good example for
registering)
Select [Face Recog.] on the [Rec] m enu, an d then p ress [MENU/SET].
(P38)
/
Press 3
4 to select [MEMORY] and then press [MENU/SET].
Press 3/4/2/1 to select the Face
Recognition frame that is not registered,
and then press [MENU/SET].
Take the picture adjusting the face with
the guide.
• The faces of subjects other than people (pets, etc.)
cannot be registered.
• An information for taking face images is displayed
when [DISP.] is pressed.
• Confirmation screen is displayed. It is executed wh en
[Yes] is selected.
- 70 -
Page 71

Recording
Select item to edit with 3/4, and then press [MENU/SET].
• You can register up to 3 face images.
Item De scription of settings
It is possible to register names.
1 Press 4 to select [SET] and then press [MENU/SET].
[Name]
[Age]
[Focus Icon]
2 Enter the name.
•
For details on how to en te r cha r acters, refer to “Entering Text”
section on P73.
It is possible to register the birthday.
1 Press 4 to select [SET] and then press [MENU/SET].
2 Press 2/1 to select the items (Year/Month/Day), and
then press 3/4 to set and then press [MENU/SET].
Change the displayed focus icon when the subject is focused.
Press 3/4 to select the focus icon, and then press [MENU/
SET].
To add additional face images.
(
Add Images)
1 Select the unregistered face recognition frame, and then
press [MENU/SET].
[Add Images]
2 Perform steps 4 in “Face Settings”.
To delete one of the face images.
(Delete)
Press 2/1 to select the face image to delete, and then press
[MENU/SET].
•
If there is only one image registered, it cannot be deleted.
• Exit the menu after it is set.
- 71 -
Page 72

Recording
Change or delete the information for a registered person
You can modify the pictures or information of an already registered person. You can also
delete the information of the registered person.
1 Select [Face Recog.] from the [Rec] menu, and then press [MENU/SET]. (P38)
2 Press 4 to select [MEMORY] and press [MENU/SET].
3 Press 3/4/2/1 to select the face image to edit or delete and then press
[MENU/SET].
4 Press 3/4 to select the item and then press [MENU/SET].
Item Description of settings
[Info Edit]
[Priority]
[Delete]
•
Exit the menu after it is set.
Changing the information of an already registered person.
Perform step
The focus and exposure are preferentially adjusted for
higher-priority faces.
Press 3/4/2/1 to select the priority and then press
[MENU/SET].
Deleting information of a registered person.
5 in “Face Settings”.
- 72 -
Page 73

Recording
Entering Text
It is possible to enter babies’ and pets’ names and the names of travel destinations when
recording. (Only alphabetical characters and symbols can be entered.)
Display the entry screen.
• You can di splay the entry screen via the following operations.
–[Name] of [Baby1]/[Baby2] or [Pet] in Scene Mode
–[Name] in [Face Recog.]
–[Location] in [Travel Date]
–[ Title Edit]
Press 3/4/2/1 to select text and then press
[MENU/SET] to register.
• Move the cursor to [ ] and then press [MENU/SET] to switch
text between [A] (capitals), [a] (lower case), [1] (numbers) and
[&] (special characters).
• T o enter the same character again, rotate the zoom lever
towards [Z] (T) to move the cursor.
• The following operations can be performed by moving the cursor to the item and
pressing [MENU/SET]:
–[]]: Enter a blank
–[Delete]: Delete a character
–[ ]: Move the entry position cursor to the left
–[ ]: Move the entry position cursor to the right
• A maximum of 30 characters can be e ntered . (Maximum of 9 characters when setting
names in [Face Recog.])
¢ A maximum of 15 c har acte rs c an be ent ere d for [ ], [ ], [ ], [ ] and [ ] (Maximum
of 6 characters when setting names in [Face Recog.]).
Press 3/4/2/1 to move the cursor to [Set] and then press
[MENU/SET] to end text input.
Note
Text can be scrolled if al l of the entered text does not fit on the screen.
•
•It is displayed in order of title, location, [Name] ([Ba by1]/[Baby2], [P e t]) , [N a m e ] ([ Fac e
Recog.]).
- 73 -
Page 74

Recording
Using the [Rec] Menu
For details on [Rec] menu settings, refer to P38.
[Picture Size]
Applicable modes:
Set the number of pixels. The higher the numbers of pixels, the finer the detail of the
pictures will appear even when they are printed onto large sheets.
Settings Picture Size
[] 4320k3240
[]
[] 2560k1920
[]
[] 640k480
[] 4320k2880
[] 4320k2432
[] 3232k3232
¢ This item cannot be set in the Intellig ent Auto Mode.
X :
Y : Aspect ratio of a 35 mm film camera
W :
¢
¢
3648k2736
2048k1536
Aspect ratio of a 4:3 TV
Aspect ratio of a high-definition TV, etc.
:
Square aspect ratio
Note
•
In specific modes, Extended Optical Zoom cannot be used, and the picture size for [ ] is not
displayed. For details regarding modes in which Extended Optical Zoom cannot be used, refer
to P52.
•Pictures may appear mosaic depending on the subject and the recording conditions.
- 74 -
Page 75

Recording
[Quality]
Applicable modes:
Set the compression rate at which the pictures are to be stored.
Settings Description of settings
[A] ([Fine]) when giving priority to the picture quality
[›] ([Standard]) when using the standard picture quality and increasing the
Note
The setting is fixed to [›] in [High Sens.] in Scene Mode.
•
•The following icons are displayed during the 3D recording .
[ ] ([3D+Fine]):
[ ] ([3D+Standard]): Both MPO images and standard JPEG images are recorded
number of pictures to be recorded without changing the
number of pixels
Both MPO images and fine JPEG imag es are recorded
simultaneously.
simultaneously.
- 75 -
Page 76

Recording
[Sensitivity]
Applicable modes:
This allows the Sensitivity to light (ISO sensitivity) to be set. Setting to a higher figure
enables pictures to be taken even in dark places without the resulting pictures coming out
dark.
Settings Description of settings
[AUTO]
[]([i.ISO])
[100]
[200]
[400]
[800]
[1600]
[3200]
The ISO sensitivity is automatically adjusted according to the
brightness.
•Maximum [800] (With the flash on [1600])
The ISO sensitivity is adjusted according to the movement of the
subject and the brightness.
•Maximum [1600]
The ISO sensitivity is fixed to various settings.
[100]
Recording location
(recommended)
Shutter speed Slow Fast
Noise Less Increased
Jitter of the subject
When it is light (outdoors) When it is dark
Increased Less
[
3200]
∫ About [ ] (Intelligent ISO sensitivity control)
The camera detects movement of the subject and then automatically sets the optimum
ISO sensitivity and shutter speed to suit the movement of the subject and brightness of the
scene to minimize the jitter of the subject.
•
The shutter speed is not fixe d when the shutter button is presse d halfway . It is continuously
changing to match the movement of the subject until the shutter button is pressed fully.
Note
For the focus range of flas h when [AUTO] is set, refer to P54.
•
•The ISO sensitivity is automatically set under the following conditions.
–When recording motion pictures
–When [Burst] is set to [ ]
- 76 -
Page 77

Recording
[White Balance]
Applicable modes:
In sunlight, under incandescent lights or in other such conditions where the color of white
takes on a reddish or bluish tinge, this item adjusts to the color of white which is closest to
what is seen by the eye in accordance with the light source.
Settings Description of settings
([Auto White
[AWB]
Balance])
[V] ([Daylight]) When taking pictures outdoors under a clear sky
[Ð] ([Cloudy])
[î] ([Shade])
[Ñ] ([Incandescent]) When taking pictures under incandescent lights
[Ò] ([White Set ] )
[Ó] ([ W hi t e Set Setting])
Note
•
Under fluor e s cent lighting , LED lightin g fi xture etc., th e ap p r opriate Whit e Ba l a nce will vary
depending on the lighting ty pe, so use [AWB] or [Ó].
•The White Balance setting is memorized even if the camera is turned off. (However, the White
Balance setting for a Scene Mode returns to [AWB] when the Scene Mode is changed.)
•White Balance is fixed to [AWB] in following conditions.
–[Scenery]/[Night Portrait]/[Night Scenery]/[Handheld Night Shot]/[Food]/[Sunset] in Scene
Mode
∫ Auto White Balance
Depending on the conditions prevailing when pictures are taken, the pictures may take on
a reddish or bluish tinge. Furthermore, when a multiple number of light sources are being
used or there is nothing with a color close to white, Auto White Balance may not function
properly. In this case, set the White Balance to a mode other than [AWB].
1 Auto White Balance will work within this range
2 Blue sky
3 Cloudy sky (Rain)
4 Shade
5 Sunlight
6 White fluorescent light
7 Incandescent light bulb
8 Sunrise and sunset
9 Candlelight
KlKelvin Color Temperature
Automatic adjustment
When taking pictures outdoors under a cloudy sky
When taking pictures outdoors in the shade
Value set by using [Ó]
Set manually
- 77 -
Page 78

Recording
Setting the White Balance manually
Set the White Balance value. Use to match the condition when taking photographs.
1 Select [Ó] and then press [MENU/SET].
2 Aim the camera at a sheet of white paper etc. so that the
frame in the center is filled by the white object only and then
press [MENU/SET].
White Balance may not be set when the subject is too bright or too
•
dark. Set the White Balanc e again after adjusting to appropriate
brightness.
• Exit the menu after it is set.
Finely adjusting the White Balance
You can finely adjust the White Balance when you cannot acquire the desired hue by
setting the White Balance.
•
Fine adjustment is possible only when the White Balance is set to [V]/[Ð]/[î]/[Ñ]/[Ò].
1 Select the White Balance to finely adjust and then press [DISP.] to display
[WB Adjust.].
2 Press 2/1 to adjust the White Balance.
2 [Red]: Press when the hue is bluish.
1 [Blue]: Press when the hue is reddish.
•
Select [0] to return to the original White Balance.
3 Press [MENU/SET] to finish.
Note
•
The White Balance icon on the screen turns red or blue.
•The White Balanc e fine adjustment setting is reflected in the picture when using the flash.
•You can finely adjust the White Balance independently for each White Balance item.
•The White Balanc e fine adjustment setting is memorized even if the camera is turned of f.
•The White Balance fine adjustment level in [Ò] returns to [0] when you reset the White
Balance using [Ó].
•White Balance fine adjustment cannot be set for [B&W] and [SEPIA] in [ColorMode].
- 78 -
Page 79

Recording
[AF Mode]
Applicable modes:
This allows the focusing method that suits the positions and number of the subjects to be
selected.
Settings Description of settings
[š] ([Face Detection])
[]([AF Tracking])
[]([23-Area])
[Ø] ([1-Area])
¢
([Spot])
[Ù]
¢ [Ø] will be used during motion picture recording.
Note
The focus setting is fixed to [Ø ] in Miniature Effect Mode.
•
•It will be fixed to [š] when t he [Face Recog.] is set to [ON].
•[š] cannot be set wit h [Panorama Shot], [NightScenery], [Handheld Night Shot] or [Food] i n
Scene Mode.
•It cannot be set to [ ] in the following conditions.
–In [Panorama Shot] in Scene Mode
–In [B&W] or [SEPIA] i n [Co l or Mode]
The camera automatically detects the person’s face. (max.
15 areas) The focus and exposure can then be adjusted to fit
that face no matter what portion of the picture it is in.
Focus can be adjusted to a specified subject. Focus will keep on
¢
following the subject even if it moves. (Dynamic tracking)
Up to 23 points for each AF area can be focused. This is
¢
effective when the subject is not in the center of the screen.
(AF area frame will be same as image aspect ratio setting.)
The camera focuses on the subject in the AF area on the center
of the screen.
The camera focuses on a limited narrow area in the screen.
- 79 -
Page 80

Recording
A
∫ About [š] ([Face Detection])
The following AF area frames are displayed when the camera detects the
faces.
Yellow:
When the shutter button is pressed halfway, the frame turns green when
the camera is focused.
White:
Displayed when more than one face is detected. Other faces that are the same distance
away as the faces within the yellow AF areas are also brought into focus.
Note
•
Under certain picture-taking conditions including the f ollowing cases, the face detecti on
function may fail to work, making it impossible to detect fac es. [AF Mode] is switched to [ ]
([Ø] while motion pictures are t aken).
–When the face is not facing the camera
–When the face is at an angle
–When th e face is extremely bright or dark
–When th ere is little contrast on the faces
–When the facial features are hid den behind sunglasses, etc.
–When the face appears small on the screen
–When th ere is rapid movement
–When th e subject is not a human being
–When th e camera is shaking
–When Digital Zoom is used
•If the camera is registering something oth er than someone’s face, change the settings to
something other than [
š].
∫ Setting up [ ] ([AF Tracking])
Align the subject with the AF tracking frame, and then press 4
to lock onto the subject.
A AF tracking frame
•AF area will be displayed in yellow when a subject is recognized, and
focus will automatically adjust continuously following the subject’s
movement (Dynamic tracking).
•AF tracking is canceled when 4 is pressed aga in.
Note
Dynamic tracking function may not work in the following cases:
•
–When the subject is too small
–When the recording location is too dark or bright
–When the subject is moving too fast
–When the background has the same or similar color to the subject
–When jitter is occurring
–When using the zoom
•When the lock fails, the AF tracking frame will turn red and then disappear. Press 4 again.
•The camera rec ords pictures with [AF Mode] as [Ø] when lock ed or Dynamic Tracking is not
working.
- 80 -
Page 81

Recording
[Quick AF]
Applicable modes:
As long as the camera is held steady, the camera will automatically adjust the focus and
focus adjustment will then be quicker when the shutter is pressed. This is useful when you
do not want to miss a picture-taking opportunity.
Settings: [ON]/[ OFF]
Note
•
The battery will be consumed faster than usual.
•Press the shutter button halfway again when it is difficult to focus on the subj ect.
•It does no t operate during AF tracki ng.
•[Quick AF] cannot be set when in [Nigh t Portrait], [NightScenery ], and [ Handheld Nig ht Sho t] in
Scene Mode.
[Face Recog.]
Note
Refer to P69 for details.
•
[i.Exposure]
Applicable modes:
Contrast and exposure will be adjusted automatically when there is a big difference in
brightness between the background and subject, to bring the image close to real life.
Settings: [ON]/[ OFF]
Note
•
[ ] in the screen turns yellow when [i.Exposure] is in effect.
•Even when the [Sensitivity] is set to [10 0 ], [S en sit iv i ty] m ay be set hig h er than [10 0 ] if the
picture is taken with [i. Ex posure].
•Compensati on effect may not be achieved depending on the conditions.
- 81 -
Page 82

Recording
[Min. Shtr Speed]
Applicable modes:
You can take bright pictures in dark places by setting [Min. Shtr Speed] slower. Also, you
can set it faster to reduce the blur of the subject.
Settings: [AUTO], [1/125], [1/60], [1/30], [1/15], [1/8], [1/4], [1/2], [1]
Minimum shutter speed setting 1/125 1
Brightness Darker Brighter
Jitter Less More
Note
•
This should usually be set to [AUTO] to take pictures. (When you select a minimum shutter
speed other than [AUTO], [ ] appears on the screen.)
•When [AUTO ] is selected, shutter speed may be set up to 1 se cond when there is not much
jitter to adjust with the [Stab ilizer], or when [Stabilizer ] is set to [OFF].
•Setting [ Min. Shtr Speed] to slower speed might increase the chance of jitter, so we
recommend using a tripod and the self-t imer for taking pictures.
•Setting [ M in. Shtr Speed] to faster speed might make the picture darker, so we recommend
recording the picture in a well-lit are a. If co rrect ex posure cannot be achiev ed, [ ] will flash in
red when the shutter button is pressed halfway.
[i.Resolution]
Applicable modes:
Pictures with sharp profile and resolution can be taken by using the Intelligent Resolution
Technology.
Settings Description of settings
[ON]
[i.ZOOM]
[OFF] —
[i.Resolution] is activated.
[i.Resolution] is activated, and zoom magnification increased to
2 times while limiting deterioration of the picture.
Note
•
Refer to P51 for information about the Intelligent Zoom.
[Digital Zoom]
Applicable modes:
This can enlarge subjects even more than the Optical Zoom, Extended Optical Zoom, or
[i.ZOOM].
Settings: [ON]/[ OFF]
Note
•
Refer to P51 for details.
•The setting is fixed to [ON] in Macro Zoom Mode.
- 82 -
Page 83

Recording
10
[Burst]
Applicable modes:
Pictures are taken continuously while the shutter button is pressed.
Settings Description of settings
[]
([Intelligent Burst
¢
mode])
[]
([2 fps
AF-Continuous])
[]
([5 fps
AF-Continuous])
[]
([10 fps AF-Single])
[]
([Flash Burst])
[OFF] —
¢ This can be set only when Intelligent Auto Mode is set.
•The burst speed changes in accordance with
the motion of the subject.
•The focus, ex posure, and White Balance are
adjusted for each picture record ed in the
burst.
•The focus , ex posure and White Balance are
fixed to the settings for the first picture.
•S till pictures are taken continuously with
flash.
•This can be set only du ring Normal Picture
Mode.
•The picture size is fixed to 3M (4:3), 2.5M
(3:2), 2M (16:9) or 2.5M (1:1).
•Settings for focus, zoom, exposure, shutter
speed, ISO sensitivity, flash output are fixed
to the first pictu re.
•Number of re cordable p ictur es will b e fixed t o
5 pictures when the self-timer is used.
•The flash setting is fixed to [‰].
Number of
recordable pictures
approx. 100 pictures
approx. 100 pictures
approx. 4 pictures
approx. 5 pictures
Note
•
When [ ] or [ ] is set, focus prediction will be pe rformed in a possibl e range to priorit ize the
burst speed. Therefore, if you try to take a pict ure of a subject that is moving fast, it may have
trouble with focusing or it may take time to focus.
10
•When [ ] is set, the recording may be brighter or darker from the second picture depending
on changes in the brightness of the subject.
•The burst speed (pictures/second) may become slower depending on the recording
environment such as in dark places , if the ISO sensitivity is high, et c.
•If you take pictures in Burst Mode with the built -in memory, it will take time to write the picture
data.
•Burst Mode is not canceled when the camera is switche d off.
•You cannot use Burst Mode in following conditions.
–When using Auto Bracket
–In [Panorama Shot], [Handheld Night Shot] and [Photo Frame] in Scene Mode
•Number of recordable pictu res will be fixed to 3 picture s when the self-timer is used (except for
[]).
•The flash setting is fixed to [Œ] (except for [ ]).
- 83 -
Page 84

Recording
[Color Mode]
Applicable modes:
Sets various color effects, including making the picture sharper, brighter, or applying a
sepia tone.
Settings Description of settings
[STANDARD]
¢1
[Happy]
¢2
[VIVID]
[B&W]
[SEPIA]
¢1 This can be set only when Intelligent Auto Mode is set.
¢2 This can be set only during Normal Picture Mode.
This is the standard setting.
Image with enhanced brightness and vividness.
The picture becomes sharper.
The picture becomes black and white.
The picture becomes sepia.
[AF Assist Lamp]
Applicable modes:
AF assist lamp will illuminate the subject when the shutter button is pressed halfway,
making it easier for the camera to focus when recording in low light conditions. (Larger AF
area is displayed depending on the recording conditions.)
Settings: [ON]/[ OFF]
Note
•
The effective dist ance of the assist lamp is a maximum of
approximately 1.5 m (4.9 feet).
•When you do not wa nt to use the AF Assist Lamp A (e.g. when
taking pictures of animals in dark places), set the
[AF Assist Lamp] to [OFF]. In this case, it will become more
difficult to focus on the subj e ct.
•[AFAssist Lamp] is fixed to [OFF] in [Scenery], [Night Scenery],
[Handheld Night Shot], [Su nset], and [Glass Through] in Scene Mode.
[Red-Eye Removal]
Applicable modes:
When Red-Eye Reduction ([ ], [ ]) is selected, Digital Red-Eye Correction is
performed whenever the flash is used. The camera automatically detects red-eye and
corrects the picture.
Settings: [ON]/[ OFF]
Note
•
Only available when [AF Mode] is set to [š] and Face Detection is active.
•Under certain circumstances, red-eye cannot be corrected.
- 84 -
Page 85

Recording
[Stabilizer]
Applicable modes:
Using one of these modes, jitter during picture taking is detected, and the camera
automatically compensates the jitter, enabling jitter-free images to be taken.
Settings: [ON]/[ OFF]
Note
•
Stabilizer is fixed to [OFF] in [Panor ama Shot] in Scene Mode.
•The setting is fixed to [ON] in [Handheld Night Shot] in Scene Mode or in recording motion
pictures.
•The stabilizer funct ion may not be effective in the following cases.
Be careful of camera jitter when you press the shutter button.
–When th ere is a lot of jitter.
–When th e zoom magnification is high.
–In Digital Zoom range.
–When taking pictures while following a moving subject.
–When the shutter speed becomes slower to take pictures indo ors or in dark places.
[Date Stamp]
Applicable modes:
You can take a picture with date and time of recording.
Settings Description of settings
[W/O TIME]
[WITH TIME]
[OFF] —
Stamp the year, month, and day.
Stamp the year, month, day, hour, and minutes.
Note
Date information for pictures recorded with the [Date Stamp] set cannot be deleted.
•
•When printing pictures with [Date Stamp] at a shop or with a printer, the date will be
printed on top of the other if you choose to print with the date.
•If the time has not been set, you cannot st amp with the date informati on.
•The setting is fixed to [OFF] in the following cases.
–When recording mo ti on pi c t ur e s
–When using Auto Bracket
–In [Panorama Shot] in Scene Mode
–When using [Burst].
•[Text Stamp], [Resize], and [Cropping] c annot be set for pictures recorded with [Date Stamp]
set.
•Even if you take a picture with [Dat eStamp] set to [OFF], it is possible to stamp dates onto the
recorded pictures using [Text Stamp] (P98) or setup the Date print (P105, 124).
[Clock Set]
•Refer to P18 for details.
- 85 -
Page 86

Recording
Using the [Motion Picture] Menu
For details on [Motion Picture] menu settings, refer to P38.
In [Panorama Shot] in Scene Mode, the [Motion Picture] menu will not be displayed.
[Rec Mode]
Applicable modes:
This sets up the data format of motion pictures.
[AVCHD]
[MP4]
[Rec Quality]
Applicable modes:
This sets up the picture quality of motion pictures.
When [AVCHD] is selected
Settings Qualit y ( bit rate ) fps Aspect ratio
[FSH] 1920k1080 pixels/Approx.17 Mbps
[SH] 1280k720 pixels/Approx. 17 Mbps
Select this format to record HD (high definition) video for playback on
your HDTV using an HDMI connection.
Select this format to record standard definition video for playback on
your PC.
60i
(Sensor output is
30 fps)
60p
(Sensor output is
30 fps)
16:9
When [MP4] is selected
Settings Qualit y ( bit rate ) fps Aspect ratio
[FHD] 1920k1080 pixels/Approx. 20 Mbps
[HD] 1280k720 pixels/Approx. 10 Mbps
[VGA] 640k480 pixels/Approx. 4 Mbps 4:3
30
16:9
- 86 -
Page 87

Recording
Note
•
What is bit rate
This is the volume of data for a definite p eriod of t ime, and the qualit y become s higher whe n the
number gets bigger. This unit is using t he “VBR” rec ording method . “VBR” is an abbrev iation for
“Variable Bit Rate”, and the bit rate (volum e of data for definite period of time) is cha nged
automatically depending on the subject to record. Therefore, the recording time is shortened
when a subject with fast movement is recorded.
[Continuous AF]
Applicable modes:
It will continually keep on focusing on a subject for which the focus was once set.
Settings: [ON]/[ OFF]
Note
Set this function to [OFF] if you wish to fix the focus on the position where you started the
•
motion picture recording.
[Wind Cut]
Applicable modes:
This prevents the recording of wind-noise automatically.
Settings: [AUTO]/[OFF]
Note
Sound quality may be different than usual when [Wind Cut] is set.
•
- 87 -
Page 88

Playback/Editing
Playback/Editing
Various methods of playback
You can play back the recorded pictures in various methods.
Slide the REC/PLAY switch to [(], and then press [MODE].
Press 3/4/2/1 to select item, and then press [MENU/SET].
• Following items can be selected.
[]([Normal Play]) (P32)
[]([2D/3D Settings])
[]([Slide Show]) (P89)
[]([Filtering Play]) (P91)
[]([Calendar]) (P92)
¢ The playback method for the 3D pictures can be switched. This menu is only
displayed during HDMI output. Refer to P113 for details about the playback
method.
¢
- 88 -
Page 89

Playback/Editing
[Slide Show]
Y ou can play back the pictures you have taken in synchronization with music, and you can
do this in sequence while leaving a fixed interval between each of the pictures.
You can also put together a slide show composed of only still pictures, only motion
pictures, only 3D pictures etc.
We recommend this feature when you view your pictures by connecting the camera to a
TV.
Select the group to play back by pressing 3/4, and
then press [MENU/SET].
• Refer to P113 for the method to playback [3D Play ] pictures in
3D.
• During [Category Selection], pre ss 3/4/2/1 to select a
category , an d then press [MENU/SE T]. Refer to P91 for c ategor y
details.
Press 3 to select [Start] and then press [MENU/SET].
Press 4 to finish the slide show.
• Normal Playback resumes after the sli de show finishes.
∫ Operations performed during slide show
The cursor displayed during playback is the same as 3/4/2/1.
Play/Pause
3
Stop
4
Back to previous picture
2
Ahead to next picture
1
Reduce volume level
[W]
Increase volume level
[T]
¢ Only available during pause or during playback of a motion picture or panorama pi ct ure.
¢
¢
- 89 -
Page 90

Playback/Editing
∫ Changing the slide show settings
You can change the settings for Slide Show Playback by selecting
[Effect] or [Setup] on the slide show menu screen.
[Effect]
This allows you to select the screen effects or music effects when
switching from one picture to the next.
[NATURAL], [SLOW], [SWING], [URBAN], [OFF], [AUTO]
•
When [URBAN] has been selected, the picture may appear in black and white as a screen
effect.
•[AUTO] can be used only when [Category Selection] has been selected. The pic tures are
played back with the recommended effects in each category.
•During the [Mot ionPic. Only] slide show, [Effect] is f i xed to [OFF].
•Some [Effect] will not operate when playing back pictures displayed vertically.
[Setup]
[Duration] or [Repeat] can be set.
Settings Description of settings
[Duration] [1SEC]/[2SEC]/[3SEC]/[5SEC]
[Repeat] [ON]/[OFF]
[OFF]: There will be no sound.
[AUTO]: Music is played when the still pictures are played
[Sound]
[Music]: Music is played back.
[Audio]: Audio (only for motion pictures) is played back.
[Duration] can be set only when [ OF F ] has been selected as the [Effect] setting.
•
back, and audio is played when the motion pictures
are played back.
•When playing back a panorama picture, the [D uration] setting is disable d.
- 90 -
Page 91

Playback/Editing
[Filtering Play]
Pictures are classified into only still pictures, only motion pictures, or only 3D pictures etc.,
and played back.
Settings Description of settings
[Picture Only] Only still pictures are played back.
[Video Only] Only motion pictures are played back.
[3D Play]
[Category
Selection]
Only 3D pictures are played back.
•Refer to P113 for the method to playback [3D Play] pictures in 3D.
This mode allows you to sea rch images by Scene Mode or other categories
(such as [Portrait], [Scenery] or [Night Scenery]) and sort the pictures into
each of the categories. You can then play back the pictures in each
category.
Press 3/4/2/1 to select the category
and then press [MENU/SET] to set.
•Only the category for which pictures have been
found can be selected.
[Favorite] You can play back the pictures you have set as [Favorite] (P103).
∫ About the categories to be sorted
It will be sorted as following when [Category Selection] is set.
Recording information e.g. Scene Modes
[Face Recog .]
*
,
.
Î
í
1
¢ Press 3/4/2/1 to select the person to play back and then press [MENU/SET].
[Portrait], [i-Portrait], [Soft Skin], [Night Portrait], [i-Night Portrait], [Baby1]/
[Baby2], [i-Ba b y]
[Scenery], [i-Scenery], [Panorama Shot], [Sunset], [i-Sunset], [Glass
Through]
[Night Portrait], [i-Night Portrait], [Night Scenery], [i-Night Scenery],
[Handheld Night Shot], [iHandheld Nite Shot],
[Sports]
[Baby1]/[Baby2], [i-Baby]
[Pet]
[Food]
[Travel Date]
¢
- 91 -
Page 92

Playback/Editing
[Calendar]
You can display pictures by recording date.
Press 3/4/2/1 to select the date to be played
back.
• If there were no pictures recorded during a month, that month is
not displayed.
Press [MENU/SET] to display the pictures tha t were
recorded on the selected date.
• Press [ ] to return to the calendar screen.
Note
The recording date of the picture selected in the playback screen becomes the date selected
•
when the calendar screen is first di splayed.
•If the re are mult ipl e p ictur es with the same rec ording da te , the f irs t p ict ur e rec orde d on t ha t day
is displayed.
•You can display the calendar between January 2000 and December 2099.
•If the dat e is not set in the camera, the recording date is set as January 1st, 2012.
•If you take pictures after setting the travel destination in [World Time], the pictures are
displayed by the dates at the travel destination in Calendar Playback.
- 92 -
Page 93

Playback/Editing
Having Fun with Recorded Pictures
[Auto Retouch]
The brightness and color of the pictures taken can be balanced.
With [Auto Retouch], a new ed ited picture is created. Check that there is free space on the
•
built-in memory or the card.
[Auto Retouch] cannot be used if the card’s Write-Protect switch is set to [LOCK].
¢ These pictures are examples to show the effect.
Press 2/1 to select a picture, and then press 3.
Press 3/4 to select [Auto Retouch], and then press [MENU/SET].
Press 3/4 to select [ON], and then press [MENU/SET].
• Confirmation screen is displayed. It is exec uted when [Yes] is selected.
Note
Depending on the picture, nois e may be emphasized by [Auto Retouch].
•
•Eff ects may be difficult to see depending on the picture.
•It may not be possible to perform [Auto Retouch] on pictures which have already been
retouched.
•[Auto Retouch] may not be performed on pictures rec orded with other equipment.
•[Auto Retouch] is not possible in the following cases:
–Motion pictures
–3D picture s
–Pictures taken in [Panorama Shot] and [Photo Frame] in Scene Mode
- 93 -
Page 94

Playback/Editing
[Creative Retouch]
You can add your desired effects to the pictures that you have taken.
•
With [Creative Retouch], a n ew edited picture is created. Chec k t hat there is free space on the
built-in memory or the card.
[Creative Retouch] cannot be used if the card’s Write-Protect switch is set to [LOCK].
Press 2/1 to select an picture, and then press 3.
Press 3/4 to select [Creative Retouch], and then press [MENU/SET].
Press 3/4 to select an item, and then press
[MENU/SET].
• Confirmation screen is displayed. It is ex ecuted when [Yes] is
selected.
• When [Toy Effect] is sele ct ed, you can change the color t one to
Cool, Normal, or Warm by pressing [DISP.].
Item Effect
[EXPS] ([Expressive])
[RETR] ([Retro])
[HKEY] ([High Key]) Overall, the image effect will become brighter.
[MONO]
[TOY] ([Toy Effect])
[SOFT] ([Soft Focus])
([Dynamic
Monochrome])
This is a pop art style image effect that emphasizes
the color.
This is a soft image effect that gives the appearance
of a tarnished photograph.
This is an image effec t that increases the co ntrast fo r
providing black-and-white pictures with more
powerful impact.
This effect produces vignetting, making it look like
the image was taken with a toy camera .
This is an image effect that slightly blurs the entire
image for creating a softer atmosphere.
Note
Effects may be difficult to see depending on the picture.
•
•[Creative Retouch] may not be performed on pictures recorded with other equipment.
•[Creative Retouch] is not possible in the following cases:
–Motion pictures
–3D picture s
–Pictures taken in [Panorama Shot] in Scene Mode
- 94 -
Page 95

Playback/Editing
Using the [Playback] Menu
You can set up pictures to be uploaded to image sharing sites and perform actions like
cropping recorded pictures, as well as set up the protection of recorded images, etc.
•
With [Text S t amp ], [ Resiz e] o r [ Cropping ], a n ew e dited pict ure is cre ated. A n ew p ictur e can not
be created if there is no free space on the built-in memory or the card so we recommend
checking that there is fre e space and then editing the picture.
[Upload Set]
It is possible to setup the images to be uploaded to the image sharing sites (Facebook/
YouTube) on this unit.
•
You can only upload motion pictures to YouTube, while you may upload both motion pictures
and still pictures to Facebook.
•This cannot be d o ne to the images in the built-in memory. Copy the images to a card
(P108), and then perform the [Upload Set].
Select [Upload Set] on the [Playback] menu. (P38)
Press 3/4 to select [SINGLE] or [MULTI] and then press [MENU/
SET].
Select the picture, a nd then pres s
[MENU/SET] to set.
• The setting is canceled when
[MENU/SET] is pressed again.
• Exit the menu after it is set.
[MULTI] setting
Press [DISP.] to set (repeat), and then
press [MENU/SET] to set.
The setting is canceled when [DISP.] is
•
pressed again.
• Confirmation screen is displayed. It is
executed when [Yes] is selected.
Exit the menu after it is executed.
[SINGLE] [MULTI]
Press 2/1 to
select the picture.
Press 3/4/2/1 to
select the pictures.
- 95 -
Page 96

Playback/Editing
∫ Upload to the image sharing sites
An upload tool built into the camera, “LUMIX Image Uploader,” is automatically copied to
the card when you set up [Upload Set].
Perform the upload operation after connecting the camera to a PC (P119). For details,
refer to P121.
∫ Canceling all the [Upload Set] settings
1 Select [Upload Set] on the [Playback] menu.
2 Press 3/4 to select [CANCEL] and then press [MENU/SET].
•
Confirmation screen is displa yed. It is executed when [Yes] is selected.
Exit the menu after it is executed.
Note
Setting may not be possibl e for pictures recorded with other cameras.
•
•It cannot be set with the card less than 512 MB.
- 96 -
Page 97

Playback/Editing
[Title Edit]
Y ou can add text (comments) to pictures. Af ter text has been registered, it can be stamped
in prints using [Text Stamp] (P98).
Select [Title Edit] on the [Playback] menu. (P38)
Press 3/4 to select [SINGLE] or [MULTI] and then press [MENU/
SET].
Select the picture, a nd then pres s
[SINGLE] [MULTI]
[MENU/SET] to set.
• [’] is displayed for pictures with titles
already registered.
[MULTI] setting
Press [DISP.] to set (repeat), and then
press [MENU/SET] to set.
The setting is canceled when [DISP.] is
•
pressed again.
Press 2/1 to
select the picture.
Press 3/4/2/1 to
select the pictures.
Enter the text. (P73)
• Exit the menu after it is set.
Note
To delete the title, erase all the text in the text input screen.
•
•You can print out texts (comments) using the “PHOTOfunSTUDIO ” bundled software on the
CD-ROM (supplied).
•You can set up to 50 pictures at one time with [MULTI].
•[Title Edit] cannot be used in the following cases:
–Motion pictures
–3D picture s
–Pictures recorded with other equipment
- 97 -
Page 98

Playback/Editing
[Text Stamp]
You can stamp the recording date/time, name, location or travel date onto the recorded
pictures.
Select [Text Stamp] on the [Playback] menu. (P38)
Press 3/4 to select [SINGLE] or [MULTI] and then press
[MENU/SET].
Select the picture, a nd then pres s
[SINGLE] [MULTI]
[MENU/SET] to set.
• [‘] is displayed on pictures already with
date or text stamped.
[MULTI] setting
Press [DISP.] to set (repeat), and then
press [MENU/SET] to set.
The setting is canceled when [DISP.] is
•
pressed again.
Press 2/1 to
select the picture.
Press 3/4/2/1 to
select the pictures.
Press 3/4 to select [Set], and then press [MENU/SET].
Press 3/4 to select text stamp items, and then press [MENU/SET].
- 98 -
Page 99

Playback/Editing
Press 3/4 to select the settings, and then press [MENU/SET].
Item Setting item
Stamp the year, month and day.
Stamp the year, month , day, ho ur and minutes.
[Shooting Date]
[W/O TIME]:
[WITH TIME]:
[OFF]
[]
([Face
Stamp s names registered in name settings for
[Face Recog .] .
Stamp s names registered in name settings for
[Baby1]/[Baby2] or [Pet] in Scene Mode.
[Name]
Recognition]):
[]
([Baby/Pet]):
[OFF]
[ON]:
[Location]
Stamps the travel destination name set under
[Location].
[OFF]
[Travel Date]
[Title]
[ON]:
[OFF]
[ON]: Title input in the [Title Edit] will be stamped.
[OFF]
Stamp s the travel date set un der [TravelDate].
Press [ ].
Press 3 to select [OK], and then press [MENU/SET].
• Confirmation screen is displayed. It is ex ecuted when [Yes] is selected.
Exit the menu after it is executed.
Note
When you print pictures stampe d with text, the date will be printed o ver the stamped text if you
•
specify printing of the date at the photo shop or on the printer.
•You can set up to 50 pictures at one time in [MULTI].
•The picture quality may deteriorate when text stamping is carried out.
•Depending on the printer being used, some characters may be cut at printing. Check before
printing.
•When text is stamped onto the 0.3M pictures, it is difficult to read it.
•Text and dates cannot be stamped on the pictures in the following cases.
–Motion pictures
–Pictures taken in [Panorama Shot] in Scene Mode
–3D picture s
–Pictures recorded without setting the clock
–Pictures with date or text stamped
–Pictures recorded with other equipment
- 99 -
Page 100

Playback/Editing
[Video Divide]
Recorded motion picture can be divided in two. It is recommended for when you want to
divide a part you need with a part you do not need.
It cannot be restored once divided.
Select [Video Divide] on the [Playback] menu. (P38)
Press 2/1 to select the motion picture to divide, and then press
[MENU/SET].
Press 3 at the location to divide.
• Motion picture is played bac k from the same loc ation when 3 is
pressed again.
• You can finely adjust the l ocation for divi si o n by pr e ss i n g 2/1
while the motion picture is paused.
Press 4.
• Confirmation screen is displayed. It is ex ecuted when [Yes] is selected.
Exit the menu after it is executed.
• Motion picture may be lost if the card or battery is removed while processing the
dividing.
Note
[Video Divide] may not be performed on motion pictures recorded with other equipment.
•
•Motion pict ures cannot be divided at a location close to the start or end of the motion picture.
•With [MP4] motion pictures, the order of pictu r es will change if divided.
It is recommended to search th ese motion pictures by using [Calendar] or [Video Only] in the
[FilteringPlay].
•Motion pictures with a short recording time canno t be divided.
- 100 -
 Loading...