

Page 1
R
CQ-RG131U
●
Please read these instructions carefully before using this product and save this manual for future use.
●
Prière de lire ces instructions attentivement avant d’utiliser le produit et garder ca manuel pour l’utilisation ultérieure.
●
Lea con atención estas instrucciones ante de utilizar el producto y guarde este manual para poderlo consultar en el futuro.
Removable Face High-Power Cassette/Receiver with Changer Control
Récepteur/lecteur de cassettes à puissance élevée avec contrôleur
de changeur et panneau avant amovible
Cassette de alta potencia con placa frontal
Removible/Receptor con mando de cambiadiscos
Page 2
CQ-RG131U
2
E
N
G
L
I
S
H
Safety Information
Radio Frequency Interference Statement
(Part 15 of the FCC-Rules):
Applies only in U.S.A.
This equipment has been tested and found to comply with the limits for a Class B digital,
pursuant to Part 15 of the FCC Rules.
●
These limits are designed to provide reasonable protection against harmful interference in an
automobile installation. This equipment generates, uses, and can radiate radio frequency
energy and, if not installed and used in accordance with the instructions may cause harmful
interference to radio communications. However, there is no guarantee that interference will not
occur in a particular installation. If this equipment does cause harmful interference to radio or
television reception, which can be determined by tuning the equipment off and on, the user is
encouraged to consult the dealer or an experience radio technician for help.
FCC Warning:
Any unauthorized changes or modifications to this equipment would void the user's authority to
operate this device.
This device complies with Part 15 of the FCC Rules.
Operation is subject to the following two conditions.
(1) This device may not cause harmful interference, and
(2) This device must accept any interference received including interference that may cause
undesired operation.
For Canada:
This Class B digital apparatus complies with Canadian ICES-003.
WARNING:
TO REDUCE THE RISK OF FIRE OR
ELECTRIC SHOCK, DO NOT EXPOSE
THIS PRODUCT TO RAIN OR
MOISTURE.
TO REDUCE THE RISK OF FIRE OR
ELECTRIC SHOCK, AND ANNOYING
INTERFERENCE, USE ONLY THE
INCLUDED COMPONENTS.
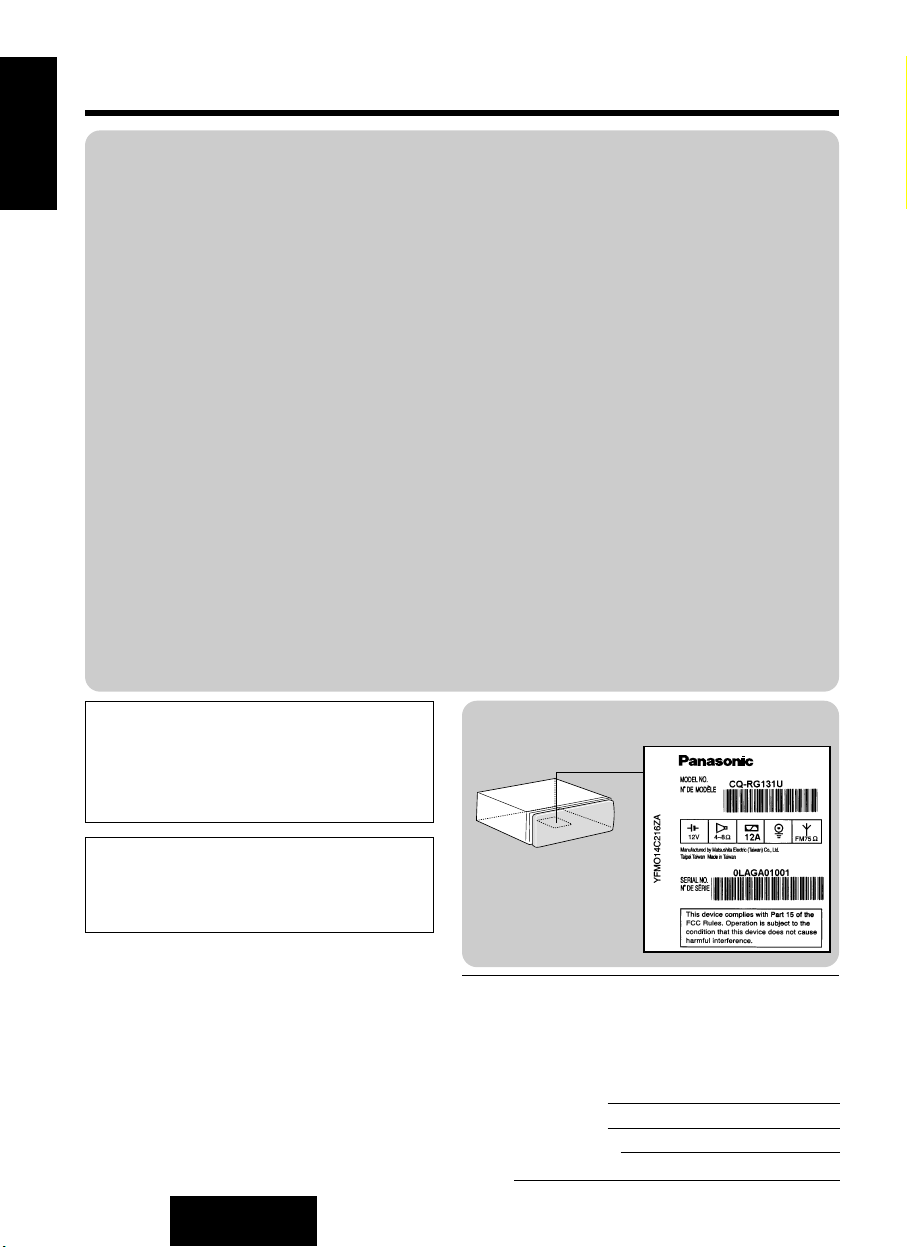
Identification Label
Find the model number and serial number on
either the back or bottom of the unit. Please
record them in the space below and retain this
booklet as a permanent record of your purchase
to help with identificaton in case of theft.
MODEL NUMBER
SERIAL NUMBER
DATE PURCHASED
FROM
CQ-RG131U
Page 3
CQ-RG131U
3
F
R
A
N
Ç
A
I
S
E
S
P
A
Ñ
O
L
Consignes de sécurité
Información para seguridad
MISE EN GARDE:
POUR RÉDUIRE LES RISOUES D'INCENDIE OU D'ÉLECTROCUTION N'EXPOSEZ
PAS CET APPAREIL À LA PLUIE OU À
L'HUMIDITÉ.
AFIN DE PRÉVENIR TOUT RISOUE D'INCENDIE OU D'INTERFÉRECES, UTILISER
UNIQUEMENT LES COMPOSANTS FOURNIS.
ADVERTENCIA:
PARA REDUCIR EL RIESGO DE INCENDIOS O SACUDIDAS ELÉCTRICAS, NO
EXPONGA ESTE PRODUCTO A LA
LLUVIA NI A LA HUMEDAD.
PARA REDUCIR RIESGO DE INCENDIOS
O SACUDIDAS ELÉCTRICAS, Y PARA
EVITAR LAS INTERFERENCIAS MOLESTAS, UTILICE SOLAMENTE LOS COMPONENTES INCLUIDOS.
l est recommandé de noter, dans l’espace prévu
ci-dessous, les numéros de modèle et de série
inscrits soit à l’arrière soit sous le fond de
l’appareil, et de conserver ce manuel comme
mémorandum de l’achat afin de permettre
l’identification de l’appareil en cas de vol.
NUMÉRO DE MODÉLE
NUMÉRO DE SÉRIE
DATE DE L'ACHAT
VENDEUR
CQ-RG131U
NÚMERO DEL MODELO
NÚMERO DE SERIE
FACHA DE COMPRA
NOMBRE DE LA TIENDA
CQ-RG131U
Busque el número del modelo y el número de
serie ya sea en la parte trasera o en el fondo de
la unidad. Sírvase anotar dichos números en el
espacio siguiente, y mantenga este librete
como una anotación permanente de su compra
para ayudar en la identificación en el caso de
robo.
Déclatalion d'interlerence the frequences
tatllo (Partie 15 des Reglements FCC):
Cst appareil numérique de Classe B est
conforme bu règlement ICES-003 canactten.
Page 4

CQ-RG131U
4
❏
Use This Product Safely
When Driving
Keep the volume level low enough product to be aware of road and traffic conditions.
When Car Washing
Do not expose the product, including the speakers and tapes, to water or excessive moisture. This
could cause electrical shorts, fire, or other damage.
When Parked
Parking in direct sunlight can produce very high temperatures inside your car. Give the interior a
chance to cool down before switching the unit on.
Use the Proper Power Supply
This product is designed to operate of a 12 volt, negative ground battery system (the normal system
in a North American car.)
Protect the Tape Mechanism
Keep magnets, screwdrivers, or other metallic objects away from the tape mechanism and tape
head to prevent poor performance or malfunctions.
Use Authorized Servicenters
Do not attempt to disassemble or adjust this precision product. Please refer to the Servicenter list
included with this product for service assistance.
Panasonic welcomes you to our ever growing family of electronic product owners. We know that this
product will bring you many hours of enjoyment. Our reputation is built on precise electronic and
mechanical engineering, manufactured with carefully selected components and assembled by
people who take pride in their work. Once you discover the quality, reliability, and value we have built
into this product, you too will be proud to be a member of our family.
E
N
G
L
I
S
H
Page 5
CQ-RG131U
5
Contents
Radio Frequency Interference Statement
(Part 15 of the FCC Rules)......................................................................2
Use This Equipment Safely....................................................................4
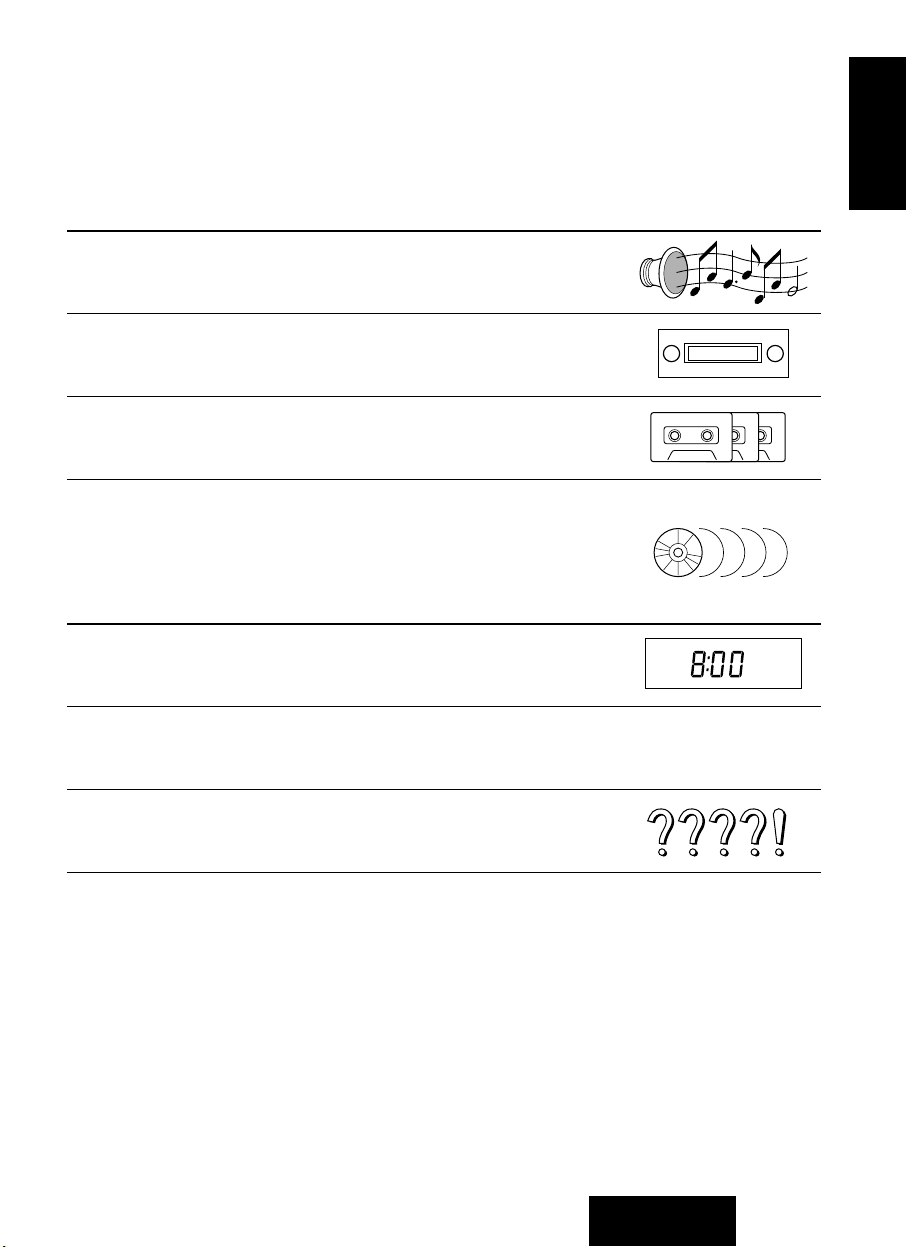
❏
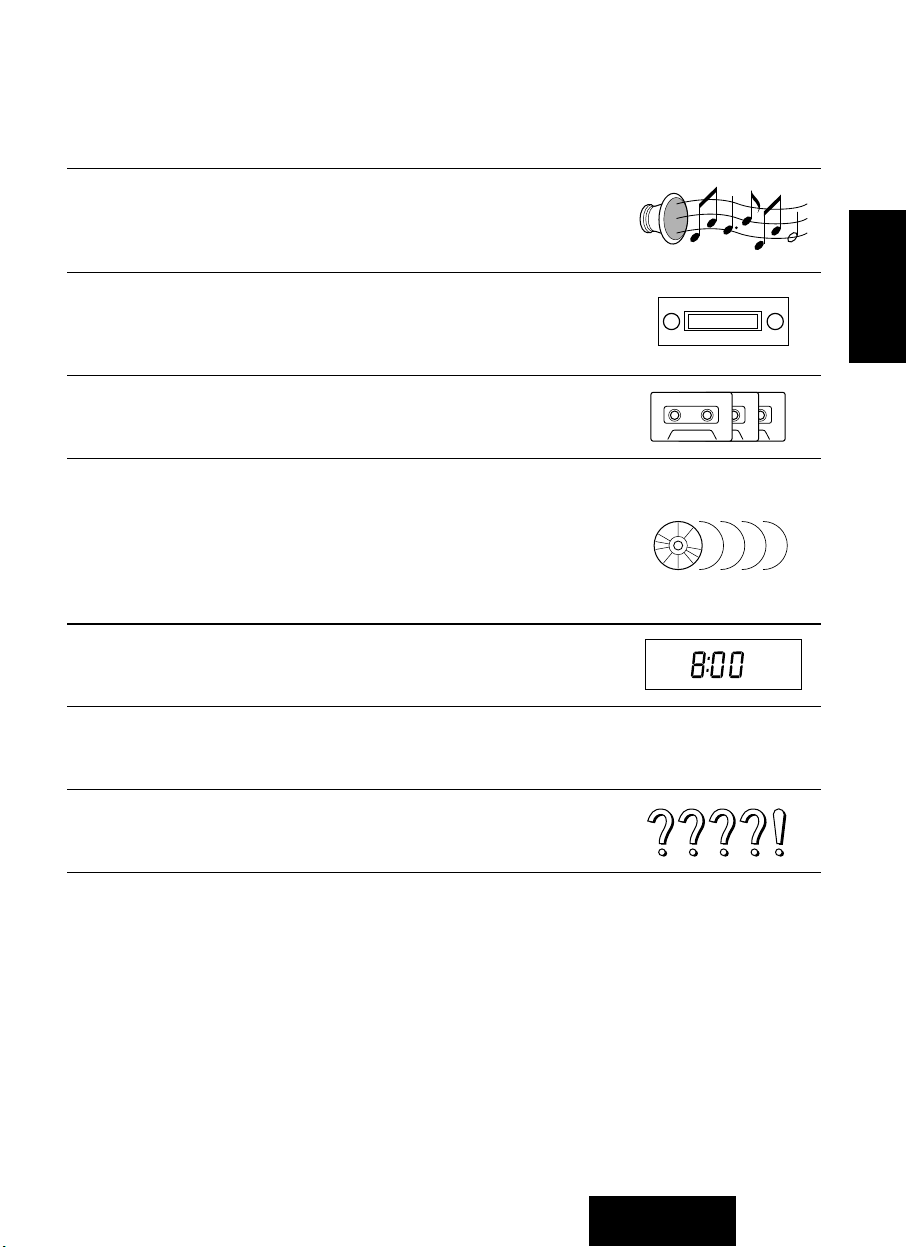
Power and Sound Controls..............................................................10
How to adjust the volume, mute, balance, and tone for best listening
❏
Radio Basics......................................................................................12
Manual and automatic tuning, band selection, preset stations
❏
Cassette Tape Player Basics............................................................14
How to load, wind, play, and eject a cassette tape
❏
CD Changer Basics...........................................................................16
Play, repeat, random and scan, error messages
Note:
CD changer controls are applicable to units with optional CD changer
unit (sold separately).
❏
Clock Basics......................................................................................18
Setting the time, selecting the clock display
❏
Installation Guide..............................................................................19
Step-by-step procedures, anti-theft system, electrical connections
❏
Troubleshooting................................................................................28
Troubleshooting tips, where to get service help
Specifications .......................................................................................29
E
N
G
L
I
S
H
Page 6

CQ-RG131U
6
❏
Précautions à prendre
Au volant
Régler le volume à un niveau qui ne risque pas de masquer les bruits ambiants.
Lavage de la v oiture
Afin de prévenir tout risque de court-circuit ou d’incendie, ne pas exposer l’équipement, y compris
les haut-parleurs et les cassettes, à l’eau ni à une humidité excessive.
Voiture stationnée
L’habitacle d’une voiture immobile exposée au soleil toutes vitres fermées devient rapidement très
chaud. Laisser rafraîchir l’intérieur du véhicule avant d’utiliser l’appareil.
Source d’alimentation
Cet appareil est conçu pour fonctionner sur un système d’alimentation avec batterie de 12 V avec
négatif à la masse (système standard sur les voitures de construction nord-américaine).
Mécanisme de défilement
Ne pas approcher d’aimants, de tournevis ou tout autre objet métallique du mécanisme de
défilement de la bande et de la tête magnétique.
Réparation
Ne pas tenter de démonter ou d’ajuster l’appareil soi-même. Confier toute réparation à un centre de
service agréé.
Panasonic est heureuse de vous compter parmi les utilisateurs de ses appareils électroniques.
Nous pouvons vous assurer que cet appareil vous procurera de longues heures d’agrément. Notre
réputation est fondée sur une ingénierie électronique et mécanique de haute précision laquelle
préside à la fabrication d’appareils ne comportant que des composants de choix assemblés par un
personnel soucieux de la bonne réputation acquise par la qualité de son travail. Après avoir
découvert la qualité, la valeur et la fiabilité de cet appareil, vous aussi serez fier d’être un client
Panasonic.
F
R
A
N
Ç
A
I
S
Page 7
CQ-RG131U
7
Table des matières
Précautions à prendre............................................................................8
❏
Interrupteur et commandes de réglage de la sonorité..................30
Réglage des volume, Mute (assourdissement), balance et tonalité pour
la meilleure écoute
❏
Fonctionnement de la radio.............................................................32
Synotonisation manuelle et automatique, sélection de la bande et
stations en mémoire
❏
Fonctionnement du lecteur de cassettes .......................................34
Chargement, rebobinage, lecture et éjection de la cassette.
❏
Fonctionnement du lecteur-changeur audionumérique................36
Lecture, lecture en reprise, lecture aléatoire et balayage, message
d’erreurs
Remarque:
Les commandes de changeur de disques ne s’appliquent qu’aux autoradios auxquels un lecteur-changeur (vendu séparément) est raccordé.
❏
Fonctionnement de I’horloge...........................................................38
Réglage de I’heure, sélection de l’affichage de l’horloge
❏
Guide d’installation...........................................................................39
Marche à suivre, système antivol, raccordements électriques
❏
En cas de difficulté ...........................................................................48
Guide de dépannage, service après-vente
Données techniques.............................................................................49
F
R
A
N
Ç
A
I
S
Page 8

CQ-RG131U
8
❏
Use este equipo de manera segura
Cuando esté conduciendo
Mantenga el nivel del volumen suficiente bajo para poder darse cuenta de las condiciones de tráfico
de la carretera.
Cuando esté lavando el auto
No exponga el equipo, incluso los altavoces y los discos compactos, a la agua o a la humedad
excesiva. Eso podría causar cortocircuitos, incendio u otros daños.
Cuando haya estacionado
El estacionar bajo la luz solar directa produce temperaturas muy altas dentro de su vehículo.
Asegúrese de enfriar el interior del vehículo antes de encender la unidad.
Use la fuente de alimentación apropiada
Este equipo está diseñado para funcionar con un sistema de 12 voltios, de polo negativo puesto a
tierra (el sistema normal en los autos norteamericanos).
Protección del mecanismo de la cinta
Mantenga imanes, destornilladores u otros objetos metálicos lejos del mecanismo de la cinta y de la
cabeza de la cinta para evitar rendimiento pobre o mal funcionamiento.
Use los centros de servicio autorizados
No intente desmontar o ajustar este equipo de precisión. Para solicitar ayuda relativa a los servicios
de mantenimiento, refiérase a la lista de los centros de servicio.
Panasonic le da la bienvenida a la familia constantemente en aumento de poseedores de
productos electrónicos. Nos esforzamos en proporcionarle las ventajas de la ingeniería mecánica y
electrónica de precisión, de una fabricación con componentes cuidadosamente seleccionados, y de
un montaje realizado por personas orgullosas de la reputación que su trabajo ha cimentado para
nuestra empresa. Estamos seguros de que este producto le proporcionará muchas horas de
distracción y, una vez comprobada la calidad, el valor y la fiabilidad incorporados, usted también se
sentirá orgulloso de pertenecer a nuestra familia.
E
S
P
A
Ñ
O
L
Page 9
CQ-RG131U
9
Indice
Use este equipo de manera segura ......................................................8
❏
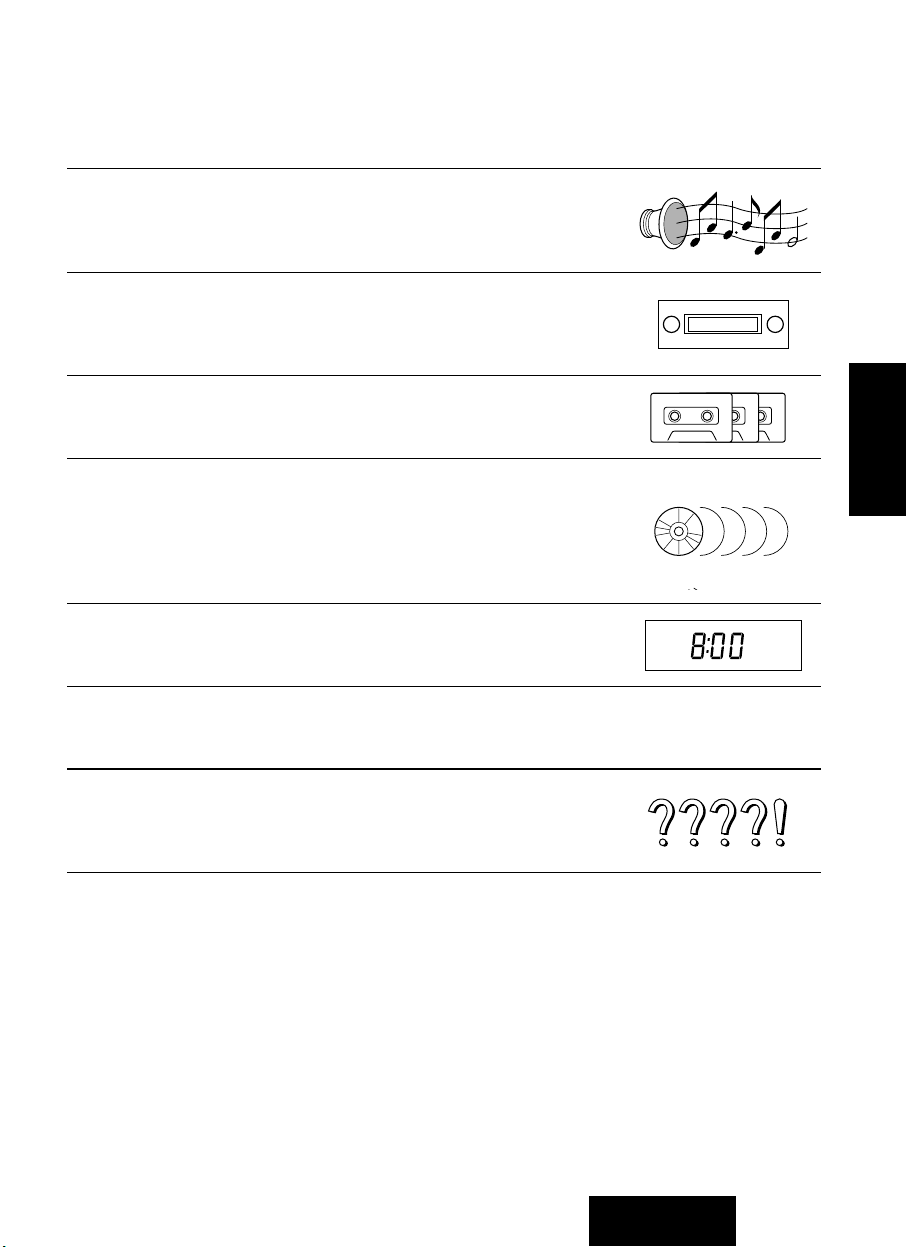
Alimentación y mandos de sonido..................................................50
Para ajustar el volumen, el silenciamiento, el balance, y el tono para
conseguir una buena recepción
❏
Operación básica del radio..............................................................52
Sintonía manual y automática, selección de la banda, estaciones
presintonizadas
❏
Operación básica del tocacintas de cassette.................................54
Cómo cargar, enrollar, tocar y expulsar una cinta cassette.
❏
Conocimientos básicos cambiadiscos de CD................................56
Reproducción, repetición, al azar y exploración, mensajes de errores.
Note:
Los mandos del cambiadiscos de CD son aplicables a la unidad con
cambiadiscos de CD opcional (vendido separadamente).
❏
Operación básica del reloj ...............................................................58
Ajuste de las horas y selección de la visualización del reloj.
❏
Guía de instalación...........................................................................59
Procedimientos paso a paso, sistema anti-robo, conexiones eléctricas
❏
Localización de avería......................................................................68
Sugerencias para localización de averías, donde obtener ayuda de
servicio.
Especificaciones...................................................................................69
E
S
P
A
Ñ
O
L
Page 10
CQ-RG131U
10
E
N
G
L
I
S
H
1
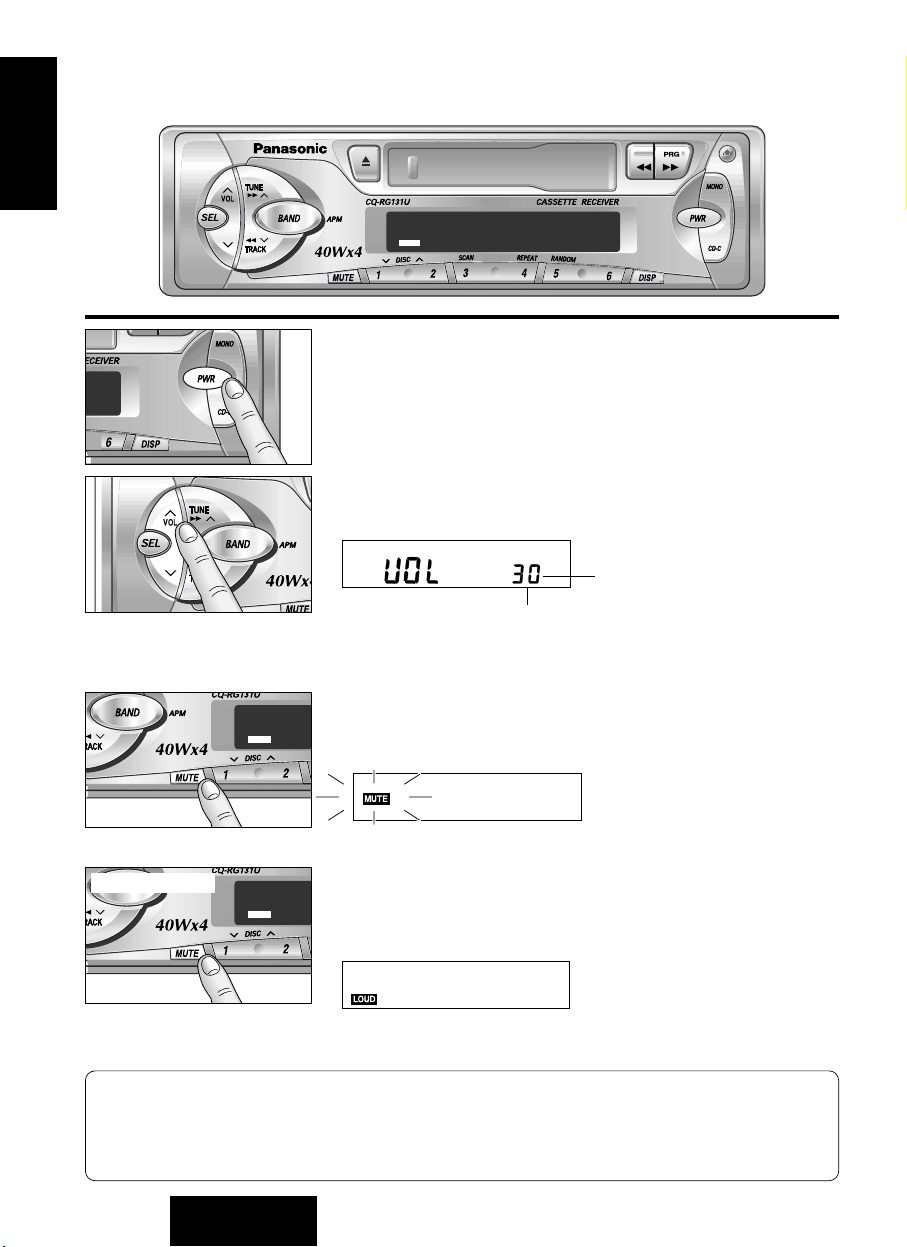
Power and Sound Controls
LOUD
LOUD
Power
Turn the key in the ignition until the accessory indicator lights.
Press [PWR] to switch on the power.
LO
U
D
Volume
●
Press [VOL
jj
] or [VOL ii] to increase or decrease volume.
0 to 39
Volume Level
●
Press [VOL jj] or [VOL ii] for more than 0.5 second to
change numeric levels on the display rapidly.
LOUD
L
O
U
D
Mute
●
Press [MUTE] to decrease volume level.
●
“MUTE” blinks while this operation.
●
Press [MUTE] again to cancel.
LOUD
LO
U
D
Tone Enhancement
●
Press and hold [MUTE] (LOUD) for more than 2 seconds to
enhance bass and treble tones when listening at low or medium
volume.
●
Press and hold [MUTE] (LOUD) for more than 2 seconds again
to deactivate when listening at higher volumes.
Note: This unit is equipped with an anti-volume-blast circuit which serves as an automatic
volume level adjuster so that you will not be deafened with sudden loud volume.
This system operates as follows. When [PWR] is switched on, the volume level is low. After that,
the volume level gradually returns to the level as the same as the one before turning off.
Anti-volume-blast circuit is not effective when volume level is lower than position 20 at the display.
Press and hold
Page 11
CQ-RG131U
11
E
N
G
L
I
S
H
2
L
O
U
D
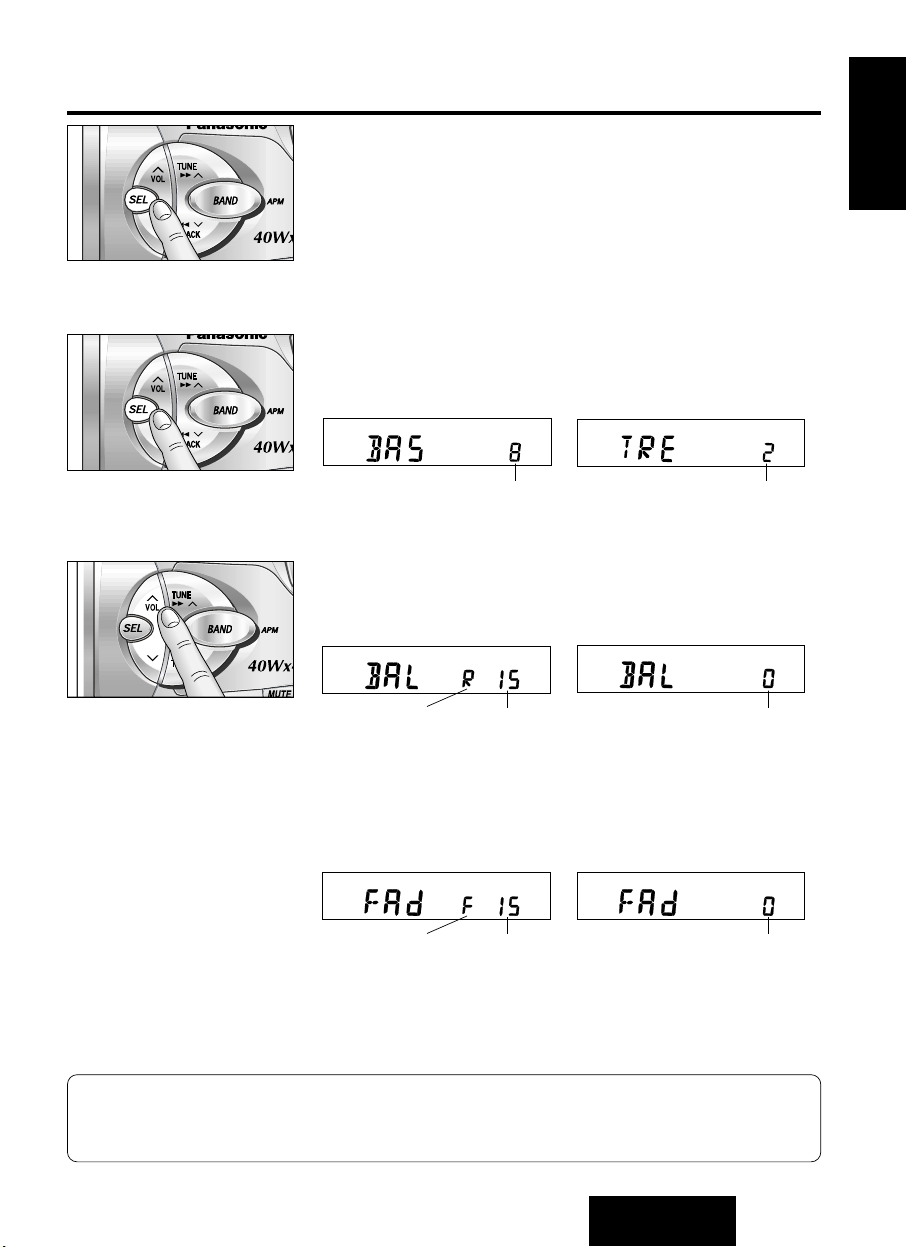
Changing Audio Modes
Press [SEL] to switch the audio modes as follows.
VOL
a
BAS
a
TRE
(Volume) (Bass) (Treble)
cd
FAd
b
BAL
(Fader) (Balance)
L
O
U
D
Bass and Treble
Press [SEL] to select the BASS (TREBLE) mode. Press [VOL jj]
or [VOL ii] to increase or decrease the bass/treble response.
–12 to 12
–12 to 12
Balance
Press [SEL] to select the BALANCE mode. Press [VOL jj] or
[VOL ii] to shift the sound volume to the right or left speakers.
1 to 15R or L Balance Center
Fader
Press [SEL] to select the FADER mode. Press [VOL jj] or [VOL
ii
] to shift the sound volume to the front or rear speakers.
1 to 15F or R
Fader Center
LO
U
D
Note: When a control mode (BAS/TRE/BAL/FAd) is selected but no operation is made within 5
seconds (2 seconds at volume mode), the display will return to the normal operation (Radio,
Cassette, etc.) mode. In such a case, press [SEL] again to select the next control mode.
d
(R: Right, L: Left)
(F: Front, R: Rear)
Page 12
CQ-RG131U
12
E
N
G
L
I
S
H
3
Radio Basics
LOUD
LOUD
LOUD
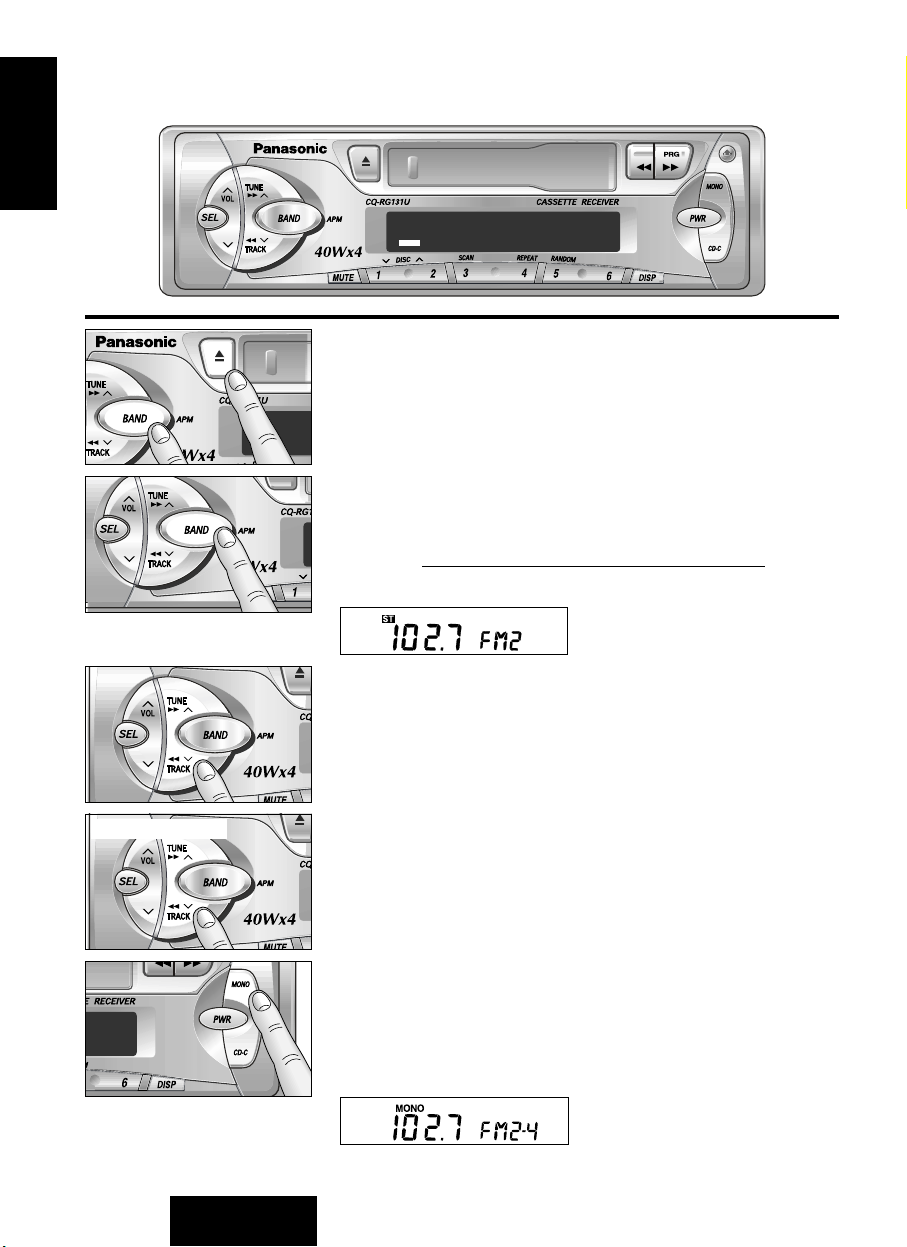
Change to the tuner mode
In case of Tape mode ..............................Eject a tape.
In case of CD Changer mode ..................Press [BAND].
L
O
U
D
Selecting a Band
Press [BAND] to select the band as follows.
FM1
a
FM2
a
FM3
a
AM
cd
"ST" indicator lights if the station is broadcasting in stereo.
LO
U
D
Manual Tuning
Press [TUNE jj] or [TUNE ii] to move to a higher or lower
frequency.
Seek Tuning
Press and hold [TUNE jj] or [TUNE ii] for more than 0.5
second, then release. The radio automatically stops on the next
station.
To reduce interference during
FM broadcasts (MONO)
Press [MONO] for monaural reception in case a lot of interference
is present in an FM stereo signal or to improve the listening quality
of weak FM broadcasts. To turn it off, press [MONO] again.
Hold and release
D
U
LO
Page 13
CQ-RG131U
13
E
N
G
L
I
S
H
4
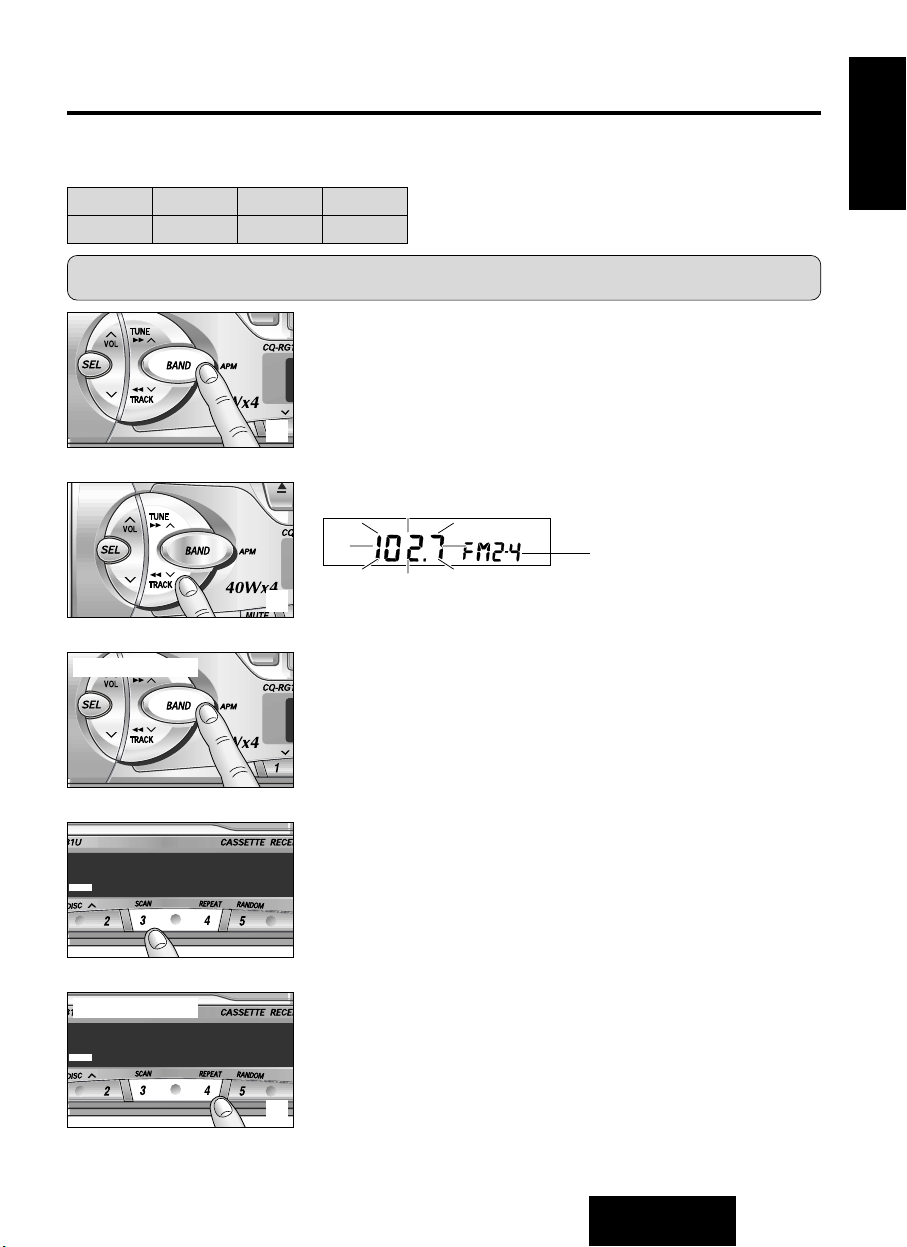
Manual Station Preset
Press [BAND] to select a desired band.
Use manual or seek tuning to find a station that you want to
program into memory.
Press and hold one of the station selector buttons 1 through 6
until the display blinks. The memory is now set for that button
on the band you have selected.
Repeat the process to set other stations for the FM1 to AM
bands.
Auto Preset Memory
Select a band, and press and hold [BAND] (APM) for more than 2
seconds.
●
The 6 strongest available stations will be automatically set in
memory on preset buttons [1] through [6].
●
Once set, the preset stations are sequentially scanned for 5
seconds.
●
Press the appropriate preset button for the station you want to
hear.
Note: The stations manually preset on the selected band will be
deleted.
Note: You can change the memory setting by repeating the above
procedure.
Preset Station Setting
Up to 24 stations can be preset in the station memory as follows;
FM1 FM2 FM3 AM
6 stations 6 stations 6 stations 6 stations
L
O
U
D
Preset Number
L
O
U
D
Press and hold
d
d
d
Caution: For safety reasons, do not attempt to program while driving.
Tuning in a Preset Station
Press any of the buttons [1] through [6] to tune in the station
preset by the above steps to .
LOUD
Press and hold
D
U
LO
LOUD
Page 14
CQ-RG131U
14
E
N
G
L
I
S
H
5
Cassette Tape Player Basics
LOUD
LOUD
LOUD
U
D
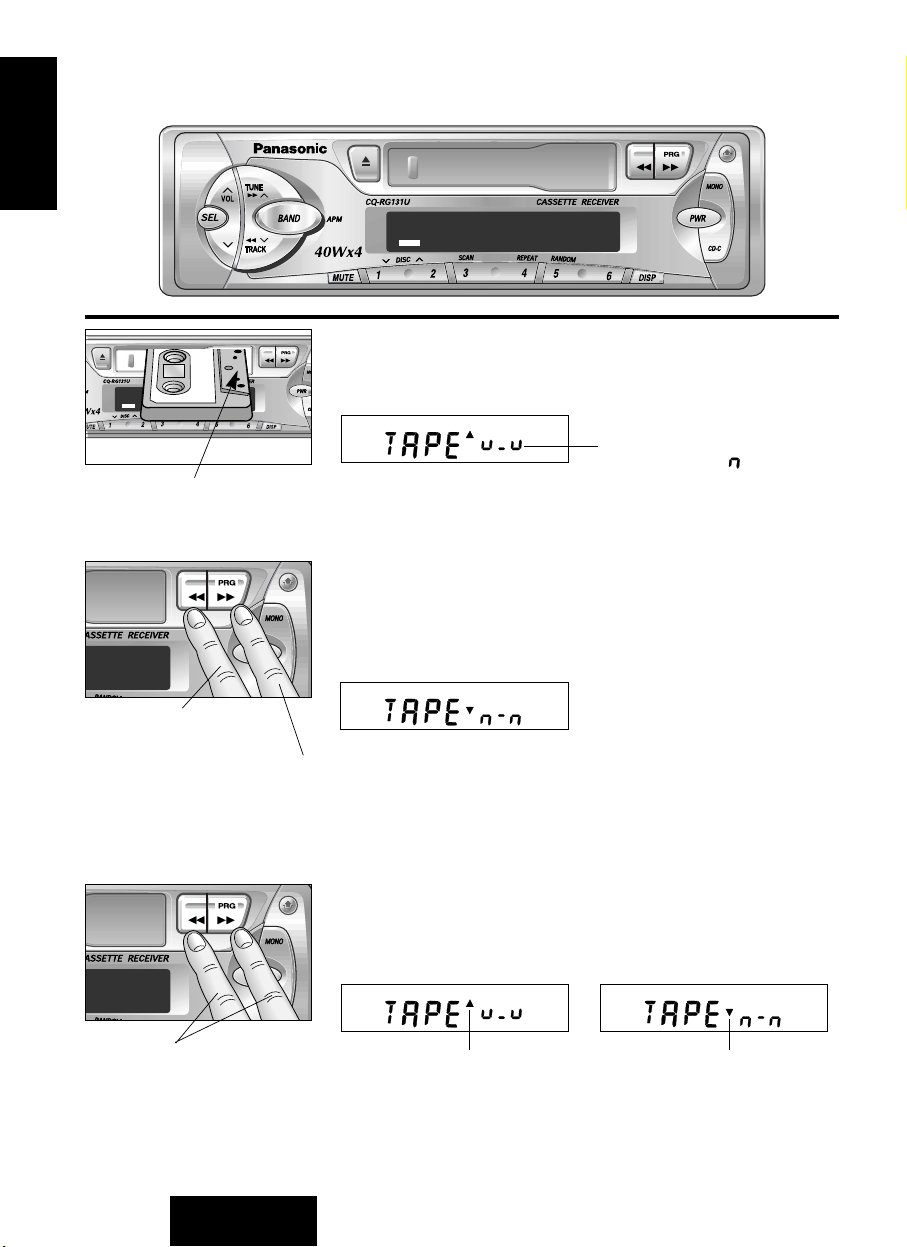
Loading a Cassette
Gently insert a cassette with the exposed tape side facing to the
right until the mechanism captures it, and playback starts.
Program Indicator
(This indication “ ” rotates.)
Rewind and Fast Forward
When the program indicator
lights, press [] to rewind or
press [] to fast forward the tape.
When the program indicator lights, press [] to fast forward or
press [] to rewind the tape.
To stop rewind or fast forward, gently press the button that is not in
use.
The tape will resume playing from that position.
Changing Sides
Press [] and [] at the same time to switch to the program
on the other side of the tape.
The display changes to indicate which program is playing.
Top Side Playing Bottom Side Playing
Press Both
“” light : Fast Forward
“” light : Rewind
“” light : Rewind
“” light : Fast F orward
Exposed Tape
Page 15
CQ-RG131U
15
E
N
G
L
I
S
H
6
LOUD
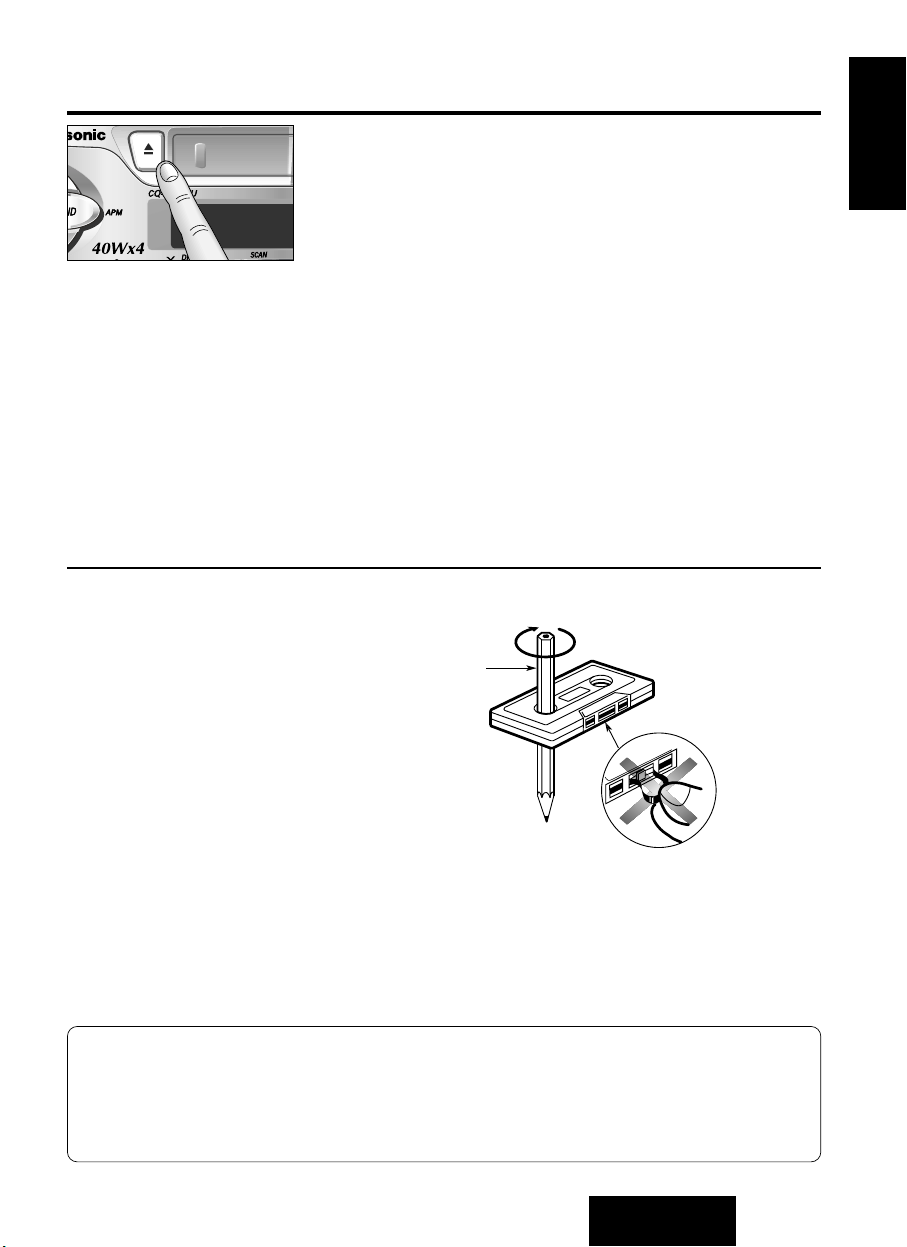
Stopping and Ejecting the
Tape
Once inserted into the unit, your tape will play continuously until
you eject it.
If you press [
u
] (EJECT), the unit ejects the tape and returns to
radio operation.
When you stop the car engine, the tape will stop but not be
ejected.
Notes:
●
You can not change to CD Changer mode or Radio mode while
tape playing. If you want to change to CD Changer mode or
Radio mode, eject the tape.
●
Always remove the cassette when you stop using the cassette
player. This will prolong the life of your tape.
Notes on Cassette Tapes
Pencil
Do not touch
or pull out
the tape.
Tape Slack:
Use a pencil or similar object to take up the slack
as shown. If a loose tape is used, this may result
in the tape becoming tangled in the rotating
parts of the unit.
Notes:
●
To maintain your cassette player in top condition, avoid using tapes that are longer than 90
minutes (C-90).
●
If you insert into the unit a cassette with a loose tape caused by forcing it into cassette with a
finger or the like, the cassette may not be properly reproduced. In such a case, eject the
cassette, make the tape tigt, then insert it back into the deck.
Page 16
CQ-RG131U
16
E
N
G
L
I
S
H
7
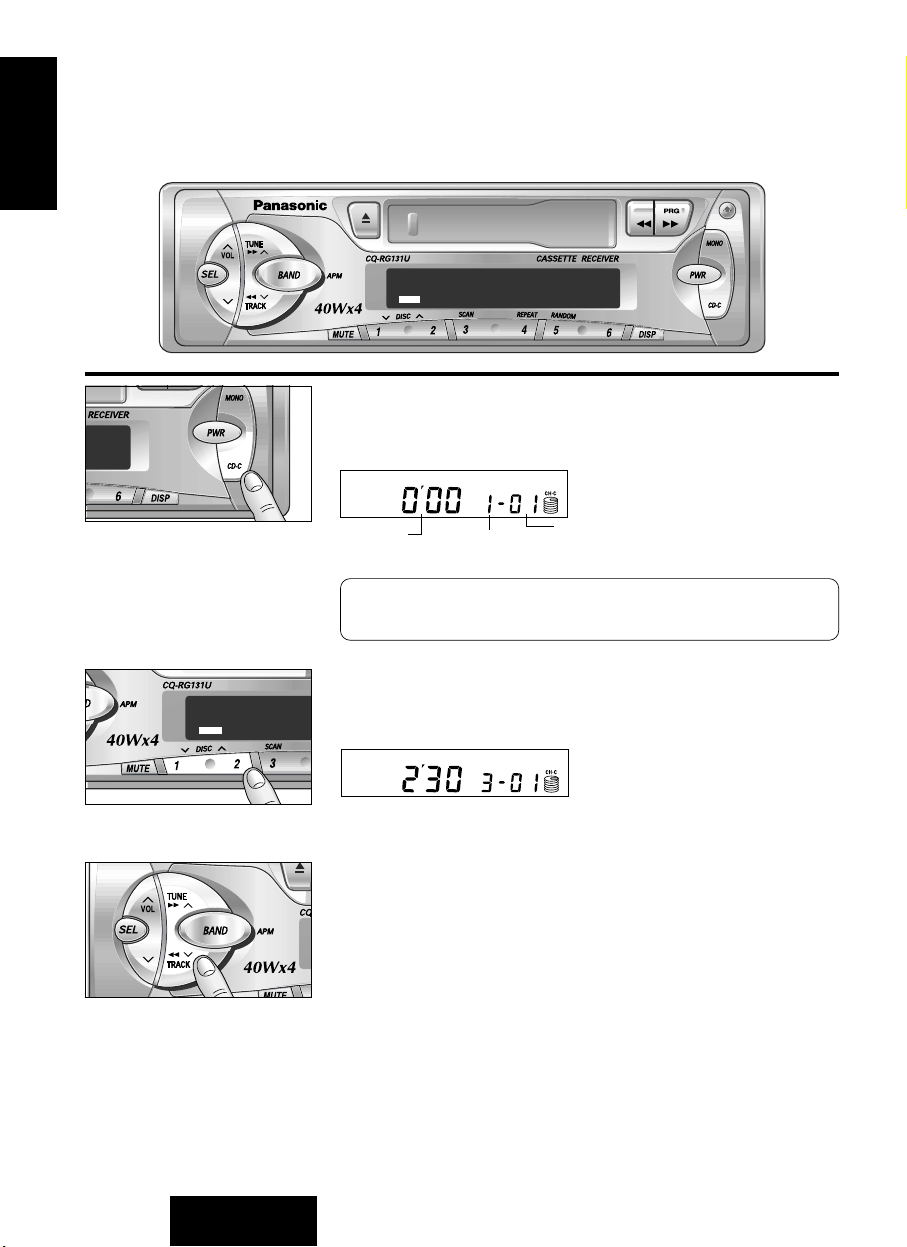
CD Changer Basics
Note:
CD changer functions are applicable to units with optional CD changer unit.
(sold separately)
LOUD
LOUD
To Changer mode
While a disc magazine inserted in the CD changer, press [CD·C].
Play starts from the first track.
LOUD
LO
U
D
Selecting a Disc
Press [DISCjj] or [iiDISC] to select discs in ascending or
descending order.
Selecting a Track
Press [TRACK ] once to go to the next track. Press repeatedly
to step forward through all the tracks.
Press [TRACK ] once to play from the beginning of the current
track. Press twice to play the previous track. Press repeatedly to
step backward through all the tracks.
Note: The cassette, if loaded, should be removed. Otherwise,
the CD play will not start.
LO
U
D
Play
Time
Disc Number
Track Number
Page 17
CQ-RG131U
17
E
N
G
L
I
S
H
8
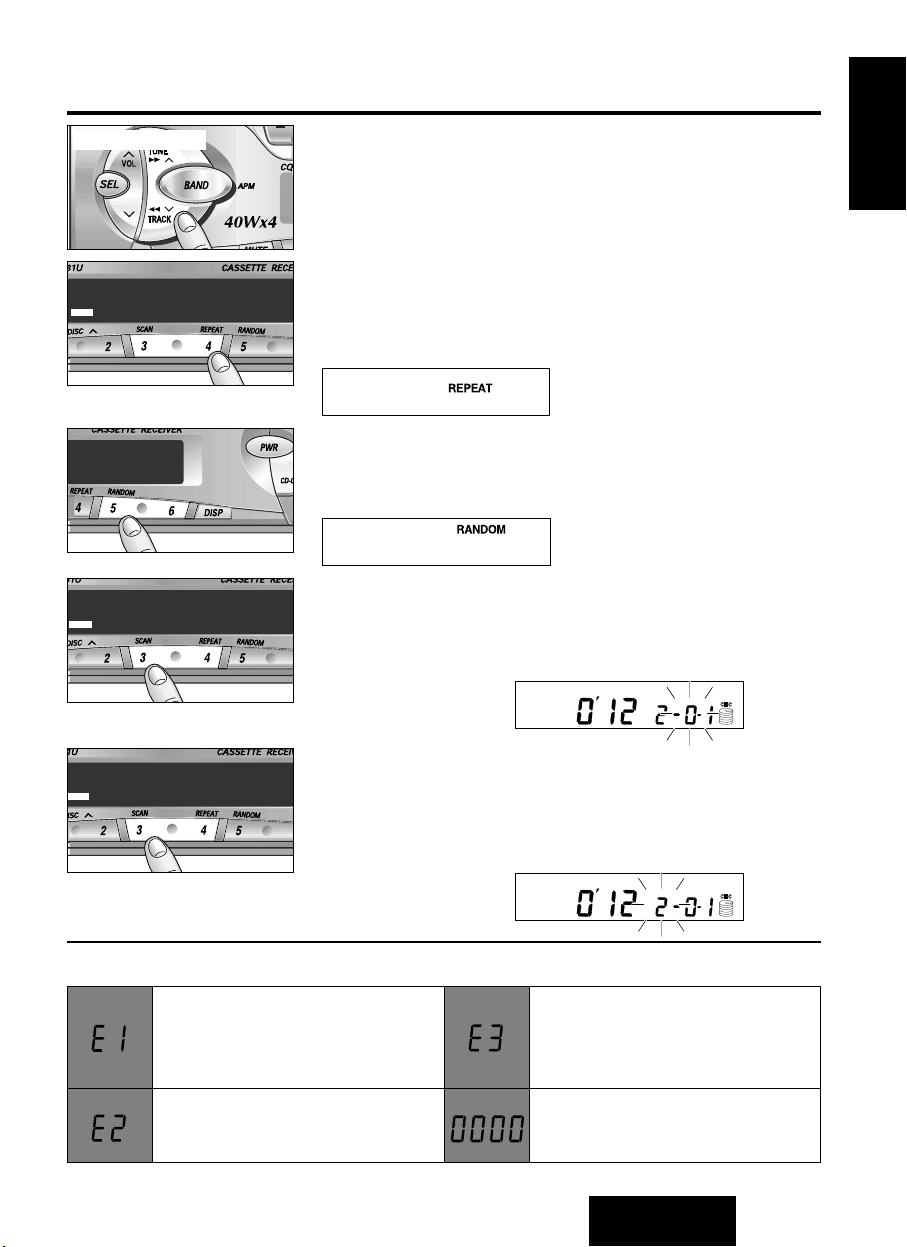
❏
Error Display Messages
Searching a Track
Press and hold [TRACK ] or [TRACK ] for more than 0.5
second to activate fast forward or reverse through a track. Release
[TRACK ] or [TRACK ] to resume the normal CD play from
that position.
L
O
U
D
Repeating a Track
●
Press [4] (REPEAT) to repeat the current selection. “REPEAT”
indicator lights.
●
The current selection continues to repeat until you press [4]
(REPEAT) again.
Hold and release
LOUD
Random Selection
●
Press [5] (RANDOM) to random selection of music is played
from all available CDs. “RANDOM” indicator lights.
●
To turn it off, press [5] (RANDOM) again.
Scanning Tracks
●
Press [3] (SCAN). The track number blinks and the first 10
seconds of each track on the discs play in sequence.
●
To stop scanning and continue with the current track, press [3]
(SCAN) again.
LOUD
Scanning Discs
Press and hold [3] (SCAN) for more than 2 seconds. The 1st track
of all the discs in the magazine is played for 10 seconds each.
Also, Disc Number blinks at the same time. To stop the current
play of the disc scanning, press and hold [3] (SCAN) for more
than 2 seconds again.
LOUD
Displays when the compact disc is
dirty or upside down. Selects the
next available compact disc.
Displays when compact disc is
scratched. Selects next available
compact disc.
Displays when the compact disc
stops operating for some reason.
Please contact your nearest
autorized panasonic Serviceter.
Displays when there is no disc in
the magazine.
Page 18
CQ-RG131U
18
E
N
G
L
I
S
H
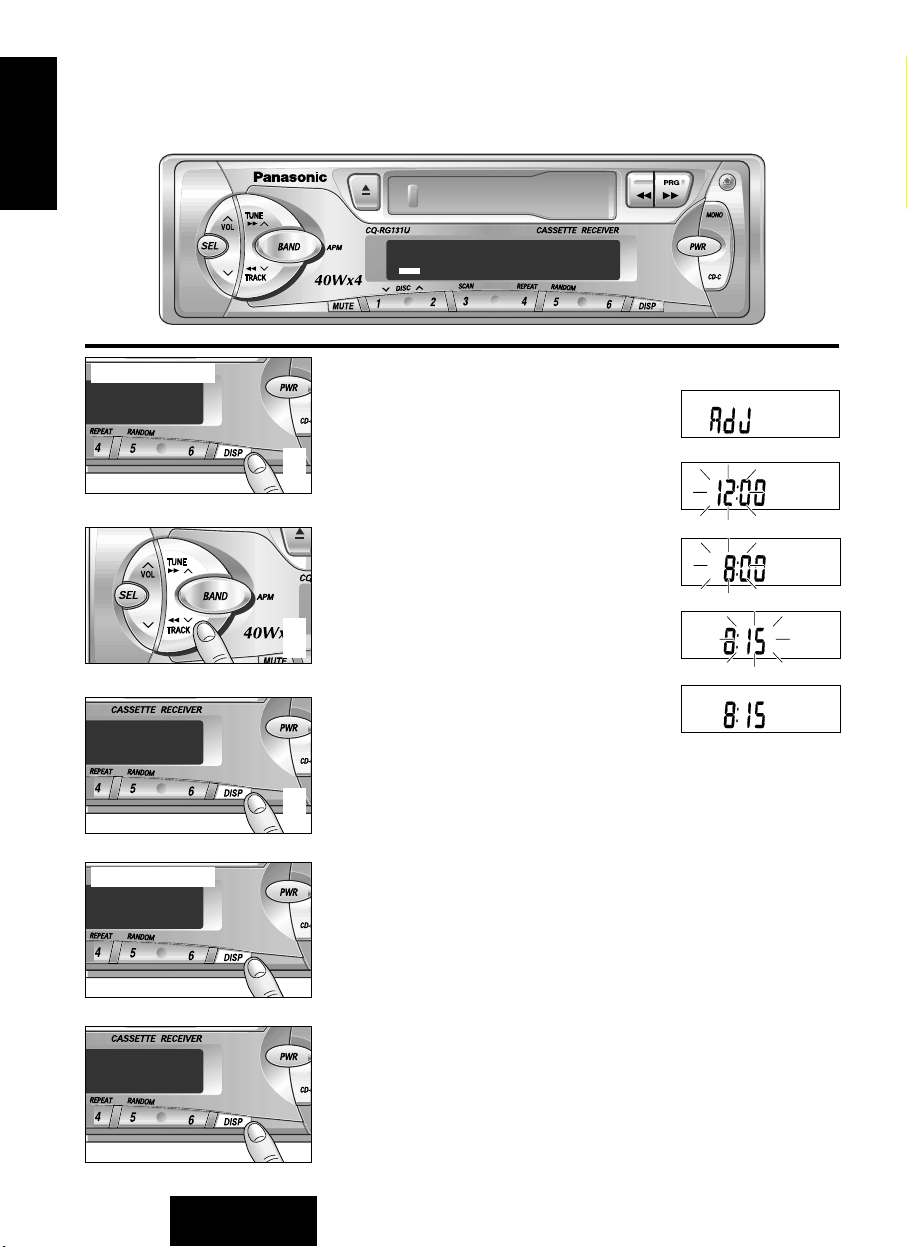
9
Clock Basics
(The clock system is 12-hours.)
LOUD
LOUD
Initial Time Setting
Press [DISP]. “AdJ” is displayed.
Press and hold [DISP] again for more
than 2 seconds. “12” blinks indicating
the time setting mode is activated.
To set hours, press [jj] or [ii].
Press [DISP] again for minute setting.
To set minutes, press [jj] or [ii].
Hold [jj] or [ii]to change numbers
rapidly.
When you have set the time, press
[DISP].
d
d
Resetting the Time
When you want to reset the time, press and hold [DISP] for more
than 2 seconds to activate the time setting mode. Then, repeat
step to above.
Selecting the Clock Display
Press [DISP] for clock display.
Press [DISP] once again, the current audio display mode
resumes.
L
O
U
D
Press and hold
Press and hold
Page 19
CQ-RG131U
19
E
N
G
L
I
S
H
10
●
Warranty Card . . . . . . . . . . . . .Fill this out promptly
●
Panasonic Servicenter for service
Directory . . . . . . . . . . . . . . . . .Keep this for future reference in case the unit needs servicing
●
Installation Hardware . . . . . . .Needed for in-dash installation
Installation Guide
This installation information is designed for experienced installers
and is not intended for non-technical individuals. It does not contain
warnings or cautions of potential dangers in attempting to install
this product.
Any attempt to install this product in a motor car by anyone other
than qualified installer could cause damage to the electrical system
and could result in serious personal injury or death.
WARNING
❏
Overview
This product should be installed by a
professional. However, if you plan to install this
unit yourself, your first step is to decide where
to install it. The instructions in these pages will
guide you through the remaining steps: (Please
refer to “WARNING” statement above).
●
Identify and label the vehicle wires.
●
Connect the vehicle wires to the wires of the
power connector.
●
Install the unit in the dash.
●
Check the operation of the unit.
If you do encounter problems, please consult
your nearest professional installer.
Caution: This unit will operate with a 12 volt
DC negative ground auto battery system only.
Do not attempt to use it in any other systems.
Doing so could cause serious damage.
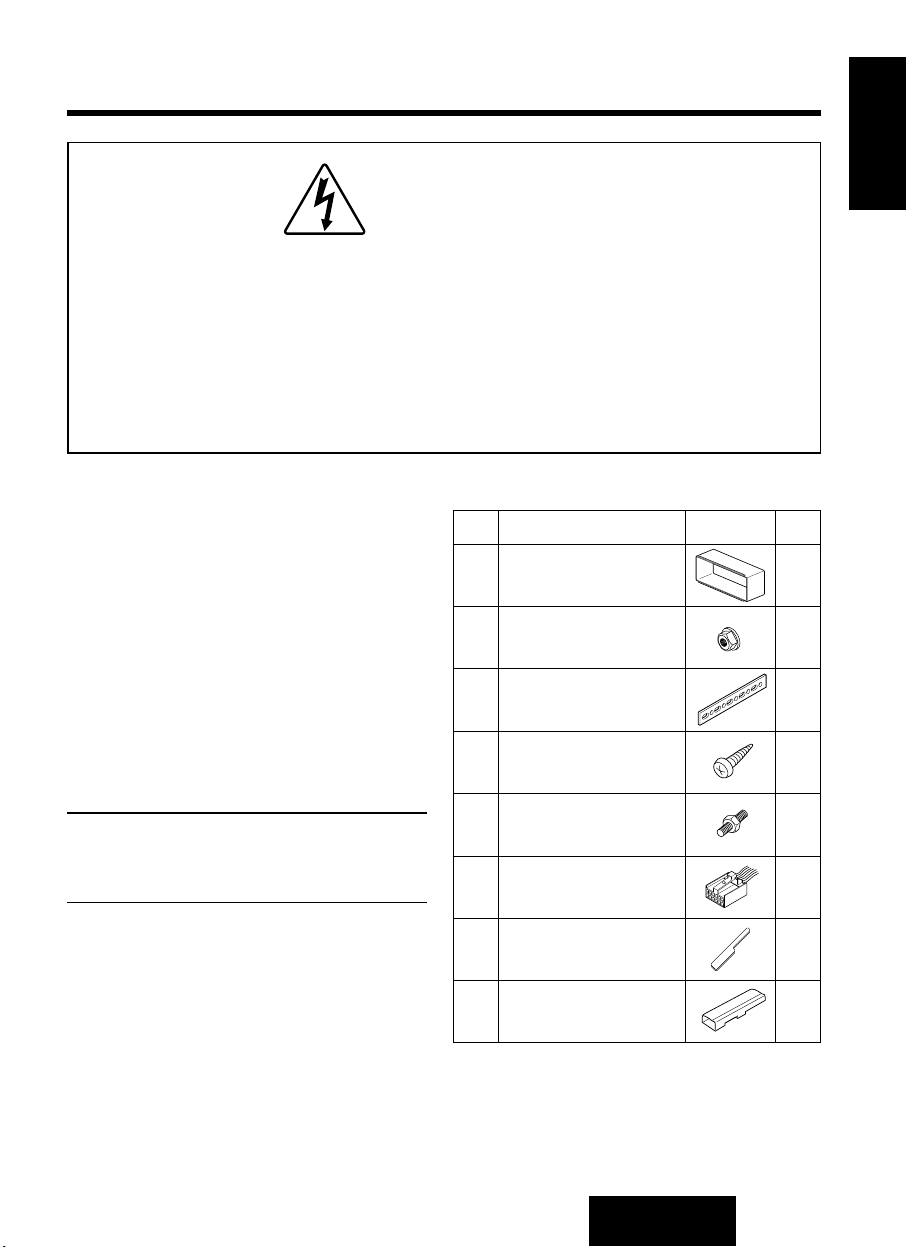
Before you begin installation, look for the
following items included in the packing with
your unit.
❏
Installation Hardware
No.
1
1
1
1
1
1
1
1
Item
Mounting Collar
Hex. Nut (5 mm
φ
)
Rear Support Strap
Tapping Screw
(5 mmφx 16 mm)
Mounting Bolt (5 mmφ)
Power Connector
Dismounting Plate
Removable Face
Plate Case
Diagram Q’ty
Page 20
CQ-RG131U
20
E
N
G
L
I
S
H
11
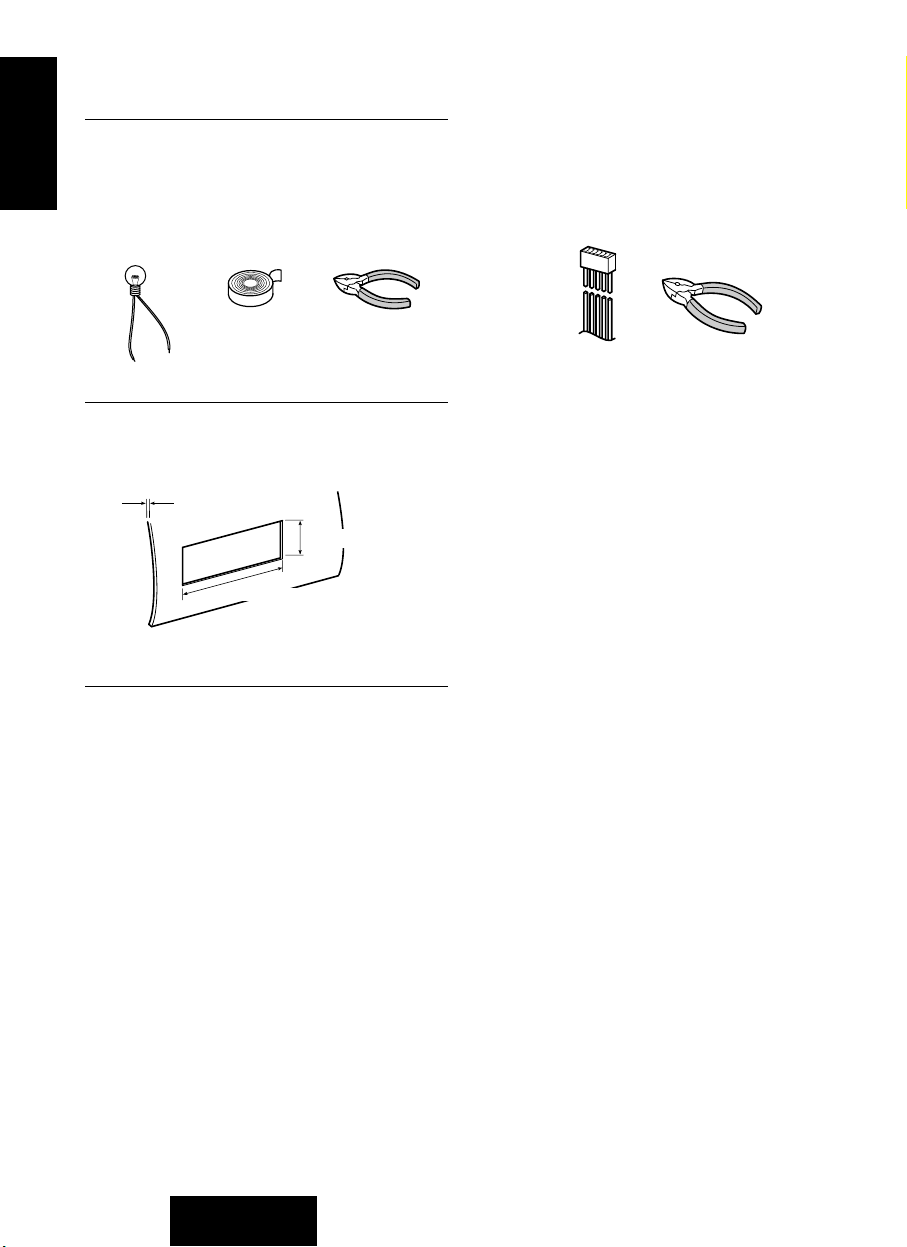
❏
Required Tools
You'll need a screwdriver, a 1.5 volt AA battery,
and the following:
❏
Dashboard Specifications
Power Lead
If your car has a radio or is pre-wired for one:
Cut the connector wires one at a time from the
plug (leaving the leads as long as possible) so
that you can work with individual leads.
Tur n the ignition on to the accessory position,
and ground one lead of the test bulb to the
chassis.
Touch the other lead of the test bulb to each of
the exposed wires from the cut radio connector
plug. Touch one wire at a time until you find the
outlet that causes the test bulb to light.
Now turn the ignition off and then on. If the bulb
also turns off and on, that outlet is the car
power lead.
If your car is not wired for an audio unit :
Go to the fuse block and find the fuse port for
radio (RADIO), accessory (ACC), or ignition
(IGN).
Battery Lead
If your stereo unit has a yellow lead, you will
need to locate the car’s battery lead. Otherwise
you may ignore this procedure. (The yellow
battery lead provides continuous power to
maintain a clock, memory storage, or other
function.)
If your car has a radio or is pre-wired for one:
With the ignition and headlights off, identify the
car battery lead by grounding one lead of the
test bulb to the chassis and checking the
remaining exposed wires from the cut radio
connector plug.
If your car is not wired for an audio unit :
Go to the fuse block and find the fuse port for
the battery, usually marked BAT.
THICKNESS
MIN. 3/16" (4.75 mm)
MAX. 7/32" (5.56 mm)
7-5/32" (182mm)
2-3/32" (53 mm)
❏
Identify All Leads
The first step in installation is to identify all the
car wires you’ll use when hooking up your
sound system.
As you identify each wire, we suggest that you
label it using masking tape and a permanent
marker. This will help avoid confusion when
making connections later.
Note: Do not connect the power connector to
the stereo unit until you have made all
connections. If there are no plastic caps on the
stereo hooking wires, insulate all exposed leads
with electrical tape until you are ready to use
them. Identify the leads as follows.
12 V DC
TEST BULB
ELECTRICAL
TAPE
SIDE-CUT
PLIERS
Installation Guide
continued
Page 21
CQ-RG131U
21
E
N
G
L
I
S
H
12
Speakers
Identify the car speaker leads. There will be two
leads for each speaker, usually color coded.
A handy way to identify the speaker leads and
the speaker they connect with is to test the
leads using a 1.5 volt AA battery as follows.
Hold one lead against one pole of the battery
and stroke the other lead across the other pole.
You will hear a scraping sound in a speaker if
you are holding a speaker lead.
If not, keep testing different lead combinations
until you have located all the speaker leads.
When you label them, include the speaker
location for each.
Antenna Motor
If your car is equipped with an automatic power
antenna, identify the car motor antenna lead by
connecting one bulb tester lead to the car
battery lead and touching the remaining
exposed wires from the cut radio connector plug
one at a time. You will hear the antenna motor
activate when you touch the correct wire.
Antenna
The antenna lead is a thick, black wire with a
metal plug at the end.
❏
Connect All Leads
Now that you have identified all the wires in the
car, you’re ready to begin connecting them to
the stereo unit wires. The connection diagram
on Page 27 show the proper connections and
color coding of the leads.
We strongly recommend that you test the unit
before making a final installation.
You can set the unit on the floor and make
temporary connections to test the unit. Use
electrical tape to cover all exposed wires.
IMPORTANT: Connect the red power lead last,
after you have made and insulated all other
connections.
Ground
Connect the black ground lead of the power
connector to the metal car chassis.
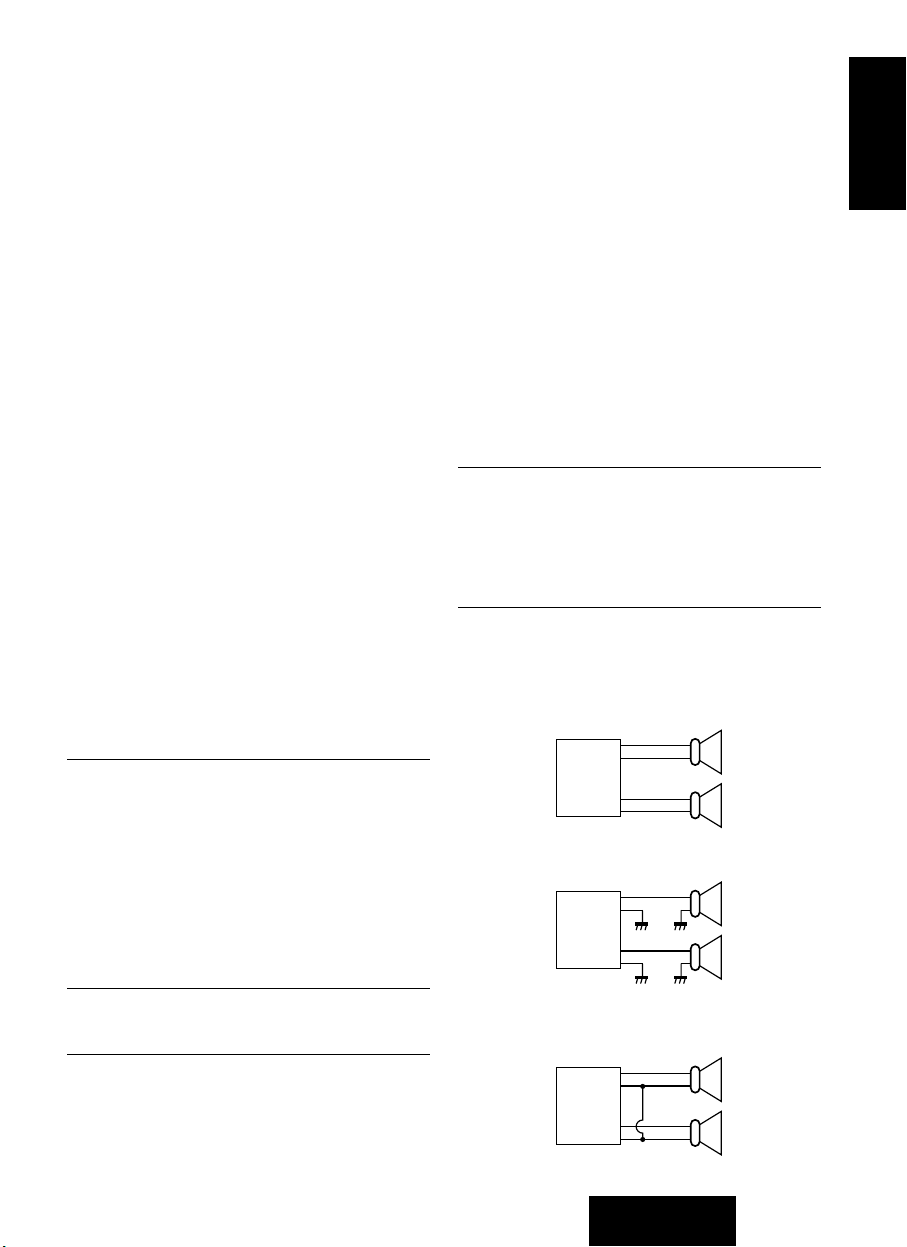
Speakers
Connect the speaker wires. See the wiring
diagram below for the proper hookups. Follow
the diagram carefully to avoid damaging the
speakers and the stereo unit.
The speaker used must be able to handle more
than 40 watts of audio power. If using an
optional audio power, the speakers should be
able to handle the maximum amplifier output
power. Speakers with low input ratings can be
damaged.
Speaker impedance should measure 4 - 8 Ω,
which is typically marked on most speakers.
Lower or higher impedance speakers will affect
output and can cause both speaker and stereo
unit damage.
Caution: Never ground the speaker cords. For
example, do not use a chassis ground system
or a three-wire speaker common system. Each
speaker must be connected separately using
parallel insulated wires. If in doubt about how
your car's speakers are wired, please consult
with your nearest professional installer.
CORRECT
No Common Ground
INCORRECT
Common Chassis Ground
INCORRECT
Speaker Common
(common earth lead)
_
+
_
+
L
_
+
_
+
R
_
+
_
+
L
_
+
_
+
R
_
+
_
+
L
_
+
_
+
R
Page 22
CQ-RG131U
22
E
N
G
L
I
S
H
13
Motor Antenna
Connect the car motor antenna lead to the blue
motor antenna relay control lead.
Battery
Connect the yellow battery lead to the correct
radio wire or to the battery fuse port on the fuse
block.
Antenna
Connect the antenna by plugging the antenna
lead into the antenna receptacle.
Product
Connect any optional product such as amplifier,
according to the instructions furnished with the
product. Keep about 12 inches (30 cm) of
distance between the speaker cords/amplifier
unit and the antenna/antenna extension cord.
Read the operating and installation instructions
for any product you will connect to this unit.
Power
Connect the red power lead to the correct car
radio wire or to the appropriate fuse port on the
fuse block.
If the stereo unit functions properly with all
these connections made, disconnect the wires
and proceed to the final installation.
❏
Final Installation
Lead Connections
Connect all wires, making sure that each
connection is insulated and secure. Bundle all
loose wires and fasten them with tape so they
won't fall down later. Now inser t the stereo unit
into the mounting collar.
Congratulations! After making a few final
checks, you’re ready to enjoy your new auto
stereo system.
❏
Final Checks
1. Make sure that all wires are properly
connected and insulated.
2. Make sure that the stereo unit is securely
held in the mounting collar.
3. Turn on the ignition to check the unit for
proper operation.
If you have difficulties, consult your nearest
authorized professional installer for assistance.
Installation Guide
continued
❏
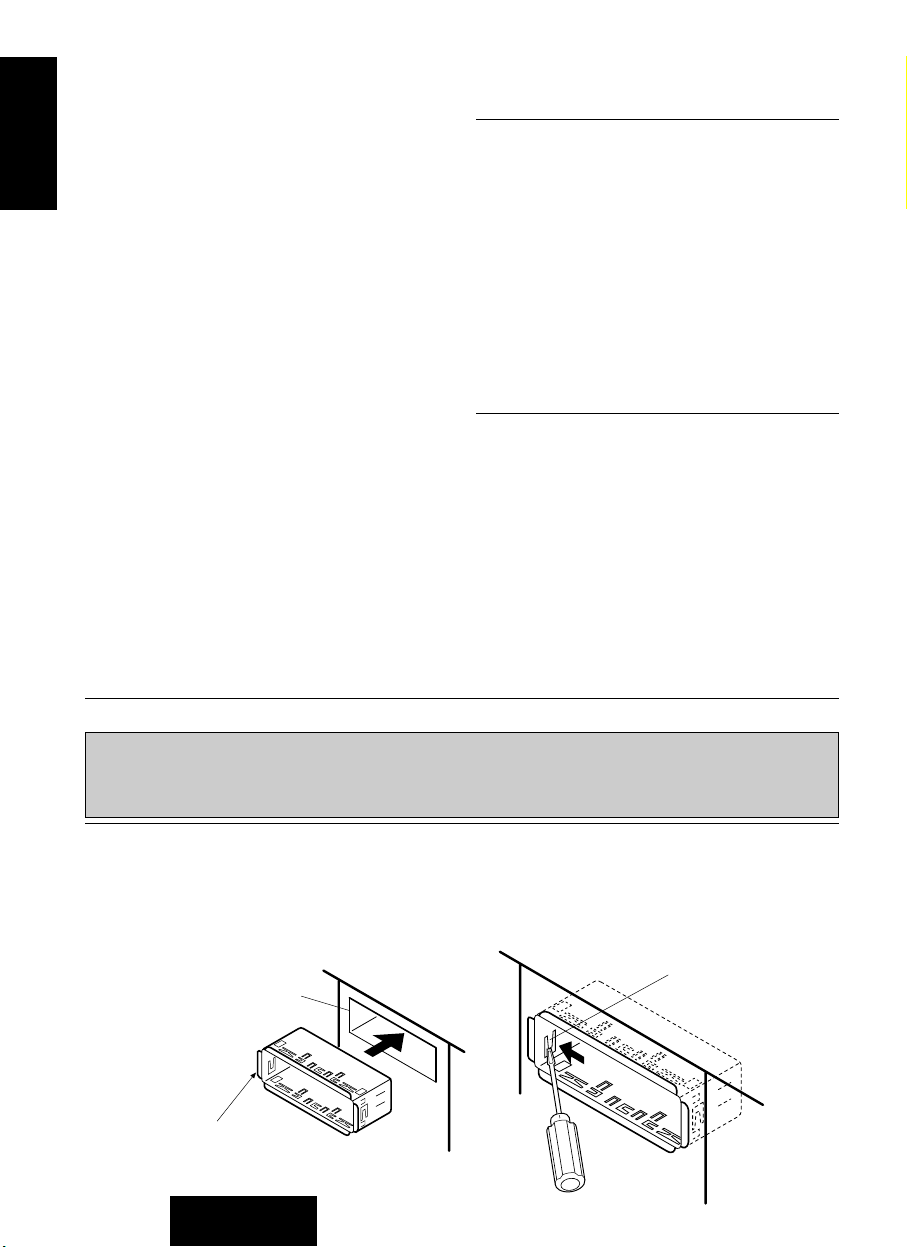
Installation Procedures
1. Secure the Mounting Collar .
Insert Mounting Collar into the car’s dashboard, and bend mounting tabs out with a
screwdriver.
Dashboard
Mounting Collar
Mounting Tab
Screwdriver
❏
Precautions
●
When bending the mounting tab of the mounting collar with a screwdriver, be careful not to
injure your hands and fingers.
●
We strongly recommend you to wear gloves for installation work to protect yourself from
injuries.
Page 23

CQ-RG131U
23
E
N
G
L
I
S
H
14
2. Secure the rear of the unit.
a) Check the electrical connection by referring to this operating instructions.
b) Connect the Mounting Bolt using a suitable wrench.
c) I nsert the Power Connector to the unit.
d) Insert the unit into Mounting Collar and push it in until “click” is heard.
e) Secure the rear of the unit to the car by either of the two recommended methods as follows.
■
Using the Rear Support Strap
Affix one end of the Rear Support Strap to the rear of the unit, and the other end to the Fire
Wall of Car, or some other metallic area.
■
Using the Rubber Cushion (Option)
(If there is an existing Rear Support Bracket on the Fire Wall of Car.)
Cover Mounting Bolt on the rear of the unit with Rubber Cushion (Option), and mount it into
the existing Rear Support Bracket.
3. After installation, reconnect the negative (–) battery terminal.
Unit
Power Connector
Unit
Mounting Bolt
Fire Wall of Car
3 mm
φ
Hex. Nut
Rear Support Strap
Mounting Bolt
Mounting Collar
Tapping Screw
Rear Support Bracket
(existing on the car)
Rubber Cushion
(Option)
Mounting Bolt
Mounting Collar
Page 24

CQ-RG131U
24
E
N
G
L
I
S
H
15
P
R
G
L
O
U
D
Screwdriver
Trim Plate
To Remove the Unit
a) Remove the trim plate with a screwdriver as shown in the figure (Fig. 1).
b) Pull out the unit while pushing the two lock levers using Dismounting Plate as follows.
(Fig 2, 3)
c) Remove the unit pulling with both hands. (Fig 4).
Note: Do not lose the Dismounting Plate. It will be needed to remove the unit from the car’s
dashboard.
Installation Guide
continued
P
R
G
L
O
U
D
PRG
CQ-RG131U
L
O
U
D
P
R
G
L
O
U
D
Lock Lever
Lock Lever
Dismounting Plate
Fig. 2
Fig. 4
Fig. 3
a
a
Fig. 1
Page 25

CQ-RG131U
25
E
N
G
L
I
S
H
16
Anti-Theft System
This unit is equipped with a removable face plate. By removing this face plate, the radio becomes
totally inoperable. The security indicator will blink.
To Remove the Removab le Face Plate
Switch off the power.
Press the release button ( ) (Fig. 5).
The removable face plate will be released.
P
R
G
LOUD
Remove the removable face plate by pulling on the right side of the unit. Place the removable
face plate in a supplied case.
As shown in Fig. 7, insert the removable face plate with the arrow pointing toward the removable
face plate case until you hear a “click”. Keep the removable face plate in the case. Then, you can
bring the plate safely.
P
R
G
L
O
U
D
Main Unit
Contacts
Security Indicator
Fig. 6
Fig. 5
Removable Face Plate Case
Set two arrows together.
Fig. 7
Press
Page 26

CQ-RG131U
26
E
N
G
L
I
S
H
17
To install the Removable Face Plate
Slide the left side of the removable face plate in place.
Press the right end of removable face plate until “click” is heard.
Installation Guide
continued
P
R
G
LOUD
P
R
G
LOUD
Cautions:
1. Before removing the removable face plate, make sure the power is off.
2. This removable face plate is not water-proof. Do not expose it to water or excessive moisture.
3. Do not remove the removable face plate while driving your car.
4. Do not place the removable face plate on the dashboard or nearby areas where the
temperature rises to high levels.
5. Do not touch the contacts on the removable face plate or on the main unit, since this may
result in poor electrical contacts.
6. If dirt or other foreign substances get on the contacts, wipe them with a clean, dry cloth.
Plastic Tab
Cutout
Removable
Face Plate
Fig. 8
Fig. 9
Page 27

CQ-RG131U
27
E
N
G
L
I
S
H
18
Electrical Connection
●
This unit can be connected to an optional CD changer (CX-DP88U). For details consult your
nearest Panasonic Servicenter.
●
For connection to a CD changer, refer to the operating instructions of the CD Changer
(CX-DP88U).
Cautions:
●
To prevent damage to the unit, be sure to follow the connection diagram below.
●
Remove the covering of the leads about 5 mm long from their end before connecting.
●
Do not insert the power connector into the unit until the wiring is completed.
●
Be sure to insulate any exposed wires from a possible short-circuit from the car chassis. Bundle
all cables and keep cable terminals free from touching any metal parts.
CQ-RG131U
LEFT SPEAKER
(FRONT )
RIGHT SPEAKER
(FRONT )
LEFT SPEAKER
(REAR )
RIGHT SPEAKER
(REAR )
(+)(–)(+)(–)
(+)(–)
(+)(–)
Antenna
PREAMP OUT CONNECTOR
CD Changer
Control Connector
DIN Extension Cord
Power
Connector
(Red)
(Yellow)
(Black)
(Violet w/Black Stripe)
(Blue)
Resistor(1kΩ)
(Gray w/Black Stripe)
SPEAKER LEAD
(White w/Black
Stripe)
(White)
(Gray)
(Green w/Black
Stripe)
(Green)
(Violet)
Battery Lead
To the car battery, continuous
+12V DC
ACC Power Lead
to ACC power, +12V DC
Ground Lead
to a clean, bare metallic part of
the car chassis
Fuse(12A)
Antenna Control Cord
to the auto antenna control power
cord of the car
External Amplifier
Control Power Lead
To an external amplifier
L(White)
R(Red)
CD-CH IN
(Rear)
Fuse(3A)
Extension Corel
(DIN/BATT/RCA/GND)
Ground Lead
(To a clean, bare metallic
part of your car)
Battery Lead
RCA Cord
DIN Cord
(White)
(Red)
(R)
(L)
CD Changer
CX-DP88U
BATTERY
Page 28

PROBLEM POSSIBLE CAUSE PROBABLE SOLUTION
CQ-RG131U
28
E
N
G
L
I
S
H
19
❏
Maintenance
Your product is designed and manufactured to ensure a minimum of maintenance. Use a soft
cloth for routine exterior cleaning. Never use benzine, thinner, or other solvents.
❏
When Something Doesn’t Work
Check the charts below for possible causes and solutions to any problem you might be
experiencing. Some simple checks or minor adjustments may eliminate the problem.
❏
Product Servicing
If the suggestions in the charts don’t solve the problem, we recommend that you take it to your
nearest authorized Panasonic Servicenter. The unit should be serviced only by a qualified
technician.
❏
Replacing the Fuse
Use fuses of the same specified rating (12 amps). Using different substitutes or fuses with higher
ratings, or connecting the unit directly without a fuse, could cause fire or damage to the stereo
unit.
If the replacement fuse fails, contact your nearest authorized Panasonic Servicenter for
service.
❏
Troubleshooting Tips
Troubleshooting
Unit will not turn on. Dead car battery.
Ignition not on.
Bad power line connection.
Fuse burned out.
Charge car battery.
Turn ignition to On or Accessory.
Check connections.
Replace fuse.
Radio has static. Antenna not hooked up.
Close to high power lines.
Hook up antenna.
Move away from high power lines.
Radio memory buttons do
not work.
Not holding buttons down
long enough.
Press and hold buttons for more
than 2 seconds.
Tape sound quality is poor. Heads are dirty.
Poor quality tape.
Clean heads. (Ask a service
representative for advice.)
Use better quality tape.
Tape will not change
programs.
Not pressing [] and []
buttons at the same time.
Press [] and [] buttons at the
same time.
CD Changer will not operate. Unit not properly connected.
Unit not switched into CD
Change mode.
No CDs in the magazine.
Check connections.
Press CD
•
C button.
Check disc magazine.
CD Changer will not play a
specific disc.
Disc loaded upside down.
Disc damaged.
Disc not loaded in magazine.
Reload disc properly.
Check disc for scratches, chips.
Check disc magazine.
Page 29

CQ-RG131U
29
E
N
G
L
I
S
H
20
Specifications
GENERAL
Power Supply : 12 V DC (11 V - 16 V) Test Voltage 14.4 V, Negative ground
Maximum Power Output : 40 W x 4 channels at 400 Hz, Volume Control maximum
Power Output : 20 W per channel into 4 Ω, 40 to 30,000 Hz at 3 % THD.
Tone Action : Bass ; ± 12 dB at 100 Hz
Treble; ± 12 dB at 10 kHz
Current Consumption : Less than 2.5 A (tape mode, 0.5 W 4-speaker)
Pre-Amp Output Voltage : 2.0 V (CD Play mode; 1 kHz 0 dB)
Speaker Impedance : 4 Ω (4 - 8 Ω acceptable)
Dimensions (W x H x D) : 7" x 1-15/16" x 5-7/8" (178 x 50 x 150 mm)
Weight : 3 lbs. 8 oz. (1.6 kg)
AM RADIO
Frequency Range : 530 - 1,710 kHz
Useable Sensitivity : 28 dB/µV (25 µV/ S/N 20 dB)
FM STEREO RADIO
Frequency Range : 87.9 - 107.9 MHz
Useable Sensitivity : 12 dBf. (1.1 µV/ 75 Ω, S/N 30 dB)
50 dB Quieting Sensitivity : 17 dBf. (1.8 µV/ 75 Ω)
Frequency Response : 30 - 15,000 Hz ±3 dB
Alternate Channel Selectivity : 75 dB
Stereo Separation : 35 dB at 1,000 Hz
Signal/Noise Ratio : 70 dB (Mono)
TAPE PLAYER
Reproduction System : 4-track, 2-program stereo
Tape Speed : 1-7/8"/sec (4.76 cm/sec)
FF/REW Time : Less than 200 sec (C-60)
Frequency Response : 35 - 14,000 Hz ±3 dB
Wow and Flutter : 0.12 % (WRMS)
Signal/Noise Ratio : 52 dB
*Above specifications comply with EIA standards.
Note:
Specifications and design are subject to modification without notice due to improvements in
technology.
Page 30

CQ-RG131U
30
F
R
A
N
Ç
A
I
S
1
Interrupteur et commandes de réglage de la
sonorité
LOUD
LOUD
Interrupteur
Si la voiture n’est pas déjà en marche, tourner la clé de contact
jusqu’à ce que le voyant des accessoires s’allume.
Appuyer sur la touche [PWR] pour établir le contact.
LO
U
D
Volume
●
Appuyer sur la touche [VOL jj] ou [VOL ii] pour augmenter
ou baisser le volume.
0 à 39
Indicateur de volume
●
Enfoncer la touche [VOL jj] ou [VOL ii] plus d’une demi-
seconde pour changer rapidement les indications numériques
de la réponse affichée.
LOUD
LO
U
D
Mute (Assourdissement)
●
Appuyer sur [MUTE] pour baisser le niveau de volume.
●
“MUTE” clignote pendant cette opération.
●
Appuyer de nouveau sur [MUTE] pour annuler.
LOUD
L
O
U
D
Compensateur physiologique
●
Enfoncer la touche [MUTE] (LOUD) pendant plus de 2
secondes pour accentuer les graves et les aigus lors d’une
écoute à bas ou moyen volume.
●
Enfoncer de nouveau la touche [MUTE] (LOUD) pendant plus
de 2 secondes pour mettre le compensateur physiologique hors
fonction lors d’une écoute à volume élevé.
Remarque: Cet appareil est doté d’un système de protection contre les surcharges de volume,
qui sert de régulateur automatique de niveau sonore, de sorte qu’on ne soit pas assourdi par une
augmentation brutale de volume. Le système fonctionne comme suit. Lors de la mise en contact
de l’appareil, le volume est réglé à un niveau faible. Par la suite, le volume augmente
graduellement jusqu’au niveau précédemment réglé avant la coupure du contact.
Le système de protection contre les surcharges de volume n’est pas effectif lorsque le volume
est inférieur à la position 20 sur l’écran d’affichage.
Press and hold
Page 31

CQ-RG131U
31
F
R
A
N
Ç
A
I
S
2
L
O
U
D
Commutation des modes de
réglage audio
Appuyer sur la touche [SEL] pour changer le mode de réglage
audio dans l’ordre suivant:
VOL
a
BAS
a
TRE
(Volume) (Grave) (Aigus)
cd
Fad
b
BAL
(Équilibre Av./Ar) (Équilibre)
LO
U
D
Graves et aigus
Appuyer sur la touche [SEL] pour sélectionner le mode de
réglage des graves ou des aigus (BAS - TRE). Appuyer ensuite
sur la touche [VOL jj] ou [VOL ii] pour accentuer ou atténuer
la réponse dans les graves ou les aigus selon le cas.
–12 à 12
–12 à 12
Équilibre
Appuyer sur la touche SEL pour sélectionner le mode de réglage
de l’équilibre (BAL). Appuyer ensuite sur la touche [VOL jj] ou
[VOL ii] pour régler le niveau de sortie sur le canal droit (R) ou
gauche (L).
1 à 15R ou L
Position d’équilibre
Équilibre avant-arrière
Appuyer sur la touche [SEL] pour sélectionner le mode de
réglage de l’équilibre avant-arrière (FAD). Appuyer ensuite sur la
touche [VOL jj] ou [VOL ii] pour régler le niveau de sortie sur
le canal avant (F) ou arrière (R).
1 à 15F ou R
Position d’équilibre avant-arrière
LO
U
D
Remarque: Lorsqu’un mode de réglage audio (BAS/TRE/BAL/FAd) a été sélectionné mais
qu’aucun réglage n’est effectué dans les 5 secondes qui suivent (2 secondes pour la commande
volume), l’affichage revient au mode de fonctionnement normal (Radio, cassette, etc). Dans un
tel cas, appuyer de nouveau sur la touche [SEL] pour sélectionner le mode de réglage audio.
d
(R: Gauche, L: Droit)
(F: Avant, R: Arrière)
Page 32

CQ-RG131U
32
F
R
A
N
Ç
A
I
S
3
Fonctionnement de la radio
LOUD
LOUD
LO
U
D
Sélection du mode radio
En mode “TAPE” ......................................Éjecter la cassete.
En mode “CD
•
CH” ....................................Appuyer sur [BAND].
L
O
U
D
Sélection de la bande
Appuyer sur la touche [BAND] pour sélectionner les bandes dans
l’ordre suivant.
FM1
a
FM2
a
FM3
a
AM
cd
L’indicateur “ST” s’allume lorsque la station syntonisée diffuse en
stéréophonie.
LO
U
D
Accord manuel
Appuyer sur la touche [TUNE jj] ou [TUNE ii] pour effectuer
l’accord vers l’extrémité supérieure ou inférieure de la bande.
Accord par recherche
Appuyer sur la touche [TUNE jj] ou [TUNE ii] pendant au
moins une demi-seconde, puis relâcher. L’accord se fait auto-
matiquement sur la première station adjacente émettant un signal
puissant.
Réduction d’interférence dans
la bande FM (MONO)
Appuyer sur la touche [MONO] pour une réception en mode
monaural lors d’interférence dans la bande FM stéréo ou pour
améliorer la réception lorsque le signal est faible.
Pour désactiver cette fonction, appuyer de nouveau sur [MONO].
Appuyer, puis
relâcher
D
U
LO
Page 33

CQ-RG131U
33
F
R
A
N
Ç
A
I
S
4
Mise en mémoire manuelle
Pour sélectionner la bande désirée, appuyer sur la touche
[BAND].
Utiliser l’accord manuel ou par recherche pour syntoniser la
station à mettre en mémoire.
Appuyer sur l’une des touches de présyntonisation (1 à 6)
jusqu’à ce que la fréquence affichée clignote. La station
accordée est entrée en mémoire et assignée à la touche de
présyntonisation sélectionnée.
Recommencer les étapes décrites ci-dessus pour chaque
station des bandes FM1 à AM devant être mise en mémoire.
Syntonisation automatique
des six stations en mémoire
Sélectionner une bande, puis appuyer sur la touche [BAND]
(APM) pendant plus de 2 secondes.
●
Les 6 stations ayant le plus puissant signal sont
automatiquement mises en mémoire et assignées aux touches
1 à 6.
●
Une fois le réglage effectué, les stations sont syntonisées une à
la fois pendant 5 secondes.
●
Appuyer sur la touche de présyntonisation correspondant à la
station désirée.
Remarque: Les stations présyntonisées manuellement sur la
gamme d’onde sélectionnée seront supprimées.
Remarque: Il est possible de changer un réglage en répétant les
directives précédentes.
Mise en mémoire des stations
La mémoire peut accepter un total de 24 stations réparties de la manière suivante.
FM1 FM2 FM3 AM
6 stations 6 stations 6 stations 6 stations
L
O
U
D
Indicateur de
l’adresse mémoire
L
O
U
D
Maintenir
enfoncée
d
d
d
Attention: Pour des raisons sécuritaires, ne pas effectuer les réglages durant la conduite.
Syntonisation d’une station en
mémoire
Appuyer sur l’une ou l’autre des touches de présyntonisation [1] à
[6] pour syntoniser une des stations mises en mémoire aux
étapes à ci-dessus.
LOUD
Maintenir
enfoncée
LOUD
D
U
O
L
Page 34

CQ-RG131U
34
F
R
A
N
Ç
A
I
S
5
Fonctionnement du lecteur de cassettes
LOUD
LOUD
LOUD
U
D
Chargement de la cassette
Insérer délicatement la cassette, côté exposé de la bande sur la
droite, jusqu’à ce que le mécanisme la saisisse; la lecture débute.
Indicateur du dispositif mémoire
(L’affichage “” tourne.)
Rebobinage/avance accélérée
Lorsque l’indicateur du programme s’allume, appuyer sur []
pour le rebobinage ou sur [] pour l’avance accélérée de la
bande.
Lorsque l’indicateur du programme s’allume, appuyer sur []
pour l’avance accélérée ou sur [] pour le rebobinage de la
bande.
Pour interrompre le rebobinage ou l’avance accélérée, appuyer
délicatement sur la touche qui n’est pas enfoncée.
La lecture se poursuit alors normalement à partir de cet endroit.
Inversion
Appuyer simultanément sur les touches [] et [] pour
inverser le défilement de la bande et lire l’autre côté de la
cassette. L’indicateur change pour confirmer quel côté de la
cassette est lu.
Défilement avant Côté inverse
Appuyer sur les
deux touches
“”
s’allume: Avance accélérée
“”
s’allume: Rebobinage
“”
s’allume: Rebobinage
“”
s’allume: Avance accélérée
Partie exposée
de la bande
Page 35

CQ-RG131U
35
F
R
A
N
Ç
A
I
S
6
LOUD
Arrêt et éjection de la cassette
Dès qu’une cassette est insérée dans le logement, la lecture se
poursuit jusqu’à ce qu’elle soit éjectée.
Sur pression de la touche [u] (éjection), l’appareil éjecte la
cassette et met la radio en circuit.
Lorsque le contact est coupé sur le véhicule, le défilement de la
bande cesse mais la cassette n’est pas éjectée.
Remarque:
●
Lors de la lecture d’une cassette, il n’est pas possible de
sélectionner le mode changeur CD ou le mode radio.Éjecter
d’abord la cassette avant de sélectionner le mode changeur CD
ou le mode radio.
●
Après usage, ne jamais laisser de cassette dans le lecteur. Cela
contribuera à prolonger la durée de vie des cassettes.
À propos des cassettes
Pour rétablir la tension de la bande:
Rétablir la tension de la bande avec un crayon
ou un objet similaire de la manière illustrée. Si
une cassette dont la tension est relâchée est
utilisée, la bande pourrait s’emmêler ou causer
d’autres problèmes.
Remarques:
●
Afin de maintenir le lecteur de cassette en état optimum, éviter d’utiliser des bandes de plus de
90 minutes (C-90).
●
Quand la cassette est introduite dans le lecteur avec la bande lâche, elle ne peut pas être
correctement lue. Dans ce cas, éjecter la cassette, enrouler la bande pour lui donner une
tension adéquate et la remettre dans l’appareil.
Crayon
Ne pas toucher
ni retirer la
bande.
Page 36

CQ-RG131U
36
F
R
A
N
Ç
A
I
S
7
Fonctionnement du lecteurchangeur audionumérique
Remarque:
Les fonctions du lecteur-changeur audionumérique ne sont possibles que lors du raccordement d’un
lecteur-changeur audionumérique (vendu séparément) à cet appareil.
LOUD
LOUD
Mode lecteur-changeur
Lorsqu’un magasin de disques est inséré dans le lecteurchangeur, appuyer sur la touche [CD·C].
La lecture s’amorce au début de la première plage.
LOUD
LO
U
D
Sélection du disque
Appuyer sur la touche [DISC jj] ou [iiDISC] pour sélectionner
les disques dans l’ordre croissant ou décroissant.
Sélection de la plage
Appuyer sur la touche [TRACK ] pour passer à la plage
suivante.
Appuyer à répétition pour passer rapidement d’une plage à l’autre.
Appuyer sur la touche [TRACK ] pour revenir au début de la
plage en cours. Appuyer à deux reprises pour aller au début de la
plage précédente. Appuyer à répétition pour sauter toutes les
plages.
Remarque: S’ll y a une cassette dans l’appareil, la retirer.
Sinon, la lecture ne pourra s’amorcer.
LO
U
D
Durée de
lecture de plage
Numéro de disque
Numéro de plage
Page 37

CQ-RG131U
37
F
R
A
N
Ç
A
I
S
8
Recherc he d’un passage au
sein d’une plage
Enfoncer la touche [TRACK ] ou [TRACK ] plus d’une
demi-seconde pour effectuer une recherche rapide, dans un sens
ou dans l’autre, au sein d’une plage. Relâcher la touche [TRACK
] ou [TRACK ] pour reprendre la lecture à partir de l’endroit
repéré.
LO
U
D
Lecture en reprise d’une plage
●
Appuyer sur la touche [4] (REPEAT) pour effectuer la lecture en
reprise de la plage en cours. L’indicateur “REPEAT” s’allume.
●
La lecture de la plage est répétée jusqu’à ce que la touche add
[4] (REPEAT) soit pressée
de nouveau.
Appuyer puisrelácher
LOUD
Séquence de lecture aléatoire
●
Appuyer sur la touche [5] (RANDOM). Une séquence aléatoire
de plages, sur tous les disques, est alors définie. L’indicateur
“RANDOM” s’allume.
●
Pour mettre un terme à la lecture aléatoire, appuyer de nouveau
sur la touche [5] (RANDOM).
Balayage des plages
●
Appuyer sur la touche [3] (SCAN). Les indications (Numéro de
plage) sur l’afficheur clignotent puis les 10 premières secondes
de chaque plage sont lues en séquence.
●
Pour mettre un terme au balayage et amorcer la lecture de la
plage repérée, appuyer de nouveau sur la touche [3] (SCAN).
Balayage des disques
Maintenir la touche [3] (SCAN) enfoncée plus de 2 secondes. La
première plage de chaque disque dans le magasin est lue
pendant 10 secondes. Le numéro de disque sur l’afficheur
clignote également. Pour mettre un terme au balayage des
disques, maintenir de nouveau la touche [3] (SCAN) enfoncée
plus de 2 secondes.
❏
Messages d’erreur
Indique que le disque est sale ou
placé à l’envers. Commande la
sélection du disque suivant.
Indique que le disque est rayé.
Commande la sélection du disque
suivant.
Cette indication apparaît lorsque le
fonctionnement de l’appareil est
interrompu pour une raison ou une
autre. Pour l’entretien, s’adresser
au service d’entretien Panasonic le
plus proche.
Cette indication apparaît lorsqu’il
n’y a pas de disque dans le
magasin.
LOUD
Page 38

CQ-RG131U
38
F
R
A
N
Ç
A
I
S
9
Fonctionnement de l’horloge
(Système de 12 heures)
LOUD
LOUD
Réglage de l’heure
Appuyer sur la touche [DISP]. “AdJ”
apparati.
Maintenir la touche [DISP] de nouveau
enfoncée plus de 2 secondes.
L’indication “12” clignote, confirmant la
validation du mode réglage de l’heure.
Pour régler le chiffredes heures, appuyer
sur la touche [jj] ou [ii].
Appuyer à nouveau sur la touche [DISP]
passer aux minutes.
Pour régler le chiffre des minutes,
appuyer sur la touche [jj] ou [ii].
Exercer et maintenir rapidement une
pression sur la touche [jj] ou [ii].
Une fois l’heure réglée, appuyer sur la
touche [DISP].
Remise à l’heure
Pour changer l’heure, maintenir une pression de plus de 2
secondes sur la touche [DISP]. Répéter les étapes à cidessus.
Sélection de l’affichage de
l’horloge
Appuyer sur la touche [DISP] pour faire afficher l'hortoge.
Appuyer de nouveau sur la touche [DISP] fait afficher le mode
audio sélectionné.
d
d
L
O
U
D
Maintenir
enfoncée
Maintenir
enfoncée
Page 39

CQ-RG131U
39
F
R
A
N
Ç
A
I
S
10
●
Carte d’homologation de la garantie ............La remplir sans délai.
●
Liste des centres de service
Panasonic agréés............................................Conserver cette liste pour consultation ultérieure.
●
Quincaillerie pour l’installation......................Requise pour l’installation dans le tableau de bord.
Guide d’installation
Les informations relatives à l’installation sont prévues uniquement
pour des techniciens qualifiés. Elles ne contiennent pas de mises en
garde ou d’avis quant aux dangers potentiels pouvant être encourus
lors de l’installation de cet appareil.
Toute tentative d’installation de cet appareil dans un véhicule
motorisé par une personne sans qualification peut causer des
dommages au système électrique et des blessures corporelles
graves ou mortelles.
Mise en garde
❏
Généralités
Cet appareil devrait être installé par un
technicien qualifié. Toutefois, si l’utilisateur
décide de le faire soi-même, la première étape
consistera au choix de l’emplacement. Les
instructions données dans ce manuel
expliqueront les étapes suivantes.
(Voir la “Mise en garde” ci-dessus.)
●
Identifier et étiqueter les fils du véhicule.
●
Raccorder les fils du véhicule à ceux du
connecteur d’alimentation.
●
Installer l’appareil dans le tableau de bord.
●
Vérifier le fonctionnement de l’appareil.
En cas de difficulté, ne pas hésiter à communiquer avec un installateur professionnel.
Précaution: Cet appareil ne peut fonctionner
que sur une batterie de 12 V c.c. avec négatif à
la masse. Afin de prévenir tout risque de
dommage, ne pas tenter de l’utiliser avec une
autre source d’alimentation.
Avant de procéder à l’installation, vérifier le
contenu de l’emballage.
❏
Quincaillerie pour Pinstallation
N
º
1
1
1
1
1
1
1
1
Description
Collier de montage
Boulon hexagonal
(5 mmφ)
Plaque de support
arrière
Vis taraudeuse
(5 mmφx 16 mm)
Boulon d’assemblage
(5 mmφ)
Connecteur d’alimentation
Plaque de démontage
Étui du panneau avant
amovible
Schéma Qté
Page 40

CQ-RG131U
40
F
R
A
N
Ç
A
I
S
11
❏
Outils requis
Un tournevis, une pile AA de 1,5 V et les accessoires suivants:
❏
Dégagement requis dans le
tableau de bord
Câble d’alimentation
Si une radio est déjà en place ou si le câblage à
cet effet est déjà installé :
Couper pour retirer le capuchon du connecteur
(en prenant soin de laisser les fils les plus longs
possible) de manière à permettre le
raccordement individuel des fils.
Mettre la clé de contact du véhicule à la position
“ACC”, puis relier un des fils du vérificateur de
continuité au cadre de l’automobile.
Relier l’autre fil du vérificateur de continuité à
chacun des fils exposés du connecteur
sectionné. Toucher un fil à la fois jusqu’à ce que
le fil faisant allumer l’ampoule du vérificateur ait
été repéré.
Ensuite, mettre la clé de contact à la position
“OFF” puis à la position “ON”. Si l’ampoule
s’éteint et se rallume, le fil identifié est le fil
d’alimentation du véhicule.
Si le câblage pour l’installation d’une radio n’est
pas déjà en place ; ouvrir le couvercle du blocfusibles et trouver le réceptacle du fusible de la
radio (RADIO), des accessoires (ACC) ou du
contact (IGN).
Fil de la batterie
Si l’appareil est doté d’un fil jaune, il sera
nécessaire de repérer le câble de la batterie ;
sinon, omettre cette étape. (Le fil jaune de la
batterie assure l’alimentation continue du circuit
de l’horloge, de la mémoire, etc.)
Si une radio ou son câblage est déjà en place :
Mettre la clé de contact à la position “OFF” et
s’assurer que les phares sont éteints. Repérer
le fil de la batterie. Pour ce faire, relier un fil du
vérificateur de continuité au cadre du véhicule
et vérifier les autres fils exposés du connecteur
au moyen de l’autre fil du vérificateur.
En l’absence de câblage pour l’installation d’une
radio :
Enlever le couvercle du bloc-fusibles et repérer
le réceptacle du fusible de la batterie (BAT).
Épaisseur
Minimum: 4.75 mm (3/16 po)
Maximum: 5.56 mm (7/32 po)
182 mm (7-5/32 po)
53 mm (2-3/32 po)
❏
Identification des fils
La première étape consiste à identifier tous les
fils du véhicule nécessaires au raccordement de
l’appareil.
Après avoir identifié chacun des fils en cause,
les étiqueter. Cela évitera tout risque de
confusion et d’erreur.
Remarque: Ne pas raccorder le connecteur
d’alimentation à l’appareil avant d’avoir effectué
tous les raccordements. S’il n’y a pas de
capuchons de plastique sur les fils de
raccordement stéréo, isoler tous les fils exposés
avec du ruban d’électricien. Identifier les fils
dans l’ordre suivant.
Vérificateur
de continuité
12 V c.c.
Ruban
d’électricien
Pinces
à sectionner
Guide d’installation
(suite)
Page 41

CQ-RG131U
41
F
R
A
N
Ç
A
I
S
12
Haut-parleurs
Identifier les fils de haut-parleur. Il y en a deux
par haut-parleur ; ils sont généralement
identifiés par un code de couleur.
Pour faciliter l’identification des fils de hautparleur et leur haut-parleur respectif, les vérifier
avec une pile AA de 1,5 V de la manière
suivante.
Tenir un fil contre l’un des pôles de la pile et
toucher l’autre pôle avec un autre fil. S’il s’agit
d’un fil de haut-parleur, un son mécanique est
entendu à travers un haut-parleur. Sinon,
poursuivre l’essai avec d’autres fils jusqu’à ce
que les fils de haut-parleurs aient été identifiés.
Au moment de leur étiquetage, indiquer à quel
haut-parleur ils doivent être raccordés.
Moteur de l’antenne
Si le véhicule est doté d’une antenne électrique,
identifier le fil du moteur de l’antenne en reliant
un fil du vérificateur de continuité au fil de la
batterie et en touchant un à un les fils exposés
du connecteur sectionné. Le fil recherché est
celui qui fait tourner le moteur de l’antenne (un
bruit de rotation sera audible).
Fil d’antenne
Le fil de l’antenne est un fil noir épais avec un
capuchon métallique à son extrémité.
❏
Raccorder tous les fils
Après avoir identifié tous les câblages et fils, il
est possible d’effectuer les raccordements. Se
reporter au schéma à la page 47.
Il est fortement recommandé de vérifier le
fonctionnement de l’appareil avant de procéder
à l’installation finale.
Il est possible de mettre l’appareil sur le
plancher du véhicule pour faire des
raccordements provisoires afin de vérifier le
fonctionnement de l’appareil. Recouvrir tous les
fils exposés avec du ruban d’électricien.
IMPORTANT: Raccorder le fil d’alimentation
rouge en dernier lieu seulement, après avoir fait
tous les autres raccordements et isolé tous les
fils.
Mise à la terre
Raccorder le fil de mise à la terre noir du
connecteur d’alimentation au cadre du véhicule.
Haut-parleurs
Raccorder les fils des haut-parleurs. Se reporter
au schéma ci-dessous afin d’assurer que les
raccordements soient conformes et de prévenir
tout risque de dommage aux haut-parleurs et à
l’appareil.
Les haut-parleurs doivent avoir une puissance
admissible minimale de 40 W. Si un
amplificateur externe est utilisé, s’assurer que la
puissance admissible nominale des hautparleurs corresponde à la puissance maximale
de l’ampli, afin de ne pas endommager les
haut-parleurs.
L’impédance des haut-parleurs doit être de 4 à
8 Ω, ce qui est le niveau standard. (L’impé-
dance est généralement inscrite sur les hautparleurs). L’utilisation de haut-parleurs d’une
impédance plus faible ou plus élevée affectera
la qualité du rendu sonore et risque
d’endommager tant l’appareil que les hautparleurs eux-mêmes.
Précaution: Ne jamais mettre les fils de hautparleur à la terre. Par exemple, ne pas utiliser
un système avec mise à la masse au cadre ou
un système de haut-parleurs à trois fils avec fil
commun. Chaque haut-parleur doit être
raccordé séparément avec des fils parallèles
isolés. En cas de doute, communiquer avec un
installateur professionnel.
CORRECT
Absence de fil de terre commun
INCORRECT
Mise à la masse au cadre
INCORRECT
Fil commun
(fil de terre commun)
_
+
_
+
G
_
+
_
+
D
_
+
_
+
G
_
+
_
+
D
_
+
_
+
G
_
+
_
+
D
Page 42

CQ-RG131U
42
F
R
A
N
Ç
A
I
S
13
Moteur de l’antenne
Relier le fil du moteur de l’antenne du véhicule
au fil d’amenée bleu du relais.
Batterie
Raccorder le fil de batterie jaune du véhicule au
fil d’amenée de la radio ou au réceptacle du
fusible de la batterie du bloc-fusibles.
Antenne
Raccorder l’antenne en branchant le fil
d’antenne dans le réceptacle de l’antenne.
Équipement auxiliaire
Raccorder tout appareil auxiliaire, tel qu’un
ampli, conformément aux instructions décrites
dans le manuel fourni. S’assurer d’éloigner d’au
moins 30 cm (12 po) les fils de hautparleur/ampli de l’antenne et du fil d’antenne.
Se reporter au manuel d’utilisation afférent à
l’appareil installé.
Alimentation
Raccorder le fil d’alimentation rouge au fil de
radio déjà en place ou au porte-fusibles
approprié du bloc-fusibles.
Si l’appareil fonctionne normalement avec tous
les raccordements ainsi effectués, débrancher
les fils et procéder à l’installation finale.
❏
Installation finale
Raccordements des fils
Raccorder tous les fils en prenant soin qu’ils
sont tous bien isolés et que les raccordements
sont corrects. Enrouler toute longueur excessive
de fil et la fixer en place avec une bande
adhésive. Installer l’appareil dans son collier de
montage.
L’installation est maintenant terminée. Effectuer
toutefois les vérifications finales suivantes.
❏
Vérifications finales
1. S’assurer que tous les fils sont bien raccordés et isolés.
2. S’assurer que l’appareil est solidement en
place dans son collier de montage.
3. Faire démarrer la voiture et vérifier le
fonctionnement de l’appareil.
En cas de difficulté, consulter un installateur
professionnel.
Guide d’installation
(suite)
❏
Installation
1. Fixer le collier de montage .
Insérer le collier de montage dans le tableau de bord et replier les languettes de montage
avec un tournevis.
Tableau de bord
Collier de montage
Languette de montage
Tournevis
❏
Mesures de précaution
●
Faire très attention de ne pas se blesser les mains ni les doigts au moment de replier la
languette de fixation du cadre d’installation avec un tournevis.
●
Il est recommandé de porter des gants pour effectuer les travaux d’installation afin de ne pas
se blesser.
Page 43

CQ-RG131U
43
F
R
A
N
Ç
A
I
S
14
2. Fixer l’arrière de l’appareil.
a) Vérifier les raccordements ; pour ce faire, se reporter au manuel d’utilisation.
b) Installer et serrer le boulon d’assemblage .
c) Brancher le connecteur d'alimentation .
d) Insérer l’appareil dans le collier de montage jusqu’à ce qu’un déclic se fasse entendre.
e) Fixer l’arrière de l’appareil au véhicule de l’une des deux manières recommandées ci-dessous.
■
Utilisation de la plaque de support arrière
Fixer une extrémité de la plaque de support à l’arrière de l’appareil et l’autre à la paroi
ignifuge du véhicule ou à toute autre pièce métallique.
■
Utilisation du coussinet en caoutchouc (facultatif)
(En présence d’une plaque de support arrière déjà en place sur la paroi ignifuge.)
Recouvrir le boulon d’assemblage à l’arrière de l’appareil avec le coussinet en caoutchouc
(facultatif), puis le fixer sur la plaque de support déjà en place.
3. L’installation terminée, rebrancher la borne négative (–) de la batterie.
Appareil
Connecteur
d'alimentation
Appareil
Boulon d'assemblage
Paroi ignifuge de la
voiture
3 mm
φ
Boulon hexagonal
Plaque de support arrière
Boulon d’assemblage
Collier de montage
Vis taraudeuse
Plaque de support
(déjà enplace)
Coussinet en
caoutchouc
(facultatif)
Boluon
d’assemblage
Collier de montage
Page 44

CQ-RG131U
44
F
R
A
N
Ç
A
I
S
15
Pour retirer l’appareil
a) Retirer la plaque enjoliveuse à l’aide d’un tournevis comme le montre l’illustration (Fig. 1).
b) Sortir l’appareil en poussant les deux leviers de blocage à l’aide de la plaque de démontage
: suivre la procédure ci-dessous. (Fig. 2, 3)
c) Retirer l’appareil en le tirant avec les deux mains. (Fig. 4)
Remarque: Conserver la plaque de démontage; elle est requise pour retirer l’appareil du tableau
de bord.
Guide d’installation
(suite)
P
R
G
L
O
U
D
Tournevis
Plaque enjoliveuse
P
R
G
L
O
U
D
PRG
CQ-RG131U
L
O
U
D
P
R
G
L
O
U
D
Levier de blocage
Plaque de
démontage
Fig. 2
Fig. 4
Fig. 3
a
a
Fig. 1
Page 45

CQ-RG131U
45
F
R
A
N
Ç
A
I
S
16
Système antivol
ThCet appareil est muni d’un panneau avant amovible. Ainsi, lorsque le panneau avant est enlevé,
l’appareil devient inutilisable. Le voyant du système de sécurité clignote.
Retrait du panneau avant amovible
Couper le contact.
Appuyer sur la touche de dégagement ( ) (Fig. 5).
TLe panneau avant amovile peut être
alors dégagé.
Retirer le panneau avant en tirant sur le côté droit. Ranger le panneau dans l’étui fourni.
Tel qu’illustré à la figure 7, insérer le panneau avant dans l’étui, avec la flèche pointant vers l’étui,
jusqu’à ce qu’un déclic se fasse entendre. Ranger le panneau dans l’étui. Le panneau peut alors
être transporté en toute sécurité.
P
R
G
LOUD
P
R
G
L
O
U
D
Appareil principal
Contacts
Voyant du système
Fig. 5
Étui du panneau avant amovible
Les deux flèches pointant l’une vers l’autre
Fig. 7
Appuyer
Fig. 6
Page 46

CQ-RG131U
46
F
R
A
N
Ç
A
I
S
17
Installation du panneau avant amovible
Faire glisser le côté gauche du panneau en place.
Appuyer sur le côté droit du panneau jusqu’à ce qu’il s’enclenche.
Guide d’installation
(suite)
Attention:
1. Avant de retirer le panneau, s’assurer que le contact est coupé.
2. Le panneau n’est pas à l’épreuve de l’eau. Ne pas l’exposer à la pluie, à l’eau ou à une
humidité excessive.
3. Ne pas tenter de retirer le panneau en conduisant.
4. Ne pas placer le panneau sur le tableau de bord ou dans un endroit susceptible de devenir
excessivement chaud.
5. Ne pas toucher aux contacts du panneau ou de l’appareil; cela pourrait affecter la qualité des
contacts électriques.
6. Au besoin, nettoyer les contacts avec un chiffon sec et propre.
P
R
G
LOUD
P
R
G
LOUD
Languette en
plastique
Découpure
Panneau avant
amovible
Fig. 8
Fig. 9
Page 47

CQ-RG131U
47
F
R
A
N
Ç
A
I
S
18
Connexions électriques
●
Cet appareil peut être raccordé à un lecteur-changeur CD (modèle CX-DP88U). Pour de plus
amples détails, consulter un détaillant Panasonic.
●
Pour les instructions relatives au raccordement, se reporter au manuel d’utilisation afférent au
lecteur-changeur CD (modèle CX-DP88U).
Précautions:
●
Toujours suivre le schéma de connexion ci-dessous pour éviter d’endommager l’appareil.
●
Avant de raccorder un câble, dénuder son extrémité d’environ 5 mm.
●
Ne pas brancher le connecteur d’alimentation avant d’avoir effectué tous les raccordements.
●
Toujours isoler les câbles exposés afin d’éviter un court-circuit possible avec le châssis de la
voiture. Rassembler tous les câbles et vérifier que les bornes des câbles ne touchent aucune
pièce métallique.
CQ-RG131U
(+)(–)(+)(–)
(+)(–)
(+)(–)
BATTERY
(Rouge)
D(Rouge)
(Blanc)
Fusible (3A)
Cordon RCA
Cordon DIN
Câble de connexion
de batterie
(D)
(G)
G(Blanc)
Connecteur de commande
de changeur CD
Fil de mise a la masse
(À connecter à une partie
métallique de la voiture)
Cordon prolongateur
(DIN/BATT/RCA/GND)
Changeur de CD
CX-DP88U
Antenna
Câble de prolongateur
(DIN)
Câble de connexion
de batterle
Á raccorder à la batterie
automobile, + 12 V c.c.
Fil de connexion
d’alimentation ACC
À raccorder à l’alimentation ACC,
+12 V c.c.
Fil de mise à la masse
Relier à une partie métallique prop
et à nue du châssis du véhicule.
Câble d’allmentation,
de l’antenne électrique
Raccorder au câble d’alimentation
de l’antenne électrique du véhicule.
Fil d’alimentation de commande
d’amplificateur extérieur
Câble d’alimentation de l’amplificateur
externe
Le raccorder à un ampli externe
(Jaune)
(Rouge)
(Noir)
Résistance (1kΩ)
FUSIBLE (12A)
(Bleu)
(Violet)
Haut-parleur
droit (arrière)
Haut-parleur
gauche (avant)
Haut-parleur
droit (avant)
Haut-parleur
gauche (arrière)
(Violet rayé noir)
(Vert)
(Vert rayé noir)
(arrière)
(Gris rayé noir)
Câble de haut-parleur
(Blanc rayé
noir)
(Blanc)
(Gris)
CD-CH IN
Sortie Préampli
Page 48

CQ-RG131U
48
F
R
A
N
Ç
A
I
S
19
Problème Cause possible Solution probable
❏
Entretien
Cet appareil est conçu et fabriqué de manière à n’exiger qu’un minimum d’entretien. Nettoyer
périodiquement les surfaces extérieures avec un chiffon propre. Ne jamais utiliser de solvant
d’aucune sorte.
❏
En cas de difficulté
Se référer au guide de dépannage suivant pour des causes et solutions possibles par rapport à
tout problème rencontré. Un contrôle simplifié ou un réglage mineur peut résoudre le problème.
❏
Service après-vente
Si, après quelques tentatives, le problème persiste, il est recommandé de confier l’appareil à un
centre de service Panasonic agréé. Confier toute réparation à un technicien qualifié.
❏
Remplacement du fusible
Utiliser un fusible de même ampérage (12A). L’utilisation de substituts ou de fusibles d’un
ampérage supérieur ou le raccordement de l’appareil sans fusible en place peuvent entraîner un
risque d’incendie et endommager l’appareil. Si le fusible de remplacement saute,
communiquer avec un centre de service Panasonic agréé.
❏
Guide de dépannage
En cas de difficulté
Le contact ne peut être établi.
La batterie est épuisée.
Le contact n’a pas été établi
sur la voiture.
Le circuit d’alimentation est
mal raccordé.
Le fusible de l’appareil a
sauté.
Recharger la batterie.
Tour ner la clé de contact (position ON
ou ACC).
Vérifier les raccordements.
Remplacer le fusible.
Réception radio avec
interférence.
L’antenne n’est pas raccordée.
La voiture est près de lignes à
haute tension.
Raccorder l’antenne.
Éloigner le véhicule des lignes à
haute tension.
Les touches mémoire de la
radio ne fonctionnent pas.
Les touches ne sont pas
appuyées suffisamment
longtemps.
Appuyer sur les touches pendant plus
de 2 secondes.
Le son à l’écoute de cassettes
est de piètre qualité.
Les têtes sont sales.
La bande est de mauvaise
qualité.
Nettoyer les têtes. (Demander conseil
à un technicien de service.)
Utiliser une bande de meilleure
qualité.
La sélection de programme
n’est pas possible (lecteur de
cassettes).
Les touches [] et [] ne
sont pas pressées
simultanément.
Appuyer sur les touches [] et []
simultanément
Le lecteur-changeur de
disques ne fonctionne pas.
L’appareil n’a pas été correcte-
ment raccordé.
L’appareil n’est pas mis en
mode de changement CD.
Il n’y a aucun disque dans le
magasin.
Vérifier les raccordements.
Appuyer sur la touche CD
•
C.
Vérifier le magasin.
La lecture d’un disque donné
n’est pas possible.
Le disque est à l’envers.
Le disque est endommagé.
Le disque n’est pas dans le
magasin.
Recharger le disque correctement.
Vérifier l’état du disque.
Vérifier le magasin.
Page 49

CQ-RG131U
49
F
R
A
N
Ç
A
I
S
20
Données techniques
Divers
Alimentation : 12 V c.c. (11 V - 16 V), Tension d’essai 14,4 V,
Négatif à la masse
Puissance de sortie maximale : 40 W x 4 canaux à 400 Hz, Volume au maximum
Puissance de sortie : 20 W par canal sous 4 Ω, 40 - 30 000 Hz avec D.H.T.
de 3 %
Action sur la tonalité : Graves; ±12 dB à 100 Hz,
Aigus; ±12 dB à 10 kHz
Consommation du courant : Moins de 2,5 A (Lecteur de cassettes en fonction;
0,5 W 4 haut-parleurs)
Tension de sortie préampli. : 2,0 V (Lecteur audionumérique en fonction; 1 kHz, 0 dB
Impédance du haut-parleur : 4 Ω (4 - 8 Ω disponible)
Dimensions (approx.) : 178(L) x 50(H) x 150(P) mm (7 po x 1 15/16 po x 5 7/8 po)
Poids (approx.) : 1,6 kg(3 lb, 8 oz)
Radio AM
Gamme de fréquences : 530 - 1 710 kHz
Sensibilité utile : 28 dB/µV (25 µV, S/B 20 dB)
Radio FM stéréo
Gamme de fréquences : 87,9 - 107,9 MHz
Sensibilité utile : 12 dBf. (1,1 µV/75 Ω, S/B 30 dB)
Sensibilité au seuil de 50 dB : 17 dBf. (1,8 µV/75 Ω)
Réponse en fréquence : 30 - 15 000 Hz ± 3 dB
Sélectivité d’alternance : 75 dB
Séparation stéréo : 35 dB à 1 000 Hz
Rapport signal/bruit : 70 dB (Mono)
Lecteur de cassettes
Pistes : 4 pistes, lecture sur 2 canaux en stéréo
Vitesse de défilement : 4,76 cm/s (1 7/8 po/s)
Durée d’avance rapide/rebobinage : Moins de 200 s (C-60)
Réponse de fréquence : 35 - 14 000 Hz, ±3 dB
Pleurage et scintillement : 0,12% (Eff. pondéré)
Rapport signal/bruit : 52 dB
Remarque:
Aux fins d’améliorations, les caractéristiques et la conception sont susceptibles de modification
sans préavis.
Page 50

CQ-RG131U
50
E
S
P
A
Ñ
O
L
1
Alimentación y mandos de sonido
LOUD
LOUD
Alimentación
Si el carro no está todavía en marcha, gire la llave de encendido
hasta que el indicador accesorio encienda.
Apriete el botón [PWR] para encender la alimentación.
LO
U
D
Volumen
●
Apriete el botón [VOL jj] o [VOL ii] para aumentar o reducir
el volumen.
0 a 39
Nivel de volumen
●
Mantenga el botón [VOL jj] o [VOL ii] apretado durante más
de medio segundo para cambiar sucesivamente los niveles
numéricos en el indicador.
LOUD
L
O
U
D
Silenciamiento
●
Presione [MUTE] para reducir el nivel de volumen.
●
“MUTE” blinks while this operation.
●
Presione de nuevo [MUTE] para cancelar la operación.
LOUD
LO
U
D
Intensificación del tono
●
Presione [MUTE] (LOUD) durante más de 2 segundos para
intensificar los tonos graves y agudos cuando esté escuchando
a volúmenes bajos a medios.
●
Presione [MUTE] (LOUD) durante más de 2 segundos
nuevamente para desactivar cuando esté escuchando a altos
volúmenes.
Nota: Este aparato está provisto de un circuito que evita la subida excesiva y súbita del volumen
que sirve como ajustador automático del nivel del volumen para que no se produzcan subidas
súbitas de volumen ensordecedor.
Este sistema opera de la forma siguiente. Cuando se conecta [PWR], el nivel de volumen es
baja. Después, el nivel de volumen retorna gradualmente al mismo nivel que antes de
desconectar la alimentación. El circuito contra ruidos fuertes no funciona cuando el nivel de
volumen es inferior a la posición 20 del visualizador.
Mantenga
Page 51

CQ-RG131U
51
E
S
P
A
Ñ
O
L
2
L
O
U
D
Cómo Cambiar los Modos de
Audio
Apriete [SEL] para conmutar los modos de audio en la siguiente
orden.
VOL
a
BAS
a
TRE
(VOLUMEN) (GRAVES) (AGUDOS)
cd
FAd
b
BAL
(DESVANECEDOR) (EQUILIBRIO)
LO
U
D
Graves y Agudos
Apriete [SEL] para elegir el modo BASS(TREBLE). Apriete [VOL
jj
] o [VOL ii] para aumentar o reducir la respuesta de los
graves/agudos.
–12 a 12
–12 a 12
Equilibrio
Apriete [SEL] para elegir el modo BALANCE. Apriete [VOLjj] o
[VOL ii] para conmutar el volumen del sonido al altavoz derecho
o izquierdo.
1 a 15R o L
Centro de Equilibrio
Desvanecedor
Apriete [SEL] para elegir el modo FADER. Apriete [VOLjj] o
[VOL ii] para conmutar el volumen del sonido a los altavoces
delanteros o traseros.
1 a 15F o R
Centro de Desvanecedor
L
O
U
D
Nota: Cuando se elige el modo de control (BAS/TRE/BAL/FAd) pero no se ejecuta ninguna
operación dentro de 5 segundos (2 segundos en el modo VOL), el indicador vuelve al modo de
operación normal (Radio, Cintas). En tal caso, apriete nuevamente [SEL] para elegir el modo de
control.
d
(R: Derecho, L: Izquierdo)
(F: Frontal, R: Trasero)
Page 52

CQ-RG131U
52
E
S
P
A
Ñ
O
L
3
Operación básica del radio
LOUD
LOUD
LO
U
D
Para cambiar el modo del
sintonizador
En el caso del modo de cintas ......................Expulse una cinta.
En el caso del modo de cargador de CD ......Presione [BAND].
L
O
U
D
Cómo Elegir una Banda
Apretar [BAND] para elegir las bandas en la siguiente orden.
FM1
a
FM2
a
FM3
a
AM
cd
El indicador “ST” enciende si la estación está transmitiendo el el
modo estereofónico.
L
O
U
D
Sintonía Manual
Apriete [TUNE jj] o [TUNE ii] para mover a una frecuencia
más baja o alta.
Sintonía por Búsqueda
Apriete [TUNE jj] o [TUNE ii] durante más de medio segundo,
y luego suéltelo.
El radio para automáticamente en la estación siguiente.
Para reducir las interf erencias
durante las difusiones de FM
(MONO)
Apretar [MONO] para cambiar a recepción monofónica en caso
de haber demasiada interferencia en la señal de FM en estéreo o
para mejorar la calidad del sonido de difusiones débiles de FM.
Para desactivarlo, presione [MONO].
Presione y suelte
D
U
O
L
Page 53

CQ-RG131U
53
E
S
P
A
Ñ
O
L
4
Presintonía Manual de las
Estaciones
Apriete [BAND] para elegir la estación deseada.
Use la sintonía manual o de búsqueda para encontrar la
estación que Ud. desea programar en la memoria.
Mantenga apretado uno de los botones selectores de estación
1 a 6 durante, hasta que el indicador comience a parpadear.
La memoria está ahora ajustada para aquél botón de la banda
que usted ha elegido.
Repita el procedimiento para presintonizar otras estaciones par
las bandas FM1 a AM.
Memoria de presintonización
automática
Elija una banda y mantenga [BAND] (APM) apretado durante
más de 2 segundos.
●
Las cinco estaciones más potentes disponibles en la banda
serán automáticamente memorizadas en los botones de
presintonía 1 a 6.
●
Una vez presintonizadas, las estaciones son barridas sucesivamente durante 5 segundos.
●
Apriete el botón de presintonía apropiado que Ud. quiere escuchar.
Nota: Se borrarán las emisoras manualmente preajustadas en la
banda selecionada.
Nota: Ud. puede cambiar el contenido de la memoria repitiendo el
procedimiento arriba mencionado.
Presintonía de estaciones
Se puede presintonizar hasta 24 estaciones en la memoria de estaciones, como sigue:
FM1 FM2 FM3 AM
6 estaciones 6 estaciones 6 estaciones 6 estaciones
LO
U
D
Indicador de canal preajustado
LO
U
D
Mantenga
d
d
d
Precaución: Por razones de seguridad, no intente programar el sistema de presintonía cuando
esté conduciendo.
Cómo Llamar una Estación
Presintonizada
Apriete cualquier uno de los botones [1] a [6] para llamar la
estación presintonizada por medios de los pasos a arriba.
LOUD
Mantenga
LOUD
D
U
O
L
Page 54

CQ-RG131U
54
E
S
P
A
Ñ
O
L
5
Operación básica del tocacintas de cassette
LOUD
LOUD
LOUD
U
D
Cómo Cargar un Cassette
Inserte cuidadosamente un cassette con la par te expuesta de la
cinta vuelta hacia la derecha, hasta que el mecanismo lo capture,
y luego la reproducción comenzará.
Indicador de programa
(Esta indicación “” gira.)
Rebobinado y Avance Rápido
Cuando se encienda el indicador de programa , presione []
para efectuar el rebobinado, o presione [] para efectuar el
avance rápido de la cinta.
Cuando se encienda el indicador de programa , presione []
para efectuar el avance rápido, o presione [] para efectuar el
rebobinado de la cinta.
Para detener el rebobinado o el avance rápido, apriete despacio
un botón que no esté siendo usado.
La cinta volverá a tocar de aquella posición.
Cómo Cambiar el Lado
PApretar [] y [] al mismo tiempo para conmutar al
programa del otro lado de la cinta.
El indicador cambia para mostrar qué programa está siendo
reproducido.
Rrepoducción del lado
superior
Rrepoducción del lado
inferior
Apriete Ambos
“”
encendido: Avance Rápido
“”
encendido: Rebobinádo
“”
encendido: Rebobinádo
“”
encendido: Avance Rápido
Cinta Expuesta
Page 55

CQ-RG131U
55
E
S
P
A
Ñ
O
L
6
LOUD
Cómo Parar y Eyectar la Cinta
Una vez insertada dentro del aparato, su cinta tocará
continuamente hasta que Ud. lo eyecte.
Si presiona [u] (EJECT), el aparato expulsará la cinta y volverá a
la operación de la radio.
Cuando pare el motor del automóvil, la cinta se detendrá pero no
saldrá expulsada.
Nota:
●
No podrá cambiar al modo de cambiador de discos compactos
ni al modo de la radio mientras se esté reproduciendo una cinta.
Si desea cambiar al modo del cambiador de discos compactos
o al de la radio, expulse la cinta.
●
Extraiga siempre el cassette cuando no utilice el reproductor de
cassettes. De este modo prolongará la vida útil de las cintas.
Notas sobre las cintas cassette
Lápiz
No toque ni tire
de la cinta
Flojedad de la cinta:
Use un lápiz o un objeto similar para eliminar la
flojedad como se muestra en la figura. Cuando
se usa una cinta floja, eso puede resultar en el
emarañado de la cinta con las partes rotatorias
de la unidad.
Notas:
●
Recomendamos encarecidamente que no se utilicen cintas de una duración de más de C-90
(90 minutos), a menos que sea absolutamente necesario.
●
Si inserta en el aparato un casete cuya cinta esté floja, es posible que el casete no se
reproduzca correctamente. En tales casos, expulse el casete, tense la cinta, y vuelva a insertar
el casete en el aparato.
Page 56

CQ-RG131U
56
E
S
P
A
Ñ
O
L
7
Conocimientos básicos cambiadiscos de CD
Nota:
Los mandos del cambiadiscos de CD son aplicables a la unidad con cambiadiscos de CD opcional
(vendido separadamente).
LOUD
LOUD
Cómo cambiar el modo
Teniendo el cambiadiscos de CD conectado, apriete el botón
[CD·C] para conmutar del modo actual al modo de cambiadiscos
de CD, y el aparato comienza a tocar automáticamente el CD.
LOUD
LO
U
D
Selección de una disco
Presione [DISCjj] o [iiDISC] para seleccionar los discos en
orden ascendente o descendente.
Cómo Elegir una Pista
Apriete el botón [TRACK ] una vez para avanzar a la pista
siguiente. Apriete repetidamente para avanzar a través de todas
las pistas sucesivas del disco.
Apriete el botón [TRACK ] una vez para comenzar a tocar
desde el comienzo de la pista actual. Apriete dos voces este
botón para vplver a la pista anterior. Apriete repetidamente para
retroceder a través de las pistas sucesivas del disco.
Nota: El casete, si está cargado, deberá extraerse. De lo
contrario, el reproductor de discos compactos no se pondrá en
funcionamiento.
L
O
U
D
Tiempo
de reproduccón
Número de disco
Número de canción
Page 57

CQ-RG131U
57
E
S
P
A
Ñ
O
L
8
Cómo Buscar una Pista
Mantenga apretado el botón [TRACK ] o [TRACK ]
durante más de medio segundo para hacer funcionar el
mecanismo de avance o retoroceso rápido a través de las pistas
sucesivas del disco. Suelte el botón [TRACK ] o [TRACK ]
para volver a la reproducción normal del disco CD cuando haya
alcanzado la pista deseada.
LO
U
D
Repetición de una canción
●
Presione [4] (REPEAT) para repetir la selección actual. Se
encenderá el indicador “REPEAT”
●
La selección actual sigue tocando hasta que Ud. apriete nuevamente el botón [4] (REPEAT).
Presione y suette
LOUD
Selección al Azar
●
Apriete el botón [5] (RANDOM). El indicador “RANDOM”
enciende.
●
Se hace la reproducción al azar de músicas de todos los CD
disponibles. Para apagarla, apriete nuevamente el botón [5]
(RANDOM).
Exploración de pistas
●
Apriete el botón [3] (SCAN). La pantalla parpadea, y el aparato
toca sucesivamente los 10 primeros segundos de cada pista.
●
Para parar la exploración y seguir con la pista actual, apriate
nuevamente el botón [3] (SCAN).
LOUD
Exploración de discos
Presione y mantenga presionado [3] (SCAN) durante más de 2
segundos. Se reproducirá la primera canción de todos los discos
de cartucho durante 10 segundos cada una. Además, el número
de disco parpadeará al mismo tiempo. Para detener la
reproducción actual de la exploración de discos, presione y
mantanga presionado otra vez [3] (SCAN) durante más de 2
segundos.
LOUD
❏
EMensajes de visualización de error
Esta indicación aparece cuando el
disco CD está sucio o invertido.
Selecciona el siguiente disco compacto disponible.
Esta indicación aparece cuando el
disco CD está arañado. Selecciona
el siguiente disco compacto
disponible.
Esta indicación aparece cuando el
disco CD cesa de funcionar debido
a alguna razón. Para la reparación,
consulte al Servicio lecnico de
Panasonic más próximo.
Se visualiza cuando no hay ningún
disco en el cartucho.
Page 58

CQ-RG131U
58
E
S
P
A
Ñ
O
L
9
Operación básica del reloj
(El sistema del reloj es de 12 horas)
LOUD
LOUD
Presione [DISP]. Se visualizará “AdJ”.
Presione y mantenga presionado [DISP]
otra vez durante más de 2 segundos.
“12” par padeará indicando que se ha
activado el modo de ajuste de la hora.
Para ajustar las horas, presione [jj] o
[ii].
Presione [DISP] otra vez para ajustar
los minutos.
Para ajustar los minutos, presione [jj] o
[ii]. Mantenga presionado [jj] o
[ii]para cambiar con rapidez los
números.
Cuando haya ajustado la hora, presione
[DISP].
Ajuste de la hora inicial
d
d
Reajuste de la hora
Cuando desee reajustar la hora, presione y mantenga
presionado [DISP] durante más de 2 segundos para activar el
modo de ajuste de la hora. Entonces, repita los pasos a de
arriba.
Selección de la visualización
del reloj
Presione [DISP] para la visualización del reloj.
Presione [DISP] otra vez, y se reanudará el modo de
visualización de audio actual.
L
O
U
D
Mantenga
Mantenga
Page 59

CQ-RG131U
59
E
S
P
A
Ñ
O
L
10
Guía de instalación
Estas informaciones de instalación están destinadas a técnicos
instaladores expertos, y no a personas sin conocimientos técnicos.
Ellas no contienen las advertencias ni los avisos sobre los posibles
peligros al intentar instalar este producto.
Cualquier intento para instalar este producto en un auto por
cualquier persona que no sea un técnico instalador puede casar
daños en el sistema eléctrico y puede resultar en serias heridas o
hasta en la muerte.
ADVERTENCIA
❏
Instrucciones generales
Si posible, este equipo deberá ser instalado por
un profesional. Sin embargo, si Ud. piensa
instalar este aparato Ud. mismo, el primer paso
es decidir donde instalarlo. Las instrucciones
contenidas en estas páginas guiará a Ud. en
los pasos siguientes: (Por favor, refiérase a la
ADVERTENCIA arriba).
●
Identifique y pegue rótulos a los alambres del
vehículo.
●
Conecte los alambres del vehículo con los
alambres del conector de alimentación.
●
Instale la unidad del en tablero de instrumentos.
●
Verifique el funcionamiento de la unidad.
Cuando tenga cualquier problema, sírvase
consultar su instalador profesional más
cercano.
Precaución: Esta unidad funcionará solamente
con un sistema de batería de auto de 12 voltios
de CC con el polo negativo puesto a tierra. No
intente usarlo con cualquier otro sistema. Si no,
podrá causar serios daños
Antes de comenzar la instalación, busque los
elementos siguientes incluidos en el embalaje
de su unidad.
❏
Herrajes Suministradas
No.
1
1
1
1
1
1
1
1
Item
Collar de montaje
Tuerca hexagonal
(5 mmφ)
Tira de soporte trasero
Tornillo de autoemrosqe
(5 mmφx 16 mm)
Perno de montaje
(5 mmφ)
Conector de
alimentación
Placa de desmontaje
Estuche de la placa
fontal removible
Diagram Cantid.
Page 60

CQ-RG131U
60
E
S
P
A
Ñ
O
L
11
❏
Herramientas necesarias
Ud. necesitará un destornillador, una pila AA de
1,5 voltio, y lo siguiente:
❏
Especificaciones del tablero
de instrumentos
Alambre de alimentación
Si su vehículo tiene un radio o está alambrado
de antemano para uno:
Corte el tapón conector (dejando los alambres
tan largos como posible), para que Ud. pueda
trabajar con los alambres individuales.
Gire la llave de encendido a la posición ACC, y
conecte uno de los conductores de la bombilla
de prueba al chasis
Toque cada uno de los alambres expuestos
cortados del tapón del conector del radio con el
otro conductor de la bombilla de prueba.
Toque un alambre de cada vez hasta encontrar
la salida que haga encender la bombilla de
prueba.
Ahora, apague la llave de encendido y en
seguida enciéndalo nuevamente. Si la bombilla
de prueba también apaga y enciende, el
alambre que está siendo tocado es el conductor
de alimentación del vehículo.
Si su vehículo no está alambrado para unidad
de audio:
Vaya al bloque de fusibles para encontrar la
boca de fusible para radio (RADIO), accesorio
(ACC) o encendido (IGN).
Conductor de la batería
Si su unidad estereofónica tiene un conductor
amarillo, Ud. necesitará localizar el conductor
de la batería del auto. Si no, Ud. podrá ignorar
este procedimiento. (El conductor amarillo de la
batería suministra una alimentación continua
para mantener el reloj, la memoria de
almacenaje y otras funciones).
Si su vehículo tiene un radio o está alambrado
de antemano para uno:
Con la llave de encendido y los faros delanteros
apagados, identifique la batería del carro
conectando un conductor de la bombilla de
prueba al chasis y verificando los alambres
restantes expuestos resultantes del corte del
tapón conector.
Si su vehículo no está alambrado para una
unidad de audio:
Vaya al bloque de fusibles y localice la boca de
fusible para la batería, normalmente marcada
con el símbolo BAT.
Espesor
Mínimo: 3/16" (4,75 mm)
Máximo: 7/32" (5,56 mm)
7-5/32" (182mm)
2-3/32" (53 mm)
❏
Identificar todos los alambres
El primer paso en la instalación es el identificar
todos los alambres del vehículo que serán
usados cuando Ud. vaya a instalar su sistema
de sonido.
Cuando vaya identificando cada alambre,
sugerimos que pegue rótulos usando una cinta
de identificación y un marcador permanente.
Eso ayudará a evitar confusiones cuando vaya
a hacer las conexiones más tarde.
Nota: No conecte el conector de alimentación a
la unidad estereofónica hasta que haya
realizado todas las conexiones. Si no hay
protectores de plástico en los alambres de
conexión del aparato estereofónico, asegúrese
de aislar todos los conductores expuestos con
cinta eléctrica hasta que Ud. esté listo para
usarlos. Identifique los alambres en la siguiente
orden.
Bombilla de
prueba de
12 V CC
Cinta adhesiva
eléctrica
Cortaalambres
Guía de instalación
continuación
Page 61

CQ-RG131U
61
E
S
P
A
Ñ
O
L
12
Altavoces
Identifique los conductores de los altavoces del
auto. Hay dos conductores para cada altavoz,
normalmente con códigos de colores.
Una manera simples de identificar los
conductores de los altavoces y los altavoces
conectados con ellos es probar los conductores
usando una batería de 1,5 voltio AA como sigue.
Apriete un conductor contra un polo de la
batería y toque instantáneamente el polo
opuesto de la batería con el otro conductor. Ud.
podrá oír un sonido de arañazo en el altavoz si
está asiendo los conductores del altavoz.
Si no, continúe probando diferentes combinaciones de conductores hasta identificar todos
los conductores de los altavoces. Cuando vaya
a pegar rótulos, incluya los rótulos para
identificar la ubicación de cada altavoz.
Motor de la antena
Si su vehículo está dotado de una antena
motorizada automática, identifique el conductor
de la antena motorizada del vehículo
conectando un conductor de la bombilla de
prueba con el conductor de la batería del
vehículo y tocando, uno a uno, los alambres
restantes expuestos del tapón conector cortado.
Ud. podrá oír el sonido de activación del motor
de la antena cuando Ud. toca el alambre
correcto.
Antena
El conductor de la antena es un alambre negro
grueso con un tapón metálico en la punta.
❏
Conecte todos los alambres
Ahora que Ud. ha identificado todos los
alambres del vehículo, estará listo para
comenzar a conectarlos con los alambres de la
unidad estereofónica. El diagrama de conexión
de la página 67 muestra las conexiones
correctas y los códigos de colores de los
alambres.
Recomendamos fuertemente que Ud. pruebe la
unidad antes de hacer la instalación final.
Ud. puede instalar la unidad sobre el suelo y
hacer conexiones temporales para probar la
Unidad. Use cinta eléctrica para cubrir los
alambres expuestos.
IMPORTANTE: Conecte el alambre rojo de alimentación por último, después de haber hecho
y aislado todas las demás conexiones.
Puesta a tierra
Conecte los conductores negros de puesta a
tierra del conector de alimentación al chasis
metálico del vehículo.
Altavoces
Conecte los alambres de los altavoces. Vea el
diagrama de alambrado abajo para hacer las
conexiones correctas. Siga el diagrama
cuidadosamente para evitar estropear los
altavoces y la unidad estereofónica.
Los altavoces usados deberán ser capaces de
manejar más de 40 vatios de potencia de audio.
Cuando esté usando un amplificador de audio
opcional, los altavoces deberán ser capaces de
manejar la potencia máxima de salida del
amplificador. Los altavoces con bajas
capacidades de entrada podrán sufrir daños.
La impedancia del altavoz deberá ser de 4 a 8
Ω, que está típicamente marcado en la mayoría
de los altavoces. Los altavoces con impedancia
más grande o más pequeña podrán afectar la
salida y causar daños tanto en los altavoces
como en la unidad estereofónica.
Precaución: Nunca ponga a tierra los cordones
de los altavoces. Por ejemplo, no use el sistema
de puesta a tierra del chasis o un sistema de
altavoces de 3 alambres. Cada altavoz deberá
ser conectado separadamente usando
alambres paralelos aislados. Cuando tenga
cualquier duda sobre cómo los altavoces de su
auto están alambrados, sírvase consultar con
su instalador profesional más cercano.
CORRECTO
Ninguna puesta a tierra común
INCORRECTO
Puesta a tierra común en el chasis
INCORRECTO
Altavoz común (conductor
de puesta a tierra común)
_
+
_
+
Izq
_
+
_
+
Der
Izq
Der
Izq
Der
_
+
_
+
_
+
_
+
_
+
_
+
_
+
_
+
Page 62

CQ-RG131U
62
E
S
P
A
Ñ
O
L
13
Antena motorizada
Conecte el conductor de la antena motorizada
del vehículo con el conductor del relé de
controle de la antena motorizada.
Batería
Conecte el conductor amarillo de la batería con
el alambre del radio o con la boca del fusible de
la batería en el bloque de fusibles.
Antena
Conecte la antena enchufando el conductor de
la antena el receptáculo de la antena.
Equipos
Conecte cualesquier equipos opcionales tales
como el amplificador, según las instrucciones
suministradas juntamente con el equipo.
Mantenga una distancia de aproximadamente
12 pulgadas (30 cm.) entre los cordones de los
altavoces y la unidad amplificadora, y la antena
y el cordón de extensión de la antena. Sírvase
leer las instrucciones de operación y de
instalación de cualquier equipo que vaya a
conectar con esta unidad.
Alimentación
Conecte el conductor rojo de alimentación con
el alambre correcto de radio del vehículo o con
la boca de fusible apropiada en el bloque de
fusibles.
❏
Instalación final
Conexión de los alambres
Conecte todos los alambres, verificando que
cada conexión está aislada y segura. Ate todos
los alambres sueltos y sujételos con una cinta
para que no se suelten posteriormente. Ahora,
inserte la unidad estereofónica dentro del
manguito de montaje.
Congratulaciones! Después de hacer algunas
verificaciones finales, Ud. estará listo para
disfrutar de su nuevo sistema estereofónico
para autos.
❏
Verificaciones finales
1. Asegúrese de que todos los alambres
están correctamente conectados y aislados.
2. Asegúrese de que la unidad
estereofónica está firmemente sujetada
en el manguito de montaje.
3. Gire la llave de encendido para verificar
que la unidad funciona correctamente.
Cuando tenga cualquier problema, consulte con
su instalador profesional autorizado más
cercano para solicitar su ayuda.
Guía de instalación
continuación
❏
Procedimente de instalación
1. Asga el collar de montaje .
Inserte el collar de montaje en el tablero de instrumentos del auto, y luego doble las orejas de
montaje apropiadas hacia fuera con un destornillador.
Tablero de instrumentos
Collar de montaje
Oreja de montaje
Destornillador
Si una unidad estereofónica funciona correctamente con todas estas conexiones hechas,
desconecte los alambres y pase a hacer la
instalación final.
❏
Precauciones
●
Cuando doble la lengüeta de montaje del collar de montaje con un destornillador, tenga
cuidado de no herirse las manos y los dedos.
●
Le recomendamos que se ponga unos guantes para realizar el trabajo de instalación con el fin
de protegerse contra heridas.
Page 63

CQ-RG131U
63
E
S
P
A
Ñ
O
L
14
2. Asga la parte trasera del aparato.
a) Verifique las conexiones eliéctricas referiiéndose a las instrucciones de manejo.
b) Apriete el perno de montaje , usando una llave apropiada.
c) Nserte el conector de alimentación .
d) Inserte el aparato en el collar de montaje hasta que se oiga un sonido de “chasquido”.
e) Fije la par te trasera del aparato en el coche por medio de cualquier de los miétodos
recomendados que se describen.
■
Usando la tira de soporte trasero
Fije una punta de la tira de soporte trasero a la parte trasera del aparato, y la otra punta al
parallamas del auto u otra área metálica.
■
Usando el cojín de goma (Opcional)
(Si hay una armazón de soporte trasero en el parallamas del auto.)
Cubra el perno de montaje situado en la parte trasera del aparato con el cojín de goma
(Opcional), y en seguida montejo en la armazón de soporte trasero existente.
3. Despuiés de teminar la instalación reconecte el terminal negativo (–) del
acumulador.
Aparato
Conector de
alimentación
Aparato
Perno de montaje
Plancha del coche
3 mm
φ
Tuerca hexagonal
Tira de soporte trasero
Perno de montaje
Collar de montaje
Tornillo de
autoemrosqe
Armazón de soporte trasero
(existente en el auto)
Cojin de goma
(Opcional)
Perno de montaje
Collar de montaje
Page 64

CQ-RG131U
64
E
S
P
A
Ñ
O
L
15
Para quitar el aparato
a) Quite la placa ornamental com um destornillador, como semuestra en la figura (Fig. 1).
b) Extraiga la unidad mientras presiona las dos palancas de bloqueo empleando la placa de
desmontaje en el orden siguiente (Fig. 2, 3).
c) Extraiga la unldad tirando de la misma con ambas manos. (Fig. 4).
Nota: No afloje la placa de desmontaje. Será necesaria para sacar la unidad del tablero de
instrumentos del automóvil.
Guía de instalación
continuación
P
R
G
L
O
U
D
Destornillador
Placa ornamenta
P
R
G
L
O
U
D
PRG
CQ-RG131U
L
O
U
D
P
R
G
L
O
U
D
Palanca de cierre
Placa de desmontaje
Fig. 2
Fig. 4
Fig. 3
a
a
Fig. 1
Page 65

CQ-RG131U
65
E
S
P
A
Ñ
O
L
16
Sistema antirrobo
Este aparato está dotado de una unidad de control removible. Cuando se quita esta unidad cuando
no hay nadie en el vehículo, el radio se pone totalmente inoperable. El indicador de seguridad
parpadeará.
Como Quitar la Placa Frontal Removible
Apague la alimentación.
Apriete el botón de liberación ( ) (Fig. 5).
La placa frontal removible se soltará.
Tire del lado derecho de la placa frontal removible para quitarla. Ponga la placa frontal removible
en el estuche anexo.
Como se muestra en la Figura 3, insertar la pleca fontal removible con la flecha mirando hacia la
caja de la placa frontal removible hasta gue escuche un ''clic''. Mantenga la placa fontal
removible dentro de la caja. Luego, Ud. podrá llevar la placa con seguridad.
P
R
G
LOUD
PR
G
L
O
U
D
Unidad princípal
Contactos
Indicador de seguridad
Fig. 5
Estuche de la placa fontal removible
Poner juntas las dos flechas.
Fig. 7
Apriete
Fig. 6
Page 66

CQ-RG131U
66
E
S
P
A
Ñ
O
L
17
Cómo Instalar la Placa Frontal Removible
Haga deslizar el lado izquierdo de la placa frontal removible hasta la posicion correcta.
Apriete la extremidad derecha de la placa frontal removible hasta que se oiga un sonido de
“chasquido”.
Guía de instalación
continuación
Precauciónes:
1. Antes de quitar la placa frontal removible, asegúrese de apagar la alimentación.
2. Esta placa frontal removible no es a prueba de agua. No la exponga a la agua o humedad
excesiva.
3. No quite la placa frontal removible mientras conduce su coche.
4. No ponga la placa frontal removible sobre el tablero de instrumentos o áreas vecinas donde la
temperatura sube a altos niveles.
5. No toque los contactos de la placa frontal removible o de la unidad principal, puesto que eso
puede resultar en mal contacto eliéctrico.
6. Cuando la suciedad u otros objetos extraños se hayan pegado en los contactos, frótelos con
un paño limpio y seco.
P
R
G
LOUD
P
R
G
LOUD
Lengueta de
plastico
Corte
Placa frontal
removible
Fig. 8
Fig. 9
Page 67

CQ-RG131U
67
E
S
P
A
Ñ
O
L
18
conexiones eléctricas
●
Esta aparato puede ser conectado con un cambiadiscos de CD opcional (CX-DP88U). Para más
detalles, consulte a su revendedor Panasonic más cercando.
●
Para hacer la conexión con el cambiadiscos de CD, refiérase al manual de instrucciones del
cambiadiscos de CD (CX-DP88U).
Precauciónes:
●
Para prevenir daños a la unidad asegúrese de seguir el diagrama de conexiones de esta
página.
●
Extraiga la cubierta de los cables en una longitud de unos 5 mm desde el extremo antes de la
conexión.
●
No inserte el conector de alimentación en el aparato hasta que haya terminado el tendido
eléctrico.
●
Asegúrese de aislar cualquier cable expuesto a un posible cortacircuito del chasis del
automóvil. Sujete todos los cables y mantenga los terminales de los cables libres de roces con
cualquier parte metálica.
CQ-RG131U
(+)(–)(+)(–)
(+)(–)
(+)(–)
BATTERY
Antena
CONECTORE DE SALIDA DE
PREAMPLIFICADOR
Conector de control
del cambiador de CD
Conector de
alimentación
(Rojo)
(Amarillo)
(Negro)
(Violeta con franja negra)
(Azul)
Resistencia (1kΩ)
(Gris con franja negra)
CONDUCTOR
ALTAVOCES
(Blanco con
franja negra)
(Blanco)
(Gris)
(Verde con
franja negra)
(Verde)
(Violeta)
Fusible(12A)
Cable de alimentación de control
del amplificador externo
A un amplificador externo.
L(Blanco)
R(Rojo)
CD-CH IN
Cable de batería
A la batería del vehiculo,
+12 V CC continuous.
Cable de la alimentación (ACC o IGN)
A la almentación de ACC, +12 V CC.
Cable de masa
A una parte metálica limpia y
desnuda del chasis del vehiculo.
Cable de control de la antena
Al cable de alimentación de control
de la antena automática del vehiculo
ALTAVOZ
IZQUIERDO
(Trasero)
ALTAVOZ
DERECHO
(Trasero)
ALTAVOZ
IZQUIERDO
(Frontal)
ALTAVOZ
DERECHO
(Frontal)
(Rojo)
(Blanco)
Fusible (3A)
Cable RCA
Cable DIN
Cable de la batería
(R)
(L)
Cable de masa
(Conectar con una parte
metálica del coche
firmemente cable de lierra)
Cable de extensión
(DIN/BATT/RCA/GND)
Cambiador de CD
CX-DP88U
Page 68

CQ-RG131U
68
E
S
P
A
Ñ
O
L
19
Problema Causa posible Solución probable
❏
Mantenimiento
Su producto está diseñado y fabricado para minimizar la necesidad de mantenimiento. Use un
paño blando para hacer la limpieza externa de rutina. Nunca use bencina, diluyente, u otros
solventes
❏
Cuando algo no funciona
Compruebe las tablas siguientes para encontrar las causas posibles y las soluciones a los
problemas que puedan aparecer. Algunas sencillas comprobaciones o pequeños ajustes
pueden eliminar el problema.
❏
Mantenimiento del producto
Si las sugerencias de los cuadros no son suficientes para solucionar el problema,
recomendamos que lleve el aparato para su Centro de Servicio Panasonic autorizado más
cercano. El mantenimiento deberá ser hecho solamente por un técnico calificado.
❏
Cómo sustituir el fusible
Use fusibles con la misma clasificación (12 amperios). El usar diferentes substitutos o fusibles
de clasificación más alta, o conectando la unidad directamente sin fusible, podrá causar
incendio o daños en la unidad estereofónica.
Si la sustitución del fusible falla, póngase en contacto con su Centro de Servicio
Panasonic autorizado más cercano.
❏
Sugerencias para localización de averías
Localización de avería
La unidad no enciende.
La batería del vehículo está
agotada
Mala conexión de la línea de
alimentación.
Fusible quemado.
Cambie la batería del vehículo
Gire la llave de encendido a la
posición ON o ACC
Verifique las conexiones.
Sustituya el fusible
El radio tiene estáticas. La antena no está conectada.
Vecindad de líneas de alta
potencia.
Conecte la antena.
Vaya para lejos de líneas de alta
potencia.
Los botones de memoria del
radio no funcionan.
Los botones no están siendo
apretados por tiempo
suficiente.
Mantenga los botones apretados
durante más de 2 segundos.
La castidad del sonido de la
cinta es pobre.
Las cabezas están sucia
Cintas de mala calidad.
Limpie las cabezas. (Solicite consejos
al representante de servicios de
mantenimiento).
Use cintas de mejor calidad.
La cinta no cambia de
programas.
Las teclas [] y [] no
están siendo apretadas al
mismo tiempo.
Apriete las teclas [] y [] al
mismo tiempo.
El tocadiscos de CD no
funciona
La unidad no está
correctamente conectada.
La unidad no está conmutada
al modo de CD.
No hay discos CD en el
portadiscos.
Verifique las conexiones.
Apriete la tecla CD
•
C.
Verifique el portadiscos.
El tocadiscos de CD no toca
un disco específico.
El disco está cargado de
manera invertida.
El disco está estropeado.
No hay disco cargado en el
portadiscos.
Recargue el disco de manera
correcta.
Verifique el disco para ver si hay
arañazos o grietas.
Verifique el portadiscos.
Page 69

CQ-RG131U
69
E
S
P
A
Ñ
O
L
20
Especificaciones
Generalidades
Alimentación : 12 V CC (11 V - 16 V), Tensión de prueba 14,4 V, negativa.
Salida máxima de potencia : 40 W x 4 canales a 400 Hz, control de volumen al máximo.
Potencia de salida EIA : 20 W por canal para 4Ω, 40 hasta 30.000 Hz a 3 % THD.
Acción de tono : Graves; ±12 dB a 100 Hz
Agudos; ± 12 dB a 10 kHz
Consumo de corriente : Menos de 2,5 A (modo de cinta, 4 altavoces de 0,5 W)
Tensión de salida de preamplificador : 2,0 V (modo de reprodución CD, 1 kHz, 0 dB)
Impedancia de altavoz : 4 Ω (4-8 Ω aceptable)
Dimensiones
(An. x Al. x Pr.) : 7” x 1-15/16” x 5-7/8” (178 x 50 x 150 mm)
Peso : 3 lbs 8 oz (1,6 kg)
Radio MW
Gama de frecuencia : 530 - 1.710kHz
Sensibilidad usable : 28 dB/µV, (25 µV/Senãl/ruido 20 dB)
Radio FM estiéreo
Gama de frecuencia : 87,9 - 107,9 MHz
Sensibilidad usable : 12 dBf. (1,1 µV/75 Ω, Senãl/ruido 30 dB)
Sensibilidad de silenciamiento : 17 dBf. (1,8 µV/75 Ω)
de 50 dB
Respuesta de frecuencia : 30 a 15.000 Hz ± 3 dB
Selectividad de canales alternados : 75 dB
Separación de estiéreo : 35 dB a 1.000 Hz
Relación de señal a ruido : 70 dB (Mono)
Pasacasetes
Sistema de reproducción : 4 pistas, 2 lados, estiéreo
Velocidad de la cinta : 1-7/8”/seg (4,76 cm/seg.)
Timpo de avance rapido/rebobinádo : Menos de 200 seg. (C-60)
Respuesta de frecuencia : 35-14.000Hz ±3dB
Lloro y tremolación : 0,12% (valor eficaz)
Relación de señal/ruido : 52dB
Nota:
Las especificaciones y el diseño están sujetos a cambios sin previo aviso con el propósito de
introducir mejoras.
Page 70

MEMO
Page 71

Page 72

YFM284C343CA TAMACO0101-0 Printed in Taiwan
Panasonic Consumer Electronics
Company, Division of Matsushita
Electric Corporation of America
One Panasonic Way, Secaucus,
New Jersey 07094
http://www.panasonic.com
Panasonic Sales Company.
Division of Matsushita Electric of
Puerto Rico, Inc. (“PSC”)
Ave. 65 de Infanteria, Km. 9.5
San Gabriel Industrial Park, Carolina,
Puerto Rico 00985
www.panasonic.com
Panasonic Canada Inc.
5770 Ambler Drive, Mississauga,
Ontario L4W 2T3
www.panasonic.ca
 Loading...