

Panasonic CQ-FX721N User Manual

VOL
MENU
BAND
SET/AUTO·P
PRG
REMOTE
PTY
DISP
S·HDB
OPEN
SOURCE
TA
PWR
AF
DIM
HDB
MUTE
TUNE
TRACK
P-SET
DISC
CH·C
1 2
EON PTY CT
CASSETTE RECEIVER WITH FULL DOT MATRIX DYSPLAY
DAB CO
NTR
OL
CQ-FX721N
Cassette Player/Receiver with Dot Matrix LCD and CD Changer Control
CQ-FX721N
Operating Instructions
¡Please read these instructions carefully before using this product and keep this manual for future reference.
¡Bitte lesen Sie diese Bedienungsanleitung vor der Verwendung dieses Produktes aufmerksam durch und bewahren Sie sie danach
für spätere Nachschlagzwecke sorgfältig auf.
¡Prière de lire ces instructions attentivement avant d’utiliser le produit et garder ce manuel pour l’utilisation ultérieure.
¡Leest u deze instructie alstublieft zorgvuldig door voor u dit product in gebruik neemt en bewaar deze handleiding voor later gebruik.
¡Läs igenom denna bruksanvisning noga innan produkten tas i bruk. Spara bruksanvisningen för framtida behov.
¡Si prega di leggere attentamente queste istruzioni prima di usare questo prodotto e di conservare questo manuale per usi futuri.
¡Lea con atención estas instrucciones antes de utilizar el producto y guarde este manual para poderlo consultar en el futuro.
Bedienungsanleitung
Manuel d’instructions
Gebruiksaanwijzing
Bruksanvisning
Manuale di istruzioni
Manual de Instrucciones
Bedienungsanleitung
Manuel d’instructions
Gebruiksaanwijzing
Bruksanvisning
Manuale di istruzioni
Manual de Instrucciones

2
CQ-FX721N
Contents
Page
Precautions ................................................... 4
Components/Remote Control Unit
Preparation.................................................... 5
General .......................................................... 6
Radio.............................................................. 8
RDS (Radio Data System) ............................ 10
CD Player....................................................... 16
Inhaltsverzeichnis
Seite
Vorsichtsmaßnahmen (ISO-Stecker)........... 4
Vorsichtsmaßnahmen .................................. 28
Vorbereitung der Fernbedienung .............. 29
Stromversorgung und Klangregler ............. 30
Rundfunkempfang ........................................ 32
Radio-Daten-System (RDS)-Empfang ......... 34
Table des matières
Page
Mesures de précaution (connecteur ISO)
...... 4
Mesures de précaution................................. 50
Préparatifs pour la télécommande............ 51
Interrupteur d'alimentation et commandes
de réglage de la sonorité .......................... 52
Utilisation de base du récepteur radio ....... 54
Inhoudsopgave
Bladzijde
Voorzorgsmaatregelen (ISO aansluiting).... 4
Voorzorgen .................................................... 72
Voorbereiding afstandsbediening ............. 73
Stroomvoorziening en geluidsregeling ...... 74
Basisbediening radio ................................... 76
RDS (Radio Data Systeem) .......................... 78
Innehåll
Sida
Observera (ISO-kontakt) .............................. 4
Observera ...................................................... 94
Förberedelser för fjärrstyrning.................. 95
Ström- och ljudreglage................................. 96
Grundläggande manövrering av radion ..... 98
RDS-mottagning (datastyrd radiomottagning)
100
Contenuto
Pag.
Precauzioni (Connettore ISO)...................... 4
Precauzioni.................................................. 116
Preparazione del telecomando ................ 117
Comandi di alimentazione e del suono..... 118
Funzionamento della radio ........................ 120
Ricezione RDS (Radio Data System) ........ 122
Indice
Pag.
Precauciones (conector ISO)..................... 4
Precauciones .............................................. 138
Preparativos del controlador remoto...... 139
Alimentación y controles del sonido ........ 140
Operación básica de la radio..................... 142
Recepción RDS
(sistema de datos radiofónicos) ........... 144

3
CQ-FX721N
SD Player ....................................................... 18
CD Changer Basics ...................................... 22
Various Settings............................................ 24
About SD ....................................................... 38
Installation..................................................... 40
Anti-Theft System ......................................... 43
Electrical Connections ................................. 44
Troubleshooting............................................ 48
Speaker Connections ................................... 54
Fuse ............................................................... 54
Maintenance .................................................. 54
Specifications ............................................... 57
Uhrzeit (CT) ................................................... 37
Cassettenwiedergabe................................... 38
Grundlagen für die Bedienung des
CD-Wechslers .......................................... 40
Einbau............................................................ 42
Diebstahlschutz ............................................ 45
Elektrischer Anschluß .................................. 46
Anschluß der Lautsprecher ......................... 48
Sicherung ...................................................... 48
Pflege ............................................................. 48
Technische Daten ......................................... 49
Réception radio RDS (Radio Data System)
.... 56
Réglage de l'horloge
...................................... 59
Utilisation du lecteur de cassette................ 60
Utilisation de base du changeur de CD ...... 62
Installation..................................................... 64
Système antivol ............................................ 67
Branchements électriques........................... 68
Branchement des haut-parleurs.................. 70
Fusible ........................................................... 70
Entretien ........................................................ 70
Données techniques..................................... 71
Gelijk zetten van de klok .............................. 81
Basisbediening van de cassettespeler....... 82
Basisbediening van de CD-wisselaar ......... 84
Installatie ....................................................... 86
Anti-diefstal systeem.................................... 89
Elektrische aansluitingen ............................ 90
Aansluitingen luidsprekers.......................... 92
Zekering......................................................... 92
Onderhoud .................................................... 92
Technische gegevens................................... 93
Tidsinställning ............................................ 103
Grundläggande manövrering av
bandspelaren .............................................. 104
CD-växlarens grundläggande funktioner .106
Montering .................................................... 108
Stöldskyddsanordning ............................... 111
Elektriska anslutningar .............................. 112
Anslutning av högtalare ............................. 114
Säkring......................................................... 114
Underhåll...................................................... 114
Tekniska data............................................... 115
Regolazione dell'orologio .......................... 125
Funzionamento fondamentale del
riproduttore a cassette............................... 126
Funzionamento fondamentale del
Cambia CD................................................... 128
Installazione ................................................ 130
Sistema antifurto ........................................ 133
Collegamenti elettrici ................................. 134
Collegamenti degli altoparlanti ................. 136
Fusibile ........................................................ 136
Manutenzione.............................................. 136
Dati tecnici................................................... 137
Ajuste de la hora......................................... 147
Operación básica del reproductor de casetes
.148
Conocimientos básicos del cambiador
de discos de CD
........................................ 150
Instalación .................................................. 152
Sistema antirrobo ....................................... 155
Conexiones eléctricas................................ 156
Conexiones de los altavoces..................... 158
Fusible ......................................................... 158
Mantenimiento ............................................ 158
Especificaciones......................................... 159

4
CQ-FX721N
1
E
N
G
L
I
S
H
Panasonic welcomes you to their constantly growing family of electronic products owners.
We endeavor to give you the advantages of precise electronic and mechanical engineering, manufactured with carefully
selected components, and assembled by people who are proud of the reputation their work has built for our company.
We know this product will bring you many hours of enjoyment, and after you discover the quality, value and reliability
we have built into it, you too will be proud to be a member of our family.
Precautions
Volume Level
For your driving safety, keep the volume level low enough to be aware of road
and traffic conditions.
Car Washing
To avoid electrical shorts which may cause fire, or other damage, do not
expose this Product (including the speakers and tape) to water or excessive
moisture.
Car Ventilation
If your car is parked for several hours in direct sunlight, the temperature inside the car may become very high. It is advisable to
drive the car and give the interior a chance to cool down before switching the
unit on.
Power Supply
This Product is designed to be used in a car having a 12-Volt negative ground
battery system.
Tape Mechanism
Keep magnets, screwdrivers and other metallic objects away from the tape
mechanism and tape head.
Service
This Product is made of precision parts. Do not attempt to disassemble or
adjust any parts. For repair, please consult your nearest authorized
Panasonic Service Center.
Note: The preset memory is cleared to return to the original factory setting
when the power connector or battery is disconnected.
5
CQ-FX721N
2
E
N
G
L
I
S
H
Components
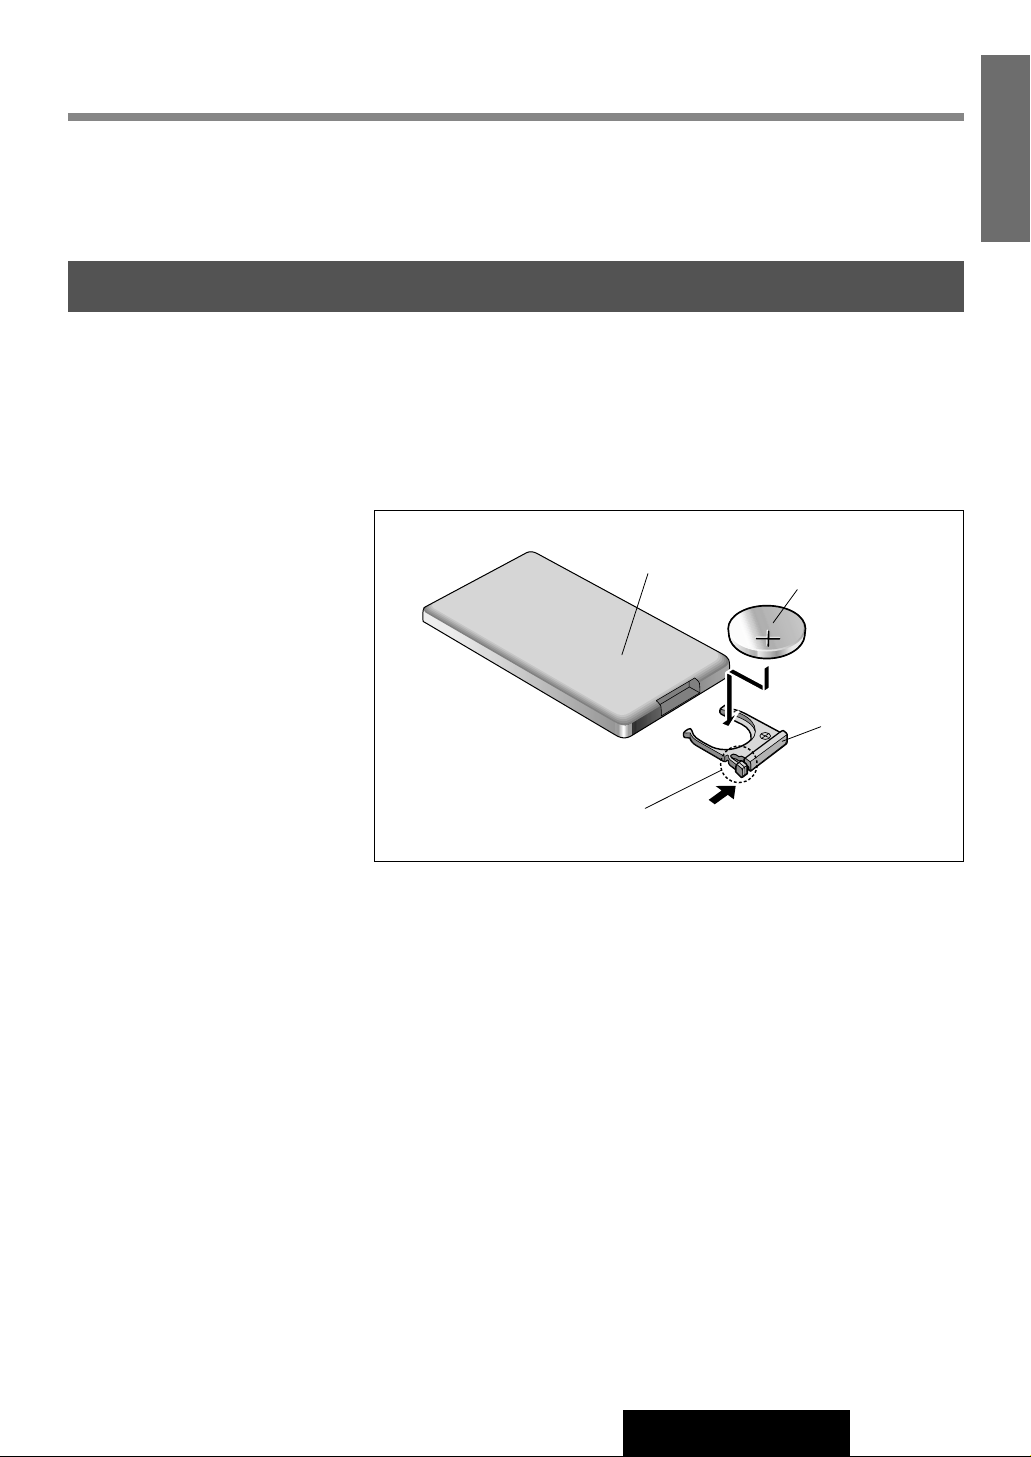
Remote Control Preparation
(Back side)
Lithium battery
Position B
Position A
Battery holder
Battery Installation
1. Remove the battery holder.
Pull the holder out at position B while pushing position A as indicated.
2. Install the battery on the battery holder.
Place the battery in the holder with its (+) side upwards as shown.
3. Insert the battery holder.
Push in the battery holder back into its original position.
Components
1. Operating Instructions .....................................................................................1
2. Supplied Hardware.................................................................1set (a page 26)
3. Warranty Card..................................................................................................1
Battery Notes
Remove and dispose of an old battery immediately.
Battery Information:
¡Battery Type: Panasonic lithium battery (CR2025) (Included)
¡Battery Life: Approximately 6 months under normal use (at room temperature)
Caution: Improper use of batteries may cause overheating, an explosion or
ignition, resulting in injury or a fire. Battery leakage may damage the unit.
¡Do not disassemble or short the battery. Do not throw a battery into a fire.
¡Keep batteries away from children to avoid the risk of accidents.
¡Follow local regulations when disposing of batteries.
VOL
MENU
BAND
SET/AUTO
·P
PRG
R
E
M
O
T
E
P
T
Y
DISP
S·HDB
O
PEN
SOURCE
TA
PWR
AF
DIM
HDB
MUTE
TUNE
TRACK
P-SET
DISC
C
H
·C
1
2
EON PTY CT
CASSE
TTE R
EC
EIVE
R W
ITH FULL DO
T M
A
TRIX
DIS
PLAY
DAB CONTROL
CQ-FX721N
DIM
VOL
M
E
NU
MUTE
SOURCE
DISP
HDB
6
CQ-FX721N
3
E
N
G
L
I
S
H
Note : When you use this unit for
the first time, a demonstration
message appears on the display.
To cancel this display, press
[DISP]
.
Power
ON : Press [SOURCE].
Source
Press [SOURCE] to change the source.
Volume
[VOL}] : Up
[VOL{] : Down
Mute/ATT (Attenuation)
MUTE/ATT ON : Press [MUTE].
MUTE/ATT OFF : Press again.
Decreasing volume range depends on setting.
(MUTE/ATT setting
a page 24)
Note : The sound level for each source is
stored in memory.
(For radio, one volume setting for AM, one volume setting for all FMs)
OFF : Press [SOURCE] again and hold for more than 1
second.
A security message is displayed, and the warning
alarm that reminds you to take the panel off.
(When S-LED is set to ON
a page 24)
Setting Range : 0 to 40
: No sound
: Decrease the volume to
1/10 of previous level.
Turn the key in the ignition until the accessory
indicator lights.
General
[VOL}] [VOL{] (Volume)
[DISP] (Display)
[MUTE]
[SOURCE]
(Power)
[VOL}] [VOL{]
(Volume)
[DISP] (Display)
[MUTE]
[SOURCE]
(Power)
[DIM] (Dimmer)
Note: When ACC selection is set to ON, security mes-
sage and panel removal alarm are performed after turning off the ignition key. (
a page 24 about ACC selection)
(When a cassette is in the player)
(When a CD changer is connected and magazine is in the
changer)
(When AUX-IN setting is set to
ON) (a page 24)
(When DAB tuner is connected
a for DAB control, please refer
to the attached Operation Guide
for CY-DAB2000N)
[HDB]
(S•HDB)
Radio Cassette Tape
CD Changer
Auxiliary
DAB
7
CQ-FX721N
4
E
N
G
L
I
S
H
When Power is ON
Press [DISP].
Display Change
Mode Display
Mode & Spectrum
Analyzer Display
When Power is OFF (when ACC Selection is set to ON)
Press [DISP].
Clock Display
(Back light is on) (Back light is off)
Display OFF
Spectrum Analyzer Display *1
Display OFF *2 Mode & Clock Display
AUDIO Indicator
*1 If you press a button, the
Mode & Spectrum Analyzer
Display appears for 5 seconds.
*2 If you press a button, the
light is turned on, the Mode
Display appears, and the
light is turned off approximately 5 seconds later.
Notes :
¡Set the Spectrum Analyzer pattern in a separate procedure. (a page 22)
¡“NO CT” is displayed before adjusting the clock. (Adjustment a page 22)
Active Indicator Display
Press and hold [DISP] for more than 2 seconds.
Indicators which are not displayed on Mode Display are displayed.
Press
[DISP] again to cancel.
Note : See page 24 about ACC Selection setting.
Super High Definition Bass
(S•HDB)
Especially for rock music, the bass-sound will be more
powerful.
Press
[HDB] on the main unit to change the Super High
Definition Bass on.
Dimmer
Press [DIM] on the main unit to change the dimmer level.
DIMMER 3
DIMMER 2
DIMMER 1
S•HDB OFF
S•HDB BOOM
S•HDB TIGHT
The bass sound of the speakers
are strongly emphasized.
The bass sounds of the speakers
are moderately emphasized. (The
sounds of the Sub-Woofer can be
heard clearly.)
(Brighter) (Default)
(Medium)
(Darker)
VOL
M
EN
U
BAND
SET/AUTO
·P
PRG
REM
OTE
PTY
DISP
S·HDB
OPE
N
SOURCE
TA
PWR
AF
DIM
HDB
MUTE
TUNE
TRACK
P-SET
D
IS
C
CH·C
1
2
E
ON
PTY
CT
CASSETTE RECEIVER WITH FULL DOT MATRIX DISPLAY
DAB CONTROL
CQ-FX721N
P-SET
DISC
BAND
SOURCE
TUNE
TRACK
M
ENU
8
CQ-FX721N
5
E
N
G
L
I
S
H
Radio Mode Display
Radio Mode
Press [SOURCE] to select the radio
mode.
Band
Press [BAND].
Note: The stereo indicator lights during
reception of an FM stereo broadcast.
1
2
Tuning
[TUNE[] / [[] : Up
[TUNE]] / []] : Down
Press and hold
[TUNE[] or [TUNE]] /
[[] or []]
for more than 0.5 seconds,
then release. Seeking will start.
3
FM1
FM2
FM3
AM (LW/MW)
Radio
[BAND]
(Auto preset memory/Set)
[SOURCE]
[TUNE]] [TUNE[]
[P·SET}] [P·SET{]
(Preset station/Select)
[SOURCE]
[}] [{]
(Preset station/Select)
[1] to [6] (Preset station)
[BAND] (Auto preset memory/Set)
[]] [[] (Tune)
Band
Frequency
Stereo Indicator
Mono/Local Selection
MONO ON : Noise is significantly decreased when weak signals are received
from an FM broadcast station.
LOCAL ON : In seek tuning, only strong stations are detected.
LOCAL OFF: Relatively weak stations are picked up.
q Press [MENU] / [SEL] during radio (FM or AM) mode.
w Press [P·SET}]
or [P·SET{] / [}] or [{] to select MONO or LOCAL.
(in AM mode, only LOCAL can be selected.)
e Press [BAND] to switch on or off in turn.
Notes:
¡If no keys have been pressed for more than 15 seconds, the display returns to the previous one after changing to the
menu display.
¡Press [DISP] to return to the regular mode.
FM Menu Display
AM Menu Display
[MENU]
[SEL] (Menu)
9
CQ-FX721N
6
E
N
G
L
I
S
H
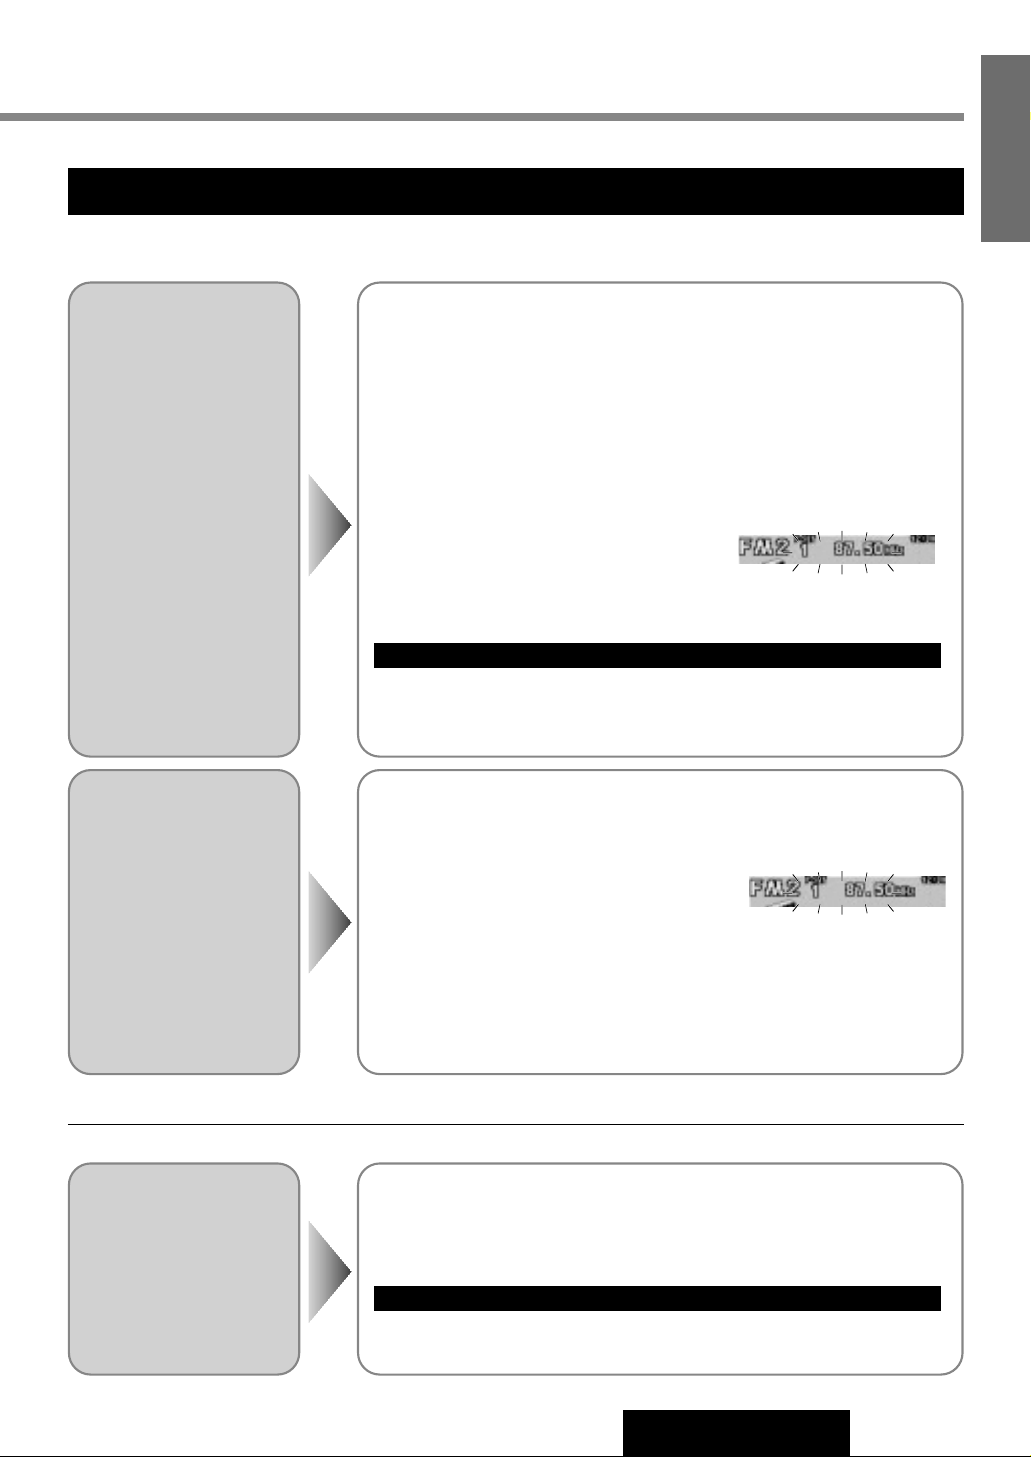
One-touch Selection of a Preset Station
Up to 6 stations can be stored in each of the FM1, FM2, FM3 and AM (LW/MW) band selections.
Manual Preset
Memory
Manually save a station in
the preset memory.
Select a band and frequency (step
q, w and e on the previous page)
q Press and hold
[P·SET}] or [P·SET{] / [}] or [{] for more
than 2 seconds until the preset number blinks.
w Press [P·SET}] or [P·SET{] / [}] or [{] to select a preset
number.
e Press and hold [P·SET}] or [P·SET{] / [}] or [{] for more
than 2 seconds to memorize.
The display blinks once, and a receiving
station is saved in the memory.
Note: Frequency setting can be performed even after selecting a preset
number.
Entering numbers directly from the remote control
Select a band and frequency (step q, w and e on the previous page)
Press and hold
[1] to [6] on the remote control for more than 2 seconds.
Auto Preset
Memory
Automatically save strong
stations in the preset
memory.
Select a band (step
q, w on the previous page)
Press and hold
[BAND] for more than
2 seconds.
¡The 6 strongest available stations will be automatically saved in the memory
under preset numbers 1
to 6.
¡Once set, the preset stations are sequentially scanned for 5 seconds each.
¡To stop the scanning, press [P·SET}]
or [P·SET{] / [}] or [{].
(Pressing [1] to [6] on the remote control also can stop the scanning.)
Preset Station
Calling
Select a band (step q, w on the previous page)
Press
[P·SET}] or [P·SET{] / [}] or [{] to select the preset number
for tuning in the preset station.
Press
[1] to [6] on the remote control.
Note: New stations are overwritten on existing saved stations after following this procedure.
Entering numbers directly from the remote control
Scanning
10
CQ-FX721N
7
E
N
G
L
I
S
H
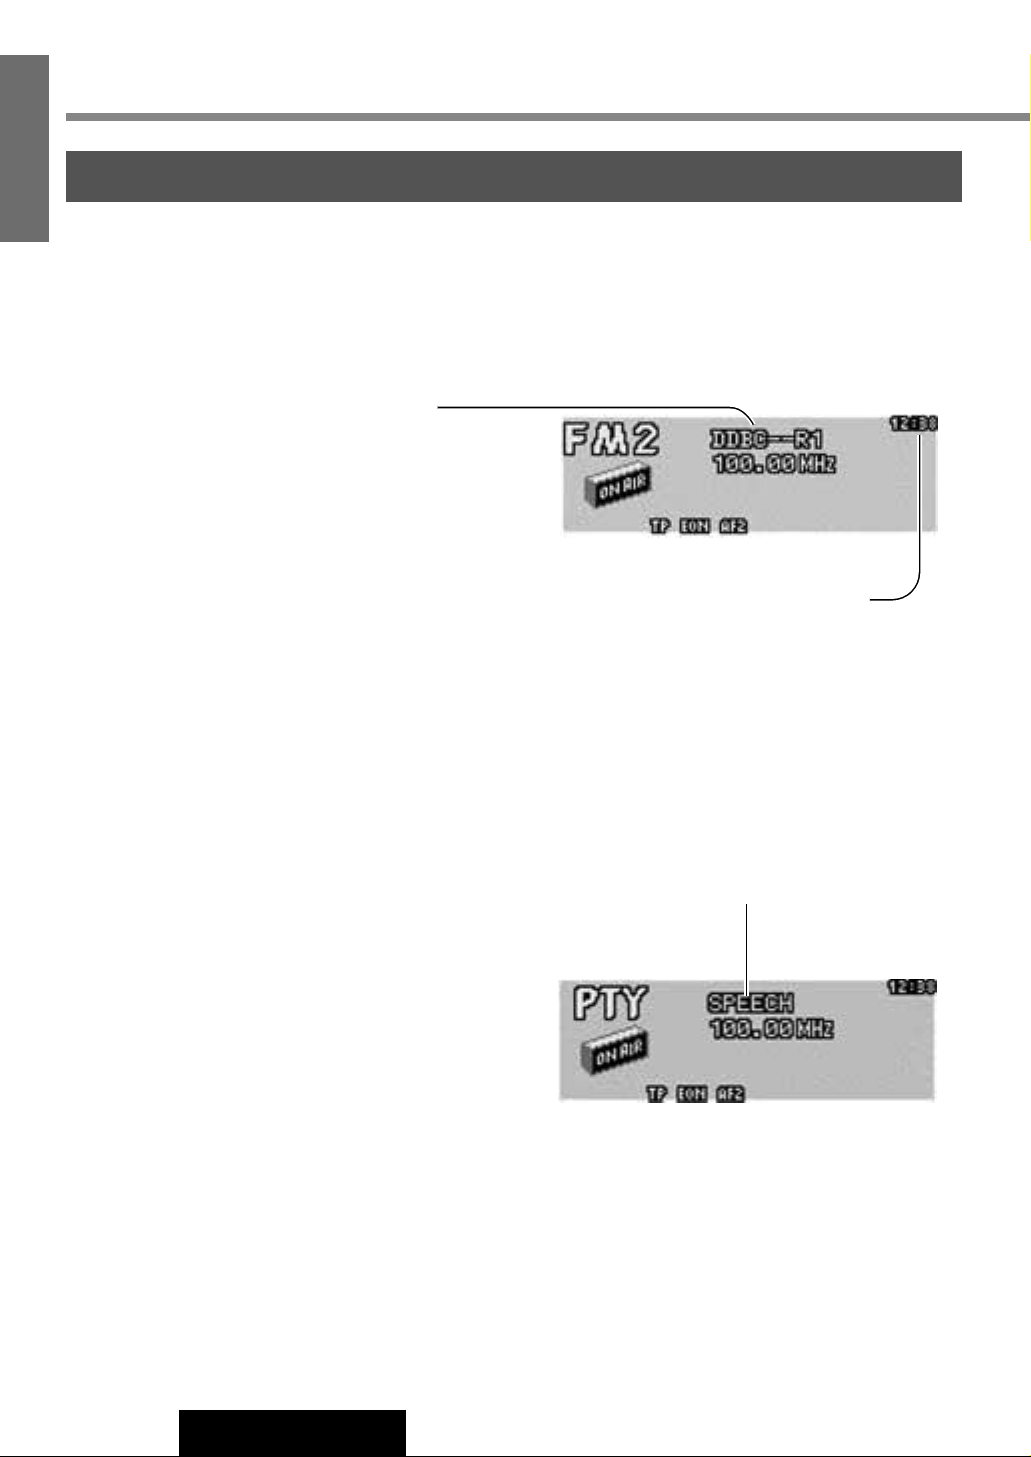
Radio Data System (RDS)
RDS Basics
Some FM stations are broadcasting added data compatible with RDS. This radio set offers convenient functions using such
data.
RDS service availability varies with areas. Please understand if RDS service is not available in your area, the following service is not available, either. This chapter explains the summary and operation regarding RDS.
The following functions are available when receiving RDS stations.
Program Service Name (PS)
Display
The name of station is displayed.
Alternative Frequency (AF)
When reception is poor, an RDS station broadcasting the
same program is tuned in automatically.
Best Station
The AF function is effective even for RDS broadcasting
stations that have been already preset when the AF mode
is activated. This function is called “Best Station.”
Select a preset number. If the reception is poor, the function automatically searches for another station that is
broadcasting the same program. If the reception is good,
the station is renewed. Activating the region mode allows
a selected network area to become smaller.
The AF function that was activated in a band previously is
still effective in the band even after changing bands.
Traffic Program (TP)
Some RDS FM stations periodically provide traffic information.
The program which broadcast the traffic information is
called Traffic Program (TP).
Traffic Announcement (TA)
Radio announcements on traffic conditions.
Clock Time (CT) Service
When receiving an RDS station, the CT (Clock Time) service automatically adjusts the time.
"-- : --" is displayed in areas where CT service is not available. (a Page 22 for Clock Adjustment)
Program Type (PTY) Display
RDS FM stations provide a program type identification
signal.
Example: news, rock, classical music, etc.
VOL
MENU
BA
ND
SET/AUTO
·P
PRG
REMOTE
PTY
DISP
S·HDB
OPEN
SOURCE
TA
PWR
AF
DIM
HDB
M
UTE
TUNE
TRACK
P-SET
DISC
CH·C
1
2
E
O
N
P
T
Y
C
T
CASSETTE RECEIVER WITH FULL DOT MATRIX DISPLAY
DAB CONTROL
CQ-FX721N
D
IM
P-SET
DISC
MENU
BAND
SOURCE
TUNE
TRACK
11
CQ-FX721N
8
E
N
G
L
I
S
H
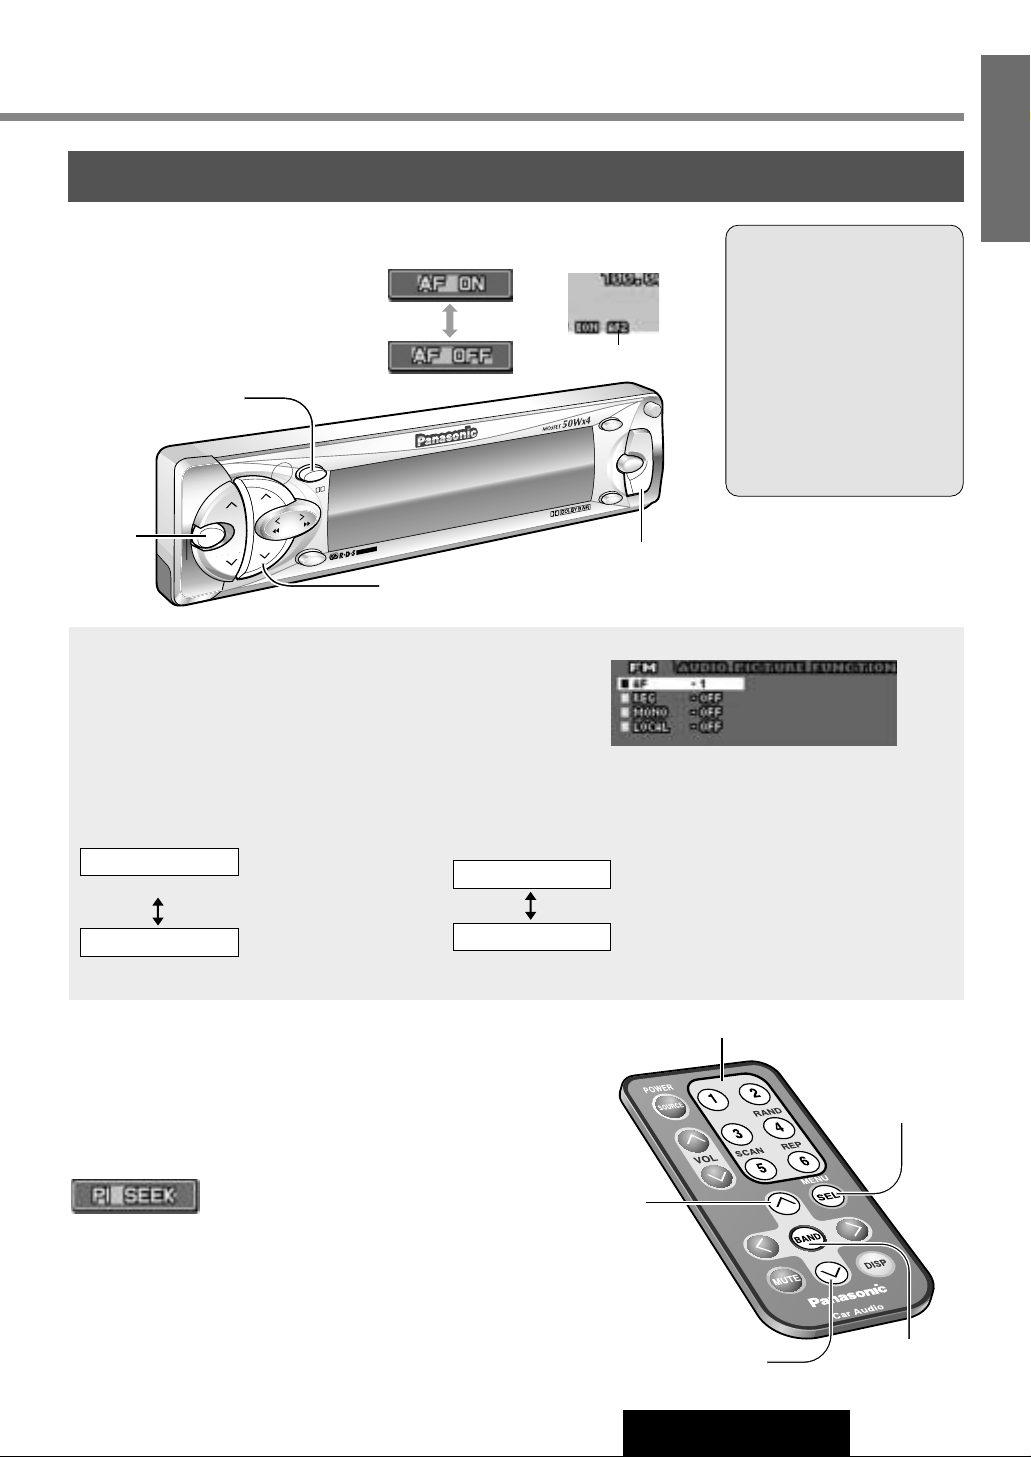
Alternative Frequency (AF)
Alternative Frequency (AF) mode
Press and hold [DIM] on the main unit
for more than 2 seconds to switch the AF
mode on or off.
Default : AF ON
Auto Preset Memory
When AF ON is selected, only
RDS stations will be memorized automatically.
(a Page 9 for auto preset
memory)
* New stations are overwrit-
ten on existing saved stations after following this
procedure.
[}]
(Select)
[{]
(Select)
[SEL]
(Menu)
Preset buttons
[BAND]
(Set)
AF Level and REG Mode
AF Level
Press [BAND] to change the AF level.
Program Identification (PI) Seek
(Only for remote control)
If Best Station does not work properly and reception is poor when
tuning in a preset station, press the same preset number button
again. PI Seek will search an AF station with good reception.
q Press [MENU] / [SEL] to display the menu.
w Press [P·SET}] or [P·SET{] / [}] or [{] to select an item.
AF 1
Low level AF sensitivity
Region (REG) Mode
Changes the selection range of AF and PI Seek.
Press [BAND] to switch on or off in turn.
AF 2
High level AF sensitivity
[BAND] (Set)
[P·SET{] [P·SET}] (Select)
[MENU]
[DIM] (AF mode)
REG ON
REG OFF
The frequency is changed only for programs
within the region.
The frequency is changed also for programs
outside the region.
FM Menu Display
When AF is on
(Default)
(Default)
Note: When REG mode is switched from ON to OFF or vice versa, AF mode turns on automatically.
VOL
MENU
BAND
SET/AUTO
·P
PRG
REMOTE
PTY
DISP
S·HDB
OPEN
SOURCE
TA
PWR
AF
DIM
HDB
M
UTE
TUNE
TRACK
P-SET
DISC
CH
·C
1
2
E
O
N
P
T
Y
C
T
CASSETTE RECEIVER WITH FULL DOT MATRIX DISPLAY
DAB CONTROL
CQ-FX721N
VOL
MENU
BAND
TA
TUNE
TRACK
12
CQ-FX721N
9
E
N
G
L
I
S
H
Radio Data System (RDS) (continued)
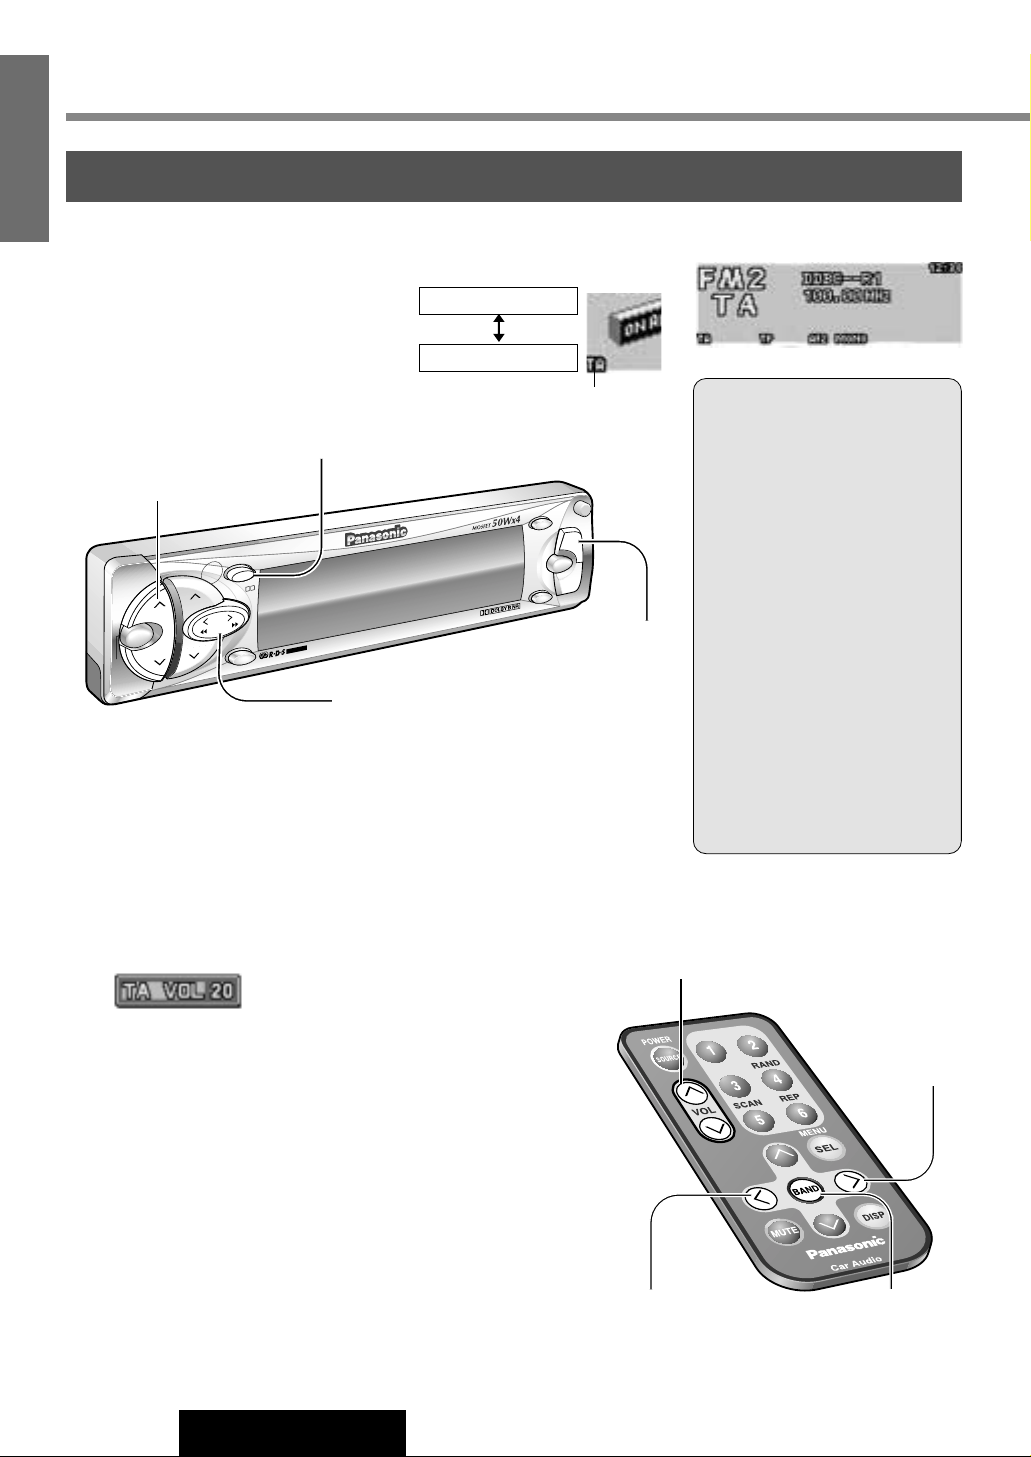
Traffic Announcement (TA)
Traffic Announcement (TA) mode
[]]
(TP Seek tuning)
[[]
(TP Seek tuning)
[BAND]
(TP auto preset memory)
TP Seek Tuning
When TA ON is selected, only
traffic program will be searched.
Press and hold [TUNE]] or
[TUNE[] / []] or [[] for
more than 0.5 seconds, then
release. Seeking will start.
TP Auto Preset Memory
When TA ON is selected, only
traffic program will be memorized automatically.
Press and hold [BAND] for
more than 2 seconds.
* New stations are overwritten on
existing saved stations after
following this procedure.
TA on
TA off
Press [TA] on the main unit to switch the TA
mode on or off.
Searches for and tunes into traffic information
broadcasts automatically when set to TA on.
TA Volume Set
While listening to an FM station
(including a traffic information
announcement), press and hold
[TA] for more than 2 seconds to
store the volume level as the TA
Volume level.
Muting in TA mode
To listen to only traffic information
announcements. While listening to
an FM station which is not currently broadcasting traffic information,
press [VOL{] to set the volume
to 0. The traffic information
announcement will be output at the
TA volume level.
[TA]
(TA mode/Volume set)
[VOL}] [VOL{] (Volume)
[VOL}] [VOL{] (Volume)
[TUNE]] [TUNE[] (TP seek tuning)
[BAND] (TP auto preset memory)
When TA is on
When Traffic Information is received
TA Standby Mode
When set to TA ON with the unit in another mode (Cassette tape, CD
changer, etc.) it will automatically switch to radio mode and output the
traffic information.
When the traffic information has finished, the unit will return to the previous mode.
VOL
MENU
BAND
SET/AUTO
·P
PRG
REMOTE
PTY
DISP
S·HDB
OPEN
SOURCE
TA
PWR
AF
DIM
HDB
MUTE
TUNE
TRACK
P-SET
DISC
CH
·C
1
2
E
O
N
P
T
Y
C
T
CASSETTE RECEIVER WITH FULL DOT MATRIX DISPLAY
DAB CONTROL
CQ-FX721N
M
EN
U
BAND
TUNE
TRACK
13
CQ-FX721N
10
E
N
G
L
I
S
H
Program Type (PTY) Reception
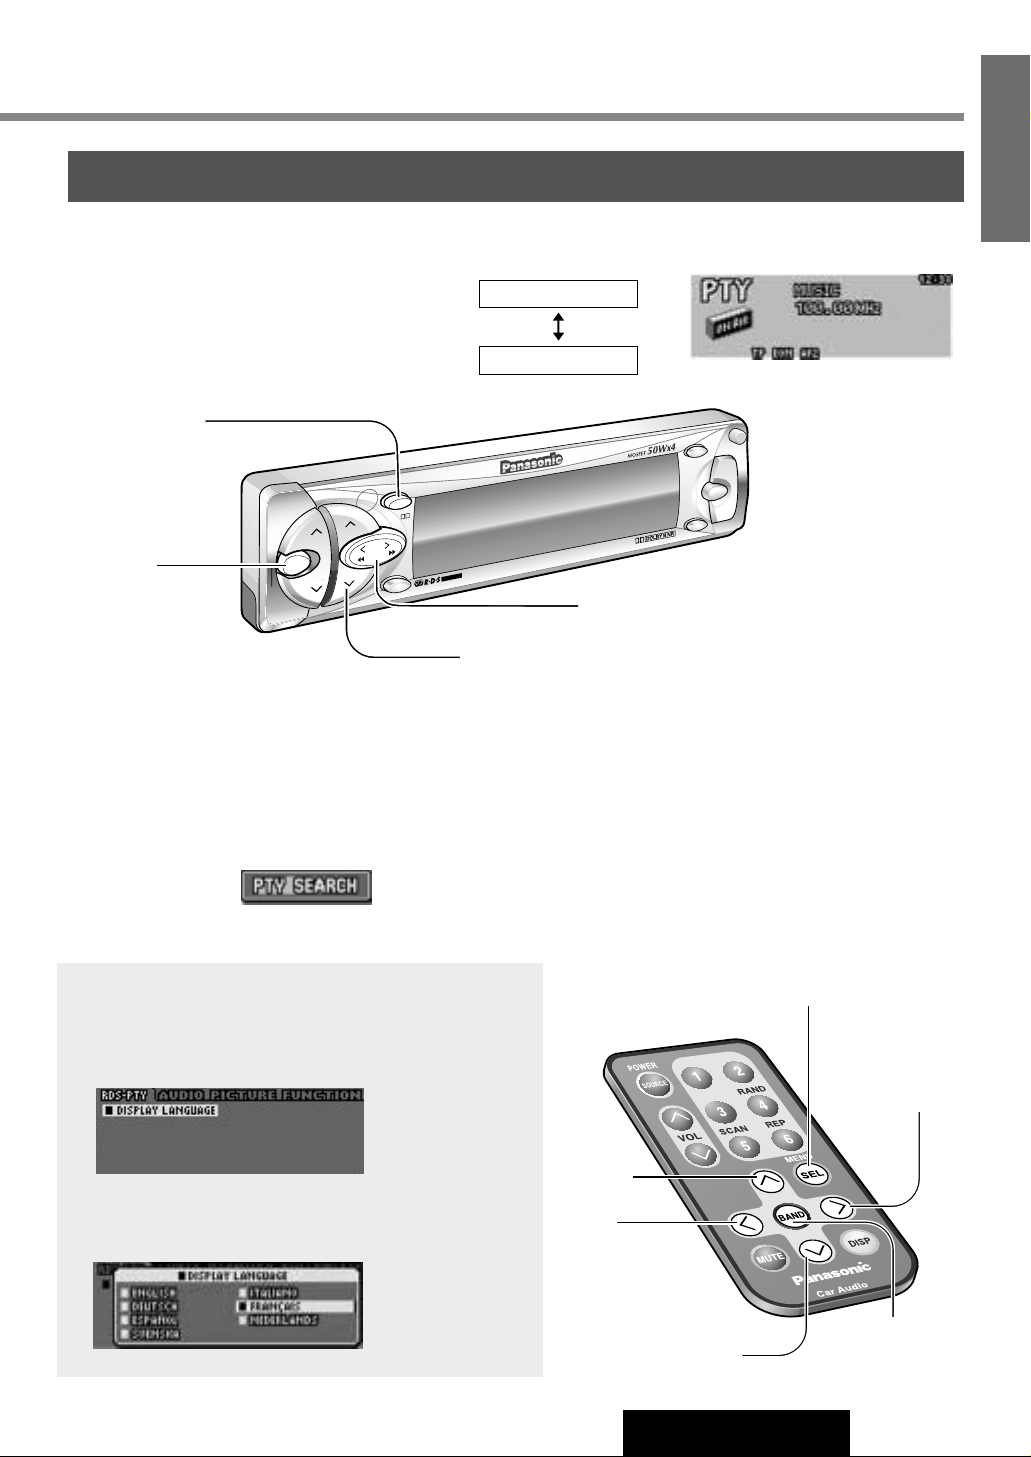
Program Type (PTY) mode
PTY on
PTY off
Press and hold [MENU] / [SEL] for more than 2
seconds to switch the PTY display mode on or off.
PTY Selection
q Press [TUNE[] / [[] to change the program type as
shown on the right. ([TUNE]] / []] : opposite direction)
w Select the desired program and press [BAND]. Seek will
start to tune in to a station broadcasting the selected program type.
SPEECH / MUSIC / NEWS / AFFAIRS /
INFO / SPORT / EDUCATE / DRAMA /
CULTURE / SCIENCE / VARIED / POP M /
ROCK M / EASY M / LIGHT M / CLASSICS /
OTHER M / WEATHER/ FINANCE / CHILDREN /
SOCIAL / RELIGION / PHONE IN / TRAVEL /
LEISURE / JAZZ / COUNTRY / NATION M /
OLDIES / FOLK M / DOCUMENT/ SPEECH
PTY Language Selection
q Press [MENU] / [SEL] to display the DISPLAY LANGUAGE
menu and press [BAND].
w Press [P·SET}] or [P·SET{] / [}] or [{] to select
the PTY display language, and press [BAND].
[SEL]
(PTY mode/menu)
[}]
(Select)
[{]
(Select)
[]]
(PTY select)
[[]
(PTY select)
[BAND]
(PTY search/Set)
[BAND]
(PTY search/Set)
[TUNE]] [TUNE[] (PTY select)
[MENU]
(PTY mode/menu)
[P·SET{] [P·SET}] (Select)
PTY Mode Display
Note: When there is no corresponding program type, “NONE” is displayed for 2 seconds.
 Loading...