

Page 1

8
CQ-FX721P
1
E
N
G
L
I
S
H
Panasonic welcomes you to their constantly growing family of electronic products owners.
We endeavor to give you the advantages of precise electronic and mechanical engineering, manufactured with carefully
selected components, and assembled by people who are proud of the reputation their work has built for our company.
We know this product will bring you many hours of enjoyment, and after you discover the quality, value and reliability
we have built into it, you too will be proud to be a member of our family.
Precautions
Volume Level
For your driving safety, keep the volume level low enough to be aware of road
and traffic conditions.
Car Washing
To avoid electrical shorts which may cause fire, or other damage, do not
expose this Product (including the speakers and tape) to water or excessive
moisture.
Car Ventilation
If your car is parked for several hours in direct sunlight, the temperature
inside the car may become very high. It is advisable to drive the car and give
the interior a chance to cool down before switching the unit on.
Power Supply
This Product is designed to be used in a car having a 12-Volt negative ground
battery system.
Tape Mechanism
Keep magnets, screwdrivers and other metallic objects away from the tape
mechanism and tape head.
Service
This Product is made of precision parts. Do not attempt to disassemble or
adjust any parts. For repair, please consult your nearest authorized
Panasonic Service Center.
Note: The preset memory is cleared to return to the original factory setting
when the power connector or battery is disconnected.
Page 2
9
CQ-FX721P
2
E
N
G
L
I
S
H
Components
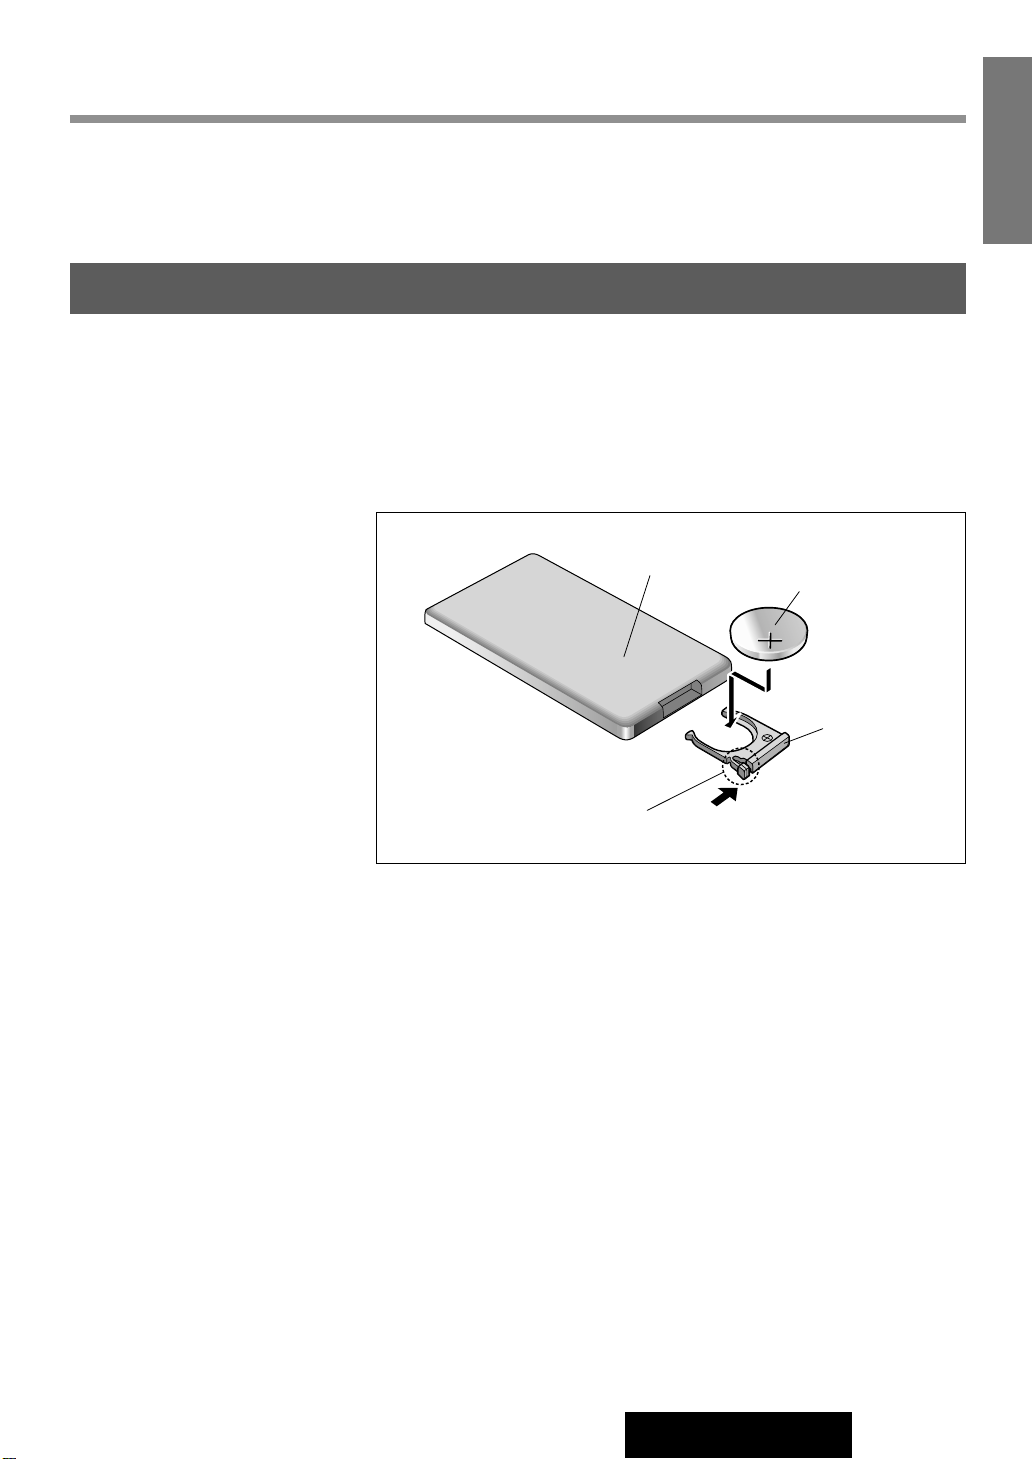
Remote Control Preparation
(Back side)
Lithium battery
Position B
Position A
Battery holder
Battery Installation
1. Remove the battery holder.
Pull the holder out at position B while pushing position A as indicated.
2. Install the battery on the battery holder.
Place the battery in the holder with its (+) side upwards as shown.
3. Insert the battery holder.
Push in the battery holder back into its original position.
Components
1. Operating Instructions .....................................................................................1
2. Supplied Hardware.................................................................1set (a page 30)
3. Warranty Card..................................................................................................1
Battery Notes
Remove and dispose of an old battery immediately.
Battery Information:
¡Battery Type: Panasonic lithium battery (CR2025) (Included)
¡Battery Life: Approximately 6 months under normal use (at room temperature)
Caution: Improper use of batteries may cause overheating, an explosion or
ignition, resulting in injury or a fire. Battery leakage may damage the unit.
¡Do not disassemble or short the battery. Do not throw a battery into a fire.
¡Keep batteries away from children to avoid the risk of accidents.
¡Follow local regulations when disposing of batteries.
Page 3
VOL
MENU
BAND
SET/AUTO·P
PRG
R
E
M
O
T
E
P
T
Y
DISP
S·HDB
O
PEN
SOURCE
TA
PWR
AF
DIM
HDB
MUTE
TUNE
TRACK
P-SET
DISC
C
H
·C
1
2
EON PTY CT
C
ASS
ETTE
RE
C
EIVER
W
ITH
FULL D
OT M
ATR
IX D
ISP
LAY
CQ-FX721P
D
O
L
B
Y
B
N
R
DIM
VOL
M
E
NU
MUTE
SOURCE
DISP
10
CQ-FX721P
3
E
N
G
L
I
S
H
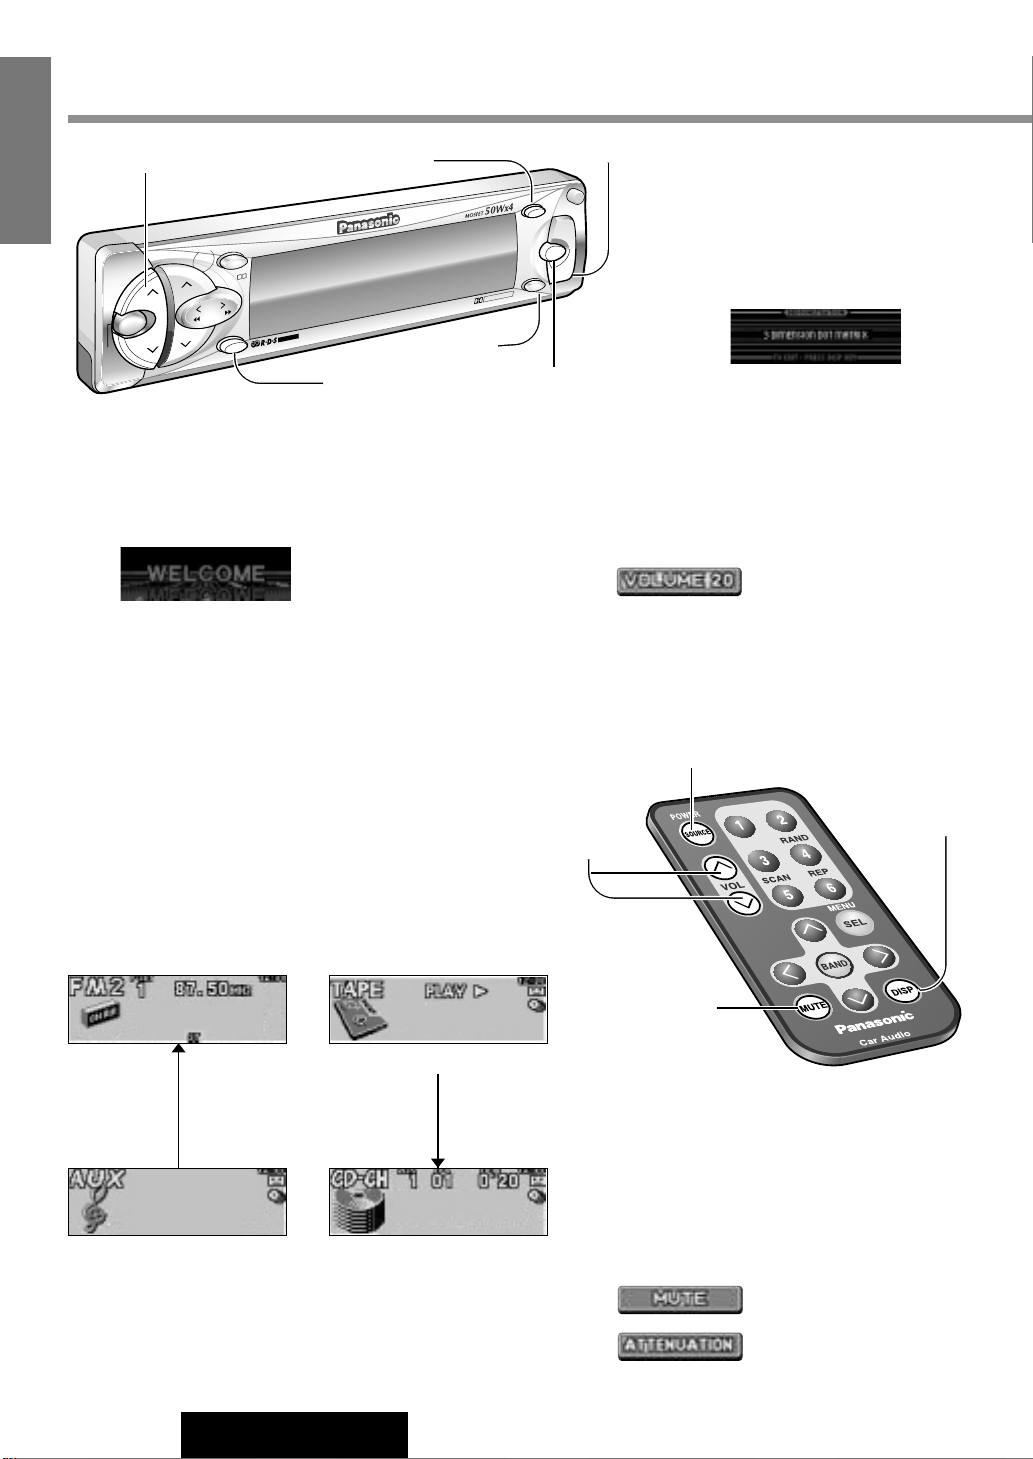
Note : When you use this unit for
the first time, a demonstration
message appears on the display.
To cancel this display, press
[DISP]
.
Power
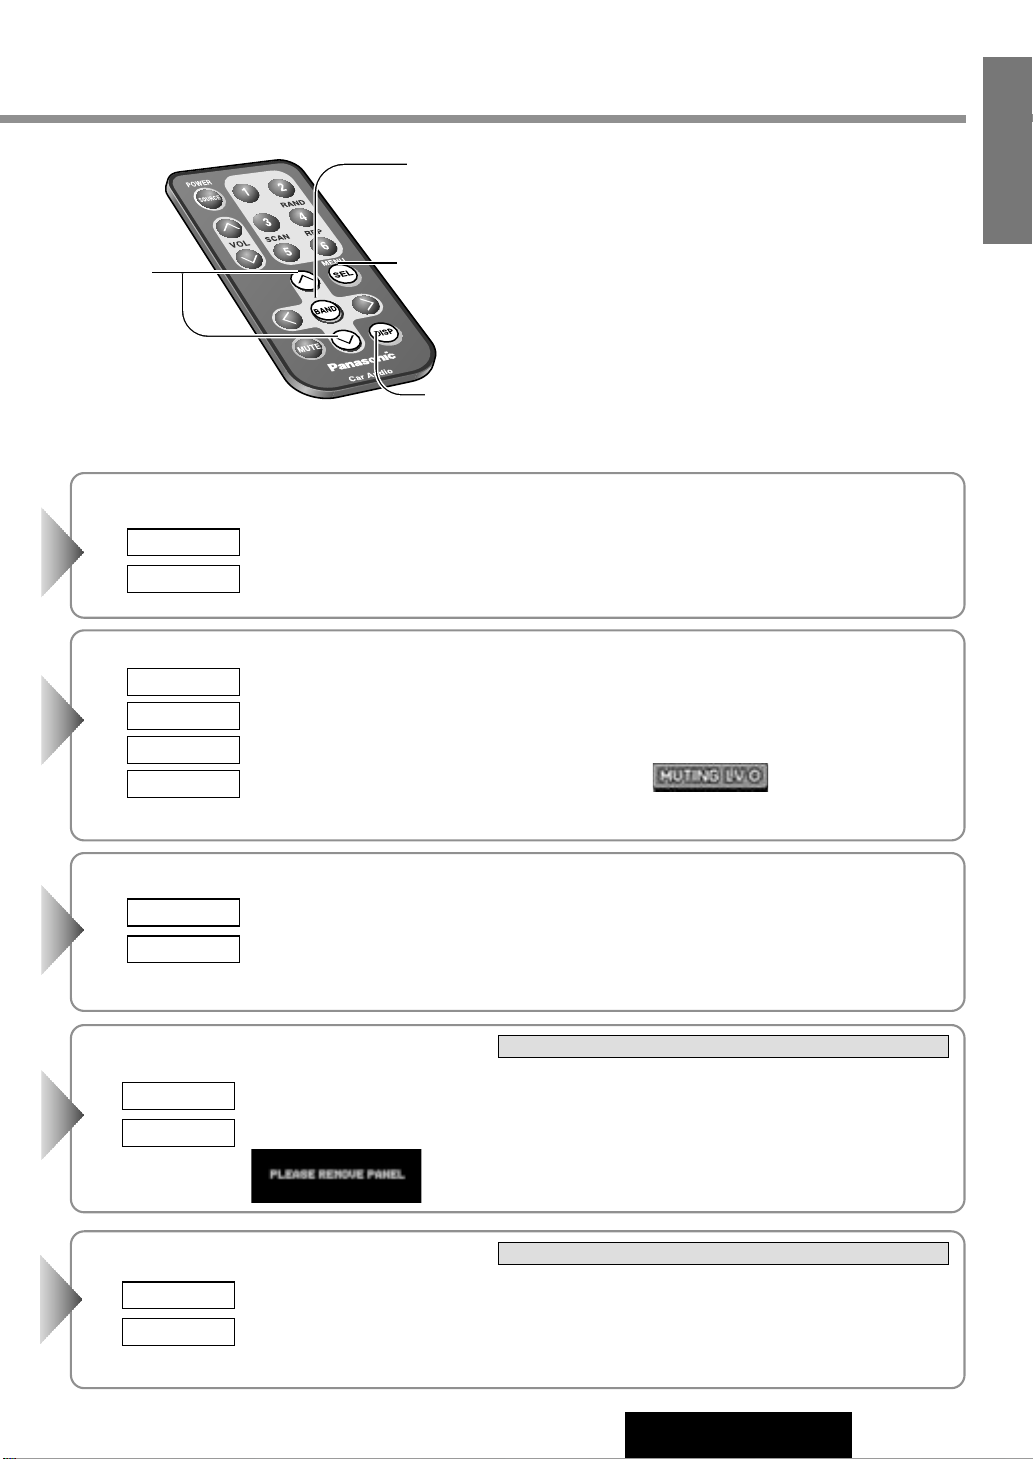
ON : Press [SOURCE].
Source
Press [SOURCE] to change the source.
Volume
[VOL}] : Up
[VOL{] : Down
Mute/ATT (Attenuation)
MUTE/ATT ON : Press [MUTE].
MUTE/ATT OFF : Press again.
Decreasing volume range depends on setting.
(MUTE/ATT setting
a page 28)
Note : The sound level for each source is
stored in memory.
(For radio, one volume setting for AM, one volume setting for all FMs)
OFF : Press [SOURCE] again and hold for more
than 1 second.
A security message is displayed, and the warning alarm that reminds you to take the panel
off.
(When S-LED is set to ON
a page 28)
Note: When ACC selection is set to ON, security message and warning alarm are performed after turning
off the ignition key. (
a page 28 about ACC selection)
Setting Range : 0 to 40
: No sound
: Decrease the volume to
1/10 of previous level.
Turn the key in the ignition until the accessory
indicator lights.
General
[VOL}] [VOL{] (Volume)
[DISP] (Display)
[MUTE]
[SOURCE]
(Power)
[VOL}] [VOL{]
(Volume)
[DISP] (Display)
[MUTE]
[SOURCE]
(Power)
[DIM] (Dimmer)
[HDB]
(S•HDB)
(When a cassette is in the player)
(When a CD changer is connected
and magazine is in the changer)
(When AUX-IN setting is set
to ON) (a page 28)
Radio Cassette Tape
CD ChangerAuxiliary
Page 4
11
CQ-FX721P
4
E
N
G
L
I
S
H
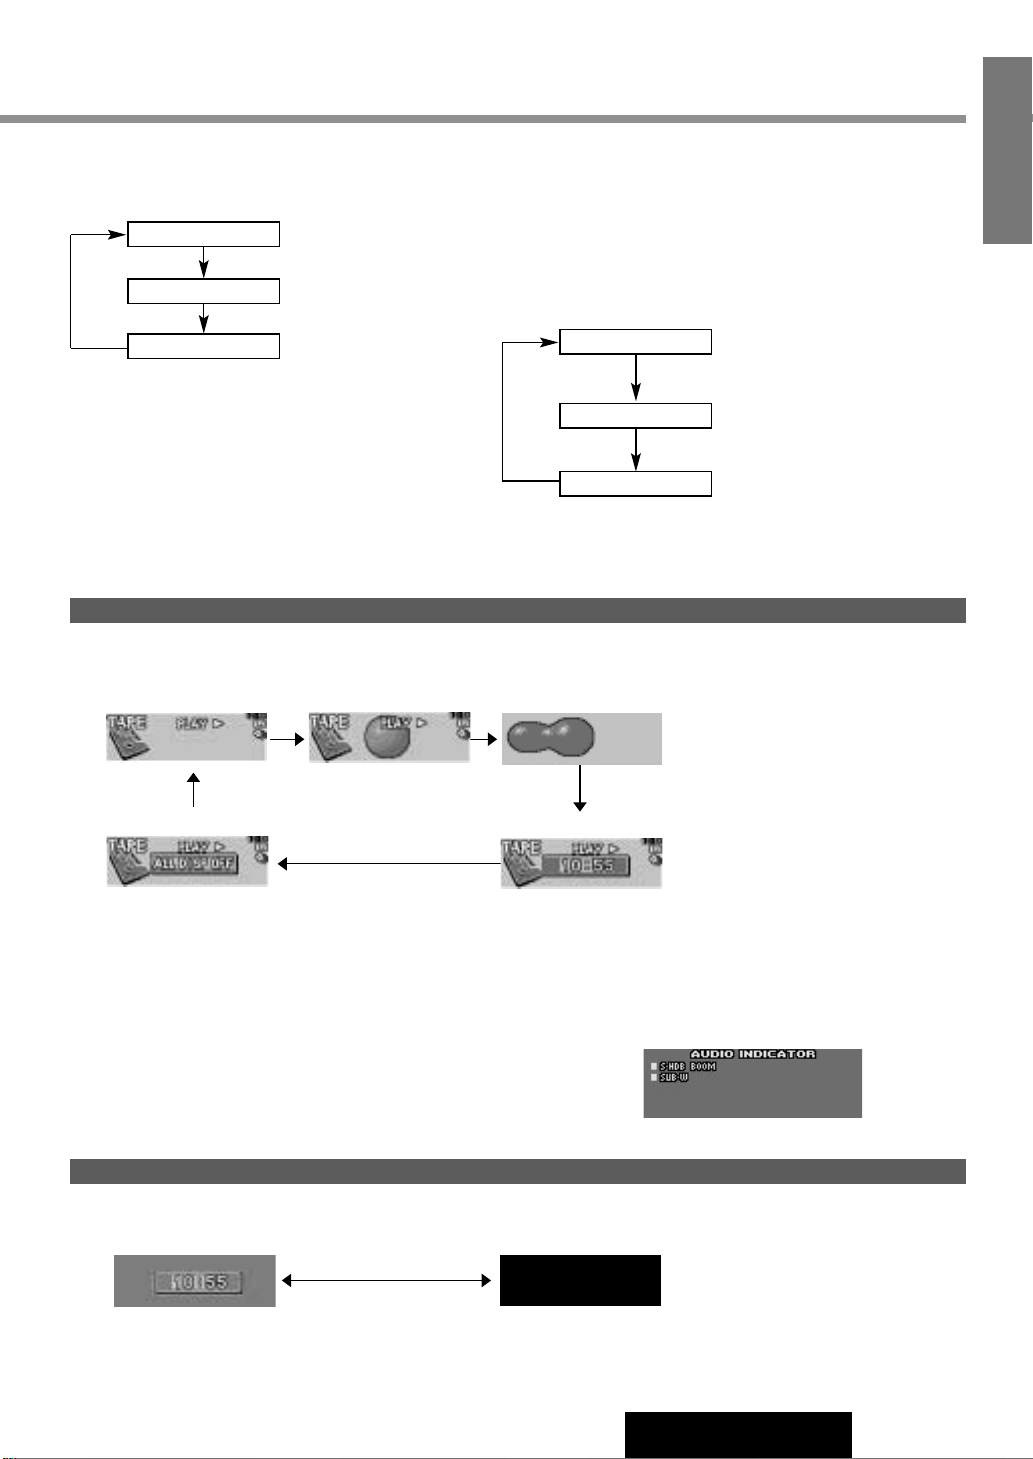
When Power is ON
Press [DISP].
Display Change
Mode Display
Mode & Spectrum
Analyzer Display
When Power is OFF (when ACC Selection is set to ON)
Press [DISP].
Clock Display
(Back light is on) (Back light is off)
Display OFF
Spectrum Analyzer Display *1
Display OFF *2 Mode & Clock Display
AUDIO Indicator
*1 If you press a button, the
Mode & Spectrum Analyzer
Display appears for 5 seconds.
*2 If you press a button, the
light is turned on, the Mode
Display appears, and the
light is turned off approximately 5 seconds later.
Notes :
¡Set the Spectrum Analyzer pattern in a separate procedure. (a page 26)
¡“NO CT” is displayed before adjusting the clock. (Adjustment a page 26)
Active Indicator Display
Press and hold [DISP] for more than 2 seconds.
Indicators which are not displayed on Mode Display are displayed.
Press
[DISP] again to cancel.
Note : See page 28 about ACC Selection setting.
Super High Definition Bass
(S•HDB)
Especially for rock music, the bass-sound will be more
powerful.
Press
[HDB] on the main unit to change the Super High
Definition Bass on.
Dimmer
Press [DIM] on the main unit to change the dimmer level.
DIMMER 3
DIMMER 2
DIMMER 1
(Brighter)(Default)
(Medium)
(Darker)
S•HDB OFF
S•HDB BOOM
S•HDB TIGHT
The bass sound of the speakers
are strongly emphasized.
The bass sounds of the speakers
are moderately emphasized. (The
sounds of the Sub-Woofer can be
heard clearly.)
Page 5
VOL
MENU
BAND
SET/AUTO
·P
PRG
REM
OTE
PTY
DISP
S·HDB
O
PEN
SOURCE
TA
PWR
AF
DIM
HDB
MUTE
TUNE
TRACK
P-S
ET
DISC
CH·C
1
2
EON
PTY
CT
CASSETTE RECEIVER WITH FULL DOT MATRIX DISPLAY
CQ-FX721P
DOLBYBNR
D·M
P-SET
DISC
BAND
SOURCE
TUNE
TRACK
12
CQ-FX721P
5
E
N
G
L
I
S
H
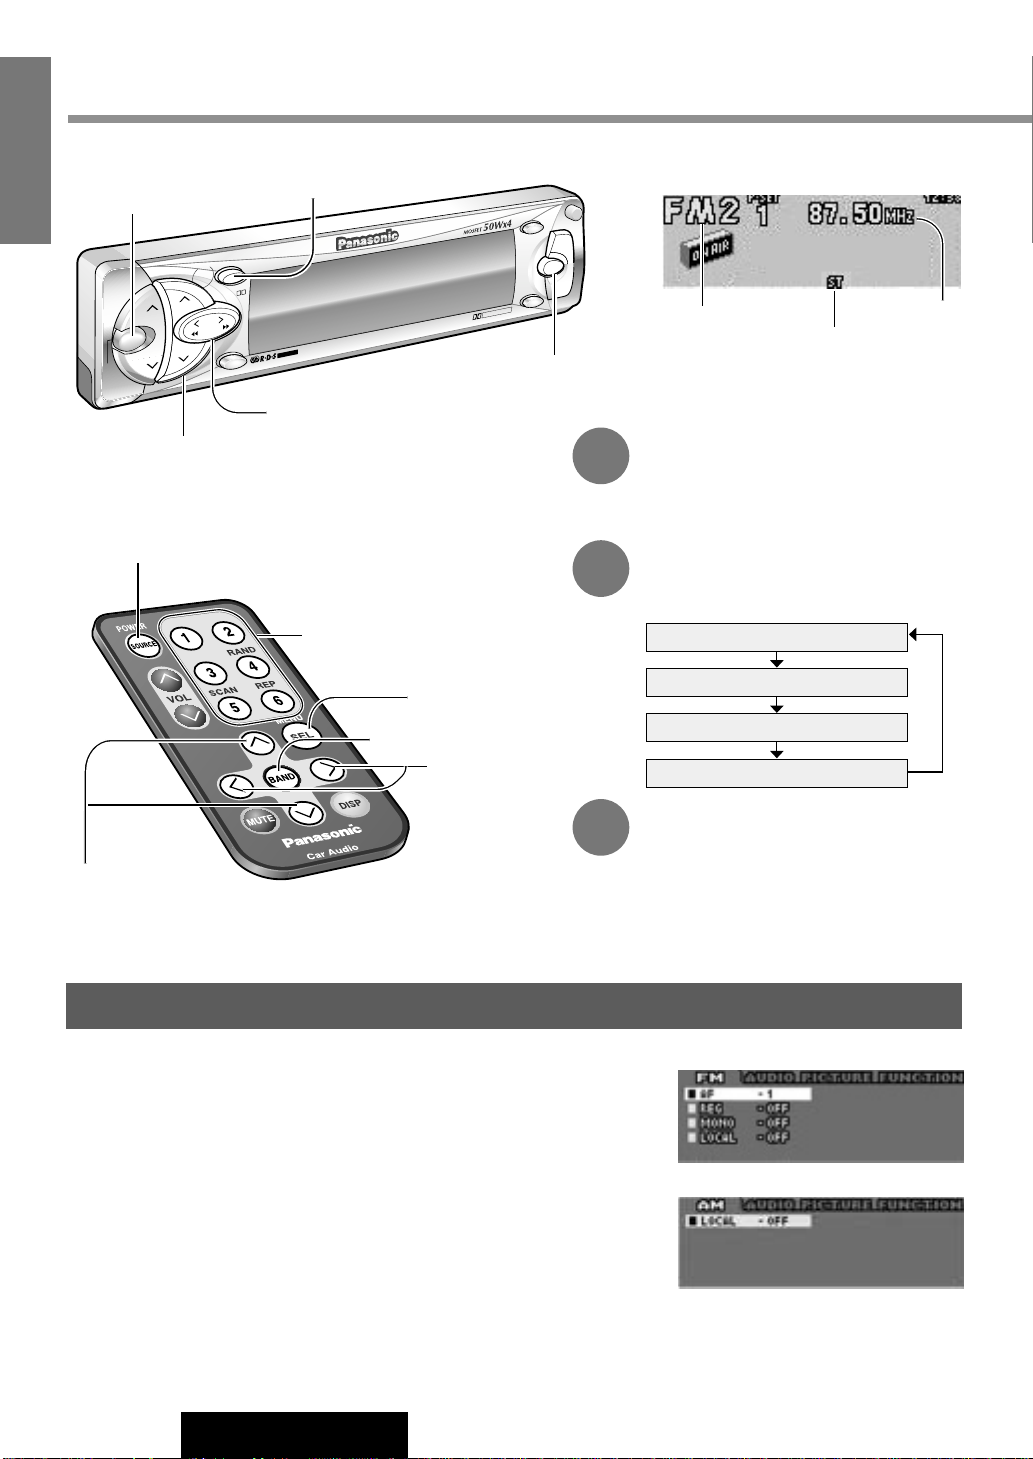
Radio Mode Display
Radio Mode
Press [SOURCE] to select the radio
mode.
Band
Press [BAND].
Note: The stereo indicator lights during
reception of an FM stereo broadcast.
1
2
Tuning
[TUNE[] / [[] : Up
[TUNE]] / []] : Down
Press and hold
[TUNE[] or [TUNE]] /
[[] or []]
for more than 0.5 seconds,
then release. Seeking will start.
3
FM1
FM2
FM3
AM (LW/MW)
Radio
[BAND]
(Auto preset memory/Set)
[SOURCE]
[TUNE]] [TUNE[]
[P·SET}] [P·SET{]
(Preset station/Select)
[SOURCE]
[}] [{]
(Preset station/Select)
[1] to [6] (Preset station)
[BAND] (Auto preset memory/Set)
[]] [[] (Tune)
Band
Frequency
Stereo Indicator
Mono/Local Selection
MONO ON : Noise is significantly decreased when weak signals are received
from an FM broadcast station.
LOCAL ON : In seek tuning, only strong stations are detected.
LOCAL OFF: Relatively weak stations are picked up.
q Press [MENU] / [SEL] during radio (FM or AM) mode.
w Press [P·SET}]
or [P·SET{] / [}] or [{] to select MONO or LOCAL.
(in AM mode, only LOCAL can be selected.)
e Press [BAND] to switch on or off in turn.
Notes:
¡If no keys have been pressed for more than 15 seconds, the display returns to the previous one after changing to the
menu display.
¡Press [DISP] to return to the regular mode.
FM Menu Display
AM Menu Display
[MENU]
[SEL] (Menu)
Page 6
13
CQ-FX721P
6
E
N
G
L
I
S
H
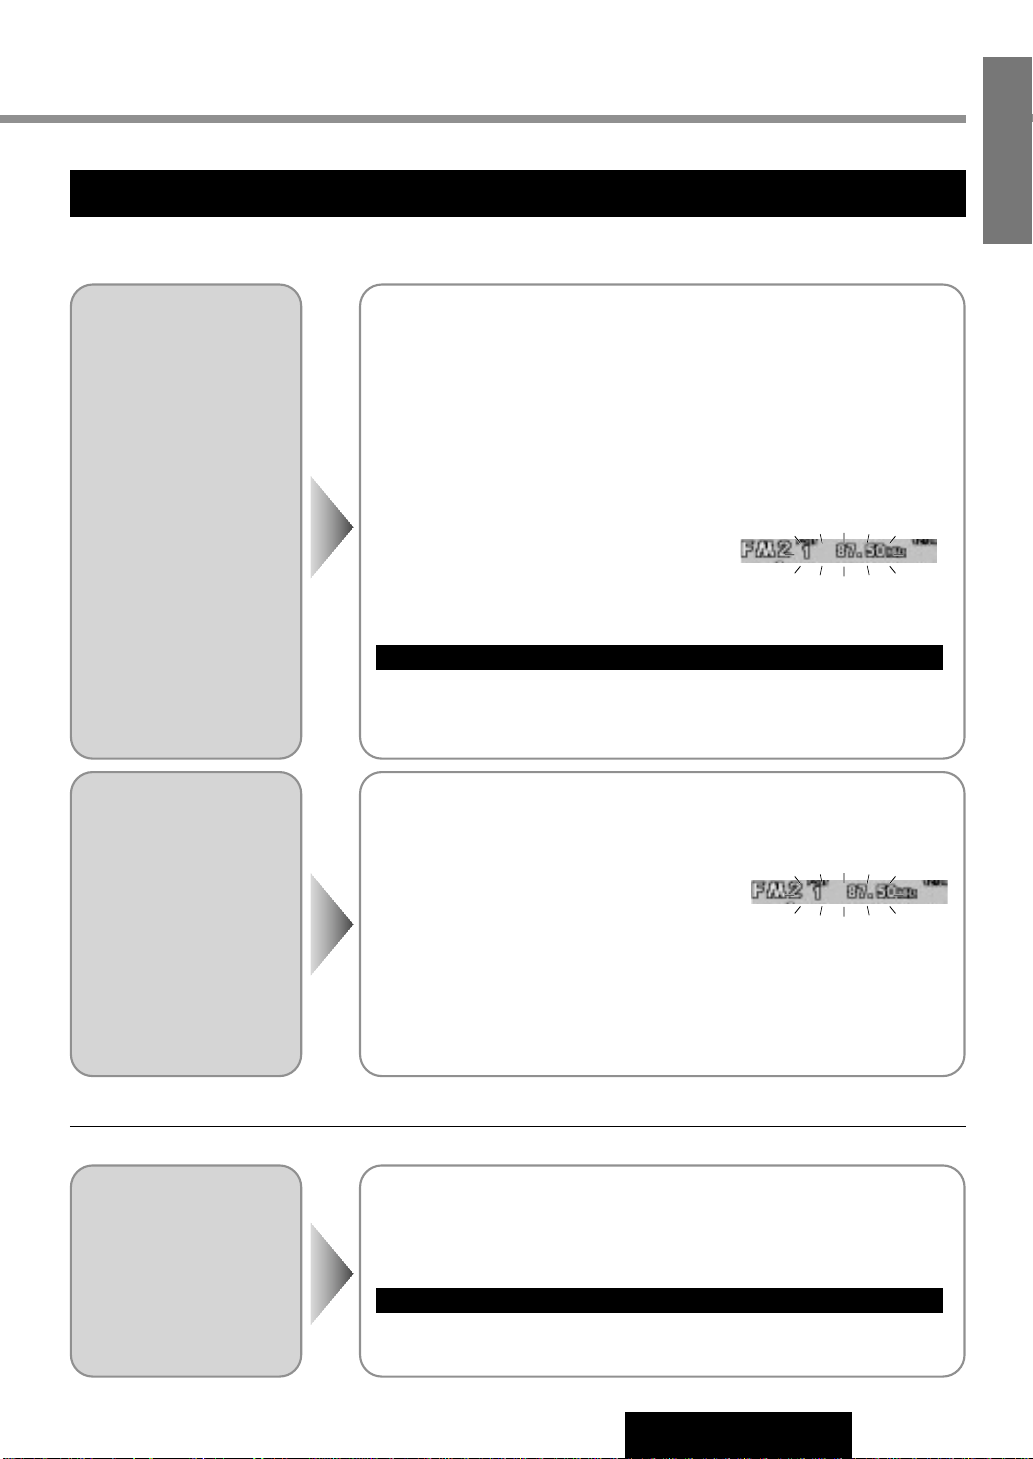
One-touch Selection of a Preset Station
Up to 6 stations can be stored in each of the FM1, FM2, FM3 and AM (LW/MW) band selections.
Manual Preset
Memory
Manually save a station in
the preset memory.
Select a band and frequency (step
q, w and e on the previous page)
q Press and hold
[P·SET}] or [P·SET{] / [}] or [{] for more
than 2 seconds until the preset number blinks.
w Press [P·SET}] or [P·SET{] / [}] or [{] to select a preset
number.
e Press and hold [P·SET}] or [P·SET{] / [}] or [{] for more
than 2 seconds to memorize.
The display blinks once, and a receiving
station is saved in the memory.
Note: Frequency setting can be performed even after selecting a preset
number.
Entering numbers directly from the remote control
Select a band and frequency (step q, w and e on the previous page)
Press and hold
[1] to [6] on the remote control for more than 2 seconds.
Auto Preset
Memory
Automatically save strong
stations in the preset
memory.
Select a band (step
q, w on the previous page)
Press and hold
[BAND] for more than
2 seconds.
¡The 6 strongest available stations will be automatically saved in the memory
under preset numbers 1
to 6.
¡Once set, the preset stations are sequentially scanned for 5 seconds each.
¡To stop the scanning, press [P·SET}]
or [P·SET{] / [}] or [{].
(Pressing [1] to [6] on the remote control also can stop the scanning.)
Preset Station
Calling
Select a band (step q, w on the previous page)
Press
[P·SET}] or [P·SET{] / [}] or [{] to select the preset number
for tuning in the preset station.
Press
[1] to [6] on the remote control.
Note: New stations are overwritten on existing saved stations after following this procedure.
Entering numbers directly from the remote control
Scanning
Page 7
14
CQ-FX721P
7
E
N
G
L
I
S
H
Radio Data System (RDS)
RDS Basics
Some FM stations are broadcasting added data compatible with RDS. This radio set offers convenient functions using such
data.
RDS service availability varies with areas. Please understand if RDS service is not available in your area, the following service is not available, either. This chapter explains the summary and operation regarding RDS.
The following functions are available when receiving RDS stations.
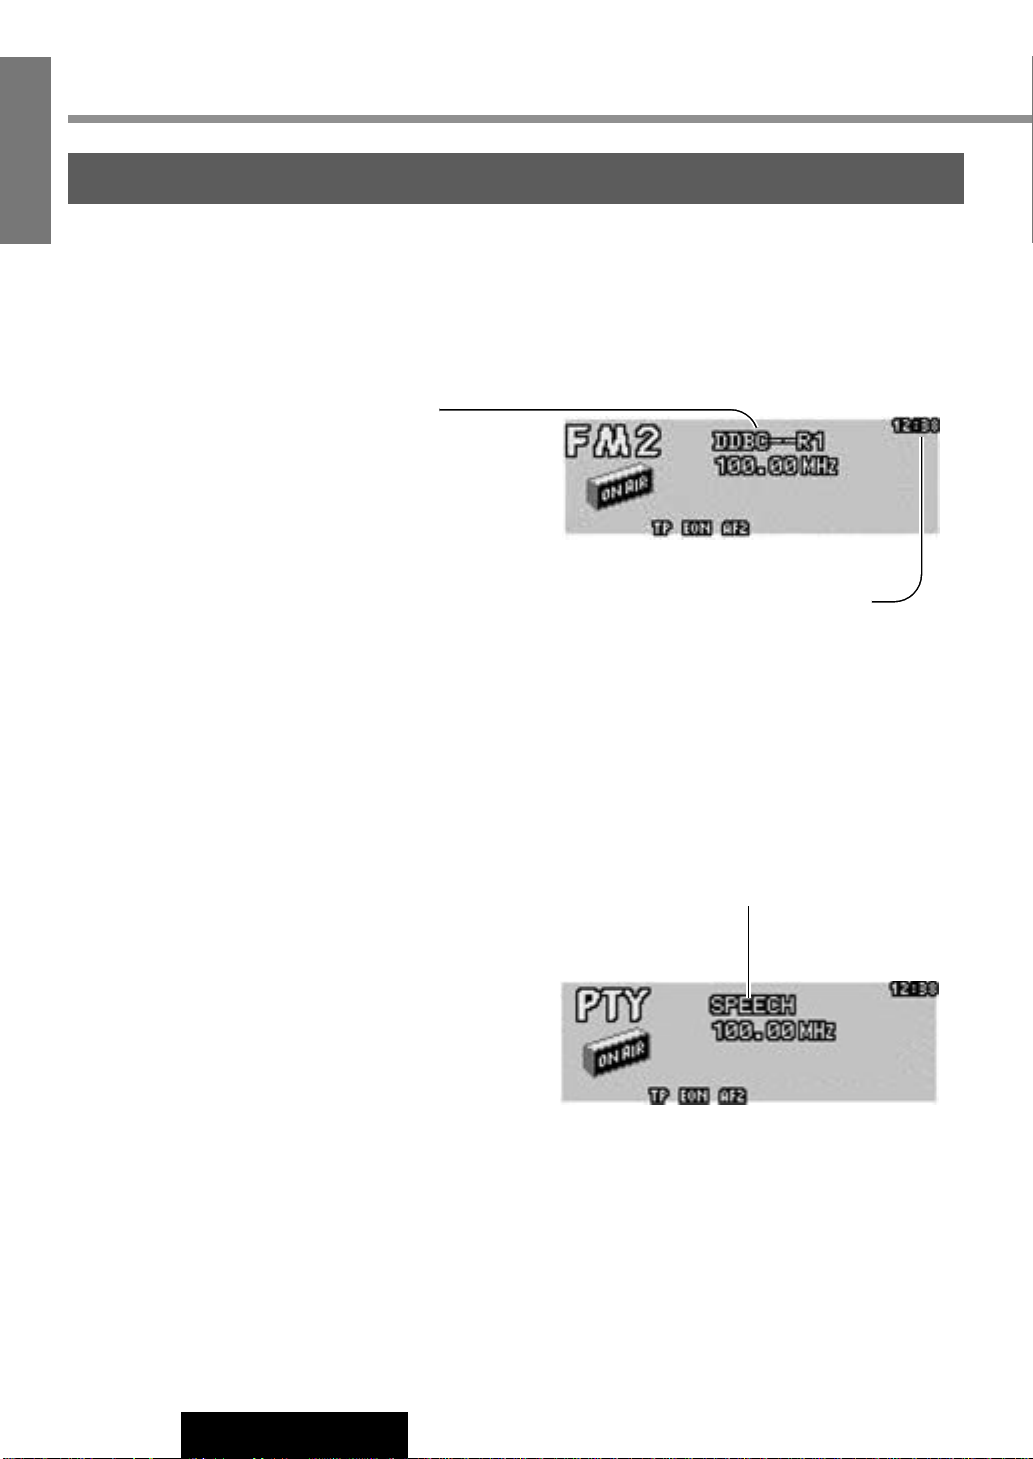
Program Service Name (PS)
Display
The name of station is displayed.
Alternative Frequency (AF)
When reception is poor, an RDS station broadcasting the
same program is tuned in automatically.
Best Station
Best Station Research is automatically activated to store
the station with the best reception for each preset button.
Traffic Program (TP)
Some RDS FM stations periodically provide traffic information.
The program which broadcast the traffic information is
called Traffic Program (TP).
Traffic Announcement (TA)
Radio announcements on traffic conditions.
Clock Time (CT) Service
When receiving an RDS station, the CT (Clock Time) service automatically adjusts the time.
"-- : --" is displayed in areas where CT service is not available. (a Page 26 for Clock Adjustment)
Program Type (PTY) Display
RDS FM stations provide a program type identification
signal.
Example: news, rock, classical music, etc.
Page 8
VOL
MENU
BAND
SET/AUTO
·P
PRG
REMOTE
PTY
D
IS
P
S
·H
D
B
OPEN
SOURCE
TA
PWR
AF
D
IM
HD
B
MUTE
TUNE
TRACK
P-SET
DISC
CH
·C
1
2
EON
PTY
CT
CASSETTE RECEIVER
W
ITH FULL DOT M
ATRIX DISPLAY
CQ-FX721P
D
O
L
B
Y
B
N
R
DIM
P-SET
DISC
MENU
BAND
SOURCE
TUNE
TRACK
15
CQ-FX721P
8
E
N
G
L
I
S
H
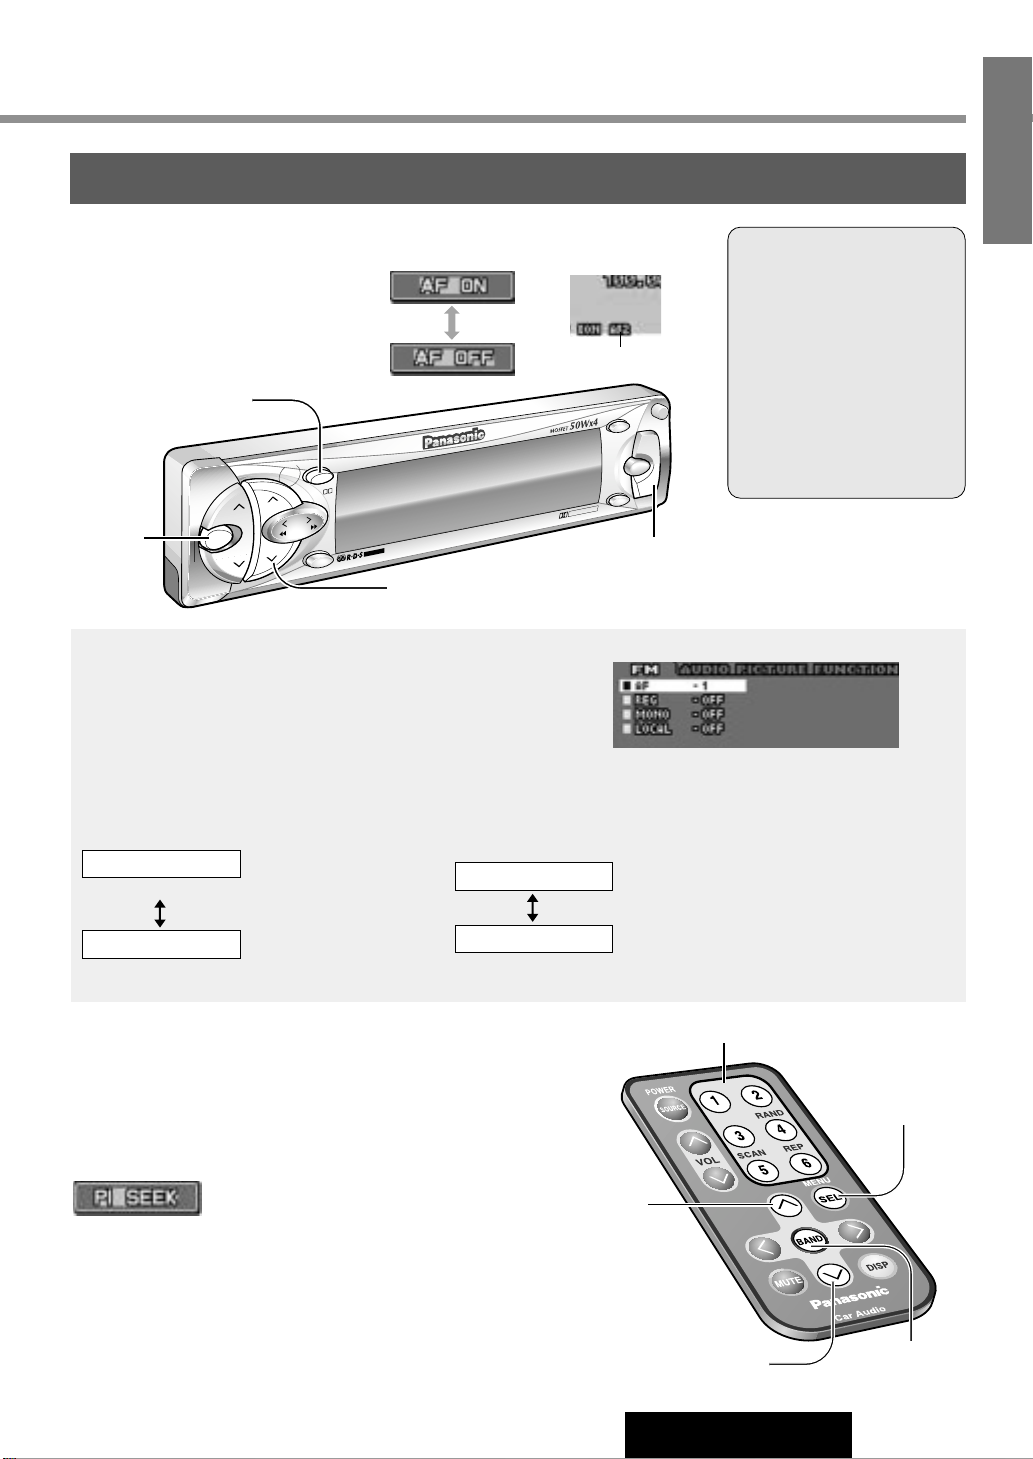
Alternative Frequency (AF)
Alternative Frequency (AF) mode
Press and hold [DIM] on the main unit
for more than 2 seconds to switch the AF
mode on or off.
Default : AF ON
Auto Preset Memory
When AF ON is selected, only
RDS stations will be memorized automatically.
(a Page 13 for auto preset
memory)
* New stations are overwrit-
ten on existing saved stations after following this
procedure.
[}]
(Select)
[{]
(Select)
[SEL]
(Menu)
[BAND]
(Set)
AF Level and REG Mode
AF Level
Press [BAND] to change the AF level.
Program Identification (PI) Seek
(Only for remote control)
If Best Station does not work properly and reception is poor when
tuning in a preset station, press the same preset number button
again. PI Seek will search an AF station with good reception.
q Press [MENU] / [SEL] to display the menu.
w Press [P·SET}] or [P·SET{] / [}] or [{] to select an item.
AF 1
Low level AF sensitivity
Region (REG) Mode
Changes the selection range of AF and PI Seek.
Press [BAND] to switch on or off in turn.
AF 2
High level AF sensitivity
[BAND] (Set)
[P·SET{] [P·SET}] (Select)
[MENU]
[DIM] (AF mode)
REG ON
REG OFF
The frequency is changed only for programs
within the region.
The frequency is changed also for programs
outside the region.
FM Menu Display
When AF is on
(Default)
(Default)
Note: When REG mode is switched from ON to OFF or vice versa, AF mode turns on automatically.
Preset buttons
Page 9
VOL
MENU
BAND
SET/AUTO
·P
PRG
REMOTE
PTY
DISP
S·HDB
OPEN
SOURCE
TA
PWR
AF
DIM
HDB
MUTE
TUNE
TRACK
P-SET
DISC
CH
·C
1
2
E
O
N
P
T
Y
C
T
CASSETTE RECEIVER WITH FULL DOT MATRIX DISPLAY
CQ-FX721P
D
O
L
B
Y
B
N
R
VOL
MENU
BAND
TA
TUNE
TRACK
16
CQ-FX721P
9
E
N
G
L
I
S
H
Radio Data System (RDS) (continued)
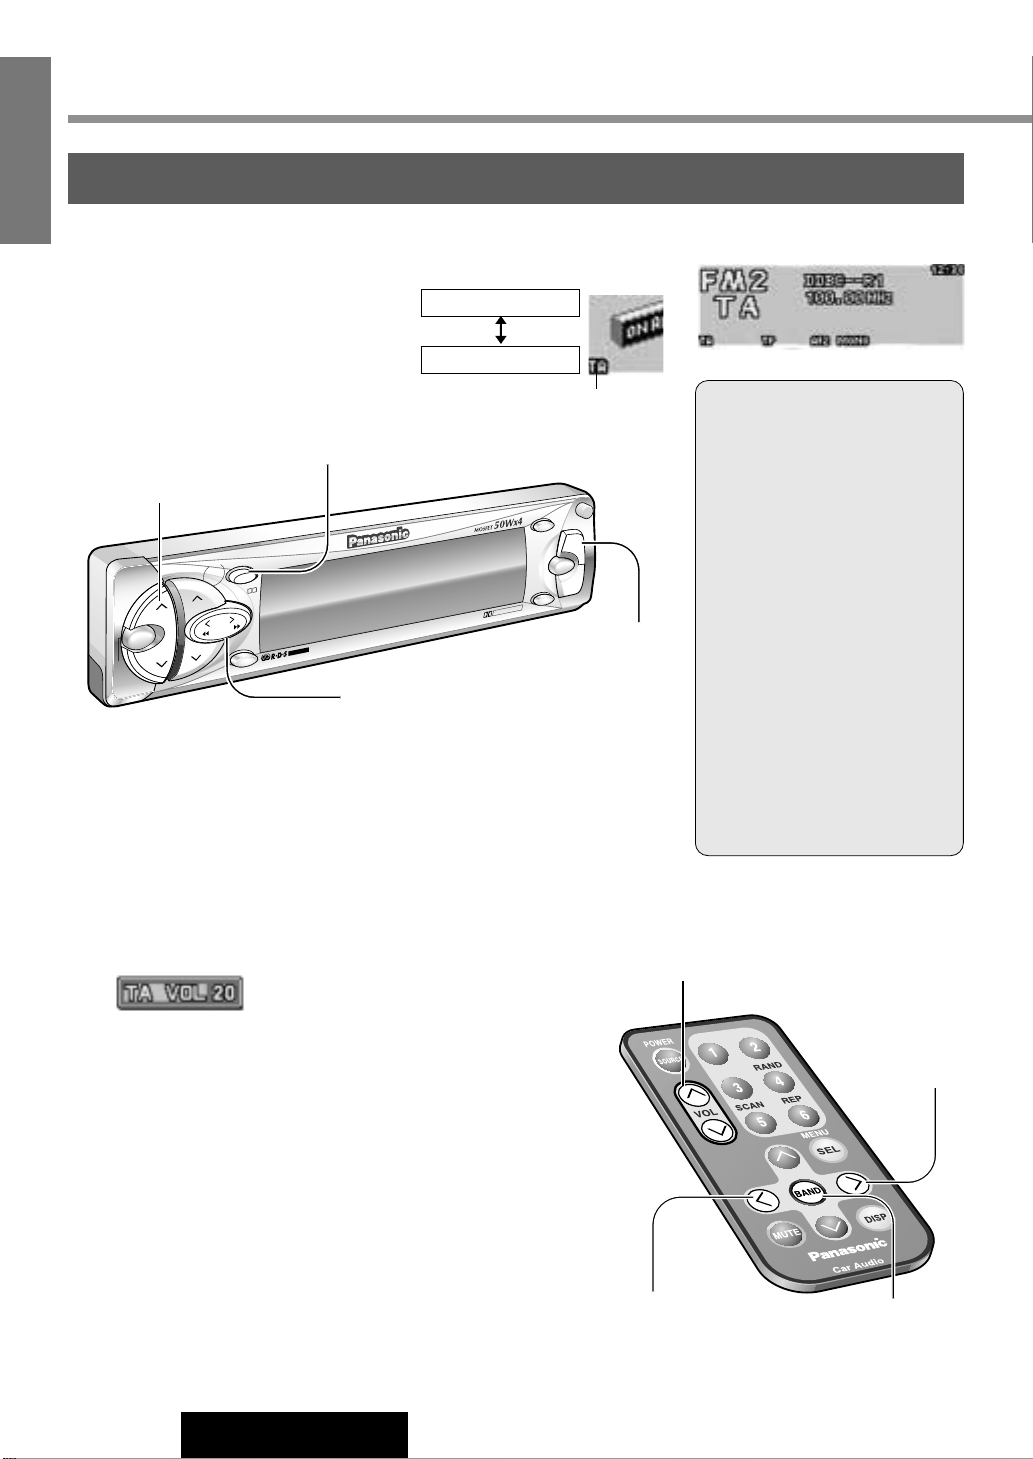
Traffic Announcement (TA)
Traffic Announcement (TA) mode
[]]
(TP Seek tuning)
[[]
(TP Seek tuning)
[BAND]
(TP auto preset memory)
TP Seek Tuning
When TA ON is selected, only
traffic program will be searced.
Press and hold [TUNE]] or
[TUNE[] / []] or [[] for
more than 0.5 seconds, then
release. Seeking will start.
TP Auto Preset Memory
When TA ON is selected, only
traffic program will be memorized automatically.
Press and hold [BAND] for
more than 2 seconds.
* New stations are overwritten on
existing saved stations after
following this procedure.
TA on
TA off
Press [TA] on the main unit to switch the TA
mode on or off.
Searches for and tunes into traffic information
broadcasts automatically when set to TA on.
TA Volume Set
While listening to an FM station
(including a traffic information
announcement), press and hold
[TA] for more than 2 seconds to
store the volume level as the TA
Volume level.
Muting in TA mode
To listen to only traffic information
announcements. While listening to
an FM station which is not currently broadcasting traffic information,
press [VOL{] to set the volume
to 0. The traffic information
announcement will be output at the
TA volume level.
[TA]
(TA mode/Volume set)
[VOL}] [VOL{] (Volume)
[VOL}] [VOL{] (Volume)
[TUNE]] [TUNE[] (TP seek tuning)
[BAND] (TP auto preset memory)
When TA is on
When Traffic Information is received
TA Standby Mode
When set to TA ON with the unit in another mode (Cassette tape, CD
changer, etc.) it will automatically switch to radio mode and output the
traffic information.
When the traffic information has finished, the unit will return to the previous mode.
Page 10
VOL
MENU
BAND
SET/AUTO
·P
PRG
REMOTE
PTY
DISP
S·HDB
OPEN
SOURCE
TA
PWR
AF
DIM
HDB
M
UTE
TUNE
TRACK
P-SET
DISC
CH·C
1
2
E
O
N
P
T
Y
C
T
CASSETTE RECEIVER WITH FULL DOT MATRIX DISPLAY
CQ-FX721P
D
O
L
B
Y
B
N
R
M
EN
U
BAND
TUNE
TRACK
17
CQ-FX721P
10
E
N
G
L
I
S
H
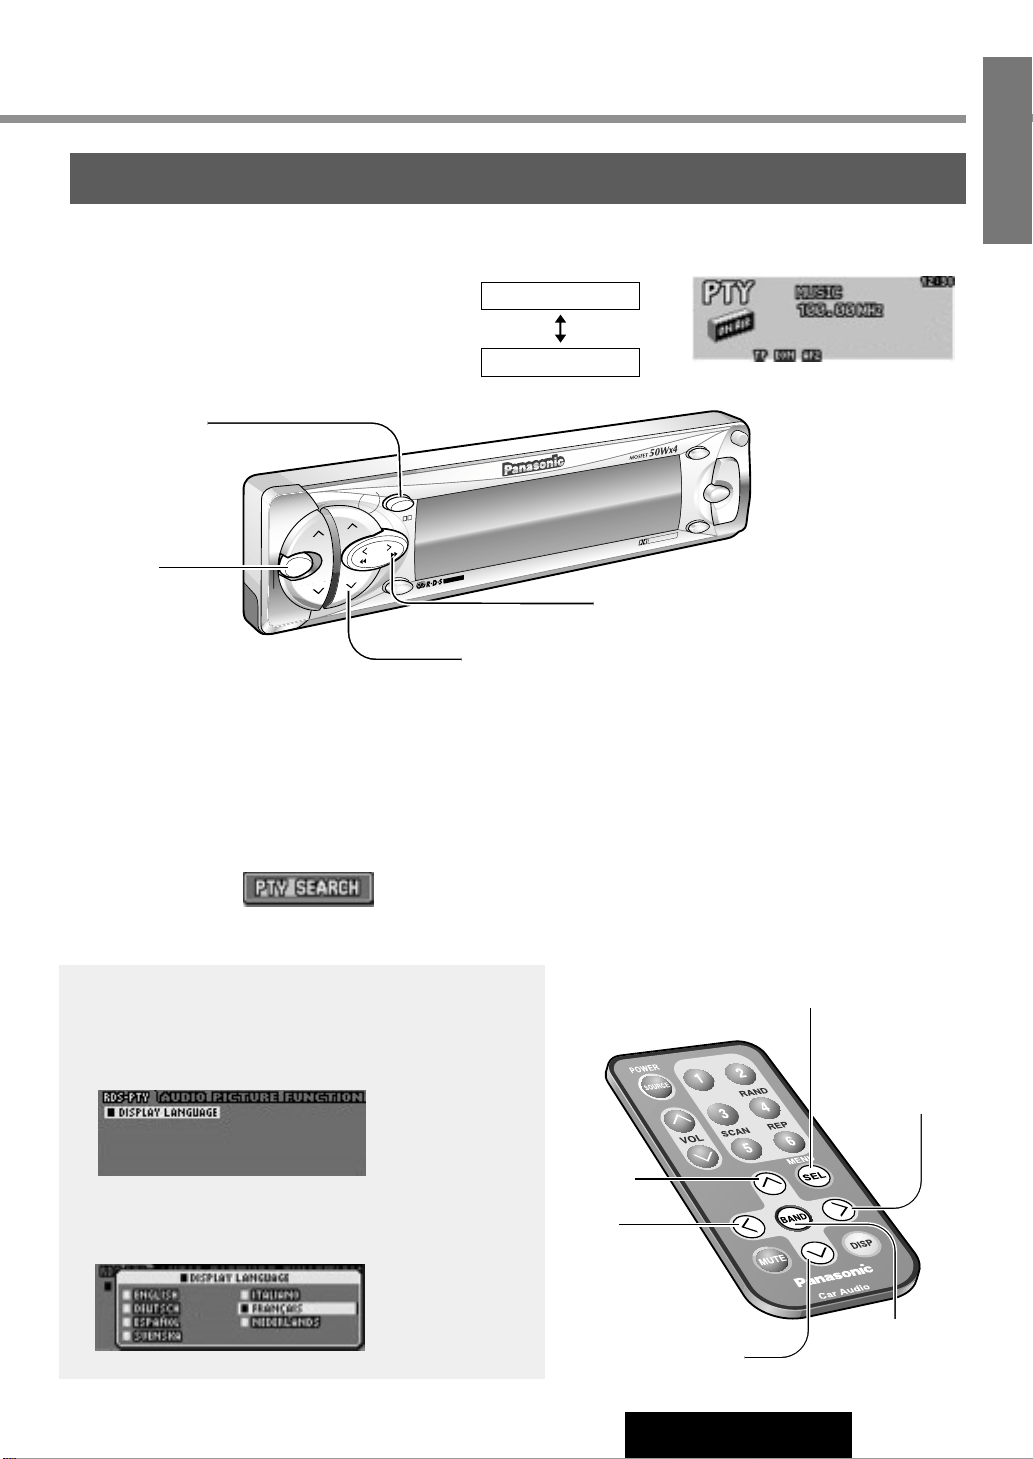
Program Type (PTY) Reception
Program Type (PTY) mode
PTY on
PTY off
Press and hold [MENU] / [SEL] for more than 2
seconds to switch the PTY display mode on or off.
PTY Selection
q Press [TUNE[] / [[] to change the program type as
shown on the right. ([TUNE]] / []] : opposite direction)
w Select the desired program and press [BAND]. Seek will
start to tune in to a station broadcasting the selected program type.
SPEECH / MUSIC / NEWS / AFFAIRS /
INFO / SPORT / EDUCATE / DRAMA /
CULTURE / SCIENCE / VARIED / POP M /
ROCK M / EASY M / LIGHT M / CLASSICS /
OTHER M / WEATHER/ FINANCE / CHILDREN /
SOCIAL / RELIGION / PHONE IN / TRAVEL /
LEISURE / JAZZ / COUNTRY / NATION M /
OLDIES / FOLK M / DOCUMENT/ SPEECH
PTY Language Selection
q Press [MENU] / [SEL] to display the DISPLAY LANGUAGE
menu and press [BAND].
w Press [P·SET}] or [P·SET{] / [}] or [{] to select
the PTY display language, and press [BAND].
[SEL]
(PTY mode/menu)
[}]
(Select)
[{]
(Select)
[]]
(PTY select)
[[]
(PTY select)
[BAND]
(PTY search/Set)
[BAND]
(PTY search/Set)
[TUNE]] [TUNE[] (PTY select)
[MENU]
(PTY mode/menu)
[P·SET{] [P·SET}] (Select)
PTY Mode Display
Note
: When there is no corresponding program type, “NONE” is displayed for 2 seconds.
Page 11
VOL
MENU
BA
ND
SET/AUTO
·P
PRG
REMOTE
PTY
DISP
S·HDB
OPEN
SOURCE
TA
PWR
AF
DIM
HDB
M
UTE
TUNE
TRACK
P-SET
DISC
CH
·C
1
2
E
O
N
P
T
Y
C
T
CASSETTE RECEIVER WITH FULL DOT MATRIX DISPLAY
CQ-FX721P
D
O
L
B
Y
B
N
R
P-SET
DISC
BAND
TUNE
TRACK
18
CQ-FX721P
11
E
N
G
L
I
S
H
Radio Data System (RDS) (continued)
Program Type (PTY) Reception
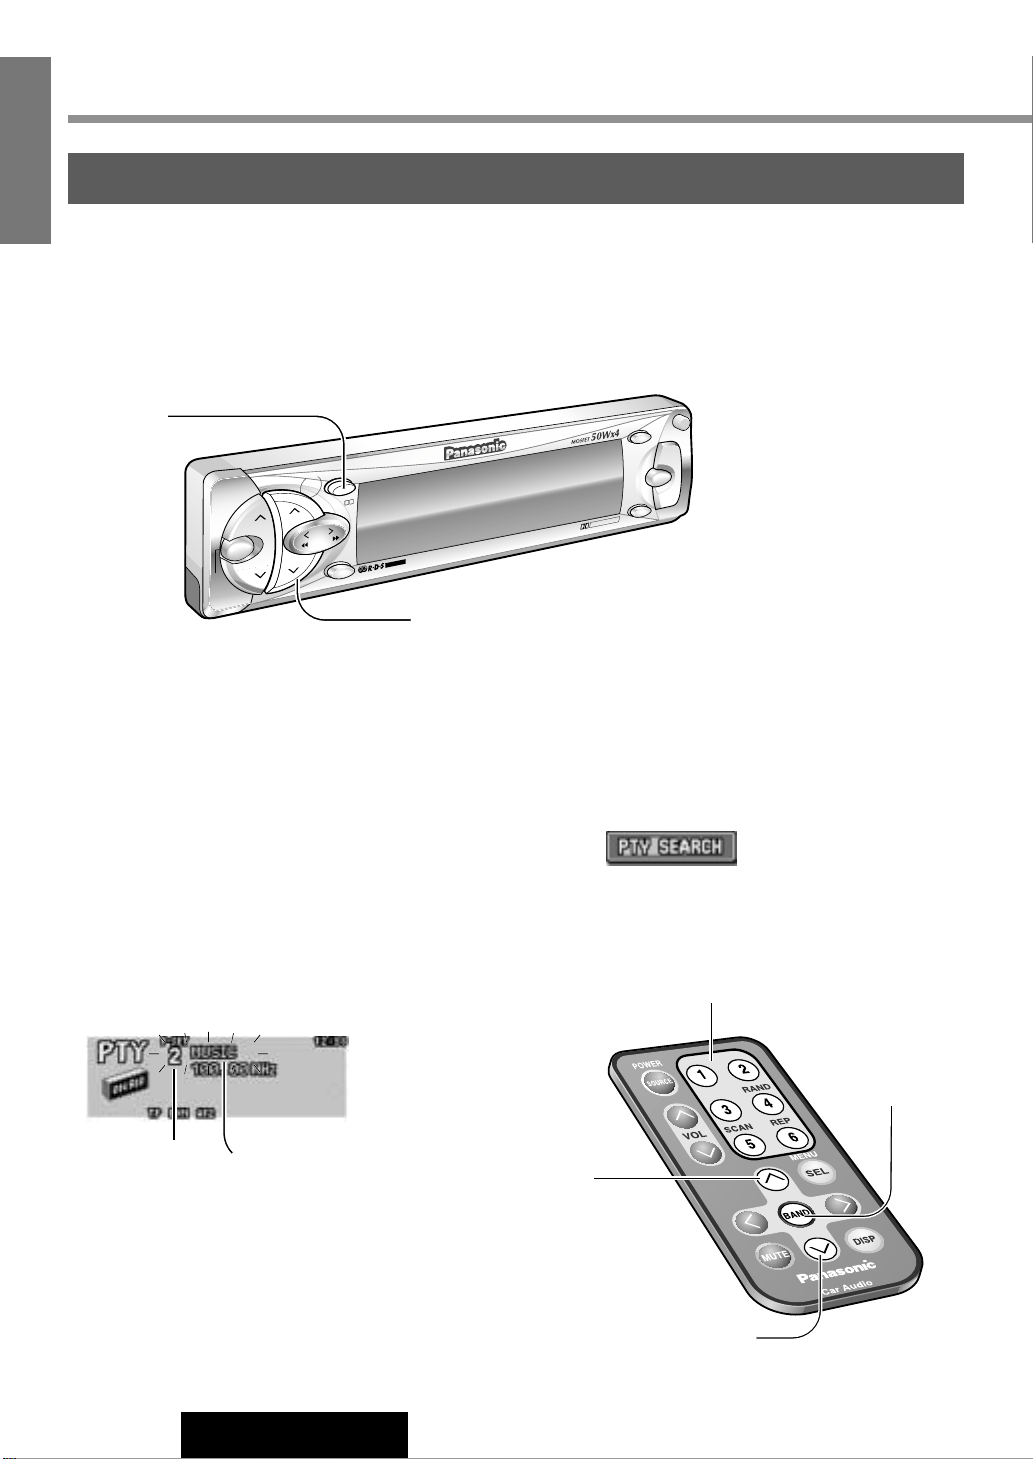
PTY Preset Call
Program types are stored in memory under preset memory number 1 to 6 as shown in the table on the next
page. To select the desired program type, press [P·SET}] or [P·SET{] / [}] or [{].
PTY Preset Change
q Select the desired program type by using PTY Selection or
PTY Preset Call.
w Press and hold [P·SET}] or [P·SET{]/ [}] or [{]
for more than 2 seconds to select the preset memory
mode.
e Press [P·SET}] or [P·SET{]/ [}] or [{] to select
the desired preset number.
r Press and hold [P·SET}] or [P·SET{] / [}] or [{]
for more than 2 seconds to memorize.
Preset PTY Search
q Select a program type by PTY preset call.
w Press [BAND] to tune in the desired program
type station.
Preset buttons
[BAND]
(Preset PTY search)
[P·SET{] [P·SET}] (PTY preset call/change)
[}]
(PTY preset call
/change)
[{]
(PTY preset call/change)
[BAND]
(Preset PTY search)
*On the remote control, press and hold the preset buttons
for more than 2 seconds.
Note: When there is no corresponding program
type, “NONE” is displayed for 2 seconds.
Program TypePreset Number
Page 12
19
CQ-FX721P
12
E
N
G
L
I
S
H
Program Type (PTY) Reception
Other RDS functions
PTY Preset (Default)
Preset No. Program Type When PTY search is activated, these program type is receivable.
1 NEWS NEWS
2 SPEECH AFFAIRS, INFO, EDUCATE, DRAMA, CULTURE, SCIENCE, VARIED,
WEATHER, FINANCE, CHILDREN, SOCIAL, RELIGION, PHONE IN,
TRAVEL, LEISURE, DOCUMENT
3 SPORT SPORT
4 POP M POP M
5 CLASSICS CLASSICS
6 MUSIC ROCK M, EASY M, LIGHT M, OTHER M, JAZZ, COUNTRY, NATION M,
OLDIES, FOLK M
Enhanced Other Network (EON)
When EON data is received, the EON indicator lights and
the TA and AF functions are expanded as follows.
TA : Traffic information from the current and other net-
work stations can be received.
AF : The frequency list of preset RDS stations is updat-
ed by EON data.
EON enables the radio to make fuller use of RDS information. It constantly updates the AF list of preset stations,
including that currently tuned in to. For example, if you
preset a station far from home, you will later be able to
receive the same station at an alternative frequency, or
any other station serving the same program. EON also
keeps track of locally available TP stations for quick
reception.
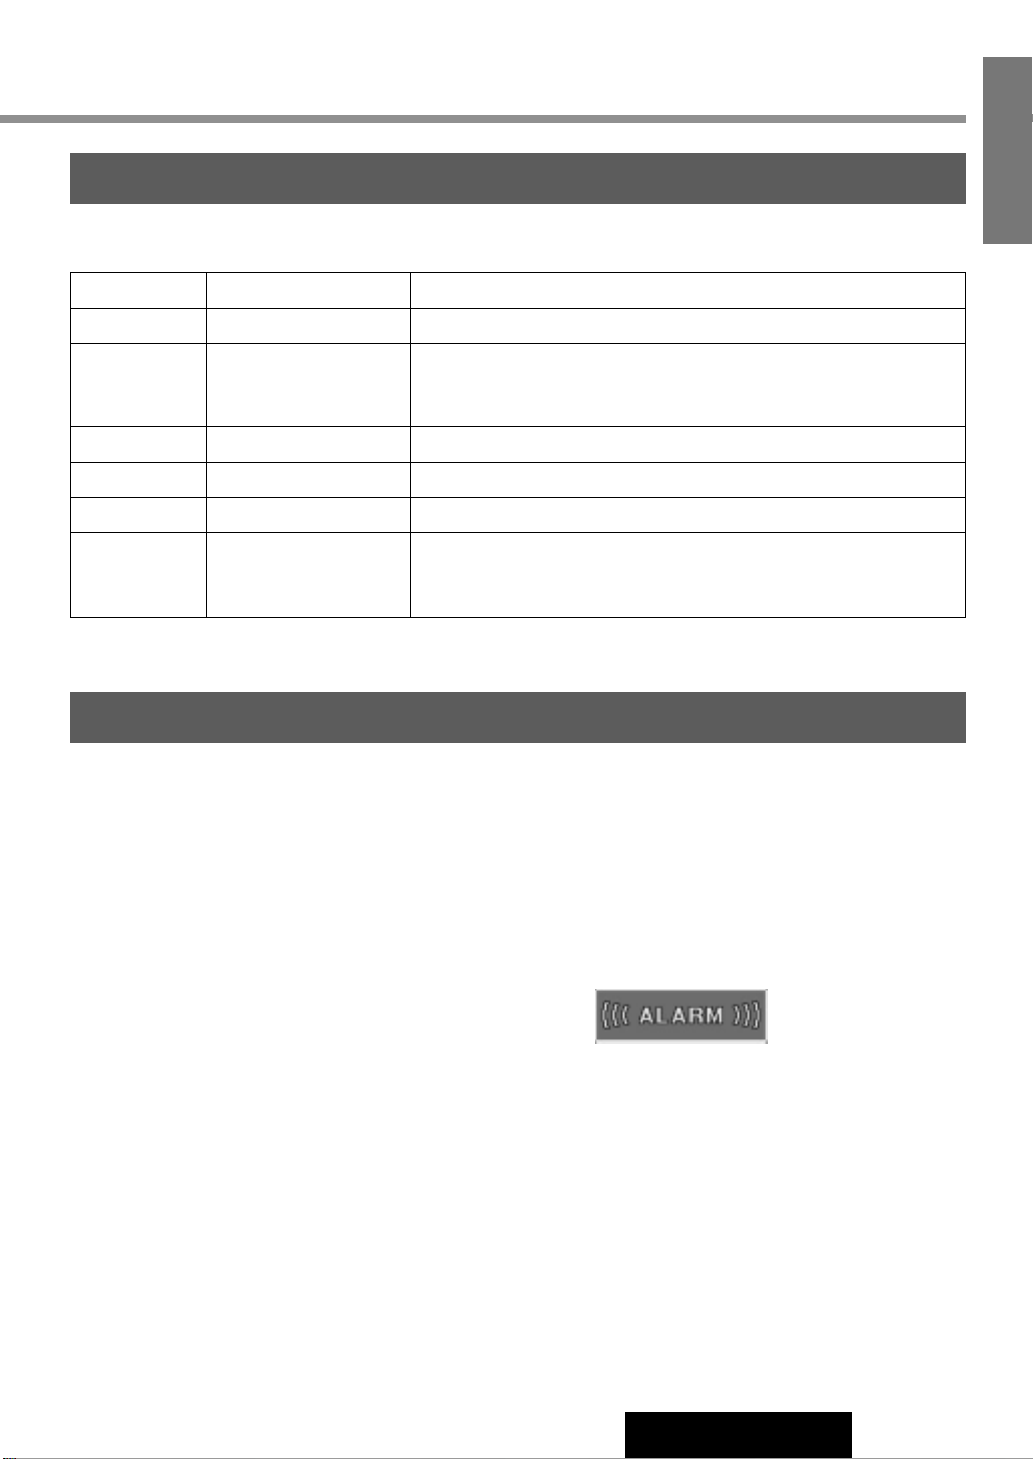
Emergency Announcement
Reception
When an emergency announcement is broadcast, the unit
is automatically switched to receiving that broadcast.
(Even when in Cassette tape mode, CD changer mode,
etc.). During receiving the emergency announcement,
"ALARM" blinks on the display.
Page 13
20
CQ-FX721P
13
E
N
G
L
I
S
H
VOL
MENU
B
A
N
D
SET/AUTO·P
REG
R
E
M
O
T
E
P
T
Y
DISP
S·HDB
O
P
EN
SOURCE
TA
PWR
AF
DIM
HDB
M
U
TE
T
UNE
TRACK
P-SET
DISC
CH·C
1
2
E
O
N
P
T
Y
C
T
C
A
S
S
E
TT
E
R
E
C
E
IV
E
R
W
ITH
F
U
LL
D
O
T M
A
TR
IX
D
IS
P
LA
Y
DA
B CONTROL
CQ
-D
FX
721N
1
2
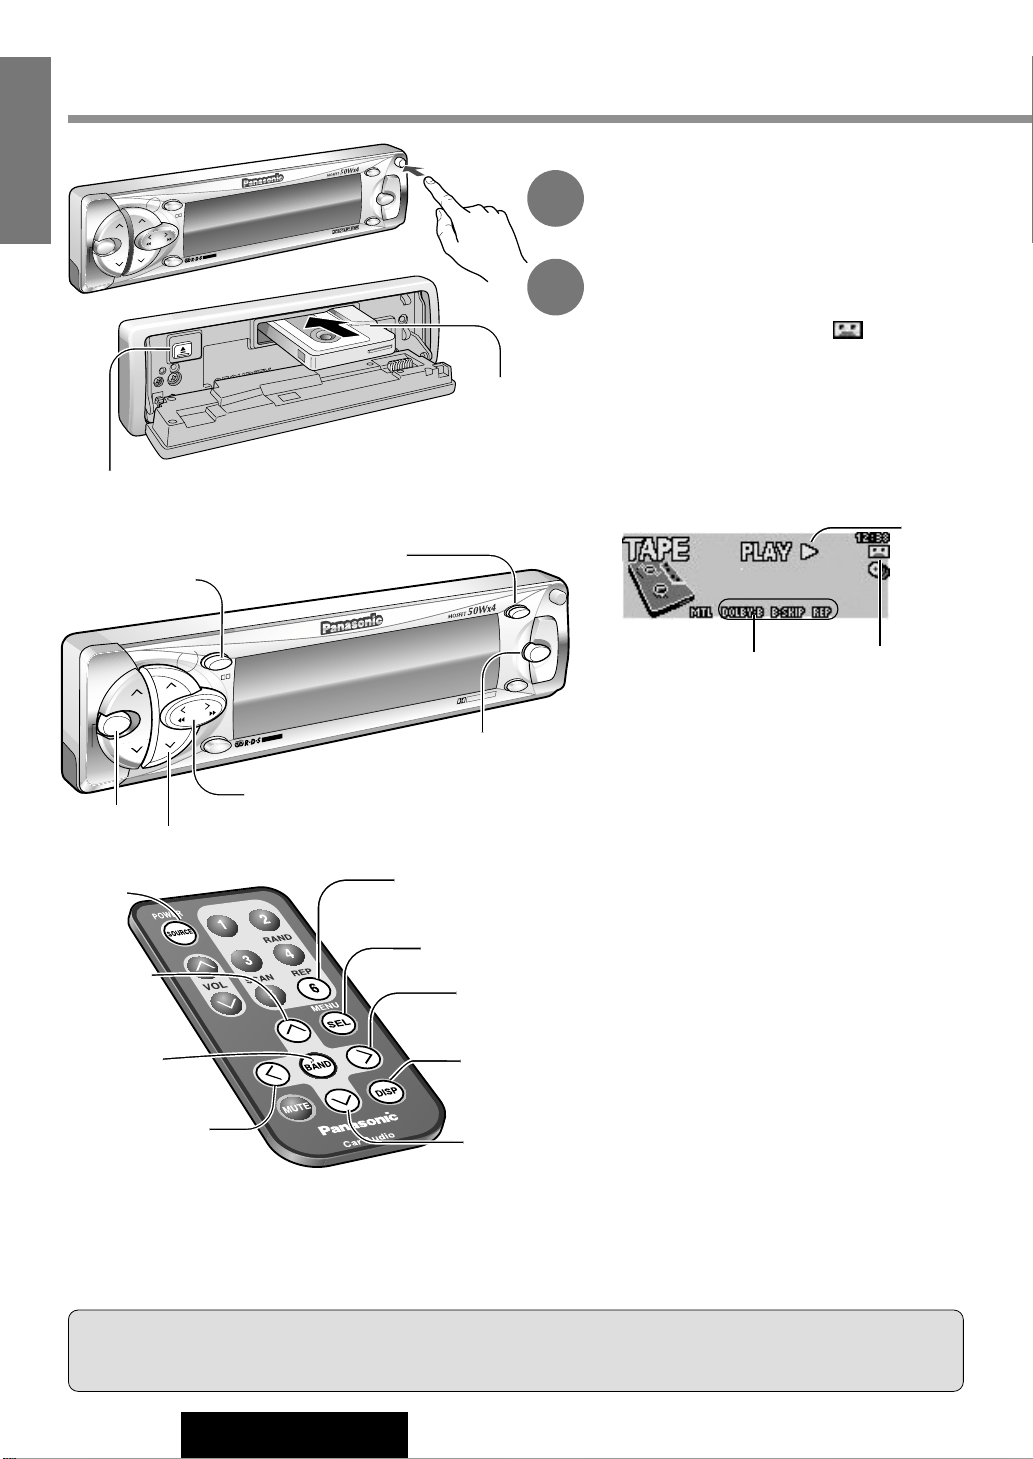
To Stop and Eject the cassette
Press [u].
Cassette Player
Exposed end
(Open end)
Cassette Player Mode Display
Open the Front Panel
Press [OPEN] on the front panel.
Cassette Insert
Playback starts. Close the front panel.
Notes :
¡Do not insert a cassette when indicator
lights.
¡Loading a cassette when the power is off allows
the power to be turned on. (When ACC
Selection is set to ON a
page 28)
¡Ejecting the cassette when the unit is in the cas-
sette mode allows the mode returns to the previous one.
When a cassette is in the player
Press [SOURCE] to select the cassette player
mode and playback starts.
Playing Side Change
Press [BAND] to reverse.
Fast forward and Rewind
[TRACK2] / [[] : Fast forward
[TRACK1] / []] : Rewind
Press [BAND] to resume the tape play.
Dolby Noise Reduction
¡Press [P·SET}] / [}] to set the Dolby B
NR mode.
¡Press [P·SET}] / [}] again to cancel.
Metal Tape Mode
¡Press and hold [P·SET}] / [}] for more
than 2 seconds
when playing metal or chromi-
um dioxide (CrO
2
) tapes.
¡Press and hold [P·SET}] / [}] again to
cancel.
Play side
When a Cassette is inside
(Blinks during Cassette play)
Metal tape, DolbyB, Blank
skip and Repeat Indicator
Cautions:
¡To avoid damaging the front panel, do not push it down or place objects on it while it is open.
¡
Do not pinch your finger or hand in the front panel. Do not insert foreign matter into the cassette slot.
Direct play setting from remote control when the menu is not
displayed
Press [6] (Repeat) on the remote control. Press again to cancel.
VOL
MENU
BAND
SET/AUTO
·P
PRG
REMOTE
PTY
DISP
S·HDB
OPEN
SOURCE
TA
PWR
AF
DIM
HDB
MUTE
TUNE
TRACK
P-SET
DISC
CH
·C
1
2
E
O
N
P
T
Y
C
T
CASSETTE RECEIVER WITH FULL DOT MATRIX DISPLAY
CQ-FX721P
D
O
L
B
Y
B
N
R
P-SET
DISC
M
EN
U
BAND
DISP
SOURCE
TUNE
TRACK
[DISP] (Return)
[BAND]
(Program/Set)
[SOURCE]
[1] [2]
[MENU]
[P·SET}] [P·SET{]
(Select)
[SEL] (Menu)
[[]
(Fast Forward)
[DISP]
(Return)
[SOURCE]
[}]
(Metal Tape)
(Dolby NR)
(Select)
[BAND]
(PRG/Set)
[{]
(TPS)
(Blank Skip)
(Select)
[]]
(Rewind)
[6] (Repeat)
Page 14
Notes:
The TPS mode may not work correctly in the following cases. This, however, does not mean that the unit is defective.
¡There is an interval less than 3 seconds or having a high level of noise or hum between programs.
¡There is particularly low-level passage during the program.
21
CQ-FX721P
14
E
N
G
L
I
S
H
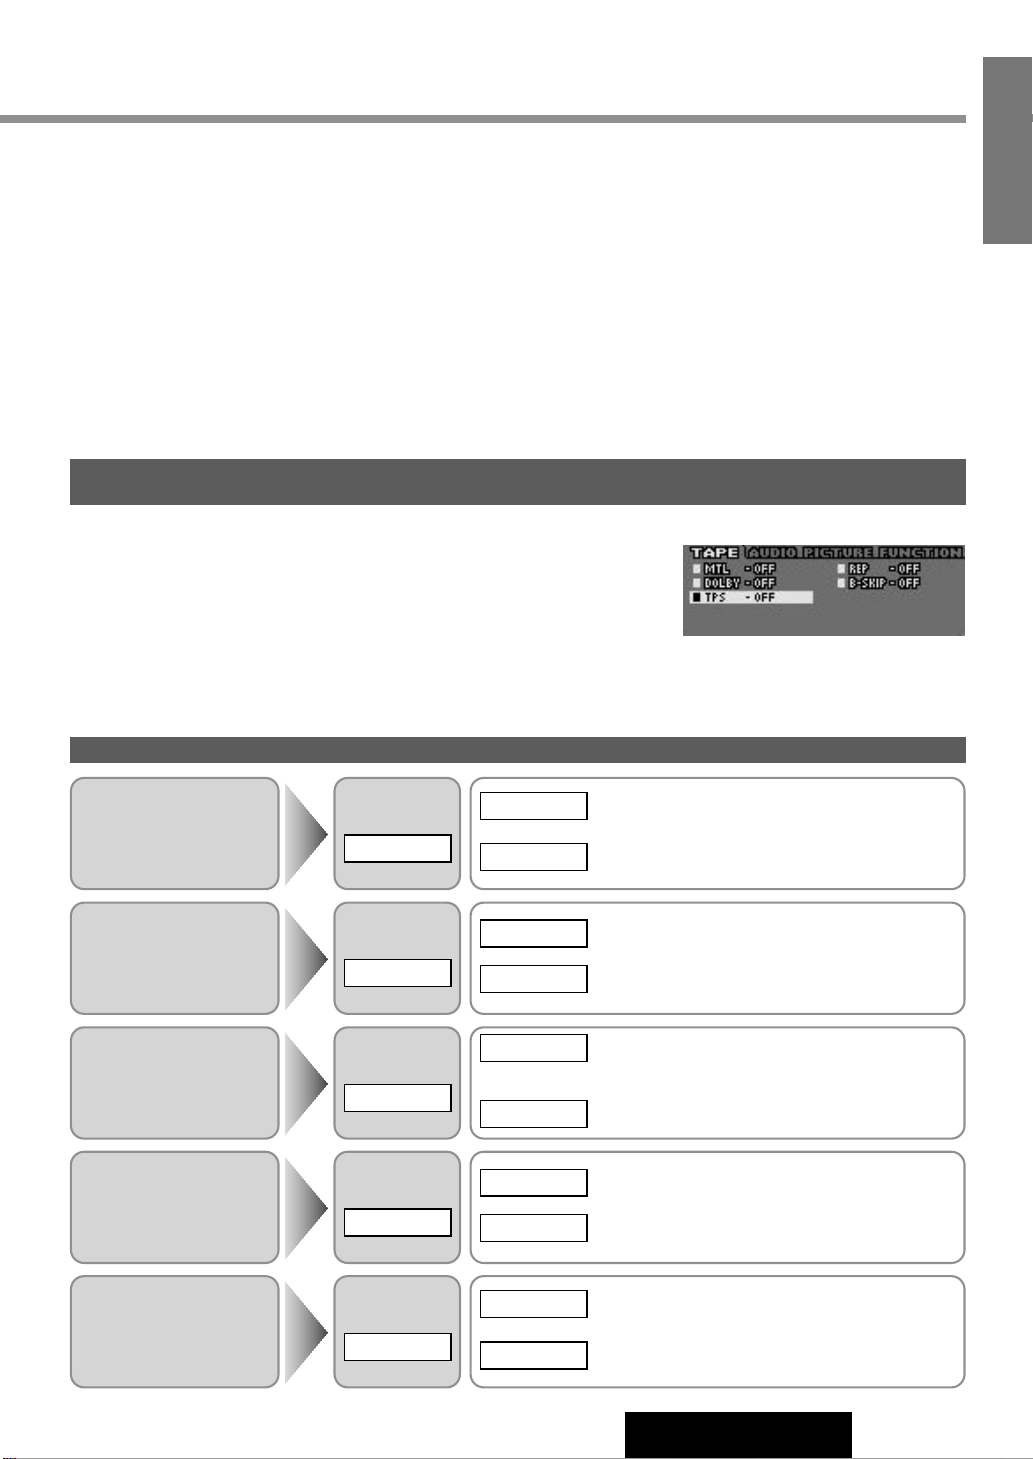
Cassette Tape Mode Setting
q Press [MENU] / [SEL] during cassette playing.
w Press [P·SET}]
or [P·SET{] / [}] or [{] to select an item.
e Press [BAND] to switch on or off in turn.
Tape Program
Search (TPS)
Play Settings
Notes:
¡If no keys have been pressed for more than 15 seconds, the display returns to the previous one after changing to the
menu display.
¡Press [DISP] to return to the regular mode.
Select
TPS
: Activate the Tape Program Search mode.
* Operation after this are the same as the opera-
tions described above.
: Cancel
OFF
ON
Repeat Play
Select
REP
: Repeat the current selection.
: Cancel
OFF
ON
Blank Skip
Select
B•SKIP
:
Skip unrecorded portions longer than 15 seconds
on the tape.
: Cancel
OFF
ON
Metal Tape
Mode
Select
MTL
: When playing metal or chromium dioxide (CrO
2
)
tapes
: Cancel - When playing normal tape
OFF
ON
Dolby Noise
Reduction
Select
DOLBY
: Set the Dolby B NR mode.
: Cancel
OFF
ON
Cassette Menu Display
Tape Program Search (TPS)
q Press [P·SET{ ] / [{ ] to activate the Tape
Program Search mode.
w To select a desired program, press [2] or [1]
corresponding times to go forward (up to 9) or
backward (up to 8).
e Press
[P·SET{] / [{] again to cancel.
Blank Skip
¡Press and hold [P·SET{] / [{] for more than 2 sec-
onds to skip unrecorded portions longer than 15 seconds on the tape.
¡Press and hold
[P·SET{] / [{] again to cancel.
Note: The blank skip does not work when an unrecorded
portion of a tape is less than 15 seconds.
Page 15
[BAND]
(Set/Changer select)
22
CQ-FX721P
15
E
N
G
L
I
S
H
VOL
MENU
BAND
SET/AUTO
·P
PRG
REMOTE
PTY
DISP
S·HDB
OPEN
SOURCE
TA
PWR
AF
DIM
HDB
MUTE
TUNE
TRACK
P-SET
DISC
CH
·C
1
2
E
O
N
P
T
Y
C
T
CASSETTE RECEIVER WITH FULL DOT MATRIX DISPLAY
CQ-FX721P
D
O
L
B
Y
B
N
R
P-SET
DISC
M
E
N
U
BAND
DISP
SOURCE
TUNE
TRACK
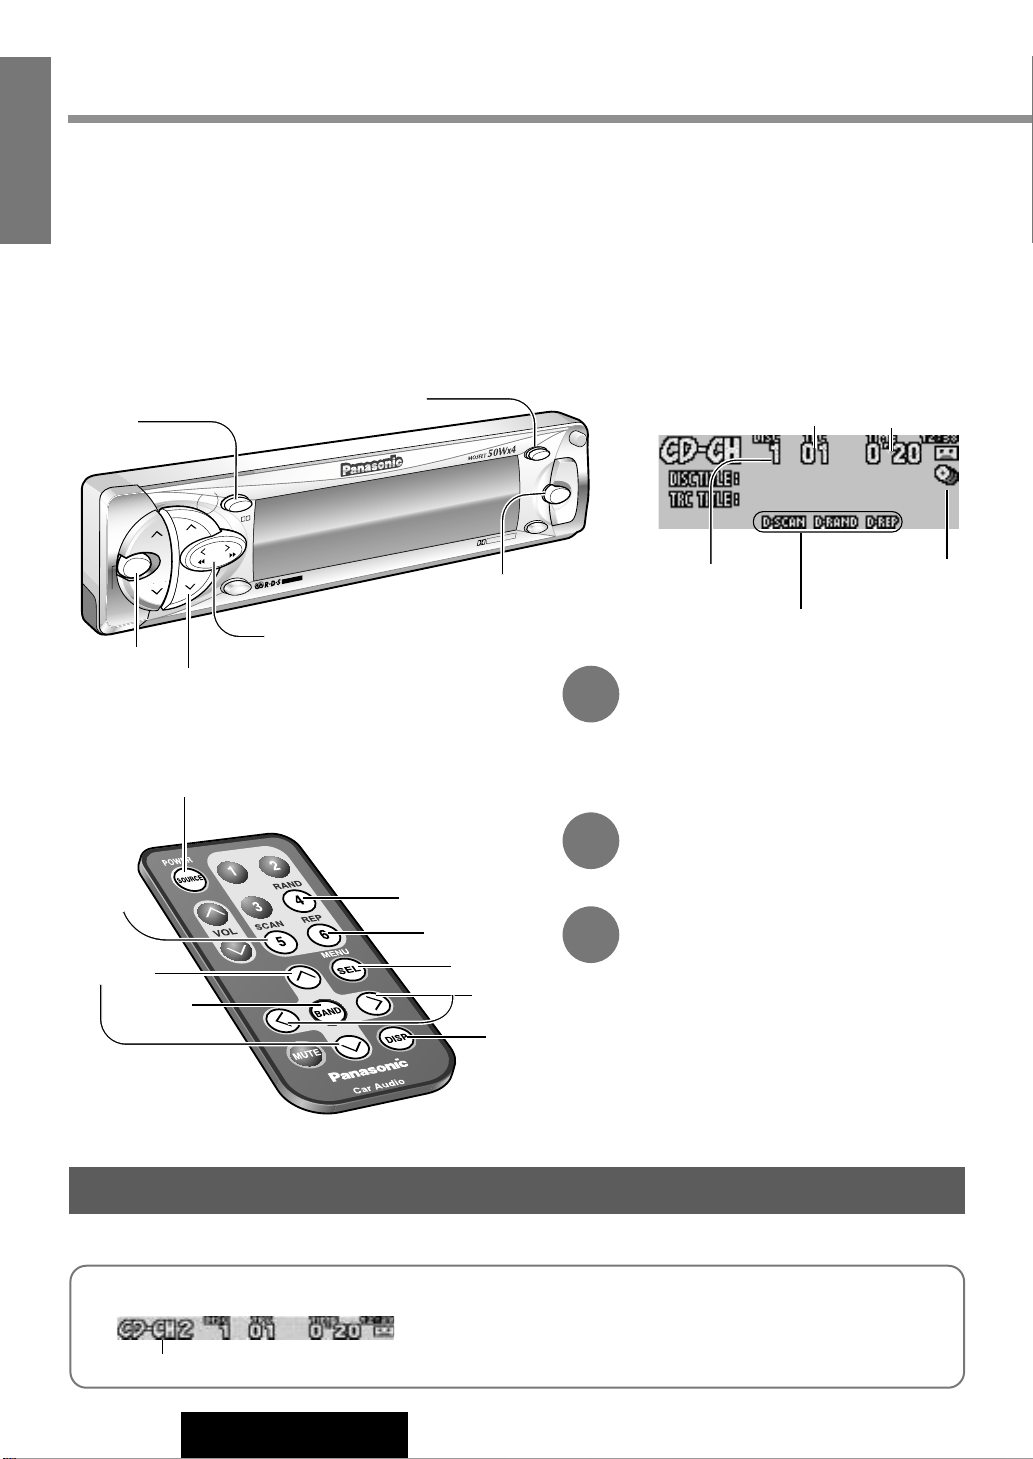
CD Changer Mode
Press [SOURCE] to select the CD changer
mode and play back starts
Note : Load a magazine with CDs when “NO
DISC” is displayed.
Disc Selection
[DISC}] / [}] : Next disc.
[DISC{] / [{] : Previous disc.
Track Selection
[TRACK2] / [[] : Next track.
[TRACK1] / []] : Beginning of the cur-
rent track.
Previous track (Press
twice)
Track Search
Press and hold.
[TRACK2] / [[] : Fast forward
[TRACK1] / []] : Fast reverse
1
2
3
CD changer functions are designed for optional Panasonic CD changer unit.
Connect the CD changer, and load a magazine.
When the unit is connected with a CD text recongizable CD changer (CX-DP9061EN, for example), CD text appears on the
display.
Notes :
¡Loading a magazine when the power is off allows the power to be turned on. (When ACC Selection is set to ON a
page
28)
¡Ejecting the magazine when the unit is in the CD changer mode allows the mode returns to the previous one.
CD Changer Control
[SOURCE]
[TRACK 1] [TRACK2]
[MENU]
[P·SET/DISC}] [P·SET/DISC{]
(Select)
[4] (Random)
[6] (Repeat)
[SEL] (Menu)
[]] [[]
(Track)
[DISP]
(Return)
[5] (Scan)
[}] [{]
(Disc/Select)
[BAND]
(Set)
CD Changer Mode Display
[SOURCE]
[DISP] (Return)
Disc Number
Play Time
When a CD changer is
connected
(Blinks during CD
changer play)
Scan, Random and
Repeat Indicator
Track Number
CD Changer Selection
Preparation: Connect another CD changer by using an optional dual CD changer selector (CA-CD55EN).
Press [BAND] to select CD changer 1 or CD changer 2.
When CD changer 2 is selected.
Note: This selection is not possible when there is no magazine
in the CD changer.
Page 16
23
CQ-FX721P
16
E
N
G
L
I
S
H
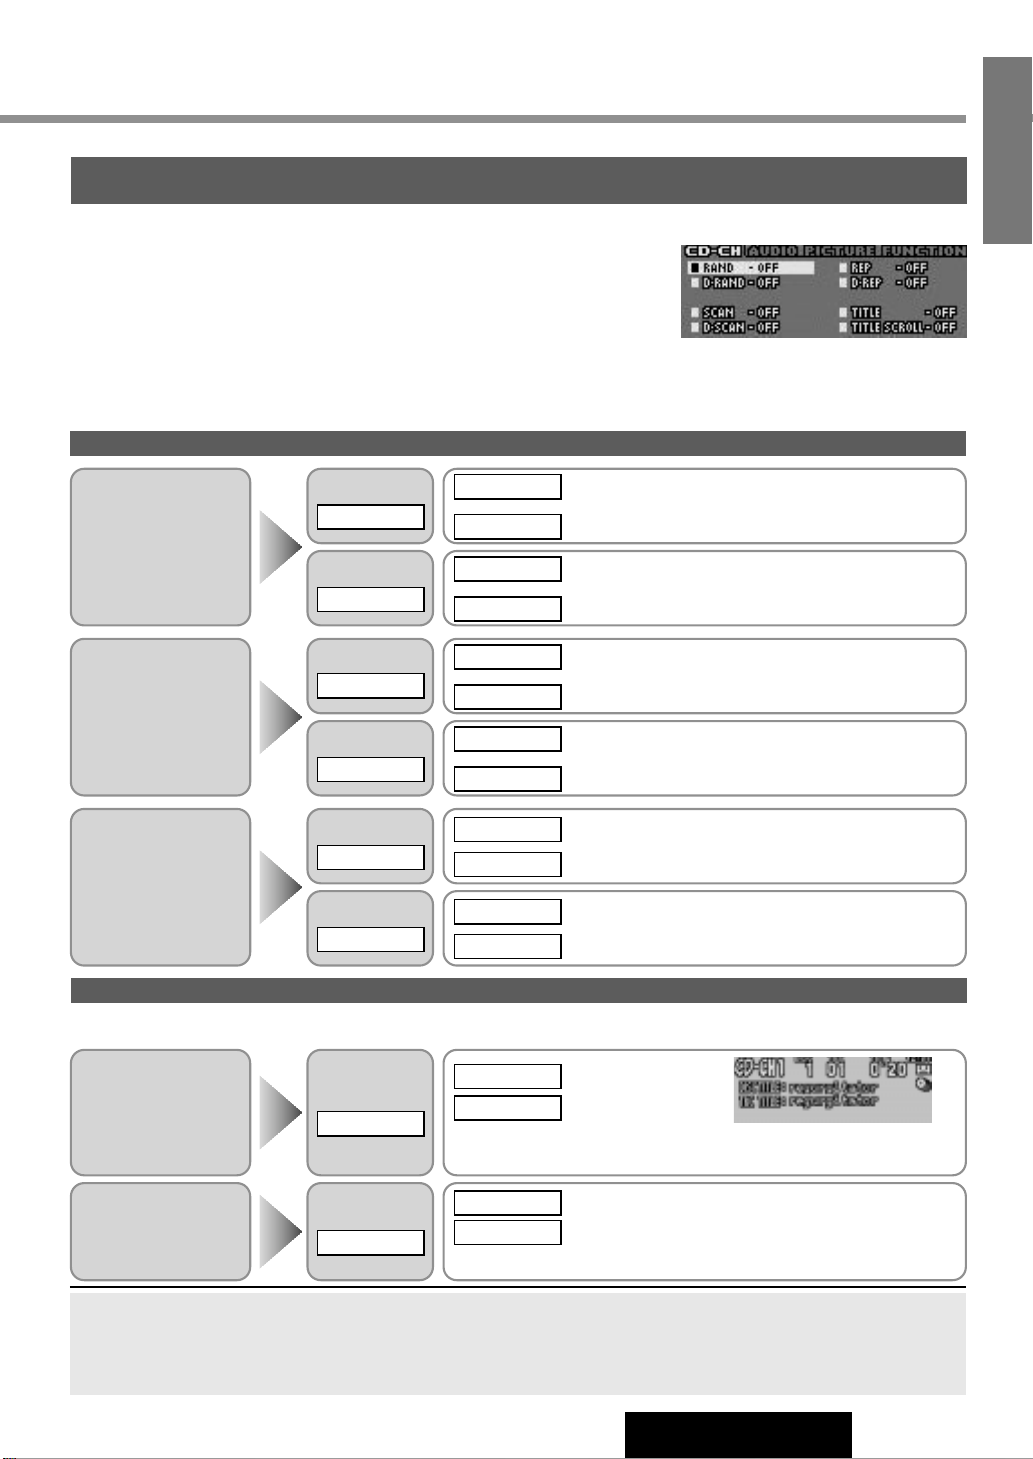
CD Changer Mode Setting
q Press [MENU] / [SEL] during CD changer playing.
w Press [P·SET}]
or [P·SET{] / [}] or [{] to select an item.
e Press [BAND] to switch on or off in turn.
Play Settings
Notes:
¡If no keys have been pressed for more than 15 seconds, the display returns to the previous one after changing to the
menu display.
¡Press [DISP] to return to the regular mode.
Random Play
Select
RAND
: All the available tracks on all discs in the magazine
are played in a random sequence.
: Cancel
OFF
ON
Select
D. RAND
: All the available tracks on current disc are played in a
random sequence.
: Cancel
OFF
ON
Scan Play
Select
SCAN
: The first 10 seconds of each track on the discs plays
in sequence.
: Cancel
OFF
ON
Select
D. SCAN
: 10 seconds from the first track of each disc in the
magazine is played.
: Cancel
OFF
ON
Repeat Play
Select
REP
: Repeat the current selection.
: Cancel
OFF
ON
Select
D. REP
: Repeat the current disc selection.
: Cancel
OFF
ON
CD Changer Menu Display
Direct play setting from remote control when the menu is not displayed
Press [4] (Random) / [5] (Scan) / [6] (Repeat) on the remote control. Press again to cancel.
Press and hold
[4] (Disc Random) / [5] (Disc Scan) / [6] (Disc Repeat) for more than 2 seconds on the remote control.
Press and hold again for more than 2 seconds to cancel.
Title Display
Title Information
Select
TITLE
: Display
: No display
¡“NO TITLE” is displayed when there is no information.
¡When the title display is set to ON, the mode display appears.
OFF
ON
Title Scroll
Select
TITLE SCROLL
: Continuous scroll
: Scroll stops after a circle scroll
Press and hold
[BAND] for more than 2 seconds to
have an another circle scroll.
OFF
ON
When the unit is connected with a CD text recongizable CD changer (CX-DP9061EN, for example), CD text appears on the display.
Page 17
24
CQ-FX721P
17
E
N
G
L
I
S
H
VOL
MENU
BAND
SET/AUTO
·P
PRG
REMOTE
PTY
DISP
S·HDB
OPEN
SOURCE
TA
PWR
AF
DIM
HDB
M
UTE
TUNE
TRACK
P-SET
DISC
CH
·C
1
2
E
O
N
P
T
Y
C
T
CASSETTE RECEIVER WITH FULL DOT MATRIX DISPLAY
CQ-FX721P
D
O
L
B
Y
B
N
R
P-SET
DISC
M
EN
U
BAND
DISP
TUNE
TRACK
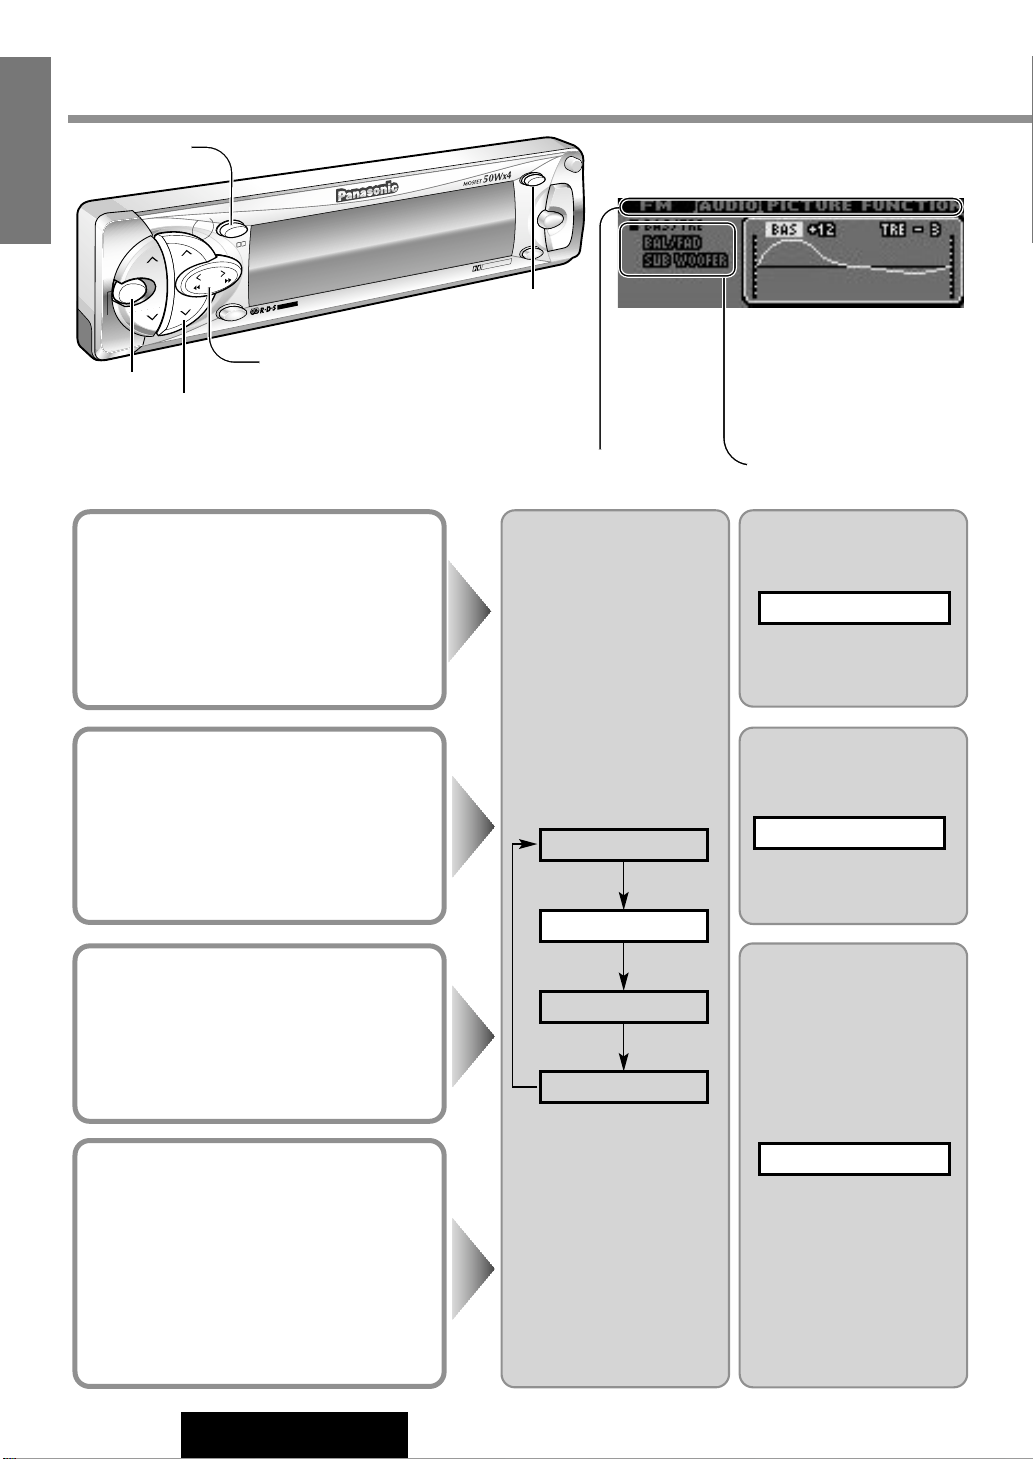
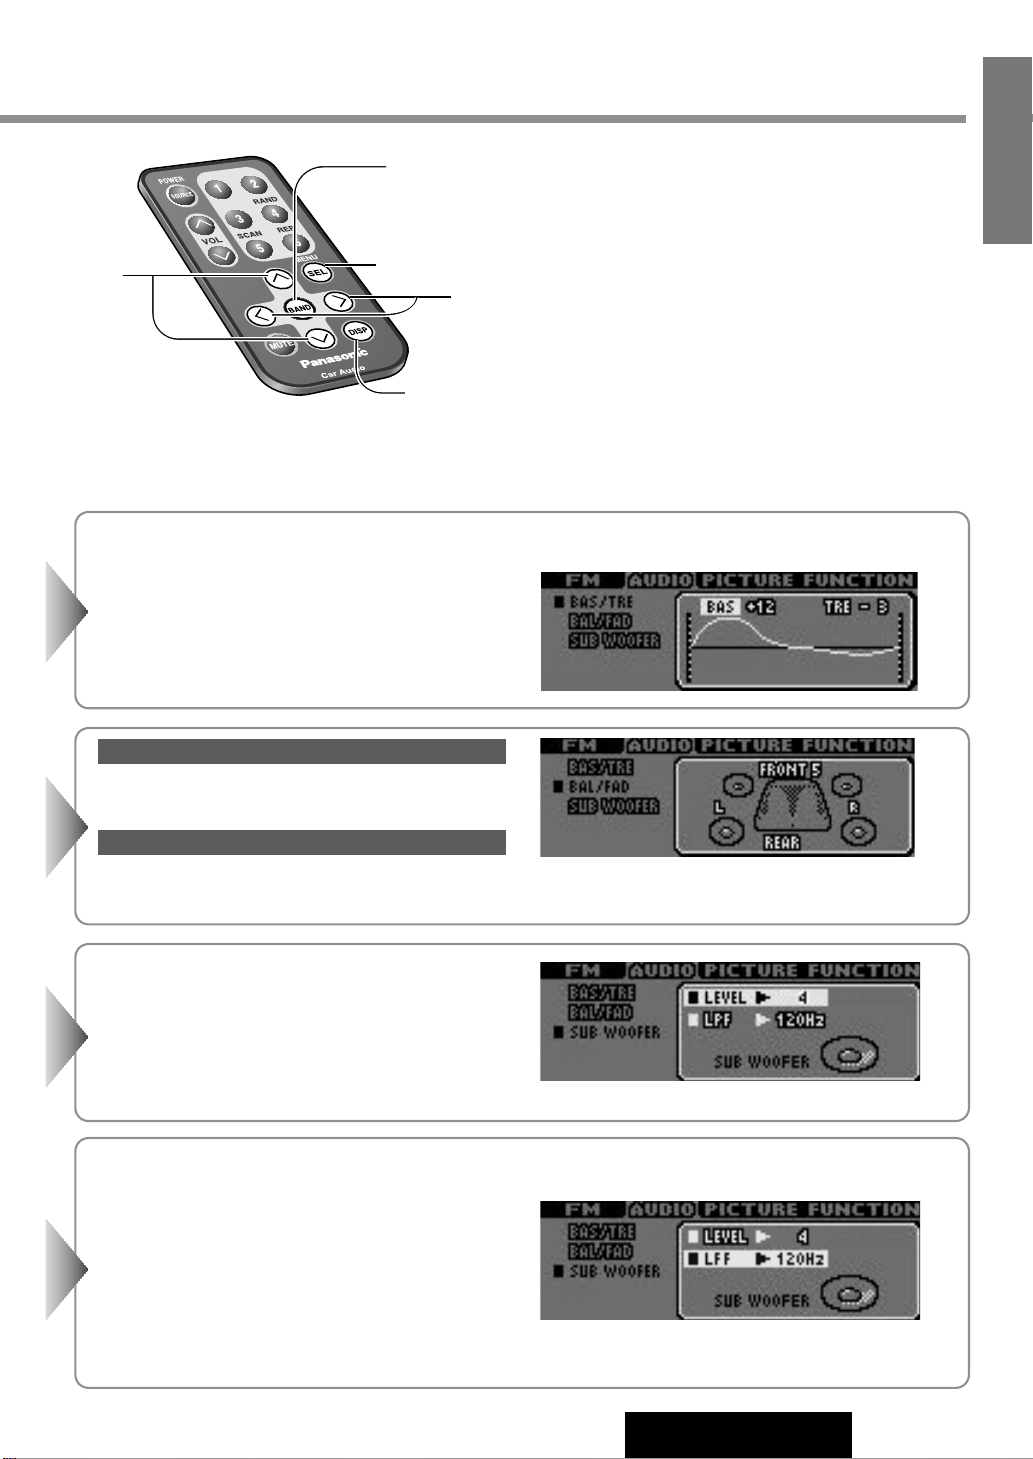
Bass and Treble
Turn the bass/treble level up or down
Default : level 0
Setting range : –12 to +12 (in 3 dB step)
Press [MENU] / [SEL] to
select AUDIO.
FUNCTION
PICTURE
AUDIO
Current Source
Press [P·SET}] or
[P·SET{] / [}] or
[{] to select
Press
[BAND] to set.
BAS/TRE
Press [P·SET}] or
[P·SET{] / [}] or
[{] to select.
Press
[BAND] to set.
SUB WOOFER
Audio Setting – AUDIO Menu
[BAND] (Set)
[TUNE]] [TUNE[] (Select)
[MENU]
[P·SET}] [P·SET{]
(Select/Adjust)
AUDIO Menu Display
[DISP]
(Return)
Balance and Fader
You can adjust the sound balance among the
front, rear, right and left speakers.
Default : L/R(Balance) : Center
FRONT/REAR(Fader) : Center
Setting range : 15 levels each
Sub-Woofer Volume
Default : 4
Setting range :0 to 8
Sub-Woofer Low Pass
Filter
Select the upper limit frequency of the sound
from Sub-woofer
Default : 120 Hz
Frequency : 80 Hz or 120 Hz
Press [P·SET}] or
[P·SET{] / [}] or [{]
to select.
Press
[BAND] to set.
BAL/FAD
Press [MENU] / [SEL]
q
Press [}] or [{]
w
Page 18
25
CQ-FX721P
18
E
N
G
L
I
S
H
Notes:
¡If no keys have been pressed for more than 15 sec-
onds, the display returns to the previous one after
changing to the menu display.
¡Press [DISP] to return to the regular mode.
[]] [[]
(Select)
[}] [{]
(Select/Adjust)
[BAND] (Set)
[SEL] (Menu)
[DISP] (Return)
[P·SET}] / [}] : Front enhanced
[P·SET{] / [{] : Rear enhanced
FRONT/REAR (Fader)
[TUNE[] / [[] : Right enhanced
[TUNE]] / []] : Left enhanced
L/R (Balance)
Press [BAND] to set.
w [P·SET}] / [}] : Enhanced
[P·SET{] / [{] : Decrease
q [TUNE[] / [[]
or [TUNE]] / []]
: Select "BAS" (Bass) or "TRE"(Treble)
e Press [BAND] to set.
q [P·SET}] / [}]
or [P·SET{] / [{] : Select "LEVEL"
w [TUNE[] / [[] : Enhanced
[TUNE]] / []] : Decrease
e Press [BAND] to set.
q [P·SET}] / [}]
or [P·SET{] / [{] : Select "LPF"
w [TUNE]] / []] : No more than 80 Hz
[TUNE[] / [[] : No more than 120 Hz
e Press [BAND] to set.
Press [}] , [{] , []] or [[], and press [BAND].
e
Page 19
VOL
MENU
BAND
SET/AUTO
·P
PRG
REMOTE
PTY
DISP
S·HDB
OPEN
SOURCE
TA
PWR
AF
DIM
HDB
MUTE
TUNE
TRA
CK
P-SET
DISC
CH
·C
1
2
E
O
N
P
T
Y
C
T
CASSETTE RECEIVER WITH FULL DOT MATRIX DISPLAY
CQ-FX721P
D
O
L
B
Y
B
N
R
P-SET
DISC
MENU
BAND
DIS
P
TUNE
TRACK
26
CQ-FX721P
19
E
N
G
L
I
S
H
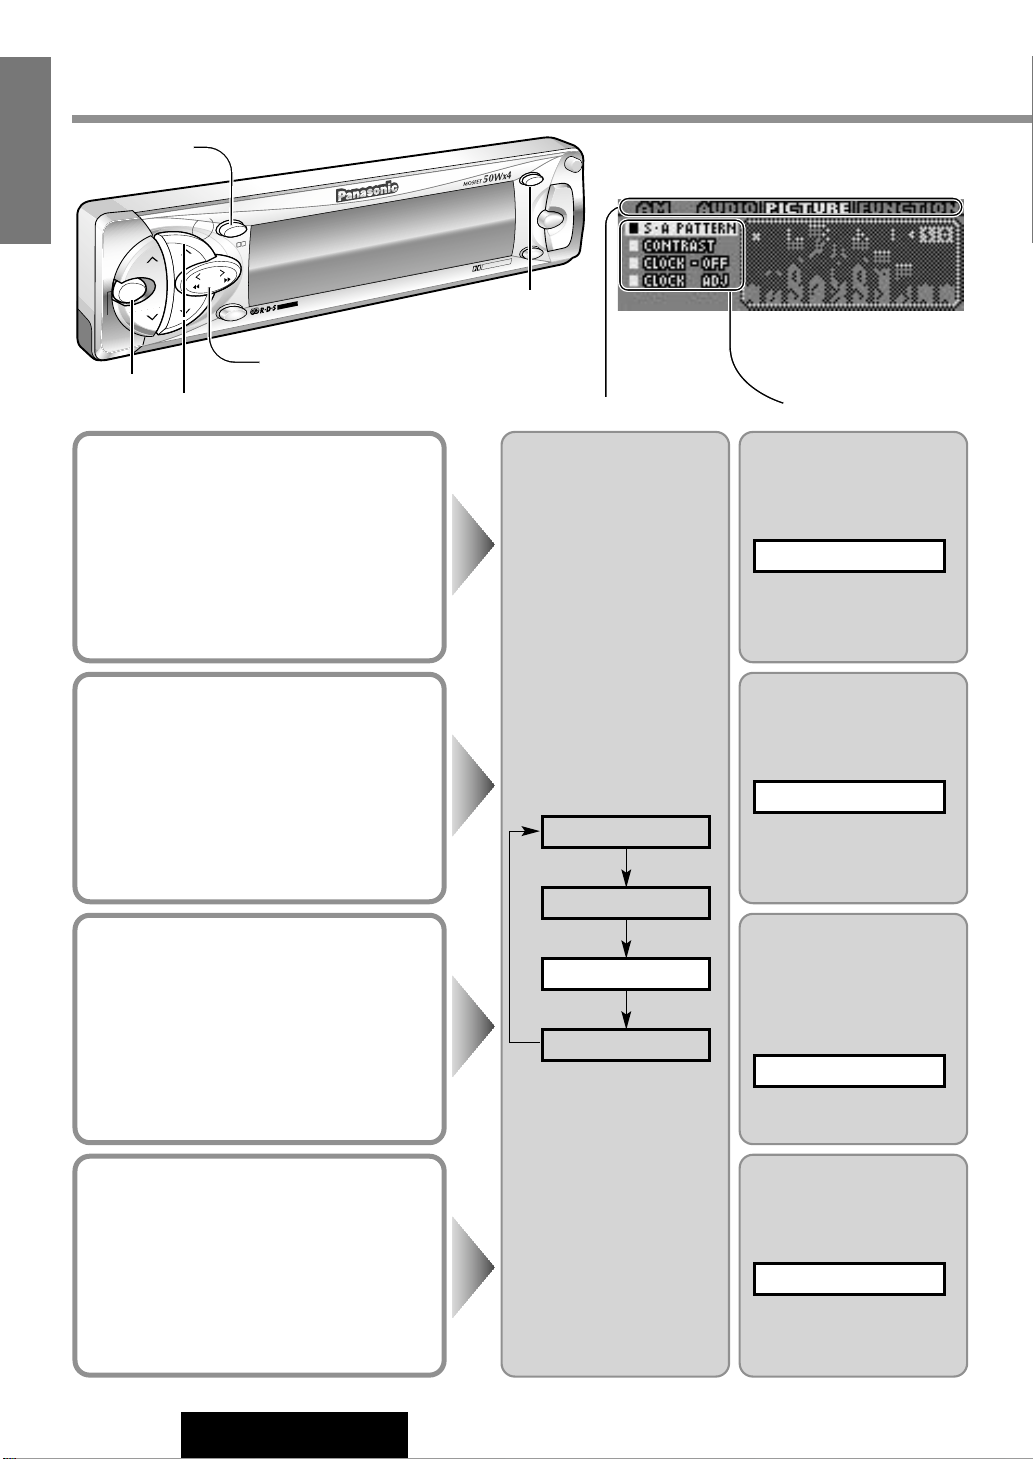
Spectrum Analyzer
Display Pattern
Default : Pattern A
Variety : 6 types
Contrast
Allows you to adjust the display contrasts for
better viewing.
Default : Level 3
Setting range : Level 1 to Level 5
Clock Display
Default : ON (Not adjusted. “--:--” will appear.)
Clock Adjustment
When receiving an RDS station, the clock time
(CT) service automatically adjusts the time.
(
a page 14) If CT service is not available,
adjust the clock.
Default : Not adjusted. “0:00”
Press [P·SET}] or
[P·SET{] / [}] or [{]
to select.
Press
[BAND] to set.
S·A PATTERN
Press [P·SET}] or
[P·SET{] / [}] or [{]
to select.
Press
[BAND] to set.
CONTRAST
Press [P·SET}] or
[P·SET{] / [}] or [{]
to select.
CLOCK
Press [P·SET}] or
[P·SET{] / [}] or [{]
to select.
Press
[BAND] to set.
CLOCK ADJ
Display Setting – PICTURE Menu
[BAND] (Set)
[TUNE]] [TUNE[] (Select/Adjust)
[MENU]
[P·SET}] [P·SET{]
(Select/Adjust)
PICTURE Menu Display
Press [MENU] / [SEL] to
select PICTURE.
FUNCTION
PICTURE
AUDIO
Current Source
Press [MENU] / [SEL]
q
Press [}] or [{]
w
[DISP]
(Return)
Page 20
27
CQ-FX721P
20
E
N
G
L
I
S
H
Notes:
¡If no keys have been pressed for more than 15 sec-
onds, the display returns to the previous one after
changing to the menu display.
¡Press [DISP] to return to the regular mode.
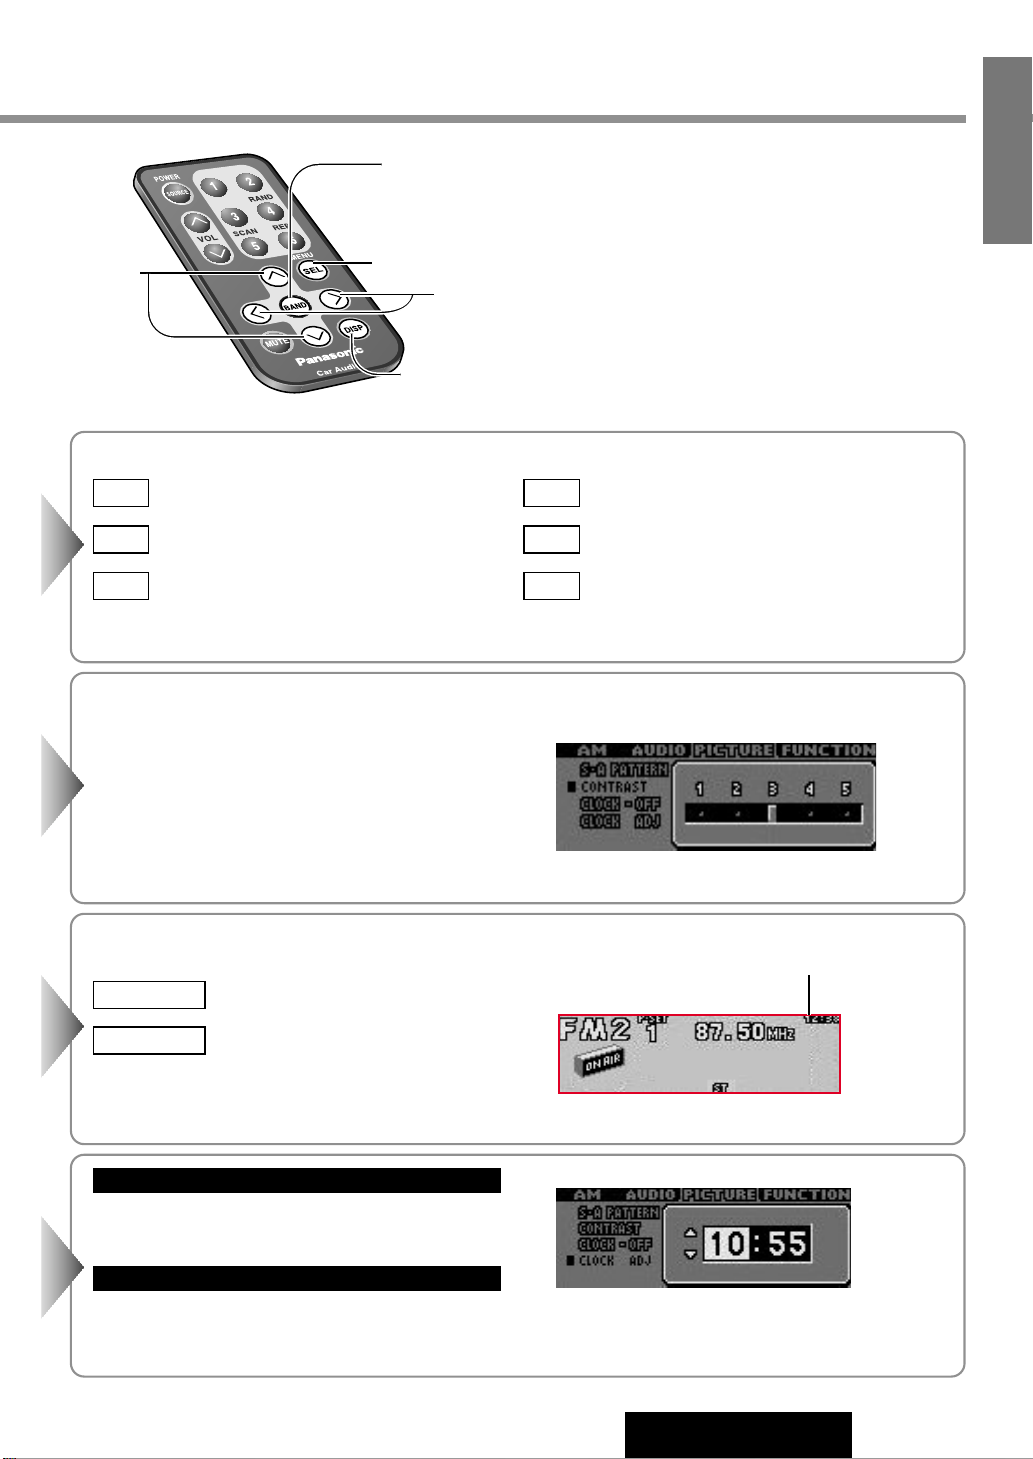
[P·SET}] / [}]
: Put forward hour/minute.
[P·SET{] / [{] : Put back hour/minute.
Hour / Minute Switch
[TUNE]] / []] : The hour display
[TUNE[] / [[] : The minute display
Hour / Minute Adjustment
Press [BAND] to set.
[TUNE[] / [[] : Level up
[TUNE]] / []] : Level down
Press
[BAND] to set.
Press
[BAND] to switch on or off in turn.
: Clock display ON
: Clock display OFF
OFF
ON
[TUNE[] or [TUNE]] / [[] or []] to change.
Press
[BAND] to set.
: Display showing a cube that continues to
change
: Display showing a globe that continues to
change
: Display showing a flower or doll pattern
: Display showing a bird flapping its wings
: Display showing the image of a circuit
: Standard spectrum analyzer display (9 band)
STD
E
D
C
B
A
Note: Switch the screen display to have the Spectrum Analyzer Display. (a page 11)
[]] [[]
(Select/Adjust)
[}] [{]
(Select/Adjust)
[BAND] (Set)
[SEL] (Menu)
Clock Display
[DISP] (Return)
Press [}] , [{] , []] or [[], and press [BAND].
e
Page 21
VOL
MENU
BAND
SET/AUTO
·P
PRG
REMOTE
PTY
DISP
S·HDB
OPEN
SOURCE
TA
PWR
AF
DIM
HDB
MUTE
TUNE
TRA
CK
P-SET
DISC
CH
·C
1
2
E
O
N
P
T
Y
C
T
CASSETTE RECEIVER WITH FULL DOT MATRIX DISPLAY
CQ-FX721P
D
O
L
B
Y
B
N
R
P-SET
DISC
MENU
DIS
P
TUNE
TRACK
BAND
28
CQ-FX721P
21
E
N
G
L
I
S
H
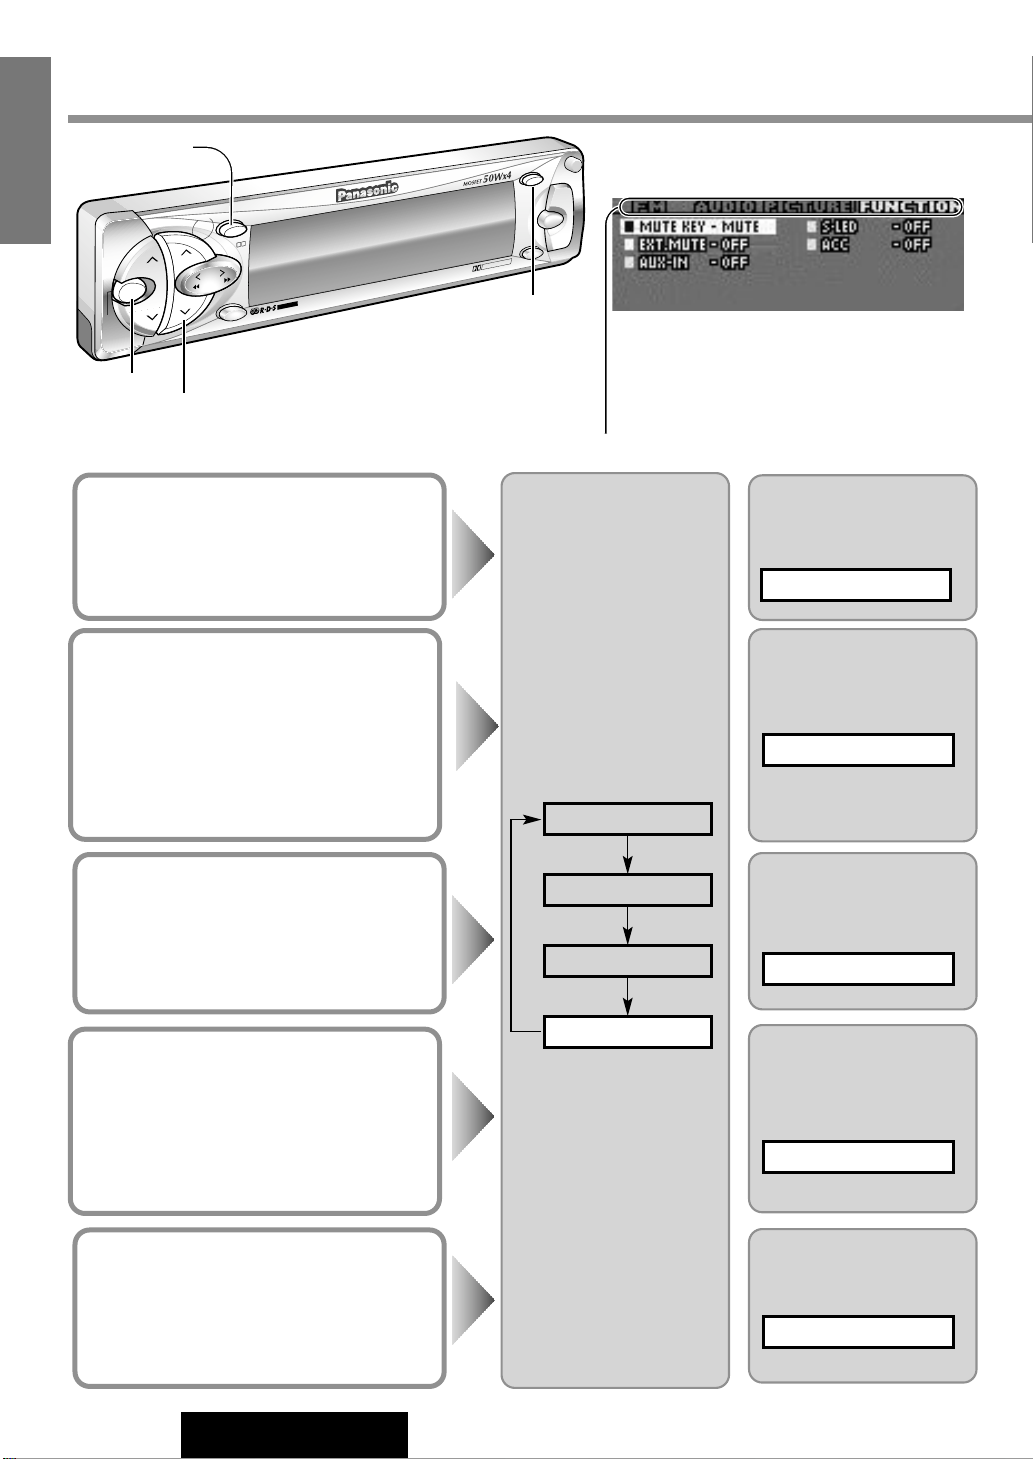
Mute/ATT (Attenuation)
Decreasing range by pressing [MUTE] button
can be selected.
Default : Mute
Press [P·SET}] or
[P·SET{] / [}] or [{]
to select.
MUTE KEY
External Mute
Allows you to mute the current source while
your navigation system provides voice guidance or car telephone conversation is in
progress.
Default : Lv 0
Press [P·SET}] or
[P·SET{] / [}] or [{]
to select.
EXT. MUTE
Excluding AUX-IN from
Source Selection
Default : ON
Press [P·SET}] or
[P·SET{] / [}] or [{]
to select.
AUX-IN
Security Function
The security indicator blinks while the removable face plate is removed from this unit.
Default : ON
Press [P·SET}] or
[P·SET{] / [}] or [{]
to select.
S·LED
Function Setting – FUNCTION Menu
[BAND] (Set)
[MENU]
[P·SET}] [P·SET{]
(Select)
FUNCTION Menu Display
[DISP]
(Return)
Press
[MENU] / [SEL] to
select FUNCTION.
FUNCTION
PICTURE
AUDIO
Current Source
Press [P·SET}] or
[P·SET{] / [}] or [{]
to select.
ACC
ACC Selection
If your car has ACC, turn it ON. Otherewise,
turn it off.
Default : OFF
Press
[MENU] / [SEL].
q
Press [}] or [{].
w
Page 22
29
CQ-FX721P
22
E
N
G
L
I
S
H
Notes:
¡If no keys have been pressed for more than 15 sec-
onds, the display returns to the previous one after
changing to the menu display.
¡Press [DISP] to return to the regular mode.
Press [BAND] to switch between mute or attenuation in turn.
: No sound
: Decrease to 1/10
ATT
MUTE
Press [BAND] to change the volume level of the sound source as shown.
Press [BAND] to activate the function or inactivate it in turn.
: External input (AUX-IN) is selectable as a source.
: External input (AUX-IN) is not selectable as a source.
With AUX-IN set to OFF, AUX-IN will not be selected when
[SOURCE] is pressed.(a page 10)
OFF
ON
Press [BAND] to activate the function or inactivate it in turn.
: Security function is active.
: Security function is inactive.
OFF
ON
Note: The setting state of the External Mute is displayed when the
voice guidance or car telephone is used (except when the setting
state is OFF).
: No sound
: Decrease to 1/30
: Decrease to 1/10
: Unchanged
OFF
Lv 2
Lv 1
Lv 0
When the power is turned off (at ACC OFF setting)
When the key in the ignition is turned OFF (at ACC ON setting)
¡Security message will be displayed.
¡The panel removal alarm will be active.
When the front panel is removed.
¡The security indicator blinks. (a page 33)
Security Function
[DISP] (Return)
[}] [{]
(Select)
Press [BAND] to switch the ACC on or off in turn.
: ACC provided
: ACC not provided
OFF
ON
[BAND] (Set)
[SEL] (Menu)
Press
[BAND].
e
¡The power turns on automatically by inserting a cassette
tape to this player or a CD magazine to a CD changer.
¡The clock is displayed even while the power is off.
¡The demonstration is displayed when the power is turned
on by pressing and holding [SOURCE] for 4 seconds.
ACC ON
Page 23
30
CQ-FX721P
23
E
N
G
L
I
S
H
Installation
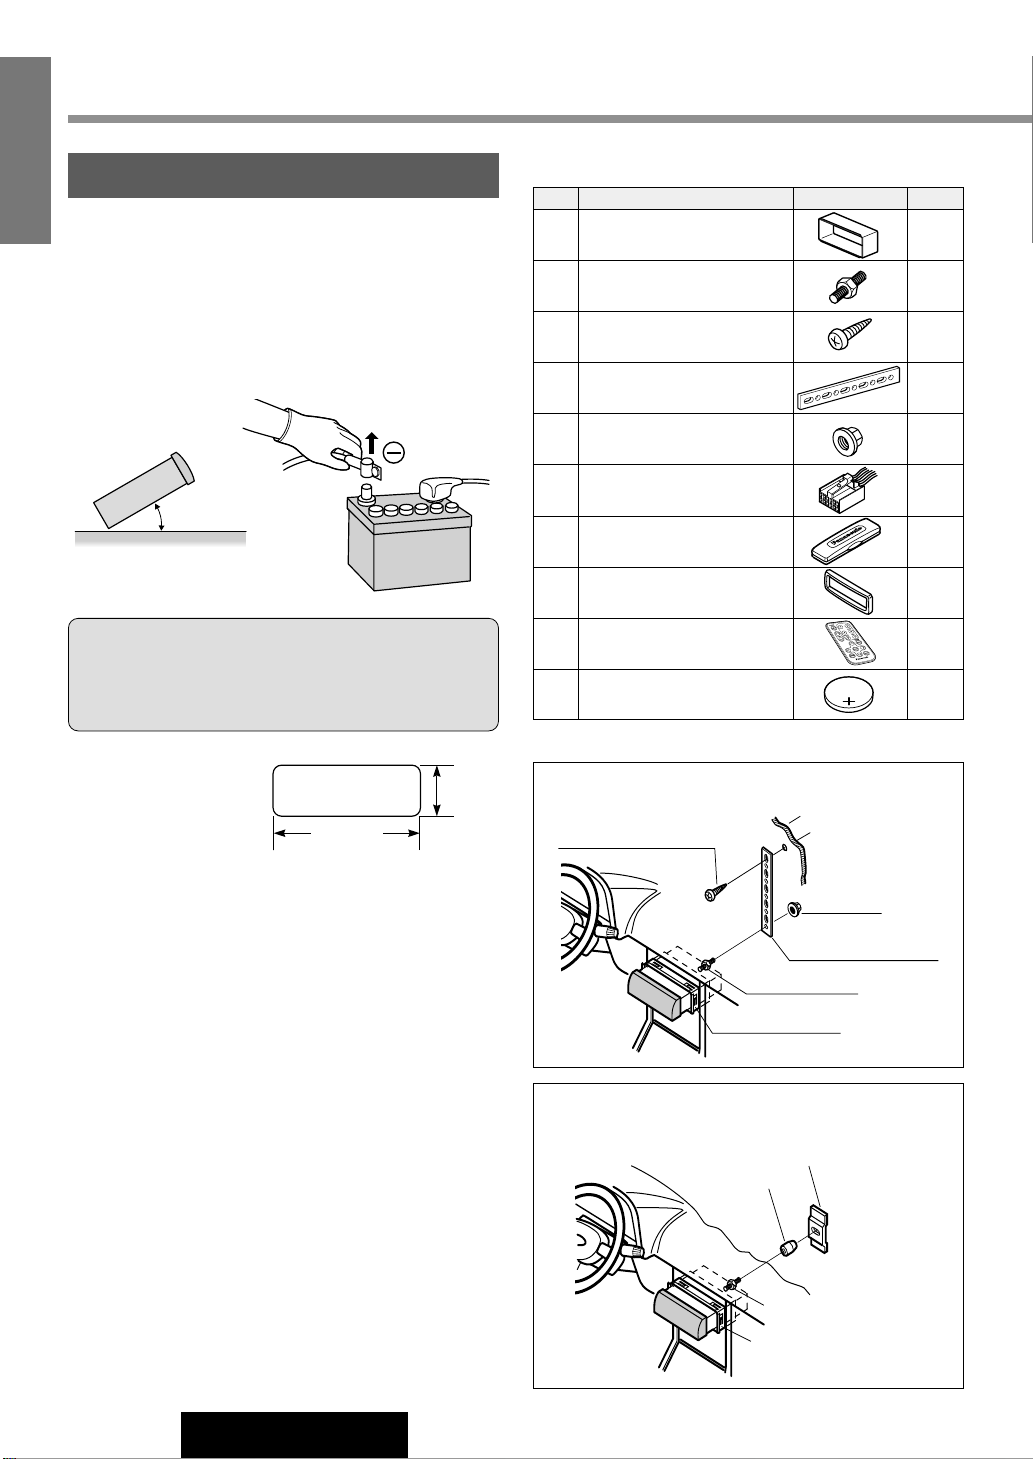
Fire Wall of Car
tHex. Nut
rRear Support Strap
wMounting Bolt
qMounting Collar
eTapping Screw
3 mmø
(a) Using the Rear Support Strap (Option)
Rubber Cushion
(Option)
wMounting Bolt
qMounting Collar
Rear Support Bracket
(Provided on the car)
(b) Using the Rubber Cushion (Option)
Caution: Do not disconnect the battery terminals of a
car with trip or navigational computer since all user settings stored in memory will be lost. Instead take extra
care with installing the unit to prevent shorts.
Preparation
¡Before installation, check the radio operation with anten-
na and speakers.
¡Disconnect the cable from the negative (–) battery termi-
nal (see caution below).
¡Unit should be installed in a horizontal position with the
front end up at a convenient angle, but not more than
30°.
Dashboard
Installation
Installation Opening
The unit can be installed in
any dashboard having an
opening as shown at right. The dashboard should be 4.5
mm - 6 mm thick in order to be able to support the unit.
Installation Precautions
This product should be installed by a professional installer,
if possible.
In case of difficulty, please consult your nearest authorized
Panasonic Service Center.
1. This system is to be used only in a 12-volt, DC battery
system (car) with negative ground.
2. Follow the electrical connections carefully (
a Page 34).
Failure to do so may result in damage to the unit.
3. Connect the power lead (red) after all other connections
are made.
4. Be sure to connect the battery lead (yellow) to the positive terminal (+) of the battery or fuse block (BAT) terminal.
5. Insulate all exposed wires to prevent short circuiting.
6. Secure all loose wires after installing the unit.
7. Please carefully read the operating and installation
instructions of the respective equipment before connecting it to this unit.
182 mm
53 mm
30° or less
Q’tyDiagramItemNo.
y
Supplied Hardware
q
w
u
i
o
!0
Mounting Collar
Mounting Bolt (5 mmø)
Power Connector
Removable Face Plate Case
Trim Plate
Remote Control Unit
Lithium Battery (CR2025)
1
1
e
Tapping Screw 1
r
Rear Support Strap 1
t
Hex. Nut 1
1
1
1
1
1
Page 24
31
CQ-FX721P
24
E
N
G
L
I
S
H
¡We strongly recommend that you wear gloves for installation work to protect yourself from injuries.
¡When bending the mounting tab of the mounting collar with a screwdriver, be careful not to injure your hands and
fingers.
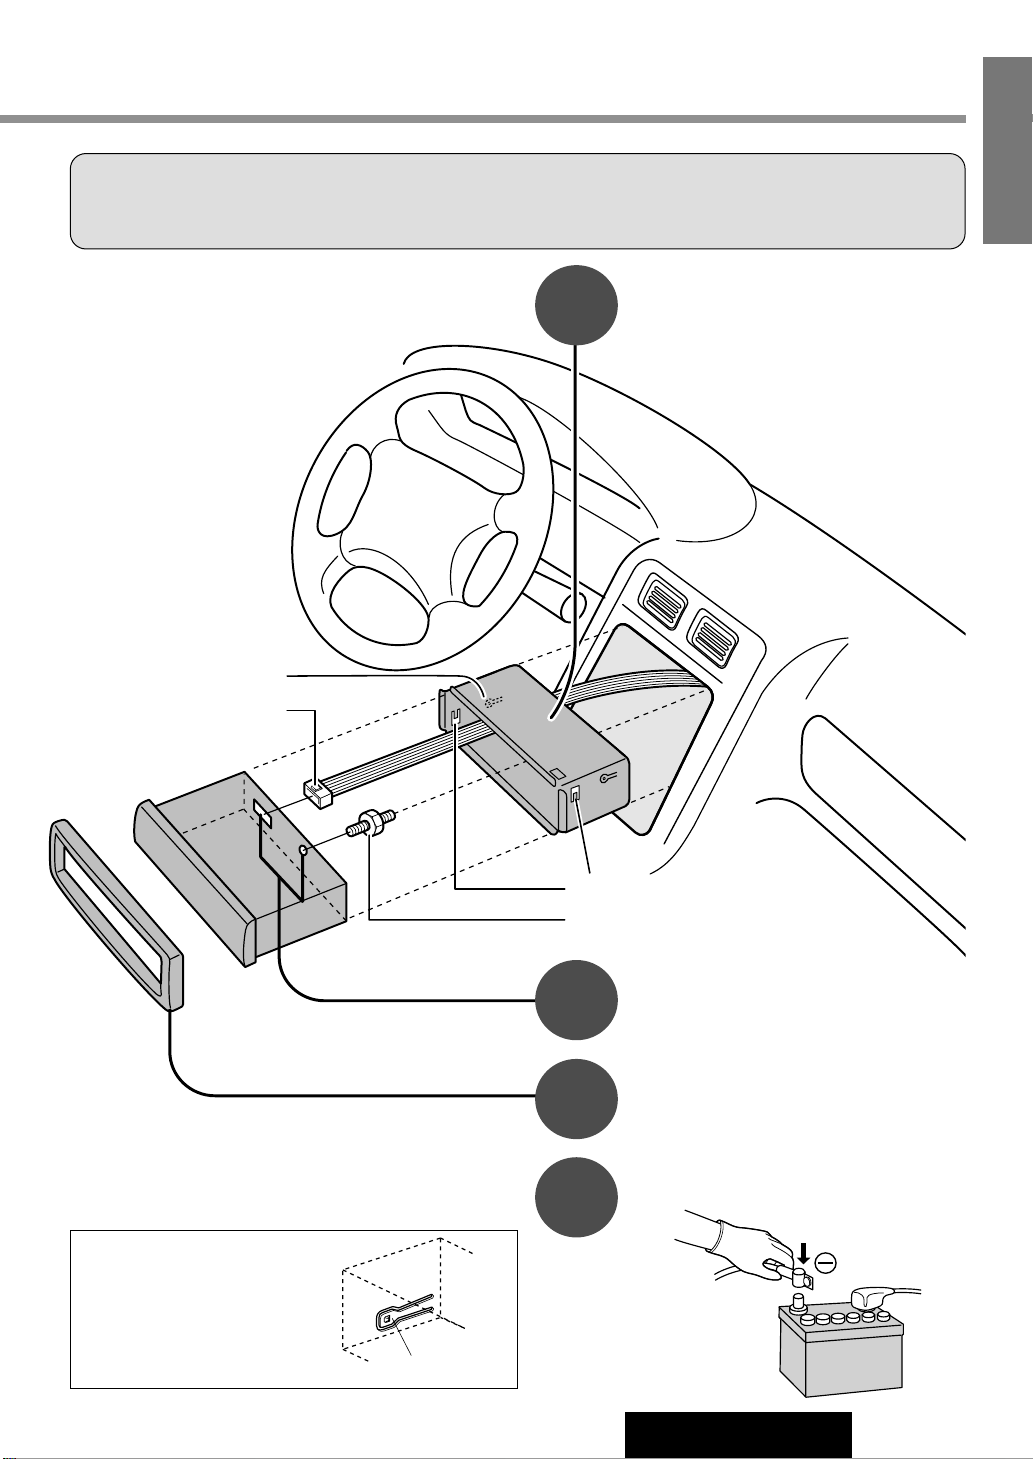
1
2
3
4
Mounting Tabs
Mounting Bolt w
Secure the rear of the unit.
After fixing Mounting Bolt w and Power
Connector y, fix the rear of the unit to the car
body by either method (a) or (b) shown on the
previous page.
Insert Trim Plate i.
After installation reconnect the negative (–) battery terminal.
Insert Mounting Collar q into the
dashboard, and bend the mounting
tabs out with a screwdriver.
First complete the electrical connections, and
then check them for correctness.(
a Page 34)
Lock Lever (C)
Power Connector y
Make sure that the lock lever (C)
is flush with the mounting collar
(not projecting outward).
Lock Lever
Page 25
32
CQ-FX721P
25
E
N
G
L
I
S
H
;;;;;
;
;;;
;
;
;;
;
;;
;;;
;
;
;
2
1
3
1
2
;;;;;;
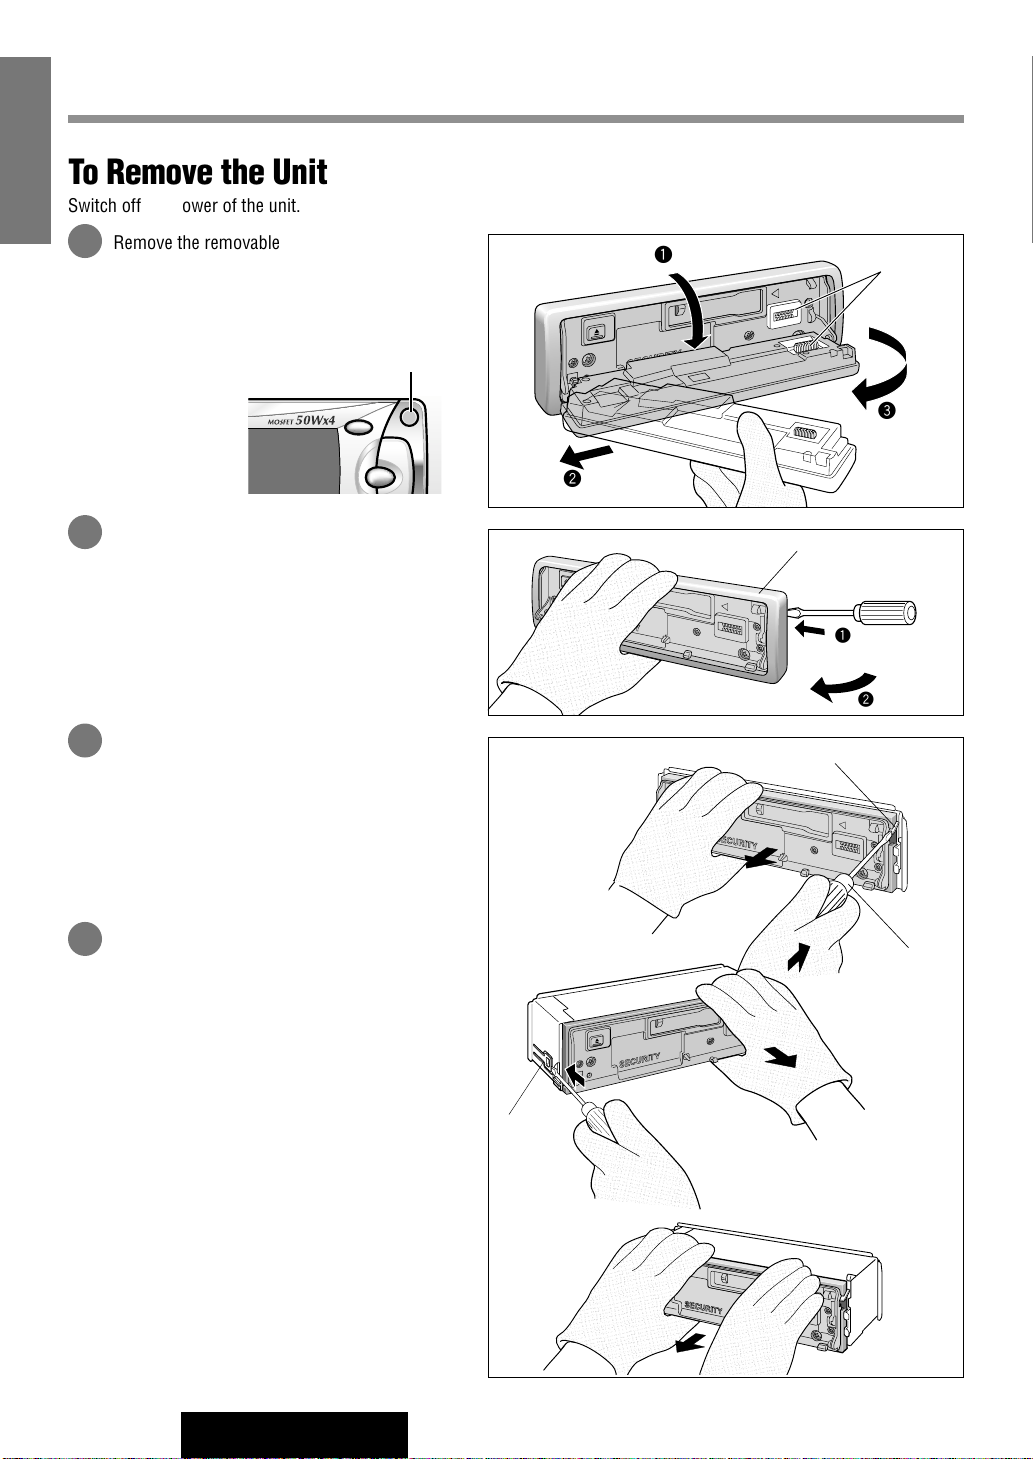
To Remove the Unit
Switch off the power of the unit.
Remove the removable face plate.
q Press [OPEN]. The removable face plate will
be opened.
w Push the face plate to either the right or left.
e Pull it out toward you.
Remove the Trim Plate
i with a screwdriver.
Pull out the unit while pushing down the lock
lever with a screwdriver.
Remove the unit pulling with both hands.
Installation
(continued)
Open
Contact
Pull out
Push
i Trim Plate
Screwdriver
Lock Lever
Screwdriver
1
2
3
4
DISP
OPEN
SOURCE
TA
PWR
Open
;;;;;;
;;;;;;;
;;;;;;;
;;;;;;;
;;;;;;;
;;
;;;;;
;;;;;
;;;;;
;;;
;;;;;;
;;;;;
Lock Lever
Page 26
33
CQ-FX721P
26
E
N
G
L
I
S
H
Cautions:
¡This face plate is not waterproof. Do not expose it to water or excessive moisture.
¡Do not remove the face plate while driving your car.
¡Do not place the face plate on the dashboard or nearby areas where the temperature rises to high levels.
¡Do not touch the contacts on the face plate or on the main unit, since this may result in poor electrical contacts.
¡If dirt or other foreign substances get on the contacts, wipe them off with clean and dry cloth.
¡To avoid damaging the front panel, do not push it down or place objects on it while it is open.
1
3
2
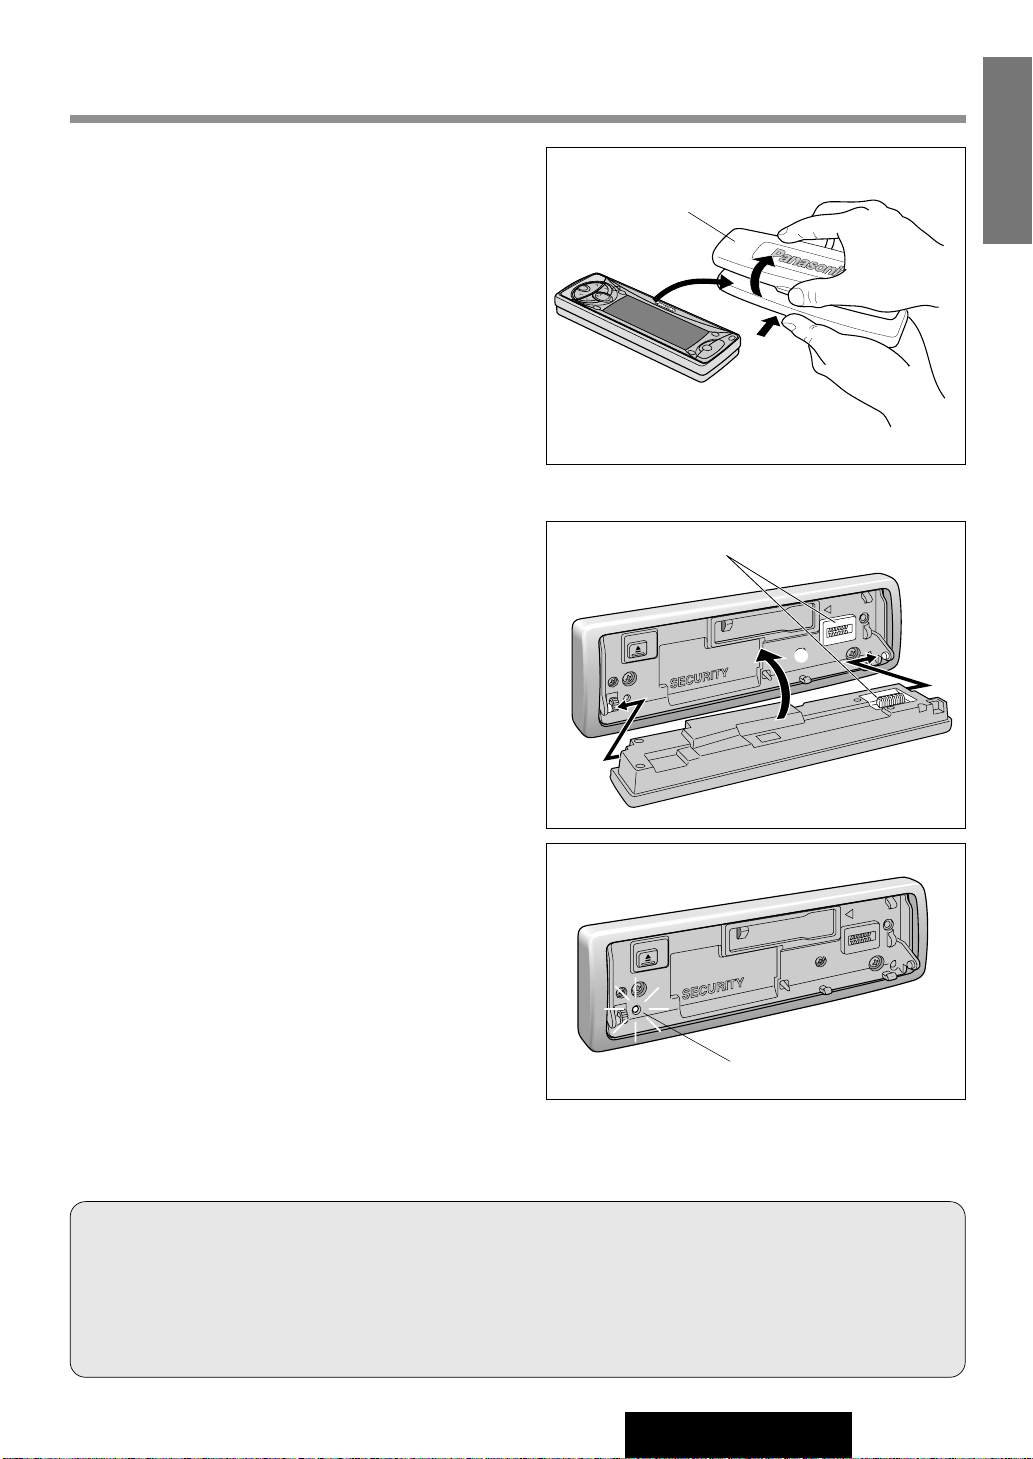
This unit is equipped with a removable face plate. Removing
this face plate makes the radio totally inoperable. The security
indicator will blink.
Place Removable Face Plate into
Case
q Switch off the power of the unit.
w Remove the removable face plate.
(
a Page 32)
e Gently press the bottom of the case and open the cover.
Place the face plate into the case and take it with you
when you leave the car.
Install Removable Face Plate
q Fit the face plate with its right or left hole on one of the
pins provided on the main unit.
w Fit the other hold on the other pin applying slight pres-
sure.
e Move the face plate up and down a few times to make
sure it is secure. Then close the front panel and press
down the right side of the face plate until it clicks into
plate.
Security Indicator
The security indicator blinks when the removable face plate is
removed from the unit.
Activate the security function in the FUNCTION menu display.
(
a page 28)
Panel Removal Alarm
This alarm sounds to warn you not to forget to remove the
panel before leaving your car. This function is activated when
the security indicator is on.
Security Indicator
Anti-Theft System
u Removable Face Plate Case
Contact
Page 27
34
CQ-FX721P
27
E
N
G
L
I
S
H
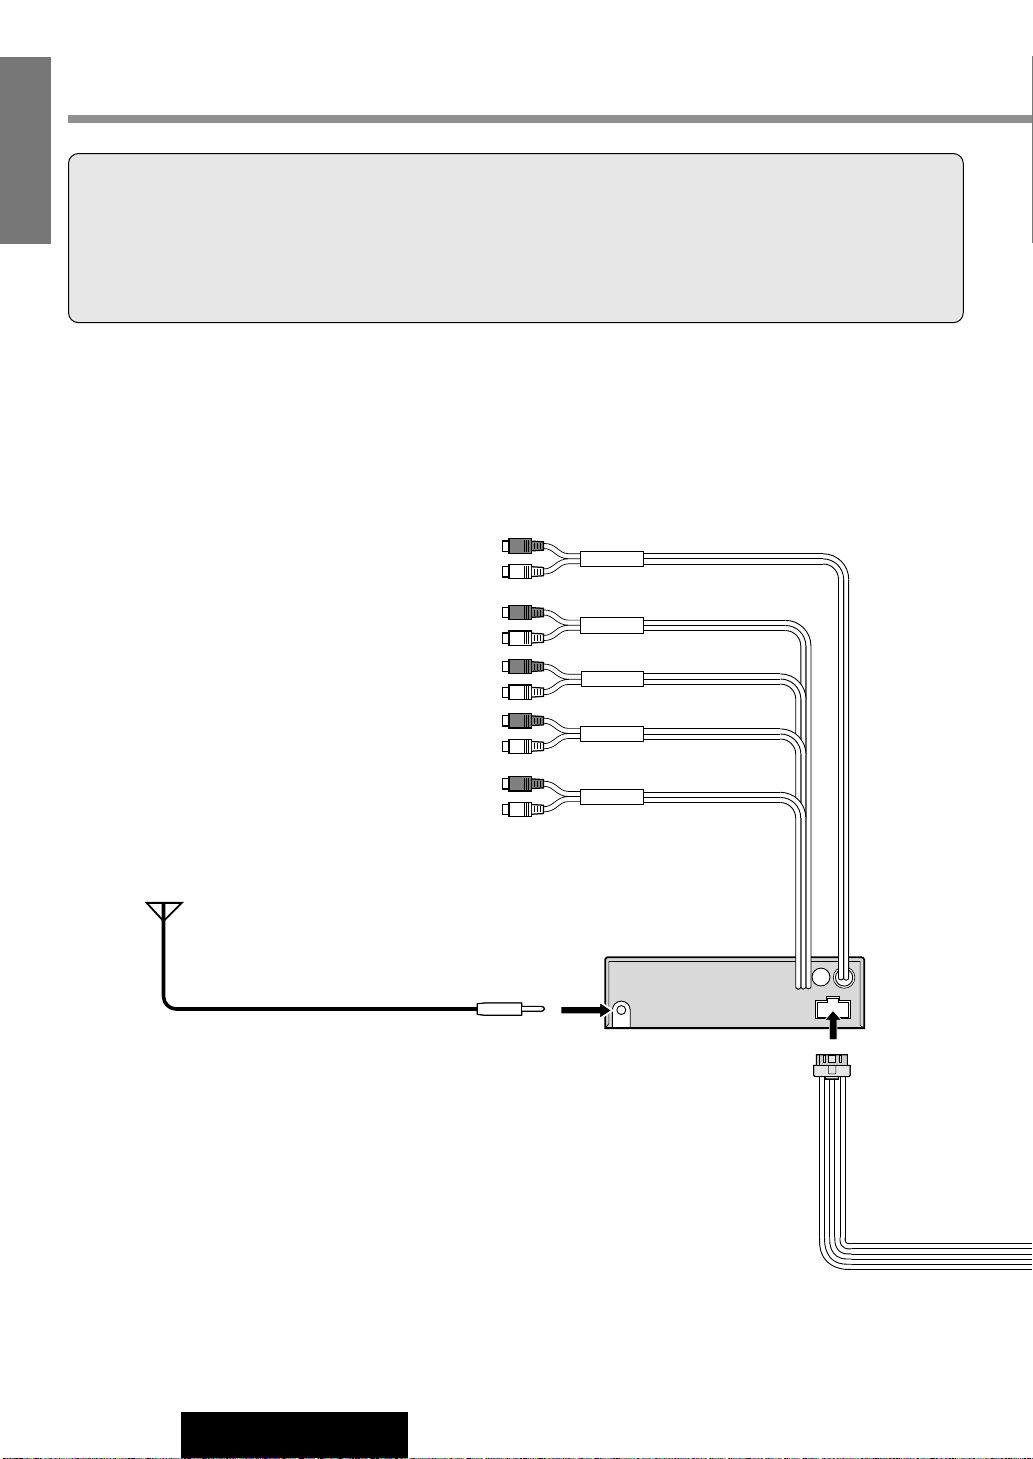
Electrical Connections
FRONT
REAR
S·W-OUT
CH·C-IN
AUX-IN
CQ-FX721P
Pre-out Cord (Front)
(R) (Red)
(L) (White)
Pre-out Cord (Rear)
(R) (Red)
(Red)
(L) (White)
(White)
(Monaural)
Sub-Woofer Cord
AUX Input Cord
(R) (Red)
(L) (White)
CD Changer Input Cord
(R) (Red)
(L) (White)
y Power
Connector
Cautions:
¡This unit is designed for use in a car having a 12-volt negative ground battery system.
¡To prevent damage to the unit, be sure to follow the connection diagram below.
¡Strip about 5 mm of the lead ends for connection (only non-ISO connector cords).
¡Do not insert the power connector into the unit until the wiring is completed.
¡Be sure to insulate any exposed wires to prevent short circuiting with the car chassis. Bundle all cables, and prevent
cable terminals from touching any metal parts.
Cable Wiring Diagram
Page 28
35
CQ-FX721P
28
E
N
G
L
I
S
H
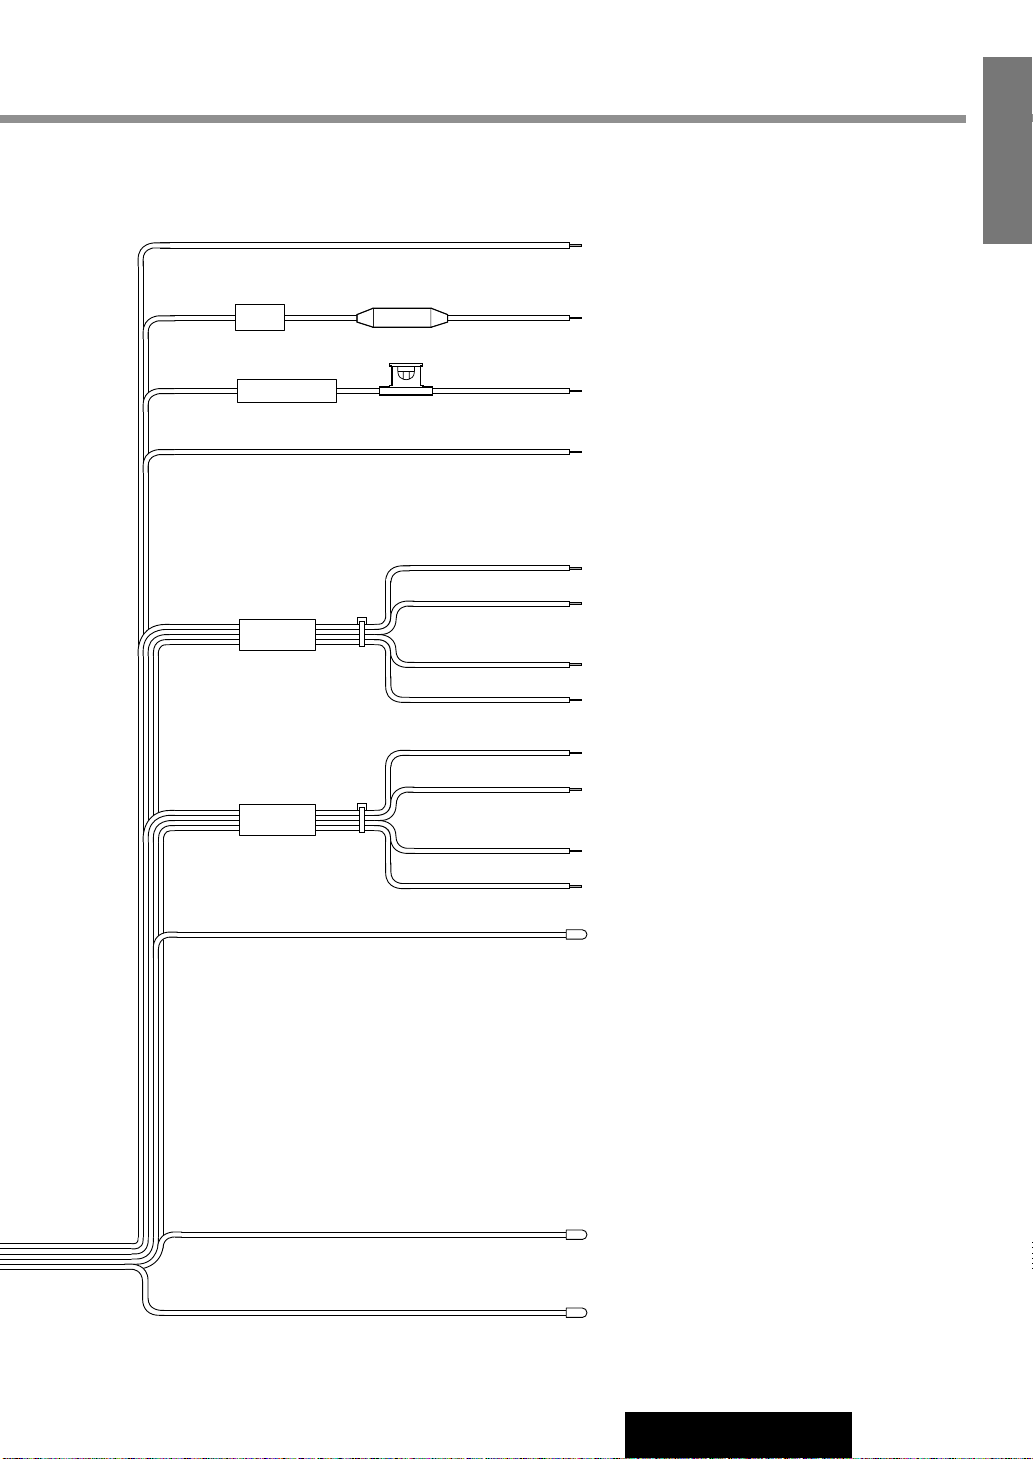
FRONT SP
REAR SP
ACC
BATTERY 15A
Ground Lead (Black)
To a clean, bare metallic part
of the car chassis
Power Lead (Red)
To ACC power, +12 V DC
Battery Lead (Yellow)
To the car battery, continuous +12 V DC
Speaker Leads
External Mute Lead (Orange)
Rear Right+ (Violet)
Rear Right− (Violet w/black stripe)
Rear Left+ (Green)
Resistor 1 kΩ
Fuse 15A
Rear Left− (Green w/black stripe)
Front Right+ (Gray)
Front Right− (Gray w/black stripe)
Front Left+ (White)
Front Left− (White w/black stripe)
Telephone Mute Lead (Orange)
Connect to the car telephone mute lead.
Note: This telephone mute lead is for
connection only to the radio mute lead.
Be sure to ascertain this because it will not
work with other type of output system.
Navi Mute Lead (Orange)
Connect to the Navi Mute lead of the
Panasonic car navigation system
Dual CD Changer Control Lead
(Brown w/white stripe)
External Amplifire Control Power
Lead (Blue w/white stripe)
To an external amplifire
Motor Antenna Relay Control Lead
(Dark blue)(To Motor Antenna)
(Max. 500 mA)
This lead is not intended for use with
switch actuated power antenna.
Page 29
T
E
X
T
D
P
9
0
6
1
C
D
C
H
A
N
G
E
R
CH·C-IN
36
CQ-FX721P
29
E
N
G
L
I
S
H
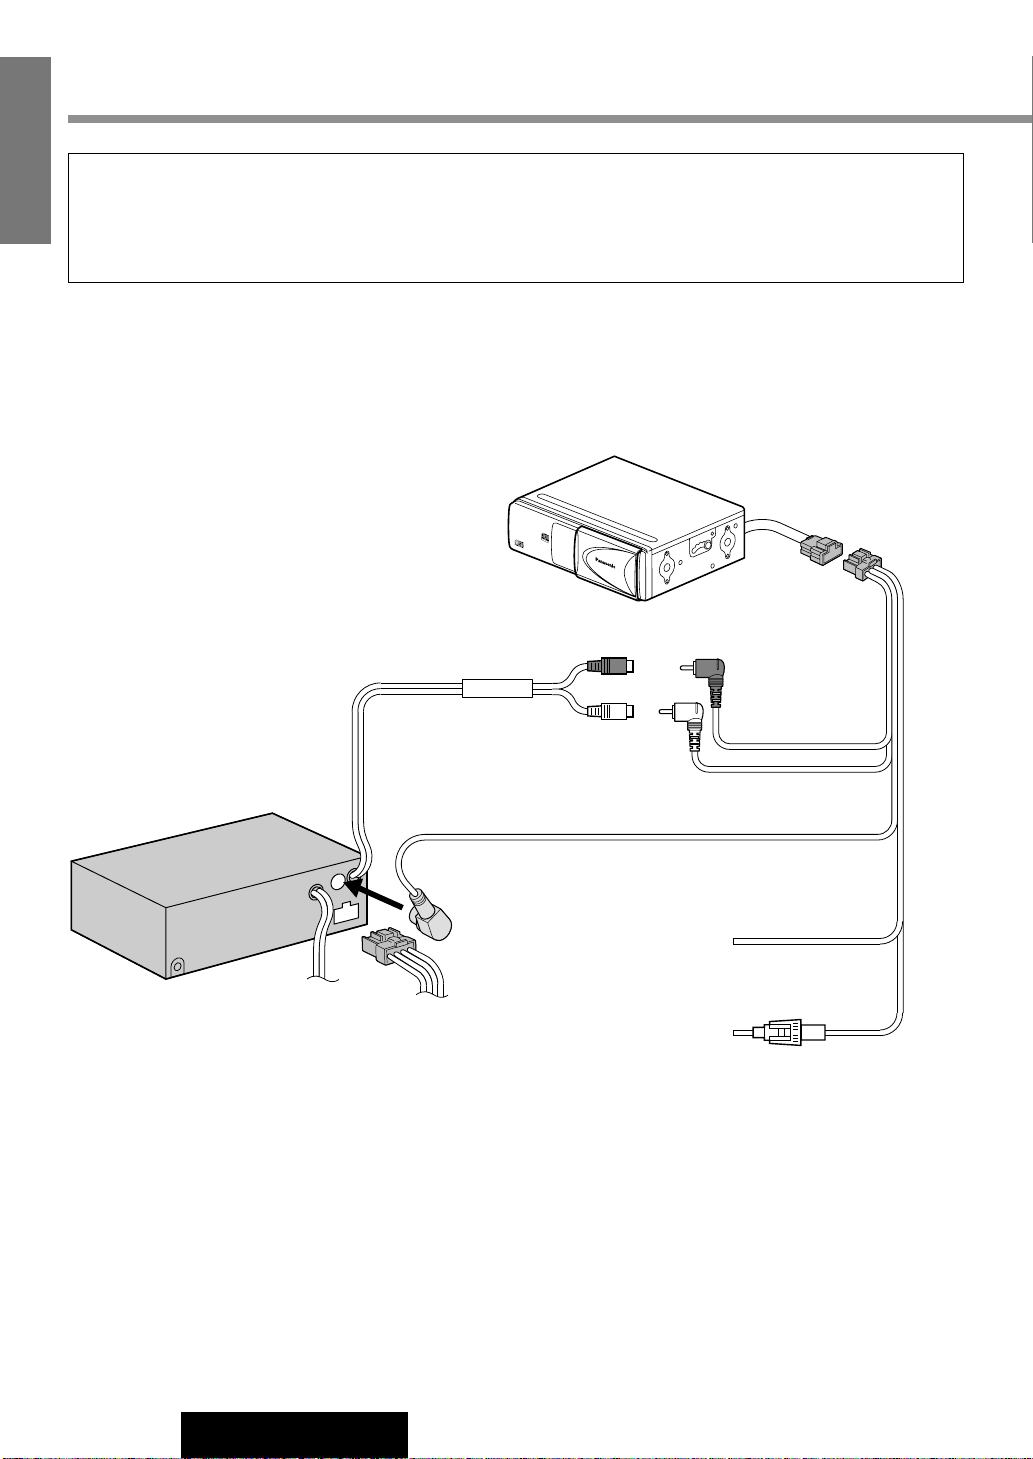
Electrical Connections (continued)
¡This unit can be connected to an optional CD changer (CX-DP9061/DP9060EN, CX-DP88N, CX-DP801/DP803EN or
CX-DP601EN) and optional extension cord.
¡For details consult your nearest authorized Panasonic Dealer.
¡For connection to a CD changer, refer to the operating instructions of the CD changer (CX-DP9061/DP9060EN, CX-
DP88N, CX-DP801/DP803EN or CX-DP601EN).
Example : Connection with CD changer
CX-DP9061EN (Option)
Ground Lead (Black)
To a clean, bare metallic part of the car chassis
Battery Lead (Yellow)
To the car battery, continuous +12 V DC
CD Changer Input Cord
(L) (White)
(R) (Red)
y Power Connector
CQ-FX721P
Page 30
37
CQ-FX721P
30
E
N
G
L
I
S
H
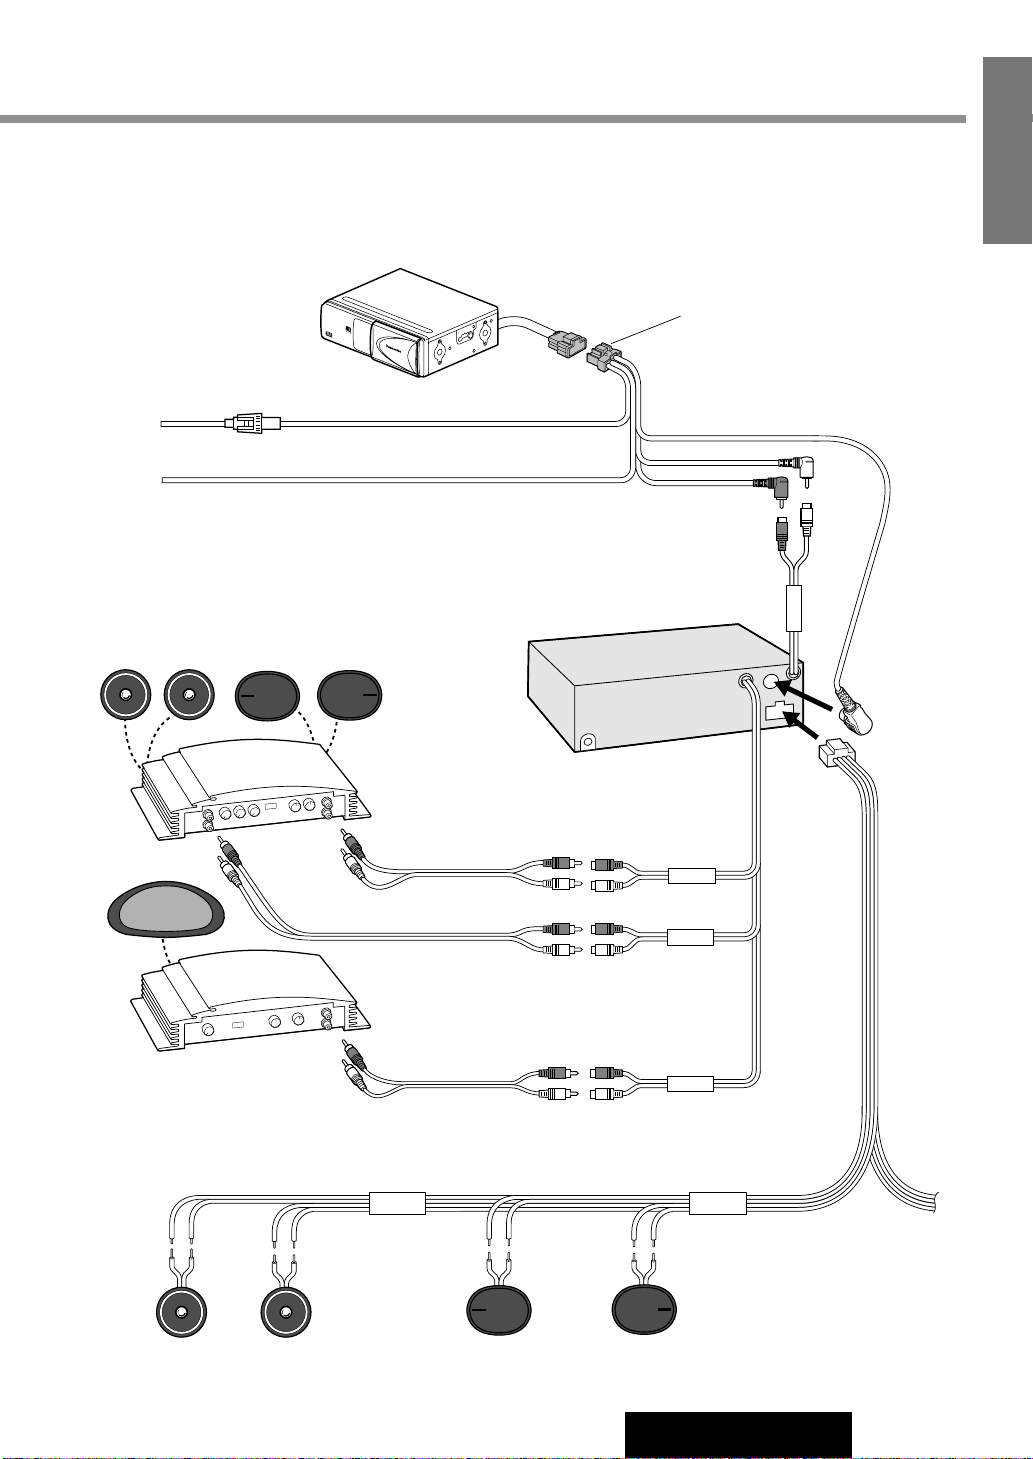
System Upgrade Example 1: Nine Speakers and CD changer
Combination: CX-DP9061EN, CY-M9054EN, CY-M7052EN
CQ-FX721P
Panasonic
Panasonic
REAR
FRONT
SW-OUT
FRONT SP
REAR SP
Panasonic
Panasonic
CH·C IN
TE
XT
D
P
90
6
1 C
D
C
HA
N
G
ER
4 Channel Power
Amplifire
CY-M9054EN
(Option)
CD Text Recognizable
CD Changer
CX-DP9061EN
(Option)
Stereo/Mono
Power Amplifire
CY-M7052EN
(Option)
Sub-woofer
RCA Cord
(Option)
RCA Cord
(Option)
RCA Cord (Option)
(R) (Red)
(R) (Red)
(R) (Red)
(L) (White)
(L) (White)
(L) (White)
(Mono)
∗ For use as a monaural amplifire
(Bridge connection)
Battery Lead (Yellow)
To the car battery, continuous +12 V DC
Power Connector
(Supplied to CX-DP9061EN)
Ground Lead (Black)
To a clean, bare metallic part of the car chassis
DIN Cord
RCA Cord
y
Power
Connector
Page 31

38
CQ-FX721P
31
E
N
G
L
I
S
H
System Upgrade Example 2: Connection with two CD Changers
Combination: CD Changer (CX-DP9061EN)
Note: The dual changer control unit (CA-CD55EN) is necessary.
Electrical Connections (continued)
TE
XT
D
P
9
0
61
C
D
CH
AN
G
ER
TEXT
D
P
9061
C
D C
HA
N
G
E
R
CQ-FX721P
CA-CD55EN
CH·C-IN
CD·C-1
CD·C-2
TWIN CD·C-CONT
DIN Cord
DIN Cord
RCA Cord
RCA Cord
(R) (Red)
(R) (Red)
(R)
(Red)
(L) (White)
(L) (White)
(L)
(White)
(R)
(Red)
(L)
(White)
CD Text Recognizable
CD Changer
CX-DP9061EN
(Option)
CD Text Recognizable
CD Changer
CX-DP9061EN
(Option)
DIN Cord
(Supplied to
CA-CD55EN)
RCA Cord
(Supplied to
CA-CD55EN)
Battery Lead (Yellow)
To the car battery, continuous +12 V DC
Ground Lead (Black)
To a clean, bare metallic part of the car chassis
Battery Lead (Yellow)
To the car battery, continuous +12 V DC
Ground Lead (Black)
To a clean, bare metallic part of the car chassis
y Power Connector
Power Connector
(Supplied to CX-DP9061EN)
Power Connector
(Supplied to CX-DP9061EN)
Dual Changer Control Lead
(Brown w/white stripe)
Page 32
39
CQ-FX721P
32
E
N
G
L
I
S
H
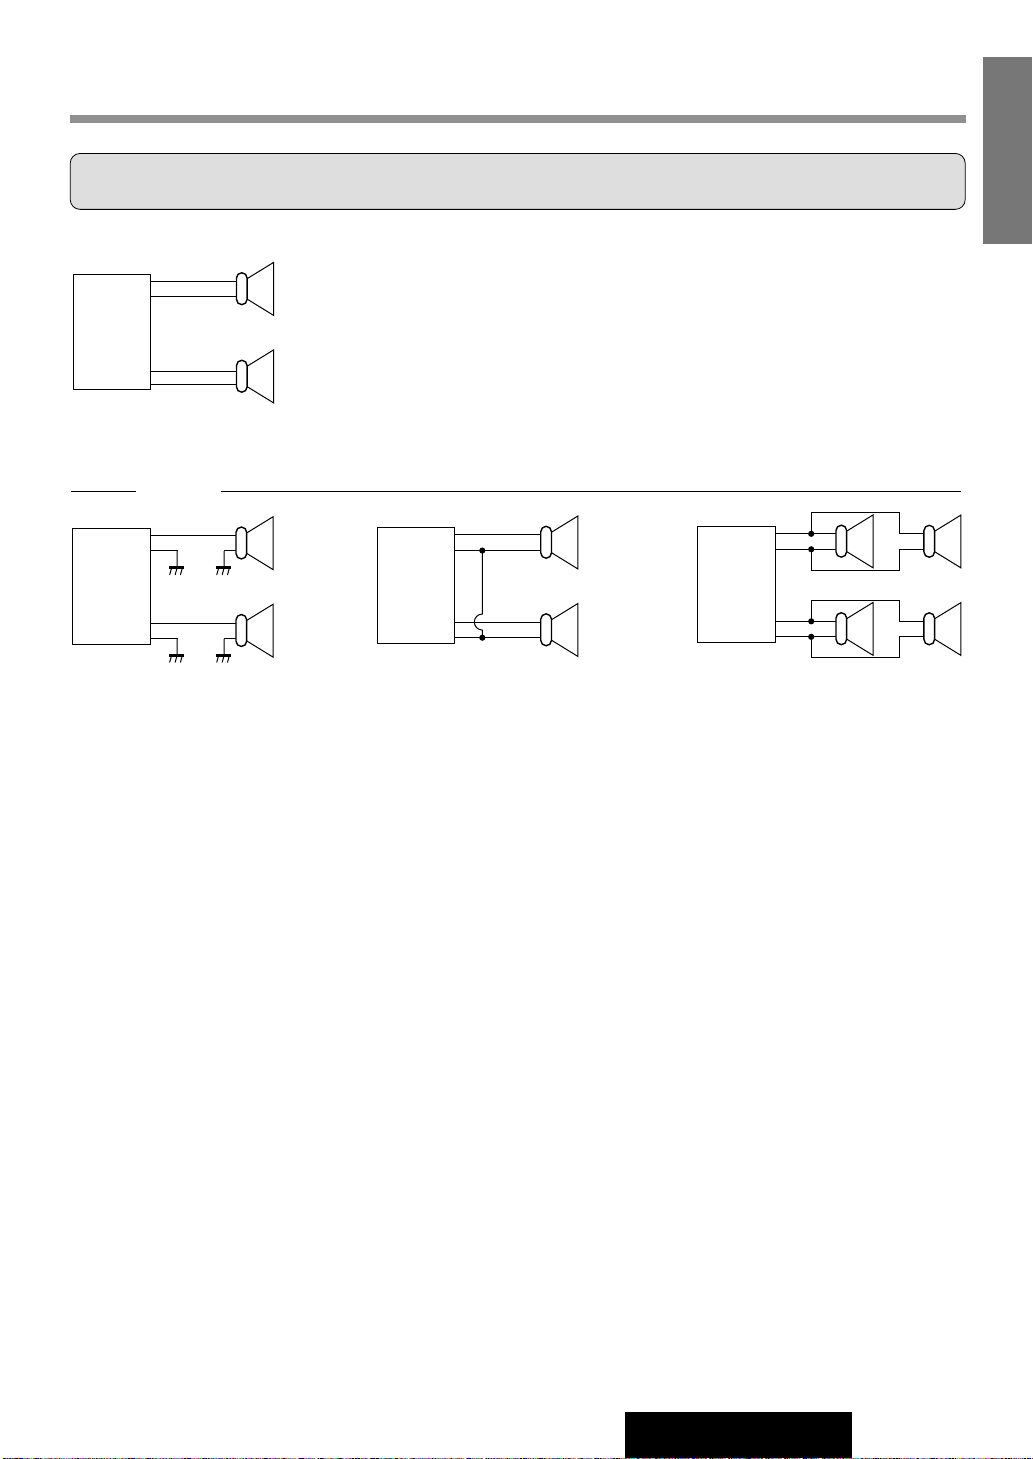
Caution:
Please follow the instructions given below. Failure to do so will cause damage to the unit and speakers.
L
R
-
-
-
-
-
-
-
-
-
-
+
+
+
+
+
+
+
+
+
+
-
+
-
+
-
+
-
+
-
+
-
+
-
+
-
+
L
R
L
R
L
R
<Right>
<Wrong>
(White)
(White
w/black stripe)
Chassis
(Gray
w/black stripe)
(Gray)
Chassis
¡Use ungrounded speaker only.
¡The maximum speaker output should be 50 W or more. (If used with
the optional power amplifier, the speaker output should be higher than
the maximum amplifier output.)
¡The speaker impedance should be 4 - 8 Ω.
¡This unit uses the BTCL circuit, so each speaker should be connected
separately using parallel vinyl insulated cords.
¡The speaker cords and the power amplifier unit should be kept away
(about 30 cm apart) from the antenna and antenna extension cord.
¡Never connect the speaker cord to
the body of the car.
¡Do not use a 3-wire type speaker
system having a common earth
lead.
¡Do not connect more than one
speaker to one set of speaker
leads.
Speaker Connections
Page 33
Maintenance
40
CQ-FX721P
33
E
N
G
L
I
S
H
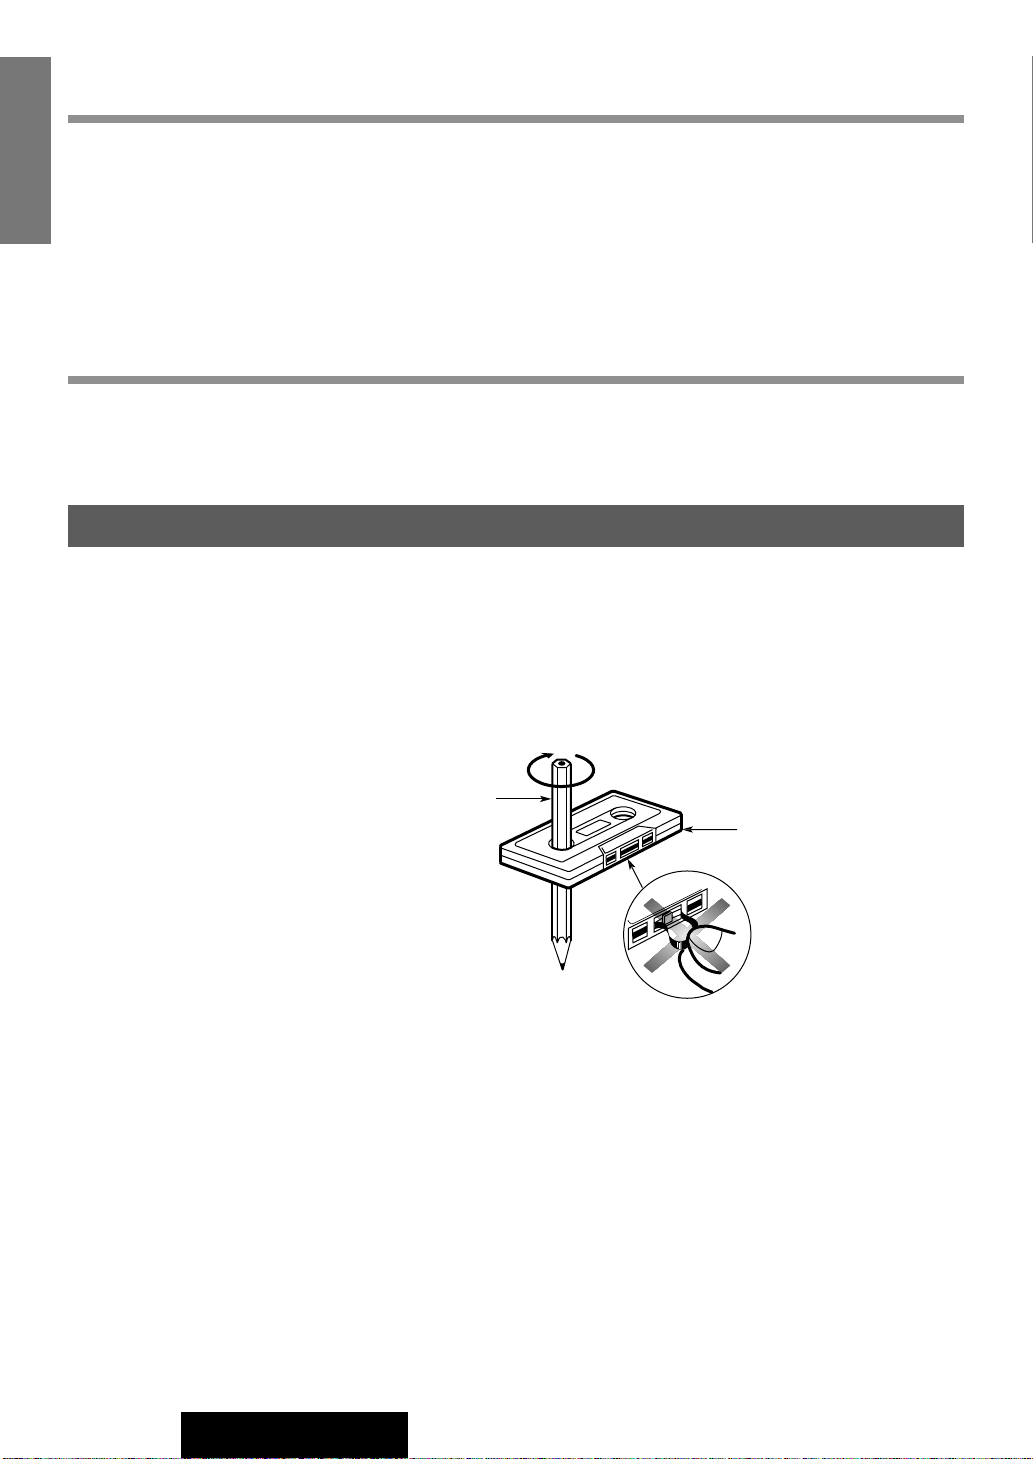
Notes on Cassette Tape
Tape Slack:
Use a pencil or similar object to take up the slack as shown. If a loose tape is used, this may result in the tape
becoming tangled in the rotating parts of the unit.
Exposed end
(Open end)
Pencil
Do not touch or
pull out the tape.
Use fuses of the same specified rating (15 A). Using different substitutes or fuses with higher ratings, or connecting the
unit directly without a fuse, could cause fire or damage to the unit.
If the replacement fuse fails, contact your nearest authorized Panasonic Service Center.
Your product is designed and manufactured to ensure the minimum of maintenance. Use a soft cloth for routine exterior
cleaning. Never use benzine, thinner, or other solvents.
Fuse
Note: To maintain your cassette player in top condition, avoid using tapes that are longer than 90 minutes (C-90).
Page 34
Troubleshooting
41
CQ-FX721P
34
E
N
G
L
I
S
H
Preliminary Steps
Check and take steps as described in the tables below.
If You Suspect Something Wrong
Immediately switch power off.
Disconnect the power cable and check that there is neither smoke
nor heat from the unit before asking for repairs. Never try to repair
the unit yourself because it is dangerous to do so.
Cautions:
¡Do not use the unit if it malfunctions or
something is wrong.
¡Do not use the unit in an irregular condition,
for example, without sound, or with smoke
or foul smell, which can cause ignition or
electric shock. Immediately stop using the
unit and call the store where you purchased
it.
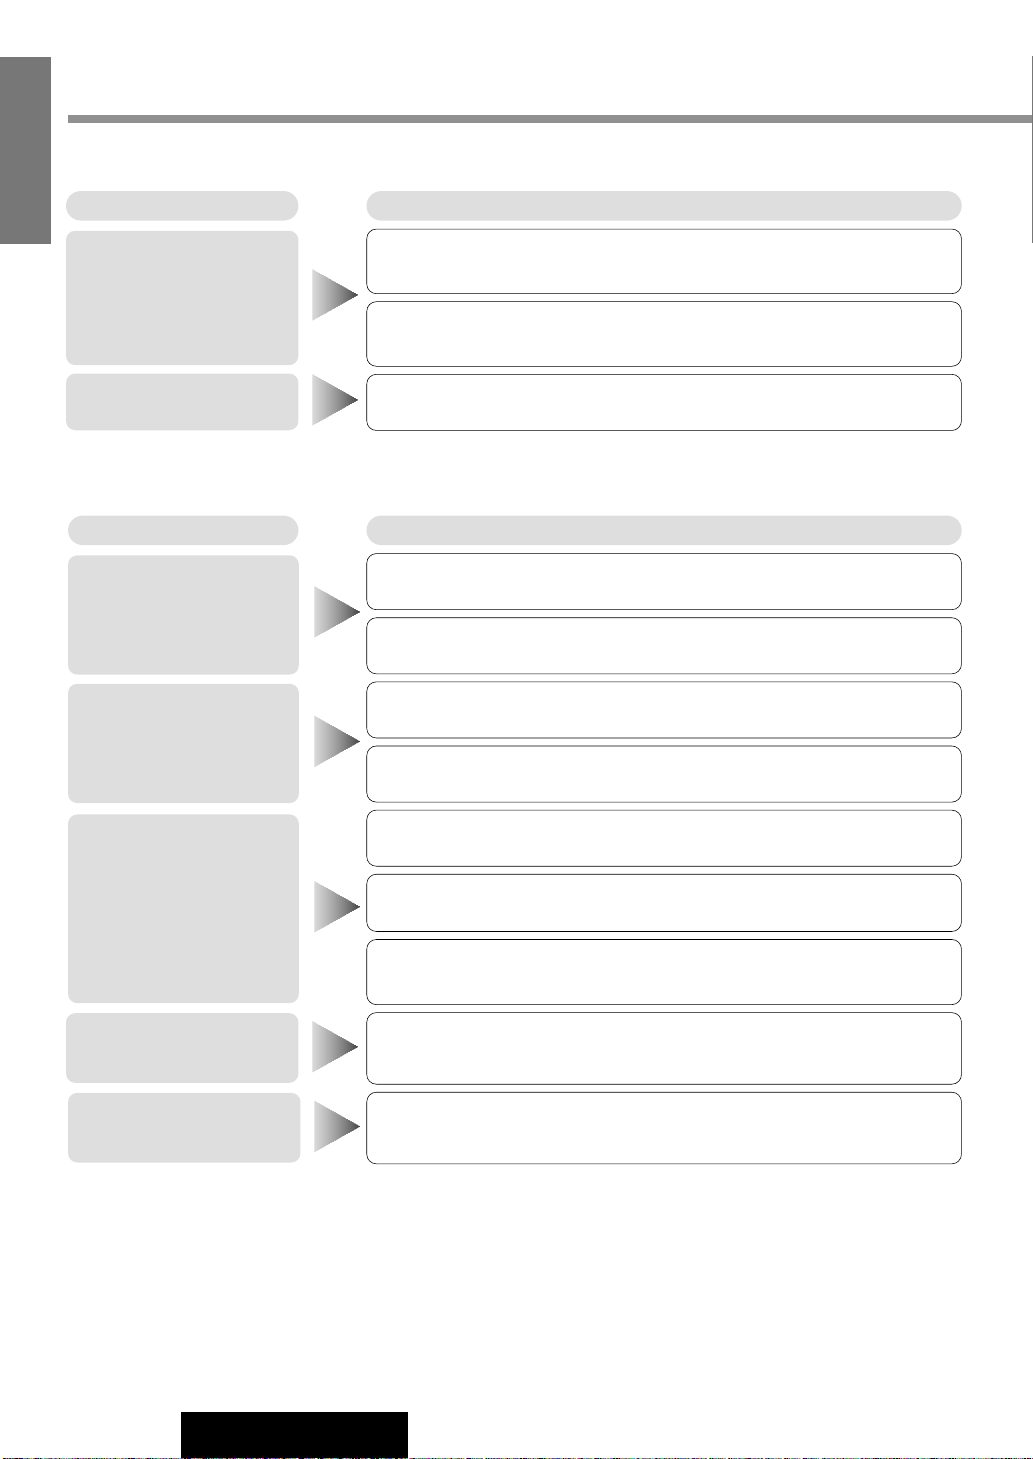
Problem Possible cause / Possible solution
No power
No sound
Buttons unusable
(each source operation)
Only sound, no display
Noise
Menu mode is displayed.
aPress [DISP] to return to the regular mode.
A mobile phone is used near the unit.
aKeep the mobile phone away from the unit.
The display is set to the No Display mode.
aPress [DISP] to change the display.
Condensation (dew)
aWait for a while before use.
Cables are not correctly connected.
aConnect cables correctly.
Mute is set to ON.
aSet it to OFF.
Fuse is burnt.
a
Call the store where you purchased the unit, or your nearest Panasonic
Service Center
and ask for fuse replacement.
Grounding wire is not correctly connected.
aConnect the grounding wire to a metal part of your car.
Accessory cable is not correctly connected.
aConnect the accessory cable to your car's ACC source.
Battery cable is not correctly connected.
aConnect the battery cable to the terminal that is always live.
Cables are not correctly connected.
aConnect cables correctly.
Car’s engine switch is not on.
aTurn your car’s ignition switch to ACC or ON.
■ Common
Page 35
42
CQ-FX721P
35
E
N
G
L
I
S
H
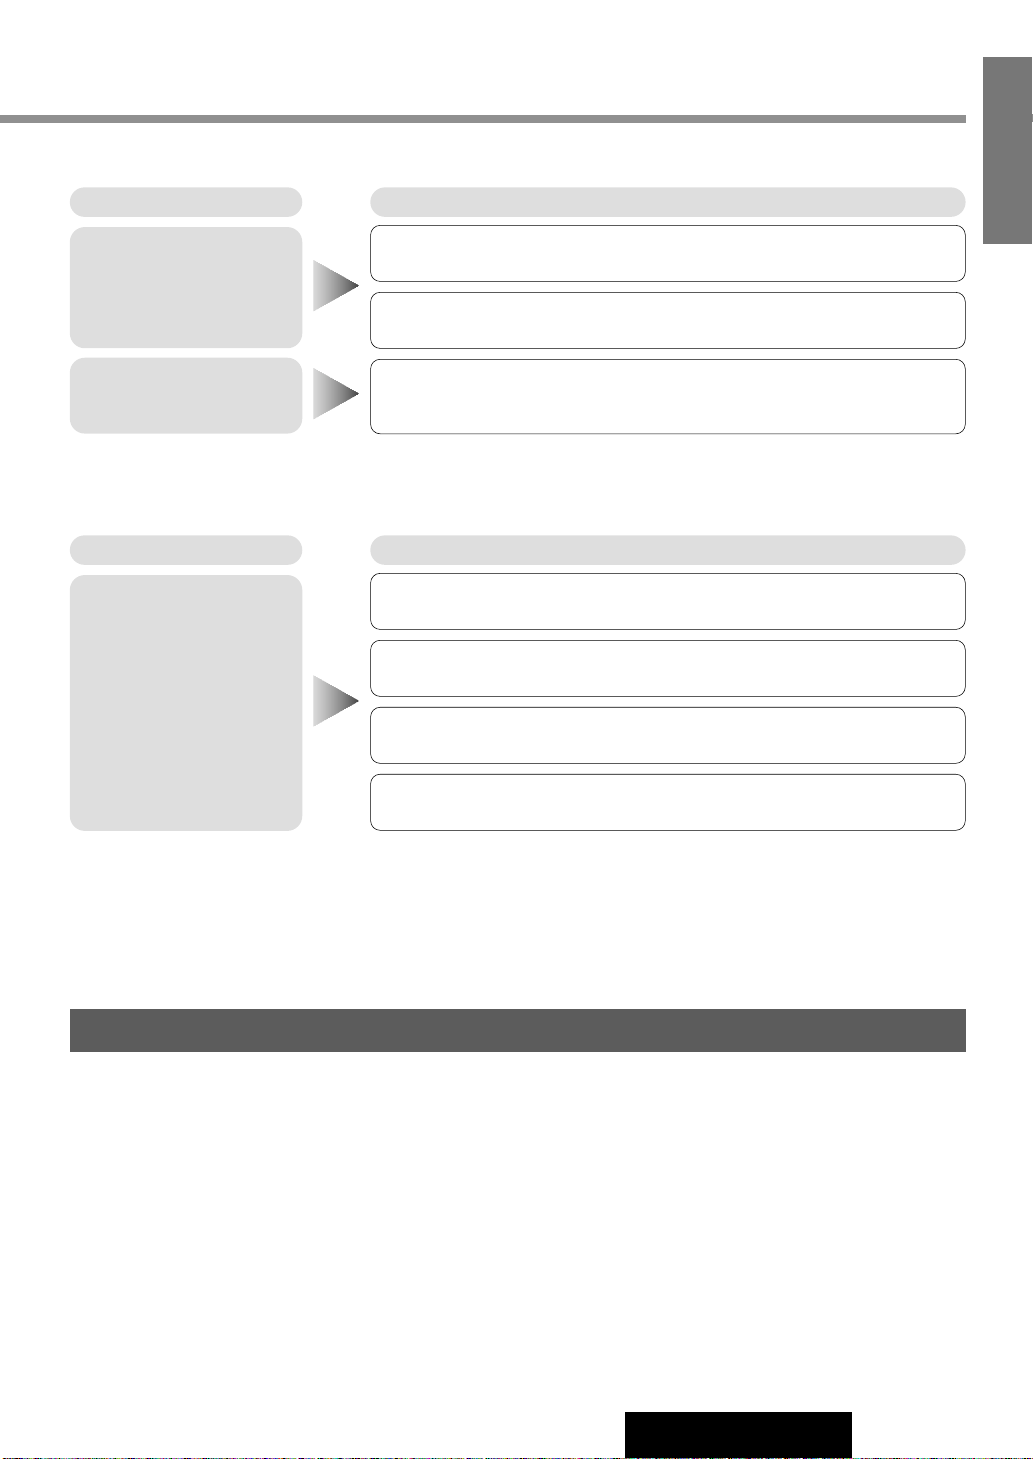
Problem Possible cause / Possible solution
Battery cable is not correctly connected.
aConnect the battery cable to the terminal that is always live.
The radio antenna is not extended enough.
aExtend the radio antenna enough.
Station is too far, or signals are too weak.
aSelect other stations of higher signal level.
Much noise in FM
stereo and monaural
broadcasts
Preset station is reset
Problem Possible cause / Possible solution
Tape running mechanism is dirty or out of order.
aClean tape running mechanism, or repair it. (Ask a service representative
for advice.)
Blank tape is inserted into the unit.
aInsert recorded tape into the unit.
Heads are magnetized.
aDemagnetize heads.(Ask a service representative for advice.)
Normal type tape plays with Metal mode
aChange Metal mode to Normal mode.
Non-Dolby B NR tape plays with Dolby B NR on
aSet Dolby B NR to OFF.
Metal type tape plays with normal mode.
aChange Nomal mode to Metal mode.
Dolby B NR tape plays with Dolby B NR off.
aSet Dolby B NR to ON.
Poor quality tape.
aUse better quarity tape.
Heads are dirty.
aClean heads. (Ask a service representative for advice.)
Tape sound quality is
poor.
High tones are improperly emphasized.
Reproduction of high
tones is poor.
■ Radio
■ Cassette Tape Player
Troubleshooting (continued)
No sound
Wow and flutter is very
high.
Page 36
43
CQ-FX721P
36
E
N
G
L
I
S
H
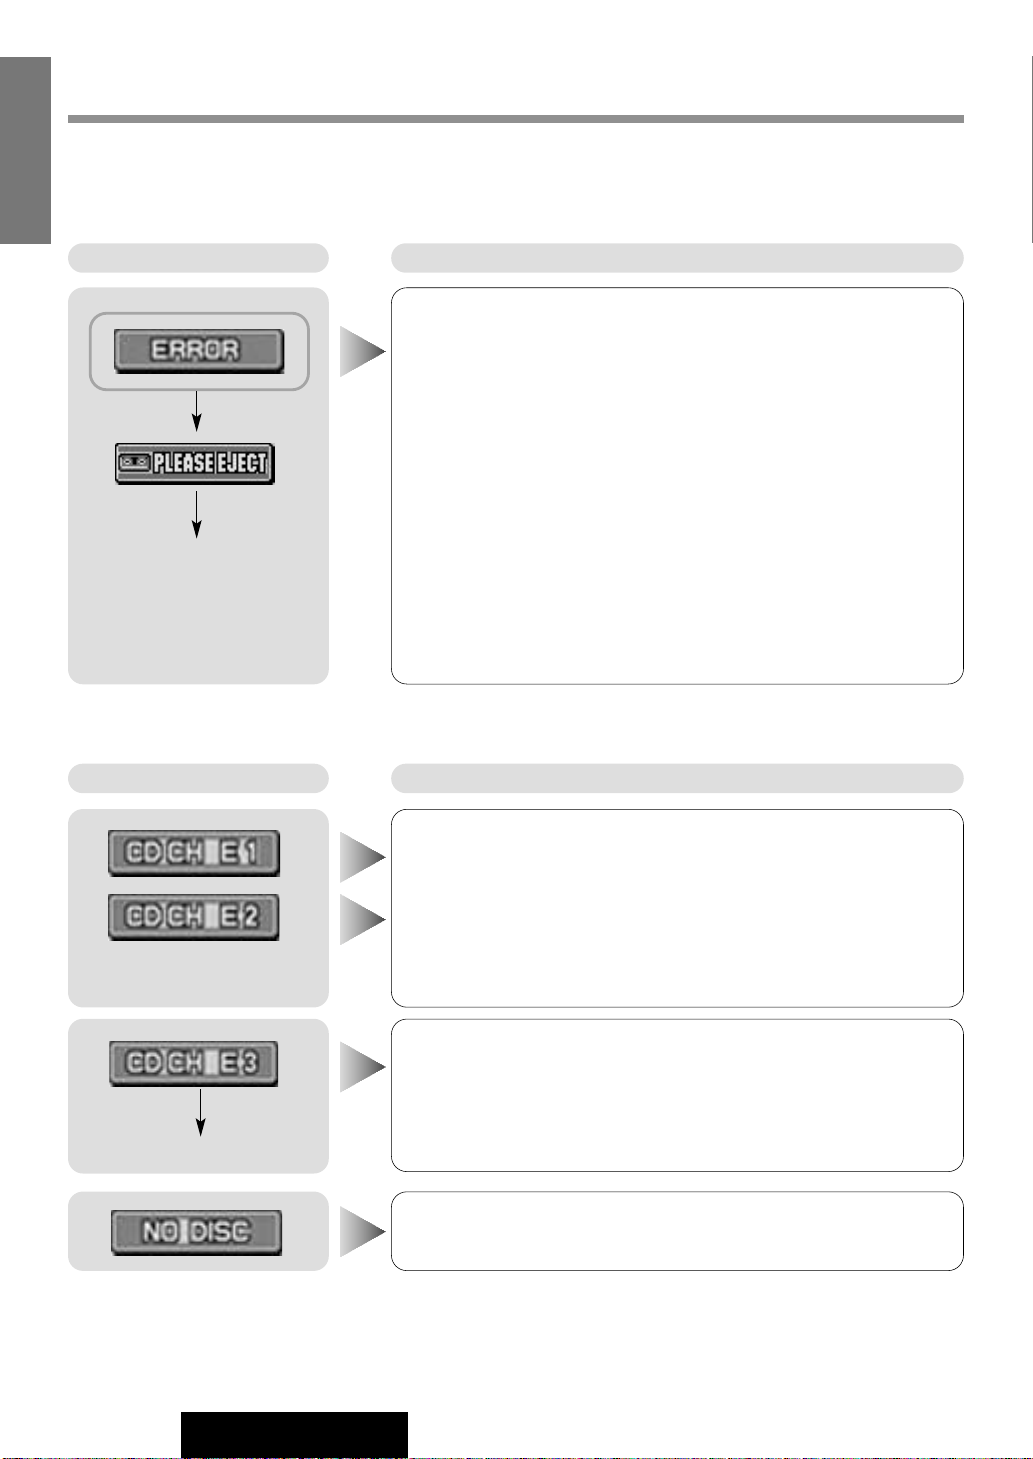
Problem Possible cause / Possible solution
Buttons are invalid for
operation.
Remote control is in the wrong direction.
aDirect the remote controller at REMOTE (sensor) on the panel.
Battery have run down.
aReplace the battery.
Wrong battery
aCheck the battery.
Battery polarities (+) (–) are reversed.
aInsert the batteries correctly.
■ Remote Control
Product Service
If the suggestions in the charts do not solve the problem, we recommend that you take it to your nearest authorized
Panasonic Service Center. The product should be serviced only by a qualified technician.
Problem Possible cause / Possible solution
No sound from left,
right, front, or rear
speaker
Left and right sounds
are reversed in stereo
listening.
The right speaker lead is connected to the left speaker and the left speaker lead
to the right speaker.
aConnect the speaker leads to the correct one.
Cables are not correctly connected.
aConnect the cables correctly.
Left and right balance, or front and rear balance is off on one side.
aAdjust BAL/FAD as appropriate.
■ Sound Setting
Page 37
Troubleshooting (continued)
44
CQ-FX721P
37
E
N
G
L
I
S
H
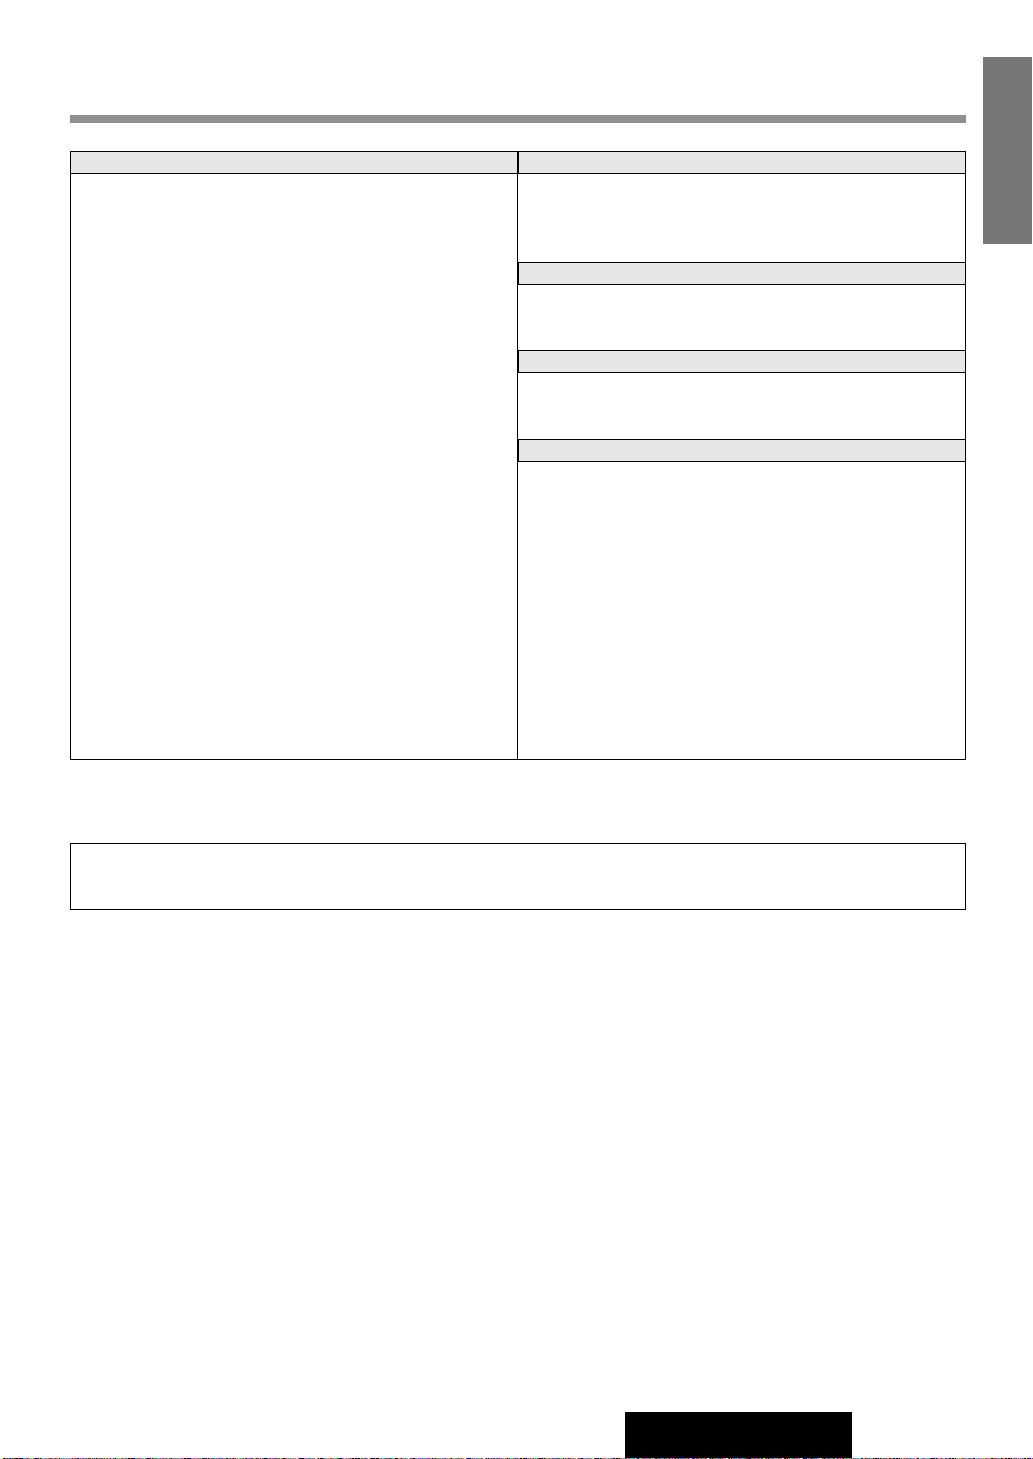
Display Possible cause / Possible solution
No operation by some cause
aOpen the panel and press [u].
¡Check cassette tape.
¡Load the cassette again.
Return to previouos mode.
After 5 seconds
After 5 seconds
Display Possible cause / Possible solution
Disc is dirty, or is upside down.
Disc has scratches.
aEject the magazine.
¡Check disc.
¡Load the disc again.
To next disc automatically
No operation by some cause.
aEject the magazine. If failure persists, press the reset switch. If nor-
mal operation is not restored, call the store where you purchased the
unit or the nearest Panasonic Service Center to ask for repairs.
The display continues if the power is not turned off automatically.
No disc is in the player.
aInsert discs into the changer (magazine).
Note:
Displays and the steps to be taken for errors vary in part from changer to changer. For details, refer to the Operating
Instructions for the changer used.
■ Changer
Error Display Messages
■ Cassette Tape Player
Return to previouos mode.
Page 38
45
CQ-FX721P
38
E
N
G
L
I
S
H
Specifications
Power Supply : DC 12 V (11 V - 16 V), Test
Voltage 14.4 V, Negative
Ground
Tone Controls : Bass; ±12 dB at 100 Hz
Treble; ±12 dB at 10 kHz
Current Consumption : Less than 2.5 A (tape mode,
0.5 W 4-Speaker)
Maximum Power Output : 50 W x 4 (at 4 Ω)
Power Output : 22 W x 4 (DIN45 324, at 4 Ω)
Speaker Impedance : 4 - 8 Ω
Pre-Amp Output Voltage : 5 V (CD changer mode)
Pre-Amp Output Impedance
: 200 Ω
Sub-Woofer Output Voltage : 5 V
Dimensions : 178(W) x 50(H) x 150(D) mm
Weight : 1.6 kg
General
Frequency Range : 87.5 - 108 MHz
Usable Sensitivity : 6 dB/µV (S/N 30 dB)
Stereo Separation : 35 dB (at 1 kHz)
Frequency Range : 531 - 1,602 kHz
Usable Sensitivity : 28 dB/µV (S/N 20 dB)
Frequency Range : 153 - 279 kHz
Usable Sensitivity : 32 dB/µV (S/N 20 dB)
Reproduction System : 4-track, 2-program stereo
Tape Speed : 4.76 cm/sec.
FF/REW Time : Less than 110 sec. (C-60)
Frequency Response : 30 - 17,000 Hz (normal)
30 - 18,000 Hz (metal)
Wow and Flutter : 0.12 % (WRMS)
Signal to Noise Ratio : 52 dB
(Dolby off)
62 dB (Dolby B NR on)
Cassette Player
LW Radio
MW Radio
FM Stereo Radio
Note: Specifications and design are subject to modification without notice due to improvements.
Dolby noise reduction manufactured under license from Dolby Laboratories Licensing Corporation.
“DOLBY” and the double-D symbol B are trademarks of Dolby Laboratories Licensing Corporation.
 Loading...