

Page 1

Panasonic
Removable Full Front CD Player/Receiver with CD Changer Control
Lecteur CD/récepteur avec panneau avant amovible et eontrôle de changeur CD
Reproductor de CD/Receptor con Controlador de Cambiador de Discos y Frênîé Completo DesiTiûntâble
CQ-DF802U
Operating Instructions
Manuel d’instructions
Manual de Instrucciones
nCOMPAET
tìog®
&l6ltM AUDIO
• Please read ihese instruciicns carefully before using this product and save this manual for future use
• Pnòro de Ibe ces Instructions attontlvemoni avant d'ublisur lo ptudud ot garnet ce niaiumi pom I'miiisatian unerieur^
• Lea ton aienciòi» tótas oistrucciùnes antes de iifil»2"ar el producto y guartf« estft rtianuil (mra poderlo corisultar en ei futuro
Page 2
Safety Information
Radio Frequency Interference Statement (Part 15 of the FCC Rules):
Applies only In U.S.A.
This equipment has been tested and found to comply with the limits for a Class B digital, pursuant to Part
15 of the FCC Rules.
• These limits are designed to provide reasonable protection against harmful interference in an automobile
installation. This equipment generates, uses, and can radiate radio frequency energy and, if not installed
and used in accordance with the instructions, may cause harmful interference to radio communications.
However, there is no guarantee that interference will not occur in a particular installation. If this .equip
ment does cause harmful interference to radio reception, which can be determined by turning the equip
ment off and on, the user is encouraged to consult the dealer or an experience radio technician for help.
FCC Warning:
Any unauthorized changes or modifications to this equipment would void the user’s authority to operate
this device.
This device complies with Part 15 of the FCC Rules:
Operation is subject to the following two conditions:
(1) This device may not cause harmful interference, and
(2) This device must accept any interference received, including interference that may cause undesired op
^For Canada:
This Class B digital apparatus complies with Canadian ICES-003.
________________________________________________________________________________
eration.
CAUTION:
THIS PRODUCT IS A
UCT.
USE OF CONTROLS
PERFORMANCE OF
THAN THOSE SPECIFIED HEREIN MAY RESULT
IN HAZARDOUS RADIATION EXPOSURE.
DO NOT OPEN COVERS AND DO NOT REPAIR
YOURSELF. REFER SERVICING TO QUALIFIED
PERSONNEL.
CLASS 1 LASER PROD-
OR ADJUSTMENTS OR
PROCEDURES OTHER
Laser products:
Wave length: 780 nm
Laser power: No hazardous radiation is emitted
with safety protection.
WARNING:
TO REDUCE THE RISK OF FIRE OR ELECTRIC
SHOCK, DO NOT EXPOSE THIS PRODUCT TO
RAIN OR MOISTURE.
TO REDUCE THE RISK OF FIRE OR ELECTRIC
SHOCK, AND ANNOYING INTERFERENCE, USE
ONLY THE INCLUDED COMPONENTS.
Label indication and location
Panasonic
Model No. ncnn^ii
N' De Modèle CQ-DF802U
□
H —
12V 4-BH
Manufactured dy Dalian Matsushita
Communication Industrial Co.. Lid.
Dalian China Mads in China
Serial No.
N' De Sèrie
TTiis device compliee wtth Part 15 of the
FCC Rules. Operation ia subject to the
corKlition that this device doe$ not causa
harmful interlererpca.
Find the model number and serial number on either
the back or bottom of the unit. Please record them
in the space below and retain this booklet as a per
manent record of your purchase to help with identi
fication in case of theft.
MODEL NUMBER
SERIAL NUMBER
DATE PURCHASED
Q
an
15A
lZIU
CQ-DF802U
Y
FM75Ì1
CQ-DP802U
FROM
Page 3
Consignes de sécurité
Información para su seguridad
AHENTION :
CET APPAREIL EST UN PRODUIT LASER DE LA
CLASSE 1.
L’UTILISATION DE COMMANDES OU RÉGLAGES OU
L’EXÉCUTION D’OPÉRATIONS AUTRES QUE CELLES
QUI SONT INDIQUÉES DANS CE DOCUMENT PEUVENT
RÉSULTER EN UNE EXPOSITION À UN RAYONNEMENT
DANGEREUX.
N’OUVREZ PAS LES COUVERCLES ET N’ESSAYEZ PAS
D’EFFECTUER VOUS-MÊME DES RÉPARATIDNS.
ADRESSEZ-VOUS À UN PERSONNEL QUALIFIÉ POUR
TOUTE RÉPARATION.
Produits laser:
Longueur d’onde: 780 nm
Puissance du laser: Aucune radiation dangereuse
n’est émise avec la protection de
sécurité.
MISE EN GARDE:
POUR RÉDUIRE LES RISQUES D’INCENDIE OU D’ÉLEC-
TROCUTION, N’EXPOSEZ PAS CET APPAREIL À U
PLUIE OU À L’HUMIDITÉ.
AFIN DE PRÉVENIR TOUT RISQUE D’INCENDIE OU
D’INTERFÉRENCES, UTILISER UNIQUEMENT LES
COMPOSANTS FOURNIS.
PRECAUCION:
ÉSTE ES UN PRODUCTO LÁSER DE LA CLASE I.
LA UTILIZACIÓN DE CONTROLES, EL HACER AJUSTES
0 EL SEGUIR PROCEDIMIENTOS DISTINTOS DE LOS
ESPECIFICADOS EN ESTE MANUAL PODRÍA CAUSAR
UNA EXPOSICIÓN PELIGROSA A LA RADIACIÓN.
NO ABRA LAS CUBIERTAS NI HAGA REPARACIONES
USTED MISMO. SOLICITE LOS TRABAJOS DE SERVICIO
AL PERSONAL CALIFICADO.
Productos láser:
Longitud de onda: 780 nm
Potencia láser: Con protección de seguridad
emite radiación peligrosa.
no
ADVERTENCIA:
PARA REDUCIR EL RIESGO DE INCENDIOS O SACU
DIDAS ELÉCTRICAS, NO EXPONGA ESTE PRODUCTO
ALA LLUVIA NI A LA HUMEDAD.
PARA REDUCIR EL RIESGO DE INCENDIOS O SACUDI
DAS ELÉCTRICAS, Y PARA EVITAR LAS
INTERFERENCIAS MOLESTAS, UTILICE
SOLAMENTE LOS COMPONENTES INCLUIDOS.
•^Déclaration d’interférence de fréquences radio
(Partie 15 des Règlements FCC):
Cet appareil numérique de Classe B est conforme au
règlement NMB-003 canadien.
II est recommandé de noter, dans l’espace prévu cidessous, les numéros de modèle et de série inscrits soit
à l’arrière soit sous le fond de l’appareil, et de conserver
ce manuel comme mémorandum de l’achat afin de per
mettre l’identification de l’appareil en cas de vol.
NUMÉRO DE MODÈLE
NUMÉRO DE SÉRIE
DATE DE L’ACHAT
VENDEUR
CQ-DF802U
Busque el número del modelo y el número de serie ya
sea en la parte trasera o en el fondo de la unidad. Sírvase
anotar dichos números en el espacio siguiente, y man
tenga este librate como una anotación permanente de su
compra para ayudar en la identificación en el caso de
robo.
NÚMERO DEL MODELO
NÚMERO DE SERIE
FECHA DE COMPRA
NOMBRE DE LA TIENDA
CQ-DF8Q2U
CQ-DF802U
Page 4
Panasonic
welcomes you to our ever growing family of electronic product owners. We know that this
product will bring you many hours of enjoyment Our reputation is built on precise electronic and mechani
cal engineering, manufactured with carefully selected components and assembled by people who take pride
in their work. Once you discover the quality, reliability, and value we have built into this product, you too
will be proud to be a member of our family.
□ Use this Product Safely
When Driving
Keep the volume level
road and traffic conditions.
low
enough to be aware of
When Washing Your Car
Do not expose the product, including the speakers
and CDs, to water or excessive moisture. This
could cause electrical shorts, fire, or other damage.
When Parked
Parking in direct sunlight can produce very high
temperatures inside your car. Give the interior a
chance to cool down before switching the unit on.
Use the Proper Power Supply
This product is designed to operate with a 12 V DC,
negative ground battery system (the normal system
in a North American car).
Disc Mechanism
Do not insert coins or any small objects. Keep
screwdrivers and other metallic objects away from
the disc mechanism and disc.
Use Authorized Servicenters
Do not attempt to disassemble or adjust this preci
sion product. Please refer to the Servicenter list in
cluding with this product for service assistance.
For Installation
The product should be installed in a horizontal po
sition with the front end up at a convenient angle,
but not more than 30*.
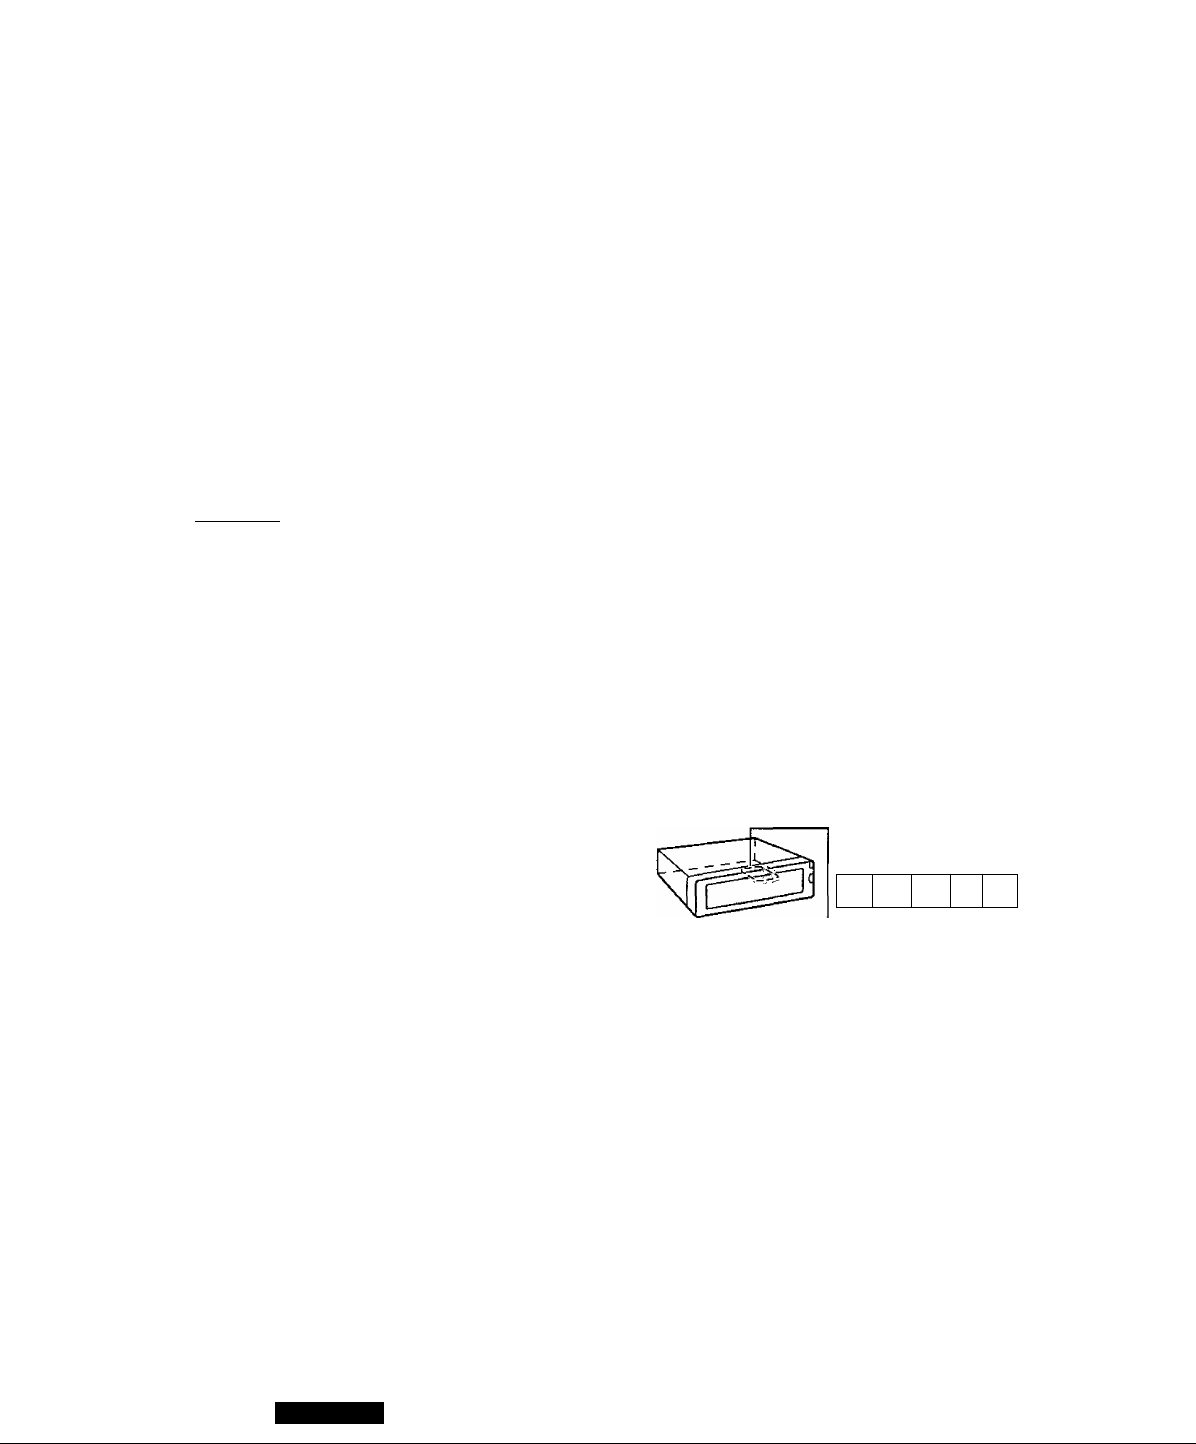
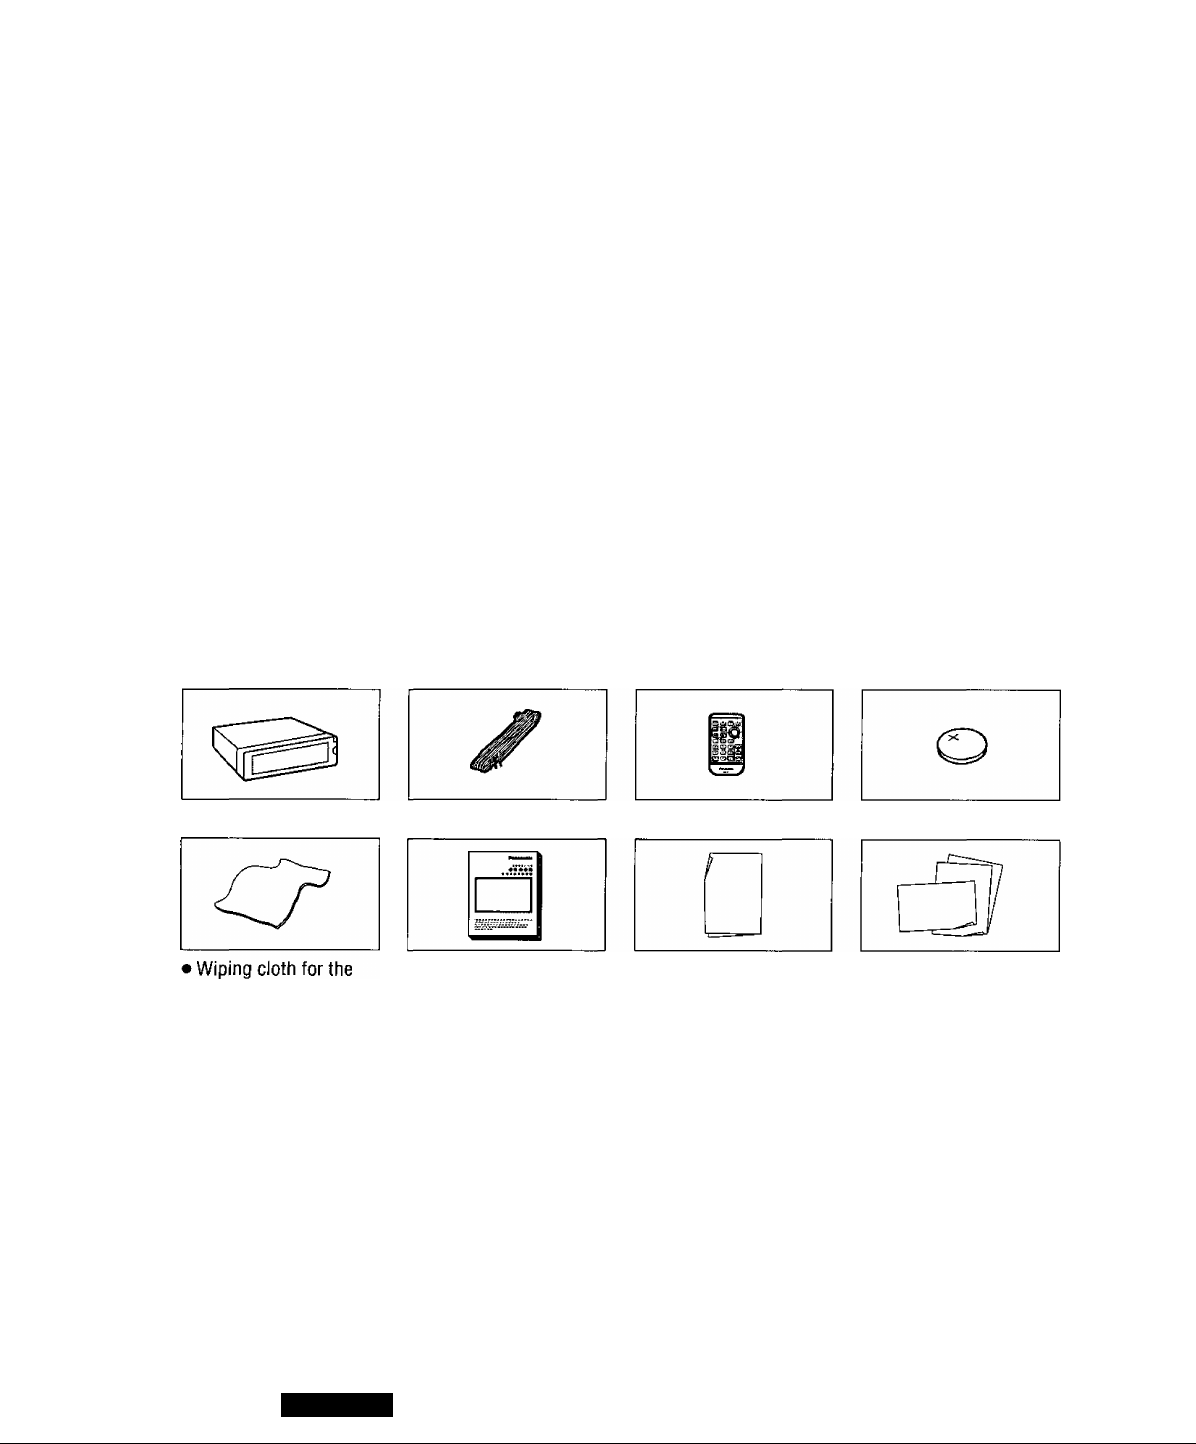
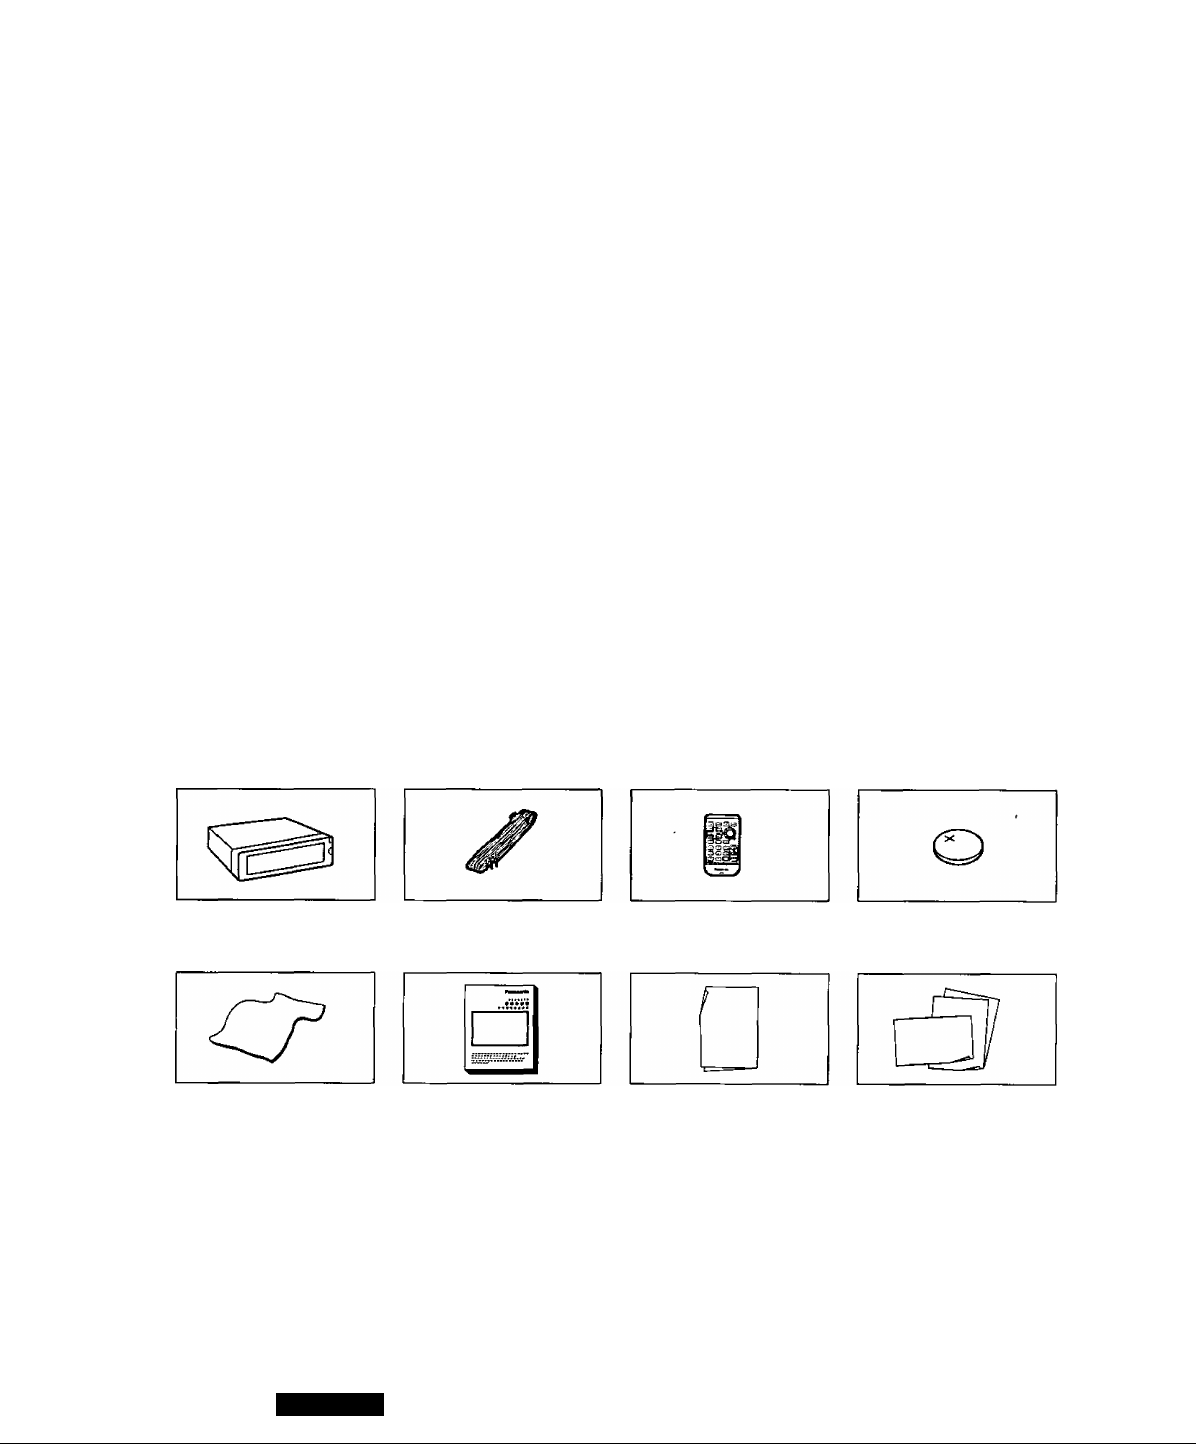
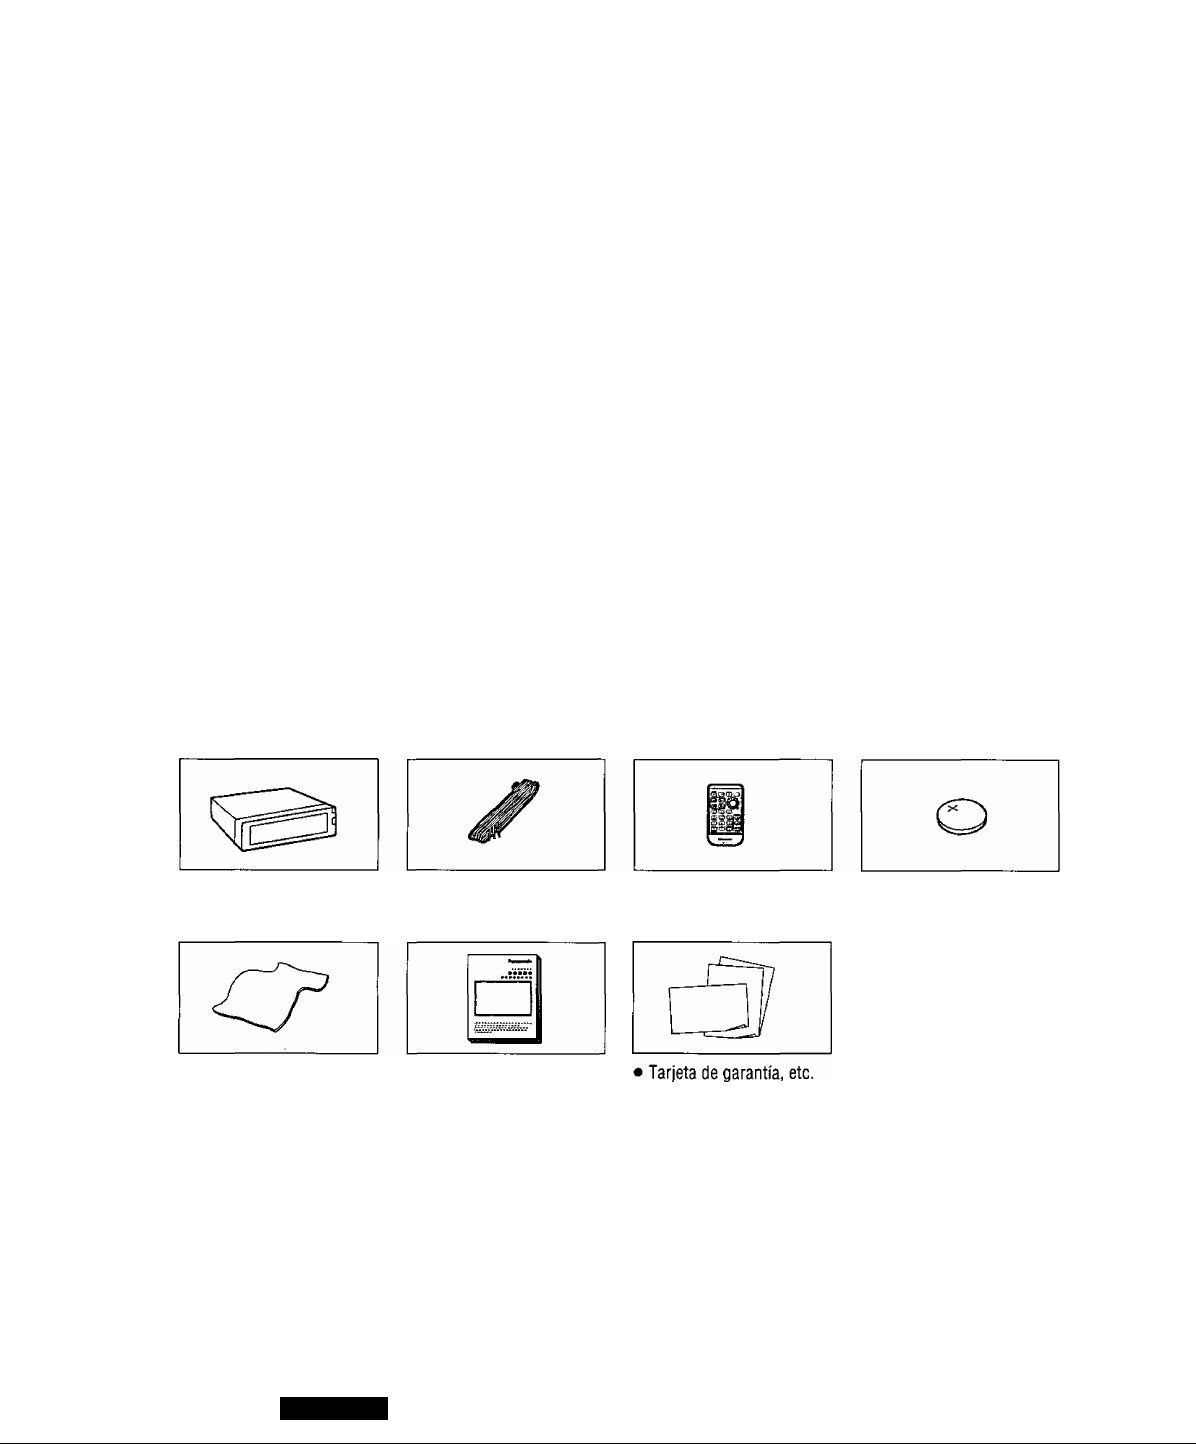
□ Components The numbers in parentheses indicate the accessory quantities.
CD player/receiver (1)
Power connector (1)
Remote control unit (1) • Lithium battery (CR2025) (1)
• Operating instructions (1) • Operation guide (1)
touch panel (1)
• Installation hardware (screws, cords, etc.) (^ page 54)
Note:
• Do not throw away the film which was attached to the touch panel (the front panel area) when the unit was
shipped from the factory. Keep the film as it may be useful at a later time.
• Also be careful not to lose the included operation guide, which you may need when operating the unit. Store
it in a location such as one of the door pockets in your car.
Warranty card, etc.
NOTICE:
□ Language for Manuals of Products Using LCD
This product has a fluorescent lamp that contains a small amount of mercury. It also contains lead in some
components. Disposal of these materials may be regulated in your community due to environmental con
siderations. For disposal or recycling information please contact your local authorities, or the Electronics
Industries Alliance: <http://www.elae.org.>
CQ-DF8Q2U
Page 5
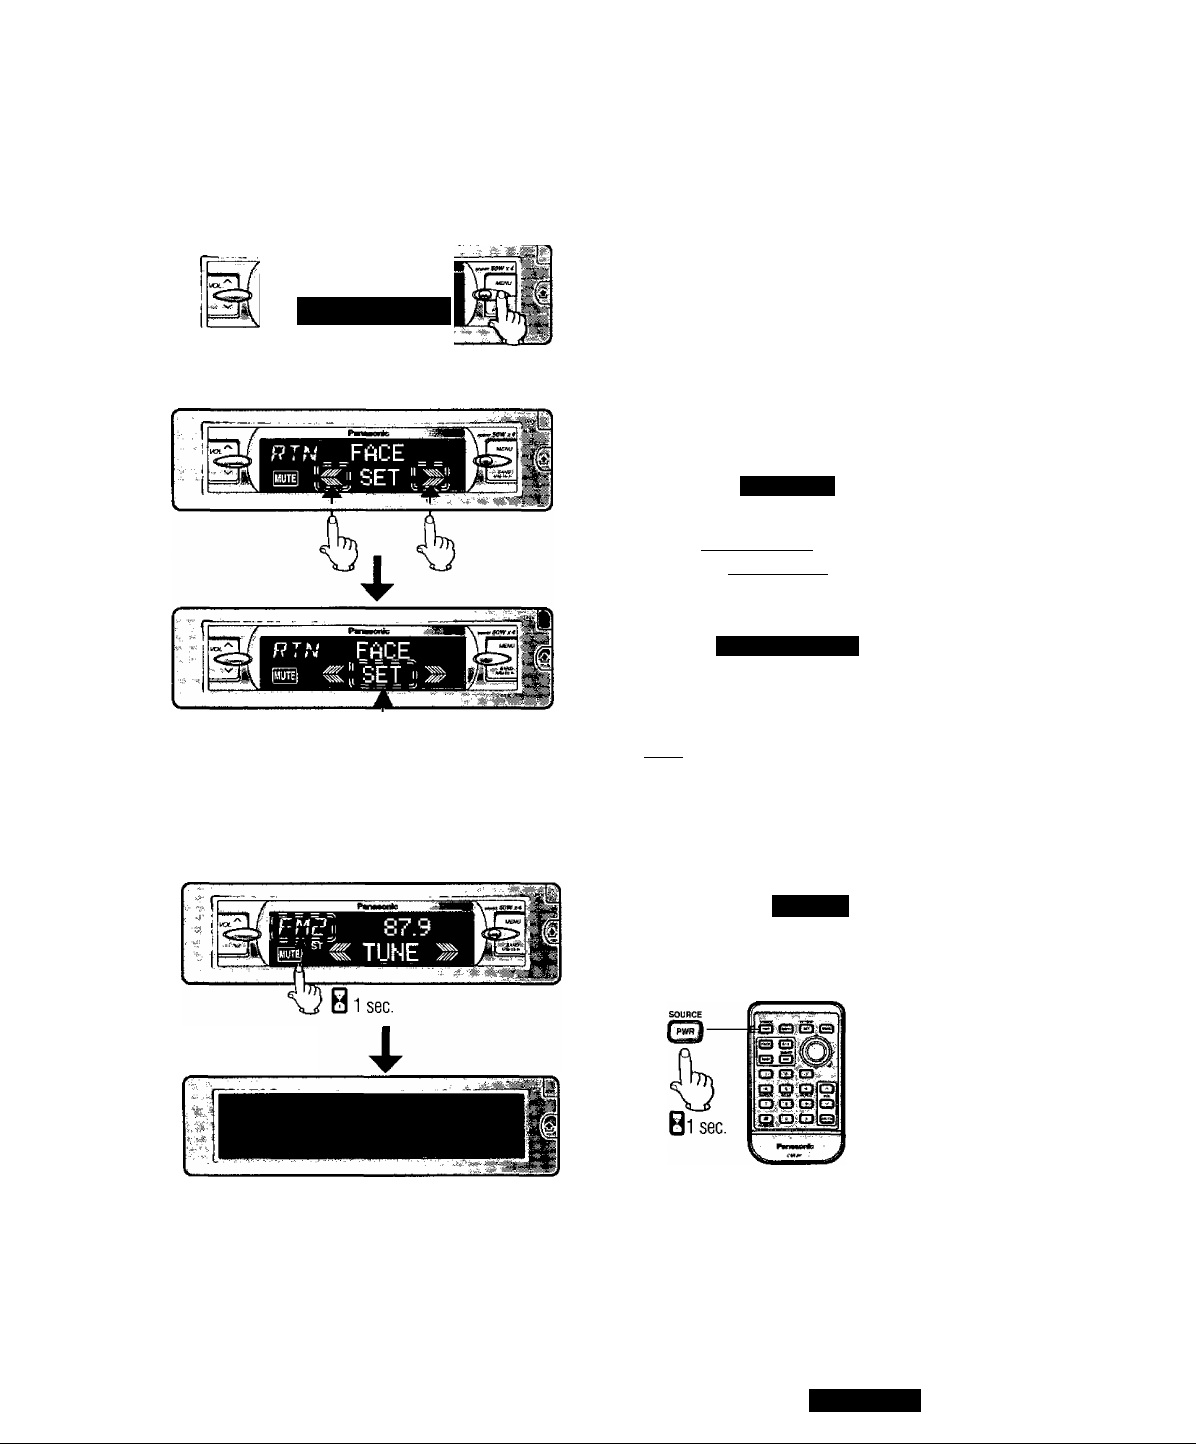
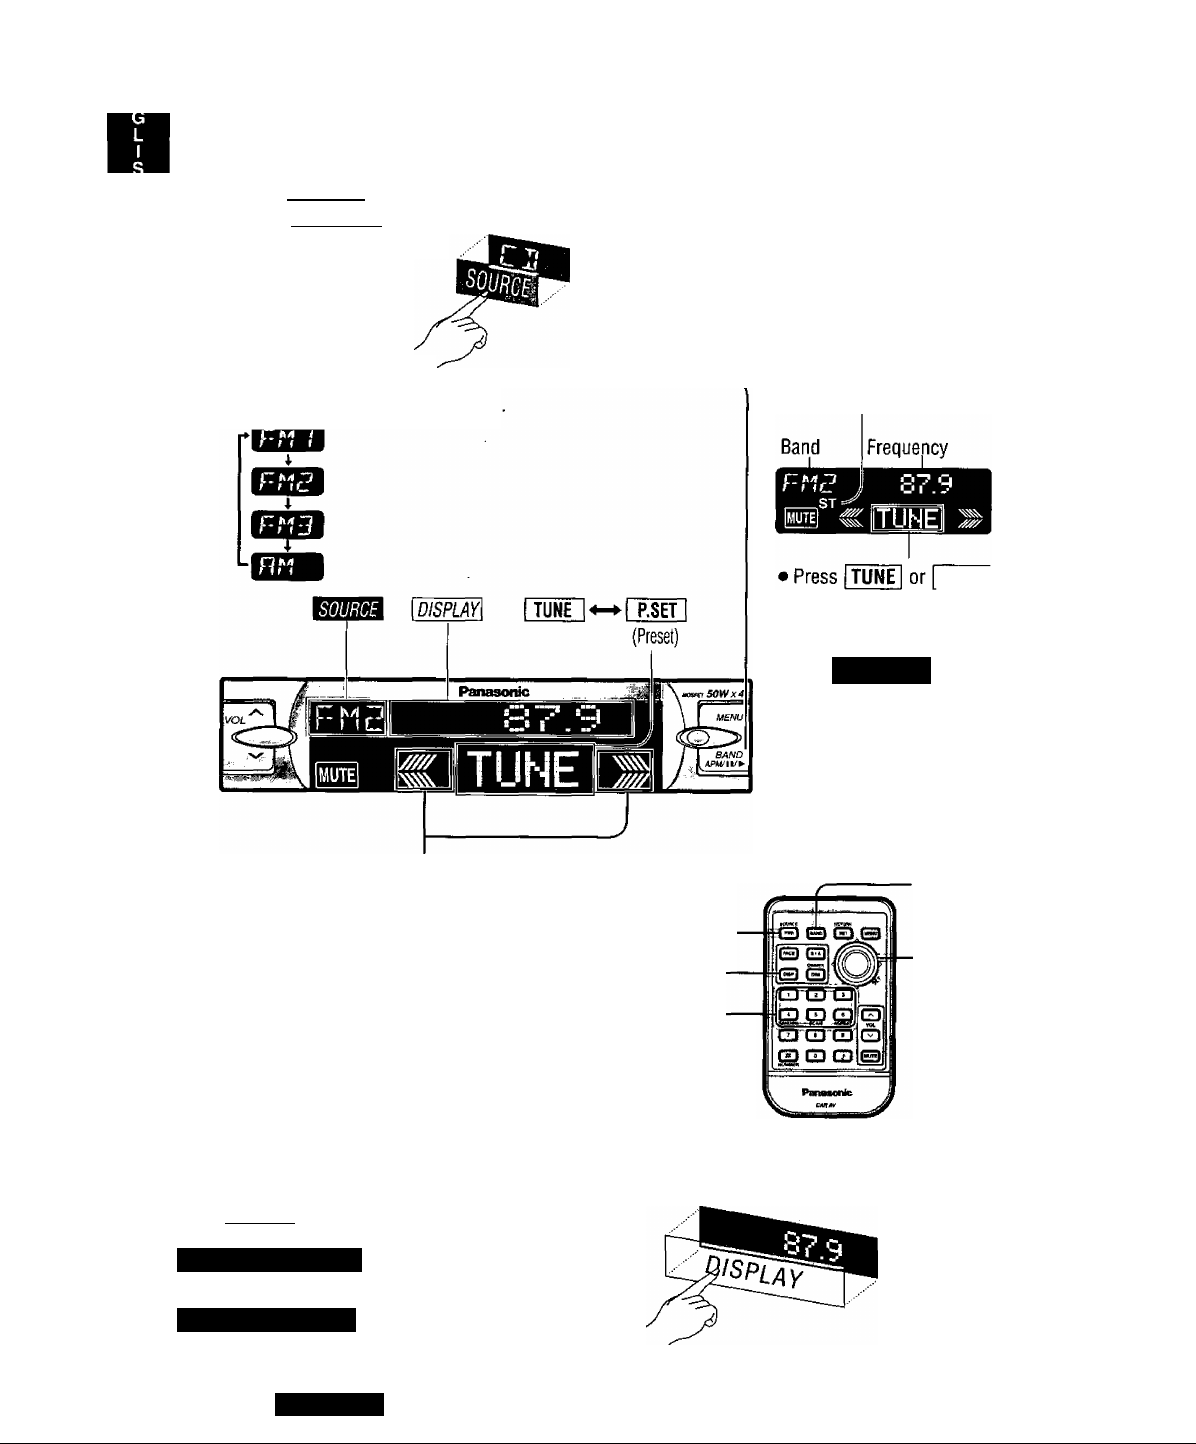
To Operate this Unit
Touch Panel
□ Power on
On the main unit: Press the center of the touch pane!.
Power off (demonstration mode)
Tslw
-.1 ir - i
Note:
• When you use this unit for the first time or you seiect “DEMO” of dispiay setting page 44), the demon
stration mode appears.
• Operations can be performed no matter which part of the touch panel is pressed BUT ONLY WHEN THE
POWER IS ON.
Power off (biack dispiay)
''
or
On remote control unit: source
Press [PWR] (SOURCE). S
©
pm
□ Changes the Mode
On the main unit:
Press ■ wi7f/;wa (source dis
play) to change the source.
On remote control unit:
Press (SOURCE) to change
the source.
Power on
r
.............................
1Í- -n ”
^
......................
bmii
-
.
—á
Radio mode page 28)
• Band
• Tuning
• Manual preset memory, auto
preset memory, preset station
calling
CD player mode page 30)
• Playback
• Stop
• Track selection/search
• Direct track selection
CD changer control
page 34)
• Disc selection
•Track selection/search
•Direct disc selection
AUXIN setfing
CQ-DF802U
Page 6
To OpetBte this Unit
(Continued)
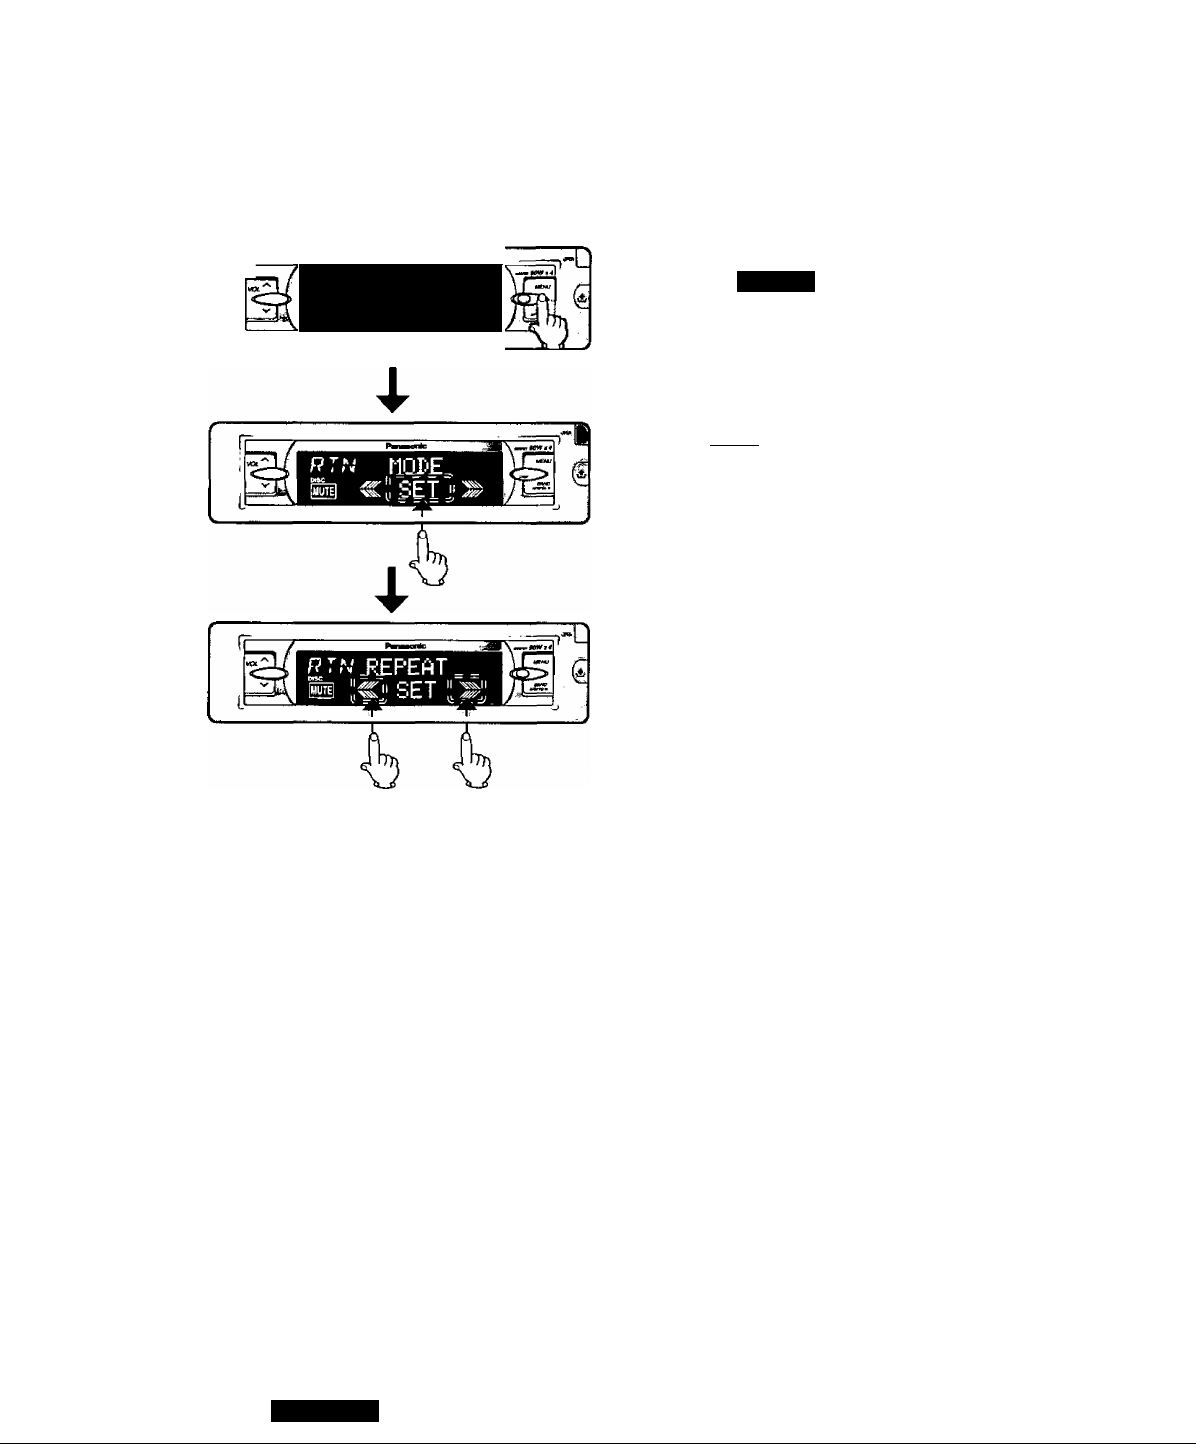
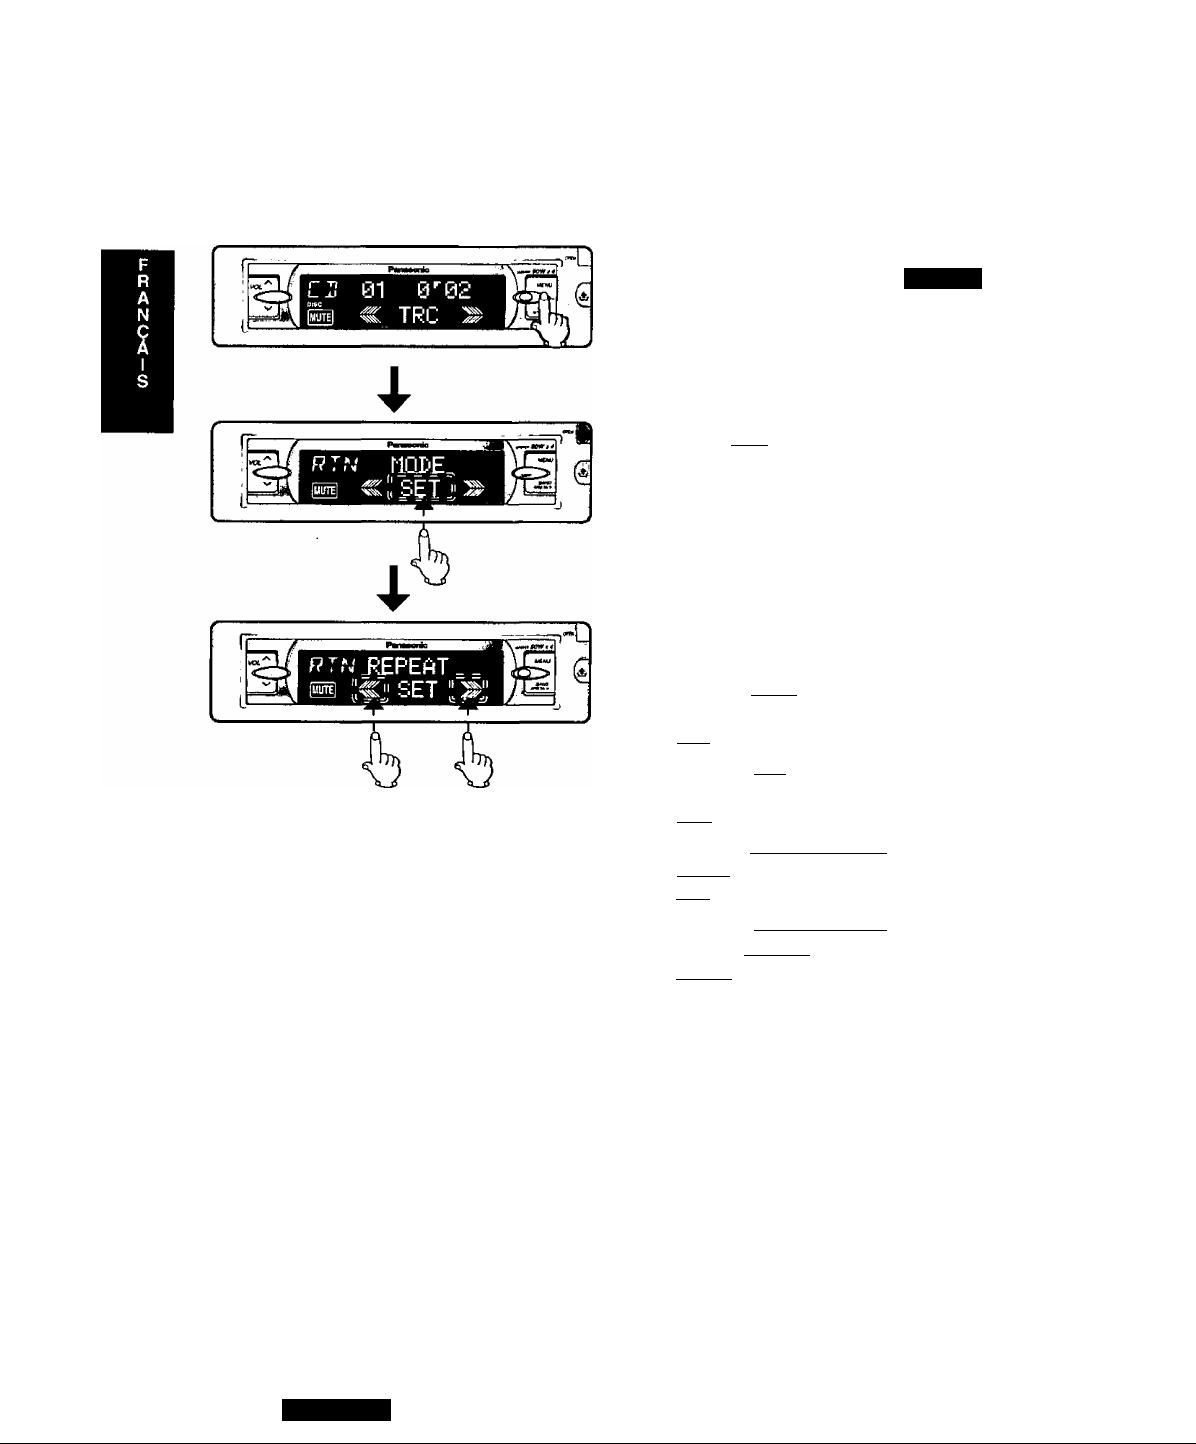
□ Menu Settiny PIsy [MODE] (CD player mode/CO changer control)
fr
t_ M
Oi$C
ImlîteI
TÎ
01
0"02
JW
O Press [MENU! during CD/CD changer playing to
display
© Press I SFT |.
O Press ^ or ^ to select submenu.
Repeat play:
Select
Random play:
Select
Disc repeat play (CDC only):
Select and press
Disc random play (CDC only):
Select and press
(^ page 36)
MOr-E
REPEAT
pages 32, 36)
RAHt'On
pages 32, 36)
page 36)
and press EET
and press HiriFT
SET
SET
CQ-DF802U
Page 7

□ Menu Settings [FACE] [AUDIO] [PICTURE] [FUNCTION]
Example: radio mode
O Press [MENU].
O Press or ^ to select menu.
Audio and sound settings:
Select
Picture (display) settings:
Select ■ afwagBiEisM and press I !-;Fl
Function settings:
Select
Front panel settings:
Select
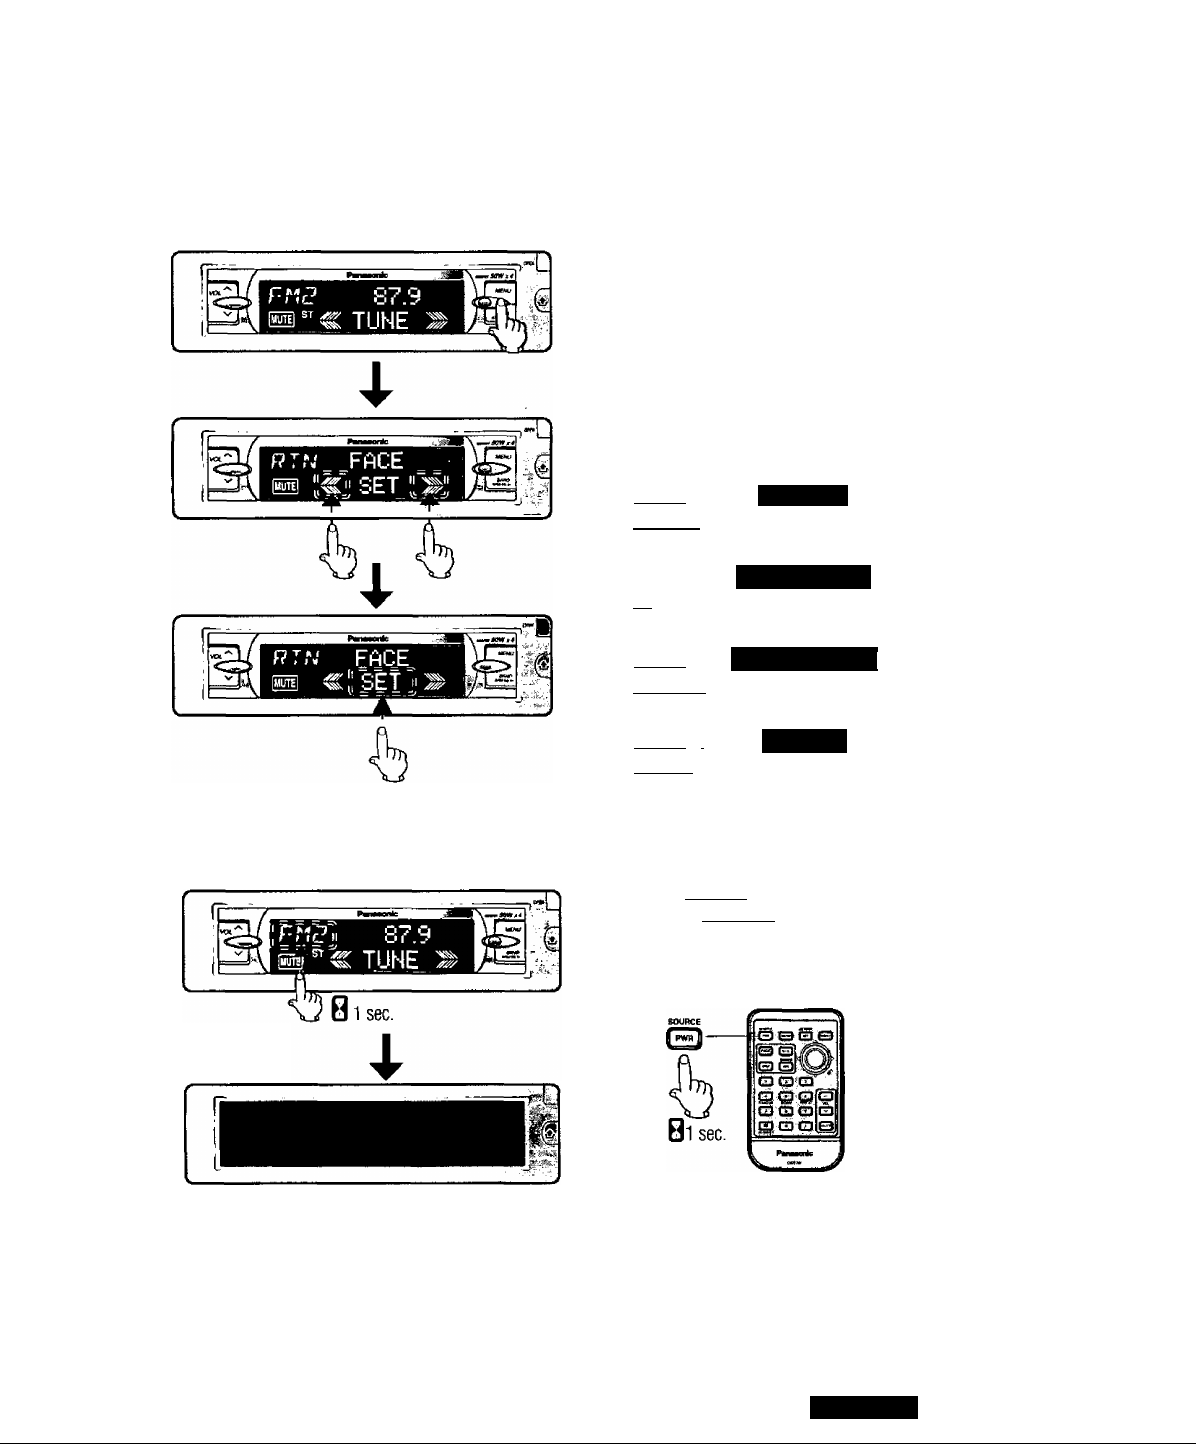
□ Power off
AUt' I 0
page 38)
page 42)
FUNCTION
page 44)
FACE
page 38)
and press [ kfT
and press | ;-;F T I-
and press | RFT 1-
Power on
Example: radio mode
Power off
(black display)
To switch on again:
Press the center of the touch panel.
Display setting:
You can select display pattern on the unit off.
page 44)
• Demonstration display
• Clock display
• Black display
On the main unit:
Press and hold
more than 1 seconds.
^3"
01
On remote control unit:
Press and hold [PWR] (SOURCE) for more than
1 seconds.
Security system based on LCD system (Black display):
The display controls are no longer visible while the
power is off. (Default)
SOURCE
O
0 G3l 0
sec.
(source display) for
CD
CQ-DF802U
Page 8

Contents
Safety Information...............................................................................Page 2
Radio Frequency Interference Statement (Part 15 of the FCC Rules)
Use this Product Safely................................................................................ 4
Components............................................................................................... 4
Language for Manuals of Products Using LCD
To Operate this Unit.................................................................................... 5
□ Before Use and Preparations...................................................................22
Notes for the touch panel
...............................................
..............
2
4
□ Name of Controls Functions................................................................23
Remote control unit, battery installation, battery notes, main unit and
touch panel, display
□ General.................................................................................................26
Power, source, volume, mute/attenuation, open/close the front panel
□ Clock Basics...........................................................................................27
Initial time, time reset
□ Radio....................................................................................................28
Radio mode, band, tuning, display change, one-touch selection of a
station, manual preset memory, auto preset memory (АРМ), preset station
calling
О CD Player................................................................................................30
Disc insert and playback, stop and disc eject, listening to a CD, CD player
mode, track selection, track search, pause, direct track selection, display
change, menu setting on CD player mode, repeat play, random play, scan
play
____________________________________________________________
□ CD Changer Control...............................................................................34
CD changer mode, disc selection, track selection, track search, direct disc
selection, display change, menu setting on CD changer mode, repeat play,
disc repeat play, random play, disc random play, scan play, disc scan play
О
о
о
'o
о о
о о
о о
WELCOME
8 = 00
FM
о
О
О
□ Front Panel Settings [FACE].................................................................. 38
Front panel brightness, color change
Cl Audio and Sound Settings [AUDIO]
S-HDB (Super High Definition Bass), bass and treble, balance and fader,
subwoofer level, subwoofer low pass filter
П Picture (Display) Settings [PICTURE]........................................................42
Dimmer (display brightness setting range). Spectrum Analyzer (S-A)
display pattern, contrast
□ Function Settings [FUNCTION]................................................................44
Mute/attenuation, button operation sound, security function, display
setting
CQ-DF802U
..........................................................
38
Page 9

□ Troubleshooting
Preliminary steps, if you suspect something wrong, troubleshooting tips,
error display messages, if the unit does not operate properly,
maintenance, product servicing, replacing the fuse
..............................................................................
46
□ Maintenance...................................................................................52
Care of the unit, clean touch panel by wiping lightly with a soft cloth, notes
on CD/CD media (CD-R, CD-RW), notes on CD-Rs/RWs
□ Installation Guide............................................................................54
Remove the unit
□ Anti-Theft System
Place the removable face plate into case, install removable face plate,
security indicator, panel removal alarm
..........................................................................
59
□ Electrical Connections......................................................................60
Caution, wiring diagram, upgrading the system
□ Specifications..................................................................................63
CQ-DF802U
Page 10
Panasonic est heureuse de vous compter parmi les utilisateurs de ses appareils électroniques. Nous pouvons vous
assurer que cet appareil vous procurera de longues heures d’agrément. Notre réputation est fondée sur une ingénierie
électronique et mécanique de haute précision, laquelle préside à la fabrication d’appareils ne comportant que des
composants de choix assemblés par un personnel soucieux de la bonne réputation acquise par la qualité de son travail.
Après avoir découvert la qualité, la valeur et la fiabilité de cet appareil, vous aussi serez fier d'être un client Panasonic.
□ Précautions à prendre
Au volant
Réglez le volume à un niveau qui ne risque pas de
masquer les bruits ambiants.
Lavage de la voiture
Afin de prévenir tout risque de court-circuit ou
d’incendie, n’exposez pas l’équipement, y compris les
haut-parleurs et les disques, à l’eau ou à une humidité
excessive.
Voiture stationnée
L’habitacle d’une voiture immobile exposée au soleil
toutes vitres fermées devient rapidement très chaud.
Laisser rafraîchir l’intérieur du véhicule avant d’utiiiser
l’appareil.
Source d’alimentation
Cet appareil est conçu pour fonctionner sur un système
d'alimentation avec batterie de 12 V à masse négative
(système standard sur les voitures de construction
nord-américaine).
□ Eléments constitutifs
• Les chiffres entre parenthèses indiquent la quantité d’accessoires.
Mécanisme de disque
N’insérez pas de pièces de monnaie ou de petits objets.
Gardez les tournevis et autres objets métalliques à l’écart
du mécanisme de disque et du disque.
Réparation
Ne tentez pas de démonter ou d’ajuster l’appareil
vous-même. Veuillez vous référer à la liste des centres de
service fournie avec cet appareil pour contacter le service
d’assistance.
Installation
L'appareil doit être installé en position horizontale avec
son extrémité avant inclinée vers le haut à un angle
commode, mais ne dépassant pas 30".
• Lecteur CD/récepteur (1)
• Chiffon pour essuyer le • Manuel d’instructions (1) • Guide d’utilisation (1)
panneau tactile (1)
• Quincaillerie pour l’installation (vis, cordons, etc.) page 96)
Remarque:
• Ne pas jeter le film qui a été fixé au panneau tactile (la partie du panneau avant) de l'appareil en usine lors son
expédition.
Conserver le film, il pourra être utile plus tard.
• Prenez également garde de perdre le guide d’utilisation inclus, dont vous aurez peut-être besoin pour faire fonctionner
l’appareil. La ranger par exemple dans une des poches de portière de la voiture.
10
CQ-DF802U
• Connecteur
d’alimentation (1)
• Télécommande (1)
• Pile au lithium (CR2025)
(1)
• Carte de garantie, etc.
Page 11
Pour utiliser cet appareil
Panneau tactile
□ Mise sous tension
Sur Tappareil principal:
Hors tension (mode de démonstration)
Appuyez au centre du panneau tactile.
ft
ou
Hors tension (affichage noir)
Sur la télécommande: source
Appuyez sur
tPWR] (SOURCE). Q
Remarque:
• Lorsque vous utilisez cet appareil pour la première fois ou sélectionnez «DEMO» dans le réglage
{"• page 86), l’affichage de démonstration apparaît.
• Les commandes peuvent être effectuées en appuyant sur n’importe quelle partie du panneau tactile, MAIS
LORSQUE L’APPAREIL EST SOUS TENSION.
□ Changement de mode
Sur l’appareil principal:
Appuyez sur
(affichage de la source) pour
changer de source.
Sous tension
Mode radio
• Bande
• Syntonisation
• Mémoire de présyntonisation
Mode de lecteur
• Lecture
• Arrêt
• Sélection/recherche de plage
• Sélection directe de plage
Commande de changeur CD
M
page 76)
^ • Sélection de disque
• Sélection/recherche de plage
• Sélection directe de disque
page 70)
manuelle, mémoire de
présyntonisation automatique,
appel de station présyntonisée
de l’affichage
UNIQUEMENT
CD page 72)
Sur la télécommande:
Appuyez sur
changer de source.
(SOURCE)
pour
Réglage AUX-IN
(entrée auxiliaire)
CQ-DF802U
11
Page 12
Pour utiliser cet appareil
(suite)
□ Lecture par réglage de menu [MODE] (Mode de lecteur CD/Commande de changeur CD)
O
Appuyez sur
CD/changeur CD pour afficher
@ Appuyez sur fs F T 1-
O Appuyez sur ^ ^ pour sélectionner le sous-
menu.
[MENU]
pendant la lecture du
MÜI:*E
Lecture en répétée:
Sélectionnez P^Jis appuyez sur
I SFT i (-► pages 74,78)
Lecture aléatoire:_________________
Sélectionnez puis appuyez sur
î:-;F T I. (-► pages 74, 78)
Lecture en répétée de disque (CDC seulement):
Sélectionnez appuyez sur
i SET I. (• page 78)
Lecture aléatoire de disque (CDC seulement):
Sélectionnez I^HSiaiglSMil puis appuyez sur
ISET
l page 78)
_______________
12
CQ-DF802U
Page 13
□ Réglages de menu [FACE] [AUDIO]
Exemple:
mode radio
[PICTURE] [FUNCTION]
O
Appuyez sur
Q
Appuyez sur ^ pour sélectionner le menu.
Réglages audio:
Sélectionnez
I SET I.
Réglages d’image (affichage):
Sélectionnez |
rnm page 84)
Réglage de fonction
Sélectionnez
[MENU].
__ __ __ ___ __ _
__ __ __ ___ __ _
rtUt IO
{-► page 80)
PICTURE
__ _ __ _ __ _ __ _
FUNCTION
1 SET I. (-» page 86)
Réglages du panneau avant:
Sélectionnez |
I !-iF r I.
(•• page 80)
FACE
puis appuyez sur
puis appuyez sur
puis appuyez sur
puis appuyez sur
□ Mise hors tension
Sous tension
Exemple:
mode radio
Hors tension
(afficliage noir)
Pour remettre sous tension:
Appuyez au centre du panneau tactile.
Réglage de l’aftichage:
Vous pouvez sélectionner la configuration de
l’affichage pour l’appareil hors tension. (-► page 86)
• Affichage de démonstration
• Affichage de l’horloge
• Affichage noir
Sur l’appareil principal:
Appuyez sur
plus d'une seconde.
Sur la télécommande:
Appuyez sur
seconde.
Dispositif de sécurité basé sur le système LCD
(affichage noir):
Les commandes de l’affichage ne sont plus visibles
lorsque l’appareil est hors tension. (Valeur par défaut)
wsftiiuwa
[PWR] (SOURCE)
(affichage de la source) pendant
pendant plus d’une
CQ-DF802U
13
Page 14
Table des matières
Consignes de sécurité............................................................................................................ Page 3
Précautions à prendre..................................................................................................................... 10
Éléments constitutifs....................................................................................................................... 10
Pour utiliser cet appareil.................................................................................................................. 11
□ Préparatifs avant l'utilisation..........................................................................................................................................................64
Remarques relatives au panneau tactile
G Noms des fonctions de commande..................................................................................................................................................65
Sur la télécommande, installation de la pile, remarques sur la pile, appareil principal
et panneau tactile, affichage
□
O O
O O
O O
□ Généralités................................................................................................................................................................................................... 68
Alimentation, source, volume, süencieux/atténuation, ouvrir/fermer le panneau avant
□ Fonctions de base de l’horloge .....................................................................................................................................................69
Temps initial, réglage du temps
G Radio.........................................................................................................................................................................................................................70
Mode radio, bande, syntonisation, changement d’affichage, sélection à une touche
d’une station, présyntonisation manuelle, présyntonisation automatique (АРМ),
appel de station présyntonisée
O Lecteur CD.............................................................................................................................................................................................................72
Insertion et lecture de disque, arrêt et éjection de disque, écoute d’un CD, mode de
lecteur CD, sélection de plage, recherche de plage, pause, sélection directe de plage,
changement d’affichage, réglage de menu en mode de lecteur CD, lecture répétée,
lecture aléatoire, lecture des débuts de plage
G Commande de changeur CD...................................................................................................................................................................76
Mode de changeur CD, sélection de disque, sélection de plage, recherche de plage,
sélection directe de disque, changement d’affichage, réglage de menu en mode de
changeur CD, lecture répétée, lecture répétée de disque, lecture aléatoire, lecture
aléatoire de disque, lecture des débuts de plage, lecture des débuts de plage des
disques
G Réglages de panneau avant [FACE]..........................................................................................................................80
Luminosité du panneau avant, changement de couleur
G Réglages audio [AUDID].............................................................................................................................................................................80
S-HDB (graves à définition supérieure), graves et aigus, balance et équilibrage,
niveau du haut-parleur d’extrêmes-graves, filtre passe-bas du haut-parleur
d’extrêmes-graves
G Réglages d’image (affichage) [PICTURE].......................................................................................................................................84
Gradateur (plage de réglage de la luminosité d’affichage), type d’affichage
d’analyseur de spectre (S A), contraste
G Réglages de fonctions [FUNCTION]....................................................................................................................................................86
Silencieux/atténuation, émission de son par les touches, fonction de sécurité,
réglage de l’affichage
0
O
O
WELCOME
8 = 00
FM
O
O
O
14
CQ-DF802U
Page 15

□ En cas de difficulté............................................................................................................................................................................................88
Étapes préliminaires, lorsqu’on soupçonne que quelque chose est défectueux, guide de
dépannage, messages d’erreur, si l’appareil ne fonctionne pas correctement, entretien,
service après-vente de l’appareil, remplacement d’un fusible
□ Entretien.................................................................................................................................................................. .................................................94
Entretien de l’appareil, nettoyez le panneau tactile en l’essuyant légèrement avec un
chiffon souple, remarques relatives aux CD et supports de type CD (CD-R, CD-RW),
remarques relatives aux CD-R/RW
G
Guide d’installation
Pour retirer l’appareil
□ Système antivol....................................................................................................................................................................................................101
Mettre la plaque de façade amovible dans l’étui, installer la plaque de façade amovible,
voyant du système de sécurité, alarme de retrait du panneau
□ Branchements électriques.........................................................................................................................................................................102
Précaution, schéma de câblage, système évolutif
□ Données techniques........................................................................................................................................................................................105
96
CQ-DF802U
15
Page 16
Panasonic le da la bienvenida a la familia constantemente en aumento de poseedores de productos electrónicos. Nos
esforzamos en proporcionarle las ventajas de la ingeniería mecánica y electrónica de precisión, de una fabricación con
componentes cuidadosamente seleccionados, y de un montaje realizado por personas orguilosas de ia reputación que
su trabajo ha cimentado para nuestra empresa. Estamos seguros de que este producto le proporcionará muchas horas
de distracción y, una vez comprobada la calidad, el valor y la fiabilidad incorporados, usted también se sentirá
orgulloso de pertenecer a nuestra familia.
□ Uso de este equipo con seguridad
Cuando conduzca
Mantenga el nivel del volumen suficientemente bajo para
estar atento a la carretera y a las condiciones del tráfico.
Cuando lave el automóvil
No exponga el equipo, incluyendo ios altavoces y los
CDs, al agua o a una humedad excesiva. Esto puede
causar cortocircuitos eléctricos, incendios u otros daños.
Cuando esté estacionado
El estacionamiento a la luz solar directa puede producir
temperaturas muy altas en el interior de su vehículo.
Procure enfriar el interior antes de encender la unidad.
Uso de la alimentación apropiada
Este equipo ha sido diseñado para funcionar con un sis
tema de batería de 12 V con negativo a masa (el sistema
normal en un vehículo norteamericano).
Mecanismo de disco
No inserte monedas ni ningún objeto pequeño. Mantenga
los destornilladores u otros objetos metálicos apartados
del mecanismo de disco y del disco.
Uso de los centros de servicio
autorizados
No intente desmontar ni ajustar este equipo de precisión.
Consulte la lista de centros de servicio incluidos con este
producto para acudir a ellos cuando sea necesario.
Instalación
La unidad deberá instalarse en posición horizontal, con el
extremo delantero hacia arriba formando un ángulo
conveniente, pero con no más de 30“.
□ Componentes • Los números entre paréntesis indican las cantidades de accesorios.
• Reproductor de CD/receptor(1)
• Trapo de limpieza para el
panel táctil (1)
• Accesorios suministrados {tornillos, cables, etc.) (•* página 138)
Nota:
• No tire la lámina que venía adherida al panel táctil (zona del panel frontal) desde fábrica. Guarde esa lámina, pues
puede ser de utilidad más adelante.
• Tenga cuidado además para no perder la guía de funcionamiento inciuida, que podrá necesitar durante el uso de la
unidad. Guarde esa hoja, por ejemplo, en uno de los portadocumentos de las puertas del coche.
16
CQ-DF802U
Conector de alimentación • Unidad del controlador
(1) remoto (1)
• Manual de instrucciones
(1)
• Pila de litio (CR2025) (1)
Page 17
Para utilizar esta unidad
Panel táctil
□ Encendido
En la unidad principal: Presione el centro del panel táctil.
Apagado (modo de demostración)
'tS
0
Apagado (pantalla en negro)
:
Encendido (modo de radio)
L
En el control remoto:
Presione [PWR] (SOURCE). ^
SOURCE
• Cuando utilice esta unidad por primera vez o cuando seleccione “DEMO” como ajuste de pantalla página 128),
aparece el modo de demostración.
• Las operaciones pueden realizarse presionando sobre cualquier punto del panel táctil, PERO SÓLO CUANDO LA UNIDAD
ESTÁ ENCENDIDA.
□ Cambia ei modo
En la unidad principal:
Presione (pantalla
de fuente) para cambiar la
fuente.
Encendido
Modo de radio (»»página 112)
• Banda
• Sintonización
• Memoria de preprogramación
manual, memoria de presintonización
automática, llamada de emisoras
presintonizadas
Modo de reproductor de CD
(-► página 114)
• Reproducción
• Parada
• Selección/búsqueda de pista
• Selección directa de pista
Control del cambiador de CD
* •
página 118)
• Selección de disco
• Selección/búsqueda de pista
• Selección directa de disco
En el control remoto:
Presione (SOURCE) para
cambiar la fuente.
Ajuste AUX-IN
CQ-DF802U
17
Page 18

Para utilizar esta unidad
□ Reproducción para ajuste de menú [MODE]
(Modo de reproductor de CD/Control del cambiador de CD)
O Presione [MENU] durante la reproducción del CD/
(continuación)
cambiador CD para visualizar
O Presione^ o ^ para seleccionar el submenij.
Repetición de reproducción:
S^e^ione V presione
II-IFT I. páginas 116,120)
Reproducción aleatoria:
Seleccione H^SSl^SSlili V presione
__________
I SET I. (“► páginas 116,120)
Repetición de reproducción de disco
(CDC solamente):
Seleccione V presione
]. página 120)
Reproducción aleatoria de disco
(CDC solamente):
Seleccione ■maKiannoil y presione
________
________
í !-iFT I. página 120)
MOr-E
18
CQ-DF802U
Page 19
a Ajustes de menú [FACE] [AUDIO] [PICTURE] [FUNCTION]
Ejemplo: modo de radio
O Presione [MENU].
ST ^ -ri iijr:
^ 1 UrHt. Æ)'
Q Presione ^ o ^ para seleccionar el menú.
Ajustes de audio y sonido;
Seleccione йипо
]J. (-página 122)
Ajustes de imagen (Pantalla):
Seleccione иаюдМШЯД
,-.r—Г
.“ii" i
Ajustes de función:
Seleccione I
t„-L _ j
Ajustes de panel frontal:
Seleccione
Fib I I. {- página 122)
(— página 126)
FUNCTION
(— página 128)
I
j y presione
y presione
y presione
y presione
□ Apagado
Encendido
Ejemplo: modo de radio
Apagado
(pantalla en negro)
Para activar de nuevo;
Presione el centro del panel táctil.
Ajuste de pantalla:
Puede seleccionar el patrón de pantalla con la unidad
apagada. página 128)
• Pantalla de demostración
• Pantalla del reloj
• Pantalla en negro
En la unidad principah
Mantenga presionado
durante más de un segundo.
En el control remoto:
Mantenga presionado [PWR] (SOURCE) durante más de
un segundo.
Sistema de seguridad basado en el sistema LCD
(pantalla en negro):
Los controles de pantalla no se visualizan cuando la
unidad está apagada. (Ajuste predeterminada)
__
SOURCE
(pantalla de fuente)
CQ-DF8Q2U
19
Page 20
Indice
Información para su seguridad
Uso de este equipo con seguridad
Componentes............................................................................................. 16
Para utilizar esta unidad
G Preparativos antes de usar la unidad.........................................................................................................................................106
Notas sobre el panel táctil
D Nombre de los controles y funciones....................................................................................................................................107
Control remoto, sustitución de la pila, notas sobre la pila, unidad principal y panel
táctil, visualización
□ Generalidades............................................................................................................................................................................................... 110
Alimentación, fuente, volumen, enmudecimiento/atenuación, abertura/cierre del panel
delantero
G Información básica sobre el reloj................................................................................................................................111
Hora inicial, reajuste de hora
G Radio................................................................................................................................................................................................................112
Modo de la radio, banda, sintonización, cambio de visualización, selección con un
solo toque de una emisora, memoria de presintonización manual, memoria de
presintonización automática (APM), llamada a emisoras presintonizadas
G Reproductor CD
inserción y reproducción de discos, parada y expulsión de disco, para escuchar un
CD, modo de reproductor de CD, selección de pista, búsqueda de pista, pausa,
selección directa de pista, cambio de visualización, ajuste de menú en el modo de
reproductor de CD, repetición de reproducción, reproducción aleatoria, reproducción
con exploración
G Control del cambiador de CO.......................................................................................................................................................118
Modo de cambiador de CD, selección de disco, selección de pista, búsqueda de pista,
selección directa de disco, cambio de visualización, ajuste de menú en el modo del
cambiador CD, repetición de reproducción, repetición de reproducción de disco,
reproducción aleatoria, reproducción aleatoria de disco, reproducción con
exploración, reproducción con exploración de disco
G Ajustes de panel frontal [FACE].........................................................................................................................................................122
Brillo de panel frontal, cambio de color
...........................................
...........................................................
..............................................................
..............................................................................
................................................................................................................................................114
Página 3
16
17
WELCOME
o
o
FM
o
o
o o
o o
o o
8 = 00
o
O
O
O Ajustes de sonido [AUDIOl..............................................................................................................................................................122
S-HDB (graves de definición super alta), graves y agudos, equilibrio y
desvanecimiento, nivel de altavoz subgraves, filtro de paso bajo de subgraves
G Ajustes de imagen (Visualización) [PICTURE]........................................................................................................................126
Regulador de la intensidad de luz (gama de ajuste de brillo de visualización), patrón
' de visualización del analizador de espectro (S-A), contraste
G Ajustes de funciones [FUNCTION].............................................................................................................................................128
Enmudecimiento/atenuación, botón o sonido de funcionamiento, función de
seguridad, ajuste de pantalla
20
Page 21
□ Solución de problemas......................................................................................................................................................................130
Pasos preliminares, si cree que hay algo que no funciona bien, consejos para
localizar y solucionar averías, mensajes de visualización de error, si el aparato no
funciona correctamente, mantenimiento, mantenimiento del producto, cómo sustituir
el fusible
□ Mantenimiento.........................................................................................................................................................................................136
Cuidado de la unidad, limpie el panel táctil frotando suavemente con un trapo suave,
notas sobre soportes CD/CD (CD-R, CD-RW), notas sobre discos CD-R/RW
o Guía de instalación....................................................................................................................................................................................138
Para extraer el aparato
n Sistema antirrobo.......................................................................................................................................................................................143
Coloque la placa frontal removible en la caja, instale la placa frontal removible,
indicador de seguridad, alarma de extracción del panel
□ Conexiones eléctricas...................................................................................................................................................................144
Precaución, diagrama del cableado, mejora del sistema
O Especificaciones..........................................................................................................................................................................................147
CQ-DF802U
21
Page 22

Before Use and Preparations
□ Notes for the touch panel
When operating
• You must use your fingers to touch the panel and perform operations.
• Do not press the buttons too forcefully. If you do so, you may damage or break the glass on the top surface
of the touch panel.
• Do not allow the top surface of the touch panel to be caught by your fingernails or any hard objects. If you
do so, you may damage or break the glass on the top surface of the touch panel.
• Do not use a pen or other sharp implement to perform touch panel operations. If you do so, you may dam
age or break the glass on the top surface of the touch panel.
• Performing operations whiie the top surface of the touch panel is covered with dust may damage the glass
on the top surface of the touch panel.
When not operating
• Be sure to keep the front panel with the removable face plate case (included) when it has been detached
from the main unit.
• Take care not to drop the front panel when it has been detached from the main unit. Also take care not to
bump the top surface of the touch panel into anything. If you do so, you may break the glass on the top sur
face of the touch panel.
• Do not allow the top surface of the touch panel to be caught by your fingernails or any hard objects. If you
do so, you may damage or break the glass on the top surface of the touch panel.
When cleaning page 52)
22
CQ-DF802U
Page 23
Name of Controls Functions (Remote Control Unit)
Point the remote control unit at the main unit’s sensor. page 24)
tPWR] (SOURCE)
• Switches on/off the power. page 26)
• Selects a source. page 26)
[BAND]
• Selects a band. page 28)
• Pause CD playing. page 31)
[FACE]
• Selects the button color and display
brightness. {■* page 39)
[S-A] (Spectrum Analyzer)
• Selects the Spectrum Analyzer display
pattern. page 43)
[DISP] (Display)
• Changes the display.
(^ pages 28, 31,35)
[DIM] (DIMMER)
• Changes the dimmer levei.
(^ page 43)
[#] (NUMBER)
• Enters the number input mode.
(^ pages 31, 35)
[0] to [9]
• Memorizes broadcast stations. (^ page
• Selects track/disc. (^ page 31,35)
[4] (RAND0M)/[5] (SCAN)/[6| (REPEAT)
• Selects listening item. (^ pages 32,36)
fa
tD'”CD”GDi
TeSeT Sw!t
a
steel
29)
[RET] (RETURN)
• Returns to the previous display in menu setting
mode.
[MENU]
• Enters the menu setting mode.
• Returns to the regular mode during menu play setting.
[/v] [V] (Hour/minute/disc)
• Seiects (vertically) or adjusts an op
eration or item.
• Adjusts the clock. (^ page 27)
• Seiects disc. (^ page 34)
[<11>] (Track/tune)
• Selects (horizontally) or adjusts an
operation or item.
© CD
• Selects or searches frequency/track.
(^ pages 28, 31,34)
[SET]
• Determines an operation or item.
[^][v]VOL (Volume)
• Adjusts the sound volume.
[MUTE]
• Lowers the volume.
(^ page 27)
[J>](S-HDB)
• Sets the Super High Definition Bass
sound. (^ page 39)
page 27)
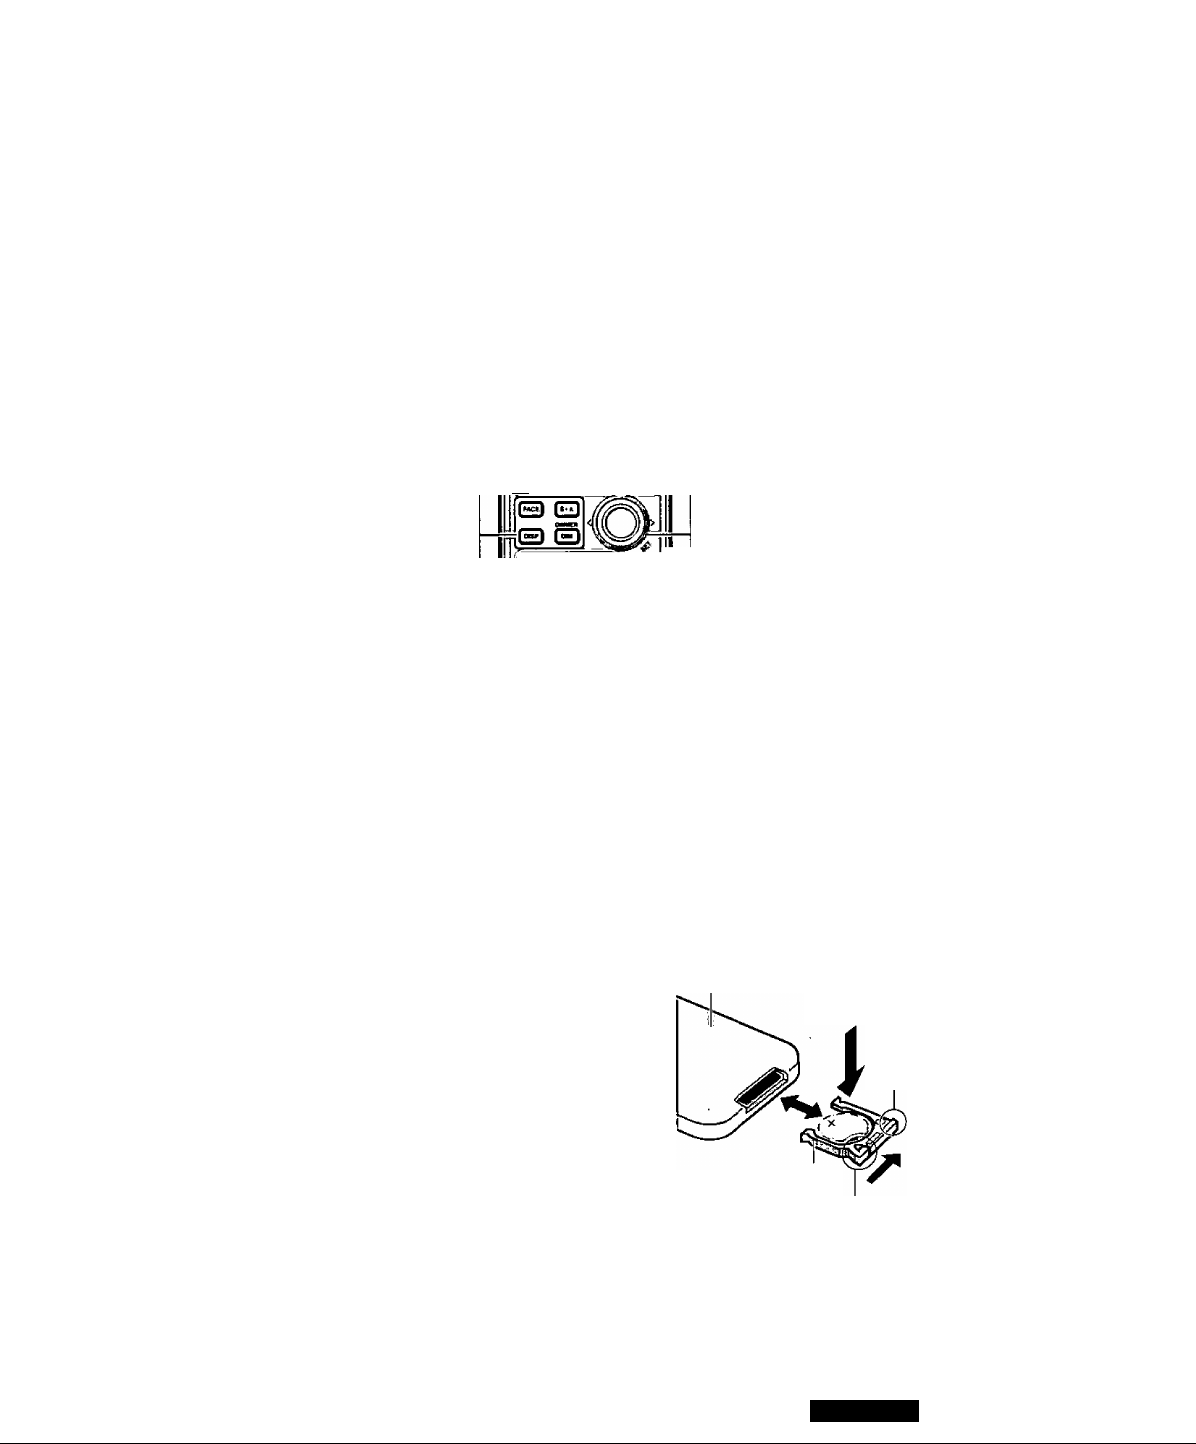
Battery Installation
O Remove the battery holder.
Pull the battery holder by the position B while pushing posi
tion A in the direction indicated by the arrow.
O Install the battery on the battery holder.
As shown in the figure on the right, fit the battery into the battery
holder with the “-i- ” side facing up while pressing on position A.
0 Insert the battery holder.
Push the battery holder back into its original position.
Back side
Lithium battery (included)
Position B
Battery Notes Battery holder
Remove and dispose of an old battery immediately. Position A
Battery Information: • Battery type: Panasonic lithium battery (CR2025) (included)
• Battery life: Approximately 6 months with normal use (at room temperature)
Caution: Improper use of batteries may cause overheating, an explosion or ignition, resulting in injury or a
fire. Battery leakage may damage the unit.
• Do not disassemble or short the battery. Do not throw a battery into a fire.
• Keep batteries away from children to avoid the risk of accidents.
• Be careful to observe proper local disposal rules when you dispose of batteries.
CQ-DF802U
23
Page 24
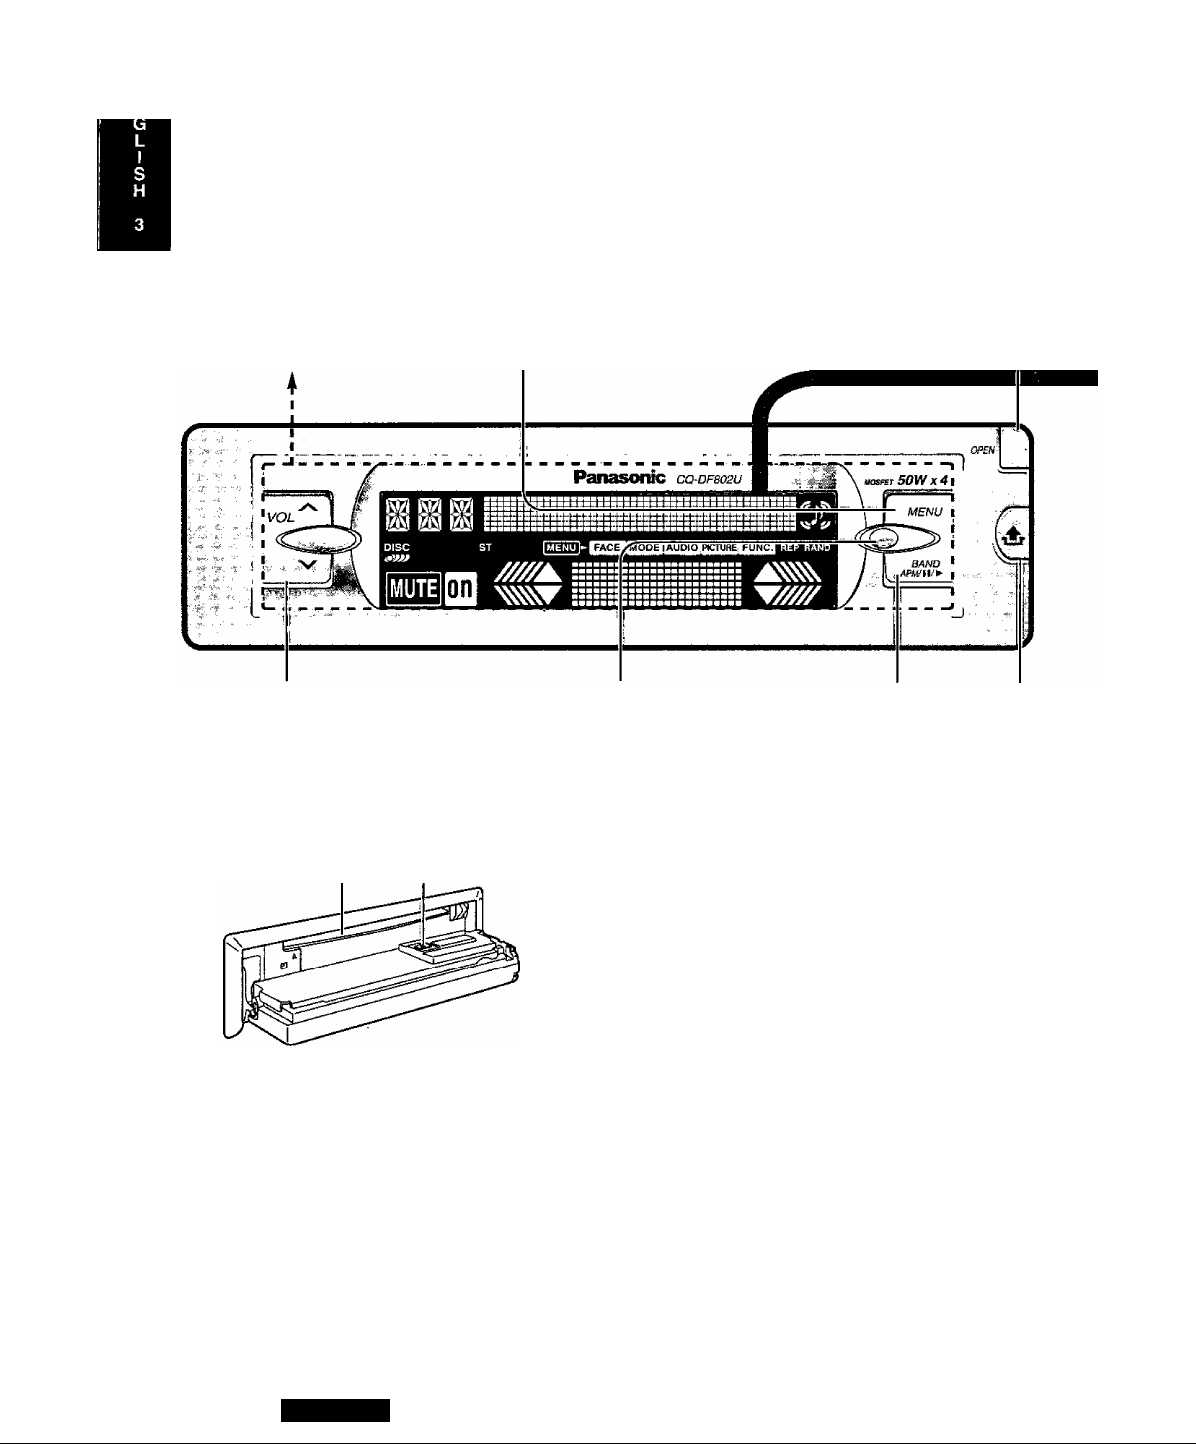
Name o f Con tr ol s Fun ct io ns
(Main Unit and Touch Panel)
Touch panel
• Switches on the power.
page 26)
Note:
• Operations can be performed no
matter which part of the touch
panei is pressed BUT ONLY
WHEN THE POWER IS ON.
[^][v] VOL (Volume)
• Adjusts the sound volume.
(«• page 27)
Disc slot
• Loading the disc. page 30)
Ш (Eject)
• Ejects the disc. (■ page 30)
[MENU]
• Enters the menu setting
mode.
• Returns to the regular
mode during menu setting.
Remote control sensor
[OPEN]
--------------------
• Opens the front panel,
page 27)
Display next page)
[BAND] (APM/I !/► )
(Auto Preset Memory/Pause)
• Selects a band. (^ page 28)
• Pause CD playing.
(-* page 31)
• Sets the auto preset memory
(АРМ) mode. (^ page 29)
[^] (Release)---------------------------
• Releases the front panel.
(^ page 58)
^ The brightness of the screen illustrations in this manual is different from the actual screen brightness.
□ You can operate this unit by pressing buttons on the main unit and the remote control unit, and touch pan
els on the main unit.
• Some operations can be activated by pressing buttons only on main unit or remote control unit.
Those cases are described in the instructions.
Example: Press [OPEN] on the main unit.
•These instructions describe buttons that are concerned with operations as follows.
Example: Press [VOL y\] or [VOL v]/[^] or [ v].
[buttons on the main unit]/[remote control unit]
24
CQ-DF802U
Page 25
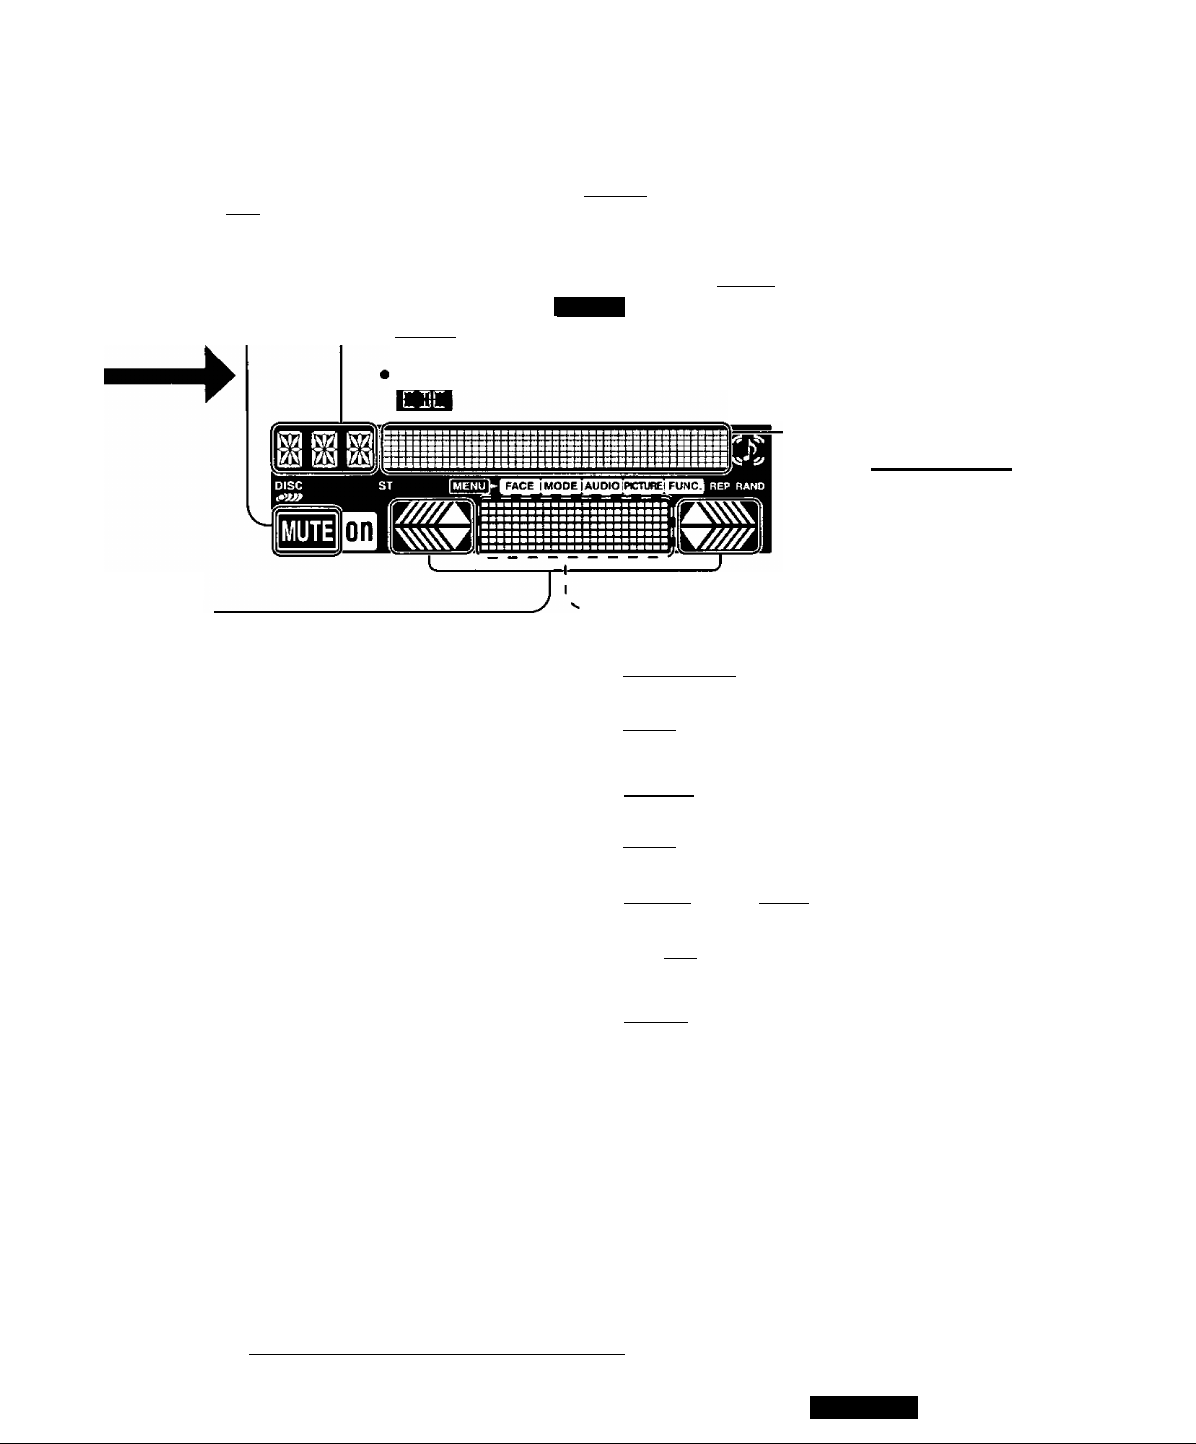
(Display)
MUTE (Indicates [mute].)
• Lowers the volume,
page 27)
Cursors
Source display (Indicates Rff/Kwa.)
• Switches off the power. page 26)
(Press and hold.)
• Selects a source. page 26)
• Radio
Fri inFriEPIFM^ini
CD player mode
CD changer control
(
or
(Hour/minute/preset/disc/menu/submenu)
• Selects (vertically) or adjusts an operation or
item.
• Adjusts the clock. (■» page 27)
• Selects a preset memory. page 29)
• Selects disc. page 34)
^ O'" ^ (Tune/track/setting)
• Selects (horizontally) or adjusts an operation or
item.
• Selects or searches frequency/track.
(^ pages 28, 31,34)
Note:
• Press the Spectrum Analyzer display to active the
cursor of the touch panel or ^ ^ ■
• AUX-IN setting
• Menu setting mode
Returns to the previous display in
menu setting mode.
Dot display
(Indicates \display\.)
• Changes the display.
(^ pages 28, 31,35)
• Returns to the previous
display.
- Spectrum Analyzer (S-A) display (^ page 42)
• Clock basics (^ page 27)
HUURI
I ri lN I
• Radio mode (^ page 28)
P.SETl (Preset)
• Enters a preset memory mode. (^ page 29)
(Minute)
fiPHEl
• CD player mode (■ • page 30)
I i H'C I (Track)
• CD changer control (*• page 34)
I
I Hi...: I (Track), U1 HU
• Menu setting mode
1 j I
• Returns to the previous display.
rSETI
• Determines an operation or item in menu set
ting mode.
Example: Press or /[^]or[v].
cursor on the touch panel /[remote control unit]
(^ above.)
Example: Press |j^/[MENU]/[DISPl.
Spectrum Analyzer display on the touch panel |/[buttons on main unitl/lremote control unit]
(^ above.)
CQ-DF802U
25
Page 26
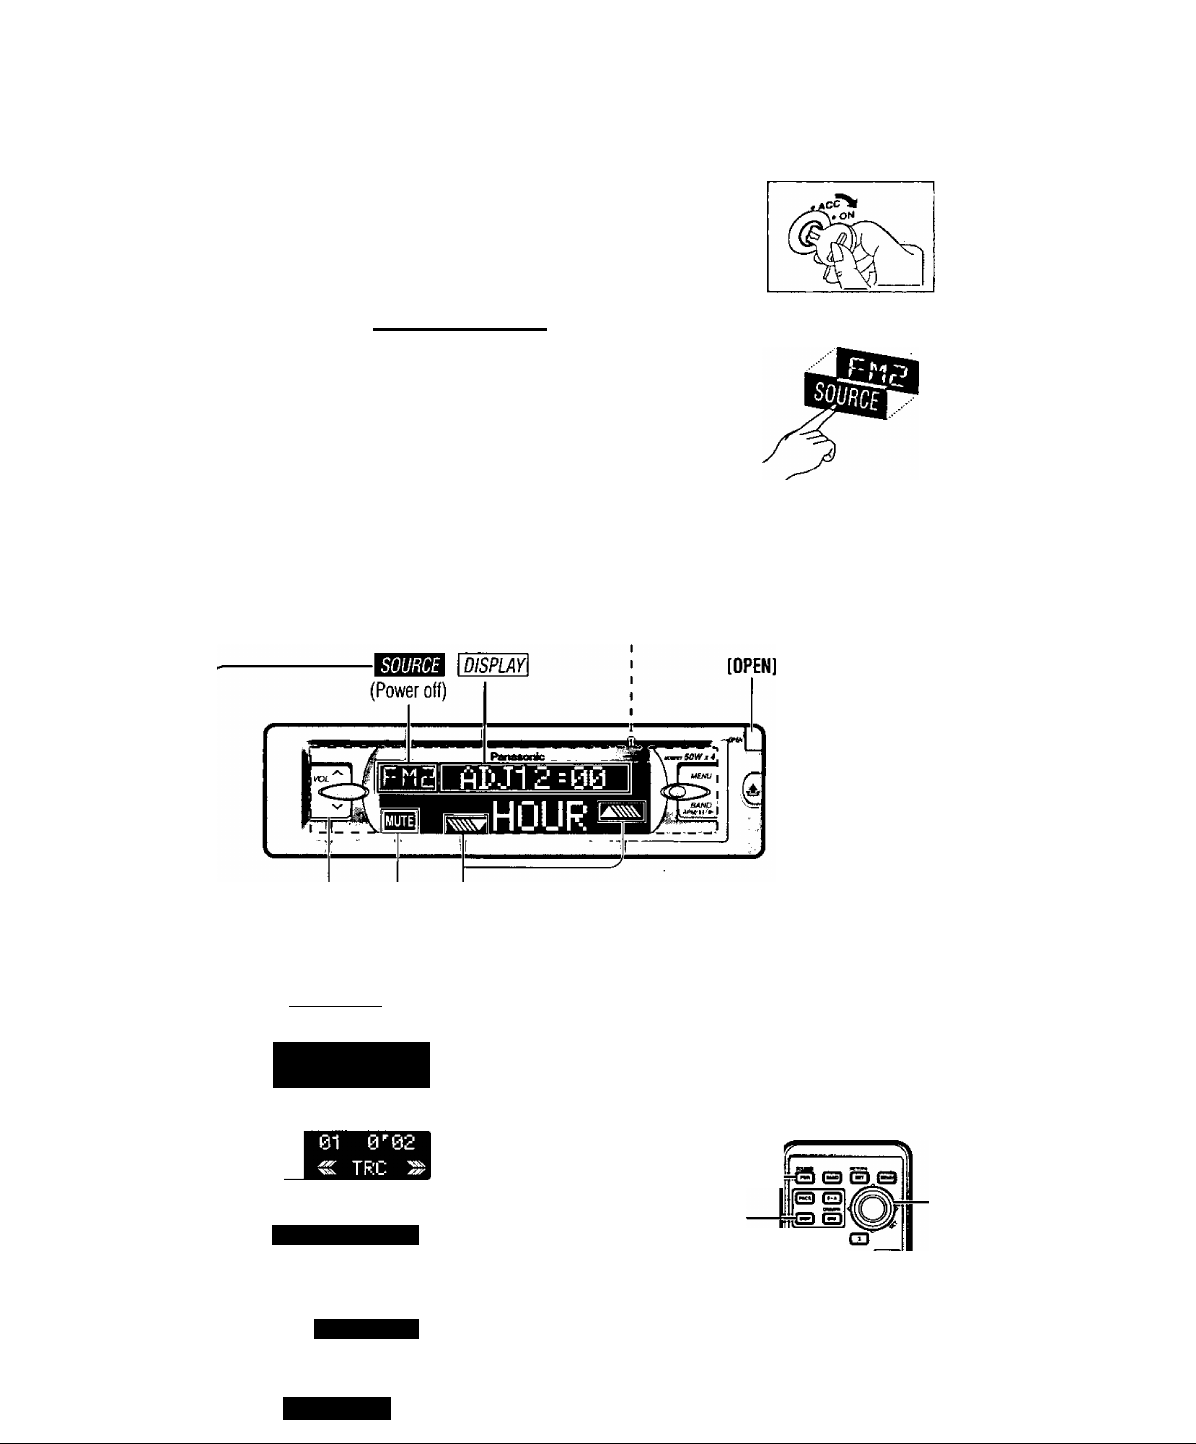
General
Power
Turn the key in the ignition until the accessory indicator lights.
■ Power on
Press the touch panel on the main unit.
Press [PWR] (SOURCE) on the remote control unit.
■ Power off
Press and hold
1 second.
Press and hold [PWR] (SOURCE) on the remote control unit
again for more than 1 second.
Note:
• After turning off the ignition key, a security message is displayed, and the panel removable alarm that
reminds you to take the panel is activated. {When security function is set to on ^ page 44)
• Operations can be performed no matter which part of the touch panel is pressed BUT ONLY WHEN
THE POWER IS ON.
SOURCE
on the main unit again for more than
-Touch panel (Power on)
26
[VOL aHVOL V]
(Volume)
Source
0
Press ■ Bfijwjfflfa/fSOURCE] to change the source.
Radio
87.9
MÉ' ^ TUNE :i>
CD player
IEB03
CD changer control
r:ii:iJ0i-T002
AUX-IN setting
4^
<AUX IH>
CÛ-DF802U
Jim
(When a CD is in the player.)
(When a CD changer is
connected and magazine is in
the changer.) (^page 34)
(Hour/minute)
[PWR]
(SOURCE)
[DISP]
(Display)
CD CD
CD CD CD
jgl Q CD
(Hour/minute)
VOL (Volume)
[MUTE]
Page 27
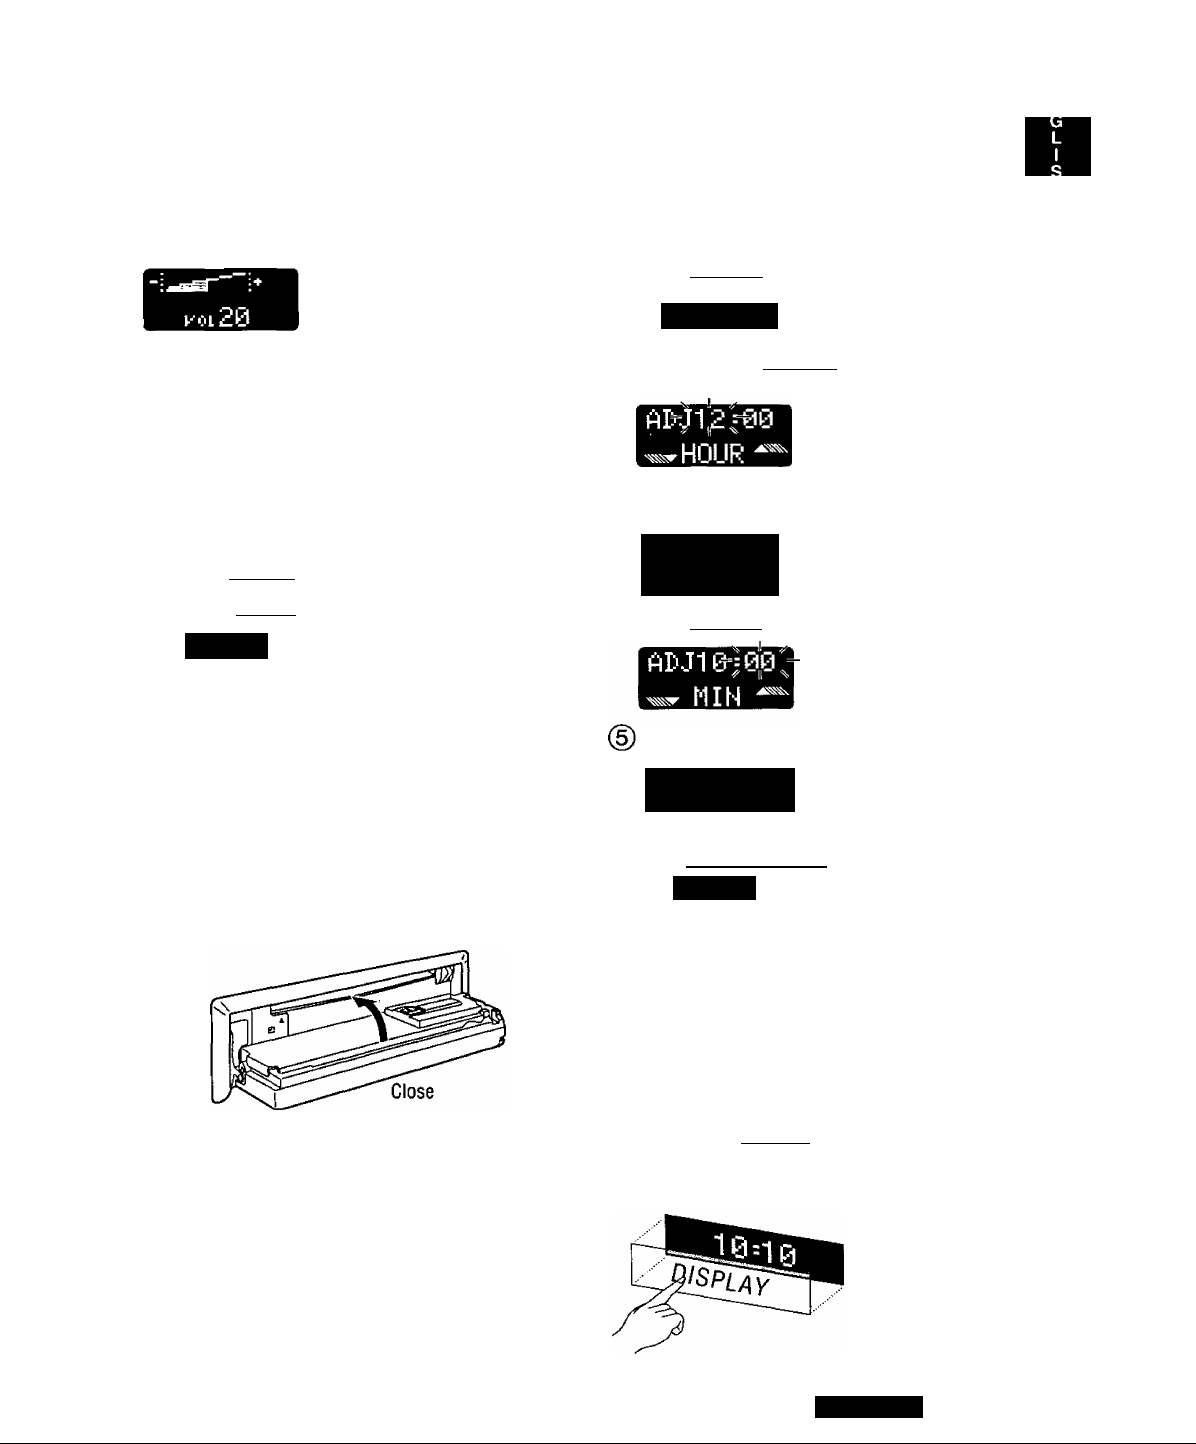
Clock Basics
Volume
[VOL Al: Up
IVOL V]: Down
Setting range: 0 to 40
Note:
• The sound level for each source is stored in
memory.
(There is one volume setting for AM radio
band, and one volume setting for FM radio
band.)
Mute/Attenuation
ON: Press I MUTE I /[MUTEl.
OFF: Press [MUTE] /[MUTE] again.
NUTE
Decreasing volume range depends on setting.
(^ page 44)
: No sound.
; Decrease the volume to Vio.
(Q D
indicator lights.)
The 12-hour system is used for the clock.
Initial Time
(T) Press IP/SPMy|/[DISP] (display).
HlJJUST
(Clock display)
@ Press and hold |o/SPMy|/tOISPl (display) tor
more than 2 seconds.
(Hours blink.)
Press or or [V].
hI'J10=00
(Hours set.)
xwHOUR
@ Press |d/spla7|/[DISP] (display).
(Minutes blink.)
Press or /[/\] or [V].
AL'J10=10
MIN ^
(Minutes set.)
Open/Close the Front Panel
OPEN: Press [OPEN] on the front panel.
CLOSE: Raise the panel by hand.
Caution:
• To avoid damaging the front panel, do not push
it down or place objects on it while it is open.
• Do not pitch your finger or hand in the front
panel.
• Do not insert foreign matter into the disc slot.
(6) Press \display\/[D\S?\ (display).
10=10
Note:
• Press and hold or
change numbers rapidly.
• You can select the clock display during the unit
off. (^ page 44)
(End.)
'^^/[ /\ ]
or [v] to
Time Reset
Press and hold lo/SPMyj/fDISP] (display) for more
than 2 seconds to activate the time setting mode to
reset the time. Then, repeat steps @ to (g).
CQ-DF802U
27
Page 28
Radio
Radio Mode
Press ■ B/’w/awa/iSOURCEl to change to
the radio mode.
Band--------------
Press [BAND] to change the band
Caution:
• To ensure safety, never attempt to preset sta
tions while you are driving.
Radio mode display
FM stereo indicator
P.SET to
change the cursor.
Note:
ENPTV
Displays when not have any
menu settings. Radio and AUX
IN mode do not have any menu
settings.
M/M. 'W/M {Preset station/select)
fTiinpi
Tuning
©
/[<]: Down
Press and hold ^ or ^ /[<] or [>] for
more than 0.5 seconds, then release.
Seeking will start.
Display Change
Press (p/gPMy(/[DISP] (display) to change the display.
r: h/t;ji 0"7 Q
r f tc. w i .y
28
X
10=10
CQ-DF802U
Radio mode display
(Default)
Clock display
(SOURCE)
[DISP]
(Display)
into [6]
(Preset station)
[BAND]
(Auto preset
memory)
[<I [>]
(Tune)
[^][v]
(Preset station/
select)
Page 29

One-Touch Selection of a Station
Up to 6 stations each can be saved in the FM1, FM2, FM3 and AM preset station memories.
(T) Select a band and frequency (steps 0> © and O on the previous
page).
@ Press and hold the Spectrum Analyzer display |TUNE| for more than
2 seconds until the preset number blinks.
@ Press or /[^] or [ v] to select a preset number (1-6).
(4) Press and hold |P.SET| (preset) for more than 2 seconds to memo
Manual Preset Memory
Manually save a station in
the preset memory.
rize. Preset number
• The display blinks once, and a re
ceiving station is saved in the
memory.
Note: Spectrum Analyzer display |P.SET
• Frequency setting can be performed even after selecting a preset num
ber.
Entering numbers directly onthe remote control unit
(J) Select a band and frequency (step 0> © and 0 on the previous
page).
(2) Press and hold [1J to [6] for more than 2 seconds to memorize.
Auto Preset
Memory (АРМ)
Automatically save rela
tively strong stations in
the preset memory.
-
Note:
• Existing saved stations are oi
-------
Preset Station Calling
(J) Select a band (steps О and @ on the Scanning:
previous page). ^ '
@ Press and hold [BANDJ (АРМ) for
more than 2 seconds.
• The 6 strongest available stations will be automatically saved in the
memory under preset number 1 to 6.
• Once set, the preset stations are sequentially scanned for 5 seconds
each. (Scanning)
• Press or /[/\] or [V] for the broadcast you want to listen
to.
(Press [1] to [6] on the remote control unit.)
^^
i/erwritten with new stations after following this procedure.
-
------------------------------------------------------------------------------------,
(J) Select a band (steps O and O on the previous page).
@ Press the Spectrum Analyzer display |TUNE| to show |P,SEf| (preset).
@ Press
or A] or [V] to select the preset number for tuning
in the preset station.
(Press [11 to [61 on the remote control unit.)
Г
r I t(L
ImuteI
= ^ Q =
d r-e
.-rP.SET
CQ-DF802U
29
Page 30
CD Player
Disc Insert and Playback
Open the front panel.
Press [OPEN] on the front panel.
Insert the disc.
e
Playback will start automatically after the
unit recognized the loaded disc as an ordi
nary music CD. (When a CD-R or CD-RW
which has CD-DA formatted data as the
same as an ordinary music CD is loaded,
this unit recognizes it as an ordinary music
CD.) ■
Close the front panel manually.
Note:
• Loading a disc when the power is off allows the
power to be turned on.
Stop and Disc Eject
(T) Press [OPEN] on the front panel.
(2) Press [A] (eject) to stop CD play and eject the
disc.
Note:
• Ejecting the disc when the unit is in the CD player
. mode allows the power to be turned off.
jm 'm rTrarli\
CD player mode display
Track playing time
Track number
Repeat and random indicator
• Do not insert a disc when “DISC” indi
cator lights.
• Lights when the disc is loaded/played.
4^.
----
[BAND] (Pause)
(SOURCE) —
[DISP] -
(Display)
[#]
-------------
(NUMBER)
A
(El ED^
OQtD
(mCDE3
w\
â)
[BAND] (!!/► )
[<][>]
(Track)
[SET]
[0]to [9]
(Track number)
(Pause)
30
CO-DF802U
Page 31

Caution:
• Only 5" (12 cm) CD, CO-DA data recorded CD-R and CD-RW discs are available for this unit.
• This unit does not support CO text display.
• This unit does not support MP3 disc playback.
• Refer to page 53 about notes on CD-Rs/RWs.
• To avoid damaging the front panel, do not push it down or place objects on it while it is open.
• Do not use irregular shaped discs.
• Do not use discs that have a seal or label attached.
• Do not insert foreign matter into the disc slot.
• The back side of the front panel becomes hot during use, but this is not an indication of any problem. Do
not touch anything here except E^] (eject).
• The disc insertion slot and its vicinity become hot, but this is not an indication of any problem. Be care
ful when inserting a disc or pressing [^1 (eject).
Listening to a CD
CD Player Mode
(When a CD is in the player.)
Press irf<W;MJ/[SOURCE] to change to CD
player mode.
Playback starts automatically.
Track Selection
^ /[>]: Advance to the next track.
^ /[<]: Back to the beginning of the current track.
Back to the previous track. (Press twice.)
Track Search
Press and hold.
^ /[>]: Fast forward
^ /[<]: Fast backward
Release to resume the regular play.
Direct Track Selection
Only for the remote control unit
Example: track number 10
© Press [#] (NUMBER).
T)
Jj
TRACK
i
©Press [11 [0].
1
@ Press tSETl to set.
The corresponding track starts playing.
Note:
• Press 1d/SPMK1/[DISP1 (display) or [#] (NUM
BER) to return to the regular mode.
• If a non-existent track number is input and en
tered, the command is invalid and the display re
turns to regular mode.
r Tí
JJ
10 0''02
Display Change
Press |o/SPM/|/[DISP] (display) to change the dis
play.
Track number/track
playing time (Default)
Pause
Press [BAND] (■■/►).
Press [BAND! (I !/►) again to cancel.
PAUSE
Clock display
CQ-DF802U
31
Page 32

CD Player
(Continued)
Menu Setting on CD Player Mode
^ Menu
■: Lights during menu play setting.
I MODE I ; Lights during CD player menu mode.
0 [MENU]
& Submenu
^ Menu Submenu
© Press ^ or
[<1 or [>1 to select
“REPEAT”.
(D Press [s|t]/[SET] to set.
0 Press ^ or
[<] or [>] to select
“RANDOM".
(2) Press [SET|/[SET] to set.
Only for the remote control unit
Scan Play
Default: Off
32
CQ-DF802U
When the menu is not displayed
Press 15] (SCAN) to change setting.
On: The first 10 seconds of each track plays in sequence.
Blinks.
Off: Cancel
{Displayed for 2 seconds.)
Page 33

Setting
Note:
• Press [E^/tMENUl/tlVIENU], [DISP] (display) to
return to the regular mode.
• Press [3U|/tRET] (RETURN) to return to the previ
ous display.
• REP: Lights during repeat play.
RAND; Lights during random play.
(Setting)
Direct setting on the re
mote control unit when the
menu is not dispiayed
Press or or [v] to change setting.
REP OH
REP OFF
f
Press or or [V] to change setting.
RAHt‘ ON
RANr> OFF
: Repeat the current track.
: Cancel
: All the available track plays in a random
sequence.
: Cancel
[DISP] (Display)
[5] (SCAN) ” ^ ^
[4] (RANDOM)
[6] (REPEAT)
o (3 Q
CD O
CD CD
Press [6] (REPEAT) to change
setting.
(When you press a button, the
screen on the left is displayed
for 2 seconds.)
1
>
m
Press [4] (RANDOM) to
change setting.
On: “RAND” lights.
RAHI:* OFF
Off:
(Displayed for 2 seconds.)
[MENU]
[<][>]
(Menu/submenu)
[^][v]
(Setting)
[SET]
J
CQ-DF802U
33
Page 34

CD Changer Control
CD changer functions are designed for optional Panasonic CD changer unit.
Preparation:
• Connect the CD changer, and load a magazine (disc).
Note:
• Loading a magazine when the power is off allows the power to be turned on.
• Ejecting the magazine when the unit is in the CD changer mode allows the power to be turned off.
• This unit does not support CD-ROM, CD-R or CD-RW playback through the CD changer. Use the CD changer
to listen to normal music CD exclusively.
• Pausing does not function in the CD changer mode.
CD Changer Mode
(When a CD changer is connected and a maga
zine is in the changer.)
Press igg7№J/ISOURCE] to
change to CD changer mode.
Playback starts automatically.
CD changer mode display
Repeat and random indicator
Disc number Track number
Note:
Disc Selection
o
lihUjOBjlW : Load a magazine with CDs.
: Magazine is ejected in the
CD changer mode.
am. 'w/aa
(Disc)
'm a/// (Irack)
Next disc.
/[V]: Previous disc.
• Press DISC or [ TRC | to change
the cursor.
Lights when the changer (magazine) is con
nected.
Lights when the disc is played.
34
Track Selection
@
^ /[>]: Advance to the next track.
^ /[<]: Back to the beginning of the current track
Back to the previous track. (Press twice.) ^ /[<]: Fast backward
CQ-DF802U
Track Search
Press and hold.
^ /[>]: Fast forward
Release to resume the regular play.
Page 35

Direct Disc Seiection
Only for the remote control unit
Example: disc number 10
©Press l#l (NUMBER).
©Press [1110].
(3) Press tSETl to set.
The first track of the corresponding disc starts
playing.
Note:
• Press \DiSPLAY\f[0\SP] (display) or [#] (NUM
BER) to return to the regular mode.
• If a non-existent disc number is input and en
tered, the command is invalied and the display
returns to regular mode.
Dispiay Change
Press |p/SPMy|/[DISPl (display) to change the dis
play.
Disc/track number (Default)
Track playing time
Clock display
Note:
Press |o/SP/7IK|/[DISP] (display) to return to the
regular mode.
(SOURCE)
IDISP]
(Display)
[<1 (>] (Track)
[r.][v](Disc)
[SETJ
[0] to [9]
(Disc number)
CQ-DF802U
35
Page 36

CD Changer Control (continued)
Menu Setting on CD Changer Mode
O IVIenu
: Lights during rrtenu play setting.
I MODE I : Lights during CO changer menu mnde.
Repeat Play
Default: REP OFF
r
--------- -----------------
Disc Repeat Play
Default: D-REPOFF
Random Play
Default: RAND OFF
©IMENUl
@[sel
^ Menu
■
" -
© Press [MENU] during CD
changer playing to display
“MODE”.
@ Press [S|g/[SET1 to set.
Submenu
© € @[1E ©S> (SutJiïienu)
Submenu
® Press ^ or ;^ /
l<] or [>] to select
“REPEAT".
d) Press iSETl/ISET] to set.
© Press or ^
[<]or[>]to select
“D-REPEAT”.
@ Press |SET|/[SET] to set.
© Press ^ or ^ /
[<] or [>] to select
“RANDOM”.
© Press [Slfl/ISET] to set.
Disc Random Play
Default: D-RND OFF
Only for the remote control unit
Scan Play
Default: Off
r
Disc Scan Play
Default: Off
36
CQ-DF802U
When the menu is not displayed
■r
Press [5] (SCAN) to change set
ting.
Press and hold [5] (SCAN) for
more than 2 seconds to change
setting.
© Press C or ^ /
[<] or [>] to select
“D-RANDOM".
© Press |SET|/[SET] to set.
Blinks.
Blinks.
Page 37

Note:
• Press rWT|/[MENU]/[MENUl, [DISP] (display) to
return to the regular mode.
• Press ^0/[RET] (RETURN) to return to the previ
ous display.
• REP: Lights during repeat play.
Blinks during disc repeat play.
RAND; Lights during random play.
Blinks during disc random play.
Direct setting on the remote con
trol unit when the menu is not
displayed
Press or /[a] or [v] to change setting.
i^m ) : Repeat the current track.
[gp- IFir 1: Cancel
Press or /[A] or [V] to change setting.
] : Repeat the current disc.
: Cancel
Press or /1 A] or [vj to change setting.
^: All the available tracks on all discs
^ plays in a random sequence.
: Cancel
Press or
mmm
^ /[A] or [V] to change setting.
: All the available tracks on the current
disc plays in a random sequence.
: Cancel
Press [61 (REPEAT) to change setting.
(When you press a button, the
screen on the left is displayed for
2 seconds.)
Press and hold (61 (REPEAT) for more
than 2 seconds to change setting.
(When you press a button, the
screen on the left is displayed for
2 seconds.)
Press [4] (RANDOM) to change setting.
On; "RAND” lights
(Displayed for 2 seconds.)
Press and hold [41 (RANDOM) for
more than 2 seconds to change setting.
On: “RAND” blinks.
Off:G
(Displayed for 2 seconds.)
On: The first 10 seconds of each track on all
discs plays in sequence.
(Displayed for 2 seconds.)
On: The first 10 seconds of the first track of all
the discs plays in sequence.
Off: Cancel
(Displayed for 2 seconds.)
CQ-DF802U
[MENUl
[<1[>]
(Menu/
submenu)
[A][V]
(Setting)
[SETl
37
Page 38

Front Panel Settings [FACE]
A Menu
(DCtCDLUT] CDlXMenu)
I: Lights during menu play setting.
[ face I
[audio!
Front Panel Brightness
The brightness of the screen can be ad
justed to the desired level so that it will fit
in with the equipment inside the car and
the front panel buttons.
Default: LOOK-IN
Setting range: LOOK-IN, PEEK, SLEEP
: Lights during FACE mode.
: Lights during AUDIO mode.
...............................................IVI^nu
Q Submenu
Q [MENU]
© Press [MENU],
© Press ^ or ^ /
[<I or [>] to select
“FACE”.
® Pf6SS |SET|/[SET] to set.
®m ®[M
Ф
(Submenu)
Submenu
Press ^ or
[<] or [>] to select
“SHUHER”.
Press |SET|/ISET] to set.
^ /
Color Change
You can change the color of the [VOL a
v][MENU] [BAND] buttons.
Default: STORM
Variety: 5 kinds, LEVEL, STORM
Audio and Sound Settings [AUDIO]
^ Menu
f \
S-HDB (Super High
Definition Bass)
Especially for rock music, the bass-sound
will be more powerful.
Default: S-HDB OFF
Setting range: S-HDB OFF, BOOM, TIGHT
38
CQ-DF802U
© Press [MENU].
® Press ^ or /
[<] or [>] to select
“AUDIO”.
(3) Press jSETl/[SET] to set.
Press ^
©
[<1 or [>1 to select
“COLOR”.
Press [^/[SET] to set.
^ Submenu
—
© Press ^ or
[<] or [>] to select
“S-HDB”.
© Press |SET|/[SET] to set.
Ч
______________
^ f
Page 39
^ Setting
Setting
Press or /1^1 or [V] to change setting.
The brightness of the entire front
panel changes.
SLEEP
PEEK
(See page 42 for information on changing
the brightness of just the display area.)
----------------------------------: Bright (brighter than “PEEK”)
: The entire front panel darkens and the illuminated
colors inside the panel change in appearance.
: Bright
Note:
• Press rEjmn/[MENU]/[MENU], [DISP] (display) to
[MENU] return to the regular mode.
• Press [¡¡¡J|/[RET] (RETURN) to return to the previ
ous display.
-
Direct setting on the re
mote controi unit when the
menu is not displayed
Press and hold [FACE]
more than 2 seconds
change setting.
(When you press a button,
the screen on the left is displayed for 2 seconds.)
^_______________________
for
to
J
Press or /[/^1 or [V] to change setting.
L
STORM
LE^EL
FIRE
: 5 kinds (below),
white and yellow
: Changes according
to the volume level.
:Red
TUIILIGHT
C'l/I. J
OCEOH
FOREST
^ Setting
Press or or [V] to change setting.
; The bass sounds of the speakers are strongly
emphasized. lights.
; The bass sounds of the speakers are moder
ately emphasized. “''5" lights.
(The sounds of the subv\/oofer can be heard
clearly.)
; S-HDB is non-active.
Or\Y
: Purple
:6lue
: Aqua blue
: Green
_________
Press [FACE] to change set
ting.
(When you press a button,
the screen on the left is dis
played for 2 seconds.)
/
Direct setting on the re
mote control unit when the
menu is not displayed
PressfJ'l (S-HDB) to change
setting.
(When you press a button,
the screen on the left is dis
played for 2 seconds.)
CQ-DF802U
39
Page 40

Audio and Sound Settings [AUDIO] (Continued)
^ Menu
®s: ®iw
; Lights during menu play setting.
[audioI : Lights during AUDIO mode. _
.................................................................
Bass and Treble
You can adjust the bass and treble sound.
Default: BAS (Bass) 0 dB
TRE (Treble) OdB
Setting range: -12 dB to +12 dB
(by 2 dB)
(DX (Menu)
0 IMENUI
» Submenu
0]^ (Submenu)
Submenu
© Press ^ or
[<1 or [>] to select
“BASS”.
@ Press [SET]/1SET1 to set.
© Press =€ Of 5^ /
[<] or [>] to select
“TREBLE”.
@ Press [SET]/ISET] to set.
/
Balance and Fader
You can adjust the sound balance among
the front, rear, right and left speakers.
Default: BAL (Balance) CNT (Center)
FAD (Fader) CNT (Center)
Setting range: 15 levels each
Subwoofer Level
You can change the subwoofer volume level.
Default: 0 dB
Setting range: (subwoofer mute),
-6dBto+6dB(by2dB)
Subwoofer Low Pass Filter
Select the upper limit frequency of the
sound from subwoofer.
Default: 120 Hz
Setting range: 120 Hz/80 Hz
© Press [MENU],
(2) Press ^ or ^ /
[<1 or [>] to select
“AUDIO”.
(D Press |SET|/[SET] to set.
© Press or ^ /
I<] or [>] to select
“BALANCE”.
© Press [^/[SETl to set.
© Press
i<] or [>] to select
“FADER”.
© Press [^/iSET] to set.
© Press ^ or
[<] or [>] to select
“SUB-W LEV”.
© Press [^/[SETI to set.
© Press ^ or /
[<1 or [>1 to select
“SUB-W FRQ".
© Press (Sig/ISET] to set.
^ o\ ^ /
/
40
CQ-DF802U
Page 41

^ Setting
'«ssr i EXIT I Jim. (Setting)
^ Setting
Press or or [V] to adjust the level.
/[^]: Increase the bass.
/[V]: Decrease the bass.
Press or /[/\] or [V] to adjust the level.
/[/\]: Increase the treble.
/[V]: Decrease the treble.
[MENU]
EAS 0dE
IRE 0dE
Note:
Press U^/tlVIENUl/iMENU], [DISP] (display) to
return to the regular mode.
Press [¡¡¡J|/[RET] (RETURN) to return to the previ
ous display.
[MENU]
[<][>]
(Menu/subinenu)
[A][V]
(Setting)
[SET]
Press or /[A] or [V] to adjust the level.
/[A]: Right enhanced.
/[V]: Left enhanced.
Press or A] or [V] to adjust the level.
/[A]: Front enhanced.
/[V]: Rear enhanced.
Press or /[A] or [V] to adjust the level.
/[A]: Increase the level.
/[V]: Decrease the level.
ERL CHT
FRD CHT
LEy 0dE
CQ'DF802U
41
Page 42

Picture (Display) Settings [PICTURE]
O
_ __
©[SET]
[lAia.MiiJ • Lights during menu play setting.
|picture| : Lights during PiCTURE mode.
..................................................
Dimmer (display brightness
setting range)
The brightness of ¡ust
the dispiay area of the
front panel changes.—
Default; DIMMERS
Setting range: DIMMER 1 to 3
^ Submenu
©(MENU!
®m@LSELJ (Submenu)
Q Submenu
® Press ^ ^ /
[<] or [>] to select
“DIMMER”.
® Press [S|t]/[SET] to set.
Spectrum Analyzer (S A) Display Pattern
Default: KEY
Variety: KEY, PAHERN 1 to 5
Contrast
Allows you to adjust the display contrasts
for better viewing.
Default: C0NT3
Setting range: CONT1 to 5
© Press [MENU].
@ Press ^ or > /
[<] or [>] to select
“PICTURE”.
(D Press [Slx]/iSET] to set.
© Press ^ or ^ /
I<] or I>] to select
“S-A”.
® Press [SEXl/iSET] to set.
© Press ^ or ^ /
[<] or [>] to select
“CONTRAST”.
@ Press ¡SET]/[SET] to set.
42
CQ-DF8Q2U
Page 43

^ Setting
Setting
è
Note:
• Press Hm1/[MENU]/[MENU], [DISP] (display) to
[MENU]
return to the regular mode.
• Press [5E1/IRET] (RETURN) to return to the previ
ous display.
• Press Spectrum Analyzer display on S A setting to
return to the previous display.
m (Setting)
Direct setting on the re
mote control unit when the
menu is not displayed
Press or
PIMMER 3
UINMER 2
^ /[/^] or [V] to change setting.
: Bright
: Medium
l:-INNER 1
(See page 38 for information on changing
the brightness of the entire front panel.)
Press or /[A] or [V] to change setting.
:S A off (regular
display)
PATTERH1
PATTERN2
Press or /[A] or [V] to change setting.
COHT 5
:S-A1
:S-A2
Level up
CONT 4
CONT 5
CONT 2
COHT 1
Level do\wn
®i
PATTERN4
BSHBaia sa5
I®
:SA4
Press [DIM] (DIMMER) to
change setting.
(When you press a button,
the screen on the left is dis
played for 2 seconds.)
Press [S-A] to change setting.
(When you press a button,
the screen on the left is dis
played for 2 seconds.)
[DISP]
(Display)
[S-A]
(Spectrum Analyzer)
[MENU]
[<][>]
O CD U3
CD OGS
mcBIB V ^ wPfSr
CD CD CD
(Menu/submenu)
[A][V]
CD
(Setting)
CD
[SET]
[DIM] (DIMMER)
CQ-DF802U
43
Page 44

Function Settings [FUNCTION]
A Menu
1
(D
«@LmJ
: Lights during menu play setting.
[FUNC.g
: Lights during FUNCTION mode.
Mute/Attenuation
You can select how much to tower the
volume when [MUTE]/ [MUTE]is pressed.
Default: KEY: MUTE
Setting range: KEY: MUTE. KEY: AH
Button Operation Sound
Enable or disable the beep or button op
eration.
Default: BEEP ON
Security Function
The security indicator (LED) blinks when
the removable face plate is removed from
the unit.
Default: SLED ON
©'Z (Menu)
A Submenu
© [MENU]
RTNÌ-IGTE-'ATT
S H
©«©LSii
-o Menu -o Submenu
A r
<0 Press [MENU],
® Press ^ ^ /
[<] or [>] to select
“FUNCTION”.
@ Press |SET|/[SET] to set.
, ,
____________
0 Press Of ^ /
[<] or (>] to select
“MUTE/AH”.
@ Press [pxl/ISET] to set.
0 Press C or > /
[<] or [>] to select
“BEEP SET”.
0 Press [||t]/[SET] to set.
0 Press ^ or ^ /
[<] or [>] to select “SE
CURITY”.
0 Press |SET|/[SET] to set.
<iaia_
......
0]^ (Submenu)
Display Setting
You can select display pattern on the unit
off.
Default: BLACK
Setting range: DEMO, CLOCK, BLACK
44
CQ-DF802U
0 Press ^ or ^ /
[<] or [>] to select “OFF
DISP”.
0 Press [pf]/[SET] to set.
Page 45

^ Setting
Note:
• Press rEjar|/[MENU]/[MENUl. [DISP] (display) to
fMFNUi to the regular mode.
^ ■ • Press [¡¡¡¡/[RET] (RETURN) to return to the previ
ous display.
[D SP] (Display)
Setting
h
Press or /[/V] or [V] to change setting.
KEViMUTE
KEV:ATT
Press or '^*^/[/\] or [v] to change setting.
BEEP OFF
Press or /[^) or [V] to change setting.
SLEE- OH
: No sound.
: Decrease the volume to Vio. (Attenuation)
: Operation sound (beep) is on.
!: Operation sound (beep) in off.
: Security function is active.
: Security function is non-active.
sm (Setting)
[MENU]
[<][>]
(Menu/submenu)
[A][v]
(Setting)
[SET]
Security function
When the key in the ignition is turned OFF.
• Security message \n\W be active.
PANEL !
• The panel removable alarm will be active.
When the removable face plate is removed.
• The security indicator blinks. (^ page 59)
Press or /[^] or [V] to change setting.
BLACK
BEMO
CLOCK
: Black display
: Demonstration display
: Clock display is on.
Direct setting on the remote controi unit on the unit off
Press [DISP] (display) to change
setting on the unit off.
CQ'DF8Q2U
45
Page 46

Troubleshooting
Preliminary Steps
Check and take steps as described in the tables below.
If You Suspect Something Wrong
Imnnediately switch power off.
Disconnect the power connector and check that there is nei
ther smoke nor heat from the unit before asking for repairs.
Never try to repair the unit by yourself because it is danger
ous to do so.
Troubleshooting Tips
□ Common
c
No power.
Trouble
c
Car’s engine switch is not on.
^Turn your car’s ignition switch to ACC or ON.
Cables are not correctly, connected.
»Connect cables correctly.
Battery cable is not correctly connected.
»Connect the battery cable to the terminal that is always active.
Accessory cable is not correctly connected.
»Connect the accessory cable to your car’s ACC source.
Caution:
• Do not use the unit if it malfunctions or
if there is something wrong.
• Do not use the unit in abnormal condi
tion, for example, without sound, or if it
emits smoke or a foul smell, which can
cause ignition or electric shock.
Immediately stop using the unit and call
the store where you purchased it.
Cause/Step
No sound.
L
______
(
I
Noise.
I
_____
_
r—-
The display shows
demonstration message.
L.
46
Grounding wire is not correctly connected.
»Connect the grounding wire to a metal part of the car.
Fuse is burnt.
»Call the store where you purchased the unit, or your nearest
Servicenter (see the attached sheet) and ask for fuse replacement.
Mute is set to ON.
»Set it to OFF.
Cables are not correctly connected.
»Connect cables correctly.
Condensation (dew).
»Wait tor a while before use.
A mobile phone is used near the unit.
»Keep the mobile phone away from the unit.
Demonstration mode is ON.
»Press |o/SPL^iV'|/[DISP] (display) to cancel demonstration mode.
CQ-DF802U
Page 47

□ CD
47
Page 48

48
CQ-DF802U
Page 49

Error Display Messages
□ CD Player
[ Display ) P
J
Power off
1
Power off
i
Power off
Cause/Step
• Disc is dirty, or is upside down.
• A disc that has data other than CD-DA type is loaded.
^ Check disc.
Disc has scratches.
^ Check disc.
V j
No operation by some cause.
•^If normal operation is not restored, call the store where you pur
chased the unit or the nearest Servicenter to ask for repairs.
CQ-DF802U
49
Page 50

Troubleshooting (continued)
□ CD Changer
Display
r~ Tir"
-E1- s
Disc number
jr NO PI SC
Note:
• For details, refer to operating instructions for the changer used.
D C
• Disc is dirty, or is upside down.
• A disc other than a music CD (CD-DA type) is loaded.
^Check disc. (The changer automatically switches to the next
disc.)
Disc has scratches.
^Check disc. (The changer automatically switches to the next
disc.)
No operation by some cause.
^If normal operation is not restored, call the store where you pur
chased the unit or the nearest Servicenter to ask for repairs.
The display continues if you cannot switch off the power.
No disc is in the changer (magazine).
^Insert discs into the changer (magazine).
Cause/Step
_
_________
N
>
If the Unit does not Operate Properly
50
CQ-DF802U
Reset switch
Push a thin, unbreakabie object into this hole to press
the reset switch.
• After a reset, the unit reverts to its initial state.
Note that any information or settings stored in the
unit’s memory will be lost.
Caution:
• Press the reset switch if pressing any of the other
buttons has no effect.
Page 51

Maintenance
Your product is designed and manufactured to ensure a minimum of maintenance. Use a dry, soft cloth for
routine exterior cleaning. Never use benzine, thinner or other solvents.
Product Servicing
If the suggestions in the charts do not solve the problem, we recommend that you take it to your nearest au
thorized Panasonic Servicenter. The product should be serviced only by a qualified technician.
Replacing the Fuse
Use fuses of the same specified rating {15 A). Using different substitutes or fuses with higher ratings, or con
necting the unit directly without a fuse, could cause fire or damage to the stereo unit.
If the replacement fuse falls, contact your nearest Panasonic Servicenter for service.
CQ-DF802U
51
Page 52

Maintenance
Before cleaning, turn off in the ignition or remove the front panel.
Care of the Unit
□ Cleaning this Unit
Use a dry, soft cloth to wipe.
□ Caution on Cleaning
Never use solvents such as benzine, thinner as they
may mar the surface of the unit.
Clean Touch Panel by Wiping Lightly with a Soft Cloth
When the top surface of the touch panel has become dirty, use the included wiping cloth to wipe the surface
thoroughly. Under no circumstances should detergents or other such cleaning substances be used for this
purpose.
Do not allow the top surface of the touch panel to be caught by your fingernails or any hard objects. If you
do so, you may damage or break the glass on the top surface of the touch panel.
52
CQ-DF802U
Page 53

Notes on CD/CD Media (CD-R, CD-RW)
„ . .
...................
nCOMBACT
Do not play any ordinary music CDs with labels Cn rigfp
other than this one. ULlUyiiD
How to hold the disc
• Do not touch the underside of the disc.
• Do not scratch the disc.
• Do not bend disc.
• When not in use, keep the disc in the case.
Do not use irregular shaped discs.
Do not leave discs on the following places:
• Direct sunlight
• Near car heaters
• Dirty, dusty and damp areas
• Seats and dashboards
Disc cleaning
Use a dry, soft cloth to wipe from the center outward.
Caution on new discs
A new disc may have rough edges on its inner and outer
perimeter. These may cause malfunction.
Remove the rough edges using a pencil, etc.
Label side
Do not use irregular shaped discs.
<Right> <Wrong>
DIGITAL AUDIO
Rough edges
Do not attach any seals or labels to your discs.
Do not write on the disc label in a heavy pen or ball
point pen stroke.
Notes on CD*Rs/RWs
• You may have trouble playing back some CD-R/RW discs recorded on CD recorders (CD-R/RW drives), ei
ther due to their recording characteristics or dirt, fingerprints, scratches, etc. on the disc surface.
• CD-R/RW discs are less resistant to high temperatures and high humidity than ordinary music CDs. Leaving
them inside a car for extended periods may damage them and make playback impossible.
• The unit may not successfully play back a CD-R/RW that was made by the combination of writing software, a
CD recorder {CD-R/RW drive) and a disc if they are incompatible one another.
• This player cannot play the CD-R/RW discs if the session is not closed.
• This player cannot play the CD-R/RW discs which contains other than CD-DA data.
• Be sure to observe the instructions of CD-R/RW disc for handling it.
CQ-DF802U
53
Page 54

Installation Guide
WARNING
This installation information is designed for experienced Installers and is not in
tended for non-technical individuals. It does not contain warnings or cautions of po
tential dangers involved in attempting to install this product.
Any attempt to install this product in a motor car by anyone other than qualified in
staller could cause damage to the electrical system and could result in serious per
sonal injury or death.
□ Installation Hardware
No.
Mounting collar 1
©
Hex. nut (5 mm0)
©
Rear support strap 1
Tapping screw
0
(5 mm0x16 mm)
Mounting bolt (5 mm0)
(D
Power connector
®
Removable face plate
©
case
Trim plate
Mounting spring (R) 1
CD
Mounting spring (L) 1
0
Flat-head screw
0
(5 mm0x6 mm)
Lock cancel plate
Item Diagram Q’ty
1
1
1
1
1
1
2
2
□ Overview
This product should be installed by a professional.
However, if you plan to install this product yourself,
your first step is to decide where to install it.
The instructions in these pages will guide you
through the remaining steps:
(Please refer to the “WARNING” statement
above.)
• Identify and label the car wires.
• Connect the car wires to the wires of the power
connector.
• Install the unit in the dashboard.
• Check the operation of the unit.
If you encounter problems, please consult your
nearest professional installer.
Caution:
• This unit operates with a 12 V DC negative
ground auto battery system only. Do not at
tempt to use it in any other system. Doing so
could cause serious damage.
Before you begin installation, look for the items
which are packed with your unit.
• Warranty Card...Fill this out promptly.
• Panasonic Servicenter List for Service Directory
...Keep for future reference In case the product
needs servicing.
• Installation Hardware...Needed for in-dash in
stallation.
□ Required Tools
You’ll need a screwdriver, a 1.5 V AA battery, and
the following:
12 V DC
Test bulb
Electrical
tape
Side-cut
pliers
54
CQ-DF802U
Page 55

□ Dashboard Specifications
Thickness Min. (4.75 mm)
□ Identify All Leads
The first step in installation is to identify all the car
wires you’ll use when hooking up your sound sys
tem.
As you identify each wire, we suggest that you label
it using masking tape and a permanent marker.
This will help avoid confusion when making con
nections later.
Note:
• Do not connect the power connector to the stereo
unit until you have made all connections, if there
are no plastic caps on the stereo hooking wires,
insulate all exposed leads with electrical tape until
you are ready to use them. Identify the leads in
the following order.
Power Lead
If your car has a radio or is pre-wired for one:
Cut the connector wires one at a time from the plug
(leaving the leads as long as possible) so that you
can work with individual leads.
If your car has a radio or is pre-wired for one:
With the ignition and headlights off, identify the car
battery lead by grounding one lead of the test bulb
to the chassis and checking the remaining exposed
wires from the cut radio connector plug.
If your car is not wired for an audio unit:
Go to the fuse block and find the fuse port for the
battery, usually marked BAT.
Speakers
Identify the car speaker leads. There are two leads
for each speaker which are usually color coded.
A handy way to identify the speaker leads and the
speaker they are connected with is to test the leads
using a 1.5 V AA battery as follows.
Hold one lead against one pole of the battery and
stroke the other lead across the other pole. You will
hear a scraping sound in one of the speakers if you
are holding a speaker lead.
If not, keep testing different lead combinations until
you have located all the speaker leads. When you
label them, include the speaker location for each.
Antenna Motor
If your car is equipped with an automatic power an
tenna, identify the car motor antenna lead by con
necting one bulb tester lead to the car battery lead
and touching the remaining exposed wires from the
cut radio connector plug one at a time. You will
hear the antenna motor activate when you touch
the correct wire.
Antenna
The antenna lead is a thick, black wire with a metal
plug at the end.
Turn the ignition on to the accessory position, and
ground one lead of the test bulb to the chassis.
Touch the other lead of the test bulb to each of the
exposed wires from the cut radio connector plug.
Touch one wire at a time until you find the outlet
that causes the test bulb to light.
Now turn the ignition off and then on. If the bulb
also turns off and on, that outlet is the car power
lead.
If your car is not wired for an audio unit:
Go to the fuse block and find the fuse port for radio
(RADIO), accessory (ACC), or ignition (IGN).
Battery Lead
If your stereo unit has a yellow lead, you will need
to locate the car’s battery lead. Otherwise you may
ignore this procedure. (The yellow battery lead pro
vides continuous power to maintain a clock, memo
ry storage, or other function.)
□ Connect All Leads
Now that you have identified all the wires in the car,
you are ready to begin connecting them to the
stereo unit wires. The wiring diagram (^ page 60)
shows the proper connections and color coding of
the leads.
We strongly recommend that you test the unit be
fore making a final installation.
You can set the unit on the floor and make tempo
rary connections to test the unit. Use electrical tape
to cover all exposed wires.
Important:
• Connect the red power lead last, after you have
made and insulated all other connections.
Ground
Connect the black ground lead of the power con
nector to the metal car chassis.
CQ-DF802U
55
Page 56

Installation Guide
(Continued)
Speakers
Connect the speaker wires. See the wiring diagram
page 60) for the proper hookups. Follow the di
agram carefully to avoid damaging the speakers
and the stereo unit.
The speakers used must be able to handle more
than 50 W of audio power. If using an optional
audio amplifier, the speakers should be able to han
dle the maximum amplifier output power. Speakers
with low input ratings can be damaged. Speaker
impedance should measure 4-8 Q, which is typi
cally marked on most speakers. Lower or higher
impedance speakers will affect output and can
cause both speaker and stereo unit damage.
Motor Antenna
Connect the car motor antenna lead to the dark blue
motor antenna relay control lead.
(Do not confuse the antenna lead with blue/white
stripe lead for a power amplifier.)
Battery
Connect the yellow battery lead to the correct radio
wire or to the battery fuse port on the fuse block.
Antenna
Connect the antenna by plugging the antenna lead
into the antenna receptacle.
Equipment
Connect any optional equipment such as an amplifi
er, according to the instructions furnished with the
equipment. Leave about 12" (30 cm) of distance
between the speaker teads/amplifier unit and the
antenna/antenna extension cord. Read the operat
ing and installation instructions of any equipment
you will connect to this unit.
Power
Connect the red power lead to the correct car radio
wire or to the appropriate fuse port on the fuse
block.
If the stereo unit functions properly with all these
connections made, disconnect the wires and pro
ceed to the final installation.
□ Final Installation
Lead Connections
Connect all wires, making sure that each connec
tion Is insulated and secure. Bundle all loose wires
and fasten them with tape so they will not fall down
later. Now insert the stereo unit into the mounting
collar.
Congratulations! After making a few final checks,
you’re ready to enjoy your new auto stereo system.
□ Final Checks
1. Make sure that all wires are properly connected
and insulated.
2. Make sure that the stereo unit is securely held in
the mounting collar.
3. Turn on the ignition to check the unit for proper
operation.
If you have difficulties, consult your nearest author
ized professional installer for assistance.
□ Preparation
• We Strongly recommend that you wear gloves
for installation work to protect yourself from
injuries.
• When bending the mounting tabs of the
mounting collar with a screwdriver, be careful
not to injure your hands and fingers.
• Disconnect the cable from the negative © battery
terminal (see caution below).
• Unit should be installed in a horizontal position
with the front end up at a convenient angle, but
not more than 30°.
\ Less than 30"
Caution:
• Do not disconnect the battery terminals of a
car with a trip or navigational computer since
all user settings stored in memory will be lost.
Instead take extra care with instailing the unit
to prevent shorts.
Dashboard Installation
Installation Opening
23/32"
,,(53 mm)
- 75/32" -
(182 mm)
This unit can be installed in any dashboard having
an opening as shown above. The dashboard should
be 3/16" (4.75 mm)-y32" (5.56 mm) thick in order to
be able to support the unit.
56
CQ-DF802U
Page 57

□ Installation Procedures
First complete the electrical connections, and
then check them for correctness. page 60)
The included mounting collar 0 is designed
specifically for this unit. Do not use it to attach
any other model.
(0) Flat-head screw
{5 mm0x6 mm)
@ Mounting
4 spring (L)
Mounting tab
d) Mounting bolt {5 mm0)
Mounting spring (R)
0 Flat-head screw (5 mm^x
Note for the trim plate (g):
• Attach the trim plate after attaching the
main unit to the vehicle. Remove the
front panel to attach the trim plate.
Insert mounting collar 0 into the dashboard, and bend the mounting tabs out with a screwdriver.
Fastening the mounting collar
The tabs to be bent vary depending on
the car. Bend them with a screwdriver
to fasten the mounting collar
curely in the dashboard.
Dashboard
— 0 Mounting collar
Note:
• To securely install the unit, fully bend a
number of the tabs so that there is no
rattling.
• Be sure to fasten the unit securely when
6 mm)
Attach the mounting springs 0,0 to the unit.
ioining it with the mounting collar ©.
e
Secure the rear of the unit.
о
After fixing mounting bolt (D and power connector
®, fix the rear of the unit to the car body by either
method (a) or (b) shown below.
Insert trim plate ®.
о
After installation, recon
nect the negative
e
tery terminal.
0
bat
0 se
(a) Using the rear support strap @
Fire wall of car
0 Tapping screw /
(5mm<^x16mm) / 3 mm^
0 Hex. nut
3) Rear support
strap
® Mounting bolt
(5 mm0)
Mounting collar
(5 mm0)
(b) Using the rubber cushion (option)
Rear support bracket
Rubber cushion (option) (provided on the car)
0 Mounting bolt
(5 mm0)
0 Mounting collar
CQ-DF802U
57
Page 58

Installation Guide
Remove the Unit
Switch off the power of the unit.
Remove the removable face plate.
Remove the trim plate (g) with a screwdriver.
• First remove one side, then the other.
e
O Fit the screwdriver into the hole of 0 Insert the screwdriver until “click” is heard,
the trim plate.
(Continued)
58
©Trim plate g„ewdriw
CQ-DF802U
Page 59

Anti-Theft System
This unit is equipped with a removable face plate. Removing this face plate makes the radio totally inoperable.
The security indicator will blink..
Place the Removable Face Plate into Case
О Switch off the power of the unit.
О Remove the removable face plate. (-> page 58)
© Gently press the bottom of the case and open
the cover. Place the face plate into the case and
take it with you when you leave the car.
Note:
• Be sure to keep the front panel with the removable face plate case (included) when it has been detached
from the main unit.
• Take care not to drop the front panel when it has been detached from the main unit. Also take care not to
bump the top surface of the touch panel into anything. If you do so, you may break the glass on the top sur
face of the touch panel.
Install Removable Face Plate
O Slide the left side of the removable face plate in
place.
© Press the right end of removable face plate until
“click” is heard.
Security Indicator
The security indicator blinks when the removable
face plate is removed from the unit.
Active the security function in the function settings,
page 44)
Panel Removal Alarm
This alarm sounds to warn you not to forget to re
move the panel before leaving your car. This func
tion is activated when the security indicator is on.
Caution:
• This face plate is not waterproof. Do not expose it to water or excessive moisture.
• Do not remove the face plate while driving your car.
• Do not place the face plate on the dashboard or nearby areas where the temperature rises to high level.
• Do not touch the contacts on the face plate or on the main unit, since this may result in poor electrical
contacts.
• If dirt or other foreign substances get on the contacts, wipe them off with clean and dry cloth.
• To avoid damaging the front panel, do not push it down or place objects on it while it is open.
CQ-DF802U
59
Page 60

Electrical Connections
Caution:
• This product is designed to operate with a 12 V DC, negative ground battery system.
• To prevent damage to the unit, be sure to foliow the connection diagram below.
• Remove approximately W' (5 mm) of protective covering from the ends of the ieads before connecting.
• Do not insert the power connector into the unit until the wiring is completed.
• Be sure to insulate any exposed wires from a possible short-circuit from the car chassis. Bundle all cables
and keep cable terminals free from touching any metal parts.
• Remember, if your car has a drive computer or a navigation computer, the data of its memory may be
erased when the battery terminals are disconnected.
□ Wiring Diagram
Antenna
External amplifier control lead <
(Max. 500 mA)
This lead is lor connection to the power amplifier.
Note:
• This lead is used for power control when an external power
amplifier is connected. The power supply of a power amplifier
will be activated when turning on the power of this unit.
Not used.
Note:
• Insulate this lead with vinyl tape.
Motor antenna relay control lead ^-----------------------------
(To motor antenna) (Max. 500 mA)
This lead is not intended for use with switch actuated power antenna.
Note:
• The power antenna extends automatically when the AM/FM
radio mode is selected.
ACC power lead ^
To ACC power, -I-12VDC.
Battery lead ^
To the battery, continuous +12 V DC.
------------------------------
-----------------------
---------------------------
(BlueMhite stripe)
(Brown/white stripe)
(Dark blue)
Register (1 kQ)
Fuse (15 A)
=j M BATTERY 15A
,-----------------------------
ACC
(Red)
(Yellow)
60
CQ-DF802U
Ground lead ^--------------------------------
To a clean, bare metallic part of the car chassis.
(Black)
Page 61

Accessory used for wiring
No. Item I Q’ty
CD
Power connector | 1
CQ-DF802U
61
Page 62

Electrical Coanections (Continued)
□ Upgrading the System
Example Combination
• CD changer (CX-DP88U, option)
• Stereo power amplifier
Note:
• For wiring, carefully read the operating instructions for the devices connected.
Ground lead
62
Stereo power
amplifier
A A
Subwoofer speakers
CQ-DF802U
Page 63

Specifications
□ General
Power supply:
Current consumption:
Maximum power output:
Tone adjustment range:
Bass:
Treble:
Suitable speaker impedance:
Preamp output voltage:
Subwoofer output voltage;
Preamp output impedance:
Subwoofer output impedance: 60 O
Dimensions (WxHxD): 7"xVVi6"x6Vb" (178x50x155 mm)
Weight; 3 lbs. 12 oz (1.7 kg)
□ FM Stereo Radio
Frequency range:
Usable sensitivity:
50 dB quieting sensitivity:
Alternate channel selectivity:
Stereo separation:
Image response ratio:
IF response ratio:
Signal/noise ratio:
12 V DC {10.8 V-16 V), test voltage 14.4 V, negative ground
Less than 2.2 A (CD play mode; 0.5 Wx4 channels)
50 Wx4 channels at 1 kHz, volume control maximum
±12 dB at 120 Hz ■
±12 dB at 10 kHz
4-8 0
5.0 V (CD play mode; 1 kHz, 0 dB)
5.0 V
60 0
87.9 MHz-107.9 MHz
12.0 dBf. (75 O)
15.0 dBf. (75 0)
75 dB
35 dB (1 kHz)
75 dB
100 dB
60 dB
□ AM Radio
Frequency range:
Usable sensitivity:
530 kHz-1 710 kHz
29dB/iiV (25 [iV, S/N 20 dB)
□ CD Player
Sampling frequency:
DA converter:
Error correction system:
Pick-up type:
Light source;
Wave length:
Frequency response:
Signal/noise ratio:
Total harmonic distortion:
Wow and flutter;
Channel separation:
Above specifications comply with EIA standards.
Note:
• Specifications and the design are subject to modification without notice due to improvements in technology.
8 times oversampling
MASH-1 biV4DAC system
Panasonic super decoding algorithm
Astigma 3-beam
Semiconductor laser
780 nm
20 Hz-20 kHz(±1 dB)
95 dB
0.02 % (1 kHz)
Below measurable limits
90 dB
CQ-DF802U
63
Page 64

Préparatifs avant I’utilisation
□ Remarques relatives au panneau tactile
Lors de rutilisation
• Vous devez toucher te panneau du doigt pour effectuer les opérations.
• N’appuyez pas trop fort sur les touches. Sinon, vous risqueriez d'endommager ou de briser la surface de verre qui
recouvre le panneau tactile.
• Prenez garde de toucher la surface du panneau tactile avec l’ongle ou tout objet solide. Sinon, vous risqueriez
d’endommager ou de briser la surface de verre qui recouvre le panneau tactile.
• N’utilisez pas un stylo ou tout autre objet pointu pour effectuer les opérations sur le panneau tactile. Sinon, vous
risqueriez d’endommager ou de briser la surface de verre qui recouvre le panneau tactile.
• Le fait d’utiliser le panneau tactile alors que sa surface est recouverte de poussière comporte un risque d’endommager la
surface de verre qui le recouvre.
Lorsqu’il n’est pas utilisé
• Lorsque vous retirez le panneau avant de l’appareil principal, rangez-le dans l’étui de rangement du panneau avant
amovible (fourni).
• Prenez garde d’échapper le panneau avant après l’avoir retiré de l’appareil principal. Prenez garde aussi de heurter la
surface du panneau tactile contre quoi que ce soit. Sinon, vous risqueriez de briser la surface de verre qui recouvre le
panneau tactile.
• Prenez garde de toucher la surface du panneau tactile avec l’ongle ou tout objet solide. Sinon, vous risqueriez
d’endommager ou de briser la surface de verre qui recouvre le panneau tactile.
Lors du nettoyage page 94)
64
CQ-DF802U
Page 65

Noms des fonctions de commande
Pointez la télécommande sur le capteur de l’appareil principal. page 66)
(sur la télécommande)
[PWR] (SOURCE)
[RET] (RETURN)
• Pour rnettre l’appareil sous/hors tension. (^ page 68) • Pour revenir à l’affichage précédent en mode de
• Pour sélectionner une source. (•• page 68) réglage de menu.
[BAND]
• Pour sélectionner une bande. (^ page 70)
• Pause de lecture CD. (■► page 73)
1.__ _ _ _ _ _ _ _ _ _____ _ _ _ _ _ _ _ _____ _ _ _ _ _ _ _ _ _____ _ _ _ _ _ _ _ _____ _ _ _ _ _ _ _ _ _____ _ _ _ _ _ _ _ ______
[FACE]
• Pour sélectionner la couleur des
touches et la luminosité de l’affichage.
page 81)
[S-A] {Analyseur de spectre)
• Pour sélectionner le type d’affichage de
l’analyseur de spectre. (-• page 85)
[DISP] (Affichage)
• Pour modifier l’affichage.
pages 70,73,77)
[DIM] (DIMMER)
• Pour modifier le niveau du gradateur.
page 85)
[MENU]
• Pour activer le mode de réglage de menu.
• Pour revenir au mode ordinaire pendant le réglage de
lecture par menu. ^
[A] [V] (Heure/minutes/disque)
• Pour sélectionner (verticalement) ou faire
le réglage d’une opération ou d’une option.
• Pour régler l’horloge. (^ page 69)
• Pour sélectionner le disque, (^ page 76)
Kl l>] (Plage/syntonisation)
• Pour sélectionner (horizontalement) ou
faire le réglage d’une opération ou d'une
option.
• Pour sélectionner ou chercher une
fréquence ou une plage.
(^ pages 70, 73, 76)
[SET]
• Pour valider une opération ou une option.
[#] (NUMBER)
• Pour activer le mode de saisie de
numéro. pages 73,77)
[0]à [9]
• Pour mémoriser les stations émettrices. {■
[A][v]VOL (Volume)
• Pour régler le volume du son.
(-► page 69)
[MUTE]
• Réduit le volume. (^ page 69)
• Pour sélectionner la plage ou le disque.
(• pages 73, 77)
[4] (RAND0M)/[5] (SCAN)A6] (REPEAT)
• Pour sélectionner l’option d’écoute. (^ pages 74,78)
[j'I (S-HDB)
• Pour régler le son sur les graves à
définition supérieure. page 81)
Installation de la pile
O Retirez le porte-pile.
Tirez le porte-pile par la partie B en poussant la partie A dans le
sens indiqué par la flèche.
0 Installez la pile sur le porte-pile.
Tel qu’indiqué sur l’illustration de droite, insérez la pile dans le
porte-pile en orientant le pôle «+» vers le haut et en appuyant
sur la position A.
0 Réinsérez le porte*pile.
Repoussez le porte-pile jusqu’à sa position d’origine.
Remarques sur la pile
Remplacez la pile dès les premiers signes d’affaiblissement.
Information sur la pile; • Type de pile; Pile au lithium Panasonic (CR2025) (fourni) Partie A
• Durée de vie; Environ 6 mois lors d’une utilisation normale (à température ambiante normale)
Précaution: Une utilisation inadéquate de la pile peut causer une surchauffe, une explosion ou une ignition d’aliumage
pouvant provoquer des blessures ou un incendie. Les fuites de la pile peuvent endommager l’appareil.
• Ne démontez pas la pile ni provoquer de court-circuit. Ne jettez pas la pile au feu.
• Afin de prévenir tout risque d’accident, conserver les piles hors de portée des enfants.
• Lors du rejet des piles, observer les règlements y afférents.
Panneau arrière
Pile au lithium (fourni)
Porte-pile
CQ-DF802U
Partie B
65
Page 66

Noms des fonctions de commande (Appareil principal et panneau tacOle)
[OPEN]
Panneau tactile
• Pour mettre l’appareil sous
tension. page 68)
Remarque:
• Les opérations peuvent être ef
fectuées sur n’importe quelle par
tie du panneau tactile, MAIS
UNIQUEMENT LORSQUE L’AP
PAREIL EST SOUS TENSION.
[MENU]
• Pour activer le mode de réglage
de menu.
• Pour revenir en mode ordinaire
pendant le réglage de menu.
----------------------------------
• Pour ouvrir te panneau
avant. page 69)
Affichage (■• page suivante)
l^] [V] VOL (Volume)
• Pour régler le volume du son
(^ page 69)
Capteur de signal de télécom
mande
[BAND] (APM/II/^)
(Présyntonisation automatique/pause)
• Pour sélectionner une bande.
(• page 70)
Logement du disque
• Pour insérer le disque.
(-» page 72)
tA] (Éjection)
• Pour éjecter le disque.
(^ page 72)
• Pour faire une pause de lecture CD.
(^ page 73)
• Pour régler le mode de présyntoni
sation automatique (АРМ).
(• page 71)
ÎA] (Dégagement)
----------------------
• Pour dégager le panneau avant.
(• page 100)
^La luminosité des illustrations de l’écran, dans ce mode d’emploi, diffère de la véritable luminosité de l’écran.
* •
□Vous pouvez faire fonctionner cet appareil en appuyant sur tes touches de l’appareil principal ou de la télécommande, ou
encore en touchant le panneau sur l'appareil principal.
• L’exécution de certaines opérations n’est possible qu'en appuyant sur les touches de l’appareil principal ou de la
télécommande.
Ces cas font l’objet d’une description dans le mode d’emploi.
Exemple: Appuyez sur la touche [OPEN] sur l’appareil principal.
• Le présent mode d’emploi décrit de la façon suivante les touches auxquelles s’appliquent les opérations.
Exemple: Appuyez sur la touche [VOL /\] ou [VOL v]/[a] ou [ v].
66
[touches sur l’appareil principal]/[télécommande]
CQ-DF802U
Page 67

(Affichage)
MUTE (Indique iMUTEl.l
• Réduit le volume,
page 69)
Curseurs
ou '^3^ (Heure/minutes/présyntonisation/disque/
menu/menu secondaire)
• Pour sélectionner (verticalement) ou faire le réglage
d’une opération ou d’une option.
• Pour régler l’horloge. (^ page 69)
• Sélectionne une mémoire de présyntonisation.
(-► page 71)
• Pour sélectionner le disque. (^ page 76)
^ ou ^ (Syntonisation/plage/réglage)
• Pour sélectionner (horizontalement) ou faire le réglage
d’une opération ou d’une option.
• Pour sélectionner ou chercher une fréquence ou une
plage. (^ pages 70,73,76)
Remarque:
• Appuyez sur l’affichage d’analyseur de spectre
pour activer le curseur du panneau tactile
.mk. ou ^ ^
Source d’affichage (Indique
r
• Pour mettre l'apperei! hors tension.
(>* * page 68) (Appliquez enfoncé.)
• Pour sélectionner une source.
page 68)
• Radio
FM inFM^PIFn^IRn
“(I
• Lecture CD
• Commande de changeur CD
SOURCE
• Réglage AUX'IN
• Mode de réglage de menu
Pour revenir à l’affichage précédent en
mode de réglage de menu.
Affichage par points [Indique
IDISPLAYI (Affichage).]
• Pour modifier l’affichage,
(• pages 70,73,77)
• Pour revenir à l’affichage
précédent.
- Affichage de l’analyseur de spectre (S-A) (^ page 84)
• Fonctions de base de l’horloge (•* page 69)
HOi IRI (Heure), I N I Ñ1 (Minutes)
• Radio (■» page 70)
F SE Tl (Présyntonisation)
• Pour activer un mode de présyntonisation.
(■> page 71)
n I ÍÑE] (Syntonisation)
• Lecture CD (^ page 72)
ITRiJI (Plage)
• Commande de changeur CD (^ page 76)
I Tpr: I (Plage), IH ï SG (Disque)
• Mode de réglage de menu
SUD
• Pour revenir à l’affichage précédent.
r^FTI
• Pour valider une opération ou une option en mode
de réglage de menu.
Exemple: Appuyez sur la touche ou /[^1 ou [vj.
Icurseur sur le panneau tactile [/[télécommande]
(^ ci-dessus.)
Exemple: Appuyez sur la touche I EXIT |/[MENU]/IDISP1.
I Affichage de l’analyseur de spectre sur le panneau tactilën/ftouches sur l’appareil principal]/[télécommande]
(^ ci-dessus.)
CQ-DF802U
67
Page 68

Généralités
Alimentation
Tournez la clé de contact jusqu’à ce que le voyant des accessoires s’allume.
■ Mise sous tension
Appuyez sur le panneau tactile sur l’appareil principal.
Appuyez sur la touche [PWR] (SOURCE) sur la télécommande.
■ Mise hors tension
Appliquez de nouveau et maintenez enfoncé
d’une seconde l’appareil principal.
Appliquez de nouveau et maintenez enfoncé [PWR] (SOURCE) pendant
plus d’une seconde sur la télécommande.
Remarque:
• Une fois la clé de contact tournée à la position OFF, un message de sécurité s’affiche et l’alarme de retrait du
panneau s'active pour vous rappeler de prendre le panneau.
(Lorsque la fonction de sécurité est activée • page 86)
• Les opérations peuvent être effectuées sur n’importe quelle partie du panneau tactile, MAIS UNIQUEMENT
LORSQUE L'APPAREIL EST SOUS TENSION.
__________
SOURCE
pendant plus
Panneau tactile (Mise sous tension)
[OPEN]
68
Source
0
Appuyez sur I
Radio
Lecteur CD
liro
Commande de changeur CD
î:::îî: 1)01-1002
Réglage AUX-IN
CQDF802U
[VOL A] [VOL V]
(Volume)
SOURCE
^ TRC 1
|/(SOURCE) pour changer la source.
(Lorsqu’il y a un CD dans le lecteur.)
(Lorsqu’un changeur CD est raccordé
et que le magasin est dans le changeur.)
(^ page 76)
w jsm (Heure/minutes)
[PWR]
(SOURCE).
[DISP]
(Affichage)
[A][V]
(Heure/minutes)
gj^[^][v]
VOL (Volume)
[MUTE]
Page 69

Fonctions de base de
rhorloge
Volume
[VOL /s]: Haut
[VOL V]: Bas
Plage de réglage: 0 à 40
Remarque;
• Le niveau de son est sauvegardé en mémoire pour
chaque source.
(Il y a un réglage du volume pour la bande radio
AM et un autre pour chacune des bandes radio FM.)
Silencieux/atténuation
ON: Appuyez sur iMUTEl /[MUTE].
(L’indicateu QD s’allume.)
OFF: Appuyez de nouveau.
MUTE
La plage de réduction du volume varie selon le réglage.
(-» page 86)
: Pas de son.
: Réduit le volume à Vio.
L’horloge fonctionne sur un cycle de 12 heures.
Temps initial
(T) Appuyez sur |g/SPLA/|/[DISP] (affichage).
ADJUST
Maintenez enfoncé |/?/SPLAK|/[DISP] (affichage)
pendant plus de 2 secondes.
Appuyez sur ou /[/v] ou [v].
AM10=00
vwHOLIR
(4) Appuyez sur \DISPLAY\/[D\SP] (affichage).
Appuyezsur ou'^^/[/\] DU [V].
fttJ10=10
w MIN
Appuyezsur |0/5PMK|/[DISP] (affichage).
(Affichage de l’horloge.)
(L’heure clignote.)
(Réglage de l’heure.)
(Les minutes clignotent.)
(Réglage des minutes.)
Ouvrir/Fermer le panneau avant
OUVRIR: Appuyez sur [OPEN] sur le panneau avant.
FERMER: Soulevez le panneau manuellement.
Fermer
Attention:
• Pour éviter d’endommager le panneau avant, ne
l’appuyez pas vers te bas et ne placez pas d’objet
dessus lorsqu’il est ouvert.
• Ne mettez pas le doigt ou la main dans ie panneau
avant.
• N’insérez pas de corps étranger dans le logement du
disque.
10=10
Remarque:
• Maintenez enfoncéx^ak. ou ou [v] pour
changer ies chiffres rapidement.
(Fin.)
• Vous pouvez sélectionner l’affichage de l’horloge pour
l’appareil hors tension. (-► page 86)
Réglage du temps
Maintenez enfoncé |0/SPL4K|/[DISP] (affichage)
pendant plus de 2 secondes pour activer le mode de
réglage du temps et régler le temps. Répétez ensuite les
étapes @ à (g).
CQ-DF802U
69
Page 70

Radio
Mode radio
Appuyez sur Bfftftfwa /ISO U R CEI
pour passer en mode radio.
Bande
Appuyez sur [BAND] pour changer de bande.
F
ho 1
t ( t
------------
F l ' ir ?
r-riB
SOURCEDISPLAYl
(Affichage) (Syntonisation) (Présyntonisation)
TUNE P.SET
Attention:
• Pour éviter tout danger, n’essayez jamais de présyntoniser
des stations lorsque vous êtes au volant.
Affichage du mode radio
Indicateur FM stéréo
Bande
I
• Appuyez sur [ TUNE | ou I P.SET |
ou pour passer de curseurs.
Remarque;
S'affiche lorsqu’il n’y a aucun
réglage de menu. La radio et le
mode AUX-IN n’ont aucun réglage
de menu.
Fréquence
Î=l7 q
ENPTV
/m. (Station présyntonisée/sélection)
^ (Syntonisation)
Syntonisation
Syi
¿
^ /[>]: Haut
C /!<]: Bas
Maintenez enfoncée la touche ^
[>] pendant plus de 0,5 seconde, puis relâchez.
La recherche de station commence alors.
ou
^ /[<] ou
Changement d’affichage
Appuyez sur |0/SPMX|/[DISP] (affichage) pour changer l’af
fichage.
r.
r Í ( C_
Affichage du mode de radio
(Valeur par défaut)
Í
FrV2 10=10
70
CQ-DF802U
Affichage de l’horloge
(SOURCE)
[DISP]
(Affichage)
[1]à[6]
(Station
présyntonisée)
[BAND]
(Présyntonisation
automatique)
[<][>]
(Syntonisation)
[a][n/]
(Station présyntonisée/
sélection)
Page 71

Sélection à une touche d’une station
Jusqu’à 6 stations peuvent respectivement être sauvegardées dans les mémoires de station présyntonisée FMI, FM2, FM3
et AM.
(î) Sélectionnez une bande et une fréquence (étapes 0< O O de la page
précédente).
(2) Maintenez enfoncé l’affichage de l'analyseur de spectre [ TUNE !
(syntonisation) pendant plus de 2 secondes, jusqu’à ce que le numéro de
présyntonisation clignote.
Appuyez sur la touche ou ou Iv] pour sélectionner un
numéro de présyntonisation (1-6).
Présyntonisation
manueile
Sauvegarder manuellement
une station dans la mémoire
de présyntonisation,
@ Maintenez enfoncé | P.SEïj (présyntonisation) pendant plus de 2 secondes
pour mettre en mémoire. Numéro de pré syntonisation
• L’affichage clignote une fois, et une station
captée est sauvegardée en mémoire.
Remarque:
• Le réglage de fréquence peut être effectué
même après la sélection d’un numéro de
présyntonisation. spectre jP.SEX
Saisie des numéros directement à partir de ta télécommande
L’affichage de l’analyseur de
(T) Sélectionnez une bande et une fréquence (étapes 0> @ ^1 O la page
précédente).
Maintenez enfoncée une touche de [11 à [6] pendant plus de 2 secondes pour
mettre en mémoire.
Présyntonisation
automatique
(АРМ)
Pour sauvegarder automa
tiquement les stations rela
tivement bien captées dans
la mémoire de préréglage.
^_________________________________________________________—y
Remarque:
• Après cette procédure, les nouvi
-
------------------------------^
3lles stations remplacent les stations précédemment sauvegardées.
,,------------------- ,
Appel de station
présyntonisée
L-------------------------------------------------1---------------------------------------------------y
(T) Sélectionnez une bande (étapes O et ©
de la page précédente).
Maintenez enfoncée la touche [BANDI
(АРМ) pendant plus de 2 secondes.
• Les 6 stations les mieux captées seront automatiquement sauvegardées en
mémoire sous les numéros de présyntonisation 1 à 6.
• Une fois réglées, les stations de présyntonisation sont balayées dans l’ordre
pendant 5 secondes chacune. (Balayage)
• Appuyez sur la touche ou /[/^1 ou [v] pour sélectionner l’émission
que vous désirez écouter.
(Sur la télécommande, appuyez sur [1] à [6].)
(î^ Sélectionnez une bande (étapes O et © de la page précédente).
(5) Appuyez sur l’affichage de l’analyseur de soectre 1 TUNE | (syntonisation)
pour afficher jP.SETl (présyntonisation).
@ Appuyez sur ou /[/\] ou [v] pour sélectionner le numéro de
présyntonisation de la station désirée.
(Appuyez sur une touche de [1] à [6] sur la télécommande.)
Balayage:
hndF’B
e vx.-^P.SÊT
CQ-DF802U
87.9
-
71
Page 72

HO
Lecteur CD
Insertion et lecture de disque
Ouvrez le panneau avant.
Appuyez sur [OPEN] sur le panneau avant.
^ (Éjection)
Insérez le disque.
0
La lecture commence automatiquement une fois
que l’appareil a identifié le disque inséré en tant
que CD audio ordinaire. (Si un CD-R ou CD-RW
contenant des données enregistrées en format
CD-DA comme dans le cas des CD audio
ordinaires, l’appareil l’identifie comme un CD
audio ordinaire.)
Fermez le panneau avant manuellement.
Remarque:
• L’insertion d’un disque lorsque l’appareil est hors ten
sion le met sous tension.
[OPEN]
///// m /pianp'i
m /m l^iagej
Affichage du mode de lecteur CD
Temps de lecture de la plage
Numéro de plage I
0"02
[BAND] (II»
RE
REP RAND
(Pause)
TRC J
Indicateur de lecture répétée/aléatoire
• N’insérez pas de disque lorsque «DISC»
indicateur est allumé.
• S’allume lorsque le disque est inséré/lu.
Arrêt et éjection de disque
(T) Appuyez sur [OPEN] sur le panneau avant.
@ Appuyez sur [AJ (éjection) pour arrêter la lecture du
CD et éjecter le disque.
Remarque:
• L’éjection d'un disque lorsque l’appareil est en mode
de lecteur CD le met hors tension.
72
CQ-DF802U
[BAND] (Pause)
(SOURCE)
[DISP]
(Affichage)
(NUMBER)
[piDCD
Q? Q
©cDa
[<][>]
(Plage)
[SET]
[Olà [9]
(Numéro de plage)
Page 73

Attention:
• Seuls les CD de 12 cm (5 po) et des données de format CD-DA enregistrées sur disque CD-R ou CD-RW sont
utilisables avec cet appareil.
• Cet appareil ne prend pas en charge l’affichage des informations textuelles de CD.
• Cet appareil ne prend pas en charge la lecture des disques MP3.
• Référez-vous à la page 95 pour les remarques relatives aux CD-R/RW.
• Pour éviter d’endommager le panneau avant, ne l’appuyez pas vers le bas et ne placez pas d’objet dessus lorsqu’il est
ouvert.
• N’utillsez pas de disques de forme irrégulière.
• N’utilisez pas de disques sur lequel a été fixé un autocollant ou une étiquette.
• N’insérez pas de corps étranger dans le logement du disque.
• La face arrière du panneau avant devient chaude pendant le fonctionnement, mais il ne s’agit pas d'un
dysfonctionnement. Ne touchez pas d'autres parties que la touche t^l (éjection).
• L’appareil devient chaud sur la partie qui entoure l’entrée du logement de disque, mais il ne s’agit pas d’un
dysfonctionnement. Veuillez faire attention lorsque vous insérez un disque ou appuyez sur la touche (éjection).
Ecoute d’un CD
Mode de lecteur CD
(Lorsqu’il y a un CD dans le lecteur.)
Appuyez sur ^^^^/[SOURCEI pour passer en mode
de lecteur CD.
La lecture commence
automatiquement.
Sélection de plage
^ /[>1: Avancer à la plage suivante.
^ /[<]: Reculer au début de la plage actuelle.
Reculer à la plage précédente.
(Appuyez deux fois.)
Recherche de plage
Maintenez enfoncé.
^ /[>1: Avance accélérée
^/[<]: Recul accéléré
Relâchez pour reprendre la lecture normale.
Pause
Appuyez sur [BAND] (!!/►).
Appuyez sur [BAND] (ll/^) de nouveau pour annuler.
Sélection directe de plage
Avec la télécommande uniquement
Exemple: plage numéro 10
(T) Appuyez sur [#] (NUMBER).
@ Appuyez sur [1] [0].
Appuyez sur [SET] pour valider.
La lecture de la plage correspondante commence.
Remarque:
• Appuyez sur |P/SPMy|/[DISP] (affichage) ou [#1
(NUMBER) pour revenir en mode normal.
• Si un numéro de plage inexistant est saisi et validé, la
commande est inopérante et l'affichage revient en
mode normal.
Changement d’affichage
Appuyez sur |D/SPL/I/|/[DISP1 (affichage) pour changer
l’affichage.
Numéro de plage/temps de
lecture de la plage (valeur
par défaut)
Affichage de l’horloge
CJÎ PAUSE
CQ-DF802U
73
Page 74

Lecteur CD
Réglage de menu en mode de lecteur CD
(suite)
O Menu
[UjiâüUm : S’allume pendant le réglage de lecture par menu. **.
[mode I : S’allume en mode de menu de lecteur CD.
® IMENUl
^ Menu
N r
Lecture répétée
Valeur par défaut: REP OFF (désactivée)
(î) Appuyez sur [MENU] en-
dant la lecture de CD pour
afficher «MODE».
® Appuyez sur I SET |/[SET]
pour valider.
Lecture aléatoire
Valeur par défaut: RAND OFF (désactivée)
^ Menu secondaire
(Menu secondaire)
Ч
e Menu secondaire
® Appuyez sur ^ ou ^ /
[<] ou [>] pour sélectionner
«REPEAT».
(D Appuyez sur I SET [/[SET] pour
valider.
® Appuyez sur ^ ou ^ /
[<1 ou [>] pour sélectionner
«RANDOM».
@ Appuyez sur ISET [/[SET] pour
valider.
Avec ta télécommandé uniquement
Lecture des débuts de
plage
Valeur par défaut: Désactivée
74
CQ-DF802U
J
V
Lorsque le menu ne s’affiche pas
Appuyez sur [5] (SCAN) pour modifier le réglage.
Activé: Lecture successive des 10 premières secondes de
chaque plage.
Clignote.
Désactivée: Annulation
SCAN OFF
/
I (S'affiche pendant 2 secondes.)
Page 75

Réglage
Réglage
Remarque:
• Appuyez sur I EXIT |/[MENU]AMENU], [DISP]
(affichage) pour revenir en mode normal.
• Appuyez sur mu/[RET] (RETURN) pour revenir à
l’affichage précédent.
• REP: S’allume pendant la lecture répétée.
RAND; S’allume pendant la lecture aléatoire.
(Réglage)
Réglage direct sur la
télécommande lorsque le
menu ne s’affiche pas
Appuyez sur ou /[a] ou [v] pour modifier le réglage.
; Répétition de la plage actuelle
REP OFF
: Annulation
r~ ì
Appuyez sur ou /[a] ou [v] pour modifier le réglage.
RAND ON
RAND OFF
1 : Lecture en ordre aléatoire de toutes les plages
disponibles
I : Annulation
[DISP] (Affichage) -
[üj (SCAN)
[4] (RANDOM) —
f61 (REPEAT]
-------------
■S3 jgK Q O
MMwm
^ J
Appuyez sur [6] (REPEAT) pour
modifier le réglage.
(Lorsque vous appuyez sur une
touche, l’écran de gauche s’af
fiche pendant 2 secondes.)
Appuyez sur [4] (RANDOM) pour
modifier le réglage.
Activé: «RAND» s'allume.
Désactivée:
y
[MENU]
[<][>]
(Menu/menu secondaire)
[A][V]
(Réglage)
[SET]
RAHD OFF
(S’affiche pendant
2 secondes.)
CQ-DF802U
75
Page 76

Commande de changeur CD
Les fonctions de changeur CD sont conçues pour le changeur CD Panasonic en option.
Préparatifs:
• Raccordez le changeur CD et insérez un magasin (disque).
Remarque:
• L’insertion d’un magasin lorsque l’appareii est hors tension le met sous tension.
• L’éjection du magasin lorsque l’appareil est en mode de changeur CD le met hors tension.
• Cet appareil ne prend pas en charge la lecture des CD-ROM, CD-R et CD-RW par le changeur CD. Ne l’utilisez que pour
écouter des CD audio ordinaires.
• La pause n’est pas possible en mode de changeur CD.
Affichage du mode de changeur CD
Mode de changeur CD
(Lorsqu’un changeur CD est raccordé et qu’un magasin
y est inséré.)
Appuyez sur RflJfHifa/ISOURCEl
pour passer en mode de changeur CD.
La lecture commence
automatiquement.
Remarque:
NO I^ISC
EJECT
: Insérez un magasin avec des
CD.
: En mode de changeur CD, le
magasin est éjecté.
• S'allume lorsqu’un changeur (magasin) est
raccordé.
• S’allume pendant la lecture de disque.
Indicateur de lecture répétée/aléatoire
Numéro de disque Numéro de piage
• Appuyez sur [ DISC | ou j TRC | pour
passer de curceurs.
76
NS& /ÆT (Plage) ,
Sélection de disque
/r^l' nitiniip <ïiiiv/pnt
©
/[A]: Disque suivant
/[vj: Disque précédent
Sélection de plage
©
^ /i>J: Pour avancer à la plage suivante.
^ /[<]: Pour reculer au début de la plage actuelle.
Pour reculer à la plage précédente. (Appuyez
deux fois.)
CQ-DF802U
Recherche de plage
Maintenez enfoncé.
^ /[>]: Avance accélérée
^ /[<]: Recul accéléré
Relâchez pour reprendre la lecture normale.
Page 77

Sélection directe de disque
Avec la télécommande uniquement
Exemple: disque numéro 10
©Appuyez sur[#l {NUMBER).
Appuyez sur
[11 [0].
CIÎCI)10-T001
© Appuyez sur [SET] pour valider.
La lecture de la première plage du disque
correspondant commence.
Remarque:
• Appuyez sur lO/SPMKl/lDiSP] (affichage) ou
[#] (NUMBER) pour revenir en mode normal.
• Si un numéro de disque inexistant est saisi et validé, la
commande est inopérante et l'affichage revient en mode
normal.
Changement d’affichage
Appuyez sur |0/5PMK|/[DISP] (affichage) pour changer
l’affichage.
Numéro de disque/ptage
(valeur par défaut)
Temps de lecture de la plage
Affichage de l’horloge
Remarque:
• Appuyez sur |0/SPMl^|/[DISP] (affichage) pour
revenir en mode normal.
(SOURCE)
[DISPl (Affichage)
[#1
------
(NUMBER)
r
Stó*'' -T'i@ O
(3^
CD CD G]
oaa
seP
1 Panuorite ;
V
------------
m0:
Q
^
Kl [>] (Plage)
[A] [V] (Disque)
[SETI
[01 à[9]
al
(Numéro de disque)
(Z)
e|
CQ-DF802U
77
Page 78

Commande de changeur CD (suite)
Réglage de menu en mode de changeur CD
0 [MENU]
3 : S’allume pendant le réglage de lecture par menu.
I MODE I : S’allume en mode de menu de changeur CD.
.........................................................
*^0 Menu
Lecture répétée
Valeur par défaut; REP OFF (désactii/ée)
Lecture répétée de disque
Valeur par défaut; D-REP OFF (désactivée)
Lecture aléatoire
Valeur par défaut: RAND OFF (désactivée)
(3) Appuyez sur [MENU]
(2) Appuyez sur I SET |/[SET]
Q Menu secondaire
pendant la lecture du
changeur CD pour afficher
«MODE».
pour valider.
(Menu secondaire)
Menu secondaire
r
® Appuyez sur ^ ou ^ /
[<] ou [>] pour sélectionner
«REPEAT».
(2) Appuyez sur [SËf l/ISET] pour
valider.
® Appuyez sur ^ ou ^ /
[<J ou [>] pour sélectionner
«D-REPEAT».
(2) Appuyez sur [set I/ISET] pour
valider.
® Appuyez sur ^ ou /
[<] ou I>] pour sélectionner
«RANDOM».
@ Appuyez sur i SET I/ÎSET] pour
valider.
Lecture aléatoire de disque
Valeur par défaut: 0-RND OFF (désactivée)
Avec la télécommande uniquement
'
----------------------------------------------------
Lecture des débuts de
plage
Valeur par défaut; Désactivée
Lecture des débuts de
plage des disques
Valeur par défaut: Désactivée
78
CQ-DF802U
® Appuyez sur ^ ou ^ /
[<] ou t>] pour sélectionner
«D-RANDOM».
(2) Appuyez sur I SET 1/lSET] pour
valider.
Lorsque le menu ne s’affiche pas
■
Appuyez sur [5] (SCAN) pour lÉkteÎISiKSïîéjSÈ-
pendant plus de 2 secondes pour
modifier le réglage. Clignote.
—
Clignote.
Page 79

Réglage
Réglage
Remarque:
• Appuyez sur 1 EXIT |/[MENU1/[MENU], [DISP] (affichage)
pour revenir en mode normal.
• Appuyez sur rm/fRET1 (RETURN) pour revenir à
l’affichage précédent.
• REP: S’allume pendant la lecture répétée.
Clignote pendant la lecture répétée de disque.
RAND; S’allume pendant la lecture aléatoire.
Clignote pendant la lecture aléatoire de disque.
Réglage direct sur
télécommande lorsque
menu ne s’affiche pas
Appuyez sur
REP OH
REP OFF
Appuyez sur ou /1^1 ou [ v] pour modifier le réglage.
Ü-REP OFF
Appuyez sur
mm OFF
Appuyez sur ou /[^} ou (v) pour modifier le réglage.
D-RHI> OH
D-RHD OFF
ou /[/\] ou [V] pour modifier le réglage.
: Répétition de la plage en cours de lecture
: Annulation
; Répétition du disque en cours de lectureIJ-REP OH
: Annulation
ou /[/\] ou IV] pour modifier le réglage.
; Toutes les plages disponibles de tous les disques
du magasin sont lues dans un ordre aléatoire.
: Annulation
i: Toutes les plages disponibles du disque en cours
de lecture sont lues dans un ordre aléatoire.
Annulation
Appuyez sur [6] (REPEAT) pour
modifier le réglage.
(Lorsque vous appuyez sur une
touche, l’écran de gauche s’affiche
pendant 2 secondes.)
Maintenez enfoncé [6] (REPEAT)
pendant plus de 2 secondes pour
modifier le réglage.
(Lorsque vous appuyez sur une
touche, l’écran de gauche s’affiche
pendant 2 secondes.)
Appuyez sur [4] (RANDQM) pour
modifier le réglage.
Activé: «RAND» s’allume.
Désactivée:
(S’affiche pendant 2 secondes.)
Maintenez enfoncé [4] (RANDOM)
pendant plus de 2 secondes pour
modifier le réglage.
Activé: «RAND» clignote.
Désactivée:
(S’affiche pendant 2 secondes.)
I:>-RHt OFF
_____________
Activé: Les 10 premières secondes de chaque
plage des disques sont lues dans l’ordre.
Désactivée: Annulation
(S’affiche pendant 2 secondes.)
Activé: Les 10 premières secondes de la première
plage de tous les disques du magasin sont lues
dans l’ordre.
Désactivée: Annulation
(S’affiche pendant 2 secondes.)
CJjrSCAH OFF
__________________
CJÎCD SŒ OFF
[DISP]
(Affichage)
[5] (SCAN)
[4] (RANDOM)
[6] (REPEAT)
[MENU]
[<][>]
(Menu/
menu secondaire)
l^][v]
(Réglage)
[SET]
CQ-DF802U
79
Page 80

Réglages de panneau avant [FACE]
U Menu
; S’allume pendant le réglage de lecture par menu. *•,
: S’allument en mode FACE.
fÂUDIol
Luminosité du panneau avant
La luminosité de l’écran peut être réglée sur le
niveau désiré afin qu'elle convienne aux
conditions d’éclairage du véhicule et aux
touches du panneau avant.
Valeur par défaut: LOOK-IN
Plage de réglage: LOOK-IN, PEEK, SLEEP
Changement de couleur
Vous pouvez changer la couleur des boutons
[VOL/s v][MENU] et [BAND].
Valeur par défaut: STORM
Choix: 5 autres couleurs, LEVEL, STORM
: S’allument en mode AUDIO.
& Menu secondaire
© [MENU]
®^{Menu)
^ Menu secondaire
© Appuyez sur ^ ou ^ /
I<] ou [>] pour sélectionner
«SHUTTER».
® Appuyez sur
(D Appuyez sur ^ ou ^
® Appuyez sur[W1/[SET]
[MENU].
[<] ou [>] pour
sélectionner «FACE».
pour valider.
@ Appuyez sur
© Appuyez sur ^ ou
@ Appuyez sur
|SET|/[SET]
pour valider.
'^ /
[<] ou [>] pour sélectionner
«COLOR».
I SET |/[SET]
pour valider.
m/
(Menu secondaire)
Réglages audio [AUDIO]
80
^ Menu O Menu secondaire
Page 81

Réglage
Appuyez sur /[>^] ou [ v] pour modifier le réglage.
La luminosité change sur l'ensemble
du panneau avant.
SLEEP
PEEK
(Consultez la page 84 si vous désirez modifier.
uniquement la luminosité.)
---------------------------
; Clair (plus clair que «PEEK»)
: L’ensemble du panneau avant devient noir et
l’apparence des couleurs illuminées change légèrement
dans ta partie intérieure du panneau.
: Clair
Remarque:
• Appuyez sur
pour revenir en mode normal.
• Appuyez sur
l’affichage précédent.
I EXIT |/[MENU1/[IV1ENU1, [DISP]
[HÜ|/[RET) (RETURN)
Ik
(affichage)
pour revenir à
Réglage direct sur la
télécommande lorsque le
menu ne s’affiche pas
Maintenez enfoncé
plus de 2 secondes pour modifier
le réglage.
(Lorsque vous appuyez sur une
touche, l’écran de gauche s’affiche
pendant 2 secondes.)
[FACE]
pendant
Appuyez sur oc /[/\] ou [v] pour modifier le réglage.
: 5
couleurs (ci-dessous),
blanc et jaune
LEUEL
FIRE
: La couleur change suivant le
niveau du volume,
: Rouge
e Réglage
Appuyez sur ou /[a] ou [v] pour modifier le réglage.
BOOM
TIGHT
: Les graves des haut-parleurs sont considérablement
amplifiés, «iv» s’allume.
; Les graves des haut-parleurs sont amplifiés de façon
modérée.
(Les sons du haut-parleur d’extrêmes-graves sont
clairement audibles.)
: S-HDB est désactivé.
«T*»
s’allume.
OŒmN
FOREST
: Pourpre
Bleu
Bleu vert
Vert
Appuyez sur
le réglage.
(Lorsque vous appuyez sur une
touche, l’écran de gauche s’affiche
pendant 2 secondes.)
[FACE]
pour modifier
Réglage direct sur la
télécommande lorsque le
menu ne s’affiche pas
Appuyez sur [J'I (S-HDB) pour
modifier le réglage.
(Lorsque vous appuyez sur une
touche, récran de gauche
s’affiche pendant 2 secondes.)
CQ-DF802U
81
Page 82

Réglages audio [AUDIO]
(suite)
A Menu
©m@LSE]J
; S’allume pendant le réglage de lecture par menu.
|audio|
: S’allument en mode AUDIO.
.........................................................................
Graves et Aigus
Vous pouvez régler les sons graves et aigus.
Valeur par défaut: BAS (Graves) 0 dB
TRE (Aigus) 0 dB
Plage de réglage: -12 dB à +12 dB
(par pas de2dB)
^/////
(D [MENU]
(Menu)
A Menu secondaire
•<
O Menu secondaire
(T) Appuyez sur ^ ou
[<] OU [>J pouf sélectionner
«BASS».
(D Appuyez sur I SET |/[$ET]
pour valider.
® Appuyez sur ^ ou
[<] ou (>] pour sélectionner
«TREBLE».
(D Appuyez sur I SET I/ISET]
pour valider.
(Menu secondaire)
^
/
Balance et Équilibrage
Vous pouvez régler l’équilibre et la balance du
son sur les haut-parleurs avant, arrière, droit
et gauche.
Valeur par défaut: BAL (Balance) CNT (Centre)
PAD (Équilibrage) CIVT (Centre)
Plage de réglage: 15 niveaux chacun
Niveau du haut-parleur d’extrêmes-graves
Vous pouvez modifier le niveau du volume du
haut-parleur d’extrêmes-graves.
Valeur par défaut; O dB
Plage de réglage: -« (Silencieux du haut-parleur
d’extrêmes-graves), -6dB to +6 dB (par pas de 2 dB)
Filtre passe-bas du haut-parleur d’extrêmes-graves
Sélectionnez la limite supérieure de fréquence pour
le son émis par le haut-parleur d’extrêmes-graves.
Valeur par défaut: 120 Hz
Plage de réglage: 120 Hz/80 Hz
® Appuyez sur [MENU],
(g) Appuyez sur ^ ou ^
I<] ou [>] pour
sélectionner «AUDIO».
@ Appuyez sur r$ET |/[SET]
pour valider.
(T) Appuyez sur ^ ou
[<] ou [>J pour sélectionner
«BALANCE».
(g) Appuyez sur I SET l/ISET]
pour valider.
® Appuyez sur ^ ou ^ /
[<) ou [>] pour sélectionner
«FADER».
(D Appuyez sur] SET |/[SET]
pour valider.
® Appuyez sur ^ ou
[<] OU [>] pour sélectionner
«SUB-W LEV».
(5) Appuyez sur I SET |/[SET]
pour valider.
® Appuyez sur ^ ou
[<] ou I>] pour sélectionner
«SUB-W FRQ».
CD Appuyez sur I SET |/[SET]
pour valider.
^
Æ' I
Æ'
,
/
/
82
CQ-DF802U
Page 83

^ Réglage
Réglage
h
Remarque:
• Appuyez sur rËxin/[IVIENU]/[MENU], [DISP] (affichage)
pour revenir en mode normal.
[MENU] • Appuyez sur lïïïïl/fRETl (RETURN) pour revenir à
l’affichage précédent.
(Réglage)
Appuyez sur ou /[ Aj ou [v] pour modifier le niveau.
/[^J : Augmente les graves.
/[V] : Diminue les graves.
BAS 0dE
Appuyez sur ou /[^] ou [v] pour modifier le niveau.
/I/\] : Augmente les aigus. ———
/fv] ; Diminue les aigus.
Appuyez sur ou /f/\] ou [v] pour modifier le niveau.
: Plus élevé à droite.
/[V]
; Plus élevé à gauche.
BAL CNT
Appuyez sur ou /[/\] ou [v] pour modifier le niveau.
: Plus élevé en avant.
/1'^] : Plus élevé en arrière.
FAE* CNT
Appuyez sur ou /[a] ou [v] pour modifier le niveau.
/[A] : Augmente le niveau.
/[V] : Diminue le niveau.
LEy 0dB
IDISP] (Affichage)
c
O O O
03 (BO
SOCD
V
[MENU]
[<][>]
(Menu/
menu secondaire)
[A][V]
(Réglage)
[SET]
CQ-DF802U
83
Page 84

Réglages d’image (affichage) [PICTURE]
^ Menu
[ÎTmnl
|PtCTURE|
Gradateur (plage de réglage de la luminosité d’affichage)
Seule Change la
luminosité sur le
panneau avant.
Valeur par défaut: DIMMER 3
Plage de réglage: DIMMER 1 à 3
: S’allume pendant le réglage de lecture par menu.
: S’allument en mode PICTURE.
(D [MENU]
9
Menu
Menu secondaire
©«cocoli ®:p
{Menu secondaire)
© Menu secondaire
© Appuyez sur ^ ou ^ /
[<J OU [>] pour sélectionner
«DIMMER».
(gi Appuyez
pour valider.
sur fSET I/ISET]
Type d’affichage d’analyseur de spectre (S A)
Valeur par défaut: KEY
Variantes: KEY, PAHERN 1 à 5
Contraste
Vous permet de régler les contrastes de
l’affichage pour mieux le voir.
Valeur par défaut: CONT 3
Plage de réglage: CONT 1 à 5
(T) Appuyez sur [MENU],
® Appuyez sur ^ ou ^ /
Kl ou [>] pour
sélectionner «PICTURE».
(3) Appuyez sur |SET|/[SET)
pour valider.
® Appuyez sur ou /
Kl ou (> I pour sélectionner
«S-A».
® Appuyez suri SET |/[SET]
pour valider.
® Appuyez sur ^ ou ^ /
[<] ou [>] pour sélectionner
«CONTRAST».
@ Appuyez sur I SET I/ÎSET]
pour valider.
84
CQ-DF802U
Page 85

N Réglage
Réglage
Appuyez sur ou /[/\] ou [v] pour modifier le réglage.
DINNER 3
DINNER 3
DINNER 1
(Consultez la page 80 si vous désirez modifier
l’ensemble de la luminosité du panneau avant.) -
~ : Clair
[MENU]
sm (Réglage)
Remarque:
• Appuyez sur I
pour revenir en mode normal.
• Appuyez sur
l’affichage précédent.
• Appuyez sur l’affichage d’analyseur de spectre réglage S-A
pour revenir à l’affichage précédent.
EXIT j/[MENU]/[MENU]. [DISP]
rïïl/ÏRET] (RETURN)
pour revenir
(affichage)
à
Réglage direct sur la
télécommande lorsque le
menu ne s’affiche pas
Appuyez sur
pour modifier le réglage.
(Lorsque vous appuyez sur une
touche, l’écran de gauche
s’affiche pendant 2 secondes.)
[DIM] (DIMMER)
Appuyez sur ou /[^] ou [ v] pour modifier le réglage.
KEV
PATTERN1
PATTERH2
Appuyez sur ou y[/\] ou [v] pour modifier le réglage.
CONT
: S'A désactivé
(affichage normal)
;S'A1
:S'A2
■ Niveau haut
COHT 4
T 3
CONT 1
Niveau bas
PATTERNS
PATTERH4
PATTERNS
;S A3
;S'A4
:S'A5
Appuyez sur
le réglage.
(Lorsque vous appuyez sur une
touche, l’écran de gauche
s’affiche pendant 2 secondes.)
[DISP] (Affichage)
■A] (Analyseur de spectre)
[S
tS-A]
pour modifier
- [MENU]
GD G3
ac DO
G3KD
S
^ y
[<l[>l
(Menu/
menu secondaire)
[A][V]
(Réglage)
[SET]
[DIM] (DIMMER)
CQ-DF802U
85
Page 86

Réglages de fonctions [FUNCTION]
O
IVIenu
: S’allume pendant le réglage de lecture par menu.
FUNC.
: S’allument en mode FUNCTION.
Silencieux/atténuation
Vous pouvez Sélectionner le niveau de
réduction du volume lorsque vous appuyez
sur
[MUTE]/ [mute] .
Valeur par défaut: KEY: MUTE
Plage de réglage: KEY: MUTE, KEY: AH
Emission de son par les
touches
Pour activer ou désactiver le son émis par les
touches.
Valeur par défaut: BEEP ON
Fonction de sécurité
L’indicateur de sécurité (LEO) clignote lorsque
le panneau avant amovible est retiré de
l'appareil.
Valeur par défaut: SLED ON
n Menu secondaire
® [MENU]
(Menu)
►O Menu Menu secondaire
® Appuyez sur
@ Appuyez sur ^ ou
(5) Appuyez sur
[MENU].
[<] ou [>) pour
sélectionner «FUNCTION».
[SÊfl/tSET]
pour valider.
CO CC< © I
SET
© Appuyez sur ^
I<] ou [>] pour
sélectionner «MUTE/ATT».
@ Appuyez sur
pour valider.
© Appuyez sur ^ ou
[<] ou [>I pour
sélectionner «BEEP SET».
© Appuyez sur
pour valider.
© Appuyez sur^
[<I ou [>] pour
sélectionner «SECURITY».
© Appuyez suri
pour valider.
ou /
[SET|/[SET]
fSET |/[SET]
SET [/[SET]
(Menu secondaire)
'm.
^ f
OU /
I
Réglage de l’affichage
Vous pouvez sélectionner la configuration de
l’affichage pour l’appareil hors tension.
Valeur par défaut: BLACK
Plage de réglage: DEMO, CLOCK, BLACK
86
CQ-DF802U
© Appuyez sur
[<] ou [>] pour
sélectionner «OFF DISP».
© Appuyez sur I
SET l/iSET]
pour valider.
ou
^ f
Page 87

O Réglage
Réglage
è
Appuyez sur ou /[a] ou [v] pour modifier le réglage,
KEViNUTE
KEViATT
i; Aucun son.
I
; Réduction du volume au Vto. (Atténuation)
[MENU]
Remarque:
• Appuyez sur I
pour revenir en mode normal.
, Appuyez sur
üni/fRETl (RETURN)
l’affichage précédent.
EXIT |/[MENU]/IIVIENU]. [DISP]
pour revenir à
[DISP] (Aifichage)
CD CD CB
1^ @ O
CD CB CB
SI CB CB
V
{affichage}
[MENU]
[<][>]
(Menu/
menu secondaire)
[^][v]
(Réglage)
[SET]
J
Appuyez sur ou /[a]
ou
EEEP ON
BEEP OFF
Appuyez sur ou
réglage.
SLEI' OFF
Appuyez sur ou /[a]
ou
BLACK
tEriO
CLOCK
[ v] pour modifier le réglage.
: L’émission de son (bip) par les touches est
activée.
: L’émission de son (bip) par les touches est
désactivée.
/[a]
ou [v] pour modifier le
: La fonction de sécurité est activée.
: La fonction de sécurité est désactivée.
[v] pour modifier le réglage.
: Affichage noir
: Affichage de démonstration
; L’affichage de l’horloge est activé.
Fonction de sécurité
Lorsque la clé de contact est tournée à la position
OFF.
• Le message de sécurité est activé.
PANEL !
• L’alarme de retrait du panneau amovible est
■ activée.
Lorsque le panneau avant amovible est retiré.
• Le voyant du système de sécurité clignote,
(^ page 101)
Réglage direct sur la télécommande lorsque
Tappareil est hors tension
^
--------------------------------------------------
Appuyez sur
pour modifier le réglage lorsque
l’appareil est hors tension.
[DISP]
- - —
(affichage)
CQ-DF802U
87
Page 88

En cas de difficulté
Etapes préliminaires
Vérifiez les indications mentionnées dans les tableaux ci-dessous et
prenez les dispositions indiquées.
Lorsqu’on soupçonne que quelque chose est défectueux
Coupez immédiatement l’alimentation.
Débranchez le câble d’alimentation et vérifiez que l’appareil ne
dégage ni de la fumée ni de la chaleur avant d’exiger un dépannage.
N’essayez jamais de faire vous-même des réparations parce que cela
peut s’avérer dangereux.
Guide de dépannage
□ Problèmes communs
Précaution;
• N’utilisez pas l’appareil s’il ne fonctionne pas
normalement ou si quelque chose est
défectueux.
• Le fait d’utiliser l’appareil dans des
conditions anormales, par exemple lorsque
aucun son n’est délivré, s’il dégage de la
fumée ou une odeur anormale, peut
favoriser un amorçage électrique ou une
électrocution. Arrêtez-le immédiatement et
demandez au magasin qui vous l’a vendu de
la vérifier.
88
Page 89

a Radio
(
Les programmes FM stéréo
et mono sont fortement
parasités.
Remise à zéro de station
présyntonisée.
Panne
□ Disque CD
c
Il y a un disque dans le
logement de CD mais il n’y
a pas de son ou le disque
est automatiquement éjecté.
Panne
Ì
J
D C
(
La station émettrice est trop éloignée ou les signaux reçus sont trop faibles. ,
^Sélectionnez d’autres stations dont le niveau des signaux est plus élevé.
Le fil de commande de relais d’antenne automatisé n’est par correctement
raccordé.
■*Si le vétiicule est équipé d’une antenne à commande électrique, raccordez
correctement le fil de commande de relais d’antenne automatisé au fil de
l’antenne à commande électrique.
L’antenne radio n’est pas suffisamment déployée.
»Déployez complètement l’antenne radio.
Le câble de la batterie n’est pas branché correctement.
»Branchez le câble de la batterie à la borne délivrant le courant.
Le disque est à l’envers.
»Placez le disque en l’orientant dans le bon sens, étiquette vers le haut.
• Le disque est sale.
• Le disque est rayé.
»Nettoyez le disque en vous référant à la section «Remarques relatives aux
CD et supports de type CD (CD<R, CD-RW)».
Les disques de 8 cm (3 po) sont éjectés automatiquement.
Un disque comportant des données de format autre que CD-DA est lu.
»Vous devez utiliser des disques dont les données sont de format CD-DA.
Origine/Dispositlon à prendre
Origine/DIspositlon à prendre
J
Des passages du son sont
sautés, la qualité du son
est mauvaise (à cause de
parasites par exempte).
»11 se peut que l’appareil ne puisse pas lire correctement les CD-R/RW
gravés en combinant un logiciel d’écriture, un graveur CD (lecteur
CD-R/RW) et un disque qui ne sont pas compatibles. Référez-vous aux
modes d’emploi respectifs pour plus de détails.
• Le disque est sale.
• Le disque est rayé.
»Nettoyez le disque en vous référant à la section «Remarques relatives aux
CD et supports de type CD (CD-R, CD-RW)».
»11 se peut que l’appareil ne puisse pas lire correctement les CD-R/RW
gravés en combinant un logiciel d’écriture, un graveur CD (lecteur
CD-R/RW) et un disque qui ne sont pas compatibles. Référez-vous aux
modes d’emploi respectifs pour plus de détails.
CQ-DF802U
89
Page 90

En cas de difficulté (suite)
G Disque CD (suite)
f
___________
Des passages du son sont
sautés en présence de
vibrations.
Le disque n’est pas éjecté.
Le temps détife mais aucun
son n’est émis.
Panne ]
Origine/Disposition à prendre
angle d’installation de l’appareil est supérieur à 30“
^Faites en sorte que l’angle d'installation de l’appareil ne népasse pas 30^
g
Installation Instable.
i>
^Installez fermement l’appareil en utilisant les accessoires d’installation
tout en se référant à la section traitant des travaux d’installation.
• Le disque est défectueux.
• Panne d’ordre mécanique.
■»Appuyez sur [OPEN] pour ouvrir le panneau et appuyez sur la touche
[^] (éjection). Si le fonctionnement normal n’est toujours pas rétabli,
contactez le magasin où vous avez fait l’achat de l’appareil ou le centre de
service après-vente le plus près pour faire une demande de réparation.
La première plage d’un disque en mode mixte est reproduite. (Le mode mixte est
un format où les données non musicales sont enregistrées sur la première
plage, tandis que les données musicales sont enregistrées sur les autres plages
pendant une session.)
^Faites la lecture des données musicales enregistrées sur les plages autres
que la première plage.
□ Réglage du son
( Panne ) Г
f ^
Aucun son n’est délivré par
le haut-parleur gauche,
droit, avant ou arrière.
^
Le son délivre à gauche
et
à
droite est inversé
pendant l’écoute d’un pro
gramme stéréo. J
Origine/Disposition à prendre
La balance gauche et droit ou la balance avant et arrière est coupée d’un côté. ^
^ ^Réglez adéquatement la balance et l’équilibreur.
Les câbles ne sont pas branchés correctement. ^
>
^Branchez les fils correctement.
--------------------------------------------------------------------------------
Les fils du haut-parleur droit sont raccordés au haut-parleur gauche et les fils du
haut-parleur gauche sont raccordés au haut-parleur droit.
^Branchez les fils de haut-parleur aux haut-parleurs correspondants.
<
_ _ __ _ _ _ _ _ _ _ ___ _ _ _ _ _ _ _ __ _ _ _ _ _ _ _ _ __ _ _ _ _ _ _ _ _ __ _ _ _ _ _ _ _ ___ _ _ _ _ _ _ _ __ _ _ _ _ _ _ _
>
90
CQ-DF802U
Page 91

□ Télécommande
Messages d’erreur
□ Disque CD
[ Alllchage
-E1-
CIÎ CP EJECT
i
Hors tension
HH CP EJECT
Hors tension
m -E3-
CIÏ CP EJECT
l
Hors tension
Cause et mesure à prendre
• Le disque est sale ou est à l’envers.
• Un disque contenant des données de format autre que CD-DA est inséré.
-»Vérifiez le disque.
Le disque est rayé.
^Vérifiez te disque.
k
______________________________________
Ne fonctionne pas pour une raison quelconque.
^Si te fonctionnement normal n’est pas rétabli, contactez le magasin où
►
vous avez fait l’achat de l’appareil ou le centre de service après-vente le
plus près pour faire une demande de réparation.
J
CQ-DF802U
91
Page 92

En cas de difficulté
□ Changeur CD
(suite)
f Affichage
cz
Cause et mesure à prendre
—
i~
Tïf-
{~ Tir~
Remarque:
• Référez-vous au manuel d’instructions du changeur de CD utilisé pour obtenir des explications plus détaillés à ce sujet.
-El- 6
Numéro de disque
Hors tension
HO DISC
• Le disque est sale ou est à l’envers.
• Un disque de format autre que CD audio (de type CD-DA) est inséré.
^Vérifiez le disque.
(Le changeur passe automatiquement au disque suivant.)
Le disque est rayé.
•»Vérifiez le disque.
(Le changeur passe automatiquement au disque suivant.)
Ne fonctionne pas pour une raison quelconque.
^Si le fonctionnement normal n’est pas rétabli, contactez le magasin où
vous avez fait l’achat de l’appareil ou le centre de service après-vente le
plus près pour faire une demande de réparation.
Cet affichage demeure en place si vous ne pouvez pas mettre l'appareil hors
tension.
Il n’y a pas de disque dans le changeur (magasin).
* Insérez des disques dans le changeur (magasin).
Si l’appareil ne fonctionne pas correctement
92
CQ-DF802U
Bouton de réinitialisation
Appuyez sur le bouton de réinitialisation se trouvant
dans cet orifice avec une pointe fine non cassable.
• Après une réinitialisation, l’appareil revient à l’état
initial.
Notez que les informations ou rubriques enregistrés
dans la mémoire de l’appareil seront perdues.
Précaution:
• Appuyez sur le bouton de réinitialisation si les
touches sont inopérantes.
Page 93

Entretien
Votre appareil a été conçu et fabriqué de manière à n’exiger qu’un minimum d’entretien. Nettoyez régulièrement les
surfaces extérieures de l'appareil avec un morceau de tissu souple. N’utilisez jamais de benzine, de diluant ou autres
solvants.
Service après-vente de l’appareil
Si les suggestions indiquées dans les tableaux de dépannage ne permettent pas de résoudre le problème, il est
recommandé de confier l’appareil à un centre de service après-vente Panasonic agréé. Confiez toute réparation de l’appareil
uniquement à un technicien qualifié.
Remplacement d’un fusible
Utilisez les fusibles de l’ampérage spécifié (15 A). L’utilisation de substituts ou de fusibles différents dont l’ampérage est
supérieur ou le raccordement direct de l’appareil sans passer par l’intermédiaire d’un fusible risque de provoquer un
ncendie, voire d’endommager sérieusement l’appareil stéréo.
Si le fusible de remplacement saute, renseignez-vous auprès du centre de service après-vente Panasonic agréé le
plus proche.
CQ-DF802U
93
Page 94

Entretien
Avant de nettoyer, coupez le contact ou retirez le panneau avant.
Entretien de l’appareil
□ Nettoyage de l’appareil
Utilisez un chiffon sec et souple pour essuyer l’appareil.
Nettoyez le panneau tactile en l’essuyant légèrement avec un chiffon souple
Lorsque la surface du panneau tactile est sale, utilisez le chiffon fourni pour bien la nettoyer. N’utilisez en aucun cas des
détergents ou autres produits de nettoyage.
Prenez garde de toucher la surface du panneau tactile avec l’ongle ou tout objet solide. Sinon, vous risqueriez
d’endommager ou de briser la surface de verre qui recouvre le panneau tactile.
□ Précautions à prendre lors du
nettoyage
N’utilisez jamais de solvants tels que ta benzine ou
du diluant: ils risquent d’endommager la surface de
l’appareil.
94
CQ-DF8Û2U
Page 95

Remarques relatives aux CD et supports de type CD (CD-R, CD-RW)
—
Ne faites la lecture d’aucun CD audio comportant une étiquette
différente de celle-ci.
___________________________________________________________________
iolngfg
DIGITAL AUDIO
------\
______
'
Comment saisine disque
• Ne toucfiez pas la surface inférieure du disque.
• Veiliez à ne pas rayer ia surface du disque.
• Ne pilez pas ie disque.
• Remettez ie disque dans son boîtier après utilisation.
N’utilisez pas de disques de forme irrégulière.
Ne laissez pas les disques dans les endroits suivants:
• En plein soleil.
• Près des appareils de chauffage de la voiture.
• Dans les endroits sales, poussiéreux ou humides.
• Sur les sièges ou le tableau de bord.
Nettoyage des disques
Utilisez un chiffon sec et souple pour nettoyer en partant du centre
du disque.
Précautions à prendre avec les disques neufs
Le bord d’un disque neuf risque de présenter des imperfections
autant à la périphérie que sur le bord du trou intérieur. Ceci peut
être à l'origine d’un fonctionnement anormal.
Retirez les imperfections avec un crayon, etc.
Ne posez pas d’autocollants ou d’étiquettes sur les disques.
N’écrivez pas sur la face imprimée du disque au moyen d’un
stylo lourd ou d’un stylo à faille.
Face étiquetée
N’utilisez pas de disques CD de forme irrégulière.
<Procédé correcb <Procédé incorrect>
Bord présentant des imperfections
Remarques relatives aux CD-R/RW
• Il se peut que la lecture de certains disques CD-R/RW enregistrés au moyen d’un graveur CD (lecteur CD-R/RW) ne
fonctionne pas bien, soit à cause des caractéristiques d’enregistrement, soit à cause de la présence de saletés,
empreintes, rayures, etc., à la surface du disque.
• Les disques CD-R/RW offrent une moins grande résistance à la chaleur et à l’humidité élevées que les CD audio
ordinaires. Le fait de les laisser dans un véhicule pendant une période prolongée risque de les endommager et d'en
rendre la lecture impossible.
• Il se peut que l’appareil ne puisse pas lire correctement les CD-R/RW gravés en combinant un logiciel d’écriture, un
graveur CD (lecteur CD-R/RW) et un disque qui ne sont pas compatibles.
• Ce lecteur ne peut pas faire la lecture des disques CD-R/RW lorsque la session n'est pas fermée.
• Ce lecteur ne peut pas faire la lecture des disques CD-R/RW qui contiennent des données d'un format autre que CD-DA.
• Manipulez les disques CD-R/RW en respectant les instructions qui les accompagnent.
CQ-DF802U
95
Page 96

Guide d’installation
MISE EN GARDE
Les informations relatives à l’installation sont prévues uniquement pour des tech
niciens qualifiés. Elles ne contiennent pas de mises en garde ou d’avis quant aux
dangers potentiels pouvant être encourus lors de l’installation de cet appareil.
Toute tentative d’installation de cet appareil dans un véhicule motorisé par une
personne sans qualification peut causer des dommages au système électrique et
des blessures corporelles graves ou mortelles.
□ Quincaillerie pour l’instaiiation
N"
©
0
Description
Collier de montage
Écrou hexagonal
(5 mm^)
Plaque de fixation arrière
Vis taraudeuse
(5 mm0xl6 mm)
Boulon d’assemblage
(5 mm0)
Connecteur d’alimentation
Schéma Qté
✓
Étui de rangement du pan
neau avant amovible
Plaque de garniture
Ressort d’assemblage (R)
Ressort d’assemblage (L) 1
0
Vis à tête plate
0
(5 mm0x6 mm)
Plaque de déverrouillage 2
□ Généralités
Cet appareil doit être installé par un technicien qualifié.
Toutefois, si vous prévoyez l’installer vous-même, la
1
1
1
1
1
1
1
1
1
2
première étape consistera au choix de remplacement.
Les instructions données dans ce manuel expliqueront
les étapes suivantes.
(Voir la «MISE EN GARDE» ci-dessus.)
• Identifiez et étiquetez les fils du véhicule.
• Raccordez les fils du véhicule à ceux du connecteur
d’alimentation.
• Installez l’appareil dans le tableau de bord.
• Vérifiez le fonctionnement de l’appareil.
En cas de difficulté, n'hésitez
installateur professionnel.
Précaution:
• Cet appareil ne peut fonctionner que sur une
batterie de 12 V c.c. avec négatif à la masse. Afin de
prévenir tout risque de dommage, ne tentez pas de
l’utiliser avec une autre source d’alimentation.
Avant de procéder à l’installation, vérifiez le contenu de
remballage.
• Carte de garantie...
• Liste des centres de service Panasonic agréés...
Conservez cette liste pour consultation ultérieure si
l’appareil doit être réparé.
• Quincaillerie pour l’installation..
l'installation dans le tableau de bord.
Veuillez la remplir sans tarder.
pas à consulter un
.Nécessaire pour
□ Outils requis
Un tournevis, une pile AA de 1,5 V et les accessoires
suivants;
Vérificateur de Ruban
continuité 12 V c.c. d’électricien
Pinces à
sectionner
96
CQ-DF802U
Page 97

□ Dégagement requis dans le
tableau de bord
Épaisseur Minimum: 4,75 mm {^le po)
—^¡1'— Maximum: 5,56 mm
(%2
po)
mm (7V32 po)
53 mm (2%2 po)
□ Identifiez tous les fils et câbles
La première étape consiste à identifier tous les fils du
véhicule nécessaires au raccordement de l’appareil.
Après avoir identifié chacun des fils en cause, nous vous
suggérons de les étiqueter à l’aide de ruban-cache et
d‘un marqueur indélébile. Cela évitera tout risque de
confusion lors des raccordements par la suite.
Remarque:
• Ne raccordez pas le connecteur d’alimentation
à l'appareil avant d’avoir effectué tous les
raccordements. S’il n’y a pas de capuchons de
plastique sur les fils de raccordement stéréo, isolez
tous les fils exposés avec du ruban d’électricien
jusqu’à ce que vous soyez prêt pour les utiliser.
Identifiez les fils dans l’ordre suivant.
Câble d’alimentation
Si une radio est déjà en place ou si le câblage à cet effet
est déjà installé:
Coupez les fils du connecteur un à la fois (en prenant
soin de laisser les fils les plus longs possible) de manière
à permettre le raccordement individuel des fils.
Mettez la clé de contact du véhicule à la position
«ACC», puis reliez un des fils du vérificateur de
continuité au cadre de l’automobile.
Reliez l’autre fil du vérificateur de continuité à chacun des
fils exposés du connecteur sectionné.
Touchez un fil à la fois jusqu’à ce que le fil faisant allumer
l’ampoule du vérificateur ait été repéré.
Ensuite, mettez la clé de contact à la position «OFF»
puis à la position «ON». Si l’ampoule s’éteint et se
rallume, le fil identifié est le fil d’alimentation du véhicule.
Si le câblage pour l’installation d’une radio n’est pas déjà
en place:
Ouvrez le couvercle du bloc-fusibles et trouvez le
réceptacle du fusible de la radio (RADIO), des
accessoires (ACC) ou du contact (IGN).
Fil de la batterie
Si l’appareil est doté d’un fil jaune, il sera nécessaire de
repérer le câble de la batterie: sinon, omettez cette étape.
(Le fit jaune de la batterie assure l’alimentation continue
du circuit de l’horloge, de ta mémoire, etc.)
Si une radio ou son câblage est déjà en place:
Mettez la clé de contact à la position «OFF» et
assurezvous que les phares sont éteints. Repérez le fil de
la batterie. Pour ce faire, reliez un fil du vérificateur de
continuité au cadre du véhicule et vérifiez les autres fils
exposés du connecteur sectionné au moyen de l’autre fil
du vérificateur.
En l’absence de câblage pour l’installation d’une radio:
Enlevez le couvercle du bloc-fusibles et repérez le réceptacle
du fusible de la batterie, généralement indiqué par BAT.
Haut-parleurs
Identifiez les fils de haut-parleur. Il y en a deux par haut-par
leur; ils sont généralement identifiés par un code de couleur.
Pour faciliter l’identification des fils de haut-parleur et
leur haut-parleur respectif, vérifiez-les avec une pile AA
de 1,5 V de la manière suivante.
Tenez un fil contre l’un des pôles de la pile et touchez l’autre
pôle avec un autre fil. S’il s’agit d’un fil de haut-parleur, un
son mécanique est entendu à travers un haut-parleur.
Sinon, poursuivez l’essai avec d’autres fils jusqu’à ce que
les fils de haut-parleurs aient été identifiés. Au moment
de leur étiquetage, indiquez à quel haut-parleur ils
doivent être raccordés.
Moteur de l’antenne
Si le véhicule est doté d’une antenne électrique, identifiez
le fil du moteur de l’antenne en reliant un fil du
vérificateur de continuité au fil de la batterie et en
touchant un à un les fils exposés du connecteur
sectionné. Le fil recherché est celui qui fait tourner le
moteur de l’antenne (un bruit de rotation sera audible).
Fil d’antenne
Le fil de l’antenne est un fil noir épais avec un capuchon
métallique à son extrémité.
□ Raccordez tous les fils
Après avoir identifié tous les câblages et fils, il est
possible d’effectuer les raccordements. Le schéma de
câblage (i^» page 102) représente les raccordements
corrects et le code couleur des fils.
Il est fortement recommandé de vérifier le fonctionnement
de l’appareil avant de procéder à l’installation finale.
Il est possible de mettre l’appareil sur le plancher du
véhicule pour faire des raccordements provisoires et de
vérifier le fonctionnement de l’appareil. Recouvrez tous
les fils exposés avec du ruban d’électricien.
Important:
• Raccordez le fil d’alimentation rouge en dernier
lieu seulement, après avoir fait tous les autres
raccordements et isolé tous les fils.
CQ-DF802U
97
Page 98

Guide d’installation (suite)
Conducteur à la masse
Raccordez le conducteur à la masse noir du connecteur
d’alimentation au cadre métallique du véhicule.
Ha ut-parleurs
Raccordez les fils des haut-parleurs. Pour le
raccordement, consultez le schéma de câblage page
102). Respectez rigoureusement les indications du
schéma pour ne pas risquer d’endommager les hautparleurs et l’appareil.
Les haut-parleurs doivent avoir une puissance admissible
minimale de 50 W. Si un amplificateur externe est utilisé,
assurez-vous que la puissance admissible nominale des
haut-parleurs correspond à la puissance maximale de
l'ampli, afin de ne pas endommager les haut-parleurs.
L’impédance des haut-parleurs doit être de 4 à 8 Q, ce
qui est le niveau standard. L’utilisation de haut-parleurs
d’une impédance plus faible ou plus élevée affectera la
qualité du rendu sonore et risque d’endommager tant
l’appareil que les haut-parleurs eux-mêmes.
Moteur de l’antenne
Reliez le fil du moteur de l’antenne du véhicule au fit
d’amenée bleu foncé du relais.
(Prenez garde de confondre le fil de l’antenne avec le fil
bleu rayé blanc de l’amplificateur de puissance.)
Batterie
Raccordez le fil de batterie jaune du véhicule au fil
approprié de la radio ou au réceptacle du fusible de la
batterie du bloc-fusibles.
Antenne
Raccordez l’antenne en branchant le fil d’antenne dans le
réceptacle de l’antenne.
Équipement auxiliaire
Raccordez tout appareil auxiliaire, tel qu’un ampli,
conformément aux instructions fournies avec l’appareil.
Bien éloignez d’au moins 30 cm (12 po) les fils de
haut-parleur/ampli de l’antenne et du fil/ratlonge
d’antenne. Reportez-vous au manuel d’utilisation et
d’installation afférent à l’appareil installé.
Alimentation
Raccordez le fil d’alimentation rouge au fil de radio ou au
porte-fusibles approprié du bloc-fusibles.
Si l’appareil fonctionne normalement avec tous les
raccordements ainsi effectués, débranchez les fils et
procédez à l’installation finale.
□ Installation finale
Raccordement des fils
Raccordez tous les fils en prenant soin qu’ils soient tous
bien isolés et solidement raccordés. Enroulez toute
longueur excessive de fil et fixez-la en place avec une
bande adhésive. Installez l’appareil dans son collier de
montage.
Félicitations! Après avoir effectué quelques vérifications
finales, vous serez prêt à utiliser votre nouvel appareil
stéréophonique d’automobile.
□ Vérifications finales
1. Assurez-vous que tous les fils sont bien raccordés et
isolés.
2. Assurez-vous que l’appareil est solidement en place
dans son collier de montage.
3. Faites démarrer la voiture et vérifiez le fonctionnement
de l’appareil.
En cas de difficulté, consultez un installateur
professionnel.
□ Préparation
• Pour vous protéger contre les blessures, nous vous
recommandons vivement de porter des gants.
• Lorsque vous pliez les languettes de fixation du
collier de montage avec un tournevis, veillez à ne
pas vous blesser les mains et les doigts.
• Déconnectez le câble à la borne négative 0 de la
batterie (voir Précaution ci-dessous).
• L’appareil doit être installé en position horizontale avec
son extrémité avant inclinée vers le haut à un angle
commode, mais ne dépassant pas 30“
30“ ou moins
Précaution:
• Si votre véhicule est doté d’un ordinateur de
navigation ou de conduite, ne déconnectez pas les
bornes de la batterie car tous les réglages des
paramètres en mémoire seraient perdus. Au lieu de
cela, procédez avec les plus grandes précautions
lors de l’installation de l’appareil pour éviter les
courts-circuits.
Installation sur le tableau de bord
Baie d’installation
53 mm
,, (23/32 po)
— 182 mm —
(75/32 po)
Cet appareil peut être installé sur tout tableau de bord qui
possède une baie telle que celle représentée ci-dessus.
Le tableau de bord doit avoir une épaisseur de
4,75 mm (Vie po) à 5,56 mm
supporter l’appareil.
Çhi
po) pour pouvoir
98
CQ-DF802U
Page 99

□ Procédures d’installation
Effectuez d’abord les connexions électriques,
vérifiez si elies sont correctes. page 102}
Le collier de montage 0 fourni est conçu
spécialement pour cet appareil. Ne pas l’utiliser
pour fixer tout autre modèle.
^ Vis à tête plate
(5 mm^x6 mm)
® Ressort
d’assem-
\
biage (L)
Connecteur
^ d’alimentation
Insérez le collier de montage 0 dans le tableau de bord et pliez les languettes de fixation avec un tournevis.
Fixation du coûter de montage
Les languettes à plier varient suivant le véhicule.
Pliez-les au moyen d’un tournevis pour fixer
solidement le collier de montage (T) dans le
tableau de bord.
Tableau de bord
-Languette
3"^
□
Remarque:
• Pour installer l'appareil de manière sécuritaire
et éviter qu’il ne produise des bruits de
cliquetis, quelques-unes des languettes doivent
être pliées complètement.
• Lors de l’assemblage du collier de montage 0
et de l’appareil, fixez-les solidement.
Fixez les ressorts d’assemblage 0, ® à l’appareil.
— 0 Collier de montage
-Languette
Remarque sur la plaque de garniture
• Fixez la plaque de garniture après avoir fixé
l’appareil principal au véhicule. Retirez le pan
neau avant pour fixer la plaque de garniture.
(a) Utilisation de la plaque de fixation
arrière
@ cloison parefeu de la voiture
0 Vis taraudeuse
(5 mmçixie mm)
@ Plaque de fixation
0 Boulon d’assemblage
{5 mm0)
0 Collier de montage
3 mm0
Écrou hexagonal
(5 mm0)
arrière
Fixez [’arrière de l’appareil.
Après avoir posé le boulon d’assemblage ® et le connecteur
d’alimentation ©, fixez l’arrière de l'appareil à la carrosserie
du véhicule par la méthode (a) ou (b) représentée cidessous.
Insérez la plaque de garniture ®.
Après rinstallation, rebranchez
ta borne négative
batterie.
0
de la
(b) Utilisation du coussinet en
caoutchouc (en option)
Coussinet en caoutchouc gp place)
(en option)
Support de fixation arrière
® Boulon d’assemblage
(5 mm0)
0 Collier de montage
CQ-DF802U
99
Page 100

Guide d’installation
Pour retirer l’appareil
Coupez l’alimentation de l'appareil.
Retirez la plaque de façade amovible.
Retirez la plaque de garniture (§) avec un tournevis.
• Retirez d’abord un côté, puis l’autre.
0
(suite)
100
O
O
Insérez les plaques de déverrouillage ® le
long des rainures qui se trouvent des deux
côtés de l’appareil principal, jusqu’à ce
qu’un clic soit émis.
Insérez le bout de
la plaque dans
l'entaille du côt^
extérieur.
Retirez l’appareil des deux mains.
O
CQ-DF802U
@ Retirez l’appareil en le tirant, tout en poussant
davantage les plaques vers l’intérieur.
® Plaque de déverrouillage
O
«Clic»
 Loading...