

Page 1
2
CQ-C9901W/C9801W
3
English
CQ-C9901W/C9801W
Safety Information
Safety Information
Warning
Observe the following warnings when using
this unit.
❑
The driver should neither watch the display nor
operate the system while driving.
Watching the display or operating the system will distract
the driver from looking ahead of the vehicle and can cause
accidents. Always stop the vehicle in a safe location and use
the parking brake before watching the display or operating
the system.
❑
Use the proper power supply.
This product is designed for operation with a negative
grounded 12 V DC battery system. Never operate this product with other battery systems, especially a 24 V DC battery
system.
❑
Keep batteries and insulation film out of reach of
infants.
Batteries and insulation film can be ingested, so keep them
out of the reach of infants. If an infant ingests a battery or
insulation film, please seek immediate medical attention.
❑
Protect the Deck Mechanism.
Do not insert any foreign objects into the slot of this unit.
❑
Do not disassemble or modify the unit.
Do not disassemble, modify the unit or attempt to repair the
product yourself. If the product needs to be repaired, consult your dealer or an authorized Panasonic Service center.
❑
Do not use the unit when it is out of order.
If the unit is out of order (no power, no sound) or in an
abnormal state (has foreign matter in it, is exposed to water,
is smoking, or smells), turn it off immediately and consult
your dealer.
❑
The remote control unit should not lie about in the
car.
If the remote control unit lies about, it could fall on the floor
while driving, get wedged under the brake pedal, and lead to
a traffic accident.
❑
Refer fuse replacement to qualified service personnel.
When the fuse burns out, eliminate the cause and have it
replaced with the fuse prescribed for this unit by a qualified
service engineer. Incorrect replacement of the fuse may lead
to smoke, fire, and damage to the product.
Observe the following warnings when
installing.
❑
Disconnect the lead from the negative (–) battery
terminal before installation.
Wiring and installation with the negative (–) battery terminal
connected may cause electrical shock and injury due to a
short circuit.
Some cars equipped with the electrical safety system have
specific procedures of battery terminal disconnection.
FAILURE TO FOLLOW THE PROCEDURE MAY LEAD TO THE
UNINTENDED ACTIVATION OF THE ELECTRICAL SAFETY
SYSTEM RESULTING IN DAMAGE TO THE VEHICLE AND
PERSONAL INJURY OR DEATH.
❑
Never use safety-related components for installation, grounding, and other such functions.
Do not use safety-related vehicle components (fuel tank,
brake, suspension, steering wheel, pedals, airbag, etc.) for
wiring or fixing the product or its accessories.
❑
Installing the product on the air bag cover or in a
location where it interferes with airbag operation is
prohibited.
❑
Check for piping, gasoline tank, electric wiring, and
other items before installing the product.
If you need to open a hole in the vehicle chassis to attach or
wire the product, first check where the wire harness, gasoline tank, and electric wiring are located. Then open the hole
from outside if possible.
❑
Never install the product in a location where it interferes with your field of vision.
❑
Never have the power cord branched to supply other
equipment with power.
❑
After installation and wiring, you should check the
normal operation of other electrical equipment.
The continuation of their using in abnormal conditions may
cause fire, electrical shock or a traffic accident.
❑
In the case of installation to an airbag-equipping
car, confirm warnings and cautions of the vehicle
manufacturer before installation.
❑
Make sure the leads do not interfere with driving or
getting in and out of the vehicle.
❑
Insulate all exposed wires to prevent short circuiting.
Caution
Observe the following cautions when using this
unit.
❑
Keep the sound volume at an appropriate level.
Keep the volume level low enough to be aware of road and
traffic conditions while driving.
❑
Do not insert or allow your hand or fingers to be
caught in the unit.
To prevent injury, do not get your hand or fingers caught in
moving parts or in the disc slot. Especially watch out for
infants.
❑
This unit is designed for use exclusively in automobiles.
❑
Do not operate the unit for a prolonged period with
the engine turned off.
Operating the audio system for a long period of time with the
engine turned off will drain the battery.
❑
Do not expose the unit to direct sunlight or excessive heat.
Otherwise these will raise the interior temperature of the
unit, and it may lead to smoke, fire, or other damage to the
unit.
❑
Do not use the product where it is exposed to water,
moisture, or dust.
Exposure of the unit to water, moisture, or dust may lead to
smoke, fire, or other damage to the unit. Make especially
sure that the unit does not get wet in car washes or on rainy
days.
Observe the following cautions when
installing.
❑
Refer wiring and installation to qualified service
personnel.
Installation of this unit requires special skills and experience.
For maximum safety, have it installed by your dealer.
Panasonic is not liable for any problems resulting from your
own installation of the unit.
❑
Follow the instructions to install and wire the product.
Not following the instructions to properly install and wire the
product could cause an accident or fire.
❑
Take care not to damage the leads.
When wiring, take care not to damage the leads. Prevent
them from getting caught in the vehicle chassis, screws, and
moving parts such as seat rails. Do not scratch, pull, bend or
twist the leads. Do not run them near heat sources or place
heavy objects on them. If leads must be run over sharp
metal edges, protect the leads by winding them with vinyl
tape or similar protection.
❑
Use the designated parts and tools for installation.
Use the supplied or designated parts and appropriate tools
to install the product. The use of parts other than those supplied or designated may result in internal damage to the unit.
Faulty installation may lead to an accident, a malfunction or
fire.
❑
Do not block the air vent or the cooling plate of the
unit.
Blocking these parts will cause the interior of the unit to
overheat and will result in fire or other damage.
❑
Do not install the product where it is exposed to
strong vibrations or is unstable.
Avoid slanted or strongly curved surfaces for installation. If
the installation is not stable, the unit may fall down while
driving and this can lead to an accident or injury.
❑
Installation Angle
The product should be installed in a horizontal position with
the front end up at a convenient angle, but not more than
30˚.
The user should bear in mind that in some areas there may
be restrictions on how and where this unit must be installed.
Consult your dealer for further details.
❑
Wear gloves for safety. Make sure that wiring is
completed before installation.
❑
To prevent damage to the unit, do not connect the
power connector until the whole wiring is completed.
❑
Do not connect more than one speaker to one set of
speaker leads. (except for connecting to a tweeter)
Observe the following cautions when handling
the batteries for the remote control unit.
●
Use only specified battery (CR2025).
●
Match the polarity of the battery with the (+) and (–) marks
in the battery case.
●
Replace dead battery as soon as possible.
●
Remove the battery from the remote control unit when not
using it for an extended period of time.
●
Insulate the battery (by placing them in a plastic bag or covering them with vinyl tape) before disposal or storage.
●
Dispose of the battery according to the local regulations.
●
Do not disassemble, recharge, heat or short the battery. Do
not throw a battery into a fire or water.
In case of battery leakage
●
Thoroughly wipe the battery liquid off the battery case and
insert new battery.
●
If any part of your body or clothing comes into contact with
battery liquid, wash it with plenty of water.
●
If battery liquid comes into contact with your eyes, wash
them with plenty of water and get immediate medical attention.
■
Read the operating instructions for the unit and all other components of your car audio system carefully before using the
system. They contain instructions about how to use the system in a safe and effective manner. Panasonic assumes no
responsibility for any problems resulting from failure to
observe the instructions given in this manual.
■
This manual uses pictographs to show you how to use the
product safely and to alert you to potential dangers resulting
from improper connections and operations. The meanings of
the pictographs are explained below. It is important that you
fully understand the meanings of the pictographs in order to
use this manual and the system properly.
Warning Caution
This pictograph intends to alert you to the presence of important operating instructions and
installation instructions. Failure to heed the
instructions may result in severe injury or death.
This pictograph intends to alert you to the presence of important operating instructions and
installation instructions. Failure to heed the
instructions may result in injury or material damage.
Page 2
4
CQ-C9901W/C9801W
5
English
CQ-C9901W/C9801W
Safety Information, Before Reading These Instructions
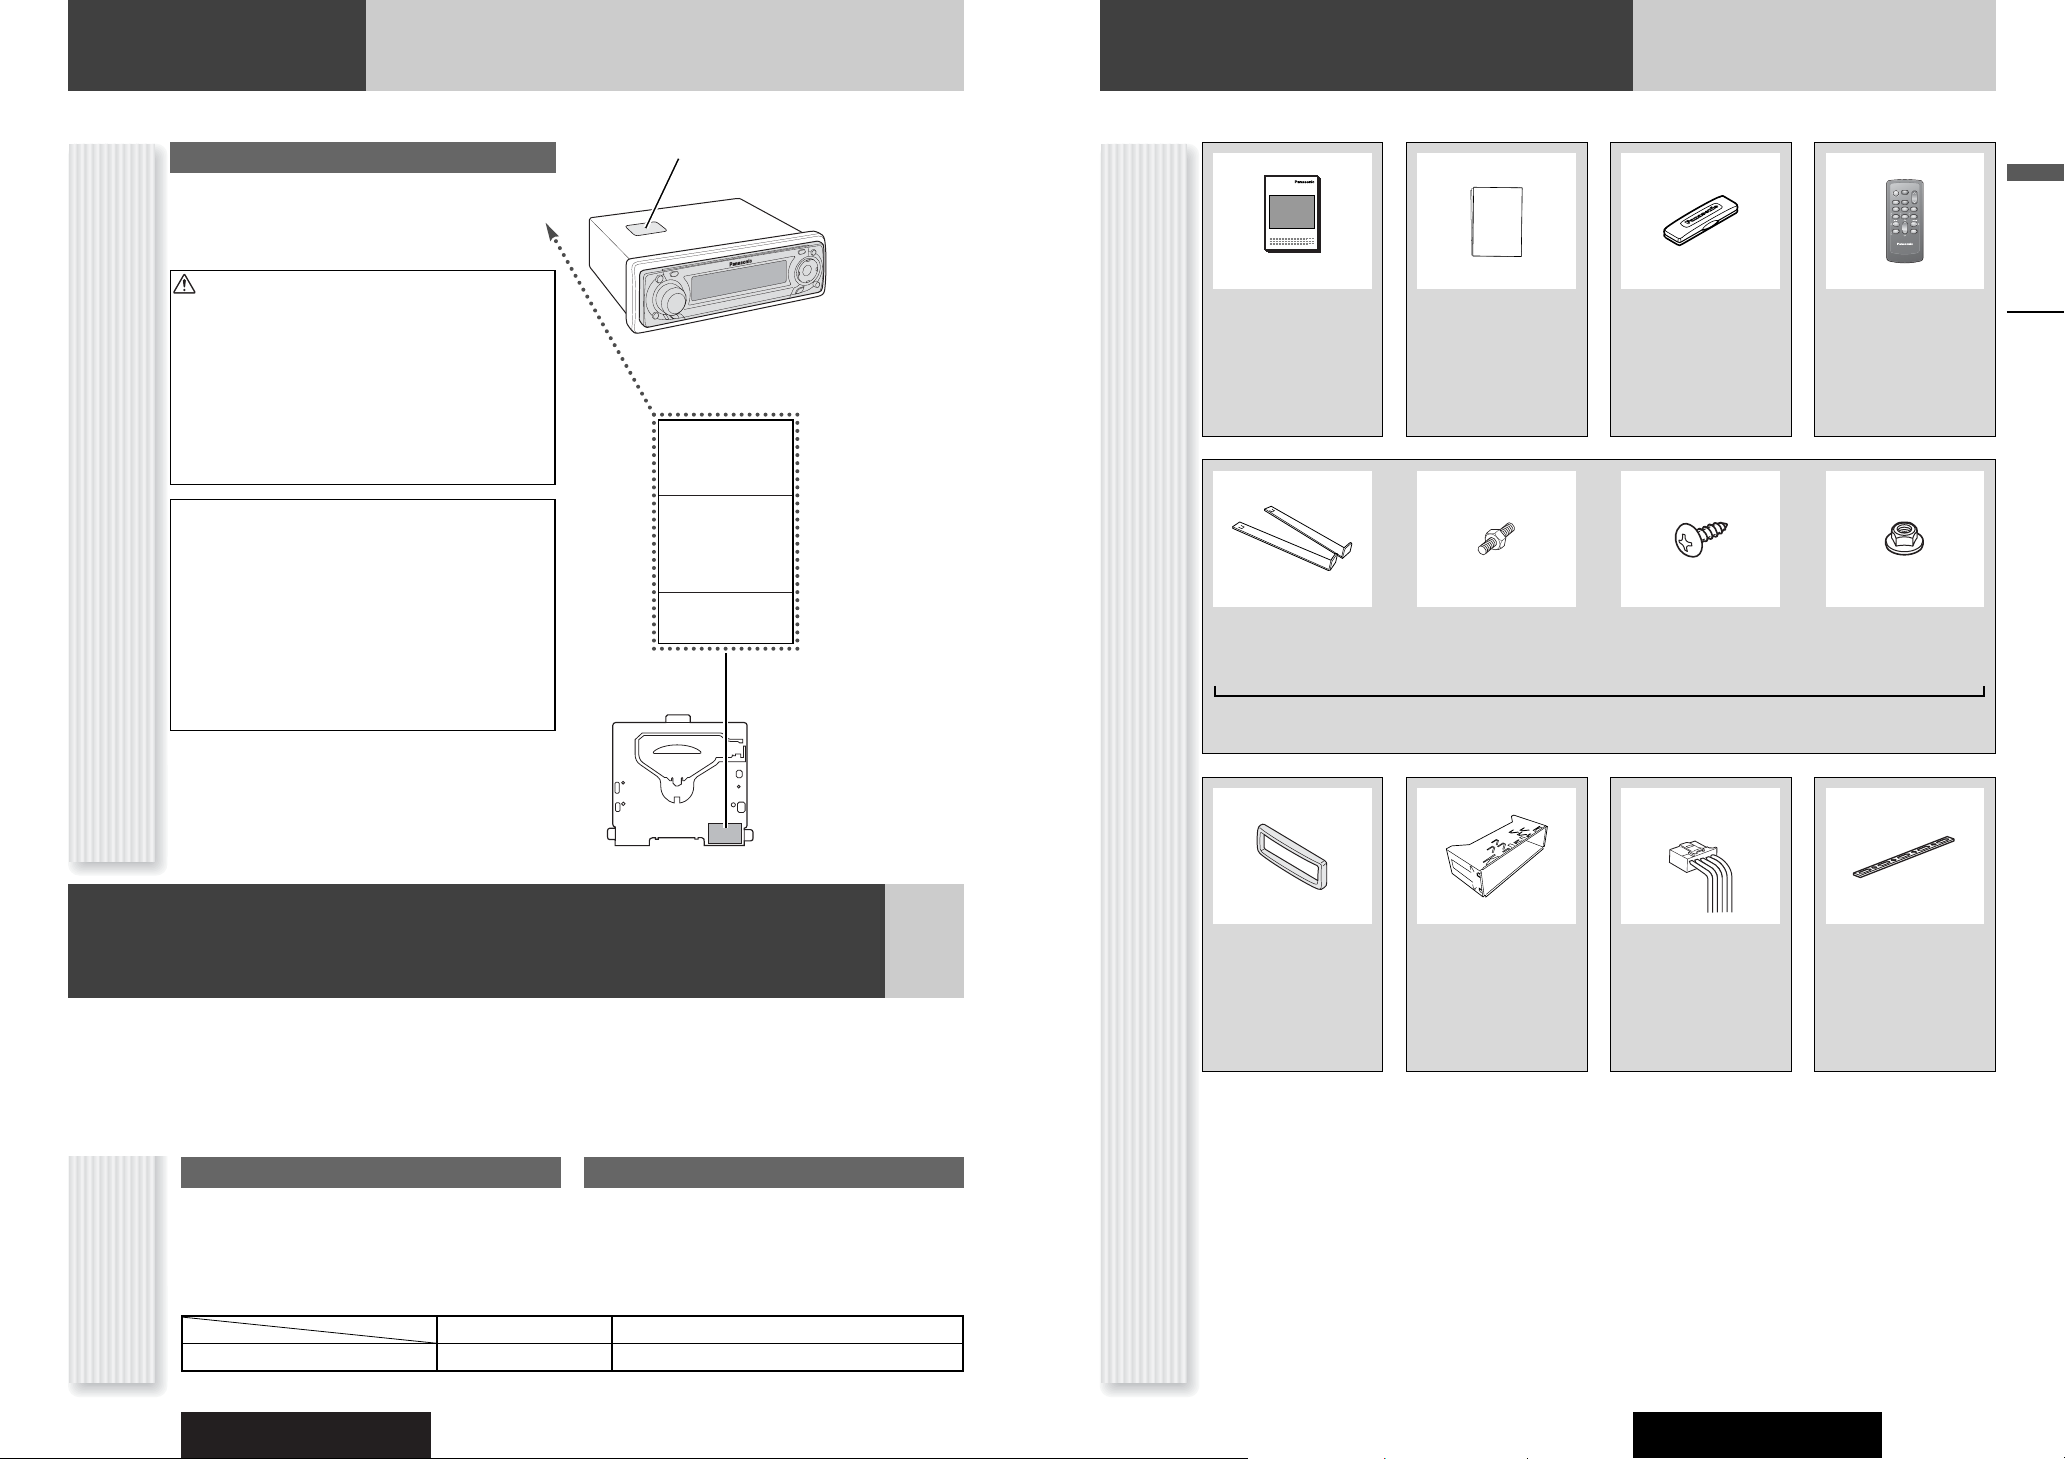
Safety Information
Accessories
Notes:
¡ The number in parenthesis underneath each accessory part name is the part number for maintenance and service.
¡ Accessories and their parts numbers are subject to modification without prior notice due to improvements.
¡ Mounting Collar and Trim Plate are mounted on the main unit at shipment.
Power Connector
(YEAJ02871)
Q'ty: 1
Lock Cancel Plate
Q'ty: 2
Mounting Bolt
Q'ty: 1
Tapping Screw
(5 mmø x 16 mm)
Q'ty: 1
Hexagonal Nut
(5 mmø)
Q'ty: 1
Mounting Collar
(YEFXO217222)
Q'ty: 1
Removable Face Plate
Case
(YEFA131646)
Q'ty: 1
SEL
SRC
BAND
MUTE
VOL
DISP
Remote Control Unit
(Includes a battery:
CR2025)
(EUR7641010)
Q'ty: 1
Trim Plate
(YEFC05606):
CQ-C9801W
(YEFC05655):
CQ-C9901W
Q'ty: 1
Installation kit (YEP0FZ5701)
Before Reading These Instructions
Label Indications and Their Locations
CAUTION
LASER RADIATION WHEN OPEN. DO NOT STARE
INTO BEAM.
Caution
THIS PRODUCT IS A CLASS 1 LASER PRODUCT.
USE OF CONTROLS OR ADJUSTMENTS OR PERFORMANCE OF PROCEDURES OTHER THAN THOSE
SPECIFIED HEREIN MAY RESULT IN HAZARDOUS
RADIATION EXPOSURE.
DO NOT OPEN COVERS AND DO NOT REPAIR BY
YOURSELF. REFER SERVICING TO QUALIFIED PERSONNEL.
Do not take apart this unit or attempt to
make any changes yourself.
This unit is a very intricate device that uses a laser
pickup to retrieve information from the surface of
compact discs. The laser is carefully shielded so that
its rays remain inside the cabinet.
Therefore, never try to disassemble the player or alter
any of its parts since you may be exposed to laser
rays and dangerous voltages.
CLASS 1 LASER PRODUCT
Deck Ass’y (Upper Side)
Laser Product
CQ-C9901W
WMA MP3 CD Player/Receiver with 512 Color OEL
(Organic electroluminescence) Display
CQ-C9801W
WMA MP3 CD Player/Receiver with Full Dot Matrix
Display
This operating instruction manual is for 2 models CQ-C9901W and CQ-C9801W.
The difference among these models’ are mentioned below.
All screens and main body illustrations in this book represent CQ-C9901W unless otherwise specified.
CQ-C9901W CQ-C9801W
Display unit 512 Color OEL Full Dot Matrix (Light Blue)
Features
Models
Before Reading These Instructions
Differences
among 2 models
Panasonic welcomes you to our constantly growing family of electronic products owners.
We endeavor to give you the advantages of precise electronic and mechanical engineering, manufactured with carefully selected
components, and assembled by people who are proud of the reputation their work has built for our company. We know this product
will bring you many hours of enjoyment, and after you discover the quality, value and reliability we have built into it, you too will be
proud to be a member of our family.
Operating Instructions
(YEFM285648)
Q'ty: 1
Installation Instructions
(YEFM293973)
Q'ty: 1
Rear Support Strap
(YEFG04019)
Q'ty: 1
CAUTION - LASER
RADIATION WHEN
OPEN. AVOID EXPOSURE TO BEAM.
ЗзаеДзаЦ – гДбЦкзйЦ
абгмуЦзаЦ ика
йндкхнаа. абЕЦЬДнъ
ЗйбСЦвлнЗаь
гДбЦкзйЙй
абгмуЦзаь.
注意-打開時避免被激
光輻射光束照射到。
XXXXXXXXXXXXXXX
XXXXXXXXXXXXXXXXX
XXXXXXXXXXXXXX
XXXXXXXXXXXXXXXX
OO-OOOOO
POWER
SOURCE
MENU
SEL
SEL
SRC
SRC
VOL
VOL
SET
BAND
MUTE
BAND MUTE
2 31
231
SCAN REPEAT
RANDOM
5
64
5
64
97
97
8
8
TUNE TUNE
0
0
DISP
DISP
#
#
NUMBER
CAR AUDIO
Page 3
6
CQ-C9901W/C9801W
7
CQ-C9901W/C9801W
Contents
¡Safety Information 2
¡Before Reading These Instructions 4
¡Features 6
¡Controls Layout 8
¡Preparation 10
¡General 12
¡Sound Control 16
¡Radio 19
¡CD Player 22
¡MP3/WMA Player 24
¡Disc Changer
(when CDs or MP3 discs are loaded)
28
¡Disc Changer (when DVDs or VCDs are loaded) 30
¡Audio Setting 32
¡Function Setting 34
¡Display Setting 35
¡Customize the Display 36
¡Troubleshooting 38
¡Error Display Messages 42
¡Notes on Discs 43
¡Maintenance 44
¡Contents by Functions 44
¡Specifications 45
Features
English
46
90
CommonEach SourceAs Needed
New Features
Full Digital CD Receiver
The CQ-C9901W/C9801W uses Radio DSP for digital
conversion and processing of FM/AM signals, and a
digital amp to provide amplification of the digital data.
With this technology, Panasonic achieves full digital
processing of radio and CD signals from input to speaker
output. This means faithful reproduction of the original
sound.
Radio DSP
By digitally converting and processing FM/AM broadcast
signals, this greatly reduces adjacent interference and
multipath distortion.
A radio's IF filter has the job of preventing neighboring
broadcast frequencies from interfering with reception of
your desired station. Panasonic's Radio DSP uses an
advanced algorithm to perform this task with digital
control. It maintains the optimum balance between noise
suppression and sound quality by automatically adjusting
the IF filter bandwidth in response to the changing
interference characteristics as you drive.
Fully Motorized Front Panel
A touch is all it takes to slide the front panel down for
access to the disc slot. A three-stage tilt function permits
viewing angle to be adjusted to 15, 25 or 35 degrees for
optimum display visibility.
256x64 pixel 512-color OEL display
(CQ-C9901W only)
Multicolored expression can be achieved thanks to OEL
display. You can use this unit in your original way in collaboration with the customization function.
Sound Control
CS Auto (CIRCLE SURROUND AUTOMOTIVE)
CS Auto allows your car interior to change to a splendid
audio room in a moment. Every speaker can be finetuned. (a page 16)
*CS Auto, TruBass, FOCUS, SRS and symbol are
trademarks of SRS Labs, Inc.
CS Auto technology is incorporated under license from
SRS Labs, Inc.
Note: If you enable CS Auto, the following functions are
automatically disabled:
SQ, POSITION, BASS/TREBLE, BALANCE/FADER, SUBWOOFER LEVEL, LPF, HPF, SBC-SW
SQ (SOUND QUALITY)
You have six preset modes (FLAT, POP, ROCK, VOCAL,
JAZZ, CLUB). You can customize your settings for these
(except FLAT) and save them for instant recall.
SQ9 (9-Band Sound Quality)
Center frequency and level are adjustable in each of nine
bands. This lets you fine tune sound quality for each
genre to suit car-interior acoustics and your personal
preferences. (a page 16)
Full lineup of optional parts
You can also enjoy watching DVDs if the optional DVD
changer and display unit are connected.
New radio tuner
Innovated APM (Auto Preset Memory) method for FM
bands. In addition to the conventional method (EACH
BAND), we have successfully launched the enhanced ALL
BAND method that presets 18 stations at the same time.
(a page 21)
Delightful sound space thanks to system buildup
Sub-Woofer
(Option)
CQ-C9901W/C9801W
Head unit
Stereo/Mono
Power Amplifier (Option)
DVD Changer
CX-DH801W
(Option)
Monitor: CY-VM1500EX
(Option)
Page 4
8
CQ-C9901W/C9801W
9
English
CQ-C9901W/C9801W
y / 5 PAUSE/PLAY
BAND
SET
APM
AUTO PRESET MEMORY
Controls Layout
Note: This instruction manual explains operations for use with the buttons on the main unit. (Different operations excluded)
SRC
CS
SEL
SRC
BAND
MUTE
VOL
DISP
One-touch operation is available for selecting a track
playing style by use of [4] (RANDOM), [5] (SCAN), or
[6] (REPEAT). (For a Folder/Disc playing style, hold
down the same button for 2 sec. or more.)
Direct Access
A track (CD mode), disc (Disc changer), file and folder
(MP3/WMA mode) can be directly selected.
Example: Track number 5
1
Press [#] (NUMBER).
2
Press [5].
3
Press [BAND] (SET).
SRC SOURCE
PWR POWER
MUTE
SBC·SW SUPER BASS
CONTROL-SUBWOOFER
CS
CIRCLE SURROUND AUTOMOTIVE
SQ SOUND QUALITY
MENU
DIM DIMMER
D•M DIRECT MEMORY
VOLUME
PUSH SEL SELECT
DISP
DISPLAY
TUNE
TRACK
(FILE)
Release
CS
TILT
OPEN (eject)
SRC SOURCE
PWR POWER
MUTE
SBC·SW SUPER BASS
CONTROL-SUBWOOFER
BAND
SET
APM AUTO PRESET
MEMORY
SEL SELECT
MENU
VOL VOLUME
}: Up
{: Down
DISP DISPLAY
8
0
0
RANDOM
SCAN
REPEAT
Number Buttons
to
NUMBER
RANDOM
SCAN
REPEAT
TUNE
TRACK (FILE)
P·SET (PRESET)
DISC (FOLDER)
VOL
DISP
BAND
SET
SEL
MENU
Controls Layout
Main Unit
Remote Control UnitFunctions only by remote control unit
Disc slot
When Panel Opens
P·SET
PRESET
DISC
(FOLDER)
MUTE
SRC
POWER
SOURCE
NUMBER
CS
99
##
NUMBER
NUMBER
RANDOM
RANDOM
44
SCAN
SCAN
55
REPEAT
REPEAT
66
77
99
808
0
POWER
POWER
SOURCE
SOURCE
SRC
SRC
SET
SET
BAND
BAND
MENU
MENU
SEL
SEL
POWER
SOURCE
SRC
SRC
SET
BAND MUTE
BAND
RANDOM
TUNE TUNE
#
#
NUMBER
CAR AUDIO
MENU
SEL
SEL
VOL
VOL
MUTE
2 31
231
SCAN REPEAT
5
64
5
64
97
97
8
8
0
0
DISP
DISP
VOL
VOL
MUTE
MUTE
DISP
DISP
Page 5

10
CQ-C9901W/C9801W
11
English
CQ-C9901W/C9801W
Preparation
Note: Adjust the clock when “ADJUST” appears on the
display.
1
Press [MENU] to display the menu display.
For using the remote control, hold down [MENU]
for 2 sec. or more.
2
Press []] or [[] to display the DISPLAY menu.
3
Press [{] to select “CLOCK ADJ”.
4
Press [BAND] (SET) to confirm the display.
5
Adjust the setting value.
[[]:Adjusting minutes
[]]
:
Adjusting hours
[}]
:
Forward
[{]
:
Backward
6
Press [BAND] (SET) to confirm the
adjustment.
Note: For cancellation of clock adjustment, press
[DISP].
7
Press [MENU].
For using the remote control, hold down [MENU]
for 2 sec. or more.
When the power is switched on for the first time, a
demonstration message appears on the display. Press
[DISP] to change to regular mode.
1
Set your car’s ignition switch to the ACC
or ON position.
The demonstration screen appears.
Example: CQ-C9901W
2
Press [DISP: DISPLAY].
The demonstration screen is cancelled, and no more
appears.
Note: If you would like to turn on the power and make
the demonstration message appear, hold down [SRC]
(PWR: POWER) for 4 sec. or more.
You may need to set the following depending on the
devices to be connected.
Using Subwoofer
¡ Subwoofer level adjustment (a page 32)
¡ Subwoofer low pass filter (a page 32)
Connecting an AV device (TV, VTR)
If you connect TV to AUX1 terminal, set the AUX1 setting
to TV.
1
Press [SRC: SOURCE] to select the
AUX1 mode. (a page 14)
2
Press [MENU] to display the menu display.
For using the remote control, hold down [MENU]
for 2 sec. or more.
3
Press [BAND] (SET) to adjust.
: TV
: Other devices (Default)
Note: When using an external TV unit manufactured by
a third party, select the TV mode.
4
Press [MENU] to confirm the adjustment.
The following functions are activated when the Security
Function is ON. (a page 34)
¡ The security indicator blinks when removing the face
plate.
¡ The alarm sounds and the message appears on the
screen to warn you to remove the face plate at power
off.
Security Indicator
SRC
CS
Preparation
First Time Power On
(DEMONSTRATION)
Remote Control PreparationSecurity Function
Setting
Other SettingsClock adjustment
(CLOCK ADJ: CLOCK ADJUSTMENT)
Battery Replacement
Preparation Before Initial Use
Pull the insulation film out
from the backside of
remote control gently.
Warning
¡Keep batteries and insulation film out of reach
of infants. If an infant ingests a battery, please
seek immediate medical attention.
Caution
¡
Remove and dispose of an old battery immediately.
¡ Do not disassemble, heat or short a battery.
Do not throw a battery into a fire or water.
¡ Follow local regulations when disposing of a
battery.
¡Improper use of a battery may cause overheat-
ing, an explosion or ignition, resulting in injury
or a fire.
Note:
¡Battery Information:
Battery Type: Panasonic lithium battery (CR2025)
(Included in the remote control)
Battery Life: Approximately 6 months under nor-
mal use (at room temperature)
q
w
q Remove the battery holder
with the remote control unit
placed on a flat surface.
q Stick your thumbnail into
the groove, and push the
holder in the direction of
the arrow, and at the
same time.
w Pull it out in the direction
of the arrow using a
tough pointed object.
w Put a battery in the case with
(+)-side facing up.
e Put the case back.
2
3
Tough pointed object
Back side
Insulation film
Page 6
12
CQ-C9901W/C9801W
13
English
CQ-C9901W/C9801W
Power on
Press [SRC] (PWR: POWER).
Notes:
¡ The opening screen appears. You can overwrite the
opening screen (moving picture) with new one. (a
page 36)
¡ When the power is switched on for the first time, a
demonstration message appears on the display. Press
[DISP] to change to regular mode. (a page 10)
Power off
Hold down [SRC] (PWR: POWER) for 2
sec. or more and release it.
Note: The ending screen appears. You can overwrite the
ending screen (moving picture) with new one. (a page
36)
General
This chapter explains how to turn on or off the power, how to adjust the volume, etc.
You can remove the face
plate to prevent it from
being stolen.
Removing
1
Turn off the power
(a page 12)
2
Press [] (Release).
(The face plate disengages
with a click when it is
removed.)
The face plate automatically closes in 5 seconds if it is open or tilted.
Note: The power is automatically turned off while
the unit is active.
3
Put the face plate in the case.
Mounting
1
Slide the left side of the face plate in
place.
2
Press the right end of the face plate
until “click” is heard.
Caution
¡ It is recommended to remove or mount the face
plate when the plate is at the closed position.
Do not remove or mount the face plate when the
plate is in motion.
¡ This face plate is not waterproof. Do not expose it to
water or excessive moisture.
¡ Do not remove the face plate while driving your car.
¡ Do not place the face plate on the dashboard or
nearby areas where the temperature rises to high
levels.
¡ Do not touch the contacts on the face plate or on the
main unit, since this may result in poor electrical
contacts.
¡ If dirt or other foreign substances get on the con-
tacts, wipe them off with clean and dry cloth.
¡ To avoid damaging the face plate, do not push it
down or place objects on it while it is open.
Open/Eject
Press [] (OPEN).
When a disc is already loaded, the disc will automatically
be ejected.
Close
Press [] (OPEN).
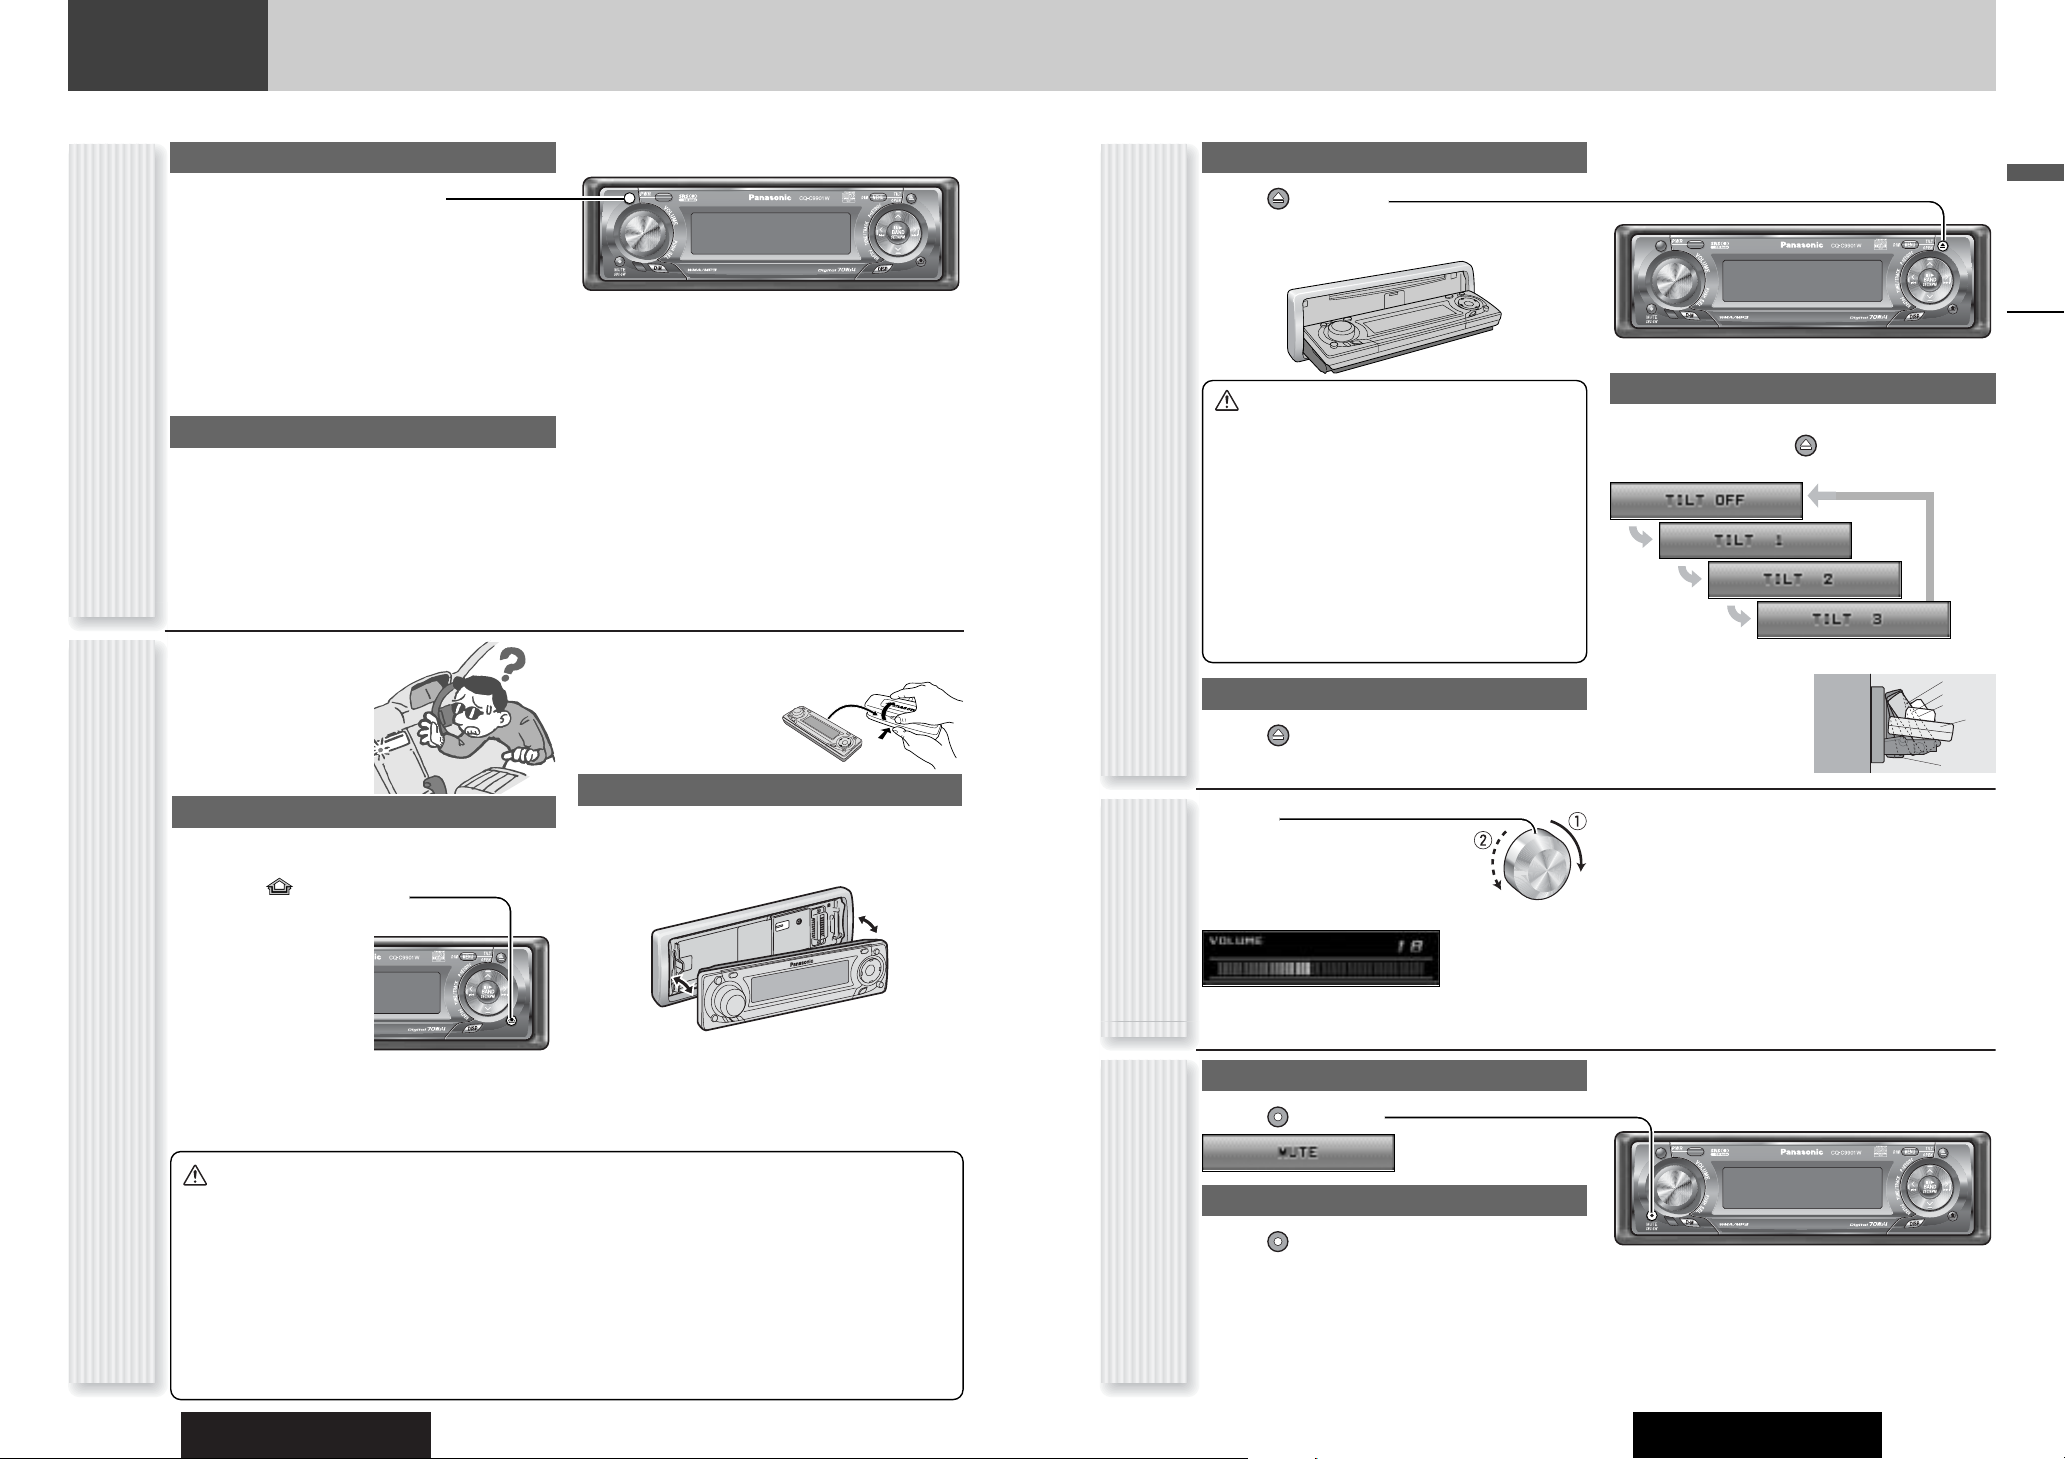
Tilt
The display angle changes among 4 levels as follows
every time you hold down [] (TILT) for 1 sec. or
more and release.
Note: The last selected
angle is maintained even
after turning off the power.
Notes:
¡ The volume level can be set independently for each
source. (For radio, one volume setting for AM, one
volume setting for all FMs)
¡ The volume is not adjustable while an error appears
on the monitor or the external mute function is
enabled. (a page 42)
q Up
w Down
Setting Range: 0 to 40
Default: 18
Volume off (down)
Press [](MUTE).
Cancel
Press [](MUTE) again.
Note:
Volume-down range can be specified. (a page
34)
Power On/off
(PWR: POWER)
Face Plate Motion (Open/Close, Tilt)
(OPEN/CLOSE, TILT)
Volume Adjustment
(VOLUME)
Temporary Volume Off (Down)
MUTE (ATT: ATTENUATION)
Caution
¡ To avoid damaging the face plate, do not push it
down or place objects on it while it is open.
¡ Do not pinch your finger or hand in the face plate.
¡ Do not insert foreign objects into the disc slots.
¡ For the following cases, the face plate automatical-
ly closes. Use caution not to catch your finger.
¡ After a lapse of 20 seconds
¡ When a disc is inserted
¡ When the face plate is removed (a page 12)
¡ Five seconds after turning off the power or
turning the key to ACC OFF.
Face Plate Removing/Mounting
(ANTI-THEFT)
SRC
CS
SRC
SRCCSSRC
CS
General
TILT 1
TILT 2
TILT 3
TILT OFF
OPEN
Page 7
14
CQ-C9901W/C9801W
15
English
CQ-C9901W/C9801W
General
The display changes as follows every time [DISP:
DISPLAY] is pressed.
Note: You can select a graphic pattern and a still image
from originally stored data. (a page 35) You can also use
your original images. (Customize Function a page 36)
At power-off:
Clock display (default)
The dimmer level changes as follows every time you hold
down [MENU] (DIM: DIMMER) for 2 sec. or more.
Brighter (Default)
Medium
Mode
Folder hierarchy (MP3/WMA mode only.)
Ordinary display + still image
Ordinary display + clock
Display OFF
All displays disappear in 5 seconds.
At power-on:
Darker
Off
Only graphic pattern
Only still image
Display Change
(DISP: DISPLAY)
Dimmer Control
(DIM: DIMMER)
Note: This setting is not adjustable with the remote control.
SRCCSSRC
CS
General
Radio
FM1, FM2, FM3, AM (a page 19)
Source Selection
(SRC: SOURCE)
The source changes as follows every time
[SRC: SOURCE] is pressed.
Player
Auxiliary (AUX 1)
Auxiliary (AUX2)
SRC
CS
SRC
When connecting CD Changer, DVD Changer (a page
28, 30)
When connecting a device that is not
compatible with this unit
When loading CD (a page 22)
When loading MP3/WMA disc (a page 24)
When connecting a TV
When connecting a device that is not compatible with
this unit
Notes: Please connect a CD changer or a DVD changer
to AUX2. (a Installation Instructions)
Ordinary display + graphic pattern
Page 8

16
CQ-C9901W/C9801W
17
English
CQ-C9901W/C9801W
Sound Control
You can optimize the performance of CS Auto (Circle
Surround Automotive) by following the steps below.
1
Set the CS Auto mode to on.
2
Hold down [CS] for 2 sec. or more to
display the audio menu display.
3
Press [BAND]
(SET) to adjust.
4
Press [DISP] to
confirm the adjustment.
SRC
CS
General
Sound Control
CS Auto
(CS: CIRCLE SURROUND AUTOMOTIVE)
CS Auto allows your car interior to change to a splendid
audio room in a moment. Every speaker can be finetuned.
You can toggle the CS Auto function on and off every
time you press [CS: CIRCLE SURROUND AUTO-
MOTIVE]. Select CS Auto on or off after setting each
item.
Note: If you enable CS Auto, the following functions are
automatically disabled:
SQ, POSITION, BASS/TREBLE, BALANCE/FADER, SUBWOOFER LEVEL, LPF, HPF, SBC-SW
SRC
CS
CS
Lights when CS Auto is activated.
SBC-SW:
SUPER BASS CONTROL-SUBWOOFER
The rear speaker can be used as a substitutional subwoofer when a subwoofer is not connected.
Holding down [] (SBC-SW) for 2 sec. or more tog-
gles SBC-SW on and off.
CS AUTOMOTIVE MENU display
You can toggle the SQ function on and off every
time you press [CS] (SQ).
Notes:
¡ Each SQ level is changeable. (a page 18)
¡ If you enable SQ, the following functions are
automatically disabled:
CS Auto, F-TruBass, R-TruBass, S.W.-TruBass,
F-Focus, R-Focus, F-R MIX
Lights when SQ is activated.
(Hidden in the FLAT mode)
SQ
(SQ: SOUND QUALITY)
SRC
CS
CS
You have six preset modes (FLAT, POP, ROCK, VOCAL,
JAZZ, CLUB).
SQ9 (9-Band Sound Quality)
Center frequency and level are adjustable in each of nine
bands. This lets you fine tune sound quality for each
genre to suit car-interior acoustics and your personal
preferences.
Off (default)
On
Notes:
¡ If ON is selected, the settings of subwoofer level
adjustment and subwoofer low pass filter are activated. (a page 32)
¡ When SBC-SW is set to ON, the CS mode automati-
cally turns off.
Lights when SBC-SW is activated.
SRC
CS
CS
CS AUTO MODE
Three-dimensional natural sound field is reproduced with
clarity in response to sound.
: Music
(default in other than the AM mode)
: Cinema
: Monaural (default in the AM mode)
Page 9

18
CQ-C9901W/C9801W
19
English
CQ-C9901W/C9801W
Radio
Radio
Sound Control
1
Press [SRC: SOURCE] to select the
radio mode.
2
Press [BAND] to select a band.
Notes:
¡ For tuning in on only stations whose receiving condi-
tions are good in the station search, set LOCAL to ON.
(a page 21)
¡ For reducing noise when a receiving FM stereo wave
is weak, set FM MONO to ON. (a page 21)
3
Select a station.
Frequency adjustment
[]] (TUNE): Lower
[[] (TUNE): Higher
Note: Hold down for 0.5 sec. or more and release
for station search.
Preset station selection
[{] (P·SET: PRESET): Lower preset number
[}] (P·SET: PRESET): Higher preset number
Notes:
¡ Direct Access can be executed with [1] to [6]
buttons on remote control.
¡ Stations in FM 1 to 3 are sequentially selectable
without changing bands when “ALL BAND” is
selected in “AUTO PRESET”.
Band
Frequency
Lights when LOCAL is
activated. (a page 21)
Radio mode display
Preset Number
Lights while receiving an FM stereo signal.
(“STEREO”: CQ-C9801W)
Lights when MONO is activated.
(a page 21)
Operation Flow
SRC
CS
SRC
Indicates the intensity of
the radio wave.
A radio DSP is integrated into this unit. The IF filter allows the radio to adjust the bandwidth automatically to maintain optimum reception.
SOUND QUALITY Menu display
You can make a fine adjustment of SQ and Position.
1
Set the SQ mode to on.
2
Hold down [CS] (SQ) for 2 sec. or more
to display the audio menu display.
3
Press [}] or [{] to select a function to
be adjusted.
4
Press [BAND]
(SET) to adjust.
5
Adjust the setting value.
[}][{][]][[]: Select
[BAND](SET): Confirm
6
Press [DISP] to confirm the adjustment.
SQ PRESET SELECT
Select your favorite type from 6 kinds of SQ Presets.
Note: You can also select the SQ preset number by
pressing [1] to [6] on the remote control.
SQ ADJUSTMENT (SQ9)
You can make a fine adjustment to the currently selected
SQ presetting in each type (except FLAT).
[]][[]: Frequency band selec-
tion
qw: Frequency selection
[
}][{]: Level up/down
Note: If you hold down [BAND] for 2 sec. or more, the
presetting that is called up can be turned into the default.
SQ PRESET MEMORY
The current value is assigned to one of SQ preset 2 to 6.
1
Select a preset number by pressing
[}], [{], []] or [[] .
2
Hold down [BAND] for 2 sec. or more.
Note: You can also select the SQ preset number by
pressing [2] to [6] on the remote control, and assign the
current value to the selected preset number by holding
down the same button for 2 sec. or more.
POSITION
You can make the optimal sound field in accordance with
your seat.
Sound Control
CS
CS
SRC
Page 10

20
CQ-C9901W/C9801W
21
English
CQ-C9901W/C9801W
In the AM mode, only NOISE SUPPRESSION and LOCAL
can be selected.
1
Press [MENU] to
display the menu
display.
For using the remote
control, hold down
[MENU] for 2 sec. or
more.
2
Press [}] or [{] to select a mode to be
adjusted.
3
Press [BAND]
(SET) to adjust.
4
Press [MENU] to confirm the adjustment.
For using the remote control, hold down [MENU]
for 2 sec. or more.
MONO (Monaural)
Noise reduction when the signal strength decreases
: Receiving in stereo (default)
: Receiving in mono and reducing the noise level
LOCAL
Setting when searching for a station
: Searching even for a relatively low-intensity
radio wave station (default)
: Searching only for a high-intensity radio wave
station
NOISE SUPPRESSION
IF filter setting for noise suppression
: Wide range
: Middle range (default)
: Narrow range
AUTO PRESET
You can select 6 or 18 stations for FM presetting with the
use of APM.
:
Presets 6 stations to FM1 to FM3 respectively, that is, 18
stations in total at the same time. This function is useful
for presetting more than 6 stations. (default)
:
Presets 6 stations with good reception to the selected
band from FM1 to FM3. This function is useful for presetting stations in different areas in different bands.
PRESET EDIT
You can arrange the order of the preset stations. Preset
stations can be reordered as you like after executing APM
or the like.
1
Press [}], [{], []] or [[] to select one
station to be interchanged.
2
Press [BAND] to confirm your selection.
3
Press [}], [{], []] or [[] to select the
other station to be interchanged.
4
Press [BAND] to confirm your selection.
●Calling an FM station registered on D·M
RADIO AUDIO FILTER
You can select the reception status (band) of FM stations
registered on D·M.
: Off (default)
: High cut level 1
: High cut level 2 (same processing at receiving
an FM station)
Mono/Local Setting (Radio Menu Display)
(MONO/LOCAL)
Radio
Radio
Up to 6 stations can be preset in AM, FM1, FM2, and FM3
respectively.
Preset stations can be simply called up by pressing [}]
(P·SET) or [{] (P·SET).
Notes:
¡ Direct Access can be executed with [1] to [6] buttons
on remote control.
¡ You can switch between 6 and 18 for FM presetting
stations.
(a page 21)
¡ Preset stations are changeable. (a page 21)
Auto Preset Memory (APM)
Stations with good receiving conditions are automatically
preset.
1
Select a band.
2
Hold down [BAND]
(APM) for 2 sec.
or more.
The preset stations under best receiving conditions
are received for 5 sec. each after presetting the stations (SCAN). To stop scanning, press [}] or [{].
Note: New stations overwrite existing saved stations.
Manual station preset
1
Tune in to a station.
2
Hold down [}] or [{] for 2 sec. or
more.
3
Select a preset number by pressing [}]
or [{].
4
Preset the station by holding down [}]
or [{] for 2 sec. or more.
Frequency/preset number blinks once.
Notes:
¡ New stations overwrite existing saved stations.
¡ In step 2, a station can be registered by holding down
the numeric button [1] to [6] for 2 sec. or more.
¡ To stop presetting stations, press [DISP] (Display).
Station Preset
(APM: AUTO PRESET MEMORY, P·SET: PRESET)
Direct Memory
(D·M: DIRECT MEMORY)
You can assign your favorite broadcasting station to the
[D·M] button. As the result of doing that, your favorite
broadcasting station can be received even if the CD mode
or the CD changer mode is activated.
(Default: FM 87.50 MHz)
Note:
For the use of an FM transmitter, it is useful
for users to register applicable frequencies on D·M
(Direct Memory).
D·M station calling
1
Press [D·M: DIRECT MEMORY].
D·M station writing
1
Select a station you would like to preset.
2
Hold down [D·M: DIRECT MEMORY]
for 2 sec. or more.
Lights when the D·M mode is activated.
SRC
CS
Page 11

22
CQ-C9901W/C9801W
23
English
CQ-C9901W/C9801W
CD Player
CD Player
Caution
¡ This unit does not support 8 cm discs.
¡ Do not use irregularly shaped discs. (a page 43)
¡ Do not use discs that have a seal or label attached.
¡ To avoid damaging the face plate, do not push it down or
place objects on it while it is open.
¡ Do not pinch your finger or hand in the face plate when the
panel is in motion.
¡ Do not insert foreign matter into the disc slots.
¡ Refer to the section on “Notes on CD/CD Media (CD-ROM,
CD-R, CD-RW)” (a page 43).
¡ This unit does not support a MIX mode CD (a CD containing
both CD-DA and MP3/WMA data). In case of using such a
CD, problems may occur such as an acoustic playback.
When a disc is already loaded, press [SRC: SOURCE]
to select the CD mode.
1
Press [] (OPEN) to open the face
plate.
When a disc is already loaded ( lights), the disc
will automatically be ejected.
2
Load a disc with the label-side facing up.
The face plate closes automatically, and the unit recognizes the disc and starts playing automatically,
too.
3
Select a desired track.
Track selection
[7] (TRACK): Next track
[6] (TRACK): Preceding track (press twice)
Note: Hold down for fast forward/reverse.
Pause
Press [BAND] (
h
/
5
).
Press again to cancel.
4
Press [] (OPEN/eject) to eject the
disc.
Track number Time
Lights when the disc is
loaded.
Play Mode indicators
Lights when each mode is
activated.
CD-TEXT display
Notes:
¡ For scrolling text, hold down [DISP] for 2 sec. or
more.
¡ “NO TEXT” is displayed when there is no information
on the disc.
Random and Repeat play can be set.
1
Press [MENU] to display the menu display.
For using the remote
control, hold down
[MENU] for 2 sec. or
more.
2
Press [}] or [{] to select a mode to be
adjusted.
3
Press [BAND]
(SET) to adjust.
4
Press [MENU] to confirm the adjustment.
For using the remote control, hold down [MENU]
for 2 sec. or more.
RANDOM
: Off (default)
: Random playback
REPEAT
: Off (default)
: Playing the current track repeatedly
TEXT
Text display
: Enabled (default)
: Disabled
Play Mode Selection
One-touch operation is available for selecting a track
playing style by use of [RANDOM] or [REPEAT].
RANDOM
Press [RANDOM].
Press again to cancel.
REPEAT
Press [REPEAT].
Press again to cancel.
SCAN play
You can find your favorite track by playing first 10-sec. of
each track.
Press [SCAN].
Press again to cancel.
Direct Access
A track can be directly selected.
Example: track number 5
1
Press [#] (NUMBER).
2
Press [5].
3
Press [SET].
Note: To suspend direct selection, press [DISP].
Operation FlowCD mode display
Functions only by
remote control unit
Random, Repeat Play (CD Menu Display)
(RANDOM, REPEAT)
SRC
CS
Page 12

24
CQ-C9901W/C9801W
25
English
CQ-C9901W/C9801W
MP3/WMA Player
Notes:
¡ Refer to the section on “Notes on MP3/WMA” (a page 26)
¡ This unit does not support a MIX mode CD (a CD containing
both CD-DA and MP3/WMA data). In case of using such a
CD, problems may occur such as an acoustic playback.
Operation Flow
When a disc is already loaded, press [SRC: SOURCE]
to select the CD mode.
1
Press [] (OPEN) to open the face
plate.
When a disc is already loaded ( lights), the disc
will automatically be ejected.
2
Load a disc with the label-side facing up.
The face plate closes automatically, and the unit recognizes the disc and starts playing automatically,
too. (It may take several minutes to start for a disc
that has a lot of files.)
3
Select a desired folder/file.
Folder selection
[}] (FOLDER): Next folder
[{] (FOLDER): Preceding folder
File selection
[7] (TRACK): Next file
[6] (TRACK): Preceding file (press twice)
Note: Hold down for fast forward/reverse.
Pause
Press [BAND] (
h
/
5
).
Press again to cancel.
4
Press [] (OPEN/eject) to eject the
disc.
MP3/WMA mode display
Folder number
Information Display
Notes:
¡ For scrolling text, hold down [DISP] for 2 sec. or
more.
¡ “NO TEXT” is displayed when there is no information
on the disc.
¡ ID3/WMA tag information is displayed for the album
name and title/artist name.
File number
File type indicator
(Folder Random)
(Folder Repeat)
(Folder Scan)
Random and Repeat play can be set.
1
Press [MENU] to display the menu display.
For using the remote
control, hold down
[MENU] for 2 sec. or
more.
2
Press [}] or [{] to select a mode to be
adjusted.
3
Press [BAND]
(SET) to adjust.
4
Press [MENU] to confirm the adjustment.
For using the remote control, hold down [MENU]
for 2 sec. or more.
RANDOM
: Off (default)
: Random playback (from whole disc)
FOLDER RANDOM
: Off (default)
: Random playback (from selected folder)
REPEAT
: Off (default)
: Playing the current file repeatedly
FOLDER REPEAT
: Off (default)
: Playing the current folder repeatedly
TEXT
: Folder name/File name
(default)
: Album/Title (tag information)
: No display
Play Mode Selection
One-touch operation is available for selecting a file playing style by use of [RANDOM] or [REPEAT].
RANDOM, REPEAT
Press the button. Press again to cancel.
FOLDER RANDOM, FOLDER REPEAT
Hold down the button for 2 sec. or more. Hold
down again to cancel.
SCAN play
You can find your favorite file by playing first 10-sec. of
each file.
SCAN (All files)
Press [SCAN]. Press again to cancel.
FOLDER SCAN (1st file in each folder)
Hold down [SCAN] for 2 sec. or more. Hold down
again to cancel.
Direct Access
A file in the current folder can be directly selected.
Example: file number 5
1
Press [#] (NUMBER).
2
Press [5].
3
Press [SET].
Notes:
¡ For folder selection, enter a number after pressing [#]
(NUMBER) twice.
¡ If there is no playable file in the selected folder, the
first file or folder on the disc is selected.
¡ To suspend direct selection, press [DISP].
Random, Repeat Play (MP3/WMA Menu Display)
(RANDOM, REPEAT)
Functions only by
remote control unit
Time
Lights when the disc is
loaded.
Play Mode indicators
Lights when each mode is
activated.
MP3/WMA Player
CS
SRC
Page 13

26
CQ-C9901W/C9801W
27
English
CQ-C9901W/C9801W
MP3/WMA Player
What is MP3/WMA?
MP3 (MPEG Audio Layer-3) and WMA (Windows Media
TM
Audio) are the compression formats of digital audio. The
former is developed by MPEG (Motion Picture Experts
Group), and the latter is developed by Microsoft
Corporation. Using these compression formats, you can
record the contents of about 10 music CDs on a single
CD media (This figures refer to data recorded on a
650MB CD-R or CD-RW at a fixed bit rate of 128 kbps
and a sampling frequency of 44.1 kHz).
Notes:
¡ MP3/WMA encoding and CD writing software pro-
grams are not supplied with this unit.
¡ CD writing software is not supplied with this unit.
Points to remember when making MP3/WMA files
Common
¡ High bit rate and high sampling frequency are recom-
mended for high quality sound.
¡ Selecting VBR (Variable Bit Rate) is not recommended
because playing time is not displayed properly and
sound may be skipped.
¡ The playback sound quality differs depending on the
encoding circumstances. For details, refer to the user
manual of your own encoding software and writing
software.
MP3
¡ It is recommended to set the bit rate to “128 kbps or
more” and “fixed”.
WMA
¡ It is recommended to set the bit rate to “64 kbps or
more” and “fixed”.
¡ Do not set the copy protect attribute on the WMA file
to enable this unit to play back.
Display Information
Displayed items
Displayable characters
¡ Displayable length of file name/folder name: within 64
characters.
¡ Name files and folders in accordance with the stan-
dard of each file system. Refer to the instructions of
writing software for details.
¡ ASCII character set and special characters in each lan-
guage can be displayed.
ASCII character set
A to Z, a to z, digits 0 to 9, and the following symbols:
(space) ! ” # $ % & ’ ( ) * + , - . / : ; < = > ? @ [ \ ] ˆ
_ ` { | } ~
Notes:
¡ With some software in which MP3/WMA format files
have been encoded, the character information may not
be displayed properly.
¡ Undisplayable characters and symbols will be convert-
ed into an asterisk (
*
).
¡ It is recommended that the length of the file name is
less than 8 (excluding the file extension).
Caution
Never assign the “.mp3”, or “.wma” file
name extension to a file that is not in the
MP3/WMA format. This may not only pro-
duce noise from the speaker damage, but
also damage your hearing.
¡ CD-TEXT
Disc title
Track title
¡ MP3/WMA
Folder name
File name
¡ MP3 (ID3 tag)
Album name
Title name/Artist name
¡ WMA (WMA tag)
Album name
Title name/Artist name
¡ You are recommended to minimize the chances of
making a disc that contains both CD-DA files and
MP3/WMA files.
¡ If CD-DA files are on the same disc as MP3 or WMA
files, the songs may not play in the intended order,
or some songs may not play at all.
¡ When storing MP3 data and WMA data on the same
disc, use different folders for each data.
¡ Do not record files other than MP3/WMA files and
unnecessary folder on a disc.
¡ The name of MP3/WMA file should be added by rules
as shown in the following descriptions and also comply with the rules of each file system.
¡ The file extension “.mp3” or “.wma” should be
assigned to each file depending on the file format.
¡ You may encounter trouble in playing MP3/WMA files
or displaying the information of MP3/WMA files
recorded with certain writing software or CD
recorders.
¡ This unit does not have the play list function.
¡ Although Multi-session recording is supported, the
use of Disc-at-Once is recommended.
Supported file systems
ISO 9660 Level 1/Level 2, Apple Extension to ISO 9660,
Joliet, Romeo
Note: Apple HFS, UDF 1.50, MIX mode CD, CD Extra are
not supported.
Recording MP3/WMA files on a CD-media
Compression formats
(Recommendation: “Points to remember when making MP3/WMA files” on the previous page)
Folder selection order/file playback order
Maximum number of files/folders
¡ Maximum number of files: 999
¡ Maximum number of files in one folder: 255
¡ Maximum depth of trees: 8
¡ Maximum number of folders: 255 (Root folder is
included.)
Notes:
¡ This unit counts the number of folders irrespective of
the presence or absence of MP3/WMA file.
¡ If the selected folder does not contain any MP3/WMA
files, the nearest MP3/WMA files in the order of playback will be played.
¡ Playback order may be different from other MP3/WMA
players even if the same disc is used.
¡ “ROOT” appears when displaying the root folder
name.
Copyright
It is prohibited by copyright laws to copy, distribute and
deliver copyrighted materials such as music without the
approval of copyright holder except enjoying yourself
personally.
No warranty
Above description complies with our investigations as of
December 2004. It has no warranty for reproducibility
and displayability of MP3/WMA.
Windows Media, and
the Windows logo are
trademarks, or registered trademarks of
Microsoft Corporation
in the United States
and/or other countries.
Notes on MP3/WMA
Notes on MP3/WMA (continued)
MP3/WMA Player
32, 44.1, 48 kHzNo64 k-192 kbpsWindows Media Audio Ver. 2, 8
16, 22.05, 24 kHzYes8 k-160 kbpsMPEG 2 audio layer 3 (MP3)
32, 44.1, 48 kHzYes32 k-320 kbpsMPEG 1 audio layer 3 (MP3)
Sampling frequencyVBRBit rateCompression method
2
3
Root Folder
(Root Directory)
q
4
w
5
6
7
e
r
8
Folder Selection
File Selection
q
t
y
1 8
–In the order
–In the order
(Max.)
y
1
Tree 1 Tree 2 Tree 3 Tree 4 Tree 8
Page 14

28
CQ-C9901W/C9801W
29
English
CQ-C9901W/C9801W
Disc Changer
(when CDs or MP3 discs are loaded)
Note: MP3 files are playable only when a DVD changer is connected. Please refer to the operating instructions for each changer
regarding applicable discs and formats.
Notes:
¡ Please connect a CD changer or a DVD changer
(
CX-DH801W
)
to CH/AUX2.
¡ When CX-DP880 or CX-DH801W is connected, a CD-RW
disc is playable.
¡ Trouble may occur while playing CD-Rs. Refer to the section
on “Notes on CD/CD Media (CD-ROM, CD-R, CD-RW)” (a
page 43).
1
Load a magazine (discs).
When a magazine is already loaded ( lights),
press [SRC: SOURCE] to select the changer
mode.
The unit recognizes the magazine and starts playing
automatically.
Note: The changer is automatically turned on when
the magazine is inserted.
2
Select a desired disc/folder/file/track.
Disc selection
[}]: Next disc
[{]: Preceding disc
Folder selection
Hold down for 2 sec. or more.
[}] (FOLDER): Next folder
[{] (FOLDER): Preceding folder
Track/File selection
[7]: Next track/file
[6]: Preceding track/file (press twice)
Note: Hold down for fast forward/reverse.
Pause
Press [BAND] (
h
/
5
).
Press again to cancel.
Disc number Lights when the changer is
connected.
Play Mode indicators
Lights when each mode is
activated.
Changer indicator
(Folder Repeat)
(CD changer)
(DVD changer)
Random and Repeat play can be set.
1
Press [MENU] to display the menu display.
For using the remote
control, hold down
[MENU] for 2 sec. or
more.
2
Press [}] or [{] to select a mode to be
adjusted.
3
Press [BAND]
(SET) to adjust.
4
Press [MENU] to confirm the adjustment.
For using the remote control, hold down [MENU]
for 2 sec. or more.
RANDOM
¡ CD-DA
RANDOM playback of the selected disc (DVD changer)
RANDOM playback of all discs in the magazine (CD
changer)
¡ MP3 disc
RANDOM playback of the selected folders
: Off (default)
: Random playback
DISC RANDOM (only for CD changer)
: Off (default)
: Random playback (from selected disc)
REPEAT
: Off (default)
: Playing the current track/file repeatedly
DISC REPEAT (only for CD-DA disc)
: Off (default)
: Playing the current disc repeatedly
FOLDER REPEAT (only for MP3 disc)
: Off (default)
: Playing the current folder repeatedly
Random, Repeat Play (Changer Menu Display)
(RANDOM, REPEAT)
Functions only by
remote control unit
Play Mode Selection
One-touch operation is available for selecting a track
playing style by use of [RANDOM] or [REPEAT].
RANDOM, REPEAT
Press the button. Press again to cancel.
DISC RANDOM, DISC REPEAT, FOLDER REPEAT
Hold down the button for 2 sec. or more. Hold
down again to cancel.
SCAN play
You can find your favorite track by playing first 10-sec. of
each track.
SCAN (CD changer: All tracks, DVD changer:
From selected disc)
Press [SCAN]. Press again to cancel.
DISC SCAN (CD changer: 1st track in each disc)
Hold down [SCAN] for 2 sec. or more. Hold down
again to cancel.
Direct Access
A disc can be directly selected.
Example: disc number 5
1
Press [#] (NUMBER).
2
Press [5].
3
Press [SET].
Note: To suspend direct selection, press [DISP].
Operation FlowChanger mode display
SRC
CS
SRC
(Disc Random) CD changer only
(Disc Repeat)
(Disc Scan) CD changer only
Disc Changer (when CDs or MP3 discs are loaded)
Disc type (DVD changer only)
(CQ-C9801W)
Disc type (DVD changer only)
(CQ-C9901W)
(MP3)
(MP3)
Page 15

30
CQ-C9901W/C9801W
31
English
CQ-C9901W/C9801W
Disc Changer
(when DVDs or VCDs are loaded)
You can play DVDs or VCDs when connecting this unit to DVD changer.
Notes:
¡ Please connect a CD changer or a DVD changer
(
CX-DH801W
)
to CH/AUX2.
¡ “AUX2” is displayed when connecting a changer that is not
compatible with this unit.
1
Load a magazine (discs).
When a magazine is already loaded ( lights),
press [SRC: SOURCE] to select the DVD changer
mode.
The unit recognizes the magazine and starts playing
automatically.
Note: The changer is automatically turned on when
the magazine is inserted.
2
Select a desired disc/chapter.
Disc selection
[}]: Next disc
[{]: Preceding disc
Chapter/Track selection
[7]: Next chapter/track
[6]: Preceding chapter/track (press twice)
Note: Hold down for fast forward/reverse.
Pause
Press [BAND] (
h
/
5
).
Press again to cancel.
Repeat play can be set.
1
Press [MENU] to display the menu display.
For using the remote
control, hold down
[MENU] for 2 sec. or
more.
2
Press [}] or [{] to select a mode to be
adjusted.
3
Press [BAND]
(SET) to adjust.
4
Press [MENU] to confirm the adjustment.
For using the remote control, hold down [MENU]
for 2 sec. or more.
●DVD playing
CHAPTER REPEAT
: Off (default)
: Playing the current chapter repeatedly
TITLE REPEAT
: Off (default)
: Playing the current title repeatedly
Note: The unit may not operate for some DVDs.
●VCD playing
REPEAT
: Off (default)
: Playing the current track repeatedly
DISC REPEAT
: Off (default)
: Playing the current disc repeatedly
Notes:
¡ The unit may not operate for some VCDs.
¡ The unit may not operate for a disc with the play back
function activated.
Repeat Play (DVD Changer Menu Display)
(REPEAT)
Functions only by
remote control unit
Play Mode Selection
One-touch operation is available for selecting a track
playing style by use of [REPEAT].
CHAPTER REPEAT, REPEAT
Press the button. Press again to cancel.
TITLE REPEAT, DISC REPEAT
Hold down the button for 2 sec. or more. Hold
down again to cancel.
Direct Access
A disc can be directly selected.
Example: disc number 5
1
Press [#] (NUMBER).
2
Press [5].
3
Press [SET].
Note: To suspend direct selection, press [DISP].
Operation FlowChanger mode display
SRC
CS
SRC
Disc number Lights when the changer is
connected.
Play Mode indicators
Lights when each mode is
activated.
(Disc Repeat)
Disc type (DVD changer only)
(CQ-C9801W)
(Title Repeat)
(Chapter Repeat)
Disc Changer (when DVDs or VCDs are loaded)
Notes:
¡ For DVD operations other than the above (i.e. DVD
menu, closed caption, etc.), use the remote control unit supplied with the DVD changer.
¡ The remote control unit supplied with the DVD
changer does not work properly when you aim it
at this unit.
¡ When using the remote control unit supplied with
the DVD changer, aim it at the monitor display
(CY-VM1500EX).
Disc type (DVD changer only)
(CQ-C9901W)
Page 16

32
CQ-C9901W/C9801W
33
English
CQ-C9901W/C9801W
Audio Setting
Adjustment to each speaker and an optional subwoofer
Main volume adjustment
(Setting range: 0 to 40, Default: 18)
q : Up
w : Down
BASS
(Setting range: –12 dB to +12 dB, 2 dB step, Default: Bass 0)
q : Up
w : Down
TREBLE
(Setting range: –12 dB to +12 dB, 2 dB step, Default: Treble 0)
q : Up
w : Down
Note: Do not activate SQ and Bass/Treble at the same
time to avoid causing sound distortion.
Balance adjustment
(Setting range: L15 to R15 and Center, Default: Center)
q : Right enhanced
w : Left enhanced
Fader adjustment
(Setting range: R15 to F15 and Center, Default: Center)
q : Front enhanced
w : Rear enhanced
Subwoofer level adjustment
(Setting range : mute (-∞), -6 dB to +6 dB, 2 dB Step,
Default: 0)
q : Up
w : Down
Subwoofer Low Pass Filter
(Setting range: Filter OFF, 60 Hz to 160 Hz,
5 Hz Step,
Default 120 Hz)
q : Up
w : Down
High Pass Filter
(Setting range: Filter OFF, 90 Hz to 225 Hz,
5 Hz Step,
Default: Filter OFF)
q : Up
w : Down
Subwoofer output range
Other speakers output ranges
Audio Setting (when CS Auto disactivated)
1
Set the CS Auto mode to off.
(a page 16)
2
Press [VOLUME]
(
SEL
: SELECT)
to display the
menu display.
3
Press
[VOLUME]
(
SEL
: SELECT)
to select a mode
to be adjusted.
4
Turn [VOLUME]
clockwise or counterclockwise to adjust.
Note: If no operation takes place for more than 10 sec.
in the audio menu (2 sec. in Main volume adjustment),
the display returns to the regular mode.
Audio Setting
Main volume adjustment
(Setting range: 0 to 40, Default: 18)
q : Up
w : Down
F-FOCUS (Front Focus)
(Setting range:
Lv 1
to
Lv
10 and OFF, Default:
Lv
5)
q : Up
w : Down
R-FOCUS (Rear Focus)
(Setting range:
Lv 1
to
Lv
10 and OFF, Default:
Lv
5)
q : Up
w : Down
F-TruBass (Front TruBass)
(Setting range:
Lv 1
to
Lv
10 and OFF, Default:
Lv
4)
q : Up
w : Down
R-TruBass (Rear TruBass)
(Setting range:
Lv 1
to
Lv
10 and OFF, Default:
Lv
4)
q : Up
w : Down
S.W-TruBass (Sub Woofer TruBass)
(Setting range:
Lv 1
to
Lv
10 and OFF, Default:
Lv
4)
q : Up
w : Down
F-R MIX (Front to Rear Mixing)
(Setting range:
Lv 1
to
Lv
10 and OFF, Default:
Lv
4)
q : Up
w : Down
Audio Setting (when CS Auto activated)
1
Set the CS Auto mode to on.
(a page 16)
2
Press [VOLUME]
(
SEL
: SELECT)
to display the
menu display.
3
Press
[VOLUME]
(
SEL
: SELECT)
to select a mode
to be adjusted.
4
Turn [VOLUME]
clockwise or counterclockwise to adjust.
Note: If no operation takes place for more than 10 sec.
in the audio menu (2 sec. in Main volume adjustment),
the display returns to the regular mode.
You can adjust the settings of bass sound reproduction and 3-dimensional sound field in the CS Auto mode.
Notes:
¡ TruBass
TruBass is an audio technology to which the technique
of bass sound reproduction used in pipe organs is
electrically applied, and in which an equalizer is not
used at all and bass sound from the speakers to be
used is richly reproduced.
¡ FOCUS
Focus is an audio technology that moves the sound
image of playing sound vertically to reproduce the
sounds of instruments and voices clearly.
Page 17

34
CQ-C9901W/C9801W
35
English
CQ-C9901W/C9801W
Display Setting
Adjustment to display on the DISPLAY menu
Function Setting, Display Setting
DISPLAY Menu display
1
Press [MENU] to display the menu display.
For using the remote
control, hold down
[MENU] for 2 sec. or
more.
2
Press []] or [[] to display the DISPLAY menu.
3
Press [}] or [{] to select a function to
be adjusted.
4
Press [BAND]
(SET) to confirm
the display.
5
Adjust the setting
value.
6
Press [BAND] (SET) to confirm the
adjustment.
7
Press [MENU].
For using the remote control, hold down [MENU]
for 2 sec. or more.
GRAPHIC PATTERN
(Setting range: 5 types (CQ-C9901W)/ 6 types (CQ-
C9801W), Default: ALL)
Switching by []] or [[]
ALL: Sequential display from pattern A to E.
Pattern A-E
Pattern E: CQ-C9801W only
CONTRAST (CQ-C9801W only)
(Setting range: 1 to 5, Default: Contrast 3)
[[]: Tilting up view angle
[]]: Tilting down view angle
CLOCK ADJ
Note: Adjust the clock when “ADJUST” appears on the
display.
[[]: Adjusting minutes
[]]: Adjusting hours
[}]: Forward
[{]: Backward
Note:
¡ The graphic pattern and still image are changeable.
(a page 36)
¡ If corrupted data is selected, “DISPLAY FILE INCOM-
PLETE” appears. (a page 36)
Function Setting
Adjustment to display on the FUNCTION menu
FUNCTION Menu display
1
Press [MENU] to display the menu display.
For using the remote
control, hold down
[MENU] for 2 sec. or
more.
2
Press []] or [[] to display the FUNCTION menu.
3
Press [}] or [{] to select a function to
be adjusted.
4
Press [BAND]
(SET) to adjust.
5
Press [MENU].
For using the remote control, hold down [MENU]
for 2 sec. or more.
MUTE KEY
Setting [MUTE] buttons’ functions
: Volume off (default)
: Volume down by 10 steps
: Volume down by 5 steps
SECURITY
Setting the security function (a page 10)
: ON (default)
: OFF
BUILT-IN AMP
You can toggle the integrated amplifier on and off.
: Amplifier on (default)
: Amplifier off (when the external amplifier is
used)
RGB ADJ (CQ-C9901W only)
(Setting range: 1 to 11 each, Default: 1)
You can adjust the screen color.
[[]: Up
[]]: Down
[}][{]: Select
STILL IMAGE
(Setting range: 11types, Default: ALL)
Switching by []] or [[]
ALL: Sequential display from pattern 1 to 10
No.1-10
Page 18

36
CQ-C9901W/C9801W
37
English
CQ-C9901W/C9801W
Customize the Display
Notes on Customize Function
Note on Download Service
The download service may be suspended or stopped
without advance notice. The download service is not
available in some areas. Please visit the site below for
further information.
Panasonic Web site:
(http://www.panasonic.co.jp/global/)
Notes on IMAGE STUDIO
¡ This download service is not available in some areas.
For details, please access the Panasonic website.
¡ IMAGE STUDIO is available only by downloading from
the address below. It is not bundled with this unit.
¡ Refer to the downloaded operating manual for how to
use IMAGE STUDIO.
Notes on File
¡ The customize-specific file is downloadable from the
URL below. You can create exclusive files stored with
a digital camera or other devices by using exclusive
software, IMAGE STUDIO that can be accessed from
the same URL.
¡ Do not change the extension. Otherwise, the data can-
not be recognized.
At Disc Making
¡ Save only customize-specific data.
¡ Save all data in the root directory. Files contained in a
folder cannot be recognized.
¡ Follow the table below with regard to the number of
files that are saved to a disc. Files beyond the specified capacity are not readable.
At Customizing
¡ If customizing is interrupted on account of turning off
the power, stopping the engine, removing the face
plate or other reasons, you may lose the data. In such
a case, try customizing again.
¡ The default image exists on the Panasonic Web site. If
you would like to restore it, download the image from
the site.
Error Display Messages
NO FILES DETECTED
No customize-specific data on the disc
a Load a disc that contains customize-specific
data.
CUSTOMIZING FAILED
Customize failed
a Check to see whether or not the extension is cor-
rect and file contents are appropriate.
DISPLAY FILE INCOMPLETE
Intended moving image or still image is damaged.
a Customize it again and overwrite the file with
new one.
Type Extension Max. number
GRAPHIC PATTERN .pfm 10
STILL IMAGE .pfs 15
OPENING MESSAGE .pfo 5
CLOSING MESSAGE .pfe 5
Download site:
http://panasonic.co.jp/pas/en/software/
customize/index.html
Customize the Display
You can edit the moving images and still images that are initially stored in the unit. You also can use the data that is downloaded from
the Panasonic Web site and the data that is stored with a digital camera or other devices and processed with exclusive software,
IMAGE STUDIO. See “Notes on Customize Function” (a page 37) as well.
Note: Visit Panasonic Web site (http://panasonic.co.jp/pas/en/software/customize/index.html) for details.
CUSTOMIZE Menu display
Preparation:
Put the CD-R/RW that contains data to
be customized in hand.
1
If there is a disc inside, take out the
disc.
2
Press [SRC:
SOURCE] to
select the CD
mode.
3
Hold down [SEL] for 4 sec. or more to
display the menu screen.
4
Load a CD-R/RW that contains data.
Note:
¡ It may take time for the unit to identify the CD-
R/RW.
¡ Discs recorded by the packet writing software are
not supported.
5
Select an item to be customized.
[}][{]: Select
[BAND] (SET):Confirm
Note: To exit the customize menu, hold down
[SEL] 4 sec. or more.
GRAPHIC PATTERN
Moving image data (a page 35)
STILL IMAGE
Still image data (a page 35)
OPENING MESSAGE
Moving image at power on (a page 12)
CLOSING MESSAGE
Moving image at power off (a page 12)
6
Select a file.
Example: GRAPHIC PATTERN
[}][{][]][[]:Select
[BAND] (SET): Confirm
Notes:
¡ Files are automatically identified by their exten-
sions, and target files are displayed.
¡ If [BACK] is selected, the screen of step 5
appears.
7
For a moving image file or still image
file, select where to save the file.
[]][[]: Select
[BAND] (SET):Confirm
Notes:
¡ New data overwrites existing data.
¡ If [BACK] is selected, the screen of step 6
appears.
8
Confirm the changed item.
[]][[]: Select
[BAND] (SET):Confirm
Customization is performed. Do not turn off the
power in mid-operation. (It takes approx. 8 minutes
to complete this operation for a 751 KB moving
image.) After completion of this operation, the
screen of step 5 appears.
Note: If [NO] is selected, the screen of step 5
appears.
9
Press [OPEN] to eject the disc.
10
Hold down [SEL] for 4 sec. or more.
The CD mode comes back.
SRC
CS
SRC
Page 19

38
CQ-C9901W/C9801W
39
English
CQ-C9901W/C9801W
Troubleshooting
If You Suspect Something Wrong
Check and take steps as described below.
If the described suggestions do not solve the problem, it is recommended to take the unit to your nearest authorized Panasonic Service center.
The product should be serviced only by qualified personnel. Please refer
the checking and the repair to professionals. Panasonic shall not be
liable for any accidents arising out of neglect of checking the unit or your
own repair after your checking.
Warning
¡ Do not use the unit in an irregular condition, for
example, without sound, or with smoke or foul
smell, which can cause ignition or electric shock.
Immediately stop using the unit and consult your
dealer.
¡ Never try to repair the unit by yourself because it is
dangerous to do so.
Problem
Possible causeaPossible solution
Common
No power to the
unit
The power cord (battery, power and ground) is connected in the wrong way.
a Check the wiring.
Fuse blowout
a Eliminate the cause of fuse blowout and replace the fuse with new one.
Consult your dealer.
Sound is not
generated.
MUTE is set to ON.
a Set MUTE to OFF.
The wiring of speaker lines are not correct, or a break or poor contact arises.
a Check the wiring in accordance with the wiring diagram. (Installation
Instructions)
BUILT-IN AMP is set to ON.
a Set BUILT-IN AMP to OFF. Observe that “AMP OFF” is displayed on the
screen.
The demonstration
screen displayed
and no operable
You cannot operate the unit while the demonstration screen appears.
a Press [DISP] to end the demonstration screen.
If the demonstration screen appears frequently, there is a possibility that poor
contact or wrong wiring arises between the battery lead of the unit and the battery
cable of the car. (The battery lead should be always powered.)
a Check the battery wiring in accordance with the wiring diagram.
Noise
There is an electromagnetic-wave generator such as a cellular phone near the unit or
its electrical lines.
a Keep an electromagnetic-wave generator such as a cellular phone away from
the unit and the wiring of the unit. In case that noise cannot be eliminated
due to the wiring harness of the car, consult your dealer.
The contact of the ground lead is poor.
a Make sure that the ground lead is connected to an unpainted part of the chas-
sis securely.
Noise is made in
step with engine
revolutions.
Alternator noise comes from the car.
a Change the wiring position of the ground lead.
a Mount a noise filter on the power supply.
Troubleshooting
Common (continued)
Some operations
are not executable.
Some operations are not executable in particular modes such as menu mode.
a Read the operating instructions carefully and cancel the mode.
If the unit is
still out of order, consult your dealer.
Problem
Possible causeaPossible solution
No sound from
speaker (s)
Balance/Fader setting is not appropriate.
a Readjust Balance/Fader.
There is a break, a short circuit, poor contact or wrong wiring regarding the speaker
wiring.
a Check the speaker wiring.
The speaker
channels are
reversed between
right and left.
The speaker wiring is reversed between right and left.
a Perform the speaker wiring in accordance with the wiring diagram.
The sound field is
not clear in the
stereo mode.
Central sound is
not settled.
The plus and minus terminals at right and left channels of speakers are connected
reversely.
a Perform the speaker wiring in accordance with the wiring diagram.
The power of the
unit fails
unintentionally.
The safety device works.
a Consult your dealer, or your nearest Panasonic Service center.
Disc unejectable
Something such as a peeled label obstructs the disc coming out.
a Press and hold the [OPEN] for more than 2 seconds when the face plate is
open (disc forced ejection). In case that the disc forced ejection does not
work, consult your dealer.
The microcontroller in the unit operates abnormally due to noise or other factors.
a Unplug the power cord and plug it again. In case the unit is still out of order,
consult your dealer.
Playing sound is
interrupted
An inappropriate speaker network (device) is used.
a Use a speaker without any speaker network, or use an appropriate speaker
network system that does not cause interruption.
Page 20

40
CQ-C9901W/C9801W
41
English
CQ-C9901W/C9801W
Troubleshooting
Troubleshooting
Problem
Possible causeaPossible solution
The number of auto
preset stations is
less than 6.
The number of receivable stations is less than 6.
a Move to an area where receivable stations number is maximum, and try pre-
setting.
Preset stations
cannot be stored.
The contact of the battery lead is poor, or the battery lead is not always powered.
a Make sure that the battery lead is connected securely, and preset stations
again.
Radio
Poor reception or
noise
Antenna installation or wiring of antenna cable is faulty.
a Check whether the antenna mounting position and its wiring are correct. In
addition, check to see whether the antenna ground is securely connected to
the chassis.
No power is supplied to the antenna amplifier (when using a film antenna, etc.).
a Check the wiring of the antenna battery lead.
FM Stereo
broadcast is
received only in
mono.
The MONO mode is active.
a Cancel the MONO mode.
Only nearby
stations can be
received.
The LOCAL mode is active.
a Cancel the LOCAL mode.
Problem
Possible causeaPossible solution
No playback or
disc ejected
The disc is inserted upside down.
a Insert a disc correctly.
There is a flaw or foreign material on the disc.
a Remove the foreign material, or use a flawless disc.
Sound skipping or
noise
There is a flaw or foreign material on the disc.
a Remove the foreign material, or use a flawless disc.
Sound skipping
due to vibration
The unit is not sufficiently secured.
a Secure the unit to the console box.
The unit is tilted at over 30˚ in the front-to-end direction.
a Make the angle 30˚ or less.
MP3/WMARemote control unit
The CD-R/RWs that
are playable on
other devices are
not playable on
this unit.
The playability of some CD-R/RWs may depend on the combination of media,
recording software and recorder to be used even if these CD-R/RWs are playable on
other devices such as a PC.
a Make CD-R/RWs in different combination of media, recording software and
recorder after referring to the description about MP3/WMA.
No response to
pressing buttons
The battery is inserted in the wrong direction. A wrong battery is inserted.
a Insert a correct battery in the correct direction.
The battery is weak.
a Replace the battery with new one.
The aiming direction of the remote control unit is wrong.
a Aim the remote control unit at the sensor of the unit and press buttons.
The sensor is exposed to direct sunlight. (The remote control unit may not be
operable when the sensor is exposed to direct sunlight. In such a case, the system
is not faulty.)
a Block off sunlight to the sensor.
Sound skipping or
noise
There is a flaw or foreign material on the disc.
a Remove the foreign objects, or use a flawless disc. For MP3/WMA, refer to
the description about MP3/WMA.
Playing VBR (Variable Bit Rate) files may cause sound skipping.
a Play Non-VBR files.
CD
Note: Refer to “Notes on MP3/WMA”. (a Page 26)
Page 21

42
CQ-C9901W/C9801W
43
English
CQ-C9901W/C9801W
Error Display Messages, Notes on Discs
Error Display Messages
The player for some reason cannot read the file you are trying to play. (File
recorded in an unsupported file system, compression scheme, data format, file
name extension, damaged data, etc.)
a Select a file that the player can read. Check the type of data recorded on the
disc. Create a new disc if necessary.
(After 5 seconds)
To next file automatically
Display
Possible causeaPossible solution
The disc is dirty or upside down.
a Check the disc.
The disc has scratches.
a Check the disc.
No operation by some cause.
a Unplug the power cord and plug it again. In case the unit is still out of order,
consult your dealer.
A WMA file can be copyrighted.
a The file protected by copyright is not playable.
No disc.
Disc is dirty, or is upside down.
Disc has scratches.
a Eject the magazine.
¡Check the disc.
¡Load the disc again.
(After 5 seconds)
To next disc automatically
No operation by some cause.
a Eject the magazine. If failure persists, press the reset switch on the CD
changer. If normal operation is not restored, call the store where you purchased the unit or the nearest Panasonic Service Center to ask for repairs.
No disc (magazine).
a Insert discs into the changer (magazine)
No changer.
a Verify the wiring.
Changer
An error arises in the DVD changer.
a Check the DVD changer. (“REGION ERROR” etc.)
Note: Messages in the action and display sections of the error chart vary with changers. Refer to the operating
instructions for the CD changer for details.
CD/MP3/WMA
Notes on Discs
How to hold the disc
¡ Do not touch the underside of a disc.
¡ Do not scratch on a disc.
¡ Do not bend a disc.
¡ When not in use, keep a disc in the case.
Do not use irregularly shaped discs.
Do not leave discs in the following places:
¡ In direct sunlight
¡ Near car heaters
¡ Dirty, dusty and damp areas
¡ On seats and dashboards
Disc cleaning
Use a dry, soft cloth to wipe from the centre outward.
Do not attach any seals or labels to your discs.
Do not write on the disc label with a ballpoint
pen or other hard-point pens.
Label side
<Correct> <Wrong>
Do not use irregularly shaped discs.
If you use commercial CDs, they must have either of
these labels shown at right.
Some copy-protected music CDs are not playable.
TEXT
¡ You may have trouble playing back some CD-R/RW discs recorded on CD recorders (CD-R/RW drives), either due
to their recording characteristics or dirt, fingerprints, scratches, etc. on the disc surface.
¡ CD-R/RW discs are less resistant to high temperatures and high humidity than ordinary music CDs. Leaving them
inside a car for extended periods may damage and make playback impossible.
¡ Some CD-R/RWs can not be played back successfully due to incompatibility among writing software, a CD recorder
(CD-R/RW drive) and the discs.
¡ This player cannot play the CD-R/RW discs if the session is not closed.
¡ This player cannot play the CD-R/RW discs which contains other than CD-DA or MP3/WMA data.
¡ Be sure to observe the instructions of CD-R/RW disc for handling it.
Notes on CD/CD Media (CD-ROM, CD-R, CD-RW)
Notes on CD-Rs/RWs
Page 22

44
CQ-C9901W/C9801W
45
English
CQ-C9901W/C9801W
Maintenance, Contents by Functions, Specifications
This unit is designed and manufactured to ensure the minimum of maintenance. Use a dry, soft cloth for
routine exterior cleaning. Never use benzine, thinner, or other solvents.
Maintenance
Contents by Functions
Cleaning the UnitFuseContents by Functions
If the fuse blows out, consult your dealer, or your nearest authorized Panasonic Service Center.
Warning
Use fuses of the same specified rating (15 A). Using substitutes or fuses with higher ratings, or connecting the unit
directly without a fuse could cause fire or damage to the unit. If the replaced fuse fails, contact your near-
est authorized Panasonic Service center.
Clock adjustment (CLOCK ADJ: CLOCK ADJUSTMENT) 11
Temporary Volume off (Down) (MUTE (ATT : ATTENUATION)) 13
Display Change (DISP : DISPLAY) 15
Dimmer Control (DIM : DIMMER) 15
SBC-SW: SUPER BASS CONTROL-SUBWOOFER 16
Direct Memory
(D · M : DIRECT MEMORY) 20
Specifications
Notes:
¡ Specifications and design are subject to modification without notice due to improvements.
¡ Some figures and illustrations in this manual may be different from your product.
General
Sampling Frequency 8 times oversampling
Pick-Up Type Astigma 3-beam
Light Source Semiconductor laser
Wavelength 790 nm
Frequency Response 20 Hz – 20 kHz (±1 dB)
Signal to Noise Ratio 96 dB (2 V), 106 dB (5 V)
Total Harmonic Distortion 0.01 % (1 kHz)
Wow and Flutter Below measurable limits
Channel Separation 86 dB (2 V)
FM
Frequency Range
87.5 MHz – 108.0 MHz
Usable Sensitivity
8 dB/µV (S/N 30 dB)
Stereo Separation
40 dB (1 kHz)
AM
Frequency Range
531 kHz – 1 602 kHz
Usable Sensitivity
25 dB/µV (S/N 20 dB)
CD PlayerStereo
Radio
Power Supply DC 12 V (11 V – 16 V), Test Voltage 14.4 V, Negative Ground
Tone Controls (Bass/Treble) Bass; ±12 dB at 80 Hz, Treble; ±12 dB at 6 kHz
Equalizer Center Frequency (SQ) 62.5, 125, 250, 500, 1 k, 2 k, 4 k, 8 k, 16 k (Hz, default)
Variable Range of Equalizer
-
12 dB to 12 dB (2 dB step)
Current Consumption Less than 2.5 A (CD mode, 0.5 W 4-Speaker)
Maximum Power Output 70 W x 4 (at 4 Ω)
Power Output 33 W x 4 (at 4 Ω)
Speaker Impedance 4 to 8 Ω
Pre-amp output voltage 5 V (CD mode)
Subwoofer-output voltage 5 V
Pre-amp output impedance 60 Ω
Subwoofer impedance 60 Ω
External Input Impedance 10 kΩ (AUX1, CH/AUX2 IN)
External Input Sensitivity Max. 2 V (AUX1, CH/AUX2 IN)
Dimensions (Main Unit) 178 (W) x 50 (H) x 155 (D) mm
Weight (Main Unit) 1.7 kg
 Loading...