

Page 1

Operating Instructions
Global VoIP Telephone
Model No. BB-GT1500E
BB-GT1520E
BB-GT1522E
BB-GT1540E
BB-GT1500E
This unit is compatible with Caller ID. To use this feature, you must
subscribe to the A service offered by deltathree, Inc. or the appropriate
service offered by your landline service provider.
Charge the handset battery for 7 hours before initial use.
Please read these Operating Instructions before using the unit and save for
future reference.
Page 2

Table of Contents
Introduction
Product information . . . . . . . . . . . . . . . 3
Accessory information. . . . . . . . . . . . . 7
Symbols used in these operating
instructions . . . . . . . . . . . . . . . . . . . . 10
Important Information
Important information . . . . . . . . . . . . 11
Security caution. . . . . . . . . . . . . . . . . 12
Preparation
Controls (Base unit). . . . . . . . . . . . . . 14
Controls (Handset) . . . . . . . . . . . . . . 17
Installation . . . . . . . . . . . . . . . . . . . . . 18
Battery charge. . . . . . . . . . . . . . . . . . 21
Understanding the indicators on the
base unit . . . . . . . . . . . . . . . . . . . . . . 23
Displays. . . . . . . . . . . . . . . . . . . . . . . 26
Setting the unit before use . . . . . . . . 29
Making/Answering Calls
(Handset)
Making calls. . . . . . . . . . . . . . . . . . . . 32
Answering calls . . . . . . . . . . . . . . . . . 33
Useful features during a call . . . . . . . 33
Making/Answering Calls
(Base Unit)
Making calls. . . . . . . . . . . . . . . . . . . . 36
Answering calls . . . . . . . . . . . . . . . . . 36
Useful features during a call . . . . . . . 37
Making Internet Calls (Mobile
Phone)
Making internet calls using your mobile
phone . . . . . . . . . . . . . . . . . . . . . . . . 39
Handset Phonebook
Handset phonebook . . . . . . . . . . . . . 40
Base Unit Speed Dialler
Base unit speed dialler . . . . . . . . . . . 43
Caller ID Service
Using Caller ID service . . . . . . . . . . . 44
Caller list . . . . . . . . . . . . . . . . . . . . . . 45
Programming
Programmable settings . . . . . . . . . . 47
Answering System
Answering system . . . . . . . . . . . . . . 60
Greeting message . . . . . . . . . . . . . . 61
Listening to messages using the base
unit . . . . . . . . . . . . . . . . . . . . . . . . . . 61
Listening to messages using the
handset. . . . . . . . . . . . . . . . . . . . . . . 62
Voice memo . . . . . . . . . . . . . . . . . . . 63
Remote operation. . . . . . . . . . . . . . . 64
Answering system settings . . . . . . . . 66
Voice Mail Service
Using Voice Mail service . . . . . . . . . 68
Intercom Features
Intercom features between handsets 69
Intercom features between the handset
and base unit . . . . . . . . . . . . . . . . . . 70
A Service
Using A service features . . . . . . . 73
Useful Information
Belt clip. . . . . . . . . . . . . . . . . . . . . . . 76
Wall mounting for charger . . . . . . . . 76
Registering a handset . . . . . . . . . . . 77
IP RESET button . . . . . . . . . . . . . . . 78
Character entry. . . . . . . . . . . . . . . . . 79
Error messages . . . . . . . . . . . . . . . . 81
Troubleshooting . . . . . . . . . . . . . . . . 84
Open Source Software . . . . . . . . . . . 92
Specifications . . . . . . . . . . . . . . . . . 102
Conditions of guarantee . . . . . . . . . 103
Customer services . . . . . . . . . . . . . 104
Index
Index. . . . . . . . . . . . . . . . . . . . . . . . 107
2
Page 3
Product information
Thank you for purchasing a Panasonic GLOBARANGE phone.
These operating instructions can be used for the following models:
Introduction
BB-GT1500
BB-GT1522
Important:
L The suffix (E) in the following model numbers will be omitted in these instructions:
BB-GT1500E/BB-GT1520E/BB-GT1522E/BB-GT1540E
BB-GT1520
BB-GT1540
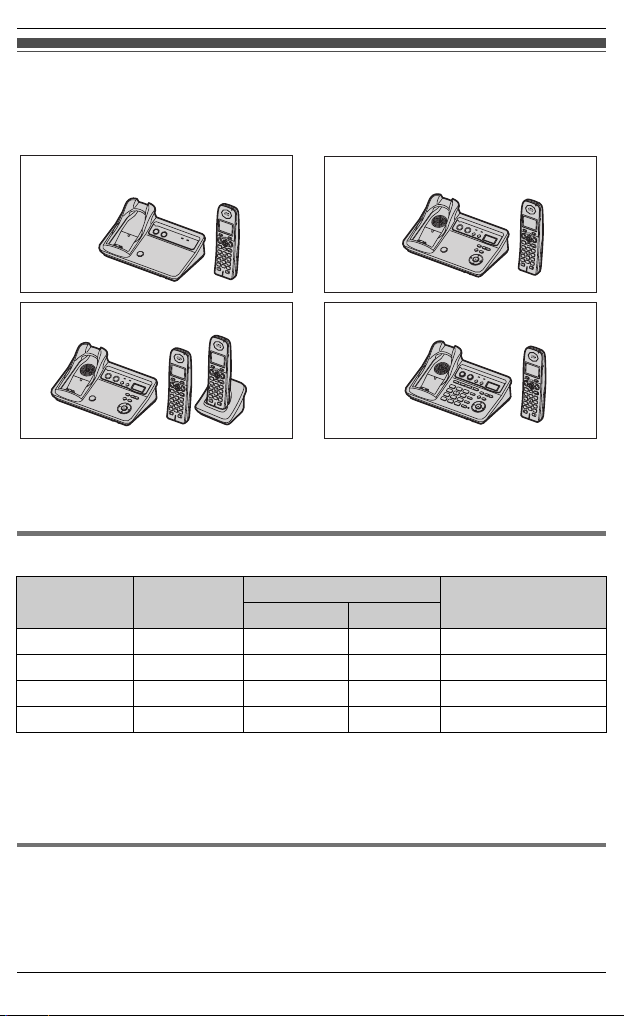
Notable feature differences between models
Model no.
BB-GT1500 – – r
BB-GT1520 rrr
BB-GT1522 rrr –
BB-GT1540 rrr
Answering
system
Intercom Make/answer calls
f ⇔ N*1N ⇔ N
*2
*3
*3
*3
with base unit
–
–
r
*1 Intercom calls can be made between the handset and base unit.
*2 Intercom calls can be made between the handsets.
*3 Intercom calls can be made between the handsets by purchasing and registering
1 or more optional handsets (BB-GTA150E, page 9).
How the GLOBARANGE phone works
Connect this phone to both a landline and the Internet (IP line) so you can make or
receive internet calls as well as landline calls.
When you make calls with A, a VoIP (Voice over Internet Protocol) service, your
voice will be sent as data packets over the Internet to the person you are calling
For product assistance, visit www.globarange.com
For A assistance, visit www.joip.com
3
Page 4

Introduction
converted into voice. Basically, you can make internet calls using the A service
virtually the same as using a landline. For more information, see “What is A/A
number?” below and visit www.joip.com
Modem
Router
IP
line
Computer
Internet
(optional) *2
GLOBARANGE
PSTN
(Public Switched
Telephone Network)
Landline
(PSTN line)
phone *1
*1 Model shown is BB-GT1500.
*2 Computer is not required for setup or making/answering internet calls.
What is A/A number?
A is the VoIP service provided by deltathree Inc. After connecting this phone to the
Internet (page 18, 30), a unique A number is sent to your handset display (page
31), so you can use your IP line as follows:
1. Make and receive free calls to and from other A numbers for a full period of 3
years from the date of setup.
2. Make calls from your A number to landline and mobile phones at very low rates
by subscribing to the appropriate service at www.joip.com
3. Receive calls from landline and mobile phone numbers via your IP line by
subscribing for additional phone number(s) at www.joip.com
These additional phone numbers can be chosen regardless of your geographic
location from a list of international and local area codes offered by A. There
may be restrictions in obtaining phone numbers from certain countries or areas.
Visit www.joip.com for details.
*1*2
A A number consists of a # followed by 10 digits, enabling you to make and
receive free calls to and from other A number owners for a full period of 3 years
from the date of setup.
The A number does not involve extra charges and is given free to Panasonic
GLOBARANGE phone owners.
*1 Requires both parties to have a Panasonic GLOBARANGE Phone, activated the
A service from deltathree, Inc., and broadband internet service provided by a
cable company or internet service provider for a fee.
*2 After 3 years, the A service may require a fee.
4
*1*2
For product assistance, visit www.globarange.com
For A assistance, visit www.joip.com
Page 5

Introduction
Important:
For A services, please visit the A website: www.joip.com or contact the A
service provider.
L Terms of Use for the A services are available on the supplied leaflet or at
www.joip.com and must be read and accepted prior to using A services.
L NEITHER PANASONIC COMMUNICATIONS CO., LTD., PANASONIC SALES
COMPANIES NOR PANASONIC SALES AGENCIES IS IN ANY WAY
AFFILIATED WITH, OR RESPONSIBLE FOR THE ACTS OR OMISSIONS OF,
DELTATHREE, INC. NEITHER PANASONIC COMMUNICATIONS CO., LTD.,
PANASONIC SALES COMPANIES, PANASONIC SALES AGENCIES NOR ANY
OF THEIR EMPLOYEES OR AFFILIATES OR CUSTOMERS MAKE ANY
WARRANTIES OR REPRESENTATIONS, EITHER EXPRESS OR IMPLIED, TO
ANY CUSTOMER OR ANY OTHER THIRD PARTY WITH RESPECT TO ANY OF
THE SERVICES PROVIDED BY DELTATHREE, INC., NOR ASSUME NOR
CREATE ANY OTHER OBLIGATION OF ANY KIND ON BEHALF OF
DELTATHREE, INC.
L In the event that your unit requires service within or outside of the Limited
Warranty, Panasonic will not be responsible for any loss of ringtones or other
information previously downloaded, including the cost to repurchase such
ringtones or other information.
For emergency calls, use the landline.
L Even if you select the IP line, the landline is automatically used when dialling
emergency phone numbers.
Note:
L We recommend installing only one Panasonic GLOBARANGE phone base unit. If
you install more than one Panasonic GLOBARANGE phone base unit, you may
not be able to make or receive internet calls properly.
L Sound quality and overall performance of IP phone may vary depending on the
condition of your network connection. Refer to “Troubleshooting”, page 89.
Trademarks
L deltathree and A are either registered trademarks or trademarks of deltathree,
Inc., in the United States and/or other countries.
L All other trademarks identified herein are the property of their respective owners.
For product assistance, visit www.globarange.com
For A assistance, visit www.joip.com
5
Page 6

Introduction
Feature highlights
■ Free calls to other A service subscribers (Panasonic GLOBARANGE
phone owners) for a full period of 3 years from the date of setup
■ High quality IP telephony using your Internet connection
Enjoy high-quality calls at low rates to any destination worldwide using the A
service.
■ Standard phone using a landline
■ Expandable phone system (up to 6 total handsets)
*2
Allows you to make an internet call on one handset while another handset is
talking on the landline.
■ Save 100 phonebook items on a handset
■ Phonebook/Ringtone data downloading
Easily edit the phonebook items from a computer using the A website
(www.joip.com). Download phonebook items and ringtones to the base unit, then
import them to a handset.
■ Internet call ability using a mobile phone via the unit’s answering system
(BB-GT1520/BB-GT1522/BB-GT1540)
*3
*1 After 3 years, the A service may require a fee.
*2 Requires optional additional handsets (sold separately, page 9).
*3 Requires subscription for additional phone number(s) for your A IP line other
than the A number (page 4).
Note:
L A, a service powered by deltathree, Inc., offers special features such as Caller
ID, Call Waiting, and Voice Mail. For more information, visit the A website
(www.joip.com).
L Your landline service provider may offer special telephone services such as Caller
ID, Call Waiting, and Voice Mail. Please contact your landline service provider for
details and availability in your area.
*1
6
For product assistance, visit www.globarange.com
For A assistance, visit www.joip.com
Page 7

Introduction
System requirements
Your network must meet the following technical specifications for the unit to work as
an IP phone.
Item Description
Internet
connection
Modem Broadband modem with Ethernet port (USB-only modems
Router Broadband router
*1 This unit is not compatible with the following:
– PPPoE (Point to Point Protocol over Ethernet)
– PPTP (Point-to-Point Tunneling Protocol)
– L2TP (Layer 2 Tunneling Protocol)
If your Internet service provider uses a PPPoE, PPTP, or L2TP connection, a
compatible router is required.
*2 This unit is designed to obtain an IP address automatically from a DHCP (Dynamic
Host Configuration Protocol) server. We recommend using the DHCP server
(page 30).
Broadband Internet connection such as DSL or cable
are not supported.)
*1*2
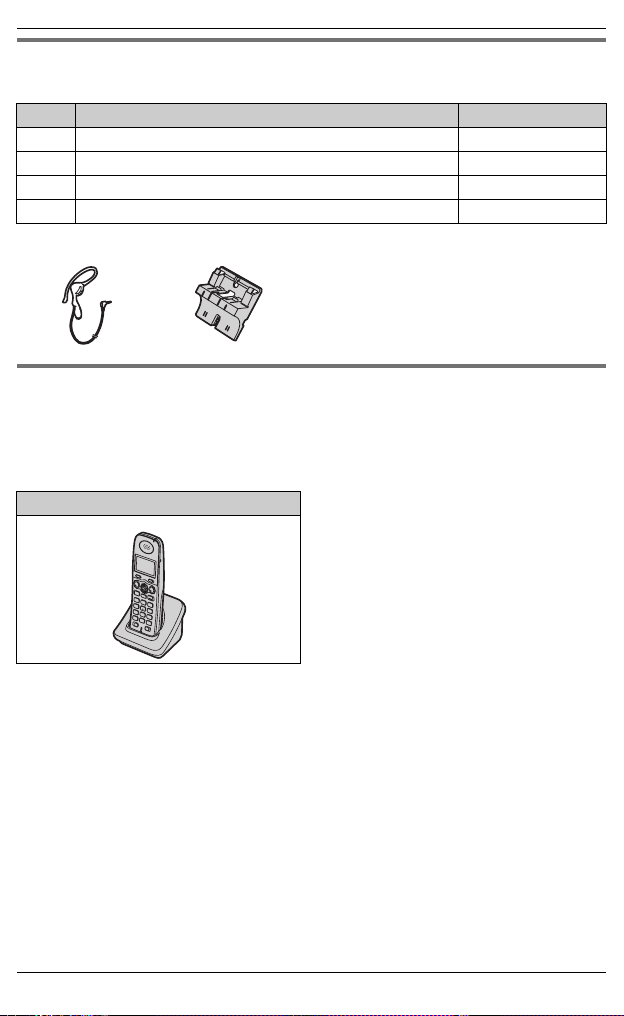
Accessory information
Supplied accessories
No. Accessory item Order number Quantity
BB-GT1500/
BB-GT1520/
BB-GT1540
1 AC adaptor for
base unit
2 Telephone line
cord
3 Battery HHR-P107 1 2
4 Handset cover
5 Ethernet cable
(Category 5E
straight cable)
6 Belt clip PQKE10478Z2 1 2
7 Charger PQLV30054N – 1
For product assistance, visit www.globarange.com
For A assistance, visit www.joip.com
PQLV203EZ
(PQLV203E)
PQJA87S
(for UK)
*1
PQYNGTA150BR 1 2
PQJA10181Z 1 1
11
11
BB-GT1522
7
Page 8

Introduction
No. Accessory item Order number Quantity
BB-GT1500/
BB-GT1520/
BB-GT1540
8 AC adaptor for
charger
*1 The handset cover comes attached to the handset.
PQLV208EZ
(PQLV208E)
BB-GT1522
–1
5
1
2
6
7
3
4
8
8
For product assistance, visit www.globarange.com
For A assistance, visit www.joip.com
Page 9
Introduction
Additional/replacement accessories
Please contact your nearest Panasonic dealer for sales information.
No. Accessory item Order number
1 Rechargeable nickel metal hydride (Ni-MH) battery HHR-P107
2 Additional handset with charger BB-GTA150E
3 Headset KX-TCA94EX
4 Wall mounting adaptor for base unit PQZMGT1500
34
Expanding your phone system
You can expand the phone system by registering optional handsets to a single base
unit.
L A maximum of 6 total handsets (supplied and optional) can be registered to a
single base unit.
Handset (optional): BB-GTA150E
For product assistance, visit www.globarange.com
For A assistance, visit www.joip.com
9
Page 10

Introduction
Symbols used in these operating instructions
Symbol Meaning
l Features and operations for using the IP line
k Features and operations for using the landline
N Perform with the handset.
f Perform with the base unit.
{ } The words in the brackets indicate button names on the
i Proceed to the next operation.
“ ” The words in quotations indicate the menu on the display.
{V}/{^}: “ ” Push the handset joystick down or up to select the words
{>}/{<}/{<}/{>}
(BB-GT1520/
BB-GT1522/
BB-GT1540)
{6}
(BB-GT1520/
BB-GT1522/
BB-GT1540)
handset and base unit.
Example: “Ringer ID”
in quotations.
Example: {V}/{^}: “Off”
Press up, down, left, or right on the base unit navigator
key.
Press the centre of the base unit navigator key.
10
For product assistance, visit www.globarange.com
For A assistance, visit www.joip.com
Page 11

Important information
General
L Use only the AC adaptor supplied with
this product, noted on page 7.
L Do not connect the AC adaptor to any
AC outlet other than a standard 220–
240 V AC outlet.
L Do not open the base unit, charger, or
handset other than to replace the
battery(ies).
L This product should not be used near
emergency/intensive care medical
equipment and should not be used by
people with pacemakers.
L Care should be taken that objects do
not fall onto, and liquids are not spilled
into, the product. Do not subject this
product to excessive smoke, dust,
mechanical vibration or shock.
Environment
L Do not use this product near water.
L This product should be kept away
from heat sources such as radiators,
cookers, etc. It should also not be
placed in rooms where the
temperature is less than 5 °C or
greater than 40 °C.
L The AC adaptor is used as the main
disconnect device. Ensure that the AC
outlet is installed near the product and
is easily accessible.
Warning:
L To prevent the risk of electrical shock,
do not expose this product to rain or
any other type of moisture.
L Unplug this product from power
outlets if it emits smoke, an abnormal
smell, or makes unusual noise. These
conditions can cause fire or electric
shock. Confirm that smoke has
Important Information
stopped emitting and contact an
authorised service centre.
L Do not spill liquids (detergents,
cleansers, etc.) onto the telephone
line cord plug, or allow it to become
wet at all. This may cause a fire. If the
telephone line cord plug becomes
wet, immediately pull it from the
telephone wall jack, and do not use.
L Do not place or use this product near
automatically controlled devices such
as automatic doors and fire alarms.
Radio waves emitted from this product
may cause such devices to
malfunction resulting in an accident.
L Regularly remove any dust, etc. from
the AC adaptor/power plug by pulling
it from the power outlet, then wiping
with a dry cloth. Accumulated dust
may cause an insulation defect from
moisture, etc. resulting in a fire.
L Do not damage the power cord/plug.
This may cause a short circuit, electric
shock, and/or fire.
L Do not touch the plug with wet hands.
Battery caution
L We recommend using the battery(ies)
noted on page 9. Use only
rechargeable battery(ies).
L Do not dispose of the battery(ies) in a
fire, as they may explode. Check with
local waste management codes for
special disposal instructions.
L Do not open or mutilate the
battery(ies). Released electrolyte
from the battery(ies) is corrosive and
may cause burns or injury to the eyes
or skin. The electrolyte may be toxic if
swallowed.
L Exercise care when handling the
battery(ies). Do not allow conductive
materials such as rings, bracelets or
keys to touch the battery(ies),
otherwise a short circuit may cause
For product assistance, visit www.globarange.com
For A assistance, visit www.joip.com
11
Page 12

Important Information
the battery(ies) and/or the conductive
material to overheat and cause burns.
L Charge the battery(ies) in accordance
with the information provided in these
operating instructions.
L Only use the supplied base unit (or
charger) to charge the battery(ies). Do
not tamper with the base unit (or
charger). Failure to follow these
instructions may cause the
battery(ies) to swell or explode.
No responsibility will be taken by our
company with respect to
consequences resulting from the
inappropriate use, damage or both of
the unit.
Information on Disposal for Users of
Waste Electrical & Electronic
Equipment (private households)
details of your nearest designated
collection point.
Penalties may be applicable for incorrect
disposal of this waste, in accordance
with national legislation.
For business users in the European
Union
If you wish to discard electrical and
electronic equipment, please contact
your dealer or supplier for further
information.
Information on Disposal in other
Countries outside the European
Union
This symbol is only valid in the European
Union.
If you wish to discard this product,
please contact your local authorities or
dealer and ask for the correct method of
disposal.
This symbol on the products and/or
accompanying documents means that
used electrical and electronic products
should not be mixed with general
household waste. For proper treatment,
recovery and recycling, please take
these products to designated collection
points, where they will be accepted on a
free of charge basis. Alternatively, in
some countries you may be able to
return your products to your local retailer
upon the purchase of an equivalent new
product.
Disposing of this product correctly will
help to save valuable resources and
prevent any potential negative effects on
human health and the environment
which could otherwise arise from
inappropriate waste handling. Please
contact your local authority for further
12
For product assistance, visit www.globarange.com
For A assistance, visit www.joip.com
Security caution
When using this product, take
appropriate measures to avoid the
following security breaches.
L Leaks of private information via this
product
L Illegal use of this product by a third
party
L Interference or suspension of the use
of this product by a third party
Take the following measures to avoid
security breaches:
L To prevent illegal access, keep the
base unit software updated (if you do
not have the latest version of
software, this can lead to blocked
access or information leaks) (page
57).
Page 13

L You are responsible for the security
settings, such as the remote code for
the answering system, to access this
product. This information should not
be made available to any third parties
outside the user group. To prevent
unauthorised access to this product,
we recommend that you regularly
change the remote code (page 64).
L Place this product where it is unlikely
to be stolen.
L During an internet call, outside
interference may occur resulting in
improper call transmission and/or unit
function.
Notice for product disposal, transfer,
or return
L This product can store your
private/confidential information. To
protect your privacy/confidentiality, we
recommend that you erase the
information such as phonebook or
caller list entries from the memory
before you dispose, transfer or return
the product.
– Erasing caller list information (page
46)
– Erasing phonebook information
(page 41)
– Erasing messages (page 62, 74)
L When transferring this product to
another party or disposing of this
product, be sure to cancel the service
contract with A at www.joip.com if
you subscribed to optional A
services.
Important Information
Routine care
L To clean the product, use a dry soft
cloth. The outer surface of the
product can be scratched by
wiping or rubbing with a hard cloth.
L Do not use benzine, thinner, or any
abrasive powder.
For product assistance, visit www.globarange.com
For A assistance, visit www.joip.com
13
Page 14
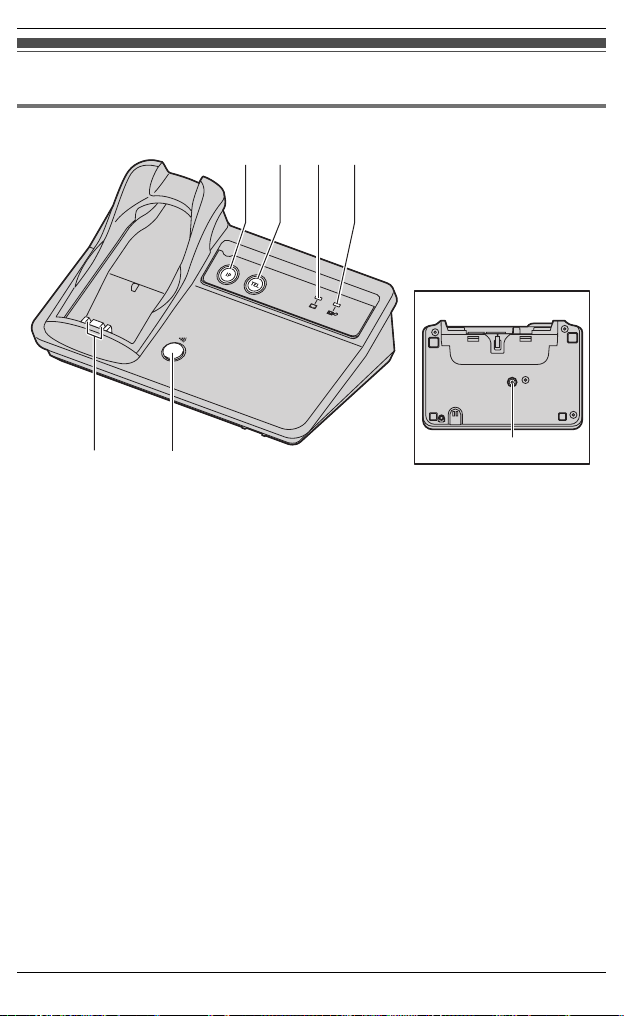
Preparation
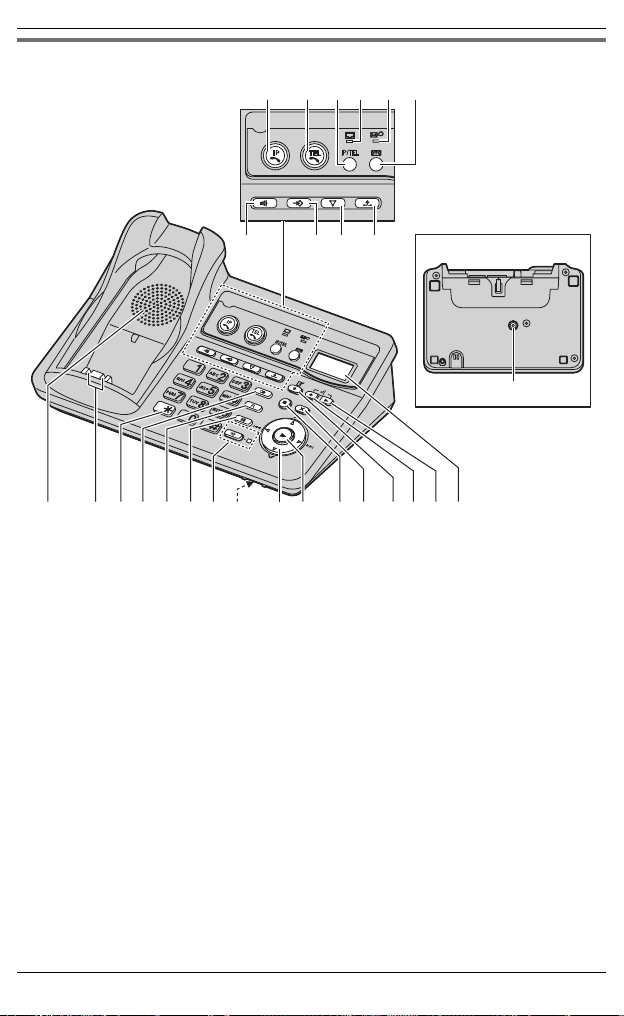
Controls (Base unit)
BB-GT1500
AB DC
Bottom view
IP RESET
E
A IP indicator
B TEL indicator
C 4 (Status) indicator
D 0 (Voice Mail) indicator
*1 You can locate a misplaced handset by pressing {x}. To stop paging, press it
again or {i} on the handset.
14
F
E Charge contacts
F {x} (Page)
G {IP RESET}
For product assistance, visit www.globarange.com
For A assistance, visit www.joip.com
*1
G
Page 15
BB-GT1520/BB-GT1522
Preparation
AB
G
LI N O P QJ K MH
A IP indicator
B TEL indicator
C 4 (Status) indicator
D 0 (Voice Mail) indicator
E {IP/TEL}
F {s} (Answer on)/Answer on indicator
G Speaker
H Charge contacts
I {x} (Page/Intercom)
J {7} (Memo)
K {■} (Stop)
L Microphone
M Navigator key ({>}/{<}/{<}/{>})
N {6} (Message)/Message indicator
O {4} (Erase)
P {dr} (Greeting record)
Q {d>} (Greeting check)
R Display
S {IP RESET}
C D
EF
Bottom view
IP RESET
S
R
For product assistance, visit www.globarange.com
For A assistance, visit www.joip.com
15
Page 16
Preparation
BB-GT1540
AB DC FE
I JG
H
Bottom view
IP RESET
!
M NK O PQ T U
A {IP} (IP line)
IP indicator
B {TEL} (Landline)
TEL indicator
C {IP/TEL}
D 4 (Status) indicator
E 0 (Voice Mail) indicator
F {s} (Answer on)
Answer on indicator
G {x} (Page/Intercom)
H {l} (Auto/Program)
I {5} (Conference)
J {a} (Hold)
K Speaker
L Charge contacts
M {*}
N {R} (Pause/Redial)
O {6} (Recall)
P {T} (Mute)
16
For product assistance, visit www.globarange.com
For A assistance, visit www.joip.com
R
SL VXYW
Z
Q {s} (Speakerphone)
Speakerphone indicator
R Microphone
S Navigator key
({>}/{<}/{<}/{>})
T {6} (Message)
Message indicator
U {■} (Stop)
V {4} (Erase)
W {7} (Memo)
X {dr} (Greeting record)
Y {dg} (Greeting check)
Z Display
! {IP RESET}
Page 17
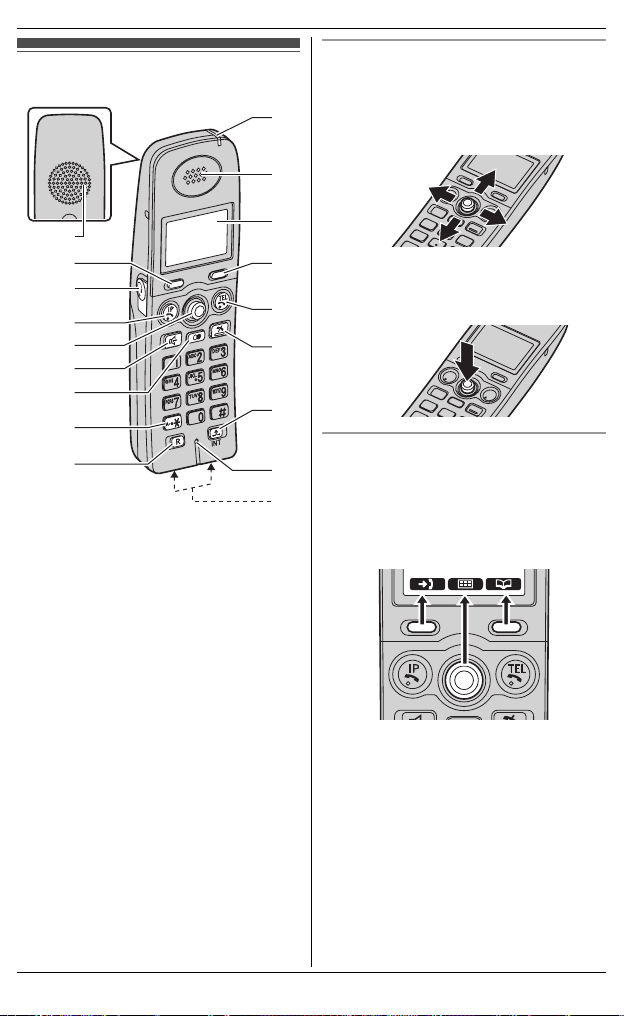
Controls (Handset)
Using the joystick
The handset joystick can be used to
navigate through menus and to select
items shown on the display, by pushing it
J
up {^}, down {V}, left {<}, or right {>}.
K
Preparation
A
B
C
D
E
F
G
H
I
A Speaker
B Soft keys
C Headset jack
D {IP} (IP line)
E Joystick
F {s} (Speakerphone)
G {R} (Redial/Pause)
H {*}
I {6} (Recall)
J Charge indicator
Ringer indicator
Message indicator
K Receiver
L Display
M {TEL} (Landline)
N {i} (Off)
O {a} (Hold)
{INT} (Intercom)
P Microphone
Q Charge contacts
L
B
The joystick can be used to select the
centre soft key icon, by pressing down
on the centre of the joystick.
M
N
O
Using the soft keys
The handset features 2 soft keys and a
P
joystick. By pressing a soft key, or by
Q
pressing the centre of the joystick, you
can select the feature shown directly
above it on the display.
For product assistance, visit www.globarange.com
For A assistance, visit www.joip.com
17
Page 18
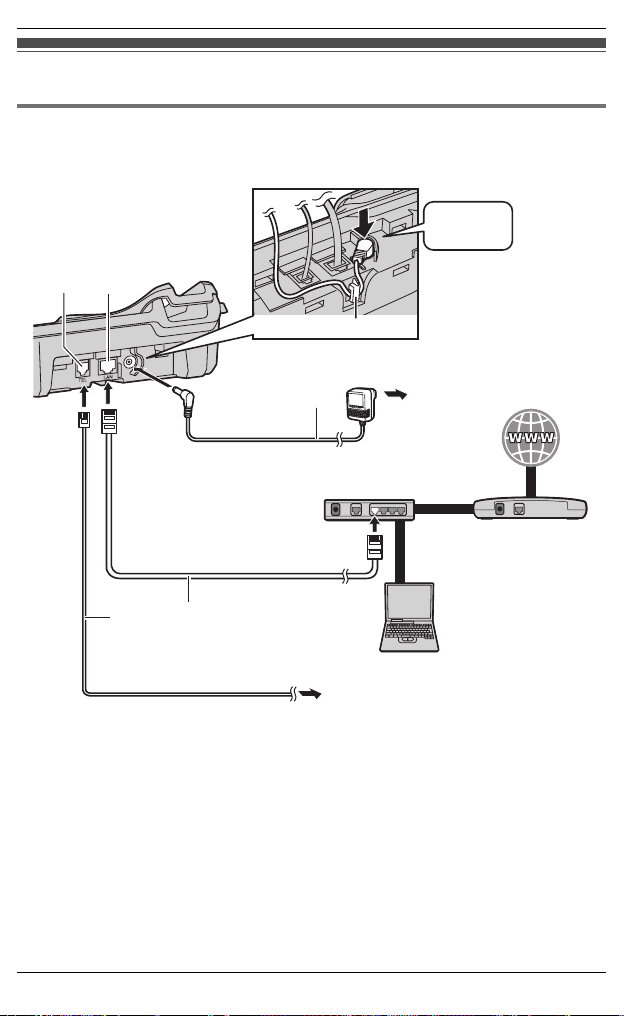
Preparation
Installation
Connecting to a landline and the Internet (IP line)
Connect the base unit to a broadband router or modem with a built-in router.
*1 Computer is not required for setup or making/answering internet calls.
Press
plug firmly.
TEL
LAN
Hook
To AC mains outlet
(220-240 V, 50 Hz)
3
AC adaptor
Router
Ethernet cable
2
Telephone
line cord
1
Computer
(Optional) *1
To telephone network
1 Connect the supplied Ethernet cable until it clicks into the “LAN” port on the base
unit and unused Ethernet (LAN) port on your router or modem with a built-in
router.
2 Connect the supplied telephone line cord until it clicks into the “TEL” port on the
base unit and telephone line jack.
3 Connect the supplied AC adaptor to the base unit by pushing the plug firmly, then
plug the other end into the AC outlet.
L Use only the supplied Panasonic AC adaptor.
L The 4 indicator on the base unit lights in red for about 3 seconds (page 23).
Internet
Cable or
DSL modem
18
For product assistance, visit www.globarange.com
For A assistance, visit www.joip.com
Page 19
Preparation
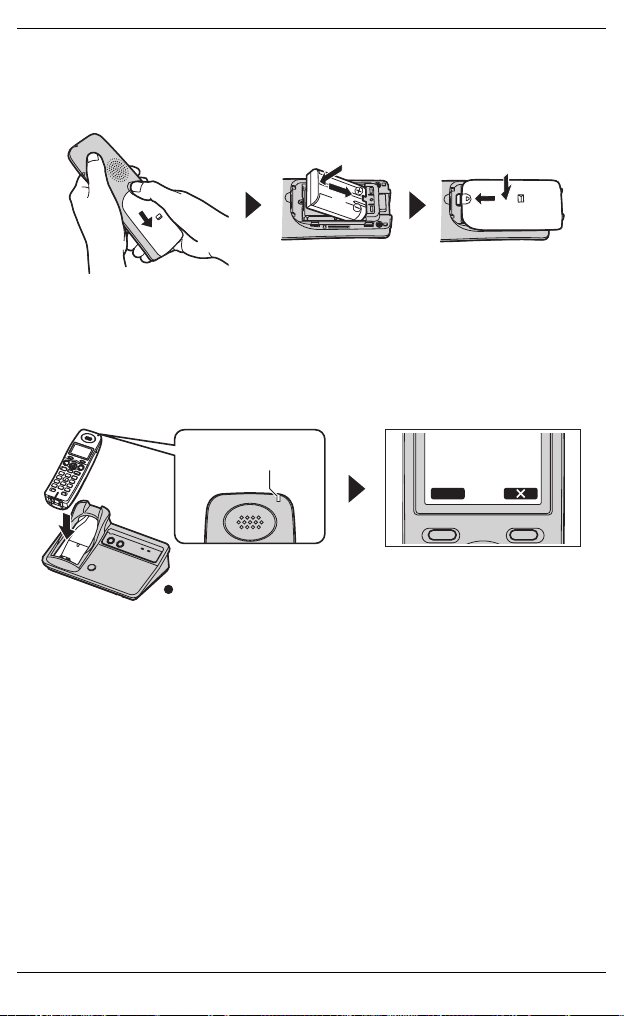
4 Install the battery:
Press the notch of the handset cover firmly, and slide it in the direction of the
arrow (A). Insert the battery (B), and press it down until it snaps into position
(C). Then close the handset cover (D, E).
A
C
B
D
E
5 Charge the battery:
Place the handset on the base unit.
L If “Charge for 7 HRS” is displayed, wait for at most 15 minutes until
“Please read joip Terms of Use. Agree?” is displayed.
L To fully charge the battery, place the handset on the base unit for 7 hours. For
battery information, see page 21.
Confirm the charge
indicator is on.
Model shown is BB-GT1500.
Please read joip
Terms of Use.
Agree?
OK
[
6 Agree to the A Terms of Use:
To use the A IP line, read the Terms of Use for the A services on the
supplied leaflet or at www.joip.com then press M (left soft key) while “Please
read joip Terms of Use. Agree?” is displayed.
L To agree to the Terms of Use later, press W. When you want to agree, press
{IP} and wait until the display changes from “Free calls! Plug
internet cable. www.joip.com” to “Please read joip Terms of
Use. Agree?”. Press M to agree to it.
7 Check for Internet access:
Wait until the 4 indicator on the base unit turns green.
– When the 4 indicator on the base unit lights in green, the installation is
complete. Your A number is displayed on the handset 1 (supplied with your
base unit). Once you start operations with the handset, it disappears from the
display (page 31).
For product assistance, visit www.globarange.com
For A assistance, visit www.joip.com
19
Page 20
Preparation
– When the 4 indicator on the base unit does not light in green even if you wait
for a few minutes, see page 24.
Amber Green
Your A number
joip:#1001060429
Set Date & Time
Model shown is
BB-GT1500.
Note:
L Never install telephone wiring during a lightning storm.
L The AC adaptor must remain connected at all times. (It is normal for the adaptor to
feel warm during use.)
L The AC adaptor should be connected to a vertically oriented or floor-mounted AC
outlet. Do not connect the AC adaptor to a ceiling-mounted AC outlet, as the
weight of the adaptor may cause it to become disconnected.
L The unit will not work during a power failure. To use the landline, we therefore
recommend you also connect a corded-type telephone (without AC adaptor) to the
same telephone line using a T-adaptor. Your Panasonic sales shop can offer you
more information about connection possibilities.
Location
L For maximum distance and noise-free operation, place your base unit:
– away from electrical appliances such as TVs, radios, personal computers or
other phones.
– in a convenient, high and central location.
Connecting the AC adaptor (BB-GT1522)
To AC mains outlet
(220-240 V, 50 Hz)
Bottom of
the charger
Hooks
20
Hooks
Fasten the AC adaptor cord to prevent
it from being disconnected.
For product assistance, visit www.globarange.com
For A assistance, visit www.joip.com
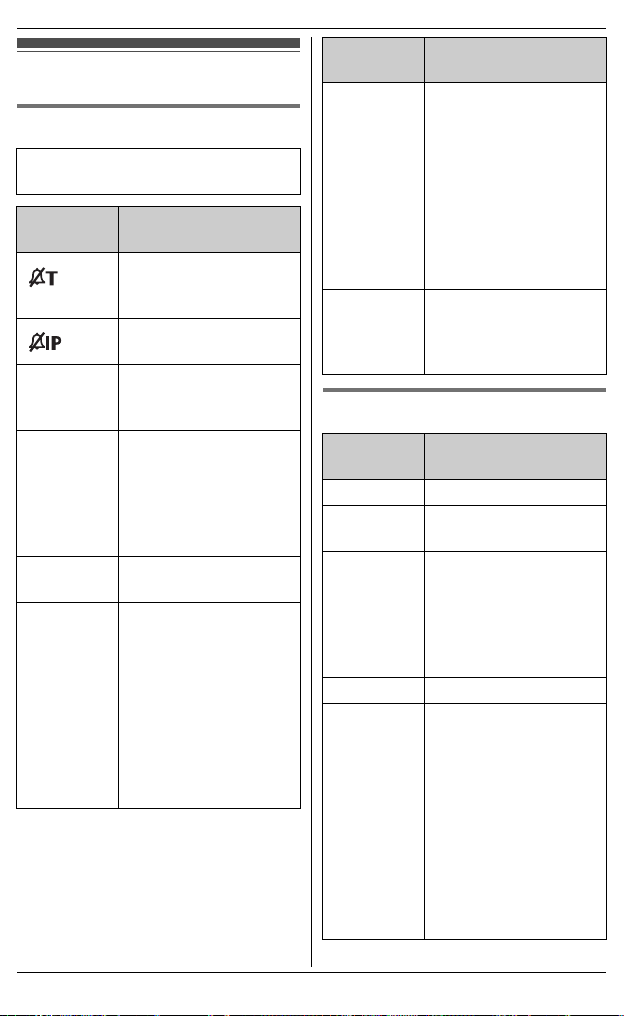
Page 21
Battery charge
Battery charge
To fully charge the battery, place the
handset on the base unit or charger for 7
hours.
L While charging, the charge indicator
on the handset lights in amber. When
the battery is fully charged, the
indicator lights in green.
Base unit
Charge
contacts
L Model shown is BB-GT1500.
Charger
Available model:
BB-GT1522
Preparation
Note:
L It is normal for the handset to feel
warm during charging.
L If you want to use the handset
immediately, charge the battery for at
least 15 minutes.
L To ensure that the battery charges
properly, clean the charge contacts of
the handset, base unit, and charger
with a soft, dry cloth once a month.
Clean more often if the unit is subject
to the exposure of grease, dust, or
high humidity.
Charge
contacts
For product assistance, visit www.globarange.com
For A assistance, visit www.joip.com
21
Page 22

Preparation
Battery level
Battery
icon
1 Fully charged
2 Medium
3 Low
4 Empty
Note:
L When the battery needs to be
charged, the handset beeps
intermittently during use.
Panasonic battery performance
Operation Operating time
While in use
(talking)
While not in use
(standby)
Note:
L It is normal for the battery not to reach
full capacity at the initial charge.
Maximum battery performance is
reached after a few complete cycles of
charge/discharge (use).
L Battery operating time may be
shortened over time depending on
usage conditions and surrounding
temperature.
L Battery power is consumed whenever
the handset is off the base unit or
charger, even when the handset is not
in use.
L After the handset is fully charged,
displaying “Charge completed”, it
may be left on the base unit or charger
without any ill effect on the battery.
L The battery level may not be
displayed correctly after you replace
Battery level
Flashing: needs to be
recharged.
Up to 8 hours
Up to 14 days
the battery. In this case, place the
handset on the base unit or charger
and let it charge for 7 hours.
Battery replacement
Important:
L Use only the rechargeable Panasonic
battery noted on page 9.
Replace the old battery with a new one.
See page 19, step 4.
22
For product assistance, visit www.globarange.com
For A assistance, visit www.joip.com
Page 23

Preparation
Understanding the indicators on the base unit
TEL indicator/IP indicator
The TEL indicator and IP indicator show the status of the landline and IP line,
respectively, as follows.
Status Meaning
Light off The line is available.
Light on The line is in use.
Flashing rapidly A call is being received.
Flashing A call is put on hold.
*1 k When another phone uses the same landline, the TEL indicator lights.
The answering system is answering a call.
(BB-GT1520/BB-GT1522/BB-GT1540)
The IP indicator flashes when the base unit software is
being downloaded from the A service.
4 (Status) indicator
During the startup process you may notice that the 4 indicator on the base unit is
flashing. This indicates that the base unit is booting up with the A service. You may
find the following flash patterns helpful to you:
Status Meaning
Colour Light pattern
Green On L The base unit is connected to the Internet. The
startup process is complete and you may now make
and receive A internet calls.
Flashing L The base unit is downloading data from the A
Red On L When the base unit is turned on, the 4 indicator
Flashing L The base unit is registering a handset.
Flashing
rapidly
service. Do not disconnect the Ethernet cable or AC
adaptor from the base unit until the 4 indicator
stops flashing and lights in steady green.
lights in red for about 3 seconds.
L The base unit is paging handsets.
(BB-GT1500)
*1
For product assistance, visit www.globarange.com
For A assistance, visit www.joip.com
23
Page 24

Preparation
Status Meaning
Colour Light pattern
Amber On L The base unit’s IP address may conflict with the IP
addresses of other devices on your local network.
Check the base unit’s static IP address using the
handset: K i {#}{5}{0}{1}, then check the IP
addresses of the other devices on your local
network. If necessary, change the base unit’s static
IP address (page 30).
Flashing L The base unit is obtaining an IP address or is
obtaining configurations from the A service.
Please wait.
L The base unit is registering with the A service.
Please wait.
L If the 4 indicator continues flashing, check the
following:
– Check the base unit’s IP address using the
handset: K i {#}{5}{0}{1}
If necessary, change the base unit’s static IP
address (page 30).
– If an IP address was not acquired, check your
network devices’ (router, modem, etc.)
connections. If the connections are made
properly but the problem persists, check your
network devices’ (router, modem, etc.) settings.
– Many installation issues can be resolved by
resetting all the equipment. First, shut down your
modem, router, base unit, and computer. Then
turn the devices back on one at a time in this
order: modem, router, base unit, computer.
– If you cannot access Internet Web pages using
your computer, check to see if your Internet
service provider is having connection issues in
your area.
– For more troubleshooting help, visit www.joip.com
or contact the A service provider.
Flashing
rapidly
L Unplug the base unit’s AC adaptor to reset the unit,
then reconnect the AC adaptor. If the 4 indicator is
still flashing rapidly, there may be a problem with the
base unit hardware. Contact Panasonic service
personnel.
24
For product assistance, visit www.globarange.com
For A assistance, visit www.joip.com
Page 25

Status Meaning
Colour Light pattern
OFF — L The power on the base unit is off.
L To use the A IP line, you need to agree to the
Terms of Use for the A services using the
handset (page 19).
L The Ethernet cable is not connected properly.
Connect it.
L Your network devices (hub, router, etc.) are turned
off. Check the LEDs for the link status of the devices.
Preparation
For product assistance, visit www.globarange.com
For A assistance, visit www.joip.com
25
Page 26
Preparation
Displays
Base unit display items
Available model:
BB-GT1520/BB-GT1522/BB-GT1540
Displayed
item
E Greeting or voice
Example:
H 1
H Paging all handsets
m Landline is selected
Meaning
Base unit ringer for
landline is off (page
59).
Base unit ringer for IP
line is off (page 59).
memo recording error
(page 61, 63)
Handset number:
displayed when
paging, or being
paged (example
shown here: handset
1).
(page 71)
for the answering
system or ringer
setting (page 59, 60).
When flashing: the
answering system is
answering a landline
call or playing a
message on the
landline (page 61).
Displayed
item
n IP line is selected for
P Base unit is in
Meaning
the answering system
or ringer setting (page
59, 60).
When flashing: the
answering system is
answering an internet
call or playing a
message on the IP
line (page 61).
programming mode
(page 43). (BBGT1540)
Handset display items
Displayed
item
E Alarm is on (page 55).
w Within range of the
_ Handset has no link to
1 Battery level
S Landline is in use.
Meaning
base unit
base unit (out of range
of base unit, handset
is not registered to
base unit, or no power
on base unit).
When flashing:
– a landline call is on
hold.
– the answering
system is
answering a
landline call.
When flashing rapidly:
a landline call is being
received.
*2
*1
26
For product assistance, visit www.globarange.com
For A assistance, visit www.joip.com
Page 27
Preparation
Displayed
item
i IP line is used.
s
z
Example:mThe handset’s
3 Night mode is on.
*1 k When another phone uses
the same landline, S is
displayed.
*2 BB-GT1520/BB-GT1522/
BB-GT1540
Meaning
When flashing:
– an internet call is on
hold.
– the answering
system is
answering an
internet call.
When flashing rapidly:
an internet call is
being received.
Speaker is on.
Call privacy mode is
on (page 34).
extension number
(example shown here:
handset 1)
Handset ringer for
landline is off (page
52).
Handset ringer for IP
line is off (page 52).
Handset ringers for
landline and IP line
are off (page 52).
A text message is
protected (page 74).
(page 58)
Dial lock is on. (page
58)
*2
Soft key icons
Soft key
icon
U Returns to the
] Allows you to make a
K Displays the menu.
1 Mutes your voice.
\ Opens the caller list.
M Accepts the current
n Opens the handset
£ Displays the
} Sends the handset
{ Edits the handset
~ Adds the handset
s Switches between
/ Changes the
O Stops playback.
W Erases the selected
Action
previous screen.
call. Answers an
intercom call.
selection.
phonebook.
phonebook search
menu.
phonebook item(s) to
selected handset to
copy.
phonebook item.
phonebook item.
AM, PM, and 24-hour
time entry.
character entry mode.
(BB-GT1520/
BB-GT1522/
BB-GT1540)
item. Cancels the
base unit software
update.
For product assistance, visit www.globarange.com
For A assistance, visit www.joip.com
27
Page 28
Preparation
Soft key
icon
g Saves the handset
^ Erases the character
d Goes to the next
w Establishes a
| Protects a joip text
2 Turns off the handset
0 Plays the message(s).
[ Registers the handset
Action
phonebook item.
or number.
screen.
conference call.
message.
ringer.
to the base unit.
Handset menu icons
When in standby mode, pressing down
on the centre of the joystick (K)
reveals the handset’s main menu. From
here you can access various features
and settings.
Menu
icon
Menu/feature
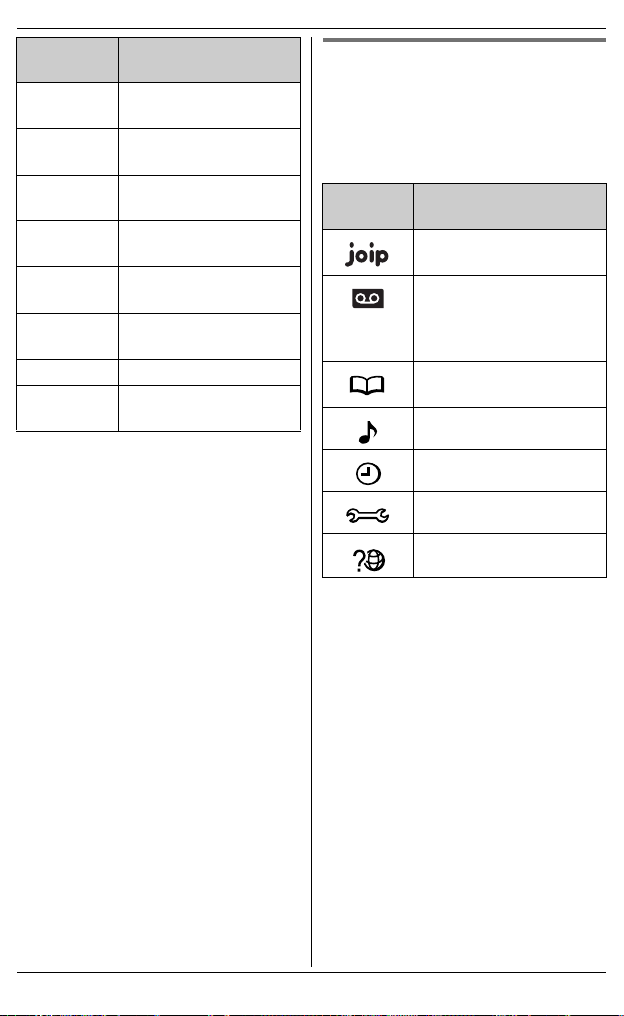
joip
(For A services)
Answer System
(BB-GT1520/
BB-GT1522/
BB-GT1540)
Phonebook
(BB-GT1500)
Ringer settings
Set Date & Time
Initial settings
Customer support
28
For product assistance, visit www.globarange.com
For A assistance, visit www.joip.com
Page 29

Setting the unit before use
Important:
L To program features by scrolling
through the display menus, see page
47.
L Mainly the direct command method is
used in these operating instructions.
Display language N
The default setting is “English”.
1 {i} i K i {#}{1}{1}{0}
2 {V}/{^}: Select the desired setting.
3 M i {i}
Date and time N
Set the correct date and time so that:
– You can use the alarm function (page
55).
– The unit will announce the day and
time a message was recorded when
you play back on the answering
system (page 61). (BB-GT1520/
BB-GT1522/BB-GT1540)
1 K i {#}{1}{0}{1}
2 Enter the current date, month, and
year by selecting 2 digits for each.
Example: 15 August, 2007
{1}{5} {0}{8} {0}{7}
3 Enter the current hour and minute by
selecting 2 digits for each.
Example: 9:30 PM
{0}{9} {3}{0} i Press s until
“09:30 PM” is displayed.
4 M i {i}
Note:
L If you make a mistake when entering
the date and time, push the joystick
Preparation
right, left, up, or down to move the
cursor, then make the correction.
IP/TEL line selection
The line selection mode determines the
line selected when you press {s} to
make a call.
– “IP”: IP line is selected.
– “TEL” (default): Landline is selected.
If you dial a A number (page 4)
then press {s} using the handset, the
IP line is automatically selected.
Note:
L You can select a line manually
regardless of the line selection mode
by pressing {TEL} or {IP}.
Handset line selection N
1 K i {#}{2}{5}{0}
2 {V}/{^}: Select the desired setting.
3 M i {i}
Note:
L When you press ] to make a call
(page 32), the set line is selected.
When you call back from the redial list
or caller list, the line indicated by V
(landline) or j (IP line) is selected
(page 32, 45, 62).
Base unit line selection N
Available model:
BB-GT1540
1 K i {#}{*}{2}{5}{0}
2 {V}/{^}: Select the desired setting.
3 M i {i}
For product assistance, visit www.globarange.com
For A assistance, visit www.joip.com
29
Page 30

Preparation
Configuring the Internet
connection settings
If your local network uses a DHCP
(Dynamic Host Configuration Protocol)
server for automatic IP address
assignments, you do not need to change
any settings. If your local network uses a
static IP address, turn the DHCP
connection mode off.
Leaving the DHCP connection mode on
allows the base unit to receive an IP
address automatically from a DHCP
server on your local network.
Automatic setup (default) N
The base unit automatically obtains an
IP address and other Internet connection
settings (subnet mask, default gateway,
and DNS server addresses).
Turning the DHCP connection mode
on:
1 K i {#}{5}{0}{0}
2 {V}/{^}: “On”
3 M i {i}
L Wait until the 4 indicator on the
base unit turns green. When the
4 indicator lights in green, the
setting is complete. Confirm your
A number (page 31).
L When the 4 indicator on the
base unit does not light in green
even if you wait for a few minutes,
see page 24.
Note:
L To view the Internet connection
settings:
K i {#}{5}{0}{1} i When
finished, press {i}.
Static setup N
If your local network does not use a
DHCP server for automatic IP address
assignments, turn the DHCP connection
mode off first. Then set the static IP
address and other Internet connection
settings corresponding to your local
network.
Turning the DHCP connection mode
off:
1 K i {#}{5}{0}{0}
2 {V}/{^}: “Off”
3 M i {i}
Setting the static IP address and
other settings:
1 K i {#}{5}{0}{1}
2 Set the IP address and other
settings.
L Push the joystick down {V} or up
{^} to move between the
following 5 items.
IP
address
Subnet
mask
Default
gateway
Enter the IP address in
this data field.
L Set 4 numbers (0-
255) separated by
periods such as
“192.168.0.253”.
Enter the subnet mask
in this data field.
L Set 4 numbers (0-
255) separated by
periods such as
“255.255.255.0”.
Enter the default
gateway address in
this data field.
L Set 4 numbers (0-
255) separated by
periods such as
“192.168.0.1”.
*1
*1
*1
30
For product assistance, visit www.globarange.com
For A assistance, visit www.joip.com
Page 31

DNS1
(DNS
server 1)
DNS2
(DNS
server 2)
L To move the cursor, push the joystick
right {>} or left {<}. To correct digits,
press ^.
*1 There are some restrictions on these
entries. For example, “0.0.0.0” and
“255.255.255.255” are not available.
Enter the DNS
(Domain Name
System) server
addresses, in each
data field.
L Set 4 numbers (0-
*1
255) separated by
periods such as
“172.23.0.100”.
3 M i {i}
L Wait until the 4 indicator on the
base unit turns green. When the
4 indicator lights in green, the
setting is complete. Confirm your
A number (page 31).
L When the 4 indicator on the
base unit does not light in green
even if you wait for a few minutes,
see page 24.
Preparation
*1 To receive calls via the IP line from
landline phones or mobile phones,
you need to specially subscribe for
additional phone number(s) from A
at www.joip.com (page 4).
Confirming your A numbers N
After the installation is complete (page
18, 30), the unit is registered to the
service and you receive your A
number. The A number is displayed
on handset 1 (supplied with the base
unit). Once you start operations with the
handset, it disappears from the display.
You can also view your A number
using any handset as follows.
1 K i {#}{1}{0}{3}
L The A number is displayed.
L To view additional phone
number(s) for the IP line, push the
joystick down {V} or up {^}.
*1
2 {i}
For product assistance, visit www.globarange.com
For A assistance, visit www.joip.com
31
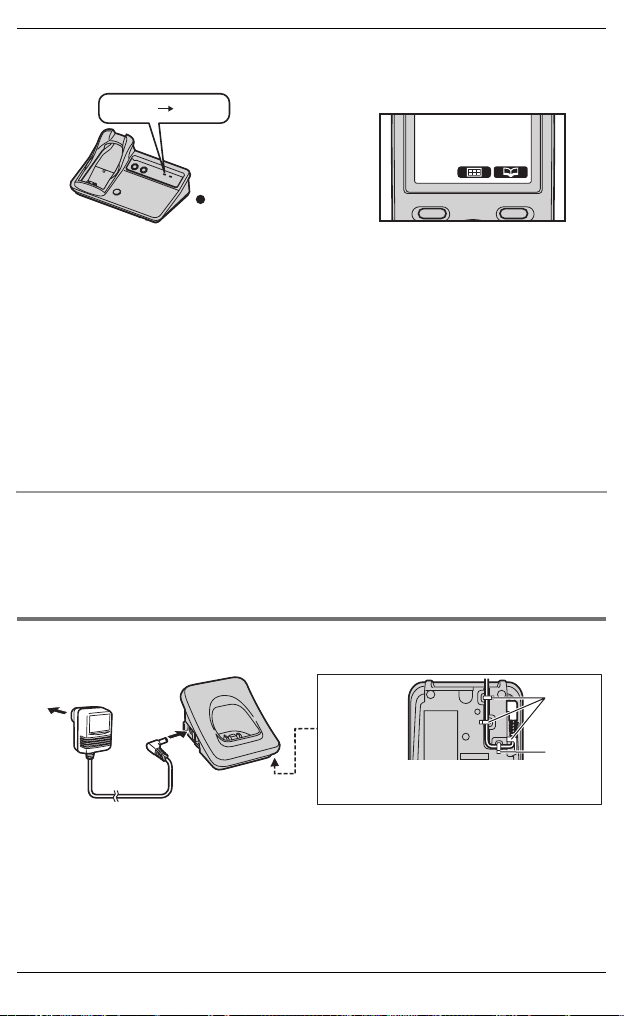
Page 32

Making/Answering Calls (Handset)
Making calls
Important:
L You can choose the landline or IP line
to make a call. Make sure to choose
the appropriate line for the phone
number.
L To call a Panasonic GLOBARANGE
phone, dial the A number
consisting of a # followed by 10 digits
(page 4).
Using the handset N
1
Dial the phone number.
L To correct a digit, press ^.
2 To make a landline call, press
{TEL}.
To m a k e a A internet call, press
{IP}.
3 When you finish talking, press {i}
or place the handset on the base
unit or charger.
Note:
L l To make calls from your A
number to landline and mobile phone
numbers via your IP line, you need to
subscribe to the appropriate service at
www.joip.com
When calling, you may not hear
ringtones from your receiver/speaker
for more than 1 minute as the unit tries
to access the destination phone
number. This is normal, please wait.
L You can also make a call by pressing
] in step 2. The line set for line
selection mode is automatically
selected (page 29). When a A
number is dialled (page 3), the IP line
is selected.
L l If it takes some time to call the
number in step 2, press {#} to call it
immediately.
32
For product assistance, visit www.globarange.com
For A assistance, visit www.joip.com
Using the speakerphone
1 Dial the phone number, and press
{s}.
L The line set for line selection
mode is automatically selected
(page 29). When a A number
is dialled (page 3), the IP line is
selected.
L Speak alternately with the other
party.
2 When you finish talking, press {i}.
Note:
L Use the speakerphone in a quiet
environment.
L To switch to the receiver, press {s}.
Adjusting the receiver/speaker
volume
Push the joystick up or down while
talking.
Making a call using the redial list
The last 10 phone numbers dialled are
stored in the redial list (each 48 digits
max.). V (landline) and j (IP line)
indicate which line you made the call on.
1 {R}
2 {V}/{^}: Select the desired phone
number.
3 Press ] or {s}.
L The indicated line is selected.
L You can also select the line by
pressing {TEL} or {IP}.
L k If {s} is pressed and the
other party’s line is engaged, the
unit will automatically redial
multiple times. The ringer
indicator flashes. To cancel,
press {i}.
Note:
L The caller’s name is not stored in the
redial list when calling back a number
from the caller list.
Page 33

Erasing a number in the redial list
1 {R}
2 {V}/{^}: Select the desired phone
number.
3 W i {V}/{^}: “Yes” i M
i {i}
Pause button
A pause is sometimes required when
making calls, for example using a PBX
or long distance service. When storing a
calling card access number and/or PIN
in the phonebook, a pause is also
needed (page 42).
For example, if you need to dial the line
access number “0” when making outside
calls with a PBX:
1 {0} i {R} i Dial the phone
number.
2 {TEL}
Note:
L A 3 second pause is inserted each
time {R} is pressed. Press
repeatedly to insert longer pauses.
Making/Answering Calls (Handset)
To answer the A internet call,
press ], {IP}, or {s}.
L You can also answer the call by
pressing any dial key from {0} to
{9}, {*}, or {#}. (Any key talk
feature)
2 When you finish talking, press {i}.
Note:
L You can change the ringer indicator
colour and the ringtone (page 52, 54).
You can also adjust the handset ringer
volume (page 52).
Auto talk
This feature allows you to answer a call
by simply lifting the handset off the base
unit or charger. You do not need to press
], {TEL}, or {IP}. To activate this
feature, see page 51.
Temporary ringer off
While the handset is ringing for an
outside call, you can turn the ringer off
temporarily by pressing 2 or {i}.
Handset LCD backlight
The handset’s LCD backlight colour
changes as follows.
Colour Meaning
Green Landline is used.
Amber IP line is used.
Answering calls
Using the handset N
When a call is being received, the ringer
indicator on the handset flashes rapidly.
1 To answer the landline call, press
], {TEL}, or {s}.
For product assistance, visit www.globarange.com
For A assistance, visit www.joip.com
Useful features during a call
Hold button N
This feature allows you to put an outside
call on hold.
Press {a} 2 times during an outside
call.
L To release hold, press {TEL} or {IP}.
L A user of another unit can take the call
by pressing {TEL} or {IP}.
Note:
L If a call is kept on hold for more than 9
minutes, an alarm tone starts to sound
and the ringer indicator flashes
33
Page 34

Making/Answering Calls (Handset)
rapidly. After 1 additional minute on
hold, the call is disconnected.
L k If another phone is connected to
the same line (page 20), you can also
take the call by lifting its handset.
Mute button N
While mute is turned on, you can hear
the other party, but the other party
cannot hear you.
To mute your voice, press 1.
L To return to the conversation, press
1.
Note:
L When this feature is turned on, 1
flashes.
{6} button N
k
Pressing {6} allows you to use special
features of your host PBX such as
transferring an extension call, or
accessing optional telephone services.
Note:
L To change the recall time, see page
57.
l
Pressing {6} allows you to use optional
services from A. Visit www.joip.com
or contact the A service provider for
details.
Making another call on the IP line:
While you are talking with an outside
caller, you can make a 2nd call on the
same line by pressing {6} then dialling.
L The 1st call is put on hold.
L To hang up the 2nd call, press {i}.
The alarm tone starts to sound. Press
{IP} to talk with the 1st caller again. If
you do not press {IP}, the alarm tone
sounds for 1 minute and the 1st call is
disconnected.
You can combine the calls to make a
conference call by pressing {6} again
after the 2nd call is connected.
L To hang up the 2nd call and talk with
the 1st caller, press {6}.
L To hang up both lines, press {i}.
For Call Waiting service users
N
Call Waiting service is provided by your
landline service provider and A.
This feature allows you to receive calls
while you are already talking on the
phone. If you receive a call while on the
phone, you will hear a Call Waiting tone.
Press {6} to answer the 2nd call.
L To switch between calls, press {6}.
Note:
L k Please contact your landline
service provider for details.
L l Please visit www.joip.com or
contact the A service provider for
details.
Call share N
This feature allows you to join an
existing outside call.
When another unit is on an outside call,
press {TEL} or {IP} to select the line that
is being used for the call.
Note:
L Multiple parties can join a conference
call. The possible number of
participating parties depends on the
current system usage. When another
participating party cannot join a
conversation, the busy tone sounds
and the handset displays “Busy”.
Call privacy N
Call privacy allows you to prevent other
users from joining your conversations
with outside callers. To allow other users
34
For product assistance, visit www.globarange.com
For A assistance, visit www.joip.com
Page 35

to join your conversations, leave this
feature off.
1 Press K during an outside call.
2 Press {2} to select “Privacy on”
or “Privacy off”.
L When this feature is turned on,
“z” is displayed.
Note:
L This feature will turn off after you hang
up the call.
Using the other line,
conference call N
When a call is being received on the
other line during a conversation, the
interrupt tones sound.
You can answer the 2nd call while
holding the 1st call. You can also
combine the landline call and internet
call to make a conference call.
Example: If you are using the landline
1 Press {a} 2 times to put the 1st
call (landline) on hold.
2 Press {IP} to make or answer a 2nd
call.
L To hold the 2nd call, press {a} 2
times.
3 To hang up the 2nd call and
return to the 1st call (landline):
Press {TEL}.
To make a conference call:
Press w.
L To hang up only one line, press
{TEL} or {IP} for the party with
which you want to continue
talking.
L To put both lines on hold, press
{a}. To talk with only one caller,
press {TEL} or {IP} for the party
with which you want to continue
talking. To resume both lines,
press w.
Making/Answering Calls (Handset)
Note:
L If you subscribe to the Caller ID
service, the 2nd caller’s information is
displayed as the call is being received
(page 44).
L To turn the interrupt tone off, see page
51.
For product assistance, visit www.globarange.com
For A assistance, visit www.joip.com
35
Page 36

Making/Answering Calls (Base Unit)
Making calls
Important:
L You can choose the landline or IP line
to make a call. Make sure to choose
the appropriate line for the phone
number.
L To call a Panasonic GLOBARANGE
phone, dial the A number
consisting of a # followed by 10 digits
(page 4).
access the destination phone number.
This is normal, please wait.
L l If it takes some time to call the
number in step 2, press {#} to call it
immediately.
L While on a call, you can switch from
the base unit to the handset:
– Press {TEL} or {IP} on the
handset, then press {s} on the
base unit.
– If the handset is on the base unit,
simply lift it.
Using the base unit f
Available model:
BB-GT1540
To make a landline call, press
1
{TEL}.
To m a k e a A internet call, press
{IP}.
L You can also make a call by
pressing {s}. The line set for line
selection mode is automatically
selected (page 29).
2 Dial the phone number.
3 When the other party answers,
speak into the MIC.
L Speak alternately with the other
party.
4 When you finish talking, press {s}.
Note:
L Use the speakerphone in a quiet
environment.
L l To make calls from your A
number to landline and mobile phone
numbers via your IP line, you need to
subscribe to the appropriate service at
www.joip.com
When calling, you may not hear
ringtones from your speaker for more
than 1 minute as the unit tries to
Adjusting the speaker volume
Press {>} or {<} repeatedly while
talking.
Redialling the last number dialled
Press {TEL} or {IP}. i {R}
L k If the other party’s line is
engaged, the unit will automatically
redial multiple times. The
speakerphone indicator flashes. To
cancel, press {■}.
Answering calls
Using the base unit f
Available model:
BB-GT1540
When a call is being received, the TEL
indicator or IP indicator flashes rapidly.
1 {s}
L You can also answer the call by
pressing the flashing {TEL} or
{IP}.
2 Speak into the MIC.
3 When you finish talking, press {s}.
36
For product assistance, visit www.globarange.com
For A assistance, visit www.joip.com
Page 37

Useful features during a call
Available model:
BB-GT1540
Hold button f
This feature allows you to put an outside
call on hold.
Press {a} during an outside call.
L To release hold, press the flashing
{TEL} or {IP}.
L A handset user can take the call by
pressing {TEL} or {IP}.
Note:
L While an outside call is on hold, the
TEL indicator or IP indicator on the
base unit flashes.
L If a call is kept on hold for more than 9
minutes, an alarm tone starts to
sound. After 1 additional minute on
hold, the call is disconnected.
L k If another phone is connected to
the same line (page 20), you can also
take the call by lifting its handset.
Mute button f
While mute is turned on, you can hear
the other party, but the other party
cannot hear you.
To mute your voice, press {T}.
L To return to the conversation, press
{T} or {s}.
{6} button f
k
Pressing {6} allows you to use special
features of your host PBX such as
transferring an extension call, or
accessing optional telephone services.
Making/Answering Calls (Base Unit)
Note:
L To change the recall time, see page
57.
l
Pressing {6} allows you to use optional
services from A. Visit www.joip.com
or contact the A service provider for
details.
Making another call on the IP line:
While you are talking with an outside
caller, you can make a 2nd call on the
same line by pressing {6} then dialling.
L The 1st call is put on hold.
L To hang up the 2nd call, press {s}.
The alarm tone starts to sound. Press
{IP} to talk with the 1st caller again. If
you do not press {IP}, the alarm tone
sounds for 1 minute and the 1st call is
disconnected.
You can combine the calls to make a
conference call by pressing {6} again
after the 2nd call is connected.
L To hang up the 2nd call and talk with
the 1st caller, press {6}.
L To hang up both lines, press {s}.
For Call Waiting service users
f
Call Waiting service is provided by your
landline service provider and A.
This feature allows you to receive calls
while you are already talking on the
phone. If you receive a call while on the
phone, you will hear a Call Waiting tone.
Press {6} to answer the 2nd call.
L To switch between calls, press {6}.
Note:
L k Please contact your landline
service provider for details.
L l Please visit www.joip.com or
contact the A service provider for
details.
For product assistance, visit www.globarange.com
For A assistance, visit www.joip.com
37
Page 38

Making/Answering Calls (Base Unit)
Call share f
This feature allows you to join an
existing outside call.
When a handset is on an outside call,
press {TEL} or {IP} to select the line that
is being used for the call.
Note:
L Multiple parties can join a conference
call. The possible number of
participating parties depends on the
current system usage. When another
participating party cannot join a
conversation, the busy tone sounds.
Using the other line,
conference call f
When a call is being received on the
other line during a conversation, the
interrupt tones sound.
You can answer the 2nd call while
holding the 1st call. You can also
combine the landline call and internet
call to make a conference call.
Example: If you are using the landline
1 Press {a} to put the 1st call
(landline) on hold.
2 Press {IP} to make or answer a 2nd
call.
L To hold the 2nd call, press {a}.
3 To hang up the 2nd call and
return to the 1st call (landline):
Press {TEL}.
To make a conference call:
Press {5}.
L To hang up only one line, press
{TEL} or {IP} for the party with
which you want to continue
talking.
L To put both lines on hold, press
{a}. To talk with only one caller,
press {TEL} or {IP} for the party
with which you want to continue
talking. To resume both lines,
press {5}.
Note:
L To turn the interrupt tone off, see page
51.
38
For product assistance, visit www.globarange.com
For A assistance, visit www.joip.com
Page 39

Making internet calls using your mobile phone
Available model:
BB-GT1520/BB-GT1522/BB-GT1540
l
Important:
L To use this feature, you need an
additional phone number for the IP
line other than the joip number (page
4). If you do not have one, subscribe
at www.joip.com
You can make internet calls with your
mobile phone via the base unit. First, call
your unit’s answering system by dialling
the additional phone number you
subscribed at www.joip.com
Next, dial the phone number you want to
call. You can make cheaper international
calls, even while you are out.
Perform the following beforehand:
– Set your own remote code of the
answering system to turn the remote
operation on (page 64).
– Turn on the answering system for the
IP line (page 60, 65).
1 Dial the phone number you
subscribed at www.joip.com
2 After the greeting message starts,
enter your remote code of the
answering system (page 64).
3 {#}{9}
4 After the dial tone sounds, dial the
phone number you want to call. i
{#}
L The phone number is dialled via
the IP line.
5 When you finish talking, hang up.
Making Internet Calls (Mobile Phone)
Note:
L The handset or base unit cannot join
the call.
Turning this feature on or off f
The default setting is ON. If you do not
want to use this feature, you can turn it
off using the base unit.
First press and hold {■ }, then press and
hold {IP/TEL}. Keep holding down both
buttons until the base unit beeps.
L When turned on, one beep sounds.
L When turned off, 2 beeps sound.
For product assistance, visit www.globarange.com
For A assistance, visit www.joip.com
39
Page 40

Handset Phonebook
Handset phonebook
You can add up to 100 items to the
handset phonebook and search for
phonebook items by name.
Important:
L Caller ID subscribers can use ringer
ID and light-up ID features (page 45).
L You can add and edit phonebook
items by accessing your account on
the A website (www.joip.com), then
downloading your web phonebook to
the base unit. To import them to your
handset, see page 73.
Adding items to the handset
phonebook
n
1
2 ~
3 Enter the name (max. 16 characters;
page 79). i M
4 Enter the phone number (max. 32
digits). i M
L If you do not need to assign the
ringer ID and light-up ID, go to
step 9.
5 {V}/{^}: “Set Ringer ID” i
M
6 {V}/{^}: Select the desired ringer ID
(page 45). i M
L When selecting “No Ringer
ID”, the ringtone set for the IP line
rings (page 54).
7 {V}/{^}: “Set Light-up ID” i
M
8 {V}/{^}: Select the desired light-up
ID (page 45). i M
9 g
L To add other items, repeat from
step 3.
10 {i}
40
For product assistance, visit www.globarange.com
For A assistance, visit www.joip.com
Note:
L In step 2, you can also press K i
{V}/{^}: “New Entry” i M
instead of pressing ~.
L If you select “No Ringer ID”
(default) in step 6, the handset uses
the ringtone you selected on page 54
when a call is received from that
caller.
L If you select “No Light-upID”
(default) in step 8, the handset uses
the ringer indicator colour you
selected on page 52 when a call is
received from that caller.
To store emergency numbers
Emergency numbers are numbers
stored in the phonebook that can be
dialled using the phonebook even when
dial lock is turned on (page 58). To store
a number as an emergency number, add
# at the beginning of the name (see
“Adding items to the handset
phonebook”, page 40).
Finding and calling a handset
phonebook item
Important:
L Make sure to choose the appropriate
line for the phone number to call back.
Searching for a name alphabetically
by scrolling through all items
1 n
2 {V}/{^}: Select the desired item.
3 To make a landline call, press
{TEL}.
To make a joip internet call, press
{IP}.
Searching for a name by initial
1 n i £
Page 41

2 {V}/{^}: Select the character entry
mode that contains the character
you are searching for (page 79). i
M
3 Press the dial key ({0} – {9}, or
{#}) that corresponds to the first
letter you are searching for (page
79).
L If there is no item corresponding
to the letter you selected, the next
item is displayed.
4 {V}/{^}: Select the desired item.
5 To make a landline call, press
{TEL}.
To m a k e a A internet call, press
{IP}.
Editing items in the handset
phonebook
n
1
2 Find the desired item (page 40). i
{
3 {V}/{^}: Select the information you
want to change.
To change
the name or
phone
number
To change
the ringer ID
Select the name or
phone number. i
M i Edit the
information (page
79). i M
Select the current
ringer ID. i M
i {V}/{^}: Select
the desired item.
i M
*1 To turn the ringer
ID off, select “No
Ringer ID”.
For product assistance, visit www.globarange.com
For A assistance, visit www.joip.com
*1
Handset Phonebook
To change
the light-up
ID
Select the current
light-up ID. i M
i {V}/{^}: Select
the desired light-up
*1
i M
ID.
*1 To turn the light-
up ID off, select
“No LightupID”.
4 g i {i}
Erasing items in the handset
phonebook
Erasing an item
1 n
2 Find the desired item (page 40).
3 K i {V}/{^}: “Erase” i M
4 {V}/{^}: “Yes” i M i {i}
Erasing all items
1 n i K
2 {V}/{^}: “Erase All” i M
3 {V}/{^}: “Yes” i M
4 {V}/{^}: “Yes” i M
L When all items have been
erased, “Erased” is displayed.
5 {i}
Chain dial
This feature allows you to dial phone
numbers in the handset phonebook
while you are on a call. This feature can
be used, for example, to dial a calling
card access number or bank account
PIN that you have stored in the handset
phonebook, without having to dial
manually.
1 During an outside call, press n.
2 Find the desired item (page 40). i
]
41
Page 42

Handset Phonebook
Note:
L When storing a calling card access
number and your PIN in the
phonebook as one phonebook item,
press {R} to add pauses after the
number and PIN as necessary (page
33).
Copying handset phonebook
items
You can copy one or all of the
phonebook items from one handset to
another.
Important:
L Ringer ID and light-up ID for
phonebook items are not copied.
Copying an item
1 n
2 Find the desired item (page 40). i
K
3 {V}/{^}: “Copy” i M
4 {V}/{^}: Select the handset to copy
to. i }
L When the item has been copied,
“Completed” is displayed.
L To continue copying another item:
{V}/{^}: “Yes” i M i Find
the desired item (page 40). i
}
5 {i}
Copying all items
1 n i K
2 {V}/{^}: “Copy All” i M
3 {V}/{^}: Select the handset to copy
to. i }
L When all items have been copied,
“Completed” is displayed.
4 {i}
42
For product assistance, visit www.globarange.com
For A assistance, visit www.joip.com
Page 43

Base unit speed dialler
Available model:
BB-GT1540
You can assign one phone number to
each of the 10 dial keys ({0} – {9}) on
the base unit.
Adding phone numbers to the
speed dialler
Important:
L Before adding phone numbers, make
sure the base unit is not being used.
1 {l}
2 Enter the phone number (max. 32
digits).
L If a pause is required for dialling,
press {R} where needed.
L If you misdial, press {■} and
repeat from step 1.
3 {l}
4 Press a dial key ({0} – {9}).
Note:
L If a phone number is assigned to a dial
key which already contains a phone
number, the old number will be
erased.
L We recommend you make a note of
which phone numbers are stored in
which dial keys.
L When {*} is pressed, “$” is
displayed.
When {#} is pressed, “#” is
displayed.
When {6} is pressed, “F” is
displayed.
Base Unit Speed Dialler
dial the line access number “0”
(example) when making landline calls
with a PBX:
In step 2, press {0}, {R}, then enter the
phone number.
Note:
L A 3 second pause is inserted each
time {R} is pressed. Press
repeatedly to insert longer pauses.
“P” is displayed when {R} is
pressed.
To erase a stored phone number
1 Press {l} 2 times.
2 Press the desired dial key ({0} –
{9}).
Calling someone with the
speed dialler
Important:
L Make sure to choose the appropriate
line for the phone number.
1 To make a landline call, press
{TEL}.
To m a k e a A internet call, press
{IP}.
2 {l}
3 Press the desired dial key ({0} –
{9}).
Note:
L Speed dial numbers assigned to the
base unit dial keys can only be dialled
from the base unit.
PAUSE button
A pause is sometimes required when
making calls, for example using a PBX
or long distance service. If you need to
For product assistance, visit www.globarange.com
For A assistance, visit www.joip.com
43
Page 44

Caller ID Service
Using Caller ID service
This unit is Caller ID compatible. To use
Caller ID features, you must subscribe to
Caller ID services offered by your
landline service provider and the A
service provider.
Note:
L k Please contact your landline
service provider for details.
L l Please visit www.joip.com or
contact the A service provider for
details.
Caller ID features N
k
When an outside call is being received,
the calling party’s phone number is
displayed.
L Generally caller information is
displayed from the 2nd ring.
l
When a call is received from a
Panasonic GLOBARANGE phone, the
calling party’s A number is displayed.
If the caller sets to show the name at
www.joip.com, it is displayed.
Caller information for the last 50 callers
is logged in the caller list from the most
recent call to the oldest.
L If the unit cannot receive caller
information, the following is displayed:
– “Private Caller”: The caller
requested not to send caller
information.
– k “Out of Area”: The caller
dialled from an area which does not
provide Caller ID service.
L k If the unit is connected to a PBX
system, caller information may not be
received properly. Consult your PBX
supplier.
Missed calls N
If a call is not answered, the unit treats
the call as a missed call. “Missed
call” is displayed on the handset. This
lets you know if you should view the
caller list to see who called while you
were out. You can view the number of
missed calls by pressing \.
Note:
L If you press \, then press {i}
without viewing all missed calls in the
caller list, “Missed call”
disappears from the display. When
you receive another new call, it is
displayed again.
Custom name display N
When the Caller ID number is received
and it matches a phone number stored in
the phonebook, the stored name from
the phonebook is displayed and logged
in the caller list.
Call Waiting Caller ID display N
The 2nd caller’s information is displayed
after you hear a call waiting tone (page
34). Press {6} to answer the 2nd call.
L To switch between calls, press {6}.
Note:
L k You must subscribe to both
Caller ID and Call Waiting with Caller
ID services. Please contact your
landline service provider for details
and availability of this service in your
area.
L l Please visit www.joip.com or
contact the A service provider to
subscribe.
44
For product assistance, visit www.globarange.com
For A assistance, visit www.joip.com
Page 45

Ringer ID/Light-up ID N
These features can help you identify
who is calling by using different ringers
and ringer indicator colours for different
callers stored in the phonebook. You can
assign a different ringer and indicator
colour to each phonebook item. When a
call is received from a caller stored in the
phonebook, the assigned ringer rings
and the assigned ringer indicator colour
flashes after Caller ID information is
displayed.
If you select “No Ringer ID” (default)
or “No Light-upID” (default), the
handset uses the ringtone or ringer
indicator colour you selected (page 52,
54) when a call is received from that
caller.
Caller list
Important:
L Only 1 person can access the caller
list at a time.
Viewing the caller list and
calling back N
\
1
2 Push the joystick down to search
from the most recent call, or push
the joystick up to search from the
oldest call.
3 To call back, select the indicated line
by pressing {TEL} or {IP}.
To exit, press {i}.
Note:
L V (landline) and j (IP line) indicate
which line the caller information was
received from.
Caller ID Service
L A Q is displayed for caller information
which has already been viewed or
answered by any handset.
L If an arrow (>) is displayed after the
number, the whole phone number is
not shown. Push the joystick right to
see the remaining information. To
return to the previous display, push
the joystick left.
Editing a caller’s phone
number before calling back N
You can edit a phone number in the
caller list.
1 \
2 {V}/{^}: Select the desired item. i
{
3 Add or erase digits to the beginning
of the number as necessary.
L To add a digit, press the desired
dial key.
L To erase a digit, press ^.
4 Press ].
Note:
L { is not displayed for A
numbers. They are not necessary to
be edited.
L The edited phone number is not saved
in the caller list.
Storing caller information into
the handset phonebook N
\
1
2 {V}/{^}: Select the desired item. i
K
3 {V}/{^}: “Add Phonebook” i
M
L To change the information,
perform step 3, “Editing items in
the handset phonebook”, page
41.
For product assistance, visit www.globarange.com
For A assistance, visit www.joip.com
45
Page 46

Caller ID Service
4 g i {i}
Erasing caller information N
Erasing a selected item
1 \
2 {V}/{^}: Select the desired item.
3 W i {V}/{^}: “Yes” i M
i {i}
Erasing all items
1 \
2 W i {V}/{^}: “Yes” i M
46
For product assistance, visit www.globarange.com
For A assistance, visit www.joip.com
Page 47

Programming
Programmable settings
Handset
You can customise the unit by programming the following features.
To access the features, there are 2 methods:
– scrolling through the display menus (page 47)
– using the direct commands (page 51)
Base unit
To change the base unit ringer volume and tone, see page 59. (BB-GT1520/
BB-GT1522/BB-GT1540)
Programming by scrolling through the display menus N
K
1
2 Push the joystick up {^}, down {V}, left {<}, or right {>} to select the desired
menu. i M
L If there are sub-menu(s), push the joystick down {V} or up {^} to select the
desired item. i M
3 Push the joystick down {V} or up {^} to select the desired setting. i M
L This step may vary depending on the feature being programmed.
4 {i}
BB-GT1500
Main menu Sub-menu 1 Sub-menu 2 Page
joip joip service –75
joip message –74
My joip numbers –31
joip settings DHCP
Phonebook ––40
For product assistance, visit www.globarange.com
For A assistance, visit www.joip.com
*1
IP settings
joip MSG alert 75
*1
30
30
47
Page 48

Programming
Main menu Sub-menu 1 Sub-menu 2 Page
Ringer
settings
(
Set Date & Time Set Date & Time
Initial
settings
Customer
support
Ringer Volume ––
Ext. Ringtone
–54
(External ringtone)
Import ringtone –73
Interrupt tone ––
Ring colour ––
Night Mode Start/End 58
On/Off 58
Ring Delay 59
*1
–29
Alarm –55
Time Adjustment
Dial lock
*1
*1
––
–57
Auto Intercom –69
Contrast ––
Keytones ––
Auto Talk –33
New Msg. Alert –68
IP/TEL select –29
Base Unit Setup Base Unit PIN
Set phone line Set recall time
*1
*1
Registration Register Handset 77
Deregistration 77
Handset Name –56
Calling Code –55
Select Language –29
Web site –52
Software version
*1
–57
56
57
*1 If you program these settings using one of the handsets, you do not need to
program the same item using another handset.
48
For product assistance, visit www.globarange.com
For A assistance, visit www.joip.com
Page 49

Programming
BB-GT1520/BB-GT1522/BB-GT1540
Main menu Sub-menu 1 Sub-menu 2 Page
joip joip service –75
joip message –74
My joip numbers –31
joip settings DHCP
Answer System Play New Msg. –62
Play All Msg. –62
To erase all
*1
Settings Number of Rings
Ringer
settings
(
Ringer Volume ––
Ext. Ringtone
(External ringtone)
Import ringtone –73
Interrupt tone ––
Ring colour ––
Night Mode Start/End 58
Set Date &
Time
Set Date & Time
Alarm –55
Time Adjustment
*1
*1
*1
IP settings
*1
30
30
joip MSG alert 75
–63
*1
66
66
64
67
Recording Time
Remote Code
*1
Call Screening
*1
*1
–54
On/Off 58
Ring Delay 59
–29
––
For product assistance, visit www.globarange.com
For A assistance, visit www.joip.com
49
Page 50

Programming
Main menu Sub-menu 1 Sub-menu 2 Page
Initial
settings
Dial lock
*1
Auto Intercom –69
–57
Contrast ––
Keytones ––
Auto Talk –33
New Msg. Alert – 66, 68
IP/TEL select –29
Base Unit Setup Interrupt tone
Night Mode
IP/TEL select
Base Unit PIN
Set phone line Set recall time
*1
*1*3
*1*2
*1
*1
Registration Register Handset 77
Deregistration 77
Handset Name –56
Calling Code –55
Select Language –29
Customer
support
Web site –52
Software version
*1
–57
*1 If you program these settings using one of the handsets, you do not need to
program the same item using another handset.
*2 BB-GT1540
*3 Night mode has “Start/End”, “On/Off” and “Ring Delay” sub-menus.
–
58
29
56
57
50
For product assistance, visit www.globarange.com
For A assistance, visit www.joip.com
Page 51

Programming
Programming using the direct commands N
1
K i {#}
2 Enter the desired feature code.
3 Enter the desired setting code. i M
L This step may vary depending on the feature being programmed.
4 {i}
Note:
L In the following table, < > indicates the default setting.
L If you make a mistake or enter the wrong code, press {i}, then start again from
step 1.
Feature Feature code Setting code Page
Alarm {7}{2}{0} –55
Auto Intercom {2}{7}{3}{1}: On (Ringer On)
Auto Talk
Base Unit PIN
Contrast
(Display contrast)
Deregistration {1}{3}{1} –77
Dial lock
Display Language {1}{1}{0} –29
Ext.
Ringtone
(External
ringtone)
(Handset)
Handset Name {1}{0}{4} –56
Interrupt tone
(Handset)
Interrupt tone
(BB-GT1520/
BB-GT1522/
BB-GT1540 base unit)
IP/TEL select
(Handset)
IP/TEL select
(BB-GT1540 base unit)
*1
*2
*2
IP {1}{6}{1}{1}{1}-{3}: Ringtone 1-3
TEL {1}{6}{1}{2}
*2
{2}{0}{0}{1}: On {0}: <Off>33
{1}{3}{2} –56
{1}{4}{5}{1}-{6}: Level 1–6 <3>–
{2}{5}{1} –57
*3
{2}{0}{1}{1}: <On>
*2*3
{*}{2}{0}{1} –
{2}{5}{0}{1}: IP
{*}{2}{5}{0} 29
{2}: On (Ringer Off)
{0}: <Off>
{4}-{6}: Melody 1-3
{7}: Demo
IP: <Ringtone 2>
TEL: <Ringtone 1>
{0}: Off
{2}: <TEL>
*6
69
54
–
29
For product assistance, visit www.globarange.com
For A assistance, visit www.joip.com
51
Page 52

Programming
Feature Feature code Setting code Page
Keytones
*4
{1}{6}{5}{1}: <On> {0}: Off –
New Msg. Alert {3}{4}{0}{1}: On {0}: <Off> 66, 68
Night
*5
Mode
(Handset)
Start/
End
On/Off {2}{3}{8}{1}: On {0}: <Off>58
Ring
Delay
{2}{3}{7} –58
{2}{3}{9}{1}: 30 sec.
59
{2}: <60 sec.>
{3}: 90 sec.
{4}: 120 sec.
{0}: No Ringing
Night
*2*5
Mode
(BBGT1520/
BBGT1522/
BBGT1540
base unit)
Start/
End
{*}{2}{3}{7} –58
On/Off {*}{2}{3}{8}{1}: On {0}: <Off>58
Ring
Delay
{*}{2}{3}{9}{1}: 30 sec.
{2}: <60 sec.>
59
{3}: 90 sec.
{4}: 120 sec.
{0}: No Ringing
Register Handset {1}{3}{0} –77
Ring colour
(Ringer indicator
colour)
{2}{3}{5}{1}: <Colour1>
{2}: Colour2
{3}: Colour3
–
{4}: Multicolour
Ringer
Volume
(Handset)
Set Date & Time
Web site
IP {1}{6}{0}{1}{1}-{6}: Level 1–6 <6>
TEL {1}{6}{0}{2}
*2
*7
{1}{0}{1} –29
{6}{8}{0} www.globarange.com –
{0}: Off
–
(Customer support)
*1 If you subscribe to Caller ID service and want to view the caller’s information after
lifting up the handset to answer a call, turn off this feature.
*2 If you program these settings using one of the handsets, you do not need to
program the same item using another handset.
*3 This tone lets you know when you receive a call while you are on the other line, on
an intercom call, or monitoring a room. The tone sounds 2 times.
*4 Turn this feature off if you prefer not to hear key tones while you are dialling or
pressing any keys, including confirmation tones and error tones.
*5 In order to set the night mode, you must first set the date and time (page 29).
*6 The preset song “Demo” in this product is used with the permission of © 2006
Copyrights Vision Inc.
52
For product assistance, visit www.globarange.com
For A assistance, visit www.joip.com
Page 53

Programming
*7 The handset can display the Internet address where you can get further
information for this product using your computer.
For landline k
Feature Feature code Setting code Page
Calling Code {2}{5}{9} –55
Set recall time
Time Adjustment
(Caller ID subscribers
only)
*1 If you program these settings using one of the handsets, you do not need to
program the same item using another handset.
*2 If the caller ID time and date display service is available in your area, this feature
allows the unit to automatically adjust the date and time setting when caller
information is received. To use this feature, set the date and time first.
For IP line l
Feature Feature code Setting code Page
*1
DHCP
Import ringtone {1}{7}{0} –73
IP settings
joip message {3}{6}{0} –74
joip MSG alert
(A message alert)
joip service {5}{3}{0} –75
My joip numbers {1}{0}{3} –31
Software version
*1
{1}{2}{1} –57
*1 *2
{2}{2}{6}{1}:
–
<Caller ID[Auto]>
{2}: Manual
{5}{0}{0}{1}: <On> {0}: Off 30
*1
{5}{0}{1} –30
{3}{6}{1}{1}: <On> {0}: Off 75
*1
{7}{2}{4} –57
*1 If you program these settings using one of the handsets, you do not need to
program the same item using another handset.
For product assistance, visit www.globarange.com
For A assistance, visit www.joip.com
53
Page 54

Programming
For the answering system (BB-GT1520/BB-GT1522/BB-GT1540)
Feature Feature code Setting code Page
Call Screening
Number of
*1
Rings
Play All Msg.
(All message
playback)
Play New Msg.
(New message
playback)
Recording
*1
Time
Remote Code
To erase all
(Erasing all
messages)
*1 If you program these settings using one of the handsets, you do not need to
program the same item using another handset.
*2 l Depending on the condition of your network connection, “Toll saver”
may not be used for the IP line.
*1
{3}{1}{0}{1}: <On> {0}: Off 67
IP {2}{1}{1} i {1}{2}-{7}: Rings
TEL {2}{1}{1} i {2}
{3}{2}{4} –62
{3}{2}{3} –62
IP {3}{0}{5} i {1}{1}: 1 Minutes
TEL {3}{0}{5} i {2}
*1
{3}{0}{6} Default: Off 64
*1
{3}{2}{5} –63
<4 Rings>
{0}: Toll saver
{2}: 2 Minutes
{3}: <3 Minutes>
66
*2
66
Adjusting the handset ringtone N
You can change the ringtone heard when an outside call is received for each line. You
can also assign the ringtone you have imported (page 73). The default setting for the
IP line is “Ringtone 2” and for the TEL line is “Ringtone 1”.
1 K i {#}{1}{6}{1}
2 {V}/{^}: Select the desired line.
3 {V}/{^}: Select the desired setting.
4 M i {i}
54
For product assistance, visit www.globarange.com
For A assistance, visit www.joip.com
Page 55

Programming
Alarm N
An alarm will sound for 3 minutes at the set time. Set the date and time beforehand
(page 29).
1 K i {#}{7}{2}{0} i M
2 {V}/{^}: Select the desired alarm mode. i M
Off Turns alarm off. Go to step 5.
Once The alarm sounds once at the set time. Enter the desired date.
Daily An alarm sounds daily at the set time.
3 Set the desired time. i M
4 {V}/{^}: Select the desired ringtone. i M
L We recommend selecting a ringtone different from the ringtone set for
incoming calls.
5 {V}/{^}: “Save” i M i {i}
Note:
L To stop the alarm, press any dial key or place the handset on the base unit or
charger.
L When the handset is in use, the alarm will not sound until the handset enters
standby mode.
L If you are on a call, beeps will sound and E will flash at the set time. The alarm will
not sound until you hang up.
L If you select “Once”, the setting will change to “Off” after the alarm sounds.
L The ringer volume for the alarm follows the higher volume level of the 2 lines (page
52).
L When the ringer volume is set to off for both lines, the handset rings at the low level
for alarm.
Calling code for the handset N k
If you need to dial a special calling code to make calls using the telephone services
of a certain service provider, you can store the calling code in advance and dial it by
simply pressing and holding the {*} while dialling a phone number.
Important:
L To use this feature, you must store the calling code in advance.
Example:
L If you store the calling code “098” and press and hold {*} before dialling
“12345”, the unit dials “09812345” automatically.
Assigning the calling code number
1 K i {#}{2}{5}{9}
2 Enter the desired calling code (24 digits max.). i M i {i}
For product assistance, visit www.globarange.com
For A assistance, visit www.joip.com
55
Page 56

Programming
Making calls using a calling code
When dialling manually:
1 Press and hold {*}.
L The calling code you stored will be displayed.
2 Dial the phone number manually.
3 {TEL}
L You can also make a call by pressing ]. The line set for line selection mode
is automatically selected (page 29).
When dialling from the redial list, phonebook, or caller list:
1 Display the desired phone number in the redial list (page 32), phonebook (page
40), or caller list (page 45).
2 Press and hold {*}.
L The calling code you stored will be displayed before the phone number.
3 {TEL}
L You can also make a call by pressing ]. The line set for line selection mode
is automatically selected (page 29).
Changing the base unit PIN (Personal Identification Number) N
Important:
L If you change the PIN, please make note of your new PIN. The unit will not reveal
the PIN to you. If you forget your PIN, see page 91.
1 K i {#}{1}{3}{2}
2 Enter the current 4-digit base unit PIN (default: “0000”).
3 Enter the new 4-digit base unit PIN.
4 M i {i}
Changing the handset name N
Each handset can be given a customised name (“Bob”, “Kitchen”, etc.). This is useful
when you make intercom calls between handsets. You can also select whether or not
the handset name is displayed in standby mode. The default setting is “Off”. If you
select “On” without entering any handset name, “Handset 1” to “Handset 6” is
displayed.
1 K i {#}{1}{0}{4}
2 Enter the desired name (max. 10 characters; see the character table, page 79).
L If not required, go to step 3.
3 M
4 {V}/{^}: Select the desired setting. i M i {i}
56
For product assistance, visit www.globarange.com
For A assistance, visit www.joip.com
Page 57

Programming
Setting the recall time k N
The recall time depends on your telephone exchange or host PBX. Consult your PBX
supplier if necessary. The default setting is “100 millisecond”. The setting
should stay at “100 millisecond” unless pressing {6} fails to pick up the call
waiting call.
1 K i {#}{1}{2}{1}
2 {V}/{^}: Select the desired setting. i M i {i}
Updating the base unit software N
A may offer new features and improve its software version from time to time. If you
set the base unit software update setting to manual mode at www.joip.com, you need
to download the update when “Update version. Press OK.” is displayed on the
handset.
Important:
L Make sure the 4 indicator is lit in green and the IP indicator is not lit on the base
unit.
1 Press M while “Update version. Press OK.” is displayed.
L The current and new base unit software versions are displayed.
L If you want to download the update later, press W. When you are ready to
download, see “Confirming the base unit software version”, page 57.
2 M
Note:
L The IP indicator and 4 indicator on the base unit flash while downloading. When
the download is complete, the IP indicator goes out while the 4 indicator stops
flashing and changes to steady green.
Confirming the base unit software version
1 K i {#}{7}{2}{4}
L The current base unit software version is displayed.
2 If “Update version?” is displayed, press M to download. If not, press W.
Dial lock
This feature prohibits making outside calls. The default setting is “Off”.
Important:
L When dial lock is turned on, only phone numbers stored in the phonebook
as emergency numbers (numbers stored with a # at the beginning of the
name) can be dialled using the phonebook (page 40). We recommend storing
emergency numbers in the phonebook before using this feature.
L When dial lock is turned on:
– you cannot store, edit, or erase items in the phonebook
– you cannot import those items to the handset (page 73)
For product assistance, visit www.globarange.com
For A assistance, visit www.joip.com
57
Page 58

Programming
To turn dial lock on N
1 K i {#}{2}{5}{1}
2 Enter a 4-digit password.
L This password is required when turning dial lock off. We recommend writing
the password down.
3 Press M 2 times. i {i}
To turn dial lock off N
1 K i {#}{2}{5}{1}
2 Enter the same password that was entered when dial lock was turned on.
3 Press M 2 times. i {i}
Note:
L If you forget the password, see page 91.
Night mode
Night mode allows you to select a block of time during which the handset or base unit
will not ring for outside calls. This feature is useful for times when you do not want to
be disturbed, for example, while sleeping. Night mode can be set independently for
the handset and the base unit (page 58). Set the date and time beforehand (page
29).
Setting the start and end time for night mode N
The default start time is “23:00”. The default end time is “06:00”.
1 To set for the handset:
K i {#}{2}{3}{7}
To set for the base unit (BB-GT1520/BB-GT1522/BB-GT1540):
K i {#}{*}{2}{3}{7}
2 Enter the desired hour and minute you wish to start this feature.
3 Enter the desired hour and minute you wish to end this feature.
4 M i {i}
Turning night mode on/off N
The default setting is “Off”.
1 To set for the handset:
K i {#}{2}{3}{8}
To set for the base unit (BB-GT1520/BB-GT1522/BB-GT1540):
K i {#}{*}{2}{3}{8}
2 {V}/{^}: Select the desired setting. i M i {i}
58
For product assistance, visit www.globarange.com
For A assistance, visit www.joip.com
Page 59

Programming
Setting the ring delay for night mode N
This setting allows the handset or base unit to ring during night mode if the caller
waits long enough. After the selected amount of time passes, the unit will ring. If you
select “No Ringing”, the unit will never ring during night mode. The default setting
is “60 sec.”.
1 To set for the handset:
K i {#}{2}{3}{9}
To set for the base unit (BB-GT1520/BB-GT1522/BB-GT1540):
K i {#}{*}{2}{3}{9}
2 {V}/{^}: Select the desired setting. i M i {i}
Note:
L When the answering system answers the call, this feature does not work.
(BB-GT1520/BB-GT1522/BB-GT1540)
Adjusting the base unit ringer volume (BB-GT1520/
BB-GT1522/BB-GT1540) f
Press {IP/TEL} repeatedly until the display shows the desired line (n or
1
m).
L You cannot set the ringer volume for both lines at the same time.
2 Press {>} or {<} repeatedly to select the desired volume.
L To turn the ringer off, press and hold {<} until the unit beeps.
L To stop ringing, press {■}.
Setting the base unit ringtone (BB-GT1520/BB-GT1522/
BB-GT1540) f
There are 3 tones and 3 melodies.
1 Press {IP/TEL} repeatedly until the display shows the desired line (n or
m).
L You cannot set the ringtone for both lines at the same time.
2 {>}
3 Within 10 seconds, press {<} or {>} repeatedly to select the desired tone.
L To stop ringing, press {■}.
For product assistance, visit www.globarange.com
For A assistance, visit www.joip.com
59
Page 60

Answering System
Answering system
Available model:
BB-GT1520/BB-GT1522/BB-GT1540
This unit contains an answering system
which can answer and record calls for
you when you are unavailable to answer
the phone.
Important:
L Only 1 person can access the
answering system at a time.
L When callers leave messages, the
unit records the day and time of each
message. Make sure the date and
time have been correctly set (page
29).
Memory capacity
The total recording capacity (including
caller messages and voice memos) is
about 45 minutes.
A maximum of 99 messages can be
recorded.
L If the message memory becomes full,
{6} on the base unit flashes rapidly.
Erase unnecessary messages (page
62).
L When the message memory becomes
full, the greeting message is different
depending on your situation:
– If you use the pre-recorded greeting
message, the unit automatically
switches to another pre-recorded
greeting message asking callers to
call again later.
– If you recorded your own greeting
message, the same message is still
announced to callers even though
their messages are not recorded.
Turning the answering system
on f
1
Press {IP/TEL} repeatedly until the
display shows the desired line(s)
(n and/or m).
2 Press {s} to turn on the answering
system.
L The s indicator lights.
Note:
L In standby mode, the display shows
the line(s) set for the answering
system (n and/or m).
Turning the answering system off
Press {s}.
L The s indicator turns off.
Screening calls
While a caller is leaving a message, you
can listen to the call through the base
unit’s speaker. To adjust the speaker
volume, press {<} or {>} repeatedly.
L To answer the call using the base unit,
press the flashing {TEL} or {IP}.
(BB-GT1540)
L To answer the call using the handset,
press {TEL} or {IP}.
Note:
L To turn this feature off, see page 67.
60
For product assistance, visit www.globarange.com
For A assistance, visit www.joip.com
Page 61

Answering System
Greeting message
When the unit answers a call, callers are
greeted by a greeting message. You can
record your own greeting message or
use a pre-recorded greeting message.
Recording your greeting
message f
You can record your own greeting
message (max. 2 minutes) that is played
when the answering system answers a
call.
The greeting messages can be
recorded:
– separately for either the IP line or
landline.
– for both the IP line and landline using
a common greeting.
If you do not record a greeting message,
a pre-recorded greeting message is
used.
1 Press {IP/TEL} repeatedly until the
display shows the desired line(s)
(n and/or m).
2 {dr}
3 Within 10 seconds, press {dr}
again.
4 After the base unit beeps, speak
clearly about 20 cm away from the
MIC.
5 To stop recording, press {■}.
Using a pre-recorded greeting
message
If you erase or do not record your own
greeting message, the unit plays a prerecorded greeting message for callers
and asks them to leave messages.
Playing back the greeting
message f
1
Press {IP/TEL} repeatedly until the
display shows the desired line(s)
(n and/or m).
2 {dg}
Erasing your greeting
message f
Press {IP/TEL} repeatedly until the
1
display shows the desired line(s)
(n and/or m).
2 Press {dg}, and then press {4}
while your greeting message is
playing.
Listening to messages using the base unit
When new messages have been
recorded, {6} on the base unit flashes.
Press {6} (centre of navigator key).
L The base unit plays new messages
including voice memos.
L When you have no new messages,
the base unit plays back all
messages.
Playing back messages for the
desired line(s)
1 Press {IP/TEL} repeatedly until the
display shows the desired line(s)
(n and/or m).
2 Press {6} (centre of navigator key).
Note:
L If you select the line(s), voice memos
are not played (page 63).
For product assistance, visit www.globarange.com
For A assistance, visit www.joip.com
61
Page 62

Answering System
Operating the answering
system
Key Operation
{>}/{<} Adjust the speaker
{<} Repeat a message
{>} Skip a message
{■} Pause a message
{4} Erase message
*1 If pressed within the first 5 seconds of
a message, the previous message is
played.
Erasing all messages
Press {4} 2 times while the unit is not
being used.
L All messages including voice memos
are erased.
Erasing all messages for the desired
line(s)
volume
(during playback)
(during playback)
(during playback)
– To resume playback,
press {6} (centre of
navigator key).
– To stop playback
completely, press
{■} again.
currently playing
*1
1 Press {IP/TEL} repeatedly until the
display shows the desired line(s)
(n and/or m).
2 Press {4} 2 times.
Listening to messages using the handset
When new messages have been
recorded:
– “New message” is displayed.
– The message indicator on the handset
flashes slowly if the message alert
feature is turned on (page 66).
1 K i 0
L The handset plays new messages
including voice memos.
L When you have no new
messages, the handset plays
back all messages.
2 When finished, press {i}.
Note:
L You can also listen to the messages
as follows:
To play new messages:
K i {#}{3}{2}{3}
To play all messages:
K i {#}{3}{2}{4}
L To switch to the receiver, press {s}.
Calling back (Caller ID subscribers
only)
If Caller ID information was received for
the call, you can call the caller back
while listening to the message.
1 Press M during playback.
L To edit the number before calling
back, press {. Then add or
erase digits to the beginning of
the number by pressing the
desired dial key or ^.
2 Press ].
L The indicated line is selected.
L You can also select the line by
pressing {TEL} or {IP}.
62
For product assistance, visit www.globarange.com
For A assistance, visit www.joip.com
Page 63

Operating the answering
system
You can also operate the answering
system by pressing dial keys on the
handset.
To use the following commands:
K i {V}/{^}: “Answer System”
i M
Key Operation
Pushing the
joystick up
or down.
{1} or push
the joystick
left
{2} or push
the joystick
right
{3} Enter the
{4} Play new messages
{5} Play all messages
{9}/O Stop playback
{0} Turn answering
{*}{4}/W Erase message
{*}{5} Erase all messages
{#}{1}{8} Turn answering
{#}{2}{8} Turn answering
{#}{0}{8} Turn answering
Adjust the receiver/
speaker volume
(during playback)
Repeat message
(during playback)
Skip message
(during playback)
“Settings” menu
system off
currently playing
system on for IP line
only
system on for
landline only
system on for both
IP line and landline
*1
Answering System
*1 If pressed within the first 5
seconds of a message, the
previous message is played.
Erasing all messages
1 K i {#}{3}{2}{5}
2 {V}/{^}: “Yes” i M
L When all items have been
erased, “Erased” is displayed.
3 {i}
Voice memo
Recording a voice memo f
You can use the base unit to leave a
voice memo (voice message) for
yourself or someone else (max. 3
minutes). Voice memos can be played
back later with the same operation used
to play back answering system
messages.
1 {7}
2 After the unit beeps, speak clearly
about 20 cm away from the MIC.
3 To stop recording, press {■}.
For product assistance, visit www.globarange.com
For A assistance, visit www.joip.com
63
Page 64

Answering System
Remote operation
Using a touch tone phone, you can call
your phone number from outside and
access the unit to listen to messages.
The unit’s voice guidance prompts you to
press certain dial keys to perform
different operations.
Important:
L In order to operate the answering
system remotely, you must first turn
on remote operation by setting a
remote code (page 64). This code
must be entered each time you
operate the answering system
remotely.
L To call the unit via the IP line from a
landline phone or mobile phone, you
need an additional phone number you
subscribed at www.joip.com other
than the joip number (page 4).
turned off (page 60). This call may be
answered before the ring delay
feature of the night mode (page 59)
activates. You need to select “30
sec.” for activating the ring delay
feature.
Using the answering system
remotely
Dial your phone number from a
1
touch tone phone.
2 After the greeting message starts,
enter your remote code (page 64).
L The unit plays back new
messages.
3 Control the unit using remote
commands (page 65).
4 When finished, hang up.
Note:
L When you press a key, press firmly.
Turning remote operation on
N
A 3-digit remote code must be entered
when operating the answering system
remotely. This code prevents
unauthorised parties from listening to
your messages remotely. After you store
your remote code, remote operation is
possible. The default setting is “Off”.
1 K i {#}{3}{0}{6}
2 To turn on remote operation, enter a
3-digit remote code. Enter the
desired 3-digit remote code.
L To turn off remote operation,
press {*}.
3 M i {i}
Note:
L If you have stored the remote code,
you can turn on the answering system
by calling the unit even when it is
64
For product assistance, visit www.globarange.com
For A assistance, visit www.joip.com
Voice guidance
During remote operation, the unit’s voice
guidance starts and prompts you to
press {1} to perform a specific
operation, or press {2} to listen to more
available operations. Operations are
presented by voice guidance in the
following order:
– Play back all messages
– Play back new messages
– Record your message
– Erase all messages
– Record your greeting message
Note:
L If you do not press any dial keys within
10 seconds after a voice guidance
prompt, the unit disconnects your call.
Page 65

Remote commands
You can press dial keys to access
certain answering system functions
without waiting for the voice guidance to
prompt you.
Key Operation
{1} Repeat message
(during playback)
{2} Skip message (during
playback)
{4} Play new messages
{5} Play all messages
{9} Stop recording
Stop playback
{0} Turn answering
system off
{*}{4} Erase message
currently playing
{*}{5} Erase all messages
{#}{1}{7} Record a greeting
message for IP line
only.
{#}{2}{7} Record a greeting
message for landline
only.
{#}{0}{7} Record a common
greeting message for
both IP line and
landline.
{#}{1}{8} Turn answering
system on for IP line
only.
{#}{2}{8} Turn answering
system on for landline
only.
{#}{0}{8} Turn answering
system on for both IP
line and landline.
{*}{#} End remote operation
(or hang up).
*1
*2
Answering System
*1 If pressed within the first 5
seconds of a message, the
previous message is played.
*2 To resume operation, enter a
remote command within 15
seconds, or the voice guidance
starts.
Turning on the answering
system remotely
If the answering system is off, you can
turn it on remotely by calling the selected
line in “Turning the answering system on
f”, page 60.
1 Dial the phone number from a touch
tone phone.
2 Let the phone ring 20 times.
L A long beep will be heard.
3 Enter your remote access code
within 10 seconds after the long
beep.
L The unit answers your call with
the greeting message.
L You can hang up, or enter your
remote code again and begin
remote operation (page 64).
Skipping the greeting
message to leave a message
You can leave a message just as any
outside caller can. Call your phone
number. When the answering system
picks up, press {*} to skip the greeting
message and record your message after
the beep.
For product assistance, visit www.globarange.com
For A assistance, visit www.joip.com
65
Page 66

Answering System
Answering system settings
Number of rings N
You can change the number of times the
phone rings before the unit answers
calls. The default setting is “4 Rings”.
“Toll saver”
the 2nd ring when new messages have
been recorded, and on the 5th ring when
there are no new messages. If you call
your phone from outside to listen to new
messages (page 64), you will know that
there are no new messages when the
phone rings for the 3rd time. You can
then hang up without being charged for
the call.
1 K i {#}{2}{1}{1}
2 {V}/{^}: Select the desired line.
3 {V}/{^}: Select the desired setting.
4 M i {i}
*1 l Depending on the condition of
your network connection, “Toll
saver” may not be used for the IP
line.
For Voice Mail service subscribers
Please note the following:
L To use the Voice Mail service provided
by your landline service provider/A
rather than the unit’s answering
system, turn off the answering system
(page 60).
L To use this unit’s answering system
rather than the Voice Mail service,
please contact your landline service
provider/A service provider to
deactivate your Voice Mail service.
If your service provider cannot do this:
– Set this unit’s “Number of
Rings” setting so that this unit’s
*1
: The unit answers on
answering system answers calls
before the Voice Mail service does.
It is necessary to check the number
of rings required to activate the
Voice Mail service before changing
this setting.
– Change the number of rings of the
Voice Mail service so that the
answering system can answer the
call first. To do so, consult your
landline service provider/A
service provider.
Caller’s recording time N
You can change the maximum message
recording time allotted to each caller.
The default setting is “3 Minutes”.
1 K i {#}{3}{0}{5}
2 {V}/{^}: Select the desired line.
3 {V}/{^}: Select the desired setting.
4 M i {i}
Message alert N
You can select whether or not the
message indicator on the handset
flashes (slowly) when new messages
are recorded. The default setting is
“Off”.
Important:
L If there are new Voice Mail messages
(page 68), the message indicator on
the handset also flashes slowly.
1 K i {#}{3}{4}{0}
2 {V}/{^}: Select the desired setting.
3 M i {i}
Note:
L While message alert feature is on, the
battery operating time is shortened
(page 22).
66
For product assistance, visit www.globarange.com
For A assistance, visit www.joip.com
Page 67

Call screening N
This feature allows you to listen to a
message from the base unit while the
answering system is recording the
message. The default setting is “On”.
1 K i {#}{3}{1}{0}
2 {V}/{^}: Select the desired setting.
3 M i {i}
Answering System
For product assistance, visit www.globarange.com
For A assistance, visit www.joip.com
67
Page 68

Voice Mail Service
Using Voice Mail service
This unit is compatible with Voice Mail
services offered by your landline service
provider and A. After you subscribe to
these services, the Voice Mail system of
your service provider will answer calls
for you when you are unavailable to
answer the phone or when your line is
busy. Messages are recorded by your
Voice Mail service provider, not your
telephone.
L k Please contact your landline
service provider for details.
L l Please visit www.joip.com or
contact the A service provider for
details.
Important:
L To use the Voice Mail service rather
than the unit’s answering system, turn
off the answering system (page 60).
Voice Mail message indication l
The unit lets you know that you have
new Voice Mail messages in the
following ways:
– The 0 indicator on the base unit
flashes.
– “VoiceMail:joip” is displayed on
the handset. “VoiceMail:joip”
indicates the messages received by
A.
– The message indicator on the handset
flashes slowly if the message alert
feature is turned on (page 68).
To listen to your Voice Mail messages
received by A, access the A Vo ice
Mail from the A service menu using
the handset (page 75).
Note:
L If the handset or base unit still
indicates there are new messages
68
For product assistance, visit www.globarange.com
For A assistance, visit www.joip.com
even after you have listened to all new
messages, turn it off by pressing and
holding {i} on the handset until a
beep sounds.
Message alert N
You can select whether or not the
message indicator on the handset
flashes (slowly) when there are new
recorded messages in the Voice Mail
system. The default setting is “Off”.
Important:
L If there are new messages in the
answering system (page 60), the
message indicator on the handset
also flashes slowly. (BB-GT1520/BBGT1522/BB-GT1540)
1 K i {#}{3}{4}{0}
2 {V}/{^}: Select the desired setting.
3 M i {i}
Note:
L While message alert feature is on, the
battery operating time is shortened
(page 22).
Page 69

Intercom features between handsets
Intercom calls
Intercom calls can be made between
handsets.
Note:
L If you receive an outside call while
talking on the intercom, the interrupt
tone sounds. To answer the call, press
{TEL} or {IP}. To turn the interrupt
tone off, see page 51.
L When paging, the paged handset
beeps for 1 minute.
Making an intercom call
1 {INT}
2 To page a handset, enter its
extension number ({1} – {6}).
L To stop paging, press {i}.
3 When you finish talking, press {i}.
Answering an intercom call
1 Press ] to answer the page.
2 When you finish talking, press {i}.
Note:
L The ringer volume for intercom calls
follows the higher volume level of the
2 lines (page 52).
L When the ringer volume is set to off for
both lines, the handset rings at a low
level for intercom calls.
Transferring calls, conference
calls
Outside calls can be transferred
between 2 handsets. 2 handsets can
have a conference call with an outside
party.
For product assistance, visit www.globarange.com
For A assistance, visit www.joip.com
Intercom Features
1 During an outside call, press {INT}
to put the call on hold.
2 To page a handset, enter its
extension number ({1} – {6}).
3 Wait for the paged party to answer.
L If the paged party does not
answer, press {TEL} or {IP} to
return to the outside call.
4 To complete the transfer:
Press {i}.
L The outside call is being routed to
the handset.
To make a conference call:
Press w.
L To leave the conference, press
{i}. The other 2 parties can
continue the conversation.
L To put the outside call on hold,
press {a}. To resume the
conference, press w.
Answering a transferred call
Press ] to answer the page.
L After the paging party disconnects,
you can talk to the outside caller.
Auto intercom/Room monitor
This feature allows you to:
– answer an intercom call without
pressing any buttons on the handset.
– listen to the sound in a room where
the handset is located.
Turning auto intercom on/off
“Off” (Default): Turns this feature off.
“On (Ringer On)”: When an intercom
call is received, the handset rings 2
times then the speakerphone is
automatically turned on.
“On (Ringer Off)”: When an
intercom call is received, the handset
does not ring and the speakerphone is
automatically turned on. This allows you
to easily monitor a baby’s room, for
69
Page 70

Intercom Features
example, from different areas of the
house.
1 K i {#}{2}{7}{3}
2 {V}/{^}: Select the desired setting.
3 M i {i}
Note:
L Auto intercom cannot be used when:
– your handset is receiving a
transferred outside call.
– all handsets are being paged by the
base unit.
Answering an intercom call using
auto intercom
1 When you are paged by another
handset, speak into the
microphone.
L To switch to the receiver, press
{s}.
2 To end the intercom, press {i}.
Monitoring audio in a room
You can listen to the sound in a room
where another handset is located.
Important:
L Before using this feature, set auto
intercom on the destination handset to
“On (Ringer Off)” to allow access
by other handsets.
1 Call the destination handset (page
69).
L You can listen to the audio.
2 To mute your sound output, press
1 if necessary.
3 Press {i} to stop monitoring.
Intercom features between the handset and base unit
Available model:
BB-GT1520/BB-GT1522/BB-GT1540
Intercom calls
Intercom calls can be made between the
handset and base unit.
Note:
L If you receive an outside call while
talking on the intercom, the interrupt
tone sounds. To answer the call:
–press {TEL} or {IP} on the handset.
–press {TEL} or {IP} on the base
unit. (BB-GT1540)
To turn the interrupt tone off, see page
51.
L When paging unit(s) for an intercom
call, the paged unit(s) beeps for 1
minute.
Making an intercom call
Handset
1 {INT}
2 To page the base unit, press {0}.
L To stop paging, press {i}.
3 When you finish talking, press {i}.
Base unit
BB-GT1520/BB-GT1522
1 {x}
L All handsets beep for 1 minute.
L To stop paging, press {x}.
2 When you finish talking, press {x}.
70
For product assistance, visit www.globarange.com
For A assistance, visit www.joip.com
Page 71

Note:
L You can locate a misplaced handset
by paging it.
BB-GT1540
1 {x}
2 To page a specific handset, enter its
extension number ({1} – {6}).
To page all handsets, press {0} or
wait for a few seconds.
L The paged handset(s) beeps for 1
minute.
L To stop paging, press {x}.
3 When you finish talking, press {x}.
Note:
L You can locate a misplaced handset
by paging it.
Answering an intercom call
Handset
1 Press ] to answer the page.
2 When you finish talking, press {i}.
Base unit
1 Press {x} to answer the page.
2 When you finish talking, press {x}.
Note for handset and base unit:
L The ringer volume for intercom calls
follows the higher volume level of the
2 lines (page 52, 59).
L When the ringer volume is set to off for
both lines, the handset or base unit
rings at a low level for intercom calls.
Answering an intercom call using
auto intercom
Before using the auto intercom, turn auto
intercom on (page 69).
Handset
1 When you are paged by the base
unit, speak into the microphone.
Intercom Features
L To switch to the receiver, press
{s}.
2 To end the intercom, press {i}.
Monitoring audio in a room using
auto intercom (BB-GT1540)
Base unit
You can listen to the sound in a room
where the handset is located using the
auto intercom (page 69).
Important:
L Before using this feature, set auto
intercom on the destination handset to
“On (Ringer Off)” to allow access
by the base unit (page 69).
1 Call the destination handset (page
71).
L You can listen to the audio.
2 To mute your sound output, press
{T} if necessary.
3 Press {x} to stop monitoring.
Transferring calls, conference
calls (BB-GT1540)
Outside calls can be transferred
between the handset and base unit. The
handset and base unit can have a
conference call with an outside party.
Handset
1 During an outside call, press {INT}
to put the call on hold.
2 To page the base unit, press {0}.
3 Wait for the paged party to answer.
L If the paged party does not
answer, press {TEL} or {IP} to
return to the outside call.
4 To complete the transfer:
Press {i}.
L The outside call is being routed to
the base unit.
For product assistance, visit www.globarange.com
For A assistance, visit www.joip.com
71
Page 72

Intercom Features
To make a conference call:
Press w.
L To leave the conference, press
{i}. The other 2 parties can
continue the conversation.
L To put the outside call on hold,
press {a}. To resume the
conference, press w.
Base unit
1 During an outside call, press {x} to
put the call on hold.
2 To page a specific handset, enter its
extension number ({1} – {6}).
To page all handsets, press {0} or
wait for a few seconds.
L Even if you call all handsets, only
the handset user who answers
first can take the transferred call.
3 Wait for the paged party to answer.
L If the paged party does not
answer, press {x} to return to the
outside call.
4 To complete the transfer:
Press {s}.
L The outside call is being routed to
the handset.
To make a conference call:
Press {5}.
L To leave the conference, press
{s}. The other 2 parties can
continue the conversation.
L To put the outside call on hold,
press {a}. To resume the
conference, press {5}.
Note for handset and base unit:
L After the paging party disconnects,
you can talk to the outside caller.
Answering a transferred call
Handset
Press ] to answer the page.
Base unit
Press {s} to answer the page.
72
For product assistance, visit www.globarange.com
For A assistance, visit www.joip.com
Page 73

Using A service features
A service offers not only IP phone
features but other various features such
as ringtones, text messages, community
directory, and more. For further
information, visit the A website at
www.joip.com
Importing downloaded
phonebook items to the
handset N
You can add and edit phonebook items
by accessing your account on the A
website (www.joip.com), then
downloading your web phonebook to the
base unit.
“New phonebook” is displayed after
new phonebook items are downloaded.
Import them to a handset.
1 n i K
2 {V}/{^}: “Import phonebook”
3 M
Note:
L “New phonebook” disappears from
all handsets’ displays after the
handset imported the phonebook
items. Other handset users can import
the phonebook items separately.
Importing downloaded
ringtones to the handset N
You can download a maximum of 3
ringtones to the base unit using the A
website (www.joip.com). After new
ringtones are downloaded, “New
ringer” is displayed on the handset.
You can import these ringtones to the
handset. A maximum of 3 imported
ringtones can be stored in a handset at
A Service
one time. You can also set them as the
handset ringer(s).
1 K i {#}{1}{7}{0}
2 {V}/{^}: Select the desired ringtone.
3 M
L “Receiving” is displayed on the
handset while importing.
L When the item has been
imported, “Completed” is
displayed.
4 To assign the ringtone to a line:
{V}/{^}: “Yes” i M
Not to assign the ringtone to a line:
{V}/{^}: “No” i M i Go to
step 6.
5 {V}/{^}: Select the desired line.
L To import other ringtones, repeat
from step 2.
6 {i}
Note:
L “New ringer” disappears from all
handset displays after step 1. Other
handset users can import the
ringtones separately.
L To assign a ringtone to a line later, see
page 54.
L To use a ringtone for a ringer ID of a
handset phonebook item, see page
40, 41.
L To use a ringtone for the alarm, see
page 55.
L In step 3, if “Overwrite?” is
displayed, 3 ringtones have already
been imported. To overwrite with the
new one, select a ringtone you do not
need. i M
L If the overwritten ringtone was used
for:
– a handset ringer, “Ringtone 1”
(landline) or “Ringtone 2” (IP
line) is used instead
For product assistance, visit www.globarange.com
For A assistance, visit www.joip.com
73
Page 74

A Service
– a ringer ID of a handset phonebook
item, the ringer set on page 54 is
used instead
– the alarm, “Ringtone 1” is used
instead
L Downloaded ringtones are
temporarily stored in the base unit.
When a 4th ringtone is downloaded to
the base unit, it replaces the oldest
one. All ringtones will be erased by
pressing {IP RESET} (page 78).
A text messages N
You can view the A text messages
using a handset.
The unit can receive a maximum of 88
messages. The number of received
messages may decrease depending on
the size of each message as follows:
Size of message Maximum
320 characters
12 or less
characters
*1 The maximum number of characters
per message
Note:
L The unit erases the oldest message
when the message memory is full. We
recommend you protect the
messages you want to keep (page
74).
Viewing A text messages
When new text messages have been
received:
– “New joip message” is displayed if
the A text message alert is on
(page 75).
– The message indicator on the handset
also flashes slowly if both the A text
message alert and the message alert
*1
number of
messages
14
88
for the Voice Mail or answering
system are on (page 66, 68).
1 K i {#}{3}{6}{0}
L The numbers of the new
messages and total messages
are displayed.
2 {V}/{^}: Select the desired item.
i M
L To view another text message,
press U and repeat step 2.
3 {i}
Note:
L A Q is displayed in the message list
for a message which has already
been viewed by any handset.
L If an arrow (>) is displayed, some
information is not shown. Push the
joystick right to see the remaining
information. To return to the previous
display, push the joystick left.
L “New joip message” disappears
from all handset displays after viewing
all new A text messages.
Protecting a A text message
You can protect a maximum of 8
messages. When the message memory
is full, protected messages are not
erased until you release the protection.
Press | while viewing a message.
L To release the protection, press |
again.
Erasing a A text message
1 While viewing the message list or
message, press W.
2 {V}/{^}: “Yes”
3 M i {i}
Erasing all A text messages
You can erase all text messages except
protected messages (page 74).
1 K i {#}{3}{6}{0}
74
For product assistance, visit www.globarange.com
For A assistance, visit www.joip.com
Page 75

2 While viewing the number of the
total text messages, press W.
3 {V}/{^}: “Yes”
4 M i {i}
Turning the A text message alert
on/off
You can select whether or not “New
joip message” is displayed on the
handset when new A messages have
been received. The default setting is
“On”.
1 K i {#}{3}{6}{1}
2 {V}/{^}: Select the desired setting.
3 M i {i}
“joip service” menu N
Some A services such as Voice Mail
can be accessed from the “joip
service” menu using the handset.
This menu can be downloaded from
A. Select the desired service from the
“joip service” menu. The access
number is automatically dialled via the IP
line. For further information about the
services, visit www.joip.com
1 K i {#}{5}{3}{0}
L The available menu is displayed.
2 {V}/{^}: Select the desired item. i
M
L The unit dials to access the
service.
3 When finished, press {i}.
A Service
For product assistance, visit www.globarange.com
For A assistance, visit www.joip.com
75
Page 76

Useful Information
Belt clip
You can hang the handset on your belt or
pocket using the supplied belt clip.
To attach the belt clip
To remove the belt clip
While pressing the top of the clip (A),
pull the right edge in the direction of the
arrow (B).
B
A
Wall mounting for charger
Available model:
BB-GT1522
1 Drive the screws (not supplied) into
the wall.
25.4 mm
Screws
(220-240 V, 50 Hz)
2 Mount the charger (A), then slide it
down (B) and to the right (C) until it
is secure.
A
B
C
76
For product assistance, visit www.globarange.com
For A assistance, visit www.joip.com
Page 77

Registering a handset
The supplied handset and base unit are
pre-registered. If for some reason the
handset is not registered to the base
unit, register the handset.
Important:
L If you have already deregistered the
handset, perform steps 2 and 3 only.
1 Handset:
K i {#}{1}{3}{0}
2 Base unit:
BB-GT1500
Press and hold {x} until the 4
indicator flashes in red.
BB-GT1520/BB-GT1522/BBGT1540
Press and hold {x} until the
registration tone sounds and the 4
indicator flashes in red.
L If all registered handsets start
ringing, stop ringing by pressing
the same button. Then repeat this
step.
L After the 4 indicator starts
flashing in red, the rest of the
procedure must be completed
within 90 seconds.
3 Handset:
[
4 Wait until “Enter Base PIN” is
displayed, then enter the base unit
PIN (default: “0000”), then press
M.
L If you forget your PIN, see page
91.
L When the handset has been
registered successfully, _ will
change to w. If the keytone is
turned on (page 52), a
confirmation tone will be heard.
Useful Information
Registering an additional handset
See page 9 for information on the
available model. Start from step 2.
Deregistering a handset
Handset
K i {#}{1}{3}{1}
1
2 {3}{3}{5} i M
3 {V}/{^}: Select the handset you
want to cancel. i M
4 {V}/{^}: “Yes” i M
L When you cancel a different
handset than the one you are now
using, press {i} to exit.
Base unit
BB-GT1540
1 Press and hold {x} until the
registration tone sounds, and the 4
indicator flashes in red.
2 Press and hold the handset number
({1} - {6}) that you want to cancel
until a confirmation tone sounds.
For product assistance, visit www.globarange.com
For A assistance, visit www.joip.com
77
Page 78

Useful Information
IP RESET button
Using the {IP RESET} button on the
bottom of the base unit, you can reset
the Internet connection settings.
– DHCP connection mode is returned to
“On” (default).
– If you set the static IP address and
other settings (“Subnet mask”,
“Default gateway”, “DNS1”,
“DNS2”), they are erased.
– The Terms of Use for the A
services you previously agreed to is
cancelled. You need to agree to it
again using the handset.
IP RESET
{IP RESET}
1 Make sure that the AC adaptor is
connected.
Press and hold {IP RESET} for
about 7 seconds with a pointed
object such as a pen.
2 “Please read joip Terms of
Use. Agree?” is displayed on the
handset. Read the Terms of Use for
the A services on the supplied
leaflet or at www.joip.com and press
M.
3 Wait until the 4 indicator turns
green.
L If necessary, set the Internet
connection settings again (page
30).
Note:
L Ringtones and phonebook data
downloaded from the A website
78
For product assistance, visit www.globarange.com
For A assistance, visit www.joip.com
(www.joip.com) to the base unit are
erased. If necessary, import ringtones
and phonebook data to the handset
before pressing {IP RESET} (page
73).
L A text messages are not affected.
L Entries in the handset phonebook,
caller list, and redial list are not
affected.
L The unit’s settings (excluding internet
connection settings) are not reset to
default.
Page 79

Useful Information
Character entry
The dial keys are used to enter characters and numbers. Each dial key has multiple
characters assigned to it. The available character entry modes are Alphabet (ABC),
Numeric (0-9), Greek (F), Extended 1 (G ), Extended 2 (H), and Cyrillic
(I). When in these entry modes except Numeric, you can select which character
is entered by pressing a dial key repeatedly.
– Use the joystick to move the cursor.
– Press dial keys to enter characters and numbers.
–Press ^ to erase the character or number highlighted by the cursor. Press and
hold ^ to erase all characters or numbers.
–Press {*} to switch between uppercase and lowercase.
L To enter another character located on the same dial key, push the joystick right to
move the cursor to the next space, then press the appropriate dial key.
Character entry modes
Several character entry modes can be used when entering text. The characters that
can be entered depend on the entry mode.
Characters available in each character entry mode
When a character entry screen is displayed on the handset:
/ i Select a character entry mode. i M
Alphabet character table (ABC)
Numeric entry table (0-9)
Greek character table (M)
For product assistance, visit www.globarange.com
For A assistance, visit www.joip.com
79
Page 80

Useful Information
Extended 1 character table (N)
Extended 2 character table (O)
Cyrillic character table (P)
80
For product assistance, visit www.globarange.com
For A assistance, visit www.joip.com
Page 81

Useful Information
Error messages
If the unit detects a problem, one of the following messages is shown on the handset
display.
Display message Cause/solution
Busy L The called handset or base unit is in use.
L Privacy mode is on for the call you tried to join
(page 34).
L Other units are in use and the system is busy.
Try again later.
L The line is in use. Wait until i or S
disappears from the handset display.
Free calls! Plug
internet cable.
www.joip.com
L Confirm the Ethernet cable is properly
connected (page 18).
L Check the base unit’s IP address using the
handset: K i {#}{5}{0}{1}
If necessary, change the base unit’s static IP
address (page 30).
L Check your network devices’ (router, modem,
etc.) connections. If the connections are made
properly but the problem persists, check your
network devices’ (router, modem, etc.)
settings.
L If you cannot access Internet Web pages
using your computer, check to see if your
Internet service provider is having connection
issues in your area.
L Check your device connections with the
installation instructions (page 18). The order
in which you turn on the devices is important.
L Many installation issues can be resolved by
resetting all the equipment. First, shut down
your modem, router, base unit, and computer.
Then turn the devices back on one at a time in
this order: modem, router, base unit,
computer.
L For more troubleshooting help, visit
www.joip.com or contact the A service
provider.
L You have not received the A number.
Install the base unit to your local network
(page 18, 30).
For product assistance, visit www.globarange.com
For A assistance, visit www.joip.com
81
Page 82

Useful Information
Display message Cause/solution
Dial locked L Dial lock is turned on. To turn it off, see page
58.
Error L The software update of the base unit has
Failed L The handset you tried to copy phonebook
Incomplete L The destination handset’s phonebook
Invalid setting L The Internet connection settings are not
joip message
Memory Empty
Memory Full
*1
Memory full. Memory
limited to 8 MSGs.
Memory Empty L Your phonebook or redial list is empty.
Messages full
*1
failed. Confirm that the IP line is not being
used, and try again (page 57).
L The entered password was wrong in
programming dial lock. Enter the correct
password.
items to is in use.
L The handset you tried to copy phonebook
items to is out of area.
memory is full. Erase unnecessary items from
the destination handset’s phonebook (page
41).
correct. Enter the correct settings (page 30).
L There are no A text messages (page 74).
L The message memory for the answering
system is full. Erase unnecessary messages
(page 62).
L The maximum number of A text messages
you can protect is 8. To release a protected
text message, see page 74.
L There is no downloaded data (phonebook
data, ringtone data, or A service menu
data) in the base unit.
L The unit is not registered to the A service.
Check the connections (page 18) and confirm
the 4 indicator lights in green (page 23).
L The message memory for the answering
system is full. Erase unnecessary messages
(page 62).
82
For product assistance, visit www.globarange.com
For A assistance, visit www.joip.com
Page 83

Useful Information
Display message Cause/solution
No link to base. Move
closer to base, try
again.
Phonebook Memory Full L There is no space to store new items in the
Please hang up and try
again.
Please read joip Terms
of Use. Agree?
This message is not
erasable.
This message contains
invalid characters.
*1 BB-GT1520/BB-GT1522/BB-GT1540
L The handset has lost communication with the
base unit. Move closer to the base unit, and
try again.
L Unplug the base unit’s AC adaptor to reset the
unit. Reconnect the adaptor and try again.
L The handset’s registration may have been
cancelled. Re-register the handset (page 77).
phonebook. Erase unnecessary items (page
41).
L A handset button was pressed while the
handset was on the base unit or charger. Lift
the handset and press the button again.
L You have not agreed to the Terms of Use for
the A services. To use the A IP line, you
need to agree to it using the handset (page
19).
L The protected messages remain. All other
messages are erased.
L The characters the unit cannot recognise are
replaced with “_”.
For product assistance, visit www.globarange.com
For A assistance, visit www.joip.com
83
Page 84

Useful Information
Troubleshooting
General use
Problem Cause/solution
The unit does not work. L Make sure the battery is installed correctly
l I cannot hear a dial tone
for the IP line.
and fully charged (page 19, 21).
L Check the connections (page 18).
L Unplug the base unit’s AC adaptor to reset the
unit. Reconnect the adaptor and try again.
L The handset has not been registered to the
base unit. Register the handset (page 77).
L Confirm the Ethernet cable is properly
connected (page 18).
L You have not agreed to the Terms of Use for
the A services. To use the A IP line, you
need to agree to it using the handset (page
19).
L Check the base unit’s IP address using the
handset: K i {#}{5}{0}{1}
If necessary, change the base unit’s static IP
address (page 30).
L Check your network devices’ (router, modem,
etc.) connections. If the connections are made
properly but the problem persists, check your
network devices’ (router, modem, etc.)
settings.
L Many installation issues can be resolved by
resetting all the equipment. First, shut down
your modem, router, base unit, and computer.
Then turn the devices back on one at a time in
this order: modem, router, base unit,
computer.
L If you cannot access Internet Web pages
using your computer, check to see if your
Internet service provider is having connection
issues in your area.
L For more troubleshooting help, visit
www.joip.com or contact the A service
provider.
84
For product assistance, visit www.globarange.com
For A assistance, visit www.joip.com
Page 85

Problem Cause/solution
k I cannot hear a dial tone
for the landline.
The indicator on the top right of
the handset flashes slowly.
I have changed the display
language to a language I
cannot read.
*1 BB-GT1520/BB-GT1522/BB-GT1540
L Confirm the telephone line cord is properly
connected (page 18).
L Disconnect the unit from the telephone line
and connect a known working telephone. If
the working telephone operates properly,
contact Panasonic service personnel to have
the unit repaired. If the working telephone
does not operate properly, contact your
landline service provider.
L New messages have been received. Listen to
the new messages (page 61).
L l New Voice Mail messages have been
recorded. Listen to the new Voice Mail
messages, see page 68.
L New A text messages have been received.
To view the text messages, see page 74.
L Change the display language (page 29).
Useful Information
*1
For product assistance, visit www.globarange.com
For A assistance, visit www.joip.com
85
Page 86

Useful Information
4 (Status) indicator
Problem Cause/solution
The 4 indicator continues
flashing in amber.
The 4 indicator flashes in
amber rapidly although the IP
address was acquired.
The 4 indicator lights in
amber although the Ethernet
cable is connected properly.
L An IP address may not have been acquired or
the static IP address is not appropriate. Check
the base unit’s IP address using the handset:
K i {#}{5}{0}{1}
– If necessary, change the base unit’s static
IP address (page 30).
– If an IP address was not acquired, check
your network devices’ (router, modem, etc.)
connections. If the connections are made
properly but the problem persists, check
your network devices’ (router, modem, etc.)
settings.
L Many installation issues can be resolved by
resetting all the equipment. First, shut down
your modem, router, base unit, and computer.
Then turn the devices back on one at a time in
this order: modem, router, base unit,
computer.
L If you cannot access Internet Web pages
using your computer, check to see if your
Internet service provider is having connection
issues in your area.
L For more troubleshooting help, visit
www.joip.com or contact the A service
provider.
L Unplug the base unit’s AC adaptor to reset the
unit, then reconnect the AC adaptor. If the 4
indicator is still flashing in amber rapidly, there
may be a problem with the base unit
hardware. Contact Panasonic service
personnel.
L The base unit’s IP address may conflict with
the IP addresses of other devices on your
local network. Check the base unit’s static IP
address using the handset: K i
{#}{5}{0}{1}, then check the IP addresses
of the other devices on your local network. If
necessary, change the base unit’s static IP
address (page 30).
86
For product assistance, visit www.globarange.com
For A assistance, visit www.joip.com
Page 87

Useful Information
Problem Cause/solution
The 4 indicator is off. L The power of the base unit is off.
L You have not agreed to the Terms of Use for
the A services. To use the A IP line, you
need to agree to it using the handset (page
19).
L The Ethernet cable is not connected properly.
Connect it.
L Your network devices (hub, router, etc.) are
turned off. Check the LEDs for the link status
of the devices.
Programmable settings
Problem Cause/solution
I cannot program items. L Programming is not possible while either
While programming, the
handset starts to ring.
I cannot register a handset to a
base unit.
Battery recharge
Problem Cause/solution
I fully charged the battery, but
3 continues to flash, or 4
is displayed.
The handset display is blank. L Confirm that the battery are properly installed.
another handset or the base unit is being
used. Try again later.
L Programming is not possible while the base
unit is downloading data from the A
service. Wait until the 4 indicator stops
flashing and lights in steady green.
L A call is being received. Answer the call and
start again after hanging up.
L The maximum number of handsets (6) are
already registered to the base unit. Cancel
unused handset registrations from the base
unit (page 77).
L You entered the wrong PIN number. If you
forget your PIN, see page 91.
L Place the handset and the base unit away
from other electrical appliances.
L Clean the charge contacts and charge again
(page 21).
L The battery may need to be replaced with new
ones (page 22).
L Fully charge the battery (page 21).
For product assistance, visit www.globarange.com
For A assistance, visit www.joip.com
87
Page 88

Useful Information
Making/answering calls, intercom
Problem Cause/solution
w is displayed, but I cannot
make a call.
Static is heard, sound cuts in
and out. Interference from
other electrical units.
The handset does not ring. L The ringer volume is turned off. Adjust it (page
The base unit does not ring.
I cannot make a call. L l Check if the 4 indicator is lit in green.
L The handset and base unit could not
communicate for some reason, such as
interference from other electrical appliances.
Perform the following:
– Move the handset and base unit away from
other electrical appliances such as
antennas and mobile phones.
– Move closer to the base unit.
L Move the handset and base unit away from
other electrical appliances.
L Move closer to the base unit.
L k Your unit is connected to a landline with
DSL service. We recommend connecting a
filter (contact your DSL service provider) to
the telephone line between the base unit and
the telephone line jack.
52).
L The night mode feature is turned on. To turn it
off, see page 58.
*1
L The ringer volume is turned off. Adjust it (page
59).
L The night mode feature is turned on. To turn it
off, see page 58.
If it is not lit in green, see “4 (Status)
indicator” (page 86).
L l You cannot make a call while the base
unit is downloading the software update. Wait
until the 4 indicator stops flashing and
changes to steady green.
L You may have selected the wrong line by
pressing {TEL} or {IP}. Select the appropriate
line to call the phone number.
L The base unit or another handset is in use. Try
again later.
L Dial lock is turned on. To turn it off, see page
58.
88
For product assistance, visit www.globarange.com
For A assistance, visit www.joip.com
Page 89

Useful Information
Problem Cause/solution
l I cannot make a call
using a mobile phone.
*1
I cannot page the handset. L The paged handset is too far from the base
I cannot page the base unit.
l I answered a call when
the phone rang, but the call
was disconnected.
l During a conversation,
the following occurs:
– noise is heard.
– the sound is interrupted.
– the sound is delayed.
*1 BB-GT1520/BB-GT1522/BB-GT1540
Caller ID
Problem Cause/solution
The handset does not display
the caller information.
L The IP line or the answering system is in use.
Try again later.
L The remote code of the answering system is
the default setting. You need to set your own
remote code for security (page 64).
unit.
L The paged handset is in use. Try again later.
*1
L The base unit is in use. Try again later.
L The ringer may continue to sound for several
seconds after the caller hangs up because of
the time lag of the signal transmission.
L It may be caused by someone using a
computer connected to the same network as
the unit.
L Confirm the speed of Internet connection. The
unit requires 100 kbps for each upstream and
downstream. If less than 100 kbps is
provided, visit www.joip.com or contact the
A service provider.
L You have not subscribed to Caller ID.
k Contact your landline service provider
to subscribe.
l Visit www.joip.com or contact the A
service provider to subscribe.
L The caller requested not to send caller
information (page 44).
L k Generally, caller information is
displayed from the 2nd ring.
L k Your unit is connected to a landline with
DSL service. We recommend connecting a
filter (contact your DSL service provider) to
the telephone line between the base unit and
the telephone line jack.
L k Other telephone equipment may be
interfering with this unit. Disconnect the other
equipment and try again.
For product assistance, visit www.globarange.com
For A assistance, visit www.joip.com
89
Page 90

Useful Information
Problem Cause/solution
I cannot access the caller list. L Someone is viewing the caller list from
another handset.
A service features
Problem Cause/solution
I cannot import phonebook
data or ringtone data to the
handset.
I cannot view the A text
message.
Answering system (BB-GT1520/BB-GT1522/BB-GT1540)
Problem Cause/solution
I cannot listen to messages
from a remote location.
The unit does not record new
messages.
L While the base unit is downloading data
excluding the base unit software, you cannot
import phonebook data or ringtone data to the
handset. Wait until the 4 indicator stops
flashing and lights in steady green.
L Someone is viewing a A text message from
another handset.
L While the base unit is downloading data
excluding the base unit software, you cannot
view the A text message. Wait until the 4
indicator stops flashing and lights in steady
green.
L A touch tone phone is required for remote
operation.
L Enter the remote code correctly and press
each key firmly (page 64).
L The answering system is off. Turn it on (page
65).
L The answering system is not turned on for the
line you wish to record messages from. Select
the desired line or both lines by pressing
{IP/TEL} on the base unit repeatedly, then
turn the answering system on (page 60, 65).
L The message memory is full. Erase
unnecessary messages (page 62, 63).
L The answering system is activated for both
lines, and the 1st caller is leaving a voice
message. The 2nd caller cannot leave a
message, but the caller information will be
stored (page 45).
L If you subscribe to the Voice Mail service,
messages are recorded by the landline
service provider/A not your telephone
(page 66).
90
For product assistance, visit www.globarange.com
For A assistance, visit www.joip.com
Page 91

Useful Information
Problem Cause/solution
I cannot operate the answering
system.
Dial lock/Base unit PIN
Important:
L Anyone can turn off the dial lock/base unit PIN using the following method.
Be sure to keep these Operating Instructions in a safe place in order to
prevent unauthorised persons from using your phone without permission.
Problem Cause/solution
I cannot remember the dial lock
password.
L Someone is operating the answering system.
L If someone is talking on a conference call, you
may not be able to operate the answering
system. Try again later.
L Turn the dial lock off using the following
method.
1 K i {#}{2}{5}{1}
2 Press {*}{7}{0}{0}{0}.
3 Press M 2 times. i {i}
I cannot remember the PIN. L Change the PIN using the following method.
1 K i {#}{1}{3}{2}
2 Press {*}{7}{0}{0}{0}.
3 Enter the new 4-digit base unit PIN. i
M i {i}
For product assistance, visit www.globarange.com
For A assistance, visit www.joip.com
91
Page 92

Useful Information
A
A
A
Open Source Software
Parts of this product use Open Source Software. Relevant conditions apply to this
software. Panasonic cannot accept inquiries regarding the content of the following
copyright and license information.
<<NetBSD kernel>>
This product uses a part of NetBSD kernel.
The use of a part of NetBSD kernel is based on the typical BSD style
license below.
Copyright (c)
The Regents of the University of California. All rights reserved.
Redistribution and use in source and binary forms, with or without
modification, are permitted provided that the following conditions
are met:
1. Redistributions of source code must retain the above copyright
notice, this list of conditions and the following disclaimer.
2. Redistributions in binary form must reproduce the above copyright
notice, this list of conditions and the following disclaimer in the
documentation and/or other materials provided with the distribution.
3. All advertising materials mentioning features or use of this software
must display the following acknowledgement:
This product includes software developed by the University of
California, Berkeley and its contributors.
4. Neither the name of the University nor the names of its contributors
may be used to endorse or promote products derived from this software
without specific prior written permission.
THIS SOFTWARE IS PROVIDED BY THE REGENTS AND CONTRIBUTORS
``AS IS'' AND
NY EXPRESS OR IMPLIED WARRANTIES, INCLUDING, BUT NOT LIMITED
TO, THE
IMPLIED WARRANTIES OF MERCHANTABILITY AND FITNESS FOR A
PARTICULAR PURPOSE
RE DISCLAIMED. IN NO EVENT SHALL THE REGENTS OR CONTRIBUTORS
BE LIABLE
FOR ANY DIRECT, INDIRECT, INCIDENTAL, SPECIAL, EXEMPLARY, OR
CONSEQUENTIAL
DAMAGES (INCLUDING, BUT NOT LIMITED TO, PROCUREMENT OF
SUBSTITUTE GOODS
OR SERVICES; LOSS OF USE, DATA, OR PROFITS; OR BUSINESS
INTERRUPTION)
HOWEVER CAUSED AND ON ANY THEORY OF LIABILITY, WHETHER IN
CONTRACT, STRICT
LIABILITY, OR TORT (INCLUDING NEGLIGENCE OR OTHERWISE) ARISING IN
NY WAY
92
For product assistance, visit www.globarange.com
For A assistance, visit www.joip.com
Page 93

Useful Information
A
A
A
A
A
A
A
A
OUT OF THE USE OF THIS SOFTWARE, EVEN IF ADVISED OF THE
POSSIBILITY
OF SUCH DAMAGE.
-----
However, parts of the NetBSD Kernel are provided with the following copyright
notices.
Copyright (c) 1980, 1983, 1988, 1993 The Regents of the University of California.
ll rights reserved.
Copyright (c) 1980, 1986, 1989, 1993 The Regents of the University of California.
ll rights reserved.
Copyright (c) 1980, 1986, 1991, 1993 The Regents of the University of California.
ll rights reserved.
Copyright (c) 1980, 1986, 1993 The Regents of the University of California. All
rights reserved.
Copyright (c) 1982, 1985, 1986, 1988, 1993, 1994 The Regents of the University
of California. All rights reserved.
Copyright (c) 1982, 1986, 1988, 1990, 1993 The Regents of the University of
California. All rights reserved.
Copyright (c) 1982, 1986, 1988, 1990, 1993, 1994, 1995 The Regents of the
University of California. All rights reserved.
Copyright (c) 1982, 1986, 1988, 1990, 1993, 1995 The Regents of the University
of California. All rights reserved.
Copyright (c) 1982, 1986, 1988, 1991, 1993 The Regents of the University of
California. All rights reserved.
Copyright (c) 1982, 1986, 1988, 1993 The Regents of the University of California.
ll rights reserved.
Copyright (c) 1982, 1986, 1988, 1993, 1995 The Regents of the University of
California. All rights reserved.
Copyright (c) 1982, 1986, 1989, 1991, 1993 The Regents of the University of
California. All rights reserved.
Copyright (c) 1982, 1986, 1989, 1993 The Regents of the University of California.
ll rights reserved.
Copyright (c) 1982, 1986, 1990, 1991, 1993 The Regents of the University of
California. All rights reserved.
Copyright (c) 1982, 1986, 1990, 1993 The Regents of the University of California.
ll rights reserved.
Copyright (c) 1982, 1986, 1990, 1993, 1994 The Regents of the University of
California. All rights reserved.
Copyright (c) 1982, 1986, 1991, 1993 The Regents of the University of California.
ll rights reserved.
Copyright (c) 1982, 1986, 1991, 1993, 1994 The Regents of the University of
California. All rights reserved.
Copyright (c) 1982, 1986, 1991, 1993, 1995 The Regents of the University of
California. All rights reserved.
Copyright (c) 1982, 1986, 1993 The Regents of the University of California. All
rights reserved.
Copyright (c) 1982, 1986, 1993, 1994 The Regents of the University of California.
ll rights reserved.
Copyright (c) 1982, 1986, 1993, 1994, 1995 The Regents of the University of
For product assistance, visit www.globarange.com
For A assistance, visit www.joip.com
93
Page 94

Useful Information
A
A
A
California. All rights reserved.
Copyright (c) 1982, 1986, 1993, 1995 The Regents of the University of California.
ll rights reserved.
Copyright (c) 1982, 1988, 1991, 1993 The Regents of the University of California.
ll rights reserved.
Copyright (c) 1983, 1990, 1993 The Regents of the University of California. All
rights reserved.
Copyright (c) 1983, 1993 The Regents of the University of California. All rights
reserved.
Copyright (c) 1985, 1986, 1993 The Regents of the University of California. All
rights reserved.
Copyright (c) 1985, 1986, 1993 The Regents of the University of California. All
rights reserved.
Copyright (c) 1986, 1989, 1991, 1993 The Regents of the University of California.
ll rights reserved.
Copyright (c) 1986, 1993 The Regents of the University of California. All rights
reserved.
Copyright (c) 1987, 1991, 1993 The Regents of the University of California. All
rights reserved.
Copyright (c) 1987, 1993 The Regents of the University of California. All rights
reserved.
Copyright (c) 1987, 1993 The Regents of the University of California. All rights
reserved.
Copyright (c) 1988 Regents of the University of California. All rights reserved
Copyright (c) 1988 Stephen Deering.
Copyright (c) 1988 University of Utah.
Copyright (c) 1988, 1989, 1993 The Regents of the University of California. All
rights reserved.
Copyright (c) 1988, 1991, 1993 The Regents of the University of California. All
rights reserved.
Copyright (c) 1988, 1992, 1993 The Regents of the University of California. All
rights reserved.
Copyright (c) 1988, 1993 The Regents of the University of California. All rights
reserved.
Copyright (c) 1989 The Regents of the University of California. All rights reserved.
Copyright (c) 1989, 1991, 1993 The Regents of the University of California. All
rights reserved.
Copyright (c) 1989, 1993 The Regents of the University of California. All rights
reserved.
Copyright (c) 1989, 1993, 1994 The Regents of the University of California. All
rights reserved.
Copyright (c) 1990, 1991, 1993 The Regents of the University of California. All
rights reserved.
Copyright (c) 1990, 1993 The Regents of the University of California. All rights
reserved.
Copyright (c) 1991, 1993 The Regents of the University of California. All rights
reserved.
Copyright (c) 1991, 1993, 1994 The Regents of the University of California. All
rights reserved.
Copyright (c) 1992 Regents of the University of California. All rights reserved.
Copyright (c) 1992, 1993 The Regents of the University of California. All rights
94
For product assistance, visit www.globarange.com
For A assistance, visit www.joip.com
Page 95

Useful Information
reserved.
Copyright (c) 1993 The Regents of the University of California. All rights reserved.
Copyright (c) 1993 Adam Glass
Copyright (C) 1993 by Sun Microsystems, Inc. All rights reserved.
Copyright (c) 1994 Gordon W. Ross
Copyright (c) 1994 Winning Strategies, Inc. All rights reserved.
Copyright (c) 1995 The Regents of the University of California. All rights reserved.
Copyright (C) 1995, 1996, 1997, and 1998 WIDE Project. All rights reserved.
Copyright (c) 1996 The Regents of the University of California. All rights reserved.
Copyright (c) 1996 John S. Dyson All rights reserved.
Copyright (c) 1996 Matt Thomas. All rights reserved.
Copyright (c) 1996 Matthew R. Green. All rights reserved.
Copyright (c) 1996 Paul Kranenburg
Copyright (c) 1996, 1997, 1999, 2001 The NetBSD Foundation, Inc. All rights
reserved.
Copyright (c) 1996, 2000 Christopher G. Demetriou. All rights reserved.
Copyright (c) 1996,1999 by Internet Software Consortium.
Copyright (c) 1996-1999 by Internet Software Consortium.
Copyright (c) 1997 Jonathan Stone and Jason R. Thorpe. All rights reserved.
Copyright (c) 1997 Christos Zoulas. All rights reserved.
Copyright (c) 1997 Manuel Bouyer. All rights reserved.
Copyright (c) 1997, 1998 The NetBSD Foundation, Inc. All rights reserved.
Copyright (c) 1997, 1998, 1999, 2000 The NetBSD Foundation, Inc. All rights
reserved.
Copyright (c) 1997, 1998, 1999, 2001 The NetBSD Foundation, Inc. All rights
reserved.
Copyright (c) 1997, 1998, 1999, 2002 The NetBSD Foundation, Inc. All rights
reserved.
Copyright (c) 1997, 1998, 2000, 2001 The NetBSD Foundation, Inc. All rights
reserved.
Copyright (c) 1997, 1998, 2001 The NetBSD Foundation, Inc. All rights reserved.
Copyright (c) 1997,98 The NetBSD Foundation, Inc. All rights reserved.
Copyright (C) 1997-2000 Sony Computer Science Laboratories Inc. All rights
reserved.
Copyright (c) 1997-2002 The NetBSD Foundation, Inc. All rights reserved.
Copyright (c) 1998 The NetBSD Foundation, Inc. All rights reserved.
Copyright (c) 1998 Todd C. Miller <Todd.Miller@courtesan.com> All rights
reserved.
Copyright (c) 1998, 1999 The NetBSD Foundation, Inc. All rights reserved.
Copyright (c) 1998, 1999, 2000 The NetBSD Foundation, Inc. All rights reserved.
Copyright (c) 1998, 1999, 2000, 2001 The NetBSD Foundation, Inc. All rights
reserved.
Copyright (c) 1998, 2000 The NetBSD Foundation, Inc. All rights reserved.
Copyright (c) 1998, 2000, 2001 The NetBSD Foundation, Inc. All rights reserved.
Copyright (c) 1999 The NetBSD Foundation, Inc. All rights reserved.
Copyright (C) 1999 WIDE Project. All rights reserved.
Copyright (c) 1999, 2000 Jason L. Wright (jason@thought.net) All rights reserved.
Copyright (c) 1999, 2000 The NetBSD Foundation, Inc. All rights reserved.
Copyright (c) 1999, 2000, 2001 The NetBSD Foundation, Inc. All rights reserved.
Copyright (c) 1999, 2001 The NetBSD Foundation, Inc. All rights reserved.
Copyright (c) 2000 The NetBSD Foundation, Inc. All rights reserved.
For product assistance, visit www.globarange.com
For A assistance, visit www.joip.com
95
Page 96

Useful Information
f
Copyright (c) 2000, 2001 The NetBSD Foundation, Inc. All rights reserved.
Copyright (c) 2000, 2001, 2002 The NetBSD Foundation, Inc. All rights reserved.
Copyright (c) 2001 The NetBSD Foundation, Inc. All rights reserved.
Copyright (c) 2002 The NetBSD Foundation, Inc. All rights reserved.
Copyright 1998 Massachusetts Institute of Technology. All rights reserved.
Copyright 2001 Wasabi Systems, Inc. All rights reserved. Portions
Copyright (c) 1993 by Digital Equipment Corporation. Portions
Copyright (c) 1995 by International Business Machines, Inc.
Copyright (c) 1983, 1989 The Regents of the University of California. All rights
reserved.
Copyright (c) 1996 by Internet Software Consortium. All rights reserved.
Copyright (c) 1980, 1986, 1989 Regents of the University of California. All rights
reserved.
Copyright (c) 1988 The Regents of the University of California. All rights reserved.
Copyright (c) 1992, 1993 The Regents of the University of California. All rights
reserved.
Copyright (c) 1994 Christopher G. Demetriou. All rights reserved.
Copyright (c) 1997 The NetBSD Foundation, Inc. All rights reserved.
Copyright (c) 1999 The NetBSD Foundation, Inc. All rights reserved.
Copyright (c) 2001 The NetBSD Foundation, Inc. All rights reserved.
Copyright (c) 1996 Gardner Buchanan <gbuchanan@shl.com> All rights reserved.
Parts of the NetBSD Kernel are provided with the licenses that are slightly
different from the
above Berkeley-formed license. Please refer the source code of the NetBSD
Kernel about the details.
The source code of the NetBSD Kernel is provided by the NetBSD CVS
Repositories
(http://cvsweb.netbsd.org/bsdweb.cgi/), and this product includes parts of the
source code in the
ollowing directories.
http://cvsweb.netbsd.org/bsdweb.cgi/src/sys/kern/
http://cvsweb.netbsd.org/bsdweb.cgi/src/sys/net/
http://cvsweb.netbsd.org/bsdweb.cgi/src/sys/netinet/
<<OpenSSL>>
The product includes software developed by the OpenSSL Project and it is used
under the following license.
LICENSE ISSUES
==============
The OpenSSL toolkit stays under a dual license, i.e. both the conditions of
the OpenSSL License and the original SSLeay license apply to the toolkit.
See below for the actual license texts. Actually both licenses are BSD-style
Open Source licenses. In case of any license issues related to OpenSSL
please contact openssl-core@openssl.org.
OpenSSL License
---------------
96
For product assistance, visit www.globarange.com
For A assistance, visit www.joip.com
Page 97

Useful Information
/
A
* ============================================================
========
* Copyright (c) 1998-2006 The OpenSSL Project. All rights reserved.
*
* Redistribution and use in source and binary forms, with or without
* modification, are permitted provided that the following conditions
* are met:
*
* 1. Redistributions of source code must retain the above copyright
* notice, this list of conditions and the following disclaimer.
*
* 2. Redistributions in binary form must reproduce the above copyright
* notice, this list of conditions and the following disclaimer in
* the documentation and/or other materials provided with the
* distribution.
*
* 3. All advertising materials mentioning features or use of this
* software must display the following acknowledgment:
* "This product includes software developed by the OpenSSL Project
* for use in the OpenSSL Toolkit. (http://www.openssl.org/)"
*
* 4. The names "OpenSSL Toolkit" and "OpenSSL Project" must not be used to
* endorse or promote products derived from this software without
* prior written permission. For written permission, please contact
* openssl-core@openssl.org.
*
* 5. Products derived from this software may not be called "OpenSSL"
* nor may "OpenSSL" appear in their names without prior written
* permission of the OpenSSL Project.
*
* 6. Redistributions of any form whatsoever must retain the following
* acknowledgment:
* "This product includes software developed by the OpenSSL Project
* for use in the OpenSSL Toolkit (http://www.openssl.org/)"
*
* THIS SOFTWARE IS PROVIDED BY THE OpenSSL PROJECT ``AS IS'' AND
NY
* EXPRESSED OR IMPLIED WARRANTIES, INCLUDING, BUT NOT LIMITED
TO, THE
* IMPLIED WARRANTIES OF MERCHANTABILITY AND FITNESS FOR A
PARTICULAR
* PURPOSE ARE DISCLAIMED. IN NO EVENT SHALL THE OpenSSL
PROJECT OR
* ITS CONTRIBUTORS BE LIABLE FOR ANY DIRECT, INDIRECT, INCIDENTAL,
* SPECIAL, EXEMPLARY, OR CONSEQUENTIAL DAMAGES (INCLUDING, BUT
* NOT LIMITED TO, PROCUREMENT OF SUBSTITUTE GOODS OR
SERVICES;
* LOSS OF USE, DATA, OR PROFITS; OR BUSINESS INTERRUPTION)
* HOWEVER CAUSED AND ON ANY THEORY OF LIABILITY, WHETHER IN
CONTRACT,
* STRICT LIABILITY, OR TORT (INCLUDING NEGLIGENCE OR OTHERWISE)
For product assistance, visit www.globarange.com
For A assistance, visit www.joip.com
97
Page 98

Useful Information
A
* ARISING IN ANY WAY OUT OF THE USE OF THIS SOFTWARE, EVEN IF
DVISED
* OF THE POSSIBILITY OF SUCH DAMAGE.
* ===========================================================
=========
*
* This product includes cryptographic software written by Eric Young
* (eay@cryptsoft.com). This product includes software written by Tim
* Hudson (tjh@cryptsoft.com).
*
*/
Original SSLeay License
-----------------------
/* Copyright (C) 1995-1998 Eric Young (eay@cryptsoft.com)
* All rights reserved.
*
* This package is an SSL implementation written
* by Eric Young (eay@cryptsoft.com).
* The implementation was written so as to conform with Netscapes SSL.
*
* This library is free for commercial and non-commercial use as long as
* the following conditions are aheared to. The following conditions
* apply to all code found in this distribution, be it the RC4, RSA,
* lhash, DES, etc., code; not just the SSL code. The SSL documentation
* included with this distribution is covered by the same copyright terms
* except that the holder is Tim Hudson (tjh@cryptsoft.com).
*
* Copyright remains Eric Young's, and as such any Copyright notices in
* the code are not to be removed.
* If this package is used in a product, Eric Young should be given attribution
* as the author of the parts of the library used.
* This can be in the form of a textual message at program startup or
* in documentation (online or textual) provided with the package.
*
* Redistribution and use in source and binary forms, with or without
* modification, are permitted provided that the following conditions
* are met:
* 1. Redistributions of source code must retain the copyright
* notice, this list of conditions and the following disclaimer.
* 2. Redistributions in binary form must reproduce the above copyright
* notice, this list of conditions and the following disclaimer in the
* documentation and/or other materials provided with the distribution.
* 3. All advertising materials mentioning features or use of this software
* must display the following acknowledgement:
* "This product includes cryptographic software written by
* Eric Young (eay@cryptsoft.com)"
* The word 'cryptographic' can be left out if the rouines from the library
* being used are not cryptographic related :-).
98
For product assistance, visit www.globarange.com
For A assistance, visit www.joip.com
Page 99

Useful Information
A
* 4. If you include any Windows specific code (or a derivative thereof) from
* the apps directory (application code) you must include an acknowledgement:
* "This product includes software written by Tim Hudson (tjh@cryptsoft.com)"
*
* THIS SOFTWARE IS PROVIDED BY ERIC YOUNG ``AS IS'' AND
* ANY EXPRESS OR IMPLIED WARRANTIES, INCLUDING, BUT NOT LIMITED
TO, THE
* IMPLIED WARRANTIES OF MERCHANTABILITY AND FITNESS FOR A
PARTICULAR PURPOSE
* ARE DISCLAIMED. IN NO EVENT SHALL THE AUTHOR OR
CONTRIBUTORS BE LIABLE
* FOR ANY DIRECT, INDIRECT, INCIDENTAL, SPECIAL, EXEMPLARY, OR
CONSEQUENTIAL
* DAMAGES (INCLUDING, BUT NOT LIMITED TO, PROCUREMENT OF
SUBSTITUTE GOODS
* OR SERVICES; LOSS OF USE, DATA, OR PROFITS; OR BUSINESS
INTERRUPTION)
* HOWEVER CAUSED AND ON ANY THEORY OF LIABILITY, WHETHER IN
CONTRACT, STRICT
* LIABILITY, OR TORT (INCLUDING NEGLIGENCE OR OTHERWISE) ARISING
IN ANY WAY
* OUT OF THE USE OF THIS SOFTWARE, EVEN IF ADVISED OF THE
POSSIBILITY OF
* SUCH DAMAGE.
*
* The licence and distribution terms for any publically available version or
* derivative of this code cannot be changed. i.e. this code cannot simply be
* copied and put under another distribution licence
* [including the GNU Public Licence.]
*/
<<MD5>>
This software uses the Source Code of RSA Data Security, Inc. described in the
RFC1321 (MD5 Message-Digest Algorithm).
---------------------------------------------------------------Copyright (C) 1991-2, RSA Data Security, Inc. Created 1991. All
rights reserved.
License to copy and use this software is granted provided that it
is identified as the "RSA Data Security, Inc. MD5 Message-Digest
lgorithm" in all material mentioning or referencing this software
or this function.
License is also granted to make and use derivative works provided
that such works are identified as "derived from the RSA Data
Security, Inc. MD5 Message-Digest Algorithm" in all material
mentioning or referencing the derived work.
RSA Data Security, Inc. makes no representations concerning either
the merchantability of this software or the suitability of this
software for any particular purpose. It is provided "as is"
For product assistance, visit www.globarange.com
For A assistance, visit www.joip.com
99
Page 100

Useful Information
A
without express or implied warranty of any kind.
These notices must be retained in any copies of any part of this
documentation and/or software.
<<MT19937>>
The MT19937 software that Takuji Nishimura and Makoto Matsumoto developed
is contained, and this product shall be used subject to the following
license conditions.
Copyright (C) 1997 - 2002, Makoto Matsumoto and Takuji Nishimura,
All rights reserved.
Redistribution and use in source and binary forms, with or without
modification, are permitted provided that the following conditions
are met:
1. Redistributions of source code must retain the above copyright
notice, this list of conditions and the following disclaimer.
2. Redistributions in binary form must reproduce the above copyright
notice, this list of conditions and the following disclaimer in the
documentation and/or other materials provided with the distribution.
3. The names of its contributors may not be used to endorse or promote
products derived from this software without specific prior written
permission.
THIS SOFTWARE IS PROVIDED BY THE COPYRIGHT HOLDERS AND
CONTRIBUTORS
"AS IS" AND ANY EXPRESS OR IMPLIED WARRANTIES, INCLUDING, BUT
NOT
LIMITED TO, THE IMPLIED WARRANTIES OF MERCHANTABILITY AND
FITNESS FOR
A PARTICULAR PURPOSE ARE DISCLAIMED. IN NO EVENT SHALL THE
COPYRIGHT OWNER OR
CONTRIBUTORS BE LIABLE FOR ANY DIRECT, INDIRECT, INCIDENTAL,
SPECIAL,
EXEMPLARY, OR CONSEQUENTIAL DAMAGES (INCLUDING, BUT NOT
LIMITED TO,
PROCUREMENT OF SUBSTITUTE GOODS OR SERVICES; LOSS OF USE,
DATA, OR
PROFITS; OR BUSINESS INTERRUPTION) HOWEVER CAUSED AND ON
NY THEORY OF
LIABILITY, WHETHER IN CONTRACT, STRICT LIABILITY, OR TORT
(INCLUDING
NEGLIGENCE OR OTHERWISE) ARISING IN ANY WAY OUT OF THE USE OF
THIS
SOFTWARE, EVEN IF ADVISED OF THE POSSIBILITY OF SUCH DAMAGE.
<<thttpd>>
The thttpd software that ACME Labs developed is contained, and this product
100
For product assistance, visit www.globarange.com
For A assistance, visit www.joip.com
 Loading...