

Panasonic Barcode Scanners Using Instruction
Using a Barcode Scanner
バーコードスキャナーの使いかた
®
ENGLISH
日本語日本語
日本語
日本語日本語
SUPPLEMENTARY INSTRUCTIONS
Precautions ...................................................2
Names and Functions of Parts ....................2
First-time Operation .....................................3
Setting for Barcode Scanner .......................4
Scanning Barcodes ...................................... 5
Scanning PDF417 (2D) Barcodes
(only for 2D barcode model) ................... 6
Troubleshooting ............................................7
Specifications ...............................................8
Cleaning the Scanning Window ................... 9
Laser Devices ................................................ 9
Labeling / Marking ...................................... 10
Symbols ...................................................... 11
補足説明書補足説明書
補足説明書
補足説明書補足説明書
使用上のお願い使用上のお願い
使用上のお願い
使用上のお願い使用上のお願い
各部の名称と働き各部の名称と働き
各部の名称と働き
各部の名称と働き各部の名称と働き
はじめて使うときはじめて使うとき
はじめて使うとき
はじめて使うときはじめて使うとき
バーコードスキャナーを設定するバーコードスキャナーを設定する
バーコードスキャナーを設定する
バーコードスキャナーを設定するバーコードスキャナーを設定する
バーコードを読み取るバーコードを読み取る
バーコードを読み取る
バーコードを読み取るバーコードを読み取る
22
次元バーコード次元バーコード
2
次元バーコード
22
次元バーコード次元バーコード
(PDF417(PDF417
(PDF417
(PDF417(PDF417
困ったときのQ&A困ったときのQ&A
困ったときのQ&A
困ったときのQ&A困ったときのQ&A
仕様仕様
......................................................................
仕様
...................................
仕様仕様
......................................................................
読み取り窓のお手入れ読み取り窓のお手入れ
読み取り窓のお手入れ
読み取り窓のお手入れ読み取り窓のお手入れ
ラベルラベル
ラベル
ラベルラベル
動作確認用バーコード動作確認用バーコード
動作確認用バーコード
動作確認用バーコード動作確認用バーコード
..................................................................
.................................
..................................................................
..................................................
.........................
..................................................
..............................................
.......................
..............................................
..............................................
.......................
..............................................
..................
.........
..................
......................................
...................
......................................
(PDF417)(PDF417)
(PDF417)
(PDF417)(PDF417)
モデルのみモデルのみ
モデルのみ
モデルのみモデルのみ
を読み取るを読み取る
を読み取る
を読み取るを読み取る
))
..................................
)
.................
))
..................................
..........................................
.....................
..........................................
......................................
...................
......................................
....................................
..................
....................................
1313
13
1313
1313
13
1313
1414
14
1414
1515
15
1515
1616
16
1616
1717
17
1717
1818
18
1818
1919
19
1919
1919
19
1919
2020
20
2020
2020
20
2020
ENGLISH
日
日
日
日
日
本
本
本
本
本
語
語
語
語
語
First-time Operation
Supplementary Instructions
This Supplementary Instructions explains how to get started with a barcode scanner and
point out cases where the operation of the computer will differ from that in the Operating
Instructions.
Precautions
Do not look directly into the scanning window.
DO NOT LOOK DIRECTLY AT THE LASER LIGHT.
Do not scan barcodes with parameter settings. Erroneous settings may be set in the scanner, necessitating repair work.
Be sure to read “Precautions” in the Handheld Computer Operating Instructions.
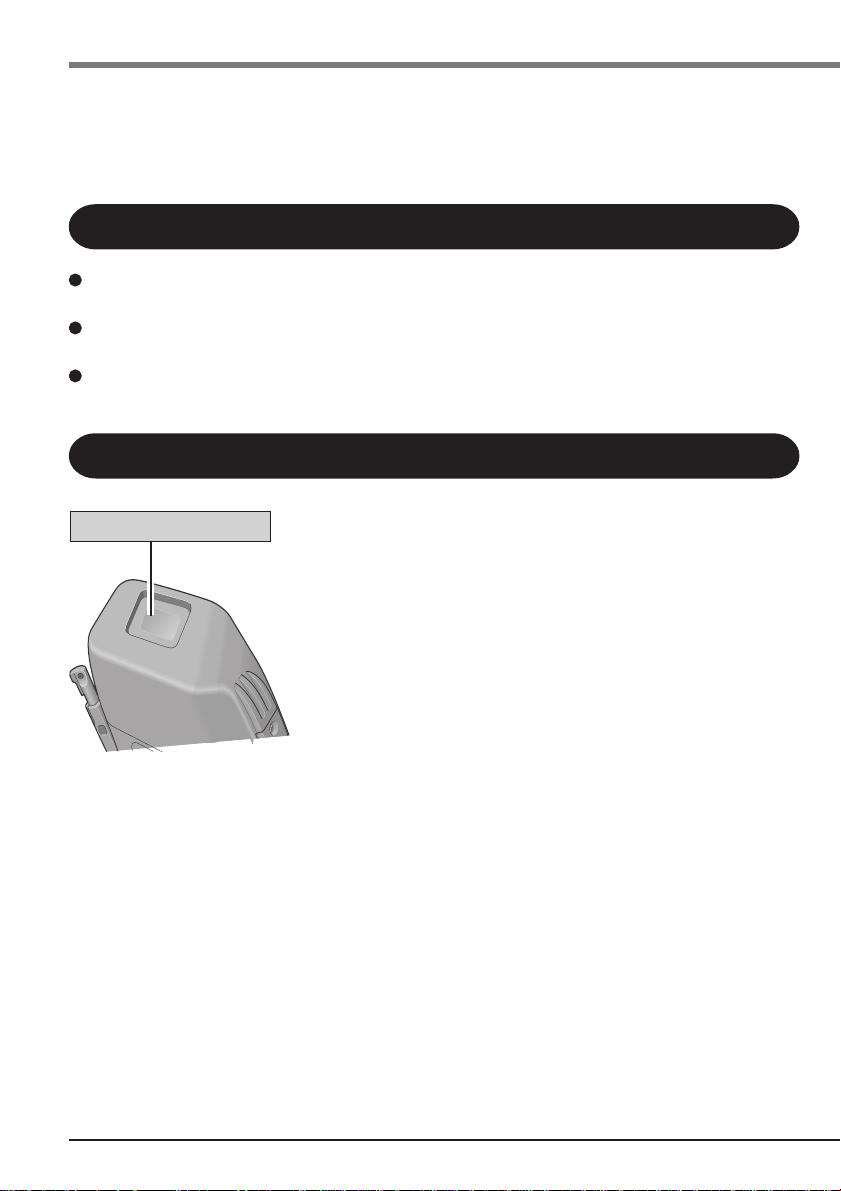
Names and Functions of Parts
Scanning Window
2
First-time Operation
After finishing the”First-time Operation” of Operating Instructions, install the driver
for Barcode Scanner using the following procedure.
Install the driver for Barcode Scanner
If the [PanaBCI] file is not inside the [Options] folder in [My Computer], perform all steps
from (1) to (7).
If the [PanaBCI] file is present, perform steps (4) through (7).
(1)Tap [Start]-[Run] in order, then input “ffrestore.exe r”, and then tap [OK].
The driver for Barcode Scanner will be copied from the Flash memory to the [Options]
folder in [My Computer].
(2)When [Complete] is displayed, press
* Varies depending on the models.
(3)Double-tap [My Computer], and then double-tap the [Options] folder.
(4)Double-tap [PanaBCI].
A screen will be displayed specifying the install destination folder.
(5)Tap [OK].
(6)When [Setup Complete] is displayed, tap [OK].
(7)Push the reset switch using the stylus.
* or * .
NOTE
Once the power switch has been pressed, you must wait at least 10 seconds before pressing it again.
ENGLISH
3

Supplementary Instructions
Setting for Barcode Scanner
(1)Tap [Start]-[Settings]-[Control Panel] and then double-tap [Barcode Scanner]
(2)If necessary, tap the tab and adjust the settings.
To display a hidden tab, tap the on the right edge of the tab.
[Keyboard Emulation]: Determines whether or not scanned barcode data is targeted for key
emulation.
[Laser]: Laser mode setting
[Decode Format]: [Prefix/Suffix data format] and [code ID Data format] settings
[Code Type Option]: Code type option settings
[Code Type]: Select valid code type(s). Items showing check marks are valid items.
[Button]: To scan barcodes by pressing the trigger on either side of the com-
[BEEP]: Set whether to emit a “beep” sound when the barcode scan is success-
(3)Tap [OK].
[Raster Height] and [Raster Speed] can only be set when [Always Raster] and [Programmable Raster] have been selected.
In [The irradiation time of the laser], set the length of time before laser
irradiation stops in the event that the barcode scan is unsuccessful.
To add Check Digit Codes, tap [OPEN DIALOG BOX].
puter, set [Trigger Enable/Disable] to [Enable].
When triggers are not used for scanning, select one of the following:
F1 button, F2 button, F3 button, or option button.
ful.
NOTE
Close the [Barcode Scanner] settings screen when scanning a barcode.
Even if you perform “All Reset” on this computer, settings for [Laser], [Decode Format], [Code Type Option], and [Code Type] items will not return to their default settings.
To return these items to their default settings, tap the [Version] tab, and then tap the [Set
Default] button.
4

Scanning Barcodes
Aim the scanner at the barcode.
1
2 Press one of the trigger buttons on either side
of the computer.
If the barcode scan application software has been set for use
with F1, F2, F3, or option buttons (using [Start]-[Settings][Control Panel]-[Barcode Scanner]-[Button]), press the button assigned for this function (
the Handheld Computer Operating Instructions).
The red scan beam for reading is emitted from the scanning
window. Make sure the red scan beam covers the entire barcode.
NOTE
It is impossible to scan a barcode for 5 or 6 seconds after turning on the computer
because the barcode scanner is being initialized.
To Correctly Read a Barcode with This Computer, Observe the Following.
The scanning angle is a very important factor. The scanner may be unable to correctly
read a barcode if it is directly perpendicular to the barcode and the red scan beam is
reflected back into the scanner. Perform reading at the angle indicated in the figure. Set at
a 15
°
angle from the perpendicular position.
Right Wrong
“Program Buttons” in
Press trigger button.
ENGLISH
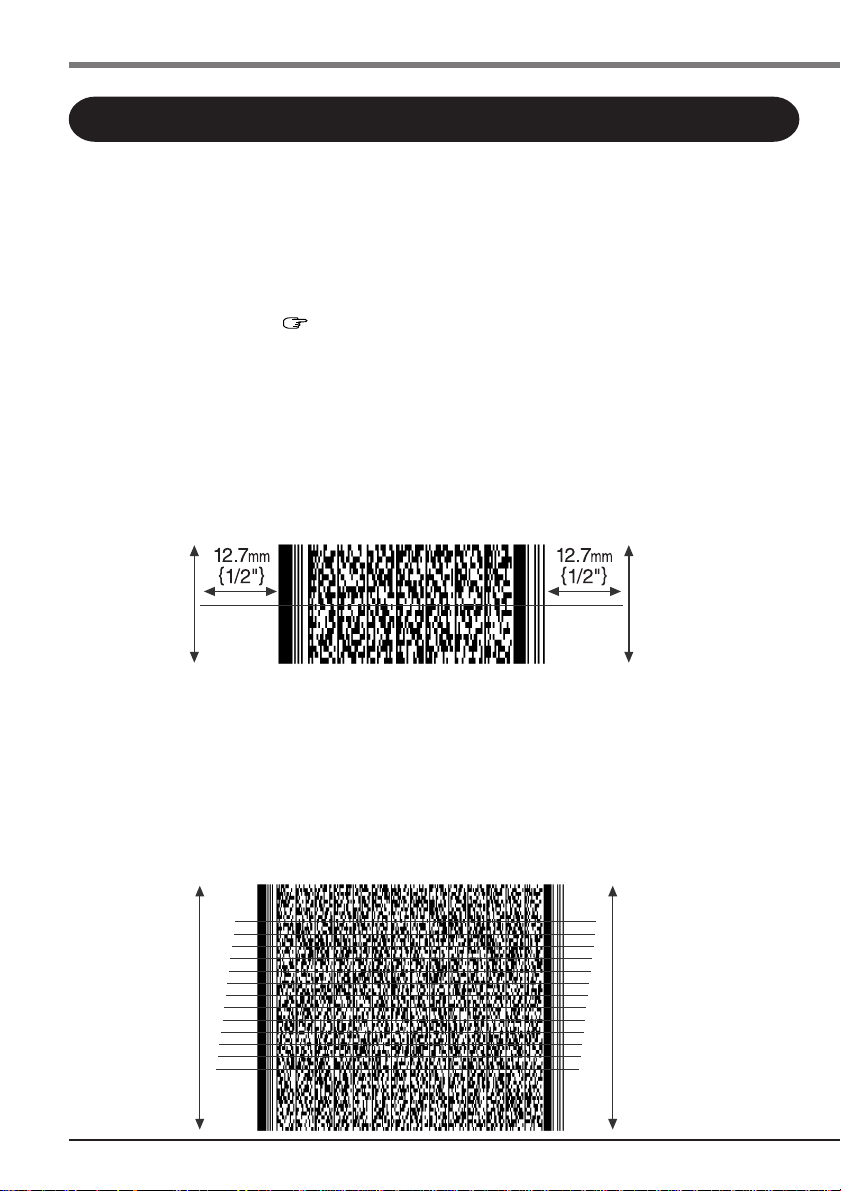
Perform scanning so that the red scan beam for reading intersects the barcode itself (including at least 12.7 mm {1/2"} beyond each edge of the barcode).
Right
Hold the scanner farther away when reading a larger barcode, and closer in when reading
a smaller barcode or a thinner barcode.
Wrong
5
Supplementary Instructions
Scanning PDF417 (2D) Barcodes
The 2-Dimensional terminal supports PDF417 barcode reading. It produces a raster pattern
featuring multiple scanning rows to accommodate the multiple rows of a PDF417 symbol.
(Only for 2D barcode model)
1 Aim the scanner at the PDF417 barcode.
2 Press one of the trigger buttons on either side of the computer.
If the barcode scan application software has been set for use with F1, F2, F3, or option buttons
(using [Start]-[Settings]-[Control Panel]-[Barcode Scanner]-[Button]), press the button assigned for this function (
tions).
The red scan beam for reading is emitted from the scanning window. Make sure the red
scan beam covers the entire barcode.
Read the previous page for precautions when performing reading with the scanner.
“Program Buttons” in the Handheld Computer Operating Instruc-
3 Hold the button down and keep the scan pattern parallel to the symbol’s
rows.
Be sure the scan pattern extends at least 12.7 mm {1/2"} beyond each edge of the barcode.
"Tall" PDF Barcodes
If the vertical scan pattern is not high enough to cover a “tall” PDF417 symbol, try a slow up
and down scanning motion. With the raster pattern open, move the scanner slowly down
towards the bottom of the symbol, keeping the beam horizontal to the rows, and then slowly
back up towards the top.
6
Troubleshooting
When reinstalling the driver
for Barcode Scanner, “File
Write Error” is displayed.
A message indicating insufficient memory appears
while scanning.
Scanning is not possible.
It is impossible to scan a
barcode even if the trigger
button is pressed.
Check if the computer memory is full. If it is full, de-
lete unnecessary files.
Check if the [Options] folder in [My Computer] has
been deleted. If it has been deleted, recreate the [Op-
tions] folder in [My Computer] as follows:
(1) Double tap [My Computer], tap [File], and then tap
[New Folder].
(2) Input “Options” for new folder name.
Free memory of at least two times the scan data is necessary.
Confirm that the scanning application has been in-
stalled.
Confirm that the barcode is readable (without damage,
etc.)
Confirm the range for scanning
Be sure the scanner is programmed to read the type of
barcode you are scanning.
The distance from the scanner to the barcode is impor-
tant. As a rule of thumb, a farther distance should be
used for a larger symbol to allow the raster pattern to
cover the symbol. In addition, a closer distance should
be used for a thinner symbol.
If the laser beam is not emitted even after the button is
pressed, confirm the remaining battery level.
Confirm that the trigger button is active on the [Button]
tab under [Barcode] on the [Control Panel].
ENGLISH
7
Supplementary Instructions
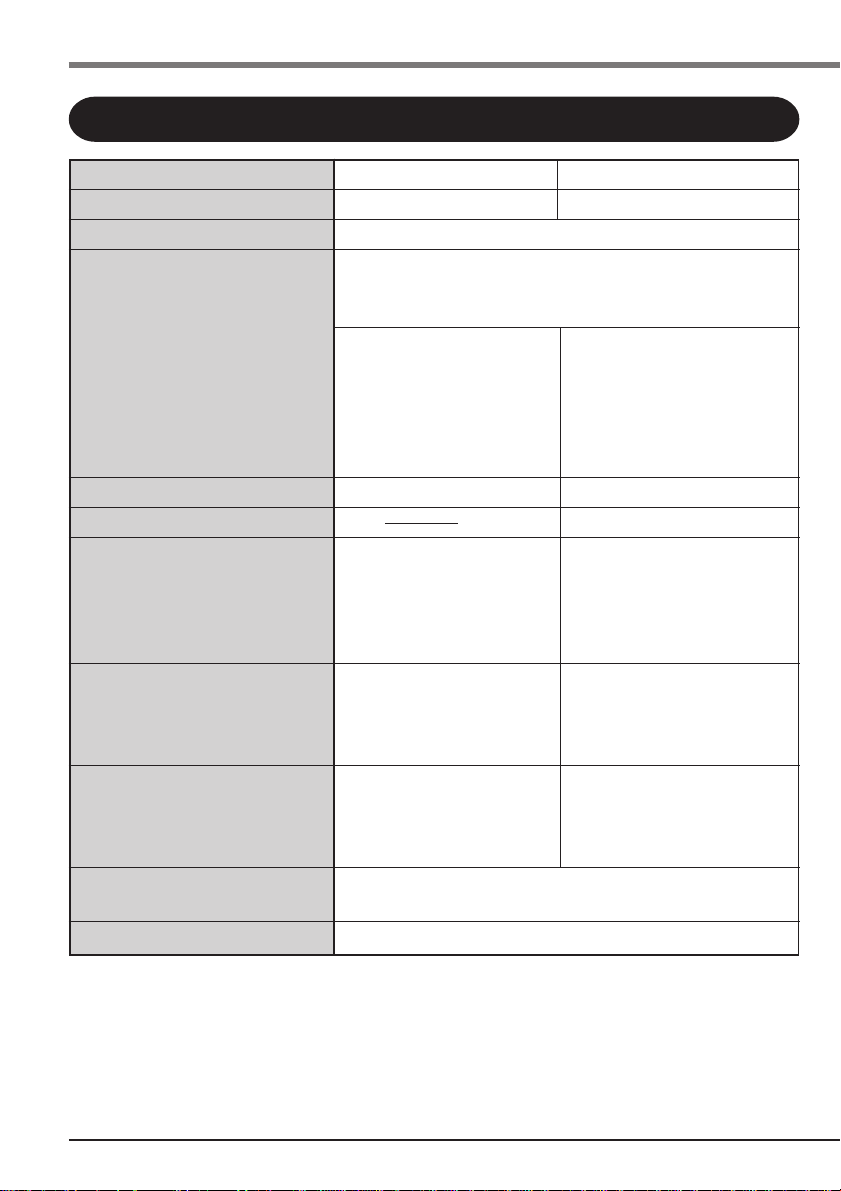
Specifications
Barcode (1D) model Barcode (2D) model
Scan Pattern
Light Source
Decode Capabilities
Scan Rate (X direction)
Frame Rate (Y direction)
Optical Resolution
Angular Orientation
Tolerances: Skew
Pitch
Ambient Light Immunity
Artificial Lighting
Sunlight
Physical Dimensions
Weight*
(WxHxD)
Single Line Scanning Raster Scanning
650 nm Visible light semiconductor laser
This computer can be programmed to decode the following code types :
(The readable code depends on the setting.)
1D:UPC/EAN/JAN,
UCC/EAN-128,
Code39, Code39 Full
ASCII, Code93,
Code128, I2 of 5, D2
of 5, NW-7
36 scans per second 580 scans per second
1D: 5 mil (0.127 mm)
± 65° (“front to back”) ± 30° (“front to back”)
± 60° from plane parallel
to symbol (“side-to-side”)
450 ft.candles (4845 lux) 450 ft.candles (4845 lux)
10.000 ft.candles 8000 ft.candles (86,112 lux)
(107,640 lux)
*
114 mm x 41 mm x 220 mm
Approx. 605 g {Approx. 1.3 lb.} (excluding the strap)
1D: UPC/EAN/JAN, UCC/
EAN-128,Code39,
Code39 Full ASCII,
Code93, Code128, I2
of 5, D2 of 5, NW-7
2D: PDF417
20 frames per second
1D:
6 mil (0.152 mm)
2D: PDF417
X dimension: 6.6 mil
(0.167 mm)
Y dimension: 3X
± 15° from plane parallel
to symbol (“side-to-side”)
{4.9" x 1.6" x 8.7"}
(excluding the strap)
* These only apply to models equipped for a barcode scanner.
Actual dimentions and weight vary depending on the model.
8
 Loading...