

Page 1

User Guide
Wireless LAN Upgrade Software Key
Model No.AJ-SFU3100G
ENGLISH
M0311AT0 -FJ VQT3R17 (E)
Page 2

Contents
About Trademarks . . . . . . . . . . . . . . . . . . . . . . . . . . . . . . . . . . . . . . . . . . . . . . . . . . . . . . . 3
Before Using . . . . . . . . . . . . . . . . . . . . . . . . . . . . . . . . . . . . . . . . . . . . . . . . . . . . . . . . . . . . 3
Getting Started . . . . . . . . . . . . . . . . . . . . . . . . . . . . . . . . . . . . . . . . . . . . . . . . . . . . . . . . . . 4
Precautions . . . . . . . . . . . . . . . . . . . . . . . . . . . . . . . . . . . . . . . . . . . . . . . . . . . . . . . . . . . . . 5
Major Operations . . . . . . . . . . . . . . . . . . . . . . . . . . . . . . . . . . . . . . . . . . . . . . . . . . . . . . . . 6
Preparation . . . . . . . . . . . . . . . . . . . . . . . . . . . . . . . . . . . . . . . . . . . . . . . . . . . . . . . . . . . . . 7
Attach the wireless module (AJ-WM30G) . . . . . . . . . . . . . . . . . . . . . . . . . . . . . . . . . . . . . . . . . . . . . . . . . . . . 7
Enable the wireless LAN function . . . . . . . . . . . . . . . . . . . . . . . . . . . . . . . . . . . . . . . . . . . . . . . . . . . . . . . . . . 7
Setup the Network . . . . . . . . . . . . . . . . . . . . . . . . . . . . . . . . . . . . . . . . . . . . . . . . . . . . . . . 9
Set wireless LAN for the P2 cam . . . . . . . . . . . . . . . . . . . . . . . . . . . . . . . . . . . . . . . . . . . . . . . . . . . . . . . . . . 9
Activate the wireless LAN function . . . . . . . . . . . . . . . . . . . . . . . . . . . . . . . . . . . . . . . . . . . . . . . . . . . . . . . . 10
Set wireless LAN for computer/cell phone terminals. . . . . . . . . . . . . . . . . . . . . . . . . . . . . . . . . . . . . . . . . . . 11
Connecting to computer/iPad . . . . . . . . . . . . . . . . . . . . . . . . . . . . . . . . . . . . . . . . . . . . . 18
Connecting to iPod Touch/iPhone . . . . . . . . . . . . . . . . . . . . . . . . . . . . . . . . . . . . . . . . . 22
Glossary . . . . . . . . . . . . . . . . . . . . . . . . . . . . . . . . . . . . . . . . . . . . . . . . . . . . . . . . . . . . . . 23
Compatible Models. . . . . . . . . . . . . . . . . . . . . . . . . . . . . . . . . . . . . . . . . . . . . . . . . . . . . . 23
List of Contents . . . . . . . . . . . . . . . . . . . . . . . . . . . . . . . . . . . . . . . . . . . . . . . . . . . . . . . . 23
Notice Regarding Security. . . . . . . . . . . . . . . . . . . . . . . . . . . . . . . . . . . . . . . . . . . . . . . . 24
2
Page 3

About Trademarks
SD logo is a registered trademark.
SDHC logo is a trademark of SD-3C, LLC.
Microsoft, Windows, and the Windows logo are trademarks
or registered trademarks of Microsoft Corporation in the
United States and other countries.
This document refers to the following OS (Operating
System) as “Windows 7”.
Micorsoft
Micorsoft
®
Windows® 7 operating system
®
Windows Vista® operating system
Before Using
Descriptions in this document are based on the assumption
that settings regarding the wireless LAN on the computer
and mobile terminals are completed. For how to setup these
settings, please contact the manufacturers of the devices
you are using.
Please note that Panasonic cannot take any responsibility
regarding any damages caused by incorrect setting of the
network in order to use this function. Please also note that
Panasonic cannot take any responsibility regarding any
damages caused by using this function.
Descriptions in this document are based on the assumption
that you have read the operating instructions of the P2 Cam
(Part number: AJ-HPX3100G) and understand the operation
of the memory card and camera recorder (referred as P2
Cam hereafter) .
Phrases in “ ” in this document refer to button names and
icon names displayed on the browser screen. Phrases in [ ]
in this document refer to contents displayed on the P2 Cam
menu.
This document describes reference pages as (page 00).
Apple, Mac, Mac OS, MacBook, iPhone, iPod Touch, iPad,
QuickTime and Safari are registered trademarks of Apple
Inc., in the United States and other countries.
Java and other Java-based marks are trademarks or
registered trademarks of Sun Microsystems, Inc. in the U.S.
Wi-Fi is a registered trademark of Wi-Fi Alliance.
Other company names and product names mentioned in
this document are registered trademarks or trademarks of
their respective companies.
_ About the illustrations in this document
Illustrations of the P2 Cam itself or the menu screen may be
different from how they actually are.
_ About the terms
Both SD Memory Cards and SDHC Memory Cards are
referred to as SD Memory Cards.
Memory cards with the “P2” logo (optional AJ-P2C064XG,
etc.) are referred to as “P2 Card”(s).
An image created with a single recording operation is
referred to as a “clip”, and is described as such in this
document.
_ About the Software Licensing Agreement
Before using the product, first read the “Software Licensing
Agreement”. To use the product, you must agree to the
terms of this Agreement. If you do not agree to this
Agreement, or if you have any questions, do not open the
pouch containing the key code, and contact the dealer at the
point of purchase.
If you open the pouch containing the key code, you are
agreeing to contents of this license agreement.
_ About the Key Code
Because the key code is required for re-registration of this
product, keep it in a safe place together with the associated
P2 cam serial number.
3
Page 4

Getting Started
Confirming status / shot setting information
Confirmation of the thumbnail
Proxy playback
Download of proxy file/clip management information
Metadata display/edit
Adding/deleting of the metadata (Shotmark/TextMemo)
IEEE802.11b/g Ad Hoc Mode
The AJ-SFU3100G wireless LAN upgrade software key is an upgrade software key to enable the wireless LAN connection option
function for the AJ-HPX3100G P2 cam.
it is possible to perform the following using a Web browser.
Wireless LAN is compatible with IEEE802.11b and IEEE802.11g.
Confirmation of the camera status
Confirmation of the thumbnail images
Proxy playback
Download of proxy file/ clip management information
Displaying of the metadata.
Adding/deleting of the metadata (Shotmark/Textmemo)
<Note>
The optional wireless module (model number: AJ-WM30) is required. Do not attach other commercially-available wireless
modles.
When downloading the proxy file to a PC, make sure that there is enough capacity on the disk for the download before operating.
The separately-sold video encoder board (AJ-YDX30G) is required to play the proxy and download the proxy file.
4
Page 5

Precautions
_ Carefully read “Before using” and “Precautions when using” in the Operating Instructions for the wire-
less module (model number: AJ-WM30) and use after fully understanding the content.
_ To avoid mistakes with this product, the following restrictions apply.
Supported
specification
Communication
frequency
Communication
IEEE802.11b/g
* IEEE802.11a and IEEE802.11n cannot be used
2412 MHz - 2462 MHz (1 - 11 ch)
* 12 ch or higher cannot be used.
Mode ad hoc
* Cannot be used in infrastructure mode.
_ On use abroad
In order to comply with regulations concerning radio in various regions of the world, the following four AJ-WM30 models are for
sale. Note that none of the products may be used outside the countries or regions that support them.
Product name Region where it can be used
AJ-WM30MC People’s Republic of China
AJ-WM30P United States of America, Canada, Mexico, Argentina, Peru, Taiwan
AJ-WM30E EU member nations, EFTA member nations, Australia, New Zealand, Russia, Ukraine, Saudi Arabia, UAE,
Kuwait, Oman, Egypt, Republic of South Africa, Republic of Korea, the Philippines, Malaysia, Singapore
AJ-WM30 Japan
_ In addition, note the following when used in these countries.
In France outdoor use is not allowed.
_ The Wireless Module (AJ-WM30) is installed with the antenna facing the rear of the P2 camera (AJ-
HPX3100). Because of this, signal strength is reduced towards the front of the camera (lens side). When
performing tasks requiring high transfer speeds, such as viewing or downloading proxies, please use the
computer, iPad, iPod Touch, iPhone, etc., from a position within 45 degrees of the rear of the camera.
5
Page 6

Major Operations
Computer environment required for
connection
First, confirm that the wireless LAN function is installed on
the computer you are using.
Make sure to confirm the following setting before connecting
the wireless module (AJ-WM30) to the computer.
This does not guarantee the operation between all the
wireless LAN adapters and the wireless LAN adapter
installed in the computer.
Check 1: Settings of the wireless LAN
Computer with a built-in wireless LAN function
Is the wireless LAN enabled?
Computer without a built-in wireless LAN function
Is the wireless LAN adapter correctly recognized?
Is the wireless LAN adapter enabled?
Install the driver for the wireless LAN adapter in
advance.
For how to install the driver, refer to the operating
instructions of the wireless LAN adapter.
Check 2: Settings of the computer
You may not be able to connect with the P2 Cam when
security (firewall) software or utility software for the
wireless LAN adapter is installed.
Is the network bridge setup?
Is the firewall disabled?
Required system configuration
A computer fulfilling the following conditions is required to use
wireless LAN.
_ Windows PC
Microsoft Windows® 7 Professional 32/64 bit
Microsoft Windows Vista
_ Macintosh
Mac OS X v10.5.x, v10.6.x
*1 Not guaranteed except for pre-installed or a clean install.
The latest information regarding the operation check version
is published on the following website.
_ iPad/iPod touch/iPhone
iOS v 4.2
*2 For iPod Touch and iPhone devices before the 3rd
generation, images recorded with HQ and SHQ mode
cannot be played.
The latest information regarding the operation check version
is published on the following website.
<Note>
Please note that there is no guarantee of operation when used
on a system environment other than that mentioned above, or
on home-made computers.
_ About the Web browser
A Web browser is required to perform Web control.
Regarding supported browsers, the latest information is
published on the following website.
®
Business 32/64bit
*1
*2
_ About The Media Player
QuickTime is required to play the proxy image.
The latest information regarding the operation check version
is published on the following website.
_ About Java Runtime
Java Runtime is used for the camera status display.
The latest information regarding the operation check version
is published on the following website.
http://pro-av.panasonic.net/
This does not guarantee operation with computers that fulfill the above conditions.
6
Page 7

Preparation
Screws
Cover
AJ-WM30
Preparing to connect computers, iPad/iPod Touch/iPhone to the P2 cam.
Attach the wireless module (AJ-WM30G)
1 Remove 2 screws from the P2 Cam (Part number: AJ-
HPX3100G) main body, and remove the cover by sliding
it backward of the P2 Cam.
2 Attach the wireless module (Part number: AJ-WM30) to
the USB port.
Enable the wireless LAN function
When connecting the P2 cam with a computer after purchase,
enable the function by importing the 30 digit activation code
into the P2 cam main unit.
The activation code can be obtained by accessing the site
where activation codes are issued, and authenticate the
device information exported from the P2 cam and the key
code bundled with the product following the displayed
procedure.
The procedure requires an SD memory card (formatted with
the P2 cam), a computer equipped with an SD memory card
slot, and an Internet connection environment.
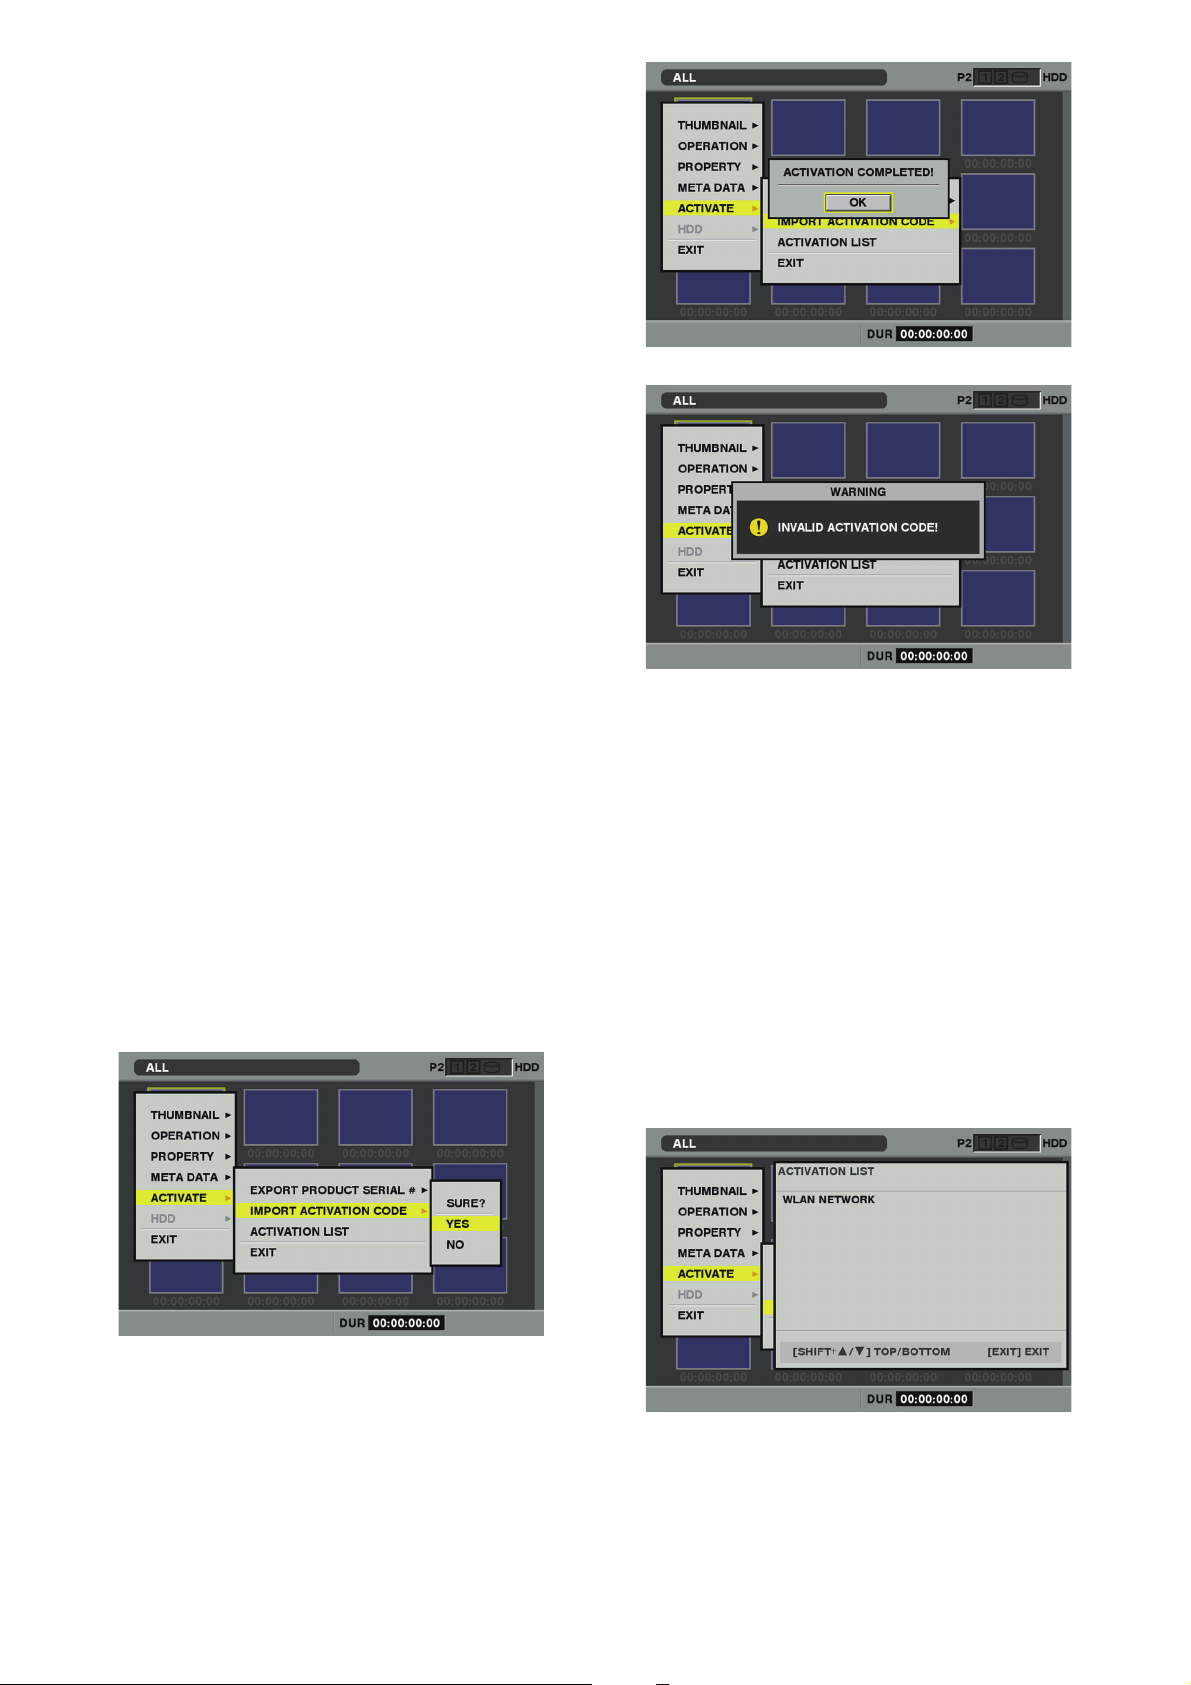
1 Export the device information of the P2 cam to the
SD memory card
Start the P2 cam, insert the SD memory card and press
the THUMBNAIL button, when you select [ACTIVATE][EXPORT PRODUCT SERIAL #] - [YES], the folder,
private/meigroup/pavcn/sbg/p2sd/actv/ is created inside
the SD memory card, and the P2 cam device information
is saved in the file, SERIAL.LST.
3 Replace the cover removed in 1, and fasten the 2
screws.
<Note>
When using wireless LAN, make sure the cover removed in
the foregoing task is firmly fastened.
Close the dialog display by pressing the [SET] button.
When the [ACTIVATE] menu does not appear, it is
necessary to update the firmware version in the
AJHPX3100G.
See the latest information about firmware on the P2
support page on the following website.
http://pro-av.panasonic.net/
Perform the update after seeing “Updating the
Firmware incorporated into the unit” (page 199) in the
AJ-HPX3100G Operating Instructions for how to
update the firmware.
7
Page 8
Device information for a maximum of 100 devices can
be stored in one SD memory card by repeating the
operations in step 1 for P2 cams that you want to
issue the activation code for. The site that issues the
activation code can read all device information for
multiple devices stored on the SD memory card, and
batch issue activation codes for the multiple devices.
When an error dialog appears, check insertion of the
SD memory card, write inhibit setting, free space, etc.
It is recommended that you use an SD memory card
formatted with the P2 cam to prevent unexpected
errors.
2 Remove the SD memory card from the P2 Cam.
Insert it in a computer and connect to the activation
code publication site below from a browser. Follow
the procedures described in the site to acquire the
activation code.
http://panasonic.biz/sav/actkey_e
<Notes>
The private/meigroup/pavcn/sbg/p2sd/actv/ folder
created in step
delete the folder, or format the SD memory card.
When a file named ACTIVE.LST already exists in the
private/meigroup/pavcn/sbg/p2sd/actv/ folder of the
SD memory card, the file name may automatically
change depending on the browser that you are using.
Save the file after confirming that ACTIVE.LST does
not exist in the folder mentioned above.
1 will be required in step 3, so do not
3 Save the acquired activation code in the private/
meigroup/pavcn/sbg/p2sd/actv/ folder of the SD
Memory Card created in Step 1 following the
instructions from the site then remove the SD
Memory Card from the computer.
<Note>
Depending on the computer and the OS type,
sometimes operations are required before removing the
SD memory card.
4 Insert the SD memory card where the P2 cam
activation code is stored, press the THUMBNAIL
MENU button, and select [ACTIVATE] - [IMPORT
ACTIVATION CODE] - [YES]
If activation fails, the following message will appear.
<Notes>
If an error dialog is displayed, check the insertion of the SD
memory card and the storage location of the file where the
activation code was stored in step
ACTIVE.LST).
Activation codes acquired based on information for other P2
devices than AJ-HPX3100 or other key codes for other
products do not work.
3 (file name:
5 Restart the P2 cam
<Notes>
During the above operations, if you perform operations not
mentioned in the above procedures on data in the SD
memory card, you may not be able to continue the activation
process.
When activation is completed, the menu required for setting
the wireless LAN network will appear.
The activated function can be checked on the [ACTIVATE] -
[ACTIVATION LIST] menu.
After activation, the message [ACTIVATION
COMPLETED!] will be displayed.
8
Page 9

Setup the Network
Setup with the following procedure to connect with the
wireless LAN.
1. Set wireless LAN for the P2 cam
2. Activate the wireless LAN function
3. Set wireless LAN for computer/cell phone terminals
Set wireless LAN for the P2 cam
Perform the wireless LAN setting
Open the wireless LAN setting screen and perform the
settings with the following procedure.
1 Press the THUMBNAIL button to open the thumbnail
screen and then open the menu with the MENU
button where you select [OPERATION] - [DEVICE
SETUP] - [WLAN]
<Note>
[WLAN] items are not displayed when the wireless LAN
function on the P2 Cam is not enabled. Enable the
wireless LAN function of the P2 Cam following [Enable
the wireless LAN function] (page 7).
2 Press the MENU button again, and select
[INITIALIZE] to perform the initialization setting
process
When the initialization setting process is completed, the
factory settings are displayed.
3 Set each item when necessary
Setting item:
Item name Content
MAC ADDRESS
DHCP SERVER
IP ADDRESS IP address (Factory default setting: 192.168.0.1)
SUBNET MASK
SSID
ENCRYPT KEY
CHANNEL Used channel (Factory default setting: blank)
USER SETTING Move to user setting screen
<Notes>
Depending on the setting items, there may be a limit
on the characters or values that can be input.
The address assignment range of the DHCP server is
the 15 values after the set IP address.
IP address may not be assigned correctly when a
value larger or equal to [240] is set, so make sure to
use a value between [0] and [239].
Example: When the IP address of the P2 cam is
Used channel is either blank (AUTO) or in a range of
[1] to [11]. If a channel is set to [1] up to [11], this
channel will be given priority assignment. However, a
different channel may be assigned depending on the
environment used.
WEP encryption key is set from one of the following
inputs. The number of characters takes precedence.
Thus, if set using 5 characters or 13 characters, the
WEP key will be viewed a character string even if only
numbers are used.
Setting
content
No encryption No setting required
64 bit
encryption
128 bit
encryption
You can store setting items that exclude [USER
SETTING] on the SD memory card or read saved
contents by pressing the MENU button.
- When storing, select [SAVE TO SD CARD] from the
- When you want to read out, select [LOAD FROM
Settings other than the [MAC ADRESS] will be
restored to factory settings when the initialization
setting process in Step
MAC address of the wireless LAN adapter
(cannot be changed)
Setting for usage of DHCP SERVER function
ENABLE: Will use the DHCP
DISABLE: Will not use the DHCP
(Factory default setting: ENABLE)
Subnet mask
(Factory default setting: 255.255.255.0)
Network name (SSID)
(Factory default setting: AJ_HPX3100)
WEP encryption key (see below)
(Factory default setting:
01234567890123456789abcdef)
[192.168.0.1], from [192.168.0.2] to
[192.168.0.16] are allocated to the terminal.
Input content
10 digit hexadecimal or 5 digit character
string
26 digit hexadecimal or 13 digit
character string
menu, then a dialog appears to input the name of
the file to be stored. Numbers corresponding to
month, day and time will appear as the name in the
default setting, but you can modify it if necessary
and then store the new setting by pressing OK.
SD CARD] from the menu, then a list of stored
files will appear and you can choose what you
want to read and press the SET button.
2 is performed.
4 Select [USER SETTING] in the setting item and
display the user setting screen
9
Page 10

5 Perform user registration by selecting [NEW USER]
ERR
from the menu as required
<Notes>
User registration will be required when connecting
from the WEB browser (see page 18).
You can move between the items with the
THUMBNAIL MENU button in the user registration
dialog.
User name is 31 characters or less.
Password is between 6 and 15 characters (inclusive).
[guest] is registered in the factory setting. (Password
is [p2guest])
Up to three users can be registered
From the menu, you can also remove the registered
users (DELETE USER) and change the password
(CHANGE PASSWORD).
User settings will be restored to factory settings when
the initialization setting process in Step
You will still be able to carry out the initialization
process even if you have forgotten your user name or
password. However, since the [DHCP SERVER], [IP
ADDRESS], [SUBNET MASK], [SSID], [ENCRYPT
KEY], and [CHANNEL] settings will also be restored to
factory settings, make note of these settings before
executing the initialization process.
2 is performed.
6 Return to the thumbnail button by pressing the EXIT
button once or twice
<Notes>
Depending on the setting item, its content will not be
reflected until you return to the thumbnail screen.
It may take a while for the operation in the thumbnail
screen to become available due to the reflect settings
processing.
7 Exit the thumbnail screen by pressing the THUMBNAIL
button
<Note>
Make sure to change the WEP encryption key and
USER SETTING from the factory settings for security
purposes.
Activate the wireless LAN function
The wireless LAN function MENU in the P2 cam is set by the
[WLAN MODE] on the [SYSTEM MODE] screen in the
SYSTEM SETTING page of the setting menu.
Items/
Data Saved
WLAN MODE OFF
You can check the operational status of the wireless LAN with
the USB lamp or MODE CHECK screen.
USB lamp MODE CHECK screen
Green lights “WLAN” lights Operating normally.
Green blinks
When it is not operating normally, check the installation of the
wireless module, etc.
<Notes>
[WLAN MODE] items are not displayed when the wireless
LAN function on the P2 Cam is not enabled. Enable the
wireless LAN function of the P2 Cam following [Enable the
wireless LAN function] (page 7).
When the [ACCESS LED] item is turned “OFF” on the
[OPTION MODE] screen in the SYSTEM SETTING page of
the setting menu, the USB lamp showing the wireless LAN
operational status is turned off along with the P2 card
access LED.
The [WLAN MODE] settings may change to [OFF] when
data written in the SD memory card (using WRITE from the
<SD CARD READ/WRITE> screen of the Settings Menu's
file page on a P2 Cam prior to activation) is read using an
activated P2 Cam. Therefore, check the menu and reset.
Adjustable
Range
ON
“WLAN ” blinks
Select ON/OFF of the wireless LAN
function.
OFF:
Stop the wireless LAN function.
ON:
Use the wireless LAN function.-CUF-
Remarks
Wireless operational
status
Not operating normally.
10
Page 11

Set wireless LAN for computer/cell phone terminals
Perform the setting of the computer and mobile terminal connecting to the P2 Cam.
There are 2 communication modes, “infrastructure mode” and
“ad hoc mode” as the wireless LAN connection in general.
This unit is connected with “ad hoc mode” which does not
require an access point.
<Notes>
Confirm that computer and mobile terminal are enabled to
connect to a wireless LAN connection. For how to confirm,
refer to the operating instructions of the device.
Ad hoc mode cannot connect with IEEE802.11a/
IEEE802.11n.
Ad hoc mode only supports the WEP as the encryption
method.
Perform Windows 7/ Windows Vista
settings
1 Turn off the P2 cam
2 Display the Windows [Network and Sharing Center]
screen
Click [Start] - [Control Panel] - [Network and Sharing
Center] in sequence.
4 Click [Create an ad hoc network]
5 Click [Next] and set up the wireless LAN on the
screen below
3 Click [Manage wireless networks] - [Add]
[Network Name]: Enter the SSID set in the P2 cam
(factory default: AJ_HPX3100).
Security type: Select “WEP”.
Security key: Enter the “Encrypt Key” set in the P2
cam.
(Factory default: 01234567890123456789abcedf)
Enter a check for [Save this network].
6 Click [Close]
11
Page 12

7 Click [Adapter properties]
8 Click [Internet Protocol Version 4 (TCP/IPv4)
Properties] and set up either of the following
depending on the DHCP setting of the P2 cam
setting of the P2 cam
_ When the P2 cam DHCP is set as [Enable]
[General] tag: Select [Obtain an IP address automatically]
and [Obtain DNS server address automatically]
[Alternate Configuration]: Select [Automatic private IP
address].
_ When the P2 cam DHCP is set as [Disable]
[General] tag: Select [Use the following IP address]
and enter the setting shown below
- IP address:
Network Address:
The same address as the P2 Cam
Host Address:
Address that doesn't overlap with the address of
the P2 Cam and peripheral devices
- Subnet mask: 255.255.255.0
[Default gateway], [Preferred DNS server], and
[Alternate DNS server] are not required so leave them
blank.
9 Click [OK] twice
10 Turn on the P2 cam
11 Click [Network and Sharing Center] - [Connect
Network] and check the connection
<Note>
It takes several seconds after the P2CAM main unit is turned
on before the wireless LAN starts operation. Wait a few
moments before checking the connection.
12
Page 13

Perform Mac OS X settings
1 Turn on the P2 Cam
2 Click [Open Network Preferences...] among the
menu bar AirMac status icons
When icons are not displayed on the menu bar, click
[Apple] menu- [SYSTEM Preferences] and then click
[Network].
3 Select AirMac in the service and click [Advanced...]
of [Show Airport status in menu bar] at the bottom
right
4 Set up either of the following depending on the
DHCP setting in the P2 cam
_ When the P2 cam DHCP is set as [Enable]
[Configure IPv4]: Select [Using DHCP].
[Configure IPv6]: Select [Automatically].
_ When the P2 cam DHCP is set as [Disable]
[Configure IPv4]: Select [Manually] and enter the
following settings.
- IP address:
Network Address:
The same address as the P2 Cam
Host Address:
Address that doesn’t overlap with the address of
the P2 Cam and peripheral devices
- Subnet mask: 255.255.255.0
- Router: This is unnecesary. Leave blank
[Configure IPv6]: Select [Automatically].
[Default gateway], [Preferred DNS server], and
[Alternate DNS server] are not required so leave them
blank.
Select TCP/IP from the detailed items.
13
Page 14

5 Select the target network (factory default:
AJ_HPX3100) in [Network Name] item
<Notes>
In the [OFF] status, you cannot select the network
unless you click [Trun Airport ON] to change the status
to [ON] status.
The target P2 cam will not appear as options unless its
WLAN is enabled and its power is on.
7 The On status will change to no IP address. Wait a
few moments
8 Status will alter to self-assigned IP. Wait a few
moments (approximately 1- 2 minutes)
6 Enter the WEP encryption key (factory default:
01234567890123456789abcdef) set in the P2 cam in
response to the password request, enter a check for
[Remember this network] and click OK
9 Confirm that the status changes to connected
14
Page 15

Mobile devices (iPad/iPod Touch/iPhone)
(when acquiring IP address automatically
by DHCP)
1 Turn on the P2 Cam
2 From the top screen of the iPod Touch, open
[Settings] - [Wi-Fi] - [Choose a Network...], and
confirm that the network name for the P2 Cam is
displayed
3 Tap on the button at the right of the P2 Cam
network to connect, and select [DHCP] in the [IP
Address]
4 Return to [Wi-Fi Network] and touch the key icon
5 Enter the password (factory default:
01234567890123456789abcdef) correctly, then tap
[Join]
Connection is completed when the Wi-Fi icon is
displayed at the top left of the screen.
For iPod Touch/iPhone
For iPod Touch/iPhone
For iPad
For iPad
15
Page 16

Mobile devices (iPad/iPod Touch/iPhone)
(method to acquire the IP address
manually)
1 From the top screen of the iPod Touch, open
[Settings] - [Wi-Fi] - [Choose a Network...], and
confirm that the network name for the P2 Cam is
displayed
2 Tap on the button at the right of the P2 Cam
network to connect, and select [Static] in the [IP
Address]
For iPod Touch/iPhone
3 Setup the network
There are the following 5 items to setup here, but only IP
Address and Subnet Mask need to be setup.
IP address
Address to be assigned to the iPad/iPod Touch/
iPhone. Enter the following settings.
Network Address:
The same address as the P2 Cam
Host Address:
Address that doesn’t overlap with the address of the
P2 Cam and peripheral devices
Subnet Mask
Set to [255.255.255.0].
Router (address)
This is not required, so keep it blank.
DNS (address)
This is not required, so keep it blank.
Search Domains
This is not required, so keep it blank.
For iPad
For iPod Touch/iPhone
For iPad
16
4 Return to [Wi-Fi Network]
Page 17

5 Enter the password (factory default:
01234567890123456789abcdef) correctly, then tap
[Join]
Connection is completed when the Wi-Fi icon is
displayed at the top left of the screen.
For iPod Touch/iPhone
For iPad
17
Page 18

Connecting to computer/iPad
Startup the application from the Web
browser
Once the network connection setting is completed on the P2
Cam and the computer/iPad, startup the Web browser with the
following procedure.
1 Startup the Web browser
For Windows 7/Windows Vista:
Click [Start] - [All Program] - [Internet Explorer]
For Mac OS X:
Click [Go] - [Application], and double-click [Safari] in the
list.
For iPad:
Tap the [Safari] icon in the home screen.
2 Enter the P2 cam IP address in the Web browser
Enter the IP address set in the P2 cam (factory default:
http://192.168.0.1) in the address bar at the top of the
Web browser screen to access the P2 cam.
3 “P2 Browser” will start up
[USER NAME] and [PASSWORD] input screen will
appear, enter [USER NAME] (factory default: guest) and
[PASSWORD] (factory default: p2guest) set in the P2
cam. Connection is completed when a screen similar to
the one below is displayed.
Customize the layout
P2 Browser started from a computer/iPad has a function for
customizing the screen display.
P2 Browser can assign 1 function to a GUI on the screen
which is referred to as a panel, and the panels can be laid out
on the screen by selecting 1 from 12 patterns.
Changing the partition
1 After starting up the P2 Browser, click the “Partition”
button
A screen similar to the below is displayed.
2 Select 1 pattern from the 12 patterns shown above.
P2 The layout of the “P2 Browser” will switch to the
selected layout screen.
18
Page 19
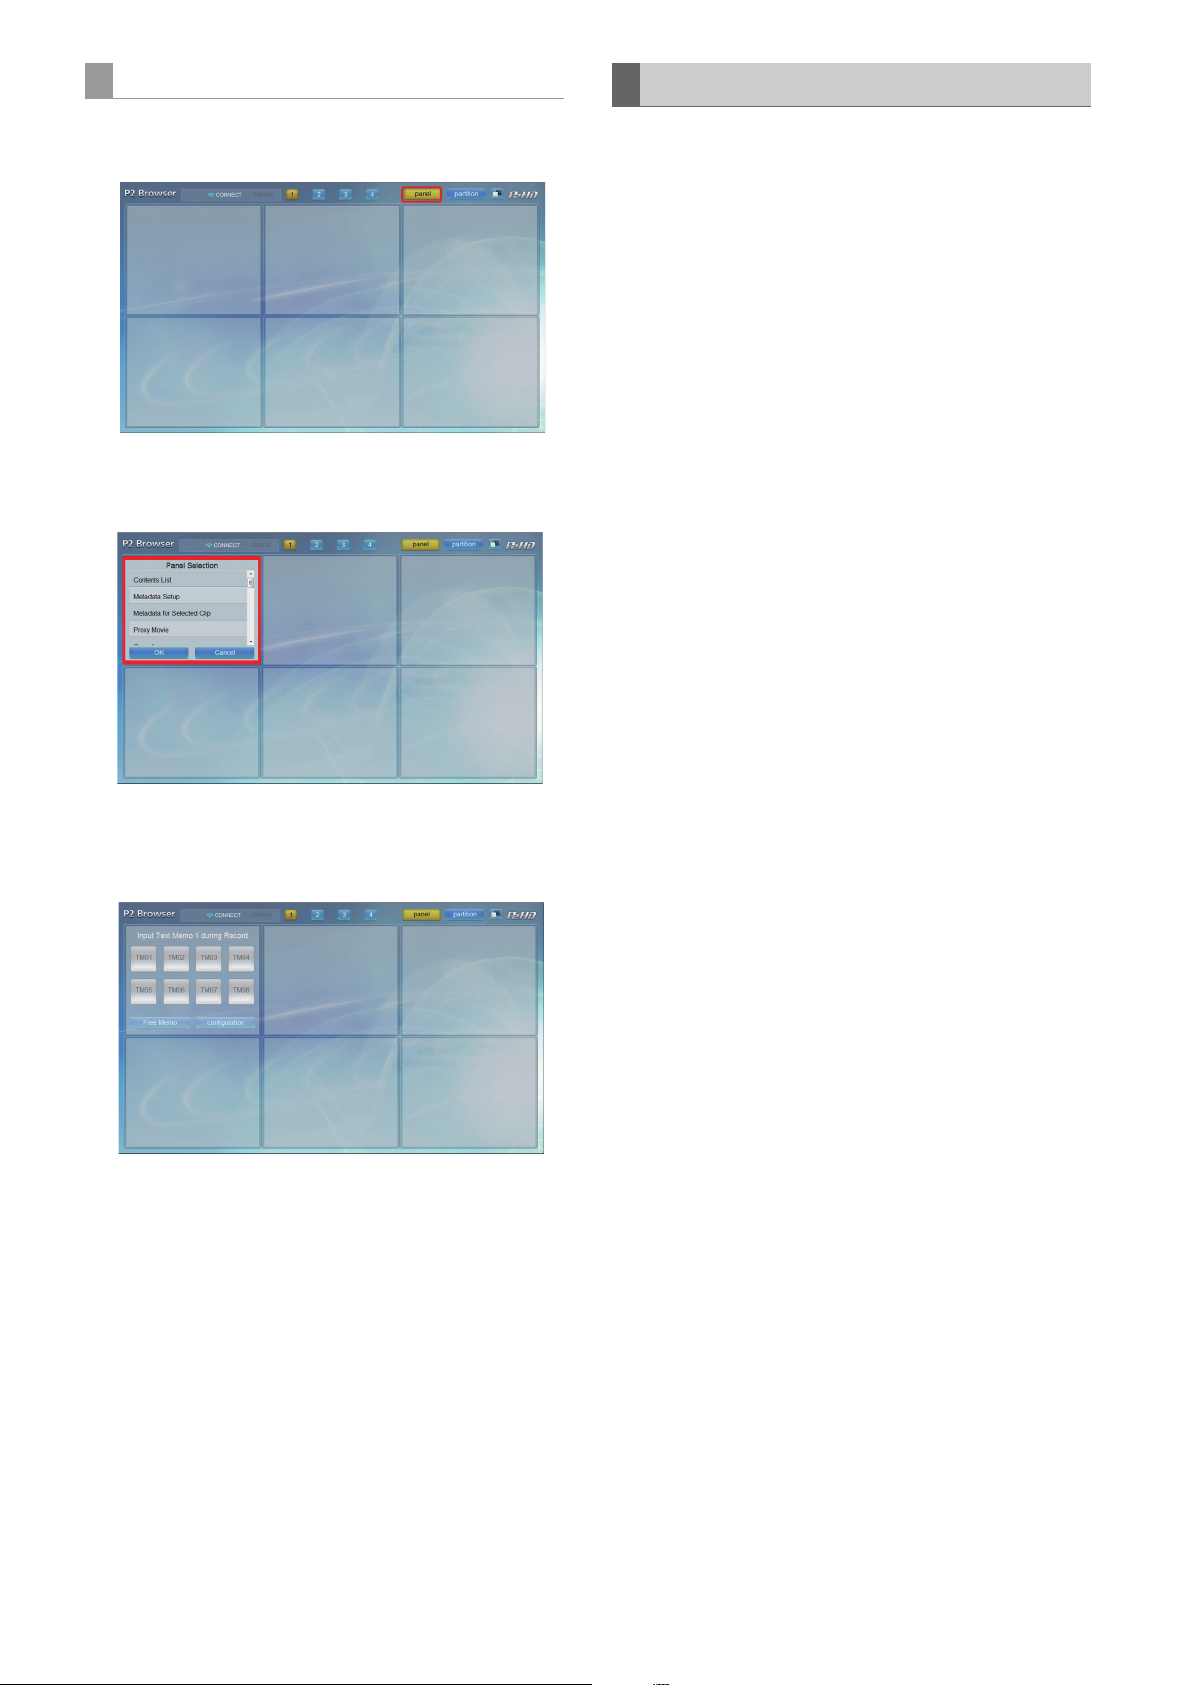
Selecting panel
Contents that can be displayed
1 Click on the “Panel” button.
A screen similar to the below is displayed.
2 Select the panel to change its display
A list of functions that can be assigned to the panel is
displayed.
Each panel can select from 1 - 12 of the following table.
For detailed operating instructions, visit the following website.
http://pro-av.panasonic.net/
1. Camera Status Panel
Status of the P2 Cam is displayed.
Time code
Displays the value of the time code generator maintained by
the P2 Cam.
Recording format
Displays the system mode, video codec, shooting recording
rate, etc. of the P2 cam.
MEDA level / usage
Displays the level and usage of the P2 card inserted in the
P2 cam.
You can switch the display to “remain” or “used”.
The display unit is “minutes”.
Battery level
Displays the level of the battery inserted in the P2 cam
<Note>
This panel’s display requires Java. The latest information
regarding the operation check version is published on the
following website.
http://pro-av.panasonic.net/
3 Select the function to display
A screen corresponding to the selected function is
displayed by selecting a function from the list and
clicking the “OK” button.
4 Setup other panels
Repeat the operation in steps
functions to other panels.
2-3, and assign required
5 After completing the panel settings, click the
“Panel” button.
2. Camera Info Panel
Displays the set values or statuses of lenses or filters etc.
regarding shooting with the P2 cam.
You can switch the display unit to “feet” or “m” by clicking the
button displayed in the FOCUS field.
<Note>
The LENS TYPE, IRIS, FOCUS, and ZOOM values will only
be displayed when using a lens with digital control system.
3. Contents List Panel
Thumbnail list of the clips recorded on the P2 Card inserted in
the P2 Cam is displayed. Thumbnail list is updated to the most
current state by pressing the “update” button.
Shot mark can be added to or cleared from the selected clip
by pressing the “SHOT MARKER” button.
<Notes>
Up to 300 of the most current recorded clips can be
displayed in the thumbnail.
Operation with the “SHOT MARKER” button is not available
when thumbnails are displayed in the P2 cam.
Operation by the “update” button or the “SHOT MARKER”
button is not possible when operations such as recording,
playback, etc., are performed on the P2 Cam.
Click the thumbnail to play the proxy.
Occasionally thumbnails will not appear properly after
recording is finished (For example, “X” is displayed). When
this happens, please use the browser’s refresh button,
rather than the “update” button on the panel.
19
Page 20

4. Proxy Movie Panel
Proxy image of the clip selected from the Contents List Panel
is played back.
<Notes>
If the proxy is not recorded on the P2 card, playback is not
available. Install the video encoder board (AJ-YDX30G),
and set to record the proxy.
QuickTime is required for playback. The latest information
regarding the operation check version is published on the
following website.
http://pro-av.panasonic.net/
For a clip with multiple clips connected, playback will be for
each clip. “prev” and “next” buttons are displayed for these
clips, allowing you to playback the previous or next clip by
pressing the relevant button.
5. Contents Download Panel
The proxy file of the selected clip or the XML file of the
management information on the clip can be downloaded.
Thumbnail list is updated to the most current state by pressing
the “update” button.
Using the “XML”/”PROXY” button, you can choose whether to
download the proxy file or the XML file.
<Notes>
This function cannot be selected with the iPad.
Perform this after confirming that there is enough capacity
on the recording media to be downloaded to.
To download a file, move the mouse pointer over the
thumbnail you wish to download and left click to open a
subwindow. Thumbnails of the clips included in the file is
displayed in the subwindow, so right-click over the target
thumbnail and use the download function of your browser
to download. Note, however, that this function may vary
depending on the browser used.
If tasks such as recording, playback, fast forward,
rewind, or removal of P2 card are performed on the P2
camera during a download, the download will be
interrupted, and the file will not be created properly.
Please do not perform the proceeding operations
during download. Please also check after every
download that the file hs been properly downloaded. If
the beginning of the clip begins to play properly, it can
be assumed that the clip is intact, so it is not
necessary to watch to the end. If the download was
not completed correctly, please try again.
6. Metadata for Selected Clip Panel
Various metadata for the clip selected in the thumbnail display
screen is displayed. By clicking on each metadata, the
metadata modification screen is displayed to modify the
metadata.
<Note>
Metadata cannot be modified when the P2 card is being
accessed while the P2 Cam is recording or playing, or when
thumbnails are displayed.
8. Input Text Memo [#] during Record Panel
A text memo can be added to a clip currently recording.
You can switch the input mode to “One Touch”/”Free Memo”
using the bottom left button.
In “One Touch” mode, the contents of the 8 buttons that was
set in advance will be added as text memos.
The name, color scheme, and attached text memo contents
can be set using the “Configuration” button.
In “Free Memo” mode, optional text memos can be added.
Entered text memos is added using the “submit” button.
This panel has 3 preset types. They can be distinguished by
the numbers 1 to 3 which is displayed on the [#] portion of the
panel name. Multiple panels can be used simultaneously.
<Notes>
Text memo cannot be added to the recorded clips when
operations such as recording, playback, etc., are performed
on the P2 cam.
Metadata cannot be modified when the P2 card is being
accessed while the P2 Cam is recording or playing, or when
thumbnails are displayed.
9. Input Text Memo [#] for Selected Clip Panel
Add a text memo to the selected clip using the Contents List
Panel.
<Notes>
Metadata cannot be modified when the P2 card is being
accessed while the P2 Cam is recording or playing, or when
thumbnails are displayed.
For information about “One Touch” mode and “Free Memo”
mode, refer to [8.Input Text Memo [#] during Record Panel].
10.Text Memo during Record Panel
Displays the list of text memos added to clips that are currently
recoding.
11.Text Memo for Selected Clip Panel
Displays the list of text memos that were added to the selected
clip using the Content List panel.
Also, when a proxy image is displayed on the proxy playback
screen, clicking a selected text memo in the text memo list will
seek the proxy image to the position where that text memo
was added.
Text memos that have already been added can be deleted
using the “X” button.
<Note>
Metadata cannot be modified when the P2 card is being
accessed while the P2 Cam is recording or playing, or when
thumbnails are displayed
12.Error List Panel
Addition of the intended metadata may fail in cases such as
when the wireless LAN is unstable. This screen will display the
history of such failures of addition.
Failed operations are performed again with the “submit” button
when the wireless LAN connection becomes stable again.
7. Metadata Setup Panel
Modify the various metadata attached to a clip. Clicking the
item you want to modify will bring you to the metadata
modification screen where you can modify the metadata. The
modified value will be applied to succeeding clip recordings.
20
Page 21

Saving/Switching the Layout
“P2 Browser” can individually save 4 different layouts. They
can be switched using 4 buttons, “1”- “4” placed at the top, and
each can save a separate layout.
Alter the tone
You can switch two basic tone screens using the “ ” button.
You can switch them to suit the surroundings and your taste.
21
Page 22

Connecting to iPod Touch/iPhone
Startup the application from the Web
browser
Once the network connection setting is completed on the P2
Cam and the iPod Touch/iPhone, startup the Web browser
with the following procedure.
1 Startup the Web browser
Tap the [Safari] icon on the home screen.
2 Enter the P2 cam IP address in the Web browser
Enter the IP address set in the P2 cam (factory default:
http://192.168.0.1) in the address bar at the top of the
Web browser screen to access the P2 cam.
3 The web application “P2 Browser” will startup
[USER NAME] and [PASSWORD] input screen will
appear, enter [USER NAME] (factory default: guest) and
[PASSWORD] (factory default: p2guest) set in the P2
cam. Connection is completed when a screen similar to
the one below is displayed.
The thumbnail screen will not automatically refresh when a
P2 card is removed and re-inserted, or when recording is
finished. Please push the CONTENTS button on the bottom
left of the screen to refresh.
2. INPUT Panel
Text memos and shot marks can be attached to the clip being
recorded.
3. STATUS Panel
Various P2 cam statuses as shown below will be displayed.
Time code
Time code maintained by the P2 Cam is displayed.
Recording format
Displays the system mode, video codec, shooting recording
rate, etc. of the P2 cam.
Media level / usage
Displays the level and usage of the P2 card inserted in the
P2 cam.
You can switch the display to “remain” or “used”. The display
unit is “minutes”.
Battery level
Battery level of the P2 Cam is displayed.
Metadata Settings
The various metadata added to a clip is displayed in a list.
Setting details can also be modified by clicking on each
metadata.
The modified value will be applied to succeeding clip
recordings.
Contents that can be displayed
You can select from 1 to 4 below. For detailed operating
instructions, visit the following website.
http://pro-av.panasonic.net/
1. CONTENTS Panel
Thumbnail list of the clips recorded on the P2 Card inserted in
the P2 Cam is displayed.
By selecting a clip, the screen will switch to the proxy playback
screen.
The metadata and text memo of the clip being played is
displayed in the proxy playback screen.
You can edit the metadata by clicking on it.
<Notes>
Up to 100 of the most current recorded clips can be
displayed in the thumbnail.
If the proxy is not recorded on the P2 card, playback is not
available. Install the video encoder board (AJ-YDX30G),
and set to record the proxy.
For a clip with multiple clips connected, playback will be for
each clip. “prev” and “next” buttons are displayed for these
clips, allowing you to playback the previous or next clip by
pressing the relevant button.
Text memos cannot be edited.
4. INFO Panel
Displays the set values or statuses of lenses or filters etc.
regarding shooting with the P2 cam.
<Note>
The LENS TYPE, IRIS, FOCUS, and ZOOM values will only
be displayed when using a lens with digital control system.
22
Page 23

Glossary
Term Description
LAN An abbreviation of Local Area Network. A network in a relatively small area, such as within a company.
INFRASTRUCTURE A mode to connect via access points.
AD HOC A mode in which computers communicate directly without going through an access point.
An abbreviation of Dynamic Host Configuration Protocol.
DHCP (dynamic)
Static
IP address
MAC address
Network address
Host address
SSID
WEP
Subnet Mask
A function for assigning IP addresses automatically to connected equipment. If there is equipment with a
DHCP server function connected to the LAN, an IP address will be automatically assigned to the connected
equipment.
A connection method not using the DHCP. This is a method where the user sets up the fixed IP address.
Setup with this method if you have received a fixed value to setup from the network administrator.
An address where the data is delivered on the network.
IP (Internet Protocol) is a protocol to deliver data, and same IP address cannot be used within a network.
An ID number unique to each network adapter.
All the network adapters in the world are assigned with a unique number, and data communication between
the adapters are performed based on this.
This number is a combination of the unique number for each manufacturer managed and assigned by the
IEEE, and a number assigned by the manufacturer to each adapter.
In the bit string that constitutes the IP address, it is the address of the portion set to the binary digit “1” by the
subnet mask.
So if the IP address is [192.168.0.1] and the subnet mask is [255.255.255.0], the network address will be
[192.168.0].
In the bit string that constitutes the IP address, it is the address of the portion set to the binary digit “0” by the
subnet mask.
So if the IP address is [192.168.0.1] and the subnet mask is [255.255.255.0], the host address will be [1].
An abbreviation of Service Set ID. It is required to setup an identification code referred to as an SSID to
determine if the access point is the one you want to communicate with using the wireless LAN. It may be
displayed as [ESSID] or [Network name] on some of the wireless LAN adapters.
An abbreviation of Wired Equivalent Privacy. This is a method for encrypting the data being communicated.
By creating an encryption key that is given only to the other party involved in the communication, it
prevents decryption of data by a third party.
A network may be managed by dividing a large network into numbers of smaller networks called subnets.
The value to delimit the IP address in such a case is called a subnet mask.
Compatible Models
Memory Card Camera Recorder: AJ-HPX3100G
List of Contents
Installation Guide “Read before use”
Software Licensing Agreement
User Guide (CD-R)
“Pouch containing the key code”
* If you open the pouch containing the key code, you are
agreeing to the contents of the license agreement of the
bundled software.
After unpacking the product, please dispose of the packaging
material properly.
23
Page 24

Notice Regarding Security
When using this product, you may encounter the following
damages.
Leaking of customer privacy via this product
Illegal operation of this product by malicious third parties
Interference or stopping of this product by malicious third
parties
Caution regarding security when using a wireless LAN product
Wireless LAN can communicate information between computers, etc., and the wireless access point using radio waves instead
of LAN cables, which allows you to connect to the LAN anywhere as long as the radio waves can reach you.
However, radio waves can reach anywhere in their range even through obstacles (walls, etc.). Therefore, it may give rise to the
following problems if you do not perform the settings regarding security.
Interception of communication contents
Malicious third parties may intercept the radio waves, and private information such as ID, password, or credit card numbers,
etc., contents of the mail, may be intercepted.
Unauthorized invasion
Malicious third party may access a private or corporate network without authorization, and steal private information or
classified information (leakage of information), release fraud information by impersonating a specific person (spoofing),
rewrite and distribute the intercepted contents (falsification), destroy data or systems by spreading computer viruses, etc.
(destruction), etc.
The wireless adapters and wireless access points have security mechanisms to deal with these problems, so just by using these
settings when using the product will decrease the chance of these problems occurring.
Security settings may not be setup on the wireless LAN equipment at the time of purchase. To reduce the chance of security
problems occurring at the user site, make sure to setup all the settings regarding wireless LAN equipment in accordance with
the operating instructions of each item of wireless LAN equipment.
Also, please note that the security settings may be breached by special methods due to the specification of the wireless LAN.
If you cannot setup the security settings by yourself, when using the P2 Cam (Part number: AJ-HPX3100) via wireless LAN,
please contact the Service Center in your region.
It is recommended to use the product fully understanding the risk when the security setting is not setup, and to setup the security setting under judgment and responsibility of the customer.
Take appropriate security measures.
Limit the users that can log in by setting up passwords.
Use passwords that are hard to guess.
Change the password periodically.
Panasonic Corporation and its affiliate companies will not
directly inquire as to a customer’s password. Do not give
your password in answer to any such direct inquiries.
24
Page 25

G
Web Site: http://panasonic.net
Panasonic Solutions Company
3 Panasonic Way, Secaucus, NJ 07094 Tel: 877-803-8492
www.panasonic.com/broadcast e-mail: MediaProServices.PSC@us.panasonic.com
Panasonic Canada Inc.
5770 Ambler Drive, Mississauga, Ontario L4W 2T3 Tel: 905-624-5010
Panasonic de México S.A. De C.V.
Casa Matriz: Felix Cuevas No.6 Piso 2 y 3 Col. Tlacoquemecatl Del Valle Del.Benito Juárez, México, D.F., C.P.03200
Tel: 55-5488-1000 Fax: 55-5575-6783
Panasonic Latin America, S.A.
P.O.Box 0816-03164 Panama, Republic of Panama Tel: +507-229-2955 Fax: 507-229-5352
Panasonic do Brasil Ltda.
Rua Cubatão, 320-6o andar-Paraíso CEP 04013-001- São Paulo -SP Tel: 11-3889-4000 Fax: 11-3889-4004
파나소닉 코리아 주식회사 (PKL)
서울특별시 서초구 서초동 1553-5 오퓨런스 17 층
서비스 문의 : 02-533-8452
http://panasonic.kr
〒 571-8503 大阪府門真市松葉町 2 番 15 号 i (06) 6901ー 1161
©
2011
 Loading...