

Page 1
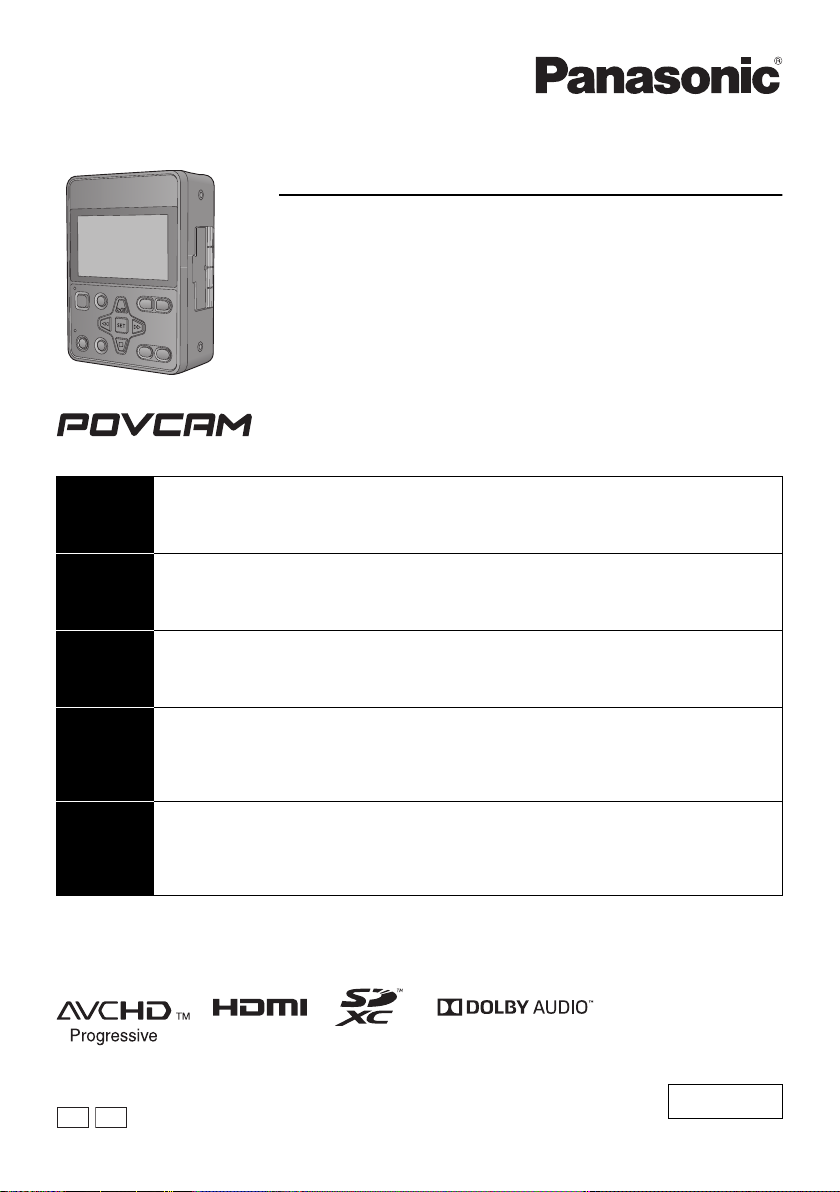
Basic Operating Instructions
EJ
Memory Card Portable Recorder
ENGLISH
DEUTSCH
FRANÇAIS
ITALIANO
ESPAÑOL
Model No.
AG-UMR20P
AG-UMR20E
Before using this product, be sure to read “Information for Your Safety” (pages 3 to 8).
More detailed operating instructions are available in “Operating Instructions (PDF format)”.
To read it, download it from the website.
http://pro-av.panasonic.net/en/manual/index.html
Bitte lesen Sie sorgfältig die “Sicherheitshinweise” vor der Nutzung dieses Produkts. (Seiten 9 bis 12).
Detailliertere Bedienungsanweisungen finden Sie in der “Bedienungsanleitung (PDF-Format)”.
Um sie zu lesen, laden Sie diese von der Website herunter.
http://pro-av.panasonic.net/en/manual/index.html
Avant d’utiliser cet appareil, assurez-vous de lire la section “Précautions à prendre” (pages 13 à 17).
Un mode d'emploi plus détaillé est présent dans “Mode d'emploi (format PDF)”.
Pour le consulter, téléchargez-le depuis le site web.
http://pro-av.panasonic.net/en/manual/index.html
Prima di utilizzare il prodotto, assicurarsi di leggere “Informazioni riguardanti la vostra sicurezza”
(pagine 18 a 21).
Istruzioni per l'uso più dettagliate sono disponibili in “Istruzioni per l'uso (formato PDF)”.
Per leggerlo, scaricarlo dal sito web.
http://pro-av.panasonic.net/en/manual/index.html
Antes de usar este producto, asegúrese de leer “Información para su seguridad” (páginas 22 a 26).
Se pueden encontrar instrucciones de funcionamiento más detalladas en “Instrucciones de
funcionamiento (formato PDF)”.
Para leerlo, descárguelo de la página web.
http://pro-av.panasonic.net/en/manual/index.html
Please read these instructions carefully before using this product, and save this manual for future use.
PJ
F0417SQ0
Printed in Japan
ENGLISH
DVQX1262ZA
Page 2

ɛɴɥɝɚɪɫɤɢ
ɉɨɫɟɬɟɬɟɫɥɟɞɧɢɹɭɟɛɫɚɣɬɨɬɧɨɫɧɨɢɧɮɨɪɦɚɰɢɹɡɚɛɟɡɨɩɚɫɧɨɫɬɬɚɢɜ
ɚɠɧɢ
ɭɜɟɞɨɦɥɟɧɢɹɡɚɩɪɨɞɭɤɬɚ
Hrvatski
=DVLJXUQRVQHLQIRUPDFLMH L YDåQH REDYLMHVWL R SURL]YRGX SRVMHWLWH
VOMHGHüX
LQWHUQHWVNXVWUDQLFX
ýHãWLQD
1DQiVOHGXMtFtPZHEX QDMGHWH EH]SHþQRVWQt LQIRUPDFH D GĤOHåLWp SR]QiPN\
N
WRPXWRSURGXNWX
'DQVN
%HV¡JI¡OJHQGHZHEVLGH IRU VLNNHUKHGVLQIRUPDWLRQ RJ YLJWLJH EHPUNQLQJHU
YHGU¡UHQGHSURGXNWHW
1HGHUODQGV
*DQDDUGH YROJHQGH ZHEVLWH YRRU YHLOLJKHLGVLQIRUPDWLH HQ EHODQJULMNH
PHOGLQJHQ
RYHUKHWSURGXFW
(HVWL
7RRGHWSXXGXWDYD RKXWXVWHDEH MD ROXOLVWH PlUNXVWH VDDPLVHNV NODVWDJH
MlUJPLVW
YHHELOHKWH
Suomi
.l\VHXUDDYDOODYHUNNRVLYXOODVDDGDNVHVLWXUYDOOLVXXVWLHWRMDMD
WlUNHLWlWLHWRMDOLLWW\HQ
ODLWWHHVHHQ
ǼȜȜȘȞȚțȐ
īȚĮʌȜȘȡȠijȠȡȓİȢ ıȤİIJȚțȐȝİșȑȝĮIJĮĮıijȐȜİȚĮȢțĮȚıȘȝĮȞIJȚțȑȢ İȚįȠʌ
ȠȚȒıİȚȢʌȠȣ
ĮijȠȡȠȪȞIJȠʌȡȠȧȩȞıĮȢİʌȚıțİijIJİȓIJİIJȠȞȚıIJȩIJȠʌȠʌȠȣĮțȠȜȠȣșİȓ
Magyar
$WHUPpNNHONDSFVRODWRVEL]WRQViJLLQIRUPiFLyNpUWpVIRQWRVpUWHVtWpVHNpUWOiWRJDVVRQ
HOD]DOiEELZHEROGDOUD
/DWYLHãX
/DLLHJnjWXLQIRUPƗFLMXSDUGURãƯEXXQVNDWƯWXVYDUƯJXVSD]LƼRMXPXV
SDUãRSURGXNWX
DSPHNOƝMLHWWƗOƗNQRUƗGƯWRWƯPHNƺDYLHWQL
/LHWXYLǐ
-HLUHLNLD VDXJRVLQIRUPDFLMRVLUVYDUELǐ SUDQHãLPǐDSLHJDPLQƳ
DSVLODQN\NLWHWROLDX
QXURG\WRMHVYHWDLQơMH
3ROVNL
,QIRUPDFMHREH]SLHF]HĔVWZLH L ZDĪQH LQIRUPDFMH R SURGXNFLH ]QDMGXMą
VLĊZ
SRQLĪV]HMZLWU\QLHLQWHUQHWRZHM
Português
&RQVXOWHRVHJXLQWH ZHEVLWH SDUD DV LQIRUPDo}HV GH VHJXUDQoD H LPSRUWDQWHV
QRWL¿FDo}HVVREUHRSURGXWR
5RPkQă
9L]LWD܊LXUPăWRDUHDSDJLQăZHESHQWUXLQIRUPDĠLLGHVHFXULWDWH܈L
QRWL¿FăULLPSRUWDQWH
FXSULYLUHODSURGXV
6ORYHQVN\
3UHEH]SHþQRVWQpLQIRUPiFLHDG{OHåLWpR]QiPHQLDV~YLVLDFHVSURGXNWRP
QDYãWtYWH
W~WRZHERY~VWUiQNX
6ORYHQãþLQD
=DYDUQRVWQHLQIRUPDFLMH LQ SRPHPEQD REYHVWLOD Y ]YH]L ] L]GHONRP
RELãþLWH
QDVOHGQMHVSOHWQRPHVWR
6YHQVND
%HV|NI|OMDQGHZHEESODWV I|U VlNHUKHWVLQIRUPDWLRQ RFK YLNWLJD PHGGHODQGHQ
RP
SURGXNWHQ
2
DVQX1262
http://pro-av.panasonic.net/en/manual/index.html
Page 3
Information for Your Safety
WARNING:
To reduce the risk of fire, electric shock or product damage,
≥ Do not expose this unit to rain, moisture, dripping or splashing.
≥ Do not place objects filled with liquids, such as vases, on this unit.
≥ Use only the recommended accessories.
≥ Do not remove covers.
≥ Do not repair this unit by yourself. Refer servicing to qualified service personnel.
CAUTION!
To reduce the risk of fire, electric shock or product damage,
≥ Do not install or place this unit in a bookcase, built-in cabinet or in another confined space. Ensure this unit is
well ventilated.
≥ Do not obstruct this unit’s ventilation openings with newspapers, tablecloths, curtains, and similar items.
≥ Do not place sources of naked flames, such as lighted candles, on this unit.
CAUTION:
About using a headphone
≥ Excessive sound pressure from earphones and headphones can cause hearing loss.
≥ Listening at full volume for long periods may damage the user’s ears.
CAUTION:
Do not leave the unit in direct contact with the skin when in use.
≥ Low temperature burns may result if the skin is left in direct contact with the high temperature parts of the unit
or heated air from the ventilation openings of the unit.
CAUTION:
About using SD Card
≥ Keep the Memory Card out of reach of children to prevent swallowing.
indicates safety information.
∫ Product identification marking
Product Location
Memory Card Portable Recorder Bottom
AC adaptor Bottom
This unit is intended for use in moderate and tropical climates. (Southeast Asia, Middle East only)
This unit is intended for use in moderate climates. (Except Southeast Asia, Middle East)
DVQX1262
3
Page 4
<For the U.S.A. and Canada only>
AC adaptor
This AC adaptor operates on AC between 100 V and 240 V.
But
≥ In the U.S.A. and Canada, the AC adaptor must be connected to a 120 V AC power supply only.
≥ When connecting to an AC supply outside of the U.S.A. or Canada, use a plug adaptor to suit the AC outlet
configuration.
≥ When connecting to a supply of greater than AC 125 V, ensure the cord you use is suited to the voltage of the AC
supply and the rated current of the AC adaptor.
≥ Contact an electrical parts distributor for assistance in selecting a suitable AC plug adaptor or AC cord set.
The power plug is the disconnecting device. Install this unit so that the power plug can be unplugged from the socket
outlet immediately.
≥ The unit is in the standby condition when the AC adaptor is connected. The primary circuit is always “live” as long
as the AC adaptor is connected to an electrical outlet.
≥ Do not use any other AC adaptors except the supplied one.
<For other countries or regions>
The mains plug is the disconnecting device. Install this unit so that the mains plug can be unplugged from the socket
outlet immediately.
<For the U.S.A. and Canada only>
Conforms to UL STD 60065.
Certified to CAN/CSA STD C22.2 No.60065.
<For Europe only>
∫ EMC Electric and magnetic compatibility
This symbol (CE) is located on the rating plate.
∫ Concerning the battery
CAUTION
≥ Danger of explosion if battery is incorrectly replaced. Replace only with the type recommended by the
manufacturer.
≥ When disposing of the batteries, please contact your local authorities or dealer and ask for the correct method of
disposal.
Warning
Risk of fire, explosion and burns. Do not disassemble, heat above 60 oC (140 oF) or incinerate.
≥ We recommend using Panasonic batteries (VW-VBD58/AG-VBR59/AG-VBR89/AG-VBR118).
≥ If you use other batteries, we cannot guarantee the quality of this product.
≥ Do not heat or expose to flame.
≥ Do not leave the battery(ies) in a car exposed to direct sunlight for a long period of time with doors and windows
closed.
4
DVQX1262
Page 5

Battery pack (Lithium ion battery pack)
≥ Use the specified unit to recharge the battery pack.
≥ Do not use the battery pack with equipment other than the specified unit.
≥ Do not get dirt, sand, liquids, or other foreign matter on the terminals.
≥ Do not touch the plug terminals (i and j) with metal objects.
≥ Do not disassemble, remodel, heat or throw into fire.
If any electrolyte should come into contact with your hands or clothes, wash it off thoroughly with water.
If any electrolyte should come into contact with your eyes, never rub the eyes. Rinse eyes thoroughly with water, and
then consult a doctor.
∫ IMPORTANT SAFETY INSTRUCTIONS
Read these operating instructions carefully before using the unit. Follow the safety instructions on the unit and the
applicable safety instructions listed below. Keep these operating instructions handy for future reference.
1) Read these instructions.
2) Keep these instructions.
3) Heed all warnings.
4) Follow all instructions.
5) Do not use this apparatus near water.
6) Clean only with dry cloth.
7) Do not block any ventilation openings. Install in accordance with the manufacturer’s instructions.
8) Do not install near any heat sources such as radiators, heat registers, stoves, or other apparatus (including
amplifiers) that produce heat.
9) Do not defeat the safety purpose of the polarized or grounding-type plug. A polarized plug has two blades with
one wider than the other. A grounding-type plug has two blades and a third grounding prong. The wide blade or
the third prong are provided for your safety. If the provided plug does not fit into your outlet, consult an electrician
for replacement of the obsolete outlet.
10) Protect the power cord from being walked on or pinched particularly at plugs, convenience receptacles, and the
point where they exit from the apparatus.
11) Only use attachments/accessories specified by the manufacturer.
12) Use only with the cart, stand, tripod, bracket, or table specified by the manufacturer, or sold
with the apparatus. When a cart is used, use caution when moving the cart/apparatus
combination to avoid injury from tip-over.
13) Unplug this apparatus during lightning storms or when unused for long periods of time.
14) Refer all servicing to qualified service personnel. Servicing is required when the apparatus
has been damaged in any way, such as power-supply cord or plug is damaged, liquid has
been spilled or objects have fallen into the apparatus, the apparatus has been exposed to rain or moisture, does
not operate normally, or has been dropped.
DVQX1262
5
Page 6
FCC NOTICE (USA)
Declaration of Conformity
Model Number: AG-UMR20P
Trade Name: Panasonic
Responsible Party: Panasonic Corporation of North America
Two Riverfront Plaza Newark NJ07102
Support contact: 1-800-524-1448
This device complies with Part 15 of the FCC Rules.
Operation is subject to the following two conditions:
(1) This device may not cause harmful interference, and (2) this device must accept any interference received,
including interference that may cause undesired operation.
To assure continued compliance, follow the attached installation instructions and do not make any unauthorized
modifications.
CAUTION:
This equipment has been tested and found to comply with the limits for a Class B digital device, pursuant to Part
15 of the FCC Rules. These limits are designed to provide reasonable protection against harmful interference in
a residential installation. This equipment generates, uses and can radiate radio frequency energy and, if not
installed and used in accordance with the instructions, may cause harmful interference to radio
communications. However, there is no guarantee that interference will not occur in a particular installation. If this
equipment does cause harmful interference to radio or television reception, which can be determined by turning
the equipment off and on, the user is encouraged to try to correct the interference by one or more of the
following measures:
≥ Reorient or relocate the receiving antenna.
≥ Increase the separation between the equipment and receiver.
≥ Connect the equipment into an outlet on a circuit different from that to which the receiver is connected.
≥ Consult the dealer or an experienced radio/TV technician for help.
The user may find the booklet “Something About Interference”
available from FCC local regional offices helpful.
FCC Warning:
To assure continued FCC emission limit compliance, follow the attached installation instructions and the user
must use only shielded interface cables when connecting to host computer or peripheral devices. Also, any
unauthorized changes or modifications to this equipment could void the user’s authority to operate this device.
NOTIFICATION (Canada)
CAN ICES-3(B)/NMB-3(B)
indicates safety information.
<For U.S.A. only>
AG-UMR20P
6
DVQX1262
Page 7
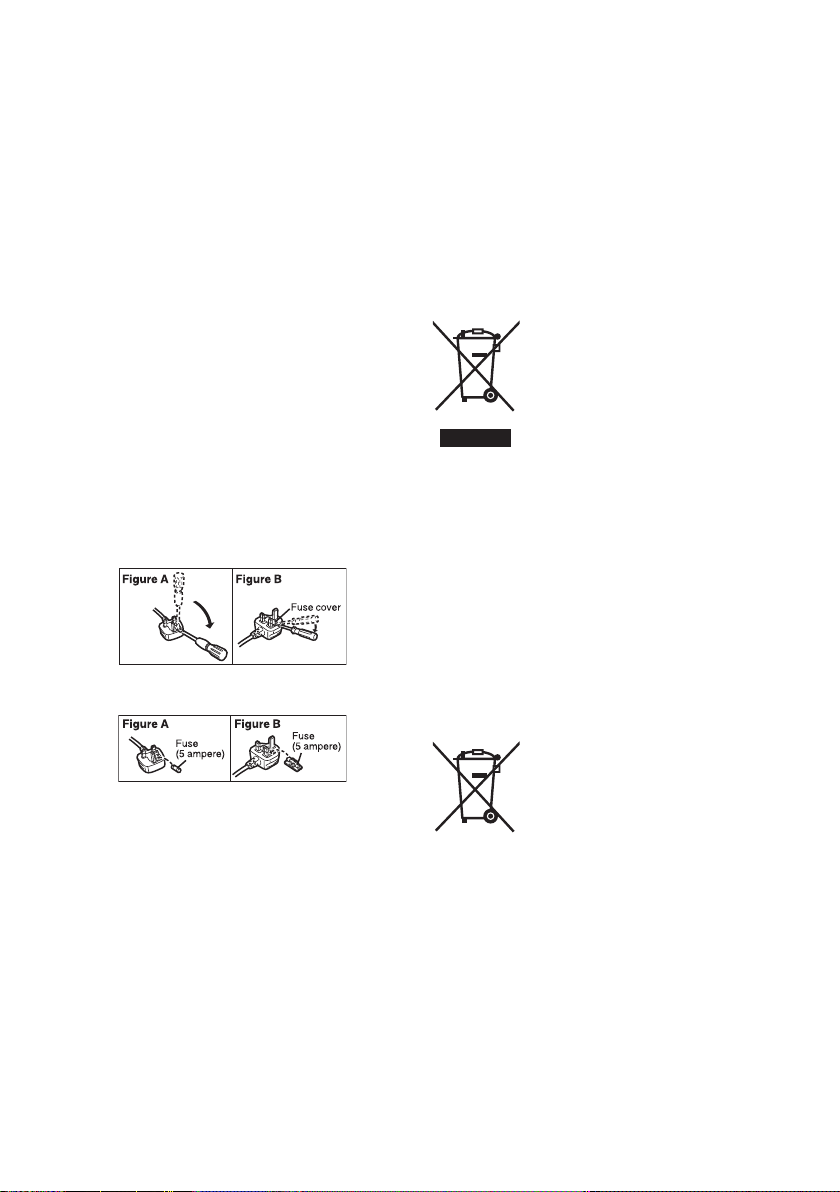
For the AC mains plug of three pins
∫ Caution for AC mains lead
For your safety, please read the following text carefully.
This appliance is supplied with a moulded three pin
mains plug for your safety and convenience. A 5-ampere
fuse is fitted in this plug.
Should the fuse need to be replaced please ensure that
the replacement fuse has a rating of 5-ampere and that it
is approved by ASTA or BSI to BS1362.
Check for the ASTA mark Ï or the BSI mark Ì on the
body of the fuse.
If the plug contains a removable fuse cover you must
ensure that it is refitted when the fuse is replaced.
If you lose the fuse cover the plug must not be used until
a replacement cover is obtained.
A replacement fuse cover can be purchased from your
local dealer.
Before use
Remove the connector cover.
How to replace the fuse
The location of the fuse differ according to the type of AC
mains plug (figures A and B).
Confirm the AC mains plug fitted and follow the
instructions below.
Illustrations may differ from actual AC mains plug.
1. Open the fuse cover with a screwdriver.
2. Replace the fuse and close or attach the fuse
cover.
<For USA only>
Disposal may be regulated in your community due to
environmental considerations. For disposal or recycling
information, please visit Panasonic website: http://
www.panasonic.com/environmental or call 1-888-769-
0149.
<For Europe only>
∫ Disposal of Old Equipment and
Batteries
Only for European Union and
countries with recycling systems
These symbols on the products,
packaging, and/or accompanying
documents mean that used
electrical and electronic products
and batteries must not be mixed
with general household waste.
For proper treatment, recovery
and recycling of old products and
used batteries, please take them
to applicable collection points in accordance with
your national legislation.
By disposing of them correctly, you will help to
save valuable resources and prevent any
potential negative effects on human health and
the environment.
For more information about collection and
recycling, please contact your local municipality,
dealer or supplier.
Penalties may be applicable for incorrect disposal
of this waste, in accordance with national
legislation.
Note for the battery symbol
(bottom symbol):
This symbol might be used in
combination with a chemical
symbol. In this case it complies
with the requirement set by the
Directive for the chemical involved.
DVQX1262
7
Page 8
<For India only>
AC adaptor information
AEEE Yönetmeliğine Uygundur.
AEEE Complies with Directive of Turkey.
IS 616/IEC 60065
R-41016268
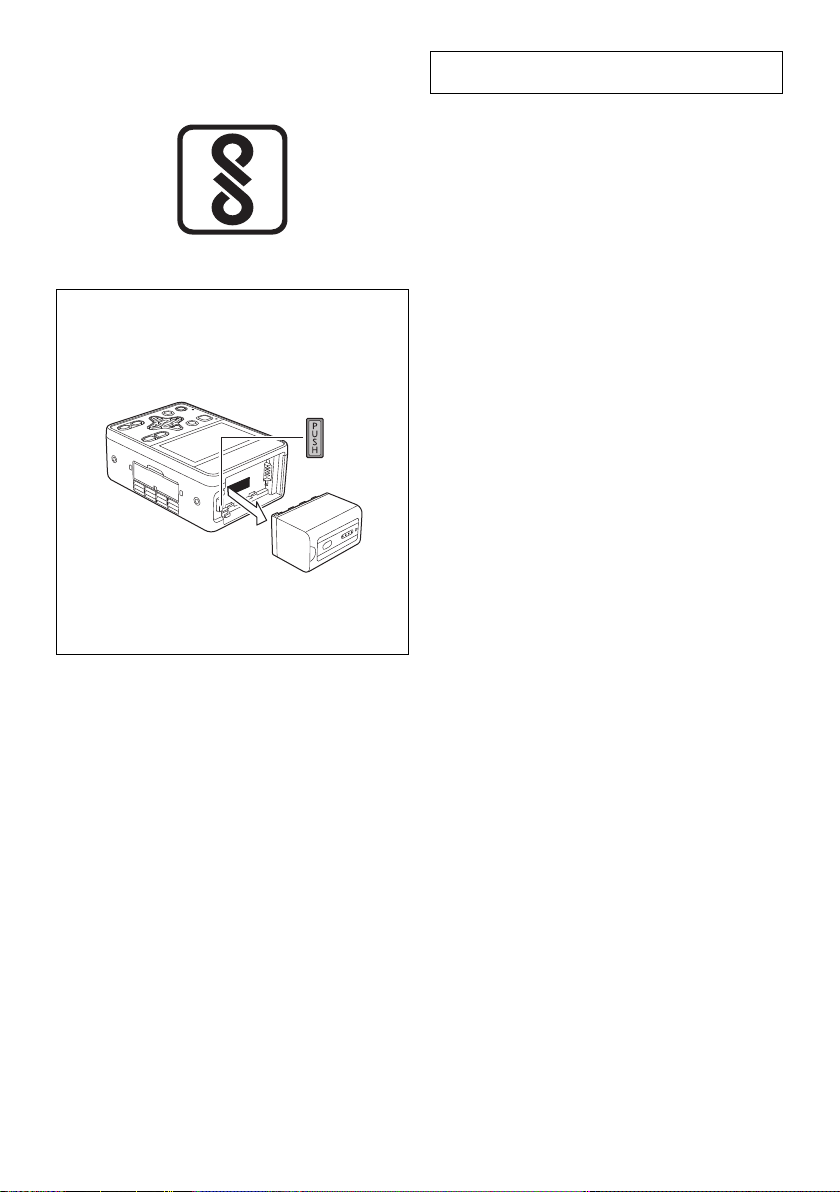
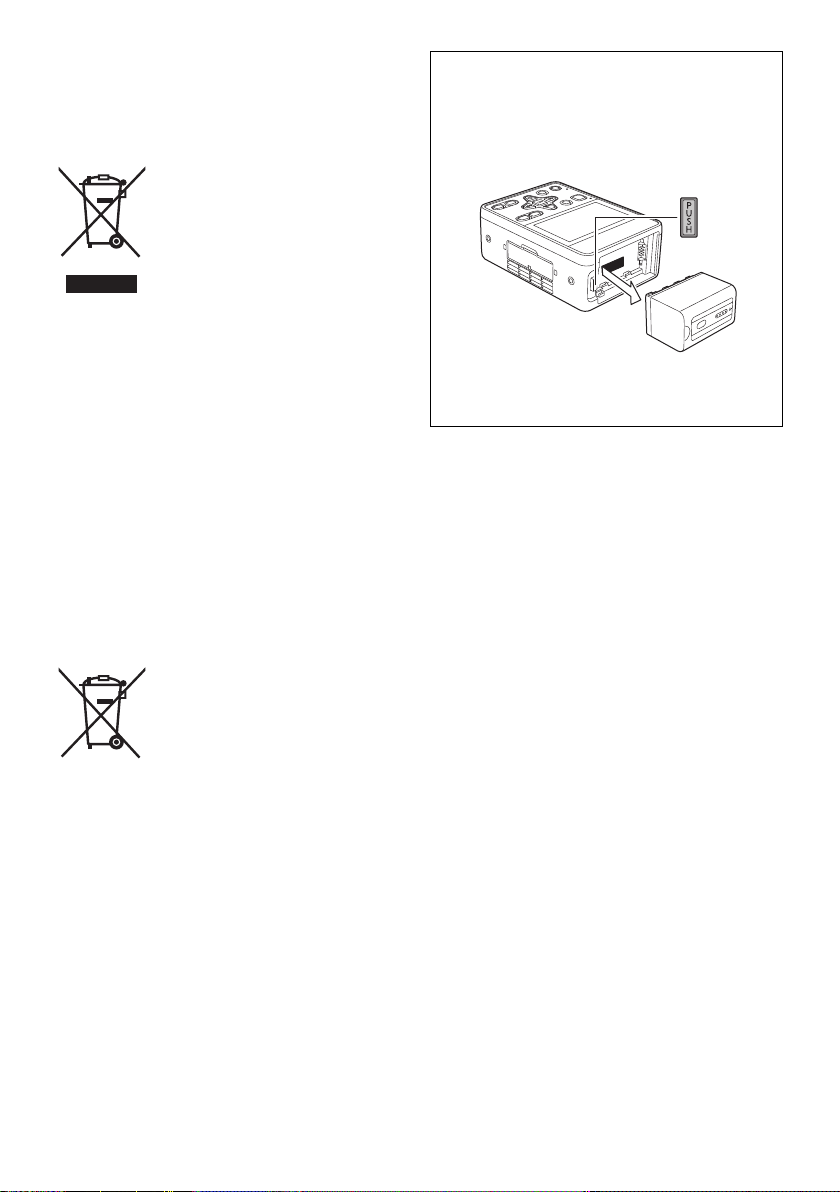
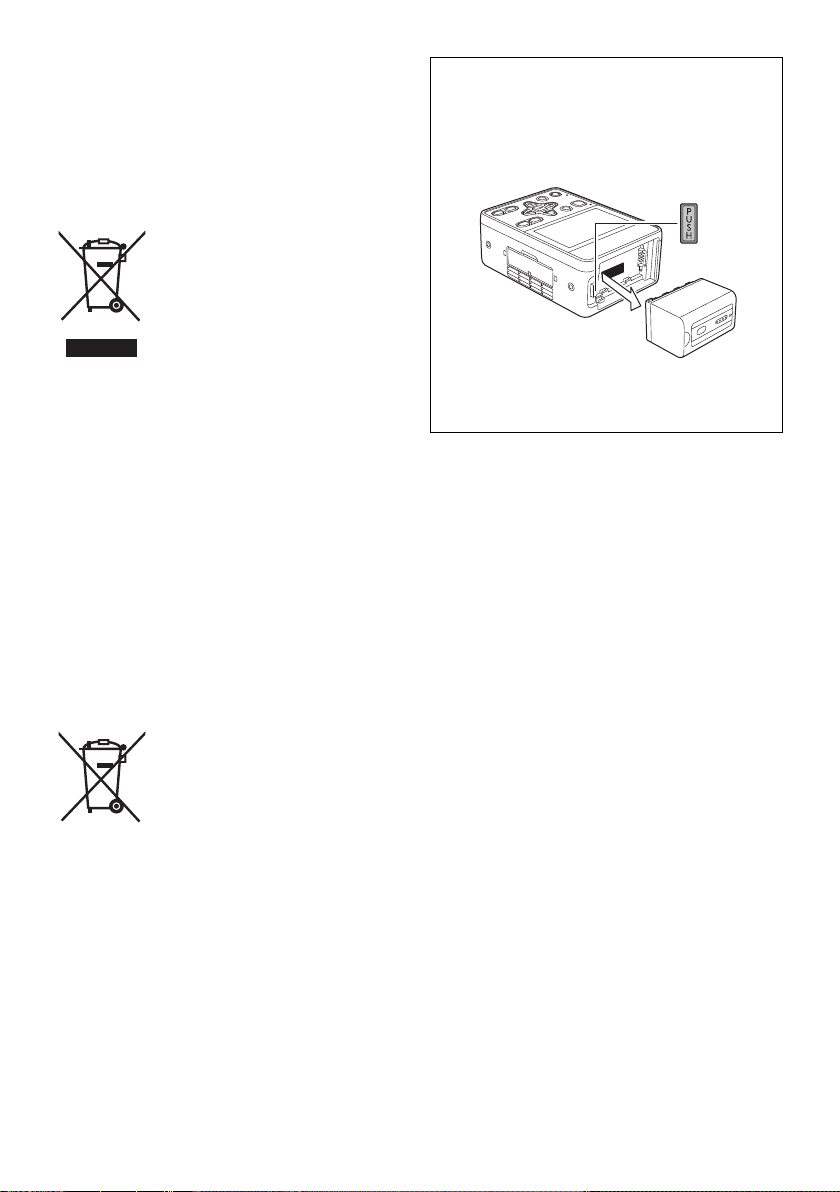
To remove the battery
Main Power Battery (Lithium ion Battery)
While pressing the battery release button, remove the
battery.
Back-up Battery (Lithium Battery)
≥ For the removal of the battery for disposal at the end
of its service life, please consult your dealer.
Note regarding the Power Management
function specified under COMMISSION
REGULATION (EC) No 1275/2008
implementing Directive 2009/125/EC of the
European Parliament and of the Council.
This device is designed and manufactured for use at a
broadcasting station and/or in a similar environment.
This device is not equipped with a Power Management
function or the Power Management function is set to OFF
as it will prevent the device from fulfilling its intended
purpose for the reasons below.
1. If the device is a Studio Camera, a Weather Camera,
a Mixer or other processor:
A Power Management function may cause the device to
suddenly stop during recording or while On Air.
2. If the device is a Studio Monitor:
A Power Management function may cause video for the
confirmation of whether a signal is normal, or whether the
signal has been lost, to be un-viewable.
3. If the device is a Camera Recorder:
A professional camera recorder must be able to start
quickly at any time, but a Power Management function
will cause an increase in the time taken to resume from
Stand-by mode.
8
DVQX1262
Page 9

Sicherheitshinweise
DEUTSCH
WARNUNG:
Um die Gefahr eines Brandes, eines Stromschlages oder einer Beschädigung des Produktes zu reduzieren,
≥ Setzen Sie dieses Gerät weder Regen, noch Feuchtigkeit, Tropfen oder Spritzern aus.
≥ Stellen Sie keine mit Flüssigkeiten gefüllten Gefäße, wie Vasen, auf dieses Gerät.
≥ Verwenden Sie nur das empfohlene Zubehör.
≥ Entfernen Sie die Abdeckungen nicht.
≥ Reparieren Sie das Gerät nicht selbst. Wenden Sie sich zu diesem Zweck an qualifiziertes
Kundendienstpersonal.
ACHTUNG!
Um die Gefahr eines Brandes, eines Stromschlages oder einer Beschädigung des Produktes zu reduzieren,
≥ Installieren oder positionieren Sie dieses Gerät nicht in einem Bücherregal, Einbauschrank oder einem
sonstigen engen Raum. Stellen Sie eine gute Belüftung des Gerätes sicher.
≥ Achten Sie darauf, die Entlüftungsschlitze des Gerätes nicht durch Gegenstände aus Papier oder Stoff zu
blockieren, z.B. Zeitungen, Tischdecken und Vorhänge.
≥ Stellen Sie keine Quellen offener Flammen, z.B. brennende Kerzen, auf das Gerät.
ACHTUNG:
Gebrauch eines Kopfhörers
≥ Übertriebene Lautstärke von Kopfhörern oder Headsets kann zu schweren Hörschäden führen.
≥ Das Hören bei voller Lautstärke kann auf lange Sicht das Gehör des Anwenders schädigen.
ACHTUNG:
Vermeiden Sie direkten Hautkontakt mit dem Gerät, wenn Sie das Gerät verwenden.
≥ Es besteht ein Verbrennungsrisiko, wenn die Haut über einen längeren Zeitraum mit einem
Hochtemperaturbereich oder der erwärmten Luft aus den Entlüftungsschlitzen des Geräts Kontakt hat.
ACHTUNG:
Informationen zur Verwendung der SD-Karte
≥ Bewahren Sie die Speicherkarte außerhalb der Reichweite von Kindern auf, damit diese die Karte nicht
verschlucken können.
ist die Sicherheitsinformation.
≥ Bei angeschlossenem Netzteil befindet sich das Gerät im Standby-Zustand. Der Hauptstromkreis steht immer
unter Spannung, solange das Netzteil an eine Steckdose angeschlossen ist.
≥ Verwenden Sie nur die mitgelieferten Netzadapter.
DVQX1262
9
Page 10

∫ Kennzeichnung für Produkterkennung
Produkt Stellung
Tragbarer Speicherkarten-Rekorder Unterseite
Netzadapter Unterseite
Dieses Gerät ist für den Betrieb in Regionen mit gemäßigtem und tropischem Klima bestimmt. (Nur Südostasien und
Nahost)
Dieses Gerät ist für den Betrieb in Ländern mit gemäßigtem Klima bestimmt. (Außer Südostasien und Nahost)
Der Netzstecker ist die Vorrichtung zum Trennen des Gerätes. Installieren Sie dieses Gerät so, dass der Netzstecker
sofort aus der Steckdose gezogen werden kann.
∫ EMV – Elektromagnetische Verträglichkeit
Das CE-Zeichen befindet sich auf dem Typenschild.
∫ Zum Thema des Akkus
ACHTUNG
≥ Explosionsgefahr bei falschem Anbringen der Batterie. Ersetzen Sie die Batterie nur durch den vom Hersteller
empfohlenen Typ.
≥ Wenden Sie sich zur Entsorgung der Batterien an die lokalen Behörden oder erfragen Sie die richtige
Vorgehensweise zur Entsorgung.
Warnung
Brand-, Explosions- und Verbrennungsgefahr. Nicht zerlegen, auf über 60 oC erhitzen oder verbrennen.
≥ Wir empfehlen, Panasonic-Akkus zu benutzen (VW-VBD58/AG-VBR59/AG-VBR89/AG-VBR118).
≥ Bei Einsatz anderer Akkus übernehmen wir keine Gewähr für die Qualität dieses Produkts.
≥ Setzen Sie den Akku weder Hitze noch offenem Feuer aus.
≥ Lassen Sie Akkus nie für längere Zeit bei direkter Sonneneinstrahlung in einem geschlossenen Auto liegen.
10
DVQX1262
Page 11
∫ Entsorgung von Altgeräten und
Batterien
Nur für die Europäische Union und
Länder mit Recyclingsystemen
Dieses Symbol, auf den
Produkten, der Verpackung und/
oder den Begleitdokumenten,
bedeutet, dass gebrauchte
elektrische und elektronische
Produkte sowie Batterien nicht in
den allgemeinen Hausmüll
gegeben werden dürfen.
Bitte führen Sie alte Produkte und
verbrauchte Batterien zur Behandlung,
Aufarbeitung bzw. zum Recycling gemäß den
gesetzlichen Bestimmungen den zuständigen
Sammelpunkten zu.
Indem Sie diese Produkte und Batterien
ordnungsgemäß entsorgen, helfen Sie dabei,
wertvolle Ressourcen zu schützen und eventuelle
negative Auswirkungen auf die menschliche
Gesundheit und die Umwelt zu vermeiden.
Für mehr Informationen zu Sammlung und
Recycling, wenden Sie sich bitte an Ihren
örtlichen Abfallentsorgungsdienstleister, Händler
oder Zulieferer.
Gemäß Landesvorschriften können wegen nicht
ordnungsgemäßer Entsorgung dieses Abfalls
Strafgelder verhängt werden.
Hinweis für das Batteriesymbol
(Symbol unten):
Dieses Symbol kann in
Kombination mit einem
chemischen Symbol abgebildet
sein. In diesem Fall erfolgt dieses
auf Grund der Anforderungen
derjenigen Richtlinien, die für die betreffende
Chemikalie erlassen wurden.
Entfernen des Akkus und der Knopfzelle
Hauptspannungsversorgungsakku (Lithium-IonenBatterie)
Entfernen Sie den Akku, während Sie auf den AkkuFreigabehebel drücken.
Reservebatterie (LithiumBatterie)
≥ Wenden Sie sich zur Entfernung erschöpfter
Batterien an Ihren Händler.
Hinweis zur Energiesparfunktion, spezifiziert
unter VERORDNUNG (EG) Nr. 1275/2008 DER
KOMMISSION zur Implementierung der
Verordnung 2009/125/EC des Europäischen
Parlaments und des Rats
Dieses Gerät ist für die Verwendung bei einem
Radiosender oder in ähnlicher Umgebung ausgelegt.
Dieses Gerät ist nicht mit einer Energiesparfunktion
ausgestattet, oder die Energiesparfunktion weist die
Einstellung "AUS" auf, da anderenfalls die Zwecke des
Geräts aus nachfolgend genannten Gründen nicht erfüllt
werden können.
1. Wenn es sich beim Gerät um eine Studiokamera, eine
Wetterkamera, einen Mischer oder anderen Prozessor
handelt:
Durch eine Energiesparfunktion kann es während
Übertragungen zu Unterbrechungen der Aufnahme
kommen.
2. Wenn es sich beim Gerät um einen Studiomonitor
handelt:
Durch eine Energiesparfunktion können Videosignale
zur Bestätigung von vorhandenen/normalen Signalen
unbrauchbar werden.
3. Wenn es sich beim Gerät um einen Camcorder
handelt:
Professionelle Camcorder müssen jederzeit sofort
einsatzfähig sein. Durch eine Energiesparfunktion
wird jedoch das Fortsetzen von Aufnahmen aus dem
Standby-Modus heraus verlängert.
11
DVQX1262
Page 12
∫ Sicherheits- und Anwendungshinweise
Halten Sie dieses Gerät möglichst weit von elektromagnetischen Geräten (wie z.B. Mikrowellenherde,
Fernseher, Videospiele usw.) entfernt.
≥ Wenn Sie dieses Gerät auf einem Fernseher oder in seiner Nähe verwenden, könnten die Bilder und/oder der Ton
an diesem Gerät von der Abstrahlung der elektromagnetischen Wellen gestört werden.
≥ Verwenden Sie dieses Gerät nicht in Nähe von Mobiltelefonen, da dadurch ein nachteiliges Geräusch entstehen
könnte, das die Bilder und/oder den Ton betrifft.
≥ Durch die starken Magnetfelder, die durch Lautsprecher oder starke Motoren erzeugt werden, kann es zu einer
Beschädigung der Aufnahmen oder zu Bildstörungen kommen.
≥ Die von Mikroprozessoren generierte Abstrahlung der elektromagnetischen Wellen könnte dieses Gerät nachteilig
betreffen und die Bilder und/oder den Ton stören.
≥ Wenn dieses Gerät nachteilig von einer elektromagnetischen Ausstattung betroffen ist und den korrekten Betrieb
einstellt, schalten Sie dieses Gerät aus und nehmen Sie den Akku heraus bzw. trennen Sie den Stromadapter ab.
Legen Sie dann den Akku erneut ein bzw. schließen Sie den Stromadapter wieder an und schalten Sie dieses Gerät
ein.
Verwenden Sie dieses Gerät nicht in Nähe von Funkgeräten oder Hochspannungsleitungen.
≥ Wenn Sie in Nähe von Funkgeräten oder Hochspannungsleitungen aufnehmen, könnten die aufgenommenen
Bilder und/oder der Ton nachteilig betroffen sein.
Informationen zum Anschließen an einen PC
≥ Verwenden Sie ein handelsübliches Kabel nach USB 2.0-Standard. Schließen Sie einen miniB-Anschluss an dieses
Gerät an.
Beim Anschließen des speziellen Kamerakopfs (AG-UCK20G)
≥
Verwenden Sie für den Kamerakopf stets ein Originalkabel von Panasonic (AG-C20003G (3 m), AG-C20020G (20 m):
Sonderzubehör).
Beim Verbinden mit einem Netzwerk
≥ LAN-Kabel
* Es wird empfohlen, ein STP-Kabel (Shielded Twisted Pair) zu verwenden.
Beim Anschließen eines SDI-Eingabe-/Ausgabegeräts
≥ Verwenden Sie zur Verbindung mit dem SDI IN- oder SDI OUT-Anschluss ein doppelt geschirmtes BNC-Kabel nach
5C-FB-Standard (im Handel erhältlich).
Hinweis zum Wiedergeben von Videos/Fotos auf einem externen Monitor
≥ Verwenden Sie ein im Handel erhältliches High-Speed-HDMI-Kabel. Es wird empfohlen, ein Kabel von maximal 3 m
Länge zu verwenden.
*
(Kategorie 5 oder höher), max. 100 Meter
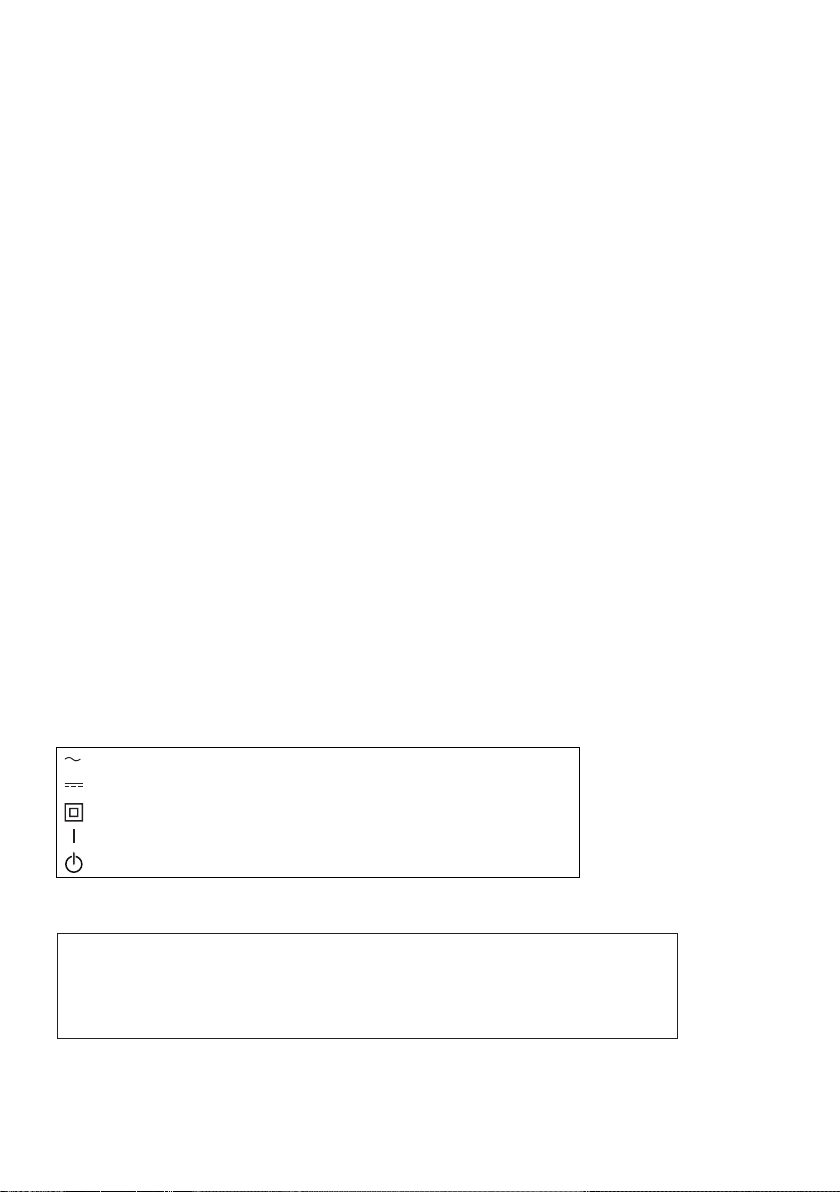
Die Symbole an diesem Produkt (einschließlich Zubehör) haben die folgenden Bedeutungen:
Wechselstrom
Gleichstrom
Gerät der Klasse II (das Produkt wurde mit doppelter Isolierung konstruiert.)
EIN
Standby
Hergestellt von: Panasonic Corporation, Osaka, Japan
Name und Adresse des Importeurs gemäß EU-Bestimmungen:
Panasonic Marketing Europe GmbH
Panasonic Testing Centre
Winsbergring 15, 22525 Hamburg, Deutschland
12
DVQX1262
Page 13
Précautions à prendre
FRANÇAIS
AVERTISSEMENT:
Afin de réduire les risques d’incendie, de chocs électriques ou d’endommagement du produit,
≥ N’exposez pas cet appareil à la pluie, l’humidité, l’égouttement ou les éclaboussures.
≥ Ne placez pas d’objets remplis d’eau, comme des vases, sur cet appareil.
≥ Utiliser uniquement les accessoires recommandés.
≥ Ne retirez pas les caches.
≥ Ne réparez pas vous-même l’appareil. Adressez-vous à un personnel qualifié.
ATTENTION!
Afin de réduire les risques d’incendie, de chocs électriques ou d’endommagement du produit,
≥ N’installez pas et ne placez pas cet appareil dans une bibliothèque, un placard ou un autre endroit confiné.
Assurez-vous que l’appareil est bien ventilé.
≥ Ne bouchez pas les ouvertures de ventilation de l'appareil avec des journaux, des serviettes, des rideaux, et
d'autres éléments similaires.
≥ Ne placez pas de source de flamme nue, comme une bougie allumée, sur cet appareil.
ATTENTION:
A propos de l’utilisation d’un casque
≥ Une pression excessive du son provenant des écouteurs et hautparleurs peut entraîner une perte de l’ouïe.
≥ A pleine puissance, l’écoute prolongée du baladeur peut endommager l’oreille de l’utilisateur.
ATTENTION:
Ne mettez pas cet appareil en contact direct avec la peau lorsqu'il est en cours d'utilisation.
≥ Cela pourrait causer de légères brulures si la peau est en contact direct avec les parties à température élevée
de l'appareil ou avec l'air chaud provenant des ouvertures de ventilation de l'appareil.
ATTENTION:
À propos de l'utilisation d'une carte SD
≥ Conservez la carte mémoire hors de portée des enfants afin qu’ils ne puissent pas l’avaler.
Informations concernant la sécurité.
∫ Plaque signalétique
Produit Positionnement
Enregistreur portable de carte mémoire En-dessous
Adaptateur secteur En-dessous
Cet appareil est conçu pour être utilisé sous un climat tempéré et tropical. (Asie du Sud-Est, Moyen-Orient
uniquement)
Cet appareil est conçu pour être utilisé sous un climat tempéré. (Sauf Asie du Sud-Est, Moyen-Orient)
13
DVQX1262
Page 14
<Pour les É.-U. et le Canada uniquement>
Adaptateur secteur
Cet adaptateur secteur fonctionne sur le courant alternatif entre 100 V et 240 V.
Par contre,
≥ Aux États-Unis et au Canada, l’adaptateur secteur doit uniquement être connecté à une prise électrique de 120 V.
≥ Lors du raccordement de l’adaptateur secteur dans une prise de courant à l’extérieur du Canada ou des États-
Unis, utilisez un adaptateur de prise conçu pour la prise secteur.
≥ Pour connecter une prise secteur de 125 V et plus, assurez-vous que le cordon électrique est adapté au voltage
de la prise secteur et au courant nominal de l’adaptateur secteur.
≥ Consultez un distributeur de fournitures électriques pour connaître l’adaptateur de prise et le câble appropriés.
L’appareil doit être installé de façon à permettre son débranchement immédiat en cas de problème.
≥ L’unité se met en attente lorsque l’adaptateur secteur est branché. Le circuit principal reste “chargé” aussi
longtemps que l’adaptateur secteur est branché à une prise électrique.
≥ N’utilisez aucun autre adaptateur secteur que celui fourni.
Conforme à la norme CAN/CSA C22.2 No.60065.
<Pour l'Europe uniquement>
∫ Compatibilité électrique et magnétique EMC
Le symbole (CE) est placé sur la plaque d’évaluation.
CE QUI SUIT NE S’APPLIQUE QU’AU CANADA.
CAN ICES-3(B)/NMB-3(B)
∫ Concernant la batterie
ATTENTION
≥ Il y a un danger d'explosion si la batterie n'est pas remplacée correctement. Remplacez uniquement avec le type
recommandé par le fabricant.
≥ Pour mettre au rebut les batteries, prenez contact avec les autorités locales ou le revendeur et renseignez-vous
sur la méthode correcte de la mise au rebut.
Avertissement
Il existe des risques d’incendie, d’explosion et de brûlure. Ne pas démonter, chauffer au-delà de 60 oC (140 oF) ou
incinérer.
≥ Nous vous conseillons d’utiliser des batteries Panasonic (VW-VBD58/AG-VBR59/AG-VBR89/AG-VBR118).
≥ Si vous utilisez d’autres batteries, nous ne pouvons pas garantir la qualité de ce produit.
≥ N’exposez pas la batterie à la chaleur et tenez-la éloignée de toute flamme.
≥ Ne laissez pas la ou les batteries dans un véhicule exposé au soleil avec vitres et portes fermées pendant une
longue période de temps.
14
DVQX1262
Page 15

Batterie (batterie au lithium-ion)
≥ Utilisez l’appareil spécifié pour recharger la batterie.
≥ N’utilisez la batterie avec aucun autre appareil que l’appareil spécifié.
≥ Évitez que de la saleté, du sable, des liquides ou d’autres corps étrangers n’entrent en contact avec les bornes.
≥ Ne touchez pas les bornes des fiches (i et j) avec des objets métalliques.
≥ Évitez de démonter, remodeler, chauffer ou jeter au feu.
Si de l’électrolyte entre en contact avec vos mains ou vos vêtements, lavez-les avec beaucoup d’eau.
Si de l’électrolyte entre en contact avec vos yeux, ne les frottez pas.
Rincez-vous les yeux avec beaucoup d’eau, puis consultez un médecin.
∫ Directives importantes
Avant d’utiliser l’appareil, lire attentivement les instructions qui suivent. Se conformer tout particulièrement aux
avertissements inscrits sur l’appareil et aux consignes de sécurité indiquées ci-dessous. Conserver le présent manuel
pour consultation ultérieure.
1) Lire attentivement ces instructions.
2) Conserver ces instructions.
3) Lire toutes les mises en garde.
4) Suivre toutes les instructions.
5) Ne pas utiliser cet appareil près d’une source d’eau.
6) Ne nettoyer qu’avec un chiffon sec.
7) Ne pas bloquer les évents d’aération. Installer l’appareil selon les instructions du fabricant.
8) Ne pas installer l’appareil près d’un appareil de chauffage tel qu’un radiateur, une cuisinière, un registre de
chaleur ou tout dispositif émettant de la chaleur (y compris un amplificateur).
9) Pour des raisons de sécurité, ne pas modifier la fiche polarisée ou celle de mise à la terre. Une fiche polarisée est
une fiche à deux lames, dont une plus large. Une fiche de mise à la terre est une fiche à deux lames avec une
broche de masse. La lame plus large ou la broche de masse procure une protection accrue. Si ce genre de fiche
ne peut être inséré dans une prise de courant, communiquer avec un électricien pour remplacer la prise.
10) S’assurer que le cordon est placé dans un endroit où il ne risque pas d’être écrasé, piétiné ou coincé. Faire
particulièrement attention à ses extrémités de branchement, y compris sa fiche.
11) N’utiliser que les accessoires ou périphériques recommandés par le fabricant.
12) Ne placer l’appareil que dans une baie ou sur un support, trépied, gabarit d’installation, etc.,
recommandé par le fabricant ou vendu avec l’appareil. Le chariot sur lequel se trouve
l’appareil doit être déplacé avec soin. Des arrêts brusques, l’utilisation d’une force
excessive et des surfaces inégales peuvent entraîner la chute du chariot.
13) Débrancher cet appareil lors d’un orage ou en cas de non-utilisation prolongée.
14) Confier l’appareil à un technicien qualifié pour toute réparation : cordon d’alimentation ou
fiche endommagé, liquide renversé ou objet tombé dans l’appareil, exposition à la pluie ou à une humidité
excessive, mauvais fonctionnement ou échappement de l’appareil.
15
DVQX1262
Page 16
<Pour l'Europe uniquement>
∫ L’élimination des équipements et des
batteries usagés
Applicable uniquement dans les pays
membres de l’Union européenne et
les pays disposant de systèmes de
recyclage
Apposé sur le produit lui-même,
sur son emballage, ou figurant
dans la documentation qui
l’accompagne, ce pictogramme
indique que les piles, appareils
électriques et électroniques
usagés, doivent être séparées des
ordures ménagères.
Afin de permettre le traitement, la
valorisation et le recyclage adéquats des piles et
des appareils usagés, veuillez les porter à l’un
des points de collecte prévus, conformément à la
législation nationale en vigueur.
En les éliminant conformément à la
réglementation en vigueur, vous contribuez à
éviter le gaspillage de ressources précieuses
ainsi qu’à protéger la santé humaine et
l’environnement.
Pour de plus amples renseignements sur la
collecte et le recyclage, veuillez vous renseigner
auprès des collectivités locales, votre revendeur
ou fournisseur.
Le non-respect de la réglementation relative à
l’élimination des déchets est passible d’une peine
d’amende.
Note relative au pictogramme à
apposer sur les piles
(pictogramme du bas):
Si ce pictogramme est combiné
avec un symbole chimique, il
répond également aux exigences
posées par la Directive relative au
produit chimique concerné.
Pour enlever la batterie
Batterie alimentation principale (Batterie au lithiumion)
Tout en appuyant sur la touche de déverrouillage de la
batterie, retirez la batterie.
Pile de sauvegarde (Batterie Lithium)
≥ Pour le retrait et la dépose de la pile à la fin de sa
durée de vie, consultez votre revendeur.
Note concernant la fonction de gestion de
l'alimentation spécifiée dans le RÈGLEMENT
(CE) No 1275/2008 de la Commission portant
application de la directive 2009/125/CE du
Parlement européen et du Conseil.
Ce dispositif est conçu et fabriqué pour être utilisé dans
une station de radiodiffusion et/ou dans un
environnement similaire.
Ce dispositif n'est pas équipé d'une fonction de gestion
de l'alimentation ou bien la fonction de gestion de
l'alimentation est réglée sur OFF car elle empêche le
dispositif d'arriver à ses fins dans les cas suivants.
1. Si le dispositif est une Caméra de studio, une Caméra
Météo, une Table de mixage ou un autre appareil :
Une fonction de gestion de l'alimentation peut provoquer
l'arrêt brutal du dispositif durant l'enregistrement ou le
mode On Air.
2. Si le dispositif est un Moniteur de studio :
Une fonction de gestion de l'alimentation peut rendre
invisible la vidéo de vérification servant à savoir si un
signal est normal ou si le signal a été perdu.
3. Si le dispositif est un Caméscope :
Un caméscope professionnel doit être en mesure de
démarrer rapidement à tout moment, mais une fonction
de gestion de l'alimentation causera une augmentation
du temps nécessaire pour la reprise à partir du mode
veille.
16
DVQX1262
Page 17
∫ Précautions d’utilisation
Gardez cet appareil aussi loin que possible des appareils électromagnétiques (comme les fours à micro-onde,
les téléviseurs, les consoles vidéo etc.).
≥ Si vous utilisez cet appareil au dessus ou près d’un téléviseur, les images et/ou le son de cet appareil peuvent être
perturbés par les ondes électromagnétiques.
≥ N’utilisez pas cet appareil à proximité d’un téléphone cellulaire car cela pourrait entraîner des parasites nuisibles à
l’image et/ou au son.
≥ Les données enregistrées peuvent être endommagées ou les images fixes peuvent être perturbées par des champs
magnétiques puissants créés par des haut-parleurs ou de gros moteurs.
≥ Les ondes électromagnétiques émises par les microprocesseurs peuvent affecter cet appareil en perturbant l’image
et/ou le son.
≥ Si cet appareil est affecté par un appareil électromagnétique et arrête de fonctionner normalement, éteignez cet
appareil et retirez la batterie ou débranchez l’adaptateur. Puis réinstallez la batterie ou reconnectez l’adaptateur
secteur et allumez cet appareil.
N’utilisez pas cet appareil à proximité d’un émetteur radio ou de lignes à haute tension.
≥ L’utilisation de l’appareil à proximité d’un émetteur radio ou de lignes à haute tension pourrait nuire à l’image et/ou
au son.
A propos de la connexion à un ordinateur
≥ Veuillez utiliser un câble compatible avec la norme USB 2.0 disponible dans le commerce. Branchez une prise
miniB à cet appareil.
Pour raccorder la tête de caméra dédiée (AG-UCK20G)
≥ Utilisez toujours un véritable câble de tête de caméra en option Panasonic (AG-C20003G (3 m (118-1/8 q)),
AG-C20020G (20 m (787-3/8 q)) : en option).
Pour se raccorder au réseau
≥ Câble LAN
* L’utilisation d’un câble STP (shielded twisted pair: paire torsadée blindée) est recommandée.
Pour raccorder un dispositif d'entrée/sortie SDI
≥ Pour raccorder la prise SDI IN ou la prise SDI OUT, utilisez un câble BNC à double blindage équivalent à 5C-FB
(disponible dans le commerce).
Remarque sur la visualisation de vidéos/photos sur un moniteur externe
≥ Utilisez un câble HDMI Haute vitesse disponible dans le commerce. Si possible, nous vous conseillons d'utiliser un
câble d'une longueur maximale de 3 m (9,84 pi).
*
(catégorie 5 ou supérieure), max. 100 mètres (328 pi)
Les symboles présents sur ce produit (y compris sur les accessoires) indiquent ce qui suit :
CA
CC
Équipement de classe II (le produit est doublement isolé.)
MARCHE
Veille
Fabriqué par : Panasonic Corporation, Osaka, Japon
Nom et adresse de l’importateur en accord avec les règlements de l’Union Européenne :
Panasonic Marketing Europe GmbH
Panasonic Testing Centre
Winsbergring 15, 22525 Hamburg, Allemagne
17
DVQX1262
Page 18
Informazioni riguardanti la vostra sicurezza
ITALIANO
AVVISO:
Per ridurre il rischio di incendi, scosse elettriche o danni al prodotto,
≥ Non esporre questa unità a pioggia, umidità, infiltrazioni o schizzi.
≥ Non collocare su questa unità oggetti riempiti di liquidi (ad esempio vasi).
≥ Utilizzate solo gli accessori consigliati.
≥ Non rimuovere le coperture.
≥ Non riparare da soli l'unità. Per la manutenzione rivolgersi a personale qualificato.
ATTENZIONE!
Per ridurre il rischio di incendi, scosse elettriche o danni al prodotto,
≥ Non installare o posizionare questa unità in uno scaffale, armadietto incassato o altro spazio ristretto.
Accertarsi che l’unità sia sufficientemente ventilata.
≥ Non ostruire le prese d’aria dell’unità con giornali, tovaglie, tende o altri oggetti di simile natura.
≥ Non collocare sull’unità oggetti che generano una fiamma libera come, ad esempio, una candela accesa.
ATTENZIONE:
Utilizzo di cuffie
≥ Un volume eccessivo delle cuffie può portare alla perdita dell’udito.
≥ L’ascolto a tutto volume per periodi prolungati può causare danni all’udito.
ATTENZIONE:
Non lasciare l'unità a contatto diretto con la pelle quando è in uso.
≥ Se una parte dell'unità con temperatura elevata o l'aria calda dalle aperture di ventilazione viene a contatto
diretto con la pelle, questo può causare ustioni.
ATTENZIONE:
Informazioni sull'uso della scheda SD
≥ Tenete la scheda di memoria fuori dalla portata dei bambini per evitare che possano ingerirla.
sono le informazioni sulla sicurezza.
≥ Quando l’alimentatore CA è collegato l’unità è in modalità di attesa. Quando l’alimentatore CA è collegato a una
presa elettrica il circuito primario è sempre “attivo”.
≥ Non utilizzare altri alimentatori CA salvo quello fornito in dotazione.
18
DVQX1262
Page 19

∫ Marcatura d’identificazione
Prodotto Ubicazione
Registratore portatile di schede di memoria Parte inferiore
Alimentatore CA Parte inferiore
Questa unità è progettata per essere utilizzata in climi miti e tropicali. (Solo Sud-Est asiatico, Medio Oriente)
Questa unità è progettata per essere utilizzata in climi miti. (Tranne Sud-Est asiatico, Medio Oriente)
La spina è il dispositivo di scollegamento. Installare questa unità in modo che sia possibile scollegare
immediatamente la spina del cavo di alimentazione dalla presa.
∫ EMC Conformità alle norme elettromagnetiche
Il simbolo (CE) si trova sulla piastrina d’identificazione.
∫ Informazioni sulla batteria
ATTENZIONE
≥ Pericolo di esplosioni se la batteria viene sostituita in modo non corretto. Sostituirla solo con una del tipo
consigliato dal produttore.
≥ Quando si smaltiscono le batterie, contattare le autorità locali o il rivenditore e chiedere informazioni sul metodo
corretto di smaltimento.
Avviso
Rischio di incendio, esplosione e ustioni. Non disassemblare, riscaldare al di sopra dei 60 oC o incenerire.
≥ Si consiglia di utilizzare batterie Panasonic (VW-VBD58/AG-VBR59/AG-VBR89/AG-VBR118).
≥ Se si utilizzano batterie di tipo diverso, non è possibile garantire la qualità di questo prodotto.
≥ Non riscaldare o esporre alla fiamma.
≥ Non lasciare la(e) batteria(e) in auto esposta alla luce solare diretta per un lungo periodo di tempo, con le porte e i
finestrini chiusi.
19
DVQX1262
Page 20

∫ Smaltimento di vecchie
apparecchiature e batterie usate
Solo per Unione Europea e Nazioni
con sistemi di raccolta e smaltimento
Questi simboli sui prodotti,
sull’imballaggio e/o sulle
documentazioni o manuali
accompagnanti i prodotti indicano
che i prodotti elettrici, elettronici e
le batterie usate non devono
essere buttati nei rifiuti domestici
generici.
Per un trattamento adeguato,
recupero e riciclaggio di vecchi prodotti e batterie
usate vi invitiamo a portarli negli appositi punti di
raccolta secondo la legislazione vigente nel
vostro paese.
Con uno smaltimento corretto, contribuirete a
salvare importanti risorse e ad evitare i potenziali
effetti negativi sulla salute umana e sull’ambiente.
Per ulteriori informazioni su raccolta e riciclaggio,
vi invitiamo a contattare il vostro comune,
rivenditore o fornitore.
Lo smaltimento non corretto di questi rifiuti
potrebbe comportare sanzioni in accordo con la
legislazione nazionale.
Note per il simbolo batterie
(simbolo sotto):
Questo simbolo può essere usato
in combinazione con un simbolo
chimico. In questo caso è
conforme ai requisiti indicati dalla
Direttiva per il prodotto chimico in
questione.
Per rimuovere la batteria
Batteria di alimentazione principale (Litio Ioni
batteria)
Rimuovere la batteria tenendo premuto il pulsante di
rilascio batteria.
Batteria di riserva (Litio batteria)
≥ Per la rimozione della batteria ai fini del suo
smaltimento al termine della sua vita utile, consultare
il proprio rivenditore.
Nota relativa alla funzione di Gestione Energia
specificata nella NORMA DELLA
COMMISSIONE (CE) Nr 1275/2008 che
implementa la Direttiva 2009/125/CE del
Parlamento Europeo e del Consiglio.
Questo dispositivo è stato progettato e prodotto per l'uso
presso una stazione televisiva e/o in un ambiente simile.
Questo dispositivo non è munito di una funzione di
Gestione Energia o la funzione di Gestione Energia è
impostata su OFF in quanto impedirebbe al dispositivo di
soddisfare lo scopo per cui è stato progettato per le
seguenti ragioni.
1. Se il dispositivo è una Videocamera da Studio, una
Videocamera Meteo, un Mixer o altro processore:
Una funzione di Gestione Energia può causare l'arresto
improvviso del funzionamento del dispositivo durante la
registrazione o la trasmissione dal vivo.
2. Se il dispositivo è un Monitor da Studio:
La funzione di Gestione Energia può rendere non
visualizzabile il video per confermare se un segnale è
normale o è stato perso.
3. Se il dispositivo è un Camcorder:
Un camcorder professionale deve essere in grado di
accendersi velocemente in qualsiasi momento, ma una
funzione di Gestione Energia causerà l'aumento del
tempo necessario per riavviarsi dalla modalità Stand-by.
20
DVQX1262
Page 21

∫ Precauzioni per l’uso
Tenere l’unità quanto più lontano possibile da apparecchi elettromagnetici (come forni a microonde, TV,
videogiochi, ecc.).
≥ Se si utilizza l’unità sopra o vicino a un apparecchio TV, le immagini e/o i suoni di questa unità potrebbero essere
disturbati dalle onde elettromagnetiche.
≥ Non utilizzare l’unità vicino a telefoni cellulari perché ciò potrebbe essere causa di disturbi alle immagini e/o ai
suoni.
≥ I forti campi magnetici creati da altoparlanti o grandi motori possono danneggiare seriamente la registrazione e
distorcere le immagini.
≥ Le onde elettromagnetiche generate da un microprocessore possono avere effetti negativi sull’unità, causando
disturbi a immagini e/o suoni.
≥ Se l’unità è disturbata da apparecchi elettromagnetici e smette di funzionare correttamente, spegnerla e rimuovere
la batteria o scollegare l’alimentatore CA. Ricollegare quindi la batteria o ricollegare l’alimentatore CA e accendere
l’unità.
Non utilizzare l’unità vicino a trasmettitori radio o linee ad alta tensione.
≥ Se si registrano delle immagini vicino a trasmettitori radio o linee ad alta tensione, immagini e/o suoni potrebbero
risultare disturbati.
Connessione a un PC
≥ Usare un cavo disponibile in commercio compatibile con lo standard USB 2.0. Collegare un terminale miniB a
questa unità.
Collegamento alla Testa Camera dedicata (AG-UCK20G)
≥ Usare sempre un cavo testa camera opzionale originale Panasonic (AG-C20003G (3 m), AG-C20020G (20 m):
opzionale).
Collegamento ad una rete
≥ Cavo LAN
* Si raccomanda l'uso di un cavo STP (shielded twisted pair).
Collegamento ad un dispositivo input/output SDI
≥ Per il collegamento al terminale SDI IN o al terminale SDI OUT, utilizzare un cavo BNC a doppia schermatura
equivalente a 5C-FB (disponibile in commercio).
Nota sulla visione di video/foto su un monitor esterno
≥ Utilizzare un cavo HDMI High Speed disponibile in commercio. Se possibile, si consiglia di utilizzare un cavo di
lunghezza pari o inferiore a 3 m.
*
(categoria 5 o superiore), massimo 100 metri
I simboli su questo prodotto (compresi gli accessori) rappresentano quanto segue:
CA
CC
Apparecchiatura Class II (il prodotto dispone di doppio isolamento.)
ON
Standby
Fabbricato da: Panasonic Corporation, Osaka, Giappone
Nome e indirizzo dell'importatore in conformità con le normative UE:
Panasonic Marketing Europe GmbH
Panasonic Testing Centre
Winsbergring 15, 22525 Hamburg, Germania
21
DVQX1262
Page 22

Información para su seguridad
ESPAÑOL
ADVERTENCIA:
Para reducir el riesgo de incendio, de descarga eléctrica, o de daño del producto,
≥ No exponga esta unidad a la lluvia, humedad, goteo o salpicaduras.
≥ No ubique los objetos llenos con líquido, como floreros, sobre esta unidad.
≥ Use solamente los accesorios recomendados.
≥ No retire las tapas.
≥ No repare esta unidad ussted mismo. Consulte la reparación del personal de servicio calificado.
¡ATENCIÓN!
Para reducir el riesgo de incendio, de descarga eléctrica, o de daño del producto,
≥ No instale o coloque esta unidad en una estantería, en un armario empotrado o en cualquier otro espacio
reducido. Asegúrese de que la unidad esté correctamente ventilada.
≥ No obstaculice las aberturas de ventilación de la unidad con periódicos, manteles, cortinas u objetos
similares.
≥ No coloque fuentes de llamas libres, como velas encendidas, en esta unidad.
ATENCIÓN:
Acerca de cómo usar el auricular
≥ La excesiva presión del sonido desde los auriculares puede causar la pérdida del oído.
≥ Escuchar al volumen máximo durante largos períodos de tiempo puede dañar los oídos del usuario.
ATENCIÓN:
No deje la unidad en contacto directo con la piel mientras está en uso.
≥ Si se deja la piel en contacto directo con las partes a altas temperaturas de la unidad o con el aire caliente de
las aperturas de ventilación de la misma, podrían producirse quemaduras.
ATENCIÓN:
Acerca del uso de la tarjeta SD
≥ Mantenga las tarjetas de memoria fuera del alcance de los niños para evitar su ingesta accidental.
indica información de seguridad.
∫ Placa de identificación de los productos
Producto Ubicación
Grabador portátil de tarjetas de memoria Parte inferior
Adaptador de CA Parte inferior
Esta unidad está destinada a ser usada en climas moderados y tropicales. (Únicamente Sudeste asiático y Oriente Medio)
Esta unidad está destinada a ser usada en climas moderados. (Excepto Sudeste asiático y Oriente Medio)
22
DVQX1262
Page 23

<Solamente para EE. UU. y Canadá>
Adaptador de CA
Este adaptador funciona en CA entre 100 V y 240 V.
Pero
≥ En Estados Unidos y Canadá, el adaptador de CA se debe conectar a un suministro de alimentación de 120 V CA
solamente.
≥ Al conectar a un suministro de CA fuera de Estados Unidos o Canadá, use un adaptador de enchufe para que
coincida con la configuración del tomacorriente de CA.
≥ Al conectar a un suministro de más de 125 V de CA, asegúrese de que el cable que usa coincida con el voltaje del
suministro de CA y con la corriente nominal del adaptador de CA.
≥ Comuníquese con un distribuidor de piezas eléctricas para obtener asistencia para seleccionar un adaptador de
enchufe de CA o un conjunto de cables de CA.
El enchufe de suministro de energía es el dispositivo de desconexión. Instale esta unidad de manera que el enchufe
de suministro de energía se pueda desenchufar de inmediato de la toma de corriente.
≥ El dispositivo está en condición de espera cuando el adaptador de CA está conectado. El circuito principal está
siempre “con corriente” mientras el adaptador de CA está conectado a una toma.
≥ Utilice tan sólo el adaptador de CA suministrado.
<Solamente para Europa>
∫ EMC Electric and magnetic compatibility
This symbol (CE) is located on the rating plate.
∫ Acerca de la batería
ATENCIÓN
≥ Existe peligro de explosión si la batería se sustituye incorrectamente. Sustitúyala sólo por el tipo de batería
recomendada por el fabricante.
≥ Al desechar las baterías, póngase en contacto con las autoridades locales o el distribuidor para seguir el método
de eliminación correcto.
Advertencia
Riesgo de fuego, explosión y quemaduras. No desmonte, caliente a más de 60 oC (140 oF) ni incinere.
≥ Le recomendamos utilizar baterías Panasonic (VW-VBD58/AG-VBR59/AG-VBR89/AG-VBR118).
≥ No podemos garantizar la calidad de este producto si se utilizan baterías de otras marcas.
≥ No caliente ni exponga a llamas.
≥ No deje la/las batería/s durante un largo período expuesto a la luz directa del sol dentro de un coche con las
puertas y las ventanillas cerradas.
Paquete de batería (Batería de iones de litio)
≥ Use la unidad especificada para recargar el paquete de batería.
≥ No use el paquete de batería con un equipo que no sea la unidad especificada.
≥ No permita que haya suciedad, arena, líquidos y otras materias extrañas en los terminales.
≥ No toque los terminales del enchufe (i y j) con objetos metálicos.
≥ No desarme, remodele, caliente o tire al fuego.
Si un electrolito entra en contacto con sus manos o ropa, lávelas minuciosamente con agua.
Si un electrolito entra en contacto con sus ojos, no se frote los ojos. Enjuáguese los ojos con agua y luego consulte
a un médico.
DVQX1262
23
Page 24

∫ INSTRUCCIONES DE SEGURIDAD IMPORTANTES
Lea atentamente estas instrucciones de funcionamiento antes de usar la unidad. Siga las instrucciones de seguridad
en la unidad y las instrucciones de seguridad aplicables que se mencionan abajo. Guarde a mano estas instrucciones
de funcionamiento para consultarlas en el futuro.
1) Lea estas instrucciones.
2) Guarde estas instrucciones.
3) Cumpla con todas las advertencias.
4) Siga todas las instrucciones.
5) No use este aparato cerca del agua.
6) Limpie solamente con un paño seco.
7) No bloquee las aperturas de ventilación. Instale de acuerdo con las instrucciones del fabricante.
8) No instale cerca de fuentes de calor como radiadores, registros de calor, estufas u otros aparatos (inclusive
amplificadores).
9) No reduzca el propósito de seguridad del enchufe polarizado o con descarga a tierra. Un enchufe polarizado
tiene dos aspas, una más ancha que la otra. Un enchufe con descarga a tierra tiene dos aspas y una tercera
espiga de conexión a tierra. El aspa ancha o la tercera espiga se proporcionan para su seguridad. Si el enchufe
suministrado no entra en su tomacorriente, consulte a un electricista para reemplazar el tomacorriente obsoleto.
10) Proteja el cable para que no lo pisen o lo doblen particularmente en los enchufes, tomas de corriente y el punto
donde sale del aparato.
11) Use solamente accesorios especificados por el fabricante.
12) Use solamente con el carro, pedestal, trípode, soporte o mesa especificados por el
fabricante o que se venden con el aparato. Cuando se usa un carro, tenga cuidado al
mover la combinación del carro y el aparato para evitar lesiones debido a una caída.
13) Desenchufe este aparato durante tormentas eléctricas o cuando no se usa durante largos
períodos de tiempo.
14) Derive la reparación al personal de servicio calificado. La reparación se requiere cuando el
aparato se dañó de alguna forma, como un cable de alimentación o enchufe dañado, líquido derramado u objetos
que cayeron sobre el aparato, si el aparato se expuso a lluvia o humedad, si no funciona normalmente o si se
cayó.
24
DVQX1262
Page 25

<Solamente para Europa>
∫ Eliminación de Aparatos Viejos y de
Pilas y Baterías
Solamente para la Unión Europea y
países con sistemas de reciclado
Estos símbolos en los productos,
su embalaje o en los documentos
que los acompañen significan que
los productos eléctricos y
electrónicos y pilas y baterías
usadas no deben mezclarse con
los residuos domésticos.
Para el adecuado tratamiento,
recuperación y reciclaje de los
productos viejos y pilas y baterías usadas llévelos
a los puntos de recogida de acuerdo con su
legislación nacional.
Si los elimina correctamente ayudará a preservar
valuosos recursos y evitará potenciales efectos
negativos sobre la salud de las personas y sobre
el medio ambiente.
Para más información sobre la recogida o
reciclaje, por favor contacte con su ayuntamiento,
su distribuidor o su proveedor.
Puede haber sanciones por una incorrecta
eliminación de este residuo, de acuerdo con la
legislación nacional.
Nota para el símbolo de pilas y
baterías (símbolo debajo):
Este símbolo puede usarse en
combinación con el símbolo
químico. En este caso, cumple con
los requisitos de la Directiva del
producto químico indicado.
Extracción de la batería
Batería de alimentación principal (Batería de litio
iones)
Mientras presiona el botón para expulsar la batería,
retire la batería.
Batería de carga de seguridad (Batería de litio)
≥ Si desea extraer la batería para desecharla al final de
su vida útil, póngase en contacto con su distribuidor.
Nota acerca de la función de gestión
energética especificada en el REGLAMENTO
DE LA COMISIÓN (CE) N.º 1275/2008 por el
que se aplica la Directiva 2009/125/CE del
Parlamento Europeo y del Consejo.
Este dispositivo ha sido diseñado y fabricado para su
uso en una emisora de radiodifusión y/o entorno similar.
Este dispositivo no está equipado con una función de
gestión energético o dicha función de gestión energética
está desactivada ya que evitaría que el dispositivo
cumpliera su fin previsto por las siguientes razones.
1. Si el dispositivo es una cámara de estudio, una
cámara meteorológica, un mezclador u otro
procesador:
Una función de gestión energética podría causar que el
dispositivo se detuviera repentinamente durante la
grabación o durante la emisión.
2. Si el dispositivo es un monitor de estudio:
Una función de gestión energética podría provocar que
no se pudiera ver el vídeo para confirmar si la señal es
normal o si se ha perdido la señal.
3. Si el dispositivo es una videocámara:
Una videocámara profesional debe poder iniciarse
rápidamente en cualquier momento, pero una función de
gestión energética provocaría un aumento del tiempo de
reanudación desde el modo de espera.
25
DVQX1262
Page 26

∫ Precauciones sobre el uso de este producto
Mantenga esta unidad lo más alejada posible del equipo electromagnético (como hornos microondas, TV,
video juegos, etc.).
≥ Si usa esta unidad arriba o cerca de un TV, es posible que las imágenes y/o sonidos en esta unidad se distorsionen
debido a la radiación de ondas electromagnéticas.
≥ No use esta unidad cerca de teléfonos celulares porque al hacerlo se puede crear un ruido que afecta
adversamente las imágenes y/o el sonido.
≥ Los campos magnéticos fuertes creados por altavoces o motores grandes pueden dañar las grabaciones y
distorsionar las imágenes.
≥ La radiación de ondas electromagnéticas generada por microprocesadores puede afectar adversamente esta
unidad, distorsionando las imágenes y/o el sonido.
≥ Si esta unidad es afectada adversamente por el equipo electromagnético y deja de funcionar correctamente,
apague esta unidad y saque la batería o desconecte el adaptador de CA. Luego vuelva a colocar la batería o a
conectar el adaptador de CA y encienda esta unidad.
No use esta unidad cerca de transmisores de radio o líneas de alto voltaje.
≥ Si graba cerca de transmisores de radio o líneas de alto voltaje, es posible que se afecten adversamente las
imágenes y/o el sonido grabados.
Sobre cómo conectar a un ordenador
≥ Utilice un cable disponible comercialmente compatible con el estándar USB 2.0. Conecte un terminal miniB a esta
unidad.
Al conectar al cabezal de cámara específico (AG-UCK20G)
≥ Utilice siempre un cable opcional para cabezal de cámara Panasonic (AG-C20003G (3 m (118-1/8 q)),
AG-C20020G (20 m (787-3/8 q)): opcional).
Al conectar a una red
≥ Cable LAN
* Se recomienda utilizar un cable STP (par retorcido blindado).
Al conectar a un dispositivo de entrada/salida SDI
≥ Para la conexión con el terminal SDI IN o el terminal SDI OUT, utilice un cable BNC con doble blindaje equivalente
a 5C-FB (disponible en comercios).
Nota sobre la visualización de imágenes en movimiento/imágenes fijas en un monitor externo
≥ Utilice un cable HDMI de alta velocidad disponible en comercios. Si es posible, le recomendamos que utilice un
cable con una longitud máxima de 3 m (9,84 pies).
*
(categoría 5 o superior), máx. 100 metros (328 pies)
Los símbolos en este producto (incluidos los accesorios) representan lo siguiente:
CA
CC
Equipamiento de Clase II (Producto fabricado con aislamiento doble.)
ENCENDIDO
En espera
Fabricado por: Panasonic Corporation, Osaka, Japón
Nombre y dirección del importador conforme a las normas de la UE:
Panasonic Marketing Europe GmbH
Panasonic Testing Centre
Winsbergring 15, 22525 Hamburg, Alemania
26
DVQX1262
Page 27

∫ Cautions for use
About this unit
The unit and the SD card become warm during
use. This is not a malfunction.
Keep this unit as far away as possible from
electromagnetic equipment (such as microwave
ovens, TVs, video games etc.).
≥ If you use this unit on top of or near a TV, the pictures
and/or sound on this unit may be disrupted by
electromagnetic wave radiation.
≥ Do not use this unit near cell phones because doing so
may result in noise adversely affecting the pictures
and/or sound.
≥ Recorded data may be damaged, or pictures may be
distorted, by strong magnetic fields created by
speakers or large motors.
≥ Electromagnetic wave radiation generated by
microprocessors may adversely affect this unit,
disturbing the pictures and/or sound.
≥ If this unit is adversely affected by electromagnetic
equipment and stops functioning properly, turn this unit
off and remove the battery or disconnect AC adaptor.
Then reinsert the battery or reconnect AC adaptor and
turn this unit on.
Do not use this unit near radio transmitters or highvoltage lines.
≥ If you record near radio transmitters or high-voltage
lines, the recorded pictures and/or sound may be
adversely affected.
About connecting to a PC
≥ Please use a commercially available cable compatible
with the USB 2.0 standard. Connect a miniB terminal
to this unit.
When connecting to the dedicated Camera Head
(AG-UCK20G)
≥ Always use a genuine Panasonic Camera head option
cable (AG-C20003G (3 m (118-1/8 q)), AG-C20020G
(20 m (787-3/8 q)): optional).
When connecting to a network
≥ LAN cable
(328 feet)
* Use of an STP (shielded twisted pair) cable is
recommended.
When connecting to an SDI input/output device
≥ To connect to the SDI IN terminal or SDI OUT terminal,
use a double-shielded BNC cable equivalent to 5C-FB
(commercially-available).
Note on viewing motion pictures/still pictures on an
external monitor
≥ Use a commercially-available High Speed HDMI cable.
If possible, we recommend using a cable with a length
of 3 m (9.84 feet) or less.
*
(category 5 or above), max. 100 meters
Make sure to use the supplied cords. If you use optional
accessories, use the cords and the cables supplied with
them.
Do not extend the cords and the cables.
Do not spray insecticides or volatile chemicals onto
the unit.
≥ If the unit is sprayed with such chemicals, its body may
be marred and the surface finish may peel off.
≥ Do not leave rubber or plastic products in contact with
the unit for a long time.
When you use the unit in a sandy or dusty place
such as a beach, do not let sand or fine dust get into
the body and terminals of the unit.
Also, keep the unit away from sea water.
≥ Sand or dust may damage the unit. (Care should be
taken when inserting and removing a card.)
≥ If sea water splashes onto the unit, wipe off the water
with a well wrung cloth. Then wipe the unit again with a
dry cloth.
When carrying the unit, do not drop or bump it.
≥ A strong impact can break the unit’s casing, causing it
to malfunction.
Cleaning
When cleaning, do not use benzine or thinner.
≥ Using benzine or paint thinners may deform the
recorder and/or cause the surface finish to peel off.
≥ Before proceeding with maintenance, remove the
battery or disconnect the AC cable from the power
outlet.
≥ Use a soft, clean cloth to wipe the recorder. To remove
stubborn dirt, wipe the recorder with a cloth moistened
with kitchen detergent that has been diluted with water
and then use a dry cloth to take up the remaining
moisture.
When you are not going to use the unit for an
extended time
≥ When storing the unit, it is recommended that you
place a desiccant (silica gel) in with it.
About terminal protection
≥ When not using the connecting terminal, please attach
the cover.
Do not allow the cord to drag on the ground or pull a
connected cord along the passage
≥ The cord will be damaged, causing fire or electrical
shock, when the cord gets caught by the feet, excite
will also cause personal injury.
27
DVQX1262
Page 28

About the battery (optional) About the AC adaptor (supplied)/
The battery used in this unit is a rechargeable lithium-ion
battery. It is susceptible to humidity and temperature and
the effect increases the more the temperature rises or
falls. In cold areas, the full charge indication may not
appear or the low battery indication may appear about
5 minutes after starting use. At high temperatures, the
protection function may be triggered, making it
impossible to use the unit.
Be sure to detach the battery after use.
≥ If the battery is left attached, a minute amount of
current continues to flow even if the unit is off. Keeping
the unit in this state may result in over discharge of the
battery. This may result in you not being able to use
the battery even after it is charged.
≥ The battery should be stored in the vinyl bag so metal
does not come into contact with the terminals.
≥ The battery should be stored in a cool place free from
humidity, with as constant temperature as possible.
(Recommended temperature: 15 oC to 25 oC (59 oF to
77 oF), Recommended humidity: 40%RH to 60%RH)
≥ Extremely high temperatures or low temperatures will
shorten the life of the battery.
≥ If the battery is kept in high-temperature,
high-humidity, or oily-smoky places, the terminals may
rust and cause malfunctions.
≥ To store the battery for a long period of time, we
recommend you charge it once every year and store it
again after you have completely used up the charged
capacity.
≥ Dust and other matter attached to the battery terminals
should be removed.
Prepare spare batteries when going out for
recording.
≥ Prepare batteries enough to last for 3 to 4 times the
period you are planning to record for. Cold places such
as a ski resort can shorten recording time.
If you drop the battery accidentally, check to see if
the terminals are damaged.
≥ When this unit or battery charger is attached with the
terminal part in a deformed state, this unit or battery
charger may be damaged.
Do not throw old battery into fire.
≥ Heating a battery or throwing it into a fire may result in
an explosion.
If the operating time is very short even after the
battery has been recharged, the battery has worn
out. Please purchase a new battery.
battery charger (optional)
≥ If the temperature of the battery is extremely high or
extremely low, charging may take time or the battery
may not be charged.
≥ If the CHARGE indicators keeps flashing in orange,
make sure that the terminals of the battery or the
battery charger are not exposed to dirt, foreign objects
or dust, then reconnect them properly.
Disconnect the AC cable from the AC outlet when you
remove dirt, foreign objects or dust on the terminals of
the battery or the battery charger.
≥ If the battery’s temperature is excessively high or
excessively low, the CHARGE indicators will blink
orange. Charging will start automatically when the
battery reaches an acceptable temperature for
charging.
≥ If the CHARGE indicators blinks orange when the
battery’s temperature is normal, the battery or the
battery charger may be malfunctioning. In such cases,
contact your dealer.
≥ If you use the AC adaptor or battery charger near a
radio, radio reception may be disturbed. Keep the AC
adaptor or battery charger 1 m (3.3 feet) or more away
from the radio.
≥ When using the AC adaptor or battery charger, it may
generate whirring sounds. However, this is normal.
≥ After use, be sure to disconnect the AC cable from the
AC outlet. (If you leave this unit connected, the AC
adaptor will consume approximately 0.1 W.)
≥ Always keep the electrodes of the AC adaptor, battery
charger and battery clean.
≥ Install the device near an AC outlet so that the
power disconnection device (AC mains plug) can
be accessed easily by hand.
After use, remove the battery or unplug the power
cord from the outlet.
28
DVQX1262
Page 29

About the SD card (optional)
When disposing of or giving away the SD card, note
that:
≥ Formatting and deletion of this unit or computer only
changes the file management information and does
not completely delete the data in the SD card.
≥ It is recommended that the main SD card is either
physically destroyed or the SD card is physically
formatted using this unit when disposing of or giving
away the SD card.
≥ To physically format, connect this unit to the AC
adaptor, select [CARD FUNCTION] #
[FORMAT CARD] # [SD CARD 1] or [SD CARD 2]
from the menu, and touch [YES]. Press and hold REC/
PAUSE button in the following screen for three
seconds. Screen to delete the SD card data is
displayed, so select [YES] and follow the instruction on
the screen.
≥ The customer is responsible for the management of
the data in the SD card.
LCD monitor
≥ When the LCD monitor is dirty or condensation has
occurred, please wipe it using a soft cloth such as a
lens cloth.
≥ Do not touch the LCD monitor with your finger nails, or
rub or press with strong force.
≥ It may become hard to see or hard to recognize the
touch when the LCD protection sheet is affixed.
≥ When the unit has become very cold, for example due
to storage in a cold area, its LCD monitor will be
slightly darker than usual immediately after the unit is
turned on. The normal brightness will be restored
when the unit’s internal temperature rises.
Extremely high precision technology is employed to
produce the LCD Monitor screen. The result is more
than 99.99% effective dots with a mere 0.01% of the
dots inactive or always lit. However, this is not a
malfunction and does not affect the recorded picture.
About operation from the Web screen
It is possible to distribute the streaming image of the unit
(IP image transmission) or change the setup of the unit
(IP control) by operating the web browser screen of a PC
or mobile terminal connected to the unit via a network.
For details, refer to the Operating Instructions (PDF
format).
≥ The IP video refresh speed may be reduced and
operations from the web screen may be slower,
depending on the network environment used,
performance of the personal computer or the mobile
terminal, subjects and access count.
≥ Do not run the Easy IP Setup Software on a multiple
number of personal computers for a single camera and
set the IP address at the same time. Otherwise, you
will be unable to complete the proper procedure and
set the IP address correctly.
∫ About combination of Memory Card
Portable Recorder and Compact
Camera Head
This unit (AG-UMR20) is compatible only to the
dedicated camera head AG-UCK20G.
It will not operate if any other model is connected.
The camera head AG-UCK20G will not operate when
connected to any recorder other than this unit
(AG-UMR20).
∫ About the recording method for
recording motion pictures
This unit can record motion pictures using two different
recording methods, including MP4 and AVCHD*. (l 45,
52)
* AVCHD Progressive (1080/59.94p, 1080/50.00p)
supported.
MP4:
These recording methods are suitable for editing images.
Audio is recorded in linear PCM.
≥ Those methods are not compatible with clips in
AVCHD format.
≥ Those methods can record motion pictures in formats
that support 4K. 4K motion pictures offer a resolution
four times higher than that of full high-definition motion
pictures.
AVCHD:
This recording method is suitable for playback on a highdefinition compatible external monitor.
Audio is recorded in Dolby Audio
TM
.
∫ Regarding system frequencies
You can change the system frequency (59.94 Hz/
50.00 Hz) for this unit by using the menu.
([SYSTEM FREQ]: l 51)
≥ You cannot store AVCHD clips recorded with different
system frequencies on the same SD card. If you have
switched the system frequency, use another SD card.
29
DVQX1262
Page 30

∫ Disclaimer of warranty
IN NO EVENT SHALL Panasonic Corporation BE
LIABLE TO ANY PARTY OR ANY PERSON, EXCEPT
FOR REPLACEMENT OR REASONABLE
MAINTENANCE OF THE PRODUCT, FOR THE CASES,
INCLUDING BUT NOT LIMITED TO BELOW:
1 ANY DAMAGE AND LOSS, INCLUDING WITHOUT
LIMITATION, DIRECT OR INDIRECT, SPECIAL,
CONSEQUENTIAL OR EXEMPLARY, ARISING
OUT OF OR RELATING TO THE PRODUCT;
2 PERSONAL INJURY OR ANY DAMAGE CAUSED
BY INAPPROPRIATE USE OR NEGLIGENT
OPERATION OF THE USER;
3 UNAUTHORIZED DISASSEMBLE, REPAIR OR
MODIFICATION OF THE PRODUCT BY THE
USER;
4 INCONVENIENCE OR ANY LOSS ARISING WHEN
IMAGES ARE NOT DISPLAYED, DUE TO ANY
REASON OR CAUSE INCLUDING ANY FAILURE
OR PROBLEM OF THE PRODUCT;
5 ANY PROBLEM, CONSEQUENTIAL
INCONVENIENCE, OR LOSS OR DAMAGE,
ARISING OUT OF THE SYSTEM COMBINED BY
THE DEVICES OF THIRD PARTY;
6 ANY DEMANDS FOR COMPENSATION, CLAIMS,
ETC. OCCASIONED BY THE INFRINGEMENT OF
PRIVACY BY INDIVIDUALS OR ORGANIZATIONS
WHOSE IMAGES WERE SHOT BY THE USER
BECAUSE THESE IMAGES (INCLUDING THE
RECORDINGS MADE) WERE MADE AVAILABLE
BY THE USER TO THE PUBLIC DOMAIN FOR
SOME REASON OR OTHER (INCLUDING USE
WHEN NETWORK USER AUTHENTICATION IS
TURNED OFF) OR BECAUSE THE IMAGES
ENDED UP BEING USED FOR UNINTENDED
PURPOSES;
7 LOSS OF REGISTERED DATA CAUSED BY ANY
FAILURE (INCLUDING INITIALIZATION OF THE
PRODUCT DUE TO FORGOTTEN
AUTHENTICATION INFORMATION SUCH AS A
USER NAME AND PASSWORD)
∫ Indemnity about recorded content
Panasonic does not accept any responsibility for
damages directly or indirectly due to any type of
problems that result in loss of recording or edited
content, and does not guarantee any content if recording
or editing does not work properly. Likewise, the above
also applies in a case where any type of repair is made to
the unit.
∫ Network security
As you will use the unit connected to a network, your
attention is called to the following security risks.
1 Leakage or theft of information through the unit
2 Use of the unit for illegal operations by persons with
malicious intent
3 Interference with or stoppage of the unit by persons
with malicious intent
It is your responsibility to take precautions such as those
described below to protect yourself against the above
network security risks.
≥ Use the unit in a network secured by a firewall, etc.
≥ If the unit is connected to a network that includes
personal computers, make sure that the system is not
infected by computer viruses or other malicious
entities (using a regularly updated antivirus program,
anti-spyware program, etc.).
≥ Protect your network against unauthorized access by
setting up user authentication to restrict users to those
who log in with an authorized user name and
password. In addition, to prevent third parties from
identifying user name information (including
passwords), register new user name information and
delete the default user name information. For details,
refer to the Operating Instructions (PDF format).
≥ After accessing the unit as an administrator, be sure to
close all web browsers.
≥ Store authentication information (user names and
passwords) appropriately so that no third parties will
be able to access it.
≥ Change the administrator password periodically.
≥ Restrict access to the unit by authenticating the users,
for example, to prevent setting information stored on
the unit from leaking over the network.
≥ Do not install the camera in locations where the
camera or the cables can be destroyed or damaged by
persons with malicious intent.
≥ Avoid connections that use public lines.
≥ Concerning user authorization
User authentication on the unit can be performed via
digest authentication or basic authentication. If basic
authentication is used without using a dedicated line
equipped with an authentication function, password leaks
may occur.
≥ Usage restrictions
Use of the same segment is recommended for the
network in which the unit and the controller or personal
computer are connected.
If the equipment uses connections with different
segments, events based on the settings inherent to the
network equipment, for instance, may occur so check
this thoroughly prior to operation.
30
DVQX1262
Page 31

∫ About security
Be careful about the possibility of theft or loss of the unit,
and be careful not to leave the unit unattended. Please
note that Panasonic does not accept any responsibility
for the compromise, manipulation, and loss of
information caused by these events.
∫ Caution regarding laser beams
The lens may suffer damage if struck by a laser beam.
Make sure that laser beams do not strike the lens when
shooting in an environment where laser devices are
used.
∫ Cards that you can use with this unit
SDHC Memory Card and SDXC Memory Card
≥ 4 GB or more Memory Cards that do not have the
SDHC logo or 48 GB or more Memory Cards that do
not have the SDXC logo are not based on SD Memory
Card Specifications.
≥ Refer to page 41 for more details on SD cards.
∫ For the purposes of these operating
instructions
≥ The battery pack is referred to as the “Battery”.
≥ SDHC Memory Card and SDXC Memory Card are
referred to as the “SD card”.
≥ Function that can be used for CAM Mode:
Function that can be used for SDI Mode:
Function that can be used for Playback Mode:
≥ An image created by one recording operation is called
a “Clip” and is described as such.
≥ The Compact Camera Head (AG-UCK20G) sold
separately is described as “Camera Head”.
≥ Clip(s) to be recorded or that was recorded with
[PRIORITY MODE] set to [REC/PB(4K)] →“MP4
clip(s)”
≥ Clip(s) to be recorded or that was recorded with
[PRIORITY MODE] set to [REC/PB] →“AVCHD clip(s)”
≥ Notation of < > indicates the setup item name of the
USER button that can be set with the menu of [USER
SW]→[USER1] to [USER13].
≥ Pages for reference are indicated by an arrow, for
example: l 00
≥ For the purposes of this manual, the model numbers of
the units are given as listed in the table below.
Model number of unit
AG-UMR20P
AG-UMR20E
AW-RP50N AW-RP50
AW-RP120G AW-RP120
AK-HRP200G AK-HRP200
≥ These operating instructions are designed for use with
models AG-UMR20P/AG-UMR20E. Such as screen
illustrations are as an example AG-UMR20P.
Model number given in
SDI
manual
AG-UMR20
∫ About Condensation
(When the lens of the Camera Head or
the LCD monitor of this unit becomes
cloudy)
Condensation occurs when there is a change in
temperature or humidity, such as when the unit is taken
from outside or a cold room to a warm room. Please be
careful, as it may cause the lens, the viewfinder or LCD
monitor to become soiled, moldy, or damaged.
When taking the unit to a place which has a different
temperature, if the unit is accustomed to the room
temperature of the destination for about one hour,
condensation can be prevented. (When the difference in
temperature is severe, place the unit in a plastic bag or
the like, remove air from the bag, and seal the bag.)
When condensation has occurred, remove the battery
and/or the AC adaptor and leave the unit like that for
about one hour. When the unit becomes accustomed to
the surrounding temperature, fogginess will disappear
naturally.
31
DVQX1262
Page 32

Contents
Information for Your Safety ................................ 3
Sicherheitshinweise ............................................9
Précautions à prendre ....................................... 13
Informazioni riguardanti la vostra sicurezza
Información para su seguridad ........................ 22
Accessories ........................................................ 33
Optional accessories...................................... 33
Preparation
....... 18
Recording
Selecting a media to record .............................. 51
Formatting media .......................................... 51
System frequency Selection .......................... 51
Record on SD card ............................................. 52
Switch Recording Mode .................................... 52
Using the zoom .................................................. 54
What you can do with this unit ......................... 34
Recording to the SD card............................... 34
Linking to external devices............................. 35
Network connection ....................................... 36
Names and Functions of Main Parts ................ 38
Power supply ...................................................... 40
Using the AC adaptor..................................... 40
Using the battery............................................ 40
Preparation of SD cards .................................... 41
Cards that you can use with this unit ............. 41
Inserting/removing an SD card....................... 42
Connecting this unit to the Camera Head
(CAM Mode) ........................................................ 43
Turning the unit on/off ....................................... 44
Selecting a mode ...............................................45
Switching between the CAM Mode and
the SDI Mode ................................................. 45
Switching the priority mode............................ 45
Switching between Recording Mode and
Playback Mode .............................................. 46
Using the menu screen ..................................... 47
Menu setting by button operation................... 47
Menu setting by touch screen operation........ 48
How to use the touch screen ......................... 48
Setting date and time ......................................... 49
Before recording ................................................ 50
Playback
Clip/Still picture playback ................................. 55
Others
About copyright ................................................. 57
Specification ....................................................... 58
32
DVQX1262
Page 33

Accessories
Check the accessories before using this unit.
Keep the accessories out of reach of children to prevent swallowing.
AC adaptor
AC cable
(AG-UMR20P)
(AG-UMR20E)
A For U.K. and Saudi Arabia
B For Continental Europe, etc.
C For India only
≥ Be sure to use the supplied AC adaptor.
≥ To purchase extra accessories, contact your dealer.
Optional accessories
Some optional accessories may not be available in some countries.
Battery charger (AG-B23/AG-BRD50)
Battery pack (VW-VBD58/AG-VBR59/AG-VBR89/AG-VBR118)
Compact Camera Head (AG-UCK20G)
Camera head option cable (AG-C20003G [3 m] (118-1/8 q)/AG-C20020G [20 m] (787-3/8 q))
Product numbers correct as of April 2017. These may be subject to change.
(AG-UMR20E)
Caution for AC Mains Lead
FOR YOUR SAFETY PLEASE READ THE
FOLLOWING TEXT CAREFULLY.
This product is equipped with 3 types of AC
mains cable.
Appropriate mains cable must be used in each
local area, since the other type of mains cable is
not suitable.
33
DVQX1262
Page 34

Preparation
What you can do with this unit
Recording to the SD card
It is possible to record motion pictures and still pictures to the SD card using a variety of recording functions.
≥ This unit supports relay recording using double card slots.
Connecting to the Camera Head (optional) to record (CAM Mode)
It is possible to connect to the Camera Head and record onto an SD card.
≥ It is possible to manually operate Camera Head camera functions such as Zoom, Focus, and IRIS with this unit.
A Camera Head
B Camera head option cable (optional)
Input SDI to this unit and record (SDI Mode)
It is possible to connect to external devices (HD camera recorder, HD information camera system etc.) equipped with
an HD-SDI output terminal and record video signals, audio signals, time code (SLTC) etc. on the SD card.
≥ This is suitable for long-term backup recording etc.
C Camera recorder (SDI output device)
D BNC cable
* To connect to the SDI IN terminal or SDI OUT terminal, use a double-shielded BNC cable equivalent to 5C-FB
(commercially-available).
≥ For details about SDI Mode, refer to the Operating Instructions (PDF format).
34
DVQX1262
*
Page 35

Linking to external devices
Connection to a PC (USB connection)
Transfer data (files) to perform nonlinear editing on another device (PC, etc.).
≥ This unit supports USB 2.0.
A SD card
*1 SD cards are optional and not supplied with this unit.
*2 A USB 2.0 cable is not supplied with this unit. Use a commercially available cable compatible with the USB 2.0
standard. Connect the miniB connector to this unit.
*1
B USB 2.0 cable (A-miniB type)
*2
C PC
Connection to external monitor/external device (such as a recorder)
Connect to an external monitor or an external device (such as a recorder) and output video.
A Camera recorder (SDI
output device)
B Camera Head
*3 Use a commercially-available High Speed HDMI cable. If possible, we recommend using a cable with a length of
3 m (9.84 feet) or less.
*4 To connect to the SDI IN terminal or SDI OUT terminal, use a double-shielded BNC cable equivalent to 5C-FB
(commercially-available).
When connecting with an HDMI cable using an HDMI-to-DVI converter, etc., be sure to connect the HDMI
cable to the connector of this unit last.
Connecting the HDMI cable to the connector of this unit first may result in malfunction.
C HDMI cable
D BNC cable
*3
*4
E External monitor/external
device such as a recorder
≥ When connecting in SDI Mode, it is possible to change the output method to the external device by setting
[SDI MODE SEL].
≥ The video signal of the SDI output may stop temporarily when the HDMI cable is disconnected and connected or the
connected monitor is replaced, for example.
35
DVQX1262
Page 36

Network connection
Connection with remote camera controller
This unit supports the remote camera controllers AW-RP50/AW-RP120 and the remote operation panel AK-HRP200.
(Connection example)
TALLY/GPI
SIGNAL GND
TO PAN/TILT HEAD
54321
POWER
ON
12V IN
LAN
BOOT
SV
NM
ヒビヷ リワ
ロモワ ンヴノフビビ ヱンユヷリユヸ
ヴリヨワモロチヨワュ
ヤヤヶ
: LAN cable
A Camera head option cable
B HDMI cable/BNC cable
1 AG-UMR20
2 Camera Head
3 Switching hub
4 Remote camera controller AW-RP50
*1
5 Remote camera controller AW-RP120
6 Remote Operation Panel AK-HRP200
*1
7 External monitor
*1 The illustration of the supplied AC adaptor is omitted.
*2 The illustration of the external DC power supply is omitted.
≥ This unit will automatically recognize straight cables and crossover cables connected to the LAN terminal.
36
DVQX1262
*2
*2
Page 37

Connection to PC/mobile terminal
ヴユヵ
ヴユヵ
This unit can display an IP image on a PC connected to the network via wired LAN or a mobile terminal connected via
a wireless access point.
(Connection example)
: LAN cable
: BNC cable
1 AG-UMR20
2 Camera Head or SDI output device
3 AG-UMR20
output device
4 Switcher
5 External monitor
*2
*3
connected to the Camera Head/SDI
A Camera head option cable or BNC cable
B LAN cable (straight cable)
6 Remote camera controller AW-RP50
7 Switching hub
8 PC
9 Wireless access point
: Mobile terminal
*1 The cable to be connected and the terminal where the cable plugs in differ depending on the connected device
(Camera Head/SDI input device).
*2 The illustration of the supplied AC adaptor is omitted.
*3 The illustrations of the Camera Head and SDI output device are omitted.
≥ This unit will automatically recognize straight cables and crossover cables connected to the LAN terminal.
*2
*1
DVQX1262
37
Page 38

Preparation
1
25 26 2424
2
8
10
34 56
11 12 13 14 15 16
7
9
17 18
21
22
23
19 20
27
28
29
Names and Functions of Main Parts
1 LCD monitor (Touch screen)
2 Power button [ ] (l 44)
3 Menu button [MENU] (l 47)
4 button
5 AUDIO MON/ADV j button
6 AUDIO MON/ADV i button
7 Status indicator (l 44)
8 button
9 Tally lamp
10 button
11 REC/PAUSE button (l 52)
12 SHIFT button
13 button
14 SET button
15 MODE button
16 User 1 button [USER1]
17 CAMERA terminal
18 Headphone terminal [ ]
19 MIC/LINE IN input terminal
20 Camera remote terminal [CAM REMOTE]
≥ FOCUS IRIS terminal (3.5 mm (0.14 q) diameter mini
jack)
≥ ZOOM S/S terminal (2.5 mm (0.1 q) diameter super
mini jack)
21 SDI IN terminal [HD SDI IN]
22 SDI OUT terminal [HD SDI OUT]
23 HDMI OUT terminal [HDMI OUT]
24 Multipurpose screw hole
≥ M3 (3 mm (0.1 q) diameter) type screws with lengths
up to 8 mm (0.3 q) can be used for the four screw holes
on the side of this unit.
38
DVQX1262
≥ When using screws, do not apply excessive force.
Also, if you use a M3 (3 mm (0.1 q) diameter) type
screw longer than 8 mm (0.3 q) in length, this unit may
be damaged.
25 Exhaust opening (cooling fan) (l 50)
26 Speaker
27 DC input terminal [DC IN] (l 40)
≥ Connect the DC 12 V power source. When the voltage
drops to approximately 10 V, if the battery is not
connected, the unit will turn off automatically. After
that, even if the power supply voltage recovers, it will
not turn back on automatically. Please press the power
button for at least 2 seconds to turn on the unit.
5.9
[7/32]
0
[1/8]
-0.2
3
+0.1
0
1.05
[1/32] [11/32]
Units: mm [inch]
28 USB 2.0 terminal
29 LAN connector for IP control [LAN ACT/LINK]
≥ This LAN connector (RJ-45) is connected when
exercising IP control over the unit from an external
device. Use a cable with the following specifications for
the connection to the LAN connector:
LAN cable* (category 5 or above), max. 100 meters
(328 feet)
* Use of an STP (shielded twisted pair) cable is
recommended.
8
9
0
[5/16]
-0.2
0.1
Page 39

30 Inlet (cooling fan) (l 50)
24 2430 31 32
38 38
33 35 3634 37
31 Battery release button [PUSH]
32 Battery holder
33 SD Card slot cover (l 42)
34 Access lamp (card 1) (l 42)
35 Card slot 1 (l 42)
36 Card slot 2 (l 42)
37 Access lamp (card 2) (l 42)
38 Setting legs
39
DVQX1262
Page 40

Preparation
Power supply
Using the AC adaptor
The unit is in the standby condition when the AC adaptor is connected. The primary circuit is always “live” as long as
the AC adaptor is connected to an electrical outlet.
Important:
≥ Use the supplied AC adaptor. Do not use the AC adaptor of another device.
≥ Do not use the AC cable with any other equipment as it is designed only for this unit. Also, do not use the
AC cable from other equipment with this unit.
1 Connect the AC cable to the AC adaptor and the
AC outlet.
2 Connect the AC adaptor to the DC input terminal
[DC IN].
≥ When disconnecting the AC adaptor, be sure to press and hold
the power button to turn off the unit, and check that the status
indicator has gone out before removing it. (l 44)
≥ Insert the plugs as far as they will go.
≥ Even when you use the AC adaptor for recording images, keep the battery connected. This allows you to continue
the recording even if a power failure occurs or the AC adaptor is unplugged from the AC outlet by accident.
≥ This unit consumes a small amount of power even when turned off. When leaving the product unused for a long
time, disconnect the AC adaptor from the AC outlet for power saving.
Using the battery
∫ About batteries that you can use with this unit (as of April 2017)
The battery that can be used with this unit is VW-VBD58/AG-VBR59/AG-VBR89/AG-VBR118.
≥ The AG-VBR59/AG-VBR89/AG-VBR118 supports quick charging.
≥ It is recommended to charge with the AG-BRD50 battery charger that supports fast charging.
It has been found that counterfeit battery packs which look very similar to the genuine product are made
available to purchase in some markets. Some of these battery packs are not adequately protected with
internal protection to meet the requirements of appropriate safety standards. There is a possibility that
these battery packs may lead to fire or explosion. Please be advised that we are not liable for any accident
or failure occurring as a result of use of a counterfeit battery pack. To ensure that safe products are used
we would recommend that a genuine Panasonic battery pack is used.
≥ For information on how to charge the battery, refer to the Operating Instructions for the battery charger.
≥ For information such as how to attach the battery, refer to the Operating Instructions (PDF format).
40
DVQX1262
Page 41

Preparation
Preparation of SD cards
The unit can record motion pictures or still pictures to an SD card.
≥ We recommend that you use a Panasonic Memory Card.
Cards that you can use with this unit
∫ About the Speed Class ratings for recording motion pictures
≥ The required card differs depending on the setting of [PRIORITY MODE].
Use a card that meets the following ratings of the SD Speed Class.
Use of a non-compatible card may cause recording to stop suddenly.
≥ SD Speed Class is the speed standards regarding continuous writing. To check the class, see the labelled side, etc.
of the card.
PRIORITY MODE Speed Class ratings Label examples
REC/PB(4K) Class10 or more
REC/PB Class4 or more
≥ Keep the Memory Card out of reach of children to prevent swallowing.
41
DVQX1262
Page 42

Inserting/removing an SD card
When using an SD card for the first time, it is necessary to format the SD card. (l 51) When the SD card is
formatted, all of the recorded data is deleted. Once the data is deleted, it cannot be restored.
Caution:
Check that the access lamp has gone off.
Access lamp A
≥ When this unit is accessing the SD card, the
access lamp lights up.
1 Open the SD card slot cover and insert
(remove) the SD card into (from) the card
slot B.
≥ One SD card can be inserted into each of the card slot
≥ Do not touch the terminals on the back of the SD card.
≥ Do not apply strong shocks, bend, or drop the SD card.
≥ Electrical noise, static electricity or the failure of this unit or the SD card may damage or erase the data stored on the
SD card.
≥ When the card access lamp is lit, do not:
j Remove the SD card
j Turn the unit off
j Insert and remove the USB Cable
j Expose the unit to vibrations or shock
Performing the above while the lamp is on may result in damage to data/SD card or this unit.
≥ Do not expose the terminals of the SD card to water, dirt or dust.
≥ Do not place SD cards in the following areas:
j In direct sunlight
j In very dusty or humid areas
j Near a heater
j Locations susceptible to significant difference in temperature (condensation can occur.)
j Where static electricity or electromagnetic waves occur
≥ To protect SD cards, return them to their cases when you are not using them.
≥ About disposing of or giving away the SD card. (l 29)
1 and the card slot 2.
≥ Face the label side C in the direction shown in the
illustration and press it straight in as far as it will go.
≥ Press the center of the SD card and then pull it straight
out.
2 Securely close the SD card slot cover.
42
DVQX1262
Page 43

Preparation
Connecting this unit to the Camera Head
(CAM Mode)
∫ Attaching the Camera head option cable (optional)
Be sure to turn off the unit before attaching the Camera head option cable.
A Camera head option cable
1 Insert Camera head option cable D into this unit’s CAMERA
terminal and the Camera Head connecting terminal.
≥ Align notch A of the terminal of the Camera head option cable and guide B
of the connecting terminal to insert.
2 Turn the Camera head option cable terminal ring C
clockwise.
≥ Fix firmly so that there is no looseness.
≥ This unit will start up in the CAM Mode when it is turned on after connection.
The Camera Head is turned on and recording is possible.
∫ Removing the Camera head option cable
Be sure to turn off this unit before removing the Camera head option cable.
1 Loosen the ring on the terminal of the Camera head option cable by turning it
counterclockwise.
2 Hold the ring on the terminal of the Camera head option cable and pull it straight out.
43
DVQX1262
Page 44

Preparation
Turning the unit on/off
≥ The method for turning on the unit depends on the setting of [POWER UP OPTION].
Press power button B for 2 seconds or more to turn on the unit.
To turn off the unit
ヴユヵ
A The status indicator lights on.
≥ Operation Mode icon ( / ) is displayed on the screen.
j (CAM Mode): Displayed when the unit is turned on while connected to the Camera Head.
j (SDI Mode): Displayed when the unit is turned on while not connected to the Camera Head. It is also
displayed if the unit is turned on while pressing and holding the USER1 button after connecting the Camera Head.
≥ This unit may automatically reboot when turned on in the following cases.
j When turned on for the first time after connecting this unit with the Camera Head
j When turned on after connecting this unit with another Camera Head
The setup of the [
≥ When in SDI Mode, to turn on the unit again after [ECONOMY (BATT)] or [ECONOMY (AC)] have worked, press the
power button for 2 seconds or longer to turn on the unit.
≥ Connecting or removing the Camera Head with this unit turned on may cause this unit and the Camera Head to
malfunction. Be sure to turn off this unit before connecting/disconnecting the Camera Head to/from it.
≥ If the camera head is faulty, such as a fault or a cable disconnection, [System error. Please turn off.] is displayed on
the LCD monitor, recording is not possible.
≥ When you switch to Playback Mode or turn off the unit with the power button, the unit memorizes the Camera
Head's zoom and focus positions. To start up the Camera Head while maintaining the zoom and focus positions
after turning off the unit without pressing the power button, perform the above operation in advance.
SCENE FILE] menu saved in the Camera Head is reflected to this unit after the reboot.
Press the power button for 2 seconds or more.
The status indicator goes off.
44
DVQX1262
Page 45

Preparation
ヮユワヶ
Selecting a mode
Switching between the CAM Mode and the SDI Mode
Always turn off this unit and turn it on again when switching between the SDI Mode and the CAM Mode.
≥ Connect this unit and the Camera Head when switching to the CAM Mode. (l 43)
≥ To boot this unit in the SDI Mode with the Camera Head connected, turn on while pressing and holding the USER1
button.
Switching the priority mode
By switching [PRIORITY MODE], this unit can operate according to various applications.
The items that can be set vary depending on the device to be connected. (CAM Mode: l 43/SDI Mode: l 34)
Select the menu. (l 47)
: [RECORD SETUP] # [PRIORITY MODE] # desired setting
±: Recording is possible/s: Recording or distribution is not possible
[PRIORITY MODE]
setting
REC/PB(4K)
REC/PB
*1 Clips recorded on an SD card can be downloaded to a PC and transferred to an FTP server.
*2 On the Live screen of this unit, 4K image in the H.264 format cannot be displayed. To display 4K images, please
use a 4K image-compatible external device or external software.
*3 This unit is not compatible with clips recorded with AVCHD.
*1
*1
*2
IP(4K)
IP s
Record to SD card
± (MP4*3) s
± (AVCHD)
s
H.264 JPEG
IP streaming
Distribution of 1ch is
possible
Distribution of 2ch is
possible
Distribution of 1ch is
possible
≥ [IP(4K)] and [REC/PB(4K)] are not available in SDI Mode.
45
DVQX1262
Page 46

Switching between Recording Mode and Playback Mode
ヴユヵ
ヮヰュユ
When [PRIORITY MODE] is set to [REC/PB] or [REC/PB(4K)], press the MODE button to switch between Recording
Mode and Playback Mode.
≥ If set to [IP], [IP(4K)], even if the MODE button is pressed, this unit will not enter Playback Mode.
Press the MODE button A to switch between Recording Mode and Playback Mode.
Recording Mode (l 52) The recording screen is displayed. You can
Playback Mode (l 55) The thumbnail screen for playback is displayed.
≥ When you turn on this unit, it starts up in Recording Mode.
record motion pictures.
You can play back clips and still pictures.
∫ Switching between Recording Mode and Standby Mode
When [PRIORITY MODE] is set to [IP] or [IP(4K)], press the MODE button to switch between Recording Mode and
Standby Mode.
≥ In Standby Mode, this unit appears as follows.
j The status indicator flashes slowly.
j Turn off the LCD monitor of this unit.
j This unit’s SDI output, HDMI output and IP distribution stops.
j In the CAM Mode, functions other than the Camera Head network function and the cooling fan stop.
46
DVQX1262
Page 47

Preparation
Using the menu screen
ヮユワヶ
ヴユヵ
Menu setting by button operation
1 Press the MENU button .
2 Press the /// buttons to move the cursor to the menu, and press the SET button
to select.
3 Place the cursor on [EXIT] and press the SET button to finish the menu setting.
∫ About page switching
It is not possible to select the / / / icon with button operation.
If the cursor is on the top item, press the button, or if the cursor is on the bottom item, press the button to
switch the page.
∫ To adjust the numerical value by button operation
In the menu for setting the numerical value, after selecting the numerical display part, press the / / /
buttons to adjust.
ヮユワヶ
(For example, when adjusting the brightness with [LCD SET])
1 Place the cursor on the numerical display A and press the SET
button to select.
2 Press the / buttons to adjust the value.
≥ When the SET button is pressed, the adjusted value is set.
≥ There is also a menu to adjust by pressing the / buttons.
47
DVQX1262
Page 48

Menu setting by touch screen operation
1 Press the MENU button .
ヮユワヶ
2 Touch the top menu A.
3 Touch the submenu B.
≥ Next (Previous) page can be displayed by touching
/.
4 Touch the desired item to enter the setting.
5 Touch [EXIT] to exit the menu setting.
How to use the touch screen
You can operate by directly touching the LCD monitor (touch screen) with your finger.
∫ Touch
Touch and release the touch screen to select icon or picture.
≥ Touch the center of the icon.
≥ Touching the touch screen will not operate while you are touching
another part of the touch screen.
∫ Slide while touching
Move your finger while pressing on the touch screen.
∫ About the operation icons
///:
Touch when changing a page or performing settings.
[RETURN]:
Returns you to the previous screen.
≥ Do not touch the LCD monitor with hard pointed tips, such as ball point pens.
48
DVQX1262
Page 49

Preparation
ヮユワヶ
Setting date and time
When this unit is turned on, the message [SET TIME ZONE AND DATE/TIME] may appear.
To make these settings, select [YES], and follow the instructions from Step 2-3 of the time zone setting procedure.
Time zone
Time difference from the Greenwich Mean Time can be set.
1 Select the menu. (l 47)
ヮユワヶ
: [OTHER FUNCTION] # [TIME ZONE]
2 Touch / and set the region to record.
3 Touch [ENTER] to complete the setting.
≥ If the [CLOCK SET] screen appears, perform [CLOCK SET].
≥ Touch [EXIT] to close the menu screen.
≥
When the time zone setting is changed, the date/time setting of the unit also changes automatically.
Clock setting
1 Select the menu. (l 47)
: [OTHER FUNCTION] # [CLOCK SET]
2 Touch the date or time to be set, then set the desired value
using / .
≥ The year can be set between 2000 and 2035.
3 Touch [ENTER] to complete the setting.
≥ Touch [EXIT] to close the menu screen.
≥ The date and time function is driven by a built-in lithium battery.
≥ If the time display becomes [- -], the built-in lithium battery needs to be charged. To recharge the built-in lithium
battery, connect the AC adaptor or attach a charged battery to this unit. Leave the unit as it is for approx. 24 hours
and the battery will maintain the date and time for approx. 6 months. (The battery is still being recharged even if the
unit is off.)
≥ The way that time is displayed can be changed in the menu settings.
[DISP SETUP] # [DATE/TIME] or [DATE FORMAT]
49
DVQX1262
Page 50

Preparation
Before recording
≥ When recording, make sure your footing is stable and there is no danger of colliding with another person or object.
≥ When you are outdoors, record pictures with the sunlight behind you. If the subject is backlit, it will become dark in
the recording.
≥ For stable images, it is recommended to use a tripod whenever possible.
≥ Do not block the air inlet or exhaust opening of the cooling fan of this unit or the Camera Head with your hands, etc.
∫ To fix the Camera Head to a tripod
Attach the tripod to the tripod mounting hole of the Camera Head.
A Tripod mounting hole
≥ The depth of the screw hole in the tripod mounting hole is 6 mm (0.24 q). When attaching this unit to a tripod or the
like, do not tighten the screw with excessive force. Also, if screws other than 1/4-20 UNC type are used, the Camera
Head may be damaged.
≥ When fixing to something other than a tripod, pay attention to the following points.
j Use the tripod mounting hole to fix securely
j Do not block the Camera Head inlet, exhaust opening or built-in microphone with fixing parts
≥ If the Camera Head is held as shown below, a heavy load will be applied to the cable and the terminal, which may
cause damage. Also, be careful as the cable may come off and the Camera Head may fall or collide with the
surrounding walls and be damaged.
B Hold the cable only or fix C Hold the cable only and suspend this unit
50
DVQX1262
Page 51

Recording
ヮユワヶ
ヮユワヶ
ヮユワヶ
ヮユワヶ
Selecting a media to record
You can specify the card slot to which motion pictures are to be recorded.
Select the menu.
: [RECORD SETUP] # [MEDIA SELECT] # [SD CARD 1]/[SD CARD 2]
≥ You can also change the card slot used for motion picture recording by pressing the USER button to which <SLOT
SEL> is registered or touching the applicable USER button icon while recording is paused.
≥ If [PRIORITY MODE] is [IP] or [IP(4K)], it cannot be set.
Formatting media
If you use the SD cards for the first time for recording with this unit, format the cards.
Please be aware that if a medium is formatted, then all the data recorded on the medium will be erased and cannot be
restored. Back up important data on a PC etc.
≥ When using two SD cards, format both SD cards.
1 Select the menu.
: [CARD FUNCTION] # [FORMAT CARD]
2 Touch [SD CARD 1] or [SD CARD 2].
≥ When formatting is complete, touch [EXIT] to exit the message screen.
≥ Do not turn this unit off or remove the SD card, while formatting. Do not expose the unit to vibrations or shock.
Use this unit to format media.
Do not format an SD card using any other equipment such as a PC. Otherwise it may not be possible to use
the card on this unit.
System frequency Selection
Set the system frequency of this unit.
Select the menu.
(In Recording Mode)
: [RECORD SETUP] # [SYSTEM FREQ] # desired setting
(In Playback Mode)
: [OTHER FUNCTION] # [SYSTEM FREQ] # desired setting
[59.94Hz]: The system frequency for NTSC television broadcasting system regions
[50.00Hz]: The system frequency for PAL television broadcasting system regions
≥ After you have changed the system frequency, this unit will be restarted automatically.
≥ By default, the system frequency is set to the broadcasting system of the region where this product was purchased.
≥ When recording [PRIORITY MODE] with [REC/PB], clips with different system frequencies cannot be recorded on
one SD card. Please prepare an SD card for each system frequency.
51
DVQX1262
Page 52

Recording
ヴユヵ
ンユヤバ
ヱモヶヴユ
REC
AUTO
F1: F2:
F3:
F2:
AUTO
F1:
Record on SD card
1 Set [PRIORITY MODE] to [REC/PB] or [REC/
PB(4K)] to switch to Recording Mode. (l 45, 46)
2 Press REC/PAUSE button A to start recording.
≥ When recording starts, REC (red) appears on the screen and the
tally lamp lights up.
≥ Press again to stop recording.
Recording
Switch Recording Mode
There are four Recording Mode presets according to the recording situation on this unit. ([AUTO]/[F1:]/[F2:]/[F3:])
Touch the appropriate operation icon to switch between Auto Mode ([AUTO]) and Manual Mode ([F1:], [F2:], [F3:]).
AUTO
Touch , , or to switch between Auto Mode and
F1:
Manual Mode.
: The optimum setting adjustment is automatically
//*: Make detailed settings manually according to the
F2: F3:
* It is possible to save your favorite image settings to each scene number. Please switch the scene number according
to the recording situation. Please read the Operating Instructions (PDF format) for the image settings that can be
saved.
F3:
performed according to the recording conditions.
recording conditions and preferences.
≥ If the screen is touched while the operation icons are displayed, or if there is no touch operation for a period of time,
the operation icons will disappear. To display again, touch the screen.
≥ You can also switch between Auto Mode and Manual Mode by setting the menu.
[SCENE FILE]→[SELECT SCENE]
52
DVQX1262
Page 53

∫ About Auto Mode
In Auto Mode, the following menu items are set automatically. Their settings cannot be changed.
Menu item Setting
[SCENE FILE] → [DETAIL LEVEL] 0
[SCENE FILE] → [V DETAIL LEVEL] 0
[SCENE FILE] → [DETAIL CORING] 0
[SCENE FILE] → [SKIN TONE DTL] OFF
[SCENE FILE] → [CHROMA LEVEL] 0
[SCENE FILE] → [CHROMA PHASE] 0
[SCENE FILE] → [COLOR CORRECTION SETTING] All setup values are set to 0
[SCENE FILE] → [MASTER PED] 0
[SCENE FILE] → [GAMMA] HD NORM
[SCENE FILE] → [BLACK GAMMA] 0
[SCENE FILE] → [KNEE] AUTO
[SCENE FILE] → [DRS] OFF
[SCENE FILE] → [NR CONTROL] 0
[SW SETUP] → [IRIS MODE] AUTO
[SW SETUP] → [GAIN MODE] AUTO
[SW SETUP] → [SUPER GAIN] OFF
∫ Controls that are disabled in Auto Mode
In Auto Mode, the following operation is invalid.
≥ pressing the USER button set for <SUPER GAIN>
53
DVQX1262
Page 54

Recording
Using the zoom
The unit can deliver a maximum optical zoom of 20k.
≥ You can check the zoom magnification on-screen, displayed as a value between Z00 and Z99. The value gets larger
as you zoom in, and smaller as you zoom out.
Press the / buttons to zoom.
: Close-up recording (zoom in)
: Wide-angle recording (zoom out)
∫ About the zoom speed
≥ Hold down the button to perform zoom operation at low speed and press and hold the button after pressing twice in
succession to zoom in at high speed
≥ It is also possible to zoom in at low speed by pressing the USER buttons that are set for <ZOOM T> or <ZOOM W>.
≥ If the Camera Head and the unit are close to each other, when your finger is released from the button during the
zoom operation, the operation sound may be recorded. When you release the button, please return it gently.
≥ Even if you turn off the unit, the zoom magnification from the last time the unit was turned off with the power button
or switched to Playback Mode will be maintained.
≥ When the zoom magnification is at the maximum magnification, the minimum focusing distance is approximately
1.5 m (4.9 feet).
≥ When the zoom magnification is k1, the minimum focusing distance is approximately 3 cm (1.2 q).
≥ The sound of the zoom mechanism becomes louder than usual during fast zoom operation. This may cause the
sound to be recorded during recording.
≥ Depending on the subject, Auto Focus may not track it when Fast Zoom is in use.
54
DVQX1262
Page 55

Playback
1111
11
101010
121212
131313
141414
151515
161616
171717
PH PH PH
PH PH PH
PH PH PH
181818
4K
PS
PHHAHE
PM
Clip/Still picture playback
1 Set this unit to playback mode. (l 46)
2 Touch the play mode select icon A.
3 Select the card slot C you wish to play back.
Card display
The selected card slot is displayed in yellow.
4 (When setting to clip Playback Mode)
Touch the desired recording mode D and recording format E
for playback.
≥ To play clips recorded with [PRIORITY MODE] set to [REC/PB(4K)] in
Recording Mode, touch Recording Mode [MP4].
To playback recorded clips set to [REC/PB], touch Recording Mode [AVCHD].
≥ When there is a recorded clip in Recording Mode, the text color is displayed in green.
≥ The available recording format options differ depending on [SYSTEM FREQ] (l 51) or the recording mode option
you have touched.
≥ Next (Previous) page can be displayed by touching / .
≥ Touch [ENTER].
≥ A recording mode icon B will be displayed on the thumbnail display. ( / )
(If you have touched the recording mode option [MP4])
≥ When you touch recording format, the icon is displayed in the thumbnail.
≥ If you touch the recording format option [ALL], all clips of the same recording mode in the selected media are
displayed.
For clips with different system frequencies, is displayed in the thumbnail. You can play them back by changing
the [SYSTEM FREQ] setting. (l 51)
≥ (If you have touched the recording mode option [AVCHD])
After you have touched a recording format option, one of the following icons will be displayed on each thumbnail.
j : Clip recorded with: [PS 1080/59.94p]/[PS 1080/50.00p]
j : Clip recorded with: [PH 1080/59.94i]/[PH 1080/23.98p]/[PH 720/59.94p]/[PH 1080/50.00i]/[PH 720/50.00p]
j : Clip recorded with: [HA 1080/59.94i]/[HA 1080/50.00i]
j : Clip recorded with: [HE 1080/59.94i]/[HE 1080/50.00i]
j : Clip recorded with: [PM 720/59.94p]/[PM 720/50.00p]
(To set this unit to Still Picture Playback Mode)
Touch the still picture (JPEG) F.
55
DVQX1262
Page 56

5 Touch the clip or the still picture to be played back.
101010 1111
11
131313
141414
151515
161616
171717
181818
PH PH PH
PH PH PH
PH PH PH
121212
TC 00:02:30.00TC 00:02:30.00TC 00:02:30.00
≥ Next (Previous) page can be displayed by touching / .
≥ You can change the playback media by pressing the USER button to which <SLOT
SEL> is registered.
6 Select the playback operation by touching the operation icon.
G Operation icon
≥ If you touch the screen while an operation icon is being displayed or do not
touch the icon for a certain period, it will disappear. To display again, touch
the screen.
Clip playback Still picture playback
1/;: Playback/Pause
6: Fast rewind playback
5: Fast forward playback
*1, 2
*1, 2
∫: Stops the playback and shows the
thumbnails.
≥ Playback is also possible by pressing the / / / buttons.
j : Play/stop clip, start/pause slide show
j : Fast rewind
j : Fast forward
* 1, 2
, play the previous still picture
* 1, 2
, play the next still picture
j : Stop and return to thumbnail display
*1 If you touch twice or push the button twice, the fast rewind/fast forward speed will become faster. (Screen display
will change to / .)
*2 When pressed during clip playback
1/;: Slide show (playback of the still pictures in
numerical order) start/pause.
2;: Plays back the previous picture.
;1: Plays back the next picture.
∫: Stops the playback and shows the
thumbnails.
≥ If the unit is switched to Playback Mode, the status of the unit displayed on the web screen*3 of the PC/mobile
terminal connected to the unit via a network will be switched to standby mode.
*3 For details about the web screen, refer to the Operating Instructions (PDF format).
56
DVQX1262
Page 57

Others
About copyright
∫
Carefully observe copyright laws
Recording of pre-recorded tapes or discs or other
published or broadcast material for purposes other
than your own private use may infringe copyright
laws. Even for the purpose of private use, recording
of certain material may be restricted.
Transferring, copying, disassembling, decompiling
or reverse engineering the software included in this
unit, or exporting it in violation of export laws is
prohibited.
∫ Licenses
≥ SDXC Logo is a trademark of SD-3C, LLC.
≥ “AVCHD”, “AVCHD Progressive” and the “AVCHD
Progressive” logo are trademarks of Panasonic
Corporation and Sony Corporation.
≥ Dolby, Dolby Audio, and the double-D symbol are
trademarks of Dolby Laboratories.
≥ The terms HDMI and HDMI High-Definition Multimedia
Interface, and the HDMI Logo are trademarks or
registered trademarks of HDMI Licensing
Administrator, Inc. in the United States and other
countries.
≥ Microsoft
≥ Microsoft product screen shot(s) reprinted with
≥ Intel
≥ Apple, Mac, macOS, iPhone, iPod Touch, iPad, and
≥ Android
≥ Other names of systems and products mentioned in
®
trademarks or trademarks of Microsoft Corporation in
the United States and/or other countries.
permission from Microsoft Corporation.
Corporation in the U.S. and/or other countries.
Safari are registered trademarks of Apple Inc. in the
United States and other countries.
Google Inc.
these instructions are usually the registered
trademarks or trademarks of the manufacturers who
developed the system or product concerned.
and Windows® are either registered
®
and Intel®Core™ are trademarks of Intel
™
is a trademark or registered trademark of
This product is licensed under the AVC Patent Portfolio
License for the personal use of a consumer or other uses
in which it does not receive remuneration to (i) encode
video in compliance with the AVC Standard (“AVC
Video”) and/or (ii) decode AVC Video that was encoded
by a consumer engaged in a personal activity and/or was
obtained from a video provider licensed to provide AVC
Video. No license is granted or shall be implied for any
other use. Additional information may be obtained from
MPEG LA, L.L.C.
See http://www.mpegla.com
This product incorporates the following software:
(1) the software developed independently by or for
Panasonic Corporation,
(2) the software owned by third party and licensed to
Panasonic Corporation,
(3) the software licensed under the GNU General Public
License, Version 2.0 (GPL V2.0),
(4) the software licensed under the GNU LESSER
General Public License, Version 2.1
(LGPL V2.1), and/or
(5) open source software other than the software
licensed under the GPL V2.0 and/or LGPL V2.1.
The software categorized as (3) - (5) are distributed in
the hope that it will be useful, but WITHOUT ANY
WARRANTY, without even the implied warranty of
MERCHANTABILITY or FITNESS FOR A PARTICULAR
PURPOSE.
For details please refer to the license conditions
displayed by the method described in Operating
Instructions (PDF format) [Setup from the web screen] →
[Maintenance screen [Maintenance]] → [■ Product
information tab [Product info.]] → [OSS license display]
At least three (3) years from delivery of this product,
Panasonic will give to any third party who contacts us at
the contact information provided below, for a charge no
more than our cost of physically performing source code
distribution, a complete machine-readable copy of the
corresponding source code covered under GPL V2.0 or
LGPL V2.1, as well as the respective copyright notice
thereof.
Contact Information:
oss-cd-request@gg.jp.panasonic.com
The source code and the copyright notice are also
available for free in our website below.
https://panasonic.net/cns/oss/index.html
57
DVQX1262
Page 58

Others
11.4
[7/16]
32.1 [1-1/4]
59.4 [2
-
11/32]
43.5 [1
-
23/32]
12
[15/32]
29.5 [1
-
5/32]
24.2 [15/16]
12.5 [1/2]
12.5 [1/2]
78.4 [3-3/32]
Specification
Memory Card Portable Recorder
Appearance (Unit: mm [inch])
22 [7/8]
16.5
7/32]
9/32]
-
-
58 [2
107.5 [4
[21/32]
19.5 [25/32]
19 [3/4]
41.6 [1-5/8]
32.1 [1-1/4]
[7/16]
26 [1-1/32]
46.1 [1-13/16]
78.4 [3-3/32]
100 [3-15/16]
101 [3-31/32]
38.15 [1-1/2]
12
[15/32]
1/2]
-
140 [5
5/32]
-
29.5 [1
24.2 [15/16]
2.1 [3/32]
1/32]
3/32]
-
53.5 [2
2.1 [3/32]
11/32]
-
59.4 [2
11.4
3.2
[1/8]
-
23/32]
26.2 [1
-
43.5 [1
3/4]65.2 [2
-
44.6 [1
9/16]
-
41.6 [1-5/8] 34.6 [1-3/8]
58
DVQX1262
20 [25/32]
3/4]
-
95 [3
1/4]
-
32 [1
12.5 [1/2]
26 [1-1/32]
12.5 [1/2]
16.5
7/32]
-
107.5 [4
[21/32]
2- 7.1 [2- 9/32]
2- 8.5 [2- 11/32]
68 [2-11/16]
14.5
11/32]
-
110.5 [4
[9/16]
Page 59

General
AC adaptor
Power:
DC 7.28 V (When using battery)
DC 12 V (When using AC adaptor)
Current consumption:
When only SDI recording is used;
1.1 A (When using battery)
0.7 A (When using AC adaptor)
When the special optional camera head
(AG-UCK20G) is connected for recording;
2.2 A (When using battery)
1.4 A (When using AC adaptor)
indicates safety information
Ambient operating temperature:
0 oCto40oC (32 oF to 104 oF)
Ambient operating humidity:
10%RH to 80%RH (no condensation)
Storage temperature:
-10 oCto60oC (14 oF to 140 oF)
Storage humidity:
30%RH to 80%RH
Storage atmospheric pressure:
500 hPa to 1060 hPa
Mass (Weight):
Approx. 590
Dimensions (WkHkD):
100 mmk53.5 mmk140 mm
[3-15/16 qk2-3/32 qk5-1/2 q]
(excluding protrusions)
g (Approx. 1.3 lbs.)
Power source:
AC 100 V to 240 V,
50 Hz/60 Hz, 1.2 A
Power output:
DC 12 V, 3.0 A
indicates safety information
Ambient operating temperature:
0 oCto40oC (32 oF to 104 oF)
Ambient operating humidity:
10%RH to 90%RH (no condensation)
Approx. 225
Dimensions (WkHkD):
115 mmk37 mmk57 mm
[4-1/2 q k1-7/16 qk2-1/4 q]
(Excluding the DC cord portion)
The symbols on this product (including the accessories)
represent the following:
g (Approx. 0.496 lbs.)
AC
DC
Class II equipment (The construction of the
product is double-insulated.)
ON
Standby
59
DVQX1262
Page 60

EU
Декларація про Відповідність
Вимогам Технічного Регламенту Обмеження Використання деяких Небезпечних Речовин в
електричному та електронному обладнанні
(затвердженого Постановою №1057 Кабінету Міністрів України)
Виріб відповідає вимогам Технічного Регламенту Обмеження Використання деяких
Небезпечних Речовин в електричному та електронному обладнанні (ТР ОВНР).
Вміст небезпечних речовин у випадках, не обумовлених в Додатку №2 ТР ОВНР, :
1.свинець(Pb) – не перевищує 0,1 % ваги речовини або в концентрації до 1000 частин на мільйон;
2.кадмій (Cd)– не перевищує 0,01 % ваги речовини або в концентрації до 100 частин на мільйон;
3.ртуть(Hg) – не перевищує 0,1 % ваги речовини або в концентрації до 1000 частин на мільйон;
4.шестивалентний хром (Cr6+) – не перевищує 0,1 % ваги речовини або в концентрації до
1000 частин на мільйон;
5.полібромбіфеноли (PBB) – не перевищує 0,1 % ваги речовини або в концентрації до 1000
частин на мільйон;
6.полібромдефенілові ефіри (PBDE) – не перевищує 0,1 % ваги речовини або в концентрації
до 1000 частин на мільйон.
Manufactured by: Panasonic Corporation, Osaka, Japan
Importer’s name and address of pursuant to EU rules:
Panasonic Corporation
Web site: http://www.panasonic.com
© Panasonic Corporation 2017
Panasonic Marketing Europe GmbH
Panasonic Testing Centre
Winsbergring 15, 22525 Hamburg, Germany
 Loading...