

Page 1
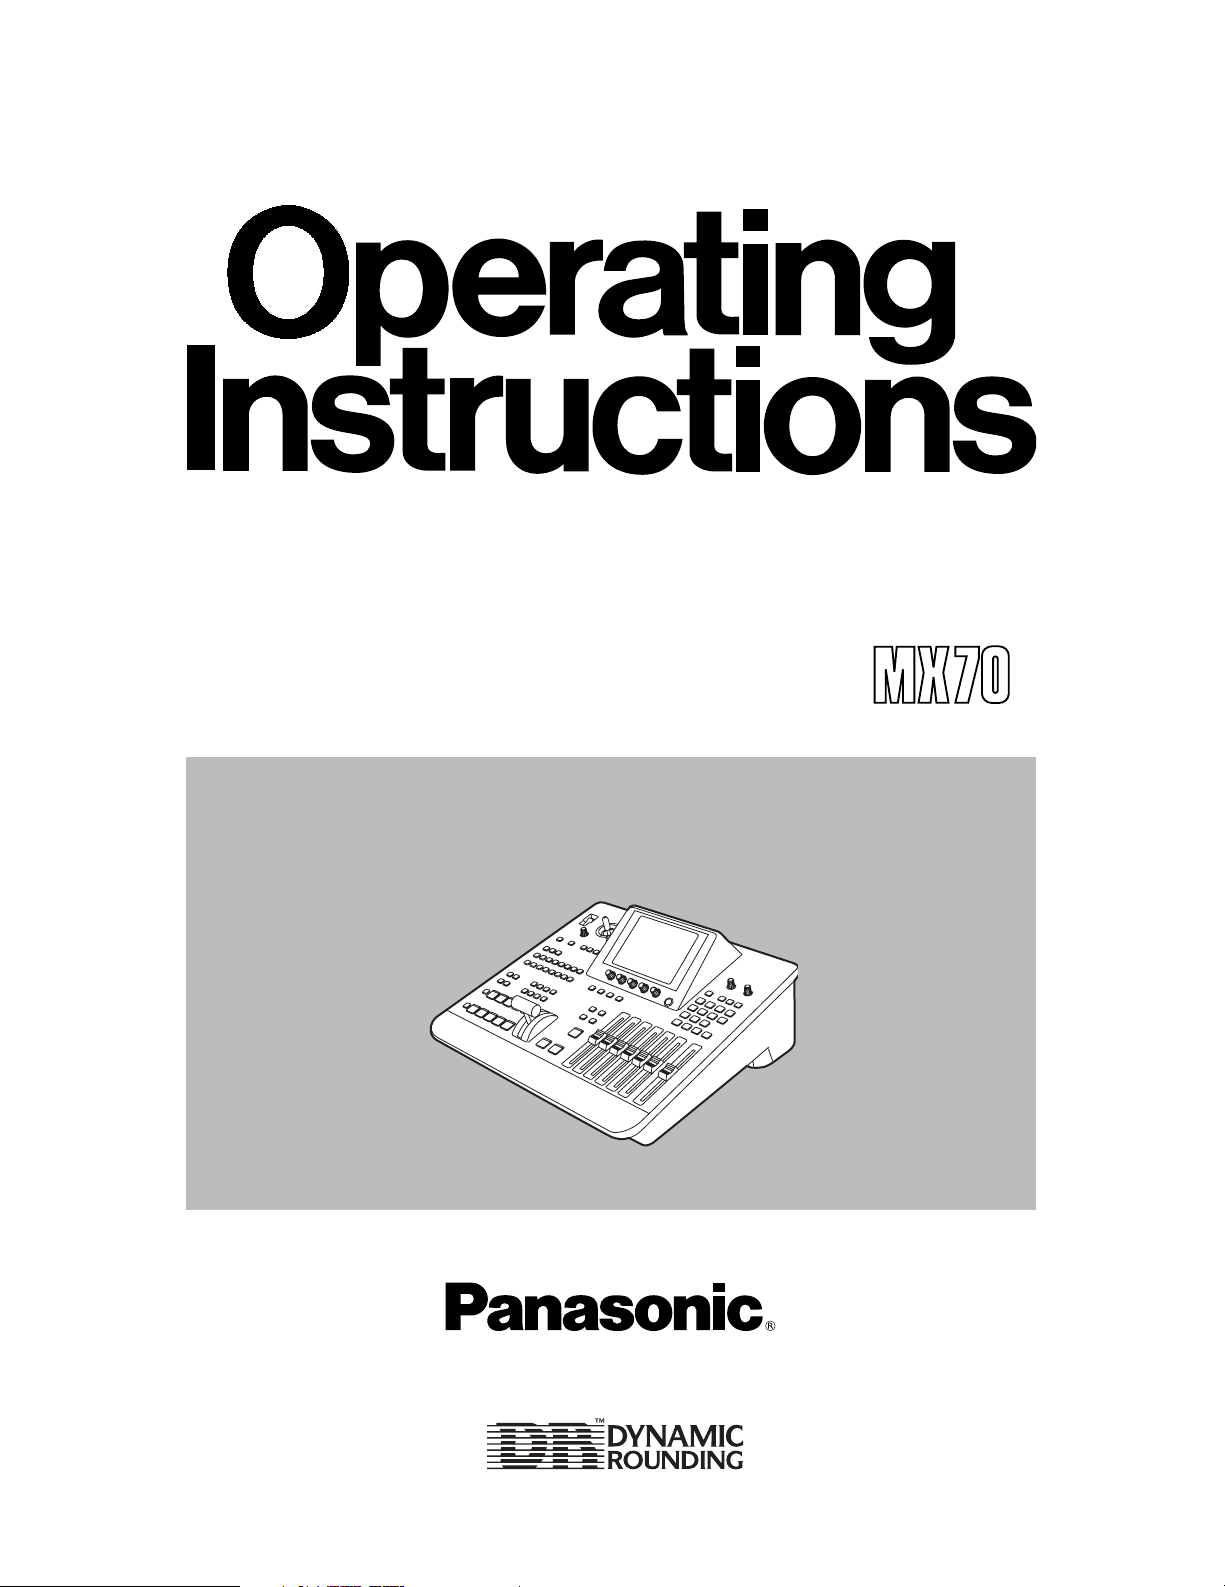
Before attempting to connect, operate or adjust this product, please read these instructions completely.
AG- P
Digital AV Mixer
Page 2

2
indicates safety information.
CAUTION
RISK OF ELECTRIC SHOCK
DO NOT OPEN
CAUTION: TO REDUCE THE RISK OF ELECTRIC SHOCK,
DO NOT REMOVE COVER (OR BACK).
NO USER SERVICEABLE PARTS INSIDE.
REFER TO SERVICING TO QUALIFIED SERVICE PERSONNEL.
The lightning flash with arrowhead symbol,
within an equilateral triangle, is intended to
alert the user to the presence of uninsulated
“dangerous voltage” within the product’s
enclosure that may be of sufficient magnitude
to constitute a risk of electric shock to
persons.
The exclamation point within an equilateral
triangle is intended to alert the user to the
presence of important operating and
maintenance (service) instructions in the
literature accompanying the appliance.
WARNING:
TO REDUCE THE RISK OF FIRE OR SHOCK
HAZARD, DO NOT EXPOSE THIS
EQUIPMENT TO RAIN OR MOISTURE.
CAUTION:
TO REDUCE THE RISK OF FIRE OR SHOCK
HAZARD AND ANNOYING INTERFERENCE,
USE THE RECOMMENDED ACCESSORIES
ONLY.
FCC Note:
This device complies with Part 15 of the FCC Rules.
To assure continued compliance follow the attached
installation instructions and do not make any
unauthorized modifications.
This equipment has been tested and found to comply
with the limits for a class A digital device, pursuant to
Part 15 of the FCC Rules. These limits are designed
to provide reasonable protection against harmful
interference when the equipment is operated in a
commercial environment. This equipment generates,
uses, and can radiate radio frequency energy and, if
not installed and used in accordance with the
instruction manual, may cause harmful interference to
radio communications. Operation of this equipment in
a residential area is likely to cause harmful
interference in which case the user will be required to
correct the interference at his own expense.
CAUTION:
TO REDUCE THE RISK OF FIRE OR SHOCK
HAZARD, REFER MOUNTING OF THE
OPTIONAL INTERFACE BOARD TO
QUALIFIED SERVICE PERSONNEL.
WARNING:
TO REDUCE THE RISK OF FIRE OR SHOCK
HAZARD, KEEP THIS EQUIPMENT AWAY
FROM ALL LIQUIDS—USE AND STORE
ONLY IN LOCATIONS WHICH ARE NOT
EXPOSED TO THE RISK OF DRIPPING OR
SPLASHING LIQUIDS, AND DO NOT PLACE
ANY LIQUID CONTAINERS ON TOP OF THE
EQUIPMENT.
CAUTION:
Do not install or place this unit in a
bookcase, built-in cabinet or any other
confined space in order to maintain adequate
ventilation. Ensure that curtains and any
other materials do not obstruct the
ventilation to prevent risk of electric shock or
fire hazard due to overheating.
Page 3

3
Overview
This digital audio mixer is designed for a host of applications including cases where the video signals of video equipment are
combined through digital processing or where many different kinds of effects are added. It incorporates two frame
synchronizers, a feature which makes it unnecessary for two video signals to be synchronized. Its dedicated software
program, the MX-Navi, enables titles to be downloaded from a PC to facilitate the insertion of titles. In addition to the wipe,
mix and digital effects, this unit comes with built-in chroma key and luminance key functions. Since its downstream keys,
fade controls and audio mixers can also be used, the effects required for AB roll editing can be added by just this one unit.
Connectors for connecting an external controller are also provided.
≥AB roll editing
AB roll editing is made possible by the unit’s two built-in frame synchronizers.
≥Connection of external editing controller
The unit is equipped with GPI and RS-422A/RS-232C connectors to enable an external editing controller to be connected.
≥Digital effect functions
By using the unit’s internal digital memory, it is possible to mobilize the still, strobe, negative, mono, multi-strobe (division
into 4, 9 or 16), mirror, mosaic and paint functions. Field/frame switching is possible for the still, strobe and multi functions.
Ripple, multi, spark and other effects can also be provided by adding the 3D optional board (AG-VE70).
≥Audio mixing
The unit comes with four sets of input facilities.
≥Mixed effects
The unit provides a range of mixed effect functions enabling chroma key, luminance key, mix, wipe and DVE combinations
as well as DSK and fading.
≥Internal event memory
The unit has a built-in memory that accommodates 100 patterns.
≥Advanced reference 1 output featured
Page 4

4
Contents
Overview .......................................................... 3
Parts and their functions ................................ 6
Front panel controls ..................................................... 6
Rear panel connection area ....................................... 14
External interfaces ........................................ 17
GPI ................................................................................ 17
RS-422A ....................................................................... 17
RS-232C ....................................................................... 17
Tally .............................................................................. 17
System diagram ............................................ 18
Power supply and backup ............................ 20
Setting panel screen ..................................... 20
[INTVideo] internal video setting screen .... 20
[Color Effects] setting screen ...................... 23
[Video Effects] setting screen ..................... 24
Execution of Effects ..................................... 30
Effect-by-effect setting screens .................. 31
[Transition] wipe pattern settings ............................. 31
[Chroma Key] setting .................................................. 34
[Luminance Key] and[EXT Key] (external key) settings
... 36
[Title Key] setting ........................................................ 37
[Basic Pattern Key] setting ........................................ 38
Other key settings ...................................................... 39
DSK/Fade settings ........................................ 46
[DSK Source] settings ................................................ 46
[DSK Key] settings ...................................................... 47
[Crop] setting .............................................................. 47
[DSK On/Off] setting ................................................... 47
[Fade] settings ............................................................ 48
[Audio Effects] settings ................................ 49
[PAN] setting ............................................................... 49
[EQ] equalizer setting ................................................. 50
[EQ Mid] equalizer midrange setting ......................... 50
[Voice] (voice changer) setting .................................. 50
[Mute] setting .............................................................. 50
[Setup] initial setting screen ........................ 51
[Power] (power ON) setting ........................................ 52
[Direct Pattern] setting ............................................... 52
[Audio Video Input] settings .......................................54
[Memory] setting ......................................................... 55
[Gen Lock] external synchronization setting ........... 55
[Video Format] setting ................................................ 55
[System1] setting ........................................................ 56
[System2] setting ........................................................ 56
[Bus] setting ................................................................ 56
[Audio Level] setting .................................................. 57
[File] setting ................................................................. 57
Other settings ............................................... 58
Event memory ............................................................. 58
Pattern settings ........................................................... 58
Transition time setting ............................................... 59
Transition patterns ........................................ 60
Key patterns .................................................. 68
AG-MX70
≥ “Microsoft” and “Windows” are registered trademarks of Microsoft Corporation of the United States in both the
U.S. and other countries.
≥ “Dynamic Rounding” licensed from Quantel, Ltd. The DR logo is a trademark of Quantel Ltd.
Page 5

5
Contents
About this software ...................................... 74
Description of the software ........................................ 74
System requirements ................................................. 74
Overview of MX-Navi .................................... 74
Processing of image data ............................ 75
By data type ................................................................ 75
Display methods ......................................................... 75
DSK effects .................................................................. 75
Image size .................................................................... 75
Image formats supported ........................................... 75
Management of the image memory ........................... 76
Before use ..................................................... 77
AG-MX70 connections ................................................ 77
Installation of the USB driver ..................................... 77
For Windows 98 and Windows 2000 ................. 77
For Windows ME ................................................. 78
For Windows XP .................................................. 78
Installation of MX-Navi ............................................... 79
Operation confirmation .............................................. 79
Startup and shutdown .................................. 80
How to start up MX-Navi ............................................. 80
How to shut down MX-Navi ........................................ 80
Screen descriptions ..................................... 80
Main window ............................................................... 80
Icon mode ............................................................ 80
List mode ............................................................. 82
Menu descriptions ........................................ 83
File menu ..................................................................... 83
Edit menu .................................................................... 83
View menu ................................................................... 84
Cursor menu ............................................................... 84
Operation menu .......................................................... 85
Tool menu .................................................................... 85
Help menu ................................................................... 85
Title data operations ..................................... 86
Flow until Title data playback .................................... 86
Registering Title data in the transmission list ......... 86
Setting the Title data playback properties ................ 86
Manual transmission and playback of Title data ..... 88
Automatic transmission and playback of Title data
.... 88
Clearing Title data ....................................................... 88
Checking the Title data image ................................... 89
Reordering the transmission list ............................... 89
Saving the transmission list ...................................... 89
Opening the transmission list ................................... 89
Deleting Title data from the transmission list .......... 89
Other operations ........................................... 90
Checking the memory status of the AG-MX70 ......... 90
Changing the AG-MX-70 memory settings ............... 90
Transmission and playback of IntVideo data ........... 91
Clearing IntVideo data ................................................ 91
Reading data ............................................................... 91
Recalling events ......................................................... 91
Setting the initial properties ...................................... 92
Setting the operating environment ........................... 93
List of short-cut keys ................................... 94
Before calling for service ............................. 95
Specifications ............................................... 97
MX-Navi
Page 6
6
Modify
POWER
X / Y
Pb / Pr
ON
OFF
ASPECT
Z
HV
ON
CENTER
SCENE
GRABBER
EDITOR
HOLD
DR
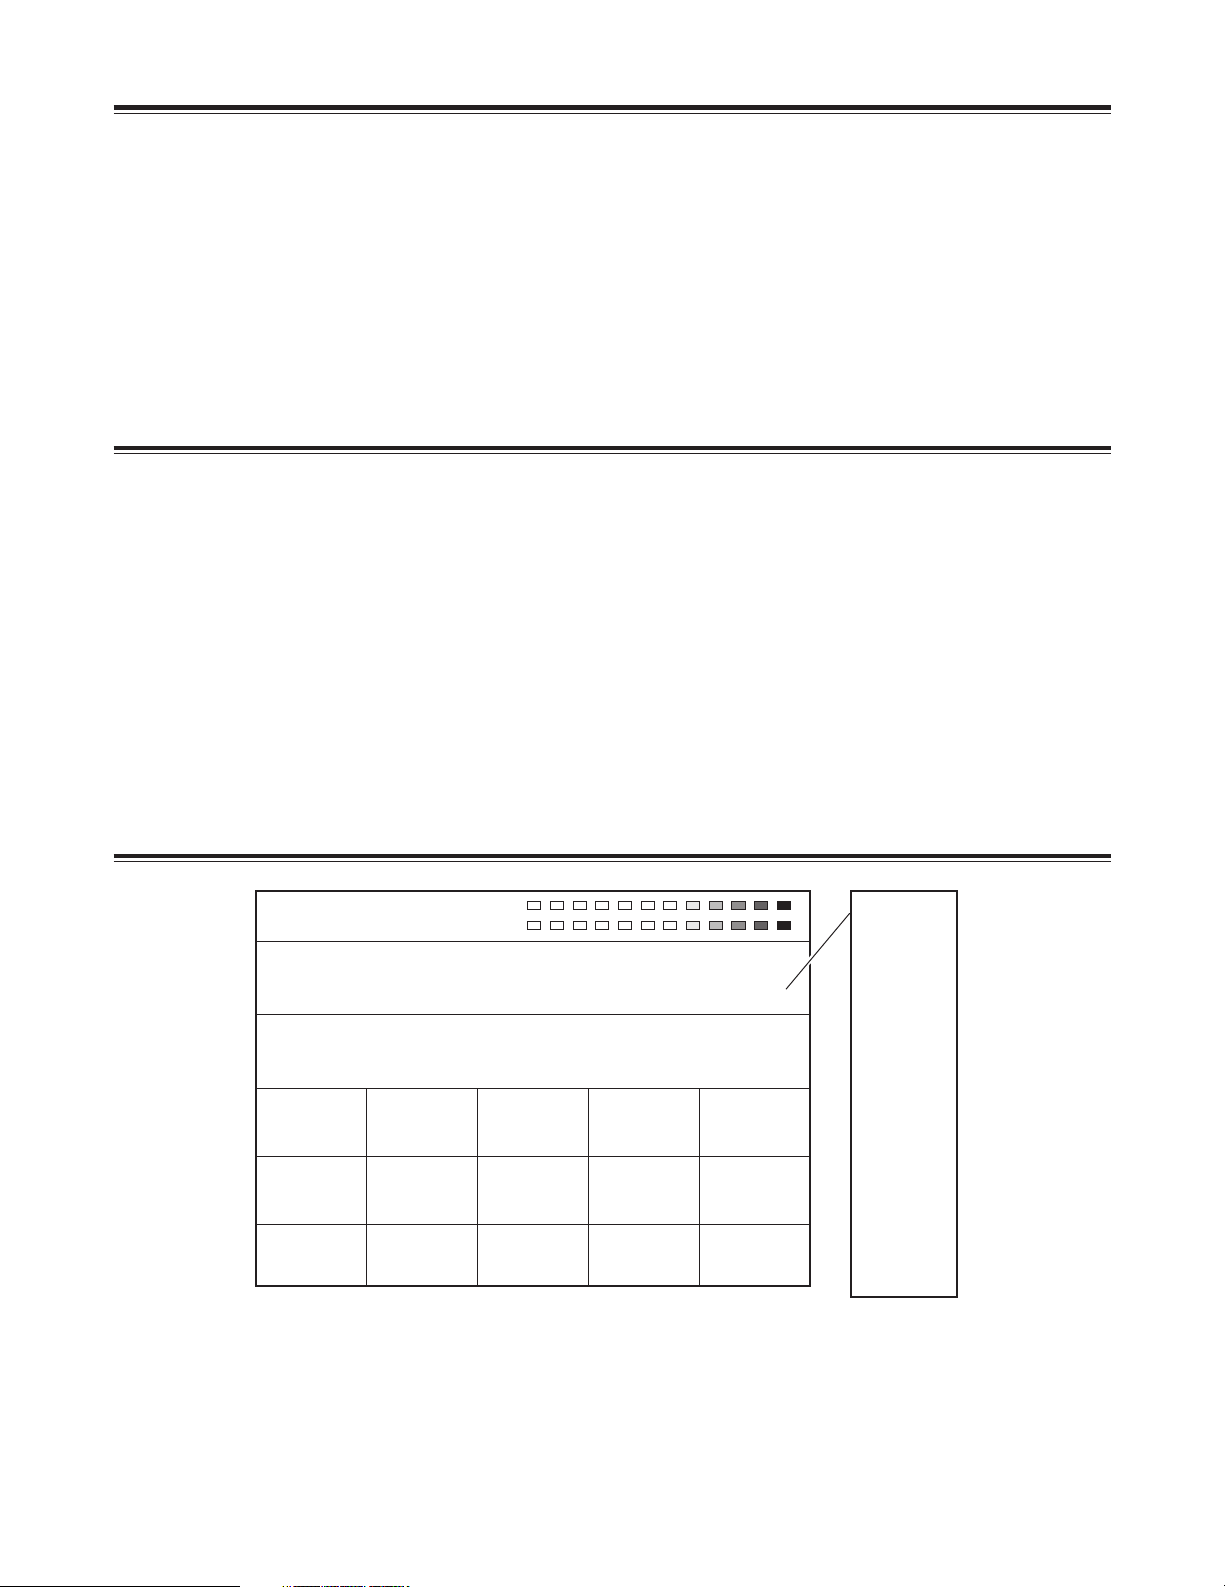
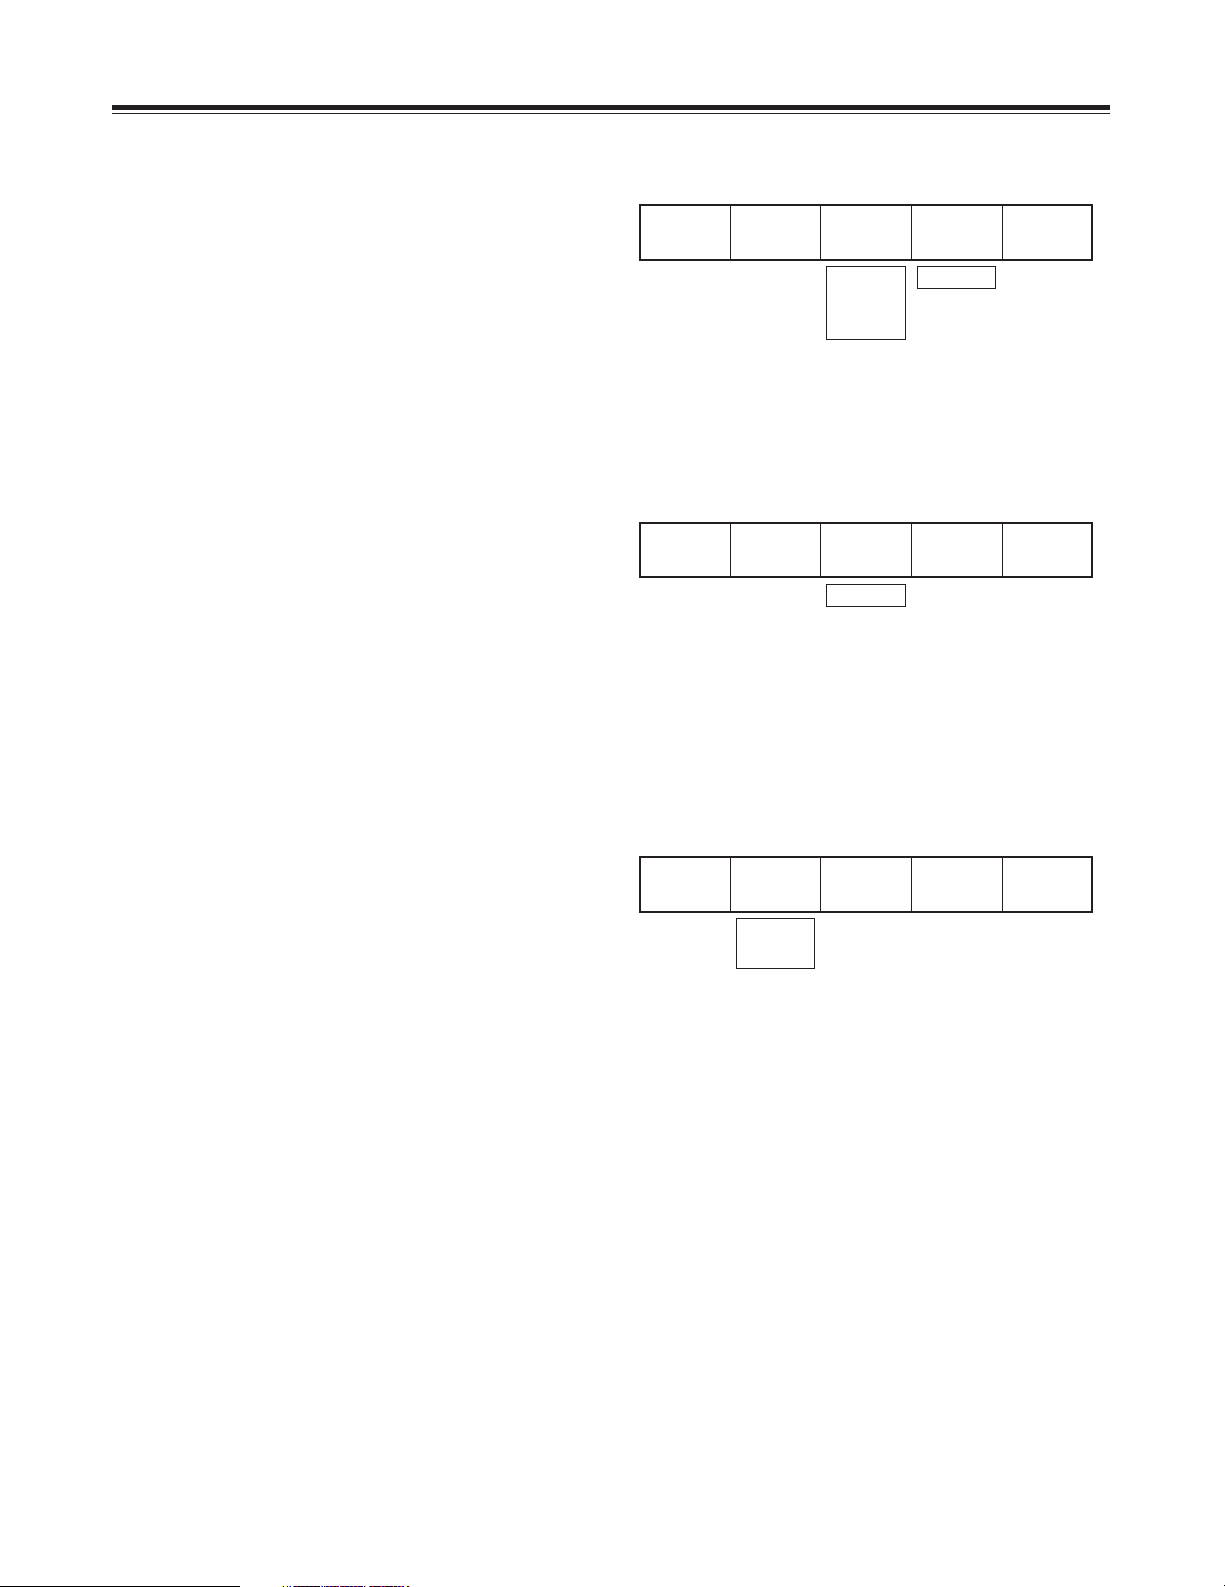
POWER switch
This is used to switch the AC power on and off. Select
“Power” from the “Setup” initial setting screen: “Reset” is
selected to establish the default setting when the power
is turned ON, and “Preset” is selected to start operation
using the same settings which were in effect upon
conclusion of the previous operation. When [Demo] is
selected, the demo mode is established after the power
is turned on. The demo mode can be exited by selecting
[Enter].
When the power is off, the operation panel settings are
stored in the memory.
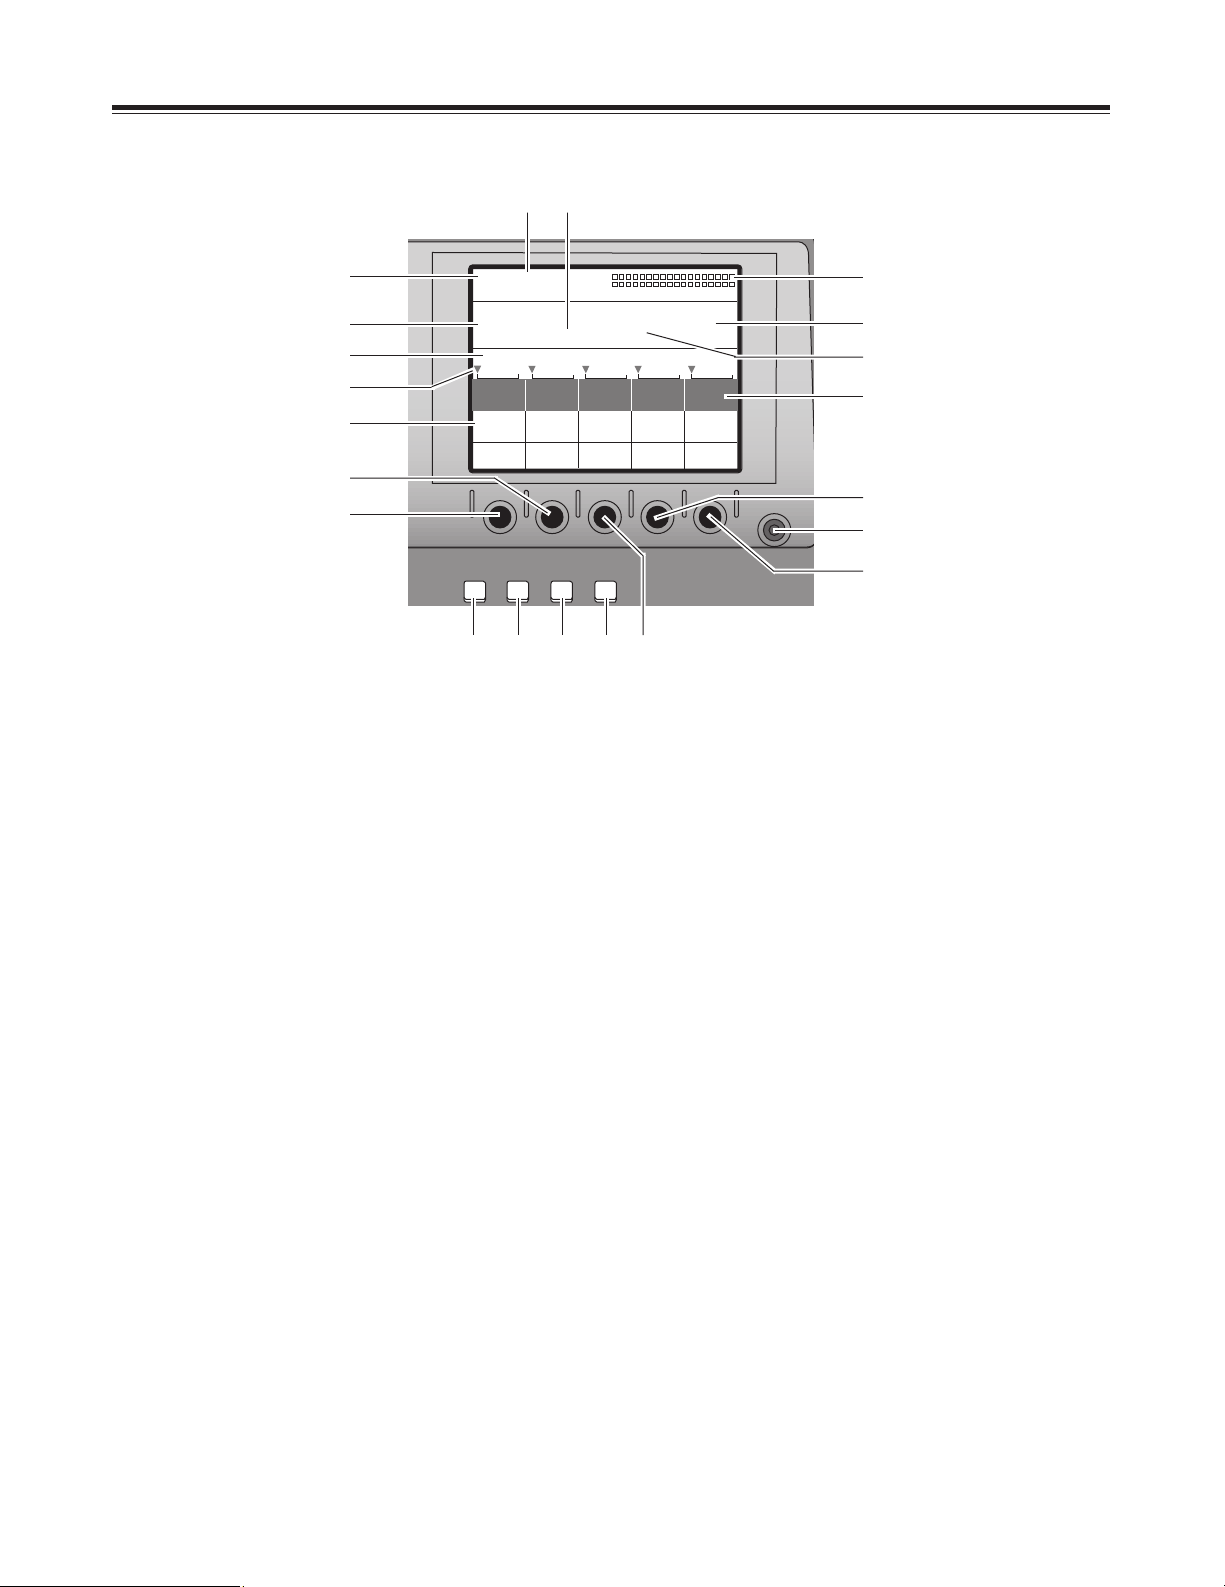
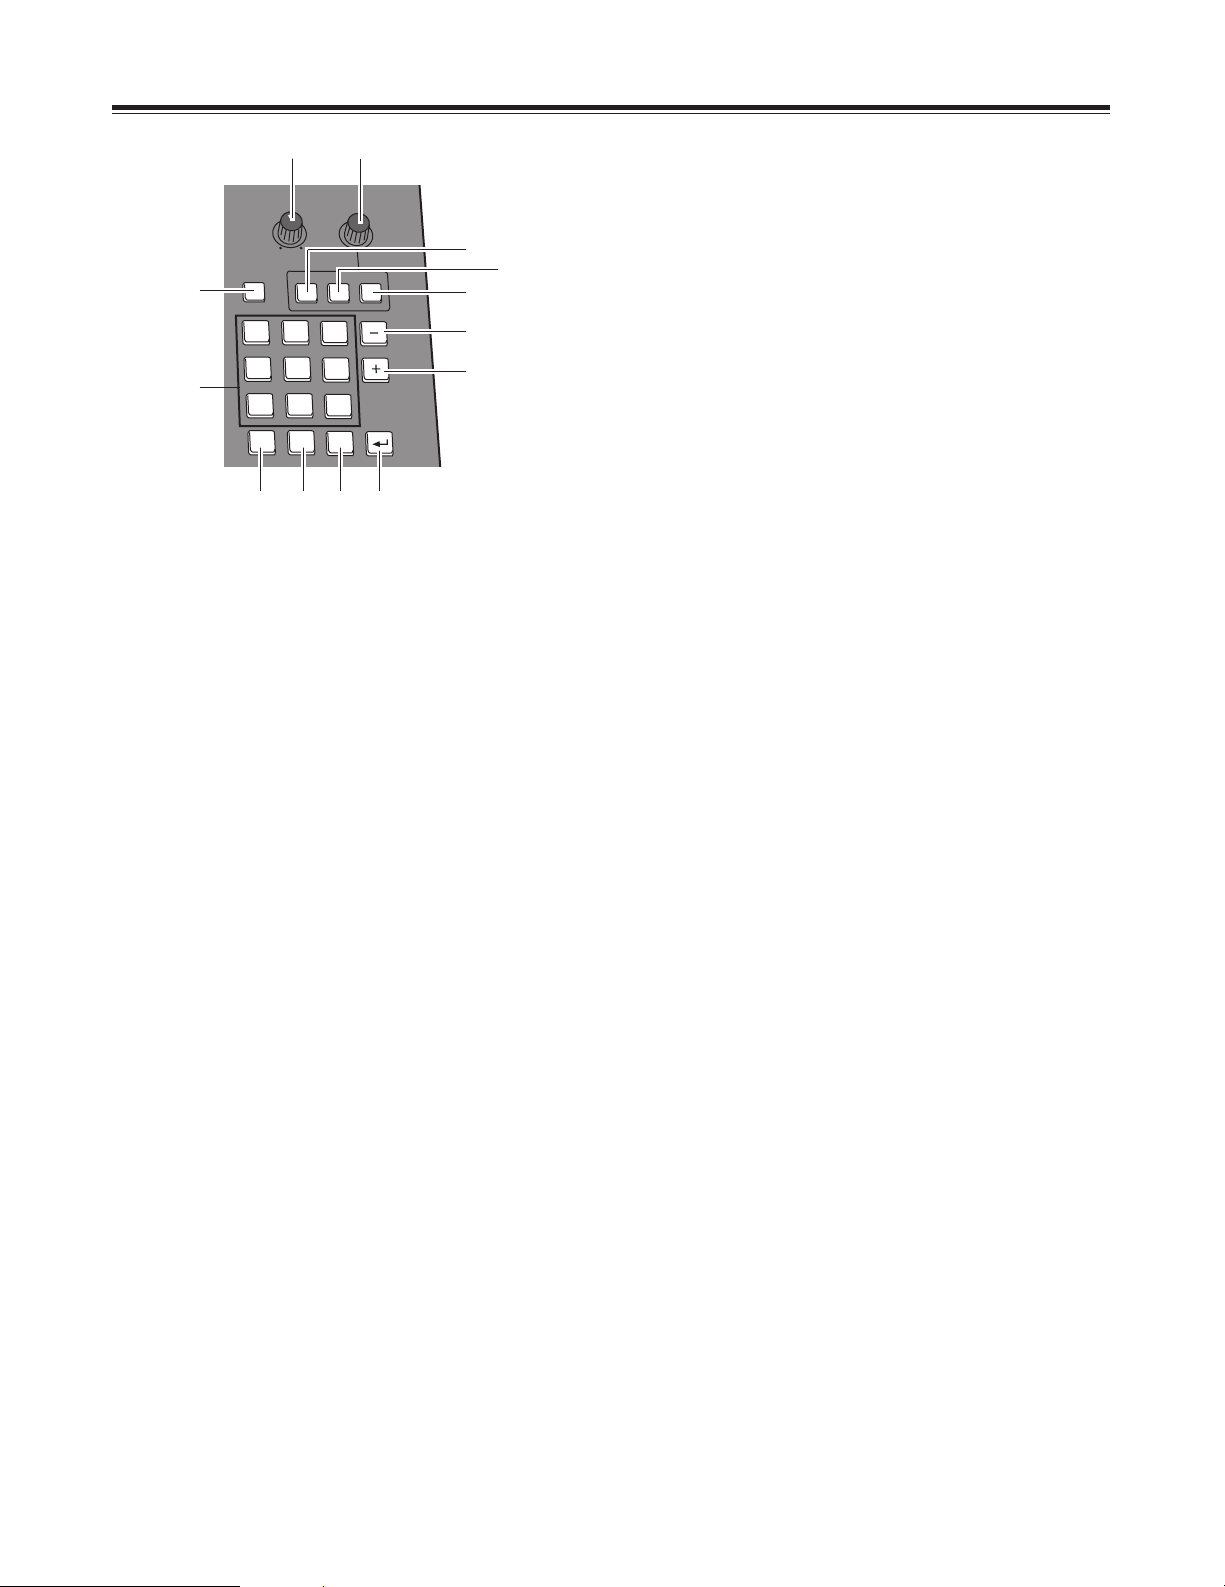
Parts and their functions
1
1
98654
3
2
7
2
Joystick
The joystick is used both as the XY positioner and the
controller for the color settings. It is switched as
required. It can set X, Y and Z for patterns that can be
positioned.
It can also set the color corrector UV white balance and
chroma saturation.
It can be used as the position X/Y controller for the
selection of the blue background when the chroma keys
are set.
3
Rotary Z control
This control is used to set the key size Z during the key
position settings and the luminance setting Y among the
color settings.
4
5
SCENE GRABBER button
When this is set to ON with a specific key pattern, it can
paste the image in the key onto the pattern and move it.
CENTER button
Centering is performed when this button is set to ON.
In the case of color settings, the color saturation is set to
zero.
In the case of position settings, the pattern is centered.
6
HOLD button
The joystick operation is stopped when this button is set
to ON. However, even when this button is set to ON, the
center button can be used.
Updating to the joystick value occurs when this button is
set to OFF.
7
ASPECT ratio control
This control is used to set the aspect ratio for key
patterns whose aspect ratio can be set. When it is
turned in the H direction, the width (horizontal) is
increased; when it is turned in the V direction, the height
(vertical) is increased.
8
Aspect ON button
When this button is at ON, the setting performed by the
aspect ratio control takes effect. When it is at OFF, the
default aspect ratio (center value) is established.
9
EDITOR enable button
Editor enable can enable or disable control using RS422A, and when control is disabled, settings can be
performed by manual operations even during editing
operations using RS-422A.
When the lamp of this button is lighted (ON), the settings
from the editor are accepted; when it is off (OFF), the
settings are canceled, and the settings can be performed
manually.
<Note>
It is possible to select either the multi-strobe or scene
grabber (but not both). Whichever one was selected last
takes precedence, and the previously selected effects are
canceled.
Front panel controls
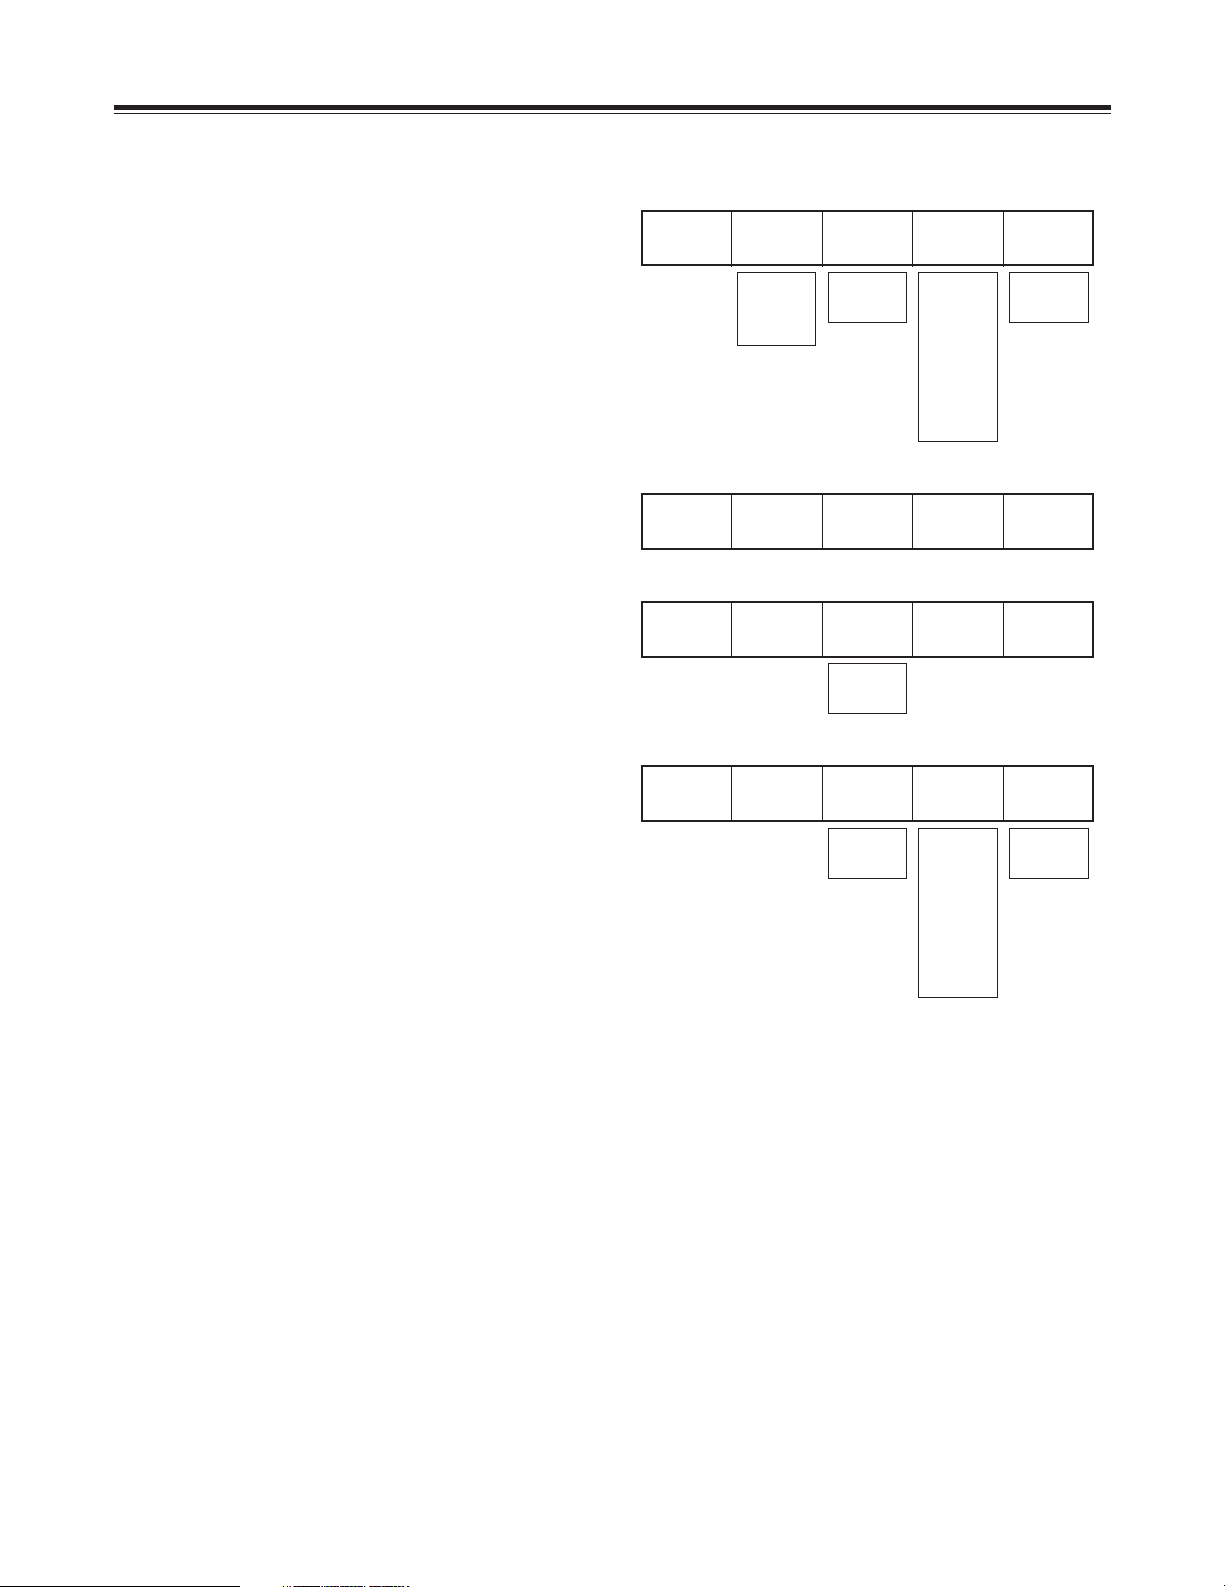
Page 7

7
P in P
Modify
PATTERN
REV
LUM
MIX
CHRM
EXT
ONE
WAY
DSK
EFFECTS
DR
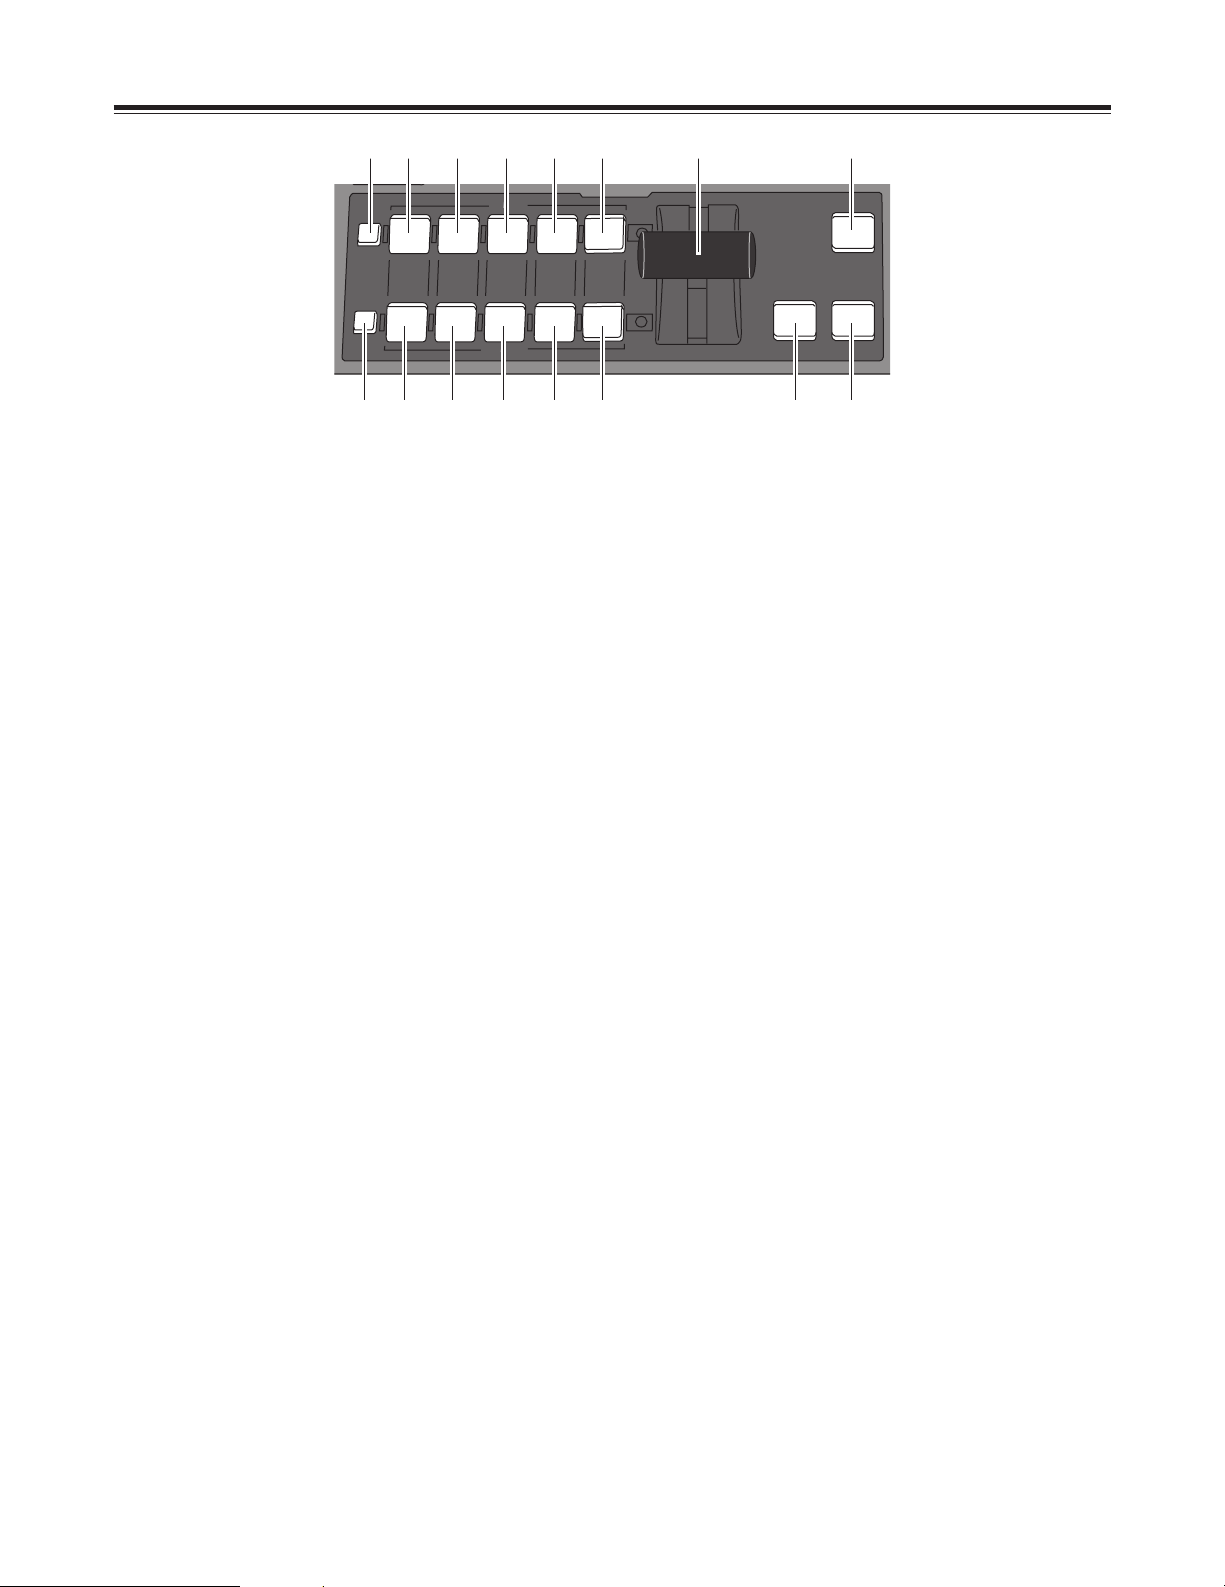
Parts and their functions
REV (reverse) button
This button is used to reverse the keys and transition key
patterns, reverse the frame in/out, and reverse the
chroma key, luminance key, external key and title
α key
signals.
The button’s lamp flashes with patterns that have no
reverse operations, indicating that these patterns cannot
be reversed.
1
7
1
2
ONE WAY button
At the AB bus setting stage, this button sets the transition
pattern to a pattern from one direction.
The button’s lamp flashes with preset bus or program
bus or with patterns that have no reverse patterns,
indicating that the effects cannot be executed.
3
DSK EFFECTS button
When this button is set to the ON position, the transition
pattern and 3D-DVE are used for DSK. ME is set to
Diss.
When the DSK effects are ON, the chroma key and
luminance key cannot be selected.
This button is set to OFF as the default setting, and
some patterns cannot be used for the DSK effects.
4
5
Direct key pattern buttons
These buttons are used to call the key patterns directly.
With the setup initial settings, key patterns can be set
from the default settings to any patterns.
The settings accompanying borders are also stored in
the memory for each button.
Direct transition pattern buttons
These buttons are used to directly call the transition
patterns directly. With the setup initial settings, transition
patterns can be set from the default settings to any
patterns.
The settings accompanying borders are also stored in
the memory for each button.
6
MIX button
This is used to call mix transitions.
7
LUM (luminance) key button
This is used to call the luminance key. When it is called,
the previous setting is stored in the memory.
8
CHRM (chroma) key button
This is used to call the chroma key. When it is called,
the previous setting is stored in the memory.
6
2 3
8
4
5
<Note>
If DSK-Effects has been set to ON for a pattern which is not
supported by DSK using a wipe pattern number, the button’s
lamp flashes to indicate that DSK effects cannot be applied.
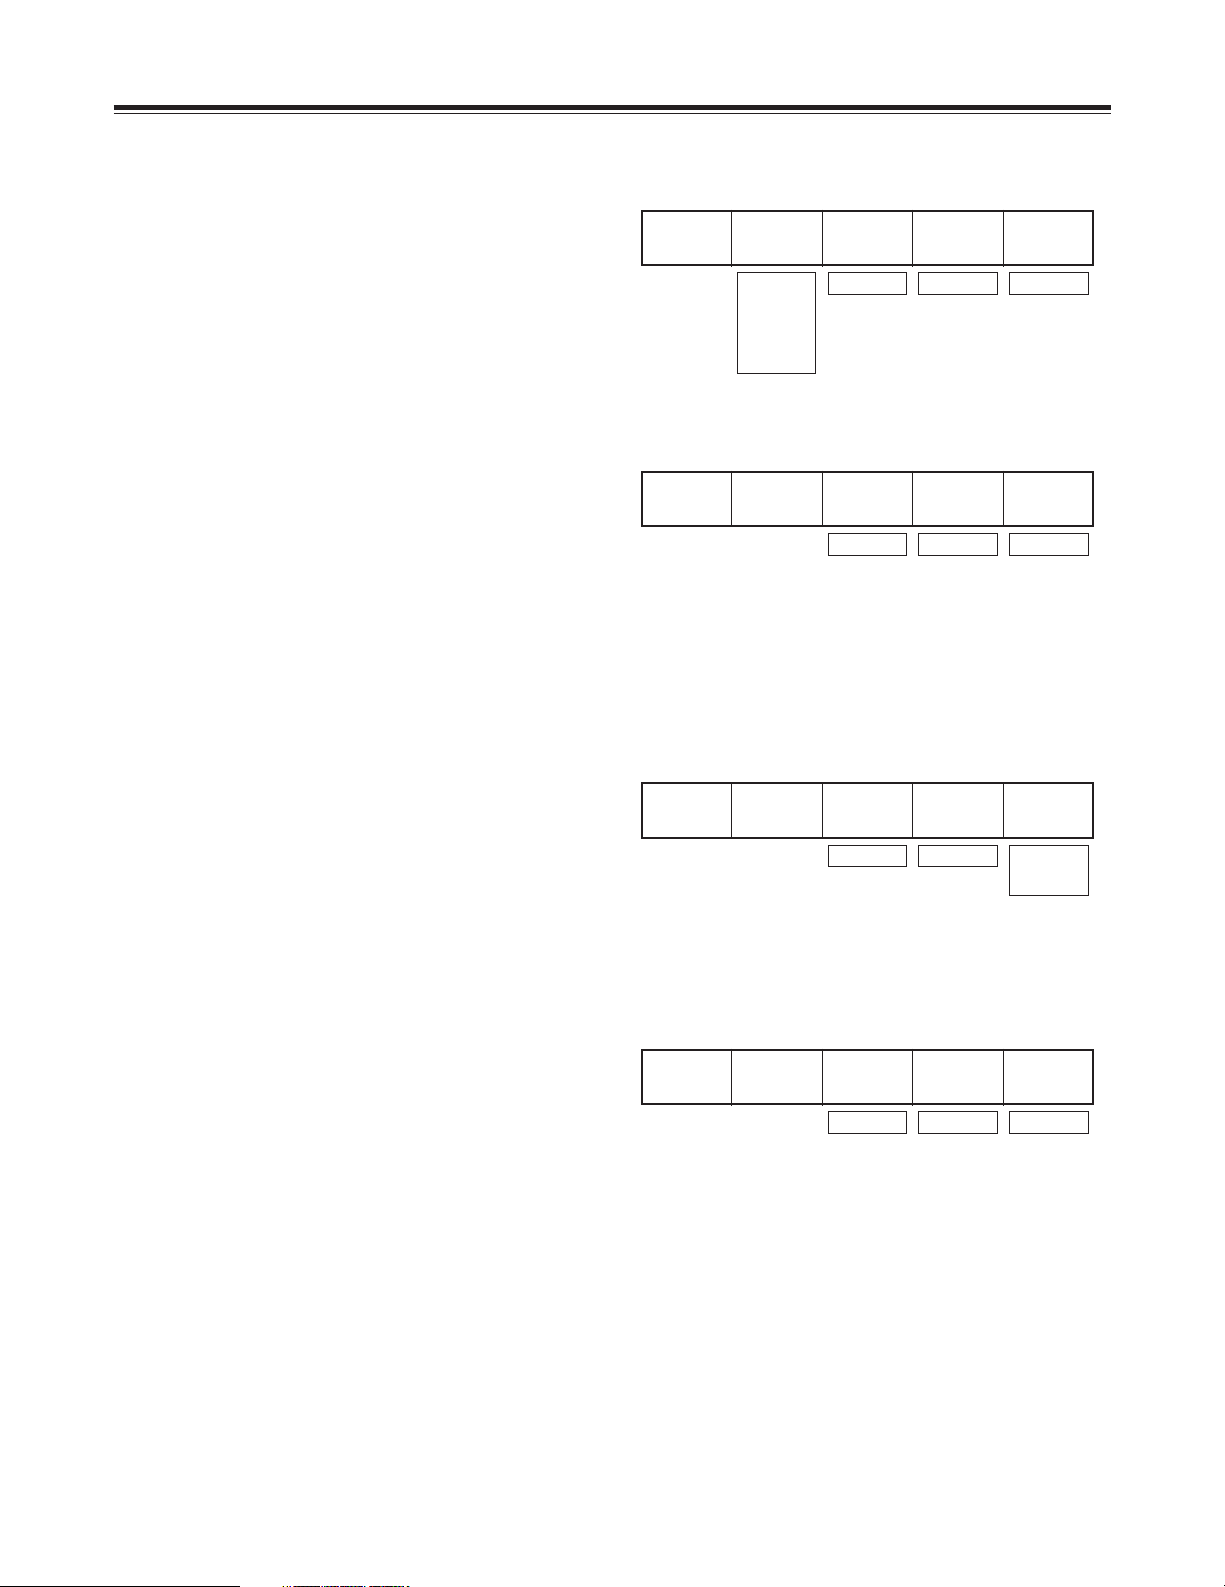
Page 8

8
Parts and their functions
Preview output selection area
The controls in this area are used to determine which
images among the transition preview, DSK preview and A/B
bus images are to be output from the PREVIEW output
connector on the rear panel.
Effect execution button area
Modify
PREVIEW
ME
PRV
DSK
A
PROG
A
PROG
STILL
STROBE
VIDEO
EFFECTS
COLOR
EFFECTS
B
PRESET
B
PRESET
EFFECTS
MIX EFFECT
DR
ME PRV selector button
This button is used to select ME preview as the image to
be output to the preview connector. With transitions, the
image of the transition destination can be previewed;
with keys, combined images can be previewed.
1
34
2
A/PROG bus selector button
This button is used to select the A/PROG bus as the
image to be output to the preview connector.
3
B/PRESET bus selector button
This button is used to select the B/PRESET bus as the
image to be output to the preview connector.
4
5
DSK selector button
This button is used to select the DSK combined image as
the image to be output to the preview connector.
A/PROG bus / STILL execution button
This button forcibly applies the still effect to the A/PROG
bus.
When it is pressed, the A/PROG video effect setting
page appears on the LCD screen.
6
B/PRESET bus / STILL execution button
This button forcibly applies the still effect to the
B/PRESET bus.
When it is pressed, the B/PRESET video effect setting
page appears on the LCD screen.
8
B/PRESET bus / STROBE execution button
This button forcibly applies the strobe effect to the
B/PRESET bus.
When the button is pressed, the B/PRESET video effect
setting page appears on the LCD screen. The still and
strobe field/frame setting is performed using the time
effect settings of [Video Effects].
7
A/PROG bus / STROBE execution button
This button forcibly applies the strobe effect to the
A/PROG bus. The setting is performed as a [Video
Effects] setting screen.
When the button is pressed, the A/PROG video effect
setting page appears on the LCD screen.
9
A/PROG bus / VIDEO EFFECTS execution
button
This applies the mosaic, decay and other video effects
set by [Video Effects] to the A/PROG bus.
When the button is pressed, the A/PROG video effect
setting page appears on the LCD screen. When it is
pressed together with the Shift button, the A/PROG video
effect setting page can be displayed on the LCD screen
without changing the ON/OFF setting of the effects.
:
B/PRESET bus / VIDEO EFFECTS execution
button
This applies the mosaic, decay and other video effects
set by [Video Effects] to the B/PRESET bus.
When it is pressed together with the Shift button, the
A/PROG video effect setting page can be displayed on
the LCD screen without changing the ON/OFF setting of
the effects.
;
A/PROG bus color effect execution button
This applies the white balance, brightness adjustment
and other color effects set by [Color Effects] to the
A/PROG bus.
When it is pressed together with the Shift key, the
A/PROG color effect setting page can be displayed on
the LCD screen without changing the ON/OFF setting of
the effects.
<
B/PRESET bus / COLOR EFFECTS
execution button
This applies the white balance, brightness adjustment
and other color effects set by [Color Effects] to the
B/PRESET bus.
When it is pressed together with the Shift key, the
B/PRESET color effect setting page can be displayed on
the LCD screen without changing the ON/OFF setting of
the effects.
68:<
1 2 5 7 9 ;
<Note>
Both the color effects and mono effects cannot be selected
at the same time. If both are selected, the mono effects
always take precedence.
<Note>
Both still and strobe cannot be selected at the same time.
Whichever one was selected last takes precedence. In the
case of manual strobe, the effect is applied by pressing the
button together with “Shift.”
Page 9
9
SET UP
INT
VIDEO
DSK
FADE
AUDIO
EFFECTS
POS.X 119
Z 235
X 107
EVENT
00
E
ME Time
02:00
F
Pattern
2101
INT
Wht
Transition
Pattern
Edge
Effects
Hard
Off
Light
On
MoModifdify
CONTRAST
DR
Parts and their functions
Setting panel area
LCD (liquid crystal) display
The effect parameters, time settings and other
information are shown on this display.
1
9
A
2
Joystick, Z parameter display area
During positioning, the X/Y/Z parameters are displayed
here; during the color settings, the Pb/Pr/Y parameters
are displayed.
3
Audio level meter
This indicates the level of the output sound.
4
Event number display area
The event numbers are displayed here.
Pattern number display area
The transition and key numbers are displayed here.
6
7
Internal (internally generated) video display
area
The settings for the internal video signals are displayed
here.
8
Setting page display area
The name of the page which has been set by the button
operations is displayed here.
9
Rotary control setting position display area
The currently set positions of the rotary 1, 2, 3, 4 and 5
controls are displayed here.
5
Time display area
The ME, DSK and FADE transition times are displayed
here.
Scroll bar
This displays the position on the page of the item
currently displayed.
:
;
Item, parameter setting area
The details which are set using the setting pages are
switched and displayed here.
The selected settings are displayed negatively, and the
parameters can each be changed using the rotary 1, 2,
3, 4 and 5 controls.
<
Rotary 1 control
This control is used to set the parameter of a selected
item.
=
Rotary 2 control
This control is used to set the parameter of a selected
item.
Rotary 4 control
This control is used to set the parameter of a selected
item.
?
@
Rotary 5 control
This control is used to set the parameter of a selected
item.
>
Rotary 3 control
This control is used to set the parameter of a selected
item.
;
8
4
1
<
=
:
7
6
3
2 5
?
@
>B C D E
Page 10
10
Parts and their functions
A
LCD CONTRAST control
This control is used to adjust the contrast of the LCD
display.
B
SET UP (initial setting page display) button
This button displays the initial setting page.
D
DSK FADE (DSK/fade setting page display)
button
This button displays the DSK/fade setting page.
C
INT VIDEO (internal video setting page
display) button
This button displays the internal video setting page.
E
AUDIO EFFECTS (audio effect setting page
display) button
This button displays the audio effect setting page.
EVENT
RECALL
EFFECTS
ON
FOLLOW
SET
AUDIO
DR
13
2 4
EVENT RECALL button
This button is used to read out events.
1
2
EVENT SET button
This button is used to store events in the memory.
3
AUDIO EFFECTS ON (audio effect
execution) button
At the button’s ON setting, the effects which were set on
the audio effect setting page are executed.
4
AUDIO FOLLOW video button
This button enables the audio to be matched with the
video during video ME transition or fading. Its function is
supported at the ON position.
ON or OFF is preset for fading on the DSK/fade setting
page.
SET UP
INT
VIDEO
DSK
FADE
AUDIO
EFFECTS
POS.X 119
Z 235
X 107
EVENT
00
E
ME Time
02:00
F
Pattern
2101
INT
Wht
Transition
Pattern
Edge
Effects
Hard
Off
Light
On
MoModifdify
CONTRAST
DR
9
A
;
8
4
1
<
=
:
7
6
3
2 5
?
@
>B C D E
Page 11
11
7
89
65
4
1
0
.
2
SHIFT
3
PHONE
PATTERN
TITLE PLAY
INT PLAY
CANCEL
ME
DSK
FADE
MIN
MAX
TIME
DR
Parts and their functions
PHONE (headphone volume) control
This control is used to adjust the level of the rear panel
headphone (PHONE) output.
The sound of the portion to be faded using the DSK/Fade
setting can be monitored before fading so that it can be
heard even when AudioFade is used.
The sound is output from the rear panel. Since the audio
meter displays the Prog output level, it will remain
unchanged even when the headphone level is changed.
1
36
4
5
2
TIME (time setting) rotary control
This control is used to set the ME, DSK and FADE
transition times.
3
PATTERN (transition/key pattern number
setting) button
Set this button to ON to set the pattern numbers using
the number keys. At its OFF position, the time can be
set using the number keys.
ME (ME transition/key transition time)
setting button
Set this button to ON to set the time to be applied to the
ME transition/key using the time setting rotary control.
When the pattern number setting button is OFF, the time
can be set using the number keys.
4
5
DSK (DSK transition time) setting button
Set this button to ON to set the time to be applied to DSK
using the time setting rotary control.
When the pattern number setting button is OFF, the time
can be set using the number keys.
Number keys 1 to 9
These keys can be used to input numerical values for the
event numbers when the event recall button or event
setting button is ON, for the pattern numbers when the
event recall button or event setting button is OFF and the
pattern number setting button is ON, and for the
transition times when the pattern number setting button
is OFF.
7
8
“–” key
This key is used to decrement the event numbers when
the event recall button or event setting button is ON, the
pattern numbers when the event recall button or event
setting button is OFF and the pattern number setting
button is ON, and the transition times when the pattern
number setting button is OFF.
9
“+” key
This key is used to increment the event numbers when
the event recall button or event setting button is ON, the
pattern numbers when the event recall button or event
setting button is OFF and the pattern number setting
button is ON, and the transition times when the pattern
number setting button is OFF.
0 number key
This key is used to input zeros. When it is pressed
together with the shift key, the animation in the title
memory now selected starts playing.
:
;
Period key
This key is used to enter the seconds when inputting the
time.
Example: [2][.][5]
> 2 seconds 5 frames
When it is pressed together with the shift key, the internal
video movie now selected starts playing.
Shift key
When this key is pressed together with another key, the
resulting effect differs from the one produced when the
key concerned is pressed on its own.
<
=
Enter key
This key is used to enter numerical values.
When "OK?" appears on the LCD display, press this key
to enter the setting.
Entry is canceled when it is pressed together with the
shift key.
6
FADE (fade transition time) setting button
Set this button to ON to set the time to be applied to the
FADE using the time setting rotary control.
When the pattern number setting button is OFF, the time
can be set using the number keys.
7
8
9
1 2
=<;:
Page 12
12
Parts and their functions
Modify
A / PROG
B / PRESET
SHIFT
SOURCE
1 / 5 2 / 6 3 / 7 4 / 8
SOURCE SOURCE SOURCE
INT/EXT
FADE
DSK
AUTO
TAKE
MIX EFFECTS
DR
1 2 4 6 8 : < =
1 3 5 7 9 ; > ?
SHIFT key
This key has the same function as the shift key for the
number keys.
1
2
A/PROG /SOURCE 1/5 selector button
This button is used to select source 1 selected by the
initial settings for the A/PROG bus. When it is pressed
together with the shift key, source 5 is selected.
3
B/PRESET / SOURCE 1/5 selector button
This button is used to select source 1 selected by the
initial settings for the B/PRESET bus. When it is pressed
together with the shift key, source 5 is selected.
A/PROG / SOURCE 2/6 selector button
This button is used to select source 2 selected by the
initial settings for the A/PROG bus. When it is pressed
together with the shift key, source 6 is selected.
4
B/PRESET / SOURCE 2/6 selector button
This button is used to select source 2 selected by the
initial settings for the B/PRESET bus. When it is pressed
together with the shift key, source 6 is selected.
5
A/PROG / SOURCE 3/7 selector button
This button is used to select source 3 selected by the
initial settings for the A/PROG bus. When it is pressed
together with the shift key, source 7 is selected.
6
B/PRESET / SOURCE 3/7 selector button
This button is used to select source 3 selected by the
initial settings for the B/PRESET bus. When it is pressed
together with the shift key, source 7 is selected.
7
A/PROG / SOURCE 4/8 selector button
This button is used to select source 4 selected by the
initial settings for the A/PROG bus. When it is pressed
together with the shift key, source 8 is selected.
8
B/PRESET / SOURCE 4/8 selector button
This button is used to select source 4 selected by the
initial settings for the B/PRESET bus. When it is pressed
together with the shift key, source 8 is selected.
9
:
A/PROG / INT/EXT selector button
This button is used to select the image (INT) selected on
the internal video setting page for the A/PROG bus.
When it is pressed together with the shift key, the
external input (EXT) is selected.
;
B/PRESET / INT/EXT selector button
This button is used to select the image (INT) selected on
the internal video setting page for the B/PRESET bus.
When it is pressed together with the shift key, the
external input (EXT) is selected.
<
Transition lever
This lever enables transitions to be performed manually.
=
FADE (fade execution) button
This button enables fade-out into the color set on the
[DSK/FADE] setting page.
During execution, its lamp lights; during fade-out, it
flashes.
>
AUTO TAKE button
This button enables the ME transitions and keys to be
transited automatically. During execution, its lamp lights.
When it is pressed again during transiting, the transiting
stops at the position where it was pressed.
While the transiting is stopped, it flashes. When it
pressed again, the transiting resumes.
?
DSK execution button
This enables DSK which was set on the [DSK/FADE]
setting page to be executed.
During execution, its lamp lights; during DSK, it flashes.
Page 13
13
Parts and their functions
Audio mixer area
MAX
MIN MIN
MAX
MASTER
SOURCE
1 / 5
SOURCE
2 / 6
SOURCE
3 / 7
SOURCE
AUX 1
MIC /
AUX 2
4 / 8
DR
1 2 3 4 5 6 7
SOURCE 1/5 fader
This fader is used to adjust the audio level of input 1
which was set on the initial setting page; when it is
operated together with the shift key, it is used to adjust
the audio level of input 5.
The operation of the fader lever takes effect from where
the internal level and lever position match or where the
higher/lower relationship between them has been
reversed when the input has been switched.
1
2
SOURCE 2/6 fader
This fader is used to adjust the audio level of input 2
which was set on the initial setting page; when it is
operated together with the shift key, it is used to adjust
the audio level of input 6.
The operation of the fader lever takes effect from where
the internal level and lever position match or where the
higher/lower relationship between them has been
reversed when the input has been switched.
3
SOURCE 3/7 fader
This fader is used to adjust the audio level of input 3
which was set on the initial setting page; when it is
operated together with the shift key, it is used to adjust
the audio level of input 7.
The operation of the fader lever takes effect from where
the internal level and lever position match or where the
higher/lower relationship between them has been
reversed when the input has been switched.
SOURCE 4/8 fader
This fader is used to adjust the audio level of input 4
which was set on the initial setting page; when it is
operated together with the shift key, it is used to adjust
the audio level of input 8.
The operation of the fader lever takes effect from where
the internal level and lever position match or where the
higher/lower relationship between them has been
reversed when the input has been switched.
4
5
AUX 1 fader
This fader is used to set the audio level of input AUX 1.
6
MIC/AUX 2 fader
This fader is used to adjust the audio level of the input
AUX2 selected on the initial setting page or of MIC
(sound selected by Setup).
7
MASTER fader
This fader is used to adjust the output level.
It executes the effects which have been set by the Audio
Effects ON button.
<Note>
The adjusted sounds of 1 to 8 are selected at the cross
points and combined.
When [FOLLOW] is ON, the transition is coupled with Video.
When [FOLLOW] is OFF, the transition is not coupled with
Video. The sounds of both A and B are combined.
The output level can be adjusted using the MASTER fader.
The effects that have been set are executed using the Audio
Effects ON button.
Page 14

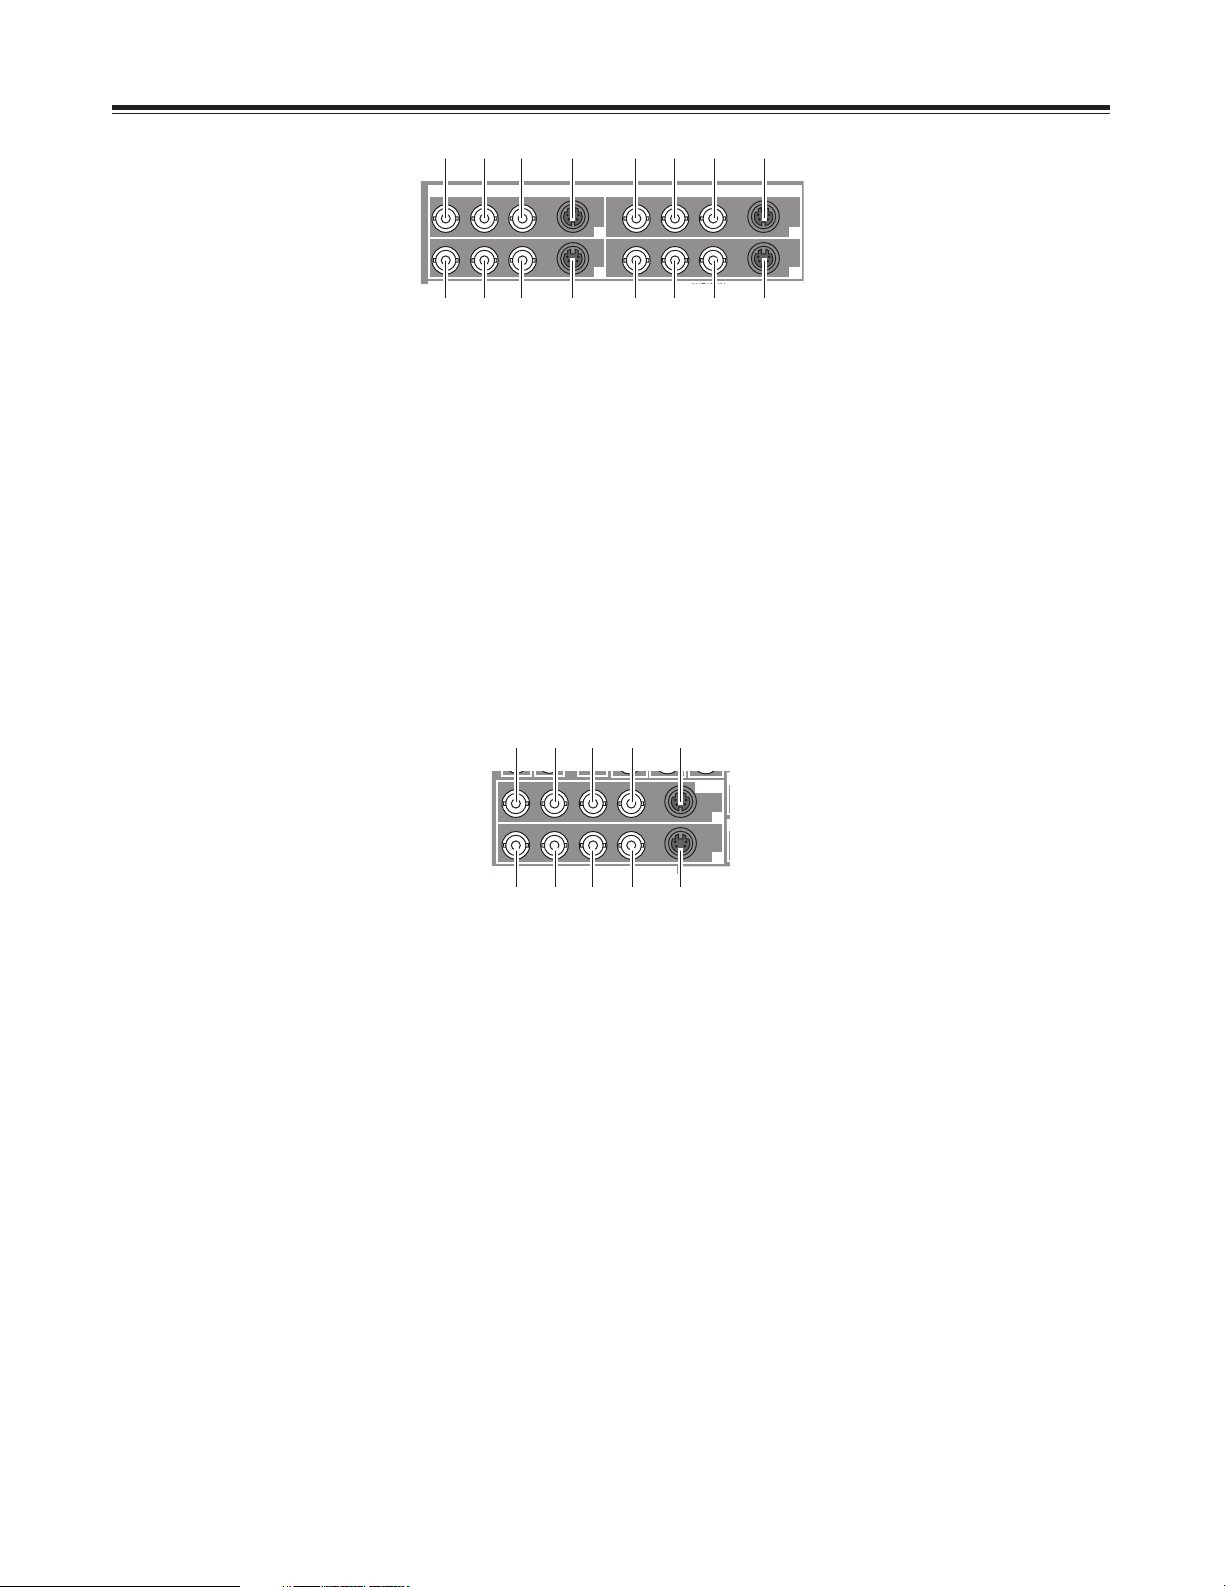
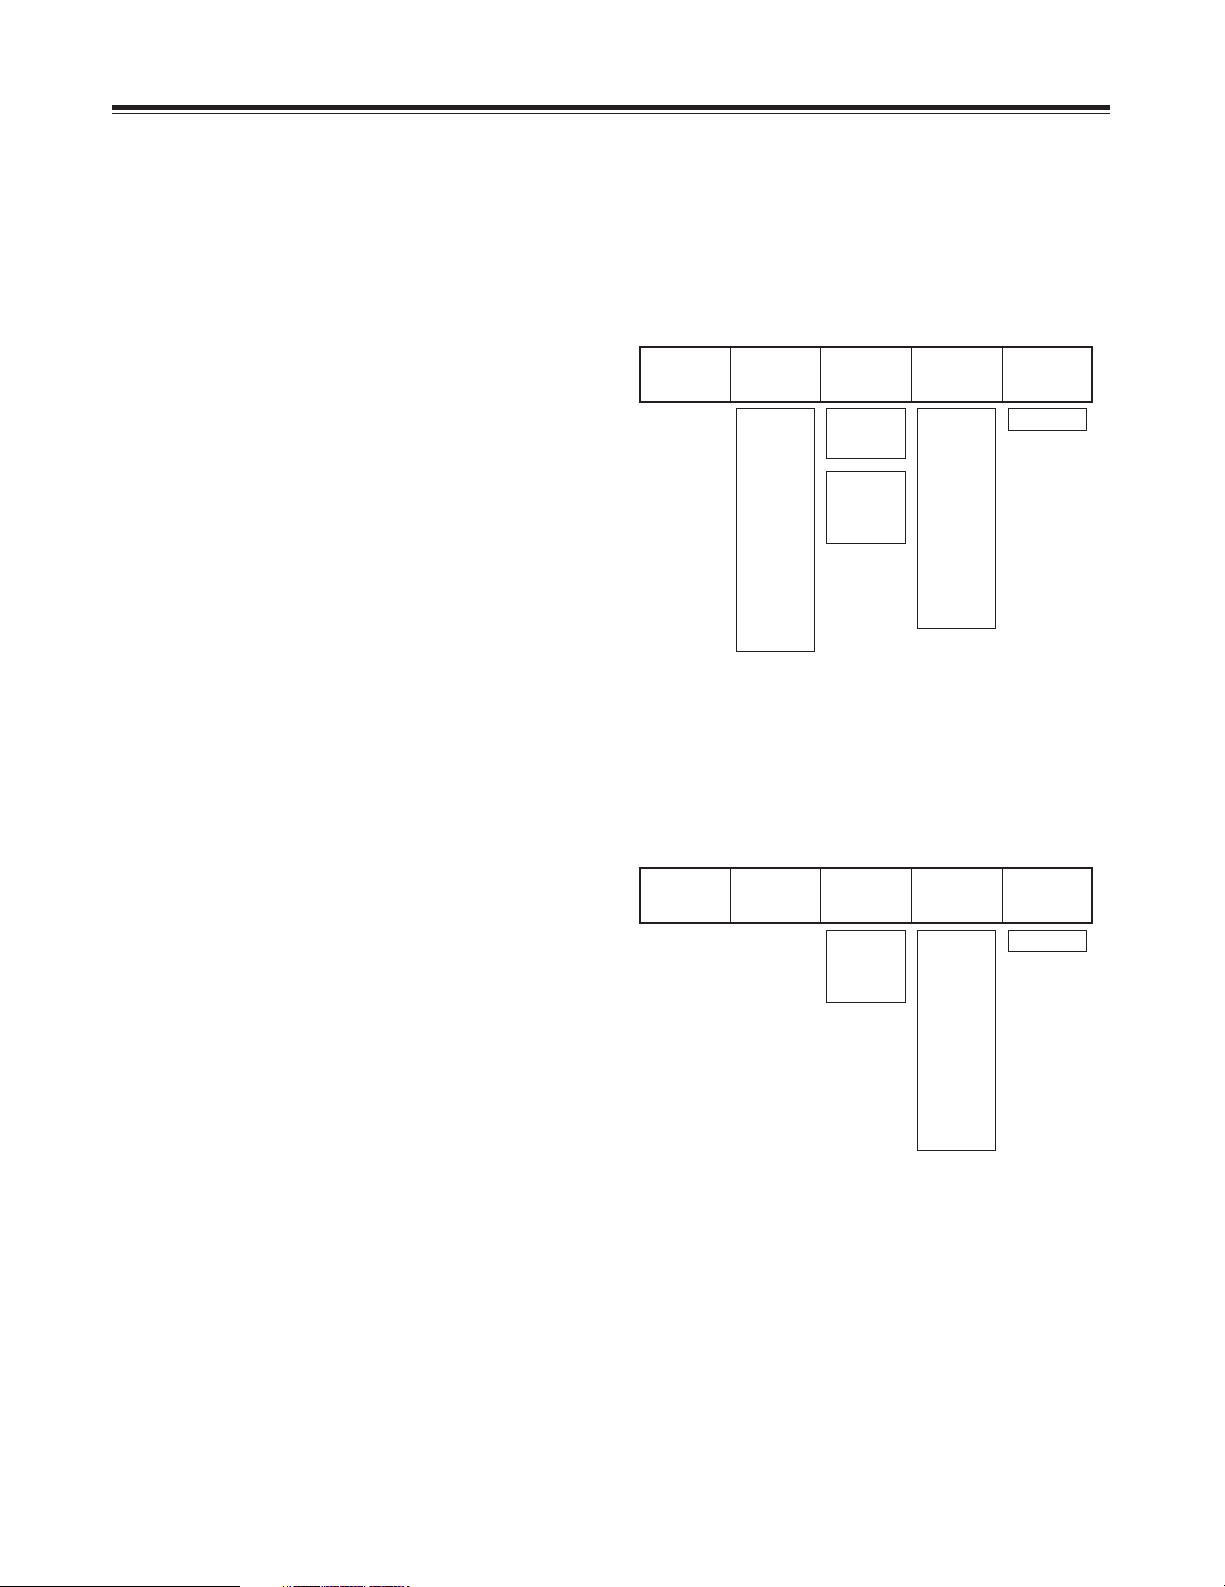
14
G/L
MIC
PHONE
USB
ADV-REF
PREVIEW
GPI
AUX IN
1
2
L
R
L
R
AUDIO OUT 2
589 :
1 2 3 4 6 7
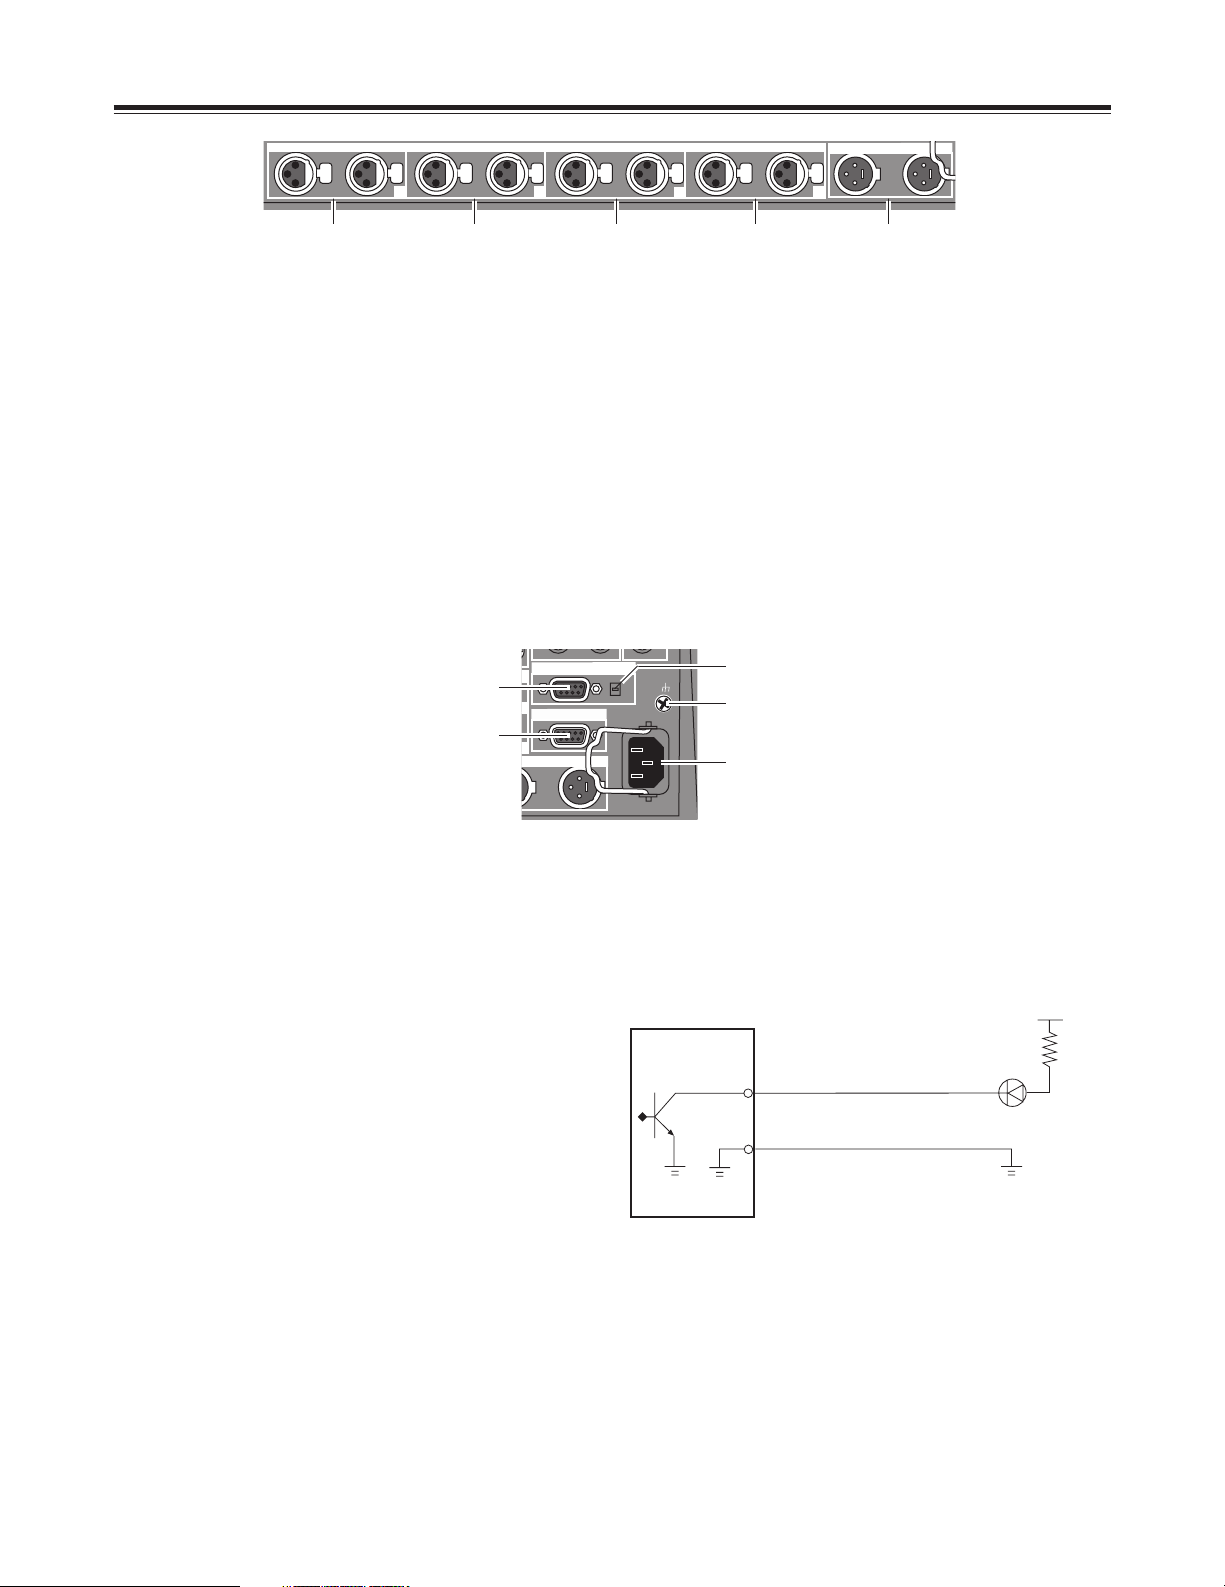
MIC input connector
This connector can be set to MIC or AUX 2 on the initial
setting page.
1
2
PHONE (headphone) output connector
The headphones are connected to this connector.
3
USB interface connector
This connector is used to connect to a personal
computer and download files.
4
5
ADV-REF (advanced reference) output
connector
This connector outputs the reference signal with
advanced vertical phase for source input uses.
8
AUX IN (spare) 1 L and R input connectors
AND
9
AUX IN (spare) 2 L and R input connectors
These connectors can be used by making a selection on
the initial setting page.
:
AUDIO OUT 2 L and R output connectors
These are unbalanced audio output connectors.
G/L (genlock reference) input connectors
These are loop-through, automatically terminated
connectors.
They supply signals to the source VTR or camera and
initiate genlock.
They enable genlock for the G/L input or EXTKEY input
by making a selection on the initial setting page.
6
PREVIEW output connector
The signals selected by the preview selector button are
output from this connector.
7
GPI input connector
A trigger is applied and a transition is enabled for ME,
DSK or fade as selected on the initial setting page. The
effect is applied 3 frames later.
Parts and their functions
KEY
EXT IN
Y
B
P
R
P
IN1 IN2 IN3 IN4 OUT
SDI
EXT IN (external key input area)
SDI (SDI option area)
1 2 3 4 5 6 7 8 9
External key input connector
This connector can be used for key or DSK applications.
It can also be used for genlock signal using the settings
on the initial setting page.
1
2
External input Y connector
The cross point EXT or DSK Y signal is input to this
connector.
The DSK source can be set on the DSK/FADE setting
page.
3
External input PB connector
The cross point EXT or DSK PB signal is input to this
connector.
9
OUT connector
The connectors listed above are used when the optional
board (AG-YA70) has been installed.
4
External input PR connector
The cross point EXT or DSK PR signal is input to this
connector.
<Notes>
≥ Non-standard signals are not accepted.
≥ Since the input signals do not pass through the frame
synchronizers, they must be synchronized with this
unit.
5
6
IN1 connector
IN2 connector
7
IN3 connector
8
IN4 connector
Rear panel connection area
Page 15
15
Y/V
P /V5
YC
B
R
P
Y/V
P /V6
YC
B
R
P
Y/V
P /V7
YC
B
R
P
Y/V
P /V8
YC
B
R
P
VIDEO IN
1
2
3 4
Parts and their functions
Composite/component Y input 1 connector
1
2
Composite 5/component PBinput 1 connector
3
Component P
R
input 1 connector
4
YC input 1 connector
5
Composite/component Y input 2 connector
6
Composite 6/component PBinput 2 connector
7
Component P
R input 2 connector
8
YC input 2 connector
9
Composite/component Y input 3 connector
:
Composite 7/component PBinput 3 connector
;
Component P
R
input 3 connector
<
YC input 3 connector
=
Composite/component Y input 4 connector
>
Composite 8/component PBinput 4 connector
?
Component P
R input 4 connector
@
YC input 4 connector
9
: ; < = > ? @
1 2 3 4 5 6 7 8
VIDEO
OUT
1
2
VY
B
P
R
P
YC
VY
B
P
R
P
YC
6 7 8 9 :
Composite output 1 connector
1
2
Component Y output 1 connector
3
Component P
B
output 1 connector
4
Component P
R output 1 connector
5
YC output 1 connector
6
Composite output 2 connector
7
Component Y output 2 connector
8
Component P
B
output 2 connector
9
Component P
R output 2 connector
:
YC output 2 connector
1
2 3 4 5
Page 16
16
Parts and their functions
L
R
L
R
L
R
L
R
1
2
3
4
L
R
AUDIO IN
AUDIO OUT 1
1
Analog audio 1 input connectors
The audio signals supplied to these connectors are input
to the cross point selected on the initial setting page.
1
2
Analog audio 2 input connectors
The audio signals supplied to these connectors are input
to the cross point selected on the initial setting page.
3
Analog audio 3 input connectors
The audio signals supplied to these connectors are input
to the cross point selected on the initial setting page.
4
5
Analog audio 4 input connectors
The audio signals supplied to these connectors are input
to the cross point selected on the initial setting page.
Analog audio output connectors
2
3 4 5
EDITOR interface connector (9-pin)
This connector is used to connect the unit with an RS422A or RS-232C controller.
1
2
RS-422A/RS-232C selector switch
This is used to switch between the RS-422A and RS232C control protocols.
4
TALLY output connector
The rear panel tally is for the cross point 1, 2, 3, 4, 5, 6, 7
or 8 output.
The connector used by the cross point is turned ON.
Example of tally connections
3
SIGNAL GND (ground) terminal
5
AC IN power socket
RS422
RS232C
SIGNAL
GND
~AC IN
R
TALLY
EDITOR
1
4
2
5
3
AG-MX70
GND
TALLY
output
Tally LED
(Max. current: 50 mA)
(Max. voltage: 3.5V)
Page 17
17
External interfaces
This unit comes with three connectors to support four
external interfaces: a GPI input connector, RS-422A/RS-232
(9-pin) connector and a Tally output connector. Select the
connector that suits the editing controller model used.
∫ GPI (general purpose interface)
This enables the use of auto takes with the GPI output of
the external controller. At the fall of the GPI signal, wipe/mix
set on the panel or DSK or Fade is executed.
∫ RS-422A
This enables the AG-A850 external editing controller to be
connected to the unit and the VTR to be controlled from a
remote location.
≥ Functions that can be controlled from the AG-A850
±Wipe settings
±Mixing
±Auto take time and auto fade time settings
±Downstream key fade-in and fade-out
±Cross point source 1/source 2 (source 2/source 3
or source 3/source 4) switching
(Cross mode switching is performed by the RS422A/RS-232C selector switch on the rear panel.
Support for the editing controller is shown below.)
≥ Connections
1) Set the RS-422A/RS-232C selector switch to
“RS-422A.”
2) Connect the connecting cable from the AG-A850
to the editing controller connector on this unit.
3) The pin layout of the editing controller connector
is shown below.
∫ RS-232C
This enables the unit to be controlled using a personal
computer. All of the unit’s functions with the exception of
AUX 1 and AUX 2 can be set.
≥ Connection of conversion cable
RS-232C AG-MX70
25-pin 9-pin
1 TXD 1 SPARE
3 RXD 2 RXD
4 RTS 3 TXD
5 CTS 4 DTR
6 DSR 5 SIG.G
7 SIG.G 6 DSR
20 DTR 9 SPARE
[DCE CONNECTION]
Use the above conversion with the 9-pin straight cable
as well.
<Notes> Editing using the RS-422A, RS-232 and GPI
interface connectors
≥ The commands are received and then executed 3 frames
later.
≥ If, while the 3D optional board is installed, the 1-Frame
Dly mode has been selected by the system 1 settings
(see page 56) on the “Setup” initial setting screen, the
pictures and sound from the source are always output
with a 1-frame delay.
≥ When selecting a DVE pattern, set the transition time to
more than 2 frames. No guarantees are made for frame
accuracy if the time setting is lower than this.
∫ Tally
This is the open connector for the tally lamp.
Pin No
1
2
3
4
5
6
7
8
9
Signal
FRAME GROUND
TRANSMIT A
RECEIVE B
RECEIVE COMMON
SPARE
TRANSMIT COMMON
TRANSMIT B
RECEIVE A
FRAME GROUND
5 4 3 2 1
9 8 7 6
Connector (9P)
5 4 3 2 1
9 8 7 6
Connector (9P)
Pin No
1
2
3
4
5
6
7
8
9
Signal
Output for cross point 1
Output for cross point 2
Output for cross point 3
Output for cross point 4
Output for cross point 5
Output for cross point 6
Output for cross point 7
Output for cross point 8 or EXT
GND
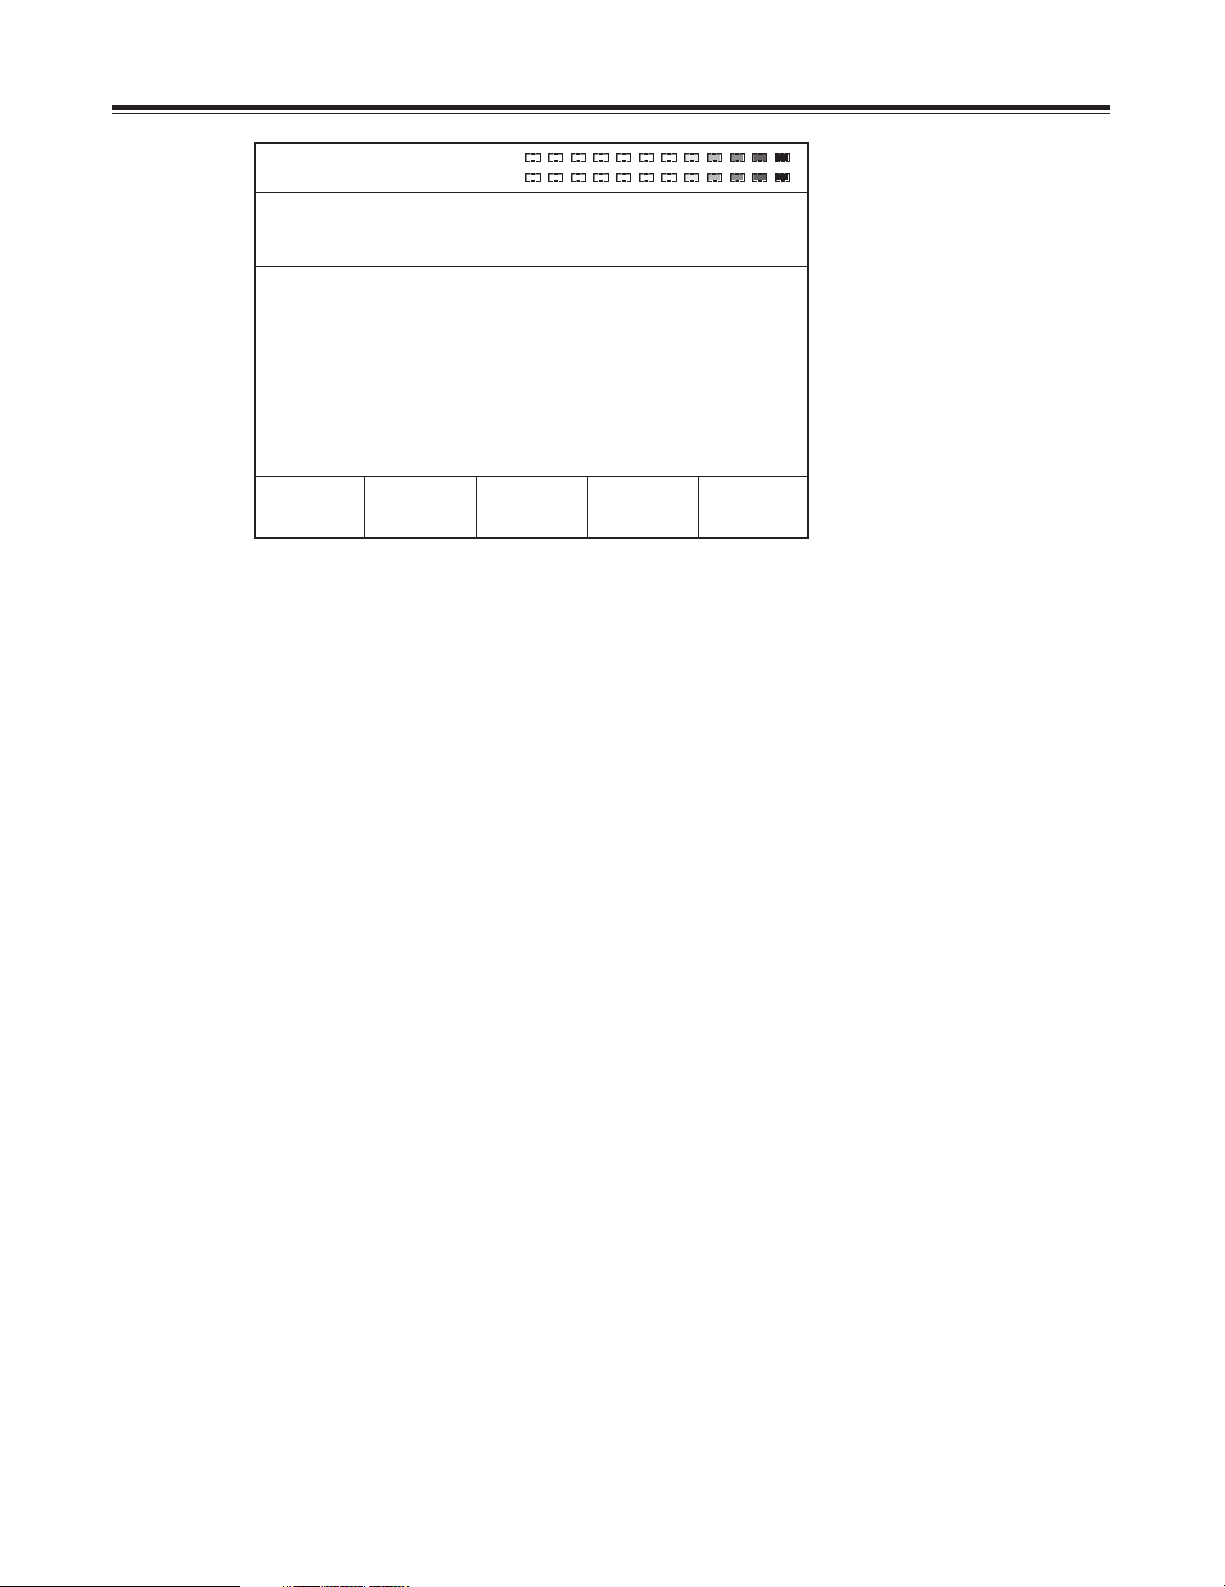
Page 18
18
Through
connection
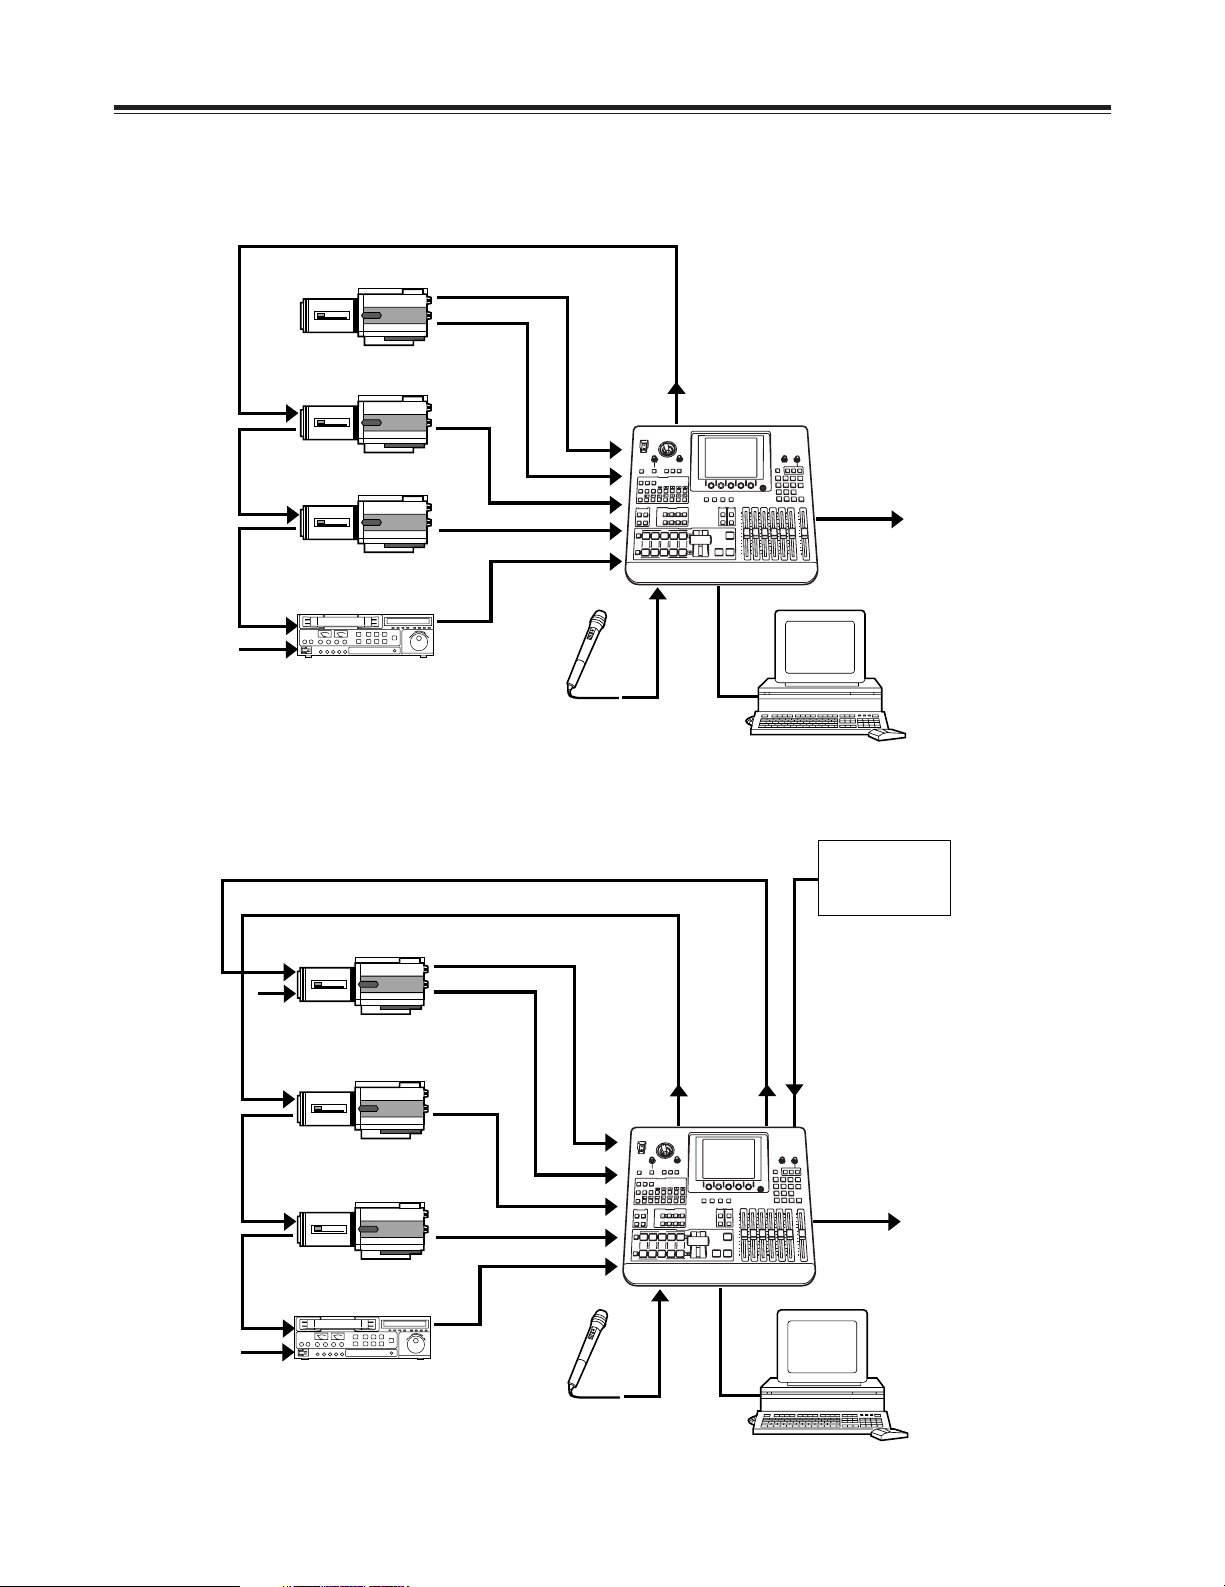
System Diagram
AG-MX70
PC (with MX-Navi already
installed)
ADV-REF
ADV-REF
CPST
Through connection
Through connection
Through connection
Through connection
Termination
Termination
Termination
Y, Pb, Pr
KEY
(Genlock
enabled as
genlock
source)
KEY
G/L
(Genlock enabled
as genlock source)
Y, Pb, Pr
SDI IN2
SDI OUT
SDI
(Video)
SDI
(Video)
SDI
(Video)
SDI
(Video)
SDI
(Audio/Video)
SDI
(Audio/Video)
SDI IN3
SDI IN4
Y, Pb, Pr
Y, Pb, Pr
CPST
SDI IN2
SDI IN3
SDI IN4
MIC USB
Box camera
Box camera
Box camera
VTR
Microphone
AG-MX70
PC (with MX-Navi already
installed)
SDI OUT
MIC USB
Box camera
Box camera
Box camera
VTR
Microphone
Signal
generator
By connecting cameras, VTRs and other video components, this unit can digitally process the video signals of these
components.
Example 1 Live application (1)
Example 2 Live application (2)
Page 19
19
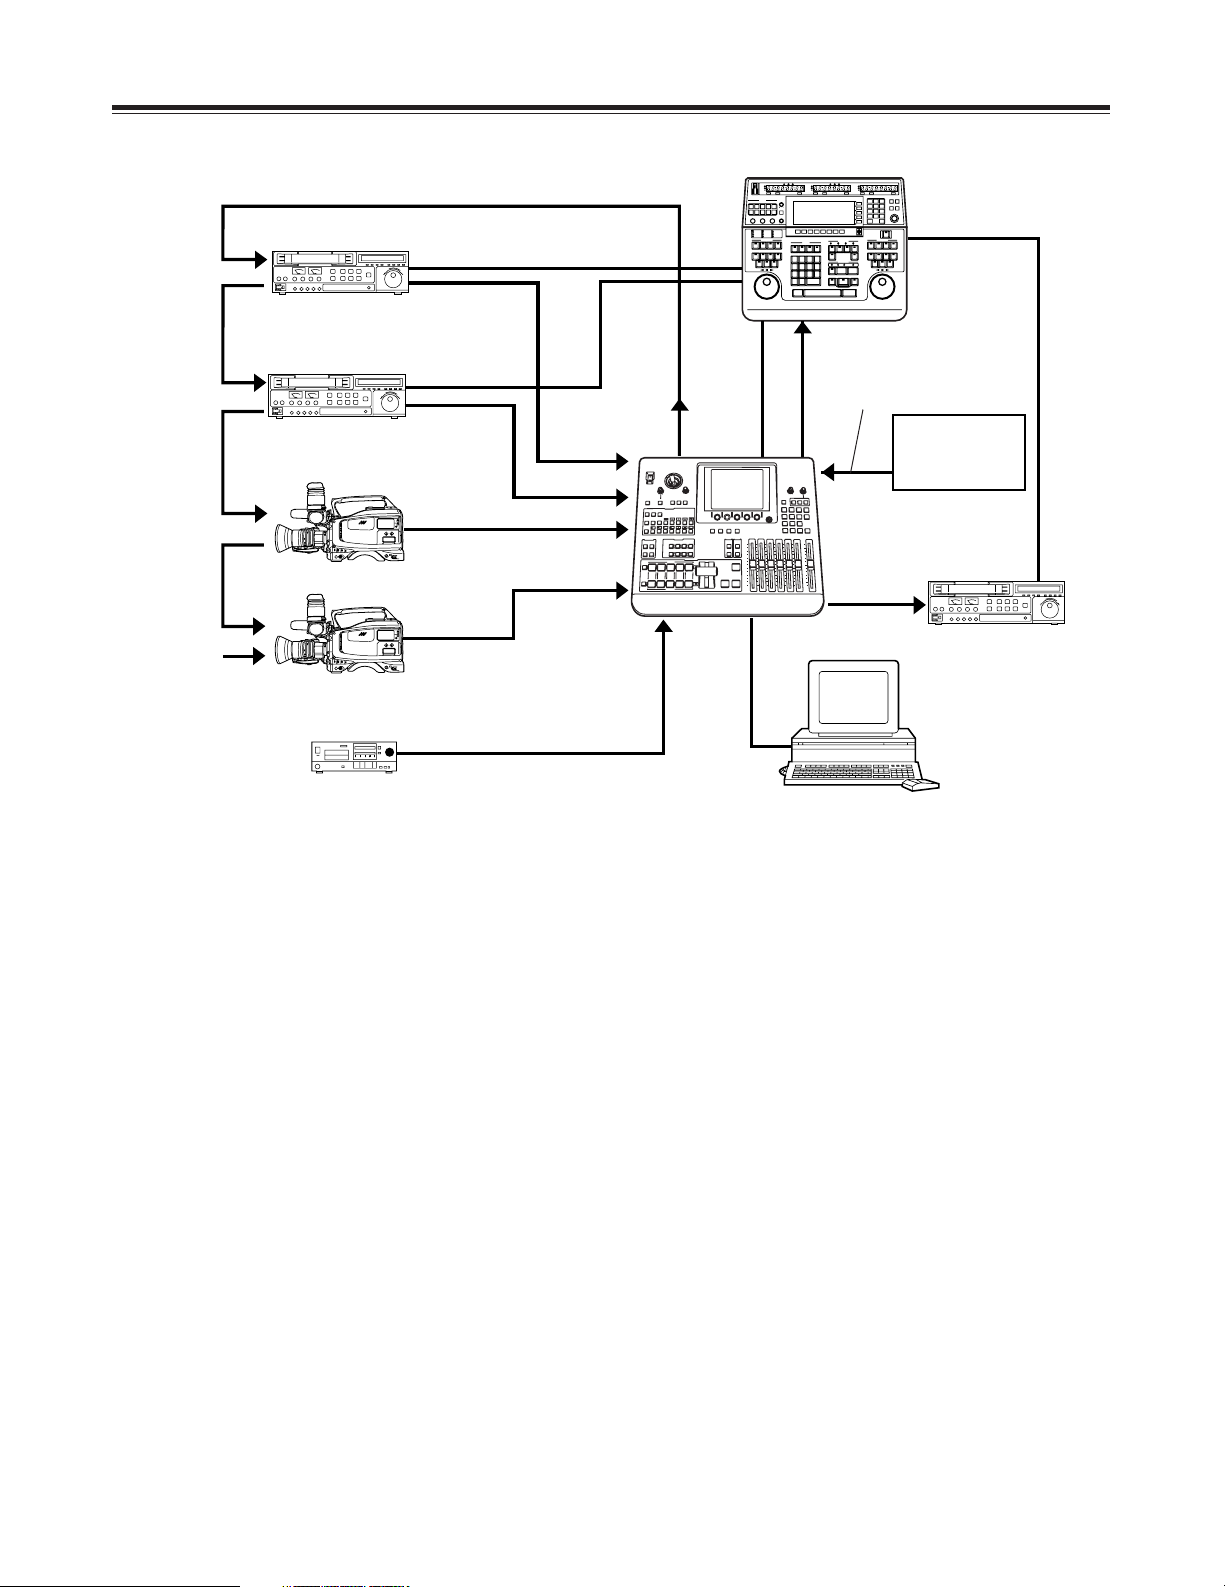
System Diagram
ADV
REF *1
RS-422A
RS-422A
RS-422A
RS-422A
G/L *2
(Genlock enabled as
genlock source)
SDI
(Audio/Video)
SDI
(Audio/Video)
SDI
(Audio/Video)
SDI
(Audio/Video)
SDI IN2
SDI IN1
SDI IN3
SDI IN4
AUX1/AUX2
AG-MX70
PC (with MX-Navi already
installed)
SDI OUT
Analog audio signals
USB
Video camera
Video camera
VTR
VTR
VTR
CD player, etc.
Signal
generator
Editing
controller
Example 3 Editing application
*1: Connection of the ADF REF signal is not absolutely essential but when this signal has been connected,
“StillOff” can be selected by the bus setting (see page 56) on the “Setup” initial setting screen and input can
be switched directly using the cross point button.
*2: ADV REF can also be used as an alternative to the G/L loop-through signal as the sync signal supplied to
the AG-A850 editing controller.
Through
connection
Through
connection
Through
connection
Through
connection
Termination
Page 20
20
Setting panel screen
[INTVideo] internal video setting screen
Power supply and backup
The operation panel settings are stored in the memory when the power is turned off.
The default settings are established when the power is turned back on by selecting [Power] > [Reset] on the [Setup] initial
setting screen, and the system is started from the settings which were established at the completion of the previous session
by selecting [Power] > [Preset]. If [Demo] has been selected on the [Setup] panel, the demonstration mode is established
when the power is turned on.
Select [Reset] or [Preset] on the [Setup] panel from the demonstration mode to restart the system. The demonstration mode
can be exited using [Enter].
The panel settings, setup settings and their files, key learn settings and event memory data are saved. These settings and
data are backed up by the flash memory even when the power is turned off.
Wash Pb 128 Pr 128
Y 128
Event ME Time Pattern INT
00E 10:00F 3015 Blue
INT Video Grade Pos 80
Back
Matte
Color
Bar
Memory Page
1
Frame
1F Field
Mode
Write
Color
White
Level
255
Pattern
H1
Grade
0
Wht
Yelw
Cyan
Gren
Mgt
Red
Blue
Blk
Cst1
Cst2
CL Br
St 1-30
Mv 1-30
The internal video settings are performed on this screen.
This menu is selected when the INTVideo button below the LCD display is pressed. It is not selected using INT at a
crosspoint. While these settings are performed, the color setting mode is established for joystick XYZ and rotary Z control.
The color set appears at the top right.
Setting items
[Back Matte], [Color Bar] and [Memory] are selected using the rotary 1 control.
The unit’s various functions are adjusted on the setting panel screen. This screen is basically configured as follows.
≥ Displayed at the top level of the screen are the joystick XY and rotary Z values and the audio meter.
≥ Displayed at the second level of the screen from the top are the event number, transition time, pattern number and
internal video setting.
≥ Displayed at the third level of the screen from the top are the title of the menu on the display and the item setting ranges.
≥ The settings are displayed from the center down. The settings of four items are displayed per page. If there are more
than four item settings, they can be scrolled and displayed using the rotary 1 or 2 control. Two lines are allocated to
each item, and 7 or so alphanumerics are displayed per item. In some cases, abbreviations are used for the displays.
≥ The display of selected setting item is highlighted in reverse video.
≥ Selected setting items are returned to their default settings using [Shift] + [.].
R1 R2 R3 R4 R5
Page 21
21
[INTVideo] internal video setting screen
Colors are selected using the rotary 2 control. There are 10
choices: White, Yellow, Cyan, Green, Magenta, Red, Blue,
Black, Custom1 and Custom2.
The color level (Y level for White) is set using the rotary 3
control. When [Custom1] or [Custom2] has been selected,
either Back Matte or Wash is set.
[Pattern] (gradation pattern) is set using the rotary 4 control.
There are the following nine choices.
[Off] : No gradation
[H1] : Horizontal gradation 1
[H2] : Horizontal gradation 2
[H3] : Horizontal gradation 3
[V1] : Vertical gradation 1
[V2] : Vertical gradation 2
[V3] : Vertical gradation 3
[Diag1] : Diagonal gradation 1
[Diag2] : Diagonal gradation 2
The [Grade] combined gradation level is set using the rotary
5 control. Any value from 0 to 255 can be set. The
gradation position is set using [Shift] + rotary 5 control.
Back
Matte
Color
White
Level
255
PatternH1Grade
0
White
Yellow
Cyan
Green
Magenta
Red
Blue
Black
Custom1
Custom2
Level
0 - 255
0 - 255
Off
H1
H2
H3
V1
V2
V3
Diag1
Diag2
Set
BackM
Wash
When [Back Matte] has been selected
The joystick XY and rotary Z control displays are set to Wash, and the wash color that is the companion color for gradation is
set.
The joystick [X][Y] and rotary [Z] display change to [Pb], [Pr] and [Y], and the color can be set. [Pb][Pr] can be set to any
value from 0 to 255 and [Y] to any value from 16 to 255 but only when [Custom1] or [Custom2] has been selected using
rotary 2 control.
Black
Matte
Color
Custom1
Set
BackM
PatternH1Grade
0
0 - 255
Off
H1
H2
H3
V1
V2
V3
Diag1
Diag2
Set
BackM
Wash
When [Custom1, 2] has been selected
The rotary 3 control is used to select whether BackM (back
matte) or Wash is to be set using the joystick. With Set
BackM, the joystick XY and rotary Z control at the top of the
screen appear as “Matte,” and with Set Wash, they appear
as “Wash,” enabling the respective colors to be adjusted.
The default color for Custom1 and Custom2 is black.
R1 R2 R3 R4 R5
R1 R2 R3 R4 R5
Page 22
22
[INTVideo] internal video setting screen
When [Memory] has been selected
It is possible to write Prog output images in the memory using [Still] (still picture) or [Movie] (moving picture), and then play
the written images back. It is possible to set the number of frames (number of pages) that can be used to a maximum of 30
(NTSC) or 26 (PAL). However, if pages are allocated to titles, the number of pages will be reduced by the equivalent
amount. The page allocation can be changed on the “Setup” initial setting screen.
≥ Write procedure
Use the rotary 5 control to set the mode to “Write.”
Use the rotary 2 control to select the page on which the
images are to be written.
Use the rotary 3 control to set the number of frames to be
written. Set 1 as the number of frames for Still writing and
set a number greater than 1 for Movie writing.
Check the image to be written at the Prog output, and
when the image to be written appears, write it using
“Enter.” In the case of Movie, the images are written
consecutively from the page designated by the rotary 2
control up to the page equivalent to the number of frames
designated by the rotary 3 control. Any existing data will
be deleted in the process of image writing.
≥ Playback procedure
Set the mode to [Preview] using the rotary 5 control.
Select the page to be played back using the rotary 2
control.
If Still images are to be played back, select [Field] output
or [Frame] output using the rotary 4 control.
Memory Page
1
Frame
1 Field
Mode
Write
1 - 30/26
(NTSC/PAL)
1 - 30/26
(NTSC/PAL)
1 - 30/26
(NTSC/PAL)
Write
Preview
Exit
Field
Frame
Memory Page
1
Frame
5F Repeat
Mode
Write
1 - 30/26
(NTSC/PAL)
Write
Preview
Exit
Repeat
Once
If Movie images are to be played back, set the number of frames using the rotary 3 control, and select [Repeat] (repeated}
playback or [Once] (once-only) playback using the rotary 4 control. If the setting for the number of frames exceeds the
number written using the rotary 3 control, it will be ignored.
Start the playback using [Enter]. Even when the page selected by the rotary 2 control is midway through the Movie, the
Movie is played back from its beginning.
If the settings are acceptable, use the rotary 5 control to set the mode to “Exit”, then enter the settings using “Enter.” The
page set is recalled by the “INTVideo” button and played back.
Even when another “Matte” or “CustomColor” selection has been set using “INTVideo” upon completion of the settings, the
images previously stored in the memory can be read by selecting “Memory” again but they will be cleared after the power is
turned off.
The playback trigger is applied using “Shift” + “.”.
The “Grade” setting which was set by “BackMatte” also takes effect for “Memory.”
<Note>
Images cannot be written during Movie playback. If images are to be written, first set [Mode] to [Exit] and press the [Enter]
button to exit Movie playback, and then proceed.
R1 R2 R3 R4 R5
R1 R2 R3 R4 R5
When Frame = 1
When Frame > 1
Page 23
23
This menu is selected using the A or B bus [Color Effects] button. If the status of the [Color Effects] button is not to be
changed, press the [Color Effects] button of the bus to be set while holding down the [Shift] key.
Settings can be performed separately for the A bus and B bus.
Preview is set to A by pressing the [Color Effects] button for A.
Preview is set to B by pressing the [Color Effects] button for B.
The Y setup [–128 to 127] can be set using the rotary 1 control. The default setting is 0.
The Y gain [–128 to 127] can be set using the rotary 2 control (0dB=0). The default setting is 0.
The Pb and Pr color balance can be set using the joystick’s X direction (for adjusting Pb) and rotary 3 control or using the
joystick’s Y direction (for adjusting Pr) and rotary 4 control, and the chroma gain can be set using the rotary Z and rotary 5
controls.
At this time, the XYZ display is switched to Pb/Pr/C Gain.
Using transition pattern numbers 200 to 211, 215 to 220 and 222, effects are applied to the B or Preset bus using the settings
established for this channel, and the pattern is changed to MIX (56).
<Notes>
≥ In the case of pattern numbers 221, 222, 1068 and 1069, color effects can be applied to the B channel and transitions can
be initiated. When this is done, the pattern is changed to MIX (56). (With the A bus/B bus)
With the preset bus/program bus, the effects are applied to preset, and they are turned off by setting the reverse button to
ON.
≥ Color effects cannot be applied to the INT EXT inputs.
[Color Effects] setting screen
Color Pb 128 Pr 128
Effect C Gain 0
Event ME Time Pattern INT
00E 10:00F 3015 Blue
Color Effects
ch A
Y Setup0Y Gain
0
Pb
128
Pr
128
C Gain
0
R1 R2 R3 R4 R5
Page 24

24
[Video Effects] setting screen
This menu is selected using the A or B bus [Video Effects] button. If the status of the [Video Effects] button is not to be
changed, press the [Video Effects] button of the bus to be set while holding down the [Shift] key. Settings can be performed
separately for the A bus and B bus.
At this time, the bus to be set is automatically output to Preview.
The following video effects can be selected and set using the rotary 1 control: [Mosaic], [Defocus], [Mono], [Time Effects],
[Decay], [Paint], [Nega], [Mirror] and [3D]. [OFF], [Ripple], [Multi] or [Spark] can be selected for 3D.
<Note>
Video effects cannot be applied to the INT EXT inputs.
Pos. X 128 Y 128
Z 128
Event ME Time Pattern INT
00E 10:00F 3015 Blue
Video Effects ch
A
Mosaic
Defocus
Off
Level
0
Mono
Off
Time
Effects Off Field
Screen
1
Time
10F
Decay
Off
Time
16
Paint
Off
Level
4
Nega Y
Off
C
Off
Mirror H
Off
V
Off
3D
Ripple
Level
0
Time
16
Width
1
Off XY
Size
0
Channel display
Scrolled display
R1 R2 R3 R4 R5
Page 25
25
[Video Effects] setting screen
[Mosaic] setting
Select [On] or [Off] for this effect using the rotary 2 control.
The default setting is [Off].
Select [XY] (both horizontal and vertical), [X] (horizontal
only) or [Y] (vertical only) using the rotary 3 control.
Set the size using the rotary 4 control. Any setting from 0 to
30 can be set for Size, and the setting can be changed in 2step increments. The default setting is 8.
This level setting is used for the level of transition numbers
1001, 1002 and 1003 (200, 201 and 202).
Mosaic
Off XY
Size
8
X
Y
XY
0 - 30
[Defocus] setting
Select [On] or [Off] for this effect using the rotary 2 control.
The default setting is [Off].
Select level 0 to 7 using the rotary 3 control. The default
setting is 2.
This level setting is used for the level of transition number
1004 (203). It cannot be made to take effect at the same
time as a 2-dimensionally compressed pattern.
Defocus
Off
Level
2
0 - 7
[Mono] (monochrome) setting
Select [On] or [Off] for this effect using the rotary 2 control.
The default setting is [Off].
This effect takes precedence over the setting initiated by
[Color Effects].
Mono
Off
On
Off
<Note>
Either [Mosaic] or [Defocus] can be selected. The effect selected last takes precedence, and the previously selected effect is
canceled.
R1 R2 R3 R4 R5
R1 R2 R3 R4 R5
R1 R2 R3 R4 R5
Page 26
26
[Time Effects] still/strobe setting
Select the still or strobe effect with Video Effects ON using
the rotary 2 control.
Time
Effects Still Field
Screen1Time
10F
Off
Still
Strobe
Field
Frame
Field
Frame
Field
Frame
1
@4
@9
@16
R4
R9
R16
1
@4
@9
@16
R4
R9
R16
2 - 124
Manual
2 - 124
Manual
≥ When [Off] has been selected
The regular screen is output.
≥ When [Still] has been selected
Either [Field] or [Frame] is selected as the type using the
rotary 3 control. The default setting is [Field].
Time
Effects Off
Time
Effects Still Field
≥ When [Strobe] has been selected
Set the number of strobe screens and the repeat
operation using the rotary 4 control. The default setting is
1.
Select the strobe time setting from 2 to 124 using the
rotary 5 control. The default setting is 20. The time
setting can be changed in 2-step increments.
Select @4 to @16 for a once-only still operation. Select
R4 to R16 for repeat operations. The number denotes
the number of screens. At the Manual setting, the screen
can be stopped by pressing the cross point [Strobe]
button with the [Shift] key. This time setting is used for
the level of transition numbers 1062, 1063, 1064 and
1065 (215, 216, 217 and 218). Still and strobe (including
multi strobe) cannot be made to take effect at the same
time as a 2-dimensionally compressed pattern.
Time
Effects Strobe Field
Screen1Time
10F
[Video Effects] setting screen
<Notes>
≥ Only one of three effects—namely soft, border or soft border—for both multi strobe and pattern edges can be selected
when any of the special patterns below have been selected. The effect selected last takes precedence, and the previously
selected effect is canceled.
• 1541 to 1550 (32 to 35, 130 to 133, 141 to 142)
• 1601 to 2617
• 3303, 3314, 3324, 3501 to 3378
• 4601 to 6716
≥ Only multi strobe or scene grabber can be selected. The effect selected last takes precedence, and the previously
selected effect is canceled.
≥ Noise may remain on the screen while the VHS is set to a special playback (such as fast forwarding or rewinding) mode.
R1 R2 R3 R4 R5
R1 R2 R3 R4 R5
R1 R2 R3 R4 R5
R1 R2 R3 R4 R5
Page 27

27
[Decay] setting
The A and B multi strobe, transition, Key, DSK shadow and
trail cannot be selected at the same time. Only one of these
effects is valid at a time.
Select [On] or [Off] for the effect using the rotary 2 control.
Any time setting from 0 to 32 can be selected using the
rotary 3 control. The default setting is 16.
This level setting is used for the level of transition number
1066 (219).
Decay
Off
Time
16
0 - 32
[Paint] setting
Select [On] or [Off] for the effect using the rotary 2 control.
Any level setting from 0 to 7 can be selected using the
rotary 3 control. The default setting is 4.
This level setting is used for the level of transition number
1034 (211).
Paint
Off
Level
4
0 - 7
On
Off
[Nega] (negative) setting
The Y negative setting and chroma key negative setting can
be selected separately using the rotary 2 control and rotary
3 control, respectively. In both cases, the default setting is
[Off].
Nega Y
Off
C
Off
On
Off
On
Off
[Mirror] setting
The H (horizontal direction) mirror setting and V (vertical
direction) mirror setting can be selected separately using the
rotary 2 control and rotary 3 control, respectively. In both
cases, the default setting is [Off].
Mirror H
Off
V
Off
On
Off
On
Off
On
Off
[Video Effects] setting screen
<Note>
Only one of the effects—namely, multi strobe, decay, trail or shadow hardware—effect can be selected. The effect selected
last takes precedence, and the previously selected effect is canceled.
R1 R2 R3 R4 R5
R1 R2 R3 R4 R5
R1 R2 R3 R4 R5
R1 R2 R3 R4 R5
Page 28
28
[Video Effects] setting screen
On
Off
≥ When [Multi] (multi-screen) has been selected
[Size] can be set to any value from 0 to 15 using the
rotary 3 control. The default setting is 8.
[Pitch] can be set to any value from 0 to 255 using the
rotary 4 control. The default setting is 16.
[Reverse] can be set to [On] or [Off] using the rotary 5
control. The default setting is [Off].
This level and other settings are used as the transition
number 1983 settings.
≥ When [Spark] has been selected
[Width] can be set to any value from 0 to 255 using the
rotary 3 control. The default setting is 32.
[Size] can be set to any value from 1 to 3 using the rotary
4 control. The default setting is 2.
[Time] can be set to any value from 0 to 255 using the
rotary 5 control. The default setting is 255.
This level and other settings are used as the transition
number 1982 settings.
3D
Multi
Size
8
Pitch
16
Reverse
Off
0 - 15
0 - 255
≥ When [Ripple] has been selected
The extent of the [Level] effect can be set to any value
from 0 to 255 using the rotary 3 control. The default
setting is 32.
[Time] can be set to any value from 0 to 255 using the
rotary 4 control. The default setting is 64.
[Width] can be set to any value from 0 to 5 using the
rotary 5 control. The default setting is 1.
The ripple position can be set using joystick XY.
This level and other settings are used as the transition
number 1981 settings.
3D
Ripple
Level
32
Time
64
Width
1
0 - 255
0 - 255 0 - 5
3D
Spark
Width
32
Size
2
Time
255
0 - 255
0 - 2551 - 3
[3D] setting
Select [OFF], [Ripple], [Multi] or [Spark] for 3D using the
rotary 2 control. This setting is only effective when the 3D
optional board (AG-VE70) has been installed. It cannot be
made to take effect at the same time as 3D transition or key
pattern. The default setting is [Off].
3D
Ripple
Level
32
Time
64
Width
1
Off
Ripple
Multi
Spark
0 - 255 0 - 255 0 - 5
R1 R2 R3 R4 R5
R1 R2 R3 R4 R5
R1 R2 R3 R4 R5
R1 R2 R3 R4 R5
Page 29

29
[Video Effects] setting screen
<Notes>
≥ In the case of pattern numbers 200 to 211, 1001 to 1034, 213 to 220, 222, 1060 to 1067 and 1069, transitions can be
initiated with the DVE setting parameters applied to the B channel. When this is done, the pattern is changed to MIX (56).
(With the A bus/B bus) With the preset bus/program bus, the effects are applied to preset, and they are turned off by
setting the reverse button to ON.
≥ [Ripple], [Multi], [Spark] and other 3D patterns*
1
can be selected for one channel only, either A or B. The pattern selected
last takes precedence, and the previously selected pattern is canceled.
*1 The “other 3D patterns” are as follows.
• 1501 to 1533 (28 to 31, 36 to 42, 128 to 129) 2Dcomp
• 1301 to 1333 (43 to 46, 51 to 54, 138 to 140) Slide
• 1401 to 1498 (143 to 182) 2Dcomp/Move
• 3301 to 3303, 3311 to 3313, 3321 to 3323, 3401 to 3478 2Dcomp Key
• 3601 to 3623 Bounce keys
• 1601 to 2999 Transition patterns
• 4601 to 6999 Key patterns
Page 30

30
Execution of Effects
3) Pattern selection
Select the pattern using the direct transition button or
using the number keys. Patterns with numbers 3000 and
up are key patterns.
Perform the border, shadow, trail and other settings on
the LCD setting screen.
The separate border, trail and other settings are stored in
each direct button and read out.
4) Key adjustment
Adjust the slice, slope and other settings on the LCD
setting screen.
5) Execution
Slide the transition lever to the B side or set the ME
transition time and press the Auto Take button.
DSK key
1) Preparation
Check that the DSK button’s lamp is neither lighted nor
flashing. If it is lighted or flashing, it means that the DSK
ON status is already established so press the DSK button
to turn off the lamp.
2) Setting
Select the input source of the transition destination using
the Preset bus cross point button.
The preview selection can now be set as ME and the
images of the transition destination can be previewed at
the Preview connector.
3) Execution
Press the DSK/Fade button and perform the DSK/Fade
settings.
Select the DSK source, and perform the slice and slope
settings.
Set the DSK transition time.
When the button is pressed again, the transition is
executed until the DSK ON status. To set DSK to OFF,
press the DSK button to turn off its lamp.
Fade
1) Preparation
Perform the fade destination color and audio fade settings
using the DSK/Fade settings.
2) Execution
Press the FADE button. When its lamp flashes, the fadeout status is established. For fade-in, press the FADE
button to turn off its lamp.
AB transition
1) Preparation
Slide the transition lever to the A side.
2) Input selection and preview
Select the input source of the transition destination using
the B bus cross point button.
The preview selection can now be set as ME and the
images of the transition destination can be previewed at
the Preview connector.
3) Pattern selection
Select the pattern using the direct transition button or
using the number keys. Patterns with numbers 2999 or
lower are transition patterns.
Perform the border, shadow, trail and other settings on
the LCD setting screen.
The separate border, trail and other settings are stored in
each direct button and read out.
4) Execution
Slide the transition lever to the opposite side or set the
ME transition time, and then press the Auto Take button.
To execute a transition from B to A, set the A bus input in
step 2) and follow the same procedure.
Preset program transmission
1) Preparation
When the transition lever is slid all the way to one end, the
cross point button setting is switched over by Prog/Preset.
2) Input selection and preview
Same as for AB transition.
3) Pattern selection
Same as for AB transition.
4) Execution
Same as for AB transition.
The transition can be executed by repeating steps 2), 3)
and 4).
Key
1) Preparation
Slide the transition lever to the A side. The A bus now
becomes the background.
2) Input selection and preview
Select the input source to be inlaid using the B bus cross
point button.
The preview selection can now be set as ME and the
keyed images can be previewed at the Preview
connector. In the case of chroma keys, the colors are
selected using the cursor on the preview screen.
Page 31

31
Effect-by-effect setting screens
Pos. X 128 Y 128
Z 196
Event ME Time Pattern INT
00E 10:00F 0013 Wht
Transition
Modify
Pattern
Edge Hard
Width
32
Color
White
Effects
Off
Off
The settings for the transition and key patterns are performed on these screens. The items that can be set differ from one
pattern to another. The LCD display changes as soon as one of the patterns is selected. The key slice, slope, key level,
crop, edge, effects and DVEPlus settings are stored in the memory for each effect group. If the system was started using
Reset, the default settings are established. Furthermore, the 3D modify settings are stored for each pattern group.
[Transition] wipe pattern settings
The transition wipe patterns (numbers 1 to 2999) are opened directly or when selected using the number keys.
<Note>
When transition numbers 200 to 222 (1001 to 1004, 1021 to 1023, 1030 to 1034 and 1059 to 1069) and 1981 to 1983 are
selected, the pattern is changed to MIX (56).
[Modify] settings
The item to be changed in the pattern is selected from [Off],
[Comp] (compression), [Slide], [Multi] and [Blinds] using the
rotary 2 control. The default setting is [Off].
The levels applying when the settings are selected are set
using the rotary 3 control.
With the [Comp] setting: ....... [Single] or [Both]
With the [Slide] setting: ........ [Single] or [Both]
With the [Multi] setting: ......... [H3], [V3], [HV3], [H6], [V6],
[HV6], [Pair], [H3 Pair], [V3
Pair], [HV3 Pair], [H6 Pair],
[V6 Pair], [HV6 Pair]
With the [Blinds] setting: ...... None
Only the basic patterns and their related patterns can be
set.
Modify
Off
Off
Comp
Slide
Multi
Blinds
R1 R2 R3 R4 R5
R1 R2 R3 R4 R5
Page 32

32
Effect-by-effect setting screens
[Pattern Edge] setting
This is used to set edges for the patterns. The border color
set here is used as the border matte for trail. It is updated
by the color which is read out for the direct pattern.
Select [Hard], [Soft], [Border] or [Soft Border] using the
rotary 2 control. The default setting is [Hard].
When [Soft] or [Soft Border] has been selected, No.2001 to
2195 and 6008 to 6010 patterns cannot be selected.
When [Soft Border] has been selected, the #701 to No.707
(24 to 27), 801 to 814 (183 to 196) patterns cannot be
selected.
The [Width] thickness can be set to any value from 1 to 255
using the rotary 3 control. The default setting is 32. Only 1
or 2 can be set for [Width] if any of the following patterns
have been selected:
≥ No.701 to 707 (24 to 27), 801 to 814 (183 to 196)
Select the [Color] border color using the rotary 4 control.
[White], [Yellow], [Cyan], [Green], [Magenta], [Red], [Blue],
[Black], [Custom1] or [Custom2] can be selected. Custom1
and Custom2 are colors which have been set by INT Matte.
Pattern
Edge Hard
Color
White
Hard
Soft
Border
Soft Border
1 - 255
White
Yellow
Cyan
Green
Magenta
Red
Blue
Black
Custom1
Custom2
Width
32
R1 R2 R3 R4 R5
<Note>
When the PinP pattern has been selected and STILL is executed through B bus, the edge cannot be reflected.
Page 33

33
≥ When [Trail] has been set
Set the trail color and spark using the rotary 3 control.
Select the [Self] original image, [Self-spark], [BodM]
border color or [BodM-spark] border spark.
The time can be set to any value from 1 to 32 using the
rotary 4 control.
When trail has been set, the trail offset position can be set
by setting the position while holding down [Shift]. In this
case, the center, scene grabber and hold buttons flash
temporarily. Whichever trail or shadow effect was
selected last among trail and shadow for DSK, and multi
strobe and decay for A/B videoEffects takes effect, and
the previous effect is canceled.
<Note>
Only one of three settings—namely, soft, border or soft border—for both multi strobe and pattern edges can be selected
when a special pattern has been selected. For further details, refer to the note on page 26.
Effects
Trail
Time
16
Light
On
Lights
when 3D
board has
been
installed.
Self
Self-spark
BodM
BodM-spark
1 - 32
Self
Effects
Off
Light
On
Off
Shadow
Trail
Lights
when 3D
board has
been
installed.
Effects
Shadow
Light
On
Lights
when 3D
board has
been
installed.
[Effects] setting
This is used to perform the DVE settings.
Select the [Off], [Shadow] or [Trail] effect using the rotary 2
control.
Set the [Light] (lighting) using the rotary 5 control. This is
valid only when the 3D optional board (AG-VE70) has been
installed for use.
≥ When [Shadow] has been set
When [Shadow] has been selected, the shadow position
can be set by setting the position while holding down
[Shift].
In this case, the center, scene grabber and hold buttons
flash temporarily.
R1 R2 R3 R4 R5
R1 R2 R3 R4 R5
R1 R2 R3 R4 R5
Effect-by-effect setting screens
Page 34

34
Effect-by-effect setting screens
Pos. X 128 Y 128
Z 196
Event ME Time Pattern INT
00E
10:00F 3101 Wht
Chroma Key 1 R = - - - G = - - - B = - - -
Key
Color
Cancel
Offset
128
C Slice
128
C-Area
3
Mono L
6
Crop
A
2
8
12
7
12
Effects
Off
DVE
Plus Off 6301
3D
Modify
Rotate
0
Time
0
TransF
255
KeyColor1Slice1
128
Slope1
8
K Level
255
[Chroma Key] setting
The chroma key is opened directly or when selected using the number keys. ME is automatically selected for the Preview
output, and the chroma key cursor and keyed output are displayed.
Display of selected
number: 1, 2 or 3 is
selected.
Selected color display
Displayed only
with 3Dop
Displayed by DVEPlus
only with special
patterns
Scrolled display
[Key] setting
Up to three colors to be removed can be stored in the
memory. After selecting the number of the color using the
rotary 2 control, align the cursor on the chroma key preview
screen with the color (blue) that is to be removed, using
joystick X and Y, and store the color in the memory using
[Enter]. The previous values will be overwritten in this
process. To release a color which has been stored in the
memory, press [Shift] + [Selected number].
The [Slice] level of the selected colors can be set to any
value from 0 to 225 using the rotary 3 control.
The [Slope] level setting of the selected colors can be set to
any value from 0 to 15 using the rotary 4 control.
The [K Level] key (transparency) level can be set to any
value from 0 to 255 using the rotary 5 control. This setting
is valid for all the colors stored in the memory. It can also
be set separately from the other keys.
Key
KeyColor
1
Slice1
128
Slope18K Level
255
0 - 15
0 - 2551 - 3 0 - 255
R1 R2 R3 R4 R5
R1 R2 R3 R4 R5
6
A
Border Color
White
Page 35

35
[Color cancel] setting
This is used to perform the settings for color cancel.
The offset from the [Offset] key can be set to any value from
0 to 255 using the rotary 2 control.
The [C Slice] (cancel slice) can be set to any value from 0 to
255 using the rotary 3 control.
The [C-Area] (cancel area) can be set to any value from 0 to
3 using the rotary 4 control.
The [Mono L] (monochrome level) can be set to any value
from 0 to 15 using the rotary 5 control.
[Crop] setting
This is used to perform the crop settings for the keys.
These settings can be performed separately with [LumKey],
[EXTKey] and [PatternKey].
The top part of the image can be set to any value from 2 to
230 (NTSC) or to 277 (PAL) using the rotary 2 control. The
default setting is 6.
The bottom part of the image can be set to any value from 2
to 230 (NTSC) or to 277 (PAL) using the rotary 3 control.
The default setting is 2.
The left part of the image can be set to any value from 0 to
680 using the rotary 4 control.
Effect-by-effect setting screens
Color
Cancel
Offset
128
C Slice
128
C-Area3Mono L
6
0 - 255
0 - 255 0 - 3 0 - 15
Crop
A
2
8
12
7
12
2 - 230
(NTSC)
2 - 277
(PAL)
2 - 230
(NTSC)
2 - 277
(PAL)
0 - 680 0 - 680
The right part of the image can be set to any value from 0 to 680 using the rotary 5 control. The default setting in each case
is 12.
If the top setting is changed, the bottom setting will change, and vice versa, in such a way that the total setting will not exceed
230 (NTSC) or 277 (PAL). Similarly, if the left setting is changed, the right setting will change, and vice versa, in such a way
that the total setting will not exceed 680. The left and right settings can be changed in 1-step increments.
[Border] setting
Select the [Color] (border color) using the rotary 2 control. There are 10 choices: White, Yellow, Cyan, Green, Magenta, Red,
Blue, Black, Custom1 and Custom2. The default setting is [White]. Custom1 and Custom2 are colors which have been set
by INT Matte.
[Effects] setting
The effects can be added in the same way as with the basic patterns. The default setting is [Off].
[DVE Plus]
This takes effect only when the 3D optional board (AG-VE70) has been installed.
It is possible to add the DVEs in key numbers 3401 to 3478, 3601 to 3623, 6001 to 6003, 6006, 6007, and 6009 to 6634.
Select [On] or [Off] using the rotary 2 control. The default setting is [Off].
The numbers are input using the rotary 3, 4 and 5 controls. The parameters for patterns with numbers 6001 to 6438 and
6601 to 6716 can be changed with [3D Modify].
R1 R2 R3 R4 R5
R1 R2 R3 R4 R5
6
A
Page 36

36
[Luminance Key] and [EXT Key] (external key) settings
The luminance key and external key are opened directly or when selected using the number keys.
Effect-by-effect setting screens
Pos. X 128 Y 128
Z 196
Event ME Time Pattern INT
00E
10:00F 3102 Wht
Luminance Key
Key
Crop
A
2
8
12
7
12
Effects
Off
DVE
Plus Off 6301
3D
Modify
Rotate
0
Time
0
TransF
255
Slice
0
Slope
15
K Level
255
Luminance Key
Ext Key
Scrolled display
Displayed only
with 3D option
Displayed by
DVEPlus only with
special patterns
[Key] setting
The [Slice] level can be set to any value from 0 to 255 using the rotary 3 control. The default setting is 0.
[Slope] can be set to any value from 0 to 15 using the rotary 4 control. The default setting is 15.
The [K Level] key level can be set to any value from 0 to 255 using the rotary 5 control. This can be set separately from the
other keys. The default setting is 255.
The crop setting can also be set separately from the other keys. Effects can be added for the effect settings in the same way
as for other patterns. The settings are performed as with the DVE’s chroma key.
R1 R2 R3 R4 R5
6
A
Border Color
White
Page 37

37
Effect-by-effect setting screens
[Title Key] setting
The title key is opened directly or when selected using the number keys. It is not displayed when Page is 0. The number of
frames (number of pages) that can be stored in the memory for PC Title can be set on the [Setup] screen.
Pos. X 128 Y 128
Z 196
Event ME Time Pattern INT
00E 10:00F 9501 Wht
Title Key Still
Key
Effects
Off
Crop
A
2
8
12
7
12
DVE
Plus Off 6301
3D
Modify
Rotate
0
Time
0
TransF
255
Slice
0
Slope
0
K Level
255
Still
Crawl
Roll
Movie
Scrolled display
Displayed only
with 3D option
Displayed by DVEPlus
only with special
patterns
[Key] setting
The playback type of the title is displayed in the top section.
The [Slice] level can be set to any value from 0 to 255 using the rotary 3 control. The default setting is 0.
[Slope] can be set to any value from 0 to 15 using the rotary 4 control. The default setting is 15.
The key level can be set to any value from 0 to 255 using the rotary 5 control. This can be set separately from the other
keys. The default setting is 255.
The crop setting can also be set separately from the other keys. Effects can be added for the effect settings in the same way
as for other patterns. The settings are performed as with the DVE’s chroma key.
<Note>
The title key cannot be selected during DSK execution.
R1 R2 R3 R4 R5
6
A
Border Color
White
Page 38

38
Effect-by-effect setting screens
[Basic Pattern Key] setting (numbers 3001 to 3046)
The basic pattern key is opened directly or when selected using the number keys.
Pos. X 128 Y 128
Z 196
Event ME Time Pattern INT
00E
10:00F 3002 Wht
Basic Pattern Key
Pattern
Edge
Effects
Off
DVE
Plus Off 6301
3D
Modify
Rotate
0
Time
0
TransF
255
Key
Learn
Empty
9000 Setup
Hard
Width
16
Color
White
K Level
255
Scrolled display
Select [Hard], [Soft], [Border] or [Soft Border] using the rotary 2 control. The default setting is [Hard].
The thickness can be set to any value from 0 to 255 using the rotary 3 control. The default setting is 16.
Select the border color using the rotary 4 control. [White], [Yellow], [Cyan], [Green], [Magenta], [Red], [Blue], [Black],
[Custom1] or [Custom2] can be selected. The default setting is [White].
The key level (transparency level) can be set to any value from 0 to 255 using the rotary 5 control. This can be set
separately from the other keys. The default setting is 255.
Displayed only
with 3D option
Displayed by
DVEPlus only with
special patterns
R1 R2 R3 R4 R5
Page 39

39
Effect-by-effect setting screens
Other key settings (numbers 3301 and up)
The pattern keys are opened directly or when selected using the number keys.
The size is set using the rotary Z control. With patterns whose positions can be changed, the position can be set using the
joystick.
Pos’ X 128 Y 128
Z 196
Event ME Time Pattern INT
00E
10:00F 3301 Wht
Pattern Key
Pattern
Edge
Effects
Off
Light
On
Crop
A
2
8
12
7
12
3D
Modify
Rotate
0
Amp
16
Time
16
Key
Learn
Empty
9000 Setup
Hard
Width
16
Color
White
K Level
255
Scrolled display
Valid only with special
patterns
Displayed only with
special patterns
during 3D option
[Pattern edge] setting
This is used to set the pattern edge.
Select [Hard], [Soft], [Border] or [Soft Border] using the
rotary 2 control. The default setting is [Hard].
When [Soft] or [Soft Border] has been selected, No. 2001 to
2195 and 6008 to 6010 patterns cannot be selected.
When [Soft Border] has been selected, No. 701 to 707 (24
to 27), 801 to 814 (183 to 196) patterns cannot be selected.
The [Width] thickness can be set to any value from 1 to 255
using the rotary 3 control. The default setting is 16. Only 1
or 2 can be set for the thickness setting if any of the
following patterns have been selected:
• No. 701 to 707 (24 to 27), 801 to 814 (183 to 196)
Select the [Color] (border color) using the rotary 4 control.
[White], [Yellow], [Cyan], [Green], [Magenta], [Red], [Blue],
[Black], [Custom1] or [Custom2] can be selected.
Pattern
Edge Hard
Width
16
Color
White
K Level
255
1 - 255
Hard
Soft
Border
Soft Border
White
Yellow
Cyan
Green
Magenta
Red
Blue
Black
Custom1
Custom2
0 - 255
The default setting is [White].
The [K Level] key level (transparency level) can be set to any value from 0 to 255 using the rotary 5 control. This can be set
separately from the other keys. The default setting is 255.
The crop setting can also be set separately from the other keys. Effects can be added for the effect settings in the same way
as for other patterns.
R1 R2 R3 R4 R5
R1 R2 R3 R4 R5
6
A
Page 40

40
Effect-by-effect setting screens
3D
Modify
Rotate
128
Time
0
TransF
255
0 - 255
0 - 255 0 - 255
3D
Modify
Width
192
Angle
96
Time
48
Amp
32
0 - 255
0 - 255 0 - 255 0 - 255
3D
Modify
Width
160
Angle
96
Amp
48
0 - 255
0 - 255 0 - 255
3D
Modify
Rotate
128
Axis
0
View
128
Depth
64
0 - 255
0 - 255 0 - 255 0 - 255
[3Dmodify] setting
This takes effect only for the special 3D patterns (numbers 6001 to 6438 and 6601 to 6716) when the 3D optional board (AGVE70) has been installed.
The parameters of the pattern for the 3D keys can be changed using the rotary 2, 3, 4 and 5 controls. They can be stored in
the memory for each pattern.
≥ With the sphere group (numbers 6001, 6301 to 6438)
R2: [Rotate] (rotation) setting
R4: [Time] setting
R5: [TransF] (transformation) setting
≥ With the flag group (numbers 6002, 6101 to 6139)
R2: [Width] (flag width) setting
R3: [Angle] setting
R4: [Time] (fluttering time) setting
R5: [Amp] (amplitude) setting
≥ With the accordion group (numbers 6003, 6201 to
6239)
R2: [Width] (accordion width) setting
R3: [Angle] setting
R5: [Amp] (amplitude) setting
≥ With perspectives (numbers 6006 and 6007, 6601 to
6634 and 6501 to 6532)
With door number 6004 to 6005, 6701 to 6716 groups
R2: [Rotate] (rotation) setting
R3: [Axis] (rotary axis) setting
R4: [View] (viewer) setting
R5: [Depth] setting
6007 to 6007: All parameters can be set.
6601 to 6634: Only [View] and [Depth] can be set.
6501 to 6532: Only [View] and [Depth] can be set.
Door
6004 to 6005: Only [Depth] can be set.
6701 to 6716: Only [View] and [Depth] can be set.
R1 R2 R3 R4 R5
R1 R2 R3 R4 R5
R1 R2 R3 R4 R5
R1 R2 R3 R4 R5
Page 41

4141
≥ With the page turn group (number 6008)
R2: [Rotate] (rotation) setting
R3: [Angle] setting
R4: [Turn] setting
R5: [Radius] setting
≥ With the ripple group (number 6031)
R2: [Level] (amplitude) setting
R3: [Time] setting
R4: [Width] setting
The position of the ripple center can be changed using
[Shift] + XY.
≥ With the spark group (number 6032)
R2: [Width] setting
R3: [Size] setting
R4: [Time] setting
≥ With the melt group (numbers 6033 to 6034)
R2: [Level] setting
≥ With the twist group (numbers 6009 to 6010)
R2: [Rotate] (rotation) setting
R3: [Turn] setting
R4: [Tilt] setting
3D
Modify
Rotate
128
Angle
32
Turn
64
Radius
3
0 - 255
0 - 255 0 - 255 0 - 7
3D
Modify
Level
32
Time
64
Width
1
0 - 255
0 - 255 0 - 5
3D
Modify
Width32Size
2
Time
255
0 - 255
1 - 3 0 - 255
3D
Modify
Level
128
0 - 255
3D
Modify
Rotate
128
Turn
128
Tilt
128
0 - 255
0 - 255 0 - 255
Effect-by-effect setting screens
R1 R2 R3 R4 R5
R1 R2 R3 R4 R5
R1 R2 R3 R4 R5
R1 R2 R3 R4 R5
R1 R2 R3 R4 R5
Page 42

42
3D
Modify
Empty
9000 Setup
9000 - 9019
Empty
Saved
Setup
Preview
CLR
All CLR
Effect-by-effect setting screens
[Key Learn] setting
This is used to set key learn. It cannot be set for number
3001 to 3006, 3301 to 3305, 6001 to 6003 and 6006 to 6010
doors. The key XYZ, key level and 3D modify settings are
stored in the memory for each key frame.
The key patterns are selected using the rotary 2 and 3
controls. Selection is made from 9000 to 9019.
[Saved] is displayed for a pattern once set by the pattern
number, and [Empty] is displayed for a pattern which has
not yet been set.
Select [Setup], [Preview], [CLR] or [All CLR] using the rotary
4 control, and enter the selection using [Enter].
The operation of a set key is reproduced by selecting a
pattern with the [Saved] display and then selecting [Preview]
followed by [Enter].
When a pattern with the [Saved] display is selected and
either [CLR] or [All CLR] is selected followed by [Enter],
[OK?] appears. By selecting [Enter] at this point, the
selected key learn pattern is cleared if [CLR] was selected
or all the key learn patterns are cleared if [All CLR] was
selected. Clearing is canceled using [Shift] + [Enter].
With either [Empty] or [Saved] patterns, the editing mode is
established by selecting [Setup] followed by [Enter], and the
display is switched. When a [Saved] pattern is to be set,
[OK?] appears: use [Enter] to set the pattern or [Shift] +
[Enter] to cancel the setting.
R1 R2 R3 R4 R5
Page 43

43
With Sphere (#6001)
Effect-by-effect setting screens
Pos. X 128 Y 128
Z 196
Event ME Time Pattern INT
00E 10:00F 3013 Wht
Key
Learn
CLR KF
Copy
K Frame
00
K Level
255
Insert
Replace Basic
Paste
Exit
9000
In the key learn editing mode, the key frame number is displayed in [K Frame].
Using the rotary 1 control, the editing items are selected and key frames are set. Key frames 00 to 19 can be set, and they
are displayed during editing in the rotary 2 control display area.
The time settings for the key frames to date can be set by [ME Time]. This is useful for an additional [KeyFrame]. During
learning, ME is automatically selected for time.
Editing items that can be selected by the rotary 1 control
Insert: A key frame is inserted in the space of the next key frame. Insert is executed using [Enter].
Replace: The current key frame is replaced. Replace is executed using [Enter].
CLR KF: The current key frame is cleared. Clear is executed using [Enter].
Copy: The current key frame is copied. Copy is executed using [Enter].
Paste: The key frame in the copy buffer is pasted by overwriting. Paste is executed using [Enter]. If the key frame has
not been copied, the execution menu cannot be selected.
Exit: Key learn is stored in the memory after exiting the editing mode. Exit is executed using [Enter].
In the editing mode, it is possible to set the parameters using the rotary 2, 3, 4 and 5 controls, XYZ using the joystick XY and
rotary Z control, the aspect ratio using [Aspect], the key frames using [Shift] + rotary 2 control, and the key level using [Shift]
+ rotary 5 control.
To set another key pattern, first exit this screen, proceed with key pattern input again, and execute key learn.
Insert
Replace
CLR KF
Copy
Paste
Exit
Basic
K Frame
00
K Level
255
Insert
Replace
CLR KF
Copy
Paste
Exit
Sphere
K Frame
00
K Level
255
Rotate
128
Time
0
TransF
255
With basic patterns (#3001 to #3006) that can be
positioned and basic compressed patterns (#3301 to
#3304)
R2: [Rotate] rotation setting
R4: [Time] setting
R5: [TransF] (transformation) setting
XY Position
3D parameters are the same as with 3DModify.
R1 R2 R3 R4 R5 R1 R2 R3 R4 R5
R1 R2 R3 R4 R5
Page 44

44
With flag (#6002)
Effect-by-effect setting screens
Insert
Replace
CLR KF
Copy
Paste
Exit
Flag
K Frame
00
K Level
255
Width
192
Angle
64
Time
48
Amp
32
R2: [Width] (flag width) setting
R3: [Angle] setting
R4: [Time] (fluttering time) setting
R5: [Amp] (amplitude) setting
3D parameters are the same as with 3DModify.
With accordion (#6003)
Insert
Replace
CLR KF
Copy
Paste
Exit
Accordion
K Frame
00
K Level
255
Width
192
Angle
64
Amp
32
R2: [Width] (accordion width) setting
R3: [Angle] setting
R5: [Amp] (amplitude) setting
3D parameters are the same as with 3DModify.
With the perspectives group (#6006 to #6007)
Insert
Replace
CLR KF
Copy
Paste
Exit
Perspective
K Frame
00
K Level
255
Rotate
128
Axis
0
View
128
Depth
64
R2: [Rotate] (rotation) setting
R3: [Axis] (rotary axis) setting
R4: [View] (viewer) setting
R5: [Depth] setting
3D parameters are the same as with 3DModify. Key
learn is not possible for doors.
With page turn (#6008)
Insert
Replace
CLR KF
Copy
Paste
Exit
Page Turn
K Frame
00
K Level
255
Rotate
128
Angle
32
Turn
64
Radius
3
R2: [Rotate] (rotation) setting
R3: [Angle] setting
R4: [Turn] setting
R5: [Radius] setting
3D parameters are the same as with 3DModify.
With twist group (#6009 to #6010)
Insert
Replace
CLR KF
Copy
Paste
Exit
Twist
K Frame
00
K Level
255
Rotate
128
Turn
128
Tilt
128
R2: [Rotate] (rotation) setting
R3: [Turn] setting
R4: [Tilt] setting
R1 R2 R3 R4 R5 R1 R2 R3 R4 R5
R1 R2 R3 R4 R5 R1 R2 R3 R4 R5
R1 R2 R3 R4 R5
Page 45

45
Effect-by-effect setting screens
<Notes>
When a compression effect has been applied to images, some of the effects may be automatically canceled.
≥ When applying 2D compression effects to channel A
Under the conditions below, the Still, Strobe and Multi Strobe for channel A are turned OFF when the Transition lever or
key size adjustment Z has been changed or the compression rate has been changed by the aspect ratio.
Conditions: When [DSK-Effects] is OFF and any of the Rev or Dual PinP patterns below has been selected
• 2DcompKey (2D + 3Dcomp included) + Rev
• 2DcompTrans + Rev
• 2Dcomp2Trans (+ Rev)
• 2Dslide1Trans (+ Rev)
• 2Dslide2Trans (+ Rev)
≥ When applying 2D compression effects to channel B
Under the conditions below, the Still, Strobe and Multi Strobe for channel B are turned OFF when the Transition lever or
key size adjustment Z has been changed or the compression rate has been changed by the aspect ratio.
Conditions: When [DSK-Effects] is OFF and any of the Norm or Dual PinP patterns below has been selected
• 2DcompKey (2D + 3Dcomp included) + Rev
• 2DcompTrans
• 2Dcomp2Trans
• 2Dslide1Trans
• 2Dslide2Trans
The processing procedure differs depending on whether the 3D optional board (AG-VE70) has been installed or nor. Details
are as follows.
≥ When the 3D optional board (AG-VE70) is not installed
Pattern number selected Processing after cancel operation
1501 to 1533 (28 to 31, 36 to 42, 128 to 129) 2Dcomp
1541 to 1550 (32 to 35, 130 to 133, 141 to 142) 2chComp
1301 to 1333 (43 to 46, 51 to 54, 138 to 140) 2DSlide1 (only Multi Strobe is set OFF)
1341 to 1348 (47 to 50, 134 to 137) 2DSlide2 (only Multi Strobe is set OFF)
3301 to 3303, 3311 to 3313, 3501 to 3578 2Dcomp Key
3304, 3314, 3324, 3501 to 3378 Dual PinP
1401 to 1498 (143 to 182) 2Dcomp/MoveKey
3401 to 3478 2DcompMoveKey (OFF when Z is changed)
3601 to 3623 Bounce Key (OFF when Z is changed)
Pattern number selected Processing after cancel operation
1341 to 1348 (47 to 50, 134 to 137) 2DSlide2 (only Multi Strobe is set OFF)
1541 to 1550 (32 to 35, 130 to 133, 141 to 142) 2chComp
3304, 3314, 3324, 3501 to 3378 Dual PinP
4601 to 5614, 6031 to 6037 3D + 2Dcomp Key (OFF when Z is changed)
≥ When the 3D optional board (AG-VE70) is installed
Page 46

46
[DSK Source] settings
These are used to select the DSK [Key] and [Fill] signals.
Select the key signals using the rotary 2 control. Either
[EXT] (external) or [Title] can be selected.
Select the key fill signals using the rotary 3 control. [EXT]
(external) input, [Title] or [BodMat] (border matte) can be
selected.
Select the page number of the title memory using the rotary
4 control. The total number of pages can be changed on
the [Setup] setting screen.
DSK
Source
Key
EXT
Fill
EXT
Page
1-1
Mode
Write
EXT
Title
EXT
Title
BodMat
1-30/26
(NSTC/PAL)
- 1-8
Write
Preview
Set the operation using the rotary 5 control. Either [Write] or [Preview] can be selected.
Set [Mode] to [Write], and write the KEY, Y, Pb and Pr external input signals into the memory using [Enter].
What is written is the whole frames of the images. Sub-frames are ignored. If the page concerned is used as a group, the
pages of the entire group will be cleared as well. Since the saving that is initiated by [Write] supports only the [EXT] external
inputs, set [Key] and [Fill] to [EXT].
Set [Mode] to [Preview], and select [Enter] to initiate the preview display. It is now possible to check the slides or movie
movements from On to Off. The default setting is [Preview].
When [Title] has been selected for [Key] and [Fill] and preview is initiated, the title, star and heart keys are canceled and
changed to MIX (56).
The title page can be selected using the rotary 4 control. The first number is for the page and the second number for the
sub-pages.
When part of a group has been selected, playback is initiated from the start of that part.
The playback type of the title concerned is displayed in the top section. Preview for [Movie], [Crawl] and [Roll] is initiated by
[Shift] + [0].
R1 R2 R3 R4 R5
Pos. X 128 Y 128
Z 196
Event ME Time Pattern INT
00E 10:00F 3015 Wht
DSK Fade Still
DSK
Source
DSK
On/Off
ME Trig
Off
Slide In
Off
Slide Out
Off
Speed
8
DSK
Effects Off
Light
On
Crop
A
2
8
12
7
12
Fade To
Black
Audio
On
Phone
After
Key
EXT
Fill
EXT
Page
1-1
Mode
Write
DSK
Key
Slice
0
Slope
0
K Level
255
These settings are opened when the DSK/FADE button or DSK Preview is selected. Both DSK and Fade settings can be
performed.
Select the [DSK Source], [DSK Key], [Crop], [DSK On/Off], [DSK Effects] or [Fade] item using the rotary 1 control. When the
title memory is 0, the Key [Memory], Source [Memory], [Memory], [Mode] and [Slide] settings are canceled.
Still
Crawl
Roll
Movie
R1 R2 R3 R4 R5
DSK/Fade settings
6
A
Page 47

47
DSK/Fade settings
[DSK Key] settings
These are used to set the DSK key signals (for external
applications). Memory keys are used in their original form.
The [Slice] level can be set to any value from 0 to 255 using
the rotary 2 control. The default setting is 0.
[Slope] can be set to any value from 0 to 15 using the rotary
3 control. The default setting is 0.
The [K Level] (key level) can be set to any value from 0 to
255 using the rotary 5 control. The default setting is 255.
[Crop] setting
This is used to set crop for DSK.
The top can be set to any value from 2 to 200 using the
rotary 2 control. The default setting is 6.
The bottom can be set to any value from 2 to 200 using the
rotary 3 control. The default setting is 2.
The left can be set to any value from 0 to 680 using the
rotary 4 control.
The right can be set to any value from 0 to 680 using the
rotary 5 control.
The default setting in each of these cases is 12.
If the top setting is changed, the bottom setting will change,
and vice versa, in such a way that the total setting will not
exceed 200. Similarly, if the left setting is changed, the right
setting will change, and vice versa, in such a way that the
total setting will not exceed 680. The left and right settings
can be changed in 1-step increments.
DSK
Key
Slice
0
Slope
0
K Level
255
0 - 255
0 - 15 0 - 255
Crop
A
2
8
12
7
12
0 - 200
0 - 200 0 - 680 0 - 680
R1 R2 R3 R4 R5
R1 R2 R3 R4 R5
[DSK On/Off] setting
This is used to set the DSK on/off operations. [Slide
IN/OUT] takes effect when [Title] has been selected for
[Key] and [Fill].
Whether the in or out operation is to be initiated during an
ME transition is set using the rotary 2 control.
Whether the sliding in operation is to be initiated in the
horizontal or vertical direction during DSK ON is set using
the rotary 3 control.
Whether the sliding out operation is to be initiated in the
horizontal or vertical direction during DSK OFF is set using
the rotary 4 control.
1: Slide toward the right
2: Slide toward the left
3: Slide toward the top
4: Slide toward the bottom
DSK
On/Off
ME Trig
Off
Slide In
Off
Slide Out
Off
Speed
8
On
Off
Off
1
2
3
4
Off
1
2
3
4
2 - 64
The default setting in each of these cases is [Off].
The sliding speed is set using the rotary 5 control. Any even number from 2 to 64 can be selected. The default setting is 8.
When sliding has been selected, the DSKTime is changed to 0. During sliding, the DSK buttons have no effect but become
operational again upon completion of the sliding operation. This setting can also be changed at the PC.
<Note>
Sliding in the vertical direction cannot be used when the data selected for the DSK source is other than DIVIDE1. For details
on DIVIDE, refer to page 76.
R1 R2 R3 R4 R5
6
A
Page 48

48
DSK/Fade settings
[Fade] settings
These are used to perform the fade settings.
The image to be faded is selected from [Black], [White] or
[Blue] using the rotary 2 control. The default setting is
[Black].
[On] or [Off] is selected for [Audio] fading using the rotary 3
control. The default setting is [On].
[After] or [Pre] is selected for [Phone] fading using the rotary
4 control. At [After], the sound is heard with the fading
effect applied to the images; at [Pre], it is heard with no
fading effect applied to the images. The default setting is
[After].
Fade To
Black
AudioOnPhone
After
Black
White
Blue
On
Off
After
Pre
<Note>
Only one of three settings—namely, DSK memory, title key or star/heart key—can be selected. The key selected last takes
precedence, and the previously selected key is canceled.
When the pattern is changed to MIX (56), the title key or heart/star key is to be canceled. During title DSK, the heart/star key
cannot be used.
R1 R2 R3 R4 R5
Page 49

49
[Audio Effects] settings
[PAN] setting
Set [On] or [Off] using the rotary 3 control. The default
setting is [Off].
Select the input channel to be used using the rotary 4
control. Select [L], [R] or [L+R]. The default setting is [L].
Set the output balance using the rotary 5 control. Make the
selection from L7 to 0 to R7. The default setting is 0.
PAN
1 Off
IN Ch
L
Balance
0
L7 - 0 - R7
On
Off
L
R
L+R
Pos. X 128 Y 128
Z 196
Event ME Time Pattern INT
00E 10:00F 3015 Wht
Audio Effects
EQ
Mid
M Level0Freq
1.01KHz
Q
0.5
Voice
Change Off
Pitch
Up
Level
5
Mute
Off AB
Pan
Off
IN Ch
L
Balance
0
1EQ
On
Low
0
High
0
1 - 8
Aux1
Aux2
[Audio Effects] is opened using Audio Effects or the ON button. Audio effects can be set for each input.
Select the input from [1] (crosspoint 1), [2] (crosspoint 2), [3] (crosspoint 3), [4] (crosspoint 4), [5] (crosspoint 5), [6]
(crosspoint 6), [7] (crosspoint 7), [8] (crosspoint 8), [AUX1] or [AUX2] using the rotary 1 control.
Select the item from [PAN], [EQ] (equalizer), [EQ Mid] equalizer midrange, [Voice] (voice changer) or [Mute] using the rotary
2 control.
R1 R2 R3 R4 R5
R1 R2 R3 R4 R5
Page 50

50
[Audio Effects] settings
[EQ Mid] equalizer midrange setting
The [M Level] midrange level can be set in 2 dB intervals to
any value from –14 dB to 0 to +14 dB using the rotary 3
control. The default setting is [0].
The midrange frequency can be set to any value from 100
Hz to 10.2 kHz using the rotary 4 control. The default
setting is 1.01 kHz.
Select [0.5], [1], [2] or [5] for Q using the rotary 5 control.
The default setting is [0.5].
[Voice Change] (voice changer) setting
This is used to set the voice changer.
Set [On] or [Off] using the rotary 3 control. The default
setting is [Off].
Set [Up] or [Down] for the [Pitch] using the rotary 4 control.
The default setting is [Up].
[Level] can be set to any value from [0] to [10] using the
rotary 5 control. The default setting is [5].
1
EQ
MId
M Level0Freq
1.01KHz
Q
0.5
–14 - +14
100 Hz -
10.2 KHz
0.5
1
2
5
1
Voice
Change Off
Pitch
Up
Level
5
On
Off
Up
Down
0 - 10
[Mute] setting
Set the mute level using the rotary 3 control. [Off], [–12 dB],
[–20 dB] or [–60 dB] can be selected. The default setting is
[Off].
Select the channel to be muted using the rotary 4 control.
[AB] (AB bus only), [ABAUX1] (AB bus and Aux1) or [All]
can be selected. The default setting is [All].
Mute
–12dB AB
Off
–12dB
–20dB
–60dB
AB
ABAUXl
All
[EQ] equalizer setting
This is used to set the equalizers.
Set [On] or [Off] for all equalizers using the rotary 3 control.
The default setting is [On].
The [L Level] bass level can be set in 2 dB intervals to any
value from –14 dB to 0 to +14 dB using the rotary 5 control.
The default setting is [0].
The [H Level] treble level can be set in 2 dB intervals to any
value from –14 dB to 0 to +14 dB using the rotary 4 control.
The default setting is [0].
1
EQ
On
L Level0H Level
0
On
Off
–14 - +14 –14 - +14
R1 R2 R3 R4 R5
R1 R2 R3 R4 R5
R1 R2 R3 R4 R5
R1 R2 R3 R4 R5
Page 51

51
[Setup] initial setting screen
Select the item to be set using the rotary 1 control. Items consist of [Power], [Direct Pattern], [Audio Video], [Memory], [Gen
Lock], [Video Format], [System1], [System2], [Bus], [Audio Level] and [File].
The setup settings are not returned to the factory settings even if the system is started by Reset. They can be restored to the
factory settings by pressing [Shift] and [Enter] together when the power is turned on.
Wash Pb 128 Pr 128
Y 196
Event ME Time Pattern INT
00E 10:00F 3015 Wht
Setup
Power
Direct
Pattern Setup
Audio
Video
Input
Setup
Memory INT V
15
Title
15
Gen
Lock
Ref In
G/L
H Phase
128
SC Phase
512
Video
Format NTSC
Aspect
4:3
Setup
0
Pb Pr
BCAM
System1 Dly
1Frame
Time
Sec
GPI
ME
RS422
GVG
System2 Lcd Stby0VBClean
Off
DR
On
Chr.Lmt
Off
Bus Type
AB
Still
On
Audio
CP
Tally
8
Audio
Level
Alignment
4dB
Head
20dB
File Empty
1 Save
Reset
Scrolled display
R1 R2 R3 R4 R5
Page 52

52
[Setup] initial setting screen
[Power] (power ON) setting
Whether the system is to be started from the [Reset] status,
from the [Preset] status or in the [Demo] mode can be
selected using the rotary 2 control.
With [Reset], the settings except for the event memories,
setup settings, file memory and key learn settings are
initialized.
With [Preset], the mode in which the system is started from
the status prior to power OFF is established when the power
is next turned on.
Power
Reset
Reset
Preset
Demo
[Direct Pattern] setting
This is used to set the pattern which is to be called as the
direct pattern.
When [Setup] is selected using the rotary 2 control and
[Enter] is pressed, [OK?] appears so press [Enter] to change
to the setting mode. Use [Shift] + [Enter] to cancel.
When [Default] is selected using the rotary 2 control and
[Enter] is pressed, [OK?] appears so press [Enter] to change
to the default setting. Use [Shift] + [Enter] to cancel.
Direct
Pattern Setup
Setup
Default
Setting method in the setting mode
[ME] is selected for Preview so it can be used to check.
1. Press the direct pattern button.
2. The lamp of the selected button flashes. The [Mix], [Chrm] (chroma) key and [Lum] (luminance) key cannot be set.
3. Use the number keys to input the pattern to be assigned. (The pattern is displayed in the pattern area.) The program
output can be checked using the wipe lever.
If no status prior to power OFF existed (when, for instance, the system is used for the very first time after assembly or its
memories have been destroyed), the system is started from the factory setting status.
With [Demo], the system starts up in the demonstration mode when the power is next turned on. This menu is displayed in
the demonstration mode so that when the system is restarted by selecting [Preset] or [Reset], the regular operation screen
will appear. Alternatively, when [Enter] is pressed, the demonstration mode is suspended and operation is enabled. To
execute the demonstration mode again, turn the power off and then back on again. The audio faders can be used even in
the demonstration mode.
The default setting is [Preset].
R1 R2 R3 R4 R5
R1 R2 R3 R4 R5
Page 53

53
[Setup] initial setting screen
The LCD display now shows the setting screens for each effect pattern. Proceed to set the edges and effects, and if the
settings are acceptable, enter them using [Enter], and return to the direct pattern settings.
Example of transition
Pos. X 128 Y 128
Z 196
Event ME Time Pattern INT
00E
10:00F 2001 Wht
Direct Pattern Transition
Enter to EXIT
Modify
Effects
Off
Comp Off
Pattern
Edge Hard
Width
0
Color
White
If the setting operation is exited part of the way through (by pressing other buttons, etc.), the settings performed so far will not
be stored in the memory.
The settings of six key patterns and seven transitions patterns are stored in the memory. The edges and effects of each of
the patterns are also stored.
Example of key pattern
Pos. X 128 Y 128
Z 196
Event ME Time Pattern INT
00E 10:00F 6301 Wht
Direct Pattern Key
Enter to EXIT
Pattern
Edge
Effects
Off
Light
On
Crop
A
2
8
12
7
12
3D
Modify
Rotate
0
Time
0
TransF
255
Hard
Width
0
Color
White
K Level
255
Key patterns 3xxx, 4xxx and 5xxx as well as key learn patterns 9000 to 9019 can be assigned to direct key pattern buttons.
Transition patterns 0xxx, 1xxx and 2xxx can be assigned to direct key transition buttons.
The factory settings are the patterns displayed.
R1 R2 R3 R4 R5
R1 R2 R3 R4 R5
6
A
Page 54

54
R1 R2 R3 R4 R5
[Setup] initial setting screen
[Audio Video Input] settings
These are used to set the audio and video inputs.
When [Setup] is selected using the rotary 2 control and
[Enter] is pressed, [OK?] appears so press [Enter] to change
to the setting mode. Use [Shift] + [Enter] to cancel.
When [Default] is selected using the rotary 2 control and
[Enter] is pressed, [OK?] appears so press [Enter] to change
to the default setting.
When [V-Link] is selected using the rotary 2 control and
[Enter] is pressed, [OK?] appears so press [Enter] to change
operation so that the audio input is matched with the video
input.
Factory settings
Audio
Video
Input
Setup
Setup
Default
V-Link
Event ME Time Pattern INT
00E 10:00F 3015 Wht
Audio Video Input Setup Enter to EXIT
1 V S-1 Video A S-1 Analog
2 V S-2 Video A S-2 Analog
3 V S-3 Video A S-3 Analog
4 V S-4 Video A S-4 Analog
5 V S-5 Video A S-1 Analog
6 V S-6 Video A S-2 Analog
7 V S-7 Video A S-3 Analog
8 V S-8 Video A S-4 Analog
AUXin Mic
Video
YC
Y Pb Pr
SDI
V S-1
V S-2
V S-3
V S-4
V S-5
V S-6
V S-7
V S-8
Mic
AUX2
Analog
SDI
A S-1
A S-2
A S-3
A S-4
Setting method
Press the button of the cross point to be set. Alternatively, select the button of the cross point which is to be set using the
rotary 1 control. The lamp of the selected button flashes, and the bus is automatically output to Preview. When the cross
point has been selected using the rotary 1 control, the A bus is output to Preview.
Select V S-1, V S-2, V S-3, V S-4, V S-5, V S-6, V S-7 or V S-8 as the video input using the rotary 2 control.
Select [Video] composite, [YC], [Y Pb Pr] component or [SDI] using the rotary 3 control.
Except for [Video], the sources extend from S-1 to S-4 so [5] is changed to [1], [6] to [2], [7] to [3] and [8] to [4]. If the setting
operation is exited part of the way through, the settings performed so far will not be stored in the memory. They are entered
using [Enter], and operation returns to the [Audio Video Input] settings.
Select A S-1, A S-2, A S-3 or A S-4 as the audio input using the rotary 4 control.
Select [ANALOG] or [SDI] using the rotary 5 control.
Video input combinations that cannot be set: S-5 to S-8 + YC/Y Pb Pr/SDI
Audio input combinations that cannot be set: Combination of SDIs with different source numbers
Example: SDI of S-1 for video and SDI of S-2 for audio
[Mic] or [AUX2] can be set for [AUXin] using the rotary 4 control. The default setting is [Mic].
R1 R2 R3 R4 R5
Page 55

55
[Setup] initial setting screen
[Memory] setting
This is used to set the memories used for INTVideo and
DSK. When the setting is changed, all the memories are
cleared. How much memory is to be used for [INT V] and
how much for [Title] for DSK and TitleKey is set using the
rotary 2 and 3 controls.
If the allocation to one memory is changed, the allocation to
the other memory will change so that the total remains 30.
When a change is to be made, [OK?] appears. Execute the
change using [Enter], and use [Shift] + [Enter] to cancel.
The default setting is 15 each for [INT V] and [Title] with
NTSC and 13 each for [INT V] and [Title] with PAL.
Memory INT V
15
Title
15
0 - 30/26
0 - 30/26
[Gen Lock] external synchronization setting
Select [G/L] or [ExtKey] as the [Ref In] (reference) source
using the rotary 2 control. The default setting is [G/L].
Adjust the [H Phase] (horizontal phase) using the rotary 3
control. The default setting is 128.
Adjust the [SC Phase] (subcarrier phase) using the rotary 4
control. The default setting is 512.
[H Phase] and [SC Phase] are stored in the memory
separately in accordance with [G/L] or [Ext Key] for the
input.
Gen
Lock
Ref In
G/L
H Phase
128
SC Phase
512
G/L
Ext Key
28 - 228
[Video Format] setting
Either [NTSC] or [PAL] is selected as the format by the
rotary 2 control.
The default setting is the format used in the area where the
system was purchased.
When a change is to be made, [OK?] appears. Execute the
change using [Enter], and use [Shift] + [Enter] to cancel.
Set [4:3] or [16:9] as the [Aspect] ratio of the patterns using
the rotary 3 control. The default setting is [4:3].
Video
Format NTSC
Aspect
4:3
Setup
0
Pb Pr
BCAM
NSTC
PAL
4:3
16:9
0
7.5
BCAM
MII
0 - 1023
R1 R2 R3 R4 R5
R1 R2 R3 R4 R5
R1 R2 R3 R4 R5
Select [0] or [7.5] for [Setup] using the rotary 4 control. The default setting is [0].
Select [BCAM] or [MII] for the [Pb Pr] component level using the rotary 5 control. The default setting is [BCAM].
When the NTSC or PAL format is changed, the system is initialized, and the [INT V] and title memories are cleared.
Page 56

56
[Setup] initial setting screen
System1 Dly
1Frame
Time
Sec
GPI
ME
RS422
GVG
1Frame
0Frame
Sec
Frame
ME
DSK
Fade
GVG
SONY
System2 LCDStby0VBClean
Off
DR
On
Chr.Lmt
Off
0 - 60
On
Off
On
Off
On
Off
[System1] setting
This is used to perform a variety of settings.
The rotary 2 control is used to set the amount of delay for
the source input when the [AdvRef] advanced reference
signal is connected with the 3D optional board (AG-VE70)
installed. If 0Frame is selected, the video delay amount is
different between when the 3D effects are applied and when
they are not. The default setting is 1Frame. The setting is
fixed at 0Frame when the 3D optional board is not installed.
The audio source delay amount is also set according to this
setting.
[System2] setting
The time taken until the LCD is set to the power saving
mode can be selected using the rotary 2 control.
With the 0 setting, the display is always on. The time can
be set in 10-minute increments from 0 to 60. The default
setting is 0.
[On] or [Off] is selected using the rotary 3 control to set
whether or not cleaning is to be performed inside the vertical
blanking period (VBlk). The default setting is [Off].
Bus Type
AB
Still
On
Tally
8
Audio
CP
AB
Prg PreOnOff
8
EXT
CP
1, 2
[Bus] setting
AB (AB bus) or PrgPre (program/preset system) can be
selected as the bus system using the rotary 2 control. The
default setting is AB.
[On] (initiate Still) or [Off] (do not initiate Still) when cross
points are to be changed is selected using the rotary 3
control. The default setting is [On].
The Audio MIX system can be selected using the rotary 4
control.
[Sec] (seconds + frames) or [Frame] (frames) only is selected for the time display using the rotary 3 control. The default
setting is [Sec].
Whether [ME], [DSK] or [Fade] is to be executed by GPI can be set using the rotary 4 control. The default setting is [ME].
[GVG] or [SONY] can be selected as the RS-422A protocol using the rotary 5 control. The default setting is [GVG].
[On] or [Off] is selected using the rotary 4 control to set whether or not the [DR] (dynamic rounding) is to be performed. The
default setting is [On].
[On] or [Off] is selected using the rotary 5 control to set whether restrictions are to be applied to the SDI and component
output chroma. If [On] has been selected, the chroma is restricted by the 100% color bar level. The default setting is [Off].
<Note>
Selecting [Off] for [VBClean] may result in a deviation in the amount of delay between the video signals and vertical blanking
signals depending on the setting for the [Dly] item among the [System1] settings and on whether the 3D optional board (AGVE70) has been installed.
R1 R2 R3 R4 R5
R1 R2 R3 R4 R5
R1 R2 R3 R4 R5
At the [CP] setting, two audio sources allocated to the selected cross point are output. At the [1,2] setting, the audio sources
1, 2 allocated to the cross point are mixed at all times. The default setting is [CP].
[8] or [EXT] can be selected using the rotary 5 control as the setting for the eight tally outputs. At the [8] setting, the tally
signal is output when cross point 8 has been selected; at the [EXT] setting, it is output when EXT has been selected.
<Note>
When [Still] has been set to [Off], the picture may be disturbed if direct switching is performed between SDI/composite and
YC/component. This setting must always be used with either an SDI-only/composite system or YC-only/component-only
system.
Page 57

57
[Setup] initial setting screen
Audio
Level
Alignment
–3dB
Head
18dB
–3dB
0dB
4dB
18dB
20dB
[Audio Level] setting
The [Alignment] (alignment) level is set using the rotary 2
control. [–3 dB], [0 dB] or [4 dB] can be selected. The
default setting is [4 dB] for NTSC and [0 dB] for PAL.
The [Head] (headroom) is set using the rotary 5 control.
Either [18 dB] or [20 dB] can be selected. The default
setting is [20 dB] for NTSC and [18 dB] for PAL.
File Empty
1 Save
1 - 8
Empty
Saved
Save
Recall
AllCLR
[File] setting
The statuses set by [Setup] can be stored in the memory.
Select 1 to 8 using the rotary 2 control. An empty file is
indicated by [Empty]. A file with settings is indicated by
[Saved].
Select [Save], [Recall] or [AllCLR] using the rotary 3 control,
and execute using [Enter]. [Save] saves the settings and
overwrites any existing settings, [Recall] loads the settings,
and [All CLR] clears the settings.
When [Save] or [AllCLR] is selected, [OK?] appears. Enter
the selection again using [Enter] or cancel using [Shift] +
[Enter].
It is also possible to clear all the settings by holding down
[Shift] + [Enter] when the power is turned on so that the
factory settings are restored.
R1 R2 R3 R4 R5
R1 R2 R3 R4 R5
Page 58

58
Other settings
Setting method
One hundred panel statuses can be stored in event
memories 0 to 99. Press the Set button, set the event
number using the number keys, and enter the setting using
[Enter].
Event memory
Event
00E
Press the [Pattern] button, input the pattern number using
the number keys, and execute using [Enter]. If the pattern
does not exist, operation will jump to the nearest pattern
number.
Each time [Pattern] is pressed, the function is set to ON or
OFF. The default setting is MIX (56).
Pattern numbers are incremented and decremented using
the “+” and “–” keys. Patterns that do not exist are skipped
and displayed in turn.
Pattern settings
Pattern
3015
Set button: Its lamp lights during the setting process. When [Enter] is pressed, it flashes for two seconds and then
goes off.
When the setting is in progress, Event is displayed in reverse video, and the event is then entered using [Enter]. Event
numbers can be incremented and decremented using the “+” and “–” keys. Empty events are indicated by [E] appearing next
to the event number.
Recall method
Press the [Recall] button, select the event number to be loaded using the number keys, and recall it using the [Enter] or
[AutoTake] button.
Recall button: Its lamp flashes while recall is underway. It lights when the button is set to ON, and goes off when it is set
to OFF or when the recall is completed.
Since the input settings are not reflected during loading, events are executed in respect of the input set beforehand.
Events 50 to 59, 60 to 69, 70 to 79, 80 to 89 and 90 to 99 can be set consecutively in units of 10 events and also recalled
consecutively so they can also serve as key frame settings. Events are executed using the [AutoTake] button. With the
recall of events 50 to 99, the Setup status of the head event is valid.
Clearing events
Set the number of the event to be cleared using [Recall], and execute clearing using [Shift] + [Enter]. Clearing all the events
is possible by inputting a period twice at the recall stage and then pressing [Shift] + [.]. Alternatively, this can be achieved by
starting the system by pressing [Shift] + [Enter] when the power is turned on, and restoring the factory settings.
Page 59

59
Select the item to be set, and press the [ME], [DSK] or
[FADE] button.
Input the numerical value using the number keys, and press
[Enter].
The numerical value can be incremented and decremented
using rotary TIME or the “+” and “–” keys.
Set the ME (back, key transition), DSK or fade time.
Set the time of the item selected for ME, DSK or Fade
above the number keys.
The time is indicated on the LCD display. It can also be
input or output using the number keys.
With x:xx displays, it is possible to input [2][.][5] to display
2:05 where [.] is used as a delimiter.
The default setting is 60F.
Transition time setting
ME Time
10:00F
7
89
65
4
CONTRAST
PHONE
PATTERN
ME
DSK
FADE
MIN
MAX
TIME
DR
Transition time selection
Other settings
Correlation between number key settings and [Pattern] button
[Pattern] takes precedence over [ME], [DSK] and [Fade].
Items selected by ME, DSK or Fade can be set by the rotary controls. The number keys can also be used when Pattern is
OFF. The items selected appear on the LCD display.
There are three options—ME, DSK and Fade—and they can be set to OFF by pressing the ON button. In this case, neither
the rotary controls nor the number keys can be used.
Number key priorities
The number key priorities are: event memories > pattern settings > transition time settings > LCD screen settings. In the event memories, the number keys cannot be used for pattern settings, transition time settings or LCD screen settings.
Page 60

60
Transition patterns
Blinds
79 80 81 82 83 84 85 86
Basic
1234567891011
Pair
63 64 65 66 67 68 69 70
87 88 89
Multi H3
301 302 303 304 305 306 307 308
Multi
PairH3
Overlap
122
415
416 417 418 419
Multi H6
Overlap
103
341
342 343 344 345 346 347 348
Multi V3
321 322 323 324 325 326 327 328
Multi
PairV3
Overlap
123
428
429 430 431 432
Multi V6
104
361
362
363 364 365 366 367 368
Multi HV3
381 382 383 384 385
Multi HV6
105
398
106
399
107
400
108
401
109
402
Page 61

61
Transition patterns
Basic
12
13 14 15 16 17 18 19
20
21 22 23
Blinds
90 91 92 93 94 95 96 97 98 100 101 102
Multi H3
309 310 311 312 313 314 315 316 317 318 319 320
Multi H6
349 350 351 352 353 354 355 356 357 358 359 360
Multi V6
369 370 371 372 373 374 375 376 377 378 379 380
Multi HV3
386 387 388 389 390 391 392 393 394 395 396 397
Multi HV6
Overlap
110
403
111
404
112
405
113
406
114
407
115
408
116
409
117
410
118
411
119
412
120
413
121
414
Multi V3
329 330 331 332 333 334 335 336 337 338 339 340
Multi
PairH3
420 421 422 423 424 425 426 427
Multi
PairV3
Overlap
124
433
125
434
435 436
126
437
127
438
439 440
Pair
7271 73 74 75 76 77 78
Page 62

62
Transition patterns
Mtrix
Overlap24701
25
702
26
703
27
704
705 706 707
Multi
PairHV6
479 480 481 482
STILL
STILL
STILL
STILL
Shutter
Overlap
223
1091
224
1092
225
1093
226
1094
DVE
BPreset
Overlap
200
1001
201
1002
202
1003
Mosaic
XY
MosaicXMosaic
Y
203
1004
204
1021
205
1022
Defocus
H Mirror V Mirror
206
1023
207
1030
208
1031
HV
Mirror
NegaYCNega
Y
209
1032
210
1033
211
1034
Nega
C
Mono Paint
Direct
Pattern
241 242 243
DT 1
DT 2 DT 3
244 245 246
DT 4
DT 5 DT 6
247
DT 7
Basic2
Overlap
183
801
184
802
185
803
186
804
187
805
188
806
189
807
191
809
190
808
192
810
Comp1
Overlap
+Diss
28
1501
1521
29
1502
1522
30
1503
1523
31
1504
1524
36
1505
1525
37
1506
1526
38
1507
1527
40
1509
1529
39
1508
1528
41
1510
1530
Comp2
Overlap321541331542341543351544
130
1545
131
1546
132
1547
133
1548
Multi
PairHV3
467 468 469 470
<Notes>
≥ The DVE and Shutter patterns cannot be used for DSK effect. The Comp1 and Comp2 patterns can be used for DSK effect only when the 3D optional board
(AG-VE70) has been installed.
≥ Pattern MIX (56) is used for DVE BPreset.
≥ With Comp2, the image at the transition destination cannot be checked using ME preview when the lever is at the end point.
Multi
PairH6
441
442 443 444 445
Multi
PairV6
454 455 456 457 458
Page 63

63
Transition patterns
Panel
990
Panel
Setting
Panel
Setting
60
1081
NAM
MIX
MIX
Basic2
55
1010
193
811
56
1080
57 58
194
812
195
813
196
814
197
1082
LUM
198
1083
CUT
MIX
199
1084
SAT
MIX
Multi
PairHV6
483 484 485 486 487 488 489 490
DVE
BPreset
212
1059
213
1060
214
1061
CUT
Still
Field
Still
Fram
215
1062
216
1063
217
1064
Strobe
4Multi
Strob
9Multi
Strob
218
1065
219
1066
220
1067
16Multi
Strob
Decay
Video
FaaB
221
1068
222
1069
Color
FaaB
V+C
FaaB
Direct
Pattern
248 249 250
DK 1
DK 2 DK 3
251 252 253
DK 4
DK 5 DK 6
Multi HV3
471 472 473 474 475 476 477 478
Comp1
Overlap
+Diss
42
1511
1531
128
1512
1532
129
1513
1533
Tumble
Overlap
141
1549
142
1550
+DISS: This denotes a pattern to which the dissolve effect can be applied.
<Note>
With patterns 60 and 1081 and Tumble, the image at the transition destination cannot be checked using ME preview when the lever is at the end point.
Multi
PairH6
446 447 448 449 450 451 452 453
Multi
PairV6
459 460 461 462 463 464 465 466
Page 64

Pers1
64
Transition patterns
2D Move2
/Exp
Curve2
Overlap
+Diss
167
1461
1471
168
1462
1472
169
1463
1473
170
1464
1474
171
1465
1475
172
1466
1476
173
1467
1477
174
1468
1478
Rotate
+Diss
1601
1611
1602
1612
1603
1613
1604
1614
Split Slide
+Diss
1620
1660
1621
1661
1622
1662
1623
1663
1624
1664
1625
1665
1626
1666
1627
1667
1628
1668
1629
1669
1630
1670
Split
+Diss
1639
1679
1640
1680
1641
1681
1642
1682
1643
1683
1644
1684
1645
1685
1646
1686
1647
1687
1648
1688
1649
1689
1650
1690
+Diss
1701
1741
1702
1742
1703
1743
1704
1744
1705
1745
1706
1746
1707
1747
1708
1748
1730
1750
1731
1751
1732
1752
1733
1753
PersMove1
+Diss
1761
1781
1762
1782
1763
1783
1764
1784
1765
1785
1766
1786
1767
1787
1768
1788
PersMove2
+Diss
1801
1821
1802
1822
1803
1823
1804
1824
1805
1825
1806
1826
1807
1827
1808
1828
2D Move2
/Exp
Overlap
+Diss
151
1421
1431
152
1422
1432
153
1423
1433
154
1424
1434
155
1425
1435
156
1426
1436
157
1427
1437
158
1428
1438
<Notes>
≥ The 2D Move2/EXP patterns cannot be used for DSK effect. The Slide1, Slide2, 2D Move1 and 2D Move2 patterns can be used for DSK effect only when the
3D optional board (AG-VE70) has been installed.
≥ Transition patterns 1601 to 2617 can be used only when the 3D optional board (AG-VE70) has been installed.
≥ With Slide2, the image at the transition destination cannot be checked using ME preview when the lever is at the end point.
Slide2
Overlap471341481342491343501344
134
1345
135
1346
136
1347
137
1348
2D Move1
Overlap
+Diss
143
1401
1411
144
1402
1412
145
1403
1413
146
1404
1414
147
1405
1415
148
1406
1416
149
1407
1417
150
1408
1418
Slide1
Overlap
+Diss
43
1301
1311
44
1302
1312
45
1303
1313
46
1304
1314
51
1305
1315
52
1306
1316
53
1307
1317
54
1308
1318
Page 65

65
Transition patterns
Overlap
+Diss
175
1481
1491
176
1482
1492
177
1483
1493
178
1484
1494
179
1485
1495
180
1486
1496
181
1487
1497
182
1488
1498
2D Move2
/Exp
Curve2
Split Slide
2DComp
+Diss
1631
1671
1632
1672
1633
1673
1634
1674
1635
1675
1636
1676
1637
1677
1638
1678
Split
+Diss
1651
1691
1652
1692
1653
1693
1654
1694
1655
1695
1656
1696
1657
1697
1658
1698
1659
1699
Pers1
+Diss
1734
1754
1735
1755
1736
1756
1737
1757
1738
1758
1739
1759
PersMove1
+Diss
1769
1789
1770
1790
1771
1791
1772
1792
1773
1793
2D Move2
/Exp
Overlap
+Diss
159
1441
1451
160
1442
1452
161
1443
1453
162
1444
1454
163
1445
1455
164
1446
1456
165
1447
1457
166
1448
1458
Bounce
Overlap
+Diss
138
1321
1331
139
322
1332
140
1323
1333
+DISS: This denotes a pattern to which the dissolve effect can be applied.
Page 66

66
Transition patterns
Page2
+Diss
2118
2168
2119
2169
2120
2170
2121
2171
2122
2172
2123
2173
2124
2174
2125
2175
Page3
+Diss
2131
2183
2132
2184
2133
2185
2134
2186
2135
2187
2136
2188
2137
2189
2138
2190
Sphere
2DComp
+Diss
2201
2231
2202
2232
2203
2233
2204
2234
2205
2235
2206
2236
2207
2237
2208
2238
2209
2239
Accordion
Flag1
2DComp
+Diss
2401
2461
2402
2462
2403
2463
2404
2464
2405
2465
2406
2466
2407
2467
2408
2468
2409
2469
2410
2470
2411
2471
2412
2472
Flag2
2DComp
+Diss
2431
2491
2432
2492
2433
2493
2434
2494
2435
2495
2436
2496
2437
2497
2438
2498
2439
2499
2440
2500
MIX
Ripple
2DComp
+Diss
2601
2611
2602
2612 2613
2604
2614
2605
2615
2606
2616
MIX
2617
Page1
+Diss
2101
2151
2102
2152
2103
2153
2104
2154
2105
2155
2106
2156
2107
2157
2108
2158
<Notes>
≥ The Flip Tumble, Twist and Roll and Page1, 2, 3 patterns cannot be used for DSK Effect.
≥ Transition patterns 1601 to 2617 can be used only when the 3D optional board (AG-VE70) has been installed.
≥ With Flip Tumble, the image at the transition destination cannot be checked using ME preview when the lever is at the end point.
Twist
+Diss
2001
2011
2002
2012
2003
2013
2004
2014
2005
2015
2006
2016
2007
2017
2009
2019
2008
2018
Roll
+Diss
2051
2071
2052
2072
2053
2073
2054
2074
2055
2075
2056
2076
2057
2077
2058
2078
Spin
+Diss
1841
1851
1842
1852
1843
1853
1844
1854
1845
1855
1846
1856
Flip
Tumble
Overlap 1902 1903 1904 1905 1906 1960 1961 1962 1963
Page 67

67
Transition patterns
Spin
2DComp
+Diss
1861
1871
1862
1872
1863
1873
1864
1874
1865
1875
1866
1876
1881
1891
1882
1892
1883
1893
1884
1894
Page2
+Diss
2126
2176
2127
2177
2128
2178
2129
2179
Page3
+Diss
2139
2191
2140
2192
2141
2193
2142
2194
2143
2195
Sphere
+Diss
2210
2240
2211
2241
2212
2242
2213
2243
2214
2244
2215
2245
2216
2246
2217
2247
2218
2248
2219
2249
2220
2250
Accordion
Flag1
+Diss
2413
2473
2414
2474
2415
2475
2416
2476
2417
2477
2418
2478
2419
2479
2420
2480
2421
2481
2422
2482
2423
2483
Flag2
+Diss
2441
2501
2442
2502
2443
2503
Page1
+Diss
2109
2159
2110
2160
2111
2161
2112
2162
2113
2163
2114
2164
2115
2165
2116
2166
2117
2167
Shutter
Overlap 1971 1972 1973 1974 1981 1982 1983
Ripple Spark
Multi
Move
Roll
+Diss
2059
2079
2060
2080
2061
2081
2062
2082
2063
2083
2064
2084
2065
2085
2066
2086
2067
2087
2068
2088
3D DVE
Flip
Tumble
Overlap 1964 1965 1966 1967
+DISS: This denotes a pattern to which the dissolve effect can be applied.
<Notes>
With Flip Tumble, the image at the transition destination cannot be checked using ME preview when the lever is at the end point.
Page 68

68
Key patterns
BasicPattern
Key
Diss
Exp
Exp+Diss
3001
3021
3041
3002
3022
3042
3003
3023
3043
3004
3024
3044
3005
3025
3045
3006
3026
3046
PinP
Diss
Exp
Exp+Diss
3301
3311
3321
3302
3312
3322
3303
3313
3323
3304
3314
3324
Rotate
2DComp
+Diss
4601
4611
4602
4612
4603
4613
4604
4614
2D Move
Exp
+Diss
3401
3411
3402
3412
3403
3413
3404
3414
3405
3415
3406
3416
3407
3417
3408
3418
2D Move2
ExpCurve2
+Diss
3441
3451
3442
3452
3443
3453
3444
3454
3445
3455
3446
3456
3447
3457
3448
3458
DualPinP
Move
+Diss
3501
3511
3502
3512
3503
3513
3504
3514
3505
3515
3516
3516
3507
3517
3508
3518
DualPinP
Move
+Diss
3541
3551
3542
3552
3543
3553
3544
3554
3545
3555
3546
3556
3547
3557
3548
3558
3D Slide
2DComp
+Diss
4620
4660
4621
4661
4622
4662
4623
4663
4624
4664
4625
4665
4626
4666
4627
4667
4628
4668
4629
4669
4630
4670
Slide1
+Comp
Move
+Diss
3601
3621
3602
3622
3603
3623
Basic Key
Overlap
62
3101613102593103
CHR LUM EXT
Split
2DComp
+Diss
4639
4679
4640
4680
4641
4681
4642
4682
4643
4683
4644
4684
4645
4685
4646
4686
4647
4687
4648
4688
4649
4689
4650
4690
<Notes>
≥ The key patterns that can be used for DSK Effect are 6001, 6002, 6003, 6006, 6007 and 6101 to 6634.
≥ BasicPattern Key, Basic Key and Title are the key patterns for which Rev can be used.
≥ Key patterns 4601 to 6716 can be used only when the 3D optional board (AG-VE70) has been installed.
Page 69

69
Key patterns
Spot Light
Diss
Exp
Exp+Diss
3305
3315
3325
2D Move
Exp
+Diss
3421
3431
3422
3432
3423
3433
3424
3434
3425
3435
3426
3436
3427
3437
3428
3438
2D Move2
ExpCurve2
+Diss
3461
3471
3462
3472
3463
3473
3464
3474
3465
3475
3466
3476
3467
3477
3468
3478
DualPinP
Move
+Diss
3521
3531
3522
3532
3523
3533
3524
3534
3525
3535
3526
3536
3527
3537
3528
3538
DualPinP
Move
+Diss
3561
3571
3562
3572
3563
3573
3564
3574
3565
3575
3566
3576
3567
3577
3568
3578
3D Slide
2DComp
+Diss
4631
4671
4632
4672
4633
4673
4634
4674
4635
4675
4636
4676
4637
4677
4638
4678
Split
2DComp
+Diss
4651
4691
4652
4692
4653
4693
4654
4694
4655
4695
4656
4696
4657
4697
4658
4698
4659
4699
+DISS: This denotes a pattern to which the dissolve effect can be applied.
EXP: This denotes a pattern that appears bigger and bigger.
Back Back
Page 70

70
Key patterns
Ripple
2DComp
+Diss
6031 6032
Sphere
2DComp
+Diss
5201
5231
5202
5232
5203
5233
5204
5234
5205
5235
5206
5236
5207
5237
5208
5238
5209
5239
Flag Move
Move
+Diss
6101
6111
6102
6112
6103
6113
6104
6114
6105
6115
6106
6116
6107
6117
6108
6118
6109
6119
Spin
2DComp
+Diss
4841
4851
4842
4852
4843
4853
4844
4854
4845
4855
4846
4856
PersMove1
2DComp
+Diss
4761
4781
4762
4782
4763
4783
4764
4784
4765
4785
4766
4786
4767
4787
4768
4788
PersMove2
2DComp
+Diss
4801
4821
4802
4822
4803
4823
4804
4824
4805
4825
4806
4826
4807
4827
4808
4828
Flag1
2DComp
+Diss
5401
5461
5402
5462
5403
5463
5404
5464
5405
5465
5406
5466
5407
5467
5408
5468
5409
5469
5410
5470
Flag2
2DComp
+Diss
5431
5491
5432
5492
5433
5493
5434
5494
5435
5495
5436
5496
5437
5497
5438
5498
5439
5499
5440
5500
3DBasic
+Diss 6001 6002 6003 6004 6005 6006 6007 6008 6009 6010
MIX
Ripple
2DComp
+Diss
5601
5611
5602
5612
5613 5614
5411
5471
5412
5472
<Notes>
≥ The key patterns that can be used for DSK Effect are 6001, 6002, 6003, 6006, 6007 and 6101 to 6634.
≥ Key patterns 4601 to 6716 can be used only when the 3D optional board (AG-VE70) has been installed.
Pers1
2DComp
+Diss
4701
4741
4702
4742
4703
4743
4704
4744
4705
4745
4706
4746
4707
4747
4708
4748
4730
4750
4731
4751
4732
4752
4733
4753
Page 71

71
Key patterns
Flag1
2DComp
+Diss
5413
5473
5414
5474
5415
5475
5416
5476
5417
5477
5418
5478
5419
5479
5420
5480
5421
5481
5422
5482
5423
5483
Melt
2DComp
+Diss
6033 6034
Sphere
2DComp
+Diss
5210
5240
5211
5241
5212
5242
5213
5243
5214
5244
5215
5245
5216
5246
5217
5247
5218
5248
5219
5249
5220
5250
Flag Move
Move
+Diss
6121
6131
6122
6132
6123
6133
6124
6134
6125
6135
6126
6136
6127
6137
6128
6138
6129
6139
Spin
2DComp
+Diss
4861
4871
4862
4872
4863
4873
4864
4874
4865
4875
4866
4876
4881
4891
4882
4892
4883
4893
4884
4894
PersMove1
2DComp
+Diss
4769
4789
4770
4790
4771
4791
4772
4792
4773
4793
Flag2
2DComp
+Diss
5441
5501
5442
5502
5443
5503
Pers1
2DComp
+Diss
4734
4754
4735
4755
4736
4756
4737
4757
4738
4758
4739
4759
+DISS: This denotes a pattern to which the dissolve effect can be applied.
EXP: This denotes a pattern that appears bigger and bigger.
Page 72

72
Key patterns
Pers In 2
Move
+Diss
6701
6711
6702
6712
6703
6713
6704
6714
6705
6715
6706
6716
Pers In
Move
+Diss
6601
6611
6602
6612
6603
6613
6604
6614
6605
6615
6606
6616
6607
6617
6608
6618
Sphere
Curve
Move
+Diss
6401
6411
6402
6412
6403
6413
6404
6414
6405
6415
6406
6416
6407
6417
6408
6418
Spin to
Pers
Move
+Diss
6501
6521
6502
6522
6503
6523
6504
6524
6505
6525
6509
6529
6506
6526
6510
6530
6507
6527
6511
6531
6508
6528
6512
6532
Title
Diss 9501 9511 9521
T-1 T-2 T-3
9531 9541 9551
T-4 T-5 T-6
9561 9571 9581
T-7 T-8 T-9
9591 9601 9611
T-10 T-11 T-12
Key Learn
9000 9001 9002
Key
Learn1
Key
Learn2
Key
Learn3
9003 9004 9005
Key
Learn4
Key
Learn5
Key
Learn6
9006 9007 9008
Key
Learn7
Key
Learn8
Key
Learn9
9009
Key
Learn10
Title
Diss 9741 9751 9761
T-25 T-26 T-27
9771 9781 9791
T-28 T-29 T-30
<Notes>
≥ The key patterns that can be used for DSK Effect are 6001, 6002, 6003, 6006, 6007 and 6101 to 6634.
≥ Key patterns 4601 to 6716 can be used only when the 3D optional board (AG-VE70) has been installed.
Accordion
Move
+Diss
6201
6211
6202
6212
6203
6213
6204
6214
6205
6215
6206
6216
6207
6217
6208
6218
6209
6219
Sphere
Move
+Diss
6301
6311
6302
6312
6303
6313
6304
6314
6305
6315
6306
6316
6307
6317
6308
6318
Page 73

73
Key patterns
Pers In
Move
+Diss
6621
6631
6622
6632
6623
6633
6624
6634
Sphere
Curve
Move
+Diss
6421
6431
6422
6432
6423
6433
6424
6434
6425
6435
6426
6436
6427
6437
6428
6438
Title
Diss 9621 9631 9641
T-13 T-14 T-15
9651 9661 9671
T-16 T-17 T-18
9681 9691 9701
T-19 T-20 T-21
9711 9721 9731
T-22 T-23 T-24
Title
Diss 9010 9011 9012
Key
Learn11
Key
Learn12
Key
Learn13
9013 9014 9015
Key
Learn14
Key
Learn15
Key
Learn16
9016 9017 9018
Key
Learn17
Key
Learn18
Key
Learn19
9019
Key
Learn20
Accordion
Move
+Diss
6221
6231
6222
6232
6223
6233
6224
6234
6225
6235
6226
6236
6227
6237
6228
6238
6229
6239
Sphere
Move
+Diss
6321
6331
6322
6332
6323
6333
6324
6334
6325
6335
6326
6336
6327
6337
6328
6338
6329
6339
+DISS: This denotes a pattern to which the dissolve effect can be applied.
EXP: This denotes a pattern that appears bigger and bigger.
Page 74

74
Overview of MX-Navi
MX-Navi is software used when transmitting images from a PC to the AG-MX70 and displaying them and when reading still
images from the AG-MX70 into a PC.
The following are possible when a PC has been connected to the AG-MX70.
≥ DSK display of the PC screen as telop or animation.
≥ Display of the PC screen with internal matte.
≥ Images provided as input to the AG-MX70 can be read into the PC as still images and be converted to image files.
About this software
Description of the software
The software contained in the CD is described below.
∫ USB driver
This driver software is for communications when the AGMX70 is connected to a PC via the USB port.
∫ MX-Navi
This software is for use when transmitting images from a PC
to the AG-MX70 and playing them back and when reading
still images from the AG-MX70 into a PC. Installing this
software makes the following possible.
Transmitting of images from a PC to the AG-MX70
≥ PC images can be transmitted to the AG-MX70 as Title
data or IntVideo data.
≥ Playback and pause operations can be performed with
the transmitted data.
Reading of still images from the AG-MX70 into a PC
≥ Images displayed on the AG-MX70 can be read into a
PC as still images.
Management of the AG-MX70 memory
≥ It is possible to check the status and change the
settings of the AG-MX70’s image memory.
Refer to “Before use” on pages 77 to 79 when installing this
software.
System requirements
The PC to be used should meet the following requirements.
≥ Computer DOS/V with USB port
≥ OS Windows 98
Windows ME
Windows 2000 Professional
Windows XP HomeEdition
Windows XP Professional
≥ CPU Pentium II 300 MHz or better
≥ RAM 64 MB or more
≥ Display True Color (24 bits, 32 bits)
800a600 dots or more
≥ Hard disk 5 MB or more free space
≥ Other CD-ROM drive
Page 75

75
Processing of image data
∫ By data type
Image data is processed by the AG-MX70 either as Title
data or IntVideo data, depending on the application. When
image data is transmitted to the AG-MX70, it is necessary to
first select one of these 2 data types.
≥ Title data
Data to be used for DSK playback should be
transmitted as Title data. RGB data and α channel
data are used by Title data. When an image having
an α channel is used, the image is subjected to
transparency processing corresponding to the value
of the α channel. When an image not having an α
channel is used, transparency processing is not
performed.
≥ IntVideo data
When the image is to be played back as internal
matte, it is transmitted as IntVideo data. The image
uses only RGB data. As the α channel is not used,
transparency processing is not performed.
∫ Display methods
It is possible to select from the following display methods
according to how the image data is to be played back.
≥ STILL
With this method, a single image is played back as a
still image. Both Title data and IntVideo data can be
used. When Title data is used, it is possible to set the
horizontal position and vertical position of the image.
∫ DSK effects
When an image is displayed on (DSK ON) or cleared from
(DSK OFF) the monitor, it is possible to apply dissolve or 2
or 3D transition effects.
∫ Image size
The appropriate size of images for the Monitor 1 screen
differs, depending on the video format setting of the AGMX70 and the MX-Navi settings.
NTSC: Monitor 1 screen = 640 a 480
PAL: Monitor 1 screen = 768 a 576
It is possible to select any image size for playback, however,
if the image size selected is larger than the Monitor 1
screen, only the part of the image that fits onto the screen
will be transmitted and played back.
∫ Image formats supported
It is possible to use the following image formats for playback
with the AG-MX70.
≥ TARGA (.tga)
24 bit/pixel (no α channel) data and 32 bit/pixel (with
α channel) data can be used.
≥ JPEG (.jpg)
≥ BMP (.bmp)
24 bit/pixel (no α channel) data can be used.
A 32 bit/pixel image of the TARGA format must be used
when the image is to be displayed with transparency
processing. When displaying images using either MOVIE,
ROLL or CRAWL methods, it is necessary to use
consecutively numbered file names.
(e.g. Image001.tga to Image015.tga)
151
5
15
≥ MOVIE
With this method, two or more images are played back
consecutively. A single image is processed as one
frame. It is possible to select from ONCE or REPEAT
playback. Both Title data and IntVideo data can be
used. When Title data is used, it is possible to set the
horizontal position and vertical position of the image.
≥ CRAWL
Two or more images are lined up one after the other
and played back (scrolled) horizontally on the screen.
It is possible to set the direction and the speed for
scrolling. Only Title data can be used with this
method. It is possible to set the vertical position of
the image.
1
5
1
5
≥ ROLL
Two or more images are lined up one after the other
and played back (scrolled) vertically on the screen. It
is possible to set the direction and the speed for
scrolling. Only Title data can be used with this
method. It is possible to set the horizontal position of
the image.
Page 76

76
Processing of image data
∫ Management of the image memory
≥ Memory capacity
Images transmitted from the PC are stored in the
AG-MX70’s image memory. The memory capacity
differs, depending on the AG-MX70’s video format
setting.
NTSC: 30 pages
(1 page = amount of memory required for 1
image on Monitor 1 screen)
PAL: 26 pages
The image memory is divided into separate areas for
Title data and IntVideo data and capacity can be
allocated freely as required.
≥ DIVIDE
The number of memory pages used differs,
depending on the number of vertical pixels, however
this only applies when images are transmitted as
Title data. The memory pages being used can be
reduced by adjusting the size of the image for DSK
playback, so that a larger number of images can be
played back.
NTSC
Number of vertical pixels
Number of memory pages used
1 to 60 1/8 page
1/4 page
1/2 page
61 to 120
121 to 240
1 page241 to 480
PAL
1 to 72 1/8 page
1/4 page
1/2 page
73 to 144
145 to 288
1 page289 to 576
<Notes>
≥ When the vertical position is set, images with a small
number of vertical pixels can be played back on the lower
part of the screen. This is effective for DSK playback of
telop or logos at the lower part of the screen.
≥ IntVideo data always use one memory page, regardless of
the image size.
Page 77

77
Before use
AG-MX70 connections
It is necessary to connect the PC to the AG-MX70 using the
USB cable before installing the software. Follow the steps
below.
1) Turn off the power to the AG-MX70.
2) Connect the PC to the AG-MX70 using the USB
cable.
Insert the USB cable connectors into the
corresponding USB ports on the PC and on the rear
panel of the AG-MX70.
This completes the connection. When the 2 units are being
connected for the first time, install the USB driver by
following the steps in “Installation of USB driver” below.
<Note>
The USB cable is not supplied with this unit. Use a
commercially available 3 m or shorter USB cable. Note that
if the cable to be used is more than 3 m in length,
communications may not be performed correctly.
Installation of the USB driver
It is necessary to install this driver in the PC to enable USB
communications between the PC and AG-MX70 after they
are connected for the first time. (It is only necessary to
install the USB driver software once.) Follow the steps
below.
∫ For Windows 98 and Windows 2000
<Notes>
≥ The steps outlined below are for Windows 98.With
Windows 2000, the screens will differ slightly, but the
driver software can still be installed following the same
steps.
≥ Be sure to log on as a user with Administrator rights when
installing this software in a PC with Windows 2000.
1) Connect the PC to the AG-MX70 correctly.
2) Turn on the power to the PC.
Check that Windows has started up.
3) Place the setup CD-ROM in the PC’s CD-ROM drive.
4) Turn on the power to the AG-MX70.
After a short while, the “Add New Hardware Wizard”
dialog will be displayed.
5) Click on the “Next” button.
6) Select “Search for the best driver for your device,”
then click on the “Next” button.
8) If the driver is searched correctly, a screen similar to
the one shown below will be displayed.
9) When the screen indicating that the installation is
complete is displayed, click on the “Finish” button.
7) Place a check next to “Specify a location,” enter the
USB_DRV folder in the setup CD-ROM as the search
location and click on the “Next” button.
Page 78

78
Before use
∫ For Windows XP
<Note>
Be sure to log on as a user with Administrator rights when
installing this software.
1) Connect the PC to the AG-MX70 correctly.
2) Turn on the power to the PC.
Check that Windows has started up.
3) Place the setup CD-ROM in the PC’s CD-ROM drive.
4) Turn on the power to the AG-MX70.
After a short while, the “Found new hardware wizard”
dialog will be displayed.
5) Select “Install the software automatically,” then click
on the “Next” button.
∫ For Windows ME
1) Connect the PC to the AG-MX70 correctly.
2) Turn on the power to the PC.
Check that Windows has started up.
3) Place the setup CD-ROM in the PC’s CD-ROM drive.
4) Turn on the power to the AG-MX70.
After a short while, the “Add New Hardware Wizard”
dialog will be displayed.
5) Select “Automatic search for a better driver,” then
click on the “Next” button.
6) When the screen indicating that the installation is
complete is displayed, click on the “Finish” button.
6) If the installation warning screen is displayed, click on
the “Continue Anyway” button.
7) When the screen indicating that the installation is
complete is displayed, click on the “Finish” button.
Page 79

79
Before use
Operation confirmation
This completes installation of all of the software. Use the
following procedure to confirm that the software has been
installed correctly.
1) Confirm that the PC and the AG-MX70 have been
connected correctly and that the power of the AGMX70 is switched on.
2) Select “Programs” > “Panasonic AG-MX70” > “MXNavi” from the Windows Start menu. MX-Navi will
start.
3) When the display column of the status bar on the left
bottom of the main window of MX-Navi shows
“Connecting,” it means that the software has been
installed correctly.
5) The installation contents confirmation screen
appears.
To proceed with the installation of the contents
shown, click the “Next” button. To change the
contents, use the “Back” button to return to the
previous screen, and change the settings.
Check that this column
shows “Connecting.”
<Notes>
If “Not connecting” is shown, check the following.
≥ PC and AG-MX70 must be connected correctly.
≥ The power of the AG-MX70 must be switched on.
≥ The length of the USB cable must be within 3 m.
When a USB hub is being used, correct operation may be
obtained when the hub is removed and the cable is
connected directly to the USB port of the PC.
Installation of MX-Navi
After installing the USB driver, install MX-Navi, the software
for handling image exchange with the AG-MX70. Follow the
steps below.
1) Select “Run…” from the “Start” menu. Click the
“Browse” button, select Setup.exe in the MX-Navi
folder of the setup CD-ROM, and click “OK.”
2) The setup start screen will be displayed. Click the
“Next” button.
3) The screen for setting the MX-Navi installation
destination will be displayed. If the destination shown
is the one desired, just click the “Next” button.
To change the installation destination, click the
“Browse” button, change the installation destination,
and click the “Next” button.
4) The screen for selecting the installation type is
displayed. When “Typical” has been selected, the
program files of MX-Navi and sample images are
installed. When “compact” has been selected, only
the MX-Navi program is installed.
Select the type and click the “Next” button.
6) After the files have been copied, the installation end
screen appears. Installation is completed by clicking
the “Finish” button now.
Page 80

80
Startup and shutdown
Screen descriptions
How to start up MX-Navi
Select “Program” > “Panasonic AG-MX70” > “MX-Navi” from the Windows Start menu.
How to shut down MX-Navi
Shutdown is possible in the following two ways.
≥ Click the button at the right top of the main window.
≥ Select “Exit” from the “File” menu of the main window.
1
2
3 4 5 6 7 8 9
For data with a Mark setting, the Mark number is
displayed. For details on Mark settings, refer to page 87.
1
This is displayed for data with the Protect setting. For
details on the Protect setting, refer to page 87.
2
O (Order)
The order of the data in the transmission list is displayed.
The color changes according to the title transmission
status.
Not transmitted ....................... Dark gray
Transmitted ............................ Light gray
Transmission not possible ...... Dark red (insufficient
MX70 memory)
3
Main window
A list of Title data, called the transmission list, is displayed on the main window. The main window of MX-Navi has two
display modes, the icon mode and the list mode. The modes can be switched using the “view” menu.
Icon mode
Page 81

81
TYPE
The data playback format will be displayed.
When double-clicked, the Properties window (page 86)
will open.
7
OFF
The operation at the time of DSK OFF will be displayed.
The display contents are the same as for DSK ON.
When double-clicked, the Properties window (page 86)
will open.
8
NAME/COMMENT
The name given to the data and the comment string will
be displayed.
When double-clicked, the Properties window (page 86)
will open.
9
Duration
(This appears only when Auto Trigger of
DSK OFF is valid.)
Screen descriptions
Data playback format
Still
Movie Once
Movie Repeat
Crawl
Roll
ON
The operation at the time of DSK ON will be displayed.
When double-clicked, the Properties window (page 86)
will open.
6
ICON
The image is reduced and displayed. When several files
are used with one title, one of them will be used for the
display. The aspect ratio of the reduced image changes
according to the memory setting (16:9/4:3) of the main
unit.
When double-clicked, the image display screen (page
89) opens and the original image can be checked.
5
Special
effects and
effect time
Slide
setting
Trigger setting
AutoTrigger is valid.
The time taken for DSK ON
to be established is
displayed at the side.
AutoTrigger is not valid.
D, F
The upper line shows the Divide value for the data and
the lower line shows the number of images of the data.
4
Page 82

82
OFF
The operation at the time of DSK OFF will be displayed.
The display contents are the same as for DSK ON.
When double-clicked, the Properties window (page 86)
will open.
8
NAME/COMMENT
The name given to the data will be displayed.
When double-clicked, the Properties window (page 86)
will open.
9
Screen descriptions
TYPE
The data playback format will be displayed.
When double-clicked, the Properties window (page 86)
will open.
7
Duration
(This appears only when Auto
Trigger of DSK OFF is valid.)
Data playback format
Still
Movie Once
Movie Repeat
Crawl
Roll
List mode
1
2
3 4 5 6 7 8 9
For data with a Mark setting, the Mark number is
displayed.
1
This is displayed for data with the Protect setting.
2
O (Order)
The order of the data in the transmission list is displayed.
This is the same as with icon mode.
3
D
The Divide value of the data is shown.
4
F
The number of images of the data is shown.
5
ON
The operation at the time of DSK ON will be displayed.
When double-clicked, the Properties window (page 86)
will open.
6
Special effects Slide settingTrigger setting
The yellow frame is the cursor. The data marked by the cursor will be the object for transmission, deletion, memory clearing,
property setting, etc.
When the mouse is left-clicked on data, the cursor will move to that data. When “Ctrl” is held down, several titles can be
selected by left-clicking, and when “Shift is held down, the titles between the first click and the last click will be selected.
When several titles are selected, the data selected first will be the object for Properties settings and screen display. For other
operations, all selected titles will be the object.
<Note>
For the setting contents for DSK ON and DSK OFF, refer to “Setting the title data playback properties” (page 86).
Page 83

83
Menu descriptions
File menu
Creation of a new list
This clears the current transmission list and creates a new
one (refer to page 86). The same operation can be
performed with the operation button .
Open image
This opens an image and adds the title data at the end of
the transmission list. The same operation can be performed
with the operation button .
Open List
This clears the current transmission list and opens a
previously saved transmission list. The same operation can
be performed with the operation button .
Save List
This overwrites and saves the current transmission list.
If the current transmission list does not have a name, the
operation becomes the same as with “Save List as...”
The same operation can be performed with the operation
button .
Save List as...
This saves the current transmission list with a new name.
Preview
This opens the image display screen and displays the image
of the title selected by the cursor. The same operation can
be performed by double-clicking the ICON column of the
data display and selecting “Preview” from the pop-up menu.
Property
This opens the Properties setting screen for the title
selected by the cursor.
The same operation can be performed by double-clicking
the column IN, TYPE, OUT, NAME of the title data display
or by right-clicking the title data and selecting “Property”
from the displayed menu.
Read flash memory
This reads the data (SETUP menu settings, operation panel
settings, etc.) in the flash memory of the AG-MX70, and
saves it in files.
Select this menu item after turning on the power while
holding down the “0” key and “5” key on the operation panel
of the AG-MX70 and setting the AG-MX70 to the flash
memory backup mode. A dialog box now appears so input
the file name and click the “OK” button to save the flash
memory data.
Write Flash memory
This writes the data of the saved file into the flash memory
of the AG-MX70.
Select this menu item after turning on the power while
holding down the “0” key and “5” key on the operation panel
of the AG-MX70 and setting the AG-MX70 to the flash
memory backup mode. A dialog box now appears so select
the file and click the “OK” button to write the file data. When
this operation is performed, all the data in the flash memory
of the AG-MX70 is replaced.
Exit
This shuts down the program.
Edit menu
Undo
This undoes data additions, deletions and other operations.
Up to 16 steps can be undone.
The same operation can be performed by pressing “Ctrl” +
“Z.”
Redo
This cancels the contents of the Undo.
The same operation can be performed by pressing “Ctrl” +
“Y.”
Cut
This deletes the selected title from the transmission list and
saves it to the clipboard. The saved title can be added to
the transmission list via the “Paste” menu. Only the title cut
last will be saved.
The same operation also can be performed by “Ctrl” + “X” or
by right-clicking the title data display column and selecting
“Cut” from the pop-up menu.
Copy
This copies the selected title to the clipboard.
The saved title can be added to the transmission list via the
“Paste” menu. Only the title cut last will be saved.
The same operation can be performed with “Ctrl” + “C” or by
right-clicking the title data display column and selecting
“Copy” from the pop-up menu.
Paste
This adds the title saved on the clipboard to the
transmission list.
The same operation can be performed with “Ctrl” + “V” or by
right-clicking the title data display column and selecting
“Paste” from the pop-up menu.
Page 84

84
Menu descriptions
Delete
This deletes the selected title from the transmission list.
The same operation can be performed with the “DEL” key or
by right-clicking on the title data display column and
selecting “Delete” from the pop-up menu.
Select all
This selects all titles in the transmission list.
The same operation can be performed by pressing “Ctrl” +
“A.”
View menu
ICON view
This switches the display mode for the main screen to icon
mode.
The same operation can be performed by right-clicking the
data display and selecting “View” > “ICON view” from the
displayed pop-up menu.
LIST view
This switches the display mode for the main screen to list
mode.
The same operation can be performed by right-clicking the
data display and selecting “View” > “LIST view” from the
displayed pop-up menu.
Sort by name
This rearranges the data of the transmission list by the
Name character order.
The same operation can be performed with the ,
buttons in the Name heading part of the data display.
Sort by comments
This rearranges the transmission list by the Comment
character order.
The same operation can be performed with the ,
buttons in the Comment heading part of the data display.
Cursor menu
Top
This moves the cursor to the start of the transmission list.
The same operation can be performed with the operation
button or with the HOME key.
Jump to 10th Previous
This moves the cursor up 10 from the present position.
The same operation can be performed with the operation
button or with the Left arrow key.
Previous
This moves the cursor up one from the present position.
The same operation can be performed with the operation
button or with the Up arrow key.
Next
This moves the cursor down one from the present position.
The same operation can be performed with the operation
button or with the Down arrow key.
Jump to 10th Next
This moves the cursor down 10 from the present position.
The same operation can be performed with the operation
button or with the Right arrow key.
Bottom
This moves the cursor to the end of the transmission list.
The same operation can be performed with the operation
button or with the END key.
Jump to the Current DSK Title
This moves the cursor to the title being played.
The same operation can be performed with the number key
0.
Jump to the marked Title
This moves the cursor to a title with a Mark setting.
Select Mark1 to Mark9 from the submenu.
The same operation can be performed with the number keys
1 to 9.
Page 85

85
Menu descriptions
Tool menu
Memory status
This displays the memory status screen. For details, refer
to “Checking the memory status of the AG-MX70” (page 90).
AG-MX70 setup
This displays the memory setting screen. For details, refer
to “Changing the AG-MX-70 memory settings” (page 90)
and “Recalling events” (page 91.)
Properties initial value setting
This displays the Properties initial value setting screen. For
details, refer to “Initial set of Property data” (page 92).
Operating environment
This displays the Operating environment screen. For
details, refer to “Setting the operating environment” (page
93).
Help menu
Help
This displays the Help contents.
The same operation can be performed with the operation
button .
Version
This displays the version of this application.
Operation menu
(effective only when the AG-MX70 is connected)
AutoLoad
This automatically transmits the data from the selected data
to the end of the list and performs DSK playback. For
details, refer to “Automatic transmission and playback of
Title data” (page 88).
The same operation can be performed with the operation
button or with “Shift” + “Space.”
Load Title
This transmits the selected data. For details, refer to
“Manual transmission and playback of Title data” (page 88).
The same operation can be performed with the operation
button or with the L key.
Play
This performs DSK playback for the selected data. When
the data has not yet been transmitted, DSK playback will be
performed after transmission. For details, refer to “Manual
transmission and playback of Title data” (page 88).
The same operation can be performed with the operation
button or with “Space.”
Stop
This stops DSK playback.
The same operation can be performed with the operation
button .
Clear the selected title
This clears the selected data from the image memory of the
AG-MX70. For details, refer to “Clearing Title data” (page
90).
The same operation can be performed with the operation
button or with “Ctrl” + “R.”
Clear all titles
This clears all data in the transmission list from the image
memory of the AG-MX70. For details, refer to “Clearing
Title data” (page 88).
The same operation can be performed with the operation
button or with “Ctrl” + “T.”
Auto Take
This executes Auto Take using the AG-MX70.
Page 86

86
Title data operations
Flow until Title data playback
The procedure for transmission of PC images as Title data
and DSK playback is as follows.
1) Register the image in the list of Title data for
transmission to the AG-MX70 (transmission list).
2) Perform data playback settings.
3) Play back and transmit data manually or
automatically.
Registering Title data in the transmission list
The transmission list is a list of Title data to be transmitted
to the AG-MX70. Up to 99 Title data items can be
registered in the transmission list. Images can be registered
as Title data in the transmission list using the following
procedure.
1) Select “Open image” from the “File” menu of the main
window. The “Open file” dialog will open.
2) Select the image to be transmitted. When playback
as MOVIE, ROLL, or CRAWL is desired, select the
image to be displayed first from a series of images.
3) Set the data playback format etc.
1
2
3
1 Set the data playback format.
2 Set the data frame number (number of images).
3 Set the frame number for the image to be
displayed in the Icon row.
<Note>
When the selected image is not a series format, it will be
registered automatically as STILL data, so this screen will
not be displayed.
4) The data is added to the transmission list and
displayed in the main window.
Setting the Title data playback properties
Setting of special effects with DSK ON, DSK OFF, the data
display position, etc. will be done automatically according to
the initial value settings at the time the data was registered
in the transmission list.
These settings can be changed on the Properties screen of
the data. The properties screen of the data is opened using
the following procedure.
1) Move the mouse cursor to the data for which the
settings are to be changed and left click on the data.
The yellow band cursor will move and the data will be
selected.
2) Select “Property” from the “File” menu of the main
window.
The Properties window will open.
Page 87

87
Off: This is used for setting the operation to be
performed when the data is deleted from the
screen (DSK OFF).
≥ AutoTrigger: This sets the start operation.
No check: DSK OFF will be performed when the playback
button on the main window is pressed or when
the DSK button on the main unit is pressed.
Check: DSK OFF will be performed according to the
time set for Duration.
≥ Effect: Same as for DSK ON.
≥ Slide : Same as for DSK ON.
Duration: This is used for setting the data playback time.
The playback time also includes the time for
DSK ON and DSK OFF. This is effective only
when AutoTrigger of DSK OUT is checked.
Position: This is used for setting the data display position
as the offset (pixels) from the left top of the
screen.
X and Y can be set for STILL and MOVIE, Y can
be set for CRAWL, and X can be set for Roll.
≥ X: A value from 0 to 719 can be set for NTSC
as well as PAL.
≥ Y: A value of 0 to 480 can be set for NTSC,
and a value of 0 to 576 can be set for PAL
(only even numbers).
Protect: When this is checked, the data will not be
cleared from the memory by normal clearing
operation.
Mark: Any number from 1 to 9 can be set. When the
number to be set is selected via “Cursor” >
“Jump to Mark.” it is possible to jump straight to
the desired data.
Name: This is used for setting the name of the data. Up
to 128 single-byte characters can be entered.
Comment: This is used for setting a comment for the data.
Up to 128 single-byte characters can be entered.
<Notes>
≥ The initial value for the playback setting can be changed
at the “Initial set of Property data” screen. (Refer to page
92.)
≥ When the pattern entered for DSK ON and DSK OFF is a
pattern that can not be used with DSK, automatic
correction will be made to a similar pattern.
≥ When there are 3000 or more patterns, the same pattern
must be used for DSK ON and DSK OFF.
For 0 to 2999 patterns, the combination of DSK ON and
DSK OFF can be selected freely.
≥ Set Time as 00:00 when no special effects are to be used
with DSK ON and DSK OFF.
≥ When 1 has been selected for DIVIDE with the CRAWL
data, the Position Y value cannot be set.
Title data operations
Description of the setting items (depending on the data
playback format, some items may not be displayed or
setting may not be possible)
Icon: This is used for setting the frame number of the
image to be used for display in the ICON row of
the main window.
Mode: This is used for selecting ONCE or REPEAT
when MOVIE display is being used.
During ROLL and CRAWL, it is used for
selecting the scroll direction and entering the
speed (number of pixels to be moved per field).
On: This is used for setting the operation when the
data is displayed on the screen (DSK ON).
≥ AutoTrigger: This sets the start operation.
No check: DSK ON will be performed when the playback
button on the main window is pressed or when
the DSK button on the main unit is pressed.
Check: DSK ON will be executed when the specified
time has expired after the data playback
operation.
≥ Effect: This sets the special effects.
Pattern: The specified pattern will be used at DSK ON.
Diss: Dissolve will be used.
Time: Set the time for execution of special effects
from 00:00 to 00:30.
≥ Slide: This is used for the slide display settings.
Dir: Click the arrow to select the slide direction.
When a setting other than 1 has been selected
for DIVIDE, sliding in the vertical direction
cannot be set.
Speed: Enter the slide speed (number of pixels to be
moved per field).
Page 88

88
Automatic transmission and playback of Title data
The data from the cursor position to the end of the
transmission list can be transmitted automatically and DSK
playback can be performed automatically.
Select “Operation” > “Autoload” from the menu of the main
window.
Manual transmission and playback of Title data
Data registered in the transmission list can be transmitted to
the AG-MX70 using the following procedure.
1) Move the cursor to the data to be transmitted and left
click on the data.
The yellow frame cursor moves to the selected data.
2) Select “Operation” > “Load title” from the menu of
the main window.
The data is transmitted to the AG-MX70.
<Notes>
≥ The time required for the transmission differs according to
the image size and the number of images.
≥ Transmission is not possible when the image memory of
the AG-MX70 does not have the required free space.
Clear any data that is not required from the image
memory (refer to “Clearing Title data”) and repeat the
transmission operation.
≥ Images cannot be transmitted while the “Loading...”
display appears on the LCD screen immediately after the
AG-MX70’s power has been turned on or immediately
after changes have been made to the image memory
settings.
≥ While transmission is in progress, the LCD display of the
AG-MX70 shuts down.
DSK playback of the transmitted data is possible using the
following procedure.
1) Move the cursor to the data for DSK playback and left
click on the data.
The yellow frame cursor moves to the selected data.
2) Select “Operation” > “Play” from the menu of the
main window.
DSK playback is performed for the data.
<Note>
In order to perform DSK playback for the data, it is
necessary to set Key and Fill to Title using the DSK/Fade
item on the DSK Fade menu of the AG-MX70. For details,
refer to page 46.
Title data operations
1
2
5
3
4
1 The DSK status is displayed here.
2 The transmission status is displayed here.
3 This executes DSK ON/OFF.
4 This stops automatic loading.
5 When a check is entered, a return is made to the
initial data and playback continues after the last
data on the transmission list has been played
back.
<Notes>
≥ Any data that has not been transmitted will be transmitted
automatically. Transmission also will be executed during
playback of other data.
≥ If the data transmission has not been completed by the
time the DSK playback stage is reached, standby status
will be maintained until it is completed.
≥ After DSK playback, data without the Protect setting will
be cleared from the memory.
Clearing Title data
The data written to the image memory of the AG-MX70 will
be cleared only by a clearing operation or when the power
supply of the AG-MX70 is switched off. When space is
required for transmission of new data, delete any data that
is not required. The clearing operation is performed using
the following procedure.
1) Move the cursor to the data to be cleared and left
click on the data.
The yellow frame cursor moves to the selected data.
2) Select “Operation” > “Clear the selected title” from
the menu of the main window.
The data is cleared.
<Notes>
≥
When “Operation” > “Clear all title” is selected from the menu
of the main window, all transmitted Title data will be cleared.
≥ Data for which Protect has been set will not be cleared by
this operation. Clearing of data for which Protect has
been set must be done from the memory status screen.
(Refer to page 90.)
Page 89

89
Reordering the transmission list
The transmission list can be reordered by any one of the
following methods.
≥ Select the reordering method as “Sort by name” or
“Sort by comments” from the “Display” menu.
≥ Double-click the , buttons in the heading column
of NAME/COMMENT of the transmission list. When
the display mode is Icon mode, reordering by name will
be done with the left button and reordering by comment
with the right button. When the display mode is List
mode, it is only possible to reorder by name.
≥ Data can be dragged to a different position by left-
clicking on the data and releasing the button after
dragging the cursor to a new position. The data will be
moved to the position where the button was released.
Saving the transmission list
The created transmission list can be saved to a file.
1) Select “Save list as...” from the “File” menu of the
main window.
The “Save List as...” dialog will be displayed.
2) Enter the list name and click on the “Save” button.
Opening a transmission list
A saved transmission list can be opened as follows.
1) Select “Open list” from the “File” menu of the main
window.
The “Open file” dialog will be displayed.
2) Select the list to be opened and click on the “Open”
button.
Deleting Title data from the transmission list
Data registered in the transmission list can be deleted from
the list using the following procedure.
1) Move the cursor to the data to be deleted and leftclick on the data.
The yellow frame cursor moves to the selected data.
2) Select “Edit” > “Delete” from the menu of the main
window.
The data is deleted from the transmission list.
1
Title data operations
Checking the Title data image
The image of the data selected on the image display screen
can be displayed in the original size so it can be checked.
The image display screen can be displayed using one of the
following methods.
≥ Select “Preview” from the file menu of the main
window.
≥ Select “Preview” from the menu displayed when the
mouse is right-clicked on the data.
≥ Double-click the ICON part in the data display column.
When the selected data has been changed on the main
window, the image changes to reflect the changes.
1 Order
This is the order of the data to which the displayed
image belongs. The order displayed data can be
changed either by direct input of numbers or by
clicking the arrows.
2 Frame
This shows the data frame to which the displayed
image corresponds. The displayed frame can be
changed either by direct input of numbers or by
clicking the arrows.
2
Page 90

90
Checking the memory status of the AG-MX70
The status of the image memory of the AG-MX70 can be
checked on the memory status screen.
Select “Tools” > “Memory status” from the menu of the
main window to open the memory status screen.
Other operations
1
2
1 The system setting status of the AG-MX70 is
displayed here.
2 This is the memory status display column.
≥ One line corresponds to one page.
≥ The column with the line numbers displayed in
yellow is the Title data area, and the blue column
shows the range of the IntVideo data.
≥ With Title data, the color differs according to the
data type.
Orange: Normal data
Pink: Data with Protect setting
Green: Data that cannot be recognized by MX-Navi
(data written on the AG-MX70 side, data transmitted the
previous time when MX-Navi had been started, etc.)
≥ The data can be selected by left-clicking on the data
in the status display column. The selected data
becomes the object for clearing and for reading to
the PC.
<Notes>
≥ On this screen, select the data to be cleared and then
select “Operation” > “Clear specified area ” from the
menu. Title data with Protect setting also will be cleared
by this operation.
≥ All Title IntVideo data can be cleared by selecting
“Operation” > “All Clear” from the menu of this screen.
Changing the AG-MX-70 memory settings
The settings of the AG-MX70 (switching between NTSC and
PAL, switching between 4:3 and 16:9, changing the page
distribution between Title data and IntVideo data) can be
changed from the PC.
1) From the menu of the main window, select “Tools” >
“AG-MX70 setup” to open the mixer setting screen.
2) Change the memory settings in the Memory column
on the mixer setting screen.
Signal This setting can be switched between NTSC
and PAL.
Aspect This setting can be switched between 4:3
and 16:9.
Allocation The page distribution between Title data and
IntVideo data can be changed here.
3) The settings are reflected by clicking the “Set” button.
<Notes>
≥ When the memory setting has been switched to 4:3 or
when the page distribution for Title data and IntVideo data
has been changed, all data will be cleared from the image
memory.
≥ When the memory setting has been switched from NTSC
to PAL or vice versa, the current transmission list will be
closed and a new list will be opened.
Page 91

91
Other operations
3) Select “File” >“Capture Title” from the menu of the
memory status screen to read in Title data.
Select “File” >“Save IntVideo” from the menu of the
memory status screen to read in IntVideo data.
4) Enter the image format and the file name and click
“Save.”
When the data to be read in is composed of multiple
images, a number will be automatically appended at
the end of the file name.
<Notes>
≥ For saving in of Title data, the image format is fixed to
TARGA (32 bit/pixel, with α channel).
≥ For saving in of IntVideo data, the image format can be
selected as TARGA, JPEG, or BMP (all 24 bits/pixel, no α
channel).
≥ Capture the IntVideo data after the IntVideo playback has
been stopped at the AG-MX70 main unit.
≥ Images cannot be transmitted while the “Loading...”
display appears on the LCD screen immediately after the
AG-MX70’s power has been turned on or immediately
after changes have been made to the image memory
settings.
≥ While transmission is in progress, the LCD display of the
AG-MX70 shuts down.
Recalling events
AG-MX70 events can be recalled from the PC.
1) Select “AG-MX70 setup” from the “Tools” menu of the
main window.
2) Input the number of the event to be recalled into the
“Event Recall” column on the mixer setting window,
and click the “Recall” button. The event is now
recalled.
Select the data by leftclicking in the status
display column.
Saving data
Title data or IntVideo data can be read to the PC from the
image memory of the AG-MX70 and can be stored as still
images. Use the following procedure.
1) Select “Tools” >“Memory status” from the menu of
the main window to open the memory status screen.
2) Left-click on the data to be read into the PC in the
status display column of the memory status screen.
The data changes to selected status (the color will
become darker).
Transmission and playback of IntVideo data
The operations for transmission and playback of PC images
as IntVideo data is described below.
1) Select “Tools” >“Memory status” from the menu of
the main window and open the memory status
screen.
2) Select “File” >“Load Intvideo” from the menu of the
memory status screen.
The “Open file” dialog will be opened.
3) For transmission of a STILL image to the AG-MX70,
select the image and click “Open.”
To play back MOVIE images, select the image to be
played back first from a series of images and click
“Open” to display the playback format setting screen.
When the playback format and the number of frames
to be transmitted have been set and “OK” is clicked,
the images will be transmitted to the AG-MX70.
4) Left-click the data to be played back in the status
display column on the memory management screen.
The data is set to the selected status (status in which
the color darkens).
5) Select “Operation” >“Preview” from the memory
status screen menu.
The data is now played back.
<Notes>
≥ Crawl and Roll playback formats cannot be used for
IntVideo data.
≥ Images cannot be transmitted immediately after the AG-
MX70’s power has been turned on or immediately after
changes have been made to the image memory settings.
≥ While transmission is in progress, the LCD display of the
AG-MX70 shuts down.
≥ Before playback, INT/EXT must be selected by the AG-
MX70.
Clearing IntVideo data
The operation for deletion of transmitted IntVideo data from
the image memory of the AG-MX70 is described below.
1) Select “Tools” >“Memory status” from the menu of
the main window to open the memory status screen.
2) Left-click the data to be deleted in the status display
column of the memory status screen.
The data changes to selected status (the color
becomes darker).
3) Select “Operation” >“Clear specified area ” from the
menu of the memory status screen.
The data is cleared.
Page 92

92
Other operations
Setting the initial properties
The initial values for the properties to be used with new data can be set on the “Initial set of Property Data” setting screen.
1) Select “Initial set of Property Data” from the Tools menu of the main window.
The “Initial set of Property Data” setting screen is displayed.
2) Set the individual items and click the “OK” button to change the settings.
All settings can be returned to the initial value by pressing the “Cancel” button.
Still Duration
The duration is set for when Still is used as the data
playback format.
1
Movie Duration
The duration is set for when Movie Repeat is used as the
data playback format.
2
Roll Speed
The speed is set for when Roll is used as the data
playback format.
3
Crawl Speed
The speed is set for when Crawl is used as the data
playback format
4
Position
The display position is set here. The vertical position is
different for NTSC and PAL.
X: The horizontal position can be set from 0
to 719.
Y (NTSC): For NTSC, the vertical position can be set
from 0 to 480. (Only even numbers.)
Y (PAL): For PAL, the vertical position can be set
from 0 to 576. (Only even numbers.)
5
ON, OFF settings
The operation at the time of DSK ON and DSK OFF is
set. For further details on each item, refer to “Setting the
data playback properties” (page 86).
≥ AutoTrigger (OFF only)
When this is checked, the OFF Trigger is set to
Auto.
≥ Effect
The pattern to be used for special effects and the
special effects time are set here.
≥ Slide
The slide direction and the speed are set here.
6
1
2
3
4
6
5
Page 93

93
Other operations
Setting the operating environment
The operation settings for this application can be set on the
operation environment screen.
1) Select “Operating environment” from the Tools menu
of the main window.
The Environment screen will be displayed.
2) Set the individual items and click the “OK” button to
change the settings.
Boot and shutdown
The operation at the time of boot and shutdown of this
application is set.
≥ Resume mode
When this is checked, the transmission list which
was open when the application was shut down the
last time will be opened at startup and the status
effective at the time the application was shut down
the last time will be re-established.
When this is not checked, a new transmission list
will be opened at startup.
≥ Confirmation mode
When this is checked, the confirmation screen will
be displayed when the application is shut down.
1
Memory management
The operation when the AG-MX70 is connected to the
PC is set.
When “Memory clear when re-connect” is checked, all
Title and IntVideo data will be cleared when the AGMX70 is connected.
Check “Clear the protected data” when data with the
Protect setting is also to be cleared.
2
File Management
When adding an image that has once been used as title
data to the transmission list, select whether the previous
property settings are to be used.
The previous properties can be cleared using the “Clear
previous property” button.
≥ Always Use previous property
When the previous properties are still available, the
previous property settings are used again and
again.
≥ Confirm using previous property
When the previous properties are still available, a
confirmation screen for using or canceling the
previous properties appears.
If the previous properties are not going to be used,
alternative properties are handled as new data.
≥ Not use the previous property
The data will always be handled as new data.
3
1
3
4
2
Target folder
The folder to be opened first when opening or saving
data is set. Enter the folder directly or click the “Browse”
button and select from the displayed folder selection
screen.
≥ List folder
The folder to be opened first for opening or saving a
transmission list is set.
The default folder is the ListData folder created
under the folder in which this application has been
installed.
≥ Title folder
The folder to be opened first when opening or
saving Title data is set.
The default folder is the TitleData folder created
under the folder in which this application has been
installed.
≥ IntVideo folder
The folder to be opened first when opening or
saving IntVideo data is set.
The default folder is the IntVideoData folder created
under the folder in which this application has been
installed.
4
Page 94

94
List of short-cut keys
Move the cursor to the top Home
Move the cursor back by 10 Left arrow
Move the cursor back Up arrow
Move the cursor ahead Down arrow
Move the cursor ahead by 10 Right arrow
Jump to the data in DSK 0
Jump to the data of the corresponding Mark setting
1 to 9
Move the cursor to the bottom End
Open the properties of the selected data
Enter
Transfer the selected data L
Play back the selected data Space
Stop the data being played back
S
Automatically play back the data Shift + Space
Select all the data Ctrl + A
Delete the selected data Delete
Cut out the selected data Ctrl + X
Copy the selected data Ctrl + C
Paste the data Ctrl + V
Clear the selected data Ctrl + R
Undo Ctrl + Z
Clear all data Ctrl + T
Redo Ctrl + Y
Page 95

95
Before calling for service
Troubleshooting
Contact your dealer if the problem persists even when you have checked the following items.
Problem What to check
≥
The power can not be
switched on.
≥
Is the plug of the power cable inserted properly in the outlet?
≥
Has the fan stopped operating?
≥
There is no picture.
≥
Is the power of the VTR or other connected equipment switched on?
≥
Are the cables connected correctly?
≥
Has fade been applied?
≥
Has the source been input correctly?
≥
There is no color.
≥
Is the monochrome selection switch set to ON?
≥
Is only “Y” provided as input instead of the composite signal?
≥
Has the source been input correctly?
≥
There is no sound.
≥
Has audio fade-out been applied?
≥
Has the source been input correctly?
≥
The image does not
change even when the
transition lever is moved
during mix/wipe mode.
≥
Has the same signal been selected for A-side and B-side?
AG-MX70-related problems
Problem What to check
≥
A menu for title load or
playback etc. is grayed
out and operation is not
possible.
The AG-MX70 has not been recognized by the PC. Check the following items.
≥ Is the power of the AG-MX70 switched on?
≥ Are the AG-MX70 and the PC connected correctly via a USB cable?
≥ Is the length of the USB cable less than 3 m?
When operation is still not possible even though the above items are fulfilled, it is possible that
the USB driver has not been installed successfully. Execute DrvUninstaller.exe in the
DrvUninstaller folder of the setup CD-ROM to delete the USB driver (at this time the message
“Cannot delete some files” may be displayed, but this does not present a problem), and then
install the USB driver again.
≥
Image transmission or
reading has been performed,
but the processing stopped
and the message “AG-MX70
is not ready to transfer,
Please check Power and
connection, and try again..”
is displayed.
Images cannot be transmitted or captured while the “Loading...” display appears on the LCD
screen immediately after the AG-MX70’s power has been turned on or immediately after
changes have been made to the image memory settings. Wait until the “Loading...” display is
cleared, and then try again.
≥
The image does not
change to DSK even
when DSK playback
operation is performed.
Check that the DSK/Fade items Key and Fill in the DSK/Fade menu of the AG-MX70 are set to
Title.
MX-Navi-related problems
Page 96

96
Before calling for service
Problem What to check
≥
The Title data has been
cleared, but the data has
not been deleted from
the image memory.
When Protect has been set for the data, it will not be cleared even when clearing is performed
from the menu of the main window. To clear data with the Protect setting, perform the clearing
operation from the memory status window.
≥
The button display of
main window is
abnormal.
In a Windows 98 environment with certain video cards, the button display may become
abnormal. Even if this problem should occur, operation of this software will not be influenced.
It may be possible to eliminate the problem using one of the following methods.
≥
Update the video card driver to the newest version.
≥
Click “Advanced” on the “Settings” page of “My Computer” >“Control Panel” >“Display,”
open the “Performance” page on the displayed Properties screen, and set the hardware
accelerator setting to “Basic” or “None.”
MX-Navi-related problems
≥
Patterns set for DSK ON
and DSK OFF for Title
data are changed.
When the set pattern can not be used for DSK, the pattern is changed automatically to a
different pattern.
Page 97

97
Specifications
[GENERAL]
Power Source : 120 V AC, 50/60 Hz
Power Consumption : 52 W (with no optional accessories installed),
70 W (with all optional accessories installed)
Operating temperature: 41 °F to 104 °F (+ 5 °C to + 40 °C)
Operating humidity: Less than 90% (relative humidity)
Dimensions (W kH kD): 16-3/4 k7-3/4 k15-3/4 inch (424 k197 k400 mm)
Weight: 8.2 kg (with no optional accessories installed)
8.7 kg (with all optional accessories installed)
indicates safety information.
[VIDEO]
Video format: 525 (NTSC)/625 (PAL) switchable
Quantization: Main input: 9 bit
External input (EXT): 8 bit
Internal processing: 4: 2: 2: 4
8 bits (ON/OFF switching for Dynamic Rounding processing
enabled)
Key: 13.5 MHz
Y: 13.5 MHz
Pb/Pr: 6.75 MHz
S/N ratio: Component signal, Y: Less than –54 dB
Pb/Pr: Less than –52 dB
Composite signal, Y/C: Less than –50 dB
Band width: Main input Y: 0.5 MHz to 4.5 MHz (n1.0 dB)
Pb/Pr:0.2 MHz to 2.0 MHz
(+0.5 dB to –3.0 dB)
External input (EXT) Y: 0.5 MHz to 4.5 MHz (n1.0 dB)
Pb/Pr:0.2 MHz to 2.0 MHz (n1.0 dB)
K factor: Less than 1%
DG/DP: Less than 4%/2°
[AUDIO]
Sampling frequency: 48 kHz
Quantization: Analog Input: 20bit, Digital Input (option): 24bit
Frequency response: 20 Hz to 20 kHz (–1.0 dB to +1.0 dB)
Dynamic range: More than 85dB (analog In/out)
THD: Less than 0.05% (1 kHz)
Cross talk: Less than –70 dB (1 kHz, between any two channels)
Headroom: 20 dB/18 dB switchable
Page 98

98
Specifications
[VIDEO INPUT/OUTPUT]
Component input connectors: BNC a 4 (sources 1/2/3/4)
Y: 1.0 Vp-p, 75 h
Pb/Pr (525): 0.525/0.757 Vp-p switchable, 75 h
Pb/Pr (625): 0.7 Vp-p, 75 h
Composite input connectors: BNC a 8 (sources 1 to 8), 1.0 Vp-p, 75 h
YC input connectors: Mini-DIN4 a 4 (sources 1/2/3/4)
Y: 1.0 Vp-p, 75 h
C: 0.286 Vp-p, 75 h (525)/0.3 Vp-p, 75 h (625)
EXT (external input) connector: BNC a 1 (Y/Pb/Pr), Analog component signals
Y: 1.0 Vp-p, 75 h
Pb/Pr (525): 0.757 Vp-p, 75 h
Pb/Pr (625): 0.7 Vp-p, 75 h
Key: BNC a 1, 1.0 Vp-p, 75 h
Analog composite signals (genlock possible)
G/L input connector: BNC a 1 (with loop-through configuration), 1.0 Vp-p, 75 h
Composite signal (genlock selection enabled from G/L, EXT-Key)
Component output connectors: BNC a 2
Y: 1.0 Vp-p, 75 h
Pb/Pr (525): 0.525/0.757 Vp-p switchable, 75 h
Pb/Pr (625): 0.7 Vp-p, 75 h
Composite output connectors: BNC a 8 (sources 1 to 8), 1.0 Vp-p, 75 h
YC input connectors: Mini-DIN4 a 4
Y: 1.0 Vp-p, 75 h
C: 0.286 Vp-p, 75 h (525)/0.3 Vp-p, 75 h (625)
Preview output connector: BNC a 1, 1.0 Vp-p, 75 h
Advanced reference input connector: BNC a 1 (with loop-through configuration), 75 h,
composite signals
Sync: 0.286 Vp-p (525)/0.3 VP-P (625)
Burst: 0.286 Vp-p (525)/0.3 Vp-p (625)
[AUDIO INPUT/OUTPUT]
Audio input (L/R) connectors: XLR a 4 sets, +4/0/–3 dBu switchable, 10 kh, balanced
AUX input (L/R) connectors:
RCA a 2 sets, –10 dBV, 10 kh, unbalanced (AUX2 switchable
with MIC)
Mic input jack: M6 a 1, –60 dBv, 2 kh, unbalanced (switchable with AUX2)
Audio output (L/R) connectors: Program 1:XLR a 1 set, +4/0/–3 dBu switchable, 47 h,
balanced
Program 2: RCA a 1 set, 10 dBv, 47 h, unbalanced
Headphone output jack: M6 a 1, 8 h, unbalanced
Page 99

99
Specifications
[OTHER]
Editor: D-sub 9-pin, RS-422A/232C switchable
RS-422A protocol; GVG/Sony switchable
Connectable Editor: Panasonic: AG-A850, AJ-A900,
SONY: BVE-2000, BVE-910, PVE-500
Tally Out: D-sub 9-pin, open-collector k8 ch
Collector current: Less than 50 mA,
Maximum voltage: 35 V DC
GPI: BNC k1, Make-contact
USB: Type-B connector k1, USB Ver.1.1 (cable length: max. 3 m)
[SDI] (Option)
Video input connectors: BNC a4 (inputs 1/2/3/4), SMPTE 259M-C
Video output connectors: BNC a1, SMPTE 259M-C
Audio input connectors: Embedded audio (channels 1/2)
Audio output connectors: Embedded audio (channels 1/2)
[ACCESSORIES]
Power cable ............................................................1
Operating Instructions...........................................1
MX-Navi installation CD.........................................1
Warranty card.........................................................1
Page 100

PANASONIC BROADCAST & TELEVISION SYSTEMS COMPANY
UNIT COMPANY OF MATSUSHITA ELECTRIC CORPORATION OF AMERICA
Executive Office:
One Panasonic Way 4E-7, Secaucus, NJ 07094 (201) 348-7000
EASTERN ZONE:
One Panasonic Way 4E-7, Secaucus, NJ 07094 (201) 348-7621
Southeast Region:
1225 Northbrook Parkway, Ste 1-160, Suwanee, GA 30024 (770) 338-6835
Central Region:
1707 N Randall Road E1-C-1, Elgin, IL 60123 (847) 468-5200
WESTERN ZONE:
3330 Cahuenga Blvd W., Los Angeles, CA 90068 (323) 436-3500
Government Marketing Department:
52 West Gude Drive, Rockville, MD 20850 (301) 738-3840
Broadcast PARTS INFORMATION & ORDERING:
9:00 a.m. – 5:00 p.m. (EST) (800) 334-4881/24 Hr. Fax (800) 334-4880
Emergency after hour parts orders (800) 334-4881
TECHNICAL SUPPORT:
Emergency 24 Hour Service (800) 222-0741
Panasonic Canada Inc.
5770 Ambler Drive, Mississauga, Ontario L4W 2T3 (905) 624-5010
Panasonic de Mexico S.A. de C.V.
Av angel Urraza Num. 1209 Col. de Valle 03100 Mexico, D.F. (52) 1 951 2127
Panasonic Sales Company
Division of Matsushita Electric of Puerto Rico Inc.
San Gabriel Industrial Park, 65th Infantry Ave., Km. 9.5, Carolina, Puerto Rico 00630 (787) 750-4300
P
 Loading...