

Page 1
Xplore G18
User Manual
Page 2

Copyright
Copyright © 2003 Group Sense PDA Ltd., All rights reserved.
Palm OS, Graffiti, the Palm Powered logo, and HotSync are registered trademarks of PalmSource, Inc. a subsidiary of Palm, Inc.
Palm Desktop, the HotSync logo and Palm Powered are trademarks of PalmSource, Inc. a subsidiary of Palm, Inc.
THE CHINESE HANDWRITING RECOGNITION SYSTEM IS AUTHORIZED BY HANWANG TECHNOLOGY CO.,LTD.
The manufacturer reserves the right to change the specifications without notice.
Page 3

Table of Contents
About This Guide 1
1 Safety 2
Traffic safety . . . . . . . . . . . . . . . . . . . . . . . . 2
Phone operating . . . . . . . . . . . . . . . . . . . . . . . 2
Electronic devices . . . . . . . . . . . . . . . . . . . . . . 2
Persons with pacemaker. . . . . . . . . . . . . . . . . . . 3
Hearing aids . . . . . . . . . . . . . . . . . . . . . . . 3
Other medical devices . . . . . . . . . . . . . . . . . . . 3
Vehicles . . . . . . . . . . . . . . . . . . . . . . . . . . 3
Posted facilities . . . . . . . . . . . . . . . . . . . . . . . 4
Potentially explosive environment . . . . . . . . . . . . . . . . 4
Aircraft . . . . . . . . . . . . . . . . . . . . . . . . . . 4
2 Introduction to the G18 PDA PHONE 6
System requirements for Windows. . . . . . . . . . . . . . . . 6
G18 components . . . . . . . . . . . . . . . . . . . . . . . 7
Locating front panel controls . . . . . . . . . . . . . . . . . 7
Locating back panel components . . . . . . . . . . . . . . 10
Desktop Charger . . . . . . . . . . . . . . . . . . . . . . 11
Tapping versus clicking . . . . . . . . . . . . . . . . . . . 12
Starting pda phone and calibrating screen . . . . . . . . . . . . 13
Adjusting the brightness of your screen . . . . . . . . . . . . . 14
Adjusting the contrast of your screen . . . . . . . . . . . . . . 14
To open applications . . . . . . . . . . . . . . . . . . . . 15
Using the pda phone interface . . . . . . . . . . . . . . . . 16
Using menus and menu commands . . . . . . . . . . . . . 19
Displaying tips . . . . . . . . . . . . . . . . . . . . . 20
Entering data . . . . . . . . . . . . . . . . . . . . . . 20
Palm Desktop software . . . . . . . . . . . . . . . . . . . 21
Connecting the HotSync cable . . . . . . . . . . . . . . . . 21
Installing Palm Desktop . . . . . . . . . . . . . . . . . . . 22
G18 User Manual 1
Page 4

3 Entering Data in Your G18 PDA PHONE 23
Using the onscreen keyboard . . . . . . . . . . . . . . . . . 23
Entering data using Graffiti 2 handwriting software . . . . . . . . 24
Learning to write Graffiti 2 characters . . . . . . . . . . . . 24
General Guidelines for Graffiti 2 Writing . . . . . . . . . . . 25
Graffiti 2 tips . . . . . . . . . . . . . . . . . . . . . . 27
The Graffiti 2 alphabet . . . . . . . . . . . . . . . . . . 27
Writing punctuation marks and other special characters . . . . . 28
Using the Graffiti 2 tuner . . . . . . . . . . . . . . . . . 30
Using Graffiti 2 Gestures . . . . . . . . . . . . . . . . . . 31
Using Graffiti 2 ShortCuts . . . . . . . . . . . . . . . . . . 31
Importing data. . . . . . . . . . . . . . . . . . . . . . . 33
4 Performing Common Tasks 35
Creating records . . . . . . . . . . . . . . . . . . . . . . 35
Editing records . . . . . . . . . . . . . . . . . . . . . . 36
Selecting Text. . . . . . . . . . . . . . . . . . . . . . 36
Using the Edit menu . . . . . . . . . . . . . . . . . . . 36
Deleting records . . . . . . . . . . . . . . . . . . . . . 37
Purging records . . . . . . . . . . . . . . . . . . . . . 38
Categorizing records . . . . . . . . . . . . . . . . . . . . 39
Finding records . . . . . . . . . . . . . . . . . . . . . . 42
Finding Address Book records . . . . . . . . . . . . . . . 42
Using the Find option. . . . . . . . . . . . . . . . . . . 43
Using Phone Lookup . . . . . . . . . . . . . . . . . . . 44
Sorting records . . . . . . . . . . . . . . . . . . . . . . 44
Making records private . . . . . . . . . . . . . . . . . . . 45
Attaching notes . . . . . . . . . . . . . . . . . . . . . . 47
Choosing fonts . . . . . . . . . . . . . . . . . . . . . . 47
Getting information on an application . . . . . . . . . . . . . 49
5 Managing Applications 50
Using the Applications Launcher . . . . . . . . . . . . . . . 50
Selecting applications . . . . . . . . . . . . . . . . . . 50
Categorizing applications . . . . . . . . . . . . . . . . . 51
Changing the Applications Launcher display . . . . . . . . . 51
G18 User Manual 2
Page 5

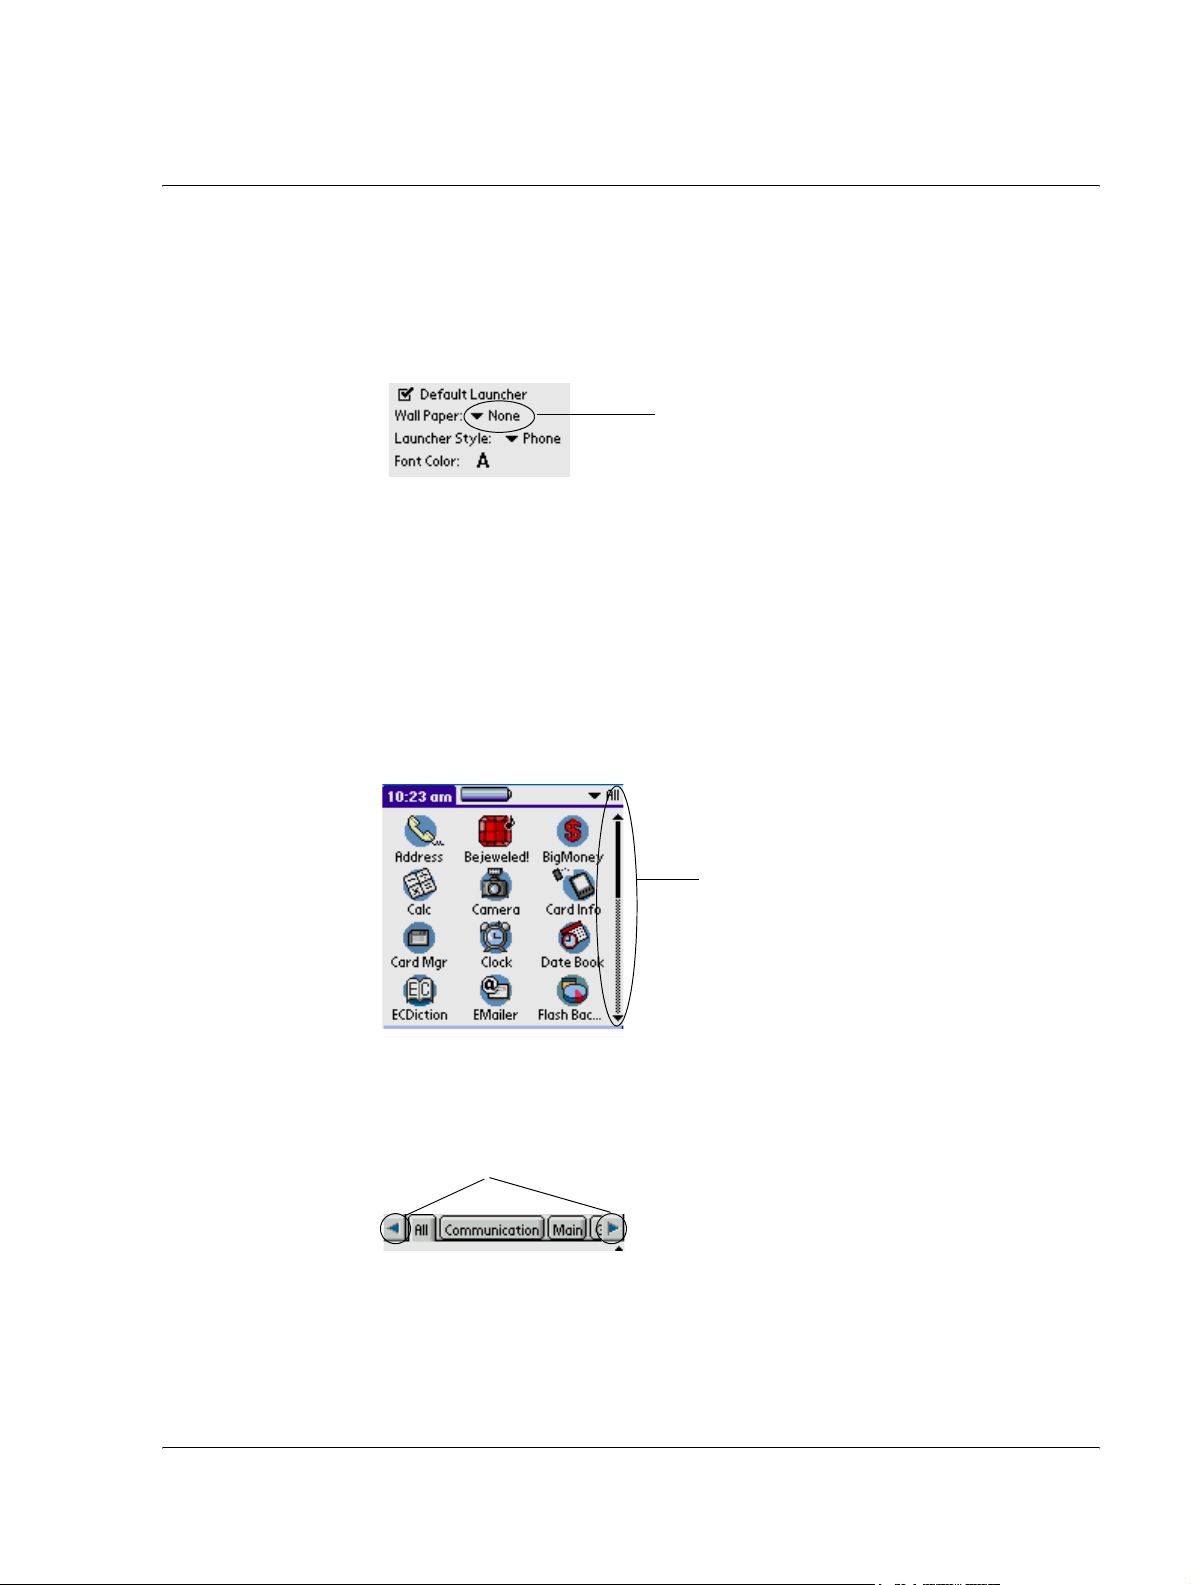
Setting preferences for applications . . . . . . . . . . . . . . 52
Installing add-on applications. . . . . . . . . . . . . . . . . 55
Removing applications . . . . . . . . . . . . . . . . . . . 58
Removing Palm Desktop . . . . . . . . . . . . . . . . . . 58
6 Working with Communication Applications 60
Using the Phone . . . . . . . . . . . . . . . . . . . . . . 61
To open the Phone application . . . . . . . . . . . . . . . 61
Making a call . . . . . . . . . . . . . . . . . . . . . . 61
Receiving a call . . . . . . . . . . . . . . . . . . . . . 63
Call Setting. . . . . . . . . . . . . . . . . . . . . . . 64
Call Time . . . . . . . . . . . . . . . . . . . . . . . 66
Call Records . . . . . . . . . . . . . . . . . . . . . . 66
Speed Dial . . . . . . . . . . . . . . . . . . . . . . . 67
Phone Security Setting . . . . . . . . . . . . . . . . . . 68
Phone ringing Setting. . . . . . . . . . . . . . . . . . . 71
Quick Switch . . . . . . . . . . . . . . . . . . . . . . 73
Testing the Phone Connection . . . . . . . . . . . . . . . 74
Using the SMS Short Message . . . . . . . . . . . . . . . . 77
Function list: . . . . . . . . . . . . . . . . . . . . . . 77
To open the SMS : . . . . . . . . . . . . . . . . . . . . 77
SMS setting: . . . . . . . . . . . . . . . . . . . . . . 78
Writing SMS & Sending SMS: . . . . . . . . . . . . . . . 79
Receiving SMS: . . . . . . . . . . . . . . . . . . . . . 80
Replying SMS & Forwarding SMS: . . . . . . . . . . . . . 80
Using the jMMS . . . . . . . . . . . . . . . . . . . . . . 83
Function list: . . . . . . . . . . . . . . . . . . . . . . 83
To open the jMMS application: . . . . . . . . . . . . . . . 83
Settings . . . . . . . . . . . . . . . . . . . . . . . . 86
Browse . . . . . . . . . . . . . . . . . . . . . . . . 88
New and Send . . . . . . . . . . . . . . . . . . . . . 89
Deleting . . . . . . . . . . . . . . . . . . . . . . . . 91
Draft . . . . . . . . . . . . . . . . . . . . . . . . . 92
Sorting . . . . . . . . . . . . . . . . . . . . . . . . 92
Using the EMailer . . . . . . . . . . . . . . . . . . . . . 93
G18 User Manual 3
Page 6

Function list: . . . . . . . . . . . . . . . . . . . . . . 93
To open the EMailer application: . . . . . . . . . . . . . . 93
Setting: . . . . . . . . . . . . . . . . . . . . . . . . 94
To choose the folder: . . . . . . . . . . . . . . . . . . . 97
To create and send an e-mail:. . . . . . . . . . . . . . . . 97
To browse an e-mail: . . . . . . . . . . . . . . . . . . . 98
To edit an e-mail: . . . . . . . . . . . . . . . . . . . . 99
To delete an e-mail: . . . . . . . . . . . . . . . . . . . 99
To reply an e-mail: . . . . . . . . . . . . . . . . . . . . 99
To search: . . . . . . . . . . . . . . . . . . . . . . . 100
Using the WAP Browser . . . . . . . . . . . . . . . . . . . 101
Function list: . . . . . . . . . . . . . . . . . . . . . . 101
To open the WAP Browser application: . . . . . . . . . . . . 101
Surfing Net. . . . . . . . . . . . . . . . . . . . . . . 104
Favorites. . . . . . . . . . . . . . . . . . . . . . . . 105
History . . . . . . . . . . . . . . . . . . . . . . . . 106
Statistics . . . . . . . . . . . . . . . . . . . . . . . . 106
Using the STK (SIM Tool Kit) . . . . . . . . . . . . . . . . 107
7 Working with Studio Applications 108
Using the Camera . . . . . . . . . . . . . . . . . . . . . 109
To open the Camera application: . . . . . . . . . . . . . . 109
To set the preferences of a photograph: . . . . . . . . . . . . 109
Taking photos . . . . . . . . . . . . . . . . . . . . . . 110
Browsing Photos . . . . . . . . . . . . . . . . . . . . 110
Using the MelodyManager . . . . . . . . . . . . . . . . . . 111
To open the MelodyMgr application:. . . . . . . . . . . . . 111
The source of Melody . . . . . . . . . . . . . . . . . . 111
To listen or delete a melody . . . . . . . . . . . . . . . . 111
Using the Photo Album . . . . . . . . . . . . . . . . . . . 113
Function list: . . . . . . . . . . . . . . . . . . . . . . 113
To open the Album application: . . . . . . . . . . . . . . . 113
Album management . . . . . . . . . . . . . . . . . . . 113
To browse photos . . . . . . . . . . . . . . . . . . . . 116
Using the Photo Editor . . . . . . . . . . . . . . . . . . . 117
G18 User Manual 4
Page 7

Function list: . . . . . . . . . . . . . . . . . . . . . . 117
To open the Photo Editor application: . . . . . . . . . . . . 117
To create a picture: . . . . . . . . . . . . . . . . . . . . 117
To edit a picture:. . . . . . . . . . . . . . . . . . . . . 118
To add individual signature: . . . . . . . . . . . . . . . . 122
To add seal: . . . . . . . . . . . . . . . . . . . . . . 122
To hide toolbar: . . . . . . . . . . . . . . . . . . . . . 122
8 Working with Main Applications 123
Using the Address Book . . . . . . . . . . . . . . . . . . . 124
Function: . . . . . . . . . . . . . . . . . . . . . . . 124
To open the Address Book application: . . . . . . . . . . . . 124
Record List. . . . . . . . . . . . . . . . . . . . . . . 125
Using the Clock . . . . . . . . . . . . . . . . . . . . . . 130
Function list: . . . . . . . . . . . . . . . . . . . . . . 130
To open the Clock application: . . . . . . . . . . . . . . . 130
Using the Calculator . . . . . . . . . . . . . . . . . . . . 138
To open the Calculator application: . . . . . . . . . . . . . 138
Using the Calculator buttons . . . . . . . . . . . . . . . . 138
Displaying recent calculations . . . . . . . . . . . . . . . 139
Using the Date Book . . . . . . . . . . . . . . . . . . . . 140
Use the Date Book to . . . . . . . . . . . . . . . . . . . 140
To open the Date Book application: . . . . . . . . . . . . . 140
Scheduling events . . . . . . . . . . . . . . . . . . . . 140
Scheduling untimed events . . . . . . . . . . . . . . . . 144
Adding Address Book information to an event . . . . . . . . . 147
Setting the alarm . . . . . . . . . . . . . . . . . . . . 148
Changing the Date Book view . . . . . . . . . . . . . . . 150
Changing the Date Book display . . . . . . . . . . . . . . 155
Using the GSL Launcher . . . . . . . . . . . . . . . . . . 158
Function list: . . . . . . . . . . . . . . . . . . . . . . 158
To open the GSL Launcher application: . . . . . . . . . . . 158
To delete applications. . . . . . . . . . . . . . . . . . . 161
Using the Memo Pad . . . . . . . . . . . . . . . . . . . . 163
Use the Memo Pad to . . . . . . . . . . . . . . . . . . . 163
G18 User Manual 5
Page 8

To open the Memo Pad application: . . . . . . . . . . . . . 163
Creating memos . . . . . . . . . . . . . . . . . . . . . 164
Reviewing memos . . . . . . . . . . . . . . . . . . . . 166
Using the ShortHand . . . . . . . . . . . . . . . . . . . . 168
Function list: . . . . . . . . . . . . . . . . . . . . . . 168
To open the ShortHand application: . . . . . . . . . . . . . 168
Using the To Do List . . . . . . . . . . . . . . . . . . . . 171
Use the To Do List to . . . . . . . . . . . . . . . . . . . 171
To open the To Do List application: . . . . . . . . . . . . . 171
To Do List function list . . . . . . . . . . . . . . . . . . 176
9 Enjoy with Game Applications 178
Playing the Bejeweled! . . . . . . . . . . . . . . . . . . . 179
To start the game: . . . . . . . . . . . . . . . . . . . . 179
Bejeweled - Easy Mode . . . . . . . . . . . . . . . . . . 179
Bejeweled - Timed Mode . . . . . . . . . . . . . . . . . 180
Winning the game . . . . . . . . . . . . . . . . . . . . 182
Bejeweled Hidden Features . . . . . . . . . . . . . . . . 182
Playing the Big Money . . . . . . . . . . . . . . . . . . . 184
To start the game: . . . . . . . . . . . . . . . . . . . . 184
Game Rules . . . . . . . . . . . . . . . . . . . . . . 185
Winning the game . . . . . . . . . . . . . . . . . . . . 185
Big Money Hidden Features . . . . . . . . . . . . . . . . 186
Insaniquarium-LowRes . . . . . . . . . . . . . . . . . . . 187
To start the game: . . . . . . . . . . . . . . . . . . . . 187
How To Play . . . . . . . . . . . . . . . . . . . . . . 187
Game Modes . . . . . . . . . . . . . . . . . . . . . . 188
Other Options. . . . . . . . . . . . . . . . . . . . . . 189
Insaniquarium Hidden Features . . . . . . . . . . . . . . . 189
Playing the MegaBowling . . . . . . . . . . . . . . . . . . 190
Description . . . . . . . . . . . . . . . . . . . . . . . 190
Game scoring . . . . . . . . . . . . . . . . . . . . . . 190
Scoresheet Samples . . . . . . . . . . . . . . . . . . . 191
To start the game: . . . . . . . . . . . . . . . . . . . . 192
Abandon game . . . . . . . . . . . . . . . . . . . . . 192
G18 User Manual 6
Page 9

Game type . . . . . . . . . . . . . . . . . . . . . . . 192
IR game . . . . . . . . . . . . . . . . . . . . . . . . 193
Hi Score . . . . . . . . . . . . . . . . . . . . . . . . 194
Options . . . . . . . . . . . . . . . . . . . . . . . . 194
Arcade mode . . . . . . . . . . . . . . . . . . . . . . 195
Stroke mode . . . . . . . . . . . . . . . . . . . . . . 195
Zap!2000c . . . . . . . . . . . . . . . . . . . . . . . . 196
To start the game: . . . . . . . . . . . . . . . . . . . . 196
To Use menu of Zap!2000 . . . . . . . . . . . . . . . . . 196
How to play . . . . . . . . . . . . . . . . . . . . . . 197
10 Working with Utility Applications 199
Using the E-C Dict . . . . . . . . . . . . . . . . . . . . . 200
To open the E-C Dict application: . . . . . . . . . . . . . . 200
To inquire Word: . . . . . . . . . . . . . . . . . . . . 200
To get explanations and examples of a word: . . . . . . . . . 201
Searching for a string . . . . . . . . . . . . . . . . . . . 203
Using the SD Manager . . . . . . . . . . . . . . . . . . . 205
Function list: . . . . . . . . . . . . . . . . . . . . . . 205
To open the SD Manager application: . . . . . . . . . . . . 205
11 Working with System Applications 212
Customizing your pda phone . . . . . . . . . . . . . . . . . 213
To open the Preferences application: . . . . . . . . . . . . . 213
To personalize your pda phone: . . . . . . . . . . . . . . . 213
To set the date, time, and time zone: . . . . . . . . . . . . . 214
To format the date, time, and numbers: . . . . . . . . . . . . 216
To set the auto-off delay time: . . . . . . . . . . . . . . . 217
To set the sounds and volumes . . . . . . . . . . . . . . . 218
To set the Language: . . . . . . . . . . . . . . . . . . . 218
To set Adv.Setting:. . . . . . . . . . . . . . . . . . . . 220
To set PowerOn: . . . . . . . . . . . . . . . . . . . . . 220
To set GSM/GPRS: . . . . . . . . . . . . . . . . . . . 221
. . . . . . . . . . . . . . . . . . . . . . . . . . . . 223
Assigning security options . . . . . . . . . . . . . . . . . . 223
Masking and hiding records . . . . . . . . . . . . . . . . 223
G18 User Manual 7
Page 10

Assigning and editing passwords . . . . . . . . . . . . . . 224
Locking your pda phone . . . . . . . . . . . . . . . . . 225
Recovering from a forgotten password . . . . . . . . . . . . 226
Using CardInfo . . . . . . . . . . . . . . . . . . . . . . 227
To open the CardInfo application: . . . . . . . . . . . . . . 227
Flash Backup Manager . . . . . . . . . . . . . . . . . . . 229
To open the Flash Backup Manager: . . . . . . . . . . . . . 229
Backup via Flash Backup Manager . . . . . . . . . . . . . 231
Restore via Flash Backup Manager . . . . . . . . . . . . . 232
12 Exchanging and Updating Data using HotSync® Operations 235
Performing a HotSync operation for the first time . . . . . . . . . 235
Performing the first local HotSync operation . . . . . . . . . 236
Creating a user profile . . . . . . . . . . . . . . . . . . 237
Selecting HotSync setup options . . . . . . . . . . . . . . . 238
Customizing HotSync application settings . . . . . . . . . . . . 240
IR HotSync operations . . . . . . . . . . . . . . . . . . . 242
Preparing your computer for infrared communication . . . . . . 242
Configuring HotSync Manager for infrared communication. . . . 244
Performing an IR HotSync operation. . . . . . . . . . . . . 244
Returning to using the HotSync cable for HotSync operations . . . 245
Conducting a HotSync operation via the modem . . . . . . . . . 245
Preparing your computer . . . . . . . . . . . . . . . . . 246
Preparing your pda phone . . . . . . . . . . . . . . . . . 247
Selecting conduits for a modem HotSync operation . . . . . . . 248
Performing a HotSync operation via a modem . . . . . . . . . 249
Conducting a HotSync operation via a network . . . . . . . . . . 250
Using File Link . . . . . . . . . . . . . . . . . . . . . . 252
13 Using the Attention Manager 253
Insistent alarms . . . . . . . . . . . . . . . . . . . . . . 253
Using the Reminder dialog screen . . . . . . . . . . . . . . 254
Setting alarm volume . . . . . . . . . . . . . . . . . . . 254
Setting alarm sound effects . . . . . . . . . . . . . . . . 255
Using the Reminders list screen. . . . . . . . . . . . . . . 255
Subtle alarms . . . . . . . . . . . . . . . . . . . . . . . 257
G18 User Manual 8
Page 11

Understanding the blinking alarm indicator . . . . . . . . . . 257
14 Using an Expansion Card 258
Displaying contents of G18 . . . . . . . . . . . . . . . . . 258
Launching an application on the G18 . . . . . . . . . . . . . . 259
Displaying G18 application information . . . . . . . . . . . . 260
Copying a G18 application to your handheld or desktop . . . . . . 261
Beaming applications on the G18 . . . . . . . . . . . . . . . 263
G18 User Manual 9
Page 12

About This Guide
About This Guide
Welcome to the G18 handheld device. This guide is designed to help you
get up and running quickly on your PDA phone. It describes all you need to
know about how to use your G18 PDA phone and the applications that
come with it.
This guide shows you how to:
• Identify all the parts of your PDA phone
• View and enter data
• Use your PDA phone with your computer
• Personalize your PDA phone with your own preference settings
After you become familiar with the basic functionality of your G18 PDA
phone, you can use the rest of this guide as a reference for less common
tasks, for maintaining your G18 PDA phone, and also as a source of
information if you have problems operating it.
G18 User Manual 1
Page 13

Traffic safety
Safety
Traffic safety
1
Safety
Please check the laws and regulations on the use of mobile phones in the
areas where you are driving. Always obey them. Please use the hands-free
kit while driving.
Pull off the road and park before making or answering a call if driving
conditions so require.
Always secure the phone in its holder. Do not place the phone on the
passenger seat or where it can break loose in a collision or sudden stop.
Phone operating
Remember to follow any special regulations in force in any area and
always switch off your phone whenever it is forbidden to use it, or when it
may cause interference or danger.
When connecting, read the Owner's Guide for detailed safety instructions.
Do not connect it to incompatible products.
Electronic devices
Most modern electronic equipment is shielded from radio frequency (RF)
signals.However, certain electronic equipment may not be shielded against
the RF signals from your wireless phone.
G18 User Manual
2
Page 14

Safety
Vehicles
Persons with pacemaker
• Should always keep the phone more than 20cm (6 inches) from
their pacemaker when the phone is switched on.
• Should not carry the phone in a breast pocket.
• Should use the ear opposite the pacemaker to minimize the
potential for interference.
• If you have any reason to suspect that interference is taking place,
switch OFF your hand-held phone immediately.
Hearing aids
Some digital wireless phones may interfere with some hearing aids. In the
event of such interference, you may want to consult your operator or
service provider.
Vehicles
Other medical devices
Operation of any radio transmitting equipment, including wireless phones,
may interfere with the functionality of inadequately protected medical
devices. Consult a physician or the manufacturer of the medical device to
determine if they are adequately shielded from external RF signal or if you
have any question.
Switch off your phone in health care facilities when any regulation posted
in these areas instruction you to do so. Hospitals or health care facilities
may be using equipment that could be sensitive to external RF signal.
RF signals may affect improperly installed or inadequately shielded
electronic systems in motor vehicles. Check with the manufacturer or its
representative regarding your vehicle. You should also consult the
manufacturer of any equipment that has been added to your vehicle.
G18 User Manual
3
Page 15

Do not carry it with any combustible, explosive object. In such
environment, it could cause an explosion or fire resulting in injury or even
death.
An air bag inflates with great force. Do not place objects, including both
installed or portable wireless equipment, in the area over the air bag or in
the air bag deployment area. If in-vehicle wireless equipment is improperly
installed and the air bag inflates, serious injury could result.
Posted facilities
Turn your phone OFF in any facility where posted notices require you to do
so.
Safety
Posted facilities
Potentially explosive environment
Turn your phone OFF and do not remove the battery when in any area with
potentially explosive environment and obey all signs and instructions.
Sparks, from your battery, in such areas could cause an explosion or fire
resulting in injury or even death.
Areas with a potentially explosive environment are often, but not always
clearly marked. They include fueling areas such as gasoline stations; lower
deck of boats; fuel or chemical transfer or storage facilities; areas where
fuel odors are present, i.e.
if a gas/propane leak occurs in a car or home; areas where the air contains
chemicals or particles, such as grain, dust, or metal powders; and any other
area where you would normally be advised to turn off your vehicle engine.
Aircraft
FCC regulations prohibit the use of your phone while in the air. Switch
OFF your phone before boarding an aircraft.
G18 User Manual
4
Page 16

Safety
Aircraft
Turn your phone OFF before boarding a plane. To avoid interfering with
the aircraft instrument, do not use the phone on the plane.
Persons who disregard the regulations could have their wireless device
being confiscated, or being charged in court; OR both.
G18 User Manual
5
Page 17

Introduction to the G18 PDA PHONE
System requirements for Windows
2
Introduction to the
G18 PDA PHONE
With your G18 pda phone, you’ll successfully be able to manage meetings
and appointments, remember people’s names and personal details, and
keep track of all the items on your To Do List at both work and home.
Become familiar with its physical buttons and controls, and use HotSync®
technology to synchronize (exchange and update) your G18 pda phone and
Palm Desktop™ software. You’ll find it easy to start using the G18 pda
phone, Once you familiarize yourself with the basic workings of the G18
pda phone, you’ll easily be able to do the following:
• Enter all your schedule details in the Date Book and view them by
the day, week, or month, and even set an alarm to remind you of an
important event
• Keep all your contact names, addresses, phone numbers, and other
details in the Address Book, so you can find them as soon as you
need them
• Add your tasks to the To Do List, prioritize them so you don’t
overlook them, and assign them a due date
• Ensure that you don’t lose any of this important information simply
by synchronizing your data with Palm Desktop on your computer to
create a backup copy
• Customize your pda phone and set different levels of security to
prevent unauthorized users from viewing your data
System requirements for Windows
To install and operate Palm Desktop on Windows, your computer system
must meet the following requirements:
G18 User Manual 6
Page 18

Introduction to the G18 PDA PHONE
G18 components
• Windows 98/NT/2000/XP
• 8 MB RAM (memory) minimum, 16 MB recommended (required
with Windows NT 4.0)
•20 MB available hard disk space
• VGA monitor or better (the G18 Quick Tour requires a 256 color
video display)
• CD-ROM drive (or download Palm Desktop from the internet)
• Mouse pointing device
• One available serial port
In addition, the following equipment is optional:
• Modem
• Windows-compatible printer
G18 components
Locating front panel controls
Brightness control button. Displays the onscreen brightness control. You
can adjust the screen for the screen brightness display according to the
lighting conditions or temperature of the environment where you use your
organizer. For more information see “Adjusting the brightness of your
screen” later in this chapter.
Contrast control button. Displays the onscreen contrast control. You can
adjust the screen for the clearest screen display according to the lighting
conditions or temperature of the environment where you use your
organizer. For more information see “Adjusting the contrast of your
screen” later in this chapter.
Power button. Pressing the power button turns the pda phone on (if it is
off) and returns to the last screen that was displayed. Press the power
button to turn the pda phone off.Use the backlight to illuminate the screen
in low-light conditions.
G18 User Manual 7
Page 19
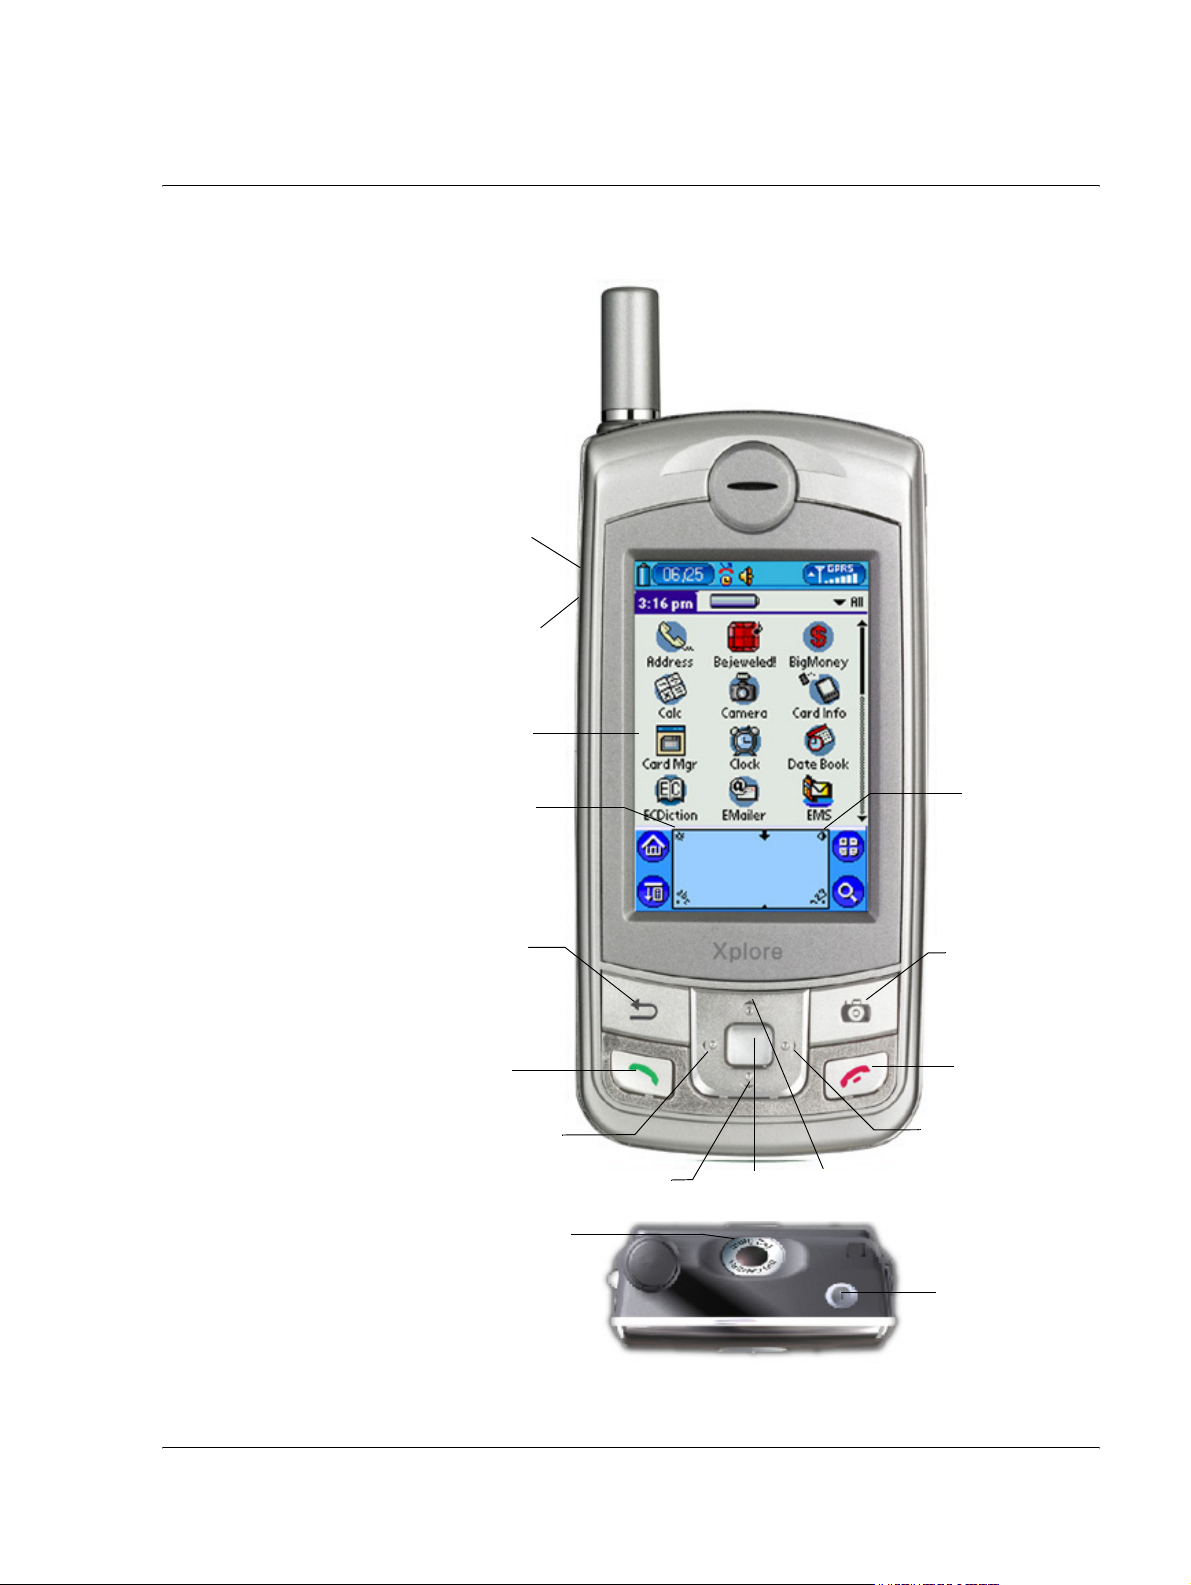
Increase Calling Volume Key
Decrease Calling Volume Key
Introduction to the G18 PDA PHONE
G18 components
Sub Menu Icon
Brightness
Control Button
Escape Key
Call Key
Left Key
Camera
Down Key
Enter Key
Contrast
Control Button
Camera Key
End Call Key
Right Key
Up Key
Power Button
G18 User Manual 8
Page 20

Introduction to the G18 PDA PHONE
G18 components
PDA PHONE screen. Displays the applications and data stored in your
pda phone. It is touch-sensitive and responds to the stylus.
Text input area. Write letters and numbers in this area using the
Graffiti®2 alphabet. Chapter 2 explains how to enter data using Graffiti 2
characters.
Up/Down Key. Displays text and other information that extends beyond
the area of the pda phone screen. Press the lower half of the scroll button to
scroll down and view information below the viewing area. Press the upper
half to view information above the viewing area.
Application buttons. Activates the individual pda phone applications that
correspond to the icons marked on the buttons: Date Book, Address Book,
To Do Li st,and Memo Pad. See “Assigning applications to buttons” in
Chapter 3 for details on reassigning these buttons to other applications on
your pda phone.
TIP: If your pda phone is turned off, pressing any application button
turns on the pda phone and opens the corresponding application.
G18 User Manual 9
Page 21
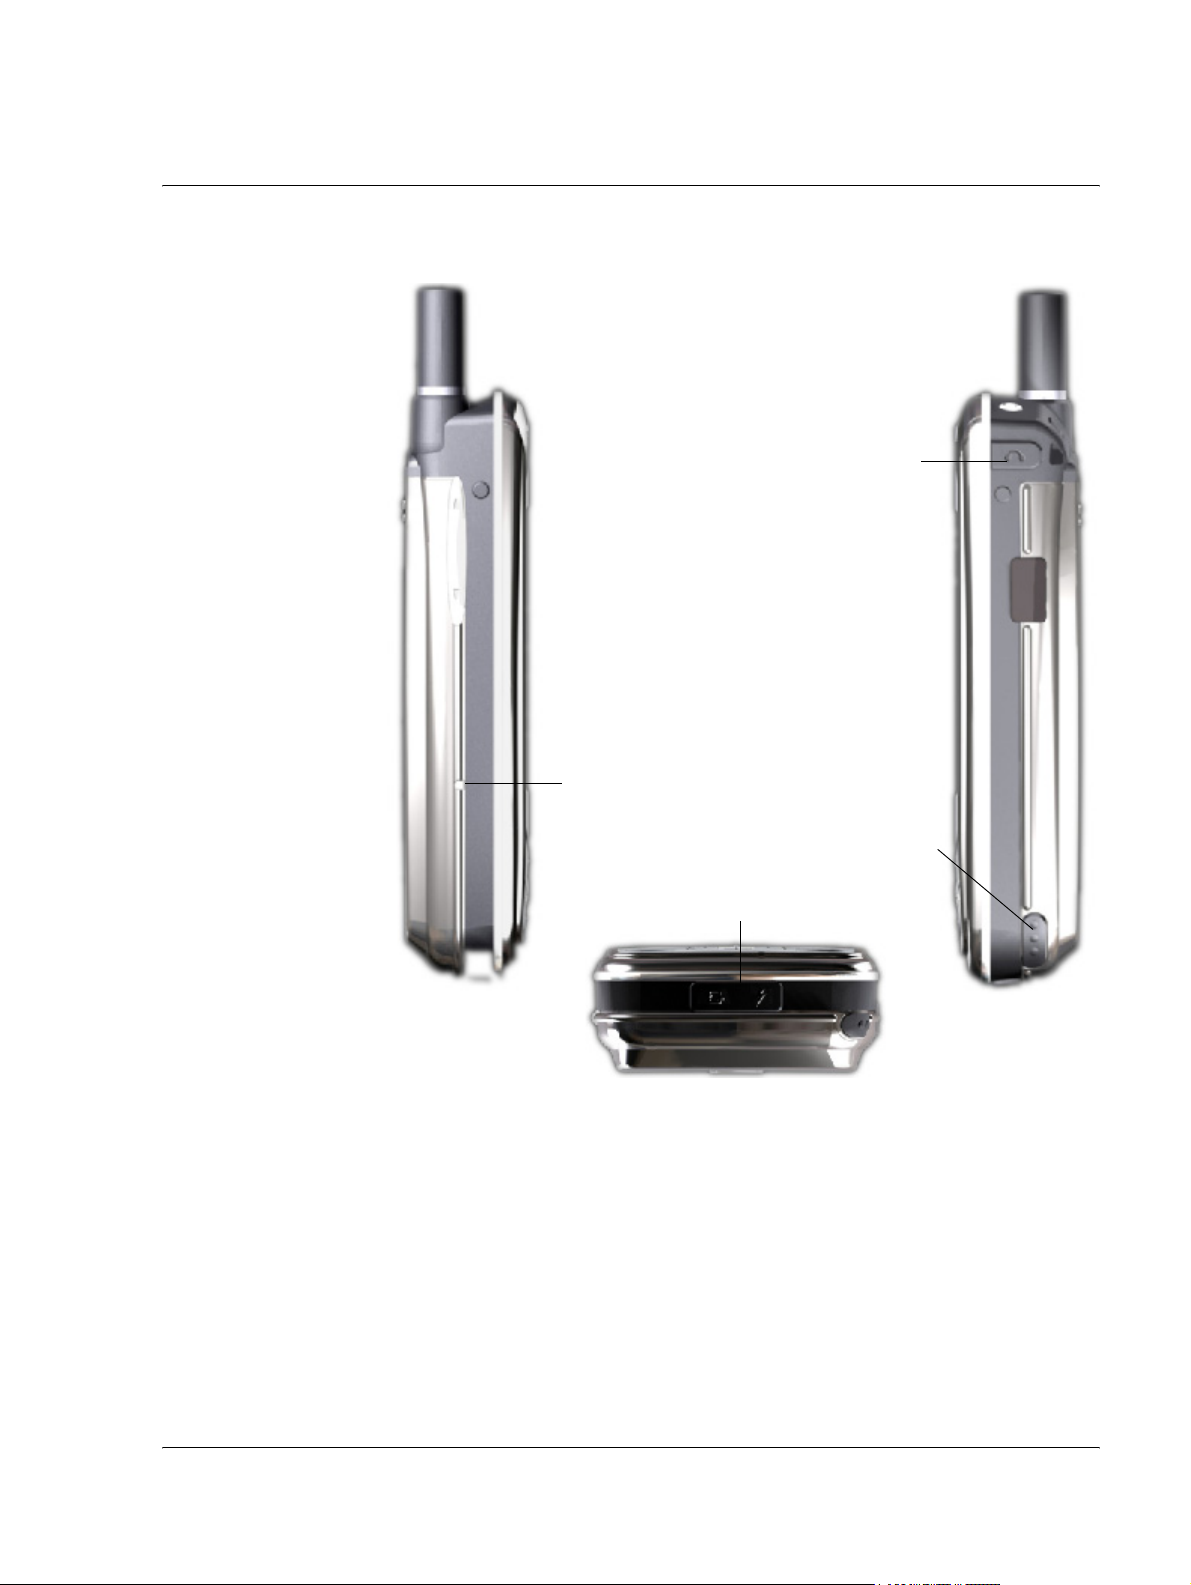
Introduction to the G18 PDA PHONE
Locating back panel components
G18 components
earphone
hole
Reset
Button
Side channel
Serial Port
Side channel. Hold the stylus, front cover, or similar attachments that can
be slid in and out of either side channel. To use the stylus, remove it from
the side channel and hold it as you would have a pen or pencil.
Reset button. Under normal use, you should not have to use the reset
button. See “Resetting your pda phone” for information on when and how
to use the reset button.
G18 User Manual 10
Page 22
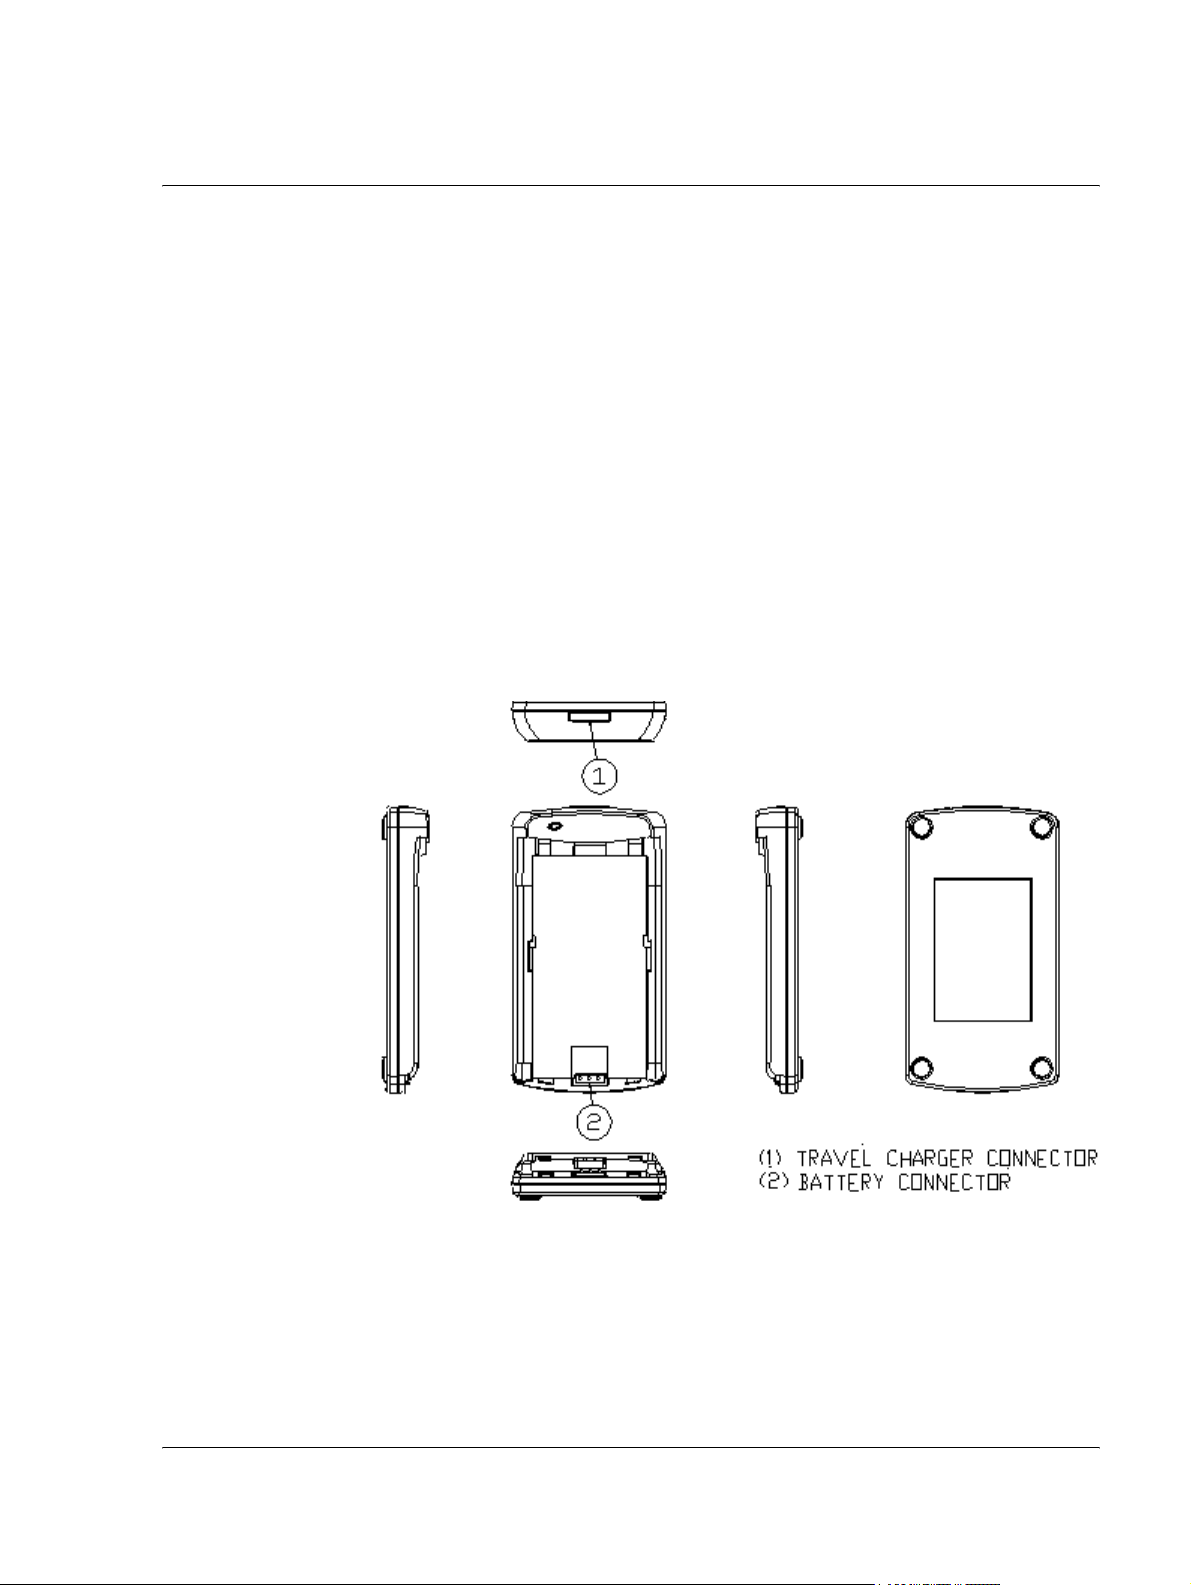
Serial Port connector. Connects your pda phone to PC through HotSync
cable. This allows you to update the information between your pda phone
and the computer using HotSync technology.
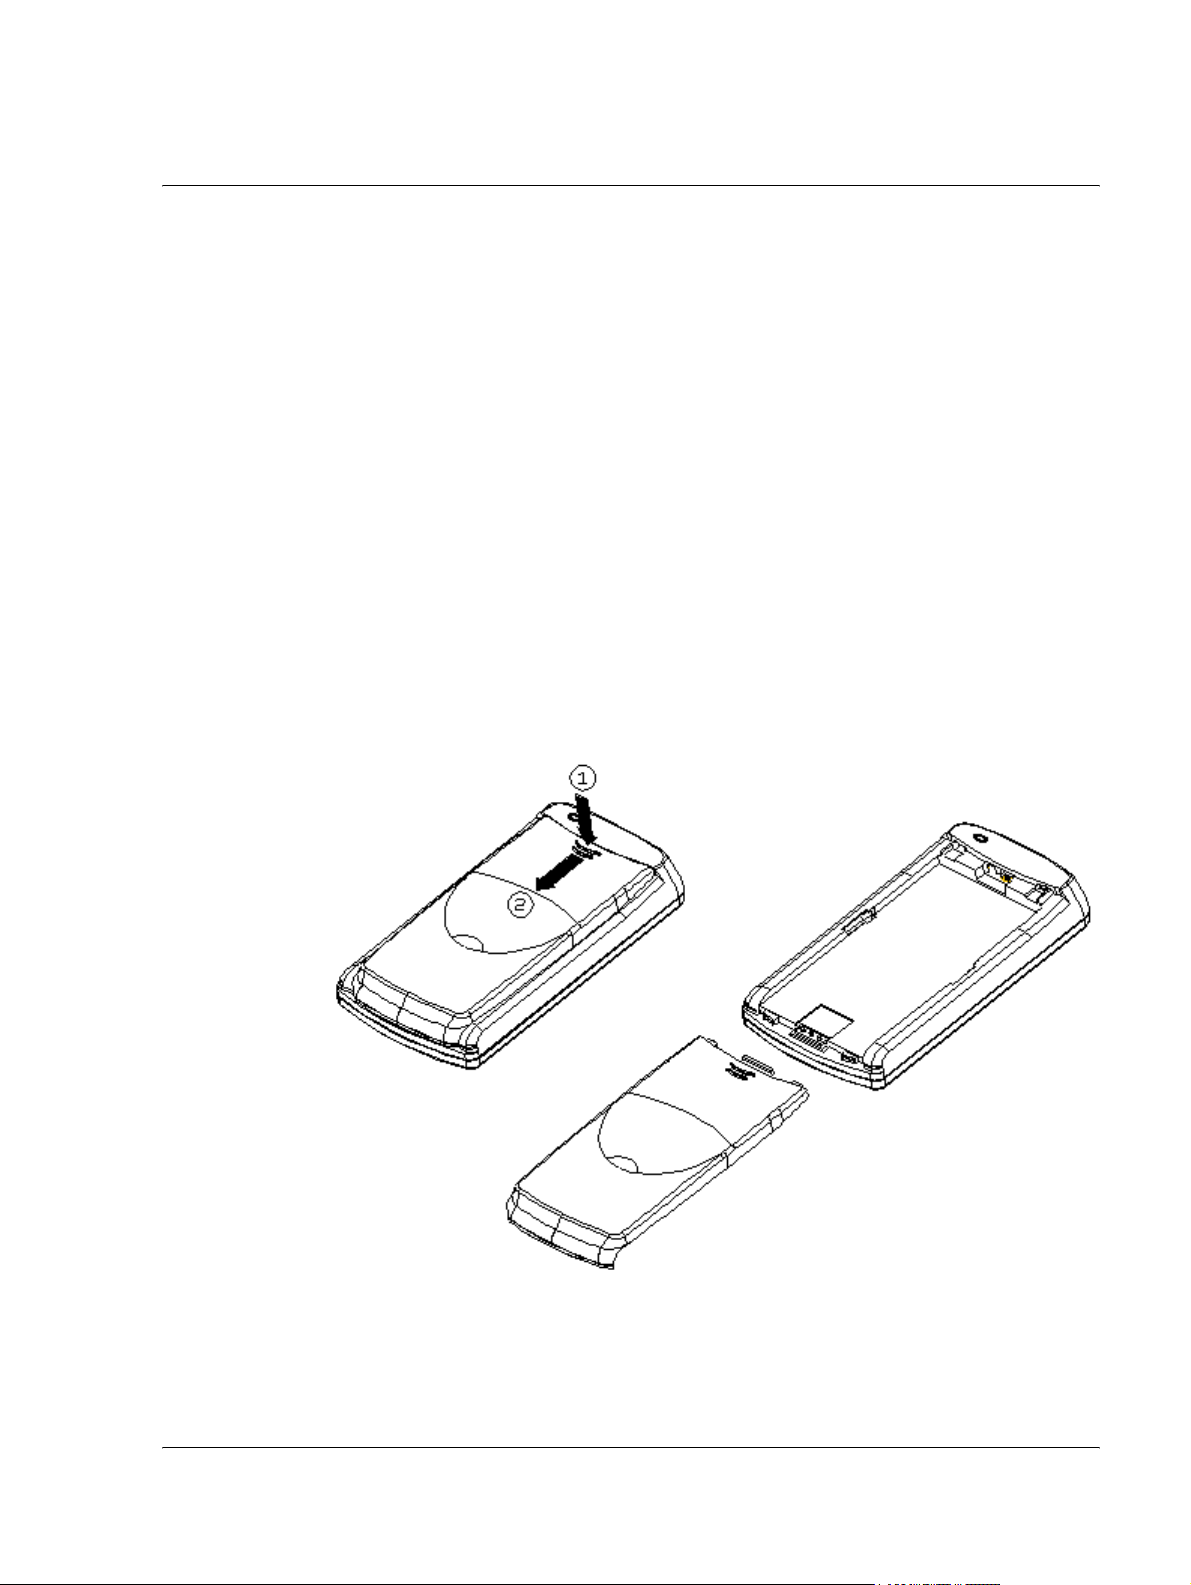
Desktop Charger
Compatible with Travel Charger.
Compact and convenient solution to charging your phone battery and spare
battery.
For further instructions, please refer to the following:
1. Installing phone battery
• Press the release grip of the back cover on the Desktop Charger to
remove it.
• Insert the phone battery, and push it slightly until it clicks.
Introduction to the G18 PDA PHONE
Desktop Charger
2. Charging the battery
• Place the battery in the Desktop charger correctly.
G18 User Manual 11
Page 23
• Plug the Travel Charger into the socket at the base of the Desktop
Charger.
• Connect the Travel Charger to the mains power supply.
• Charge the battery for about 120 minutes. (Approximate charging
time depends upon battery usage)
3. Important Notice
• For further information on care and maintenance of the accessories,
please refer to the user manual in CD ROM.
• To maximize the performance of the phone and not void the
warranty, always purchase the accessories that are specially
designed for use with the phone. Customer Service can not be held
liable for any damage due to use with non authorized accessories.
Introduction to the G18 PDA PHONE
Tapping versus clicking
Tapping versus clicking
Just as you use a mouse pointer to click elements on your computer’s
screen, you use the stylus to tap elements on your pda phone’s touch-
G18 User Manual 12
Page 24

Introduction to the G18 PDA PHONE
Starting pda phone and calibrating screen
sensitive screen. Tapping is the basic action used to execute tasks on your
pda phone.
IMPORTANT: Always use the point of the stylus for tapping or
making strokes on the pda phone screen. Do not use a pen, pencil, or any
other sharp object to write on the pda phone screen. If you misplace your
stylus, please contact the supply provider.
With your pda phone turned on, you can tap the pda phone screen to
perform many operations, such as the following:
• Open applications.
• Choose menu commands.
• Initiate a global Find operation.
• Select options in dialog boxes.
• Open the onscreen keyboards.
Just as you drag the mouse to select text or move objects on your computer,
you can drag the stylus to select text. In addition, you can use the stylus to
drag the slider of any scroll bar.
Starting pda phone and calibrating screen
The first time you start the G18 pda phone, setup instructions appear
onscreen. These instructions include a calibration screen, or a digitizer.
Calibration aligns the internal circuitry of the pda phone with its touchsensitive screen so your pda phone can detect the task you want to perform
when you tap an element on the screen.
To calibrate your screen:
1. Tap the Applications icon, and then tap Prefs.
2. In the pick list in the upper right corner of the screen, tap Digitizer.
3. Follow the on-screen instructions, tapping the screen where indicated.
G18 User Manual 13
Page 25

Introduction to the G18 PDA PHONE
Adjusting the brightness of your screen
Adjusting the brightness of your screen
You can adjust the brightness of your screen to make it easy to see in a
variety of lighting conditions.
To adjust the brightness of your pda phone screen:
1. Turn on your device.
2. Tap icon at the upper left conner. The Adjust Brightness slider
appears.
Tap here to show
this slider
3. Do one of the following:
• Drag the slider to adjust the brightness.
• Tap to the right or left of the slider to adjust the brightness in small
increments.
• Press or press and hold the PageUp or PageDown buttons to adjust
the brightness in small or large increments, respectively.
Adjusting the contrast of your screen
You can adjust the contrast of your screen to make it easy to see in a variety
of lighting conditions.
To adjust the contrast of your pda phone screen:
1. Turn on your device.
2. Tap icon at the upper right conner. The Adjust Contrast slider
appears.
Tap here to
show this
slider
G18 User Manual 14
Page 26
3. Do one of the following:
• Drag the slider to adjust the contrast.
• Tap to the right or left of the slider to adjust the contrast in small
increments.
• Press or press and hold the PageUp or PageDown buttons to adjust
the contrast in small or large increments, respectively.
To open applications
You can use the Applications Launcher to open any application installed on
your pda phone. You can also open the four main applications—Date
Book, Address Book, To Do List, and Memo Pad—with the application
buttons on the front panel of your pda phone.
TIP: When you press a application button on the front panel of your
device, the selected application immediately appears, even if the device
was turned off.
Introduction to the G18 PDA PHONE
To open applications
In addition to providing a way for you to open applications, the
Applications Launcher displays the current time, battery level, and
application category.
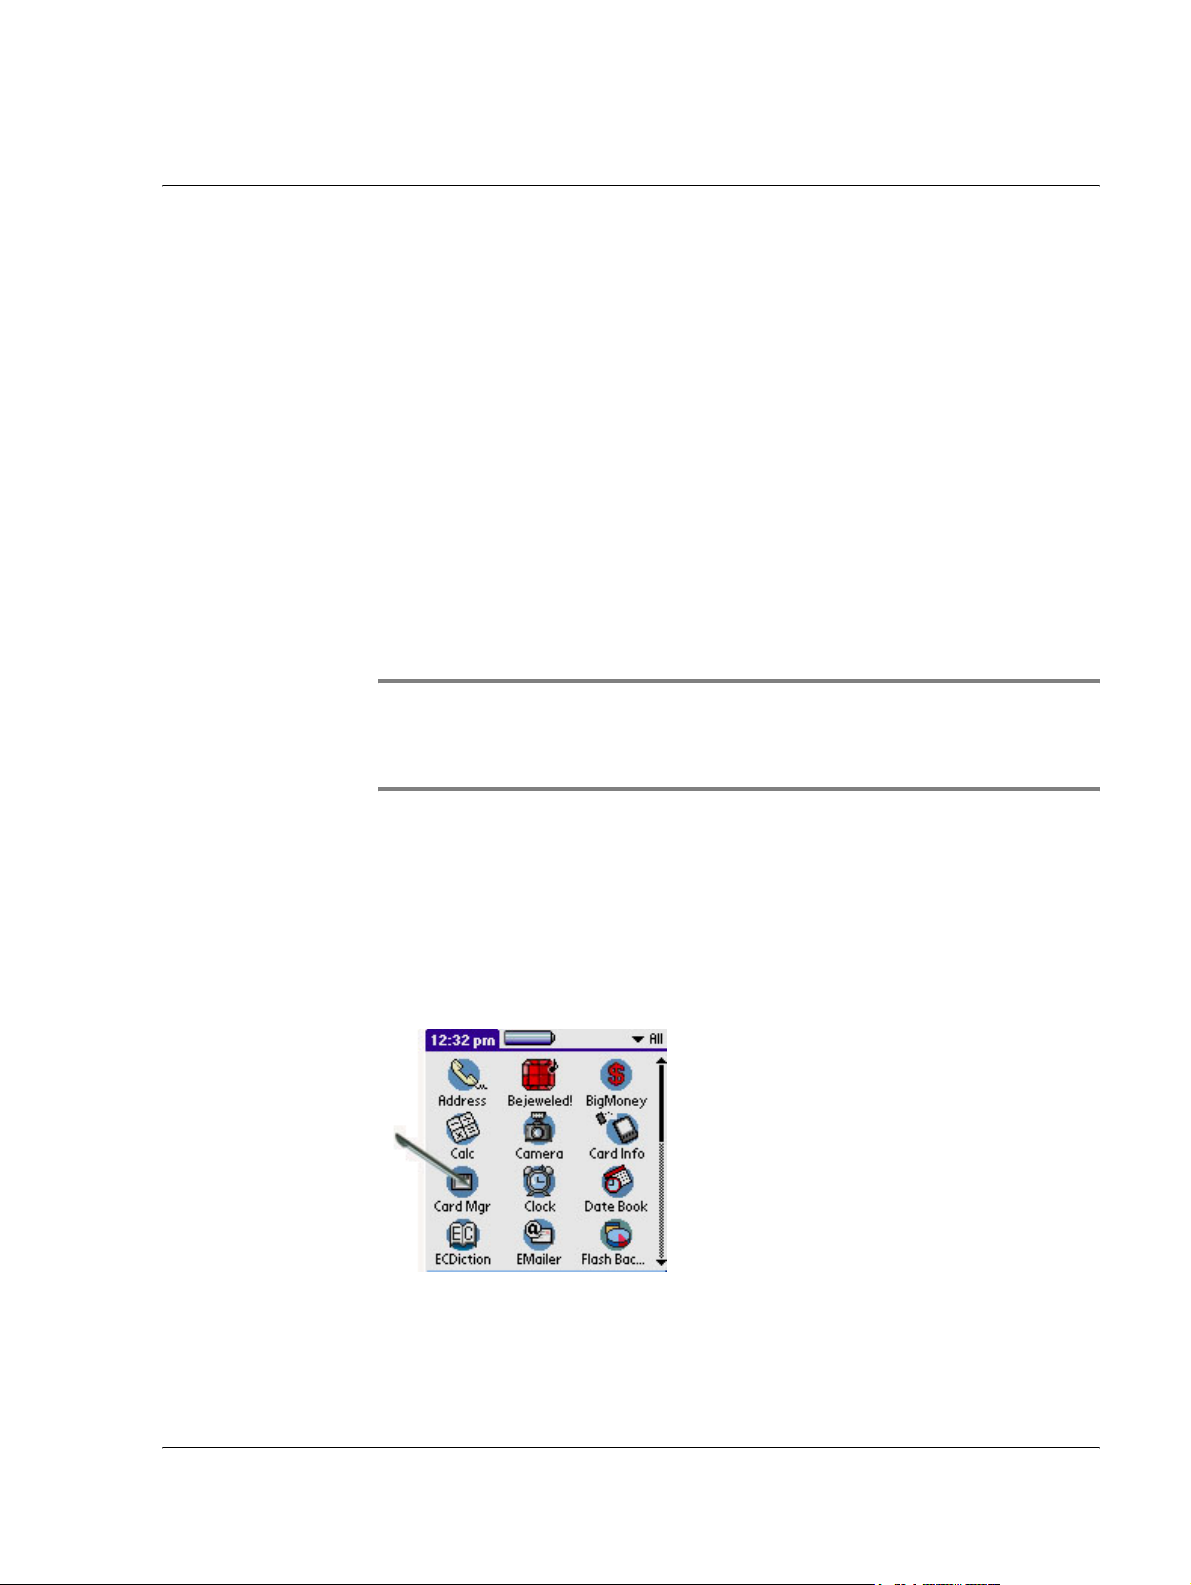
To open an application:
1. Tap the Applications icon.
2. Tap the icon of the application you want to open. If you have many
applications installed on your G18 pda phone, tap the scroll bar to see
all the available applications.
G18 User Manual 15
Page 27
Introduction to the G18 PDA PHONE
TIP: You can find an application quickly by writing the Graffiti 2
character for the first letter of its name. The Application Launcher
scrolls to the first application with a name that begins with that letter.
Using the pda phone interface
Your pda phone includes the following interface elements:
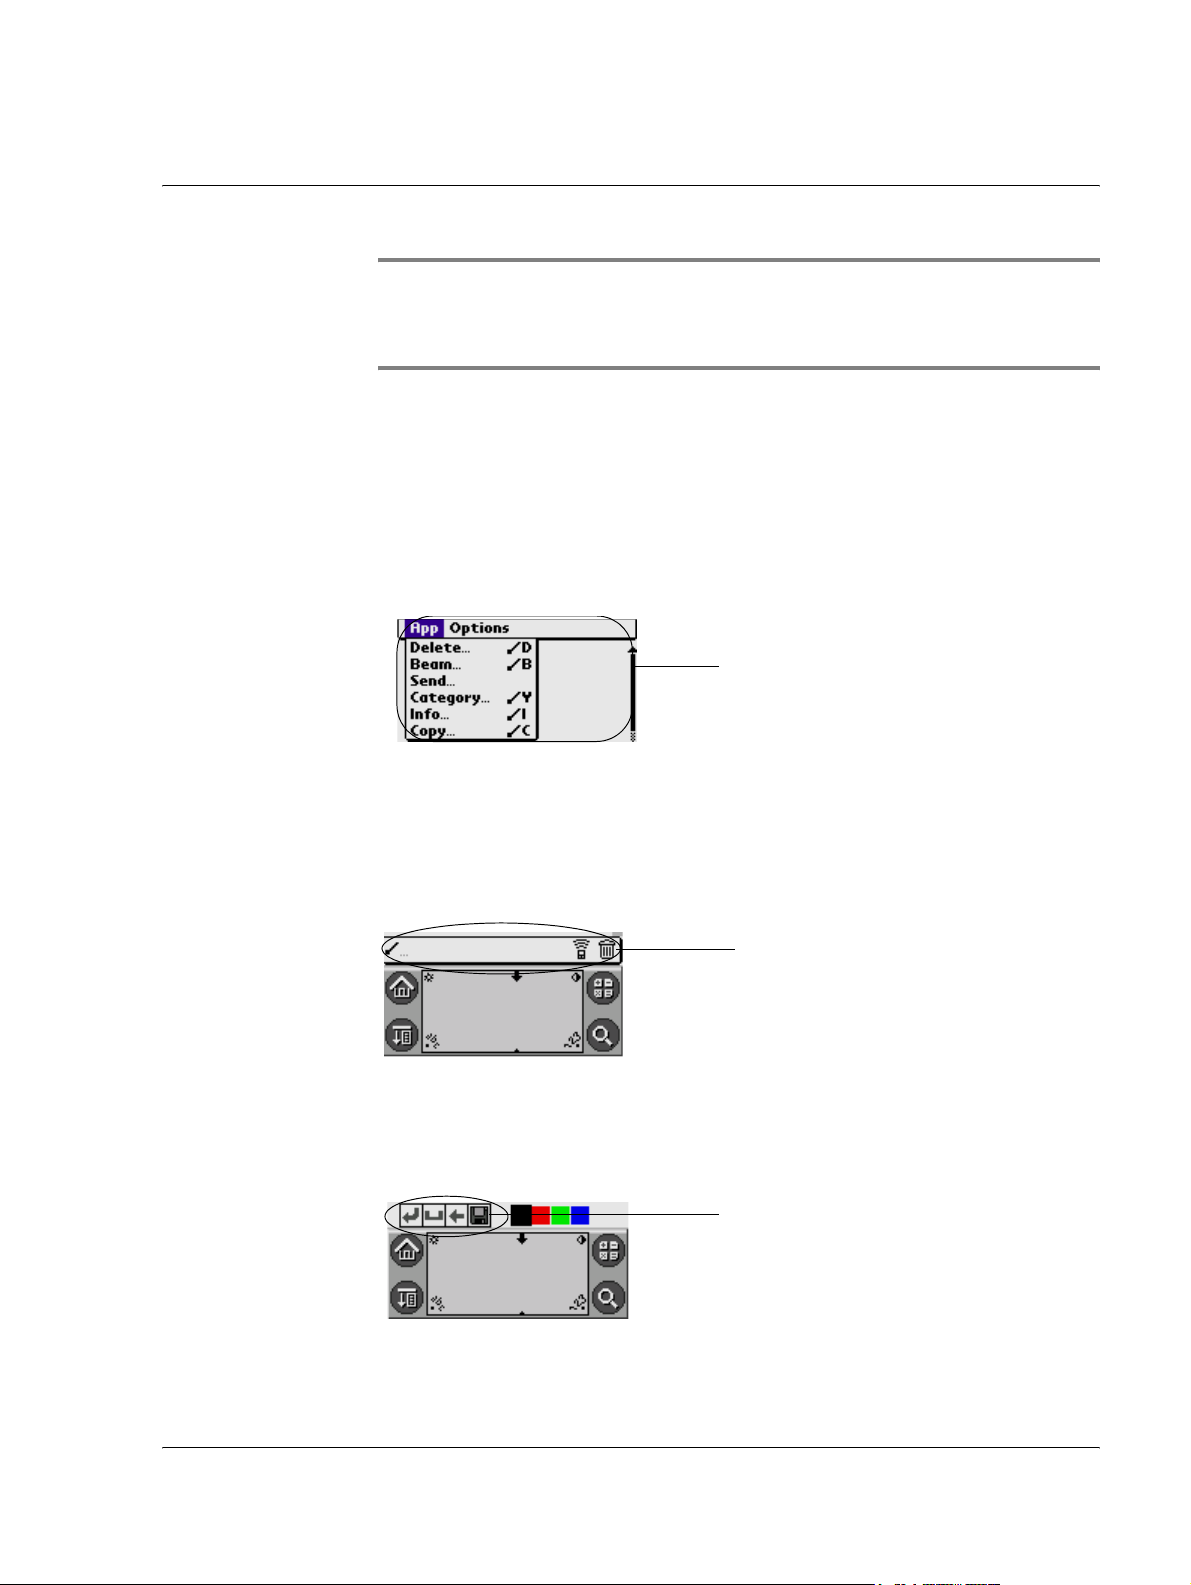
• A menu bar containing a set of menu commands specific to the
application. Not all applications have a menu bar.
Using the pda phone interface
menu bar
• A command bar that lets you tap icons or write a ShortCut stroke to
initiate a command instead of tapping a command in the menu bar.
The icons displayed in the Command bar vary within each
application.
command bar
• Command buttons that initiate a command when tapped. Command
buttons appear in dialog boxes or at the bottom of application
screens.
command button
G18 User Manual 16
Page 28
Introduction to the G18 PDA PHONE
Using the pda phone interface
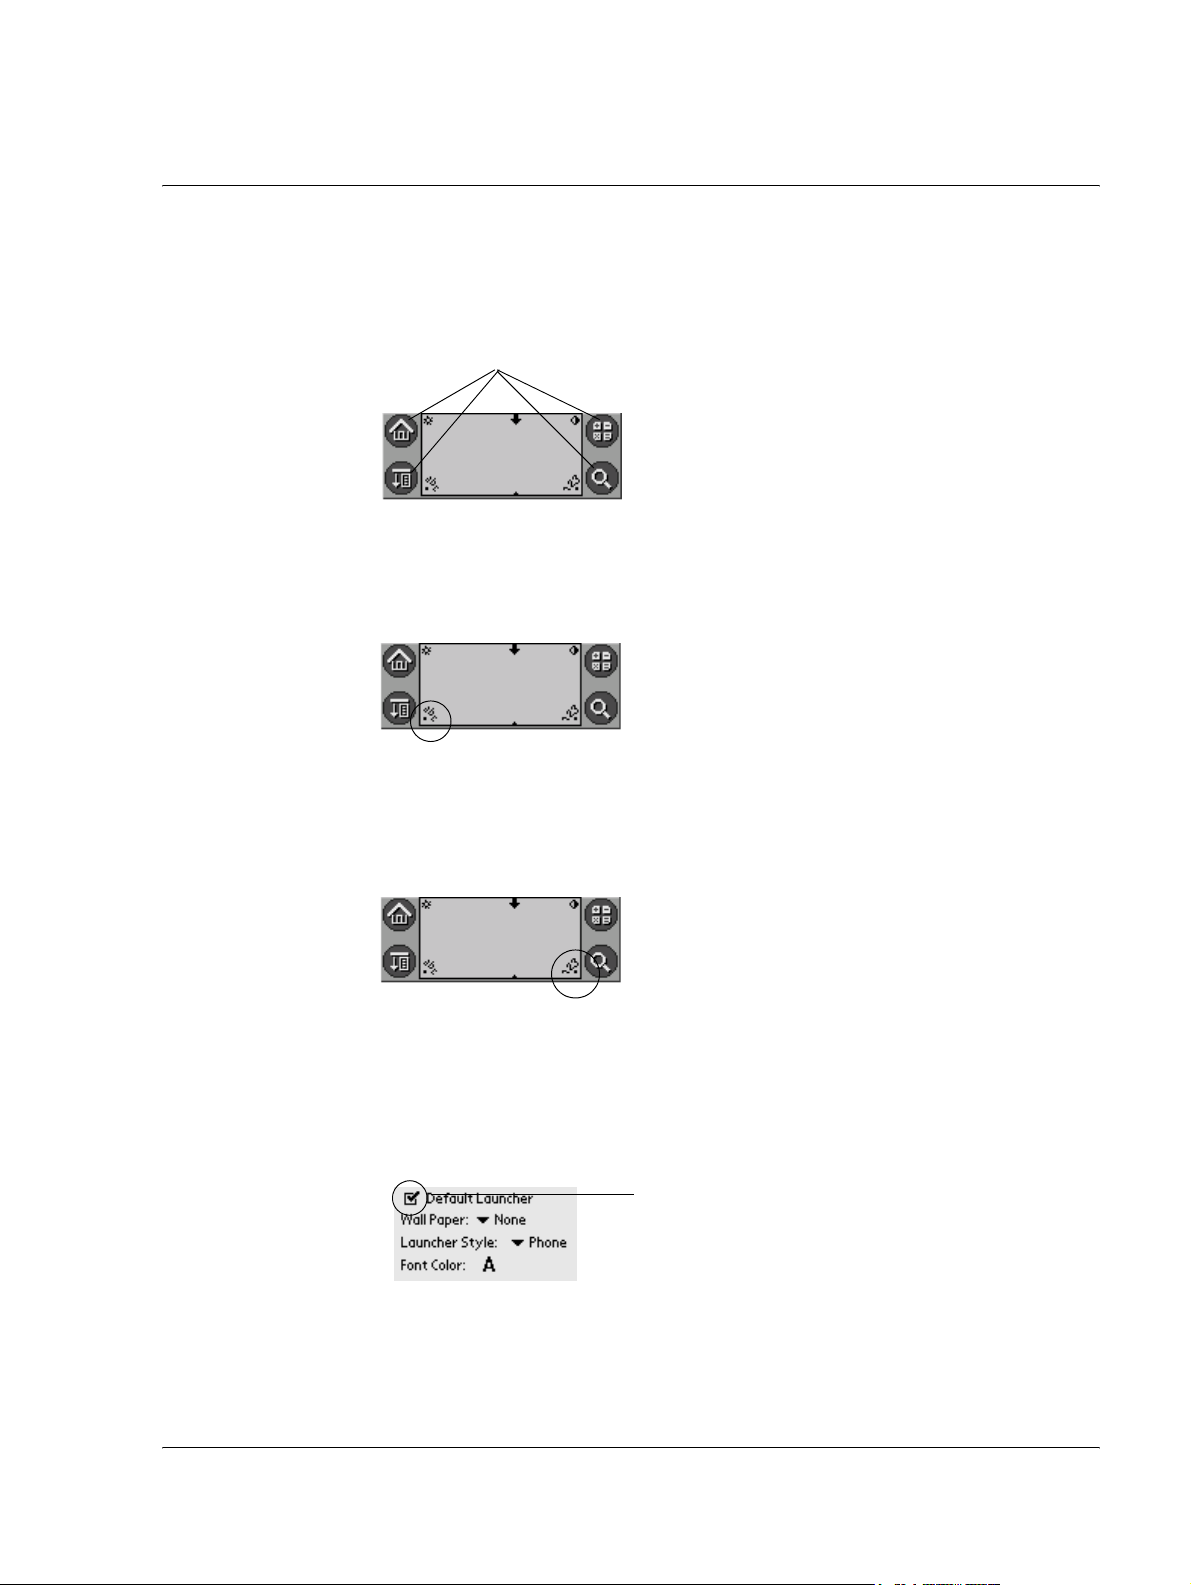
• Icons that open applications and menus, and find text anywhere in
your data.
icons
•An abc dot in the input area that activates the alphabetic keyboard
when tapped; note that the cursor must be in an input field for this
option to work.
•A 123 dot in the input area that displays the numeric keyboard
when tapped; note that the cursor must be in an input field for this
option to work.
• Check boxes that indicate the state of the corresponding option. A
check mark in a check box indicates that the option is active. If a
check box is empty, tapping it inserts a check mark. If a check box
is checked, tapping it removes the check mark.
check box
G18 User Manual 17
Page 29
Introduction to the G18 PDA PHONE
Using the pda phone interface
• Pick lists that display a list of choices. Tap the black triangle next to
the pick list name to display a list of choices, and then tap an item in
the list to select it.
pick list
• A scroll bar to move through long notes or memos. Tap and hold
down the scroll bar slider to scroll through pages; tap the slider
arrow at either end to move one line at a time. To scroll to the
previous page, tap the scroll bar just above the slider; to scroll to the
next page, tap the scroll bar just below the slider. You can also
scroll to the previous and next pages by pressing the upper and
lower portions of the scroll button on the front panel of the pda
phone.
scroll bar
• Previous/ nextarrows that display the previous or next page of
information.
next/previous arrows
• Text areas and screens in which you can enter information.
G18 User Manual 18
Page 30
Introduction to the G18 PDA PHONE
Using the pda phone interface
screen
text area
Using menus and menu commands
Menus on your pda phone are easy to use, and work the same way in all
applications. Menu bars and menu commands differ based on the
application and the area of the application in which you’re working. For
example, in the Memo Pad, the Memo List screen and the Memo screen
display different menus.
Menu commands for each application are described in the corresponding
application’s chapter, with the exception of the Edit menu.
Most menu commands have an equivalent Graffiti 2 command stroke,
which is similar to keyboard shortcuts used to execute commands on
computers. To use Graffiti 2 menu commands, menus must be closed.
To display a menu bar and choose a command:
1. Do one of the following:
• Open an application (such as the Date Book); then tap the Menu
icon. Select the desired command from the menu.
• Tap the inverted tab at the top of any application’s screen (The
Calculator does not have an inverted tab); then tap the desired
command.
• In the text input area of your device’s screen, drag a diagonal line
from the lower left to upper right to display the Command toolbar.
The command bar is displayed for approximate 4 seconds.
G18 User Manual 19
Page 31

Introduction to the G18 PDA PHONE
Using the pda phone interface
Tap an icon that represents the command you want, or enter the ShortCut
for the command in the text input area below the Command toolbar. For
example, to choose Select All in the Edit menu, draw the Graffiti 2
command stroke in the text area to display the Command toolbar; then
draw the letter S. Note that if you wait more than three seconds to draw the
ShortCut letter, you’ll have to redraw the Graffiti 2 command stroke to
redisplay the Command toolbar.
Displaying tips
Many of the dialog boxes that appear on your pda phone contain a Tips
icon in the upper right corner. Tips anticipate questions you may have and
provide shortcuts for using the dialog box or other useful information.
To display a tip:
1. Tap the Tips icon (the lowercase “i” in the upper right corner of the
dialog box).
Tips icon
2. Tap Done after reading the tip.
Entering data
You can enter data into your G18 in four ways:
• Using the onscreen keyboard
• Using Graffiti 2
• Using an external keyboard
G18 User Manual 20
Page 32

• Entering or importing data in Palm Desktop, and then
synchronizing with your pda phone
For more information, see these topics in Chapter 3, “Entering Data in
Your G18 PDA PHONE”.
Palm Desktop software
Palm Desktop includes the same main applications as your G18 pda phone:
Address Book, Date Book, To Do List, Memo Pad, Expense, and desktop
e-mail connectivity. You can use the HotSync feature of this software to
back up and exchange data between your pda phone and your computer.
It’s a good idea to back up your data in case something happens to the data
on your G18 pda phone. Changes you make on your G18 pda phone or
Palm Desktop appear in both places after you synchronize.
With Palm Desktop, you can do the following:
Introduction to the G18 PDA PHONE
Palm Desktop software
• Work with your G18 pda phone applications on your computer.
Palm Desktop duplicates the Date Book, Address Book, To Do
List, and Memo Pad applications on your pda phone, so that you
can view, enter, and modify any data stored on your pda phone.
• Back up the data stored on your pda phone with HotSync
technology and synchronize the data on your Palm Desktop.
Synchronization is a one-step procedure that ensures your data is
always safe and up to date. See “Exchanging and Updating Data
using HotSync Operations” in Chapter 11 for more information.
• Import and export data, so you can easily transfer data from other
desktop applications into any of your main applications. See
“Importing data” in Chapter 3 for more information.
• Print your Date Book, Address Book, To Do List, and Memo Pad
information on any printer.
Connecting the HotSync cable
The HotSync cable that comes with your G18 pda phone enables you to
synchronize the information on your G18 pda phone with the Palm
Desktop using HotSync technology.
G18 User Manual 21
Page 33

To connect your HotSync cable:
• Turn off your computer and plug the HotSync cable from the G18
pda phone into the serial port on your computer.
Installing Palm Desktop
The following instructions guide you through installing Palm Desktop so
that you can transfer data from your computer to your pda phone.
After installation, refer to the online Help in Palm Desktop for information
on how to use the software.
To ensure a safe and uninterrupted installation of Palm Desktop, do the
following before installing:
• Turn off your computer and connect to it with the HotSync cable.
• If you are installing from floppy disks (rather than the CD included
in the box), make sure that the original Palm Desktop disks are
write-protected, and then make backup copies of them. When you
have finished, use the copies to install the software, and store the
original disks in a safe place. Refer to your computer’s manual or
operating system documentation for information on locking or
copying diskettes.
Introduction to the G18 PDA PHONE
Installing Palm Desktop
• Do not copy the Palm Desktop files to your computer’s hard disk.
You must use the installer to place the files in their proper locations
and to decompress the files.
To install Palm Desktop:
1. Exit any open programs, including those that run at startup such as
Microsoft Office, and disable any virus-scanning software.
2. Insert the Palm Desktop CD into the computer’s CD-ROM drive (or
insert the Setup disk into the floppy disk drive).
3. When the Palm Desktop Installer Menu screen appears, click the
Install button to begin the installation procedure.
4. Follow the onscreen instructions to complete the installation. When
prompted, use the HotSync cable to connect your pda phone.
G18 User Manual 22
Page 34

Entering Data in Your G18 PDA PHONE
Using the onscreen keyboard
3
Entering Data in Your
G18 PDA PHONE
You can enter data into your G18 pda phone by using the onscreen
keyboard, writing with the stylus in the text input area, using an external
keyboard, or by importing data from another application.
Using the onscreen keyboard
You can open the onscreen keyboard anytime you need to enter text or
numbers on your pda phone.
To use the onscreen keyboard:
1. Open any application (such as the Address Book).
2. Tap any record, or tap New.
3. Choose one of the following to display the alphabetic or numeric
keyboard:
• Tap abc on the front panel of your pda phone to display the
alphabetic keyboard.
• Tap 123 on the front panel of your pda phone to display the
numeric keyboard.
Tap abc for
alphabet
keyboard.
Tap 123 for numeric keypad.
TIP: To select any of the three keyboards, tap the Menu icon and then
tap Edit. Tap Keyboard, and then tap the keyboard you want.
G18 User Manual 23
Page 35

Entering Data in Your G18 PDA PHONE
Entering data using Graffiti 2 handwriting software
Alpha
Tab
Caps Lock
Caps Shift
Tap here to display alphabetic keyboard
Numeric
Tap here to display
numeric keyboard.
Backspace
Carriage return
International
Tap here to display
international keyboard.
4. Tap the desired characters or numbers; then tap Done to enter the text
or numbers.
Entering data using Graffiti 2 handwriting software
You can use Graffiti 2 strokes to create letters, numbers, punctuation, and
symbols. The Graffiti 2 writing strokes include all letters, numbers, and
symbols found on a standard keyboard.
Learning to write Graffiti 2 characters
With only a few minutes of practice, you’ll find it easy to enter accurate
text and numbers using Graffiti 2 writing strokes.
The Graffiti 2 demo shows how to use the handwriting software. The first
time you turn on your pda phone, or perform a hard reset, the Welcome
application will automatically guide you through the setup process. When
you complete setup, you will be invited to learn how to use your
handwriting software.
G18 User Manual 24
Page 36

Entering Data in Your G18 PDA PHONE
Entering data using Graffiti 2 handwriting software
You should try the demo if Graffiti 2 is new to you. After you view the
Welcome application the first time, a Graffiti 2 Demo icon will appear on
the Applications Launcher screen. Tap on this icon to view the demo at any
time.
TIP: When you reach the Stroke Lookup screen of the demo, use the
pick list to view a wide variety of characters that you can make. As you
tap a character, you will see an animation of the strokes used to form
that character.
General Guidelines for Graffiti 2 Writing
Follow these guidelines to learn and use Graffiti 2 writing strokes
successfully:
• To achieve 100% accuracy, practice drawing characters exactly as
they appear in the tables later in this chapter.
• The heavy dot on each shape indicates where to start the stroke.
Some characters have similar shapes, but different starting and
G18 User Manual 25
Page 37

Entering Data in Your G18 PDA PHONE
Entering data using Graffiti 2 handwriting software
ending points. Always start the stroke at the heavy dot. (Do not
draw the heavy dot; it is there only as a guideline.)
• The Graffiti 2 writing strokes for letters closely resemble letters of
the standard English alphabet, both upper case and lower case.
Graffiti 2 includes symbols made with a single stroke and symbols
made with multiple strokes.
For multi-stroke characters, a temporary character is displayed after
the first stroke, to show that the stroke was recognized. For
example, after the first vertical stroke of “t”, a temporary “l” is
shown. There is a limited time window, during which the second
stroke must be drawn. Otherwise the temporary stroke is recorded.
• The text input area is divided into two parts, one for writing
lowercase letters and one for writing numbers. The small marks at
the top and bottom of the text input area define the division line. To
have your pda phone recognize letters and numbers, you must begin
letter strokes on the left side, and number strokes on the right side
of the text input area. Uppercase letters are formed by writing
across the division line.
Write lowercase letters here
Write numbers here
To write Graffiti 2 letters:
1. Tap the screen where you want to write text, for example, on a line
next to a time in the Date Book.
NOTE: A blinking cursor must appear onscreen above the Graffiti 2
writing area before you can begin writing text.
2. Use the tables on the following pages to find the stroke shape for the
letter you want to write. For example, the stroke shown below creates
the letter n.
G18 User Manual 26
Page 38

Entering Data in Your G18 PDA PHONE
Entering data using Graffiti 2 handwriting software
Lift stylus here.
Start stroke at
heavy dot.
You use the same shape to create both the lowercase letter and the
uppercase letter.
3. Position the stylus in the appropriate place of the text input area.
4. Start your stroke at the heavy dot, and draw the stroke shape as it
appears in the tables.
5. Lift the stylus from the screen at the end of the stroke shape.
6. Your pda phone recognizes your stroke immediately and displays the
letter at the insertion point tap onscreen. As soon as you lift the stylus
from the screen, you can begin the stroke for the next character you
want to write.
Graffiti 2 tips
When using Graffiti 2 writing, keep the following tips in mind:
• For greater accuracy, draw letters with large strokes; strokes that
nearly fill the text input area are easily interpreted.
• To delete characters, set the insertion point to the right of the
character you want to delete, and draw the Backspace stroke (a line
from right to left) in the text input area.
• Write at natural speed. Writing too slowly can produce errors.
• Do not write at a slant. Keep vertical strokes parallel to the sides of
the text input area.
• When letters and numbers can be written using two different
strokes, use the easiest one for you.
• Press firmly.
The Graffiti 2 alphabet
Draw Graffiti 2 letters according to the following alphabet.
G18 User Manual 27
Page 39

Entering Data in Your G18 PDA PHONE
Entering data using Graffiti 2 handwriting software
Write lowercase
Write uppercase letters across these division markers
Write numbers here
Writing punctuation marks and other special characters
Using Graffiti 2 writing, you can create any punctuation symbol and
special character available from a standard keyboard.
• The period and comma punctuation marks can be written on either
side of the text input area (the letter or number side). Other
common punctuation marks can be written on one side of the text
input area according to the chart below (in general, the more
frequently used punctuation is on the left side).
Note that the punctuation characters can also be entered anywhere
on the text input area if you first use the shift character. This
G18 User Manual 28
Page 40

Entering Data in Your G18 PDA PHONE
Entering data using Graffiti 2 handwriting software
requires an additional shift stroke, but you may find it more
convenient, since you don’t have to remember on which side of the
input area to make the stroke.
• When writing letters with accent marks, first write the letter stroke
on the left side (or in the center for uppercase letters) of the input
area. Then quickly write the accent stroke on the right side of the
input area, as shown in the illustration below.
• Symbols and other special characters can be written using the Shift
command. When you make a vertical stroke from the bottom to the
top in the text input area, the Shift indicator arrow appears in the
lower right corner of the screen. While this arrow is visible , you
can make the punctuation shift characters shown in the illustration
below. Once the arrow goes away, the punctuation mark appears.
TIP: Using an additional Shift stroke to finish writing the character (as
shown in the demo) is optional, but will make the character appear more
quickly.
Draw punctuation, symbols or accent marks using the following strokes:
G18 User Manual 29
Page 41

Entering Data in Your G18 PDA PHONE
Entering data using Graffiti 2 handwriting software
TIP: Samples of the character strokes are available in the Graffiti 2
Help file. To view the Help file, use the full-screen pen stroke, dragging
the stylus from the text input area to the top of the screen. Note that the
accented characters appear on a Punctuation Shift screen, but do not use
the Shift command. To write uppercase accented characters, write the
letter across the division mark, just as you would do with an ordinary
letter.
Using the Graffiti 2 tuner
The Graffiti 2 tuner provides alternate strokes for making the T, P, Y, and $
characters. For example, you may want to write the letter “T” by using
strokes similar to a space and an “L”. But if this technique is difficult to
control, you can turn off this option.
To use the tuner:
1. Tap the Applications icon.
2. In the pick list in the upper right corner of the screen, tap Main or
System.
3. Tap on the Prefs icon.
4. Select Graffiti 2 from the pick list in the upper right corner of the
screen.
G18 User Manual 30
Page 42

5. Tap on one of the letters available for you to tune:
Using Graffiti 2 Gestures
Gestures are editing commands, such as cut, paste, and the ShortCut
command which will be explained in the next section. To use gestures,
draw the following strokes:
Entering Data in Your G18 PDA PHONE
Using Graffiti 2 Gestures
Using Graffiti 2 ShortCuts
Graffiti 2 ShortCuts let you quickly and easily enter commonly used words
or phrases. ShortCuts are similar to the Glossary or Autotext features of
some word processors. Graffiti 2 writing comes with several predefined
ShortCuts. You can also create your own, for any words, letters, or
numbers.
You can create ShortCuts, with up to 45 characters, using the ShortCut
preferences. For example, you could create a ShortCut for your name or for
the header of a memo. All ShortCuts you create appear on the list in the
ShortCut Preferences screen, are available in any of your pda phone
applications, and are backed up on your computer when you perform a
HotSync® operation.
G18 User Manual 31
Page 43

Entering Data in Your G18 PDA PHONE
Using Graffiti 2 ShortCuts
Your pda phone includes the following predefined Graffiti 2 ShortCuts for
common entries:
• ds—Date stamp
• ts—Time stamp
• dts—Date/time stamp
•me—Meeting
• br—Breakfast
• lu—Lunch
• di—Dinner
To use a ShortCut:
Draw the ShortCut stroke, followed by the ShortCut character or
characters.
When you draw the ShortCut stroke, the ShortCut symbol appears at the
insertion point.
ShortCut
To create a ShortCut:
1. Tap the Applications icon.
2. Select All or System from the pick list in the upper right corner.
3. Select Prefs from the menu.
4. Tap ShortCuts in the pick list in the upper right corner.
5. Tap New.
6. In the ShortCut Name line of the ShortCut Entry screen, enter the
letters you want to use to activate the ShortCut.
G18 User Manual 32
Page 44

Entering Data in Your G18 PDA PHONE
Importing data
Tap New.
7. Tap the ShortCut Text area, then enter the text that will appear when
you write the ShortCut characters.
8. You can add a space character after the last word in your ShortCut
text, so that a space automatically follows the ShortCut text.
9. Tap OK.
To edit a ShortCut:
1. In the ShortCut Preferences screen, tap the ShortCut you want to edit.
2. Tap Edit.
3. Make the changes you want, then tap OK.
To delete a ShortCut:
1. In the ShortCut Preferences screen, tap the ShortCut you want to
delete.
2. Tap Delete, then tap Yes.
Importing data
If you have data stored in computer applications such as spreadsheets and
databases, or if you want to import data from another device, you can
transfer the data to your G18 pda phone without having to key it in
manually. Save the data in one of the file formats listed below, import it
into Palm Desktop, and then perform a HotSync operation to transfer the
data to your pda phone.
Palm Desktop can import data in the following file formats:
• Comma delimited (.csv, .txt): Address Book and Memo Pad only.
G18 User Manual 33
Page 45

Entering Data in Your G18 PDA PHONE
Importing data
• Tab delimited (.tab, .tsv, .txt): Address Book and Memo Pad only.
• CSV (Lotus Organizer 2.x/97 Mapping): Address Book only.
• Date Book archive (.dba).
• Address Book archive (.aba).
• To Do List archive (.tda).
• Memo Pad archive (.mpa).
Archive formats can only be used with Palm Desktop. Use the archive file
formats to share information with other people who use Palm Powered
handhelds or to create a copy of your important Palm Desktop information.
To import data:
1. Open Palm Desktop.
2. Click the application into which you want to import data.
3. If you are importing records that contain a field with category names,
do the following:
a. Select All in the Category box.
b. Make sure that the same categories that appear in the imported file
also exist in the application. If the categories do not exist, create
them now; otherwise, the records will be imported into the Unfiled
category.
4. Choose File > Import; then select the file you want to import, and click
Open.
5. To import data into the correct Palm Desktop fields, drag fields in the
left column so that they are opposite to the corresponding imported
field on the right.
6. To exclude a field from being imported, deselect the field’s check box.
7. Click OK.
8. The imported data is highlighted in the application.
9. To add the imported data to your pda phone, perform a HotSync
operation.
See Palm Desktop online Help for more information on importing and
exporting data.
G18 User Manual 34
Page 46

Performing Common Tasks
Creating records
4
Performing Common
Tasks
The tasks described in this section use the term records to refer to an
individual item in any of the basic applications, for example, a single Date
Book event, Address Book entry, To Do List item, Memo Pad memo, or
Expense item.
Creating records
You can use the following procedure to create a new record in Date Book,
Address Book, To Do List, Memo Pad, and Expense.
To create a record:
1. Select the application in which you want to create a record.
2. Tap New. (For the Date Book only, select start and end times for your
appointment and tap OK.)
3. Enter text for the record.
NOTE: The pda phone automatically capitalizes the first letter of each
field (except numeric and e-mail fields).
4. As an option, tap Details to select attributes for the record.
5. In the Address Book and Memo Pad only, tap Done.
Your pda phone saves the new record automatically.
G18 User Manual 35
Page 47

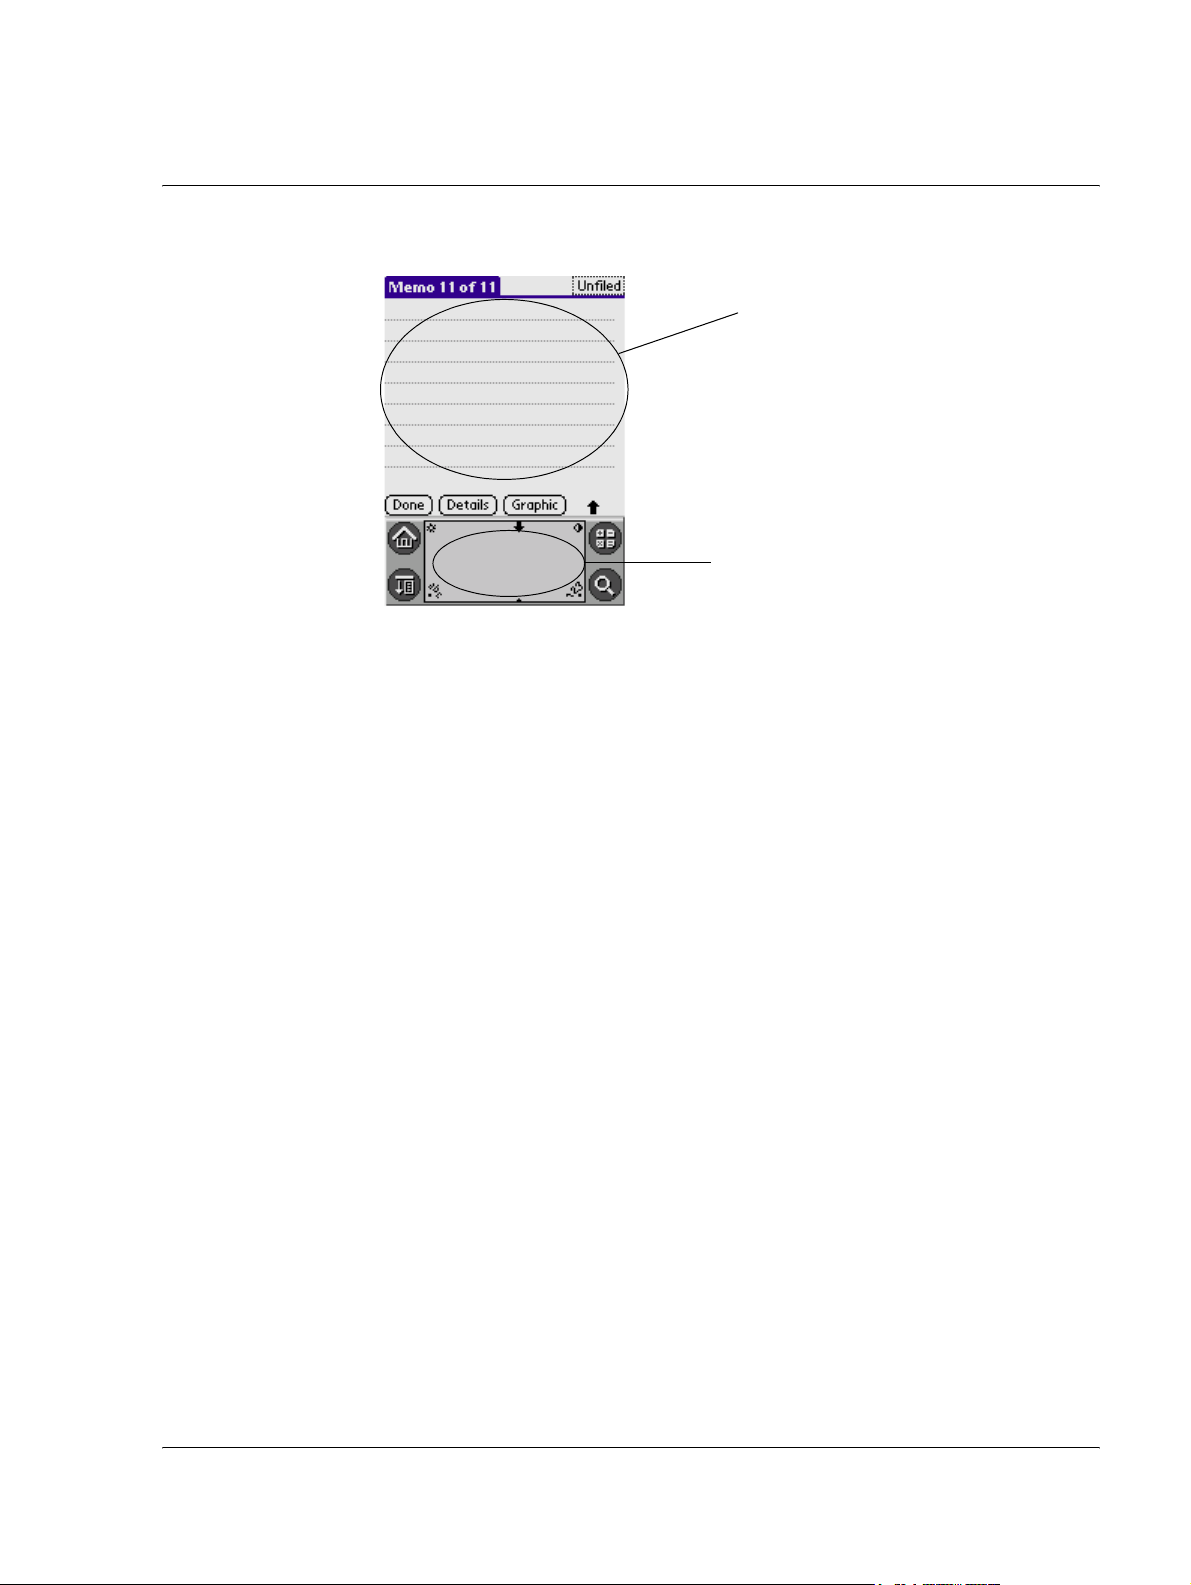
Editing records
After you create a record, you can change, delete, or add new information
at any time. When the screen is in edit mode, a blinking cursor appears
within the information, and the information appears on a dotted gray line
called an edit line.
You can enter text in any of the ways described in Chapter 3, “Entering
Data in your G18 PDA PHONE”.
Performing Common Tasks
Editing records
Cursor
Edit line
Selecting Text
Select the text you want to edit using one of the following techniques:
• Double-tap on a word in a field to select the word.
• Triple-tap on any word on a line to select the entire line.
• To select a segment character in the character: you can tap the top
or trail of character you want to select, then pull to the trail or top of
the segment you want to select. So you can select several character
one time.
Using the Edit menu
The Edit menu is available from any screen where you enter or edit text. As
a general rule, the Edit menu commands affect the selected text. You can
display the Edit menu in three ways: by tapping the Menu icon, by tapping
the inverted tab at the top of the screen, and by writing a Graffiti
ShortCut.
®
2
G18 User Manual 36
Page 48

Performing Common Tasks
Editing records
To use the Edit menu:
1. Do one of the following to display the Edit menu:
• Tap the Menu icon; then tap the Edit menu to display the
commands in the menu.
• Tap the inverted tab at the top of the screen; then tap the Edit menu
to display the commands in the menu.
• In the text input area, drag a diagonal line from the lower left to
upper right to display the Command toolbar. To select a command,
either tap the icon representing a command on the Command
toolbar, or draw the Graffiti 2 ShortCut in the text area of your
screen.
2. Choose from the following commands, depending on the application
you’re using:
• Undo reverses the last action taken.
• Cut removes a selection from its current location to memory. You
can then paste the text into another area of the current application or
into a different application.
• Copy copies a selection and moves it to memory. You can paste the
selection into another area of the current application or into a
different application.
• Paste inserts a selection from memory into an area you select. Paste
produces no result if you have not used the Cut or Copy commands,
it will excute this command.
• Select All selects all the text in the current record or screen.
• Keyboard opens the onscreen keyboard. Tap Done to close the
keyboard.
• Graffiti 2 Help opens the Graffiti 2 character stroke screen.
Deleting records
You can delete records in any of the basic applications.
To delete a record in any of the basic applications:
1. Select the record you want to affect.
G18 User Manual 37
Page 49

Performing Common Tasks
Editing records
2. Do one of the following:
• Tap the Menu icon, open the Record menu, and then tap the Delete
command.
The Delete command differs depending on the application you’re
using, for example, Delete Event appears in the Record menu while
you’re in the Date Book, and Delete Item appears when you’re
using the To Do List.
• Tap the inverted tab at the top of the screen, open the Record menu,
and then select the desired Delete command.
• In the Details dialog box of the application, tap Delete, and then tap
OK.
• Delete the text of the record.
NOTE: In the Date Book, deleting the text of a repeating event deletes
all instances of the event.
• In the text input area, drag a diagonal line from the lower left to
upper right to display the Command toolbar; then tap the Delete
icon or draw a Graffiti 2 ’D’ in the text area.
Delete icon
A confirmation dialog box appears.
3. To archive a copy of the deleted file on your PC, select the Save
Archive option. If you choose the archive option, the record is
transferred to the archive file on your PC the next time you perform a
HotSync operation.
4. Tap OK to delete the record.
Purging records
Over time, as you use Date Book, To Do List, and Expense, you may
accumulate records that are no longer useful. For example, events that
occurred months ago remain in the Date Book, and completed To Do List
items and Expense items remain in the list.
Outdated records take up memory on your pda phone, so it’s a good idea to
remove them by using Purge. If you think Date Book or To Do List records
G18 User Manual 38
Page 50

Performing Common Tasks
Categorizing records
might prove useful later, you can purge them from your pda phone and save
them in an archive file.
Purging is also available in Mail. Purging is not available in Address Book
or Memo Pad; delete records from these applications manually.
To purge records:
1. Open the application from which you want to purge records.
2. Choose from the following options:
• Tap the Menu icon, open the Record menu, and then tap Purge. A
confirmation dialog box appears.
• Tap the inverted tab at the top of the screen, open the Record menu,
and select Purge.
3. Choose from the following options:
• For the Date Book, select the Delete Events Older Than pick list
and select an option—1 week, 2 weeks, 3 weeks or 1 month.
• For the Date Book or To Do list, select Save Archive Copy on PC
to save a copy of purged records in an archive file on your desktop.
Selecting this option transfers purged records to an archive file the
next time you perform a HotSync operation. Tap OK.
• For the Expense application, tap a category and tap Purge. Tap Yes
to confirm the deletion, and then tap Done.
Categorizing records
You can categorize records in the Address Book, To Do List, Memo Pad,
and Expense applications for easy retrieval. (The Date Book does not have
categories.) When you create a record, it is automatically assigned to the
currently displayed category. For example, if the All category is displayed,
the record is assigned to the Unfiled category. A record can remain unfiled
or it can be assigned to a category at any time.
Each application has a default set of categories:
• The Address Book includes a Business, Personal, and QuickList
category.
• The To Do List includes a Business, Personal, and All category.
• The Expense application includes a New York, Paris, and All
category.
G18 User Manual 39
Page 51

Performing Common Tasks
Categorizing records
You can rename or delete the default categories, and you can create new
categories. Each application can have up to 15 categories.
To move a record into a category:
1. Select the record you want to categorize.
2. Tap Details. (From the Address View screen, tap Edit first.)
3. In the Details dialog box, tap the Category pick list, select the desired
category, and then tap OK.
To display a category of records:
1. Open one of the following applications: the Address Book, the To Do
List, or the Memo Pad, or the Expense application.
2. Tap the pick list in the upper right corner of the screen; then tap the
category you want to display.
Tap thepick list
Select a category
TIP: Pressing the Address Book, To Do List, or Memo Pad button on
your pda phone toggles through the categories assigned to the
application respectively.
To add or edit application categories:
1. In the Address Book, To Do List, Memo Pad, or Expense application,
choose from the following options:
• Tap the pick list in the upper right corner of the screen, and tap Edit
Categories.
G18 User Manual 40
Page 52

Performing Common Tasks
Categorizing records
Edit Categories
• In the Address Book, select a record and tap Edit; then tap Details.
In the Category pick list, tap Edit Categories.
• In the Memo Pad and To Do List, select a record from the list, and
tap Details. In the Category pick list, tap Edit Categories.
2. Select any of the following options:
• To create a new category, tap New, and enter a new name in the
text input area. Tap OK.
• To rename a category, tap it in the list to select it. Tap Rename,
enter a new name in the text input area, and Tap OK.
• To delete a category, tap it in the list to select it. Tap Delete.
3. Tap OK.
To rename a category:
1. Tap the pick list in the upper right corner of the screen; then tap Edit
Categories.
2. Select the category you want to rename; then tap Rename.
G18 User Manual 41
Page 53

3. Enter the new name for the category, and tap OK.
4. Tap OK to exit the Edit Categories dialog box.
TIP: You can move records from multiple categories into a single
category by renaming all discrete categories with a single category
name.
Finding records
Your pda phone lets you find information in several ways:
• In all applications, starting with the current application, you can
find the selected text.
• In the Date Book, the To Do List, and the Memo Pad, you can use
Phone Lookup to display the Address List screen and add the
information from this list to a record.
Performing Common Tasks
Finding records
• In the Address Book, you can use the Look Up option to enter the
first letter of a name to scroll immediately to that name.
• In your EMailer application, you can use Lookup to access
information in your Address Book.
Finding Address Book records
You can look up Address Book records using the scroll button on the front
panel of your device or by typing the first few letters of a name in the Look
Up option at the bottom of the address screen.
To look up an Address Book record:
1. Do one of the following:
• From the Address screen, enter the first few letters of the name you
want to locate.
G18 User Manual 42
Page 54

Performing Common Tasks
Finding records
Look Up option
• Use the scroll button on the front panel of the device to scroll a
screen at a time. Holding down the scroll button accelerates
scrolling.
Using the Find option
The Find option lets you locate text in any or all applications. For example,
if the text “dog” appears in the Address Book and the Date Book, the Find
option displays both occurrences in the Find dialog box.
To use the Find option:
1. Tap the Find icon.
2. Enter the text you want to find, then tap OK.
Note that the Find option is not case sensitive; searching for
"davidson" also finds "Davidson."
TIP: Select text in an application before tapping Find to automatically
place the text in the Find dialog box.
Find searches for the text in all records and all notes within all applications.
G18 User Manual 43
Page 55

Performing Common Tasks
Sorting records
If there have no the recorder you want to search in the found recorder, you
can tap the Continue Find.
Using Phone Lookup
The Phone Lookup option lets you add a telephone number from the
Address list to an entry in another application. For example, you can add
your dentist’s telephone number to your dental appointment date in the
Date Book.
To use Phone Lookup:
1. Display the record in which you want to insert a phone number. The
record can be in the Date Book, the To Do List, or the Memo Pad.
2. Do one of the following:
• Tap the Menu icon. Tap Options, and then tap Phone Lookup.
• Tap the inverted tab at the top of the screen; then tap Options and
tap Phone Lookup.
• In the text input area, drag a diagonal line from the lower left to
3. Select a record or write the first few letters of the name you want to
add. Tap Add to add the information to the record.
NOTE: You can also search based on the selected text. Drag to
highlight the text, then follow step 2 above. When the search is
complete, the name and phone number of the candidate will replace the
selected text.
Sorting records
You can sort lists of records in various ways, depending on the application.
Sorting is available in applications that display lists—in the Address Book,
To Do List and Memo Pad.
To sort records in the To Do List applications:
1. Open the application to display the list screen.
upper right to display the Command toolbar. In the text area, write
an L, the ShortCut for the Phone Lookup command.
G18 User Manual 44
Page 56

Performing Common Tasks
Making records private
2. Tap Show.
3. Tap the Sort By pick list, and select an option.
4. Tap OK.
To sort records in the Address Book and Memo Pad:
1. Open the application to display the list screen.
2. Do one of the following:
• Tap the Menu icon. From the Options menu, tap Preferences.
• Tap the inverted tab at the top of the screen; then tap Preferences in
the Options menu.
• In the text input area, drag a diagonal line from the lower left to
upper right to display the Command toolbar. In the text area, write
an R, the ShortCut for the Preferences command.
3. In the Preferences dialog box, tap the option you want; then tap OK to
sort the list.
To sort the Memo List manually:
Tap and drag a memo to a new location in the list.
TIP: To display the list of your memos on your computer as you
arranged them manually on your pda phone, open Memo Pad in Palm
Desktop click List By, and select Order on Handheld.
Making records private
In all the basic applications except the Expense and Mail application, you
can make individual records private. Private records can be either masked
or hidden. Private records remain visible and accessible until you select a
security setting to Hide Records. Private record names are covered with a
gray bar when the security setting is set to Mask Records.
If you have assigned a password to your device, you must enter it before
private records are displayed.
To make a record private:
1. In your application, do one of the following:
G18 User Manual 45
Page 57

Performing Common Tasks
Making records private
• Create a new record and tap Edit, and then tap Details.
• Select an existing record, and tap Details.
2. Tap the Private check box. Tap OK.
3. At the alert in the Private Records dialog box, tap OK.
To hide private records:
1. Do one of the following:
• Tap the Menu icon; tap the Security Set or Security in the Options
menu.
• Tap the inverted tab at the top of the screen; then tap Security Set or
Security in the Options menu.
• Bring up the Command Bar and tap the padlock icon. To bring up
the Command Bar, drag your pen diagonally across the text input
area from lower left to upper right.
2. In the Change Security dialog box, in the Current Privacy pick list, tap
Hide Records; then tap OK.
To display private records:
1. Do one of the following:
G18 User Manual 46
Page 58

• Tap the Menu icon; tap the Security Set or Security in the Options
• Tap the inverted tab at the top of the screen; then tap Security Set or
• Bring up the Command Bar and tap the padlock icon. To bring up
2. From the Current Privacy pick list, tap Show Records; then tap OK.
3. If you have assigned a password, you must enter the password before
the hidden records are displayed.
4. Enter your password, and then tap Show.
Attaching notes
You can attach notes to records in all the basic applications except the
Memo Pad. A note can be up to several thousand characters long.
Performing Common Tasks
Attaching notes
menu.
Security in the Options menu.
the Command Bar, drag your pen diagonally across the text input
area from lower left to upper right.
To attach a note to a record:
1. Display the entry to which you want to add a note.
2. In Address Book only, tap Edit.
3. Tap Details(Tap Notes in Address Book directly).
4. Tap Note; then enter the desired note.
5. Tap Done.
Choosing fonts
You can change the font style in all basic applications. You can choose a
different font style for each application.
G18 User Manual 47
Page 59

Small font
Bold font
Performing Common Tasks
Choosing fonts
Large font
To change the font style:
1. Open an application.
2. Do one of the following:
• Tap the Menu icon. From the Options menu, tap Font.
• Tap the inverted tab at the top of the screen; then tap Font in the
Options menu.
• In the text input area, drag a diagonal line from the lower left to
upper right to display the Command toolbar. In the text area, write
an F, the ShortCut for the Font command.
3. Tap the font style you want; then tap OK.
Tap here for bold font.
Tap here for large font.
Tap here for small font.
G18 User Manual 48
Page 60

Performing Common Tasks
Getting information on an application
Getting information on an application
You can get information on any application by displaying its About box.
The About box displays the name and version number of the application.
To display the About box:
1. Tap the Menu icon from any location.
2. In the Options menu, tap About.
3. The text following the About command differs based on your location.
For example, if you’re in the Date Book, the command is About Date
Book; if you are in the Address Book, the command is About Address
Book.
G18 User Manual 49
Page 61

Managing Applications
This chapter explains how to switch between applications on your G18 pda
phone, how to personalize application settings, and how to categorize
applications into related groups.
Using the Applications Launcher
The Applications Launcher displays all the available applications on your
pda phone by default. You can also display only selected applications by
arranging applications into categories.
Managing Applications
Using the Applications Launcher
5
To open the Applications Launcher:
Tap the Applications icon.
Selecting applications
Your G18 pda phone is equipped with a variety of applications. All the
applications installed on your pda phone appear in the Applications
Launcher.
In addition to providing a way for you to open applications, the
Applications Launcher displays the current time, battery level, and
application category.
To open an application:
Choose from the following options:
• Tap the Applications icon, and then tap the icon of the application
you want to open. If you have many applications installed on your
G18 pda phone, tap the scroll bar to see all the available
applications.
• Press an application button on the front panel to display the selected
application immediately.
G18 User Manual 50
Page 62

Managing Applications
Using the Applications Launcher
• To switch between applications, tap the Applications icon or press
an application button on the front panel of your pda phone. Your
pda phone automatically saves your work in the current application
and displays it when you return to that application.
Categorizing applications
The category feature enables you to manage the number of application
icons that appear onscreen in the Applications Launcher. You can assign an
application to a category and then display a single category or all your
applications.
To categorize an application:
1. Tap the Applications icon on the front panel of your device.
2. Tap the Menu icon.
3. From the App menu, tap Category.
4. Choose from the following options:
• To choose a category for an application, tap the pick list next to
each application.
• To create a new category for an application, tap Edit Categories
from the application’s pick list. Tap New, enter the category name,
and then tap OK to add the category. Tap OK.
5. Tap Done.
To display applications by category:
1. Tap the Applications icon.
2. Do one of the following:
• Tap the Applications icon repeatedly to cycle through all the
categories.
• Tap the pick list in the upper right corner of the screen, then tap the
category you want to display.
Changing the Applications Launcher display
By default, the Applications Launcher displays applications as icons. As an
alternative, you can display applications in a list format.
G18 User Manual 51
Page 63

Managing Applications
Setting preferences for applications
To change the view of applications:
1. Tap the Applications icon; then tap the Menu icon.
2. From the Options menu, tap Preferences.
3. From the View By option tap List; then tap OK to see your
applications in list format.
select Icon and tap OK
In addition to displaying applications by icon or list, you can set an option
to display the last-selected category of applications each time you open the
Applications Launcher.
To display the last-selected category of applications:
1. Tap the Applications icon; then tap the Menu icon.
2. From the Options menu, tap Preferences.
3. In the Preferences dialog box, tap Remember Last Category.
4. Tap OK. Each time you return to the Applications Launcher, the last
category of applications you selected is displayed.
NOTE: If you do not select the Remember Last Category option, all
applications are displayed when you select the Applications Launcher.
Setting preferences for applications
You can set preferences for individual applications in the Preferences
dialog box. Not all applications have preference settings.
G18 User Manual 52
Page 64

Managing Applications
Setting preferences for applications
To set preferences for an application:
1. Open an application. For instructions, see “Selecting applications” in
this chapter.
2. Tap the Menu icon.
3. From the Options menu, select Preferences.
4. Enter the desired preference settings; then tap OK.
Assigning applications to buttons
Buttons preferences let you assign different applications to the buttons on
the front panel of the pda phone. For example, if you find that you seldom
use the To Do List and often use Mail, you can assign the To Do List button
to start the Mail application.
You can also change whether the full-screen pen stroke activates the
Graffiti®2 Help application or one of your pda phone controls using
Buttons preferences.
use the pen pull to the top of the screen
If you assign a different application to a button, you can still select the
original application using the Applications Launcher. Changes made in the
Buttons Preferences screen or HotSync Buttons dialog box take effect
immediately.
To change the Buttons preferences:
1. Enter the Application Start.
2. Select All or System from the pick list in the upper right corner.
G18 User Manual 53
Page 65

Managing Applications
Setting preferences for applications
3. Select Prefs from the menu.
4. In the pick list in the upper right corner, tap Buttons.
5. In the Buttons Preferences screen, tap the pick list next to the button
you want to re-assign.
6. Tap the application that you want to assign to the button.
TIP: To restore all of the buttons to their factory settings, tap Default.
To change the HotSync buttons preferences:
1. Tap the Applications icon, then tap the Prefs icon.
2. In the pick list in the upper right corner, tap Buttons.
3. In the Buttons Preferences screen, tap HotSync.
4. Tap the pick list next to the button you want to assign.
Tap arrow to
show thepick
list.
5. Tap the application you want to assign to each button.
The default setting for each button is the HotSync setting, which means the
HotSync cable perform their normal HotSync functions.
To change what the full-screen pen stroke activates:
1. Tap the Applications icon.
2. Select All or System from the pick list in the upper right corner.
3. Select Prefs from the menu.
4. In the pick list in the upper right corner, tap Buttons.
5. In the Buttons Preferences screen, tap Pen.
G18 User Manual 54
Page 66

Managing Applications
Installing add-on applications
6. Tap the pick list, and tap one of the following settings for the fullscreen pen stroke:
• Backlight turns on the backlight of your pda phone.
• Keyboard opens the onscreen keyboard for entering text characters.
• Graffiti 2 Help opens a series of screens that show the complete
Graffiti 2 character set.
• Turn Off & Lock turns off and locks the pda phone. You must
assign a password to lock the pda phone. When locked, you need to
enter the password to use your pda phone.
• Beam Data beams the current record to another PDA connected
organizer.
7. Tap OK.
Installing add-on applications
In addition to the applications that came with your pda phone, you can
install applications (called add-on applications) using the Install Tool
during a HotSync® operation. A variety of third-party applications are
available for your device, such as games and other software, from the
internet.
Add-on applications reside in RAM memory and can be removed at any
time; for information, see “Removing applications” later in this chapter.
Installing games
In addition, you can install games included on the CD using the G18 Install
Tool. These games include:
• Giraffe (a fun and simple way to practice Graffiti 2 writing)
• HardBall
G18 User Manual 55
Page 67

Managing Applications
Installing add-on applications
• MineHunt
•Puzzle
• SubHunt
After you install and start a game, its instructions appear in the Game
menu. Depending on the game, the Game menu may also contain
commands to show high scores, start a new game, or set preferences for the
game.
To install add-on applications on your pda phone:
1. From your computer desktop, copy or download the applications you
want to install into the add-on folder in your Palm Desktop directory.
2. If the application is compressed, for example, as a .zip file, decompress
the application into the add-on folder before continuing.
3. Double-click the Palm Desktop icon on your computer desktop to open
it, then click Install.
G18 User Manual 56
Page 68

Managing Applications
Installing add-on applications
TIP: You can also select the Install Tool dialog box by selecting
Install Tool from the Palm Desktop program group or by doubleclicking any file with a PRC file extension.
4. In the User drop-down list, select the user name that corresponds to
your G18 pda phone; then click Add.
5. In the file list of the Add-on folder, select the application that you want
to install on your pda phone; then click Open. The file appears in the
Palm Install Tool dialog box.
6. If decide not to install an application, select it in the list of files in the
Palm Install Tool dialog box and click Remove. The application is
removed from the dialog box list, but not from your computer.
7. Click Done. A message appears to indicate that the application or
applications will be installed the next time you perform a HotSync
operation.
G18 User Manual 57
Page 69

8. Perform a HotSync operation to install the applications. See Chapter
11, “Exchanging and Updating Data using HotSync Operations” for
more information.
Removing applications
You can remove add-on applications, patches, and extensions from your
pda phone if you run out of memory or no longer need them.
You cannot remove the built-in applications that reside in the ROM portion
of your device, including the Date Book, Address Book, To Do List, Memo
Pad, Expense, Calculator, and Mail applications.
To remove an add-on application:
1. Tap the Applications icon; then tap the Menu icon.
2. Tap Delete.
Managing Applications
Removing applications
3. In the Delete dialog box, tap the application you want to remove.
4. Tap Delete.
5. Tap Yes.
6. Tap Done.
Removing Palm Desktop
If you no longer want to use Palm Desktop, you can remove it from your
computer.
To remove Palm Desktop:
1. In Windows, from the Start menu, choose Settings > Control Panel.
G18 User Manual 58
Page 70

Managing Applications
Removing Palm Desktop
2. Open the Add/Remove Programs icon.
3. On the Install/Uninstall tab, select Palm Desktop; then click Add/
Remove.
NOTE: You must retain the HotSync Manager from the CD for
installation to synchronize data with another PIM.
G18 User Manual 59
Page 71

Working with Communication Applications
Working with
Communication
Applications
Your G18 includes the following communication applications:
• Phone
6
•SMS
• jMMS
• EMailer
• WAP Browser
•STK
G18 User Manual 60
Page 72

Using the Phone
To open the Phone application
The telephone function can be activated by
1. Tap the Applications icon .
2. Select Communication from the pick list in the upper right corner;
then tap the Phone icon. (icon added)
TIP: Alternatively, you can press the Call key to activate the
telephone function.
Making a call
Using the Phone
1. Tap Numeric keyboard(0 ~ 9, * and # ) to key in telephone numbers.
G18 User Manual 61
Page 73

2. Press the Call key to dial the numbers.
3. After the call is connected:
Using the Phone
Tap Hold button to hold
the call.
Tap Mute button to
mute the call.
• Press the End Call Key to end the call.
Tap New button to pause the
calling to call another number.
Tap DTMF button to
input DTMF.
G18 User Manual 62
Page 74

Using the Phone
Receiving a call
1. When receiving a call, you will see the incoming call number onscreen.
Touch the Accept button to
answer the call.
Touch the Reject button to
reject the call.
TIP: Alternatively, the user can press the Call key to accept the
call, while pressing the End Call Key enables you to reject the
call.
G18 User Manual 63
Page 75

2. When the call is connected :
Using the Phone
Tap Hold button to hold
the call.
Tap Mute button to
mute the call.
• Press the End Call Key to end the call.
Call Setting
1. Tap the Menu icon .
2. Choose Call > Call Setting.
Tap New button to go to Applications Launcher and press
the CALL key to return.
Tap DTMF button to
input DTMF.
Back
Save
a. Call Waiting
G18 User Manual 64
Page 76

b. Call line ID
Using the Phone
•On to enable
• Off to disable
•Network: Determined by GSM
network
• Display: Choose to display the Call
line ID
• Hide: Choose to hide the Call line ID
c. Region Code Setting
• Only code: Add a region code only
• "+” and code: Add a letter ‘+’ before
region code
d. Auto redial
G18 User Manual 65
Page 77

Using the Phone
• On to enable
• Off to disable auto redial function
3. When finished setting, Tap Save button to save the setting, then Tap
Left Arrow icon to exit.
Call Time
1. Tap the Menu icon .
2. Choose Call > Call Time.
Tap back button
to exit
Call Records
1. Tap the Menu icon .
Tap Delete button to reset timer.
G18 User Manual 66
Page 78

2. Choose Call > Call Records.
Using the Phone
Tap Delete to delete the detail of the call record (figure
needed)
Tap Save to save the phone
number in the call record (figure needed)
Tap SMS to send the short
message to the selected
number
TIP: In the call interface , you can press Call key to enter the
call record interface directly.
Speed Dial
1. Tap the Menu icon.
2. Choose Call > Speed dial.
Tap Edit to edit the phone
number (figure added)
Tap Delete to delete the detail
of the record (figure added)
G18 User Manual 67
Page 79

Phone Security Setting
1. Tap the Menu icon.
2. Choose Security > Setting.
Using the Phone
Tap Setting
Tap done
button to
exit
a. Changing PIN/PIN2/Barring Code
WARNING! Incorrectly entering your SIM PIN three times causes the
SIM card to be blocked.To unblock your SIM card, you must contact
your service provider and obtain the SIM PIN Unblocking Key (PUK)
code from your service provider.If you unsuccessfully enter the PUK
code ten times, the SIM card is permanently blocked and must be
replaced. If this happens, all data will be lost. You have to purchase a
new SIM card.
– Tap the Menu icon on front panel of your pda phone
– Choose Change password > PIN code / PIN2 code / Barring
code to configurate
G18 User Manual 68
Page 80

Tap Barring code
Using the Phone
Tap PIN
Tap PIN2
b. Setting
Enable/PIN Code
Input the PIN
Code
• Tap On from the pick list to enable the PIN Code.
• If the PIN Code has not been set, a dialog box will appear and ask
you to set the PIN Code.
G18 User Manual 69
Page 81

Using the Phone
Disable PIN Code
• Tap Off from the pick list to disable the PIN Code.
• If there is an enabled PIN Code, a dialog box will appear and ask
you to input the PIN Code.
• If your input is right, the PIN Code will be disabled.
Voice Call Barring
• Four types of setting are available for Outgoing item.
• Deactivated for "disable call
barring function".
• All for "All calls".
• Int'l for "International call".
• Int'l for x Home for "International
calls except home call".
• Three types of setting are available for incoming item.
• Deactivated means that accepting all
incoming calls
• All means that blocking all incoming
calls
• Roaming means that Barring function
will be enabled when roaming
Fix Dialing
G18 User Manual 70
Page 82

Select one of the following options in the Fix Dialing section:
•On for enable.
• Off for disable.
3. Tap the Save button to save the setting.
4. Tap left arrow to exit.
Phone ringing Setting
Using the Phone
Tap to reset all
Back
the fields to default setting
a. Ringing set
Tap the Profile, you can find the following pre-defined profiles
G18 User Manual 71
Page 83

Using the Phone
You can edit each profile as you like
by changing any other section in this
page
b. Incoming type
You can specify Call or Message as the incoming type for Alert, Melody,
and Volume setting below
c. Alert
You can choose the Alert
style when call the incoming message
d. Melody
You can specify the melody for your phone, default None for silence
NOTE: You can pick up one of your favourite melody. For the usage
of Melody, see [Using the MelodyManager] in Chapter 7 for details.
G18 User Manual 72
Page 84

Using the Phone
e. Volume
Tap on the volume bar to specify the
volume of the melody for your phone
Quick Switch
Tap the Enter Key in front panel of your pda phone, you can enter
the Quick switch dialog.
• Tap Address book button to enter Address application, you can pick
up the phone number from the address book. For the usage of
Address, please refer to Chapter 8 [Using the Address Book] for
details.
• Tap Call record button to view the call record history list.
Reference to the part of Call Recodr in this chapter.
G18 User Manual 73
Page 85

Using the Phone
• Tap Speed Dial button to pick up one phone number from Speed
dial list. Reference to the part of Call Recodr in this chapter.
• Tap Country Code button to select the country code. Tap cancel to
quit without selecting.
• Tap Return to quit to main view.
Testing the Phone Connection
For the first time to use the telephone function, you may need to check and
test the phone connection.
1. Tap the Applications icon .
2. Select System from the pick list in the upper right corner.
3. Tap the Prefs icon ; then select Phone from the pick list in the
upper right corner.
4. For Connection, select Default Phone Connect.
G18 User Manual 74
Page 86

Using the Phone
Tap "Phone"
5. Tap the Test button to launch the phone connection test.
6. Wait for a while, there will appear a dialog box to show wether it's ok
or anything fails.
7. If the test is ok, you could try to launch the Phone application to call
someone.
8. If the test fails, you might need to check whether the SIM or the other
things go wrong.
G18 User Manual 75
Page 87

Conference call/ Call Devert
A calls B, after connected:
C calls A
A calls C, after connected
Switch the call
with B or C by using Call Devert
function
Using the Phone
Invite B and C to
the confrence call
A calls D to
enter the conference call
Interuppt the
conference call
and talk to only
one person
Tap to restart the conference call
Note: Tap the ,tap Call>Call Setting, select "On" in
the "Call divert" option, then tap to save your
setting.
G18 User Manual 76
Page 88

Using the SMS Short Message
Function list:
• Short messages are saved in different categories.
• Users can customize their short messages and send them in groups.
• Short messages can be sorted by date or by name.
• Each short message can contain 70 Chinese characters or Chinese
and English characters mixture. However, it can contain 160 pure
English characters.
To open the SMS :
1. Tap the Applications icon .
Using the SMS Short Message
2. Select Communication from the pick list in the upper right corner.
3. Tap the SMS icon .
Tap SMS icon to enter
the inbox interface
G18 User Manual 77
Page 89

Using the SMS Short Message
SMS setting:
In the main screen, which lists out Inbox messages by default, tap the
Menu icon on the front panel of your PDA phone, choose Tools > Setting
to enter the setting interface.
Outgoing:
• Return Receipt:
Return a receipt when receiptor got the message.
•Warn Over
You will get a warning when the SMS package is over the limitation.
• Expires
Set a period of time for which the message can be retained in the message
center before you send it out.
• Message Center
Before sending any short message, you must input the short message
service center number, which you can get from your service provider. Of
course it can be recognized once the SIM card was inserted.
NOTE: If you change your SIM card, SIM only displays the short
messages in the current SIM card.
G18 User Manual 78
Page 90

Using the SMS Short Message
Writing SMS & Sending SMS:
1. In the list view ( in SMS interface), tap the New button to enter
the editing interface.
Tap to show the
list
have been read
still havn't been read
Create an SMS
Make a call
After being tapped, a dialog
box will appear to ask for
confirmation of deletion
2. Tap the Menu icon on the front panel of your PDA phone, choose Edit
> Keyboard to switch to keyboard entry. Now you can input number
and the content of message. Once finished, tap Done button on
keyboard and return to the message edited interface.
3. Tap the different icons to conduct respective functions, for example,
tap Send icon to send the message.
G18 User Manual 79
Page 91

Using the SMS Short Message
Enter Address Book to select phone
number
Send SMS, whatever success or not
you will get a return message
Save to draft box
Return to previous interface
4. You can also set the font. Tap the function title. After the menu pops
up, tap Font, and then select Set Font to complete the operation.
Receiving SMS:
If you receive a short message, it will automatically show a dialog box(it
will appear a envelop icon). You can easily view its content. The short
message may be stored in Inbox or SIM according to the preferred storage
setting.
Tap [Check]
Replying SMS & Forwarding SMS:
1. In the list view, select proper records in the relative box.
G18 User Manual 80
Page 92

Using the SMS Short Message
2. Tap one record to enter SMS short message interface. You can do
relative operation according to the prompt of icons.
answer the addresser
forward the current SMS
return to the previous direction
After being tapped, a dialog
box will appear to ask for
confirmation of deletion
Delete the short message :
Delete the short mssage to dustbin.
Select any of the message you want to delete.
Tap the DELETE button ,then appears a dialog box.
after deleting,it will be
placed in the
dustbin
G18 User Manual 81
Page 93

Using the SMS Short Message
In the dialog box, tap the OK button, then delete the message; tap the
Delete All button, then the all message in the directory will be deleted, tap
the Cancel button , then canel the operation.
Delete forever:
Tap the MENU icon, then a pick list will appear.
In the list , select the Empty Trash , then delete all the message saved in
the dustbin.
tap "Empty Trash"
G18 User Manual 82
Page 94

Using the jMMS
Function list:
•Browse
•New
•Send
•Delete
•Draft
• Compositor
To open the jMMS application:
1. Tap the Applications icon .
2. Select Communication from the pick list in the upper right corner.
Using the jMMS
3. Tap the jMMS icon . and enter the inbox interface.
Tap to enter MMS
application
New Delete SortingMove
Doodles
G18 User Manual 83
Page 95

Using the jMMS
1. Tap the New icon at the bottom of the inbox, and enter the Compose
interface.
2. Then tap the icon at the bottom of the compose interface, and
enter the picture interface.
3. Tap the icon at the bottom of picture interface, then you can
Dooles.
• Setting the color
1. Enter the dooles interface ,then tap Menu icon , pop-up menu
appears.
2. Select Pict > Color to enter color selection interface.
Tap Color
3. Select your favorite color and tap OK or tap Cancel.
• Setting the thickness of line.
G18 User Manual 84
Page 96

Using the jMMS
1. Tap the icon in the upper right corner to pop a list.
Thin <------------> Thick
•Drawing
1. Tap icon or icon in the upper right corner to pop a list.
Select object rectangle
Color picker
Draw a line
Draw a oval
Draw a rectangle
Draw a solid oval
Draw a solid rectangle
Paintbrush
Text
Eraser
2. Select a drawing tool, for example: select .
Save
Undo
3. Tap icon or icon in toolbar, select Pict > Clear to erase
everything.
G18 User Manual 85
Page 97

Tap Clear
4. Tap Save icon in the toolbar to save the picture.
Settings
• Tap Menu icon to pop up the pulldown menu, and then select
Tools > Profiles.
Using the jMMS
Tap Profiles to enter the
profiles interface
Edit button
• Tap Edit icon to edit the MMSC URL, (Notice: Please edit the
content on the line after the keyboard appeared in order to avoid
missing something) input the address of the local MMS service
center, such as “mmsc.conternet.com”.
G18 User Manual 86
Page 98

Using the jMMS
Locate the cursor in
the input column,
tap "abc" on the tablet to start up the letter Keyboard, edit
the content
Tap "Done" to
exit edit
• To edit "IP address", please input the IP address corresponding to
the local MMS service center, such as "10.0.0.7", the default port is
"9201", change it correspondingly if necessary.
• Tap [OK] to save the settings, or tap [Cancel] to cancel the settings.
Configuration
• Tap icon to pop up a menu, and select View > Configuration.
Tap Configuration
pop-up list
• According to what you need, you can set Manual, Automatic or
Custom when downloading the MMS.
G18 User Manual 87
Page 99

Using the jMMS
Restrict the message's size
Set the message's class
• Tap OK to save the configuration, tap Cancel to quit without
changing anything.
Browse
• In Inbox screen, tap any message.
• Tap View in the pick list to browse the message.
Tap View
Reply
Reply all
Send to others
Property
Properties
Frame:
Tap [OK] to exit
G18 User Manual 88
Page 100

Using the jMMS
• Tap Title Name or shortcut menu icon to pup up the pulldown
menu, and execute the corresponding operation.
Save the image inside the message
Save the tune inside the message
• Scroll bar: Tap up-down arrow or scroll bar to browse the content.
• Exit button: Tap it to return to the Previous interface.
New and Send
Tap New icon in the toolbar at the bottom of inbox interface to enter new
MMS editing interface, you can write message and send it with pictures
and music.
Display the number
of new MMS
Input the content in the input
area
Browse button
Send
button
Insert a picture
button
Insert Tune
button
New another button
Delete button
• Input area: you can use stylus or keyboard to input words or
numbers.
• : Tap the Insert Picture icon on the toolbar to enter the picture
library, or dooles yourself, and then select a picture to attach.
G18 User Manual 89
 Loading...