

Page 1

Sprint® Service
Sprint Power VisionSM Smart Device
Treo™ 755
www.sprint.com
© Sprint Nextel. All rights reserved. No
reproduction in whole or in part without prior
written approval. SPRINT and other trademarks
are trademarks of Sprint Nextel.
PN: 406-11072-00
v. 1 .0
P by Palm
Page 2

Intellectual Property Notices
© 2005–2007 Palm, Inc. All rights reserved. Blazer, HotSync, Palm, Palm Desktop, Palm OS, Treo, VersaMail, and
the Palm and Treo logos are among the trademarks or registered trademarks owned by or licensed to Palm, Inc.
Documents To Go is a trademark or registered trademark of DataViz, Inc. © 2001-2007 Good, Good Technology,
the Good logo, Good Mobile Messaging, GoodLink, and Powered by Good are trademarks of Good Technology,
Inc. Microsoft, Word, Excel, PowerPoint, Outlook and ActiveSync are either registered trademarks or trademarks
of Microsoft Corporation in the United States and/or other countries. All other brand and product names are or
may be trademarks of, and are used to identify products or services of, their respective owners.
This product is protected by one or more of the following United States patents:
6,976,226; 6,975,304; 6,965,375; 6,961,567; 6,961,029; 6,957,397; 6,952,571; 6,950,988; 6,947,975;
6,947,017; 6,943,667; 6,940,490; 6,924,752; 6,907,233; 6,906,701; 6,906,741; 6,901,276; 6,850,780;
6,845,408; 6,842,628; 6,842,335; 6,831,662; 6,819,552; 6,804,699; 6,795,710; 6,788,285; 6,781,824;
6,781,575; 6,766,490; 6,745,047; 6,744,451; 6,738,852; 6,732,105; 6,724,720; 6,721,892; 6,712,638;
6,708,280; 6,697,639; 6,687,839; 6,685,328; 6,665,803; 6,618,044; 6,590,588; 6,539,476; 6,532,148;
6,523,124; 6,519,141; 6,516,202; 6,490,155; 6,480,146; 6,457,134; 6,456,247; 6,442,637; 6,441,824;
6,437,543; 6,429,625; 6,425,087; 6,389,572; 6,388,877; 6,381,650; 6,363,082; 6,344,848; 6,317,085;
6,241,537; 6,222,857; 6,185,423; 6,147,314; 6,115,248; 6,064,342; D421,251; D429,252; D466,128; D478,091.
Patent pending.
This product also is licensed under United States patent 6,058,304.
This product is protected by certain intellectual property rights of Microsoft Corporation. Use or distribution of
such technology outside this product is prohibited without a license from Microsoft or an authorized Microsoft
subsidiary.
All rights reserved.
This product contains ACCESS Co., Ltd.’s NetFront 3.0 Internet browser software. © 1996-2007 ACCESS Co., Ltd.
and ACCESS Systems America, Inc. NetFront is the trademark or registered trademark of ACCESS Co., Ltd. in
Japan and in other countries except the United States of America. NetFront is a registered trademark of
NetFront Communications, Inc. in the United States of America and is used under a license. A portion of this
software includes software modules developed by the Independent JPEG group.
Disclaimer and Limitation of Liability
Palm, Inc. and its suppliers assume no responsibility for any damage or loss resulting from the use of this guide.
Palm, Inc. and its suppliers assume no responsibility for any loss or claims by third parties that may arise
through the use of this software. Palm, Inc. and its suppliers assume no responsibility for any damage or loss
cause d by deleti on of data as a result of malfu nction, de ad battery, or r epairs. Be sure to make backup copies of
all important data on other media to protect against data loss.
Page 3

Table of Contents
Welcome to Sprint . . . . . . . . . . . . . . . . . . . . . . . . . . . . . . . . . . . . . . . . . . . . . . . . . . . . . . . . . . . 1
How to Use This Guide . . . . . . . . . . . . . . . . . . . . . . . . . . . . . . . . . . . . . . . . . . . . . . . . . . . . . . . . 2
Section 1: Setting Up Your Smart Device and Your Computer . . . . . . . . . . . . . . . . . . . . . 5
1A. Setting Up Your Treo™ 755P Smart Device by Palm . . . . . . . . . . . . . . . . . . . . . . . . . . . . . . . . 7
What You Need . . . . . . . . . . . . . . . . . . . . . . . . . . . . . . . . . . . . . . . . . . . . . . . . . . . . . . . . . . . . . . . . . . . . . . . . . . . . . . . . . . 8
Your New Treo 755P Smart Device by Palm . . . . . . . . . . . . . . . . . . . . . . . . . . . . . . . . . . . . . . . . . . . . . . . . . . . . . . . 10
Inserting the Battery . . . . . . . . . . . . . . . . . . . . . . . . . . . . . . . . . . . . . . . . . . . . . . . . . . . . . . . . . . . . . . . . . . . . . . . . . . . . 15
Charging the Battery . . . . . . . . . . . . . . . . . . . . . . . . . . . . . . . . . . . . . . . . . . . . . . . . . . . . . . . . . . . . . . . . . . . . . . . . . . . . 16
1B. Setting Up Service . . . . . . . . . . . . . . . . . . . . . . . . . . . . . . . . . . . . . . . . . . . . . . . . . . . . . . . . . . . 21
Making Your First Call . . . . . . . . . . . . . . . . . . . . . . . . . . . . . . . . . . . . . . . . . . . . . . . . . . . . . . . . . . . . . . . . . . . . . . . . . . . 22
Setting Up Your Voicemail . . . . . . . . . . . . . . . . . . . . . . . . . . . . . . . . . . . . . . . . . . . . . . . . . . . . . . . . . . . . . . . . . . . . . . . 25
Creating Sprint Account Passwords . . . . . . . . . . . . . . . . . . . . . . . . . . . . . . . . . . . . . . . . . . . . . . . . . . . . . . . . . . . . . . 26
1C. Connecting to Your Computer . . . . . . . . . . . . . . . . . . . . . . . . . . . . . . . . . . . . . . . . . . . . . . . . .27
Why Connect My Device to My Computer? . . . . . . . . . . . . . . . . . . . . . . . . . . . . . . . . . . . . . . . . . . . . . . . . . . . . . . . 28
Upgrading From Another Palm OS® Device . . . . . . . . . . . . . . . . . . . . . . . . . . . . . . . . . . . . . . . . . . . . . . . . . . . . . . 29
Installing the Desktop Synchronization Software . . . . . . . . . . . . . . . . . . . . . . . . . . . . . . . . . . . . . . . . . . . . . . . . . 32
Connecting Your Treo Device to Your Computer . . . . . . . . . . . . . . . . . . . . . . . . . . . . . . . . . . . . . . . . . . . . . . . . . . 34
Synchronizing Information—The Basics . . . . . . . . . . . . . . . . . . . . . . . . . . . . . . . . . . . . . . . . . . . . . . . . . . . . . . . . . 35
Section 2: Your Treo™ 755P Smart Device by Palm . . . . . . . . . . . . . . . . . . . . . . . . . . . . . . 39
2A. Moving Around on Your Smart Device . . . . . . . . . . . . . . . . . . . . . . . . . . . . . . . . . . . . . . . . . 41
Moving Around the Device Screen . . . . . . . . . . . . . . . . . . . . . . . . . . . . . . . . . . . . . . . . . . . . . . . . . . . . . . . . . . . . . . . 42
Using the Keyboard . . . . . . . . . . . . . . . . . . . . . . . . . . . . . . . . . . . . . . . . . . . . . . . . . . . . . . . . . . . . . . . . . . . . . . . . . . . . . 46
Opening Applications . . . . . . . . . . . . . . . . . . . . . . . . . . . . . . . . . . . . . . . . . . . . . . . . . . . . . . . . . . . . . . . . . . . . . . . . . . . 51
Page 4

2B. Using Your Device’s Phone Features . . . . . . . . . . . . . . . . . . . . . . . . . . . . . . . . . . . . . . . . . . . 53
Turning Your Device On and Off . . . . . . . . . . . . . . . . . . . . . . . . . . . . . . . . . . . . . . . . . . . . . . . . . . . . . . . . . . . . . . . . . 54
Opening the Phone Application . . . . . . . . . . . . . . . . . . . . . . . . . . . . . . . . . . . . . . . . . . . . . . . . . . . . . . . . . . . . . . . . . 56
Making Calls . . . . . . . . . . . . . . . . . . . . . . . . . . . . . . . . . . . . . . . . . . . . . . . . . . . . . . . . . . . . . . . . . . . . . . . . . . . . . . . . . . . . 57
Receiving Calls . . . . . . . . . . . . . . . . . . . . . . . . . . . . . . . . . . . . . . . . . . . . . . . . . . . . . . . . . . . . . . . . . . . . . . . . . . . . . . . . . . 61
Using Voicemail . . . . . . . . . . . . . . . . . . . . . . . . . . . . . . . . . . . . . . . . . . . . . . . . . . . . . . . . . . . . . . . . . . . . . . . . . . . . . . . . 63
What Can I Do When I’m On a Call? . . . . . . . . . . . . . . . . . . . . . . . . . . . . . . . . . . . . . . . . . . . . . . . . . . . . . . . . . . . . . . 65
Using Sprint Voice Command . . . . . . . . . . . . . . . . . . . . . . . . . . . . . . . . . . . . . . . . . . . . . . . . . . . . . . . . . . . . . . . . . . . 73
Defining Favorite Buttons . . . . . . . . . . . . . . . . . . . . . . . . . . . . . . . . . . . . . . . . . . . . . . . . . . . . . . . . . . . . . . . . . . . . . . . 74
Using a Phone Headset . . . . . . . . . . . . . . . . . . . . . . . . . . . . . . . . . . . . . . . . . . . . . . . . . . . . . . . . . . . . . . . . . . . . . . . . . . 78
Customizing Phone Settings . . . . . . . . . . . . . . . . . . . . . . . . . . . . . . . . . . . . . . . . . . . . . . . . . . . . . . . . . . . . . . . . . . . . . 84
Controlling Your Roaming Experience . . . . . . . . . . . . . . . . . . . . . . . . . . . . . . . . . . . . . . . . . . . . . . . . . . . . . . . . . . . 93
Checking Signal Strength and Phone Status . . . . . . . . . . . . . . . . . . . . . . . . . . . . . . . . . . . . . . . . . . . . . . . . . . . . . . 95
Section 3: Using Sprint Vision and Other Wireless Connections. . . . . . . . . . . . . . . . . . 99
3A. Sprint Vision—The Basics . . . . . . . . . . . . . . . . . . . . . . . . . . . . . . . . . . . . . . . . . . . . . . . . . . . . 101
Getting Started With Sprint Vision . . . . . . . . . . . . . . . . . . . . . . . . . . . . . . . . . . . . . . . . . . . . . . . . . . . . . . . . . . . . . . 102
Sprint Vision Features . . . . . . . . . . . . . . . . . . . . . . . . . . . . . . . . . . . . . . . . . . . . . . . . . . . . . . . . . . . . . . . . . . . . . . . . . . 103
Accessing Sprint Vision . . . . . . . . . . . . . . . . . . . . . . . . . . . . . . . . . . . . . . . . . . . . . . . . . . . . . . . . . . . . . . . . . . . . . . . . . 104
3B. Sprint Power Vision . . . . . . . . . . . . . . . . . . . . . . . . . . . . . . . . . . . . . . . . . . . . . . . . . . . . . . . . .105
Getting to Know Sprint Power Vision . . . . . . . . . . . . . . . . . . . . . . . . . . . . . . . . . . . . . . . . . . . . . . . . . . . . . . . . . . . 106
Personalizing Your Service With On Demand . . . . . . . . . . . . . . . . . . . . . . . . . . . . . . . . . . . . . . . . . . . . . . . . . . . . 107
Using Your Device’s Phone as a Modem . . . . . . . . . . . . . . . . . . . . . . . . . . . . . . . . . . . . . . . . . . . . . . . . . . . . . . . . . 110
3C. Using Email . . . . . . . . . . . . . . . . . . . . . . . . . . . . . . . . . . . . . . . . . . . . . . . . . . . . . . . . . . . . . . . .113
What Email Applications Can I Use on My Smart Device? . . . . . . . . . . . . . . . . . . . . . . . . . . . . . . . . . . . . . . . . 114
The VersaMail Application . . . . . . . . . . . . . . . . . . . . . . . . . . . . . . . . . . . . . . . . . . . . . . . . . . . . . . . . . . . . . . . . . . . . . 115
Using Good Mobile Messaging . . . . . . . . . . . . . . . . . . . . . . . . . . . . . . . . . . . . . . . . . . . . . . . . . . . . . . . . . . . . . . . . . 131
Page 5

3D. Messaging . . . . . . . . . . . . . . . . . . . . . . . . . . . . . . . . . . . . . . . . . . . . . . . . . . . . . . . . . . . . . . . . .133
Creating and Sending Messages . . . . . . . . . . . . . . . . . . . . . . . . . . . . . . . . . . . . . . . . . . . . . . . . . . . . . . . . . . . . . . . .134
Receiving Messages . . . . . . . . . . . . . . . . . . . . . . . . . . . . . . . . . . . . . . . . . . . . . . . . . . . . . . . . . . . . . . . . . . . . . . . . . . . . 139
Using Messaging to Chat . . . . . . . . . . . . . . . . . . . . . . . . . . . . . . . . . . . . . . . . . . . . . . . . . . . . . . . . . . . . . . . . . . . . . . . 141
Managing Your Messages . . . . . . . . . . . . . . . . . . . . . . . . . . . . . . . . . . . . . . . . . . . . . . . . . . . . . . . . . . . . . . . . . . . . . . 142
Customizing Your Messaging Settings . . . . . . . . . . . . . . . . . . . . . . . . . . . . . . . . . . . . . . . . . . . . . . . . . . . . . . . . . . 143
Using Online Services . . . . . . . . . . . . . . . . . . . . . . . . . . . . . . . . . . . . . . . . . . . . . . . . . . . . . . . . . . . . . . . . . . . . . . . . . . 145
3E. Browsing the Web . . . . . . . . . . . . . . . . . . . . . . . . . . . . . . . . . . . . . . . . . . . . . . . . . . . . . . . . . .147
Viewing a Web Page . . . . . . . . . . . . . . . . . . . . . . . . . . . . . . . . . . . . . . . . . . . . . . . . . . . . . . . . . . . . . . . . . . . . . . . . . . . 148
Working With Web Pages . . . . . . . . . . . . . . . . . . . . . . . . . . . . . . . . . . . . . . . . . . . . . . . . . . . . . . . . . . . . . . . . . . . . . . 151
Working With Bookmarks and Saved Pages . . . . . . . . . . . . . . . . . . . . . . . . . . . . . . . . . . . . . . . . . . . . . . . . . . . . . 155
Customizing Your Web Browser Settings . . . . . . . . . . . . . . . . . . . . . . . . . . . . . . . . . . . . . . . . . . . . . . . . . . . . . . . 157
3F. Using Bluetooth® Wireless Technology and Dial-Up Networking . . . . . . . . . . . . . . . . .159
Connecting to Devices With Bluetooth Wireless Technology . . . . . . . . . . . . . . . . . . . . . . . . . . . . . . . . . . . . .160
Using Your Device as a Wireless Modem . . . . . . . . . . . . . . . . . . . . . . . . . . . . . . . . . . . . . . . . . . . . . . . . . . . . . . . . 164
Section 4: Your Portable Media Device . . . . . . . . . . . . . . . . . . . . . . . . . . . . . . . . . . . . . . . 169
4A. Working With Your Pictures and Videos . . . . . . . . . . . . . . . . . . . . . . . . . . . . . . . . . . . . . . . 171
Taking Pictures and Videos . . . . . . . . . . . . . . . . . . . . . . . . . . . . . . . . . . . . . . . . . . . . . . . . . . . . . . . . . . . . . . . . . . . . . 172
Customizing Your Camera Settings . . . . . . . . . . . . . . . . . . . . . . . . . . . . . . . . . . . . . . . . . . . . . . . . . . . . . . . . . . . . . 176
Viewing Pictures and Videos . . . . . . . . . . . . . . . . . . . . . . . . . . . . . . . . . . . . . . . . . . . . . . . . . . . . . . . . . . . . . . . . . . . 177
Organizing Pictures and Videos . . . . . . . . . . . . . . . . . . . . . . . . . . . . . . . . . . . . . . . . . . . . . . . . . . . . . . . . . . . . . . . . . 179
Using Your Online Album . . . . . . . . . . . . . . . . . . . . . . . . . . . . . . . . . . . . . . . . . . . . . . . . . . . . . . . . . . . . . . . . . . . . . . 183
Viewing Pictures and Videos on Your Computer . . . . . . . . . . . . . . . . . . . . . . . . . . . . . . . . . . . . . . . . . . . . . . . . . 184
4B. Listening to Music . . . . . . . . . . . . . . . . . . . . . . . . . . . . . . . . . . . . . . . . . . . . . . . . . . . . . . . . . .185
Setting Up Windows Media Player for MP3 . . . . . . . . . . . . . . . . . . . . . . . . . . . . . . . . . . . . . . . . . . . . . . . . . . . . . 186
Transferring MP3 Files From Your Computer . . . . . . . . . . . . . . . . . . . . . . . . . . . . . . . . . . . . . . . . . . . . . . . . . . . . 188
Page 6

Transferring Music From a CD to Your Device . . . . . . . . . . . . . . . . . . . . . . . . . . . . . . . . . . . . . . . . . . . . . . . . . . . 190
Listening to Music on Your Treo Device . . . . . . . . . . . . . . . . . . . . . . . . . . . . . . . . . . . . . . . . . . . . . . . . . . . . . . . . . 191
4C. Watching Sprint TV . . . . . . . . . . . . . . . . . . . . . . . . . . . . . . . . . . . . . . . . . . . . . . . . . . . . . . . . .195
Accessing Streamed Media . . . . . . . . . . . . . . . . . . . . . . . . . . . . . . . . . . . . . . . . . . . . . . . . . . . . . . . . . . . . . . . . . . . . . 196
Viewing Streamed Media . . . . . . . . . . . . . . . . . . . . . . . . . . . . . . . . . . . . . . . . . . . . . . . . . . . . . . . . . . . . . . . . . . . . . . 197
Section 5: Your Mobile Organizer. . . . . . . . . . . . . . . . . . . . . . . . . . . . . . . . . . . . . . . . . . . . 199
5A. Using Your Device’s Organizer Features . . . . . . . . . . . . . . . . . . . . . . . . . . . . . . . . . . . . . . . 201
Contacts . . . . . . . . . . . . . . . . . . . . . . . . . . . . . . . . . . . . . . . . . . . . . . . . . . . . . . . . . . . . . . . . . . . . . . . . . . . . . . . . . . . . . . . 202
Calendar . . . . . . . . . . . . . . . . . . . . . . . . . . . . . . . . . . . . . . . . . . . . . . . . . . . . . . . . . . . . . . . . . . . . . . . . . . . . . . . . . . . . . . . 206
Tasks . . . . . . . . . . . . . . . . . . . . . . . . . . . . . . . . . . . . . . . . . . . . . . . . . . . . . . . . . . . . . . . . . . . . . . . . . . . . . . . . . . . . . . . . . . 215
Memos . . . . . . . . . . . . . . . . . . . . . . . . . . . . . . . . . . . . . . . . . . . . . . . . . . . . . . . . . . . . . . . . . . . . . . . . . . . . . . . . . . . . . . . . 219
5B. Increasing Your Productivity . . . . . . . . . . . . . . . . . . . . . . . . . . . . . . . . . . . . . . . . . . . . . . . . .221
Using the Documents Application to Work With Your Office Files . . . . . . . . . . . . . . . . . . . . . . . . . . . . . . . . 222
Voice Memo . . . . . . . . . . . . . . . . . . . . . . . . . . . . . . . . . . . . . . . . . . . . . . . . . . . . . . . . . . . . . . . . . . . . . . . . . . . . . . . . . . . 224
World Clock . . . . . . . . . . . . . . . . . . . . . . . . . . . . . . . . . . . . . . . . . . . . . . . . . . . . . . . . . . . . . . . . . . . . . . . . . . . . . . . . . . . . 226
Calculator . . . . . . . . . . . . . . . . . . . . . . . . . . . . . . . . . . . . . . . . . . . . . . . . . . . . . . . . . . . . . . . . . . . . . . . . . . . . . . . . . . . . . 228
Section 6: Managing Your Information and Settings . . . . . . . . . . . . . . . . . . . . . . . . . . 231
6A. Managing Files and Applications . . . . . . . . . . . . . . . . . . . . . . . . . . . . . . . . . . . . . . . . . . . . . 233
Using Find . . . . . . . . . . . . . . . . . . . . . . . . . . . . . . . . . . . . . . . . . . . . . . . . . . . . . . . . . . . . . . . . . . . . . . . . . . . . . . . . . . . . . 234
Installing Applications . . . . . . . . . . . . . . . . . . . . . . . . . . . . . . . . . . . . . . . . . . . . . . . . . . . . . . . . . . . . . . . . . . . . . . . . . 235
Removing Applications . . . . . . . . . . . . . . . . . . . . . . . . . . . . . . . . . . . . . . . . . . . . . . . . . . . . . . . . . . . . . . . . . . . . . . . . . 238
Viewing Application Information . . . . . . . . . . . . . . . . . . . . . . . . . . . . . . . . . . . . . . . . . . . . . . . . . . . . . . . . . . . . . . . 240
Sending Information Using Bluetooth® Wireless Technology . . . . . . . . . . . . . . . . . . . . . . . . . . . . . . . . . . . .241
Beaming Information . . . . . . . . . . . . . . . . . . . . . . . . . . . . . . . . . . . . . . . . . . . . . . . . . . . . . . . . . . . . . . . . . . . . . . . . . . 243
Synchronizing Information—Advanced . . . . . . . . . . . . . . . . . . . . . . . . . . . . . . . . . . . . . . . . . . . . . . . . . . . . . . . . . 246
Using Expansion Cards . . . . . . . . . . . . . . . . . . . . . . . . . . . . . . . . . . . . . . . . . . . . . . . . . . . . . . . . . . . . . . . . . . . . . . . . . 253
Page 7

6B. Customizing Your Device . . . . . . . . . . . . . . . . . . . . . . . . . . . . . . . . . . . . . . . . . . . . . . . . . . . . 259
Setting System Sounds . . . . . . . . . . . . . . . . . . . . . . . . . . . . . . . . . . . . . . . . . . . . . . . . . . . . . . . . . . . . . . . . . . . . . . . . . 260
Adjusting the Display and Appearance . . . . . . . . . . . . . . . . . . . . . . . . . . . . . . . . . . . . . . . . . . . . . . . . . . . . . . . . . . 262
Changing the Applications Settings . . . . . . . . . . . . . . . . . . . . . . . . . . . . . . . . . . . . . . . . . . . . . . . . . . . . . . . . . . . . . 265
Customizing Device Buttons . . . . . . . . . . . . . . . . . . . . . . . . . . . . . . . . . . . . . . . . . . . . . . . . . . . . . . . . . . . . . . . . . . . 267
Setting the Date and Time . . . . . . . . . . . . . . . . . . . . . . . . . . . . . . . . . . . . . . . . . . . . . . . . . . . . . . . . . . . . . . . . . . . . . 269
Optimizing Power Settings . . . . . . . . . . . . . . . . . . . . . . . . . . . . . . . . . . . . . . . . . . . . . . . . . . . . . . . . . . . . . . . . . . . . . 271
Locking Your Device and Information . . . . . . . . . . . . . . . . . . . . . . . . . . . . . . . . . . . . . . . . . . . . . . . . . . . . . . . . . . . 272
Using Connection Settings . . . . . . . . . . . . . . . . . . . . . . . . . . . . . . . . . . . . . . . . . . . . . . . . . . . . . . . . . . . . . . . . . . . . . 280
Purchasing Accessories for Your Device . . . . . . . . . . . . . . . . . . . . . . . . . . . . . . . . . . . . . . . . . . . . . . . . . . . . . . . . . 281
Section 7: Resources . . . . . . . . . . . . . . . . . . . . . . . . . . . . . . . . . . . . . . . . . . . . . . . . . . . . . . . 283
7A. Help . . . . . . . . . . . . . . . . . . . . . . . . . . . . . . . . . . . . . . . . . . . . . . . . . . . . . . . . . . . . . . . . . . . . . . .285
Trouble Upgrading? . . . . . . . . . . . . . . . . . . . . . . . . . . . . . . . . . . . . . . . . . . . . . . . . . . . . . . . . . . . . . . . . . . . . . . . . . . . . 286
Resetting Your Treo Device . . . . . . . . . . . . . . . . . . . . . . . . . . . . . . . . . . . . . . . . . . . . . . . . . . . . . . . . . . . . . . . . . . . . . 288
Replacing the Battery . . . . . . . . . . . . . . . . . . . . . . . . . . . . . . . . . . . . . . . . . . . . . . . . . . . . . . . . . . . . . . . . . . . . . . . . . . 291
Troubleshooting . . . . . . . . . . . . . . . . . . . . . . . . . . . . . . . . . . . . . . . . . . . . . . . . . . . . . . . . . . . . . . . . . . . . . . . . . . . . . . . 292
Making Room on Your Treo Device . . . . . . . . . . . . . . . . . . . . . . . . . . . . . . . . . . . . . . . . . . . . . . . . . . . . . . . . . . . . . 313
Third-Party Applications . . . . . . . . . . . . . . . . . . . . . . . . . . . . . . . . . . . . . . . . . . . . . . . . . . . . . . . . . . . . . . . . . . . . . . . . 314
Errors . . . . . . . . . . . . . . . . . . . . . . . . . . . . . . . . . . . . . . . . . . . . . . . . . . . . . . . . . . . . . . . . . . . . . . . . . . . . . . . . . . . . . . . . . . 316
Where to Learn More . . . . . . . . . . . . . . . . . . . . . . . . . . . . . . . . . . . . . . . . . . . . . . . . . . . . . . . . . . . . . . . . . . . . . . . . . . . 317
7B. Glossary . . . . . . . . . . . . . . . . . . . . . . . . . . . . . . . . . . . . . . . . . . . . . . . . . . . . . . . . . . . . . . . . . . .321
Section 8: Safety and Specifications . . . . . . . . . . . . . . . . . . . . . . . . . . . . . . . . . . . . . . . . . 325
8A. Important Safety Information . . . . . . . . . . . . . . . . . . . . . . . . . . . . . . . . . . . . . . . . . . . . . . . . 327
General Precautions . . . . . . . . . . . . . . . . . . . . . . . . . . . . . . . . . . . . . . . . . . . . . . . . . . . . . . . . . . . . . . . . . . . . . . . . . . . . 328
Maintaining Safe Use of and Access to Your Device . . . . . . . . . . . . . . . . . . . . . . . . . . . . . . . . . . . . . . . . . . . . . . 329
Using Your Phone With a Hearing Aid Device . . . . . . . . . . . . . . . . . . . . . . . . . . . . . . . . . . . . . . . . . . . . . . . . . . . 332
Page 8

Caring for the Battery . . . . . . . . . . . . . . . . . . . . . . . . . . . . . . . . . . . . . . . . . . . . . . . . . . . . . . . . . . . . . . . . . . . . . . . . . . 335
Radiofrequency (RF) Energy . . . . . . . . . . . . . . . . . . . . . . . . . . . . . . . . . . . . . . . . . . . . . . . . . . . . . . . . . . . . . . . . . . . . 337
Static Electricity, ESD, and Your Device . . . . . . . . . . . . . . . . . . . . . . . . . . . . . . . . . . . . . . . . . . . . . . . . . . . . . . . . . . 339
Owner’s Record . . . . . . . . . . . . . . . . . . . . . . . . . . . . . . . . . . . . . . . . . . . . . . . . . . . . . . . . . . . . . . . . . . . . . . . . . . . . . . . . 341
User’s Guide Proprietary Notice . . . . . . . . . . . . . . . . . . . . . . . . . . . . . . . . . . . . . . . . . . . . . . . . . . . . . . . . . . . . . . . . 342
8B. Specifications . . . . . . . . . . . . . . . . . . . . . . . . . . . . . . . . . . . . . . . . . . . . . . . . . . . . . . . . . . . . . .343
Specifications . . . . . . . . . . . . . . . . . . . . . . . . . . . . . . . . . . . . . . . . . . . . . . . . . . . . . . . . . . . . . . . . . . . . . . . . . . . . . . . . . . 344
Index . . . . . . . . . . . . . . . . . . . . . . . . . . . . . . . . . . . . . . . . . . . . . . . . . . . . . . . . . . . . . . . . . . . . . . . . . .347
Page 9

Welcome to Sprint
The Power to Do More.
Sprint and Nextel have come together offering you more choice and flexibility to do
whatever you want, whenever you want.
This powerful combination brings you access to more products, more services, and more of
what you need to do more of what you want. With Sprint, the power is back in your hands.
Sprint. Power Up.
Welcome and thank you for choosing Sprint.
1
Page 10

How to Use This Guide
We know you’re eager to start using your device right away, and the sections of this guide
are designed to help you do just that.
䢇 Section 1: Setting Up Your Smart Device and Your Computer guides you through the
process of setting up your new Sprint Power Vision
your Sprint Service, and your computer.
䢇 Section 2: Your Treo™ 755P Smart Device by Palm shows you the basics of your device and
service with quick, easy-to-follow instructions. This section also describes the features
of your device’s phone and shows you how to use Sprint service features such as
voicemail, call waiting, and call forwarding.
䢇 Section 3: Using Sprint Vision and Other Wireless Connections shows you how to use Sprint
Vision features, including Web browsing, messaging, and email. It also describes other
types of wireless connections such as Bluetooth® wireless technology.
䢇 Section 4: Your Portable Media Device shows you how to use your device’s camera
(camera version only)—including how to use the Sprint Picture Mail application—and
how to transfer and listen to music files on your device.
䢇 Section 5: Your Mobile Organizer guides you through the process of using the built-in,
full-featured, Palm OS® organizer that gives you instant access to your Contacts,
Calendar, Tasks, Memos, Calculator, and more.
䢇 Section 6: Managing Your Information and Settings describes the tools for managing files
and applications and the preferences that enable you to customize your device.
䢇 Section 7: Resources answers frequently asked questions and shows you what to do if
something goes wrong. It also includes a helpful glossary of terms.
䢇 Section 8: Safety and Specifications outlines recommended safety and maintenance
guidelines and displays the technical specifications for your Treo device.
SM
Smart Device Treo™ 755P by Palm,
2
Page 11

WAR NIN G:
Please refer to “Important Safety Information” on page 327 to learn
about information that helps you safely use your phone. Failure to read
and follow the Important Safety Information in this phone guide may
result in serious bodily injury, death, or property damage.
3
Page 12

4
Page 13

Section 1
Setting Up Your Smart Device
and Your Computer
Page 14

6
Page 15

Setting Up Your Treo™ 755P Smart Device by Palm
In This Section
⽧ What You Need
⽧ Your New Treo 755P Smart Device by Palm
⽧ Inserting the Battery
⽧ Charging the Battery
Section 1A
Device Setup
Section 1A: Device Setup 7
Page 16

What You Need
Your Treo™ 755P smart device by Palm box contains the following:
Hardware
䢇 Treo device.
䢇 Rechargeable battery.
䢇 AC charger.
䢇 USB sync cable.
䢇 Stereo headset.
䢇 Sprint charger adapter.
Documentation
䢇 Read This First setup poster.
䢇 Welcome to Sprint brochure.
䢇 Getting Started Guide.
䢇 Setting Up Email booklet.
䢇 Experience Sprint Power Vision guide.
䢇 Terms & Conditions.
䢇 War rant y.
䢇 Software License Agreement.
8 Section 1A: Device Setup
Page 17

Software
䢇 Palm Software Installation CD (includes desktop synchronization software and links to
bonus software for your device).
You’ll also need the following items to complete the installation and activation:
䢇 An activated Sprint service plan.
䢇 A location with wireless coverage for your device.
䢇 An electrical outlet.
䢇 The computer with which you want to synchronize your personal information.
Device Setup
Section 1A: Device Setup 9
Page 18
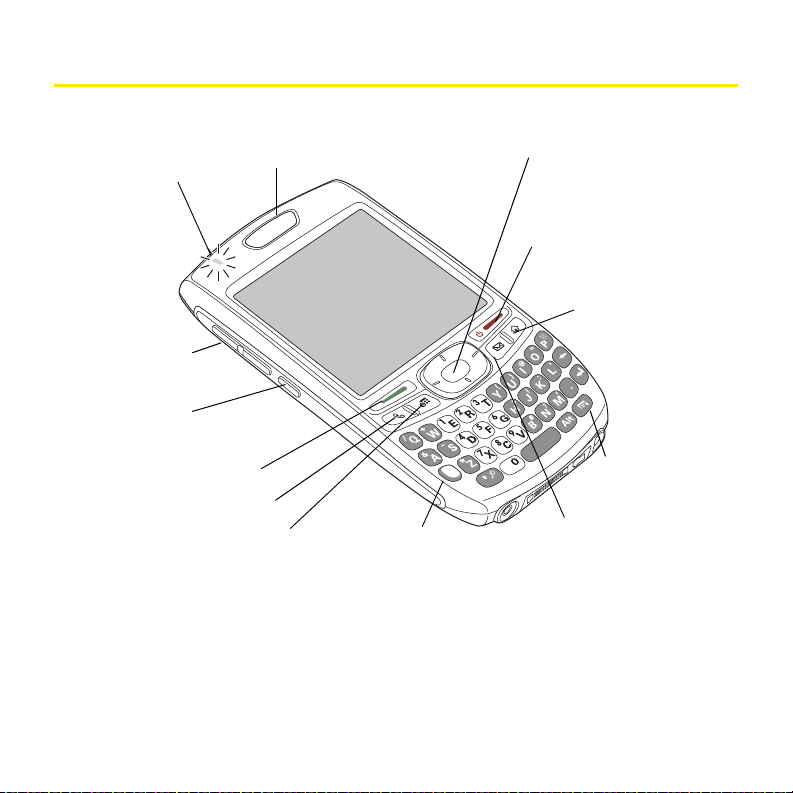
Your New Treo 755P Smart Device by Palm
1. Indicator
Light
3. 5-way
Navigator
4. Power/End
11. Talk
10. Phone
12. Side
Button
2. Earpiece
13. Volume
Button
6. Menu
9. Calendar
5. Applications
7. Messaging
8. Option
Your Device’s Features: Front View
1. Indicator Light provides status information for your device based on the color of the
2. Earpiece serves as the speaker on your device when you are not using the
10 Section 1A: Device Setup
light and the blink state. The indicator is visible only when the light is on.
speakerphone feature or a headset.
Page 19

3. 5-way Navigator gives you one-handed access to moving around the device screen
and selecting options. See “Moving Around the Device Screen” on page 42 for
instructions.
4. Power/End turns the device’s phone on and off, wakes up and turns off the screen,
and hangs up calls.
5. Applications opens Applications view.
6. Menu opens the application menus.
7. Messaging opens the Messaging application.
8. Option activates the secondary function of a key or button. See “Using the Keyboard”
on page 46 for details.
9. Calendar opens the Calendar application.
10. Phone opens the Phone application.
11. Tal k dials when a phone number is selected or entered, and answers an incoming
phone call.
12. Side Button records voice memos by default, and performs context-sensitive actions
when an application is open, such as playing or pausing MP3 files in the Pocket
Tunes™ application. You can also reassign this button to open your favorite
application.
13. Volume Button adjusts the earpiece, speaker, and ringer volume levels.
Device Setup
Section 1A: Device Setup 11
Page 20
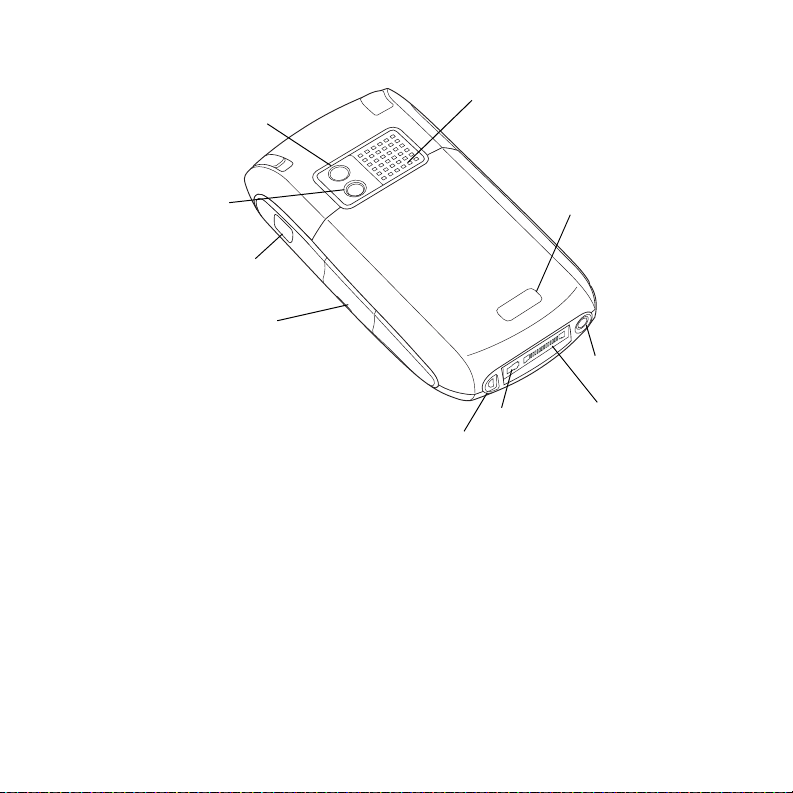
Your Device’s Features: Back View
23. Camera Lens
(camera
version only)
16. Battery Door
Release
18. Sync
Connector
14. Self-portrait
Mirror
17. Headset
Jack
20. Microphone
15. Speaker
22. Infrared (IR) Port
21. Expansion Card Slot
19. Charger
Jack
14. Self-portrait Mirror enables you to take a picture of yourself (if your device includes a
camera).
15. Speaker plays ringtones and alarms, and serves as the speaker for the speakerphone
feature.
16. Battery Door Release opens the battery compartment.
17. Headset Jack enables you to connect a hands-free headset. Use only headsets that are
compatible with your device.
18. Sync Connector enables you to attach the USB sync cable to your device.
19. Charger Jack enables you to attach the AC charger to your device.
20. Microphone serves as the mouthpiece on your device’s phone.
12 Section 1A: Device Setup
Page 21

21. Expansion Card Slot allows you to expand the capabilities of your device using a
miniSD card. See “Using Expansion Cards” on page 253.
22. Infrared (IR) Port uses infrared technology to transmit information to and receive
information from other infrared-enabled devices that use compatible software.
23. Camera Lens enables you to take pictures using the built-in camera (if included).
There are two models of the Treo 755
P smart device by Palm: One comes with a
camera and the other does not. The packaging for your device identifies whether a
camera is included.
Device Setup
Note:
Your device’s speaker includes a large magnet, so be sure to keep your
device away from credit cards or other items that could become
demagnetized.
Section 1A: Device Setup 13
Page 22
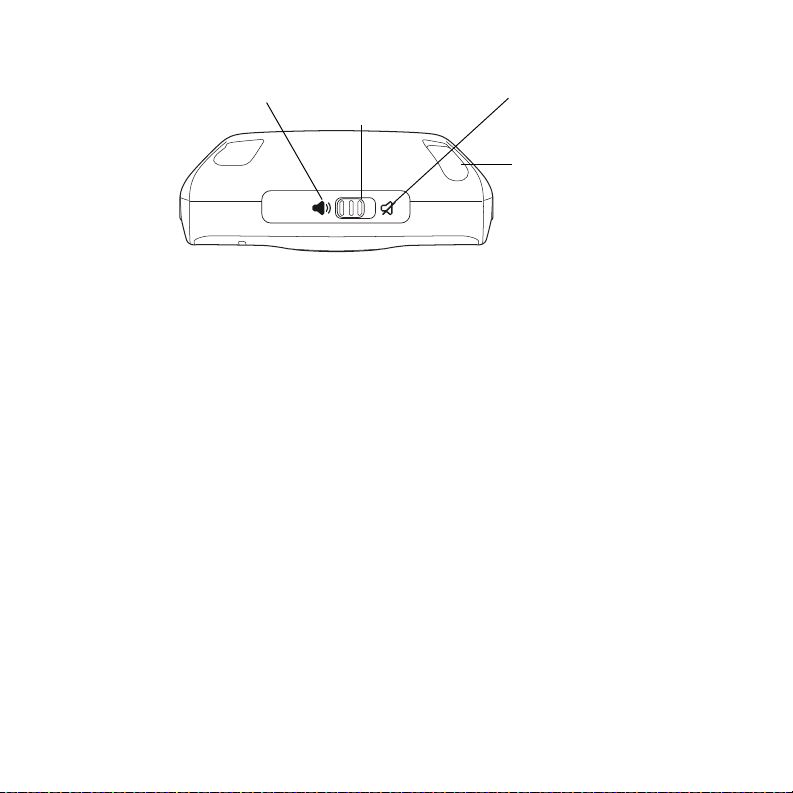
Your Device’s Features: Top View
24. Sound On
27. Stylus
25. Ringer
Switch
26. Sound Off
24. Sound On turns on the ringer and all other sounds, including alarms and music, when
the Ringer switch is set to this position.
25. Ringer Switch controls the ringer setting. See “Setting System Sounds” on page 260
for details on changing the settings.
26. Sound Off silences the ringer and turns off all other sounds, including alarms and
music, when the Ringer switch is set to this position.
27. Stylus allows you to tap options on your device’s screen. To use the stylus, slide it out
of the slot and hold it as you would a pen or pencil.
14 Section 1A: Device Setup
Page 23
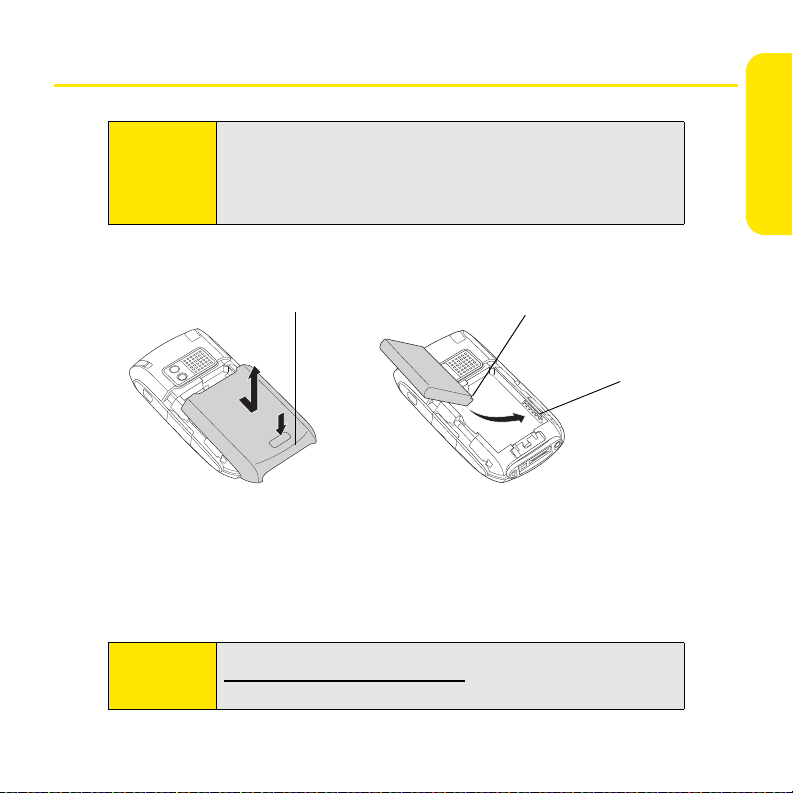
Inserting the Battery
Battery Contacts
Battery
Compartment
Contacts
Battery Door Release
Device Setup
WAR NIN G:
1. Use one hand to press the Battery Door Release, and use your other hand to slide the
battery door downward to remove it from your device.
2. Align the battery contacts with the battery compartment contacts.
3. Insert the battery into the compartment at a 45-degree angle, and then press it into
place.
4. Slide the battery door onto the back of the device until it clicks into place.
5. Follow the onscreen instructions to set up your device.
Tip:
Use only Sprint-approved or manufacturer-approved batteries and
chargers with your device. The failure to use a Sprint-approved or
manufacturer-approved battery and charger may increase the risk of
your device overheating, catching fire, or exploding, which may result in
serious bodily injury, death, or property damage.
Buy an extra battery as a spare for long trips or heavy data use. Visit
www.palm.com/mypalm/755psprint to purchase batteries that are
approved by Sprint and that are compatible with your device.
Section 1A: Device Setup 15
Page 24
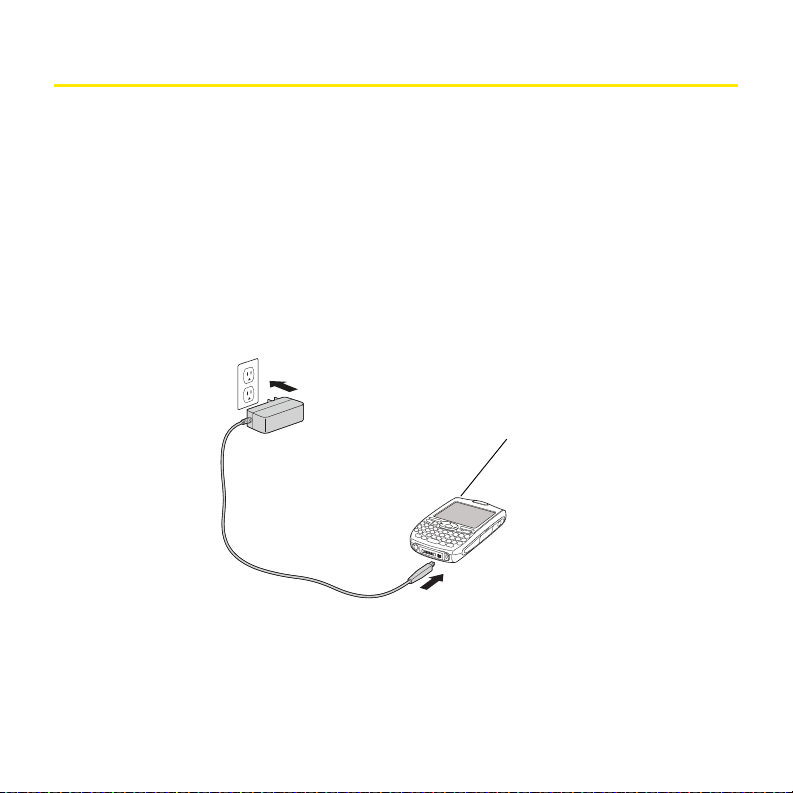
Charging the Battery
Indicator Light
The battery comes with a sufficient charge to complete the setup process and activate your
phone. After activation, we recommend charging your device for three and a half hours to
give it a full charge. See “Maximizing Battery Life” on page 19 for tips on maximizing the
life of your device’s battery.
1. Plug the AC charger into a wall outlet.
2. Connect the charger cable to the charger jack on the bottom of the device. Make sure
the arrow on the connector is facing up, toward your device’s screen.
3. To confirm that your device is charging, check the indicator light.
䡲 Red indicates that your device is charging.
䡲 Green indicates that your device is fully charged.
If the battery is fully drained, it may take a few moments for the indicator light to turn on
while the battery is charging.
16 Section 1A: Device Setup
Page 25
Tip:
You can also charge your device by connecting it to your computer with
the sync cable. You can do this with or without using the charger cable
(see “Connecting Your Treo Device to Your Computer” on page 34). Keep
in mind that it takes longer to charge the battery using the sync cable,
and if your laptop isn’t plugged into a power source, it can drain the
laptop’s battery.
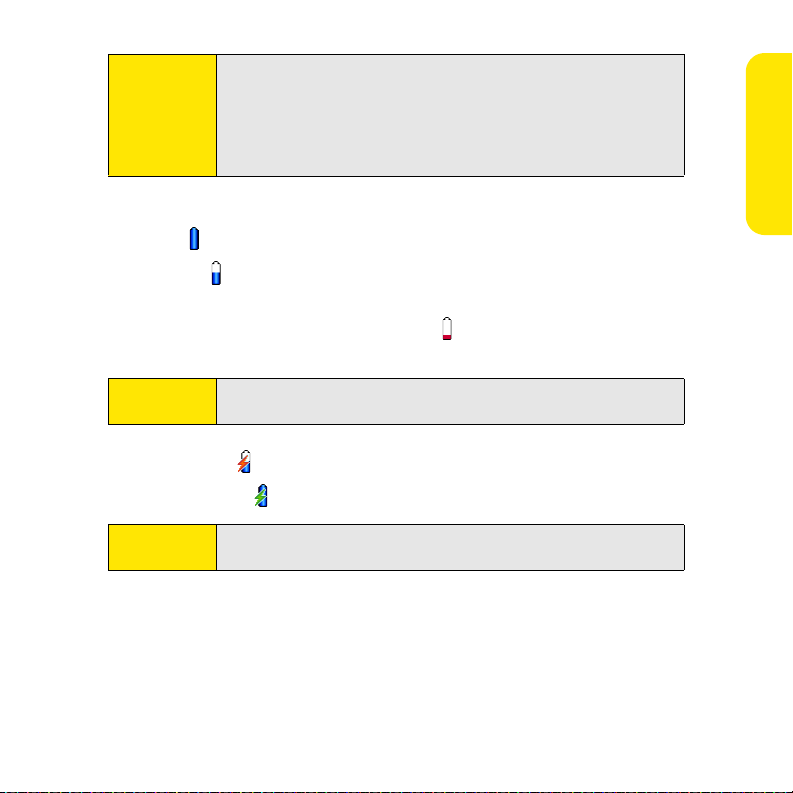
The onscreen battery icon displays the power status:
䢇 Full battery : Battery is not connected to a wall outlet and is fully charged.
䢇 Partial battery : Battery is not connected to a wall outlet and has some power but is
not fully charged.
䢇 Almost-empty battery with red at the bottom : Battery needs to be charged
immediately.
Device Setup
Note:
Your device’s indicator light blinks red when the battery needs to be
charged.
䢇 Red lightning bolt : Battery is connected to a wall outlet and is charging.
䢇 Green lightning bolt : Battery is connected to a wall outlet and is fully charged.
Tip:
To see exactly how much power is left in your battery, tap the onscreen
battery icon.
Section 1A: Device Setup 17
Page 26
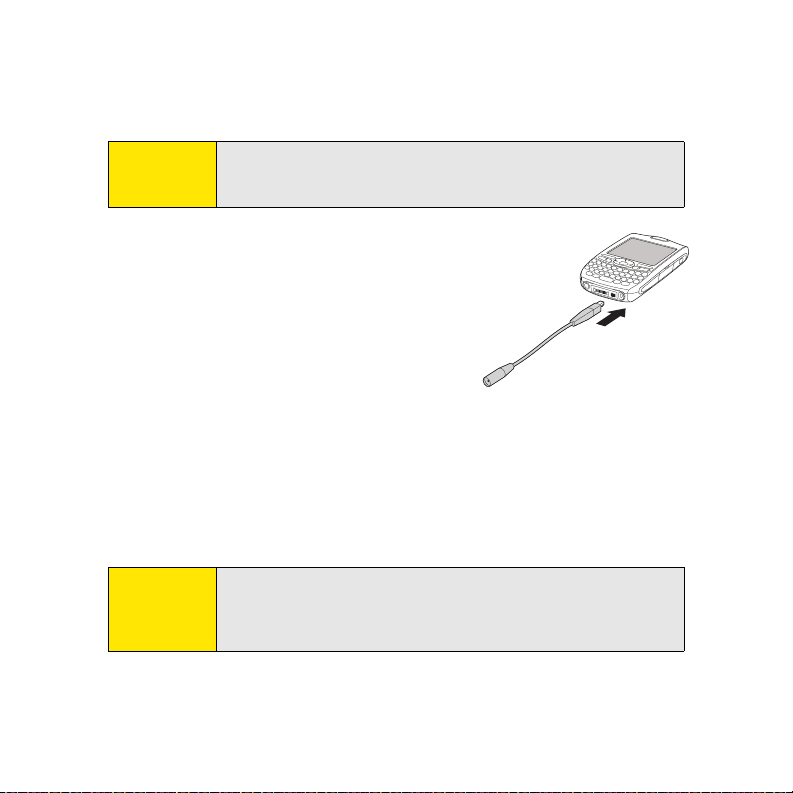
Using a Sprint Charger Adapter
Sprint Charger Adapter
If the connector on your Sprint-approved 1 Amp AC charger or vehicle charger doesn’t fit
into the connector on the bottom of your device, use the included Sprint charger adapter.
WAR NIN G:
Use only with 1 Amp AC chargers distributed by Sprint for your device.
Using any unapproved AC charger may destroy the AC charger and cause
a fire.
1. Plug the AC charger into a power source.
2. Connect the Sprint charger adapter to the
charger jack on bottom of the device.
3. Connect the charger cable to the Sprint charger
adapter.
4. Charge your device as described earlier.
Battery Life
Battery life depends on individual use. Consumption factors include signal strength,
speakerphone use, and use of wireless features.
If the battery drains to the point where your device doesn’t turn on, the device stores your
information safely until you recharge the battery. To avoid draining the battery, we
recommend that you charge and synchronize your device every day, especially if you use the
wireless features of your phone often.
Note:
Using your device’s phone has an effect on the battery life. You can
extend the battery life by turning off your device’s phone while using the
organizer features. In any case, regular charging is recommended for
optimal performance.
18 Section 1A: Device Setup
Page 27

Maximizing Battery Life
You can increase the life of your device’s battery by following a few easy guidelines.
Remember that battery life depends on how you use your device.
䢇 Charge your device whenever you’re at your desk, or charge it overnight each day. The
Lithium-ion (Li-ion) battery has a much longer useful life when it is topped off
frequently, versus charging it after it is fully drained.
䢇 Your device’s wireless features (phone, email, messaging, Web, and any applications
that use a Sprint Power Vision connection, such as Sprint TV) and media features
(camera, media players, eBooks, and games) consume more power than its organizer
features. If you spend a lot of time using the wireless and media features, keep an eye
on the battery icon and charge when necessary.
䢇 If you don’t plan to use the wireless features on your device for awhile, turn off your
phone (see “Turning Your Device’s Phone On and Off” on page 55). You can forward calls
to a different number or let all calls be picked up by voicemail (see “Call Forwarding” on
page 71).
䢇 As with any mobile phone, if you are in an area with no wireless coverage, your device
searches for a signal, which consumes power. If you cannot move to an area of better
coverage, you may want to temporarily turn off your phone. While your phone is off,
you can continue to use your device’s nonwireless features.
䢇 Turn down the screen brightness (see “Adjusting the Brightness” on page 262).
䢇 Decrease the settings in Power Preferences and turn off Beam Receive (see “Optimizing
Power Settings” on page 271).
䢇 Turn off the Bluetooth feature if you are not using it (see “Connecting to a Bluetooth
Hands-Free Device” on page 79).
Device Setup
Tip:
You can buy an extra battery as a spare for long airplane trips or periods
of heavy use. To purchase batteries that are compatible with your smart
device, go to www.palm.com/mypalm/755psprint.
Section 1A: Device Setup 19
Page 28

20
Page 29

Section 1B
Setting Up Service
In This Section
⽧ Making Your First Call
⽧ Setting Up Your Voicemail
⽧ Creating Sprint Account Passwords
Setting up service on your new Treo ™ 7 55 P smart device by Palm is quick and easy. This
section walks you through the necessary steps to unlock your device, set up your voicemail,
establish passwords, and contact Sprint for assistance with your Sprint Service.
Setting Up Service
Section 1B: Setting Up Service 21
Page 30
Making Your First Call
Determining If Your Device’s Phone Is Already Activated
If you received your device in the mail or purchased it at a Sprint Store, it probably has
already been activated. All you need to do is unlock it.
If your phone is not activated, please call Sprint at 1-888-211-4727.
Unlocking Your Device
1. If the screen is off, press and release Power/End to wake up the screen.
2. Press Center on the 5-way to turn off Keyguard (see “Moving Around the
Device Screen” on page 42 for information on the 5-way ).
3. Enter your four-digit lock code. (For security purposes, the code is not visible as you
type.)
Note:
22 Section 1B: Setting Up Service
If you can’t recall your lock code, try using the last four digits of either
your Social Security number or wireless phone number, or try 0000. If
none of these works, call Sprint Customer Service at 1-888-211-4727.
See “Where to Learn More” on page 317 for other ways to get help from
Sprint if you are having trouble with your service.
Page 31

Making a Call
Volume Butt on
Side Button
1. Press Phone .
2. Press Center on the 5-way
to turn off Keyguard
(see “Locking Your Keyboard (Keyguard)” on page 272 for
information on Keyguard).
3. Tap the onscreen Dial Pad or press the number keys on the
keyboard to enter the number you want to call.
4. Press Tal k
5. After you finish the call, press Power/End
to dial.
to end the
call.
Adjusting Call Volume
While a call is in progress, press the Volu me button on the side of your device to adjust the
call volume.
䢇 To increase the volume, press the upper half of the Volu me button.
䢇 To decrease the volume, press the lower half of the Vol um e button.
Setting Up Service
Section 1B: Setting Up Service 23
Page 32

What’s My Phone Number?
Look Here for
Your Pho ne
Number
1. Make sure your phone is on (see “Turning Your
Device’s Phone On and Off” on page 55 for
information).
2. Press Phone .
3. Press Menu .
4. Select Options, and then select Phone Info.
24 Section 1B: Setting Up Service
Page 33

Setting Up Your Voicemail
All unanswered calls to your device’s phone are automatically transferred to your voicemail,
even if your phone is in use or turned off.
To set up your voicemail:
1. Press Phone .
2. Press and hold 1.
3. Follow the system prompts to:
䡲 Create your password.
䡲 Record your name announcement.
䡲 Record your greeting.
䡲 Choose whether or not to activate Skip Pass Code (a feature that lets you access
your voicemail simply by pressing and holding 1, bypassing the need for you to
enter your password). If you do not activate Skip Pass Code, your device uses the
Voicemail Pass Code feature, which requires you to enter your password each time
you want to access your voicemail.
Setting Up Service
Note:
If you are concerned about unauthorized access to your voicemail
account, we recommend that you use the Voicemail Pass Code.
For more information about using your voicemail, see “Using Voicemail” on page 63.
Section 1B: Setting Up Service 25
Page 34

Creating Sprint Account Passwords
As a Sprint customer, you enjoy unlimited access to your personal account information,
your voicemail account, and your Sprint Vision or Sprint Power Vision account. To ensure
that no one else has access to your information, you need to create passwords to protect
your privacy.
Account Password
If you are the account owner, you’ll have an account password to sign on to
www.sprint.com
password is the last four digits of your Social Security number. If you are not the account
owner (if someone else pays for your Sprint Service), you can get a sub-account password at
www.sprint.com
Voicemai l Password
You’ll create your voicemail password when you set up your voicemail. See “Setting Up Your
Voicemail” on page 25.
Sprint Power Vision Password
With your Treo device, you may elect to set up a Sprint Power Vision password. This
optional password can be used to authorize the purchase of Premium Services content and
to protect personal information on multi-phone accounts.
For more information or to change your passwords, sign on to www.sprint.com
Sprint Customer Service at 1-888-211-4727.
and to use when calling Sprint Customer Service. Your default account
.
or call
26 Section 1B: Setting Up Service
Page 35

Connecting to Your Computer
In This Section
⽧ Why Connect My Device to My Computer?
⽧ Upgrading From Another Palm OS® Device
⽧ Installing the Desktop Synchronization Software
⽧ Connecting Your Treo Device to Your Computer
⽧ Synchronizing Information—The Basics
Section 1C
Computer Connection
Section 1C: Computer Connection 27
Page 36

Why Connect My Device to My Computer?
You need to install the desktop software and connect the sync cable so that you can
synchronize the information on your computer with the information on your device. You
can use either Palm® Desktop software (included) or Microsoft Outlook for Windows (sold
separately) as your synchronization software.
Synchronization means you can enter or change information on your device or on your
computer and then synchronize to automatically update the information in both places.
There’s no need to enter the information twice. We strongly recommend that you
synchronize your device and your computer frequently to keep your information up-to-date
(and backed up) in both locations.
System Requirements
Windows computers
䢇 Windows 2000, XP Service Pack 2, or Windows Media Center Edition
䢇 32MB of available memory (RAM)
䢇 170MB of free hard disk space
䢇 CD drive
䢇 Available USB port
Mac computers
䢇 Mac OS X version 10.2 or later
䢇 128MB of total memory (RAM)
䢇 190MB of free hard disk space
䢇 CD drive
䢇 Available USB port
28 Section 1C: Computer Connection
Page 37

Upgrading From Another Palm OS® Device
Note:
If you are setting up your first Palm OS® device, skip ahead to
“Connecting Your Treo Device to Your Computer” on page 34.
You can transfer all compatible applications and information from your previous Palm OS
device to your new Treo™ 755
P smart device by Palm. This includes your calendar events,
contacts, memos, and tasks, as well as your application settings and any compatible
third-party applications and files.
When you install Palm Desktop software, some third-party applications may be
quarantined because they are not compatible with the Palm OS software version 5.4.9 on
your new Treo device. Quarantined files are not installed on your device, nor are they
deleted; these files are placed in a new folder on your computer: C:\Program
Files\Palm\<device name>\PalmOS5 Incompatible Apps. (On some systems, Palm may be
replaced with palmOne or Handspring.)
Note:
Some third-party utilities allow you to back up your old device’s
information onto an expansion card and then transfer the information
to your Treo device. We do not recommend this method because any
incompatible applications are also transferred.
1. Calculate how much space your applications and information occupy on your previous
Palm OS device:
䡲 From Applications view, press Menu .
䡲 Select Info on the App menu.
䡲 At the bottom of the screen, select Size.
Computer Connection
Section 1C: Computer Connection 29
Page 38

䡲 Look at the numbers on the Free Space line and subtract
the number on the left from the number on the right to
calculate the space used. For example, on the device
shown here, 22.4 - 17.5 = 4.9. This means that 4.9MB of
space is occupied on this device.
2. If the space occupied on your old device is 60MB or less, go to
step 3. If the space occupied is greater than 60MB, then do any
of the following to free up some space before you go to the
next step:
䡲 Delete any third-party applications that you no longer use.
䡲 Move large files, such as eBooks and images, to an expansion card.
䡲 Move third-party applications to an expansion card.
䡲 Purge old information in applications such as Calendar (Date Book), Tasks (To D o),
and email. Refer to the documentation that came with your old device for
instructions on these items.
3. Synchronize your old device with your old desktop software to back up your
information one last time.
4. Connect your new smart device to your computer (see “Connecting Your Treo Device
to Your Computer” on page 34).
5. Install the new desktop synchronization software from the Palm Software Installation
CD (see “Installing the Desktop Synchronization Software” on page 32).
Important:
Do not synchronize your new Treo 755P smart device by Palm with any
previous versions of Palm Desktop software.
6. During the installation process, synchronize your new Treo device with your new
desktop synchronization software as instructed. When prompted, do the following:
䡲 Connect your new device to your computer (see “Connecting Your Treo Device to
Your Computer” on page 34).
30 Section 1C: Computer Connection
Page 39

䡲 Indicate whether you want to sync all applications or only PIM (personal
information management) applications.
䡲 Select a device name for your new device; be sure to select the same name that
you used for your old device. (This is the name that appears in the User list in
Palm Desktop software.)
7. (Mac users only) If you have pictures on your old device, copy them from your old
device to an expansion card or beam them to your new Treo devi ce.
8. If you plan to continue using your old device, perform a hard reset to remove its
associated device name. (See the documentation that came with your old device for
instructions on performing a hard reset.) Each device you synchronize with your
computer must have a unique name. The next time you synchronize your old device
with your computer, be sure to assign it a new name.
If any third-party applications are quarantined during the installation, do not manually
install any of the quarantined files. Contact the third-party developer for software updates
and information about compatibility with your new device.
Computer Connection
Section 1C: Computer Connection 31
Page 40

Installing the Desktop Synchronization Software
Even if you already own a Palm OS device and have installed a previous version of the
desktop software, you must install the software from the Palm Software Installation CD
that comes with your Treo 755
P smart device by Palm.
Note:
Windows Vista Users: Before inserting the Palm Software Installation CD, go to
www.palm.com/windowsvista
If you are installing the software on a computer at work, make sure your
company allows you to install new software. Contact your company’s IT
department for help.
to find information about installing Palm Desktop software
on Windows Vista.
1. Close any applications that are currently running on your computer, including those
that are minimized. Your computer must have all its resources available to install the
software.
2. Insert the Palm Software Installation CD into the CD drive on your computer.
3. If you are installing the software on a Mac, double-click the CD icon on the desktop,
and then double-click the PalmSoftware.pkg icon.
32 Section 1C: Computer Connection
Page 41

4. When the installation wizard opens, follow the onscreen instructions. Please note
these important points about the installation process:
䡲 (Windows only) You can choose which desktop software you want to use for
synchronization: Palm Desktop software or Microsoft Outlook. (Microsoft Outlook
desktop software sold separately. Microsoft Outlook synchronization conduit
included.)
Note:
䡲 When the install process prompts you to connect your device to your computer, go
If you use Microsoft Outlook as your desktop email application, select
Microsoft Outlook as your desktop synchronization software. If you
select Microsoft Outlook, Palm Desktop software is still installed on your
computer. When you enter information on your computer, be sure to
enter your information in Microsoft Outlook, not in Palm Desktop
software.
to “Connecting Your Treo Device to Your Computer” on page 34.
Tip:
If you want to sync information with applications other than
Palm Desktop or Microsoft Outlook, you need to purchase additional
third-party sync software. This sync software is sometimes called a
conduit.
Section 1C: Computer Connection 33
Computer Connection
Page 42

Connecting Your Treo Device to Your Computer
Sync Button
Sync Cable
Charger
Cable
1. Plug the AC charger into a wall outlet.
2. Plug the USB sync cable into an available USB port or a powered USB hub on your
computer.
3. With the sync button facing up, connect the sync cable to the bottom of your device.
Do not press the sync button until you are instructed to do so.
4. Connect the charger cable to the charger jack.
You are now ready to synchronize. Go to “Synchronizing Information—The Basics” on
page 35.
34 Section 1C: Computer Connection
Page 43

Synchronizing Information—The Basics
Synchronizing means that information that is entered or updated in one place (your device
or your computer) is automatically updated in the other, so there’s no need to enter the
information twice. We strongly recommend that you synchronize your Treo device with
your computer or corporate server frequently to keep your information up-to-date (and
backed up) in both locations.
Important:
To sync your information, you must install the software from the Palm
Software Installation CD that came with your Treo 755P smart device by
Palm—even if you sync with Outlook or another third-party application.
See “Installing the Desktop Synchronization Software” on page 32 for
instructions.
Information from all the following applications is updated by default each time you
synchronize your device with your desktop software:
Tip:
You can also set up the VersaMail® application to synchronize email on
your device with email on your computer. See the User Guide for the
VersaMail Application at www.palm.com/mypalm/755psprint for
information.
Section 1C: Computer Connection 35
Computer Connection
Page 44

How each application syncs depends on your computer type and the desktop software you
are using, as follows:
Computer Desktop What Syncs and Where
Windows Outlook
䢇 Calendar, Contacts, Memos, and
Tasks sync with Outlook.
䢇 Pics&Videos syncs with
Palm Desktop software.
Windows Palm Desktop software All applications sync with
Palm Desktop.
Mac Palm Desktop software All applications sync with
Palm Desktop.
Tip:
Tip:
You can download a trial version of Microsoft Outlook and learn about
discount offers by visiting:
www.palm.com/mypalm/755psprint-bonus.
For information on locating your pictures and videos on your computer,
see “Viewing Pictures and Videos on Your Computer” on page 184.
1. Connect your Treo device to your computer as described in “Connecting Your Treo
Device to Your Computer” on page 34.
Note:
If you’re performing initial setup, your device should already be
connected to your computer.
36 Section 1C: Computer Connection
Page 45

2. Press the sync button on the sync cable.
Sync Button
A message indicates that synchronization is in progress.
3. Wait for a message that indicates that the process is complete before you disconnect
the sync cable.
Tip:
If you have any problems synchronizing, see “Synchronization” on
page 294 for troubleshooting suggestions.
If you’re finishing your initial setup, you now have the option to install bonus software from
www.palm.com/mypalm/755psprint-bonus. If you choose to install some of the bonus
software, you need to sync again to install the software on your device. To install bonus
software later, see “Installing Applications” on page 235.
Note:
Section 1C: Computer Connection 37
For more synchronization options, including customizing which
applications sync, see “Synchronizing Information—Advanced” on
page 246.
Computer Connection
Page 46

38
Page 47

Section 2
Your Treo™ 755P Smart Device
by Palm
Page 48

40
Page 49

Moving Around on Your Smart Device
In This Section
⽧ Moving Around the Device Screen
⽧ Using the Keyboard
⽧ Opening Applications
Section 2A
Moving Around
Section 2A: Moving Around 41
Page 50

Moving Around the Device Screen
Left
Right
Center
Up
Down
To move around the screen on your Treo™ 755P smart device by Palm, you can use the 5-way
navigator for one-handed navigation, or you can tap items on the screen with the
stylus. With use, you can find your own favorite way to scroll, highlight, and select menu
items.
Note:
The 5-way includes Right , Left , Up , Down , and Center buttons.
Some third-party applications may not work with the 5-way, and you
must use the stylus instead. In this guide, arrow icons are used to
indicate directions on the 5-way. These arrows are different from any
onscreen scroll arrows or pick-list arrows.
Scrolling Through Screens
As on a computer, you scroll on the Treo device to move from field to field or page to page,
or in some cases to highlight an item or option in a list.
42 Section 2A: Moving Around
Page 51

The behavior of the 5-way for list screens and entry screens varies by application. Here
Scroll Arrows
Scroll Bar
are some general scrolling tips that apply to most applications:
䢇 Press Right , Left , Up , and Down on the 5-way to move to the next field,
button, or action in that direction.
䢇 In list screens, press and hold Up or Down to scroll one screen at a time.
䢇 Press Option and Up or Down to scroll to the
next page of information within the current record (see
“Using the Keyboard” on page 46).
䢇 When inside a text field, press Right or Left to scroll
to the next character or word, and press Up or Down
to scroll between lines.
You can also scroll using the stylus. Tap an onscreen scroll
arrow, or drag the slider of an onscreen scroll bar.
Highlighting and Selecting Items
On most screens, one item—a button, a list entry, or a check
box—is highlighted by default. The highlight identifies which item is affected by your next
action. Use the 5-way to move the highlight from one item to another before opening
or selecting it.
The highlight can take one of two forms, depending on what is highlighted:
䢇 Border glow: When an onscreen button (OK, Cancel, etc.) or pick list
is highlighted, the button acquires a glow around its border.
䢇 Colored background: When a phone number, text, an email
address, or a Web link is highlighted, the item appears as white text
against a colored background.
After highlighting an item, you can select or activate it by pressing Center or by tapping
the item with the stylus.
Moving Around
Section 2A: Moving Around 43
Page 52

Highlighting Text
Menu Shortcut
You can use the stylus to highlight text on the screen.
䢇 Tap and drag the stylus across the text you want to highlight.
䢇 To highlight a word, double-tap it.
䢇 To highlight a paragraph, triple-tap it.
Accessing Command Buttons
In most applications, command buttons such as New, OK, and Details appear at the bottom
of the screen. In many cases, you can jump directly to these buttons instead of scrolling to
them. The 5-way
controls vary according to the application, but here are some general
rules that apply to most applications:
䢇 From a list screen, such as the Contacts list or Memos list, press Right or Down to
jump to the first button.
䢇 From a screen where you create or edit entries, such as Edit Contacts, press Center
to jump to the first button.
䢇 From a dialog box, such as Edit Categories, press Up , Down , Right , or Left to
scroll to the buttons.
Selecting Menu Items
Many applications have menus to provide access to additional
features. These menus are usually hidden from view, but they
appear when you press Menu . To get the most out of your
device, it’s a good idea to familiarize yourself with the additional
features available through the various application menus.
1. Press Menu to open an application’s menus.
2. Press Right and Left to switch between menus.
3. Press Up and Down to highlight a menu item.
44 Section 2A: Moving Around
Page 53

4. Press Center to select the menu item, or press Menu to close the menus and
cancel your selection.
Tip:
Most menu items have menu shortcuts listed in the menu. To use a
menu shortcut, press Menu plus the shortcut letter. You don’t have to
see the menu item to use the menu shortcut. For example, when you’re
in Calendar, you can press Menu + N to create a new event.
Selecting Options in a Pick List
A range of options is often presented in a type of menu called a pick list, which can be
identified by a downward-pointing arrow. Pick lists are different from the application
menus previously described. The application menus give you access to additional features,
and pick lists enable you to select the contents for a particular field.
You can select an option from a pick list with the 5-way or the stylus:
䢇 Use the 5-way to highlight the pick list, and then press Center to display the
items in the list. Press Up and Down to highlight the item you want, and then
press Center
selection, press Left or Right .
䢇 Use your stylus to tap the pick list, and then tap the item you want from the list. To exit
the pick list without making a selection, tap outside the list.
to select the highlighted item. To exit the pick list without making a
Moving Around
Section 2A: Moving Around 45
Page 54

Using the Keyboard
Option
Shift/Find
Alt
Space
Backspace
Return
Backlight
Menu
When using the keyboard, most people find it easiest to hold the device with two hands
and use the tips of both thumbs to press the keys.
The Backspace, Return, Space, and Shift keys, as well as the letter keys, work in the same
way as do those found on any computer keyboard. In addition, your device offers several
special function keys.
46 Section 2A: Moving Around
Page 55

Key Fun cti on
Option When pressed in conjunction with a second key, gives that key
an alternate function. For example:
䢇 Option + <any lettered key> enters the symbol or number
displayed at the top of the key.
䢇 Option + <any quick button> opens a secondary application
(see “Using the Quick Buttons” on page 51).
䢇 Option + Shift/Find opens the Find feature (see “Using Find”
on page 234).
䢇 Option + Menu dims the device screen.
Alt
When pressed in conjunction with a second key, displays a
variety of alternate characters that can be entered using that
key. See “Entering Other Symbols and Accented Characters” on
page 49 for details.
Menu Opens application menus. See “Selecting Menu Items” on
page 44 for details.
Moving Around
Tip:
The Treo 755P smart device by Palm includes a keyboard backlight that
turns on and off when the screen turns on or off. Press Option + P to
adjust screen and keyboard backlight brightness. The backlight also dims
when an active call lasts longer than a specified period of time. See
“Optimizing Power Settings” on page 271 to adjust the automatic
shut-off and dimming intervals.
Section 2A: Moving Around 47
Page 56

Entering Lowercase and Uppercase Letters
Letter
Symbol
䢇 To enter lowercase letters, press the desired keys.
䢇 To enter an uppercase letter, press Shift/Find , and then press a letter key. You don’t
need to press and hold Shift/Find while entering uppercase letters. When Shift is
active, an up arrow appears in the lower-right corner of the screen.
䢇 To turn Caps Lock on, press Shift/Find twice. To turn it off, press Shift/Find once.
When Caps Lock is on, an underlined up arrow appears in the lower-right corner of
the screen.
Entering Numbers, Punctuation, and Symbols
Numbers, punctuation, and symbols appear above the letters on
the keys. To enter these characters, do one of the following:
䢇 Press Option , and then press the key with the desired
character shown above the letter. You don’t need to press and
hold Option while pressing the second key. When Option is active, the symbol
appears in the lower-right corner of the screen.
䢇 To turn Option Lock on, press Option twice. To turn it off, press Option once.
When Option Lock is on, the symbol appears in the lower-right corner of the screen.
Tip:
48 Section 2A: Moving Around
Some application views automatically default to Option Lock, such as
the Dial Pad view of the Phone application, or the Calculator. In this case,
you do not need to press Option to enter numbers.
Page 57

Entering Other Symbols and Accented Characters
Symbols and accented characters that do not appear on the keyboard are sometimes called
alternate characters because you use the Alt key to enter them.
1. Enter the character that corresponds to the symbol or accented character you want.
(See the table on the next page.)
2. Press Alt .
3. Press Up , Down , Right , or Left to highlight the desired character.
4. Press Center
to insert the character.
Tip:
To see a list of additional alternate characters, position the cursor at the
beginning of the line or after a space, and then press Alt. The alternate
characters are grouped by their similarity to the base key. For example,
the alternate characters available for the e key are é, è, ë, and ê.
Section 2A: Moving Around 49
Moving Around
Page 58

Symbols and Accented Characters
Press …
a á à ä â ã å æ S
A Á À Ä Â Ã Å Æ t or T ™
b or B ß u ú ù ü û
c ç ¢ © U Ù Ú Ü Û
C Ç ¢ © x or X × ¤
e è é ë ê y ý ÿ
E È É Ë Ê Y Ý Ÿ
i ì í ï î 0 1 2 3 4 5 6
I Ì Í Ï Î
l or L £ ! ¡
nñ ?¿
N Ñ : ; :-) :-( ;-)
o
O Ò Ó Ö Ô Œ Õ
p or P ¶
r or R ®
s
Then press to select …
ò ó ö ô
œ õ $ £ ¥ ¢
ß š
Press …
7 8 9 . , ‘ “ @
+ - * / # ( or )
Then press to select …
ß Š §
; _ • \ % =
{ } < > « » © ® ™ ^ Ø |
÷ £ ¥ ¢ [ ]
°
50 Section 2A: Moving Around
Page 59

Opening Applications
Phone
Calendar
Messaging
Applications
When you open an application using either a quick button or Applications view, you
automatically close the application you were previously using.
Using the Quick Buttons
The front of the Treo device has three buttons that you can use to open applications. The
fourth button opens Applications view, which allows you to open all the applications on
your device (see “Using Applications View” on page 52).
Each of the three application quick buttons can be used to open two applications. To open a
button’s primary application—as indicated by the graphic on the button—simply press the
button. To open a button’s secondary application, press Option , and then press the
quick button.
Note:
Button Primary Application Secondary Application
Pressing any of the quick buttons or the Applications button
automatically wakes up your device screen. See “Waking Up the Screen”
on page 54.
Phone
Calendar
Messaging
+ Web
+ World Clock
+ Email
Moving Around
Section 2A: Moving Around 51
Page 60

Tip:
You can also customize the buttons. See “Customizing Device Buttons”
on page 267 for details.
Using Applications View
You can access all available applications through Applications view.
1. Press Applications .
2. Use the 5-way to highlight the application you want to
open.
3. Press Center
In Applications view, you can also do any of the following:
䢇 Press Applications repeatedly to cycle through various
categories of applications. See “Changing the Applications
Settings” on page 265 for more information on categories.
䢇 Enter the first few letters of the application’s name to highlight it. For example, if you
enter “p,” it highlights Phone; if you then enter “r,” it highlights Prefs. If you pause and
then enter “r,” it highlights the first application that starts with “r.”
to open the selected application.
Tip:
You can also press and hold Applications from any screen on your device
to select from a list of your most recently used applications.
52 Section 2A: Moving Around
Page 61

Using Your Device’s Phone Features
In This Section
⽧ Turni ng Your Device O n and Off
⽧ Opening the Phone Application
⽧ Making Calls
⽧ Receiving Calls
⽧ Using Voicemail
⽧ What Can I Do When I’m On a Call?
⽧ Using Sprint Voice Command
⽧ Defining Favorite Buttons
⽧ Using a Phone Headset
⽧ Customizing Phone Settings
⽧ Controlling Your Roaming Experience
⽧ Checking Signal Strength and Phone Status
Section 2B
Phone Features
Section 2B: Phone Features 53
Page 62

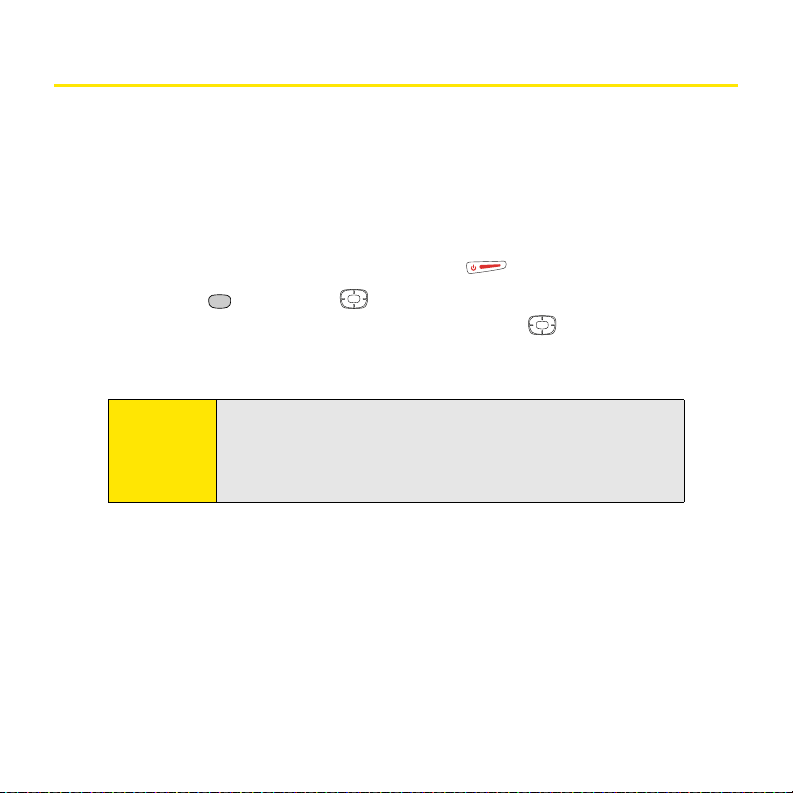
Turning Your Device On and Off
Center
Power/End
Note:
Throughout this guide the term device is used to describe your Treo
smart device and its physical attributes. The term phone is used to
describe the feature of your smart device that enables you to connect to
the Sprint National Network.
You can turn on your device screen and your phone independently. For example, the device
screen can be off while the phone is on, or the device screen can be on while the phone is
off. You can also have both the device screen and the phone turned on or off at the same
time.
Waking Up the Screen
When your device screen is off, you need to wake up the screen.
1. Press and release Power/End to wake up the screen.
2. Press Center to turn off Keyguard. For more information about turning Keyguard
on and off, see “Locking Your Keyboard (Keyguard)” on page 272.
3. Press and release Power/End to turn off the screen.
Note:
You can also press any of the application quick buttons on the front of
your device to wake up the screen and to go directly to the application
associated with that button.
54 Section 2B: Phone Features
Page 63

Turning Your Device’s Phone On and Off
When your phone is on, it is connected to the Sprint National Network (provided you are in
a coverage area), so that you can make and receive phone calls and use wireless services,
such as email, messaging, and the Web browser. During initial setup, your phone is on by
default, so you can use wireless services right away.
If you turn off your phone, you can still use the organizer features such as Contacts and
Calendar, as well as the media features such as the Pocket Tunes
Pics&Videos. This is sometimes referred to as flight mode and is ideal for using your device
on airplanes and for maximizing battery life.
1. Wake up the screen.
2. Press and hold Power/End . (You hear a series of ascending tones and see a
“Welcome” screen. When your device locates a signal, “Sprint” and the
signal-strength icon appear at the top of the Phone application screen, indicating
that you can use the phone and Internet features, if they are supported by the local
network.)
3. Press and hold Power/End again to turn off your phone. (You hear a series of
descending tones and see a “Powering off” screen. When your phone is off, “Phone
Off” appears at the top of the Phone application screen. You can still use the
nonwireless features of your device, such as Contacts, Calendar, Tasks, and Memos.)
™
music application and
Phone Features
Section 2B: Phone Features 55
Page 64

Opening the Phone Application
Favorite Buttons
Dial Pad
Status Icons
䢇 Press Phone to open the Main view of the Phone application.
56 Section 2B: Phone Features
Page 65

Making Calls
Your Treo™ 755P smart device by Palm offers several options for making phone calls. As you
become familiar with your device, you’ll discover which method you prefer.
Dialing Using the Onscreen Dial Pad
1. Press Phone .
2. Enter the phone numbers by tapping the onscreen Dial Pad
with the stylus.
3. Ta p Dial, press Tal k , or press Center
to dial.
Note:
Tip:
Section 2B: Phone Features 57
If you changed the wallpaper in the Main view of the Phone application
(see “Customizing the Main View in the Phone Application” on page 84),
you can still access the Dial Pad. From the Main view of the Phone
application, press Talk and then select Dial Pad.
You can paste numbers directly into Main view. Copy a number from
another application, and then press Phone to switch to Main view. Open
the Edit menu, and then select Paste. Press Ta lk to dial.
Phone Features
Page 66

Dialing From the Keyboard
Characters you enter
appear here
1. Press Phone .
2. Press the numbered keys to enter the phone
number. (You don’t need to press Option .)
3. Press Tal k to dial.
Dialing by Contact Name
Before you can dial a call by contact name, you must
create some contacts (see “Adding a Contact” on page 202), or import them by
synchronizing (see “Synchronizing Information—The Basics” on page 35).
1. Press Phone .
2. Select the Contacts favorite button.
3. Using the keyboard, start entering one of the following for
the contact you want to call:
䡲 First name (JOH for John).
䡲 Last name (SMI for Smith).
䡲 First initial and last name (JSM for John Smith).
For example, entering SM might display Smila Anderson, John
Smith, and Sally Martin. Entering JSM finds only John Smith.
4. Select the number you want to call, and press Talk to dial.
Tip:
To see more information for a contact, highlight the name and press
Center on the 5-way. To restart your search, press Backspace to delete
letters you’ve entered, or select Cancel to return to Main view.
58 Section 2B: Phone Features
Page 67

Dialing With a Speed-Dial Favorite Button
Your device comes with a few predefined speed-dial favorite
buttons, but you can also create your own favorites. See “Creating a
Speed-Dial Favorite Button” on page 75.
1. Press Phone .
2. Press Down
3. Use the 5-way
favorite button. (Speed-dial favorite buttons are indicated by
the icon
4. Press Center or tap the speed-dial favorite button to dial the number associated
with the selected button.
to access your favorite buttons.
to highlight the desired speed-dial
.)
Tip:
To view more favorite buttons, press Right or Down on the 5-way. If the
highlighted favorite was added from Contacts, press Space to view all
numbers associated with that contact.
Dialing From a Web Page or Message
Your device recognizes most phone numbers that appear on Web
pages or in text, email, or Sprint Picture Mail messages. If you can’t
use the 5-way or stylus to highlight and dial a phone number on
a Web page or in a message, it means that your device doesn’t
recognize the number as a phone number.
1. Select the phone number on the Web page or in the message.
2. Press Center
3. Select Dial to dial the number.
Section 2B: Phone Features 59
to open the Dial Number dialog box.
Phone Features
Page 68

Redialing a Recently Called Number
䢇 From the Main view in the Phone application, press and hold Talk to dial the last
number you called.
–or–
To select from your most recently dialed numbers, from the Main view in the Phone
application, press Tal k to open the Redial list, select the number you want to call,
and then press Tal k again to dial.
–or–
To select from a chronological list of calls, select the Call Log favorite button. You can
also access the Call Log from the Main view in the Phone application by pressing Tal k
and selecting Call Log from the Redial list.
60 Section 2B: Phone Features
Page 69

Receiving Calls
To receive calls, your device’s phone must be on. This is different from having only the
screen turned on (see “Turning Your Device’s Phone On and Off” on page 55). When your
phone is off, your calls go to voicemail.
Answering Calls
䢇 Press Tal k .
–or–
Using the 5-way , select the onscreen Answer button.
–or–
If the headset is attached, press the headset button.
Tip:
To prevent calls from accidentally being answered while the device is in a
pocket or briefcase, you can disable the screen’s touch-sensitive feature
when an incoming call arrives (see “Locking Your Screen” on page 274).
Sending Calls to Voicemail
䢇 Press Power/End .
–or–
Using the 5-way , select the onscreen Ignore button.
䢇 Using the 5-way , select the onscreen Ignore with Text button. This option sends
the call to voicemail and opens a text message addressed to the caller.
Tip:
Section 2B: Phone Features 61
Do not press Power/End to ignore a call-waiting alert; this hangs up your
current call (the call-waiting alert then changes to an incoming call
alert). Use the 5-way method instead.
Phone Features
Page 70

Silencing the Ring of an Incoming Call
䢇 Press any key on your device except Tal k , Power/End , or Center .
–or–
To immediately silence all system sounds including the ringer, slide the Ringer switch to
Sound Off (see “Silencing Sounds” on page 260).
If music is playing and a call arrives, the phone rings softly and the music automatically
pauses. The music resumes if you ignore the call or, if you answer the call, the music
resumes when you hang up.
62 Section 2B: Phone Features
Page 71

Using Voicemail
Setting Up Your Voicemail
Your voicemail number is preset when you activate your device. The first time you call
voicemail, you are prompted to enter your voicemail password. If necessary, please contact
Sprint for your password and enter it as prompted.
1. Make su re your phone is turned on (see “Turnin g Your Device’s
Phone On and Off” on page 55).
2. Press Phone .
3. Select the Voi ce mai l favorite button to dial the automated
voicemail system.
4. Follow the voice prompts to set up your voicemail.
Tip:
You can also press and hold 1 to dial voicemail from the Dial Pad and
Favor ites.
Voicemai l Notification
When you have a new voicemail message, you are notified with an
Alert screen. To respond to the Alert screen, select OK to dismiss the
alert or select Listen to play the message. When you have messages
that you have not listened to, the Voic em ail icon also appears in
the title bar at the top of the Main view in the Phone application.
Section 2B: Phone Features 63
Phone Features
Page 72

Retrieving Your Voicemail Messages
1. Press Phone .
2. Press and hold 1 to dial the voicemail system, or select the Vo ice ma il favorite button.
3. Enter your voicemail password by using the keyboard, or select Extra Digits if you
defined this option (see “Defining Favorite Buttons” on page 74 for details on
defining extra digits). Remember that you do not need to press Option to enter
numbers, an asterisk (*), or a pound sign (#) during a call.
Tip:
If the Voicemail icon appears in the title bar of the Main view of the
Phone application, you can select this icon to retrieve your voicemail.
Accessing Your Voicemail From Another Phone
1. Dial your wireless phone number.
2. Press * when your voicemail answers.
3. Enter your password, and then press #.
Displaying Numeric Pages
If an incoming call goes to voicemail, the caller can choose to enter their phone number as
a numeric page instead of leaving a voicemail message. When someone pages you, the
page is displayed on the Alert screen. If there is just one alert, the page icon is a phone
with a bubble on it. If there are multiple alerts, the messaging icon appears instead.
1. From the Alert screen, highlight an item with an alert icon.
2. Select Go To to view the page in the Messaging application. The page displays the
caller’s phone number.
64 Section 2B: Phone Features
Page 73

What Can I Do When I’m On a Call?
Caller’s Name
and Number
Current Duration
of Call
Dial Pad
Mute
When you make or receive a call, Active Call view appears. Use the 5-way to access the
onscreen buttons in this view.
The onscreen buttons in Active Call view perform the following functions:
Ends the call immediately. You can also press the headset button
(if the headset is attached).
Turns on the speakerphone. When the speakerphone is on, you can
take the device away from your ear and use other features during a call.
For example, you can check your calendar or look up contact
information.
Turns off the speakerphone when it is on.
Replaces the Spkr-phone button when a Bluetooth® hands-free device
such as a headset or car kit is attached. Select this button to transfer
the call from the Bluetooth hands-free device to the built-in earpiece.
Phone Features
Section 2B: Phone Features 65
Page 74

Places the current call on hold.
Enables you to place another call while the first call is on hold. For
information on handling a second outgoing call, see “Making a Second
Call” on page 69.
Opens the Dial Pad so you can manually dial additional numbers, such
as an extension or a response to a voice prompt.
Dials any extra digits (such as a password or an extension) that you
assigned to a favorite button. This button replaces the Dial Pad button
during outgoing calls to numbers that include predefined extra digits.
See “Defining Favorite Buttons” on page 74 for information on defining
extra digits.
Mutes the microphone so that you cannot be heard.
Tip:
To avoid accidentally pressing onscreen buttons while holding the device
to your ear, you can disable the screen’s touch-sensitive feature during
your calls (see “Locking Your Screen” on page 274).
Ending a Call
Do one of the following to end a call:
䢇 Press Power/End .
䢇 Select Hang Up All.
䢇 Press the button on the headset (if the headset is attached).
66 Section 2B: Phone Features
Page 75

Tip:
When a call lasts longer than two minutes, the screen dims. Press any
key except Power/End to wake up the screen, and then press Power/End
to hang up the call. Be careful not to press Power/End to wake up the
screen because this accidentally ends the call.
Switching Applications During a Call
You can use many other applications on your device while holding a phone conversation,
including the organizer and text messaging features. You cannot, however, make a data
connection while on a call. This means that you cannot browse the Web or send and receive
email or Picture Mail messages while on a call.
1. Do one of the following:
䡲 Select Hold.
䡲 Select Spkr-phone to continue the conversation while you view the other
application.
䡲 Connect a headset (see “Using a Phone Headset” on page 78).
2. Press Applications .
3. Select the icon for the application you want to open.
4. Complete the task in the application.
5. Press Phone to return to Active Call view.
Tip:
If you’d like to continue talking while viewing another application, select
Spkr-phone before you switch to the other application. If you’re using a
headset, you can skip this step.
Section 2B: Phone Features 67
Phone Features
Page 76

Saving Phone Numbers
After you complete an outgoing call to a number that is not in your Contacts list, you are
prompted to add the number to your Contacts list. You are also prompted to add new
numbers from incoming calls with caller ID.
䢇 To create a new contact entry for this number, select Create a
New Contact, and enter the contact’s information.
䢇 To add this number to an existing contact entry, select Add to a
Contact, and then select the contact. The number is pasted into
the first available phone number field for that contact.
䢇 To decline adding this number, select Cancel.
䢇 To disable the Add New Number prompt, check the Don’t ask
me this again box.
Tip:
You can re-enable the Add New Number prompt if you’ve disabled it. In
the Phone application, press Menu and select Phone Preferences. Check
the Ask to add unknown phone numbers after calls box.
If you don’t add a number right away, follow these steps to add it later:
1. In the Call Log (see “Redialing a Recently Called Number” on page 60), highlight the
number you want to save.
2. Press Menu .
3. Select Add Contact.
4. Enter the information for the entry.
5. Select Done.
68 Section 2B: Phone Features
Page 77

Making a Second Call
You can make a second call while your first call is still active.
1. Dial the first number and wait until the person answers.
2. Use the 5-way to select Hold.
3. Use the 5-way to select Add Call.
4. Dial the second number using any of the methods described
in “Making Calls” on page 57.
5. When the Dial another call? prompt appears,
select Ye s.
Tip:
Active Call view now includes two status lines, each representing one of
the calls. You can join the two calls in a conference call by selecting Conf,
or finish the second call and return to the first call, but you cannot
switch between the two calls.
6. Press Power/End to end both calls. To return to the first call, wait for the second
call to hang up.
Answering a Second Call (Call Waiting)
When you are on a call, you can receive a second call. When the second call comes in, you
hear a call-waiting tone and the Call Waiting dialog box appears. You can do any of the
following to handle the second call:
䢇 To place the current call on hold and answer the new call, press Talk or use the
5-way to select Answer.
䢇 To send the new call to voicemail, use the 5-way to select Ignore.
䢇 To send the new call to voicemail and send the caller a text message, use the 5-way
to select Ignore with Text.
Section 2B: Phone Features 69
Phone Features
Page 78

䢇 To hang up the current call and answer the new call, press Power/End . When the
incoming call message reappears, select Answer or press Tal k .
Tip:
Note:
Once you have answered a second call, to switch back and forth between
the original call and the call you answered, use the 5-way to select Swap.
When you answer a second call and then select the Hang Up All button,
it ends both calls. In this situation, if the first caller has not yet hung up
the phone, the Sprint National Network automatically redials your
number from the first caller’s number and you see an incoming call alert.
You can answer to continue your call with the first caller.
Making a Conference Call Using Three-Way Calling
You can join two calls in a conference session by using three-way calling. Normal airtime
rates apply for each of the two calls.
1. When your first call is active, place a second call (see “Making a Second Call” on
page 69). (You cannot initiate a three-way call if the second call is an incoming call.)
2. When you’re connected to the second party, use the 5-way to select Conf to
begin your three-way call.
70 Section 2B: Phone Features
Page 79

Note:
If one of the people you called hangs up, you and the remaining caller
stay connected. The screen does not change to indicate that one of the
callers has hung up. If you initiated the call and are the first to hang up,
all three callers are disconnected.
3. To end the three-way call, press Power/End or select Hang Up All.
Call Forwarding
You can forward calls to another number. You can still make calls from your device while
call forwarding is activated. There is an additional per-call charge for this service. When call
forwarding is active, an
1. Press Phone .
2. Press Menu .
3. Select Options, and then select Phone Preferences.
4. Select the Call forwarding pick list.
䡲 If the forwarding number appears in the pick list, select
the number.
䡲 If the forwarding number does not appear in the pick list,
select Edit numbers, and then select New. Enter a 10-digit
forwarding number without spaces, and select OK. Then
select the number from the Call forwarding pick list.
5. Select OK.
6. Call your Treo device to confirm that call forwarding is active.
icon appears in the title bar of the Phone application’s Main view.
Phone Features
Section 2B: Phone Features 71
Page 80

Using Flash Mode
Flash mode provides an alternate way to manage your calls while one or more calls are
active. For example, you can dial another call, swap between calls, or join two calls in a
conference session with the press of a button while in Flash mode.
1. Press Tal k from Active Call view.
2. If the Do you want to switch to Flash mode? prompt appears,
select Ye s.
3. While in Flash mode, do any of the following:
䡲 If you have one call in progress and you answer an
incoming second call, press Talk to swap between
the calls
.
䡲 If you have one call in progress, to make an outgoing
second call, dial the number using any of the methods
described in “Making Calls” on page 57.
䡲 If you have one call in progress and you place an outgoing second call, press Talk
after establishing a connection with the second party to set up a
conference session using three-way calling.
䡲 If you have two calls in conference, press Tal k to hang up one of the calls;
you can then dial another number and include the new caller in the conference
session.
Note:
Pressing Tal k during a conference call usually hangs up the second call.
However, depending on your network connection, you may occasionally
hang up the first call.
4. To exit Flash mode and end all the calls, press Power/End .
72 Section 2B: Phone Features
Page 81

Using Sprint Voice Command
If you subscribe to the Sprint Voice Command service, you can call a number by just saying a
name. (There is a monthly charge for this service.)
To activate Sprint Voice Command, you must speak to a Sprint Customer
Service representative:
1. Make sure your phone is turned on (see “Turning Your Device’s Phone On and Off” on
page 55).
2. Press Phone .
3. Press *, press 2, and then press Talk to contact Sprint Customer Service and sign
up.
Setting Up Your Personal Address Book
To use Sprint Voice Command, you must first set up your personal address book.
1. From the Main view of the Phone application, press *, and then press Tal k .
Follow the system prompts. (You’ll hear a tone, followed by the prompt “Ready.”)
2. Say “Add Name” to begin setting up your Personal Address Book, and then follow the
voice prompts.
Making a Call With Sprint Voice Command
1. From the Main view of the Phone application, press *, and then press Tal k .
(You’ll hear a tone followed by the prompt “Ready.”)
2. After the prompt, say “Call” and the name you’ve assigned to the number you want to
call. (Your request repeats and you are asked to verify it.)
3. Say “Yes” to dial the call. Say “No” to cancel.
Phone Features
Section 2B: Phone Features 73
Page 82

Defining Favorite Buttons
Your device provides 70 favorite buttons (69 programmable) for
quick access to the following common tasks:
䢇 Dialing a phone number (speed dial)
䢇 Accessing your Call Log
䢇 Accessing the onscreen Dial Pad
䢇 Opening an application
䢇 Accessing a Web page
䢇 Addressing a text, email, or Picture Mail message
䢇 Accessing voicemail (preset on your device)
Sprint presets favorite buttons on your device so that you can easily access your device’s
wireless features. You can customize all favorite buttons except Voicemail—either delete
and reassign existing favorite buttons or create new ones—to perform any of the
supported tasks.
For each favorite button, you can also set up a Quick Key that gives you instant access to
the phone number or corresponding screen. Quick Keys are optional and can be letters only,
except for the Voicemail Quick Key, which is preprogrammed as 1. The letter equivalent for
that key is E, so you cannot assign E as a Quick Key to another favorite button.
Tip:
If you’re upgrading from a previous Treo device, your favorites might be
transferred along with your other information. However, you may need
to rearrange the order in which your favorite buttons appear by pressing
Menu, selecting Record, and then selecting Edit Favorites Pages.
74 Section 2B: Phone Features
Page 83

Creating a Speed-Dial Favorite Button
1. Press Phone .
2. Use the 5-way to select a blank favorite button.
Tip:
If there are no blank favorite buttons on the current Favorites page, press
Right on the 5-way to scroll through the other pages. If you run out of
blank favorite buttons, you can delete some existing favorites to make
room for new ones (see “Editing or Deleting an Existing Favorite Button”
on page 76).
3. Enter a label for the favorite.
䡲 If the entry is for an existing contact, select Lookup. Start
entering the contact’s last name, and then select the
number you want for the contact when it appears in the
lookup list.
䡲 If the entry is for a new contact, enter the Label, press
Down , and enter the Number.
4. (Optional) Enter a Quick Key, a letter that you can press and
hold from the Main, Dial Pad, or Favorites view of the Phone application, to dial this
speed-dial number.
5. (Optional) Select More, and then select advanced options:
䡲 Extra Digits lets you define additional digits to dial, such as a password or
extension. To enter a one-second pause, insert a comma between digits. To add a
longer pause, enter more commas.
䡲 Dial Extra Digits automatically dials predefined extra digits immediately after
dialing the phone number, when checked.
6. Select OK.
Section 2B: Phone Features 75
Phone Features
Page 84

Creating Other Types of Favorite Buttons
1. Press Phone .
2. Use the 5-way to select a blank favorite button.
3. Select the Typ e pick list and select Call Log, Dial Pad, Contacts, Application, Message,
Email, or Web Link.
4. Enter a label for the favorite and enter any other necessary information on the screen.
Tip:
5. (Optional) Enter a Quick Key, a letter that you can press and hold from the Main, Dial
Pad, or Favorites view of the Phone application, to open the favorite.
6. Select OK.
When creating a Message or Email favorite you can enter multiple
addresses; simply separate each address with a comma. This is an easy
way to send messages to a group of people.
Editing or Deleting an Existing Favorite Button
You can edit or delete most favorite buttons. You cannot edit or delete the preset Voic em ail
button, but you can add extra digits or move the Voic em ail button to a different position.
1. Press Phone .
2. Use the 5-way to access Favorites.
3. Highlight the favorite button you want to edit or delete.
4. Press Menu .
5. Select Edit Favorites Button on the Record menu.
6. To edit the entry, make the desired changes. (For example, you can add a Quick Key
shortcut to any favorite.) To delete the entry, select Delete.
7. Select OK.
76 Section 2B: Phone Features
Page 85

Tip:
You can also organize your favorite buttons on different pages. Open the
Record menu, and then select Edit Favorites Pages. To arrange your
favorites, drag and drop the buttons into a new slot. To move a favorite
to another page, drag the button onto the page icon at the bottom of
the screen.
Phone Features
Section 2B: Phone Features 77
Page 86

Using a Phone Headset
Microphone
Headset
Button
Speakers
You can connect a phone headset for hands-free operation. If you need to use your device
while driving and this is permitted in your area, we recommend using a phone headset
(wired headset included) or a hands-free car kit (sold separately).
In addition to the stereo headset included with your Treo device, your device is compatible
with the following types of headsets that are sold separately:
䢇 Wired headsets with a 2.5mm connector (3-pin or 4-pin).
䢇 Wireless headsets and car kits enabled with Bluetooth 1.1 or 1.2 wireless technology.
Note:
For a list of compatible hands-free devices, go to
www.palm.com/treo755psprint-support.
Check the specifications for your headset or car kit to confirm compatibility. Please note
that you cannot use stereo headphones with Bluetooth wireless technology to listen to
music files.
Using a Wired Headset
78 Section 2B: Phone Features
Page 87

When using the headset that is included with your device, you can press the headset
button to perform any of the following tasks:
䢇 Answer an incoming call or a call waiting call.
䢇 Pick up a call that is on hold.
䢇 Switch between two calls (if the second call is incoming).
䢇 Join two calls in a conference (if the second call is outgoing).
䢇 Hang up a single call.
Note:
The headset designed for Treo™ 180, 270, and 300 devices is not
compatible with your Treo 755P smart device by Palm. Standard headsets
sold with other Sprint phones are compatible with your device. If you
hear a headset buzz or experience poor microphone performance, your
headset may be incompatible with your device.
Connecting to a Bluetooth Hands-Free Device
Once you set up a partnership with a Bluetooth hands-free device such as a headset or car
kit, you can communicate with that device whenever it is turned on and within range.
Bluetooth range is up to 30 feet in optimum environmental conditions. Performance and
range may be affected by physical obstacles, radio interference from nearby electronic
equipment, and other factors.
Note:
Section 2B: Phone Features 79
In the documentation for the other device, a partnership might be
referred to by a term such as trusted pair, trusted device, or pairing.
Phone Features
Page 88

1. Press Applications and select Bluetooth , or tap the
Bluetooth
icon in the title bar.
2. Select Bluetooth On.
3. (Optional) Enter a device name that identifies your device
when it is discovered by other Bluetooth devices.
Note:
Use the same device name for all your Bluetooth connections. If you
change the device name, you need to recreate any partnerships you have
already created.
4. Prepare your hands-free device to accept a connection from another Bluetooth device.
(For instructions, see the documentation that came with your hands-free device.)
5. Select Setup Devices.
6. Select Hands-free Setup.
7. Follow the onscreen instructions to create a partnership with
the specific hands-free device. When prompted, enter a
passkey.
Important:
Some hands-free devices have a predefined passkey. If your device has a
predefined passkey, you can find the passkey in the documentation for
that device. Other devices provide a screen where you enter a passkey
that you make up. In either case, you must use the same passkey on both
your Treo device and your hands-free device. We recommend that, where
possible, you make up a passkey of 16 alphanumeric characters (letters
and numerals only) to improve the security of your device. The longer the
passkey, the more difficult it is for the passkey to be deciphered.
80 Section 2B: Phone Features
Page 89

8. After you finish setting up the device, select Done to return to Trusted Devices view.
Note:
For some car kits, you need to initiate a Bluetooth connection from your
Treo device to complete the partnership process. To do this, highlight the
car kit in Trusted Devices view, press Menu, and then select Connect.
9. (Optional) Enable advanced hands-free features by pressing the multifunction button
(MFB) on the hands-free device.
You know that the connection is successful when you see a headset
icon in the title bar
of the Phone application. You can now use your device with the Bluetooth hands-free
device such as a headset or car kit.
Using a Bluetooth Hands-Free Device
After you create a partnership with your Bluetooth hands-free device and you turn it on
within range (up to 30 feet), your Treo device automatically routes all calls to the
hands-free device instead of to the earpiece on your Treo device. When a call comes in, your
Treo device rings and the hands-free device beeps. Even if you answer the call on your Treo
device, the call goes to the hands-free device. If you prefer to route calls to the earpiece on
your Treo device, you can change the settings on your device to do this (see “Customizing
Advanced Settings for Your Hands-Free Device” on page 83).
The features available on your hands-free device vary by model. Check the documentation
for your hands-free device for details on the supported features and how to use those
features. Your Treo device can support the following features, provided that your
hands-free device also supports them:
䢇 Answer an incoming call.
䢇 Hang up a call and answer a call-waiting call.
䢇 Place a call on hold and answer a call-waiting call.
䢇 Hang up a single call.
䢇 Transfer a call from the device’s earpiece to the hands-free device.
Phone Features
Section 2B: Phone Features 81
Page 90

䢇 Ignore an incoming call.
䢇 Redial the last number you called from the hands-free device.
䢇 View a log of recently received, missed, and dialed calls, and dial numbers for these calls
directly from the hands-free device.
䢇 Transfer speed-dial favorites and Contacts entries containing phone numbers from your
device to the hands-free device phone book, up to the maximum number of entries
allowed in your hands-free device’s phone book.
Tip:
Your device transfers speed-dial favorites first, and then contacts in
alphabetical order up to the maximum number of entries allowed in
your hands-free device’s phone book. So if you have important numbers
that you want to show up in your hands-free device’s phone book, be
sure to create speed-dial favorites for them before you transfer the
numbers.
82 Section 2B: Phone Features
Page 91

Customizing Advanced Settings for Your Hands-Free Device
You can set whether your Bluetooth hands-free device automatically answers incoming
calls, provided the device supports this feature.
1. Press Applications and select Prefs .
2. Select Hands-Free.
3. Do one of the following:
䡲 To send all calls to the hands-free device: Check the Always route calls to
Hands-Free box. Select the Auto answer pick list and select whether you want
your hands-free device to automatically answer incoming calls and how quickly it
answers.
䡲 To choose between the earpiece on your device and your hands-free device on a
call-by-call basis: Uncheck the Always route calls to Hands-Free box. When the
phone rings, you can answer the call with your hands-free device by pressing the
multifunction button on your hands-free device, or you can answer the call with
your device’s earpiece (see “Receiving Calls” on page 61).
4. Select Done.
Phone Features
Section 2B: Phone Features 83
Page 92

Customizing Phone Settings
Customizing the Main View in the Phone Application
Phone Display Options let you customize the appearance and text entry mode of the Main
view in the Phone application.
1. Press Phone .
2. Press Menu .
3. Select Options, and then select Phone Display Options.
4. Set any of the following options:
䡲 Show … sets whether the Dial Pad or wallpaper appears in
the Main view of the Phone application. If you select Show
Wallpaper, select the thumbnail image and then select an
image to use as wallpaper.
䡲 Typing … sets whether typing enters numbers in the Dial
Pad or starts a contact search.
Tip:
䡲 Show Calendar event sets whether the current event from the Calendar
If you choose to have typing start a contact search, you need to press
Option to enter a number when dialing from the Dial Pad.
application appears in the Main view of the Phone application. When this option
is enabled, you can then select this event to jump to the Calendar application.
䡲 Show Favorite buttons sets whether Favorites appear in the Main view of the
Phone application.
䡲 Rows sets the number of favorite button rows that appear in the Main view of the
Phone application.
5. Select OK.
84 Section 2B: Phone Features
Page 93

Selecting Ringtones
You can set various tones for various types of incoming phone calls.
Tip:
You can download any compatible ringtone directly to your device (see
“Downloading Files From a Web Page” on page 151). You can also download
ringtones to your computer and then email them to your device.
1. Press Phone .
2. Press Menu .
3. Select Options, and then select Sound Preferences.
4. Select the Application pick list, and then select Ring Tones.
5. Select the Vol um e pick list, and then select the volume level.
6. Select the Vibrate pick list, and then select when you want
the vibrate option to turn on.
7. (Optional) Check the Escalate ring tone volume box if you want the ring to play softly
and then increase to full volume the longer it rings.
8. Select ringtones from the following pick lists:
䡲 Known Caller for an incoming call from someone in your Contacts or Favorites.
䡲 Unknown Caller for an incoming call from someone identified by caller ID who is
not in your Contacts or Favorites.
䡲 Roaming for incoming calls when you’re outside the Sprint National Network.
9. Select Done.
Tip:
You can also preview, delete, and send sounds on your device. Press
Applications
select it, and then press
and then press
, select
Backspace
Sounds
, and then select
Center
on the
. To send a sound, select it, and then select
Manage
5-way
. To play a sound,
. To delete a sound, select it,
Tal k
.
Phone Features
Section 2B: Phone Features 85
Page 94

Selecting Phone Alert Tones
You can set various tones for various types of alerts.
1. Press Phone .
2. Press Menu .
3. Select Options, and then select Sound Preferences.
4. Select the Application pick list, and then select Phone Alerts.
5. Select the Vol um e pick list, and then select the volume level.
6. Select the Vibrate pick list, and then select when you want
the vibrate option to turn on.
7. Select options for when an alert should sound:
䡲 Voicemail Alert to indicate when a new voicemail message has arrived.
䡲 Coverage in/out to indicate if you’ve moved in or out of a coverage area.
䡲 Signal faded to indicate if the network signal lost strength or disappeared and a
call was dropped.
8. Select Done.
86 Section 2B: Phone Features
Page 95

Adjusting Call Volume
Volume Butt on
Side Button
䢇 While a call is in progress, press the Volu me button on the side of your device to adjust
the call volume.
Adjusting Ringer Volume
䢇 When you are not on a call, press the Volu me button on the side of your device to adjust
the ringer volume, and then press the Side button to confirm the change.
Assigning a Caller ID Ringtone
Caller ID ringtones can let you know who is calling before you even look at your device. This
is a great way to keep track of calls from important people in your life and to screen calls
you’d prefer not to answer.
Phone Features
Section 2B: Phone Features 87
Page 96

1. Press Phone .
2. Select the Contacts favorite button.
3. Open the contact entry to which you want to assign a caller ID
ringtone, and then select Edit.
4. Select the Ringtone pick list and select a ringtone for this
contact.
5. Select Done.
Tip:
You can assign a ringtone to an entire category of contacts. For example,
use a special ringtone for categories such as Family, Work, or Golf
Buddies. Select the category pick list in the upper-right corner, select Edit
Categories, and then select the category. Select the ringtone on the Edit
Category screen.
Assigning a Caller ID Picture
1. Press Phone .
2. Select the Contacts favorite button.
3. Open the contact entry to which you want to assign a caller ID
picture, and then select Edit.
4. Select the Picture box and do one of the following:
䡲 Select Camera to take a picture and add it to this contact
entry when you save the picture (if your device includes a
camera).
䡲 Select Photos and select an existing picture that you want to assign to this
contact.
5. Select Done.
88 Section 2B: Phone Features
Page 97

Setting Your Dialing Preferences
Dialing preferences let you add a prefix to your phone numbers. For example, you can
automatically dial a 1 before all 10-digit phone numbers you enter from Contacts. You can
also add a different prefix based on the length of the phone number.
1. Press Phone .
2. Press Menu .
3. Select Options, and then select Dial Preferences.
4. Set any one or more of the following options:
䡲 Dialing from North America formats phone numbers
using North American conventions (XXX-XXX-XXXX).
䡲 Always dial 1 in front of the area code adds a 1 in front of
10-digit phone numbers you dial from Contacts (see “Dialing by Contact Name”
on page 58). A 1 is not automatically entered if you dial using the keyboard or
the Dial Pad. This option is available only when Dialing from North America
is enabled.
䡲 International Prefix adds the specified prefix in front of international phone
numbers; in the U.S. and Canada, this prefix is 011. When you dial, the plus
symbol (+) preceding the phone number is replaced by this prefix.
䡲 To 7 digit numbers adds a prefix to 7-digit numbers. For example, enter your own
area code to automatically add your area when you dial local numbers.
䡲 To 6/5/4 digit numbers adds a prefix to numbers with the specified number of
digits. For example, if all the phone numbers in your office begin with 555,
followed by a 4-digit extension, you can select 4 and enter 555 as the prefix.
When you want to call a colleague, simply enter the colleague’s 4-digit extension.
Your device automatically dials 555 plus the 4-digit extension. You can also create
contact entries with just the extension number and then dial the number from
your Contacts list.
5. Select OK.
Phone Features
Section 2B: Phone Features 89
Page 98

Setting Phone Preferences
1. Press Phone .
2. Press Menu .
3. Select Options, and then select Phone Preferences.
4. Select any one or more of the following preferences:
䡲 Call forwarding lets you forward calls to another number.
See “Call Forwarding” on page 71 for details.
䡲 Location ON allows the Sprint National Network to
determine your longitude and latitude position at any
time in order to provide location-specific services. 911
Only restricts your location information to emergency
services only.
Note:
䡲 Short DTMF Tones lets you choose to send DTMF tones (a certain type of
Your device is equipped with a location feature for use in connection
with location-based services that may be available in the future.
Currently the location information is used to help identify your longitude
and latitude position during an emergency call in areas where E-911
service is available. For your safety, your location information is always
provided during a 911 emergency call regardless of whether you select
this setting.
touch-tone dialing tone) stored as Extra Digits as rapid tones (see “Defining
Favorite Buttons” on page 74 for information on defining extra digits).
Note:
䡲 Clear Voicemail Icon lets you manually reset the Voicemail icon if it continues to
Some older answering machines may not recognize short tones.
appear in the Phone application title bar even after you have listened to all your
voicemail.
90 Section 2B: Phone Features
Page 99

䡲 TTY/TDD enables you to use your device’s phone if you are hearing impaired.
Select Default Mode to send and receive text. Select VCO Mode (Voice Carry Over)
to send voice and receive text. Select HCO Mode (Hearing Carry Over) to send text
and receive voice. See the following section, “TTY Use With Sprint Service,” for
more information.
䡲 Ask to add unknown phone numbers after calls displays a prompt asking whether
you would like to add the unknown phone number to your Contacts list when you
complete a call.
䡲 Hearing Aid Compatibility sends the audio from your phone calls to the telecoil
rather than to the microphone of your hearing aid. See “Turning on the HAC
Setting” on page 333 for more information on this setting.
Caution:
Do not turn on the Hearing Aid Compatibility setting unless you use a
hearing aid with a telecoil. Using this setting without a hearing aid or
with a hearing aid without a telecoil may be harmful to your hearing.
5. Select OK.
TTY Use With Sprint Service
A TTY (also known as a TDD or Text Telephone) is a telecommunications device that allows
people who are deaf or hard of hearing, or who have speech or language disabilities, to
communicate by telephone.
Your device is compatible with select TTY devices. You can connect a TTY/TDD machine,
headset, or hands-free kit to your device through the headset jack while this mode is
enabled. Please check with the manufacturer of your TTY device for connectivity
information and to ensure that the TTY device supports digital wireless transmission.
When establishing your Sprint Service, please call Sprint Customer Service via the state
Telecommunications Relay Service (TRS) by first pressing 711, and then pressing Tal k .
Then provide the state TRS with this number: 866-727-4889.
Section 2B: Phone Features 91
Phone Features
Page 100

WAR NIN G:
911 Emergency Calling
Sprint recommends that TTY users make emergency calls by other
means, including Telecommunications Relay Services (TRS), analog
cellular, and landline communications. Wireless TTY calls to 911 may be
corrupted when received by public safety answering points (PSAPs),
rendering some communications unintelligible. The problem
encountered appears related to TTY equipment or software used by
PSAPs. This matter has been brought to the attention of the FCC, and the
wireless industry and PSAP community are currently working to resolve
this.
92 Section 2B: Phone Features
 Loading...