

Page 1

q u i c k
reference
g u i d e
g u í a d e
referencia
r á p i d a
W E L C O M E T O V E R I Z O N W I R E L E S S
B I E N V E N I D O A V E R I Z O N W I R E L E S S
Page 2

Quick Reference Guide
Using Your Treo™ 755p Smartphone .................1
Guía de referencia rápida
Uso del teléfono Treo™ 755p Smartphone... . 105
Page 3

Intellectual property notices
© 2005-2007 Palm, Inc. All rights reser ved. Trademark, copyright,
patent, and other intellectual property notices are s et forth on page ii
within You r P al m
the Palm Software Installation CD.
®
Tre o™ 755P Smartphone User Guide located on
Disclaimer and limitation of liability
Palm, Inc. and its suppliers assume no responsibilit y for any damage
or loss resulting from the use of this guide. Palm, Inc. and its
suppliers assume no responsibility for any loss or claims by third
parties that may arise through the use of this software. Palm, Inc. and
its suppliers assume no responsibility for any damage or loss c aused
by deletion of data as a result of malfunction, dea d battery, or repairs.
Be sure to make backup copies of all important data on other media
to protect against data loss.
Palm Take Back and Recycling Program
As part of Palm’s corporate commitment to be a good steward of the
environment, we strive to use environmentally friendly materials,
reduce waste, and develop the highest standard s in electronics
recycling. Our recycling program keeps Palm handheld devices, Treo
smartphones, and mobile companions ou t of landfills through
evaluation and disposition for reuse and recycling.
Palm customers may participate in the recycling program free of
charge. Visit www.palm.com/recycle
for additional details and informatio n about how you can help reduce
electronic waste.
or in the US call 877-869-7256
Page 4

CONTENTS
Welcome . . . . . . . . . . . . . . . . . . . . . . . . . . . . . . . . . .iii
Welcome and thank you for choosing Verizon Wireless . . . . . . . . . . . . . iii
Our Worry-free Guarantee
How to sign up for New Every Two . . . . . . . . . . . . . . . . . . . . . . . . . . . . . iv
Learning the basics . . . . . . . . . . . . . . . . . . . . . . . . . . . 7
Overview: The Palm®Treo™ 755P smartphone . . . . . . . . . . . . . . . . . . . . 7
Synchronizing information—basics . . . . . . . . . . . . . . . . . . . . . . . . . . . . . 9
Moving around the screen . . . . . . . . . . . . . . . . . . . . . . . . . . . . . . . . . . . 11
Using the keyboard . . . . . . . . . . . . . . . . . . . . . . . . . . . . . . . . . . . . . . . . 15
Opening applications . . . . . . . . . . . . . . . . . . . . . . . . . . . . . . . . . . . . . . . 17
Your phone . . . . . . . . . . . . . . . . . . . . . . . . . . . . . . . . 19
Turning your smartphone on/off . . . . . . . . . . . . . . . . . . . . . . . . . . . . . . 19
Phone overview . . . . . . . . . . . . . . . . . . . . . . . . . . . . . . . . . . . . . . . . . . . 21
Making calls . . . . . . . . . . . . . . . . . . . . . . . . . . . . . . . . . . . . . . . . . . . . . . 22
Receiving calls . . . . . . . . . . . . . . . . . . . . . . . . . . . . . . . . . . . . . . . . . . . . 25
Using voicemail . . . . . . . . . . . . . . . . . . . . . . . . . . . . . . . . . . . . . . . . . . . 26
What can I do when I’m on a call? . . . . . . . . . . . . . . . . . . . . . . . . . . . . . 27
Defining favorite buttons . . . . . . . . . . . . . . . . . . . . . . . . . . . . . . . . . . . . 32
Using a phone headset . . . . . . . . . . . . . . . . . . . . . . . . . . . . . . . . . . . . . . 33
Customizing phone settings . . . . . . . . . . . . . . . . . . . . . . . . . . . . . . . . . . 36
Your email . . . . . . . . . . . . . . . . . . . . . . . . . . . . . . . . 39
Which application should I use? . . . . . . . . . . . . . . . . . . . . . . . . . . . . . . 39
The Wireless Sync application . . . . . . . . . . . . . . . . . . . . . . . . . . . . . . . . 40
The Versamail
®
application . . . . . . . . . . . . . . . . . . . . . . . . . . . . . . . . . . 48
Your messages and web browser . . . . . . . . . . . . . . . . . 52
Messaging . . . . . . . . . . . . . . . . . . . . . . . . . . . . . . . . . . . . . . . . . . . . . . . 52
Web browser . . . . . . . . . . . . . . . . . . . . . . . . . . . . . . . . . . . . . . . . . . . . . 58
®
to you . . . . . . . . . . . . . . . . . . . . . . . . . . . . . . iii
1
Page 5

Connections with Bluetooth® devices . . . . . . . . . . . . . . . . . . . . . . . . . . 62
Your photos, videos, and music . . . . . . . . . . . . . . . . . . 65
Camera and Camcorder . . . . . . . . . . . . . . . . . . . . . . . . . . . . . . . . . . . . . 65
Pics&Videos . . . . . . . . . . . . . . . . . . . . . . . . . . . . . . . . . . . . . . . . . . . . . 68
Pocket Tunes™ . . . . . . . . . . . . . . . . . . . . . . . . . . . . . . . . . . . . . . . . . . . 70
Your contacts, calendar, and tasks . . . . . . . . . . . . . . . . 75
Contacts . . . . . . . . . . . . . . . . . . . . . . . . . . . . . . . . . . . . . . . . . . . . . . . . . 75
Calendar . . . . . . . . . . . . . . . . . . . . . . . . . . . . . . . . . . . . . . . . . . . . . . . . . 77
Tasks . . . . . . . . . . . . . . . . . . . . . . . . . . . . . . . . . . . . . . . . . . . . . . . . . . . 80
Your documents and memos . . . . . . . . . . . . . . . . . . . . 82
Documents to Go® Professional and the Documents application . . . . . . 82
Voice Memo . . . . . . . . . . . . . . . . . . . . . . . . . . . . . . . . . . . . . . . . . . . . . . 83
Your application and info management tools . . . . . . . . . 84
Installing applications . . . . . . . . . . . . . . . . . . . . . . . . . . . . . . . . . . . . . . 84
Beaming information . . . . . . . . . . . . . . . . . . . . . . . . . . . . . . . . . . . . . . . 86
Using expansion cards . . . . . . . . . . . . . . . . . . . . . . . . . . . . . . . . . . . . . . 87
Your personal settings . . . . . . . . . . . . . . . . . . . . . . . . 89
System sound settings . . . . . . . . . . . . . . . . . . . . . . . . . . . . . . . . . . . . . 89
Display and appearance settings . . . . . . . . . . . . . . . . . . . . . . . . . . . . . . 89
Application settings . . . . . . . . . . . . . . . . . . . . . . . . . . . . . . . . . . . . . . . . 91
Locking your smartphone and info . . . . . . . . . . . . . . . . . . . . . . . . . . . . 91
Getting help . . . . . . . . . . . . . . . . . . . . . . . . . . . . . . . 94
Performing a soft reset . . . . . . . . . . . . . . . . . . . . . . . . . . . . . . . . . . . . . 94
Where to learn more . . . . . . . . . . . . . . . . . . . . . . . . . . . . . . . . . . . . . . . 95
Index . . . . . . . . . . . . . . . . . . . . . . . . . . . . . . . . . . . . 99
2
Page 6

WELCOME
WELCOME AND THANK YOU FOR CHOOSING VERIZON WIRELESS
You’re now connected to the power of America’s most reliable wireless network.* This guide
helps you understand your new Palm
®
Treo™ 755P smartphone and all the things you can do
with it.
Other resources are available to help you use your smartphone, including a User Guide that
provides complete information on features and functionality. For a list of these resources and
where to locate them, see “Where to learn more” on page 95. If you ever have any questions and
would like to access an online Q&A, please visit us online at www.verizonwireless.com or
http://support.vzw.com.
OUR WORRY-FREE GUARANTEE® TO YOU
You’ll enjoy America’s best, most reliable wireless network.
You can change your calling plan at any time.
As your needs change, you can change to any current calling plan. You won’t pay any additional
fees and you won’t have to extend your contract.
If you ever have a problem, it becomes our problem the first time you call.
No run-around, no hassles. If your issue can’t be resolved during the course of your first call,
we’ll get back to you with an answer.
*America’s most reliable wireless network claim based on fewest aggregate blocked and dropped connections.
ww.verizonwireless.com/bestnetwork for details.
See w
3
Page 7

Your satisfaction is guaranteed with our Test Drive program.
Now you can Test Drive our network; make calls and even try out a cool new device. Every device
you purchase from Verizon Wireless comes with a 30-day satisfaction guarantee. And if you don’t
love us, take your number to someone else within 30 days. You won’t have to pay an early
termination fee, and we’ll pay for any calls you’ve made.
Test Drive: Credit/refund for activation, plan access & voice overage charges only. America’s Choice or select data plan req’d.
Customer must pay all other charges, incl. taxes, surcharges, and separately-billed data & download charges. Early
termination fee applies unless device is returned. Some plans are only available with specific equipment. Acceptance of a
promotion may require a new 1- or 2-year agreement.
You can get a free phone every two years with New Every Two®.
Sign up for a calling plan of at least $34.99 and qualify for a free phone after two years, with a
two-year renewal. Or choose to apply your New Every Two credit towards the purchase of a more
expensive phone.
HOW TO SIGN UP FOR NEW EVERY TWO
If you maintain service on a Calling Plan of $34.99 or higher and fulfill your 2-year term, you will
qualify for a free wireless device. If your Calling Plan monthly access is $79.99 or higher for the
entire 3 months prior to completing your New Every Two wireless device upgrade, you will get up
to $100 toward the purchase of that wireless device. If your Calling Plan monthly access was
between $34.99 and $79.99 at any time during the 3 months prior to completing your New Every
Two wireless device upgrade, you will get up to $50 toward the purchase of that wireless device.
When completing your New Every Two upgrade, you will need to renew your agreement for
another two years on a calling plan with a monthly access of $34.99 or higher. Upgrading your
wireless device at a discounted price, including exercising your Annual Upgrade option, will restart your eligibility for New Every Two.
4
Page 8

Subject to the Customer Agreement and calling plan.
You must retain the same wireless device for 24 months in order to receive the advantages of this program. If you choose to
replace your wireless device at a discounted price, you will forfeit your benefits and be automatically re-enrolled if you meet
the requirements of the program. If you enrolled in the program on or after 11/25/02, you must take advantage of the New
Every Two offer within six months after becoming eligible; otherwise, you may be charged full retail price to upgrade your
current wireless device. Discount amount will be applied toward the 2-year Customer Agreement retail price. Secondary
Family SharePlan
®
lines are not eligible to participate in the program.
The New Every Two discount cannot exceed the price of the wireless device after mail-in rebates. If your 2-year Customer
Agreement with a digital calling plan of $34.99 or higher began on or after 6/2/04, you were automatically enrolled in the
program. Customers who began their 2-year agreements on or after 4/1/00 on a digital calling plan of $35 or higher were also
automatically enrolled in the program. If you enrolled in the program prior to 2/5/06 and continued to meet the requirements
of the program, you will be eligible for a free wireless device up to $100, or a credit of up to $100 toward a more expensive
wireless device, when you become eligible for you next New Every Two upgrade (after which time you will be enrolled in the
$50/$100 New Every Two program described in the New Every Two brochure). New Every Two discount amounts and calling
plan tiers subject to change at Verizon Wireless’s sole discretion.
5
Page 9

6
Page 10

LEARNING THE BASICS
Indicator light (phone
and charge indicator)
Multiconnector
5-way navigator and
Center button
Earpiece
Applications
Microphone
Headset jack
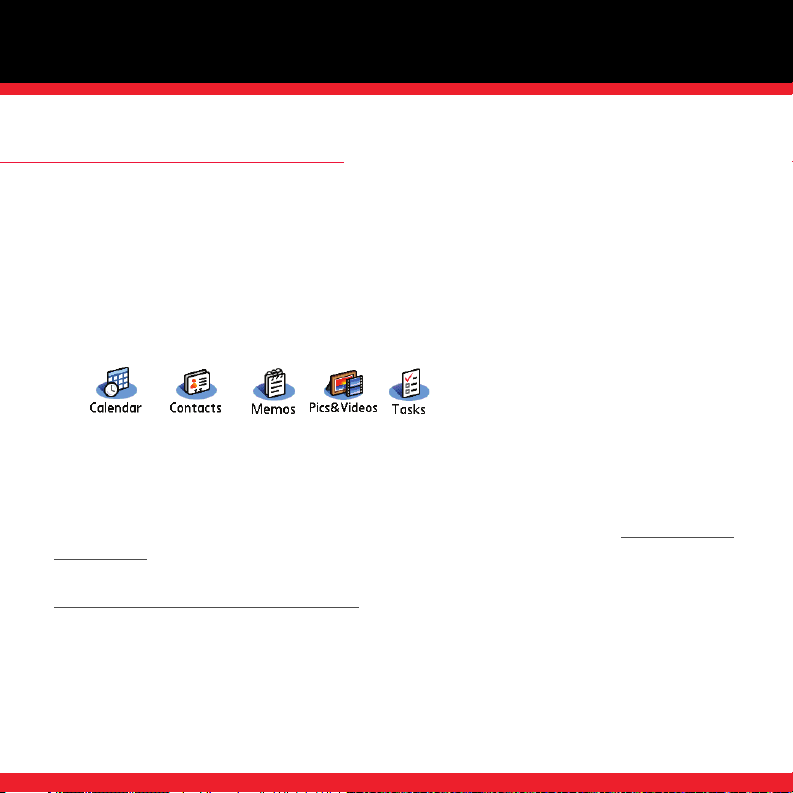
Calendar
Phone
Side button
Power/End
Volume button
Send
Wireless Sync
Menu
Option
OVERVIEW: THE PALM®TREO™ 755P SMARTPHONE
7
Page 11
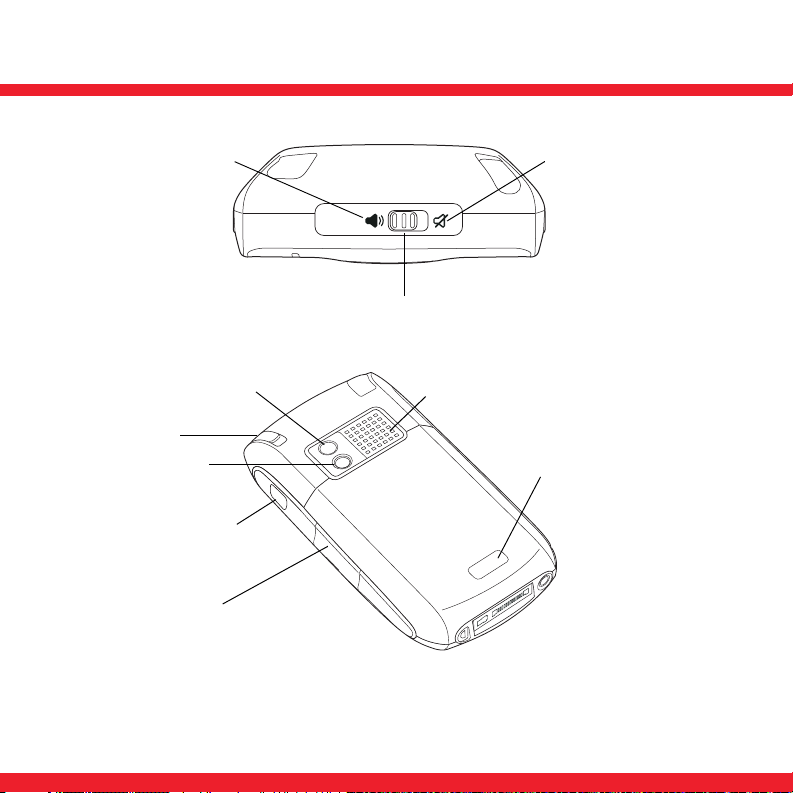
Ringer switch
Sound Off
Sound On
Camera lens
(camera
version only)
Battery door release
Speaker
Self-portrait mirror
(camera version only)
Stylus
Mini-expansion
card slot
Infrared (IR) port
8
Page 12
SYNCHRONIZING INFORMATION—BASICS
Synchronizing means that information that is entered or updated in one place (your smartphone
or your computer) is automatically updated in the other, so there’s no need to enter the
information twice. We strongly recommend that you synchronize your smartphone with your
computer or corporate server frequently to keep your information up-to-date (and backed up) in
both locations.
The info from all the following applications is updated by default each time you sync your
smartphone with your desktop software:
Windows XP users: To sync your info, you must install Palm® Desktop software from the Palm
Software Installation CD that came with your smartphone—even if you sync with Outlook (sold
separately) or another third-party application. See the User Guide for info.
Windows Vista users: Before inserting the Palm Software Installation CD, go to
windowsvista to find information about installing Palm Desktop software on Windows Vista.
NOTE You can download a trial version of Microsoft Outlook® and learn about discount offers by visiting:
www.palm.com/mypalm/755pverizon-bonus.
www.palm.com/
9
Page 13
How each application syncs depends on your computer type and the desktop software you are
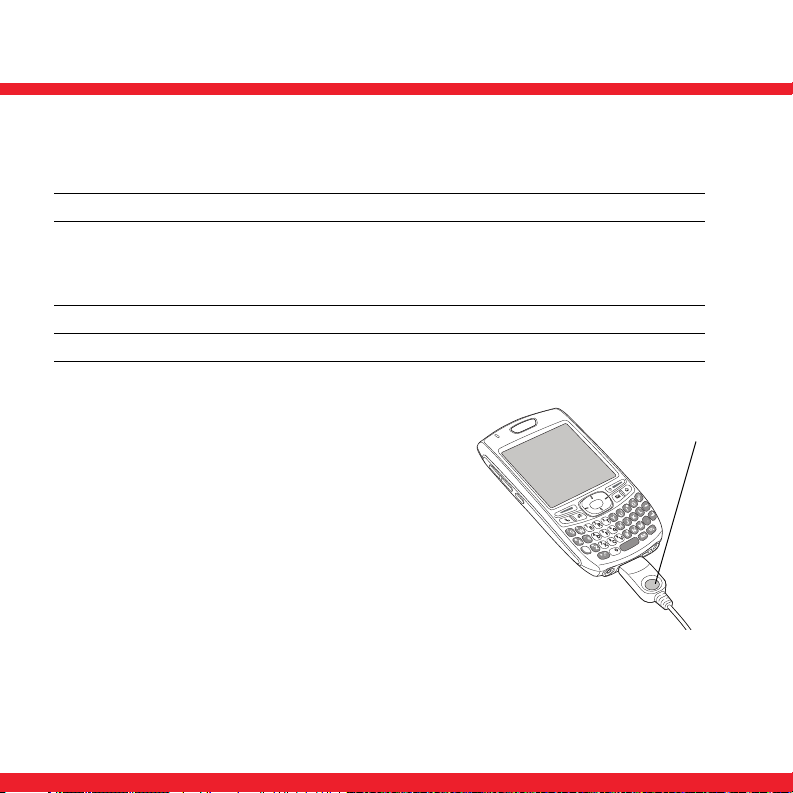
Sync button
using, as follows:
Computer type Desktop type What syncs and where
Windows Microsoft Outlook
(sold separately)
Calendar, Contacts, Memos, and Tasks sync
with Outlook
Pics&Videos syncs with Palm Desktop
Windows Palm Desktop All apps sync with Palm Desktop
Mac Palm Desktop All apps sync with Palm Desktop
NOTE You can customize which applications synchronize; see the User Guide for information.
1. Connect your smartphone to your computer (see the
User Guide for instructions).
2. Press the sync button on the sync cable.
3. Messages appear on both your smartphone and on
your computer indicating that synchronization is in
progress.
4. Wait for messages that indicate that the process is
complete before you remove the sync cable.
10
Page 14

MOVING AROUND THE SCREEN
Left
Right
Up
Down
To move around the screen, you can use the 5-way navigator for one-handed navigation, or
you can tap items on the screen with the stylus. With use, you’ll find your own favorite way to
scroll, highlight, and select items.
The 5-way includes Right , Left , Up , Down , and Center
buttons.
Scrolling through screens
As on a computer, you scroll on your smartphone to move from field to field or page to page,
or in some cases to highlight an item or option in a list. There are several methods of scrolling:
■ Use the 5-way on the front of your smartphone. Press Right , Left , Up , or
Down to move to the next field, button, or action in that direction.
■ In list screens, press and hold Up or Down to scroll one screen at a time.
11
Page 15

■ When inside a text field, press Right or Left to scroll to the
Scroll arrows
Slider
next character or word, press Up or Down to scroll between
lines, or press and hold Up or Down to scroll one screen at a
time.
■ Using the stylus, tap an onscreen scroll arrow or drag the slider of
an onscreen scroll bar.
Highlighting and selecting items
On most screens, one item—a button, a list entry, or a check box—is
highlighted by default. The highlight identifies which item is affected by
your next action. Use the 5-way to move the highlight from one item to
another before opening or selecting it.
The highlight can take one of two forms, depending on what is highlighted:
Border glow: When an onscreen button (such as OK or Cancel) or a pick list
is highlighted, the item displays a glow around its border.
Colored background: When a phone number, text, an email address, or a
web link is highlighted, the item is displayed as white type on a colored
background.
After highlighting an item, you can select or activate it by pressing Center
item with the stylus.
or by tapping the
12
Page 16

Accessing command buttons
In most applications, command buttons such as New, OK, and Details appear at the bottom of
the screen. In many cases, you can jump directly to these buttons instead of scrolling to them.
5-way controls vary according to application, but here are some general rules that apply to
most applications:
■ From a list screen, such as the Contacts list or Memos list, press Right to jump to the first
button.
■ From a screen where you create or edit entries, such as Edit Contacts, press Center to
jump to the first button.
■ From a dialog box, such as Edit Categories, press Up , Down , Right , or Left to
scroll to the buttons.
Selecting menu items
Many applications have menus to give you access to additional features. These menus are usually
hidden from view, but they appear when you press Menu . To get the most out of your
smartphone, it’s a good idea to familiarize yourself with the additional features available through
the various application menus.
13
Page 17
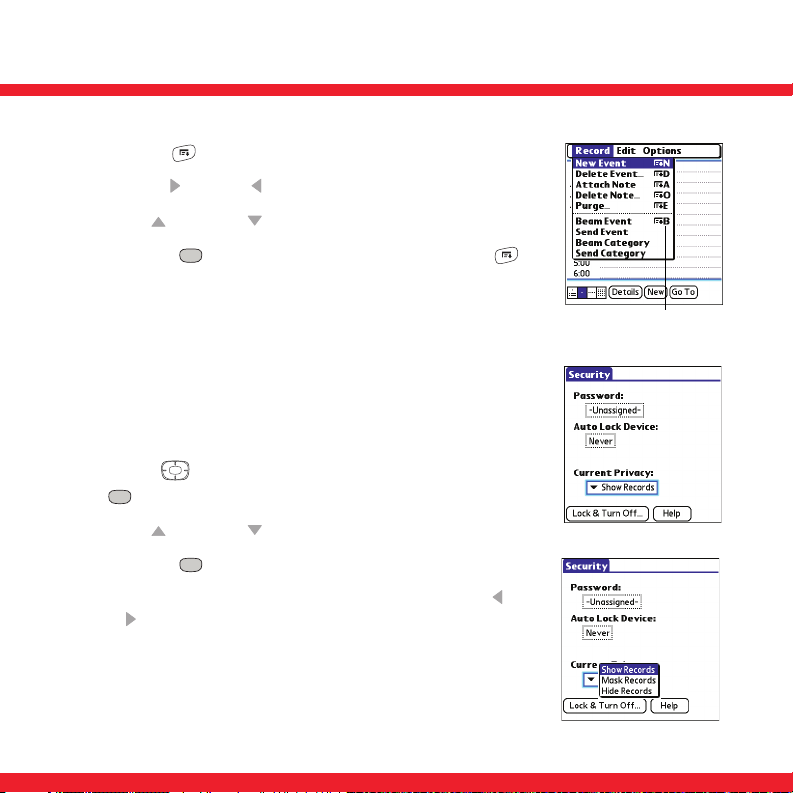
1. Press Menu to display an application’s menus.
Menu shortcut
2. Press Right and Left to switch between menus.
3. Press Up and Down to highlight a menu item.
4. Press Center to select the menu item, or press Menu
to close the menu and cancel your selection.
Selecting options in a pick list
A range of options is often presented in a type of menu called a pick
list, which can be identified by a downward-pointing arrow. Pick
lists are different from the application menus previously described.
The application menus give you access to additional features and
pick lists let you select the contents for a particular field.
Use the 5-way to highlight the pick list, and then press
Center to display the items in the list.
■ Press Up and Down to highlight the item you want.
■ Press Center to select the highlighted item.
■ To exit the pick list without making a selection, press Left or
Right .
14
Page 18
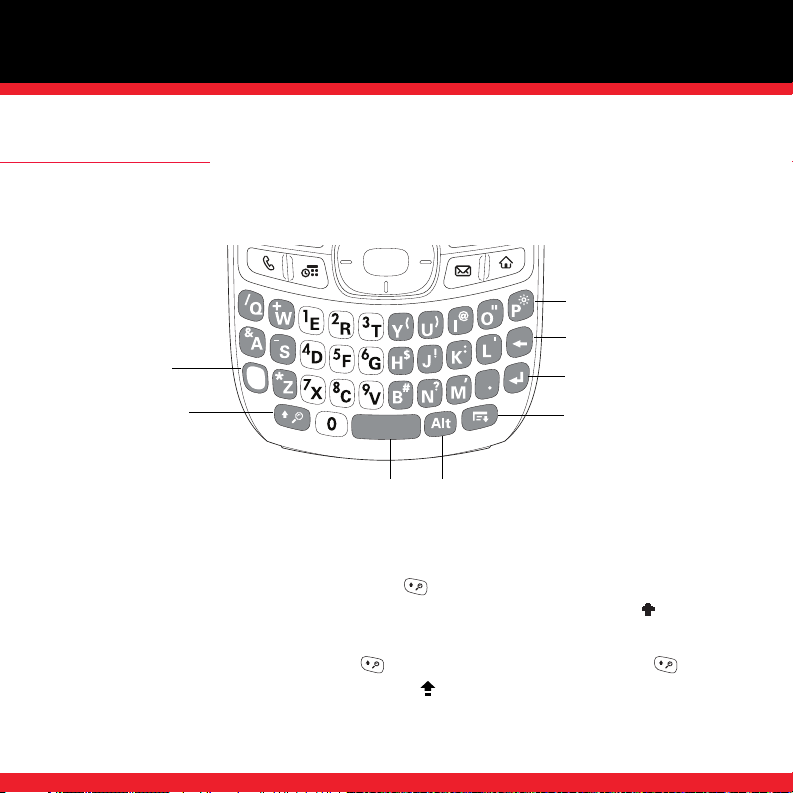
USING THE KEYBOARD
Backspace
Return
Menu
AltSpace
Option
Shift/Find
Backlight
When using the keyboard, most people find it easiest to hold the smartphone with two hands and
to use the tips of both thumbs to press the keys.
Entering lowercase and uppercase letters
■ To enter lowercase letters, press the desired keys.
■ To enter an uppercase letter, press Shift/Find and then press a letter key. You don’t need
to press and hold Shift while entering a letter. When Shift is active, an up arrow appears in
the lower-right corner of the screen.
■ To turn Caps Lock on, press Shift/Find twice. To turn it off, press Shift/Find once.
When Caps Lock is on, an underlined up arrow appears in the lower-right corner of the
screen.
15
Page 19

Entering numbers, punctuation, and symbols
Letter
Symbol
Numbers, punctuation, and symbols appear above the letters on
the keys. To enter these characters, do one of the following:
■ Press Option , and then press the key with the desired character
shown above the letter. You don’t need to press and hold Option while pressing the second
key. When Option is active, the symbol appears in the lower-right corner of the screen.
■ To turn Option Lock on, press Option twice. To turn it off, press Option once. When
Option Lock is on, the symbol appears in the lower-right corner of the screen.
Entering other symbols and accented characters
Symbols and accented characters that do not appear on the keyboard are sometimes called
alternate characters because they are entered using the Alt key.
1. Enter the character that corresponds to the symbol or accented character you want. For
example, to enter an É, press E.
2. Press Alt .
3. Press Up , Down , Left , or Right to highlight the desired character.
4. Press Center to insert the character.
NOTE To see a list of additional alternate characters, position the cursor at the beginning of the line or after a space,
and then press Alt. See the User Guide for a complete list of alternate characters.
16
Page 20
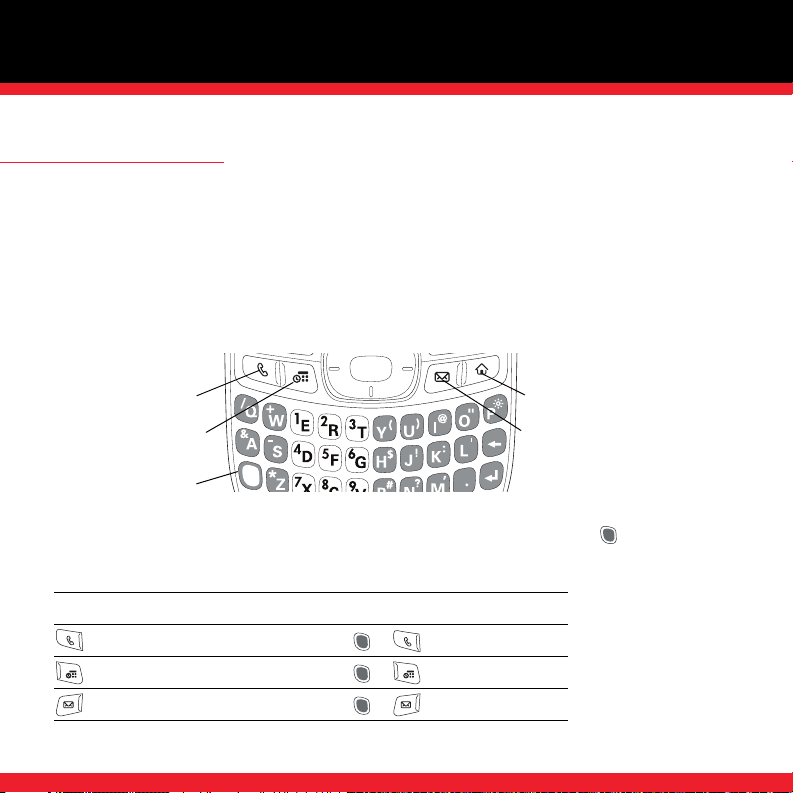
OPENING APPLICATIONS
Phone
Calendar
Applications
Wireless Sync
Option
You don't need to close applications; just open the next app you want to use, using Applications
View or a quick button.
Using the quick buttons
The front of your smartphone has three buttons that you can use to wake up your smartphone
screen and open specific applications. The fourth button opens Applications View, which allows
you to access all the applications on your smartphone.
Each of the three quick buttons opens an application. When you press Option first, each quick
button opens a secondary application.
Button Primary application Secondary application
Phone + Web
Calendar + Wo rld Clock
Wireless Sync + Messaging
17
Page 21

Using Applications View
You can access all available applications through Applications View:
1. Press Applications .
2. Use the 5-way to highlight the application you want to use.
3. Press Center to open the selected application.
In Applications View, you can also do any of the following:
■ Press Applications repeatedly to cycle through various
categories of applications. See the User Guide for more info on categories.
■ Enter the first few letters of the application’s name to highlight it. For example, if you enter
“p,” it highlights Phone; if you then enter “r,” it highlights Prefs. If you pause and then enter
“r,” it highlights the first application that starts with “r.”
18
Page 22
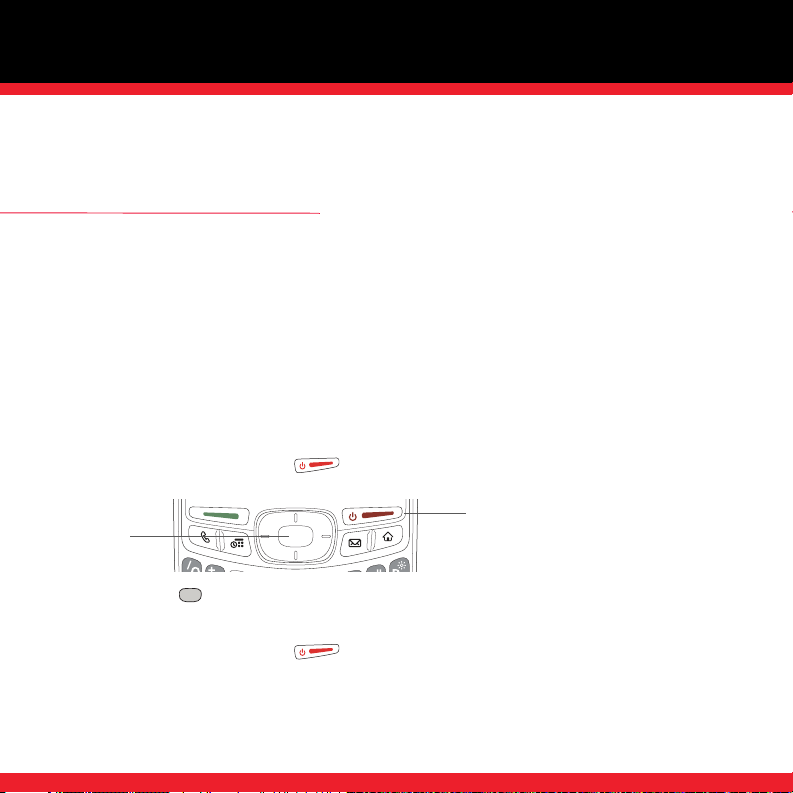
YOUR PHONE
Center
Power/End
TURNING YOUR SMARTPHONE ON/OFF
NOTE Throughout this guide the term smartphone is used to describe your device and its physical attributes. The term
phone is used to describe the feature of your Palm
Wireless network.
®
Treo™ 755P smartphone that enables you to connect to the Verizon
You can turn on your smartphone screen and your phone independently. For example, the
smartphone screen can be off while the phone is turned on, or the smartphone screen can be on
while the phone is off. You can also have both the smartphone screen and the phone turned on or
off at the same time.
Waking up the screen
When your smartphone screen is off, you need to wake up the screen.
1. Press and release Power/End to wake up the screen.
2. Press Center to turn off Keyguard. For more info about turning Keyguard on and off, see
“Locking your keyboard (Keyguard)” on page 91.
3. Press and release Power/End to turn off the screen.
NOTE To conserve battery power, the screen turns off after a period of inactivity. To change the time interval, go to
Applications, select Preferences, and then select Power. Select the Auto-off after pick list, and then change the time
interval.
19
Page 23
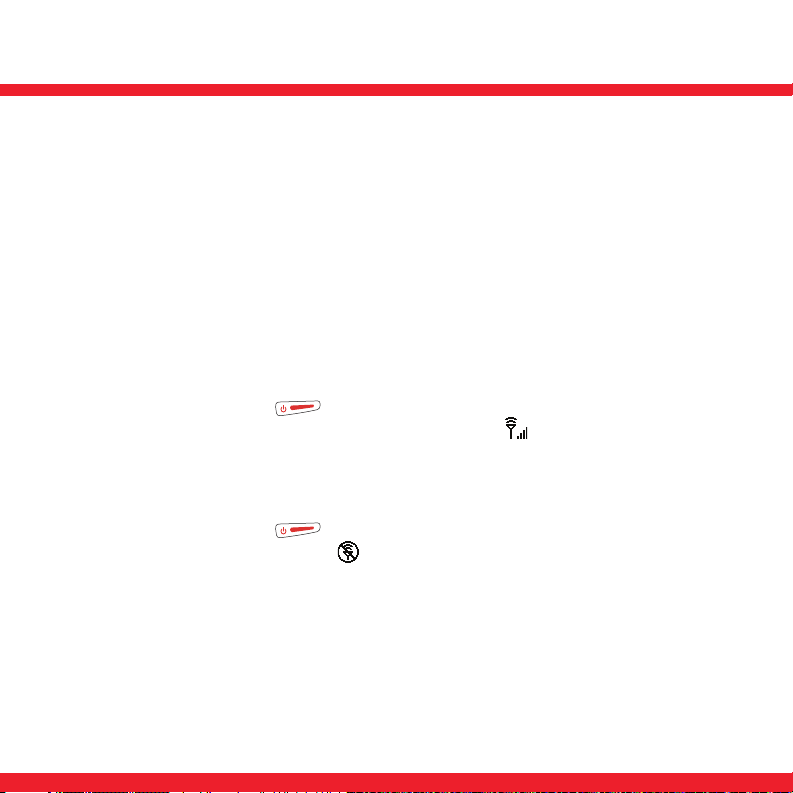
Turning your phone on and off
When your phone is on, it is connected to a mobile network (provided you are in a coverage area)
so that you can make and receive phone calls and use wireless services, such as email,
messaging, and the web browser. During initial setup, your phone is on by default, so you can
use wireless services right away.
If you turn off your phone, you can still use the organizer features such as Contacts and Calendar,
as well as the media features, such as the Pocket Tunes™ music application and Pics&Videos.
This is sometimes referred to as flight mode and is ideal for airplane flights and maximizing
battery life.
1. Wake up the screen.
2. Press and hold Power/End to turn on your phone. When your smartphone locates a
signal, the words Verizon Wireless and the signal-strength icon appear at the top of the
screen, indicating that you can use the phone and Internet features (if supported by the local
network). If you’re outside a coverage area, the indicator light flashes amber and no bars
appear in the signal-strength icon.
3. Press and hold Power/End again to turn off your phone. When your phone is off, the
words Phone Off and the phone-off icon appear at the top of the screen and your
smartphone is not connected to any mobile network. You can still use the nonwireless
features of your smartphone, such as Contacts, Calendar, Tasks, and Memos.
20
Page 24

PHONE OVERVIEW
Favorite buttons
Dial Pad
Status icons
Look here for
your phone
number
Opening the Phone application
■ Press Phone to open the Main View of the Phone application.
What’s my number?
1. Make sure your phone is on (see “Turning your
phone on and off” on page 20).
2. Press Phone .
3. Press Menu .
4. Select Options, and then select Phone Info.
NOTE If your phone number doesn’t appear in Phone Info, follow
the steps in the User Guide to activate your phone. Be sure to turn
your phone off and on again before you recheck Phone Info.
21
Page 25

MAKING CALLS
Your smartphone offers several options for making phone calls. As you become familiar with
your smartphone, you’ll discover which method you prefer.
NOTE Be sure your phone is on before you make calls using any of these methods (see “Turning your phone on and off” on
page 20).
Dialing using the onscreen Dial Pad
1. Press Phone .
2. Enter the phone number by tapping the onscreen Dial Pad
with the stylus.
3. Tap Dial or press Send to make the call.
Dialing using the keyboard
1. Press Phone .
2. Press the numbered keys to enter the phone number.
(You don’t need to press Option .)
3. Press Send to make the call.
22
Page 26
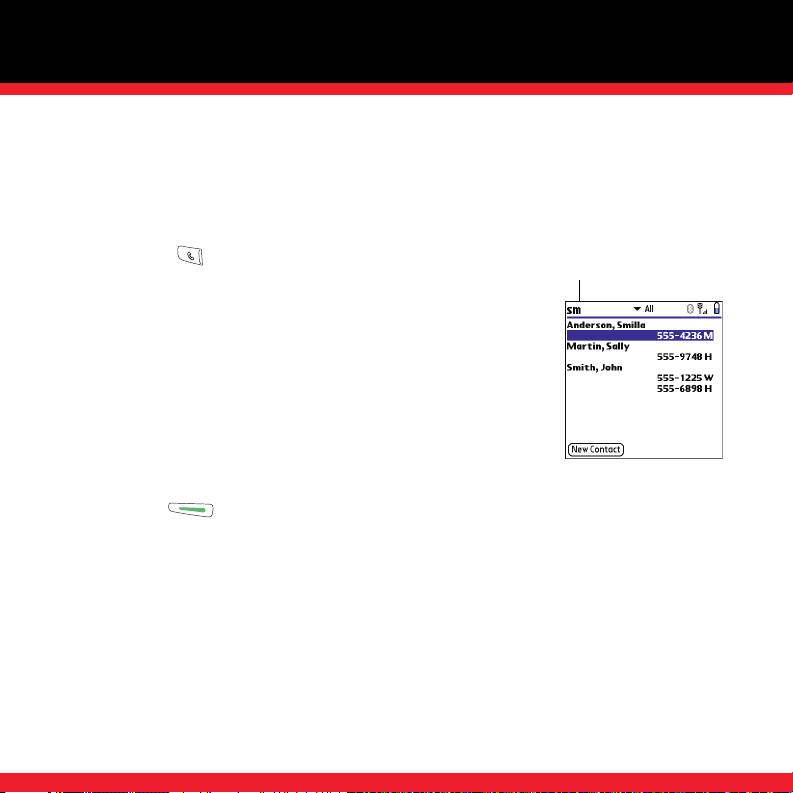
Dialing by contact name
Text appears here
as you enter it
You need to have names and numbers in your contact list before you can dial a call by using a
contact name (see “Adding a contact” on page 75). You can also import names and numbers by
synchronizing (see “Synchronizing information—basics” on page 9).
1. Press Phone .
2. Select the Contacts favorite button.
3. Using the keyboard, just start entering one of the following for
the contact you want to call:
■
First name (JOH for John)
■
Last name (SMI for Smith)
■
First initial and last name (JSM for John Smith)
4. Select the number you want to dial.
5. Press Send to make the call.
NOTE To restart your search, press Backspace to delete letters you’ve entered. Or select Cancel to return to the
Main View.
23
Page 27
Dialing with a speed-dial favorite button
Your smartphone comes with several predefined favorite buttons, but
you can also create your own favorites. See “Creating a speed-dial
favorite button” on page 32.
1. Press Phone .
2. Press Down to access your favorite buttons.
3. Use the 5-way
to highlight the desired speed-dial favorite
button .
4. Press Center to call the number associated with the selected button.
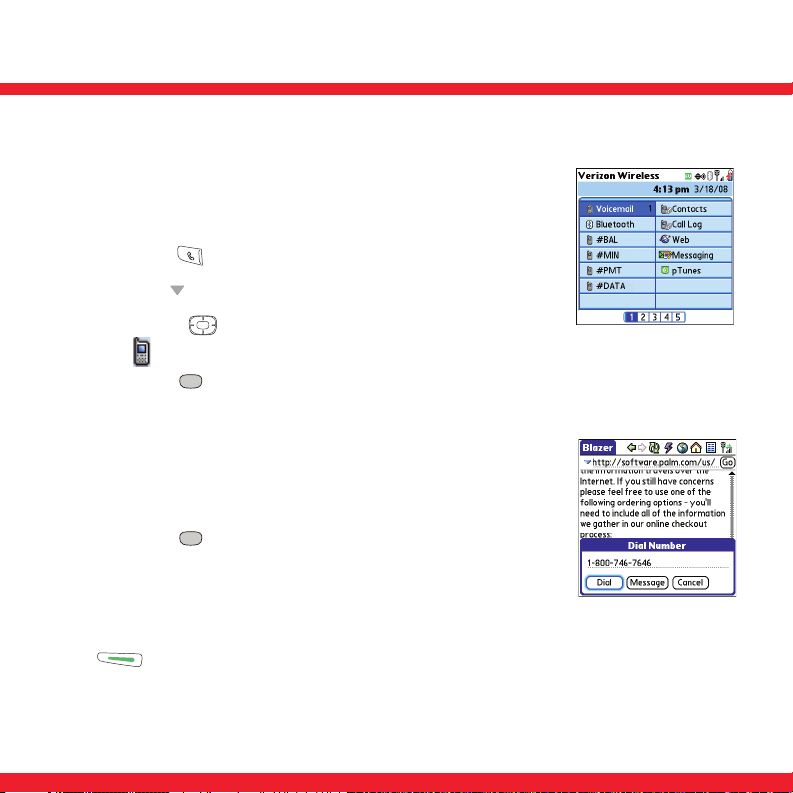
Dialing from a web page or message
Your smartphone recognizes most phone numbers that appear on web
pages or in text, email, or multimedia messages.
1. Select the phone number on the web page or in the message.
2. Press Center to open the Dial Number dialog box.
3. Select Dial to call the number.
Redialing a recently called number
To dial the last number: From the Main View in the Phone application, press and hold
Send to redial the last number you called.
24
Page 28

To select from your most recently dialed numbers: From the Main View in the Phone
application, press Send to open the Redial List, select the number you want to call,
and then press Send again to make the call.
To select from a chronological list of calls: Select the Call Log favorite button. You can also
access the Call Log from the Main View in the Phone application by pressing Send and
selecting Call Log from the Redial List.
RECEIVING CALLS
To receive calls, your phone must be on. This is different from having only the screen turned on
(see “Turning your phone on and off” on page 20). When your phone is off, your calls go to
voicemail.
To answer a call, do one of the following:
■ Press Send .
■ Using the 5-way or the stylus, select the onscreen Answer button.
■ Press the headset button (if the headset is attached).
To ignore a call, do one of the following:
Send the call to voicemail: Press Power/End or use the 5-way to select Ignore.
Send the caller a text message: Use the 5-way to select Ignore with Text. This option
sends the call to voicemail and opens a text message addressed to the caller.
25
Page 29

To silence the phone while it is ringing, do one of the following:
■ Press any key on your smartphone except Send , Power/End , or the
5-way .
■ Slide the Ringer switch to Sound Off to immediately silence all system sounds, including
the ringer.
NOTE When you silence the ringer, you can either answer the call or let it ring through to voicemail.
USING VOICEMAIL
Your Verizon Wireless service includes voicemail. Keep in mind that airtime and other charges
apply when using voicemail from your smartphone.
Setting up voicemail
1. Make sure your phone is turned on (see “Turning your phone on
and off” on page 20).
2. Press Phone .
3. Press and hold 1 or select the Voicemail favorite button to call the
Verizon Wireless automated voicemail system.
4. Follow the voice prompts to set up your voicemail.
Listening to voicemail messages
1. Press Phone .
2. Press and hold 1 or select the Voicemail favorite button to call the voicemail system.
26
Page 30

3. Enter your voicemail password using the keyboard, or select Extra Digits if you defined this
Caller’s name
and number
Call duration
option (see the User Guide for information on defining extra digits). Remember, you do not
need to press Option to enter numbers, *, or # when responding to voicemail prompts.
WHAT CAN I DO WHEN I’M ON A CALL?
When you make or receive a call, Active Call View
appears. Use the 5-way to access the onscreen
buttons in this view.
The onscreen buttons in Active Call View perform the
following functions:
Ends the call immediately. You can also press the headset
button (if the headset is attached).
Turns on the speakerphone. When the speakerphone is on, you
can take the smartphone away from your ear and use other
features during a call. For example, you can check your
calendar or look up contact info.
Turns off the speakerphone when it is on.
27
Page 31

Replaces the Spkr-phone button when a Bluetooth hands-free
device, such as a headset or car kit, is attached. Select this
button to transfer the call from the Bluetooth hands-free device
to the built-in earpiece on your smartphone.
Places the current call on hold.
Enables you to make another call while the first call is on hold.
For information on handling a second outgoing call, see the
User Guide.
Opens the Dial Pad so you can manually enter additional
numbers, such as an extension or a response to a voice
prompt.
Dials any extra digits (such as a password or an extension) that
you assigned to a favorite button. This button replaces the Dial
Pad button during outgoing calls to numbers that include
predefined extra digits. See “Defining favorite buttons” on
page 32 for information on defining extra digits.
Mutes the microphone so that you cannot be heard.
NOTE If the screen dims during a call, press any key except Power/End to return the screen to normal brightness. Be
careful not to press Power/End to wake up the screen because this will accidentally end the call.
28
Page 32

Ending a call
Do one of the following:
■ Press Power/End .
■ Select Hang Up All.
■ Press the button on the headset (if the headset is attached).
Switching applications during a call
You can use your organizer applications and other applications while you’re talking on the phone;
so go ahead and check your calendar, or go to Memos and enter the driving directions your caller
is giving you. You can even send text messages while you’re on a call.
NOTE What you can’t do, however, is make a data connection while on a call. This means that you can’t browse the web or
send or receive email or multimedia messages.
1. Press Applications .
2. Select the icon for the application you want to open.
3. Complete the task in the application.
4. Press Phone to return to Active Call View.
NOTE If you’d like to continue talking while viewing another application, select Spkr-phone before you switch to the
other application. If you’re using a headset, you can skip this step.
29
Page 33

Saving phone numbers
After you complete an outgoing call to a number that is not in your
Contacts list, you are prompted to add the number to your Contacts list.
You are also prompted to add new numbers from incoming calls with
caller ID.
■ To create a new contact entry for this number, select Create a New
Contact and enter the contact’s info.
■ To add this number to an existing contact entry, select Add to a
Contact, and then select the contact. The number appears in the first
available phone number field for that contact.
■ To decline adding this number, select Cancel.
■ To disable the Add New Number prompt, check the Don’t ask me this again box.
Answering a second call (call waiting)
When you are on a call, you can receive a second call. When the second call comes in, you hear a
call waiting tone and the Call Waiting dialog box appears. You can do any of the following to
handle the second call:
■ To place the current call on hold and answer the new call, press Send or use the
5-way to select Answer.
■ To send the new call to voicemail, use the 5-way to select Ignore.
■ To send the new call to voicemail and send the caller a text message, use the 5-way to
select Ignore with Text.
30
Page 34

■ To hang up the current call and answer the new call, press Power/End . When the
incoming call message reappears, select Answer or press Send .
NOTE When two calls are active and you press Power/End, you hang up both calls. To return to the first call, wait for the
person on the second call to hang up.
Making a conference call
You can join two calls in a conference session, provided the service is available in your area.
Please contact Verizon Wireless
for more information. Additional charges may apply and minutes
in your mobile account may be deducted for each call you place.
1. Place the first call and then use the 5-way
to select Hold.
2. Select Add Call.
3. Enter the second phone number, and then press Send .
4. Select Yes to place the call.
5. Use the 5-way
to select Conf. This joins the two calls in a conference session.
6. To end the conference, press Power/End to end all the calls.
31
Page 35

DEFINING FAVORITE BUTTONS
Your smartphone provides 70 favorite buttons for quick access to
common tasks, including dialing a phone number (speed dial), opening
an application, accessing a web page, or accessing voicemail.
Verizon Wireless may preset favorite buttons on your smartphone that
are customized for their services. You can customize the remaining
favorite buttons to perform any of the supported tasks.
Creating a speed-dial favorite button
1. Press Phone .
2. Use the 5-way to select a blank favorite button.
3. Enter a label for the favorite:
■
If the entry is for an existing contact, select Lookup. Start
entering the last name of the contact, and select the contact when
it appears in the lookup list.
■
If the entry is for a new contact, enter the label, press Down ,
and enter the number.
4. (Optional) Enter a Quick Key, which you can press and hold from the
Phone application to instantly dial this speed-dial number.
32
Page 36

5. (Optional) Select More, and then select advanced options:
Extra Digits: Defines additional digits to dial, such as a password or extension. To enter a
one-second pause, insert a comma between digits. To add a longer pause, enter more
commas.
Dial Extra Digits Automatically: Dials predefined extra digits immediately after dialing the
phone number, when checked.
6. Select OK.
NOTE To edit a favorite, highlight the favorite, press Menu, and then select Edit Favorites Button from the Record
menu.
USING A PHONE HEADSET
You can connect a phone headset for hands-free operation. If you need to use your phone while
driving and this is permitted in your area, we recommend using a phone headset (wired stereo
headset included) or a hands-free car kit (sold separately).
Using a wired headset
When using the headset that is included with your smartphone, you can press the headset button
to perform any of the following tasks:
■ Answer an incoming call ■ Pick up a call that is on hold
■ Answer a call-waiting call ■ Hang up all calls
■ Switch between two calls (if the second
call is incoming)
■ Join two calls in a conference (if the
second call is outgoing)
33
Page 37

Connecting to a Bluetooth hands-free device
Once you set up a partnership with a Bluetooth hands-free device, you can communicate with
that device whenever it is turned on and within range. Bluetooth range is up to 30 feet in optimum
environmental conditions. Performance and range may be reduced by physical obstacles, radio
interference from nearby electronic equipment, and other factors.
NOTE Partnership is also know as paired relationship, pairing, trusted device, and trusted pair.
For a list of compatible hands-free devices, go to www.palm.com/treo755pverizon-support.
1. Press Applications and select Bluetooth , or tap the Bluetooth icon in the title
bar.
2. Select Bluetooth On.
NOTE The Bluetooth icon changes from gray to blue to let you know that Bluetooth
technology is turned on.
3. (Optional) Enter a device name that identifies your smartphone
when it is discovered by other Bluetooth devices.
NOTE Use the same device name for all your Bluetooth connections. If you change
the device name, you need to re-create any partnerships you already created.
4. Prepare your hands-free device to accept a connection from another Bluetooth device. See
the documentation that came with your hands-free device for instructions.
5. Select Setup Devices.
34
Page 38

6. Select Hands-free Setup.
7. Follow the onscreen instructions to create a partnership with the
specific hands-free device. When prompted, enter a passkey.
[ ! ] IMPORTANT Some hands-free devices have a predefined passkey. If your device
has a predefined passkey, you can find it in the documentation for that device. Other
devices provide a screen where you enter a passkey that you make up. In either case,
you must use the same passkey on both your smartphone and your hands-free device.
We recommend that where possible, you make up a passkey of 16 alphanumeric characters (letters and numerals only)
to improve the security of your smartphone. The longer the passkey, the more difficult it is for the passkey to be
deciphered.
8. After you finish setting up the device, select Done to return to Trusted Devices View.
NOTE For some car kits, you need to initiate a Bluetooth connection from your smartphone to complete the
partnership process. To do this, highlight the car kit in Trusted Devices View, press Menu, and then select Connect.
9. (Optional) Enable advanced hands-free features by pressing the multifunction button (MFB)
on the hands-free device.
You can tell the connection is successful when you see a light blue headset icon in the title bar of
the Phone application. You can now use your smartphone with the Bluetooth hands-free device.
NOTE If you have both a Bluetooth headset and a car kit, the last one you connected becomes the active device. To switch
between the headset and car kit, turn off the active device before you try to connect to the other device.
Customizing advanced settings for your hands-free device
You can set whether your hands-free device automatically answers calls, provided the device
supports this feature.
35
Page 39

1. Press Applications and select Prefs .
2. Select Hands-free.
3. Do one of the following:
To send all calls to your hands-free device: Check the Always route calls to Hands-Free
box. Select the Auto answer pick list and select whether you want your hands-free device to
automatically answer incoming calls and how quickly it answers.
To choose between the earpiece on your smartphone and your hands-free device on a
call-by-call basis: Uncheck the Always route calls to Hands-Free box. When the phone
rings, you can answer the call with your hands-free device by pressing the multifunction
button on your hands-free device, or you can answer the call with your smartphone’s earpiece
(see “Receiving calls” on page 25).
4. Select Done.
CUSTOMIZING PHONE SETTINGS
Selecting ringtones
1. Press Phone .
2. Press Menu .
3. Select Options, and then select Sound Preferences.
4. Select the Application pick list and select Ring Tones.
36
Page 40

5. Select the Volume pick list and select the volume level.
6. Select the Vibrate pick list and select how you want your smartphone to vibrate upon an
incoming call.
7. (Optional) Uncheck the Escalate ring tone volume box if you want the ring to play at the
same volume level regardless of how long it rings. When this box is checked, the ring volume
begins softly and then increases the longer it rings.
8. Select ringtones from the following pick lists:
Known Caller: An incoming call from someone in your Contacts or Favorites.
Unknown Caller: An incoming call from someone identified by caller ID who is not in your
Contacts or Favorites.
Roaming: A special tone for incoming calls when you’re outside your home mobile network.
This tone overrides all other ringtones, unless it is set to No Sound.
9. Select Done.
NOTE You can also record sounds and use them as ringtones. Select Manage on the Sound & Alerts Preferences
screen. To record a sound, select New. To play a sound, select it and press Center on the 5-way.
Selecting phone alert tones
1. Press Phone .
2. Press Menu .
3. Select Options, and then select Sound Preferences.
4. Select the Application pick list and select Phone Alerts.
37
Page 41

5. Select the Volume pick list and select the volume level.
Title bar
icons
6. Select the Vibrate pick list and select how you want your
smartphone to vibrate when an alert is received.
7. Select alert options from the following pick lists:
Voicemail Alert: Plays when you have a new voicemail message.
Coverage in/out: Plays when you enter or leave a coverage area.
Signal faded: Plays when the signal loses strength and a call is dropped.
8. Select Done.
Adjusting call volume
While a call is in progress, press the Volume button on the side of your smartphone to adjust the
call volume.
Adjusting ringer volume
When a call is not in progress and music is not playing, press the
Volume button on the side of your smartphone to adjust ringer
volume, and then press the Side button to confirm your selection.
What are all those icons?
You can monitor the status of several items using icons in the title bar
of the Phone application. For a complete list of the icons and what
they mean, see the User Guide.
0
38
Page 42

YOUR EMAIL
Your Palm®Treo™ 755P smartphone includes two email applications: the Wireless Sync
application and the VersaMail
smartphone’s web browser.
NOTE You must activate data services on your Verizon Wireless account before you can use email on your smartphone.
WHICH APPLICATION SHOULD I USE?
I want to… Use this app…
Check free web mail, such as Hotmail, Gmail, or Yahoo! Web browser
Check fee-based Internet mail, such as Yahoo! Mail Plus Wireless Sync
Sync my email and organizer info with my company’s Exchange server Wireless Sync
Sync my email with my company’s Domino server Wireless Sync
®
application. You can also access web-based email from your
or VersaMail
or VersaMail
or VersaMail
Sync my email and organizer info with my company’s Lotus Notes/Domino
Wireless Sync
server
Check messages from multiple email addresses VersaMail
39
Page 43

I want to… Use this app…
Connect to my company’s Wireless Sync server Wireless Sync
Access email on my smartphone, my computer, and the Verizon Wireless
Wireless Sync
website
Use the Advanced Encryption Standard (AES) while sending and receiving
Wireless Sync
messages
NOTE An email application is not an email provider. It works with an account from a provider to transfer messages to your
smartphone.
THE WIRELESS SYNC APPLICATION
In addition to sending and receiving email messages, you can also use Wireless Sync to sync
your email and other information when you’re away from your computer.
The sections that follow cover how to enter your email account settings in the Wireless Sync
application. To use the Wireless Sync application, you must subscribe to the Wireless Sync
feature from Verizon Wireless (additional charges may apply). For more info on Wireless Sync
and to learn how to send and receive mail, see the documentation at the following location:
http://www.wirelesssync.vzw.com.
How do I get started?
1. If you are setting up a personal email account, or if your corporate email account does not
use a Microsoft Exchange Server or a Domino server, gather the following info, and then
follow the steps in “Setting up Wireless Sync to work with Internet email” on page 42.
40
Page 44

■
Wireless Sync password (if you have one)
■
Mobile phone number
■
Email address and password
■
Incoming mail server name
■
Incoming mail server port number
■
Mail protocol: POP or IMAP
2. If your corporate email account uses a Microsoft Exchange Server or a Domino server, gather
the following info, and then follow the steps in “Setting up Wireless Sync to work with
corporate email” on page 44.
■
Wireless Sync password (if you have one)
■
Mobile phone number
■
Email address and password
3. If your corporate email account uses a Wireless Sync server which connects to a Microsoft
Exchange Server or a Domino server, gather the following info, and then follow the steps in
“Setting up Wireless Sync to work with a corporate Wireless Sync server” on page 46.
■
The URL for the Wireless Sync server
■
Your corporate login and password
41
Page 45

Setting up Wireless Sync to work with Internet email
In the Wireless Sync application, all personal email accounts, such as Earthlink, AOL, or Yahoo!
Mail Plus, are considered Internet email accounts. In addition, any corporate email account that
does not use a Microsoft Exchange or Domino server is referred to as an Internet email account.
1. Press Wireless Sync
.
2. Select Start to download the Wireless Sync software to your smartphone. (The download
takes a few minutes.)
3. When asked if your company has a sync server, leave the box unchecked, and then select
Next.
4. Select Yes, No, or Forgot, to indicate whether you have a Wireless Sync password. If you
select No, your smartphone’s web browser opens so you can create an account. If you select
Forgot, Verizon Wireless sends a temporary password to your smartphone.
5. Set the following Account Setup info, and then select Next:
Mobile number: Enter your smartphone’s phone number, if it is not already filled in.
Password: Enter the password for your Wireless Sync account.
Read Terms & Conditions: Select this button to read about your Wireless Sync account.
I agree to the terms & conditions: Check the box to indicate that you agree to the terms and
conditions. You cannot continue unless you check this box.
NOTE You are prompted to scribble on the screen to create a random number for encryption.
42
Page 46

6. Set the following Account Setup info, and then select Next:
Confirm home time zone: Select the pick list and select the time zone where you live.
Enable weather info for my ZIP code: Enter the ZIP code where you live, so that you can
receive local weather reports.
7. Select OK to continue.
8. Set the following Email Setup info, and then select Next:
Set up Internet email: Select this setting to set up Wireless Sync to work with your existing
Internet email account.
Email Address: Enter the email address you want Wireless Sync to access.
Password: Enter the password you use to access this email address.
9. If Wireless Sync recognizes your mail settings, the first sync begins and you are done with
the setup process.
If Wireless Sync does not recognize your mail settings, enter the following information, and
then select Next:
Server name: Enter the name of your incoming mail server, such as mail.myisp.com.
Port: Enter the port number for your incoming mail server, such as 110 (POP) or 143 (IMAP).
POP: If you are connecting to a POP server, check the POP box. If you are connecting to an
IMAP server, leave this box empty. If you are not sure which type of server you’re connecting
to, contact your email provider.
43
Page 47

Leave messages on server: Check this box if you want to leave a copy of your messages on
the mail server after you download them to your smartphone. If you want to delete the
messages from your mail server after downloading them to your smartphone, leave this box
empty.
10. When the Congratulations message appears, select Done.
11. During the first sync you are prompted to select one of the following:
Refresh: Replaces Calendar and Contacts on the device with information on the server. (Not
recommended for POP and IMAP users.)
Merge: Merges items on the device with items on the server.
The first sync can take several minutes; once complete, Wireless Sync is ready to keep you up-todate.
Setting up Wireless Sync to work with corporate email
If your company uses a Microsoft Exchange Server or a Domino server, follow these steps to set
up your email account settings in the Wireless Sync application. If your company uses a different
type of mail server, see “Setting up Wireless Sync to work with Internet email” on page 42 for
instructions.
1. Press Wireless Sync
.
2. Select Start to download the Wireless Sync software to your smartphone. (The download
takes a few minutes.)
3. When asked if your company has a sync server, leave the Wireless Sync server box empty,
and then select Next.
44
Page 48

4. Select Yes, No, or Forgot, to indicate whether you have a Wireless Sync password. If you
select No, your smartphone’s web browser opens and you are taken through a series of steps
to create an account. If you select Forgot, Verizon Wireless sends a temporary password to
your smartphone.
5. Set the following Account Setup info, and then select Next:
Mobile number: Enter your smartphone’s phone number, if it is not already filled in.
Password: Enter the password for your Wireless Sync account.
Read Terms & Conditions: Select this button to read about your Wireless Sync account.
I agree to the terms & conditions: Check the box to indicate that you agree to the terms and
conditions. You cannot continue unless you check this box.
NOTE You are prompted to scribble on the screen to create a random number for encryption.
6. Set the following Account Setup info, and then select Next:
Confirm home time zone: Select the pick list and select the time zone where you live.
Enable weather info for my ZIP code: Enter the ZIP code where you live, so that you can
receive local weather reports.
7. Set the following Email Setup info, and then select Next:
Set up Exchange or Domino email: Select this setting to set up Wireless Sync to work with
your corporate email account.
Email Address: Enter the email address you want Wireless Sync to access.
45
Page 49

8. When the Congratulations message appears, select Done.
9. On your computer, go to
www.wirelesssync.vzw.com/monitor to install the software that lets
Wireless Sync work with your server.
10. During the first sync you are prompted to select one of the following:
Refresh: Replaces Calendar and Contacts on the device with information on the server.
Merge: Merges items on your smartphone with items on the server.
The first sync can take several minutes; once complete, Wireless Sync is ready to keep you up-todate.
Setting up Wireless Sync to work with a corporate Wireless Sync server
If your company uses a Wireless Sync server to connect to your Microsoft Exchange Server or a
Domino server, follow these steps to set up your email account settings in the Wireless Sync
application.
1. Press Wireless Sync
.
2. Select Start to download the Wireless Sync software to your smartphone. (The download
takes a few minutes.)
3. Check the box asking if your company has a Wireless Sync server, and then select Next.
4. Enter the URL for your company’s Wireless Sync server, and then select Next.
5. Select Yes or No to indicate whether you have a Wireless Sync password. If you select No,
your smartphone’s web browser opens and you are taken through a series of steps to create
an account.
46
Page 50

6. Set the following Account Setup info, and then select Next:
Mobile number: Enter your corporate login in this field. This may be your username or may
include your corporate domain information. Contact your Wireless Sync administrator for
more information.
Password: Enter the corporate password.
Read Terms & Conditions: Select this button to read about your Wireless Sync account.
I agree to the terms & conditions: Check the box to indicate that you agree to the terms and
conditions. You cannot continue unless you check this box.
7. Set the following Account Setup info, and then select Next:
Confirm home time zone: Select the pick list and select the time zone where you live.
Enable weather info for my ZIP code: Enter the ZIP code where you live, so that you can
receive local weather reports.
8. When the Congratulations message appears, select Done.
9. During the first sync you are prompted to select one of the following:
Refresh: Replaces Calendar and Contacts on your smartphone with information on the
server.
Merge: Merges items on your smartphone with items on the server.
The first sync can take several minutes; once complete, Wireless Sync is ready to keep you up-todate.
47
Page 51

THE VERSAMAIL® APPLICATION
Before you can use VersaMail, you need to enter your email account settings. If you have multiple
email accounts, you must enter settings for each email account.
After you enter your email account settings, see the User Guide for the VersaMail Application at
www.palm.com/mypalm/755pverizon to find information on sending and receiving messages and
customizing your VersaMail application settings.
How do I get started?
1. Download the VersaMail application from www.palm.com/mypalm/755pverizon-bonus and
install it on your smartphone and your computer. See “Installing bonus software from My
Palm on your computer” on page 85 for details.
®
2. If you already use the VersaMail application on a Palm OS
device, and you want to transfer
those settings to your new smartphone, see the User Guide for the VersaMail Application for
upgrade information.
®
3. If you’re entering settings for an email account on a Microsoft Exchange ActiveSync
server,
a Lotus Notes server, or a Microsoft MAPI server, see the User Guide for the VersaMail
Application for setup steps.
4. If your email provider is listed in the following table, then skip to “Setting up VersaMail to
work with common providers” on page 50.
48
Page 52

0
AOL Concentric NetZero
Apple.Mac Covad RCN
AT&T Global Cox Central SBC/PacBell
AT&T Worldnet Cox East SBC/Prodigy
BellSouth Cox West Speakeasy
Cablevision EarthLink USA.net
Charter Gmail Verizon DSL
Comcast Juno Yahoo! Mail Plus (feeCompuServe Mail.com
based accounts only)
5. If your email provider’s name is not listed, then you need to obtain the following info from
your system administrator or ISP, and then skip to “Setting up VersaMail to work with other
providers” on page 50:
■
Mail protocol: POP or IMAP
■
Incoming and outgoing mail server names, such as mail.myisp.com
■
Incoming and outgoing mail server port numbers, such as 110 (incoming POP), 143
(incoming IMAP), or 25 (outgoing POP or IMAP)
■
(If necessary) Security settings: APOP, ESMTP, SSL
NOTE The correct protocol, server, and security settings are required for VersaMail to be able to send and receive
email for your account. Your email provider can easily provide these settings. You may be able to find this account setup
info on your email provider’s website.
49
Page 53

Setting up VersaMail to work with common providers
1. Press Applications and select Email .
2. When prompted to select an initial setup option, select Continue.
NOTE If you are not prompted to select a setup option and the Inbox appears instead, press Menu, select Accounts,
select Account Setup, and then select New.
3. In the Account Name field, enter a descriptive name, such as Work
Email.
4. Select the Mail Service pick list, and then select your email
provider, such as Earthlink. Select Next.
5. Enter the username for your email account. Your username appears
before the @ symbol in your email address.
6. Select the Password box, enter your email account password, select
OK, and then select Next.
7. Select Next, and then select Done.
Setting up VersaMail to work with other providers
1. Press Applications and select Email .
2. When prompted to select an initial setup option, select Continue.
NOTE If you are not prompted to select a setup option and the Inbox appears instead, press Menu, select Accounts,
select Account Setup, and then select New.
50
Page 54

3. In the Account Name field, enter a descriptive name, such as Work
Email.
4. Select the Mail Service pick list, and then select Other.
5. Select the Protocol pick list, and then select POP or IMAP (based
on the info you got from your system administrator or ISP). Select
Next.
6. Enter the username for your email account. Your username appears
before the @ symbol in your email address.
7. Select the Password box, enter your email account password, select OK, and then select
Next.
8. Enter your email address and the names of the incoming and outgoing mail servers, and then
select Next.
9. If your system administrator or ISP provided port numbers or security settings, select
Advanced, and then enter those settings.
10. Select Done.
51
Page 55

YOUR MESSAGES AND WEB BROWSER
MESSAGING
You can use the Messaging application to exchange brief text messages (SMS) and multimedia
messages (MMS) with other devices and email addresses that support these forms of
messaging. Before you use your smartphone to send or receive messages, refer to your service
plan for pricing and availability of messaging services.
NOTE Make sure your phone is turned on (see “Turning your phone on and off” on page 20).
Creating and sending a text message
1. Press Option + Wireless Sync .
2. Select New.
3. Select the To field to address the message:
■
Press Center . If the recipient’s name appears in the list of
recent addresses, select it from the list.
■
If the recipient is in your Contacts list, enter the first initial and
last name (no spaces), and then select the recipient’s phone number or email address,
depending on where you want to send the message.
■
If the recipient’s name isn’t in the list of recent addresses or your Contacts list, enter the
mobile number, email address, or a Verizon Wireless alias.
4. Enter your message or select QuickText to insert predefined phrases. To insert
emoticons, select .
52
Page 56

5. (Optional) Press Menu , and then select High Priority from the Compose menu to mark
the message as urgent.
6. Select Send.
NOTE If you see numbers when you expect to see letters (or the other way around), you need to turn Option Lock on
by pressing Option twice or turn it off by pressing Option once.
Creating and sending a multimedia message
Multimedia messages consist of text, photos, videos, and sounds presented as one or more
slides. You can include any of the following items:
0
Item Supported File Types
Pictures JPEG, GIF, BMP
Videos MPEG4, 3GP2
Ringtones MIDI
Sound clips WAV, QCELP
1. Press Option + Wireless Sync .
2. Select New.
3. Select Add Media.
53
Page 57

4. Select the To field to address the message with up to 10 addresses:
■
Press Center . If the recipient’s name appears in the list of recent addresses, select it
from the list.
■
If the recipient is in your Contacts list, enter the first initial and last name (no spaces), and
then select the recipient’s phone number or email address.
■
If the recipient’s name is not in the list of recent addresses or your Contacts list, enter the
mobile number, email address, or alias.
■
If you want to upload a picture or video to your Verizon Wireless PIX Place account, press
Center , and then select PixPlace.
5. Enter a subject.
6. Select the image placeholder, and then select one of the following:
Attach image: Insert one or more photos or videos from your
smartphone or an expansion card (sold separately).
Take new picture: Take a picture with the built-in camera and add
it to the message (camera version only).
Take new video: Capture a video with the built-in camcorder and
add it to the message (camera version only).
54
Page 58

7. (Optional) Select sound , and then select one of the following:
Record new: Record a sound clip of up to 1 minute.
Attach voice memo: Select a memo you recorded in the Voice Memo application.
Attach ringtone: Select a ringtone.
8. Enter a text message or caption.
9. Select Add slide to insert additional slides.
10. (Optional) Select Preview to view the message as the recipient will see it.
11. Select Send.
Receiving messages
When your phone is turned on and is in an area of wireless coverage, you automatically receive
new text messages. For multimedia messages, you can set your smartphone to automatically
download new messages or to notify you that a message is ready to be downloaded; see the User
Guide for details.
55
Page 59

The new message alert may include any of the following buttons:
OK: Dismisses the alert and places the message in your Inbox.
Reply: Opens the Chat View, where you can reply with a text message.
To send an MMS reply, select Add from the Chat View.
Call Back: Dials the sender’s phone number.
Go To Msg: Opens the message so you can view its full contents.
Delete: Removes the message from your smartphone.
NOTE You can send and receive text messages even while you are on a phone call. This is easiest when using a hands-free
headset or the speakerphone.
Viewing/playing a multimedia message
1. Press Option + Wireless Sync .
2. Select the message you want to view.
3. If there are sounds or multiple slides, playback begins
immediately.
4. Do any of the following:
■
Use the onscreen controls to scroll to other slides and messages.
■
To play a sound, select the sound icon.
■
To save a sound, press Menu and select Save Sound from the Message menu.
56
Page 60

■
To save a picture, press Menu and select Save Picture from the Message menu.
You can access saved pictures later by pressing Applications and selecting
Pics&Videos .
■
To save a calendar or contact entry, select it. You can access saved entries later by
pressing Applications and selecting Calendar or Contacts , depending on
the type of entry you saved.
■
To select the text, position the cursor in the text area, and then press Center .
■
To stop playback of a message, select Play/Stop.
■
To view message details, press Menu and select Message Details from the
Message menu.
5. Select OK.
Chatting with Messaging
When you exchange more than one message with a single contact, the messages you exchange
with that person are grouped into a chat session. When you select a chat session from your
message list, the upper part of the Chat view displays all messages you’ve exchanged with this
contact, and the lower part provides an entry area.
You can carry on multiple chats at the same time and easily switch between them, using the pick
list at the top of the screen.
57
Page 61

1. Press Option + Wireless Sync .
2. Do one of the following:
Start a new chat: Select a message and reply to it.
Continue an existing chat: Select a message with the chat icon.
3. Enter your message.
4. Select Send.
WEB BROWSER
The web browser on your smartphone provides quick and easy access to web pages. You can
view most sites you use on your computer, including those with security and advanced features,
such as JavaScript and frames. To browse the web, you must activate data services from Verizon
Wireless.
Viewing a web page
1. Make sure your phone is turned on (see “Turning your phone on and
off” on page 20).
2. Press Phone and confirm that data services are available.
You should see either the NationalAccess icon or the
BroadbandAccess icon in the title bar.
If you do not see a NationalAccess or BroadbandAccess icon, data
services are not available in your current location and you cannot connect to the Internet.
58
Page 62

3. Press Applications and select Web .
4. Enter a web page address (URL) in the Address Bar and select Go. If you browse to a secure
web page, a lock appears in the Address Bar.
5. Do any of the following to navigate within the web page:
View a page in wide layout format (as on your computer): Press Menu , select Options,
and then select Wide Page Mode.
Scroll through the page: In Optimized Mode (the default format which is optimized for your
smartphone screen), press Up or Down . In Wide Page Mode, press Up , Down ,
Left , or Right to scroll in all directions.
Follow a link to another web page: In Optimized Mode, highlight the link by pressing Left
or Right , and then press Center to go to the selected page. In Wide Page Mode, use
the stylus to select a link.
Submit a form: Enter the info and then select the onscreen button to submit the form. If the
form doesn’t have an onscreen button, press Return .
6. Use the 5-way to access any of the following icons in the title bar:
Goes to your home page.
Opens a dialog box where you can enter a web address you want to go to
or view a list of recently viewed web pages.
Goes to the previous web page.
59
Page 63

Goes to the next web page.
Refreshes the page with the latest content from the Internet.
Opens a list where you can select Fast Mode (no images or style sheets)
or Normal Mode (with images and style sheets).
NOTE To quickly jump to the title bar from anywhere on a web page, press Space to go to the Address Bar, and then
press Up on the 5-way.
Creating a bookmark
With bookmarks you can instantly access a web page without entering the address every time.
The web browser can store up to 100 bookmarks or saved pages, allowing you to open your
favorite web pages quickly. Note that a bookmark is different from a favorite (see “Defining
favorite buttons” on page 32).
1. Go to the page you want to bookmark.
2. Press Menu .
3. Select Add Bookmark from the Page menu.
4. (Optional) Change the entries in the Name and Description fields.
5. Select OK, and then select OK again.
60
Page 64

Downloading files from a web page
The web browser lets you download files that are recognized by one of the applications on your
smartphone. When you download a file, you can open it in the application that recognizes the file.
You can download files in many popular formats.
0
Item Supported File Types
Pictures JPEG, WBMP, GIF
Videos MP4, 3G2, ASF
Ringtones MIDI, AAC
Music MP3
1. Go to the page with the link to the file you want to download.
2. Press
Left or Right to highlight the link to the file, and then press Center .
3. If prompted, select what you want to do with the file: Play, Save To Device, or Save To Card.
4. Select Yes.
Streaming files from a web page
The web browser lets you stream files that are recognized by one of the applications on your
smartphone. For example, you can choose to play music and video files in many popular formats
(MP3, AAC, WMA, WMV).
1. When the web browser recognizes streamed content on a web page, it displays a play
icon. To view or listen to the streamed content, select play .
61
Page 65

2. Once streaming begins, playback starts automatically. Use the following controls when
viewing or listening:
■
Select to return to the web page containing the streamed content.
■
Select or press Center to pause playback of a prerecorded file.
■
Select or press Center to resume playback after pausing.
■
A few seconds after playback begins, the toolbar is hidden and you can view the content
on the full screen. Press Up or Down to display the toolbar; press Up or
Down again to hide the toolbar again.
■
Press the Volume button on the side of your smartphone to adjust the volume.
CONNECTIONS WITH BLUETOOTH® DEVICES
With your smartphone’s built-in Bluetooth® wireless technology, you can connect to a number of
Bluetooth devices, such as a headset, car kit, printer, or GPS receiver, as well as to other
smartphones and handhelds that are equipped with Bluetooth wireless technology. If your
computer is enabled with Bluetooth wireless technology, you can also synchronize wirelessly or
use your phone to connect your computer to the Internet.
You can create a list of Bluetooth devices that you trust to communicate with your smartphone.
When communicating with trusted devices, your smartphone skips the discovery process and
creates a secure link as long as the device is within range. Bluetooth range is up to 30 feet in
optimum environmental conditions. Performance and range can be reduced by physical
obstacles, radio interference from nearby electronic equipment, and other factors.
62
Page 66

The following steps explain how to connect devices like a friend's handheld or smartphone and
have it added to your Trusted Devices list. If you want to connect to a hands-free headset or car
kit, see “Connecting to a Bluetooth hands-free device” on page 34.
1. Press Applications and select Bluetooth .
2. Select Bluetooth On.
3. (Optional) Enter a device name that identifies your smartphone
when it is discovered by other Bluetooth devices.
NOTE Use the same device name for all your Bluetooth connections. If you change
the device name, you need to re-create any partnerships you already created.
4. Select Setup Devices.
5. Select Trusted Devices.
6. Select Add Device. The Discovery icon appears, indicating that the
discovery process is active.
7. Select the Show pick list and select Nearby devices.
8. If the device you want to add doesn’t appear on the Discovery
Results list, make sure that the other device is ready to receive a
connection request (see the device’s documentation), and then
select Find More on your smartphone to search again.
9. Enter the same passkey on your smartphone and on the Bluetooth device, and select OK.
[ ! ] IMPORTANT Some hands-free devices have a predefined passkey. If your device has a predefined passkey, you
can find it in the documentation for that device. Other devices provide a screen where you enter a passkey that you make
63
Page 67

up. In either case, you must use the same passkey on both your smartphone and your hands-free device. We recommend
that where possible, you make up a passkey of 16 alphanumeric characters (letters and numerals only) to improve the
security of your smartphone. The longer the passkey, the more difficult it is for the passkey to be deciphered.
10. Select Done.
64
Page 68

YOUR PHOTOS, VIDEOS, AND MUSIC
CAMERA AND CAMCORDER
Your Palm®Treo™ 755P smartphone comes with an easy-to-use, built-in, 1.3-megapixel camera
with 2x digital zoom (camera version only). You can use the camera to take and view pictures and
videos and send them to your friends and family. If your smartphone doesn’t have a built-in
camera, you can still receive and view pictures and videos, send pictures and videos to other
people as email attachments or multimedia messages (MMS), and use pictures to personalize
your smartphone (such as wallpaper or picture caller ID; see “Adding a contact” on page 75).
Taking a picture
1. Press Applications and select Camera .
2. By default, the Camera application stores pictures you take in the Palm album on your
smartphone. If you have an expansion card (sold separately) inserted in your smartphone’s
expansion card slot, the Camera application creates a Palm album on the card and store
pictures there. To store the picture in a different location, select the album pick list in the
lower-right corner of the screen, and then do one of the following:
<Album name>: Stores the picture in the selected album. The storage location is based on
the location of the album (smartphone or expansion card).
New Albums: Opens a dialog box where you can enter an album name and select the storage
location (smartphone or expansion card).
3. (Optional) Adjust the zoom setting by pressing Up to select 2x or pressing Down to
select 1x.
65
Page 69

4. Point the lens on the back of your smartphone at the subject you
want to photograph.
5. Press Center to capture the picture.
6. Select any of the following:
Saves the picture in the location you selected in step 2
Deletes the picture
Opens an MMS message, so you can send the picture to a phone number
or email address that supports picture messages
Lets you add an audio caption
Recording a video
1. Press Applications and select Camcorder .
2. By default, the Camcorder application stores videos you record in the Palm album on your
smartphone. If you have an expansion card (sold separately) inserted in your smartphone’s
expansion card slot, the Camcorder application creates a Palm album on the card and store
videos there. To store the video in a different location, select the album pick list in the lowerright corner of the screen, and then do one of the following:
<Album name>: Stores the video in the selected album. The storage location is based on the
location of the album (smartphone or expansion card).
66
Page 70

New Albums: Opens a dialog box where you can enter an album name and select the storage
location (smartphone or expansion card).
3. Adjust the position of your smartphone until you see the subject
you want to record on the screen.
4. Press Center to start recording.
5. After you finish recording, press Center again to stop.
6. Select any of the following:
Plays the video, so you can review it
Saves the video in the location you selected in step 2
Deletes the video
Opens an MMS message, so you can send the video to a phone number
or an email address that supports video messages
Opens a dialog box where you can adjust the volume during playback
NOTE The video recording screen displays the approximate recording time you have left based on the space available
on your smartphone or expansion card. Actual recording time may vary depending on how fast you are moving, how
many colors you are recording, and so on.
67
Page 71

PICS&VIDEOS
Viewing a picture
In addition to viewing the pictures you capture with the built-in camera, you can view pictures
captured on many popular digital cameras or downloaded from the Internet. Your smartphone
supports the JPG, TIF, BMP, and GIF picture formats.
1. Press Applications and select Pics&Videos .
2. Select the album that contains the picture you want to see.
3. Select the picture you want to view.
4. Press Right or Left to scroll to the next item in the album.
5. If the picture has an audio caption, select
6. Tap the picture or press Center
to return to the Thumbnail View.
to hear it.
Viewing a video
In addition to viewing the videos you capture with the built-in camera, you can view videos
captured on many popular digital cameras. Your smartphone supports the 3GP, 3G2 (MPEG-4
video + QCELP audio + .3g2 file type), MP4, MPG, M4V, ASF (with MPEG-4 and IMA-ADPCM
audio), and AVI (with MJPEG video and PCM audio) video file types.
1. Press Applications and select Pics&Videos .
2. Select the album that contains the video you want to view.
68
Page 72

3. Select the video you want to view.
4. Hold down Right or Left to seek within the current video, or press Right or Left to
scroll to the next item in the album.
NOTE To adjust the volume during playback, press the Volume button on the side of your smartphone. You can also
press Space to pause and resume playback.
5. Tap the video or press Center to return to the Thumbnail View.
Sending pictures or videos
You can send pictures or videos to other devices or to an
email address.
1. From the Album list, select the album that contains the item(s) you
want to send.
2. Select in the lower-right corner of the screen.
3. Select the pictures or videos to send, or select Select All to send
the entire album. (A + sign appears next to selected items.)
4. Select Share.
5. Enter any text you want to add to the message.
6. Address and send the message (see “Creating and sending a
multimedia message” on page 53 for details).
69
Page 73

Saving a picture as wallpaper
You can select a picture to use as wallpaper for the Main View in the Phone application.
1. Open the picture you want to save as wallpaper.
2. Press Menu .
3. Select Options, and then select Save as Wallpaper.
4. Confirm by selecting Yes, or decline by selecting No.
POCKET TUNES™
You can listen to music through the speaker on the back of your smartphone or through the
included stereo headphone. To listen to music on your smartphone, you need to convert the
music files into MP3 format using Windows Media Player (Windows computers) or iTunes (Mac
computers), and then transfer the music files to your smartphone or an expansion card (sold
separately). After you transfer the music files, you can play them using the Pocket Tunes
application on your smartphone.
[ ! ] IMPORTANT If you are transferring files from a Mac computer, you need an expansion card to listen to music on
your smartphone. You cannot transfer MP3 files from your Mac directly onto your smartphone.
Setting up Windows Media Player for MP3
The version of Pocket Tunes that is included with your smartphone is compatible Windows Media
Player version 9 and version 10; it is not compatible with Windows Media Player version 11.
NOTE For information on using your smartphone and desktop software with Windows Vista, visit www.palm.com/
windowsvista.
70
Page 74

1. Connect your smartphone to your computer with the sync cable.
Click
Properties
Select your
smartphone
2. Press Applications and select pTunes .
3. On your computer, open Windows Media Player, and then click the full-screen icon in the
upper-right corner to maximize the window.
4. Click Tools, and then click Options.
5. Click the Rip Music tab, click the Format pick list, and then select mp3. Click OK.
6. Click Tools, and then click Options.
7. Click the Devices tab, select Palm Handheld from the Devices list, and then click Properties.
8. Click the Quality tab, uncheck the Convert files as required by this handheld
(recommended) box. Click Apply.
71
Page 75

9. Click OK, and then click OK again.
Uncheck box
Setting up iTunes for MP3
On a Mac, use iTunes (included with OS X) to convert music from a CD to MP3 format. For more
information on using the iTunes software, see the documentation that came with your Mac.
1. On your Mac, open iTunes.
2. Select Preferences.
3. Click the Advanced button at the top of the window, and then click Importing.
4. Click the Import Using pop-up menu and select MP3 Encoder.
5. (Optional) Click the Setting pop-up menu and select Good Quality.
72
Page 76

Transferring MP3 files from your computer
If your MP3 files are already on your computer’s hard drive, you need to transfer them to your
smartphone to listen to them on your smartphone.
[ ! ] IMPORTANT You must synchronize your smartphone with your computer at least once before you can transfer MP3
files from your computer.
1. Connect your smartphone to your computer with the USB sync cable.
2. On your smartphone, press Applications and select pTunes .
3. If you are using a Mac computer, insert an expansion card into your smartphone. This step is
optional if you are using a Windows computer.
4. Do one of the following:
Windows: Open Windows Media Player on your computer. Select
the Sync tab, and then select Palm Handheld from the drop-down
list. Select Start Sync. The files are transferred to your smartphone.
Mac: Drag and drop the MP3 files onto the Send To Handheld droplet in the Palm folder.
Select your device name, the file name, and the destination (card). Click OK. Synchronize
your smartphone with your computer. Be patient; transferring music to an expansion card can
take several minutes.
NOTE You can also use a card reader accessory (sold separately) to transfer MP3 files from your computer to your
expansion card. Create a Music_Audio folder in the root directory of the card, and store your MP3 files in this folder.
73
Page 77

Listening to music on your smartphone
Previous song
Next song
Volume
Choose song
Progress indicator
Play/Pause
1. Press Applications and select pTunes .
2. Do any of the following:
Plays or resumes playback of the current song
Plays the next song
Plays the previous song
Opens a list so you can select a different song to play
Pauses playback
NOTE To adjust the volume during playback, press the Volume button on the side of your smartphone. You can also
press Space to pause and resume playback, as well as use the 5-way to navigate among songs or pause and resume
playback.
NOTE If a call comes in when you’re listening to music, you can take the call and the music pauses automatically. After you
finish the call, the music starts again.
74
Page 78

YOUR CONTACTS, CALENDAR, AND TASKS
This section introduces you to a few of the applications you can use to stay organized. To learn
about the other organizer applications on your smartphone, such as Memos, see the User Guide.
CONTACTS
Adding a contact
NOTE If you have several contacts to enter, it’s more efficient to use the included Palm®Desktop software or Microsoft
®
(sold separately) on your computer and then synchronize your Palm®Treo™ 755P smartphone with your computer.
Outlook
For more information, see “Synchronizing information—basics” on page 9.
1. Press Phone .
2. Select the Contacts favorite button.
3. Select New Contact.
4. Use the 5-way to move between fields as you enter
information.
5. (Optional) Do any of the following:
Add a caller ID photo: Select the Picture box, and then do one of the following:
■
Select Camera to take a picture and add it to this contact when you save the picture
(camera version only).
■
Select Photos to add an existing picture to this contact.
75
Page 79

Add a caller ID ringtone: Select the Ringtone pick list and select a ringtone from the list to
give incoming calls from this contact a distinctive ring.
Place the entry in a category or mark it private: Select Details. (See the User Guide for
more info.)
Add a note to an entry: Select Note .
Display additional fields for this contact: Select Plus .
6. After you enter all the information, select Done.
Viewing or changing contact information
1. In the Contacts list, begin entering one of the following for the contact you want to view or
edit:
■
First name (JOH for John)
■
Last name (SMI for Smith)
■
First initial and last name (JSM for John Smith)
2. Select the name of the entry you want to open.
3. Select Edit.
4. Make changes to the entry as necessary, and then select Done.
76
Page 80

Defining your business card
1. Create a new contact and enter your own business card info.
2. Open the contact entry containing your business card info.
3. Press Menu .
4. Select Business Card from the Record menu, and then select OK.
NOTE After you define your business card, you can beam it to other Palm OS® devices. In any Phone view or the
Contacts application, open the Record menu and select Beam Business Card.
CALENDAR
Displaying your calendar
■ Press Calendar repeatedly to cycle through the various views:
Agenda View: Shows your daily schedule and any items on your Tasks list that are overdue
or due today. If there’s room, Agenda View also shows your schedule for the next dates that
have events scheduled.
Day View: Shows your daily schedule one day at a time.
Week View: Shows your schedule for an entire week. The time
frames are based on the Start Time and End Time settings in
Calendar Preferences.
Month View: Shows your schedule for a whole month.
77
Page 81

■ From any Calendar view, open the Options menu and select Year View to view a calendar for
Selected
day
Selected
date
an entire year.
■ From any Calendar view (except Agenda View), use the 5-way to move to another day,
week, month, or year (based on the current view).
■ From any Calendar View (except Agenda View), select Go To, and then select a date from
the calendar.
Creating an event
NOTE If you have several appointments to enter, it’s more efficient to use the included Palm Desktop software or Microsoft
Outlook (sold separately) on your computer and then synchronize the info on your smartphone with the info on your
computer. For more information, see “Synchronizing information—basics” on page 9.
1. Press Calendar until Day View appears.
2. Press Left or Right to select the desired day.
3. Using the keyboard, enter a starting hour and minute for the event.
For example, enter 545 for 5:45. (Remember to press Option
before entering numbers.)
4. Select the End Time box and enter the ending hour and minute for
the event.
5. (Optional) To assign a time zone to the event, select the Time Zone
pick list and select a city in the time zone you want.
6. Select
OK.
7. Enter a description for the event.
78
Page 82

NOTE To automatically assign a time zone to your events, open the Options menu, select Preferences, and check the
Type of time units
Number of time units
New events use time zones box. All your new events will be assigned to your local time zone (existing events aren’t
affected), and you can change the time zone setting for individual events.
Adding an alarm to an event
1. In Calendar, select the event.
2. Select Details.
3. Check the Alarm box and select the number of minutes, hours, or days before the event you
would like to receive the alarm.
4. Select OK.
79
Page 83

Scheduling a repeating event
This icon indicates a
repeating event
1. Create an event, and then select it.
2. Select Details.
3. Select the Repeat pick list, and then select a repeat interval. If the interval you need doesn’t
appear on the list, select Other to define a custom interval.
4. Select OK.
TASKS
Adding a task
1. Press Applications and select Task s .
2. Select New to create a new task.
3. Enter a description of the task. The text can be longer than one line.
80
Page 84

4. (Optional) To enter details for a task, select the task description, and
then select Details. Set any of the following:
Priority: Select the priority number for this task (1 is most
important). Later you can arrange your tasks based on the
importance of each task.
Category: Assign the task to a specific category.
Due Date: Select the Due Date pick list and select a due date for the
task.
Alarm: Set an alarm for this task.
Repeat: Indicate whether the task occurs at regular intervals and how often it repeats. When
you check off a repeating task, the next instance of this task automatically appears in your
task list.
Private: Check this box to mark this task private. See the User Guide for additional
information.
: Select this button to enter additional text that you want to associate with the task.
5. Select OK.
81
Page 85

YOUR DOCUMENTS AND MEMOS
DOCUMENTS TO GO® PROFESSIONAL AND THE DOCUMENTS APPLICATION
With the Documents application on your smartphone, you can take your important office info
with you. You can create, view, and edit Microsoft
®
Word and Excel® files directly on your
smartphone. You can also view and manage PowerPoint® and PDF files. For example, you can
open email attachments, files you download with the web browser, and files stored on an
expansion card (sold separately)—as long as the files are in a supported format.
NOTE The ver sion of Docu ments To Go® that co mes with you r smartpho ne does not support M icrosoft Offic e 2007. To
access Office 2007 files on your smartphone, you must save the files in Office 2003 format. For information about an
upgrade that supports Office 2007, go to
www.dataviz.com/office2007 (additional fees may apply).
Here are a few more examples of what you can do with Documents:
■ Send and receive email attachments in Word, Excel, PowerPoint, and Acrobat
®
file formats
(DOC, XLS, PPT, and PDF).
■ View Word, Excel, PowerPoint, and Acrobat files (DOC, XLS, PPT, and PDF).
■ Create or edit a Word-compatible document or Excel-compatible spreadsheet on your
smartphone, and then save it in the native DOC or XLS format.
NOTE The Documents application does not support some editing functions, such as multiple font sizes and spell-checking.
Go to www.palm.com/mypalm/755pverizon-bonus and install Documents To Go desktop software.
It enables you to synchronize Microsoft Office files so that changes you make to these files show
up on both your smartphone and your computer. You can save files in their native Office format
or make use of the optimized Documents To Go formats.
82
Page 86

VOICE MEMO
Voice Memo provides a place for you to record and play back notes and other important thoughts
directly on your smartphone. Voice memos do not transfer to your computer during
synchronization.
Creating a voice memo
1. Press Applications and select Voice Memo .
2. Press the Side button on your smartphone. Face your smartphone and begin speaking.
3. After you finish recording, press the Side button again. The memo is automatically saved to
your smartphone.
4. (Optional) Press Menu , select Rename Memo from the Voice Memo menu, and then
enter a title for the memo.
83
Page 87

YOUR APPLICATION AND
INFO MANAGEMENT TOOLS
INSTALLING APPLICATIONS
Your Palm®Treo™ 755P comes with several built-in and ready-to-use applications. You can also
install free bonus software, such as business software, games, and more. You can install the
bonus software wirelessly using the My Treo™ application on your smartphone, or you can
download the bonus software from
and then synchronize to install it on your smartphone. You can also use the web browser on your
smartphone or your computer to purchase other third-party Palm OS
Installing bonus software from the My Treo™ application on your smartphone
1. Press Applications and select My Treo .
2. Select the Bonus tab.
3. Select the Install link below the name of the application you want to install.
4. Repeat step 3 to install additional applications.
Installing applications from the Internet
You can use the web browser on your smartphone to install Palm OS files (PRC or PDB) directly
from the Internet. When you download a PRC or PDB file, it is automatically installed on your
smartphone. If a file is compressed (ZIP or SIT), you need to download it to your computer and
expand the file before installing it on your smartphone.
www.palm.com/mypalm/755pverizon-bonus to your computer
®
applications.
84
Page 88

NOTE The instructions in this section tell you how to install basic PRC (Palm OS application) and PDB (Palm OS database)
files on your smartphone. Some Palm OS software uses an installer or wizard to guide you through the process. For details,
consult the documentation that came with the software.
1. Open the web browser (see “Viewing a web page” on page 58).
2. Go to the page that contains the link to the application you want to download.
3. Press Left or Right to highlight the link to the file, and then press Center to initiate
the download process.
4. Follow the onscreen instructions to accept and install the application.
Installing bonus software from My Palm on your computer
1. On your computer, go to
www.palm.com/mypalm/755pverizon-bonus.
2. Follow the onscreen instructions to download the applications you want to install.
3. When prompted to select either Save or Run, select Run to place the application in the
install queue.
4. Synchronize your smartphone with your computer to install the application(s) on
your smartphone.
NOTE If you select Save in step 3, you need to manually add the application to the install queue. See “Installing other
third-party applications from a computer” on page 85 for details.
Installing other third-party applications from a computer
NOTE To install a third-party application from your computer to your smartphone, you must first install Palm®Desktop
software on your computer (see the User Guide for instructions).
85
Page 89

1. Windows: Drag and drop the file(s) onto the Palm Quick Install icon on the
Windows desktop.
Mac: Drag and drop the file(s) onto the Send To Handheld droplet in the Palm
folder.
2. Select your device name from the User list, and then click OK.
3. Synchronize your smartphone with your computer to install the application(s) on your
smartphone.
Getting help with third-party applications
If you encounter a problem with a third-party application (such as an error message), contact the
application’s author or vendor. For general troubleshooting of third-party applications, see the
User Guide.
BEAMING INFORMATION
Your smartphone is equipped with an IR (infrared) port so that you can beam information to
another Palm OS device with an IR port. The IR port is located on the side of your smartphone,
above the expansion card slot, behind the small dark shield.
Beaming an entry
You can beam an individual entry or item such as a contact or a picture. You can also beam all the
entries in the selected category, such as all the contacts in the Business or Family category.
1. Select the entry or category you want to beam. You cannot beam an item that has a lock
next to it.
86
Page 90

2. Press Menu .
3. Select Record, and then select one of the following:
Beam: Sends an individual record.
Beam Category: Sends all entries in the current category.
4. When the Beam Status dialog box appears, point the IR port on your smartphone directly at
the IR port of the receiving device.
5. Wait for the Beam Status dialog box to indicate that the transfer is complete before you
continue using your smartphone.
NOTE For best results, the path between the two devices must be clear of obstacles, and both devices must be
stationary. If you have difficulty beaming, shorten the distance and avoid bright sunlight.
USING EXPANSION CARDS
The expansion card slot on your smartphone enables you to insert mini-SD cards (sold
separately) to extend the storage capacity of your smartphone. For example, expansion cards can
store the following:
■ Photos ■ Games ■ Adobe
■ MP3 audio files ■ eBooks ■ Applications
■ Email attachments ■ Microsoft Office files ■ Databases
®
Acrobat® files
87
Page 91

Inserting an expansion card
1. Open the door of the expansion card slot.
2. Hold your smartphone with the screen facing you,
and hold the card with the label facing you. (The
notch on the card should be in the lower-left
corner next to the keyboard.)
3. Insert the card into the expansion card slot until
you feel the card lock into place.
4. Close the door of the expansion card slot.
NOTE Your smartphone has a push-push mechanism: push in
gently to insert a card; push in gently to remove it.
Removing an expansion card
1. Open the door of the expansion card slot.
2. Press the card into the expansion card slot to
release it from the slot.
3. After you feel the expansion card slot eject the
card, remove it from the slot.
4. Close the door of the expansion card slot.
NOTE If the Ringer switch is set to Sound On, you hear a
confirmation tone when you insert or remove an expansion card.
88
Page 92

YOUR PERSONAL SETTINGS
Sound On Sound Off
Backlight
SYSTEM SOUND SETTINGS
Silencing sounds
You can immediately silence all alerts, ringtones, music, and system sounds by sliding the Ringer
switch to Sound Off. This does not mute the audio during a phone call.
1. Slide the Ringer switch to Sound Off . Your
®
Palm
Treo™ 755P smartphone vibrates once to let you
know that sounds are turned off.
2. To hear all sounds again, slide the Ringer switch to Sound
On . Any previous sound settings are restored.
DISPLAY AND APPEARANCE SETTINGS
Adjusting the screen and keyboard brightness
1. Press Option , and then press
Backlight .
2. Press Left and Right to adjust
the brightness.
3. Select Done.
89
Page 93

Changing the text size
Large font
Small font
Small bold font
Large bold font
You can change the screen font in Calendar, Contacts, Memos, Messaging, Tasks, and Web. The
font styles may vary between applications, and some applications may offer fewer choices.
1. Open the application in which you want to change the font.
2. Press Menu .
3. Select Options, and then select Font.
4. Select a font style. (In the web browser, select the Font size pick list and select Large or
Small.)
5. Select OK.
90
Page 94

APPLICATION SETTINGS
Reassigning buttons
With Buttons Preferences you can select which applications are associated with the quick buttons
and the Side button on your smartphone. You can assign a primary and secondary application to
each of the three quick buttons that open an application.
NOTE We recommend that you keep the primary button assignments on the factory settings until you become comfortable
with the features of your smartphone. If you do change the primary button assignments, remember that the instructions in
this guide and in the other help features refer to the original button settings.
1. Press Applications and select Prefs .
2. Select Buttons.
3. Select the pick list next to the button, or select the Option +
Button combination you want to reassign, and select an
application.
4. Select Done.
LOCKING YOUR SMARTPHONE AND INFO
NOTE In addition to the locking features described here, you can also lock your phone, your smartphone, and individual
entries. See the User Guide for details.
Locking your keyboard (Keyguard)
The Keyguard feature locks the keyboard so that you don’t accidentally press buttons or activate
items on the screen while your smartphone is in a pocket or bag.
91
Page 95

By default, Keyguard turns on whenever the screen is off. Each time you wake up the screen, you
must turn off Keyguard to unlock the keyboard and use your smartphone.
To turn off Keyguard, do the following:
1. When the screen is off, press Power/End to wake up the
screen.
2. Press Center to turn off Keyguard.
You can change how quickly Keyguard turns on, or you can disable this
feature altogether. To change the Keyguard settings, do the following:
1. Press Applications and select Prefs .
2. Select Keyguard.
3. Select the Auto-Keyguard pick list, and then do one of the following:
■
Select how quickly you want Keyguard to turn on: When power is turned off, 5 seconds
after power off, or 30 seconds after power off.
■
Select Disable to completely disable the Keyguard feature until you turn it on again.
4. Select Done.
NOTE If you disabled Keyguard, you can turn Keyguard on manually by pressing Option + Power/End when the screen
is on. If you use this method, Keyguard only stays on until you press Center to turn it off; it does not come back on. To
re-enable Keyguard, follow the preceding procedure and select one of the time options from the Auto-Keyguard pick list.
92
Page 96

Locking your screen
You can set your smartphone to automatically lock the screen’s touch-sensitive features in
certain situations.
1. Press Applications and select Prefs .
2. Select Keyguard.
3. Check one of the following boxes:
Incoming calls received: Disables the screen when the phone rings. You must use the
5-way to select the onscreen Answer and Ignore buttons, or press Send to
answer the call or Power/End to ignore the call.
On a call: Disables the screen after you answer a call. You must use the 5-way to select
the onscreen buttons during the call. Use this setting to avoid accidentally pressing onscreen
buttons while you’re holding your smartphone near your ear to speak.
4. Select Done.
93
Page 97

GETTING HELP
PERFORMING A SOFT RESET
If your Palm®Treo™ 755P smartphone is not responding or you have trouble synchronizing with
your computer, a soft reset may help. All your info is retained when you perform a soft reset.
1. Press Power/End to turn off the screen.
2. Press the battery door release, and slide the battery
door downward to remove it from your smartphone.
3. Remove the battery from the battery compartment.
4. Align the metal contacts on the battery with the contacts
inside the battery compartment, insert the battery at a
45-degree angle, and then press it into place.
5. Slide the battery door onto the back of your smartphone
until it clicks into place.
NOTE If the phone and Bluetooth signals were on before a reset, these
signals automatically turn on after the reset.
94
Page 98

WHERE TO LEARN MORE
For a quick introduction
Quick Tour: The Quick Tour introduces you to many of your smartphone’s features. It is already
installed on your smartphone, and you can open it anytime. Press Applications , and then
select Quick Tour .
While using your smartphone
User Guide: The User Guide provides complete information on using your smartphone, including
descriptions of advanced features not included in this reference guide. You can find the User
Guide in the following locations:
■ On the Palm Software Installation CD.
■ On your computer, go to: www.palm.com/mypalm/755pverizon.
■ On your smartphone, press Applications , select My Treo , select the Support tab,
and then select User Guide.
Interactive User Guide: Walks you through how to move around on your smartphone, set up
features (such as voicemail and email), and perform common tasks. To view this guide, go to
www.verizonwireless.com/multimedia/mim/palm_treo755p.
Tips: Many of the built-in applications include helpful tips for getting the most out of your
smartphone. To view these tips, open an application, press Menu , select Options, and then
select Tips.
95
Page 99

Information: Many dialog boxes have a Tips icon in the upper-right corner. Select the Tips
icon to learn about the tasks you can perform in that dialog box.
Online support from Palm: For up-to-date downloads, troubleshooting, and support information,
go to
www.palm.com/treo755pverizon-support.
If you need more information
Vista users: For information on using your smartphone and desktop software with Windows
Vista, visit www.palm.com/windowsvista.
®
Books: Many books on Palm OS
devices are available in local or online book retailers (look in the
computers section), or visit www.palm.com/mypalm/755pverizon.
Online forums: Consult online user discussion groups to swap information and learn about
topics you may find nowhere else. Visit
www.palm.com/mypalm/755pverizon for details.
Customer service from Verizon Wireless: For questions about your mobile account or features,
contact Verizon Wireless technical support at 800-922-0204 or Verizon Wireless customer
service and billing at 800-256-4646.
96
Page 100

Intellectual property notices
© 2007 Palm, Inc. All rights reserved. Trademark, copyright, patent, and other intellectual
property notices are set forth on page ii within Your Palm
®
Treo™ 755P User Guide, available on
the Palm Software Installation CD.
Disclaimer and limitation of liability
Palm, Inc. and its suppliers assume no responsibility for any damage or loss resulting from the
use of this guide. Palm, Inc. and its suppliers assume no responsibility for any loss or claims by
third parties that may arise through the use of this software. Palm, Inc. and its suppliers assume
no responsibility for any damage or loss caused by deletion of data as a result of malfunction,
dead battery, or repairs. Be sure to make backup copies of all important data on other media to
protect against data loss.
Palm Take Back and Recycling Program
As part of Palm's corporate commitment to be a good steward of the environment, we strive to
use environmentally friendly materials, reduce waste, and develop the highest standards in
electronics recycling. Our recycling program keeps Palm handheld devices, Treo smartphones,
and mobile companions out of landfills by evaluating them for possible reuse and recycling.
Palm customers may participate in the recycling program free of charge. Visit
palm.com/recycle
for additional details and information about how you can help reduce electronic waste.
97
 Loading...