

Page 1
DTA INSTALLATION PROCESS & USER
GUIDE FOR CHARTER CONSUMER BULK TV
This guide is intended for owners or managers and front desk personnel.
This guide is not intended for tenants.
Customer Care 1-800-314-7195
charter.com
Thank you for choosing Charter Communications
Page 2
This document details the steps a property manager should take to install Digital Transport Adapters (DTAs). DTAs are small,
receiving SD service.
digital devices that will allow TVs to show programming delivered by Charter’s digital network. Any TVs that are not connected to
a digital device (either a DTA or other digital receiver) will not be able to view programming from Charter’s network.
DTAs that are connected to Charter’s network will remain active. However, when a DTA is disconnected from the network, it will
timeout after 30 days and require remote activation from Charter when it is reconnected to the network.
This DTA install process should take approximately 10 minutes per device. Please contact Customer Care at 1-800-314-7195 with
any questions.
PRIOR TO BEGINNING THE INSTALLATION PROCESS, ENSURE THAT YOU HAVE THESE
ITEMS FOR EACH TV:
• DTA
• RF/HDMI cable(s)
• Power cord
• Remote control
• Batteries
• Velcro
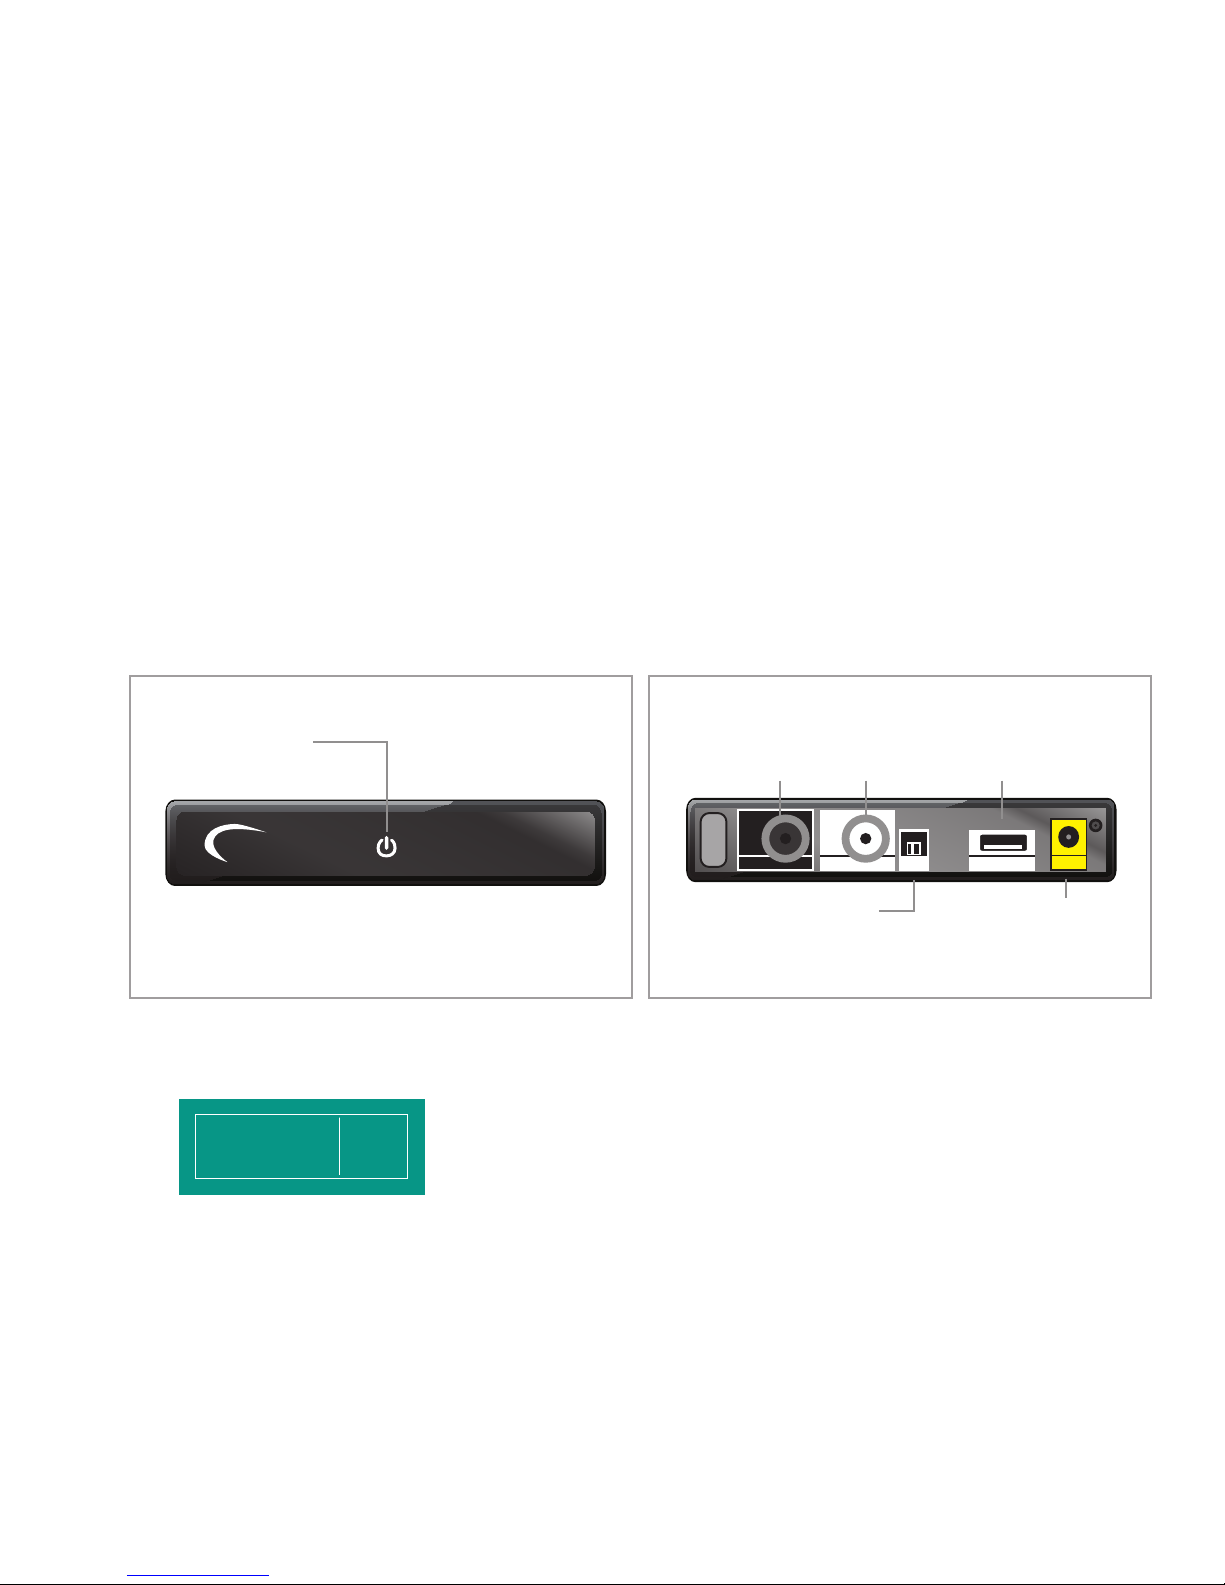
DTA Front Panel DTA Back Panel
POWER LED
Lights when your
digital adapter is fully on
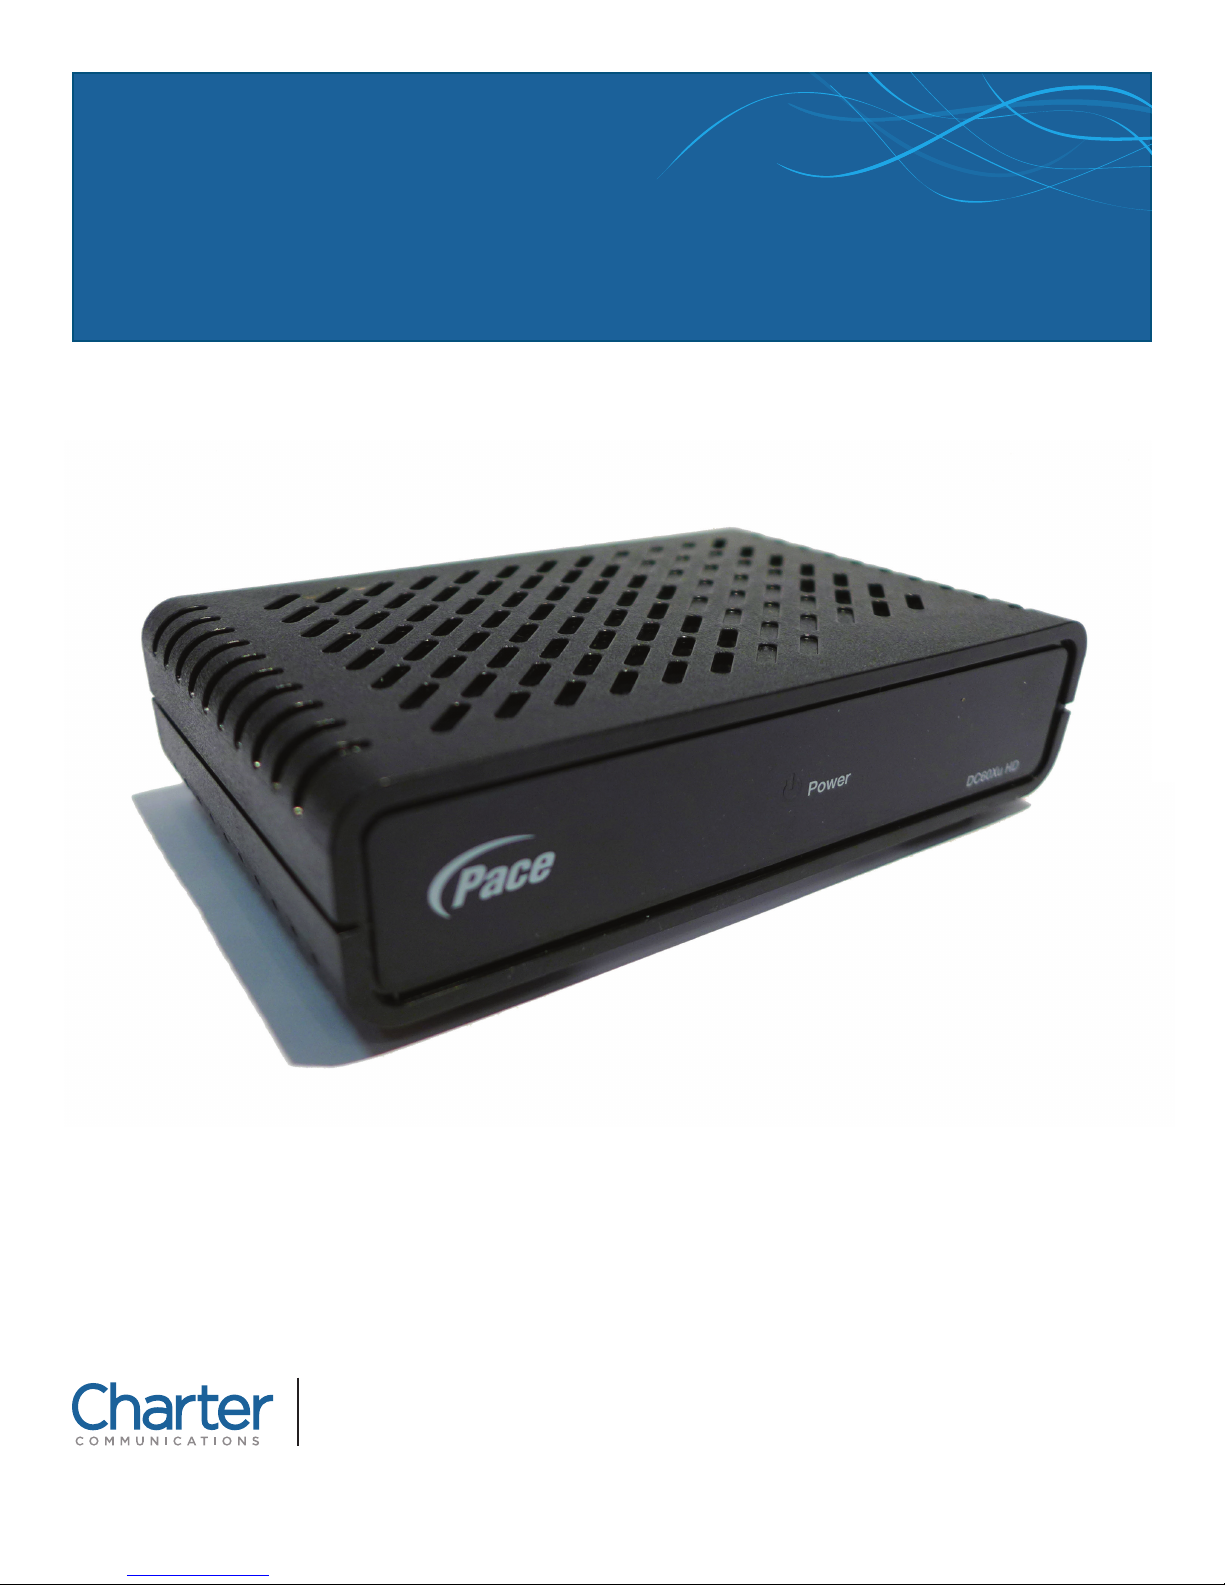
Pace
Power
DC80Xu HD
CABLE IN
From cable
service provider
CHANNEL 3/4
Switch for tuning your
digital adapter
HD service required for HD content. HDMI port can still be used for HDTVs
*
1. Connect the DTA to the Cable Outlet
a. Please write the room or unit location where the DTA is being installed on the DTA label.
Charter Equipment. Do not Room #
remove from property. Contact
Property Management for return.
b. Locate the cable that currently runs from the cable wall outlet to the back of the TV. Leave the cable connected
to the wall, but disconnect the other end from the back of the TV.
c. Reconnect this end of the cable to the “Cable In” input on the back of the DTA.
TO TV
RF output to
the TV
Ch 3/4To TVCable in
(if required)
HDMI
Video and audio output
for digital HDTV*
HDMI
POWER INPUT
Make this connection
last of all
Power
2. Connect the DTA to the TV
a. If you have an HDTV, connect the HDMI connector to the HDMI port on the back of the DTA to the HDMI input
on the back of your TV.
2Thank you for choosing Charter Communications
Page 3

b. If you have an SD or analog TV, connect one end of the 3-foot coax cable to the “To TV” input on the back of the DTA.
Power
HDMI
Ch 3/4To TVCable in
Digital Adapter
HDMI
HDTV
Supplied
RF cable
To the wall
AC outlet
Supplied
HDMI cable
From your
cable service
Connect the other end to the “Cable In/RF In” input on the back of your TV.
HDTV
HDTV
HDMI
Supplied
HDMI cable
From your
cable service
From your
cable service
Supplied
RF cable
Digital Adapter
SD or Analog TV
SDTV
RF cable
Ch 3/4To TVCable in
Ch 3/4To TVCable in
HDMI
HDMI
Power
Power
To the wall
AC outlet
Supplied
RF cable
3. Power Up
a. Connect the external power supply unit to the connector marked “Power” on the DTA.
b. Connect the other end into a power outlet surge protector.
c. If the DTA has timed out, call Charter at 1-800-314-7195 for remote activation.
i. To reactivate you will need the phone number associated with the bulk master account and the serial number
that can be found on the bottom of the DTA.
Digital Adapter
Set this switch
to Channel 3
To the wall
AC outlet
3Thank you for choosing Charter Communications
Page 4

4. Set the Channel (if using an HDTV, proceed to step 5)
a. Turn on your TV and tune it to channel 3.
b. Set the switch on the back of the DTA to channel 3.
Note: Some parts of the country use channel 4. If you do not have a picture after completing this step, you may need to
switch both your TV and the DTA to channel 4.
5. Enable RF Remote Control Pairing
a. If two AA batteries are not already in the remote control, insert them now. If the TV is not on, turn it on.
b. Press MENU on the remote control.
c. Scroll to Remote Control in the Setup Menu.
d. Scroll to RF Remote Setup (Advanced) and press OK/ENTER
OK
to enable RF remote pairing.
ENTER
Ensure you are NOT disabling the feature but enabling it.
e. Scroll to IR Remote Setup (Advanced) and press OK/ENTER
OK
to disable IR remote capabilities.
ENTER
Ensure you are disabling the feature, NOT enabling it.
6. Program the Remote Control to the DTA
a. Point the remote control toward the DTA. Press and hold SETUP
LED turns red, then release.
b. Press and release MENU rapidly (up to 5 times) until the Remote Control Pairing overlay
appears on-screen.
c. Enter the three digit code that is displayed.
d. Once the device is paired, you will see “Success!” displayed on-screen. Press OK/ENTER
to complete the process.
e. Test the remote to ensure the buttons now control the TV.
SETUP
until the All Power
OK
ENTER
7. Program the Remote Control to the TV (3 pairing options exist)
Option 1: Popular Brands Method (chart on right)
a. Manually turn the TV on.
b. Press and hold SETUP
LED blinks twice.
c. Press the TV Power button on the remote control (top left).
d. Press and hold the corresponding digit button for the TV brand.
e. Release the digit button when the TV turns o. Setup is complete.
f. Test the remote to ensure the buttons now control the TV and DTA.
Option 2: Popular Brands Method (Remote Control Manual)
a. Manually turn the TV on.
b. Press and hold SETUP
c. Find the manufacturer’s code for the TV from the Remote Control Manual supplied with the DTA.
d. Enter the first code for the brand of the TV. (A full listing of codes can be found at urcsupport.com).
e. Press the TV Power button on the remote control to test. If the TV turns o, setup is complete. If the TV
does not turn o, repeat steps 2 through 3 using the next code listed for the TV brand.
f. Test the remote to ensure the buttons now control the TV and DTA.
SETUP
on the remote control until the
SETUP
on the remote control until the LED blinks twice.
4Thank you for choosing Charter Communications
Page 5

Option 3: Code Search Method
a. Manually turn the TV on.
b. Press and hold SETUP
c. Press and hold down OK/ENTER
SETUP
on the remote control until the LED blinks twice.
OK
.
ENTER
d. Release the button when the TV turns o. Setup is complete.
e. Test the remote to ensure the buttons now control the TV and DTA.
TV Power
Cable Power
(currently
deactivated)
Guide
(currently
deactivated)
OK/Enter
Info
TV Volume Up
TV Volume Down
TV Mute
Setup
Menu
Menu Up
Menu Down
Menu Left
Menu Right
Exit
Page Up
Page Down
Channel Up
Channel Down
Last Channel
Digits 0-9
Language
(currently
deactivated)
8. Place the DTA
a. After programming the remote, place the DTA in a suitable location, observing the ventilation requirements
described in the safety information manual.
b. For your convenience, you can use adhesive fasteners (Velcro) to attach your DTA to the side or back of your TV.
CONGRATULATIONS! You’ve completed the DTA installation process. You are now ready to program the following
settings via the Menu on the remote control. A default setting for each is in place now, unless otherwise requested by the
property. In the event a setting is changed, an instruction on how to adjust each setting is also included.
CHANNEL TUNING LIST
Users can access channels using the Channel Up and DownCHbuttons on the remote control, or by entering a channel
number on the remote.
Note: A message similar to the following will appear if a user attempts to tune a channel to which your property does not subscribe. This
should only occur if your property subscribes to Limited Basic Service only, does not subscribe to HBO or does not use insertion channels.
5Thank you for choosing Charter Communications
Page 6

If a tenant would like to upgrade to additional video services he or she must call 1-888-345-7139 to subscribe to create an account
in his or her name. The resident will be responsible for returning to Charter any additional equipment he or she receives.
CLOSED CAPTIONS
Default setting for Closed Captions is preconfigured to CS1 for digital service.
(Note: Analog Services are not supported.) To access Closed Captions, press
MENU . Use the Down button to highlight Closed Captioning and press
OK/ENTER
OK
. Use the Directional
ENTER
buttons or follow the on-screen
navigation to turn On or O.
AUDIO LANGUAGE
Default setting for Audio Language is “English”. To change the language setting,
press MENU . Use the Down button to highlight Audio Language and
press OK/ENTER
OK
. Use the Directional
ENTER
buttons to follow the on-screen
navigation and change the Audio or Menu language.
Note: Not all programming is available in an alternate language. If the audio is changed
from English, and alternate audio is not available, there may be no audio present.
HDMI (APPLIES ONLY TO HDTVs CONNECTED VIA HDMI CABLE)
Default setting for HDMI will either be "Auto", or the installer will configure it to
match the highest resolution allowed by the TV. The device will automatically
configure the best HDMI resolution to be compatible with the TV. To adjust the
HDMI resolution, press MENU . Use the Down button to highlight HDMI
Setup and press OK/ENTER
OK
. Choose the preferred option.
ENTER
If the property subscribes to Standard Definition service, all channels should be in full-screen format. HD channels will come
in a letterbox format (black bars on top and bottom). If this is not correct on the TV, modify the Aspect Ratio setting to 4:3 and
check again.
If a resident has an HDTV but the property subscribes to the Standard Definition package, all HD channels should be in a
pillar-box format (black bars on the left and right), but SD channels will remain in full-screen format. To modify these settings,
check the TV settings for stretched, zoom, or crop options.
If the property has HDTVs and subscribes to the HD package, all SD channels will be in a pillar-box format (black bars on the
left and right). All HD channels should be full screen in a 16:9 format. If not, modify the Aspect Ratio setting to 16:9.
Note: All Aspect Ratio modifications take 10 seconds before change is completed.
OUTPUT RESOLUTION (HDTVs ONLY)
Default setting for Screen Format is “Auto”. To select another format, press MENU . Use the Down button to highlight
HDM1 Setup and press OK/ENTER
OK
. If you do not have an HDTV, this will always default to “Auto” and will not provide
ENTER
additional options.
CHANNEL LOCKS
Default for Channel Locks is "O". Charter does not recommend changing this setting.
Important Note: If a tenant sets a Channel Lock PIN through the Menu, a call to Charter will be required in order to reset it. Should this
occur in one or more units at your property, please have an authorized sta member call Charter at 1-800-314-7195 and request a
"PIN reset". The Charter representative will need the unit number where the impacted device is located. After the reset, if you are prompted
to enter a PIN, please use "0000" and turn Channel Locks "O". There is no need to set a new PIN.
6Thank you for choosing Charter Communications
 Loading...