

Page 1

Instruction Booklet
12 CUP COFFEE MAKER
Manuel
d’hstructions
CAFETlfRE DE 2,9 LITRES
Manual de Instrucciones
CAFETERA DE 2.9 LITROS
Manual de Instrucbes
CAFETEIRA
ELETRICA PARA
2,9 LITROS
Page 2

l
Do not use this appliance for other than intended use.
WARNING - To avoid breakage of, or injury
from glass carafe, follow these precautions:
l
Do not set a hot carafe on a wet or cold surface.
l
Do not place hot carafe on or near paper, cloth or other
flammable material.
l
This carafe is designed for use with this coffee maker only.
l
Never use the carafe on a range top or in a conventional microwave oven.
l
Do not allow liquid to evaporate from carafe. Do not heat carafe
when empty.
l
Do not move entire unit when carafe contains hot liquid.
l
Use the lid on the glass carafe while brewing and pouring coffee.
l
Discard carafe if damaged in any manner, or a carafe having a loose or
weakened handle. A chip or crack could result in breakage or contaminate
liquid contents with glass particles.
l
Do not clean carafe with scouring powders, steel wool pads
or other abrasive materials.
l
This carafe is designed for use with this coffee maker only.
No User Maintenance. Return to Service Station.
This Unit for Household Use Only
Page 3

SAFETY FEATURES
l
A short power supply cord is provided to reduce the hazards resulting from
entanglement or tripping over a longer cord.
l
An extension cord may be used if care is exercised in its use.
l
If an extension cord is used, the marked electrical rating of the extension cord should be
at least as great as the electrical rating of the appliance. The extension cord should be
arranged so that it does not drape over the counter or table-top where it can be pulled
on by children or tripped over accidentally. The electrical rating of the coffee maker is
listed on the bottom panel of the unit.
. This appliance has a polarized alternating current plug (one blade is wider than the
other). To reduce the risk of electric shock, as a safety feature, this plug will fit in a
polarized outlet only one way. If the plug does not insert fully in the outlet, reverse the
plug. If it still fails to fit, contact a qualified electricianm replace the obsolete outlet,
DO NOT ATTEMPT_JLDEFEAT THIS SAFETY FEATURE.
Water Reservoir
Filter
Door
Pause & Serve
6
Water Window
&-
Carafe Lid
.On Light
~&-$.&-Power
Button
Page 4
FEATURES
. P-Hour Automatic Shut-Off
For safety, the OsteP coffee maker has been designed with an auto shut-off feature,
The coffee maker shuts off automatically 2 hours after brewing cycle is complete,
in both the regular and auto-start modes. To restart simply press the Power Button
until On Light illuminates.
l
Pause 81 Serve
Allows you to interrupt the brewing cycle and pour a cup of coffee before the entire
carafe is finished brewing. To restart the brewing process, return carafe to warming plate
and coffee will automatically begin flowing through filter basket. Make sure carafe is
placed all the way on the warming plate.
CAUTION:OONOTREMOVECARAFEFORLONGERTHAN30 SECONDS
ORTHEFILTER
BASKETMAYOVERFLOW.
l
Cup Select
Rich, flavorful coffee, every time! When brewing 1-3 cups, the Small Quantity Setting
extends the brew cycle and allows the water to saturate the grounds longer, maximizing
flavor while eliminating a watered-down taste.
l Water Window
Large easy-to-read numbers indicate how many cups of water have been poured
into the coffee maker.
. On Light
On Light lets you know when the coffee maker is on for safe operation.
l
Flavor Seal
Carafe lip and lid seal to help preserve the coffee’s natural flavor and temperature by
preventing excessive evaporation.
l
Easy-Pour Carafe
Uniquely designed carafe with all-around lip and traditional pour spout allows
you to conveniently pour from any side. Easy to grip handle for added comfort.
Cup markings on each side of the handle make it easier to measure the water level
when filling the carafe.
l
Non-Stick Warming Plate
Makes clean-up easy.
. Cord Storage
Hidden cord storage allows you to hide excess cord for neat appearance.
l
Swing Away Basket
Filter door swings for convenient filling.
l
Black Lined Cone Filter Basket
Cone-shaped filter basket enriches flavor and prevents bitter taste. Black lining
helps to hide stains. A standard #4 cone-shaped filter must be used.
Page 5

HOW TO USE YOUR OSTER COFFEEMAKER
PREPARING YOUR COFFEE MAKER FOR USE
l
Carefully unpack the coffee maker and remove all packaging materials.
l
Before making coffee in your new
Oster@
coffee maker, thoroughly clean the carafe,
carafe lid and filter basket with warm, soapy water. Rinse and dry. Do not use harsh
or abrasive cleaners.
l
You may wipe the warming plate with a clean, damp cloth. However, do not immerse
the coffee maker in water or other liquid.
l
Prior to brewing your first pot of coffee, operate coffee maker once or twice with water
but without ground coffee or a paper filter. This will remove any dust that may have
settled inside the coffee maker which might affect the flavor of coffee.
IMPORTANT: Use cold water for best results.
USING YOUR COFFEE MAKER’S CONTROLS
l
On Light - This button indicates that power is going to the coffee maker,
and the coffee maker is in normal operating stage.
. Power Button - This button controls three power modes: ON/OFF/AUTO.
The OFF mode does not have a light indicator.
BREWING SMALL AMOUNTS
When making 1-3 cups of coffee, press Cup Select Button. The Small Quantity
Light will illuminate.
PREPARING COFFEE MAKER FOR BREWING COFFEE
l
Place your OsteP coffee maker on a flat, level surface away from any edge.
l
Plug the unit into a 120 volt 60Hz AC only outlet.
l
The lid of the glass carafe must be placed properly onto the carafe during
the brewing process and the carafe must be set on the warming plate.
l
The filter basket door must be properly closed during brewing process.
CAUTION: If the filter basket door is not completely closed,
the Pause & Serve feature will not function properly.
It could cause hot water or hot coffee to overflow.
Page 6

FILLING THE WATER RESERVOIR
l
Open the hinged water reservoir cover located
at the top of the coffee maker. Fill the glass
carafe with the desired amount of cold water,
Empty the water from the carafe into the water
reservoir. The water window indicates how
much water is in the container. Close the
hinged lid. Place the glass carafe with the lid
in place on the warming plate.
NOTE: The amount of brewed coffee after the
brewing process will always be slightly
less than the amount of water placed into
the coffee maker, since some water is
absorbed by the coffee grounds and
filter. Add a little extra water at the
beginning so that you have the exact
number of cups desired.
PUTTING IN THE COFFEE
l
Swing the filter basket door outward to
your right. Lift out the removable filter basket,
Insert a #4 cone-shaped filter into the
filter basket.
l
A permanent filter may be used instead of
or in addition to the paper filter. Fill the
permanent filter with the required amount
of coffee. After brewing cycle, empty the
grounds and rinse thoroughly with water,
l
Place the desired amount of ground coffee
into the filter. According to coffee industry
standards, use one standard coffee measure
(2 level tablespoons) of grounds for each
six ounces of water. After using your coffee
maker several times, the amount of coffee
may be adjusted to suit your particular taste,
by decreasing or increasing the amount of
coffee used.
NOTE: Be sure to use coffee grounds prepared specifically
for automatic drip coffee makers.
Page 7

l
Return the filter basket with the filled filter to the door. Be sure the filter basket is seated
properly in the door. Swing the door closed and snap into place.
CAUTION:
Do not operate your coffee maker if the door does not close completely. If the
door does not close completely, check to see that the filter basket is properly
sealed, and snap door into place.
l
Press the Power Select Button. Auto Start Light will go on. Press the Power Button
again, then the ON Light will go on indicating that the coffee maker has begun the
brewing cycle. In a few minutes the coffee maker will complete the brewing cycle and
switch over to the warming mode which will keep the coffee hot for two hours.
l
Press the Power Select Button to OFF when the carafe is empty or when the coffee maker
is not in use.
HINTS FOR GREAT TASTING COFFEE
l
A clean coffee maker is essential for making great tasting coffee. Regular cleaning, as
specified in “Cleaning Your Coffee Maker,” is highly recommended.
l
Always use fresh, cold water in your coffee maker.
l
Fine grind coffee promotes fuller extraction and provides rich, full-tasting coffee.
Regular grind will require slightly more coffee per cup to provide the strength
of a finer grind.
l
Store coffee in a cool, dry place. Once coffee has been opened, keep it tightly sealed in
the refrigerator to maintain freshness.
l
For optimum coffee, buy whole beans and grind them finely just before brewing.
l
Do not re-use coffee grounds since this will greatly impair coffee flavor.
l
Reheating coffee is not recommended. Coffee is at its peak flavor immediately
after brewing.
l
Small oil droplets on the surface of brewed black coffee is due to the extraction of oil
from the coffee grounds. Oiliness may occur more frequently if heavily roasted coffees
are used. Over-extraction may also cause oiliness, indicating a need to clean your
coffee maker.
RECOMMENDED AMOUNT OF COFFEE
Number of Cups Ground Coffee
2
2 Tbs. - 4 Tbs. (1-2 scoops)
4
4 Tbs. - 8 Tbs. (2-4 scoops)
6
6 Tbs. - 12 Tbs. (3-6 scoops)
8
8 Tbs. - 16 Tbs. (4-8 scoops)
10
10 Tbs. - 20 Tbs. (5-10 scoops)
12
12 Tbs. - 24 Tbs. (6-l 2 scoops)
Page 8

CLEANING YOUR COFFEE MAKER
CAUTION:
Always make sure coffee maker is unplugged and warming plate is cool before
attempting to clean. To protect against electric shock, do not immerse cord,
plug or unit in water or other liquid.
l
The outside of your coffee maker can be cleaned by wiping the surface with a damp,
soft cloth.
IMPORTANT:
Never immerse the coffee maker in water or other liquid.
l
Glass carafe, carafe lid and removable filter basket may be washed with warm, soapy
water, or placed in the top rack of the dishwasher. Do not place any other parts of the
coffee maker in the dishwasher,
l
Do not clean the inside of the water reservoir with a cloth as the cloth may have a lint
residue that could clog the coffee maker.
l
For stubborn stains, use a nylon or plastic pad with a non-abrasive cleanser. Do not use
metal scouring pads or abrasive cleansers.
l
Calcium deposits may build up in the coffee maker as a result of minerals commonly
found in drinking water. The build-up is normal and may result in a slow-down of the
coffee maker’s brewing time. The slow-down can be eliminated by periodically
decalcifying the coffee maker.
l
To decalcify, fill the carafe with cold water and two tablespoons of white vinegar. Pour the
solution into the water reservoir, then close the lid. Place the carafe on the warming plate
and allow the coffee maker to brew the vinegar solution. While decalcifying, do not use a
filter in the filter basket. When the vinegar solution has finished brewing, empty the
carafe and rinse it out with cold water. Refill the water reservoir with cold water only and
run another brew cycle to remove any remaining vinegar solution. Repeat if necessary.
Page 9

TROUBLE-SHOOTING THE COFFEEMAKER
Potential Problems Probable Cause
ON
LIGHTDOESN'TILLUMINATE
l Unplugged
l Power outaae
COFFEEISNOTBREWING
l Unplugged
l Power outage
l The water reservoir is empty;
check water window
l The filter basket door is not
properly closed
l Carafe is not placed all the way
on the warming plate
COFFEE MAKER ONLYBREWSWATER
l
No groundsinfilterbasket
COFFEEMAKERBREWSSLOWLY
l Coffee maker needs decalcifying
FILTERBASKETOVERFLOWS
l The filter basket door is not
properly closed
l Carafe is not placed all the way
on the warming plate
l Carafe was removed from warming
BURNING COFFEESMELL
plate longer than 30 seconds
l Empty carafe was left on hot
warming plate
l Coffee was spilled on a
warming plate
COFFEEISNOTHOT
l Power outage
l 2-hour automatic shut-off
was activated
COFFEETASTESBAD
l Coffee grounds other than for
automatic drip coffee maker
were used
l Grounds-to-water ratio
was unbalanced
QUESTIONS? You can call us toll-free at I-800-986-0008
Page 10

1YEARLIMlTEDWARRANTY
Sunbeam Products Inc. warrants that, for a period of one year from date of purchase, this
product shall be free of mechanical and electrical defects in material and workmanship.
Our obligation hereunder is limited to repair or replacement, at manufacturer’s option,
of this product during the warranty period, provided that the product(s) purchased in the
United States are sent postage prepaid directly to:
SUNBEAM APPLIANCE SERVICE STATION
117 Central Industrial Row
Purvis, MS 39475
Answers to questions regarding this warranty or your nearest U.S.A. authorized service
location may be obtained by calling toll free l-800-597-5978 or by writing to Sunbeam
-
Consumer Affairs at P.O. Box 948389, Maitland, Florida 32794-8389.
For products purchased in Canada please return call to:
SUNBEAM APPLIANCE SERVICE STATION (KND)
1-800-667-86231or email us at
consumeraffairs@consumer.sunbeam.com
Answers to questions regarding this warranty or your nearest Canadian authorized service
location may be obtained by calling toll free in Canada I-800-667-8623.
For warranty information or an authorized service location outside of the United States
and Canada please see the warranty service card inserted in the product packaging.
DO NOT RETURN THIS PRODUCT TO THE
PLACE OF PURCHASE; DOING SO MAY DELAY THE
PROCESSING OF YOUR WARRANTY CLAIM.
This warranty does not cover normal wear of parts or damage resulting from any of the
following: negligent use or misuse of the product, use on improper voltage or current, use
contrary to operating instructions, or disassembly, repair or alteration by any person other
than authorized by the service center. Product repair or replacement as provided under this
warranty is your exclusive remedy. Sunbeam Products Inc. shall not be liable for any
incidental or consequential damages for breach of any expressed or implied warranty
on this product. Except to the extent prohibited by applicable law, any implied warranty of
merchantability or fitness for a particular purpose on this product is limited in duration to
the duration of the above warranty. Some states and provinces do not allow the exclusion
or limitation of incidental or consequential damages, or allow limitation on how long an
implied warranty lasts, so the above limitations or exclusion may not apply to you. This
warranty gives you specific legal rights, and you may also have other rights which vary
state to state or province to province.
Page 11

Lors de I’utilisation d’appareils electriques, pour reduire le risque d’incendie,
electrocution
et/au
blessures personnelles, toujours prendre les precautions
necessaires, incluant
celles qui suivent:
l Lisez toutes les directives attentivement.
l Eviter de toucher les surfaces chaudes. Utiliser les manivelles
ou les interrupteurs.
l Pour vous proteger des risques d’electrocution, ne plongez jamais
le cordon, ou la cafetiere dans
l’eau ou tout autre liquide.
l Faites particulierement attention lorsque I’appareil est utilise par, ou en
presence d’enfants.
l Debrancher I’appareil lorsqu’il nest pas utilise, laissez refroidir avant d’y
placer ou y retirer des pieces et avant de le nettoyer.
l Ne pas faire fonctionner un appareil dont le
fil
ou la fiche est endommage
ou
apres que I’appareil
ait
mal fonctionne,
qu’il ait ete
echappe ou
endommage d’une
facon quelconque. Retourner I’appareil au centre de
service
autorise pour fin de verification ou reparation.
l L’utilisation d’accessoires non recommandes par
Oster@
peut causer des
blessures.
l Ne pas I’utiliser
a
I’exterieur.
l Ne pas laisser le
fil
pendre de la table ou d’un comptoir et eviter
qu’il
touche a une surface chaude.
l Ne pas placer sur ou pres d’un poele chaud ou dans un four chaud.
8 Branchez toujours le cordon dans la prise murale avant de mettre toute
commande
sous tension. Pour debrancher, mettez le commutateur de
marche-arret hors tension (a la position OFF), puis retirez la fiche de la
prise
murale.
l Preparez toujours le cafe
a
partir d’eau froide. L’eau chaude et les autres
liquides peuvent endommager la cafetiere.
l L’echaudage peut se produire si le couvercle est enleve durant I’infusion.
l Ne pas utiliser la cafetiere autre que pour son utilisation intentionnelle.
Page 12

AVERTISSEMENT - Afin d’éviter tout bris de la carafe en verre et
ainsi tout risque de blessure,
prenez les précautions suivantes:
l Ne déposez jamais une carafe chaude sur une surface froide ou mouillée.
l Tenez toujours une carafe chaude éloignée du papier, du tissu et d’autres
matériels inflammables.
l Cette carafe est conçue pour être utilisée exclusivement
avec cette cafetière.
l N’utilisez jamais la carafe sur le dessus d’une cuisinière ou dans un four
micro-ondes ordinaire.
l Évitez de laisser le liquide s’évaporer de la carafe. Ne faites jamais chauffer
une carafe vide.
l Évitez de déplacer l’appareil complet pendant que la carafe contient du
liquide chaud.
l Gardez le couvercle sur la carafe en verre lorsque vous préparez ou versez
du café.
l Mettez au rebut une carafe endommagée d’une quelconque façon ou dont
la poignée est affaiblie ou branlante. Un éclat, une écaillure, une fente ou
une fissure peut produire un bris ou contaminer le contenu de particules
de verre.
l Ne pas nettoyer la carafe avec des recurants abrasifs.
Aucun Entretien Nécessaire de la Part de I’UtiUsateur. Retournez à l’Atelier de Service.
Pour Usage Domestique Seulement
Page 13

MESURESDESiCURITi
l L’appareil est livre avec un cordon d’alimentation court pour reduire les risques
d’enchevetrement ou de trebuchement accidentel.
l Si necessaire, utiliser une rallonge electrique, en faisant preuve de precaution.
l La capacite electrique nominale de la rallonge devra
etre
au minimum egale a la
puissance electrique nominale de I’appareil. Placer le cordon d’alimentation de maniere
a ce
qu’il
ne pende pas du comptoir ou de la table, oti il pourrait
etre
accessible aux
enfants ou provoquer un trebuchement par inadvertance. Les valeurs electriques
nominales de la cafetiere figurent sur le panneau inferieur de I’appareil.
l Cet appareil est dote
dune
fiche polarisee (une broche est plus large que I’autre). Pour
reduire le risque de choc electrique, cette fiche ne va que dans un sens seulement sur
une prise de courant polarisee. Si la fiche ne s’enfonce pas compktement dans la prise,
la retourne et essayer de nouveau. Si elle ne s’adapte toujours pas a fond, consulter un
electricien qualifie.
VElLLEZI\RESPECTERLESMESURESDESiCURIT~DELAPRlSEPDLARIS~E.
Portillon
du
Panier
Filtreur-
II
II
Ill II
1~1
Niveau
d’Eau
Actionneur de la
Fonction
Pause
et Service
Compartiment
d’Entreposage
moin lndicateur de
seSous
Tension
ombre de Tasses
Page 14

CARACTÉRISTIQUES
l
Mise à I’Arrêt Automatique 2 Heures
Pour des raisons de sécurité, la cafetière
Oster@
intègre une mise à l’arrêt automatique.
Son fonctionnement s’arrête automatiquement 2 heures après la fin du cycle de
préparation, tant en mode ordinaire qu’en mode de mise en marche automatique.
Pour relancer le cycle, appuyez sur le commutateur de marche-arrêt jusqu’à ce
que s’allume le témoin indicateur de mise sous tension.
l
Fonction Pause et Service
Cette fonction vous permet d’interrompre le cycle de préparation et de verser une tasse
de café avant que se termine la préparation du contenu entier de la carafe. Pour relancer
le cycle de préparation, redéposez la carafe sur la plaque réchaud, et le café se remettra
automatiquement à couler au travers du panier filtreur. Assurez-vous de poser la carafe
au complet sur la plaque réchaud.
ATTENTION: NE RETIREZ PAS LA CARAFE PLUS DE 30 SECONDES,
SINON LE PANIER FILTREUR POURRA DÉBORDER.
l
Choix du Nombre de Tasses
Un café toujour riche et savoureux! Lors de la préparation de 1 à 3 tasses,
le Mode Petite Quantité allonge la durée d’infusion et permet à l’eau d’imbiber
la mouture plus longtemps pour en extraire un maximum de saveur et éviter que la café
ait un goût dilué.
l
Visière de Vérification du Niveau d’Eau
Des chiffres de grande dimension faciles à lire indiquent le nombre de tasses
de café qu’on a versées dans la cafetière,
. Témoin Indicateur de Mise Sous Tension
Le témoin indicateur de mise sous tension vous signale que la cafetière est en marche,
pour assurer un fonctionnement sécuritaire.
l
Garde-Saveur Étanche
L’étanchéité du bec verseur et du couvercle de la cafetière préserve la saveur et
la température naturelles du café en prévenant une évaporation excessive.
l
Carafe Verseuse Intégrale
La carafe de conception unique avec pourtour verseur universel en plus du bec verseur
classique vous permet de verser commodément de tous les côtés. Une poignée facile à
agripper assure un maniement tout confort. Les marques de graduation de tasses de chaque
côté de la poignée facilite la mesure du niveau d’eau durant le remplissage de la carafe.
l
Plaque Réchaud Anticollante
Facilite le nettoyage.
l
Compartiment d’Entreposage du Cordon
Le compartiment dissimulé pour l’entreposage du cordon vous permet de cacher
la longueur superflue de cordon pour assurer une apparence soignée.
Page 15

l
Panier Articulé à Battant
Le portillon du panier filtreur se déplace de côté pour faciliter le remplissage.
l
Panier Filtreur Conique à Garniture Noire
Le panier filtreur de forme conique enrichit la saveur et prévient le goût âpre.
La garniture noire aide à dissimuler les taches. II faut utiliser un filtre conique
No
4 normal.
MODED'EMPLOIDEVOTRECAFETIÈREOSTER
PRÉPARATION DE VOTRE CAFETIÈRE EN VUE DE SON UTILISATION
l
Déballez soigneusement la cafetière et enlevez tous matériaux de conditionnement.
l
Avant de préparer du café dans votre nouvelle cafetière Oster? nettoyez la carafe,
son couvercle et le panier filtreur à fond avec de l’eau chaude savonneuse.
Rincez et asséchez le tout. N’utilisez aucun nettoyant fort ou abrasif.
l
Vous pouvez essuyer la plaque réchaud à l’aide d’un chiffon propre et humide.
Cependant, évitez d’immerger la cafetière dans de l’eau ou tout autre liquide.
l
Avant de préparer votre première carafe de café, faites fonctionner la cafetière une
ou deux fois avec de l’eau mais sans café moulu ni filtre à papier. Cela évacuera toute
poussière ou saleté qui ait pu s’infiltrer ou même s’accumuler dans la cafetière et qui
pourrait altérer le goût du café.
IMPORTANT: Utilisez de l’eau froide pour obtenir de meilleurs résultats.
UTILISATION DES COMMANDES DE VOTRE CAFETIÈRE
*Témoin
Indicateur de Mise Sous Tension -Le témoin indicateur de mise sous
tension vous signale que la cafetière est en marche, pour assurer un fonctionnement
sécuritaire.
l
Commutateur de Marche-Arrêt-Ce bouton commande les trois modes
de fonctionnement: sous tension, hors tension, et automatique. Le mode hors tension ne
correspond à aucun témoin indicateur.
PRÉPARATION DE PETITES QUANTITÉS
Lorsque vous préparez de 1 à 3 tasses de café, appuyez sur le bouton
de sélection du nombre de tasses.
PRÉPARATION DE LA CAFETIÈRE POUR PRÉPARER LE CAFÉ
l
Posez votre cafetière Oster@ sur une surface plane de niveau en l’éloignant des rebords.
l
Branchez l’appareil à une prise murale de ca. 120 volts 60Hz seulement.
l
Durant le processus de préparation, le couvercle de la carafe de verre doit absolument
reposer convenablement sur la carafe, et celle-ci sur la plaque réchaud.
l
Le portillon du panier filtreur doit absolument rester convenablement fermé durant
le processus de préparation.
ATTENTION: Si le portillon du panier filtreur
n’estpas
complètement fermé,
le dispositif Pause et Service ne fonctionnera pas adéquatement.
Cela peut provoquer le débordement d’eau ou de café bouillants.
Page 16

REMPLISSAGEDURÉSERVDIRÀEAU
l
Ouvrez le couvercle du réservoir à eau à battant,
situé sur le dessus de la cafetière. Remplissez
la carafe en verre de la quantité désirée d’eau
froide et vider celle-ci dans le réservoir à eau.
La visière de vérification du niveau d’eau
indique la quantité d’eau présente dans le
conteneur. Refermez le couvercle à battant.
Posez la carafe en verre avec le couvercle en
place sur la plaque réchaud.
NOTA:
La quantité de café produit par le
processus de préparation sera toujours
légèrement inférieure à celle d’eau qu’on
aura versée dans le réservoir, puisque
le café moulu et le filtre absorbent
toujours un peu d’eau. Ajoutez un
peu d’eau supplémentaire au début
de façon à obtenir le nombre exact
de tasses désiré.
AJOUT DU CAFÉ
l
Déplacez le portillon du panier filtreur vers
l’extérieur à droite. Levez et retirez le panier
filtreur amovible. Insérez un filtre conique
N” 4 dans le panier filtreur.
l
Vous pouvez utiliser un filtre permanent au lieu
ou en plus du filtre à papier. Remplissez le filtre
permanent de la quantité requise de café.
Une fois le cycle de préparation terminé, jetez
le café moulu et rincez à fond à l’eau courante.
l
Placez la quantité désirée de café moulu dans
le filtre. Selon les normes de l’industrie du café,
utilisez une mesure normale de café (deux
cuillers à table rases) de café moulu par 186 g
(6 oz.) d’eau. Une fois que vous aurez utilisé
votre cafetière plusieurs fois, vous pouvez
régler la quantité de café à votre goût individuel
en augmentant ou en diminuant la quantité
de café ajouté.
e
NOTA: Veillez à utiliser du café moulu expressément préparé
pour les cafetières automatiques à égouttement.
Page 17

l
Retournez le panier filtreur avec le filtre rempli au portillon. Assurez-vous de bien
appuyer le panier filtreur dans le portillon. Refermez le portillon et encliquetez en place.
ATTENTION: Ne faites pas fonctionner la cafetière si le portillon ne se ferme pas
complètement. Dans un tel cas, assurez-vous de bien appuyer le panier
filtreur et encliquetez le portillon en place.
l
Appuyez sur le commutateur de marche-arrêt. Le témoin indicateur de mise sous
tension s’allumera pour signaler que la cafetière a lancé le processus de préparation.
Dans quelques minutes, elle terminera le cycle de préparation et passera en mode
réchaud afin de garder le café chaud durant deux heures.
l
Mettez le commutateur de marche-arrêt hors tension (OFF) lorsque la carafe
est vide ou lorsque vous ne vous servez pas de la cafetière.
TRUCS POUR UN CAFÉ SUCCULENT
l
Une cafetière propre est essentielle à un café délicieux. Nous recommandons fortement
un nettoyage périodique tel que le spécifie la section
<<Nettoyage
de votre cafetière)).
l
Utilisez toujours de l’eau froide dans votre cafetière.
l
Une mouture fine favorise une extraction plus complète et un café de goût riche
et robuste. Une mouture ordinaire nécessitera légèrement plus de café par tasse
pour produire la richesse d’une mouture plus fine.
l
Entreposez le café dans un endroit frais et sec. Une fois le café ouvert, gardez-le
hermétiquement fermé au réfrigérateur afin d’en préserver la fraîcheur.
l
Pour obtenir une saveur optimale, achetez des grains entiers et faites-les moudre
fin juste avant de le préparer.
l
Ne réutilisez jamais du café moulu: cela peut grandement altérer la saveur du café.
l
Nous déconseillons de réchauffer du café. La saveur est la meilleure immédiatement
après la préparation.
l
La présence de fines gouttelettes d’huile à la surface de café noir fraîchement préparé
provient de l’extraction d’huile des grains de café. L’utilisation de cafés fortement
torréfiés pourra augmenter la fréquence de l’apparition de telles gouttelettes,
Une surextraction pourra causer un goût huileux, indiquant la nécessité d’un
nettoyage de la cafetière.
QUANTITÉ RECOMMANDÉE DE CAFÉ
Nombre de Tasses Café Moulu
2
De 2 à 4 cuillers à table
(1 à 2 mesures pleines)
4
De 4 à 8 cuillers à table (2 à 4 mesures pleines)
6
De 6 à 12 cuillers à table
(3 à 6 mesures pleines)
8
De 8 à 16 cuillers à table (4 à 8 mesures pleines)
10
De 10 à 20 cuillers à table (5 à 10 mesures pleines)
12
De 12 à 24 cuillers à table (6 à 12 mesures pleines)
Page 18

NETTOYAGE DE VOTRE CAFETIÈRE
ATTENTION:
Assurez-vous toujours que la cafetière est débranchée et la plaque réchaud
fraîche au toucher avant de tenter un nettoyage. Pour éviter tout risque de
choc électrique, n’immergez jamais le cordon, la fiche, ou l’appareil dans de
l’eau ou autre liquide.
l
Vous pouvez nettoyer l’extérieur de la cafetière en essuyant sa surface à l’aide d’un
chiffon doux humide.
IMPORTANT:
N’immergez jamais la cafetière dans de l’eau ou autre liquide.
l
Vous pouvez laver la carafe en verre, son couvercle, et le panier filtreur amovible dans de
l’eau chaude savonneuse ou les placer sur le tiroir supérieur du lave-vaisselle. Évitez de
placer quelque autre partie de la cafetière dans le lave-vaisselle.
l
Pour nettoyer le filtre permanent, jetez le café moulu et rincez à fond.
l
Évitez d’utiliser un chiffon pour nettoyer l’intérieur du réservoir: le chiffon peut laisser un
résidu de peluche qui peut boucher la cafetière.
l
Pour éliminer les taches rebelles, servez-vous d’un tampon en plastique ou en nylon et
d’un nettoyant non abrasif. N’utilisez jamais de tampon à
récurrer
métallique ou de
nettoyant abrasif.
l
Des dépôts de calcaire peuvent se former dans la cafetière en raison des minéraux
généralement présents dans l’eau potable. Ces dépôts sont normaux et peuvent entraîner
un ralentissement du processus de préparation de la cafetière. Vous pouvez éliminer ce
ralentissement en décalcifiant périodiquement la cafetière.
l
Pour décalcifier la cafetière, remplissez-la d’eau froide et de deux cuillers à table de
vinaigre blanc. Versez cette solution dans le réservoir à eau et fermez le couvercle. Posez
la carafe sur la plaque réchaud et laissez la cafetière préparer la solution vinaigrée.
Durant cette opération de décalcification, n’utilisez aucun filtre dans le panier filtreur.
Une fois terminée la préparation de la solution vinaigrée, videz la carafe et rincez-la à
l’eau froide. Réemplissez le réservoir à eau avec de l’eau froide seulement et mettez en
marche un autre cycle de préparation afin de purger toute solution vinaigrée restante.
Répétez au besoin.
Page 19
REPÉRAGE D’ANOMALIES
Problèms Potentiels
LE TÉMOIN INDICATEUR DE MISE
SOUS TENSION NE S’ALLUME PAS
LECAFÉNESEPRÉPAREPAS
Cause Probable
@Appareil débranché.
*Panne d’électricité.
. Appareil débranché.
l
Panne d’électricité.
l
Réservoir à eau vide; examinez
la visière de vérification du
niveau d’eau.
l
Le portillon du panier filtreur
n’est pas fermé convenablement.
l
La carafe n’est pas placée au
complet sur la plaque réchaud.
LA CAFETIÈRE NE PRODUIT QUE DE L’EAUl Aucun café moulu dans le
panier filtreur.
LA PRÉPARATION SE FAIT TRÈS LENTEMENT . La cafetière doit se faire décalcifier.
LE PANIER FILTREUR DÉBORDE
l
Le portillon du panier filtreur n’est
pas fermé convenablement.
l
La carafe n’est pas placée au
complet sur la plaque réchaud.
l
On a retire la carafe de la plaque
réchaud plus de 30 secondes.
ODEUR DE CAFÉ BRÛLÉ
l
On a laissé une carafe vide sur
la plaque réchaud chaude.
l
Café renversé sur la plaque
réchaud chaude.
LE CAFÉ N’EST PAS CHAUD
l
Panne d’électricité.
l
La mise à l’arrêt automatique
2 heures s’est actionnée.
LE CAFÉ A MAUVAIS GOÛT
l
On a utilisé une mouture de café
autre que pour une cafetière
automatique à égouttement.
l
Rapport café-eau déséquilibré.
Page 20

1
AN DE GARANTIE LIMITÉE
Sunbeam Products Inc. garantit que pour une période de un an à compter de la date d’achat,
ce produit ne présentera aucun vice mécanique ou électrique, matériel ou de fabrication.
Notre obligation ci-après se limite à la réparation ou au remplacement de ce produit au choix
du fabricant durant la période de couverture de la garantie, pourvu qu’on envoie
le(les) produit(s)
acheté(s) aux États-Unis, par la poste, port payé, directement à l’adresse suivante:
SUNBEAM APPLIANCE SERVICE STATION
117 Central Industrial Row
Purvis, MS 39475
En cas de questions ou pour obtenir des renseignements à propos de cette garantie ou du bureau
de service après-vente agréé de votre région aux États-Unis, appelez sans frais d’interurbain le
l-800-597-5978 ou écrivez à l’adresse suivante Sunbeam - Consumer Affairs en P.O. Box 948389,
Maitland, Florida 32794-8389.
En ce qui concerne les produits achetés au Canada s'il vous plait l'appel:
SUNBEAM APPLIANCE SERVICE STATION (KND)
1-800-667-8623 ou email nous
consumeraffairs@consumer.sunbeam.com
En cas de questions ou pour obtenir des renseignements à propos de cette garantie ou du bureau
de service après-vente agréé de votre région au Canada, appelez sans frais d’interurbain au Canada
le l-800-667-8623.
En cas de questions ou pour obtenir des renseignements à propos de cette garantie ou d’un bureau
de service après-vente agréé à l’extérieur des États-Unis et du Canada, veuillez consulter la carte
de service sous garantie insérée dans
I’eIIIballaQe du produit.
NE RETOURNEZ PAS CE PRODUIT
À
L’ENDROIT Où VOUS L’AVEZ ACHETÉ, CAR CELA POURRAIT
RALENTIR LE TRAITEMENT DE VOTRE DEMANDE DE REMBOURSEMENT SOUS GARANTIE.
La présente garantie ne couvre ni l’usure normale des pièces ni les dommages entraînes par l’un
quelconque des cas suivants: l’utilisation inappropriée ou négligente du produit, son utilisation à
une tension ou à un courant inadéquats, son utilisation contraire aux directives du mode d’emploi,
ou son démontage, sa réparation, son remaniement, sa modification ou sa transformation par toute
personne autre qu’un centre de service après-vente agréé. La réparation ou le remplacement du
produit prévus aux termes de la présente garantie constituent votre seul unique recours. Sunbeam
Products Inc. n’acceptera aucune responsabilité de
dOrMIIaQE!S conséquents ou accessoires
découlant du manquement à quelque garantie explicite ou implicite sur ce produit. Sauf dans la
mesure où l’empêchent les lois applicables, la durée de toute garantie implicite sur la qualité
marchande ou le caractère utilisable de ce produit pour un but précis se limite à la duréé de la
garantie susmentionnée. Certains états ou provinces interdisent l’exclusion ou la limitation des
dommages conséquents ou accessoires, ou la limitation de la durée d’une garantie implicite; il
s’ensuit que les limitations ou exclusions ci-dessus peuvent ne pas s’appliquer à vous. La présente
garantie vous confère des droits légaux précis, et vous pourriez aussi avoir d’autres droits qui
varient selon l’état ou la province.
•l
Page 21

Cuando use algún aparato eléctrico, para reducir el riesgo de fuego o
descargas électricas,
y/o
daños a personas precauciones básicas de
seguridad siempre deben de tomarse, incluyendo las siguientes:
l Lea todas las instrucciones cuidadosamente.
l No toque las superficies calientes. Use las perillas o asas.
l Para protejerse contra una descarga eléctrica, no coloque el cordón,
contacto o la cafetera en agua o en otros líquidos.
l Supervisión cercana es necesaria cuando el aparato es usado por o cerca
de niños.
l Desconecte el aparato cuando no esté en uso y antes de limpiarlo. Permita
que éste se enfríe antes de poner o quitar partes y antes de limpiar el
electrodoméstico.
l No opere ningún aparato con un cordón dañado o después de que
el aparato ha funcionado inadecuadamente o ha sido dañado en cualquier
manera. Regrese el aparato a un centro de servicio autorizado para su
examinación, reparación 0 ajuste.
l El uso de accesorios o aditamentos no recomendados por
Oster@
puede
causar lesiones.
l No se use en exteriores.
l No permita que el cordón cuelgue sobre la orilla de la mesa o del
mostrador o toque superficies calientes.
l No coloque sobre o cerca de quemadores de estufas de gas o dentro de un
horno caliente.
l Siempre conecte el la toma de corriente de la pared antes de encender
cualquiera de los controles. Para desconectar, coloque el control en la
posición de
APAGADO/OFF,
después remueva el enchufe de la toma
de corriente.
l Siempre use agua fría para preparar café. Agua tibia u otros líquidos
Page 22

pueden causar daños a la cafetera.
l Si la tapa se remueve o se levanta mientras el ciclo de preparación se lleva
acabo, se pueden ocasionar quemaduras.
l No use este aparato más que para lo que ha sido diseñado.
PRECAUCION - Para evitar que el vidrio de la jarra se rompa o
cause daños, siga estas instrucciones:
l No coloque la jarra de vidrio caliente en una superficie fría o mojada.
l No coloque la jarra de vidrio caliente sobre o cerca de papel,
tela o cualquier otro material flamable.
l Esta jarra está diseñada para usarse con esta cafetera solamente.
l Nunca use la jarra de vidrio sobre las hornillas de la estufa o en un horno
convencional o de microondas.
l No permita que el líquido se evapore de la jarra. No la caliente cuando
esté vacía.
l No mueva la unidad cuando la jarra contiene líquido caliente.
l Use la tapa de la jarra de vidrio mientras prepara o sirve el café.
l Deseche la jarra si tiene algún daño cualquiera que éste sea, o si el asa
está débil o floja. Si la jarra esta astillada o tiene alguna rajada puede
resultar en que se rompa o en contaminar con partículas de vidrio a los
líquidos contenidos en ella.
l No limpie la jarra con polvos limpiadores, fibras metálicas o de lana o
cualquier otro material abrasivo.
El Usuario No Puede Dar Manetimiento. Regrese al Centro de Servicio.
Esta Unidad es para Uso Doméstico Solamente
Page 23
CARACTERISTICAS DE SEGURIDAD
l El aparato tiene un cordón eléctrico corto como medida de seguridad para prevenir
el riesgo
de tropezar, tirar o enredarse con un cordón más largo.
l Puede usar cables de extensión si se observan las precauciones adecuadas.
l Si se usan los cables de extensión la capacidad nominal eléctrica del cable de extensión
debe ser igual
o mayor que el amperaje que se muestra en el electrodoméstico.
Colóque
el cordón de extensión de manera que no cuelgue sobre el borde del mostrador o mesa
donde pueda tirarlo un niño
o
pueda tropezar con él accidentalmente. La capacidad
nominal eléctrica de la cafetera está listada abajo del aparato.
l Este aparato cuenta con una clavija polarizada (una pata es más ancha que la otra). Para
reducir el riesgo de descarga eléctrica, esta clavija entra sólo de una manera en un enchufe
polarizado. Si la clavija no encaja en el enchufe simplemente colóquela
alrevés. Si aún así
no encaja llame a un electricista de su confianza para reemplazar el enchufe obsoleto.
DE NINGUNA MANERA INTENTE MODIFICAR ESTA MEDIDA DE SEGURIDAD
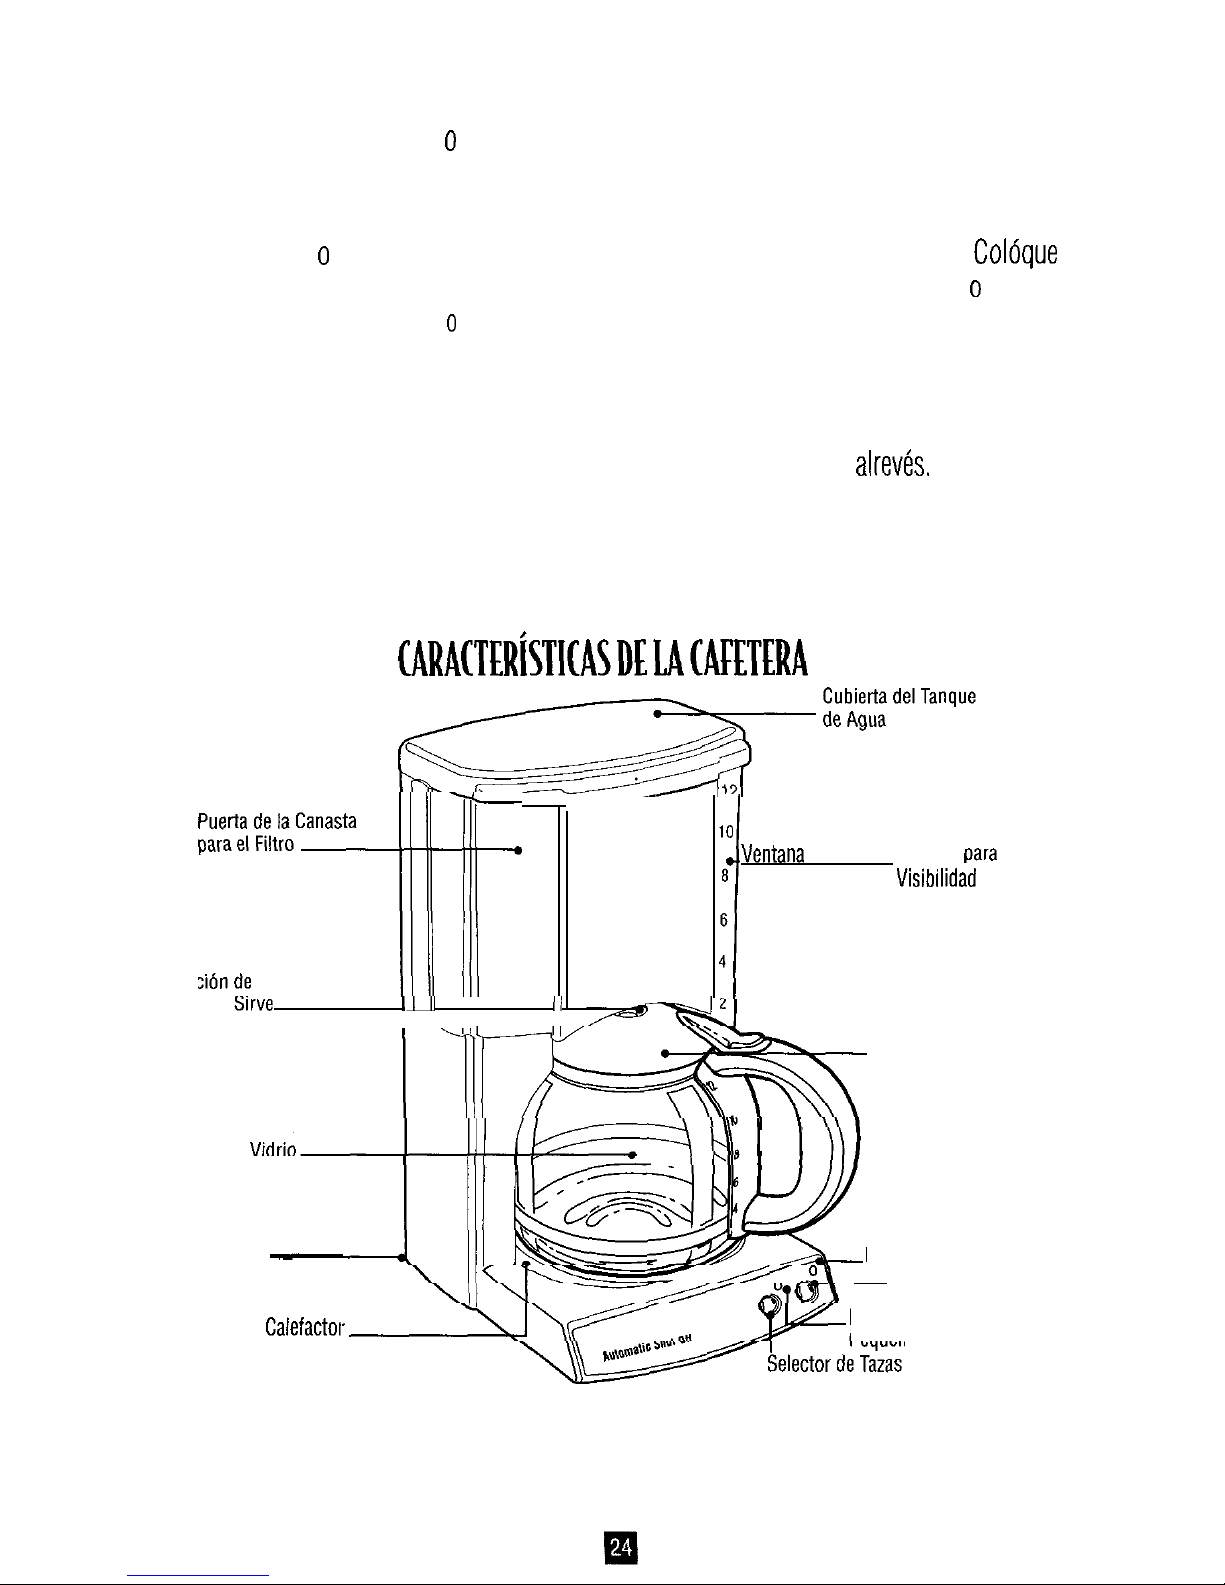
CARACTERíSTKASDELACAFETERA
Función de
1
K:;/1;
----
Ventana
para
Pausa y Swve
IIII
III
0
III
Jarra de
VidrioI
I
I
Almacenamiento
del Cordón
-
Plato
Calefactor
rapa de la Jarra
Luz de Encendido
Botón de Encendido
Luz de Preparación de
Pequeñas Cantidades
Page 24
CARACTERISTICAS
l
Apagado Automático en 2 Horas
Por seguridad la cafetera
Oster@
ha sido diseñada con apagado automático como una
medida de seguridad. La cafetera se apaga automaticamente en 2 horas después de que
el ciclo de preparación de café ha sido completado, en el modo de inicio automático y
en el regular. Para encenderla nuevamente sólo presione el Botón de Encendido hasta
que la Luz de Encendido se ilumine.
l
Pausa y Servir
Le permite interrumpir el ciclo de preparación de café y servir una taza de café antes de
que la jarra esté completamente llena. Para reiniciar el ciclo de preparación, regrese la
jarra al plato calefactor y el café automaticamente empezará a fluir por la canasta del
filtro. Asegúrese de que la jarra esté colocada correctamente en el plato calefactor.
PRECAUCION: NO REMUEVA LA JARRA POR MAS DE 30 SEGUNDOS 0 LA
CANASTA DEL FILTRO DERRAMARA EL CAFE.
l
Selector de Tazas
iSelecciona Tazas de Café sabroso todo el tiempo! Cuando prepare de 1 a 3 tazas de
café, el Botón Selector de Pequñas Cantidades extiende el ciclo de preparación y permite
que el agua sature los granos de café por más tiempo, maximizando el sabor del café y
eliminando el sabor de los químicos en el agua.
l
Ventana para Visibilidad
Números grandes y fáciles de leer indican cuantas tazas de agua han sido vertidas
dentro de la cafetera.
l
Luz de Encendido
La Luz de Encendido le indica cuando la cafetera está encendida, para una operación
segura.
l
Sello del Sabor
El orificio y la tapa de la jarra se se sellan para ayudar a preservar el sabor natural del
café, así como la temperatura al prevenir la excesiva evaporación.
l
Jarra para Servir Facilmente
Jarra de diseño único con borde alrededor y el tradicional pico que le permite
convenientemente vertir desde cualquier lado. Asa más cómoda y fácil de manejar.
Marcado del número de tazas en cada lado del asa hace más fácil la medición del nivel
de agua cuando se llena la jarra.
l
Plato Calefactor Antiadherente
Fácil de limpiar
l
Almacenamiento del Cordón
Almacenamiento del cordón oculto que le permite esconder el cordón extra para una
apariencia más organizada.
Page 25
l
Canasta Giratoria
La puerta del filtro gira para un llenado fácil.
l
Canasta para el Filtro en Forma Cónica Negra
La canasta para el filtro en forma cónica mejora el sabor al prevenir el sabor amargo.
El color negro ayuda a ocultar manchas. Un filtro estandar #4 de forma cónica debe
ser usado.
COMO USAR SU CAFETERA OSTER
PREPARANDOSUCAFETERAPARAELUSO
l Con cuidado desempaque la cafetera y remueva todos los materiales de empaque.
l Antes de preparar el café en su nueva cafetera Oster? limpie bien la jarra,
la tapa de la jarra y la canasta del filtro con agua tibia y jabón. Enjuague y seque.
No use limpiadores abrasivos.
l Usted puede limpiar el plato calefactor con un paño húmedo. Pero no sumerja
la cafetera en agua o en cualquier otro líquido.
l Antes de preparar su primera taza de café, opere la cafetera una o dos veces con agua
pero sin café molido y sin filtro de papel. Esto removerá el polvo que se acumuló y
que puede afectar el sabor del café.
IMPORTANTE: Use agua fría para mejores resultados
USANDO LOS CONTROLES DE SU CAFETERA
l Luz de Encendido
-
La Luz de Encendido le indica cuando la cafetera está encendida,
para una operación segura.
l Botón de Encendido
-
Este botón controla los tres modos de poder:
ENCENDIDO/APAGADO/AUTOMATICO
(ON/OFF/AUTO).
El modo de
APAGADO/OFF
no tiene luz indicadora.
PREPARANDO PEQUEÑAS CANTIDADES
Cuando prepare de 1 a 3 tazas de café, presione el Botón Selector de Tazas.
PREPARANDO SU CAFETERA PARA HACER
CAFE
l Coloque su cafetera
Oster@
en una superficie plana, lejos de cualquier orilla.
l Conecte el enchufe en una toma de corriente alterna de 120 volt y 60Hz.
l La tapa de la jarra de vidrio debe estar colocada correctamente en la jarra durante
el proceso de preparación y la jarra debe de estar colocada correctamente en
el plato calefactor.
l La puerta del filtro debe estar cerrada adecuadamente durante el proceso de preparación.
PRECAUCION: Si la puerta de la canasta para el filtro no está
completamente cerrada, la función de Pausa y Sirve no funcionará bien.
Puede causar que se derrame agua o café caliente.
Page 26

LLENANDO EL TANQUE DE AGUA
l Abra la tapa del tanque de agua localizada
en la parte superior de la cafetera. Llene la jarra
de vidrio con la cantidad deseada de agua fría.
Vacíe el agua de la jarra dentro del tanque.
La ventana de visibilidad indicará cuanta agua
hay dentro del contenedor. Cierre la cubierta.
Coloque la jarra de vidrio sobre el plato calefactor.
NOTA: La cantidad de café preparado siempre será
ligeramente menor a la cantidad de agua
colocada dentro de la cafetera, ya que un
poco de agua es absorbida por los granos
de café y por el filtro. Agregue un poco de
más agua al iniciar el proceso, de manera
que usted obtenga la cantidad exacta
de tazas deseada.
COLOCANDO EL CAFE
l Gire la canasta del filtro a la derecha.
Levante la canasta del filtro removible. Inserte
un filtro de papel de forma cónica #4 dentro de
la canasta del filtro.
l Un filtro permanente puede usarse en lugar de
el filtro de papel. Llene el filtro permanente con
la cantidad requerida de café. Después del ciclo
de preparación, vacíe los granos y enjuague
muy bien con agua.
l Coloque la cantidad deseada de granos de café
dentro del filtro. De acuerdo a los estándares de
la industria del café, use una medida estandar
de café (2 cucharadas soperas) de granos por
cada seis onzas de agua. Después de usar su
cafetera varias veces, la cantidad de café puede ser
ajustada a su gusto particular, al disminuir o
aumentar la cantidad de café usado.
NOTA: Asegurese de que los granos de café estén preparados
específicamente para cafeteras de goteo automático.
Page 27

l Regrese la canasta del filtro con el filtro lleno y coloque dentro del soporte en la puerta,
Asegurese de que está correctamente colocado. Gire la puerta de la canasta y ajuste
en su lugar.
PRECAUCION: No opere su cafetera si la puerta de la canasta no cierra completamente.
Si la puerta no cierra completamente, revise que la canasta del filtro
este sellada correctamente y ajuste la puerta en su lugar.
l Presione el Botón de Encendido. La Luz de Encendido se iluminará, indicando que
la cafetera ha iniciado el ciclo de preparación. En unos minutos, la cafetera completará
el ciclo de preparación
e
iniciará el modo de calentamiento, que mantendrá el café
caliente por dos horas.
l Presione el Botón de Encendido a
APAGADO/OFF
cuando la jarra esté vacía o cuando
la cafetera no esté en uso.
CONSEJOS PARA UN CAFE CON UN SABOR EXCELENTE
l Una cafetera limpia es escencial para prepar un café de buen sabor. Limpieza regular
como la indicada en
”
Limpiando su Cafetera” es altamente recomendable.
l Siempre use agua fresca y fría en su cafetera.
l Un café finamente molido ayuda a una extracción más rica y un sabor más fuerte
del café. Un molido normal requerirá ligeramente más café por taza para dar
el sabor de un café más molido.
l Almacene el café en un lugar seco y templado. Una.vez que el café ha sido abierto,
manténgalo cerrado en el refrigerador para mantener la frescura.
l Para un café óptimo, compre granos completos y muelalos finamente justo
antes de preparar café.
l No use dos veces los mismos granos de café ya que no tendrán el mismo sabor.
l No se recomienda recalentar el café. El mejor momento del sabor del café es
inmediatamente después de preparado.
l Pequeñas gotas de aceite en la superficie del café negro se deben a la extracción
de aceite de los granos de café. Esto ocurrirá frecuentemente en granos de café
muy tostados. Muchas extracciones pueden causar esto también, lo que indica
que debe de limpiar su cafetera.
CANTIDAD RECOMENDADA DE CAFE
Numero de Tazas Café Molido
2
2
-
4 Cucharadas Soperas
(l-
2 Cucharones)
4
4 - 8 Cucharadas Soperas (4 - 8 Cucharones)
6
6 - 12 Cucharadas Soperas (3 - 6 Cucharones)
8
8 - 16 Cucharadas Soperas (4 - 8 Cucharones)
10
10
- 20 Cucharadas Soperas
(5-10
Cucharones)
12
12 - 24 Cucharadas Soperas (6-12 Cucharones)
Page 28

LIMPIANDO SU CAFETERA
PRECAUCIÓN: Siempre asegurese de que su cafetera esté desconectada y que el plato
calefactor esté frío antes de intentar limpiarla. Para protejerse contra
descargas eléctricas, no sumerja el cordón, el enchufe o la unidad en
agua u otros líquidos.
. El exterior de su cafetera puede limpiarse frotando la superficie con un paño humedo y
suave.
IMPORTANTE: Nunca sumerja la cafetera en agua o en otros líquidos.
l La jarra de vidrio, la tapa de la jarra y la canasta del filtro removible, pueden ser lavadas
con agua tibia y jabón, o colocadas en la parte superior de la lavavajillas. No coloque
cualquier otra parte de la cafetera dentro de la lavavajillas.
l Para limpiar el filtro permanente, vacíe los granos y enjuague muy bien.
l No limpie el interior del tanque de agua con un paño de tela, ya que puede dejar peluzas
o residuos que pueden obstruir la cafetera.
l Para manchas difíciles, use una esponja de nylon o plástico con un limpiador
no abrasivo. No use fibras de metal o limpiadores abrasivos.
l Depósitos de calcio pueden acumularse como resultado de existencia de minerales que
comunmente se encuentran en el agua para beber. Esto es normal y puede resultar en
que el tiempo de preparación de café del aparato sea más largo del tiempo normal. Esto
se puede eliminar por medio de descalcificación periódica de la cafetera.
l Para descalcificar, llene la jarra de vidrio con agua fría y dos cucharadas de vinagre
blanco. Vacíe la solución dentro del tanque de agua, y cierre la tapa. Coloque la jarra en
el plato calefactor y permita que la cafetera funcione con la solución de vinagre.
Mientras se descalcifica, no use el filtro en la canasta para el filtro. Cuando la solución
de vinagre ha sido vertida dentro de la jarra completamente vacíe la jarra y enjuáguela
con agua fría. Llene nuevamente el tanque de agua con agua fría unicamente y haga
funcionar la cafetera durante otro ciclo para eliminar cualquier cantidad de solución de
vinagre remanente. Repita si es necesario.
Page 29
PROBLEMAS Y SOLUCIONES OE SU CAFETERA
Problema Potencial
Posible Causa
LA CUZ DE ENCENDIDO NO SE ILUMINA l Desconectada
l No hav poder
NO INICIA EL CICLO DE PREPARACION
l Desconectada
l No hay poder
l El tanque de agua está vacío,
revise la ventana de visibilidad
l La puerta de la canasta del filtro
no está bien cerrada
l La jarra de vidrio no está correctamente
colocada sobre el
olato calefactor
LA CAFETERA SOLAMENTE PREPARA AGUA
l No haygranosde caféen el filtro
LACAFETERAES
MUYLENTA
l Se requiere la descalcificación
LA CANASTA DEL FILTRO SE DERRAMA
l La puerta de la canasta del filtro
no está bien cerrada
OLOR A CAFE QUEMADO
l La jarra de vidrio no está correctamente
colocada sobre el plato calefactor
l La jarra de vidrio fue removida del plato
calefactor por más de 30 segundos
l Se dejó la jarra de vidrio vacía sobre
el plato calefactor
l Se derramó café sobre el plato
calefactor
EL CAFE NO ESTA CALIENTE
l No hay poder
l Está activado el apagado automático
en 2 horas
MAL SABOR DEL CAFE l Se usaron granos de café no adecuados
para cafetera de goteo automático
. La cantidad de agua usada no fue la
adecuada para la cantidad de café
Page 30
1
AÑOS DI
GARANTíA
LIMITADA
Sunbeam Products Inc. garantiza que, por un período de dos años desde la fecha de compra,
este producto estará libre de defectos mecánicos y eléctricos en el material y la fabricación,
Nuestra obligación está limitada a la reparación o a la reposición, bajo la opinión del
fabricante, de éste producto durante el período de la garantía, para productos comprados
en Estados Unidos devuélvalo(s) con gastos de envío prepagados directamente
a:
SUNBEAM APPLIANCE SERVICE STATION
117 Central Industrial Row
Purvis, MS 39475
Respuestas a sus preguntas respecto a esta garantía o a la localización del centro de
servicio autorizado más cercano en Estados Unidos pueden obtenerse llamando gratis al
l-800-597-5978 o al escribir a Sunbeam - Consumer Affairs en P.O. Box 948389,
Maitland, Florida 32794-8389.
Para productos comprados en Canadá, por favor llame al:
SUNBEAM APPLIANCE SERVICE STATION (KND)
1-800-667-8623 or email us at
consumeraffairs@consumer.sunbeam.com
Respuestas a sus preguntas respecto a esta garantía 0 a su locación más cercana en
Canadá pueden obtenerse llamando gratis al l-800-667-8623.
Para información sobre la garantía o la localización de un centro de servicio autorizado
fuera de los Estados Unidos y Canada por favor vea la tarjeta de garantía insertada en el
empaque del producto.
NO ENVIE ESTE PRODUCTO AL LUGAR DONDE FUE ADQUIRIDO.
AL HACERLO ATRASARA EL PROCESO DE RECLAMO DE SU GARANTIA.
Esta garantía no cubre el desgaste normal de las partes por el uso del producto, ni daños
por cualquier mal uso o negligencia, así como el uso de voltajes o corrientes inadecuadas,
uso contrario al manual de operaciones, desmantelamiento, reparación o alteraciones
hechas por cualquier persona ajena al centro autorizado de servicio. La reparación o
reposición del producto es la única solución. Sunbeam Products Inc. no será responsable
por daños incidentales o causados por el producto, ni de cualquier garantía implícita o
explícita de este producto. Excepto de lo que la ley indica, cualquier garantía de
comercialización o ajustada para un propósito en particular a este producto está limitada
a la duración de esta garantía. Algunos estados no permiten la exclusión o limitación de
daños incidentales o causados por el
producto,0 permiten la limitación dependiendo de
la duración de la garantía implícita, así que las limitaciones o exclusiones arriba
mencionadas pueden no aplicarse a usted. Esta garantía le da a usted derechos legales
específicos y puede usted tener otros derechos que varían de estado a estado o de
provincia a provincia.
Page 31
Sempre que utilizar eletrodomésticos, para evitar risco de incêndio, choque
elétrico,
e/ou ferimentos, vote deve tomar algumas medidas básicas de
seguranca, como as que seguem:
l Leia todas as intrucões atentamente.
l Não toque em superfícies quentes. Use o puxador e as alcas.
l Para evitar risco de choque elétrico, não submerja o fio, o tomada ou o
aparelho em água
ou qualquer outro líquido.
l É necessário manter urna supervisão muito próxima quando este aparelho
for usado por, em ou perto de
criancas.
l Desconecte o aparelho, sempre que ele não estiver em uso e antes de
efetuar
sua limpeza. Deixe esfriar antes de colocar ou retirar partes de
aparel ho e limpe-o.
l Não use nenhum aparelho eletrônico que tenha o fio ou a tomada
danificada, ou após ter apresentado algum defeito ou após caído no chão.
Neste caso, leve o aparelho
à
assistência técnica autorizada para revisão
ou conserto.
l 0 uso de pecas de repos@o não recomendadas pelo
Oster@
podem causar ferimentos.
l Não use o aparelho ao ar livre.
l Não deixe o fio pendurado para
fora
de mesa ou superfície
onde o aparelho estiver sendo utilizado, ou em contato com superfícies
quentes.
l Não coloque o aparelho em cima ou perto de um fogão ou estufa elétrica
ou a gás, nem sobre forno quente.
l Sempre ligue o fio elétrico na tomada antes de ligar o aparelho.
Para desconectar o fio, desligue o aparelho e depois desligue o fio
da tomada.
l Sempre use água fria para fazer café. Água morna ou outros líquidos
podem danificar a cafeteira.
Page 32

l Queimadura pode ocorrer se a tampa for levantada ou removida durante o
ciclo de preparo.
l Não utilize o aparelho para outros fins que não aqueles para os quais
foi
projetado.
CUIDADO - Para evitar que o copo quebre ou que algum acidente
aconteGa, siga estas precau@es:
l Não coloque o copo em superfície fria ou molhada.
l Não coloque o copo em cima ou perto de papel, pano ou qualquer
material inflamável.
l Este copo
foi
desenhado somente para este modelo de cafeteira.
l Nunca use o copo no fogão ou no forno de microondas.
l Não deixe que o líquido evapore no copo. Não esquente o copo quando
ele
estiveriazio.
l Não desloque o aparelho quando o copo estiver cheio de líquido quente.
l Coloque a tampa no copo quando você estiver fazendo ou servindo café.
l Não utilize o copo caso ele esteja danificada ou com a alca solta ou
quebrada. 0 vidro quebrado ou rachado causará a quebra do copo ou
contaminará o líquido com
pedacos de vidro.
l Não limpe o copo com pó de limpeza, esponjas de a$o e outros materiais
abrasivos.
Caso Precise de Manutenqão
leve
o Aparelho para um Centro Autorizado
Este Aparelho
Somente Para Uso Doméstico
Page 33

CARACTERíSTICASDESEGURANCA
l 0 fio elétrico fornecido é curto para reduzir o risco de enrolamento ou
tropqão em un
fio mais longo.
l Exten@es podem ser usadas tomando as devidas precaucões durante o uso.
l Caso urna
exteyão
seja utilisada, esta deve ter as voltagens do aparelho. 0 fio deve ser
arrumado de tal maneira que não fique pendurado no balcão, ou mesa, onde o aparelho
pode ser puxado por criancas ou derrubado involuntariamente. A listagem elétrica da
sua cafeteira encontra-se na parte do painel inferior do aparelho.
l Este aparelho conta com un plugue polarizado (um dos contatos é mais largo do que
outro). Para evitar risco de choque elétrico, como recurso de
seguranca, este plugue
encaixa-se somente em um plug unidirecional polarizado. Se o plug não se encaixar
totalmente dentro da tomada, inverta o mesmo. Se ainda assim não encaixar, contate um
eletricista competente.
Nii0
TENTE DESATIVAR ESTE RECURSO DE
SEGURANCA.
Porta da
Cf
do Filtro
_
CARACTERíSTICASDACAFETEIRA
copo-
7
\\
Tampa do
- Re~ervatório
da Agua
Ativador de
Compartimento
Parao
Fio
Elétrico
Prato de
Aquecimento-
~f..Lur
Indicadora
0
Número
de Copos
Page 34

CARACTERíSTICAS
l
Desligamento Automático depois de 2 Horas
Para seguranca, a cafeteira
Oster@
foi desenhada com urna característica de
desligamento automático. A cafeteira desliga automaticamente 2 horas depois que
o café foi feito, mesmo que ela esteja ligada para fazer o café no automático ou no
funcionamento regular. Para
recomecar, basta ligar a cafeteira até que a luz indique
que o aparelho esteja ligado.
l Pausar
81
Servir
Esta característica permite que você pause o aparelho para servir urna xícara de café
antes que a cafeteira termine de fazer o café. Para continuar o processo, retorne
o copo para o prato de aquecimento que o café voltará a passar pela cesta do filtro,
Verifique se o copo foi colocado no prato de aquecimento devidamente.
CUIDADO: NiiD TIRE D COPO POR MAIS DE 30 SEGUNDOS,
SENÁO A CESTA DO FILTRO PODERÁ TRANSBORDAR.
l
Copo Selecionado
Café encorpado e saboroso toda hora! Quando preparando l-3 copos, o Ajuste de
Baixa Quantidade extende o ciclo de preparo e permite que a água sature os pó de
café mais longamente,
aumentando
o sabor equanto elimina o desgaste d’água.
l
Janela para Ver o Nível da Agua
Números grandes de fácil leitura indicam quantos copos de água foram colocados
dentro da cafeteira.
l
Luz Indicadora
A luz indica quando a cafeteira está ligada para uso com seguranca.
l
Veda@0
do Sabor
A tampa do copo veda para conservar o sabor natural do café, a temperatura
e para previnir a
evapora@0 excessiva.
l
Copo Fácil de Servir
0 copo tem um modelo único com a borda arredondada e o hico tradicional que
permite que você sirva o café por todos os lados.
Alca fácil de segurar para mais
conforto, A
alca é graduada nos dois lados para facilitar a medida de água quando
você estiver
enchendo
o copo.
l
Prato
de Aquecimento Náo-Aderente
Facilita a limpeza.
l
Compartimento Para o Fio Elétrico
0 compartimento para o fio elétrico é escondido permitindo que você esconda
o excesso de fio.
l
Cesta Giratória
A porta da cesta do filtro é giratória facilitando o enchimento do filtro.
l
Cesta do Filtro Com Forracáo Preta
A cesta do flitro com formato de cone enriquece o sabor e previne um sabor
amargo. A
forra@0 preta ajuda a esconder manchas. Um filtro padrão número 4
com formato de cone deve ser usado.
Page 35

COMO USARA SUA CAFETEIRA OSTER
PREPARANDO A SUA CAFETEIRA PARA D USO
l Tire cuidadosamente a cafeteira da caixa e remova todos o materiais usados
no empacotamento.
l Antes de fazer café na sua cafeteira Oster? limpe o copo, a tampa do copo e a cesta
do filtro minuciosamente com água e detergente. Enxague-os bem. Não use um
detergente abrasivo.
l Limpe o prato de aquecimento com um pano limpo e úmido, entretanto não coloque
a cafeteira dentro d’água ou outros líquidos.
l Antes de fazer o seu primeiro café, opere a sua cafeteira somente com água,
urna ou duas vezes antes de colocar o pó de café e o filtro de papel. Isto removerá
qualquer poeira encontrada dentro da cafeteira e não irá alterar o sabor do café.
IMPORTANTE: Para um melhor resultado use água
fria.
USANDO OS CONTROLES DA
SUA
CAFETEIRA
l Luz Indicadora
-
A luz indica quando a cafeteira está ligada para uso com seguranca.
l Botão
Liga/Desliga
-
Este botão controla três comandos: Ligado/Desligado/Auto.
0 comando Desligado náo tem urna luz indicadora.
PREPARANDO PEQUENAS QUANTIDADES DE CAFÉ
Quando você for fazer l-3 copos de café, presione o botáo para sele@o
do número de copos.
PREPARANDO A CAFETEIRA PARA FAZER 0 CAFÉ
l Coloque a sua cafeteira
Oster@
em urna superfície plana longe da borda.
l Ligue o aparelho somente em urna tomada de 120 volts
60Hz AC.
l A tampa do copo deve ser colocada corretamente durante o processo de prepara@0
do café e copo colocado no prato de aquecimento.
l A porta da cesta do filtro deve ser fechada adequadamente durante o processo
de
prepara@0 do café.
CUIDADO: Se a porta da cesta do filtro não estiver completamente fechada,
a característica Pausa & Serve não funcionará direito.
Isto pode causar que a água quente
ou
o café transborde.
Page 36
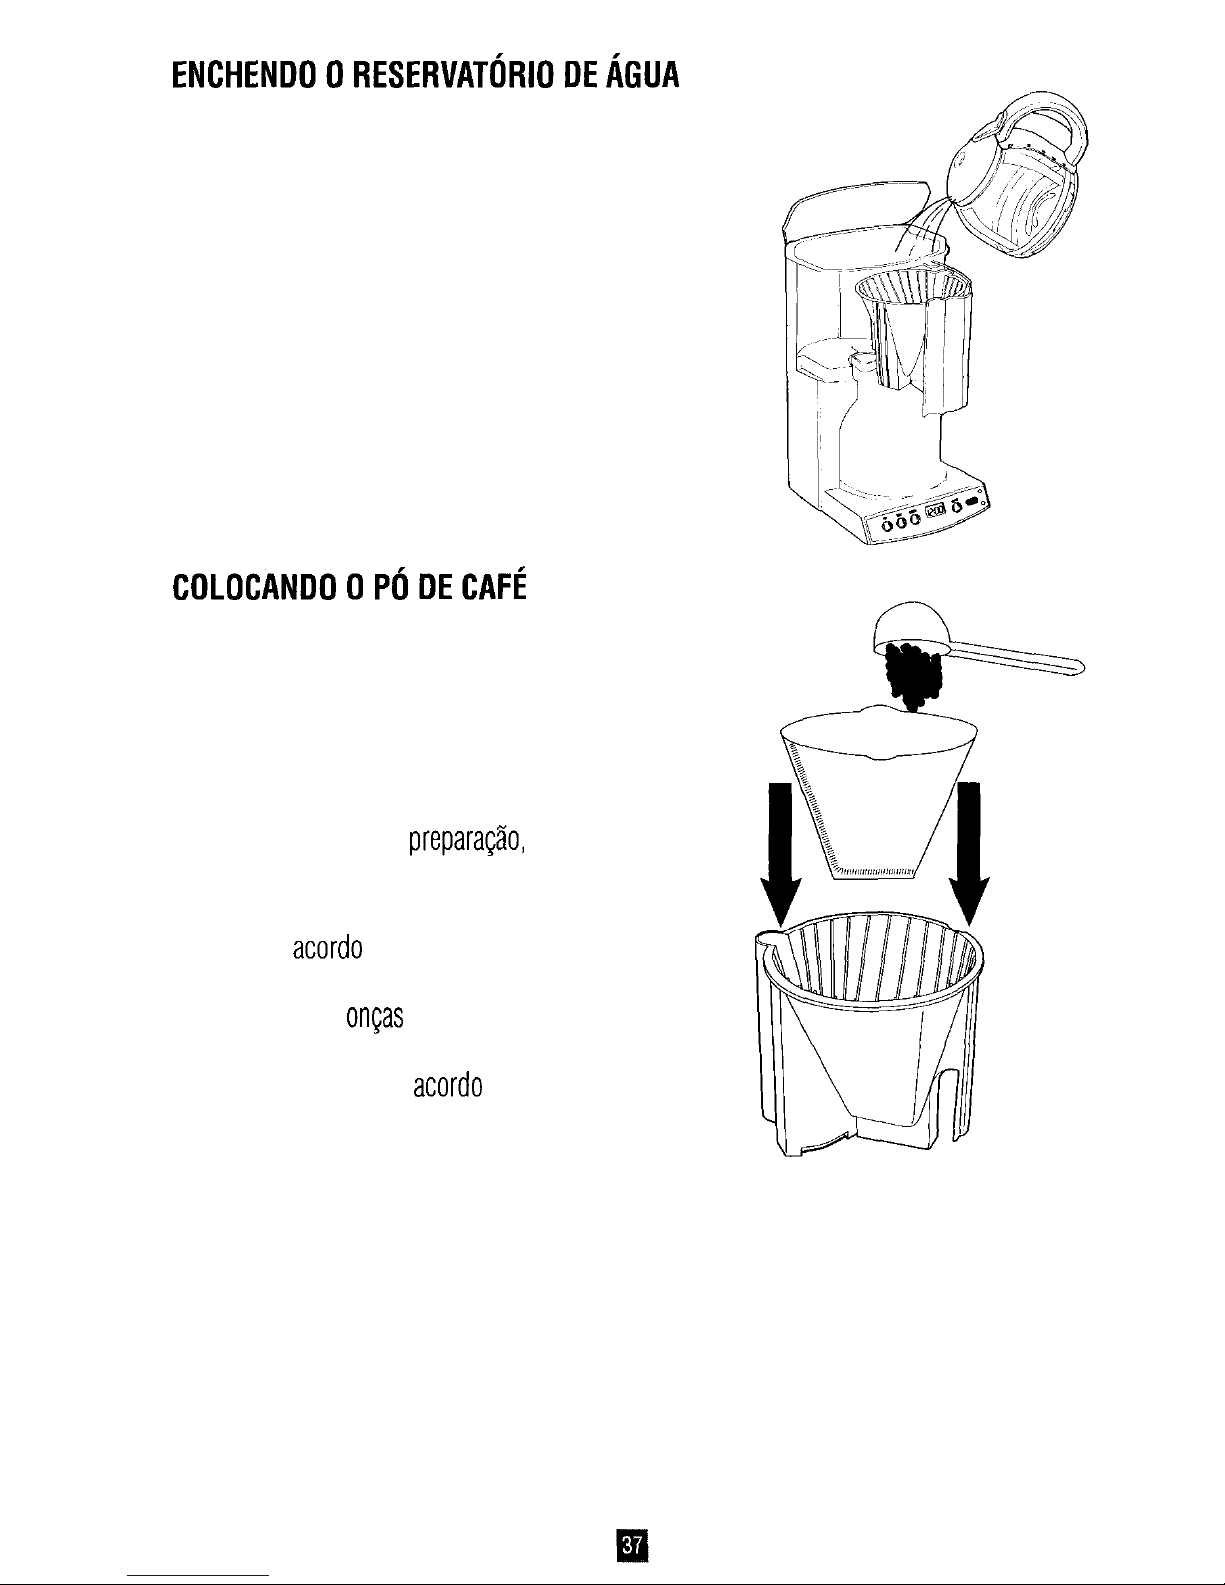
ENCHEND~~RESERVATÓRI~DEÁGUA
. Abra a tampa do reservatório de água localizado
na parte superior da cafeteira. Encha o copo com a
quantia desejada de água fria. Esvazie o copo
colocando a água dentro do reservatório. A janela
indicadora irá mostrar a quantidade de água dentro
do reservatório. Tampe o reservatório e coloque
o copono prato de aquecimento.
NOTA: A quantidade de café sempre será um pouco
menor que a quantidade de água colocada na
cafeteira já que um pouco da água é absorvida
pelo copo e pelo filtro. Adicione um pouco
mais de água no início para obter a quantidade
desejada de café.
COLOCANDOOPÓDECAFÉ
l Gire a cesta do filtro para a sua direita. Retire a cesta
removível. Coloque o filtro número 4 em forma de
cone dentro da cesta.
l Um filtro permanente pode ser usado ao invés
do filtro de papel descartável. Encha o filtro
permanente com a quantia de café desejada.
Após o processo de
preparacão, enchague-o
minuciosamente com água.
l Coloque a quantia desejada de pó de café dentro do
filtro. De
acorde com as Medidas da Indútria de Café,
use urna medida (2 colheres de mesa) de pó de café
para cada seis
ancas de água. Após usar a sua
cafeteira regularmente, a quantidade de pó de café
pode ser ajustada de acorde conveniente ao seu
paladar, diminuindo ou aumentando a quantidade
de café utilizado.
NOTA: Tenha certeza de que o pó de café usada
é especificamente para cafeteiras automáticas.
l Coloque a cesta do filtro cheia de pó de café na porta. Verifique se a cesta do filtro foi
colocada adequadamente na porta. Feche a porta até que ela trave.
CUIDADO: Náo use a sua cafeteira se a porta náo estiver devidamente fechada. Caso a
porta náo feche completamente, verifique se a cesta do filtro foi vedada
adequadamente e travada no seu devido lugar.
Page 37
l Aperte o botão para ligar o aparelho. A luz indicadora irá atender indicando que
a
cafeteira iniciou o processo. Em alguns minutos a cafeteira já terá completado este ciclo
e mudará para o processo de aquecimento, mantendo o café quente durante duas horas.
l Desligue a cafeteìra quando o copo estiver vazio ou quando o aparelho não
estiver em uso.
DICAS
PARA UM CAFÉ DELICIOSO
l Urna cafeteira limpa é essencial para fazer um café delicioso. É recomendado a limpeza
regularmente como indicado no “Como Limpar A Sua Cafeteira”.
l Sempre use água fria e fresca na sua cafeteria.
l 0 café em pó dá urna extra@0 melhor do café
e
proporciona um café mais rico
e
saboroso. Para obter o mesmo sabor de um café em pó, é necessario usar urna maior
quantidade de café granulado.
l Guarde o café em um lugar frio e seco. Urna vez aberto mantenha o café vedado na
geladeira para conservar o frescor.
l Para um ótimo café compre grãos de café e triture-os antes de faz&los.
l Não utilize o pó de café novamente porque o sabor do café será alterado.
l Não é recomendado esquentar o café. 0 sabor do café é melhor quando é feito na hora.
l Pequenas gotas de óleo podem ser encontradas na superfície do café devida a extra@0
do óleo do pó de café. A oleosidade pode ocorrer com mais frequência caso um café
mais torrado seja utilizado. Extra@0 demasiada pode causar também oleosidade
indicando que
é
necessário limpar a sua cafeteira.
QUANTIDADE RECOMENDADA DE CAFÉ
Número de Copos Pó de Café
2 2
-
4
colheres de mesa
4 4-8 colheres de mesa
6 6
-
12 colheres de mesa
8 8
-
16col heres de mesa
10 10
-
20 colheres de mesa
12 12
-
24 col heres de mesa
Page 38

COMO LIMPAR A
SUA
CAFETEIRA
CUIDADO: Verifique se a cafeteira está desligada da tomada e se o prato de aquecimento
está frio antes de
comecar a limpar. Para evitar o choque elétrico náo coloque
o fio, a tomada ou a cafeteira dentro d’água ou qualquer outro líquido.
l A superfície exterior da cafeteira pode ser limpa com um pano úmido e macio.
IMPORTANTE: Nunca coloque a cafeteira dentro d’água ou de qualquer outro líquido,
l 0 copo de vidro, a tampa do copo, ea cesta do filtro removível podem ser lavados
em água morna com detergente ou na
barte superior da máquina de lavar laucas.
l Para limpar 0 filtro permanente esvazie 0 filtro e enxague-0 minuciosamente,
l Não limpe dentro do reservatório da água com pano já que ele pode deixar resíduo
de fibras de algodáo que podem entupir a cafeteira.
l Para manchas difíceis, use urna esponja de nylon ou plástico com um material de
limpeza náo-abrasivo. Náo use esponja de
aco ou materiais de limpeza abrasivo.
l Um deposito de cálcio pode acumular na cafeteira por causa de minarais encontrados
em água potável. Este acúmulo é nornal e pode causar urna demora no processo de
prepara@0 do café da sua cafeteira. Esta demora pode ser eliminada descalcificando
periodicamente a sua cafeteira.
l Para descalcificar, encha o copo com água fria e duas colheres de mesa de vinagre
branco. Despeje a
solucáo dentro do reservatório de água e tampe o reservatório.
Coloque o copo no prato de aquecimento e deixe que a cafeteira processe a
solur$io
de vinagre. Durante a
decalcifica@o náo use o filtro dentro da cesta. @ando a solu@o
de vinagre for devidamente processada, esvazie o copo e enxague-o com água fria.
Encha novamente o reservatório de água com a água fria e deixe que outro ciclo
aconteca para que remova restos da solu@o de vinagre. Caso seja necessário
repita 0 processo.
Page 39

COMO SOLUCIONAR PROBLEMAS COM A
SUA
CAFETEIRA
Problemas Comuns
A LUZ INDICADORA
NííD ACENDE
Causa Provável
l 0 fio está desligado da tomada.
l Falta de luz.
0 CAFÉ
NAO
ESTÁ SENDO PREPARADO l 0 fio está desligado da tomada.
l Falta de luz.
l 0 reservatório da água está vazio;
verifique a janela do nível da água
l A porta da cesta não está fechada
corretamente.
l 0 copo náo foi colocado no prato
de aauecimento corretamente.
A CAFETEIRA só PROCESSA
ÁGUA
l 0 filtro está vazio.
A CAFETEIRA ESTÁ LENTA
CESTA DO FILTRO TRANSBORDA
l A cafeteira precisa de ser descalcificada.
l A porta da cesta náo foi fechada
corretamente.
CHEIRO DE CAFÉ QUEIMADO
l 0 copo náo foi colocado no prato
de aquecimento corretamente.
l 0 copo foi retirado do prato de
aquecimento por mais de tinta segundos.
l 0 copo vazio foi deixado no prato
de aquecimento que estava quente.
l Café foi derramado no prato
de aauecimento.
0 CAFÉ NÁO ESTÁ QUENTE
l Falta de luz.
l Desligamento automático depois
de duas horas foi ativado.
0 CAFÉ TEM UM GDSTO RUIM
l 0 pó de café náo
é
adequado para
cafeteiras automáticas.
l A proporr$o do pó de café não está
balanceada com a quantidade de água.
Page 40
GARANTíA
LIMITADA DE 1 ANO
A Sunbeam Products Inc. ofrece garantia por um período de um ano de que este produto náo deva
apresentar defeitos mecãnicos
e
elétricos devidos a seus materiais e à sua manufatura. Nossa
obriga@o em virtude disso é limitada ao conserto ou à substitu@o
deste
produto, conforme a
escolha do fabricante, durante o período de garantia, desde que o(s) produto(s) adquiridos nos
Estados Unidos seja(m) enviados com tarifa postal previamente paga diretamente para:
SUNBEAM APPLIANCE SERVICE STATION
117 Central Industrial Row
Purvis, MS 39475
Consultas referentes a esta garantia ou
à
localiza@o do centro de assistência e servicos mais
próximo dentro dos Estados Unidos poderáo ser
feitas
pelo telefone no número gratuito
l-800-597-5978 ou pelo correio, escrevendo para Sunbeam - Consumer Affairs en P.O. Box 948389,
Maitland, Florida 332794-8389.
Os produtos comprados no Canadá por chamado por favor:
SUNBEAM APPLIANCE SERVICE STATION (KNO)
1-800-667-8623 100 ou email nos
consumeraffairs@consumer.sunbeam.com
Consultas referentes a esta garantia ou
localizacáo do centro de assistência e servicos mais
próximo dentro do Canadá poderão ser
feitas
pelo telefone no número gratuito l-800-667-8623.
(Somente dentro do Canadá).
Para obter
informacões sobre a garantia ou sobre a localiza@o de servicos de assitência técnica
fora
dos Estados Unidos e Canadá, consulte o
cartáo
de servicos de garantia encontrado dentro
da embalagem
deste
produto.
NAO DEVOLVA ESTE PRODUTO AO LOCAL DA COMPRA DO MESMO.
ISTO PODERÁ ATRASAR 0 PROCESSAMENTO DO
SEU
PEDIDO DE GARANTIA.
Esta garantía náo cubre o desgaste normal das pecas ou os danos resultantes de qualquer urna
das
seguintes situacões: uso negligente ou indevido do produto, uso
deste
sob tensáo ou
corrente
incorretas,
uso
deste
de forma náo recomendada pelas instrucões de opera@0 ou ainda desmonte,
conserto
ou
altera@0
do mesmo por qualquer pessoa além dos técnicos do centro autorizado de
servicos. 0
concerto
ou substitui@o do produto conforme ditado pela garantia expressa ou
implícita sobre este produto.
A exce@o do âmbito proibido pelas leis apliáveis, qualquer garantia
implícita da aplicabilidade para o uso a que se destina
ou da adequacáo do produto para um fim
em particular é limitada em
sua duracáo ao prazo da garantia acíma. Alguns estados e províncias
náo permitem a exclusáo
ao
limitacáo de danos incidentais ou resultantes de um ato, ou permitem
a
limita$io
da duracáo de urna garantia implícita, de modo que as limita@es ou exclusões acima
talvez
não sejam aplicáveis ao seu caso. Esta garantia Ihe
confere
direitos legais específicos,
mas você poderá gozar também de direitos
adicionais que variam de estado para estado
e
de província para província.
q
Page 41

Page 42

.
.
@ii
N E R
B
01997 Sunbeam Corporation or its affiliated companies. All rights reserved.
Oster@ and Designer@are registered trademarks of Sunbeam Corporation or its affiliated companies.
Distributed by Sunbeam Producls Inc., Delray Beach, Florida 33445.
01997 Sunbeam Corporation ou
ses.soci#s
apparentées. Taus droits réservés.
Oster@ et Designer%ont marques deposees de Sunbeam Corporation ou de
ses
soc¡&% apparentées.
Distribue par Sunbeam Products Inc., Delray Beach, Florida 33445.
01997 Sunbeam Products Inc. o sus corporaciones afiliadas. Todos los derechos reservados.
Ostep
y Designels son marcas registradas de Sunbeam Corporation o de sus corporaciones aliliadas.
Distribuido por Sunbeam Products Ir&., Defray Beach, Florida 33445.
01997 Sunbeam Products Inc. ou suas empresas aliliadai. Todos os direitos reservados.
Oste@ e DesigneP são marcas comerciales da Sunbeam Corporation, ou de suas empresas afiliadas.
Distribuído pela Sunbeam Products Inc., Delray Beach, Florida 33445.
U.S. Patent Nos.
D373,281
and
D369,058
P.N. 66218-73
 Loading...