

Page 1
User Manual
Manuel de l’utilisateur
Ball® Mason Jar
Blender
Mélangeur
à bocal Ball
MD
www.oster.ca
/MD
User Manual
Manuel de l’utilisateur
Ball® Mason Jar
Blender
Mélangeur
à bocal Ball
MD
www.oster.ca
/MD
Page 2

2 | oster.ca oster.ca | 3
IMPORTANT SAFEGUARDS
When using electrical appliances, basic safety precautions should be followed,
including the following:
• Read all instructions before use.
• To disconnect, grasp plug and unplug cord from electrical outlet.
• To protect against risk of electrical shock, do not immerse the cord, plug or motor
base in water or any other liquids.
• Do not let cord hang over edge of table or counter or touch hot surfaces.
• Never leave appliance unattended when in use.
• Close supervision is necessary when used by or near children.
• Avoid contact with moving parts. Keep hands and utensils out of mason jar while
blending to prevent personal injury or damage to the blender.
• The blade is sharp. Handle with care.
• To reduce the risk of injury, never place cutter-assembly blades on base without
mason jar properly attached.
• Do not attempt to bypass the interlock system that powers the unit on.
• Do not blend hot liquids in the blender.
• Do not operate any appliance with a damaged cord or plug or after the appliance
malfunctions or is dropped or damaged in any manner. Return the appliance to the
nearest Authorized Sunbeam Appliance Service Center for examination, repair or
electrical mechanical adjustment.
• Do not use outdoors or for commercial purposes; this appliance is for household
use only.
• Always operate on a flat surface.
• Unplug the blender when not in use, before taking off or putting on parts and before
cleaning.
• Use this appliance for its intended use as described in this manual. The use of
attachments, including canning jars, not recommended by the manufacturer may
cause a risk of injury to persons.
SAVE THESE INSTRUCTIONS
T
his ProducT is for household use only
• This blender does not have any user serviceable parts. Any servicing should be
performed by an authorized service representative.
Please follow the instructions below to ensure the safe use of the power cord.
• This appliance is equipped with a polarized plug. This type of plug has one blade
that is wider than the other. This plug will fit in a polarized outlet only one way.
This is a safety feature intended to help reduce the risk of electrical shock. If you
are unable to insert the plug into the outlet, reverse the plug and try again. If it still
does not fit, contact a qualified electrician to replace the obsolete outlet. Do not
attempt to defeat the safety purpose of the polarized plug by modifying the plug in
any way.
• You may use an extension cord, if necessary, but be certain to follow
these guidelines:
– The marked electrical rating of the extension cord must be at least 120 Volt,
60 Hz, 10A.
–
The extension must be arranged so that it will not drape over the countertop
or tabletop, will not be within the reach of children, and will not be
tripped over.
– Do not pull, twist or otherwise abuse the power cord.
Page 3

Maintenance
• This blender does not have any user serviceable parts. Any servicing should be
performed by an authorized service representative.
Power cord instructions
Please follow the instructions below to ensure the safe use of the power cord.
• This appliance is equipped with a polarized plug. This type of plug has one blade
that is wider than the other. This plug will fit in a polarized outlet only one way.
This is a safety feature intended to help reduce the risk of electrical shock. If you
are unable to insert the plug into the outlet, reverse the plug and try again. If it still
does not fit, contact a qualified electrician to replace the obsolete outlet. Do not
attempt to defeat the safety purpose of the polarized plug by modifying the plug in
any way.
• You may use an extension cord, if necessary, but be certain to follow
these guidelines:
– The marked electrical rating of the extension cord must be at least 120 Volt,
60 Hz, 10A.
–
The extension must be arranged so that it will not drape over the countertop
or tabletop, will not be within the reach of children, and will not be
tripped over.
– Do not pull, twist or otherwise abuse the power cord.
Page 4

Using Your Oster
Clean blender according to the instructions in the “Cleaning and Storing
Your Blender” section.
Welcome
Congratulations on your purchase of an OSTER® Ball® Mason Jar blender!
To learn more about OSTER® products, please visit us at
www.oster.ca.
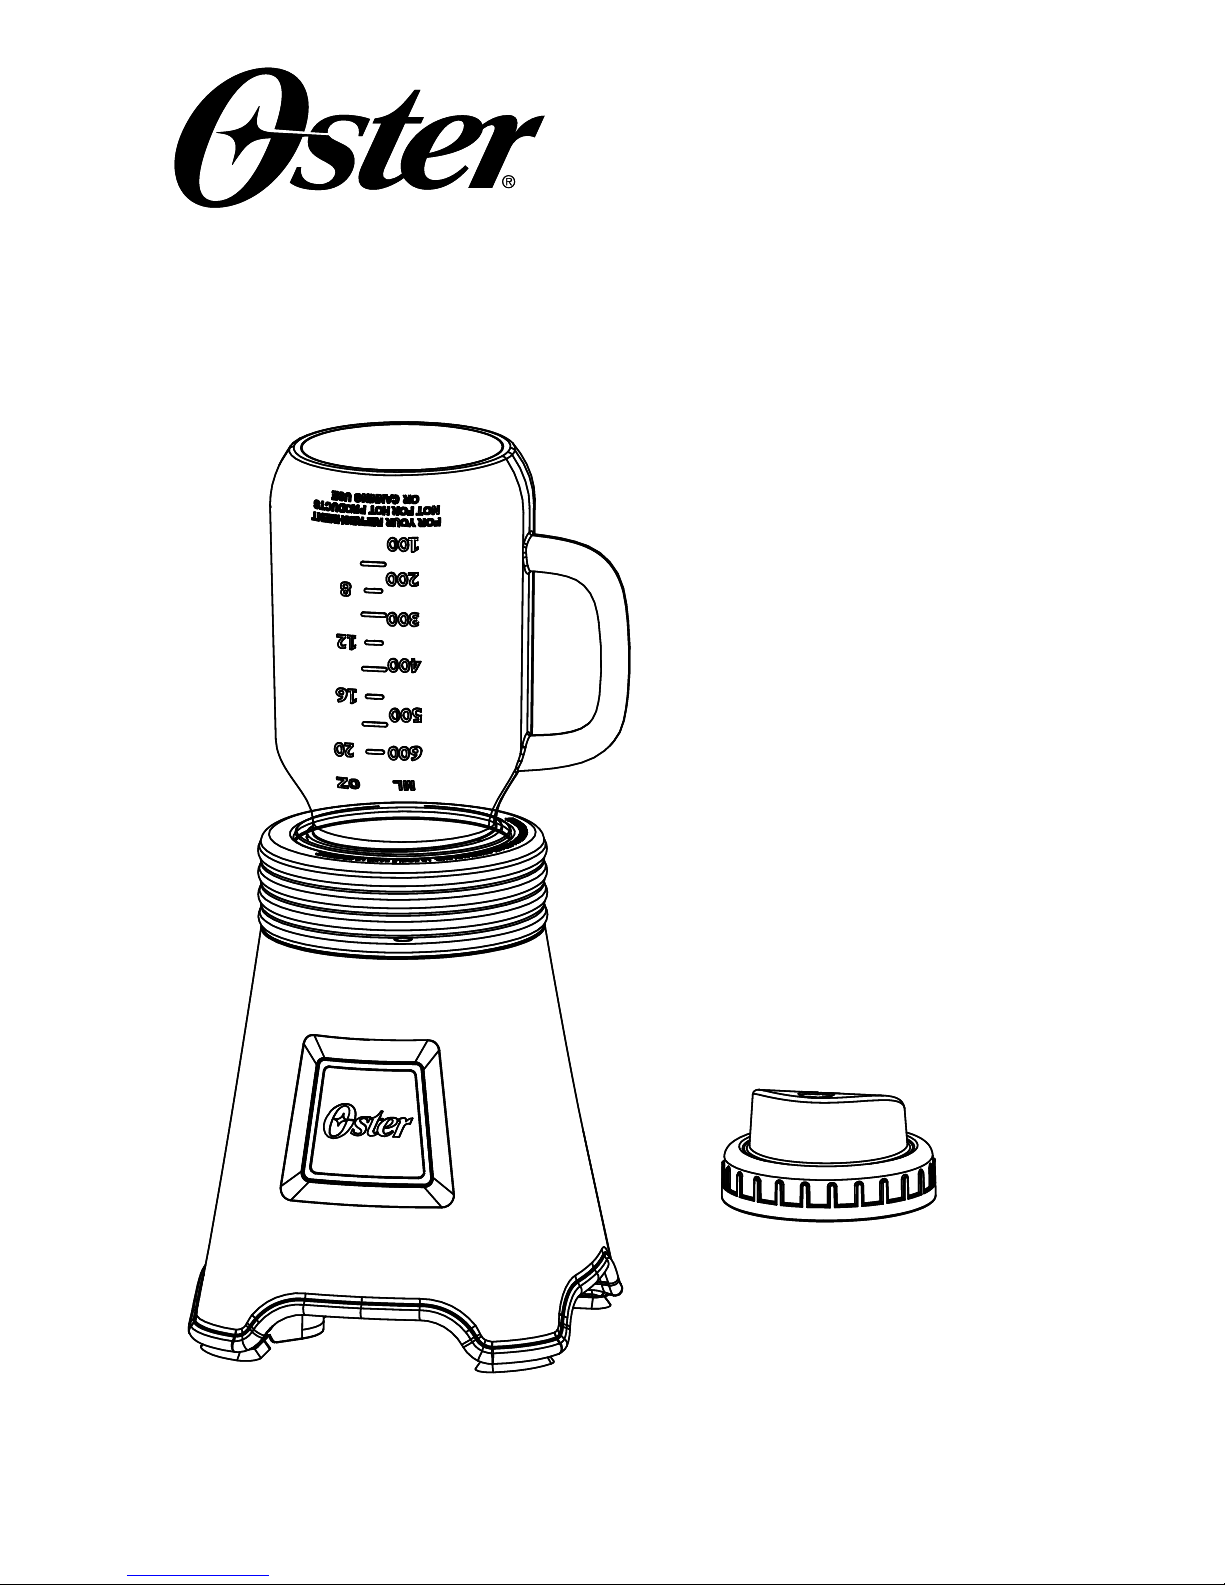
Features of Oster
®
Ball® Mason Jar blender
Place the Ball
flat surface with the open end
facing up. Fill the mason jar with
your favorite ingredients. Be sure
not to fill ingredients past the 20
oz marking.
Fasten the blade assembly on the open
end of the mason jar.
Turn the mason jar upside down, line
up arrows on the blade assembly to
the arrows on the base, and place the
mason jar in the base.
With one simple touch blending begins
by pressing the mason jar down in the
base.
To lock the mason jar in the base for
hands-free operation, simply turn
the mason jar clockwise in the base.
Blending will stop once you either
stop pressing the mason jar into the
base or once you unlock the mason jar
from the base.
Turn the mason jar over and place on a flat
surface. Replace the blase assembly with the drinking
lid & insert the straw. Now you are ready to enjoy
your drink.
1
2
3
4 | oster.ca oster.ca | 5
Jar
Blade
Base
Drinking Lid
Cap
Straw
Page 5

Using Your Oster® Ball® Mason Jar blender
Clean blender according to the instructions in the “Cleaning and Storing
Your Blender” section.
Place the Ball® Mason Jar on a
flat surface with the open end
facing up. Fill the mason jar with
your favorite ingredients. Be sure
not to fill ingredients past the 20
oz marking.
Fasten the blade assembly on the open
end of the mason jar.
Turn the mason jar upside down, line
up arrows on the blade assembly to
the arrows on the base, and place the
mason jar in the base.
With one simple touch blending begins
by pressing the mason jar down in the
base.
To lock the mason jar in the base for
hands-free operation, simply turn
the mason jar clockwise in the base.
Blending will stop once you either
stop pressing the mason jar into the
base or once you unlock the mason jar
from the base.
Turn the mason jar over and place on a flat
surface. Replace the blase assembly with the drinking
lid & insert the straw. Now you are ready to enjoy
your drink.
1
2
3
Page 6

6 | oster.ca
TIP: After you’ve consumed your blended beverage, wash out the mason jar
and reuse it throughout the day for water or other cold liquids.
Note: For optimal performance, place desired ingredients in the Jar according
to the following order: Liquids, fresh ingredients, frozen fruit, yogurt and ice
cream.
CAUTION: IT IS RECOMMENDED TO ONLY BLEND WITH THE
PLASTIC MASON JARS INCLUDED. DO NOT USE GLASS OR OTHER
MASON-STYLE JARS WITH THIS BLENDER AND BLADE ASSEMBLY.
FOR COLD DRINKS ONLY.
Blending Tips
• Put liquids in the cup first, unless a recipe says otherwise.
• Cut all firm fruits and vegetables into pieces no larger than 3/4 inch (1.8 cm)
to 1 inch (2.5 cm).
• Don’t overload mason jar.
• This blender will not mash potatoes, whip egg whites or substitute dairy
toppings, mix stiff dough or grind raw meat.
Cleaning and Storing Your Blender
CAUTION: UNPLUG BEFORE CLEANING. DO NOT IMMERSE THE
BLENDER BASE IN WATER OR ANY OTHER LIQUID.
Use a damp, soft sponge with mild detergent to clean the outside of the
blender base. All parts except for the blender base are dishwasher-safe. You
can also wash the parts, except the blender base, in warm, soapy water.
Rinse well and dry.
Storing Your Blender
After cleaning, reassemble blade assembly to open end of the jar and then
place in the blender base.
Maintenance:
This blender does not have any user serviceable parts. Any servicing should be
performed by an authorized service representative.
Recipes
Sunbeam Products, Inc. d/b/a Jarden Consumer Solutions has not tested these
recipes and is not responsible for the outcome of any recipe. You may not achieve
the results desired due to variations in ingredients, cooking temperatures, cooking
times, typos, errors, omissions, or individual cooking abilities. Please always use
your best judgment when cooking with raw ingredients such as eggs, chicken or
fish.
Recipes
Rise ’N’ Shine Shake
Makes 1 (18-ounce) serving
Raspberry-Lemon Smoothie
Makes 1 (18-ounce) serving
1 cup milk
1 cup strawberries,
hulled and halved
1 kiwi, peeled and
quartered
½ cup strawberry
frozen yogurt
1 tablespoon sugar
1 cup milk
1 teaspoon vanilla
1 ½ cups frozen
raspberries
1 container (6 ounces)
lemon yogurt
Page 7

oster.ca | 7
Recipes
Rise ’N’ Shine Shake
Makes 1 (18-ounce) serving
Raspberry-Lemon Smoothie
Makes 1 (18-ounce) serving
1 cup milk
1 cup strawberries,
hulled and halved
1 kiwi, peeled and
quartered
½ cup strawberry
frozen yogurt
1 tablespoon sugar
1 cup milk
1 teaspoon vanilla
1 ½ cups frozen
raspberries
1 container (6 ounces)
lemon yogurt
Pour milk into mason jar. Add strawberries,
kiwi, frozen yogurt and sugar. Fasten the blade
assembly on the open end
of the mason jar.
Turn the mason jar upside down and place it
in the base, lining up the arrows on the blade
assembly with the arrows on the base. Press
the mason jar down in the base or turn the
mason jar clockwise to lock it for hands-free
operation. Blend 20 to 30 seconds or until
smooth.
Turn the mason jar over and place on a flat
surface. Replace the blade assembly with the
drinking lid.
Pour milk and vanilla into mason jar. Add
raspberries and yogurt. Fasten the blade
assembly on the open end of the mason jar.
Turn the mason jar upside down and place it
in the base, lining up the arrows on the blade
assembly with the arrows on the base. Press
the mason jar down in the base or turn the
mason jar clockwise to lock it for hands-free
operation. Blend 20 to 30 seconds or until
smooth.
Turn the mason jar over and place on a flat
surface. Replace the blade assembly with the
drinking lid.
Page 8

Recipes
Frozen Hot Chocolate
Makes 1 (18-ounce) serving
Protein Energy Shake
Makes 1 (18-ounce) serving
1 cup milk
2 tablespoons
hot cocoa mix
1 cup ice cubes
½ cup chocolate
ice cream
1 container (6 ounces)
vanilla yogurt
1 cup plain soymilk
2 tablespoons honey
¼ cup walnuts
¼ to ½ teaspoon
ground cinnamon
1 ¼ cups vanilla
soy yogurt
Pour milk into mason jar. Add hot cocoa mix,
ice cubes, ice cream and yogurt. Fasten the
blade assembly on the
open end of the mason jar.
Turn the mason jar upside down and place it
in the base, lining up the arrows on the blade
assembly with the arrows on the base. Press
the mason jar down in the base or turn the
mason jar clockwise to lock it for hands-free
operation. Blend 30 to 45 seconds or until
smooth.
Turn the mason jar over and place on a flat
surface. Replace the blade assembly with the
drinking lid.
Pour milk and honey into mason jar. Add
walnuts, cinnamon and yogurt. Fasten the
blade assembly on the open end
of the mason jar.
Turn the mason jar upside down and place it
in the base, lining up the arrows on the blade
assembly with the arrows on the base. Press
the mason jar down in the base or turn the
mason jar clockwise to lock it for hands-free
operation. Blend 20 to 30 seconds or until
smooth.
Turn the mason jar over and place on a flat
surface. Replace the blade assembly with the
drinking lid.
8 | oster.ca
Recipes
Berry Morning Medley
Makes 1 (18-ounce) serving
Green Light Smoothie
Makes 1 (18-ounce) serving
1 cup milk
¼ teaspoon vanilla
¼ cup old-fashioned
oats
1 cup frozen mixed
berries
1 container (6 ounces)
plain yogurt
1 tablespoon sugar
½ cup green grapes
½ cup of baby spinach
½ cup of baby kale
¼ cup fresh pineapple
chunks
½ fresh medium
banana, peeled
¼ medium Granny
Smith apple, cored
and sliced (optional)
½ cup of cold water
1
/
3
cup ice cubes
Page 9

Recipes
Berry Morning Medley
Makes 1 (18-ounce) serving
Green Light Smoothie
Makes 1 (18-ounce) serving
1 cup milk
¼ teaspoon vanilla
¼ cup old-fashioned
oats
1 cup frozen mixed
berries
1 container (6 ounces)
plain yogurt
1 tablespoon sugar
½ cup green grapes
½ cup of baby spinach
½ cup of baby kale
¼ cup fresh pineapple
chunks
½ fresh medium
banana, peeled
¼ medium Granny
Smith apple, cored
and sliced (optional)
½ cup of cold water
1
/
3
cup ice cubes
Pour milk and vanilla into mason jar. Add oats,
berries, yogurt and sugar. Fasten the blade
assembly on the open end
of the mason jar.
Turn the mason jar upside down and place it
in the base, lining up the arrows on the blade
assembly with the arrows on the base. Press
the mason jar down in the base or turn the
mason jar clockwise to lock it for hands-free
operation. Blend 20 to 30 seconds or until
smooth.
Turn the mason jar over and place on a flat
surface. Replace the blade assembly with the
drinking lid.
Place ingredients into mason jar in order listed.
Fasten the blade assembly on the open end of
the mason jar.
Turn the mason jar upside down and place it
in the base, lining up the arrows on the blade
assembly with the arrows on the base. Press
the mason jar down in the base or turn the
mason jar clockwise to lock it for hands-free
operation. Blend 60 seconds or until smooth.
Turn the mason jar over and place on a flat
surface. Replace the blade assembly with the
drinking lid.
Page 10

3 Year Satisfaction Guarantee
Sunbeam Products, Inc. doing business as Jarden Consumer Solutions or if in Canada, Sunbeam
Corporation (Canada) Limited doing business as Jarden Consumer Solutions (collectively
“JCS”) warrants that for a period of three (3) years from the date of purchase, this product
will be free from defects in material and workmanship. JCS, at the Consumer’s sole option, will
repair or replace this product or any component of the product found to be defective during
the guarantee period. This guarantee is valid for the original retail purchaser from the date of
initial retail purchase and is not transferable. Keep the original sales receipt. Proof of purchase
is required to obtain satisfaction guarantee performance. JCS dealers, service centers, or retail
stores selling JCS products do not have the right to alter, modify or any way change the terms
and conditions of this guarantee.
What are the limits on JCS’ Liability?
JCS shall not be liable for any incidental or consequential damages caused by the breach of any
express, implied or statutory warranty or condition. Except to the extent prohibited by applicable
law, any implied warranty or condition of merchantability or fitness for a particular purpose
is limited in duration to the duration of the above limited warranty. JCS disclaims all other
warranties, conditions or representations, express, implied, statutory or otherwise. JCS shall not be
liable for any damages of any kind resulting from the purchase, use or misuse of, or inability to use
the product including incidental, special, consequential or similar damages or loss of profits, or for
any breach of contract, fundamental or otherwise, or for any claim brought against purchaser by
any other party. Some provinces, states or jurisdictions do not allow the exclusion or limitation of
incidental or consequential damages or limitations on how long an implied warranty lasts, so the
above limitations or exclusion may not apply to you. This limited warranty gives you specific legal
rights, and you may also have other rights that vary from province to province, state to state or
jurisdiction to jurisdiction.
How to Obtain Satisfaction Guarantee and/or Limited Warranty Service
In the U.S.A.
If you have any question regarding this guarantee or limited warranty or would like to obtain
guarantee or limited warranty service, please call 1-800-334-0759 and a convenient service center
address will be provided to you.
In Canada
If you have any question regarding this guarantee or limited warranty or would like to obtain
guarantee or limited warranty service, please call 1-800-667-8623 and a convenient service center
address will be provided to you.
In the U.S.A., this guarantee and limited warranty is offered by Sunbeam Products, Inc. doing
business as Jarden Consumer Solutions located in Boca Raton, Florida 33431. In Canada, this
guarantee and limited warranty is offered by Sunbeam Corporation (Canada) Limited, located at
20 B Hereford Street, Brampton, Ontario L6Y 0M1. If you have any other problem or claim in
connection with this product, please write to the Consumer Service Department.
PLEASE DO NOT RETURN THIS PRODUCT TO ANY OF THESE
ADDRESSES OR TO THE PLACE OF PURCHASE.
For inquiries regarding recycling and proper disposal of this product, please contact your local
waste management facility.
10 | oster.ca oster.ca | 11
Les précautions suivantes doivent être respectées lors de l’utilisation d’appareils
électriques :
• Lisez toutes les instructions avant l’utilisation.
• Pour débrancher, saisissez la fiche et débranchez le cordon de la prise électrique.
• Pour éviter les risques d’électrocution, n’immergez pas le cordon, la fiche ou le
moteur dans l’eau ou aucun autre liquide.
• Ne laissez pas le cordon pendre sur le bord d’une table ou d’un comptoir, ni en
contact avec des surfaces chaudes.
• Ne laissez jamais l’appareil sans surveillance lorsqu’il est en utilisation.
• Une supervision étroite est nécessaire lors de l’utilisation par des enfants ou à
proximité de ceux-ci.
• Évitez le contact avec des pièces en mouvement. Gardez les mains et les ustensiles à
l’écart du bocal pendant le mélange pour éviter toute blessure ou tout dommage au
mélangeur.
• La lame est coupante. Manipulez-la avec soin Le couteau est acéré. Manipulez-le
avec soin.
• Pour réduire les risques de blessures, ne placez jamais le couteau sur le socle sans
que le bocal ne soit bien attaché.
• Ne tentez pas de contourner le système de verrouillage de la mise en marche de
l’appareil.
• Ne mélangez pas de liquides chauds dans le mélangeur.
• Ne faites fonctionner aucun appareil avec un cordon ou une prise endommagé(e)
ou après avoir constaté des défaillances du fonctionnement de l’appareil, ou l’avoir
laissé tomber ou endommagé d’une manière quelconque. Retournez l’appareil au
centre de service agréé de Sunbeam en vue de son inspection, de sa réparation, ou
de son réglage électrique et mécanique.
• N’utilisez pas l’appareil à l’extérieur ou à des fins commerciales. Cet appareil est
destiné à un usage domestique uniquement.
• Utilisez toujours l’appareil sur une surface plane.
• Débranchez le mélangeur lorsqu’il n’est pas utilisé, avant de monter ou de démonter
des pièces, et avant le nettoyage.
• Utilisez cet appareil uniquement pour l’usage auquel il est destiné et tel qu’il est
décrit dans ce mode d’emploi. L’emploi d’accessoires, y compris de bocaux de
conserves non explicitement recommandés par le fabricant peut entraîner des
risques de blessures corporelles.
Page 11

P.N. 185624
Printed in China / Imprimé en Chine GCDS-OST43889-SL
BLSTPB-BALL Series_16EFM1
For product questions contact:
Sunbeam Consumer Service
USA : 1.800.334.0759
Canada : 1.800.667.8623
Mexico : 1.800.506.1700
www.oster.ca
© 2016 Sunbeam Products, Inc. doing business as Jarden Consumer Solutions.
All rights reserved. Distributed by Sunbeam Products, Inc. doing business as
Jarden Consumer Solutions, 20B Hereford Street, Brampton (Ontario) L6Y 0M1.
Pour les questions de produit:
Service à la clientèle de Sunbeam
États-Unis : 1.800.334.0759
Canada : 1.800.667.8623
Mexique : 1.800.506.1700
www.oster.ca
© 2016 Sunbeam Products, Inc. faisant affaire sous le nom de Jarden Consumer Solutions.
Tous droits reservés. Distribué par Sunbeam Corporation(Canada) Limited faisant affaire sous le nom
de Jarden Consumer Solutions, 20B Hereford Street, Brampton (Ontario) L6Y 0M1.
et BallMD marques commerciales de Ball Corporation utilisées sous licence.
/MD
Page 12

User Manual
Manuel de l’utilisateur
Ball® Mason Jar
Blender
Mélangeur
à bocal Ball
MD
www.oster.ca
/MD
Page 13

MISES EN GARDE
IMPORTANTES
Les précautions suivantes doivent être respectées lors de l’utilisation d’appareils
électriques :
• Lisez toutes les instructions avant l’utilisation.
• Pour débrancher, saisissez la fiche et débranchez le cordon de la prise électrique.
• Pour éviter les risques d’électrocution, n’immergez pas le cordon, la fiche ou le
moteur dans l’eau ou aucun autre liquide.
• Ne laissez pas le cordon pendre sur le bord d’une table ou d’un comptoir, ni en
contact avec des surfaces chaudes.
• Ne laissez jamais l’appareil sans surveillance lorsqu’il est en utilisation.
• Une supervision étroite est nécessaire lors de l’utilisation par des enfants ou à
proximité de ceux-ci.
• Évitez le contact avec des pièces en mouvement. Gardez les mains et les ustensiles à
l’écart du bocal pendant le mélange pour éviter toute blessure ou tout dommage au
mélangeur.
• La lame est coupante. Manipulez-la avec soin Le couteau est acéré. Manipulez-le
avec soin.
• Pour réduire les risques de blessures, ne placez jamais le couteau sur le socle sans
que le bocal ne soit bien attaché.
• Ne tentez pas de contourner le système de verrouillage de la mise en marche de
l’appareil.
• Ne mélangez pas de liquides chauds dans le mélangeur.
• Ne faites fonctionner aucun appareil avec un cordon ou une prise endommagé(e)
ou après avoir constaté des défaillances du fonctionnement de l’appareil, ou l’avoir
laissé tomber ou endommagé d’une manière quelconque. Retournez l’appareil au
centre de service agréé de Sunbeam en vue de son inspection, de sa réparation, ou
de son réglage électrique et mécanique.
• N’utilisez pas l’appareil à l’extérieur ou à des fins commerciales. Cet appareil est
destiné à un usage domestique uniquement.
• Utilisez toujours l’appareil sur une surface plane.
• Débranchez le mélangeur lorsqu’il n’est pas utilisé, avant de monter ou de démonter
des pièces, et avant le nettoyage.
• Utilisez cet appareil uniquement pour l’usage auquel il est destiné et tel qu’il est
décrit dans ce mode d’emploi. L’emploi d’accessoires, y compris de bocaux de
conserves non explicitement recommandés par le fabricant peut entraîner des
risques de blessures corporelles.
Page 14

12 | oster.ca
CONSERVEZ CES INSTRUCTIONS
ce ProduiT esT rÉserVÉ
À un usAGe doMesTiQue
entretien
• Ce mélangeur ne contient aucun composant susceptible d’être réparé par
l’utilisateur. Toute opération d’entretien doit être effectuée par un représentant de
service autorisé.
instructions relatives au cordon
Veuillez suivre les instructions ci-dessous pour assurer une utilisation du cordon
électrique sans danger.
• Cet appareil est équipé d’une fiche polarisée. Ce type de fiche comporte une lame
plus large que l’autre. Elle ne se loge dans les prises polarisées que d’une seule
manière. Il s’agit d’un dispositif de sécurité qui a pour objet de réduire les risques
d’électrocution. Si vous ne pouvez pas insérer la fiche dans la prise murale, inversez
la fiche et réessayez. Si elle ne s’adapte toujours pas, veuillez vous adresser à un
électricien qualifié pour remplacer la prise obsolète. N’essayez pas de contourner le
dispositif de sécurité de la fiche polarisée en la modifiant d’une manière quelconque.
• Vous pouvez si nécessaire utiliser une rallonge, mais veillez à bien respecter les
principes directeurs suivants :
– Le calibre électrique figurant sur le cordon de rallonge doit être d’au moins
120 Volts, 60 Hz, 10A.
– La rallonge doit être disposée de sorte à ne pas pendre du comptoir ou de la
table, ne doit pas être à la portée des enfants et il ne doit pas être possible de
trébucher sur celle-ci.
– Ne tirez pas le cordon d’alimentation électrique, ne le tordez pas et n’en faites
pas une utilisation abusive.
Bienvenue!
Félicitations pour votre achat du mélangeur à bocal Ball
en savoir plus sur les produits OSTER
www.oster.ca.
Page 15

oster.ca | 13
Bienvenue!
Félicitations pour votre achat du mélangeur à bocal BallMD d’OsterMD! Pour
en savoir plus sur les produits OSTER
®
, veuillez visiter le site
www.oster.ca.
Caractéristiques du mélangeur à
à bocal BallMD d’Oster
MD
Bocal
Couteau
Socle Moteur
Couvercle
Verseur
Bouchon
Paille
Page 16

14 | oster.ca oster.ca | 15
CONSEILS: après avoir bu la boisson mélangée, nettoyer le bocal et le réutiliser
tout au long de la journée pour boire de l’eau ou autre liquide froid.
Remarque: pour un fonctionnement optimal, remplir le bocal d’ingrédients selon
l’ordre de priorité ci-après : liquides, ingrédients frais, fruits congelés, yaourt et
glace.
ATTENTION: IL EST RECOMMANDÉ DE N’UTILISER QUE LES BOCAUX
EN PLASTIQUE INCLUS AVEC L’APPAREIL. NE PAS UTILISER DE BOCAUX
EN VERRE OU D’AUTRES RÉCIPIENTS DANS LE STYLE DES BOCAUX
AVEC CE MÉLANGEUR ET SON COUTEAU. POUR BOISSONS FROIDES
UNIQUEMENT.
Conseils de mélange
• Verser en premier les liquides dans le récipient, à moins que la recette indique le
contraire.
• Couper tous les fruits à chair ferme en morceaux pas plus longs que ¾ pouce
(1,8 cm) à 1 pouce (2,5 cm).
• Ne pas remplir le bocal à ras bord
• Ce mélangeur n’a pas été conçu pour écraser des pommes de terre, battre des
blancs en neige ou nappages non-laitiers, mélanger une pâte ferme ou hacher de la
viande crue.
Nettoyage et rangement du mélangeur
ATTENTION: DÉBRANCHER AVANT DE NETTOYER, NE PAS PLONGER LE
MÉLANGEUR DANS DE L’EAU OU AUTRE LIQUIDE
Utiliser une éponge douce et mouillée avec un produit nettoyant doux pour
nettoyer l’extérieur du socle moteur. Tous les éléments à l’exception du socle
vont au lave-vaisselle. Vous pouvez aussi les nettoyer à la main, à l’exception du
socle, dans de l’eau chaude et savonneuse. Bien rincer et sécher.
Rangement du mélangeur
Après l’avoir nettoyé, procéder au montage du couteau sur l’extrémité ouverte
du récipient et le poser ensuite sur le socle moteur.
Entretien
Ce mélangeur ne contient aucun composant susceptible d’être réparé par l’utilisateur.
Toute opération de dépannage doit être effectuée par un représentant du service agréé.
Recettes
Sunbeam Products, Inc. d/b/a Jarden Consumer Solutions n’a pas testé ces recettes et
décline toute responsabilité relative au résultat de quelconque recette. Il est possible que
vous n’atteigniez pas les résultats désirés en raison des variations des ingrédients utilisés,
des températures de cuisson, des durées de cuisson, des erreurs d’orthographe, des
erreurs, des omissions, ou en raison des aptitudes personnelles en matière de cuisine.
Veuillez toujours faire preuve de discernement lorsque vous cuisinez avec des ingrédients
crus comme par exemple des œufs, du poulet ou du poisson.
Mode d’emploi de votre mélangeur à bocal
BallMD d’OsterMD
Nettoyer le mélangeur en suivant les instructions présentées dans le chapitre
intitulé « Nettoyage et rangement du mélangeur »
Poser le Bocal Mason Ball
MD
sur
une surface plane avec l’extrémité
ouverte faisant face. Remplir
le bocal avec vos ingrédients
préférés. Veiller à ne pas remplir
le bocal au-delà de la limite
marquant les 20 oz.
Attacher le couteau sur l’extrémité
ouverte du bocal. Retourner le
bocal, aligner les flèches situées sur
l’ensemble lame avec les flèches situées
sur le socle moteur et poser le bocal
sur le socle. Avec une légère pression,
le mélange des ingrédients commence
en appuyant sur le bocal situé sur le
socle moteur. Pour verrouiller le bocal
sur le socle et employer le mélangeur
mains libres, il suffit simplement de
tourner le bocal sur le socle dans le
sens des aiguilles d’une montre. Le
mélange s’arrêtera si vous arrêtez
d’appuyer sur le bocal ou si vous
déverrouillez le bocal du socle moteur.
Retourner le bocal et le poser sur une surface plane.
Remplacer le couteau par le couvercle verseur et
insérer la paille. Vous êtes maintenant prêt à savourer
votre boisson.
1
2
3
Page 17

CONSEILS: après avoir bu la boisson mélangée, nettoyer le bocal et le réutiliser
tout au long de la journée pour boire de l’eau ou autre liquide froid.
Remarque: pour un fonctionnement optimal, remplir le bocal d’ingrédients selon
l’ordre de priorité ci-après : liquides, ingrédients frais, fruits congelés, yaourt et
glace.
ATTENTION: IL EST RECOMMANDÉ DE N’UTILISER QUE LES BOCAUX
EN PLASTIQUE INCLUS AVEC L’APPAREIL. NE PAS UTILISER DE BOCAUX
EN VERRE OU D’AUTRES RÉCIPIENTS DANS LE STYLE DES BOCAUX
AVEC CE MÉLANGEUR ET SON COUTEAU. POUR BOISSONS FROIDES
UNIQUEMENT.
Conseils de mélange
• Verser en premier les liquides dans le récipient, à moins que la recette indique le
contraire.
• Couper tous les fruits à chair ferme en morceaux pas plus longs que ¾ pouce
(1,8 cm) à 1 pouce (2,5 cm).
• Ne pas remplir le bocal à ras bord
• Ce mélangeur n’a pas été conçu pour écraser des pommes de terre, battre des
blancs en neige ou nappages non-laitiers, mélanger une pâte ferme ou hacher de la
viande crue.
Nettoyage et rangement du mélangeur
ATTENTION: DÉBRANCHER AVANT DE NETTOYER, NE PAS PLONGER LE
MÉLANGEUR DANS DE L’EAU OU AUTRE LIQUIDE
Utiliser une éponge douce et mouillée avec un produit nettoyant doux pour
nettoyer l’extérieur du socle moteur. Tous les éléments à l’exception du socle
vont au lave-vaisselle. Vous pouvez aussi les nettoyer à la main, à l’exception du
socle, dans de l’eau chaude et savonneuse. Bien rincer et sécher.
Rangement du mélangeur
Après l’avoir nettoyé, procéder au montage du couteau sur l’extrémité ouverte
du récipient et le poser ensuite sur le socle moteur.
Entretien
Ce mélangeur ne contient aucun composant susceptible d’être réparé par l’utilisateur.
Toute opération de dépannage doit être effectuée par un représentant du service agréé.
Recettes
Sunbeam Products, Inc. d/b/a Jarden Consumer Solutions n’a pas testé ces recettes et
décline toute responsabilité relative au résultat de quelconque recette. Il est possible que
vous n’atteigniez pas les résultats désirés en raison des variations des ingrédients utilisés,
des températures de cuisson, des durées de cuisson, des erreurs d’orthographe, des
erreurs, des omissions, ou en raison des aptitudes personnelles en matière de cuisine.
Veuillez toujours faire preuve de discernement lorsque vous cuisinez avec des ingrédients
crus comme par exemple des œufs, du poulet ou du poisson.
Page 18

16 | oster.ca oster.ca | 17
Recettes
Chocolat chaud glacé
Pour une boisson de 53 cl (18 onces)
Lait frappé protéocalorique
Pour une boisson de 53 cl (18 onces)
1 tasse de lait
2 cuillères à soupe
de poudre de cacao
pour chocolat chaud
1 tasse de glaçons
1/2 tasse de crème
glacée au chocolat
1 pot de 17 cl
(6 onces) de yogourt
à la vanille
1 tasse de lait de soja
non parfumé
2 cuillères à soupe de
miel
1/4 de tasse de noix
1/4 à 1/2 cuillère à café
de cannelle
1 1/4 tasse de yogourt
de soja vanillé
Recettes
Lait frappé Rise ‘N’ Shine
Pour une boisson de 53 cl (18 onces)
Yogourt frappé aux framboises et citron
Pour une boisson de 53 cl (18 onces)
1 tasse de lait
1 tasse de fraises,
équeutées et
coupées en deux
1 kiwi, épluché et
coupé en quatre
1/2 tasse de yogourt
glacé aux fraises
1 cuillère à soupe de
sucre
1 tasse de lait
1 cuillère à café de
vanille
1 1/2 tasse de
framboises surgelées
1 pot de 17 cl
(6 onces) de yogourt
au citron
Verser le lait dans le bocal. Ajouter les fraises,
le kiwi, le yogourt glacé et le sucre. Fixer le
couteau sur l’extrémité ouverte du bocal.
Retourner le bocal et le placer dans la base en
faisant correspondre les flèches du couteau avec
celles de la base. Appuyer le bocal dans la base ou
le tourner dans le sens des aiguilles d’une montre
pour le bloquer en position de fonctionnement
mains libres. Mélanger pendant 20 à 30 secondes
ou jusqu’à l’obtention d’un ensemble onctueux.
Retourner le bocal et le placer sur une surface
plate. Remplacer le couteau par le couvercle.
Verser le lait et la vanille dans le bocal. Ajouter
les framboises et le yogourt. Fixer le couteau
sur l’extrémité ouverte du bocal.
Retourner le bocal et le placer dans la base en
faisant correspondre les flèches du couteau avec
celles de la base. Appuyer le bocal dans la base ou
le tourner dans le sens des aiguilles d’une montre
pour le bloquer en position de fonctionnement
mains libres. Mélanger pendant 20 à 30 secondes
ou jusqu’à l’obtention d’un ensemble onctueux.
Retourner le bocal et le placer sur une surface
plate. Remplacer le couteau par le couvercle.
Page 19

Recettes
Chocolat chaud glacé
Pour une boisson de 53 cl (18 onces)
Lait frappé protéocalorique
Pour une boisson de 53 cl (18 onces)
1 tasse de lait
2 cuillères à soupe
de poudre de cacao
pour chocolat chaud
1 tasse de glaçons
1/2 tasse de crème
glacée au chocolat
1 pot de 17 cl
(6 onces) de yogourt
à la vanille
1 tasse de lait de soja
non parfumé
2 cuillères à soupe de
miel
1/4 de tasse de noix
1/4 à 1/2 cuillère à café
de cannelle
1 1/4 tasse de yogourt
de soja vanillé
Verser le lait dans le bocal. Ajouter la poudre
de la boisson chocolatée, les glaçons, la glace
et le yogourt. Fixer le couteau sur l’extrémité
ouverte du bocal.
Retourner le bocal et le placer dans la base en
faisant correspondre les flèches du couteau avec
celles de la base. Appuyer le bocal dans la base ou le
tourner dans le sens des aiguilles d’une montre pour
le bloquer en position de fonctionnement mains libres.
Mélanger pendant 30 à 45 secondes ou jusqu’à
l’obtention d’un ensemble onctueux.
Retourner le bocal et le placer sur une surface plate.
Remplacer le couteau par le couvercle.
Verser le lait et le miel dans le bocal. Ajouter
noix, cannelle et yogourt. Fixer le couteau sur
l’extrémité ouverte du bocal.
Retourner le bocal et le placer dans la base en
faisant correspondre les flèches du couteau avec
celles de la base. Appuyer le bocal dans la base ou
le tourner dans le sens des aiguilles d’une montre
pour le bloquer en position de fonctionnement
mains libres. Mélanger pendant 20 à 30 secondes
ou jusqu’à l’obtention d’un ensemble onctueux.
Retourner le bocal et le placer sur une surface
plate. Remplacer le couteau par le couvercle.
Page 20

18 | oster.ca oster.ca | 19
Garantie de satisfaction de 3 ans
Sunbeam Products, Inc. faisant affaire sous le nom de Jarden Consumer Solutions, ou au
Canada, Sunbeam Corporation (Canada) Limited, faisant affaire sous le nom de Jarden
Consumer Solutions (collectivement « JCS ») garantit que pendant une période de trois (3) ans
à compter de la date d’achat ce produit sera exempt de vices de matériaux et de fabrication. À
la seule discrétion du consommateur, JCS réparera ou remplacera cet article ou toute pièce de
celui-ci dont la défectuosité a été constatée au cours de la période de garantie. Cette garantie
n’est valable que pour l’acheteur au détail initial, à compter de la date d’achat au détail initial
et elle n’est pas transférable. Veuillez conserver votre preuve d’achat originale, elle est exigée
pour tout service que couvre la garantie. Les concessionnaires JCS, les centres de services ou les
détaillants qui vendent des produits JCS n’ont pas le droit d’altérer, de modifier ou de changer
d’une manière quelconque les modalités de la présente garantie.
Quelles sont les limites de responsabilité de JCS ?
JCS décline toute responsabilité en cas de dommages accessoires ou indirects résultant du non-
respect de toute garantie ou condition explicite ou implicite. Sauf dans la mesure interdite par la
législation pertinente, toute garantie ou condition implicite de qualité commerciale ou d’application
à un usage particulier est limitée à la durée de la garantie limitée ci-dessus. JCS rejette toutes
autres garanties, conditions ou représentations expresses, tacites, légales, ou autres. JCS ne sera
pas responsable des dégâts, quels qu’ils soient, résultant de l’achat, de l’utilisation abusive ou
non du produit ou de l’inaptitude à l’utiliser, y compris les dégâts directs, spéciaux, indirects ou
identiques, ni des pertes de revenus, ni de toute rupture de contrat, fondamentale ou autre, ni de
toute plainte déposée contre l’acheteur par un tiers. Certaines provinces ou juridictions et certains
États interdisent d’exclure ou de limiter les dommages accessoires ou indirects, ou ne permettent
pas la limitation de la durée d’application de la garantie implicite, de sorte que vous pouvez ne
pas être assujetti aux limites ou exclusions énoncées ci-dessus. Cette garantie limitée vous confère
des droits juridiques précis et vous pouvez avoir d’autres droits, ces droits variant d’une province,
d’une juridiction ou d’un État à l’autre.
Obtention du service prévu par la garantie de satisfaction et/ou la garantie limitée
Aux États-Unis
Pour toute question concernant cette garantie ou garantie limitée, ou bien pour obtenir un service
prévu par la garantie ou la garantie limitée, appelez au 1 800 334-0759 et l’adresse d’un centre de
services commodément situé vous sera fournie.
Au Canada
Pour toute question concernant cette garantie ou garantie limitée, ou bien pour obtenir un service
prévu par la garantie ou la garantie limitée, appelez au 1 800 667-8623 et l’adresse d’un centre de
services commodément situé vous sera fournie.
Aux États-Unis, la garantie ou la garantie limitée est offerte par Sunbeam Products, Inc. faisant
affaire sous le nom de Jarden Consumer Solutions, situé à Boca Raton, en Floride 33431. Au
Canada, la garantie ou la garantie limitée est offerte par Sunbeam Corporation (Canada) Limited,
du 20B Hereford Street à Brampton (Ontario) L6Y 0M1. Pour toute autre question ou réclamation
concernant ce produit, veuillez écrire à notre service à la clientèle.
NE RETOURNEZ CE PRODUIT NI À L’UNE DE CES ADRESSES NI AU
LIEU D’ACHAT.
Pour toute demande de renseignements en ce qui concerne le recyclage et l’élimination appropriée
de ce produit, veuillez communiquer avec l’installation de gestion des déchets locale.
Recettes
Boisson matinale aux baies
Pour une boisson de 53 cl (18 onces)
1 tasse de lait
1/4 de cuillère à café
de vanille
1/4 de tasse de flocons
d’avoine
1 tasse de baies
mélangées
surgelées
1 pot de 17 cl (6
onces) de yogourt
non parfumé
1 cuillère à soupe de
sucre
Verser le lait et la vanille dans le bocal. Ajouter
l’avoine, les fruits rouges, le yogourt et le
sucre. Fixer le couteau sur l’extrémité ouverte
du bocal.
Retourner le bocal et le placer dans la base en
faisant correspondre les flèches du couteau avec
celles de la base. Appuyer le bocal dans la base ou
le tourner dans le sens des aiguilles d’une montre
pour le bloquer en position de fonctionnement
mains libres. Mélanger pendant 20 à 30 secondes
ou jusqu’à l’obtention d’un ensemble onctueux.
Retourner le bocal et le placer sur une surface
plate. Remplacer le couteau par le couvercle.
Smoothie Vert et Léger
Pour 1 portion de 53 cl (18 onces)
½ tasse de raisins verts
½ tasse de jeunes
épinards
½ tasse de jeunes feuilles
de chou vert frisé
¼ tasse de morceaux
d’ananas frais
1/2 banane de taille
moyenne, pelée
1/4 de pomme verte
Granny Smith de
taille moyenne,
évidée et tranchée
(facultatif)
½ tasse d’eau froide
1
/
3
tasse de glaçons
Verser les ingrédients dans le bocal selon
l’ordre de priorité indiqué. Fixer le couteau sur
l’extrémité ouverte du bocal.
Retourner le bocal et le placer sur la base
en alignant les flèches du couteau avec les
flèches sur la base. Appuyer le bocal sur la
base ou le tourner dans le sens des aiguilles
d’une montre pour le verrouiller en place
et utiliser l’appareil en mode mains libres.
Mélanger pendant 60 secondes ou jusqu’à ce
que le mélange ait une consistance bien lisse.
Retourner le bocal et le poser sur une surface
plane. Remplacer le couteau par le couvercle.
Page 21

Garantie de satisfaction de 3 ans
Sunbeam Products, Inc. faisant affaire sous le nom de Jarden Consumer Solutions, ou au
Canada, Sunbeam Corporation (Canada) Limited, faisant affaire sous le nom de Jarden
Consumer Solutions (collectivement « JCS ») garantit que pendant une période de trois (3) ans
à compter de la date d’achat ce produit sera exempt de vices de matériaux et de fabrication. À
la seule discrétion du consommateur, JCS réparera ou remplacera cet article ou toute pièce de
celui-ci dont la défectuosité a été constatée au cours de la période de garantie. Cette garantie
n’est valable que pour l’acheteur au détail initial, à compter de la date d’achat au détail initial
et elle n’est pas transférable. Veuillez conserver votre preuve d’achat originale, elle est exigée
pour tout service que couvre la garantie. Les concessionnaires JCS, les centres de services ou les
détaillants qui vendent des produits JCS n’ont pas le droit d’altérer, de modifier ou de changer
d’une manière quelconque les modalités de la présente garantie.
Quelles sont les limites de responsabilité de JCS ?
JCS décline toute responsabilité en cas de dommages accessoires ou indirects résultant du nonrespect de toute garantie ou condition explicite ou implicite. Sauf dans la mesure interdite par la
législation pertinente, toute garantie ou condition implicite de qualité commerciale ou d’application
à un usage particulier est limitée à la durée de la garantie limitée ci-dessus. JCS rejette toutes
autres garanties, conditions ou représentations expresses, tacites, légales, ou autres. JCS ne sera
pas responsable des dégâts, quels qu’ils soient, résultant de l’achat, de l’utilisation abusive ou
non du produit ou de l’inaptitude à l’utiliser, y compris les dégâts directs, spéciaux, indirects ou
identiques, ni des pertes de revenus, ni de toute rupture de contrat, fondamentale ou autre, ni de
toute plainte déposée contre l’acheteur par un tiers. Certaines provinces ou juridictions et certains
États interdisent d’exclure ou de limiter les dommages accessoires ou indirects, ou ne permettent
pas la limitation de la durée d’application de la garantie implicite, de sorte que vous pouvez ne
pas être assujetti aux limites ou exclusions énoncées ci-dessus. Cette garantie limitée vous confère
des droits juridiques précis et vous pouvez avoir d’autres droits, ces droits variant d’une province,
d’une juridiction ou d’un État à l’autre.
Obtention du service prévu par la garantie de satisfaction et/ou la garantie limitée
Aux États-Unis
Pour toute question concernant cette garantie ou garantie limitée, ou bien pour obtenir un service
prévu par la garantie ou la garantie limitée, appelez au 1 800 334-0759 et l’adresse d’un centre de
services commodément situé vous sera fournie.
Au Canada
Pour toute question concernant cette garantie ou garantie limitée, ou bien pour obtenir un service
prévu par la garantie ou la garantie limitée, appelez au 1 800 667-8623 et l’adresse d’un centre de
services commodément situé vous sera fournie.
Aux États-Unis, la garantie ou la garantie limitée est offerte par Sunbeam Products, Inc. faisant
affaire sous le nom de Jarden Consumer Solutions, situé à Boca Raton, en Floride 33431. Au
Canada, la garantie ou la garantie limitée est offerte par Sunbeam Corporation (Canada) Limited,
du 20B Hereford Street à Brampton (Ontario) L6Y 0M1. Pour toute autre question ou réclamation
concernant ce produit, veuillez écrire à notre service à la clientèle.
NE RETOURNEZ CE PRODUIT NI À L’UNE DE CES ADRESSES NI AU
LIEU D’ACHAT.
Pour toute demande de renseignements en ce qui concerne le recyclage et l’élimination appropriée
de ce produit, veuillez communiquer avec l’installation de gestion des déchets locale.
Page 22

P.N. 185624
Printed in China / Imprimé en Chine GCDS-OST43889-SL
BLSTPB-BALL Series_16EFM1
For product questions contact:
Sunbeam Consumer Service
USA : 1.800.334.0759
Canada : 1.800.667.8623
Mexico : 1.800.506.1700
www.oster.ca
© 2016 Sunbeam Products, Inc. doing business as Jarden Consumer Solutions.
All rights reserved. Distributed by Sunbeam Products, Inc. doing business as
Jarden Consumer Solutions, 20B Hereford Street, Brampton (Ontario) L6Y 0M1.
Pour les questions de produit:
Service à la clientèle de Sunbeam
États-Unis : 1.800.334.0759
Canada : 1.800.667.8623
Mexique : 1.800.506.1700
www.oster.ca
© 2016 Sunbeam Products, Inc. faisant affaire sous le nom de Jarden Consumer Solutions.
Tous droits reservés. Distribué par Sunbeam Corporation(Canada) Limited faisant affaire sous le nom
de Jarden Consumer Solutions, 20B Hereford Street, Brampton (Ontario) L6Y 0M1.
et BallMD marques commerciales de Ball Corporation utilisées sous licence.
/MD
 Loading...