


U
Uss
e
err’’ss
M
M
a
a
n
n
u
u
a
all
HHiigghh DDeeffiinniittiioonn DDiiggiittaall SSaatteelllliittee RReecceeiivveerr
Model ID: HD X406p 03/2012 ak

1
Content
Safety Precaution .............................................................................................. 3
Environment protection……………………………………………………………… 4
1. General information ····························································································· 5
1.1 General Features ······················································································ 5
1.2 Accessories ······························································································· 6
2. Product Overview ································································································ 7
2.1 Front Panel ······························································································· 7
2.2 Rear Panel ································································································ 8
2.3 Remote Control Unit (RCU) ······································································ 9
3. Connection with other Devices ·········································································· 11
3.1 Connecting to TV ···················································································· 11
3.2 Connecting to Antenna ············································································ 12
4. Installation ········································································································· 14
4.1 Powering On ··························································································· 14
4.2 Antenna Settings ····················································································· 14
4.3 Factory Default ························································································ 20
4.4 USALS Setup ·························································································· 21
5. Edit Channel ······································································································ 22
5.1 Edit Channel ··························································································· 22
5.2 Edit Favorite ···························································································· 24
5.3 User Channel List ···················································································· 25
6. Settings ············································································································· 25
6.1 System Settings ······················································································ 25
6.2 OSD Setup ······························································································ 27
6.3 Parental control ······················································································· 27
6.4 CA menu ································································································· 28
6.5 CI menu ·································································································· 28
7. Times ················································································································· 29
7.1 Time Settings ·························································································· 29

2
7.2 Event Timer ····························································································· 29
7.3 Sleep Timer ····························································································· 30
7.4 Standby hour ··························································································· 31
8. Expansion ·········································································································· 32
8.1 Games ···································································································· 32
8.2 USB ········································································································· 32
8.2.1 Basic Operations ·················································································· 32
9. About STB ········································································································· 38
10. Basic Operation ······························································································· 39
10.1 Audio ····································································································· 39
10.2 Zoom In ································································································· 39
10.3 Satellite List ··························································································· 39
10.4 EPG ······································································································ 40
10.5 Subtitle ·································································································· 41
10.6 Teletext ·································································································· 41
10.7 Find channel·························································································· 41
10.8 Program Information ············································································· 42
11. Channel List ····································································································· 44
11.1 OK List··································································································· 44
11.2 Favorite List ························································································ 45
12. USB Control ···································································································· 46
12.1 Recording and Timeshift ······································································· 46
12.2 PVR List ································································································ 47
13. Network ··········································································································· 48
13.1 Connecting to Network ·········································································· 48
13.2 Connecting to Wifi (Wireless LAN) - OPTIONAL ··································· 48
13.3 Network Application ··············································································· 49
14. Additional Information ······················································································ 50
14.1 Trouble Shooting ··················································································· 50
14.2 Declaration of conformity ······································································ 52
14.3 Technical Specification ·········································································· 53

3
Safety Precautions
This STB has been designed and manufactured to satisfy the international safety
standards. Please read the following safety precautions carefully before operating
this receiver.
Main Supply:
Before operating, please check the units operating voltage is 90~250V AC
50/60Hz.
Overload:
Do not overload a wall outlet, extension cord or adapter, neither use damaged
power cord or touch it with wet hand as this may result in electric shock.
Liquid:
The receiver shall not be exposed to dripping or splashing water, and that no
objects filled with liquids, such as base, shall be placed on the apparatus.
Ventilation:
Keep the slots on top of the receiver uncover to allow sufficient airflow to the unit.
Do not put the receiver on soft furnishings or carpets. Do not expose the receiver to
direct light or do not place it near a heater or in humid conditions. Do not stack other
electronic equipments on top of the receiver.
Cleaning:
Plug out the receiver from the wall outlet before cleaning. Clean the receiver by a
soft cloth or mild solution of washing-up liquid (no solvents).
Connection:
Disconnect the receiver from the mains when you connect it to satellite LNB or
disconnect it from LNB. Failure would possibly cause damage to the LNB.
Location:
Put the receiver indoor in order to avoid lightening, raining or sunlight.
Uncover:
Do not remove the cover, to reduce the risk of electric shock. Contact qualified and
licensed service personnel to repair the receiver, or contact your dealer.

4
Environment protection
Attention!
Your product Is marked with this symbol. It means that used electrical and
electronic products should not be mixed with general household waste. There
is a separate collection system for these products.
Information on Disposal for Users (private households) in the European Union
Used electrical and electronic equipment must be treated separately and In accordance with
legislation that requires proper treatment, recovery and recycling of used electrical and
electronic equipment.
Following the implementation by member states, private households within the EU states
may return their used electrical and electronic equipment to designated collection facilities
free of charge*. In some countries* your local retailer may also take back your old product
free of charge if you purchase a similar new one. *) Please contact your local authority for
further details.
If your used electrical or electronic equipment has batteries or accumulators, please dispose
of these separately beforehand according to local requirements.
By disposing of this product correctly you will help ensure that the waste undergoes the
necessary treatment, recovery and recycling and thus prevent potential negative effects on
the environment and human health which could otherwise arise due to inappropriate waste
handling.
Information on Disposal for Business Users
In the European Union
If the product is used for business purposes and you want to discard It:
Please contact your dealer who will inform you about the take-back of the product. You might
be charged for the costs arising from take-back and recycling Small products (and small
amounts) might be taken back by your local collection facilities,
In other Countries outside the EU
If you wish to discard of this product, please contact your local authorities and ask for the
correct method of disposal.

5
1. General information
1.1 General Features
DVB-S/DVB-S2 Satellite Compliant (MPEG-II/ MPEG-IV/ H.264)
SCPC & MCPC receivable from Ku and C band satellites
Universal, Single, Single S & C Band Wideband LNB
Sensitive Tuner with Loop-Through
DiSEqC1.0/1.1/1.2/1.3 (USALS)
Unicable Supported
Blind search supported
Auto DiSEqC Search
PAL/NTSC Conversion
True full Color (32 bits) on screen display (OSD)
Storing memory: 100 satellite, 4000 transponders and 6100 channels
8 favorite group and parental lock supported
Multi-language menu supported
Multi-language audio supported
Multi-language DVB Subtitle output
7 days Electronic Program Guide (EPG)
Teletext output through VBI and OSD
USB 2.0 Interface
6
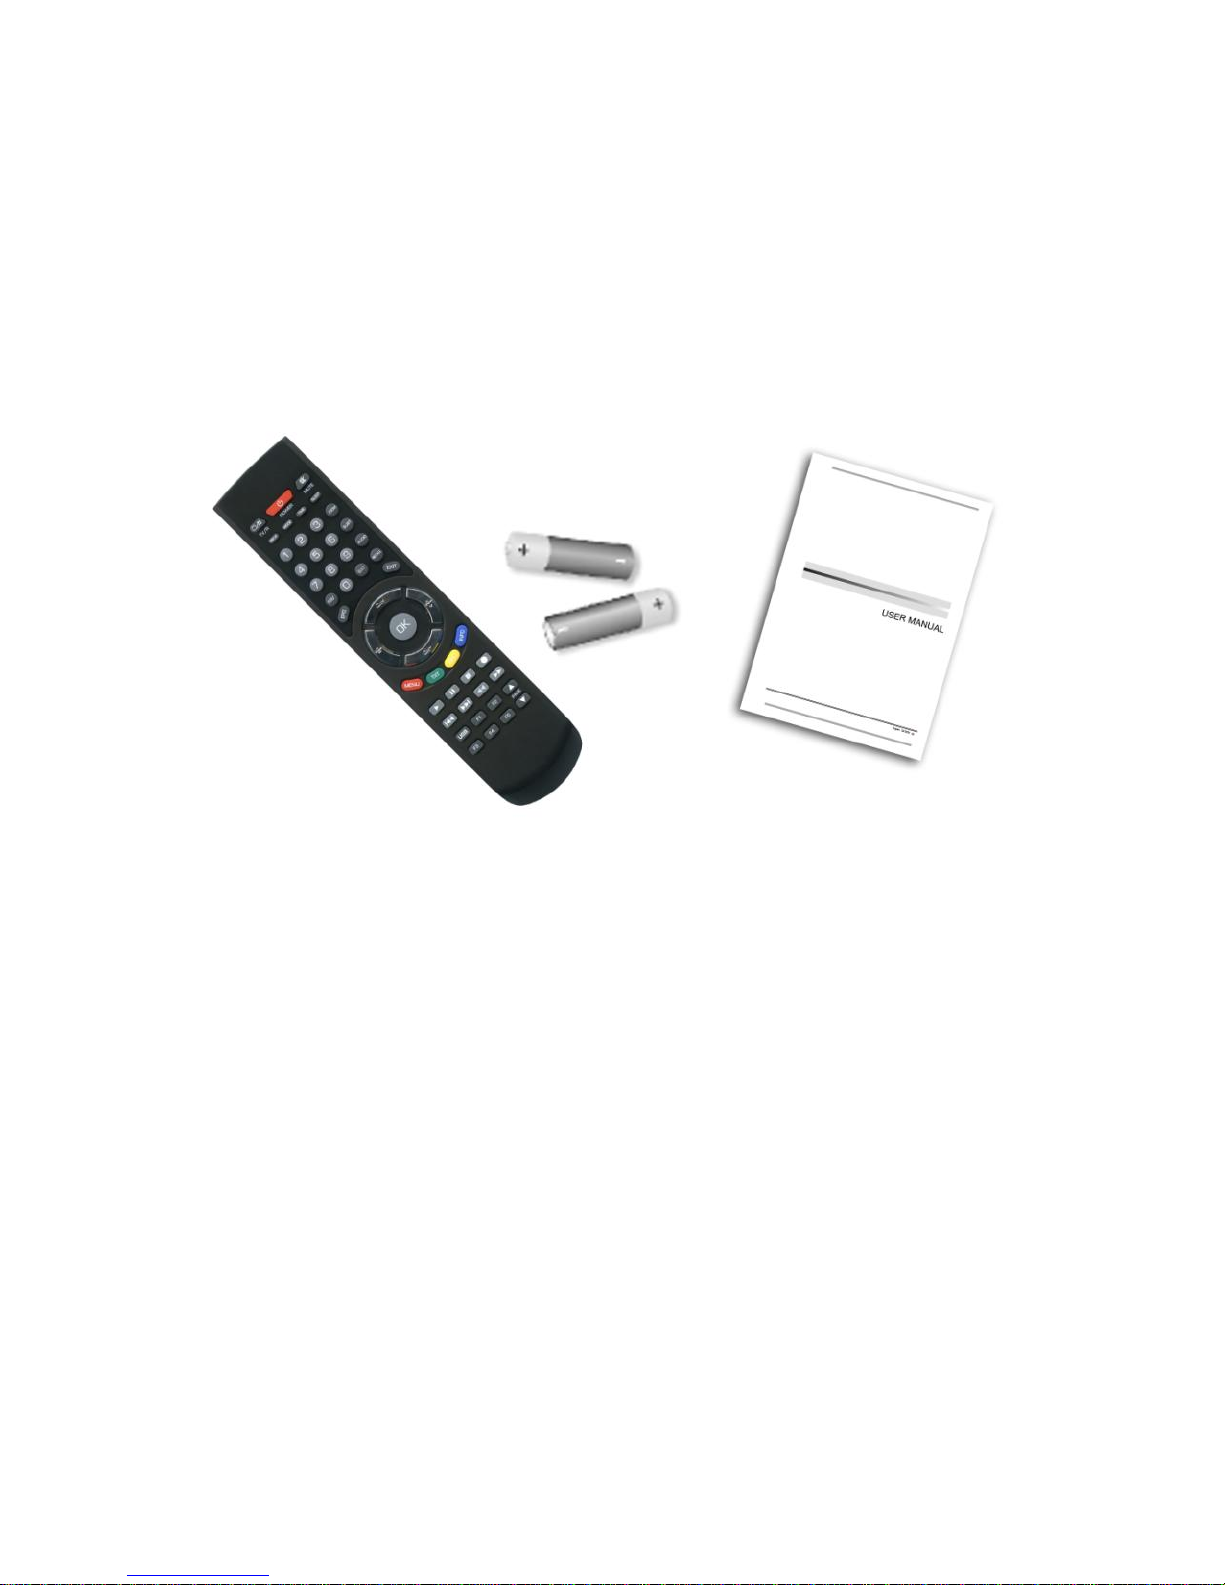
1.2 Accessories
- Users manual
- Remote Control Unit
- Batteries
Figure 1.Accessories

7
2. Product Overview
2.1 Front Panel
Figure 2. Front Panel
1. Signal LED (green)
Signal indicator.
2. Power LED (red)
Power indicator
3. Display
It displays channel information. In standby mode it displays current time.
Press front panel on the middle, above LED display, to open front panel flap.
Figure 3. Internal Front Panel
1. USB Port
USB 2.0 port
8
2. Power button
Switch between operation and standby modes.
3. MENU Button
Activate the main menu in viewing mode.
4. Exit Button
Exit current menu one menu level per one pressing.
5. OK Button
Enters to the highlighted sub menu in menu mode or activates the channel list in
viewing mode.
[6,7]. VOL-/VOL+
Decrease / increase the volume in viewing mode and change settings in menu
mode.
[8,9]. CH-/CH+
Change channel in viewing mode and move the cursor up/down in menu mode.
Card reader: Insert Conax Smart Card with golden pins down
Common Interface: One slot for for Conditional Access Module (CAM)
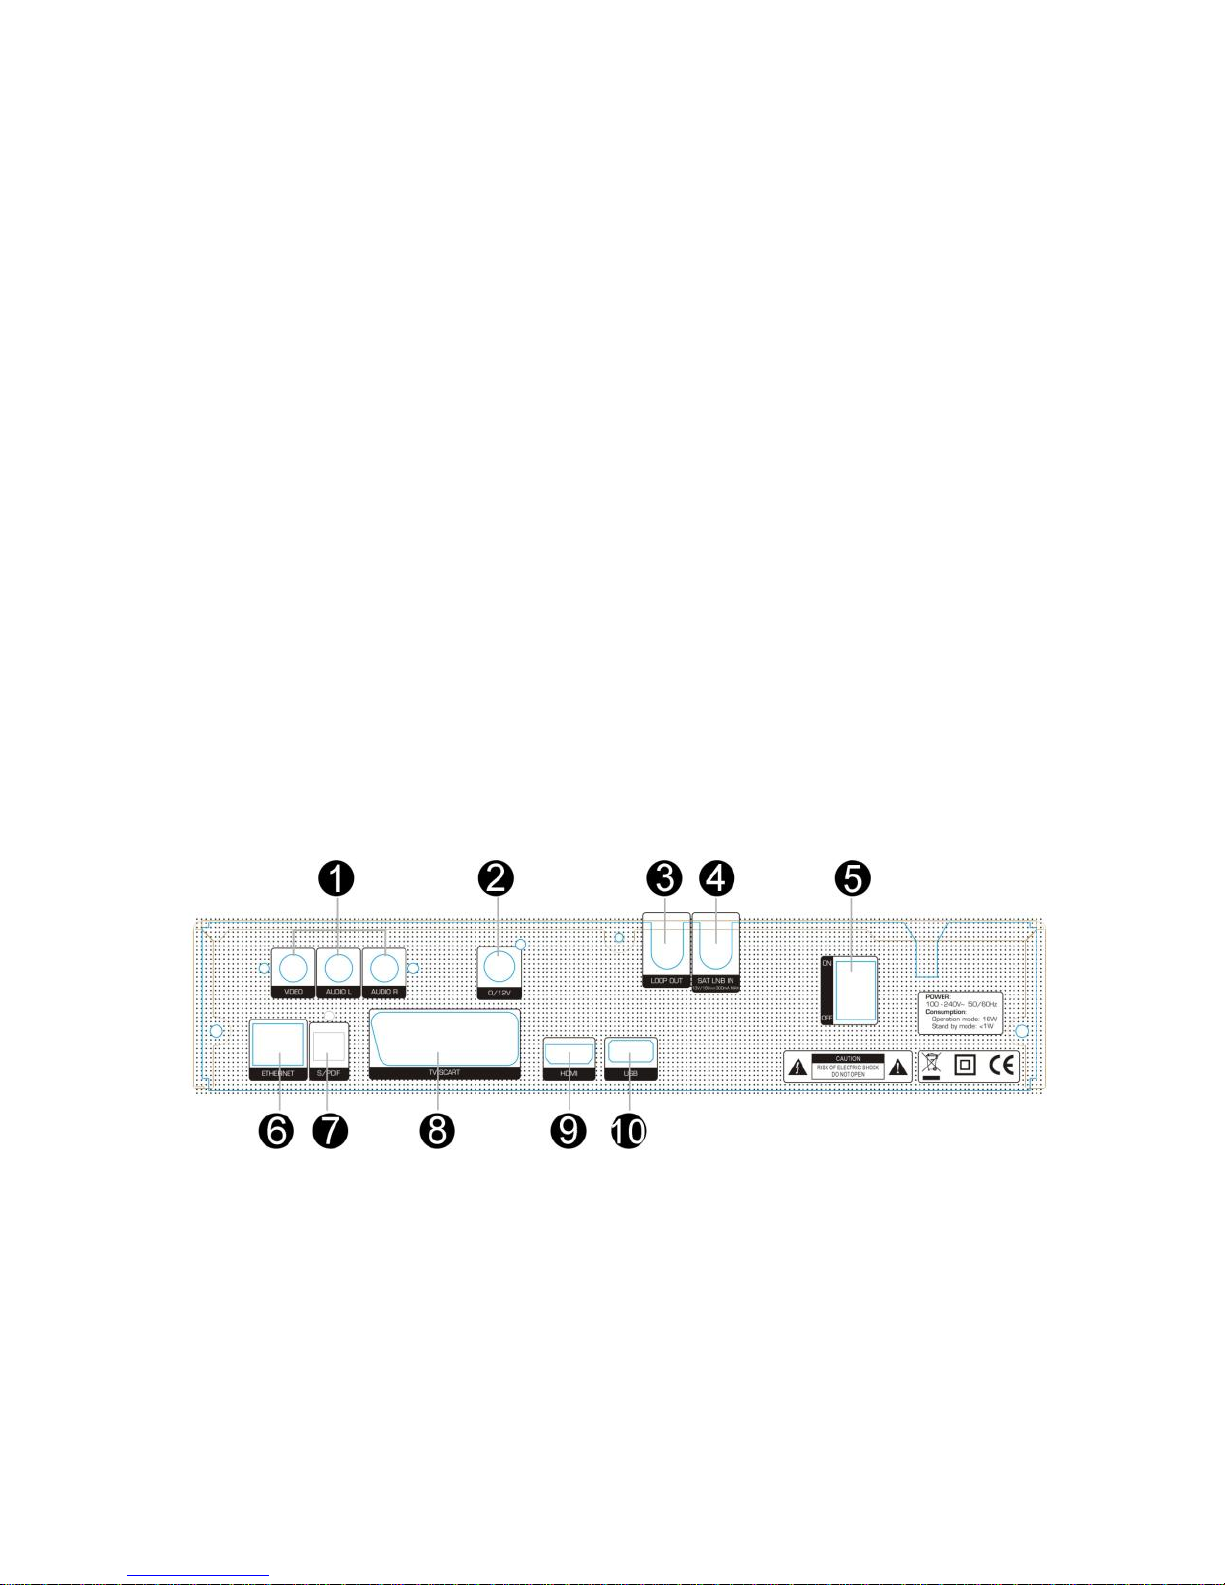
2.2 Rear Panel
Figure 3. Rear Panel
1 . AUDIO/ VIDEO OUT
Connect to the TV using a RCA cable.
2. 0/12V OUT
0/12V power output.
3. LOOP OUT
9
Connect another receiver.
4. LNB IN
Connect the satellite antenna cable.
5. ON/OFF
Power on/off.
6. LAN
Connect to the internet using an Ethernet cable.
7. SPDIF
Digital Audio output (Optical).
8. TV SCART
Connect to the TV using a Scart cable
9. HDMI
Connect to the TV using an HDMI cable.
10. USB2.0
USB 2.0 Host Port.
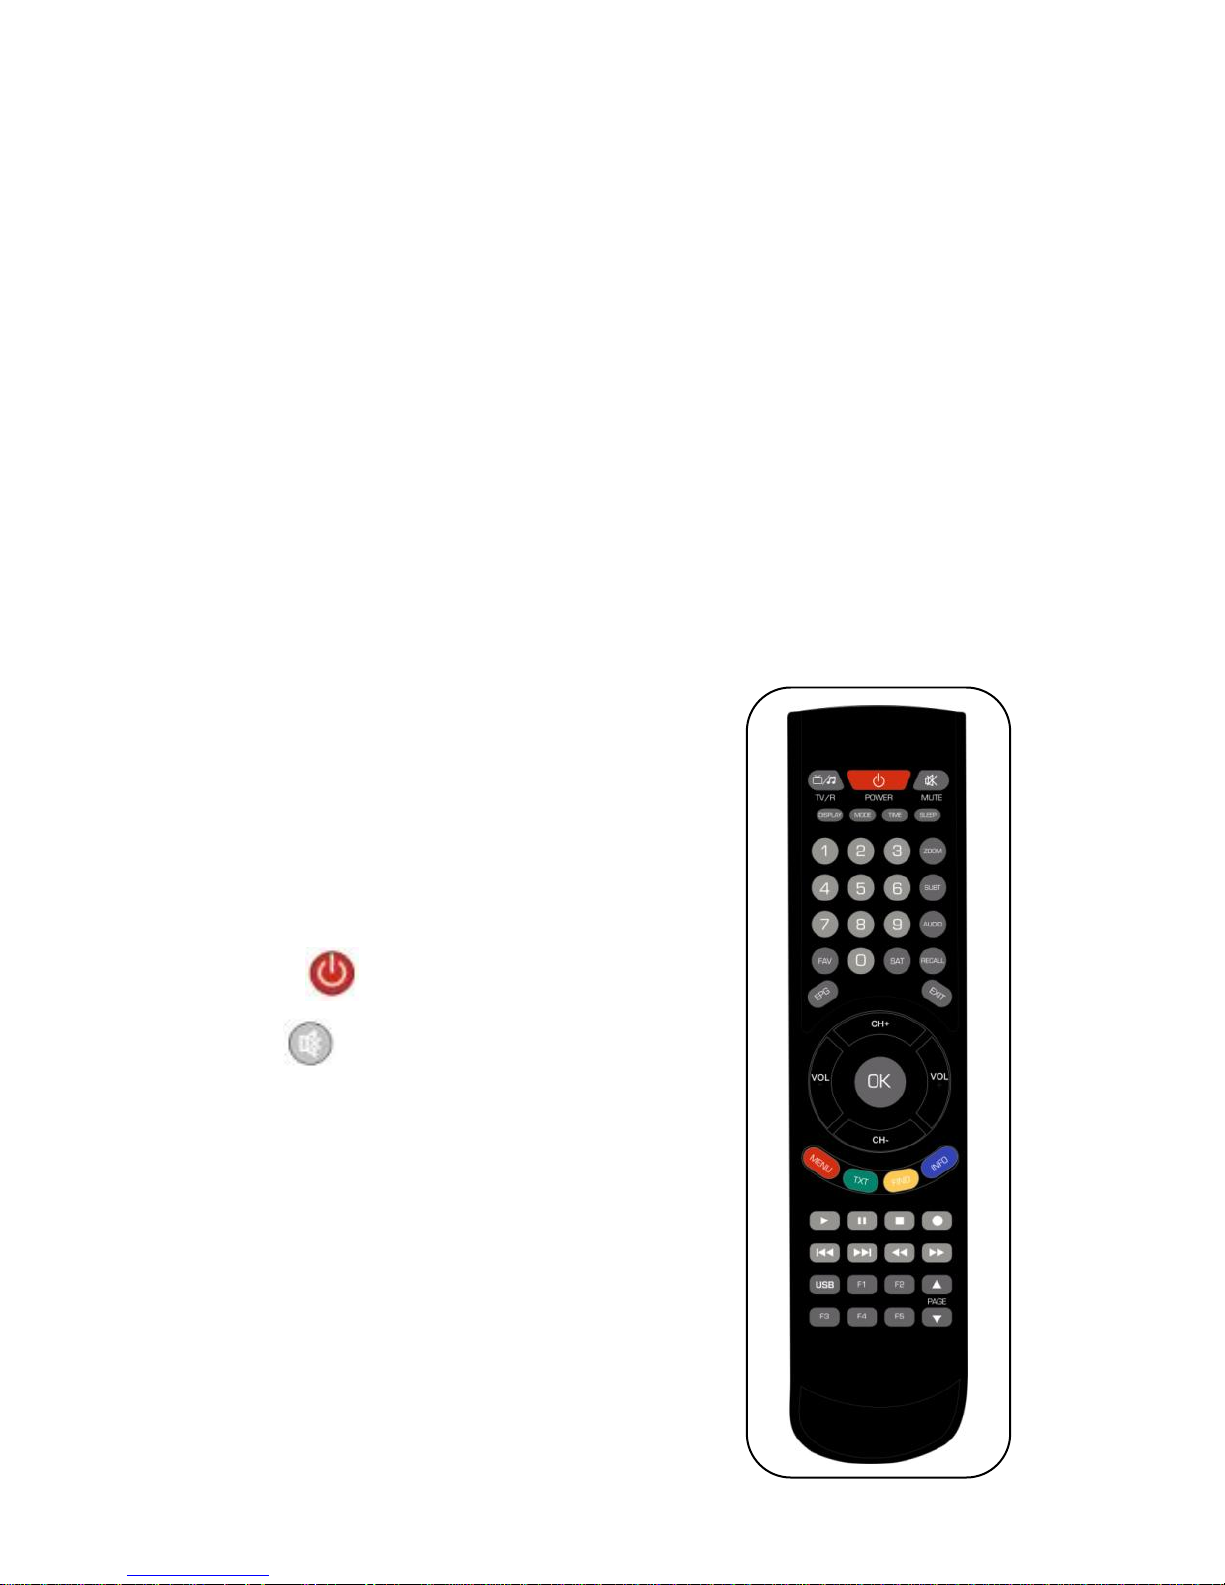
2.3 Remote Control Unit (RCU)
You can control this receiver by this remote
controller with full function.
1. TV/R: Switch between TV and RADIO.
2. POWER:
Switch between operation and standby modes.
3. MUTE: Mute audio.
4. DISPLAY: Set the HDMI mode.
5. MODE: Set the display format.
6. TIME: Setup event timer.
7. SLEEP: Set the sleep time.
8. NUMERIC KEY (0~9): Enter a TV/radio channel
number or menu option number.
9. ZOOM: Picture zooming function.
10. SUBT: Display available subtitle language list.
11. AUDIO: Display available audio list.
Figure 4. Remote Control

10
12. FAV: Display favorite channel list you set before.
13. SAT: Show the scanned satellite list.
14. RECALL: Move to the previous viewed channel.
15. EPG (Electronic Program Guide): Display the program guide.
16. EXIT: Exit current menu step by step.
17. CH+/CH-: Change program.
18. VOL+/VOL- : Change volume in viewing mode.
19. OK: Confirm the selected operation or display the channel list while watching a
program.
20. MENU: Enter to main menu.
21. TXT: Display the teletext.
22. FIND: Quickly find channels which you want.
23. INFO: Display program information.
24. : Play recorder file, resume from Pause or display recording list
25. I I : Pause/time shift.
26. ■: Stop Recording, stop playback or exit from timeshift.
27.●: Start Recording.
28. I: Previous.
29. I : Next.
30. : Fast rewind.
31. : Fast forward.
32. USB: Enter to USB menu.
33. F1/F2/F3/F4/F5: Optional functions.
34. /: Page up/down in menu.
11
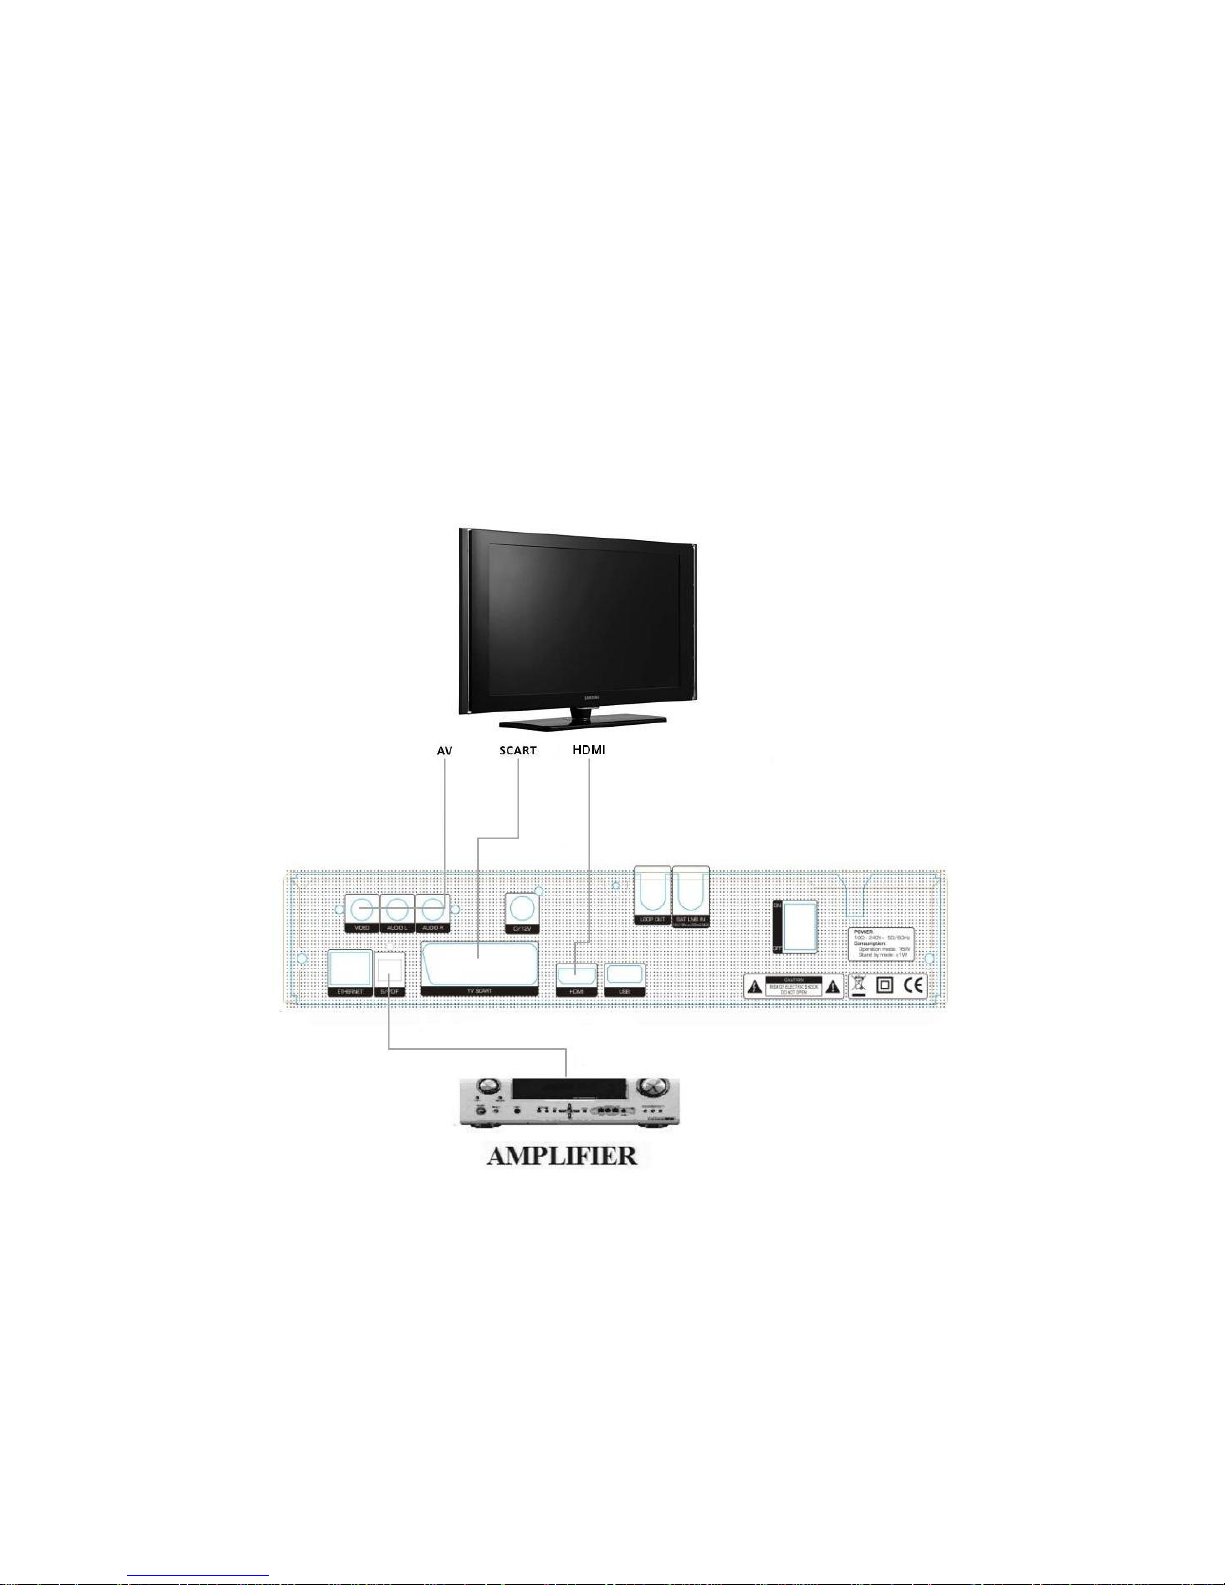
3. Connection with other Devices
The following diagram shows the connections among receiver, TV, LNB and other
equipment, please read this first if you are not sure about correct connection.
3.1 Connecting to TV
Figure 5. Connecting to TV & VCR
12
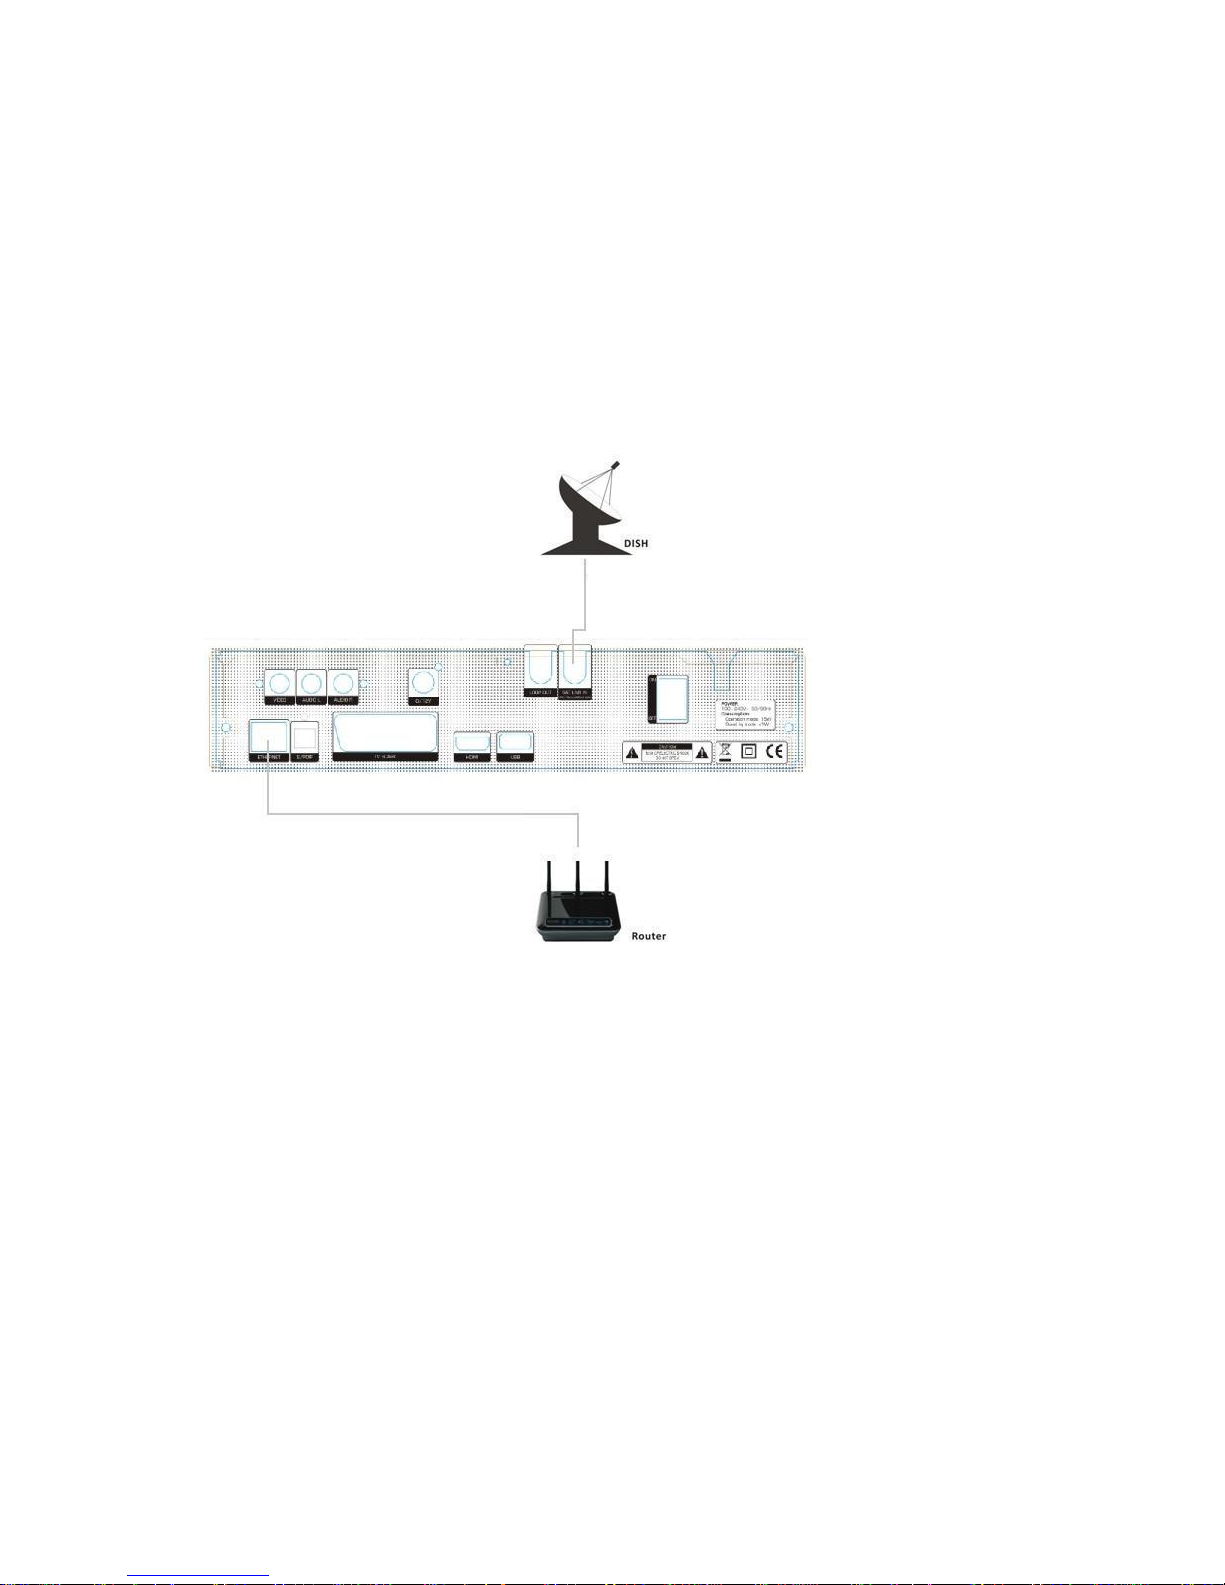
3.2 Connecting to Antenna
To connect to the dish with one single LNB, plug-in antenna cable directly to the
LNB IN.
Figure6. Connecting to Dish with single LNB

13
To connect to the dish with more than one LNB, connect antennas by DiSEqC
1.0 or 1.1 switch. Connect receiver LNB IN to DiSEqC port output.
When using DiSEqC 1.0 or 1.1 switch, remember to set proper DiSEqC port in
Installation Menu.
Figure7. Connecting to Dish with many LNBs using DiSEqC switch

14
4. Installation
After connecting antenna you should install the receiver after powering on your
product for the first time after purchase.
Tip: The default password is 0000. If you have forgotten your password, please
contact your local product distributor.
4.1 Powering On
1. Connect the power cord of the product to a wall outlet.
2. Ensure the ON/OFF switch at the rear of the product is switched to ON.
3. Power on by pressing the STANDBY button on the remote control or the
STANDBY button at the front of the product.
4.2 Antenna Settings
Antenna Settings allows you to configure the antenna setting parameters.
Menu->INTALLATION->Antenna Settings
1. Satellite: Displays currently chosen
satellite. Press the VOL+/VOL- button
to change.
2. Transponder (TP for short): Press
the VOL+/VOL- button to change the
TP.
3. LNB Type: Press the VOL+/VOL-
button to change the LNB frequency.

15
4. LNB Power: Press the VOL+/VOL- button to select the required LNB power.
5. 22kHz: Press the VOL+/VOL- button to select ON, OFF or Auto.
6. DiSEqC 1.0: Press the VOL+/VOL- button to select the required DiSEqC1.0
input.
7. DiSEqC 1.1: Press the VOL+/VOL- button to select the required DiSEqC1.1
input.
8. Motor: Press the VOL+/VOL- button to select DiSEqC1.2 or USALS motor.
9.Scan Mode: : Press the VOL+/VOL- button to choose available scan options: All
Channels/FTA channels/HD channels/ SD channels/ TV channels/ Radio
channels/ FTA TV channels/ FTA Radio channels/
10. Start search: Press the VOL+/VOL- button to select Satellite & Multi-Sat &
Blind scan & Transponder & Multi-Transponder which you want to start search.
4.2.1 Antenna Settings for Satellite
Move cursor to Satellite position. Press OK button. You can see the pre-stored
Satellite list. In this menu, you can execute Select, Add, Move, Delete, Rename
Satellites by pressing VOL+/VOL- button.
Select
In this menu, you can press the CH+/CH- keys choose the satellite which you want
to use, and then press the OK to confirm the setting.
Add
Select the Add using the VOL+/VOL-
keys. Here you can input new Satellite
angle, Satellite Direction (East, West),
Band (Ku, C). Press OK to confirm the
setting and this new satellite will be
added to the end of the Satellite list.
Move
16
In this menu, you can Select the satellite that you want to move from the satellite list
using the CH+/CH- keys. Select satellite and press OK, you will be asked where to
move the satellite, input the destination number and press OK. Then you can move
another one satellite from one position to other.
Delete
You can delete unused satellites. Select the satellite that you want to delete from
the satellite list. You will be asked to confirm whether delete the satellite or not. If
you select YES, all the channels and transponders in the selected satellite will be
deleted. Press OK key, and the selected satellite will be deleted.
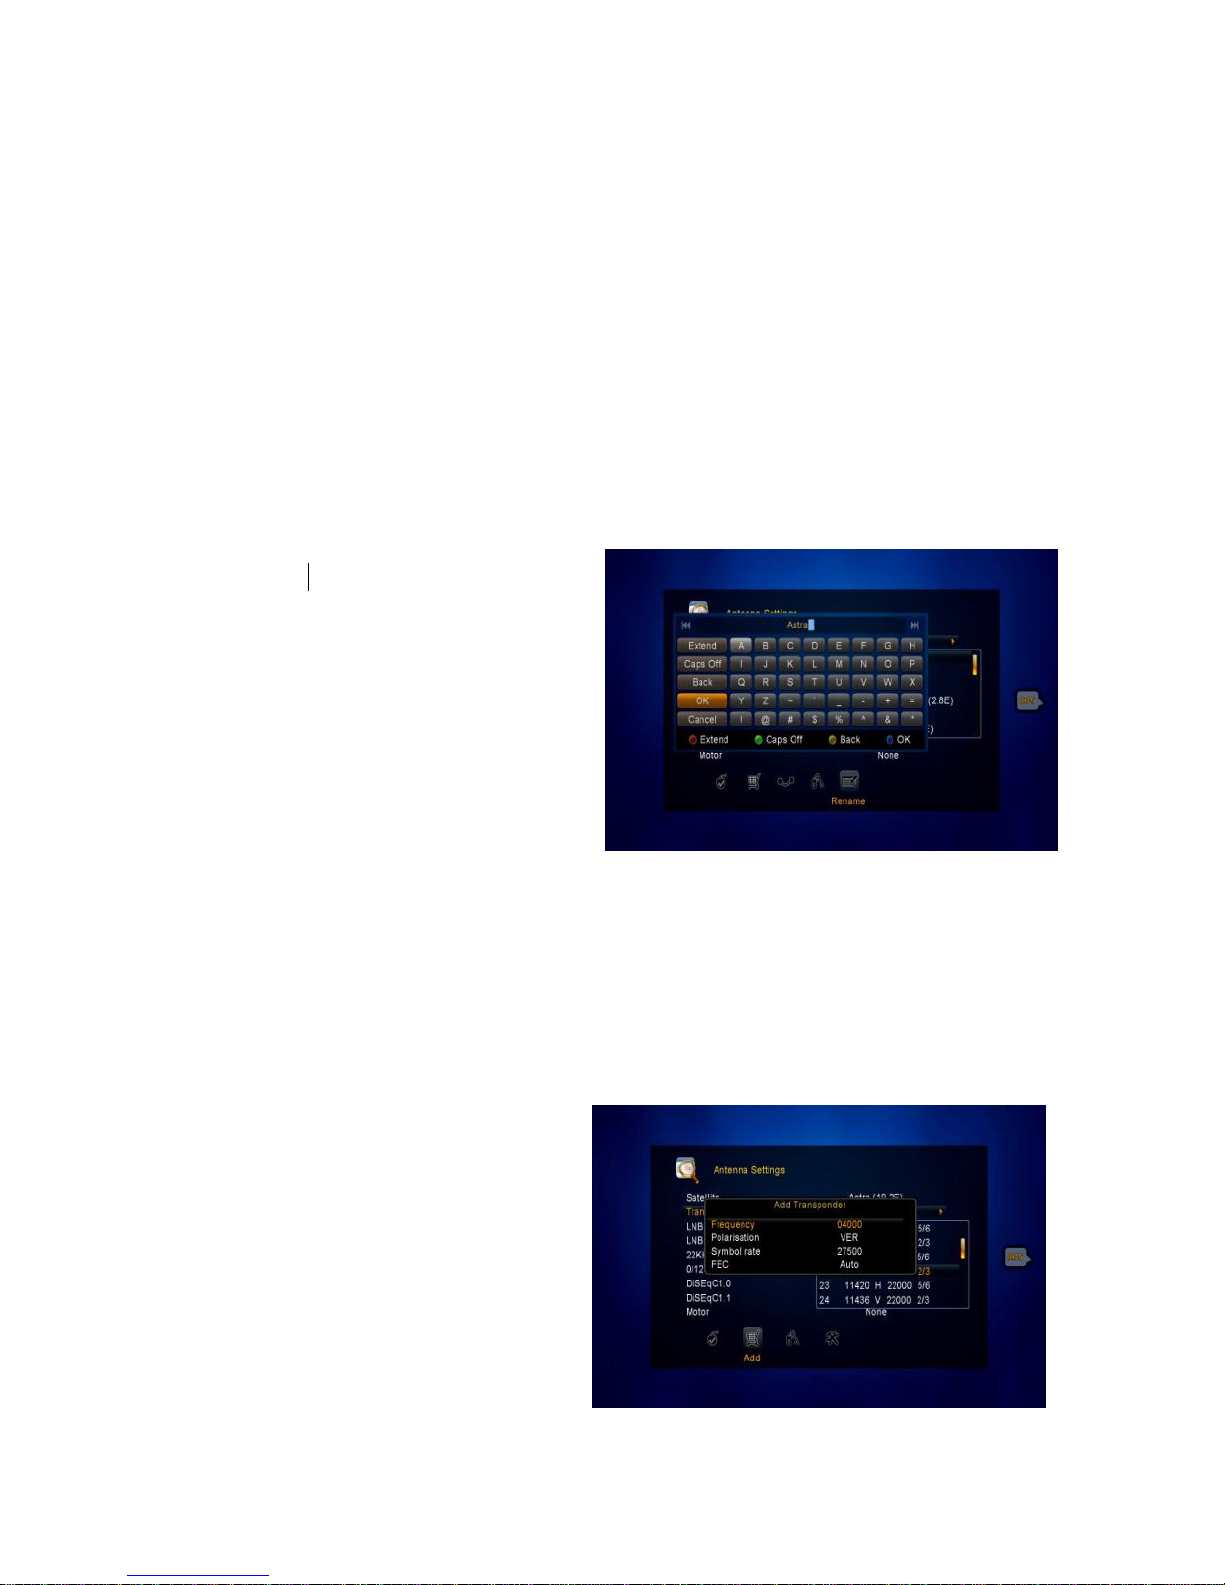
Rename
You can also change the satellite
name. Select the Rename using the
VOL+/VOL- keys. Press OK key and
select the character which you want to
edit the name. Confirm by pressing
BLUE button.
4.2.2 Antenna Settings for Transponder
If you change the satellite, the transponders list will be changed automatically. You
will find the transponder list of selected satellite here. In this menu, Press the
VOL+/VOL- or OK button you can
see the pre-stored Transponder list,
and you can execute Select, Add,
Delete, Edit Transponders by
VOL+/VOL- keys.
Select
In this menu, you can press the
CH+/CH- keys choose the
 Loading...