

Page 1

Usseerr
U
Model ID: Sat HD 220 5/2010 jp
maannuuaa
m
HHiigghh DDeeffiinniittiioonn DDiiggiittaall SSaatteelllliittee RReecceeiivveerr
l
l
Page 2

Contents
1. Safety precautions ....................................................................................................................................................................... 1
2. Environment protection .............................................................................................................................................................. 3
3. Operating notes ........................................................................................................................................................................... 4
3.1. Automatic Power Down ....................................................................................................................................................... 4
3.2. Working with ex ternal USB drive (only fo r receivers with USB conne ctor) ........................................................................... 4
3.3. Battery insta llation .............................................................................................................................................................. 5
4. Features ....................................................................................................................................................................................... 6
5. Remote control ............................................................................................................................................................................ 7
6. Front panel .................................................................................................................................................................................. 9
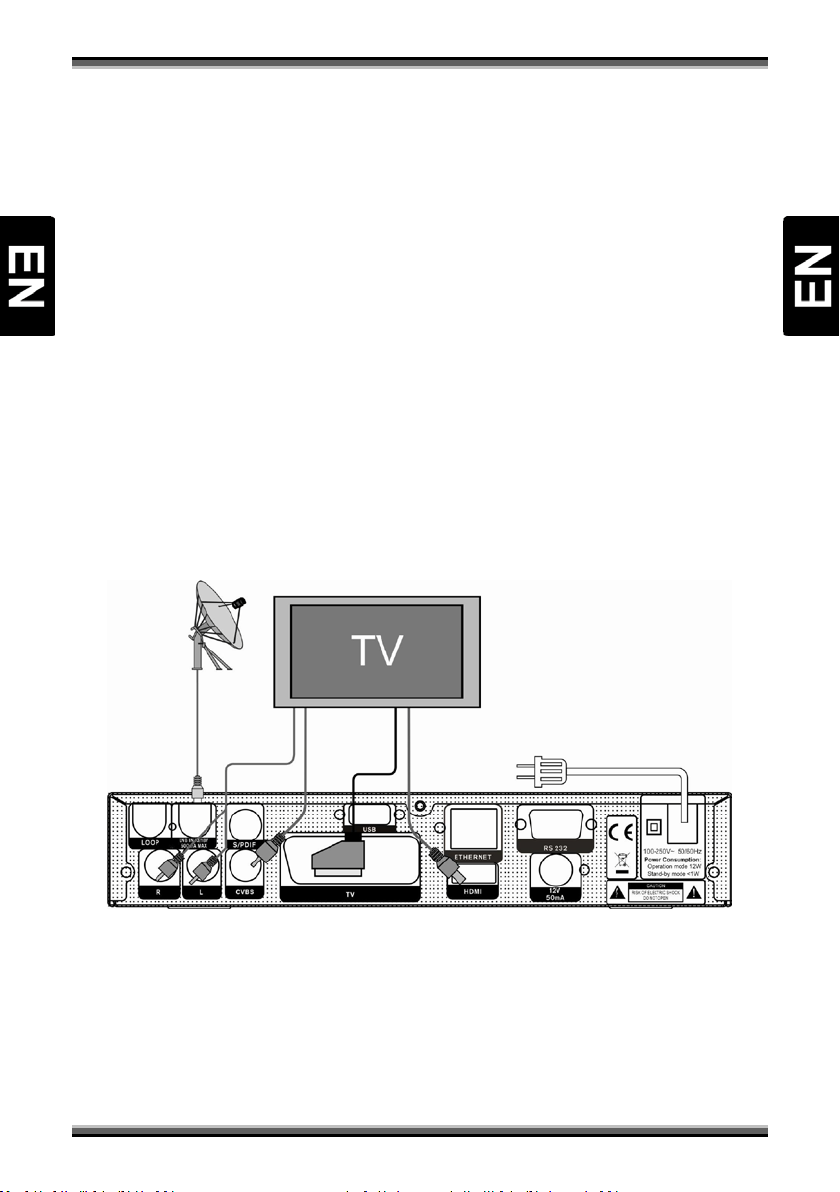
7. Rear panel ................................................................................................................................................................................... 9
8. Connecting Your system ............................................................................................................................................................ 10
9. Basic operations ........................................................................................................................................................................ 11
9.1. Turn on STB ....................................................................................................................................................................... 11
9.2. Power ................................................................................................................................................................................ 11
9.3. Channel Up/Channel Down ............................................................................................................................................... 11
9.4. Volume Up/Volume D own- ................................................................................................................................................ 11
9.5. Number ............................................................................................................................................................................. 11
9.6. Mute ................................................................................................................................................................................. 11
9.7. Pause ................................................................................................................................................................................. 11
9.8. Recall ................................................................................................................................................................................. 11
9.9. Favourite ........................................................................................................................................................................... 11
9.10. Audio ................................................................................................................................................................................. 12
9.11. Information ....................................................................................................................................................................... 12
9.12. EPG.................................................................................................................................................................................... 12
9.13. TV/RADIO .......................................................................................................................................................................... 13
9.14. Channel List ....................................................................................................................................................................... 13
9.15. Sleep ................................................................................................................................................................................. 13
9.16. Page Up/Page Down .......................................................................................................................................................... 13
9.17. TEXT .................................................................................................................................................................................. 13
9.18. Subtitle .............................................................................................................................................................................. 14
9.19. Find ................................................................................................................................................................................... 14
9.20. Zoom ................................................................................................................................................................................. 14
9.21. TV/RCV .............................................................................................................................................................................. 14
9.22. Menu ................................................................................................................................................................................. 14
9.23. Video Format ..................................................................................................................................................................... 14
9.24. Time Shift .......................................................................................................................................................................... 15
9.25. Record ............................................................................................................................................................................... 15
9.26. Exit .................................................................................................................................................................................... 15
10. Menu “Service” ......................................................................................................................................................................... 16
10.1. Organizing Serv ices ............................................................................................................................................................ 16
10.2. Organizing favo urites......................................................................................................................................................... 17
11. Menu “Installation” ................................................................................................................................................................... 17
11.1. Satellite Inst allation ........................................................................................................................................................... 17
11.2. Auto Installat ion ................................................................................................................................................................ 19
12. Menu “Preferences” .................................................................................................................................................................. 19
12.1. Language ........................................................................................................................................................................... 20
12.2. Parental Contr ol ................................................................................................................................................................ 20
12.3. Time setting....................................................................................................................................................................... 21
12.4. Timer ................................................................................................................................................................................. 21
12.5. A/V Control ....................................................................................................................................................................... 23
12.6. Miscellaneous Settings ...................................................................................................................................................... 23
12.7. OSD setting ........................................................................................................................................................................ 24
13. Menu “System” ......................................................................................................................................................................... 24
13.1. Information ....................................................................................................................................................................... 24
13.2. Default setting ................................................................................................................................................................... 25
13.3. Software upgrade .............................................................................................................................................................. 25
13.4. Upgrade By USB................................................................................................................................................................. 26
13.5. Backup to USB ................................................................................................................................................................... 26
14. Menu “Conditional Access” ....................................................................................................................................................... 27
14.1. CA Setting .......................................................................................................................................................................... 27
14.2. Common Interface (Optiona l) ............................................................................................................................................ 27
15. Menu “USB” .............................................................................................................................................................................. 27
15.1. File List .............................................................................................................................................................................. 28
15.2. Record Manager ................................................................................................................................................................ 28
15.3. Storage Information .......................................................................................................................................................... 28
15.4. PVR Setting ........................................................................................................................................................................ 29
15.5. USB Speed Test.................................................................................................................................................................. 29
16. Menu “Internet” (optional) ....................................................................................................................................................... 29
16.1. Network Local Setting ........................................................................................................................................................ 29
16.2. Http Upgrade..................................................................................................................................................................... 29
17. Menu “Game” ........................................................................................................................................................................... 30
17.1. Tetris ................................................................................................................................................................................. 30
17.2. Snake................................................................................................................................................................................. 30
17.3. Othello .............................................................................................................................................................................. 30
18. Trouble shooting ........................................................................................................................................................................ 31
19. Specifications............................................................................................................................................................................. 32
20. Declaration of conformity.......................................................................................................................................................... 33
Page 3

The lightning flash with
arrowhead symbol, within an
voltage" and to prevent from a
To reduce the risk of electric shock,
don't open the cabinet. Refer
The exclamation point within an
equilateral triangle is intended to
alert the user to important
operating and maintenance
Do not use this STB where contact with or immersion in water is a possibility. Do not use near
instructions or as marked on the unit. If you are not sure of the type of power supply (for example, 120 or
This product install diodes. Do not open the cabinet or touch any parts in the inner
To ensure proper use of this product, please read this User manual carefully and retain for further
ower is turned off, you can clean the cabinet, panel and remote control with
and/or equipment without the manufacturer consent; as such
UUsseerr mmaannuuaall
1. Safety precautions
CAUTION:
Warning:
equilateral triangle, is intended
to alert the user to "dangerous
risk of electric shock.
WARN ING:
flower vase, washbowls, kitchen sinks, laundry tubs, swimming pools, etc.
WARN ING: Do not put the candle or lamp stand on the cabinet; otherwise, there is the danger of fire.
WARN ING: The unit should be connected to a power supply only of the type described in the operating
230 V) to your home, consult your local dealer or local power company.
WARN ING:
mechanism. Consult your local dealer for technical service if the opening is required.
Note:
reference.
Note: This product install diodes. Do not open the cabinet to avoid the unit direct exposure to radiation.
Unit Cleaning: After the unit p
a soft cloth lightly moistened with a mild detergent solution.
Attachments: Never add any attachments
additions may result in the risk of fire, electric shock, or other personal injury.
servicing to qualified personnel only.
(servicing).
1
Page 4

bed, sofa, or other similar
supply cord out of the way, where it will not be walked on.
where they exit
ck. Never spill any
If the moisture forms inside the unit, it may not operate properly. To correct this problem, turn on the
laced, user should make sure the service
technician use the replacement parts specified by the manufacturer or having the same characteristics as
After all the maintenances and repairs are done, user is required to request the service
UUsseerr mmaannuuaall
Locating: Slots and openings in the cabinet are provided for ventilation to protect it from overheating. Do
not block these openings or allow them to be blocked by placing the STB on a
surface, nor should it be placed over a radiator or heat register.
Power-Cord Protection: Place the power-
Please take special attentions to cords at plugs, convenience receptacles, and the point
from the unit.
Object and Liquid Entry: Never put objects of any kind into this STB through openings, as they may touch
dangerous voltage points or short-out parts that could result in a fire or electric sho
liquid on the STB.
Note: Moisture may be formed on the lens In the following conditions:
− when the unit is suddenly moved from a cold environment or an air-condition room to a warm place.
− immediately after a heater has been turned on.
− in a steamy or very humid room.
power and wait about two hours for the moisture to evaporate.
Parts Replacement: When the unit parts need to be rep
the original part. Unauthorized replacement may put the unit In the risk of fire, electric shock or other
hazards.
Safety Check:
technician to conduct the overall safety check to ensure the machine is In the proper condition.
2
Page 5

UUsseerr mmaannuuaall
2. Environment protection
Attention!
Your product Is marked with this symbol. It means that used electrical and electronic products should not
be mixed with general household waste. There is a separate collection system for these products.
Information on Disposal for Users (private households) in the European Union
Used electrical and electronic equipment must be treated separately and In accordance with legislation
that requires proper treatment, recovery and recycling of used electrical and electronic equipment.
Following the implementation by member states, private households within the EU states may return their
used electrical and electronic equipment to designated collection facilities free of charge*. In some
countries* your local retailer may also take back your old product free of charge if you purchase a similar
new one. *) Please contact your local authority for further details.
If your used electrical or electronic equipment has batteries or accumulators, please dispose of these
separately beforehand according to local requirements.
By disposing of this product correctly you will help ensure that the waste undergoes the necessary
treatment, recovery and recycling and thus prevent potential negative effects on the environment and
human health which could otherwise arise due to inappropriate waste handling.
Information on Disposal for Business Users
In the European Union
If the product is used for business purposes and you want to discard It:
Please contact your dealer who will inform you about the take-back of the product. You might be charged
for the costs arising from take-back and recycling Small products (and small amounts) might be taken back
by your local collection facilities,
In other Countries outside the EU
If you wish to discard of this product, please contact your local authorities and ask for the correct method
of disposal.
3
Page 6

UUsseerr mmaannuuaall
3. Operating notes
NOTE!
3.1. Automatic Power Down
In accordance with actual European Union requirements, Your receiver is equipped with function
"Automatic Power Off". It works by switching the receiver into standby mode after a period of 3 hours
after the last active use. In practice this means that if during this time the receiver will not be given any
command by using the remote control or keypad on the front panel, the receiver turns off. Turning off the
receiver will be preceded (2 minutes previous) by a relevant message appears on the TV screen. Please
also note that this feature is enabled by default, but at Your own request, You can disable it using the
appropriate functions in the receiver menu.
3.2. Working with external USB drive (only for receivers with USB
connector)
•
During the selection and operation with USB drive (hard drive, flash memory), user should pay
attention on:
•
Drive is compliant with USB 2.0 and have the appropriate parameters of read and write speed,
•
Drive contain single partition, formatted in a supported format,
•
If necessary (especially for USB hard drives, which are characterized by a high power
consumption), drive should be supplied from an external power supply,
•
Do not disconnect during a write/read data operation,
•
Do not use very full or fragmented drive,
Mismatch above recommendations may result in incorrect operation of the devices and in extreme cases
can cause damage.
The manufacturer takes no responsibility for any damages directly or indirectly caused by loss of
recorded or edited data stored on an external USB drive which was connected to the receiver, and gives
no warranty for any other data on the USB drive when case of abnormal function receiver will
happened.
4
Page 7

UUsseerr mmaannuuaall
3.3. Battery installation
To install the batteries in the remote control,
remove the flap protecting the battery
compartment (see Fig.: A – slider type - push and
slide, B – latch type - lever the latch and pull the
fold). If inside the chamber there are used
batteries, they must be removed. Then put new
batteries inside. When installing the battery, pay
special attention on the polarity - the direction of
insertion of both batteries. The correct polarity of
batteries is drawn on a description inside the
battery compartment in the remote control. After
installing the batteries, place protecting flap on its
original position.
Service life of batteries
• The batteries normally last for about
one year despite that it depends on
how often and in what way the remote
control is operated.
• If the remote control fails to work even when operated near the DVB receiver, replace the
batteries.
• Use size 7 (AAA) batteries (2 pieces).
WARNING!
• Do not use rechargeable (Ni-Cd) batteries.
• Do not attempt to recharge, short circuit, disassemble, heat the batteries or throw them into
the fire.
• Do not drop, tramp or impact the remote control. This may damage the parts and lead to
malfunction.
• Do not mix used battery with new one ever when using.
• If the remote control shall be spared for a long time, remove the batteries. Otherwise,
electrolyte may leak, which may lead to malfunction, even fire accident when some substance
contacts with the electrolyte.
• Wipe away the electrolyte having leaked inside the remote control, and replace with new
batteries.
• If any electrolyte happens to touch some parts of your skin, wash it off thoroughly with clean
water immediately.
5
Page 8

UUsseerr mmaannuuaall
4. Features
• MPEG-Fully DVB-S / DVB-S2 HD compliant
• Multilingual menu text support
• Fast channel switching
• Channel list editing
• Favorite channel list editing
• Electronic Program Guide (EPG) for on screen channel information
• Teletext supported by VBI insertion and software emulation
• Subtitle supported
• Parental lock facility by channel and program event
• HDMI HD Video/Audio Output
• S/PDIF for digital audio or Dolby digital bitstream output
• LAN 10/100 Mbps Ethernet (optional)
• Software update via LAN port (optional)
• USB 2.0 Host
• Time Shift
• Video Recording
• Exciting games embedded
• DiSEqC 1.0, 1.1, 1.2 and USALS
6
Page 9

UUsseerr mmaannuuaall
5. Remote control
You can power on/off the receiver, operate on screen menu, and use a variety of hot key function.
Depending on configuration, one of two remote controllers may be attached to receivers set:
POWER
To switch your receiver on from standby or standby to on.
MUTE
Used to enable or disable the audio
NUMERIC KEYS 0 - 9
Used to select channels or e nter programming parameters
(TV / RADIO)
Receiver switches between TV and Radio mode.
(ZOOM)
Press key s elect zoom times, from X1 to X16.
(PREVIOUS)
Return to the previous menu or status.
(AUDI O)
Audio channels setup, to s elect audio mode; Left, Right , Stereo.
TV/RCV
Receiver switches between TV and receive mode.
(INFORMATION)
To display channel status or various program information of current s ervice.
EPG (Electronic Program Guide)
Display the Programs guide on sc re en when available.
MENU
Displays the Main Menu on the s creen, or return to the previous menu or status
EXIT
Cancel the user select ion and return to the viewin g mode from a menu.
OK
To select menu option, or to updated on entry.
←,→ KEYS
To adjust volume level, or to move cursor left or right in the menu
↑,↓ KEYS
To change channels, or to move cursor up or down in the menu
P+/P-
To move up the cursor to the next or previous page in the me nu or channel list
(RED KEY)
Has different functions per menu.
(GREEN KEY)
Shows teletext information of the current channe l supports.
(YELLOW KEY)
Subtitle Disp lay.
(BLUE KEY)
Has different functions per menu.
UHF
In case your TV is connected th rough RF Modulator (UHF) , select output chan nel
number between CH21 and CH6 9 with up and down key. (optional)
(FIND)
Use to prompt find channels s ort by character.
(SLEEP)
Press sleep key to switch between Sleep T imer Off /1 0/30/60/90/120 minutes.
P/N (WHITE KEY)
Press P/N button to switch the display mode among "AUTO", "PAL", "PAL-M", "PA L N", "NTSC", "HDMI 576i50", "HDMI 480i60", "HDMI 576p50" and "HDM I 480p60".
FAV( FAVOR ITE)
To set receiver to the favorite list mode, display actual favorite channel list.
ARCHIVE
Press this button to enter the Fi le Manager / File list menu directly.
TMS(Time Sh ift)
Press this button to display T ime Shift info bar.
7
Page 10

UUsseerr mmaannuuaall
Play
To play the JPEG or recording file.
Stop
To stop JPEG player, recording file, T ime Shift, or playback.
PAUSE
Used to select the freeze function. Press once to freeze the screen picture.
Record
To start re cording.
Fast Backward
To start Fast Backward function
Fast Forward
To start Fast Forward function.
Slow Backward
To start Slow Backward function.
Slow Forward
To start Slow Forward function.
F1(Rese rve)
8
Page 11

UUsseerr mmaannuuaall
6. Front panel
POWER: To switch the receiver power on/stand by
MENU KEY: To enter into the main menu.
←,→: To adjust volume level, or to move cursor left or right in the menu
↑, ↓: To change channels, or to move cursor up or down in the menu
OK KEY: To see TV/Radio channel list, or to confirm in the menu.
Remote Sensor: Detects infrared signal from remote control unit
Power Led: Lights up while the receiver is power on
Signal Led: When receiving signal is strong, the signal led is lighted.
Display(4-Digit/7-Segment): Indicates operating status of receiver
Card Slot: Smart Card Interface for CONAX cards.
Insert the smart card chip side up!
Common Interface: Socket for Conditional Access Modules CAM (optional)
7. Rear panel
Please refer to the diagram above for all possible connections of your receiver
Do not connect the unit to the mains socket until all other connections have been made and checked.
Your configuration can vary depending on model.
LNB IN 13/18V: This port is to connect the coaxial cable from LNB/Dish. Max. 500mA
LOOP: This enables the connection of another receiver. (Optional)
R, L (AUDIO OUT): These RCA connectors are used to connect any external audio amp or system.
CVBS: This RCA connector is used to connect any external video.
S/PDIF: This RCA connector is used to connect external digital audio system.
9
Page 12
UUsseerr mmaannuuaall
TV: This is used to connect your TV through SCART cable.
HDMI: Audio and Video output socket for TV set with HDMI Input Jack only.
12V 50mA: Used to connect 12V to an external device. (Optionally 0V/12V switch driver.)
USB: USB 2.0 Host, connect to USB hard disk, or flash disk
RS 232C: This is used to connect your receiver to a computer through a serial cable.
Ethernet: Network port, you can get a new software updates from this port. (Optional)
8. Connecting Your system
There are three ways to connect the receiver to your existing TV system. We recommend using one of the
following cases for the best result:
1. If you have a high definition television set, you should use a HDMI cable for best result, Plug one end of
the cable into the HDMI socket on the receiver, and the other end into the matching socket on your
television. In this case, you do not have to make audio connections because the HDMI connector can
output stereo audio or Dolby digital audio.
2. Connect one end of SCART cable to the TV (SCART) jack on the back of the receiver and the other end to
a SCART jack on your TV.
3. Connect one end of RCA cable to the RCA jack on the back of the receiver and the other end to a RCA
jack on your TV.
Finally connect the coaxial cable from LNB to the LNB IN jack on the receiver.
With External Audio / Hi-Fi System
To connect any external Audio Hi-F i system, the receiver has been provided with two RCA connectors at
the back of the receiver marked with Audio L and R.
Connect an RCA stereo cable from the AUDIO L, R jacks on the back of the receiver to the LINE, AUX,
SPARE OR EXTRA input jacks on your Hi-Fi System.
10
Page 13
UUsseerr mmaannuuaall
9. Basic operations
9.1. Turn on STB
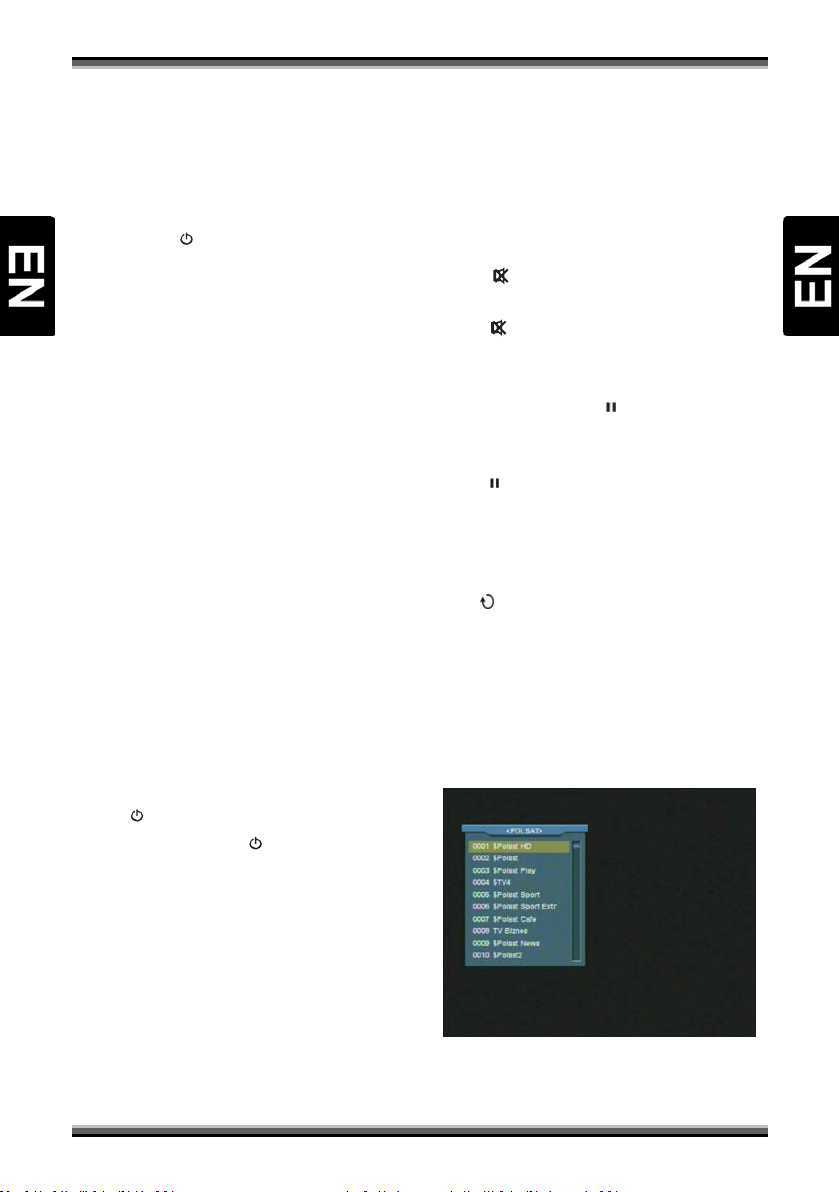
First, press the [ POWER] to turn on the unit.
When the STB is first used, there will play the first
channel from the default Channel List. If the STB is
not first used, STB will play the same channel as
last time before turning off.
? Frequently Asked Question
Q: The power of my STB has been turned on and
not in Standby mode, but the TV screen showed
nothing:
A: Make sure the TV set has been set to the
correct video input (not the TV channels). For
example, if you have connected the unit with the
Video1 input of the TV set, the TV set has to be
switched to Video1.
Q: The power of my STB has been turn on and
not in Standby mode, but the TV screen showed
nothing except popup window with “No Signal”
information.
A: That means the channel, which you select, is no
signal. Check connection of signal cable or contact
operator.
9.2. Power
1.Press [ POWER] Key can enter the Standby state
2.In Standby state, press [
call back the unit and go on play the previous
channel
3.User can also disconnect the device’s main
power to end the Standby state.
POWER] Key again can
9.5. Number
In full screen, use number key and press [OK] on
the Remote Control Unit to change channel.
9.6. Mute
1.Press [ MUTE] key to mute the sound and the
screen will show up mute OSD.
2.Press [
MUTE] key again to restore sound.
9.7. Pause
1.In playing mode, press [ PAUSE] ke y, the picture
will be paused, but the sound of the channel will
still continu es.
2.Press [
skip over to the current playing picture, and the
sound of the channel will corresponding playing.
PAUSE] key again, the screen’s picture will
9.8. Recall
Press [ (PREVIOUS)] key will directly switch to the
previous channel that you played before current
channel.
9.9. Favourite
1.In full screen, press [FAV( FAVOR ITE) ] key, it will
display a window of “Favorite Group” on the left
of the screen, which you can watch like below.
9.3. Channel Up/Channel Down
In full screen, press [↑/↓] to change channel.
9.4. Volume Up/Volume Down-
In full screen, press [←/→] to adjust volume.
2.You can press [←/→] keys to select different
“Favorite Group”.
11
Page 14
UUsseerr mmaannuuaall
Pressing [P+/P-] keys can implement the “Page
up/Page down” function
3.Press [Exit] key to exit the current window.
? Frequently Asked Question
Q: Why the screen displays “No Favorite
Channel”, after pressing [
A: It is because that you haven’t set any channels
as “favorite channel”. Please refer to Favorite
FAV( FAVOR ITE) ] key?
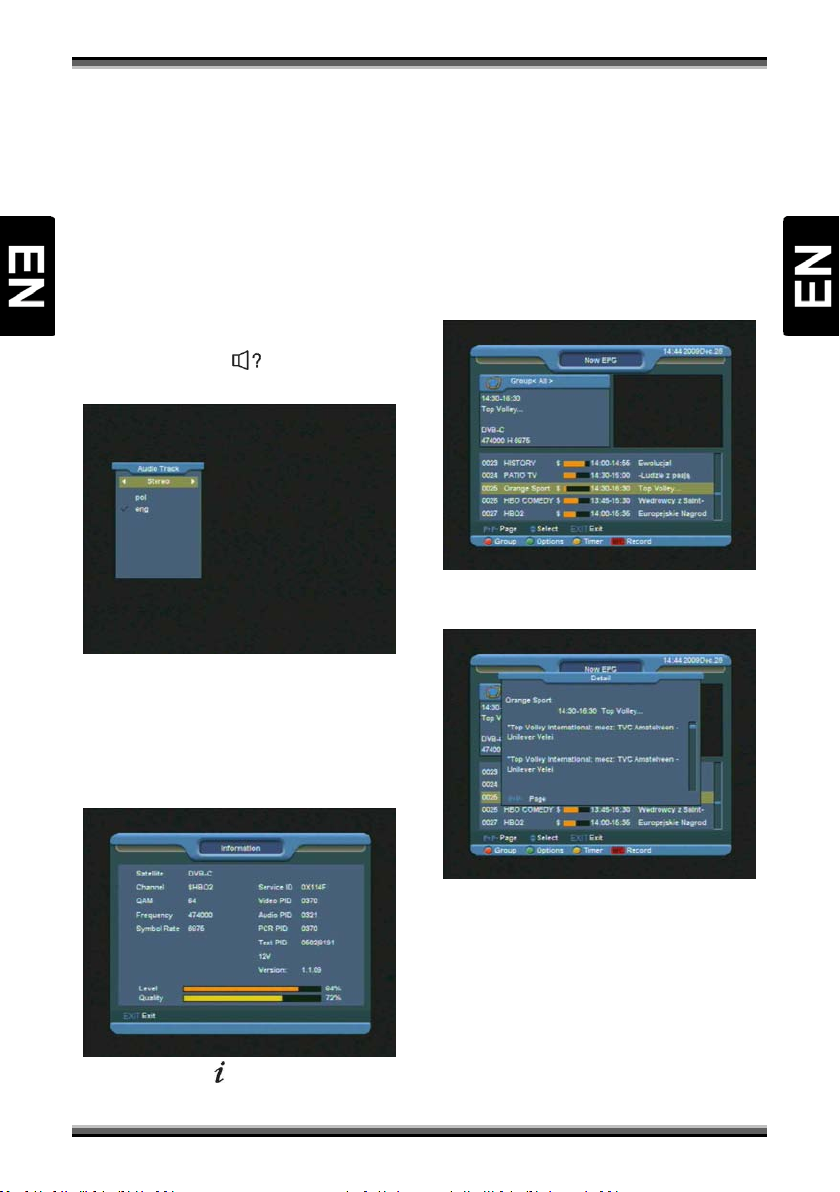
9.10. Audio
1.In full screen, press [ (AUDI O)] key can open
the “Audio” window on the screen.
2.You can modify the audio track by press [↑/↓]
key and modify the audio mode by press [←/→]
key.
3.Mode: Left/Right/Stereo/Mono
parameters of current channel.
9.12. EPG
1.The STB has an Electronic Program Guide (EPG)
to help you navigate channels through all the
possible viewing options. The EPG supplies
information such as channel listings and starting
and ending times for all available channels.
Press [EPG] key to display Program Guide.
2.Press [OK] key in each item can see more detail
information.
9.11. Information
In full screen, press [ (INFORMATION)] key can open
information screen, in the window shows the
3. Press [RED] key to open the “Group” window.
You can press [↑/↓] key to move highlight and
press [OK] key to select group of channels.
4.Press [GREEN] key to open “Options” window.
You can press [↑/↓] key to move highlight and
press [OK] key to select EPG events display mode:
Now EPG, Next EPG, More, Schedule.
12
Page 15
UUsseerr mmaannuuaall
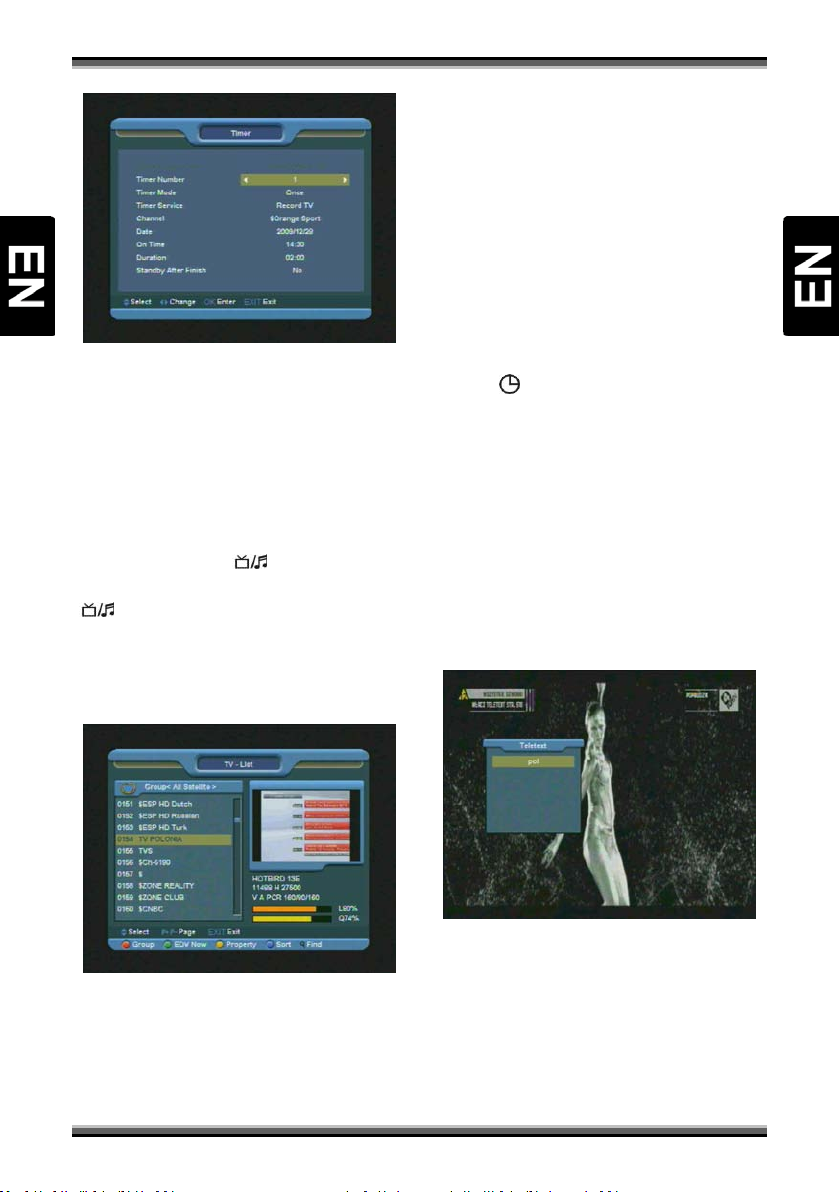
5. Press [YELLOW] key to open “Timer ” window.
User can save a timer as he want. More about
timers You can read in
6. Press [REC] key to directly add timer for
recording event.
7. In EPG menu, press [EXIT] to close EPG screen.
9.13. TV/RADIO
In TV mode, pressing [ (TV / RADIO)] key can
switch to Radio mode. In Radio mode, press
(TV / RADIO) ] key to switch to TV mode.
[
9.14. Channel List
1.In full screen, press [OK] key to enter “Channel
List”.
5.Press [YELLOW] key to enable shortcut to
channel parameters edition.
6.Press [↑/↓] key to move highlight and press [OK]
key to play the highlighted channel.
7.Press [P+/P-] key to page up and page down.
8.Press [EXIT] key to exit the channel list.
9.15. Sleep
1.This function can set sleep timer. When you set a
sleep timer and the time arrive, the system will
enter to standby automatically.
2.Press [
between Sleep Timer Off /10/30/60/90/120
minutes.
(SLEEP)] key to switch the mode
9.16. Page Up/Page Down
1.In Channel list, press [P+/P-] key can page up and
page down the channel list.
9.17. TEXT
1.Press [TEXT] key in full screen, you can open
teletext page on the channel which has teletext
information.
2.Press [RED] key to change channels group.
3.Press [BLUE] key to open the “Sort” window.
There are five kinds of sorting ways.
4.Press [GREEN] key to recall shortcut to EPG
actual event details.
1.If the channel has no teletext information, it will
show “No Teletext Data” on the screen.
13
Page 16
UUsseerr mmaannuuaall
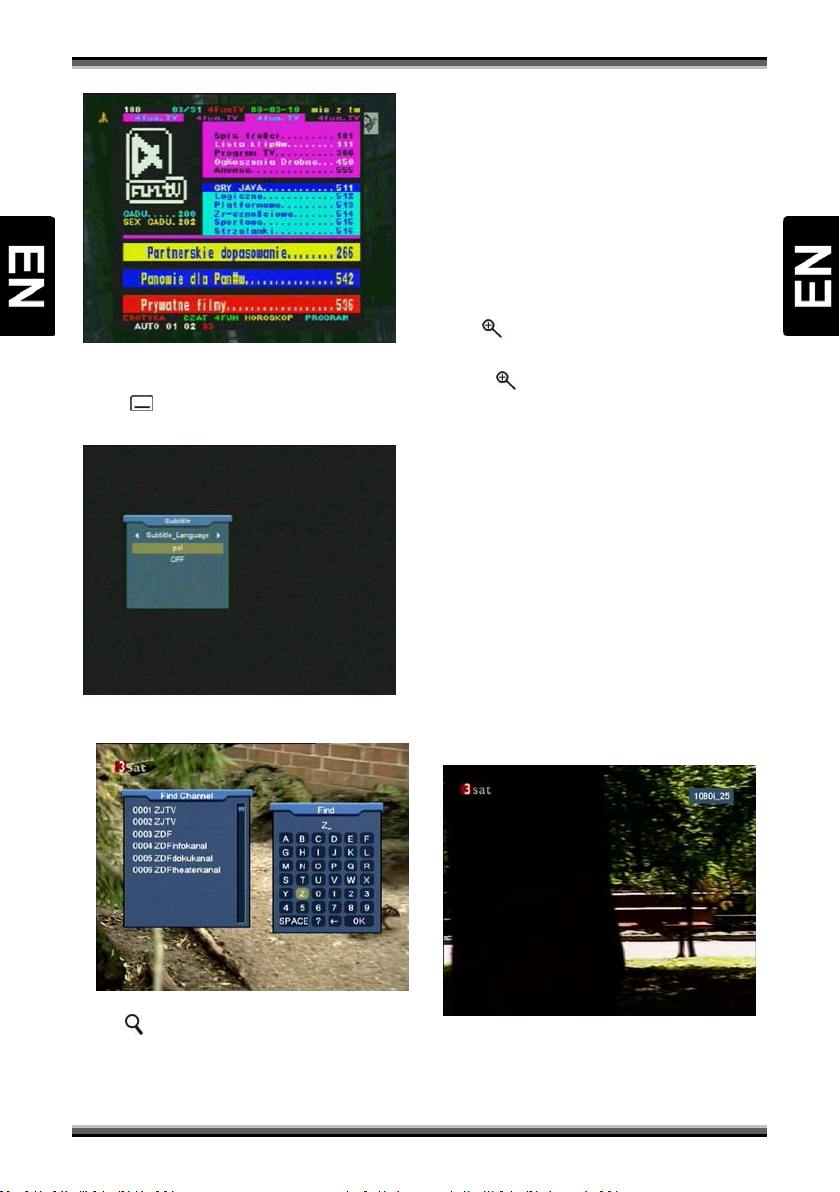
9.18. Subtitle
1.Press [ (YELLOW KEY)] key in full screen, you can
switch subtitle on or off.
selected symbol or letter into the dialogue.
2.After input each character, the program list on
the left will search the channel according your
input, and list the matched channel.
3.Move highlight to “OK” and press [OK] key can
close “Find” window and you can select channel
from the channels list directly.
9.20. Zoom
1.The [ ( ZOOM)] key allows you to magnify a
certain area on the images
2.Press [
enlarge rotate as x1, x2, x4, x6, x8, x12, x16.
3.In “x2 ~ x16” mode, using [←,→,↑,↓] keys to
move the image center area you want to see.
4.In zoom mode, press [EXIT] to close “Zoom”
window.
(ZOOM)] key again, the image will
9.21. TV/RCV
1.Press [TV/RCV] key can switch between TV mode
and STB mode
9.19. Find
1.Press[ (FIND)] key in full screen can open the
“Find” window. You can press [←,→,↑,↓] Channel
Up/Channel Down/Volume Up/Volume Down]key
to move highlight and press[OK]key to input the
9.22. Menu
1.Press [MENU] key can open the menu, exit the
current menu to last menu or close the window.
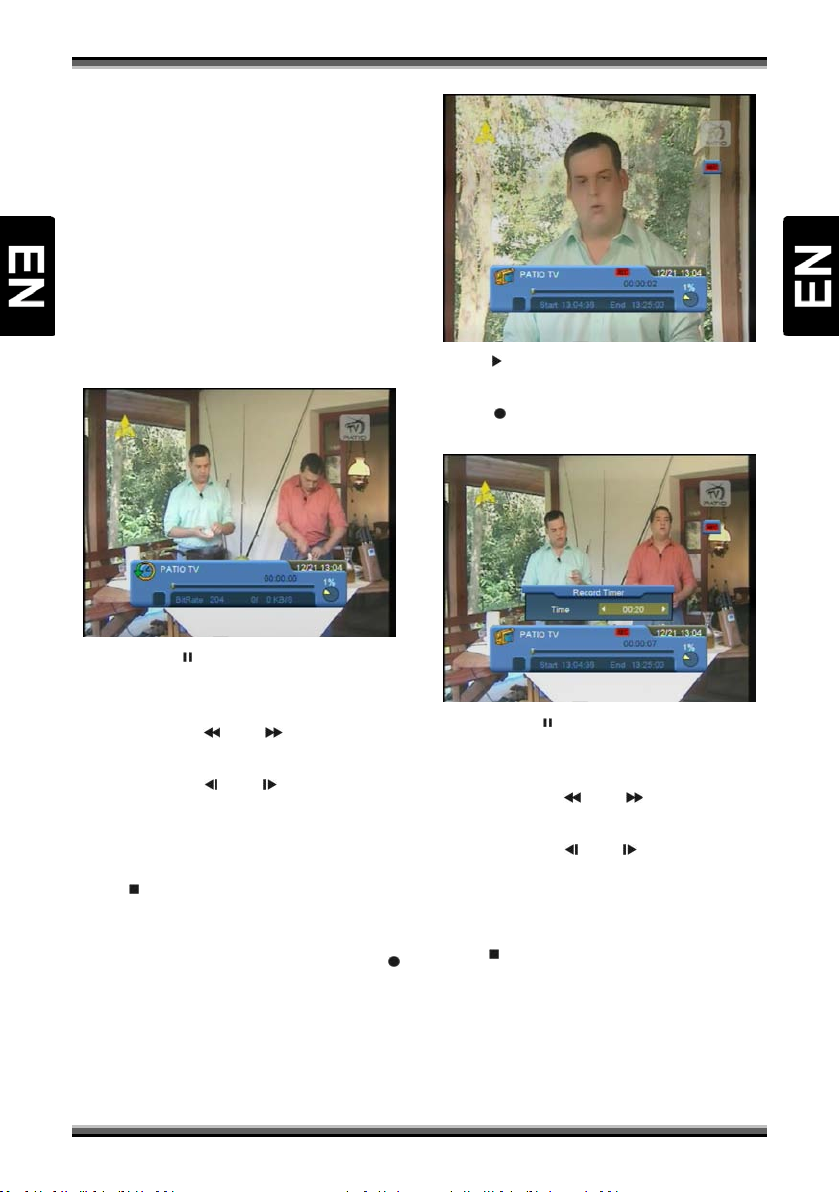
9.23. Video Format
1.Press [P/N (WHITE KEY)] key under Full Screen
playback for 1
outputting video resolution, continuously press
st
, it will show the current system
14
Page 17
UUsseerr mmaannuuaall
this key, system will switch its outputting video
resolution by sequence “by source-> by native TV -
> 480i-> 480P-> 576i-> 576p-> 720P-> 1080i”.
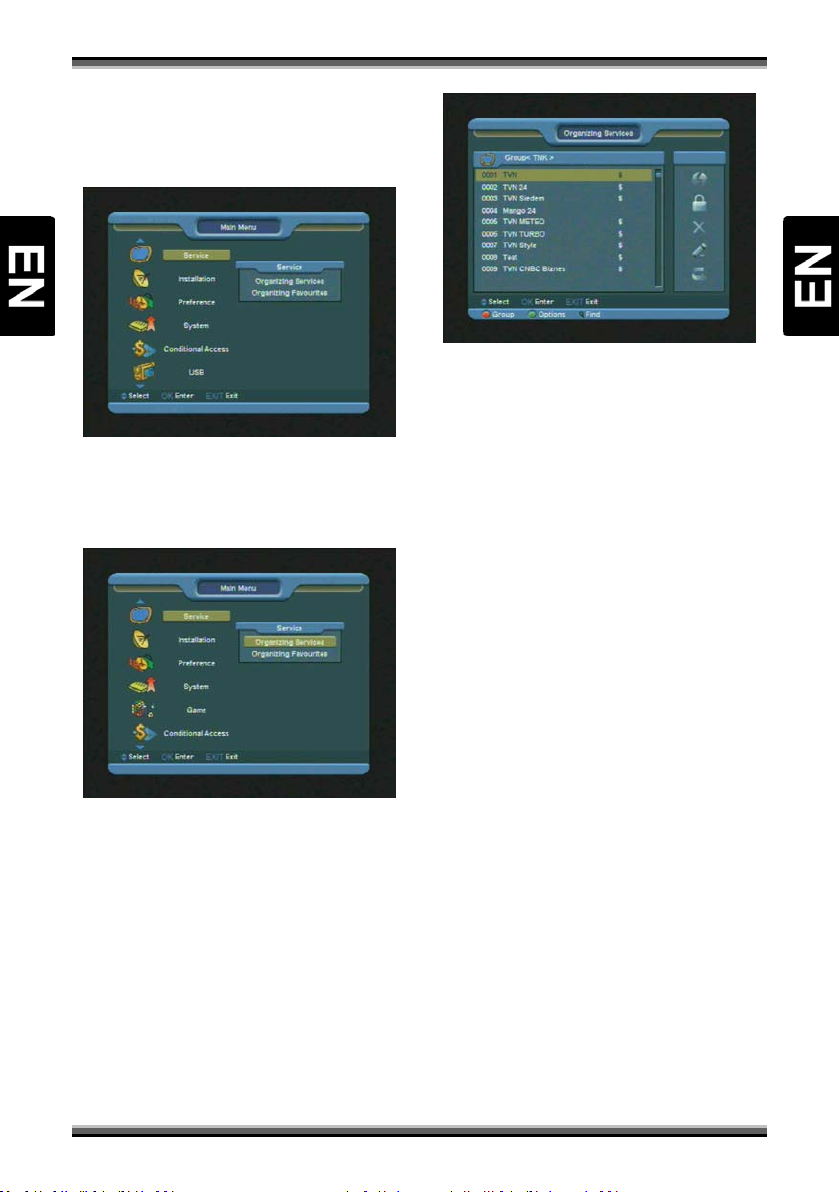
9.24. Time Shift
1.If you connect the USB HDD, and enable the
Time Shift function in the menu "Main Menu/
USB/ PVR Setting/T ime Shift", it will start the
Time Shift function automatically after you switch
the program, and when you press the [Tms]
button the Time Shift info bar will displayed as the
following picture:
2.Press [ ] button to display the record info bar
when you recording.
3.Press [
time.
] button again to setting the record
2.You can press [ ] button to pause the video, and
can save the picture to flash by press [P+] button
when the video is paused.
3.You can press [
Backward or Fast Forward.
4.You can press [
Backward or Slow Forward.
5.Press [←] or [→] button to jump to different
position, then press [OK] button to confirm.
6.Press [
] button to exit the playback.
9.25. Record
1.If you connect the USB HDD, You can press [ ]
button to start record function, as following
picture:
] or [ ] button to Fast
] or [ ] button to Slow
4.You can press [ ] button to pause the video, and
can save the picture to flash by press [P+] button
when the video is paused.
5.You can press [
Backward or Fast Forward.
6.You can press [
Backward or Slow Forward.
7.Press [←] or [→] button to jump to different
position, then press [OK] button to confirm.
8.Press [
] button to stop the recording.
] or [ ] button to Fast
] or [ ] button to Slow
9.26. Exit
Press [EXIT] key can exit the current menu to last
menu or close the window
15
Page 18
UUsseerr mmaannuuaall
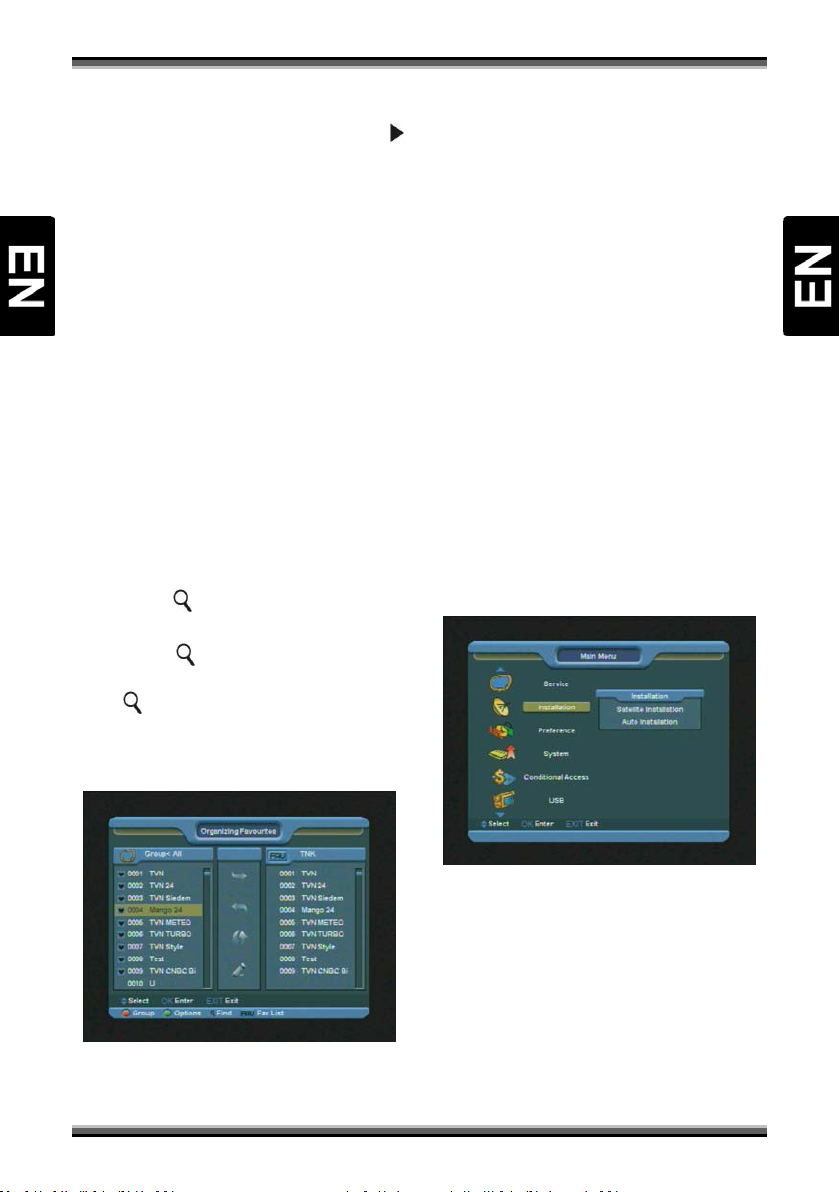
10. Menu “Service”
When you press [Menu] key to enter menu, there
will display the picture like below:
1.Press [↑/↓] key to select menu pages among
Service, Installation, Preference, System, Game,
Conditional Access, USB and Internet (optional).
2.Press [OK] key to enter the selected item.
1.You can move highlight by press [↑/↓] keys to
preview the current highlighted program in the
right side preview window.
2.You can press [P+/P-] keys to implement the
Page Up/Page Down function.
3.You can use [←/→] key to switch between list of
channels and list of channel edit functions – Move,
Lock, Delete, Rename, Skip.
4.Press color key can implement the
corresponding function – Group, Options, Find.
5.You can press [Exit] key to enter full screen
playing mode.
In “Service” menu:
1.Press[↑/↓] key to select menu items among
Organizing Services and Organizing Favourites.
2.Press[OK]key to enter the selected item.
10.1. Organizing Services
When you enter to “Organizing Services” menu,
there will display the screen like below.
10.1.1. Move
You can reorder and move the service to the
preferred position. Mark the desired services using
[OK] button, use → button to choose Move mode
and press [OK] button, then use↑,↓ buttons to
move and press [OK] button to confirm.
10.1.2. Lock
You can restrain and lock the services. Mark the
desired services using [OK] button, use → button
to choose Lock mode and press [OK] button to
confirm.
10.1.3. Delete
You can delete the services. Mark the desired
services using [OK] button, use → button to
choose Delete mode and press [OK] button to
confirm.
16
Page 19
UUsseerr mmaannuuaall
10.1.4. Rename
Mark the service you want to rename, use
button to select Rename item and press [OK]
button to display keyboard, and rename it. After
renaming it press [OK] button on keyboard to
save.
10.1.5. Skip
You can restrain and Skip (hide) the services. Mark
the desired services using [OK] button, use →
button to choose Skip mode and press [OK] button
to confirm.
10.1.6. Group (RED)
It is very useful to select services with different
Groups.
10.1.7. Options (GREEN)
It is very convenient function to Mark the desired
services with different options.
10.1.8. Find ( )
It is an item to locate certain service by name
quickly. Press [
submenu, use keyboard to enter service name and
press [
services.
] button to display the “Find”
] button again to select the desired
1.You can move highlight by press [↑/↓] keys in the
left and right side list window.
2.You can press [P+/P-] keys to implement the
Page Up/Page Down function.
3.You can use [←/→] key to switch between list of
all channels at the left, list of channel in actual
selected FAV list at the right and edit functions in
the middle of the screen – Add, Remove, Move,
Rename.
4.Press color key to implement the corresponding
function – Group, Options, Find (described in
previous chapter).
5.Press
FAV( FAVOR ITE) key when cursor is active in
left window, to choose actual FAV list.
6.You can press [EXIT] key to enter full screen
playing mode.
11. Menu “Installation”
When you enter to “Installation” menu, there will
display the screen like below:
10.2. Organizing favourites
When you enter to “Organizing favourites” menu,
there will display the screen like below.
In “Installation” menu:
1.Press [↑/↓] key to select menu items among
Satellite Installation, Auto Installation, Satel lite
Guide.
2.Press [OK] key to enter the selected item.
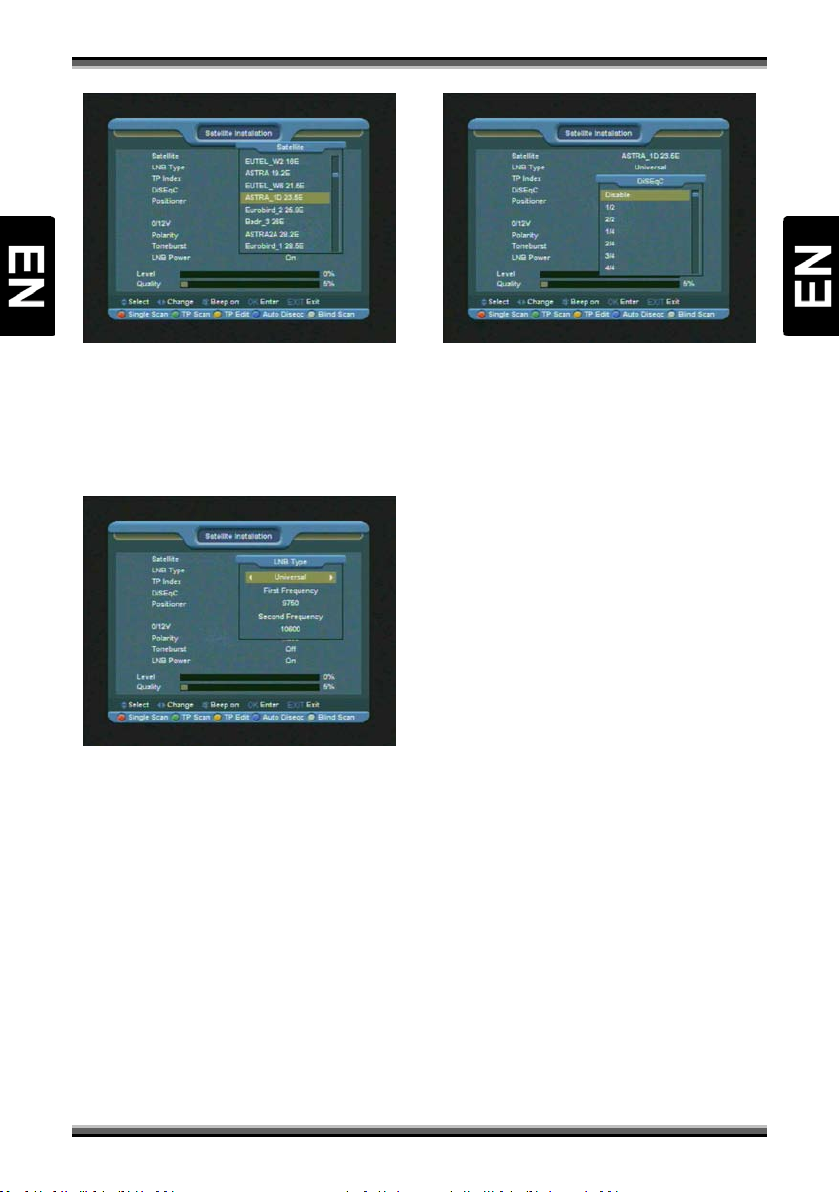
11.1. Satellite Installation
11.1.1. Satellite
1.Satellite: Press [OK] key to enter the Satellite list.
17
Page 20
UUsseerr mmaannuuaall
2.Press [↑/↓] key to select satellite. Press [P+/P-]
key to page up or page down.
11.1.2. LNB Type
In this item, press [←/→] to switch among
“Standard”, “User ” and “Universal” mode.
11.1.3. DiSEqC
DiSEqC: You can use [←/→] key to switch options.
There are several options for your selection:
• Disable: without DiSEqC.
• 1/2, 2/2: two ports DiSEqC
• 1/4, 2/4, 3/4, 4/4: 4 ports DiSEqC
• 1/8, 2/8… 8/8: 8 ports DiSEqC
• 1/16, 2/16….16/16: 16 ports DiSEqC
11.1.4. Positioner
Positioner: In “Positioner” item, you can press
[←/→] key to switch “None / DiSEqC 1.2 / USALS”
functions.
11.1.5. 22K
You can use [←/→] key to switch “ON / Off”.
When this item is switched to “ON”, receiver will
receive TV and radio input signal from 22K port. If
the item is switched to “Off”, the receiver will
receive all signal from 0K port.
Note:
When you choose LNB type “Universal”, you
cannot modify 22K.
11.1.6. 0/12V (Optional)
You can use [←/→] key to switch “0V / 12V”.
When this item switches to “12V”, receiver will
receive TV and radio input signal from 12V port. If
the item switches to “0V”, the receiver will receive
all signals from 0V port.
11.1.7. Toneburst
In “Toneburst” item, you can press [←/→] key to
switch “Off/On” functions.
11.1.8. Polarity
In “Polarity” item, [←/→] key to switch “Auto / H
/ V” functions.
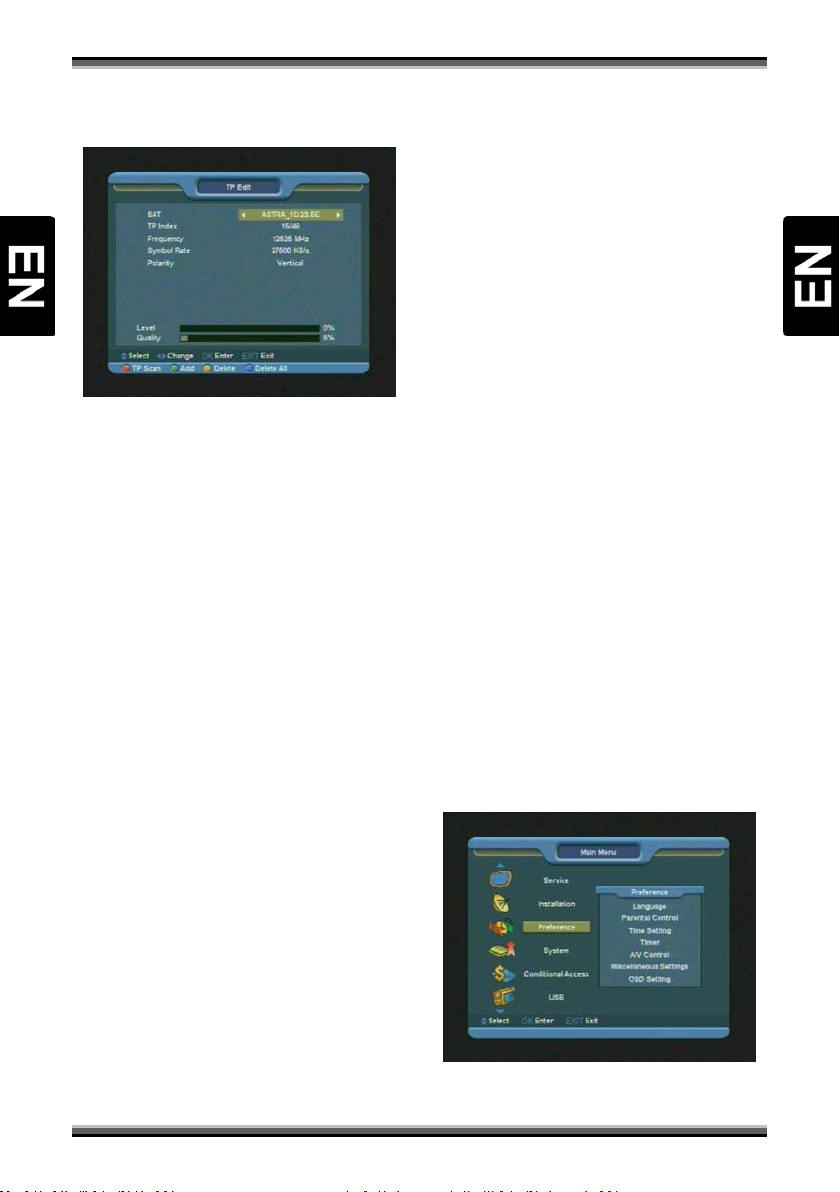
11.1.9. Edit TP
18
Page 21
UUsseerr mmaannuuaall
When you enter to “Edit TP” menu, there will
display the screen like below:
1.In “Satellite” item, press [←/→] key to switch
satellite that you want to scan or press [OK] key to
enter satellite list for selection.
2.In “TP Index” item, you not only can use [←/→]
key to select transponder but also can use [Add]
and [Delete] functions.
• When you press [GREEN] key, it will display
“New TP” in “TP Index” item; You should
set the parameters of “TP Frequency” and
“Symbol Rate” for this new transponder.
The parameters of “TP Frequency” and
“Symbol Rate” can set by number keys. The
available range are “3000~13450 MHz” and
“1000~45000Ks/s”.
• When you press [YELLOW] key, there will
show up a warning message for reminding
whether you will delete the current
transponder or not. If you select “Yes”, the
current transponder will be deleted, and
the total account of transponder will
reduce 1 correspondingly.
• When you press [BLUE] key, there will show
up a warning message for reminding
whether you will delete all transponders or
not. If you select “OK”, all transponders will
be deleted.
3.For the existed transponder, you also can use
number keys to modify the parameters of “TP
Frequency” and “Symbol Rate”.
4.When you complete your modification, Press
[RED] key, it will show up a dialog to ask you scan
mode, program type, scan type and NIT Search
on/off. After you set up, press [OK] key to start
scanning.
5.In the “TP Scan” item, press [EXIT] key to exit the
scanning and save the current parameters.
11.1.10. Single Scan
1.Press [RED] key, it will show up a dialog to ask
you scan mode (means you want to scan all
channels or only scan free channels), program
type (means you want to scan all channels or only
scan TV/Radio channels), scan type (means preset
scan, that is searching the existed TP. Automatic
Scan means blind scan. It is no need existed TP
info) and NIT Search on/off. After you set up, press
[OK] key to start scanning.
11.1.11. Blindscan
1.Press [WHITE] key into the blind scanning
immediately.
11.2. Auto Installation
This function will try to analyze Your dish/LNB
configuration and automatically scan for founded
settings.
12. Menu “Preferences”
When you enter to “Preferences” menu, you will
see the screen like below:
In “Preferences” menu:
19
Page 22
UUsseerr mmaannuuaall
1.Press [↑/↓] key to select menu items among
Language, Parental Control, Time setting, T im e r,
A/V Control, Miscellaneous, OSD Setting.
2.Press [OK] key to enter the selected item.
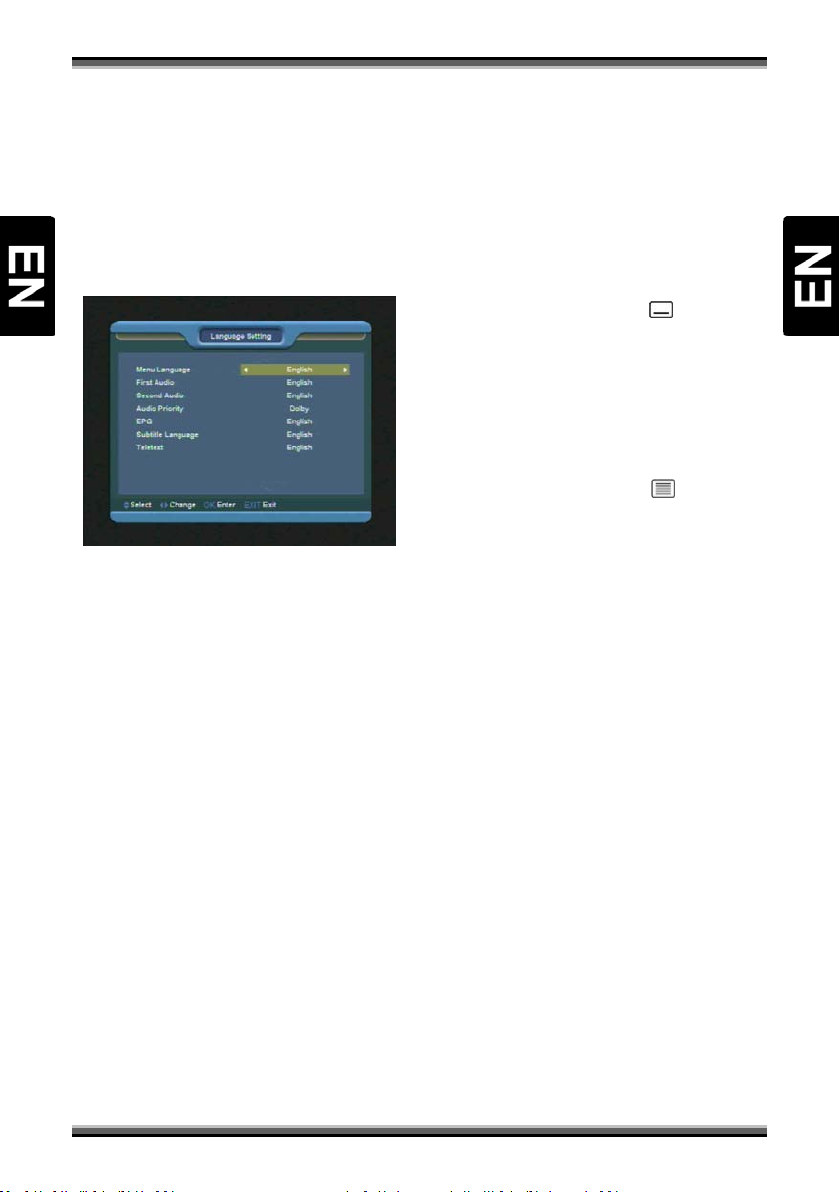
12.1. Language
When you enter to “Language” menu, you will see
the screen like below:
1.Menu Language: Press [←/→] keys to select
OSD menu language.
2.First Audio: Some channels have more than one
audio language for choosing; by this function you
can set the first audio for this channel. If the
playing channel has the same audio as the “First
Audio” you set, system will play this audio
language as default. If the channel hasn’t the
suited audio language, then the system will
compare automatically with second audio
language.
3.Second Audio: If the channel has no correspond
audio with “First Audio” but have corresponded
audio with “Second Audio”, system will play the
second audio language as default. If no audio
language corresponds with the “Second Audio”,
then the default language of current channel will
be played automatically. The selections of audio
languages include: English, French, German,
Russian, Arabic, Portuguese, Turkish, Spanish,
Polish and Italian.
4.Audio Priority: You can select the Audio Priority
among Dolby and Language. If Dolby mode is
selected, AC3 audio track will be played even if
track language not correspond to selected one in
above functions – First and Second Audio.
5.EPG Language: Press [←/→] keys to select EPG
language.
6.Subtitle Language: It is an item for changing the
language of the Subtitle.
As long as the services support it, the Subtitle
language is changeable by press
your RCU.
The supported language can be changed without
any notice.
7.Teletext Language: Press [←/→] keys to select
TXT language.
As long as the services support it, the Teletext
language is changeable by press
your RCU.
The supported language can be changed without
any notice.
8.You can press [EXIT] key to enter full screen
playing mode.
(YELLOW KEY) on
(G REEN KEY) on
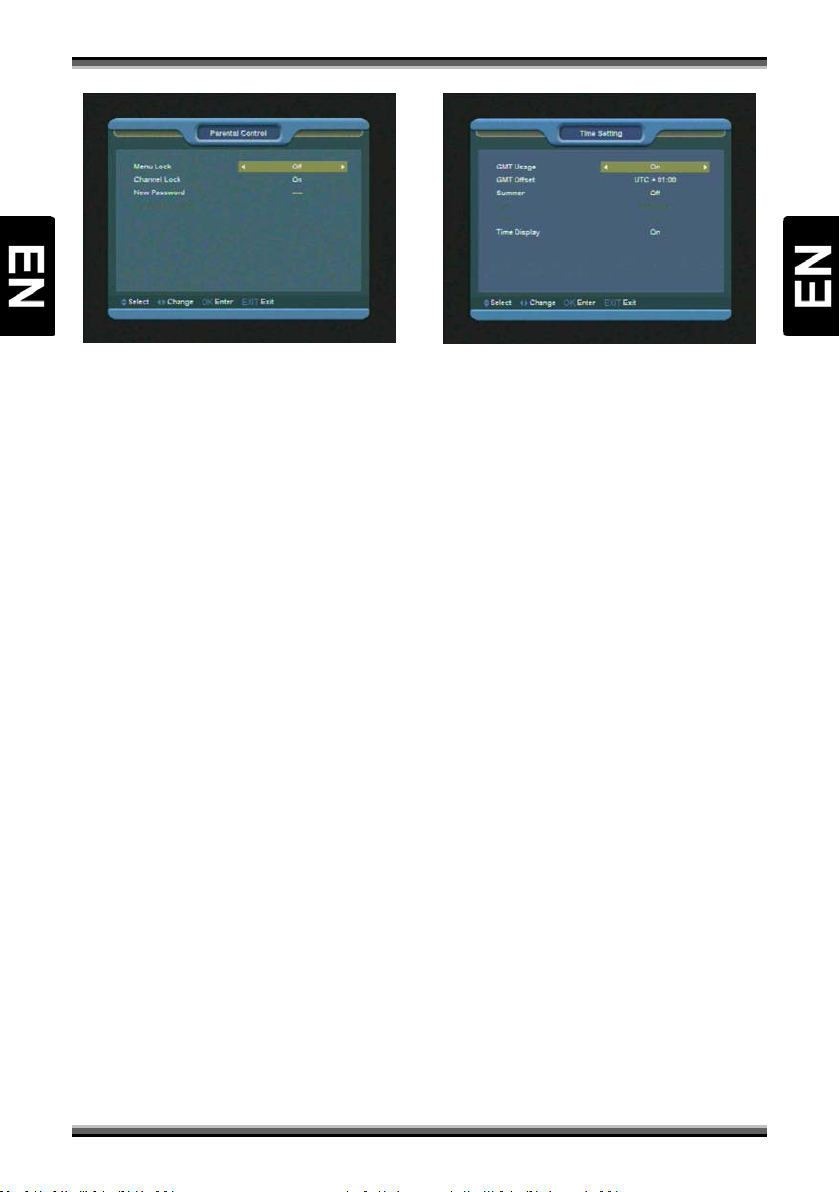
12.2. Parental Control
You can set a password for anyone who wishes to
operate in the “Installation” menu. And you can
also set the password for the lock channels. (How
to set the lock channel please refer to LOCK) Here
will show you how to setting and how to revising
the password.
1.In “Parental Control” function, press [OK] key,
there will pop an dialogue for you to input the
password. When you input the correct password,
you will see a screen like below:
20
Page 23
UUsseerr mmaannuuaall
2.Menu Lock determining that when user wish to
enter “Installation” menu, whether have to input
Password or not. If the setting of “Menu Lock” is
“Yes ” which means user have to key in password,
set “No” means unlock.
3.Channel Lock determining that when user wish
to play the lock channels, whether have to input
the password or not. If the setting is “Yes ”, play
the channels with lock mark will show up a
dialogue on the screen and ask for the password.
If the setting of “Channel Lock ”is “No”, the Lock
function will invalid.
4.New Password is used for revising password; you
can input the new password in this item by using
number keys directly. After you filled in 4 digital
numbers, the highlight will auto skip to Confirm
Password and ask you to input the new password
again. If the password is correct, the screen will
show up a message of “Change password
successfully”.
5.You can press [EXIT] key to enter full screen
playing mode.
12.3. Time setting
When you enter to “Time Setting” menu, you will
see the screen like below:
1.GMT Usage: This item is use for open the usage
of GMT. You can press [←/→] keys to switch
“On/Off”.
2.GMT Offset: This item is valid only when the
setting of “GMT Usage” is “On”. You can press
[←/→] keys to switch “GMT Offset” value, and the
range is “-12:00 ~ +12:00”, increase each half hour
progressively.
3.Summer: You can press [←/→] to control
Summer time on or off.
4.Date and Time: items are valid only when the
setting of “GMT Usage” is “Off ”. You can press
[←/→] keys to move highlight and use number
keys to input directly.
If the current channel provides the correct time
information, you will see the current time while
you enter “Time” menu. If the channel doesn’t
provide time information, you have to
date and time information manually.
5.Time Display: This item can control time display
on or off on front panel display when full screen
pl ay.
6.Press [EXIT] key to draw back from “T ime
Setting” menu.
input the
12.4. Timer
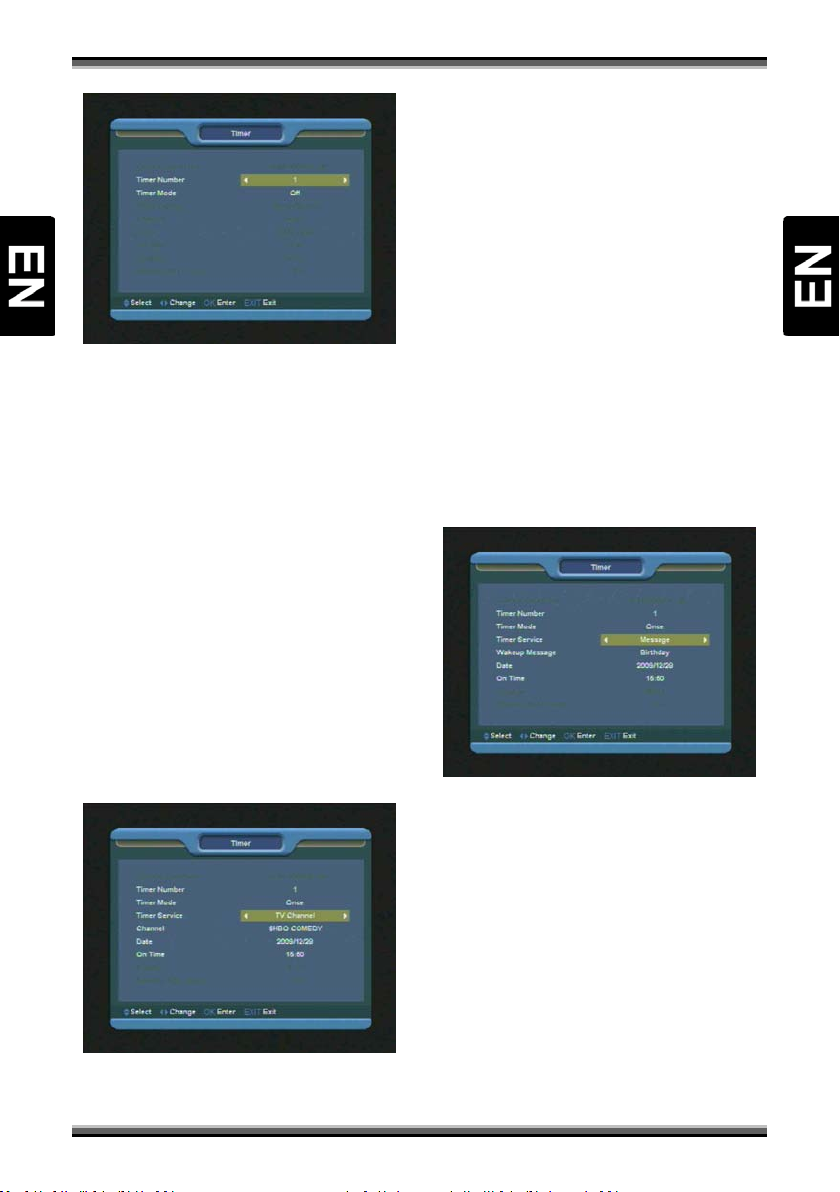
When you enter to “Timer” menu, you will see
the screen like below:
21
Page 24
UUsseerr mmaannuuaall
1.Current time information will display on the first
column; if the current time is incorrect, please
modify the time information in “Time” item.
2.Timer Number: You can press [←/→] keys to set
Timer number, and there are 8 timers in total.
3.Timer Mode: There are several modes for Timer
to setting, include Off, Once, Daily, Weekly,
Monthly and Yearly.
4.Timer Service: There are five options for “Timer
Service”, include “TV Channel” and “Radio
Channel” (timer setting for channel change and
Wakeup/Sleep) and "Record Radio" and "Record
TV" (Timer setting for Record the TV or Radio
program to USB Hard Disk) and Message
(reminding message).
5.When you select “Channel” (timer setting for
channel change and wakeup) option in “Timer
Service”, the screen will display like below:
Channel: Press [OK] key to enter channel list and
select channel that you want to setting.
Date: Use number keys to input your wakeup date.
On Time: Use number keys to input your wakeup
time. Once the time’s up, no matter what the
system is in standby mode or in playing mode, the
system will automatically switch to the channel
you want and start to play.
6.When you select “Record” option in “Timer
Service”, “On T ime” function enables to set time
of begin event planned to record. Also additional
functions become active:
Duration: Enables to set time of duration of event
planned to record.
Standby After Finish: Enables to set state of
receiver after recording event.
7.When you select “Message” (reminding
message) option in “Timer Service”, the screen
will display like below:
Wakeup Message: Press [←/→] key to select
reminding message as Birthday, Anniversary and
General.
Date: You can use number key to input your
wakeup date.
On Time: Use number keys to input your wakeup
time. Once the time’s up, no matter what the
system is in standby mode or in playing mode, the
system will automatically pop a reminding
message.
The message will always display on the screen,
you can press [EXIT] key to close it.
Press [EXIT]key to exit the current menu.
22
Page 25
UUsseerr mmaannuuaall
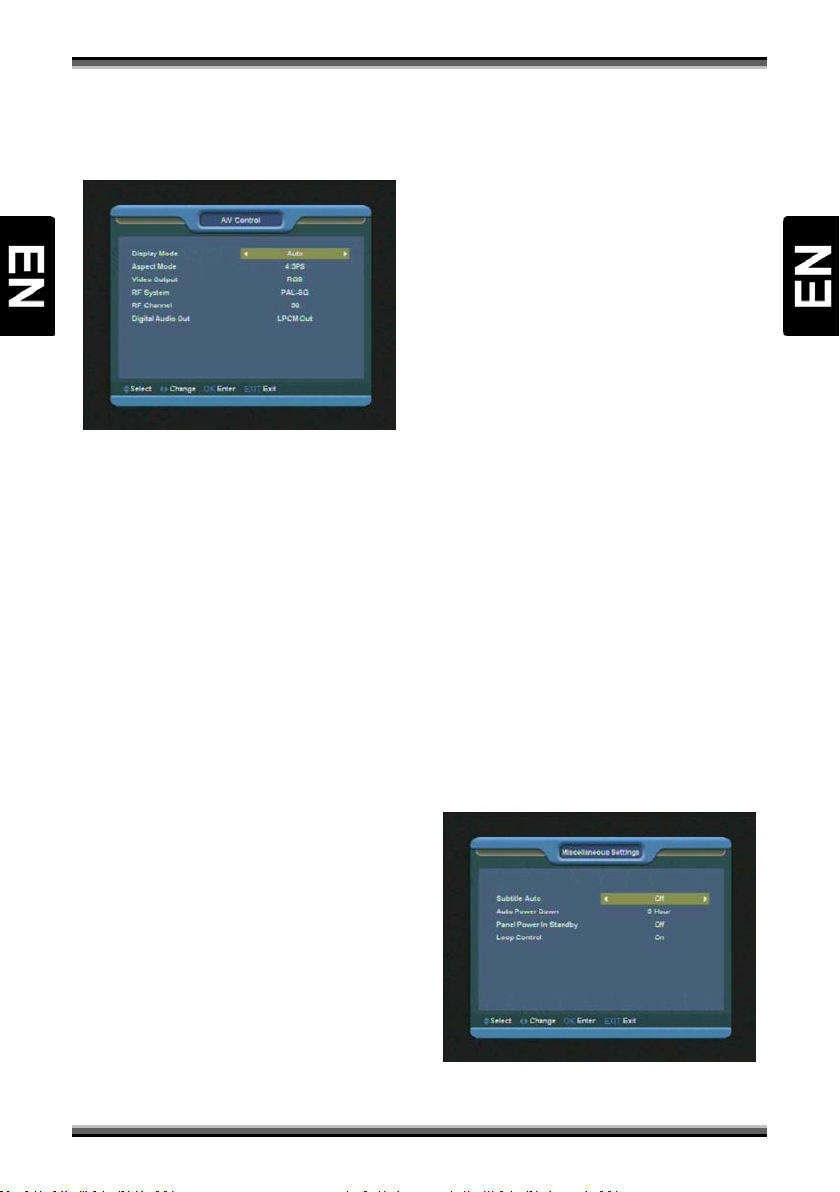
12.5. A/V Control
When you enter to “A/V Control” menu, you will
see the screen like below:
1.User can switch display resolution in view mode
P/N (WHITE KEY) button. Also Display Mode is
using
for switching the system outputting video
resolution. Move highlight on it and press left or
right key, it will switch video resolution circularly
by the sequence “by source<-> by native TV<->
480i<-> 480P<-> 576i<-> 576p<-> 720P<-> 1080i”.
By Source means system will set the video output
resolution according to the program it’s playing,
different resolution programs switching perhaps
will makes TV screen flickering. By Native TV
means system will be according to the HDMI TV’s
max supported resolution to set its resolution, if
system is not connected to a HMDI TV, it will set
resolution to be default. Depending on selected
video output, available resolutions may be
different than listed above.
2.Aspect Mode is for switching the screen aspect
ratio mode. Now we provide below options: 4:3
PS / 4:3 LB / 16:9/Auto. You can press [←/→] key
to select each mode circularly. 16:9 will provide
user pillar box mode it means user use 16:9 TV to
display but need to see a 4:3 full display picture.
System will force press wide screen picture to be
narrow and there’re black band on left and right
site. Auto means system won’t do any aspect ratio
translation, 16:9 picture source will be good
display on a 16:9 TV but will be too narrow on a
4:3 TV, and 4:3 picture source will be too wide in a
16:9 TV but will be good display in a 4:3 TV.
3.Video Output: Press [←/→] to select CVBS or
RGB.
4.RF system and RF channel (optional): are for
user to set the TV RF modulator output signal
VHF/UHF channel and TV system mode. If your TV
is too old to supports CVBS/RGB/HDMI, you can
use TV RF cable to connect STB’s TV RF output
port to TV Antenna input port. (optional)
5.Digital Audio Out is for setting the both SPDIF
and HDMI’s digital audio output mode, it has
options LPCM Out, Auto, You can press
[Left/Right] Key to select each mode circulari ty.
LPCM Out means system will decode no matter
AC3 or PCM audio track data to be LPCM, digital
audio decoder or HDMI TV will get LPCM digital
audio data. Auto means system will detect which
the connected HDMI TV can decode and then
output that data. If HDMI TV can decode AC3,
system just output RAW data, if HDMI TV can
decode LPCM only, system will just decode AC3 or
LPCM to be LPCM and then output.
6.Press [EXIT] key to draw back from “A/V Control”
menu.
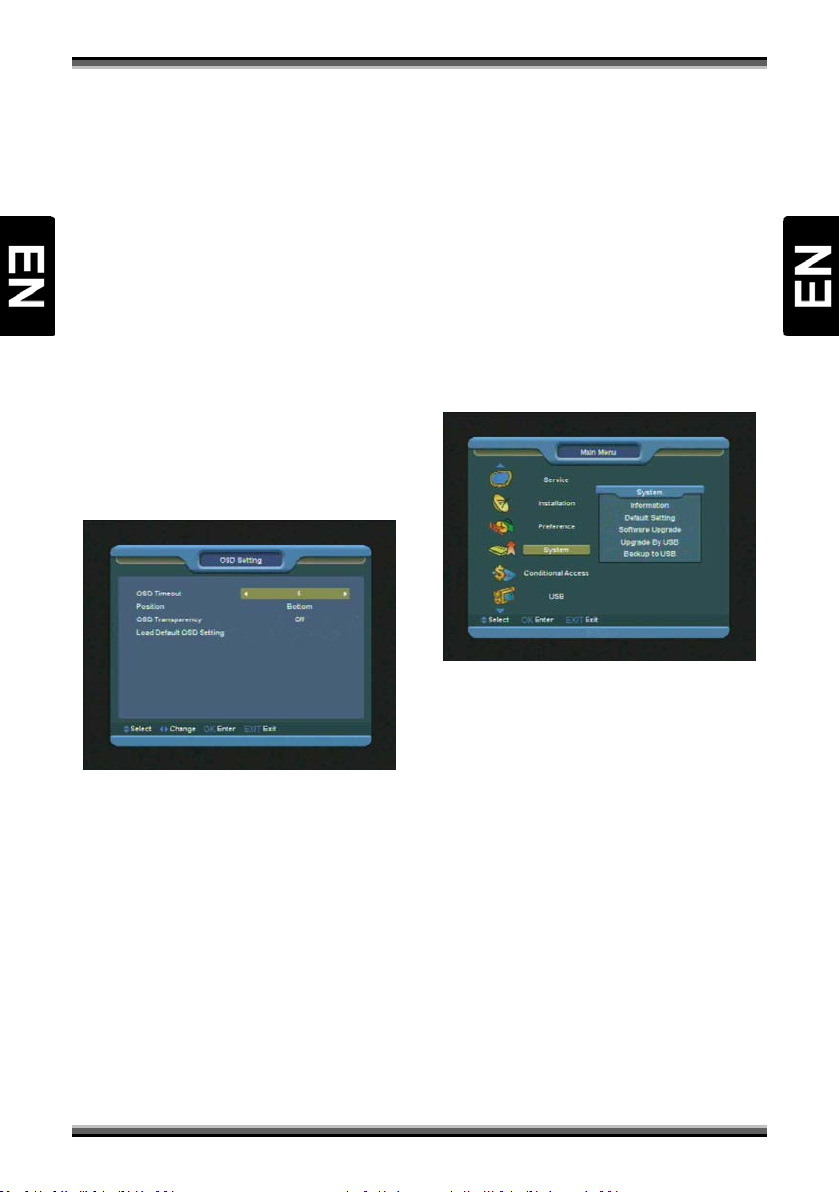
12.6. Miscellaneous Settings
When you input to “OSD Setting ” menu, you will
see a screen like below:
1.Subtitle Auto: You can press [←/→] key to select
“On” or “Off”. If the current channel has subtitle
23
Page 26
UUsseerr mmaannuuaall
information, it will be showed up while this
function is “On”. If this function is “Off”, there
won’t show up subtitle information even if the
current channel has subtitle information.
2.Auto Power Down: Enables to set time of
automatic power down of receiver when user not
use any front panel and remote controller buttons.
3.Panel Power In Standby: Enables to decide about
front panel in standby mode. “On” will display
clock with actual time. “Off” will display only red
Power LED.
4.Loop Control: Enables to activate/deactivate
loop function of tuner in standby mode.
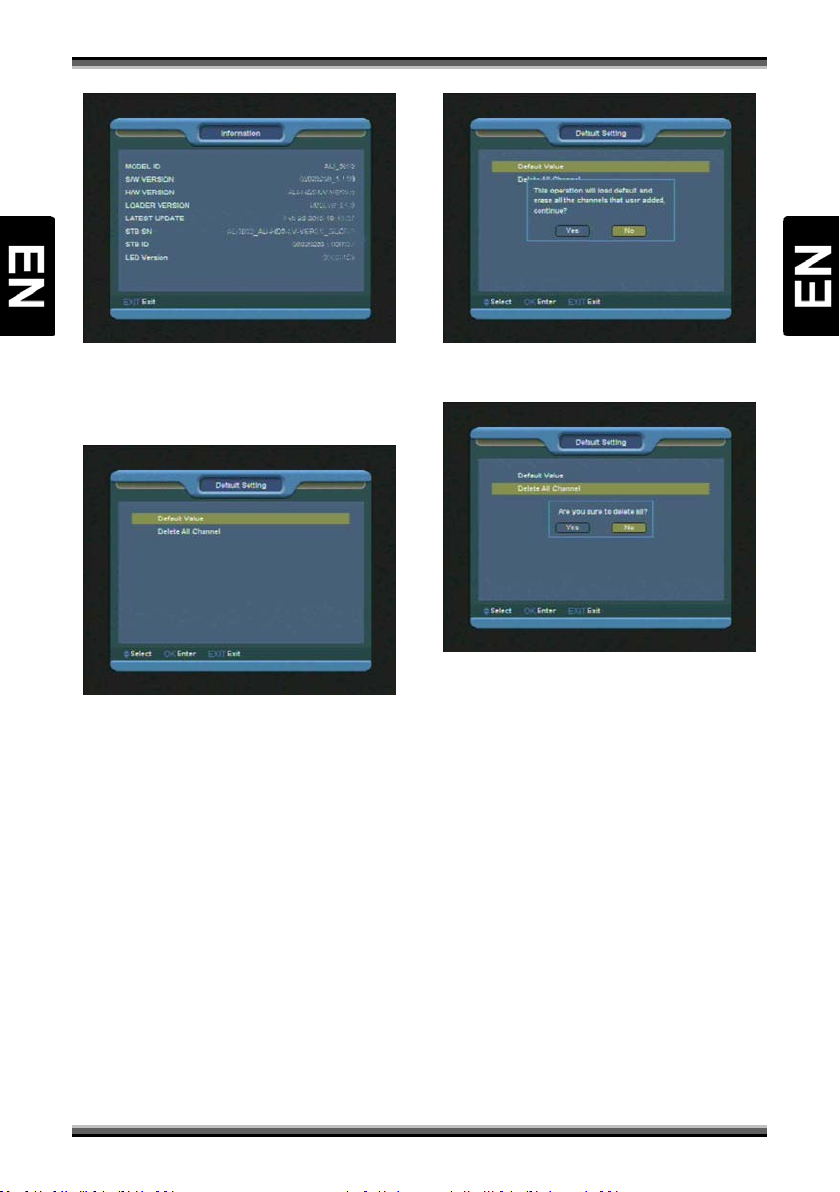
12.7. OSD setting
When you input to “OSD Setting” menu, you will
see a screen like below:
1.OSD Timeout: When you switch channels in full
screen, there will show up some information
about current channel on the lower of the screen.
And regarding to the duration of these
information show up on the screen, you can press
[←/→] key to set the time. The range of the
duration is 1 – 10 seconds.
2.Position: control display position of the info bar
in full screen mode. You can choose “bottom” or
“top”.
3.OSD Transparency: You can set the transparency
of OSD. You can press [←/→] key to select the
values. There are 5 levels of transparency, 10%,
20%, 30%, and 40% and “off” (means no
transparency function).
4.Load OSD Setting Default: If you are not satisfy
with your setting, you can move highlight to this
item and press [OK] key to reset parameters as
default value.
Press [EXIT] key to draw back from the “OSD
Setting” menu.
13. Menu “System”
When you enter to “System” menu, you will see a
screen like below:
In “Tools” menu:
1.Press [↑/↓] key to select menu items among
Information, Default Setting, Software Upgrade,
Upgrade by USB, Backup to USB.
2.Press [OK] key to enter the selected item.
13.1. Information
1.When you enter to “Information” menu, you will
see a screen like above. The screen displays
software, loader and hardware information.
2.Press [EXIT] key to draw back to “Tools” menu.
24
Page 27
UUsseerr mmaannuuaall
13.2. Default setting
1.When you enter to “Default setting” menu, you
will see a screen like below:
1.When you press [OK] key in the “Default Value”
item there will appear a dialogue box for you to
enter the password, and the default password is
“0000”.
After you input the correct password, there will
show a warning message to inquiry you “The
operation will load default and erase all the
channels that user added, continue?”.
If you select “Yes” option, the all revised
parameters of the receiver will reset to default
value. Please carefully to using this function.
In step 1 and step 2, press [EXIT] key can draw
back from this item and without saving.
2.When you press [OK] key in the “Delete All
Channel” you will see a screen like below:
If you select “Yes”, all channels will be deleted.
In step 1 and step 2, press [EXIT] key can exit the
function directly without save.
? Frequently Asked Question
Q: IF I incautiously delete all channels, what
should I do?
A: There are two ways to restore:
To r e-search all channels in “Installation” function.
Use “Default Value” function to restore all
channels in “Tools” function
13.3. Software upgrade
25
Page 28
UUsseerr mmaannuuaall
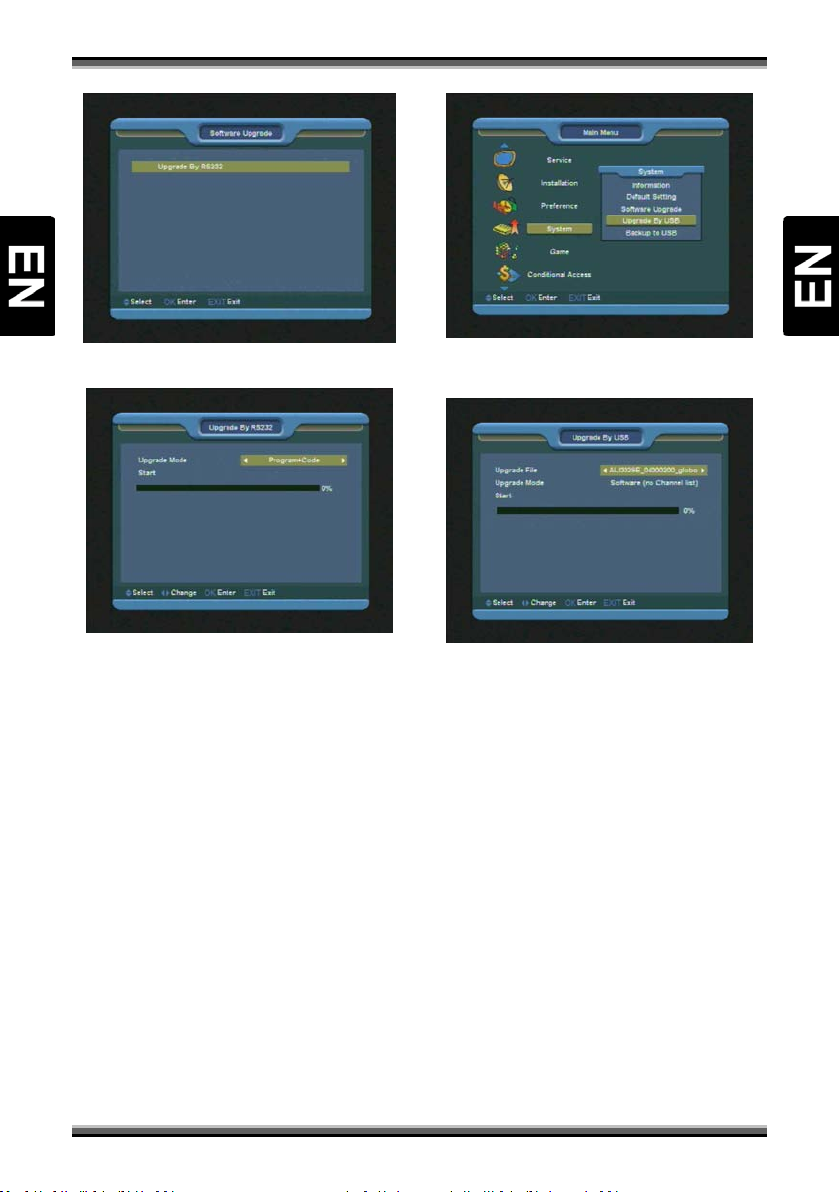
13.3.1. Upgrade by RS232:
1.We offer the functions for user to connecting
receiver (Master) to the other receiver (Slave) via
serial interface.
2.Connect master receiver to slave receiver via
serial interface. Enter “Software Upgrade” menu
in master receiver and press [↑/↓] keys to switch
upgrade mode.
3.Upgrade modes include: Code / Program List /
User Back / Video Back / Radio Back / DefaultBD
/Default DB + User DB/ Program + Code
4.Moving highlight to “Start” on master receiver
and press [OK] key to start upgrade.
5.Turn on slave receiver and it needn’t operate any
setting.
Press [EXIT]key to draw back.
13.4. Upgrade By USB
In this menu you can upgrade the software from
USB conveniently, press [OK] button to enter.
In this menu you can select the Upgrade Mode
among Software (no channel list), Channel list, All
SW + bootloader, All SW + Channel list. You can
select the appropriate upgrade file on "Upgrade
File" item. After you select the "Upgrade Mode"
and "Upgrade File", press [OK] button on "Start"
item, the receiver can upgrade automatically.
NOTE: You must put the upgrade file on the /ROOT
DIRECTORY of the USB storage.
13.5. Backup to USB
In this menu ,you can dump the software to the
USB equipment.
In "Backup file", you can press [OK] key to edit the
file name.
In "Backup to USB", you can press [OK] to start
dumping software.
26
Page 29
UUsseerr mmaannuuaall
14. Menu “Conditional
Access”
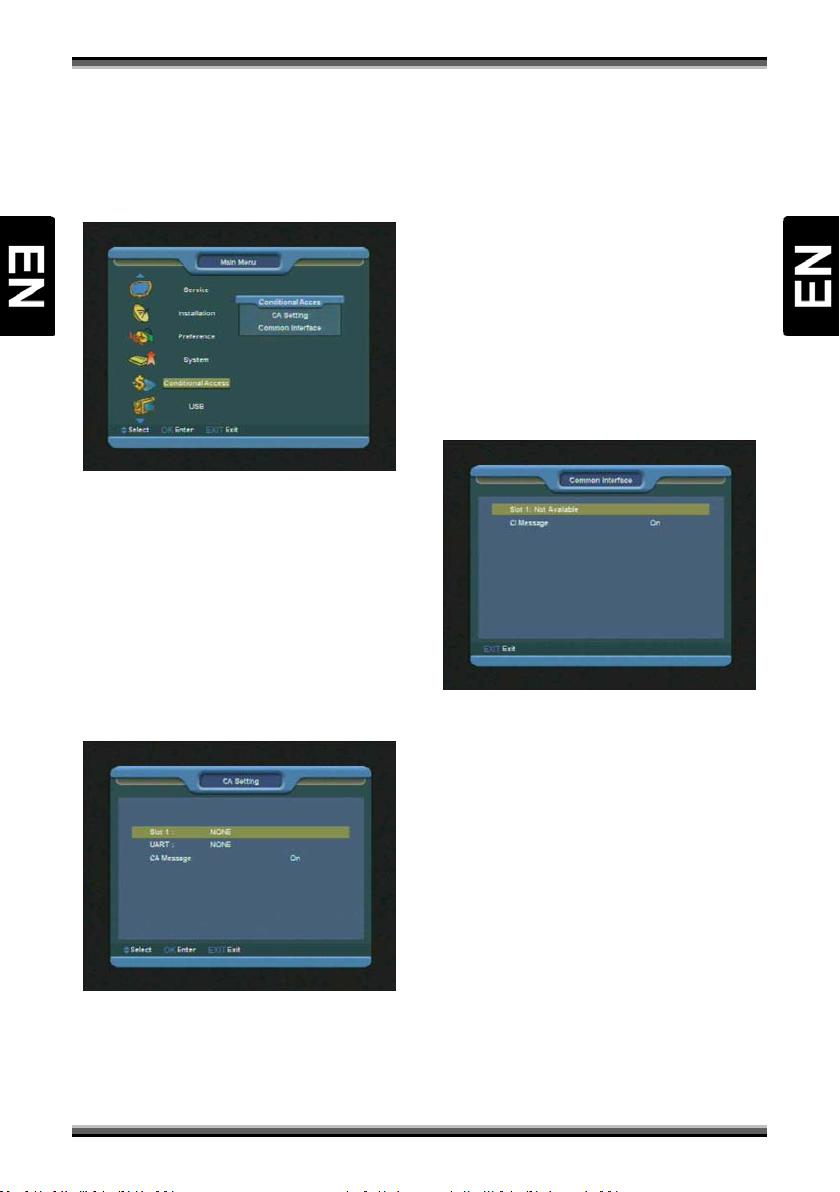
1.When you enter to “Conditional Access” menu,
you will see a screen like below:
14.1. CA Setting
Receiver provide one CA slot for user to use.
Receiver has build in smart card module with
CONAX system. By using cards in this system
provided by operators, it is possible to watch
many scrambled channels coded in this system.
This menu shows detailed information about card
inserted into card reader module. It allows
inserted according to help messages visible on the
bottom of the screen.
the card correctly at any time, a message-box will
show on the screen with message about detecting
the card, in "card info" menu all available
information will be displayed.
14.2. Common Interface (Optional)
We provide one CI slots for user to use. Using
different CAM & cards provided by different CAS
operator, you can view many type of scrambled
channels.
In this menu you can see the detail information of
the CAM & cards inserted in the slots. You can
check all this information according to the help
message at the bottom of each menu.
Note:
All information showed in this menu and submenu
is abstract from CAM & card. In case something is
wrong, it may be the problem of CAM or card.
When you insert the CAM correctly at any time, a
message will show in the screen to tell you that
which CAM has been detected by the receiver and
is available now.
Note:
All information showed in this menu and submenu
are coming from inserted card. In case if anything
is wrong, it could be card problem. After inserting
15. Menu “USB”
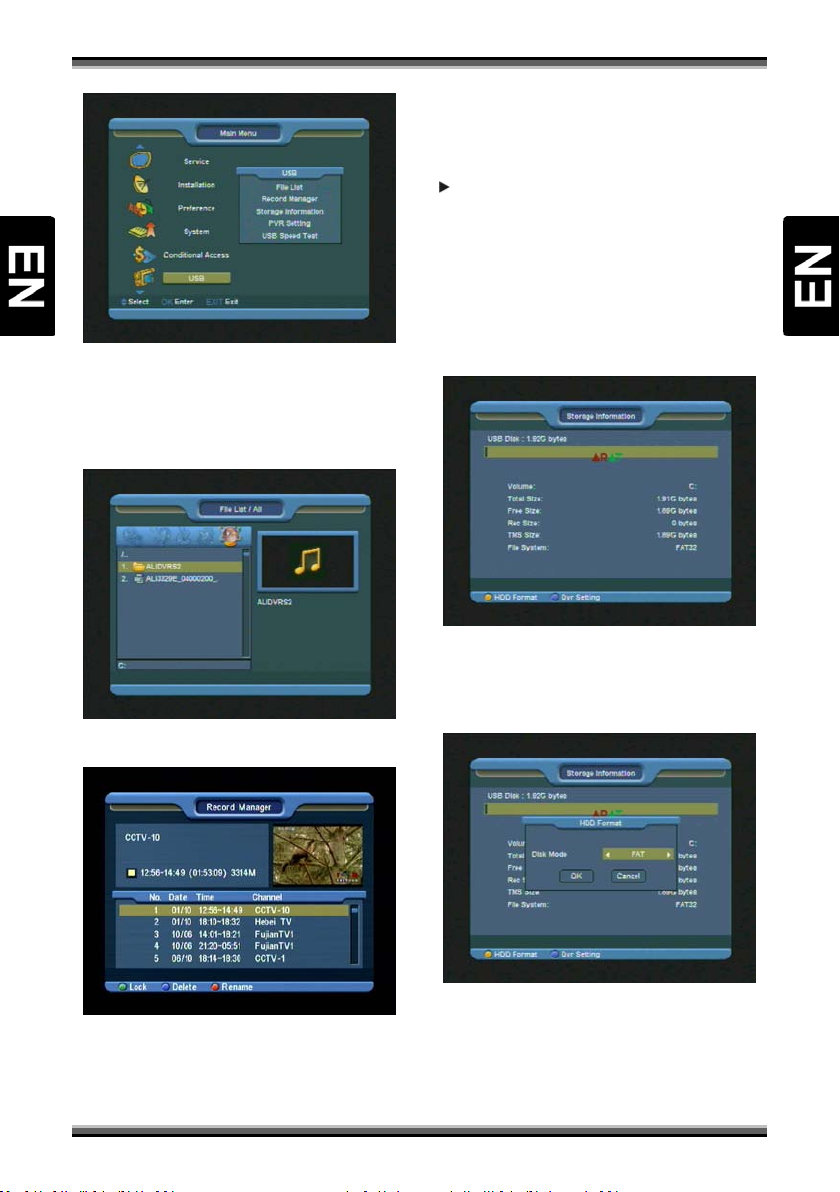
If you enter to the "USB" Menu, you will see the
picture like the below:
Note:
If no USB Hard Disk insert to the receiver this
menu is not available.
27
Page 30
UUsseerr mmaannuuaall
15.1. File List
In this menu you can check the files and folders of
the USB storage, and you can view files from 5
categories: Record, Image, Software, All.
2.To Delete the file, please press [BLUE] button.
3.To Rename the file, please press [RED] button.
4.To play the file with small window, please press
] button.
[
5.To play the file with full screen, please press [OK]
button.
15.3. Storage Information
Press [OK] button to enter the HDD Information
menu like the below picture, in this menu you can
see the details information about the HDD.
15.2. Record Manager
In this menu you can see the record files, and you
can edit it:
1.To Lock the file, please press [GREEN] button.
1.If you want to format the HDD, press [YELLOW]
button. Then select the File System between the
"FAT" and the "NTFS". Press [OK] button to
confirm.
Note: If you format the HDD, all the files include
JPEG and the record files will be deleted from the
HDD.
2.If you want to change HDD function between
Record, Timeshift and REC & TMS (both previous),
28
Page 31
UUsseerr mmaannuuaall
press [BLUE] button.
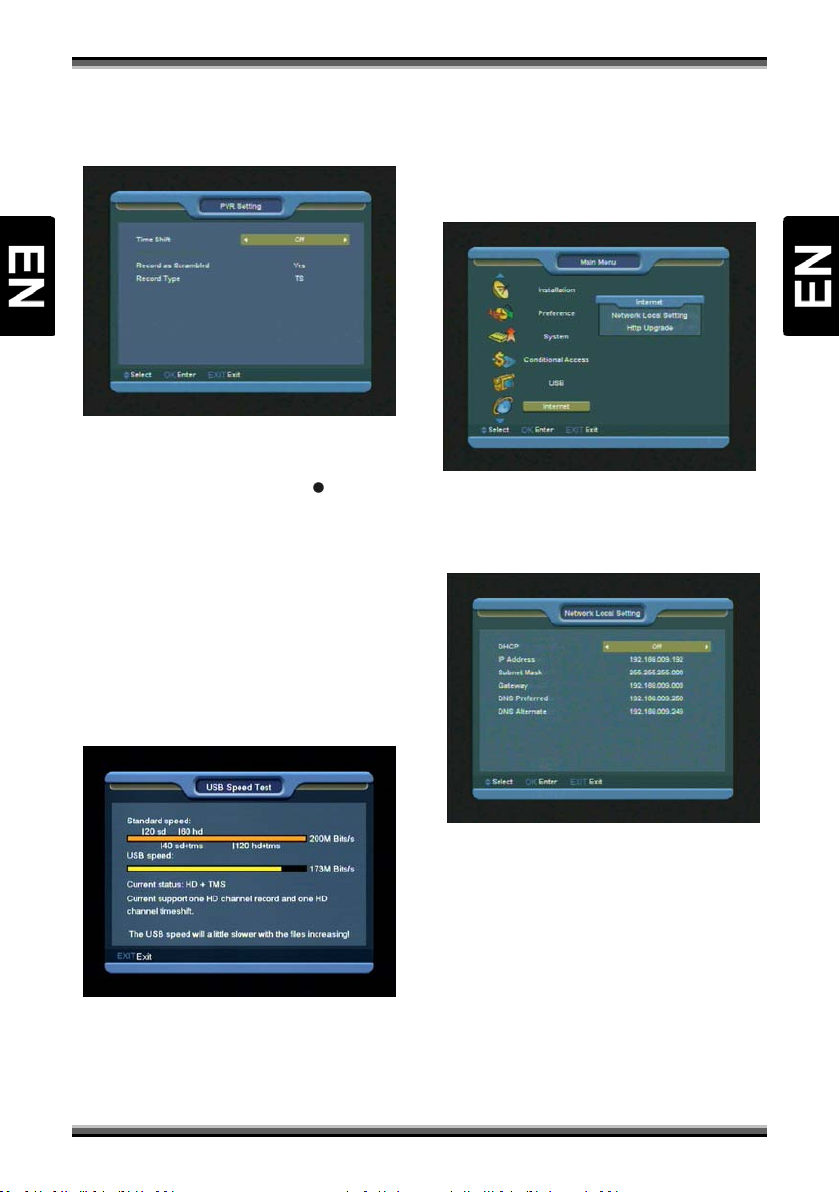
15.4. PVR Setting
1.Time Shift: Enable the Time Shift function.
2.Timeshift to Record: When this function is
turned on, when you press the [
record the program, it will merge before
Timeshifted file with actually recorded file.
3.Record as Scrambled: When this function is
turned on, when you play the recorded before
scrambled file, you must insert the CI module
and/or the smart card.
4.Record Type: This function enables to choose file
format of recorded file.
] button to
16. Menu “Internet”
(optional)
If you enter to the " Internet " Menu, you will see
the picture like the below:
You can get a new software from the network via
LAN port.
16.1. Network Local Setting
15.5. USB Speed Test
In "USB Speed Test" menu you can see the
Standard speed and your USB hard disk speed,
according this information you can know what
operation your disk can support.
1.In this menu you may assign a dynamic IP
address to the digital receiver. To do so, select the
DHCP On.
2.If you have a static IP address, unselect the
DHCP Enable, then the IP Address, Subnet Mask,
Gateway and DNS options become enabled. You
have to set these options according to your IP
address.
16.2. Http Upgrade
29
Page 32
UUsseerr mmaannuuaall
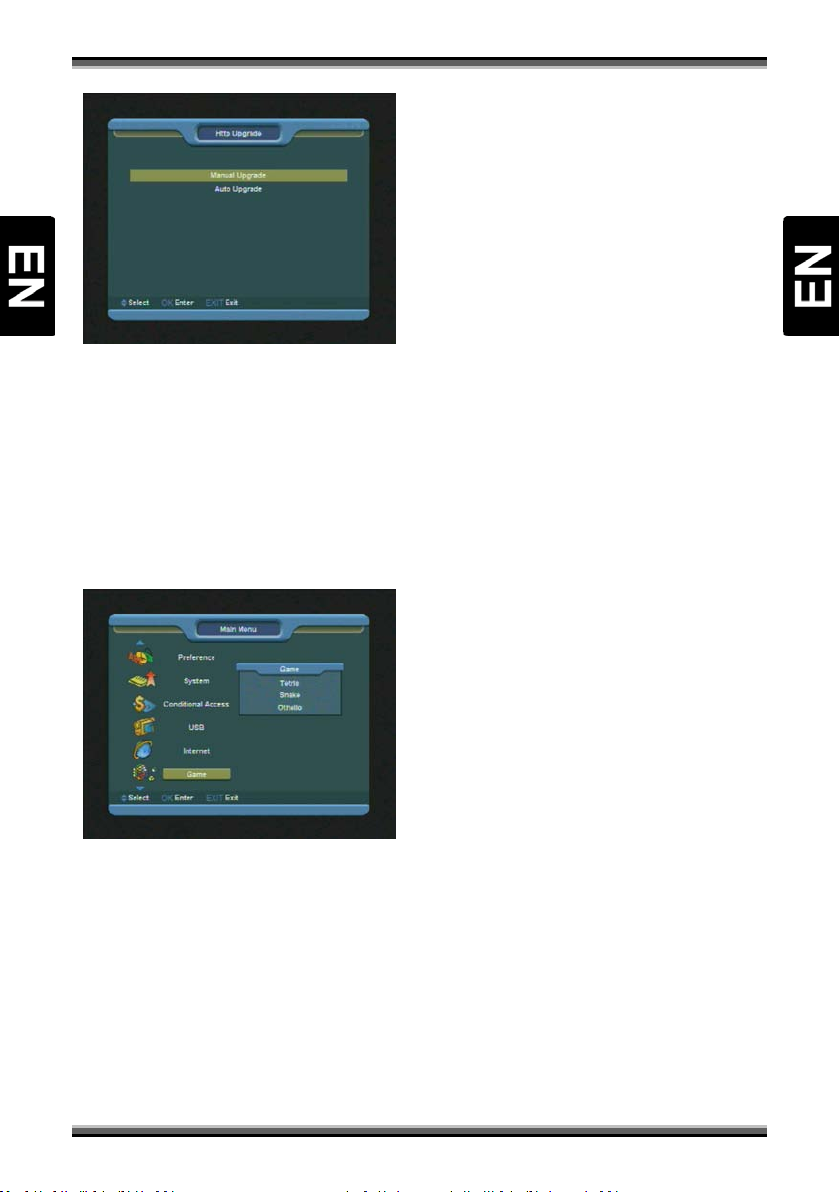
1.When connected to the Internet, receiver can
manually or automatically make software update
from file from server.
Note:
This function depends on connection with
external server. In case of no software on server,
this function will not work.
17. Menu “Game”
3.Moving highlight to [Cancel]keys and press
[OK]key to draw back from the game.
4.Start on the game:
• [←/→] Move shape left or right
• [↑] Rotate clockwise
• [↓] Faster drop
• [OK] Pause/Play the game
• [EXIT] Quit game and draw back to “Game”
menu.
17.2. Snake
1.Moving highlight to “Setup” and press [←/→]
key to select the game level (speed).
2.Moving highlight to “Start” and press [OK] key to
start the game.
3.Moving highlight to[Cancel]keys a nd press
[OK]key to draw back from the game.
Start on the game:
• [←/→/↑/↓] use these arrow keys to guide the
snake.
• [OK] Pause/Play game
• [EXIT] Quit game and draw back to “Game”
menu.
When you enter “Game” menu, you will see three
Games include Tetris, Snake and Othello.
Basic operation statement:
17.1. Tetris
1.Moving highlight to “Setup” and press [←/→]
key to select the game level (speed).
2.Moving highlight to “Start” and press [OK] key to
start the game.
17.3. Othello
1.Moving highlight to “Setup” and press [←/→]
keys to select the game level (degree of difficulty).
2.Moving highlight to “Start” and press [OK] key to
start the game.
3.Moving highlight to [Cancel] keys and press [OK]
key to draw back from the game.
Start on the game:
• [←/→/↑/↓] use these arrow keys to guide
chessman.
• [OK] set chessman.
[EXIT] Quit game and draw back to “Game” menu
30
Page 33
UUsseerr mmaannuuaall
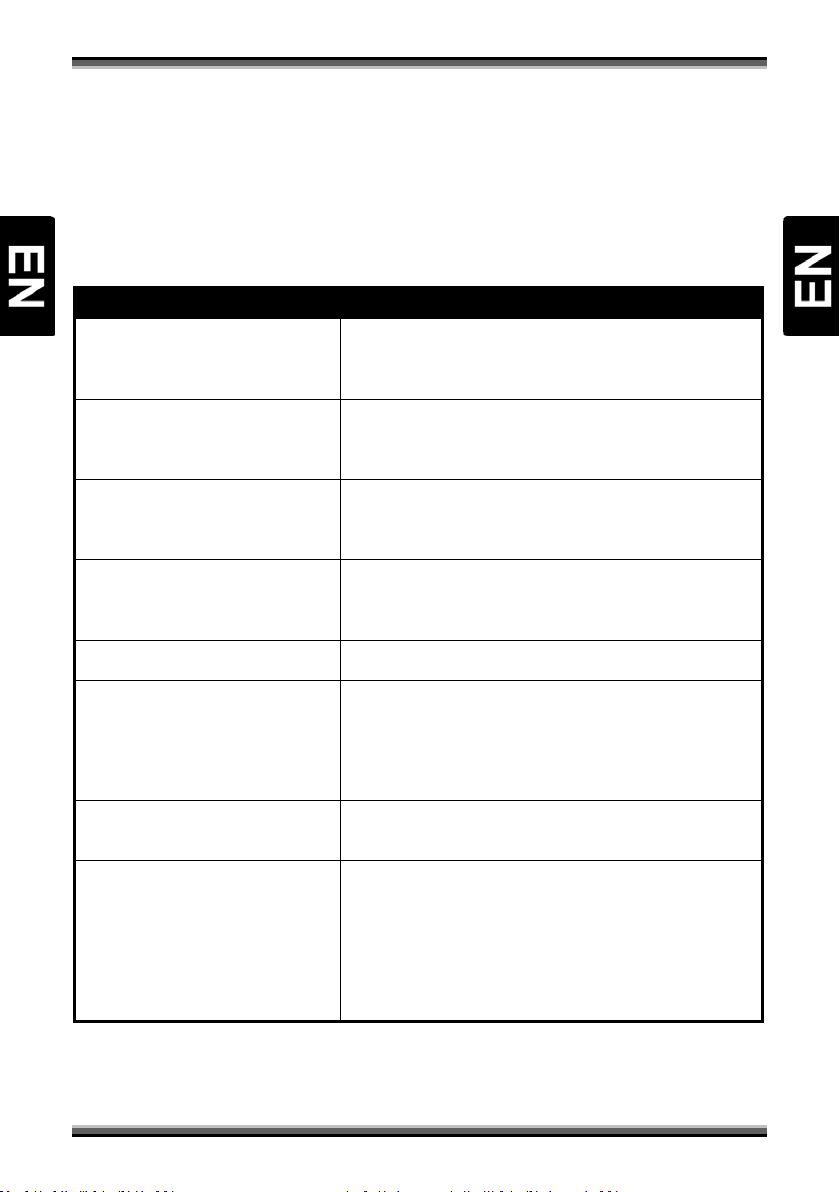
18. Trouble shooting
If you suspect there is a fault with your receiver, please check the following trouble shooting guide before
calling authorized service agent.
Warning! Under no circumstances attempt to repair the receiver yourself. Tampering with the receiver
may result in fatal electric shock and will invalidate your warranty.
Symptom Possible cause
Settings you made in the menu have not
change
No signal The level of signal is weak
The receiver lost power before being able to enter into standby mode
Some of the Settings saved by user can be deleted partly or fully
The cable is incorrectly Connected (short circuit or open circuit)
Receiver is on but no picture or sound
except the following messages (NO TV
program)
Receiver not responding to remote control
unit
Poor picture Quality The level of Signal strength is low
No sound RCA cable is connected incorrectly
No display on the LED Display
Panel(optional)
No picture on the scree n Receiver is in Standby mode
Channel is not available
Channel is scramble
RCU batteries are dead or inserte d incorrectly
The RCU is pointing toward wrong direction
The Volume level is low
Muting function is active
The power cord is not pl ugged in correctly.
RCA Jack is not connected firmly to the video output port of television
Incorrect channel or vi deo output is selected on television
Brightness level of your TV set is incorrectly defined
31
Page 34

UUsseerr mmaannuuaall
19. Specifications
General
System standard MPEG-Fully DVB-S / DVB-S2 HD compliant
Signal Level -65dBm to -25dBm
LNB power supply Vertical polarization voltage: +13V/+14V
Horizontal polarization voltage: +18V/+19V
Max. current - 500mA, Overload protection
22KHz Tone Frequency: 22±1KHz
DiSEqC Amplitude: 0.6±0.2V
Version 1.0, 1.1, 1.2, USALS
Demodulation QPSK, 8PSK
Symbol Rate 2-45 Mbps, Convolution Code Rate
1/2, 2/3, 3/4, 5/6, 7/8 i Auto
A/V Mode
Video format MPEG-II Main profile/Main level
Audio format MPEG-II layer I&II, AC3
Aspect Ratio 16:9, 4:3 LB, 4:3 PS
Audio sampling rate 32,44.1, 48kHz
Audio Type Mono Dual Mono, Stereo, Joint stereo
Graphic display 720x576(PAL), 720x480(NTSC), 1280*720, 1920*1080(HDTV)
Microprocessor & Memories
Main processor 396 MHz
Flash memory 32 Mbit
RAM memory 1024Mbit
Power & Environment Condition
Supply Voltage Free Voltage (100~250V AC, 50/60Hz)
Supply Power Max.12W
Operating temp 5℃ ~ 45℃
Storage temperature -10℃ ~ +70℃
Storage Humidity 5% ~ 95% RH (non condensing)
Physical Specification
Weight <1.5Kg
Dimensions 220(W) x 160(D) x 40(H)mm
LED display 4Digits
Connection
LNB IN IEC 169-24 Female
LOOP OUT IEC 169-24 Female
RS232 9 pin D Rs232 DCE serial port
Scart TV (CVBS/RGB)
Video Composite Video CVBS
Audio Audio left
Audio right
S/PDIF coaxial Digital Audio Output
USB 1 slot USB 2.0
HDMI VER 1.2 Type A
Ethernet (Optional) RJ45
Weight and dimensions are not absolutely exact values.
Specifications are subject to change (by manufacturer) without notice.
32
Page 35
UUsseerr mmaannuuaall
20. Declaration of conformity
The manufacturer herewith declares the conformity of that product with the following directives
and standards:
Low Voltage Directive 2006/95/EC
EN 60065:2002+A1:2006
EMC Directive 2004/108/EC
EN 55 013:2001+A1:2003+A2:2006
EN 55 020:2007
EN 61 000-3-2:2006
EN 61 000-3-3:2008
Model: Digital Satellite Receiver DVB-S
33
 Loading...