

Page 1
Quick Start
Digital Satellite Receiver
• Support of SD (MPEG2), DVB-S system
• Slot for Smart Card in Conax system
• HDMI video output
• Low power consumption in Stand-by
mode, below 1W
• Automatic Stand-By
• Compatible with Diseqc 1.0 and 1.1
• Electronic Program Guide - EPG
• Multilingual Menu, including English
• Video Games
ModelID: X80 HD MI 11/2010
Page 2
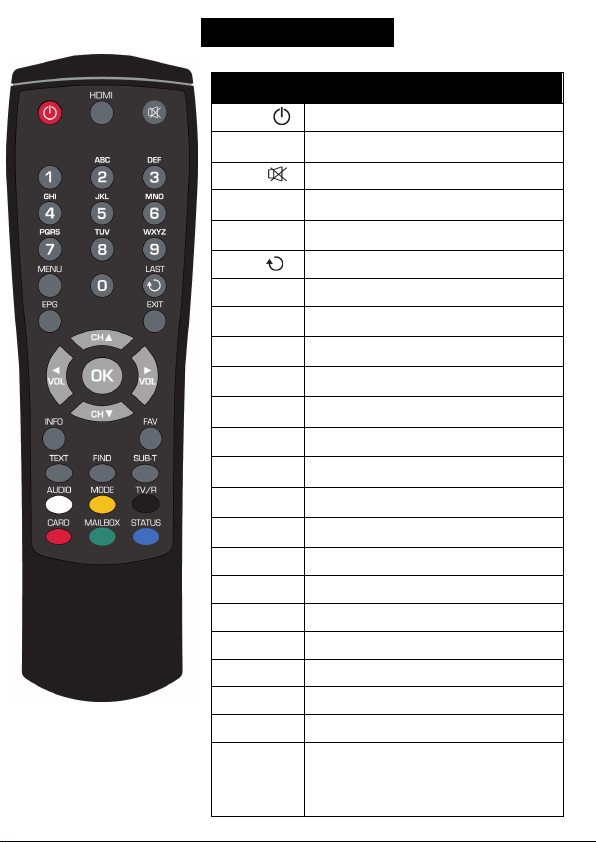
Remote controller
Set receiver to t he favourite list mode, display
channel.
numeric buttons.
Button Function
POWER -
HDMI
MUTE -
Numeric
buttons
MENU
LAST -
EPG Display the E lectronic Program Guide on s creen.
EXIT
◄VOL/►VOL
CH▲/CH▼
OK
INFO Display informa tion bar of current serv ice.
FAV
TEXT
FIND
SUB-T Subtitle setup.
AUDIO Audio channels setup.
MODE Video mode setup.
TV/R Switch receiver between TV and Radio mode.
CARD Smart Card activation manager. (Optional)
MAILBOX Smart Card mailbox manager. (Optional)
STATUS Show receiver’s status window.
WHITE,
YELLOW,
BLACK,
RED,GREEN,
BLUE
Switch your receiver on fr om standby mode.
Switch receiver video output between
HDMI/SCART
Enable or disable the au dio.
Select channel or enter pr ogramming
parameters.
Display the Ma in Menu on the screen, or return
to the previous menu or status.
Switch to the previous channel.
Cancel the user select ion and return to the
viewing mode from a menu.
Adjust volume le vel or move cursor left o r right
in the menu.
Change channel or move curs or up or down in
the menu.
Display channe l list on screen. Select an item in
menu.
actual favourite channel list.
Show teletext information of the current
Enables to find channel by name entered by
Colour buttons. (according function descriptions
on screen)
Page 3
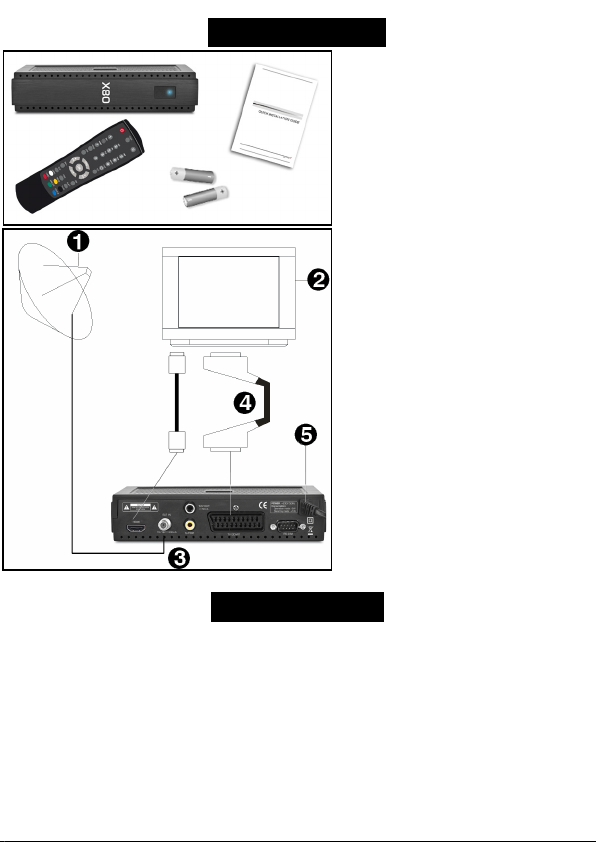
Basic connection
After purchasing receiver, unpack it and check to
make sure that all o f the following items are
included in the packag ing:
• Receiver
• Remote controller
• Quick Start manual
• Batteries - 2x AAA (opti onal)
To install the batt eries in the remote contro l,
remove the flap protecting the battery
compartment If inside the cham ber there are
used batteries, they must be removed. Then put
new batteries inside. When installing the
battery, pay s pecial attention on the polarity the direction of insertion of both batte ries. The
correct polarity of batteries is drawn on a
description inside the batt ery compartment in
the remote contro l. After installing the ba tteries,
place protecting flap on its original pos ition.
Next, connect cable from L NB/ANTENNA (1 on
picture) to re ceiver’s (3) SAT IN connect or. Using
HDMI or SCART cable (4) connect receiver with
TV Set (2). Finally, at the end con nect main cord
(5) to main socket.
Turn on the TV Set. Aft er while on TV Set screen
You should see receiver’s OSD. If TV Set not
display receiver’s OSD, probably signal source is
set wrong in TV. C heck TV Set documentation for
information h ow to change signal source.
Operating notes
Automatic Power Down
In accordance with actual Europea n Union requirements, Your receiver is equipped with fun ction "Automatic Power
Off". It works by swit ching the receiver into standby mode after a period of 3 hours after the last activ e use. In practice
this means that if during this time the receiver will not be given any command by using the remote control or keypad
on the front panel, the rece iver turns off. Turning off the receiver will be preceded (2 minutes previous) by a relevant
message appears on the TV screen. Please also note that this feature is enabled by default in software v ersions
dedicated for European U nion countries, but at Your own request, You can disable it using the app ropriate functions in
the receiver menu.
Page 4

Easy installation
Generally, once the receiver is switched on, it is ready t o play channels from defau lt channel list.
If after turning on You can see only receiver’s menu, and when You try to push MEN U or EXIT b utton, “No channels!”
information appears, it means that channel list has been erased. There are two ways to create new channel list:
• Restore default channel list, or
• Scan Your own channel l ist
Restore default channel list
To restore defau lt channel list, explo re the menu with ▲/▼ buttons , and select Tools menu. Press OK to enter. You
may be asked about pass word (default is 0000 – enter using numeric buttons). Using ▲/▼ buttons select Factory
Setting option and p ress OK. Use ◄/►buttons to move cursor to “Yes“ and again confirm by OK button. After a while,
reboot receiver usin g POWER button.
If after above settings , channels are still not played, on ly “No Signal!” information appears on screen, go to next
chapter, where Y ou can find how to config ure Your satellite inst allation.
Configure Your satellite installation
To configure satellite insta llation, explore the menu with ▲/▼ buttons, and select Installation menu. Press OK to
enter. You may be asked about pa ssword (default is 0000 – enter using nume ric buttons). Using ▲/▼ buttons select
Satellite List and press OK. In this menu, using ▲/▼ and OK butt ons You can define which satellites are available in
Your installat ion. Next, press MENU to back to Installatio n.
If Your insta llation receive signal from more than one sat ellite, use ▲/▼ buttons to select Anten na Setup and press
OK. In satellite funct ion use ◄/► buttons to c hoose satellite and in DiSEqC1.0 or D iSEqC1.1 func tion You can assign
selected satellit e to corresponding DiSEqC s witch input. Use MENU to back to Installation. Now Your satellite
installation should be f inally configured and ready to receive conne cted signal.
Scan Your own channel list
After satellite installation configure, You can create Your own c hannel list.
If You want to e rase all currently exis ting channels, explore the m enu with ▲/▼ buttons, and select Edit Channel
menu. Press OK to enter. You may be asked about password (default is 00 00 – enter using nume ric buttons). Using
▲/▼ b uttons select Delete All and press OK. Us e ◄/►buttons to mov e cursor to “Yes“ and again confirm by OK
button. After a while, cha nnel list will be empty.
Now, explore t he menu with ▲/▼ buttons, and select Installa tion menu. Press OK to enter. You may be asked about
password (default is 0000 – enter using numeric buttons). Using ▲/▼ buttons select Multi Satelli te Search and press
OK. Next, using ▲/▼ buttons select Search and press OK. Receiver st art scanning all selected pr eviously in Satellite
List function satellites. Please, be noted that this procedure may take s few minutes.
If after above procedures , Your receiver still cannot play channels, it is highly recommended to c ontact with Your local
professional installator or seller.
Page 5

Menu structure and functions description
Menu/Submenu Function
Edit Channel This menu enables to manage channels on channel lists.
TV Channel List Manage list of TV channels.
Radio Channel List Manage list of Ra dio channels.
Delete All Delete all chan nels from all channel list s.
Installation This menu enables to scan channels and setup antenna.
Satellite List Enables to choose satellites from list for scanning issues.
Antenna Setup Enables to configure ant enna / LNB parameters.
Single Satellit e Search Scan channels of one satellite (selected from Satellite List).
Multi Satellite Search Scan channels of all satellites selected in Satellite List.
TP List Manage list of t ransponders for every satellite, enables to s can channels
Operator submenus Depending on receiver’s version, this menu may contain special operator
System Setup This menu enables to set up receiver’s user interface functions.
Language Change language of OSD an d audio tracks.
TV System Change screen settings - PAL/NTSC , 16:9/4:3, RGB/CVBS.
Local Time Settings Change time settings – time zone, manually set time.
Timer Setting Enables to plan events in future - wake up receiver on s pecified channel
Conax Conditional Access Display informa tion about Smart Card ins erted to card reader.
Parental Lock Lock access to menu and spe cified channels.
OSD Setting Change transparency of OS D, choose subtitle mode.
Favourite Enables to rena me favourite channels groups.
Other Setup all other set tings – power for LNB, channe l play type and beeper
Tools This menu enables to manage rec eiver’s software.
Information D isplay information about h ardware and software vers ion of receiver.
Factory Settings Recall standa rd settings of all receiver ’s functions, delete old c hannels.
S/W Upgrade by OTA Enables to upgra de receiver’s software u sing software from satellite
Mailbox Display list o f messages from operator to user.
Game This menu contain games.
from desired transpon ders.
functions. (optional)
or remind by me ssage display.
(Beeper enables sound i n Antenna Setup menu very helpful f or
installation is sues).
stream data (optional).
Page 6
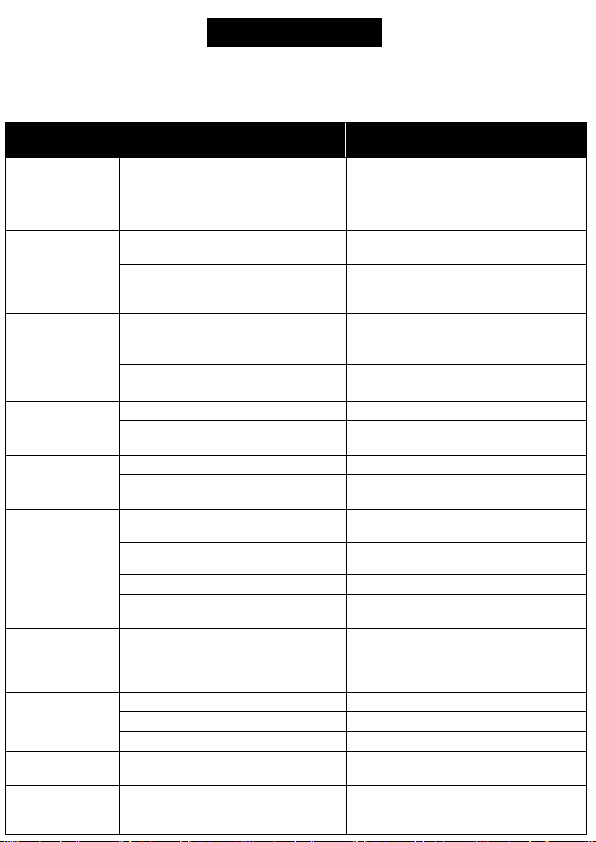
Troubleshooting
Look through the trouble sho oting information. Some simple checks o r minor adjustment of the unit on your part may
help resolve the problems. If the problems prove to be beyond your capabi lity, you had better hand it over to a
professional qualified t echnician.
Troubles Possible Causes Suggested Solutions
Plug the power cord into t he outlet tightly
and turn on the power; if no power still, turn
off the power again, and t urn it on in 5-10
minutes.
Insert smart card, according to descript ion
on right side of receiver.
Use CARD button to enter to Smart Card
activation manager and g o follow
instructions dis played on screen.
No power
Receiver cannot
play scrambled
channels
The power cord has not bee n well
connected
Smart card is not inserted, or is not
inserted correct ly into card reader slot
Smart card is not activated
Cannot scan
programs
No picture
No color
The remote
control fails to
work
Audio sound and
subtitle language
are not the
chosen items
No sound at all
No sound by
chance
Serious distortion
or cannot receive
signal normally
The antenna is not adjus ted well Adjust the antenna
Parameter input incorrectly
Output cord connect inc orrectly Connect the output cord c orrectly
The video output mode of t he unit is
different from the mode o f monitor
Output cord connect inc orrectly Connect the output cord correctly
The video output system of the unit is
different from the mode o f monitor
Batteries inco rrectly installed Install the bat tery correctly
Batteries exhausted Replace the battery
Beyond the effective ope ration range Operate within a norma l range
The remote sensor is point ed to by bright
light
Has not chosen the rig ht sound channel Press the Audio button t o shift the channel
The unit is in a mute status Cancel the mute
Volume set at a t oo low level Augment the volume
Cable connecte d incorrectly Connect the cable co rrectly
There might be a short circuit
Too much interfe rential signal Adjust the antenna.
Input Sate llite, Frequency, SR, Pola rization
parameter correc tly
Reset the working mode
Reset the working system
Place the unit elsewhere for a change
Correct the output-cable c onnection, and
turn on it.
Page 7
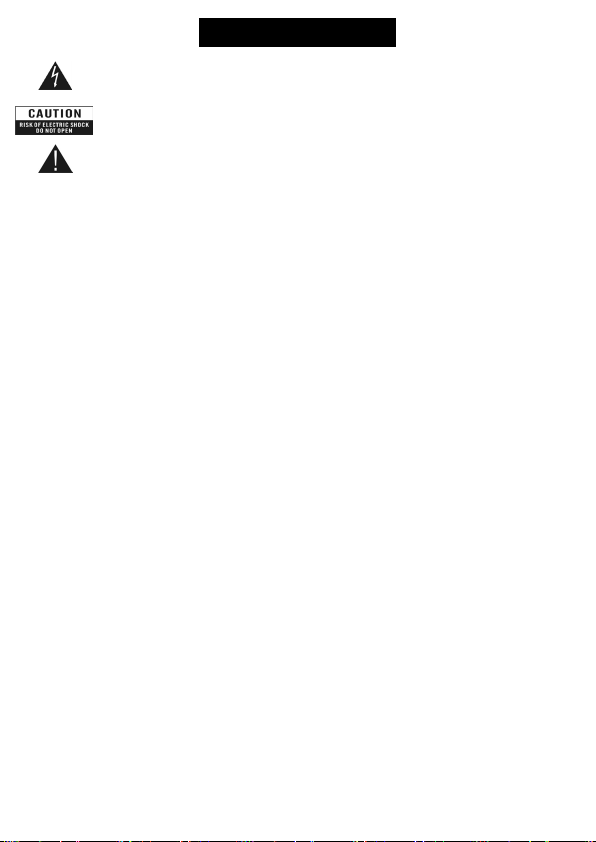
CAUTION:
Safety precautions
Warning: The lightning flash with arrowhe ad symbol, within an equilateral triangle, is intended to
alert the user to "danger ous voltage" and to preve nt from a risk of electric s hock.
Warning: To reduce the risk of electric shock, don't open the cab inet. Refer servicing to qualified
personnel only.
Warning: The exclamat ion point within an equilat eral triangle is intended to a lert the user to
important operating and maintenance (servicing).
Warning: Do not use this STB where contact w ith or immersion in water is a possibility. Do not use near flow er vase,
washbowls, kitc hen sinks, laundry tubs, s wimming pools, etc.
Warning: Do not put the candle or lamp stand on the cabinet; otherw ise, there is the danger of fire.
Warning: The unit should be connected to a power supply only of the type des cribed in the operating instructions or as
marked on the unit. If you are not sure of the type of p ower supply (for example, 12 0 or 230 V) to your home, consult
your local deale r or local power company .
Warning: This product ins tall diodes. Do not open the cabinet or touch any parts in the inner mechanism. Consult your
local dealer f or technical service if the open ing is required.
Note: To ensure proper us e of this product, please read this Us er manual carefully and retain for further reference.
Note: This product inst all diodes. Do not open the cabinet to av oid the unit direct ex posure to radiation.
Unit Cleaning: After the unit power is turned off, you can clean the cabinet, panel and remote control with a soft cloth
lightly moistened with a m ild detergent solution.
Attachments: Nev er add any attachments and/or equipment without the manufacture r consent; as such additions may
result in the r isk of fire, electric shock , or other personal inju ry.
Locating: Slots a nd openings in the cabinet are provided fo r ventilation to protect it from ove rheating. Do not block
these openings or allow t hem to be blocked by placing the STB on a bed, sofa , or other similar surf ace, nor should it be
placed over a radiator or heat register.
Power-Cord Protection: Place the power-supp ly cord out of the way , where it will not be wa lked on. Please take s pecial
attentions to cords at plugs, conve nience receptacle s, and the point where they exit fr om the unit.
Object and Liquid Entr y: Never put objects of any kind into th is STB through openings, as they may touch dangerous
voltage points or short-out parts that could result in a fire or electric s hock. Never spill any liquid on the STB.
Note: Moisture may be formed on t he lens when the unit is sudden ly moved from a cold environment or an aircondition room to a warm place or immediately after a heater has been turned on or in a steamy or very humid room.
If the moisture forms inside the unit, it m ay not operate properly. To correct this problem, turn on the power and wait
about two hours for the m oisture to evaporate.
Parts Replacement: When the un it parts need to be replaced, us er should make sure the service technician use the
replacement parts specified by the manufacturer or having the same characteristics as the original part. Unauthorized
replacement may put the un it In the risk of fire, electric shock or other hazards.
Safety Check: After a ll the maintenances and repa irs are done, user is requi red to request the service t echnician to
conduct the overall safet y check to ensure the machine is In the p roper condition.
Page 8
Environment protection
Attention!
Your product Is marked with this symbol. It means tha t used electrical and elec tronic products
should not be mixed with general household waste. There is a separate collection system for these
products.
Information on Disposal for Users (private households) in the European Union. Used electrica l and
electronic equipment mus t be treated separately and In accor dance with legislation that requires
proper treatmen t, recovery and recycling o f used electrical and elec tronic equipment.
Following the imp lementation by member st ates, private households within the EU stat es may return their used
electrical and ele ctronic equipment to desig nated collection facilities free of charge*. In some countr ies* your local
retailer may also take back your old product free of charge if you purc hase a similar new one. *) Please contact your
local authority for further details.
If your used elect rical or electronic equipm ent has batteries or accumula tors, please dispose of these separately
beforehand acc ording to local requiremen ts.
By disposing of this pro duct correctly you will help ensure that the waste undergoes the necessary tre atment, recovery
and recycling and thus prevent potential negative effects on the environment and human health w hich could otherwise
arise due to inappropriat e waste handling.
Information on Disposal for Business Users
In the European Union. If the product is use d for business purposes and you want to discard It: Please contact your
dealer who will inform you about the take-back of the pro duct. You might be charged for the costs arising from ta keback and recycling Small products (and small amounts) might be tak en back by your local collection facilit ies,
In other Countries outside the EU. If you wish to discard of this product, please contact your local authorities and a sk
for the correct method of disposal.
Declaration of conformity Technical specification
The manufacturer herewith decla res the conformity of
that product with the following dire ctives and
standards:
Low Voltage Direc tive 2006/95/EC
EN 60065:2002+A1:2 006+A11:2008
EMC Directive 200 4/108/EC
EN 55 013:2001+A1: 2003+A2:2006
EN 55 020:2007
EN 61 000-3-2:2006+A1 :2009+A2:2009
EN 61 000-3-3:2008
Model: Digital S atellite Receiver DVB-S
Input frequency range: 950-2150MHz
RF Input connector: IEC169-24, Female
Input impedance: 75Ω
Waveform: QPSK (SCPC, MCPC)
Video decoding: MPEG2(MP@ ML)
Video resolutio n: PAL 576, NTSC 480
Audio decoding: MPEG-1, 2 Layer 1 & 2
Audio track: Stereo, Left, Right
Video/Audio connect or: HDMI, SCART, Coaxial
Other connectors: RS232, 12V/50mA
Rated voltage: ~ 230V,50Hz
Rated consumption: 6 W
Standby consumption: < 1 W
Operating tempe rature: 5-40℃
Operating humid ity: <95%
Net weight: ~0,3 kg
Receiver measurements: 180 mm × 90 mm × 42 mm
Weight and dimensions are not absolutely exact
values. Specifications are subject to change (by
manufacturer) without notice.
digital audio
 Loading...