

Page 1
INSTRUCTION MANUAL
Pedometer
Model HJ-150CAN
ENGLISH
Page 2

2
TABLE OF CONTENTS
Before Using the Unit
Introduction......................................................................................3
Important Safety Information...........................................................4
Know Your Unit ...............................................................................6
Operating Instructions
Setting the Time ...............................................................................7
Attaching the Pedometer..................................................................9
Battery Saving Mode......................................................................11
Using the Memory Function ..........................................................12
Using the System Reset Function ..................................................13
Battery Installation.........................................................................14
Care and Maintenance
Care and Maintenance....................................................................16
Troubleshooting Tips .....................................................................17
Specifications .................................................................................18
FCC Statement ...............................................................................19
Warranty .........................................................................................20
Notes ..............................................................................................21
B
Page 3

3
INTRODUCTION
Thank you for purchasing the Omron®HJ-150CAN Pedometer.
Fill-in for future reference
DATE PURCHASED: ______________
Staple your purchase receipt here.
SAVE THESE INSTRUCTIONS
This pedometer is a great motivational tool to track the number of steps you
take. The power saving feature on this pedometer continues to record your
activity even when the display has automatically turned off.
Your HJ-150CAN comes with the following components:
Pedometer
Battery (CR2032 installed)
Instruction Manual
Page 4
4
IMPORTANT SAFETY INFORMATION
To assure the correct use of the product basic safety measures should
always be followed including the warnings and cautions listed in this
instruction manual.
WARNING
Indicates a potentially hazardous situation
which, if not avoided, could result in death or
serious injury.
SAFETY SYMBOLS USED IN THIS INSTRUCTION MANUAL
CAUTION
Indicates a potentially hazardous situation
which, if not avoided, may result in minor or
moderate injury to the user or patient or
damage to the equipment or other property.
OPERATING THE DEVICE
Contact your physician or healthcare provider before beginning a
weight reduction or exercise program.
Keep the unit out of the reach of young children. The unit contains
small pieces that may be swallowed. Immediately contact your
physician if any piece is swallowed.
Read all information in the instruction book and any other literature
included in the box before using the unit.
Operate the unit only as intended. Do not use for any other purpose.
Dispose of the device, battery, and components according to
applicable local regulations. Unlawful disposal be cause
environmental pollution.
Do not throw the battery into fire. The battery may explode.
Page 5

5
IMPORTANT SAFETY INFORMATION
CARE AND MAINTENANCE
Do not disassemble or modify the unit. Changes or modifications not
approved by Omron Healthcare will void the user warranty.
Do not subject the unit to strong shocks, such as dropping the unit on
the floor.
Do not submerge the unit or any of the components in water.
Page 6
6
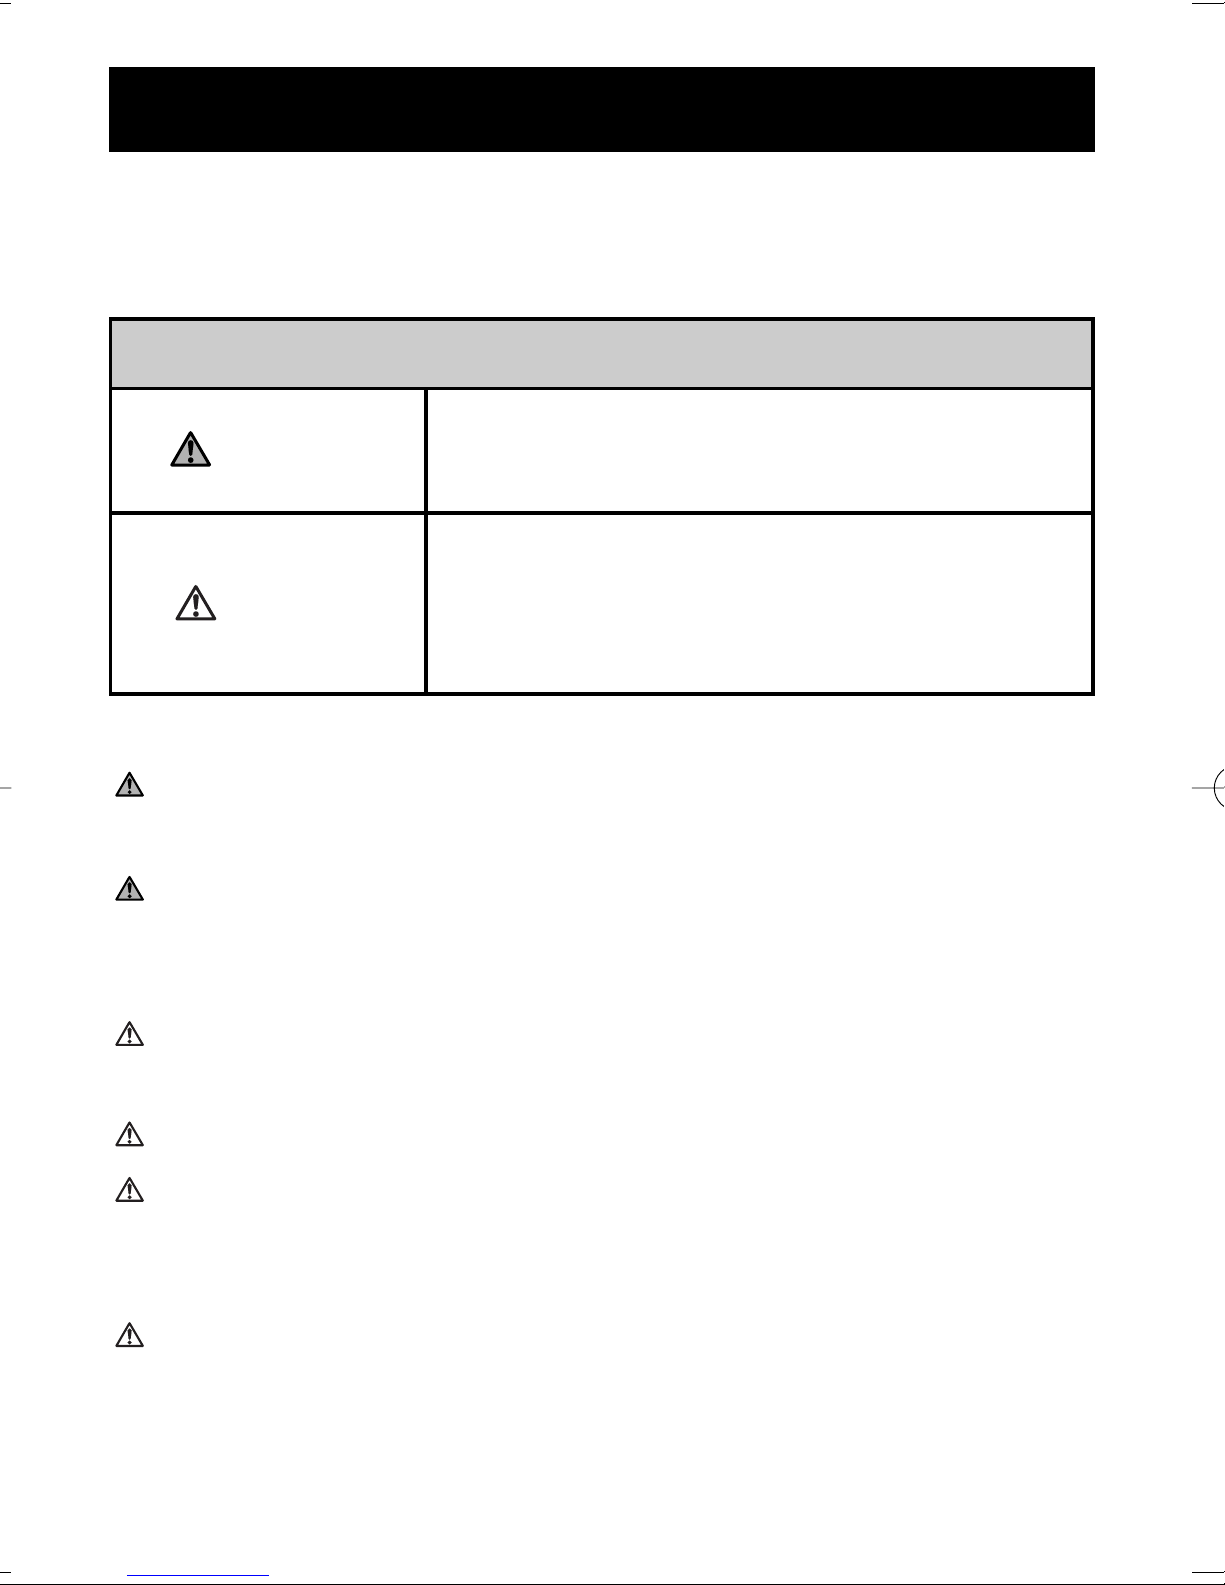
KNOW YOUR UNIT
Display
SYSTEM RESET
Button
Clip/Battery Cover
Battery Cover Screw
SET Button
MEMO Button
6
KNOW YOUR UNIT
BACK OF UNIT
FRONT OF UNIT
Page 7
77
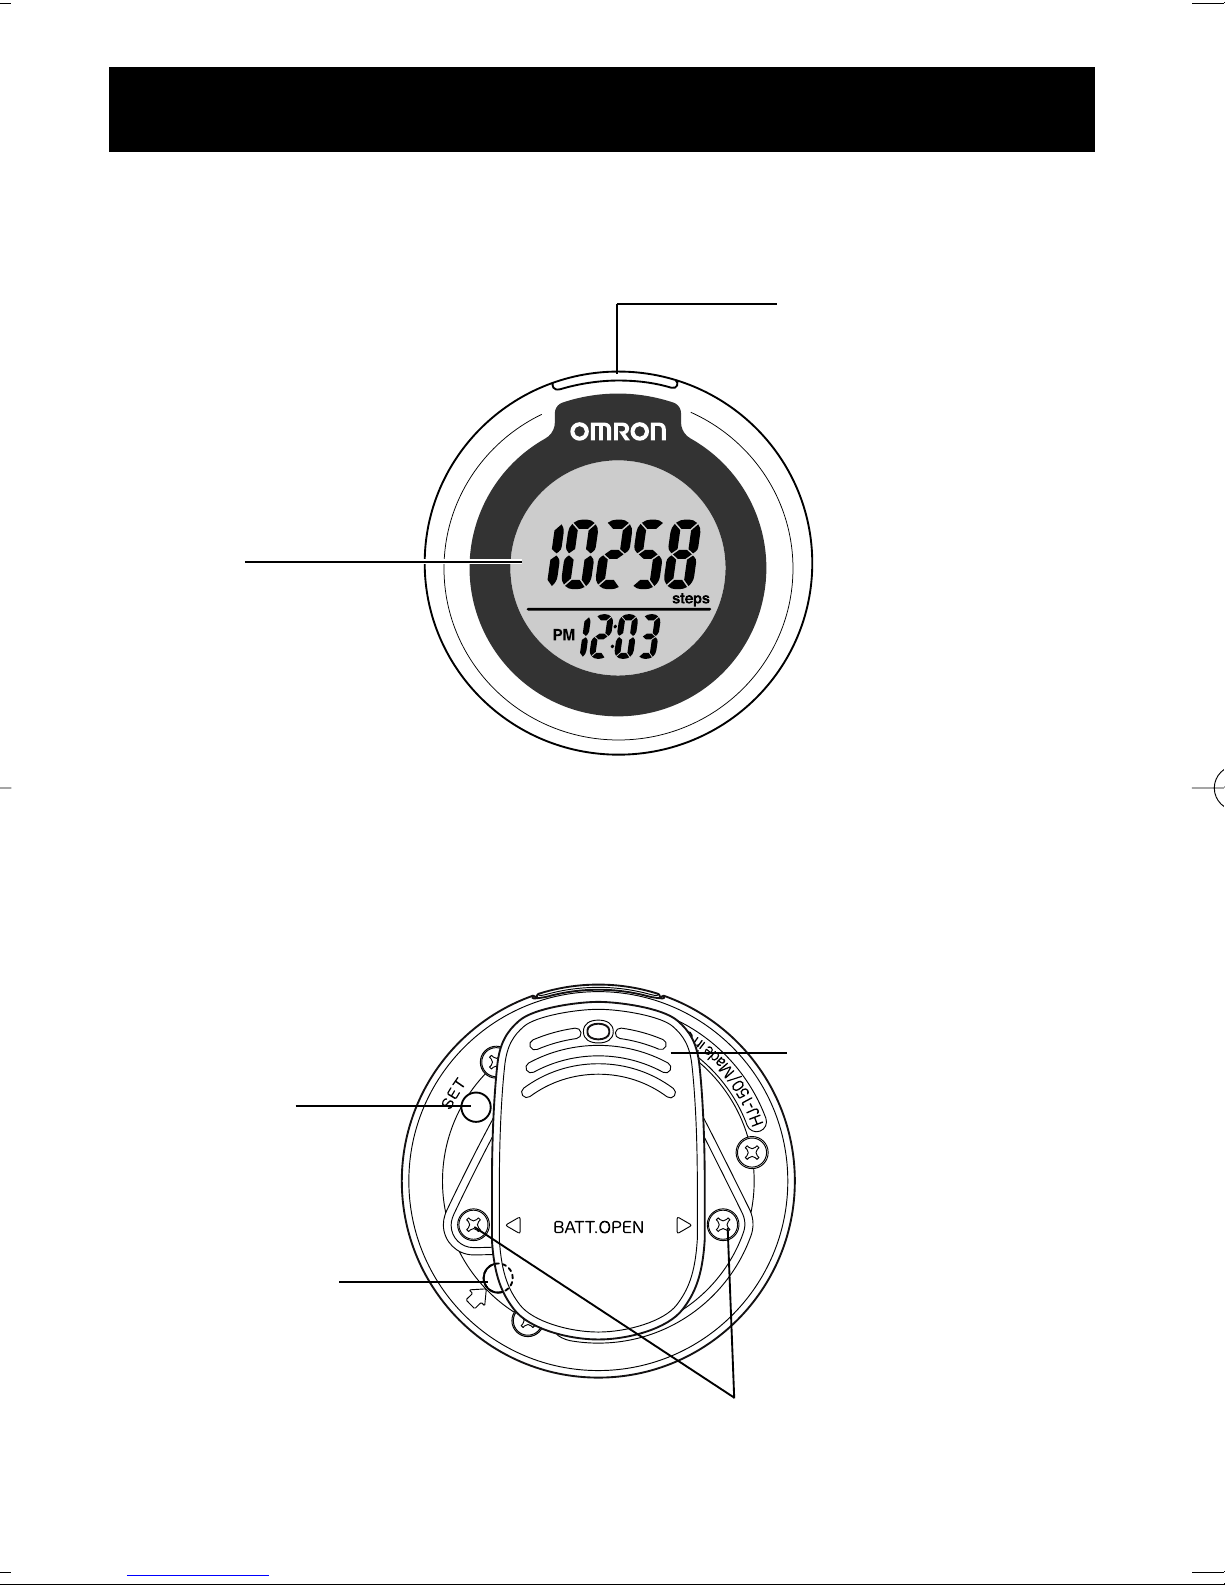
SETTING THE TIME
Operating Instructions
The unit comes with the battery installed. Set the unit by using a
thin stick that is not easily breakable.
Setting range: 12:00 AM-11:59 PM
1. A. Initial set-up or battery replacement
Press the SYSTEM RESET Button
on the back of the unit as
illustrated.
B.To adjust the settings
Press the SET Button.
The hour flashes on the display.
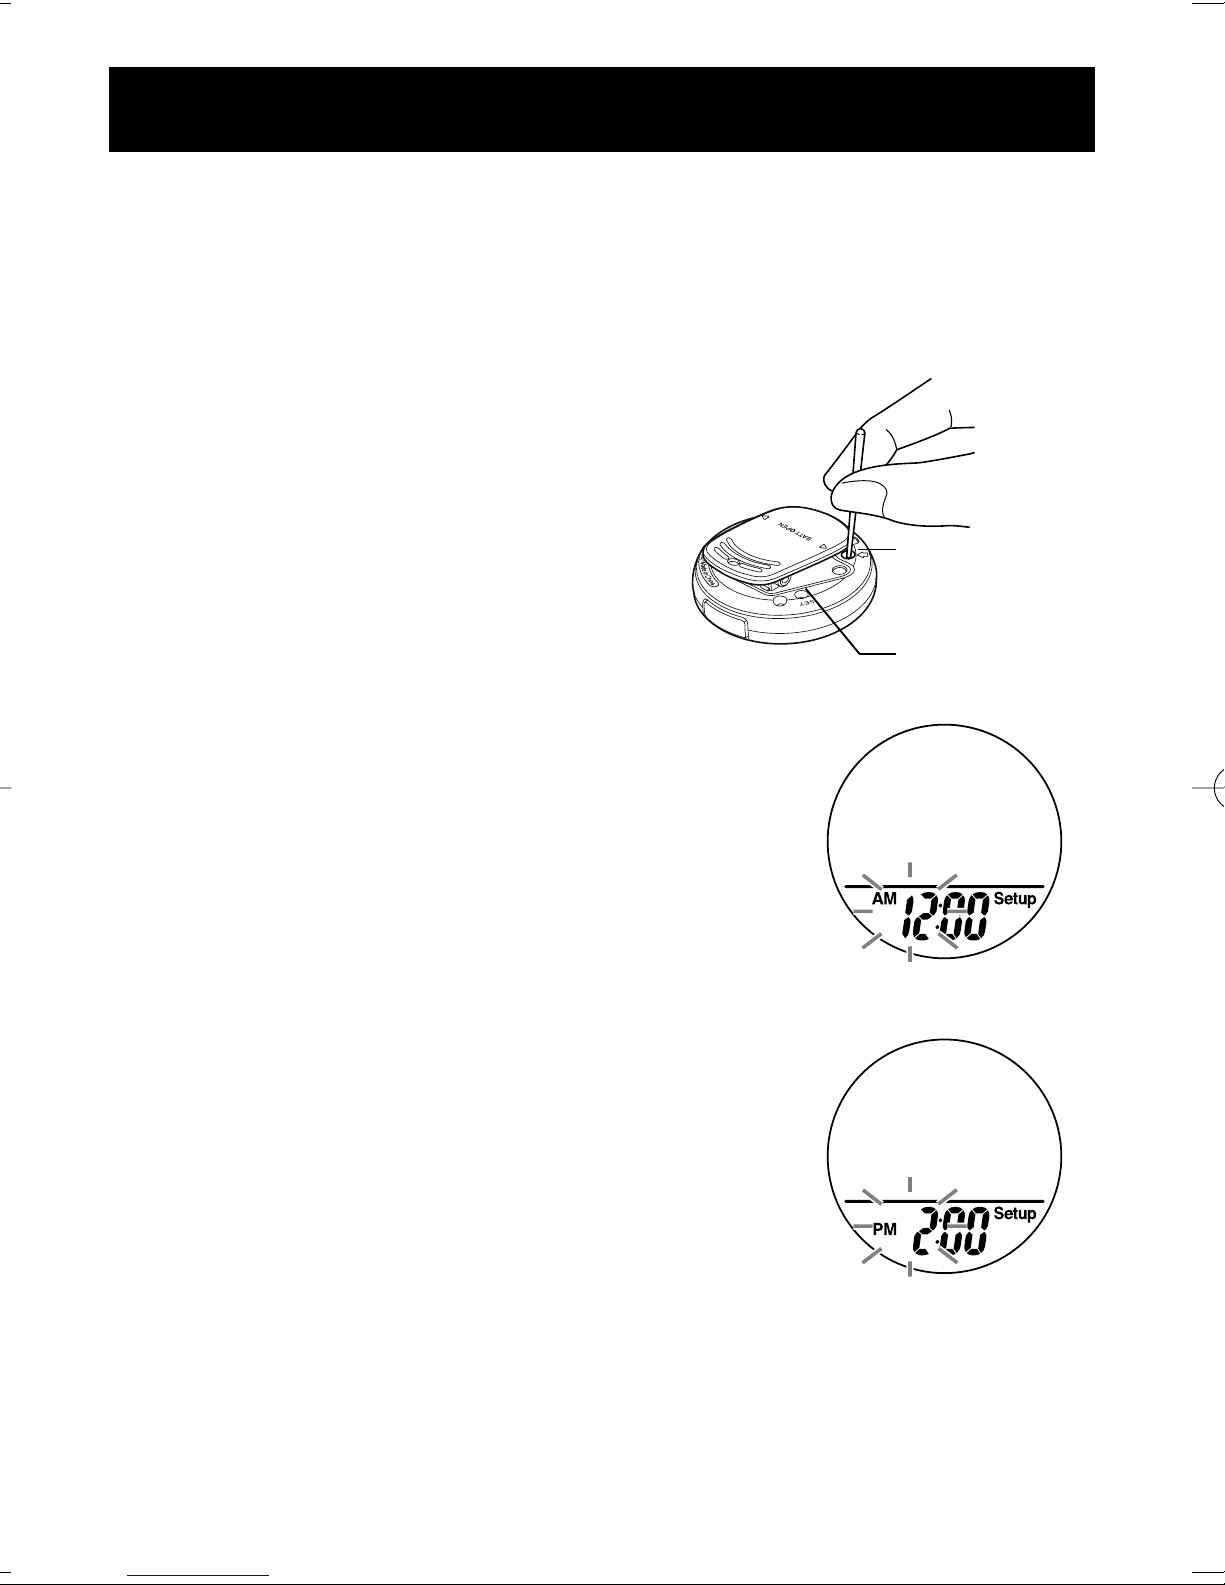
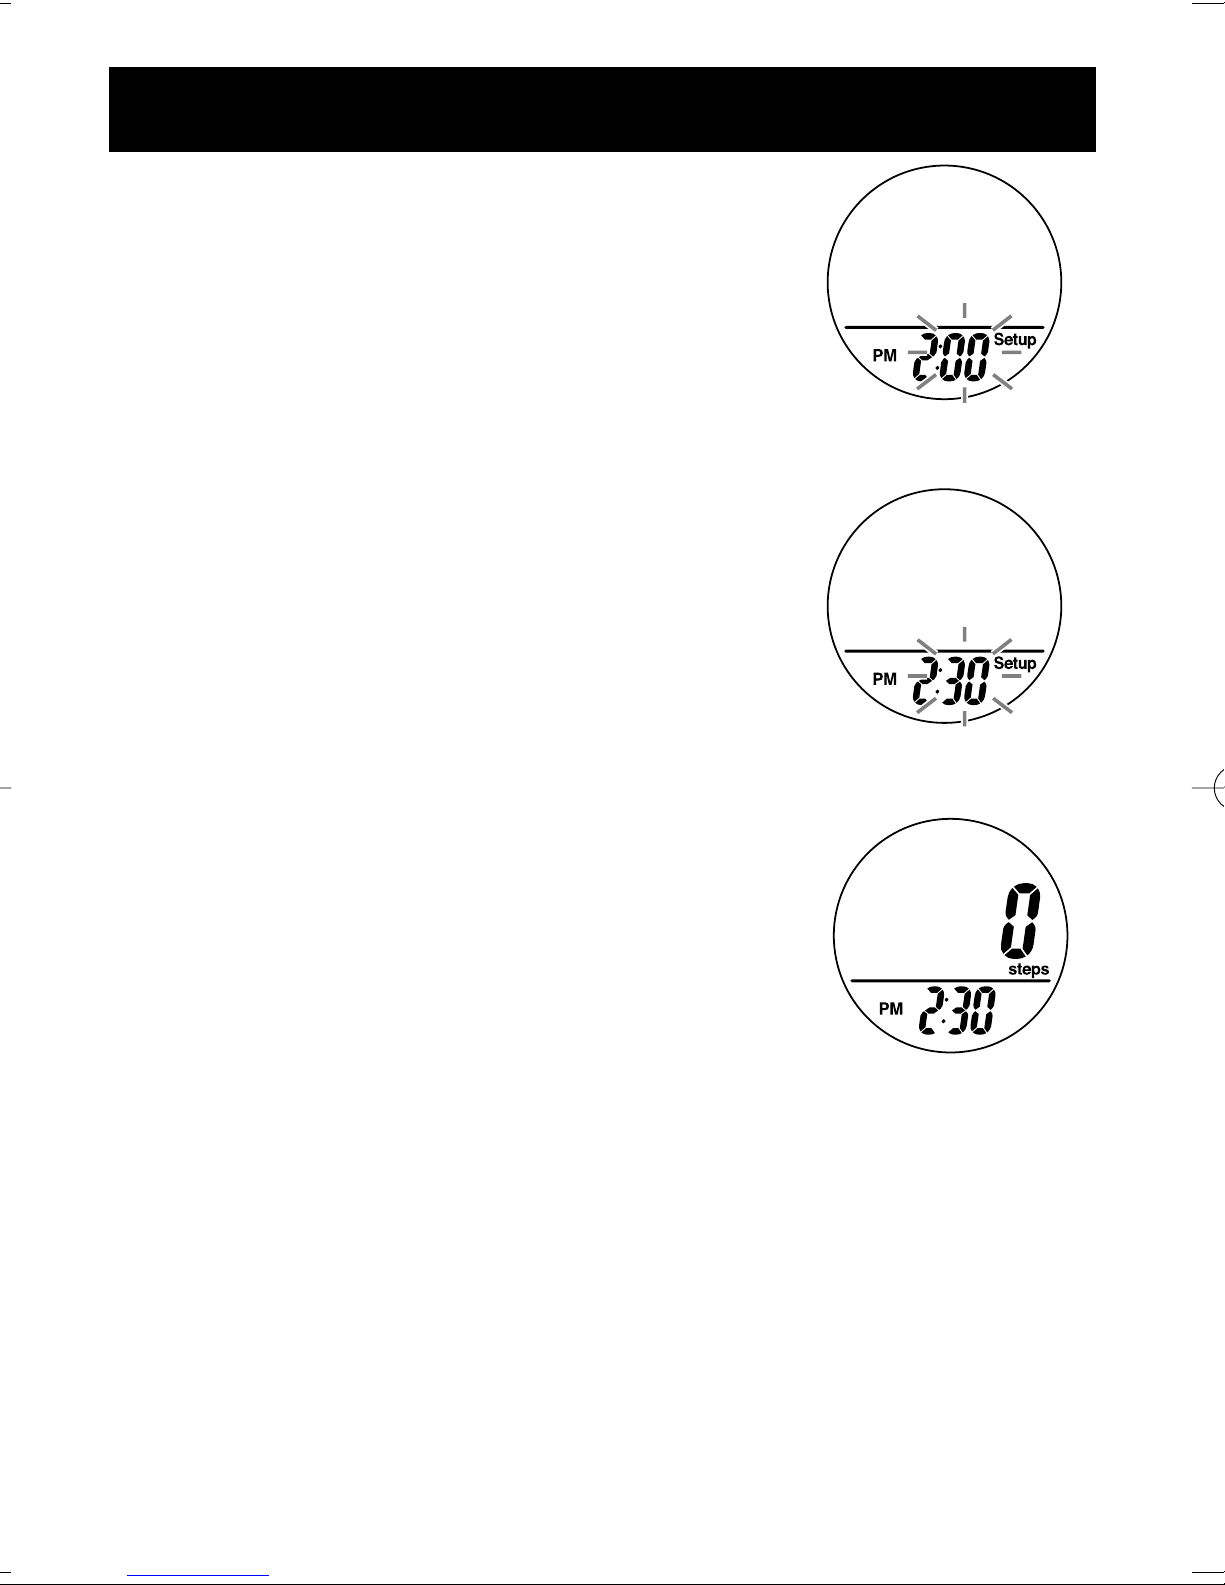
2. Press the MEMO Button to advance by
increments of one hour.
If no button is pressed for 5 minutes, the unit
will automatically turn off.
SYSTEM RESET
Button
SET Button
Page 8
8
SETTING THE TIME
3. Press the SET Button to set the hour.
The minutes flash on the display.
4. Press the MEMO Button to advance by
increments of one minute.
Press and hold the button to advance
the time in 10 minute increments.
5. Press the SET Button to set the minute.
The number of steps and time will display.
All the settings are completed.
Page 9

9
ATTACHING THE PEDOMETER
Attach the unit to your belt or the top of
your waistband.
• Do not place the unit in the back pocket of your pants.
NOTE:
Press the clip open to remove the unit. The clip may
cause scratches to the belt if it is attached or removed roughly,
depending on the belt material.
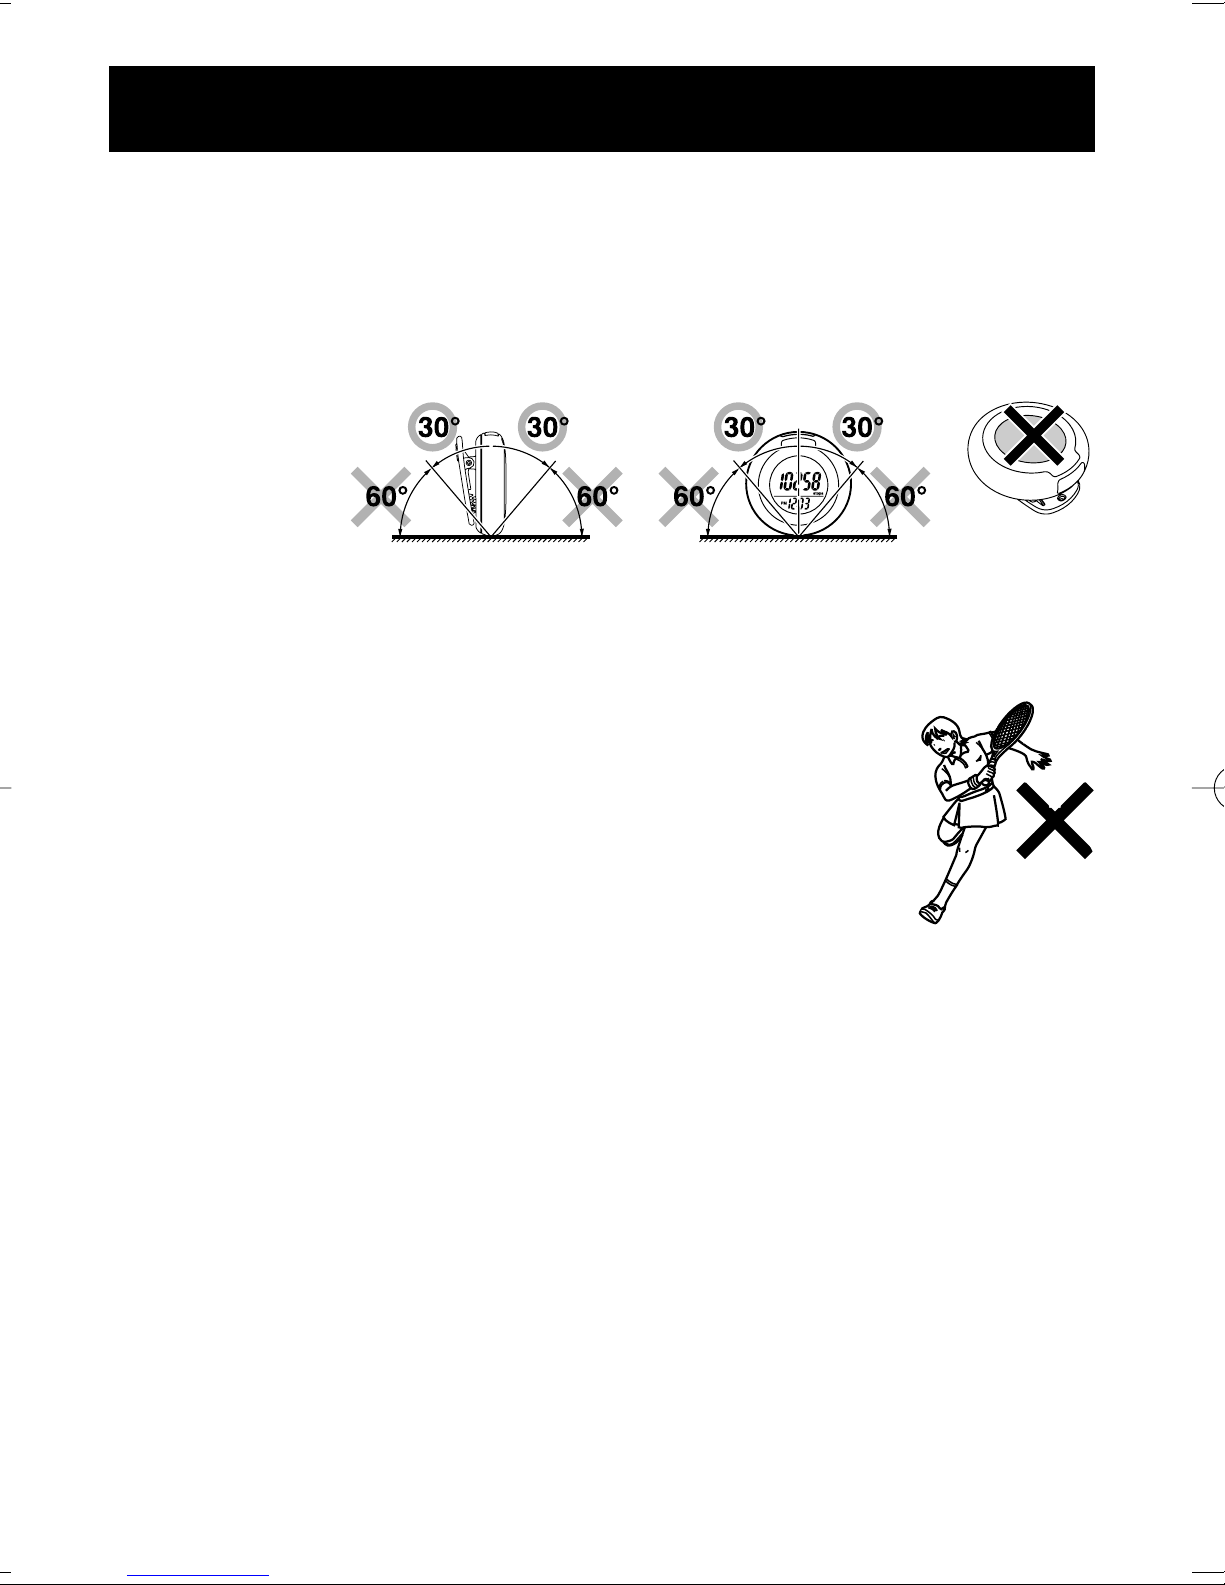
The unit must be positioned horizontally
with the ground.
When Steps are Counted
The unit determines whether you are walking continuously to avoid
counting movement other than steps. It does not display the step count
for the first four seconds of walking. If you continue walking for more
than four seconds, it displays the step count for the first four seconds and
then continues to count.
Page 10
10
ATTACHING THE PEDOMETER
1. Incorrect unit position
• When the front of the main unit is placed at an angle of less than 60°
(shown to the right) or horizontal to the ground.
2.Walking at an inconsistent pace
• When you shuffle or wear sandals
• When you fail to walk consistently in a crowded place
3. Irregular unit movement
• Standing up and/or sitting down movement
• Taking part in sports other than walking
• Ascending or descending movement on stairs or on a steep
slope
4.Vibrations from a moving vehicle
• Such as riding a bicycle, automobile, train or bus.
5. Extremely slow walking
The unit may not count steps correctly in the following
conditions:
Page 11

11
BATTERY SAVING MODE
After 5 minutes with no button being pressed, the display will
automatically turn off. However, the unit continues measuring steps.
This mode extends the battery life. Press the MEMO Button to activate
the display again.
Page 12

12
USING THE MEMORY FUNCTION
This unit can store and display up to seven days of previous data.
The current day’s data is automatically stored in memory when the
time reaches 12:00AM. The display will return to 0.
NOTE:
The time must be correctly set in the unit.
How to view data stored in the memory
Press the MEMO Button.
The previous day’s data is displayed. Continue to press the MEMO
Button to display all seven days of data.
NOTE:
If no button is pressed for more than 1 minute, the display will
return to the current day’s data.
Press and hold the MEMO Button to return to the current day’s
data.
12
Page 13

13
USING THE SYSTEM RESET FUNCTION
Use the SYSTEM RESET function in the following cases:
• When the display becomes unrecognizable
• When you want to delete all data
Press the SYSTEM RESET Button on the
back of the unit.
All the data in memory is deleted and settings
return to default values.
To reset the time refer to “Setting the Time”
on page 7.
Page 14
14
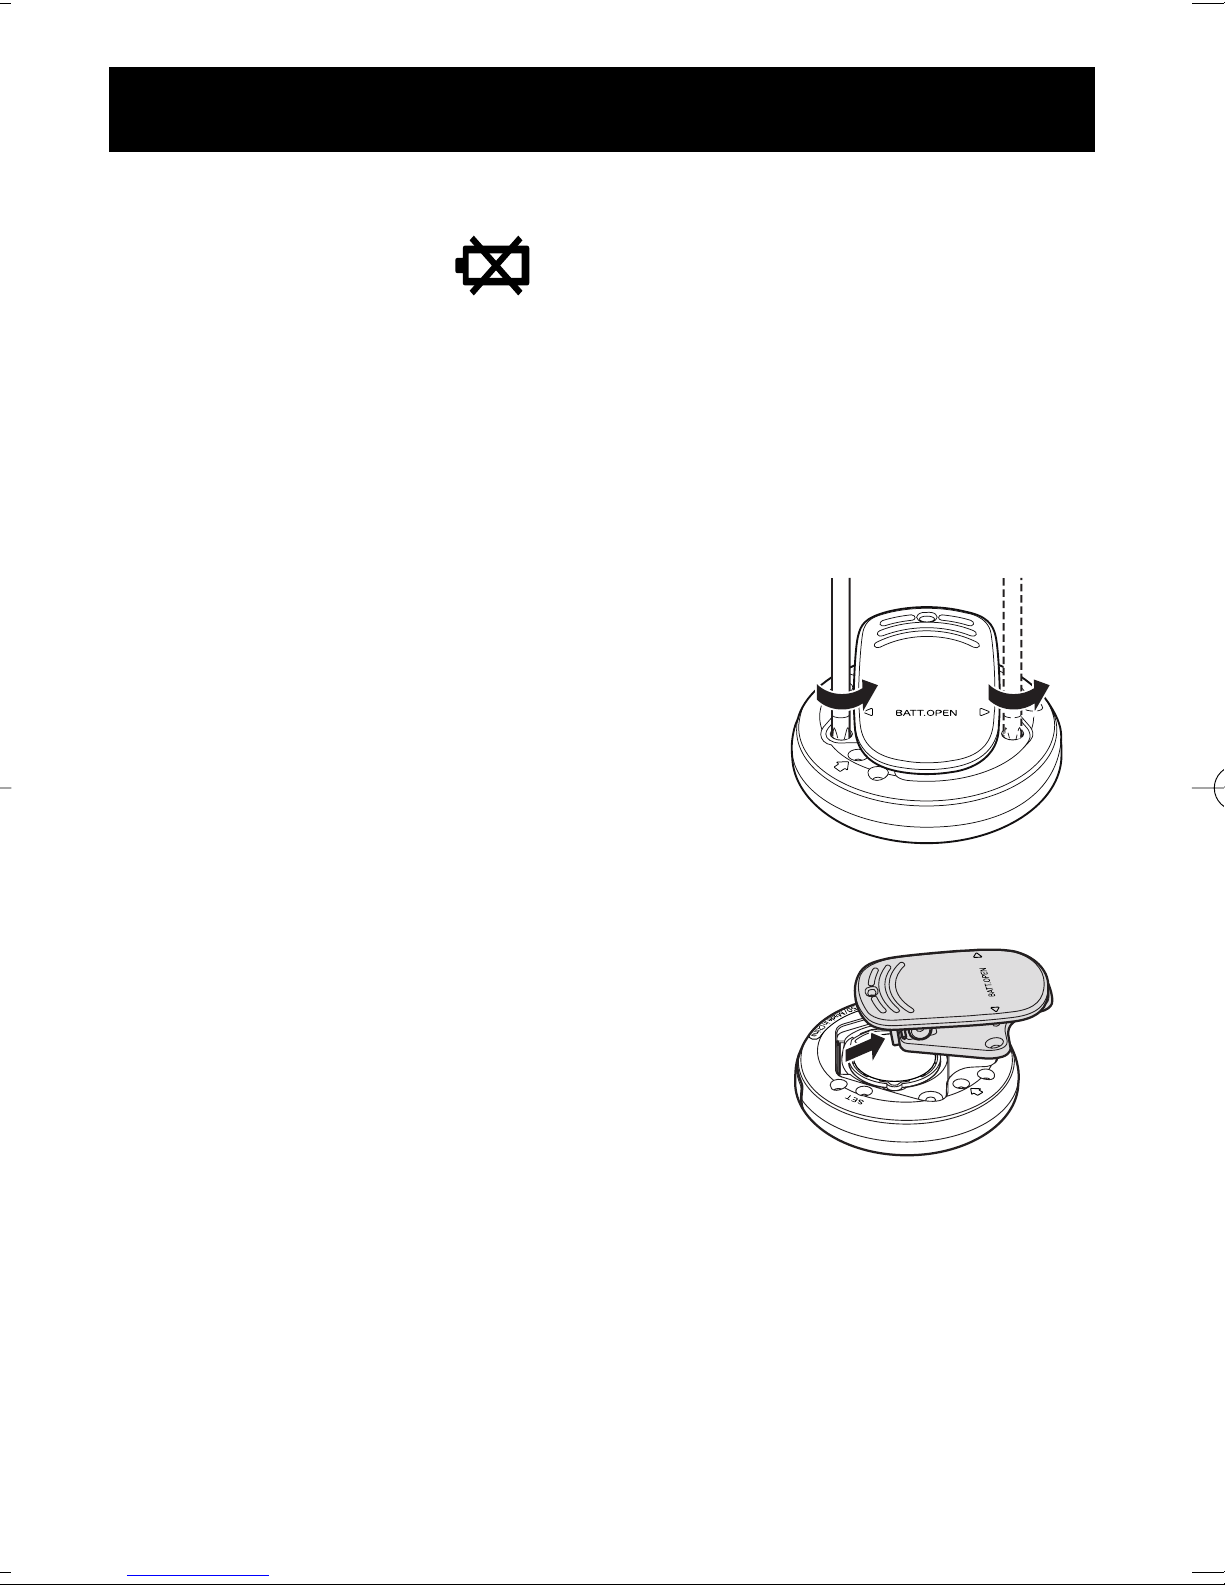
BATTERY INSTALLATION
1. Remove the screws on the battery cover
located on the back of the unit.
Use a small screwdriver to remove the
screws on the battery cover.
2. Remove the battery cover.
Low Battery Indicator
When the Low Battery Indicator appears on the display, immediately
replace the battery with a new CR2032 battery.
When the battery is removed from the unit the settings and all data
stored in the memory will be erased. Be sure to write important data
stored in the memory in a notebook.
The battery is installed in the pedometer when this unit is purchased.
Page 15

15
BATTERY INSTALLATION
3. Remove the old battery.
Take the battery out with a thin stick is not
easily breakable.
NOTE:
• DO NOT use a pair of metal tweezers
or a screwdriver.
CAUTION
Dispose of the device, battery, and components according to
applicable local regulations. Unlawful disposal be cause
environmental pollution.
CAUTION
Do not throw the battery into fire. The battery may explode.
4. Insert the new battery.
Place the positive (+) side of the battery
upward. Insert the battery in the direction
of the arrow as illustrated.
5. Replace the battery cover.
Insert the projected portion of the
battery cover as illustrated.
Tighten the screws on the battery cover.
After installing the battery, set time of day. Refer to “Setting the Time”
on page 7.
Page 16

16
CARE AND MAINTENANCE
To keep your pedometer in the best condition and protect the unit from
damage follow the directions listed below:
CAUTION
Do not disassemble or modify the unit. Changes or modifications not
approved by Omron Healthcare will void the user warranty.
Clean the unit with a soft dry cloth.
Do not use any abrasive or volatile cleaners.
Do not immerse the unit or any of the components in water.
The unit is not waterproof. Do not wash it or touch it with wet hands. Be
careful that water does not get into the unit.
Store the unit in a safe and dry location.
Avoid the unit being exposed to direct sunlight, high temperatures, high
humidity, water and/or dust.
Do not subject the unit to strong shock, drop, or step on the unit.
Remove the battery if the unit will not be used for three months
or longer.
Use of the unit must be consistent with the instructions provided
in this manual.
16
Care and Maintenance
Page 17

17
TROUBLESHOOTING TIPS
Problem Cause Solution
The Low Battery
Indicator blinks.
The battery is low
or worn.
Replace the battery with
a new one (CR2032).
Nothing is
displayed.
The displayed
values are
incorrect.
The polarities of the
battery (+ and -)
are aligned in the
wrong directions.
Insert the battery in
correct alignment.
The battery is worn.
Replace the battery with
a new one (CR2032).
The unit is
positioned
incorrectly.
Irregular movement.
Inconsistent pace.
Up and down
movement.
Refer to “Attaching the
Pedometer” on page 9.
Page 18

18
Model: HJ-150CAN
Power Supply: 3 VDC (1 lithium battery CR2032)
Measurement Range: Steps: 0 to 99,999 steps
Memory: Previous 7 days on display
Setting Range: Time: 12:00AM to 11:59PM
Operating Temperature/ 14ºF to 104ºF (-10ºC to 40ºC) /30 to 85% RH
Humidity:
Storage Temperature/ -4ºF to 140ºF (-20ºC to 60ºC)
Humidity/Air Pressure: /10 to 95% RH /700 - 1060 hPa
Precision of Step Counting:
Within +/- 5% (by vibration testing machine)
Time Precision: Within +/- 90 seconds of the average monthly deviation
(under normal temperature)
Battery Life: Approximately one year (when used for walking
10,000 steps a day)
External Dimensions: Approximately 2''(diameter) × 1''(d)
(ø53 mm × 25.8 mm)
Weight: Approximately 1 1/4 oz (battery included)
Contents: Pedometer, Battery (CR2032 installed) and Instruction
Manual
UPC: 0 73796 80150 2
• Specifications are subject to change without notice.
18
SPECIFICATIONS
Page 19

19
FCC STATEMENT
NOTE:
POTENTIAL FOR RADIO/TELEVISION INTERFERENCE (for U.S.A. only)
This product has been tested and found to comply with the limits for a Class B digital
device, pursuant to part 15 of the FCC rules.
These limits are designed to provide reasonable protection against harmful interference
in a residential installation. The product generates, uses, and can radiate radio frequency
energy and, if not installed and used in accordance with the instructions, may cause
harmful interference to radio communications. However, there is no guarantee that
interference will not occur in a particular installation. If the product does cause harmful
interference to radio or television reception, which can be determined by turning the
product on and off, the user is encouraged to try to correct the interference by one or
more of the following measures:
• Reorient or relocate the receiving antenna.
• Increase the separation between the product and the receiver.
• Connect the product into an outlet on a circuit different from that to which the receiver
is connected.
• Consult the dealer or an experienced radio/TV technician for help.
POTENTIAL FOR RADIO/TELEVISION INTERFERENCE (for Canada only)
This digital apparatus does not exceed the Class B limits for radio noise emissions from
digital apparatus as set out in the interference-causing equipment standard entitled
“Digital Apparatus”, ICES-003 of the Canadian Department of Communications.
Cet appareil numérique respecte les limites de bruits radioeléctriques applicables aux
appareils numériques de Clase B prescrites dans la norme sur le materiel brouilleur:
“Appareils Numériques”, ICES-003 édictée par le minister des communications.
Changes or modifications not expressly approved by the party responsible for
compliance could void the user’s authority to operate the equipment.
Page 20

2020
WARRANTY
Your Omron HJ-150CAN Pedometer, excluding the battery, is warranted to be free
from defects in materials and workmanship appearing within 1 year from the date of
purchase, when used in accordance with the instructions provided with the unit.
The above warranties extend only to the original retail purchaser.
We will, at our option, repair or replace without charge any pedometer covered by
the above warranties. Repair or replacement is our only responsibility and your
only remedy under the above warranties.
To obtain warranty service contact Omron Healthcare’s Customer Service by calling
1-800-634-4350 for the address of the repair location and the return shipping and
handling fee. Information for warranty service is available on our website at
www.omronhealthcare.com.
Enclose the Proof of Purchase. Include a letter, with your name, address, phone
number, and description of the specific problem. Pack the product carefully to
prevent damage in transit. Because of possible loss in transit, we recommend
insuring the product with return receipt requested.
ALL IMPLIED WARRANTIES, INCLUDING BUT NOT LIMITED TO
THE IMPLIED WARRANTIES OF MERCHANTABILITY AND FITNESS
FOR PARTICULAR PURPOSE, ARE LIMITED TO THE DURATION OF
THE APPLICABLE WRITTEN WARRANTY ABOVE. Some provinces do
not allow limitations on how long an implied warranty lasts, so the above limitation
may not apply to you.
OMRON SHALL NOT BE LIABLE FOR LOSS OF USE OR ANY OTHER
INCIDENTAL, CONSEQUENTIAL OR INDIRECT COSTS, EXPENSES
OR DAMAGES. Some states do not allow the exclusion or limitation of incidental
or consequential damages, so the above exclusions may not apply to you.
This warranty gives you specific legal rights, and you may also have other rights
which may vary from state to state.
FOR CUSTOMER SERVICE
Visit our web site at: www.omronhealthcare.com
Call toll free: 1-800-634-4350
Limited Warranty
Page 21

21
NOTES
Page 22

22
NOTES
Page 23

23
NOTES
Page 24

Made in China
Distributed by:
Omron Healthcare Canada
5500 N. Service Road Penthouse
Burlington, ON L7L 6W6
www.omronhealthcare.com
Copyright © 2006 OMRON HEALTHCARE, INC.
150CAN INST Rev
 Loading...