

Page 1
Instruction manual page 1
Gebrauchsanweisung Seite 19
Gebruiksaanwijzing pagina 37
Mode d’emploi page 55
Manuale de instructone pagina 73
Manual de instrucciones pagina 91
HJ-112-E
Stepcounter
Page 2
HJ-112-E English
1
Introduction
The OMRON Stepcounter HJ-112-E
tracks your workouts with steps, distance,
time and the calories you burned during
walking and jogging. After 10 minutes of
walking at a consistent pace the aerobic
mode is activated. This aerobic mode
helps you in building your health. The
number of steady steps is stored in the
memory of the OMRON HJ-112-E.
Page 3

2
HJ-112-E English
Table of contents
1 Use of the stepcounter 3
1.1 General 3
1.2 Tips for use 3
1.3 Cautions 3
2 Overview 4
3 Preparation 5
3.1 Assemble the stepcounter 5
3.2 How to attach the stepcounter 6
4 Settings 8
4.1 Control functions 8
4.2 Reset the system 8
4.3 Determine your stride length 9
4.4 Set time, weight and stride length 9
5 Operation 12
5.1 Adjust settings 12
5.2 Actual use 12
6 Memory 14
6.1 Recall data 14
6.2 Erase memory 15
7 Care and storage 15
7.1 Replace battery 15
8Faults: causes and rectifications 17
9Technical data 18
Page 4

HJ-112-E English
3
1. Use of the stepcounter
1.1 General
•Keep the OMRON HJ-112-E out of reach of young children.
1.2 Tips for use
• Attach the OMRON HJ-112-E perpendicular to the ground.
•Wear solid shoes.
•Walk or jog at consistent pace.
• Do not walk or jog in crowded places.
• Up and down movements can create incorrect readings.
1.3 Caution
• Do not swing the OMRON HJ-112-E.
• Do not drop or step on the OMRON HJ-112-E.
•Avoid exposure of the OMRON HJ-112-E to direct sunlight.
•Keep the OMRON HJ-112-E dry.
• Operating environment must be free from excessive vibrations, shocks magnetic
fields, electrical noise, etc.
Page 5

4
HJ-112-E English
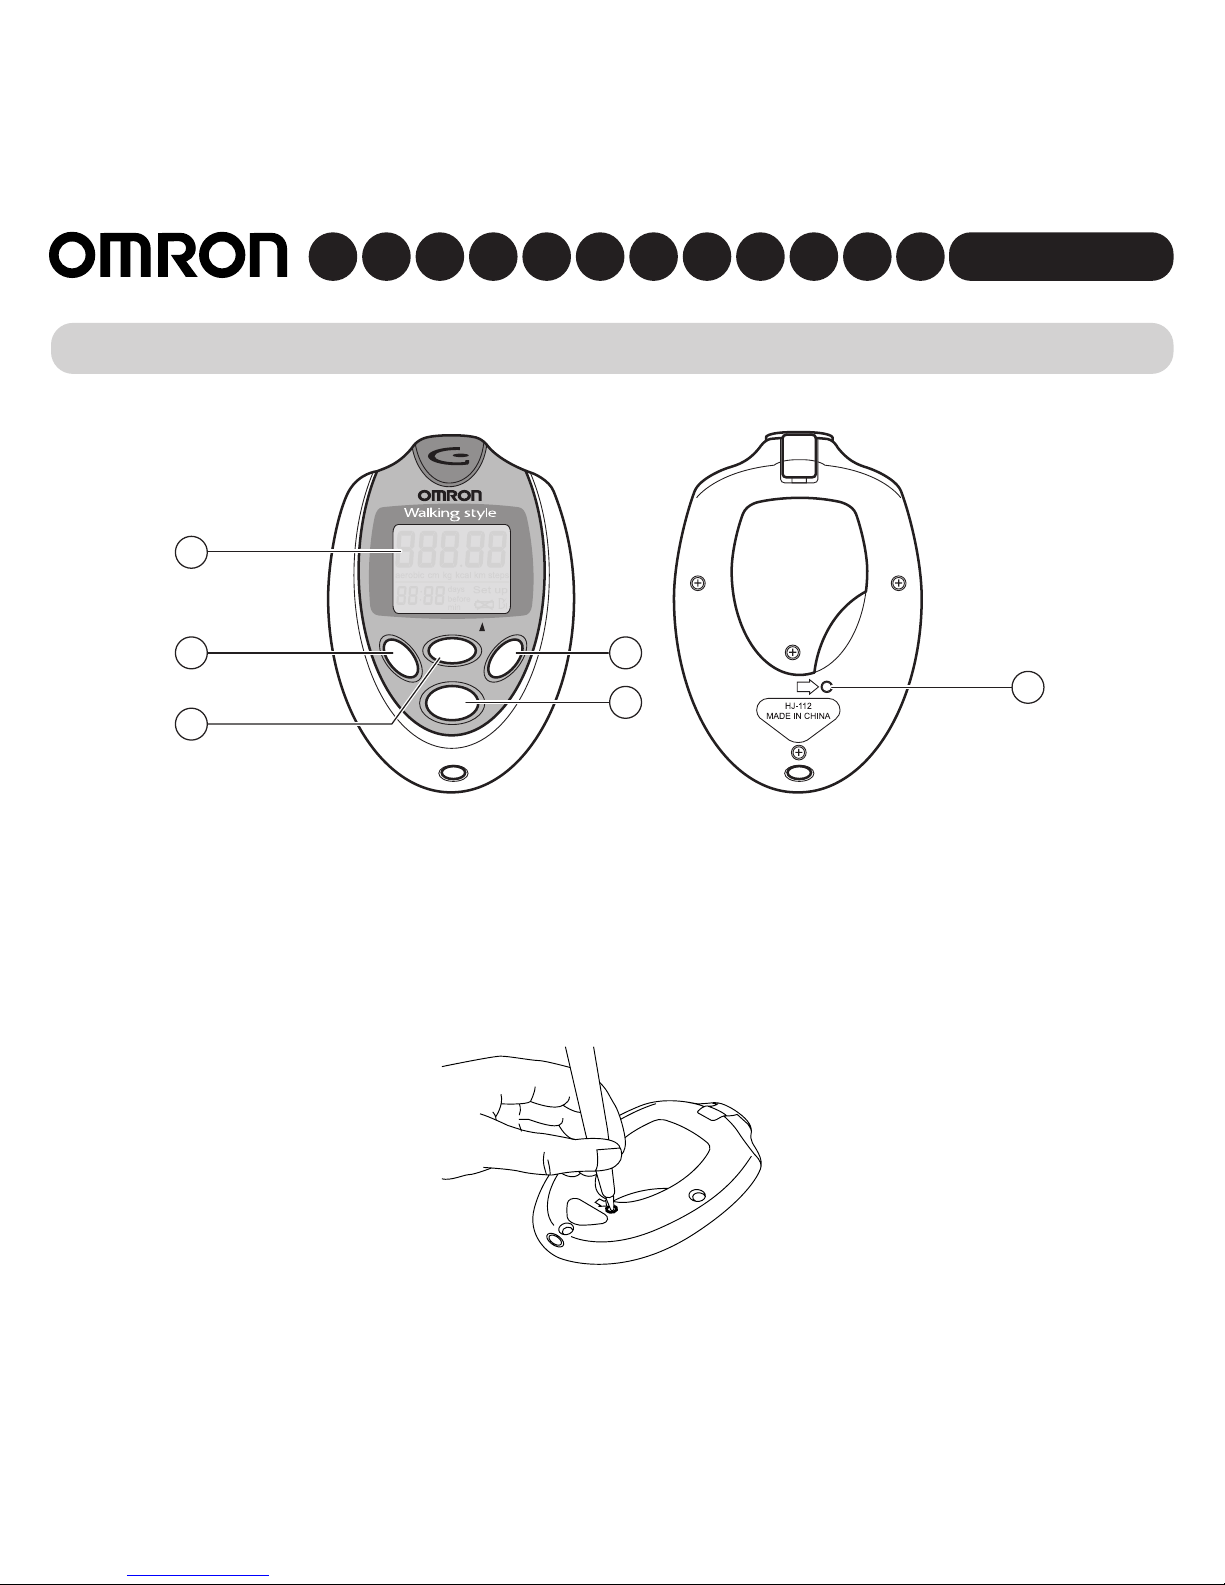
A Main unit
B Screwdriver
C Clip
D Holder
E Strap
F Battery cover
G Screw battery cover
C
B
F
G
E
D
A
2. Overview
Page 6
HJ-112-E English
5
3. Preparation
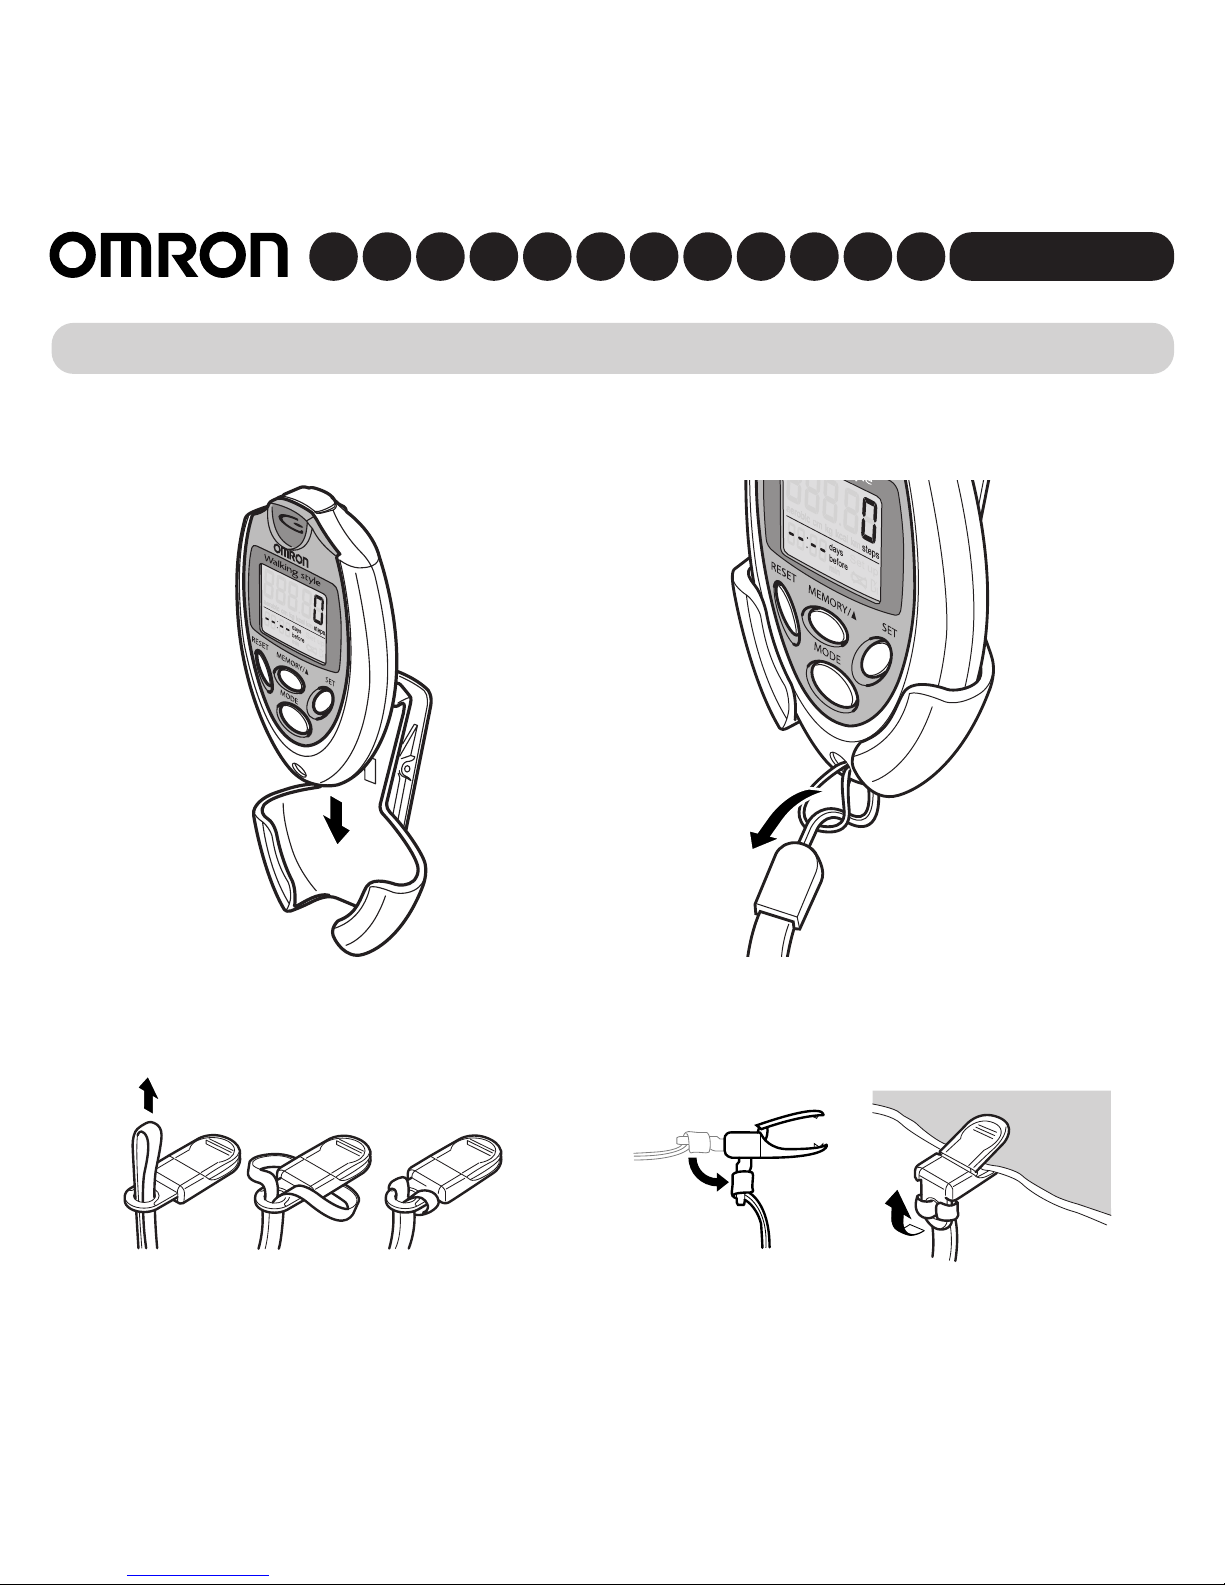
3.1 Assemble the stepcounter
1 Put the main unit in the holder. 2 Attach the strap to the main unit.
3 Attach the clip to the strap. 4 Open and close the clip.
Page 7
6
HJ-112-E English
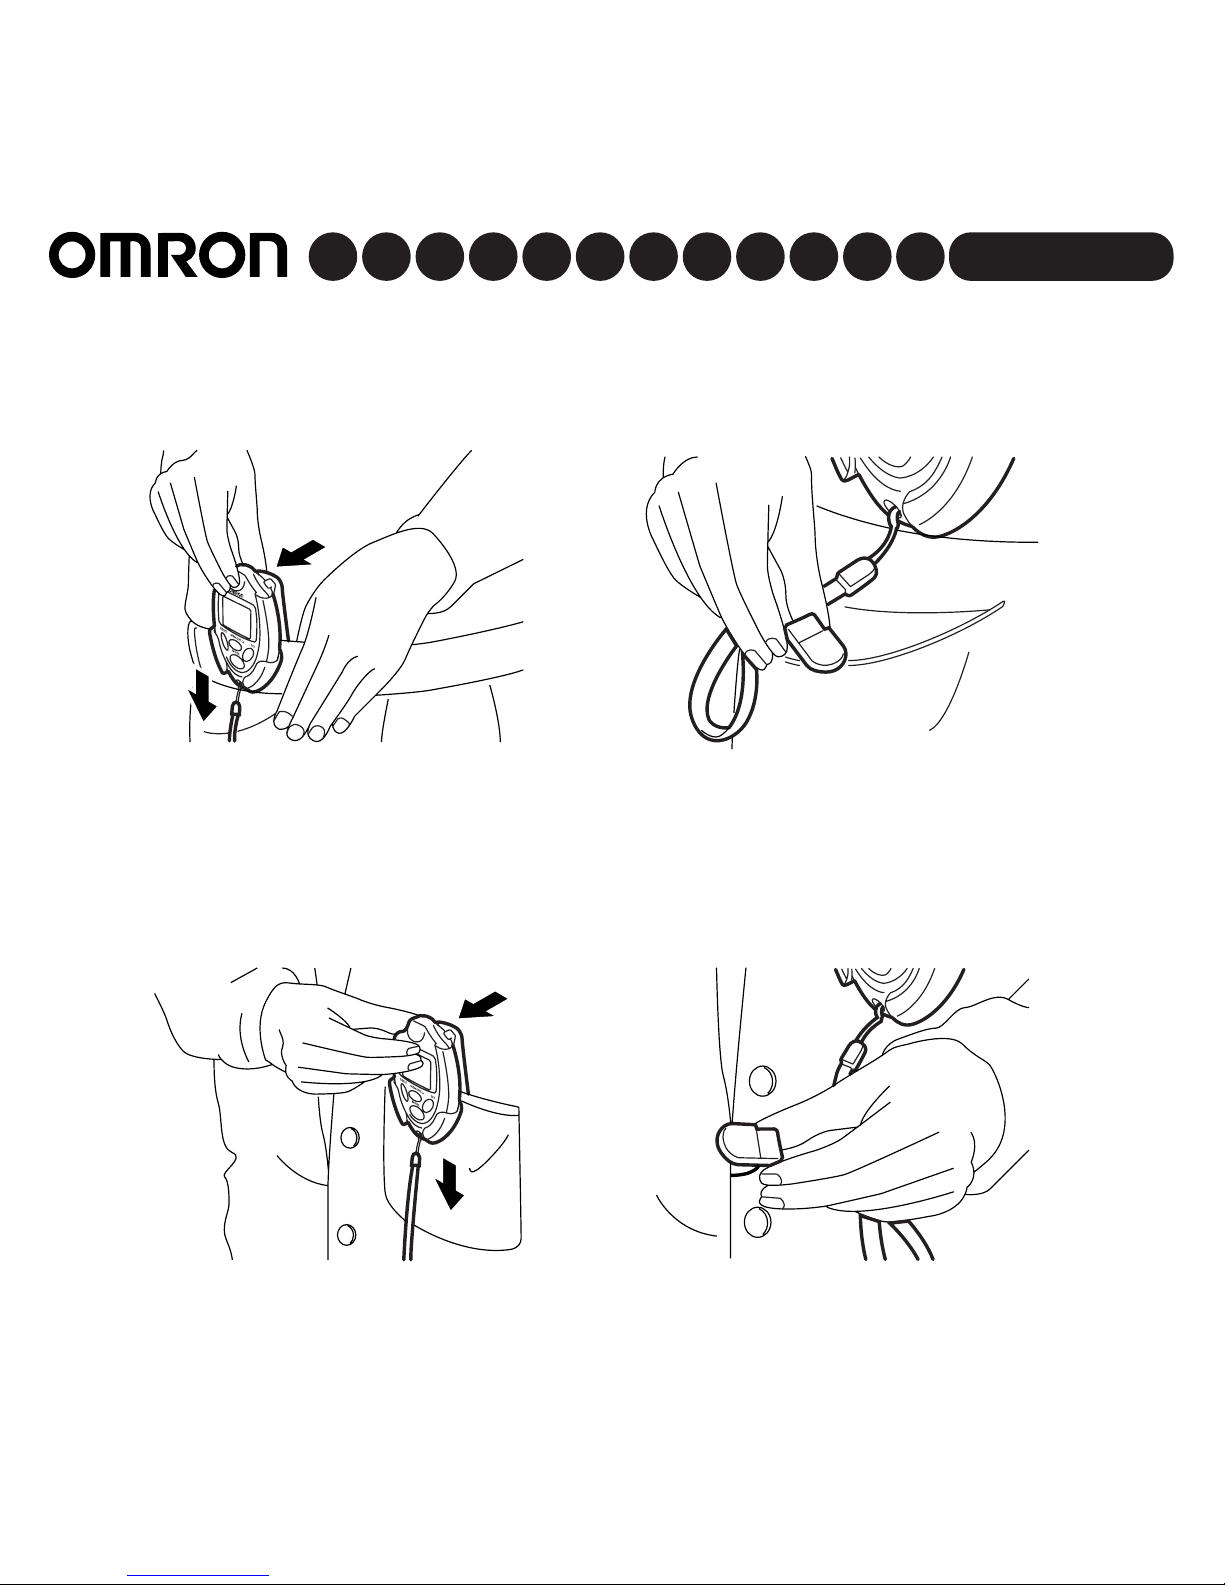
3.2 How to attach the stepcounter
We recommend attaching the stepcounter to your belt, your pocket or your bag.
Belt
1 Clip the main unit to the top of your
shorts or belt of your trousers.
Note: do not put the main unit on/in the
back pocket of your trousers.
2 Clip the strap to your pants.
1 Clip the main unit to the edge of your
upper front pocket.
2 Clip the strap to your clothes.
Pocket
Page 8
HJ-112-E English
7
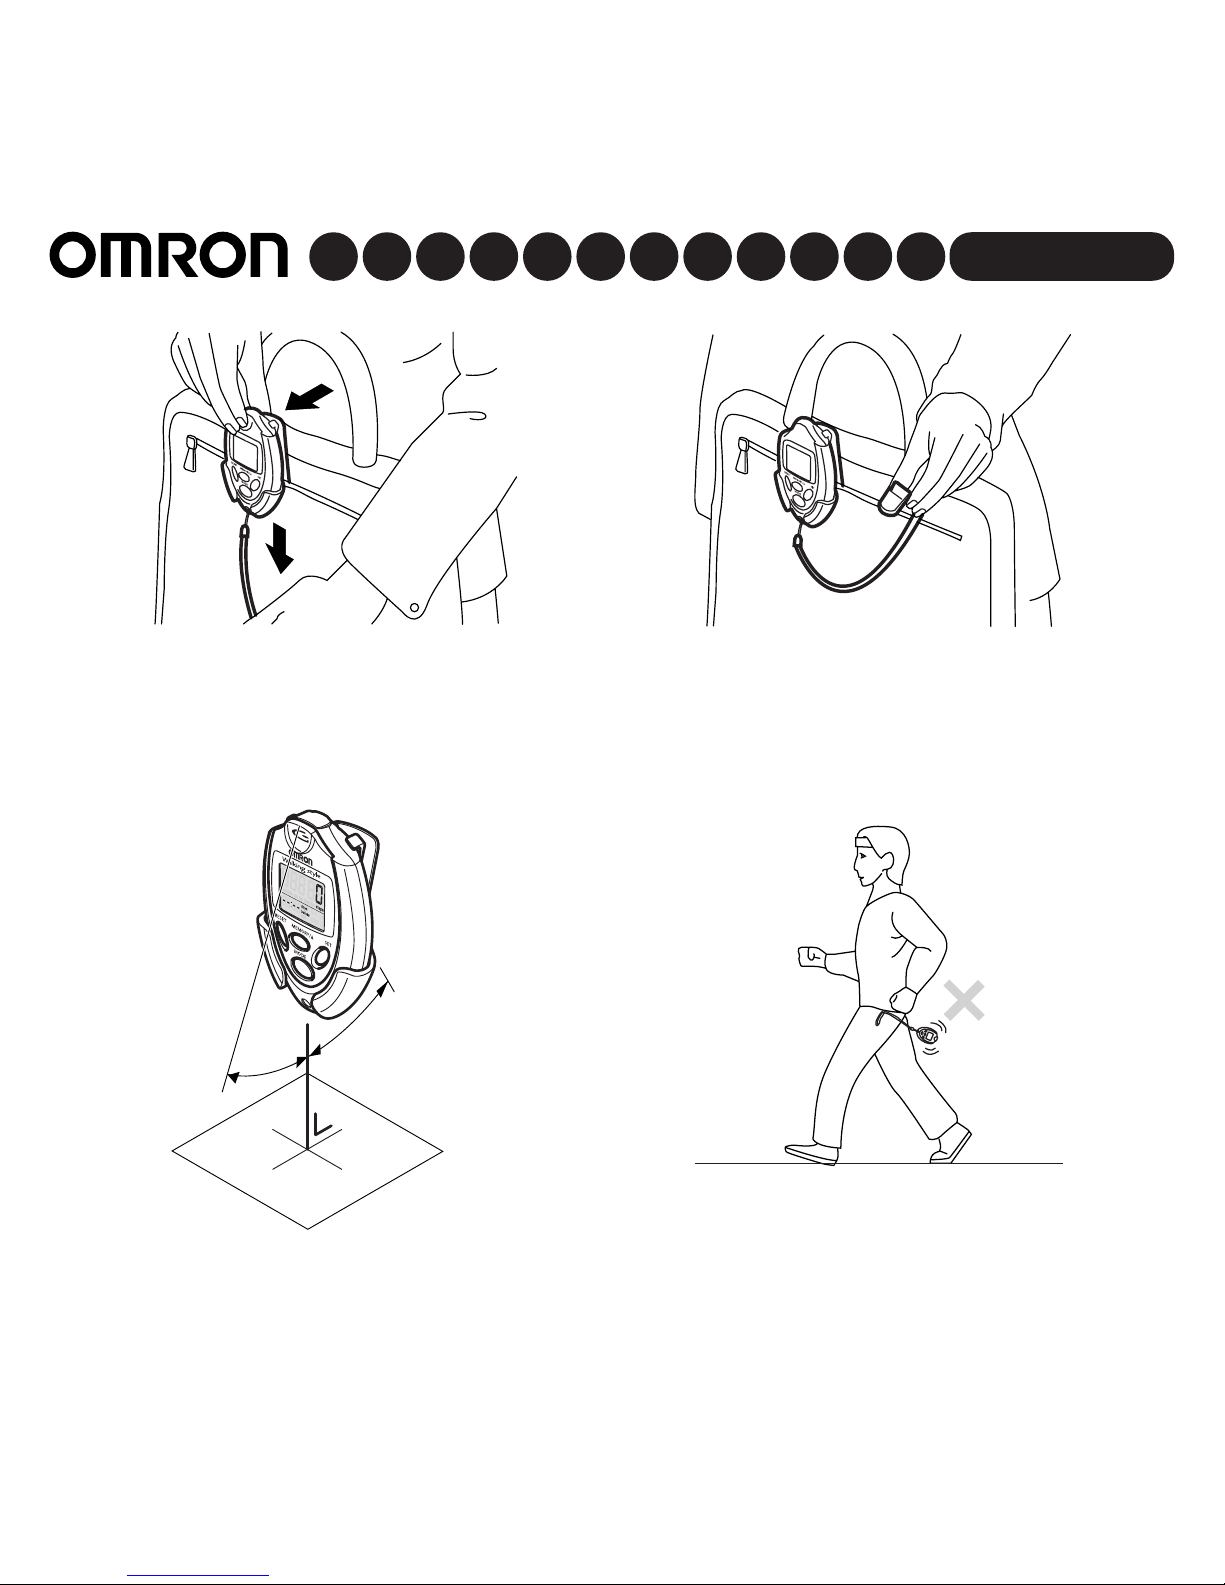
Bag
1 Clip the main unit to the pocket or
partition of a bag.
Note: be sure you can hold the bag
tightly.
2 Clip the strap to the edge of the bag.
Note: be sure the main unit is securely
fastened to you bag.
Note: attach the main unit perpendicular
to the ground.
Max. tolerance - 30° / + 30°.
Note: Do not hang the main unit from
your belt, the top of your pants or a bag.
Page 9
8
HJ-112-E English
4.1 Control functions
4. Settings
H Display
J Reset button
K Memory/button
L Set button
M Mode button
N System reset button
RESET SET
MEMORY/
MODE
K
J
M
L
N
H
4.2 Reset the system
1 Press system reset button.
Caution! All data, memory and settings will be erased!
Page 10
HJ-112-E English
9
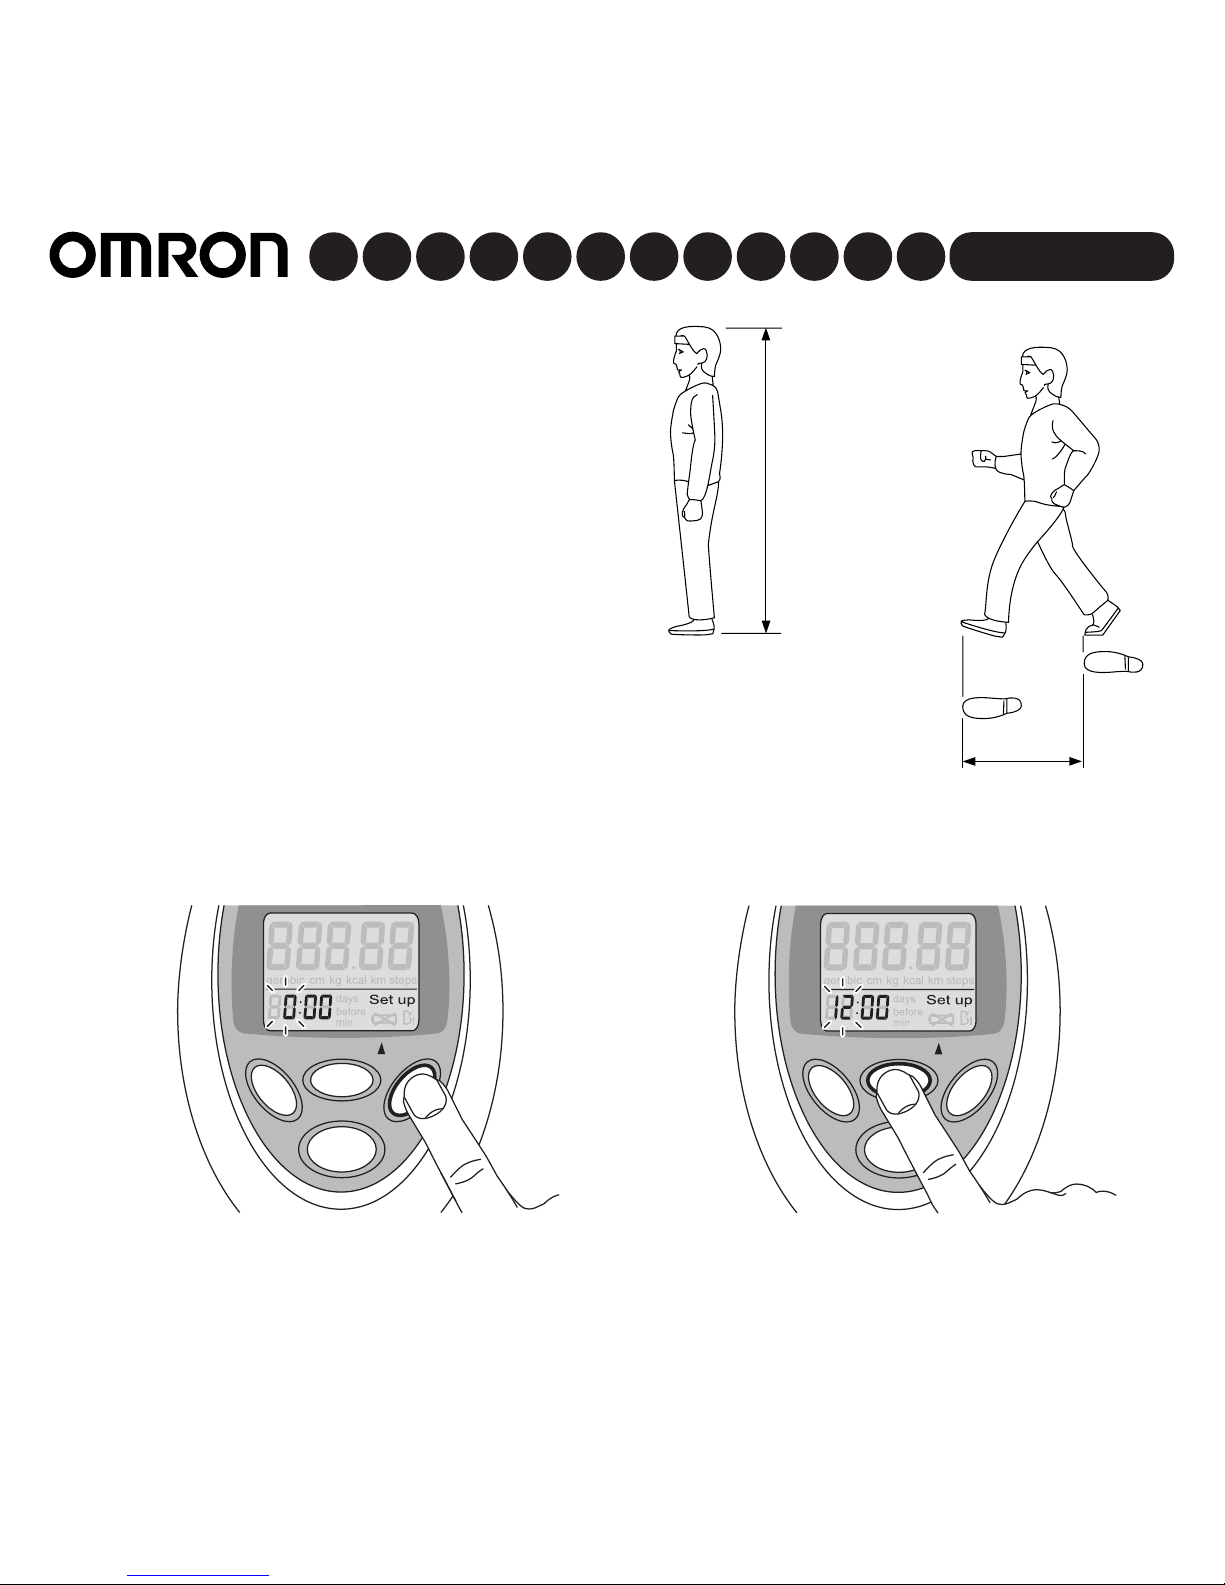
4.3 Determine your stride length
The average stride length is
approximately 40% of your body length.
Great strides > 40%, small strides < 40%
1 Calculate your stride length as follows:
a. Stride length = body length (L) x 0,4
e.g. 170 cm x 0,4 = 68 cm or b.Walk
100 meters and count your steps.
Divide the distance you walked by the
number of steps.
Note: method b is more precise.
L x 0,4
L
4.4 Set time, weight and stride length
RESET SET
MEMORY/
MODE
RESET SET
MEMORY/
MODE
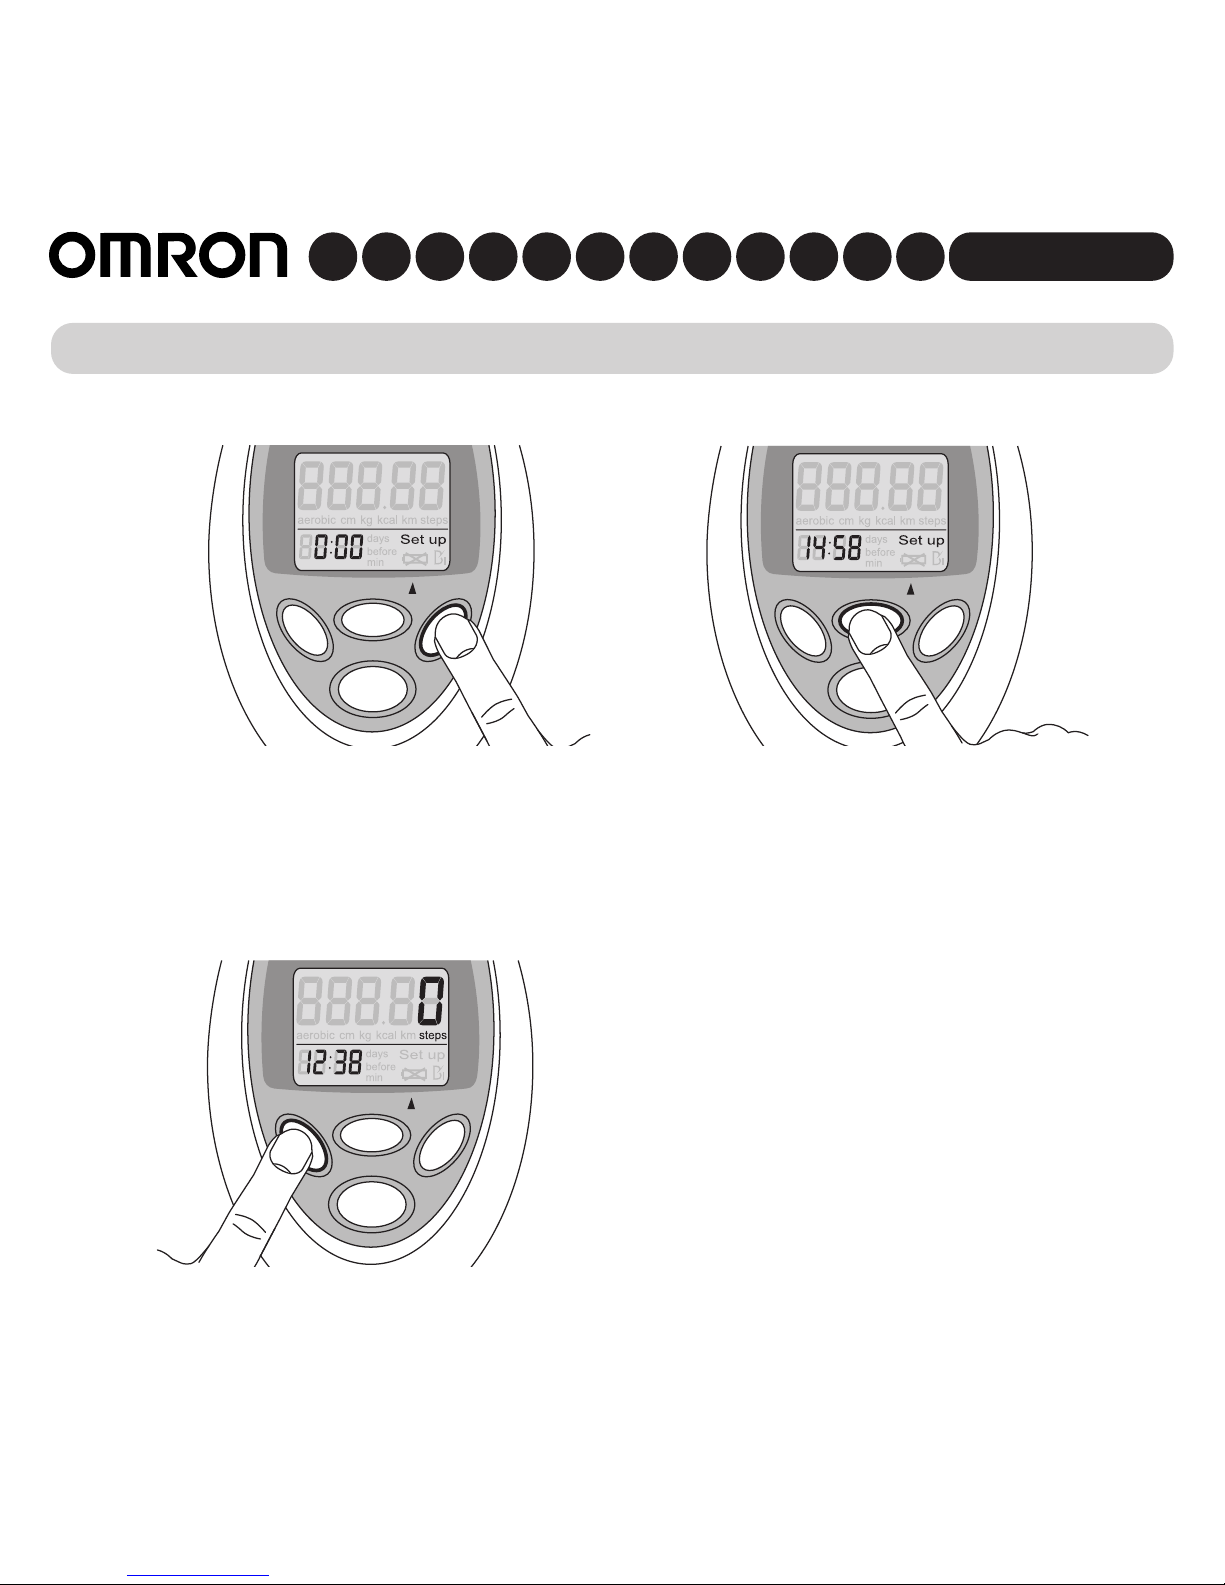
1 Press set button for 2 seconds. 2 Press memory/button to set the hour.
Page 11
10
HJ-112-E English
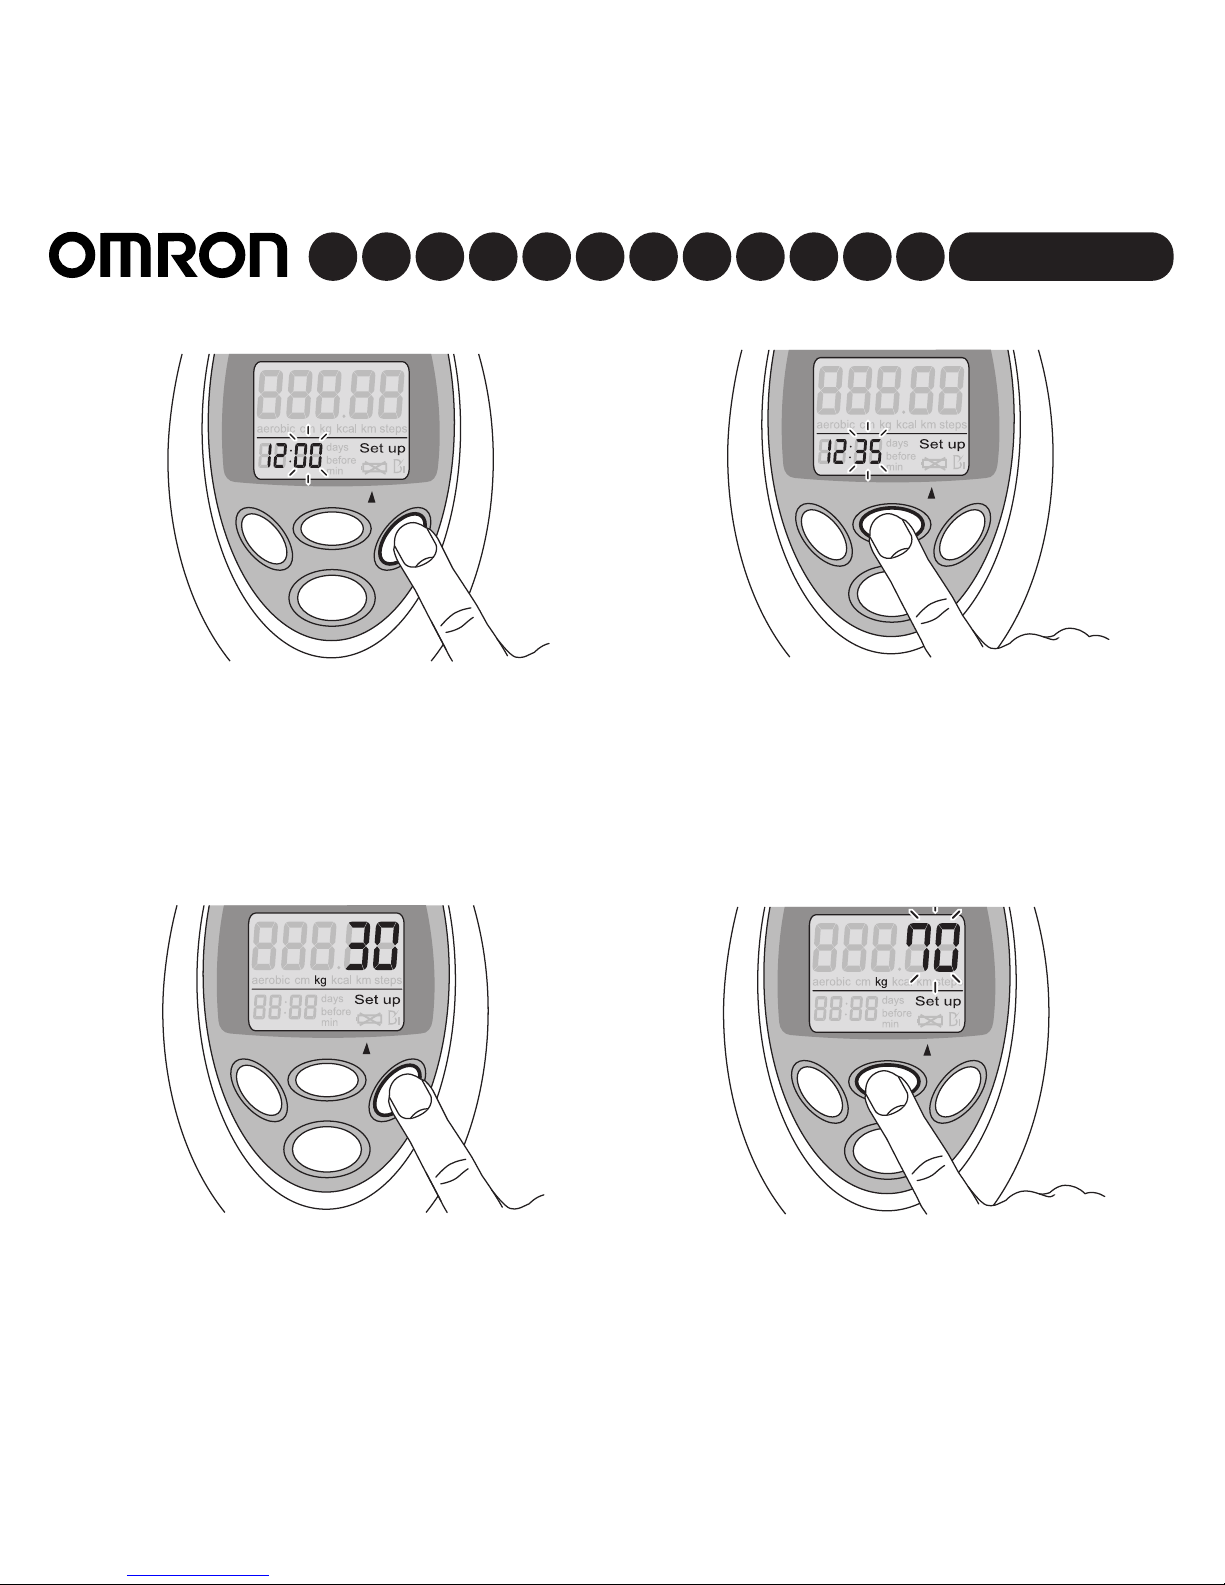
3 Press set button. 4 Press memory/
button to set the minute.
5 Press set button to set the time and to
proceed to weight setting.
Note: the initial weight is 30 kg.
6 Press memory/button to set your weight.
Note:keep pressing memory/button
to fast forward by10 kg.
Note:keep pressing memory/button to fast forward by 10 minutes.
Note: if you leave time setting for 5 minutes, the display will return to the number of
steps while time remains unchanged.
RESET SET
MEMORY/
MODE
RESET SET
MEMORY/
MODE
RESET SET
MEMORY/
MODE
RESET SET
MEMORY/
MODE
Page 12
HJ-112-E English
11
Note: if the display reaches 136 kg, it will return to 30 kg.
Note: if you leave weight setting for 5 minutes, the display will return to the number of
steps while weight remains unchanged.
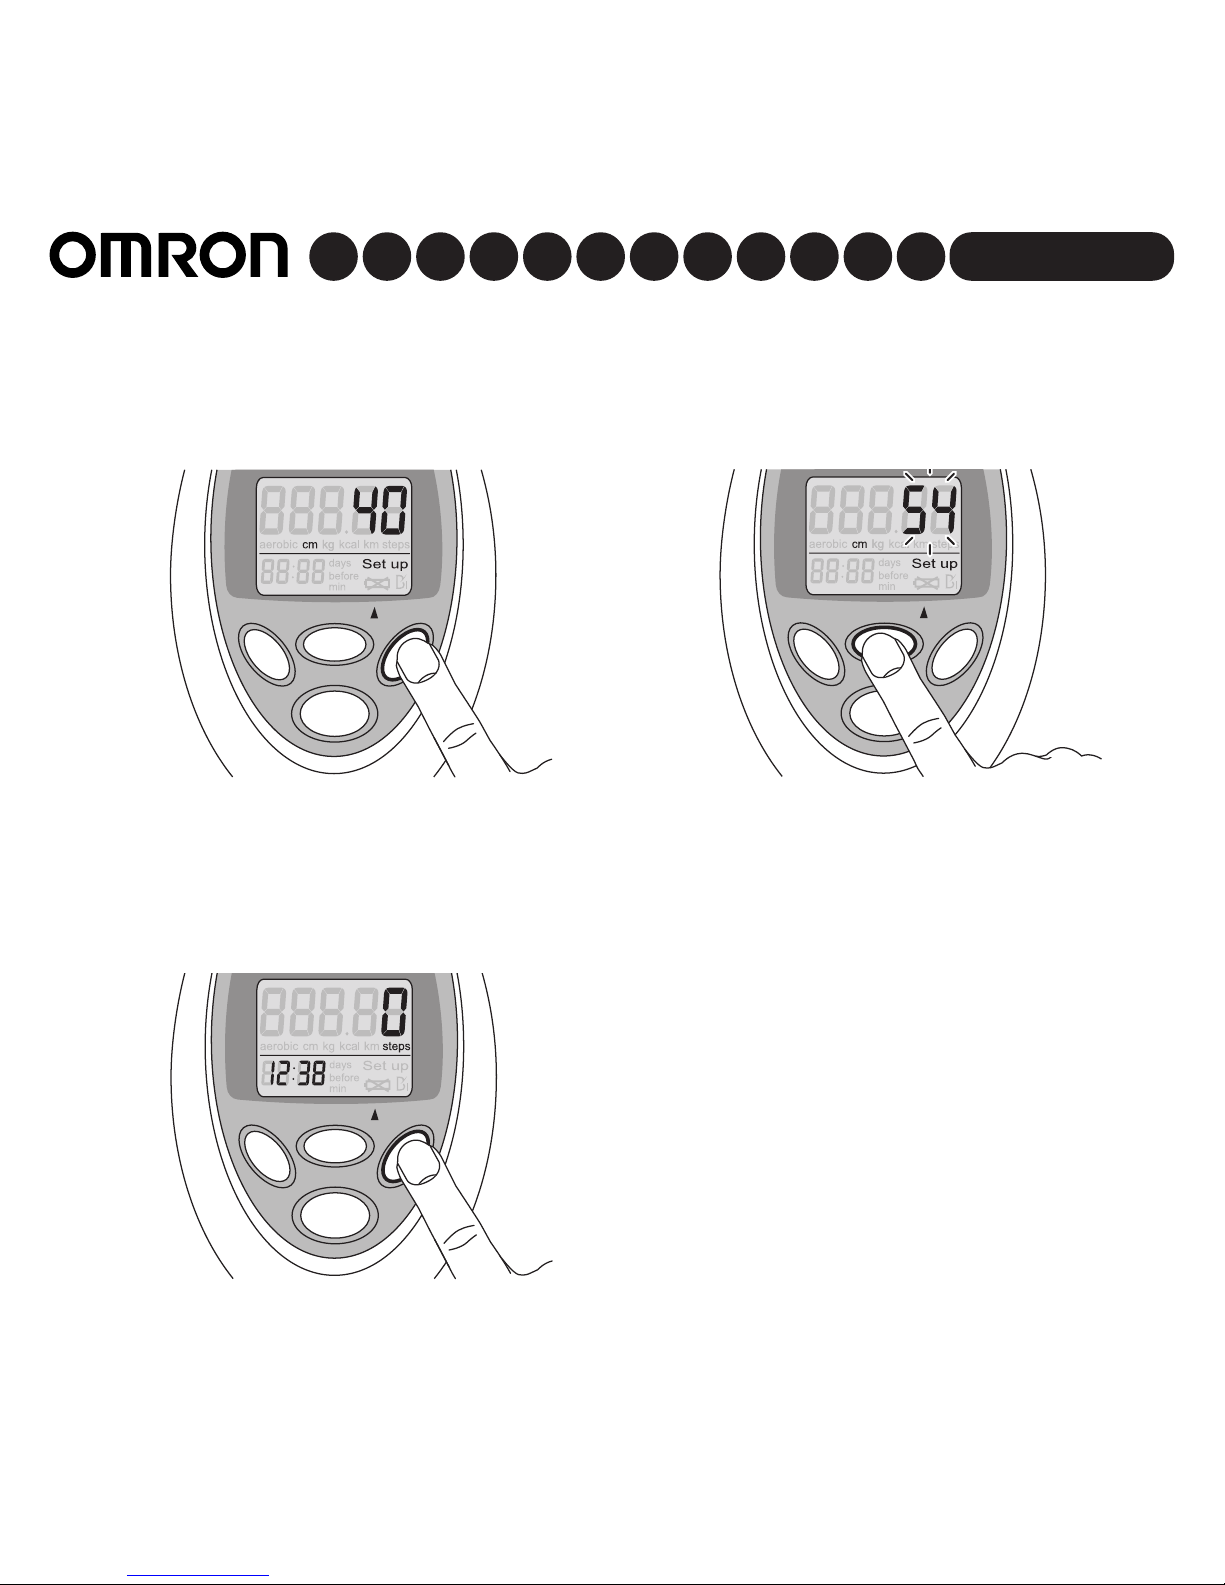
7 Press set button to set the weight and
to proceed to stride length setting.
Note: the initial stride length is 40 cm.
8 Press memory/button to set your
stride length.
Note:keep memory/button to fast
forward by10 cm.
Note: if the display reaches 120 cm, it
will return to 30 cm.
Note: pressing the reset button will
return the display to 40 cm.
Note: if you leave stride length setting
for 5 minutes, the display will return to
the number of steps while stride length
remains unchanged.
RESET SET
MEMORY/
MODE
RESET SET
MEMORY/
MODE
RESET SET
MEMORY/
MODE
9 Press set button to set all the values.
Page 13
12
HJ-112-E English
5. Operation
5.1 Adjust settings
1 Press set button for 2 seconds. 2 Press memory/to adjust time.
Note: use set button to navigate and to
check settings.
RESET SET
MEMORY/
MODE
RESET SET
MEMORY/
MODE
5.2 Actual use
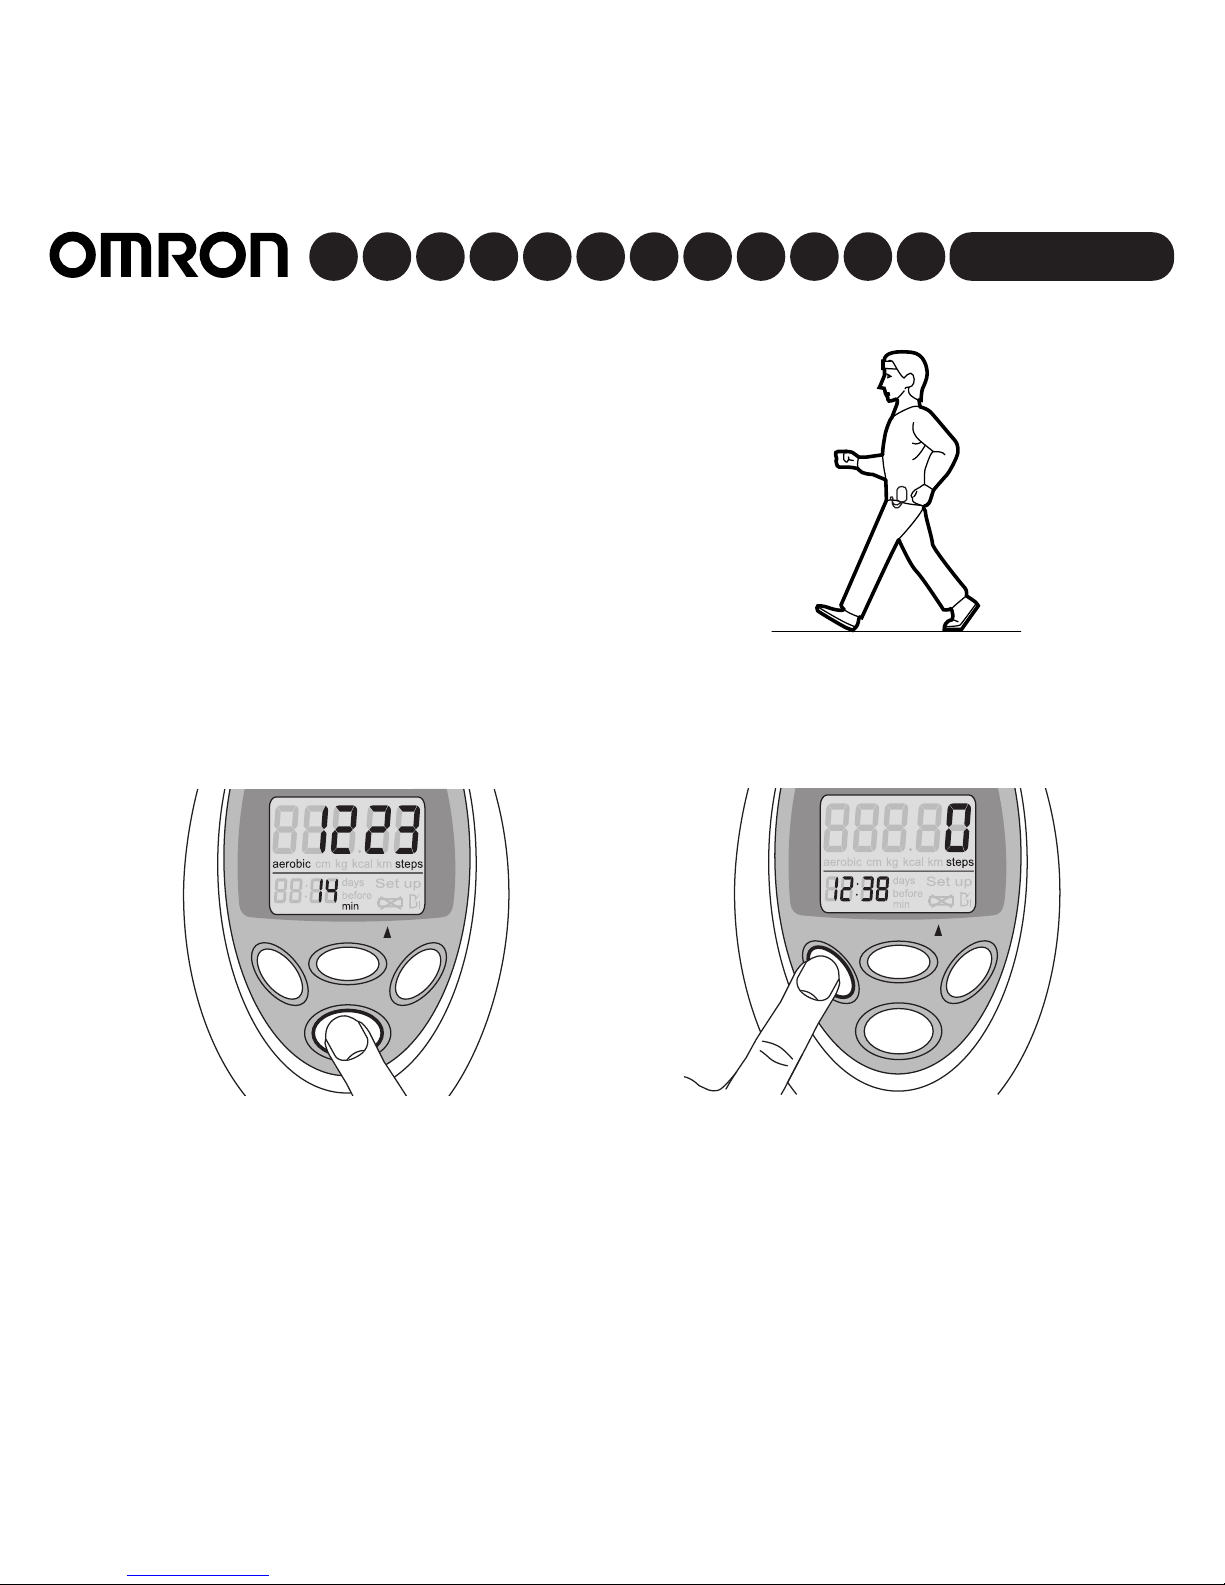
1 Press reset button for 2 seconds.
Note: all data will be set to 0.
2 Attach the main unit to your body. See
‘How to attach the stepcounter’.
Note: attach the main unit to the holder
to track workouts.
RESET SET
MEMORY/
MODE
Page 14
HJ-112-E English
RESET SET
MEMORY/
MODE
RESET SET
MEMORY/
MODE
3 Start walking / jogging.
Note: after 10 minutes of walking or
jogging at a consistent pace the
aerobic mode is activated.
4 Press mode button. 5 Press reset button for 2 seconds.
Note: all data of today (number of
steps, number of steady steps, duration
of steady walks, calorie, distance) will
be set to 0 but it will remain in memory.
Note:you cannot turn off the unit.
13
Page 15
14
HJ-112-E English
2 Press memory/s button for previous
numbers of steps.
Note: during display memory the number of steps you make will not be marked.
3 Press mode button to leave memory
display.
6.1 Recall data
6. Memory
RESET SET
MEMORY/
MODE
RESET SET
MEMORY/
MODE
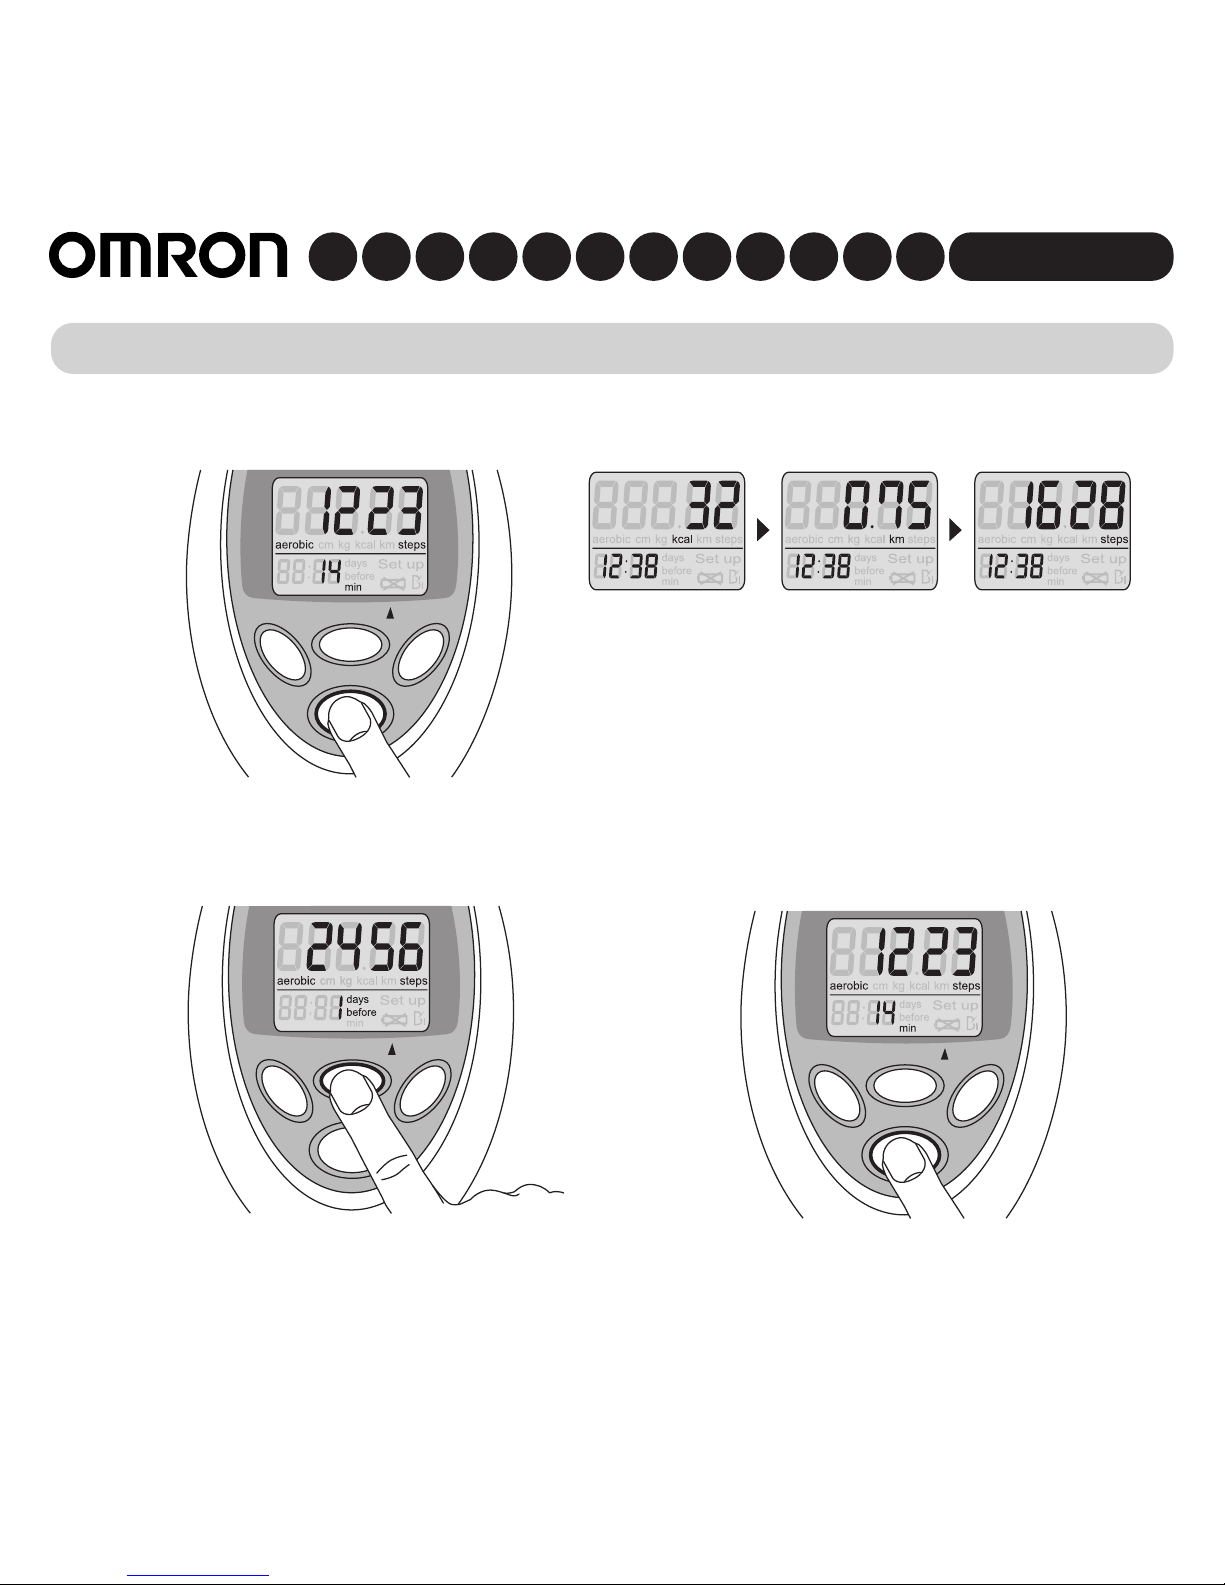
1 Press mode button one or several
times to select the mode you want:
• aerobic :number of steady steps
• kcal : calorie
• km : distance
• steps :number of steps
RESET SET
MEMORY/
MODE
Page 16
HJ-112-E English
• Use a soft, slightly moistened cloth to clean the OMRON HJ-112-E.
Caution! Do not use petrol, thinners or similar solvents!
• Do not carry out repairs of any kind yourself.
• Store the OMRON HJ-112-E in a dry, closed place.
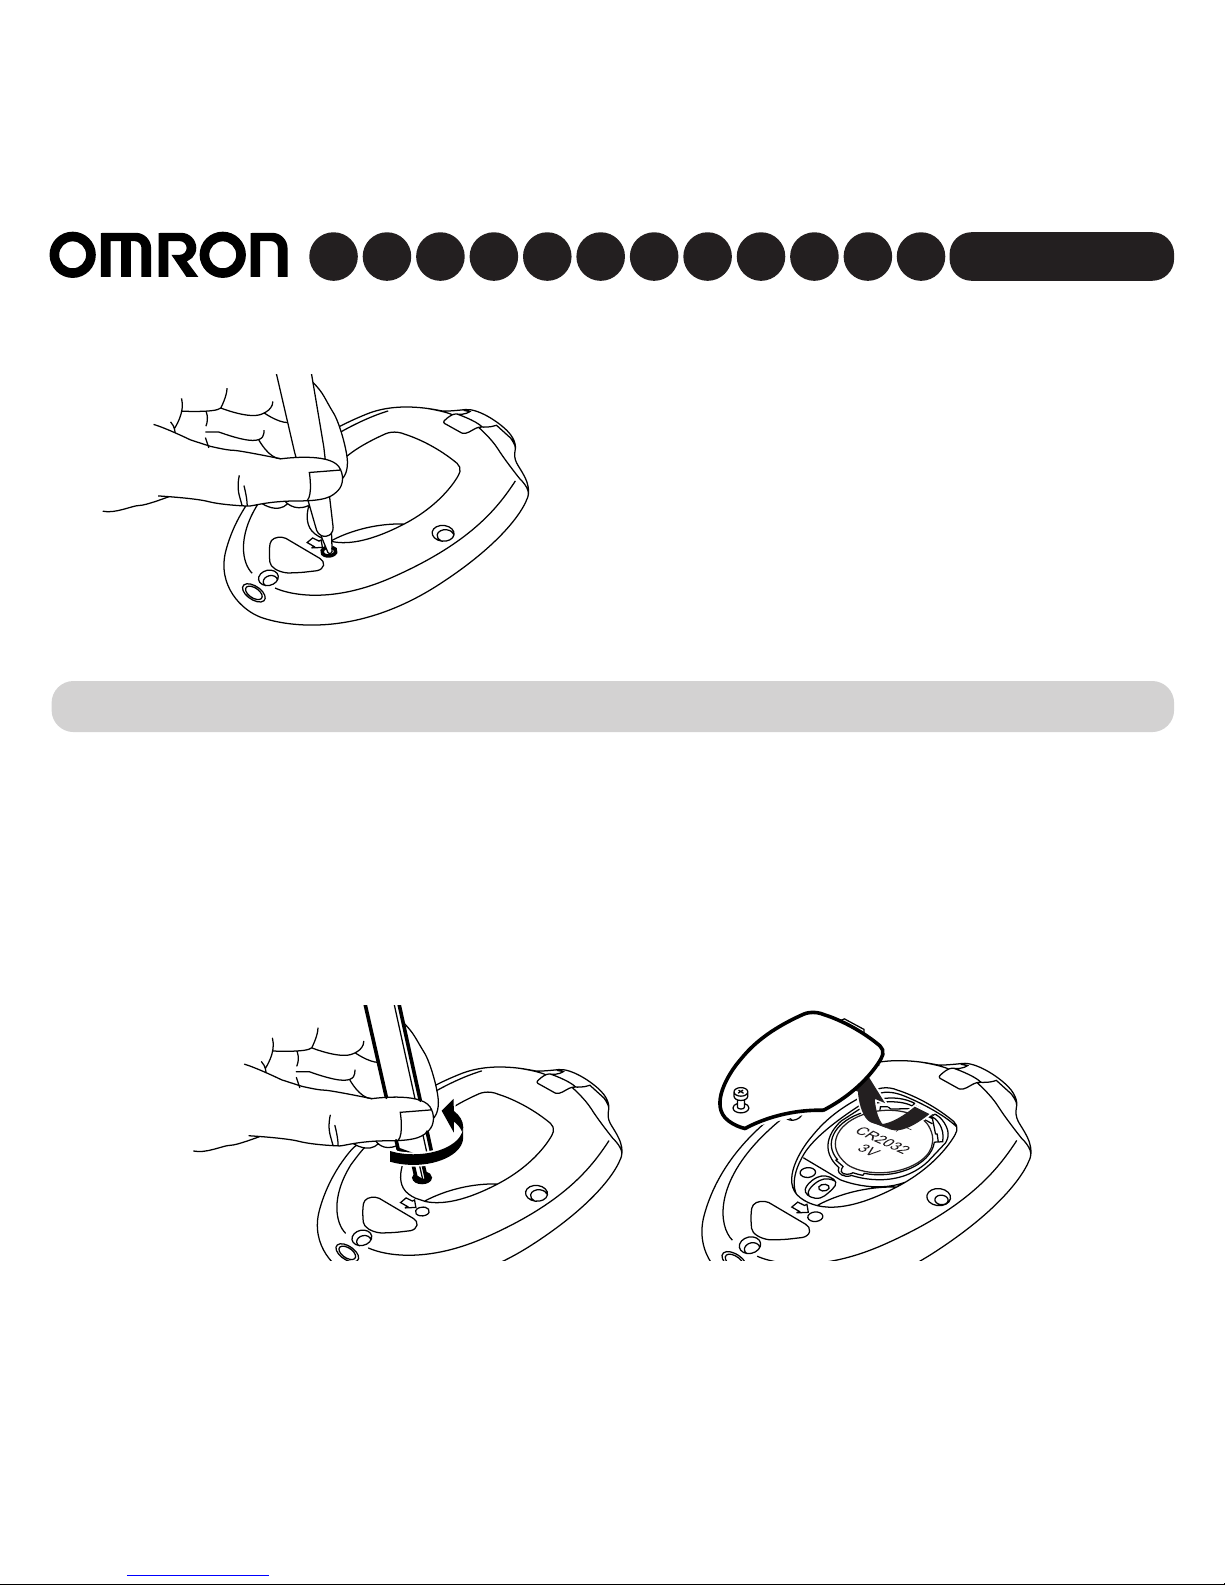
7.1 Replace battery
15
7. Care and Storage
1 Remove the battery cover.
6.2 Erase memory
1 Press system reset button.
Caution! All data memory and settings will
be erased!
Page 17
16
HJ-112-E English
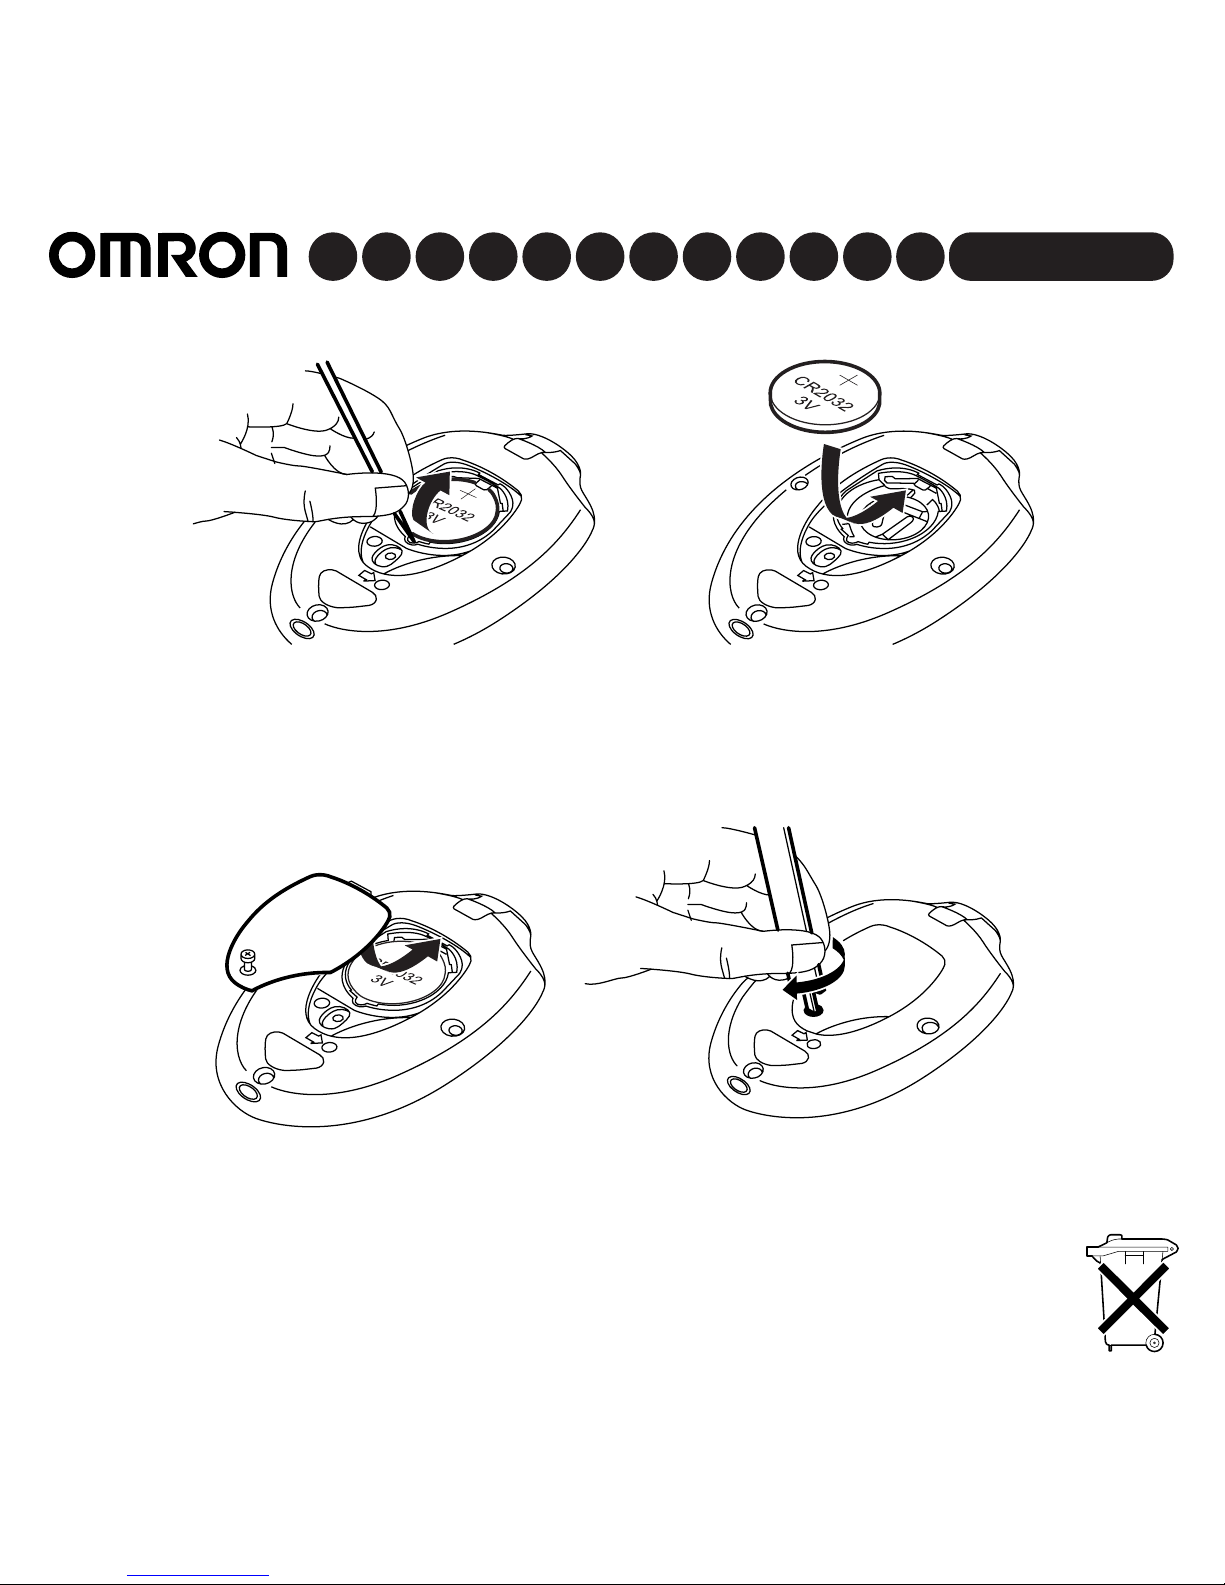
2 Remove the battery from the battery compartment and insert a new 3V lithium
battery type CR2032.
Caution! Do not use a metal object to remove battery!
3 Put the battery cover on the battery compartment and fasten the screw.
Attention! Disposal of batteries and the OMRON HJ-112-E should be carried
out in accordance with the national regulations for the disposal of electronic
products.
Page 18

HJ-112-E English
17
8. Faults: causes and rectifications
Fault Cause Rectification
Display Low voltage Battery weak/exhausted Fit a new 3V lithium
empty battery type CR2032
Inexplicable values Incorrect usage Follow instructions
You are walking with Walk at consistent
inconsistent pace pace all the time
The settings are wrong Change settings
Page 19

18
HJ-112-E English
9. Technical data
Product name OMRON Stepcounter HJ-112-E
Type HJ-112-E
Power supply 3V Lithium battery type CR2032
Battery life New battery will last for approx. 6 months (when used for
walking 10,000 steps a day)
Measurement range Number of steps: 0 to 99,999 steps / Number of steady steps: 0 to
99,999 steps / Duration of steady walk: 0 to 1440 minutes / Distance: 0.00
to 999.99 km / Calorie: 0 to 99,999 kcal / Time: 0:00 to 23:59
Memory Data from 7 days ago
Setting range Time: 0:00 to 23:59 / Weight: 30 to 136 kg in units of 1 kg /
Stride length: 30 to 120 cm in units of 1 cm
Operating temperature -10°C to +40°C
Precision of step counting Within ± 5% (by vibration testing machine)
Precision of time Within ± 30 seconds of the average monthly
deviation (under normal temperature)
External dimensions Approx. 73.5 x 52.4 x 19.1 mm
Weight Approx. 34 g (including battery)
Accessories 3V Lithium battery type CR2032, holder, strap, clip for strap,
screwdriver, instruction manual, warranty card, brochure
In the interest of product improvement, specifications are subject to change without notice.
Omron Healthcare Europe B.V. guarantees this product for 1 year after date of purchase. The guarantee
does not cover battery or packaging. The guarantee also does not cover damages of any kind due to
misusage (such as dropping or physical misuse) caused by the user. The claimed product will be replaced
only when returned together with the original invoice/ cash ticket.
EU-representative OMRON HEALTHCARE EUROPE B.V., Postbus 13, NL 2130 AA Hoofddorp
The Netherlands. Article number HJ-112-E, www.omron-healthcare.com
@: info.healthcare@eu.omron.com
Affiliate Companies OMRON HEALTHCARE (UK) LTD, 18-20 The Business Park, Henfield
West Sussex, BN5 9SL, England
Tel: 0845 130 8050, Fax: 01273 495123, @: information@eu.omron.com
OMRON MEDIZINTECHNIK Handelsgesellschaft mbH Windeckstraße 81a
D-68163 Mannheim, Germany
PZN: 023 11 65, Artikelnr. 084 003 000, www.omron-medizintechnik.de
Page 20

HJ-112-E Français
55
Introduction
Le podomètre OMRON HJ-112-E
surveille votre dépense physique et vous
indique le nombre de pas, la distance
parcourue, la durée et les calories brûlées en
marchant ou en courant. Après 10 minutes de
marche à allure constante, le mode aérobic
est activé. Ce mode vous aide à vous
construire un capital santé. Le nombre de pas
réguliers est enregistré dans la mémoire du
OMRON HJ-112-E.
Page 21

56
HJ-112-E Français
Table des matières
1. Utilisation du podomètre 57
1.1 Généralités 57
1.2 Conseils d'utilisation 57
1.3 Précautions 57
2. Présentation 58
3. Préparation 59
3.1 Assemblage du podomètre 59
3.2 Fixation du podomètre 60
4. Réglages 62
4.1 Fonctions de contrôle 62
4.2 Réinitialisation du système 62
4.3 Définition de la longueur des pas 63
4.4 Réglage de l'heure, du poids et de la longueur des pas 63
5. Fonctionnement 66
5.1 Ajustement des réglages 66
5.2 Utilisation 66
6. Mémoire 68
6.1 Rappel des données 68
6.2 Effacement de la mémoire 69
7. Entretien et rangement 69
7.1 Remplacement de la pile 69
8. Causes et résolutions des problèmes 71
9. Données techniques 72
Page 22

HJ-112-E Français
57
1. Utilisation du podomètre
1.1 Généralités
•Tenez le podomètre OMRON HJ-112-E hors de la portée des enfants.
1.2 Conseils d'utilisation
• Attachez le podomètre OMRON HJ-112-E perpendiculairement à la surface du sol.
•Portez des chaussures solides.
• Marchez ou courez à allure constante.
• Ne marchez et ne courez pas au milieu de la foule.
• Les mouvements de haut en bas peuvent provoquer des erreurs de lecture.
1.3 Précautions
• Ne jetez pas le podomètre OMRON HJ-112-E.
• Ne laissez pas tomber ou ne marchez pas sur le podomètre OMRON HJ-112-E.
• Evitez d'exposer le podomètre OMRON HJ-112-E aux rayons directs du soleil.
• Evitez de mettre le podomètre OMRON HJ-112-E en contact avec l'eau.
• L'environnement d'utilisation doit être exempt de vibrations excessives, de chocs, de
champs magnétiques, de bruits électriques, etc.
Page 23

58
HJ-112-E Français
A Unité principale
B Clé de serrage
C Pince
D Support
E Lanière
F Couvercle du compartiment à pile
G Vis du couvercle du compartiment à pile
C
B
F
G
E
D
A
2. Présentation
Page 24

HJ-112-E Français
59
3. Préparation
3.1 Assemblage du podomètre
1 Placez l'unité principale sur son support. 2 Attachez la lanière à l'unité principale.
3 Attachez la pince à la lanière. 4 Ouvrez et fermez la pince.
Page 25

60
HJ-112-E Français
3.2 Fixation du podomètre
Nous vous recommandons d'attacher votre podomètre à votre ceinture, poche ou sac.
Ceinture
1 Attachez l'unité principale à la ceinture de
votre short ou de votre pantalon.
Remarque : ne mettez pas l'unité principale sur ou dans la poche arrière de votre
pantalon.
2 Attachez la lanière à votre short ou
pantalon à l'aide de la pince.
1 Attachez l'unité principale sur le bord de
votre poche avant.
2 Attachez la lanière à vos vêtements à
l'aide de la pince.
Poche
Page 26

HJ-112-E Français
61
Sac
1 Attachez l'unité principale directement sur
votre sac ou sur l'une des poches.
Remarque : assurez-vous de garder
votre sac au plus près de vous.
2 Attachez la lanière sur le haut de votre sac.
Remarque : assurez-vous que l'unité
principale est bien fixée à votre sac.
Remarque : attachez l'unité principale perpendiculairement à la surface du sol.
Te mpératures extrêmes tolérées : -30°/+30°.
Remarque : Ne laissez pas pendre l'unité
principale à votre ceinture, votre pantalon
ou votre sac.
Page 27

62
HJ-112-E Français
4.1 Fonctions de contrôle
4. Réglages
H Ecran
J Bouton Reset (réinitialisation)
K Bouton Memory (mémoire)
L Bouton Set (réglage)
B Bouton Mode
N System reset (réinitialisation du système)
RESET SET
MEMORY/
MODE
K
J
M
L
N
H
4.2 Réinitialisation du système
1 Appuyez sur le bouton System reset.
Avertissement ! Toutes les données, la mémoire et les réglages seront effacés.
Page 28

HJ-112-E Français
63
4.3 Définition de la longueur des pas.
La longueur de pas moyenne est environ
40 % de la taille d'une personne.
Grands pas > 40 %, petits pas < 40 %
1 Calculez votre longueur de pas à l'aide
de l'une des méthodes suivantes :
a. Longueur de pas = taille (L) x 0,4
par ex. 170 cm x 0,4 = 68 cm ou
b. Marchez 100 mètres et comptez le
nombre de pas. Divisez la distance
parcourue par le nombre de pas.
Remarque : la méthode b est la plus
précise.
L x 0,4
L
4.4 Réglage de l'heure, du poids et de la longueur des pas
RESET SET
MEMORY/
MODE
RESET SET
MEMORY/
MODE
1 Appuyez sur le bouton Set pendant 2
secondes.
2 Appuyez sur le bouton Memory/▲pour
régler l'heure.
Page 29

64
HJ-112-E Français
3 Appuyez sur le bouton Set. 4 Appuyez sur le bouton Memory/▲pour
régler les minutes.
5 Appuyez sur le bouton de réglage pour
régler l'heure et passer ensuite au
réglage du poids.
Remarque : le réglage initial du poids est
30 kg.
6 Appuyez sur le bouton Memory/▲pour
définir votre poids.
Remarque : maintenez le bouton
Memory/▲enfoncé pour avancer par
tranches de 10 kg.
Remarque :maintenez Memory/▲enfoncé pour avancer par tranches de 10 minutes.
Remarque : si vous ne procédez à aucun réglage de l'heure pendant 5 minutes, l'écran
retourne au nombre de pas et l'heure reste inchangée.
RESET SET
MEMORY/
MODE
RESET SET
MEMORY/
MODE
RESET SET
MEMORY/
MODE
RESET SET
MEMORY/
MODE
Page 30

HJ-112-E Français
65
Remarque : si l'écran atteint 136 kg, il retourne automatiquement à 30 kg.
Remarque : si vous ne procédez à aucun réglage du poids pendant 5 minutes, l'écran
retourne au nombre de pas et le poids reste inchangé.
7 Appuyez sur le bouton Set pour régler le
poids et passer ensuite au réglage de la
longueur des pas.
Remarque : le réglage initial de la
longueur des pas est 40 cm.
8 Appuyez sur le bouton Memory/▲pour
régler la longueur des pas.
Remarque : maintenez le bouton Memory/
▲
enfoncé pour avancer par tranches de 10 cm.
Remarque : si l'écran atteint 120 cm, il
retourne automatiquement à 30 cm.
Remarque : si vous appuyez sur le bouton
Reset, l'écran retourne à 40 cm.
Remarque : si vous ne procédez à aucun
réglage de la longueur des pas pendant 5
minutes, l'écran retourne au nombre de pas
et la longueur des pas reste inchangée.
RESET SET
MEMORY/
MODE
RESET SET
MEMORY/
MODE
RESET SET
MEMORY/
MODE
9 Appuyez sur le bouton de réglage pour régler toutes les valeurs.
Page 31

66
HJ-112-E Français
5. Fonctionnement
5.1 Ajustement des réglages
1 Appuyez sur le bouton Set pendant 2
secondes.
2 Appuyez sur le bouton Memory/▲pour
ajuster l'heure.
Remarque : utilisez le bouton Set pour
passer d'un réglage à l'autre et les vérifier.
RESET SET
MEMORY/
MODE
RESET SET
MEMORY/
MODE
5.2 Utilisation
RESET SET
MEMORY/
MODE
1 Appuyez sur le bouton Reset pendant 2
secondes.
Remarque : toutes les données seront
remises à zéro.
2 Attachez sur vous l'unité principale. Voir “
Fixation du podomètre ”.
Remarque : placez l'unité principale sur son
support pour surveiller votre dépense physique.
Page 32

HJ-112-E Français
RESET SET
MEMORY/
MODE
RESET SET
MEMORY/
MODE
3 Commencez à marcher / courir.
Remarque : après 10 minutes de marche
ou de course à allure constante le mode
aérobic est activé.
4 Appuyez sur le bouton Mode. 5 Appuyez sur le bouton Reset pendant 2
secondes.
67
Remarque : toutes les données du jour (nombre de pas, nombre de pas réguliers, durée de
la marche régulière, calories dépensées, distance parcourue) seront remises à zéro, mais
gardées en mémoire.
Remarque :vous ne pouvez pas éteindre l'unité.
Page 33

68
HJ-112-E Français
2 Appuyez sur le bouton Memory/▲pour
rappeler les données en mémoire.
Remarque : lorsque vous affichez des
valeurs en mémoire, le nombre de pas
effectués n'est pas pris en compte.
3 Appuyez sur le bouton Mode pour quitter
les données en mémoire.
6.1 Rappel des données
6. Mémoire
RESET SET
MEMORY/
MODE
RESET SET
MEMORY/
MODE
1 Appuyez sur le bouton Mode une ou
plusieurs fois pour sélectionner le mode
souhaité.
• aerobic : nombre de pas réguliers
• kcal : calorie
• km : distance
• steps : nombre de pas
RESET SET
MEMORY/
MODE
Page 34

HJ-112-E Français
69
• Nettoyez le podomètre OMRON HJ-112-E à l'aide d'un chiffon doux et humide.
Avertissement ! N'utilisez pas d'alcool à brûler, de solvants ou d'autres produits similaires.
• N'entreprenez aucune réparation vous-même.
• Rangez l'OMRON HJ-112-E dans un endroit sec et fermé.
7.1 Remplacement de la pile
7. Entretien et rangement
1 Retirez le couvercle du compartiment à pile.
6.2 Effacement de la mémoire
1 Appuyez sur le bouton System reset.
Avertissement ! Toutes les données et les
réglages contenus dans la mémoire seront
effacés !
Page 35

70
HJ-112-E Français
2 Retirez la pile de son compartiment et introduisez une nouvelle pile au lithium 3 V de
type CR2032.
Avertissement ! N'utilisez pas d'objet métallique pour retirer la pile !
3 Remettez en place le couvercle du compartiment à pile et serrez la vis.
Attention ! La mise au rebut des piles et du podomètre OMRON HJ-112-E doit se
faire conformément aux réglementations nationales relatives à la mise au rebut des
produits électroniques.
Page 36

HJ-112-E Français
71
8. Causes et résolutions des problèmes
Problème Cause Solution
Ecran
Tension Pile faible/usée Remettez une nouvelle pile au
vide
électrique lithium 3 V de type CR2032
faible
Valeurs inexplicables Mauvaise utilisation Suivez les instructions
Vous marchez à Marchez toujours
allure irrégulière à allure régulière
Les réglages sont faux Modifiez les réglages
Page 37

72
HJ-112-E Français
9. Données techniques
Nom du produit Podomètre OMRON HJ-112-E
Type HJ-112-E
Alimentation Pile au lithium 3 V de type CR2032
Durée de vie des piles Une nouvelle pile dure environ 6 mois (si vous effectuez une marche
journalière de 10 000 pas)
Plage de mesures Nombre de pas : de 0 à 99 999 pas / Nombre de pas réguliers : de 0 à 99
999 pas / Durée d'une marche régulière : de 0 à 1 440 minutes / Distance :
de 0 à 999,99 km / Calories : de 0 à 99 999 kcal / Heure : de 0:00 à 23:59
Mémoire Données des 7 derniers jours
Plage de réglages Heure : de 0:00 à 23:59 / Poids : de 30 à 136 kg par unités de 1 kg /
Longueur des pas : de 30 à 120 cm par unités de 1 cm
Température de fonctionnement -10°C à +40°C
Précision du comptage des pas +/- 5 % (test de vibration réalisé sur machine)
Précision de l'heure +/- 30 secondes du décalage mensuel moyen (dans des conditions normales
de température)
Dimensions externes Environ 73,5 x 52,4 x 19,1 mm
Poids Environ 34 g (pile incluse)
Accessoires Pile au lithium 3 V de type CR2032, support, lanière, pince pour la lanière,
clé de serrage, manuel d'utilisation, garantie, brochure.
Afin d'améliorer le produit, les spécifications sont sujettes à modifications sans avis préalable.
Omron Healthcare Europe B.V. assure une garantie d'un an pour ce produit à compter de sa date d'achat. La
garantie ne couvre pas la pile ou l'emballage ni aucun dommage d'aucune sorte résultant d'une mauvaise
utilisation (telle qu'une chute ou un manque de soin) engageant la responsabilité de l'utilisateur. Le produit objet
du litige sera remplacé uniquement s'il est accompagné de la facture ou du ticket de caisse d'origine.
Représentant européen OMRON HEALTHCARE EUROPE B.V., Postbus 13, NL 2130 AA Hoofddorp
Pays-bas, Article n° HJ-112-E, www.omron-healthcare.com
@: info.healthcare@eu.omron.com
Sociétés affiliées OMRON HEALTHCARE (UK) LTD, 18-20 The Business Park, Henfield
West Sussex, BN5 9SL, Royaume-Uni. Tel : 0845 130 8050
Fax : 01273 495123, @: information@eu.omron.com
OMRON MEDIZINTECHNIK Handelsgesellschaft mbH Windeckstraße 81a
D-68163 Mannheim, Allemagne. PZN: 023 11 65
Artikelnr. 084 003 000, www.omron-medizintechnik.de
Page 38

HJ-112-E Español
91
Introducción
El cuentapasos OMRON HJ-112-E
controla los pasos, la distancia y la duración de sus ejercicios, así como las
calorías quemadas durante el paseo o la
carrera. Tras haber caminado durante 10
minutos a un paso uniforme, se activará el
modo aeróbico. El modo aeróbico le ayuda
a mantenerse sano. El número de pasos
uniformes se almacena en la memoria del
cuentapasos OMRON HJ-112-E.
Page 39

92
HJ-112-E Español
Índice
1. Uso del cuentapasos 93
1.1 Generalidades 93
1.2 Consejos de uso 93
1.3 Precauciones 93
2. Descripción general 94
3. Preparación 95
3.1 Montaje del cuentapasos 95
3.2 Fijación del cuentapasos 96
4. Configuración 98
4.1 Funciones de control 98
4.2 Restablecimiento del sistema 98
4.3 Determinación de la longitud de sus pasos 99
4.4 Establecimiento de la hora, el peso y la longitud de sus pasos 99
5. Funcionamiento 102
5.1 Ajuste de la configuración 102
5.2 Utilización 102
6. Memoria 104
6.1 Recuperación de los datos 104
6.2 Borrado de la memoria 105
7. Cuidados y almacenamiento 105
7.1 Sustitución de la pila 105
8. Problemas: causas y soluciones 107
9. Especificaciones técnicas 108
Page 40

HJ-112-E Español
93
1. Uso del cuentapasos
1.1 Generalidades
• Mantenga el cuentapasos OMRON HJ-112-E fuera del alcance de los niños.
1.2 Consejos de uso
• Fije el aparato de forma que quede perpendicular al suelo.
• Lleve calzado firme.
• Camine o corra a un paso uniforme
• No camine ni corra en lugares muy concurridos.
• Los movimientos hacia arriba y hacia abajo pueden producir lecturas incorrectas.
1.3 Precauciones
• Evite que el cuentapasos OMRON HJ-112-E se balancee.
• No lo deje caer ni lo pise.
• Evite que el aparato quede expuesto directamente a la luz del sol.
• Mantenga seco el cuentapasos OMRON HJ-112-E.
• En el entorno no debe haber vibraciones excesivas, movimientos bruscos, campos
magnéticos, ruido eléctrico, etc.
Page 41

94
HJ-112-E Español
A Unidad principal
B Destornillador
C Clip
D Soporte
E Correa
F Tapa del compartimento de las pilas
G To r nillo del compartimento de las pilas
C
B
F
G
E
D
A
2. Descripción general
Page 42

HJ-112-E Español
95
3. Preparaciòn
3.1 Montaje del cuentapasos
1 Coloque la unidad principal en el soporte. 2 Fije la correa a la unidad principal.
3 Fije el clip a la correa. 4 Abra y cierre el clip.
Page 43

96
HJ-112-E Español
3.2 Fijación del cuentapasos
Le recomendamos que fije el cuentapasos a su cinturón, bolsillo o bolso.
Cinturón
1 Fije la unidad principal a la parte supe-
rior de los pantalones o al cinturón.
Nota: no ponga nunca la unidad dentro
del bolsillo trasero de los pantalones ni
la sujete al mismo.
2 Fije la correa a los pantalones.
1 Fije la unidad principal al borde
superior del bolsillo delantero.
2 Fije la correa a la prenda.
Bolsillo
Page 44

HJ-112-E Español
97
Bolso
1 Fije la unidad principal al bolsillo o una
de las secciones del bolso.
Nota: sujete bien el bolso.
2 Fije la correa al borde del bolso.
Nota: compruebe que la unidad
principal esté bien sujeta al bolso.
Nota: fije la unidad principal de forma que
quede perpendicular al suelo.
Tolerancia máx.: –30° / +30°.
Nota: no lleve la unidad principal
colgando del cinturón, los pantalones o
un bolso.
Page 45

98
HJ-112-E Español
4.1 Funciones de control
4. Configuración
H Visor
J Botón Reset (Restablecer)
K Botón Memory/ (Memoria/▲)
L Botón Set (Establecer)
M Botón Mode (Modo)
N Botón de restablecimiento del sistema
RESET SET
MEMORY/
MODE
K
J
M
L
N
H
4.2 Restablecimiento del sistema
1 Pulse el botón de restablecimiento del sistema.
Advertencia: se borrarán todos los datos, la memoria y la configuración.
Page 46

HJ-112-E Español
99
4.3 Determinación de la longitud de sus
pasos
La longitud media de un paso suele equivaler
al 40% de la longitud del cuerpo. Pasos
grandes > 40%, pasos pequeños < 40%
1 Calcule la longitud de sus pasos mediante
la fórmula siguiente:
a. Longitud del paso = longitud del cuerpo
(L) x 0,4 p.ej. 170 cm x 0,4 = 68 cm o
b. Cuente cuántos pasos da en 100
metros. Divida la distancia caminada por el
número de pasos.
Nota: el método b es más preciso.
L x 0,4
L
4.4 Establecimiento de la hora, el peso y la longitud de sus pasos
RESET SET
MEMORY/
MODE
RESET SET
MEMORY/
MODE
1 Pulse el botón Set durante 2 segundos. 2 Pulse el botón Memory/▲para
establecer la hora.
Page 47

100
HJ-112-E Español
3 Pulse el botón Set. 4 Pulse el botón Memory/▲para
establecer los minutos.
5 Pulse el botón Set para grabar la hora
y pasar a establecer el peso.
Nota: el peso inicial es 30 kg.
6 Pulse el botón Memory/▲para
introducir su peso.
Nota: mantenga pulsado el botón
Memory/▲para hacer avanzar los kilos
de 10 en 10.
Nota: mantenga pulsado el botón Memory/▲para hacer avanzar los minutos de 10 en 10.
Nota: si no realiza cambios durante 5 minutos, se volverá a la pantalla de número de
pasos y no se cambiará la hora.
RESET SET
MEMORY/
MODE
RESET SET
MEMORY/
MODE
RESET SET
MEMORY/
MODE
RESET SET
MEMORY/
MODE
Page 48

HJ-112-E Español
101
Nota: si se llega a los 136 kg, la pantalla volverá a 30 kg.
Nota: si no realiza cambios durante 5 minutos, se volverá a la pantalla de número de
pasos y no se cambiará el peso.
7 Pulse el botón Set para grabar el peso
y empezar a establecer la longitud de
paso.
Nota: la longitud de paso inicial es 40 cm.
8 Pulse el botón Memory/▲para
introducir la longitud de paso.
Nota: mantenga pulsado el botón
Memory/▲para hacer avanzar los
centímetros de 10 en 10.
Nota: si se llega a los 120 cm, la
pantalla volverá a 30 cm.
Nota: si pulsa el botón Reset, la
pantalla volverá a 40 cm.
Nota: si no realiza cambios durante 5
minutos, se volverá a la pantalla de
número de pasos y no se cambiará la
longitud de paso.
RESET SET
MEMORY/
MODE
RESET SET
MEMORY/
MODE
RESET SET
MEMORY/
MODE
9 Pulse el botón Set para grabar todos los valores.
Page 49

102
HJ-112-E Español
5. Funcionamiento
5.1 Ajuste de la configuración
1 Pulse el botón Set durante 2 segundos. 2 Pulse el botón Memory/ para ajustar la
hora. Nota: use el botón Set para
desplazarse por los valores de
configuración y comprobarlos.
RESET SET
MEMORY/
MODE
RESET SET
MEMORY/
MODE
5.2 Utilización
RESET SET
MEMORY/
MODE
1 Pulse el botón Reset durante 2
segundos.
Nota: todos los datos volverán a 0.
2 Fije la unidad principal a su cuerpo.
Consulte "Fijación del cuentapasos".
Nota: fije la unidad principal al soporte
para realizar el seguimiento de sus
ejercicios.
Page 50

HJ-112-E Español
RESET SET
MEMORY/
MODE
RESET SET
MEMORY/
MODE
3 Empiece a caminar o correr.
Nota:tras haber caminado o corrido
durante 10 minutos a un paso uniforme,
se activará el modo aeróbico.
4 Pulse el botón Mode. 5 Pulse el botón Reset durante 2
segundos.
103
Nota: todos los datos de hoy (el número de pasos, número de pasos uniformes,
duración de los paseos uniformes, calorías y distancia) volverán a 0, pero
permanecerán en la memoria.
Nota: no se puede apagar la unidad.
Page 51

104
HJ-112-E Español
2 Pulse el botón Memory/ para recuperar
los datos anteriores. Nota: mientras se
muestren los valores de la memoria, no
se contarán los pasos que dé.
3 Pulse el botón Mode para salir de la
visualización de memoria.
6.1 Recuperación de los datos
6. Memoria
RESET SET
MEMORY/
MODE
RESET SET
MEMORY/
MODE
1 Pulse el botón Mode de manera
repetida hasta que aparezca el modo
deseado:
• aerobic : número de pasos uniformes
• kcal : calorías
• km : distancia
• steps : número de pasos
RESET SET
MEMORY/
MODE
Page 52

HJ-112-E Español
105
• Utilice un paño suave y ligeramente húmedo para limpiar el cuentapasos OMRON
HJ-112-E.
Atención: no utilice gasolina, disolventes ni ningún otro tipo de solución parecida.
• No realice ningún tipo de reparación por su cuenta.
• Guarde el cuentapasos en un lugar cerrado y sin humedad.
7.1 Sustitución de la pila
7. Cuidados y almacenamiento
1 Retire la tapa del compartimento de las pilas.
6.2 Borrado de la memoria
1 Pulse el botón de restablecimiento del
sistema.
Advertencia: se borrarán todos los datos
de la memoria y la configuración.
Page 53

106
HJ-112-E Español
2 Retire la pila del compartimento e inserte una pila de litio nueva de 3 V del tipo
CR2032.
Advertencia: no utilice objetos metálicos para retirar la pila.
3 Vuelva a colocar la tapa en el compartimento de las pilas y fije el tornillo.
Atención: las pilas y el cuentapasos OMRON HJ-112-E deberán desecharse
de acuerdo con las normas de desecho de productos electrónicos de cada
país.
Page 54

HJ-112-E Español
107
8. Problemas: causas y soluciones
Problema Causa Soluciòn
Visor Voltaje Pila con poca carga o Cámbiela por otra pila de
vacío bajo descargada litio de 3 V del tipo CR2032
Valores inexplicables Uso incorrecto Siga las instrucciones
No camina a un Camine a un paso
paso uniforme uniforme todo el tiempo
Configuración incorrecta Cambie la configuración
Page 55

108
HJ-112-E Español
9. Especificaciones técnicas
Nombre del producto Cuentapasos OMRON HJ-112-E
Tipo HJ-112-E
Alimentación Batería de litio de 3 V de tipo CR2032
Duración de las pilas Una pila nueva durará unos 6 meses (a un promedio de 10.000 pasos
por día)
Rango de medición Número de pasos: de 0 a 99.999 pasos / Número de pasos uniformes:
de 0 a 99.999 pasos / Duración de paseo uniforme: de 0 a 1.440 minutos
/ Distancia: de 0,00 a 999,99 km / Calorías: de 0 a 99.999 kcal / Hora: de
0:00 a 23:59
Memoria Datos de los últimos 7 días
Rango de configuración Hora: de 0:00 a 23:59 / Peso: de 30 a 136 kg en unidades de 1 kg
Longitud de paso: de 30 a 120 cm en unidades de 1 cm
Temperatura de funcionamiento de -10°C a +40°C
Precisión del recuento de pasos +/- 5 % (según la prueba de vibraciones del aparato)
Exactitud de la hora Promedio de +/- 30 segundos de desviación por mes (en condiciones
normales de temperatura)
Dimensiones externas Aprox. 73,5 x 52,4 x 19,1 mm
Peso Aprox. 34 g (pila incluida)
Accesorios Pila de litio de 3 V de tipo CR2032, soporte, correa, clip para la correa,
destornillador, manual de instrucciones, tarjeta de garantía, folleto
Con el fin de mejorar el producto, las especificaciones están sujetas a cambios sin previo aviso.
Omron Healthcare Europe B.V. garantiza este producto durante un año a partir de la fecha de compra. La
garantía no se aplica a la pila ni al embalaje, ni tampoco se aplica a daños debidos a un uso incorrecto por
parte del usuario (como dejar caer la unidad o un uso físico incorrecto). El producto sólo se sustituirá si se
devuelve con la factura o el recibo original.
Representante en la UE OMRON HEALTHCARE EUROPE B.V., Postbus 13, NL 2130 AA
Hoofddorp, Países Bajos. Número de referencia: HJ-112-E
www.omron-healthcare.com, Correo electrónico:
info.healthcare@eu.omron.com
Filiales OMRON HEALTHCARE (UK) LTD, 18-20 The Business Park, Henfield,
West Sussex, BN5 9SL, Inglaterra. Tel.: 0845 130 8050, Fax: 01273 495123
Correo electrónico: information@eu.omron.com
OMRON MEDIZINTECHNIK Handelsgesellschaft mbH Windeckstraße 81a
D-68163 Mannheim, Alemania. Código PZN: 023 11 65
Número de referencia: 084 003 000. www.omron-medizintechnik.de
 Loading...