

Page 1
INSTRUCTION MANUAL
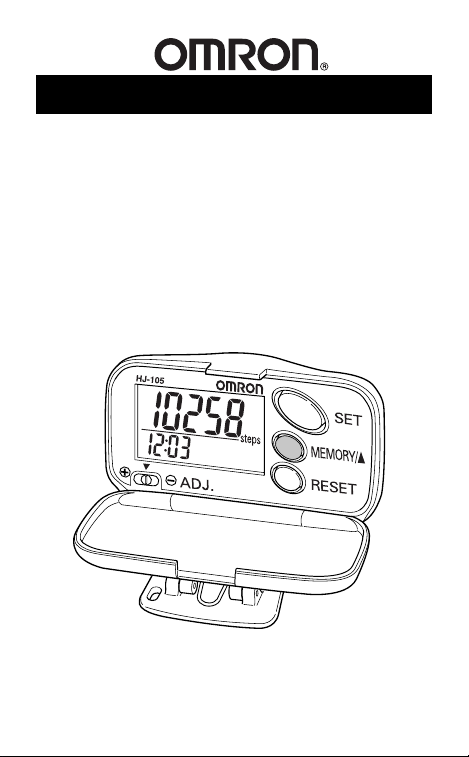
OMRON Pedometer
Model HJ-105
Page 2

TABLE OF CONTENTS
Before Using the Unit
Introduction ..........................................................................3
Important Safety Notes.........................................................4
Know Your Unit .....................................................................5
Features
Aerobic Step Function ................................................. 6
Calorie/Amount of fat burned ..................................... 7
Stride length measurement .......................................... 8
Operating Instructions
Activating the Battery...........................................................9
Setting the Time....................................................................9
Setting the Weight ..............................................................10
Setting the Stride Length....................................................10
Attaching the Pedometer ....................................................11
Using the Pedometer...........................................................12
Adjusting the Sensitivity Switch ........................................12
Using the Memory Function...............................................13
Troubleshooting..................................................................14
Care and Maintenance
Battery Installation .............................................................15
Care for your Unit ..............................................................16
Specifications......................................................................17
Warranty Information ....................................................... 18
Notes ................................................................................. 19
2
Page 3

INTRODUCTION
3
Thank you for purchasing the Omron HJ-105 Pedometer.
Fill-in for future reference
DATE PURCHASED:
Staple your purchase receipt here.
A pedometer is a great motivational tool to track your
distance, the number of steps you take and how many
calories you burn. The convenient memory function
supports the management of daily walking. The dual
display function shows both the time and the number
of steps simultaneously. You can easily set and reach
your daily goals.
Your HJ-105 comes with the following components:
• Main Unit
• LR43 Battery (installed)
• Instruction Manual
Save These Instructions
Page 4

IMPORTANT SAFETY NOTES
4
To assure the correct use of the product basic safety
measures should always be followed including the
precautions listed below:
• Read all information in the instruction book and any other
literature included in the box before using the unit.
• Operate the unit only as intended. Do not use for any
other purpose.
•Keep the unit out of reach of young children. If a young
child swallows the battery, battery cover, or screw
immediately consult with a doctor.
• Properly dispose of used battery. Do not throw the battery
into fire. The battery may explode.
• Do not disassemble or modify the unit. Changes or
modifications not approved by Omron Healthcare will
void the user warranty.
•Consult your physician or healthcare provider before
beginning an exercise program.
Page 5
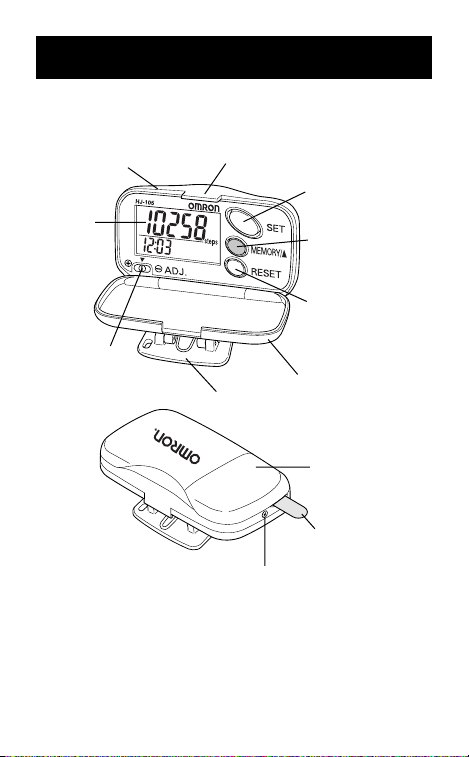
Sensitivity
Adjustment
Switch
Screw for battery cover
Digital
Display
Tab
Front Case
RESET Button
SET Button
MEMORY/▲
Button
Back Case
Clip
Battery Cover
Protective Film
5
KNOW YOUR UNIT
Page 6

AEROBIC STEP FUNCTION
6
Helpful for building your health, the unit can measure the
number of aerobic steps that can be considered an effective
exercise to improve cardiovascular fitness.
The number of “aerobic steps” indicates the number of steps
that can be considered as effective aerobic exercise.
The unit displays the total number of steps in a day, which
satisfies the following two conditions:
1. Walk more that 60 steps per minute
2. Walk for more that 10 minutes continuously
The total duration you walked as the number of
aerobic steps is also displayed in minutes.
Example: If you walk for 20 minutes at the speed of 120 steps
per minute, the number of aerobic steps is 2400.
NOTE: Taking a rest for less than 1 minute during
continuous walking for more than 10 minutes
is considered as continuous walking.
Page 7

7
Calorie/Amount of Burned Fat
The amount of fat burned is displayed in grams
simultaneously with the amount of calories consumed.
This information can be used for diet planning.
The calorie/amount of fat burned display indicates the
estimated calories consumed by walking calculated from the
weight, stride distance, number of steps, and walking speed.
The actual calories/amount of fat burned varies with age and
gender. To improve the accuracy of the calculation, multiply
the displayed calorie/amount of fat burned by the coefficient
in the table shown below.
Example of correction:
For a woman in her
50's with the calorie
display of 300, the
consumed calorie is
calculated as follows.
300 x 0.95 = 285 kcal
Correction coefficient
for calorie display
Man Woman
20's 1.10 1.07
30's 1.05 1.01
40's 1.02 0.97
50's 1.01 0.95
60's 1.00 0.95
70's 0.98 0.96
80's 0.95 0.95
CALORIE/AMOUNT
OF FAT BURNED
7
Page 8

8
STRIDE LENGTH MEASUREMENT
Measure your stride length before beginning to
set the pedometer.
1. How to measure your stride length
Walk 10 steps with your normal stride as illustrated below.
2. Measure the distance from START to END in inches.
3. Calculate your stride length by dividing the total
distance by 10.
4. Convert your stride length to feet and inches. You will set
the stride length using feet and inches.
Example:
Total Distance from START to END = 320'' (inches)
320” ÷ 10 = 32'' (inches)
32” = 2' 8'' (2 feet 8 inches)
Conversion Chart
12'' inches = 1' foot
24'' inches = 2' feet
36'' inches = 3' feet
48'' inches = 4' feet
Tip of toe of
leading foot.
Tip of toe of
back foot.
4
3
START
1
2
END
9
10
5
7
6
8
320"
Page 9

9
ACTIVATING THE BATTERY
Open the unit and remove the protective film from the
face of the display.
The pedometer will not draw power from the battery until
the insulation film is removed.
Pull the tab in the direction of the arrow
as illustrated.
All displays will turn on for approximately
2 seconds. The unit will proceed to the
setting mode.
1. Press and hold the SET Button.
Hour Display Blinking
2. Press the MEMORY Button
to adjust the hour.
NOTE: Press and hold the RESET
Button for 2 seconds to reset
the hour to 12AM.
Press the SET Button
Minute Display Blinking
3. Press the MEMORY Button to adjust
the minute. Press and hold the MEMORY
Button to advance in 10-minute increments.
NOTE: Press and hold the RESET Button
for 2 seconds to reset the minute to 00.
Press the SET Button.
The time is set.
Weight Display Blinking
SETTING THE TIME
Example: To set the
time to 2:30 p.m.
Km
Kg
step
Page 10

10
SETTING THE WEIGHT
Set weight within the range of 70 to 300 pounds
Weight Display Blinking
1. Press the MEMORY Button to adjust
the weight. Press and hold the MEMORY
Button to advance in 10-pound increments.
NOTE: Press and hold the RESET Button
for 2 seconds to reset the weight
to 88 pounds.
Press the SET Button.
The weight is set.
Stride Display Blinking
Example: To set the
weight to 145 lbs
SETTING THE STRIDE LENGTH
Set stride length between 1'00" and 4'00".
1. Press the MEMORY Button to adjust
the stride length. When the stride length
reaches 4'00” the display will return
to 1'00".
NOTE: Press and hold the RESET Button
for 2 seconds to reset the stride length to 1'08".
Press the SET Button.
The stride length is set. The screen will display
the number of steps and the time.
NOTE: If the Set Button is not pressed
for 5 minutes without setting
the time, weight, or stride
length the screen will display the number of
steps and time. Refer to Setting the Time
to set the unit.
Example: To set the
stride distance to 1'10''
Page 11

11
ATTACHING THE PEDOMETER
Clip the pedometer to your belt or the top of
your waistband.
The unit must be positioned horizontal with the ground
for the unit to function correctly.
The case should be closed during use. Open only to see
readings. The unit will not count steps if the case is open.
NOTE: The unit may not count steps correctly in the
following conditions:
1. When the unit is being set
2. When you walk at an inconsistent pace
• When you shuffle or wear sandals
• When you fail to walk consistently in a crowded place
3. When you use the unit in a place where up and down
movements take place
• Standing up and/or sitting down
• Playing sports other than walking
• Ascending or descending movement on stairs
or steep slopes
•Vertical or horizontal vibration in a moving vehicle
such as a bicycle, automobile, train or bus
Page 12

12
USING THE PEDOMETER
After you have completed setting the pedometer the unit
may display steps, number of aerobic steps,
calories and distance.
1. Press the RESET Button for 2 seconds
to reset the data to zero.
2. Close the case and attach the unit to
your belt or waistband.
3. Walk 100 steps to confirm the unit
counts your number of steps correctly.
Note: If a discrepancy between the number of steps walked
and the number of steps displayed on the unit is
found adjust the sensitivity switch.
4. Start walking.
ADJUSTING THE
SENSITIVITY SWITCH
The unit can be adjusted to a +/ - 5% accuracy rate (+/ - 5%
steps against 100 steps) when used on a level surface at
a consistent walking pace.
Attach the unit to your belt or waistband
and walk 100 steps.
• Reading is 105 steps or more
Slide the ADJ. Switch to the
minus direction.
• Reading is 95 steps or less
Slide the ADJ. Switch to the plus direction.
NOTE: You may need to adjust the Sensitivity Switch if
you change your walking speed.
-
+
Page 13

13
USING THE MEMORY FUNCTION
This unit can store up to seven days of data for the number of
steps, number of aerobic steps with minutes for aerobic steps,
calorie with amount of fat burned, and distance.
The current day data is automatically stored in memory when
the time reaches 12:00 AM. The display will return to zero.
You do not need to press the RESET Button every day.
NOTE: The time must be correctly set in the unit.
How to view data stored in the memory
Press the SET Button until the data you
want to see is displayed:
Steps
Aerobic Steps / Aerobic Time
Calories Consumes / Fat Grams Burned
Distance
Press the MEMORY Button.
The previous day data is displayed.
Continue to press the MEMORY Button
until all seven days of stored data
is displayed.
NOTE: The time is not displayed when using
the memory function.
Page 14

14
TROUBLESHOOTING
Problem Probable Cause How to Correct
The battery
indicator blinks.
The set values
are wrong.
Change in
walking speed.
The polarities
of the battery
(+ and -) are
aligned in the
wrong direction.
Nothing is
displayed.
Replace the
battery with
a new LR43.
The battery is
low or worn.
Adjust the
sensitivity
control switch.
Check the
weight and stride
length settings.
The unit is
positioned
incorrectly.
Case open
during use.
Up and down
movement.
Inconsistent pace.
Replace the
battery with
a new LR43.
The battery is
worn.
Insert the
battery in
the correct
alignment.
Refer to
“Attaching the
Pedometer”
on Page 11.
The displayed
values are
incorrect.
Page 15

15
BATTERY INSTALLATION
When the battery is removed from the unit the settings will
return to the default values. All data stored in the memory
will be erased.
1. Remove the screw from the battery cover.
Use a Phillips screwdriver.
2. Open the battery cover.
3. Replace the battery with a new
LR43 battery.
Face the positive (+) side of the new
battery upwards. Insert the battery in the
direction of an arrow.
4. Close the battery cover.
5. Tighten the screw on the battery cover.
NOTE: After installing the new battery set time of day,
weight and stride length.
Page 16

16
CARE AND MAINTENANCE
Clean the unit with a soft dry cloth.
• Do not use any abrasive or volatile cleaners.
• The unit is not waterproof. Do not wash it or touch it
with wet hands.
•Never immerse the unit in water.
• Be careful so water does not get into the unit.
Store the unit in a safe and dry location.
• Avoid the unit being exposed to direct sunlight, high
temperatures, high humidity, water and/or dust.
Do not subject the unit to strong shock, drop, or step
on the unit.
Use the unit consistent with the instruction provided
in this manual.
.
Page 17

17
SPECIFICATIONS
Model: Omron Pedometer HJ-105
Power Supply: 1.5 VDC (one LR43 battery)
Measurement Range: Number of steps: 0 to 99,999 steps
Number of aerobic steps
:0 to 99,999 steps
Duration of aerobic walk
:0 to 1440 minutes
Calorie: 0 to 99,999 kcal
Amount of burned fat
: 0.0 to 199.9 g
Distance: 0.00 to 999.99 miles
Time: 12:00 AM to 11:59 PM
Memory: Number of steps: previous 7 days
Number of aerobic steps
: previous 7 days
Duration of aerobic walk
: previous 7 days
Calorie: previous 7 days
Amount of burned fat
: previous 7 days
Distance: previous 7 days
Setting Range: Time: 12:00 AM to 11:59 PM
(12 hour display)
Weight: 70 to 300 lbs
(in increments of 1 lb.)
Stride Length: 1'00'' to 4'00''
(in increments of 1'')
Operating Temperature:
14°F to 104°F (-10°C to +40°C)
Precision of
Step Counting:
Within +/- 5% (by vibration testing machine)
Time Precision: Within +/- 90 seconds of the average monthly
deviation (under normal temperature)
Battery Life: Approx. 3 months. Varies depending on usage
External Dimensions: Approx. 2 1/2'' x 1 1/2'' x 1''
Weight: Approx. 0.85 oz (including the battery)
Contents: 1 Pedometer, 1Battery (LR43 installed) and
1 Instruction Manual
• Specifications are subject to change without notice.
Page 18

18
WARRANTY INFORMATION
LIMITED WARRANTIES
Your HJ-105 Pedometer, excluding the battery, is warranted to be
free from defects in materials and workmanship appearing within
1 year, when used in accordance with the instructions provided
with the monitor. The above warranties extend only to the
original retail purchaser.
We will, at our option, repair or replace without charge the monitor
covered by the above warranties. Repair or replacement is our only
responsibility and your only remedy under the above warranties.
To obtain warranty service, ship the monitor and all of the
components, together with proof of purchase and a note explaining
the problem with $5.00 for return shipping and insurance to:
Omron Healthcare, Inc.
Attn: Repair Department
300 Lakeview Parkway
Vernon Hills, IL 60061
Be sure to include the model number, your name and your phone
number on the enclosed note and any other correspondence.
ALL IMPLIED WARRANTIES, INCLUDING BUT NOT
LIMITED TO THE IMPLIED WARRANTIES OF
MERCHANTABILITY AND FITNESS FOR PARTICULAR
PURPOSE, ARE LIMITED TO THE DURATION OF THE
APPLICABLE WRITTEN WARRANTY ABOVE.
Some states do
not allow limitations on how long an implied warranty lasts, so the
above limitation may not apply to you.
OMRON SHALL NOT BE LIABLE FOR LOSS OF USE
OR ANY OTHER INCIDENTAL, CONSEQUENTIAL OR
INDIRECT COSTS, EXPENSES OR DAMAGES.
Some states
do not allow the exclusion or limitation of incidental or consequential
damages, so the above exclusions may not apply to you.
This warranty gives you specific legal rights, and you may also have
other rights which may vary from state to state.
FOR CUSTOMER SERVICE (US & Canada)
Visit our web site at: www
.omronhealthcare.com
Call toll free: 1-800-634-4350
Page 19

19
NOTES
Page 20

Distributed by:
OMRON HEALTHCARE, INC.
300 Lakeview Parkway
Vernon Hills, Illinois 60061
www.omronhealthcare.com
Copyright © 2004 OMRON HEALTHCARE, INC.
HJ-105INST Rev B
 Loading...