

Page 1
HEM-7080-C1_B_M02_100309.pdf
HEM-7080-C1_B_M.fm Page 1 Tuesday, March 9, 2010 9:05 AM
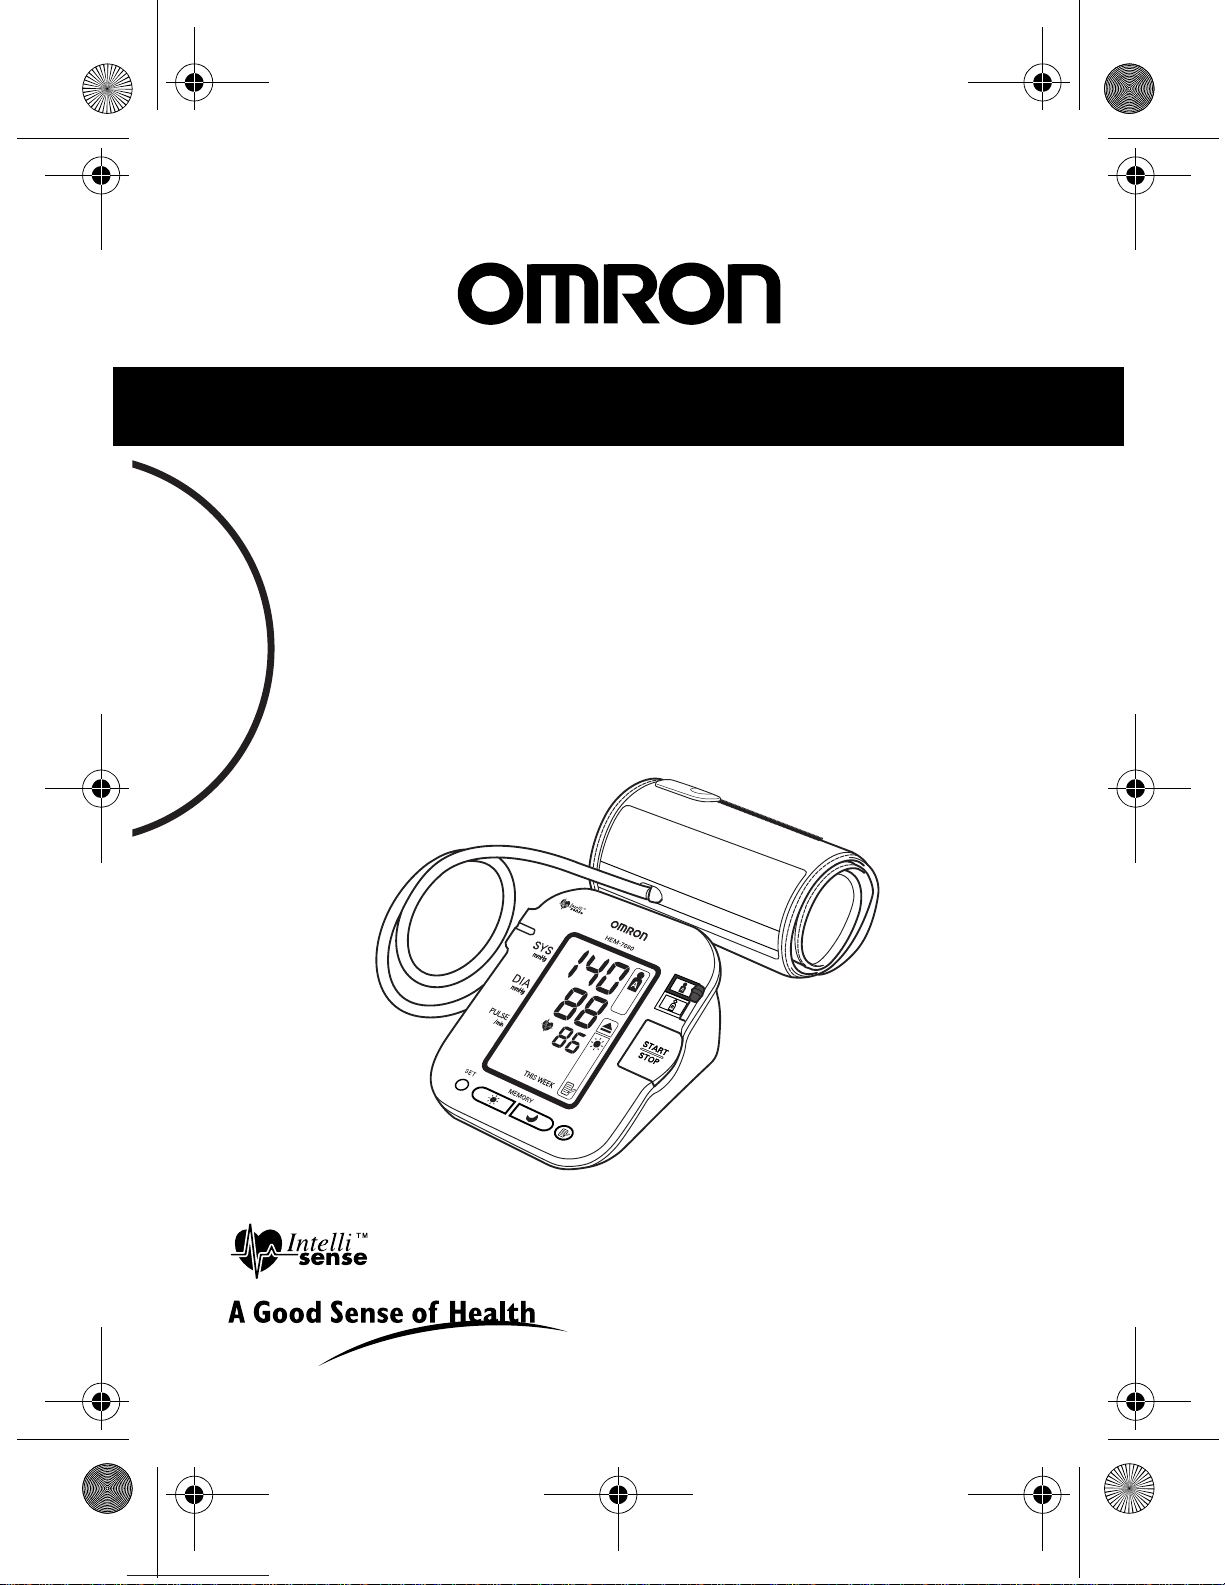
Instruction Manual
Digital Automatic
Blood Pressure Monitor
Model HEM-7080
Page 2
HEM-7080-C1_B_M.fm Page 2 Tuesday, March 9, 2010 9:05 AM
Contents
Before using the unit
Introduction............................................................................. 3
Important Safety Information................................................. 4
1. Overview ........................................................................... 6
2. Preparation ....................................................................... 9
2.1 Installing/Replacing the Batteries.................................. 9
2.2 Setting the Date and Time .......................................... 11
Operating instructions
3. Using the Unit................................................................. 15
3.1 How to Sit Correctly When Taking a Measurement .... 15
3.2 Applying the Arm Cuff................................................. 17
3.3 Taking a Reading........................................................ 20
3.4 Instructions for Special Conditions.............................. 30
3.5 Using the Memory Function........................................ 31
4. Quick Reference Guide.................................................. 38
Care and maintenance
5. Handling Errors and Problems ..................................... 39
5.1 Error Messages........................................... ................ 39
5.2 Troubleshooting .......................................................... 40
6. Maintenance and Storage.............................................. 41
7. Technical Data................................................................ 42
8. Some Useful Information about Blood Pressure ........ 44
2
Page 3
HEM-7080-C1_B_M.fm Page 3 Tuesday, March 9, 2010 9:05 AM
Before using the unit
Introduction
Thank you for purchasing the OMRON HEM-7080 Intellisense
Upper Arm Blood Pressure Monitor.
The OMRON HEM-7080 Intellisense is a fully automatic blood
pressure monitor, operating on the oscillometric principle. It
measures your blood pressure and pulse rate simply and
quickly. For comfortable controlled inflation without the need
for pressure pre-setting or re-inflation the device uses its
advanced “Intellisense” technology.
The monitor stores measurement results for two people and
features morning and evening averages. The auto mode
allows for three consecutive measurements with timed
intervals for an average reading.
Please read this instruction manual thoroughly before
using the unit. For specific information about your own
blood pressure, CONSULT YOUR DOCTOR.
3
Page 4
HEM-7080-C1_B_M.fm Page 4 Tuesday, March 9, 2010 9:05 AM
Important Safety Information
Consult your doctor during pregnancy, arrhythmia and
arteriosclerosis.
Use the unit only to store the designated users measurement
results.
Please read this section carefully before using the unit.
Caution:
(General Usage)
• Always consult your doctor. You should never stop or
change the dosage of medication prescribed by you r
doctor.
• Do not leave the unit unattended with infan ts or persons
who cannot express their consent.
• Do not use the unit for any purpose other than
measuring blood pressure.
• Use only the approved arm cuf f fo r this unit. Use of other
arm cuffs may result in incorrect measurement results.
• Do not disassemble the unit or arm cuff.
• Make sure that the air tube is not wrapped around other
parts of your body wh en taking measurements at night.
This could result in injury when the air pressure in the ai r
tube is increased.
• Do not wrap the arm cuff tightly when taking
measurements at night. This could result in injury.
• Do not inflate the arm cuff over 29 9 mmHg.
(Optional AC Adapter Usage)
• Use only AC adapter specified by Omron deale rs. Use of
unsupported adapters may damage and/or may be
hazardous to the unit. Plug the AC adapter into the
appropriate voltage outlet. Do not overload power out lets
or use extension cords.
• Do not use the AC adapter if the unit or the power cord is
damaged. T urn of f th e power and unplug the power cord
immediately.
4
Page 5
HEM-7080-C1_B_M.fm Page 5 Tuesday, March 9, 2010 9:05 AM
Important Safety Information
• Never plug in or unplug the power cord from the electric
outlet with wet hands.
(Battery Usage)
• If battery fluid should get in y our eyes, i mmediately rinse
with plenty of clean water. Consult a doctor immediately.
• If battery fluid should get on your skin or clothing,
immediately rinse with plenty of clean water.
• Use only four “AA” alkaline batte ries with this unit. Do not
use other types of batteries.
• Do not insert the bat teries wit h t heir pol ari ties inco rre ctl y
aligned.
• Replace old batteries with new ones immedi ately.
Replace all four batteries at the same time.
• Remove the batteries if the unit will not be used fo r three
months or more. If the batteries have been removed for
more than 30 seconds, the date and time setting will
need to be reset.
• Do not use new and used batteries together.
• Read and follow the “Important information regarding
Electro Magnetic Compatibility (EMC)” in the Technical
Data Section.
General Safety Precautions
• Do not forcefully bend the arm cuff or bend the air tube
excessively.
• When removing the air tube, pull on the air plug at the
connection with the main unit not the tube itself.
• Do not apply strong shocks and v ibrations to or drop the
main unit and arm cuff.
• Do not inflate the a rm cuf f when it is not wrapped around
your arm.
• Do not wash the arm cuff or immerse it in water.
• Do not take measurements after bathing, drinking
alcohol, smoking, exercising or eating.
• Read and follow the “Correct Dispo sal of This Product” in
the Technical Data Secti on when disposi ng of the device
and any used accessories or optional parts.
5
Page 6

HEM-7080-C1_B_M.fm Page 6 Tuesday, March 9, 2010 9:05 AM
1. Overview
Main Unit
A
F
E
B
C
D
H
G
I
A. Display
B. SET button
C. Morning/Evening Average
( / ) buttons
D. MEMORY button
E. START/STOP button
Arm Cuff
J. Arm cuff
(Cuff: arm circumference 22-42 cm)
K. Air Plug
L. Air Tube
F. User ID selection switch
(A & B)
G. Battery compartment
H. Air jack
I. AC adapter jack (for AC
adapter)
J
LK
6
Page 7

HEM-7080-C1_B_M.fm Page 7 Tuesday, March 9, 2010 9:05 AM
Display
1. Overview
M
N
O
P
Q
R
S
T
M. Systolic blood pressure
N. Diastolic blood pressure
O. Heartbeat symbol
1. (Flashes during
measurement)
2. (If flashing after
measurement completed
indicates blood pressure out
of recommended range)
P. Movement symbol
(Displayed if you move your
body during the
measurement.)
Q. Irregular heartbeat symbol
R. Deflation symbol
S. Auto mode symbol
(Displayed when Auto Mode is
set.)
T. Battery low symbol
U
V
W
X
Y
Z
AA
AB
AC
U. User ID symbol (A or B)
(Indicates user A or user B as
selected by the user to take a
measurement or when using
the memory function.)
V. Pulse display
W.Early morning hypertension
symbol
(Displayed if the morning
average reading for a week is
above 135 for the systolic
blood pressure value and/or
85 for the diastolic blood
pressure value.)
X. Morning average symbol
(Displayed when viewing
morning averages using the
memory function.)
Y. Evening average symbol
(Displayed when viewing
evening averages using the
memory function.)
Z. Average value symbol
(Displayed when viewing value
for the last three
measurements)
AA.Memory symbol
(Displayed when viewing
values stored in memory)
AB.Week display
AC.Date/Time display
7
Page 8
HEM-7080-C1_B_M.fm Page 8 Tuesday, March 9, 2010 9:05 AM
1. Overview
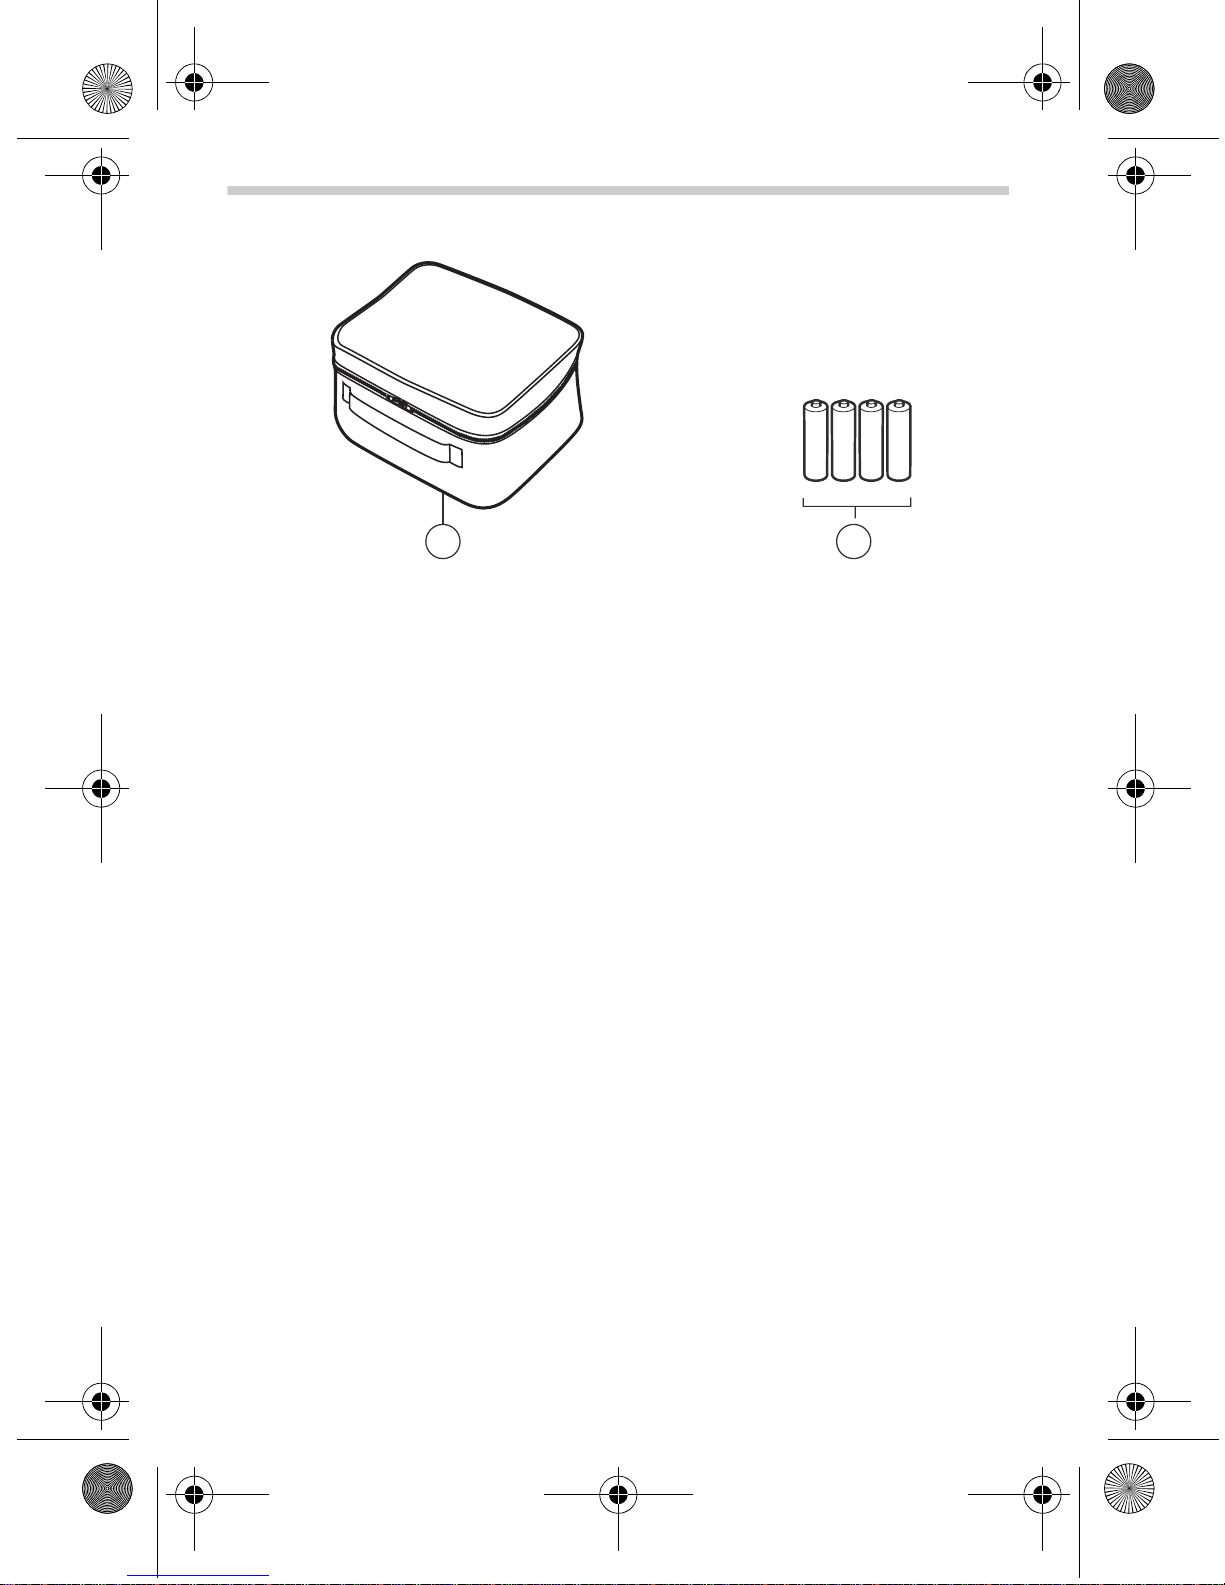
Package Contents
AD.Soft storage bag
AE.Four “AA” alkaline (LR6) batteries
• Main unit
•Cuff
• Instruction manual
AEAD
8
Page 9
HEM-7080-C1_B_M.fm Page 9 Tuesday, March 9, 2010 9:05 AM
2. Preparation
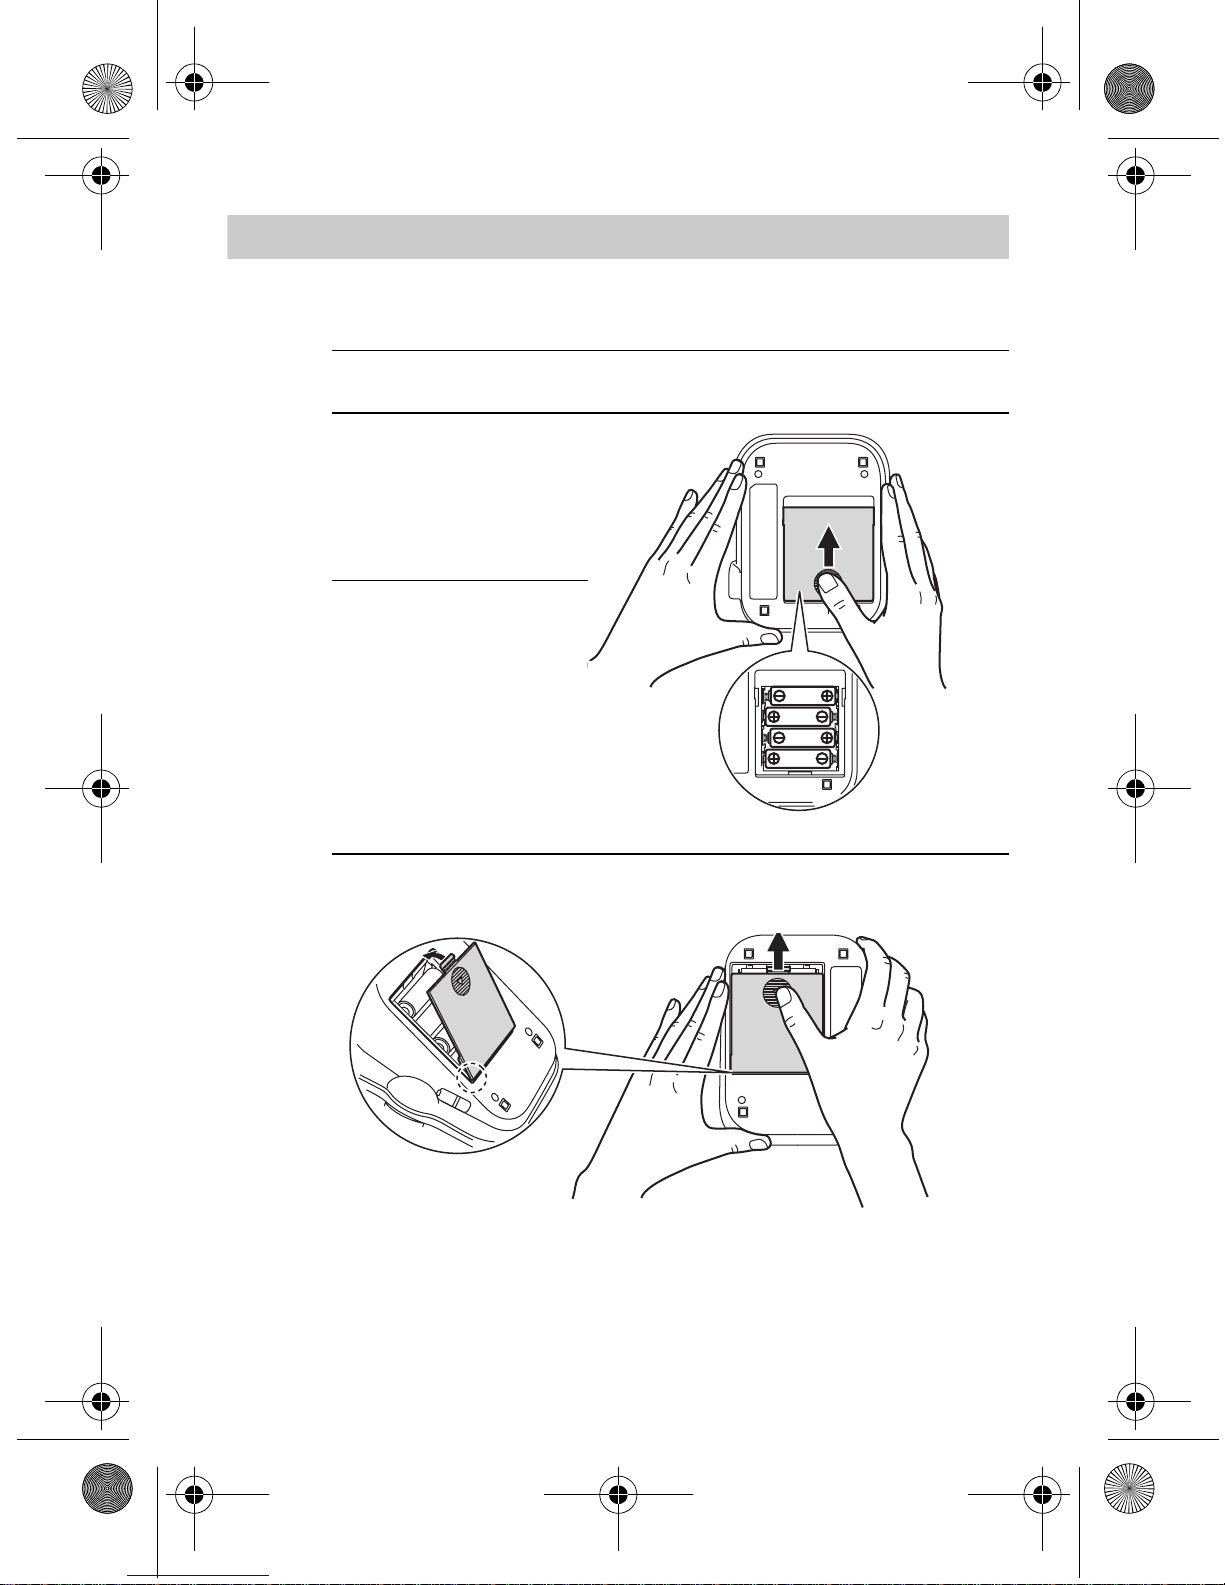
2.1 Installing/Replacing the Batteries
1. Turn the main unit upside down.
2. Slide the battery
cover in the direction
of the arrow while
pressing the ribbed
part of the cover.
3. Install or replace fo ur
“AA” size batteries
so that the +
(positive) and (negative) polarities
match the polarities
indicated on the
battery
compartment.
4. Put the battery cover back in place.
Slide the battery cover as indicated, until it clicks into place.
Note: The measurement values continue to be stored in
memory even after the batteries are replaced.
9
Page 10
HEM-7080-C1_B_M.fm Page 10 Tuesday, March 9, 2010 9:05 AM
2. Preparation
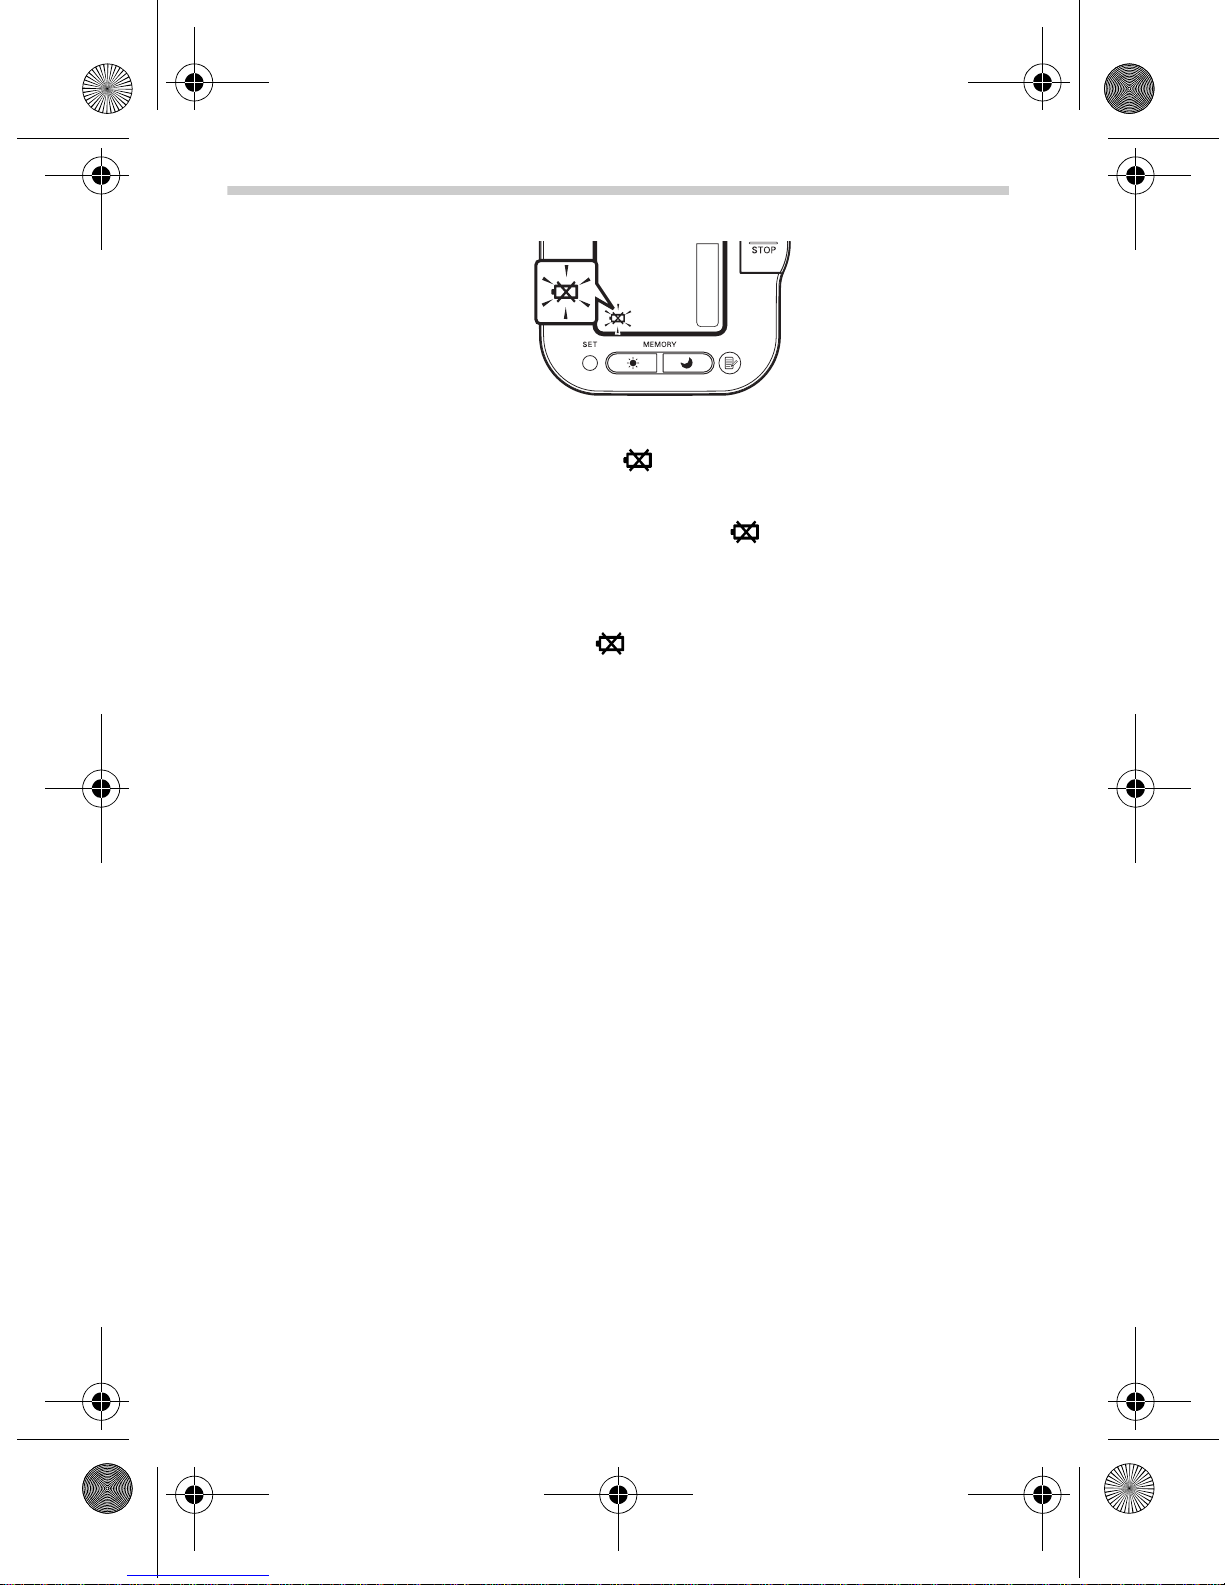
Battery Life & Replacement
If the battery low symbol ( ) appears on the display,
replace all four batteries at the same time.
- When the battery low symbol ( ) st arts to blink, you
will still be able to use the unit for a short while. You
should replace the batteries wit h new ones ahead of
time.
- When the symbol ( ) remains lit, the batt eries are
exhausted. You should replace the batteries with new
ones at once.Turn the unit off before replacing the
batteries.
• Remove the batteries if the unit will not be used for t hree
months or more.
• If the batteries have been removed for more than 30
seconds, the Date/T ime setting will need to b e reset. See
page 14 for details.
• Dispose of batteries according to applic able local
regulations.
10
Four new “AA” alkaline batteries will last for approximately
1400 measurements, when used to take six measurements a
day.
Since the supplied batteries are for monitoring use only, they
may have a shorter life and not last for 1400 measurements.
Page 11
HEM-7080-C1_B_M.fm Page 11 Tuesday, March 9, 2010 9:05 AM
2.2 Setting the Date and Time
Your blood pressure monitor automatically stores up to 84
measurement values per user with date and time.
To make use of the memory and average values functions:
• Set the unit to the correct date and time before taking a
measurement for the first time.
• If the batteries have been removed for more than 30
seconds, the Date/Time setting will need to be reset.
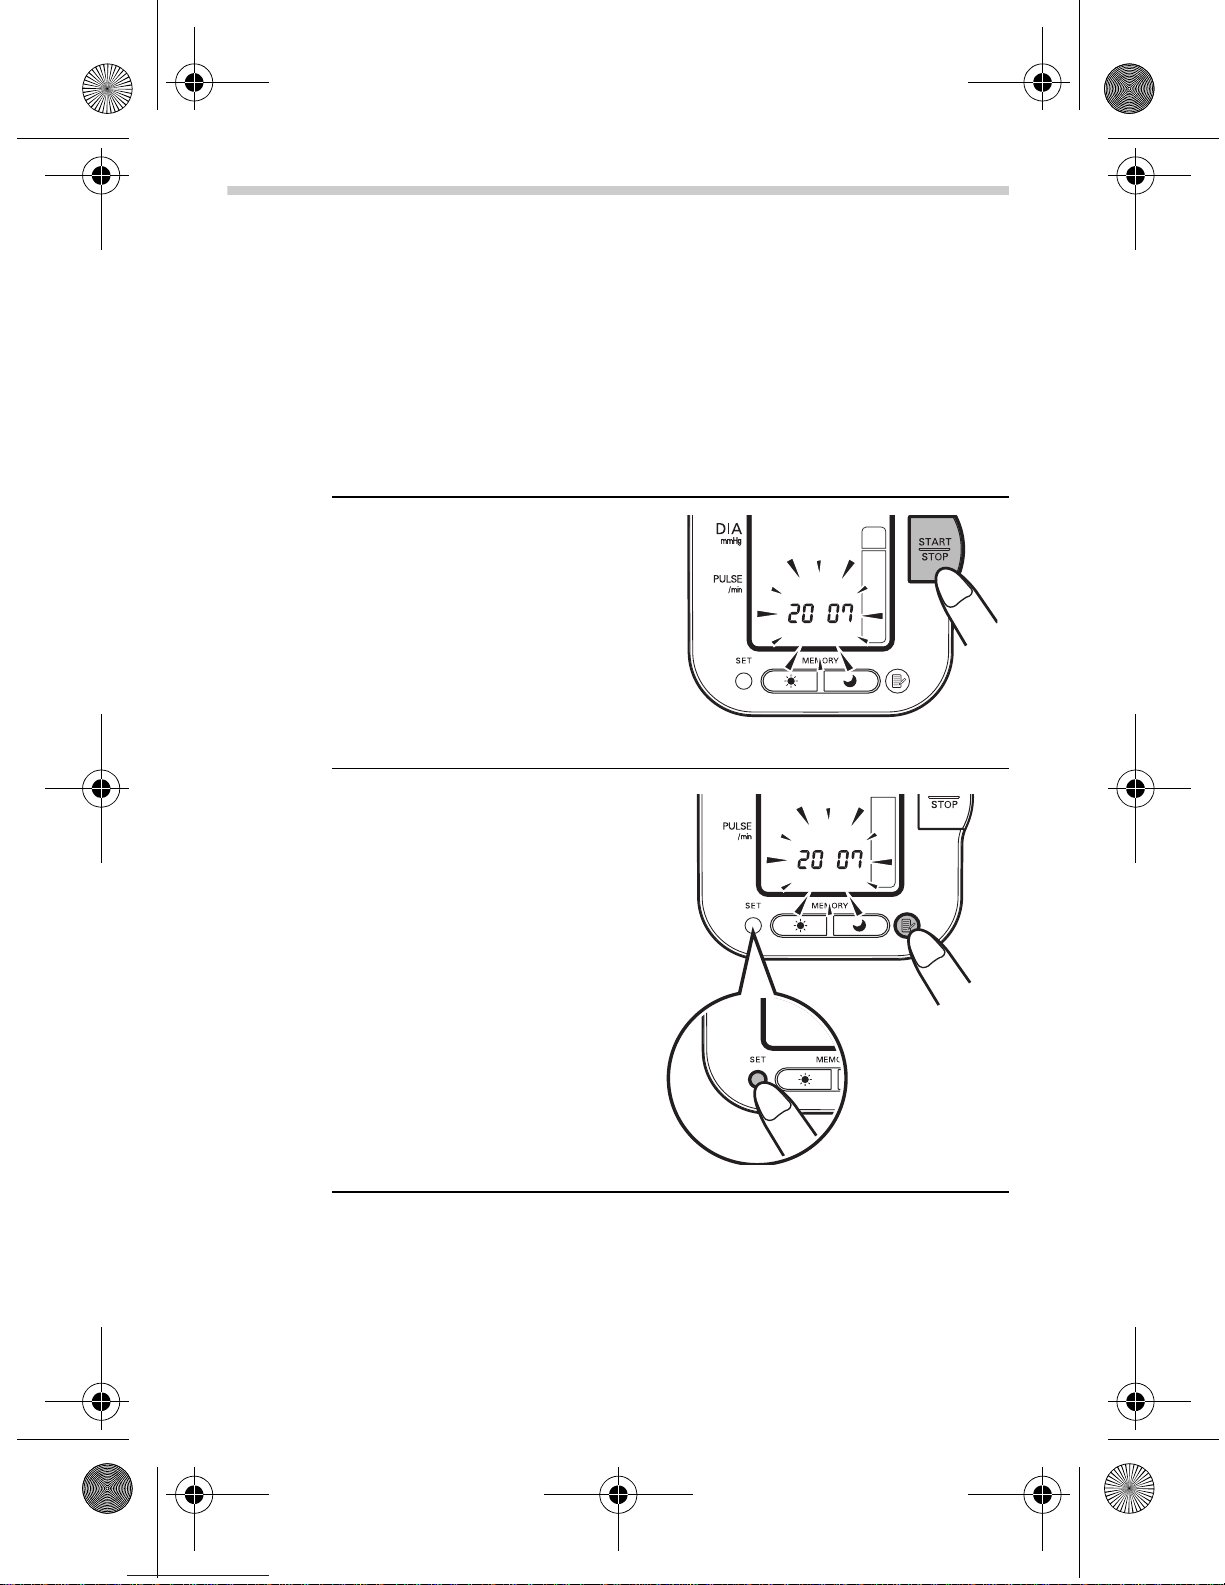
1. When the START/STOP
button is pressed to t ur n
the unit on for the first time
after inserting batteries,
the year digits (2007) will
flash on the display.
2. Preparation
2. Press the MEMORY button
to advance the digits one
at a time.
Notes:
• The range for the year
setting is 2007 to 203 0. If
the year reaches 2030, it
will return to 2007.
• If you hold down the
MEMORY button, the
digits will advance
rapidly.
3. Press the SET button to confirm the setting when the
desired number appears on the display.
The year is set and the month digits f lash on the display.
11
Page 12
HEM-7080-C1_B_M.fm Page 12 Tuesday, March 9, 2010 9:05 AM
2. Preparation
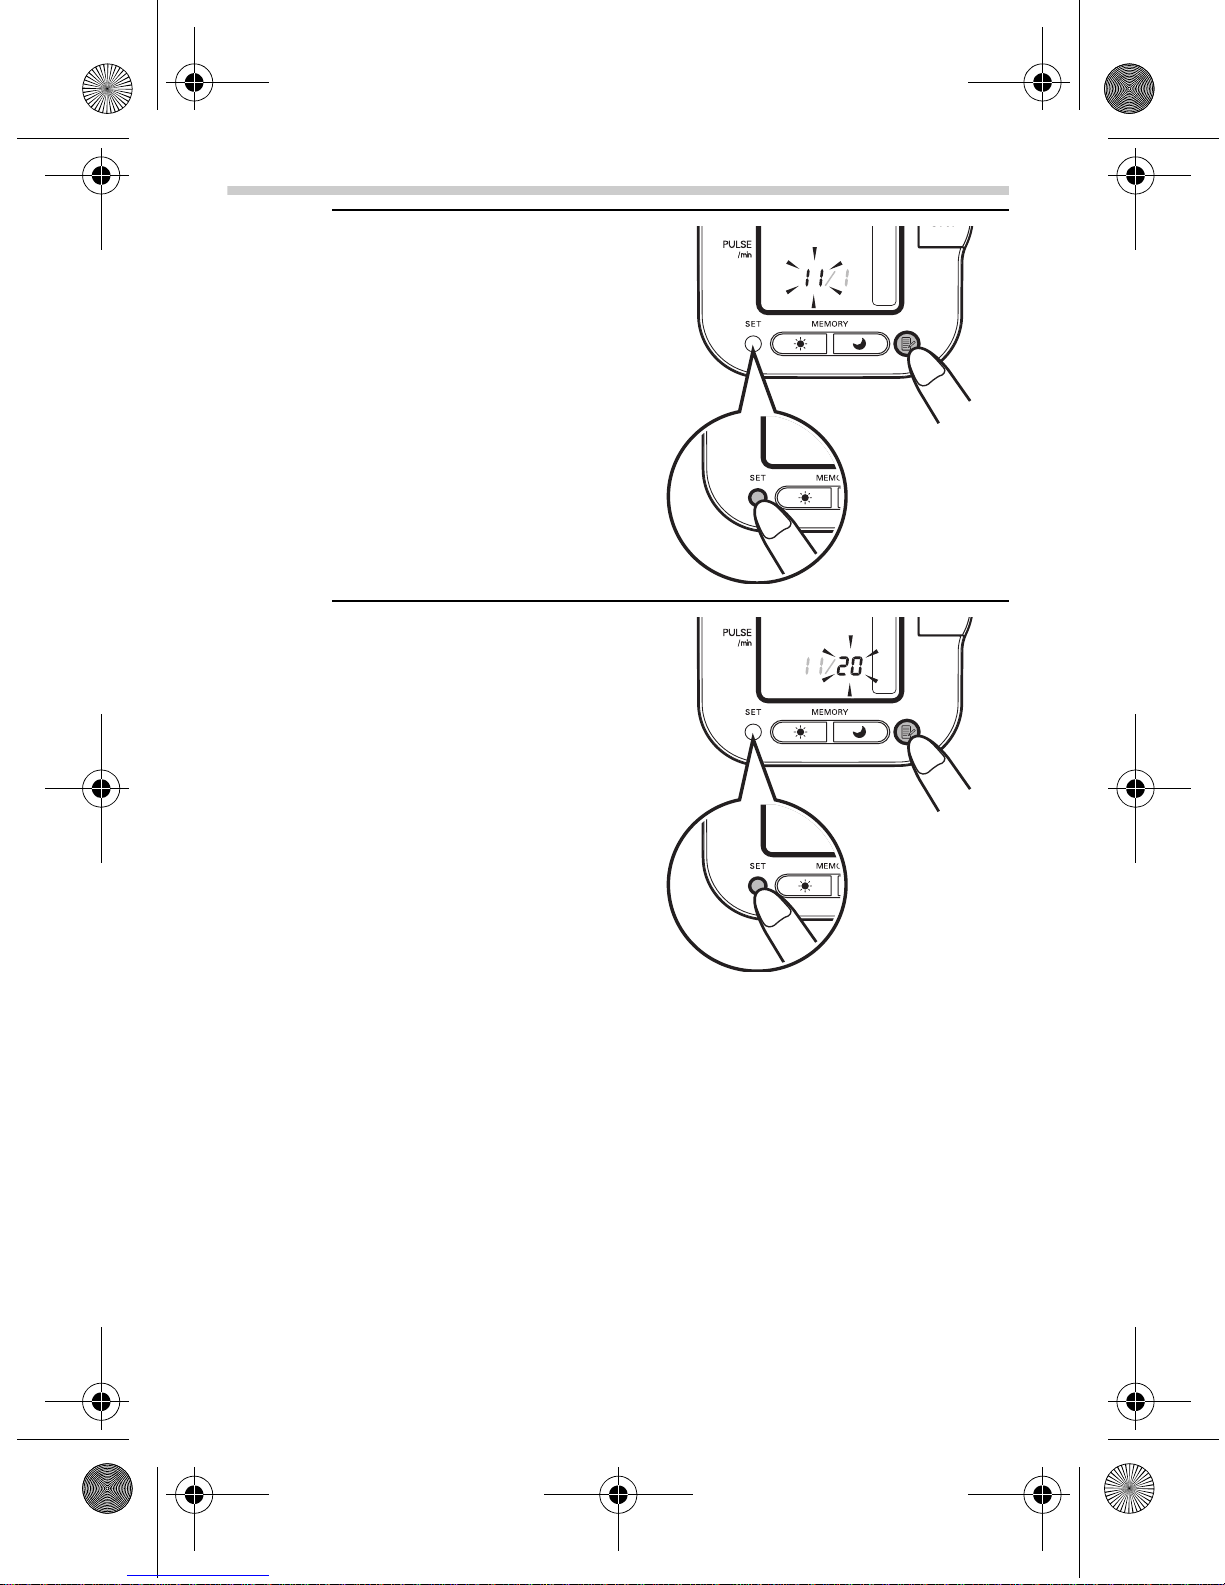
4. Repeat steps 2 and 3 to
set the month.
The month is set and the
day digits flash on the
display.
5. Repeat steps 2 and 3 to
set the day.
The day is set and the hour
digits flash on th e display.
12
Page 13
HEM-7080-C1_B_M.fm Page 13 Tuesday, March 9, 2010 9:05 AM
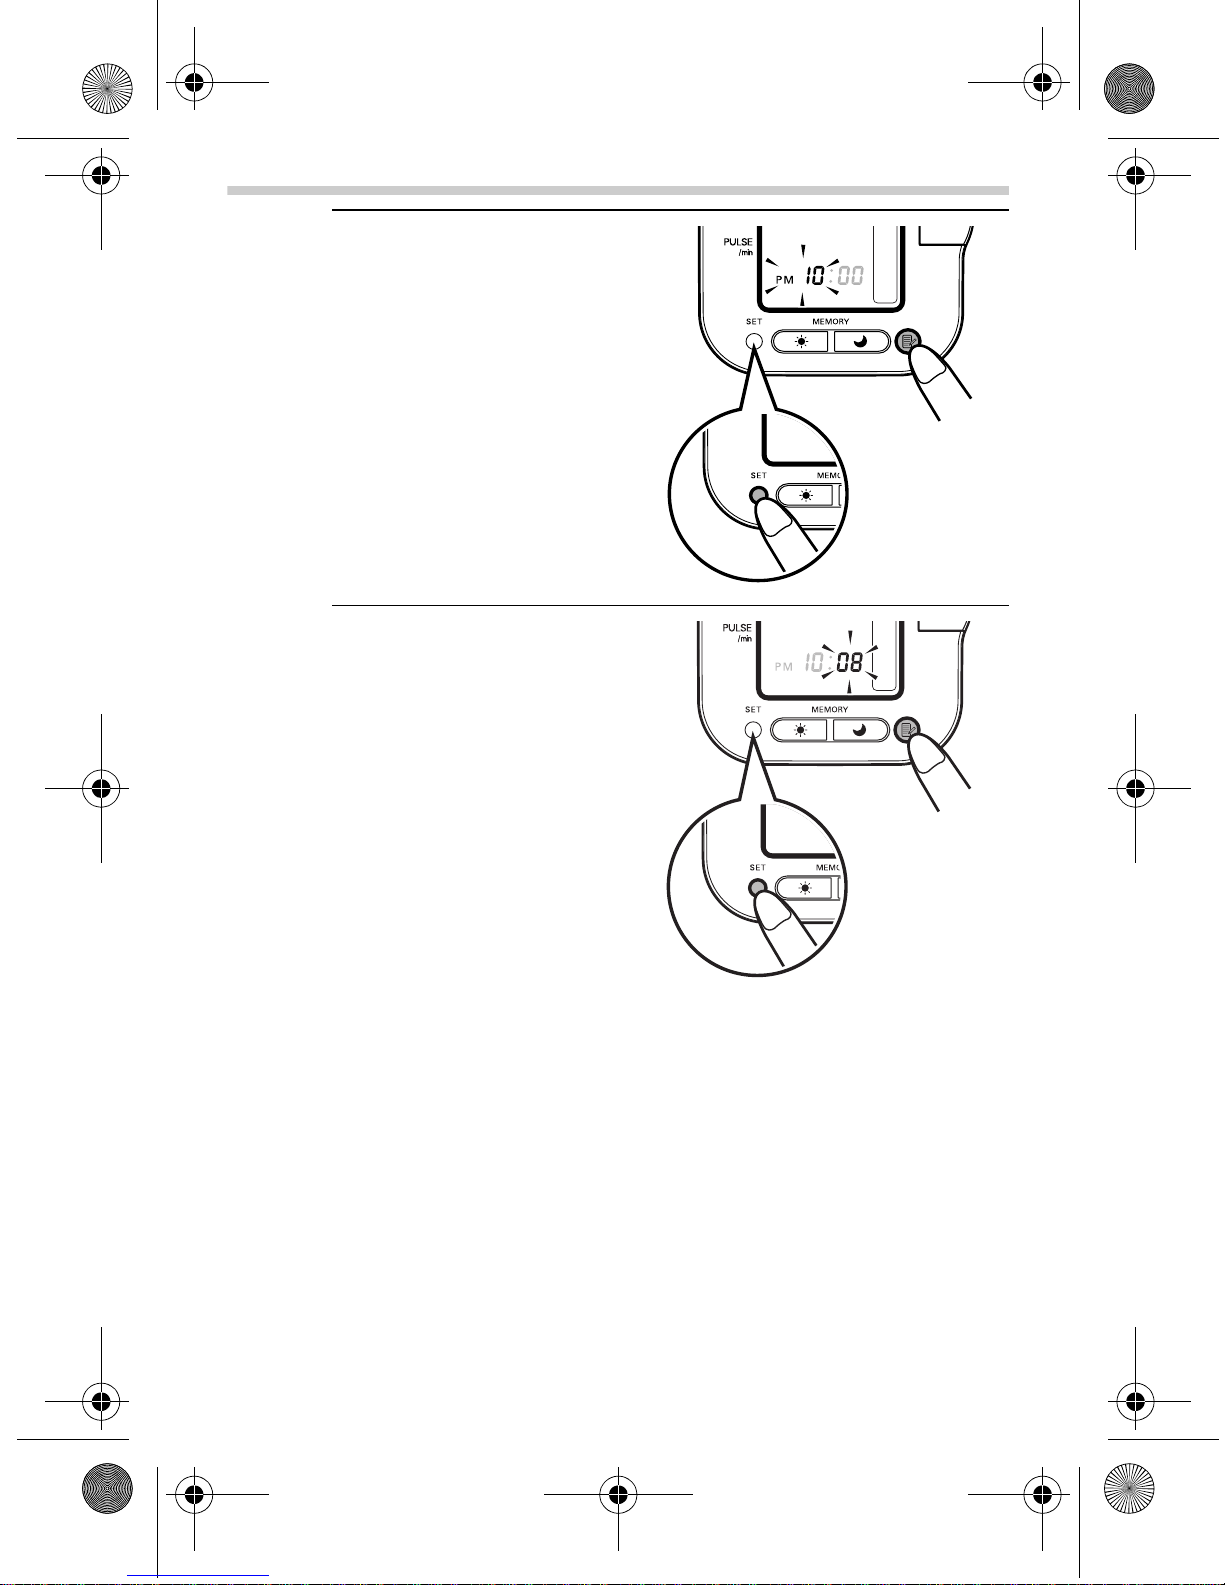
6. Repeat steps 2 and 3 to
set the hour.
The hour is set and the
minutes digits flash on the
display.
7. Repeat steps 2 and 3 to
set the minutes.
2. Preparation
The minutes settings is
set.
The unit automatically
turns itself off after the
minute setting has been
set.
To adjust the date and
time, press the SET button
while the unit is in standby
mode.
13
Page 14

HEM-7080-C1_B_M.fm Page 14 Tuesday, March 9, 2010 9:05 AM
2. Preparation
Notes on Adjusting the Date and Time Setting
If you need to adjust the date and time for some reason, or if
the date and time has been reset after replacing the batteries,
adjust the date and time between 10:00 AM and 6:59 PM.
This will avoid problems with morning and evening weekly
averages stored in memory.
To adjust the date or time at a later stage, start the unit in the
off position. Follow the steps below.
1. Press and hold the SET button.
The auto mode symbol and the current setting (on
or oFF) will appear on the display for the user ID selected.
If the year is not flashing, press the SET button once or
twice until the year is flashi ng.
The year flashes on the display.
2. Refer to page 11 to start setting the date and time.
With this manual setting of date and ti me the unit needs to
be manually shut off. It will not automatically turn off after
the minutes have been set.
Notes:
• Please ensure that the date and time have been set
correctly so that the weekly averages will be displayed
correctly. If the Date/Time settings have been
accidentally set incorrectly, press the SET button to
circle through the settings in order to adjust to their
correct values.
• In the case where the time displays incorrectly after a
long period of non-use of the unit, reset the Date and
Time (r e fer to page 11 for instructions on setti ng the
clock values). Erase the recorded values when reusing
the unit (refer to page 37 for directions on erasing the
recorded values).
14
Page 15
HEM-7080-C1_B_M.fm Page 15 Tuesday, March 9, 2010 9:05 AM
Operating instructions
3. Using the Unit
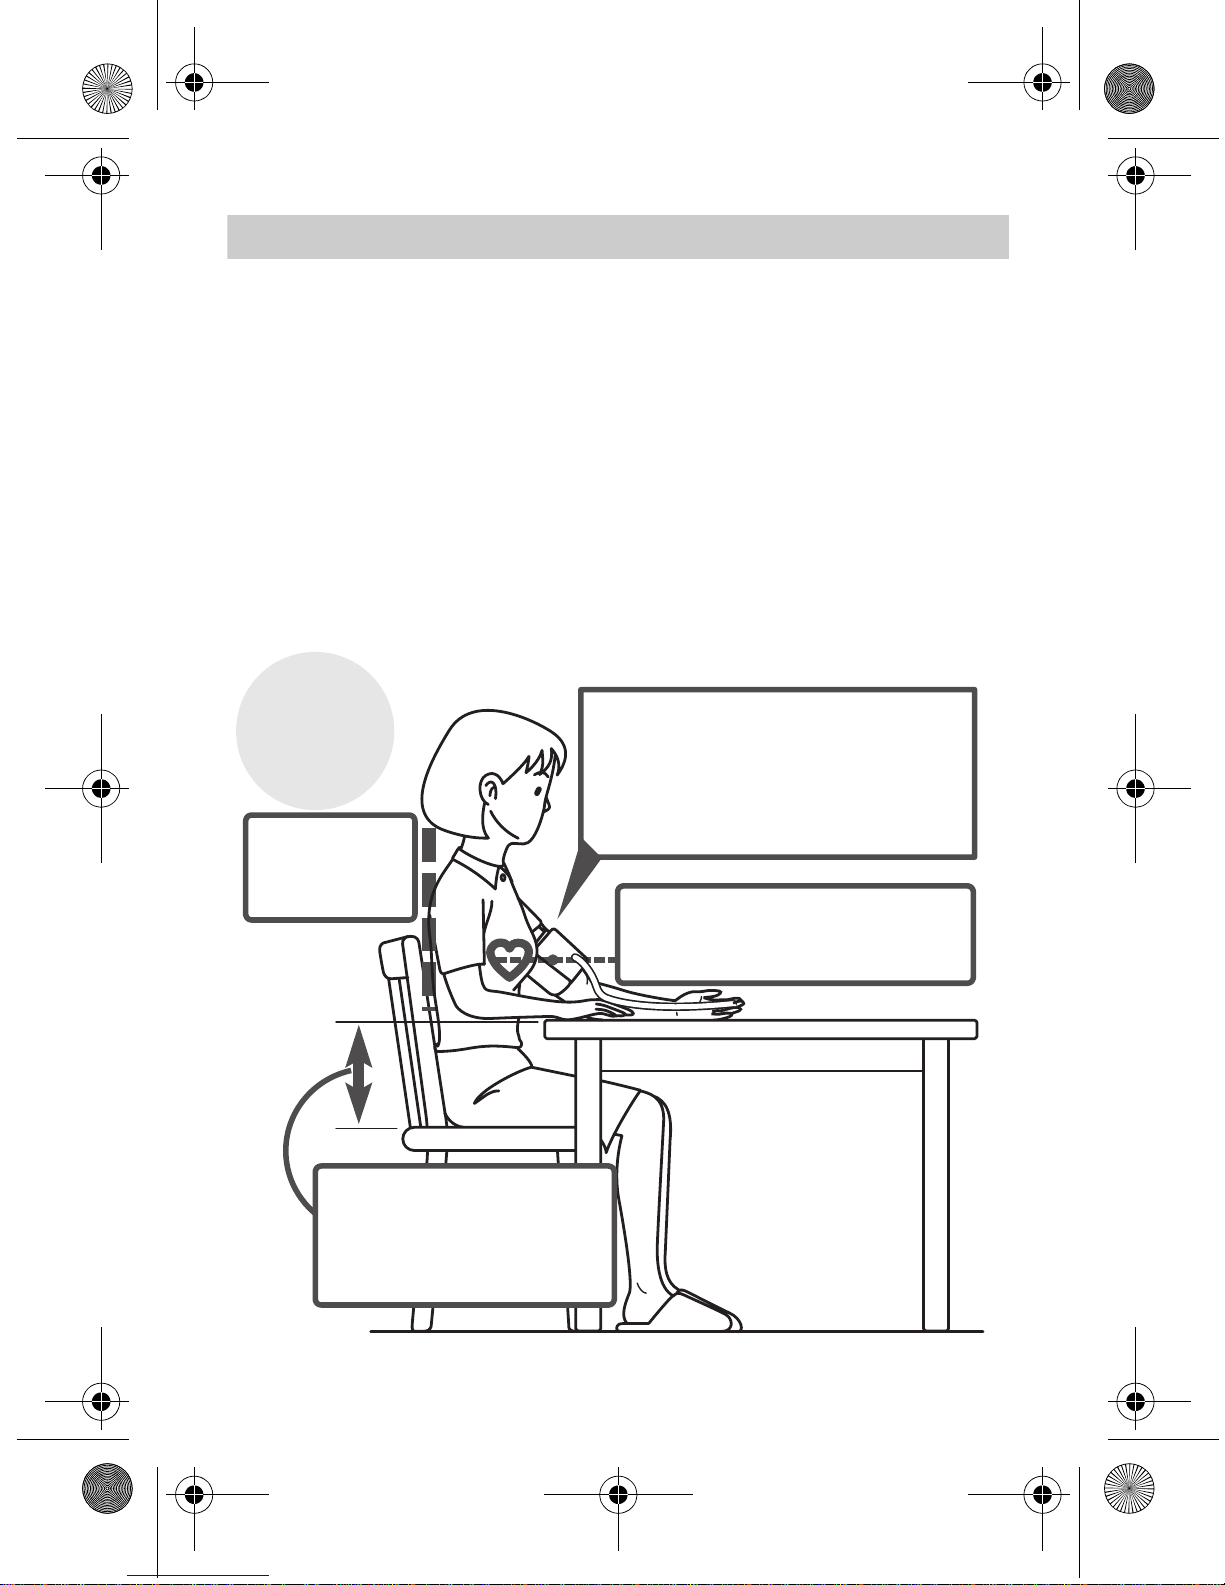
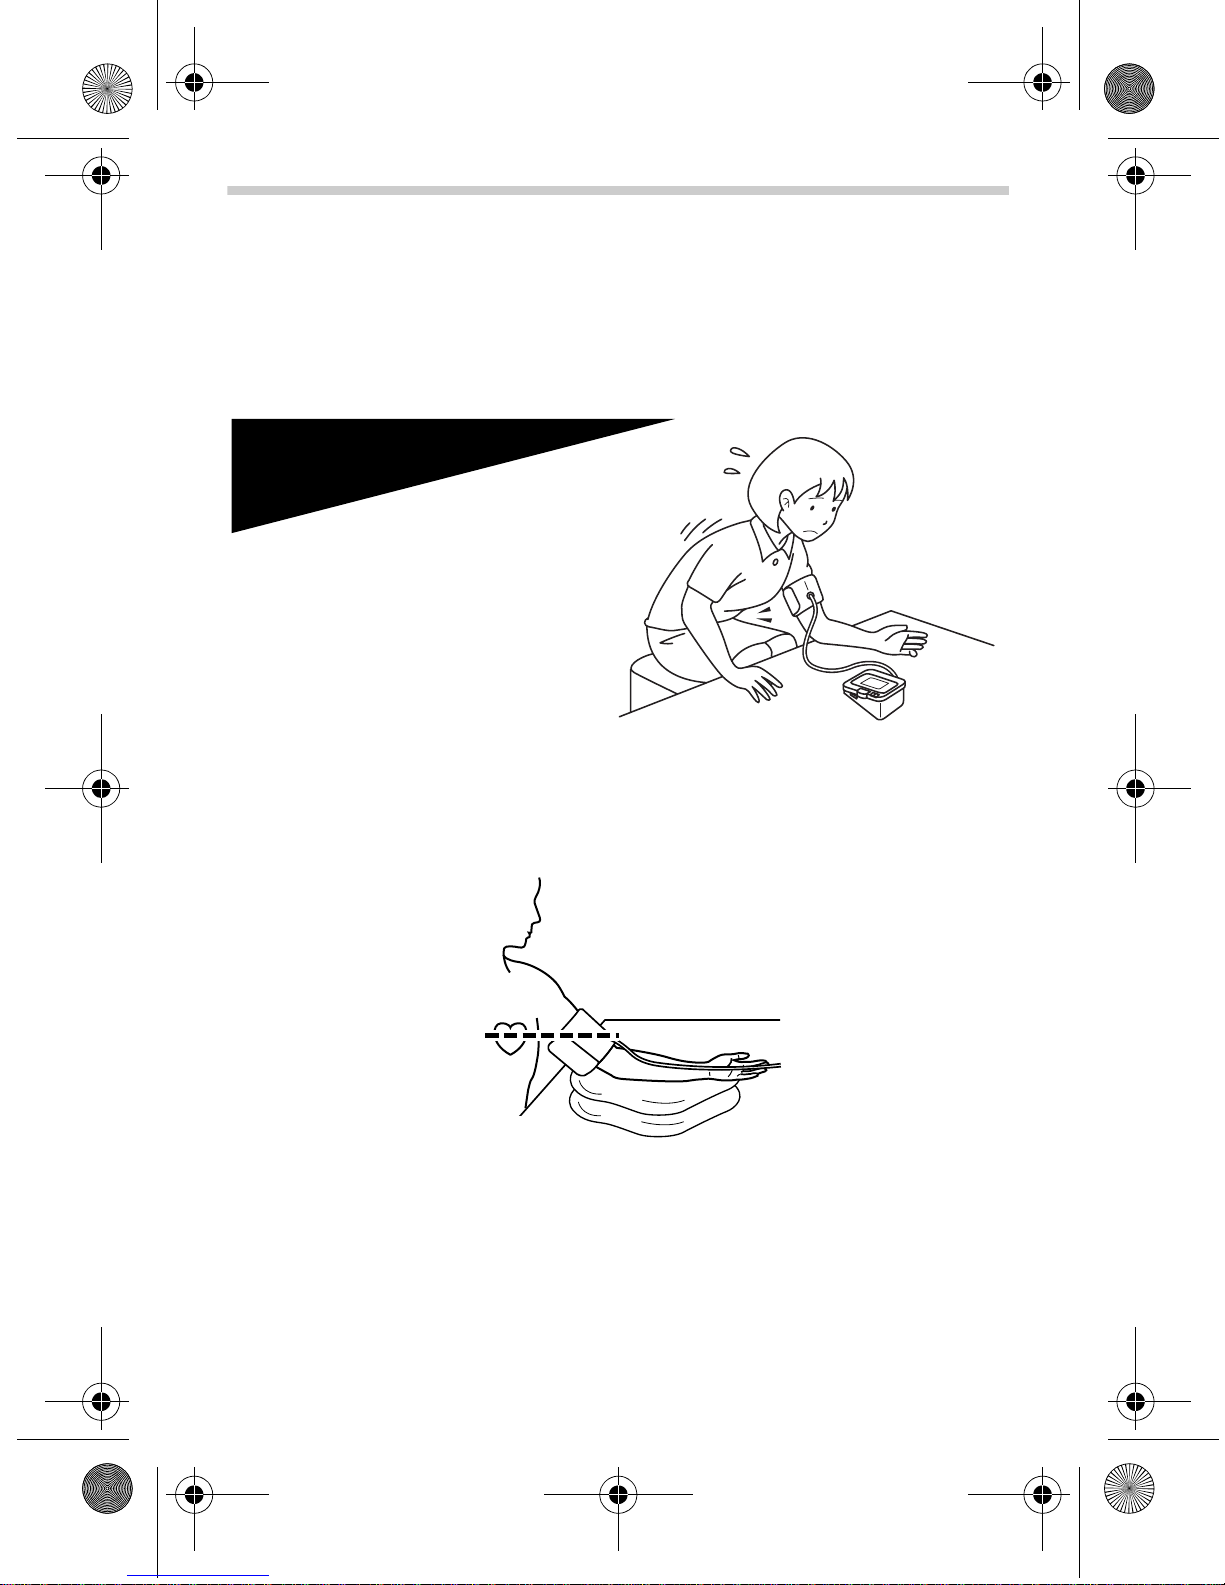
3.1 How to Sit Correctly When Taking a
Measurement
You can take a measurement on either your left or right arm.
Notes:
• Measurements should be taken in a quiet place an d you
should be in a relaxed, seated position. Make sure t hat
the room is not too hot or cold.
• Avoid eating, smoking, or exercising for at least 30
minutes before taking a measurement .
• Do not move or talk during measurement.
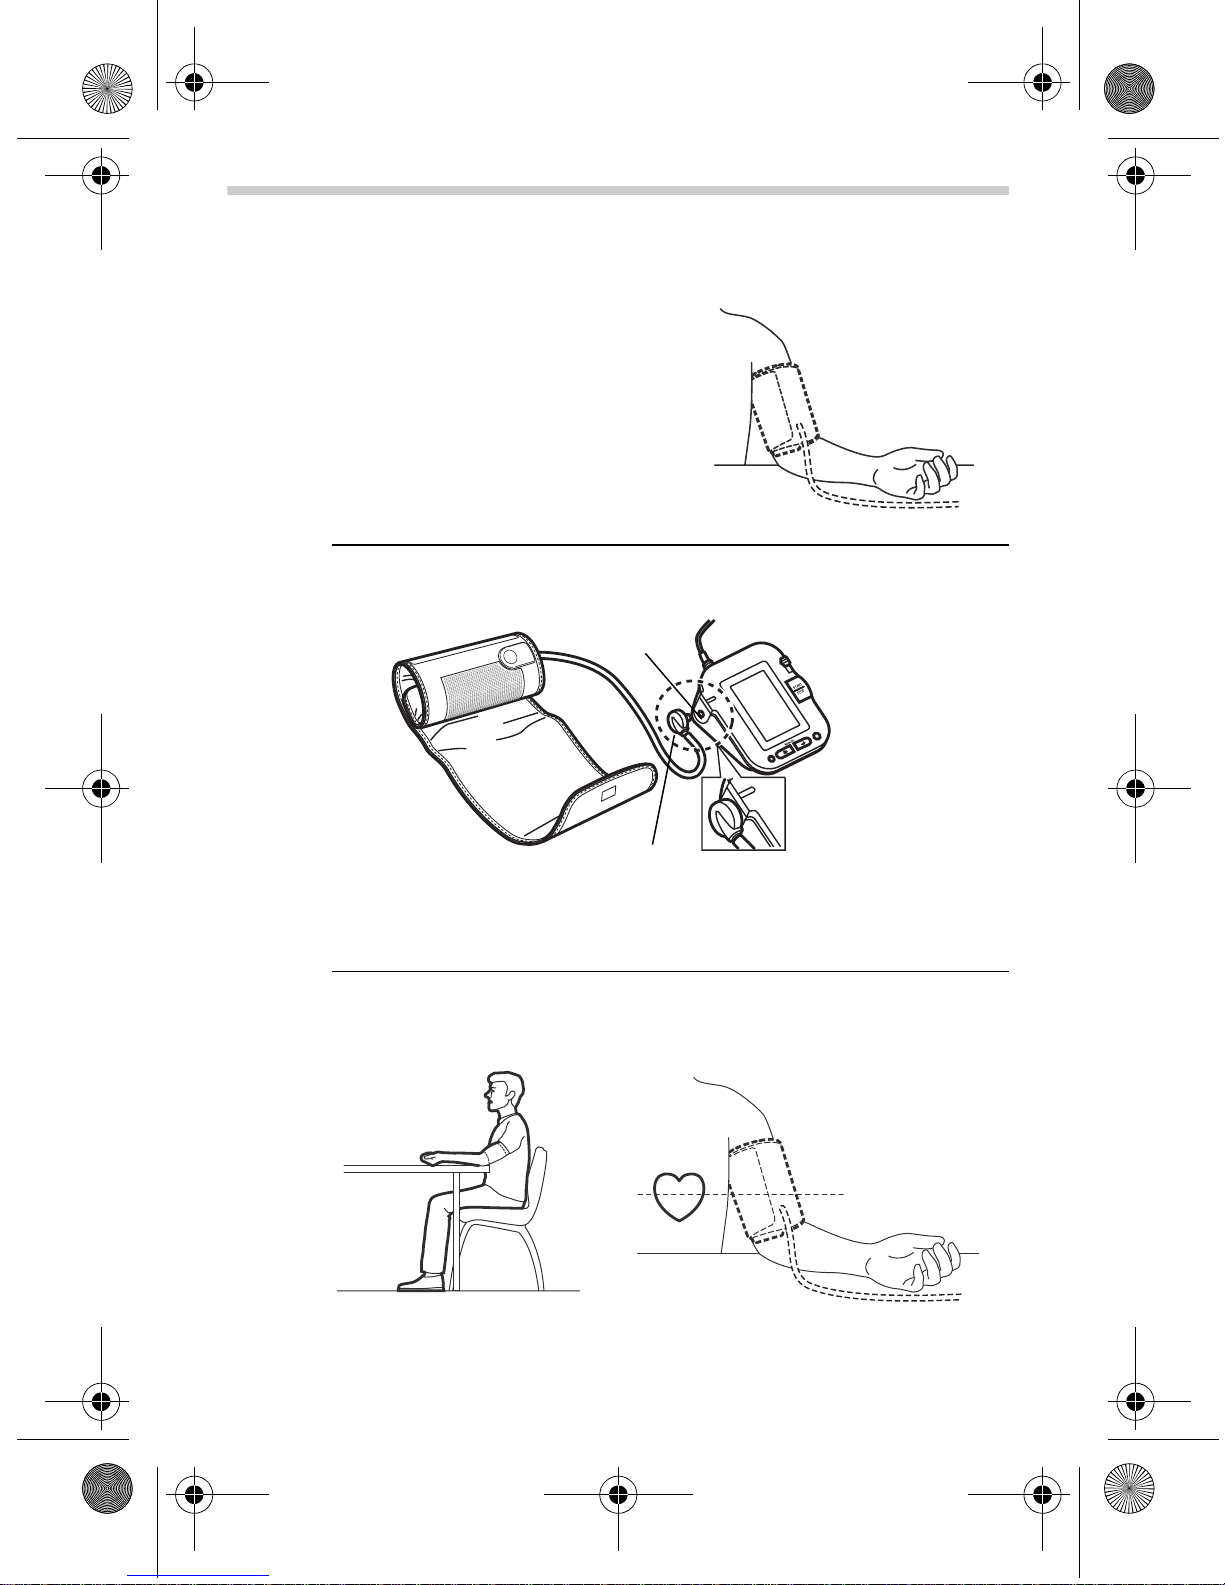
Correct
Posture
Sit upright
with your
back straight.
The gap between the chair
and the top of the table
should be between 25cm
to 30cm.
Remove tight fitting clothing from
your upper arm, and any thick
clothing such as a sweater.
Do not place the cuff over thick cl ot he s
and do not roll up your sleeve if it i s too
tight.
Place your arm on a table so
that the cuff will be at the same
level as your heart.
15
Page 16
HEM-7080-C1_B_M.fm Page 16 Tuesday, March 9, 2010 9:05 AM
3. Using the Unit
Notes:
• Correct posture during measurement is necessary to get
accurate results.
• You should also try to measure your blood pressure at
the same time each day. (Within 1 hour after waking up
is recommended.)
Incorrect Posture
• Arched back (leaning forwards)
• Sitting cross-legged
• Sitting on a sofa or at a low table
so that you tend to lean forward
These situations could lead to higher blood pressure values due to strain or
the arm cuff being lower than the heart.
If the arm cuff is at a lower position than yo ur heart use cushions etc. , to adjust
the height of your arm.
16
Page 17
HEM-7080-C1_B_M.fm Page 17 Tuesday, March 9, 2010 9:05 AM
3. Using the Unit
3.2 Applying the Arm Cuff
You can wrap the cuff either on your right or left arm.
• Remove tight-fitting
clothing from your upper
arm.
• Do not place the cuff over
thick clothes and do not
roll up your sleeve if it is
too tight.
1. Insert the air plug into the air jack (on the l eft side of the
device).
Air jack
Air plug
The cuff must be fully deflated when it is inserted into the
air jack.
2. Sit in a chair with your feet flat on the floor and place your
arm on a table so that the cuff will be at the same level as
your heart.
17
Page 18
HEM-7080-C1_B_M.fm Page 18 Tuesday, March 9, 2010 9:05 AM
3. Using the Unit
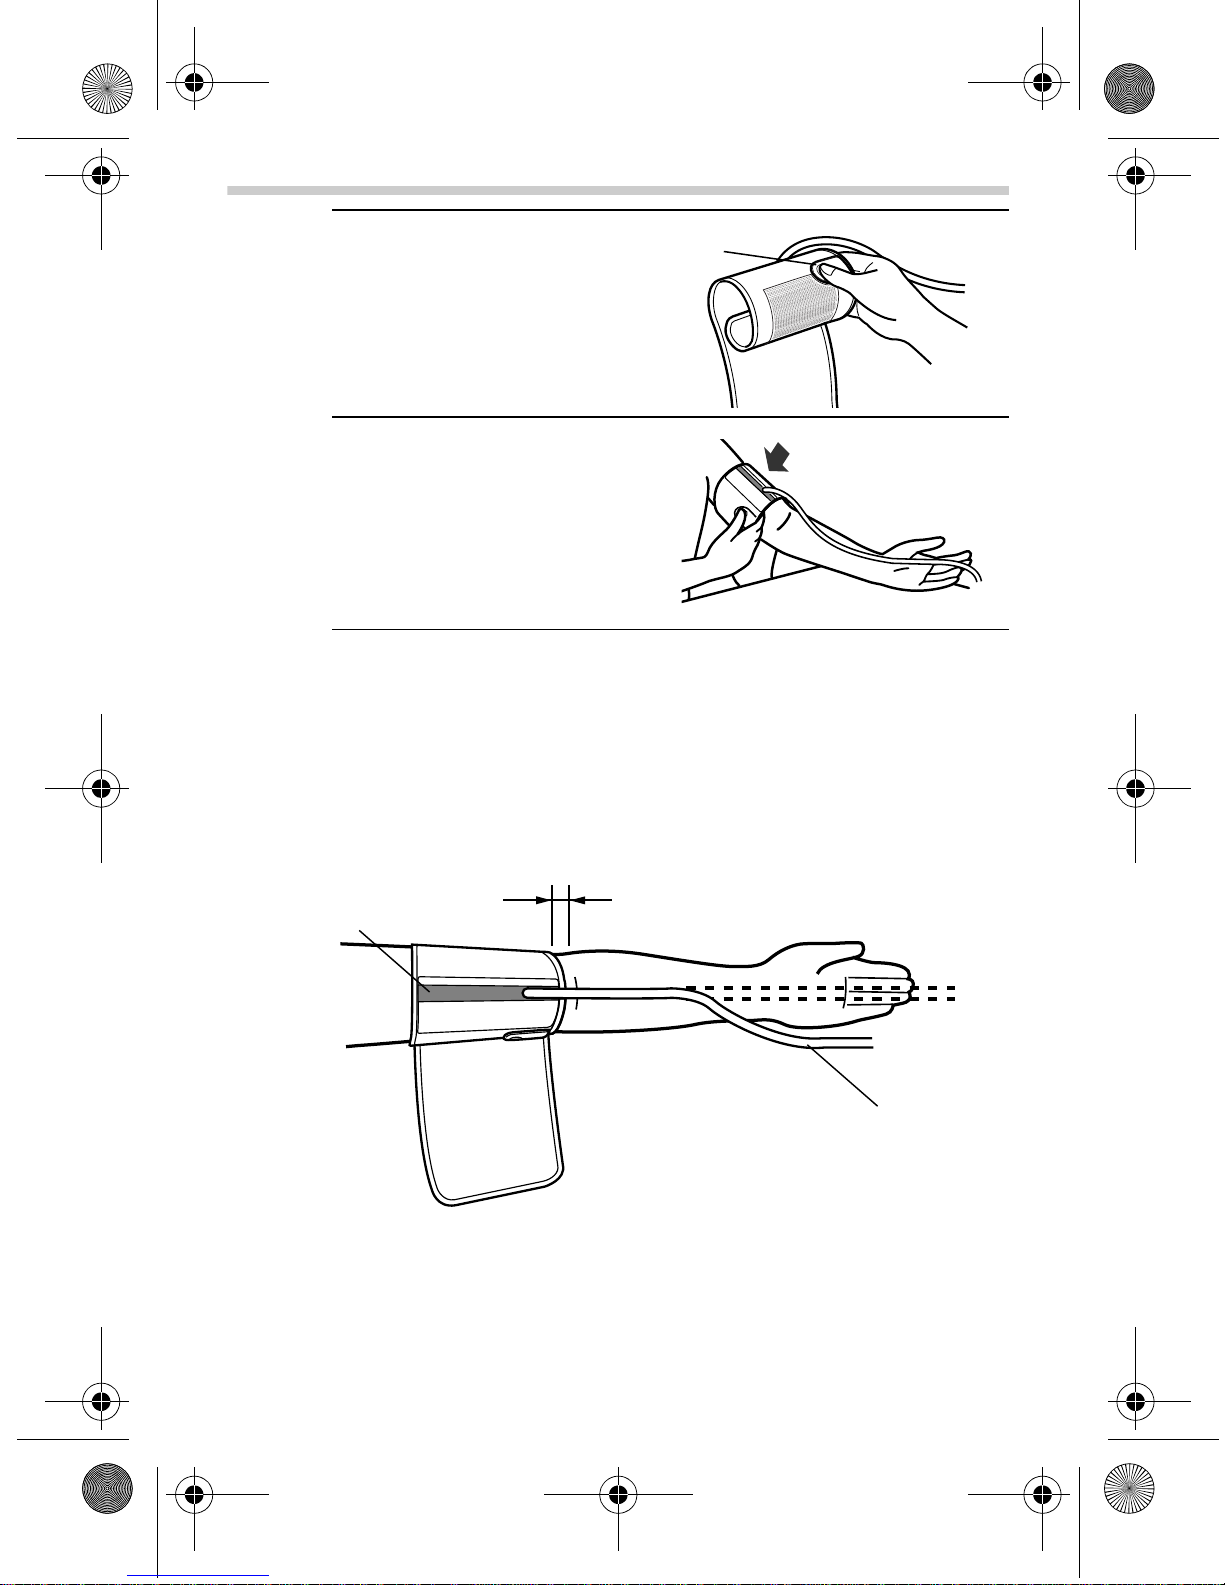
3. Hold the grip on the cuff
Grip
securely with your hand.
Fabric fastener
4. Turn the palm of your
hand upward.
5. Apply the cuff to your left upper arm so that the blue strip
is centred on the middle of your inner arm and points
down the inside of the arm. The air tube should run down
the inside of your forearm and be in line with your middle
finger.
The bottom of the cuff should be approximately 1 to 2 cm
above the elbow.
18
Bottom edge 1 to 2 cm
Blue strip
Air tube
Page 19
HEM-7080-C1_B_M.fm Page 19 Tuesday, March 9, 2010 9:05 AM
6. When the cuff i s positioned
correctly, close the fabric
fastener FIRMLY.
Notes:
• Make certain the cuff fits snugly around your arm.
• The cuff should make good contact with your skin. You
should be able to fit your index finger between the cuff
and your arm easily, so you can pull the cuff off and on.
• Make sure that there are no kinks in the air tubing.
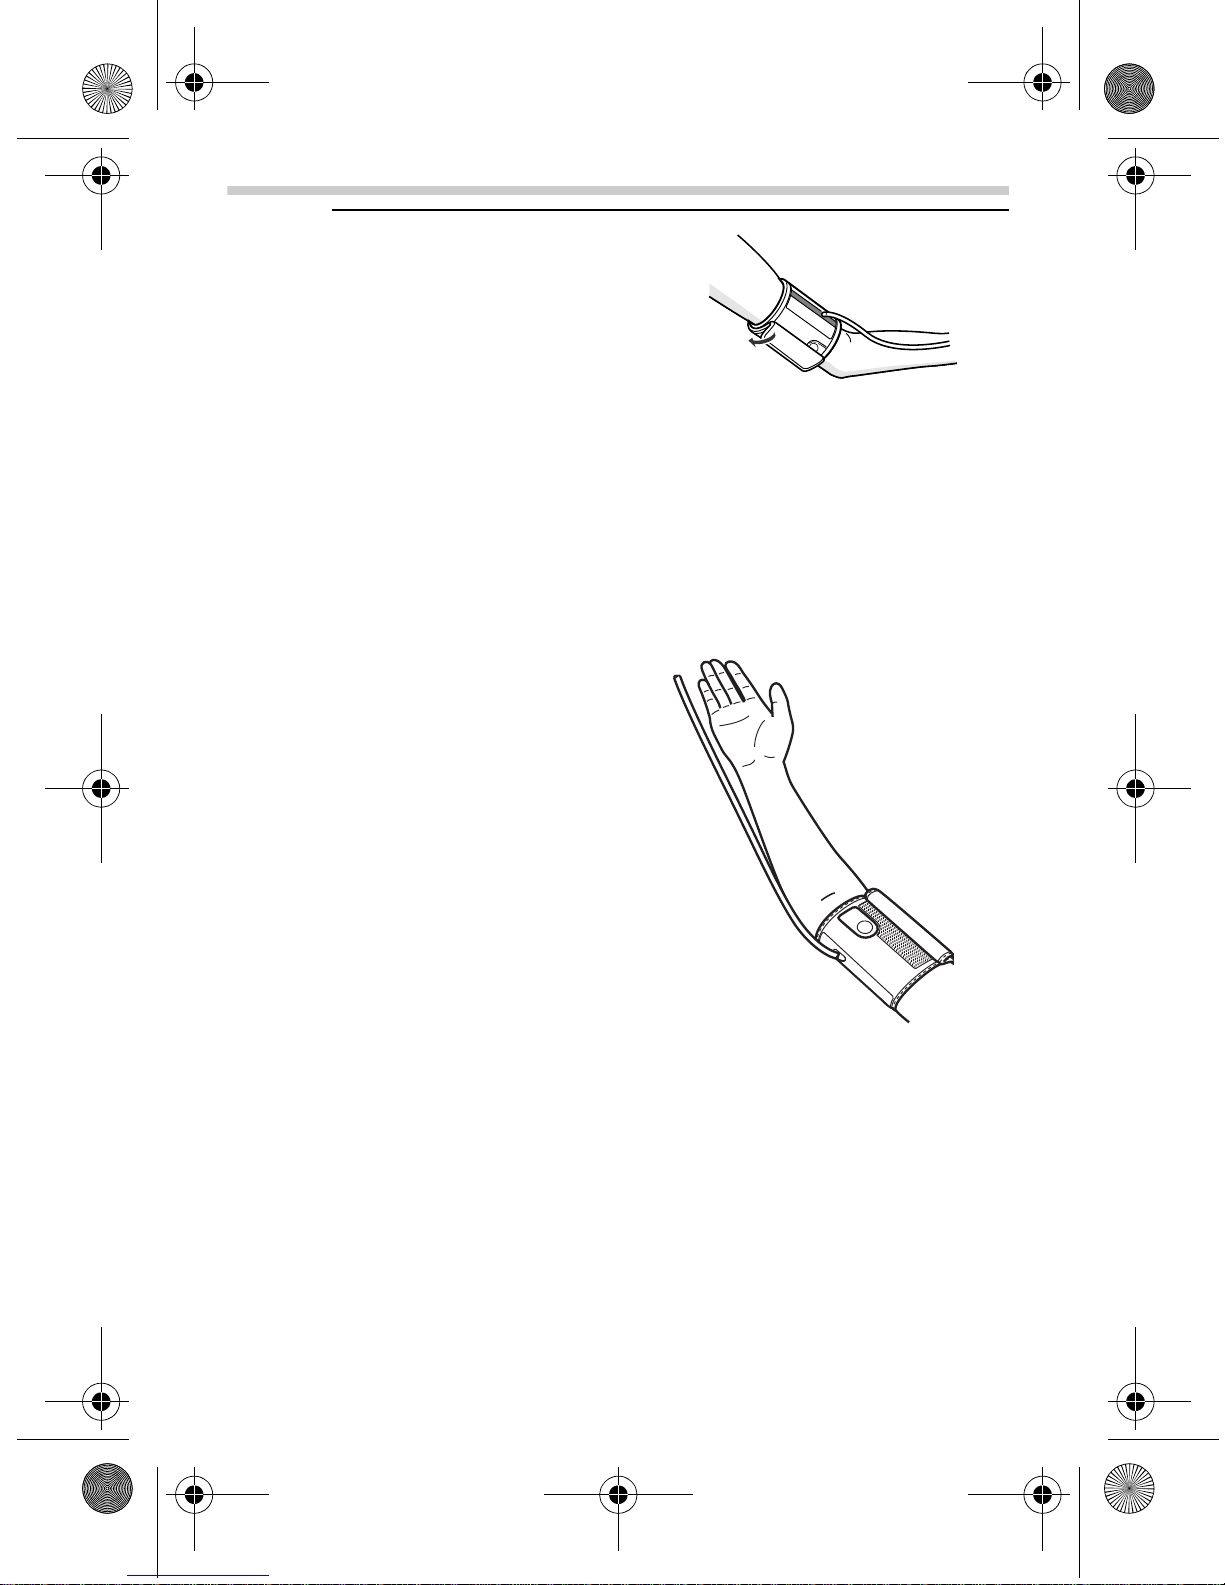
Taking measurements on the right arm
Please note the following
points when applying the
cuff to your right arm. Apply
the cuff so that the air tube is
at the side of your elbow.
3. Using the Unit
Notes:
• Be careful not to rest your
arm on the air tube as it
will restrict the flow of air
to the cuff.
• Apply the arm cuf f so that
no part of the cuff is
positioned over the elbow
joint. The cuff should be 1 to 2 cm above the elbow.
• If used 2 times per day, the cuff will last for 3 years.
• The blood pressure can dif fer between the right arm and
the left arm, and therefore also the measured blood
pressure values can be dif ferent. Omron recommends t o
always use the same arm for measureme nt. If the values
between the two arms differ substantially, please check
with your doctor which arm to use for your measurement .
19
Page 20
HEM-7080-C1_B_M.fm Page 20 Tuesday, March 9, 2010 9:05 AM
3. Using the Unit
3.3 Taking a Reading
The unit is designed to take measurements and store the
measurement values in the memory for two people using user
ID A and user ID B.
The unit can also be used to take a single measurement for
other persons using the guest mode. The user ID symbol is
not displayed when using the guest mode. Measurements
taken using the guest mode are not stored in the memory.
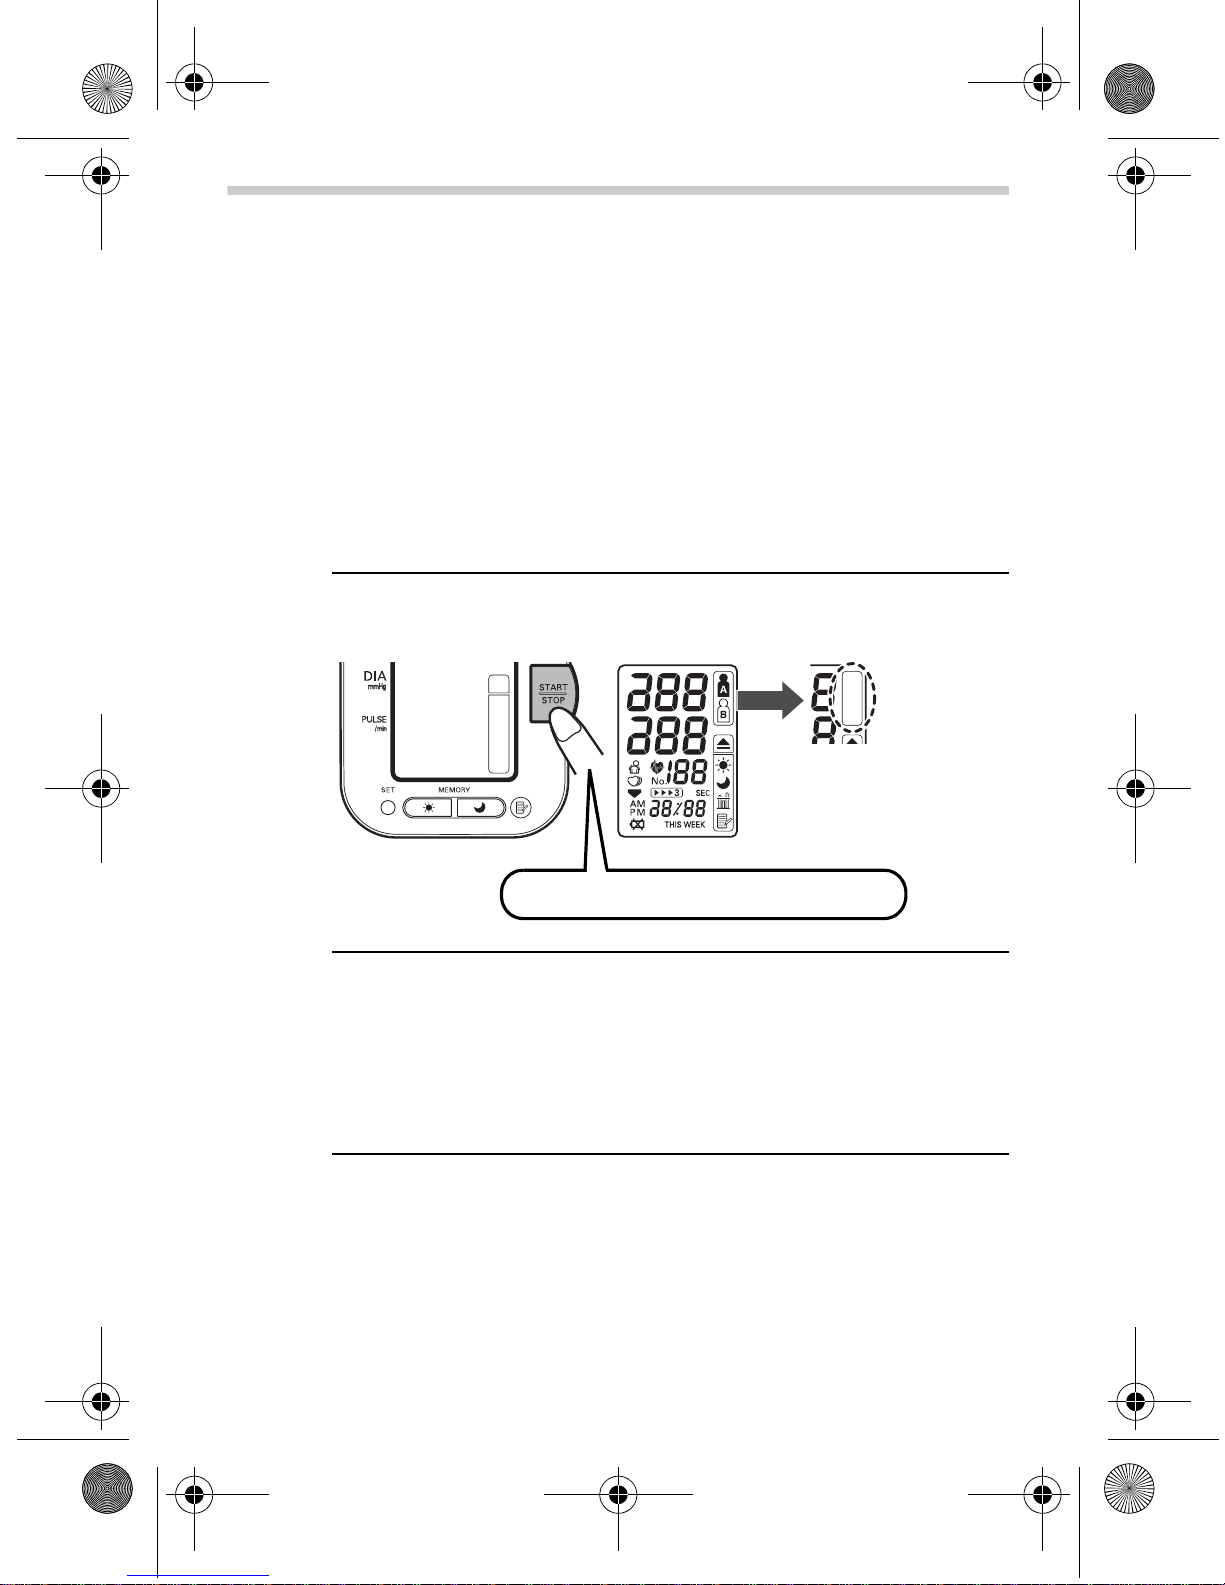
Using the Guest Mode
1. Press and hold the START/STOP button until the A and B
user symbols disappear from the display.
A and B display goes
out
Press for at least 3 seconds
2. Release the START/STOP button.
The cuff starts to inflate automatically.
Note: To stop the inflation press and release the START/
STOP button. The unit will stop inflating, start
deflation and turn off.
3. Inflation stops and the measurement is started. When the
measurement is completed, your blood pressure and
pulse rate appear on the display.
20
Page 21
HEM-7080-C1_B_M.fm Page 21 Tuesday, March 9, 2010 9:05 AM
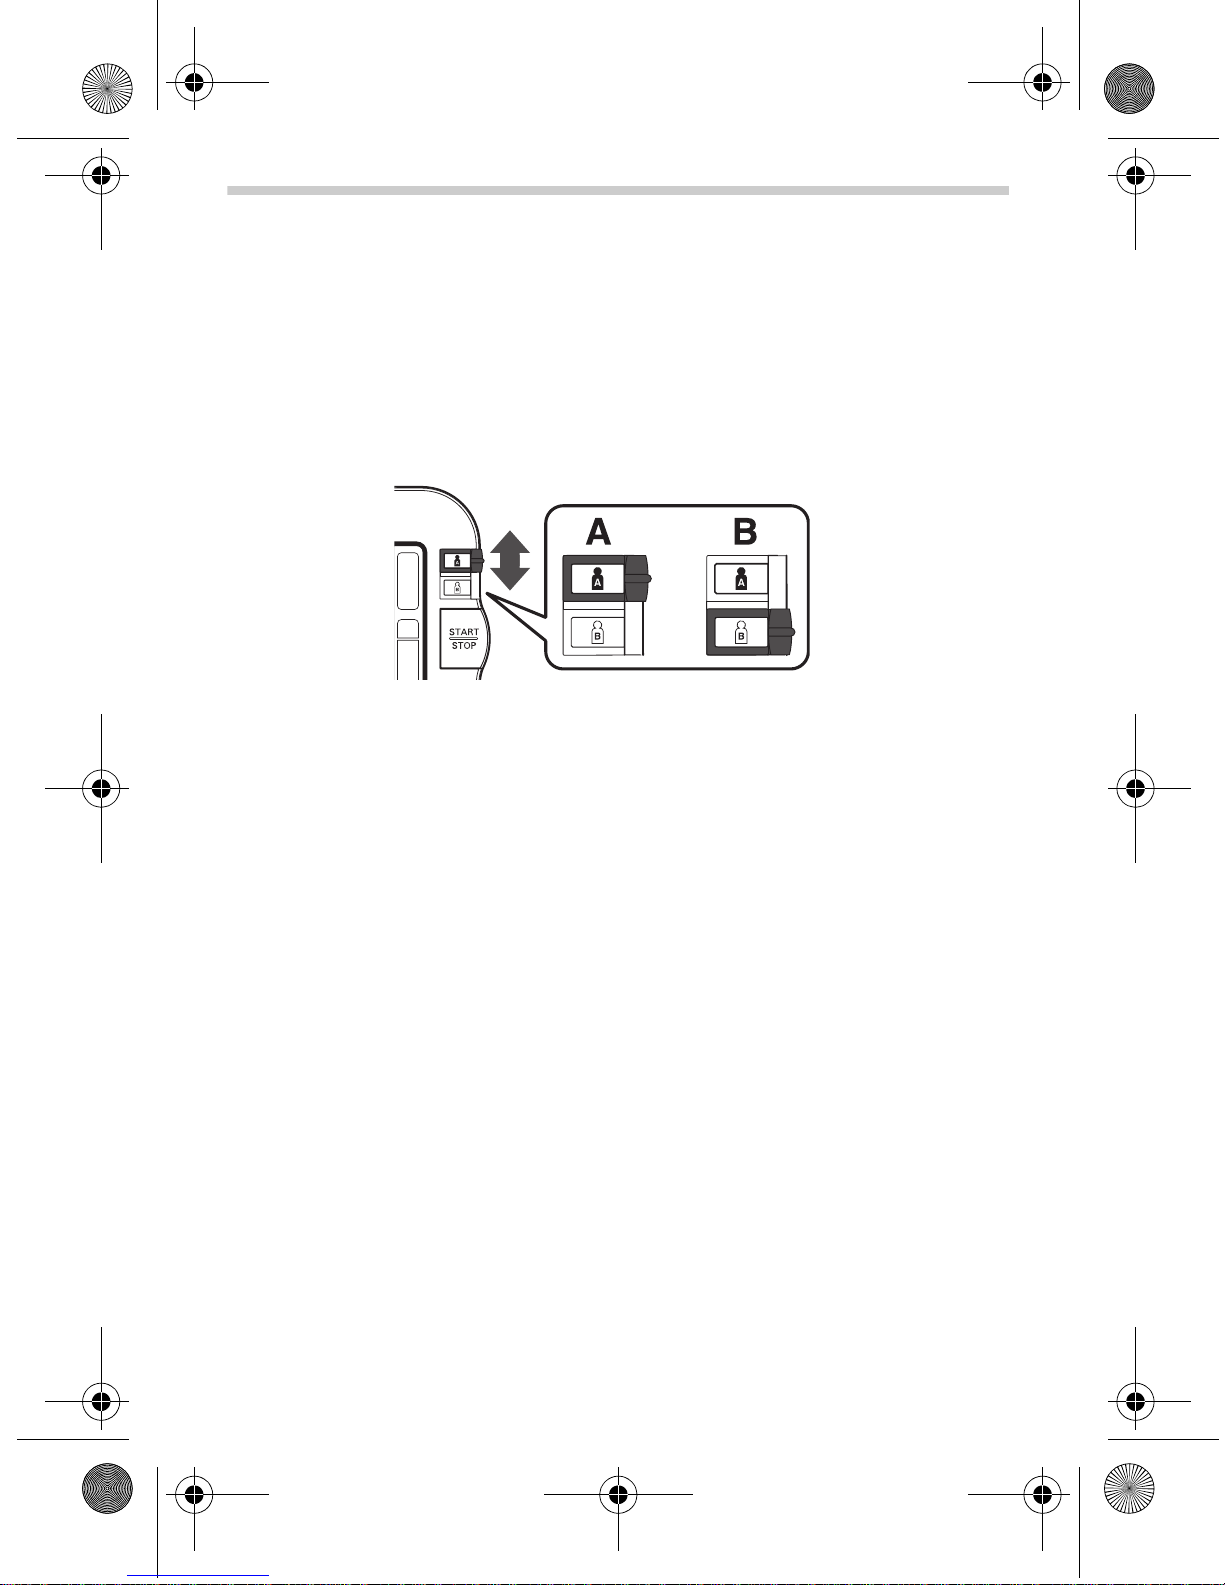
Selecting the User ID
Select your user ID. Always use the same user ID when
taking a measurement. The unit stores the measurement
values in the memory by the user ID selected. These
measurement values are used to calculate the morning
averages and evening averages.
Slide the user ID selection switch up or down to select user A
or B.
3. Using the Unit
Using the User ID
When you select a user ID the unit can be set to take one
measurement using the single mode or three consecutive
measurements using the auto mode when you press the
START/STOP button.
Note: The default value is set to the single mode to take
one measurement.
The auto mode takes three consecutive measurements. The
unit will inflate the cuff and take three measurements
separated by a short interval of time between each
measurement.
21
Page 22
HEM-7080-C1_B_M.fm Page 22 Tuesday, March 9, 2010 9:05 AM
3. Using the Unit
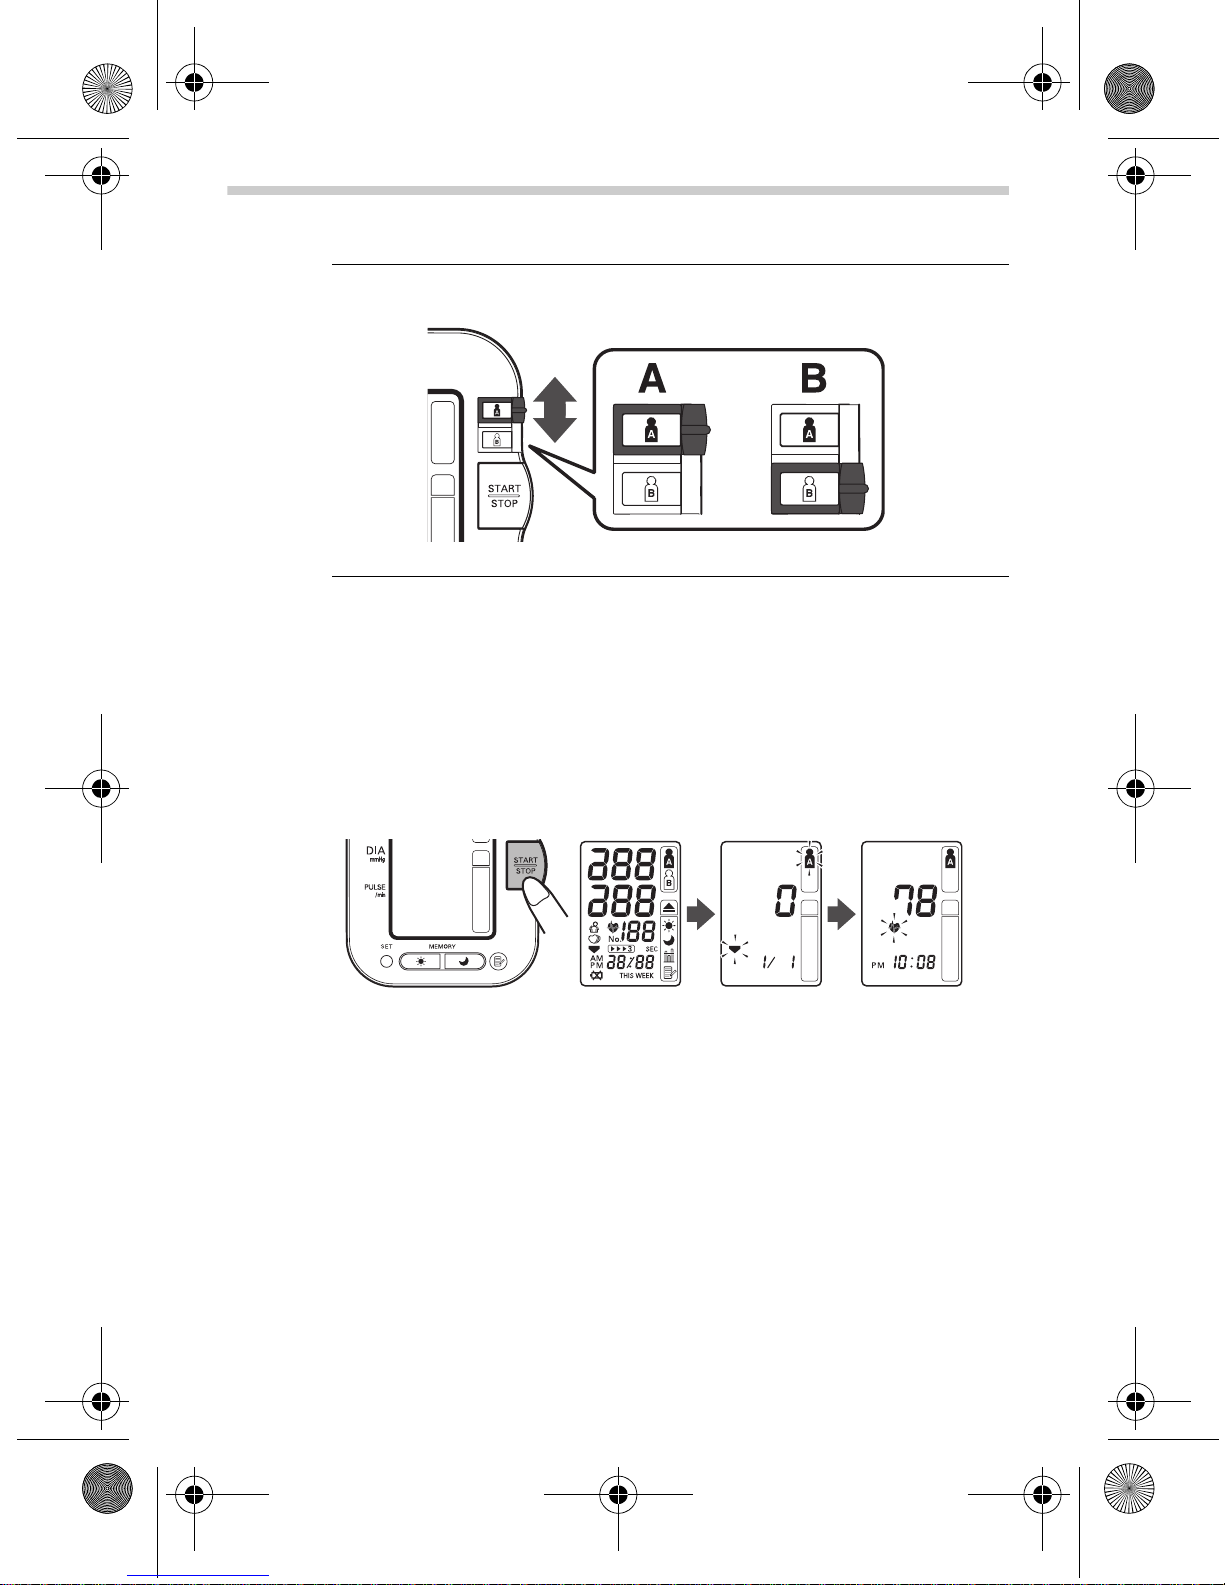
Using the Single Mode
1. Select your user ID (A or B).
2. Press the START/STOP button.
All symbols appear on t he display. The user ID symbol you
selected flashes on the display.
The cuff starts to inflate automatically. As the cuff inflates,
the unit automatically determines you r ideal inflati on level.
This unit detects the pulse during inflation. Do not move
your arm and remain still until the entire measurement
process is completed.
Note: To stop the inflation or measurement, press and
22
release the ST AR T/STOP button. The unit will stop
inflating, start deflating and will turn off.
Page 23
HEM-7080-C1_B_M.fm Page 23 Tuesday, March 9, 2010 9:05 AM
3. Using the Unit
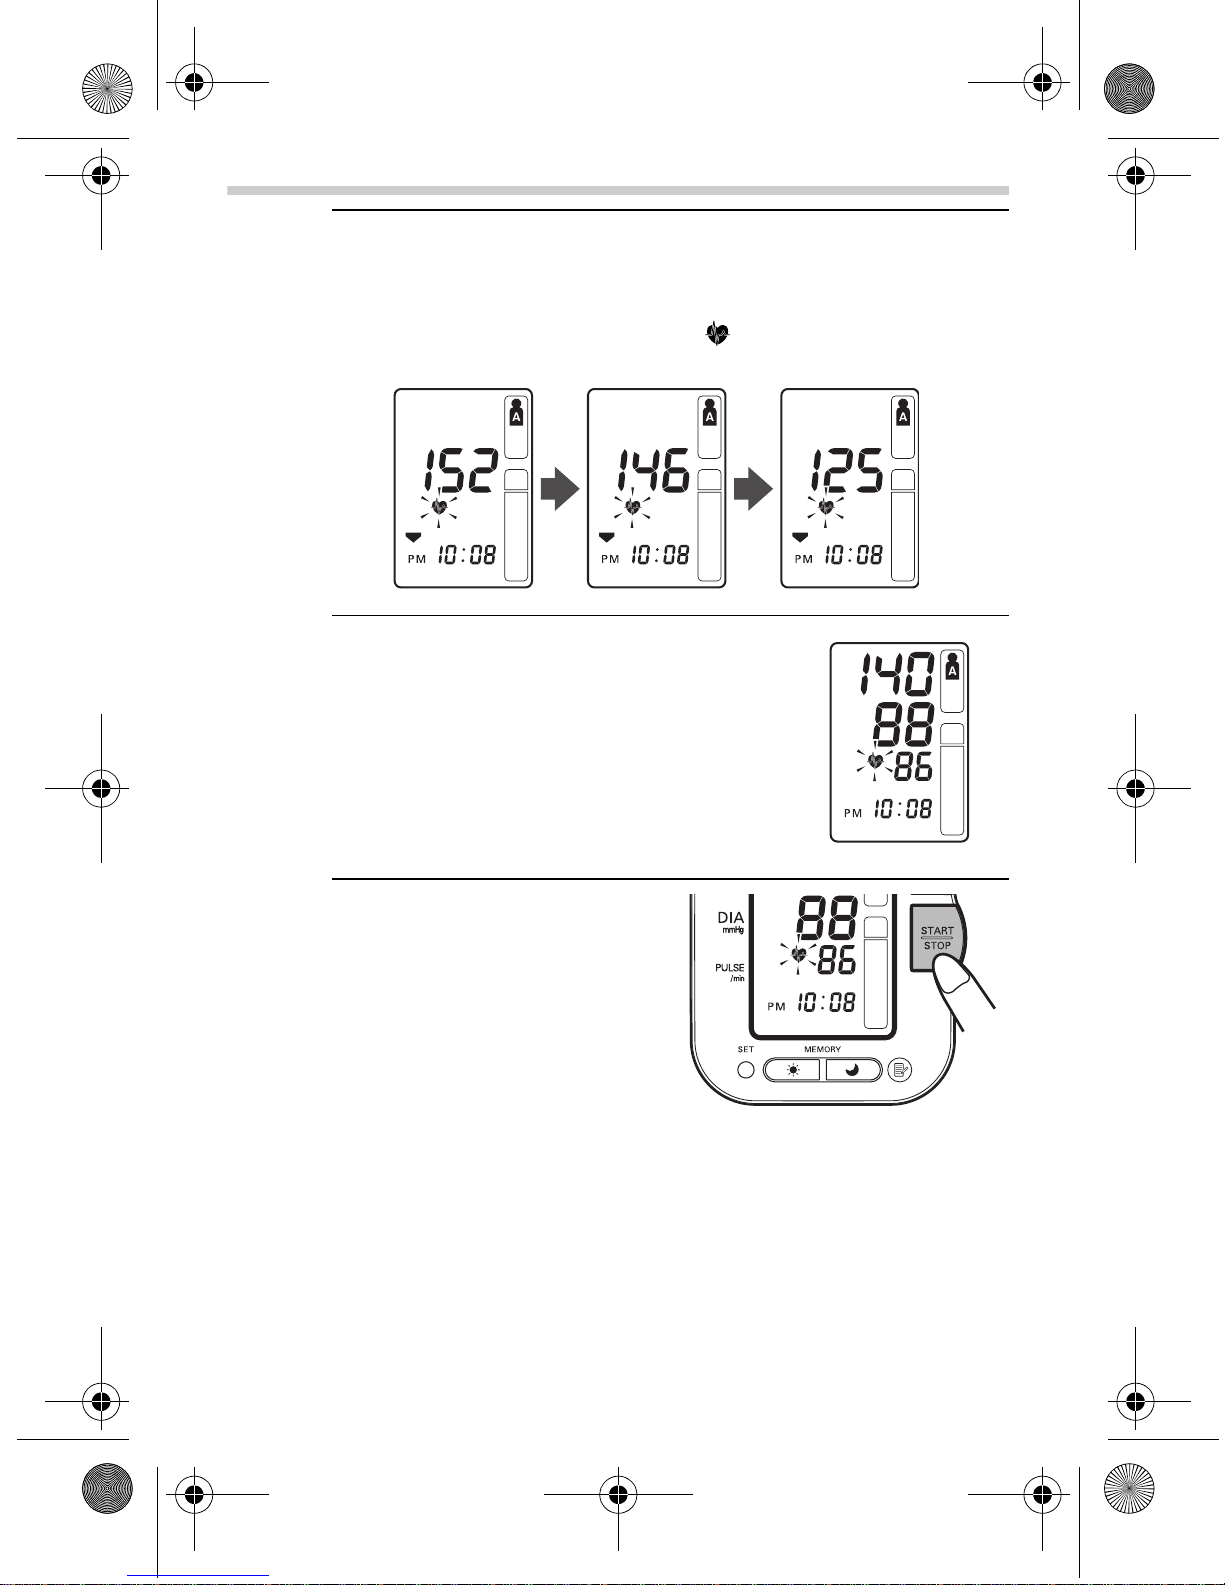
3. Inflation stops automatically and the measurement is
started.
As the cuff deflates, decreasing numbers appear on the
display. The heartbeat symbol ( ) flashes at every
heartbeat.
4. When the measurement is complete,
the arm cuff completel y deflates. Your
blood pressure and pulse rate are
displayed.
5. Press the START/STOP
button to turn the unit off.
Note: If you forget to turn
the monitor off, it
will automatically
turn off after five
minutes.
Note: Self-diagnosis of measured results and treatment
are dangerous. Please follow the instructi ons of
your doctor.
23
Page 24
HEM-7080-C1_B_M.fm Page 24 Tuesday, March 9, 2010 9:05 AM
3. Using the Unit
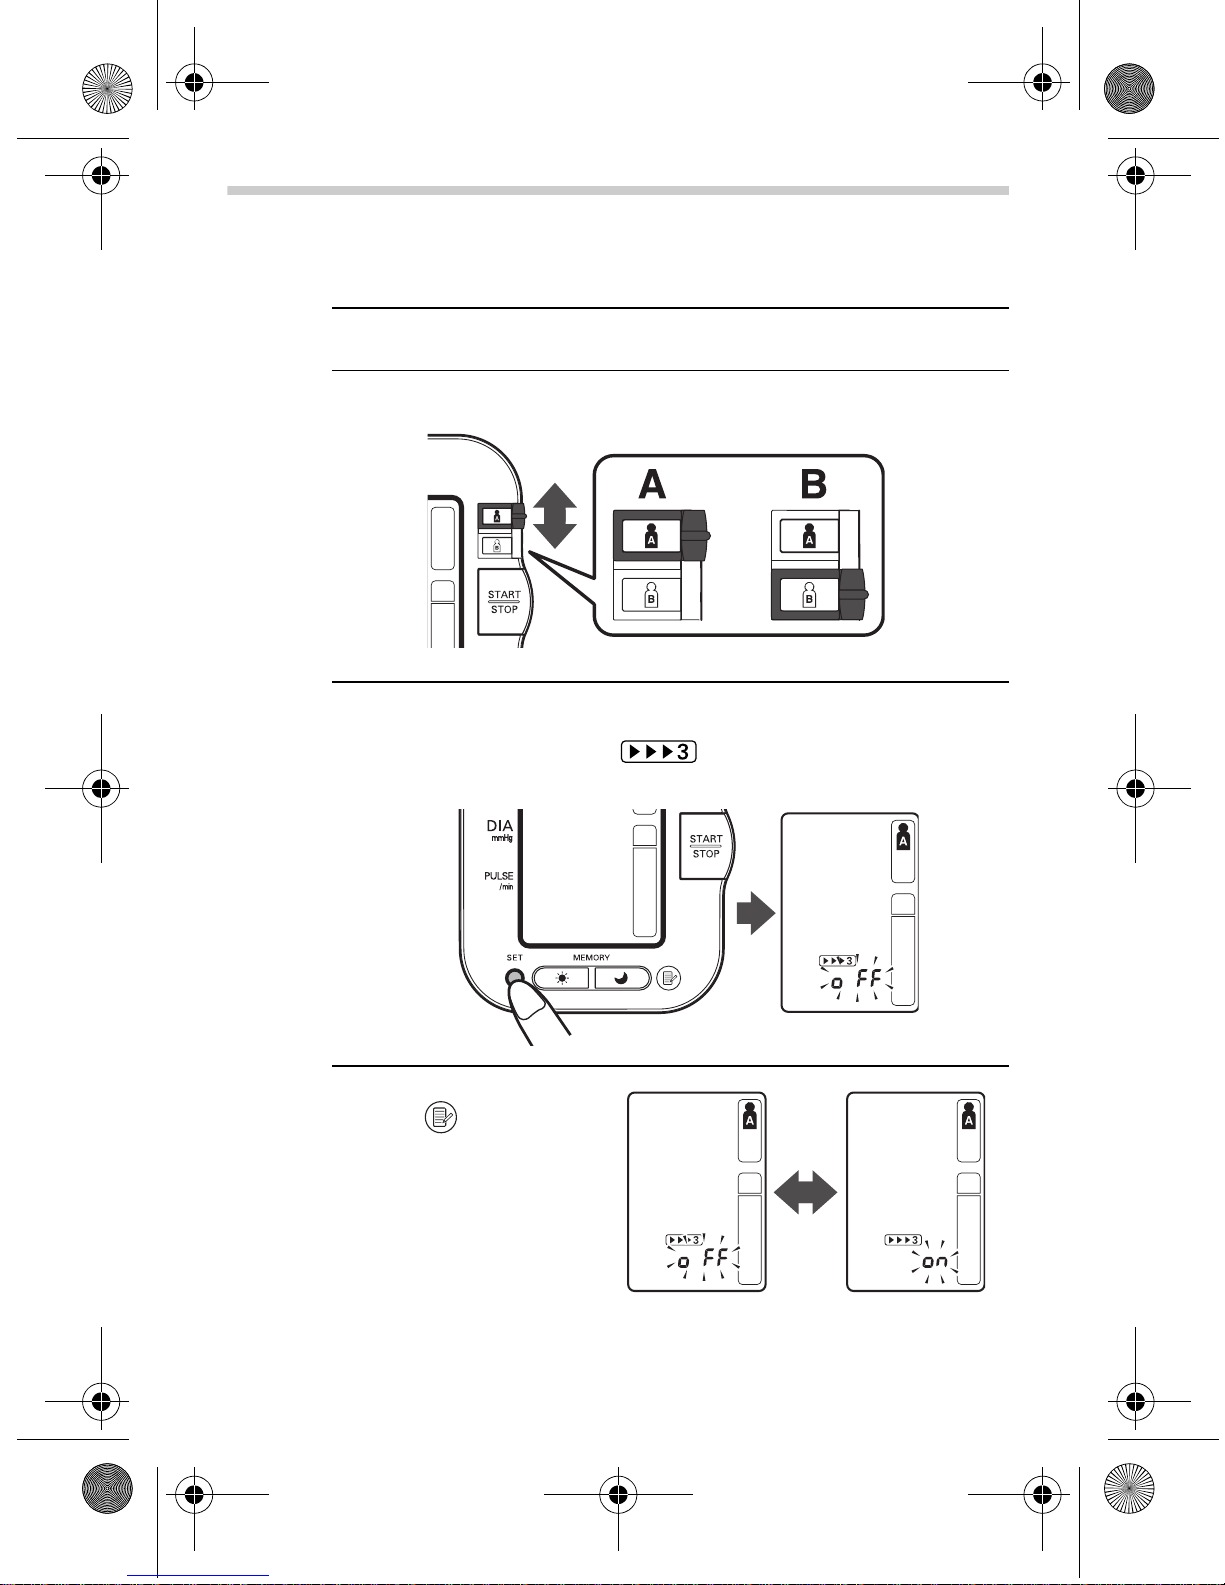
Selecting the Auto Mode
Auto Mode may be selected for either A or B user.
1. Make sure the unit is powered off.
2. Select your user ID (A or B).
3. Press and hold the SET button.
The auto mode symbol ( ) and the oFF setting
appears on the display.
4. Press the MEMORY
button ( ) to select
on.
Note: Press the
MEMORY
button to
alternate
between on
and oFF.
24
Page 25
HEM-7080-C1_B_M.fm Page 25 Tuesday, March 9, 2010 9:05 AM
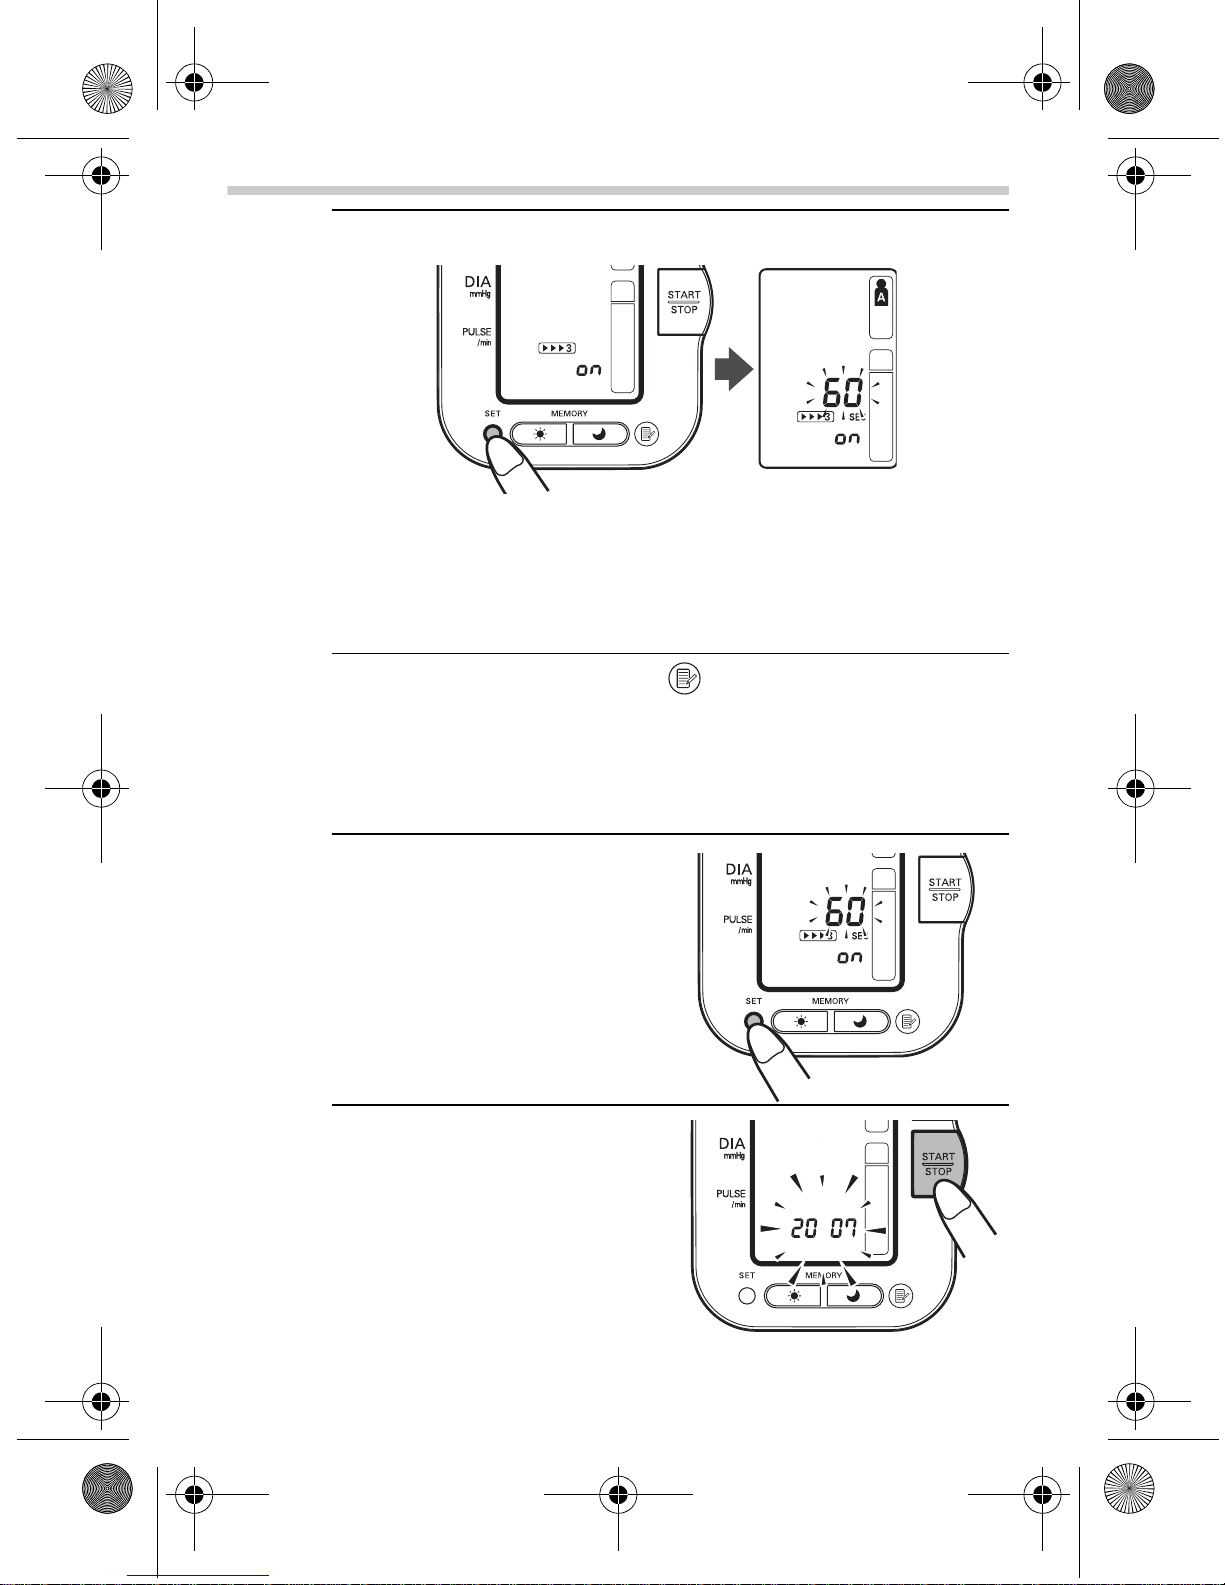
5. Press the SET button to confirm the change.
The number of seconds between each measurement is
displayed.
Note: The default value between each measurement is
60 seconds.
3. Using the Unit
6. Press the MEMORY button ( ) to change the interval of
time between each measurement.
The interval can be set to 15 seconds, 30 seconds, 60
seconds or 120 seconds. Continue to press the MEMOR Y
button until the desired interval appears on the display.
7. Press the SET button to
confirm the setting.
The year flashes on the
display.
8. Press the START/STOP
button to turn the unit off.
25
Page 26
HEM-7080-C1_B_M.fm Page 26 Tuesday, March 9, 2010 9:05 AM
3. Using the Unit
Using the Auto Mode
1. Select your user ID (A or B).
2. Press the START/STOP button.
All symbols appear on the display. The user ID Symbol
you selected flashes on the display. The cuff starts to
inflate automatically.
Note: To stop the inflation or measurement, press the
START/STOP button. The unit will stop inflating,
start deflating and will turn off.
3. Inflation stops automatically and the measurement is
started.
As the cuff deflates, decreasing numbers appear on the
display. The heartbeat symbol ( ) flashes at every
heartbeat. When the measurement is complete, the arm
cuff completely deflates.
Note: Do not move your arm and remain still until the
entire measurement process is completed.
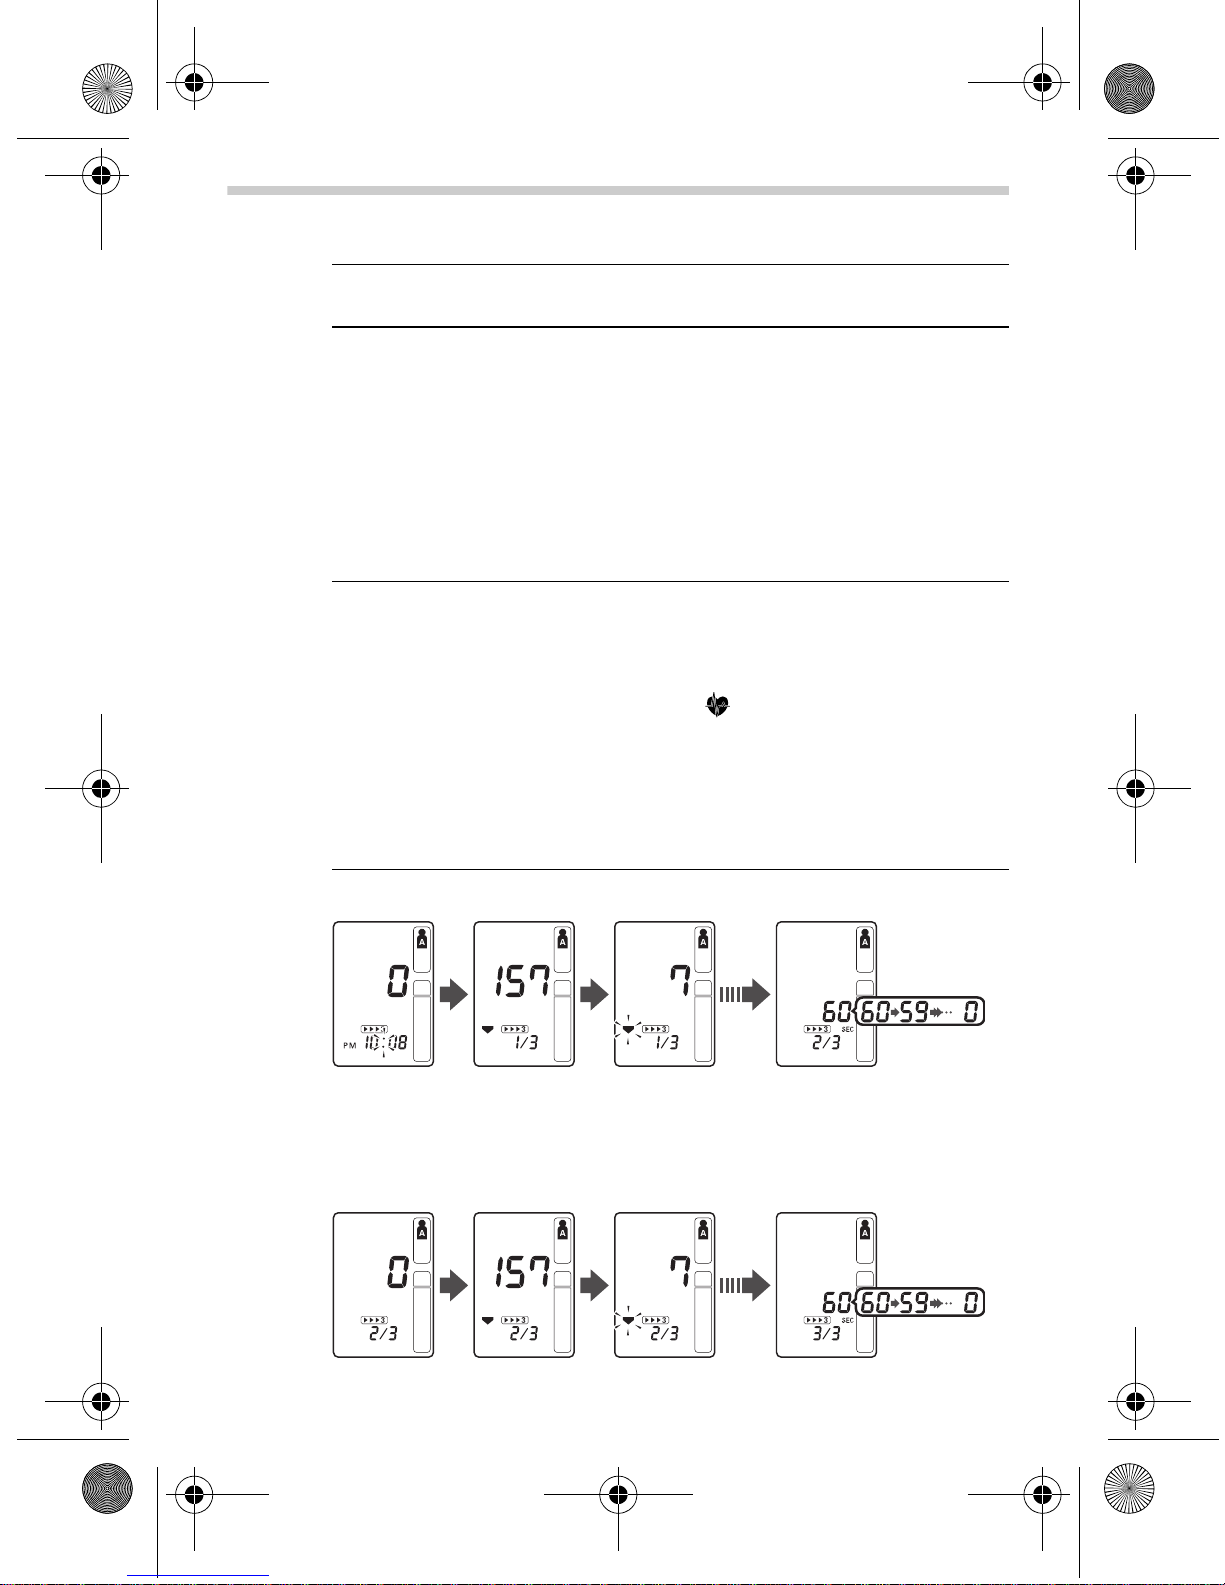
4. Check the progress of the consecutive measurements.
The first measurement is complete, waitin g to start the
next measurement. The interval of time set between each
measurement will appear on the display.
The second measurement starts automatically.
26
Page 27

HEM-7080-C1_B_M.fm Page 27 Tuesday, March 9, 2010 9:05 AM
The second measurement is complete, waiting to start the
next measurement.
The third measurement starts automatically.
The consecutive measurements are complete. The
average for the three measurements appears on the
display.
The three individual measurement results are not
displayed while Auto Mode is taking the measurements.
However , the result s for each i ndividual measuremen t can
be displayed after all the measurements have been
completed.
3. Using the Unit
Note: During the Auto Mode the unit will repeat the
measurement in case of an error. After 3 errors the
unit will stop taking further measurements. If only
two measurements are successful the avera ge of
these two measurements will be displayed. If only
one measurement is successful, this result will be
displayed.
5. Press the SET button to display the blood pressure and
pulse rate for the first measure ment. Press the SET button
again to display the next measurement.
6. Press the START/STOP button to turn the unit off.
27
Page 28

HEM-7080-C1_B_M.fm Page 28 Tuesday, March 9, 2010 9:05 AM
3. Using the Unit
Important:
• If your systolic or diastolic pressure
is outside the standard range, the
heartbeat symbol will blink when the
measurement result is displayed.
Recent research suggests that the
following values can be used as a
guide to high blood pressure for
measurements taken at home.
Systolic Blood Pressure Above 135 mmHg
Diastolic Blood Pressure Above 85 mmHg
This criteria is for home blood pressure measurement.
For professional office blood pressure measurement criteria,
please refer to page 44.
• Your blo od pressure monitor
includes an irregular heartbeat
feature. Irregular heartbeats can
influence the results of the
measurement. The irregular
heartbeat algorithm automatically
determines if the measurement is
usable or needs to be repeated. If
the measurement results are
affected by irregular heartb eats but
the result is valid, the result is shown together with the
irregular heartbeat icon. I f the irregular he artbeat s cause
the measurement to be invalid, no result is shown. If the
irregular heartbeat symbol ( ) is shown after you
have taken a measurement, repeat the measurement. If
the irregular heartbeat icon is shown freque ntly, please
make your doctor aware of it.
28
Page 29

N
HEM-7080-C1_B_M.fm Page 29 Tuesday, March 9, 2010 9:05 AM
What is Irregular Heartbeat?
An irregular
heartbeat is a
heartbeat rhythm
that varies by more
than 25% from the
Blood pressure
Pulse
average heartbeat
rhythm detected
while the unit is
measuring the
systolic and diastolic
blood pressure.
Blood pressure
Pulse
If such an irregular
rhythm is detected more than twice during measurement, the
irregular heartbeat symbol ( ) appears on the symbol
when the measurement results are displayed.
ormal Heartbeat
Irregular Heartbeat
3. Using the Unit
Short
Long
What is Arrhythmia?
A heartbeat is stimulated by electrical signals that cause the
heart to contract.
Arrhythmia is a condition where the heartbeat rhythm is
abnormal due to flaws in the bio-electrical system that drives
the heartbeat. Typical symptoms are skipped heartbeats,
premature contraction, an abnormally rapid (tachycardia) or
slow (bradycardia) pulse. This can be caused by heart
disease, aging, physical predisposition, stress, lack of sleep,
fatigue etc. Arrhythmia can only be diagnosed by a doctor
through a special examination.
Whether the appearance of the irregular heartbeat symbol
( ) in the results indicates arrhythmia or not can only be
determined by an examination and diagnosis by your doctor.
If the irregular heartbeat symbol ( ) is shown frequently,
please make your doctor aware of it. Conducting selfdiagnosis and treatment based on measurement results is
dangerous. Be sure to follow the instructions of your doctor.
29
Page 30

HEM-7080-C1_B_M.fm Page 30 Tuesday, March 9, 2010 9:05 AM
3. Using the Unit
3.4 Instructions for Special Conditions
If your systolic pressure is known to be more than 220 mmHg,
press and hold the START/STOP button until the arm cuff
inflates 30 to 40 mmHg higher than your suspected systolic
pressure.
1. Press the START/STOP
button to turn the unit on.
Measurement starts .
2. When the cuff starts to inflate, press the START/STOP
button and keep it pressed until the pressure is 30 to 40
mmHg higher than your suspected systolic pressure.
Note: You cannot inflate the cuff above 299 mmHg. (An
error will be displayed if you try to inflate the cuff
above 300 mmHg.)
3. Release the START/STOP button when the cuff has been
inflated to the desired pressure.
The cuff starts to deflate and measurement starts.
4. The rest of the procedure is the same as for normal
measurement. Refer to page 20.
Note: Do not apply more pressure than necessary.
30
Page 31

HEM-7080-C1_B_M.fm Page 31 Tuesday, March 9, 2010 9:05 AM
3.5 Using the Memory Function
The unit is designed to store the blood pressure and the pulse
rate in the memory for two people (user A and user B) every
time a measurement is completed.
The unit automatically stores up to 84 sets of measurement
values (blood pressure and pulse rate) for each user (A and
B). When 84 sets of measurement values are stored, the
oldest record is deleted to save the most recent values. The
unit also stores 8 weeks of morning averages and 8 weeks of
evening averages for each user (A and B).
Average Function
The unit calculates the average reading based on the three
most recent sets of measurement values taken within 10
minutes of the most recent reading.
3. Using the Unit
Note: If two sets of measurement values are stored in
the memory for the 10 minutes period, the average
is based on the two s ets of measurement values. I f
one set of measurement values is stored, this is
displayed as the average.
To Display the Measurement Values
1. Select your user ID (A or B).
2. Press the MEMORY button ( ).
The average value is shown and t he avera ge symbol ( )
appears above the memory symbol ( ) on the display.
31
Page 32

HEM-7080-C1_B_M.fm Page 32 Tuesday, March 9, 2010 9:05 AM
3. Using the Unit
3. Press the MEMORY button ( ) to display the most
recent set of individual measurement values on the
screen. The values are displayed from the most recent to
the oldest.
Note: The date and time
are alternately
displayed with the
measurement
values.
Alternating display
Press the MEMORY
button to display the next set of values.
Press and hold the MEMORY button t o di splay t he val ues
faster.
Auto mode
The average for the consecutive measurements appears
on the display with the auto mode symbol ( ). To
display the values for the individual measurements press
the SET button while the average is displayed.
4. Press the START/STOP button to turn the unit off.
32
Page 33

HEM-7080-C1_B_M.fm Page 33 Tuesday, March 9, 2010 9:05 AM
Morning and Evening Averages
The unit calculates and displays a weekly average for
measurements taken in the morning ( ) and evening ( ).
The unit stores 8 weeks of morning averages and 8 weeks of
evening averages for each user (A and B).
Note: The week begins Sunday at 4:00 AM
Morning Averages
Morning averages are based on the first average reading
using the auto mode or the first reading using the single
mode.
Measurement times must be between:
4:00 AM and 9:59 AM.
3. Using the Unit
Evening Averages
Evening averages are based on the last average reading
using the auto mode or the last reading using the single
mode.
Measurement times must be between:
7:00 PM and 1:59 AM.
33
Page 34

HEM-7080-C1_B_M.fm Page 34 Tuesday, March 9, 2010 9:05 AM
3. Using the Unit
About the Weekly Averages
Morning Weekly Average
This is the average for measurements taken during the
morning (4:00 AM-9:59 AM) between Sunday and Saturday.
An average for each day is calculated for up to three
measurements taken within 10 minutes of the first
measurement of the morning.
Measurements of the morning
4:00 AM
First measurement of
the morning
Within 10 minutes
Sunday Monday Tuesday Wednesday Thursday Friday Saturday
Measurement
Measurement
Measurement
Measurement
Up to 3 measurements
Morning Blood Pressure
Evening Weekly Average
This is the average for measurements taken during the
evening (7:00 PM-1:59 AM) between Sunday and Saturday.
An average for each day is calculated for up to three
measurements taken within 10 minutes of the last
measurement of the evening.
7:00 PM
Within 10 minutes
Last measurement of
the evening
1:59 AM
9:59 AM
Measurement
Measurement
Measurements of the evening
Sunday Monday Tuesday Wednesday Thursday Friday Saturday
Measurement
Measurement
Measurement
Measurement
Measurement
Measurement
Up to 3 measurements
Evening Blood Pressure
34
Page 35

HEM-7080-C1_B_M.fm Page 35 Tuesday, March 9, 2010 9:05 AM
To Display Morning and Evening Averages
1. Select your user ID (A or B).
2. Press the morning
average button
( ) or the evening
average button
().
The average for the
current week “THIS
WEEK” appears on the
display.
The morning and
evening average value
of the same week can
be displayed by
3. Using the Unit
pressing the morning average button ( ) or the
evening average button ( ). It is important to check
both morning and evening average of the same week.
3. Continue to press the morning ave rage button ( ) or
the evening average button ( ) to display the
previous weeks. The unit displays “-1 WEEK” for the
previous week to “-7 WEEK” for the oldest set of
averages.
Note: If there are not enough
measurements taken in a week to
calculate the average the display
will appear as illustrated.
4. Press the START/STOP button to turn the unit off.
35
Page 36

HEM-7080-C1_B_M.fm Page 36 Tuesday, March 9, 2010 9:05 AM
3. Using the Unit
Notes on Display Combinations
In addition to the morning average and evening average
symbols, the unit may also display the morning hypertension
symbol if the morning average for that week is above the
home blood pressure guideline. (See page 28 “Using the Unit
- Important information” for details.) Depending on your
measurement results, these may be displayed in the following
combinations.
Display
Morning
Average
Evening
average
Morning average from This
Week with Morning Average
Symbol
Evening average from This
Week with Evening Average
Symbol
Average within home blood
pressure guideline
Morning average from 7
weeks ago with Morning
Average Symbol + blinking
heartbeat Symbol + Morning
Hypertension Symbol
Evening average from 7
weeks ago with Evening
Average Symbol + blinking
Heartbeat Symbol + Morning
Hypertension Symbol
Average above home blood
pressure guideline +
Morning Hypertension
36
Page 37

HEM-7080-C1_B_M.fm Page 37 Tuesday, March 9, 2010 9:05 AM
The morning hypertension symbol ( ) appears if the weekly
average for morning measurements is above 135/85.
In this case the morning hypertension symbol ( ) is
displayed when the evening average is displayed, regardless
of the values for the evening average.
To Delete All Values Stored in the Memory
The values stored in the memory are deleted by user ID.
You cannot partially delete values stored in the memory. All
values for the user you select will be deleted.
1. Select your ID (A or B).
3. Using the Unit
2. While holding the MEMORY button ( ) press the
START/STOP button simultaneously for more than 2
seconds and all values will be deleted.
37
Page 38

HEM-7080-C1_B_M.fm Page 38 Tuesday, March 9, 2010 9:05 AM
4. Quick Reference Guide
This Quick Reference Guide is for reference on ly. Please read the
entire manual before using the unit for the first time.
To help ensure a reliable reading, avoid eating, smoking, or
exercising for at least 30 minutes bef ore taking a measurement.
Note: Remove any tight-fitting clothing from your upper arm.
1. Sit on a chair with your feet f lat on the floor and p lace your
arm on a table so that the arm cuff will be at the same
level as your heart.
2. Secure the cuff around your arm using the fabric fastener
strip.
3. Select your user ID (A or B).
4. Press the START/STOP button.
When measurement is complete,
the unit displays your blood
pressure and pulse rate, and
automatically deflat es the cuff.
Note: Please note that all
measurement results are
stored in the memory. If different people take
measurements using the same device, make sure
that you are awar e of thi s fac t.
38
Page 39

HEM-7080-C1_B_M.fm Page 39 Tuesday, March 9, 2010 9:05 AM
Care and maintenance
5. Handling Errors and Problems
5.1 Error Messages
Error Display Cause Remedy
Cuff is under inflated.
Blinks or appears
continuously .
Movement during
measurement.
Cuff over inflated.
Batteries have run down.
Movement, sound.
Carefully read and repeat
the steps listed under
Chapter 3.3 on page 20.
Replace all four “AA”
batteries with new ones.
Refer to page 9.
Carefully read and repeat
the steps listed under
Chapter 3.3 on page 20.
Cuff leaks air. Replace with a new cuff.
39
Page 40

HEM-7080-C1_B_M.fm Page 40 Tuesday, March 9, 2010 9:05 AM
5. Handling Errors and Problems
5.2 Troubleshooting
Problem Cause Remedy
No display
appears when
the START/
STOP button is
pressed.
The batteries are empty. Replace the batteries.
Cannot measure
or readings are
too high.
The blood
pressure is
different each
time. The
reading is
extremely low
(or high).
Is the cuff wrapped
correctly around the
arm?
The cuff pressure does
not rise although the
pump motor can be
heard.
Blood pressure readings constantly vary with time of
measurement and nervous condition. Take deep
breaths to relax before taking a measurement.
Attach the arm cuff
correctly.
Check that the air plug is
properly connected to
the unit. Push the air
plug firmly into the air
jack.
40
Page 41

HEM-7080-C1_B_M.fm Page 41 Tuesday, March 9, 2010 9:05 AM
6. Maintenance and Storage
To protect your unit from damage, please observe the following:
• Do not subject your unit and cuff to extreme
temperatures, humidity, moisture or direct sunlight.
• Do not fold the cuff or tubing tightly.
• Do not disassemble the unit.
• Do not carry out repairs of any kind yourself. If a defect
occurs, consult the OMRON distributor.
• The OMRON HEM-7080 is a precision measuring
device. It is important that the accuracy remains within
the specifications. It is recommended that you have the
unit inspected every two years to ensure it i s accurate
and functioning correctly . Consult t he OMRON distributor
for further details.
• Do not subject the unit to stro ng shocks or vibrations (for
example, dropping the unit on the floor.)
• Do not use volatile liquids to clean the unit. THE UNIT
SHOULD BE CLEANED WITH A SOFT, DRY CLOTH.
• Do not wash the arm cuff or immerse it in water.
Storage
Keep the unit in its soft storage
bag when not in use.
41
Page 42

HEM-7080-C1_B_M.fm Page 42 Tuesday, March 9, 2010 9:05 AM
7. Technical Data
Product Description
Model
Display
Measurement Method
Measurement Range
Accuracy
Inflation
Deflation
Memory
Rating
Power Source
Battery Life
Applied Part
Protection Against
Electric Shock
Digital Automatic Blood Pressure Monitor
OMRON HEM-7080
LCD Digital Display
Oscillometric method
Pressure: 0 mmHg to 299 mmHg
Pulse: 40 to 180/min.
Pressure: ±3 mmHg
Pulse: ± 5% of display reading
Fuzzy-logic controlled by electric pump
Automatic pressure release valve
84 Measurements with date and time for each user
(A and B)
DC6V 4W
4 “AA” batteries 1.5V or AC adapter (optional)
Capacity of new alkaline batteries is approx. 1400
measurements when used 6 times a day with 4 new
alkaline batteries
= Type B
Internally powered ME equipment (When using only
the batteries)
Class II ME equipment (Optional AC adapter)
=
Operating temperature/
Humidity
Storage temperature/
Humidity/Air Pressure
Console Weight
Cuff Weight
Outer Dimensions
Cuff Dimensions
Package Content
Note: Subject to technical modification without prior notice.
Disposal of this product and used batteries should be carried out in accordance
with the national regulations for the disposal of electronic products.
Read the instructions in this manual carefully.
+10°C to +40°C
Maximum: 30 to 85% RH
-20°C to +60°C
Maximum: 10 to 95% RH
700 - 1060 hPa
Approximately 420g without batteries
Approximately 240g
Approximately 155 (l) mm × 131 (w) mm × 84(h) mm
Approximately 152 mm × 600 mm
(Cuff: arm circumference 22 to 42 cm)
Cuff, instruction manual, soft storage bag, 4 “AA”
batteries and main unit
42
Page 43

HEM-7080-C1_B_M.fm Page 43 Tuesday, March 9, 2010 9:05 AM
7. Technical Data
• This device fulfils the provisions of EC direct ive 93/42/EEC
(Medical Device Directive).
• This blood pressure monitor is designed according to the European
Standard EN1060, Noninvasive sphygmomanometers Part 1:
General Requirements and Part 3: Supplementary requirements for
electromechanical blood pressure measuring systems.
Important information regarding Electro Magnetic Compatibility (EMC)
With the increased number of elec tronic dev ices such as PC’ s a nd mobile (cellular )
telephones, medical devices in use may be susceptible to electromagnetic
interference from other devices. Electromagnetic interference may result in
incorrect operation of the medical device and create a potentially unsafe situation.
Medical devices should also not interfere with other devices.
In order to regulate the requirements for EMC (Electro Magnetic Compatibility)
with the aim to prevent unsafe product situations, the EN60601-1-2:2007
standard has been implemented. This st an dard defi nes the levels of i mmunity to
electromagnetic interferences as well as maximum levels of electromagnetic
emissions for medical devices.
This medical device manufactured by OMRON HEALTHCARE conforms to this
EN60601-1-2:2007 standard fo r both immunity and emissions.
Nevertheless, special precautions need to be observed:
• Do not use mobile (cellular) telephones and other devices, which generate
strong electrical or electromagnetic fields, near the medical device. This may
result in incorrect operation of the unit and cr eate a pote ntially unsaf e situation.
Recommendation is to keep a minimum distance of 7 m. Verify correct
operation of the device in case the distance is shorter.
Further documentati on in accord ance wit h EN60601- 1-2:2007 i s avai lable at OMRON
HEALTHCARE EUROPE at the address mentioned in this instruction manual.
Documentation is also available at www.omron-healthcare.com.
Correct Disposal of This Product
(Waste Electrical & Electronic Equipment)
This marking shown on the product or its literature, indicates that it
should not be disposed of, with other household wastes at the end of
its working life. To prevent possible harm to the environment or human
health from uncontrolled waste disposal, please separate this from
other types of wastes and recycle it responsibly to promote the
sustainable reuse of material resourc es.
Household users should contact either the retailer where they purchase d this
product, or their local government office, for details of where and how they can
take this item for environmentally safe recycling.
Business users should cont act their supplier and check the terms and c onditions of
the purchase contract. This product should not be mixed with other commercial
wastes for disposal.
This product does not contain any hazardous substances.
43
Page 44

HEM-7080-C1_B_M.fm Page 44 Tuesday, March 9, 2010 9:05 AM
8. Some Useful Information about Blood Pressure
What is Blood Pressure?
Blood pressure is a measure of the force of blood flowing
against the walls of the arteries. Arterial blood pressure is
constantly changing during the course of the heart's cycle.
The highest pressure in the cycle is called the Systolic Blood
Pressure; the lowest is the Diastolic Blood Pressure.
Both pressure readings, the Systolic and Diastolic, are
necessary to enable a doctor to evaluate the status of a
patient's blood pressure.
Why is it a Good Thing to measure Blood
Pressure at Home?
Having your blood pressure measured by a doctor can cause
anxiety which is itself a cause of high blood pressure. As a
variety of conditions affect blood pressure, a single
measurement may not be sufficient for an accurate diagnosis.
Many factors such as physical activity, anxiety, or the time of
day, can influence your blood pressure. Thus it is best to try
and measure your blood pressure at the same time each day,
to get an accurate indication of any changes in blood
pressure. Blood pressure is typically low in the morning and
increases from afternoon to evening. It is lower in the summer
and higher in the winter.
Blood pressure is measured in millimetres of mercury (mmHg)
and measurements are written with the systolic pressure
before the diastolic e.g. A blood pressure written as 140/90, is
referred to as 140 over 90 mmHg.
44
Page 45

HEM-7080-C1_B_M.fm Page 45 Tuesday, March 9, 2010 9:05 AM
8. Some Useful Information about Blood Pressure
200
150
mmHg
100
50
61218 24
Example: fluctuation within a day (male, 35 years old)
Upper curve: systolic blood pressure
Lower curve: diastolic blood pressure
Time of day
Classification of Blood Pressure by the World
Health Organization
The World Health Organization (WHO) and the International
Society of Hypertension (ISH) developed the Blood Pressure
Classification shown in this figure.
Systolic blood pressure
(mmHg)
180
160
140
130
120
Optimal blood
(target value)
Normal systolic value
Normal blood
pressure
pressure
80
Severe hypertension
Moderate hypertension
Mild hypertension
85 90 100 110
Diastolic
blood
pressure
(mmHg)
This classification is based on the blood pressure values
measured on people in a sitting position in outpatient
departments of hospitals.
Note: There is no universally accepted definition of
hypotension. However, those having the systolic
pressure below 100 mmHg are assumed as
hypotensive.
45
Page 46

2
目彔
使用本產品之前
簡介 ...........................................................................3
安全注意事項 .............................................................4
1. 概要 .......................................................................6
2. 準備 .......................................................................9
2.1 安裝∕更換電池 ..................................................................9
2.2 設置日期與時間 ................................................................11
操作指南
3. 血壓計的使用 .......................................................15
3.1 測量時的正確坐姿 ........................................................... 15
3.2 穿戴臂帶的方法 ............................................................... 17
3.3 讀數 .................................................................................... 20
3.4 特殊條件說明 ................................................................... 30
3.5 使用記憶功能 ................................................................... 31
4. 快速參考指南 .......................................................38
保養和維修
5. 解決錯誤顯示和問題 ............................................39
5.1 錯誤信息 ............................................................................ 39
5.2 故障排除 ............................................................................ 40
6. 保養和存儲 ...........................................................41
7. 技術數据 ..............................................................42
關於血壓的資訊 ................................................... 43
Page 47

3
簡介
感謝您購買 OMRON HEM-7080 Intellisense 上臂血壓計。
OMRON HEM-7080 Intellisense 是一款根據示波測定原理操作的
全自動血壓計, 能方便快捷地測量血壓和脈搏數。本機採用
“Intellisense” 先進技術,無須預設壓力或重新加壓,控制加壓非
常方便。
本血壓計可存儲兩位測量者的測量結果,並估算早晚平均值。自
動模式下,本機能以固定時間間隔連續測量三次,取平均讀數。
使用本血壓計之前,請認真閱讀本說明書以确保正确使用本機。
有關您個人血壓的特定信息,請向您的醫生詢問。
Page 48

4
安全注意事項
若測量者處於懷孕期間或有心律不齊、動脈硬化等疾病,請咨詢
醫生瞭解相關情況。
僅將本機用於存儲指定用戶的測量結果。
首次使用本機之前請先細讀本節內容。
警告
(一般使用注意事項)
應經常向醫生咨詢。您絕不能停止服用或擅自更改醫生處
方藥物的劑量。
本機不能用於嬰兒或無法正確表達自己意愿的人士。
請勿用於測量血壓以外的目的。
請使用本機專用的臂帶。使用其它類型臂帶可能導致測量
結果不正確。
請勿拆卸血壓計或臂帶。
夜間測量時,應確保未將空氣管纏繞於身體的其它部位,
否則一旦空氣管加壓,則可能導致受傷。
夜間測量時,臂帶切勿纏繞過緊,否則可能導致受傷。
臂帶充氣不得超過 299 mmHg。
(選件交流適配器的使用注意事項)
僅允許使用 Omron 經銷商指定的交流適配器。使用不受支
持的適配器可能會損害或給血壓計造成危險。交流適配器
必須與適合本型號電壓的插座連接。切勿超負荷使用電源
插座或使用加長線。
如果血壓計或電源線受損,請勿使用交流適配器,應立即
關閉電源並拔下電源線。
切勿用濕手將電源線插入或拔出插座。
•
•
•
•
•
•
•
•
•
•
•
Page 49

5
安全注意事項
(電池使用注意事項)
若電池溶液進入眼睛,請立刻用大量清水沖洗,並馬上求
醫。
若電池溶液滴在皮膚或衣服上,請立刻用大量清水沖洗。
僅允許使用四節 “AA” 規格的堿性乾電池。 切勿使用其它
型號電池。
切勿將電池電極裝反。
及時用新的電池更換舊電池。
同時更換四節電池。
如果三個月或更長時間內不使用血壓計,請取出電池。如
果取出電池時間超過 30 秒,則需重新設置日期和時間。
新舊電池不要混合使用。
請仔細閱讀並遵守 “技術數据” 部分的 “電磁相容 (EMC) 的
有關重要信息”。
一般安全注意事項
切勿強制扭曲臂帶或過度彎曲空氣管。
當移出空气管時,要拉動與本机聯接的空气插頭,而不能
只單單拉動空气管。
避免主机及臂帶受到強烈撞擊及震動或者摔落。
臂帶未纏繞於手臂上時,請不要加壓。
不要清洗臂帶或將其浸泡於水中。
請勿在沐浴、飲酒、吸煙、運動或進食後立即測量。
處理本機或任何廢舊附件或選件之前,請仔細閱讀並遵守
“技術數据” 部分的 “關於正確處理本產品的說明”。
•
•
•
•
•
•
•
•
•
•
•
•
•
•
•
Page 50

6
1. 概要
主機
E
F
B
A
C
D
G
I
H
A. 顯示屏
B. SET(設置)按鈕
C. 日∕夜平均值
(
∕ )按鈕
D. MEMORY(記憶)按鈕
E. START/STOP(加壓∕
停止)按鈕
F 用戶 ID 選擇開關
(A 與 B)
G. 電池倉
H. 空氣管接口
I. 交流適配器插孔(用於交
流適配器)
臂帶
J
LK
J. 臂帶(臂帶︰手臂週長 22-42 cm)
K. 空氣插頭
L. 空氣管
Page 51

7
1. 概要
顯示屏
M
U
X
P
N
R
T
O
Q
W
Y
AA
AC
V
Z
AB
S
M. 收縮壓
N. 舒張壓
O. 心律符號
1.(測量時閃爍)
2.(如果在測量完成後閃
爍,則表明血壓超出了正
常值的範圍)
P. 移動符號
(如測量時身體移動,則出現
此符號。)
Q. 非正規心律符號
R. 排氣符號
S. 自動模式符號
(設置 “自動模式” 時顯
示。)
T. 電池電量不足符號
U 用戶 ID 符號(A 或 B)
(表示使用者已選擇用戶 A
或用戶 B 進行測量或正在
使用記憶功能。)
V. 脈搏顯示
W. 清晨高血壓符號
(一週的清晨收縮壓平均讀
數超過 135 或舒張壓平均
讀數超過 85 時顯示。)
X. 清晨平均值符號
(使用記憶功能查看清晨平
均值時顯示此符號。)
Y. 夜間平均值符號
(使用記憶功能查看夜間平
均值時顯示此符號。)
Z. 平均值符號
(查看最後三次測量值的平
均值時顯示。)
AA. 記憶值符號
(查看記憶中存儲的數值時
顯示此符號)
AB. 週顯示
AC. 日期∕時間顯示
Page 52

8
1. 概要
包裝內容
AEAD
AD. 柔軟存儲袋
AE. 四節 “AA” 堿性 (LR6) 乾電池
• 主機
• 臂帶
• 說明書
Page 53

9
2. 準備
2.1 安裝∕更換電池
1. 將主機翻轉過來。
2. 按住電池蓋的鋸齒部位,
朝箭頭所指方向,滑出
電池蓋。
3. 裝入或更換四節 “AA”
規格的電池,+(正)
與 −(負)極的放置與
電池倉中指明位置相符,
然後蓋好電池蓋。
4. 重新裝上電池蓋。
按指示將電池蓋滑回,直到發出 “喀嗒” 聲響就位。
注意:更換電池後,測量值仍會存儲在記憶中。
Page 54

10
2. 準備
電池壽命與更換事宜
如果出現電池電量不足符號( ),請同時更換全部四節電
池。
- 電池電量不足符號(
)開始閃爍時,您仍舊可以短暫使
用血壓計。 您應該提前更換電池。
- 若符號(
)一直亮着,則說明電池已耗盡。您應該立即
更換電池。更換電池前請關閉血壓計。
若三個月或更長的時間不使用本机,請取出電池。
若取出電池時,超過 30 秒,則需重新設置 “日期∕時間”。
有關詳情參閱第 14 頁。
請依照當地的規定處理電池。
按一天測量六次計算,四節 “AA” 全新堿性乾電池可測量約
1400 次。
由於所提供的電池僅用於試用,因此壽命可能較短,無法保
證 1400 次測量。
•
•
•
Page 55

11
2. 準備
2.2 設置日期與時間
本血壓計會為每個用戶自動存儲 84 組測量值及其日期和時
間。
要使用記憶和平均值功能:
首次測量之前,請正確設置血壓計的日期与時間。
如果取出電池時間超過 30 秒,則需重新設置日期和時間。
1. 血壓計裝入電池後,按
START/STOP(加壓∕停止)
按鈕首次開機時,顯示屏上的
年份數字 (2007) 將閃爍。
2. 按 MEMORY(記憶)按鈕增大
數字,一次增加一位。
注意:
年份設置的範圍為 2007 到
2030。若年份達到 2030,
將會返回 2007。
若按住 MEMORY(記憶)
按鈕,數字將快速推進。
•
•
3. 當所要的年份出現在顯示屏時,按 SET(設置)按鈕確定設
置值。
完成設置年份後,月份數字將在顯示屏上閃爍。
•
•
Page 56

12
2. 準備
4. 重複步驟 2 和 3,設置月份。
完成設置月份後,日數字將
在顯示屏上閃爍。
5. 重複步驟 2 和 3,設置日。
完成設置日後,小時數字將
在顯示屏上閃爍。
Page 57

13
2. 準備
6. 重複步驟 2 和 3,設置小時。
完成設置小時後,分鐘數字將
在顯示屏上閃爍。
7. 重複步驟 2 和 3,設置分鐘。
完成分鐘設置。
完成設置分鐘後,血壓計將自
動關閉。
要調整日期和時間,請在血壓
計處於關閉模式下時按下
SET(設置)按鈕。
Page 58

14
2. 準備
調整日期和時間設置須知
如果出於某些原因您需要調整日期和時間,或者更換電池後
血壓計的日期和時間已被重設,請在 10:00 AM 到 6:59 PM
之間,調整日期和時間,以防止記憶中存儲的清晨和夜間週
平均值出現錯誤。
若接下來調整日期和時間,請在關機狀態下開始。步驟如
下︰
1. 按住 SET(設置)按鈕。
用戶 ID 已被選擇,顯示屏上顯示自動模式符號
和當
前設置(on “開” 或 oFF “關”)。
如果年份數字未顯示,按一下或兩下 SET(設置)按鈕,直
至其顯示。
年份數字閃爍在顯示屏上。
2. 請參閱第 11 頁,開始設置日期和時間。
如果選擇手動設置日期和時間,血壓計也必須要手動關閉,
因為它不會在完成分鐘設置後自動關閉。
注意:
請確保日期和時間設置正確,這樣週平均值才能正確顯
示。若日期∕時間一旦設置錯誤,請按 SET(設置)按鈕
循環各個設置,將錯誤值調整正確。
如果血壓計長時間不用後時間顯示錯誤,請重設日期和時
間(參閱第 11 頁瞭解時鐘設置的有關說明)。重新使用血
壓計時請清除記憶值(參閱第 37 頁瞭解清除記憶值的相
關指示)。
•
•
Page 59

15
3. 血壓計的使用
3.1 測量時的正確坐姿
測壓左右手臂均可。
注意:
測量時應保持周圍環境安靜,身體放鬆、端坐。確保室內
溫度不會太熱或太冷。
測量之前至少 30 分鐘內不要進食、吸煙或者運動。
請勿在測量過程中移動或說話。
•
•
•
正襟危坐,
背部筆直。
脫下上臂的緊身衣服,以及任
何厚衣服,如毛線衫。
請勿將臂帶纏繞在厚衣服上,
如果太緊的話,也不要卷起衣
袖。
將手臂放於桌上,保持臂帶
與心臟同一水平。
椅子和桌子頂部之間
的間隔應保持在 25cm
到 30cm 之間。
正確姿勢
Page 60

16
3. 血壓計的使用
注意:
測量過程中正確的姿勢對於獲得準確的結果是必要的。
您應盡量在每天同一時間測量血壓。(建議起床後一小時
內)
錯誤姿勢
拱背(向前傾斜)
翹腿坐姿
坐於沙發或桌子較低,導致
您身體彎曲或向前傾斜
•
•
•
這些情形下由於張力或臂帶低於心臟,可能導致血壓值較高。
如果臂帶低於心臟位置,使用墊子調節手臂高度。
•
•
Page 61

17
3. 血壓計的使用
3.2 穿戴臂帶的方法
您可以將臂帶纏繞在您的右臂或左臂上。
脫下上臂的緊身衣服。
請勿將臂帶纏繞在厚衣服上,
如果太緊的話,也不要卷起衣袖。
1. 將空氣插頭插入空氣管接口(位於血壓計左側)。
空氣插頭
空氣管接口
空氣插頭插入空氣管接口時,臂帶必須被展開。
2. 坐在椅子上,雙腳平放於地面,將手臂放在桌子上,使臂帶
處於與心髒同一高度。
•
•
Page 62

18
3. 血壓計的使用
3. 用手牢牢握住臂帶夾柄。
夾柄
織品搭扣
4. 掌心朝上。
5. 將臂帶纏繞在左上臂上,使藍色襯帶位於內臂的中央位置,
指向手臂內側。空氣管應沿着前臂內側伸展並與中指成一直
線。
臂帶底部應置於肘部之上約 1 至 2 cm。
距離臂帶底部 1 至 2 cm
藍色襯帶
空氣管
Page 63

19
3. 血壓計的使用
6. 臂帶纏繞到位後,緊緊
地合上織品搭扣。
注意:
確保臂帶舒適地纏繞在手臂上。
臂帶應與皮膚良好接觸。臂帶與手臂之間應可輕鬆地放入
食指,以方便穿戴及摘除臂帶。
確保空氣管沒有打結。
•
•
•
右臂測量
在右臂上穿戴臂帶時,請注意
以下幾點。穿戴臂帶時應使空
氣管位於肘部一側。
注意:
小心不要將手臂壓在空氣管
上,以免影響臂帶氣體順暢
流通。
穿戴臂帶時小心臂帶的任何
部分都不要觸及肘關節。臂
帶底部應置於肘部之上約 1
至 2 cm。
如果每天使用兩次,臂帶的
使用壽命可維持三年。
由於左右臂的血壓不同,所
測得的血壓值也會有所不
同。Omron 建議使用同一
手臂進行測量。如果左右臂
血壓值相差太大,請向醫生
咨詢應使用哪只手臂進行測
量。
•
•
•
•
Page 64

20
3. 血壓計的使用
3.3 讀數
本機可通過用戶 ID A 和 ID B 對兩位用戶進行測量並存儲其測
量值到記憶中。
還可使用訪客模式為其他人進行單次測量。使用訪客模式時
不會顯示用戶 ID 符號,該模式下測得的測量值也不會存儲在
記憶中。
使用訪客模式
1. 按下 START/STOP(加壓∕停止)按鈕,直至 A 和 B 用戶符
號從顯示屏上消失。
按至少 3 秒鐘
A 和 B 顯示消失
2. 鬆開 START/STOP(加壓∕停止)按鈕,
臂帶開始自動充氣。
注意: 要停止充氣,請按下並鬆開 START/ STOP(加壓∕
停止)按鈕。血壓計將停止充氣,然後開始排氣並關
閉。
3. 充氣停止,並開始測量。測量完成後,顯示屏上會顯示您的
血壓和脈搏數。
Page 65

21
3. 血壓計的使用
選擇用戶 ID
選擇用戶 ID,並且每次測量請使用同一用戶 ID。這樣,血壓
計就可將測量值按所選擇的用戶 ID 存儲在記憶中。這些測量
值可用於計算清晨平均值和夜間平均值。
上下滑動用戶 ID 選擇開關,選擇用戶 A 或 B。
使用用戶 ID
選擇好用戶 ID 後,按下 START/STOP(加壓∕停止)按
鈕,可使用單次模式進行單次測量,也可使用自動模式連續
測量三次。
注意:血壓計已預設為單次模式進行單次測量。
使用自動模式可連續測量三次。該模式下,血壓計將自動對
臂帶充氣並進行三次測量。每兩次測量間會有短暫的時間間
隔。
Page 66

22
3. 血壓計的使用
使用單次模式
1. 選擇您的用戶 ID(A 或 B)。
2. 按下 START/STOP(加壓∕停止)按鈕。
顯示屏上顯示出所有符號。所選擇的用戶 ID 符號在顯示屏上
閃爍。
臂帶開始自動充氣。臂帶充氣開始時,血壓計會自動確定理
想的充氣級別。
由於血壓計會在充氣過程中偵測脈搏,因此在整個測量過程
完成之前,請勿移動手臂,並保持身體靜止。
注意: 要停止充氣或測量,請按下並鬆開 START/ STOP
(加壓∕停止)按鈕。血壓計將停止充氣,然後開始
排氣並關閉。
Page 67

23
3. 血壓計的使用
3. 充氣自動停止,並開始測量。
臂帶排氣時,顯示屏上會出現逐漸降低的數字,心律符號
(
) 以每次心律的頻率閃爍。
4. 測量完成後,臂帶會完全排氣,並顯示您
的血壓及脈搏數。
5. 按下 START/STOP(加壓∕
停止) 按鈕,關閉血壓計。
注意: 若忘記關閉血壓計,
會在五分鐘後自動關
閉。
注意: 依測量結果自我診斷及治療非常危險。請遵從醫生指
導。
Page 68

24
3. 血壓計的使用
選擇自動模式
用戶 A 或 B 都可使用 “自動模式”。
1. 確定血壓計已關閉。
2. 選擇您的用戶 ID(A 或 B)。
3. 按住 SET(設置)按鈕。
顯示屏上出現自動模式符號 (
) 和 oFF(關)設置。
4. 按下 MEMORY(記憶)
按鈕 (
),選擇 on(開)。
注意: 按下 MEMORY
(記憶)按鈕,在
on(開)和 oFF
(關)之間切換。
Page 69

25
3. 血壓計的使用
5. 按下 SET(設置)按鈕,確認更改。
顯示屏上顯示兩次測量間的間隔秒數。
注意:兩次測量間的預設間隔時間為 60 秒。
6. 按下 MEMORY(記憶)按鈕 ( ),更改兩次測量間的間隔
時間。
此間隔時間可設置為 15 秒、30 秒、60 秒或 120 秒。按住
MEMORY(記憶)按鈕,直到顯示屏上顯示出所需的間隔時
間。
7. 按下 SET(設置)按鈕,確認
設置值。
年份數字將在顯示屏上閃爍。
8. 按下 START/STOP(加壓∕
停止)按鈕,關閉血壓計。
Page 70

26
3. 血壓計的使用
使用自動模式
1. 選擇您的用戶 ID(A 或 B)。
2. 按 START/STOP(加壓∕停止)按鈕。
顯示屏上顯示出所有符號。所選擇的用戶 ID 符號在顯示屏上
閃爍。臂帶開始自動充氣。
注意: 要停止充氣或測量,請按下並鬆開 START/ STOP
(加壓∕停止)按鈕。血壓計將停止充氣,然後開始
排氣並關閉。
3. 充氣自動停止,並開始測量。
臂帶排氣時,顯示屏上會出現逐漸降低的數字,心律符號
( ) 以每次心律的頻率閃爍。 測量完成後,臂帶會完全排
氣。
注意: 在整個測量過程完成之前,請勿移動手臂,並保持身
體靜止。
4. 檢查連續測量進程。
首次測量完成後,請等待下一次測量開始。兩次測量間的時
間間隔將出現在顯示屏上。
第二次測量將自動開始。
Page 71

27
3. 血壓計的使用
第二次測量完成後,請等待第三次測量開始。
第三次測量將自動開始。
連續測量完成。 顯示屏上會顯示三次測量的平均值。
選用 “自動模式” 進行測量時,三次測量各自單獨的測量結果
不會顯示在顯示屏上。
但完成所有測量後,顯示屏上可顯示每次測量的測量結果。
注意: 在 “自動模式” 下,如果出現錯誤,血壓計將重新測
量。三次錯誤後,血壓計將不再進行進一步測量。如
果僅有兩次測量成功,這兩次測量結果的平均值將出
現在顯示屏上。若僅有一次測量成功,該測量結果也
將顯示在顯示屏上。
5. 按下 SET(設置)按鈕,顯示首次測量所測得的血壓和脈搏
數。 再按一下 SET(設置)按鈕,顯示第二次的測量結果。
6. 按下 START/STOP(加壓∕停止)按鈕,關閉血壓計。
Page 72

28
3. 血壓計的使用
重要事項:
如果收縮壓或舒張壓在標準範
圍之外,則顯示測量結果時,
心律符號將閃爍。
最新研究表明以下數值可作為
家庭測量時衡量高血壓的指
標。
收縮壓
135 mmHg 以上
舒張壓
85 mmHg 以上
此標準適用於家庭血壓測量。
•
您的血壓計可偵測非正規心
律。非正規心律會影響測量結
果。非正規心律功能可自動確
定測量是否有效或需要重複測
量。如果測量結果受非正規心
律影響但仍然有效,此測數將
伴隨一個非正規心律圖標。如
果非正規心律導致測量無效,
則不會顯示結果。如果在進行
測量後顯示非正規心律符號
(
),請重複測量過程。如果
非正規心律圖標頻繁顯示,請
告知醫生。
•
Page 73

29
3. 血壓計的使用
什麼是非正規心律?
非正規心律是指血壓計測
量心髒血壓收縮和血壓舒
張所得的平均心律相比,
心律高出或低過 25%。如
果在測量過程中偵測到兩
次以上的非正規心律,則
在顯示測量結果的同時,
屏幕上會出現一個非正規
心律符號(
)。
脈搏
血壓
脈搏
血壓
長
短
正常心律
非正規心律
什麼是心律失常?
心跳是受電信號刺激收縮。心律失常指的是因驅動心跳的
生物電係統發生缺陷而導致心律出現異常。常見的徵狀包
括跳躍式心跳,過早收縮,脈搏過快(心動過速)或過慢
(心搏徐緩)。這可能由心髒疾病、年老、身體因素、壓
力、睡眠不足、疲勞等引起。心律失常只能由醫生通過特
別診斷得出。
結果中出現的非正規心律符號(
)是否表示心律失常,
只能由醫生檢查判斷。
如果非正規心律符號(
)顯示頻繁,請告知醫生。通過
測量結果自我進行判斷、治療是很危險的,請確保遵照醫
生的指示。
Page 74

30
3. 血壓計的使用
3.4 特殊條件說明
若已知您的收縮壓超過 220 mmHg,請按住 START/STOP
(加壓∕停止)按鈕,將臂帶充氣到高出可能的收縮壓 30 至
40 mmHg。
1. 按下 START/STOP(加壓∕
停止)按鈕,開啟血壓計。
測量開始。
2. 臂帶開始充氣時,按住 START/STOP(加壓∕停止)按鈕,
使壓力高出可能的收縮壓 30 至 40 mmHg。
注意: 臂帶充氣不得超過 299 mmHg。(臂帶充氣超過
300 mmHg 時會出現錯誤。)
3. 臂帶充氣到所需壓力時,鬆開 START/STOP(加壓∕停止)
按鈕。
臂帶開始排氣,測量開始。
4. 步驟的其它部分與正常測量相同。參閱第 20 頁。
注意:施壓應適可而止,不要過多。
Page 75

31
3. 血壓計的使用
3.5 使用記憶功能
每次測量完成後,本機可為兩位用戶(用戶 A 和用戶 B)存
儲血壓和脈搏數到記憶中。
本機可為每位用戶(A 和 B)自動存儲 84 組測量值(血壓和
脈搏數)。存儲的測量值達到 84 組後,將會刪除最早的讀數
以存儲新的讀數。此外,本機還可為每位用戶(A 和 B)存儲
8 週清晨平均值和 8 週夜間平均值。
平均讀數功能
本機可依據最後讀取的 10 分鐘內的最近三次測量結果計算出
平均數值。
注意: 如果此 10 分鐘內有兩組測量值存儲在記憶中,則將
取這兩組測量值的平均值。如果僅存儲了一組測量
值,該測量值將作為平均值顯示在顯示屏上。
要顯示測量值
1. 選擇您的用戶 ID(A 或 B)。
2. 按 MEMORY(記憶)按鈕 ( ) 。
顯示屏上出現平均值,平均值符號 (
) 出現在記憶符號 ( )
的上方。
Page 76

32
3. 血壓計的使用
3. 按下 MEMORY(記憶)按鈕 ( ),屏幕上顯示最近測得的
几組單次測量值。測量值將從最近至最早的時間順序顯示。
注意: 測量日期和時間
將隨測量值交替顯
示。
交替顯示
按下 MEMORY(記憶)按鈕,顯示下一組測量值。
按住 MEMORY(記憶)按鈕,快速顯示測量值。
自動模式
自動模式符號 ( ) 伴隨連續測量的平均值出現在顯示
屏上。 要顯示每次測得的測量值,請在顯示平均值的同時按
SET(設置)按鈕。
4. 按下 START/STOP(加壓∕停止)按鈕,關閉血壓計。
Page 77

33
3. 血壓計的使用
清晨平均值與夜間平均值
本機可計算並顯示清晨 ( ) 和夜間 ( ) 測量所得的每週平
均值。
還可為每位用戶(A 和 B)存儲 8 週清晨平均值和 8 週夜間
平均值。
注意:每週從週日 4:00 AM 開始計算。
清晨平均值
清晨平均值是以自動模式下的首次平均讀數或單次模式下的
首次讀數為依據的。
測量時段必須為︰
4:00 AM 和 9:59 AM。
夜間平均值
夜間平均值是以自動模式下的末次平均讀數或單次模式下的
末次讀數為依據的。
測量時段必須為︰
7:00 PM 和 1:59 AM。
Page 78

34
3. 血壓計的使用
關於每週平均值
每週清晨平均值
此平均值為週日到週六清晨 (4:00 AM-9:59 AM) 測量值的平
均值。
每日清晨平均值是根據清晨首次測量後 10 分鐘內進行的三次
測量來計算的。
清晨測量
測量
測量
測量
測量
測量
測量
10 分鐘內
最多 3 組測量值
II
清晨的血壓
4:00 AM
9:59 AM
週一 週二 週三 週四 週五 週六週日
每週夜間平均值
此平均值為週日到週六夜間 (7:00 PM-1:59 AM) 測量值的平
均值。
每日夜間平均值是根據夜間末次測量後,最近 10 分鐘內進行
的三次測量來計算的。
測量
測量
測量
測量
測量
測量
夜間測量
夜間末次測量
10 分鐘內
最多 3 組測量值
II
夜間的血壓
7:00 PM
1:59 AM
週一 週二 週三 週四 週五 週六週日
Page 79

35
3. 血壓計的使用
要顯示清晨平均值和夜間平均值
1. 選擇您的用戶 ID(A 或 B)。
2. 按下清晨平均值按鈕 ( )
或夜間平均值按鈕 ( )。
本週 本週
這期的平均值"THIS WEEK"
出現在顯示屏上。
按下清晨平均值按鈕 (
)
或夜間平均值按鈕 (
)
可顯示同一週的清晨平均值和
夜間平均值。同時檢查同一週
的清晨平均值和夜間平均值非
常重要。
3. 繼續按清晨平均值按鈕 ( ) 或夜間平均值按鈕
(
),顯示之前几週的情況。其中,"-1 WEEK"(1 週
前)表示前一週的平均值,"-7 WEEK"(7 週前)表示最早的
平均值。
注意: 如果一週內未進行足夠
次數的測量而無法計算
平均值,顯示屏將如圖
顯示
4. 按下 START/STOP(加壓/停止)按鈕,關閉血壓計。
Page 80

36
3. 血壓計的使用
顯示組合須知
除了清晨平均值符號和夜間平均值符號,本機還可顯示清晨
高血壓符號(如果該週清晨血壓平均值高於家庭血壓測量標
準)。(請參閱第 28 頁︰“血壓計的使用-重要事項” 瞭解詳
情。)依據測量結果,各符號可以下列組合顯示︰
显示
清晨平均值
本週清晨平均值及清晨平
均值符號
七週前的清晨平均值與
清晨平均值符號 + 閃爍
的心律符號 + 清晨高血
壓符號
夜間平均值
本週夜間平均值及夜間平
均值符號
七週前的夜間平均值與
夜間平均值符號 + 閃爍
的心律符號 + 清晨高血
壓符號
家庭血壓測量標準以內
的平均值
家庭血壓測量標準以上
的平均值 + 清晨高血壓
符號
Page 81

37
3. 血壓計的使用
如果一週清晨測量平均值高於 135/85,將顯示清晨高血壓符
號 (
) 。
如果這樣的話,顯示夜間平均值時也會顯示清晨高血壓符號
(
),無論夜間平均值如何。
刪除全部記憶值
存儲在記憶中的數值可通過用戶 ID 刪除。
您不能刪除存儲在記憶中的部分讀數,只能刪除所選用戶的
全部讀數。
1. 選擇您的用戶 ID(A 或 B)。
2. 按住 MEMORY(記憶)按鈕 ( ),同時按下 START/STOP
(加壓∕停止)按鈕兩秒鐘以上,即可刪除全部讀數。
Page 82

38
4. 快速參考指南
“快速參考指南” 僅作參考用途。首次使用本機之前請通讀本說明
書。
為確保讀數可靠,測量之前至少 30 分鐘內不要進食、吸煙或者
運動。
注意:脫下上臂的緊身衣服。
1. 坐在椅子上,雙腳平放於地面,將手臂放在桌子上,使臂帶
處於與心髒同一高度。
2. 用織品搭扣將臂帶纏繞固定在手臂上。
3. 選擇您的用戶 ID(A 或 B)。
4. 按 START/STOP(加壓∕停止)
按鈕。
測量完成後,血壓計將顯示您的
血壓和脈搏數,同時臂帶會自動
排氣。
注意: 所有測量結果都將存儲在記憶中。如果多人使用同一
血壓計進行測量,應確保您瞭解這一情況。
Page 83

39
5. 解決錯誤顯示和問題
5.1 錯誤信息
錯誤顯示 原因 糾正措施
臂帶充气不夠。
仔細閱讀並重復第 20
頁章節 3.3 中列示的步
驟。
測量過程中有所移
動。
臂帶過度充气。
閃爍或持續
顯示。
電池耗盡。
同時更換全部四節 “AA”
電池。參閱第 9 頁。
移動、發出聲音。
仔細閱讀並重復第 20
頁章節 3.3 中列示的步
驟。
臂帶漏气。 更換新臂帶。
Page 84

40
5. 解決錯誤顯示和問題
5.2 故障排除
問題 原因 糾正措施
按下 START/
STOP (加壓∕
停止) 按鈕時無
顯示。
電池無電量。 更換電池。
無法測量或讀
數過高。
臂帶纏繞手臂是否牢
固?
正確纏繞臂帶。
可聽見氣泵電機的聲
音,但臂帶氣壓並未
增加。
檢查空氣插頭是否正
確連接到血壓計上。
將空氣插頭牢牢插進
空氣管接口中。
每次測量血壓
均不同。讀數
過低(或過
高)。
血壓讀數隨測量時間和神經條件而經常變化。
測量之前作深呼吸,以保持身體放鬆。
Page 85

41
6. 保養和存儲
為保護血壓計免遭損壞,請遵從下列事項:
不要將血壓計或臂帶置於高溫、高濕或陽光直射的環境
中。
不要用力折疊臂帶或空气管。
不要拆卸血壓計。
請勿自行維修。如果出現故障,請咨詢 OMRON 分銷商。
OMRON HEM-7080 屬精密測量設備。測量精度應保持在
規格範圍內。建議每兩年對血壓計作一次檢查,確保其正
確運行及其準確性。詳情請咨詢 OMRON 分銷商。
避免血壓計受到強烈撞擊及震動(如將血壓計摔落到地板
上)。
不要用揮發性液體來清潔血壓計。應用柔軟、乾燥的布料
來清潔血壓計。
不要清洗臂帶或將其浸泡於水中。
存儲
不用時,將血壓計放入柔軟
的存儲袋中。
•
•
•
•
•
•
•
•
Page 86

42
7 . 技 術 數 据
產品描述
自動血壓計
型號
OMRON HEM-7080
顯示屏
LCD 數字顯示
測量方法
示波測定法
測量範圍
壓力:0 mmHg 至 299 mmHg
脈搏:40 至 180/分鐘
精確度
壓力:±3 mmHg
脈搏:顯示讀數的 ±5%
充氣
電動氣泵模糊邏輯控制
排氣
自動減壓閥
記憶
可為每位用戶存儲 84 組測量值及其日期和時間
(A 和 B)
電源
4 節 "AA" 電池 1.5V
電池壽命
4 節全新堿性乾電池可進行大約 1400 次測量(如每
天測量 6 次)
使用溫度/
濕度
+10
o
C 至 +40oC
最大值:30 至 85% RH
存儲溫度/
濕度/
大氣壓力
−20
o
C 至 +60oC
最大值:10 至 95% RH
700 − 1060 hPa
主機重量
約 420 克不包括電池重量
臂帶重量
約 240 克
主機尺寸
約 155(長)mm x 131(寬)mm x 84(高)mm
臂帶尺寸
約 152 mm x 600 mm
(臂帶︰ 手臂週長 22 至 42 cm)
包裝內容
臂帶、說明書、柔軟存儲袋、4 節 "AA" 電池與主機
注:此技術數据若有變更,恕不另行通知。
應根据國家電子產品處理法規處理本產品和廢舊的電池。
= Type B
請仔細閱讀本說明書。
Page 87

43
關於血壓的資訊
世界衛生組織對血壓的分類
世界衛生組織 (WHO) 與國際高血壓協會 (ISH) 已經製定了血
壓分類標準,如下圖所示:
80 85
90 100 110
120
130
140
160
180
(mmHg)
(mmHg)
嚴重高血壓
中度高血壓
輕微高血壓
正常收縮血壓值
正常血壓
最佳血壓
(目標值)
舒張血壓
收縮血壓
該分類是依据醫院門診部坐 等候的病人所做出的測量結
果。
注意: 雖然目前還沒有全世界認可的低血壓定義標準,但
是,心髒收縮血壓低於 100 mmHg 的通常被認為是低
血壓。
Page 88

HEM-7080-C1_B_M.fm Page 46 Tuesday, March 9, 2010 9:05 AM
Asia Pacific
HQ
OMRON HEALTHCARE Co., Ltd.
24, Yamanouchi Yamanoshita-cho
Ukyo-ku, Kyoto, 615-0084 JAPAN
OMRON HEALTHCARE
EUROPE B.V.
Kruisweg 577, 2132 NA
Hoofddorp THE NETHERLANDS
OMRON HEALTHCARE
SINGAPORE PTE LTD.
438A Alexandra Road, #05-05/08,
Alexandra Technopark,
Singapore 119967
1664373-9B
 Loading...