Olympus SZ-III Service manual

OLVMPLIS
ZOOM
MODEL
STEREO
111
MICROSCOPE
REPAIR
MANUAL
PREFACE
1. It is generally considered very difficult to achieve optical alignment of a zoom stereomicroscope. In
i"
i
1
comparison with Olympus Stereo Microscopes such as Model VT-II, VB, etc., the zoom stereo microscope Model
master the optical alignment of this microscope, other Olympus stereo microscopes become easier to
you.
It
is
recommended to pay careful attention to the checking order
This order should be kept in the alignment procedure.
For instance, if you observe a double image through the binocular observation tube, points
arelis involved. In case two or more points are involved, their alignment order should not be changed.
If you check the optical alignment in the order of 3.1 and 5, you have to repeat the alignment in the
order of 1,3 and 5.
2. Requisites for Repairs
A lot of screws used in microscopes have been cemented in position with various adhesives to prevent
them from loosening in transit, operation, etc. If
their heads and ascertain whether they are cemented with what kind of adhesive. You may be able to
identify adhesives by their outside coloring and choose the best way to remove.
a.
"ARALDITE", tinted with
screwdriver.
b. "NEJI-LOCK" is slightly red. Screws cemented with "NEJI-LOCK" are removable with
driver. If not, apply heat slightly before unscrewing.
c. "SHELLAC" is
with alcohol.
d. "HIGH SUPER" (cemedine), tinted with
e.
"PLIOBOND", sober yellow, requires
screws.
SZ-Ill
is
complicated in its structure, but not so such in
it
is necessary to remove screws for repair, look at
brown.
Shellacked screws are removable with a screwdriver. If not, moisten them
white
and translucent, requires heating before loosening screws with
white.
a
requires heating before loosening screws.
small amount of mixture (alcohol and ether) to loosen
as
described in
its
optical alignment. If you
"11.
CHECK POINTS".
1, 3andlor 5
a
a
screw-
Others:
(1) First of all, ascertain what parts of the microscope the user or owner of which wishes you to repair.
(2)
Never fail to check the entire function of the microscope before you commence
1) Find out what parts are defective and how much they are damaged.
2) Prior to repair, think of the best possible order of disassembling the defective parts in
efficient way.
3) After completing the repair, check the functions of not only the re-assembled parts but also the
entire microscope to make sure no defect should be left unremedied.
4)
Be careful not to deform repair parts during the assembly; make the point of using tools and jigs
specified for purpose.
5) Make repairs promptly and accurately.
its
repair.
a
most
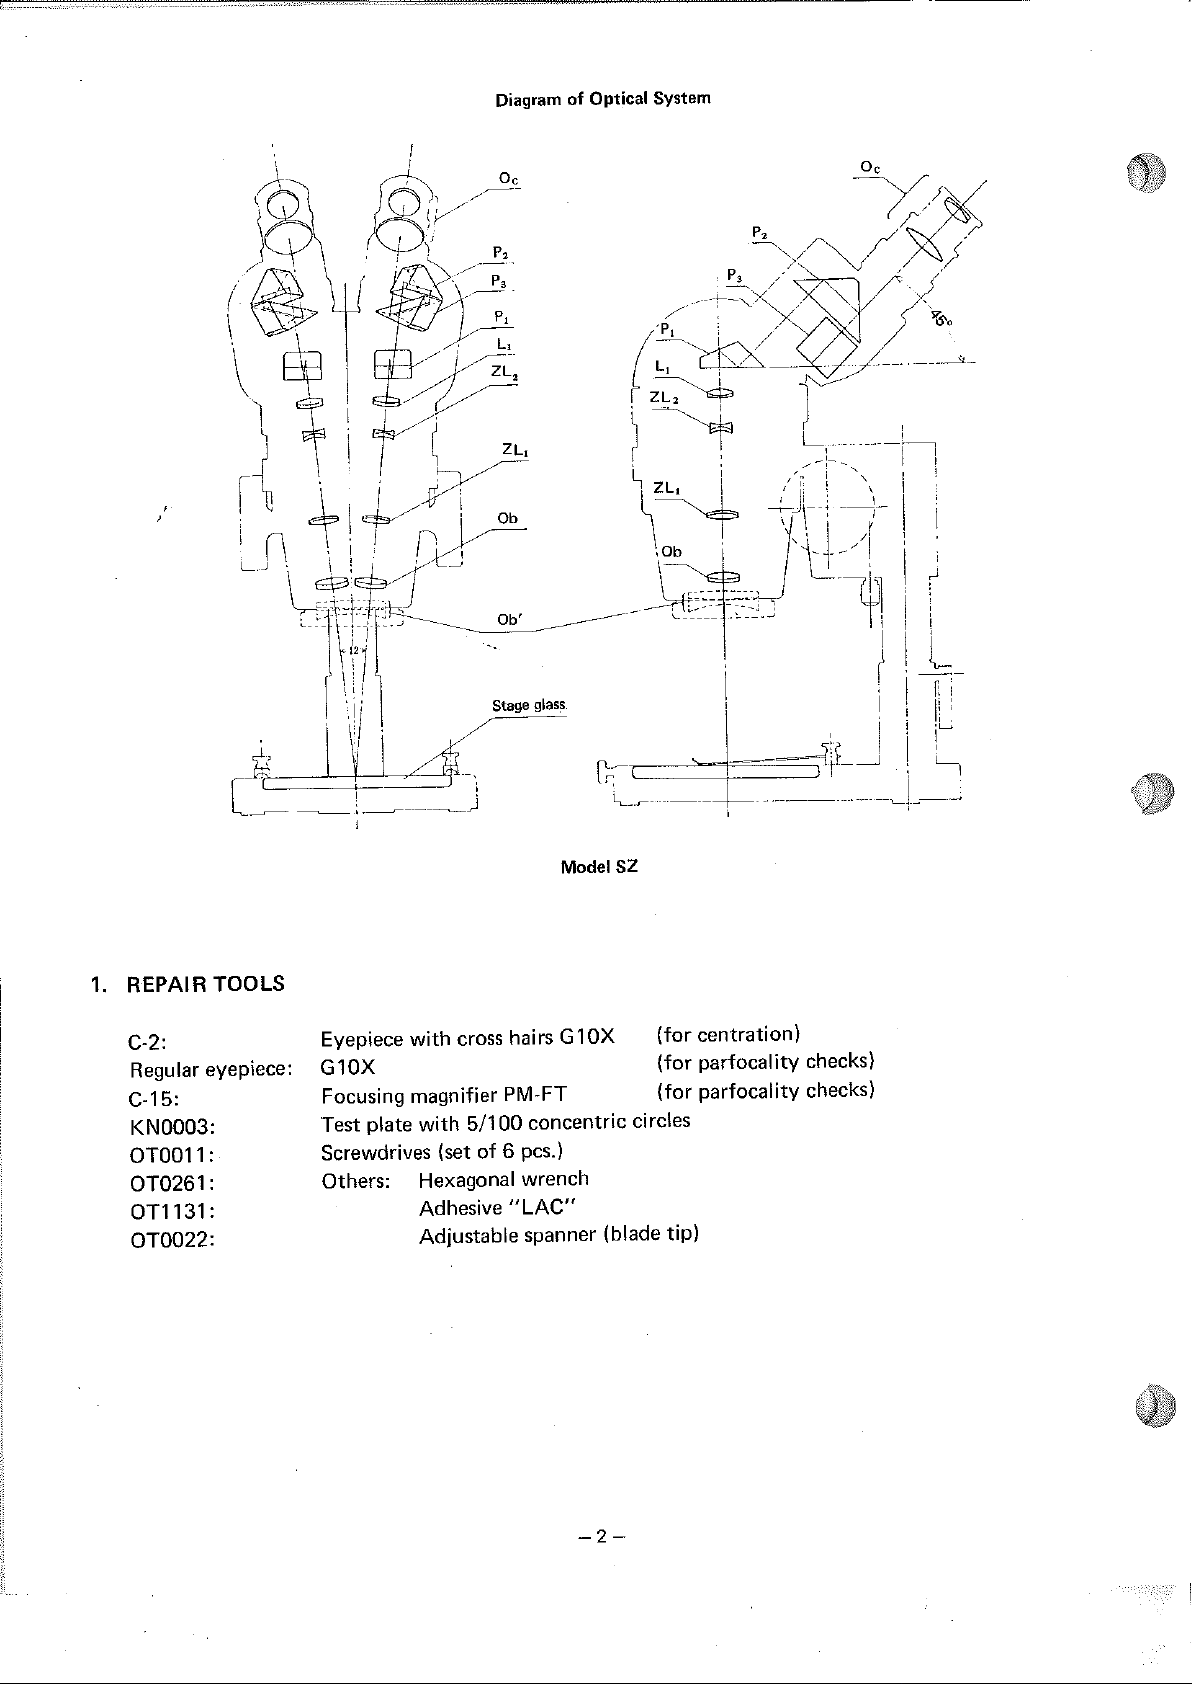
Model
SZ
1.
REPAIR
TOOLS
C-2: Eyepiece with cross hairs GIOX (for centration)
Regular eyepiece:
C-15: Focusing magnifier
GlOX (for parfocality checks)
PM-FT
(for parfocality checks)
KN0003: Test plate with 51100 concentric circles
OTOOII: Screwdrives (set of 6 pcs.)
OT0261: Others: Hexagonal wrench
OT1131: Adhesive "LAC"
OT0022: Adjustable spanner (blade tip)

2.
CHECK
POINTS
:
b
Order
1
Check
at
Decentration of image
interpupillary distances
Deterioration of focus when zooming
Decentration of image when zooming
Parfocality between right hand and
left hand optical systems
Centration of right hand and left
hand optical systems
various
Description
Decentration of image should be corrected on right
and left optical systems respectively.
at
After focusing
when zooming to low magnification should be
adjusted on the right and left hand optical systems,
respectively.
After centration of image at high magnification,
shift of image when zooming to low magnification
should be adjusted on the right and left optical
systems respectively.
After centration of image in the left hand optical
system, shift of focus in the right hand optical
system should be corrected.
After centration of image in the right hand optical
system, decentration of the left hand optical system
should be corrected.
high magnification, shift of focus
3.
ALIGNMENT PROCEDURE
Check Points
1.
Decentration of
image at various
interpupillary
distances
Working Steps
1) This alignment should be carried out in the
same order of steps on the right and left hand
optical systems, respectively.
Tools
0
Test plate (5/100
concentric circles)
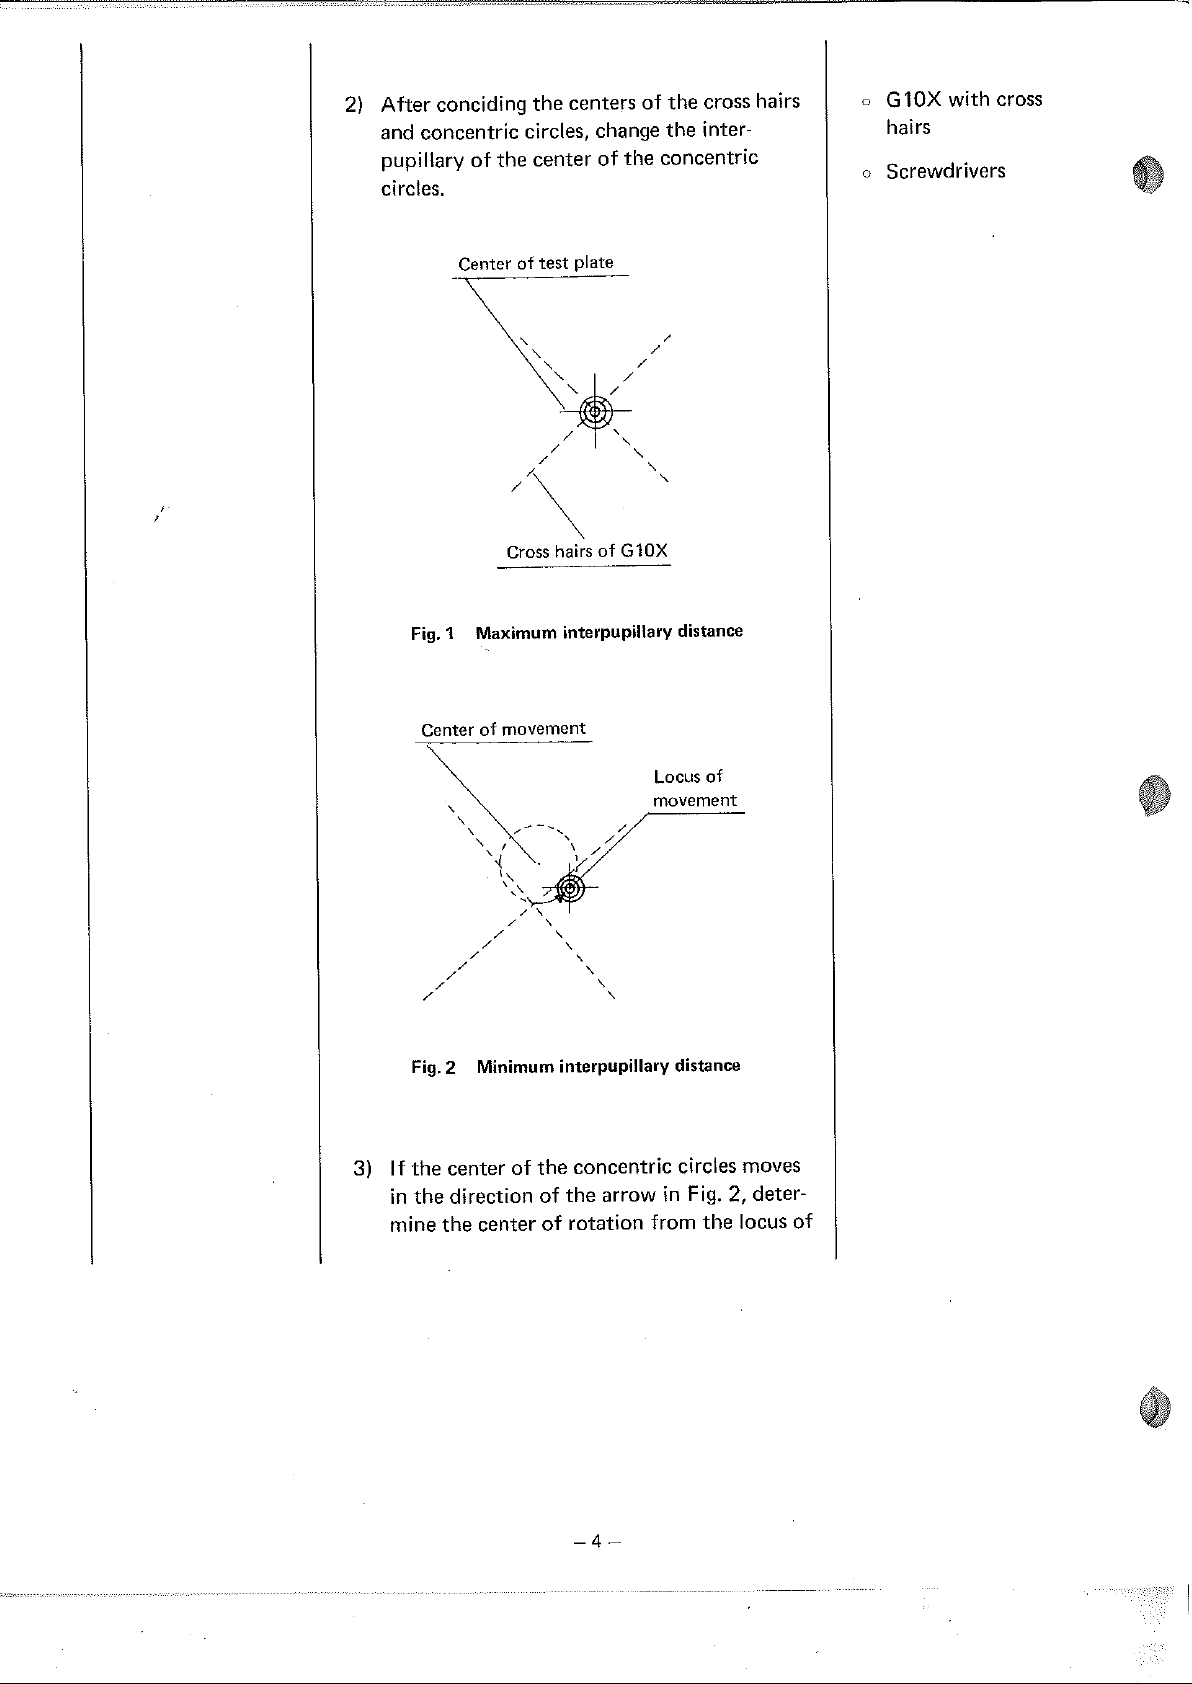
2)
After conciding the centers of the cross hairs
and concentric circles, change the
interpupillary of the center of the concentric
circles.
Center of test plate
G
?OX
with cross
hairs
o
Screwdrivers
Cross hai;s of
Fig. I Maximum interpupillary distance
Center of movement
\
I
\
Fig. 2 Minimum interpupillary distance
GlOX
Locus of
movement
3)
If the center of the concentric circles moves
in the direction of the arrow in Fig.
2,
mine the center of rotation from the locus of
deter-
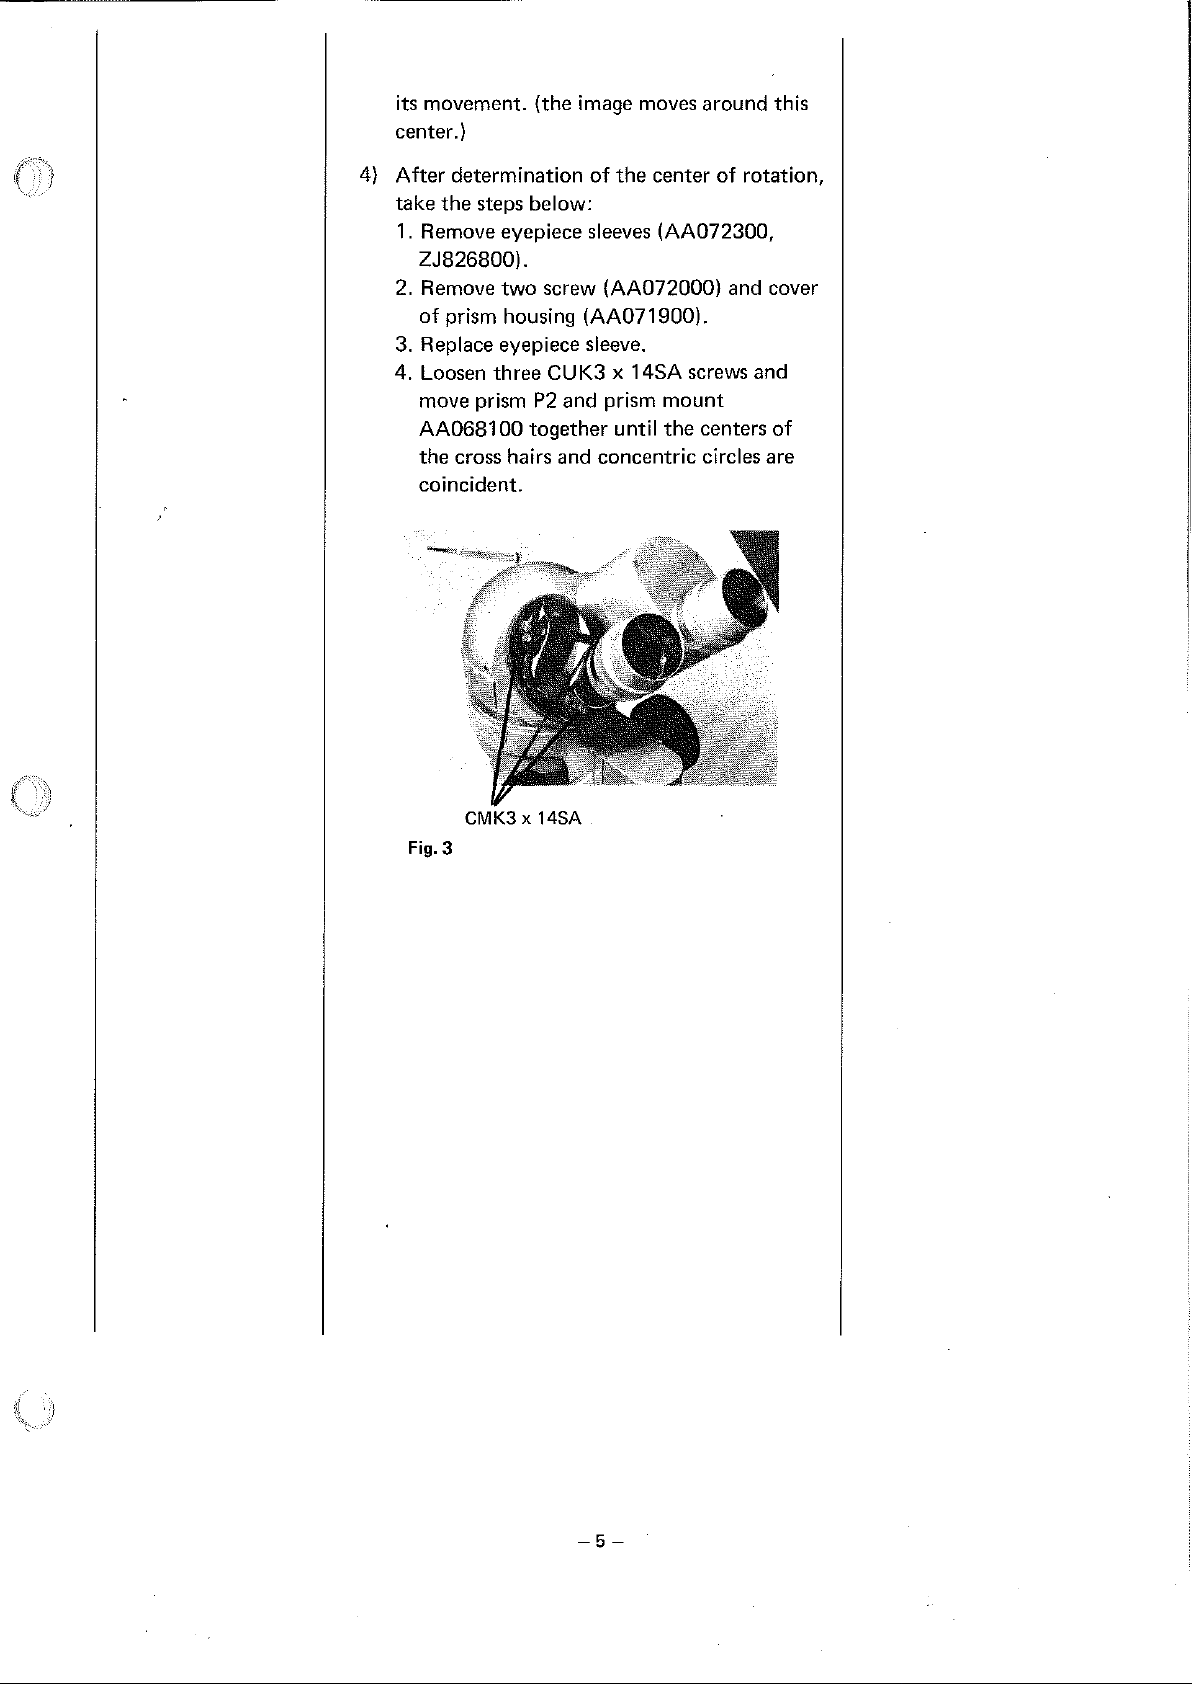
its movement. (the image moves around this
center.)
4)
After determination of the center of rotation,
take the steps below:
1. Remove eyepiece sleeves (AA072300,
ZJ826800).
2. Remove two screw (AA072000) and cover
of prism housing
3.
Replace eyepiece sleeve.
4.
Loosen three
(AA071900).
CUK3
x
14SA screws and
move prism P2 and prism mount
AA068100 together until the centers of
the cross hairs and concentric circles are
coincident.
Fig.
3
 Loading...