

Page 1
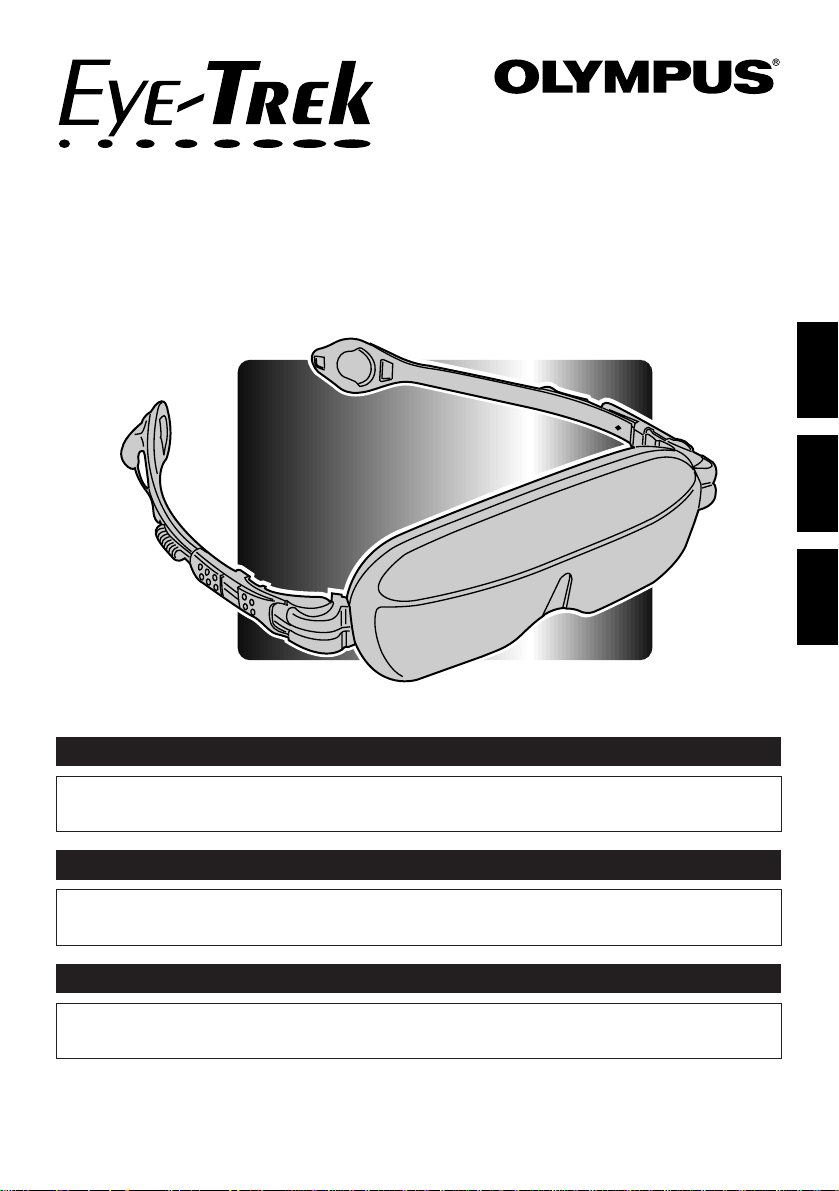
FM D
-20P
Thank you very much for purchasing an OLYMPUS product.
Please keep this manual handy for future use.
INSTRUCTION MANUAL
Nous vous remercions pour l’achat d’un produit OLYMPUS.
Veuillez conserver ce manuel à portée de main pour un usage ultérieur.
MODE D’EMPLOI
Le agradecemos por la adquisición de un producto OLYMPUS.
Conserve este manual a mano para uso futuro.
MANUAL DE INSTRUCCION
ENGLISH
FRANÇAIS
ESPAÑOL
Page 2
E-2
“ ” and “PlayStation®” are registered trademarks of Sony
Computer Entertainment Inc.
The exclamation point within an equilateral triangle is intended to alert
the user to the presence of important operating and maintenance
(servicing) instructions in the literature accompanying the product.
This is intended to alert the user to the possibility of serious
injury or death if ignored.
W ARNING:
This is intended to alert the user to the possibility of
moderate injury or damage to the equipment.
CAUTION:
SAFETY NOTICE
Trademarks:
TO REDUCE THE RISK OF FIRE OR ELECTRIC SHOCK, DO NOT
EXPOSE THIS PRODUCT TO RAIN OR MOISTURE.
W ARNING:
Page 3

ENGLISH
E-3
SAFETY INSTRUCTIONS
1
Read Instructions — All the safety and operating instructions should be read before the product is
operated.
2
Retain Instructions — The instruction manual should be retained for future reference.
3
Heed Warnings — All warnings on the product and in the operating instructions should be adhered
to.
4
Follow Instructions — All operating and use instructions should be followed.
5
Cleaning — Unplug this product from the USB connector of the “PlayStation®2” before cleaning.
Do not use liquid cleaners or aerosol cleaners. Use a damp cloth for cleaning.
6
Attachments — Do not use attachments that are not recommended by the product manufacturer
as they may cause hazards.
7
Water and Moisture — Do not use this product near water – for example, near a bath tub, wash
bowl, kitchen sink, or laundry tub; in a wet basement; or near a swimming pool; and the like.
8
Accessories — Do not place this product on an unstable cart, stand, tripod, bracket, or table. The
product may fall, causing serious injury to a child or adult, and serious damage to the product.
9
Power Sources — This product should be operated only from the USB connector of the
“PlayStation®2”.
0
Lightning — For added protection for this product during a lightning storm, or when it is left
unattended and unused for long periods of time, remove the power plug from the USB connector of
the “PlayStation®2”. This will prevent damage to the product due to lightning and power-line surges.
!
Object and Liquid Entry — Never push objects of any kind into this product through openings as
they may touch dangerous voltage points or short-out parts that could result in a fire or electric
shock. Never spill liquid of any kind on the product.
@
Servicing — Do not attempt to service this product yourself as opening or removing covers may
expose you to dangerous voltage or other hazards. Refer all servicing to qualified service
personnel.
#
Damage Requiring Service — Unplug this product from the “PlayStation®2” and refer servicing to
qualified service personnel under the following conditions:
(a) When the power cord or plug is damaged,
(b) If liquid has been spilled, or objects have fallen into the product,
(c) If the product has been exposed to rain or water,
(d) If the product does not operate normally by following the operating instructions. Adjust only
those controls that are covered by the operating instructions as improper adjustment of other
controls may result in damage and will often require extensive work by a qualified technician to
restore the product to its normal operation,
(e) If the product has been dropped or damaged in any way, and
(f) When the product exhibits a distinct change in performance – this indicates a need for service.
Page 4

E-4
FCC NOTICE
This equipment has been tested and found to comply with the limits for a Class B digital device,
pursuant to Part 15 of the FCC Rules. These limits are designed to provide reasonable protection
against harmful interference in a residential installation. This equipment generates, uses, and can
radiate radio frequency energy and, if not installed and used in accordance with the instructions, may
cause harmful interference to radio communications. However, there is no guarantee that interference
will not occur in a particular installation. If this equipment does cause harmful interference to radio or
television reception, which can be determined by turning the equipment off and on, the user is
encouraged to try to correct the interference by one or more of the following measures;
m Reorient or relocate the receiving antenna.
m Increase the separation between the equipment and the receiver.
m Connect the equipment into an outlet on a circuit different from that to which the receiver is
connected.
m Consult the dealer or an experienced radio or television technician for help.
FCC Warning: Changes or modifications not expressly approved by the party responsible
for compliance could void the user’s authority to operate the equipment.
INDUSTRY CANADA RADIO FREQUENCY INTERFERENCE NOTICE
This Class B digital apparatus meets all requirements of the Canadian Interference-Causing Equipment
Regulations.
$
Replacement Parts — When replacement parts are required, be sure the service technician has
used replacement parts specified by the manufacturer or have the same characteristics as the
original parts. Unauthorized substitutions may result in fire, electric shock, or other hazards.
%
Safety Check — Upon completion of any service or repairs to this product, ask the service
technician to perform safety checks to determine that the product is in proper operating condition.
^
Wall or Ceiling Mounting — The product should be mounted to a wall or ceiling only as
recommended by the manufacturer.
&
Heat — The product should be situated away from heat sources such as radiators, heat registers,
stoves, or other products (including amplifiers) that produce heat.
Page 5
ENGLISH
FRANÇAIS
ESPAÑOL
E-5
Children under 16 years of age
This product may interfere with development of their eyes and visual system.
Password protection is provided to prevent children under 16 from using this display
unit.
Anyone who has ever experienced convulsive or epileptic fits or
loss of consciousness from light flashes or oscillations.
This product could cause the same symptoms for those people.
Anyone who cannot see the whole image clearly, or who wears
glasses that make it hard to see the whole screen clearly, or who
has an eye movement disorder or visual field disorder.
Under those conditions, using this product for a long time could damage their eyes.
Anyone with a heart disorder, high blood pressure, a visual field
impairment, or an eye movement or alignment disorder.
If you have any of these conditions, consult a doctor before using this product, and
stop using it immediately if you feel ill.
W ARNING
Prohibited
Some people should not use this product:
Read the instruction manual, “WARNING” and “Precautions” of
the “PlayStation®2” to ensure safe operation.
Before using this product:
Page 6
E-6
Under some conditions, viewing with the Eye-Trek may cause:
● Nausea ● Eye pain or eye fatigue ● Dizziness
● Headache ● Neck or shoulder pain ● Feeling ill
● Motion sickness ● Disturbance of hand-eye coordination
If you experience any of these symptoms, stop viewing and rest until you recover.
These symptoms could temporarily disturb your vision or balance. Do not try to
operate a vehicle, walk, or move around until you feel better.
Do not use this product while you are actively moving, such as
walking, skating, riding a bicycle, or operating a motor vehicle.
This could interfere with your vision or balance, and cause a serious or fatal
accident.
Do not use this product when you are subject to strong
vibrations, such as in a car on a bumpy road.
This may cause dizziness, nausea, headaches, or motion sickness.
Do not use this product continuously for long periods.
Continuous use for long periods may damage your eyes. This product will turn off
automatically after 2 1/2 hours; when that happens, do not use it again for at least
15 minutes.
Do not use this product if the image does not appear clear and
stable in both eyes.
If the product is malfunctioning or you are not wearing it properly, viewing it could be
hazardous.
Do not listen to the sound at high volume.
This could contribute to a loss of hearing. It could also interfere with your ability to
hear important sounds around you, such as alarms, horns and sirens, especially in a
public place.
W ARNING
Prohibited
Improper use of this product may cause
serious injury:
Page 7
ENGLISH
E-7
W ARNING
Do not use this product if there is thunder or lightning. Do not
touch the control unit or power cord until after the storm has
passed.
Beware of moisture. Do not use this product or leave it in very
moist or humid places, such as in the rain, snow, fog, or a
steamy bathroom. Do not use it if it has condensation inside, or
if your hands are wet.
Do not use it near flammable gas, liquid, or vapor.
Do not expose it to very dusty environments.
Do not disassemble.
To prevent electrical shock or fire with this
product:
Page 8
E-8
W ARNING
Do not use this product in situations that are potentially
dangerous, such as on a bus or train where you may fall
down, or in places where you cannot guarantee your personal
safety.
Using this product in such a situation may result in an unexpected accident or injury.
Do not leave this product in a closed automobile or in other
places under direct sunlight for long periods.
Doing so may cause the product to be deformed by heat, resulting in a malfunction
and an electric shock hazard.
Prohibited
For your safety:
Page 9

ENGLISH
E-9
SAFETY NOTICE ..................................................E-2
SAFETY INSTRUCTIONS.....................................E-3
WARNINGS............................................................E-5
MAIN FEA TURES OF Eye-Trek ........................E-10
ADDITIONAL INFORMA TION............................E-10
CHECKING THE CONTENTS ............................E-1 1
NAMES OF P ARTS.............................................E-12
CONNECTIONS...................................................E-13
WEARING/ REMOVING THE DISPLAY UNIT....E-14
WATCHING VIDEO..............................................E-16
SETTING UP THE “PlayStation®2”................................E-16
SETTING UP THE Eye-Trek..........................................E-17
“PlayStation
®2” SYSTEM CONFIGURATION...............E-19
TURNING ON THE POWER AFTER
THE FIRST TIME............................................................E-20
ADJUSTING THE AUDIO/VIDEO ..................................E-21
REGISTERING, CHANGING OR CANCELING THE
PASSWORD...................................................................E-23
WHEN YOU ARE FINISHED..........................................E-24
CHANGING THE FRAMES (ET-FR103)............E-25
SPECIFICATIONS ..............................................E-26
TROUBLESHOOTING ........................................E-27
REP AIR SERVICE...............................................E-27
CONTENTS
Page 10

E-10
● New type of personal display that uses a unique optical system to enlarge video
images generated by small LCDs.
● With a simple connection, you can enjoy dynamic images from a “PlayStatio n®2”
system.
● Compact lightweight design.
● Powerful image equivalent to viewing a 52" screen at 6 1/2 feet.
● As easy to wear as glasses. The user can adjust the nose pad to fit the display
unit in the optimum viewing position.
● Can be worn over glasses.
● The image can be adjusted by selecting “BRIGHTNESS” and “COLOR” in the
Menu.
● Password protection is provided to prevent unauthorized use of this display unit.
● This product is exclusively designed for use with the “PlayStation®2”.
● Do not use the display unit if the image cannot be properly focused.
● The display unit may become warm after long periods of use, but this is not a
malfunction.
● A black or white spot, or a red, green or blue point may be observed, but this is
not a malfunction. More than 99.99% of this product’s effective pixels are
guaranteed.
● A vague striped pattern may appear, depending on the type of image displayed.
This is due to the optical filter built into the product for smoothing the image and
is not a malfunction.
● Lines (straight/slanted/curved) on the display may sometimes appear notched.
This is due to the characteristics of the LCD monitor and is not a malfunction.
● Depending on the shape of your glasses, you may not be able to use this
display unit.
● Refer to the “PlayStation®2” instruction manual before using this product.
MAIN FEATURES OF Eye-T rek
ADDITIONAL INFORMATION
Page 11

ENGLISH
E-11
CHECKING THE CONTENTS
Display unit
Instruction manual
Control unit
Page 12

E-12
NAMES OF PARTS
DISPLAY UNIT
Frame
Headphone
holder
Nose pad
Headphone
Frame adjuster
Display cable
Power indicator
(When the power is on, the power indicator lights in
green.)
Multi Control button
(Allows you to easily select/set the menu
and adjust volume, etc. (Z pg.17).)
Display cable
POWER switch
Power plug
(Connect to the USB connector on
the “PlayStation®2” (Z pg.13).)
Exclusive Multi-AV plug for the “PlayStation®2”
(Connect to the “PlayStation®2’s” AV MULTI OUT
connector (Zpg.13).)
CONTROL UNIT
Page 13

ENGLISH
E-13
To the “PlayStation®2’s”
AV MULTI OUT
connector
Display unit
To use this product, simply connect it to the USB connector and AV MULTI OUT connector on the
“PlayStation®2”.
Make sure that the “PlayStation®2’s” power is off before connecting the Eye-Trek.
“PlayStation®2” analog controller
“PlayStation®2” main unit
To the “PlayStation®2’s”
USB ( ) connector
Exclusive MultiAV plug for the
“PlayStation
®2”
Front
AV MULTI OUT
connector
Power plug
CONNECTIONS
Rear
USB ( ) connector
Control unit
(open) button and
indicator
Note:
Connect the power plug only to the “PlayStation®2’s” USB connector. Connecting it to any other
connector (including a USB hub) may cause a malfunction.
(standby)/
RESET button and
indicator
To display “PlayStation®2” images on the Eye-Trek and a TV at the same time
Use the optional “PlayStation®2” AV adapter (SCPH-10130U). (You must have video input jacks on
your TV for this feature.)
For further information, refer to the “PlayStation®2” instruction manual, visit the Sony Computer
Entertainment Inc. website, or call the Sony Computer Entertainment Inc. information center.
*
SCPH-10130U is a product of Sony Computer Entertainment Inc.
MAIN POWER
Page 14

E-14
Holding the tips of the frame
arms, gently move them apart
to put the display unit on.
Caution:
Do not hold the hinges. Doing
so may disengage the arms.
Remove each headphone upward from the holder as
shown in the figure.
● When putting the headphones back in the holders, simply
reverse the order of removal for each.
● If you wish to use ear pads on the headphones, use 16.0 mm
ear pads (commercially available).
Wearing the display unit
1
Put the display unit on as if
wearing glasses and insert
the headphones.
● Adjust the nose pad to put the
image to the optimal position. If
this adjustment is not performed,
the image may appear dim.
● If the image still cannot be seen
properly or is dim after adjusting
the nose pad, switch the left
and right frames (
Z pg. 25).
● When wearing the display unit
over glasses, pull the nose pad
out slightly more than usual.
● If you cannot wear the display
unit securely because there is
too much space between the
frame arms, reduce the space
using the frame arm adjusters
(
Z pg. 15).
2
● Be sure to wear the display unit properly so that the image appears clear and stable in both eyes.
● If you widen the frame arms too much when wearing the display unit, the frame adjusters may pop
out.
● Do not pull or twist the nose pad excessively in directions other than those shown in the figure. This
may break the nose pad or crack its surface.
WEARING/REMOVING THE DISPLAY UNIT
NOTICE
Headphones
Nose pad
Page 15

ENGLISH
E-15
Removing the display unit
How to adjust
Slide the frame adjuster in the direction of the display
unit. Do not slide it with the frame arm fully opened. If
you do so, the end of the frame arm will strike
the joint. Adjust without extending the frame arm fully,
being sure to set both frame adjusters to the same
position.
If you cannot wear the display unit securely even after
adjusting the space between the frame arms, switch
the left and right frame arms with each other and
adjust the space again (Z pg. 25).
Nose pad
Headphone
Frame adjuster
Adjusting the space between the frame arms
You can narrow the space between the frame arms using the frame adjusters when the frame arms
don’t fit your face.
● When removing the display unit, first remove
the headphones from your ears.
● If you are also wearing glasses, remove the
display unit by holding the left and right arms
with your fingers while pushing the frame
arms of your glasses upward with your
thumbs.
When you remove the display unit, some types of
glasses may come off together with the display unit.
To avoid this, move the bridge of the glasses in the
direction of the arrow as shown.
If the display unit is removed before the headphones have been removed from your ears, the
headphone cords will be pulled excessively and may be disconnected.
NOTICE
Bridge of glasses
Page 16

E-16
WATCHING VIDEO
Before you can start viewing “PlayStation®2” games/DVD videos, make sure that “System
Configuration”— “Component Video Out”— “Y Cb/Pb Cr/Pr” is selected in the main menu of the
“PlayStation®2”. If “RGB” is selected, change the setting to “Y Cb/Pb Cr/Pr” by referring to pg. 19,
“PlayStation®2” SYSTEM CONFIGURATION.
Notes:
● Make sure that this product is connected to the “PlayStation®2” correctly before changing settings
on the “PlayStation®2” (Z pg. 13).
● This product only supports “Y Cb Cr” video input signals with the Multi-AV plug. “Pb Pr” is not
supported.
● Refer to the “PlayStation®2” instruction manual for playing back disks and other functions.
SETTING UP THE “PlayStation®2”
Turn on the MAIN POWER switch on the rear of the “PlayStation®2” main unit.
● The (standby) indicator on the front lights up in red.
Press the (standby)/RESET button on the front of the “PlayStation®2” main unit.
● The (standby) indicator lights in green.
● Make sure that there is no disk in the disk tray before turning the power on. If there is a disk
in the tray, remove it before going on to the next step.
1
2
Page 17

ENGLISH
E-17
1 Select the desired language for the Menu screen, and 2 Enter the password (“ ”).
Power
indicator
Multi Control
button
POWER
switch
Multi Control button
The Multi Control button lets you easily control all
Eye-Trek functions from one convenient location.
● Selects numbers for the password (
Z pg.
18,20,23).
● Adjusts the volume while watching an image
(
Z pg.
21).
● Selects desired items in the Menu screen
(
Z pg.
22).
● Adjusts the brightness while watching an image
(
Z pg.
21).
● Adjusts the items you want to set while the Menu is
on the display (
Z pg.
22).
● Confirms warning/health warning screens
(
Z pg.
18, 24).
● Displays the Menu screen while watching an image
(
Z pg.
22).
● Sets items selected on the Menu (
Z pg.
22).
● Sets the password (
Z pg.
18, 20, 23).
SETTING UP THE Eye-Trek —Turning on the power for the first time—
On-Screen Display
OK
E N G L I S H
日本語
D E U T S C H
F R A N Ç A I S
I T A L I A N O
E S P A Ñ O L
Put on the display unit, then turn the power
on and select the desired language.
Put on the display unit (Zpg. 14-15) and
press the POWER switch on the control unit.
The power indicator lights up in green and the
language selection screen appears. Move
the Multi Control button up/down (
¶
,Ä
)to
select the desired language, then press it.
A warning appears on the screen.
● The mark appears next to the selected
language.
● The language selection screen will not appear the
next time the power is turned on. Refer to the
reset instructions to change the language (
Z pg.
22).
Note:
Make sure that the Power plug is connected
to the USB connector on the “PlayStation®2”
main unit correctly before turning on the
power. (Z pg.12-13)
*
Check that the “PlayStation®2’s” (standby) indicator lights up in green before turning on the
Eye-Trek (Z pg.16).
To the “PlayStation®2”
To the display unit
Move up/down
•••••
¶
Ä
Press
Move right/left
•••••
§©
1
Page 18

E-18
WARNING TO PREVENT
SERIOUS INJURY
SEE MANUAL FOR SAFETY
INFORMATION BEFORE
USING.
MAY DISTURB VISION,
BALANCE OR HAND-EYE
COORDINATION.
NOT FOR USE BY
CHILDREN UNDER 16.
PRESS OKOK TO CONTINUE.
ENTER YOUR PASSWORD.
AV
INPUT VIDEO SIGNAL
On-Screen Display
SELECT ‘ YCbCr ’ I N
‘SYSTEM CONFIGURATION’
ON THE PLAYSTATION
®2.
WATCHING VIDEO (Cont.)
f
Acknowledge the warning, then enter the
password.
1. Acknowledge the warning on the screen,
then press the Multi Control button. The
password entry screen appears.
● If the Multi Control button is not pressed on the
warning screen, the password entry screen will
not appear.
● The power will be turned off if there is no
operation for 1 minute.
2. When the password entry screen appears,
press the the Multi Control button three
times to select the number ‘ ’ for the three
digits.
● The password is set to when this product
is used for the first time or after it is reset (
Zpg.
20), therefore, the first entry will always be
.
● If no video signal is input to this unit, the message
“INPUT VIDEO SIGNAL” will appear on the
display. If this occurs, check the power and
connection to the “PlayStation
®2”. If a video
signal is input, the message will disappear. The
power will shut off automatically if a video signal is
not input to this unit for approx. 1 minute.
● If you do not wish to use the password registration,
you can cancel it. Refer to pg. 23 for REGISTERING,
CHANGING OR CANCELING THE PASSWORD.
● If “Y Cb/Pb Cr/Pr” was not selected in “System
Configuration” in the “PlayStation
®2’s” main menu,
SELECT “YCbCr” IN “SYSTEM CONFIGURATION”
ON THE PLAYSTATION
®2. will appear on the
Eye-Trek display (
Z pg.19 ).
2
Page 19

If you select “RGB”, the following will happen.
● The Eye-Trek display will be in black and white, and there will be no sound.
● When you play back a disk, the Eye-Trek display may have static or distortions, but this is not a
malfunction. Remember to take the disk out of the disk tray before changing the setting to “Y Cb/Pb Cr/Pr”.
ENGLISH
E-19
Browser
System Configuration
Enter Version
@
G
Display the “PlayStation®2” main menu on the Eye-Trek using the “PlayStation®2”
analog controller. (For more details, see “Using the main menu” in the “PlayStation®2”
instruction manual.)
When the main menu appears, perform the following steps.
1 Select “System Configuration” using the “PlayStation®2” analog controller’s up and down
directional buttons, then press the @button (Enter).
● Selected items are highlighted.
2 Select “Component Video Out” using the “PlayStation®2” analog controller’s up and down
directional buttons, then press the @button (Enter).
3 Select “Y Cb/Pb Cr/Pr” using the “PlayStation®2” analog controller’s right and left
directional buttons, then press the @button (Enter).
“PlayStation®2” SYSTEM CONFIGURATION
Press the Vbutton (Back) on the “PlayStation®2” analog controller to return to the main
menu.
Press the (open) button on the front of the “PlayStation®2” main unit, then insert a
disk.
Press the (standby) /RESET button on the front of the “PlayStation®2” main unit.
( Refer to the “PlayStation®2” instruction manual to play back the disk.)
Once an image appears on the Eye-Trek, go to “ADJUSTING THE AUDIO/VIDEO” in this
instruction manual. (Z pg. 21)
1
2
3
4
System Configuration
Component Video Out
Y Cb/Pb Cr/Pr RGB
Enter Back
Page 20

E-20
PASSWORD ENTERED
IS NOT CORRECT.
SHUTTING POWER OFF.
Turn the power on.
1. Press the POWER switch on the control unit.
The power indicator lights in green and the
warning appears on the screen.
2. Acknowledge the warning, then press the Multi
Control button.
Note:
Make sure that the Power plug is connected to the
USB connector on the “PlayStation®2” main unit
correctly before turning on the power. (Z pg.12-13)
Enter the password.
When the password has been registered...
When the password entry screen appears, press
the Multi Control button up/down(¶,Ä) to select the
registered numbers, then press it to complete the
entry.
● When the wrong password is entered...
The password entry screen appears again after
“PASSWORD ENTERED IS NOT CORRECT.” is
displayed.
If you enter the wrong password 3 times in a row,
the power automatically turns off after
“PASSWORD ENTERED IS NOT CORRECT.
SHUTTING POWER OFF.” is displayed.
When the password registration has been
canceled...
The password entry screen will not appear when
the password registration has been canceled (Z
pg. 23).
On-Screen Display
PASSWORD ENTERED
IS NOT CORRECT.
ENTER YOUR PASSWORD.
When you turn on the power after the first time, simply enter the password to display image. (The
language selection screen does not appear.)
Power
indicator
Multi Control
button
POWER
switch
WATCHING VIDEO (Cont.)
TURNING ON THE POWER AFTER THE FIRST TIME
If you have already selected “Y Cb/Pb Cr/Pr” in
“PlayStation®2” System Configuration, you can
start playing a disk on the “PlayStation®2”.
If you have not selected “Y Cb/Pb Cr/Pr” yet in
“PlayStation®2” System Configuration, go back
to pg. 19.
*
Check that the “PlayStation®2’s” (standby) indicator lights up in green before turning on the
Eye-Trek (Zpg.16).
1
2
3
Page 21

ENGLISH
E-21
ADJUSTING THE AUDIO/VIDEO
Once the image appears, adjust the VOLUME and BRIGHTNESS.
VOLUME
VOLUME LIMITON
On-Screen Display
To the “PlayStation®2”
!
~
To the “PlayStation®2”
Adjusting the brightness
1.
Move the Multi Control button right/left (§,©) while
the normal screen is displayed. The brightness level
appears on the screen.
2. Move the Multi Control button right/left (§,©) to adjust
the brightness.
©
: The entire screen becomes brighter.
§
: The entire screen becomes darker.
● The brightness of the screen will vary depending on where you
use the product. If necessary, adjust the brightness to the
desired level.
● The brightness can also be set through the Menu screen
(
Zpg.22).
● To return to the normal screen, press the Multi Control button. If
there is no operation for 3 seconds or more, the adjusted
brightness will be activated, and the display will return to the
normal screen.
Adjusting the volume
1.
Move the Multi Control button up/down (¶,Ä) while
the normal screen is displayed. The volume level
appears on the screen.
2. Move the Multi Control button up/down (¶,Ä) to adjust
the volume.
¶
: Increases the volume level.
Ä
: Decreases the volume level.
● The volume level is set to the 8th bar on the scale at the
factory.
● When “VOLUME LIMIT” is set to ON, the volume level is limited
to a certain level in order to avoid excessive noise, ear
damage, or the inability to hear outside sound. (
Z pg. 22)
● To return to the normal screen, press the Multi Control button .
If there is no operation for 3 seconds or more, the adjusted
volume level will be activated and the display will return to the
normal screen.
Page 22

E-22
WATCHING VIDEO (Cont.)
ADJUSTING THE AUDIO/VIDEO (Cont.)
You can adjust the AUDIO/VIDEO to your satisfaction from the Menu screen.
1
Call up the Menu screen.
Press the Multi Control button to display the Menu screen.
2
Select the item you want to adjust or set.
Move the Multi Control button up/down (¶,Ä) to select
an item.
● If there is no operation for 10 seconds while selecting/adjusting,
the adjusted settings will be activated, and the display will return
to the normal screen.
● The mark appears next to the selected item.
On-Screen Display
EXIT
BRIGHTNESS
COLOR
LOAD
SAVE
ORIGINAL
VOLUME LIMIT OFF
選択
!
!
~
~
Resetting (For canceling all the registered settings)
While keeping the Multi Control button pressed down, press the POWER switch for more
than 5 seconds. When the power is turned on again, all the settings will return to the initial
factory settings.
The Language selection menu will again be accessible and the password will return to .
Refer to “REGISTERING, CHANGING OR CANCELING THE PASSWORD” on pg. 23.
Cancels the menu and returns to
the normal screen.
Adjusts the brightness of the entire
screen.
Adjusts the depth of colors in the
video image.
Calls up the currently registered video
settings.
Saves personal settings for
BRIGHTNESS and COLOR.
Returns to the factory default settings
except for saved BRIGHTNESS
and COLOR settings.
Sets a limit to how high the volume
can go.
Press
© (+)
§ (–)
© (+)
§ (–)
Press or
©
Press or ©
Press or ©
©
(ON)
§ (OFF)
Can also be adjusted
on the normal screen.
To cancel all settings,
perform a reset (see
the bottom of this
page).
Menu items Functions
Multi Control
Selections Notes
button
—
Brighter
Darker
Deeper
Lighter
—
—
—
Set
Cancel
EXIT
BRIGHTNESS
COLOR
LOAD
SAVE
ORIGINAL
VOLUME
LIMIT
Page 23

ENGLISH
E-23
Follow step 1 .
Move the Multi Control button up/down (¶,Ä)
to select NO, then press it to complete.
● You can register a 3-digit password to prevent unauthorized use of this display unit.
● If you forget the password, register a new one.
You can cancel the password registration if you do not wish to use this feature.
● The password is preset to “
”
at the factory.
1
Retrieve the password registration screen.
1. When the power is on, press the POWER
switch for more than 5 seconds. The power
shuts off.
2. Press the POWER switch again. After a
warning is displayed, the password
registration screen appears.
On-Screen Display
Move the Multi Control button up/down (¶,Ä)
to select YES, then press it.
The password entry screen appears.
REGISTERING/CHANGING THE PASSWORD
2
3
Enter a password.
1. Move the Multi Control button up/down
(¶,Ä) to select 3 numbers, then press it.
The password confirmation screen appears.
2. Enter the same password again.
● If you fail to re-enter the password, the password
will not be registered and you will have to start
over from the password registration screen.
The power will automatically turn off if you fail to
enter the correct password 3 times in a row.
● If no operation is done for 1 minute, the power will
shut off automatically.
2
REGISTER YOUR PASSWORD?
YES
NO
ENTER YOUR PASSWORD.
OKOK
RE-ENTER YOUR PASSWORD.
CANCELING THE PASSWORD
REGISTERING, CHANGING OR CANCELING THE PASSWORD
Page 24

E-24
2 HRS. 30 MIN. HAVE
ELAPSED.
FOR THE HEALTH OF YOUR
EYES AND BODY, STOP
VIEWING AND REST. IF YOU
CONTINUE VIEWING, POWER
WILL SHUT OFF IN 5 MIN.
AFTER READING THE ABOVE,
PRESS .
2.5 HOURS HAVE PASSED.
PLEASE STOP WATCHING
AND REST FOR A WHILE.
IT WILL AUTOMATICALLY
TURN OFF IN A MOMENT.
Follow the steps below to turn off the power after
use.
1. Remove the headphones from your ears.
2. Remove the display unit from your face.
3. Turn off the Eye-Trek.
4. Turn off the “PlayStation®2” (Refer to “Ending a
game” in the “PlayStation®2” instruction manual).
Note:
If you turn the “PlayStation®2 ’s” power off before turning
off the Eye-Trek, electrical noise occurs in the
headphones, which will damage the Eye-Trek. To avoid
this, be sure to turn the Eye-Trek’s power off first.
Health warning
A health warning is displayed approx. 2 hours
30 minutes after the unit is turned on, as shown on the
right. The warning will be displayed until the Multi
Control button is pressed.
After an additional 5 minutes, another warning will be
displayed and the power will shut off automatically.
After 5 minutes
WATCHING VIDEO (Cont.)
Health Warning
WHEN YOU ARE FINISHED
Multi Control
button
POWER
switch
Product Care
● To clean the display unit, wipe with a soft, dry cloth. If this does not clean the unit to your
satisfaction, you can moisten the cloth with a solution of neutral detergent. Do not use
chemicals such as thinner, benzine and alcohol. If these chemicals are applied to the
windows of the display unit, it may cause them to cloud over.
● Do not wrap the display cable around the display unit or control unit, or apply excessive
force to the display cable, so as not to break the wire inside the cable.
● Protect the display unit frame from contact with hair liquids, cosmetic products or other
chemicals. If any gets on the frame, wipe it with a soft cloth moistened with a solution of
neutral detergent. If the frame is left with these types of chemicals on it, it may cause
cracks in the surface.
f
Page 25

ENGLISH
E-25
● Perform the following steps if a frame is broken and must be replaced.
● If you cannot wear the display unit securely even after increasing or decreasing the space between
the frame arms using the frame adjusters, try switching the left and right frame arms following the
steps below and adjust the space again.
Notes:
● To keep the windows of the display unit free of fingerprints, do not touch the windows when changing
the frames.
● Remove the display section from the frame only when necessary (such as when the unit is damaged).
Repeated removal and installation may result in loosening of the frame joints.
Removing the frames
1
Detach the frame adjusters.
1. Remove the headphone from the headphone holder.
2. Slide the frame adjuster to position C in the direction of the headphone. Pull the adjuster out
to detach.
3. Detach the other adjuster following the same procedures.
Frame [Left],
Adjuster [Inside]
Frame [Left],
Adjuster [Outside]
2
Attaching the frames
1. Push the frame into the display unit while matching shapes A (convex) of the frame and B
(concave) of the unit.
2. Place the headphone cord into the frame’s groove.
3. Attach the frame adjuster back to position Con the frame.
Left: 1 bump
Right: 2 bumps
Remove the frames.
1. Hold the frame so that the window part can be seen.
2. Fold the frame to align A (convex) of the frame with B (concave) of the unit.
3. While keeping A and B in the above position, slide the frame inward horizontally by approx. 1 mm.
4. To remove the right frame, twist it downward, and to remove the left, twist the frame upward.
When pulling the frames out, do not grasp the headphone cable.
Right side frame
Left side frame
CHANGING THE FRAMES (ET -FR103)
● The frame with 1 bump is attached to the left side, and the frame with 2 bumps is attached to the
right side at the factory, as shown above.
Page 26

E-26
Product
Type : Personal LCD Display
Product name : Eye-Trek
Model name : FMD-20P
Power Supply Ratings
USB connector : Rated 5 V DC
Power consumption : Approx. 2 W
Video
Video signal : NTSC format
Video display devices : TFT LCD panel x 2
Effective number of pixels : 180,000 pixels
Angle of view : 30 degrees horizontal, 23 degrees vertical
Input Jack
Audio/video input jack : Exclusive Multi-AV plug for the “PlayStation®2”
: Audio: 1.1 Vrms/47 kΩ
Video: Y : 1 Vp-p
Cb Cr : ± 350 mVp-p
Input impedance: 75 Ω
Ambient Temperatures
Operation : 5° to 35°C
Storage : –20° to 60°C
Dimensions
Display unit : Approx. 132 (W) x 50 (H) x 30 (D) mm (not including display cable
and frames)
: Approx. 161 (W) x 63.5 (H) x 50 (D) mm (not including display
cable/when the frames are folded)
Control unit : Approx. 39 (W) x 18.5 (H) x 100 (D) mm (not including display cable
and bumps)
Weight
Display unit : Approx. 85 g (not including cables)
Control unit : Approx. 35 g (not including cables)
Design and specifications are subject to change without notice.
SPECIFICATIONS
Page 27

ENGLISH
E-27
Symptom Possible Cause Solution Ref. Page
The image is not Connections are incorrect. Connect cables properly. pg. 13
displayed.
A video signal is not input or Turn on the “PlayStation®2” pg. 16-20
the power is not on. and play back video.
The image only appears “RGB” was selected in Change "RGB" to pg. 19
in black and white. System Configuration — "Y Cb/Pb Cr/Pr" in System
Component Video Out Configuration — Component
on the “PlayStation®2” Video Out .
main menu. Refer to the “PlayStation®2”
instruction manual for more
details.
The image is not clear. The display unit is being Adjust the position with the pg. 14-15
worn improperly. nose pad and frame adjuster.
Video settings Adjust video settings properly pg. 21-22
(BRIGHTNESS, COLOR) with the Multi Control button.
are adjusted improperly.
The image disappears About 2-1/2 hours have Rest your eyes. pg. 6
suddenly. elapsed since the power Set the POWER switch to ON pg. 20
was turned on
(power
when you want to use again.
turns off automatically)
.
A black, white, red, The LCD screens are manufactured to precise specifications, pg. 10
green or blue dot is but colored dots may be observed.
observed on the This is not a malfunction.
screen.
A striped pattern is This is due to the built-in optical filter which smoothes the pg. 10
observed on the image. image and is not a malfunction.
Audio is not heard. The volume is too low. Adjust the volume. pg. 21-22
The Multi-AV plug is not Check the Multi-AV plug. pg. 13
connected.
You forgot your — Re-register the password. pg. 23
password.
You want to change — Follow the reset instructions. pg. 22
the language on the
display.
TROUBLESHOOTING
The warranty period of this unit is one year from the date of purchase. Within this period, Olympus will
repair this unit free of charge. However, this warranty may not cover damage caused by user
mishandling, even if it occurs during the warranty period. If repairs are required after the warranty
period has ended, please contact the dealer from whom you purchased the unit or Olympus.
REPAIR SERVICE
Page 28

OLYMPUS AMERICA INC.
Two Corporate Center Drive, Melville, NY 11747-3157, U.S.A. Tel. 631-844-5000
(Customer Service: 888-533-4448)
http://www.olympus.com
Printed in Japan TF5616-1
 Loading...