

Page 1

User Manual
CMOS color camera
SC100
Page 2

Any copyrights relating to this manual shall belong to Olympus Soft Imagin g Solutions GmbH.
We at Olymnpus Soft Imaging Solutions GmbH have tried to make the information contained in
this manual as accurate and reliable as possible. Nevertheless, Olympus Soft Imaging
Solutions GmbH disclaims any warranty of any kind, whether expressed or implied , as to any
matter whatsoever relating to this manual, including without limitation the merchantability or
fitness for any particular purpose. Olympus Soft Imaging Solutions GmbH will from time to time
revise the software described in this manual and reserves the right to make such changes
without obligation to notify the purchaser. In no event shall Olympus Soft Imaging Solutions
GmbH be liable for any indirect, special, incidental, or consequential damages arising out of
purchase or use of this manual or the information contained herein.
No part of this document may be reproduced or transmitted in any form or by any means,
electronic or mechanical, for any purpose, without the prior written permission of
Olympus Soft Imaging Solutions GmbH.
Windows is a trademark of Microsoft Corporation which can be r egistered in var ious co untries.
© Olympus Soft Imaging Solutions GmbH
All rights reserved
510_UMA_InstallSC100_en_00_10Sep2010
Printed in Germany
Olympus Soft Imaging Solutions GmbH, Johann-Krane-Weg 39, D-48149 Münster,
Tel. (+49)251/79800-0, Fax.: (+49)251/79800-6060
Page 3

1 The CMOS color camera SC100 . . . . . . . . . . .4
1.1 Scope of supply . . . . . . . . . . . . . . . . . . . . . . . . . . . . 4
1.2 Specifications . . . . . . . . . . . . . . . . . . . . . . . . . . . . . 5
1.3 Operating and storage conditions . . . . . . . . . . . . . . 6
2 General safety instructions . . . . . . . . . . . . . . . 7
2.1 Avoiding personal injuries . . . . . . . . . . . . . . . . . . . 7
2.2 Avoiding device damage . . . . . . . . . . . . . . . . . . . . 8
3 System environment . . . . . . . . . . . . . . . . . . .10
3.1 Microscope and camera adaptor . . . . . . . . . . . . . . 10
3.2 PC . . . . . . . . . . . . . . . . . . . . . . . . . . . . . . . . . . . . . 11
3.3 Software . . . . . . . . . . . . . . . . . . . . . . . . . . . . . . . . 12
4 Installation . . . . . . . . . . . . . . . . . . . . . . . . . . .13
4.1 Step 1: Installing the software . . . . . . . . . . . . . . . . 13
4.2 Step 2: Connecting the camera . . . . . . . . . . . . . . . 14
4.3 Step 3: Selecting the camera driver . . . . . . . . . . . 15
4.4 Step 4: Selecting the camera . . . . . . . . . . . . . . . . 20
Contents
5 Care and maintenance . . . . . . . . . . . . . . . . . . 23
6 Solving problems . . . . . . . . . . . . . . . . . . . . . .24
6.1 The installation program won't start . . . . . . . . . . . 24
6.2 The camera can't be found . . . . . . . . . . . . . . . . . . 25
6.3 A faulty image appears . . . . . . . . . . . . . . . . . . . . . 32
6.4 Another problem has cropped up . . . . . . . . . . . . . 34
7 Appendix . . . . . . . . . . . . . . . . . . . . . . . . . . . . .36
7.1 Explanatory notes about conformity and disposal . 36
7.2 Glossary . . . . . . . . . . . . . . . . . . . . . . . . . . . . . . . . 37
3
Page 4
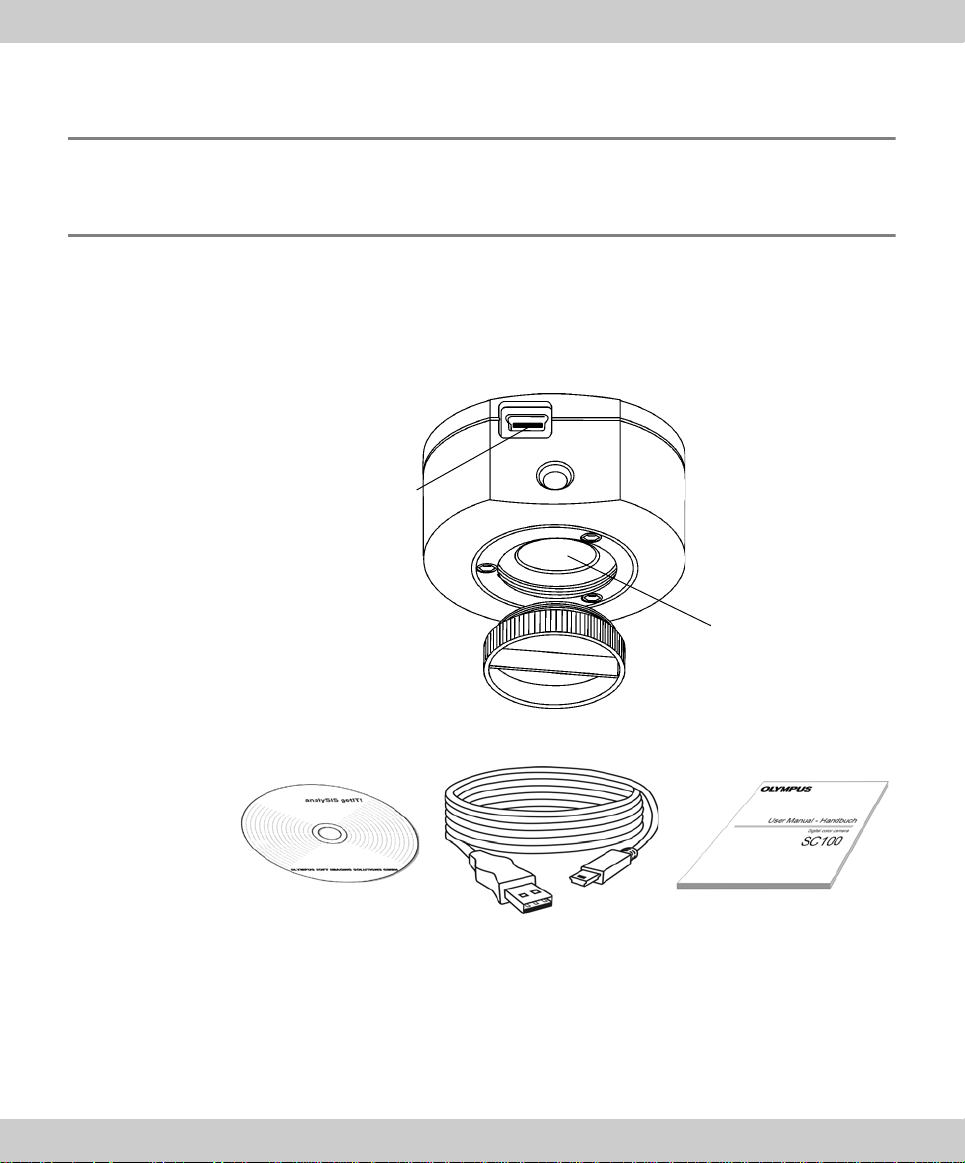
CMOS color camera SC100
Protective cap
CMOS sensor
USB port type B
Camera head
USB cable
Installation manual
USB plug type A
USB plug
type B
Driver software
1 The CMOS color camera SC100
1.1 Scope of supply
The SC100's scope of supply comprises:
Camera head with protective cap
USB cable
Installation manual
CD with getIT TWAIN software
Other essential
4
components
To be able to use the SC100, you'll also need the following components:
PC with MS-Windows operating system
Light microscope with camera adaptor or something similar, for example a
macro stand
Software to operate the camera (see chapter 3.3 on page 12)
Page 5

1 The CMOS color camera SC100 Specifications
1.2 Specifications
Properties of
the SC100
The SC100 is a CMOS color camera with a very high resolution used for biomedical
and material sciences applications. It was specially developed for acquisitions using
light microscopy, is of a compact design and can be connected to all of the prevalent
types of light microscope by a C-mount. The ICC profile technology guarantees an
optimal color mapping.
Technical data SC100
Chip type CMOS
Chip size Typ 1/2,3 Inch
Effective area (width x height) 6.12 mm x 4.59 mm
Pixel size 1.67 µm x 1.67 µm
Maximum resolution 3840 pixels x 2748 pixels
Image type 24-bit color image (RGB)
Read-out speed 5 – 36 MHz
Interface USB 2.0
Camera mount Standard C-Mount
Binning modes
The SC100 has two binning modes. In the binning mode, the camera's CMOS
sensor combines neighboring pixels into pixel blocks. This results in a higher sensitivity and a shortened processing time but also a lower resolution.
Binning Resolution Max. frame rate Exposure times
Maximum resolution 3840 x 2748 pixels 3.2 images per second 0.34 ms - 14.6 s
Binning 2x 1920 x 1374 pixels 12 images per second 0.19 ms - 3.6 s
Binning 4x* 960 x 686 pixels 42.5 images per second 0.12 ms - 3.4 s
* Binning 4x is technically the same as binning 2x with an additional "subsampling".
With "subsampling" the half of the imag e’s pixel is ignored. As a consequence the
sensitivity of both binning modes does not differ very much. The advantage of the
"Binning 4x" mode is it's high frame rate.
5
Page 6

CMOS color camera SC100
1.3 Operating and storage conditions
Please operate and store your camera in the following conditions:
The maximum permissible range for the ambient temperature during camera
operation is +0°C to +45°C.
The maximum permissible relative humidity during camera operation is 80 %
(condensation free).
When the camera is stored or transported, the ambient temperature must be
kept between -20°C and +60°C.
6
Page 7

2 General safety instructions Avoiding personal injuries
WARNING
CAUTION
Attention
WARNING
2 General safety instructions
The camera has been developed and produced on the basis of state-of-the-art technology and in conformity with recognized safety regulations. However, it is not
possible to entirely rule out possible hazards for the user, damage to the camera and
microscope or impairments of the camera's functionality. For this reason, always
read and meticulously observe the general sa fe ty instructi ons and warn ing s be fore
and during the installation.
Serious injuries can occur
The warning sign and the word WARNING indicate dangerous situations that can lead to serious injuries or even death if ignored.
Light injuries can occur
The warning sign and the word CAUTION indicate dangerous situations that can lead to light injuries if ignored.
Damage to devices can occur
The exclamation mark and the word Attention indicate situations,
where irreparable damage to the camera, microscope, or PC can
occur if ignored.
Reduced functionality can occur
Notices only printed with an exclamation mark indicate that ignoring
them can lead to a failure in, or a diminishing o f, the came ra' s fu nctionalities.
2.1 Avoiding personal injuries
Electric shock due to damaged cable!
When a cable is frayed or damaged, a person touching it risks the danger of an
electric shock.
Shut off the hardware and replace the cable immediately!
7
Page 8
CMOS color camera SC100
WARNING
CAUTION
Attention
Attention
Attention
Attention
Poisoning due to toxic gases!
In the case of a fire, the material of the camera can give off toxic gases. When
these are inhaled, it can cause irritation of the respiratory passage s and damage
to them.
Wear respiratory protection when fighting the fire!
Tripping hazard!
Cables laid across a room can be a dangerous tripping haza rd. This can cause
injuries to people and damage to equipment.
Wherever possible, lay cables along the wall or behind furniture. Fix cables that run
across the room into place!
2.2 Avoiding device damage
Never open the camera housing!
The camera's CMOS chip is extremely sensitive. Electrostatic discharge can
permanently damage the camera.
Therefore, never, under any circumstances, open the camera housing!
8
Avoid vibration shocks!
Mechanical shocks and strong vibrations can damage the camera.
Don't drop the camera during installation. Make sure it is securely mounted on the
microscope. When it's not in use, store it in a safe place!
Secure microscopes with additional components!
A top-heavy microscope can tip over or fall down and result in damage to both the
camera and the microscope.
If the microscope is top-heavy or otherwise unstable, fix it to the wall!
Don't touch the cover slip!
The cover slip over the CMOS chip is extremely sensitive and must not come into
contact with bare hands or any other objects, otherwise the acquisi tions will be
impaired by fingerprints or scratches.
Remove dust from the cover slip carefully with compressed air. For the removal of
dust stuck due to static electricity, ionized air is recommended.
Page 9

2 General safety instructions Avoiding device damage
Attention
Attention
Attention
Observe the operating conditions!
Exposure to high temperatures or humidity can damage component parts of the
camera.
Always observe the operating and storage conditions (see chapter 1.3 on page 6)!
Don't expose the camera to strong light!
Exposure to strong light can cause the camera to overheat, which may cause
damage to its component parts.
Do not expose the camera to strong light (sunlight) for long periods of time.
Only use the USB cable that is delivered with your camera
Operate the camera only with the USB cable that is part of the camera's scope of
supply. This ensures that the EMC basic standards are fulfilled.
9
Page 10
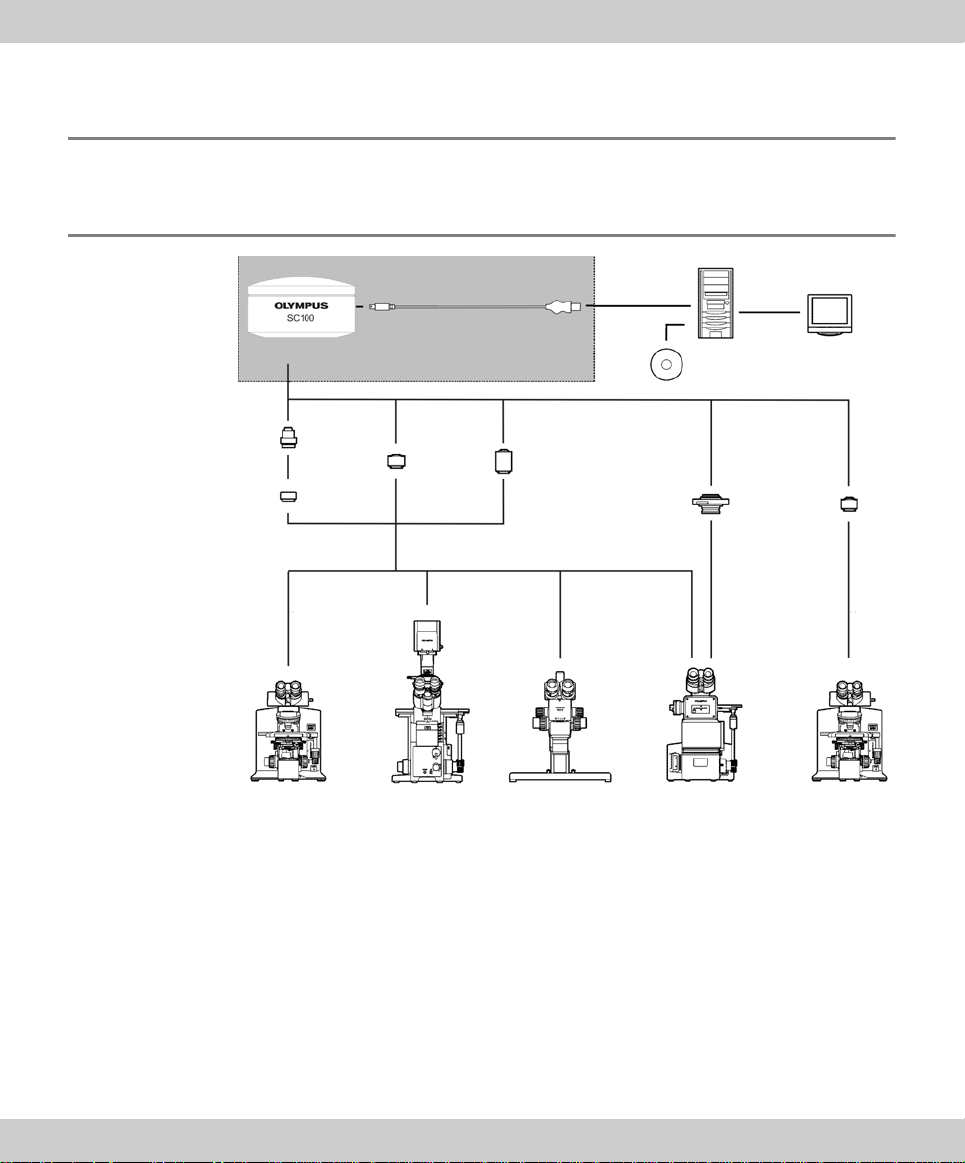
CMOS color camera SC100
USB cable
Software incl. camera driver
PC Monitor
Adaptor ring
U-CMAD3
U-TV1x-2
U-TV0.5xC-3 U-TV0.63xC
GX-TV0.5xC
GX-TV0.7xC
SC100
MVX-TV0.63xC
MVX-TV1xC
Camera head
Camera adaptor
Upright microscope
BX61/BX51/BX41
CX41/CX31
MX61L/MX61/MX51
Inverted
microscope
IX81/IX71/IX51
Stereo
microscope
SZX16/SZX10
SZX7/SZ61
Inverted
metallography
microscope
GX71/GX51
Fluorescence
microscope
MVX10
3 System environment
3.1 Microscope and camera adaptor
Suitable camera
10
The system table shows you the camera adaptors you can use to connect the
adaptor
SC100 to many available Olympus microscopes. Please note that you can also use
microscopes that are not listed there. Basically, all of the camera adaptors with the
magnification factor 0.5 or larger are suitable.
Should you require more detailed information, contact Olympus Soft Imaging Solutions Customer Service (see chapter 6.4.2 on page 34).
Page 11
3 System environment PC
3.2 PC
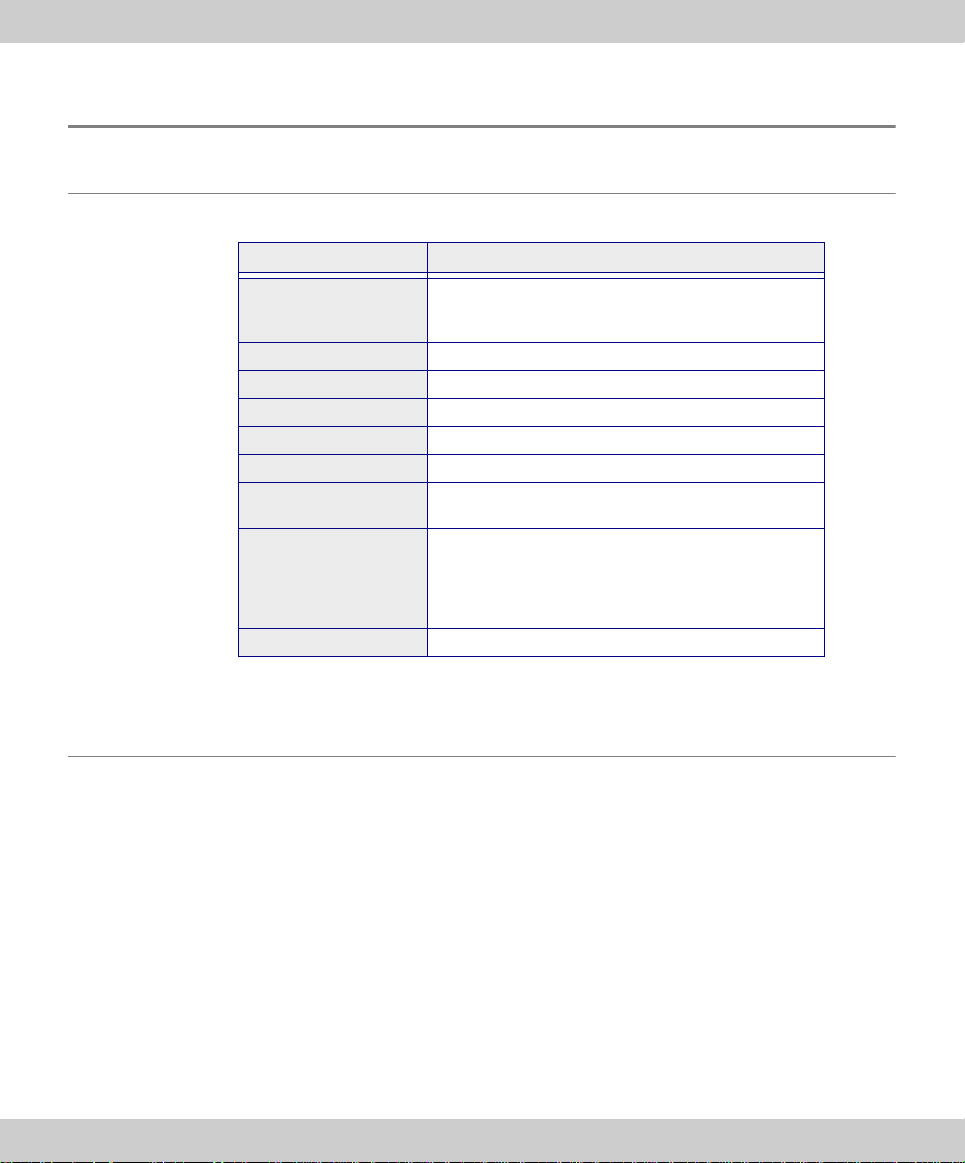
3.2.1 System requirements for the PC
For optimal use, the system requirements listed in the table must be fulfilled.
System requirements
Processor Intel Pentium D 3.0 GHz, or better
Hard disk at least 30GB free storage space
RAM at least 512 MB
Screen resolution at least 1280 pixels x 1024 pixels
VGA board 32-bit graphics card, at least 32 MB graphics memory
Drive DVD-ROM drive
Interfaces USB 2.0 with Intel® 82801FB/FBM USB2 Enhaced
Operating systems* • MS-Windows 7 (32 Bit)
Software Internet Explorer 6.0 or higher
Intel Xenon (DP/MP),
Intel Core™ Duo, or higher (SSE2 compatible)
Host Controller
• MS-Window 7 (64 Bit)
• MS-Windows XP Pro (32 Bit), Service Pack 2 or 3
• MS-Windows Vista (32 Bit)
Ultimate/Enterprise/Business/Home-Premium
* Make sure that the software you want to operate the SC100 with supports one of
the operating systems listed here.
3.2.2 Operating the camera with a laptop
Generally speaking, it is possible to operate the camera with a laptop. Owing to the
variety of such products on the market, it isn't possible to make any generally valid
statements about the technical prerequisites for this setup. It is possible that that the
power supply provided by the integrated USB interface won't be sufficient to operate
the camera. Recommendation: Connect the camera to the laptop vi a an external
USB bus with its own power supply.
Should you encounter any problems, contact Olympus Soft Imaging Solutions
Customer Service (see chapter 6.4.2 on page 34).
11
Page 12

CMOS color camera SC100
3.3 Software
You'll need the appropriate software to acquire images with the camera. Here are
some basic possibilities:
You can operate the camera with software from Olympus Soft Imaging Solu-
tions that came with the camera.
You can operate your camera with an existing Olympus Soft Imaging Solutions
software.
You can operate the camera with TWAIN software.
Installing an Olympus Soft Imaging Sol uti ons software
Optimal operating
Possible operation
You operate the camera optimally with Olympus Soft Imaging Solutions software. At
the present time, the following software products support the SC100 camera:
cellSens
Stream
GetIt
Information on how to make the installation can be found in the chapter 4.1 on
page 13.
Operating the camera with an already existing software
Generally speaking, it's basically possible to operate the camera with software from
Olympus Soft Imaging Solutions that you already have. To do so, you' ll have to
completely reinstall the software and if possible, choose the SC100 as camera.
Depending on how old the software is, it may not be possible to retroactively install
the camera driver. For this reason, we recommend that you acquire a current update
for your software. Contact Customer Service (see chapter 6.4.2 on page 34), to find
out whether your software version is sufficient for the operation of the camera.
Limited operation
12
Operating the camera with TWAIN software
Should you not want to operate the camera with software from Olympus Soft
Imaging Solutions, you can also use another TWAIN software. A TWAIN interface is
integrated in many programs (for example MS-Word). You will have to install the
TWAIN driver in order to import images from the camera via the TWAIN interface.
This is possible when you use the getIT CD that has been provided with your
camera. Information on how to make the installation can be found in the chapter 4.1
on page 13.
Install the software first!
Connecting the camera to your PC before you've installed the software can result
in problems with the camera driver.
It is extremely important that the software for your camera is installed before
connecting the camera to your PC.
Page 13

4 Installation Step 1: Installing the software
4Installation
This chapter describes the installation of the camera and the so ftware. Please be
sure to follow the steps in the correct order for a proper installation.
1) Install the software
2) Connect the camera
3) Selecting the camera driver
4) Choosing the camera (only for MS-Windows XP)
Install the software first!
Connecting the camera to your PC before you've installed the software can result
in problems with the camera driver.
It is extremely important that the software for your camera is installed before
connecting the camera to your PC.
4.1 Step 1: Installing the software
To operate the camera with your PC, the camera driver has to be in stalled. This is
accomplished by installing the software with which you operate the ca mera (see
chapter 3.3 on page 12).
instructions given you
Follow the
by the installation
wizard.
Log on as an administrator
To be able to install software, you must log on to your PC as an administrator.
Should you not possess administrator rights, contact your company's authorized
IT specialist.
Do the following:
1) Close all running application programs, including the application programs that
run in the background, for instance, an antivirus software.
2) Place the software DVD resp. CD, in the corresponding drive.
The installation program will start automatically.
3) Follow the instructions the installation wizard gives you and make the neces-
sary entries. Then, click the Next > button each time to continue.
4) Should you be asked to choose the device you want to install (for instance with
Stream), select the manufacturer Olympus Soft Imaging Solutions and the
13
Page 14

CMOS color camera SC100
Camera
adaptor
SC100
Plug type B
Monitor
PC
USB cable
Microscope
Plug type A
device SC100. With some software packages, it isn't necessary to select the
camera since all of the available camera drivers are automatically installed.
5) At the end of the installation, the files are copied to the PC. You can then
finalize the installation procedure.
The software and the camera driver have now been installed on your PC.
4.2 Step 2: Connecting the camera
14
Page 15

4 Installation Step 3: Selecting the camera driver
USB icon
You can connect the camera to the microscope and PC as soon as you've installed
the software. Do the following:
1) Remove the SC100's protective cap.
2) Screw the camera onto the microscope's camera adaptor.
3) Plug the end of the USB cable with the type B plug into the camera socket.
4) Plug the end of the camera's USB cable with the type A plug into a free USB
socket of your PC. Please note that it has to be a USB 2.0 socket. If you are
not certain, try all suitable sockets, also located on your PC's back side, until
the camera is recognized and the hardware wizard starts.
Make sure that the plug is the right way round
The USB plugs are not symmetrical. Make sure that the plugs are the right way
round, when you plug them into the corresponding camera ports.
4.3 Step 3: Selecting the camera driver
When you've finished connecting the camera to your PC, the operating system automatically starts the Found New Hardware Wizard. There are different procedures for
the installation of the camera driver, depending on which operation system you use.
Simply follow the instructions for your operating system.
4.3.1 Operating system MS-Windows Vista
1) Click the Locate and install driver software (recommended) entry.
MS-Windows Vista asks for permission to activate the device driver.
2) Confirm this by clicking the Next > button.
15
Page 16

CMOS color camera SC100
3) Wait until MS-Windows Vista displays the following message box.
4) Click the Install this driver software anyway entry.
Confirm the Olympus
Soft Imaging
Solutions' camera
driver.
5) The following dialog box shows the correct camera driver Olympus Soft
Imaging Solutions USB 2.0 Camera Driver and the installed camera Olympus
Soft Imaging Solutions SC100 Camera. Click the Close button.
6) Start the software that has already been installed.
7) The SC100 has now been registered as a device and is ready for use.
4.3.2 Operating system MS-Windows 7
When you've finished connecting the camera to your PC, MS-Windows 7
automatically installs the camera driver. In the status bar, you will receive a
corresponding message.
1) Wait until the installation of the camera driver has been finished. In the sta tus
bar, you will receive a corresponding message.
16
2) Start the software that has already been installed.
3) The SC100 has now been registered as a device and is ready for use.
Page 17

4 Installation Step 3: Selecting the camera driver
4.3.3 Operating system MS-Windows XP
1) In the Found New Hardware Wizard dialog box, select the answer No, not this
time. Then, click the Next > button.
2) In the dialog box that follows, select the Install from a list or specific location
(Advanced) option. Then, click the Next > button.
17
Page 18

CMOS color camera SC100
3) In the following dialog box, select the Don’t search. I will choose the driver to
install. option. Then, click the Next > button.
Confirm the Olympus
Soft Imaging
Solutions' camera
driver.
4) The following dialog box displays the correct camera driver Olympus Soft
Imaging Solutions USB 2.0 Camera Driver. Select this entry. Then, cli ck the
Next > button.
5) Wait until the wizard has loaded the camera driver.
18
Page 19

4 Installation Step 3: Selecting the camera driver
Continue with the
installation.
6) It's possible that the Hardware Installation dialog box will open. Ignore the infor-
mation in this dialog box and click the Continue Anyway button.
The Hardware Instal lation dialog box will be closed and the installation of
the camera driver will start.
7) When the camera driver has been installed the next dialog box opens. Click the
Finish button, to finish the Found New Hardware Wizard.
Your camera driver is now correctly installed. Then, only the camera has to
be selected. To do so, follow step 4 of the installation instructions.
19
Page 20

CMOS color camera SC100
4.4 Step 4: Selecting the camera
After you have selected the camera driver, you have to choose the camera for the
MS-Windows XP operating system. This fourth installation step is similar to step 3,
but instead of the USB 2.0 Camera driver the camera SC100 is shown. The MSWindows XP operating system automatically starts the Found New Hardware wizard
again.
1) Select the option No, not this time in the dialog box. Then, click the Next >
button.
20
2) In the dialog box that follows, select the Install from a list or specific location
(Advanced) option. Then, click the Next > button.
3) In the following dialog box, select the Don’t search. I will choose the driver to
install. option. Then, click the Next > button.
Page 21

4 Installation Step 4: Selecting the camera
Confirm the Olympus
Soft Imaging
Solutions' camera
driver.
4) The following dialog box displays the correct camera driver Olympus Soft
Imaging Solutions SC100 Camera. Select this entry. Then, click the Next >
button.
5) Wait until the wizard has loaded the camera driver.
21
Page 22

CMOS color camera SC100
Continue with the
installation.
6) It's possible that the Hardware Installation dialog box will open. Ignore the infor-
mation in this dialog box and click the Continue Anyway button.
The Hardware Instal lation dialog box will be closed and the installation of
the camera software will be loaded.
7) When the camera driver has been selected the next dialog box opens. Click the
Finish button, to finish the Found New Hardware Wizard.
22
The SC100 has now been registered as a device and is ready for use.
Page 23

5 Care and maintenance Step 4: Selecting the camera
WARNING
Attention
5 Care and maintenance
When correctly handled, the SC100 camera has a long life span and is to a large
extent maintenance-free. The full functionality is assured when you observe the care
instructions.
Cleaning the protective glass
To clean the camera's protective glass use a commercially available blower bulb to
blow dust away and wipe it gently with cleaning paper (or clean gauze).
In the case of fingerprints, oil smudges or the like on the protective glass, wipe it with
clean gauze moistened with pure alcohol.
Danger of fire when using alcohol!
Alcohol is highly flammable and can cause fires.
Make absolutely sure that the alcohol doesn't come into contact with open flames
or electric components.
Cleaning the housing
Parts other than the glass components should be cleaned by wiping with a clean
cloth. Do not use organic solvents to remove major stains. Use a soft cloth moistened with a neutral detergent solution.
Do not dismantle any parts!
The camera is made up of parts that are easily damaged and their disassembly
can quickly cause a malfunction or reduced performance.
Therefore, do not dismantle any parts of the camera.
23
Page 24

CMOS color camera SC100
6 Solving problems
Should any problems occur while you are installing the camera, try some of the solutions described in this chapter. Look for the description that corresponds to your
problem, then go to the corresponding page to solve the problem. Here is an o verview of the problems handled there:
The installation program won't start, page 24
The camera can't be found, page 25
The connection is faulty
The camera driver hasn't been correctly selected
The correct camera driver is not available
The camera was not selected
The operating system is not suitable
A faulty image appears, page 32
The color depth has been incorrectly set
The graphic card's driver is too old
The power saving mode makes the acquisition impossible
If your problem isn't addressed in this manual, contact Olympus Soft Imaging Solutions Customer Service. Information on how to do that can be found in the chapter
6.4.2 on page 34.
6.1 The installation program won't start
Problem description: You have placed the software DVD in the drive but the instal-
lation program doesn't start automatically.
Possible problem: Your PC's autorun function has been switched off.
Solution: Start the installation manually. Do the following:
1) In the Start menu, click the Computer entry (MS-Windows Vista, MS-Windows
7), or the My Computer entry (MS-Windows XP).
All of the available drives are displayed.
2) Your DVD drive appears under Devices with Removable Storage. Doubleclick
the DVD icon.
The contents of the software DVD are displayed.
Open the setup.exe
file on the DVD.
24
3) Doubleclick the file with the name setup.exe.
Now, the installation program starts.
Page 25

6 Solving problems The camera can't be found
6.2 The camera can't be found
Problem description: You have successfully installed the software with which you
want to operate the camera and have connected the camera to your PC. However,
the wizard doesn't start or your software can't acquire any images from the camera.
Possible problems:
The connection is faulty
The camera driver hasn't been correctly selected
The correct camera driver is not available
The camera was not selected
The operating system is not suitable
Solution: Verify the possible problems listed here.
6.2.1 The connection is faulty
Problem: The connection between the camera and the PC has been interrupted
because a cable isn't properly plugged in, because an unsuited USB port was
selected, or because a cable, a plug or a port is defect.
Solution: Check the connections. Do the following:
Check the cable
connections.
Check the entries in
the Device Manager:
1) Check the USB cable's port in the camera and at the PC. Check whether you
have connected the camera to an USB 2.0 port. You can find additional information about this in your PC's manual. If you are not certain, try all suitable
sockets, also located on your PC's back side. When the hardware wizards
starts the camera will be recognized. Then, follow the instructions in chapter
4.3 on page 15.
2) Otherwise, open the Device Manager. Follow the instructions according to the
operating system in use.
MS-Windows 7:
In the Start menu, click the Control Panel entry. In the Control Panel dialog
box, click on the Hardware and Sound entry. Doubleclick the Device
Manager icon.
MS-Windows Vista:
In the Start menu, click the Control Panel entry. On the top left of the
Control Panel dialog box, select the Classic View setting. Doubleclick the
Device Manager icon.
MS-Windows XP:
In the Start menu, click with the right mouse button the My Computer
entry. Select the entry Properties from the context menu. The System
Properties dialog box opens. Select the Hardware tab, then, click the
Device Manager button.
The Device Manager dialog box opens.
3) Doubleclick the USB Controller entry.
Some sub-entries will appear.
25
Page 26

CMOS color camera SC100
MS-Windows XP
MS-Windows Vista
MS-Window 7
This is what the
SC100 looks like in
the Device Manager.
An exclamation mark
highlighted in yellow
appears if the
installation went
wrong.
26
4) Check whether the Olympus Soft Imaging Solutions SC100 Camera entry is
diplayed.
If this entry appears, proceed to the next problem description.
In case only the Other devices entry appears, the camera driver has not
been correctly installed. Follow the instructions in chapter 6.2.2 on
page 27.
With the MS-Windows XP operating system, a sub-entry USB Device
might appear below the USB Controller entry, indicated with an exclamation mark that is highlighted in yellow. In this case, the camera has not
been correctly installed. Follow the instructions in chapter 6.2.4 on
page 30.
In case no suitable entry appears, unplug the USB cable and, after waiting
a little while, connect the USB cable with your PC again. Check whether
a new entry will appear below the USB controller entry. If this is not the
Page 27

6 Solving problems The camera can't be found
MS-Windows Vista MS-Windows XP
case the cable, or one of the plugs, or sockets is defect. Connect the
camera with another USB port and check the entries in the Device
Manager again.
6.2.2 The camera driver hasn't been correctly selected
Problem: In the Device Manager, the entry Other Devices appears with a similar
sub-entry. The camera driver hasn't been correctly installed It may be that you've
connected the camera with your PC before the software was installed.
Solution: Reload the camera driver. Do the following:
Doubleclick the entry
with the yellow
warning sign.
1) In the Device Manager, doubleclick the sub-entry below the Other Devices
entry.
A dialog box containing the driver's properties opens.
2) Click the Driver tab.
3) Proceed according to your operating system as follows:
27
Page 28

CMOS color camera SC100
MS-Windows Vista:
Load the camera
driver as decribed in
step 3 of the
installation
instructions.
1) Click the Update Driver button.
A dialog box will open.
2) Select the Browse for driver software on your computer option.
3) In the following dialog box select the option Let me pick from a list of device
drivers on my computer.
28
4) The following dialog box displays the correct camera driver Olympus Soft
Imaging Solutions SC100 Camera. Click the Next > button.
Page 29

6 Solving problems The camera can't be found
In case the correct camera driver is not displayed, it is not yet available on
your PC. In this case, follow the instructions in chapter 6.2.4 on page 30. .
The Windows Security dialog box will be opened.
5) In the dialog box, click the Install this driver software anyway entry.
A dialog box will open that confirms the installation of the camera driver.
6) Click the Close button.
7) Close the dialog box containing the driver's properties.
Now the correct camera driver appears in the Device Manager.
Load the camera
driver as decribed in
step 3 and 4 of the
installation
instructions.
MS-Windows XP:
1) Click the Update button.
The Found New Hardware Wizard dialog box will open.
2) Follow the steps 3 and 4 of the installation instructions decribed on page 17.
In case the correct camera driver is not displayed during the installation,
it is not yet available on your PC. In this case, follow the in structions in
chapter 6.2.4 on page 30.
29
Page 30

CMOS color camera SC100
6.2.3 The correct camera driver is not available
Problem: During the installation of the camera driver, the correct entry Olympus
Soft Imaging Solutions SC100 Camera does not appear. The correct camera driver
is not yet available on your PC.
Solution: Install your software again. Do the following:
Install the software
again.
1) Disconnect the camera and the PC by pulling out the USB plug.
2) Repeat steps 1 to 3 (MS-Windows Vista), or 1 bis 4 (MS-Windows XP) of the
installation instructions. To do this, follow the instructions on page 13. Please
be sure that you select the manufacturer Olympus Soft Imaging Solutions and
the SC100 camera in the Image Source Selection dialog box.
6.2.4 The camera was not selected
Problem: With the MS-Windows XP operating system, a sub-entry USB Device that
is highlighted in yellow appears in the Device Manager below the USB Controller
entry. The camera driver has been correctly installed, but the camera was not
selected.
Solution: Select the camera. Do the following:
Select the camera as
decribed in step 4 of
the installation
instructions.
1) Doubleclick the USB Device entry in the Device Manager.
A dialog box containing the driver's properties opens.
30
2) Click on the Driver tab, then, click the Update button.
The hardware wizard will be opened.
3) Now, follow the step-by-step-instructions in chapter 4.4 on page 20.
4) Close the dialog box containing the driver's properties.
In the Device Manager, the correct camera Olympus Soft Imaging Solutions
SC100 Camera will now appear as a sub-entry below the USB Controller.
Page 31

6 Solving problems The camera can't be found
MS-Windows Vista MS-Windows XP
6.2.5 The operating system is not suitable
Problem: You can't operate the camera with your operating system.
Solution: Check which operating system your PC works with. Do the following:
1) In the Start menu, rightclick on the Computer entry (MS-Windows Vista), or on
the My Computer entry (MS-Windows XP).
A context menu opens.
2) Select the Properties entry.
A dialog box containing the operating system's properties opens.
Check the operating
system's properties.
3) Check whether your PC's operating system supports the camera.
With MS-Windows Vista, the 32-bit-Operating System must be installed.
The 64-bit operating system isn't supported.
With MS-Windows XP, the Service Pack 2 or 3 must be installed. Service
Pack 1 and 64-bit operating systems are not supported.
4) Should the operating system not support the camera, install the camera on
another PC.
Only change the operating system after consultation!
The installation of a new operating system can lead to the loss of data and is therefore not recommended until all other possibilities have been entirely eliminated.
Should you encounter any further problems, contact Olympus Soft Imaging Solutions Customer Service (see chapter 6.4.2 on page 34).
31
Page 32

CMOS color camera SC100
6.3 A faulty image appears
Problem description: You have started the software and can activate the camera.
However, no image is displayed, or there are stripes in the image. Possible problems:
The color depth has been incorrectly set
The graphic card's driver is too old
The power saving mode makes the acquisition impossible
Solution: Verify the possible problems listed here.
6.3.1 The color depth has been incorrectly set
Problem: The color depth on your monitor has been incorrectly set.
Set the monitor's
display to a color
depth of 32 bit.
Solution: Check that with the monitor's display a color depth of 32 bit has been set.
Proceed according to your operating system as follows:
MS-Windows Vista:
1) In the Start menu, click the Control Panel entry.
The Control Panel dialog box opens.
2) Click the Classic View entry, should it appear on the left.
3) Doubleclick the Personalization icon.
The Personalize appearance and sound dialog box opens.
4) In it, click the lowermost entry Display Settings.
The Display Settings dialog box opens.
5) Under color depth, select the Highest (32 bit) option.
6) Click the OK button to confirm this.
32
Page 33

6 Solving problems A faulty image appears
MS-Windows XP:
1) In the Start menu, click the Control Panel entry.
2) Click the Switch to Classic view entry, should it appear on the left.
3) Doubleclick the Display icon.
The Display Properties dialog box opens.
4) Click the Settings tab.
5) In the color quality dialog field, click the Highest (32 bit) option.
6) Click the OK button to confirm this.
6.3.2 The graphic card's driver is too old
Problem: The graphic card's driver is too old.
Solution: Check your graphic card's driver in the Device Manager and install an
update if it's too old. Do the following:
1) Open the Device Manager as described in the chapter 6.2.1 on page 25.
2) Doubleclick the Display adapters entry.
Under it, an entry with your graphic card's label appears.
3) Doubleclick this entry.
A dialog box containing the graphic card's properties opens.
4) Click the Driver tab.
In the window, the driver type, the provider and the driver date, appear.
Load an update of the
graphic card driver
from the Internet.
5) We recommend that you run an update if your driver is more than two ye ars
old. Find a suitable download in the Internet.
Should you have a graphic card from NVIDIA, look under www.nvidia.com
Should you have a graphic card from ATI, look under www.ati.com Make
sure that you download the driver together with a catalyst.
Should you have a graphic card from another manufacturer, search for the
address in the Internet.
6.3.3 The power saving mode makes the acquisition impossible
Problem: A power saving mode has been switched on and this makes the transmis-
sion of the image data from the camera impossible.
Changes in the BIOS only by authorized and qualified pers on ne l
Changes in the BIOS (Basic Input Output System) can have a negative effect on
the way your PC operates.
Let only an administrator with corresponding qualifications make changes on the
settings in the BIOS.
33
Page 34

CMOS color camera SC100
Switch off the power
saving mode.
Solution: Switch off all hibernation modes in your operation system and in the BIOS
of your PC. Contact your administrator if you can't make these settings yourself.
6.4 Another problem has cropped up
Should your problem not have been addressed in this manual or the solutions
suggested didn't solve the problem, you'll certainly be able to find a solution by
contacting Olympus Soft Imaging Solutions Customer Service. There are two ways
in which you can do this:
Finding a solution on the Customer Service's Internet site
Contacting the Customer Ser vice
6.4.1 Finding a solution on the Customer Service's Internet site
You'll find additional problem solutions on the Olympus Soft Imaging Solutions
Customer Service Internet site. This Internet site contains questions that have
frequently been asked and shows you solutions to other problems. Do the following:
1) Enter the following address in the Internet browser: www.olympus-sis.com
In the browser, the Olympus Soft Imaging Solutions Internet site appears.
Search for your
problem on the
Customer Service
pages in the Internet.
2) Click the Customer Care tab.
The Customer Service's Internet site appears in the browser.
3) In the Customer Support Center field, click the FAQ’s (Frequently Asked Ques-
tions) entry.
In the browser, a list of solutions appears .
4) Click a solution that corresponds to your problem, then read the entry.
6.4.2 Contacting the Customer Service
When questions or problems crop up that you can't solve with the help of this
manual, the Olympus Soft Imaging Solutions Customer Service will be happy to help
you. You can best contact them by e-mail.
Contacting the Customer Service
You can contact Olympus Soft Imaging Solutions Customer Service under:
Telephone: (+ 49) 251-79800-6444
Fax: (+ 49) 251-79800-6445
E-mail: support.osis@olympus-sis.com
34
Page 35

6 Solving problems Another problem has cropped up
To make it easier and quicker for them to assist you, you can best proceed a s
follows:
1) Please clarify beforehand when and under which circumstances the problem
arose. The best way to do this, is if you can clearly reproduce the problem/error.
2) Tell them the operating system you use (see chapter 6.2.5 on page 31) and the
software you want to operate your camera with.
3) Make screen shots of (error) messages that appear on your monitor or make a
note of their exact wording.
To obtain a screen shot of the active MS-Windows window, use the
keyboard shortcut [Alt+Print]. A copy of the window is then stored in the
MS-Windows clipboard. You can insert this into an e-mail or an application
program by using the shortcut [Ctrl+V].
4) Should problems with the image quality crop up, save an image on which the
problem can clearly be seen, in TIF format. Insert this image i n your e-ma il to
our Customer Service.
5) Send the e-mail with a description of your problem and the details about your
software and operating system, along with possible attachments, to the e-mail
address: support.osis@olympus-sis.com
35
Page 36

CMOS color camera SC100
7 Appendix
7.1 Explanatory notes about conformity and disposal
7.1.1 CE Conformity
The Olympus Soft Imaging Solutions CMOS color camera SC100 conforms with the
European Union guidelines for electromagnetic compatibil ity according to the EU
Directive 2004/108/EG.
It conforms to the standard: EN 61326: 2006.
7.1.2 FCC-Conformity
This device complies with part 15 of the FCC Ru les. Operation is subject to the
following two conditions: (1) This device may not cause harmful interference, and (2)
this device must accept any interference received, including interference that may
cause undesired operation.
7.1.3 RoHS Conformity
The CMOS color camera SC100 by Olympus Soft Imaging Solutions conforms with
the European Union directive on the restriction of the use of certain hazardous
substances in electrical and electronic equipment 2002/95/EG.
It conforms to the ACPEIP standard SJ/T 11363 (2006) and also SJ/T 11364 (2006).
7.1.4 WEEE Declaration
The CMOS SC100 color camera contains electronic components. In compliance
with the European Directive 2002/96/EG concerning waste electrical and electronic
equipment, this product may not be disposed of in municipal waste b ut must be
separately collected. Contact your specialist dealer with regards to returning it.
36
Page 37

7 Appendix Glossary
7.2 Glossary
Binning
In the binning mode, the camera's sensor combines neighboring pixels into pixel
blocks. This results in a higher sensitivity and a shortened processing time but also
a lower resolution. Double binning (2x) reduces the number of pixels to a quarter.
CMOS
CMOS (Complementary Metal Oxide Semiconducto r) is a semiconductor component that can be used for circuits and also as a photo sensor. Using the CMOS technique, each pixel can be separately read out and amplified. The CMOS technique is
characterized by its low power consumption and requires very little space.
C-Mount
The C-mount is a connection with a standardized screw thread, for camera objectives. With this screw thread, the light microscope camera can be firmly attached to
all commercially available microscopes.
DVD
The Digital Versatile Disc is a digital storage medium, similar to a CD (Compact
Disc), but possessing a much higher storage capacity.
Device Manager
The Device Manager is a part of the PC's control panel, in which the connected
devices and their drivers are managed. In it, the available USB interfaces are listed,
and also the connected cameras. You open the Device Manager by selecting the
following menu points in your operating system one after the other: Start > Control
Panel (classic view) > Device Manager (MS-Windows Vista), or Start > Control
Panel (classic view) > System > Hardware > Device Manager (MS-Windows XP).
Hardware
The PC itself and all physical components that are connected to it, i.e. the monitor,
cables and printers, are considered to be hardware. Thus, a hardwa re defect is a
physical problem, for instance, a defective device or a defective plug or socket.
37
Page 38

CMOS color camera SC100
ICC-Profile technology
The International Color Consortium's profile technology provides an optimal color
matching between different acquisition and output devices. The camera's CMOS
sensors see colors in a different way to people and monitors, and in turn, they reproduce them differently. To achieve a consistent color reproduction that is optimized
for human sight, a conversion is essential. The ICC profile technology guarantees
an optimal color correction and in this way, reproduction of the acquired image.
Camera adaptor
The camera adaptor is a connection between microscope and camera that bundles
the light from the microscope and directs it onto the CMOS chip. For Olympus Soft
Imaging Solutions light microscope cameras, camera adaptors with the factor 0.5 or
larger are suitable.
Screen shot
The term 'screen shot' stands for a monitor photo of the complete screen surface, or
of a window, that can easily be created. You can make a screen shot of the complete
screen by using the [Print] key. To make a screen shot of the active MS-Windows
application window use the keyboard shortcut [Alt+Print]. The screen shot you've
just created and can be inserted into a file from the clipboard by using the shortcut
[Ctrl+V].
Driver
To enable a PC to communicate with a connected device, a device driver is required.
This driver's task is to interpret the signal sent. The drivers are chosen by the operating system and every device's driver is shown in the Device Manager. The camera
only works when the correct driver has been activated.
38
TWAIN
TWAIN is a standard for the exchange of data between image in put devices, such
as cameras and scanners, and image processing programs.
USB
The Universal Serial Bus is a specification for the connection of the PC with external
devices or storage media. It transfers data and suppli es the devices with power.
USB distinguishes itself by its high transmission reliability and velocity. The USB
cameras by Olympus Soft Imaging Solutions use the USB 2.0-Standard with a transmission rate up to 480 Mbit/s (Enhanced Host Controller Interface (EHCI)). Ports for
the USB 1.x-Standard can only transfer up to 12 Mbit/s and are not suitable.
However, they are still available in many PCs to support older devices.
Page 39

OLYMPUS SOFT IMAGING SOLUTIONS GMBH
Phone: +49 (251) 7 98 00-0, Fax: +49 (251) 7 98 00-6060, info.osis@olympus-sis.com
Johann-Krane-Weg 39, 48149 Münster, Germany
 Loading...