

Page 1

Olympus RAW File Import Plug-in
Instructions
RAW File Import Plug-in Utility
for Olympus Digital Cameras
Page 2
Introduction
Welcome!
Thank you for using this Olympus product.
Please read these instructions carefully in order to get the best results from this product.
Note
• The contents of this software and this manual may not be reproduced in whole or in part except for personal
use. It may not be transferred without permission.
• Olympus can accept absolutely no responsibility in respect of losses suffered by the customer or a third party
as a result of use of this software.
• While every care has been taken in the preparation of this manual, if you find any points which are unclear,
errors, or omissions, please contact an authorized Olympus service center.
• This software is only guaranteed to operate in the same operating environment required for the specified
Photoshop versions.
• This software supports Photoshop CS, Photoshop 7.0, and Photoshop 6.0.
• The software specification and the content of this manual are subject to change without notice. For the latest
information, visit the Olympus web site at: http://www.olympus.com
Trademarks
• Windows® is a registered trademark of Microsoft Corporation in the USA and other countries.
• Macintosh is a registered trademark of Apple Computer, Inc. in the USA and other countries.
• Adobe® and Adobe Photoshop® are trademarks of Adobe Systems Incorporated.
• Other company and product names appearing in this manual are trademarks or registered trademarks of their
respective owners.
2
Page 3
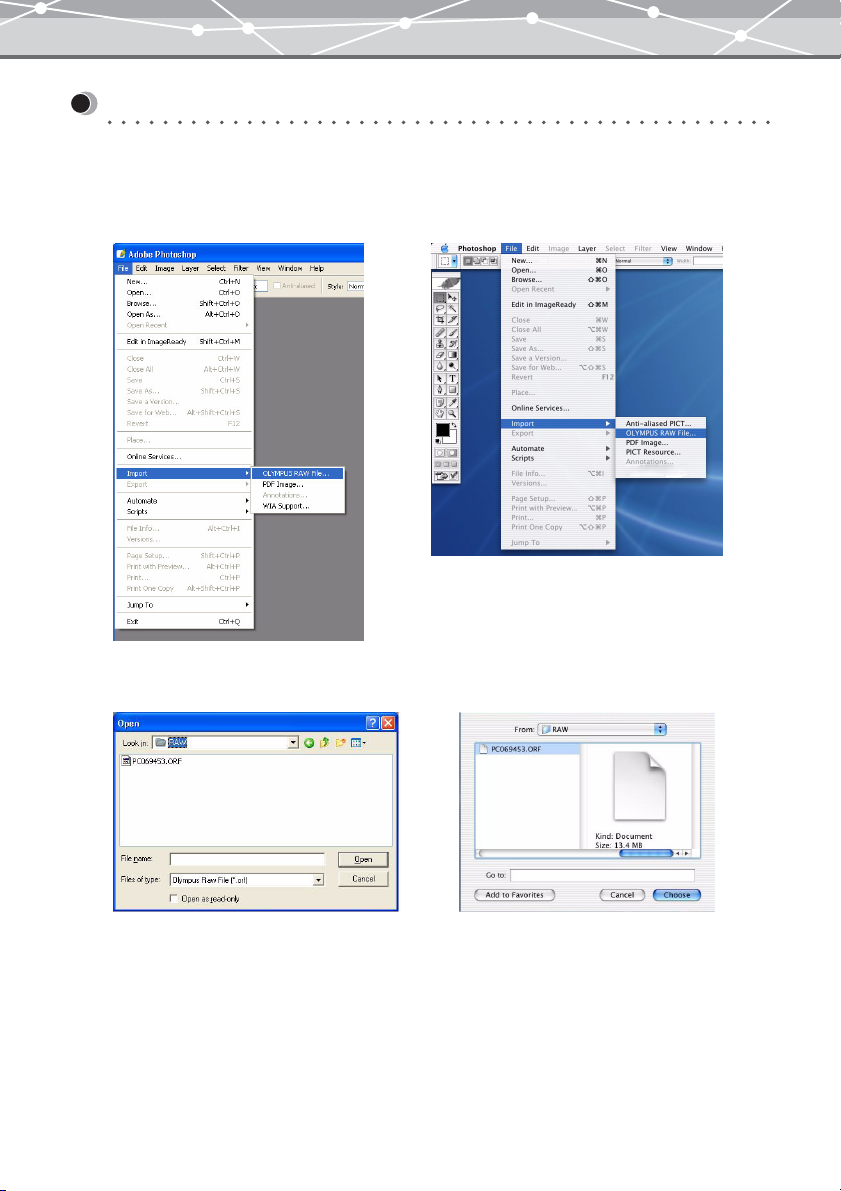
Performing RAW Development Processing
To perform RAW development processing using this software, follow the procedure below.
1 Start Photoshop.
2 From the [File] menu, select [Import], and then select [OLYMPUS RAW File...].
Macintosh screen
Windows screen
The dialog box to specify the file to be imported appears.
Windows screen
Macintosh screen
3 Click the name of the image file (File Name.orf) in the list that you want to
import, and then click the Open or Choose button.
The [RAW Development] dialog box appears.
3
Page 4

4 If desired, set the items in the RAW development setting area. For details
about each item, refer to the table below.
● Setting Items
No. Item Description
Exposure Compensation Adjusts the exposure of the image. You can manually adjust the exposure
by dragging the slider to the left or right. The exposure can be adjusted
from -2.0 to +2.0 in 0.1 EV increments. You can also directly input the
value in the edit box.
White Balance Adjusts the white balance of the image. You can select to adjust the Color
Temperature Setting or the Gray Point Specification.
Color Temperature Setting
You can manually adjust the color temperature by dragging the slider to
the left or right. The setting range is between 2000K and 10000K, in 100K
increments. You can also directly input the value in the edit box.
Fine Adjustment
If you have selected the color temperature, you can manually perform fine
adjustment of the color temperature by dragging the slider to the left or
right. The setting range is from –10 to +10, in 1 step increments. You can
also directly input the value in the edit box.
Gray Point Specification
Click the Eyedropper button to change the mouse cursor to the eyedropper
tool. Click the desired point in the preview display area to specify a gray
point.
4
Page 5

No. Item Description
Contrast Adjusts the contrast of the image. You can manually adjust the contrast by
dragging the slider to the left or right. The setting range is from –5 to +5,
in 1 step increments. You can also directly input the value in the edit box.
The shooting settings are discarded.
Sharpness Adjusts the sharpness of the image. You can manually adjust the sharpness
by dragging the slider to the left or right. The setting range is from –5 to
+5, in 1 step increments. You can also directly input the value in the edit
box. The shooting settings are discarded.
Saturation Adjusts the intensity of colors. You can manually adjust the saturation by
dragging the slider to the left or right. The setting range is from –5 to +5,
in 1 step increments. You can also directly input the value in the edit box.
The shooting settings are discarded.
Color Space Sets the color space of the image. Selects a setting method ([sRGB],
[Adobe RGB], or [ProPhoto RGB]) from the pull-down list.
5 Click the [Development] button.
The [RAW Development] dialog box closes, and a Photoshop window with the converted image is
displayed.
5
Page 6

Technical Support
Contact for Inquiries Relating to This Software
OLYMPUS IMAGING CORP.
Shinjuku Monolith, 3-1 Nishi-Shinjuku 2-chome, Shinjuku-ku, Tokyo, Japan
OLYMPUS IMAGING AMERICA INC.
Two Corporate Center Drive, P.O. Box 9058, Melville, NY 11747-9058, U.S.A.
Tel. 631-844-5000
Technical Support (U.S.A.)
24/7 online automated help: http://www.olympusamerica.com/support
Phone customer support : Tel. 1-888-553-4448 (Toll-free)
Our Phone customer support is available from 8 am to 10 pm (Monday to Friday) ET
E-Mail: distec@olympus.com
Olympus software updates can be obtained at: http://www.olympus.com/digital
OLYMPUS EUROPA GMBH
Premises: Wendenstrasse 14-18, 20097 Hamburg, Germany
Tel : +49 40-23 77 3-0
Fax : +49 40-23 07 61
Goods delivery: Bredowstrasse 20, 22113 Hamburg, Germany
Letters: Postfach 10 49 08, 20034 Hamburg, Germany
European Technical Customer Support
Please visit our homepage http://www.olympus-europa.com
or call our TOLL FREE NUMBER* : 00800 - 67 10 83 00
for Austria, Belgium, Denmark, Finland, France, Germany, Italy, Luxemburg, Netherlands, Norway,
Portugal, Spain, Sweden, Switzerland, United Kingdom
* Please note some (mobile) phone services/provider do not permit access or request an additional prefix
to +800 numbers.
For all not listed European Countries and in case that you can't get connected to the above mentioned number
please make use of the following
CHARGED NUMBERS: +49 180 5 - 67 10 83 or +49 40 - 237 73 899
Our Technical Customer Support is available from 9 am to 6 pm MET (Monday to Friday)
6
Page 7

 Loading...