

Page 1

INSTRUCTIONS
Page 2

Table of contents
Preparations before taking pictures
Loading the batteries
.................
2
Simple operating procedures
Loading
the
film ....................
4
Taking pictures
.....................
7
Unloading
the
film ..................
13
Automatic flash activation
(1)
Taking pictures
in low light
..........
15
(2)
Taking backlighted subjects ..........
18
Advanced shooting techniques
Spot metering
......................
19
Auto-zoom photography
..............
21
Taking a continuous scries
of
shots
.......
23
Using
the
self-timer
..................
24
AUTO-S flash mode .................
25
Flash OFF mode
....................
28
FILL-IN
flash
mode
.................
29
MULTI
flash
mode
.................
31
Using
the
remote control
..............
33
Use
of
fillers
.......................
36
Mounting
the
strap
..................
38
Use of the
optional Olympus c as e
........
39
Care
and
storage
......................
40
Questions
and
answers
..................
42
Description
of
controls
..................
44
Viewfinder
display
and LCD
panel
..........
46
Specifications
........................
47
• Please read this instruction manual carefully before using your camera. •This camera will not operate unless th e barrier is opened.
•Before taking important pictures such as on travels, it is recommended that you take trial pictures.
1
Page 3
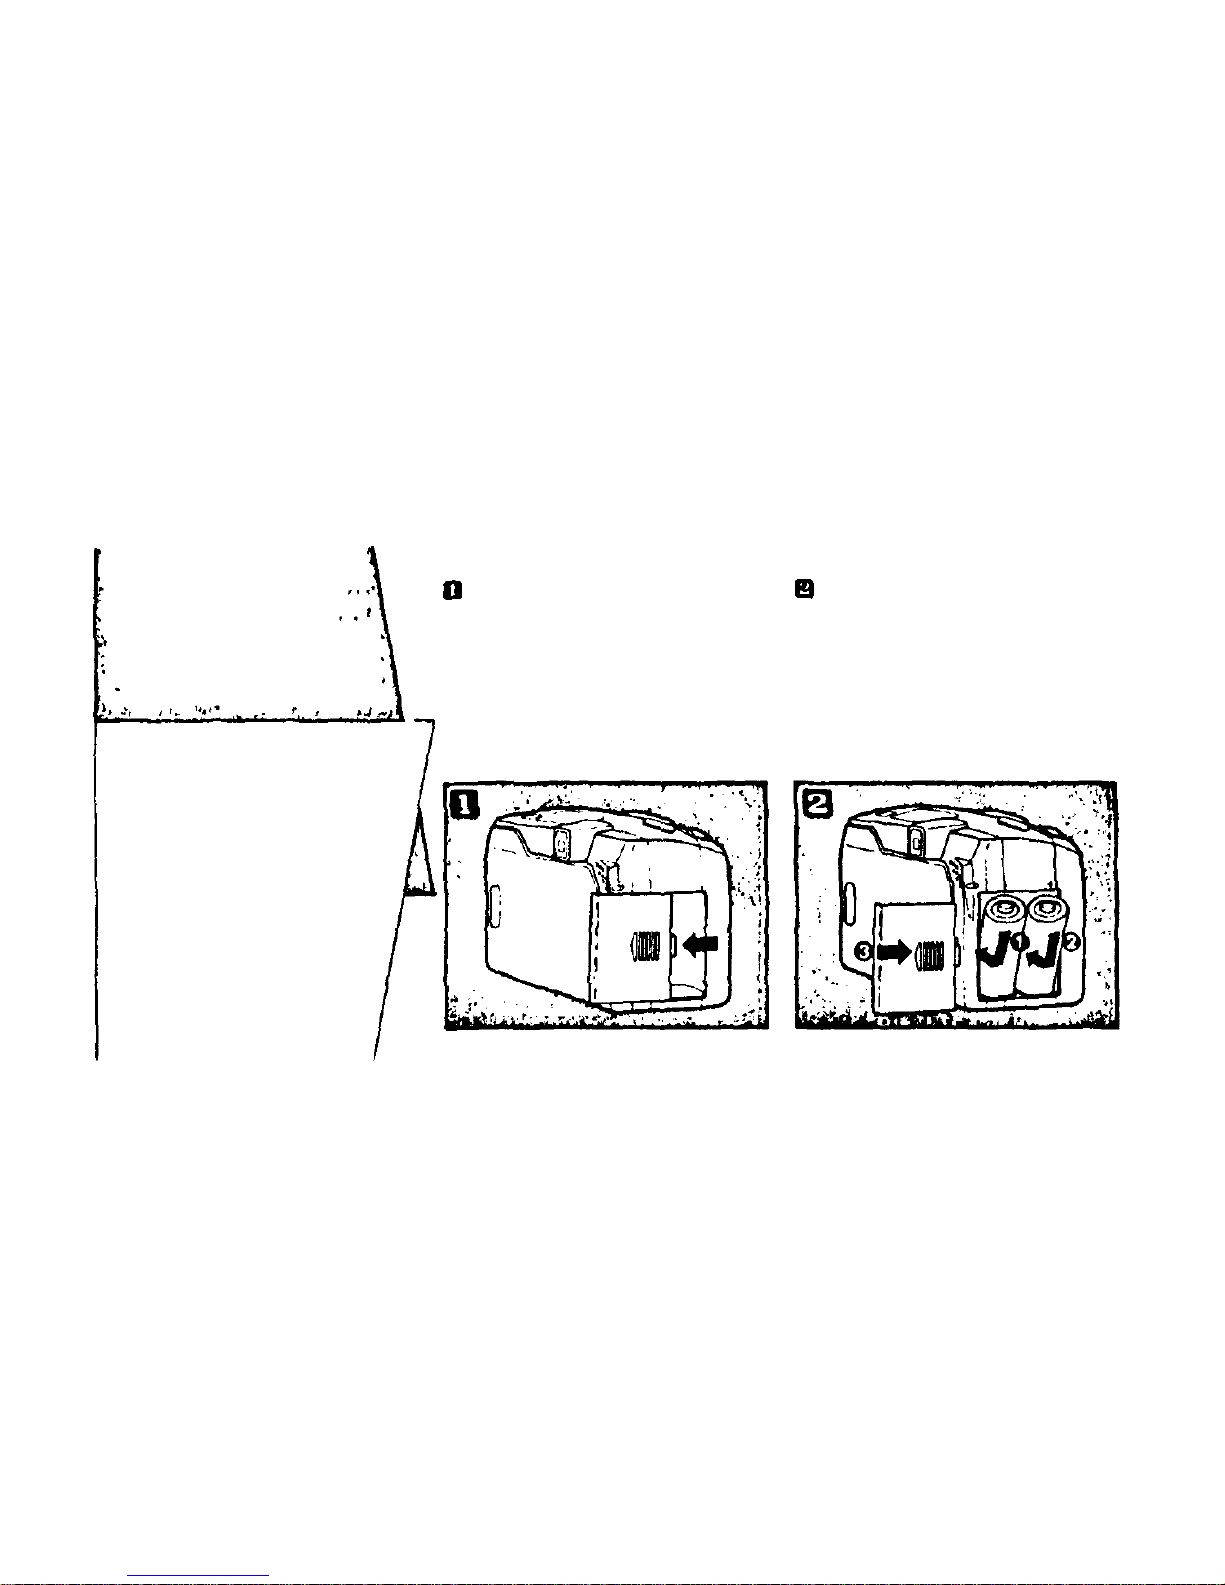
Remove the battery cover on the
side of the grip.
Insert the batteries in th e correct
directions and replace t he cover.
Preparations
before taking
pictures
Loading th e batteries
Be su re t o t h e correct
batteries, and do not mi x
new and old batteries at the
same time.
Remove the batteries and
keep t he m in a safe place if
you are not likely to use the
camera for long time.
Two 3V lithium batteries
(DL123A/CR123A)
2
Page 4
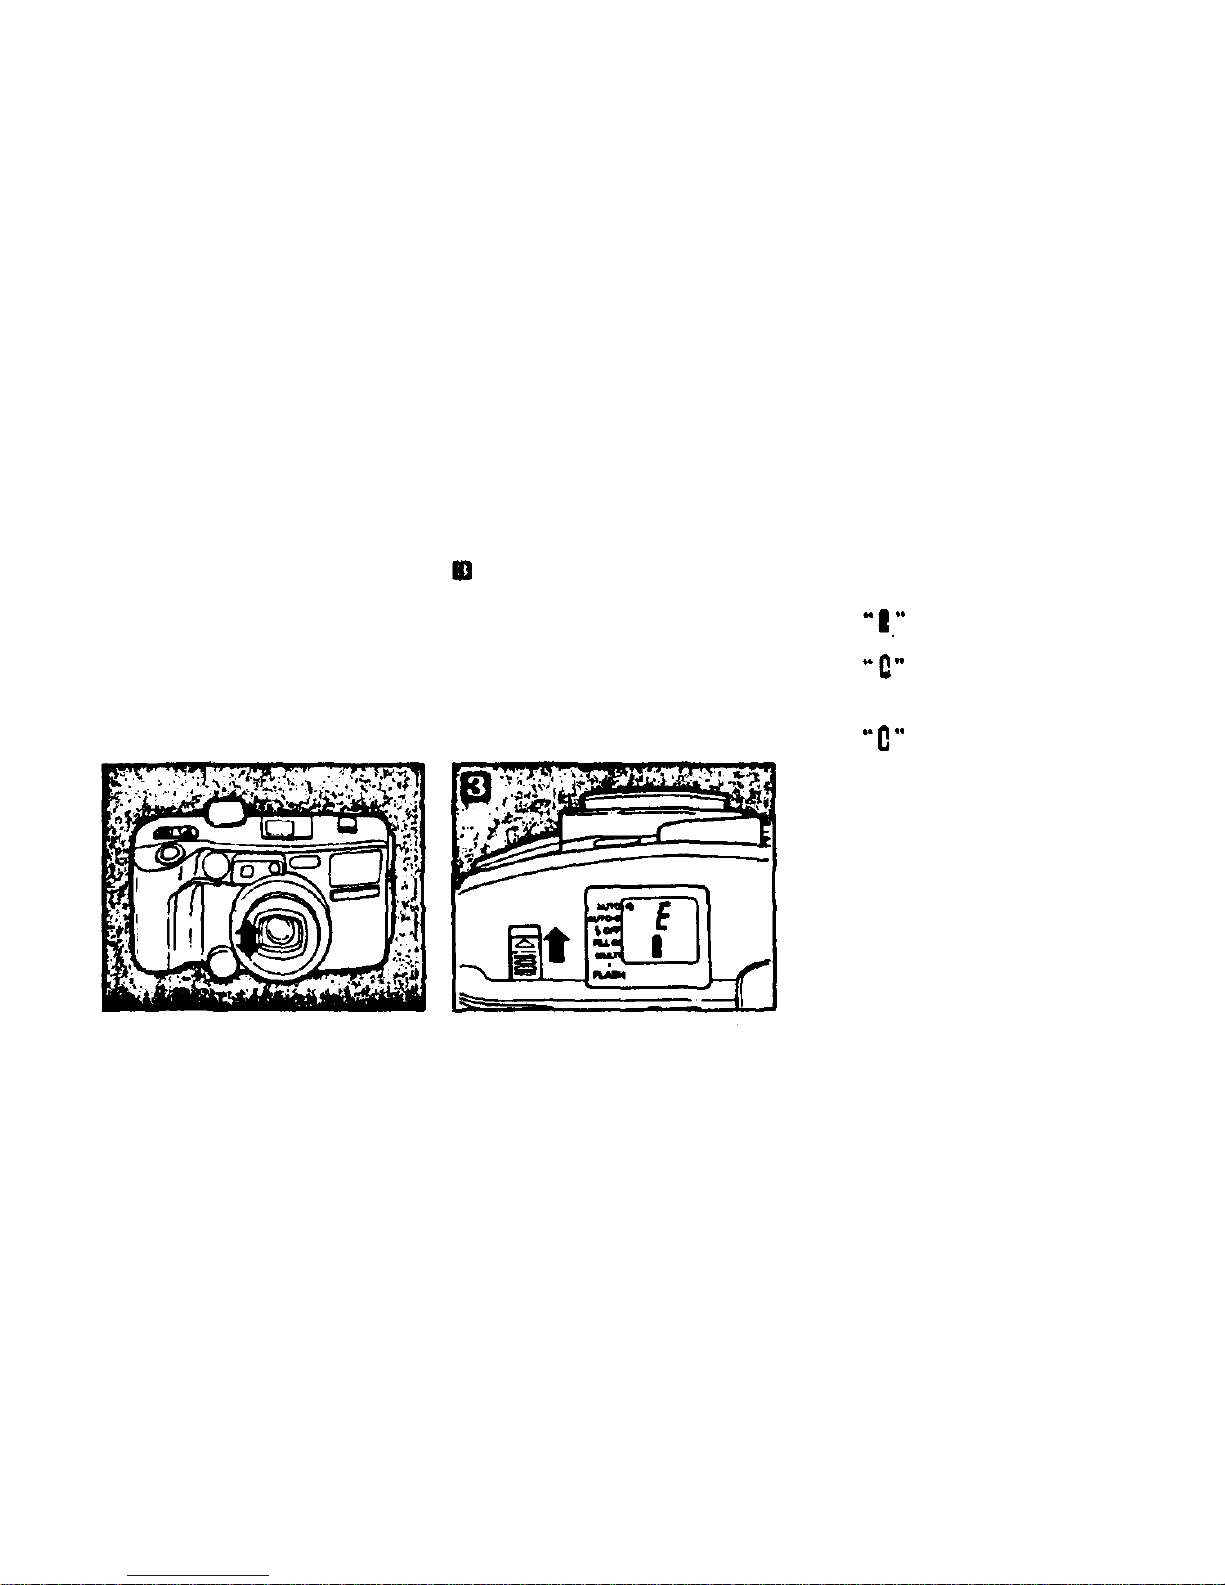
Note: After inserting the batteries the
camera may activate electronically
without having set t h e power switch
to t h e ON position I n this switch-
ON status, the barrier opens and t he
LCD panel is indicated The LCD
panel will remain on fo r approximately 4, 5 minutes.
Set t he power switch to ON and
check the charge remaining in the
batteries.
Battery power wil l be displayed in
the LCD panel.
When is displayed for 12 sec.,
the batteries are OK.
When blin ks , it indicates t ha t
the battery power is low, an d t h e
batteries should be replaced.
When lights, replace t he
batteries immediately.
3
Page 5
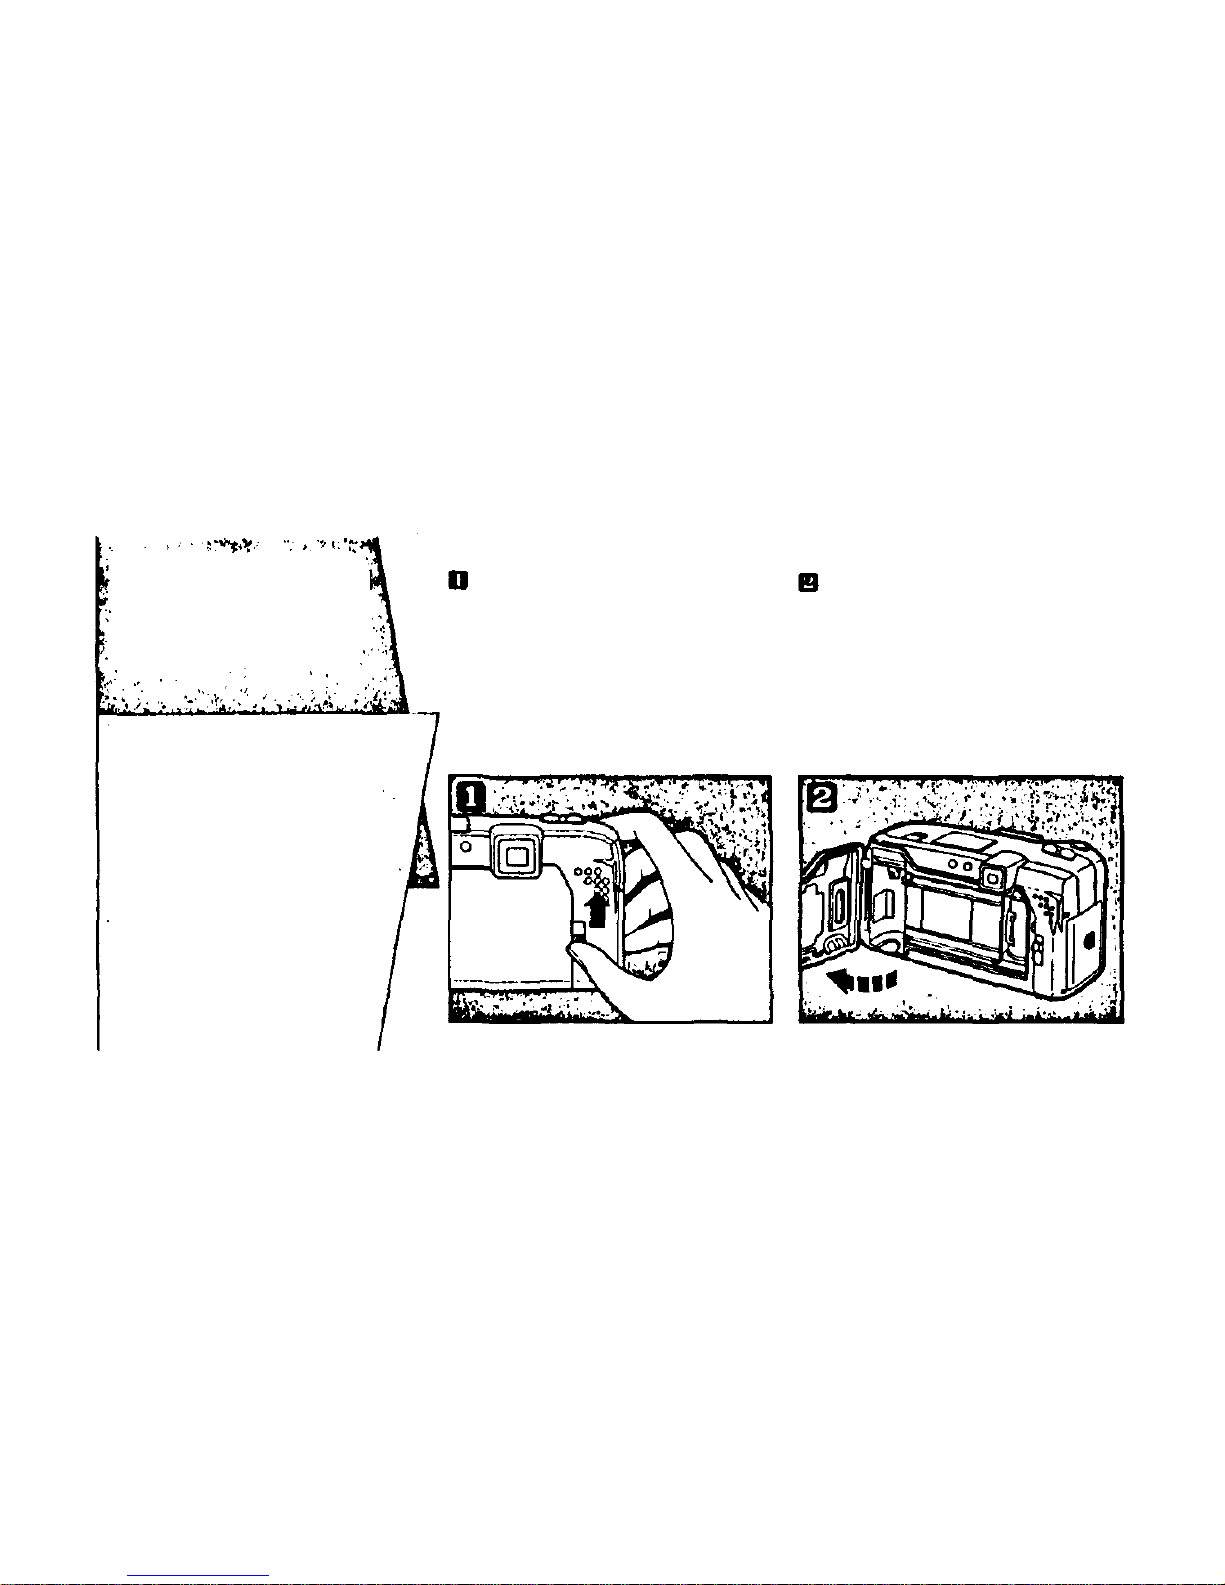
To open the back, slide the back
cover lock up.
The camera ba ck will open.
Simple operating
procedures
Loading the film
This camera is designed to
use 35mm film with "DX"
coding to automatically set
film speed.
If n o "DX" fil m is available,
use ISO-100 film.
4
Page 6
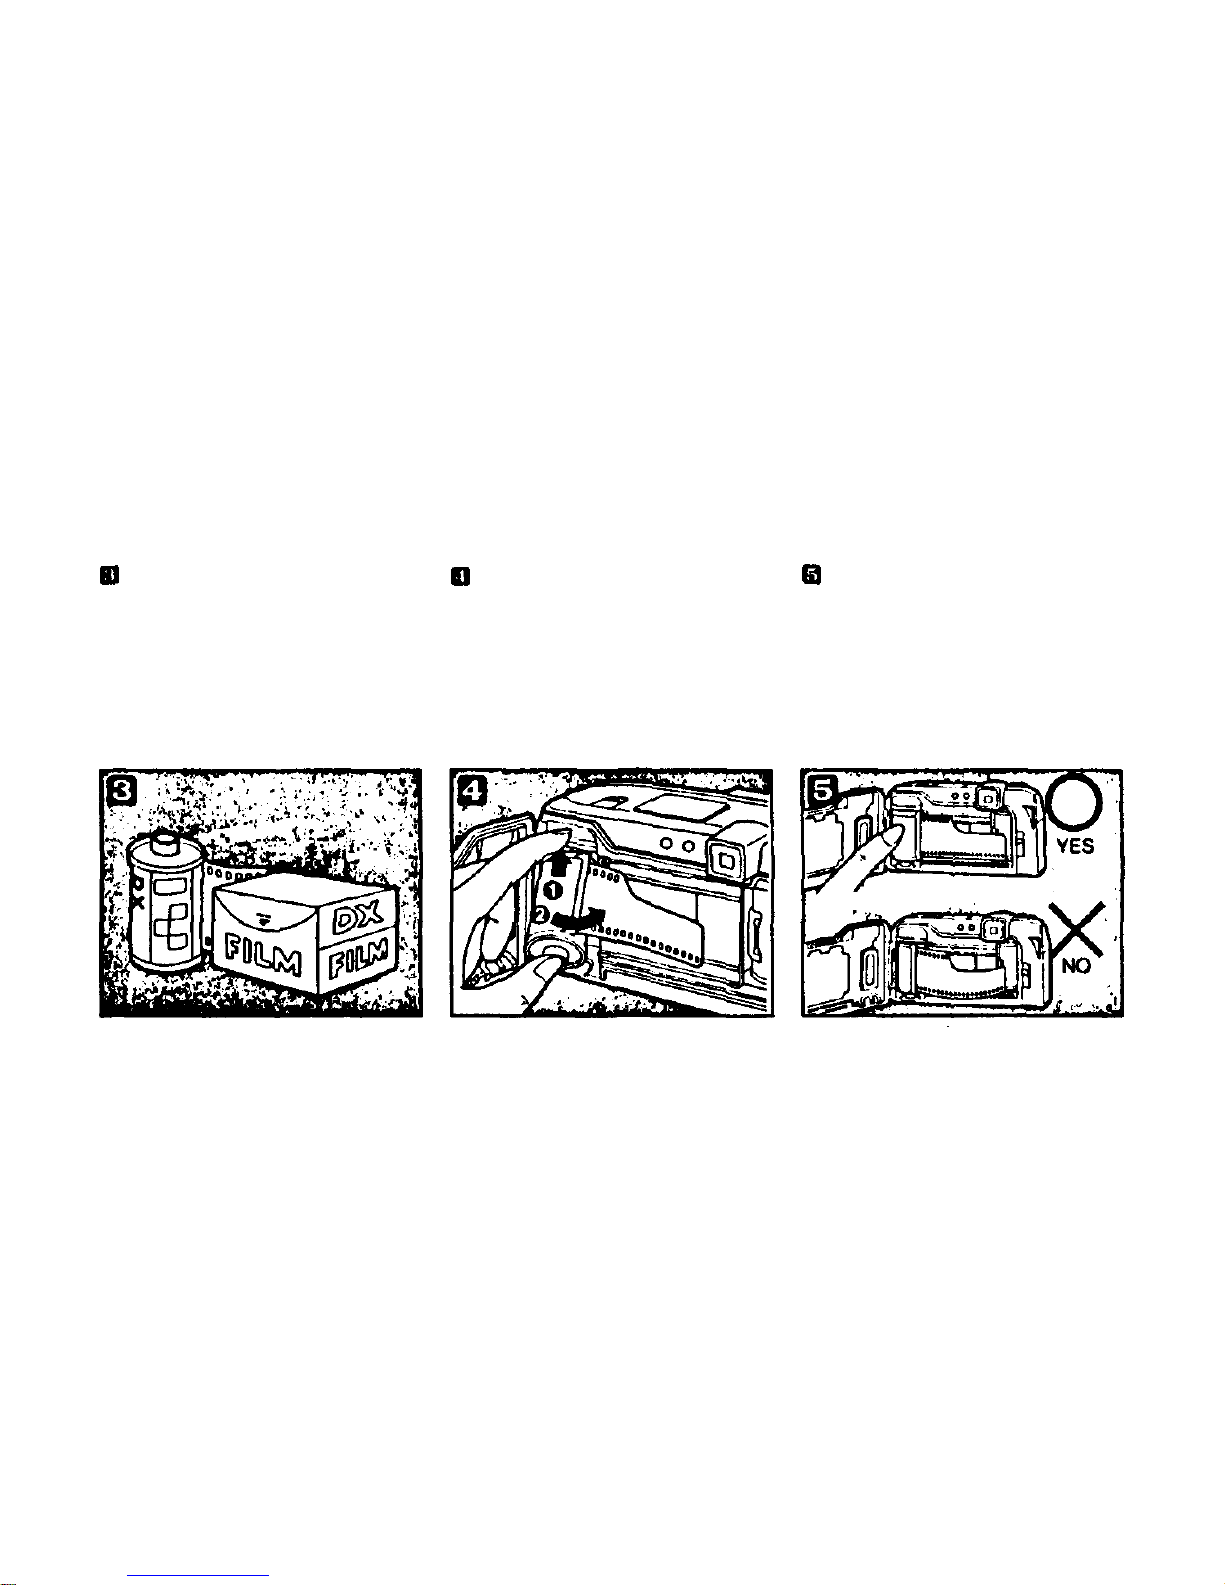
Prepare a "DX" film cartridge.
Your camera wil l automatically set
itself for DX-coded fi lm speeds
ranging from ISO 50 — 3200. (Refer
to Page 47.)
• In case of non DX film, film speed
is automatically set to ISO 100.
Insert the film cartridge into the
camera.
Always avoid direct su nligh t when
loading the film.
Make sure the film lies flat.
5
Page 7
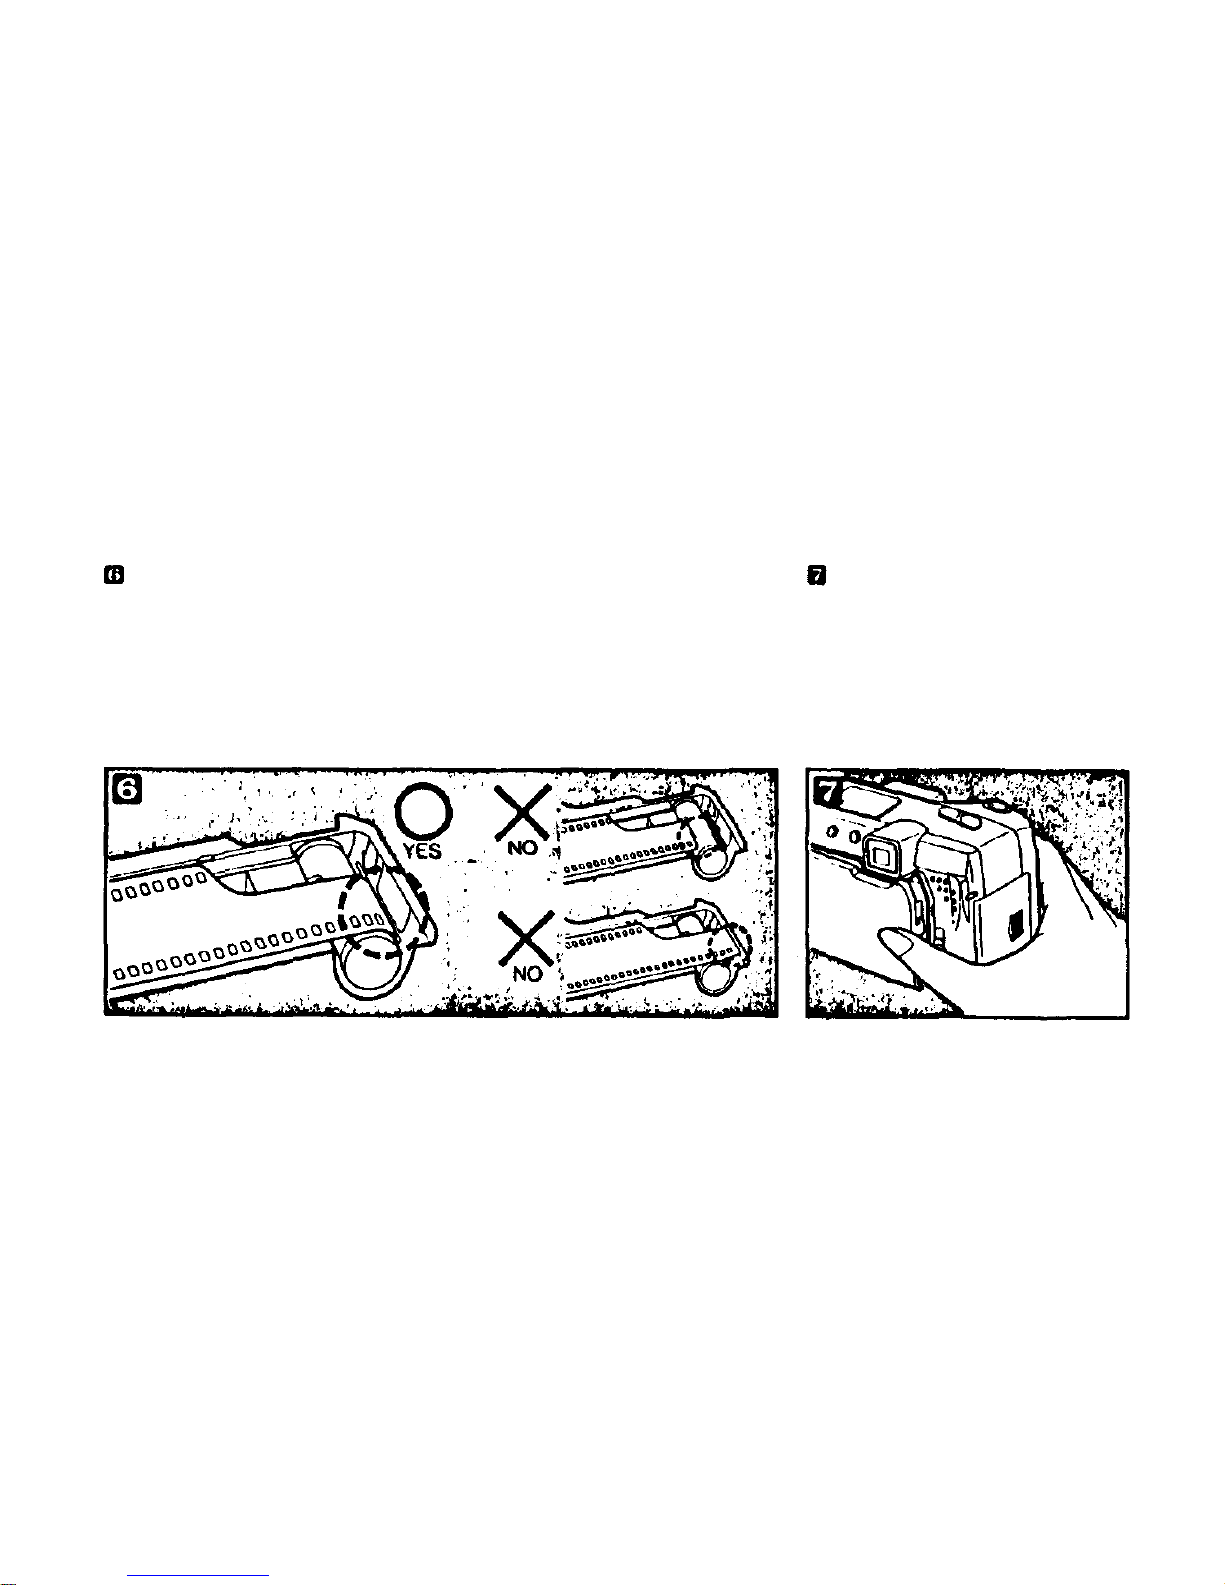
Align the film leader with the red
mark.
Close the camera back.
6
Page 8
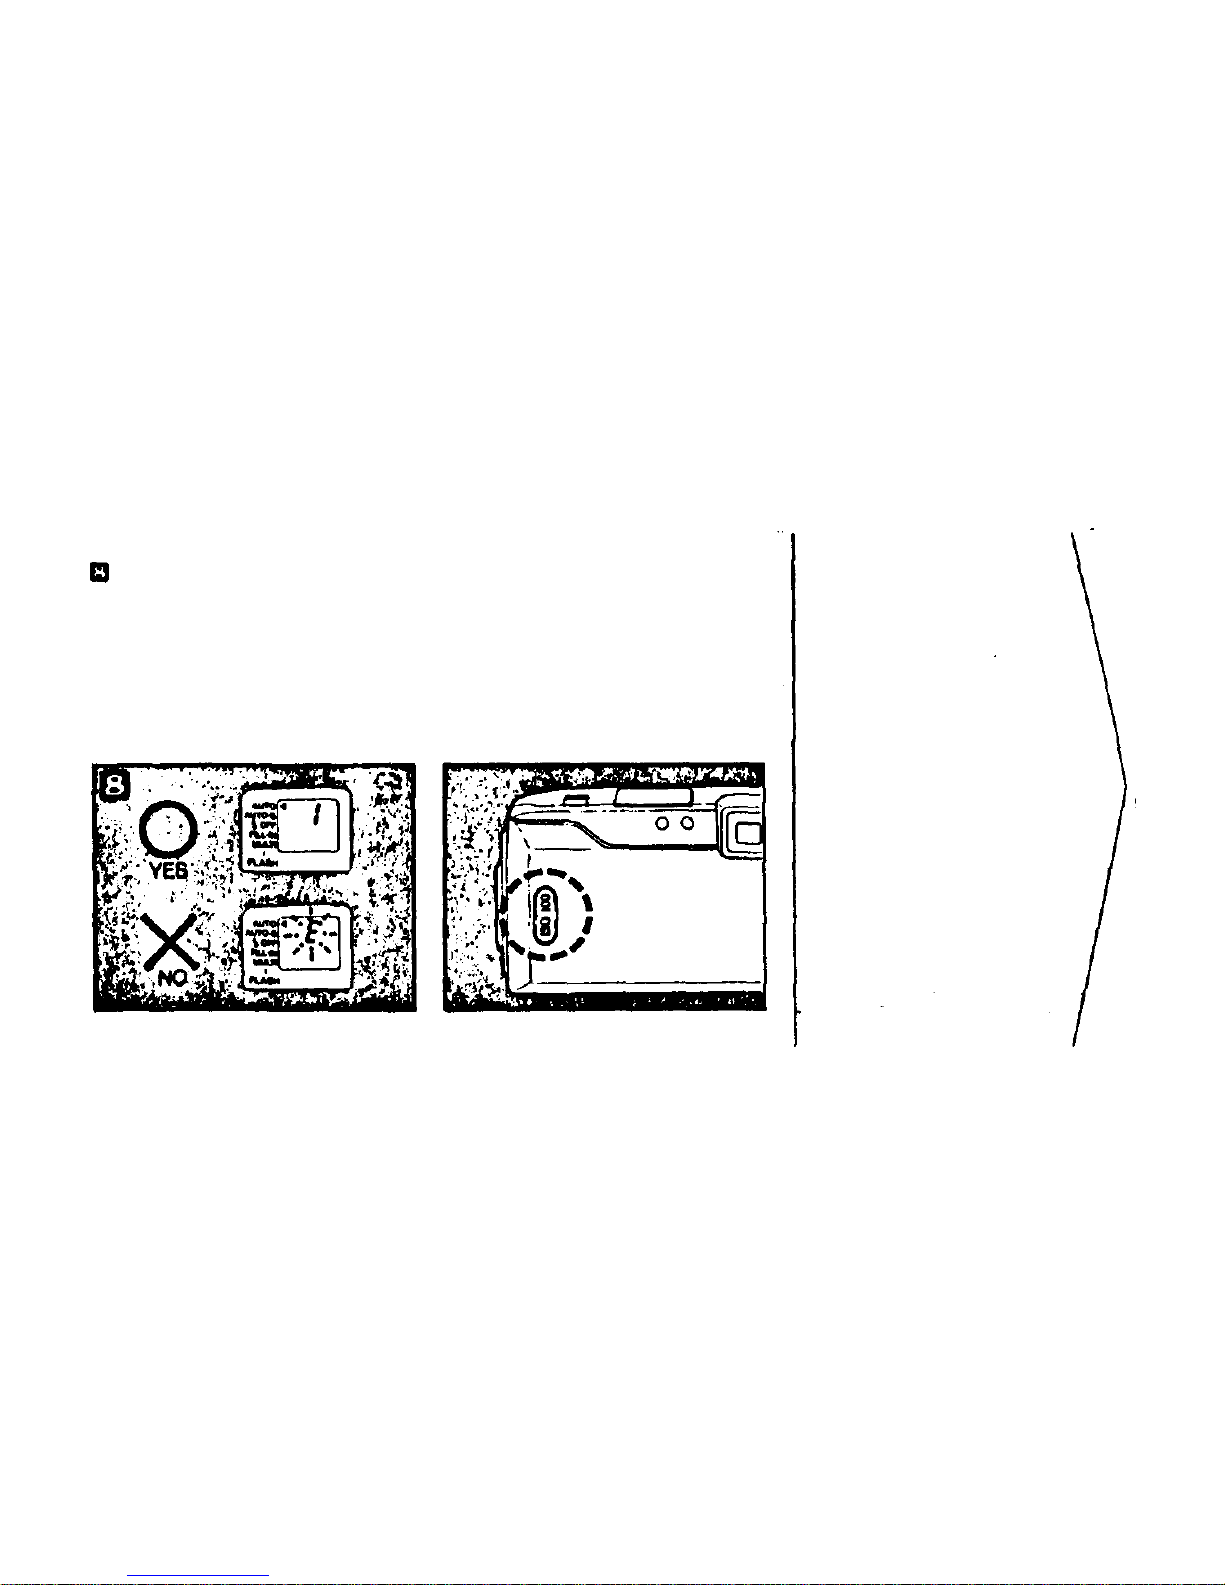
Setting the power switch to ON,
check that the exposure counter
displays "1".
•If the film is not loaded properly, the
exposure counter will not show "1"
and a display as shown in the illus-
tration will appear in th e LCD panel
In t h i s case, reload th e film correctly.
You can check the type of film in
use through the window in the
back of the camera.
Taking pictures
When the power switch is on,
the LCD panel lights.
The LCD panel goes out
after 4.5 minutes.
Then the lens will zoom
to the wide-angle
position.
7
Page 9
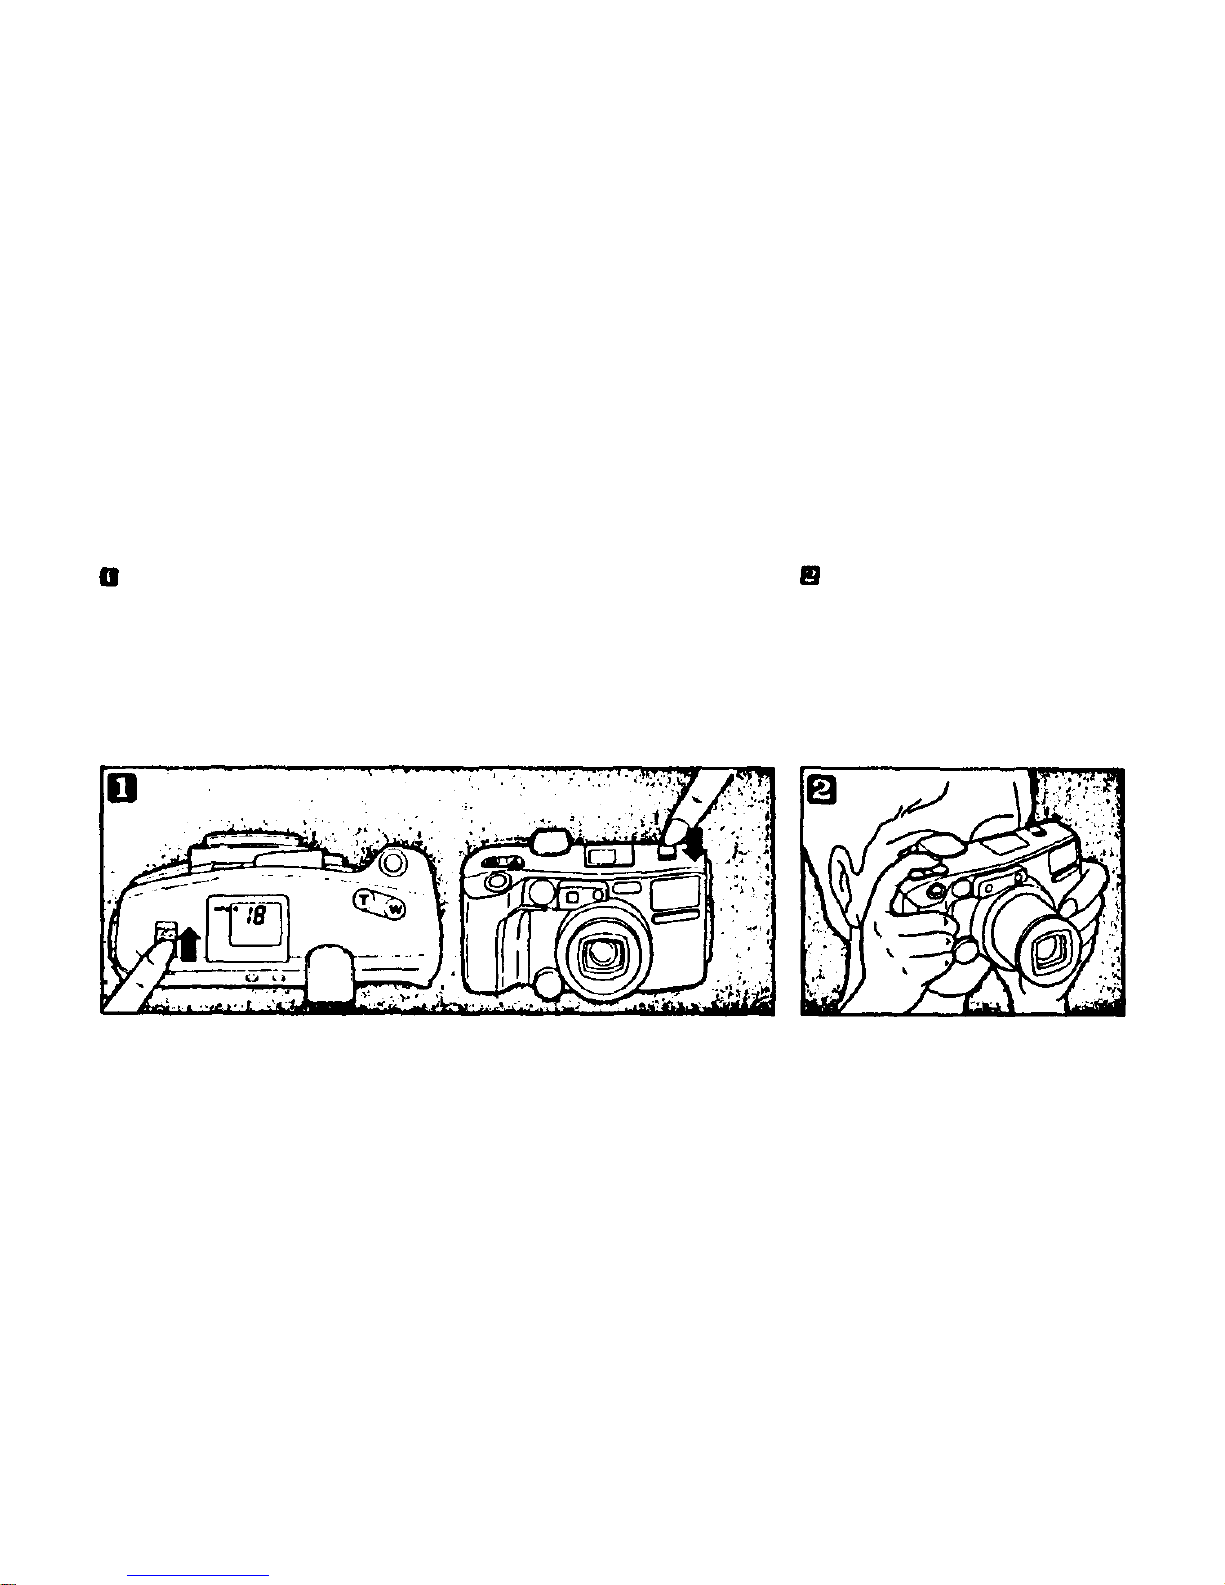
Set the power switch to ON, which
wi ll open t he lens barrier. Whe n the
camera is not in use, always set the
power switch to OFF so that the
shutter cannot be activated by accident a nd the lens barrier will be
closed to protect th e lens.
Whe n th e power swit ch is set to ON,
the barrier opens and the lens shifts
out to t he wide angle shooting
position.
While looking through the
vie w f i nd e r , a im t h e camera a t t h e
subject you want to shoot.
8
Page 10
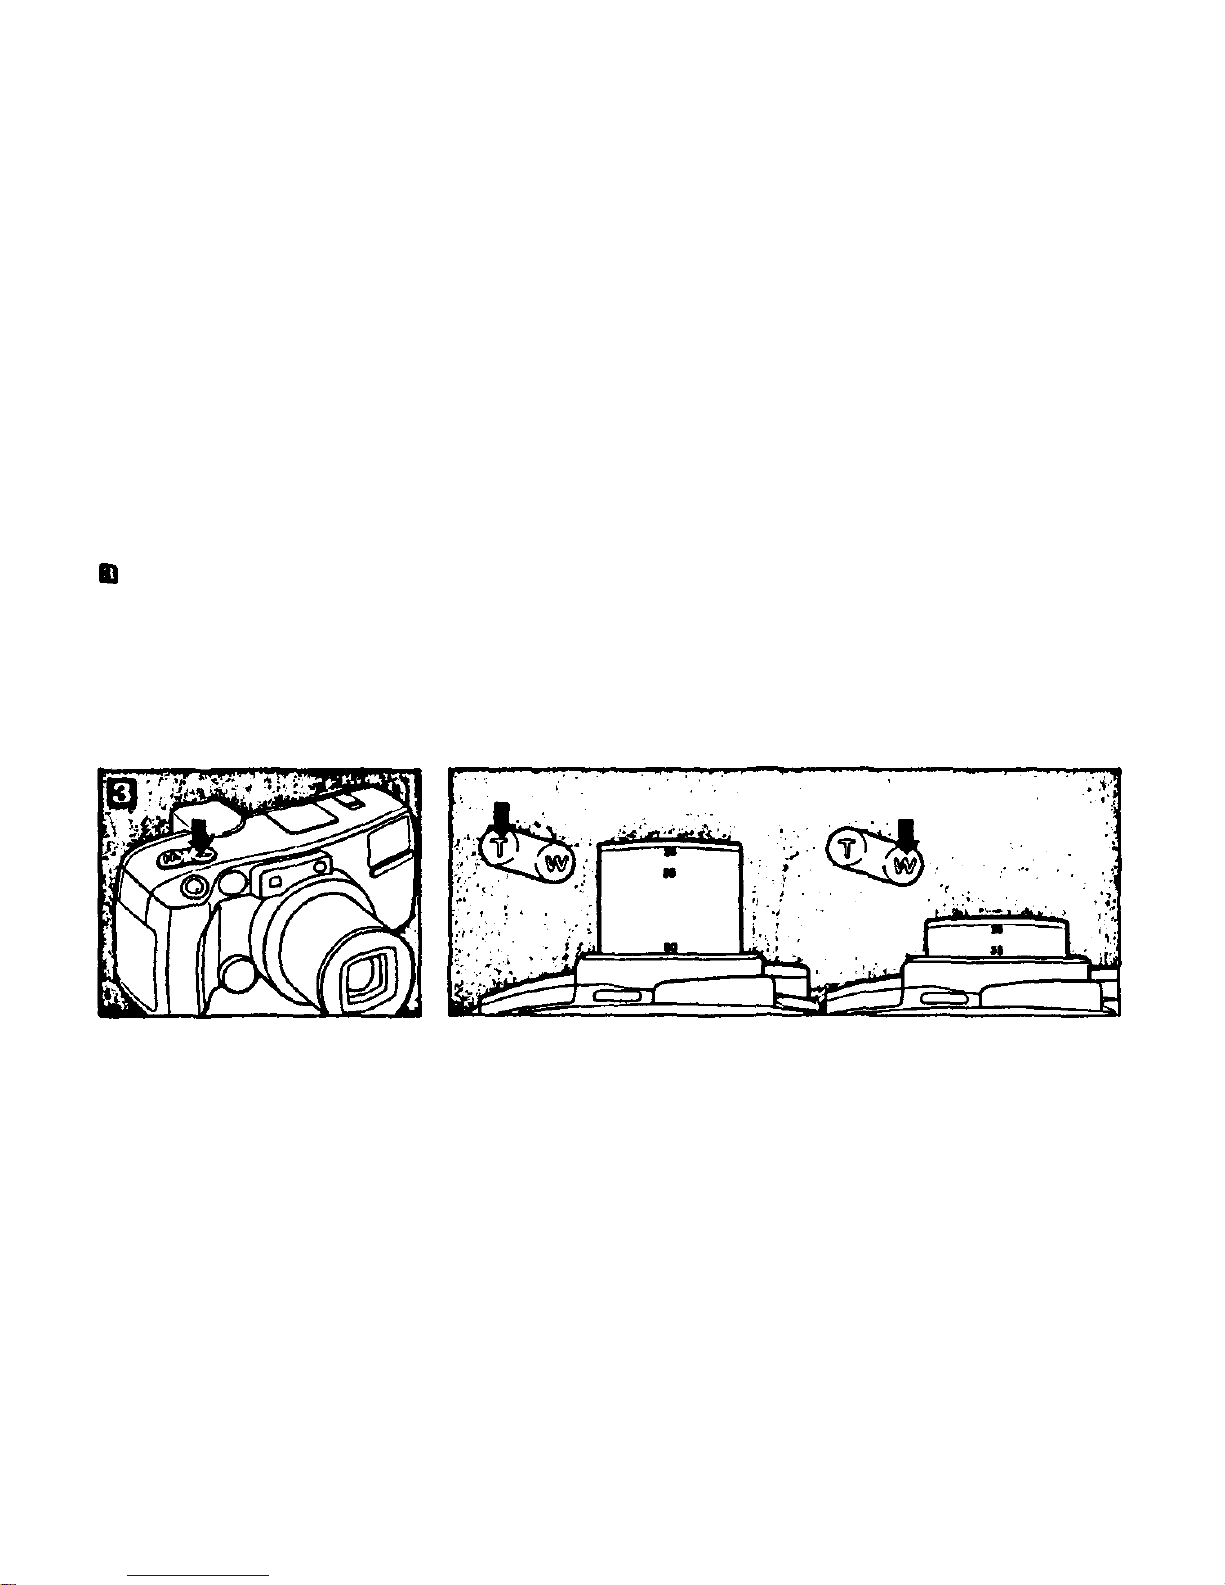
Operate t he zoom button to adjust
the lens until you see the image you
want.
Whe n t h e T side of t h e zoom button
is pressed, th e lens w i ll zoom to t h e
telephoto side.
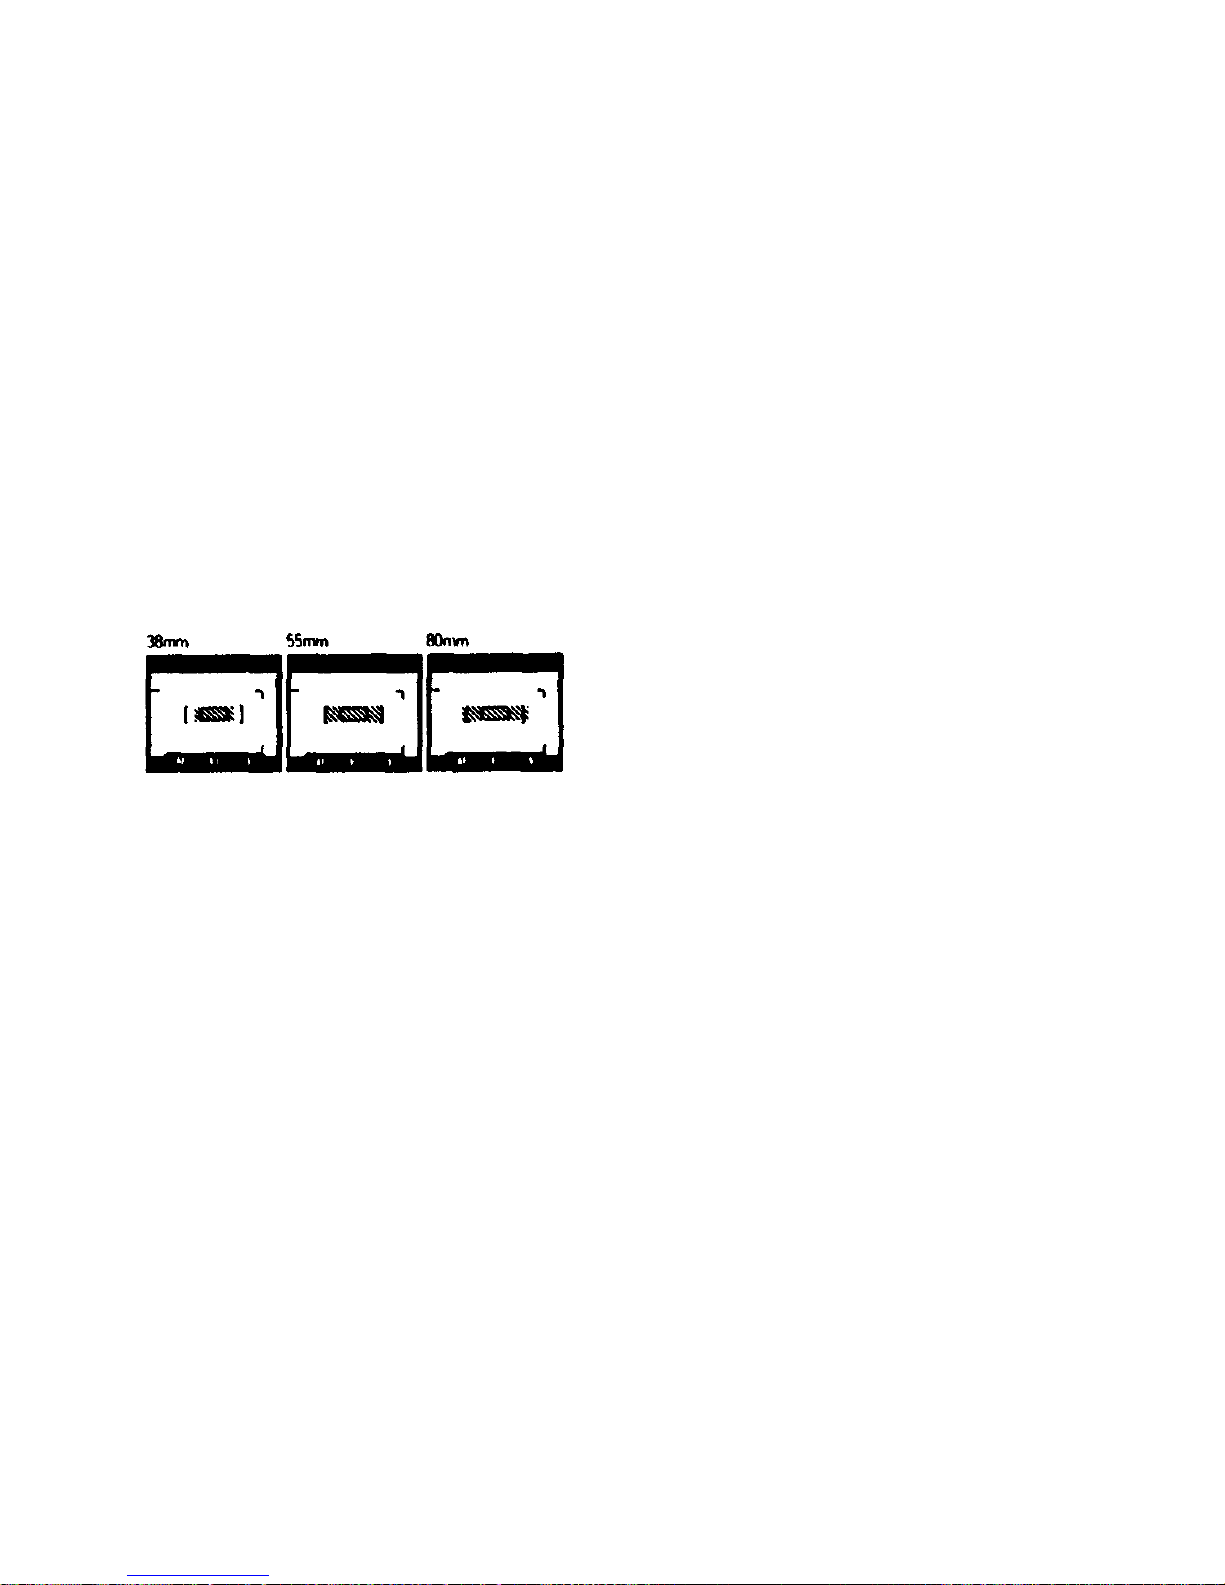
(In the telephoto position. the maximum f o c al length of the lens is
80mm.)
When the W side of the zoom button
is pressed, th e le ns wi ll zoom to the
wide-angle side.
(In t he wide-angle position, the
minimum focal length of the lens is
38mm.)
9
Page 11

Adjust the focus to position your
subject within the multi autofocus
frame.
The multi autofocus system will
focus th e camera on t he closest
subject in the mu lti autofocus frame.
Press the shutter release button light-
ly and conf irm th at the autofocus
indicator "AF" (green) lights in the
viewfinder.
The subject should be within the
picture frame.
As this camera has the multi
autofocus system built-in, correct
focu s is assured even in a composition like this when your subject is not
centered in th e viewfinder.
10
Page 12
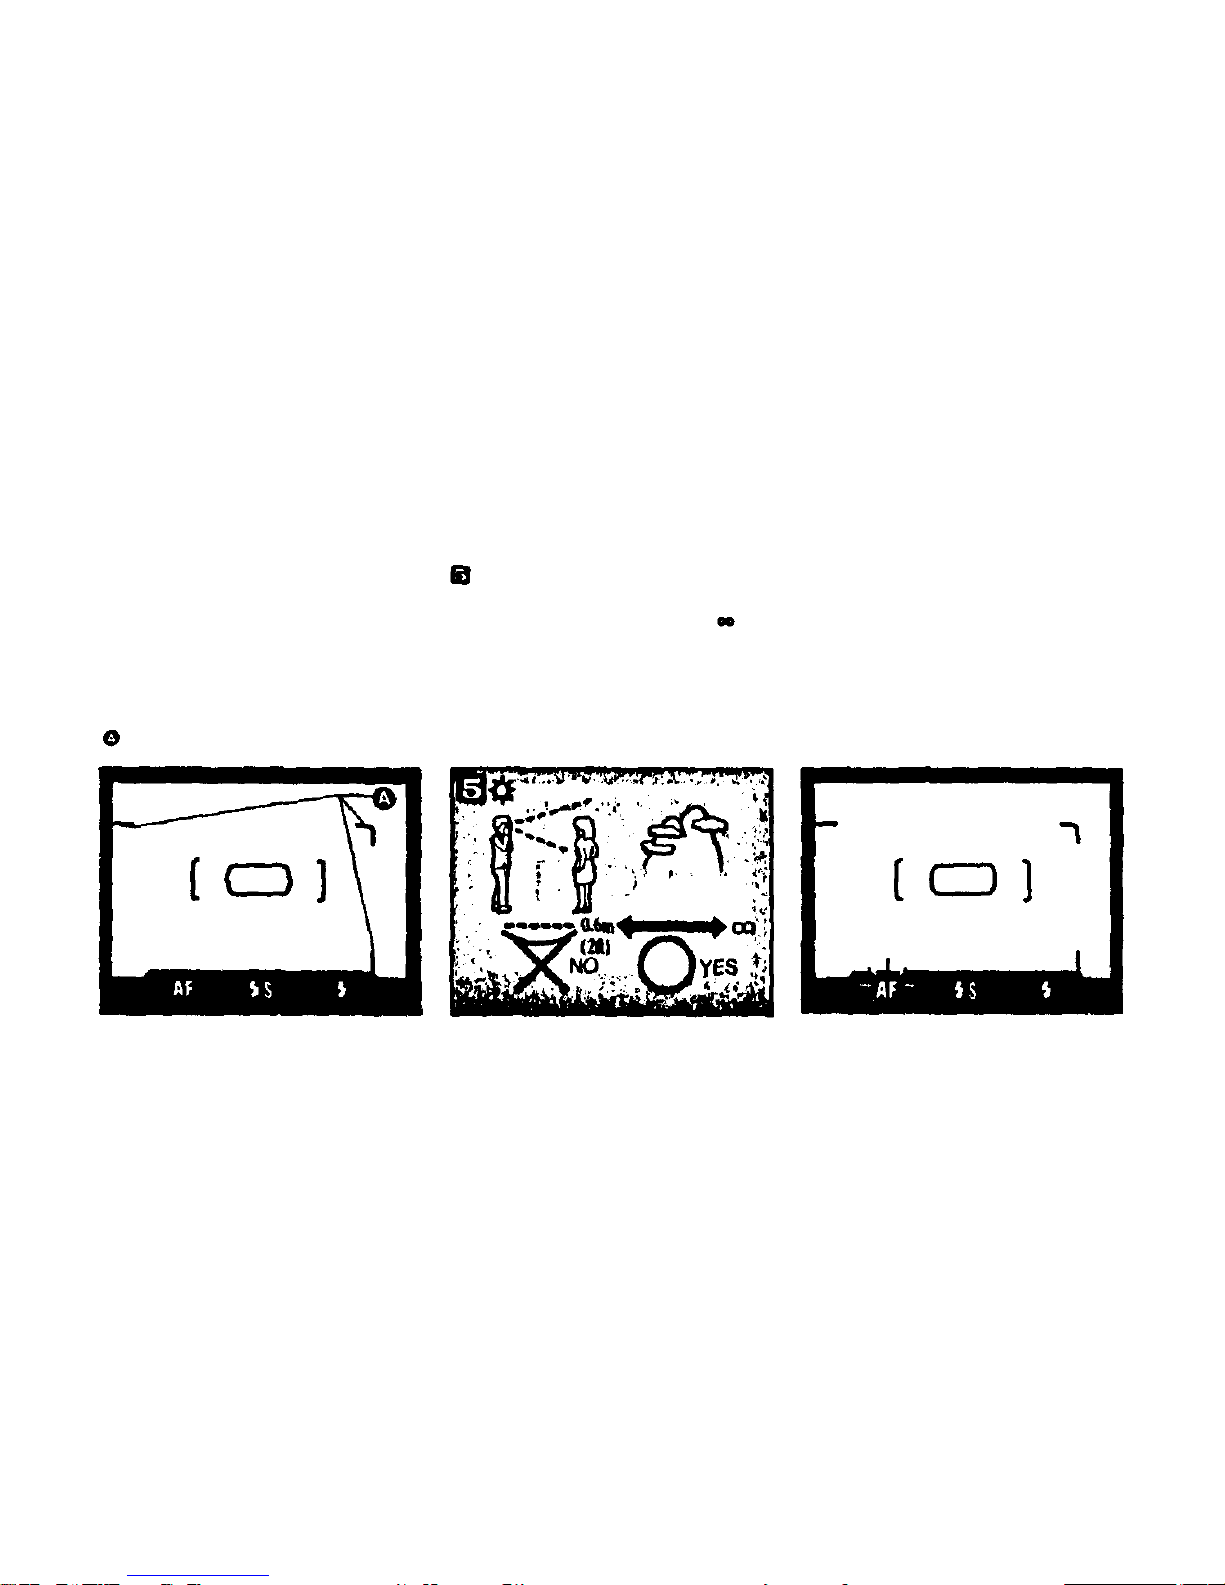
The subject should normally be
positioned within the picture frame.
However, if the subject is 0.6m (2 ft .)
from
the camera, the
actual
image
area is reduced and th e subject
should b e positioned within the
close-up correction marks.
Close-up correction marks for close
range subjects.
Shooting range:
Autofocus operates w it h t he subject
at a distance of 0.6m (2 ft) to
(infinity).
If the subject is closer t han 0.6m
(2 ft), the "AF" indicator (green)
blinks when the shutter is pressed
lightly to warn that the picture will
probably be out of focus.
Note: the A F indicator may not
blink when the subject is extremely
close even though the picture will be
11
Page 13
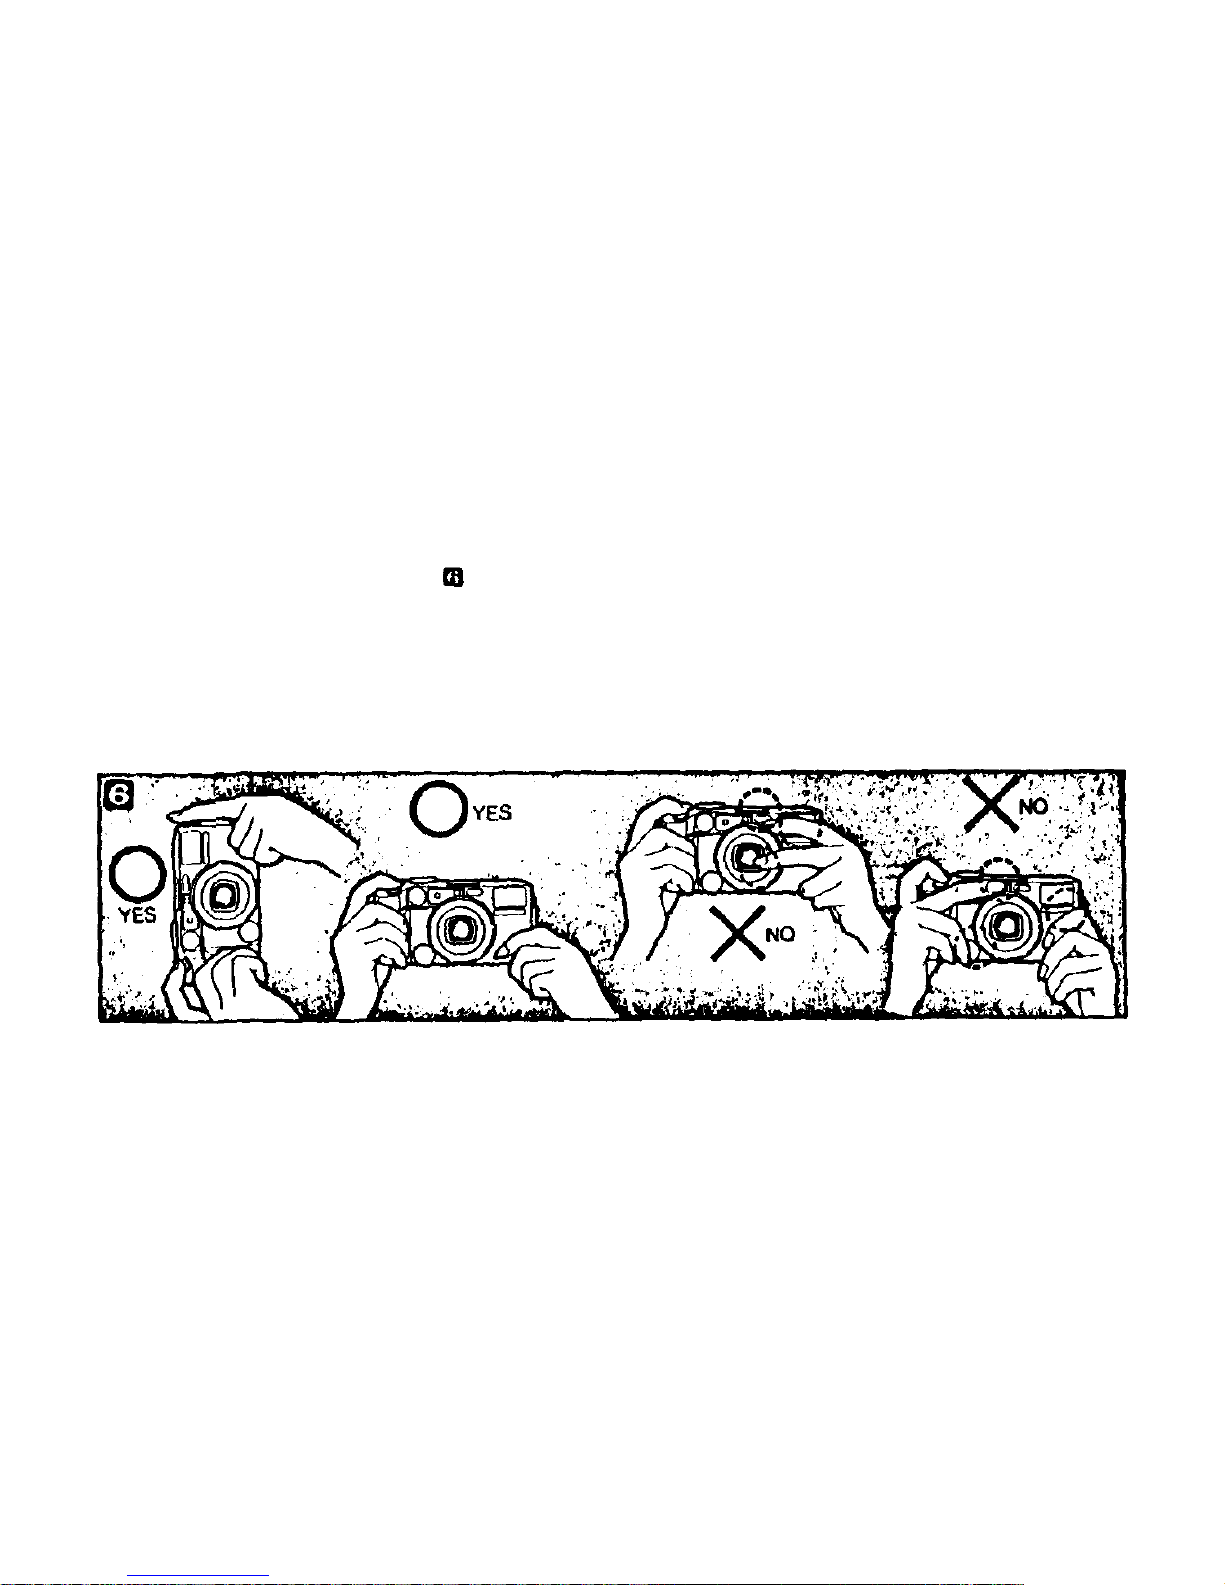
out of focus.
• The shutter can still be released
even if the AF indicator blinks.
Correct a n d incorrect ways to a i m
the camera: Be careful not to touch
th e lens or flash. When using a
shoulder strap, be careful that the
strap does not obstruct th e lens or flash.
Wh e n th e l e ns needs t o be cleaned,
wipe it softly with lens cleaner an d
lens cleaning tissue.
12
Page 14

Gently press t h e shutter release
button. If you press the button too
quickly, the camera may shake,
causing blurred pictures.
As soon as your finger is removed,
the film automatically advances to
the next frame.
As the fi lm advances one frame, the
exposure counter advances t o th e
next frame number.
Unloading the film
13
Page 15
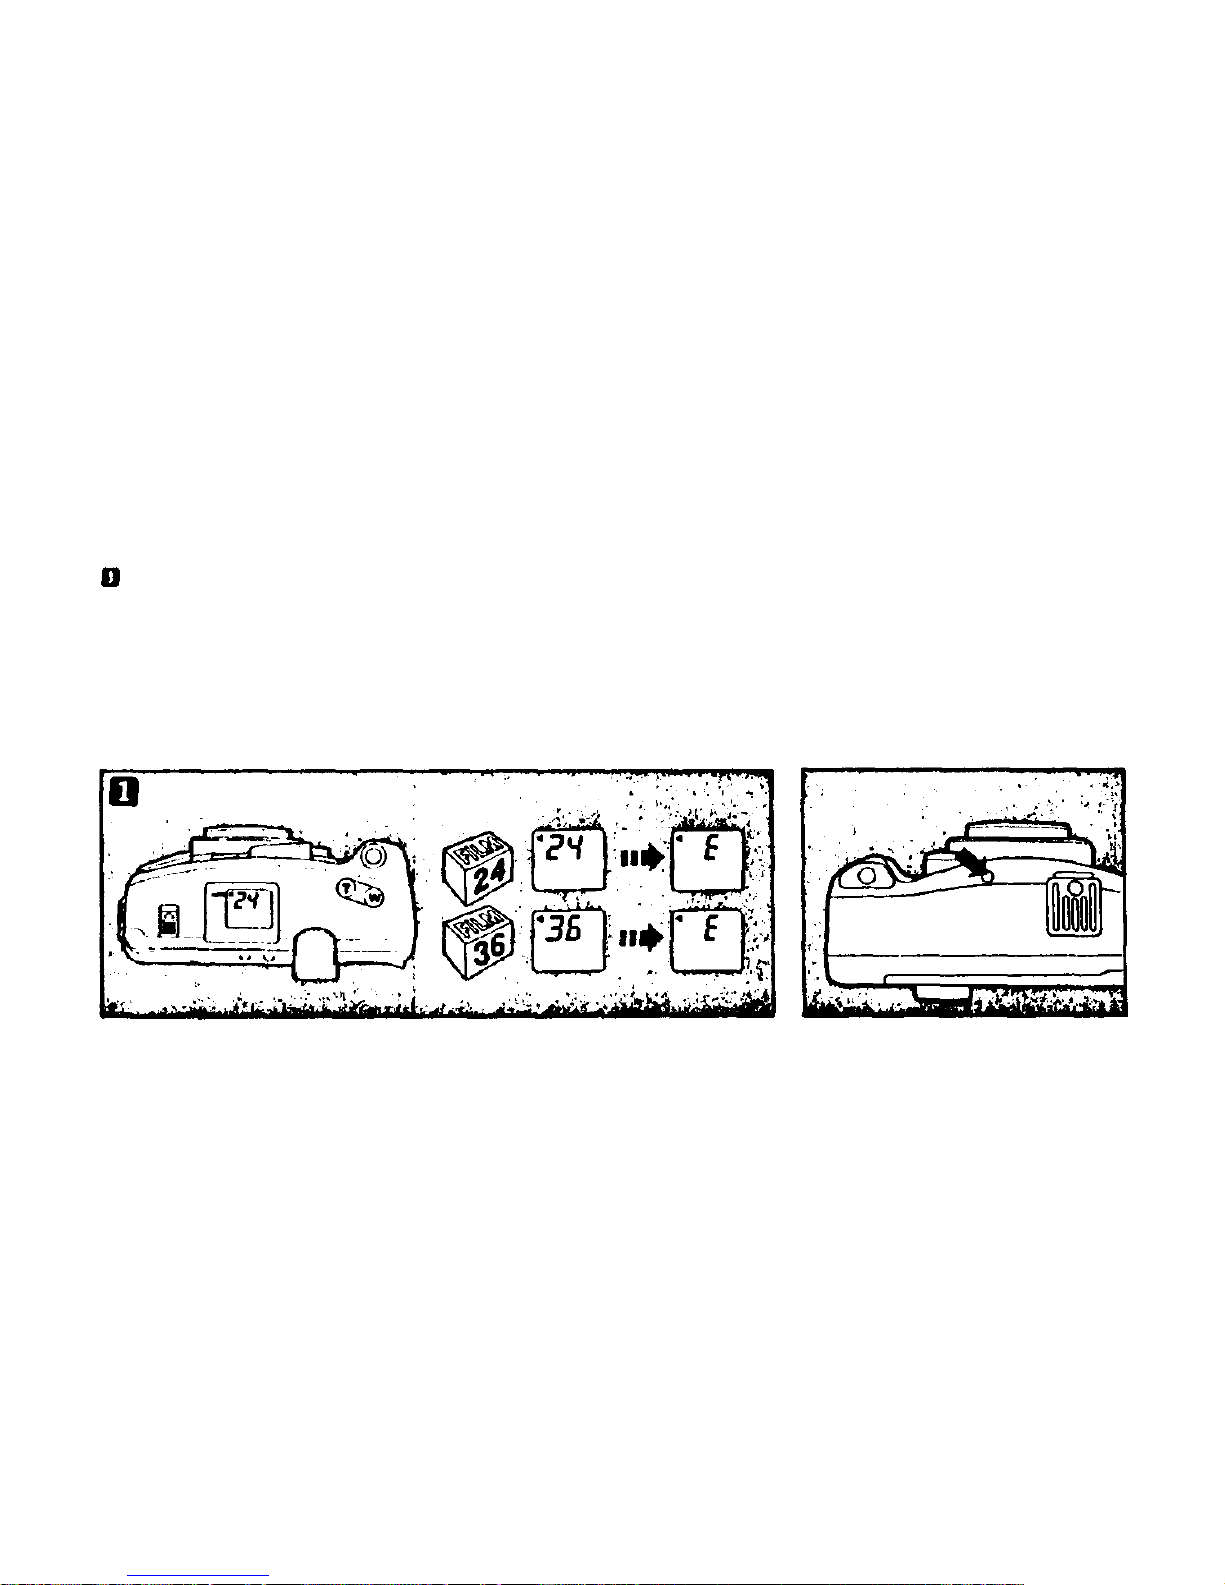
When you reach t h e end of a roll
of film, it is automatically rewound.
You will hear the motor operating
and th e exposure counter will count
back until it reads "E".
The final reading of t he exposure
counter prior to rewinding may be
more than the number of exposures
specified for the film (24 or 36), as
you may get 25 shots on a 24
exposure roll.
If you want to rewind the film before
the end of the roll, push the rewind
button using the l ip of a ball point
pen or o th e r device having a small
round lip. Do not use any device
having a sharp pointed tip.
Be careful not to press th e rewind
button with too much force.
14
Page 16
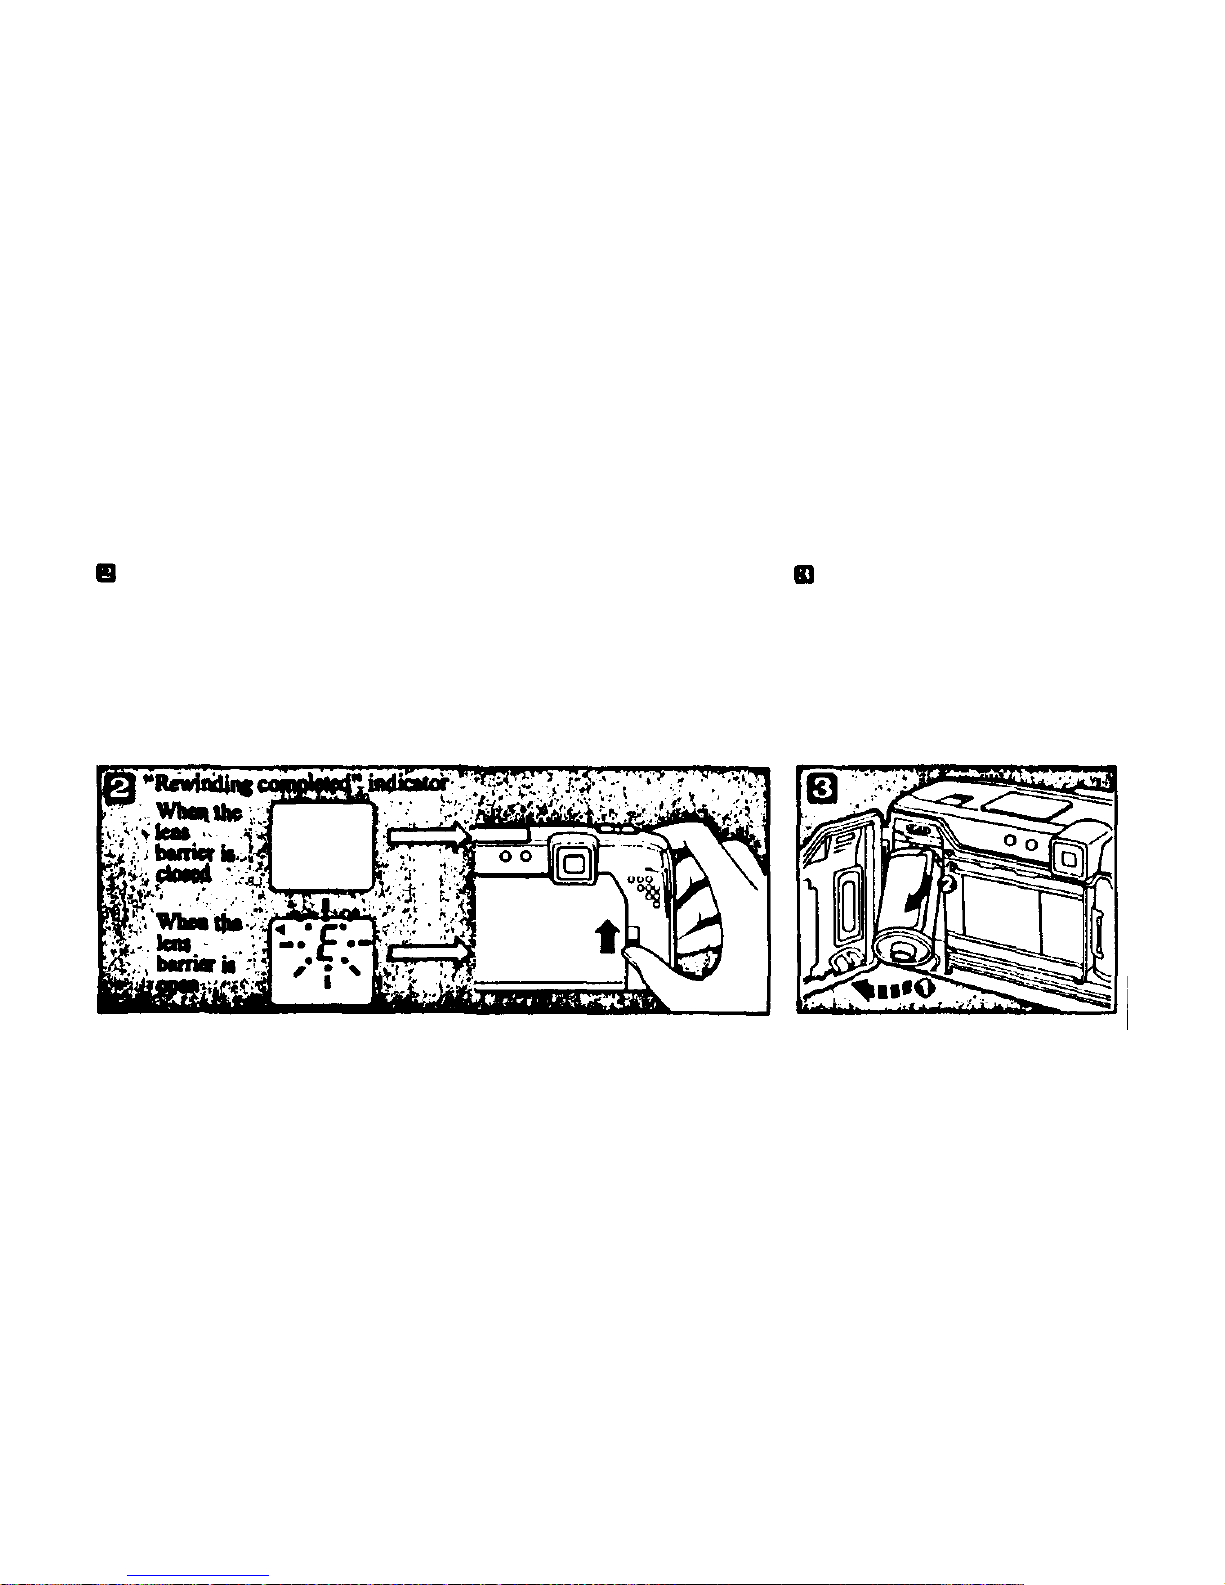
When rewinding is complete, th e
sound of the motor operating will
stop and "E" will blink in the LCD
panel. Open t he camera back.
• Once the rewinding is finished, the
cam e ra back mu s t b e opened
before any other operations are
possible.
Remove t he fi lm f rom the camera.
15
Page 17
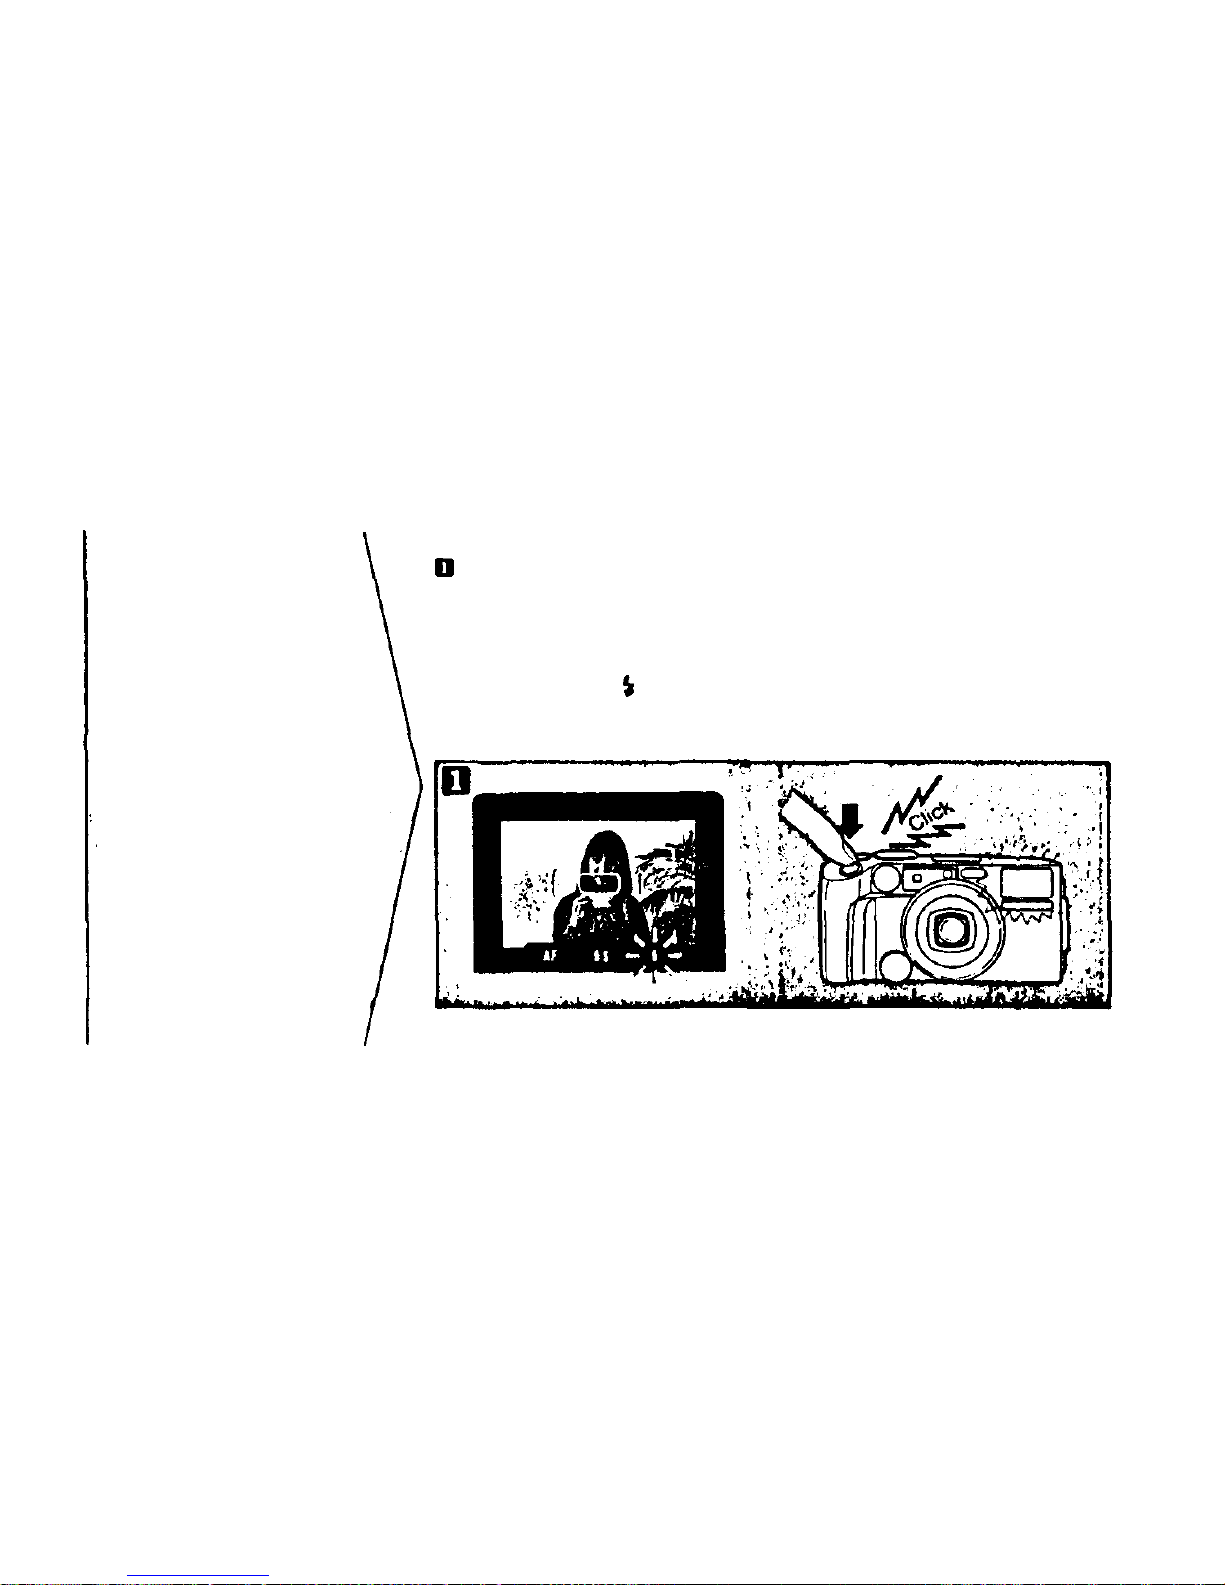
Automatic flash
activation
(1) Taking pictures
in low light
When the flash mode is set
to AUTO, the flash will fire
automatically when there is
insufficient light
If there is insufficient light, the
flash indicator (orange) will light
when the shutter release button is
pressed lightly. If a picture-taking
situation is likely to result in the Redeye phenomenon," S" will blink
in the viewfinder. Switch to the
"AUTO-S" mode. (Refer to Page 25.)
Press the shutter release butto n fu lly
to take a picture.
• While the flash is being charged,
the flash indicator (orange) may
not light and the flash may not fire.
It takes about 0. 2 — 3.5 seconds
after the film is advanced to charge
the flash (at normal temperatures).
16
Page 18
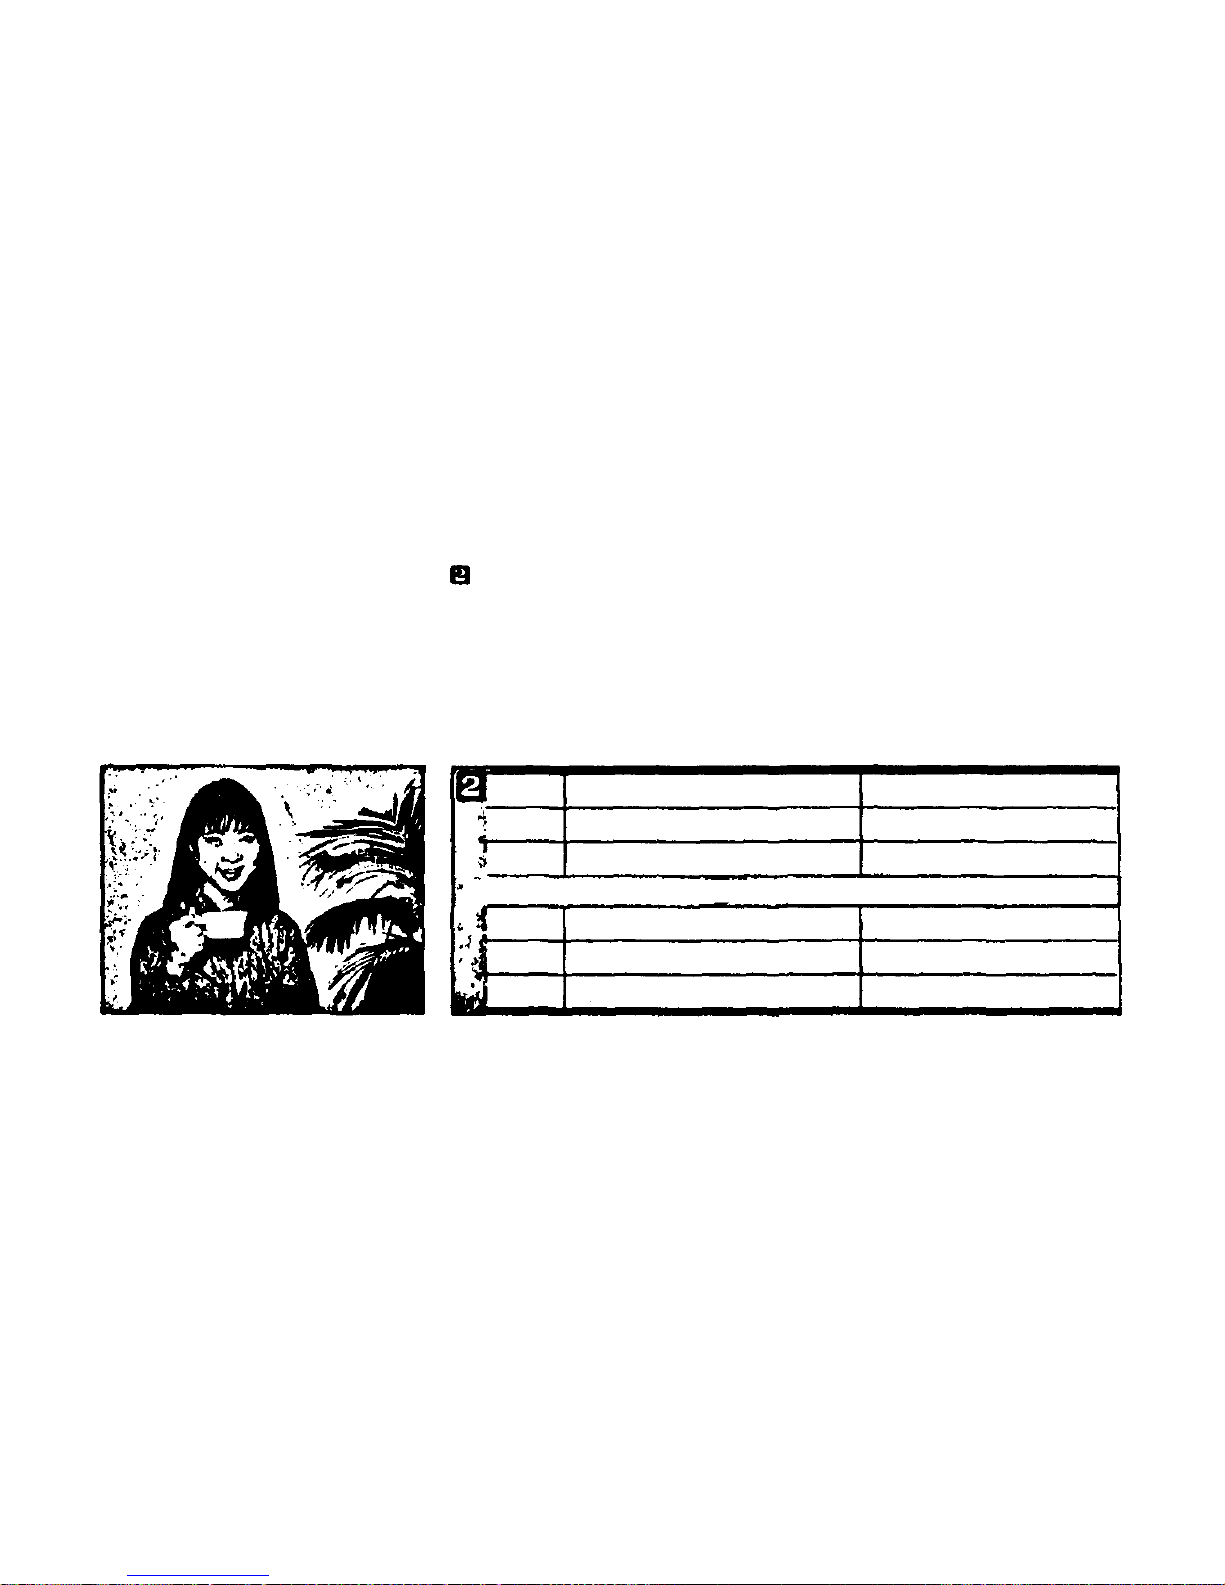
Flash working range:
Color negative film will give you
excellent pictures in t his shooting range
because i t offers the widest exposure
latitude, compensating for over and
underexposure more readily tha n
other films.
ISO
WIDE (38mm)
100
400
0.6m-4.1m(2ft-13.5ft)
0.6m-8.2m (2ft-26.9ft)
In the continuous shooting mode
ISO
100
400
WIDE (38mm)
0.6m-2.9m (2ft-9.5ft)
0.6m-5.8m(2ft-19ft)
0.6m-4m (2ft-l3.1 ft)
0.6m-2m (2ft-6.6ft)
TE LE (80mm)
0.6m-5.8m(2ft-19ft)
0.6m-2.9m (2ft-9.5ft)
TE LE (80mm)
17
Page 19
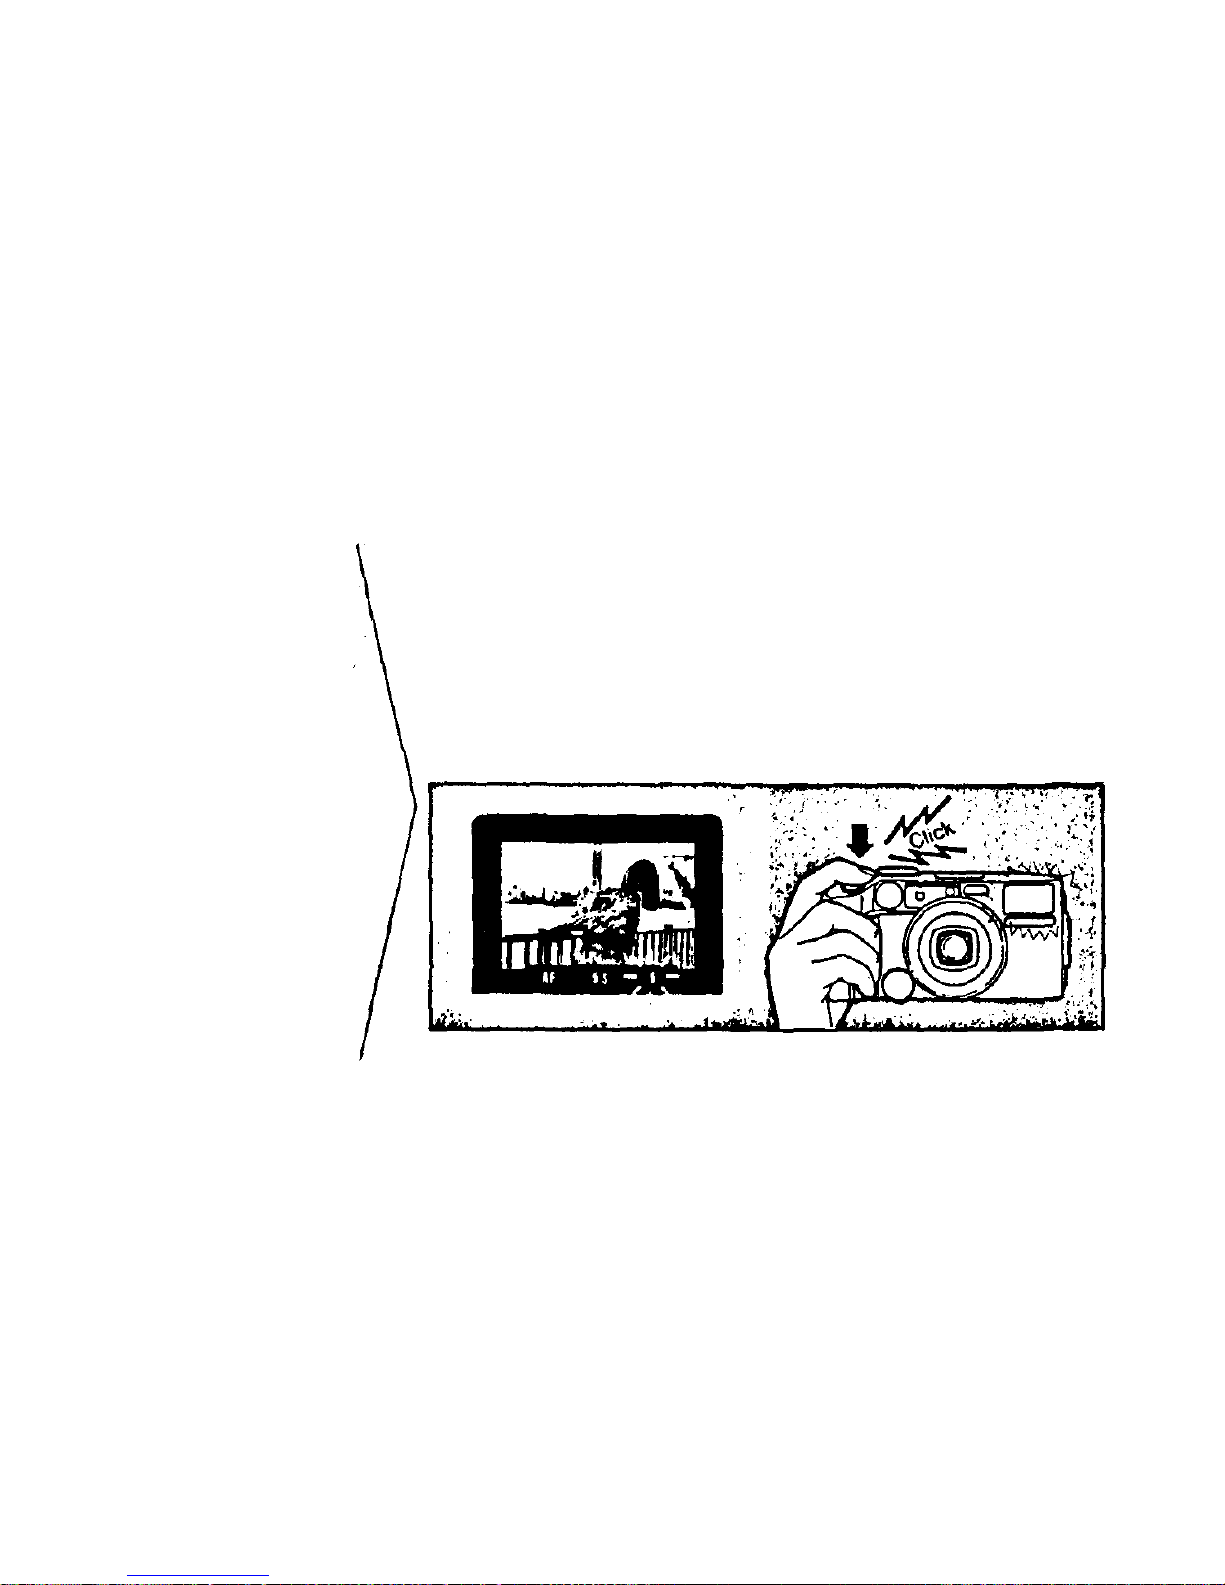
Automatic flash
activation
(2) Taking
backlighted
subjects
If you are taking backlighted sub-
jects, t h e flash indicator (orange)
will light when the shutter release is
depressed to tell you th at t he flash
will fire automatically.
Ma k e s ure to place th e ma in p art of
your subject in the multi autofocus
frame.
18
Page 20
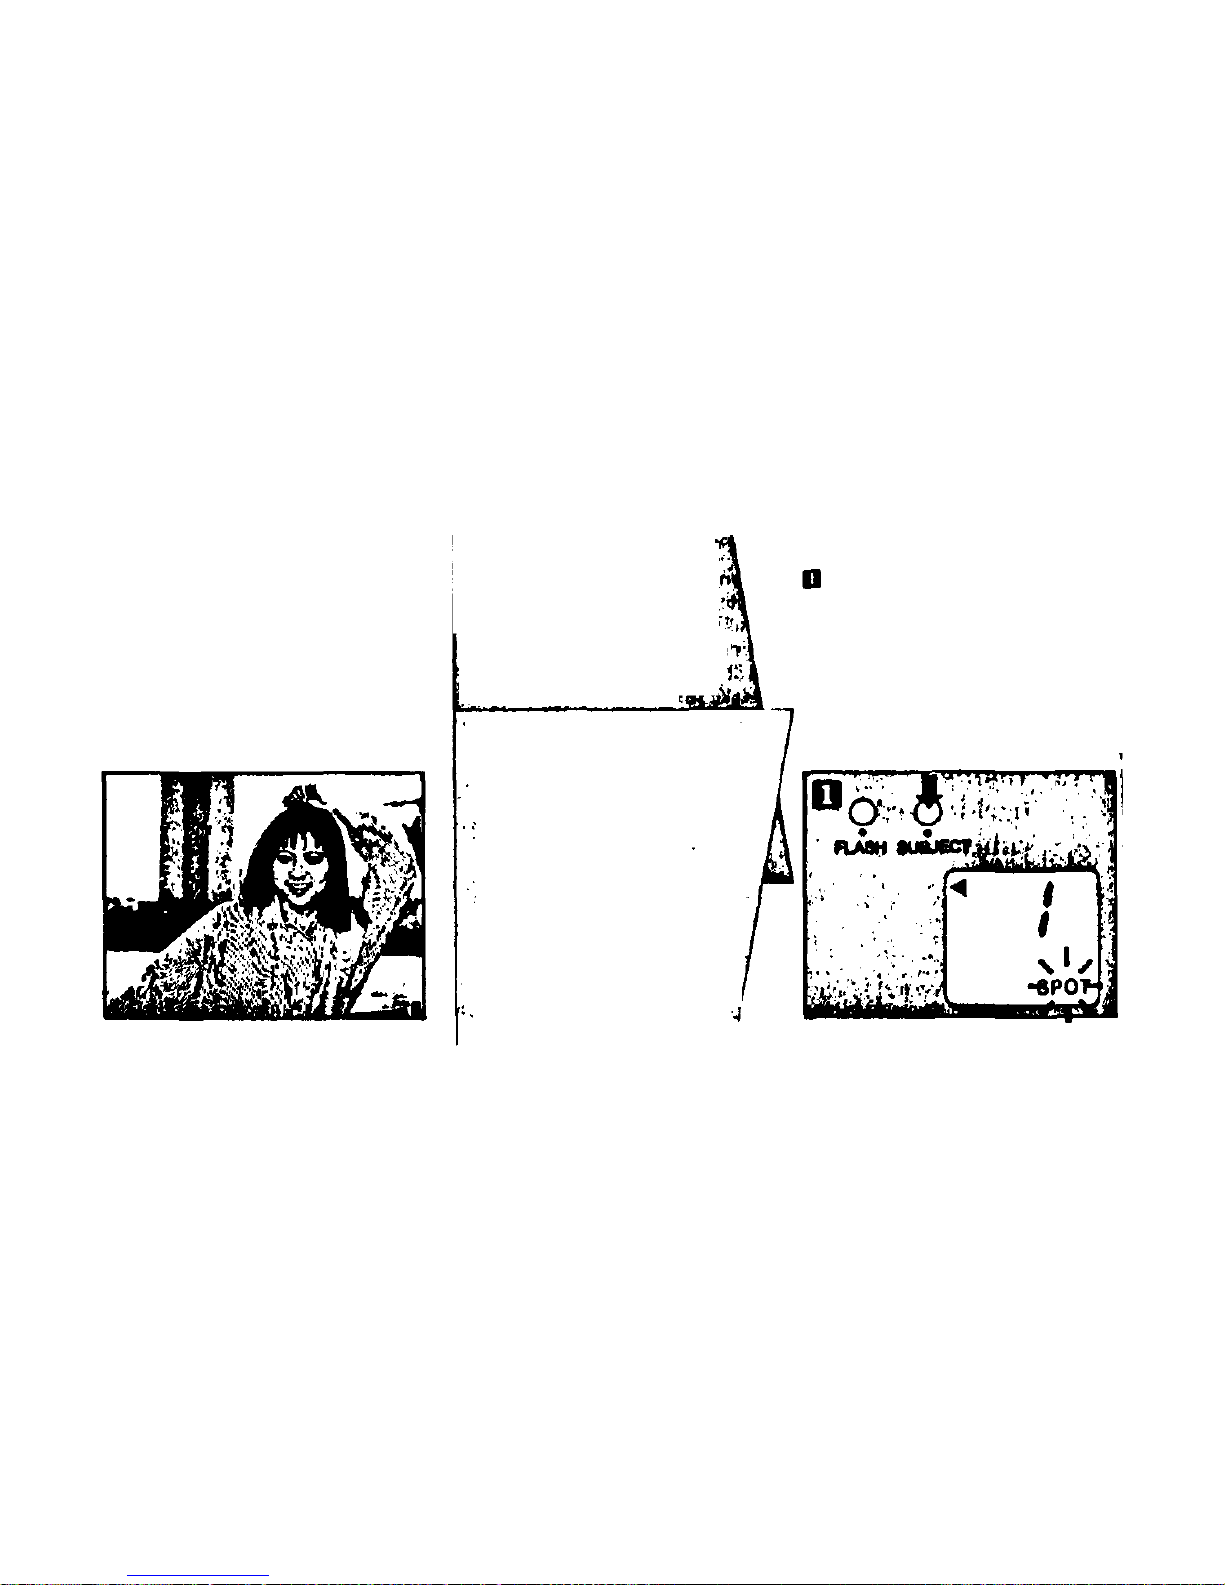
Pressing th e "SUBJECT" button.
set the mode to "SPOT".
"SPOT"
will
appear
in the LCD
panel.
Spot metering
This mode should be used
when there exists an
obstacle in front of the
image in the multi autofocus frame or if the focusin g object is ou t of the
multi autofocus frame.
This mode can also be used
in situations where uneven
lighting conditions exist.
Advanced
shooting
techniques
19
Page 21
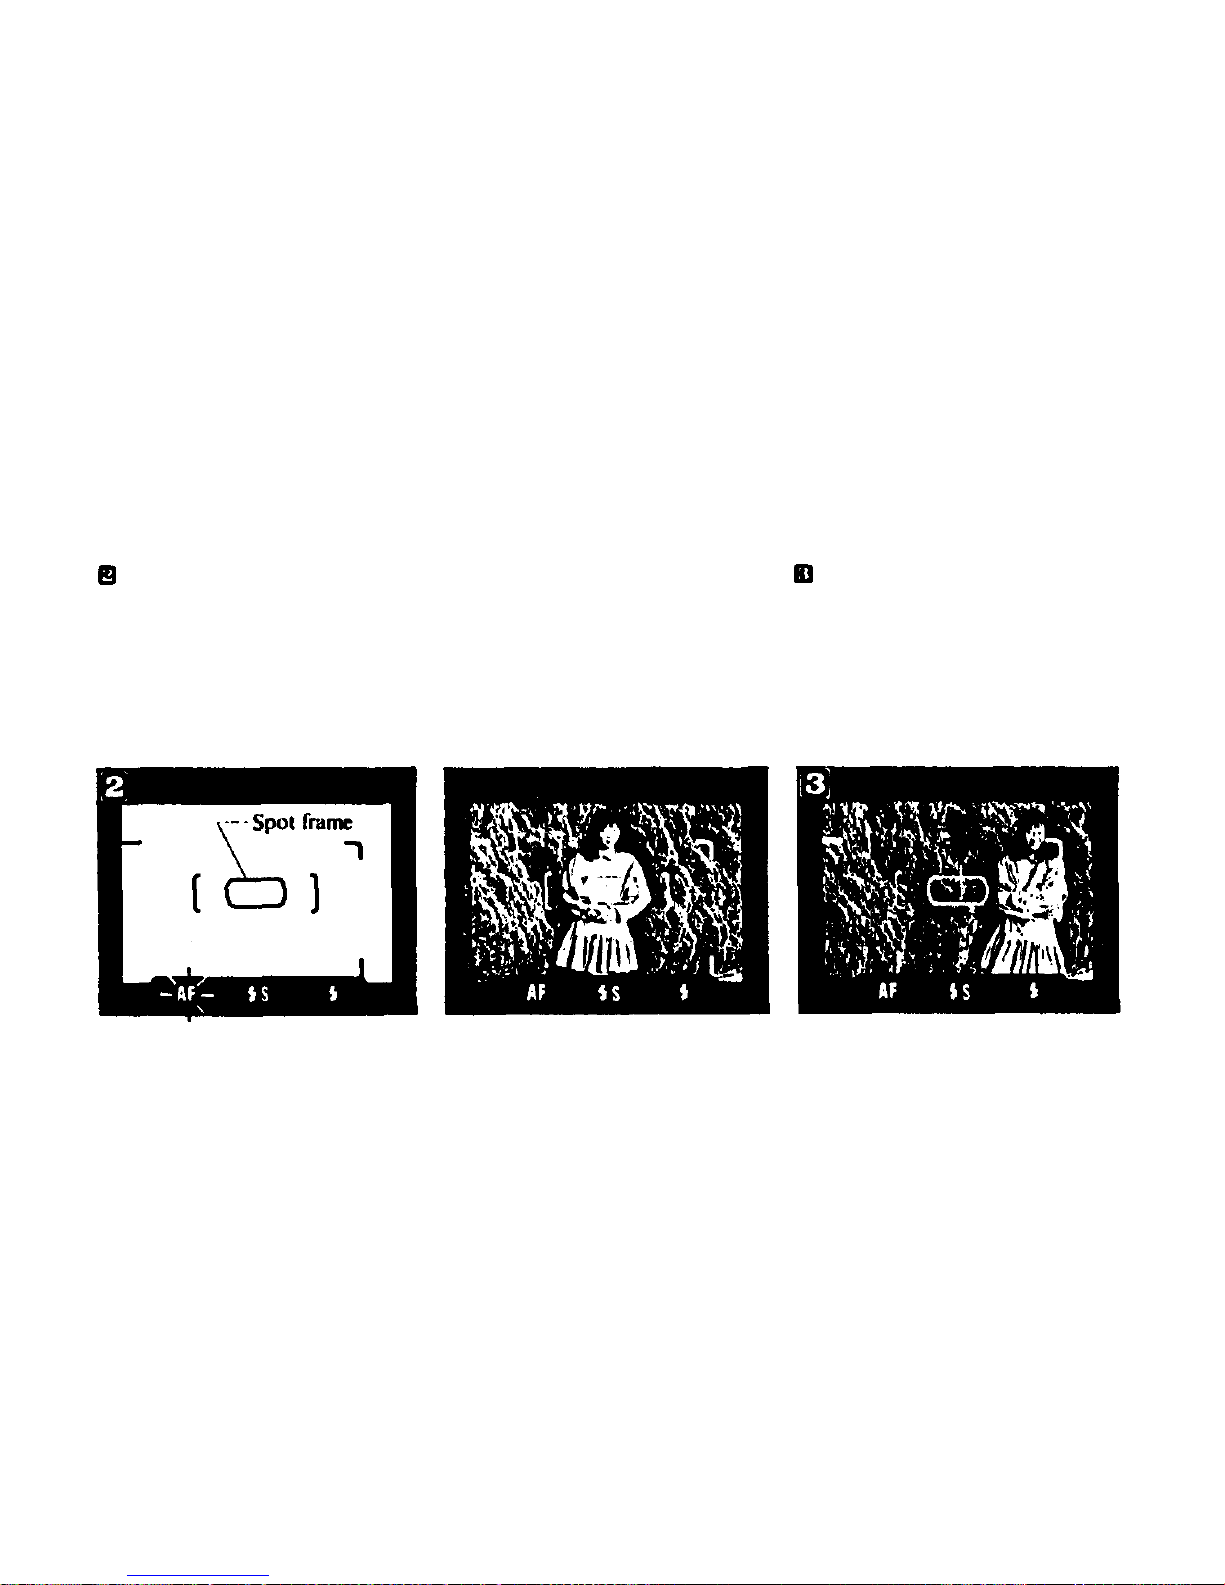
Press t h e shutter release button
lightly, aiming at the image desired.
Confirm that the "AF" indicator
(green) in t he viewfinder lights.
( In t hi s case, focusing is locked on
the spot frame at the center.
Exposure is also locked at th e same
time. Be careful to keep th e subject
inside the spot frame.)
Kee ping the sh utt er release button
pressed lightly, change the composi-
tion of the image as you want.
20
Page 22
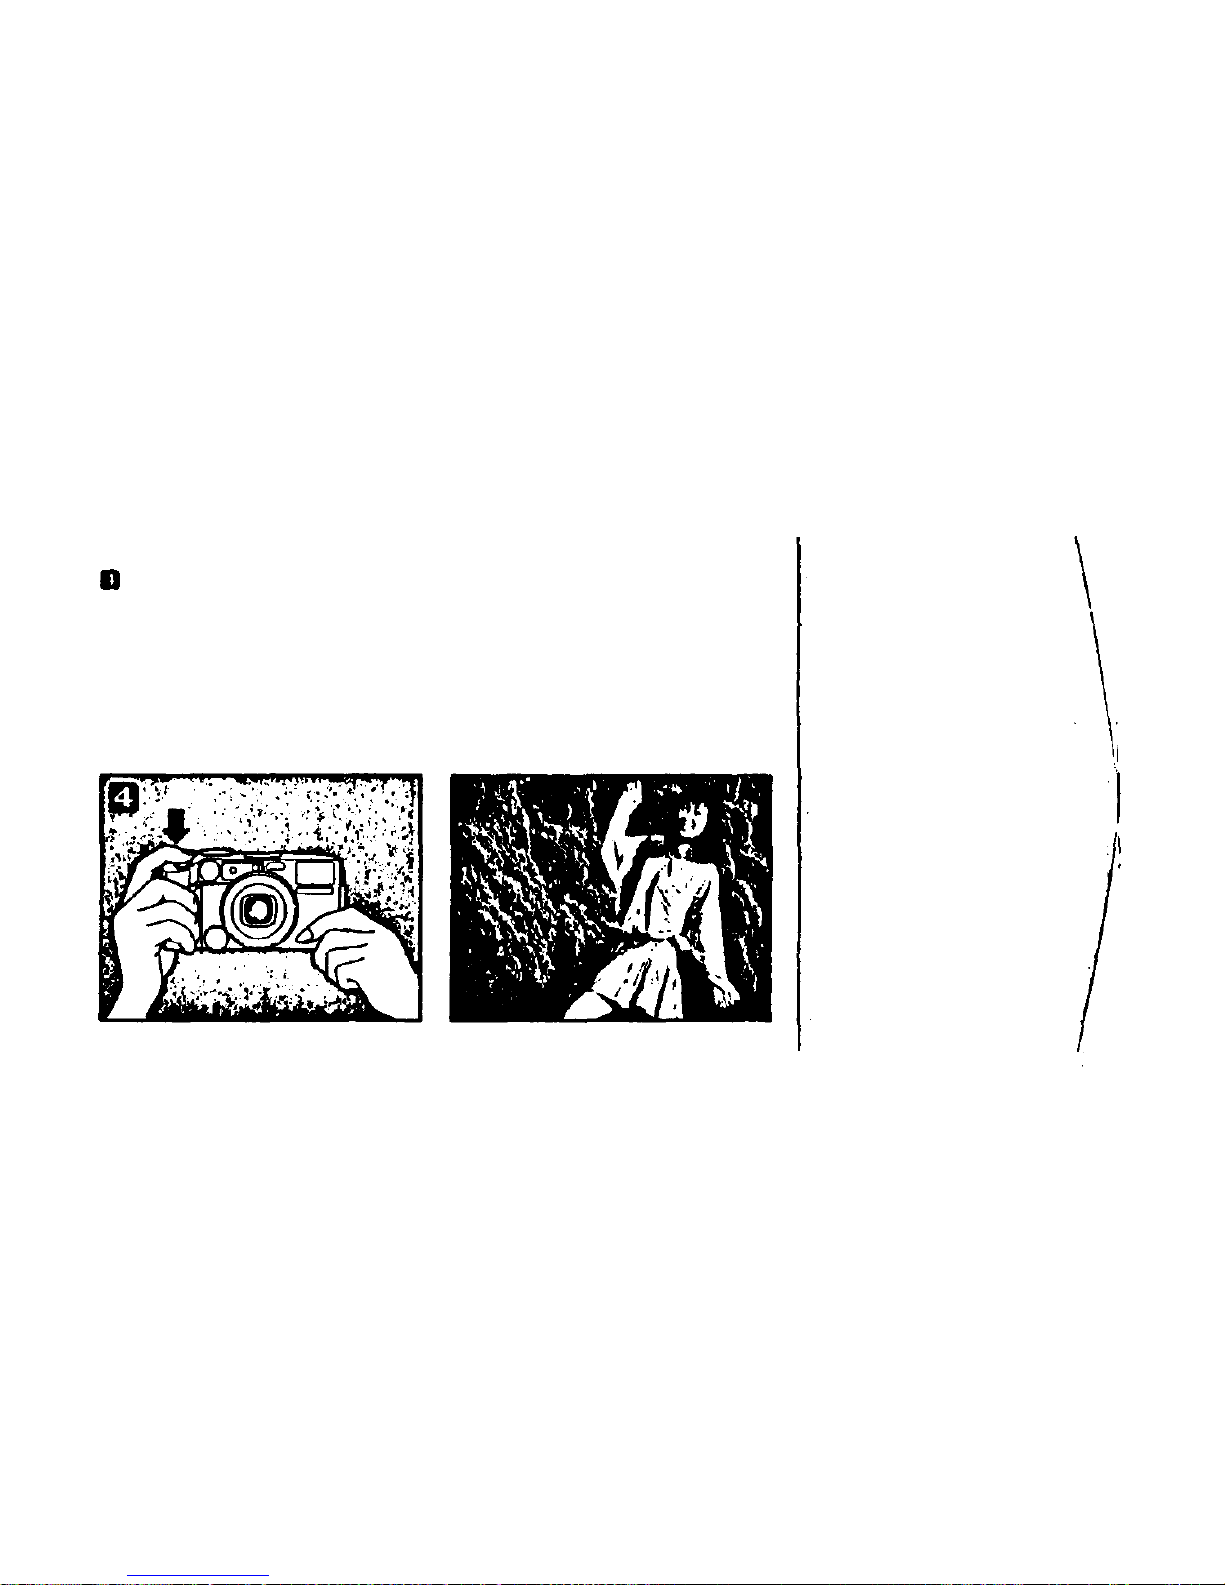
Press the shutter release button
fully to take the picture.
Auto-zoom
photography
Use this mode to obtain
photographs of portrait
composition even when the
distance to the subject
changes.
21
Page 23
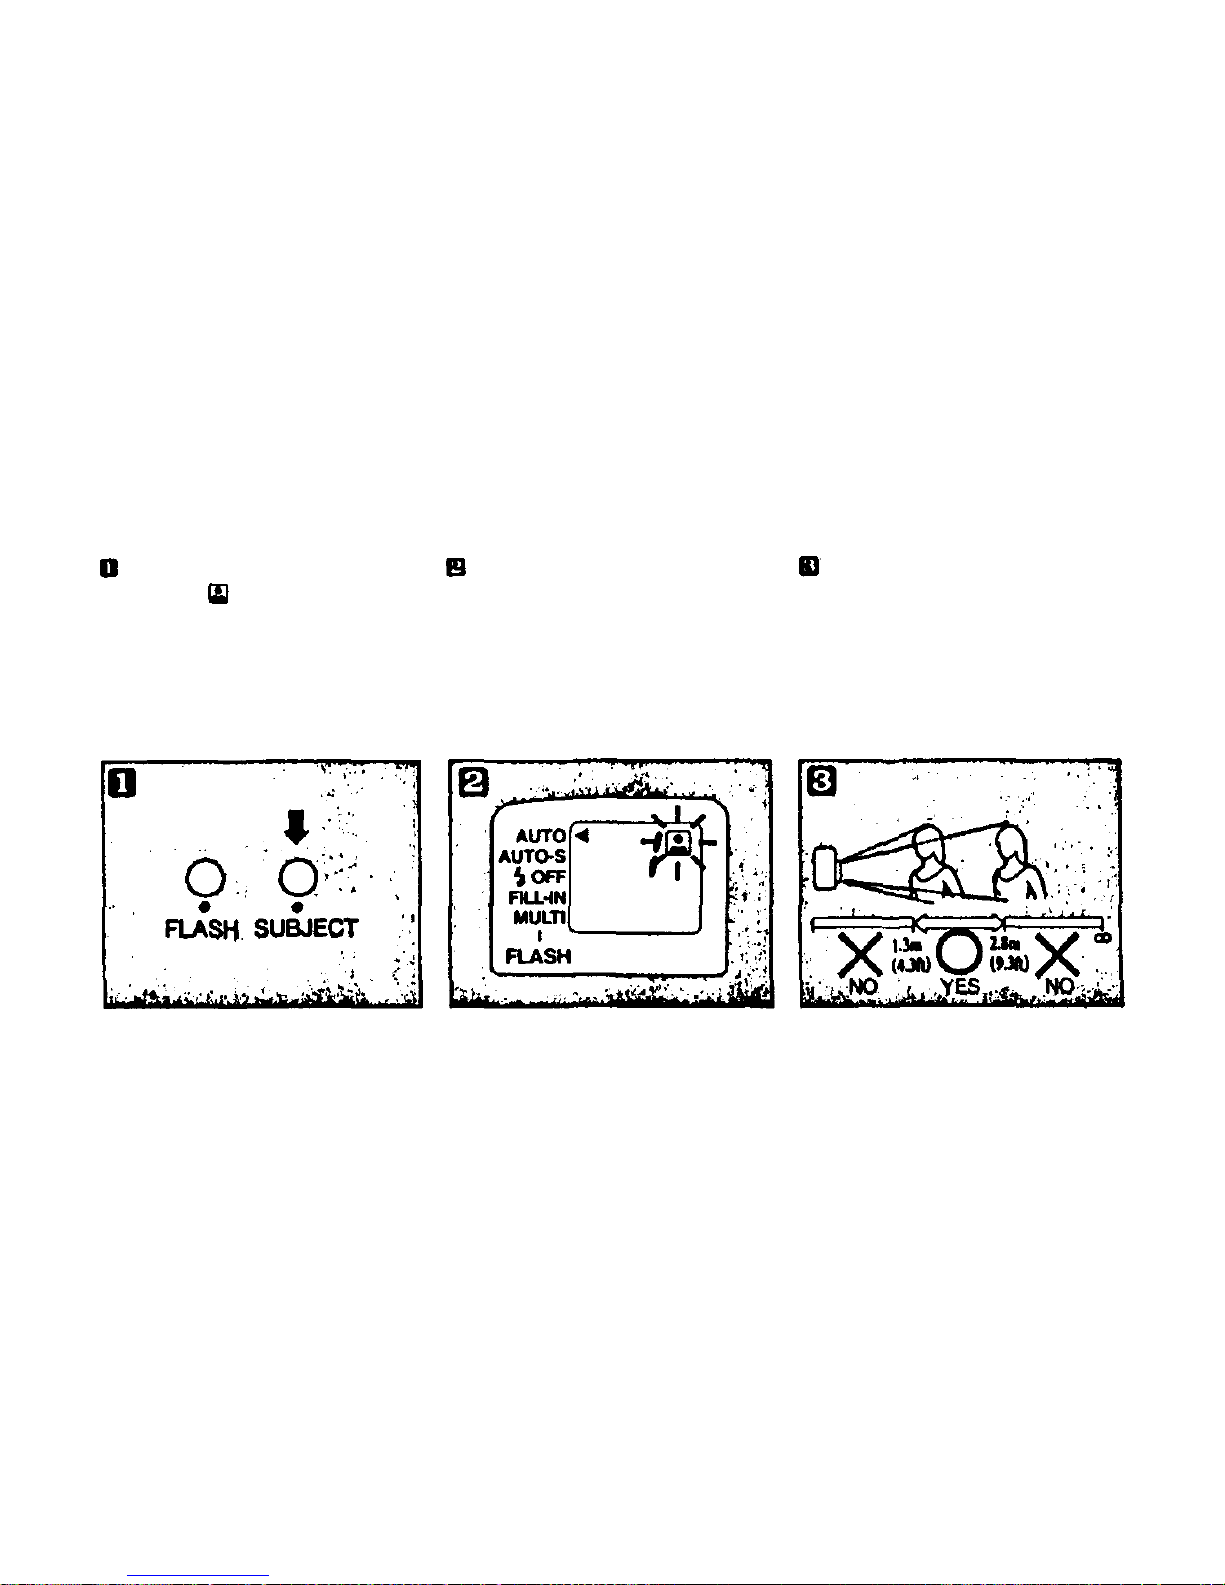
Press the SUBJECT bu tton to set
the mode to
Press the shutter release button.
The zoom operates automatically to
capture an above th e waist portrait
of a person before the shutter is
released.
Working distances:
• Outside the ranges shown in t he
illustrations below Auto-zoom
may not function.
• Even in the Auto-zoom mode it is
possible to use t he zoom button.
22
.
Page 24
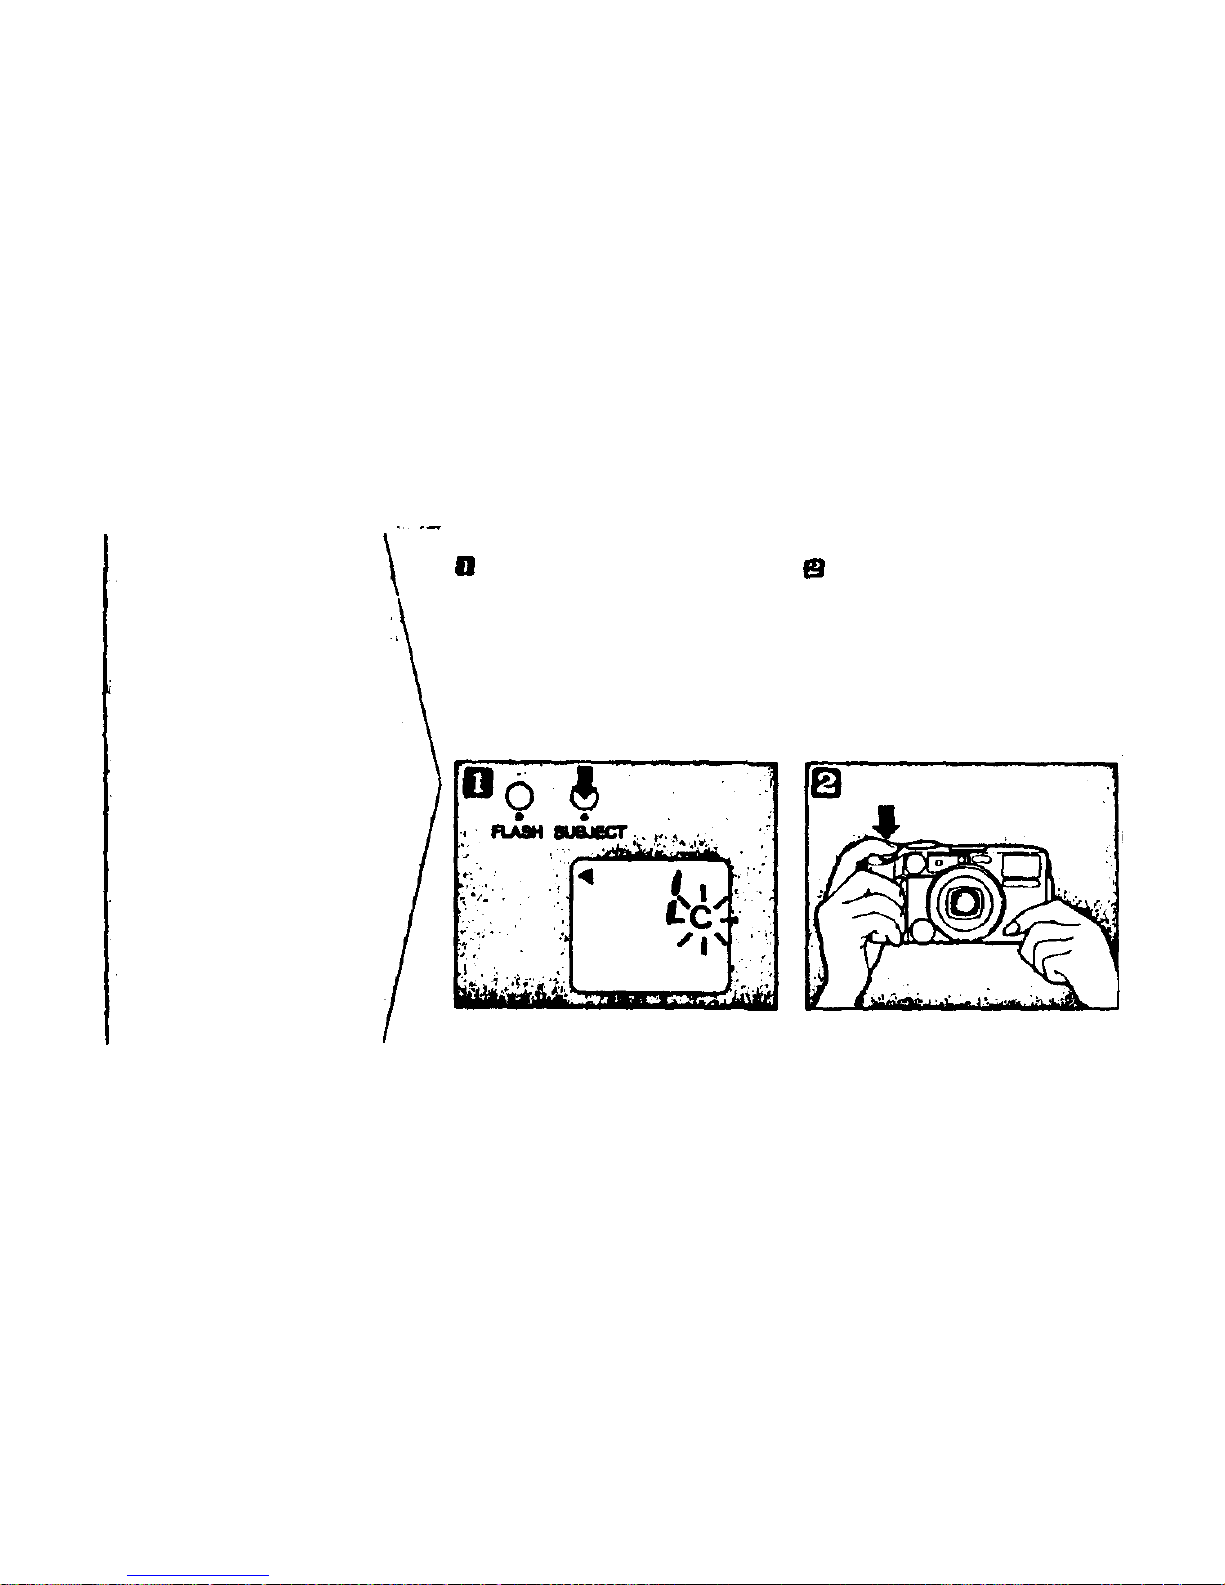
Press the SUBJECT button to set
the mode to "C".
"C" lights in the LCD panel
The camera will shoot repeatedly
as long as the shutter release button
is depressed.
• Th e aut ofocus a nd exposure w ill b e
reset instantly even when the subject is
moving toward or away fr om the
camera, and even wh en t he l ight
condition changes.
Taking a
continuous
series of shots
You can shoot continuously
at a speed of 1 frame every
approx. 1. 7 seconds (1 frame
every approx. 2.5 seconds
when the flash is used.
Refer to page 17 for the
flash working range whe n
in the continuous shooting
mode.)
23
Page 25
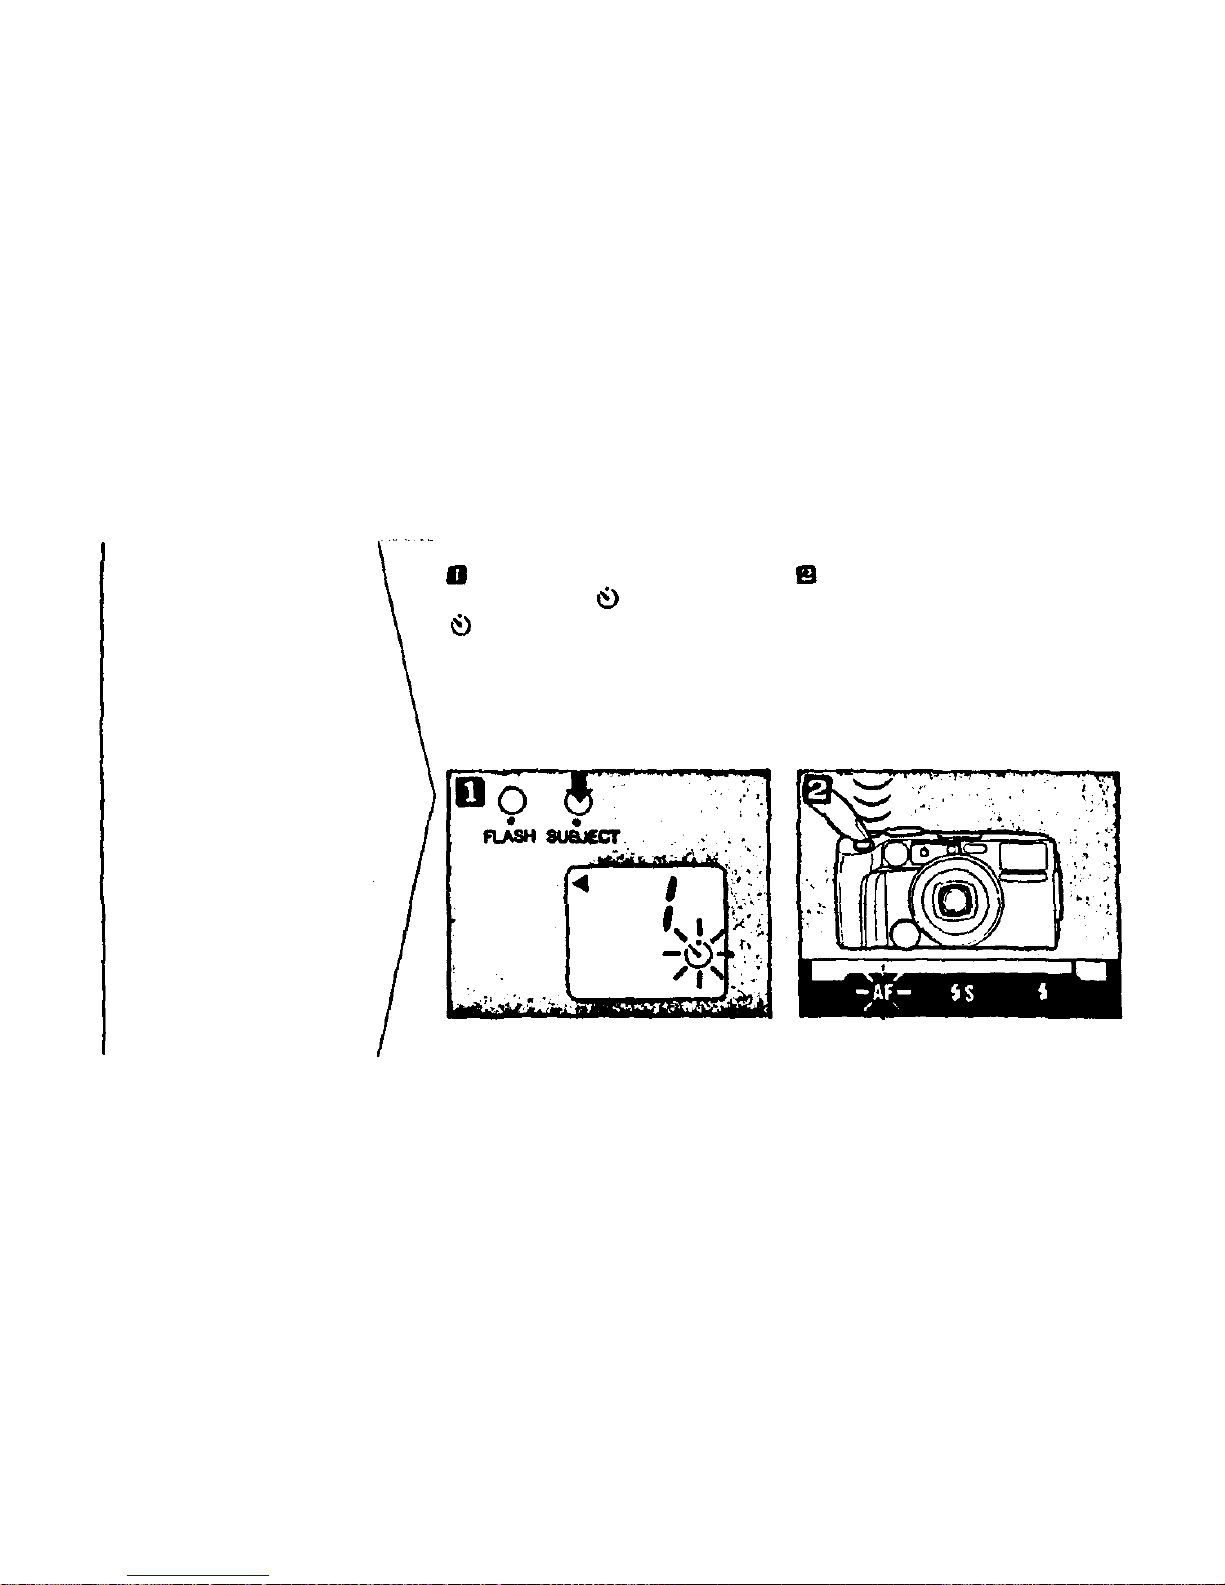
Press the SUBJECT button, and
set the mode to
ligh ts i n t he LCD panel.
Press the shutter release button
lightly, and focus on the subject you
want to shoot.
Wh en focused, the "AF" indicator
(green) lights in the viewfinder.
Using the
self-timer
The camera should be set
firmly, on a tripod, for
example.
24
Page 26
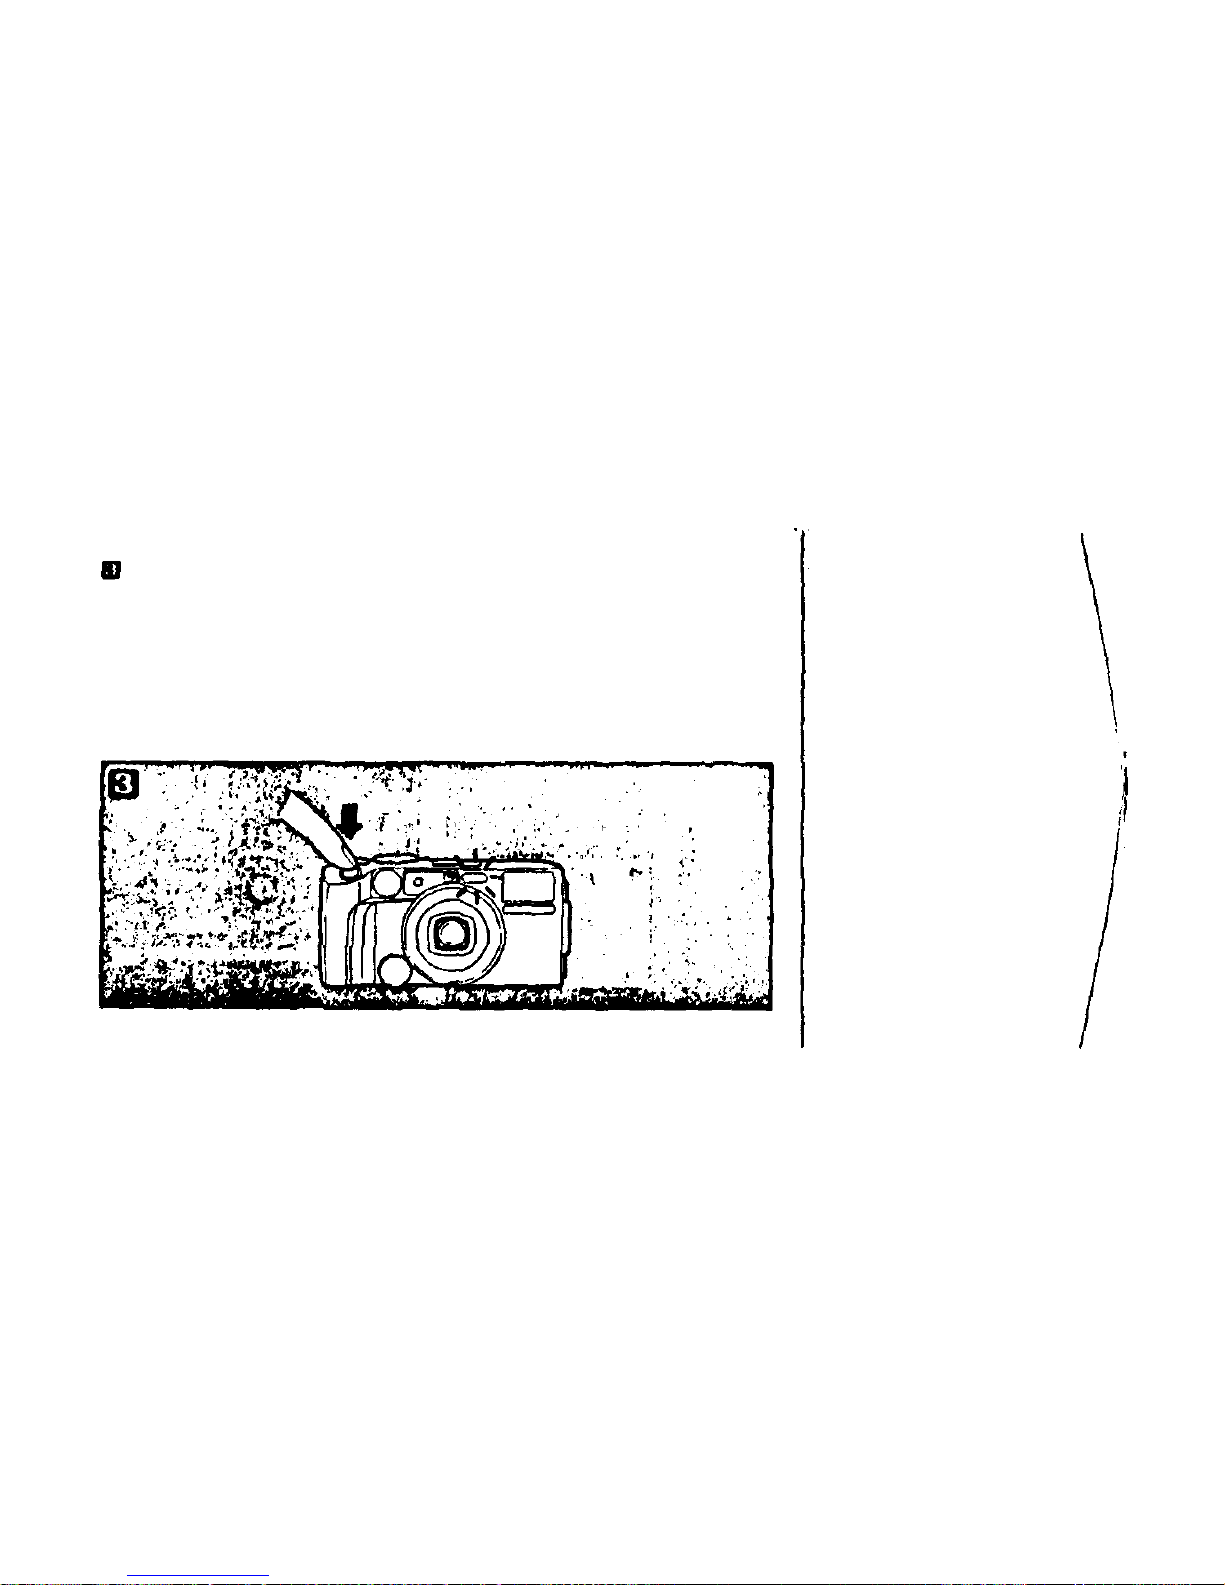
Press th e shutter release button
fully to start the self-timer.
The self-timer indicator lights and
the shutter will be released in 12
seconds.
The self-timer indicator wil l start
blinking 2 seconds before the
shutter is released.
After the shutter is released, th e
self-timer mode will be released.
(In case you want to cancel th e self-
timer function before the shutter is
released, press the SUBJECT
button, or set the power switch to
OFF.)
AUTO-S flash
mode
In t hi s mode, the red-eye
phenomenon which occurs
mostly in compact type
cameras will be minimized.
Remarks: "R ed-eye" is a
phenomenon in which the
pupil of the eye appears too
red in pictures taken with a
flash.
25
Page 27
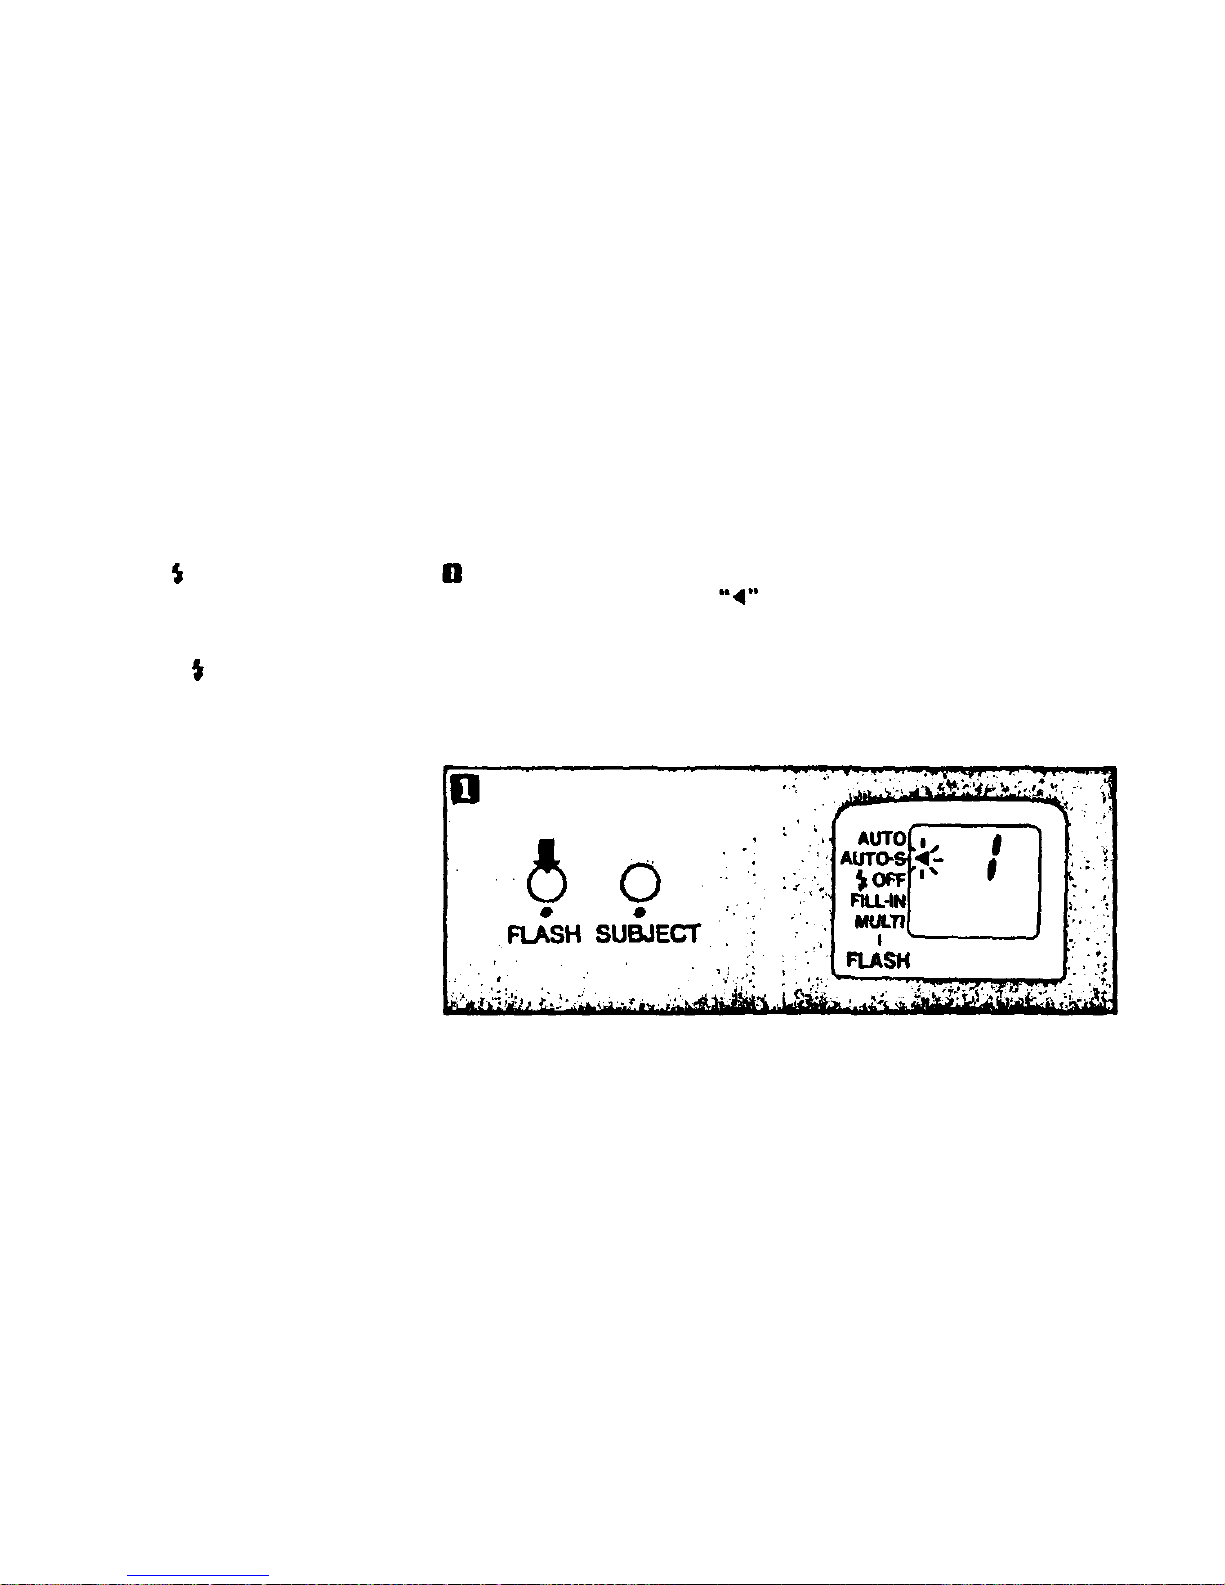
When " S" blinks in the view-
finder while the camera is in either
the AUTO or FILL-IN modes,
switch to the AUTO-S mode. The
blinking " S" will disappear.
Press t h e FLASH button to
change the mode to AUTO-S.
will light in the LCD panel.
Pressing the shutter release bu tt o n,
a preparatory flash emission occurs
before the shutter is released with
the main flash emission. The pre-
parat ory flash emission produces a
flickering beam of light which
"prepares" y o ur subject's eyes by
reducing pupil size. Th e m a i n flash
emission is the same as the normal
auto flash emission.
26
Page 28
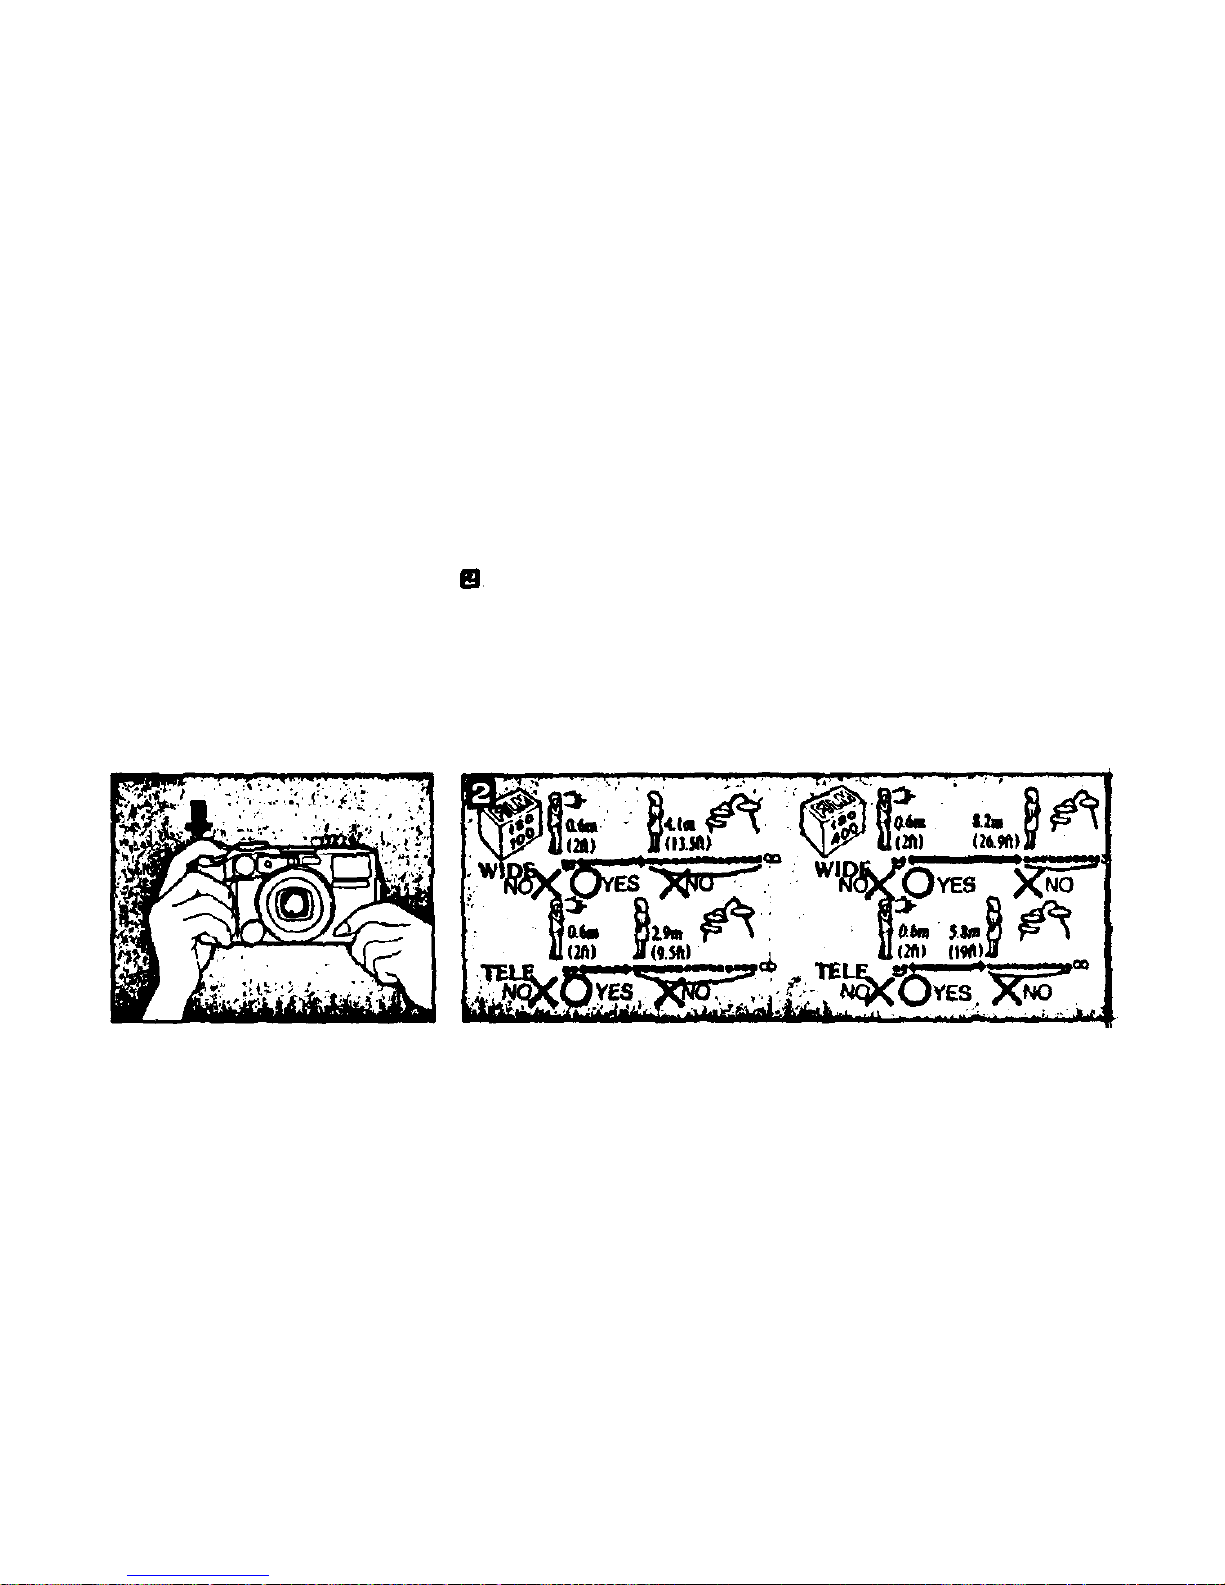
• Hold the camera steady while
pressing t h e shutter release bu t t o n
unti l the shutter is released.
• The AUTO-S mode is not cancelled by switching the power
switch to OFF. To release t h e
AUTO-S mode, press the FLASH
mode button.
AUTO-S flash mo de working
range.
27
Page 29
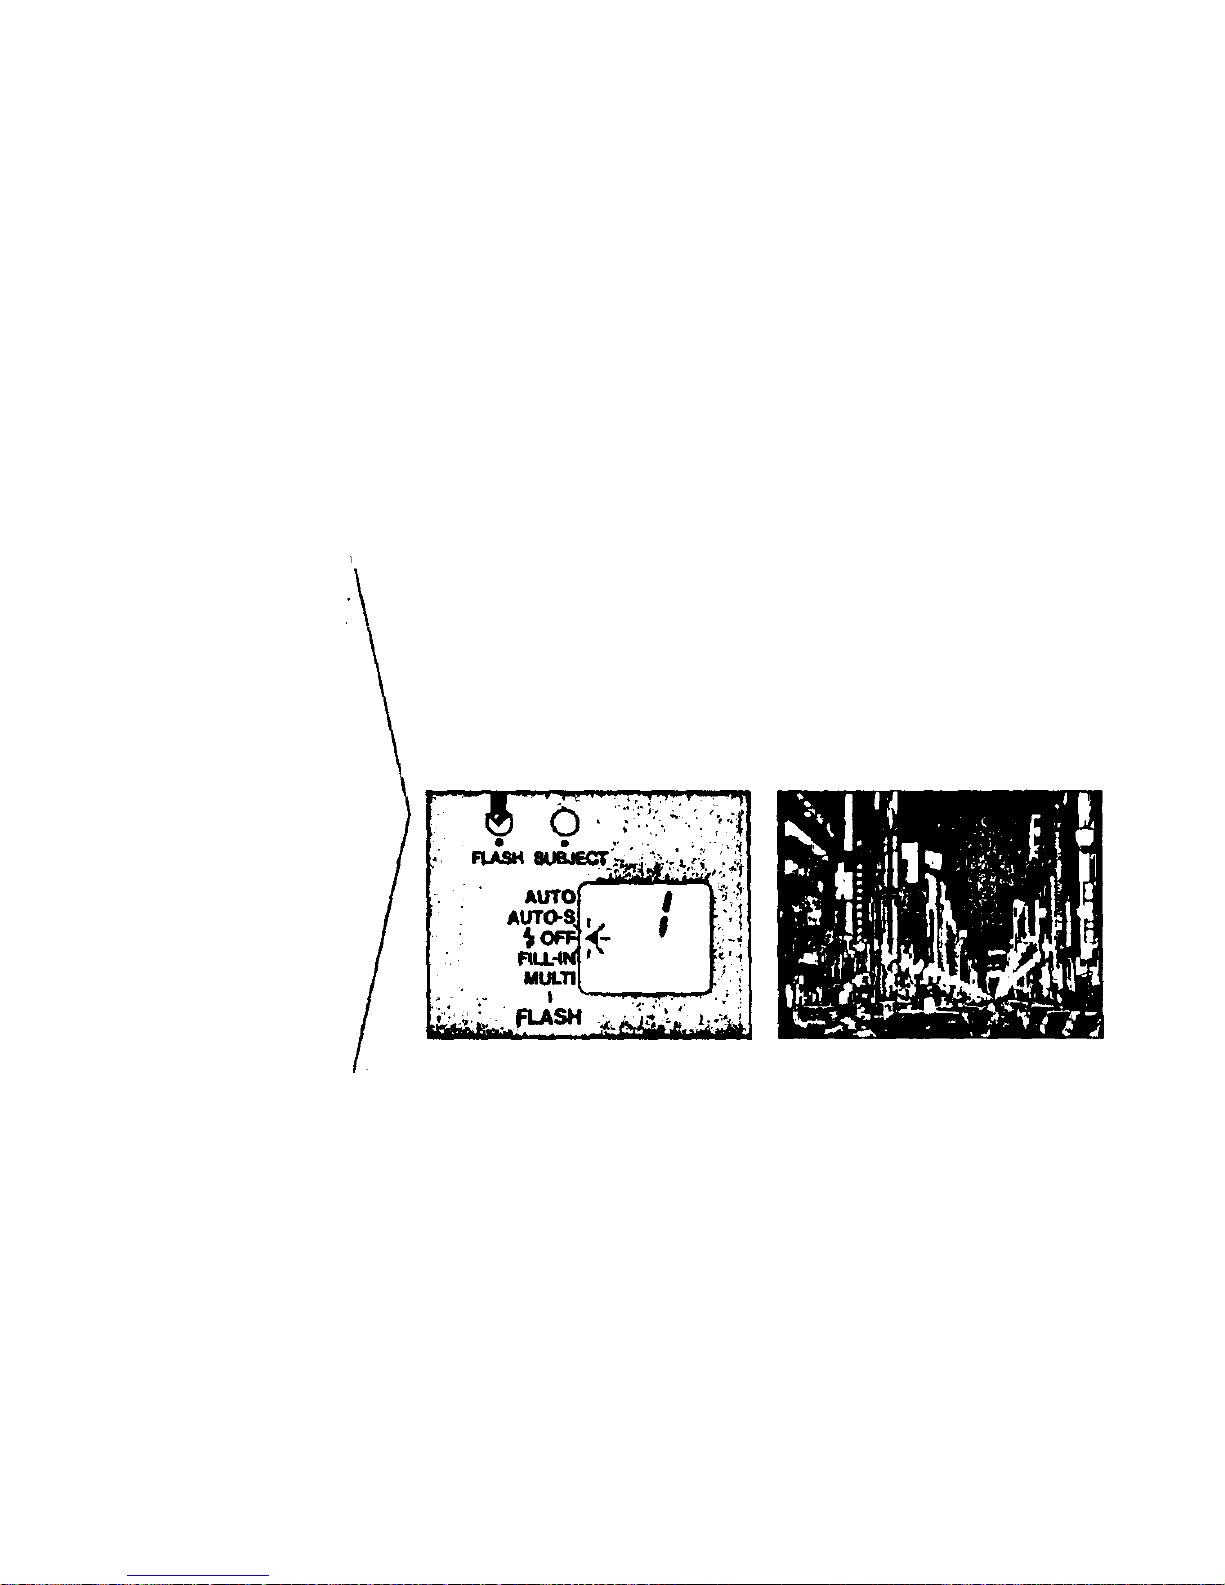
Flash OFF
mode
Use this mode in a museum,
etc., where flash photography is prohibited, or
wh en yo u don't w an t th e
flash to fire, such as during
the shooting of night scenes.
Press the FLASH bu tt on to set the
flash mode to OFF.
• In lo w lighting conditions, the
shutter speed m a y b e s low (as lon g
as 1 second). Use a tripod, etc., to
prevent th e effects of camera shake.
28
Page 30
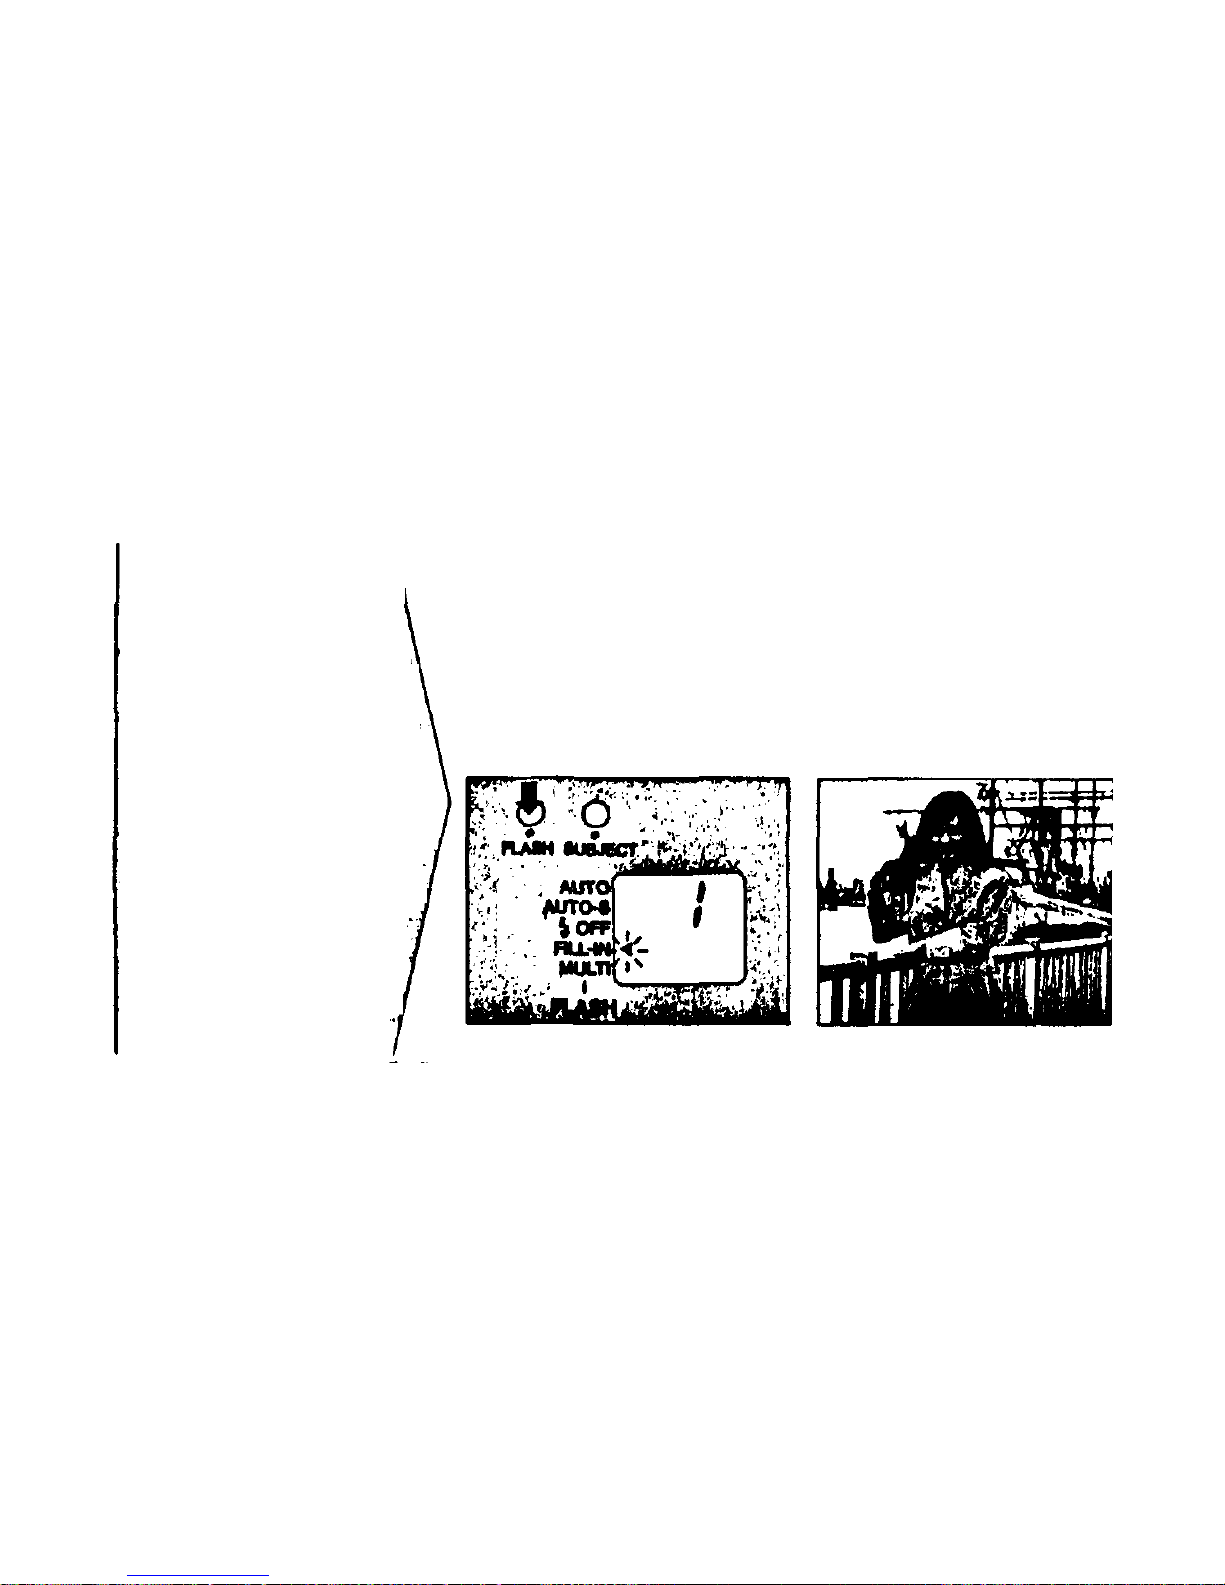
Press the FLASH button a nd set
the flash mode to FILL-IN.
With backlighting, the person's face
etc., may be too dark.
FILL-IN flash
mode
In thi s mode, the flash
always operates.
Use this mode for daylight
synchro photography or
shooting backlit subjects.
29
Page 31
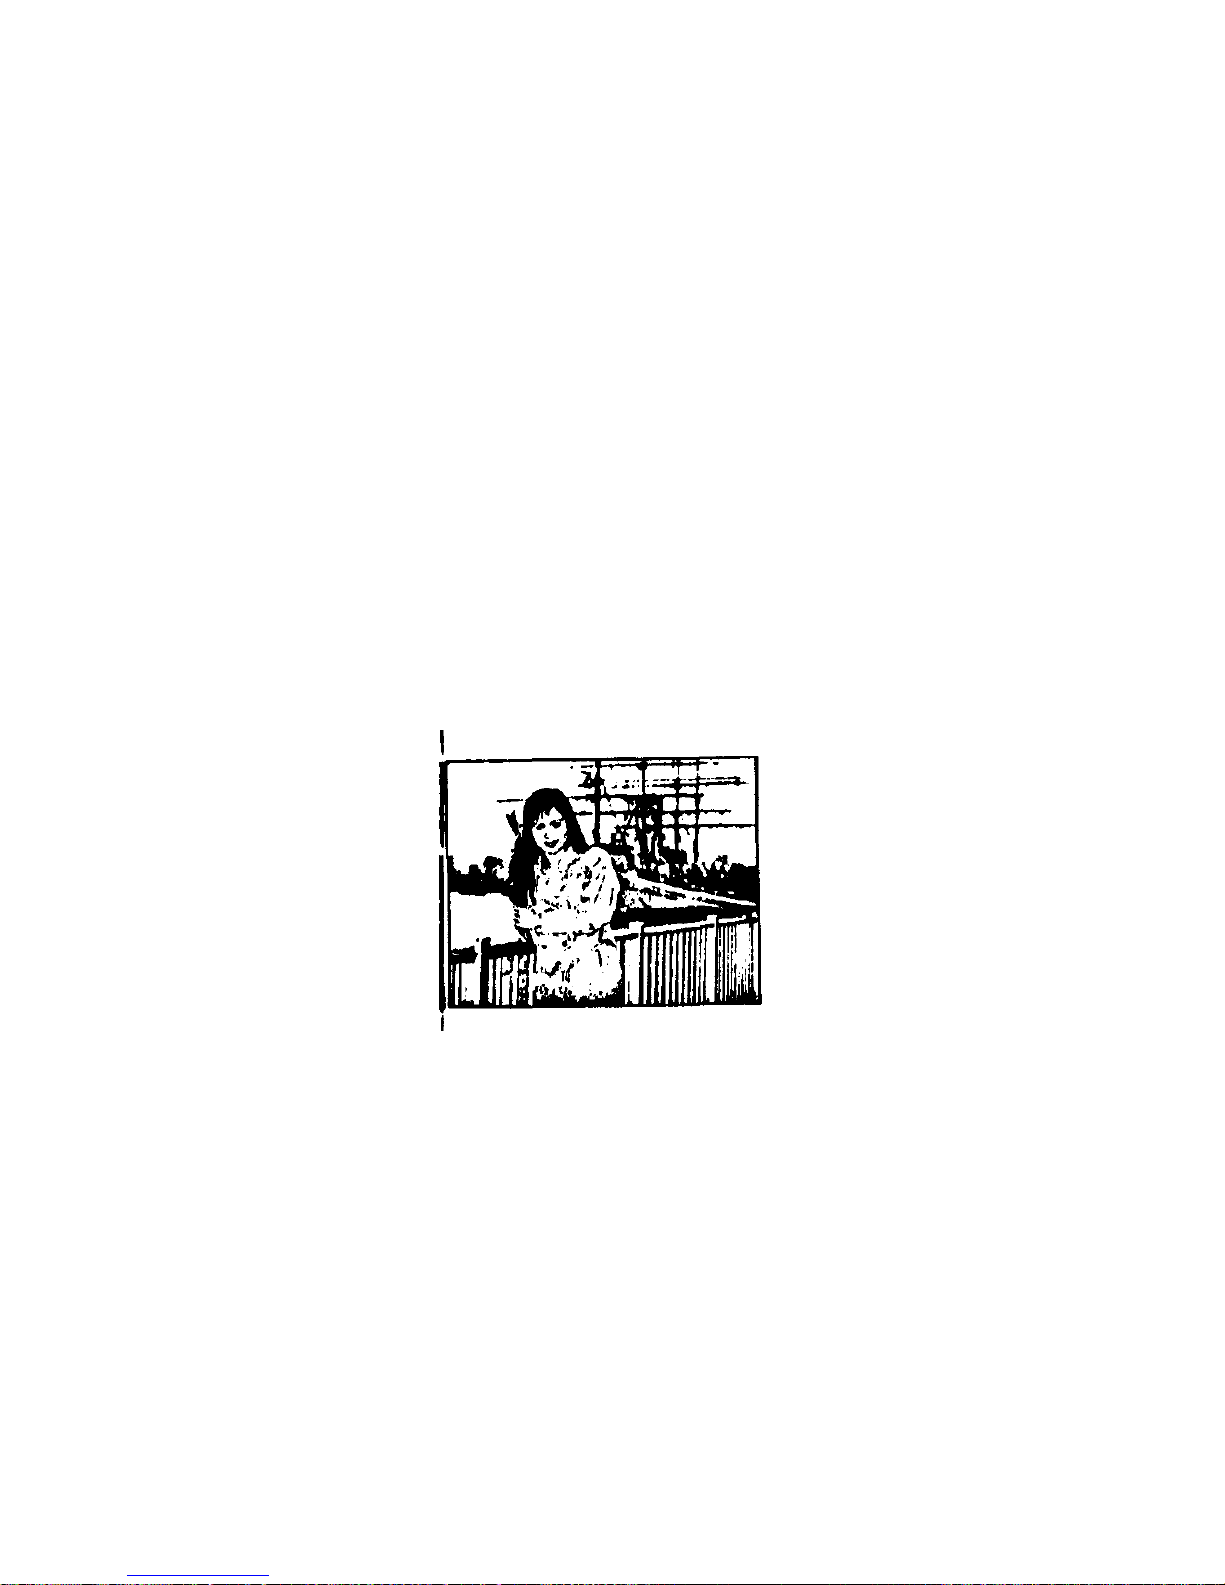
By using the FILL-IN mode, t he
subject will be properly lit by the
flash.
30
Page 32
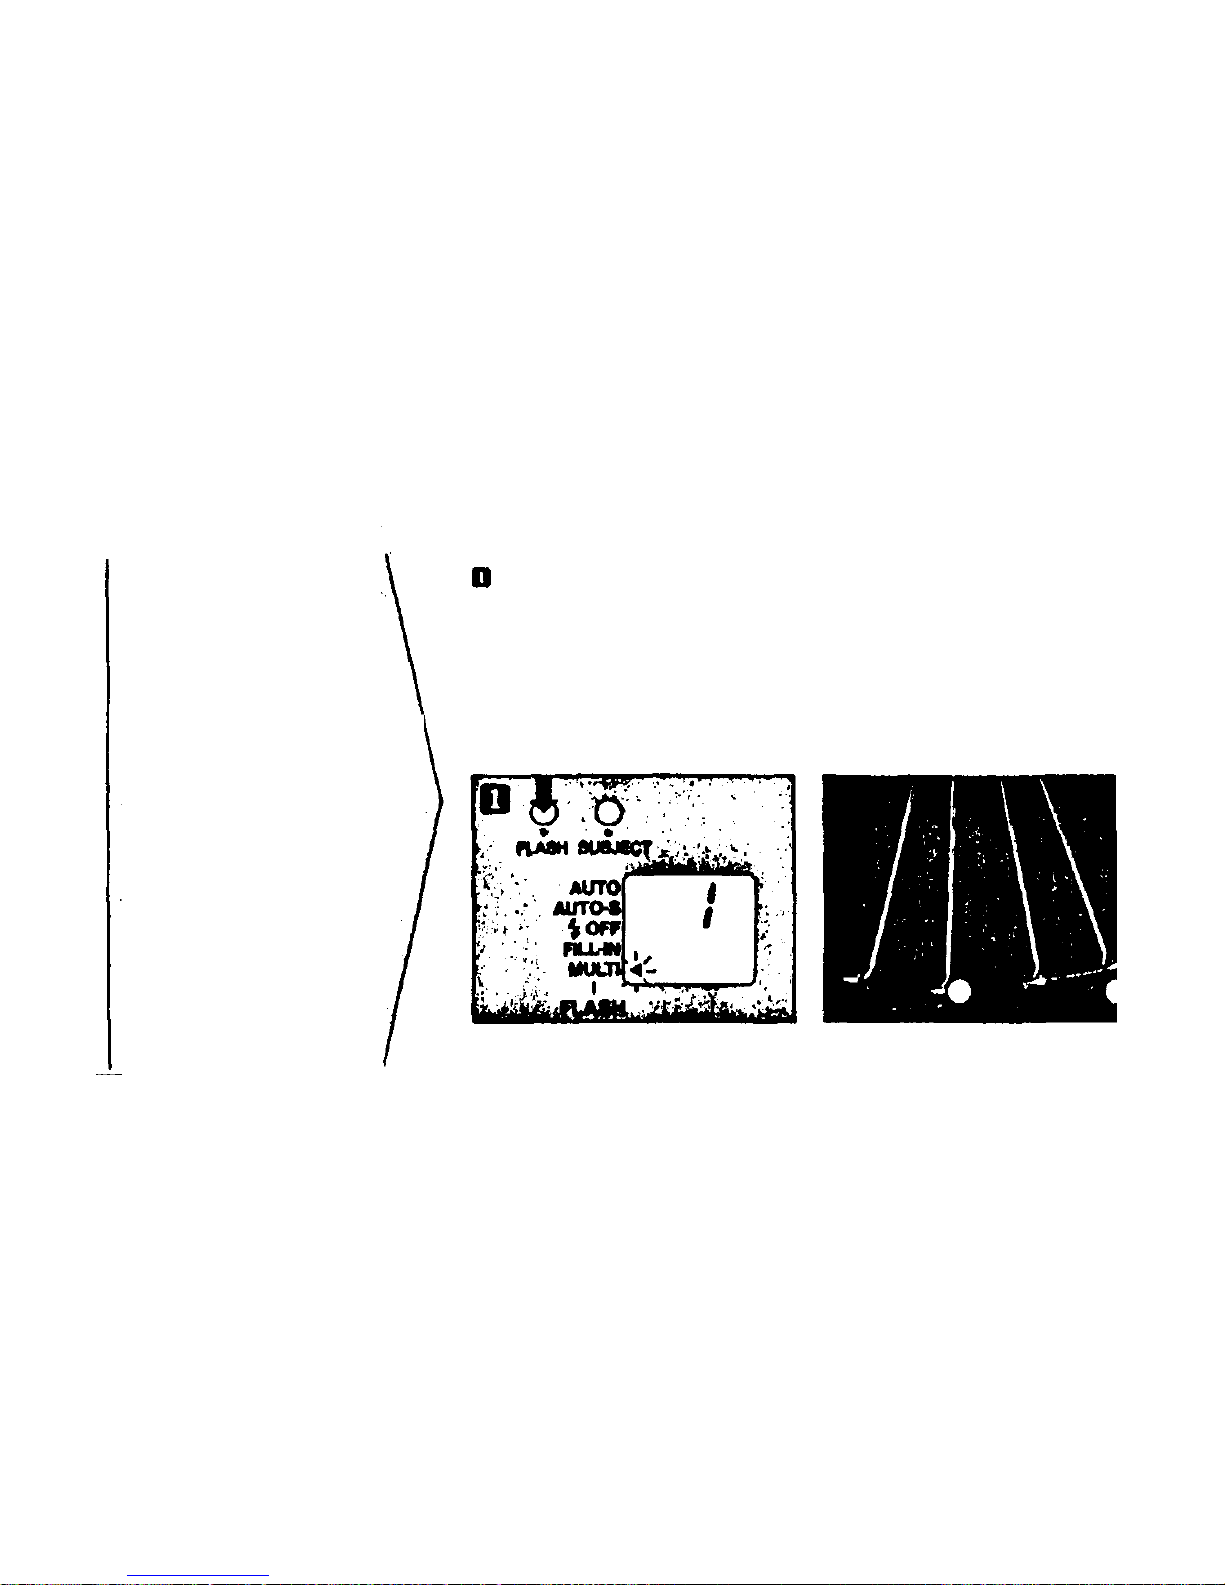
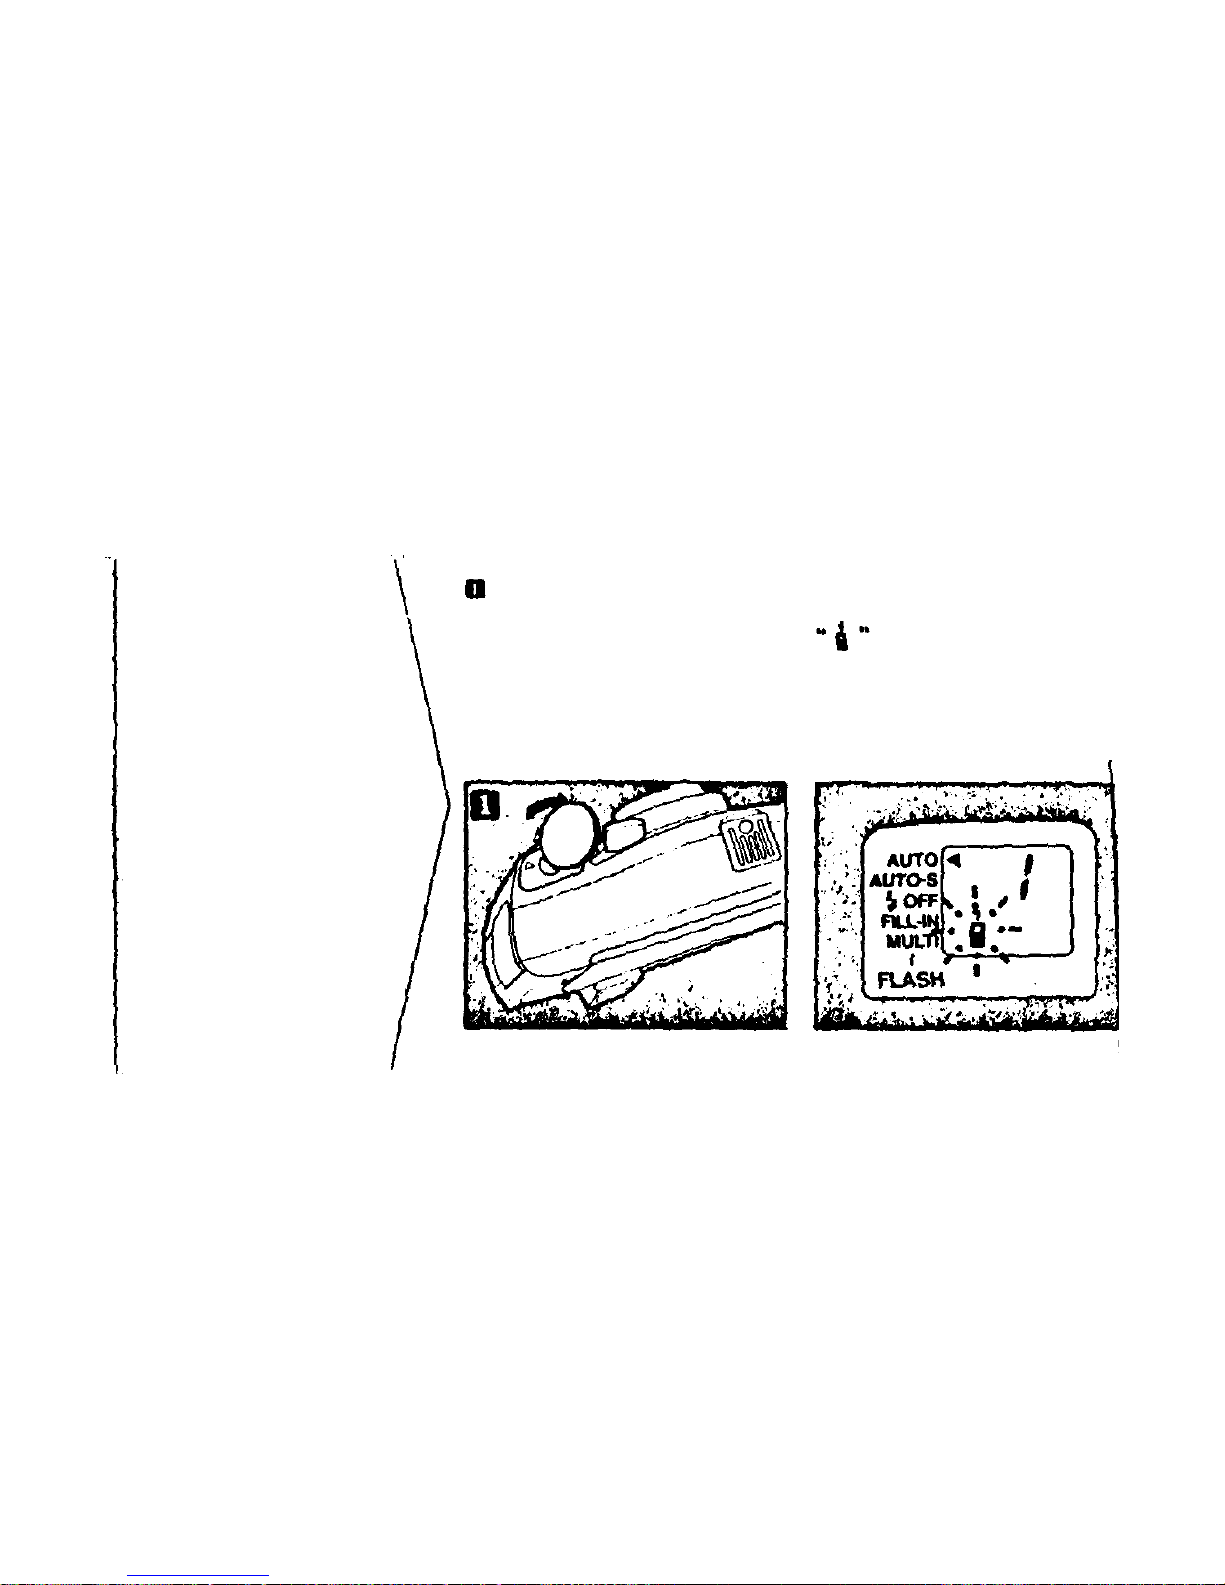
Press t h e FLASH button and set
th e flash mode to MULTI.
The flash will fire four times during
one exposure.
The shutter s peed is set to 1/6 set
Use it in low light.
If using it in a light place, the picture
will be over-exposed.
•
Use a tripod, to prevent the effect
of camera shake.
MULTI flash
mode
In the MULTI flash mode
you can segment a motion
sequence — such as a golf
single shot.
31
Page 33
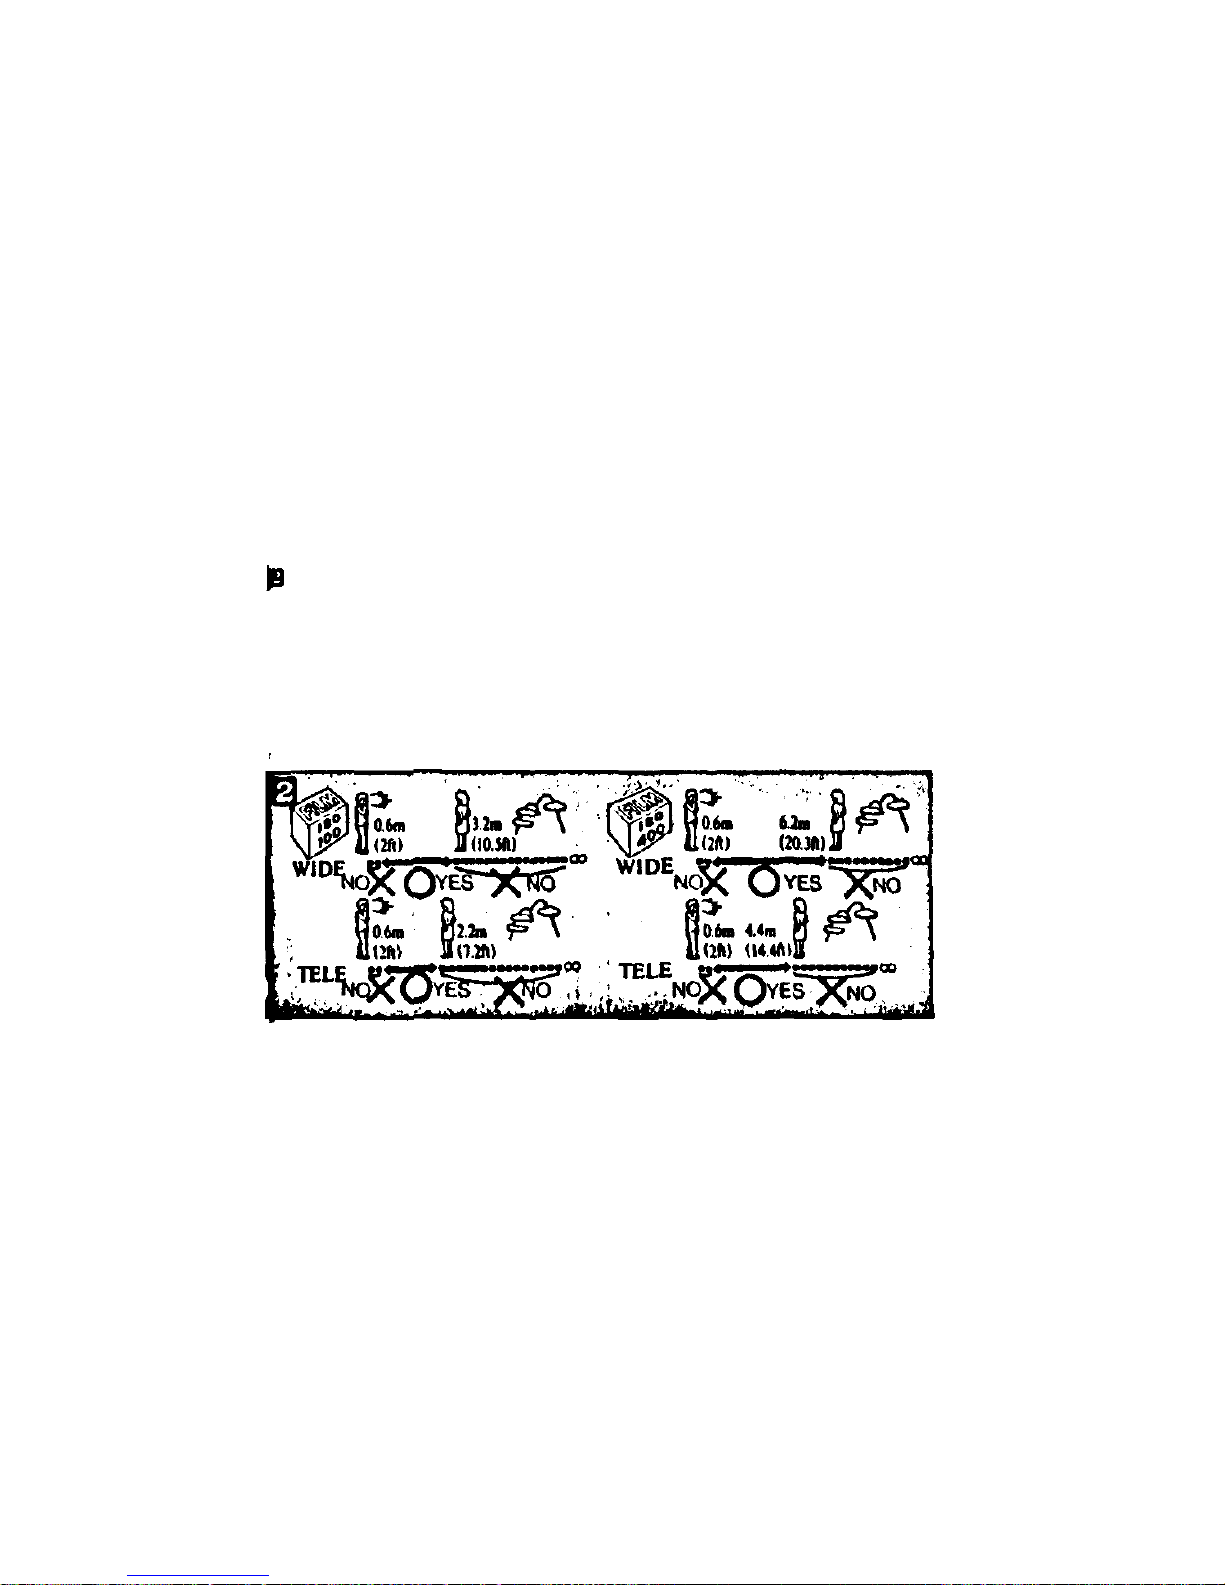
Working range of the MULTI
flash mode.
32
Page 34
Using the
remote control
Using a coin, tu rn t h e screw to
remove th e remote control device
from the camera.
When th e remot e control device
been removed from the camera,
blinks in the LCD panel
33
Page 35
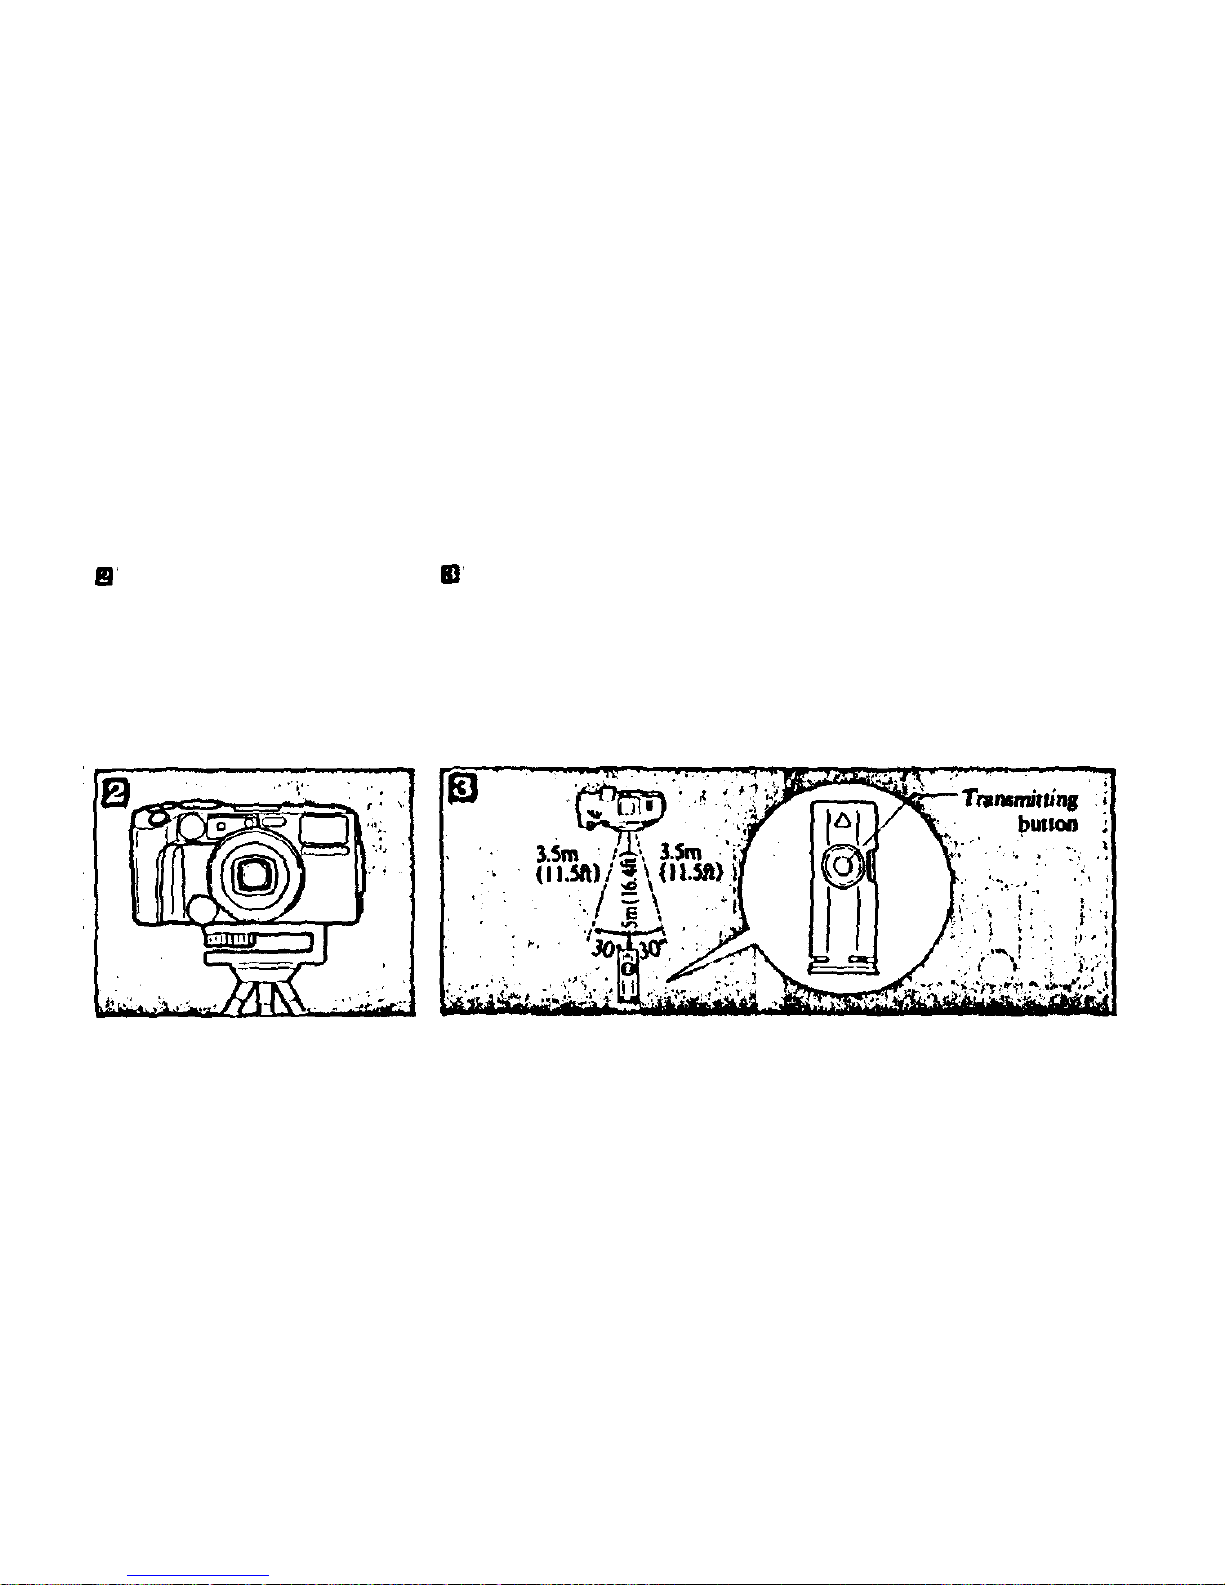
The camera should be set firmly,
on tripod, for example.
While looking throu gh the view-
finder, aim the camera a t th e subject
you want to shoot.
W i t h t he remote control device in
your hand stand wher e th e picture is
to be taken, and press the transmitt-
ing button o n the device.
• This remote control device is
usable up t o approx. 5m (16.4 f t )
directly in front of the camera, and
up to 3.5m (11.5 ft i n a diagonal
direction within 30° to the right or
left. If you are not within the above
range, use the self-timer instead.
34
Page 36
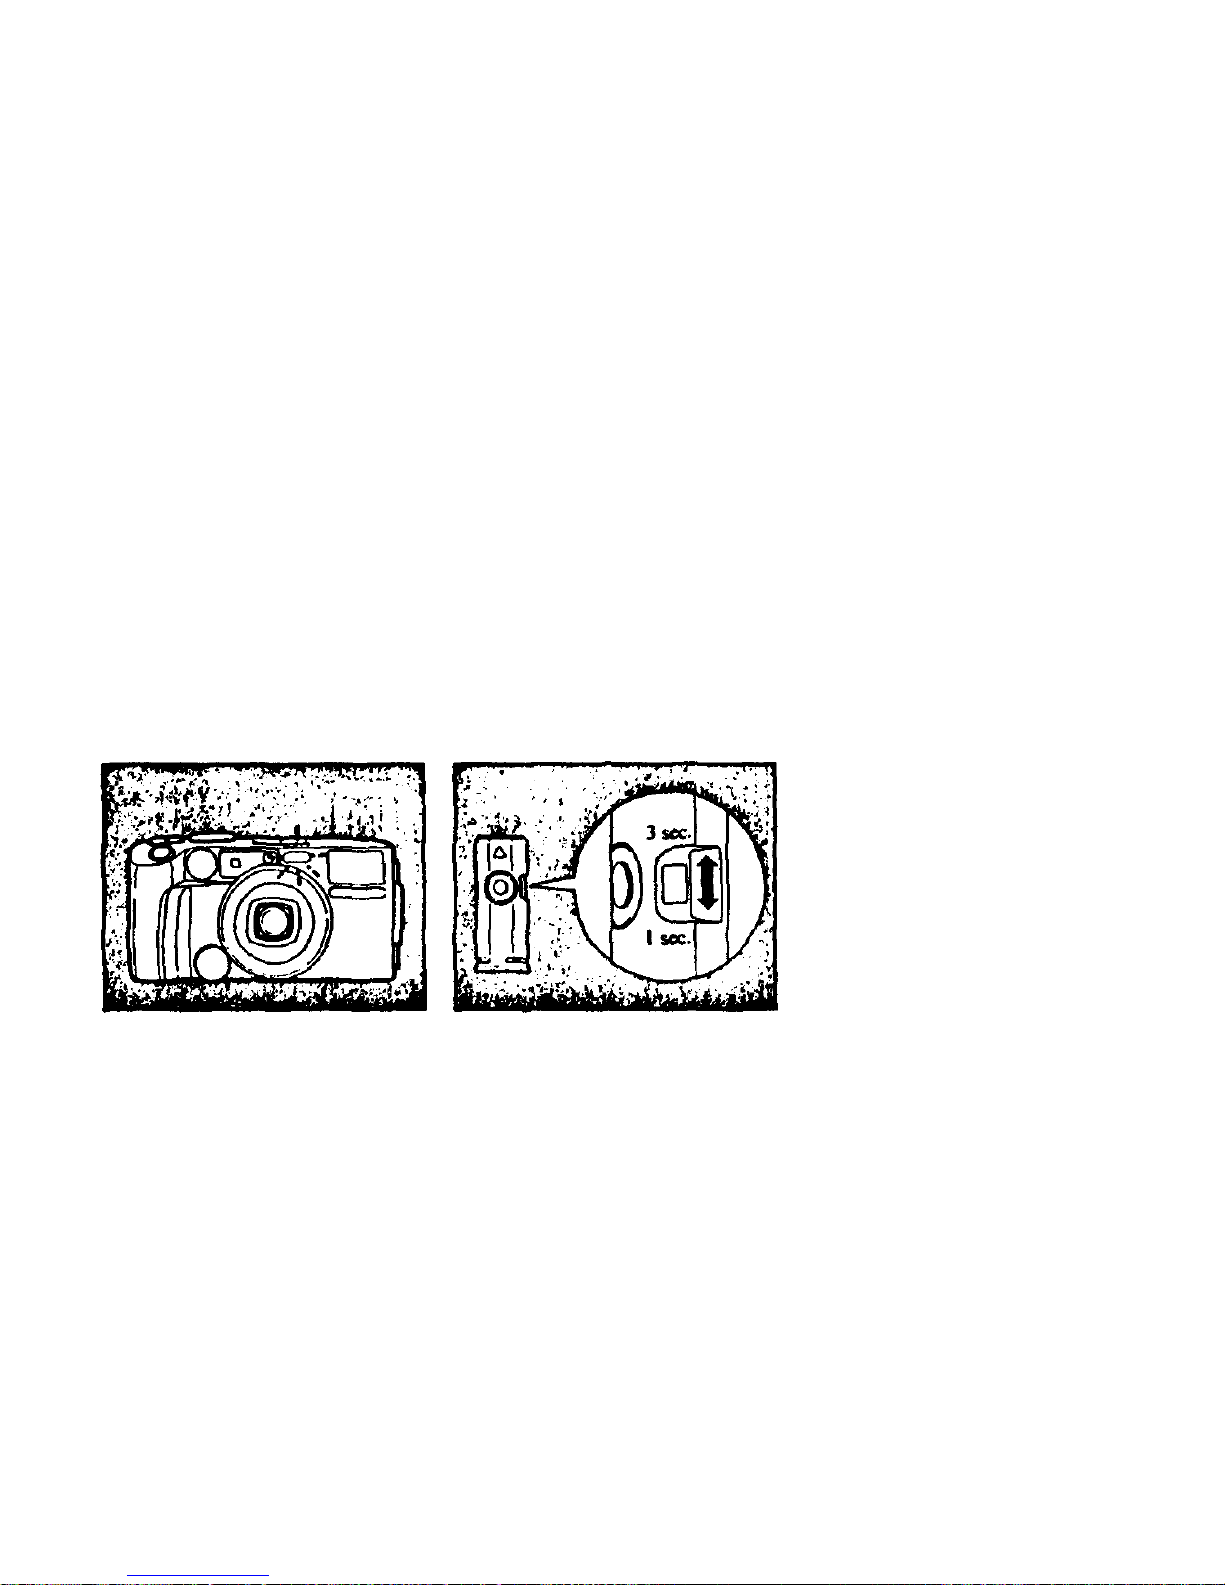
The se lf- tim er signal of the camera
blinks.
As soon as the blinking stops, t he
shutter is released
The allowance time, after having
pressed t he transmitting button on
the remote control device until the
sh u t t e r is released, can b e switched
to either 1 sec. or 3 sec.
NOTE:
The remote control device will be effective
for approximately 20 minutes after remov-
ing it from the camera.
• The remote control may not function in
backlighting situations.
• Remote control shooting can be
combined with each camera mode. In
the continuous shooting mode, however,
you are limited to two shots.
• The battery inside the remote control
device cannot be changed; however, it is
designed t o last a minimum of eight
years.
35
Page 37
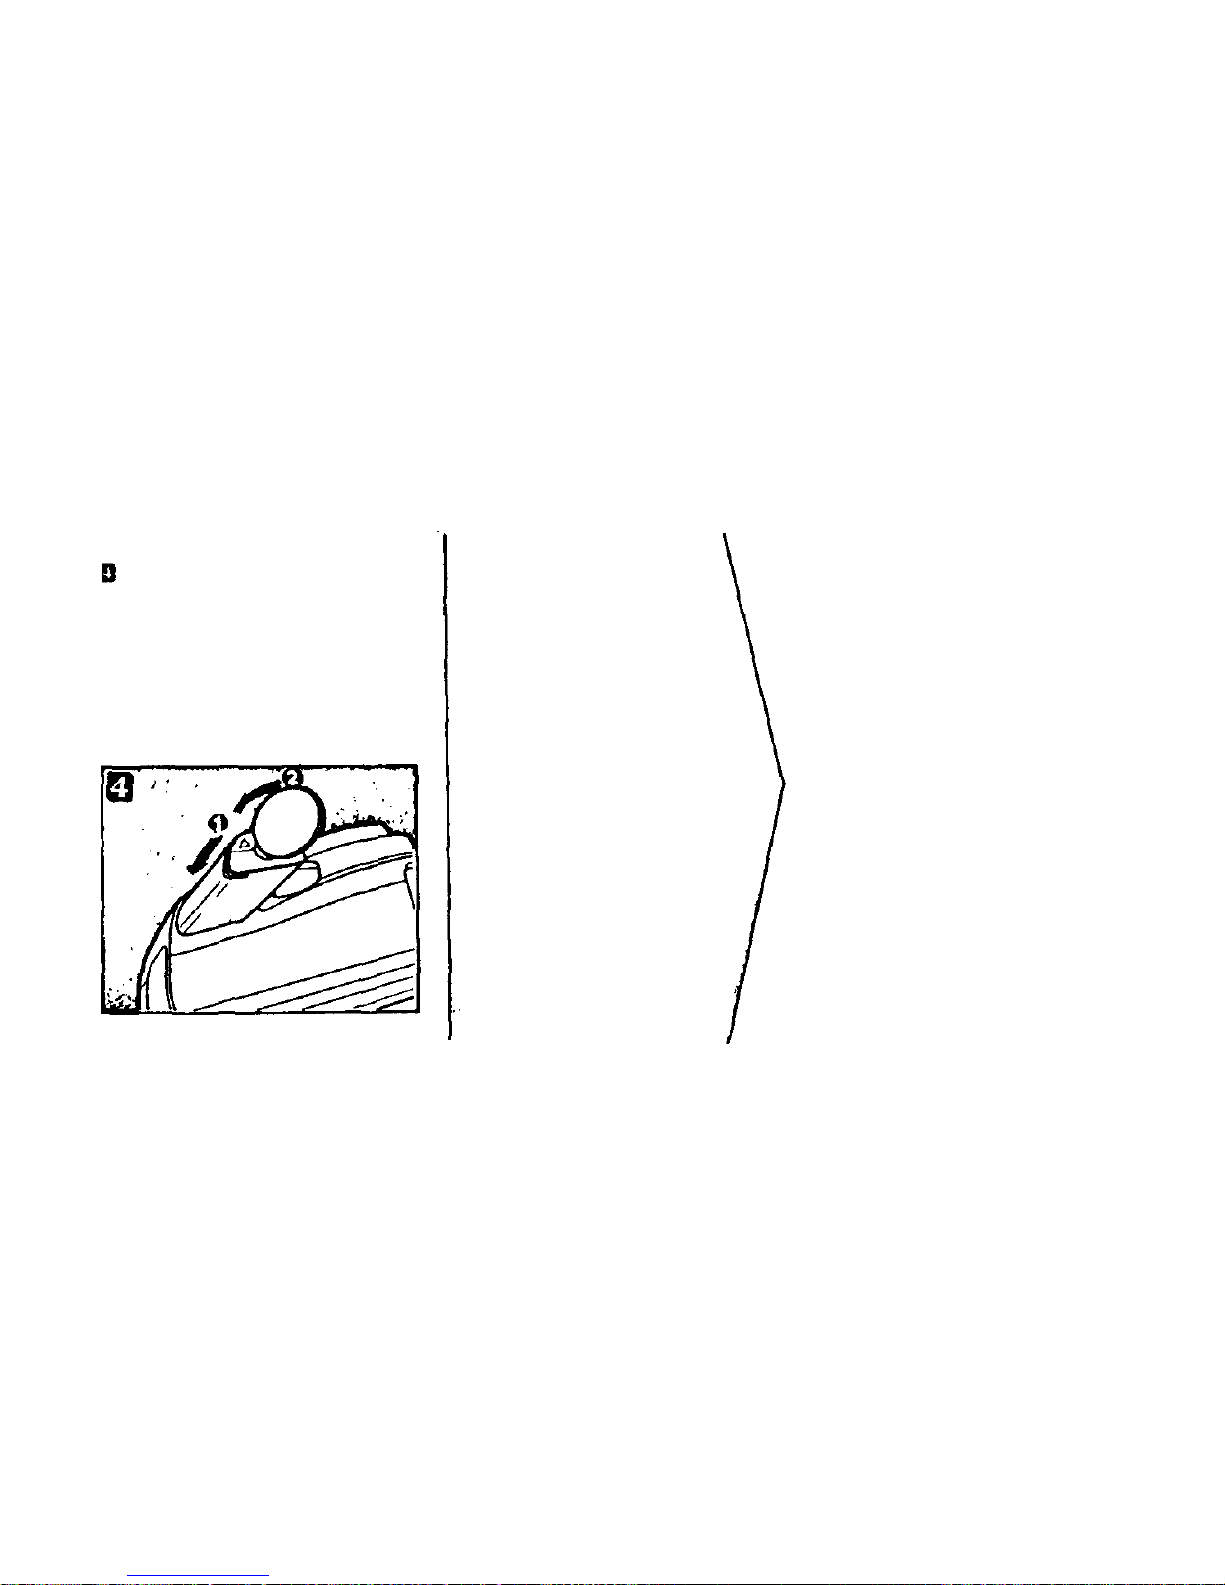
After having finished using the
remote control device, return it to the
camera and lock it i n place w it h a
coin.
Use of filters
Special-effects can be ob-
tained by using the optional
Olympus Filter set.
You can attach these filters
to this camera b y using the
optional adaptor.
Olympus offers the following
optional filters.
(Filter diameter. 35.5mm)
(1 ) Skylight
Prevents a blue tone in color photographs taken on fair weather days
an d provides an overall more nat ural
color lone.
(2)Softon
Use this for portraits; it softens the
image for more "moody" pictures.
(3 ) Sunny Cross
The photograph will have rays of
light around bright objects.
36
Page 38
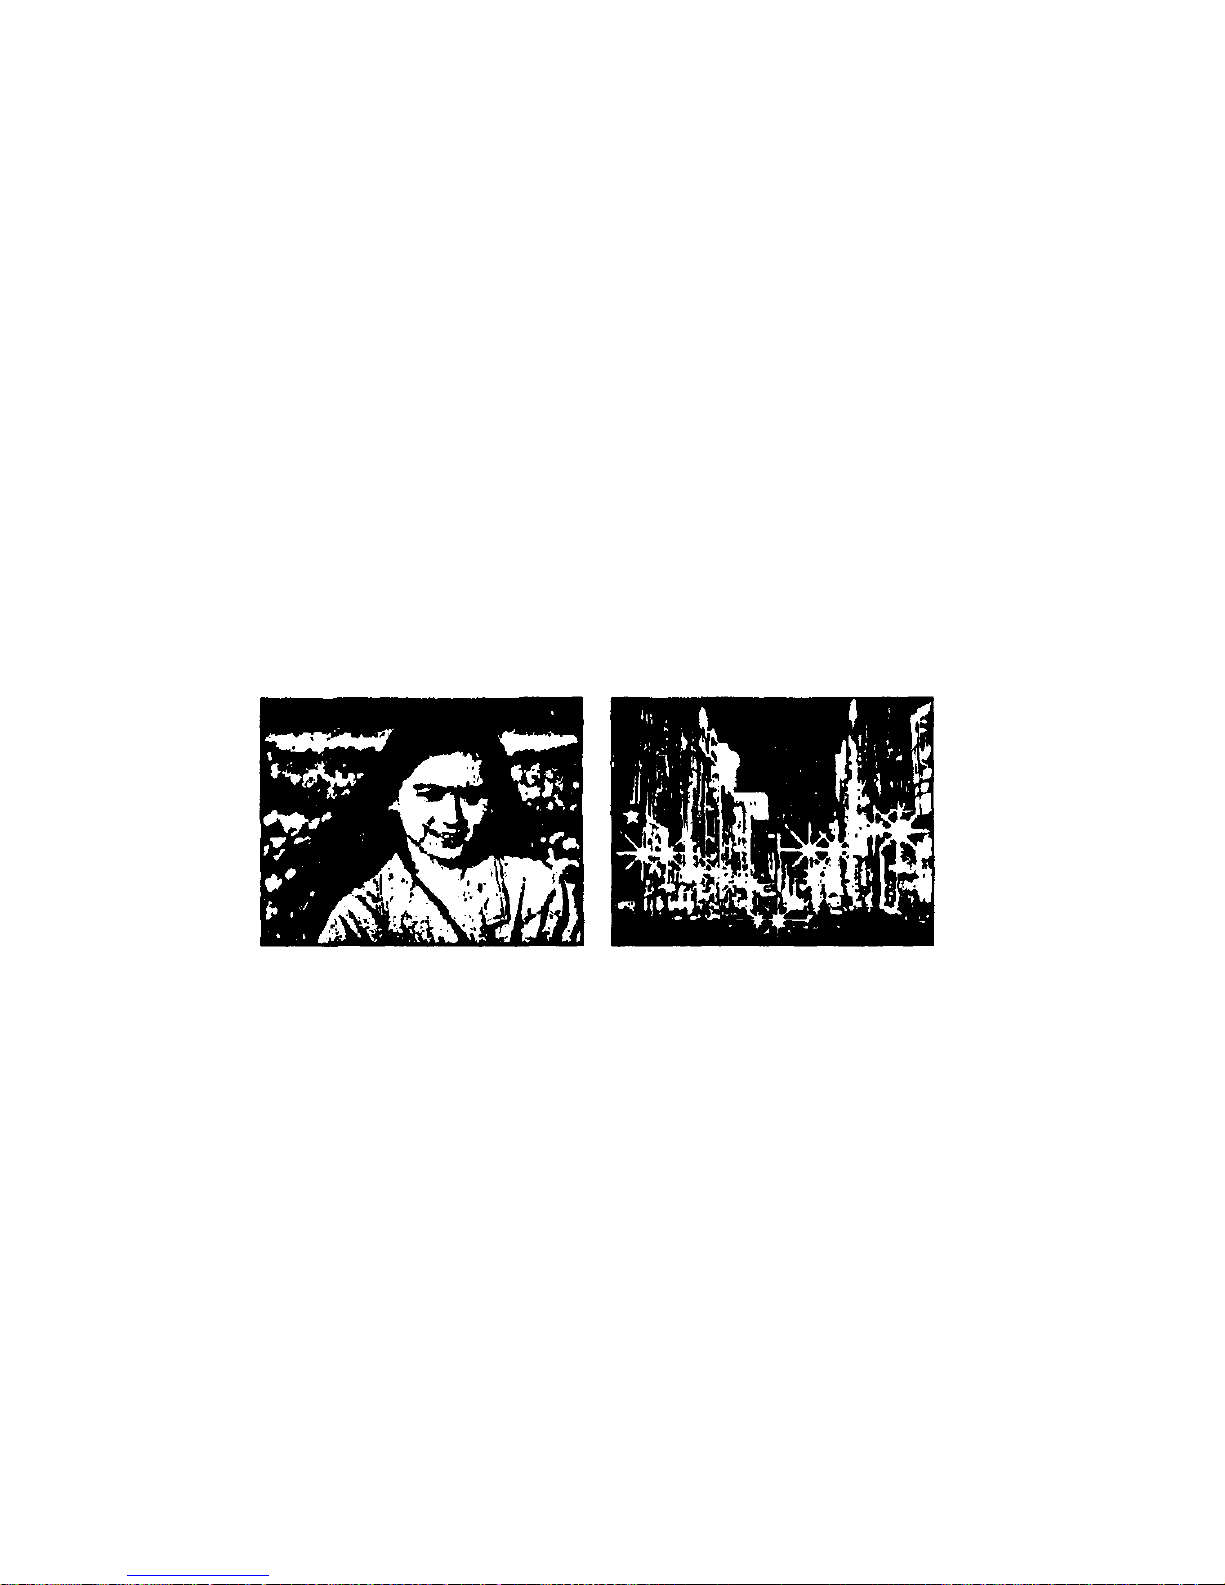
When the Softon is used.
When the Sunny Cross is used.
3
7
Page 39
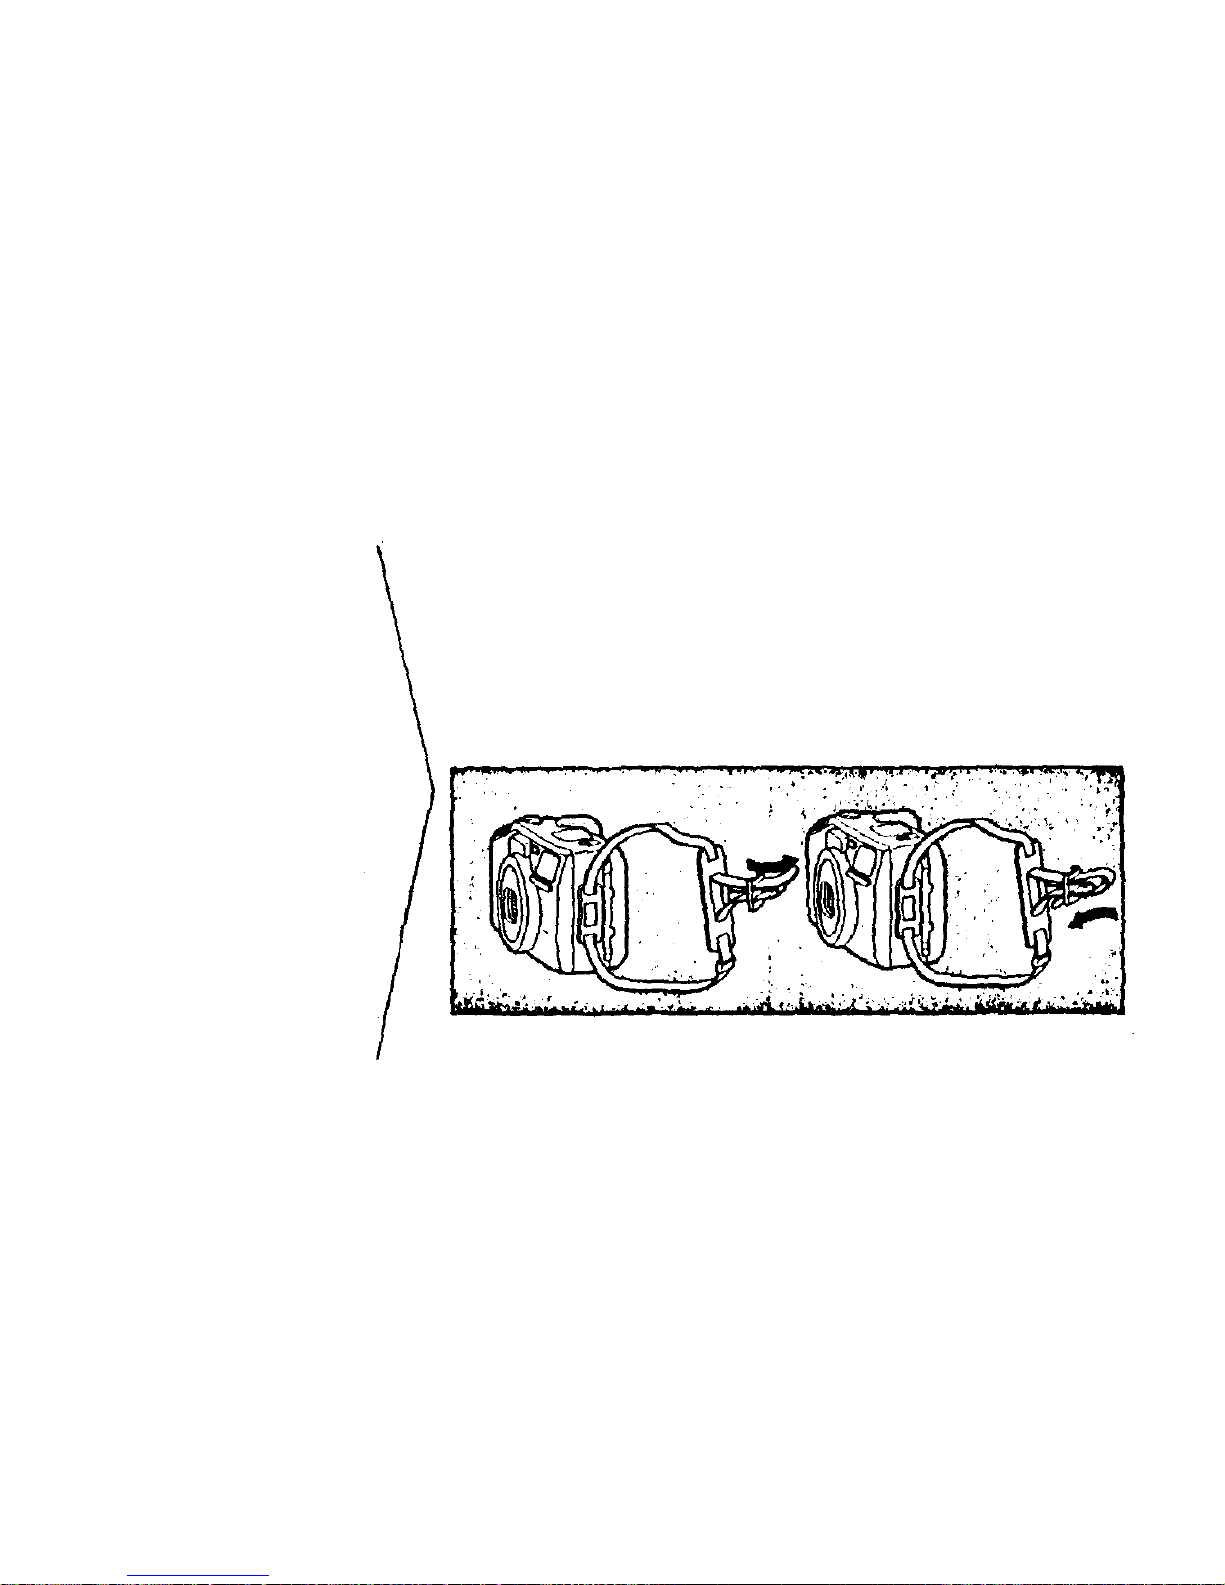
Mounting
the strap
Use of the
optional
Olympus case
Ho w t o put the strap on the camera
38
Page 40
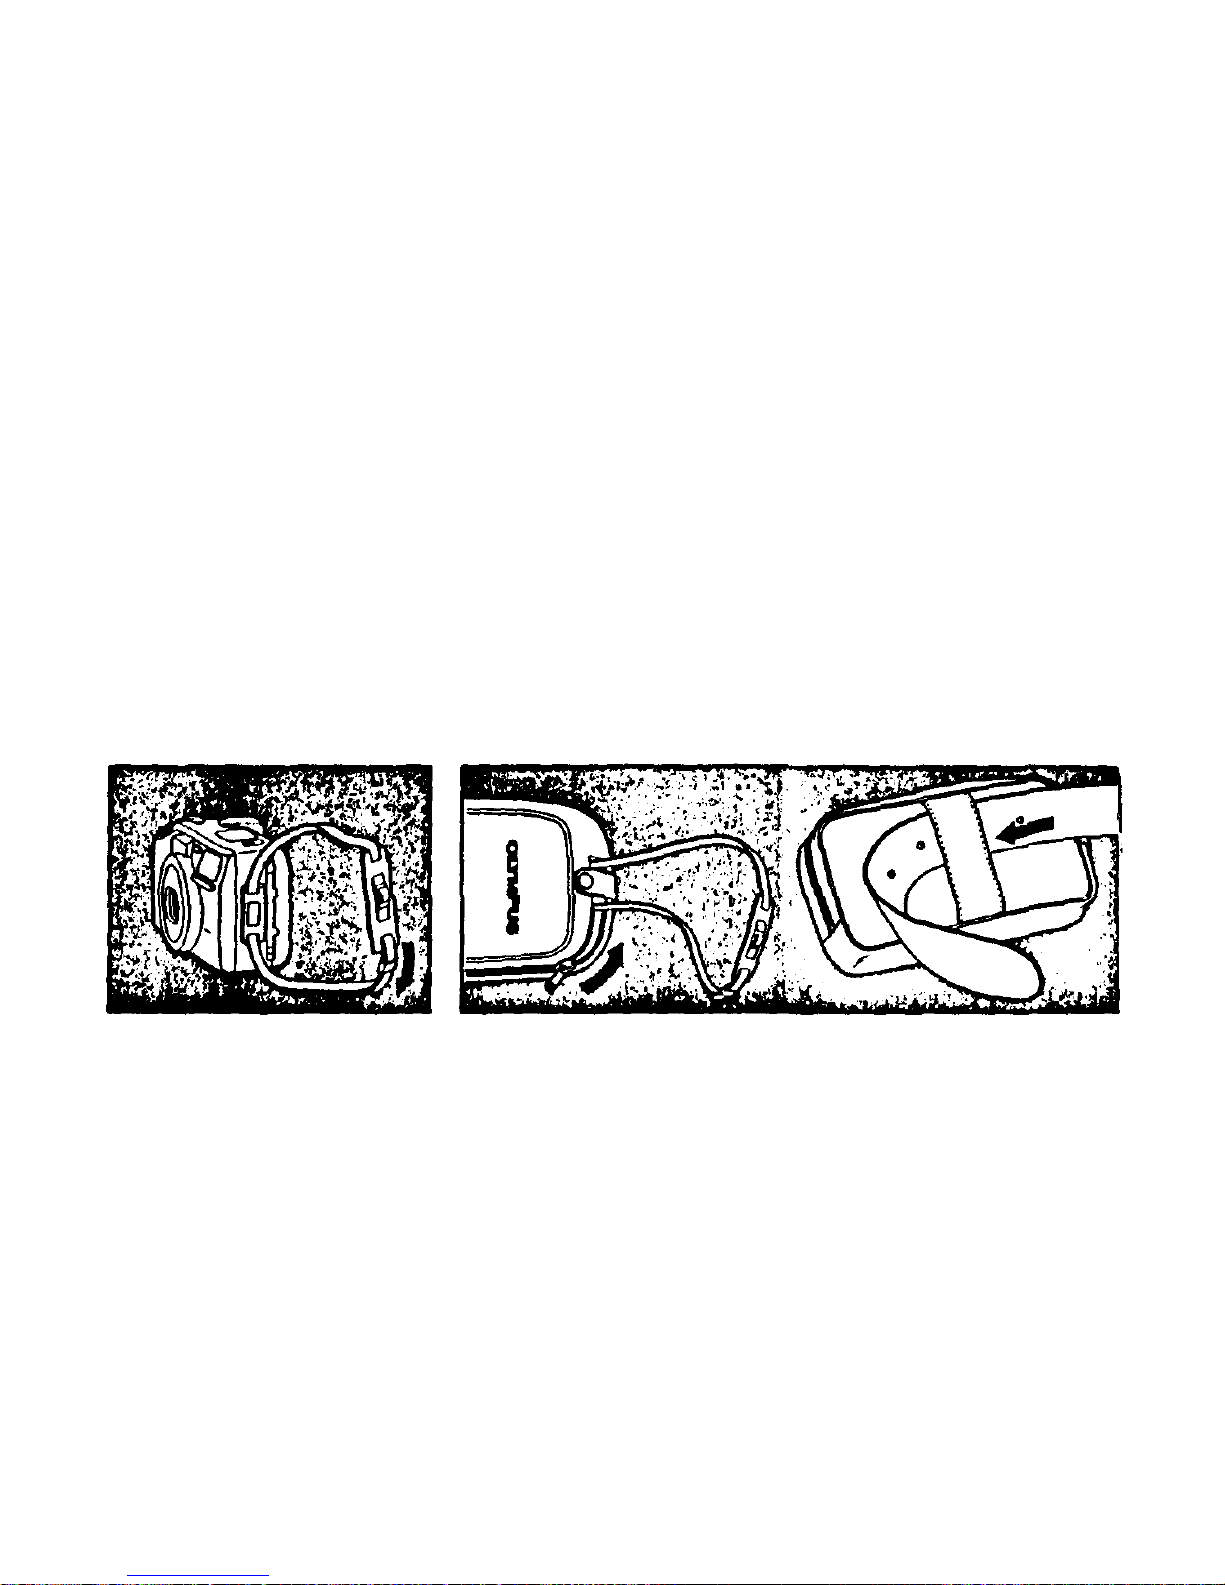
Ho w t o us e the ca s e
Mi ke sure to set t h e power switch
to OFF before the camera is
inserted int o the case.
39
Page 41
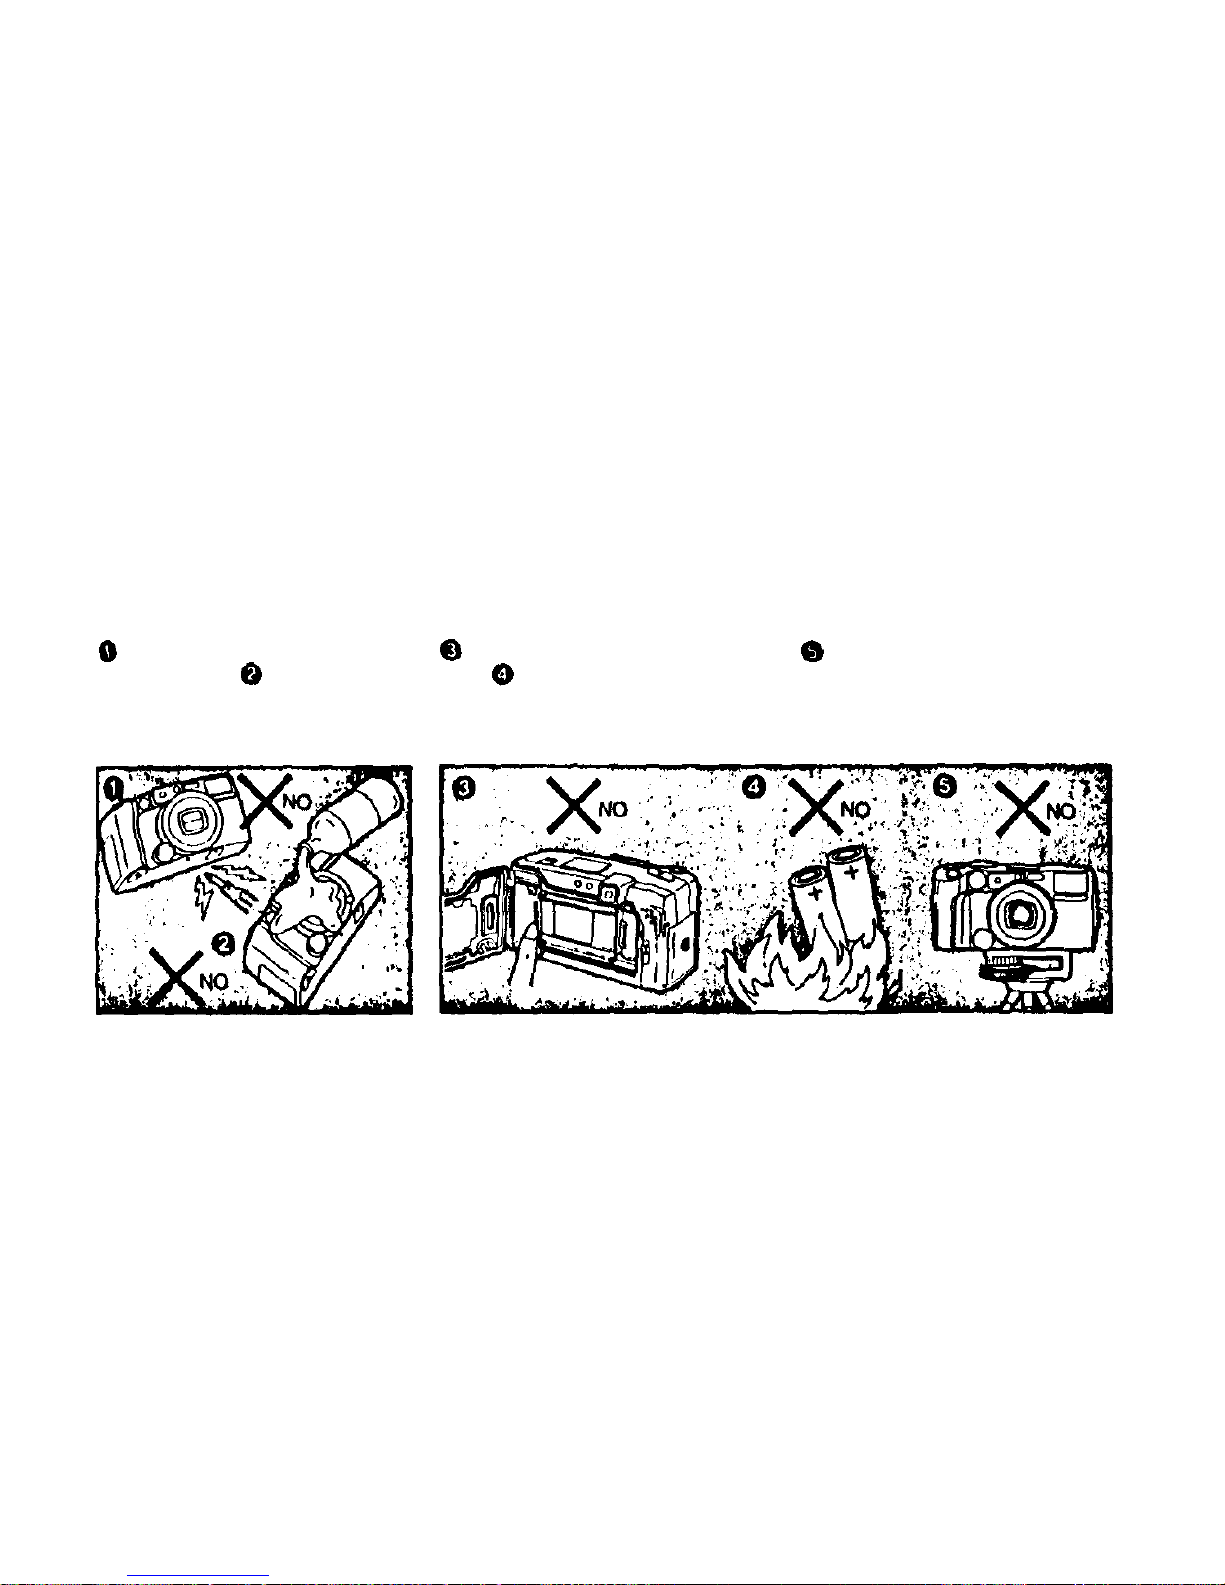
Care and storage
Do not try to disassemble the
camera yourself. Do not use
thinner, benzen or organic solvents to
clean t he camera .
Do not touch the DX readoff con-
tacts. Do not put used batteries
int o a fi re and do no t heat, disassem-
ble or try short them.
Do not rotate the camera f ur th er
once it is mounted on a tripod. Use
tripod swivel to vary direction.
40
Page 42
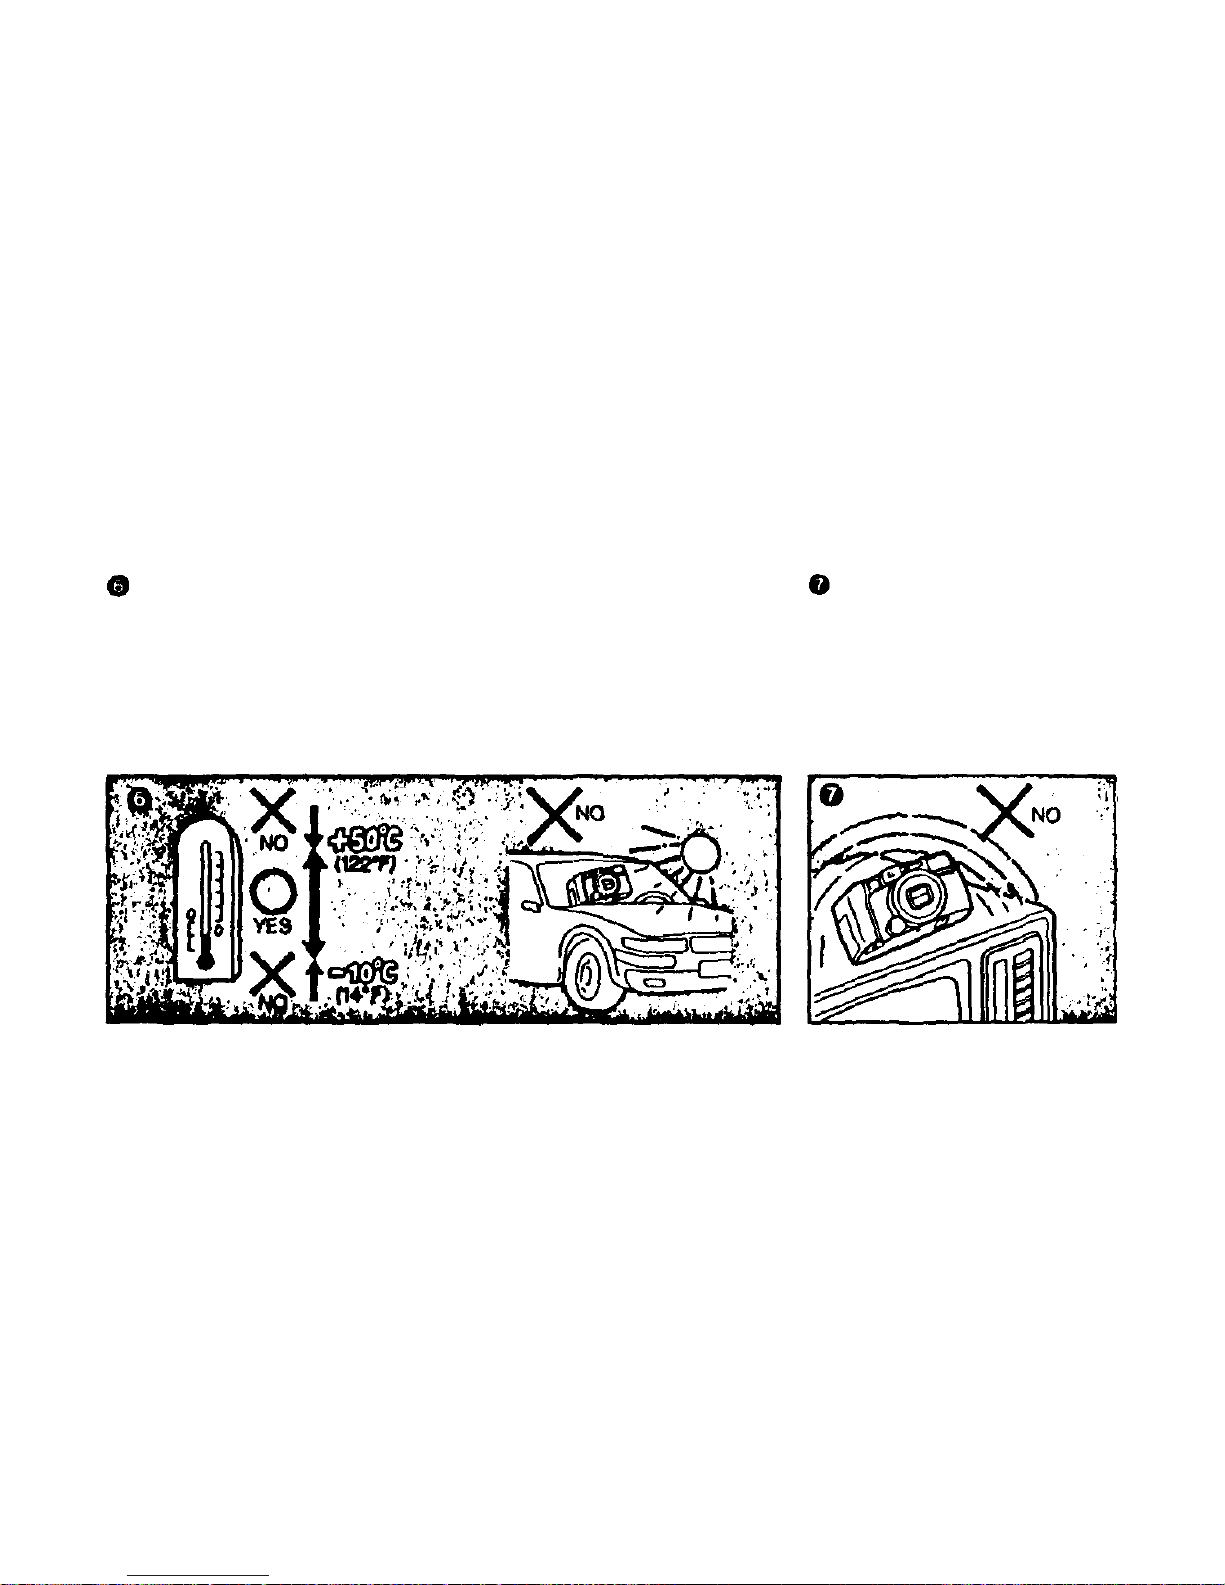
Do not expose the camera to
extreme heat (over 50°C or 122°F),
such as inside a car during the hot
summer weather, or to extreme cold
(below -10°C or 14°F).
Do not leave the camera near
magnetic fields, like on top of a
TV set, or radio.
In case of malfunction, take the
camera to your nearest Olympus
dealer or repair center.
41
Page 43

Questions and answers
Q:
What
kind of battery should I use?
A: Use two lithium Duracell DL-123A or two Panasonic
CR123A batteries. Don't install one new battery with
an old one. Change them both at th e same time.
Q: How long do the batteries last ?
A: Since long-life lithium batteries are used, approximate-
ly 30 rolls (24-exposure, half the shots with flash) can
be taken.
When the frequency with which the flash and zoom are
used is less, t h e batteries will last longer.
Q: The camera does not work. What should I do?
A: (1) Mak e sure the power switch is set to ON.
(2 ) Check to mak e sure that the batteries are loaded
and inserted corr ect ly.
(3) If the film has been rewound, the camera won't
work until new film is inserted.
Q: The camera does not focus correctly. What should I do?
A: (1) I n the foll owing situations, the camera's autofocus
mechanism may not function properly. Use the spot mode
when taking the following pictures.(Refer to P. 19)
Objects that reflect too much light Black objects
Pictures take n through a glass window or wire screening
Pictures including flames or smoke When the sun is
included in the picture.
(2) The Multi AF system built-in this camera shifts the
measuring distance according to the focal distance as
shown in the illustration.
In case there are any objects other than the primary
subjects within range of this measuring distance, the
camera m a y not focus on the subject. In such cases, use
the spot mo de. (Refer to P. 19)
42
Page 44
A: Battery performance will be reduced temporarily by
low temperatures, so it is recommended to bring spare
batteries wi th you. However, the ba tteries will function
properly again if the temperature returns to normal. In
cold weather keep the camera inside your coat until
ready to shoot.
Q: The flash doesn't fire. What should I do?
A: (1) Check to see if the flash mode is set to OFF.
(2 ) Wh e n th e flash is fired too often in succession,
flash charging will take longer, and th e f las h m a y no t
fire. Wait until the flash indicator lights.
Q:
The camera does not operate in cold weather. What
should I do?
43
Page 45
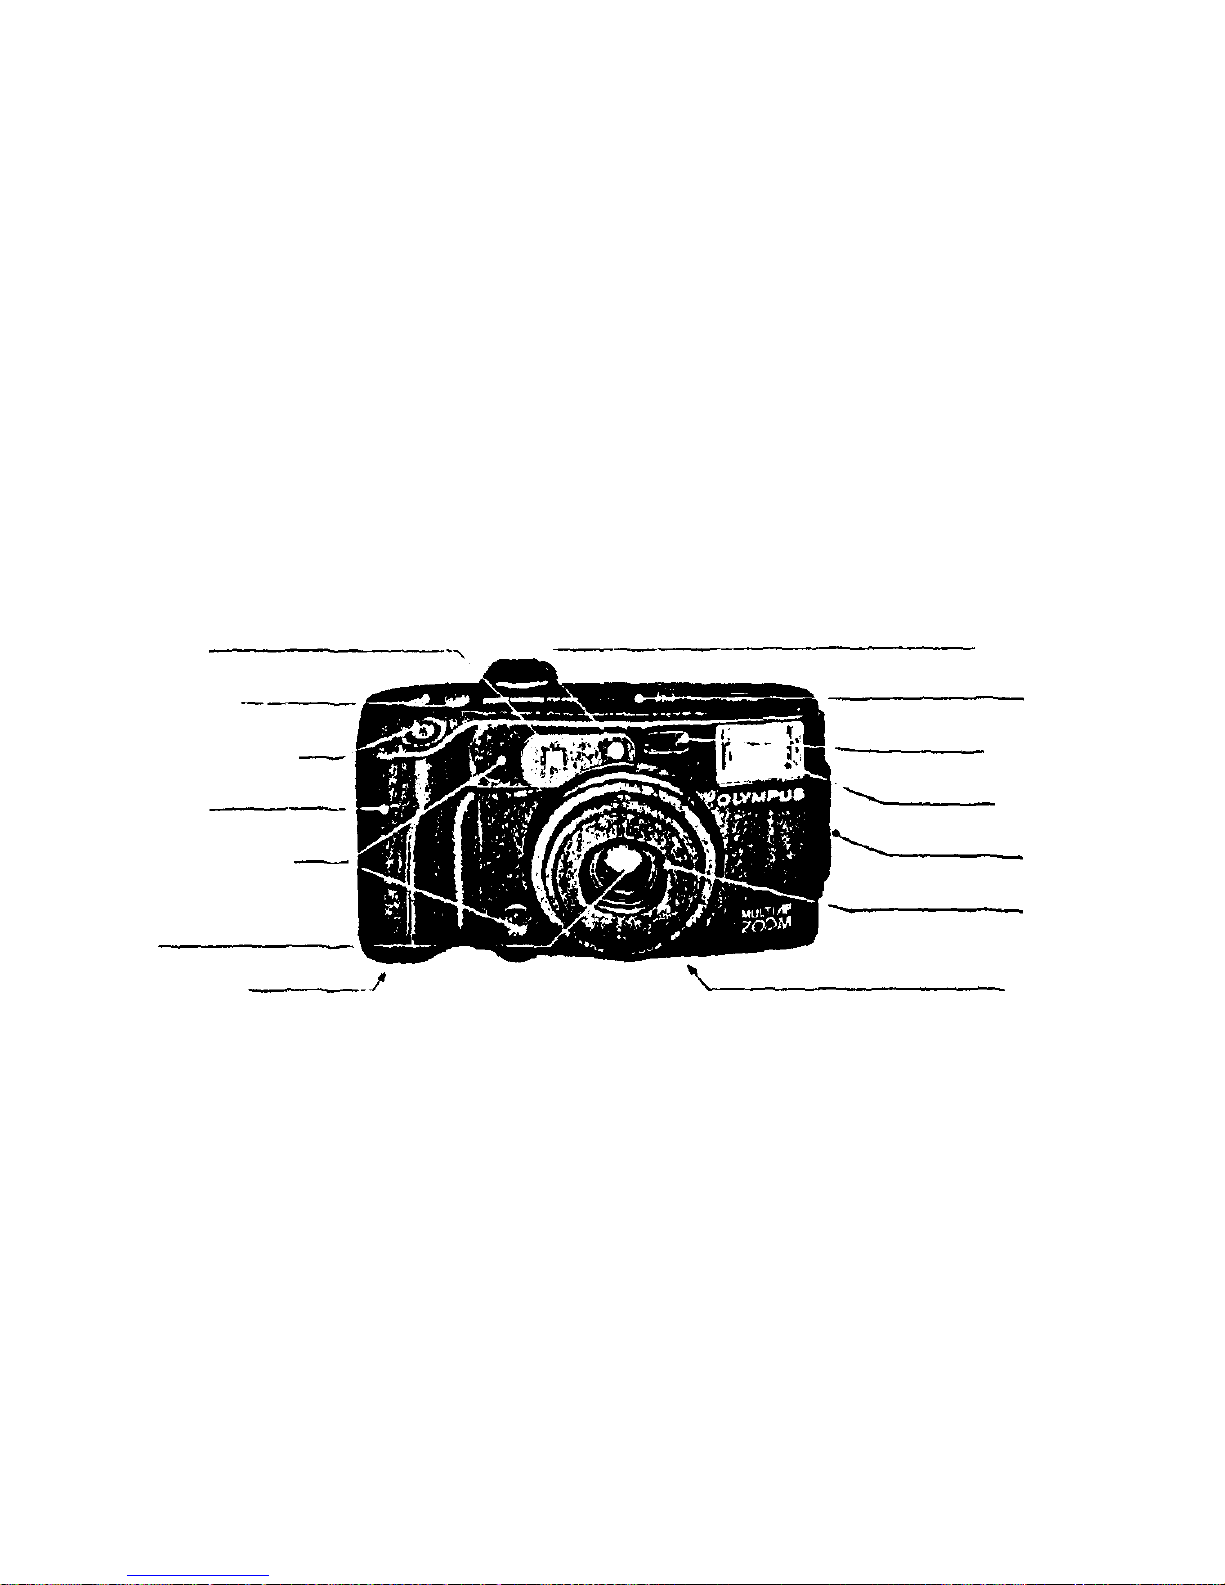
Description of controls
Remote control
Lens
Autofocus windows
Steady gr ip
Shutter release button
Power zoom
control button
Viewfinder
Tripod socket
Lens barrier
Strap eyelet
Flash reflector
Self-timer signal
LCD panel
SBC light sensor
44
Page 46
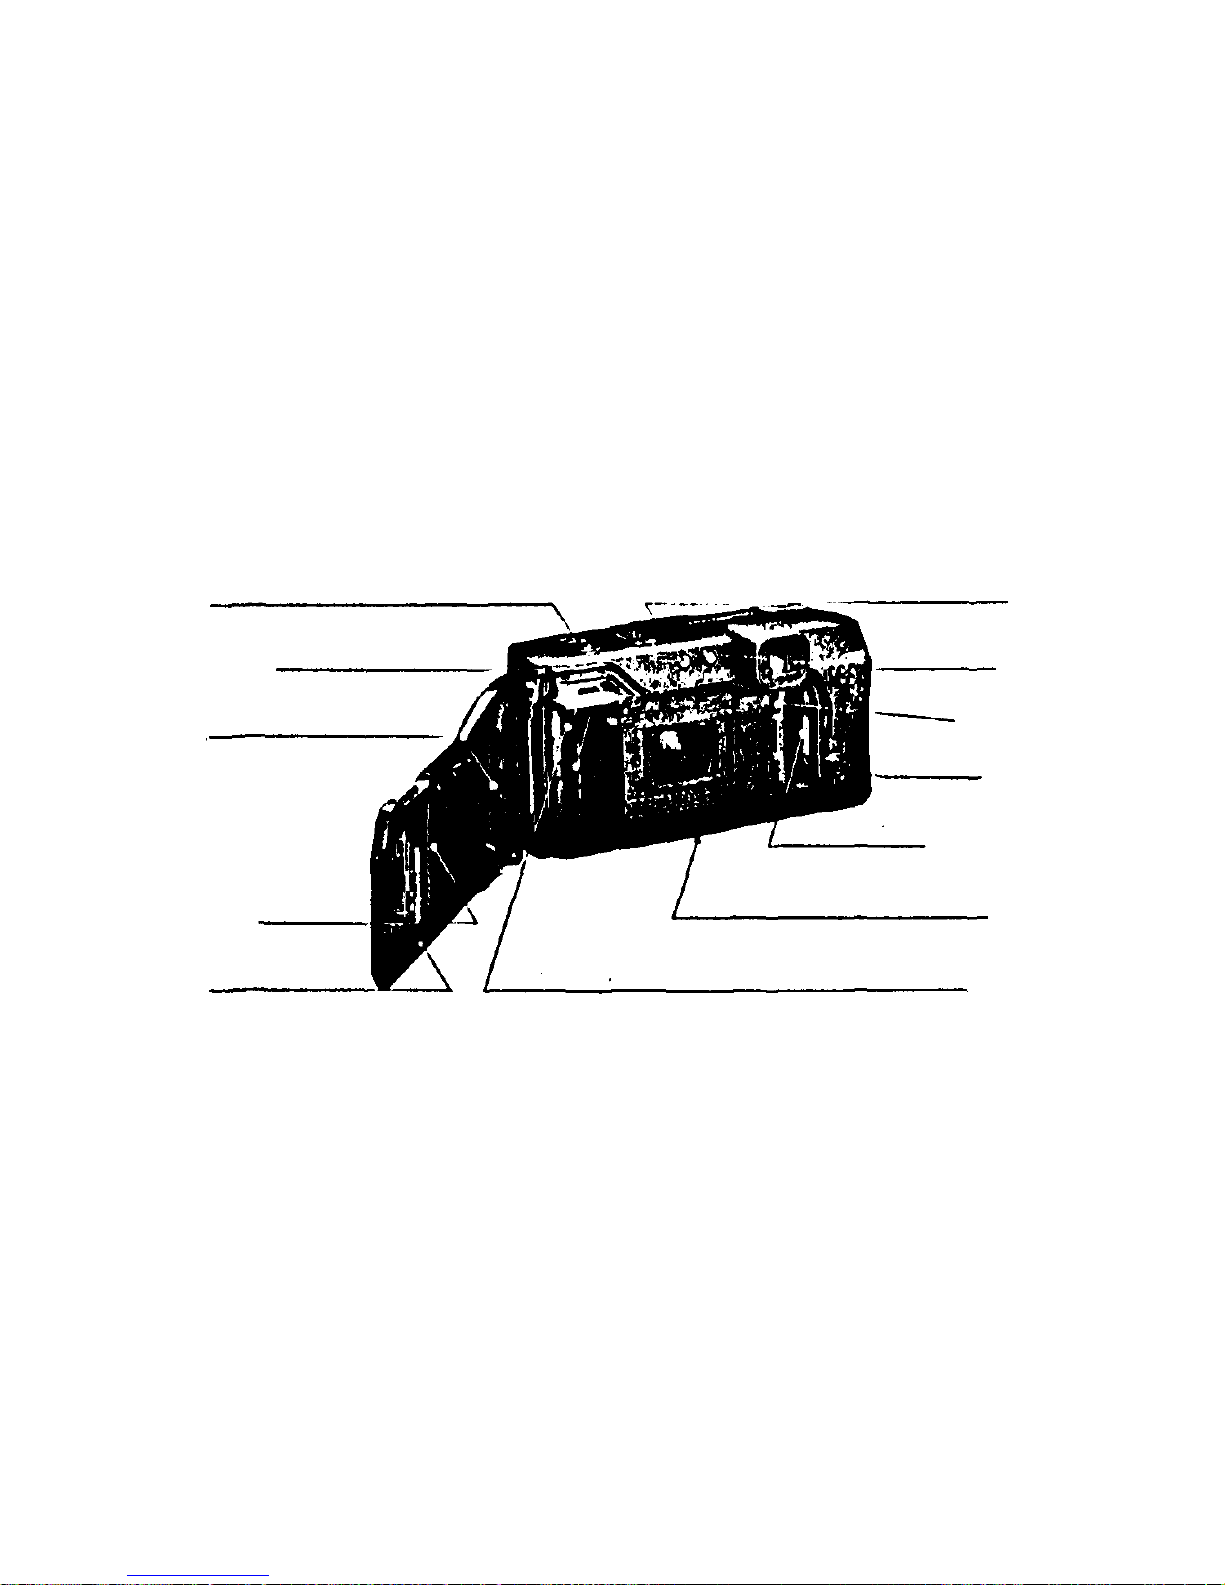
Power switch
DX read-off contacts
Film window
Film pressure plate
Camera back
Fla sh button
Fil m rewind shaft
Rewind button
Film loading indicator
Back cover lock
Film take-up spool
Subject button
45
Page 47
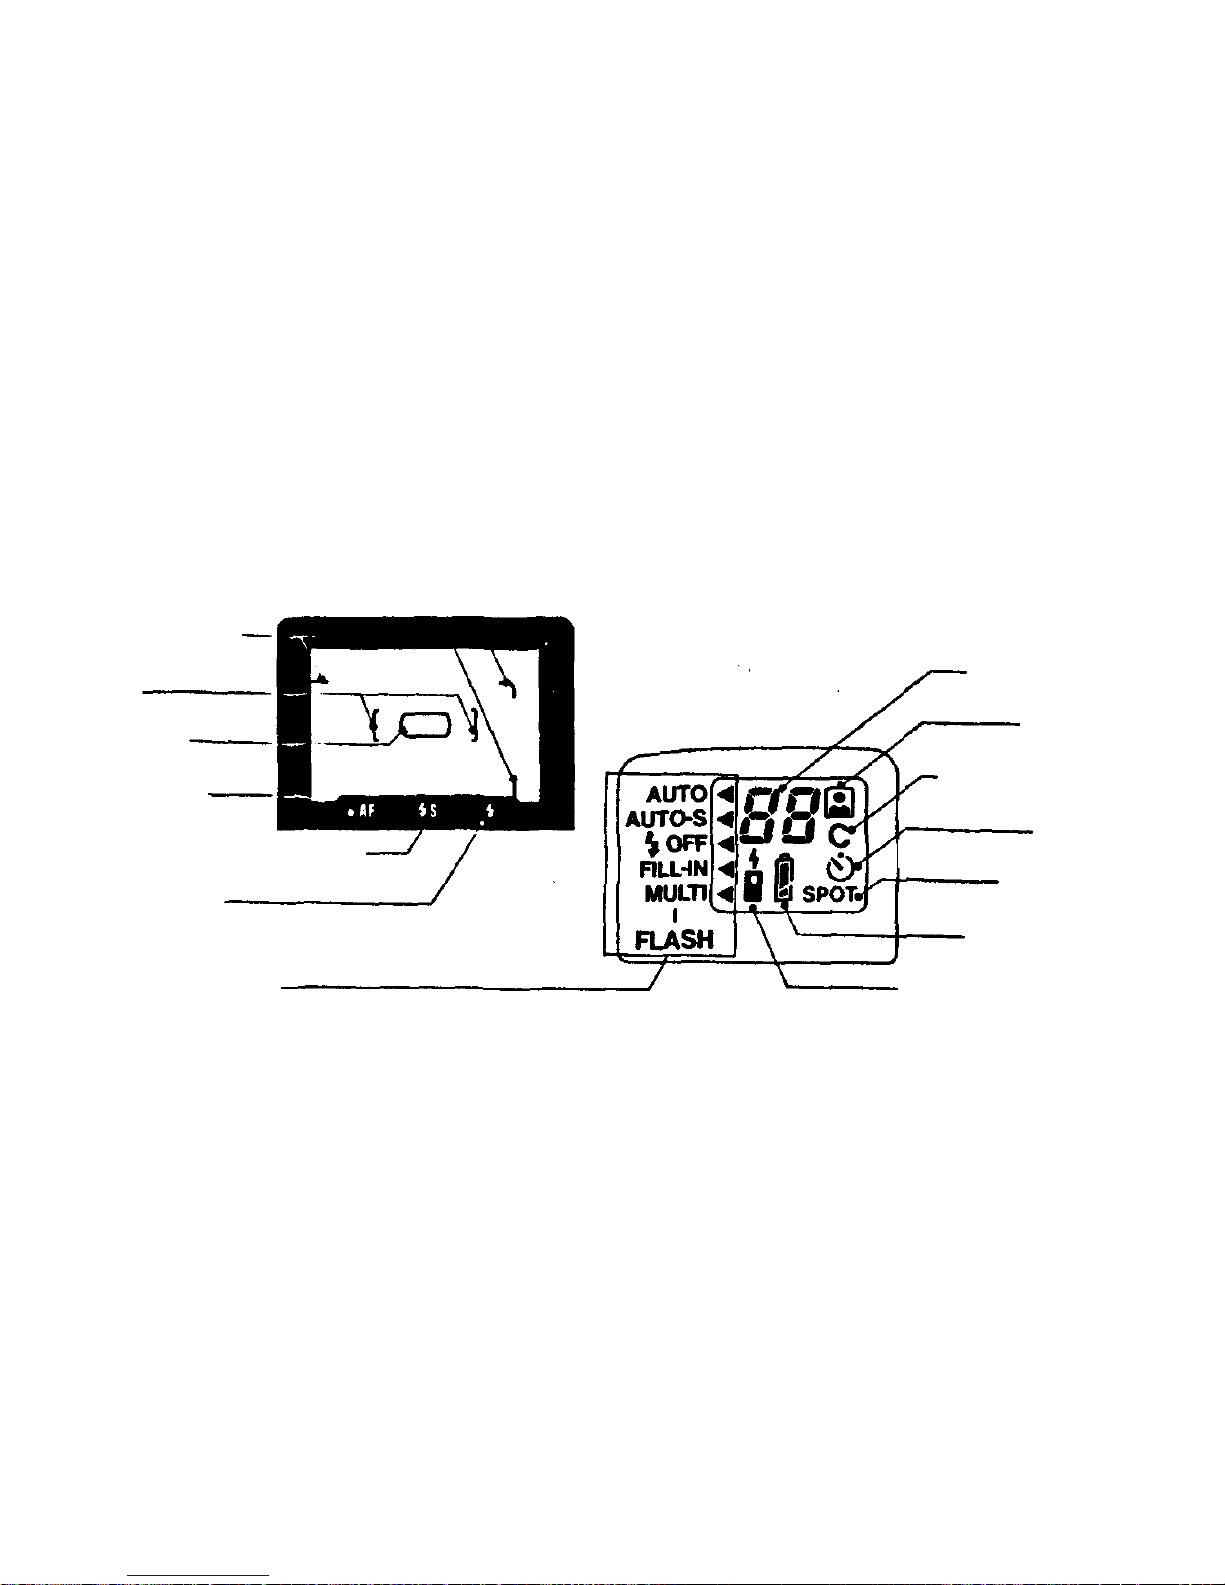
LCD panel
Viewfinder display
Flash mode indicator
Flash indicator
Flash AUTO-S mode indicator
AF indicator
Spot frame
Multi autofocus
frame
Close-up
correction marks
Remote control indicator
Battery co ndition
Sp ot metering
Self-timer
Continuous shooting
Auto zo o m
Exposure counter
46
Page 48

Specifications
Type: Full-automatic 35mm autofocus lens shutter camera
with built-in 38 -80 Zoom lens
Film format: 35mm standard DX coded film (24 x 36mm)
Lens: Olympus 38 - 80mm F4.5-6.4 lens with 7 elements
in 7 groups.
Possible
to use 35 mm
filters
with
filter
adapter.
Shutter: Programmed electronic shutter
Focusing: Active type multi autofocus system
Focus range 0.6m (2 ft) — (infinity)
Viewfinder: Kepler type zoom-finder
(with multi autofocus frame, spot f ra me , close-up
correction marks, AF indicator,
flash
indicator,
and AUTO-S flash warning indicator)
Exposure control: Automatic exposure control with pro-
grammed electronic shutter.
Center-weight average light metering, switchable to
Auto exposure range:
WIDE: EV4.3 (F4.5,1 sec.) - EV 16 (F11,1/500sec.)
TELE: EV5.4 (F6.4. 1 sec.) - EV17 (F16, 1/500 sec.)
Exposure counter:
Progressive
type,
displayed
in LCD
panel.
Self-timer: Electronic self-timer with 12 seconds delay.
Film speed range: Automatic setting with DX coded film
ISO50 - 3200 with color negative film (Actual setting
at 50, 100, 200, 400, 800, 1600. 3200. For other
intermediate f il m speeds, t h e camera is automatically
set to the
lower
speed.
For
non-DX
coded
film,
film
speed is set to ISO 100.)
Film loading:
Automatic loading (automatically advances
to first frame when camera back is closed)
Fil m advance: Automatic f ilm winding
Film rewind:
Automatic
film
rewind
(Automatic
rewind
activated at the end of film, automatic rewind stop).
spot metering
47
Page 49

Rewind possible at an y point wi t h rewin d but ton .
(Recycling time: approx. 0.2 — 3.5 sec. at normal
temperature)
Flash working range: (ISO 100 color negative film)
WIDE: 0.6m ( 2 ft) - 41 m (13.5 ft).
TELE: 0.6m (2 f t) — 2.9m (9.5 f t).
Flash working range: (ISO100 color n egative film)
WIDE:
0.6m (2 ft) - 8.2 m (26.9 ft),
TE L E 0.6m (2 ft) — 5.8m (19 ft)
AUTO (Automatic flash activation in low light and
backlight)
AUTO-S
(Red-eye
reducing, in low light and backlight)
OFF(No flash)
FI L L- I N (Forced activation)
MULTI (4 activation at fixed time of 1/6 sec.)
Battery check: Displayed in LCD panel
Power source: Two 3V lithium batteries (Duracell DL123A
or Panasonic CR123A, replaceable)
Dimensions: 135(W)mm x 70(H)mm x 57(D)mm
(5.3"x 2.8"x 2.2") (excluding protrusions)
Weight: 370g (13.1oz) (without batteries)
Remote control: Cordless remote control device with 1-
second a nd 3-second delay time.
* Specifications and design are subject to change without
notice.
Flash: Built-in flash
Flash Modes:
48
Page 50

OLYMPUS OPTICAL CO .LTD.
San-Ei Building 22-2, Nishi Shinjuku 1-chome, Shinjuku-ku, Tokyo, Japan Tel 03-340-2211
OLYMPUS CORPORATION
Crossways Park, Woodbury, New York 11797, USA. Tel 516-364-3000
OLYMPUS OPTICAL CO.(EUROPA) GMBH
Postfach 104906, Wendenstrasse 14-16, 2000 Hamburg 1, West Germany. Tel 040-2377-0
OLYMPUS OPTICAL C O (U.K.) LTD.
Copyright © OLYMPUS OPTICAL CO., LTD. (Tokyo) 1989
PRINTED IN JAPAN 0088.23MM
2-8 Honduras Street, London EC1Y OTX, England. Tel. 01-253-2772
 Loading...