

Page 1
DIGITAL CAMERA
INSTRUCTIONS
n Before using your camera, read this manual carefully to ensure correct
use.
n We recommend that you take test shots to get accustomed to your
camera before taking important photographs.
Page 2

Thank you for purchasing an Olympus digital camera. Before you start to use
your new camera, please read these instructions carefully to enjoy optimum
performance and a longer service life. Keep this manual in a safe place for
future reference.
Legal and other notices
•All contents of this publication are subject to change without notice.
•Although the contents of this publication have been carefully checked to
avoid errors, some may still occur. If you have a question about any points,
or find mistakes or omissions, please contact us.
•No part of this publication may be reproduced or reprinted except for
personal use without prior written permission from Olympus.
•Olympus makes no representations or warranties regarding any damages, or
benefit expected by using this unit lawfully, or any request from a third
person, which are caused by the inappropriate use of this product.
•Olympus makes no representations or warranties regarding any damages or
any benefit expected by using this unit lawfully which are caused by erasing
picture data.
•Olympus reserves all rights to this manual.
Radio and Television Interference
Change or modifications not expressly approved by the manufacturer may
void the user’s authority to operate this equipment. This equipment has been
tested and found to comply with the limits for a Class B digital device,
pursuant to Part 15 of the FCC Rules. These limits are designed to provide
reasonable protection against harmful interference in a residential installation.
This equipment generates, uses, and can radiate radio frequency energy and,
if not installed and used in accordance with the instructions, may cause
harmful interference to radio communications.
However, there is no guarantee that interference will not occur in a particular
installation. If this equipment does cause harmful interference to radio or
television reception, which can be determined by turning the equipment off
and on, the user is encouraged to try to correct the interference by one or
more of the following measures:
•Adjust or relocate the receiving antenna.
•Increase the distance between the camera and receiver.
•Connect the equipment to an outlet on a circuit different from that to which
the receiver is connected.
Only the RS-232C serial cable or USB cable should be used to connect the
camera to a personal computer (PC).
2
Page 3

Declaration of Conformity
Model Number: E-100RS
Trade Name: OLYMPUS
Responsible Party: Olympus America Inc.
Address: 2 Corporate Center Drive, Melville, New York 11747-3157
Telephone Number: 631-844-5000
This device complies with Part 15 of the FCC rules. Operation is subject to
the following two conditions:
(1)This device may not cause harmful interference, and
(2)This device must accept any interference received, including
interference that may cause undesired operation.
This Class B digital apparatus meets all requirements of the Canadian
Interference-Causing Equipment Regulations.
Trademarks
Windows
Macintosh
All other brand names and product names are trademarks of their respective
owners.
The standards for camera file systems referred to in this manual are the
“Design Rule for Camera File System/DCF” standards stipulated by the
Japan Electronics Industry Development Association (JEIDA).
U.S.A.
®
is a registered trademark of Microsoft Corporation.
™
is a trademark of Apple Computer Inc.
3
Page 4

Contents
Legal and other notices 2
Radio and television interference 2
Trademarks 3
Contents 4
Important safety instructions 11
Handling batteries 14
Handling the camera 17
Camera care and storage 18
Selecting batteries for your camera 19
LCD display and backlight 20
Main features 21
Package contents 23
Names of parts 25
Camera 25
Control panel indications 27
Viewfinder/Monitor indications (Picture information) 29
GETTING STARTED 31
1
Attaching the strap 32
Loading the batteries 33
Service life of NiMH battery 36
Using the AC power adapter (Optional) 37
Using the card 39
Card basics 39
Inserting the card 40
Ejecting the card 41
Selecting the card 42
Setting the date and time 43
Setting the mode dial 45
How to use the menu 46
Record mode menu list 49
Still picture record menu 49
Movie picture record menu 51
4
Page 5

Display mode menu list 53
Still picture display menu
—Shown when a still picture is displayed 53
Movie picture display menu
—Shown when a movie is displayed 54
How to use this instruction manual 55
RECORD AND DISPLAY BASICS 56
2
Turn the power on 58
How to use the viewfinder/monitor 59
Pre-recording check 60
Checking the batteries 60
Checking the card—Card check 61
Checking the remaining number of storable pictures
and remaining time 62
Number of storable pictures 63
Adjusting the diopter 64
Holding the camera 64
Using the shutter release correctly
—Pressing fully/halfway 65
How to press the shutter button and focus 65
Recording and display 66
Taking still pictures and displaying them 66
Taking still pictures 66
Quick view 68
Recording movies and displaying them 69
Recording movies 69
Displaying movies 70
Protection 72
Erasing images 73
Single frame erasure 73
All-frame erasure 74
Telephoto/Wide-angle shooting—Zoom 75
Using the flash—Auto flash 76
Turning off the power 77
5
Page 6
Contents (Cont.)
SHOOTING PICTURES CONSECUTIVELY ..........79
3
Shooting pictures consecutively at high speed
—Sequential mode 80
Selecting the sequential mode 81
Sequential shooting/AF sequential shooting 82
Selecting the sequential shooting speed 80
Recording pictures just before shutter release
—Pre-capture 83
Displaying sequential shots 161
DIFFERENT SHOOTING OPTIONS TO SUIT EVERY
4
APPLICATION ............................................000
Taking pictures under different conditions 86
Taking portrait pictures 86
Taking pictures of moving subjects 86
Taking pictures focusing on both subject
and the background 87
Taking night scenes 88
Using the scene program (S- Prg) mode 89
Setting the aperture—Aperture priority mode 91
Setting the shutter speed—Shutter priority mode 92
Setting the aperture and shutter speed
—Manual recording 93
Taking close-up pictures—Macro mode 94
Taking pictures using the self-timer 95
Taking pictures using the remote control 96
RECORD MODE SELECTION ............................99
5
Selecting the record mode/picture size 100
Setting picture size for TIFF recording—TIFF 102
Setting the picture size/record mode for SQ
recording—SQ 103
6
Page 7
SHOOTING WITH FLASH ............................105
6
Selecting the flash pattern 106
Red-eye reduction flash 107
Fill-in flash (forced activation) 107
Off (flash override) 107
How to use the flash 108
Correcting the amount of light produced by the
flash—Flash intensity control 109
Selecting the flash light emission timing
—Slow synchronization flash mode 110
Shooting with an external flash 112
Taking pictures using both the main flash and the
FL-40 external flash 112
Taking pictures using the FL-40 external flash by itself 114
Taking pictures with commercially available external flashes 115
Usable commercially available external flashes 116
ADVANCED SHOOTING TECHNIQUES ..........117
7
Focusing 118
Subjects that are difficult to focus on 118
Focusing on subjects that are not in the center of the frame
—Focus lock 119
Creative focusing—Manual focus 120
A reliable time-saving way to focus—FULL-TIME AF 121
Changing the focus range—AF MODE 122
Compensating for image blur—Stabilization system 123
Using the 27X zoom—SUPER TELE 124
Brightness/exposure 125
Changing the brightness—Exposure compensation 125
Changing the metering area
—Metering mode 126
Locking the ISO—ISO setting 127
Locking the exposure—AE lock 128
Metering the exposure of more than one point in the frame
—MULTI METERING 130
7
Page 8

Contents (Cont.)
Changing the tint 132
Selecting the tint—PRE-SET 132
Customizing the tint 134
Other recording 136
Recording with special effects—FUNCTION 136
Recording sound when taking a picture
—Sound record 137
Recording pictures sequentially with different exposures/
white balance—Auto bracket 139
DISPLAY FUNCTIONS ..................................143
8
Displaying a single image—Single image display 144
Enlarging pictures—Close-up display 145
Rotating and checking vertically oriented pictures 146
Displaying multiple pictures at one time
—Index display 147
Setting the number of pictures displayed
on the screen—4/9/16 frames 148
Displaying multiple pictures automatically in
sequence—Slide-show 149
Displaying picture information 150
Still picture information 150
Movie picture information 151
Displaying on TV 152
Adjusting the sound volume 153
Adding a sound memo to recorded still pictures 154
Initializing a card—CARD SETUP 159
Image copy between cards 162
PRINT SETTINGS ........................................164
9
About print settings 166
Print all frames stored in a card
—All-frame print reserve 168
Print selected frames
—Single-frame print reserve 170
Resetting print reserve 176
8
Page 9

FUNCTION SETTINGS FOR EASIER
10
OPERATION................................................177
Mode setting menu 178
How to use the mode setting menu screen 179
Resetting the camera’s settings when turning
it off—ALL RESET 182
Resetting the camera’s settings when turning
it on—ALL RESET—CUSTOM 184
Setting image sharpness 186
Changing the shutter sound effect 187
Changing the camera warning
sound volume 188
Setting the assist lamp for focusing
—AF ILLUMINATOR 189
Displaying the image during recording
—REC VIEW 190
Setting the times for power saving mode
—SLEEP 191
Selecting the file numbering system
—FILE NAME 192
About the file No. and folder No. 192
The file No. and folder No. in each mode 192
Canceling image writing to the card
—SHOT CANCEL 195
Adjusting the brightness of the monitor 196
Selecting meters or feet as a measurement unit
—m/ft 197
Changing the number of movie frames
per second— RATE 198
9
Page 10

Contents (Cont.)
TRANSFERRING PICTURES TO A
11
COMPUTER ................................................199
Transferring your pictures to a
personal computer 000
Connecting directly to a computer by cable 000
Saving directly from a card 000
Connecting to a computer using the exclusive
USB cable 000
Connecting to a computer 000
Removing the card 000
MISCELLANEOUS ........................................211
12
Troubleshooting 212
Operating problems 212
Problems with images 216
User maintenance 219
After use 219
Cleaning the camera 219
Connectable devices—System chart 220
Error codes 221
Optional items 223
Compatibility of the picture data 223
Specifications 224
Index 227
10
Page 11
CAUTION: TO REDUCE THE RISK OF ELECTRICAL SHOCK, DO NOT
REMOVE COVER (OR BACK). NO USER-SERVICEABLE PARTS INSIDE.
REFER SERVICING TO QUALIFIED OLYMPUS SERVICE PERSONNEL.
RISK OF ELECTRIC SHOCK
DO NOT OPEN
CAUTION
A lightning flash with an arrowhead, enclosed in a triangle, alerts
you to the presence of uninsulated voltage points inside the
product which could cause a serious electrical shock.
An exclamation point enclosed in a triangle alerts you to important
operating and maintenance instructions in the documentation
provided with the product.
WARNING!
TO AVOID THE RISK OF FIRE OR ELECTRICAL SHOCK, NEVER EXPOSE
THIS PRODUCT TO WATER OR OPERATE IN A HIGH HUMIDITY
ENVIRONMENT.
Important safety instructions
11
Page 12

Important safety instructions (cont.)
1 Read All Instructions — Before you use the product, read all
operating instructions.
2 Save These Instructions — Save all safety and operating
instructions for future reference.
3 Heed Warnings — Read carefully and follow all warning labels on
the product and all warnings described in the instructions.
4 Follow Instructions — Follow all instructions provided with this
product.
5 Cleaning — Always unplug this product from the wall outlet before
cleaning. Use only a damp cloth for cleaning. Never use any type of
liquid or aerosol cleaner, or any type of organic solvent to clean this
product.
6 Attachments — For your safety, and to avoid damaging the product,
use only accessories recommended by Olympus.
7 Water and Moisture — Never use this product around water (near a
bathtub, kitchen sink, laundry tub, wet basement, or swimming pool).
8 Location — To avoid damage to the product and to avoid personal
injury, never place this product on an unstable stand, tripod, bracket,
table or cart. Mount only on a stable tripod, stand, or bracket. Follow
the instructions which describe how to safely mount the product, and
use only the mounting devices recommended by the manufacturer.
9 Power Sources — Connect this product only to the power source
described on the product label. If you are not sure about the type of
power supply in your home, consult your local power company.
Refer to your operating instructions for information on using the
product with batteries.
10 Grounding, Polarization — If this product can be used with an
optional AC adapter, the adapter may be equipped with a polarized
alternating current line plug, a plug with one blade wider than the
other. This safety feature allows the plug to fit into the power outlet
only one way. If you cannot insert the plug into the wall outlet, pull it
out, reverse it, and then insert it again. If the plug still fails to fit,
contact an electrician and have the receptacle replaced.
11 Protecting the Power Cord — The power supply cord should be
routed so it will not be walked on. Never place a heavy object on
the power cord and never wrap the power cord around the leg of a
table or chair. Keep the areas around the power cord connection
points, at the power outlet and at the product connection, free of all
obstacles.
12
Page 13

12 Lightning — If a lightning storm occurs while using the optional AC
adapter, unplug the adapter power cord from the wall outlet
immediately. To avoid damage from unexpected power surges,
always unplug the AC adapter from the power outlet and disconnect
it from the camera when the camera is not in use.
13 Overloading — Never overload wall outlets, extension cords, power
strips, or other power connection points with too many plugs.
14 Foreign Objects, Spillage — To avoid personal injury from fire or
electrical shock from contact with internal high voltage points, never
insert a metal object into the product. Avoid using the product
where there is a danger of spillage.
15 Servicing — Refer all servicing to qualified personnel. Attempting to
remove the covers or disassemble the product, could expose you to
dangerous high voltage points.
16 Damage Requiring Service — While using the optional AC adapter,
if you notice any of the conditions described below, unplug the AC
adapter from the wall outlet and refer servicing to qualified service
personnel:
a) If liquid has been spilled, or any object has fallen into the
product.
b) If the product has been exposed to water.
c) If the product does not operate normally while following
operating instructions. Adjust only the controls described in the
operating instructions as improper adjustment of other controls
could damage the product, requiring extensive repair work by a
qualified technician to restore the product to normal operation.
d) If the product has been dropped or damaged in any way.
e) If the product exhibits a distinct change in performance, this
indicates a need for servicing.
17 Replacement Parts — When replacement parts are required, make
sure that the service center uses only parts recommended by the
manufacturer to ensure that the replacement parts have the same
characteristics as the originals. Unauthorized substitution of parts
could cause a fire, electrical shock, or create other hazards.
18 Safety Check — Upon completion of servicing or repairs, ask the
service technician to perform safety checks to determine that the
product is in good working condition.
19 Heat — Never use or store this product near a heat source such as
a radiator, heat register, stove, or any type of equipment or
appliance which generates heat, including stereo amplifiers.
13
Page 14
Important safety instructions (cont.)
WARNING!
• Keep batteries away from children.
• If a child swallows a battery, seek medical attention immediately.
• Dispose of lithium batteries promptly and safely in compliance with
local laws regarding the disposal of such items.
• To avoid causing a fire or minor burns, always handle lithium
batteries carefully.
• Never attempt to charge the lithium battery, disassemble it, heat it
above 212°F (100°C) or incinerate it.
• To ensure good contact, wipe the battery with a clean, dry cloth
before use.
• To avoid short circuiting the +/– sides of the battery, never handle a
lithium battery with a metal tool, tweezers, etc.
Danger: If the product is used without observing the information
Warning: If the product is used without observing the information
Caution: If the product is used without observing the information
given under this symbol, serious injury or death may
result.
given under this symbol, injury or death may result.
given under this symbol, minor personal injury, damage
to the equipment, or the loss of valuable data may result.
Handling Batteries
Follow these important guidelines to prevent the batteries from leaking,
overheating, burning, exploding, or causing electrical shock or burns.
DANGER
1 When using NiMH batteries, use only Olympus brand NiMH
batteries and charger.
2 Never load batteries with their +/– terminals reversed. Never force
batteries into the battery compartment.
3 To prevent causing battery leaks or damaging their terminals,
carefully follow all instructions regarding the use of batteries. Never
attempt to disassemble a battery or modify it in any way, with
soldering, etc.
4 Take precautions when carrying or storing batteries to prevent them
from coming into contact with any metal objects like jewelry, pins,
fasteners, etc.
14
Page 15

5 Never heat batteries or incinerate them.
6 Never attempt to connect a battery directly to a power outlet, or to a
cigarette lighter in a vehicle.
7 If battery fluid gets into your eyes, flush your eyes immediately with
clear, cold running water and seek medical attention immediately.
WARNING
1 Keep batteries dry at all times. Never allow them to come into
contact with fresh water or salt water.
2 To prevent batteries from leaking, overheating, or causing a fire or
explosion:
• Use only batteries recommended for use with this product.
• Never heat batteries, incinerate them, or attempt to disassemble
them.
• Never mix batteries (old and new batteries, charged and
uncharged batteries, batteries of different manufacture or capacity,
etc.).
• Never attempt to charge alkaline or lithium batteries.
• Load batteries carefully as described in the operating instructions.
Never reverse their polarity when loading.
• Do not use batteries if their body is not covered by the insulating
sheet or if the sheet is torn as it may cause fluid leak, fire, or
injury. Do not use these batteries even if they are sold in stores.
3 If NiMH batteries are not charged within the specified time, stop
charging them and do not use them.
4 Before loading, always inspect batteries carefully for leaks,
discoloration, warping, or any other abnormality.
5 Always store batteries out of the reach of small children. If a child
accidentally swallows a battery, seek medical attention immediately.
6 If a battery leaks fluid onto your clothing or skin, remove the clothing
and flush the affected area with clean, running cold water
immediately. If the fluid burns your skin, seek medical attention
immediately.
7 Never attempt to modify the battery compartment on the camera,
never insert anything (other than the recommended battery) into the
battery compartment.
15
Page 16

Important safety instructions (cont.)
CAUTION
1 Olympus NiMH batteries are intended for use only with Olympus
digital cameras. Never use these batteries with any other device.
2 Never subject batteries to strong shocks or continuous vibration.
3 Never mix batteries (old and new batteries, charged and uncharged
batteries, batteries of different manufacture or capacity, etc.).
4 Always charge sets of batteries (2 or 4) together.
5 Always charge NiMH batteries before using them for the first time, or
if they have not been used for a long period.
6 While the camera is not in use, always remove the batteries to
prevent accidental leakage which could damage the battery
compartment.
7 If a battery leaks, becomes discolored or deformed, or in any other
way becomes abnormal during operation, stop using the camera
and consult your dealer or an authorized Olympus service center.
Continued use may result in fire or electric shock.
8 Never store batteries where they will be exposed to direct sunlight,
or subjected to high temperatures in a hot vehicle, near a heat
source, etc.
9 Batteries may become hot during prolonged use. To avoid minor
burns, never remove them immediately after using the camera.
16
Page 17

Handling the Camera
WARNING
1 Use caution when taking flash pictures at close range. When you
fire the flash, you must be at least 3 ft. away from the faces of your
subjects, especially when taking pictures of infants and small
children. Firing the flash too close to the subject's eyes could cause
a momentary loss of vision.
2 To avoid damaging your eyes, never aim the camera directly into the
sun, or any other extremely bright light source.
3 To avoid causing a fire or explosion, never use the camera near
flammable or explosive gases.
4 Always use and store the camera out of the reach of young children
and infants to prevent the following dangerous situations which
could cause serious injury:
• Becoming entangled in the camera strap, causing strangulation.
• Accidentally swallowing a battery or small part.
• Accidentally firing the flash into their own eyes or into the eyes of
another child.
5 To avoid the hazards of fire or electrical shock, store the camera in a
cool, dry location where it will not be subjected to high humidity or
dust.
6 To avoid minor burns, never cover the flash with your hand when it
is fired. Never touch the flash unit after continuous use. The flash
unit becomes very hot during continuous operation.
7 If the camera is accidentally dropped in water, or if liquid is spilled
into the camera, stop using the camera, allow the camera to dry,
and then remove the batteries. Contact the nearest Olympus
authorized service center.
17
Page 18

Important safety instructions (cont.)
CAUTION
1 During operation of the camera, if you notice any unusual odors,
noise, or smoke around the camera, immediately switch the camera
off, disconnect the optional AC adapter (if it is connected), and allow
the camera to sit idle for a few minutes to allow it time to cool. Take
the camera outdoors, away from flammable objects, and carefully
remove the batteries to avoid burning your hands. Contact the
nearest Olympus service center immediately.
2 Never attempt to disassemble the camera. The internal circuits
contain high voltage points which could cause serious burns or
electrical shock.
3 To avoid dangerous electrical shock, never hold or operate the
camera with wet hands.
4 To avoid damaging the camera or causing a fire, never expose the
camera to excessive heat.
CAUTION
Camera Care and Storage
• Never store or use the camera for long periods in locations subject to
direct sunlight, high humidity, extreme variation in temperature, or
strong shocks and constant vibration. Protect the camera at all times
from dust and sand.
• Never store the camera near any type of appliance or equipment
which generates high temperatures, low temperatures, high or low
humidity, or a strong magnetic field. Never use the camera in a factory
or laboratory where flammable gases are present.
• Never shake the camera or subject it to shock or strong vibration.
• To avoid damaging its precision lens, never leave the camera pointing
directly into the sun.
• Before storing the camera for a long period, remove the batteries.
Select a cool, dry location for storage to prevent condensation or mold
from forming inside the camera. After storage, test the camera by
pressing the shutter release button to make sure that it is operating
normally.
• When the camera is mounted on a tripod, adjust the tripod head to reposition the camera; do not twist the camera.
• Never touch the flash after it has been fired. Avoid using the flash for
extended periods. Allow it to cool occasionally between shots.
• To avoid injury from electrical shock, never attempt to disassemble or
modify the camera in any way.
18
Page 19

CAUTION
Selecting Batteries for Your Camera
• This camera can use four AA NiMH batteries, four AA Alkaline
batteries, four AAlithium batteries, four AA NiCd batteries, or two CRV3 lithium battery packs. Use of Olympus brand batteries is strongly
recommended.
• Alkaline battery performance is limited, especially at low
temperatures. Using NiMH batteries is recommended.
• AA manganese batteries cannot be used with this camera.
• Always follow the battery recommendations and loading instructions.
Incorrectly loading the batteries could cause the batteries to leak or
overheating.
• When using the camera on battery power at low temperatures, try to
keep the camera and extra batteries as warm as possible. Batteries
which run down at low temperatures may be restored after they are
warmed at ambient temperature.
• Perspiration or oil from your hands on the battery contacts could
prevent them from operating. Before loading batteries, wipe the
terminals with a dry, clean cloth.
• Before going on a long trip, especially before traveling abroad,
purchase an ample supply of extra batteries. The recommended
batteries may be difficult to obtain while traveling.
• Always recharge NiMH or NiCd batteries with a charger
recommended for use with these batteries.
• Before using NiMH or NiCd batteries, always read the instructions
provided with purchase of these batteries.
• To avoid personal injury or damage to the camera, always inspect
batteries before loading. If you notice leaking, damage to the battery
cover or insulation, discoloration, warping or any other abnormality do
not use the batteries.
• Recommended temperature ranges for NiMH batteries:
Operation..................................... 32° ~ 104°F
Charge......................................... 32° ~ 104°F
Storage........................................ –4° ~ 86°F
• Using, charging, or storing the batteries outside these ranges could
shorten battery life or affect battery performance. Always unload the
batteries from the camera before storing the camera and batteries for
a long period.
19
Page 20

Important safety instructions (cont.)
NOTES
LCD Display and Backlight
● Do not point the viewfinder towards strong light like the sun, as this may
damage interior of the viewfinder.
● The backlight built into the monitor and control panel has a limited service
life. When the monitor gets dark and jittery, consult your nearest Olympus
dealer.
● In places subject to low temperatures, the backlight may take a long time to
turn on or its color may change temporarily. When using the camera in
extremely cold places, it is a good idea to occasionally place it in warm
place. A backlight exhibiting poor performance due to low temperatures will
recover in normal temperatures.
● Do not push the monitor forcibly; otherwise the image may become vague,
resulting in a Display mode failure or damage to the monitor.
● When a subject is viewed diagonally in the camera, the edges may appear
zigzagged on the monitor. This is not a malfunction; It will be less
noticeable in Display mode.
● A strip of light may appear on the top/bottom of the monitor, but this is not a
malfunction.
● The LCD display is made with high-precision technology. However,
black spots or bright spots of light may appear constantly on the LCD
display. Due to its characteristics or the angle at which you are
viewing the monitor, the spot may not be uniform in color and
brightness. This is not a malfunction.
20
Page 21

Main features
Sequential shooting at high shutter speeds (max. 15
n
frames/second) in all modes except TIFF. Shutter speed
can be selected from 10, 7.5 and 5 frames/second.
Pre-capture allows images to be recorded just before
n
the Shutter button is pressed. (P. 00)
10X optical zoom lens with a stabilization system plus
n
2.7X Super-telephoto allows you to shoot pictures
equivalent to 27X zoom. (P. 00)
Can use either SmartMedia (SSFDC) memory card or
n
CompactFlash. Images can be copied between
SmartMedia and CompactFlash.
Advanced shooting features
n
–1,510,000-pixel CCD.
–Wide-angle TFT LCD monitor.
–Electronic viewfinder.
–Remote cable jack.
–Various exposure modes (program, aperture priority,
shutter priority, manual and scene program) are
available, allowing you to adapt to different shooting
conditions.
– Multi-metering function to calculate the appropriate
exposure based on brightness metering at up to 8
different points in the frame.
– Movie recording function.
–Sound recording with both still pictures and movies.
–Built-in speaker for audio monitoring. (P. 00)
–A/V OUT jack provided for viewing pictures on TV*.
Support for AA NiMH batteries in addition to lithium
n
battery packs.
* You may not be able to view pictures on TVs in some areas,
depending on the type of TV signal used in your region.
Check the TV signal type.
21
Page 22
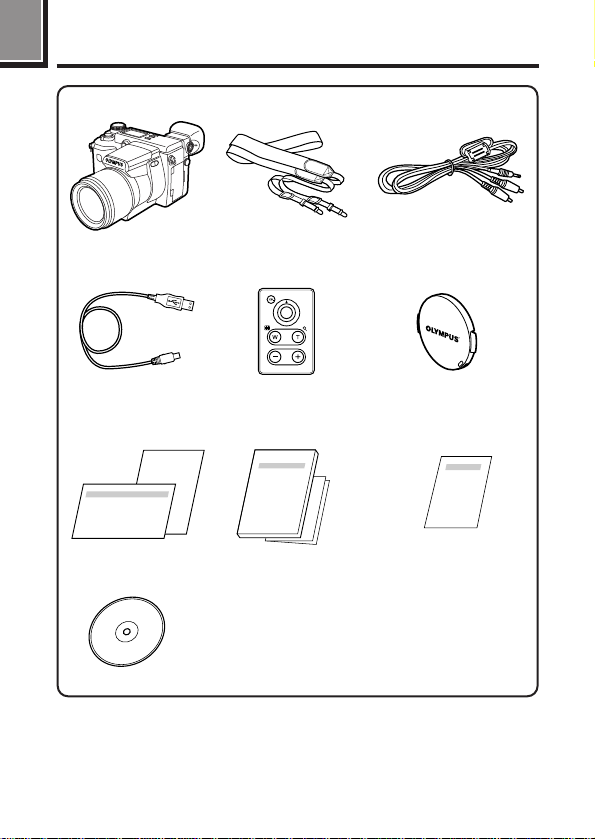
Package contents
Camera Strap A/V cable
USB cable Remote control Lens cap
Warranty card/ Instructions/ Remote control
Registration card Quick Start Guide instructions
Software CD’s
22
Page 23
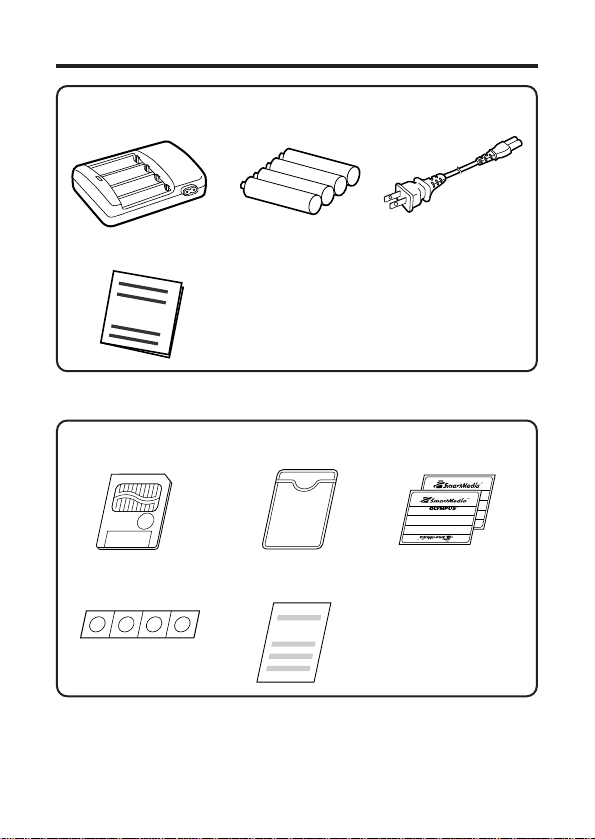
Battery charger AA NiMH batteries Power plug
Instructions
SmartMedia Static-free case Index labels
(SSFDC-8MB) (2 pieces)
Write-protect adhesive Instructions
seals (4 pieces)
(4 pieces)
23
Page 24
Names of parts
1
9
8
0
!
#
@
9
%
^
&
*
(
$
2 3 4 5
6 7
Camera
1 Zoom lever (T/W) (P. 71)/
Index-display lever ( / )
(P. 125)
2 Shutter button (P. 67)
3 Mode dial (P. 44)
4 Self-timer lamp/AF assist lamp
(P. 68/119/121/157)
5 Control panel (P. 27)
6 Diopter adjustment dial (P. 64)
7 5-pin external flash socket ( )
(P. 112)
8 Microphone (P. 123)
9 Strap eyelet (P. 32)
24
0 Remote control receiver (P. 121)
! Lens
@ Flash (built-in) (P. 72/106–116)
# Flash switch ( ) (P. 72/108/113)
$ Connector cover (P. 76/123/187)
% Remote cable jack ( )
(P. 182–187)
^ USB connector (P. 182–187)
& DC-IN jack (P. 37)
* External microphone jack (MIC)
(P. 123)
( A/V OUT jack (MONO) (P. 76)
Page 25
) Viewfinder (P. 28/29/65)
T
Y
IU
R
W
E
) q w e r t y
i
u
o
p
Q
q INFO button (P. 28)
w Flash mode button ( )
(P. 106/108)/Erase button ( )
(P. 77/78)
e DRIVE button (P. 102/117/118/ 138)
● Displays sequential shots during
display mode.
r Metering mode button ( )
(P. 132/138)
● Rotates the vertically-oriented
pictures 90° counterclockwise
during display mode.
t Macro button ( ) (P. 90/138)
● Rotates the vertically-oriented
pictures 90° clockwise during
display mode.
y AE lock button (AEL)(P.130)/
Multi-metering button (P.133)/
Print button( )(P.168–178)
u Arrow pad (P. 45–47)
i Monitor (P. 28/29/65)
o OK button (P. 47)/Manual focus
button (MF) (P. 94)/Protect button
( ) (P. 79)
p Monitor button ( ) (P. 65)
Q Menu button ( ) (P. 45)
W Power switch (POWER OFF/ON/
RESET) (P. 58)
E Card cover (P. 40)
R Card access lamp (P. 67)
T Battery compartment cover
(P. 33/34)
Y Battery compartment lock
(P. 32/34)
U Tripod socket (P. 112)
I Speaker (P. 00)
25
Page 26
Names of parts (cont.)
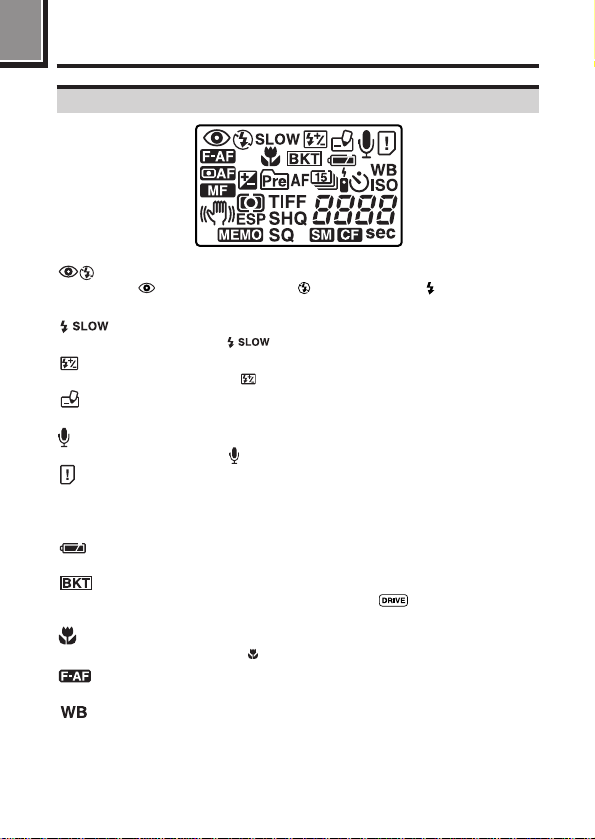
Control panel indications
: Flash mode (P. 106)
● : Red-eye reduction flash, : Off (flash override), : Fill-in flash
(forced activation), No indication: Auto flash
: Slow shutter synchronization flash (P. 110)
● Displayed when is set on the menu.
: Flash intensity control (P. 109)
● Displayed when is set on the menu.
: Card writing (P. 67)
● Displayed when recorded pictures are being written to a card.
: Sound record (P. 112)
● Displayed when is set on the menu.
: Card error (P. 61/203)
● When the power is turned on, the camera checks the card. If there is a
problem with the card, this indication appears. If the card functions properly,
this indication does not appear.
: Battery check (P. 60)
● Displayed when the power is turned on.
: Auto bracket (P. 103)
● To engage the Auto Bracket mode, press the button repeatedly until
this indication appears.
: Macro mode (P. 90)
● Displayed when the button is pressed to engage the Macro mode.
: Full-time AF (P. 95)
● Displayed when FULL TIME AF is set.
: White balance (P. 134)
● Displayed when the White Balance is set to any mode except AUTO.
26
Page 27
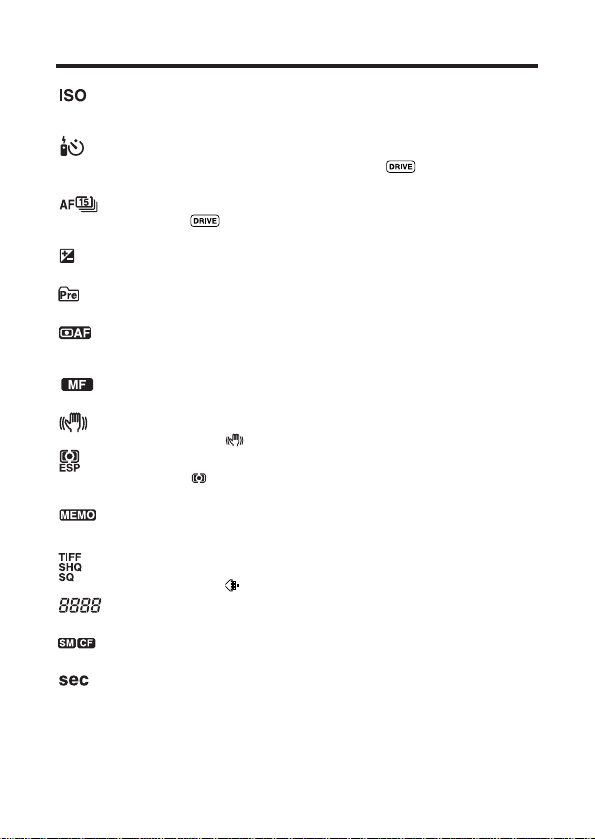
: ISO (P. 101)
● Displayed when the ISO is set to any mode except AUTO. When the ISO is
increased automatically in the AUTO mode, this indication blinks.
: Self-timer/Remote control (P. 119/120)
● To use the Self-timer/remote control, press the button repeatedly until
this indication appears.
: Sequential shooting (P. 118)
● Press the button repeatedly until the indication for the desired mode
appears.
: Exposure compensation (P. 99)
● Displayed during exposure compensation.
: Pre-capture (P. 00)
● Displayed when Pre-capture is set on the menu.
: AF system (P. 96)
● Displayed when AF MODE is set. If SPOT is selected, this indication does
not appear.
: Manual focus (P. 94)
● Displayed when the focus is adjusted manually.
: Stabilization system (P. 97)
● Displayed when is set.
: Metering mode (P. 100)
● Press the button repeatedly until the indication for the desired mode
appears.
: AE memory (P. 130)
● Displayed when the memorized exposure (AE lock) is maintained after
recording.
: Record mode (P. 104)
● Displayed when is set.
: Number of storable still pictures (P. 63)
● Displays the number of still pictures you can record.
: Card (P. 00)
● Displays the card type in use.
: Seconds remaining in Movie mode (P. 63)
● Displays the longest continuous recording time per movie frame.
27
Page 28
Names of parts (cont.)
[SM]
F2.8 1/800 +2.0 P
2
9
3
4
1
5
6 7
0
@
!
[SM]
8
F2.8 1/800 +2.0
ISO100
SQ
P
SLOW1
#
$
%
^
&
*
(
)
[SM]
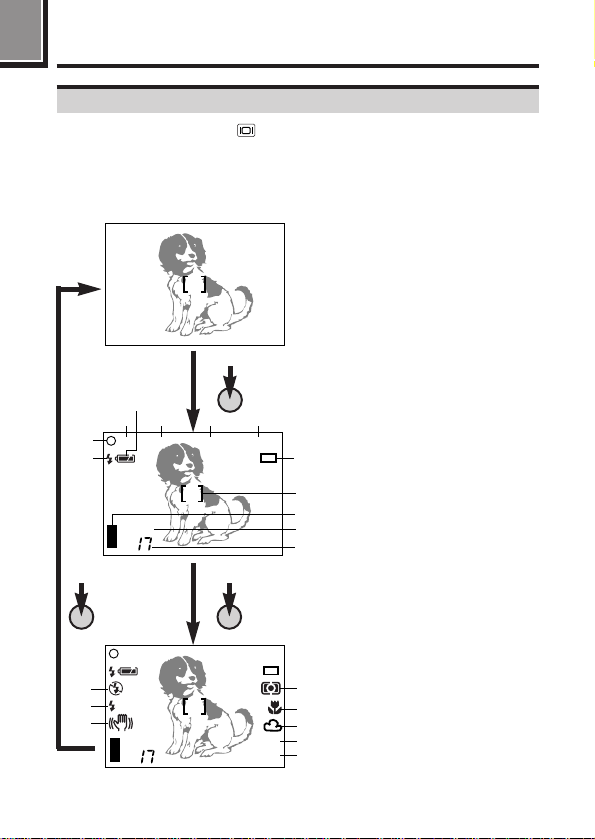
Viewfinder/Monitor indications (Picture information)
Press the Monitor button ( ) to select whether images appear on the
Monitor or in the viewfinder. (P. 00) Press the INFO button to select how
much information is displayed (P. 26). The following 3 types of display are
available. Picture information is also displayed in the Display mode.
Picture information display (P. 00)
Only the AF target mark and card:
Warnings (AF confirmation mark
and battery check) appear when
required. Settings that are changed
are displayed for approx. 2
seconds.
INFO
Partial information:
When using the camera, these
indications are displayed for
approx. 2 seconds.
INFOINFO
→
28
Full information:
These indications are displayed
constantly in the Record mode.
Page 29

1 Flash stand-by/Jitter warning/Flash charge (P. 72/108)
2 AF confirmation mark (P. 68)
3 Shooting mode (P. 44)
4 Battery check (displayed after the camera is turned on and when warnings
appear) (P. 60)
5 Aperture value (P. 87/89)
6 Shutter speed (P. 88)
7 Exposure compensation/ Exposure differential (P. 99)
8 Drive mode (P. 102/117–120)
9 AF target mark (P. 67/68)
0 Memory gauge (P. 69)
! Card (P. 00)
@ Number of storable pictures
# Metering mode (P. 100)
$ Macro mode (P. 90)
% White balance (P. 134)
^ ISO (P. 101)
& Record mode (P. 104)
* Flash mode (P. 106)
( Slow shutter synchronization flash (not displayed when the flash is in the
flash override mode) (P. 111)
) Stabilization system (P. 97)
29
Page 30

30
Page 31

1
GETTING STARTED
This chapter outlines all of the things you
need to do before you start using your
camera such as loading batteries and
inserting cards. It also explains how to use
the Mode dial and the Menus.
1
Page 32

Attaching the strap
1
Thread the strap through the strap
1
eyelet.
Thread the strap through the
2
stopper as the arrows in the
illustration show, then pull on it to
make sure it is securely fastened
to the stopper.
Attach the strap to the strap eyelet
3
on the other side of camera,
following steps 1 and 2 as
explained above.
● Be careful with the strap when you carry the camera, as it can easily catch
on stray objects, causing serious damage.
● Attach the strap correctly as shown so that the camera does not fall off. If
the strap is attached incorrectly and the camera falls off, Olympus is not
responsible for any damages.
1
2
Stopper
Camera strap eyelet
Note:
32
Page 33

Loading the batteries
This camera uses 2 CR-V3 lithium battery packs or 4 AA NiMH batteries,
NiCd batteries, alkaline batteries or lithium batteries.
Important:
Do not peel the label on a CR-V3 lithium battery pack. If an insulating sheet
covers the terminals, peel it off ONLY from the terminals.
Make sure that the camera power
1
switch is in the off position.
Slide the battery compartment
2
lock on the battery compartment
cover in the direction of .
Slide the battery compartment
3
cover in the direction of the arrow
printed on it (the direction of the
lens) with your fingertip.
● Attempting to slide the cover using
a fingernail could result in injury.
Open the battery compartment
4
cover.
1
2
3, 4
1
33
Page 34

Loading the batteries (Cont.)
1
Insert the batteries.
5
● When using AA batteries
Insert the batteries with their poles
oriented in the direction shown in
the illustration.
● When using lithium battery
packs
Insert the batteries in the direction
shown in the illustration. Do not
insert them in any other direction.
Close the battery compartment
6
cover, then press it down and
slide it in the opposite direction of
the arrow printed on it.
● When pressing the battery
compartment cover shut, be sure to
press the center of the cover, as it
may be difficult to close properly by
pressing the edge.
● Make sure the cover is completely
closed.
5
When using AA batteries
When using lithium battery packs
6
7
Slide the battery compartment
7
lock on the battery compartment
cover in the direction of .
34
Page 35

● CR-V3 lithium battery packs cannot be charged.
Note:
● Alkaline batteries have a lot of variation in their performance and deteriorate
particularly at low temperatures. It is recommended that lithium battery
packs or NiMH batteries be used.
● Manganese batteries cannot be used. Please read the cautions concerning
batteries. (See page 19.)
● If the terminals inside the battery compartment are dirty, it will noticeably
shorten the life of the batteries. Do not touch the inside of the battery
compartment.
● If the camera is left for 1 week with the batteries removed, all the internal
settings will revert to the default settings.
Caution:
Do not use batteries whose bodies are not completely covered by an
insulating sheet. If such batteries are used, they may cause leakage,
excessive heat, or explosion. Some batteries are sold with a partial
insulating sheet, or without any insulating sheet at all. Do not use these
batteries under any circumstances.
● The following AA batteries cannot be used.
Batteries whose bodies are only partially covered,
or not covered at all, by an insulating sheet.
Batteries whose — terminals are raised, but not covered
by an insulating sheet.
Batteries whose — terminals are flat and not
completely covered by an insulating sheet. (Such
batteries cannot be used even if the — terminals
are partially covered.)
1
35
Page 36

Loading the batteries (Cont.)
Service life of NiMH battery
1
The table below shows the approximate number of photographs that can be
taken and the display time available with the NiMH batteries. Note that the
lives of battery packs may vary according to the type of battery, manufacture,
camera shooting conditions, etc.
Service life of NiMH battery
Shooting/Displaying Condition Battery life
Number of photos
Display time
* These figures are for reference only and are not guaranteed.
Shooting conditions
1 • Repeat the same function in sequential 2fps shooting conditions
for no more than 10 minutes than take a break
• Sequential 2fps shooting no more than 10 minutes then break
• Flash use no more than 50%
• One zoom adjustment on each shot
• Full-time AF turned off
• Digital Zoom off
• No displaying on or connecting to a PC
• Temperature 25°C
2 Repeated sequential display in the slide show mode with periodic
breaks
Note:
● When connecting the camera to a PC, it is recommended that you
use the optional AC adapter.
● Power is consumed continuously during the conditions below. This
could reduce the number of pictures that can be taken.
• Repeated auto-focus by depressing the shutter button halfway.
• Repeated power zoom adjustments.
• When the full-time AF mode is turned on.
• When the LCD monitor is in the display mode for an extended
period of time.
• When communicating with a PC.
1
2
Approx. 100 frames
Approx. 160 minutes
36
Page 37

Using the AC power adapter (Optional)
An optional Olympus AC adapter allows you to power your digital camera
from a common AC wall outlet.
Use an AC adapter designed for the area camera is used.
Consult your nearest Olympus dealer or Service center for details.
1
Make sure that the camera power
1
switch is in the off position.
Plug the AC adapter into a power
2
outlet.
Open the jack cover and plug the
3
connection cord into the DC-In
jack.
To disconnect, turn the camera
4
switch off, and unplug the AC
adapter first from the camera then
from the outlet.
AC wall outlet
3
Open the jack cover as shown.
2
Power
plug
AC adapter
● When in use for long periods, the AC adapter may get warm. This is
normal.
Connection cord plug
DC-IN jack (Black)
Note:
1
37
Page 38

Loading the batteries (Cont.)
1
Warning:
Incorrect use of the batteries may cause fire or electric
shock.
● Be sure to use an Olympus AC adapter. Using a non-Olympus adapter
could be hazardous and may damage the camera. Olympus is not
responsible for any damage caused by the use of AC adapters not
designed for this camera.
● Never plug or unplug the AC adapter if you have wet hands. When
unplugging the adapter, hold the body of the unit, not the cord. Never pull,
bend, twist or modify the cord.
● If you experience any of the following problems, contact your local dealer or
the nearest authorized Olympus service center.
• If the AC adapter is hot, smells like smoke, or is emitting smoke.
• If there is any damage to the cord, or if there is a contact failure with the
plug.
38
Page 39

Using the card
Card basics
This camera uses SmartMedia or CompactFlash to record images. This
instruction manual uses the term “card” when referring to both. It is possible
to load both types in the camera at the same time.
What is SmartMedia?
SmartMedia is a recording medium for the Olympus CAMEDIA digital
camera. Images recorded and stored on SmartMedia can easily be deleted,
overwritten, and/or edited on a PC.
Compatible SmartMedia cards
● Provided 8 MB standard card.
● Optional Olympus 4 MB/8 MB/16 MB/ 32 MB/64 MB cards
● Market-available 3V card 4 MB/8 MB/16 MB/32 MB/64 MB
1 Contact area
The area where the card comes into contact with the
camera
1
2 Write-protect area
Attach the provided write-protect seal when you want to
2
protect your data from accidental erasure or overwriting.
3
3 Index area
Use the provided index label to indicate the card’s
contents.
Note:
● Operating temperature: 0°C to 55°C; Storing temperature: –20°C to
65° C; Humidity: up to 95 %
● Put the card into its anti-electrostatic case for storage or transportation.
● Do not bend, drop, or apply any physical shock to the card.
● Read the provided SmartMedia instruction manual carefully.
● Do not touch the contact area of the card.
● Do not use 5V cards. Use Olympus cards or other 3V (3.3V) cards.
● Non-Olympus 3V (3.3V) cards must be formatted by the camera (see
p.42).
1
39
Page 40

Using the card (Cont.)
What is CompactFlash?
1
CompactFlash is a recording medium similar to SmartMedia, but with a higher
storage capacity. Using a LEXAR Media device, equipped with a USB
connector, you can transfer images to a computer at high speed using a
JumpShot cable.
Compatible CompactFlash cards
● Commercially available LEXAR Media
16 MB/32 MB/48 MB/64 MB/80 MB/128 MB/160 MB/256 MB
● Commercially available Type II compliant cards
16 MB/32 MB/48 MB/64 MB/80 MB/128 MB/160 MB
40
Page 41

Inserting the card
To use CompactFlash, select it on the menu. [ “Selecting the card” (P. 00)
Make sure that the camera power
1
switch is in the off position.
Open the Card cover.
2
When using the SmartMedia card:
3
Insert the card in the direction
shown in the illustration.
When using the CompactFlash
card:
Insert the end of the card and
push in the card. When the tab
pops out, place it on its side.
● Note the orientation of the card. If it
is inserted incorrectly, it may
become jammed.
Close the cover tightly.
4
When using the CompactFlash card
When using the SmartMedia card
Insert the card fully until you feel it lock
into place.
3
1
2
1
Insert the card fully until
you feel it lock into place.
Tab
Tab
41
Page 42

Using the card (Cont.)
Ejecting the card
1
Make sure that the camera power
1
switch is in the off position.
Open the Card cover.
2
When using the SmartMedia card:
3
Push the card in slightly.
When using the CompactFlash
card:
Raise the tab and push it in.
When using the CompactFlash card
1
2
When using the SmartMedia card
3
42
Tab
Tab
Page 43

The card pops out so that it can be
4
withdrawn easily. Remove the
card.
When using the SmartMedia card
The card is ejected
When using the CompactFlash card
The card is ejected
1
Note:
● NEVER open the Card cover, eject the card, remove the batteries, or
disconnect the optional AC adapter while the camera is in use. Doing so
could destroy all data on the card.
● Destroyed data cannot be restored.
43
Page 44

Selecting the card
SM
CF
[
1 /5
]
F2.8 1/800 0.0
P
SM/CF
WB
[SM]
PRE-CAPTURE
Select the card you are using on the menu.
1
Set the Power switch to ON.
1
Press (Menu button).
2
● The menu is displayed in the
viewfinder when the Mode dial is
set to the Record mode. The menu
can be displayed on the monitor by
pressing (Monitor button).
3, 4
button
Press on the Arrow pad to
3
select SM/CF, then press .
To use SmartMedia, select SM. To
4
use CompactFlash, select CF.
Press the OK button.
● Press the OK button again to save
the setting and restore the normal
screen.
Changing the card type without
..
going through the menu:
While pressing down the INFO button,
press the button. The card type is
changed.
44
INFO button
4
Still picture record menu
Control panel
2
Card
1
Page 45

Setting the date and time
SETUP
[
5 /5
]
F2.8 1/800 0.0
P
ISO
[SM]
S-Prg
MODE SETUP
m/ ft
m
OFF
SHOT CANCEL
’ 00 .1 2. 23
12 :3 4
[
3 /3
]
[SM]
SETUP
m/ ft
SHOT CANCEL
[
3 /3
]
[SM]
You can adjust and include the date and time, and put them on recorded
pictures.
Press (Menu button). (P.45)
1
● Menu will be displayed on the
monitor.
Press on the Arrow pad to
2
select MODE SETUP, then press
to select SETUP. Finally, press
the OK button.
● Mode setting screen will be
displayed on the monitor.
Press to select , then
3
press . When SETUP appears
on the monitor, press the OK
button.
● Date/time setup screen will be
displayed on the monitor.
Press to set the date format
4
when is selected.
● You can choose any one of the
following formats:
DMY (Day/Month/Year)
MDY (Month/Day/Year)
YMD (Year/Month/Day)
2, 3, 4
2, 3
1
Still picture record menu
Mode setting screen
1
45
Page 46

Setting the date and time (Cont.)
1
Press to move to the year (Y)
5
setting.
Press to select the year.
6
When the year is selected, press
to set the month.
● Repeat the procedure until the date
and time are completely set.
Press the OK button.
7
● For a more accurate setting, press
the OK button when the clock hits
00 seconds. The clock will start
when you press the OK button.
● Mode setting screen will appear
here.
Press the OK button twice.
8
● Menu screen will disappear.
● The date/time setting wil remain
until you reset it.
5, 6
7, 8
Date and time screen
●The year 2000 is displayed as ’00.
● The date setting will be canceled if the camera is left with no batteries for
about one week (based on our testing). You will have to set the date again
if this happens.
Note:
46
Page 47

Setting the mode dial
M
O
D
E
D
I
A
L
S
M
S-Prg
A
P
You can change modes by turning the mode dial on the top righthand side of
the camera.
P (Program mode):
In program mode, you can take a properly exposed photograph by simply
aiming the camera and pressing the shutter button. Aperture and shutter
speed are set automatically by the camera.
A (Aperture priority mode):
Aperture can be set manually in the aperture priority mode. This is useful
when you want to have more control over image exposure. Shutter speed is
set automatically by the camera.
S (Shutter priority mode):
Shutter speed can be set manually in the shutter priority mode. Set it to a
high speed for a still picture of a moving object. Set it to a low speed to show
motion. Aperture is set automatically by the camera.
M (Manual mode):
You can set both aperture and shutter speed independently in the manual
mode.
S-Prg (Scene program mode):
The camera will automatically optimize the combination of aperture and
shutter speed according to the type of subject. You can select from Portrait,
Sports, Landscape and Night Scene. Selections are displayed in the menu.
Also read “Takng pictures under different conditions” (P.81 - 86).
(Movie mode):
You can shoot motion pictures in the movie mode. Aperture and shutter
speed are set automatically by the camera.
(Display mode):
Allows you to view a display of your photographs.
1
47
Page 48

[
1 /5
]
F2.8 1/800 0.0
P
SM/CF
WB
[SM]
7.5
SM
OFF
AUTO
PRE-CAPTURE
How to use the menu
Most functions can be easily displayed and set with the menu on the Monitor.
1
Adjustments to the mode dial will determine available menu selections.
Modes not available on the menu can be set with the corresponding buttons
on the camera.
Refer to the menu index (P.48 - 53) and select the function you need.
Functions that can be set by the mode dial are listed below.
Still picture record menu: P, A, S, M, S-Prg
Motion picture record menu:
Still picture display menu:
Motion picture display menu:
Press (Menu button).
1
● The menu is super-imposed over
the image already displayed on the
viewfinder or monitor.
Press on the Arrow pad to
2
select the item you want to adjust.
● The green frame will move from
item to item.
● To select the following items, read
these pages;
BKT: P. 00 to 00, MODE SETUP:
P. 00 to 00, WB: P. 00 to 00
Press to display further
3
selections.
● The green frame will move to the
right. Additional options for that
item will be displayed.
Scroll
2, 3
1
Monitor
48
Current settings
Scroll
1/5 page
Page 49

Example: When PRE-CAPTURE
[
1 /5
]
F2.8 1/800 0.0
P
SM/CF
WB
[SM]
OFF
ON
PRE-CAPTURE
[
1 /5
]
F2.8 1/800 0.0 P
SM/CF
WB
[SM]
7.5
SM
OFF
AUTO
PRE-CAPTURE
SLOW
MULTI
METERING
OFF
OFF
1.0 x3
O
BKT
[
2 /5
]
F2.8 1/800 0.0
P
[SM]
is set
F2.8 1/800 0.0
P
SM
SM/CF
7.5
PRE-CAPTURE
OFF
AUTO
WB
[
1 /5
]
[SM]
To set up
or
OK
The adjustment
is saved.
• If you finish by pressing
(Menu button), any adjustments
you have made will not be
saved.
4
Press to select the menu
options.
● Selected items are displayed in
green.
● To view additional menu options,
go to step 5. If no additional
selections are needed, go to step
6.
1
Example: When moving to the
following pages
• If you press at page
1/5, the monitor displays
page 5/5.
4
49
Page 50

How to use the menu (Cont.)
[
5 /5
]
F2.8 1/800 0.0
P
ISO
[SM]
S-Prg
100
AUTO
200
400
MODE SETUP
1
Press to view additional menu
5
options (for each selection), then
press to select the desired
option.
When finished, press the OK
6
button or .
● The green frame moves to the left
and adjusted items are displayed
on the right.
● When in the record mode (any
mode except ) pictures can be
taken.
Press the OK button.
7
● The setting will be saved and the
normal display will be restored.
Note:
● When you want to go back to previous menu pages (or forward to the next
pages)
[ When the green frame is at the bottom of the displayed menu options,
press (or ). The display will go to the next page. When the
monitor displays the last page, press to go back to the first page.
You can move to the last page by pressing on the first page.
● When you want to cancel the menu
[ Press (Menu button). Adjustment settings are canceled and the
normal display is restored.
● When you want to save an adjustment
[ Set “ALL RESET” — “OFF”. The adjustment settings are then
automatically saved when the camera is turned off (P.148).
● When the adjusted item does not function
[ The OK button was not pressed after the adjustment. Reset the
adjustment, then press the OK button.
50
5
6, 7
ISO setting
Page 51

Record mode menu list
The following items can be adjusted. This can be done any time. Please refer
to How to use the menu (P.45), and/or the pages for each function, in order to
set the following items (P.48 – 53).
Still picture record menu
Displays by the Still picture record mode (P, A, S, M, S-Prg).
Menu
page
1/5
2/5
Display
SM/CF
PRECAPTURE
BKT
MULTI
METERING
Function
Allows you to select the
card you are going to
use. (P. 00)
Sets the sequential
shooting speed. (P. 00)
Able to record pictures by
pressing the Shutter
button halfway.
Adjusts the white
balance according to the
light source. (P.134)
Controls the flash
intensity. (P.109)
Allows you to take
pictures of night scenes.
(P.110)
Sets the conditions for the
Auto bracket mode.
(P. 00)
Obtains the right
exposure by metering
multiple objects. (P.132)
Initial setting
SM
1.5fps
OFF
AUTO
±0
OFF
AE: ±1.0/x3,
WB: OFF
OFF
1
51
Page 52

Record mode menu list (Cont.)
Menu
1
page
3/5
4/5
5/5
Display
AF MODE
FULL-TIME
AF
SUPER TELE
FUNCTION
CARD SETUP
MODE SETUP
S-Prg
Function
Activates the Stabilization
system. (P.97)
Adjusts the focusing
range when using
autofocus. (P.96)
The camera automatically
focuses without pressing
the shutter button
halfway. (P.95)
2.7x digital zoom is
available.
Changes the picture color
to monochrome. (P. 00)
Formats the card. (P.42)
Able to record sound after
taking pictures. (P.122)
Change the camera to
your desired setting.[
Mode setting menu
(P. 144)
Adjusts the ISO
sensitivity. (P.101)
Adjusts the S-Prg mode
for each occasion. (P. 86)
Sets the record mode
(TIFF/SHQ/HQ/SQ).
(P.104)
Initial setting
ON
NORMAL
OFF
OFF
OFF
–
OFF
–
AUTO
HQ
52
Page 53

Movie picture record menu
Options when the movie picture record mode is activated.
Menu
page
1/3
2/3
Display
SM/CF
SUPER TELE
MULTI
METERING
AF MODE
FULL-TIME
AF
Function
Allows you to select the
card you are going to
use. (P. 00)
Activates the Stabilization
system. (P.97)
2.7x digital zoom is
available. (P.98)
Adjusts the white
balance according to the
light source. (P.134)
Adjusts the ISO
sensitivity. (P.101)
Obtains the appropriate
exposure by metering
multiple objects. (P.132)
Adjusts the focal point
range with autofocus.
(P.96)
The camera will always
focus automatically.
There is no need to
press the shutter button
halfway. (P.95)
Allows sound record
during movie recording.
(P.122)
1
Initial setting
SM
ON
OFF
AUTO
AUTO
OFF
NORMAL
OFF
ON
53
Page 54

Record mode menu list (Cont.)
Menu
1
page
3/3
Display
FUNCTION
CARD SETUP
MODE SETUP
Function
Changes the picture
color to monochrome.
(P. 00)
Formats the card.
(P.42)
Change the camera to
your desired setting.
[ Mode setting menu
(P. 144)
Sets the record mode
(HQ/SQ). (P.104)
Initial setting
OFF
–
–
HQ
54
Page 55

Display mode menu list
Still picture display menu
—Shown when a still picture is displayed
Options available when a still picture is displayed.
Menu
page
1/2
2/2
Display
SM/CF
COPY
CARD SETUP
MODE SETUP
Function
Allows you to select the
card you are going to
use. (P. 00)
Runs through all stored
pictures automatically.
(P.127)
Copies all pictures or
selected pictures
between SmartMedia
and CompactFlash.
Dubs sound onto
recorded pictures.
(P.139)
Adjusts sound volume of
pictures. (P. 00)
Erases all frames
(P. 78) and formats the
card (P. 42).
Change the camera to
your desired setting.
[ Mode setting menu
(P. 144)
1
Initial setting
SM
–
–
–
2
–
–
55
Page 56

Display mode menu list (Cont.)
Movie picture display menu—Shown when a movie is
1
displayed
Options available when a movie picture is displayed.
Menu
page
1/2
2/2
Display
SM/CF
MOVIE PLAY
COPY
CARD SETUP
MODE SETUP
Function
Allows you to select the
card you are going to
use. (P. 00)
Plays back movie
pictures. (P.74)
Copies all pictures or
selected pictures
between SmartMedia
and CompactFlash.
Adjusts sound volume of
pictures. (P. 00)
Erases all frames
(P. 78) and formats the
card (P. 42).
Change the camera to
your desired setting.
[ Mode setting menu
(P. 144)
Initial setting
SM
–
–
2
–
–
56
Page 57

How to use this instruction manual
This manual uses various signs and symbols to indicate different types of
information. Please read the following explanation carefully before operating
your digital camera.
Before operation, switch the mode dial until the following signs appear.
If the mode dial's setting signs are not displayed, you can use functions
without setting the mode dial.
This indicates the button, control panel
or viewfinder/monitor indications that
correspond to the function you will use.
Taking photographs at close range - macro mode
You can get as close as 8" to your subject. An approx. 2.4" x 3" subject
can be photographed almost fully within the frame.
Press several times
1
until appears on the
control panel.
● To cancel the Macro
mode, press several
times until disappears.
Take a picture.
2
1
Control panel
2
Macro
mode
1
This number shows the order of operation.
57
Page 58

1
58
Page 59

2
RECORD AND DISPLAY
BASICS
This chapter demonstrates how to use your
camera’s basic functions, such as taking
pictures, displaying stored pictures, and
erasing stored pictures. Please read this
section carefully.
2
Page 60

Turn the power on
S
M
Prg
A
P
5 Setting the power switch
2
Push the edge of the lens cap (as
1
shown by the arrows in the
illustration) to remove the lens
cap.
Turn the mode dial to P.
2
Turn the power switch on.
3
● The card access lamp blinks.
● Battery check, as well as the
number of pictures that can still be
stored, will be displayed on the
control panel. (P.60/63)
● The subject the camera is aimed at
will be displayed on the Viewfinder.
● To take a picture while viewing the
subject on Monitor, press
(Monitor button). The subject will
be displayed in the Monitor. (P.65)
OFF :Power off
ON :Power on
RESET :
● Move the switch to reset momentarily
and then release, the power switch will
automatically move back to ON. Mode
settings in the menu (P.144) will be
reset to the initial settings.
● Hold the switch in reset position for over
3 seconds, and all settings, except for
the date and time, will be reset to the
initial settings.
2
1
Set the date and time when you
4
first use the camera. (P.54)
60
Card access lamp
3
Page 61

How to use the viewfinder/monitor
Press to switch the display to
1
the monitor.
● When the power is turned on in the
Display mode , the monitor
turns on.
(Monitor button)
If nothing appears on the viewfinder:
● Is the power on?
● Has the lens cap been removed?
● Is the camera in the sleep mode?
● Is the monitor turned on with the mode?
2
Note:
● NEVER open the card cover, eject the card, remove the batteries, or pull
the plug when the card access lamp is blinking. Doing so could destroy
stored pictures and prevent storage of pictures you have just taken.
● The camera will enter sleep mode if no operations are performed during a
1-minute period. The camera will activate again as soon as you touch any
switch or button. You can adjust the sleep mode time.(P.159) Please turn
the camera off when you are not planning to use it.
61
Page 62

Pre-recording check
Checking the batteries
When the power is turned on, the
remaining battery power will be
2
displayed on the control panel. If it is
low, please replace the batteries. If your
batteries are either NiMH or NiCd,
please charge them when their power is
low.
lights and turns off automatically.
The batteries are OK. You are ready to take pictures.
blinks and other indicators on the control panel are displayed
normally.
The battery power is low and the batteries should be replaced. You can
shoot with the remaining power, but the batteries may die soon.
blinks and then turns off after 12 seconds. Other indicators on
the control also go out.
The batteries are dead and should be replaced immediately.
Control panel
Battery check
Note:
● The timing of each battery level indicator varies depending on the type of
batteries used.
● When the camera is being operated on batteries that are running low, the
camera may emit several short beeps and blink the number of storable
pictures on the control panel after you take a shot or when you turn on the
power. If this happens, the picture you have just taken will not turn out
properly. Replace the batteries and take the picture again.
62
Page 63

Checking the card—Card check
When the power is turned on, the camera checks the card.
Control panel Corrective actions and
indications monitor indications
When there is no card in the camera: The card
error indicator on the monitor blinks and NO CARD
appears on the viewfinder.
[Insert the card.
Card error
When there is a problem with the card: An error
sign appears with the blinking card error indicator
and CARD ERROR appears on the monitor.
[Format the card or use a new card.
When the card needs to be formatted: The card
error indicator turns on in the monitor and the card
format confirmation screen appears on the
viewfinder.
[Format the card (P.42).
Select with the Arrow pad
and press the OK button to
enter the card format menu
(P.42).
When formatting is complete,
the monitor will switch
screens and display the
subject that you are shooting.
CARD SETUP
OFF
ENTER
2
[SM]
OK
63
Page 64

Pre-recording check (Cont.)
CARD FULL
[SM]
Checking the remaining number of storable pictures
and remaining time
When the power is turned on in the still picture mode, the number of storable
2
pictures will appear on the control panel. For movie pictures, the seconds
remaining will appear.
● When the power is turned on with the mode dial at A, S, M, P, or S-Prg:
The number of storable pictures will appear.
Number of storable pictures
● When the power is turned on with the mode dial :
The seconds remaining will appear.
● When there is no storable space left for pictures in the still picture
record mode :
Beeps will emit when the card cannot store anymore pictures and the
displays below will appear on the control panel and viewfinder. If this
happens, replace the card with a new/storable card or erase unwanted
images in the existing card to make space (P.77/78).
Control panel
Viewfinder
Remaining time
64
Page 65

Number of storable pictures
Record mode
Number of
pixels
Memory capacity
(Image only/Image with sound)
File
8MB 16MB 32MB 64MB
1360x1024
1280x960
1024x768
640x480
1360x1024
1360x1024
1280x960
1/–
2/–
3/–
8/–
7/5
21/15
8/8
24/22
13/12
38/32
32/29
82/61
3/–
4/–
6/–
17/–
15/11
43/30
17/16
49/45
26/25
76/66
66/58
165/123
7/–
8/–
13/–
34/–
30/22
86/60
34/33
99/90
53/51
153/132
132/117
331/248
15/–
17/–
27/–
68/–
61/44
173/120
69/67
199/181
107/102
306/265
265/234
664/498
TIFF
*
SHQ
HQ
SQ
TIFF
JPEG
HIGH (quality)
NORMAL
HIGH (quality)
NORMAL
HIGH (quality)
NORMAL
1024x768
640x480
Record mode
Number of pixels
Memory capacity
4MB 8MB 16MB over
320x240
160x120
11/11
52/10
23/23
105/20
36/35
145/24
SQ
HQ
The number of storable pictures and recording time remaining will vary
depending on the selected recording mode or remaining card storage. Preset
print or sound recording will also affect memory capacity.
Number of still pictures that can be taken
* If the recording mode is set to TIFF, sound will not be recorded with a
picture when the Mode dial is set to P, A, S, or M, but it can be added later
during playback. (p. 139)
The number of seconds that you can record movie pictures:
Longest continuous recording time per movie frame (Image only/Image with sound)
● Please refer to P.104 for the recording mode.
● Because the amount of data used varies depending on the subject,
more/fewer pictures than the number shown may be photographed.
● Even when the memory capacity of SmartMedia and Compact Flash are the
same, the number of pictures that each can store may differ.
● The number of storable pictures may not be reduced every time a picture is
taken, or increased when a picture is erased.
● Numerical values are approximate.
Note:
2
65
Page 66

Adjusting the diopter
P F2.8 1/30 0.0
[SM]
Turn the Diopter adjustment dial
1
to see the AF target mark clearly.
2
Viewfinder
AF target mark
Holding the camera
Hold the camera firmly with both hands while keeping your elbows at your
sides to prevent the camera from moving.
Proper
Proper
Improper
Keep your fingers away
from the lens.
Keep your fingers away
from the flash.
1
Note:
● Keep your finger and the strap away from the lens, flash, and AF assist
lamp.
66
Page 67

Using the shutter release correctly
P F2.8 1/30 0.0
[SM]
—Pressing fully/halfway
How to press the shutter button and focus
There are 2 steps when releasing the Shutter.
Practice well before actually taking photos.
Press the shutter button halfway.
1
● The AF confirmation mark lights and
the camera emits a beep when the
focus and exposure are locked. If the
focus or exposure is not locked, the
AF confirmation mark blinks.
● To focus the camera when the
subject of the picture is outside the
AF target mark, use the focus lock.
(P.93)
Press the shutter button fully to
2
release the shutter and take a
picture.
● The camera emits a shutter sound
when the shutter is released.
● The card access lamp blinks while
the picture is being recorded.
● You can change the volume of the
beep sound emitted when operating
the camera or cancel the beep. [
Changing the camera warning
sound volume (P. 156)
..
When the AF confirmation mark
blinks
Set the camera to the macro mode when
photographing the subject closer than
23.6" (P.90).
Depending on the condition of the
subject, the focus and exposure may be
locked. (See
focus on” P.92)
● Press the shutter button gently using the ball of your finger. If it is pressed
hard, the camera may move and pictures may come out blurred.
“
Subjects that are difficult to
Press halfway
Shutter button
Press fully
Shutter button
AF confirmation mark
AF target mark
Note:
2
67
Page 68

Recording and display
P F2.8 1/30 0.0
[SM]
Taking still pictures and displaying them
n Taking still pictures
2
Compose the picture by turning
1
the camera towards the subject.
● The picture is slightly larger than
scene you viewed through the
viewfinder/monitor.
Press the shutter button halfway
2
to lock the focus and exposure.
● The AF confirmation mark will light
up and the camera will beep once.
● If the focus and exposure are not
locked, the AF confirmation mark
blinks. [ “Subjects that are
difficult to focus on” (P. 00), “Focus
lock” (P. 00)
● If a subject is not well lit and is
difficult to focus on, the AF assist
lamp will light automatically. You
can also turn off the AF assist lamp
manually if desired. [ “AF
ILLUMINATOR” (P. 00)
● The easy way to keep your images
in focus all the time. [ “FULLTIME AF” (P. 00)
● When the flash stand-by blinks,
slide (flash switch) to set the
flash. [ “Using the flash – Auto
flash” (P. 00)
2, 3
AF confirmation mark
AF target mark
68
Page 69

Press the shutter button fully to
P F2.8 1/30 0.0
[SM]
3
take a picture.
● A shutter sound means that the
picture was taken successfully.
● The lower image memory gauge
will light up and the camera will
begin storing the image onto the
card.
● Pressing (flash mode button)
while holding down the INFO
button will cancel the writing of
recorded pictures to the card. [
Canceling image writing to the card
– SHOT CANCEL (P. 00)
● Soon after displaying the picture
just taken, the viewfinder will again
show the area it is being aimed at.
[ REC VIEW (P. 00)
● Continuous shooting is available if the memory gauge shows there is
space in the card.
● When more than two images are recorded, the center block will light up.
● When the buffer memory is full, the upper block will light up and no
more pictures can be taken.
..
If you take pictures continuously
The memory gauge will gradually increase as you take pictures. If the
memory becomes full and the memory gauge lights up completely, you
cannot take any more pictures.
One picture taken No recordable space More than one taken
Number of storable pictures
Memory gauge
2
Note:
● Recorded pictures will be saved regardless of whether the camera is turned
off or the batteries are replaced.
● NEVER open the card cover, eject the card, remove the batteries, or pull
the plug when the card access lamp is blinking. Doing so could destroy
stored pictures and prevent storage of pictures you have just taken.
69
Page 70

Recording and display (Cont.)
n Quick view
You can quickly shift from the record mode to the display mode by pressing
. This allows you to check the movie you have just recorded.
2
Press twice quickly.
1
● The monitor will turn on and the
last recorded picture will be
displayed.
● Setting the Mode dial to will
also display recorded pictures.
All stored pictures in the card can
2
be displayed by pressing the
Arrow pad.
: Displays the next picture.
: Displays the previous picture.
: Jumps to the picture 10 frames
ahead.
: Jumps to the picture 10 frames
behind.
Press the shutter button halfway
3
to return to the record mode.
● The viewfinder will turn on and the
subject will appear on it.
2 1 3
1
70
Page 71

Recording movies and displaying them
F2.8 1/30 0.0
[SM]
m Recording movies
Compose the picture by turning
1
the camera towards the subject.
Press the shutter button halfway
2
to lock the focus and exposure.
● The AF confirmation mark will light
up and the camera will beep.
● If the focus and exposure are not
locked, the AF confirmation mark
blinks. [ “Subjects that are
difficult to focus on” (P. 00), “Focus
lock” (P. 00)
● The easy way to keep your images
in focus all the time. [ “FULLTIME AF” (P. 00)
Press the shutter button fully.
3
Recording will start. To stop
recording, press the shutter
button fully again.
● The mark will light up in red
while shooting movies.
You cannot take movies if the entire
●
image memory gauge is lit up.
● The seconds of recording time
remaining in the memory will
appear on the monitor.
● When recording starts, correct
focusing and exposure is
maintained continuously.
The card access lamp will blink
4
and the camera will begin storing
images onto the card.
● You cannot take the next movie
until the camera is finished storing
the current one, even if the
memory indicates that there is
sufficient memory.
2, 3
2 3
Seconds remaining
Memory gauge
..
To record the next movie
picture
Wait until the card access lamp
goes off and writing of movie
pictures into the card is finished.
71
2
Page 72

Recording and display (Cont.)
[
1 /2
]
SM/CF
COPY
[SM]
MOVIE PLAY
START
m Displaying movies
Use the Quick view to display a
1
2
recorded movie (P.73).
Select images with the mark
2
using the Arrow pad.
Press (Menu button).
3
● The menu screen will appear.
Select MOVIE PLAY, then press
4
to select START.
● Press the menu button to cancel.
2, 4
3
72
Page 73

Press the OK button.
0"/15"
,
00.12.23
[SM]
5
● The movie display will start after
the card access lamp stops
blinking.
When you want to pause...
Press the OK button while displaying
images.
You can display frames with the
Arrow pad when normal displaying
is paused or stopped.
: Jumps to the beginning of the
movie.
: Displays the end of the movie.
: Every time the right arrow is
pressed, the next frame will be
displayed. A movie is displayed
by holding down the right arrow
continuously.
: Every time the left arrow is
pressed, the previous frame will
be displayed. A movie is
displayed in reverse by holding
down the left arrow
continuously.
Press to leave the movie
6
picture display mode.
● When selecting other frames, press
again to turn the menu screen
off, then press the Arrow pad to
select the frames.
5
5
6
Date and time (Displays
for approx. 3 sec.)
Displaying time
Total recording
time
2
If you want to return to the record mode immediately
..
Press the shutter button halfway. The viewfinder will appear with the subject
displayed on it, even in the middle of displaying movies or when the menu
screen is on.
73
Page 74

Protection
10
You can prevent accidental erasure of pictures you want to keep.
2
● The card access lamp will blink and
a list of stored images will be read
out. After that, the last recorded
picture will be displayed.
Display the picture you want to
2
protect. (Single image display (P.124),
Close-up display (P.126), and Indexdisplay (P.125).)
Press the OK button. The
3
displayed picture will then be
protected.
● will appear on the monitor.
To cancel protection:
Press the OK button a second time
while the picture is displayed.
will disappear and the protection will
be cancelled.
Note:
● The protected picture will not be deleted with All-Frame erase, but will be
deleted with Card format.
● Protection is not available when the write-protect adhesive seal is placed on
the card.
● The setting will remain until it is readjusted.
Set the mode dial to .
1
2
3
1
74
Page 75

Erasing images
OK
YES NO
NO
YES
[SM]
Unwanted images can be erased using the same process for both still images
and movies. Before erasing, make sure that the protection seal has been
removed from the card and other image protection settings on the camera
have been cancelled.
Be aware of the following!
● NEVER perform the following acts while erasing pictures. They may destroy
data stored in the card.
• Open the card cover
• Eject the card
• Remove the batteries
• Pull the plug
Single frame erasure
2
Set the mode dial to .
1
● The card access lamp will blink and
a list of stored images will be read
out. After that, the last recorded
picture will be displayed.
Select the images you want to
2
erase using the Arrow pad.
Press (Erase button) .
3
● A message asking you to confirm
the erasure will appear.
Make sure that YES is selected,
4
then press the OK button.
● The selected images will be
erased.
To cancel:
Press on the Arrow pad to select
NO, then press the OK button or
(Erase button).
2 1
3
4
Confirmation screen
75
Page 76

Erasing images (Cont.)
[
2 /2
]
[SM]
CARD SETUP
MODE SETUP
OK
YES NO
NO
YES
[SM]
All-frame erasure
2
Set the mode dial to .
1
● The card access lamp will blink and
a list of stored images will be read
out. After that, the last recorded
picture will be displayed.
Press (Menu button).
2
● The menu screen will be displayed.
Select CARD SETUP, then .
3
Press the OK button.
4
● A message asking you to confirm
the erasure will appear.
To cancel:
Press on the Arrow pad to select
NO, then press the OK button or
(Erase button).
Make sure that YES is selected
5
and press the OK button.
● All of the images stored in the card
will be erased.
3 1
4, 5
2
Still image erasure menu screen
Confirmation screen
76
Page 77

Telephoto/Wide-angle shooting—Zoom
P F2.8 1/1000
P F2.8 1/1000
[SM]
[SM]
Wide
Tele
You can select telephoto or wide-angle with the 10x zoom. When SUPER
TELE in the menu is turned ON (P.98), 27x zoom is available with the 2.7x
digital zoom.
When you take a picture from a
distance (telephoto):
Press the zoom lever toward T to zoom
in.
When you take a picture at close
range (wide-angle):
Press the zoom lever toward W to zoom
out.
m The speed of the zoom-in/out can be
adjusted by changing the angle of the
zoom lever.
Slow
Quick
2
● When recording movies while zooming, images may become jittery.
Note:
77
Page 78

Using the flash—Auto flash
P F2.8 1/30 0.0
[SM]
The flash will work automatically in low-light conditions. For other conditions,
refer to P.107.
2
under the flash (see the
illustration) to raise the flash.
● Make sure that , and
do not appear on the control panel.
If there is one or more of them,
press (flash mode button) to
turn them off. [ “Selecting the
flash pattern” (P. 00)
Press the shutter button halfway.
2
● When lights on the viewfinder,
the flash is activated.
● The flash charges while is
blinking. The shutter cannot be
released at this time. Wait until
turns off before taking pictures.
Press the shutter button fully.
3
● The flash will go off.
Flash working range:
Wide-angle: approx. 11-13/16" to 13 ft
Telephoto: approx. 3.25 ft to 13 ft
Slide (flash switch) located
1
2, 3
Flash stand-by/charge mark
Flash mode button
AF confirmation mark
1
Note:
● The flash will not go off in the following modes: Auto-bracket (P.102),
Sequential mode (P. 00) and Pre-capture (P.00).
● When using the flash in the macro mode, especially during wide-angle
shooting, images may be unclear and the flash may not have the proper
effect. Confirm the results by displaying images.
78
Page 79

Turning off the power
When you are finished using the camera, turn the power off. Although the
camera will automatically enter sleep mode if not used for an extended period
of time, turning off the power is still highly recommended.
Turn the camera's power switch
1
off.
● The power will now be off. If an
image is being recorded on the
card (the card access lamp will be
blinking), the camera will turn off
after recording is complete.
Put on the lens cap.
2
Card access lamp
2
1
2
79
Page 80

2
80
Page 81

3
SHOOTING PICTURES
CONSECUTIVELY
3
Page 82

Shooting pictures consecutively at high speed
—Sequential mode
Selecting the Sequential mode
Use this mode to take pictures in sequence. When the shutter release button
is held down, the camera will take pictures in sequence. Picture-taking will
stop when you release your finger from the button. The Sequential mode is
not available if the record mode is set to TIFF. Press to change the
function of this mode. The sequential mode includes:
3
Single-picture Shooting : Takes only one picture when you press the
shutter button. (Initial setting) There is no display on the control panel.
Sequential Shooting : Takes pictures in sequence. Focus, brightness
(exposure), and white balance are locked at the first frame. The number
of still pictures that can be stored depends on the selected speed. The
approximate number is shown below.
AF sequential Shooting : Takes pictures in sequence. Focus,
brightness (exposure), and white balance are metered and adjusted in
each frame. The number of still pictures that can be stored depends on
the selected speed. The approximate number is shown below.
Self-timer/remote-control : Takes pictures with the self-timer/remote-
control. See P.119 to 121 for further information.
Auto bracket
can be selected. Brightness (exposure) and/or white balance is metered
in each frame. Focus is locked at the first frame. See P. 000 for further
information.
Record mode Number of still pictures that can be stored
TIFF Not available.
SHQ 00
HQ 00
SQ (640 X 480) 00
Takes pictures in sequence. The number of pictures
:
82
Page 83

Sequential shooting/AF sequential shooting
Set the record mode to any mode
1
other than TIFF. If the record mode
is set to TIFF, the Sequential mode
is not available. (P. 104).
Make sure that the mode dial is
2
switched to P, A, S, M or S-Prg.
Press until (sequential
3
mode) or (AF sequential
mode) is displayed.
● The number of frames selected is
displayed in the viewfinder/monitor
together with the icon.
Press the shutter button to take
4
pictures.
● If the battery power runs out during
sequential shooting and the battery
check mark blinks, shooting stops.
Pictures already taken will be
written to the card.
● You can display high-speed
sequential shots.
sequential shot (P. 00)
● Red-eye reduction mode cannot be set during the sequential mode.
● When using an external flash, set the speed fast enough to fire for each
shot during sequential shooting.
● In the Sequential mode, dark pictures may be darker than expected.
● Unless OFF is selected in All Reset, settings will be cancelled when the
power is turned off. (P. 148)
[ Displaying
Note:
Control panel
Record mode
3 2 4
Control panel
Sequential shooting mode
3
83
Page 84

Shooting pictures in sequence at high speed
[
1 /5
]
F2.8 1/800 0.0
P
SM/CF
WB
[SM]
3
5
7.5
15
PRE-CAPTURE
—Sequential mode (Cont.)
Selecting the sequential shooting speed
Sequential shooting speed is the number of frames per second. 4 speeds are
available.
2, 3
3
Press (Menu button).
1
● The menu is displayed.
Press on the Arrow pad to
2
select , then press .
Press to select the desired
3
setting (see below), then press the
OK button.
● Setting: 3, 5, 7.5, 15
● Pressing the OK button again
saves the setting and restores the
normal screen.
● The selected speed is displayed in
the viewfinder/monitor (however,
the speed is displayed on the
control panel only when 15 is
selected). When a speed other
than 15 is selected, is
displayed on the control panel.
Take pictures.
4
● It is possible to cancel recording of
pictures remaining in the camera
onto the card.[ SHOT CANCEL
(P. 00)
●
Unless OFF is selected in ALL RESET, the setting will be canceled when the
power is turned off. (P. 00)
84
Note:
3
1
Control panel
Sequential shooting speed
Page 85

Recording pictures just before shutter release
[
1 /5
]
F2.8 1/800 0.0
P
SM/CF
WB
[SM]
X1
X2
X3
X4
X5
OFF
ON
PRE-CAPTURE
[
1 /5
]
F2.8 1/800 0.0
P
SM/CF
WB
[SM]
PRE-CAPTURE
X1
X2
X3
X4
X5
OFF
ON
—Pre-capture
Normally, when you press the Shutter button all the way down, a picture will
be taken. However, the picture cannot be recorded at the same time as the
Shutter button is pressed down. With Pre-capture, pressing the Shutter button
halfway starts picture capture, and pressing it all the way records pictures. In
other words, it is possible to capture pictures just before pressing the Shutter
button all the way. It is also possible to set the number of pictures to be
captured in Pre-capture mode.
Press (Menu button).
1
● The menu is displayed.
Press on the Arrow pad to
2
select PRE-CAPTURE, then press
.
Press to select ON, then
3
press .
Press to select the number of
4
pictures you wish to capture (see
below), then press the OK button.
● Set the number of pictures you
want to pre-capture under the
number of storable still pictures.
Setting: x1, x2, x3, x4, x5
Press the OK button repeatedly
5
until the menu disappears.
Control panel
4, 5
2, 3, 4
1
3
Pre-capture
● Pre-capture is not available during Auto bracketing
● Unless OFF is selected in ALL RESET, the setting will be canceled when
the power is turned off. (P. 00)
Number of storable still pictures
Note:
.
85
Page 86

Displaying sequential shots
[SM]
EXTEND DRIVE
[SM]
1236
1243
1242
1244
EXTEND DRIVE
[SM]
1236
1238
1237
1239
BACK DRIVE
With sequential shot display (P. 00), an indication appears to show that the
frame currently displayed represents the sequence. You can move from this
frame to subsequent frames.
Sequential shots are pictures recorded in the following modes:
– Sequential mode
– Auto bracketing
– Pre-capture shooting
3
Display sequential shots (pictures
1
with ) in the single image
display mode (P. 00) or in the
index display mode (P. 00).
An indication appears to show
that you are moving to
subsequent frames.
● A representative frame is displayed.
● When sequential shots are
displayed in the index display
mode, the indication is the same as
in the single image display mode.
Press to display other
2
frames following the representative
frame.
Press . The screen returns
3
to the shot displayed in step 1.
● To display non-sequential shots,
select them on this screen.
Representative frame
Index display
Frames following the representative frame
Single image display
2, 3
86
Page 87

4
DIFFERENT SHOOTING
OPTIONS TO SUIT
EVERY APPLICATION
4
Page 88

Taking pictures under different conditions
Taking portrait pictures
A portrait-style photograph features an in-focus subject against a blurred
background. Your camera offers two different ways of achieving this effect.
m With the mode dial set to “S-Prg”,
select “S-Prg”–“ ” in the Menu (P.
86).
Focus on the subject. Exposure is
adjusted automatically according to the
conditions.
4
m Set the mode dial to “A”, then manually
set the aperture to a lower value. (P. 87)
By decreasing the aperture value, you will
force the camera to focus within a smaller
range, producing a picture with a blurred
background.
Taking pictures of moving subjects
If the subject of your photograph is moving quickly — such as athletes in a
sports scene or fast-moving vehicles, you can adjust the shutter speed to
capture the action without blurring or to heighten the sense of movement by
blurring the action. To capture fast-moving action precisely without blurring,
set the shutter speed to higher value. On the other hand, if you want your
photograph to have a sense of motion, set the shutter speed to a lower value.
This will blur the main subject, while the background remains clear.
Your camera offers two different ways of achieving these effects.
m With the mode dial set to “S-Prg”,
select “S-Prg”–“ ” in the Menu
(p.86).
Focus on the subject. Exposure is
adjusted automatically according to the
conditions.
m Set the mode dial to “S”, then select the
shutter speed manually (p.88).
88
Page 89

Taking pictures focusing on both
subject and the background
For example, if you want to take a picture with a beautiful background when
you are on travel, you will want to have both your subject and the background
in focus.
Your camera offers two different ways of achieving this effect.
m With the mode dial set to “S-Prg”,
select “S-Prg”–“ ” in the Menu
(p.86).
Focus on the subject. Exposure is
adjusted automatically according to the
conditions.
m Set the mode dial to “A”, then set the
aperture manually to a higher value.
(p.87)
Increasing the value forces your camera to
focus over a wider range to the
forward/backward directions, resulting in a
picture in which both the subject and the
background are in focus.
4
89
Page 90

Taking pictures under different conditions (Cont.)
Taking night scenes
To capture a twilight scene or sunset naturally, you need to set your shutter
speed to a lower value. If the Mode dial is set to “P”, the lack of brightness will
result in a dark picture with only the glow of the sunset or sparkle of the stars
appearing.
We recommend that you experiment by taking several pictures to determine
the optimum settings for natural-looking twilight shots.
Your camera offers two different ways of capturing twilight scenes.
m With the mode dial set to “S-Prg”,
4
select “S-Prg”–“ ” in the Menu
(p.86).
This mode uses the lower shutter speed
compared to the normal mode. Exposure
is adjusted automatically according to the
conditions.
m Set the mode dial to “M”, then select
both shutter speed and aperture
manually (p.89).
Select the optimal aperture, shutter speed
and focus range.
Note:
We recommend you to use a tripod for the
optimum result for this effect which uses the
lower shutter speed.
90
Page 91

Using the scene program (S-Prg) mode
[
5 /5
]
F2.8 1/800 0.0
P
ISO
[SM]
S-Prg
MODE SETUP
Press to display the Menu.
1
● You can display the menu
regardless of the mode selected by
the mode dial (P, A, S, M, S-Prg).
Press on the Arrow pad to
2
select “S-Prg”, then press .
Select the desired S-Prg mode
3
from “ , , , ”, then
press the OK button. (p.82-84)
Press the OK button again.
4
● The settings will be stored in
memory, and the Menu will
disappear.
Take a picture.
5
● You cannot set the aperture or shutter speed manually in S-Prg mode.
Note:
2, 3 5
3, 4
1
4
91
Page 92

Setting the aperture—Aperture priority mode
A F2.8 1/8001/800 0.0
[SM]
A F8.0 1/8001/800 0.0
[SM]
You can set the aperture manually in the Aperture priority mode. This is
especially useful for taking portrait pictures with blurred backgrounds.
2
Set the Mode dial to “A”.
1
● Aperture setting is displayed in
green.
Select on the Arrow pad to
2
4
select the aperture.
: Increases the value.
: Decreases the value.
Zoom position Range of the value
Wide (W) F2.8 – F8.0
Tele (T) F3.5 – F8.0
..
When the aperture indication
appears in red on the display
The aperture indication appears in red
when the aperture setting is unsuitable
for the conditions. “
the aperture indication when the
aperture is too large, and “
when the aperture is too small (see
illustration on the right). Adjust the
aperture to the optimum setting
according to “
● If you set the Mode dial to “A” when the ISO speed is set to AUTO, ISO
speed is automatically set to 100.
● When the built-in flash is activated, you cannot set the shutter speed to 1/30
sec. or slower when the zoom lever is set to the maximum position of “W”,
and 1/200 sec. or slower when the zoom lever is set to the maximum
position of “T”.
● Unless OFF is selected in “ALL RESET”, the setting will be canceled and
reset to off when the power is turned off. (p.148)
92
Ä” appears beneath
¶” appears
Ä/¶” on the display.
Note:
Aperture
Down exposure
1
Page 93

Setting the shutter speed—Shutter priority mode
S F2.8F2.8 1/800 0.0
[SM]
You can set the shutter speed manually in the Shutter priority mode. Set the
shutter to a fast speed to capture a moving object. Set it to a slow speed to
express motion.
Set the Mode dial to “S”.
1
● Shutter speed appears on the
display.
Press on the Arrow pad to
2
select the shutter speed.
: To increase shutter speed.
: To lower shutter speed.
Shutter speed range:
2 to 1/10000 (sec)
When the shutter speed indication
..
appears in red on the display
The shutter speed appears in red when
the shutter speed is not suitable for the
conditions. “
shutter speed indication when the
shutter speed is too high, and “
appears when the shutter speed is too
low. Adjust the shutter speed to the
optimum setting according to “
the display.
● If you set the Mode dial to “S” when the ISO speed is set to AUTO, ISO
speed is automatically set to 100.
● When the exposure setting is unsuitable, the aperture display will blink and
¶” (overexposure) or “Ä” (underexposure) will appear on the display.
“
● Unless OFF is selected in “All Reset”, the setting will be canceled and reset
to off when the power is turned off. (p.148)
Ä” appears beneath the
¶”
Ä/¶” on
Note:
2
1
Shutter speed
4
93
Page 94

Setting the aperture and shutter speed
M F2.8 1/800 –3.0
[SM]
M F2.8 1/800
[SM]
—Manual recording
You can set the aperture and the shutter speed manually in the Manual
mode. To check the exposure, refer to the exposure differential on the
display.
2 1
Set the mode dial to “M”.
1
● The aperture and the shutter speed
appear on the display.
Press on the Arrow
2
4
pad to select the aperture and the
shutter speed.
: Increases the aperture
: Decreases the aperture
: Makes faster the shutter speed
: Makes slower the shutter speed
Aperture differential
..
● The difference (ranging from –3.0 to
+3.0) between the exposure determined
by the currently selected aperture and
shutter speed compared to the exposure
level considered optimal by the camera
appears in the upper right-hand corner
on the screen.
● When is pressed, the aperture
differential appears at the bottom of the
screen indicated with the bar. Pressing
the Shutter button halfway allows you to
stop the indicator on the bar when the
exposure differential is determined by
the camera.
● When the exposure is set to less than
–3.0 or more than +3.0, the aperture
differntial appears in red on the display.
Note:
● If you set the Mode dial to “M” when the ISO speed is set to AUTO, ISO
speed is set to 100 automatically.
● Unless OFF is selected in “All Reset”, the setting will be canceled and reset
to off when the power is turned off. (p.148)
Shutter speed
Aperture
When the bar is displayed
Aperture
differential
94
Page 95

Taking close-up pictures—Macro mode
Use the Macro mode to shoot subjects at close range. You can get as close
as 4 inches to your subject (when the zoom lever is set to “W” to the
maximum position), allowing you to fill the entire frame with your subject.
Press to display “ ” on the
1
control panel.
● To cancel the Macro mode, press
the Macro button repeatedly until
the “ ” goes off on the control
panel.
Take a picture.
2
Control panel
● Each time you press , “ ” goes on and off.
Mode/Control panel Shooting range
No Macro (No indication) Approx. 23.6" to ∞ (factory preset)
Macro ( ) Approx. 3.9" to 23.6"
Macro mode shooting range when using the Zoom lever
WIDE (W) TELE (T)
Macro mode: 3.9" to 23.6" Macro mode: 3.25 ft to 6.5 ft
No Macro mode: 23.6" to ∞ No macro mode: 6.5 ft to ∞
Note:
● When you use the flash in the Macro mode, the flash may not have the
proper effect. Confirm the result on the display.
● Unless OFF is selected in “All Reset”, the setting will be canceled and reset
to off when the power is turned off. (p.148)
21
Macro mode
4
95
Page 96

Taking pictures using the self-timer
Use a tripod to fix the camera securely.
Press until (self-
1
timer/remote control) is displayed
on the control panel.
Press the shutter button.
2
● The self-timer lamp on the front of
4
the camera will light up for approx.
10 seconds. Then, the lamp will
blink for approx. 2 seconds and the
shutter will be released.
● In the mode, movie recording
starts. To stop recording, wait until
the camera stops recording (i.e.
until maximum continuous
recording time passes), or press
the Shutter button.
To stop the self-timer:
Press .
Note:
● The self-timer/remote control mode will be cancelled once self-timer
shooting is complete.
1
Control panel
Self-timer/remote control
Self-timer lamp
2
96
Page 97

Taking pictures using the remote control
You can shoot and display pictures using the remote control. (P. 76) Before
use, attach the camera to a tripod securely.
Press until (self-
1
timer/remote control) appears.
1
4
Control panel
Self-timer/Remote Control
97
Page 98

Taking pictures using the remote control (Cont.)
9.8ft
9.8ft
16.4ft
15°
15°
Compose the picture, aim the
2
remote control at the remote
control receiver on the camera,
then press the shutter button on
the remote control to take the
picture.
● The self-timer lamp will blink.
When the mode dial is set to P, A,
3
S, M, or S-Prg...
4
Press the shutter button on the
remote control.
● The self-timer lamp will blink and
the shutter will be released in
approx. 3 seconds.
When the mode dial is set to
(movie),
on the remote control.
● The self-timer lamp will blink and
..
work
● If the self-timer lamp does not blink
when the shutter button on the remote
control is pressed, get closer to the
camera and try it again.
● If the self-timer lamp does not blink,
there may be frequency interference.
Change the remote control's frequency
according to its instruction manual.
● Working distance may be reduced in brightly lit areas, such as direct
sunlight.
● Do not expose the remote control receiver to bright light.
● The self-timer/remote control mode will not be cancelled when shooting is
finished.
press the shutter button
the shutter will be released in
approx. 2 seconds. Recording will
then start. To stop recording, press
the shutter button. The card will
then begin storing the picture data
taken so far.
When the remote control does not
Note:
Self-timer lamp
Remote control receiver
98
Page 99

5
RECORD MODE
SELECTION
5
Page 100

Selecting the record mode/picture size
[
5/5
]
F2.8 1/800 0.0
P
ISO
[SM]
S-Prg
MODE SETUP
TIFF
SHQ
HQ
SQ
Select the desired record mode.
● With the mode dial set to P, A, S, M or S-Prg (for still pictures)
You can select from TIFF, SHQ, HQ and SQ. Image quality increases in the
order of SQ
pictures. Pictures shot in the SHQ or TIFF mode take longer to record and
play back than picture shot in SQ and HQ.
● With the mode dial set to (for motion picture recording)
You can select from HQ and SQ. The image quality increases in the order of
SQ[HQ.
[HQ[SHQ[TIFF. These modes are suitable for telephoto
1
5
2
3
100
Press to display Menu.
Press on the Arrow pad to
select , then press .
Press to select the image
quality, then press the OK button.
● File size and compression rate
values can be selected for TIFF
and SQ. (P. 153-155)
● Pressing the OK button again
stores the setting and restores the
normal screen.
2, 3
1
Menu (still picture recording mode)
Control panel
Record
mode
 Loading...