

Page 1

San-Ei Building, 22-2, Nishi Shinjuku 1-chome, Shinjuku-ku, Tokyo, Japan.
OLYMPUS OPTICAL CO., LTD.
(Customer support) Tel. 0426-42-7499
http://www.olympus.co.jp
OLYMPUS AMERICA INC.
Two Corporate Center Drive, Melville, NY 11747-3157, U.S.A. Tel. 631-844-5000
(Customer support) Tel. 1-888-553-4448
http://www.olympus.com
Digital Camera
Instructions
■ Thank you for purchasing this digital
Olympus camera.
■ Before you use this camera, read this
manual carefully .
■ We recommend that you spend some time
taking test shots and experimenting with
all of the features before you take
important pictures.
Instructions
Printed in Japan
(Premises/Goods delivery) Wendenstraße 14-18, 20097 Hamburg, Germany. Tel. 040-237730
OLYMPUS OPTICAL CO. (EUROPA) GMBH.
(Letters) Postfach 10 49 08, 20034 Hamburg, Germany.
http://www.olympus-europa.com
VT1621-01
Page 2

Thank you for purchasing the Camedia E-10. To ensure years of reliable and enjoyable
service, please read this instruction manual carefully and use the camera safely. Store
this instruction manual in a safe location where you can find it for future use.
Copyright
© Copyright 2000. Olympus Optical Co., Ltd. All rights reserved.
IMPORTANT NOTICES
Legal and other notices
• The contents of this document are subject to change without prior notice.
• Although the contents of this document have been carefully checked to avoid errors, some may
still occur. If you have a question about any point, or you find mistakes or omissions, please
contact us.
• No par t of this publication may be reproduced or reprinted except for personal use without prior
written permission from Olympus.
• Olympus makes no representations or warranties regarding any damages, or benefit expected by
using this unit lawfully, or any request from a third person, which are caused by the inappropriate
use of this product.
• Olympus makes no representations or warranties, regarding any damages or any benefit
expected by using this unit lawfully, caused by erasing picture image data.
Radio and Television Interference
Change or modifications not expressly approved by the manufacturer may void the user’s authority
to operate this equipment. This equipment has been tested and found to comply with the limits for
Class B digital device, pursuant to Part 15 of the FCC Rules. These limits are designed to provide
reasonable protection against harmful interference in a residential installation. This equipment
generates, uses, and can radiate radio frequency energy and, if not installed and used in
accordance with the instructions, may cause harmful interference to radio communications.
However, there is no guarantee that interference will not occur in particular installation. If this
equipment does cause harmful interference to radio or television reception, which can be
determined by turning the equipment off and on, the user is encouraged to try to correct the
interference by one or more of the following measures:
• Reorient or relocate the receiving antenna.
• Increase the distance between the camera and receiver.
• Connect the equipment to an outlet on a circuit different from that to which the receiver is
connected.
• Consult the dealer or an experienced radio/TV technician for help.
Only the included USB cable should be used to connect the camera to a personal computer.
Trademarks
• IBM is a registered trademark of International Business Machines Corporation.
• Microsoft and Windows are registered trademarks of Microsoft Corporation.
• Macintosh is a trademark of Apple Computer, Inc.
• CompactFlash and CF are trademark of San Disk Inc.
• All other company and product names are registered trademarks of their respective owners.
Declaration of Conformity
Model Number: E-10
Trade Name: OLYMPUS
Responsible Party: Olympus America lnc.
Address: 2 Corporate Center Drive, Melville, New York 11747-3157 U.S.A.
Telephone Number: 631-844-5000
This device complies with Part 15 of the FCC rules.
Operation is subject to the following two conditions:
(1)This device may not cause harmful interference, and
(2)This device must accept any interference received, including interference that may cause
undesired operation.
This Class B digital apparatus meets all requirements of the Canadian Interference-Causing
Equipment Regulations.
Page 3
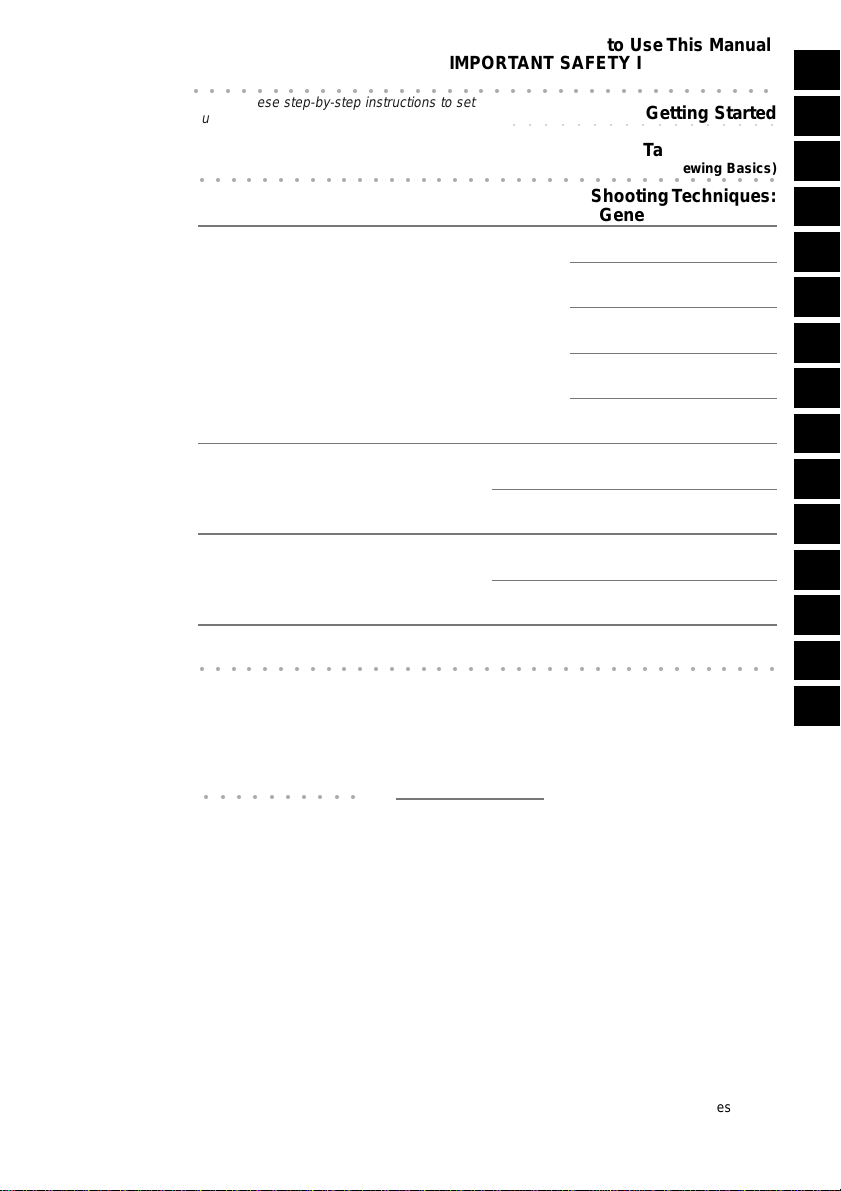
Read This First!
○○○○○○○○○○○○○○○○○○○○○○○○○○○○○○○○○○○○○
Follow these step-by-step instructions to set
up the camera and take some pictures. You
can start taking pictures right away, even if
you are a beginner, using zoom, macro mode
for close-ups, flash shooting, etc.
○○○○○○○○○○○○○○○○○○○○○○○○○○○○○○○○○○○○○
Read based on the types of
pictures that you want to take.
Caring for Your Camera, Important Parts and Names
IMPORTANT SAFETY INSTRUCTIONS
○○○○○○○○○○○○○○○○○
Getting Started
Taking Pictures
(Shooting and Viewing Basics)
Shooting Techniques:
General Introduction
Distance and Focus
Features, How to Use This Manual
1
2
3
4
Read for more details about adjusting
Taking Pictures
camera settings manually if the results
with the automatic features are not
satisfactory, or to create special artistic
effects in your pictures.
Brightness (Exposure)
Using a Flash
Color and Quality
Special Features
Playing back pictures for viewing on the
camera monitor or processing pictures
with the camera features.
Playing Back Images for Viewing
Managing Stored Pictures
Preparing pictures for printing,
transferring pictures from memory card
to a computer.
Selecting Pictures for Printing
Transferring Pictures to a Computer
○○○○○○○○○○○○○○○○○○○○○○○○○○○○○○○○○○○○○
Having a problem?
Basics for Everyone Advanced Features
○○○○○○○○○○
Appendices*, Glossary, Index
Monitor Menus
5
6
7
8
9
10
11
12
13
* Specifications/Available
Options/Image File
Compatibility/Troubleshooting/
Camera Error Messages
Page 4

CAMEDIA E-10 Features
Here is a quick summary of this camera’s most exciting features for professional
photographers, publishers, advertisers, or anyone experienced with an SLR camera who
wants to make the transition to a digital camera.
High Quality Images
• High Quality CCD with approximately 4 million elements.
• 4x zoom with f/2.0~f/2.4 ED lens, aspherical lens, fully multi-coated lenses. Reliable
reproduction of beautiful, natural color.
• Highly acclaimed balance achieved with digital ESP metering, spot metering, and
center weighted averaging metering, and a dual autofocusing system to cover low light
and low contrast situations.
Functionality
• Approx. 60ms shutter release timing*; sequence shooting at 3 frames/sec (up to 4
frames).
• Even in the macro close-up mode, you can zoom on an area up to 20 cm (8 inches)
from the lens of the camera.
• A wide choice of 5 different battery types.
• Durable, aluminum die-cast body.
• Compatible with SmartMedia, CompactFlash. (Compatible with Type I, Type II. Micro
drive cannot be used.)
* Shutter release time after focus lock and full-press on the shutter button.
Operability
• Easy to use button layout allows easy settings and adjustments.
• Viewfinder with a focusing screen which allows you to confirm focusing in real time.
• Manual focusing for fine adjustment with a focusing ring.
• Shutter speed, aperture value, other image information displayed in viewfinder.
• Monitor allows waist-level view for composing pictures.
Expandability
• Complete conversion lens system.
• Optional power battery holder kit enables prolonged uninterrupted use.
• Remote cable with 2-step release, 1st half-press and then 2nd full-press.
• Synchro socket for a non-dedicated external flash unit, hot shoe for a generic or
dedicated external flash unit.
• Allows easy connectivity to a computer with a USB interface.
2
Page 5
How to Use This Manual
The sample page below shows you how the use this manual.
Setting Tables
Initial settings
(defaults) are
indicated in bold.
Indicates the
corresponding
step number of
the procedure on
the right.
Using the Menus
To open the next
page of a menu in
the direction
indicated by the
arrows ,
press the
appropriate
pointer on the
arrow pad to
move the
highlighted green
frame in order to
perform settings.
Arrow pad
Press the black
pointer. If more than
one pointer is
marked in black,
press either pointer.
Procedures
Follow the numbered
procedures. The numbers
in the illustrations on the left
correspond to the step
numbers on the right.
Previous shot is not displayed.
Previous shot is displayed for as long
as it takes for the image to be stored
on the memory card.
Previous shot is displayed for 5 seconds.
Selecting Sharpness
Three settings are available for adjusting sharpness: HARD, NORMAL, and SOFT. SHARP sharpens
the contrast at color borders to maximize the clarity of the image.
NORMAL Enabled when you purchase the camera. Defines borders to achieve best focus fo
printing the image.
HARD Greatly enhances and sharpens borders.
SOFT Softens borders slightly and is ideal for images that you intend to process with a
computer graphics software application.
2
3
OFF
AUTO
1
5sec
Press the menu button .
1
The menu opens in the monitor.
On the arrow pad, press or to move
2
the green highlight to the sharp option mark
.
On the arrow pad, press to move the
3
green highlight to HARD, NORMAL, or
SOFT.
The mark is displayed in the control panel
when a setting other than NORMAL is
selected.
Press the button to select the setting.
4
The green highlight returns to the sharp option
mark .
Press button again to close the menu.
Note
• Selecting HARD could cause the image to appear
rough.
4
Cautions and
Notes provided
at bottom of the
page describe
precautions and
tips about using
the camera.
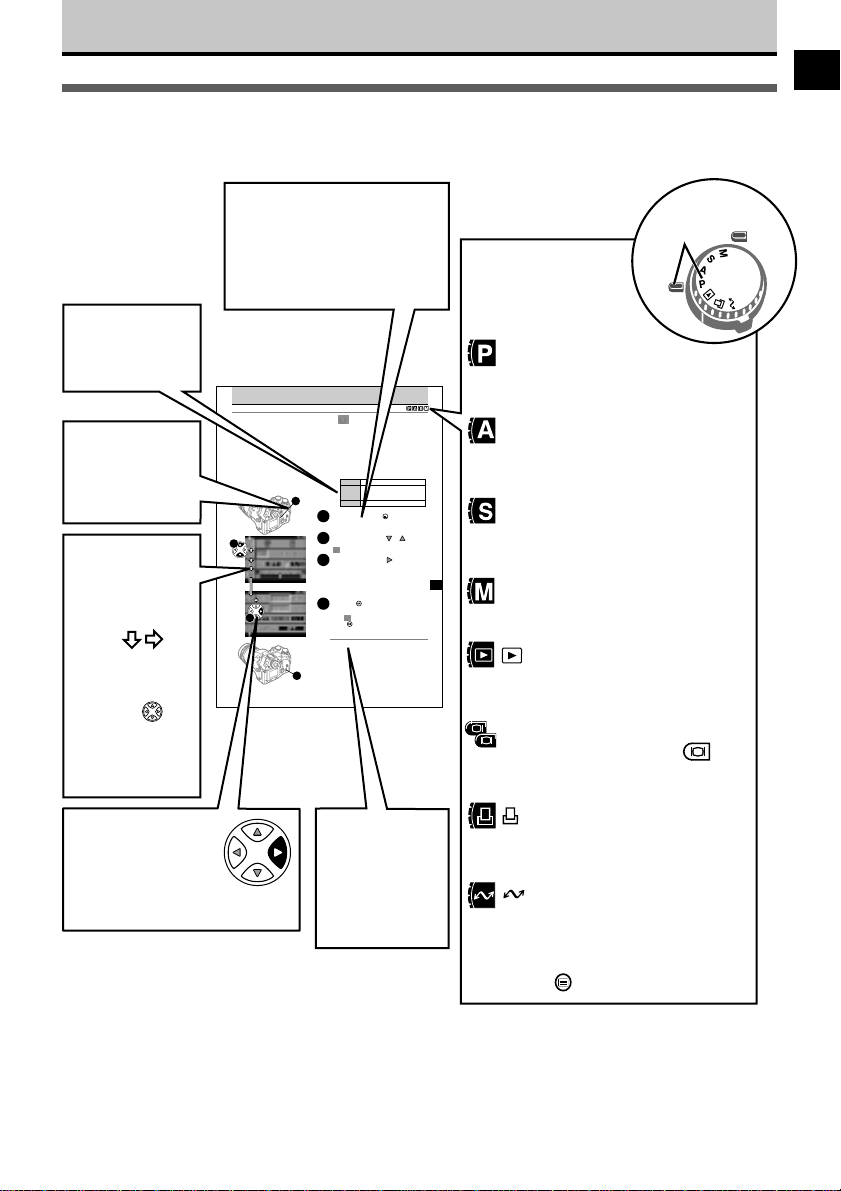
Mode Dial Setting
Tells you the possible
mode dial settings
required to follow the
procedure.
P (Program mode)
Camera automatically selects
the best aperture value and
shutter speed for the shot.
A (Aperture priority mode)
Allows you to set the aperture
value (camera selects the shutter
speed).
S (Shutter priority mode)
Allows you to set the shutter
speed (camera selects the
aperture value).
7
M (Manual mode)
Allows you to set both the shutter
speed and aperture value.
(Playback mode)
Allows you to display on the
137
monitor images of pictures you
have taken.
When shooting mode is set for P,
A, S, or M, rapidly press
(Monitor button) twice to enter the
playback mode.
(Print reserve mode)
Allows you to select images for
printing on a DPOF printer or by a
DPOF printing service.
(Setup/connection mode)
Select this setting before you
connect the camera to a computer.
Also displays the camera setup
features after you press the menu
button .
Move the mode
dial to align the
mark with .
OFF
ON
This is only a sample, not a real page. Please do not attempt to execute the procedure described on
this page.
3
Page 6
IMPORTANT SAFETY INSTRUCTlONS
Before you use this camera, read this manual
and then store it in a safe location where you
can find it for future use.
We recommend that you spend some time
taking test shots and experimenting with all of
the features before you take important
photographs.
CAUTION
RISK OF ELECTRIC SHOCK
DO NOT OPEN
CAUTION: TO REDUCE THE RISK OF ELECTRICAL SHOCK, DO NOT
REMOVE COVER (OR BACK). NO USER-SERVICEABLE PARTS INSIDE.
REFER SERVICING TO QUALIFIED OLYMPUS SERVICE PERSONNEL.
A lighting flash with an arrowhead,enclosed in a triangle, alerts
you to the presence of uninsulated voltage points inside the
product which could cause a serious electrical shock.
An exclamation point enclosed in a triangle alerts you to important
operating and maintenance instructions in the documentation
provided with the product.
WARNING!
TO AVOID THE RISK OF FIRE OR ELECTRICAL SHOCK, NEVER EXPOSE
THIS PRODUCT TO WATER OR OPERATE IN A HIGH HUMIDITY
ENVIRONMENT.
1. Read All Instructions - Before you use the
product, read all operating instructions.
2. Save These Instructions - Save all safety
and operating instructions for future
reference.
3. Heed Warnings - Read carefully and follow
all warning labels on the product and all
warnings described in the instructions.
4. Follow Instructions - Follow all instructions
provided with this product.
5. Cleaning - Always unplug this product from
the wall outlet before cleaning. Use only a
damp cloth for cleaning. Never use any type
of liquid or aerosol cleaner, or any type of
organic solvent to clean this product.
6. Attachments - For your safety, and to avoid
damaging the product, use only accessories
recommended by Olympus.
7. Water and Moisture - Never use this product
around water (near a bathtub, kitchen sink,
laundry tub, wet basement, or swimming
pool).
8. Location - To avoid damage to the product
and to avoid personal injury, never place this
product on a unstable stand, tripod, bracket,
table or cart. Mount only on a stable tripod,
stand, or bracket. Follow the instructions
which describe how to safely mount the
product, and use only the mounting devices
recommended by the manufacturer.
9. Power Sources - Connect this product only
to the power source described on the
product label. If you are not sure about the
type of power supply in your home, consult
your local power company. Refer to your
operating instructions for information on
using the product with batteries.
10.Grounding, Polarization - If this product can
be used with an optional AC adapter, the
adapter may be equipped with a polarized
alternating current line plug, a plug with one
blade wider than the other. This safety
feature allows the plug to fit into the power
outlet only one way. If you cannot insert the
plug into the wall outlet, pull it out, reverse
it, and then insert it again. If the plug still
fails to fit, contact an electrician and have
the receptacle replaced.
11.Protecting the Power Cord - The power
supply cord should be routed so it will not
be walked on. Never place a heavy object
on the power cord and never wrap the
power cord around the leg of a table or
chair. Keep the areas around the power cord
connection points, at the power outlet and at
the product connection, free of all obstacles.
12.Lightning - If a lightning storm occurs while
using the optional AC adapter, unplug the
adapter power cord from the wall outlet
immediately. To avoid damage from
unexpected power surges, always unplug
the AC adapter from the power outlet and
disconnect it from the camera when the
camera is not in use.
13.Overloading - Never overload wall outlets,
extension cords, power strip, or other power
connection points with too many plugs.
4
Page 7
14.Foreign Objects, Spillage - To avoid
personal injury from fire or electrical shock
from contact with internal high voltage
points, never insert a metal object into the
product. Avoid using the product where
there is a danger of spillage.
15.Servicing - Refer all servicing to qualified
personnel. Attempting to remove the covers
or disassemble the product could expose
you to dangerous high voltage points.
16.Damage Requiring Service - While using the
optional AC adapter, if you notice any of the
conditions described below, unplug the AC
adapter from the wall outlet and refer
servicing to qualified service personnel:
a) If liquid has been spilled, or any object
has fallen into the product.
b) If the product has been exposed to water.
c) If the product does not operate normally
while following operating instructions. Adjust
only the controls described in the operating
instructions as improper adjustment of other
controls could damage the product,
requiring extensive repair work by a
qualified technician to restore the product to
normal operation.
d) If the product has been dropped or
damaged in any way.
e) If the product exhibits a distinct change in
performance, this indicates a need for
servicing.
17.Replacement Parts - When replacement
parts are required, make sure that the
service center uses only parts
recommended by the manufacturer to
ensure that the replacement parts have the
same characteristics as the originals.
Unauthorized substitution of parts could
cause a fire, electrical shock, or create other
hazards.
18.Safety Check - Upon completion of servicing
or repairs, ask the service technician to
perform safety checks to determine that the
product is in good working condition.
19.Heat - Never use or store this product near
a heat source such as a radiator, heat
register, stove, or any type of equipment or
appliance which generates heat, including
stereo amplifiers.
WARNING!
• Keep batteries away from children.
• If a child swallows a battery, seek medical
attention immediately.
• Dispose of lithium batteries promptly and
safely in compliance with local laws
regarding the disposal of such items.
• To avoid causing a fire or minor burns,
always handle lithium batteries carefully.
• Never attempt to charge the lithium
battery, disassemble it, heat it above
212°F (100°C) or incinerate it.
• To ensure good contact, wipe the battery
with a clean, dry cloth before use.
• To avoid short circuiting the +/-sides of the
battery, never handle a lithium battery with
a metal tool, tweezers, etc.
The DANGER indication alerts you to an
Danger
imminent hazard that if not avoided could
result in death or serious injury.
The WARNING indication alerts you to a
Warning
potential hazard that if not avoided may
result in death or serious injury.
The CAUTION indication alerts you to a
potential hazard that if not avoided may result
Caution
in injury or in property or equipment damage.
Handling Batteries
Follow these important guidelines to prevent
the batteries from leaking, overheating,
burning, exploding, or causing electrical shock
or burns.
DANGER
1. If you use Ni-MH batteries, use only
Olympus Ni-MH batteries and the
recharging unit recommended for use with
these batteries.
2. Never load batteries with their +/− terminals
reversed. Never force batteries into the
battery compartment.
3. To prevent causing battery leaks or
damaging their terminals, carefully follow all
instructions regarding the use of batteries.
Never attempt to disassemble a battery or
modify it in any way, with soldering, etc.
4. Take precautions when carrying or stor ing
batteries to prevent them from coming into
contact with any metal objects like jewelry,
pins, fasteners, etc.
5
Page 8

IMPORTANT SAFETY INSTRUCTlONS (continued)
5. Never heat batteries or incinerate them.
6. Never attempt to connect a battery directly
to a power outlet, or to a cigarette lighter in
a vehicle.
7. If battery fluid gets into your eyes, flush your
eyes immediately with clear, cold running
water and seek medical attention
immediately.
WARNING
1. Keep batteries dry at all times. Never allow
them to come into contact with fresh water
or salt water.
2. To prevent batteries from leaking,
overheating, or causing a fire or explosion:
• Use only batteries recommended for use
with this product.
• Never heat batteries, incinerate them, or
attempt to disassemble them.
• Never mix batteries (old and new batteries,
charged and uncharged batteries,
batteries of different manufacture or
capacity, etc.).
• Never attempt to charge alkaline or lithium
batteries.
• Load batteries carefully as described in
the operating instructions. Never reverse
their polarity when loading.
• Batteries with any par t of the outer seal
(magnetic insulation sheath) peeling off, or
any battery split along the seam, can leak,
generate heat, or explode.
• To prevent a fire or minor burns, inspect
batteries carefully before loading. Never
load a battery if you notice that the
insulation or protective covering is
damaged in any way or if the battery cover
is warped, even if the batteries are new.
Batteries sold at stores may have these
kinds of abnormalities. Never use these
batteries.
3. If Ni-MH batteries are not charged within the
specified time, stop charging them and do
not use them.
4. Before loading, always inspect batteries
carefully for leaks, discoloration, warping, or
any other abnormality.
5. Always store batteries out of the reach of
small children. If a child accidentally
swallows a battery, seek medical attention
immediately.
6. If a battery leaks fluid onto your clothing or
skin, remove the clothing and flush the
affected area with clean, running cold water
immediately. If the fluid burns your skin,
seek medical attention immediately.
7. Never attempt to modify the battery
compartment on the camera, and never
insert anything (other than the
recommended battery) into the battery
compartment.
CAUTION
1. Olympus Ni-MH batteries are intended for
use only with Olympus digital cameras.
Never use these batteries with any other
device.
2. Never subject batteries to strong shocks or
continuous vibration.
3. Always charge sets of batteries (2 or 4)
together.
4. Always charge Ni-MH batteries before using
them for the first time, or if they have not
been used for a long period.
5. While the camera is not in use, always
remove the batteries to prevent accidental
leakage which could damage the battery
compartment.
6. If a battery leaks, becomes discolored or
deformed, or in any other way becomes
abnormal during operation, stop using the
camera and consult your dealer or an
authorized Olympus service center.
Continued use may result in fire or electric
shock.
7. Never store batteries where they will be
exposed to direct sunlight, or subjected to
high temperatures in a hot vehicle, near a
heat source, etc.
8. Batteries may become hot during prolonged
use. To avoid minor burns, never remove
them immediately after using the camera.
Handling the Camera
WARNING
1. Use caution when taking flash pictures at
close range. When you fire the flash, you
must be at least 3 ft. away from the faces of
your subjects, especially when taking
pictures of infants and small children. Firing
the flash too close to the subject’s eyes
could cause a momentary loss of vision.
6
Page 9

2. To avoid damaging your eyes, never aim the
camera directly into the sun, or any other
extremely bright light source.
3. To avoid causing a fire or explosion, never
use the camera in near flammable or
explosive gases.
4. Always use and store the camera out of the
reach of young children and infants to
prevent the following dangerous situations
which could cause serious injury:
• Becoming entangled in the camera strap,
causing strangulation.
• Accidentally swallowing a battery or small
part.
• Accidentally firing the flash into their own
eyes or into the eyes of another child.
5. To avoid the hazards of fire or electrical
shock, store the camera in a cool, dry
location where it will not be subjected to
high humidity or dust.
6. To avoid minor burns, never cover the flash
with your hand when it is fired. Never touch
the flash unit after continuous use. The flash
unit becomes very hot during continuous
operation.
7. If the camera is accidentally dropped in
water, or if liquid is spilled into the camera,
stop using the camera, allow the camera to
dry, and then remove the batteries. Contact
the nearest Olympus authorized service
center.
CAUTION
1. During operation of the camera, if you notice
any unusual odors, noise, or smoke around
the camera, immediately switch the camera
off, disconnect the optional AC adapter (if it
is connected), and allow the camera to sit
idle for a few minutes to allow it time to cool.
Take the camera outdoors, away from
flammable objects, and carefully remove the
batteries to avoid burning your hands.
Contact the nearest Olympus service center
immediately.
2. Never attempt to disassemble the camera.
The internal circuits contain high voltage
points which could cause serious burns or
electrical shock.
3. To avoid dangerous electrical shock, never
hold or operate the camera with wet hands.
4. To avoid damaging the camera or causing a
fire, never expose the camera to excessive
heat.
Camera Care and Storage
Handling
• Never store or use the camera for long
periods in locations subject to direct sunlight,
high humidity, extreme variation in
temperature, or strong shocks and constant
vibration. Protect the camera at all times from
dust and sand.
• Never store the camera near any type of
appliance or equipment which generates high
temperatures, low temperatures, high or low
humidity, or a strong magnetic field. Never
use the camera in a factory or laboratory
where flammable gases are present.
• Never shake the camera or subject it to shock
or strong vibration.
• To avoid damaging its precision lens, never
leave the camera pointing directly into the
sun.
• Before storing the camera for a long period,
remove the batteries. Select a cool, dry
location for storage to prevent condensation
or mold from forming inside the camera. After
storage, test the camera by pressing the
shutter button to make sure that it is operating
normally.
• When the camera is mounted on a tripod,
adjust the tripod head to re-position the
camera; do not twist the camera.
• Never touch the flash after it has been fired.
Avoid using the flash for extended periods.
Allow it to cool occasionally between shots.
• To avoid injury from electrical shock, never
attempt to disassemble or modify the camera
in any way.
CAUTION
Selecting batteries for your camera
• This camera can use four AA Ni-MH batteries,
four AA alkaline batteries, four AA lithium
batteries, four AA Ni-Cd batteries, or two CRV3 lithium battery packs. Use of Olympus
brand batteries is strongly recommended.
• Alkaline battery performance is limited,
especially at low temperatures. Using Ni-MH
batteries is recommended.
• AA manganese batteries cannot be used with
this camera.
• Always follow the battery recommendations
and loading instructions. Incorrectly loading
the batteries could cause the batteries to leak
or overheating.
7
Page 10

IMPORTANT SAFETY INSTRUCTlONS (continued)
• When using the camera on battery power at
low temperatures, try to keep the camera and
extra batteries as warm as possible. Batteries
which run down at low temperatures may be
restored after they are warmed at ambient
temperature.
• Perspiration or oil from your hands on the
battery contacts could prevent them from
operating. Before loading batteries, wipe the
terminals with a dry, clean cloth.
• Before going on a long trip, especially before
traveling abroad, purchase an ample supply
of extra batteries. The recommended batteries
may be difficult to obtain while traveling.
• Always recharge Ni-MH or Ni-Cd batteries
with a charger recommended for use with
these batteries.
• Before using Ni-MH or Ni-Cd batteries, always
read the instructions provided with purchase
of these batteries.
• To avoid personal injury or damage to the
camera, always inspect batteries before
loading. If you notice leaking, damage to the
battery cover or insulation, discoloration,
warping or any other abnormality do not use
the batteries.
• Recommended temperature ranges for Ni-MH
batteries:
Operation 32°~104°F
Charge 32°~104°F
Storage −4°~86°F
• Using, charging, or storing the batter ies
outside these ranges could shorten battery
life or affect battery performance. Always
unload the batteries from the camera before
storing the camera and batteries for a long
period.
• Alkaline batter y performance is limited by a
number of factors: manufacturer, date of
manufacture, warranty period, low
temperatures. Battery service could be
shortened by any of these factors. Generally
alkaline batteries perform poorly at low
temperature.
• Ni-MH batteries are rechargeable but
chemical reactions could cause the battery
capacity to deteriorate. The batteries can be
recharged up to approximately 300 times,
depending on operating conditions.
• If you use Ni-Cd batteries, make sure that you
always fully charge 4 batteries at a time on a
recharge unit rated for use with Ni-Cd
batteries. If you do not use Ni-MH batteries
for about 1 month, you may not be able to
restore them to full power with one full
recharge. You may need to recharge them
several times to restore them to full power.
Monitor and control panel light
• The fluorescent lamp of the monitor and
control panel has a long but limited service
life. If either display becomes dark or begins
to flicker, contact an Olympus authorized
service center.
• At low temperatures, the light could be slow
to light and the color could be different. When
using the camera in cold weather, try to keep
it as warm as possible. If you notice changes,
normal operation will be restored after the
camera is returned to a warm location.
• The monitor of this camera is a high precision
device. However, you may occasionally notice
residual display of frequently displayed
images, and the color and brightness of the
display could change with the angle of view.
These phenomena do not indicate problems,
but could occur with normal operation of the
monitor.
8
Page 11
Caring for Your Camera
Lens
• Purchase a standard camera lens blow brush and use it to keep the lens clean.
• To remove more difficult dust or foreign matter, use only a cleaning cloth or paper
intended for use with camera lenses to prevent scratching the lens.
• When the camera is not in use, cover the lens with the lens cover to protect it
from scratches or other accidental damage.
Monitor
• Use only a cleaning cloth or paper intended for
LCDs to clean the monitor.
General care tips
* Always protect the surface of the camera from water.
* Never store the camera with mothballs.
* Store the camera in a clean, dry, cool location that is not subject to wide variation in temperature
or humidity.
* If you store the camera for more than one month with the batteries removed, the date and time
settings will return to its factory default. This means that you will need to reset the date and time
the next time you use the camera.
* After prolonged storage check the camera to make sure that it is operating correctly. (The growth
of mold, excessive dust, etc. could interfere with operation of the camera.)
* To prevent sand or dirt from interfering with the movements of the manual focusing ring and other
moving parts, keep the camera stored in a case or bag when it is not in use. Avoid using the
camera in areas exposed to sand and dust.
9
Page 12

Contents
CAMEDIA E-10 Features ...................................................................................................2
How to Use This Manual .................................................................................................... 3
IMPORTANT SAFETY INSTRUCTlONS............................................................................4
Caring for Your Camera...................................................................................................... 9
Important Parts and Names ............................................................................................. 14
Getting Started .................................................................................................19
Box Contents: Make Sure You Have Everything......................................................... 20
Attaching the Camera Strap ....................................................................................... 21
Inserting Batteries and Attaching the Optional AC Adapter ....................................... 22
Taking Pictures (Shooting and Viewing Basics) ........................................... 29
Inserting a Memory Card............................................................................................ 30
Setting the Shooting Mode and Switching the Camera On ........................................ 32
Checking the Battery .................................................................................................. 33
Checking the Number of Storable Pictures ................................................................ 34
When the Number of Storable Pictures Is Not Displa yed ........................................... 35
Holding the Camera ................................................................................................... 36
Pushing the Shutter Button ........................................................................................ 38
If You Cannot Take a Picture....................................................................................... 40
Enlarging the Subject (Zoom and Macro)................................................................... 42
Using the Built-in Flash .............................................................................................. 44
Viewing Pictures (Playback) ....................................................................................... 46
Protecting Pictures
Deleting Single Pictures
Switching the Camera Off .......................................................................................... 52
............................................................................................ 50
...................................................................................... 51
Shooting Techniques: General Introduction..................................................53
Shooting Portraits (Focused Subject, Blurred Background) ....................................... 54
Shooting Portraits (Shooting Backlit Subjects)........................................................... 55
Shooting a Subject in Daylight Shadow (Daylight Synchro) ....................................... 56
Shooting the Subject and Background Both in Focus ................................................ 57
Shooting Moving Subjects.......................................................................................... 58
Shooting Close-up...................................................................................................... 59
Shooting Night Scenes............................................................................................... 60
10
Page 13
Shooting a Subject Against a Night Scene Background (Slow Synchronization)....... 61
Shooting Sunsets and Fireworks................................................................................ 62
Taking Pictures: Distance and Focus.............................................................63
Using Autofocus (AF) ................................................................................................. 64
Using Manual Focus (MF) .......................................................................................... 68
Taking Pictures: Brightness (Exposure) (Aperture and Shutter Speed) .......... 69
Setting the Shooting Mode ......................................................................................... 70
Aperture Values and Shutter Speeds Selected Automatically in the P Mode............. 71
Setting the Aperture Value.......................................................................................... 72
Setting the Shutter Speed .......................................................................................... 74
Selecting Aperture and Shutter Speed Manually ....................................................... 76
Selecting the Metering Method
Using Exposure Compensation .............................................................................79
AE Lock
Bracketing a Shot with Three Automatic Exposures ............................................. 81
Changing the ISO Setting .....................................................................................83
............................................................................................................ 80
............................................................ 78
Taking Pictures: Using a Flash .......................................................................85
Selecting a Flash Mode .........................................................................................86
Using Flash Control Compensation ......................................................................90
Using the Optional Dedicated External Flash FL-40 .................................................. 92
Using Other Flash Units with the Camera .................................................................. 94
Taking Pictures: Color and Quality.................................................................97
Achieving Natural Color (White Balance) ............................................................ 98
Using White Balance .......................................................................................... 100
Using Quick Reference White Balance
Using Preset White Balance .............................................................................. 102
Selecting Image Quality, Resolution, and Compression ... 103
Selecting Sharpness
Selecting the Contrast ........................................................................................ 107
Displaying the Histogram .................................................................................... 108
.......................................................................................... 106
.............................................................. 101
Taking Pictures: Special Features................................................................111
Taking Multiple Exposures .................................................................................112
Using the Self-Timer ........................................................................................... 113
Using the Camera Remote Unit RM-1 ................................................................... 114
Using the Remote Cable RM-CB1 (Optional)........................................................... 116
11
Page 14

Contents (continued)
Using Time-Lapse Photography .........................................................................118
Selecting a Card for Storing Pictures
Selecting the Shutter Sound Type and Volume .................................................. 122
Setting the Warning Sound ................................................................................. 124
Setting the Rec View Time
Setting the Date and Time .................................................................................. 126
Setting the Idle Time for the Sleep Mode ...........................................................128
Restoring All Default Settings
RAW Data Mode ................................................................................................. 131
Using an Optional Conversion Lens ..............................................................133
................................................................................. 125
+ .....................................................................130
.......................................................... 121
Playing Back Images for Viewing .................................................................137
Displaying Image Information ............................................................................138
Automatic Playback (Slide Show) ....................................................................... 140
Displaying Images on a TV Screen .......................................................................... 142
Adjusting Monitor Brightness
..............................................................................144
Managing Stored Pictures.............................................................................145
Copying Images to Another Card ....................................................................... 146
Deleting All Images ............................................................................................150
Formatting a Memory Card
Naming Image Files ...........................................................................................154
................................................................................ 152
Selecting Pictures for Printing......................................................................157
Selecting Pictures and Number of Copies for Printing ......................................... 158
Selecting All Pictures on a Card for Printing ......................................................160
Setting Up Index Printing
Selecting Pictures for Date or Time Stamping .................................................... 164
Printing with Olympus Printers ................................................................................. 166
....................................................................................162
Transferring Pictures to a Computer............................................................167
Transferring Images with a Computer Connection Kit .............................................. 168
Optional Devices for Card Reading.......................................................................... 172
Monitor Menus................................................................................................173
Monitor Menus .................................................................................................... 174
Appendices.....................................................................................................177
Appendix 1: Specifications .......................................................................................178
Appendix 2: Available Options..................................................................................180
12
Page 15

Appendix 3: Image File Compatibility ....................................................................... 181
Appendix 4: Troubleshooting .................................................................................... 182
Appendix 5: Camera Error Messages ...................................................................... 189
Glossary of Selected Terms .......................................................................... 191
Index ...............................................................................................................196
13
Page 16

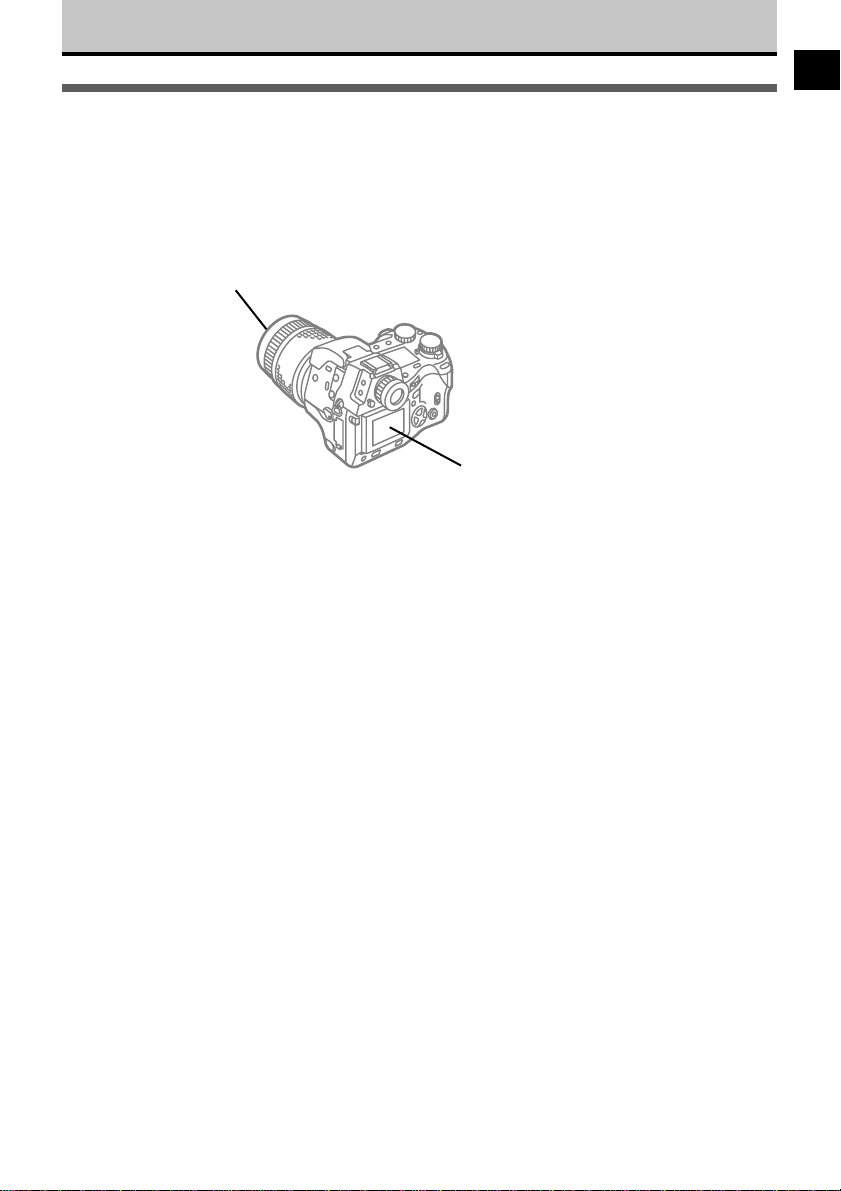
Important Parts and Names
Metering mode button* ➝ 78
Drive button*
➝ 112, 113, 114
Remote cable
jack➝ 116
Built-in flash ➝ 44, 85
Flash button
➝ 44, 89
Manual focus
ring ➝ 68
Zoom ring
➝ 42
Exposure
compensation
button* ➝ 79
Macro button*
➝ 42
Flash synchro socket
(External flash connector) ➝ 95
Focus mode switch➝ 64, 68
Strap eyelet ➝ 21
DC IN jack cap
DC IN jack ➝ 27
Flash mode button* ➝ 86
Record mode button* ➝ 103
Control panel 16
Hot shoe
➝ 95
Monitor 15, 17
Sub dial ➝
Main dial ➝
Viewfinder 17
Diopter adjustment ring ➝ 36
Eyepiece shutter lever ➝ 37
See “Main dial
and Sub dial” below.
White balance mode
button* ➝ 98
Mode dial ➝ 3, 70
Power switch ➝ 32
AE lock button ➝ 80
Light button ➝ 32
Card access lamp
➝ 23, 39
SM/CF memory
card button* ➝ 121
Card cover lock
Card cover
See “Main dial
and Sub dial” below.
➝ 30
➝ 30
Connector cover
Video OUT jack ➝ 142
USB connector ➝ 168
* Press and then turn the
main dial or sub dial to
operate.
Main dial and sub dial
You can use either the main dial or sub dial in almost all cases to select camera settings. Use
whichever is more convenient for you. However, please remember that when the mode dial is set to
M (Manual mode) the main dial is used to set the aperture value and the sub dial is used to select
the shutter speed.
14
Page 17
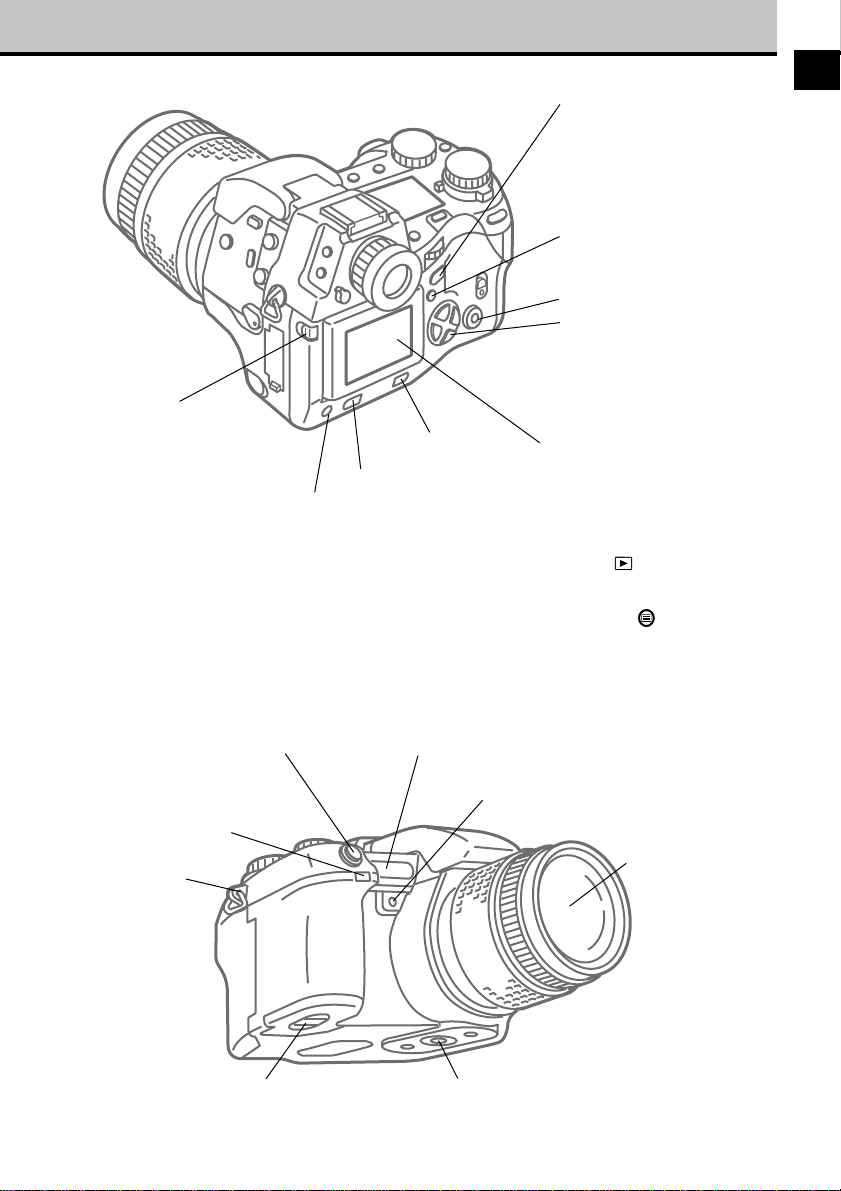
Monitor
lock/release button ➝ 37
Allows you to raise monitor
and change angle of view.
INFO button* ➝ 17, 68, 138
When the histogram is set to
display, press to switch the
histogram display on/off.
Erase button ➝ 51
Protect button ➝ 50
Monitor button ➝ 37
Press to switch monitor
off/on. In P, A, S, or M
mode press twice rapidly to
enter playback mode,
press again to leave
playback mode.
Menu button ➝ 174
Press to open menu in the
monitor.
OK button ➝ 174
Arrow pad ➝ 174
When using the menus,
press the pointers on the
arrow pad to move the green
highlight to select options,
and then press the OK
button.
Monitor ➝ 17
If you press the monitor button
with the mode dial set to P, A,
S, or M, you can use the
monitor like the viewfinder,
with the mode dial set to
playback you can view
images of pictures that you
have taken. If you press the
menu button you can open
and use the menus.
Shutter button ➝ 38
Remote control receiver/
self-timer lamp ➝ 113, 115
Strap eyelet
➝ 21
AF port ➝ 64
Quick reference
white balance button ➝ 101
Lens
Tripod socketBattery compartment ➝ 23
15
Page 18
Important Parts and Names (continued)
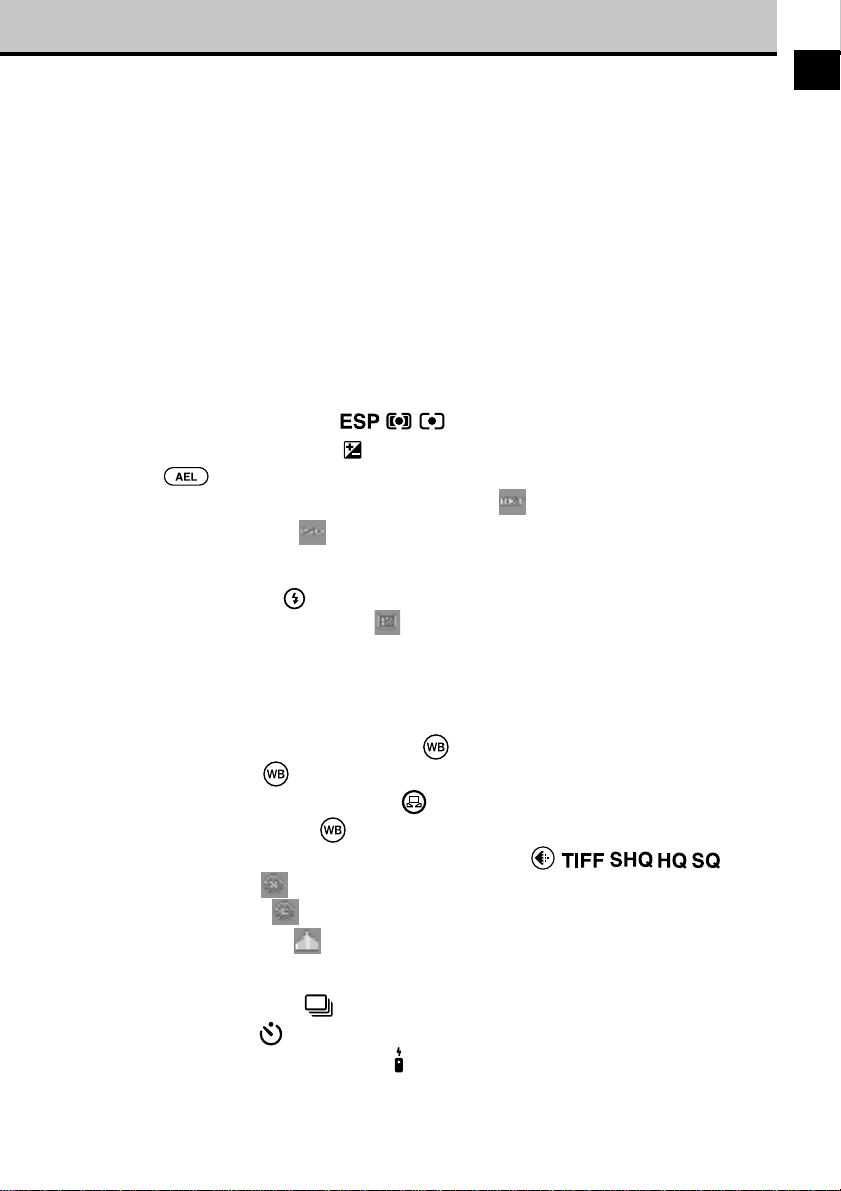
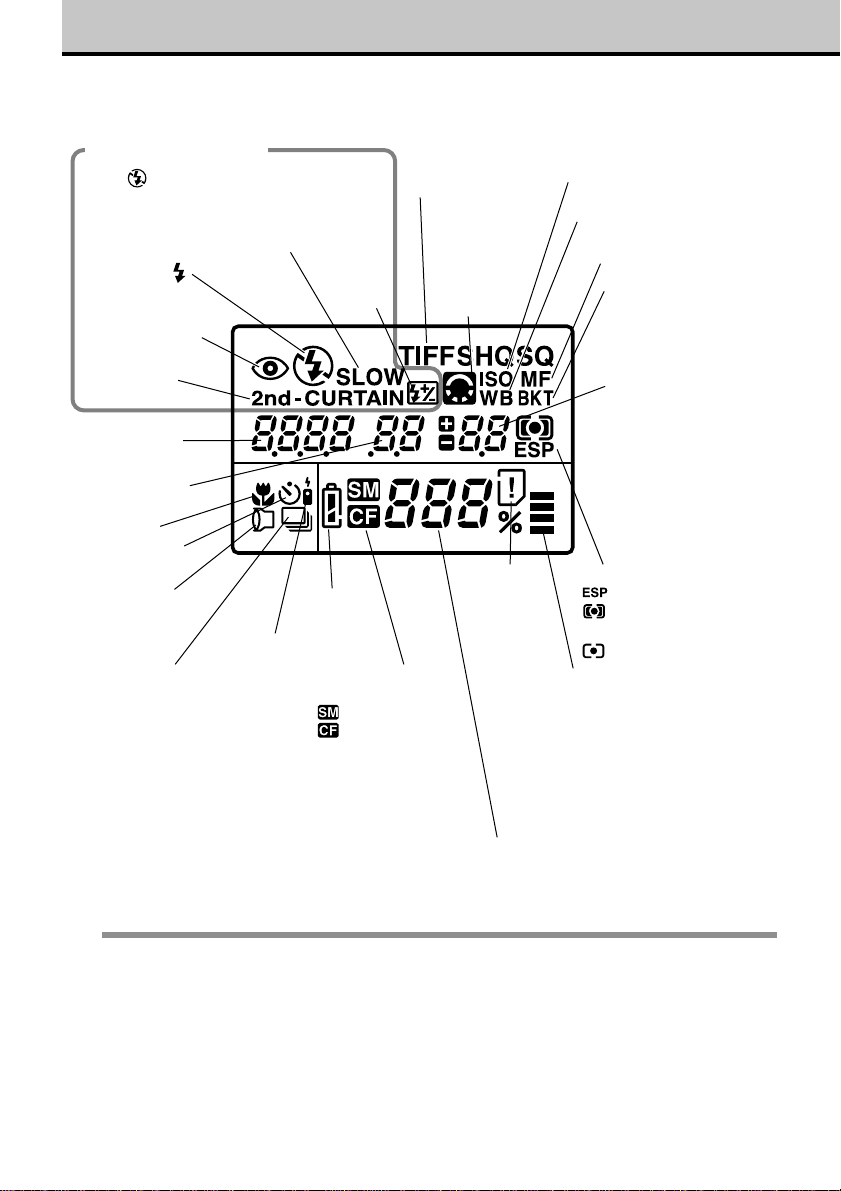
Control panel
Flash control ➝ 44, 85
Only (No Flash) is displayed when
flash is not in use. Nothing displayed for
Auto flash mode.
Slow synchro
Fill-in flash
Red-eye reduction
2nd-curtain
Shutter speed
➝ 74
Aperture value
➝ 72
Macro ➝ 42
Self-timer ➝ 113
Conversion lens
➝ 133
Remote control ➝ 114
Sequential shooting ➝ 112
Battery
check ➝ 33
Selected memory
card
SmartMedia
CompactFlash
➝ 121
Record mode
(TIFF, SHQ,
HQ, SQ) ➝ 103
Image
Flash
intensity
control
Number of storable pictures ➝ 34
At power on, also displays a percentage for the
battery check for the lithium polymer battery.
adjustment
(sharpness,
contrast)
➝ 106, 107
Card error
➝ 189
ISO (Displays setting other
than AUTO) ➝ 83
White balance (Displays
setting other than AUTO)
➝ 100, 101, 102
Metering mode ➝ 78
Digital ESP metering
Center weighted
averaging metering
Spot metering
Memory gauge ➝ 40
Displays the amount of camera
memory currently in use. One bar
lights for every picture taken and
remains on until the picture is
stored in the card and then goes
out. With no bars lit, you can take
up to 4 pictures. When all 4 bars
are lit, you cannot take a picture.
Manual focus ➝ 68
Auto bracket ➝ 81
Exposure
compensation/
Exposure level
In the P, A, S modes
displays exposure
compensation value.
(➝ 79)
In the M mode
displays the exposure
level (the difference
between the selected
and ideal exposure
levels).
(➝ 77)
Note
• If you half-press the shutter button, the viewfinder display will light on.
• After the camera is switched on, you will see “- - ” displayed for the aperture, shutter speed, and
exposure level settings until you half-press the shutter button. When you release the shutter-button
from half-pressing, you will see “- -” displayed again after 8 seconds.
16
Page 19
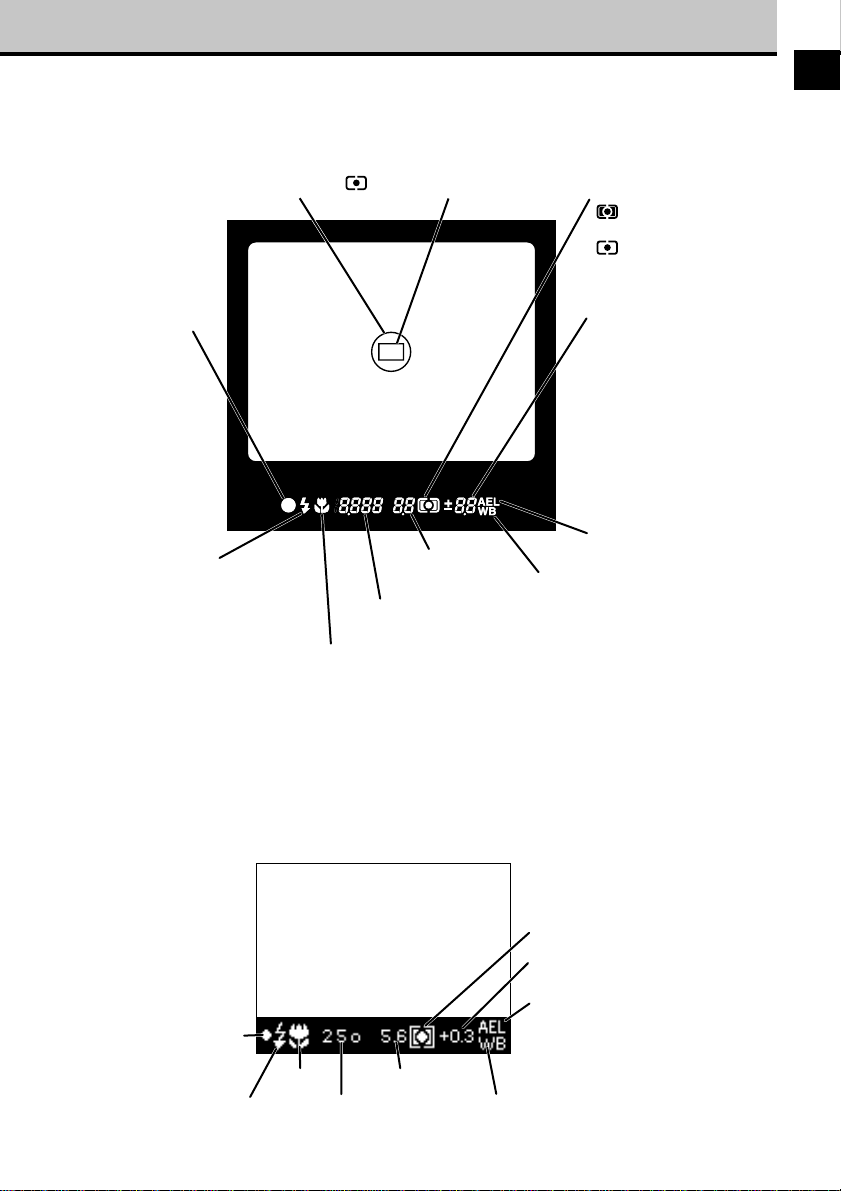
Viewfinder
Spot metering area ➝ 78
Indicates the area employed for spot metering
when camera is in spot metering mode .
AF correct mark
➝ 64
After half-pressing
shutter button,
blinks until subject
is in focus, and then
lights when subject
is in focus. Does not
blink or light when
camera is in manual
focus mode.
Flash warning ➝ 39
Blinks to warn you that flash is
required for the shot when builtin flash is closed (pressing the
flash button raises the built-in
flash), blinks while the flash is
charging, and lights when flash
is fully charged.
Shutter speed ➝ 74
Macro ➝ 42
AF target mark ➝ 36
Position this mark on the subject that
you want to focus.
Aperture
value ➝ 72
Metering mode ➝ 78
Center weighted
averaging metering
Spot metering
Nothing displayed for
digital ESP metering.
Exposure compensation/
Exposure level
In the P, A, S modes
displays exposure
compensation value.
(➝ 79)
In the M mode displays
the exposure level (the
difference between the
selected and ideal
exposure levels).
(➝ 77)
AE (Automatic
Exposure) Lock ➝ 80
White balance (Displays
setting other than AUTO)
➝ 100, 101, 102
Monitor Display (During Shooting)
Pressing the INFO button repeatedly switches the information displayed at the bottom of the monitor
in this order: Information Display ➞ Shooting Distance Display ➞ Display Off.
Shooting distance ➞ 68
Displaying Image Information ➞ 138
Metering mode
Exposure compensation/
Exposure level
AE Lock
AF correct mark
Macro
Flash warning
Aperture value
Shutter speed
White balance
17
Page 20

18
Page 21

Getting Started
After you remove the camera from the box, first make sure that you
have everything, then attach the camera strap and install the batteries
provided with the camera.
In this chapter, you will learn how to install optional batteries not
provided with the camera and how to connect and use the optional AC
adapter which allows you to power the camera with house current.
How to use this manual
The following notations are used to alert you to important information to
help you avoid personal injury, to prevent damage to the camera or the
loss of valuable images, and to provide valuable hints and tips about
using the camera.
Warning Ignoring a warning could lead to serious injur y or death.
Caution Ignoring a caution could cause minor personal injury,
damage to the equipment, or the loss of valuable data.
Note Notes provide tips or hints about using the product more
efficiently and remind you of operational limitations.
If you experience a minor problem or if you see a term in text that you
do not understand, refer to the Troubleshooting or Glossary sections
provided at the end of this manual.
1
(➞ 12) This notation tells you the number of the page where you
BEFORE YOU USE THIS CAMERA, PLEASE READ ALL THE
IMPORTANT SAFETY INSTRUCTIONS DESCRIBED ON THE
PREVIOUS PAGES.
can find more information about the procedure or feature
described in the previous sentence or paragraph.
Page 22
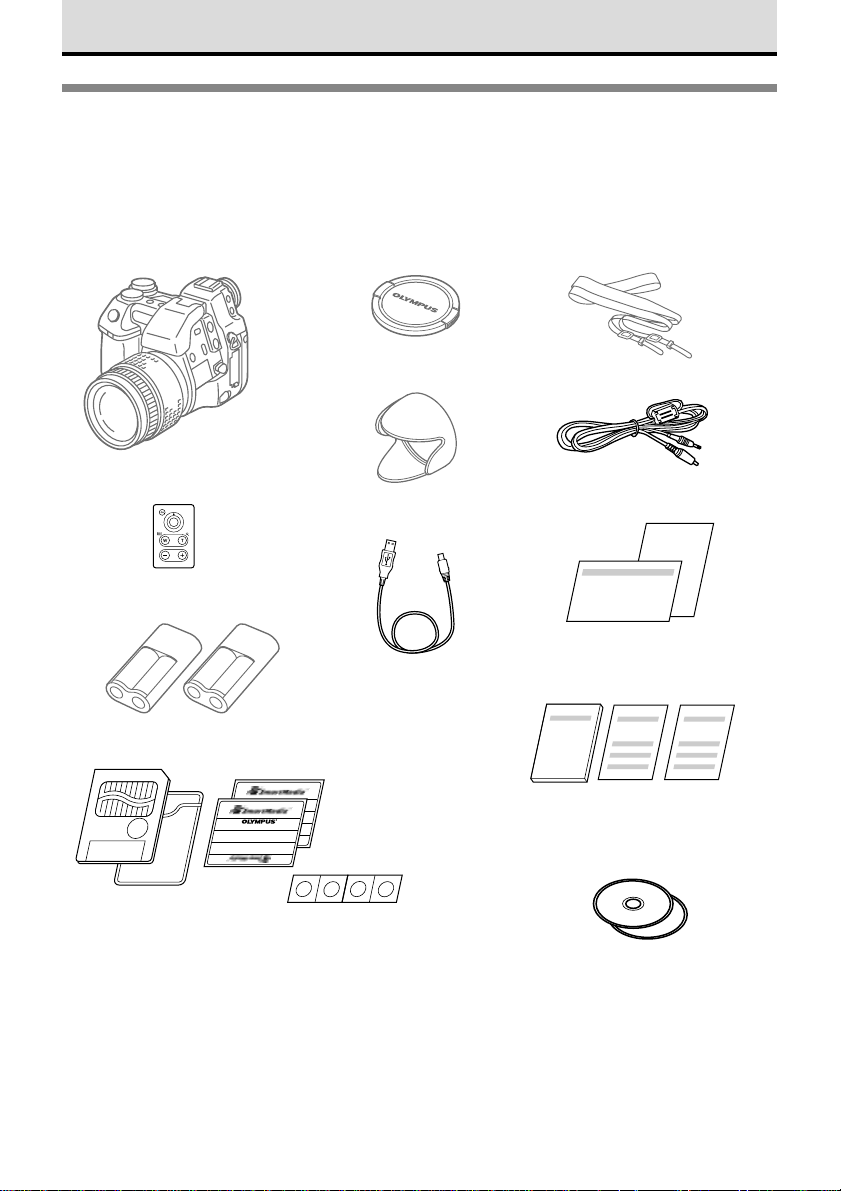
Box Contents: Make Sure You Have
Everything
As you remove each item from the box, check it against the items described below to
make sure that you have everything. If any item is missing or damaged, contact the
dealer where you purchased the camera.
Camera
Remote control
Lithium battery packs (CR-V3)
SmartMedia card (1)
SmartMedia Staticfree case (1)
SmartMedia labels (2)
SmartMedia
protect seals (4)
Lens cap
Lens hood
USB cable
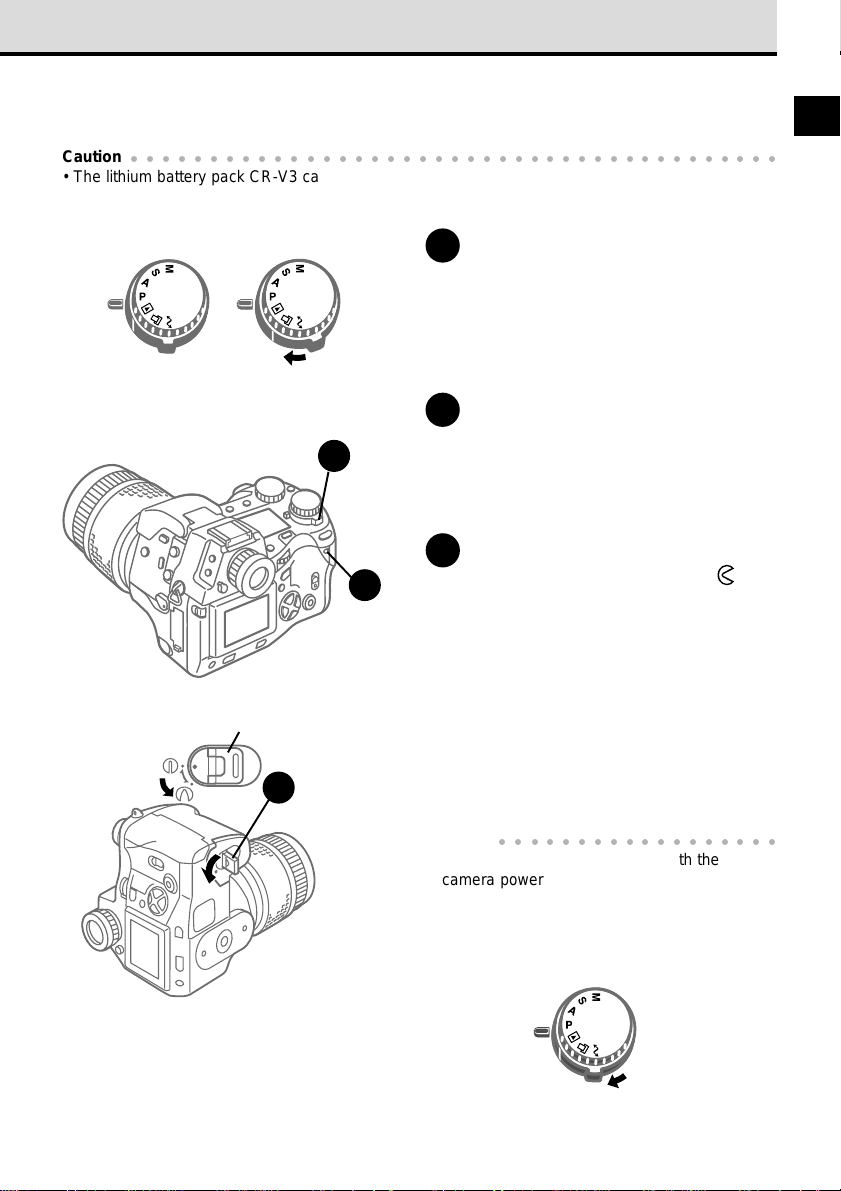
Strap
Video cable
Customer registration card
Warranty card
• Camera instructions
• SmartMedia instructions
• Remote control instructions
• Software CD’s
Windows 98 USB driver installer
software CD
20
Page 23
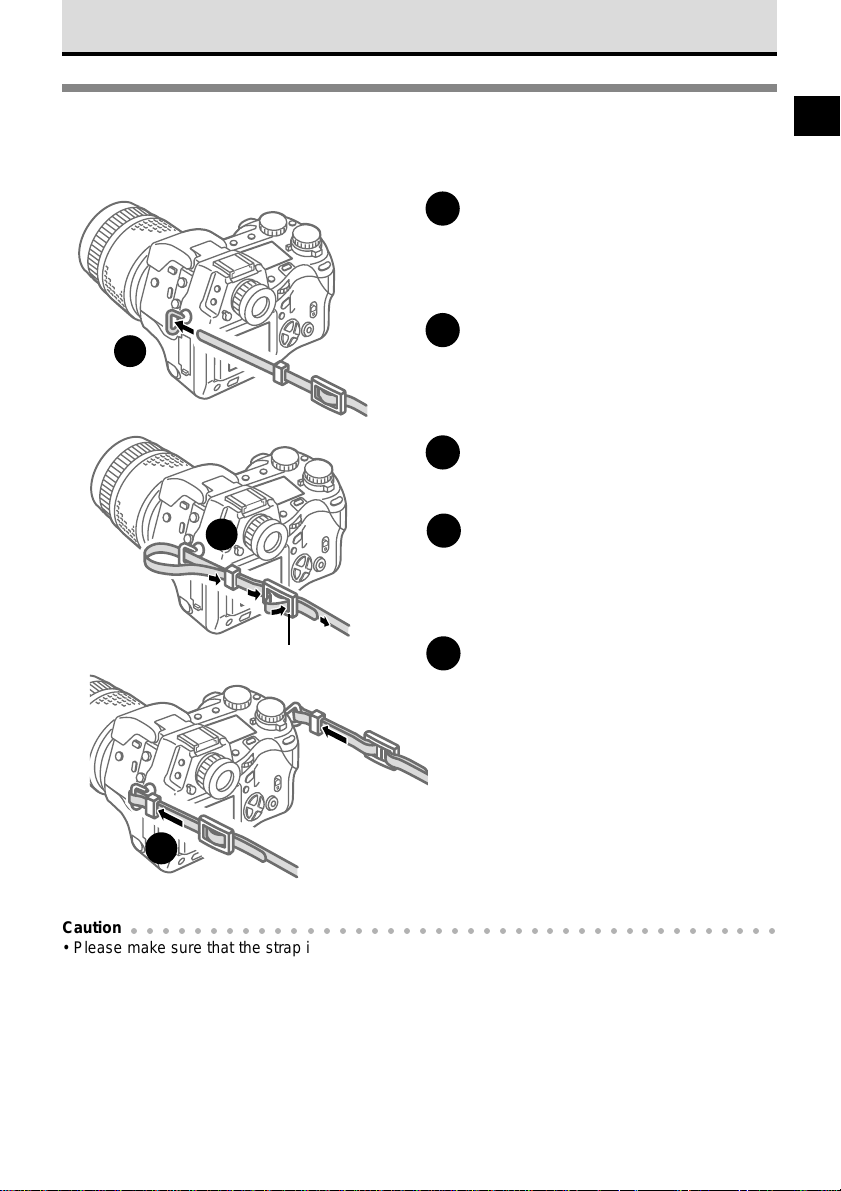
Attaching the Camera Strap
Attach the carrying strap to both sides of the camera.
Slide the end of the strap through
1
the strap eyelet on the camera.
As shown in the illustration, slide
1
2
the end of the strap through the
sleeve and frame on the strap.
Slide the sleeve up to the eyelet.
3
1
2
Frame
Pull the strap tight around the
4
frame and make sure that it does
not slip.
Repeat this procedure to attach the
5
other end of the strap to the other
side of the camera.
3
Caution
• Please make sure that the strap is connected securely to the camera. Not attaching the strap, or
attaching it incorrectly, could cause you to drop and damage the camera. Olympus can assume
absolutely no responsibility for damages resulting from incorrectly attaching or not attaching the
strap to the camera.
○○○○○○○○○○○○○○○○○○○○○○○○○○○○○○○○○○○○○○○○○
21
Page 24
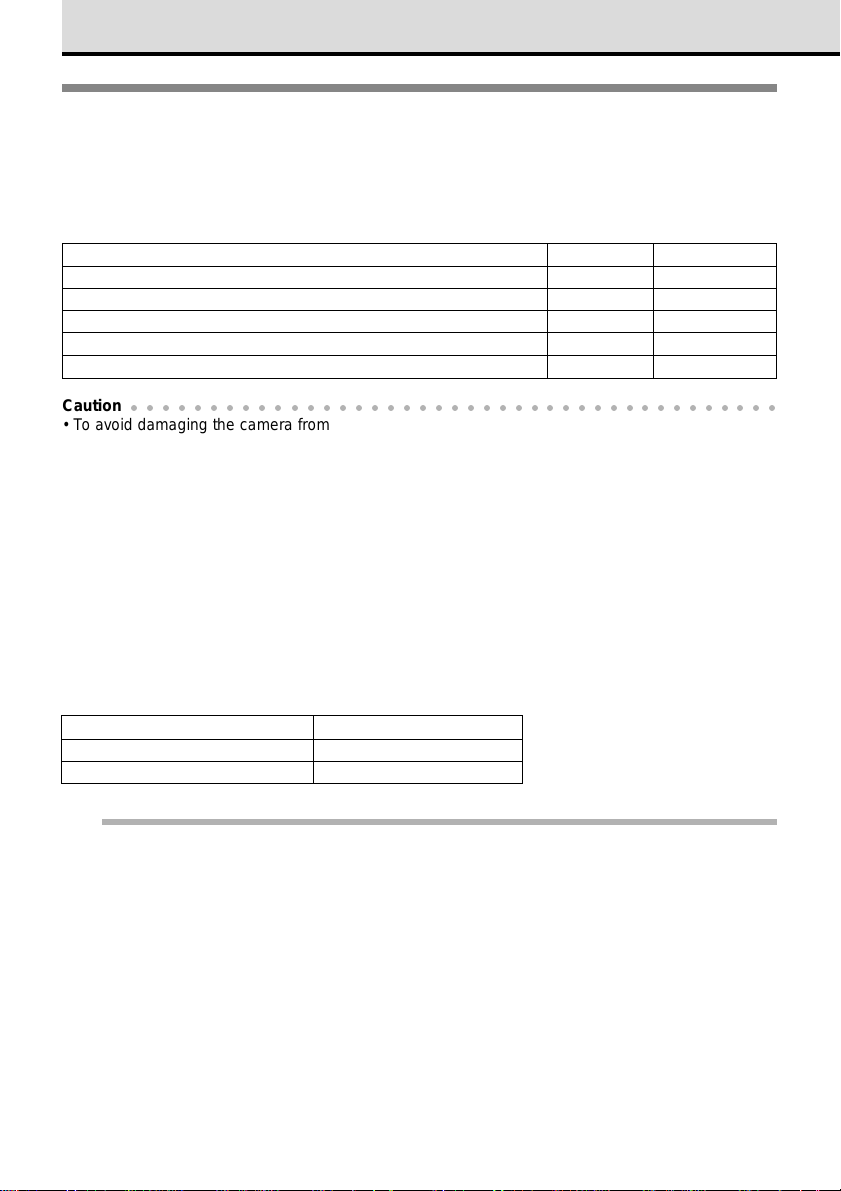
Inserting Batteries and Attaching
the Optional AC Adapter
The following five types of batteries can be used with this camera, or you can use the
optional AC adapter to connect the camera to a household power outlet.
Battery T ype Battery Set Rechargeable
Lithium battery pack CR-V3 (provided with camera) 2 NO
AA Ni-MH batteries (sold separately) 4 YES
AA Alkaline batteries 4 NO
AA Ni-Cd batteries 4 YES
Lithium polymer batteries (sold separately) (battery holder required)
1 YES
Caution
• To avoid damaging the camera from overheated batteries, never use AA manganese or AA lithium
batteries with this camera. Always use identical batteries as a set, and never mix battery types.
• The lithium battery pack CR-V3 cannot be recharged.
• Performance of AA alkaline batteries varies considerably according to brand, battery age, and
temperature. (Performance is particularly erratic at low temperatures.) In some cases these
batteries may run down very quickly. We therefore recommend the use of Ni-MH batteries, lithium
battery packs, or the lithium polymer battery in preference to AA alkaline batteries.
○○○○○○○○○○○○○○○○○○○○○○○○○○○○○○○○○○○○○○○○○
Battery service life
The service life of batteries is affected by many factors: battery type, manufacturer, how
and where the camera is used, and so on. Here are some general guidelines regarding
service life of batteries. These general guidelines are neither a warranty or guarantee;
they are provided only for general reference.
Battery Type Number of Storable Pictures*
Lithium battery pack (CR-V3) Approx. 500
AA Ni-MH batteries
Note
The following conditions listed below could cause the batteries to discharge and consequently
reduce the number of pictures that can be taken, even without taking pictures:
• Repeatedly half-pressing the shutter button or turning the manual focus ring.
• Repeatedly zooming on a subject.
• Leaving the monitor on for extended periods.
• Leaving the camera connected to a computer for a long period.
*1 Test Conditions
• Repeating 2 shot multiple exposures at 10 minute intervals until batteries are dead.
• Ambient temperature: 25°C (70°F)
• Flash intensity: 50%
• Zoom for each shot, 1 (no playback, no computer connection).
Approx. 200
1
22
Page 25
Inserting the lithium battery pack (CR-V3)
ON
OFF
Two lithium battery packs are required.
Caution
• The lithium battery pack CR-V3 cannot be recharged.
○○○○○○○○○○○○○○○○○○○○○○○○○○○○○○○○○○○○○○○○○
1
Power switch
OFF
ON
Power is OFF. Power is ON.
Battery compartment knob
OFF
ON
3
1
2
Card access
lamp
Make sure the white line on the
1
power switch is at the OFF
position.
If the power switch is set to ON, move it to
the OFF position.
Make sure that the card access
2
lamp is off.
If the card access lamp is blinking, wait for
it to go off.
Raise the battery compartment
3
knob and turn it to the open
position in the direction of the
arrow as shown in the illustration.
Caution
• If you remove the battery case with the
camera power on, the current mode and time
will be reset. The picture just taken may not be
stored on the card, and images already stored
on the card could be damaged. Please make
sure that the power switch is set to OFF.
○○○○○○○○○○○○○○○○○○
Power switch
23
Page 26
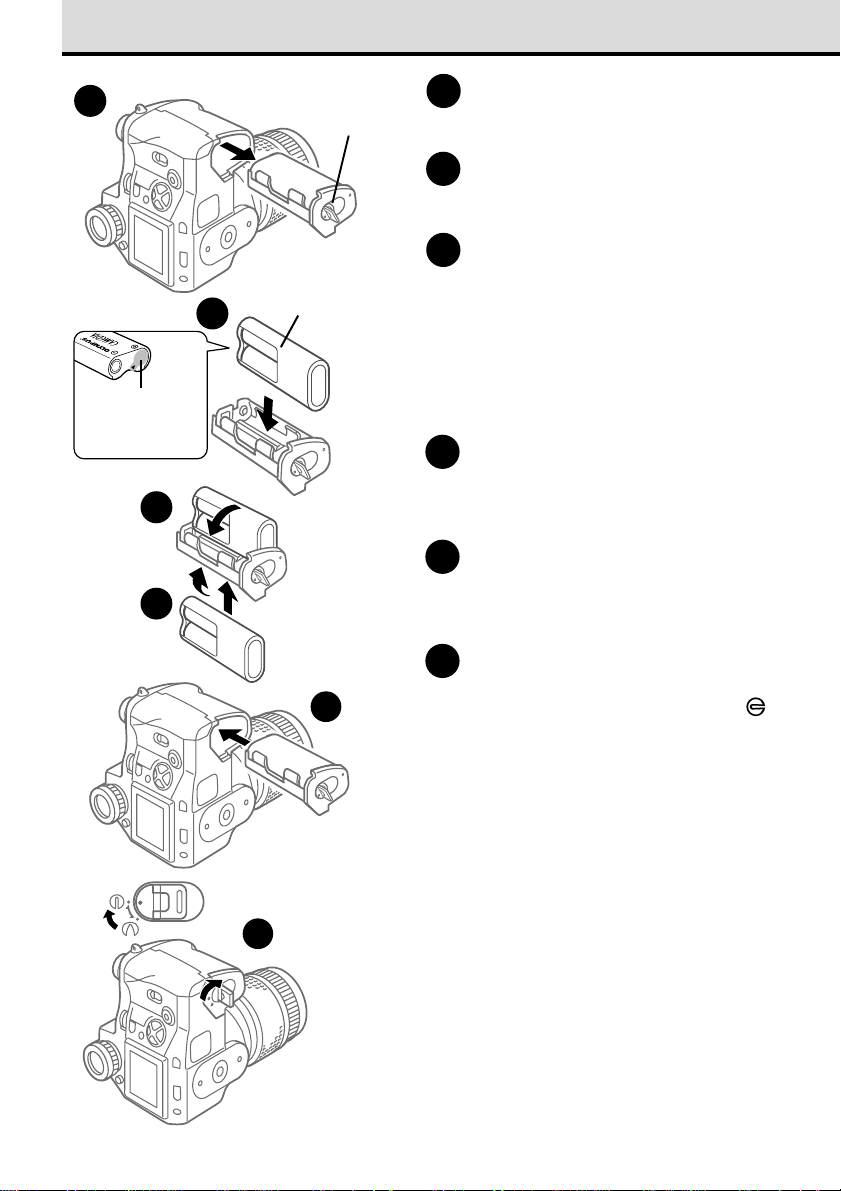
Inserting Batteries and Attaching the Optional AC Adapter (continued)
Remove the battery holder.
4
If insulation seal
is attached, peel
it off.
6
7
5
Battery holder
Do not remove
the seal.
4
Insert a battery into the battery
5
holder as shown in the illustration.
Gently press down on the battery
6
in the direction of the arrow until
you hear it lock in place.
If you accidentally insert the battery
reversed, you will not be able to fully insert
it. In this case, remove it and insert it
correctly.
Using the same procedure, insert
7
another battery in the other side of
the battery holder.
Insert the battery holder (with
8
batteries inserted) into the bottom
of the camera.
24
9
8
While pushing down on the battery
9
holder, turn the batter y
compartment knob to the close
position and push it down.
If you want to start taking pictures
now, go on to the next chapter.
(➞ 29)
Page 27
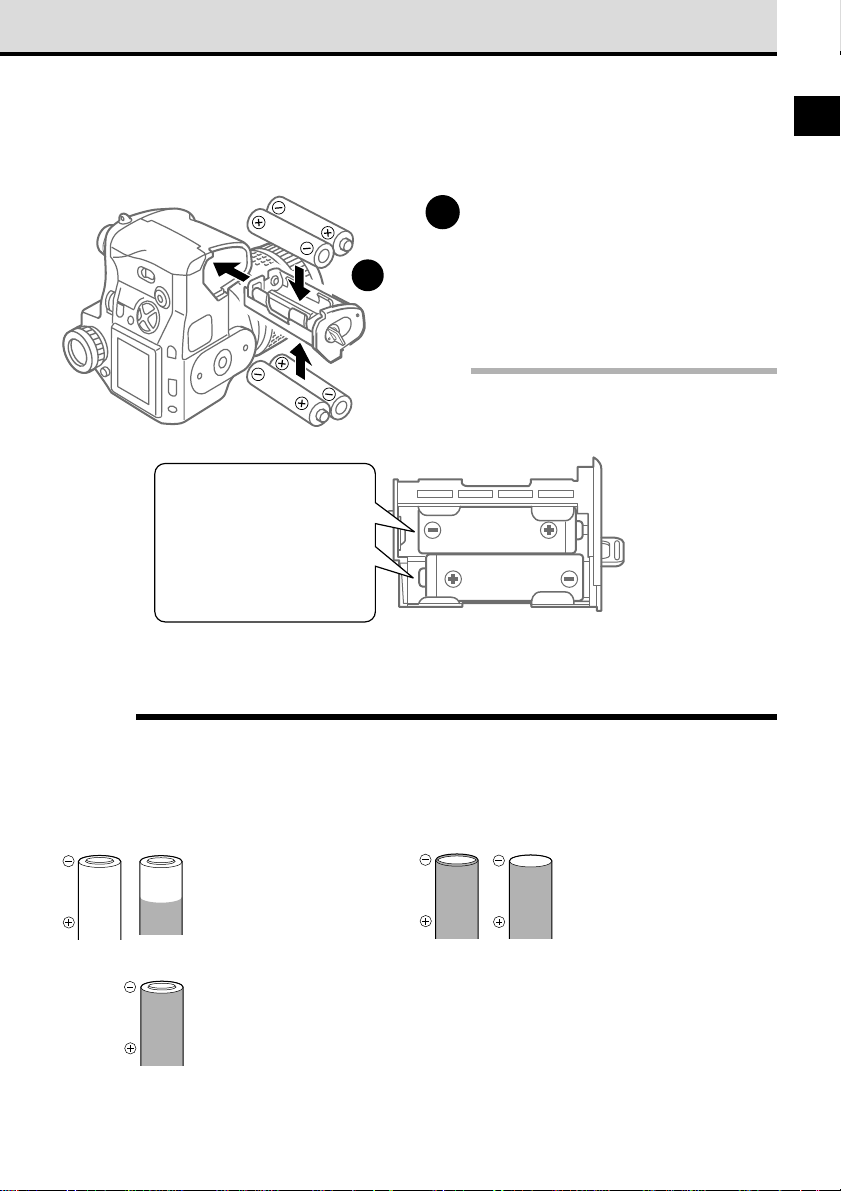
Inserting AA Ni-MH (sold separately), Alkaline, or Ni-Cd
Make sure all the batteries in the set are the same type. Before inserting Ni-MH or Ni-Cd batteries,
make sure that they are fully charged.
Insert the batteries as described in
1
the previous section for lithium
1
You may notice a gap after
loading the AA batteries into
the holder, but this is
normal. The batteries will
make proper contact when
the holder has been
inserted into the camera.
Battery holder
battery packs (CR-V3). (➞ 23)
Insert the batteries into the battery case
with the polarity of each battery aligned
correctly as shown in the illustration.
Note
• The appearance of the actual monitor menu
display may be different from the illustrations.
1
Before loading batteries ...
Warning
Batteries with any part of the outer seal (magnetic insulation sheath) peeling off, or any battery split
along the seam, can leak, generate heat, or explode. Never use damaged batteries in the camera.
Store-bought batteries occasionally may be defective, with all or part of the magnetic insulation
sheath peeling off. Never use batteries in this condition.
These batteries cannot be used:
All of the seal (electrical
insulation sheath) is peeled
off (bare batteries).
Batteries with all or part of
the electrical insulation
sheath peeled off.
Part of the negative electrode
is protruding although not
covered by the seal.
The negative electrode
(minus terminal) is flat and
only partially covered by the
seal (electrical insulation
sheath).
The negative electrode (the
minus surface) is flat and not
covered by the seal.
25
Page 28
Inserting Batteries and Attaching the Optional AC Adapter (continued)
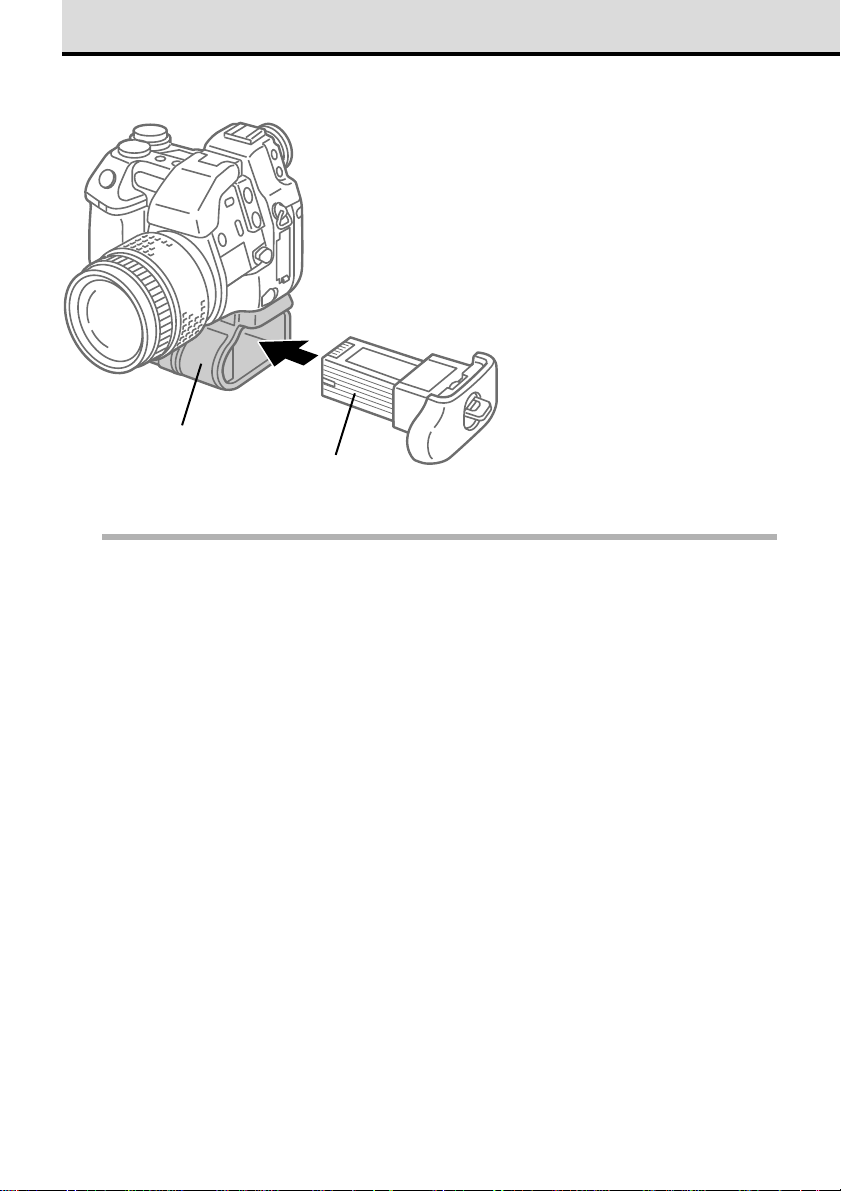
Inserting the optional lithium polymer battery (B-10LPB)
The rechargeable lithium polymer battery (sold
separately) can power the camera for long
periods. The lithium polymer battery is inserted
into a power battery holder (B-HLD10) (sold
separately) attached to the camera.
For more details about installing and using the
lithium polymer battery, refer to the lithium
polymer battery and power battery holder
instructions.
Power battery holder
Lithium polymer
battery
Note
Connecting the AC adapter with the battery installed
• The voltage of the dedicated AC adapter is higher than that of the batteries, so when you connect
the AC adapter to the camera, power is supplied from the AC adapter and the battery power is not
consumed.
• The voltage of the lithium polymer battery is higher than that of the dedicated AC adapter, so even
when the AC adapter is connected to the camera, power is supplied from the lithium polymer
battery. If the lithium polymer batter y is installed and you want to connect the AC adapter, first
remove the lithium polymer battery.
26
Page 29
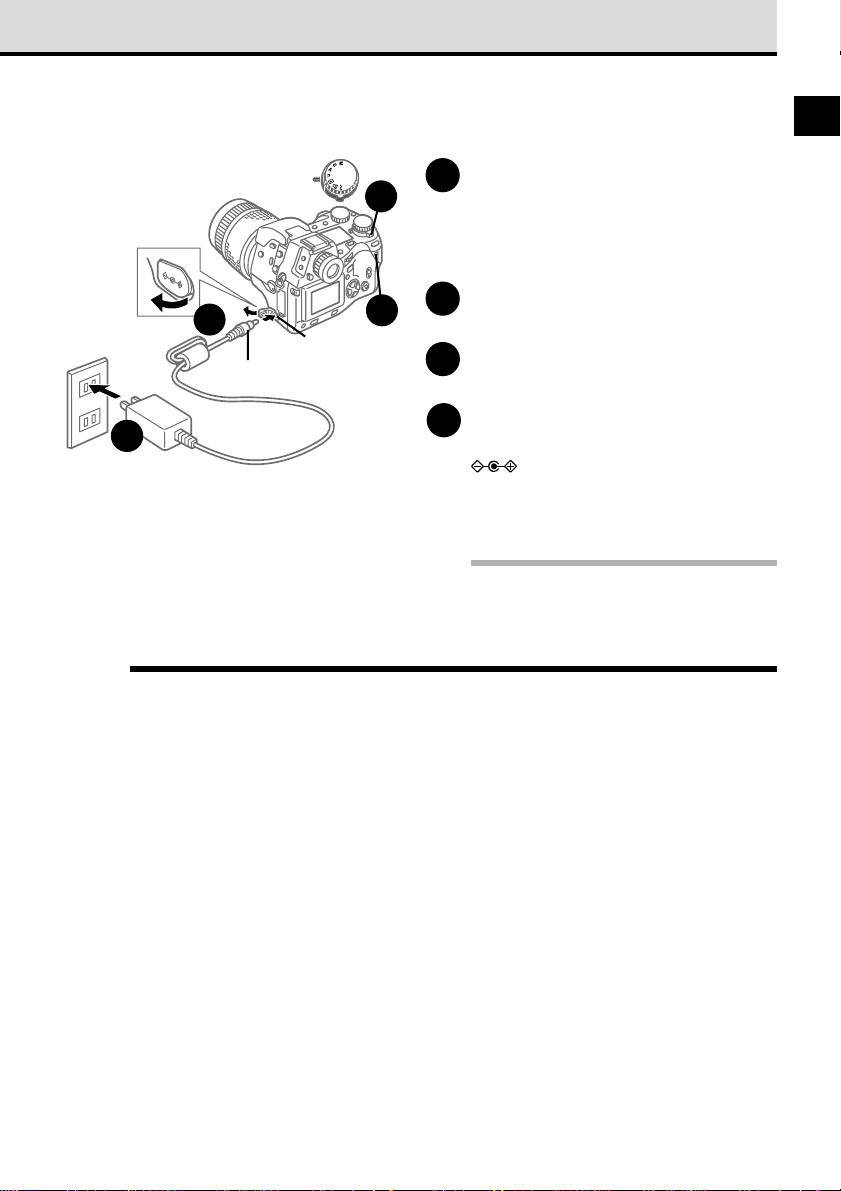
Using the AC adapter (sold separately)
The optional AC adapter allows you to power the camera from a household power outlet.
Make sure the white line on the
OFF
ON
4
DC IN jack
AC adapter power cord plug
1
2
1
power switch is at the OFF
position.
If the power switch is set to ON, move it to
the OFF position.
Make sure that the card access
2
lamp is off.
Plug the AC adapter power cord
3
into a power outlet.
1
3
3
Power outlet
Warning
Follow these simple guidelines to ensure safe operation of the camera.
• Use the correct AC adapter
To avoid damaging the camera, personal injury, or other unexpected problems, connect and use
only the AC adapter recommended for use with this camera. Olympus can accept no responsibility
for damage or injury caused by using an AC adapter that is not rated and approved for use with
this camera.
• Use the correct power source
Use only the optional AC adapter intended for use with this camera. Use the AC adapter with this
camera only in the country where you purchased it. The AC adapter is not rated for use with
different power sources, which could vary widely in different countries. Before travelling abroad,
purchase extra batteries. If you have any questions, contact an Olympus authorized service center.
AC adapter
On the lower left side of the
4
camera, locate the cover with the
mark and open it. Plug the
other end of the AC adapter power
cord into the DC IN jack.
Note
• The AC adapter may become slightly warm
during prolonged use. This is normal and does
not indicate a problem.
27
Page 30

Inserting Batteries and Attaching the Optional AC Adapter (continued)
• If a malfunction occurs
If you notice that the AC adapter body or power cord is extremely hot, or if you notice any unusual
odors or smoke around the AC adapter, unplug the AC adapter power cord from the power source
immediately. Contact your dealer or an Olympus service center for assistance.
Frequently inspect the AC adapter power cord. If you notice that the cable covering or plug is
damaged in any way, immediately contact your dealer or an Olympus service center.
• Connecting and disconnecting the AC adapter
Always make sure that the camera is switched off before you connect/disconnect the AC adapter
to/from the camera. Never handle the AC adapter power cord with wet hands.
When connecting the AC adapter, (1) first plug the AC adapter power cord into the power outlet,
(2) connect the other end of the power cord to the DC IN jack on the camera, and then (3) switch
the camera on. Make sure that the power cord is securely plugged into the power outlet.
To disconnect the AC adapter, switch the camera off, disconnect the power cord from the camera,
and then unplug the power cord from the power supply. Grip the AC adapter, not the cord, when
you unplug it. Never twist, bend, or pull on the power cord.
Always unplug the AC adapter from the power outlet when the camera is not in use.
2828
Page 31

Taking Pictures
(Shooting and Viewing Basics)
In this chapter you will learn how to insert a memory card, take a
picture, and view the picture. This chapter describes only the basic
procedures for taking and viewing pictures. For more details about
camera operation, refer to the later chapters.
2
Page 32

Inserting a Memory Card
The SmartMedia and CompactFlash card store pictures that you take with the camera.
Throughout these instructions, both the SmartMedia and CompactFlash card are simply
referred to as cards. Both cards can be installed together, or either card one at a time.
However, at least one card must be inserted in order to operate the camera.
Caution
• A memory card is a delicate, precision device. Handle it carefully. Never touch the electrical
contacts on the card, and never subject a card to strong shocks or vibrations.
• Before you can use a SmartMedia or CompactFlash card purchased separately, it must be
formatted in the camera. (➞ 152)
SmartMedia (SM) provided
You can use Olympus or any other brand 3V
(3.3V) SmartMedia memory card (5V cards
cannot be used).
○○○○○○○○○○○○○○○○○○○○○○○○○○○○○○○○○○○○○○○○○
Electrical contacts
Protect area
CompactFlash (CF) (sold separately)
Can be used same as SmartMedia to store
images.
Make sure that the card access
1
lamp is off.
If the card access lamp is blinking, wait for
it to go off. If you accidentally open the
1
Card access
lamp
card cover while the card access lamp is
blinking, you could lose the image being
stored on the card or possibly damage the
card itself.
2
Card cover lock
While pressing
here, slide up.
30
Card cover
While pressing down the round
2
release on the card cover lock,
slide and raise the card cover lock.
The card cover opens.
Page 33

Notched corner
SmartMedia
CompactFlash
Insert the card.
3
• SmartMedia card
Taking care not to touch the electrical
contacts, hold the SmartMedia card with
the notched corner down, and then insert
it into the slot closest to you. Push the
card completely into the slot.
To avoid damaging the electrical contacts,
make sure that you do not insert the
SmartMedia card into the CompactFlash
card slot.
To remove the SmartMedia card, see the
instructions below.
• CompactFlash card
With the arrow on the card facing you,
insert the CompactFlash card into the slot
farthest away from you. Push the card
completely into the slot.
Insert the card straight into the slot,
making sure that the side with the arrow is
facing toward you. To avoid damaging the
card, never force it into the slot if it cannot
be inserted smoothly.
To remove the CompactFlash card, see
the instructions below.
To close the card cover, press it
4
gently until you hear it click and
lock.
2
Removing a SmartMedia card
Gently push in on the installed SmartMedia card to release
it, and then pull it out of the camera.
Removing a CompactFlash card
Gently press the eject button to release the CompactFlash
card.
To prevent the CompactFlash card from jumping out of the
camera, press the eject button with only light pressure.
Eject button
With both cards set in the camera
With both a SmartMedia and a CompactFlash card installed in the camera, you can select
either card for storing pictures. (➞ 121)
31
Page 34

Setting the Shooting Mode and
Switching the Camera On
Switch the camera on.
If the lens cap is attached, remove
1
it.
Press the latches inward and pull the cap
off.
Turn the mode dial to align P
1
2
OFF
ON
3
Control panel
2
(Program mode) with the
Move the power switch and make
3
sure the white line on the power
switch is at the ON position.
When the camera is switched on, the
battery check and number of storable
pictures are displayed in the control panel.
Set the focus mode switch to AF
4
(autofocus).
The first time that you use the
5
camera, you should set the date
and time. (➞ 126)
mark.
MF
4
AF
Battery
check
Number of
storable
pictures
Control panel difficult to see?
Press . The control panel backlight lights
for about 8 seconds.
32
LIGHT button
(Lights the control panel)
Page 35

Checking the Battery
Control panel
Battery check
Battery Check Display Meaning
In this section we provide a general
explanation of how to read and understand
the battery check display. When the battery
check shows that the batteries are low,
replace the batteries with fresh batteries,
or recharge the Ni-MH, Ni-Cd batteries or
the lithium polymer battery.
Before taking a trip, or before an important
shooting session, always check the battery
capacity.
2
Lights for a short time after
camera is switched on and then
goes off automatically.
Blinks and continues blinking. Batteries are low. Replace batteries with
Lights for a specified time, and
the control panel goes off.
Batteries are fully charged. Camera is
ready for shooting.
fresh batteries. You may be able to shoot
more pictures, but batteries could run out
completely during shooting.
Batteries are dead. Replace batteries with
fresh batteries. Shooting is not possible.
Camera is switched on, but the control panel is not visible?
If the camera is not used for a specified time it will switch off the control panel automatically to
conserve battery power. To restore the camera to full operation, half-press the shutter button.
If the control panel remains off for one hour, the camera will power itself off automatically. To restore
the camera to full operation, you must use the power switch to switch the camera off and switch it
on again. You can select the time the camera remains idle before the control panel is switched off
automatically. (➞ 128)
Lithium polymer battery
If you are using the optional lithium polymer
battery, the amount of power remaining is
also displayed as a percentage.
Note
• Low temperatures could shorten the ser vice
life of some batteries, depending on their
characteristics.
Battery check Battery capacity (%)
displayed for only 3 sec. after
camera is switched on.
33
Page 36

Checking the Number of Storable Pictures
When you switch the camera on, the number of storable pictures is displayed in the
control panel. If you see the number 12, for example, this means approximately 12 more
pictures can be taken and stored on the memory card.
Control panel
Number of storable picturesSelected card
Memory card storage capacity
Quality
TIFF 2240 x 1680 (FULL) 1:1 11.3 MB 0 shots 2 shots
SHQ 2240 x 1680 (FULL) 1:2.7 2.8 MB 2 shots 11 shots
HQ 2240 x 1680 (FULL) 1:8 1 MB 8 shots 32 shots
SQ 1280 x 960 (SXGA) 1:8 340 KB 23 shots 94 shots
Note
• When you see “TIFF” blinking in the control panel, the camera is in the RAW data mode. (➞ 131)
In this mode, one picture file is approximately 7.6 MB, and you will be able to save approximately
4 shots on a card (32 MB card).
Resolution (pixels) Compression File Size
(Default settings) (Default settings) (Reference value)
Images per Card (Reference value)
8 MB
32 MB
If you intend to use the images on a computer...
Before you transfer files to a computer, you should select how the files are to be named. (➞ 154)
Storage capacity of a memory card other than a SmartMedia and
CompactFlash card
The storage capacity of a memory card is roughly calculated based on the file sizes of the images.
However, please understand that due to variables in data handling by the camera, file compression,
memory management, and so on, the estimation of the number of storable picture may not always
be precise.
Note
• When the number of total shots reaches 999, the number 999 is displayed in the control panel.
• The number of storable pictures displayed in the control panel changes after you select another
record mode or select files for printing.
• The amount of data required to compose a picture depends on the subject, so you may be able to
store more or fewer images on a card. Because of this difference in size, you may not be able to
store another picture, even after you delete one image from the card with single-frame delete.
• Because of the difference in cluster size used on SmartMedia and CompactFlash cards, the same
number of images may require more or less space for storage on either card. When using a
CompactFlash card, the actual capacity of the card could be slightly more or less than the
capacity indicated in the control panel.
34
Page 37

When the Number of Storable Pictures Is
Not Displayed
0 and blinking in the control panel?
The card is full and can no longer store pictures, so do one of the following:
• If a SmartMedia and CompactFlash card are both installed, select the other card. (➞ 121)
• Delete unneeded images from the full card. (➞ 51)
• Switching to a smaller file size. (➞ 103)
• Remove the full card and install a new or empty card. (➞ 30)
Record mode (quality setting)
Control panel Monitor Viewfinder
-F- and blinking in the control panel?
The card has not been formatted or the card is damaged, so do one of the following:
• Format the card. Formatting a card erases all images stored on the card. To format the card, on
the arrow pad press and then press the button. After NO PICTURE is displayed, you can
continue taking pictures.
• Replace the card. (➞ 30)
• If a SmartMedia and CompactFlash card are both installed, select the other card. (➞ 121)
2
Control panel Monitor Viewfinder
blinking in other situation (not described above)?
Appendix 5: Camera Error Messages (➞ 189)
35
Page 38

Holding the Camera
In this section you will learn how to hold the camera when shooting pictures.
Framing a picture with the viewfinder
Diopter
adjustment ring AF target mar k
Viewfinder
Holding the Camera
Horizontal grip
Adjust the viewfinder display for
1
your own eyesight.
Look at the AF target mark in the
viewfinder. If the AF target mark is blurr y
or otherwise difficult to see, turn the
diopter adjustment ring as shown in the
illustration until the AF target mark is
sharp and clear.
Grip the camera.
2
Grip the camera with both hands with your
arms and elbows down at your sides.
Make sure that your fingers or the strap do
not block the lens, built-in flash, or AF
port.
Compose the picture in the
3
viewfinder.
The picture that you take will be 5% larger
around the edges than what you see
through the viewfinder. (The viewfinder
displays 95% of the composed picture.)
Incorrect!
Finger blocking AF port
36
Vertical grip
Finger blocking flash
Finger blocking
the lens
Cannot see through the viewfinder?
• Make sure that the lens cover has been
removed.
• Check the eyepiece shutter lever on the left
side of the viewfinder. If it is down, raise it.
(➞ 14)
When the subject in the viewfinder
is dark
• Check the power switch. If the power switch is
at the OFF position, move it to ON. If the
power is off with the power switch in the ON
position, the camera may have powered itself
off. Move to OFF then move to ON again.
Note
• Do not subject the lens to physical shocks.
Page 39

Framing a picture with the monitor
2
Eyepiece shutter
lever
4
5
6
Press the monitor button .
1
O
P
E
N
3
O
PEN
1
You can see the same view in the monitor
and the viewfinder. (However, framing
pictures through the monitor consumes
more battery power than when using the
viewfinder.)
To prevent light from behind the
2
camera entering the viewfinder,
2
lower the eyepiece shutter lever.
Move the monitor lock/release
3
button to the left (see illustration).
The upper part of the monitor projects
about 1 cm (0.3 in.) from the camera.
If you need to raise the monitor,
4
pull the bottom out.
Hold the camera as steady as
5
possible.
Hold the camera carefully without blocking
the lens, flash, or AF port with the camera
strap, your fingers, etc.
Compose the picture in the
6
monitor.
The picture that you take will be the same
as the picture composed in the monitor.
(The monitor displays 100% of the
composed picture.)
You can also take a picture at Step 3 for a
high-angle shot.
Cannot see through the monitor?
• Make sure that you pressed the monitor button to activate the monitor display.
• Make sure that the lens cap has been removed.
• After the camera is left idle for a specified length of time, it will enter the sleep mode. Press the
shutter button lightly to restore the camera to full operation.
• Check the power switch. If the power switch is at the OFF position, move it to ON. If the power is
off with the power switch in the ON position, the camera may have powered itself off. Move to OFF
then move to ON again.
• Mode dial set correctly? Make sure that the mode dial is set to P, A, S, or M.
Note
• When framing a picture with the monitor, lower the eyepiece shutter lever. Light entering the
viewfinder from behind the camera could wash out the picture with white light.
37
Page 40

Pushing the Shutter Button
Grasp the grip on the camera firmly and use the flat of your finger (not your fingertip) to
press the shutter button gently. Applying too much pressure could cause camera shake
and spoil your shot by blurring the image. The shutter is released in two steps, first with a
half-press and second with a full-press.
Half-press
(gently pressing the button down half-way)
A half-press does not release the shutter.
When you half-press the shutter button,
automatic focusing and exposure adjustment
begins. The AF correct mark in the lower left
corner of the viewfinder lights when the
subject is in focus. As long as you keep the
shutter button depressed half way, the subject
will remain in focus and the exposure will not
change. This is called AF/AE lock.
Full-press
(after half-pressing, gently press down all
the way.)
Releases the shutter to take the picture.
Shutter button
Time between full-press shutter release and the start of exposure
After you full press the shutter button, the shutter actually releases after 60ms. However, when the
monitor is used to compose and shoot a picture, the time between a full shutter press and actual
release time could vary from 60ms to 100ms.
Also, please remember that when you use the flash, shutter release will be delayed approximately
200ms for firing the pre-flash.
The camera can be set to emit a sound at shutter release. (➞ 122)
38
Page 41

Half-press
Viewfinder
Lights and emits a
small beep when
subject in focus.
Blinks when subject is
not in focus. Neither
lights nor blinks when
camera is in the
manual focusing
mode.
Full-press
AF target mark
Low light warning.
When this mark
blinks, and flash is
required.
Gently half-press the shutter
1
button.
The camera emits a small beep and the
AF correct mark in the lower left corner of
the viewfinder lights green when the
subject is completely in focus. Keep the
button pressed halfway and go to Step 2.
If the AF correct mark in the lower left
corner of the viewfinder blinks, the subject
is not completely focused. Release the
shutter button, compose the picture again
by centering on another part of the picture,
and then repeat from Step 1. If you see
the mark blinking, this is the low light
warning, telling you that you must use the
built-in flash. Press the flash button to
open the built-in flash unit.
Gently full-press the shutter
2
button.
The picture is taken and the image starts
to be stored on the memory card. The card
access lamp blinks while the picture is
being stored on the card.
To take another picture, repeat from Step
1. While the camera is storing the previous
shot on the card, you can take up to 4
exposures.
2
Card access
lamp
Flash button
Taking pictures without half-pressing
You can take pictures without half-pressing the shutter button. In such cases, the camera starts
focusing when you full-press the shutter button. Therefore it takes a few moments to take a picture,
and you might miss a good picture.
Low battery warning blinks immediately after taking a shot?
Immediately after taking a shot, if you see the low battery warning blink and then light in the control
panel, the picture may not have been taken correctly. Install a new battery and then play back the
previous shot to confirm that it was stored correctly. (➞ 46, 137)
39
Page 42

If You Cannot Take a Picture
Message displayed in the viewfinder?
If you see Card 0 blinking in the viewfinder
The memory card is full and you cannot continue taking
pictures with the card. In order to continue shooting with the
card, you will have to remove some pictures from the card.
• Deleting Single Pictures (➞ 51)
• Transferring Pictures to a Computer (➞ 167)
• Deleting All Images (➞ 150)
Viewfinder
Control panel
If you see Card blinking in the viewfinder, refer to the error message summary.
Appendix 5: Camera Error Messages (➞ 189)
Four segments lit in the memory gauge?
If nothing displayed on the monitor after full-pressing the shutter button, you have to wait. The
memory gauge is divided into 4 segments. One segment lights for every image that is waiting to be
stored on the card. If all 4 segments are on, this means you cannot take another picture until at
least one of the segments in the memory gauge goes off. The amount of time required to store a
picture depends on the condition of the SmartMedia or CompactFlash card, and the record mode
setting.
40
Control panel
Memory gauge
Page 43

The AF correct mark in lower left corner of viewfinder is
blinking, or the picture is out of focus
Make sure that the focus mode switch on the left side of the camera is set to AF, and then select a
shooting mode that uses autofocusing. (➞ 32) While the camera is set for autofocus, half-pressing
the shutter button should automatically set the correct focus and exposure for the picture.
With some subjects which are difficult to focus, however, you may see the AF correct mark in the
viewfinder continue to blink after you half-press the shutter button. If this occurs:
• Point the camera slightly away from the subject to shift the AF target mark in the viewfinder and
half-press the shutter button again.
• Use manual focusing.
Taking Pictures: Distance and Focus (➞ 63)
Using Manual Focus (MF) (➞ 68)
2
41
Page 44

Enlarging the Subject (Zoom and Macro)
By moving the zoom ring you can enlarge or reduce the size of the subject in the
viewfinder. Twist the zoom ring to the left to enlarge the size of the subject (T: telephoto),
or turn it to the right to reduce the size of the subject (W: wide-angle).
Zoom ring
Zoom up (TELE)
Zoom down (WIDE)
Autofocus and close-up shots (Macro)
You can take close-up shots within 60 cm (approx. 23.5 in.) from the camera. While pressing the
macro button , turn the main dial or sub dial until you see the macro mark in the control panel
or the viewfinder.
Macro button
42
Control panel
Main dial
not displayed displayed
Autofocus can focus a
subject in the range ∞~
60 cm (approx. ∞~23.5 in.)
from the camera.
Autofocus can focus a
subject in the range
approx. 60 cm~20 cm
(approx. 23.5 in.~8 in.)
from the lens.
Page 45

Shooting distance and range
With the widest angle setting, you can approach up to 20 cm (approx. 8 in.) and shoot a subject
about the size of a business card (approx. 76 x 57 mm) (3 x 2.3 in.).
Zoom Shooting Range
WIDE Limit
TELE Limit
Note
• If you use the Macro Extension Lens Pro (MCON-35), you can approach up to 12 cm (approx. 4.8
in.). At this distance, when the camera is set for the TELE limit, you can shoot a picture 49 (W) x
37 (H) mm (approx. 2 (W) x 1.5 (H) in.).
60 cm (23.5 in.)
20 cm (8 in.)
60 cm (23.5 in.)
20 cm (8 in.)
Shooting Area Width x Height (Reference Values)
629 x 465 mm (25 x 18.6 in.)
234 x 172 mm (9.4 x 6.9 in.)
176 x 132 mm (7 x 5.3 in.)
76 x 57 mm (3 x 2.3 in.)
Shooting distance and perceived distortion
The image may appear slightly distorted with some lenses. With the camera set for wide angle,
distortion could increase as you bring the camera closer to the subject.
2
43
Page 46

Using the Built-in Flash
If the incident light on the subject is too low, when you half-press the shutter button you
will see the low light warning
viewfinder. If this occurs, press the flash button
flash will fire when you take the picture. You can also use the flash to illuminate a dark
subject positioned in front of strong backlighting.
Note
• The low-light warning blinks while the flash is recharging and then lights up when charging is
completed. You cannot take a picture when the low-light warning is blinking while the flash
recharges. Wait for the low-light warning to stop blinking and then light up before you take the next
picture.
1
blinking intermittently in the lower left part of the
to raise the built-in flash. Now the
Press the flash button .
2 3
1
The built-in flash pops up.
Half-press the shutter button.
2
The flash indicator appears in the
viewfinder. If the flash indicator is blinking,
the flash is recharging. When the flash
indicator lights and stops blinking the flash
is charged and ready to fire.
Full-press the shutter button.
3
The flash fires with an intensity adjusted
for the best exposure and the picture is
taken.
Flash will not fire?
If the subject is exposed to brighter light after the built-in flash is raised, the flash will not fire.
However, you can set the camera in the fill-in flash mode so the flash will fire even with brightly
lighted subjects. (➞ 56, 86)
Caution
• Rapid, continuous firing could cause the flash unit to overheat. To prevent damaging the flash unit,
do not fire the flash more than 30 times in succession. After prolonged firing of the flash, wait at
least 10 minutes for the flash unit to cool before you resume shooting. Check the flash frequently
and make sure that it is clean. If it is dirty, wipe it clean with a soft dry cloth. Firing the flash with its
face dirty could cause the performance of the flash unit to deteriorate.
○○○○○○○○○○○○○○○○○○○○○○○○○○○○○○○○○○○○○○○○○
44
Page 47

Flash working range
ISO Max. WIDE (WIDE Limit) Max. TELE (TELE Limit)
AUTO 0.6 (2 ft.)~8.9 m (29.4 ft.) 0.5 (1.7 ft.)~7.4 m (24.4 ft.)
80 0.6 (2 ft.)~6.3 m (20.8 ft.) 0.5 (1.7 ft.)~5.2 m (17.2 ft.)
160 0.9*1 (3 ft.)~8.9 m (29.4 ft.) 0.7*2 (2.3 ft.)~7.4 m (24.4 ft.)
320 1.3*1 (4.3 ft.)~12.5 m (41.3 ft.) 1.0*2 (3.3 ft.)~10.4 m (34.3 ft.)
*1Range starts at 0.6 m (2 ft.) if you set the camera to the A (Aperture Priority) mode and stop the
aperture size down to 6.3 or higher.
*2Range starts at 0.5 m (1.7 ft.) if you set the camera to the A (Aperture Priority) mode and stop
the aperture size down to 6.3 or higher.
If you attempt to use the flash closer than the ranges described above, the entire picture may be too
bright, or shadows may appear in parts of the picture. If you attempt to use the flash farther than the
ranges described above, the light from the flash will not reach the subject and the subject will
appear dark. You may be able to take a picture farther than these ranges by increasing the ISO
value, but raising the ISO value could cause the picture to appear grainy. With ISO set for AUTO, the
ISO value will be adjusted automatically within the range of 80~160. (➞ 83)
2
Caution
• Please do not use the lens hood or conversion lenses when shooting with the internal flash. These
attachments will block some of the flashed light, resulting in a problem known as vignetting (loss or
darkening of the corner areas of the image). The ranges in the table above assume that no such
attachments are on the camera.
For more details about how to use the flash. (➞ 85)
○○○○○○○○○○○○○○○○○○○○○○○○○○○○○○○○○○○○○○○○○
45
Page 48

Viewing Pictures (Playback)
In this section, you will learn how to view the pictures that you have taken.
You can view the pictures that you have taken one by one. You can enlarge the singleimage display, or even display several images at once with the index display.
Set the mode dial to playback .
1
OFF
ON
Previous
frame
1
10th previous
frame
2
Next
frame
10th succeeding
frame
The last picture taken is displayed on the
monitor.
If you leave the mode dial set to P, A, S, or
M, you can also rapidly press the monitor
button twice.
Use the arrow button pointers to
2
view other images.
Displays previous frame.
Displays next frame.
Displays 10th previous frame.
Displays 10th succeeding frame.
Images can also be displayed automatically, one by one, by setting up a slide show. (➞ 140)
46
Page 49

To return to the shooting mode
• When mode dial is set to playback .
You cannot press the shutter button to take a picture in the playback mode. In order to resume
shooting, set the mode dial to P, A, S, or M.
• When mode dial is set to P, A, S, or M.
You can just press the shutter button to take a picture.
Press the monitor button and wait for the monitor display to go off.
Cannot enter playback mode?
If the card access lamp is blinking, you cannot enter the playback mode, even after setting the mode
dial to playback . When the card access lamp goes off, the camera returns to the playback mode.
Monitor blank?
The camera will automatically power itself off if it remains idle for a specified length of time. (➞ 128)
The camera will switch on automatically after you start to use the camera again.
2
Caution
• To avoid damaging the monitor or interfering with the quality of its display, never touch or strike the
surface of the monitor.
○○○○○○○○○○○○○○○○○○○○○○○○○○○○○○○○○○○○○○○○○
47
Page 50

Viewing Pictures (Playback) (continued)
With the mode dial set to playback , use the main dial or sub dial to enlarge the
image, or switch to the index display and display several images at one time in the
monitor.
Index Display Enlarged Display
This feature is convenient
when you want to browse the
pictures stored on the
selected card when you need
to find a particular picture.
16 frames 9 frames 4 frames 1 frame 1.5x 2x 2.5x 3x 4x
1 Frame
Display
This feature is convenient when you want to
confirm that a picture is correctly in focus.
Enlarged display
Set the mode dial to playback , and turn the main dial to the magnifying glass mark
(or turn the sub dial clockwise) to enlarge the image in the monitor.
Move the main dial to the
1
magnifying glass mark
1
the sub dial clockwise).
The image is magnified in the monitor. If
you continue to turn either dial in the same
direction, you can enlarge the image
further.
(or move
48
2
Up
Left Right
Down
3
2
3
3
With an enlarged image displayed,
use the pointers on the arrow pad
to scroll and view other parts of
the image that you cannot see.
Scrolls up.
Scrolls down.
Scrolls left.
Scrolls right.
If you want to display another
image at normal size, turn the main
dial to the index mark
dial counterclockwise), and then
use the pointers on the arrow pad
to select the next image that you
want to display.
(or sub
Page 51

Index display
Set the mode dial to playback , and then turn the main dial to the index mark (or
turn the sub dial counterclockwise) to display several images at one time in the monitor.
Turn the main dial to the index
1
2
Moves highlight
to previous
frame
Displays next index
1
Displays previous
index
Moves
highlight
to next
frame
3
3
mark
counterclockwise).
The monitor is divided into sections and
displays 4 images. The position of the
green highlight shows the currently
selected image. If you continue to turn
either dial in the same direction, you can
display 9 and then 16 frames.
Use the pointers on the arrow pad
2
to select another image.
To display the selected image at
3
normal size, move the main dial to
the magnifying glass mark
move the sub dial clockwise) to
return to the single image display.
The selected image is displayed at normal
size.
(or turn the sub dial
Displays previous index.
Displays next index.
Moves highlight to previous frame.
Moves highlight to next frame.
(or
2
The main dial and sub dial
To perform many settings you can use either the
main dial or sub dial, so use whichever is more
convenient for you. However, please remember
that when the mode is set to M, use the main
dial to set the aperture and use the sub dial to
set the shutter speed.
Using the remote control
You can use the RM-1 remote control unit to
take pictures and view images in the index or
enlarged displays. For details, refer to the
instructions for the RM-1 remote
control unit.
Sub dial
Main dial
49
Page 52

Protecting Pictures
After you protect a picture, it is protected from accidental erasure from the memory card.
After protected images are copied to a computer, they are stored as read-only files but
are not protected from accidental erasure.
Enter the playback mode and
1
display the picture that you want to
protect. (➞ 46)
If you are using the index display, press
2
1
the pointers
to move the green highlight to the image
that you want to protect.
Press the protect button .
2
Pictures that have been protected are
annotated with the protect mark .
on the arrow pad
Monitor
Protected
image
To remove protection
Display the protected image on the monitor and
press the protect button to remove
protection.
To protect all images on a card
Attach a protect seal to a SmartMedia card in
order to protect all images stored on the card
from accidental erasure. For details, refer to the
SmartMedia instructions. Do not reuse protect
seals.
Caution
• Formatting a memory erases everything on the
○○○○○○○○○○○○○○○○○○
memory card, even images which have been
protected.
50
Page 53

Deleting Single Pictures
You can delete one by one pictures that you do not want to keep. Deleting unneeded
pictures creates more space on the selected card and increases the number of pictures
that you can store on the card.
Enter the playback mode and
1
display the picture that you want to
delete. (➞ 46)
1
2
4
3
If you are using the index display, press the
pointers
move the green highlight to the image that
you want to delete.
Press the erase button .
2
YES and NO is displayed in the monitor.
On the arrow pad, press to
3
move the green highlight to YES.
If you change your mind and you do not
want to delete the image, with NO
selected just press the button or press
the erase button .
Press the button.
4
The card access lamp blinks and the
selected image is deleted from the card.
on the arrow pad to
2
Pictures which cannot be deleted
Protected pictures cannot be deleted from the memory card. Protected pictures can be deleted later,
but only after releasing the protection before executing frame delete. (➞ 50)
Protected thumbnail files and a SmartMedia card with a protect seal attached cannot be deleted.
Reusing memory cards
After storing all the images on a card to a hard disk on a computer, you can delete all the images
from the card and then re-use the card for taking and storing more pictures. (➞ 150) Always copy
important pictures to hard disk before you delete images from a card.
51
Page 54

Switching the Camera Off
Always switch the camera off immediately after every shooting session. If you leave the
camera on while it is not being used, it will automatically enter the sleep mode and then
automatically switch itself off after one hour. (➞ 128) Always switch the camera off before
changing batteries or before storing the camera in a case or bag.
Move the power switch to OFF.
1
OFF
ON
1
The camera switches off.
If an image is being saved on a card (the
card access lamp will be blinking), the
camera will not power off until the image
has been saved on the card.
Attach the lens cap.
2
Press inward on the cap’s latches, fit the
cap over the lens, and then release the
latches. (To remove the cap: Press on the
latches and pull the cap off.)
2
Caution
• While the card access lamp is blinking, never open the card compartment cover or unplug the AC
adapter. If the power supply to the camera is interrupted while the camera is saving a picture on a
card, this could cause the camera to reset all operation mode settings (date, time, etc.), could
damage images already stored on the card, or could prevent other pictures from being saved on
the card.
○○○○○○○○○○○○○○○○○○○○○○○○○○○○○○○○○○○○○○○○○
52
Page 55

Shooting Techniques:
General Introduction
This chapter briefly introduces some basic techniques you can apply to
different situations and shoot beautiful professional looking pictures to
achieve the effects that you want, even if you have little experience
using a camera.
Portraits. You can vary the aper ture setting to blur por trait
background, adjust flash, and select a different metering mode to
create artistic effects in portraits.
Portraits (Backlit subjects). By lighting a subject from behind with
backlighting, you can soften shadows on the face and add highlight to
the outlines of the subject’s hair.
Subject in daylight shadow. Even with sufficient light on the subject,
you can set the flash to fire and reduce daylight shadows on the
subject and get beautiful results.
Subject and background both in focus. There will be occasions
when you want to change the aperture value to ensure accurate
focusing of background scenery, or to make sure that all subjects in a
large group picture are in focus.
Moving subjects. You can set a fast shutter speed to capture fast
moving subjects sharply frozen in time, or set a slow shutter speed and
show them in blurred motion.
Close-up. After setting the camera in the macro mode, you can shoot
subjects as close as 20 cm from the lens for detailed nature shots.
3
Night scenes. You can use slow shutter speeds in combination with
lower ISO settings to experiment with shooting night scenes or other
dark subjects.
Subject against a night scene background. When you shoot a
subject with a flash against a night background, you can use slow
shutter speeds to achieve a variety of artistic effects.
Sunsets and fireworks. By adjusting white balance and using manual
focusing, you can extend the range of creativity in your color pictures.
Page 56

Shooting Portraits (Focused Subject,
Blurred Background)
When you shoot a portrait, you can create the effect of the subject floating against a
blurred background. In order to achieve the effect of a floating subject, open the aperture
to take the picture.
The smaller the aperture value, the shallower the
depth of field which causes the background to blur.
You can easily confirm the current aper ture value by
reading it in the viewfinder before you take a picture.
• If you want to adjust the aperture value, set the
mode dial to A (Aperture priority mode) and adjust
the aperture value by turning the main dial or sub
dial.
• The aperture value can be adjusted within the
following ranges.
Max. TELE F2.4~F11
Max. WIDE F2.0~F11
Setting the Aperture Value (➞ 72)
• You can achieve more blurring in the background
with the TELE setting than the WIDE setting.
Viewfinder
Aperture value
• Tr y to put as much distance as possible between
the subject and the background.
54
Page 57

Shooting Portraits (Shooting Backlit
Subjects)
By lighting the subject from behind, you can add highlight to the hair. With this method
you can take a picture of a sharply outlined subject in sparkling light. If the face of the
subject appears dark, use exposure compensation and the flash to take the picture.
Position the spot meter mark on
the center of the subject’s face
The camera can be set to adjust automatically for a
backlit subject in order to attain the ideal exposure for
the shot. For a dark subject, you can use exposure
compensation or set the camera in the spot metering
mode so you can meter light on the subject’s face.
You can also adjust the flash control mode.
Using Exposure Compensation (➞ 79)
Selecting the Metering Method (➞ 78)
Shooting a Subject in Daylight Shadow
(Daylight Synchro) (➞ 56)
Viewfinder
Note
• We recommend attaching a lens hood to the camera to
prevent the occurrence of the flare or ghost effect in your
pictures.
Attaching the Lens Hood When Camera is Not Used
Flash button
Metering mode
button
White dot
White dot
3
White arrow
mark
Lens hood
White arrow mark
Align the white arrow on the
lens hood with the white dot on
the camera and then turn
clockwise in the direction of the
arrow until it stops and you hear
a click.
The lens hood can be reversed
and attached to the camera
when the camera is not in use.
Align the arrow on the lens
hood with the white dot on the
camera and then turn clockwise
in the direction of the arrow until
it stops and you hear a click.
55
Page 58

Shooting a Subject in Daylight Shadow
(Daylight Synchro)
Even with sufficient light on the subject (when the flash warning is not blinking in the
viewfinder), you can set the flash to fire and reduce daylight shadows on the subject and
take a beautiful picture.
When you see shadows on your subject in strong
daylight, use the fill-in flash mode to reduce the
shadows. You can also use the fill-in flash on a
subject which could appear too dark against a strong
backlight. In such situations, if you use the fill-in flash
at high noon to brighten the subject you can capture
both the subject and the background clearly. In either
case, you can achieve a catch light effect by the
When the background is brighter
than the subject, the subject could
become dark or the background
could wash out.
reflection of the light in the subject’s eyes to enliven
the appearance of your subject.
Selecting a Flash Mode (➞ 86)
If you use the flash, both the
subject and the background can
be shot with the correct exposure.
Flash button
56
Flash mode button
Main dial
Press the flash button
to raise the flash unit. Hold
down the flash mode button
and then turn the main
dial or sub dial. When you
see the mark displayed
in the control panel, the
camera is in the fill-in flash
mode.
Page 59

Shooting the Subject and Background
Both in Focus
Select a large aperture value to focus your subjects and the scenery in the background.
Set the mode dial to A (Aperture priority mode) and
then select a large aperture value by turning the main
dial.
Note
• The number for the aperture value is inversely proportional
to the aperture diameter. Selecting a large number (11 for
example) decreases the diameter of the aperture,
lengthens the depth of field, and brings the background
into focus.
Setting the Aperture Value (➞ 72)
However, selecting a large aper ture value in low light
will slow down the shutter speed, causing the picture
to blur as a result of camera shake. Under these
conditions, try to steady the camera as much as
possible by leaning against the side of a building, a
Viewfinder
Aperture value
tree or a lamp post, or mount the camera on a tripod.
Subject not centered in the viewfinder (➞ 65)
3
57
Page 60

Shooting Moving Subjects
When you shoot a moving subject like a runner or a moving vehicle, you can vary the
shutter speed to achieve the desired effect.
With a fast shutter speed, you can capture a
momentary facial expression or freeze a subject in
motion. Similarly, with a slow shutter speed you can
achieve the effect a blurred motion. You can shoot a
moving subject like a waterfall or river with a fast
shutter speed to freeze the action, shoot it with a
slow shutter speed to create the artistic effect of
Action shot at fast shutter speed
(1/500)
Freeze action
Action shot at slow shutter speed
(1/15)
Conveys flow of movement
flowing water in motion.
To adjust the shutter speed manually, set the mode
dial to S (Shutter priority mode), and then turn the
sub dial or main dial to select the desired shutter
speed.
Setting the Shutter Speed (➞ 74)
You can also use the sequence mode to shoot
multiple exposures to capture the subject in several
sequential positions.
Taking Multiple Exposures (➞ 112)
Viewfinder
Shutter speed
250 = 1/250, 2" = 2
seconds
58
Page 61

Shooting Close-up
For close-up shots, use the macro mode which allows you to bring the camera as
close as 20 cm (8 in.) from the subject. For example, you could accurately capture the
details of a flower’s petals, pistils, and stamens.
To set the camera in the macro mode, press and hold
Shot in macro wide-angle mode
Shot in macro TELE mode
down the macro button
dial until you see the macro mark
panel, and then take the picture.
Note
• With the camera set for TELE, you can bring the camera
as close as 20 cm (8 in.) from the subject to photograph
an area about the size of a business card, or
approximately 76 x 57 mm (3 x 2.3 in.). (➞ 42)
• There is a greater possibility of camera shake spoiling a
picture, so try to steady the camera as much as possible,
or use a tripod.
• Use as fast a shutter speed as possible to prevent the
wind or other movement from causing the subject to blur.
• If you use the flash in some situations, the lens barrel
could cause a shadow in the picture.
• For close up shots, you may find it convenient to pull out
the monitor and compose the picture in the monitor.
(➞ 37)
• For best results in close-up shots, you may want to use
the optional Macro Extension Lens Pro (MCON-35).
(➞ 133)
, turn the main dial or sub
in the control
3
Cannot focus the shot?
Using Autofocus (AF) (➞ 64)
Capturing stages of a flower blooming
You can use time-lapse photography to set up shooting
multiple exposures at pre-set intervals to capture the stages
of a flower blooming, or other slow changes over a long
period.
Using Time-Lapse Photography (➞ 118)
59
Page 62

Shooting Night Scenes
When shooting night scenes or other dark subjects, mount the camera on a tripod and
select a slow shutter speed (1/2 sec. or more).
If you select any mode where the exposure is set
automatically (P or A) and raise the built-in flash, the
shutter speed cannot be set slower than 1/30 and
you cannot achieve the correct exposure of a night
scene. If you want to shoot a night scene, take the
picture with the flash closed. With the flash closed,
the shutter speed is set for up to 2 seconds.
Night scene shot with automatic
exposure
Night scene shot with slow shutter
speed
For an extremely dark scene, use the manual mode
(M) so you can select a shutter speed of up to 8
seconds, or you can select the bulb mode so you can
keep the shutter open up to approximately 30
seconds, as long as you keep the shutter button
depressed.
Note
• We recommend using a tripod to avoid camera shake.
Selecting Aperture and Shutter Speed Manually
(➞ 76)
For the metering method, select digital ESP or Center
weighted averaging metering, as Spot metering will
measure only the light in a very small area in the
center of the picture.
Selecting the Metering Method (➞ 78)
60
You can select a higher ISO setting to brighten your
pictures, but this can also cause your pictures to
appear grainy. We recommend that you test a variety
of settings to achieve the effect that you want.
Changing the ISO setting (➞ 83)
If you have difficulty in focusing the subject, use
manual focusing.
Using Manual Focus (MF) (➞ 68)
Color not what you expect?
Set white balance (color temperature) for 5500K.
Using Preset White Balance (➞ 102)
Page 63

Shooting a Subject Against a Night Scene
Background (Slow Synchronization)
When you shoot a subject with a flash against a night background, you can use slow
shutter speeds to achieve a variety of artistic effects. This technique is called slow
synchronization.
Set the mode dial to P or A.
Press and hold down the flash mode button
then turn the main dial or sub dial until you see the
in the control panel.
In the slow synchronization mode, the shutter speed
can be set for up to 2 seconds.
Note
With the flash mode set to Auto,
the background of a night scene
may not be exposed correctly.
With the flash mode set for Slow
Synchro, you can achieve correct
exposure of both the subject and
the background of a night scene.
• We recommend using a tripod to avoid camera shake.
• The shutter remains open even after the flash fires. Ask
the subject not to move immediately after the flash has
fired, and then take the picture.
• Do not touch or move the camera again until the shutter
closes and the subject can be seen through the viewfinder
or the card access lamp starts blinking.
Selecting a flash mode (➞ 86)
3
and
Flash button
Flash mode button
Main dial
Control panel
61
Page 64

Shooting Sunsets and Fireworks
By switching the white balance setting from Auto to a preset setting manually, you can
enhance the beauty of colors in a sunset or a fireworks display.
In the Auto white balance mode, white is used as
the base color for reference in reproducing the
colors of sunsets and fireworks, so the colors in a
sunset may not appear red and the colors in
fireworks may not appear as beautiful.
To improve the accuracy of color reproduction in
these cases, press and hold down the white
, turn the main dial or sub
Sunset does not appear red when
shot with white balance.
Sunset appears in more natural
red when shot with preset white
balance (5500).
balance mode button
dial until you see the number 5500 (clear daylight)
appear in the control panel, and then take the
picture.
To increase the amount of red in the pictures, select
6500 (overcast daylight), or to reduce the amount of
red, select 3700 (incandescent bulb).
You can manually select one of the seven available
white balance settings to experiment and achieve
the artistic color effects that you desire in your
pictures.
Using Preset White Balance (➞ 102)
If fireworks are difficult to focus, move the focus
mode switch to MF (manual focus), and then use
the focus ring to focus the shots.
Using Manual Focus (MF) (➞ 68)
Colors of fireworks can also
be adjusted with white
balance.
62
Page 65

Taking Pictures:
Distance and Focus
In this section you will learn how to use both focusing methods:
autofocusing and manual focusing.
4
Page 66

Using Autofocus (AF)
When autofocusing operates, the camera focuses the subject automatically. When the
subject is in focus, the AF correct mark in the viewfinder lights.
Set the focus mode switch to AF
1
(autofocus), as shown by the arrow
in the illustration on the left.
Look through the viewfinder and
2
MF
AF
1
AF target mark
Focusing is conducted on the
subject covered by this mark.
point the camera to cover the
subject with the AF target mark in
the center of the viewfinder.
If you are using the monitor to compose
the picture, make sure that the subject is
centered in the monitor.
Half-press the shutter button.
3
When the subject is in focus, the camera
beeps and the AF correct mark in the
lower left corner of the viewfinder lights.
When the AF correct mark blinks. (➞ 66)
Full-press the shutter button to
4
take the picture.
When the subject is in focus, the camera
beeps and the AF correct mark lights.
How autofocus operates
Infrared light emitted from AF port is used to estimate the approximate distance from the camera to
the subject. This information is used to roughly focus the image of the subject by moving the lens,
and then more precise focusing is conducted by the part of the CCD that receives the light from the
lens. When the subject is in focus, the AF correct mark in the viewfinder lights.
However, with some subjects, dark subjects or subjects of low contrast, the CCD may not operate
accurately, so focusing is conducted only with the infrared light emitted from the AF port. In this
case, the picture can be taken while the AF correct mark in the viewfinder is blinking.
With the macro mode mark or conversion lens mark displayed in the control panel, focusing is
performed only with the CCD.
AF port
The infrared light emitted here
meters the distance to the subject
(1st stage focusing).
64
1
Move the lens to a position for focus based on
2
the light passing through the lens (at 2nd
stage, the AF correct mark in the viewfinder
lights).
CCD
Page 67

Focusing subjects not in the center of the viewfinder
The camera focuses on the subject covered by the AF target mark in the viewfinder. When you need
to focus on a subject that is not under the AF target mark in the center of the picture, point the
camera and cover the subject with the AF target mark in the viewfinder, half-press the shutter
button, and then while holding down the shutter button, compose the picture again.
Half-pressing and holding down the shutter button locks the focus.
AF target mark
1
2
3
4
Half-press
Full-press
Cover the subject with the AF
1
target mark in the viewfinder.
Half-press the shutter button.
2
When the subject is in focus, the camera
beeps and the AF correct mark in the
lower left corner of the viewfinder lights.
With the shutter button still half-
3
pressed, move the camera and
compose the picture in the
viewfinder.
Full-press the shutter button.
4
Note
• To prevent interfering with the accuracy and
time required for focusing, never block this port
with your finger.
AF port
4
65
Page 68

Using Autofocus (AF) (continued)
Difficult to focus subjects
The autofocus feature of this camera is effective for most subjects. However, subjects like the ones
described below could be difficult to focus with the autofocus feature. If focusing with the CCD is not
successful, after you half-press the shutter button, the AF correct mark in the lower left corner of the
viewfinder blinks. You can still take a picture under this condition by full-pressing the shutter button.
Subject of low contrast
A subject without
distinct patterns could
be difficult to focus.
Subject with center glare
A subject with center
glare could be difficult to
focus.
Two objects at different distances
from the camera
The camera cannot
autofocus on a single
subject with two objects
at different distances
from the camera in the
viewfinder.
Subject in light from street lights
and windows
A subject at night in light
from street lights or from
building windows could
be difficult to focus.
For these situations, position the AF target
mark in the viewfinder on an object that is at
the same distance from the camera as the
subject, and then half-press the shutter button
to lock the focus. While keeping your finger
half-pressed on the shutter button, frame the
picture that you want to shoot, and then fullpress the shutter button. (➞ 65)
You can also set the focus mode switch to the
MF mark to select manual focusing, and then
adjust the focus manually with the manual
focus ring. (➞ 68)
66
Page 69

Subject without vertical lines
The camera cannot
focus on a subject with
only horizontal lines.
Hold the camera
vertically, half-press the
shutter button, and then
hold it down to lock the
focus. Re-position the
camera horizontally,
compose the picture,
and then full-press the
shutter button to shoot
the picture.
Moving subject
It is impossible to hold a
fast moving object in the
center of the viewfinder
long enough for
automatic focusing, so
lock the focus on an
object that is at the
same distance from the
camera as the subject
you want to shoot, wait
for the subject to
appear, and then shoot
the picture.
4
Taking a picture through window
When taking a picture through window, the
subject could be difficult to focus. If this problem
occurs, set the focus mode switch to MF
(manual focus) and focus the subject manually.
67
Page 70

Using Manual Focus (MF)
By setting the camera in the manual focus mode, you can focus the subject manually
within the range 20 cm to ∞ (8 in. to ∞) by turning the manual focus ring.
MF
AF
Control panel
Manual focus ring
2
1
MF (manual focus) mark
Set the focus mode switch to MF
1
(manual focus), as shown by the
arrow in the illustration on the left.
The manual focus mark MF appears in the
upper right part of the control panel.
Turn the manual focus ring until
2
you see the subject focused in the
viewfinder or the monitor.
Monitor display (camerato-subject distance less
than 1 meter)
Camera-to-subject distance (distance for current focus)
Repeatedly pressing the button switches the
display on and off.
Monitor display (camerato-subject distance more
than 1 meter)
Using the focus ring design
The manual focus mechanism of this camera reads the direction and distance the manual focus ring
is moved and drives the focusing lens with a small motor. Even when the camera-to-subject distance
displayed in the monitor is 20 cm (8 in.) or ∞ , the focus ring can be turned farther, but stops at
20 cm (8 in.) or ∞.
Note
• When the camera is set in the macro mode, if you set the focus mode switch to the MF position,
the camera is automatically released from the macro mode .
68
Page 71

Taking Pictures:
Brightness (Exposure)
(Aperture and Shutter Speed)
In this section we will show you how to adjust aperture and shutter
speed to achieve the best exposure in your pictures for normal or
special effects.
The camera uses the aperture value and shutter speed to determine
the brightness (exposure) of an image. The shutter speed determines
the length of time that the shutter remains open. With a large aperture
the image becomes brighter (a greater area of the lens is used to
increase the amount of light), but the depth of field becomes shorter,
causing objects closer and farther away from the camera to be out of
focus. Slower shutter speeds create brighter images but increase the
possibility of blurring the image as result of subject movement or
camera shake.
5
Page 72

Setting the Shooting Mode
Select and set one of the four available shooting modes for the prevailing conditions or
the effect that you want to create in your pictures.
P (Program mode)
The camera automatically selects the best aperture value and shutter speed according to
the brightness of the subject. You can get great results by just pressing the shutter
button.
A (Aperture priority mode)
You can set the aperture while the camera automatically selects the correct shutter
speed according to the brightness of the subject. You can blur the background of a shot
by decreasing the aperture value. On the other hand, you can increase the aperture
value to ensure that subjects in the foreground and background are both focused.
S (Shutter priority mode)
You can set the shutter speed while the camera automatically selects the correct
aperture value according to the brightness of the subject. For a fast moving subject
select a fast shutter speed to freeze the subject for a sharp picture, or select a slow
shutter speed to create the effect of blurred movement.
M (Manual mode)
You can set the aper ture and shutter speed manually to vary the appearance of the
picture as you desire to achieve special effects in your pictures. The exposure indicator
display in the viewfinder allows you to view and confirm the current exposure setting. In
the M mode you can also set the camera in the bulb mode for long exposures.
70
OFF
Set the mode dial to the
1
appropriate mark to select the
ON
1
shooting mode.
Page 73

Aperture Values and Shutter Speeds
Selected Automatically in the P Mode
When the mode dial is set to P (Program mode) the camera automatically selects the
aperture value and shutter speed according to the brightness of the subject so you can
take the picture without adjusting the exposure.
Set the mode dial to P (Program
1
mode).
OFF
ON
1
Take the picture.
2
P (Program mode) aperture values and shutter speeds
With the camera set in the Program mode, a program automatically adjusts the aperture value and
shutter speed according to the brightness of the subject.
5678910111213141516171819
4
3
2
1
0
-1
-2
8s 4s 2s 1s 1/2 1/4 1/8
TELE
çLäpÅiWIDEÅj
WIDE
1/15 1/30 1/60
1/125 1/250 1/500
Shutter speed
1/1000
Ev
Aperture
F11
F8
F5.6
F4
F2.8
F2
F1.4
F1
Adjusting the exposure
With the mode dial set to P (Program mode) the camera automatically selects the optimum
exposure, but if you want to make the picture brighter or darker, press exposure compensation
button to use the exposure compensation feature.
Using Exposure Compensation (➞ 79)
5
71
Page 74

Setting the Aperture Value
With the mode dial set to A (Aperture priority mode), you can select the aperture value
for your shots. Because adjusting the physical size of the aperture determines the
amount of light allowed to enter the camera through the lens, the aperture setting
expresses the actual size of the aperture. It is important to remember, however, that the
smaller the value of the aperture setting, the larger the diameter of the aperture, and
conversely, the larger the value of the aperture setting, the smaller the diameter of the
aperture.
Opening the aperture not only allows more light into the lens to compensate for low light
conditions but shortens the depth of field as well. Use a large aperture to focus only the
subject and blur the background when you want to shoot a portrait. On the other hand,
use a small aperture to focus both the subject and the background.
Large Aperture Small Aperture
To focus the subject and blur
the background, select a
small aperture value for a
large aperture.
To focus the subject and the
background, select a large
aperture value for a small
aperture.
Fine adjustment of aperture and shutter speed
If the brightness is adjusted with fine adjustment of the aperture value, in some cases it may appear
that the shutter speed drive is not adjusting shutter speed. The displayed aperture value is the value
of the optical aperture, and the shutter speed is calculated based on the CCD’s sensitivity to the
brightness of the light to determine the optimum exposure. In order to achieve this, the aperture
value and shutter speed may occasionally appear not to be adjusting in fine increments and does
not indicate a malfunction of the camera.
Bright spots in the picture?
If you see extremely bright spots in your images caused by sunlight or reflected sunlight, this is a
phenomenon called “smear” which occasionally occurs with digital cameras that employ CCDs. To
avoid this problem, compose the picture again and try to eliminate the bright light, use a smaller
aperture, or use a Neutral Density filter.
72
Page 75

Large
aperture
Viewfinder
Control panel
Small
aperture
2
OFF
ON
1
2
Large
aperture
Aperture value
As the aperture is
opened, the
aperture value
decreases. As
the aperture is
closed, the
aperture value
increases.
Small
aperture
Set the mode dial to A (Aperture
1
priority mode).
Turn the main dial or sub dial as
2
shown in the illustration to change
the aperture value.
Turn the dial to adjust the aperture value
in 1/3 steps.
The aperture value you select is displayed
in the viewfinder and the control panel.
The range of aperture values available of
selection is determined by the current
zoom setting.
Aperture Range
Max.WIDE 2.0∼11
Max.TELE 2.4∼11
The shutter-speed indication blinks if the
camera cannot set the correct shutter
speed.
Shutter speed indication is blinking,
and the indicated speed is fast?
The scene is too bright—the camera
cannot set the shutter speed fast enough
to expose the shot correctly. Correct the
problem by reducing the aperture size
(increasing the aperture value). If the
indication continues to blink, reduce the
ISO setting or use a Neutral Density filter.
Shutter speed indication is blinking,
and the indicated speed is slow?
The scene is too dark—the camera cannot
set the shutter speed slow enough to
expose the shot. Correct the problem by
widening the aperture (reducing the
aperture value). If the indication continues
to blink, raise the ISO setting or use the
flash.
5
Take the picture.
3
Note
• If you set the aperture value manually, that setting will remain in effect even after you switch to
another shooting or switch the camera off and on. If you set the camera in the shooting mode
again, the camera will return to the same aperture value. However, the camera does not retain
automatically selected aperture settings.
73
Page 76

Setting the Shutter Speed
With the mode dial set to S (Shutter priority mode), you can set the shutter speed for the
movement of the subject and take a picture. For example, if you take a picture of an
athlete in motion you can freeze the subject for a sharp picture or show the subject
moving through an arc of blurred movement for artistic effect.
With a slow shutter speed you can also point the camera at a moving subject and move
the camera to achieve the effect of blurred motion.
Fast shutter speed Slow shutter speed
A fast shutter speed can stop and
freeze the action of a moving
subject.
A slow shutter speed can show
the flow of the action of a
moving subject.
To prevent camera shake
Use a monopod or tripod to prevent camera shake. The possibility of camera shake spoiling a
picture increases greatly when you zoom in on a subject.
Caution
• The flash may not be effective with shutter speeds of 1/250 or faster.
• The shutter speed that you select manually remains set, even after you change to another
shooting mode or switch the camera off and on again. Even after changing the shooting mode and
switching back to the S mode, the previously selected shutter speed remains set. However, the
camera does not remember shutter speeds selected automatically.
○○○○○○○○○○○○○○○○○○○○○○○○○○○○○○○○○○○○○○○○○
74
Page 77

Slow Fast
2
OFF
Set the mode dial to S (Shutter
1
priority mode).
Turn the main dial or sub dial as
2
ON
1
2
Fast
shown in the illustration to select a
shutter speed.
For every movement of the dial, the
shutter speed is changed in 1/3 step
increments. You can select a shutter speed
within the range 1/640~2 sec. The
selected shutter speed is displayed in the
viewfinder and control panel.
The aperture value blinks if the camera
cannot set the required aperture size.
5
Slow
Viewfinder
Control panel
Shutter speed
Shutter speeds of less than 1
second are displayed only with the
denominator of the speed setting.
For example, the 1/200 sec.
selection is displayed as 200.
Shutter speeds of more than 1
second are displayed with a doublequote mark ". For example, the 2
sec. selection is displayed as 2".
Aperture value is blinking, and the
value is at the maximum?
The scene is too bright—the camera
cannot make the aperture small enough to
expose the shot. Correct the problem by
setting a faster shutter speed. If the
indication continues to blink, reduce the
ISO setting or use a neutral density filter.
Aperture value is blinking, and the
value is at the minimum?
The scene is too dark—the camera cannot
open the aperture wide enough to expose
the shot. Correct the problem by selecting
a slower shutter speed. If the indication
continues to blink, raise the ISO setting or
use the flash.
Take the picture.
3
75
Page 78

Selecting Aperture and Shutter Speed
Manually
With the mode dial set to M (Manual mode), you can manually select both the aperture
and the shutter speed. In this shooting mode, you can also set the camera in the bulb
mode for long exposures. However, please remember that bulb shutter release is limited
to 30 seconds. Exposure will end and the shutter will release after 30 seconds if you hold
down the shutter button longer than 30 seconds.
Slow
Shutter
speed
Note
• If you set the aperture value and shutter speed manually, that setting will remain in effect even
after you switch to another shooting mode or switch the camera off and on. If you set the camera
in the shooting mode again, the camera will return to the same aperture value and shutter speed.
Fast
2
OFF
ON
Aperture value
1
2
Large
aperture
Small
aperture
Set the mode dial to M (Manual
1
mode).
Turn the main dial to select the
2
aperture value, and turn the sub
dial to select the shutter speed.
Every movement of the dial changes the
aperture value and shutter speed in 1/3
steps.
You can select the shutter speed within the
range 1/640~8 seconds (or select “bulb”).
If you select “bulb” then the shutter will
remain open for as long as you keep the
shutter button pressed down (to a
maximum of 30 seconds). This is called
the bulb shooting mode.
76
Page 79

Shutter
speed
Viewfinder
Aperture value
Control panel
Exposure
level
Difference
between the
selected and
ideal
exposure
levels.
Exposure level
Turning the main dial to the right increases
the size of the aperture and moving it to
the left decreases the size of the aperture.
The selected exposure is displayed in the
exposure indicator in the viewfinder and
the control panel. A plus mark (+) means
the picture is overexposed, a minus mark
(−) means the picture is underexposed,
and ±0 means the picture is correctly
exposed.
When the picture is overexposed by more
than 3 steps, + blinks, or when the picture
is underexposed by more than 3 steps, −
blinks.
Take the picture.
3
5
77
Page 80

Selecting the Metering Method
Select the method to meter the brightness of the subject. Three metering methods are
available: digital ESP metering, center weighted averaging metering, and spot metering.
The camera is set for digital ESP metering when you purchased the camera.
Center
weighted
averaging
metering area
Spot metering
Spot metering
area mark
Digital ESP metering
Center weighted
averaging
metering
Meters the entire picture and
reads not only the light but the
brightness patterns as well to
determine the correct exposure
value.
1
Meters the entire picture, yet
concentrates on metering light
in the center of the picture in
area three times the size of
the Spot metering area mark
(approximately 11% of the
viewfinder) to determine the
correct exposure value.
While holding down the metering
1
mode button
Concentrates on metering the
light on the area covered by
the spot meter in the center of
the viewfinder (1.2% of the
viewfinder) to determine the
correct exposure value.
on the top, left
side of the camera, turn the main
dial or sub dial until you see the
desired metering setting displayed
in the viewfinder or monitor.
Viewfinder display Control panel
Digital ESP metering
Center weighted averaging metering
Spot metering
Take the picutre.
2
Brightness of center and surrounding area different?
When there is a great difference in the level of brightness between the center of the picture and the
surrounding area, or when there is an object in the background brightly lit, digital ESP metering may
not be able to meter the scene correctly. In such a situation, switch to center weighted averaging
metering or spot metering, cover the subject with the metering mark and adjust the exposure
compensation and other settings to determine the correct exposure. For a dark subject in strong
backlighting, you can also use the flash.
78
Page 81

Using Exposure Compensation
With the mode dial set to P (Program mode), A (Aperture priority mode), or S (Shutter
priority mode), you can press the exposure compensation
or decrease the exposure automatically selected by the camera in order to create a
darker or brighter image. If you want to shoot a white subject and make it bright, you can
also use exposure compensation to capture the image just as it appears. Exposure
compensation can be adjusted in the range of ±3EV in 1/3EV steps.
OFF
ON
1
2
Set the mode dial to P, A, or S.
1
While pressing down the exposure
Plus
Minus
ViewfinderControl panel
2
compensation
main dial or sub dial as shown in
the illustration.
The exposure compensation value is
displayed in the viewfinder and the control
panel.
button to manually increase
Plus exposure
compensation
Minus exposure
compensation
button, turn the
5
Take the picture.
3
Note
• The exposure compensation setting remains
Exposure compensation value
selected even after the camera is switched off
and on again. After you adjust exposure
compensation for a shooting session, you
must remember to set exposure compensation
to 0 again when you are finished.
Adjusting the flash intensity
The flash intensity cannot be adjusted automatically, but it can be adjusted manually. (➞ 90)
79
Page 82

AE Lock
Normally the camera automatically meters the focus and the exposure when you halfpress the shutter button and locks the AF (automatic focus) and AE (automatic exposure)
at the same time. However, you can lock the exposure by pressing the
before pressing the shutter button.
If you press the shutter button with the button depressed, only AF is performed
and the exposure does not change.
Conversely, if you press the button with the shutter button half-pressed, the focus
is fixed and you can adjust the exposure.
The exposure is held only as long as the
soon as the button is released.
2 3
Viewfinder
button is depressed and released as
Point the camera at the subject for
1
which you want to set the
exposure.
Press the button.
2
Keep the button pressed down. While the
button depressed, the exposure setting will
not change. When the exposure is locked,
the AEL mark appears in the viewfinder.
If you half-press the shutter button while
holding down the button, automatic
focus also operates.
With the button still pressed
3
down, take the picture.
You can continue to take other pictures at
the same exposure, as long as you keep
the button pressed down.
button
Locked
exposure
AEL displayed
When the shutter button is half-pressed
When you press the button, the exposure setting selected by half-pressing the shutter button
is canceled and the exposure selected with the button press is used. On the other hand, if the
button is released, then exposure changes as metered automatically with a half-press on the
shutter button.
80
Page 83

Bracketing a Shot with Three Automatic
Exposures
With the mode dial set to P (Program mode), A (Aperture priority mode), or S (Shutter
priority mode), if you switch on autobracketing in the menu you can take three rapid
multiple exposures of the same picture with different (bracketed) exposure settings. One
shot will be taken at normal exposure, one shot at a lower exposure setting for a darker
picture, and one shot at a higher setting for a brighter picture.
5
Normal exposure picture Lower exposure setting for a
You can set up bracketing shots in 1/3EV, 2/3EV or 1EV full exposure step.
2
3
4
5
darker picture
1
6
Press the menu button .
1
The menu opens in the monitor.
On the arrow pad, press or
2
to move the green highlight to the
On the arrow pad, press to
3
move the green highlight to
FRAME.
On the arrow pad, press and
4
select 3 to replace OFF.
Selecting the number of shots enables
autobracketing, and selecting OFF
disables autobracketing.
On the arrow pad, press to
5
move the green highlight to the
mark.
On the arrow pad, press or
6
repeatedly to select the step
setting for adjusting the three
autobracketing exposures.
Exposure can be adjusted in three steps:
1/3EV, 2/3EV, 1EV.
Higher setting for a brighter
picture
mark.
81
Page 84

Bracketing a Shot with Three Automatic Exposures (continued)
Press the button.
7
This completes setting the camera for
autobracketing. In the control panel, you
7
Control panel
Autobracket
setting mark
Sequential mode
Sequential mode selected
automatically when
autobracketing is selected.
will see BKT and the sequential mode
mark displayed. This confirms that the
camera is set for both autobracketing and
shooting multiple exposures. (When
shooting in the single-frame mode, hold
down the drive button and turn the
main dial or sub dial until you do not see
the sequential mode mark displayed in
the control panel.)
Press the button again to close the
menu.
Take the picture.
8
When the camera is set in the sequential
mode, press the shutter button once to
shoot three rapid pictures with the
exposure setting varied automatically for
each shot.
When the camera is set in the singleframe shooting mode, you must press the
button once to take each picture with the
exposure setting varied automatically for
each shot.
Note
• The autobracketing setting is disabled and cannot be used in the following cases:
- When the mode dial is set to M (Manual mode)
- When the flash button is pressed and the built-in flash is raised.
• The mode dial setting determines which features are changed during autobracketing.
P Program mode. Shutter speed and aperture value adjusted.
A Aperture pr iority mode. Shutter speed adjusted.
S Shutter priority mode. Apeture adjusted.
• The shutter speed and aper ture value display the adjusted exposure.
• If autobracketing (➞ 81) and exposure compensation (➞ 79) are selected together, then values
are calculated for both during shooting with autobracketing.
• If the camera is switched off suddenly during autobracket shooting, the camera will finish the
autobracketing shooting sequence after the camera is switched on again.
• Autobracketing will halt as soon as you release your finger from the shutter button and resume
shooting the remaining pictures after you press the shutter button again.
• With the camera set in autobracketing, you cannot select the self-timer mark , or the remote
control mark . To select these marks, release the camera from autobracketing with the menu.
• If you select autobracketing while the self-timer mode or the remote control mode is set, both
modes will be automatically released.
82
Page 85

Changing the ISO Setting
The sensitivity can be adjusted with the ISO setting. This ISO setting is the equivalent of
the ISO settings performed with traditional SLR cameras which employ film. Three ISO
settings are available with this camera: 80, 160, and 320. Although you can increase the
sensitivity by raising the ISO setting to take pictures of dark subjects, this could cause
the pictures to appear grainy. To prevent poor exposure, we recommend leaving the ISO
setting set for AUTO or 80. With AUTO selected the camera can adjust the ISO setting
automatically only when the intensity of the flash is insufficient. (For most situations,
AUTO selects 80 for the ISO.)
Press the menu button .
1
The menu opens in the monitor.
5
2
3
1
4
Displayed when setting
other than AUTO is selected
On the arrow pad, press or
2
to move the green highlight to the
mark.
On the arrow pad, press to
3
move the green highlight to AUTO,
80, 160, or 320.
Press the button to select the
4
setting.
The green highlight returns to the ISO
mark .
Press button again to close the menu.
ISO is displayed in the control panel only
when any setting other than AUTO is
selected.
Control panel
83
Page 86

84
Page 87

Taking Pictures:
Using a Flash
In this section you will learn how to use the built-in flash and external
dedicated flash FL-40. The built-in and external flash can be used
separately or together. We also describe the limitations on using other
external flash units not designed exclusively for this camera.
Use the built-in flash to take pictures of subjects in low incident light or
dark subjects in strong backlight. To use the flash, you must first press
the flash button to raise the built-in flash unit.
When you see the flash mark blinking in the viewfinder, the flash is
charging. Wait for the mark to stop flashing before firing the flash again.
To prevent the deterioration of the flash unit from overheating, do not fire
the flash more than 30 times in succession, and allow the flash to cool
for 10 minutes or more after a long session. Keep the flash unit clean.
Continuously firing the flash with the flash unit unclean, could cause the
flash unit to deteriorate.
6
Page 88

Selecting a Flash Mode
The flash mode selection determines how the flash is fired to achieve various effects.
Flash mode selections and features
Auto Flash
The camera automatically fires the flash at the appropriate intensity when shooting in dark
conditions or against strong backlighting. In dark environments, the camera fires the flash as
necessary to keep the shutter speed to 1/30 sec. or less (since exposures longer than 1/30 sec. are
likely to be spoiled by camera shake). When shooting against a backlight, the camera fires the flash
as necessary to adjust the brightness of the subject.
Slow Synchronization
When shooting a subject against an illuminated night scene with the flash, you may only capture the
subject and the background may turn out black. To capture the background as well in this situation,
you can select slow synchro for the flash control setting and adjust the shutter speed up to 2
seconds (for ISO 80) for the darkness of the background. However, if you use a slower shutter
speed we recommend that you mount the camera on a tripod and ask the subject to remain still
until the picture is taken. (At slow shutter speeds the picture could easily blur as a result of camera
shake or if the subject moves while the shutter is still open.) The camera is in the 1st-cur tain mode
when is not displayed, and the flash fires at the beginning of a slow shutter release.
The camera is in the 2nd-curtain mode when is
displayed, and the flash fires at the end of a slow shutter release. In
the slow synchronization mode with 1st-curtain selected, for
example, if you were to photograph a moving car at night, the flash
would fire at the beginning of the slow shutter release and capture
the image of the car. In the picture you would see the headlights of
the car appearing to flow ahead of the car in the direction of travel
as only the headlights were captured for the remainder of the shutter
release. If you were to select 2nd-curtain for the same picture, the
flash would fire at the end of the slow shutter release and you would
see the tail lights trailing behind the car because the vehicle was
captured by the flash at the end of the slow shutter release. In order
to use slow shutter release effectively, first set the mode dial to S
(Shutter priority mode) and select a slow shutter speed.
Moving vehicle
photographed in 2nd-Curtain
mode, showing lights trailing
behind
86
Page 89

Fill-in Flash
Use fill-in flash when you want the flash always to fire, regardless of the light conditions. For
example, if the subject’s face appears dark in front of strong backlighting, if a tree or other large
object is casting a shadow on the subject’s face, or when shooting under fluorescent or other
artificial lighting to achieve the best color reproduction, you should use the fill-in flash mode.
However, the flash could lose its effect when shooting a subject in extremely bright light. Use
exposure compensation or use spot metering to meter the light only on the part of the subject that
you want to shoot. (➞ 78)
Red-eye Reduction
To prevent the occurrence of the red-eye phenomenon in the eyes of photographed subjects, the
camera fires 10 short burst flashes to contract the pupils of the eyes before the main flash fires.
When you use this flash mode, there is a 1 second delay before the flash fires after full-pressing the
shutter button, so make sure that the camera is steady. Red-eye reduction may not always be
completely effective for the following reasons:
- The subject was not looking directly at the camera when the flash
fired.
- The subject was not looking at the camera when the preliminary
flashes fired.
- The subject was too far from the camera.
- Differences among subjects in their physical reactions to the
preliminary flashes.
Example of the red-eye
6
87
Page 90

Selecting a Flash Mode (continued)
To select the flash mode, press and hold down the flash mode button and turn the
main dial or sub dial. Turn the main dial or sub dial to the right to display the available
settings in the order indicated by the arrow in the table below. (Turning either dial to the
left displays the settings opposite the direction of the arrow in the table.)
Flash control modes for the P (Program), A (Aperture priority) modes
Control Panel Display
(None)
Flash mode Flash Timimg
Auto flash
Auto flash
(Red-eye Reduction)
Slow synchro
(Red-eye Reduction)
Slow synchro
Red-eye
Reduction
NO
YES
YES
NO
1st-curtain YES
1st-curtain
1st-curtain
1st-curtain
Fires automatically
in dark light,
backlighted subject
YES
YES
YES
Always
fires
NO
NO
NO
NO
Slow synchro
(2nd Curtain)
Fill-in flash
NO
NO
2nd-curtain
1st-curtain
Flash control modes for the S (Shutter priority), M (Manual) modes
Control Panel Display
Flash mode
Red-eye
Reduction
Fill-in flash
(Red-eye Reduction)
Fill-in flash
(2nd Curtain)
Fill-in flash
Note
• If the flash mode is set in the P or A shooting
mode and then the mode dial is reset to S or
M, the flash mode settings change as shown
below.
Original Setting Changes To:
AUTO Fill-in
Slow Synchro Fill-in
Slow Synchro (2nd Curtain) Fill-in (2nd Curtain)
AUTO (Red-eye Reduction) Fill-in (Red-eye Reduction)
Slow Synchro (Red-eye Reduction) Fill-in (Red-eye Reduction)
Fill-in Fill-in
Flash Timimg
YES
NO
1st-curtain
2nd-curtain
1st-curtain
• If the flash mode is set in the S or M shooting
mode and then the mode dial is reset to P or
A, the flash mode settings change as shown
below.
Original Setting Changes To:
Fill-in Fill-in
Fill-in (2nd Curtain) Slow Synchro (2nd Curtain)
Fill-in (Red-eye Reduction) AUTO (Red-eye Reduction)
Fires automatically
in dark light,
backlighted subject
YES
NO
NO
NO
NONO
NO
YES
Always
fires
YES
YES
YES
88
Page 91

1
2
Press the flash button .
1
The built-in flash opens.
If the built-in flash is not raised, the flash
mode remains set at OFF and cannot be
changed.
Press and hold down the flash
2
mode button
main dial or the sub dial. Continue
to turn the dial until you see the
desired combination of flash
control setting marks, and then
stop turning the dial.
Take the picture.
3
, and then turn the
When the flash is not required
When you do not want to use the flash, for
example when photographing subjects as a
sunset or night scene, shooting a subject that
the flash will not reach, or shooting a subject in
a location where flash photography is not
allowed (such as in a museum), just press down
the built-in flash to close it. If an external flash
unit is connected to the camera, switch it off or
remove it. (Some external flash units may
require removal and others may not; you can
just switch them off.)
6
89
Page 92

Using Flash Control Compensation
The camera can automatically adjust the flash intensity according to the brightness of
the subject, light reflected from the subject, and the camera-to-subject distance, and
because of this the image of a subject could appear too bright or too dark. In such cases
you can use flash control compensation to capture images that are not too bright or too
dark. Flash control may not have enough effect when using a high shutter speed.
Press the menu button .
1
The menu opens in the monitor.
On the arrow pad, press or
2
to move the green highlight to the
mark.
2
3
4
1
On the arrow pad, press to
3
move the green highlight to the
scale to the right of the flash
control mark
To increase or decrease the flash
4
intensity, press
Every time you press or , the flash
compensation value changes in 1/3EV
steps through a range of −2EV to +2EV.
.
or .
90
Page 93

Displayed only when an
exposure value other
than 0 is selected.
Control panel
5
Press the button.
5
The green highlight returns to the flash
control mark and the setting is stored.
When any value other than zero (0) is
selected, the flash control mark is
displayed in the control panel. Please
remember that this setting is retained even
after the camera is switched off and
switched on again.
To release this setting, reset the value for
zero.
Press the button again to close the
menu.
Take the picture.
6
To use the dedicated external flash
and built-in flash together
When the dedicated external flash is mounted
on the camera, the camera automatically sets
the flash for TTL-AUTO. With this setting, the
camera can adjust the intensity of the flash fired
from the dedicated flash, just as it automatically
adjusts the flash intensity for the built-in flash. If
you set the dedicated flash for MANUAL, this
disables automatic adjustment of the flash
intensity only for the dedicated external flash;
the intensity of the built-in flash will continue to
be controlled by the camera.
6
91
Page 94

Using the Optional Dedicated External
Flash FL-40
The dedicated external flash FL-40 increases the amount of light and can illuminate
subjects which are beyond the range of the built-in flash. You can also use the dedicated
external flash to bounce light onto the subject from another direction, allowing more
variety in the use of lighting. The dedicated external flash can be mounted on the hot
shoe on top of the camera or mounted on the optional flash bracket attachment. With the
dedicated external flash, you can use flash control compensation and select the flash
mode, just like you can with the built-in flash. (➞ 90)
To use only the dedicated external flash
If you want to use only the dedicated external flash, just push down the built-in flash.
To use the dedicated external flash and built-in flash together
With the built-in flash you can also use the dedicated external flash to bounce light onto the subject
to create a catch-light effect to light the eyes of the subject more naturally. When the built-in flash
and external flash are used together, the built-in flash provides about half of the light emitted from
the dedicated external flash. When you use the external flash to bounce light onto a subject, in
some cases the intensity of the external flash could be insufficient, even with the range for flash
shooting, please remember that you may not be able to achieve the correct exposure.
To set the flash mode for the FL-40
When the dedicated external flash is mounted on the camera,
the camera automatically sets the flash for TTL-AUTO, and the
intensity of the dedicated external flash can be controlled from
the camera. With the mode dial set to M (Manual mode), you
can select MANUAL on the dedicated external flash. This allows
you to set the guide number on the dedicated external flash,
and select the aperture on the camera for taking a picture.
Shooting
Mode
M
Dedicated External
Flash Mode
P
A TTL-AUTO only
S
TTL-AUTO,
MANUAL
92
Page 95

1
OFF
ON
Hot shoe cover
2
Remove the hot shoe cover from
1
the camera and attach the FL-40
external flash unit.
Slide the hot shoe cover toward the back
of the camera. Attach the dedicated
external flash unit to the hot shoe. For
details about attachment, refer to the
dedicated external flash FL-40 instructions.
Store the hot shoe cover in a safe location
where you will not lose it, so you can reattach it later after removing the external
flash unit.
Warning
• The dedicated external flash unit could fire
accidentally when it is connected with the
camera or dedicated external flash unit
switched on.
Switch on the dedicated external
2
flash unit.
If you intend to use the external dedicated
flash with the built-in flash, press the flash
button to raise the built-in flash. When
you do not want to use the built-in flash,
just press it down to close it.
6
Back of FL-40 dedicated
external flash unit
∼
Mode button
Select the flash mode. (➞ 86)
3
Take the picture.
4
Using the flash with close-up
photography
Shooting a subject 1.5 meters (approx. 4.9 ft.)
from the camera or closer, could cause the
pictures to be too bright or cause dark shadows.
If you experience these problems with the
external flash, adjust flash intensity on the
external flash unit, or use only the built-in flash.
Preventing the dedicated external
flash from firing
To prevent the dedicated external flash from
firing, just switch it off.
93
Page 96

Using Other Flash Units with the Camera
An external flash unit not designed for this camera can be connected to either the hot
shoe or the synchro socket on the left side of the camera and used, provided that it
meets the conditions described below. However, please remember that a generic
external flash unit, unlike the dedicated FL-40 flash unit, cannot be used to control the
intensity of the flash.
Requirements for other flash units used with this camera
1. Use a flash unit with an angle of illumination wider than the rang e of the camera.
The focal length of this camera is 35 mm~140 mm (1.3 in.~5.6 in.), calculated based on 35 mm
film, and requires that the angle of illumination be wider than the focal length used. In order to
use the full focal length area, over 35 mm is required. In order to br ing into use the remaining
portion of the illumination area, use an external flash with a wide adapter.
2. When using full flash, set the flash timing shorter than 5ms.
With a ring flash, or other flash unit with long flash duration, the shutter may close during the
flash and part of the light might not be used in the exposure.
3. Do not attempt to any flash unit (other than the FL-40) which employs electronic flash
control between the flash unit and the camera.
Setting a non-dedicated flash unit
1. Using auto flash (controlled by the external flash)
The intensity of the flash must be adjusted with the controls on the flash unit. The f/stop and ISO
settings on the flash unit must match these settings on the camera. Depending on the shooting
conditions, you may not be able to achieve satisfactory exposure. In this case, you will have to
adjust the aperture values and ISO settings on both the camera and the external flash unit. Flash
control settings performed on the camera are ignored by the flash unit.
2. If you want to set the guide number on the external flash, calculate the aperture value
from the guide number, camera-to-subject distance, and the ISO setting.
Cautions about using external flash units other than the FL-40
Even when is displayed, an external flash not designed for this camera may fire for every shot. If
you do not want the flash to fire, switch if off. If the flash continues to fire after the flash is switched
off, disconnect the flash from the camera. Further, the intensity of such a flash must be controlled by
adjustments on the external flash unit. The results in your pictures could differ, depending on the
shooting conditions, type of external flash unit used, and the camera settings. Please understand
that we cannot guarantee the performance of the camera and picture quality when a flash unit not
designed for this camera is used.
94
Page 97

Using a non-dedicated flash unit
Flash synchro socket
Hot shoe
An external flash can be attached
1
to the camera at the hot shoe or at
the flash synchro socket.
Set the mode dial to M (Manual
2
mode).
Select the shutter speed and aperture
value. Selecting a slow shutter speed
increases the possibility of camera shake.
On the flash unit select AUTO, and
3
then set the same aperture and ISO
settings selected on the camera.
For some shots you may not be able to
achieve the correct exposure. If this
occurs, then you can experiment with
different aperture and ISO settings on the
external flash unit. (In this situation, the
flash control mode setting on the camera
is disabled.)
6
95
Page 98

96
Page 99

Taking Pictures:
Color and Quality
In this section we will show you how to set up white balance, select the
record mode for images saved on the memory card, and how to use the
sharpness, contrast, and histogram options to enhance your captured
images.
There can be great differences in the way the camera reproduces color
in images taken in natural or artificial light, especially under fluorescent
lights. In such cases, you may need to adjust the white balance setting
of the camera in order to achieve the best natural color reproduction in
pictures taken indoors under incandescent or fluorescent lighting.
You can select a record mode best suited for your purpose. You can
select a high quality setting to produce the best quality image possible,
resulting in a larger file size but reducing the number of images that you
can save on a card. If your aim is to store more images on a card, or to
store as many images as possible on a card, you can select a lower
quality setting which will compress the images into smaller file sizes,
allowing you to store more images on a single card.
You can use the shar pness, contrast, and histogram options to enhance
the appearance of your images as they are taken.
7
Page 100

Achieving Natural Color (White Balance)
The source of incident light on the subject affects color. For example, the same sheet of
white paper held under sunlight may appear tinged with red when held under an
incandescent light. Because the human eye adapts to the colors of source light, it
perceives the sheet as white in both cases. White balance adjustment attempts to
reproduce colors naturally so images are not affected by surrounding light. With a
camera that uses film, you could purchase film suited for reproducing color under
different light sources and adapt to shooting conditions by using filters. Similarly, with a
digital camera you have the option of adjusting the white balance.
There are three ways to adjust white balance with this camera.
Auto white balance
The camera automatically determines the amount of white light and adjusts the color balance. Auto
white balancing is sufficient for most conditions, but if there is no near white color in the picture,
colors that are not originally white may appear white in the image and the white balance of the
image may not be correct. In such a case, use a white surface and quick reference white balance to
achieve the correct white balance, or use preset white balance to select a color temperature for the
incident light to achieve the correct white balance.
Quick reference white balance
You select an object like a white wall or a piece of white paper to be used as the white base to
balance color in your picture before shooting. Just point the camera at a sheet of white paper and
press the white balance mode button to set the white base for balancing color in the picture. The
setting that you capture is saved as a “preset” white balance setting and recorded in the camera's
color temperature selections.
Preset white balance
You select a color temperature setting appropriate for the light source. For example, use preset
white balancing when you want to reproduce more red in a picture of a sunset, or capture a warmer
artistic effect under artificial lighting. By experimenting with different preset white balancing settings,
you can achieve a variety of pleasing color effects in your pictures.
98
 Loading...