

Page 1

DIGITAL VOICE
RECORDER
DS-330
ON LINE
INSTRUCTIONS
Thank you for purchasing an Olympus
Digital Voice Recorder.
Please read these instructions for information about using
the product correctly and safely.
Keep the instructions handy for future reference.
To ensure successful recordings, we recommend that
you test the record function and volume before use.
1
Page 2

For Safe and
General Precautions
Correct Usage
Before using your new recorder, read this
manual carefully to ensure that you know
how to operate it safely and correctly. Keep
this manual in an easily accessible location
for future reference.
• The warning symbols indicate important
safety related information. To protect yourself
and others from personal injury or damage to
property, it is essential that you always heed
the warnings and information provided.
2
● Do not leave the recorder in hot, humid
locations such as inside a closed
automobile under direct sunlight or on the
beach in the summer.
● Do not store the recorder in places exposed
to excessive moisture or dust.
● Do not use organic solvents such as alcohol
and lacquer thinner to clean the unit.
● Do not place the recorder on top of or near
electric appliances such as TVs or
refrigerators.
● Avoid recording or playing back near
cellular phones or other wireless equipment,
as they may cause interference and noise.
If you experience noise, move to another
place, or move the recorder further away
from such equipment.
● Avoid sand or dirt. These can cause
irreparable damage.
● Avoid strong vibrations or shocks.
● Do not disassemble, repair or modify the
unit yourself.
● Do not operate the unit while operating a
vehicle (such as a bicycle, motorcycle, or
go-cart).
● Keep the unit out of the reach of children.
..........................................................................
IBM and PC/AT are the trademarks or registered
trademarks of International Business Machines
Corporation.
Microsoft and Windows are registered trademarks
of Microsoft Corporation.
Intel and Pentium are registered trademarks of
Intel Corporation.
Adobe and Acrobat Reader are registered
trademarks of Adobe Systems Incorporated.
CORTOLOGIC is a registered trademark of
Cortologic AG.
Apple, Macintosh, iMac, Mac, and PowerMac
are trademarks or registered trademarks of
Apple Computer, Inc.
Other product and brand names mentioned
herein may be the trademarks or registered
trademarks of their respective owners.
Page 3

Batteries
AC Adapter
Warning
• Batteries should never be exposed to
flame, heated, short-circuited or
disassembled.
• Do not attempt to recharge alkaline,
lithium or any other non-rechargeable
batteries.
• Never use any battery with a torn or
cracked outer cover.
• Keep batteries out of the reach of
children.
• If you notice anything unusual when
using this product such as abnormal
noise, heat, smoke, or a burning odor:
1 remove the batteries immediately while
being careful not to burn yourself, and;
2 call your dealer or local Olympus
representative for servicing.
Warning
• Do not attempt to disassemble, repair or
modify the AC adapter in any way.
• Keep foreign objects including water,
metal, or flammable substances from
getting inside the product.
• Do not moisten the AC adapter or touch
it with a wet hand.
• Do not use the AC adapter in the vicinity
of flammable gas (including gasoline,
benzine and lacquer thinner).
In case
• ... the internal parts of the AC adapter are
exposed because it has been dropped or
otherwise damaged:
• ... the AC adapter is dropped in water, or
if water, metal flammable substances or
other foreign objects get inside it:
• ... you notice anything unusual when
using the AC adapter such as abnormal
noise, heat, smoke, or a burning odor:
1 do not touch any of the exposed parts;
2 immediately disconnect the power supply
plug from the power outlet, and;
3 call your dealer or local Olympus
representative for servicing. Continued
use of the AC adapter under these
circumstances could result in electric
shock, fire or injury.
3
Page 4

Main Features
● The recorder stores highly compressed
DSS format voice messages in 16 MB
integrated flash memory.
● The recorder supports two recording modes,
SP (Standard Playback) mode or LP (Long
Playback) mode. (☞ P.18)
• Continuous recording time is approximately 2
hours and 35 minutes in SP mode and
approximately 5 hours and 30 minutes in LP
1
mode.*
● The five folders can hold 199 files each,
for a maximum of 995 recordings. (☞ P.12)
● You may assign your own names to folders.
(☞ P.32)
• Each of the 5 folders can have a name of up to
8 characters.
• This recorder has 10 pre-set name templates.
● Recorded files may be moved from one
folder to another. (☞ P.36)
● Has a built-in Variable Control Voice
Actuator (VCVA) function. (☞ P.16)
●
You can insert or delete index marks.
(☞ P.27)
• If you insert index marks during recording or
playback, you will later be able to quickly find
the recording you want to hear.
● The recorder has a Noise Cancel Function.
(☞ P.23)
• Cortologic AG Noise Suppression Technology
reduces noise in files and enables clear sound
playback.
4
● You can input file comments. (☞ P.35)
• You can add comments of up to 100 characters
to each recorded file.
• This recorder has 10 pre-set comment
templates.
● It has a large backlight full-dot display (LCD
display screen).
• The screen displays information about recorded
voice files and easily understood operational
messages.
● It has Fast Playback and Slow Playback
functions to control playback speed.
(☞ P.21)
● If you connect the recorder to a computer,
you can use it as a USB microphone or
USB speaker.*2 (☞ P.69)
● Comes with DSS Player software. (☞ P.42)
• If you transfer voice files recorded with the recorder
to a PC, you can easily play back, organize, and edit
the files.
● Connect the included USB cable to your
computer for faster transmission speed.
• It comes with a special cradle for convenient
connection to a PC.
*1: Available recording time for one continuous file.
Available recording time may be shorter if many
short recordings are made. (The displayed
available recording time and recorded time are
approximate indications.)
*2: Do not use with Windows 98 as computer
operation may become unstable.
Page 5

Table of Contents
Getting Started
Identification of Parts ................................ 6
Inserting Batteries ..................................... 8
Using the AC Adapter ................................ 9
Basic operations
Recording ................................................ 12
Using the Variable Control
Voice Actuator (VCVA)...................... 16
Recording Modes .................................... 18
Microphone Sensitivity ............................ 19
Other functions
Locking Files ........................................... 26
Index Marks ............................................ 27
Alarm Playback Function ........................ 28
LCD Contrast Adjustment ....................... 30
Backlight ................................................. 31
Assigning Folder Names ......................... 32
Managing Files on Your PC
Using DSS Player Software .................... 42
Installing Software ................................... 44
Uninstall Software ................................... 47
Using Online Help ................................... 49
Connecting to Your PC ............................ 50
Running DSS Player ............................... 52
Window Names ....................................... 54
Import Voice Files to Your PC ................. 55
Play a Voice File ..................................... 57
Upload Voice Files to the Recorder ........ 58
Hold ........................................................... 9
Setting Time/Date ................................... 10
Playing .................................................... 20
Continuous Playback .............................. 22
Noise Cancel Function ............................ 23
Erasing .................................................... 24
Assigning File Comments ....................... 35
Moving Files Across Folders ................... 36
System Sounds ....................................... 38
LCD Display Information ......................... 39
Formatting the Recorder ......................... 40
Menu List ................................................ 41
Direct Recording on PC and Editing on PC
.......................................................... 59
Send Voice Files with E-mail................... 62
Changing User ID ................................... 62
Change a Folder Name ........................... 63
Editing File Comments ............................ 63
Editing a Template ................................... 64
Using Voice Recognition Software (optional) .... 65
USB Microphone/USB Speaker .............. 69
Other Information
Alarm Message List ................................ 70
Troubleshooting ...................................... 71
Accessories (optional) ............................. 73
Specifications .......................................... 74
Technical Assistance and Support .......... 75
5
Page 6
Identification of Parts
123
Identification of Parts
&
^
%
$
#
@
4
5
6
7
8
9
0
!
*
(
e
)
w
-
=
q
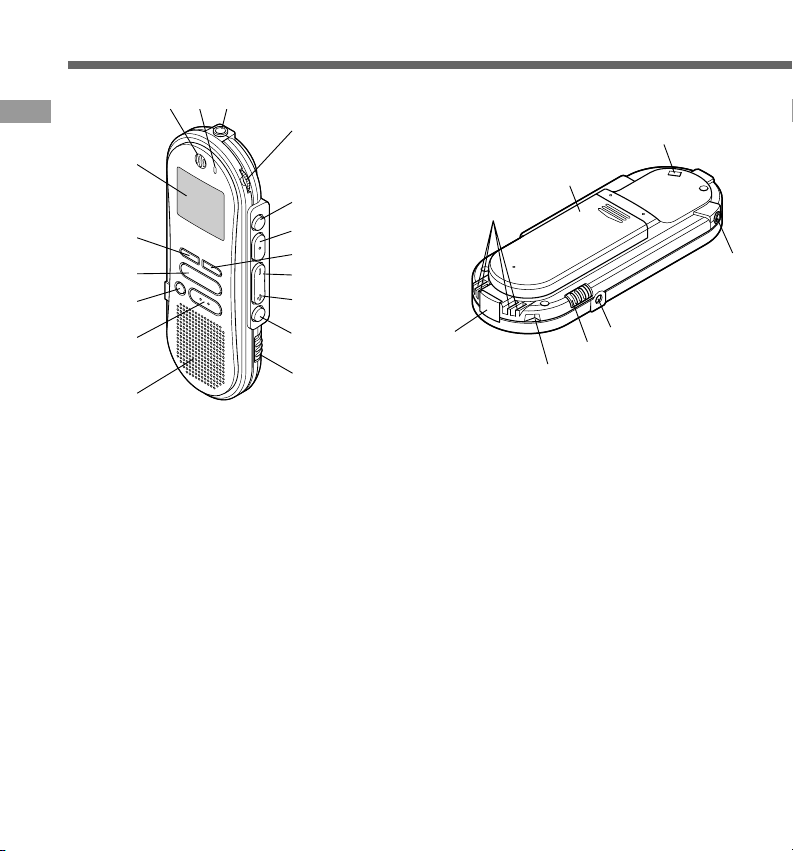
1 Built-in microphone
2 Record/Play indicator lamp
3 Microphone jack
4 VOLUME control
5 NEW button
6 REC (Record)/SET button
7 INDEX button
8 REW (Rewind) /– button
9 FF (Fast Forward) /+ button
0 FOLDER/MENU button
! HOLD switch
@ Built-in speaker
# STOP button
$ ERASE button
% PLAY button
6
^ DISPLAY button
& Display (LCD panel)
* PC (USB) terminal
( Cradle connection terminals
) Battery cover
- Strap hole
= Earphone jack
q Power jack
w MICSENS (Microphone sensitivity)
switch
e Cradle attachment point
Page 7
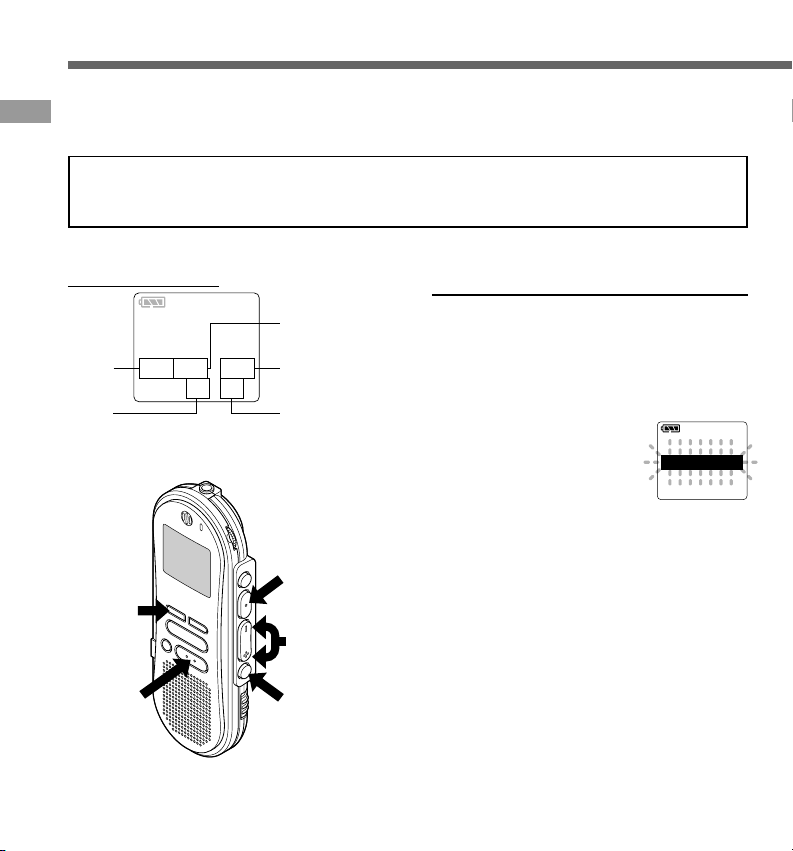
Display (LCD Panel)
5
1
2
3
4
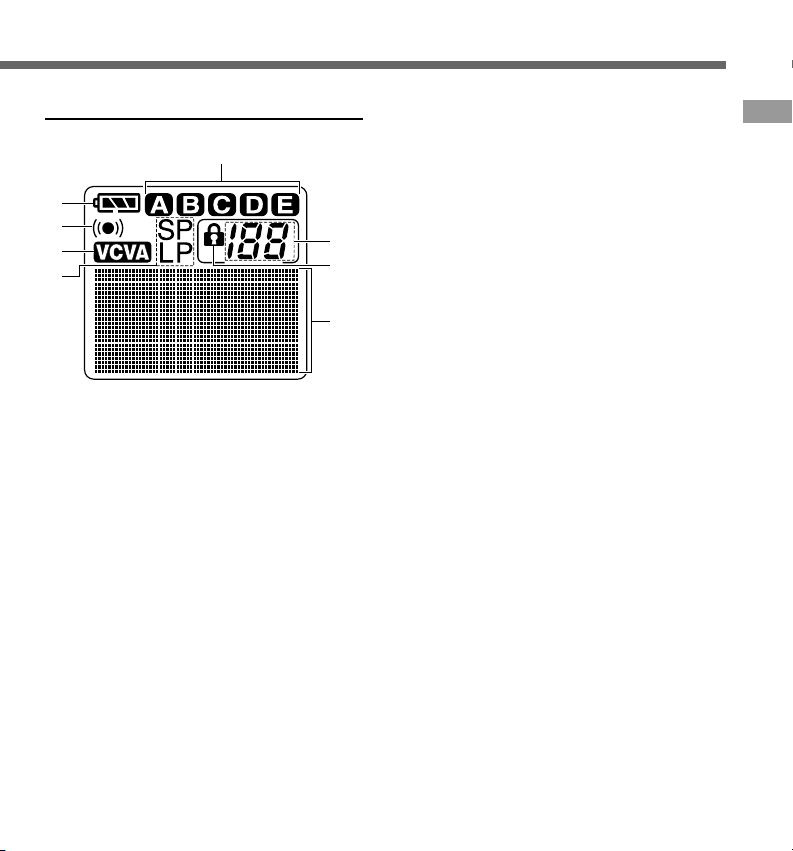
1 Battery indicator
2 Alarm indicator
3 VCVA(Variable Control Voice
Actuator) indicator
4 Record mode indicator
5 Folder
6 Current file
7 Erase lock indicator
8 Character Information display
6
7
8
Identification of Parts
7
Page 8
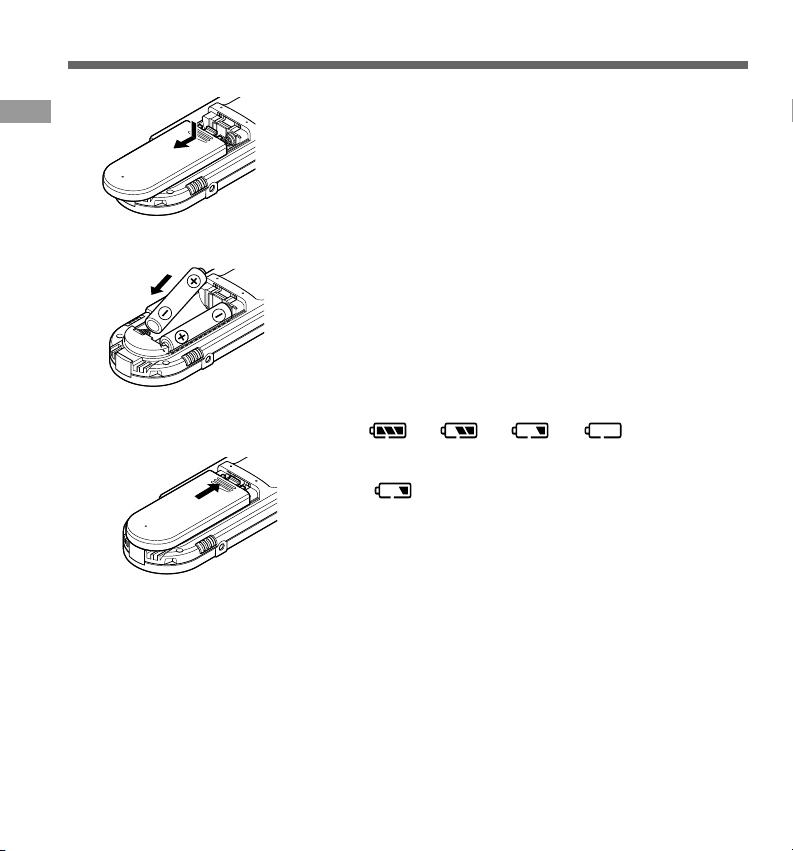
Inserting Batteries
Lightly press down on the arrow and slide the
1
Inserting Batteries
2
3
...............................................................................................................................................
Notes
• Be sure to stop the recorder before replacing the batteries. Unloading the batteries while the recorder is
recording, erasing or otherwise accessing an audio file may corrupt the file. If you are recording into a file and
the batteries run out, you will lose your currently recorded file because the file header will not be able to close.
So, it is crucial to change the batteries once you see only one mark in the battery icon
• Be sure to replace both batteries at the same time.
• Never mix old and new batteries, or batteries of different types and/or brands.
• If it takes longer than 1 minute to replace dead batteries, you may have to reset the time when you load fresh
batteries. (☞ P.10)
• Remove the batteries if you are not going to use the recorder for an extended period of time.
battery cover open.
1
Insert two AAA alkaline batteries, observing
the correct polarity.
2
Close the battery cover completely.
3
Replacing batteries
The battery indicator on the display changes as the batteries
lose power.
→ → →
When appears on the display, replace the batteries as
soon as possible.
When the batteries are too weak, the recorder shuts down
and “BATTERY LOW” appears on the display. AAA alkaline
batteries are recommended.
“BATTERY
LOW”
8
Page 9
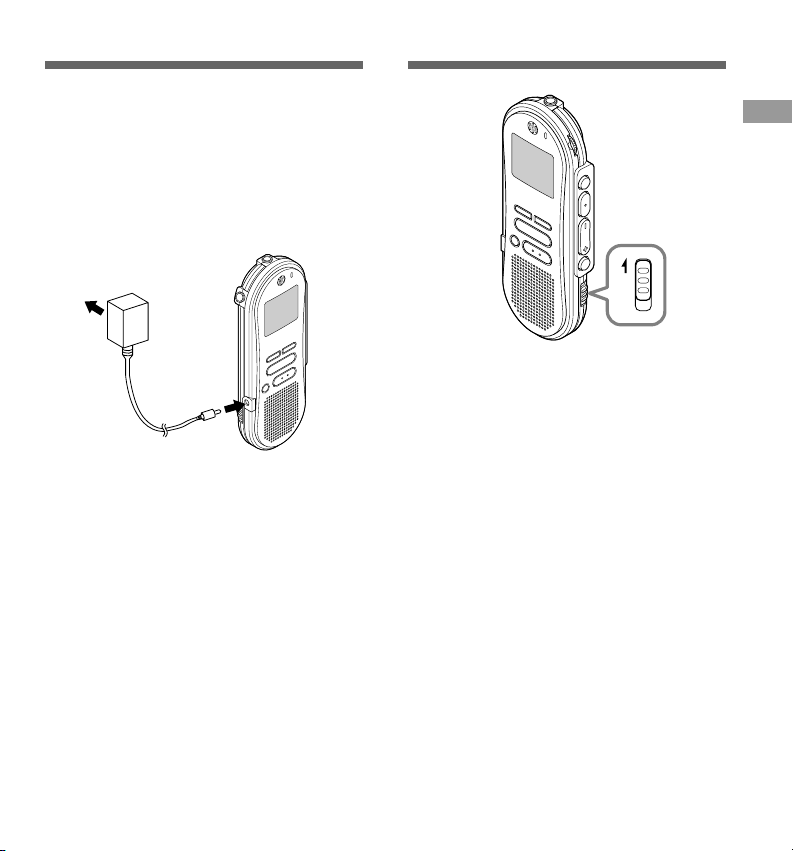
Using the AC Adapter
HOLD
Plug the optional AC adapter (Olympus Model
A321 or A322) into household power outlet and
connect the power plug to the recorder’s power
connector (DC 3 V) as shown in the illustration.
Always stop recording before connection.
Otherwise it may not be possible to play back
the voice data being recorded.
• Always stop recording before connection
or disconnection.
• When the AC adapter is not in use,
disconnect the power supply plug from
the power outlet.
• Use only the correct power supply voltage
as indicated on the adapter.
• Do not use the AC adapter when
connecting the recorder to the USB port.
Hold
Setting the HOLD switch to the HOLD
position.
If you set the recorder to HOLD status by sliding
the HOLD switch in the direction of the arrow, the
current conditions will be preserved, and all buttons
and switches except the HOLD switch will be
disabled. This feature is useful when the recorder
has to be carried in a bag or pocket.
Remember to reset the HOLD switch when
using the recorder.
Notes
• If you set the recorder to hold during Stop mode,
the display goes dark. If you press any button, the
time will flash for about 2 seconds, but the function
of the button is disabled.
• The alarm will sound at the scheduled time even if
the recorder is set to hold. The recorder begins to
play the file associated with the alarm when you
press any button.
• If you are recording when you switch the recorder
to HOLD, recording will continue until the recorder
memory runs out.
Using the AC Adapter / Hold
9
Page 10
Setting Time/Date
If you have set the time and date, information as to when an audio file is recorded is stored
automatically with that file. The time and date should be set to ease file management tasks. The
Setting Time/Date
time and date setting is also needed to perform the alarm playback function. (☞ P.28)
The hour indicator will flash automatically when you load batteries before using the
recorder for the first time, or after the recorder hasn't been used for a long time. Proceed
from step 3.
Time/Date Screen
TIME&DATE
03
7
DISPLAY
button
(switching the
data displayed)
STOP
button
10
M14D
'02
Y
AM12:58
FOLDER/
MENU
button
8
6
53,4
REC/SET
button
(accepts a choice
and moves on to
the next item)
FF/+ or
REW/– button
(alters a choice)
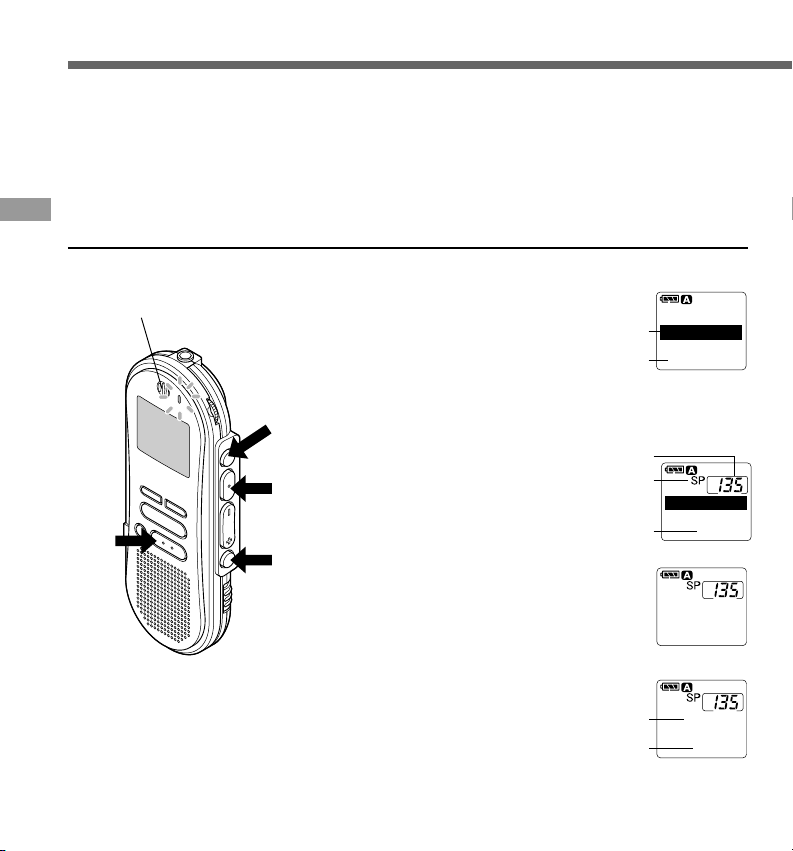
Changing the Time/Date
Press and hold the FOLDER/
MENU button for 1 second or
1
longer.
The menu opens. (☞ P.41)
Press the FF/+ or
REW/– button until
2
“TIME&DATE ”
flashes on the
display.
Press the REC/SET button.
Time/Date screen appears. The hour
3
indicator flashes, indicating the start of
the Time/Date setup process.
• You can choose between 12 and 24
hour display by pressing the DISPLAY
button while setting the hour and minute.
Example: 5:45 P.M.
PM 5:45 ←→ 17:45
TIME&DATE
FolderName
COMMENT
Page 11

Set the hour.
1 Press the FF/+ button or REW/–
4
button to set the hour.
2 Press the REC/SET button to accept
the hour.
Set the minute.
1 Press the FF/+ button or REW/–
5
button to set the minute.
2 Press the REC/SET button to accept
the minute.
Set the year.
1 Press the FF/+ button or REW/–
6
button to set the year.
2 Press the REC/SET button to accept
the year.
• You can choose the order of the year,
month, day by pressing the DISPLAY
button while setting them.
Example: March 14, 2002
Set the date.
1 Press the FF/+ button or REW/–
8
button to set the date.
2 Press the REC/SET button to
accept the date.
Press the STOP button to end.
This completes the Time/Date setup
9
procedure.
.....................................................................
Note
If you press the STOP button during the setup
operation, the clock will use the items that were set
to that point.
Setting Time/Date
3M 14D ’02Y (Initial setting)
↓
14D 3M ’02Y
↓
’02Y 3M 14D
Set the month.
1 Press the FF/+ button or REW/–
7
button to set the month.
2 Press the REC/SET button to accept
the month.
←
11
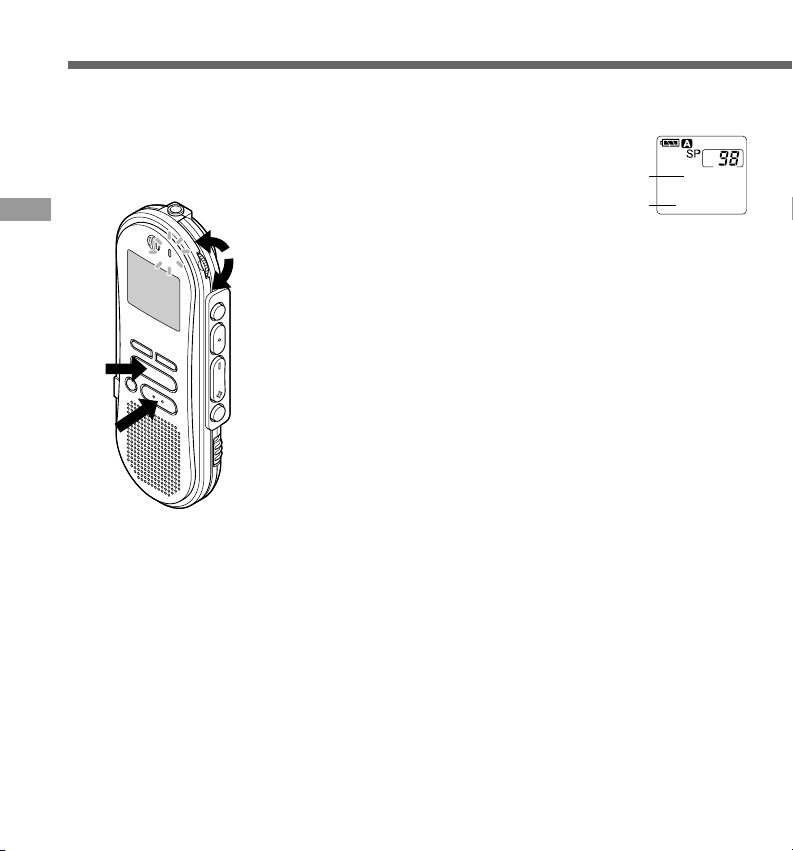
Page 12
Recording
TOTALTOTAL 134134
FOLDERFOLDER A
a
b
()
5858M1818
S
NEWNEW FILEFILE
[REMAIN][REMAIN]
c
d
e
()
5858M1818
S
0000M0202
S
[REMAIN][REMAIN]
f
g
The recorder provides five folders, A, B, C, D and E, and each message recorded in a folder
is saved as a Digital Speech Standard (DSS) file. These five folders can be selectively used to
distinguish the kind of recording; for example, A might be used to store private information, while
B might be dedicated to holding business information (☞ P.32). Up to 199 messages can be
recorded per folder. Four recording modes are available: new, append, overwrite, and insert.
Recording
New Recording
Create a new file to record in.
Microphone
4
Press the FOLDER/MENU button
to choose a folder.
1
The folder name is displayed for
approximately 2 seconds.
a Folder name
b Total number of recorded files in the
2
3
1
folder
Press the NEW button to create a
new file.
2
c New file number
d Current recording mode
e Remaining recording time
Press the REC/SET button to start
recording.
3
The record/play indicator lamp glows red.
Aim the microphone at the sound source.
f Current recording time
g Remaining recording time
00
M00S
RECORD
{
12
Press the STOP button to stop
recording.
4
If you want to append additional recordings to the same
file, press the REC/SET button once again.
Page 13

Notes
[REMAIN]
58
M18S
• A beep will sound when remaining recording time
reaches 60 seconds, 30 seconds, and 10 seconds
while recording.
•“MEMORY FULL” or “FOLDER FULL” will be
displayed when the memory or file capacity is full.
Delete any unnecessary files before recording any
further(☞ P.24) or transfer voice files to your
computer using DSS Player Software. (☞ P.42)
• You cannot select a different mode than that of
the original file before append recording.(☞ P.18)
Pause Recording
Pause
Press the REC/SET button while recording.
“REC PAUSE” will flash on the display.
➥
To instantly review a recording
(Quick review)
Press the REW/– button while recording, and
release it when you want to start playing a file.
The recorder plays up to the quick review point,
then stops.
You can append additional recordings in the
same file from that point.
Listening While Audio Is Recorded
(Recording Monitor)
Insert the earphone into the earphone jack to
monitor what is being recorded. (Volume can
be controlled using the Volume control.)
Recording
Resume Recording
Press the REC/SET button again.
Recording will resume at the point of
➥
interruption.
Note
The recorder stops when it has been left
paused for 10 minutes or longer.
To see the remaining recording time
The remaining recording time
appears on the display when
the recorder is stopped and
the STOP button is pressed.
13
Page 14
Recording
()
1H5858M1818
S
0000M5151
S
[LENGTH][LENGTH]
a
b
Overwrite Recording
You can overwrite a previously recorded file from any point within the file.
Note that the overwritten recordings will be erased.
Choose and play the file you want
to overwrite.
3
1
1
1
Press the STOP button where you
want to start overwriting.
2
a Current playback time
b Total recording time of the file being
played
Press the REC/SET button to start
overwriting.
3
The record/play indicator lamp glows red.
Press the STOP button to stop
overwriting.
4
Recording
1
2,4
FOLDER A
TOTAL 134
······················································································································································
Notes
• You can pause and resume overwrite recording by pressing the REC/SET button.
• You cannot select a different mode than that of the original file before overwrite recording. (☞ P.18)
14
Page 15
Insert Recording
TOTAL 134
FOLDER A
()
INSERTINSERT RECREC
[REMAIN][REMAIN]
5858
M
1818
S
a
Additional recordings can be inserted into previously recorded files.
Choose and play the file you want
to insert.
1
While playing a file, press the
FOLDER/MENU button if you want
2
to insert additional recording.
“INSERT REC?” appears on the display.
3
Press the REC/SET button to start
1
4
1
1,2
inserting additional recording.
3
As insert recording progresses, remaining
memory grows smaller.
a Remaining recording time
Press the STOP button to stop
inserting additional recording.
4
M51S
F 00
INSERT
REC?
Recording
······················································································································································
Notes
• You can pause and resume insert recording by pressing the REC/SET button.
• The recording time and date of the file into which recording has been inserted is updated to the time and date
of when the inserted recording was recorded.
• You cannot select a different mode than that of the original file before insert recording. (☞ P.18)
15
Page 16
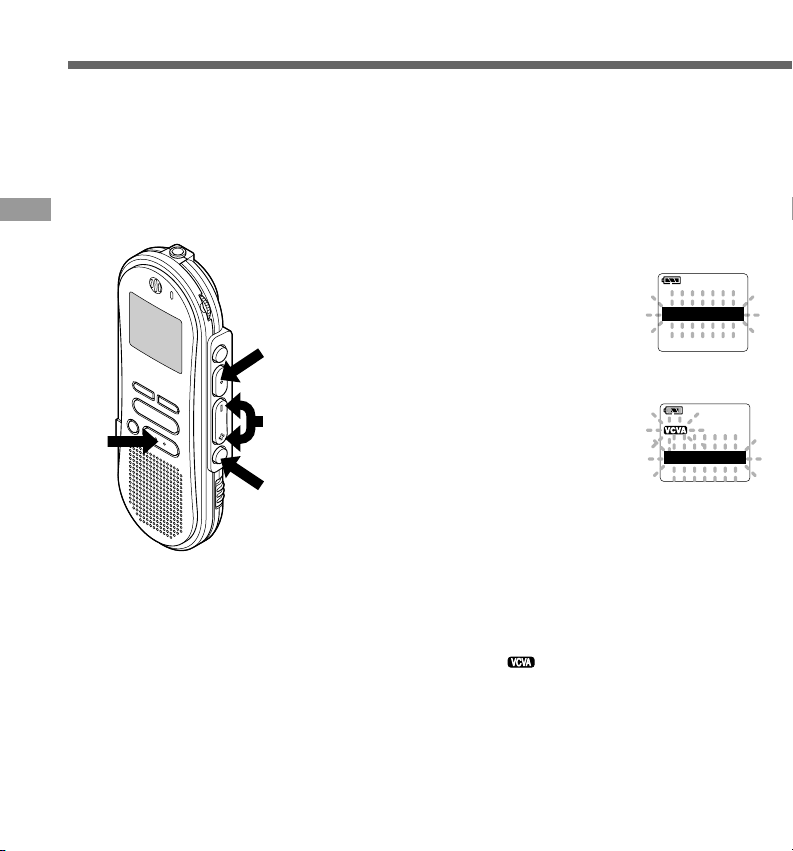
Using the Variable Control Voice Actuator (VCVA)
ALARM
VCVA
LOCK
When the microphone senses that sounds have reached a preset volume, the built-in Variable
Control Voice Actuator (VCVA) starts recording automatically, and stops when the volume drops.
Particularly helpful for extended recording, the VCVA not only conserves memory by turning off
recording during silent periods, but also makes playback more efficient and convenient.
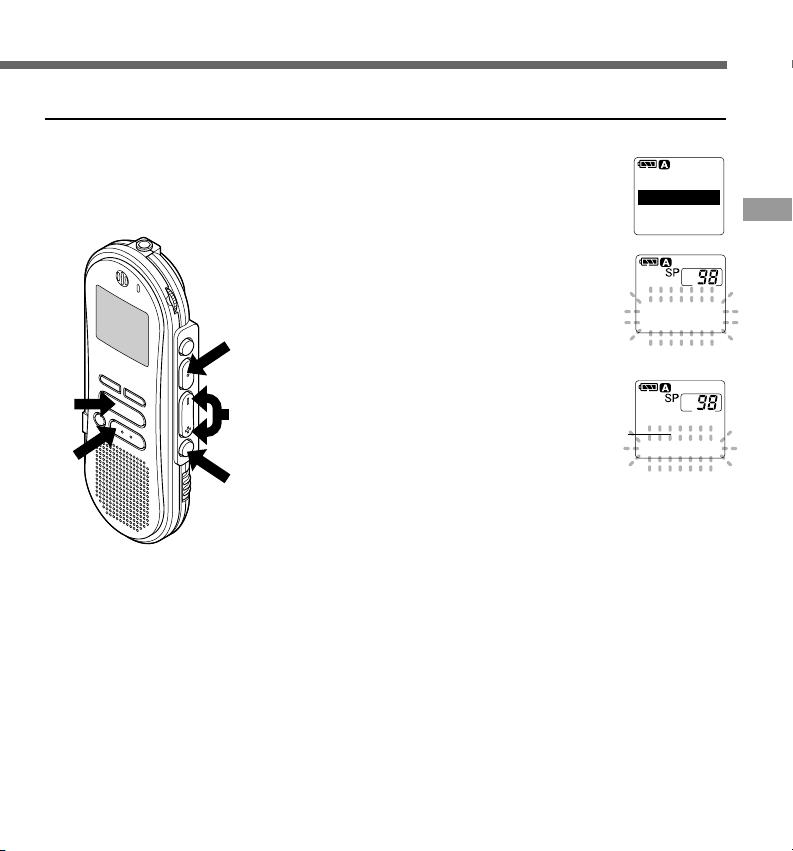
Using the Variable Control Voice Actuator (VCVA)
3,5
2,4
6
1
Press and hold the FOLDER/MENU
button for 1 second or longer.
1
The menu opens. (☞ P.41)
Press the FF/+ or REW/– button
until “VCVA” flashes on the
2
display.
Press the REC/SET button.
The VCVA setup process begins.
3
Press the FF/+ or REW/– button to
choose between ON and OFF.
4
ON : Will start recording in VCVA mode.
OFF : Will resume recording in normal
mode.
Press the REC/SET button to
complete the setup screen.
5
Press the STOP button to close the
menu.
6
When ON is selected, a indication will be
displayed on the screen.
VCVA
LOCK
ALARM
VCVA
ON
OFF
SP
16
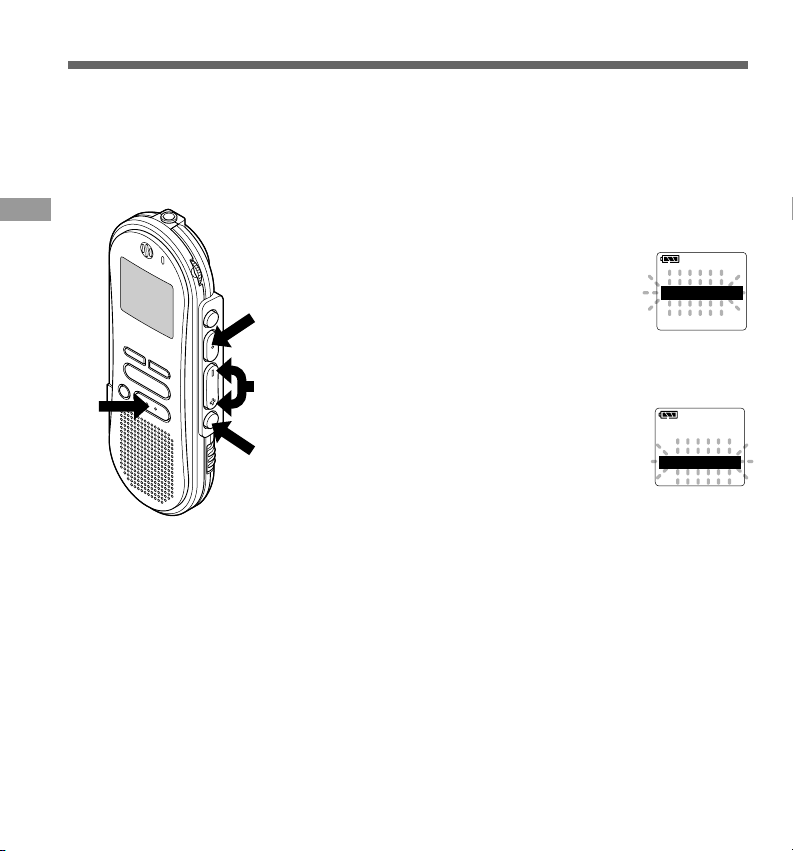
Page 17
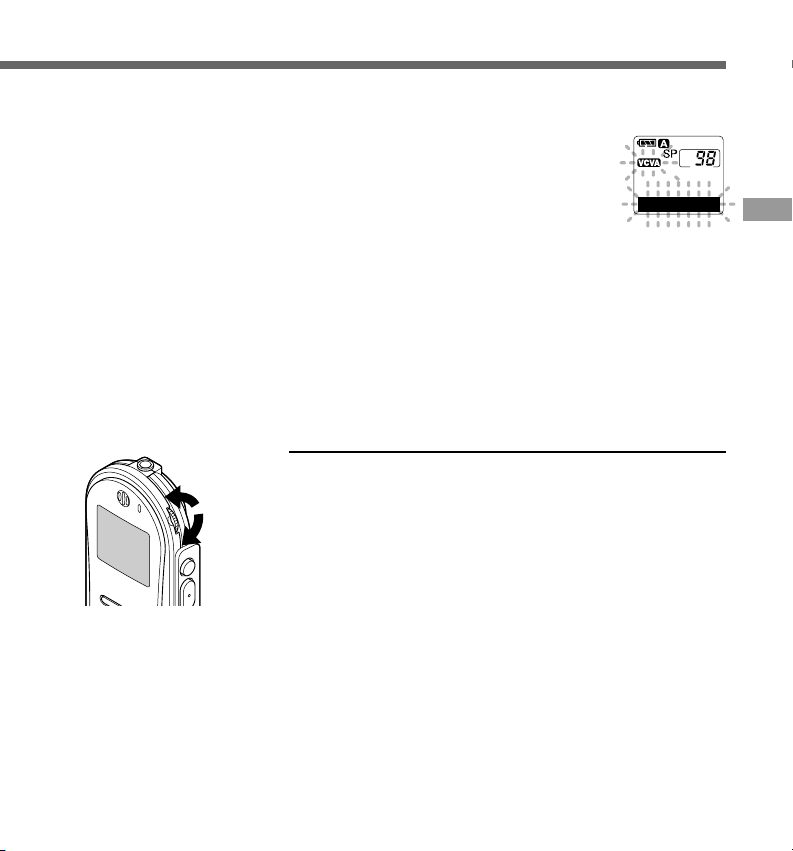
Start the recording.
00M51
S
STANDBY
7
When the sound volume is lower than the
preset pause sound level, recording
automatically pauses after approximately
1 second, and “STANDBY” flashes on the
display. The record/play indicator lamp
glows when recording starts and flashes
when recording pauses.
Adjust the start/stop actuation level
Using the Variable Control Voice Actuator (VCVA)
Low
Using the VOLUME control, adjust the start/stop
actuation level.
Hi
·······················································································································································
Notes
• The start/stop actuation level also varies depending on the selected microphone sensitivity mode. (☞ P.19)
• To ensure successful recordings, prior testing and adjustment of the start/stop actuation level is recommended.
The pause sound level can be set to any of 15 different
values. The higher the value, the higher the sound sensitivity.
At the highest setting, even a small sound will activate
recording.
The VCVA pause sound level can be adjusted according to the
ambient (background) noise.
17
Page 18
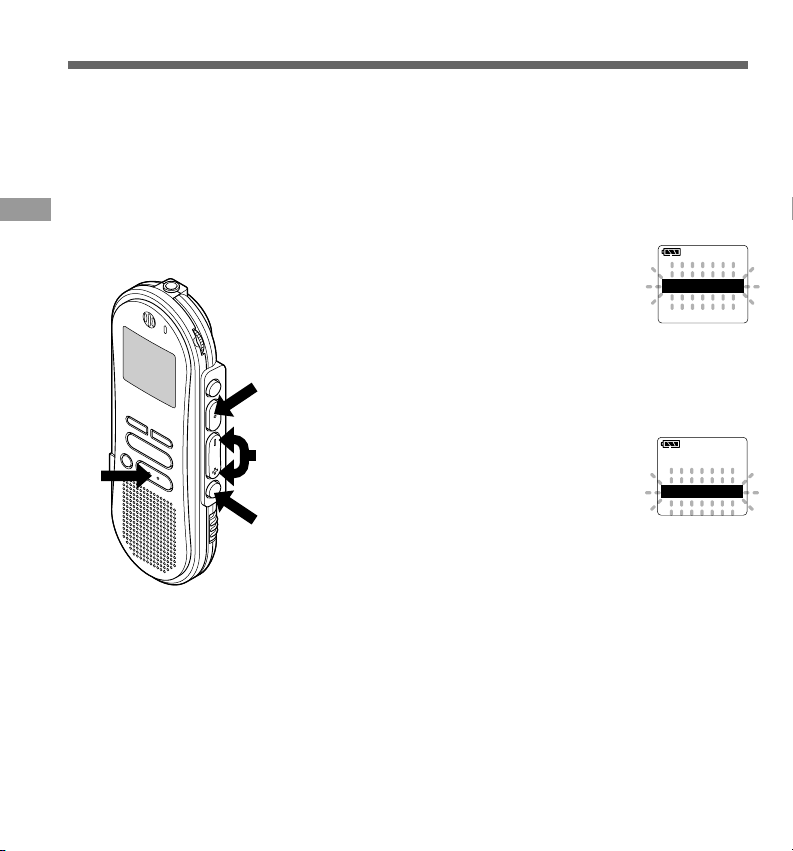
Recording Modes (REC MODE)
LP
REC
MODE
SP
LOCK
REC
MODE
VCVA
You can choose between two recording modes: SP (Standard Playback) mode and LP (Long
Playback) mode. Once you choose a mode, files are recorded in the selected mode as long as you
do not change the mode.
The included 16MB integrated flash memory holds approximately 2 hours and 35 minutes in SP
mode and approximately 5 hours and 30 minutes in LP mode. Available recording time for one
continuous file. Recording time may be shorter if many short recordings are made.
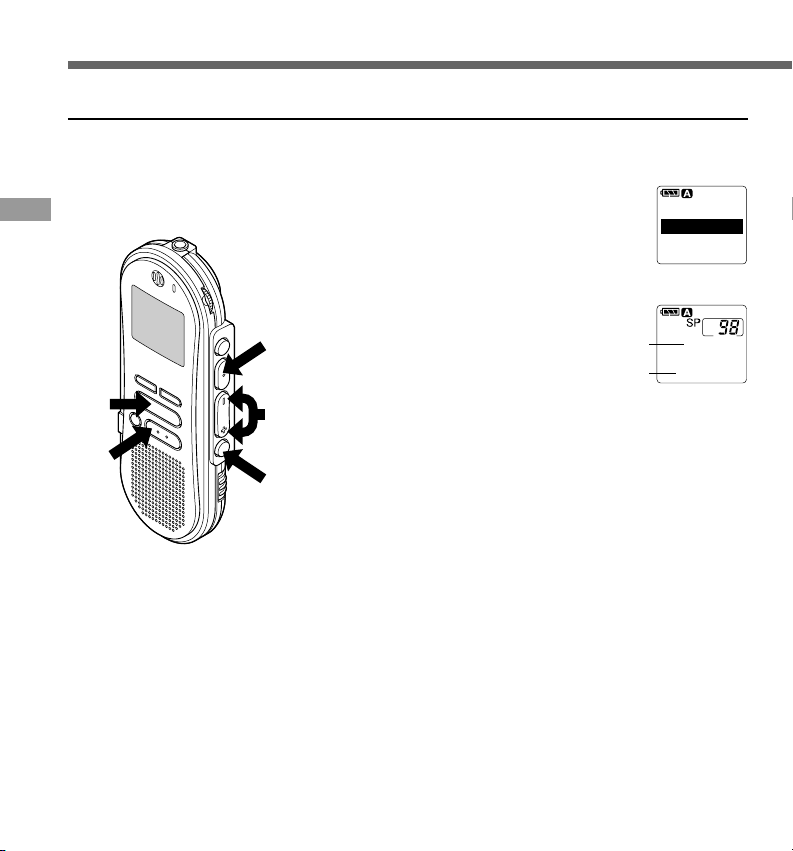
Recording Modes (REC MODE)
Press and hold the FOLDER/
MENU button for 1 second or
5
1
2,4
2
3
3
1
4
5
longer.
"REC MODE" will be displayed on the
screen.
Press the REC/SET button.
The recording mode setup process
begins.
Press the FF/+ or REW/– button
to choose between SP and LP.
Press the REC/SET button to
complete the setup screen.
Press the STOP button to close the
menu.
REC
VCVA
LOCK
REC
MODE
MODE
SP
LP
······················································································································································
Notes
• Choose SP mode for recording meetings or lectures with crisp clarity.
• You cannot select a different mode than that of the original file before append, overwrite, or insert recording.
(☞ P.14-15)
• Use SP mode in conjunction with voice recognition software. (☞ P.65)
18
Page 19
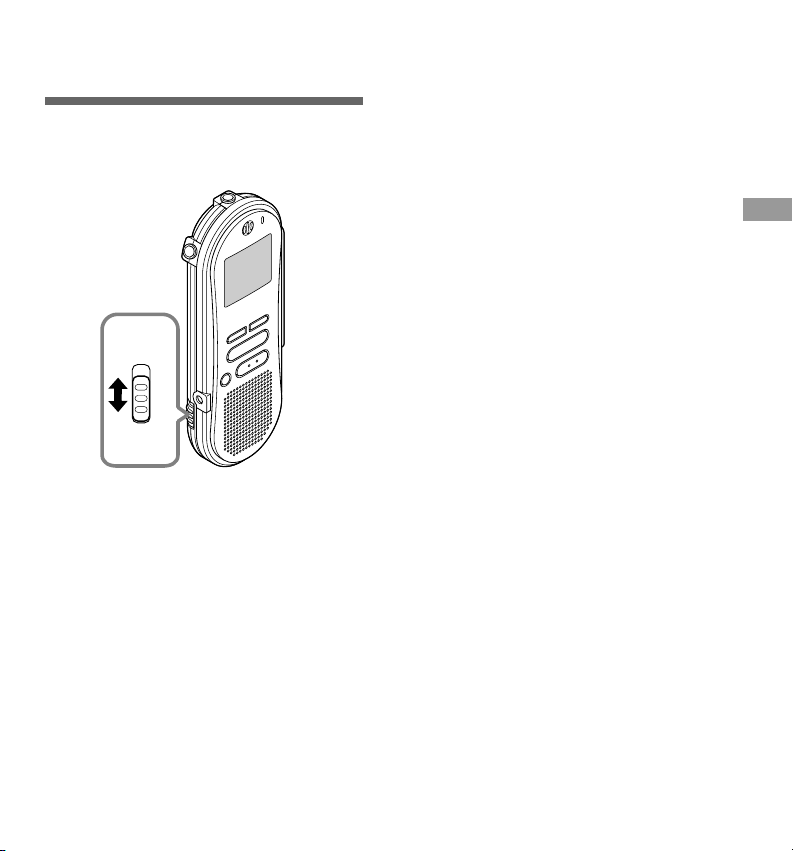
Microphone
Sensitivity
Microphone sensitivity is adjustable to meet
recording needs.
CONF DICT
MICSENS
Using the MICSENS switch, choose
between the CONF and DICT positions.
CONF : High-sensitivity mode that records
sounds in all directions.
DICT : Low-sensitivity mode suited for
dictation.
Notes
• If you want to clearly record dictation, switch to
DICT mode and place the internal microphone
close (5 to 10 cm) to the speaker.
• If the ambient (background) noise is too loud to
get a clear recording even in DICT mode, we
recommend that you use an ME-12 single
directional microphone (sold separately).
Microphone Sensitivity
19
Page 20
Playing
()
1H5858M1818
S
0000M1515
S
[LENGTH][LENGTH]
a
b
You can start playing a file at any point.
MIN
Playing
2
MAX
1
Press the PLAY button to start
playback.
1
The record/play indicator lamp glows
green.
a Current playback time
b Total recording time of the file being
played
Adjust the VOLUME control to
your liking.
2
3
20
Press the STOP button at any
point you want to stop the
3
playback.
Resume playback by pressing PLAY
button again.
Page 21

Operation How to CancelPlayback
functions
Fast
Playback
(F.PLAY)
Slow
Playback
(S.PLAY)
Fast
Forward
(FF)
Rewind
(REW)
Cue
(CUE)
Review
(REV)
• If you press the FF/+ button once while fast-forwarding or twice while stopped, the recorder will stop at the end
of the file.(F.SKIP)
• If you press the REW/– button once while rewinding or twice while stopped, the recorder will stop at the
beginning of the file (B.SKIP). If the REW/– button is pressed within 2 seconds, the recorder skips to the
beginning of the previous file.
Press the PLAY button once while playing
a file.
→ The recorder plays back at approximately
50% faster than normal rate.
Press the PLAY button once while fast
playing back.
→ The recorder plays back at approximately
25% slower than normal rate.
Press the FF/+ button once while stopped.
→ (If the FF/+ button is pressed at the end of
a file, the recorder stops at the beginning
of the next file. And if the FF/+ button is
pressed within 2 seconds, the recorder
skips to the beginning of the next file.)
Press the REW/– button once while stopped.
→ (If the REW/– button is pressed at the
beginning of a file, the recorder starts
rewinding from the end of the previous file.)
Hold the FF/+ button while stopped or
playing a file.
Hold the REW/– button while stopped or
playing a file.
Press the PLAY button 2 times while fast
playing back.
→ Playback returns to normal rate.
Press the PLAY button once while slow playing
back.
→ Playback returns to normal rate.
Press the STOP button.
→ The recorder stops immediately.
(If you do not press the STOP button, the
recorder will reach the end of the file and
then stop automatically.)
Press the STOP button.
→ The recorder stops immediately.
(If you do not press the STOP button, the
recorder will reach the beginning of the file and
then stop automatically.)
Release the FF/+ button.
→ The recorder will resume playback.
(If you do not release the FF/+ button, the
recorder will reach the end of the file and then
stop automatically.)
Release the REW/– button.
→ The recorder will resume playback.
(If you do not release the REW/– button, the
recorder will reach the beginning of the file and
then stop automatically.)
Note
If you set Noise Cancel to “LOW” or “HI”, you cannot use the Fast Playback and Slow Playback functions.
(☞ P.23)
Playing
21
Page 22
Continuous Playback (ALL PLAY)
OFF
ALL
PLAY
ON
BACKLIGHTBACKLIGHT
ALLALL PLAYPLAY
CONTRASTCONTRAST
When a file finishes playing back, the next file is played without stopping until it reaches the last file
in the folder.
Press and hold the FOLDER/
MENU button for 1 second or
1
Continuous Playback (ALL PLAY)
3,5
2,4
6
1
longer.
The menu opens. (☞ P.41)
Press the FF/+ or REW/– button
until “ALL PLAY” flashes on the
2
display.
Press the REC/SET button.
The Continuous Playback setup process
3
begins.
Press the FF/+ or REW/– button
to choose between ON and OFF.
4
ON : Continuous playback.
OFF: Returns to normal playback mode.
Press the REC/SET button to
complete the setup screen.
5
Press the STOP button to close the
menu.
6
ALL
PLAY
ON
OFF
22
Page 23
Noise Cancel Function
CANCELHIHI
00
00
NOISE
CANCEL
OFF
00
00
NOISE
If recorded sound is difficult to hear because of noisy surroundings, adjust the Noise Cancel setting
level. Noise will be reduced in the file when it's played back for clearer sound quality.
Press and hold the PLAY button
for 1 second or longer while the
1,2
1
file is playing.
Displays currently set Noise Cancel level.
Press the PLAY button to choose a
noise cancel level.
2
Each time you press the PLAY button, the
display changes as follows.
OFF : (Initial Setting)
LOW : Reduces noise.
HI : Reduces more noise.
If the display is already set to Noise Cancel, start from step 2.
Change the Noise Cancel level within 8 seconds, otherwise the level is
set at the displayed level and the display returns to its original view.
00
M
00
NOISE
CANCEL
OFF
00
M
00
NOISE
CANCEL
S
S
Noise Cancel Function
······················································································································································
Notes
• If you set Noise Cancel to "LOW" or "HI", the setting remains valid until it's set to "OFF".
• If you set it to "LOW" or "HI", the display flashes the Noise Cancel level for about 2 seconds when a file is
played back.
• If you use the Fast Playback and Slow Playback function,you cannot set Noise Cancel to "LOW" or "HI".
(☞ P.21)
23
Page 24

ERASE!
FILE
Erasing
Erasing One File at a Time
A selected file can be erased from a folder.
Erasing
3,4
2
1
Press the FOLDER/MENU button
to choose a folder.
1
The folder name is displayed for
approximately 2 seconds.
Press the FF/+ or REW/– button
to choose the file you want to
2
erase.
Press the ERASE button.
“FILE ERASE?” flashes on the display for
3
approximately 8 seconds.
a File to be erased
Press the ERASE button once more
when “FILE ERASE?” is flashing.
4
The display changes to "FILE ERASE!"
and erasing will start.
“ERASE DONE” is displayed when the file is
erased. File numbers are incremented
automatically.
FOLDER A
TOTAL 134
a
FILE
ERASE?
FILE
ERASE!
{
ERASE
DONE
······················································································································································
Notes
• If the ERASE button is not pressed within the 8 seconds after “FILE ERASE?” starts flashing, the recorder will
revert to stop status.
• An erased file cannot be restored.
• Locked files cannot be erased. (☞ P.26)
24
Page 25

Erase All Files from a Folder
TOTALTOTAL 134134
FOLDERFOLDER A
a
ERASE!
ALL
DONE
ERASE
All files in a folder can be erased simultaneously, except for locked files. (☞ P.29)
Press the FOLDER/MENU button
to choose the folder you want to
1
erase all files.
The folder name is displayed for
approximately 2 seconds.
a Folder from which to erase files
Press the ERASE button for 3
seconds or longer.
2
“ALL ERASE?” flashes on the display for
approximately 8 seconds.
ALL
ERASE?
Erasing
2,3
Press the ERASE button once more
1
when “ALL ERASE?” is flashing.
3
The display changes to “ALL ERASE!”
and erasing will start.
“ERASE DONE” is displayed when the files are
erased. Locked files are reassigned file
numbers in ascending order.
······················································································································································
Notes
• If the ERASE button is not pressed within the 8 seconds after “ALL ERASE?” starts flashing, the recorder will
revert to stop status.
• It might take more than 10 seconds to complete erasing all files.
{
25
Page 26

Locking Files (LOCK)
Locking a file keeps important data from being accidentally erased.
Locked files are not erased when you choose to erase all files from a folder. (☞ P.25)
Press the FOLDER/MENU button to
choose a folder.
1
Press the FF/+ or REW/– button to
choose the file you want to lock.
2
Press and hold the FOLDER/MENU
button for 1 second or longer.
3
5,7
Locking Files (LOCK)
2,4,6
8
1,3
The menu opens. (☞ P.41)
Press the FF/+ or REW/– button
until “LOCK” flashes on the display.
4
Press the REC/SET button.
The file locking setup process begins.
5
Press the FF/+ or REW/– button to
choose between ON and OFF.
6
ON : Locks the file and prevents it from
being erased.
OFF : Unlocks the file and allows it to be
erased.
a File to be locked
b Erase lock indicator
LOCK
ALARM
ALL PLAY
a
b
LOCK
ON
OFF
Press the REC/SET button to complete
the setup screen.
7
Press the STOP button to close the
menu.
8
······················································································································································
Notes
• You cannot append, overwrite, or insert recordings into locked files. (☞ P.12-15)
• You cannot set index marks in locked files. (☞ P.27)
• Any locked files are erased when you format the recorder. (☞ P.40)
26
Page 27

Index Marks
1010
0000
M
5151
S
INDEXINDEX
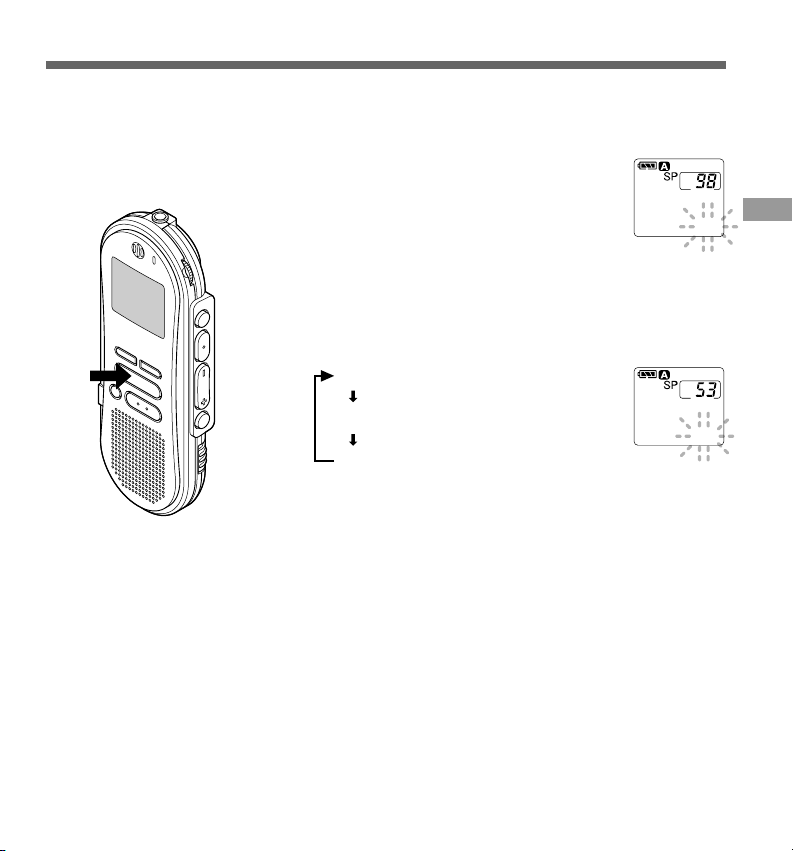
Index marks can be incorporated into a file during recording or playback to make it easy to locate
interesting information.
Setting an Index Mark
1
Press the INDEX button during
recording or playback to set an
1
index mark.
An index number appears on the display.
Locating an Index Mark
1
Hold the FF/+ or REW/– button
while playing a file.
1
The recorder stops for 1 second when it
reaches the index mark.
Clearing an Index Mark
1
2
······················································································································································
Notes
• Up to 16 index marks can be set in a file. Attempting to set more index marks will cause “INDEX FULL” to
appear on the display.
• Index marks cannot be set or cleared in a locked file. (☞ P.26)
Locate the index mark you want to
clear.
1
Press the ERASE button while the
index number appears for
2
approximately 2 seconds on the
display.
The index mark is erased.
00
M51S
INDEX 10
ERASE
Index Marks
27
Page 28

Alarm Playback Function (ALARM)
b
OFFOFF
ALARMALARM
ONON
a
The alarm playback function can be set to play a selected file at a pre-set time.
Press the FOLDER/MENU button
to choose a folder.
1
Press the FF/+ or REW/– button
to choose the file to be played
2
when the alarm sounds.
Press and hold the FOLDER/
MENU button for 1 second or
5
Alarm Playback Function (ALARM)
2,4,6
3
longer.
The menu opens. (☞ P.41)
Press the FF/+ or REW/– button
until “ALARM” flashes on the
4
display.
1,3
Press the REC/SET button.
The alarm playback setup process begins.
5
Press the FF/+ or REW/– button
to choose between ON and OFF.
6
ON : Enables alarm playback.
OFF: Disables alarm playback.
a File to be played when alarm sounds
b Alarm indicator
ALARM
ALL PLAY
CONTRAST
28
Page 29

Press the REC/SET button to
ALARMALARM
AM12:58AM12:58
ALARMALARM
AM12:58AM12:58
complete the setup screen.
7
When you choose ON, the hour
indicator flashes.
When you choose OFF, the alarm
indicator disappears and finishes with
Step 12.
Press the FF/+ or REW/– button
to set the hour.
8
7,9,11
8,10
12
······················································································································································
Notes
• The alarm playback function can be set for only one file at a time.
• The alarm will sound at the scheduled time every day unless the alarm playback setting is cleared.
• If you wish to change the file for alarm play, first turn the alarm settings “OFF”, then make any desired new
alarm settings.
• The alarm will sound for 5 minutes and then stop.
• If you are using the recorder at the scheduled time, the alarm will sound after you’re done.
• The alarm will sound at the scheduled time even if the recorder is set to hold. The recorder begins to play the
file associated with the alarm when you press any button.
• The alarm playback setting is cleared if the selected file is erased.
Press the REC/SET button to
accept the hour.
9
The minute indicator flashes.
Press the FF/+ or REW/– button
to set the minute.
10
Press the REC/SET button to
accept the minute.
11
Press the STOP button to close
the menu.
12
An alarm tone will sound at the scheduled time. Press any button
while the alarm sounds to play the file you associated with the alarm.
Alarm Playback Function (ALARM)
29
Page 30

LCD Contrast Adjustment (CONTRAST)
BEEP
CONTRAST
BACKLIGHT
CONTRAST
LEVEL
If the display is difficult to see because of environmental conditions and temperature, you can
adjust the contrast using this function to easily see the LCD display (display contrast).
Display contrast can be adjusted in 10 levels.
Press and hold the FOLDER/
MENU button for 1 second or
1
longer.
The menu opens. (☞ P.41)
Press the FF/+ or REW/– button
until “CONTRAST” flashes on the
LCD Contrast Adjustment (CONTRAST)
6
3,5
2,4
1
2
display.
Press the REC/SET button.
The LCD display contrast setup process
3
begins.
Press the FF/+ or REW/– button
to set the contrast level.
4
You can adjust the LCD display contrast
level from 1 to 10.
(Initial setting ......6)
Press the REC/SET button to
complete the setup screen.
5
Press the STOP button to close the
menu.
6
CONTRAST
BACKLIGHT
BEEP
CONTRAST
LEVEL
0 6
30
Page 31

Backlight (BACKLIGHT)
OFF
BACKLIGHT
ON
The backlight for the recorder will be activated for approximately 10 seconds each time a button
is pressed. You can select whether or not you would like to use the backlight.
Press and hold the FOLDER/
MENU button for 1 second or
1
longer.
The menu opens. (☞ P.41)
Press the FF/+ or REW/– button
until “BACKLIGHT” flashes on the
6
3,5
2,4
1
2
display.
Press the REC/SET button.
The backlight setup process begins.
3
Press the FF/+ or REW/– button
to choose between ON and OFF.
4
ON : Backlight is enabled.
OFF: Backlight is disabled.
Press the REC/SET button to
complete the setup screen.
5
Press the STOP button to close the
menu.
6
BACKLIGHT
BEEP
USB AUDIO
BACKLIGHT
ON
OFF
Backlight (BACKLIGHT)
31
Page 32

Assigning Folder Names (FolderName)
FORMAT
FolderName
COMMENT
FOLDER
FolderName
You can give each of the five A to E folders a name with up to 8 characters.
Frequently used words such as "dictation (DICT.)", "meeting (MEETING)" and "schedule
(SCHEDULE)" are pre-set in a template.
Press and hold the FOLDER/
MENU button for 1 second or
1
longer.
The menu opens. (☞ P.41)
Press the FF/+ or REW/– button
until “FolderName” flashes on the
2
display.
3,5
Assigning Folder Names (FolderName)
Press the REC/SET button.
The folder name setup process begins.
3
2,4,6
Press the FF/+ or REW/– button
1
to choose the folder you want to
4
name.
Press the REC/SET button to
accept the chosen folder.
5
Press the FF/+ or REW/– button
to choose characters.
6
The recorder assigns the following
buttons to inputting procedures.
(Available characters ☞ P.34)
FolderName
FolderName
FOLDER
FOLDER A
A
32
Page 33

Recorder buttons that are used to input characters
Push ActionButton
REC/SET
Press once
Press and hold
FF/+
Press once
Press and hold
REW/–
Press once
Press and hold
NEW
ERASE
INDEX
----------
----------
Press once
Press and hold
DISPLAY
Press once
Press and hold
Use the two following methods to quickly find characters.
1. When the INDEX button is pressed, the displayed character group (example: Uppercase,
lowercase, template, symbols) will change, and you can then press the FF/+ or REW/– buttons
to select characters.
2. Every time the DISPLAY button is pressed, it will skip ahead by five characters, so you can
quickly move closer to the character you want.
(Currently displayed character) = (Space) = DICT. = TO DO = A = F = K = P = U = Z = a = f =
k = p = u = z = 1 = 6 = , = ( = } = $ = ^ = (Space) = DICT. = TO DO...
If you press the DISPLAY button while a character other than one of the above appears, you will skip to the
closest forward character in the above cycle.
Pressing the DISPLAY button again will then cycle through every fifth character as shown above.
example:
If you press the DISPLAY button while “MEMO” is displayed, “TO DO” will appear.
If you press the DISPLAY button while “B” is displayed, “F” will appear.
To input the selected character and advance the input position.
Confirms folder name or file comment.
Selects character to be input: forward.
Skips forward quickly through characters.
Selects character to be input: back.
Skips back quickly through characters.
Returns to previous character.
To delete the flashing character.
Switches between character groups (type).
Quickly cycles through the character groups (types).
Selects character to be input: skips ahead by 5 characters.
Quickly skips ahead in increments of five characters.
Assigning Folder Names (FolderName)
33
Page 34

Assigning Folder Names (FolderName)
Available characters
Template
Large caps
Small caps
Numerics
Assigning Folder Names (FolderName)
Symbols
Folder name input
File comment
input
7
8
DICT. = MEETING = MEMO = NOTE = IDEA =TO DO =
REMINDER = LECTURE =SCHEDULE = ARCHIVE
TOP PRIORITY = PRIORITY = IMPORTANT =
CONFIDENTIAL = PRIVATE = DON’T FORGET =THINGS
TO DO =MESSAGE = CONVERSATION =REPORT
A= B=C=D= E =F= G=H=I= J=K =L= M=N =
O= P=Q=R= S=T =U= V=W =X= Y=Z
a= b=c=d= e =f= g=h =i=j= k=l=m= n=o =
p= q=r=s= t=u =v= w= x=y=z
1= 2=3=4= 5 =6= 7=8 =9= 0
, = . = ; = ! = _ = ( = ) = [ = ] = { = } = +
= – = = = # = $ = % = & = ’ = ` = ^ = @
When you have finished setting the folder
name, press and hold the REC/SET button for
7
1 second or longer.
This completes the folder naming procedure.
(If you wish to continue assigning names to folders,
press the REC/SET button and repeat the procedure
from step 4.)
Press the STOP button to close the menu.
8
ActionType of Characters
······················································································································································
Notes
• The folder naming process ends automatically when the eighth character is set.
• If you input more than 8 characters, "OVERFLOW" appears on the display.
• You can use a PC to easily change the folder names on the recorder.
34
(☞ P.63)
Page 35

Assigning File Comments (COMMENT)
REC
MODE
COMMENT
FORMAT
COMMENTCOMMENT
You can add comments of up to 100 characters to each recorded file.
If you include the date, time, and other information, you can easily find files without replaying
them.
Press and hold the FOLDER/
MENU button for 1 second or
1
longer.
The menu opens. (☞ P.41)
Press the FF/+ or REW/– button
until “COMMENT” flashes on the
6
3,5
2
1
2
display.
Press the REC/SET button.
The file comment setup process begins.
3
Input the character.
If you will input characters using the
4
recorder, see step 6 of “Assigning Folder
Names”. (☞ P.32)
If you will input characters using a
computer, see “Editing File Comments”.
(☞ P.63)
When you have finished setting
the file comments, press and hold
5
the REC/SET button for 1 second
or longer.
This completes the file comment input
procedure.
Press the STOP button to close the
menu.
6
COMMENT
FORMAT
REC
MODE
Assigning File Comments (COMMENT)
35
Page 36

Moving Files Across Folders
A recorded file can be transferred from one folder to another.
The file is added at the end of existing files in the destination folder.
Choose the file you want to move
and play it.
1
Press the FOLDER/MENU button
while playing the file.
2
“INSERT REC?” appears on the display.
4
Press the FOLDER/MENU button
Moving Files Across Folders
1
1
again to change to “FILE MOVE?”.
3
FILE MOVE?
36
1,2,3
Press the REC/SET button.
The destination folders blink on the
4
display.
a File to transfer
b Current folder
c Destination folder
a
FILE MOVE?
b
A>>B
c
Page 37

Press the FF/+ or REW/– button
A>>B
FILE
MOVE!
DONE
FILE MOVE
to choose a destination folder.
5
If you choose the current folder as the
destination folder, the selected file will
move to the end of the existing files in it.
Press the REC/SET button to
accept the chosen destination
6
6
5
······················································································································································
Notes
• If the destination folder is full (a maximum of 199 files), “FOLDER FULL” appears on the display and files
cannot be transferred to it.
• The file transfer process is aborted if you press the STOP button or leave the recorder idle for 8 seconds after
you choose a destination folder.
folder.
The file is moved.
Transfer is complete when “FILE MOVE DONE”
appears.
FILE
A>>B
{
MOVE!
Moving Files Across Folders
37
Page 38

TIME&DATE
BEEP
USB
AUDIO
OFF
BEEP
ON
System Sounds (BEEP)
The recorder beeps to alert you to button operations or warn you of errors. System sounds may be
turned off.
Press and hold the FOLDER/
MENU button for 1 second or
1
longer.
The menu opens. (☞ P.41)
Press the FF/+ or REW/– button
until “BEEP” flashes on the
System Sounds (BEEP)
6
3,5
2,4
2
display.
Press the REC/SET button.
The system sound setup process begins.
3
Press the FF/+ or REW/– button
to choose between ON and OFF.
4
ON : System sounds are enabled.
OFF: System sounds are disabled.
BEEP
USB
TIME&DATE
1
Press the REC/SET button to
complete the setup screen.
5
Press the STOP button to close the
menu.
6
AUDIO
BEEP
ON
OFF
ON
······················································································································································
Note
If the alarm playback function has been set, the alarm will sound at the scheduled time even if system sounds
are turned off.
38
Page 39

LCD Display Information
58
18
00
00
[LENGTH]
00
00
[REC
DATE]
12
31
'02
----
00
00
[COMMENT]
AM12:58
00
00
[REC
TIME]
This recorder is capable of switching views on its LCD display. If you press the DISPLAY button
while stopped or while playing back a file, the LCD display will switch and you can confirm file
information and various recorder settings.
Press the DISPLAY button.
The LCD display views will switch every time the DISPLAY
1
button is pressed.
While stop or playback mode
It will repeatedly cycle through 1 to 4.
1 File length
Shows how long a file is.
S
2 Time stamp
Shows the year, month, and date that
the file was recorded.
Y
3 Time stamp
Shows the time that the file was
recorded.
1
00
M
00
()
[LENGTH]
()
[REC
12
()
[REC
S
1H58
M
18
{
M
00
S
00
DATE]
M
31
D
'02
{
00
M
00
S
TIME]
AM12:58
{
LCD Display Information
4 File comment*
00
M
00
()
[COMMENT]
* If a comment contains many characters, it will scroll horizontally to display the complete comment.
S
----
Shows comment added to a file.
(If there is no comment, “----” will
appear.)
39
Page 40

Formatting the Recorder (FORMAT)
FORMAT
START
FORMAT
CANCEL
If you format the recorder, all function settings will return to their defaults*.
All files** stored in the recorder will be deleted.
If you have important files that you want to save, connect the recorder to a computer and transfer
those files from the recorder to the computer before formatting the device. (☞ P.55)
* Date and time settings won't be cleared, so you won’t need to set them again.
** Locked files will also be deleted.
Press and hold the FOLDER/
MENU button for 1 second or
1
longer.
The menu opens. (☞ P.41)
Press the FF/+ or REW/– button
until “FORMAT” flashes on the
Formatting the Recorder (FORMAT)
3,5
2,4
2
display.
Press the REC/SET button.
The formatting process is selected.
3
Press the FF/+ or REW/– button
to choose “START”.
4
FORMAT
REC MODE
VCVA
1
Press the REC/SET button again.
Formatting begins and an indicator
5
flashes on the display.
“FORMAT DONE” displays when
formatting ends.
FORMAT
CANCEL
START
FORMAT
!
{
FORMAT
DONE
......................................................................................................................................................
Note
If no action is taken within 8 seconds after step 4, the menu will revert to the status of step 2.
40
Page 41

Menu List
Press and hold the FOLDER/MENU
button for 1 second or longer.
REC MODE
1
VCVA
2
3
LOCK
4
ALARM
5
ALL PLAY
6
CONTRAST
7
BACKLIGHT
BEEP
8
USB AUDIO
9
TIME&DATE
0
!
FolderName
COMMENT
@
FORMAT
#
Record mode setting (☞P.18). Selection
between SP and LP modes.
VCVA setting (☞P.16). Switch between ON
(enabled) and OFF (disabled).
Locking files setting (☞P.26). Selection
between ON (locked) and OFF (unlocked).
Alarm playback setting (☞P.28).
Selection between ON (enabled) and
OFF (disabled).
Continuous playback setting (☞P.22).
Selection between ON (enabled) and
OFF (disabled).
LCD contrast adjustment (☞P.30).
Adjust the level from 1 to 10.
Backlight setting (☞P.31). Selection
between ON (enabled) and OFF
(disabled).
System sounds setting (☞P.38).
Selection between ON (enabled) and
OFF (disabled).
USB Microphone/Speaker setting
(☞ P.69). Selection between ON
(enabled) and OFF (disabled).
Date/time setting. In order of hour,
minute, year, month and day. (
Folder naming. (☞P.32)
Assigning file comments. (☞P.35)
Recorder formatting.(
☞P.40)
Press the FF/+ button or
REW/– button.
☞P. 1 0)
Press the FOLDER/MENU button
during playback.
INSERT REC ?
1
FILE MOVE ?
2
Inserting recording. (☞ P.15)
Moving files. (☞ P.36)
Press the FOLDER/MENU button.
Notes
• If you press the STOP button, the REC/SET button,
or the FOLDER/MENU button during a menu setup
operation, the recorder will stop and apply the items
that were set to that point.
• The recorder will stop if you leave it idle for 3
minutes during a menu setup operation, when a
selected item is not applied.
Menu list
41
Page 42

Using DSS Player Software
By connecting the recorder to your PC, you will be able to use DSS Player in the following ways:
• Play and archive voice files from your PC.
• Send voice mail by sending an attached voice file with e-mail.*
• Make backup files of the voice files on the recorder to your PC, and can later transfer files on
your PC to the recorder, as necessary.
* The e-mail software is not included in this package.
Operating Environment
Windows
Using DSS Player Software
PC:
Operating System:
CPU:
RAM:
Hard drive space:
Drive:
Sound card:
Browser:
Display:
USB port:
Audio I/O terminals:
······················································································································································
Notes
• USB ports are not available on PCs running Windows 95 or that have been upgraded from Windows 95 to any
other OS.
• Certain functions, such as remote and direct recording, do not work on PCs that don't have USB ports.
• Do not use the recorder as a USB microphone/speaker on Windows 98 as computer operation may become
unstable. (Use only with Windows 98SE or later versions of the OS.)
IBM PC/AT compatible PC
Microsoft Windows 98/ 98SE/ Me/ 2000 Professional/
NT Workstation 4.0 with SP4 or later/ XP Professional,Home Edition
Intel Pentium II class 333 MHz processor or better
64 MB or more
10 MB or more
2x or faster CD-ROM drive
Creative Labs Sound Blaster 16 or 100% compatible sound card
Microsoft Internet Explorer 4.01 or later
800 x 600 pixels or more, 256 colors or more
One free port
Earphone output or speakers
42
Page 43

Macintosh
PC:
Operating System:
RAM:
Hard drive space:
Drive:
Display:
USB port:
Audio I/O terminals:
iMac/ iBook/ Power Mac G3,G4/ PowerBook G3
(The computer must support a standard USB port.)
Mac OS 8.6/9.0/9.1/9.2/10.1
16 MB or more
5 MB or more
2x or faster CD-ROM drive
800 x 600 pixels or more, 256 colors or more
One free port
Microphone input and earphone (or speaker) output
Using DSS Player Software
43
Page 44

Installing Software
Before you connect the USB cable to the recorder and your PC, you must first install the
software.
Be sure to confirm the following before installation:
• Exit all running applications.
• Eject the floppy disk if you are using one.
• If you are running Windows 2000 /XP (Professional only) on a network, you need to log on as an
administrator.
Windows
Insert Olympus DSS Player into the
CD-ROM drive.
1
Installing Software
The installation program will start
automatically. Once the program starts,
jump to step 4. If it does not, follow the
procedures in steps 2 and 3.
Click on the [Start] button and
select [Run].
2
Enter “D:/Setup.exe” in the [Open]
field and click on [OK].
3
This is assuming the CD-ROM is in drive
D.
The installation Language Selection
dialog box opens.
4
Click on the desired language to select it.
Click on [Next] when the DSS Player
opening screen appears.
5
44
Confirm your acceptance of the
terms of the Licensing Agreement.
6
You must accept the terms of the Licensing
Agreement to install DSS Player. If you
accept them, click on [Yes].
Register user information.
Register user information. Enter your
7
name, company name, and license ID
number (serial number).
The license ID number is printed on the license
ID card. Click on [Next]. A confirmation dialog
box opens, click on [Yes].
Select where to install DSS Player.
This lets you specify the folder in which to
8
install DSS Player. Click on [Browse] to find
the desired installation folder. To accept the
default folder, click on [Next].
Note
If the installation folder does not exist, a
confirmation dialog box opens to get your
permission to create a folder for this purpose.
Click on [Yes].
Page 45

Select a program menu folder.
You may change the program menu
9
folder to another one, such as [Start Up].
To accept the default folder, click on
[Next].
Authorizing the start of file
copying.
10
Confirm all “Current Settings”. To accept
them, click on [Next].
Note
To change the program menu folder or
installation folder, click on [Back].
Copy files.
Wait until DSS Player is installed on your
11
PC, then click on [Finish].
Set up Acrobat Reader.
When the Acrobat Reader Setup dialog
12
box opens, click on [Next].
Select where to install Acrobat
Reader.
13
Specify the folder in which to install
Acrobat Reader. To accept the default
folder, click on [Next].
Setup Status.
Wait until Acrobat Reader is installed on
14
your PC.
Exit Acrobat Reader setup.
When the Exit Setup dialog box opens,
15
click on [OK].
Install Shield Wizard complete.
You may be requested to restart your PC
16
when setup is complete. If so, make sure
that [Yes, I want to restart my PC now.]
is selected before clicking on [Finish].
Then, when the message to do so
appears, shut your PC off and restart it.
Installing Software
45
Page 46

Installing Software
Macintosh
Insert DSS Player for Mac into the
CD-ROM drive.
1
Double-click on CD icon.
Double-click on the desired language to
2
select it.
Double-click on DSS Player for Mac
Installer icon.
3
The installation program will start.
Installing Software
Click on [Continue] when the DSS
Player for Mac opening screen
4
appears.
Confirm your acceptance of the
terms of the Licensing Agreement.
5
You must accept the terms of the Licensing
Agreement to install DSS Player for Mac.
If you accept them, click on [Agree].
Select where to install DSS Player
for Mac.
6
This lets you specify the folder in which to
install DSS Player for Mac. To accept
the default folder, click on [Choose].
If you use OS10.1, proceed to step 7.
Restart the computer.
You need to restart your computer when
7
DSS Player for Mac is installed. To
continue, click on [Yes]. To cancel
installation, click on [No].
Completing setup.
Installation has finished.
8
Click either [Quit] or [Restart]. To continue
with the installation, click the Continue Set
up Acrobat Reader.
When the Acrobat Reader Setup dialog box
opens, click on [Next].
46
Page 47

Uninstall Software
The process of removing software installed on your PC is called uninstalling. Perform uninstalling
when you no longer need the software.
Windows
Exit DSS Player.
2
1
Click on the [Start] button,
select [Programs], then
2
[Olympus DSS Player 2002].
(in Windows XP, click on the [Start]
button, select [All Programs], then
[Olympus DSS Player 2002].)
Click on [Uninstall Olympus
DSS Player 2002].
3
Follow the directions on
screen to start the uninstall
4
process.
2 3
Uninstall Software
47
Page 48

Uninstall Software
Macintosh
Exit DSS Player.
1
Double-click the Macintosh HD
icon.
2
If you use OS10.1, proceed to step 5.
Delete the following eight drivers
from Function Enhancement in the
3
System Folder:
(OS 8,9 only)
“DSS10USBDriver”
Uninstall Software
“DSS10USBShim”
“DSS1USBDriver”
“DSS1USBShim”
“DSSFSUSBDriver”
“DSSFSUSBShim”
“DSSUSBDriver”
“DSSUSBShim”
Delete the following folder
from the System Folder:
4
(OS 8,9 only)
“DSS Player for Mac Help”
Delete the following file from
Initialization in the System Folder:
5
“DSS Preference”
(In OS10.1, User folder: Library folder:
Preference folder.)
Delete the DSS Player for Mac folder.
6
If you optionally created a new message folder,
be sure to delete that message folder as well.
48
Page 49

Using Online Help
To open Online Help, do either of the following:
(Windows)
• Click on the [Start] button, select [Programs], then [Olympus DSS Player 2002], then click on
[Help].
• While DSS Player is running, choose [Contents] from the [Help] menu.
• While DSS Player is running, press [F1] on the keyboard.
(Macintosh)
• While DSS Player is running, choose [DSS Player for Mac Help] from the [Help] menu.
Search by contents
Once the Online Help screen
appears, click on the Contents
1
tab.
Double-click on the icon of
the desired topic heading.
2
The title of the topic is displayed.
Double-click on the icon of the
desired topic.
3
An explanation of the topic is displayed.
1
2
3
······················································································································································
Note
For more information on menus and operations, refer to Online Help. You will be able to use Online Help after
DSS Player is installed.
Search by keyword
Once the Online Help screen
appears, click on the Index tab.
1
A list of keywords by which you can
search is displayed.
Enter text.
Matching keywords are located
2
automatically.
Choose a topic, then click on
[Display].
3
An explanation of the topic is displayed.
1
2
3
Using Online Help
49
Page 50

Connecting to Your PC
Be sure to finish installing DSS Player before connecting the recorder. If you connect the recorder
before installing DSS Player, the “Add New Hardware Wizard” dialog box will open. If this happens,
click on [Cancel] to exit the wizard, then install DSS Player.
Once you connect the recorder to your PC, the included USB cable will supply the power so you
will not have to use batteries or an AC adapter with the recorder.
You can directly connect the recorder's USB terminal to your PC, or use the cradle included in the
package (desktop holder).
Connecting to your PC using the USB
connection cable
Connecting to Your PC
······················································································································································
Notes
• NEVER disconnect the USB connecting cable while the record/play indicator lamp is flashing. If you do, the
data will be destroyed.
• Some PCs and USB hubs may not supply sufficient power and the recorder may not connect. If that happens,
turn the USB AUDIO "OFF" in the recorder's menu settings. (☞ P.41)
• Refer to the user's manual for your PC regarding the USB port or USB hub on your PC.
• Be sure that you connect the USB cable either directly to the USB port on your PC or the self-power (AC
adapter connection) USB hub.
• Be sure to push the cable connector all the way in. Otherwise, the recorder may not operate properly.
• Release the HOLD switch. (☞ P.9)
50
Insert end A of the USB cable to your
PC's USB port or USB hub.
1
Confirm that the recorder is not in
use before attaching end b of the
2
USB cable to the PC terminal port
of the recorder.
“REMOTE” is displayed on recorder if the
USB cable is connected.
REMOTE
Page 51

Hook
Connecting to your PC using the cradle
Place the recorder on the cradle
Insert end A of the USB cable to your PC's USB
port or USB hub.
1
Connect the end b of the USB connection cable
to the cradle.
2
Make sure that the recorder is stopped, and place
it in the cradle.
3
When you place the recorder on the cradle, 1insert the
recorder so its bottom slot meets the hook on the front of
the cradle (at the low end). 2Hold the top of the recorder
and push it against the cradle until it clicks.
“REMOTE” is displayed on recorder if the USB cable is
connected.
Remove the recorder from the cradle
Make sure that the recorder's record/play indicator
lamp isn't flashing, and remove the recorder from
4
the cradle.
Hold the cradle with your hand, and raise the recorder from
the top end to remove it from the hook, as shown in the
illustration.
Disconnect the USB connecting cable.
5
Connecting to Your PC
······················································································································································
Notes
• Do not needlessly touch the connection point on the front of the cradle (at the low end), as that may cause
damage resulting in a bad connection.
• Release the HOLD switch. (☞ P.9)
51
Page 52

Running DSS Player
Windows
Start Windows.
3
1
Connect the recorder to your PC.
For the connection procedure, refer to
2
“Connecting to Your PC”. (☞ P.50)
When you connect the recorder to your
PC for the first time, the USB Driver Setup
Wizard will open. Follow the instructions
on the screen to install the driver.
Running DSS Player
Click on the [Start] button, select
[Programs], then [Olympus DSS
3
Player 2002].
(in Windows XP, click on the [Start] button,
select [All Programs], then [Olympus DSS
Player 2002].)
Click on [Olympus DSS Player
2002].
4
About automatic startup
By connecting the recorder to your PC, you can automatically start an application.
1 Right-click on icon of the Task Bar on the lower right-hand corner on the screen,
then click on Select startup application.
2 Check the application to automatically start.
The application that you check will automatically start. If you do not want it to automatically
start, uncheck the application.
·······················································································································································
Notes
• You will not be able to run the included DSS Player 2002 and DSS Player 3.0/3.1/3.5 for DS-150/320 at the
same time.
• If you connect the recorder before installing DSS Player, the “Add New Hardware Wizard” dialog box will open.
If this happens, click on [Cancel] to exit the wizard, then install DSS Player.
52
3
4
Page 53

Macintosh
To start DSS Player for Mac, follow these steps:
It is assumed that DSS Player for Mac has been installed. For installation instructions,
see Installing DSS Player for Mac. (☞ P.46)
Start your Macintosh.
1
Connect the recorder to your
PC.
2
For cable connection instructions, see
“Connecting to Your PC”. (☞ P.50)
Double-click the DSS Player
for Mac folder.
3
The DSS Player for Mac folder opens.
Double-click DSS Player.
DSS Player for Mac launches.
4
3
Running DSS Player
4
53
Page 54

Window Names
1
2
3
Window Names
1 Play Control Bar
2 Dictation Folder Window
(Windows)
Control buttons to play and stop voice files.
Will display the directory structure of the
DSS, WMA, WAVE (Windows only) and
AIFF (Macintosh only)-format files
stored on your PC's hard disk.
1
2
3
4
(Macintosh)
4
3 Device Manager Window
Will display the directory structure of the
folders in the recorder.
4 Voice File List Box
Will display the folders selected in 2 and
3.
54
Page 55

Import Voice Files to Your PC
Importing voice files to your PC from the recorder is called downloading. With DSS Player, there
are three ways to download voice files to your PC:
• Download Selected Files
• Download Folders
• Download All
The following is an explanation of “Download Selected Files”. For explanations of “Download Folders”
and “Download All”, refer to Online Help.
Download one or several voice files to your PC.
Download all the voice files in one folder.
Click on the icon and download all the voice files stored in the recorder to your PC.
Download Selected Files
Select the folder.
From the Device Manager window, select the folder that
1
contains the voice file you would like to download. The
illustration shows that Folder A has been selected.
Select the voice file.
Select the voice file you would like to download
2
from the Voice File List Box. To select more
than one file, hold either the [Ctrl] or [Shift]
key and select files. The illustration shows that
one voice file is selected.
1
Import Voice Files to Your PC
2
55
Page 56

Import Voice Files to Your PC
Download the voice file.
(Windows)
3
From the [Download] menu, click on
[Download Selected Files].
(Macintosh)
From the [Tools] menu, click on
[Download Selected Files].
3
Import Voice Files to Your PC
Download complete.
Once the transmission screen closes and the
4
record/play indicator lamp on the recorder
goes dark, the downloading is completed.
·······················································································································································
Notes
• NEVER disconnect the USB connecting cable while the record/play indicator lamp is flashing. If you do, the
data will be destroyed.
• Depending on the size of the voice file and your PC, it may take some time to download the files.
• The downloaded files will be stored in the download tray folder that corresponds to the folder in the recorder.
(Example: A voice file downloaded from Folder A will be stored in download tray A on your PC.)
• If a voice file already exists on your PC with the same name, date and time recorded, the new file will not be
downloaded.
56
Page 57

Play a Voice File
Select the folder.
Select the folder that contains the voice file
1
you would like to play.
The illustration shows that to select from
among voice files already downloaded, Folder
A in the Dictation Folder window was selected.
Select the voice file.
Select the voice file to play from the Voice File
2
List Box.
Play the voice file.
Click on the (play) button of the Play
3
Control Bar.
Other play controls such as Rewind, Fast Forward, Stop, Speed Control, Volume Control, Time
Axis, and Index Skip can also be operated. For details, refer to Online Help.
If you connect the recorder and use DSS Player to play back a file, you can use the recorder as
your PC speaker. For connection procedures, see "USB Microphone/USB Speaker". (☞ P.69)
File name
File names are assigned in the following manner:
DS330001.dss
Extension
File number ....... A serial number automatically assigned by a Digital Voice Recorder.
User ID ........ The name that has been set on the Digital Voice Recorder. The default name on the
Digital Voice Recorder is DS33. The user ID can be modified with DSS Player. ( ☞ P.62)
3
12
Play a Voice File
······················································································································································
Note
DSS Player cannot play back WMA files with DRM (Digital Rights Management) copyright protection that constrains
distribution and playback.
57
Page 58

Upload Voice Files to the Recorder
DSS Player has a feature to enable you to upload DSS-format voice files from your PC to the
recorder.
Select the folder.
Select the folder that contains the voice file
1
to upload from the Dictation Folder window.
Select the voice file.
Upload Voice Files to the Recorder
Select the voice file to upload from the Voice
2
File List Box.
Select the folder to upload.
(Windows)
3
From the [Download] menu select [Upload Files] or click on the Upload icon. Once the folder
list box where the file is to be uploaded is displayed, select the folder from which the file is to
be uploaded.
(Macintosh)
From the [Tools] menu, click on [Upload Files].
Upload the voice file.
The voice file is uploaded to the recorder.
4
Upload complete.
Once the transmission screen closes and the record/play indicator lamp on the recorder
5
goes dark, the uploading is completed.
You can also drag and drop files from the Voice File List Box to the Device Manager window.
·······················································································································································
Notes
• NEVER disconnect the USB connecting cable while the record/play indicator lamp is flashing. If you do, the
data will be destroyed.
• You will not be able to upload a file if another file with the same name already exists at the destination.
• You can upload only DSS files to the recorder.
12
58
Page 59

Direct Recording on PC and Editing on PC
Windows
If you want to record and edit voice files using your PC, open the [Remote Edit] window while the
recorder is connected to your PC (☞ P.50). You can easily create new files, insert recordings, overwrite
recordings, edit index marks, and do other tasks. See the Online Help for details.
Direct Recording on PC and Editing on PC
Recording a new file
From the Main Window, select [New
File] in the [File] menu, or click
1
icon.
Remote Edit screen opens.
Press the (record) button to
start recording.
2
Press the (stop) button to
stop recording.
3
······················································································································································
Notes
• You cannot edit WAV files.
• You can only edit files in DSS format.
Editing existing files
From the Main Window, select the
file you want to edit from the Voice
1
File List Box.
Select [Edit File] in the [File] menu,
or click icon.
2
Remote Edit screen opens.
Edit it.
You can partially delete recordings, edit
3
index marks and priorities, insert recordings
from the position designated using the
position control bar (check on [Insert
recording]) and overwrite recordings.
59
Page 60

Direct Recording on PC and Editing on PC
Macintosh
You can record voice files from a Digital Voice Recorder directly to a computer. With a Digital Voice
Recorder connected, choose the [Direct Record to PC] command from the [Tools] menu.
Direct Recording on PC and Editing on PC
Recording a new file
Set recording.
A recording setup window opens.
1
Click on [Set File Name].
Set the recording destination and
file name.
2
Type the recording destination folder
name and file name and click on [Save].
1
60
2
Page 61

Start recording.
Click on [Start] in the recording setup window.
3
Recording will start.
You can only change the sound quality and
sensitivity settings before recording.
Stop recording.
Click on [Stop] in the Record Window.
4
Converting File Formats to AIFF Files*
Choose the [Save as] from the [File] menu.
When a DSS file is converted to an AIFF file, unique DSS
information such as priority and index marking will be lost.
* AIFF format ......... The standard Macintosh audio file format with the aif extension. It cannot
contain index and priority settings.
4
3
Direct Recording on PC and Editing on PC
······················································································································································
Notes
• AIFF files cannot be converted to DSS format.
• You cannot partially delete, add index marks to, or set priorities.
61
Page 62

Send Voice Files with E-mail
You can attach voice files to your e-mails.
How to send attachment with e-mails, refer to the user's manual for your e-mail software.
• Even if the person to whom you send a voice file does not have DSS Player, he/she will be able
to play the voice file using DSS Player-Lite. You can download DSS Player-Lite free from the
Send Voice Files with E-mail / Changing User ID
Olympus home page, http://www.olympus.com/
Start DSS Player.
1
Start the e-mail software, then select New Mail.
2
Attach the voice file.
Select the voice file to attach from the Voice File List Box of DSS Player and drag and drop
3
the file into the New Mail text window.
·······················································································································································
Note
If your e-mail software is not compatible with the above operation, select the voice file to send from the folder
where the voice file is located and send the file as an attached file according to the functions of the e-mail software.
(Windows) The default folder is set to C:\Program Files\Olympus\DSS Player 2002\Message\Folder A (or B, C, D, E).
(Macintosh) By default,voice files are stored on Macintosh HD: DSS Player for Mac: Message Folder: Folder A (or B, C, D, E).
Changing User ID
The user ID is used in DSS file names (☞ P.57) that are recorded on a Digital Voice Recorder.
Enter the user ID in the [Transfer UserID] window.
(Windows) From the [Download] menu.
1
(Macintosh) From the [Tools] menu.
Click on [Transfer].
The new user ID will be transferred to the Digital
2
Voice Recorder.
62
2
1
Page 63

Changing a Folder Name
Changing a folder name in the Voice Folder window
(Windows)
You can change a folder name using the [Rename Folder] command from the [Edit] menu. A
folder name can be up to 20 characters long and cannot use \ /:*?"<>|.
(Macintosh)
Choose the [Rename Folder] command from the [File] menu.
Changing a folder name in the Device window
(Windows)
Right-click the folder name to change, select the [Rename Folder] and input the new folder
name.
(Macintosh)
Choose the [Rename Folder] from the [Tools] menu and type a folder name.
The names of the folders on the Digital Voice Recorder is updated with the new folder names.
Device Window folder names consist of a string of eight or fewer single-byte alphanumeric characters.
Editing File Comments
You can use a PC to create or edit file comments in DSS Player in the [Edit Comments] window,
and transfer them from the PC to the recorder. You can also edit file comments imported from the
recorder to a PC.
Choose the [Edit Comments] command from the [Tools] menu.
Files comments can use up to 100 alphanumerical characters and symbols.
Changing a Folder Name / Editing File Comments
63
Page 64

Editing a Template
You can edit folder name and file comment templates in DSS Player in the [Edit & Upload Templates]
window and transfer them to the recorder. Templates downloaded from the recorder can also be
edited.
(Windows)
Select [Edit & Upload Templates] from [Download] to open the [Edit and Upload Template]
window.
(Macintosh)
Select [Edit & Upload Templates] from [Tools] to open the [Edit and Upload Template] window.
Up to 20 alphanumerical characters can be used for a folder name or a comment.
Editing a Template
64
Upload templates
from the recorder
Transfer all
comment and
folder information
to the recorder
Delete all changed
content
Transfer edited content
to the recorder
Save edited content
Read saved content
Delete edited content
Close the
dialog box
Page 65

Using Voice Recognition Software (optional)
When you use voice-recognition software such as IBM ViaVoice, it is recommended that you set
the recorder to PC microphone and have the software learn the characteristics of the speaker’s
voice and the recorder’s built-in microphone to maximize the accuracy of voice recognition.
Click the [Start] button and select [Programs] → [IBM ViaVoice VoiceCenter].
1
Click the [ViaVoice] button of [IBM ViaVoice VoiceCenter], then select [Tool]
and [Analyze My Voice].
2
The [ViaVoice User Wizard]
window appears.
3
Select [Olympus DSS File] in the
[Device] list box, then click the [Next]
button.
The [Audio Setup Wizard]
window opens.
4
Use PC connection cable (KP4) if you
use Windows 98, or use the USB
connection cable if you use Windows
98SE or later operating system
versions.
Using Voice Recognition Software (optional)
65
Page 66

Using Voice Recognition Software (optional)
TRAINTRAIN PCPC
Using the USB Cable
1 Connect the recorder with the USB cable, and
follow the instructions on screen.
Using Voice Recognition Software (optional)
Release the HOLD switch.
2 [Selecting a Sound Card]
When the [Selecting a Sound Card] window
appears, select [USB Audio Device] for [Input] and
follow the instructions on screen. (Select
[Microphone Control (DS-330)] for Windows XP.)
During audio setup or while enrolling, please
input voice data from the recorder.
Using the PC Connection Cable
1 Do not connect the recorder, and follow the instructions on screen.
2 [Connect Input Device]
When the [Connect Input Device] window appears, connect the recorder and your
PC using the PC connection cable by following the instructions on screen.
To input voice during audio setup or while enrolling, turn on the microphone
by pressing the NEW button on the recorder. "TRAIN PC" appears on the
recorder display.
We recommend you enroll the surrounding environment using the recorder before using voice
recognition on files. This enables you to better register the characteristics of your voice to improve
recognition.
······················································································································································
Notes
• Set the recording mode to "SP" when enrolling using the PC connection cable (KP4). If you set it to "LP" mode,
a warning "CHANGE REC MODE" appears and you won't be able to enroll. (☞ P.18)
• Turn "OFF" the USB AUDIO on the recorder's menu settings and use the PC connection cable (KP4) to enroll.
(☞ P.41)
• Voice recognition is only available with Windows operating systems.
66
Page 67

Executing Voice Recognition
Select the folder.
Select the folder containing the voice
1
file you want to process with voice
recognition from the Dictation Folder
window.
Select the voice file.
Select the desired voice file to process
2
with voice recognition from the Voice
File List Box.
Start of voice recognition.
Click the start voice recognition icon .
3
The voice recognition software window appears and voice recognition starts.
Noise Canceling Function
Check [Use Noise Cancel] in [Voice Recognition] on the
menu bar, to output voice using the noise canceling
function to the voice recognition software.
See the voice recognition software operating manual for
voice recognition functions such as modifying converted
characters.
1
2
Using Voice Recognition Software (optional)
3
67
Page 68

Using Voice Recognition Software (optional)
Notes on Recording For Voice Recognition
When recording voices for use in voice
recognition, set up your DSS recorder
as follows to facilitate recognition.
Using Voice Recognition Software (optional)
• Set the microphone sensitivity to "DICT".
(☞ P.19)
• Set the recording mode to "SP". (☞ P.18)
• Set the Variable Control Voice Actuator
(VCVA) to "OFF". (☞ P.16)
• Only record voices that have already been
registered in the voice recognition software
speak.
• Record in a relatively quiet environment.
• Have the person speaking within 5-10 cm
of the built-in microphone of the recorder
(5 to 10 cm).
• Speak continuously.
Voice files recorded under the following
conditions cannot be processed by
voice recognition because their
recognition rates may be very low.
• A conference or meeting where the voices
of many people have been recorded.
• Seminar or lecture in which ambient noise
tends to be recorded.
68
Page 69

USB Microphone/USB Speaker (USB AUDIO)
Using the recorder as a USB speaker
This recorder can be used as USB speaker when it's
connected to a PC. If you use the recorder as a USB
speaker, you can output voice from the recorder
without using a PC speaker.
Select [Select Speaker] from [Tools] on the menu
bar, and choose voice output.
Using the recorder as USB microphone
This recorder can function as a USB microphone when it's connected to a PC. If you use voice
recognition software or other applications, you can use the recorder as a USB microphone.
For Windows 98SE, Me, 2000
Select [Control Panel] → [(Sound and) Multimedia] → [Audio] tab, and choose [USB Audio Device]
from among the recording devices.
For Windows XP
Select [Control panel] → [Sound, Voice, and Audio Device] → [Sound and Audio Device] →
[Audio] tab, and chose [Microphone Control (DS-330)] from among the recording devices.
······················································································································································
Notes
• USB speaker can be switched using [Control Panel], in the same manner as the USB microphone.
• Do not use the recorder as a USB microphone/speaker on Windows 98 as computer operation may become
unstable. (Use only with Windows 98SE or later versions of the OS.)
• The recorder can be used as a USB microphone/speaker only with Windows.
• If you turn the USB AUDIO "OFF" using the recorder's menu setting, you cannot use the recorder as a USB
Microphone/USB Speaker. (☞ P.41)
• You cannot use the recorder as a USB Microphone/USB Speaker on Windows NT.
USB Microphone/USB Speaker (USB AUDIO)
69
Page 70

Alarm Message List
Message
BATTERY LOW
LOCK ON
INDEX FULL
FOLDER FULL
MEMORY FULL
NO FILE
CHANGE REC
MODE
MEMORY ERROR
SYSTEM ERROR
Alarm Message List
OVER FLOW
TRAIN PC
FORMAT ERROR
Meaning
Low battery
power
Erase-locked
Index full
Folder full
Maximum number
Zero remaining
memory
No file
Change recording
mode
Error in the internal
flash memory
System error
Too many
characters input
PC microphone
indicator
Formatting error
Explanation
Battery power is getting low.
Tried to delete a locked file.
The file is full of index marks
(maximum of 16 marks).
The folder is full of files (maximum
of 199 files).
The destination folder already has
the maximum number of files
(199).
No remaining internal memory.
No files were found in the folder.
For voice recognition applications, the
recording mode cannot be set to LP
when using the connection cable KP4.
Error in the internal memory.
System error detected in the
recorder.
Exceeds the maximum number of
characters that can be registered.
The recorder is being used as a
PC microphone. (☞ P.66)
There was an error while
formatting the recorder's memory.
Action
Replace with new batteries.
(☞ P.8)
Unlock the file. (☞ P.26)
Erase index marks that are no
longer required. (☞ P.27)
Erase unnecessary files. (☞ P.24)
Erase unnecessary files. (☞ P.24)
Erase unnecessary files. (☞ P.24)
Select another folder.
Set the recording mode to SP when
using connection cable KP4.
(☞ P.18)
This is a malfunction, so go to the
store where you purchased the
recorder or an Olympus service
station for repair.
This is a malfunction, so go to the
store where you purchased the
recorder or an Olympus service
station for repair.
Reduce the number of characters
within the limit. Up to eight
characters can be used for a folder
name. (☞ P.32-34)
Up to 100 characters can be used
for a file comment. (☞ P.35)
See DSS Player online help for
details.
Reformat the memory. (☞ P.40)
70
Page 71

Troubleshooting
Symptom
Nothing
appears on
the display
Won’t start
Unable to
record
No playback
tone heard
Unable to
erase
Noise heard
during
playback
Recording
level too low
Unable to set
index marks
Won’t work
with AC
adapter
Cannot find
the recorded
voice
Probable cause
The batteries are not loaded properly.
The batteries are dead.
If none of these suggestions works
The recorder is in HOLD mode.
The recorder is in HOLD mode.
The batteries are dead.
Low remaining internal flash memory.
The maximum number of files has been reached.
The earphone is connected.
The VOLUME control is set to 0.
The file is locked.
The recorder was shaken during recording.
The recorder was placed near a cell phone or
fluorescent lamp while recording or during playback.
The microphone sensitivity is too low.
The maximum number of index marks (16) has been
reached.
The file is locked.
A non-standard AC adapter is being used.
Wrong folder.
Action
Verify polarity is correct.
Replace with new batteries.
Reset the recorder. (☞ P.40)
Release the recorder from HOLD.
(☞ P.9)
Release the recorder from HOLD.
(☞ P.9)
Replace with new batteries.
Erase unnecessary files.
Check another folder.
Unplug the earphones to use the
internal speaker.
Adjust the VOLUME control.
Unlock the file. (☞ P.26)
Move the recorder.
Set the microphone sensitivity to
CONF mode and try again. (☞ P.19)
Erase unnecessary index marks.
(☞ P.27)
Unlock the file. (☞ P.26)
Use the Olympus A321 (for US,
Canada) or A322 (for Europe
except U.K) AC adapter
(Oprional).
Switch to the right folder.
Troubleshooting
71
Page 72

Troubleshooting
Symptom
Cannot use
Fast Playback
or Slow
Playback
Noise Cancel
function
doesn't work
Cannot
connect to PC
Cannot
connect to a
PC using a
cradle
Troubleshooting
Probable cause
Noise Cancel function is set to "LOW" or "HI".
A file is being played back in Fast Playback or Slow
Playback mode.
Some PCs and USB hubs may not provide sufficient
power.
Sometimes a connection cannot be made with some
PCs running Windows XP.
Action
Turn "OFF" the Noise Cancel
function. (☞ P.23)
The Noise Cancel function doesn't
work while a file is being played
back in Fast Playback or Slow
Playback mode. (☞ P.21)
Turn the USB AUDIO "OFF" in the
recorder's menu settings. (☞ P.41)
You need to change the PC's USB
settings. See DSS Player online
help for details. (☞ P.49)
72
Page 73

Accessories (optional)
External microphone: ME9*/11*
A lavalier omnidirectional microphone that clips
to clothing. Use to record your own voice or
people near you.
Conference microphone: ME7
A highly sensitive directional microphone
(shotgun microphone). Use to record speakers
at a distance.
Headset: E102
Stereo headset for your PC. A helpful tool for
PC based transcription.
Foot switch: RS23/24
Connect to the serial or USB port of your PC
for hands-free transcription convenience.
Noise-Cancellation microphone: ME12
(Dictation microphone)
Used to get crisp recordings of your own voice
by reducing the effects of ambient noise.
Recommended to improve the accuracy when
using voice-recognition software.
AC adapter: A321 (US and Canada) or A322
(Europe except U.K.)
Connecting cord: KA232*
Use to connect the microphone jack of this unit
to a radio or other sound source.
Plug adapter: PA3
An adapter that connects devices such as
microphones with ø2.5 mm mini-plugs to the
unit’s ø3.5 mm mini-jack.
* Use these accessories with the PA3 plug
adapter.
Accessories (optional)
73
Page 74

Specifications
Recording format
Input level ............................................................ –70 dBv
Sampling frequency
SP mode: ....................................................... 12 kHz
LP mode: ....................................................... 8 kHz
Overall frequency response
SP mode: ....................................................... 300 to 5,000 Hz
LP mode: ....................................................... 300 to 3,000 Hz
Recording time
SP mode: ....................................................... 2 hours 35 minutes
LP mode: ....................................................... 5 hours 30 minutes
Battery life
Recording: ..................................................... Approx. 12 hours
Playback: ....................................................... Approx. 8 hours
Speaker ................................................................ Built-in ø28 mm round dynamic speaker
Microphone jack .................................................. ø3.5 mm mini-jack, impedance 2 kΩ
Earphone jack ..................................................... ø3.5 mm mini-jack, impedance 8 Ω or more
Maximum working output (3 V DC) ................... 250 mW or more (8 Ω speaker)
Input power requirement
Rated voltage: ............................................... 3 V
Batteries: ........................................................ Two AAA batteries (LR03 or R03)
External power supply: .................................. AC adapter
External dimensions ........................................... 108 x 41.5 x 21mm (without protrusions)
Weight .................................................................. 75 g (including batteries)
.................................................. DSS (Digital Speech Standard)
(with alkaline batteries, based on our standard testing
procedure)
* Specifications and design are subject to change without notice.
Specifications
* Battery life varies greatly according to type of batteries used and the conditions of use.
74
Page 75

Technical Assistance and Support
The following are for only technical questions and support about OLYMPUS recorder and software.
◆ Technical Hotline Number in the U.S. and Canada
1-888-553-4448
◆ User Support E-mail address in the U.S. and Canada
distec@olympus.com
◆ Technical Hotline Number in Europe
Toll free number
00800 67 10 83 00
available for Austria, Belgium, Denmark, France, Germany, Netherlands, Norway, Sweden,
Switzerland, United Kingdom
Charged numbers
+49 180 567 1083
available for Finland, Italy, Luxemburg, Portugal, Spain and Czech Republic
+49 40 23773 899
available for Greece, Croatia, Hungary and the rest of Europe
◆ User Support E-mail address in Europe
dss.support@olympus-europa.com
Technical Assistance and Support
75
Page 76

San-Ei Building, 22-2, Nishi Shinjuku 1-chome, Shinjuku-ku, Tokyo, Japan. Tel. 03-3340-2211
Two Corporate Center Drive, Melville, NY 11747-3157, U.S.A. Tel. 1-800-622-6372
(Premises/Goods delivery) Wendenstrasse 14-18, 20097 Hamburg, Germany. Tel. 040-237730
(Letters) Postfach 10 49 08. 20034 Hamburg. Germany.
2-8 Honduras Street, London EC1Y 0TX, United Kingdom, Tel. 020-7253-2772
http://www.olympus.com
Declaration of Conformity
Model Number: DS-330
Trade Name: DIGITAL VOICE RECORDER
Responsible Party: OLYMPUS AMERICA INC.
Address: 2 Corporate Center Drive, Melville, NY 11747-3157, U.S.A.
Telephone Number: 800-622-6372
This device Complies with Part 15 of the FCC Rules. Operation is subject to the following two
conditions: (1) This device may not cause harmful interference, and (2) this device must accept any
interference received, including interference that may cause undesired operation.
Tested To Comply
With FCC Standards
FOR HOME OR OFFICE USE
Canadian RFI
This digital apparatus does not exceed the Class B limits for radio noise emissions from digital apparatus
as set out in the Radio Interference Regulations of the Canadian Department of Communications.
Cet apparail numerique ne depasse pas limits de Categorie B pour les emissions de gruit radio emanant
d’appareils numeriques, tel que prevu dans les Reglements sur l’Interference Radio du Department
Canadian des Communications.
“CE” mark indicates that this
product complies with the
European requirements for
safety, health, enviroment and
customer protection.
L’indication “CE” signifie que ce
produit est conforme aux
exigences concernant la sécurité,
la santé, l’environnement et la
protection du consommateur.
Das „CE“ Zeichen bestätigt die
übereinstimmug mit den
Europäischen Bestimmungen
fü r Betriebssicherheit und
Umweltschutz.
Il marchio “CE” indica che questo
prodotto è conforme alle norme
della comunità europea per
quanto riguarda la sicurezza, la
salute, l’ambiente e la protezione
del consumatore.
La marca “CE” indica que este
producto se encuentra de
conformidad con las exigencias
europeas sobre seguridad,
salud, medio ambiente y
protección al consumidor.
P2-2846-01
 Loading...