

Page 1

DIGIT AL VOICE
RECORDER
DS-320
ViaVoice kit
INSTRUCTIONS
Please read these instructions for information about using
the product correctly and safely.
Keep the instructions handy for future reference.
To ensure successful recordings, we recommend that
you test the record function and volume before use.
1
Page 2

For Safe and
General Precautions
Correct Usage
Thank you for purchasing the Olympus
Digital Voice Recorder DS-320. Before
using your new recorder, read this manual
carefully to ensure that you know how to
operate it safely and correctly. Keep this
manual in an easily accessible location for
future reference.
• The warning symbols indicate important
safety related information. T o protect yourself
and others from personal injury or damage
to property, it is essential that you always
follow the warnings and information provided.
2
● Do not leave the recorder in hot, humid
locations such as inside a closed automobile
under direct sunlight or on the beach in the
summer.
● Do not store the recorder in places exposed
to excessive moisture or dust.
● Do not use organic solvents such as alcohol
and lacquer thinner to clean the unit.
● Do not place the recorder on top of or near
electric appliances such as TVs or
refrigerators.
● Avoid sand or dirt. These can cause
irreparable damage.
● Avoid strong vibrations or shocks.
● Do not disassemble, repair or modify the
unit yourself.
● Do not operate the unit while operating a
vehicle (such as a bicycle, motorcycle, or
go-cart).
● Keep the unit out of the reach of children.
● Do not use the unit aboard aircraft, in
hospitals, or in other areas where its use is
prohibited.
The copyrights for the “DSS Player” software and
instruction manual are held by Olympus Optical Co., Ltd.
IBM, PC/AT and ViaVoice are the trademarks or
registered trademarks of International Business
Machines Corporation.
Microsoft and Windows are registered trademarks
of Microsoft Corporation.
Intel and Pentium are registered trademarks of Intel
Corporation.
Macintosh and Apple are registered trademarks of
Apple Computer, Inc.
Other product and brand names mentioned herein
may be the trademarks or registered trademarks of
their respective owners.
Page 3

Batteries
Warning
• Batteries should never be exposed to
flame, heated, short-circuited or
disassembled.
• Do not attempt to recharge alkaline,
lithium or any other non-rechargeable
batteries.
• Never use any battery with a torn or
cracked outer cover.
• Keep batteries out of the reach of
children.
• If you notice anything unusual when
using this product such as abnormal
noise, heat, smoke, or a burning odor:
1 remove the batteries immediately while
being careful not to burn yourself, and;
2 call your dealer or local Olympus
representative for servicing.
AC Adapter
Warning
• Do not attempt to disassemble, repair or
modify the AC adapter in any way.
• Keep objects including water, metal, or
flammable substances from getting
inside the product.
• Do not moisten the AC adapter or touch
it with a wet hand.
• Do not use the AC adapter in the vicinity
of flammable gas (including gasoline,
benzine and lacquer thinner).
• Do not insert a dirty power supply plug
into a power outlet.
• Do not damage the power cord.
In case
• ...the internal parts of the AC adapter are
exposed because it has been dropped or
otherwise damaged:
• ...the AC adapter is dropped in water, or
if water, metal flammable substances or
other foreign objects get inside it:
• ...you notice anything unusual when
using the AC adapter such as abnormal
noise, heat, smoke, or a burning odor:
1 do not touch any of the exposed parts
2 immediately disconnect the power supply
plug from the power outlet, and
3 call your dealer or local Olympus
representative for servicing. Continued
use of the AC adapter under these
circumstances could result in electric
shock, fire or injury.
3
Page 4

Hardware Section
4
Page 5

Table of Contents
Getting Started
Main Features ........................................... 6 Identification of Parts ................................ 7
Preparing for Recording
Inserting Batteries ..................................... 9
Replacing Batteries ................................. 10
Using the AC Adapter.............................. 10
Basic Operations
Recording................................................ 14
Playing and Volume Control.................... 18
Other Functions
Recording Modes .................................... 25
Microphone Sensitivity ............................ 26
Using the Variable Control
Voice Actuator (VCVA)...................... 27
Dictation Mode ........................................ 28
Other Information
Menu List ................................................ 33
Troubleshooting ...................................... 34
Hold......................................................... 11
Setting Time/Date ................................... 11
Setting an ID ........................................... 13
Erasing .................................................... 21
Index Marks ............................................ 29
Transferring Messages ........................... 30
System Sounds (Alarms) ........................ 31
Formatting ............................................... 32
Reset....................................................... 33
Specifications .......................................... 35
Accessories (optional)............................. 35
Software reference follows page 36.
5
Page 6

DS-320 Main Features
Summary of product features:
● The DS-320 digital voice recorder stores
DS-320 Main Features
highly compressed DSS format voice
messages in 16MB integrated flash
memory.
● The DS-320 supports two recording modes:
SP (Standard Playback) mode and LP (Long
Playback) mode. Continuous recording time
is approximately 2 hours and 30 minutes*
in SP mode and approximately 5 hours and
20 minutes* in LP mode.
● Recorded voice messages can be stored in
two separate folders (up to 99 messages
per folder) for easy identification at a later
time.
● The Variable Control V oice Actuator (VCV A)
helps save memory by pausing recording
when it senses silence.
● Overwrite recording, insert recording and
partial erasure functions make it easy to
correct and edit recordings.
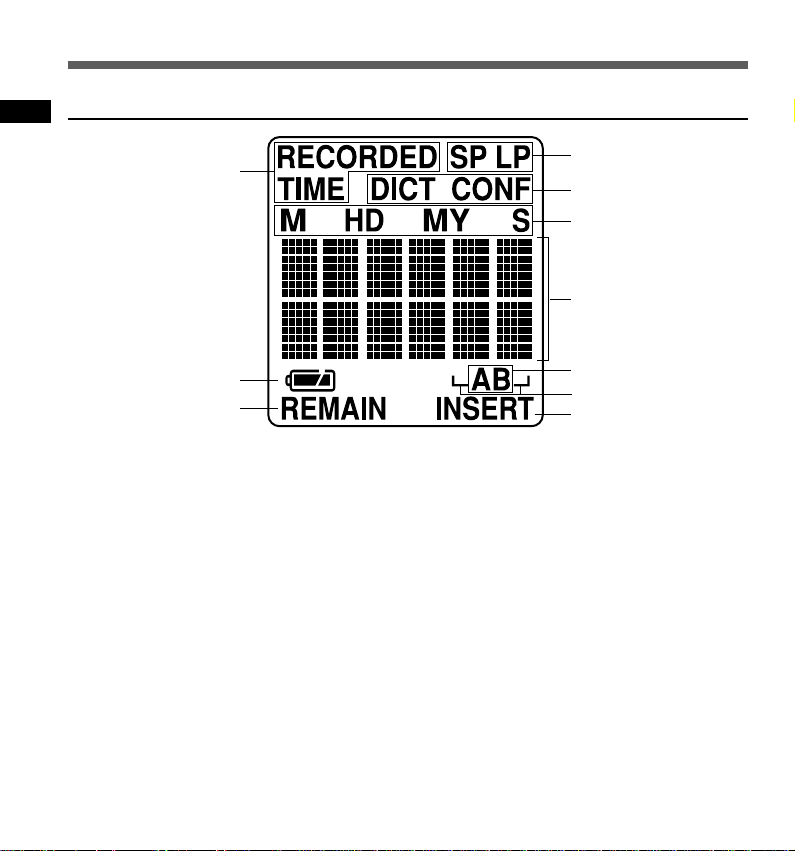
● The LCD panel includes a dot-matrix display
which clearly displays message numbers,
a real-time counter, remaining recording
time, current time and date, operating mode,
warnings, and other information.
* Maximum continuous recording time for a
single message. Recording time may be
shorter if you record many short messages.
(Use the remaining recording time and
recorded time indicators only as references.)
6
Page 7

Identification of Parts
$%^
#
Identification of Parts
@
!
0
9
8
1 SP DICT button
2 MENU/VOL switch
3 PLAY button
4 REW (Rewind) button
5 FF (Fast Forward) button
6 STOP button
7 Strap hook
8 Built-in speaker
9 REC (Record) button
0 INDEX/FOLDER button
1
2
3
4
5
6
7
&
)
*
(
! Display (LCD panel)
@ ERASE button
# Record indicator lamp
$ Built-in microphone
% Earphone jack
^ Microphone jack
& HOLD switch
* Battery cover
( POWER jack
) PC I/F (interface) connector
7
Page 8
Identification of Parts
Display (LCD Panel)
Identification of Parts
0
9
8
1 Recording mode
2 Microphone sensitivity
3 Month-date-year (M.D.Y .) and hour-
minute-second (H.M.S.)
4 Elapsed time, remaining recording
time, recording date and time
indicators, menu display , etc.
5 Folders (A and B)
6 Message number display
7 Insert recording mark
8 Remaining recording time mark
9 Remaining battery indicator
0 Recording date/time mark
1
2
3
4
5
6
7
Standby Mode and Display Shut Off
If the recorder is stopped or paused for 30
minutes or longer, it goes into standby mode
(power saving mode) and the display shuts
off. To exit standby mode and turn on the
display, press any one of the STOP, REC,
PLAY, FF , or REW buttons, or the MENU/VOL
switch. T o put the recorder into standby mode
(power saving mode) and shut off the display,
put the HOLD switch in the HOLD position
when the recorder is stopped or paused.
8
Page 9
Inserting Batteries
1
2
3
................................................................................................
* The message number under “NEW” is the number of the next message
to be recorded in this folder. For example, if you have three messages
in this folder, you will see “4”.
Slide open the battery cover.
Insert two AAA alkaline batteries, observing the
correct polarity .
Close the battery cover
completely.
The display will show the current date
and time setting for 1 second before
appearing as shown at right.
Remaining
recording
time
Folder
Message number*
Inserting Batteries
Note
If the battery cover is not closed completely, “OPEN”
appears on the display and the recorder will not work.
9
Page 10
Replacing Batteries
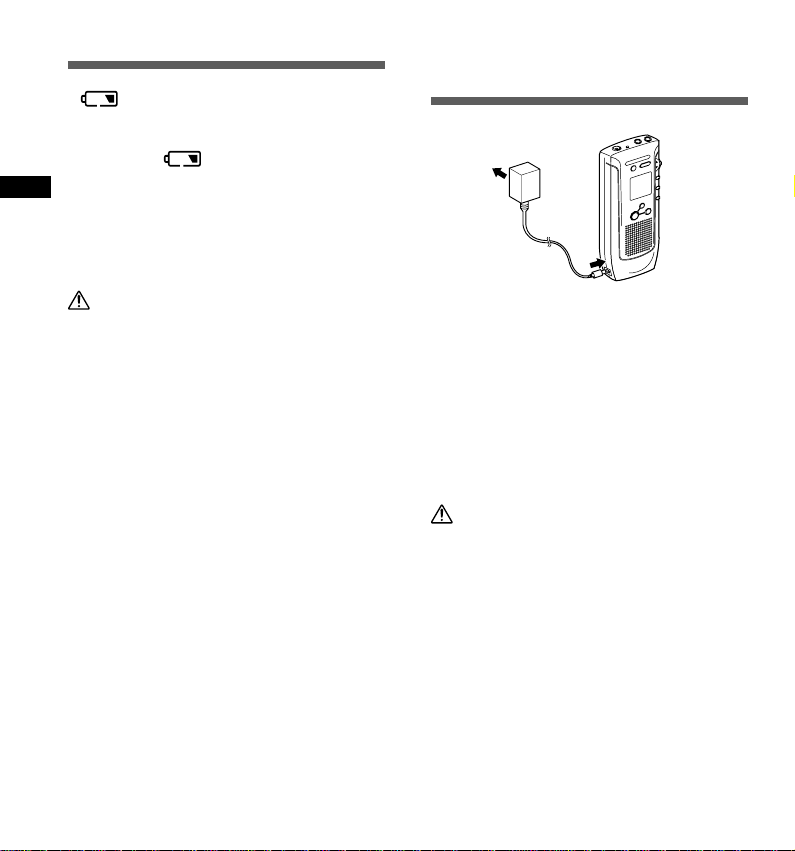
Using the AC
If begins to flash on the display, stop the
recorder and replace both batteries as soon
as possible.
If [BATT] and appear on the display, the
recorder will stop and will not operate. Replace
both batteries immediately.
Replacing Batteries/Using the AC Adapter
If the recorder fails to work properly after the
batteries are replaced, see “Reset” on page
33.
Warning
• Be sure to stop the recorder before
replacing the batteries. Unloading the
batteries while the recorder is recording,
erasing or otherwise accessing an audio file
may corrupt the file.
• Use only specified batteries with this
recorder.
• Never mix old and new batteries, or
batteries of different types and/or brands.
• Remove the batteries if you are not going
to use the recorder for an extended period
of time.
Adapter
U
N
E
M
L
O
V
/
T
C
I
D
P
S
E
S
A
R
E
INDEX/
FOLDER
P
O
T
S
C
E
R
Plug in the optional AC adapter (Olympus
Model A321 or A322) into a household power
outlet and connect the power plug to the
recorder’s power connector (DC 3 V) as shown
in the illustration. Do not connect the AC
adapter to the recorder during recording.
Always stop recording before connection.
Otherwise it may not be possible to play back
the voice data being recorded.
Warning
• Stop the recorder before disconnecting
the AC adapter.
• When not using the recorder, always
disconnect the AC adapter from the power
outlet.
• Use only the correct power supply voltage
as indicated on the adapter.
10
Page 11

Hold
Setting Time/Date
Setting the HOLD switch to the HOLD position
locks the recorder. All buttons will be disabled
and the display becomes blank. This is useful
when the recorder is carried in a bag,
briefcase, or your pocket because no buttons
will work accidentally.
Remember to release the HOLD switch
when using the recorder.
HOLD
Notes
• When setting the HOLD switch to the HOLD
position while playing a message, the recorder
continues playing until reaching at the end of
message.
• When setting the HOLD switch to the HOLD
position while recording a message, the recorder
continues recording until available recording time
runs out.
• The recorder automatically stops and the display
becomes blank after completion of playing or
recording. All buttons are disabled as long as the
switch is set to HOLD position. To stop playing or
recording, you have to release the HOLD switch.
All of your recorded messages will be stamped
with the time and date that you finished
recording. This feature is useful to manage
your recordings.
If the time and date are not set, this information
will be inaccurate.
MENU/VOL switch
ERASE
SP DICT
M
EN
U
/VO
L
INDEX/
FOLDER
R
E
C
S
TO
P
STOP button
Using the MENU/VOL switch
Press Move up or down
MENU
/VOL
Note
When batteries are inserted for the first time, the clock
starts running from its initial state (January 1, 2000,
12 a.m.).
MENU
/VOL
Hold/Setting Time/Date
11
Page 12
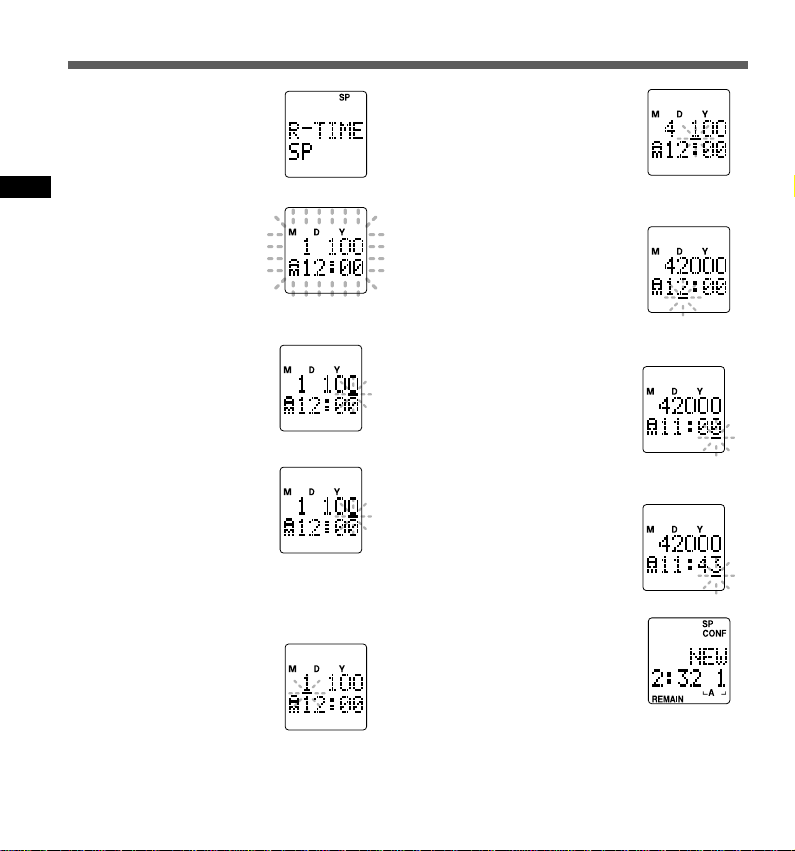
Setting Time/Date
Press the MENU/
VOL switch.
1
The menu appears on
the display.
Setting Time/Date
Move the MENU/
VOL switch up to
2
choose the screen
with the flashing
date/time indicator.
Press the MENU/
VOL switch.
3
The year cursor will
flash.
Move the MENU/
VOL switch up or
4
down to set the
year.
Continue to set the
month, date, hour, and
minute.
Press the MENU/
VOL switch.
5
The month cursor will
flash.
12
Set the month and
press the MENU/
6
VOL switch.
The date cursor will
flash.
Set the date and
press the MENU/
7
VOL switch.
The hour cursor will
flash.
Set the hour and
press the MENU/
8
VOL switch.
The minute cursor will
flash.
Set the minute and
press the STOP
9
button.
This completes the date/
time setup procedure.
....................................................................
Note
If you leave the recorder idle for more than 3 minutes
during setup, any settings entered to that point will
be canceled.
{
Page 13
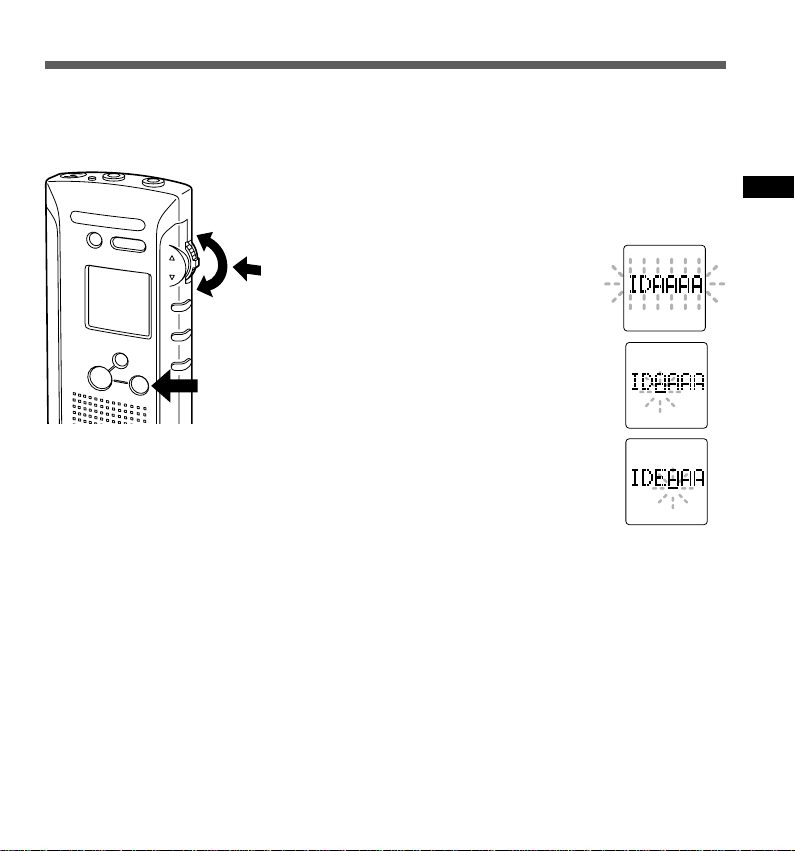
Setting an ID
If an ID is set, it is automatically included in each message to help identify who recorded the
message when it is transferred to a PC. Setting IDs is recommended for easier management of
recorded messages. To set an ID, stop the recorder and follow these steps:
ERASE
SP DICT
R
E
C
INDEX/
FOLDER
S
T
O
P
M
E
NU
/VO
L
1,3,5
2,4
6
Press the MENU/VOL switch.
The menu appears on the display.
1
Move the MENU/VOL switch up
to choose the “ID AAAA”
2
screen.
Press the MENU/VOL switch.
The cursor flashes at the first
3
character position.
Move the MENU/VOL switch up or
down to choose the first
4
character.
Characters are selectable from A to Z
and 0 through 9.
Press the MENU/VOL switch.
Accepts the character and moves to the next position.
5
Repeat the steps above to set a four-character ID.
Press the STOP button.
This completes the ID setup procedure.
6
................................................................................................
Note
If you leave the recorder idle for 3 minutes or longer during a setup
operation, any settings entered to that point will be canceled.
Setting an ID
13
Page 14
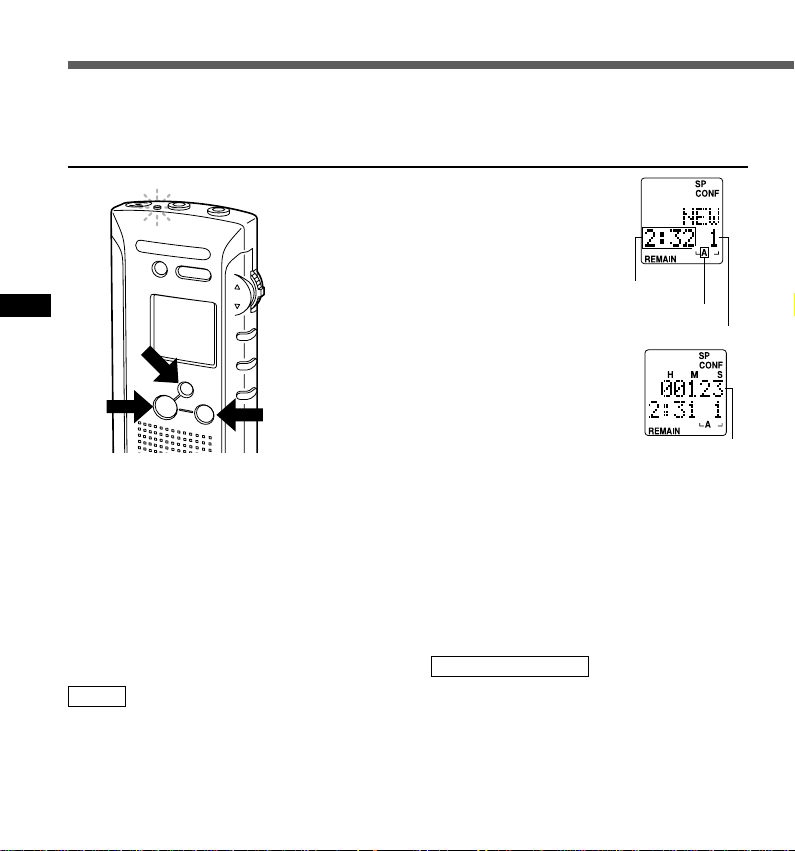
Recording
Folders A and B can each hold up to 99 voice messages.
New Recording
Press the INDEX/FOLDER
button to choose a folder.
1
The INDEX/FOLDER button toggles
between folder A and folder B each
ERASE
SP DICT
MENU
/VOL
Recording
1
INDEX/
FOLDER
2
.......................................................................................................................................................
Pause Recording
Pause
Press the REC button while recording.
The elapsed recording time indicator on
➥
the display and the record indicator lamp
will flash.
14
R
E
C
S
T
O
P
3
time you press it.
Press the REC button to start
recording.
2
The recorder starts recording, and “REC”
appears on the display for 2 seconds.
The recording indicator lamp glows.
Elapsed recording time appears on
the display in hour-minute-second
format (real-time counter).
Press the STOP button to stop recording.
The recorder will stop recording, “NEW” appears on the
3
display and the message number is incremented by one.
*
The message number under “NEW” is the number of the next
message to be recorded in this folder.
Resume Recording
Press the REC button again.
Recording will resume with the same
➥
message number.
Note
If you press the STOP button when the recorder is paused,
the recorder will stop recording, “NEW” will appear on the
display and the message number will be incremented by one.
Remaining
recording
time
Message number*
Elapsed recording
time (real-time
counter)
Folder
Page 15

Recording Settings
While the recorder is designed to record
messages without requiring special settings, it
offers a LP mode for long recordings, a DICT mode
for dictation, and a Variable Control V oice Actuator
(VCVA) to economize on memory usage. For more
details see the relevant sections of the manual.
Recording modes:
SP (Standard Playback) mode/
LP (Long Playback) mode
→ P .25
Microphone sensitivity:
CONF (conference recording)/
DICT (dictation recording)
→ P .26
Variable Control Voice Actuator (VCVA):
OFF/ON → P.27
Notes
• When “FULL” appears on the display, you cannot
record any more. To free up memory, you have to
erase messages. (see page 21). To archive your
recordings prior to erasing, you can transfer
messages to a PC. (see software section).
• While recording is in progress, never disconnect
or connect the AC adapter even if the recorder
contains batteries. This may result in failure to play
the recorded message.
• If the recorder is paused for 30 minutes or longer
while recording, it enters standby mode and the
display shuts off. (To release the recorder from
standby mode and turn on the display, press any
one of the STOP, REC, PLA Y, FF, or REW buttons
or the MENU/VOL switch.)
• See recording tips
– for Record Meetings and Lectures. (P. 26)
Overwrite recording
You can overwrite a recorded message from
any point by pressing the REC button while
the recorder is stopped or paused.
Notes
• The previous recording will be erased.
• If the overwritten recording exceeds the recorded
time of the previously recorded message, the next
message is not erased.
Recording
15
Page 16
Recording
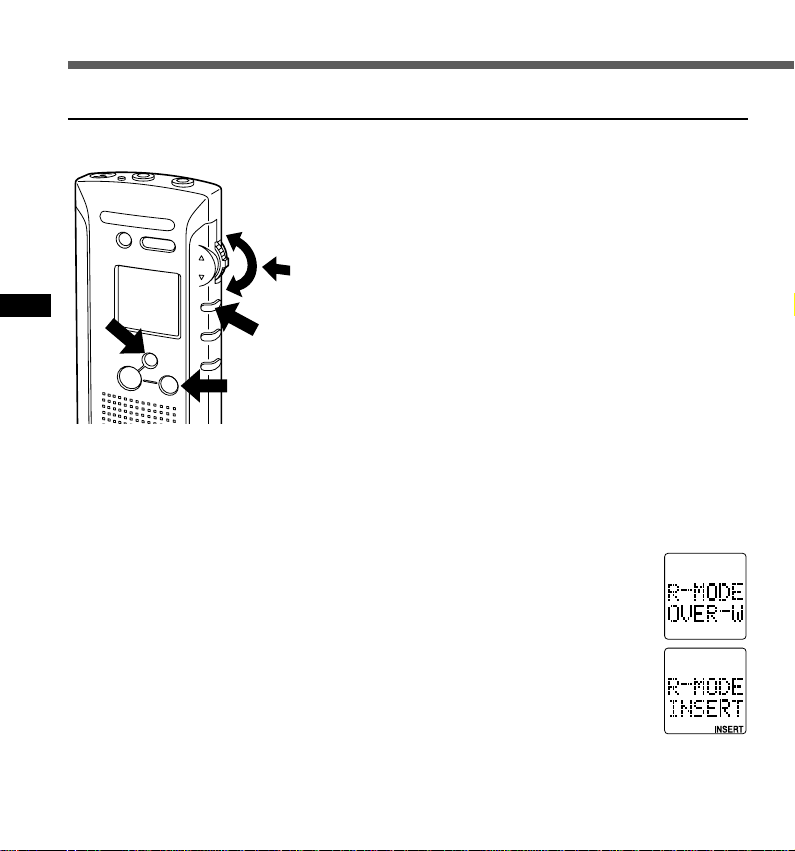
Insert recording
You can insert recordings into previously recorded messages.
Press the INDEX/FOLDER button to choose a
folder.
5,7
3
1
Move the MENU/VOL switch down to choose the
message into which you want to insert
2
recording.
Press the PLAY button to play the message.
3
Press the STOP button at the point where you
want the insertion to start.
4
Press the MENU/VOL switch.
Recording
1
ERASE
SP DICT
R
E
C
INDEX/
FOLDER
S
T
O
P
MENU
/VOL
2,6
4,8
5
Move the MENU/VOL switch up
or down to choose “R-MODE”.
6
16
Press the MENU/VOL switch to
choose “INSERT”.
7
Press the STOP button.
Insert recording is now set.
8
Page 17
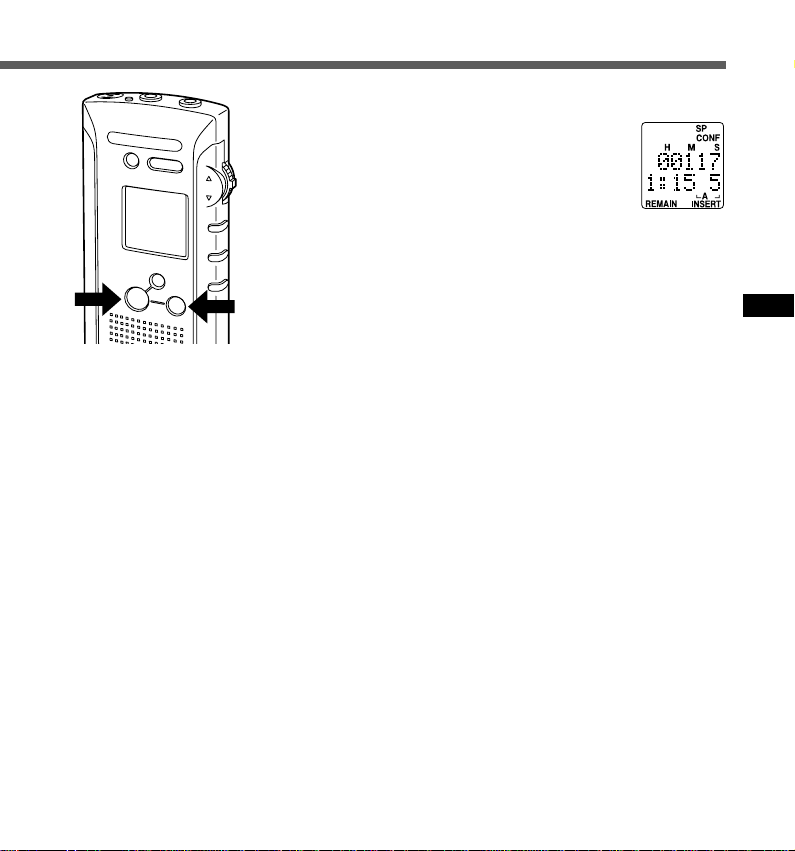
9
ERASE
SP DICT
REC
IN
F
O
STOP
Press the REC button.
The insert recording starts.
9
MENU
/VOL
Press the STOP button.
The insert recording stops.
10
................................................................................................
D
E
X
/
L
D
E
R
Notes
• Insert mode is only valid for one action. As soon as another operation
(such as Playback) is executed, the recorder will go back to Overwrite
10
mode.
• Insert recording will not work if there is no recording time available.
Recording
Listening While Recording Audio (Recording
Monitor)
Insert an earphone into the earphone jack to monitor what is
being recorded. (The volume is fixed.)
17
Page 18
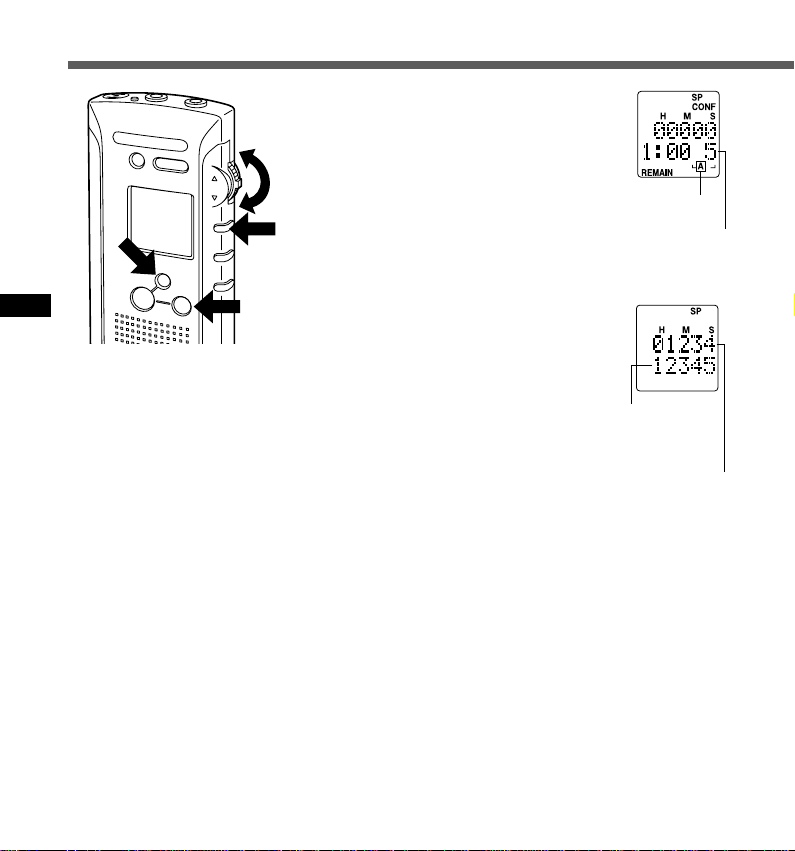
Playing and V olume Control
Press the INDEX/FOLDER
button to choose a folder.
3
1
Move the MENU/VOL switch up
or down to choose the
2
message you want to play .
The time and date when the message
was recorded are displayed.
1
ERASE
SP DICT
IN
F
O
2
MENU
/VOL
D
E
X
/
LD
E
R
Folder
Message number
Playing and Volume Control
18
REC
STOP
4
Press the PLAY button.
The recorder will start playing.
3
The elapsed playing time appears on
the display in hour-minute-second
format (real-time counter). The length
of the message being played is
displayed below in hour-minutesecond format.
Press the STOP button to stop playing.
Length of the
message being
played (1 hour, 23
minutes, 45 seconds)
Elapsed playing time
(12 minutes, 34 seconds)
4
................................................................................................
Notes
• The recording date and time appears on the display for 2 seconds at
the beginning of each message.
• The recorder stops automatically when it finishes playing each
message.
• Insert an earphone into the earphone jack to monitor playback. The
built-in speaker will be turned off.
Page 19

Volume Control
Move the MENU/VOL switch up or down
while playing a message.
Moving the switch will show the current volume
setting (0 to 30) on the display.
Moving the MENU/VOL switch up increases
the volume.
Moving the MENU/VOL switch down
decreases the volume.
ERASE SP DICT
Note
If you do not move the MENU/VOL switch for 4
seconds, the display will return to playing.
Warning
Do not turn the volume too high when listening
with an earphone. You could damage your
hearing.
INDEX/
FOLDER
MENU
/VOL
Pause Playing
Pause
Press the PLAY button.
The elapsed playing time indicator on the
➥
display will flash.
Resume Playing
Press the PLAY button again.
Playing will resume at the point of
➥
interruption.
Notes
• The recorder will stop if you press the STOP button
while it is paused.
• If the recorder is paused for 30 minutes or longer,
it enters standby mode and the display shuts off.
(To release the recorder from standby mode and
turn on the display, press any one of the STOP,
REC, PLAY, FF, or REW buttons or the MENU/VOL
switch.)
Playing and Volume Control
19
Page 20

Playing and Volume Control
Other Operations
Operation
Fast Playback
(FPLY)
Fast Forward
(FF)
Playing and Volume Control
Rewind (REW)
Cue (CUE)
(Fast Forward
While Playing)
Review (REV)
(Rewind While
Playing)
Press the PLAY button for 1 second or
longer while playing a message.
Press the FF button while stopped.
Press the REW button while stopped.
Press and hold the FF button while
playing a message.
Hold the REW button while playing a
message.
How to Cancel
Press the PLAY button for 1 second or longer
again.
➥The recorder will resume normal playback.
Press the STOP button.
➥The recorder stops immediately. (If you do not
press the STOP button, the recorder will skip to
the end of the message and then stop
automatically.)
Press the STOP button.
➥The recorder stops immediately. (If you do not
press the STOP button, the recorder will skip
back to the beginning of the message and then
stop automatically.)
Release the FF button.
➥The recorder will resume normal playback. (If
you do not release the FF button, the recorder
will skip to the end of the message and then stop
automatically.)
Release the REW button.
➥The recorder will resume normal playback. (If
you do not release the REW button, the recorder
will skip back to the beginning of the message
and then stop automatically.)
• In FPLY, the recorder plays messages about 1.5 times faster than normal.
• If you press the FF button again during a fast-forward operation the recorder will skip to the beginning of the
next message.
• If you press the REW button again during a rewind operation the recorder will skip to the beginning of that
message.
• Parentheses denote mode indications that appear on the display. “FPLY” appears for 1 second when this mode
is entered. “FF”, “REW”, “CUE”, or “REV” appears during its mode.
20
Page 21

Erasing
Erasing One Message at a Time
A selected file can be erased from a folder.
Press the INDEX/FOLDER button to choose the
folder containing the message you want to
1
erase.
3,4
1
ERASE
SP DICT
R
E
C
INDEX/
FOLDER
S
T
O
P
M
E
N
U
/VO
L
Move the MENU/VOL switch up
or down to choose the number
2
of the message you want to
2
erase.
Press the ERASE button for 1
second or longer.
3
The message number will flash.
Press the ERASE button again.
“ERASE” flashes and then “OK”
4
appears on the display to show the
message is erased.
Message numbers of subsequent
messages are changed automatically,
and available recording time increases
approximately by the length of the
erased message.
................................................................................................
Notes
• If you do not press the ERASE button within 4 seconds after Step 3
above, or if you press the STOP button, the recorder will cancel
message erasure and will return to the screen in Step 2.
• The remaining recording time available after message erasure depends
on the recording mode (R-TIME) setting.
Erasing
Message number
21
Page 22

Erasing
Erase All Messages from a Folder
All files in a folder can be erased simultaneously.
Press the INDEX/FOLDER
button to choose the folder
1
containing the messages you
want to erase.
4
Erasing
22
1
ERASE
SP DICT
R
E
C
INDEX/
FOLDER
S
T
O
P
MENU
/VOL
2
Press the MENU/VOL switch.
3
2
Move the MENU/VOL switch up
to choose “ERASE ALL”.
3
“ALL” and the folder name will flash.
Press the ERASE button for 1
second or longer.
4
“ERASE” flashes and then “OK” appears
on the display to show the messages
have been erased.
The recorder returns to the initial screen
for the folder from which all messages
have been erased, and available
recording time increases approximately
by the length of the erased messages.
................................................................................................
Notes
• If you do not press the ERASE button, or if you press the STOP button
within 3 minutes after Step 3 above, the recorder will cancel message
erasure and will return to the screen in Step 1.
• If a group of erased messages has recordings in both SP mode and
LP mode, the total recording times of the erased messages and the
increase in remaining recording time may not be equal.
Folder
Page 23

T o Partially Erase a Message
You can select part of a message to erase.
Press the INDEX/FOLDER button to choose a folder.
1
2,6
ERASE
SP DICT
M
EN
U
/VO
L
Move the MENU/VOL switch up or down to
choose the message you want to partially erase.
2
1
5,7,8
INDEX/
FOLDER
R
E
C
S
T
O
P
3
4
Press the PLAY button to play the message.
3
Press the STOP button where you want the
partial erasure to begin.
4
Press the MENU/VOL switch.
Erasing
5
Move the MENU/VOL switch up to choose
“ERASE”.
6
Press the MENU/VOL switch.
Playback resumes automatically.
7
Press the MENU/VOL switch
again at the point where you
8
want the partial erasure to stop.
The erasure ending time indicator will flash.
(continued)
23
Page 24

Erasing
Erasing
9
ERASE
SP DICT
REC
IN
F
O
STOP
Press the ERASE button for 1 second or longer.
“OK” appears on the display when the partial erasure is
9
finished.
Remaining recording time is extended for about the length
MENU
/VOL
D
E
X
/
LD
E
R
of the partial erasure.
................................................................................................
Notes
• If you do not press the ERASE button within 4 seconds after Step 8
above, or if you press the STOP button, the recorder will return to
STOP mode and partial erasure will be cancelled.
• Remaining recording time available after partial erasure depends on
the recording mode (R-TIME) setting.
24
Page 25

Recording Modes
The recorder provides approximately 2 hours and 30 minutes of continuous recording* in SP
mode and approximately 5 hours and 20 minutes* in LP mode. The default is SP mode.
SP mode: Standard Playback mode
LP mode: Long Playback mode
*Recording time may be reduced if many short messages are recorded.
Press the MENU/VOL switch.
1
ERASE
SP DICT
R
E
C
INDEX/
FOLDER
S
TO
P
M
ENU
/VO
L
1,2
3
Press the MENU/VOL switch to
choose the recording mode.
2
The MENU/VOL switch toggles
between “SP” and “LP” modes each
time you press it.
Press the STOP button.
This completes the setup procedure.
3
................................................................................................
Notes
• Recording mode cannot be changed in the middle of a message.
• The remaining recording time indicator is updated when recording mode
is switched.
• SP mode is recommended in the following situations:
– A better quality recording is desired.
– Meetings or lectures need to be clearly recorded.
– Messages will be transferred to a PC for speech-to-text conversion
with voice recognition software.
Recording Modes
25
Page 26

Microphone Sensitivity
The sensitivity of the built-in microphone is adjustable to suit recording needs.
CONF (conference recording): High-sensitivity mode that records sounds from all directions.
DICT (dictation recording): Low-sensitivity mode suitable for dictation.
Press the MENU/VOL switch.
1
ERASE
SP DICT
INDEX/
FOLDER
R
E
C
S
T
Microphone Sensitivity
O
26
M
EN
U
/VO
L
2
1,3
P
4
Move the MENU/VOL switch down to choose
“M-SENS”.
2
Press the MENU/VOL switch to
choose microphone sensitivity.
3
The MENU/VOL switch toggles
between “CONF” and “DICT” each
time you press it.
Press the STOP button.
This completes the setup procedure.
4
................................................................................................
Notes
• If an optional microphone is plugged into the microphone jack, its
sensitivity can be switched.
• If the microphone sensitivity is set to DICT, the microphone will only
record nearby sounds. Place the built-in microphone close to the
speaker’s mouth (2 to 4 inches).
Recording Meetings and Lectures
• Set the microphone sensitivity to CONF (conference
recording) to record meetings or lectures.
• Meetings and lectures sometimes cannot be recorded
clearly depending on the speakers’ voices and ambient
acoustic conditions. Recording in SP (Standard Playback)
mode is recommended in these situations.
(See Recording Modes .... P.25)
• If you are having trouble hearing the person speaking, it is
likely that your recorder will not record it.
Page 27

Using the V ariable Control Voice Actuator (VCVA)
When the microphone senses that sounds have reached a preset volume, the built-in Variable
Control Voice Actuator (VCVA) starts recording automatically, and stops when the volume drops.
Particularly helpful for extended recording, the VCVA not only conserves memory by turning off
recording during silent periods, but also makes playback more efficient and convenient by eliminating
silent periods.
Press the MENU/VOL switch.
1
5
ERASE
SP DICT
R
E
C
INDEX/
FOLDER
S
T
O
P
M
EN
U
/VO
L
2
4
1,3
Move the MENU/VOL switch down to choose
“VCVA”.
2
Press the MENU/VOL switch to
choose “ON”.
3
Press the STOP button.
This completes the VCVA setup procedure.
4
Press the REC button.
The recorder will start recording in VCVA mode.
5
................................................................................................
Notes
• When the VCVA senses sound louder than its start/stop actuation level
setting, recording starts automatically. When it senses silence for 3
seconds or longer, recording pauses automatically and the recorder
enters standby mode.
• When recording is in progress, the record indicator lamp will glow.
When the recorder is in standby mode, “VCVA” will flash on the display
and the record indicator lamp will flash.
• Pressing the STOP button will stop recording whether the recorder is
recording or in standby mode.
Using the Variable Control Voice Actuator (VCVA)
27
Page 28

Using the Variable Control V oice
Actuator (VCV A)
Adjusting the VCVA start/stop
actuation level
Move the MENU/VOL switch up or down while
recording to adjust the VCVA start/stop
actuation level (1 to 30). The higher the level,
the more sensitive the VCVA is.
Note
The VCVA start/stop actuation level also varies
depending on the selected microphone sensitivity
mode. For information about microphone sensitivity,
see page 26.
Using the Variable Control Voice Actuator (VCVA)/
Dictation Mode
ERASE SP DICT
INDEX/
FOLDER
MENU
/VOL
Dictation Mode
Simply pressing the SP DICT button sets up
the recorder for dictating or for recording
messages to be transferred to a PC for
speech-to-text conversion using voice
recognition software.
Dictation mode settings
Recording mode: SP
Microphone sensitivity:DICT
Alarm: OFF
To change settings from DICT mode, see the
following pages:
To change recording mode: See P .25.
To change microphone sensitivity:
To change alarm setting: See P.31.
.....................................................................
Notes
• Place the built-in microphone close to the speaker’s
mouth (2 to 4 inches).
• Use of an optional ME12 noise-canceling
microphone is recommended for recording with
minimum ambient noise effects.
See P .26.
28
E
R
A
S
E
S
P
D
IC
T
M
E
N
U
/V
O
L
INDEX/
FOLDER
Page 29

Index Marks
Index marks can be incorporated into a file during recording or playback to make it easy to locate
interesting information.
Press the INDEX/FOLDER button when the recorder is
recording or paused while recording.
An index mark appears on the display, along with “INDX”, and
ERASE
SP DICT
REC
IN
F
O
STOP
MENU
/VOL
D
E
X
/
L
D
E
R
the record indicator lamp flashes.
When you play a message that has an index mark, the index
mark appears on the display, along with “INDX”, when the index
point is reached.
................................................................................................
Notes
• Additional index marks cannot be recorded while the record indicator
lamp is flashing.
• A message can have up to 16 index marks.
Locating an Index Mark
Press the INDEX/FOLDER button while playing
The recorder will search for the next index mark in the message
and continue playback from that point.
Press the INDEX/FOLDER button while fast-forwarding
The recorder will search for the next index mark in the message
and then stop immediately.
Press the INDEX/FOLDER button while reversing
The recorder will search for the previous index mark in the
message and then stop immediately.
Note
If INDEX is pressed during operation and no index marks are set in the
direction that you are advancing (PLAY, FF or REW), the recorder will
continue operation.
Index Marks
29
Page 30

T ransferring Messages
A recorded message can be transferred from one folder to the other.
The file is added as the last message in the destination folder.
Press the INDEX/FOLDER button
to choose the folder containing
1
the message you want to move.
Move the MENU/VOL switch up
or down to choose the number
2
of the message you want to
move.
Press the MENU/VOL switch.
1
ERASE
SP DICT
REC
IN
F
O
STOP
MENU
3,5
/VOL
D
L
2,4
E
X
/
D
E
R
3
Transferring Messages
Move the MENU/VOL switch up
to choose “MOVE”.
4
The source folder is displayed on the
left, and the destination folder on the
right.
Press the MENU/VOL switch.
An arrow mark flashes and then “OK”
5
appears on the display when the
message is moved.
“NEW” appears on the display in the
destination folder.
................................................................................................
Canceling a move
In Step 5, press the STOP button before pressing the MENU/
VOL switch.
The recorder will return to the screen in Step 2.
Folder
Message number
30
Page 31

System Sounds (Alarms)
The recorder beeps to alert you to button operations or to warn you of errors. System sounds may
be turned off.
Press the MENU/VOL switch.
1
ERASE
SP DICT
REC
IN
F
STOP
MENU
/VOL
D
E
X
/
O
LD
E
R
2
4
1,3
Move the MENU/VOL switch
down to choose “ALARM”.
2
Press the MENU/VOL switch to
choose “ON” or “OFF”.
3
The MENU/VOL switch toggles between “ON” and “OFF”
each time you press it. The “OFF” setting disables the
system sounds.
Press the STOP button.
This completes the setup procedure.
4
................................................................................................
Guide of system sounds
Tone Explanation
Beep, long
beep, beep,
long beep
Long beep
every 15
seconds
Low-pitched
beep
Beep
Beep, beep,
beep, beep
Note
The built-in speaker will be shut off when using an earphone.
• Available recording memory is exhausted.
• The recorder has finished playing the last
message.
Less than 90 seconds of available recording time
is left while recording.
The end or beginning of a message has been
reached.
Recording has successfully started by pressing
the REC button.
Incompatible operation, such as trying to play
while “NEW” appears on the display .
System Sounds (Alarms)
31
Page 32

Formatting
If you want to initialize the built-in flash memory to its factory defaults, follow these steps:
Press the MENU/VOL switch.
1
1
3
ERASE
SP DICT
MENU
/VOL
Move the MENU/VOL switch up
or down to choose “FORMAT”.
2
“YES?” will flash.
Formatting
32
IN
D
E
X
/
F
O
L
D
E
REC
STOP
2
R
Press the ERASE button for 1 second or longer.
“FORMAT” flashes and then “OK” appears on the display
3
when formatting is complete.
................................................................................................
T o Abort Formatting
In Step 2, press the STOP button while “YES?” is flashing.
The recorder will return to the initial screen before Step 1.
Caution
Formatting will clear the flash memory of all recorded
messages, and reinitialize the clock and other settings.
If you want to initialize the flash memory to its factory defaults,
reset the recorder (P.33) after formatting.
Page 33

Reset
Menu List
Press the MENU/VOL switch
If the display or the recorder acts strangely,
lightly press the reset button in the battery
compartment with the tip of a ballpoint pen or
a similar object.
Notes
• Do not use a sharp object such as a needle.
• Pressing the reset button may cause the clock to
change. Verify the correct time and reset the time
and date.
• Voice data is not erased when the recorder is reset.
R-TIME
M-SENS
VCVA
R-MODE
ALARM
FORMAT
TIME/DATE
ERASE
MOVE
ERASE ALL
: Move the MENU/VOL switch up and down.
(P.25)
(P.26)
(P.27)
(P.16)
(P.31)
(P.32)
(P.13)
ID
(P.11)
(P.23)
(P.30)
(P.22)
Notes
• Stop the recorder before choosing any menu
settings.
• The recorder will stop if you leave it idle for 3
minutes or longer during menu setup operations.
Reset
Menu List
33
Page 34

T roubleshooting
Q.1 Nothing appears on the display
A.1 The batteries are not inserted properly.
The batteries are drained.
The HOLD switch is set to the HOLD
position.
The recorder is in standby mode.
Q.2 Won’t run
A.2 The HOLD switch is set to the HOLD
position.
The batteries are drained.
The battery cover is open.
Q.3 Unable to record
A.3 Recording time is used up.
Q.4 Record indicator lamp off
A.4 Recording time is used up.
The HOLD switch is set to the HOLD
position.
Q.5 Audible alarm sounds while recording
A.5 There is little remaining recording time.
Recording time is used up.
Q.6 No sound or quiet sound during
playback
A.6 The volume is probably turned down with
Troubleshooting
the MENU/VOL switch.
Q.7 Unable to set index marks
A.7 All 16 index marks have been used
already.
Q.8 Clock resets
A.8 The flash memory has been formatted.
Q.9 Incorrect time is shown
A.9 The batteries were replaced too slowly.
Q.10 AC adapter won’t work
A.10 Y ou are not using the proper AC adapter .
Q.11 “ERROR” appears on the display
A.11 Was the battery cover opened, or was
the AC adapter connected or
disconnected while formatting? If so, try
reformatting (P.32).
Q.12 Unable to move messages
A.12 There are already 99 messages (the
maximum) in the destination folder.
Q.13 “NEW” doesn’t appear on the display
when the STOP button is pressed
while recording
A.13 You were recording the 99th message
(the maximum).
Q.14 Cannot play a message
A.14 Does the display show “NEW”? If so,
move the MENU/VOL switch down to
move to a message that you want to play.
34
Page 35

Specifications
Accessories
Recording format
DSS (Digital Speech Standard)
Recording medium
16MB integrated flash memory
Input level –70 dBv
Overall frequency response
SP mode: 300 to 5,000 Hz
LP mode: 300 to 3,000 Hz
Recording time SP mode: Approx. 2 hours 30
minutes (1 message continuous
recording)
LP mode: Approx. 5 hours 20
minutes (1 message continuous
recording)
Speaker Built-in ø28 mm round dynamic
speaker
Microphone jack ø3.5 mm mini-jack, impedance
2 kΩ
Earphone jack ø3.5 mm mini-jack, impedance
8 Ω
Maximum output (3 V DC)
100 mW or more (8 Ω speaker)
Power supply Rated voltage: 3 V
Batteries: Two AAA
batteries (LR03
or R03)
External power supply:
AC adapter
Battery life (Recording)
Approx. 11 hours (with alkaline
batteries, based on our standard
testing procedure)
External dimensions
116 (H) × 43 (W) × 14.5 (D) mm
(without protrusions)
Weight 74 g (including batteries)
(optional)
Headset:E99
A helpful tool for transcription or concentrated work
in busy office environments.
Conference microphone:ME7
A highly sensitive directional microphone (shotgun
microphone). Used to record speakers at a distance.
External microphone:ME10*
A lavalier omnidirectional microphone that clips to
clothing. Used to record your own voice or people
near you.
Noise-Cancellation microphone:ME12
Used to get crisp recordings of your own voice by
reducing the effects of ambient noise. Recommended
to improve the accuracy when using voice-recognition
software.
AC adapter:A321 (US and Canada) or A322
(Europe except U.K.)
Connecting cord:KA232*
Use to connect the microphone jack of this unit to a
radio or other sound source.
Plug adapter:PA3
An adapter that connects devices such as
microphones with ø2.5 mm mini-plugs to the unit’s
ø3.5 mm mini-jack.
* Use these accessories with the PA3 plug adapter.
PC Data Transfer Kit: AS-200W
Allows files to be transferred to a PC through a serial
or a USB cable.
Specifications/Accessories
(optional)
* Specifications and design are subject to
change without notice.
* Battery life varies greatly according to type
of batteries used and the conditions of use.
35
Page 36

36
Software Section
Page 37

Table of Contents
Important
Operating Environment ........................... 38
Features of DSS Player and IBM ViaVoice...
Preparation
Installing DSS Player Software ............... 39
Installing IBM ViaVoice Software ............ 40
Setting Up Your Microphone and
Audio System for IBM ViaVoice........ 42
Let's Start
Starting DSS Player ................................ 48
Downloading Recorded
Voice Data to a PC ........................... 48
Selected File Downloading Window........ 49
Selected File Downloading Procedure .... 50
Other Information
Converting File Formats.......................... 58
Uninstalling DSS Player or IBM ViaV oice...
38
58
How to Use This Manual ......................... 38
Creating a Voice Model........................... 44
Connecting the Digital
Voice Recorder DS-320.................... 47
Voice File Playback Window ................... 51
Voice File Playback Procedure ............... 52
Sending Voice Files by E-mail ................ 53
Voice Recognition ................................... 54
Troubleshooting ...................................... 59
Technical Assistance and Support .......... 59
37
Page 38

Operating
Features of DSS Player
Environment
Operating Environment/Features of DSS Player and IBM ViaVoice/How to Use This Manual
● Microsoft Windows 95, Windows 98,
Windows 2000,or Windows NT Workstation
4.0 with Service Pack 5: Intel Pentium 300
MHz processor and 256K L2 cache or
equivalent (including AMD-K6 with 256K L2
cache)
● Windows Me: Intel Pentium lll 600 MHz and
256K L2 cache (including AMD-K6 with
256K L2 cache)
● 64 MB RAM for Windows 95/98/Me/NT 4.0
● 96 MB RAM for Windows 2000
● Windows 95/98/Me/NT 4.0/2000 compatible
16-bit sound card with microphone input jack
● 520 MB of available hard drive space
● Quad-speed CD-ROM drive or faster
● Serial port
● 800 x 600 dpi, 256 color display
and IBM ViaVoice
● PC storage and management of voice
recordings made with the DS-320 digital
voice recorder.
● Playback of voice files.
● Recording of voices directly on a PC using
the DS-320 digital voice recorder.
● Conversion of DSS-format files into WAVEformat files.
● Transmission of voice files via e-mail.
● Conversion of recorded voices into text
using voice recognition software.
Notes
• This document assumes that the reader is already
acquainted with the basic operations of Windows
95/98/NT4/2000/Me.
• For more information on operating your specific PC,
refer to your PC's user manual.
How to Use This Manual
This manual describes only the basic
operations of DSS Player. Please refer to the
online help for information about menus and
other details.
• Online help is available once DSS Player has
been installed.
38
Page 39

Installing DSS Player Software
In order to use the PC link functions, you must first
install DSS Player and IBM ViaVoice in your PC.
• When running Windows NT4/2000 through
a network connection, it is required to log in
as the Administrator or under a user name
designated as an Administrator.
Insert the DSS Player CD-ROM in
the CD-ROM drive.
1
The Installation program will start
automatically.
• If setup does not take place
automatically, use the following
procedure (the CD- ROM drive name is
assumed to be “D:”):
1
Click the [Start] button and select [Run].
2 Enter “D: ¥setup.exe” in the [Open]
window and click the <OK> button.
The language selection screen is
displayed.
2
DSS Player will be installed for the language
selected here. Select the desired language.
A window entitled [“OLYMPUS DSS
PLAYER SETUP”] appears. Be sure
3
to exit all applications other than
the installation program.
After exiting all applications, click <Next>.
Confirm the licensing agreement.
You have to agree with this agreement to
4
install DSS Player. Click <Yes> if you
agree with it.
Selection of the installation
destination directory.
5
Select the installation destination for DSS
Player. Click <Browse> to change the
current installation destination. If you do
not want to change it, simply click
<Next>.
Selection of the program folder.
The program folder name can be
6
changed here. If you do not want to
change it, simply click <Next>.
Confirmation of the start of file
copy.
7
Check the contents of “Current Settings”.
Click <Next> if you accept them.
• If you want to change the program
folder or installation folder, click <Back>
and change them.
File copy.
DSS Player is installed automatically. Be
8
patient. This may take a few minutes.
Completion of setup.
When installation is completed, click
9
<Finish>.
• If you are asked to restart after
installation is completed, click <Yes> to
reboot the PC.
• As soon as the installation of DSS
Player is completed, the installation of
IBM ViaVoice will automatically start.
Installing DSS Player Software
39
Page 40

Installing IBM ViaVoice Software
To use Voice recognition, you must also install IBM ViaVoice and then setup your sound system.
During installation you will see the following windows. (This section does not show all windows you will see.)
User Information
Type your name and company
name, if appropriate. Click
Installing IBM ViaVoice Software
40
<Next> when you have finished.
Installation Options
Select the install Options. To
clear an Option, click on the tick
mark in the box.
Select the option, if available, to
install ViaVoice support for
Microsoft Office only if you have
Microsoft Office 97 or Office
2000 programs installed on your
computer. This option includes
support for dictation into Word
and natural commands for
Word, Excel and Outlook®.
If you choose not to install this
support now, you can install it
later.
Page 41

Adobe® Acrobat® Reader
If Adobe Acrobat Reader is not already installed on your computer, select the option to have
ViaVoice automatically start the Adobe Acrobat Reader installation program. Adobe Acrobat Reader
enables you to view the ViaVoice Command Reference.
Click <Next> when you have finished.
Setup Complete
This window indicates that you have successfully installed the software.
Installing IBM ViaVoice Software
41
Page 42

Setting Up Your Microphone and Audio System for IBM ViaVoice
Woody appears if you placed VoiceCentre in your StartUp folder. If Woody does not appear, start
VoiceCentre by clicking [Start] ➔ [Programs] ➔ [IBM ViaVoice VoiceCentre].
Woody gives you a short presentation. (To skip this presentation, right-click on Woody and then
select [Hide].) Then, the Audio Setup Wizard starts to help you set up the microphone and audio
system so you can get started with ViaVoice.
Setting Up Your Microphone and Audio System for IBM ViaVoice
The name in the “User Name” field is probably the one you typed earlier. Leave it as it is, or type a name
by which you want ViaVoice to know you. As you use ViaV oice, words you add and other enhancements
you make go into your personal speech files. These files are associated with your user name.
You can use any name that contains the letters a to z in both uppercase and lowercase as well as
numbers, but it must not contain typographic symbols (like ” or /).
If other people will use your speech system, add their user names later but before they start ViaVoice
for themselves. People using your speech system must have their own user names. ‘Sharing’ your
user name with others will corrupt your personal speech files and cause recognition problems.
For now, ignore the other three fields and click <Next>.
42
Page 43

Audio Setup Wizard
This wizard presents several windows to help you set up your microphone. We recommend that
you use the microphone that comes with the product until you are thoroughly comfortable with
your speech system.
The Audio Setup Wizard will prompt you to identify the type of microphone and components you
have.
With the microphone on, complete all audio tests that the Audio Setup Wizard presents to you.
At this window, for example, click <Start> and then read aloud the text inside the box. Speak the
text clearly in your normal voice, pausing naturally between phrases or after punctuation marks.
(Imagine you are speaking to someone for whom English is not the native language.) After you
have read the sentences, ViaVoice will display the quality of your audio. Should V iaV oice find that
the audio quality is poor, click <Fixing Poor Audio Quality> to learn how to take corrective action.
Setting Up Your Microphone and Audio System for IBM ViaVoice
During these tests, the Audio Setup Wizard might display information windows or even start your
Web browser to display a ViaV oice-related Web page. Use the information proposed by the wizard
to solve any difficulty you might encounter during Audio Setup. ViaVoice needs these tests to be
completed successfully to set up your system properly.
43
Page 44

Creating a Voice Model
You must give ViaVoice a sample of your voice so that it can understand you. The User Wizard
makes it easy for you to do this.
When you see this window, click <Start>, then read aloud the text in the box, speaking in a normal
style. As ViaVoice recognises you, some text will become grey. In the window below, the first
sentence and all but the last word of the next sentence have been recognised. If ViaVoice does
not recognise what you say, simply say the text again until it is greyed.
Creating a Voice Model
When you have finished reading this text aloud, ViaVoice displays the Choosing a Story window.
Select the story that you want to read aloud for creating your voice model. If the story you want has
two Parts, select Part 1 first. Read the story aloud using your normal speaking voice.
44
Page 45

When ViaVoice has enough recorded data, you will see the Story Finished window . Click <Analyse>
to have ViaVoice create your voice model. However, if you have a strong regional accent, we
recommend that you click <Continue Reading> so that you can record more sentences, giving
ViaVoice more data for analysis. Doing everything you can to give ViaVoice as much information
about your voice as possible is one of the best ways to ensure excellent recognition accuracy.
Creating a Voice Model
45
Page 46

Creating a Voice Model
You see this window after clicking <Analyse>.
Creating a Voice Model
Wait until ViaV oice has fully processed your recording before turning off your computer or working
with other processing-intensive programs.
46
Page 47

Connecting the Digital Voice Recorder DS-320
Before connecting the KP3 serial connection cable to the DS-320 digital voice recorder,make sure
that the HOLD switch is released and that the recorder is in stop mode.
Connect the provided KP3
serial cable to the serial port
1
1
of the PC.
Connect the other end of the
provided serial cable to the
2
DS-320 digital voice recorder.
Connecting the Digital Voice Recorder DS-320
2
KP3
• For details or locations of the serial port on
your PC, refer to your PC's user manual.
• Do not unplug the serial connection cable
during communication. Otherwise, the data
may be corrupted.
47
Page 48

Starting DSS Player
Start DSS Player as described below.
• The following procedure assumes that DSS Player is installed in the PC. For installation, see
“Installing DSS Player Software”.
54
Start Windows.
1
Connect the DS-320 digital
voice recorder.
2
For connections, see “Connecting
Digital Voice Recorder DS-320”.
Click the [Start] button.
3
Starting DSS Player/Downloading Recorded Voice Data to a PC
Select [Programs] ➔ [Olympus
DSS Player 3.5].
4
Click [Olympus DSS Player].
5
• When DSS Player starts, the downloading
3
Downloading Recorded Voice Data to a PC
Downloading refers to transmitting voice files from the DS-320 digital voice recorder to the PC.
window is displayed.
DSS Player provides the following two methods for downloading voice files in the PC.
– Downloading selected files
One or more voice files can be selected and downloaded to the PC.
– Downloading the folder
All voice files in a selected folder can be downloaded to the PC.
The following description explains how to download selected files. For information about
downloading an entire folder.
48
Page 49

Selected File Downloading Window
Voice files can be selected and downloaded using the downloading window, which is displayed
immediately after the startup.
• To display the main window immediately after start up, open the [Option] menu and uncheck
[Open Download Window After Start].
12
3
1 Main Window button
Click to close the downloading window and open the main window.
2 Folder
Select the folder in the DS-320 digital voice recorder.
3 Folder View
Shows the list of voice files in the folder selected with 2.
Selected File Downloading Window
49
Page 50

Selected File Downloading Procedure
1 2
Selected File Downloading Procedure
• To check the contents of a voice file, select it and click the Play button
recorder will play back the file.
3
connection (when Pentium 300 MHz is used). When downloading a large voice file, it is recommended that you
use the optional AC adapter as a power source.
•
The downloading destinations are as shown below. T o change a destination, click [Download Options] in the [Download] menu.
Folder A files:C:\Program Files\Olympus\DssPly32\Message\Folder_A
Folder B files:C:\Program Files\Olympus\DssPly32\Message\Folder_B
• If a voice file has the same name as an already downloaded file, the newly downloaded file is saved under a
different file name only when the recording dates of the two files are different. If the recording dates and times
are the same as the existing file, the file will not be downloaded.
50
Selecting the folder.
Select the folder containing the
1
voice files to be downloaded. The
illustration shows the display when
folder A is selected.
Selecting the voice files.
Select the voice files to be
2
downloaded.
To select more than one voice file,
hold the Ctrl or Shift key while
selecting the voice files. The photo
shows the display when two files are
selected.
. The DS-320 digital voice
Downloading the voice files.
In the [DownLoad] menu, click
3
[Download Selected Files].
• Be careful not to disconnect any cables during
downloading.
• It is not possible to upload files from the PC
to the DS-320 digital voice recorder.
• Download times may vary depending on the
voice file sizes and PC performance.
Example) Downloading a voice file containing
one hour of voice recorded in standard mode
takes about 14 minutes with a serial
Page 51

Voice File Playback Window
A voice file can be played back from the main window.
•
T o display the main window from the downloading window, click the Main Window button in the downloading window.
123
Voice File Playback Window
4
1 Downloading Window button
Closes the main window and opens the downloading window.
2 Current Folder
Provides selection of folders in the PC.
3 Voice File list box
Shows the list of voice files in the folder selected in 2.
4 Playback control buttons
Used for playing back or stopping audio files.
5 OLE button
Click to export voice files to E-mail software or another application.
5
51
Page 52

Voice File Playback Procedure
To play back a voice file.
1
Voice File Playback Procedure
3
• For details on other operations including fast forward, fast reverse, stop, play speed control, volume control
and time axis control, refer to the online help.
2
Select the folder.
From [Active Folder], select the
1
folder containing the voice file you
want to play back. The illustration
shows the display when
“C:\ProgramFiles\Olympus\DssPly32\
Message\Folder_A”
Select the voice file.
Select the voice file from the voice
2
file list box.
The illustration shows the display
when the file “DS640001.dss” is
selected.
Play back the voice file.
Press the Play button.
3
has been selected.
52
Page 53

Sending Voice Files by E-mail
Voice files can be sent by E-mail, simply by attaching them to an e-mail message created with your
e-mail software.
Attach voice files as described below.
For details on sending e-mail, refer to the instructions of your e-mail software.
Start DSS Player.
1
Launch your e-mail program and create a new message.
2
Attaching voice files.
From the Voice Files list box of DSS Player, select the voice files to be attached and drag-
3
and-drop the OLE button to the mail creation window. (Move the files while holding the left
button of the mouse and release the button on the destination.)
• If your mailing software does not support drag-and-drop, use the file attaching function of the mailing software
and select the desired voice files from the folder containing voice files.
• Even if the e-mail recipient does not have DSS Player, the voice files can be played back using DSS PlayerLite. DSS Player-Lite can be downloaded free of charge at Olympus site http://www.olympusamerica.com/ or
http://www.olympus-europa.com/.
Sending Voice Files by E-mail
53
Page 54

Voice Recognition
Voice files can be converted into text with IBM ViaVoice.
Input Device Setup
To perform voice recognition of DSS-format files recorded with the DS-320 digital voice recorder,
you first have to set up the input device for the DS-320 digital voice recorder with IBM ViaVoice.
Click the [Start] button
and select [Programs]
1
➔ [IBM ViaVoice
V oiceCenter].
Click the [ViaV oice]
Voice Recognition
button of IBM ViaVoice
2
V oiceCenter, then
select [Tools] and
[Analyze My V oice].
The [ViaVoice User
Wizard] window
3
appears.
Select [Olympus DSS File]
in the [Device] list box, then
click the <Next> button.
54
The [Audio Setup] window opens.
Perform audio setup by following the instructions
4
displayed on your screen.
• For audio setup or enrolling using the DS-320
digital voice recorder, use the provided PC
connection cable (KP4). Insert the L-shaped plug
of the KP4 into the earphone jack of the DS-320
digital voice recorder and insert the straight plug
into the microphone jack of the PC.
Page 55

• It is sometimes necessary to input voice during audio setup
or enrolling. To enable voice input, turn on the microphone
while pressing and holding the SP DICT mode button on the
DS-320 digital voice recorder.
Creating a Voice Model
You must give ViaVoice a
sample of your voice through
the DS-320 microphone so that
it can understand your recorded
voice. The User Wizard makes
it easy to do this.
When you see this window,
click <Start>, then read the text
in the box aloud, speaking in a
normal tone of voice. As
ViaV oice recognises what you
read, that text will turn grey . In
the window below, the first
sentence and all but the last
word of the next sentence
have been recognised. If
ViaVoice does not recognise
what you say, simply say the
text again until it is greyed out.
Voice Recognition
55
Page 56

Voice Recognition
When you have finished reading the text aloud, ViaVoice displays the Choosing a Story window.
Select the story that you want to read aloud for creating your voice model. If the story you want has
two parts, select Part 1 first. Read the story aloud, speaking in a normal tone of voice.
Voice Recognition
When ViaVoice has enough data, the Story Finished window will appear . Click <Analyse> to have
ViaVoice create your voice model. However, if you have a strong regional accent, we recommend
that you click <Continue Reading> so that you can record more sentences, giving ViaVoice more
data for analysis. Giving ViaVoice as much information about your voice as possible is the best
way to ensure excellent recognition accuracy.
56
Page 57

Executing V oice Recognition
Start voice recognition as described below.
1 3 2
Select the folder.
From the DSS Player main window,
1
select the folder containing the voice
file you want to process with voice
recognition.
Select the voice file.
In the [Voice Files] list box, select the
2
desired voice file.
Start of voice recognition.
Click the [Start Voice Recognition] icon .
3
The voice recognition software window
appears and voice recognition starts.
• For more details on the functions of IBM
ViaVoice (such as correction of converted
characters), refer to the ViaVoice’ s online help.
Notes on Recording for Voice Recognition
When recording voices for use in voice recognition, set up your DSS recorder as follows.
– Set the microphone sensitivity to “DICT”.
– Set the recording mode to “SP”.
– Set the Variable Control Voice Actuator (VCVA) to “OFF”.
– Only record voices that have already been registered in the voice recognition software.
– Record in a relatively quiet environment.
– Speak within 2 to 4 inches of the built-in microphone of the recorder.
– Speak continuously.
• Voice files recorded in the “LP” recording mode cannot be processed by voice recognition.
• Following situations are not suitable for voice recognition because the accuracy may be very low:
–A conference or meeting where the voices of many people have been recorded.
–Seminar or lecture in which ambient noise tends to be recorded.
Voice Recognition
57
Page 58

Converting File Formats
Uninstalling DSS
Use the [Save As] command in the [File] menu.
To convert a voice file into the WAVE format,
select [WA V File] as the file type. When a voice
file is converted into the WAVE format,
proprietary DSS format data (priority, index
marking, etc.) will be lost.
• It is not possible to convert files from WAVE
to DSS.
File Formats Handled by DSS Player
DSS Player can handle DSS format and WA VE
format files.
• DSS format
This is the voice file format recorded by the
DS-320. The file naming convention for this
format is as follows.
AAAA 0001.dss
ID No. set by the user.
Converting File Formats/
Uninstalling DSS Player or IBM ViaVoice
A DSS-format file needs only about 102 kB of
data per minute in the SP mode or about 47kB
of data per minute in the LP mode. Index
marking and priority can be set in this file.
• WAVE format
This is the Windows standard voice file
format. WAVE files are indicated by the file
extension: wav. The sound quality of wave
files recorded with 11.025kHz, 16-bit
monaural PCM, is equivalent to the SP mode
of DSS format. The WAVE format requires
1.3 MB of data per minute. It does not show
index marks and priority levels.
Extension
File No.: Sequential number assigned
automatically by the recorder.
58
Player or IBM ViaVoice
Uninstallation refers to removing software from a
PC. Perform the following uninstallation procedure
to remove DSS Player or IBM ViaVoice.
Click the [Start] button then select
[Settings] ➔ [Control Panel].
1
Double-click [Add / Remove
Programs].
2
A list of installed applications is
displayed.
3
Select [Olympus DSS Player] or [IBM
ViaVoice] from the list.
Click [Add / Remove] (or [Change/
Delete] with Windows 2000).
4
The file deletion confirmation
window appears. Click <OK> or
5
<yes>.
Deletion.
DSS Player or IBM ViaVoice will be
6
deleted. This may take a few minutes.
• If any messages are displayed during
the deletion procedure, read the
message and perform operations as
instructed.
End of uninstallation.
When uninstallation is completed, click
7
<Finish> or <Restart Now>.
Page 59

Troubleshooting
If you have problems, check the following items before calling for service.
Symptom
Software
cannot be
installed
The DS-320
cannot be
recognized
The volume is
too low
The voice
cannot be
heard
The [Start Voice
Recognition]
button does
not work
Possible Causes
Insufficient hard disk capacity.
A connection cable is unplugged.
DSS Player is not installed.
The HOLD switch of the DS-320 is set to HOLD.
The speaker or headphone volume is set too low.
The volume of Windows or DSS Player is set too low.
The speaker or headphones is not connected.
The sound card is not connected.
The volume of Windows or DSS Player is set to 0.
Muting is set to ON.
The voice recognition software is not installed.
The voice recognition software is installed after DSS
Player.
The File was recorded in LP mode.
Solution
Make more space available.
Connect the connection cable.
Install DSS Player.
Set the HOLD switch to hold-off position.
Increase the speaker or headphones
volume.
Increase the playback volume in
Windows or DSS Player.
Connect speakers or headphones.
Connect a sound card.
Increase the playback volume in
Windows or DSS Player.
Release muting.
Install the voice recognition software.
Install the voice recognition software
before DSS Player.
Make sure that you use the SP recording
mode for all voice recognition recordings.
Technical Assistance and Support
The following are for only technical questions and support about OLYMPUS DSS player.
◆ Technical Hotline Number in the U.S. and Canada
1-888-553-4448
◆ User Support E-mail address in the U.S. and Canada
distec@olympus.com
◆ The following are for only technical questions and support about IBM ViaVoice.
http://www.ibm.com/software/speech/support/faqolympus.html
Troubleshooting/
Technical Assistance and Support
59
Page 60

San-Ei Building, 22-2, Nishi Shinjuku 1-chome, Shinjuku-ku, Tokyo, Japan. Tel. 03-3340-2211
Two Corporate Center Drive, Melville, NY 11747-3157, U.S.A. Tel. 1-800-622-6372
(Premises/Goods delivery) Wendenstrasse 14-18, 20097 Hamburg, Germany. Tel. 040-237730
Declaration of Conformity
Model Number: DS-320
Trade Name: DIGITAL VOICE RECORDER
Responsible Party: OLYMPUS AMERICA INC.
Address: 2 Corporate Center Drive, Melville, NY 11747-3157, U.S.A.
Telephone Number: 1-800-622-6372
This device Complies with Part 15 of the FCC Rules. Operation is subject to the following two
conditions: (1) This device may not cause harmful interference, and (2) this device must
accept any interference received, including interference that may cause undesired operation.
(Letters) Postfach 10 49 08. 20034 Hamburg. Germany.
2-8 Honduras Street, London EC1Y 0TX, United Kingdom, Tel. 020-7253-2772
http://www.olympus.com
Trade Name: DIGITAL VOICE RECORDER
Model Number: DS-320
Tested To Comply
With FCC Standards
FOR HOME OR OFFICE USE
Canadian RFI
This digital apparatus does not exceed the Class B limits for radio noise emissions from digital apparatus
as set out in the Radio Interference Regulations of the Canadian Department of Communications.
Cet apparail numerique ne depasse pas limits de Categorie B pour les emissions de gruit radio
emanant d’appareils numeriques, tel que prevu dans les Reglements sur l’Interference Radio du
Department Canadian des Communications.
60
E2-2755-01
 Loading...