

Page 1

DIGITAL VOICE
DS-2500
RECORDER
DS-2500
INSTRUCTIONS
ENGLISH ........................................1
FRANÇAIS
ESPAÑOL
Thank you for purchasing an Olympus
Please read these instructions for information
about using the product correctly and safely.
Keep the instructions handy for future reference.
To ensure successful recordings, we recommend that
you test the record function and volume before use.
.....................................
.....................................
Digital Voice Recorder.
65
129
EN
Page 2
Introduction
• The contents of this document may be changed in the future without advanced notice. Contact our
Customer Support Center for the latest information relating to product names and model numbers.
• The illustration of the screen and the recorder shown in this manual may differ from the ac tual product.
The utmost care has been taken to ensure the integrity of this document, but if you find a questionable
item, error or omission, please contact our Customer Support Center.
• Any liability for passive damages or damage of any kind occurred due to data loss incurred by a defect of
the product, repair performed by the third par ty other than Olympus or an Olympus authorized service
station, or any other reason is excluded.
Trademarks
• Microsof t and Windows are registered trademarks of Microsoft Corporation.
• Macintosh is a trademark of Apple Inc.
• Intel and Pentium are registered trademarks of Intel Corporation.
• SD and SDHC are trademarks of SD Card Association.
Other produc t and brand names mentioned herein may be the trademarks or registered trademarks of their
respective owners.
EN
2
Page 3
INDEX
Table of con tents P.4
Safe an d proper usage P.5
PLAY/OK
Getti ng started P.8
Basic operations P.22
Advanced operations P.36
Manag ing files on you r PC P.53
Other p ractical u se methods P.59
Other i nformatio n P.6 0
1
2
3
4
5
6
EN
3
Page 4

Table of contents
Introduction
Table of con tents ................................................4
Safe and p roper usage ........................................5
Getting started
Main fea tures .....................................................8
Memor y card ......................................................9
Identi fication of p arts ......................................10
Display st atus indicator s (LCD panel) ....................... 11
Power supp ly ................................................... 12
Inser ting batterie s ...................................................12
Caution s concerning the ba ttery.............................. 12
Batter y settings .......................................................13
Charging b y connecting to a co mputer via USB .......14
Connect ing the USB-type AC ada pter
(optional) to c harge ............................................ 15
Turning on/of f the power ......................................... 17
Power Save Mode (Powe r Save) ............................... 17
HOLD ................................................................ 18
Inser ting and ejec ting a SD card........................ 19
Setti ng time and date [ Time & Date] .................20
Changing t he time and date..................................... 21
Basic operations
Recording ........................................................22
New recor ding ..........................................................23
Overw rite recording .................................................24
Inser t recording ........................................................ 25
Record ing modes [Rec Mod e] ............................26
Micro phone sensit ivity [Mic Sens e] ................... 27
Using the Variable Control Voice Actuator [VCVA] .... 28
Record ing monitor ........................................... 29
Playbac k ..........................................................30
Erasing .............................................................32
Erasing a f ile ............................................................. 32
Erasing al l files in a folde r ........................................ 33
EN
Partia lly erasing a file .............................................. 34
Advanced operations
Selec ting folder s and files ................................ 36
Displ aying file in formation [Inf ormation] ......... 37
Index ma rks .....................................................38
Menu lis t ..........................................................39
Learni ng to use the menu ................................. 41
Locki ng files [Lock] ........................................... 42
Backl ight [Backlig ht] ........................................ 43
LCD Contra st adjustmen t [Contrast] ..................44
LED [LED] ..........................................................45
Langu age [Language] ....................................... 46
System so unds [Beep] .......................................47
Changi ng the USB class [USB S ettings] .............. 48
Format ting the card [For mat] ...........................50
Check s ystem inform ation [System in fo.] ..........52
Managing files on your PC
DSS Player so ftware .........................................53
Minimum re quirement ............................................ 53
Instal ling soft ware .......................................... 54
Uninst alling sof tware ...................................... 55
Using on line help ............................................. 55
Connec ting record er to PC ................................ 56
Connec ting to your PC using the USB c able .............56
Disconne cting from yo ur PC .....................................57
Runnin g DSS Player Soft ware ...........................58
Other practical use methods
Using as e xternal memo ry of the comp uter ....... 59
Other information
Alarm me ssage list ........................................... 60
Troubles hooting............................................... 61
Technica l assistanc e and support ......................62
Accesso ries (optional) .......................................63
Specifications .................................................. 64
4
Page 5
Safe and proper usage
Befo re using your new re corder, read this manual
carefully to ensure that you know how to operate
it safely and correctly. Keep this manual in an
easily accessible location for future reference.
• The warning symbols indicate important
safety related information. To protect yourself
and others from personal injury or damage to
proper ty, it is essential that you always read the
warnings and information provided.
f Danger
If the product is used without observing
the information given under this symbol,
serious injury or death may result.
f Warning
If the product is used without observing
the information given under this symbol,
injury or death may result.
f Caution
If the product is used without observing
the information given under this symbol,
minor personal injury, damage to the
equipment, or loss of valuable data may
result.
Convention used in this manual
• The word “card” is used to refer to the SD card.
• The word “DSS Player” is used to refer to
the DSS Player Standard Dic tation Module
in Windows environment and DSS Player in
Apple Macintosh environment.
• The Notes at the bottom of a page are used for
additional information, exceptions, or related
events.
• Words in uppercase form such as PLAY or REC
are used to describe a function or button on
the recorder.
Caution for usage environment
• To protect the high-precision technology
contained in this product, never leave the
recorder in the places listed below, no matter
if in use or storage:
• Places where tempe ratures and/or humidit y
are high or g o through extrem e changes. Direc t
sunlight , beaches, locke d cars, or near othe r heat
sources (stove, ra diator, etc.) or humidif iers.
• Near flammable items or explosives.
• In wet places, such as bathrooms or in the rain.
• In places prone to strong vibrations.
• Never drop the recorder or subject it to
severe shocks or vibrations.
• The recorder may malfunction if it is used in
a location where it is subject to a magnetic/
electromagnetic field, radio waves, or high
voltage, such as near a TV set, microwave,
video game, loud speakers, large monitor unit,
TV/radio tower, or transmission towers. In such
cases, turn the recorder off and on again before
further operation.
• Avoid recording or playing back near cellular
phones or other wireless equipment, as they
may cause interference and noise. If you
experience noise, move to another place, or
move the recorder further away from such
equipment.
• Do not use organic solvents such as alcohol
and lacquer thinner to clean the unit.
Warning re garding data lo ss:
• Recorded content in memory may be destroyed or
erased by operating mistakes, unit malfunction, or
during repair work. It is recommended to back up
and save important content to other media such
as a computer hard disk.
• Any liability for passive damages or damage of
any kind occurred due to data loss incurred by a
defect of the product, repair performed by the
third par ty other than Olympus, an Olympus
authorized service station or any other reason is
excluded from the Olympus liability.
EN
5
Page 6

Safe and proper usage
Handling the recorder
f Warning:
• Keep the recorder out of the reach of children
and infant s to prevent the following dangerous
situation that could cause serious injury:
1 Accidentally swallowing the battery, cards or
other small parts.
2 Accidentally being injured by the moving parts
of the recorder.
• Do not disassemble, repair or modify the unit
yourself.
• Use SD/SDHC memory cards only. Never use
other types of cards.
If you accidentally insert another type of
card into the recorder, contac t an authorized
distributor or service center. Do not try to
remove the card by force.
• Do not operate the unit while operating a
vehicle.
f Caution:
• Stop using the recorder immediately if you
notice any unusual odors, noise, or smoke
around it.
Never remove the batter y with bare hands,
which may cause a fire or burn your hands.
• Do not leave the recorder in places where
it may be subject to extremely high
temperatures.
Doing so may cause parts to deteriorate and,
in some circumstances, cause the recorder to
catch fire. Do not use the charger or AC adapter
if it is covered. This could cause overheating,
resulting in fire.
• Handle the recorder with care to avoid
getting a low-temperature burn.
• When the recorder contains metal parts,
overheating can result in a low-temperature
burn. Pay attention to the following:
• When used for a long period, the recorder will
EN
get hot. If you hold on to the recorder in this
state, a low-temperature burn may be caused.
6
• In places subject to extremely cold
temperatures, the temperature of the
recorder ’s body may be lower than the
environmental temperature. If possible, wear
gloves when handling the recorder in cold
temperatures.
Battery handling precautions
f Danger:
• Do n ot solder lead wires or te rminals direc tly
onto a battery or modif y it.
• Do not connect the = and - terminals
together. This may cause fire, overheating or
electric shock.
• When carr ying or storing t he battery, be su re
to put it in t he provided case to protect its
termin als. Do not carr y or store the battery
with any metal objects (such as key rings). If
this warning is not followe d, fire, overheating
or elec tric shock may occur.
• Do n ot connect the b atteries directly to a
power outlet or a cigaret te lighter of an
automobile.
• Do n ot insert the batteries with t heir = and
- terminals reversed.
• If any liqui d from a battery gets into your eyes,
prompt ly wash it off with clean water and
consul t your doctor at once.
There is a h ole from which gas escapes on the
•
= terminal. Do not cover or block it.
f Warning:
• The battery should never be exposed to flame ,
heated , short-circuited o r disassembled.
• Do not attempt to recharge alkaline, lit hium
or any other non-rechargeable batteries.
• Never use any battery with a t orn or cracked
outer cove r.
Page 7

Safe and proper usage
• Keep bat teries out of the reach of c hildren.
• I f y o u n o t i c e a n y t h i n g u n u s u a l w h e n u s i n g t h i s
produc t, such as abnormal noise, heat , smoke,
or a burni ng odor:
1 remove the battery immediately, taking care
not to burn yourself, and;
2 call your dealer or local Olympus
representative for service.
• Do not expose the r echargeable batteries
to water. Do not allow water to cont act the
terminals.
• Do not rem ove or damage the bat tery
insulating sheet.
• Do not use t he batteries i f you find something
wrong wi th them such as le akage, color
change or deformity.
• Unplug t he charger if the charg ing is still
incomp lete after the specified time it should
take.
• Should a ny battery liquid get on s kin or
clothing, promptly wash it off with clean
water.
• Keep bat teries away from f ire.
f Caution:
• Do not subject batt eries to strong shock s.
• Do not use b atteries of different typ es,
voltages, and/or brand name s.
• Rechargeable battery is exclusively for use with
Olympus digital voice recorder DS-2500.
• There is a risk of explosion if the batter y is
replaced with the incorrect battery type.
• Dispose of the used battery following the
instructions.
• Please rec ycle batteries to help save our
planet ’s resources. When you throw away dead
batteries, be sure to cover their terminals and
always observe local laws and regulations.
• Always charge a rechargeable battery when
using it for the first time, or if it has not been
used for a long period.
• Rechargeable batteries have limited lifetime.
When the operating time becomes shorter even
if the rechargeable battery is fully charged,
replace it with a new one.
LCD monitor
• The LCD used for the monitor is made with
high-precision technology. However, black
spots or bright spots of li ght may appear on
the LCD mon itor. Due to its characteri stics
or the ang le at which you are vi ewing the
monitor, the spot may n ot be uniform in co lor
and brightness . This is not a malfuncti on.
Memory Card
f Warning:
• Do not touch the card contacts. This may
damage the card.
• D o not place the car d in locations with
static electricity.
• Store the c ard in a location t hat is out of
the reach of chil dren. In case of accidental
ingest ion, consult a physician immediately.
EN
7
Page 8

Getting started
M a i n fe at u r e s
s Support type of memory: SD card ( ☞ P.9) .
s Three programmable smart buttons F1, F2 and F3.
s Recording and storing voice in Digital Speech Standard Pro (DS2 format).
s Two recording modes, QP (Quality Playback) mode or SP (Standard Playback) mode
( ☞ P. 26).
1
Main features
s Overwrite Recording and Insert Recording (partial insertion) available (☞ P. 24 , P. 25).
s Supports USB 2.0. High-Speed, which enables high-speed data transmission from the
recorder to your computer.
s Five folders and up to 200 files per folder, for a maximum of 1,000 recordings ( ☞ P. 22 ).
s It has a built-in Variable Control Voice Actuator (VCVA) function (☞ P. 28 ).
s Large LCD screen with backlight.
s Index mark function which is useful to search particular points in the dictation files
( ☞ P. 38).
s DSS Player software included ( ☞ P.53).
EN
8
Page 9
Memory card
This recorder uses memory in the form of SD card
memory.
Compatible cards
The recorder supports cards with memory
capacit y between 512 MB to 32 GB.
Sett ings and ope rating env ironmen t relatin g to the
card
Check the latest operating information on the
Olympus homepage (http://www.olympus.
com) when using cards other than the included
card. In addition, refer to the following pages
as well when handling the card.
• Inserting and ejecting a SD card (☞ P.1 9 ).
• For matting the card [Format
SD card
1
SD card
3
2
1 Card lock
SD card is equipped with a lock function.
When the lock function is used, impor tant
data is protected by preventing it from being
accidentally overwritten or erased.
When the lock function is set [
the display.
2 Index area
For writing down information identifying card
or content.
3 Contact area
Comes into contact with the recorder’s signal
read contacts.
] (☞ P. 50).
] will appear on
Check card information [Card Info.]
Information such as the memory capacity and
remaining memory for installed cards can be
displayed on the recorder ( ☞ P.4 0).
Card Info.
SD
Remain
Capacity
BACK EXIT
Notes
• When initializing (formatting) a card,
confirm that no necessa ry data is store d on
the memory car d beforehand. Initializat ion
comple tely erases the existing data o n the
card.
• In some cases cards which have been formatted
(initialized) by another device, such as a computer,
cannot be recognized. Be sure to format them
with this recorder before using.
• The card has a ser vice life. When reaching the end
of its life, writing or erasing data on the card will
be disabled. In this case, replace the card.
• If you use a PC card adapter compatible with the
card to save or delete some data on the card, the
maximum recording time on the card may be
decreased. To recover the original recording time,
initialize/format the card in the recorder.
• Olympus will not be held liable for any data
corruption or loss due to misuse of the media
card.
540MB
2.0GB
9
EN
1
Memory card
Page 10
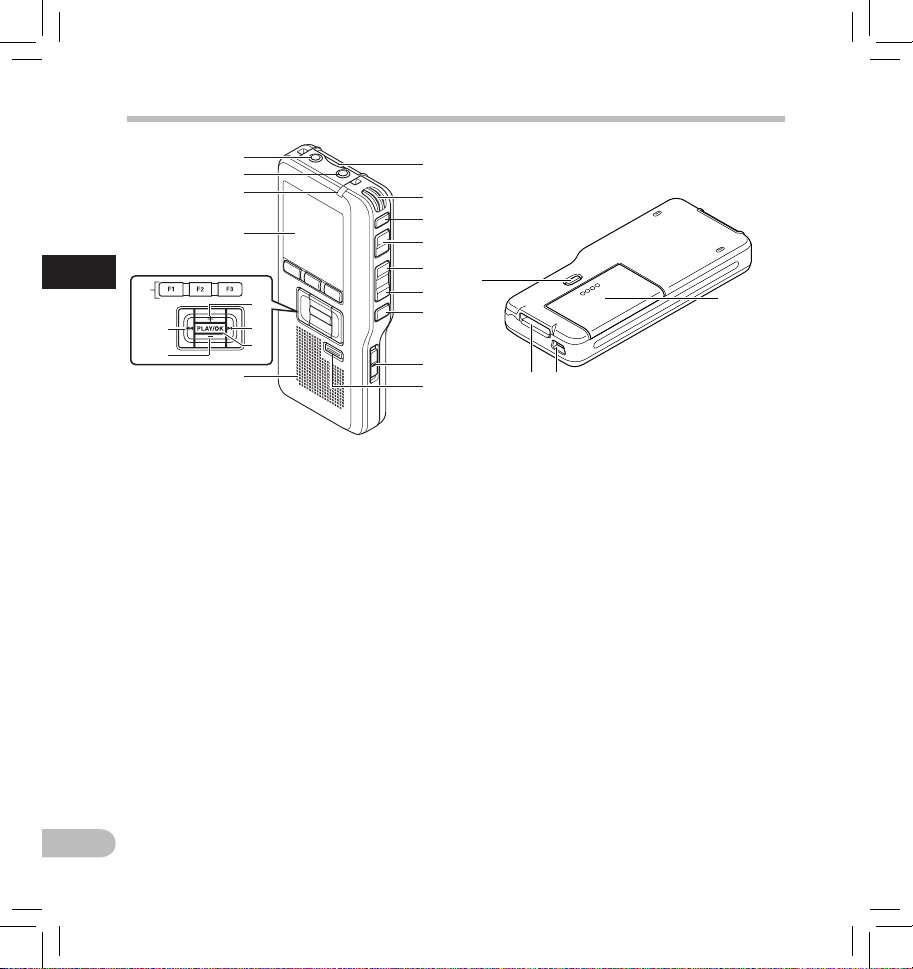
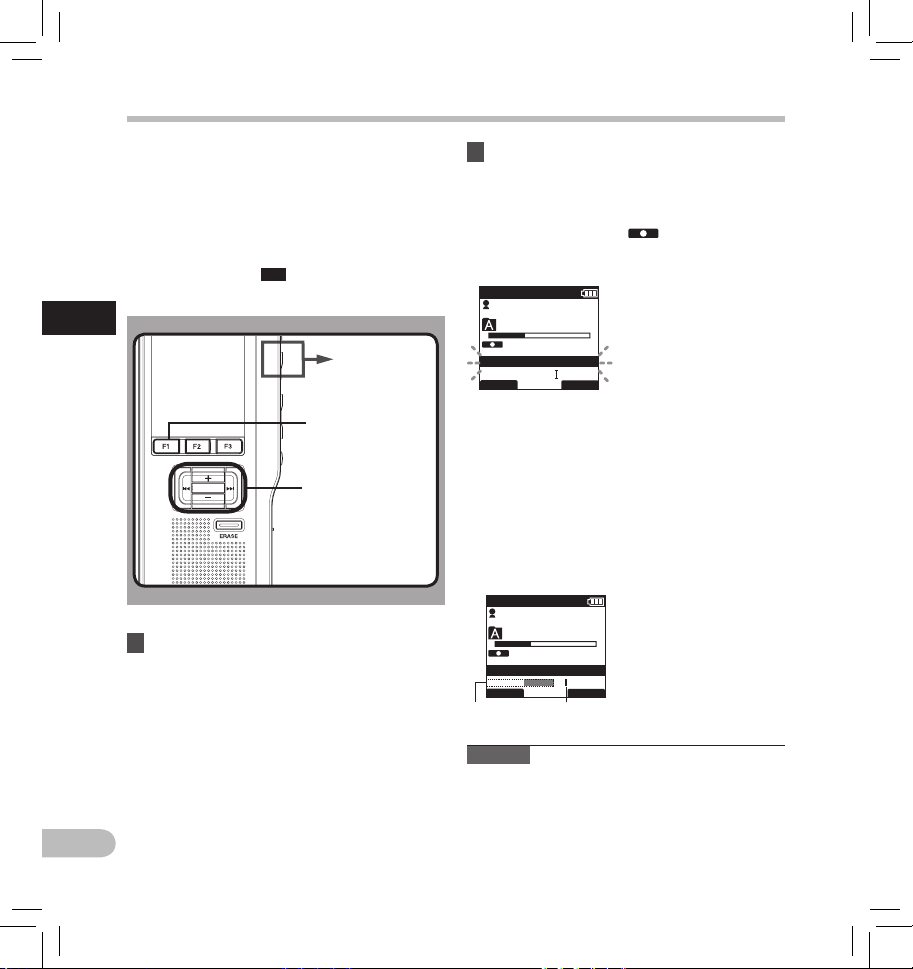
Identification of parts
q
1
&
Identification of parts
*
(
1 SD card slot
2 Built-in microphone
3
NEW
button
4
REC
button
5
REW
button
6
FF
button
7
STOP
button
8
POWER/HOLD
9
ERASE
0
!
button
EAR
(Earphone) jack
MIC
(Microphone) jack
@ Record indicator light
# Display (LCD panel)
0
!
@
#
$
%
^
)
switch
1
2
3
4
5
w
6
7
8
9
$
+
=
(Volume) button
% Fast Forward (9) button
^
PLAY/OK
button
& Smart button (F1,F2,F3)
* Rewind ( 0) button
( – (Volume) button
) Built-in speaker
- Batte ry cove r
= PC (USB) terminal
q Cradle connector
w
Battery cover release button
-
EN
10
Page 11
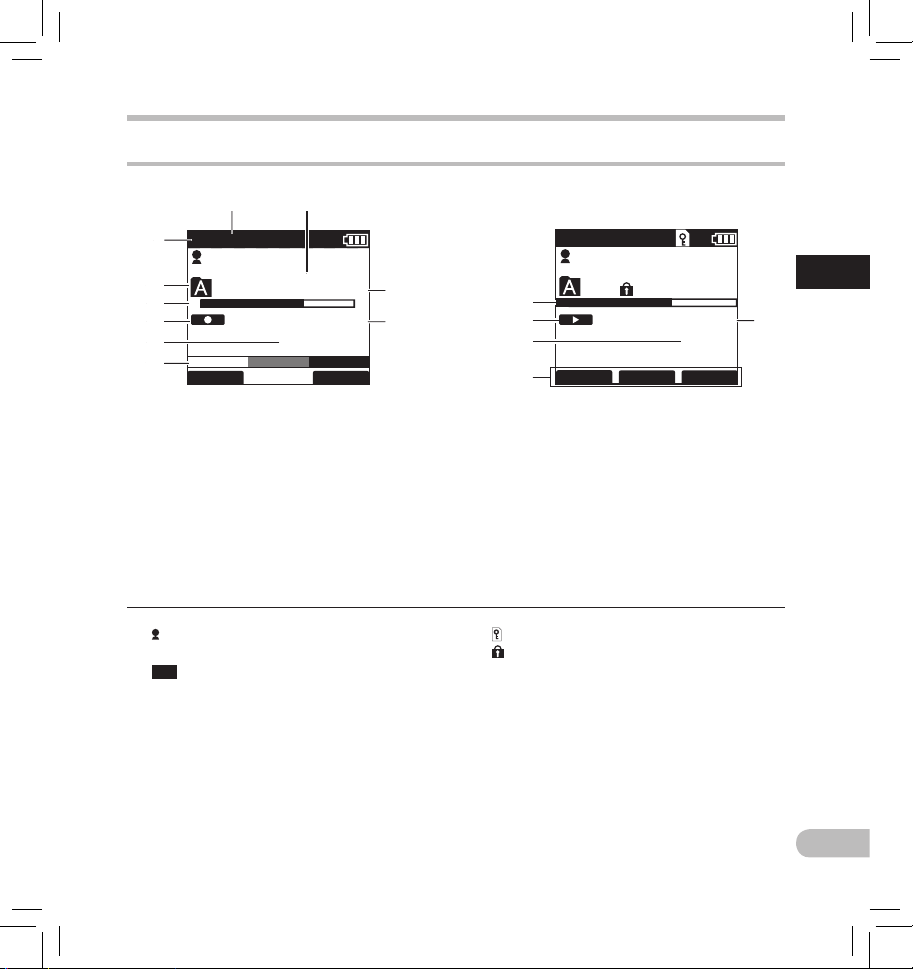
Display status indicators (LCD panel)
Identification of parts
7
QP DICT
1
2
3
4
5
6
1 Record mode indicator
2 Current folder
3 Memory remaining indicator (E/F bar)
4 Record indicator
5 Remaining recording time
6 Level meter indicator
7 Microphone sensitivity indicator
8 Current file number
[ ] Author ID indicator
[ õú] Battery indicator
[
DS2500
EF
DISPLY
Displ ay in the record ing mode Displ ay in the playbac k mode
VCVA
] VCVA (Variable Control Voice
Actuator) indicator
8
Ni
025 / 030
00 M 10 S
15 H 22 M 30S
INDEX
9
0
QP DICT VCVA
DS2500
!
@
#
INSERT
$
9 Total number of files in the folder
0 Recording elapsed time
! Playback position bar indicator
@ Play ind icator
# Total recording time of the selected file
$ Button guide display
% Current playback time
] Card lock indicator
[
[
] Erase lock indicator
025 / 030
SPEED INDEX
02 M 50 S
12M 0 5 S
Ni
%
1
Identification of parts
11
EN
Page 12
Power supply
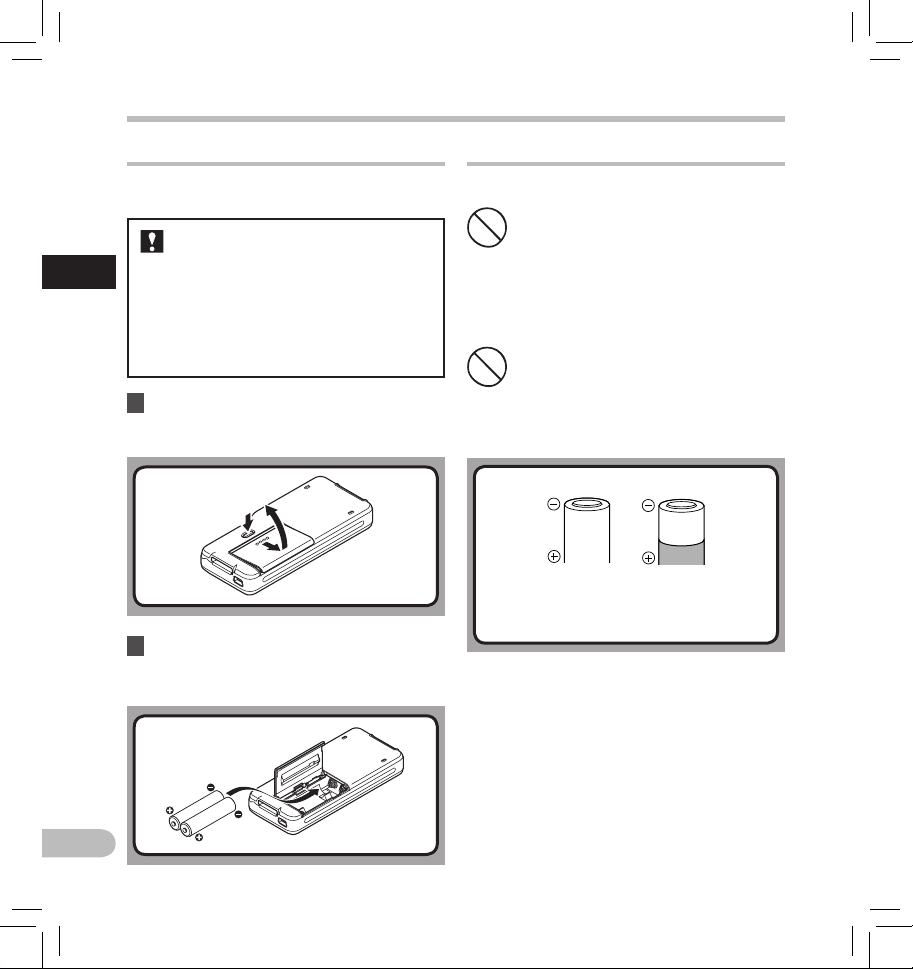
Inserting batteries
This recorder can be used with either Ni-MH
rechargeable batteries or A AA alkaline batteries.
• When charging with the recorder,
be sure to use the supplied Ni-MH
1
Power supp ly
1 Lightly press down on the battery cover
2 Insert batteries, observing the correct
rechargeable batteries (BR404).
• The supplied rechargeable batteries
are not fully charged. Before using
the recorder or after long periods of
disuse, it is recommended that you
continuously charge them until full
(☞ P.14, P. 15) .
release button, then open the battery
cover.
polarity as shown in the illustration
below, then close the battery cover.
Cautions concerning the battery
f Warning:
• Using batteries for which part
or all of the external coating
(insulating sheath) is peeling
off or batteries which have
ruptured may cause fluid leaks,
overheating, and explosions.
For this reason such batteries
should absolutely not be used.
• Commercially available
batteries for whi ch part or all of
the external co ating (insulation
sheath) has b een peeled of f
should absolute ly not be used.
Unusable batteries
Batteries for which the entire ex ternal coating
(insulating sheath) is peeled off (naked
batteries), or those where it has par tially been
peeled off .
EN
12
Page 13
Power supply
Notes
• Manganese batteries may not be used in this
recorder.
• When changing batteries, AA A alkaline batteries
or Olympus Ni-MH rechargeable batteries are
recommended.
•
Be sure to t urn OFF the recorder before
replacing the b atteries. Removing the batteries
while the recorder is in use may corrupt the card.
If you are recording into a fi le and the batteries
run out, you will lose your currently recorded fi le
since the fi le header will not be written. It is crucial
to replace the batteries when one hash mark is
shown in the batter y icon.
• Be sure to replace both batteries at the same time.
• Never mix o ld and new batteries, or batteri es
of different t ypes and/or bran ds.
• If it takes longer than 15 minutes to replace the
dead batteries or if you take the batteries in and
out repeatedly at shor t intervals, you may have
to redo the battery and time set tings. In this case,
the [Battery] screen will appear. For more details,
see “Battery settings”.
• Remove the bat teries if you are not going to use
the recorder for an extended period of time.
• When replacing rechargeable batteries, be sure to
use Ni-MH rechargeable bat teries (optional). The
use of other manufac turers’ products can damage
the recorder and should be avoided.
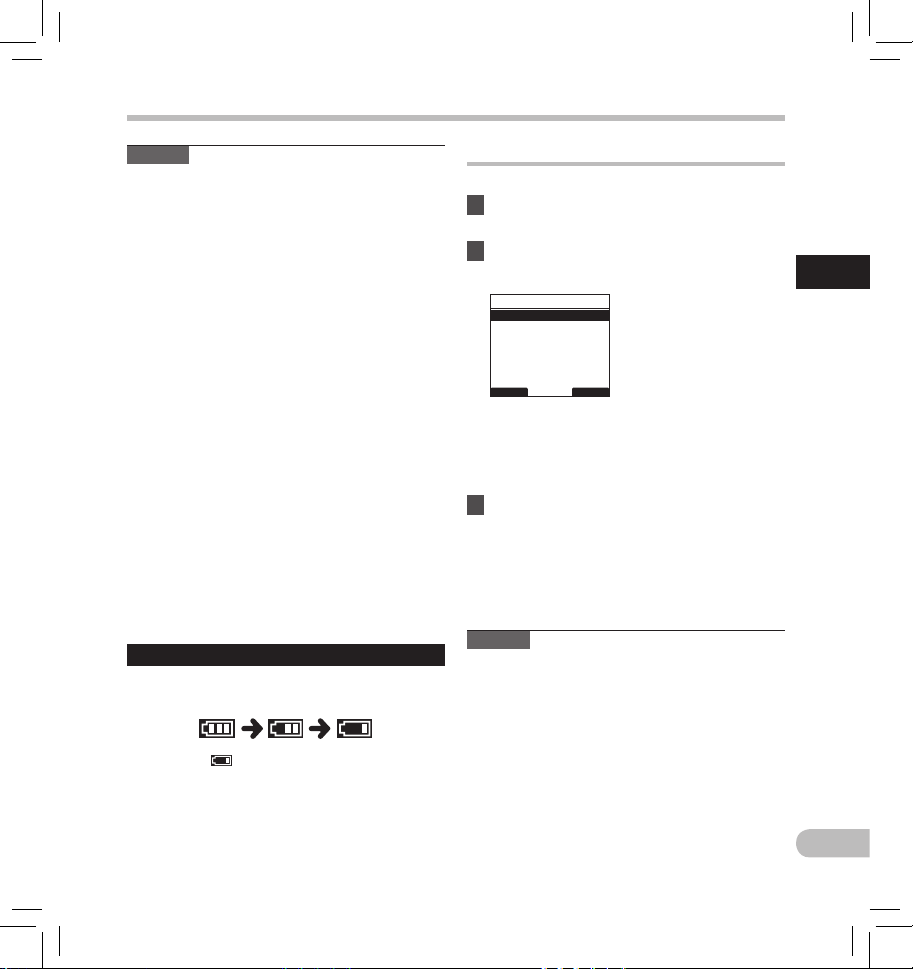
Battery indicator
The battery indicator on the display changes as the
batteries lose power.
Battery settings
Select to match the battery you are using.
1 Replace the batteries and turn on the
recorder (☞ P.12 ).
2 Press the + or − button to change the
setting.
Battery
Ni-MH
Alkaline
BACK EXIT
[Ni-MH] (õ):
Select when using the Olympus Ni-MH
rechargeable batteries (BR404).
[Alkaline] (ú):
Select when using alkaline batteries.
3 Press the
the setting.
• If the “Hour” indicator flashes in the display,
Note
• When playing a voice fi le, the recorder may be
reset due to the reduction of the voltage output of
the batteries depending on the volume level even
if [º] is displayed in the battery indicator. In this
case, lower the volume of the recorder.
PLAY/OK
button to complete
see “Setting t ime and date [Tim e & Date]”
(☞
P. 20).
1
Power supp ly
• When this [
replace the batteries as soon as possible.
When the batteries are too weak,
[ Battery Low ] appears on the display and the
recorder shuts down.
] indicator appears on the display,
[ s ] and
EN
13
Page 14
Power supply
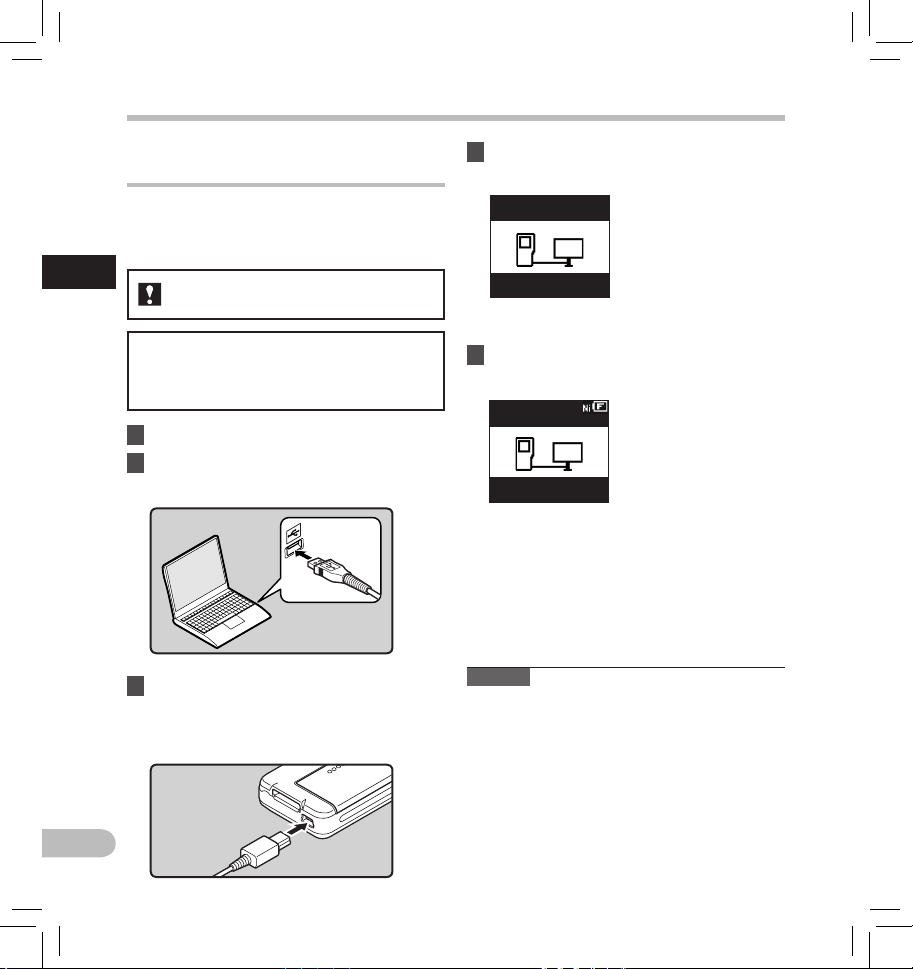
Charging by connecting to a computer via
USB
You can charge the batteries by connecting to a
PC’s USB port. When charging, be sure to correctly
place the rechargeable batteries (supplied) into the
recorder (☞ P.12 ).
1
Power supp ly
Before connecting the USB cable, exit HOLD
mode (☞ P.18 ).
Do not cha rge primar y batteries su ch as alkalin e
or lith ium batterie s. It may cause ba ttery
leakag e or heating, w hich may cause th e
recorder to malfunction.
1 Boot the PC.
2 Connect the USB cable to the USB port
of the PC.
3 While the recorder is in stop mode or
turned off, connect the USB cable to the
connecting terminal on the bottom of
the recorder.
4 Press the
PLAY/OK
button to start
charging.
Press OK to
start charging
Remote
(Storage)
• While [Press O K to start cha rging] is fl ashing, press
the PLAY/OK button.
5 Charging is completed when battery
indication becomes to [¿].
Battery Full
Remote
(Storage)
Charging time: approximately 3 hours *
* It shows the approximate time when
charging rechargeable batteries fully from no
remaining power at the room temperature.
The charging time will be changed depending
on the remaining amount and the state of
batteries.
Notes
• The recorder cannot be charged when the PC is
not turned on. It may not also be charged when
the PC is in standby, hibernate, or sleep mode.
• Do not charge the recorder with the USB hub
connected.
EN
14
Page 15
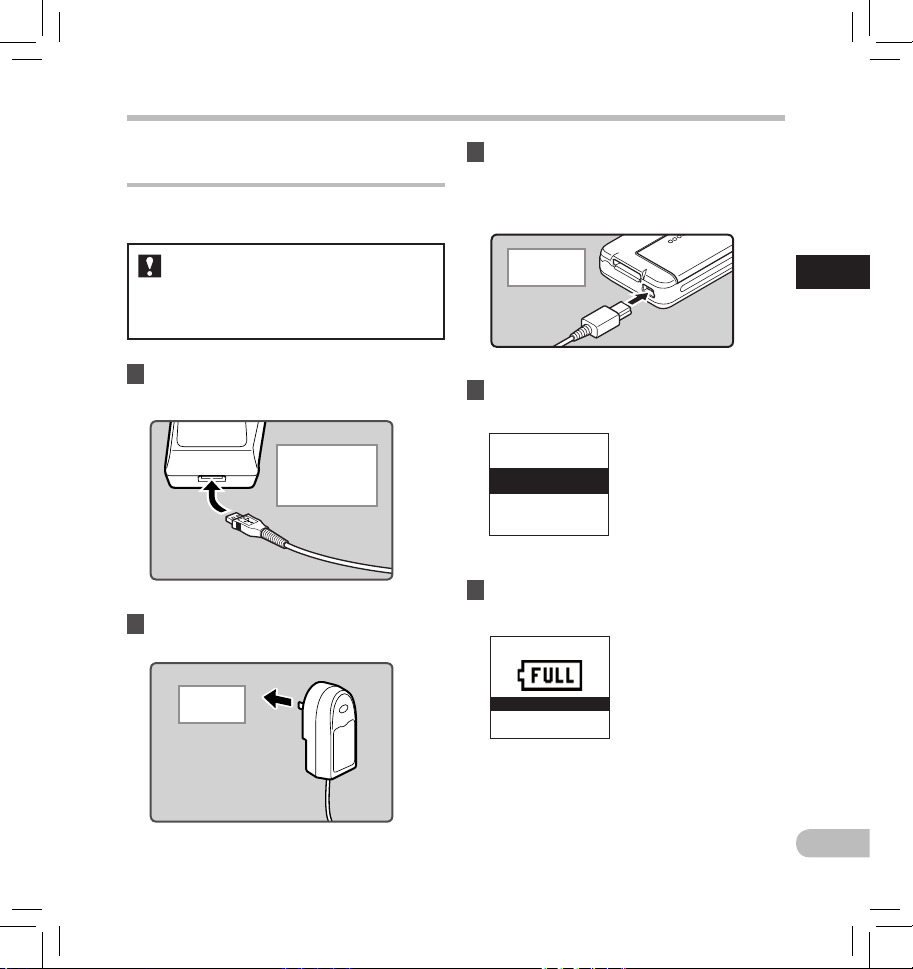
Power supply
Connecting the USB-type AC adapter
(optional) to charge
It can be charged by connecting to the USB
connecting AC adapter (A514) (optional).
• Before connecting the AC adapter,
switch the USB connection setting to
[AC Adapt er] (☞ P.4 8) .
• Before connecting the USB cable, exit
HOLD mode (☞ P.18 ).
1 Plug the recorder’s USB cable into the
AC adapter.
To th e USB
connectin g AC
adapter’s (A514)
USB connector.
2 Plug the AC adapter into AC outlet.
To the
AC outlet
3 While the recorder is in stop mode or
turned off, connect the USB cable to the
connecting terminal on the bottom of
the recorder.
To th e USB
connector
4 Press the
PLAY/OK
button to start
charging.
Press OK to
start charging
• While [Press OK to start charging] is flashin g, press
the PLAY/OK button.
5 Charging is completed when [
Full
] is displayed.
Battery Full
Battery
1
Power supp ly
EN
15
Page 16

Power supply
Notes
• Insert the supplied rechargeable bat tery and
set [Battery] to [Ni-MH]. If [Battery] is set to
[Alkaline], you cannot recharge (☞ P. 13).
•
You cannot charg e when [ø]*1 or [√]*2
blinks. Charge the batteries at a temperature in
the range of 5°C to 35°C (41°F to 95°F).
ø
*1 [
1
Power supp ly
]: When the surrounding temperature is low.
√
*2 [
]: When the surrounding temperature is
• When using time becomes notably short even
• Be sure to push the USB connector all the way in.
• Be sure to use the included dedicated USB cable.
• If selecting [Composite] in the USB connection
• In case you would like to charge using the
Read the following descriptions carefully when you
use the Ni- MH rechargeable batteries.
Discharging:
Rechargeable bat teries self-discharge while not in
use. Be sure to charge them regularly before use.
high.
after the batteries are fully charged, replace them
with new ones.
Otherwise, the recorder may not operate properly.
If any other company’s cable is used, it may lead
to malfunc tion of the recorder. Also, never use
this dedicated cable with any other company’s
products.
settings:
-
Charge will not be possible if the recorder is
operating. Charge will start 1 minute after the
end of the operation.
-
Charge may not be possible depending on the
application in use on the computer connected.
[Composite] setting, select [Optional] in the USB
connection settings, then connect the USB cable
to the recorder. Selecting [AC Adap ter] at the
[USB Connect] display will enable you to charge
(☞
P.4 8).
Cauti ons concer ning the re chargea ble batter ies
Operating temperature:
The rechargeable batteries are chemical products.
The rechargeable batteries efficienc y may fluctuate
even when operating within the recommended
temperature range. This is an inherent nature of such
products.
Recommended temperature range:
When operating appliance:
0°C - 42°C/ 32°F - 107.6°F
Charging:
5°C - 35°C/ 41°F - 95°F
Storage f or a long period:
–20°C - 30°C/ –4°F - 86°F
Using the rechargeable batteries outside the above
temperature range may result in declining ef ficiency
and shorter battery life. In order to prevent battery
leakage or rust, remove the rechargeable batteries
from the products when you will not be using them
for a long time, and store them separately.
Notes
• This recorder is designed to fully charge batteries
regardless of their energy level. However, for
best results when charging newly purchased
rechargeable batteries or batteries that have not
been used for a long time (more than one month),
it is recommended to fully charge the batteries
then discharge repeatedly for 2 to 3 times.
• When disposing rechargeable batteries, always
observe the local laws and regulations. Contact
your local recycling center for proper disposal
methods.
• If Ni-MH rechargeable batteries are not fully
discharged, protect against short-circuiting (e.g.
by taping the contacts) before disposing.
EN
16
Page 17
Power supply
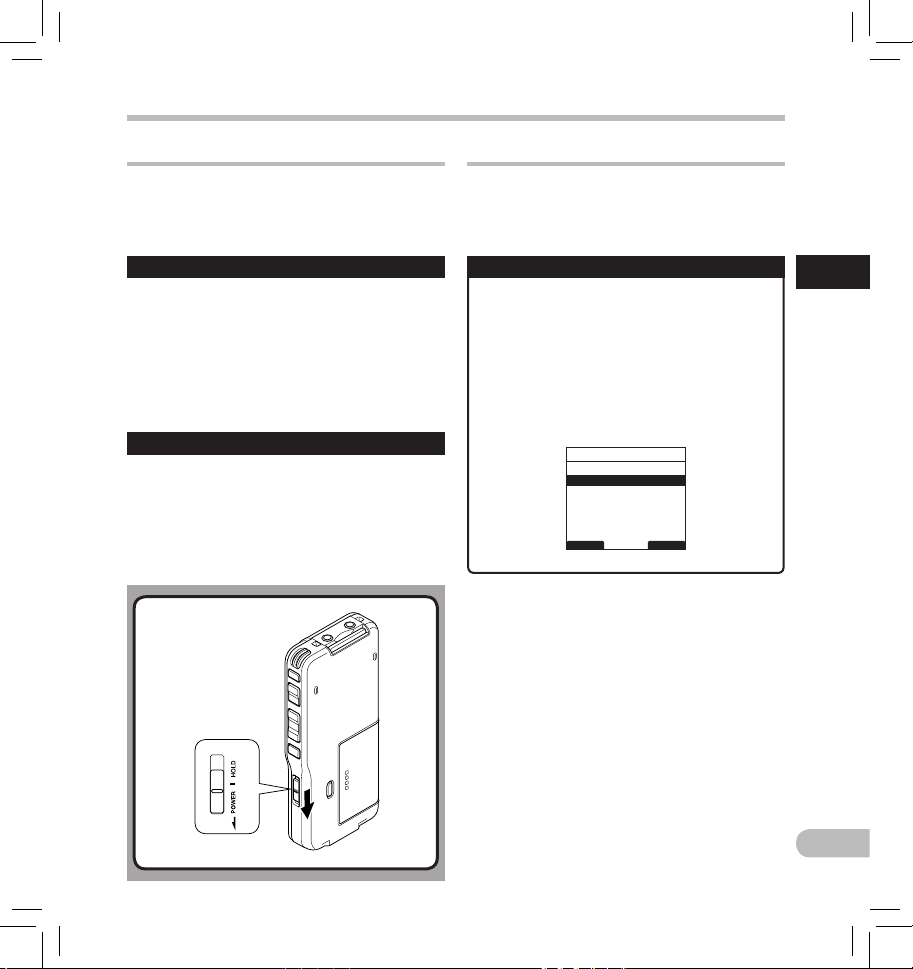
Turning on/off the power
When the recorder is not being used, turn the power
off to reduce batter y consumption to a minimum.
Even if the power is turned off, existing data, mode
settings, and clock settings will be maintained.
Turning o n the power
While the recorder is turned off, slide the
POWER/HOLD
arrow.
• The display will turn on, and after [System Check]
appears, the power will be turned on. The resume
function will bring the recorder back to the stop
position in memor y before power was turned off.
Turning o ff the powe r
Slide the
direction of the arrow, and hold it for 0.5
seconds or longer.
• The display shuts off and the power will be turned
off. The resume function remembers the stop
position before the power is turned off.
switch to the direction of the
POWER/HOLD
switch to the
Power Save Mode (Power Save)
When the recorder is ON but not in use for 10
minutes, by default, it will switch to power save
mode automatically. To reactivate the recorder again,
operate any button or the slide switch.
Power Save S etting
You can set the time to enter Power Save mode
from among [5 minutes], [10 minute s], [30
minutes], [1 hour], and [Off].
To exit power save, press any button.
The [Power Save] setting can be changed from
the Menu. For more details, refer to “Menu
list” (☞ P.39) and “Lear ning to use the men u”
(☞
P.41) .
Power Save
5 minutes
10 minutes
30 minutes
1 hour
Off
BACK EXIT
1
Power supp ly
17
EN
Page 18
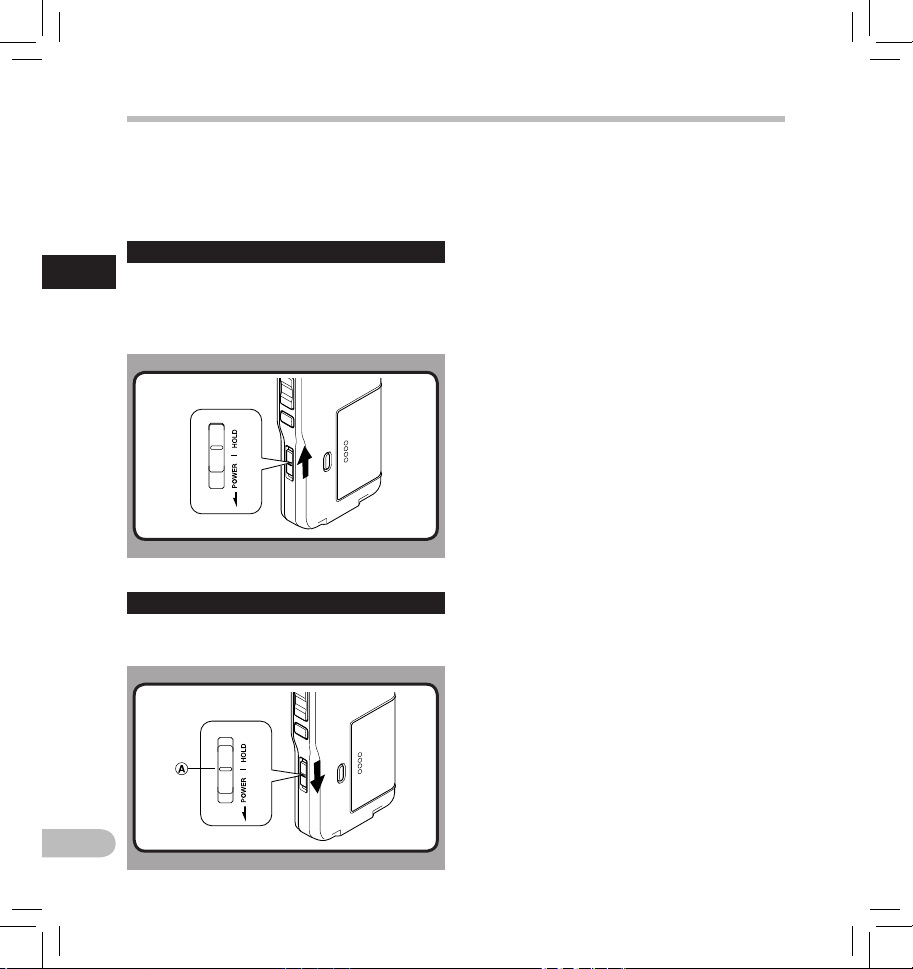
HOLD
If you bring the POWER/HOLD switch to the HOLD
position, the current conditions will be preserved,
and all but tons and switches will be disabled.
This feature is useful when the recorder has to be
carried in a bag or pocket.
Set the r ecorder to HO LD mode
1
Slide the POWER/HOLD switch to t he HOLD
HOLD
position.
• After [Hold] appears on the display, the recorder
is set to HOLD mode.
Exit HOLD mode
Slide the POWER/HOLD switch to t he A position.
EN
18
Page 19

Inserting and ejecting a SD card
Inser ting a SD car d
Inser t the SD card fully into the c ard slot with th e
card fac ing the direction shown in the il lustration
below, unt il it clicks into place.
• When inser ting SD card into the SD card slot, the
recorder message [Please Wait] will fl ash on the
LCD display for a few seconds while validating the
SD card.
• Insert the card keeping it straight.
Ejec ting a SD card
Push the S D card inward once to unloc k it, and
let it eje ct.
N o t e s
• The card s tops with a clic k when it is inser ted
all the way.
• Inserting the card the wrong way or at an angle
could da mage the contac t area or cause the
card to jam.
• I f the card is not inserte d all the way, data may
not be wri tten to the card .
• H old the card straight and pull it ou t.
• If an unformatted card is installed, the recorder
will automatically display the menu format option
(☞ P. 37).
• Never use any card in the recorder unless it has
been formatted on this unit (☞ P. 50 ).
• Never remove the card while the recorder is in
operation. This may damage the data.
• Releasing your finger quickly after pushing the
card inward may cause it to eject forcefully out of
the slot.
1
Inser ting and ejec ting a SD card
EN
19
Page 20

Setting time and date [Time & Date]
Setting the correc t time and date on the recorder
is very imp ortant since every file recorded on the
recorder will have the time and date information
as part of the file header. This will simplify the file
management aspects later on.
The hour indicator will flash au tomatically
when you load batteries before us ing the
1
recorder for the first t ime, or after t he
Setti ng time and date
recorder hasn’t been used for a long time.
F1, F2, F3
PLAY/OK
PLAY/OK
+, −
button
9
button
button
,
0 button
1 Press the 9 or 0 button to select
the item to set.
• Select the item from the “ hour ”, “ minute ”,
“ year ”, “ month ” and “ day ” with a flashing
point.
Time & Date
01 M 01 D 2012 Y
1: 00 AM
24H
BACK EXIT
2 Press the + or − button to set.
• Follow the same steps by pressing the 9 or
0 button to select the next item, and press
the
+
or − button to set.
Time & Date
10 M 14 D 2012 Y
5 : 45 PM
24H
BACK EXIT
• You can select between 12 and 24 hour display
by pressing the F2([24H] or [12 H])* button
while set ting the hour and minute.
Example: 5:45 P.M
5:45 PM (Initial setting) 17:45
EN
20
Page 21

Setting time and date [Time & Date]
• You can choose the order of the year,
month, day by pressing the F2([M]/[D]/[Y]
or [D]/[M]/[Y] or [Y ]/[M]/[D])* button while
setting them.
Example: October 14, 2012
10M 14D 2012Y
(Initial setting)
14D 10M 2012Y
2012Y 10M 14D
* T h e d i s p l a y w i l l v a r y d e p e n d i n g o n t h e s t a t u s o f t h e
settings.
3 Press the
PLAY/OK
button to complete
the setting.
• The clock will start from the set date and time.
Press the P LAY/O K button according to the
time signal.
N o t e s
• If you press the STOP button during the setup
operation, the settings are cancelled, and the
recorder returns to the previous screen.
• You can set the time and date from your PC using
DSS Player software (☞ P. 53 ).
Changing the time and date
When the recorder’s POWER/HOLD switch is turned
ON the [Time & Date] will be displayed for two
seconds. If the time and date is not correct, set it
using the procedure below.
1 Press the + or − button in the [
Menu
] screen, then select [
• Refer to P.41 regarding each menu item
settings.
Device Menu
Beep
Power Save
Time & Date
Battery
USB Settings
Reset Settings
BACK EXIT
2 Press the
• The time and date screen appears. The hour
3 P r e s s t h e F3(
PLAY/OK
or 9 button.
indicator flashes, indicating the start of the
time and date setup process. The following
steps are the same as Step 1 through Step 3 of
“Sett ing time and date [ Time & Date]” (☞
P. 2 0) .
EXIT
) or 0 button to
complete the setting.
Device
Time & Date
1
].
Setti ng time and date
EN
21
Page 22

Basic operations
Recording
The recorder has five folders, [ A ], [ B ], [C], [D],
[E] and you can select a folder by pressing the
F1 (FOLDER) button. These five folders can be
selectively used to distinguish the kind of recording;
for example, Folder [ A ] might be used to store
private information, while Folder [ B ] might be
dedicated to holding business information.
Up to 200 messages can be recorded per folder.
2
By default, the Recording Mode is [QP].
Recording
Record funct ion
By default, the RECORD function is configured to
record at the current position (overwrite).
However, that can be changed to any of the
following settings:
• Append: Appends the recording to the end of the
current fi le (☞ P.2 3).
• Overwrite: Overwrites the recording starting at
the current position in the fi le (☞ P. 24) .
• Insert: Inserts the recording at the current
position in the fi le (☞ P. 25).
Recording related settings
Recording related settings can be configured
to provide a suitable recording environment.
• Recording modes [Rec Mode] (☞ P. 26 ).
• Microphone sensitivity [Mic Sense]
(☞ P. 27).
• Using the Variable Control Voice Actuator
[VCVA] (☞ P. 28 ).
• Recording monitor (☞ P. 29) .
EN
22
Page 23
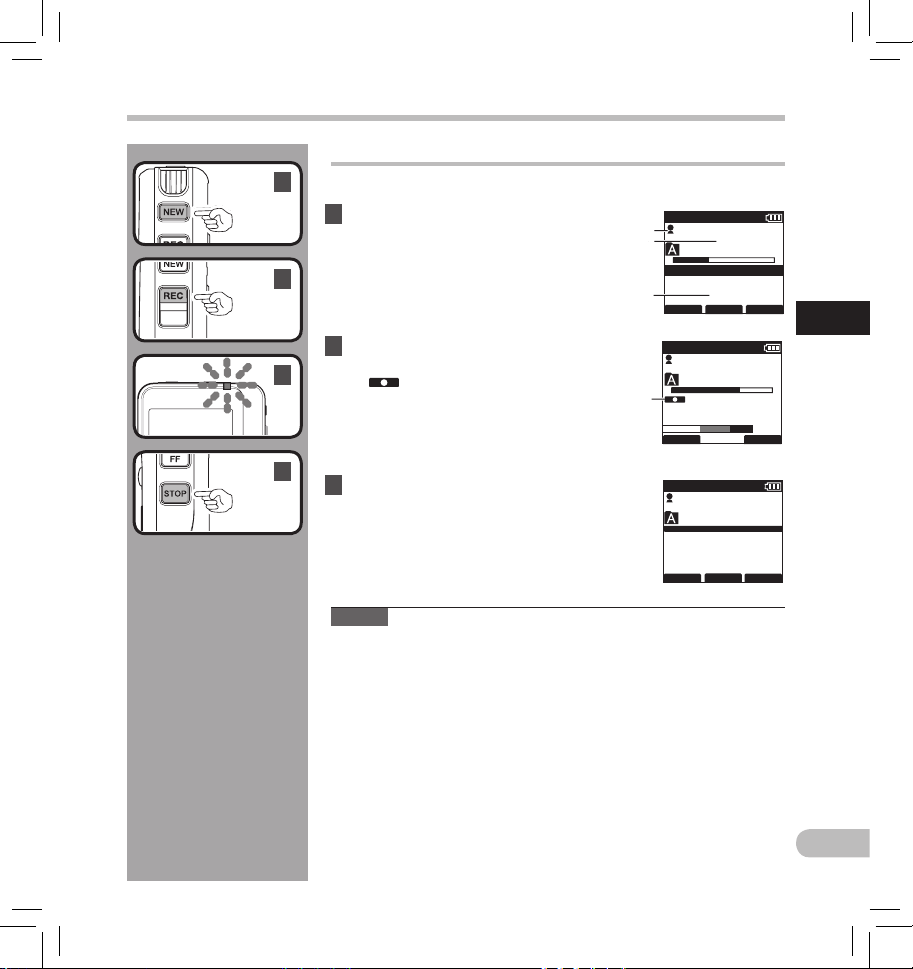
New recording
Create a new file to record in.
1
1 Press the
file.
a Selec ted Author ID
b New file number
2
c Remaining recording time
2 Press the REC button to start recording.
2
3
• The record indicator light glows orange and
d Record indicator
3 Press the STOP button to stop recording.
• If you want to append additional recordings to
N o t e s
• A beep will sound when the remaining recording time reaches 60
seconds, 30 seconds, and 10 seconds while recording.
• When remaining recording time is less than 60 seconds, the record
indicator light star ts fl ashing in orange. When the recording time is
decreasing to 30 or 10 seconds, the light fl ashes faster.
• [Memory Full] or [Folder Full] will be displayed when the memory or
folder capacity is full.
-
Delete unnecessary fi les before recording any further ( ☞ P.32) or
NEW
button to create a new
[
] (Record indicator) appears on the
display. Aim the microphone at the sound
source. When you press the F1 (DISPLY)
button during recording, you can change the
LCD scre en displays.
the same f ile, press the REC button again.
transfer dictation fi les to your PC (☞ P. 53) .
a
b
c
d
Recording
QP DICT
DS2500
EF
Remain
FOLDER
QP DICT
DS2500
E
DISPLY
QP DICT VCVA
DS2500
FOLDER
031 / 030
New File
15 H 22 M 40 s
INFO
031 / 031
00 M 10 s
15 H 2 2 M 3 0 s
E
031 / 031
30 H 02 M 20 s
15 H 0 2 M 2 0 s
INFO
Ni
MENU
Ni
INDEX
Ni
MENU
2
Recording
F
EN
23
Page 24

Overwrite recording
You can overwrite a previously recorded file from any point within the file.
2
Note that the overwritten recordings will be erased.
1 Select and play the file you want to
overwrite.
2
• Stop the playback at the point you want to
start overwriting.
Recording
2
Recording
EN
24
2 Press the REC button to star t overwriting.
• The record indicator light glows orange and
[
3
3
Note
• You cannot select a diff erent recording mode ([QP], [SP]) than that of the
] (Record indicator) appears on the
display.
a R ecording elap sed time
b Total recording time of the selected file
Press the STOP button to stop overwriting.
original fi le before overwrite recording.
a
b
QP DICT
DS2500
E
DISPLY INDEX
Ni
101 / 133
10 M 25 s
00H 1 4 M 00 s
F
Page 25
PLAY/OK
Insert recording
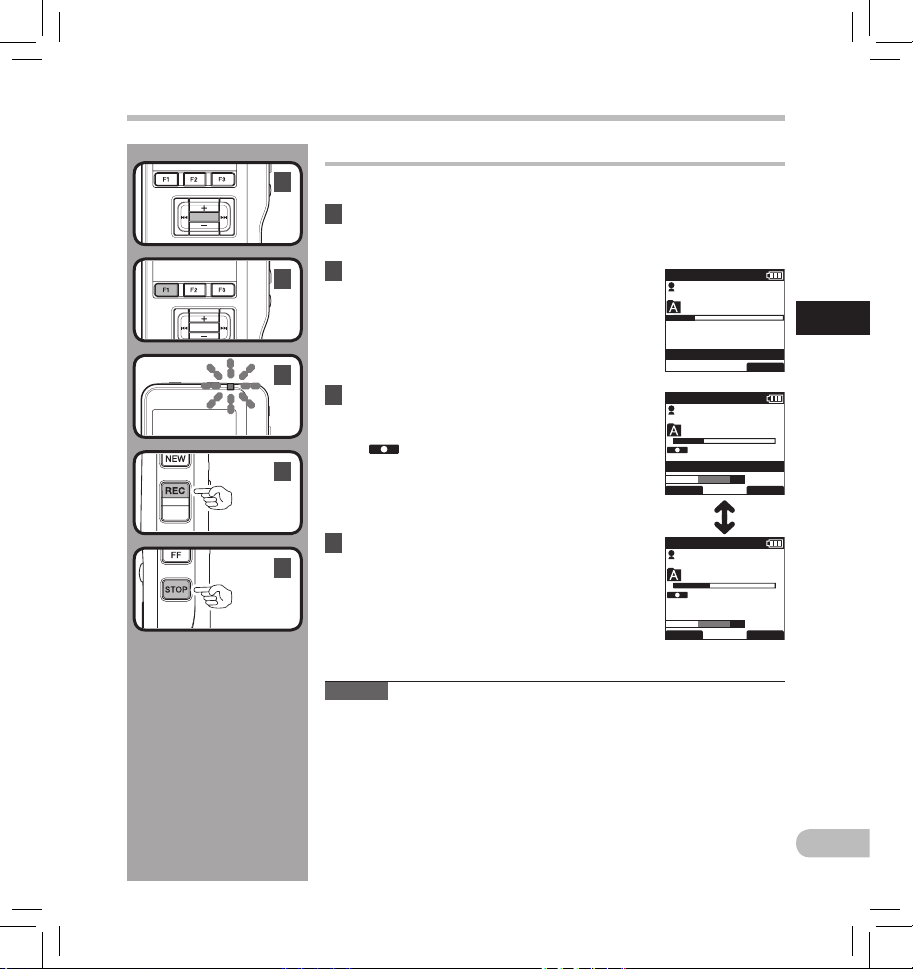
Additional recording can be inser ted into previously recorded file.
1
1 Select and play the file you want to
insert an additional recording into.
Recording
PLAY/OK
2 Whi le playing th e file, pres s the
2
button to insert an additional recording.
F1 (INSERT
)
QP DICT VCVA
• [Insert Rec?] appears on the display.
2
3 Press the REC button to start inserting
QP DICT
an additional recording.
• The record indicator light glows orange and
[
] (Record indicator) appears on the
3
display.
[Insert Rec] and the remaining recording time
will alternate on the display.
4 Press the STOP button to stop inserting
4
the additional recording.
Notes
• The recording time and date of the fi le is updated to the time and date of
the inserted recording.
• You cannot select a diff erent recording mode ([QP], [SP]) than that of the
original fi le before inserting.
E
DISPLY INDEX
QP DICT
E
DISPLY INDEX
DS2500
Insert Rec?
DS2500
DS2500
134 / 134
00 H 00 M 10 s
33 M 2 5 s
134 / 134
00 M 12s
Insert Rec
134 / 134
00 M 11s
4 H 3 3 M 0 6 S
Ni
EXIT
Ni
Ni
2
Recording
F
F
EN
25
Page 26
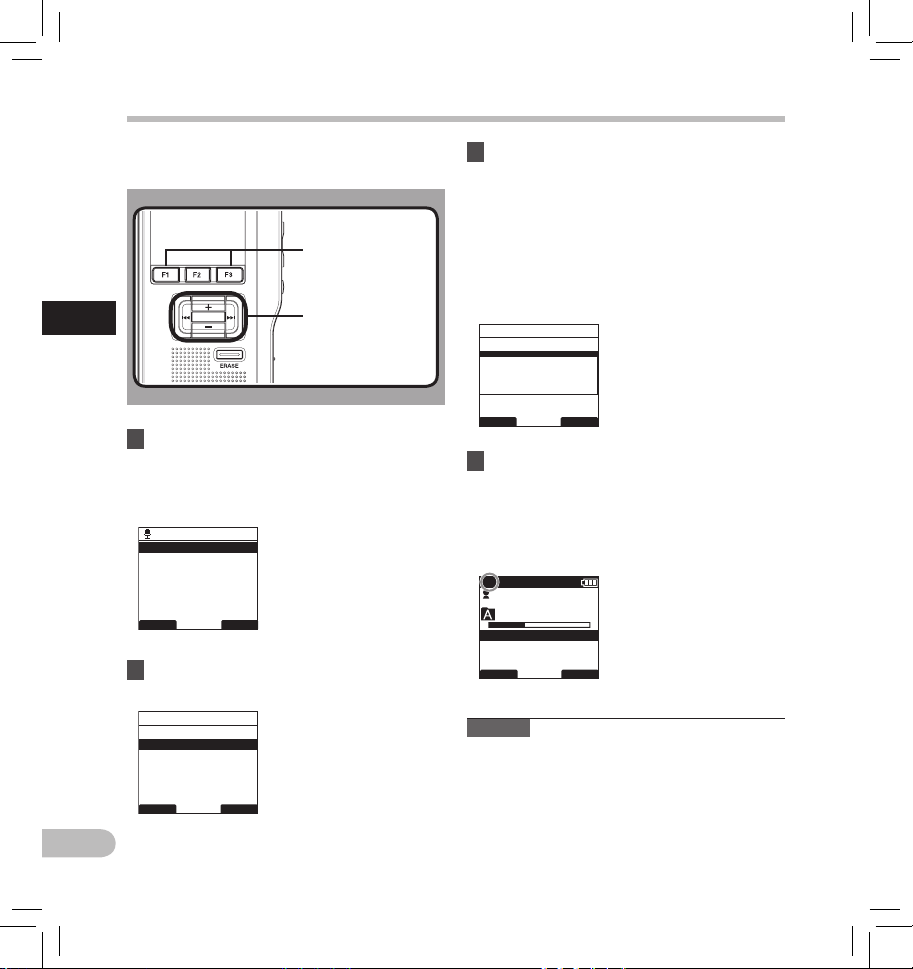
Recording modes [Rec Mode]
The recording mode can choose between [QP]
(Quality Playback) and [SP] (Standard Playback).
F1, F3
PLAY/OK
+, −
9
] at the [
PLAY/OK
Record ing modes
2
1 Select [
screen, then press the
PLAY/OK
Rec Mode
button.
• Refer to P.41 regarding each menu item
settings.
Record Menu
Rec Mode
Mic Sense
VCVA
12
BACK EXIT
2 Press the + or – button to select [QP] or
[SP].
Rec Mode
QP
SP
button
button
button
,
0 button
Record Menu
or 9
3 Press the
PLAY/OK
button to complete
the setting.
• [Setting fixed] will light up on the display,
and it will return to the [Record Menu] screen.
• If you press the 0 or F1 (BACK) button the
setting will be cancelled and it will return to
the [Record Menu] screen.
• Pressing the F3 (EXIT) button will cancel the
contents being set and take you out of the
MENU.
Rec Mode
QP
SP
Setting
fixed
BACK EXIT
]
4 Press the
F3 (EXIT
) or 0 button to
close the menu screen.
• Set recording mode is displayed when
creating the new file and during recording.
• The recording mode of file recording is
displayed during playback and in stop mode.
SP DICT
DS2500
EF
Remain
FOLDER
Note
• Choose [QP] mode for recording meetings or
lectures with crisp clarity.
031 / 030
New File
15 H 22 M 40 s
Ni
INFO
EN
26
BACK EXIT
Page 27
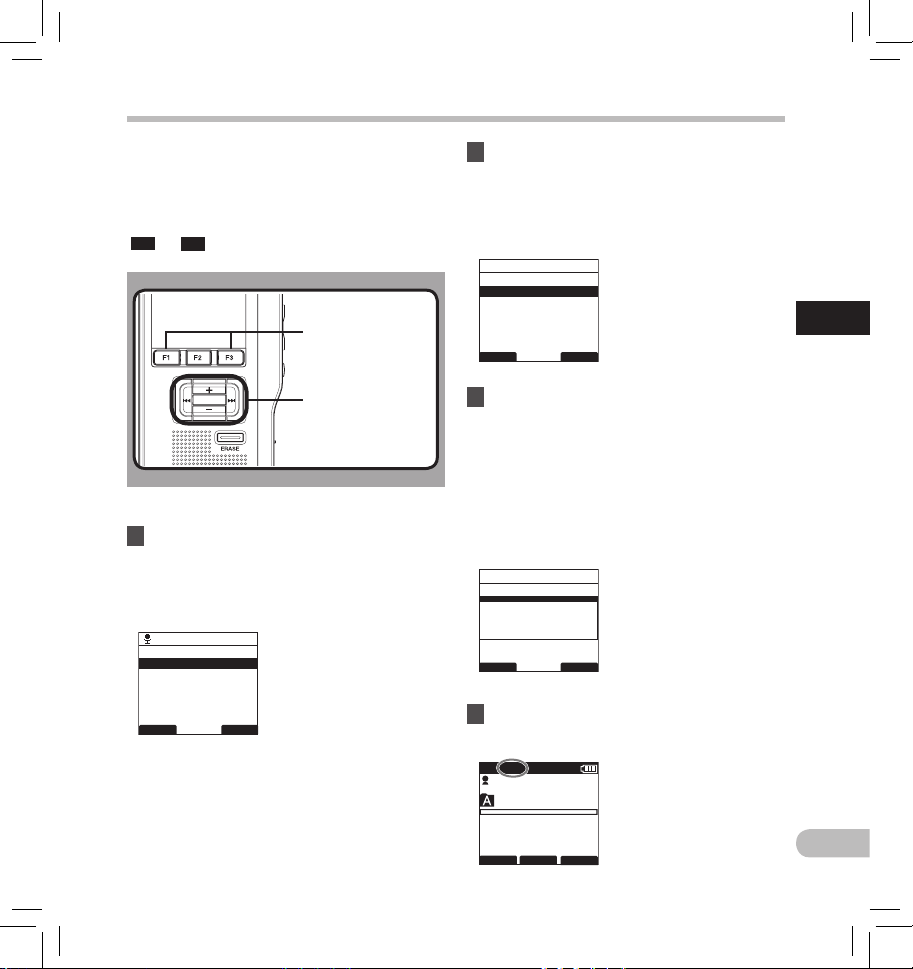
Microphone sensitivity [Mic Sense]
You can switch between t wo microphone
sensitivities to meet recording needs: [Dictation] for
oral dictation and [Conference] which is suited for
situations like meetings and conferences with a small
number of people.
The setting status will appear on the display as
CONF
DICT
[
] or [
].
F1, F3
button
PLAY/OK
PLAY/OK
1 Select [
Mic Sen se
screen, then press the
] at the [
button
+, −
button
9
,
0 button
Record Menu
PLAY/OK
]
or 9
button.
• Refer to P.41 regarding each menu item
settings.
Record Menu
Rec Mode
Mic Sense
VCVA
12
BACK EXIT
2 Press the + or – button to select
[
Conference
[Conference]: High-sensitivity mode that records
sounds in all directions.
[Dictation]: Low-sensitivity mode suited for
d i c t a t i o n .
Mic Sense
Conference
Dictation
BACK EXIT
3 Press the
] or [
Dictation
PLAY/OK
button to complete
].
the setting.
• [Setting fixed] will light up on the display,
and it will return to the [Record Menu] screen.
• If you press the 0 or F1 (BACK) button the
setting will be cancelled and it will return to
the [Record Menu] screen.
• Pressing the F3 (EXIT) button will cancel the
contents being set and take you out of the
MENU.
Mic Sense
Conference
Dictation
Setting
fixed
BACK
4 Press the
EXIT
F3 (EXIT
) or 0 button to
close the menu screen.
2
Microphone sensitivity
QP DICT
DS2500
E
FOLDER
025 / 030
New File
3 H 0 8 M 0 5 s
INFO
Ni
02 M 10 s
MENU
EN
27
Page 28
Using the Variable Control Voice Actuator [VCVA]
The Variable Control Voice Actuator (VCVA) is a
function that star ts recording automatically when
the microphone senses that sounds have reached
a preset threshold volume level, and automatically
pauses when the volume drops below the threshold.
The VCVA feature allows you to conserve memory by
automatically stopping recording in instances like
long silent periods during meetings.
When this is enabled, [
display.
2
Using th e Variable Con trol Voice Act uator
PLAY/OK
VCVA
] will appear on the
REC
F1
button
PLAY/OK
9, 0 button
1 Set the VCVA in the menu to [On].
• Refer to P.41 regarding each menu item
settings.
button
button
2 Press the REC button to start recording.
• When the sound volume is lower than the preset
actuation sound level, recording automatically
stops after 1 second approximately, and “Stand
by” flashes on the display. The record indicator
light glows orange and [
appears when recording star ts and flashes when
recording pauses.
QP DICT VCVA
DS2500
EF
DISPLY
134 /134
1 H 25 M 01 s
Standby
Ni
INDEX
] (Record indicator)
Adjust the start/stop actuation level:
While t he recorder is i n recording mode, press the
9 or 0 button to adjust the actuation leve l.
• The VCVA level can be set to any of 15 different
values. The higher the value is, the more sensitive
the recorder can react to sounds. At the highest
value, even the faintest sound will ac tivate
recording.
• The VCVA actuation level can be adjusted
according to the ambient (background) noise.
QP DICT VCVA
DS2500
EF
VCVA Level 05
DISPLY
b
Ni
134 /134
1 H 25 M 02 s
INDEX
a
a Star t level (Varies
according to the
sound vo lume being
recorded)
b
L evel meter indic ator
(moves to the l eft/right
accordin g to the set
level)
EN
28
Notes
• The start/stop actuation level also varies
depending on the selected microphone
sensitivity mode (☞ P.27 ).
• To ensure successful recordings, prior testing and
adjustment of the start/stop actuation level is
recommended.
Page 29
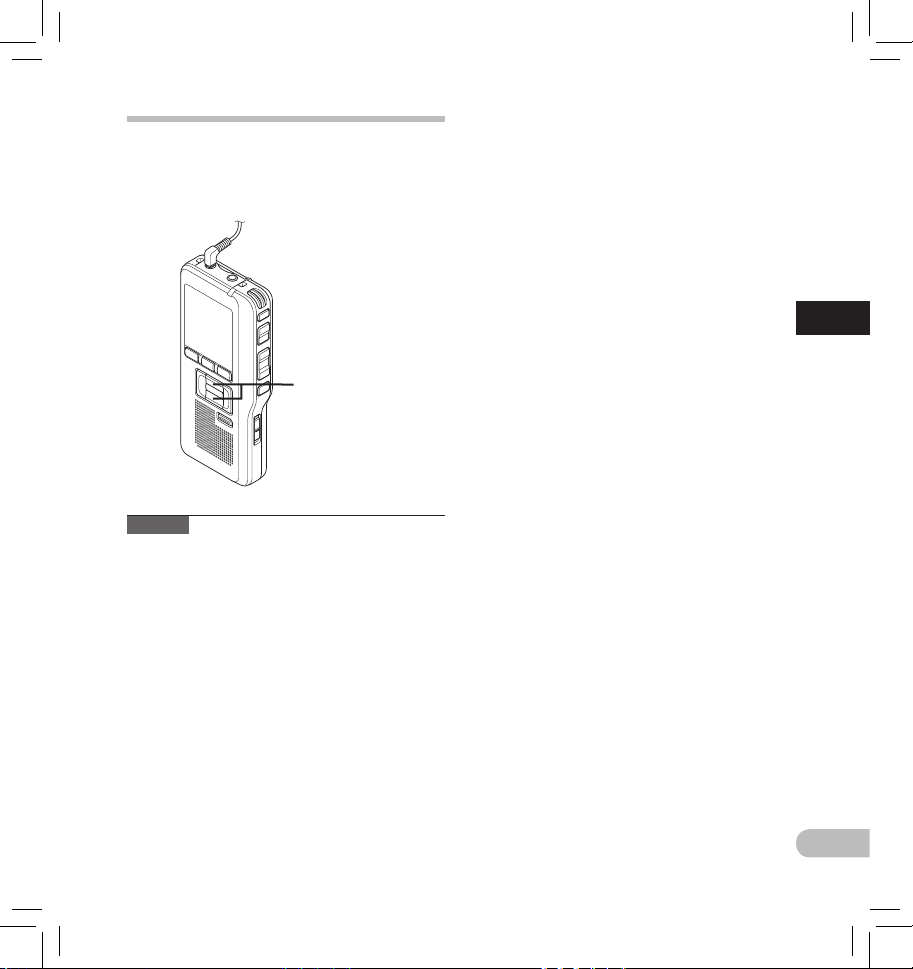
Recording monitor
It is possible to monitor your recording by listening
to the recording while recording is in progress. Insert
the earphone plug into the earphone jack and use
the
+
or – button to control the volume level.
+, −
(Volume) button
Note
• Insert the plugs in to the end as shown in the
illustration when inserting the earphone or
external microphone.
2
Record ing monitor
EN
29
Page 30
Playback
2
Playback
PLAY/OK
PLAY/OK
You can start playing a f ile at any point.
1
1 Select the file, then press the PLAY/OK
button to start playback.
• The [ ] (Play indicator) appears on the
display.
2
a Play indicator
2 Press the + or – button to adjust the
volume.
3
• The display shows the volume level. You can
choose between [00] to [30].
b Volum e level
3 Press the STOP button at any point you
want to stop the playback.
a
b
QP DICT
DS2500
INSERT
QP DICT
DS2500
Volume 15
INSERT
101 / 133
00 M 05 s
27 M 5 8 s
SPEED
101 / 133
00 M 07 s
SPEED
Ni
INDEX
Ni
INDEX
EN
30
Page 31

Playback
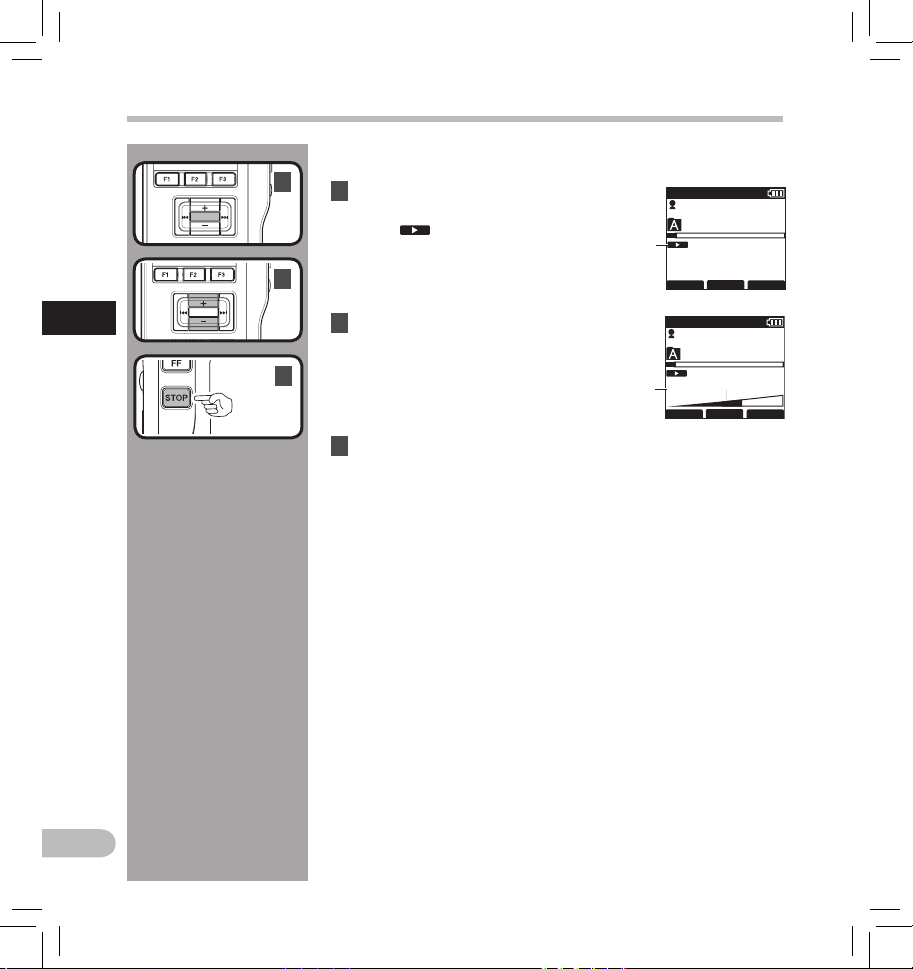
Playback functions Operation How to cancel
Fast For ward
(FF)
Rewind
(REW)
Cue
(CUE)
Review
(REV)
Playback
Speed
Notes
• If you press the 9 or FF button once while fast-forwarding or twice while stopped, the recorder will stop
at the end of the fi le (F.Skip).
• If you press the 0 or REW button once while rewinding or twice while stopped, the recorder will stop at
the beginning of the fi le (B.Skip). If the 0 or REW button is pressed within 2 seconds, the recorder skips
to the beginning of the previous fi le.
Press the 9 or FF button once while stopped. Press the PLAY/OK or STOP button.
Press the 0 or REW button once while stopped. Press the PLAY/OK or STOP button.
Press and h old the 9 or FF button whil e stopped
or playi ng a file.
Press and h old the 0 or REW button while
stoppe d or playing a fi le.
Press the F2 (SPEED) button dur ing playback .
• Every time the F2 (SPEED) but ton is pressed, th e
playback speed will switch.
Play (playback):
Playback at normal sp eed.
Slow Play (s low playback) :
Playbac k speed slows dow n (-50%), and “Slow
play” w ill turn on.
Fast Play (fas t playback):
Playbac k speed become s faster (+50%), and “Fast
play” w ill turn on.
Release the button.
Release the button.
2
Playback
EN
31
Page 32

Erasing
PLAY/OK
Erasing a file
2
Erasing or deleting a f ile from any of the folder on the recorder is a very
simple process.
2
Erasing
EN
PLAY/OK
PLAY/OK
1 Select the file you want to erase.
3
2 Press the
3 Press the + button to select [
4
then press the
ERASE
button.
PLAY/OK
4 Press the + button to select [
press the
• The display changes to [E rase !] and erasing
[Erase Done] is displayed when the file is erased.
File numbers will be reassigned automatically.
Notes
• An erased fi le cannot be restored.
• Files cannot be erased in the following cases.
-
File being set [Lock] (☞ P. 42) .
-
Files stored on a locked SD card (☞ P.9).
will start.
PLAY/OK
button.
File Era se
button.
Start
],
], then
QP DICT
DS2500
Erase in Folder
File Erase
Cancel
Erase in Folder
File Erase
Cancel
QP DICT
DS2500
File Erase
Start
Cancel
BACK
Erase !
QP DICT
DS2500
029 / 030
Erase Done
Ni
029 / 031
EXIT
Ni
029 / 031
Ni
32
Page 33

PLAY/OK
PLAY/OK
PLAY/OK
Erasing all files in a folder
All files in a folder can be erased simultaneously.
2
1 Select the file you want to erase.
2 Press the
3
3 Press the + button to select [
4
Folder
4 Press the + button to select [
press the
• The display changes to [E rase !] and erasing
[Erase Done] is displayed when the files are erased.
Any locked f iles in the folder will be reassigned new
file numbers in ascending order.
ERASE
], then press the
PLAY/OK
will start.
button.
PLAY/OK
button.
Erase i n
button.
Start
], then
QP DICT
DS2500
029 / 030
Erase in Folder
File Erase
Cancel
Erase in Folder
File Erase
Cancel
QP DICT
DS2500
E
Erase in Folder
Start
Cancel
BACK
Erase !
Erasing
Ni
EXIT
Ni
/ 030
2
Erasing
QP DICT
DS2500
E
000 / 000
Erase Done
Notes
• The erasing process may take up to 10 seconds. Do not interrupt this
process or data may be damaged.
• Files cannot be erased in the following cases.
-
File being set [Lock] (☞ P. 42) .
-
Files stored on a locked SD card (☞ P.9).
Ni
EN
33
Page 34

Partially erasing a file
45
M
02
s
You can erase a selected file in part.
2
3
1 Playback the file you would like to
partially erase.
Erasing
2
Erasing
EN
PLAY/OK
2 Press the
ERASE
button at the point to
start erasing.
• While playback continues, [Era se start] will
appear on the display.
• If you press the F2 (
skip (F.Skip) to the end of the file and then
stop. That will be set automatically as the
ending point of the partial erase.
• If you press the F1 (
skip back (B. Skip) and restart from the partial
erase starting point.
Playback will continue until the end of the
file or until the par tial erase ending point is
confirmed.
3 Press the
ERASE
) button, playback will
) button, playback will
button at the point to
end erasing.
• The erase starting point (time) set in step 2
and the ending point (time) set in this step will
alternate on the display for 8 seconds.
QP DICT
DS2500
INSERT
QP DICT
DS2500
QP DICT
DS2500
134 / 134
01 H 5 5 M 2 5 s
SPEED
01H 5 5 M 23 s
Erase start
134 / 134
01 H 5 5 M 2 5 s
Start point
134 / 134
01 H 1 5 M 2 5 s
End point
Ni
45 M 02 s
INDEX
EXIT
Ni
05 M 01 s
EXIT
Ni
45 M 32 s
EXIT
34
Page 35

Erasing
PLAY/OK
4 Press the
4
• The display changes to [Partia l erasing !] and
When [Partial erase complete d.] appears on the
display, partial erase is complete.
ERASE
erasing will start.
button to confirm erase.
Notes
• If the ERASE button is not pressed within 8 seconds after the [Start
point] and [End poi nt] are alternately displayed, the recorder will revert
to stop status.
• An erased fi le cannot be restored.
• Files cannot be partially erased in the following cases.
-
File being set [Lock] (☞ P. 42) .
-
The SD card lock is turned on (☞ P.9).
QP DICT
DS2500
QP DICT
DS2500
134 / 134
1 H 20 M 35 s
Partial
erasing !
134 / 134
1 H 20 M 35 s
Partial erase
completed.
Ni
Ni
2
Erasing
EN
35
Page 36

Advanced operations
Selecting folders and files
Changing file
F1, F3
button
PLAY/OK
3
Selec ting folde rs and files
PLAY/OK
+, −
button
9
,
0 button
Changing folders
1 While the recorder is stopped, press the
F1 (FOLDER
• The folder list screen will be displayed.
QP DICT
A
Folder A
B
Folder B
C
Folder C
D
Folder D
E
Folder E
FOLDER
2 Press the + or – button to select the
folder, then press the
• This will change the folder.
• You can switch folders by pressing the
F1 (FOLDER) button.
QP DICT
A
Folder A
B
Folder B
C
Folder C
D
Folder D
E
EN
36
Folder E
FOLDER
) button.
Ni
EXIT
PLAY/OK
Ni
EXIT
button
button.
1 While the file is being displayed, press
the 9 or 0 button.
• This will change and display the file number
order for f iles within the folder.
QP DICT VCVA
DS2500
C
001 / 010
INFO
FOLDER
Ni
00M 00 s
05 M 0 0 s
MENU
a Current file number
b To tal n umb er of
a
recorde d files in the
b
folder
Page 37

Displaying file information [Information]
The recorder can display a variety of information
related to the current file.
F2, F3
button
PLAY/OK
1 Select the file containing the
information to display.
• Refer to P.36 regarding file selection.
QP DICT
DS2500
Ni
029 / 030
00M 00 s
22 M 4 0 s
MENU
INFO
FOLDER
2 Press the
• The file information is displayed.
• You can display the f ile information by
F2 (INFO
) button.
pressing the F3 (MENU) button and selec ting
[Information] from [File Menu].
The displayed information
The following information will be displayed.
[ File Name ]:
F i l e n a m e .
[ Rec Time ]:
Time and date the file was recorded.
[ Author ID ]:
Display the Author ID of file.
Note
• When the file that Work Type or the Option
Item is set is transferred from PC to this unit,
the information will be displayed on the File
Information.
3
Displ aying file in formation
029/030
File Name
DS250006.DS2
Rec Time
Y09M23D 12:23PM
2012
Author ID
DS2500
Ni
EXIT
EN
37
Page 38

Index marks
Index marks can be placed in a f ile during recording
or playback. Index marks are used to provide a quick
and easy way to identify impor tant or significant
parts within the f ile.
F3
button
PLAY/OK
3
Index ma rks
9, 0 button
ERASE
button
Setting an index mark
1 While the recorder is recording or in
playback mode, press the
F3 (INDEX
button to set an index mark.
• An index number appears on the display.
QP DICT
DS2500
Ni
029 / 030
3H 10 M 56 s
Index 01
22M 4 0 s
Set
SPEED
INSERT
INDEX
Locating an index mark
2 While playing back a file, press and hold
the 9 or 0 button.
• The recorder stops for 1 second when it
reaches the index mark.
QP DICT
DS2500
Ni
029 / 030
3H 10 M 56 s
22M 4 0 s
Index 01
SPEED
INSERT
INDEX
Clearing an index mark
3 Locate the index mark you want to clear.
4 While the index number appears for
approximately 2 seconds on the display,
press the
)
• The index mark is erased.
QP DICT
DS2500
ERASE
Ni
button.
029 / 030
3H 10 M 56 s
Index 01
2 2 M 4 0 s
Clear
SPEED
INSERT
Notes
• Up to 32 index mark s can be set with in a fi le.
• When a fi le is locked or set to read-only, or when
the SD card lock is enabled index mark cannot be
erased. Clear the settings before erasing.
INDEX
EN
38
Page 39

Menu list
sMenu setting (While the recorder is stopped, press the F3 (ME NU) button)
Main menu
File Menu
Record Menu
Display Menu
Device Menu
(To the next p age)
Second layer Setting
Lock
Information
Rec Mode
Mic Sense
VCVA
Backlight
Contrast
LED
Languages
[Off], [On]
The fil e information i s displayed. P.37
[QP], [SP]
[Dictation], [Confeuyn.rence] P.27
[Off], [On]
[On], [Off]
Program c ontrast level [01]~[12] (Default i s [06]).
[On], [Off]
[English], [Deutsch], [Français], [Español], [Italiano],
[Русском]
Ref.page
P.4 2
P. 26
P. 28
P.4 3
P.4 4
P.4 5
P.4 6
3
Menu list
EN
39
Page 40

Menu list
3
Menu list
Main menu
Devices Menu
File Menu
(To the page 39)
Second layer Setting
Beep
Power Save
Time & Da te
Battery
USB Settings
Reset Settings
Format
Card Info.
System Inf o.
[On], [Off]
[5 minutes] , [10 minute s], [30 minutes], [1hou r],
[Off ].
In order o f hour, minute, year, mon th and day.
[ Ni-MH ] , [ A l k a l i n e ]
[USB Connect]: [PC], [AC Adapter], [Optional]
[USB Class]: [Composite], [Storage]
Return s the menu settin gs to their initia l state.
Initializes the card.
[Remain], [Capacity]
[Model Name], [Version], [Serial]
Ref.page
P.4 7
P.17
P. 20
P.13
P.4 8
P. 51
P. 50
P.9
P. 52
Notes
• The selectable language varies depending on the countries where the produc t was
purchased.
• Items appear in bold letters in the “Setting” column to indicate that they are the initial
settings.
EN
40
Page 41

Learning to use the menu
To navigate through the different options in the
menu, use the menu list flow char t (☞ P.39, P.40) and
the following steps to modify or change any settings.
F1, F3
button
PLAY/OK
PLAY/OK
1 Press the
• The [Main Menu] screen will appear on the
Main Menu
File Menu
Record Menu
Display Menu
Device Menu
display.
F3 (MENU
EXIT
) button.
2 Press the + or – button to move to [
Menu
] item to be set.
Main Menu
File Menu
Record Menu
Display Menu
Device Menu
+, −
9
button
button
,
0 button
Main
3 Press the
• Move to the setting of the selected menu
items.
PLAY/OK
or 9 button.
4 Press the + or – button to move to the
menu item to be set.
Record Menu
Rec Mode
Mic Sense
VCVA
BACK EXIT
5 Press the
PLAY/OK
or 9 button.
• Move to the setting of the selected item.
Rec Mode
QP
SP
BACK EXIT
6 Press the + or – button to change the
setting.
7 Press the
PLAY/OK
button to complete
the setting.
• If you press the 0 or F1 (BACK) button, the
setting will be cancelled and it will return to
the menu.
• Pressing the F3 (EXIT) button will cancel the
contents being set and take you out of the
MENU.
8 Press the
F3 (EXIT
) or 0 button to
close the menu screen.
3
Learn ing to use the men u
EXIT
EN
41
Page 42

Locking files [Lock]
When a file is set to [Lock], [ ] will appear on the
display, allowing you to prevent impor tant files from
accidental erase. Moreover, the file will not be erased
even when all files within a folder are erased.
F1, F3
button
PLAY/OK
3
Locking files
PLAY/OK
+, −
9
button
button
,
0 button
1 Select the file you want to lock.
2 Select [
Lock
] at the [
then press the
• Refer to P.41 regarding each menu item
settings.
File Menu
Lock
Information
BACK EXIT
File Men u
PLAY/OK
or 9 button.
EN
] screen,
3 Press the + or – button to select [On] or
[
Off
].
[On]: Locks the file and prevents it from being
erased. [
[Off]: Unlock s the file and allows it to be erased.
Lock
] appears on the display.
029 / 030
OnC
Off
BACK EXIT
4 Press the
the setting.
• [File Lock On] or [File Lock Off] will light up
• If you press the 0 or F1 (BACK) button the
• Pressing the F3 (EXIT) butt on will cancel the
Lock
OnC
Off
BACK EXIT
5 Press the
close the menu screen.
QP CONF
DS2500
FOLDER
PLAY/OK
button to complete
on the display, and it will return to the [File
Menu] screen.
setting will be cancelled and it will return to
the [File Menu].
contents b eing set and take you ou t of the MENU.
029 / 030
File Lock
On
F3 (EXIT
) or 0 button to
Ni
E
029 / 030
New File
02 M 10 s
3 H 0 8 M 0 5 s
INFO
MENU
42
Page 43

Backlight [Backlight]
When the display backlight is set to [On], the
backlight will light up for about 10 seconds when a
button is pressed.
This is useful in that it allows you to check the display
even in dark locations.
F1, F3
button
PLAY/OK
PLAY/OK
1 Select [
Backlight
screen, then press the
] at the [
button
+, −
button
9
,
0 button
Display Menu
PLAY/OK
]
or 9
button.
• Refer to P.41 regarding each menu item
settings.
Display Menu
Backlight
Contrast
LED
Language
12
BACK EXIT
2 Press the + or – button to select [On] or
[
Off
].
[On]: Backlight is enabled.
[Off]: Backlight is disabled.
Backlight
On
Off
BACK
3 Press the
EXIT
PLAY/OK
button to complete
the setting.
• [Setting fixed] will light up on the display,
and it will return to the [Display Menu]
screen.
• If you press the 0 or F1 (BACK) button the
setting will be cancelled and it will return to
the [Display Menu] screen.
• Pressing the F3 (EXIT) button will cancel the
contents being set and take you out of the
MENU.
Backlight
On
Off
Setting
fixed
BACK EXIT
4 Press the
F3 (EXIT
) or 0 button to
close the menu screen.
3
Backlight
EN
43
Page 44

LCD contrast adjustment [Contrast]
Display contrast can be adjusted from level [01] to
[12].
F1, F3
] at the [
PLAY/OK
+, −
button
9
,
Display Menu
PLAY/OK
3
LCD contrast adjustment
1 Select [
screen, then press the
PLAY/OK
Contrast
button.
• Refer to P.41 regarding each menu item
settings.
Display Menu
Backlight
Contrast
LED
Language
12
BACK EXIT
button
button
0 button
or 9
2 Press the + or – button to set the
contrast level.
• You can adjust the LCD display contrast level
from [01] to [12].
Contrast
+
Level
06
-
BACK
3 Press the
EXIT
PLAY/OK
the setting.
• The set contrast level lights up and will return
to the [Display Menu] screen.
]
• If you press the 0 or F1 (BACK) button the
setting will be cancelled and it will return to
the [Display Menu] screen.
• Pressing the F3 (EXIT) button will cancel the
contents being set and take you out of the
MENU.
Contrast
+
Setting
fixed
Level
06
-
BACK
4 Press the
EXIT
F3 (EXIT
) or 0 button to
close the menu screen.
button to complete
EN
44
Page 45

LED [LED]
You can set it so the Record indicator light does not
turn on.
LED
(Recor d
indicator light)
F1, F3
button
PLAY/OK
button
+, −
PLAY/OK
1 Select [
LED
then press the
• Refer to P.41 regarding each menu item
settings.
Display Menu
Backlight
Contrast
LED
Language
12
BACK EXIT
] at the [
PLAY/OK
button
9
,
0 button
Display Menu
or 9 button.
] screen,
2 Press the + or – button to select [On] or
[
Off
].
[On]: LED light will be set.
[Off] : L E D l i g h t w i l l b e c a n c e l l e d .
LED
On
Off
BACK EXIT
3 Press the
PLAY/OK
button to complete
the setting.
• [Setting fixed] will light up on the display,
and it will return to the [Display Menu]
screen.
• If you press the 0 or F1 (BACK) button the
setting will be cancelled and it will return to
the [Display Menu] screen.
• Pressing the F3 (EXIT) button will cancel the
contents being set and take you out of the
MENU.
LED
On
Off
Setting
fixed
BACK
4 Press the
EXIT
F3 (EXIT
) or 0 button to
close the menu screen.
3
LED
EN
45
Page 46

Language [Language]
You can select the display language for this recorder.
The selectable language varies depending on the
countries where the product was purchased.
F1, F3
button
PLAY/OK
+, −
9
] at the [
PLAY/OK
button
,
0 button
Display Menu
3
Language
1 Select [
screen, then press the
PLAY/OK
Language
button.
• Refer to P.41 regarding each menu item
settings.
Display Menu
Backlight
Contrast
LED
Language
12
BACK EXIT
2 Press the + or – button to set the
language.
[English]: Displays in English.
[Deutsch]: Displays in German.
[Franç ais]: Displays in French.
[Español] : D i s p l a y s i n S p a n i s h .
[Italiano]: Displays in Italian.
[Русском]: Displays in Russian.
EN
button
or 9
Language
English
BACK EXIT
3 Press the
PLAY/OK
button to complete
the setting.
• The displayed language is changed and will
return to the [Display Menu] screen.
• If you press the 0 or F1 (BACK) button the
setting will be cancelled and it will return to
the [Display Menu] screen.
• Pressing the F3 (EXIT) button will cancel the
contents being set and take you out of the
MENU.
]
Language
English
Setting
fixed
BACK EXIT
4 Press the
F3 (EXIT
) or 0 button to
close the menu screen.
Note
• The selec table language varies depending on the
countries where the product was purchased.
46
Page 47

System sounds [Beep]
When this is set to [On], the recorder beeps to alert
you to button operations or warn you of errors.
F1, F3
button
PLAY/OK
PLAY/OK
1 Select [
Beep
] at the [
screen, then press the
button
+, −
button
9
,
0 button
Device Menu
PLAY/OK
]
or 9
button.
• Refer to P.41 regarding each menu item
settings.
Device Menu
Beep
Power Save
Time & Date
Battery
12
USB Settings
Reset Settings
BACK EXIT
2 Press the + or – button to select [On] or
[
Off
].
[On]: System sounds are enabled.
[Off] : S y s t e m s o u n d s a r e d i s a b l e d .
Beep
On
Off
BACK
3 Press the
EXIT
PLAY/OK
button to complete
the setting.
• [Setting fixed] will light up on the display,
and it will return to the [Device Menu] screen.
• If you press the 0 or F1 (BACK) button the
setting will be cancelled and it will return to
the [Display Menu] screen.
• Pressing the F3 (EXIT) button will cancel the
contents being set and take you out of the
MENU.
Beep
On
Off
Setting
fixed
BACK
4 Press the
EXIT
F3 (EXIT
) or 0 button to
close the menu screen.
3
System s ounds
EN
47
Page 48

Changing the USB class [USB Settings]
Besides setting to [PC] (Connect to PC to transfer
files) or [AC Ad apter] (Connect to AC adapter to
recharge the battery), you can switch the USB class
according to your usage.
F1, F3
button
PLAY/OK
+, −
button
9
,
] at the [
0 button
3
Changi ng the USB class
1 Select [
Menu
PLAY/OK
USB Setti ngs
] screen, then press the
9 button.
• Refer to P.41 regarding each menu item
settings.
Device Menu
Beep
Power Save
Time & Date
Battery
USB Settings
Reset Settings
BACK EXIT
2 Press the + or – button to select [
Connect
] or [
USB Settings
USB Connect
USB Class
USB Class
].
button
Device
PLAY/OK
USB
[USB Conne ct]: Setting for connecting to the PC.
[USB Clas s] : S e t t i n g f o r U S B c l a s s .
3 Press the
• If you select [USB Class], proceed to the
PLAY/OK
operation of Step 6.
button.
When [USB Co nnect] is s elected :
4 Press the + or − button to change the
setting.
USB Connect
PC
AC Adapter
Optional
or
BACK EXIT
[PC]: Setting for when the recorder is connected
to the PC and used as a storage device or
composite device. Connected as storage or
composite.
[AC Adapt er]: Setting for when the recorder is
connected to the PC for charging or to the AC
Adapter (A514) (optional).
[Optional
5 Press the
]: Setting to confirm the connection
method each time a USB connection is made.
PLAY/OK
button to complete
the setting.
• If you select [USB Connect], proceed to the
operation of Step 8.
EN
48
BACK EXIT
Page 49

When [USB C lass] is sele cted:
6 Press the + or − button to change the
setting.
USB Class
Composite
Storage
Changing the USB class [USB Settings]
BACK
[Composite]: Setting when connected to the PC
and used as an external memory device, USB
speaker or microphone.
[Storage]: Recognized as an external memor y
device from the PC.
7 Press the
EXIT
PLAY/OK
button to complete
the setting.
8 Press the
F3 (EXIT
) or 0 button to
close the menu screen.
Notes
• When you fi rst connect the recorder to your PC
as an external storage device, the driver for the
recorder will be automatically installed in your PC.
• The PC cannot recognize when the recorder is
connected to the PC when setting for the [USB
Connect] is set to [AC Adapter].
EN
49
3
Changi ng the USB class
Page 50

Formatting the card [Format]
Cards that have been used in non-Olympus devices,
or cards that are not recognized by the recorder,
must be formatted before they can be used with the
recorder.
To familiarize yourself with the formatting process,
read the steps below.
In terms of formatting, only selected cards can be
formatted, the recorder’s menu settings cannot be
initialized. The initialization of menu items should be
set up through DSS Player or the recorder’s [Reset
Settings].
3
Format ting the car d
PLAY/OK
PLAY/OK
1 Select [
Device Menu
screen, then press the
] at the [
+, −
, 9 button
PLAY/OK
button
Format
button.
• Refer to P.41 regarding each menu item
settings.
Device Menu
Power Save
Time & Date
Battery
USB Settings
12
Reset Settings
Format
BACK
EXIT
]
or 9
2 Press the
+
or – button to select [
Start
option.
Format
Start
Cancel
BACK
3 Press the
[
Start
Format
PLAY/OK
] selection.
Data will be
cleared
EXIT
button to confirm
4 Press the + or – button again to select
[
Start
] option.
Format
Are You Sure?
Start
Cancel
BACK
5 Press the
EXIT
PLAY/OK
button again to
initiate the formatting process.
Format
Format !
Format
Format Done
]
EN
50
• [Format Done] displays when formatting
ends.
Page 51

Initi alizing t he recorde r’s menu set tings
[Reset Settings]
To return the recorder’s menu settings to their
original status from the time of purchase (initial
settings), perform the set ting from [Reset
Settings] in the [Device Menu], or perform the
same operation by using DSS Player.
Device Menu
Power Save
Time & Date
Battery
USB Settings
Reset Settings
Format
BACK EXIT
Notes
• The time required to format cards diff ers
depending on the capacity of cards. Do not
interrupt the formatting process by the following
operations. Doing so will damage the data or card.
-
Remove the card.
-
Remove the batteries.
• When the card is formatted, all the stored data,
including locked fi les, are erased.
• If an unformatted card is inserted, the recorder
automatically displays the format option in the
menu.
• SD cards for which the SD card lock is enabled
cannot be initialized.
• Formatting on the recorder will be quick format.
If you format the card, information of fi le
management is refreshed and the data inside the
card is not deleted completely. When handing
over and disposing the card, be careful about the
data leakage from the card. We recommend the
card to be destroyed when you dispose the card.
Formatting the card [Format]
3
Format ting the car d
EN
51
Page 52

Check system information [System info.]
System information about the recorder like its
[Model Name], [Version] and [Serial] can be
displayed.
In this recorder, you can check the card Information
(☞ P.9) and file Information (☞ P. 37 ).
F1, F3
button
PLAY/OK
3
Check s ystem infor mation
PLAY/OK
button
9, 0 button
1 Select [
System i nfo.
Menu
] screen, then press the
] at the [
9 button.
• [Model Name] [Version] [Serial] will appear.
• Refer to P.41 regarding each menu item
settings.
Device Menu
Battery
USB Settings
Reset Settings
Format
12
Card info.
System info.
BACK EXIT
2 Press the
PLAY/OK
, 0 or F1 (
button.
3 Press the F3(
EXIT
) or 0 button to close
the menu screen.
EN
52
Device
System Info.
Model Name
DS-2500
Version
1.00
Serial
123456789
BACK
PLAY/OK
BACK
or
EXIT
)
Page 53

Managing files on your PC
DSS Player Software
The DSS Player is a fully feature d software tool
that prov ides a simple to us e but sophisticated
method of managing your recordings. Some of
the feat ures of the DSS Player are:
• Automatic star tup of the applicat ion by connecting
the device.
• Automatic download of Dictation by connecting
the device.
• Voice recorder’s menu set ting.
• Direct recording and editing of existing Dictation
through Voice recorder’s button.
Make sure that your computer meets the minimum
requirements listed below.
Minimum requirement
Windows
Operating System:
Microsof t® Windows® XP:
Professional / Home Edition SP3 x86
Professional / Home Edition SP2 x64
Microsof t® Windows Vista®:
Ultimate / Enterprise / Business / Home
Premium / Home Basic SP2 (both x86/64)
Microsof t® Windows 7®:
Ultimate / Enterprise / Professional / Home
Premium (both x86/64)
Ultimate / Enterprise / Professional / Home
Premium SP1 (both x86/64)
C P U :
Microsof t® Windows® XP / Vis ta / 7: 1 GHz or higher
R A M :
Microsof t® Windows® XP:
256 MB or more
Microsof t® Windows Vista®:
1 GB or more
Microsof t® Windows 7®:
1 GB or more (32 bit) / 2 GB or more (64 bit)
Hard drive space:
2 GB or more
B r o w s e r :
Microsof t Internet Explorer 6.0 or later
D r i v e :
CD-ROM, CD-R, CD-RW, DVD-ROM drive
Display:
800 x 600 pixels or more, 65,536 colors or more
(16,770,000 colors or more is recommended)
U S B p o r t :
One or more free por ts
O t h e r s :
With the Dictation Module, Transcription Module:
A Microsof t WDM- or MME-compliant and
Windows-compatible sound device
Macintosh
Operating System:
Mac OS X 10.4.11 - 10.7
C P U :
PowerPC® G3 500 MHz or more,
or Intel Core Solo/Duo 1.5 GHz or more
R A M :
256 MB or more (512 MB or more is recommended)
Hard drive space:
200 MB or more
D r i v e :
CD-ROM, CD-R, CD-RW, DVD-ROM drive
B r o w s e r :
Macintosh Safari 3.0.4 or later,
mozilla Firefox 3.6.20 or later
Display:
1024 x 768 pixels or more, 32,000 colors or more
USB port:
One or more free por ts
O t h e r s :
Audio device
Notes
• Even if the above conditions are satisfi ed,
self-modifi ed computers, self-upgraded OS or
multiple OS environments are not supported.
• Macintosh version does not support voice
recognition software.
• For information on the latest OS upgrades
compatibility, visit the Olympus Web page at
http://www.olympus-global.com/en/global/ .
4
DSS Player Softwar e
EN
53
Page 54

Installing software
Be sure to c onfirm the following before in stallation:
• Exit all running applications.
• Eject the floppy disk if you are using one.
• If you are running Windows XP/Vista/7 or Mac OS X on the network, you need to log on as an Administrator.
W i n d o w s
For the Windows version, there is an installation
method for individuals and one for administrators to
install on multiple client PCs.
An explanation of the installation method for
individuals installing the software on a single PC will
be provided here.
1 Insert Olympus DSS Player CD into the
CD-ROM drive.
4
Installing software
• The installation program will start
automatically.
If the installation program does not start
automatically, browse your CD-ROM drive and
execute [launcher.exe].
2 The launcher will startup.
• Select the language you would like to install
from the upper-lef t pull-down menu and click
[DSS Player St andard Instal lation].
3 The Install Wizard will begin.
• Once you have consented to the licensing
agreement, enter your name, company name,
and license ID number (serial number).
The license ID number is printed on the license
ID card included inside the recorder package.
4 Proceed with the installation according
to the instructions on the screen.
Macintosh
1 Insert Olympus DSS Player CD into the
CD-ROM drive.
2 Double-click the CD icon.
3 Double-click the setup icon.
• The Install Wizard will begin.
Once you have consented to the
licensingagreement, follow the instruc tions
on the screen to complete the installation.
4 Proceed with the installation according
to the instructions on the screen.
5 You will be requested to restart, so
conduct a restart by following the
instructions.
EN
54
Page 55

Uninstalling software Using online help
Window
1 Exit DSS Player program.
2 Click the [
3 Select [
Contro l Panel
[
• A list of installed applications is displayed.
start
] button on the taskbar.
Add/Remove programs
].
] from the
4 Select [Olympus DSS Player Standard],
then click the [Change/Remove] button.
5 Proceed with the uninstallation
according to the instructions on the
screen.
Macintosh
1 Exit DSS Player program.
2 Double-click [
[
Application
• An uninstaller is displayed.
DSS Unins taller
] { [
DSS Player
] in
] folder.
3 Proceed with the uninstallation
according to the instructions on the
screen.
Note
• The dictation fi les you made are stored in the
[MESSAGE] folder. If you don’t need them, delete
them.
You can confi rm the location of the [MESSAGE]
folder by clicking on [Options] in the [Too ls]
menu before uninstalling.
For information on the DSS Player usage and
features, refer to the Online help.
To start online Help:
Windows
1 Click the [start] button, then select
[All Programs], [Olympus DSS Player
Standard], [Dictation Module Help].
2 While DSS Player is running, select the
[Help] menu, [Contents].
3 While DSS Player is running, press F1 on
the keyboard.
Macintosh
1 While DSS Player software is running,
select [ DSS Player Help ] from the [ Help ]
menu.
Note
• The Online help will be available after DSS Player
software installation.
4
Unins talling sof tware / Usin g online help
EN
55
Page 56

Connecting recorder to PC
Connecting to your PC using the USB cable
1 Boot the PC.
2 Connect the USB cable to the USB port of the PC.
3 Connect the USB cable to the connecting terminal on the
bottom of the recorder.
• [ Remote (Composite) ] is displayed on the recorder if the USB cable is
connected.
Once you connect the recorder to your PC, the recorder will be powered
through the USB cable.
While PC connection, the SD card is recognized as the respective
removable disk drive.
4
Connecting recorder to PC
EN
56
Notes
• NEVER remove the card or disconnect the USB cable while the record
indicator light is fl ashing. If you do, the data will be destroyed.
• Some PC’s may not supply suffi cient power and the recorder fails to
connect. Refer to your PC user’s manual regarding the USB port on your
PC.
• Do not connect the recorder to a PC by using a USB hub. Make sure to
connect to a USB port on your PC.
• Make sure to push the cable connector all the way in. Otherwise, the
recorder may not operate properly.
Page 57

Connecting recorder to PC
Disconnecting from your PC
Windows
1 Click [ ] on the task bar located at the
lower-right corner of the screen. Click
[Safely remove USB Mass Storage
Device].
• The drive letter will differ depending on the
PC being used.
2 Confirm that the record indicator light
turns off before disconnecting the USB
cable.
Macintosh
1 Move the icon of the recorder's drive
displayed on desktop to trash box by
drag and drop.
2 Disconnect the USB cable.
Notes
• NEVER remove the card or disconnect the USB
cable while the record indicator light is fl ashing. If
you do, the data on the card will get destroyed.
• Some PC’s may not supply suffi cient power and
the recorder fails to connect. Refer to your PC
user’s manual regarding the USB por t on your PC.
• Do not connect the recorder to a PC by using a
USB hub. Make sure to connect to a USB port on
your PC.
• Make sure to push the cable connector all the
way in. Otherwise, the recorder may not operate
properly.
• This is an operational environment for saving the
fi les recorded by this recorder to your PC with USB
connection.
• Even if operational environment is satisfi ed, we
do not support upgraded OS, the multi-boot
environment or self-modifi ed computers.
4
Connec ting recor der to PC
EN
57
Page 58

Running DSS Player Software
By default, connec ting the recorder to your PC, will
start the application automatically.
Windows
Disabling automatic start:
1 Right-click the Device Detector in the
System Tray in the lower right-hand
corner of the screen, then select
[Settings startup application].
2 Click [DSS Player Standard].
• The check mark on [DSS Player Standard]
disappears.
Manual start:
4
Running DSS Player Software
1 Click the [
Programs
• All program menu will be displayed.
start
] button, then select [
].
2 Select [Olympus DSS Player Standard],
then click [Dictation Module].
Macintosh
Disabling automatic start:
1 Click the Dock’s System Preferences.
2 Click Device Detector.
3 Turn the automatic startup setting Off.
Manual start:
1 Double click the DSS Player icon for the
folder in [
• All program menu will be displayed.
Application
] { [
2 Register user information.
All
• The user’s registration screen will be displayed
at the time of initial startup. Please input the
serial number. Please see the seal attached
to the CD-ROM package included with the
DSS Player, for the serial number. After the
input has ended, click [OK
registration.
DSS Player
] to complete the
].
EN
58
Page 59

Other practical use methods
Using as external memory of the computer
When the recorder is connected to your PC, it will be
recognized on your PC as a removable drive.
You can view and access the recorder card from My
Computer and download data from the card to your
PC using standard windows copy/move and delete
commands. You can also upload data from the PC to
the card in the recorder in the same way.
Examp le: Copying Da ta from PC to Ca rd Using Ex plorer
or Finder
1 Connecting the recorder to your PC.
• For connection procedure, refer to
“Connec ting to Your PC Using the USB
Cable” (☞ P. 56 ).
2 Open Windows Explorer or Finder
window.
• [Removable disk] is displayed.
3 Copy the data.
• The recorder will appear as a removable drive
icon.
4 Unplug the recorder from a computer.
Note
• NEVER remove the card or disconnect the USB
cable while the record indicator light is fl ashing.
If you do, the data on the card will get destroyed.
5
Using as e xternal mem ory of the com puter
EN
59
Page 60

Other information
Alarm message list
M e s s a g e E x p l a n a t i o n A c t i o n
[Battery Low] Battery power is getting low.
[File Protected] Attem pt to delete a locke d file.
[Index Full]
[Folder Full]
[Erase Error] An error oc curred while er asing.
[Card Error] An incompatible card was inserted.
[Unsupported Card] The card c annot be used wit h this recorder. Pleas e remove the card.
6
[Memor y Full] The car d has no remaining m emory.
Alarm message list
[Format Err or] The re was an error whil e formatting th e card.
[System Error] System e rror detecte d in the recorder.
The fil e is full of index ma rks (maximum of 32
marks).
The fold er is full of file s (maximum of 200 f iles).
The desti nation folder a lready has the ma ximum
number o f files (200).
Charge the b atteries or re place with new
batteries (☞ P.12 , P.14 , P. 15) .
Unlock th e file from the f ile menu (☞ P. 42) .
Erase ind ex marks that are n o longer requi red
(☞ P. 38 ).
Erase unne cessary fi les (☞ P.3 2) .
Erase unne cessary fi les (☞ P.3 2) .
Erase once again.
When an Er ase Error occurs f ormat the card .
Insert a c ompatible car d (☞ P.19) .
Erase fi les that are no long er required or in sert
another card.
Reform at the card (☞ P.
This is a mal function. Co ntact the place o f
purchas e or Olympus Ser vice Center for re pair.
50).
[Inser t Card] There is n o card inserte d.
[Can’t ma ke the system fil e. Connect to P C
and delete
unnec essary fil e]
The mana gement file ca nnot be created du e to
insufficient space on the card.
EN
60
Insert a c ard (☞ P.19 ).
Connec t the recorder to a com puter and delet e
unnecessary files.
Page 61

Troubleshooting
S y m p t o m P r o b a b l e c a u s e A c t i o n
Nothi ng appears on
the dis play
Won’t star t
Unable to record
No playb ack tone
heard
Unable to erase
The batt eries are not loa ded properly.
The batt eries are dead.
The recor der is in power of f mode.
The recor der is in power of f mode.
The batt eries are dead.
The card do es not have enough m emory.
The card is unformatted.
The maxi mum number of fi les has been
reached.
The SD card i s locked. Unlock th e SD card lock.
The earp hone is connect ed.
The volu me level is set to [00].
The fil e is locked.
The SD card i s locked. Unlock th e SD card lock.
Verify p olarity is cor rect ( ☞ P.1 2).
Charge the b atteries or re place with new
batteries (☞ P.12 , P.14 , P. 15) .
Turn the power o n ( ☞ P.17 ).
Turn the power on ( ☞ P.17 ).
Charge the b atteries or re place with new
batteries (☞ P.12 , P.14 , P. 15) .
Erase unne cessary fi les or insert an other card
(☞ P.19 , P. 32 ).
Format the c ard (☞ P.
Change to any o ther folder (☞ P.
Unplug th e earphones to use t he internal
speaker.
Adjust the vo lume level ( ☞ P.3 0) .
Unlock th e file from the f ile menu (☞ P. 42) .
50).
36).
6
Troubleshooting
Noise h eard during
playback
Recor ding level too
low
The recor der was shaken dur ing recording. ———
The recor der was placed ne ar a cell phone or
fluor escent lamp whil e recording or dur ing
playback.
The micro phone sensiti vity is too low.
Move the re corder.
Set the mi crophone sensi tivity to Confe rence
mode and t ry again (☞ P. 27 ).
EN
61
Page 62

Troubleshooting/Technical assistance and support
S y m p t o m P r o b a b l e c a u s e A c t i o n
Unable t o set index
marks
Cannot recharge
Cannot f ind the
recorded file
6
Cannot connect to
Troubleshooting/
Technical assistance and support
a PC
The maxi mum number of ind ex marks (32) has
been reached.
The fil e is locked.
The SD card i s locked. Unlock th e SD card lock.
[Battery] is set to [Alkaline].
You have not pres sed the PL AY/OK but ton.
[USB Cla ss] is set to [Composite].
Wrong folder.
Sometimes a connection cannot be made with
some PCs r unning Window s XP or Vista.
Erase unne cessary ind ex marks (☞ P. 38 ).
Unlock th e file from the f ile menu (☞ P. 42) .
When usi ng the supplie d rechargeabl e batteries , set the batter y setting to [Ni-MH]. A lso,
please av oid using the bat teries outsid e the
recomme nded tempera ture range (☞ P.1 3, P. 16) .
When usi ng the USB connect ion, follow the
confir mation display a nd press the PL AY/O K
button.
Stop the op eration on the rec order. Charge will
star t 1 minute after th e end of the operat ion.
Please cl ose the applica tions in use.
Switch to the ri ght folder (☞ P. 36 ).
You need to chan ge the PC’s USB settin gs. See
DSS Player On line help for det ails (☞ P. 55) .
Technical assistance and support
The following are contact information for technical support for Olympus recorders and software only.
s Technical Hotline Number in the U. S. and Canada
1-88 8-553- 4448
s User Support E-mail address in the U.S. and Canada
distec@olympus.com
s Technical Hotline Number in Europe
Toll free number: 00800 67 10 83 00
available for Austria, Belgium, Denmark, Finland, France, Germany, Italy, Luxemburg, Netherlands, Norway,
Portugal, Spain, Sweden, Switzerland, United K ingdom
Charged numbers for the Rest of Europe
+ 49 180 567 1083
+ 49 40 23773 4899
EN
s User Support E-mail address in Europe
Audio.Support@olympus-europa.com
62
Page 63

Accessories (optional)
s Headset: E62, E102
Stereo headset for your PC. A helpful tool for PC
based transcription.
s Monaural binaural earphone: E20
s Noise-cancellation microphone: ME12
(Dictation microphone)
Used to get crisp recordings of your own voice by
reducing the effects of ambient noise.
Recommended to improve the accuracy when
using voice-recognition sof tware.
s External microphone: ME15
A lavalier omni-directional microphone that clips
to clothing. Used to record your own voice or
people near you.
s Highly sensitive noise-cancellation
monaural microphone: ME52W
This microphone is used to record sound at a
distance while minimizing surrounding noise.
s Connecting cord: KA333
Use to connect the microphone jack of the
recorder to a radio or other sound source.
s Telephone pickup microphone: TP8
Earphone type microphone can be plugged into
your ear while phoning. The voice or conversation
over the phone can be clearly recorded.
s Ni-MH rechargeable battery and charger
set: BC400 (Europe only)
BC400 comes with an Ni-MH rechargeable battery
charger (BU-40 0) and 4 Ni-MH rechargeable
batteries (BR401) as a pack. This charger can quick
charge Olympus AA or AAA Ni-MH rechargeable
batteries.
s Ni-MH rechargeable battery: BR404
High-efficiency rechargeable long life batteries.
s USB connecting AC adapter: A514
DC5V AC Adapter for USB connection.
s Docking Station: CR10
6
Accessories (optional)
EN
63
Page 64

Specifications
G e n e r a l p o i n t s
4 Recording format:
DS2 (Digital Speech Standard Pro)
4 Recording media:
SD-card: 512 MB to 32 GB
4 Input level:
- 70 dBv
4 Sampling frequency:
[ QP ] mode: 16 kHz
[ SP ] mode: 12 kHz
4 Overall frequency response:
[ QP ] mode: 200 Hz to 7,000 Hz
[ SP ] mode: 200 Hz to 5,0 00 Hz
4 Recording time (2 GB Card):
[ QP ] mode: 148 h.
[ SP ] mode: 303 h.
4 Guide to battery life
The following values are strictly references.
Alkaline batterie
During record ing mode
6
(Built-in microphone):
Specifi cations
[ QP ] mode: Approx. 40 h.
[ SP ] mode: Approx. 50 h.
During playback mode
(Earphone playback):
All mode: Approx. 48 h.
Ni-MH rechargeable batteries
During record ing mode
(Built-in microphone):
[ QP ] mode: Approx. 30 h.
[ SP
] mode: Approx. 37 h.
During playback mode
(Earphone playback):
All mode: Approx. 35 h.
4 Speaker:
Built-in ø23mm round dynamic speaker
4 MIC/EAR jack:
ø3.5 mm mini-jack, impedance
MIC 2 kΩ, EAR 8 Ω or more
4 Maximum working output (3 V DC):
EN
300 mW or more (8 Ω speaker)
64
4 Maximum headphone output:
≤
_
150 mV (according to EN 50332-2)
4 Input power requirement:
Batteries: Two AAA batteries (LR03) or
two Ni-MH rechargeable bat teries
External power supply:
USB connecting AC adapter (A514) 5 V
4 External dimensions:
113.5 mm × 50.0 mm × 17 mm
(without protrusions)
4 Weight:
105 g (Including alkaline batteries)
4 Operating temperature:
0°C - 42°C/ 32° F - 107.6°F
Memor y sizes of ca rds and app roximate r ecordin g
times *1
Memory s ize [Q P] mode [SP] mode
512 MB 37.5 h r. 77 hr.
1 GB 73 hr. 150 hr. *
2 GB 148 hr. *
4 GB 290 hr. *
8 GB 588 hr. *
16 GB 1178 h r. *
32 GB 2363 hr. *
The above are the standard times, and the available
recording time will vary depending on the card.
*1: Available recording time for one continuous fi le.
Available recording time may be shor ter if many
short recordings are made.
*2: Total recording time of several fi les. The maximum
recording time per fi le is 99 hours 59 minutes.
Specif ications and design are subject to change
without notice.
Batter y life is measured by Olympus. It varies
greatly according to the type of bat teries used
and the conditions of use.
2
2
2
2
2
2
303 hr. *
595 hr. *
1205 hr. *
2413 hr. *
4843 hr. *
2
2
2
2
2
Page 65

ENREGISTREUR
DS-2500
VOCAL NUMÉRIQUE
DS-2500
MODE D’EMPLOI
Merci d’avoir porté votre choix sur cet
enregistreur vocal numérique.
Lisez ce mode d’emploi pour les informations
concernant l’emploi correct et sûr de l’appareil.
Conservez-le à portée de la main pour toute référence
ultérieure.
Nous vous recommandons de tester la fonction
d’enregistrement et le volume avant l’utilisation
pour obtenir de bons enregistrements.
FR
Page 66

Introduction
• Le contenu de ce document peut être modifié par la suite sans préavis. Veuillez contacter notre centre
de service après-vente pour obtenir les dernières informations concernant les noms de produits et les
numéros de modèles.
• Les captures d’écran et les illustrations de l’enregistreur présentées dans ce manuel peuvent ne pas
correspondre au produit réel. Le plus grand soin a été pris afin d’assurer l’intégrité de ce document, mais
si vous avez un doute ou si vous trouvez une erreur ou une omission, veuillez contacter notre centre de
service après-vente.
• Toute responsabilité pour dommages passifs ou dommages de quelque nature que ce soit survenus à
cause d’une perte de données causée par un défaut du produit, réparation effectuée par un tiers autre
que Olympus ou un ser vice agréé par Olympus, ou toute autre raison est exclue de la responsabilité de
Olympus.
Marqu es commer ciales
• Microsoft et Windows des marques de fabrique déposées par Microsoft Corporation.
• Macintosh est une marque de Apple Computer Inc.
• Intel et Pentium sont des marques de fabrique déposées par Intel Corporation.
• SD et SDHC sont des marques de fabrique de SD Card Association.
Les autres noms de produits et de marques indiqués ici peuvent être des marques de fabrique ou des marques
de fabrique déposées de leurs propriétaires respectifs.
FR
66
Page 67

INDEX
Table des ma tières P.6 8
Pour un em ploi sûr et corr ect P.69
PLAY/OK
Préparatifs P.72
Opérations de base P.86
Opérations avancées P.100
Gestio n des fichie rs sur votre PC P.117
Autres méthodes d’utilisation pratique
Autres informations P.124
P.123
1
2
3
4
5
6
FR
67
Page 68

Table des matières
Introduction
Table des mat ières ........................................... 68
Pour un em ploi sûr et corr ect ............................ 69
Préparatifs
Carac téristiqu es principa les .............................72
Carte m émoire .................................................73
Identi fication de s éléments .............................74
Affic hage des indicate urs d’état (panneau ACL) ......75
Alimentation ................................................... 76
Inser tion des piles ....................................................76
Précau tions concernant l es piles .............................. 76
Config uration des piles ............................................ 77
Recharg ement par connexi on à un ordinateur
via un por t USB ...................................................78
Branche z l’appareil à l’adaptat eur AC de connexion
USB (faculta tif) pour le c harger .......................... 79
Allumer/couper l ’alimentation................................. 81
Mode écon omie d’énergie (Eco Energi e) .................. 81
Verroui llage clavie r ..........................................82
Inser tion et éject ion des carte s SD .................... 83
Réglag e de l’heure et d e la date [Heure et Dat e]
Modif ier l’heure et la dat e........................................85
Opérations de base
Enregi s tr em en t ................................................86
Nouvel enr egistrement ............................................87
Ecrasem ent d’enregistremen t .................................. 88
Enregis trement d’inse rtion ......................................8 9
Modes d ’enr egistreme nts [Mode Enregi st.] ....... 90
Sensi bilité du mic rophone [Sens . micro] ........... 91
Utilis ation du décle nchement à la voi x [VCVA] ... 92
Contrô le de l’enregist rement............................ 93
Lecture ............................................................94
Effac ement ...................................................... 95
Effac ement d’un fichie r ............................................ 96
FR
Effac ement de tous les f ichiers d’un dossi er ............97
Effac ement partiel d ’un fichier ................................98
68
...84
Opérations avancées
Sélec tion de dossie rs et de fichi ers ................. 100
Inform ations sur le f ichier aff iché [Inform ations]
Marque s index ............................................... 102
Liste de me nus ............................................... 103
Appren tissage de l’ut ilisation de s menus ........ 105
Verroui llage de fic hiers [Vérou iller] ................ 106
Rétro éc lairé [Rétro éc lairé] ............................ 107
Réglage du contraste de l’écran ACL [Contraste]
LED [LED] ........................................................ 109
Langag e [Language] ....................................... 110
Averti ssements son ores [Signal] ..................... 111
Modif ication de la c lasse USB [Réglag esUSB] ... 112
Formata ge de la carte [For mat]....................... 114
Vérifi cation des inf ormations de s ystème
[Info Syst ème] ........................................... 116
... 101
...108
Gestion des fichiers sur votre PC
Logici el DSS Player ......................................... 117
Minimum e xigé ......................................................117
Instal lation du logi ciel ................................... 118
Désins taller un log iciel ................................... 119
Utilis er l’Aide en ligne .................................... 119
Connec ter l’enregis treur à votre PC ................. 120
Connexio n à votre PC avec le câble USB ................. 120
Déconne cter l’enregistre ur de votre PC ................. 121
Mise en ma rche du logic iel DSS Player ............. 122
Autres méthodes d’utilisation pratique
Utilis ation comme mé moire exter ne du PC ..... 123
Autres informations
Liste de s messages d’ala rme ........................... 124
Dépannage .................................................... 125
Assis tance techni que et soutien ..................... 126
Accesso ires (options) ...................................... 127
Spécifications ................................................ 128
Page 69

Pour un emploi sûr et correct
Avant d’ut iliser votre nouvel enregistreur, lisez
attent ivement ce manue l pour savoir comme nt
l’utiliser de manière sûre et correcte. Conservez
ce manue l à un endroit faci lement accessible
pour toute référence ultérieure.
Les symboles Avertissement indiquent des informations
•
importantes liées à la sécurité. Pour vous protéger
vous-même et les autres contre les blessures ou contre les
dégâts matériels, il est essentiel que vous preniez toujours
en compte les avertissements et informations fournis.
f Danger
Si le produit est utilisé sans respecter les
informations données sous ce symbole, des
blessures graves, voire mortelles pourraient
en résulter.
f Avertissement
Si le produit est utilisé sans respecter les
informations données sous ce symbole, des
blessures voire la mort pourraient en résulter.
f Attention
Si le produit est utilisé sans observer les
informations données sous ce symbole, des
blessures, des dommages à l’appareil ou des
pertes de données pourraient en résulter.
Conventions utilisées dans ce manuel
• Le mot “carte” se rapporte aux cartes SD.
• Les mots “DSS Player” se rapportent au
DSS Player Standard Dictation Module de
l’environnement Windows et au DSS Player
pour l’environnement Apple Macintosh.
• Les remarques en bas de page se rapportent
à des informations supplémentaires, des
exceptions ou des événements en rapport.
• Les mots en majuscules tels que PLAY ou REC
décrivent une fonction ou une touche sur
l’enregistreur.
Précautions pour l’environnement d’utilisation
• Pour protéger la technologie de haute
précision contenue dans ce produit, ne
jamais laisser l’enregistreur dans les endroits
indiqués ci-dessous, que ce soit en utilisation
ou pour le rangement:
Endroits où les températures et/ou l’humidité sont
•
élevées o u passent par des chan gements ext rêmes.
En plein so leil, à la plage, dans d es voitures
fermées , ou près d’autres source s de chaleur
(poêle, r adiateur, etc.) ou des humi dificateurs .
• Près de produits inflammables ou explosifs.
• Dans des endroits sablonneux ou poussiéreux.
• Dans des endroits prédisposés à de fortes
vibrations.
• Ne jamais laisser tomber l’enregistreur ou
le soumettre à des chocs violents ou à des
vibrations.
L’enregistreur peut présenter un dysfonctionnement
•
s’il est utilisé en présence d’un champ magnétique/
électromagnétique, d’ondes radio ou de lignes
à haute tension, par exemple à proximité d’un
téléviseur, d’un four à micro -ondes, d’une console de
jeux vidéos, de haut-parleurs, d’un grand moniteur,
d’une tour de télévision/radio ou de pylônes
électriques. Le cas échéant, éteignez l’enregistreur,
puis rallumez-le avant de continuer à l’utiliser.
•
Evitez d’effectuer un enregistrement ou une lecture
près d’un téléphone cellulaire ou de tout autre
appareil sans fil, car ils risquent de provoquer des
interférences et des parasites. En cas de parasites,
installez-vous ailleurs, ou éloignez davantage
l’enregistreur de ces appareils.
• N’utilisez pas de solvant organique, tel
qu’alcool ou diluant pour vernis, pour nettoyer
l’enregistreur.
Ave rtissement relati f aux pertes de données:
Les données enregistrées dans la mémoire risquent
•
d’être détruites ou effacées en cas d ’erreur de
procédure, d’anomalie de l’enregistreur, ou
pendant des travaux de réparation. Nous vous
recommandons d’enregistrer et de sauvegarder
toutes les données importantes sur un autre
suppor t, par exemple un disque.
FR
69
Page 70

Pour un emploi sûr et correct
• Toute responsabilité pour dommages passifs
ou dommages de quelque nature que ce soit
survenus à cause d’une perte de données causée
par un défaut du produit, réparation ef fectuées
par un tiers autre que Olympus ou un service
agréé par Olympus, ou toute autre raison est
exclue de la responsabilité de Olympus.
Maniement de l’enregistreur
f Avertissement:
•
Maintenez l’enregistreur hors de portée
des enfants et des bébés pour empêcher les
situations dangereuses suivantes qui pourraient
causer des blessures graves telles que:
1 Avaler accidentellement la batterie, des cartes
ou d’autres petites pièces.
2 Se blesser accidentellement par des parties en
mouvement de l’enregistreur.
• Ne démontez pas, ne réparez pas et ne
modifiez pas cet enregistreur vous-même.
• N’utilisez que des car tes mémoire SD/SDHC.
N’utilisez jamais d’autres types de cartes.
Si vous insérez accidentellement un autre
type de carte dans l ’enregistreur, contactez
un revendeur agréé ou un centre de service.
N’essayez pas de retirer la carte par la force.
• N’utilisez pas cet enregistreur pendant la
conduite d’un véhicule.
f Attention:
• Arrêtez immédiatement d’utiliser
l’enregistreur si vous remarquez une odeur,
un bruit anormal ou de la fumée provenant
de l’enregistreur.
Ne jamais retirer les batteries les mains nues, ce
qui pourrait vous brûler les mains.
• Ne pas laisser l’enregistreur dans des endroits
où il pourrait être soumis à des températures
très élevées.
Ceci pourrait causer une détérioration
de certaines pièces et, dans cer taines
FR
circonstances, l’enregistreur pourrait prendre
feu.
70
Ne pas utiliser le chargeur ni un adaptateur
secteur s’il est couvert (par exemple par
une couver ture). Ce qui pourrait causer une
surchauf fe, débouchant sur un incendie.
• Manipulez l’enregistreur soigneusement afin
d’éviter une brûlure à basse température.
• Lorsque l ’enregistreur contient des parties
métalliques, une surchauffe peut déboucher
sur une brûlure à basse température. Faire
attention aux points suivants :
• Utilisé pendant une longue durée,
l’enregistreur devient chaud. Si vous tenez
l’enregistreur dans ces conditions, une brûlure
à basse température risque de se produire.
• Dans des endroits sujets à des températures
très froides, la température du corps de
l’enregistreur peut être plus basse que la
température ambiante. Si possible, mettre
des gants en tenant l’enregistreur à des
températures basses.
Précautions de manipulation de la
batterie
f Danger:
• Ne s oudez pas directeme nt des conducte urs
ou des bornes sur une batte rie et ne la
modifiez pas.
• Ne raccordez pas e nsemble les bornes = et -.
Ce qui pour rait causer un incendie, un choc
électrique o u une surchauf fe.
Pour porter ou ranger la batterie, bien
•
s’assurer de la mettre dans l’étui fou rni pour
protéger ses bo rnes. Ne pas por ter ni ranger la
batterie avec des objets métalliques (tels que
des clés ou des bag ues). Si cet avertis sement
n’est pas respecté, un incendie, un e surchauffe
ou un choc électrique risque de se produire.
• Ne b ranchez jamai s directement les bat teries
sur une prise de cou rant ou l’allume-ciga re
d’un véhicule.
• N’inversez jamais les pôles = et - des
batteries lors de leur insert ion dans le
chargeur.
Page 71

Pour un emploi sûr et correct
• Si du liquid e de la batterie devait ent rer
en contact avec vos yeux, lavez-les avec de
l’eau propre et consultez immédiatement u n
médecin.
Si il y a un trou duque l du gaz s’échappe su r la
•
borne = , Ne pas le couv rir ni le boucher.
f Avertissement:
• Le s piles ne doivent j amais être exposées à
une flamme, chauffées, court-circuitées ou
démontées.
• N’essayez pas de recharger des piles alcaline s,
au lithi um ou autres piles nonre chargeables.
• N’utili sez jamais une pi le à couvercle ex térieur
éventré ou fissuré .
• Conser vez les piles hor s de portée des enfants.
• Si vous notez quelque chose d’inhabituel à
l’utili sation de ce produit, par exemple un
bruit anormal, d e la chaleur, de la fum ée ou
une odeur de brûlé :
1 retirez immédiatement les piles en prenant
garde de ne pas vous brûler,et ;
2 appelez votre revendeur ou le représentant
Olympus local pour une révision.
• Ne mouillez pas les piles. Ne laissez pas les
bornes entrer en contact avec de l’eau.
• Ne pas retirer ni e ndommager la feuille
isolante des batteries.
• N’utilisez plus les batt eries si vous constatez
une anomalie, co mme un suinteme nt
d’électroly te, un changement de couleur ou
une déformation.
• Débran chez le chargeur si la recharge n’est
pas terminée au bo ut de la durée spé cifiée
prévue.
• Si de l’électrol yte d’une batte rie devait entre r
en contact avec votr e peau ou vos vêtements,
lavez-le a ussitôt avec de l’eau propre.
• Ne pas jeter les batteries au feu.
f Attention:
• Ne s oumettez pas les batteries à de s chocs
violents.
• N’utili sez pas ces batte ries avec d’autres d ont
le type, la tens ion ou la marque es t différent .
• La batterie rechargeable fournie est destinée
exclusivement à l’utilisation avec l’enregistreur
vocal numérique Olympus DS-2500.
• Il existe un risque d’explosion si la batterie est
remplacée par une bat terie de type incorrect.
• Respec tez les instructions lors de la mise au
rebut de batteries usagées.
• Veuillez recycler les batteries pour préserver les
ressources de notre planète. Quand vous jetez
des batteries mor tes, s’assurer de recouvrir les
bornes et toujours respecter la réglementation
locale.
• Toujours charger une batterie rechargeable
pour l’utiliser la première fois, ou si elle n’a pas
été utilisée pendant une longue période.
• Les batteries rechargeables disposent
d’une longévité limitée. Quand la durée
de fonctionnement raccourcit, même si la
batterie est complètement rechargée suivant
la condition spécifiée, remplacez-la par une
batterie neuve.
Écran ACL
•
L’écran à cristaux liquides u tilisé pour l’éc ran ACL
est produit avec une technologie de haute précision.
Toutefois , des points noirs ou lumi neux peuvent
apparaître constamment sur l’écran ACL. À c ause
de ses car actéristiques ou selon l’angle sous lequel
vous visi onnez l’écran ACL, les points peuve nt ne
pas être uniformes en cou leur ni en lumino sité. Ce
n’est pas un mauvais fonctionnement.
Carte mémoire
f Avert issement:
• Ne touchez pas les contacts de la carte. Cela
pourrait endommager la carte.
• N e placez pas la car te dans des endr oits où
il y a de l’électricité stat ique.
• R angez la carte dans un end roit hors de
porté e des enfants. E n cas d’ingestion
accide ntelle, consultez immédiatement un
médecin.
FR
71
Page 72

Préparatifs
Caractéristiques principales
s Type de mémoire prise en charge : Carte SD ( ☞ P. 73).
s Trois touches intelligentes programmables: F1, F2 et F3
s Enregistrement et stockage de la voix au format Digital Speech Standard Pro (DS2
format).
s Deux modes d’enregistrement, le mode QP (lecture de qualité) ou le mode SP (lecture
1
Caractéristiques principales
standard) ( ☞ P. 90).
s L’enregistrement d’écrasement et l’enregistrement d’insertion (insertion partielle) sont
disponibles (☞ P.88 , P.8 9).
s Prend en charge l’USB 2.0. haute vitesse, qui permet la transmission de données à
grande vitesse de l’enregistreur à votre ordinateur.
s Cinq dossiers et jusqu’à 200 fichiers/dossier, pour un maximum de 1000
enregistrements ( ☞ P. 86 ).
s Il possède une fonction Variable Control Voice Actuator (VCVA) intégrée (☞ P. 92).
s Grand écran ACL rétroéclairé.
s Fonction de marque d’index (Index mark) utile pour rechercher des points particuliers
dans les fichiers de dictée ( ☞ P.10 2).
s Logiciel DSS Player fourni ( ☞ P.117).
FR
72
Page 73

Carte mémoire
Cet enregistreur utilise une mémoire sous forme de
carte SD.
Description de la carte
L’enregistreur accepte des cartes de capacité allant
de 512 Mo à 32 Go.
Régla ges et envir onnement d ’utilis ation rela tifs à la
carte
Consultez les dernières informations
d’utilisation sur la page d’Olympus (http://
www.olympus.com) lorsque vous utilisez des
cartes autres que la carte fournie.
De plus, référez-vous également aux pages
suivantes pour la manipulation de la carte.
•
Insertion et éjection des cartes SD (☞ P. 8 3 ).
• For matage de la carte [Format] (☞ P. 114) .
SD carte
1
SD car te
1 Verrouillage de la carte
La carte SD est équipée d’une fonction de
verrouillage. Lorsque la fonction de verrouillage
est utilisée, les données importantes sont
protégées en empêchant l’écrasement ou la
suppression accidentelle de ces dernières.
Lorsque la fonctio n de verrouillage est activée, [
apparaît à l’écran.
2 Zone index
Pour l’écriture d’informations identif iant la carte
ou le contenu.
3 Zone de contact
Est en contact avec les dispositifs de lecture de
signal de l’enregistreur.
3
2
Vérification des informations de la carte
[Info carte]
Il est possible d’afficher sur l’enregistreur des
informations telles que la capacité totale et la
capacité restante pour les cartes installées ( ☞
Info carte
SD
Valide
Capacité
RETOUR
Remarques
• Lors de l’initialisation (formatage) d’une carte,
vérifiez que des données indispensables ne
s’y trouvent pas avant. L’initialisatio n efface
complè tement les données de la c arte.
• Dans certains cas, les cartes qui ont été formatées
(initialisées) par un autre dispositif, comme un
ordinateur, ne peuvent pas être reconnues. Veillez
à les formater avec cet enregistreur avant de les
utiliser.
• La carte a une durée de vie limitée. Lorsqu’elle
arrive en fin de vie, l’écriture ou l’effacement des
données sur la carte devient impossible. Dans ce
cas, remplacezla carte.
• Si vous utilisez un adaptateur PC pour carte
compatible avec la carte pour y enregistrer ou
détruire des données, la durée d’enregistrement
maximale de la carte peut s’en trouver réduite.
Pour revenir à la durée d’enregistrement originale,
initialisez/formatez la carte dans l’enregistreur.
• Olympus ne peut être tenu pour responsable pour
la corruption ou la perte de données à cause d’un
]
mauvais usage de la carte.
540Mo
2Go
EXIT
P.104).
FR
73
1
Carte mémoire
Page 74

Identification des éléments
q
0
!
@
#
1
&
Identification des éléments
*
(
)
1 Fente pour carte SD
2 Microphone intégré
3 Tou ch e
4 Tou ch e
5 Tou ch e
6 Tou ch e
7 Tou ch e
NEW
REC
REW
FF
STOP
8 Commutat eur
9 Tou ch e
0 Prise
!Prise pour
ERASE
EAR
(écouteur)
MIC
@ Voyant d’enregistrement
# Affichage (panneau LCD)
$
%
^
POWER/HOLD
(Microphone)
1
2
3
4
5
w
6
7
8
9
$
Tou ch e + (Volume)
=
% Touche Avance Rapide (9)
^ Tou ch e
PLAY/OK
& Touche intelligente (F1,F2,F3)
* Touche Recul Rapide (0)
( Tou ch e – (Volume)
) Haut-parleur intégré
- Couvercle du logement de la pile
= Terminal PC (USB)
q Connecteur du support
w
Touche de dégagement du couvercle du
logement des piles
-
FR
74
Page 75

Affichage des indicateurs d’état (panneau ACL)
Identification des éléments
7
QP DICT
1
2
3
4
5
6
1 Indicateur de mode d’enregistrement
2 Dossier actuel
3 Barre de progression de la mémoire
4 Indicateur d’enregistrement
5 Temps d’enregistrement restant
6 Indicateur de niveau mètre
7 Indicateur de sensibilité du microphone
8 Numéro du fichier actuel
[ ] Indicateur de l’ID auteur
[ õú] Indicateur de capacité des
[
DS2500
EF
VISU.
Affic hage en mode
d’enregistremente
disponible (barre E/F)
VCVA
piles
] Indicateur VCVA (Variable Control
Voice Actuator)
8
Ni
025 / 030
00 M 10 S
15 H 22 M 30S
INDEX
9
0
QP DICT VCVA
DS2500
!
@
#
INSERT
$
Affic hage en mode le cture
9 Nombre total de fichiers contenus dans
le dossier
0 Durée d’enregistrement écoulée
! Barre de progression de la lecture
@ Indicateur de lecture
# Temps d’enregistrement total du fichier
sélectionnée
$ Affichage du guide des touches
% Temps de lecture actuel
] Indicateur de verrouillage de carte
[
[
] Indicateur de verrouillage
025 / 030
VITESS INDEX
Ni
02 M 50 S
12M 0 5 S
%
1
Identification des éléments
FR
75
Page 76

Alimentation
Insertion des piles
Cet enregistreur peut être utilisé soit avec les
batteries rechargeables Ni -MH soit avec des piles
alcalines AAA.
• Lors du chargement avec l’enregistreur,
1
Alimentation
1 Appuyez légèrement sur le bouton de
2 Insérez les piles en respectant les
veillez à utiliser les batteries Ni-MH
rechargeables fournies (BR404).
• Les batteries rechargeables fournies ne
sont pas complètement chargées. Avant
d’utiliser l’enregistreur ou après de
longues périodes sans utilisation, il est
recommandé de toujours les recharger
complètementl (☞ P. 78, P.7 9) .
dégagement du couvercle du logement
des piles, puis ouvrez le couvercle.
polarités, comme le montre l’illustration
ci-dessous, puis fermez le couvercle du
logement des piles.
Précautions concernant les piles
f Avert issement:
• L’utilisation de piles dont
une partie ou la totalité
du revêtement externe
(protection isolante) se décolle
ou de piles qui ont éclaté
risque de provoquer des
fuites, une surchauffe et des
explosions. C’est pour cette
raison que de telles piles ne
doivent absolument pas être
utilisées.
• Les piles disponibles dans le
commerce dont une partie ou la
totalité du revêtement externe
(protection isolante) est décollée
ne doivent absolument pas être
utilisées.
Piles inutilisables
Les piles dont la totalité du revêtement externe
(protection isolante) est décollée (piles nues)
ou celles où il est partiellement décollé.
FR
76
Page 77

Alimentation
Rema rques
• Il est déconseillé d’utiliser les piles manganèse
dans cet enregistreur.
• Lors du remplacement des piles, des piles
alcalines AAA ou des batteries Ni-MH
rechargeables Olympus sont recommandées.
• Vous devez arrêter l’enregist reur avant de
remplacer la batterie . Le fait d’ôter la batterie
lorsque l’enregistreur fonctionne peut corrompre
la carte. Si la batterie est épuisée pendant que
vous enregistrez un fichier, vous perdrez votre
fichier actuel parce que l’en-tête du fichier ne
pourra pas être écrit. Il est donc de toute première
importance que vous remplaciez la batterie
lorsqu’il ne reste plus qu’un repère dans l’icône de
la batterie.
• Remplacez les deux piles en même temps.
• Ne mélangez jam ais des piles neuves et
anciennes, ou d es piles de type et/ou marque
différents.
•
Si le remplacement des piles usées prend plus 15
minutes ou si les piles sont retirées puis remises en
place plusieurs fois à intervalles courts, il vous faudra
peut-être procéder de nouveau au réglage de la pile
et de l’heure. Dans ce cas, l’écran [Pile] s’affi che. Pour
plus de détails, reportez-vous à « Confi guration des
piles ».
• Retirez les piles si l’enregistreur doit rester inutilisé
pendant une période prolongée.
• Lors du remplacement des batteries
rechargeables, veillez à utiliser des bat teries
rechargeables Ni-MH (options). L’utilisation de
produits d’autres fabricants pourrait endommager
l’enregistreur et cela doit être évité.
Indic ateur de cap acité de pi le
L’indicateur de capacité de pile sur l’écran change
avec la perte de capacité des piles.
Configuration des piles
Sélectionnez en fonction de la pile que vous utilisez.
1 Remplacez les piles et allumez
l’enregistreur (☞ P.76) .
2 Appuyez sur la touche + ou − pour
modifier le réglage.
Pile
Ni-MH
Alkaline
RETOUR
[Ni-MH] (õ):
À sélectionner si vous utilisez une batterie
rechargeables Olympus Ni -MH (BR404).
[Alkaline] (ú):
À sélectionner si vous utilisez des piles
alcaline.
3 Appuyez sur la touche
valider le réglage.
• Si le témoin « Heure » clignote à l ’affichage,
voir « Réglage de l’heure et d e la date
[Heure et Date] » (☞
Remar que
• Lors de la lecture d’un fi chier vocal, l’enregistreur
peut se réinitialiser suite à une réduction de la
sortie de tension des piles en fonction du niveau
du volume même si [º] s’affi che dans l’indicateur
de capacité de pile.
Dans ce cas, diminuez le volume de l’enregistreur.
EXIT
P. 84).
PLAY/OK
pour
1
Alimentation
• Quand [
tôt possible. Lorsque les piles sont trop faibles,
[ s ] et [Alim. Faible ] s’affi chent et l’enregistreur
s’éteint.
] s’affi che, remplacez les piles le plus
FR
77
Page 78

Alimentation
Rechargement par connexion à un
ordinateur via un port USB
Vous pouvez recharger les batteries en vous
connectant au por t USB d’un PC. Lors du chargement,
veillez à placer correc tement les batteries
rechargeables (fournies) dans l’enregistreur (☞ P. 76) .
1
Alimentation
Avant de brancher le câble USB, quittez le
mode HOLD (☞
Ne rech argez pas de pi les primaire s telles que
des pile s alcalines o u au lithium. Cel a pourrait
provoqu er une fuite des p iles ou une surc hauffe,
susceptible de provoquer un dysfonctionnement
de l’enregistreur.
P. 82) .
1 Démarrez le PC.
2
Connectez le câble USB au port USB du PC.
3 Lorsque l’enregistreur est en mode stop
ou désactivé, connectez le câble USB à
la prise de raccordement sur le bas de
l’enregistreur.
4 Appuyez sur la touche
PLAY/OK
pour
démarrer la recharge.
Touche OK pour
recharger
Commande
(Stockage)
• Lorsque [Tou che OK pour rec harger] clign ote,
appuye z sur la touche PL AY/O K.
5 Le chargement est terminé lorsque
l’indicateur de capacité de pile affiche
[¿].
batterie pleine
Commande
(Stockage)
La durée de charge :
approximativement 3 heures *
* Ceci indique la durée approximative
du rechargement complet des piles
rechargeables lorsqu’elle est complètement
épuisée à température ambiante. La durée
de charge se modifiera en fonc tion du temps
restant et de l’état des batteries.
Remar ques
• L’enregistreur ne peut pas être rechargé lorsque
le PC n’est pas allumé. De même, l’enregistreur ne
peut pas être rechargé lorsque le PC est en mode
attente, en mode arrêt ou en mode veille.
• Vous ne pouvez pas recharger l’enregistreur USB
lorsque le concentrateur USB est branché.
FR
78
Page 79

Alimentation
Branchez l’appareil à l’adaptateur AC de
connexion USB (facultatif) pour le charger
Il peut être chargé en branchant l’adaptateur AC de
connexion USB (A514) (options).
• Avant de brancher l’adaptateur AC,
commutez le paramètre de connexion
USB à [Adaptateur AC] (☞ P. 112) .
• Avant de brancher le câble USB, quittez
le mode HOLD (☞ P.8 2).
1 Connectez le câble USB de l’enregistreur
à l’adaptateur secteur.
Vers le conn ecteur
USB (A514) de
l’adaptateur AC de
connexion USB
2 Connectez l’adaptateur AC dans la prise
secteur.
Vers l a prise
secteur
3 Lorsque l’enregistreur est en mode stop
ou désactivé, connectez le câble USB à
la prise de raccordement sur le bas de
l’enregistreur.
Vers l e
connecteur
USB
4 Appuyez sur la touche
PLAY/OK
pour
démarrer la recharge.
Touche OK pour
recharger
• Lorsque [Tou che OK pour rec harger] clign ote,
appuye z sur la touche PL AY/O K.
5 Le chargement est terminé lorsque
[
batterie pleine
batterie pleine
] s’affiche.
1
Alimentation
FR
79
Page 80

Alimentation
Remar ques
•
Introduisez la batterie rechargeable fournie et réglez
[Pile] sur [Ni-MH]. Si [Pile] est réglé sur [Alkaline],
vous ne pouvez pas recharger l’appareil (☞ P. 77 ).
•
Vous ne pouve z pas recharger lor sque [ø]*1 ou
[√]*2 clignote. Rec hargez les batter ies à une
températ ure comprise entre 5°C à 35°C .
*1 [ø]: Lorsque la température ambiante est
1
Alimentation
•
• Assurez-vous que la clé USB est inséré à fond.
• Veillez à utiliser le câble USB dédié fourni. Si
• Si [Composite] est sélec tionné dans les
•
Lisez attentivement les descriptions suivantes lorsque
vous utilisez des batteries rechargeables Ni-MH.
Décharge:
Les batteries rechargeables se déchargent
FR
naturellement lorsque vous ne les utilisez pas. Prenez
soin de le recharger avant leur emploi.
80
basse.
√
*2 [
]: Lorsque la température ambiante est
élevée.
Lorsque la durée d’utilisation est nettement
raccourcie même après le chargement complet des
batteries, remplacez-les par des bat teries neuves.
Sinon, l’enregistreur ne pourra pas fonctionner
correctement.
vous utilisez le câble d’une autre marque, vous
risquez de provoquer un dysfonctionnement de
l’enregistreur. De même, n’utilisez jamais ce câble
dédié avec les produits d’autres marques.
paramètres de connexion USB:
-
Le chargement ne sera pas possible si
l’enregistreur est en fonctionnement. Le
chargement commencera 1 minute après la fi n
du fonctionnement.
-
Le chargement risque de ne pas être possible
selon l’application en cours d’utilisation sur
l’ordinateur raccordé.
Si vous souhaitez procéder au chargement à partir
du paramètre [Composite], sélec tionnez [Option]
dans les paramètres de connexion USB, puis
raccordez le câble USB à l’enregistreur. Vous pouvez
recharger lorsque vous sélec tionnez [Adaptateur
AC] dans l’affichage [Connec teur USB] (☞
Préca utions con cernant l es batteri es rechar geables
P.112 ).
Température d’utilisation:
Les batteries rechargeables contiennent des produits
chimiques. L’ef ficacité des bat teries rechargeables
peut varier même lorsqu’elles sont utilisées dans la
plage de température recommandée. C’est un aspect
inhérent à ces produits.
Plage de température recommandée:
Lors du fonctionnement de l’appareil:
0°C - 42°C
Recharge:
5°C - 35°C
Rangement pour une péri ode prolongée:
–20 °C - 30 °C
Le fait d’utiliser les batteries rechargeables sans tenir
compte de la plage de température ci- dessus peut
réduire son efficacité et sa durée de vie. Pour éviter
un suintement d’électrolyte et l ’oxydation, retirez les
batteries rechargeables des appareils quand vous
prévoyez de ne pas les utiliser pendant longtemps, et
rangez-les séparément.
Remar ques
• Cet enregistreur est conçu pour recharger
complètement les batteries quel que soit leur
niveau d’énergie. Cependant, pour obtenir les
meilleurs résultats en chargeant des bat teries
rechargeables achetées récemment ou des
batteries rechargeables qui n’ont pas été utilisées
pendant une longue période (plus d’un mois), il
est recommandé de recharger complètement les
batteries puis de les décharger de façon répétée
deux ou trois fois.
• Quand les batteries rechargeables usées doivent
être jetées, faites en sorte que cela soit eff ectué
conformément aux lois en vigueur dans votre
pays. Contactez votre centre local de recyclage
pour connaître les méthodes d’élimination
appropriées.
• Si les batteries rechargeables Ni-MH ne sont pas
entièrement déchargées avant leur élimination,
protégez-les contre les court scircuits (en isolant
par exemple les contacts avec un morceau de
bande adhésive).
Page 81

Alimentation
Allumer/couper l’alimentation
Lorsque vous n’utilisez pas l’enregistreur, éteignez-le
pour réduire la consommation des piles au minimum.
Même si l’alimentation est coupée, les données,
réglages des modes et de l’horloge sont conservés.
Allumer l’alimentation
Lorsque l’enregistreur est éteint, glissez
le commutateur
direction indiquée par la flèche.
• L’écran s’allume, et lorsque [Vér if. systèm e]
s’affiche, l’appareil est allumé. La fonction de
reprise remet l’enregistreur à la position d’arrêt en
mémoire avant la mise hors tension.
Couper l’alimentation
Glissez le commutateur
la direction indiquée par la flèche pendant
0,5 seconde au moins.
• L’écran s’éteint et l’alimentation est coupée. La
fonction de reprise se souvient de la position
d’arrêt avant la mise hors tension de l’appareil.
POWER/HOLD
POWER/HOLD
dans la
dans
Mode économie d’énergie (Eco Energie)
Lorsque l ’enregistreur est en marche mais sans être
utilisé pendant 10 minutes, par défaut, il passera
automatiquement en mode d’économie d’énergie.
Pour réactiver l’enregistreur, appuyez sur n’importe
quelle touche.
Mode économie d’énergie
Vous pouvez régler le mode économie
d’énergie parmi [5 minutes], [10 minute s],
[30 minutes], [1 heure] et [Off]. Pour quitter
le mode d’économie d’énergie, appuyez sur
n’importe quelle touche.
Le réglage [Eco Ene rgie] peut être modifié à
partir du menu. Pour plus de détails, veuillez
consulter “Liste de me nus” (☞ P.103) et
“Apprentissage de l’utilisation des menus”
(☞
P.105) .
Eco Energie
5 minutes
10 minutes
30 minutes
1 heure
Off
RETOUR EXIT
1
Alimentation
FR
81
Page 82

Verrouillage clavier
Si vous mettez le commutateur POWER/HOLD
en position HOLD, les conditions actuelles seront
sauvegardées et toutes les touches et commutateurs
seront désactivés. Cette caractéristique est pratique
lorsque vous devez transporter l’enregistreur dans
un sac ou dans votre poche.
Réglez le mode HOLD de l’enregistreur
1
Glissez le commutateu r POWER/HOLD en
Verrouillage clavier
position HOLD.
• Lorsque [VERROUILLAGE] s’affi che à l’écran,
l’enregistreur est réglé en mode HOLD.
Sortie du mode HOLD
Glissez le commutateu r POWER/HOLD en
position A.
FR
82
Page 83

Insertion et éjection des cartes SD
IInser tion d’un e SD carte
Insérez la carte SD dans l e lecteur de car te dans
la direction montrée dans I’illustration jusqu’à ce
qu’elle se clique.
• Lorsque vous insérez une carte SD dans la fente
pour car te SD, le message [Patientez] clignote sur
l’écran ACL pendant quelques secondes durant la
vérifi cation de la carte SD.
• Tenez la carte droite pendant que vous l’insérez.
Ejec tion de la SD ca rte
Poussez l a ca rte SD vers l’intérieur une fois po ur
la déverrouiller, et laissez-la s’éjecter.
Remarques
• La carte s’arrête ave c un déclic lors qu’elle est
complètement insérée.
• Si la carte est insérée à l’envers ou en bia is,
vous risquez d’endommager la zone de contact
ou de coincer la carte.
• Si la carte n’est pas entièrement insé rée, les
donnée s ne pourront pas y ê tre enregist rées.
• Tenez la carte droite e t tirez-la de la f ente.
• Si une carte non formatée est insérée
l’enregistreur affiche automatiquement le menu
d’option de formatage (☞ P.101) .
• N’utilisez jamais dans cet enregistreur de car te qui
n’a pas été formatée sur cet appareil (☞ P.114 ).
• Ne retirez jamais la car te lorsque l’enregistreur
fonctionne. Cela pourrait endommager les
données.
• Si vous retirez brusquement le doigt après avoir
poussé la carte vers l’intérieur celle-ci peut
s’éjecter violemment hors de la fente.
1
Inser tion et éjec tion des car tes SD
FR
83
Page 84

Réglage de l’heure et de la date [Heure et Date]
Il est très important de régler correctement l’heure et
la date sur l’enregistreur car chaque f ichier enregistré
dessus verra l’heure et la date faire partie de l’en-tête
du fichier. Ceci simplifiera par la suite la gestion des
fichiers.
L’af fichage de l’heure clignote
automatiquement lorsque vous insérez
1
des piles avant la premièr e utilisatio n de
Réglag e de l’heure e t de la date
l’enregi streur, ou si vous ne vous en êtes pas
servi depuis l ongtemps.
F1, F2, F3
Tou che
Tou che
PLAY/OK
PLAY/OK
Tou che
+, −
Tou che 9, 0
1 Appuyez sur la touche 9 ou 0 pour
sélectionner l’élément à configurer.
• Sélectionnez l’élément parmi «heure»,
«minute», «année», «mois» et «jour» avec un
point clignotant.
Heure et Date
01 M 01 D 2012 Y
1: 00 AM
24H
RETOUR EXIT
2 Appuyez sur la touche + ou − pour
configurer l’élément.
• Suivez la même procédure en appuyant sur
la touche 9 ou 0 pour sélectionner
l’élément suivant, puis appuyez sur la touche
+
ou − pour le configurer.
Heure et Date
10 M 14 D 2012 Y
5 : 45 PM
24H
RETOUR EXIT
• Vous pouvez choisir l’aff ichage de 12 heures
ou de 24 heures en appuyant sur la touche F2
(24H ou 12H)* pendant que vous réglez les
heures et les minutes.
Exemple: 5:45 (P.M. = ap rès-midi)
5:45 PM (Réglage initial) 17:45
FR
84
Page 85

Réglage de l’heure et de la date [Heure et Date]
• Vous pouvez choisir l’ordre de l’année, du
mois et du jour en appuyant sur la touche F2
([M]/[D]/[Y] ou [D]/[M]/[Y ] ou [Y]/[M]/[D])*
pendant que vous les réglez.
Example: October 14, 2012
10M 14D 2012Y
(Réglage initial)
14D 10M 2012Y
2012Y 10M 14D
* L’ a f f i c h a g e v a r i e e n f o n c t i o n d e l ’ é t a t d e s r é g l a g e s .
3 Appuyez sur la touche
PLAY/OK
pour
valider le réglage.
• L’horloge démarrera à partir de l’heure et de
la date configurées. Appuyez sur la touche
PLAY/OK en fonction du signal horaire.
Remarques
• Si vous appuyez sur la touche STOP pendant
l’opération de réglage, les réglages seront annulés
et l’enregistreur reviendra à l’écran précédent.
• Vous pouvez régler l’heure et la date depuis votre
ordinateur avec le logiciel DSS player (☞ P. 117) .
Modifier l’heure et la date
Lorsque le commutateur POWER/HOLD de
l’enregistreur est en position ON, [Heure et Date]
s’affiche pendant deux secondes. Si l’heure et la
date ne sont pas correctes, réglezles en suivant la
procédure ci-dessous.
1 Appuyez sur la touche + ou − sur l’écran
[Menu système], puis sélectionnez
[Heure et Date].
• Veuillez consulter la P.105 en ce qui concerne
les réglages de chaque élément de menu.
Menu système
Signal
Eco Energie
Heure et Date
Pile
RéglagesUSB
MAJ réglage
RETOUR EXIT
2 Appuyez sur la touche
button.
• L’écran l’heure et de la date apparaît.
L’indication de l’heure clignote, indiquant le
début de la procédure de réglage de l’heure
et de la date. Les étapes suivantes sont les
mêmes que de l’étape 1 à l’étape 3 «Réglage
de l’heure et de la date [Heur e et Date]» (☞
P. 8 4) .
3 Appuyez sur la touche
pour valider le réglage.
PLAY/OK
F3 (EXIT
ou 9
) ou 0
1
Réglag e de l’heure e t de la date
FR
85
Page 86

Opérrattiions de base
Enregistrement
L’enregistreur possède cinq dossiers [ A ], [ B ], [C],
[D], [E] par défaut, et vous pouvez les sélectionner
en appuyant sur la touche F1 (DOSS.). Vous pouvez
utiliser ces cinq dossiers sélectivement pour
différents types d’enregistrements; par exemple
vous pouvez utiliser le dossier [ A ] p our enregistrer
des informations d’ordre privé et le dossier [ B ]
pour des informations professionnelles. Jusqu’à 200
messages sont enregistrables par dossier.
2
Enregistrement
En outre, le mode d’enregistrement par défaut est
[QP].
Fonction d’enregistrement
Par défaut, la fonction RECORD est configurée
pour enre gistrer à la position actuelle(écrasement).
Cependant, vous pouvez la changer pour l’un des
réglages suivants:
• Annexer: Ajoute l’enregistrement à la fi n du
fi chier actuel (☞ P. 87 ).
• Ecraser: Ecrasement de l’enregistrement qui
commence à la position actuelle dans le fi chier (☞
P. 8 8) .
• Insérer: Insère l’enregistrement à la position
actuelle dans le fi chier (☞ P.89 ).
Réglages relatifs à l’enregistrement
Les réglages relatifs à l’enregistrement
peuvent être configurés afin d’assurer un
environnement d’enregistrement approprié.
• Modes d’enregistrements
[Mode Enregist.] (☞ P.9 0) .
• Sensibilité du microphone
[Sens. m icro] (☞ P.9 1).
• Utilisation du déclenchement à la voix
[VCVA] (☞ P.92).
• Contrôle de l’enregistrement (☞ P. 93).
FR
86
Page 87

Nouvel enregistrement
Créez un nouveau fichier pour l’enregistrement.
1
1 Appuyez sur la touche
un nouveau fichier.
a I dentifiant Au teur sélecti onné
b N ouveau numéro de f ichier
2
2
3
c Temps d’enregistrement restant
2 Appuyez sur la touche REC pour
démarrer l’enregistrement.
• Le voyant de l’indicateur d’enregistrement
s’allume en orange et [
d’enregistrement) s’af fiche à l’écran. Lorsque
vous appuyez sur la touche F1 ( VISU.)
pendant l’enregistrement, vous pouvez
modifier les affichages de l’écran ACL.
d lndicateur d’enregistrement
NEW
pour créer
] (indicateur
Enregistrement
QP DICT
DS2500
a
b
EF
Valide
c
DOSS.
QP DICT
DS2500
E
d
VISU.
031 / 030
Nouv. fichier
15 H 22 M 40 s
INFO
031 / 031
00 M 10 s
15 H 2 2 M 3 0 s
Ni
MENU
Ni
INDEX
2
Enregistrement
F
3 Appuyez sur la touche STOP pour arrêter
l’enregistrement.
• Si vous souhaitez ajouter un enregistrement
complémentaire au même fichier, appuyez de
nouveau sur le bouton REC.
QP DICT VCVA
DS2500
E
031 / 031
30 H 02 M 20 s
INFO
DOSS.
Ni
15 H 0 2 M 2 0 s
MENU
Remarques
• Un bip retentira quand le temps restant atteint 60 secondes, 30 secondes
et 10 secondes pendant l’enregistrement.
• Lorsque le temps d’enregistrement restant est inférieur à 60 secondes,
le voyant d’enregistrement commence à clignoter en orange. Lorsque
le temps d’enregistrement atteint 30 ou 10 secondes, le voyant clignote
plus vite.
• [Mémoire pleine] ou [Dossier plein] s’affi chent lorsque la mémoire ou le
fi chier sont saturés.
-
Supprimer les fi chiers inutiles avant de continuer à enregistrer (☞
P.96) ou des fi chiers de dictée transférer sur votre PC (☞ P.117).
FR
87
Page 88

Enregistrement
Ecrasement d’enregistrement
Vous pouvez écraser un f ichier préalablement enregistré à par tir de tout
2
point du fichier. Notez que les informations écrasées seront effacées.
1 Sélectionnez et lisez le fichier que vous
souhaitez écraser.
2
• Arrêtez la lecture au niveau du début de
l’écrasement.
2
Enregistrement
FR
88
2 Appuyez sur la touche REC pour
démarrer l’écrasement.
3
• Le voyant de l’indicateur d’enregistrement
s’allume en orange et [
d’enregistrement) s’af fiche à l’écran.
a D urée d’enregist rement écoulée
b Temp s d’enregistrem ent total du fich ier sélecti onné
3
Appuyez sur la touche STOP pour arrêter
] (indicateur
a
b
l’écrasement.
Rema rque
• Vous ne pouvez pas sélectionner un autre mode d’enregistrement ([QP],
[SP]) que celui du fi chier d’origine avant d’enregistrer un écrasement.
QP DICT
DS2500
101 / 133
E
VISU. INDEX
10 M 25 s
00H 1 4 M 00 s
Ni
F
Page 89

PLAY/OK
PLAY/OK
Enregistrement
Enregistrement d’insertion
Des informations complémentaires peuvent être insérées dans des fichiers
1
précédemment enregistrés.
1 Sélectionnez et lisez le fichier dans
lequel vous souhaitez insérer un
2
2
3
4
enregistrement.
2
Pendant la l ecture du f ichier, appu yez sur la
touche F1 (INSERT) si vous souhai tez insé rer
des informations complémentaires.
• [Insert. Rec?] s’affiche.
3 Appuyez sur la touche REC pour
démarrer l’insertion d’enregistrements
complémentaires.
• Le voyant de l’indicateur d’enregistrement
s’allume en orange et [
d’enregistrement) s’af fiche à l’écran.
[Insert Rec] et la durée resta nte
d’enregistrement s’affichent alternativement.
] (indicateur
4 Appuyez sur la touche STOP pour
arrêter l’insertion d’enregistrements
complémentaires.
QP DICT VCVA
DS2500
134 / 134
00 H 00 M 10 s
33 M 2 5 s
Insert. Rec?
QP DICT
DS2500
134 / 134
E
VISU. INDEX
QP DICT
E
VISU. INDEX
DS2500
00 M 12s
Insert Rec
134 / 134
00 M 11s
4 H 3 3 M 0 6 S
Ni
EXIT
Ni
Ni
2
Enregistrement
F
F
Remar ques
• L’heure et la date d’enregistrement du fi chier sont remises à jour à l’heure
et à la date d’enregistrement des informations insérées.
• Vous ne pouvez pas sélectionner un mode d’enregistrement ([QP], [SP])
autre que celui du fi chier d’origine avant l’insertion.
FR
89
Page 90

Modes d’enregistrements [Mode Enregist.]
Vous pouvez choisir le mode d’enregistrement parmi
[QP] (lecture de qualité) et [SP] (lecture standard).
Tou che
Tou che
Tou che
Tou che 9, 0
Mode Enregist.
], puis appuyez
ou 9.
2
Modes d’enregistrements
1 Sélectionnez [
PLAY/OK
l’écran [
Menu enregist
sur la touche
• Veuillez consulter la P.105 en ce qui concerne
les réglages de chaque élément de menu.
Menu enregist.
Mode Enregist.
Sens. micro
VCVA
12
RETOUR EXIT
PLAY/OK
2 Appuyez sur la touche + ou – pour
sélectionner [QP] ou [SP].
Mode Enregist.
QP
SP
RETOUR
EXIT
FR
F1, F3
PLAY/OK
+, −
] dans
3 Appuyez sur la touche
PLAY/OK
pour
valider le réglage.
• [Réglage figé] s’allume sur l’écran et vous
revenez à l’écran [Menu enregist.].
• Si vous appuyez sur 0 ou F1 (RETOUR), le
réglage est annulé et vous revenez à l’écran
[Menu enregist.].
• En appuyant sur la touche F3 (EXIT), vous
effacez le contenu réglé et retournez au
MENU.
Mode Enregist.
QP
SP
Réglage
figé
RETOUR
4 Appuyez sur la touche
EXIT
F3 (EXIT
) ou 0
pour refermer le menu.
• Le réglage des modes d’enregistrement
s’affiche lorsque vous créez un Nouveau
fichier et pendant l’enregistrement.
• Le mode d’enregistrement du fichier
enregistré s’affiche pendant la lec ture ou en
mode d’arrêt.
SP DICT
DS2500
EF
Valide
DOSS.
Remar que
• Choisissez le mode [QP] pour enregistrer des
réunions ou conférences avec une grande netteté.
031 / 030
Nouv. fichier
15 H 22 M 40 s
Ni
INFO
90
Page 91

Sensibilité du microphone [Sens. micro]
Vous pouvez choisir entre deux sensibilités
de microphone correspondant à vos besoins
d’enregistrement: [Dictée] pour la dictée orale ou
[Conférence], plus adaptée aux situations telles que
les réunions ou les conférences accueillant un petit
nombre de personnes. L’état du réglage apparaît à
l’écran sous l’indication [
PLAY/OK
1 Sélectionnez [
[
Menu enregist.
touche
PLAY/OK
• Veuillez consulter la P.105 en ce qui concerne
les réglages de chaque élément de menu.
Menu enregist.
Mode Enregist.
Sens. micro
VCVA
RETOUR EXIT
CONF
DICT
] ou [
].
Tou che
F1, F3
Tou che
PLAY/OK
Tou che
+, −
Tou che 9, 0
Sens. micro
] dans l’écran
], puis appuyez sur la
ou 9.
2 Appuyez sur la touche + ou – pour
sélectionner [
[Conférence]: Convient pour enregistrer des
réunions et des séminaires où il y a peu de
monde.
[Dictée]: Sensibilité d’enregistrement la plus
basse convenant pour la dictée.
Sens. micro
Conférence
Dictée
RETOUR
3 Appuyez sur la touche
Conférence
EXIT
] ou [
PLAY/OK
Dictée
pour
valider le réglage.
• [Réglage figé] s’allume sur l’écran et vous
revenez à l’écran [Menu enregist.].
• Si vous appuyez sur 0 ou F1 (RETOUR), le
réglage est annulé et vous revenez à l’écran
[Menu enregist.].
• En appuyant sur la touche F3 (EXIT), vous
effacez le contenu réglé et retournez au
MENU.
Sens. micro
Conférence
Dictée
Réglage
figé
RETOUR
4 Appuyez sur la touche
EXIT
F3 (EXIT
) ou 0
pour refermer le menu.
].
2
Sensibilité du microphone
QP
DOSS.
DICT
DS2500
E
025 / 030
New File
3 H 0 8 M 0 5 s
INFO
Ni
02 M 10 s
MENU
FR
91
Page 92

Utilisation du déclenchement à la voix [VCVA]
b
Quand le microphone perçoit que les sons ont
atteint le niveau préréglé, le VCVA (Variable
Control Voice Actuator) démarre automatiquement
l’enregistrement, et s’arrête quand le volume
descend sous un certain seuil. Le VCVA économise
la mémoire en coupant automatiquement
l’enregistrement, par exemple pendant les périodes
de silence durant les réunions. Lorsque qu’il est
VCVA
activé, [
2
Utilis ation du décl enchement à la vo ix
] apparaît à l’écran.
PLAY/OK
Tou che
Tou che
Tou che
Tou che 9, 0
1 Dans le menu réglez le VCVA sur [On].
• Veuillez consulter la P.105 en ce qui concerne
les réglages de chaque élément de menu.
2 Appuyez sur la touche REC pour fermer
l’écran de configuration.
• Lorsque le volume est inférieur au niveau de
déclenchement préréglé, l’enregistrement s’arrête
automatiquement après 1 seconde environ, et
l’affichage “Veille” clignote sur l’écran. Le voyant
de l’indicateur d’enregistrement s’allume en
orange et [
s’affiche à l’écran. l’enregistrement démarre et
FR
clignote en cas de pause d’enregistrement.
] (Indicateur d’enregistrement)
F1
PLAY/OK
REC
QP DICT VCVA
DS2500
EF
VISU.
134 /134
1 H 25 M 01 s
Veille
INDEX
Ni
Ajustement du niveau d’activation de
démarrage/arrêt:
Appuyez sur les touches 9 ou 0 pour
régler le niveau sonore de la pause pendant
l’enregistrement.
• Vous pouvez régler le niveau de déclenchement
sur l’une des 15 valeurs disponibles. Plus la valeur
est élevée, plus la sensibilité sonore est élevée.
Si vous réglez le niveau de déclenchement sur la
valeur la plus élevée, un bruit infime suffira pour
activer l’enregistrement.
• Le niveau de déclenchement VCVA peut être
ajusté en fonction des bruits de fond.
QP DICT VCVA
DS2500
EF
VCVA niveau 05
VISU.
Remar ques
• Le niveau d’activation de démarrage/arrêt varie
aussi selon le mode de sensibilité du microphone
sélectionné (☞ P. 91) .
• Pour garantir de bons enregistrements, des
enregistrements d’essai et ajustement du
niveau d’activation de démarrage/arrêt sont
recommandés.
Ni
134 /134
1 H 25 M 02 s
INDEX
a
a Niveau de démarrage
(se dépla ce vers la
gauche ou v ers la droite
en fonction du niveau
spécifié)
b Indicateur de niveau
mètre (cha nge en
fonct ion du volume
sonore p endant
l’enregistrement)
92
Page 93

Contrôle de l’enregistrement
Il est possible de contrôler votre enregistrement en
l’écoutant pendant qu’il est en cours. Introduisez
la fiche de l’écouteur dans la prise pour écouter et
utilisez le touche
niveau sonore.
Remar que
• Introduisez la fi che dans la prise, comme indiqué
sur l’illustration, lorsque vous branchez l’écouteur
ou le microphone externe.
+
ou – (Volume) pour régler le
Tou che
+, −
(Volume)
2
Contrôle de l’enregistrement
FR
93
Page 94

2
Lecture
Lecture
PLAY/OK
PLAY/OK
Vous pouvez commencer à lire un fichier à partir de n’importe quel point.
1
1 Sélectionnez le fichier puis appuyez
sur la touche PLAY/OK pour lancer la
lecture.
• Le [ ] (Indicateur de lecture) affiche à
2
l’écran.
a Indicateur de lecture
a
2 Appuyez sur la touche + ou – pour
ajuster le volume.
3
• L’affichage montre le niveau du volume. Vous
pouvez choisir de [00] à [30].
b Niveau de volume
b
3 Appuyez sur la touche STOP au point où
vous souhaitez arrêter la lecture.
QP DICT
DS2500
INSERT
QP DICT
DS2500
Volume 15
INSERT
101 / 133
00 M 05 s
27 M 5 8 s
VITESS
101 / 133
00 M 07 s
VITESS
Ni
INDEX
Ni
INDEX
FR
94
Page 95

Lecture
Fonctions de lecture Opération Comment annuler
Avance r apide
(FF)
Rembobinage
(REW)
Repérage
(Répére)
Revue
(REV)
Vites se de lectur e
Remar ques
• Si vous appuyez sur la touche 9 ou FF une fois pendant l’avance rapide ou deux fois pendant l’arrêt,
l’enregistreur s’arrête à la fi n du fi chier (F.Saut avant).
• Si vous appuyez sur la touche 0 ou REW une fois pendant le rembobinage ou deux fois pendant l’arrêt,
l’enregistreur s’arrête au début du fi chier (B.Saut arr). Et si vous appuyez sur la touche 0 ou REW dans les
2 secondes, l’enregistreur saute au début du fi chier précédent.
Appuye z une fois sur la touc he 9 ou FF pe ndant
l’arrêt.
Appuye z une fois sur la touc he 0 ou REW
pendant l’arrêt.
Appuye z sur la touche 9 ou FF et mainte nez-la
pendant l’arrêt ou la lecture d’un fichier.
Appuye z sur la touche 0 ou REW et mainten ez-la
pendant l’arrêt ou la lecture d’un fichier.
Appuye z sur la touche F2 (VITESS) pen dant la
lecture.
• A chaque foi s que vous appuye z sur la touche F2
(VITESS) la vites se de lecture ch ange.
Play (lecture):
Lectu re à vitesse norma le.
Slow Play (l ecture le nte):
La vites se de lecture ra lentit (-50%), et “Sl ow
play” s’al lume.
Fast Play (lecture rapide):
La vites se de lecture acc élère (+50%), et “Fast
play” s’al lume.
Appuye z sur la touche PL AY/O K ou STOP.
Appuye z sur la touche PL AY/O K ou STOP.
Relâchez la touche.
Relâchez la touche.
2
Lecture
FR
95
Page 96

Effacement
2
Effacement
PLAY/OK
PLAY/OK
PLAY/OK
Effacement d’un fichier
2
Il est très facile d’effacer ou de supprimer un fichier
depuis n’importe quel dossier de l’enregistreur.
1 Sélectionnez le fichier que vous
souhaitez effacer.
2 Appuyez sur la touche
3
3 Appuyez sur la touche + pour
4
sélectionner [
Fichi er effacé
appuyez sur la touche
4 Appuyez sur la touche + pour
sélectionner [
la touche
• L’af fichage passe à [E ffacre !] et l’effacement
commence.
[Effacement OK] s’affiche lorsque le fichiera été
effacé. Les numéros de fichiers seront réaffectés
automatiquement.
Début
PLAY/OK
ERASE
PLAY/OK
], puis appuyez sur
.
.
], puis
.
QP DICT
DS2500
029 / 031
Supp dans doss.
Fichier effacé
Annuler
Supp dans doss.
Fichier effacé
Annuler
QP DICT
DS2500
029 / 031
Fichier effacé
Début
Annuler
RETOUR
Effacre !
Ni
EXIT
Ni
FR
96
QP DICT
DS2500
Remarques
• Un fi chier eff acé ne peut pas être rétabli.
• Les fi chiers ne peuvent pas être eff acés dans les cas suivants.
-
Le fi chier est réglé sur [Vér ouill er] (☞ P.10 6).
-
Le verrouillage de la car te SD est activé (☞ P. 73) .
Ni
029 / 030
Effacement OK
Page 97

PLAY/OK
PLAY/OK
PLAY/OK
Effacement de tous les fichiers d’un dossier
Tous les fichiers d’un dossier peuvent être effacés
2
simultanément.
1 Sélectionnez le dossier que vous
souhaitez effacer.
3
2 Appuyez sur la touche
3 Appuyez sur la touche + pour
4
sélectionner [
appuyez sur la touche
4 Appuyez sur la touche + pour
sélectionner [
la touche
• L’af fichage passe à [E ffacre !] et l’effacement
commence.
[Effacement OK] s’affiche à l’effacement des fichiers.
Tous les fichiers verrouillés du dossier se verront
réassigner de nouveaux numéros dans l’ordre
ascendant.
Supp dans doss.
Début
PLAY/OK
.
ERASE
PLAY/OK
], puis appuyez sur
.
], puis
.
Effacement
QP DICT
DS2500
029 / 030
Supp dans doss.
Fichier effacé
Annuler
Supp dans doss.
Fichier effacé
Annuler
QP DICT
DS2500
E
Supp dans doss.
Début
Annuler
RETOUR
Effacre !
Ni
EXIT
Ni
/ 030
2
Effacement
QP DICT
DS2500
E
000 / 000
Effacement OK
Remarques
• Le processus d’eff acement peut prendre jusqu’à 10 secondes. Ne
l’interrompez pas! Des données seraient détruites.
• Les fi chiers ne peuvent pas être eff acés dans les cas suivants.
-
Le fi chier est réglé sur [Vér ouill er] (☞ P.10 6).
-
Le verrouillage de la car te SD est activé (☞ P. 73) .
Ni
FR
97
Page 98

Effacement
45
M
02
s
Effacement partiel d’un fichier
Vous pouvez effacer partiellement un fichier sélectionné.
2
3
1 Commencez la lecture du fichier que
vous souhaitez effacer partiellement.
2
Effacement
PLAY/OK
2 Appuyez sur la touche
commencer l’effacement.
• Alors que la lecture continue, [Effacer]
s’affiche à l’écran.
• Si vous appuyez sur la touche F2 (
lecture passera (F.Skip) à la fin du f ichier
puis s’arrêtera. Cet emplacement sera réglé
automatiquement comme point de fin de
l’effacement partiel.
• Si vous appuyez sur la touche F1 (
reviendra en arrière (B. Skip) et reprendra à la
position de début de l’effacement partiel.
La lecture continuera jusqu’à la fin du fichier
ou jusqu’à la confirmation du point de fin de
l’effacement partiel.
ERASE
au point où
), la
), la lecture
QP DICT
DS2500
134 / 134
45 M 02 s
01 H 5 5 M 2 5 s
SPEED
01H 5 5 M 23 s
Effacer
Ni
EXIT
EXIT
3 Appuyez sur la touche
ERASE
arrêter l’enregistrement.
• Le point de début de l’effacement (heure)
réglé à l’étape 2 et le point de fin (heure) réglé
à cette étape s’affichent alternativement
pendant 8 secondes.
au point où
QP DICT
DS2500
QP DICT
DS2500
Ni
134 / 134
05 M 01 s
01 H 5 5 M 2 5 s
Début
EXIT
Ni
134 / 134
45 M 32 s
01 H 1 5 M 2 5 s
Point fin
EXIT
FR
98
Page 99

Effacement
PLAY/OK
4 Appuyez sur la touche
ERASE
pour
confirmer l’effacement.
4
• L’af fichage passe à [E ffacement partiel !] et
l’effacement commence.
Quand [Fin e ffacement partiel .] s’af fiche,
l’effacement partiel est terminé.
Remarques
• Si vous n’appuyez pas sur la touche ERASE dans les 8 secondes suivant
l’affi chage alternatif de «Début» et «Point fi n», l’enregistreur revient à
l’état d’arrêt.
• Un fi chier eff acé ne peut pas être rétabli.
• Les fi chiers ne peuvent pas être partiellement eff acés dans les cas
suivants.
-
Le fi chier est réglé sur [Vér ouill er] (☞ P.10 6).
-
Le verrouillage de la car te SD est activé (☞ P. 73) .
QP DICT
DS2500
QP DICT
DS2500
Fin effacement
134 / 134
1 H 20 M 35 s
Effacement
partiel !
134 / 134
1 H 20 M 35 s
partiel.
Ni
Ni
2
Effacement
FR
99
Page 100

Opérations avancées
Sélection de dossiers et de fichiers
Modification d’un fichier
PLAY/OK
3
Sélection de dossiers et de fichiers
Modification des dossiers
1 Appuyez sur la touche F1 (
pendant l’enregistreur est en l’arrêt.
• L’écran de liste des dossiers s’affiche.
QP DICT
A
Dossier A
B
Dossier B
C
Dossier C
D
Dossier D
E
Dossier E
DOSS.
2 Appuyez sur la touche + ou – pour
sélectionner le dossier, puis appuyez sur
la touche
• Le dossier est modifié.
• Vous p ouvez changer de dossier en appuyant
sur la touche F1 (DOSS.).
QP DICT
A
Dossier A
B
Dossier B
C
Dossier C
D
Dossier D
E
FR
100
Dossier E
DOSS.
Ni
EXIT
PLAY/OK
Ni
EXIT
.
Tou che
F1, F3
Tou che
PLAY/OK
Tou che
+, −
Tou che 9, 0
DOSS.
)
1 Appuyez sur la touche 9 ou 0
pendant l’enregistreur est à l’écran.
• L’ordre des numéros des fichiers contenus
dans le dossier est modifié et s’affiche.
QP DICT VCVA
DS2500
C
DOSS.
Ni
001 / 010
00M 00 s
05 M 0 0 s
MENU
INFO
a Numé ro du fichier
a
actuel
b Nombre total de
b
fichiers enregistrés
dans le dos sier
 Loading...