

Page 1

DIGITAL VOICE
RECORDER
DS-2200
INSTRUCTIONS
INSTRUCTIONS
EN
MODE D’EMPLOI
FR
BEDIENUNGSANLEITUNG
DE
Thank you for purchasing an Olympus
Please read these instructions for information
about using the product correctly and safely.
Keep the instructions handy for future reference.
Digital Voice Recorder.
To ensure successful recordings, we recommend that
you test the record function and volume before use.
EN
Page 2

Table of Contents
Table of Contents ...................................... 2
Safe and Proper Usage .............................4
General Precautions .................................. 4
1 Getting Started
Main Features ............................................ 6
Card Basics ............................................... 7
Identification of Parts ................................. 8
Inserting Batteries ................................... 10
Using the AC Adapter .............................. 11
Setting Time/Date (TIME&DATE)............ 12
Inserting and Ejecting a Card .................. 14
2 About Recording
Recording ................................................ 16
Using the Variable Control
Voice Actuator (VCVA) ...................... 18
Recording Modes (REC MODE) ............. 20
Microphone Sensitivity ............................ 21
3 About Playing Back
Playing ..................................................... 22
Noise Cancel Function ............................ 25
Repeat Playback ..................................... 26
4 Other functions
Erasing ..................................................... 28
Locking Files (LOCK) .............................. 30
Index Marks ............................................. 31
Alarm Playback Function (ALARM) ........ 32
LCD Display Information ......................... 34
Hold .......................................................... 36
Formatting the Card (FORMAT).............. 37
Menu List ................................................. 39
5 Managing Files on Your PC
Using DSS Player Software .................... 40
Operating Environment ........................... 41
Installing DSS Player Software ............... 42
Using Online Help ................................... 43
Connecting to Your PC ............................ 44
Running DSS Player ............................... 46
Window Names ....................................... 48
Download Voice Files from the
Recorder ............................................ 49
Play a Voice File ......................................51
Upload Voice Files to the Recorder ........ 52
2
Page 3

6 Using the Recorder as a
Reader / Writer
Using the Recorder as a
Reader/Writer ....................................53
7 Other Information
Alarm Message List ................................. 54
Troubleshooting ....................................... 56
Accessories (optional) ............................. 57
Specifications .......................................... 58
Technical Assistance and Support .......... 59
Using the Online Manual
When you install the DSS Player Pro on your
PC from the CD-ROM, you can use an online
expanded version of this instruction manual,
allowing you to learn more about the digital
voice recorder.
If the DSS Player is installed, click the [Start]
button, select [All Programs], then [OLYMPUS
DSS Player Pro], then click [DS-2200
Instructions]. You can read more about the items
listed below.
Recording with External Microphone ...... 20
Listening While Audio Is Recorded
(Recording Monitor) .......................... 21
Recording From Another Audio Device... 24
Continuous Playback (ALL PLAY) ........... 29
Auto Backspace review
(BACK SPACE) ................................. 30
LCD Contrast Adjustment
(CONTRAST) .................................... 40
Backlight (BACKLIGHT) .......................... 41
Assigning Folder Names
(FOLDER NAME) .............................. 42
Assigning File Comments
(COMMENT) ..................................... 45
Moving Files Across Folders ................... 46
System Sounds (BEEP) .......................... 47
Uninstalling DSS Player Software ........... 57
Changing User ID (Author ID) ................. 68
Changing a Folder Name ........................ 69
Editing File Comments ............................ 69
Editing a Template ................................... 70
Send Voice Files with E-mail ................... 71
How to Install and Activate Mail Function ..... 72
1
2
3
4
5
6
7
3
Page 4

Safe and Proper
General Precautions
Usage
Before using your new recorder, read this
manual carefully to ensure that you know
how to operate it safely and correctly.
Keep this manual in an easily accessible
location for future reference.
• The warning symbols indicate important
safety related information. To protect
yourself and others from personal injury or
damage to property, it is essential that you
always read the warnings and information
provided.
● Do not leave the recorder in hot, humid
locations such as inside a closed
automobile under direct sunlight or on
the beach in the summer.
● Do not store the recorder in places
exposed to excessive moisture or dust.
● Do not use organic solvents such as
alcohol and lacquer thinner to clean the
unit.
● Do not place the recorder on top of or
near electric appliances such as TVs or
refrigerators.
● Avoid recording or playing back near
cellular phones or other wireless
equipment, as they may cause
interference and noise. If you
experience noise, move to another
place, or move the recorder further away
from such equipment.
● Avoid sand or dirt. These can cause
irreparable damage.
● Avoid strong vibrations or shocks.
● Do not disassemble, repair or modify
the unit yourself.
● Do not operate the unit while operating
a vehicle (such as a bicycle, motorcycle,
or go-cart).
● Keep the unit out of the reach of
children.
<Warning regarding data loss>
Recorded content in memory may be
destroyed or erased by operating
mistakes, unit malfunction, or during
repair work.
It is recommended to back up and save
important content to other media such as
a computer hard disk.
4
Page 5
Batteries
Warning
• Batteries should never be exposed to
flame, heated, short-circuited or
disassembled.
• Do not attempt to recharge alkaline,
lithium or any other non-rechargeable
batteries.
• Never use any battery with a torn or
cracked outer cover.
• Keep batteries out of the reach of
children.
• If you notice anything unusual when
using this product such as abnormal
noise, heat, smoke, or a burning odor:
1 remove the batteries immediately while
being careful not to burn yourself, and;
2 call your dealer or local Olympus
representative for service.
AC Adapter
Warning
• Do not attempt to disassemble, repair or
modify the AC adapter in any way.
• Keep foreign objects including water,
metal, or flammable substances from
getting inside the product.
• Do not moisten the AC adapter or touch
it with a wet hand.
• Do not use the AC adapter in the vicinity
of flammable gas (including gasoline,
benzine and lacquer thinner).
In case
• ... the internal parts of the AC adapter
are exposed because it has been
dropped or otherwise damaged:
• ... the AC adapter is dropped in water, or
if water, metal flammable substances or
other foreign objects get inside it:
• ... you notice anything unusual when
using the AC adapter such as abnormal
noise, heat, smoke, or a burning odor:
1 do not touch any of the exposed parts;
2 immediately disconnect the power
supply plug from the power outlet, and;
3 call your dealer or local Olympus
representative for servicing. Continued
use of the AC adapter under these
circumstances could result in electric
shock, fire or injury.
5
Page 6

Main Features
● The recorder stores highly compressed
1
DSS and WMA format voice messages in
xD-Picture Card.
Main Features
● The recorder supports three recording
*1
modes, HQ (High Quality) mode, SP
(Standard Playback) mode and LP (Long
Playback) mode. If a stereo microphone is
used, you can enjoy recording in SHQ
(Stereo High Quality) mode (☞ P.20).
● The five folders can hold 199 files each, for
the maximum of 995 recordings (☞ P.16).
● You may assign your own names to folders.
● Recorded files may be moved from one
folder to another.
● Has a built-in Variable Control Voice
Actuator (VCVA) function (☞ P.18).
● You can insert or delete index marks
(☞ P.31).
*2
● You can input file comments.
● The recorder has Fast Playback and Slow
Playback functions to control playback
speed (☞ P.23).
● The large LCD screen with backlight can
be easily read even in the dark.
● The recorder has a Noise Cancel Function
(☞ P.25).
● A Ear/Mic/Remote Controller Jack with
switch-over depending on the application.
● When connected to the recorder, the
optional remote controller works also as a
microphone for recording.
● Comes with DSS Player software (☞ P.40).
● A USB connected Cradle for data download
from the recorder to the PC (☞ P.44).
● The recorder can also be used as a
removable external memory reader/writer
(☞ P.53).
*1: DSS format in SP and LP mode recording, and WMA
format in SHQ and HQ mode recording.
*2: For WMA files, the recorder can recognize and play only
those that are recorded with the Olympus Digital Voice
Recorder.
................................................................................
IBM and PC/AT are the trademarks or registered
trademarks of International Business Machines
Corporation.
Microsoft, Windows and Windows Media are
registered trademarks of Microsoft Corporation.
Apple, Macintosh, iMac, eMac, Mac, and PowerMac
*2
are trademarks or registered trademarks of Apple
Computer, Inc.
Intel and Pentium are registered trademarks of Intel
Corporation.
Adobe and Acrobat Reader are registered
trademarks of Adobe Systems Incorporated.
CORTOLOGIC is a registered trademark of
Ruwisch & Kollegen GmbH.
Other product and brand names mentioned herein
may be the trademarks or registered trademarks of
their respective owners.
6
Page 7
Card Basics
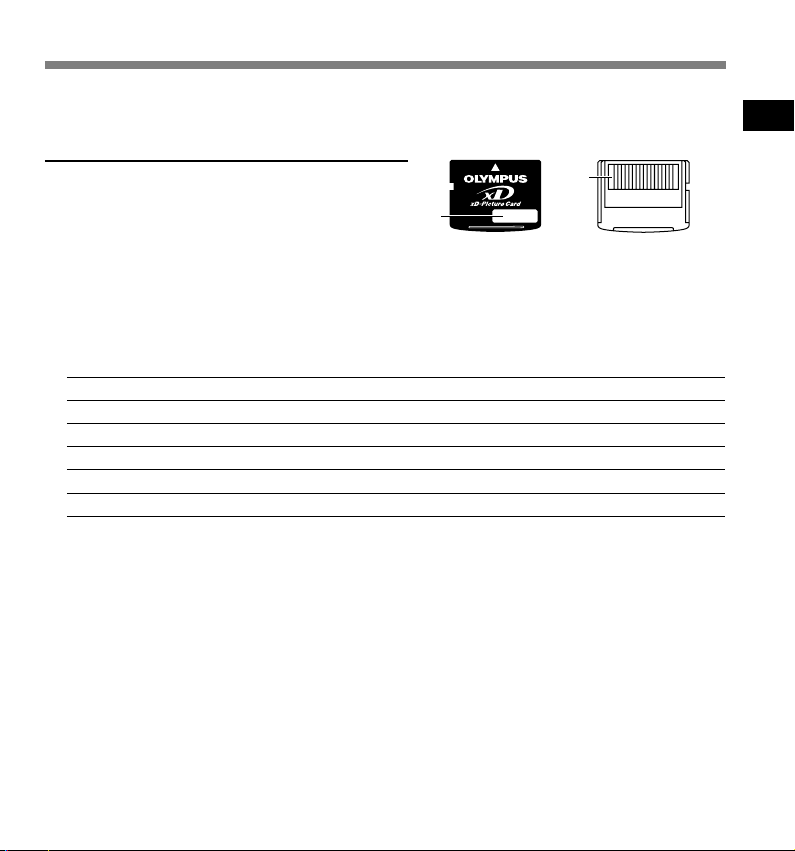
The xD-Picture Card is a removable recording media. “Card” in this manual refers to the xDPicture Card.
Compatible cards
The removable card can be used to store different
kind of data. Since the card has larger memory
capacity than a diskette, it can be used to transfer
data between different PCs. The recorder supports
cards with memory capacity between 16 to 512 MB.
1
1 Index area
You can write
down the card’s
contents.
Memory Sizes of Cards and Approximate Recording Times*
Memory Size SHQ Mode*
16 MB 30 min. 1 hr. 05 min. 2 hr. 35 min. 5 hr. 30 min.
32 MB 1 hr. 05 min. 2 hr. 10 min. 5 hr. 10 min. 11 hr. 05 min.
64 MB 2 hr. 10 min. 4 hr. 20 min. 10 hr. 25 min. 22 hr. 20 min.
128 MB 4 hr. 20 min. 8 hr. 45 min. 20 hr. 55 min. 44 hr. 45 min.
256 MB 8 hr. 50 min. 17 hr. 45 min. 42 hr. 00 min. 89 hr. 40 min.
512 MB 17 hr. 45 min. 35 hr. 30 min.*
*1: Available recording time for one continuous file. Available recording time may be shorter if many short recordings are made.
*2: Recording in SHQ mode is enabled only when a stereo microphone is used. When using the stereo microphone, only SHQ
mode is available.
*3: Total recording time of two files. The maximum recording time per file is 26 hours 40 minutes in HQ mode, and 99 hours 59
minutes in LP mode.
Notes
• When initializing (formatting) a card, confirm that no necessary data is stored on the card beforehand.
Initialization completely erases the existing data on the card.
• Cards used in a recorder must be formatted in the same recorder first unless formatted with a
CAMEDIA series Olympus digital camera.
• The card has a service life. When reaching the end of its life, writing or erasing data on the card will be
disabled. In this case, replace the card.
• If you use a PC card adapter compatible with the card to save or delete some data on the card, the maximum
recording time on the card may be decreased. To recover the original recording time, initialize/format the
card in the recorder.
• Olympus will not be held liable for any data corruption or loss due to misuse of media card.
2
HQ Mode SP Mode LP Mode
3
84 hr. 05 min. 179 hr. 30 min.*
Card may not perform as expected when formatted by a different device.
2
2 Contact area
Comes into contact
with the recorder’s
signal read contacts.
1
3
1
Card Basics
7
Page 8
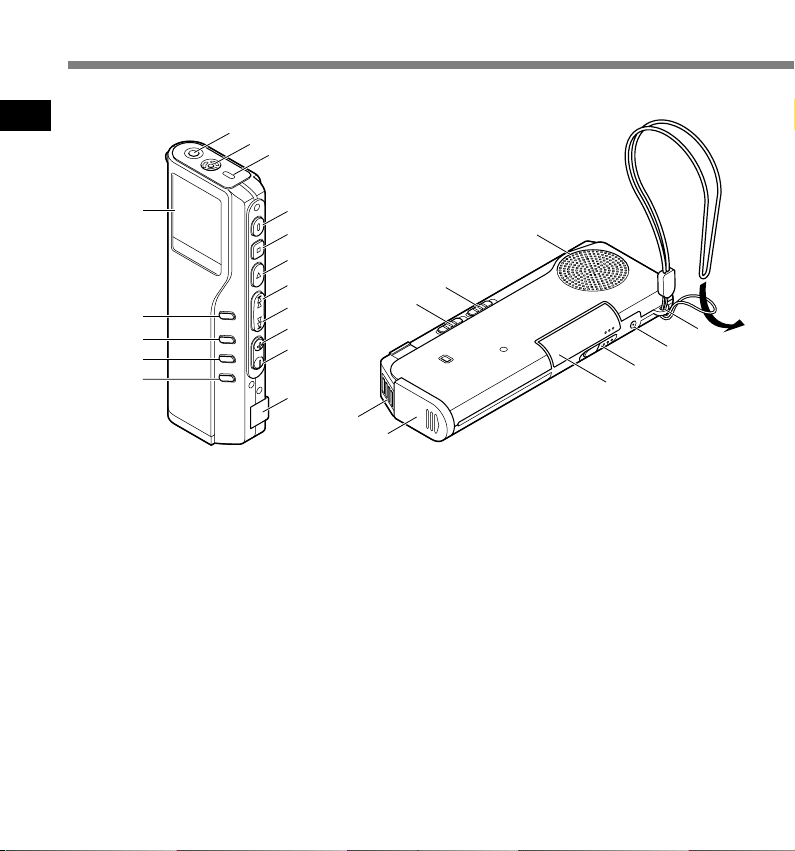
Identification of Parts
1
Identification of Parts
^
%
$
#
@
1 EAR/MIC/REMOTE jack
2 Built-in microphone
3 Record/Play indicator lamp
4 REC (Record) button
5 STOP button
6 PLAY button
7 FF (Fast Forward) button
8 REW (Rewind) button
9 VOL (+) button
0 VOL (–) button
! PC (USB) terminal
@ ERASE button
# FOLDER/REPEAT button
8
1
2
3
4
5
6
7
8
9
0
!
e
w
q
&
*
(
)
=
-
$ INDEX button
% DISPLAY/MENU button
^ Display (LCD panel)
& Strap hole
* Power jack
( Card cover lock
) Card cover
- Battery cover
= Cradle attachment point
q MICSENS (Microphone sensitivity)
switch
w HOLD switch
e Built-in speaker
Page 9
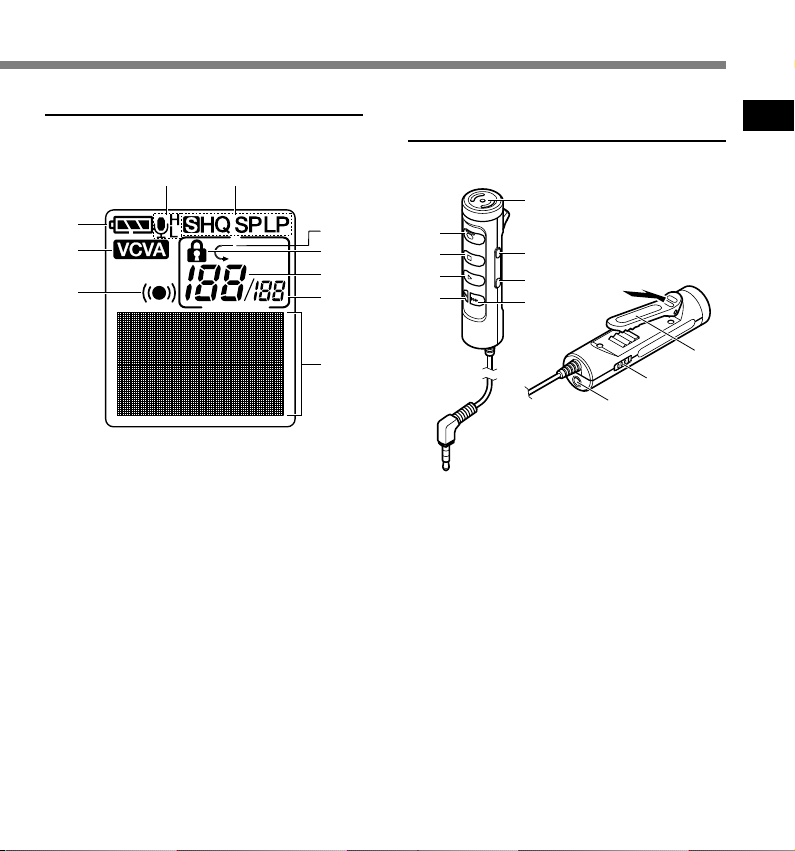
Display (LCD Panel)
0
9
!
54
1
2
3
6
7
8
9
0
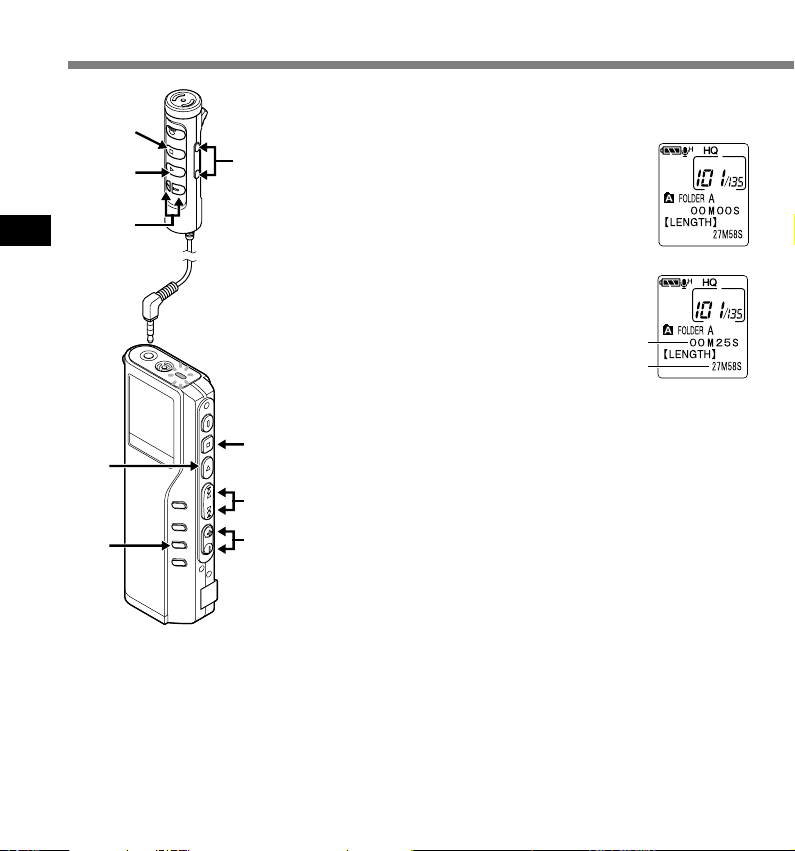
Remote Controller
Microphone: MR12
1
8
7
6
5
2
3
4
1
Identification of Parts
1 Battery indicator
2 VCVA (Variable Control Voice
Actuator) indicator
3 Alarm indicator
4 Microphone sensitivity display
5 Record mode indicator
6 Repeat play indicator
7 Erase lock indicator
8 Current file number
9 Total number of recorded files in
the folder
0 Character Information display
1 Built-in microphone
2 VOL (+) button
3 VOL (–) button
4 FF (Fast Forward) button
5 REW (Rewind) button
6 PLAY button
7 STOP button
8 REC (Record) button/
REC indicator lamp
9 Clip
0 HOLD switch
! EAR jack
9
Page 10

Inserting Batteries
Lightly press down on the arrow and slide the
1
1
Inserting Batteries
battery cover open.
1
Insert two AAA alkaline batteries, observing the
correct polarity.
2
Close the battery cover completely.
3
2
3
.................................................................................................................................................................
Notes
• Be sure to stop the recorder before replacing the batteries. Unloading the batteries while the recorder
is in use may corrupt the file. If you are recording into a file and the batteries run out, you will lose your
currently recorded file because the file header will not be able to close. It is crucial to change the batteries
once you see only one Hash mark in the battery icon.
• Be sure to replace both batteries at the same time.
• Never mix old and new batteries, or batteries of different types and/or brands.
• If it takes longer than 1 minute to replace dead batteries, you may have to reset the time when you load
fresh batteries (☞ P.12).
• Remove the batteries if you are not going to use the recorder for an extended period of time.
Replacing batteries
The battery indicator on the display changes as the batteries
lose power.
→ → →
When appears on the display, replace the batteries as
soon as possible.
When the batteries are too weak, the recorder shuts down
and “BATTERY LOW” appears on the display. AAA alkaline
batteries are recommended.
An optional Ni-MH Rechargeable Battery from Olympus
can be used for the recorder (☞ P.57).
10
Page 11

Using the AC Adapter
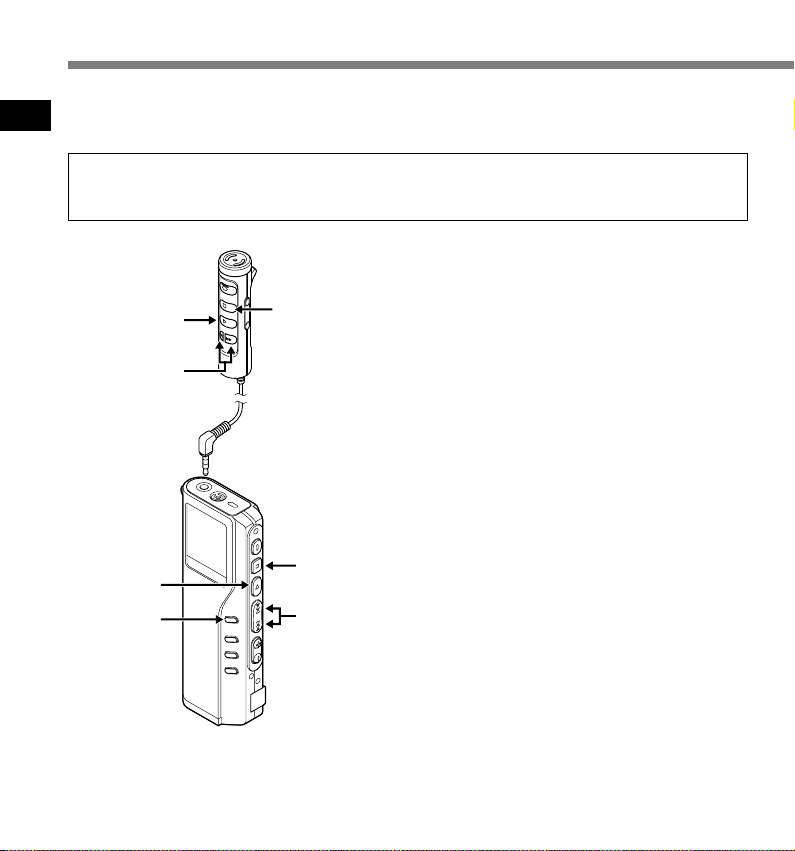
Plug the optional AC adapter (Olympus Model
A321 or A322) into household power outlet
and connect the power plug to the recorder’s
power connector (DC 3 V) as shown in the
illustration. Always stop recording before
connection. Otherwise it may not be possible
to play back the voice data being recorded.
Warning
• Always stop recording before
connection or disconnection.
• When the AC adapter is not in use,
disconnect the power supply plug from
the power outlet.
• Use only the correct power supply
voltage as indicated on the adapter.
• Do not use the AC adapter when
connecting the recorder to the USB port.
1
Using the AC Adapter
11
Page 12
Setting Time/Date (TIME&DATE)
If you have set the time and date, information as to when an audio file is recorded is stored
automatically with that file. The time and date should be set to ease file management tasks. The
1
time and date setting is also needed to perform the alarm playback function (☞ P.32).
Setting Time/Date (TIME&DATE)
The hour indicator will flash automatically when you load batteries before using the
recorder for the first time, or after the recorder hasn't been used for a long time. Proceed
from step 1.
Set the hour.
1 Press the FF button or REW button to
1
set the hour.
2 Press the PLAY button to accept the
hour.
• You can choose between 12 and 24 hour
display by pressing the MENU button
while setting the hour and minute.
Example: 5:45 P.M.
5:45 PM ←→ 17:45
(Initial setting)
Set the minute.
1 Press the FF button or REW button to
2
set the minute.
2 Press the PLAY button to accept the
minute.
Set the year.
1 Press the FF button or REW button to
3
set the year.
2 Press the PLAY button to accept t h e
year.
• You can choose the order of the year,
month, day by pressing the MENU button
while setting them.
PLAY button
FF/REW
button
PLAY button
(accepts a choice
and moves on to
the next item)
MENU
button
(switching the
data displayed)
When the remote controller microphone (optional)
is connected, buttons with the same names as
those on the recorder work analogously.
12
STOP button
STOP
button
(Exits the menu)
FF/REW
button
(alters a choice)
Page 13
Example: March 14, 2004
3M 14D 2004Y (Initial setting)
↓
14D 3M 2004Y
↓
2004Y 3M 14D
Set the month.
1 Press the FF button or REW button to
4
set the month.
2 Press the PLAY button to accept t h e
month.
Changing the Time/Date
4
1
3
1
2
2
3
Set the date.
1 Press the FF button or REW button to
5
set the date.
2 Press the PLAY button to accept the
date.
..........................................................................
Note
If you press the STOP button during the setup
operation, the recorder will save the items that were
set to that point.
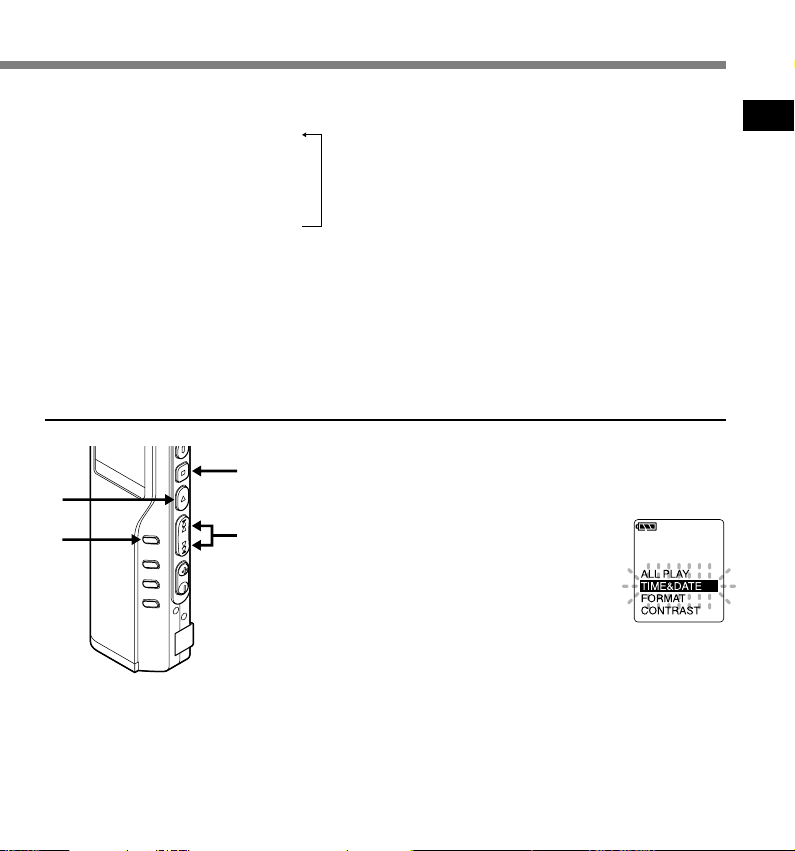
Press and hold the MENU button for
1 second or longer.
The menu opens (☞ P.39).
Press the FF or REW button until “TIME
&DATE” flashes on the display.
Press the PLAY button.
Time/Date screen appears. The hour
indicator flashes, indicating the start of the
Time/Date setup process.
Follow the same steps starting at step 1 in
“Setting Time/Date” (☞ P.12).
1
Setting Time/Date (TIME&DATE)
Press the STOP button to close the menu.
4
13
Page 14
Inserting and Ejecting a Card
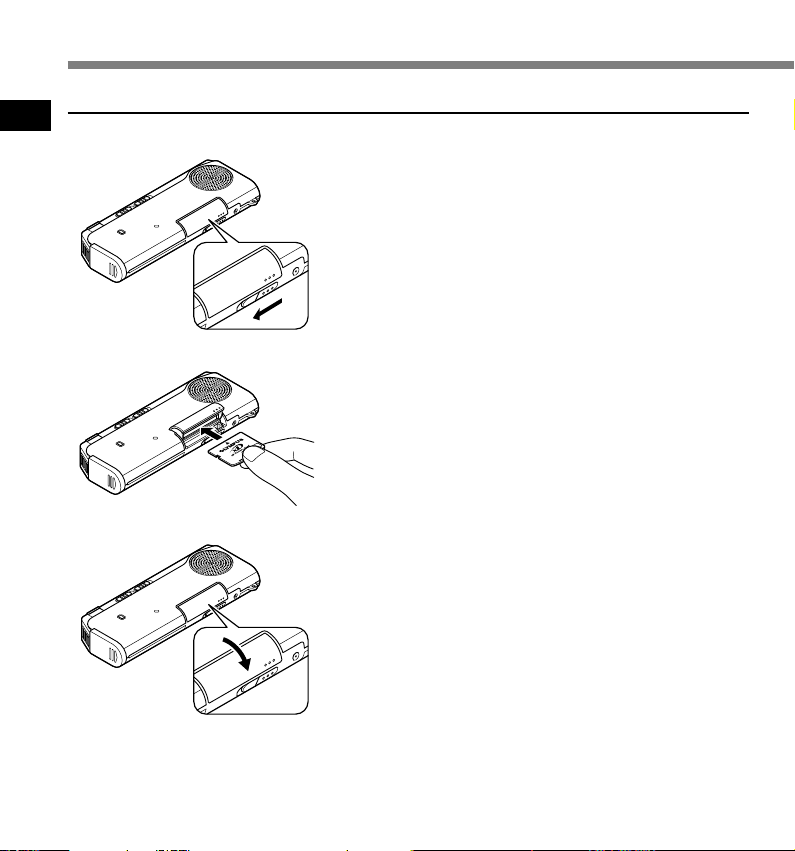
Inserting a Card
1
Inserting and Ejecting a Card
1
2
Slide the card cover lock to the direction
indicated by the arrow.
1
The card cover is unlocked and the message “CARD
COVER OPEN” appears on the display. When this
message appears, the power is switched off.
Face the card the correct way and insert it into
the card slot as shown in the illustration.
2
• Insert the card keeping it straight.
• The card stops with a click when it is inserted all the
way.
• Inserting the card the wrong way or at an angle could
damage the contact area or cause the card to jam.
• If the card is not inserted all the way, data may not be
written to the card.
Close the card cover securely.
3
Card inserted fully into the slot
3
14
The recorder sounds beeps* and the message “PLEASE
WAIT” on the display flashes for a short time.
Card not inserted fully into the slot
When the card cover is closed, the message “INSERT
CARD” on the display flashes for a short time. With the
recorder in this condition, pressing any button sounds
beeps* and flashes the message “INSERT CARD” again.
* When the system sounds are enabled.
................................................................................................
Notes
• If an unformatted card is inserted, the recorder automatically
displays the menu to format the card (☞ P.37).
• Never use any card other than one that has been formatted on this
unit or on a CAMEDIA series Olympus digital camera (☞ P.37).
Page 15
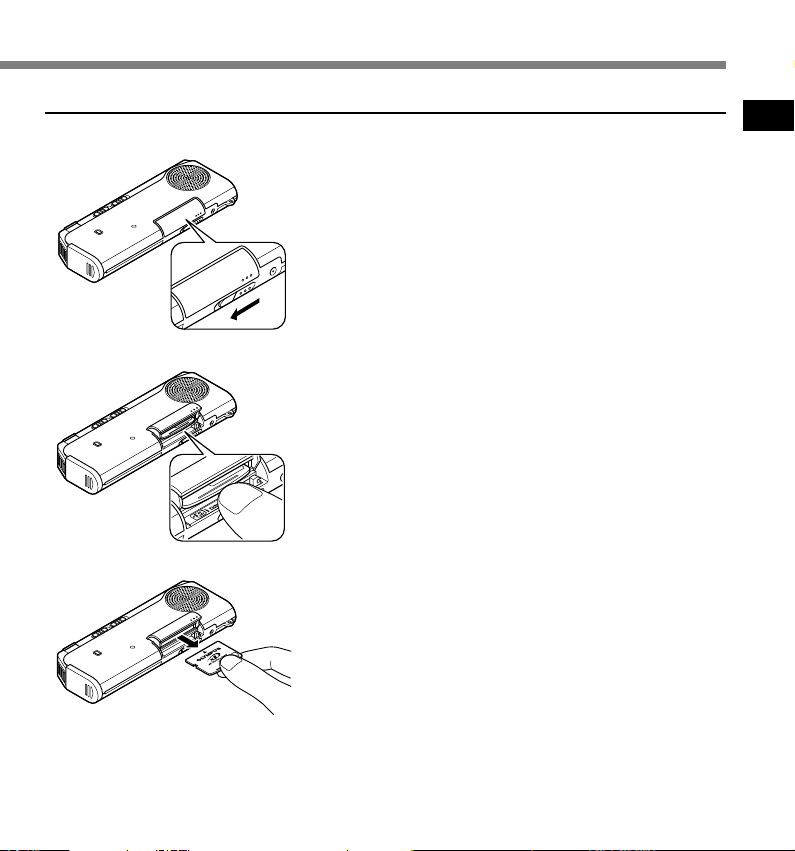
Ejecting a Card
1
2
3
Slide the card cover lock to the direction
indicated by the arrow.
1
The card cover is unlocked and the message “CARD
COVER OPEN” appears on the display. When this
message appears, the power is switched off.
Push the card all the way in to unlock it, and
let it return slowly.
2
The card is ejected a short way and then stops.
Hold the card straight and pull it out.
3
................................................................................................
Note
Releasing your finger quickly after pushing the card all the way in
may cause it to eject forcefully out of the slot.
1
Inserting and Ejecting a Card
15
Page 16
b
a
c
f
e
d
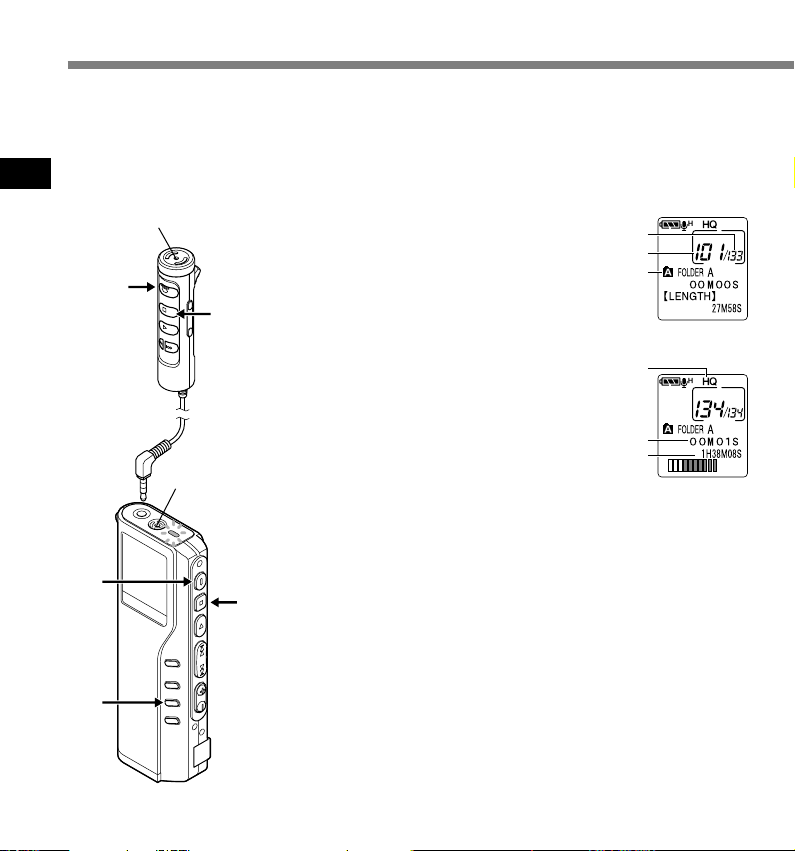
Recording
The recorder provides five folders, A, B, C, D and E, and each message recorded in a folder is
saved as a Digital Speech Standard (DSS) file or a Windows Media Audio (WMA) file. These five
folders can be selectively used to distinguish the kind of recording; for example, Folder A might
be used to store private information, while Folder B might be dedicated to holding business
information. Up to 199 messages can be recorded per folder.
2
Recording
Microphone
2
3
Microphone
2
3
Press the FOLDER button to
choose a folder.
1
The folder name is displayed.
a Total number of recorded files in the
folder
b Current file number
c Current folder
Press the REC button to start
recording.
2
The record/play indicator lamp glows red.
Aim the microphone at the sound source.
When using the remote controller
microphone for recording, the indicator
lamp and internal microphone of the
recorder are switched off.
d Current recording mode
e Recording time
f Remaining recording time
Press the STOP button to stop
recording.
3
1
16
Page 17

Notes
• A beep will sound when remaining recording time
reaches 60 seconds, 30 seconds, and 10 seconds
while recording.
•“MEMORY FULL” or “FOLDER FULL” will be
displayed when the memory or folder capacity is
full. Delete any unnecessary files before recording
any further (☞ P.28) or transfer voice files to your
computer using DSS Player Software (☞ P.49).
• In HQ and LP modes, when the recording time
reaches to the maximum recording time per file,
the recorder stops recording, displaying
“MAXIMUM REC TIME”.
If the card has remaining memory, pressing the
REC button starts recording again.
Recording functions
Pause Recording
Pause
Press the REC button while recording.
➥ “REC PAUSE” will flash on the display.
Resume Recording
Press the REC button again.
➥ Recording will resume at the point of
interruption.
Note
The recorder will time out after 10 minutes when
left in “REC PAUSE”.
2
Recording
17
Page 18
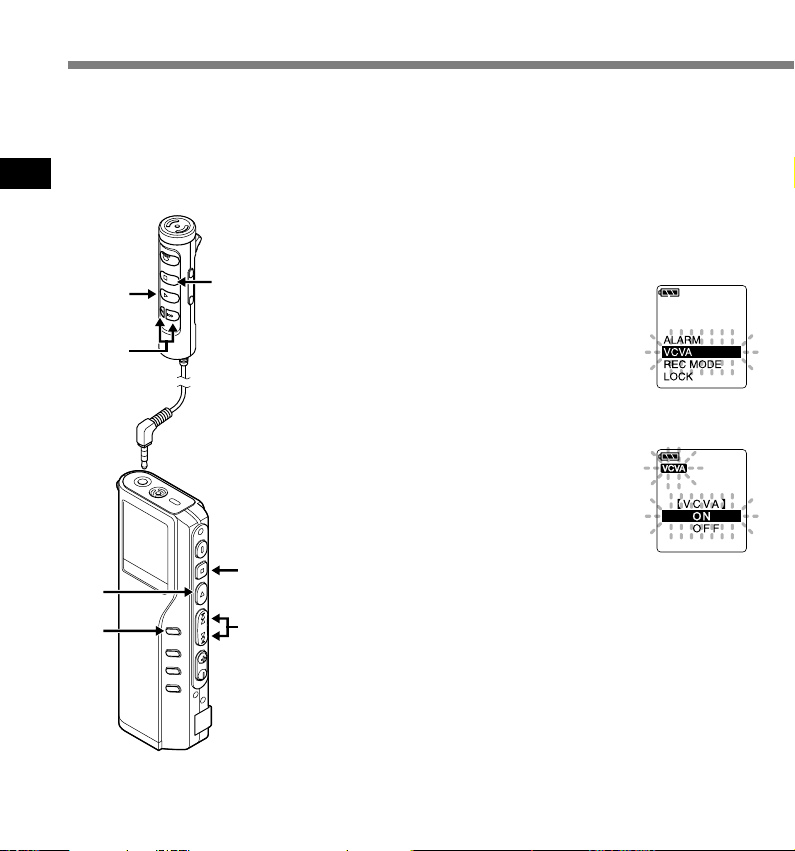
Using the Variable Control Voice Actuator (VCVA)
When the microphone senses that sounds have reached a preset threshold volume level, the
built-in Variable Control Voice Actuator (VCVA) starts recording automatically, and stops when
the volume drops below the threshold level.
The VCVA feature help extend recording time and conserve memory by turning off recording
during silent periods. This helps make the playback, with no lulls or dead space, more efficient
2
and convenient.
Using the Variable Control Voice Actuator (VCVA)
Press and hold the MENU button for
1 second or longer.
1
The menu opens (☞ P.39).
3,5
6
Press the FF or REW button until
“VCVA” flashes on the display.
2
2,4
Press the PLAY button.
The VCVA setup process begins.
3
Press the FF or REW button to choose
between ON and OFF.
4
ON : Will start recording in VCVA mode.
OFF : Will resume recording in normal mode.
18
3,5
1
6
2,4
Press the PLAY button to complete
the setup screen.
5
Press the STOP button to close the
menu.
6
When ON is selected, a VCVA indication will
be displayed on the screen.
Page 19
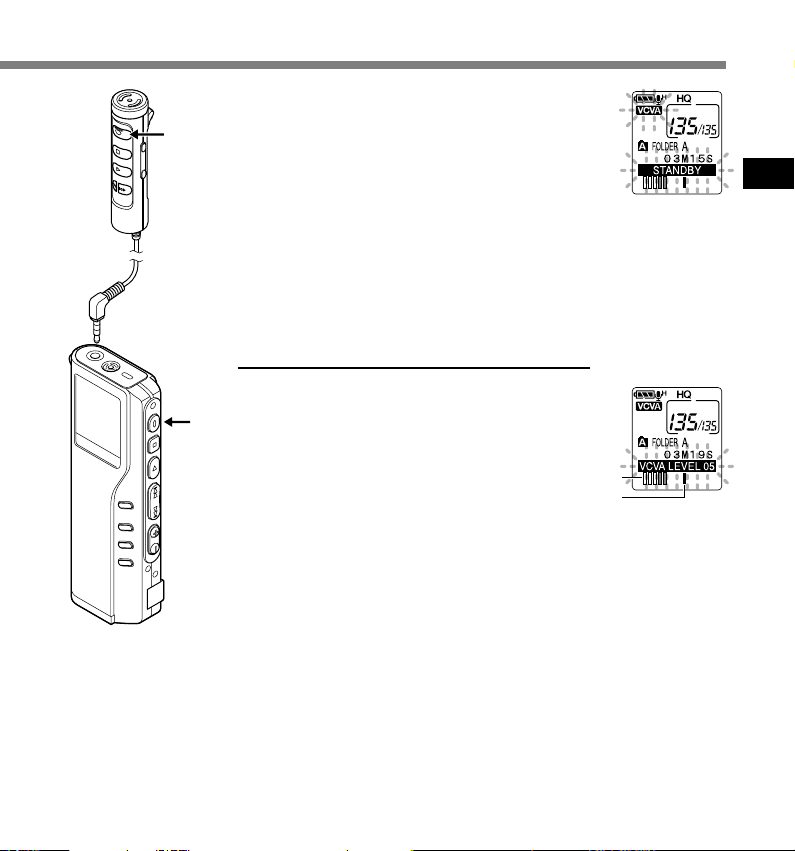
7
a
b
Press the REC button to start recording.
When the sound volume is lower than the
7
preset threshold sound level, recording
automatically stops after 1 sec approximately,
and “STANDBY” flashes on the display. The
record/play indicator lamp glows when
recording starts and flashes when recording
pauses.
* When the remote controller is connected, the REC
indicator lamp on the remote controller lights up but
the record/play indicator lamp on the recorder will
be switched off.
Adjust the start/stop actuation
level
Press the FF or REW button to adjust the
pause sound level during recording.
7
The VCVA level can be set to any of 15 different
values. The higher the value, the more sensitive
the recorder to sounds. At the highest value, even
the faintest sound will activate recording.
The VCVA pause sound level can be adjusted
according to the ambient (background) noise.
a Level meter (varies according to the sound
volume being recorded)
b Start level (moves to the right/left according to
the set level)
...................................................................................................................
Notes
• The start/stop actuation level also varies depending on the selected
microphone sensitivity mode (☞ P.21).
• To ensure successful recordings, prior testing and adjustment of the start/
stop actuation level is recommended.
2
Using the Variable Control Voice Actuator (VCVA)
19
Page 20
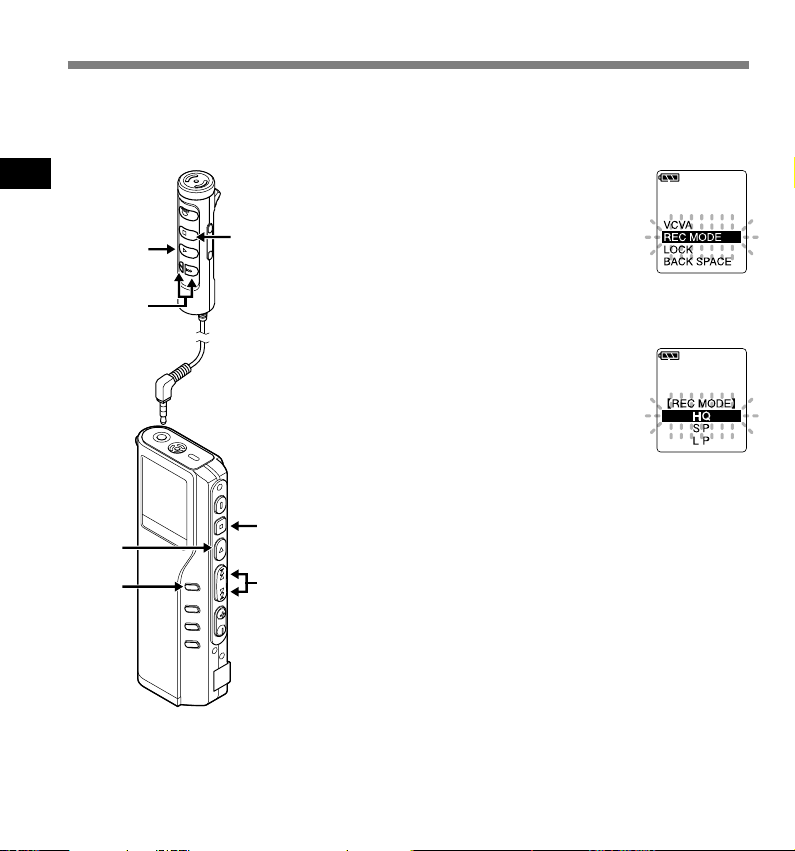
Recording Modes (REC MODE)
You can select from among three recording modes: HQ (High Quality) mode, SP (Standard
Playback) mode and LP (Long Playback) mode.
If a stereo microphone is used, the only possible recording mode is SHQ (Stereo High Quality).
2
Recording Modes (REC MODE)
2,4
3
2,4
1
5
Press and hold the MENU button
for 1 second or longer.
1
“REC MODE” will be displayed on the
screen (☞ P.39).
Press the PLAY button.
The recording mode setup process
2
begins.
Press the FF or REW button to
choose from HQ, SP and LP.
3
Press the PLAY button to complete
the setup screen.
4
5
3
Press the STOP button to close the
menu.
5
.......................................................................................................
Note
Choose SHQ/HQ or SP mode for recording meetings or lectures with
crisp clarity.
20
Page 21
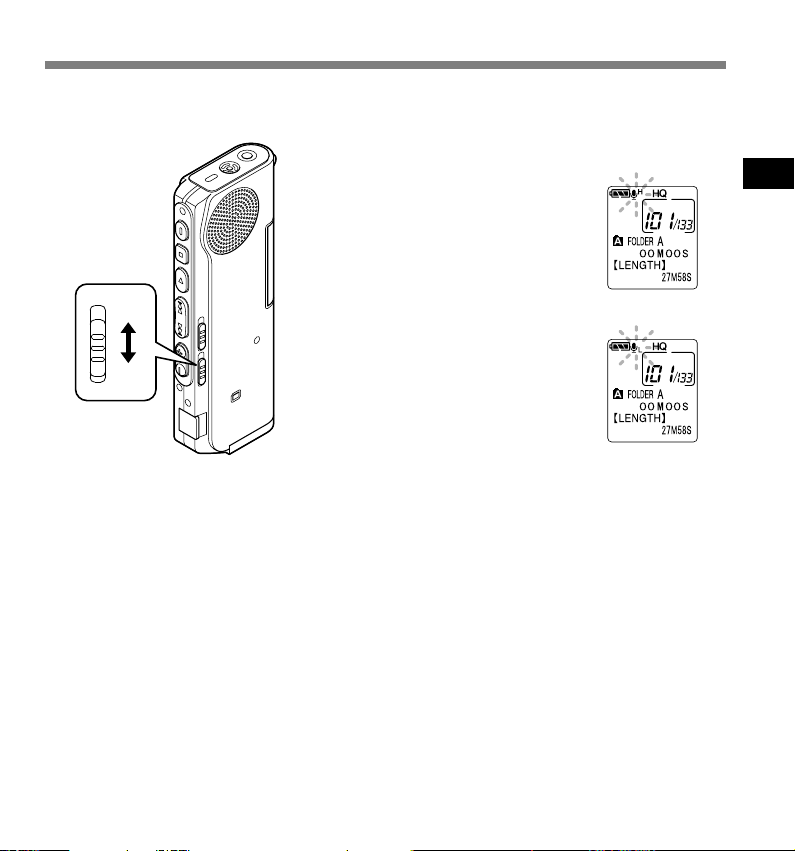
Microphone Sensitivity
Microphone sensitivity is adjustable to meet recording needs.
Using the MICSENS switch, choose between the CONF
and DICT positions.
CONF: High-sensitivity mode that
records sounds in all
directions.
CONF
DICT: Lo w -sensitivity mode
DICT
suited for dictation.
................................................................................................
Notes
• If you want to record clear or noise-free dictation, select DICT
mode and place the microphone 3 to 4 inches from the source.
• If the ambient (background) noise is too loud to get a clear
recording even in DICT mode, we recommend that you use an
ME12 single directional microphone (sold separately).
2
Microphone Sensitivity
21
Page 22
Playing
b
a
3
Playing
3
1
5
3
2
4
5
2
4
Press the FOLDER button to
choose folder.
1
Press the FF or REW button to
choose the file that you want to
2
play.
If you keep pressing the FF or REW button
in stop mode, the recorder continuously
skips to the beginnings of files.
Press the PLAY button to start
playback.
3
The record/play indicator lamp glows
green.
a Current playback time
b Total recording time of the file being
played
Press the VOL (+) or VOL ( –) button
to select the proper sound volume.
4
The display shows the volume level. You
can choose between 0 to 30.
Press the STOP button at any point
you want to stop the playback.
5
Resume playback by pressing PLAY
button again.
22
Page 23

Playback
Operation
How to Cancel
functions
Fast
Playback
(F.PLAY)
Slow
Playback
(S.PLAY)
Cue
(CUE)
Press the PLAY button once while playing a file.*
➥ The recorder plays back at approximately 50%
faster than normal rate.
Press the PLAY button once while fast playing back.*
➥ The recorder plays back at approximately 25%
slower than normal rate.
Hold the FF button while playing a file.
➥ The recorder stops when it reaches the end of the
file. Continue pressing the FF button to proceed
with the cue from the beginning of the next file.
Review
(REVIEW)
Hold the REW button while playing a file.
➥ The recorder stops when it reaches the beginning
of the file. Continue pressing the REW button to
proceed with the review from the end of the
previous file.
Skipping to
beginning
of a file*
Press the FF button during playback, fast playback, or
slow playback.*
2
➥ The next file is cued and playback starts at the
3
original speed.
Press the REW button during playback, fast playback,
or slow playback.*
3
➥ The file being played is cued and playback starts
at the original speed.
*1: As in normal playback, operations such as playback stop, file cueing, and index mark (☞ P.31) insertion are possible in fast
playback and slow playback.
*2: If you keep pressing the FF or REW button in stop mode, the recorder continuously skips to the beginnings of files (F.SKIP/
B.SKIP).
*3: If an index mark is encountered midway, playback begins at that point.
1
Press the PLAY button 2 times
while fast playing back.
➥ Playback returns to normal rate.
1
Press the PLAY button once while
slow playing back.
➥ Playback returns to normal rate.
Release the FF button.
➥ Replays at the original speed.
Release the REW button.
➥ Replays at the original speed.
3
Playing
Notes
• If you set Noise Cancel to “LOW” or “HIGH”, you cannot use the Fast Playback and Slow Playback functions.
• In case of WMA files, only the files recorded with this recorder or Olympus Digital Voice Recorders can be
played back.
• The fast playback or slow playback function plays back a SHQ file in monaural sound.
23
Page 24
Playing
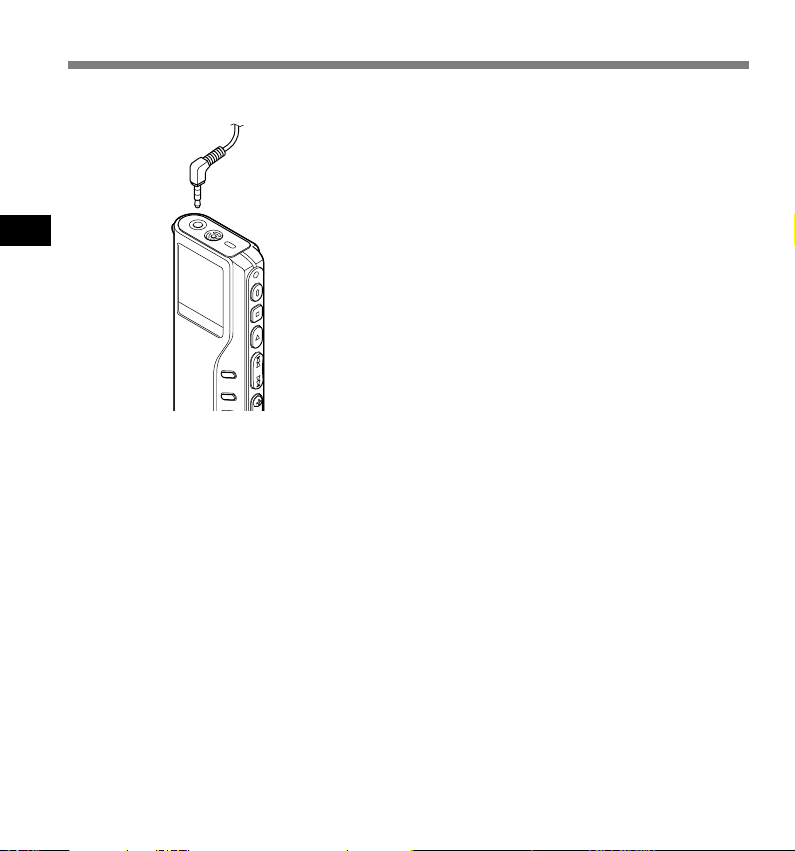
Playback through earphone
3
Playing
You can listen to audio playback through
the earphone connected to the jack on the
recorder or the EAR jack on the remote
controller.
When the earphone is used, the recorder
speaker will be switched-off.
Notes
• When using earphone, adjust sound level
moderately or hearing loose may result.
• When playing back through the earphone, sounds
can be heard from either side of the earphone
even for monaural recorded files.
• When you use an external speaker or an
earphone with built-in volume, connect it to the
EAR jack on the remote controller. If you directly
connect it to the jack on the recorder, the external
speaker or earphone may not work.
When you record the playback sound with another
recording device, connect the EAR jack on the
remote controller and the microphone jack on the
other recording device.
24
Page 25
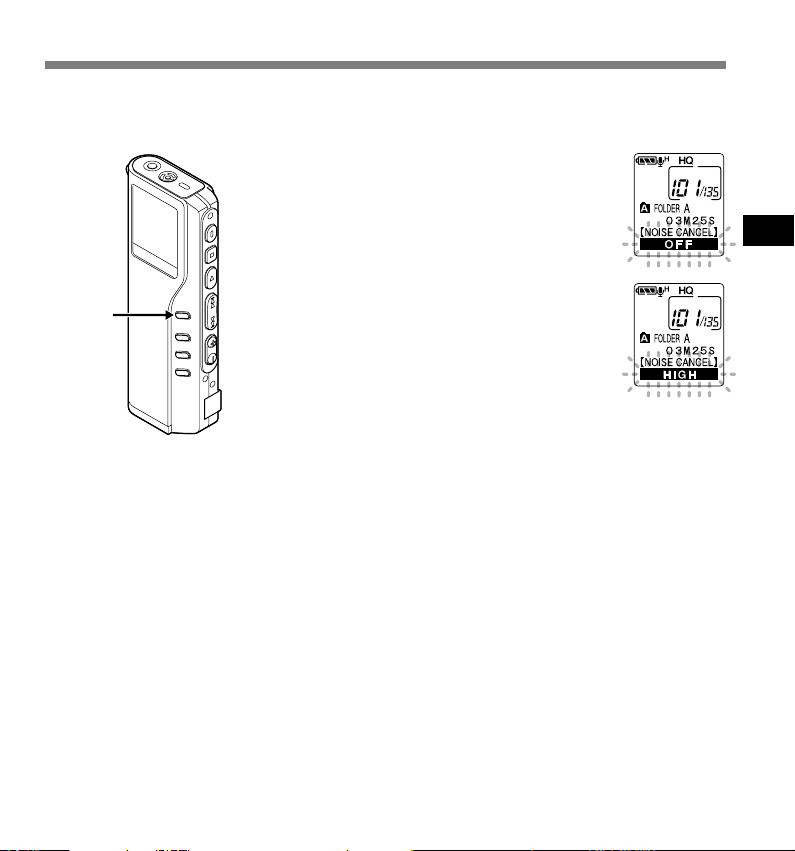
Noise Cancel Function
If recorded audio is difficult to understand because of noise, adjust the Noise Cancel setting
level. Noise will be reduced in the file when its played back for better sound quality.
Press and hold the MENU button
for 1 second or longer while the file
1
is playing.
Displays currently set Noise Cancel level.
Press the MENU button again to
choose a noise cancel level.
1,2
2
The levels switch in the following rotation,
“OFF” “LOW” “HIGH”.
If the display is already set to Noise Cancel,
start from step 2.
Change the Noise Cancel level within 2
seconds, otherwise the level is set at the
displayed level and the display returns to its
original view.
.......................................................................................................
Notes
• If you set it to “LOW” or “HIGH”, the display flashes the Noise Cancel
level for about 2 seconds when a file is played back.
• If you set Noise Cancel to “LOW” or “HIGH”, the setting remains
valid until it's set to “OFF”.
• If you set Noise Cancel to “LOW” or “HIGH”, you cannot use the
Fast Playback and Slow Playback functions.
• If Noise Cancel is used for files recorder in SHQ, the files will be
played in monaural mode.
3
Noise Cancel Function
25
Page 26
Repeat Playback
This function enables repeated playback of part of the file being played. If the continuous playback
function is used together, two or more files can be repeatedly replayed as long as they are in the
same folder.
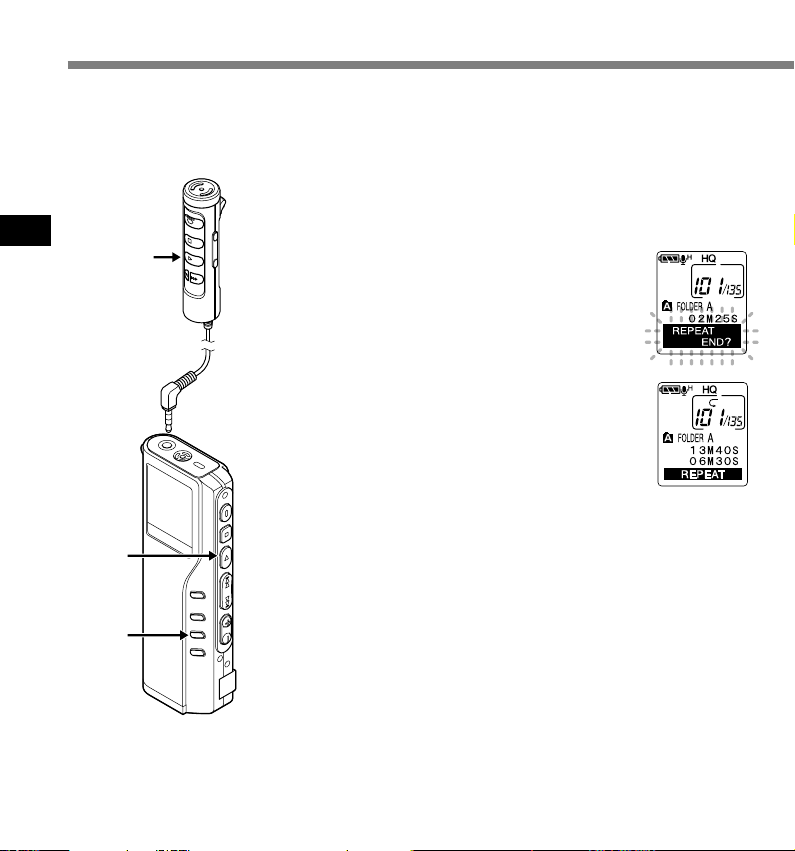
Choose the file for Repeat Playback,
and press the PLAY button.
1
3
Repeat Playback
1
1
File playback begins.
Press the REPEAT button briefly at
the point you want to start Repeat
2
Playback.
“REPEAT END?” flashes until you
designate the end point.
Press the REPEAT button briefly
again at the position you want
3
Repeat Playback to end.
The recorder repeatedly plays back the
section between the start and the end
positions until you cancel Repeat
Playback.
If continuous playback is set to ON, the
end position can be set to the extent of
the last file in the folder.
26
2,3
Page 27

4
Press the STOP button.
Repeat Playback is cancelled.
4
You can use Fast Playback and Slow Playback functions, insert
and delete index marks, and use the Noise Cancel function.
.......................................................................................................
Notes
• If no end position is designated, the end of the file becomes
automatically the end position. If continuous playback is set to “ON”,
the end of the last file in the folder is set to the end position and then
repeated playback starts.
• If you pass the start or end position by pressing the REW or FF
button, Repeat Playback will be cancelled.
• To use this function, briefly press the REPEAT button. If you hold it 1
second or longer, the Moving Files screen appears.
4
3
Repeat Playback
27
Page 28
a
Erasing
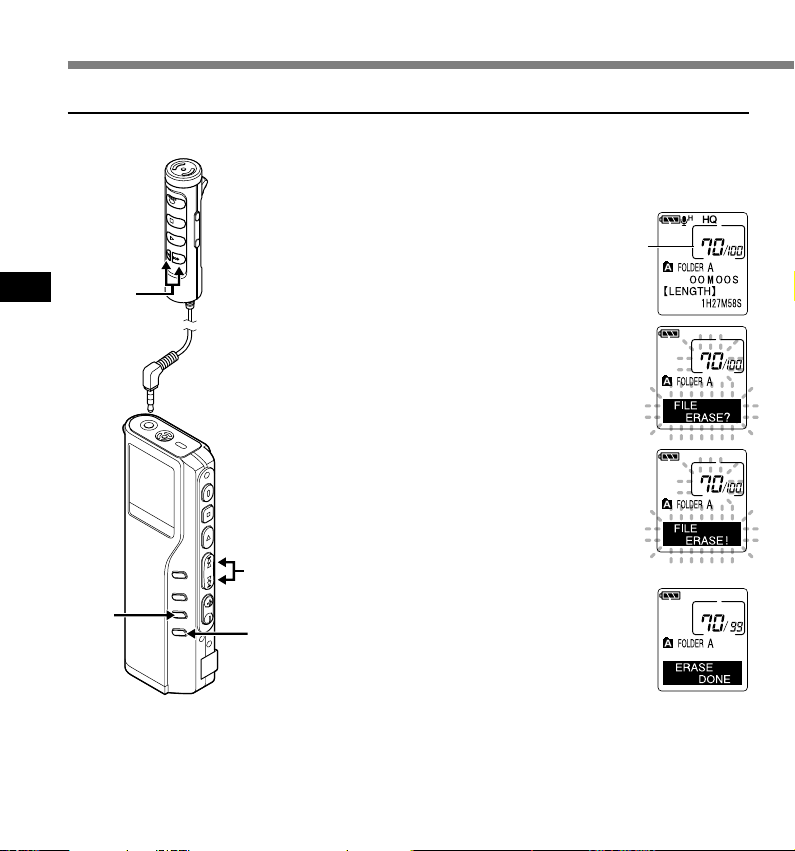
Erasing One File at a Time
A selected file can be erased from a folder.
4
Erasing
2
Press the FOLDER button to
choose a folder.
1
Press the FF or REW button to
choose the file you want to erase.
2
a File to be erased
Press the ERASE button.
“FILE ERASE?” flashes on the display for
3
approximately 8 seconds.
Press the ERASE button once more
when “FILE ERASE?” is flashing.
4
The display changes to “FILE ERASE!”
and erasing will start.
2
“ERASE DONE” is displayed when the file is
1
28
erased. File numbers will be reassigned
automatically.
3,4
{
Page 29
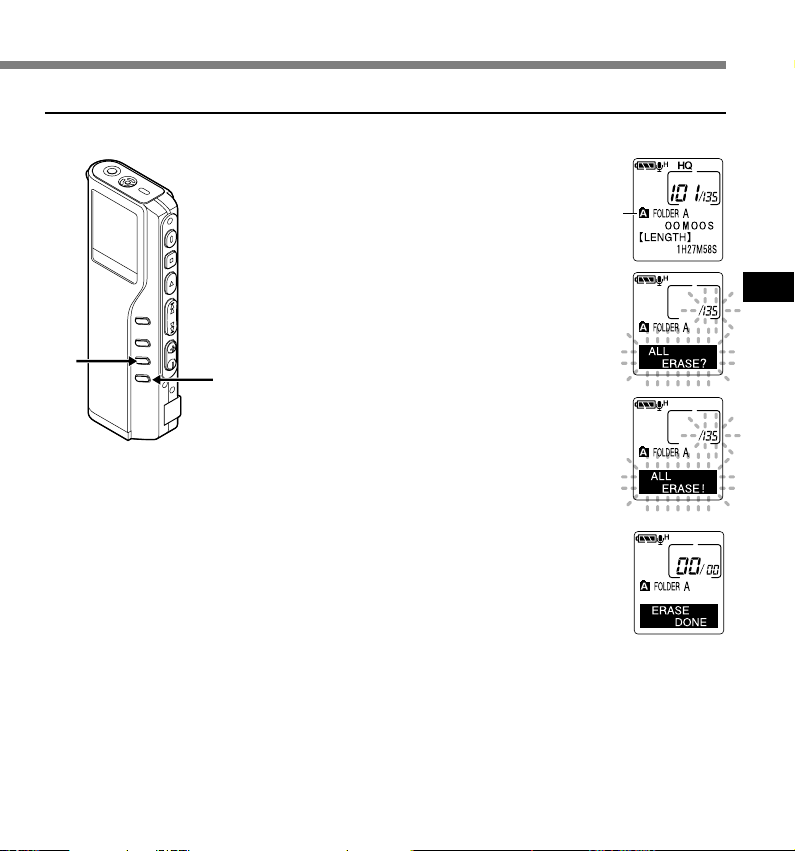
Erase All Files from a Folder
a
All files in a folder can be erased simultaneously, except for locked files (☞ P.30).
Press the FOLDER button to
choose the folder you want to
1
erase all files.
a Folder from which to erase files
Press the ERASE button for 3
seconds or longer.
2
“ALL ERASE?” flashes on the display for
approximately 8 seconds.
1
.................................................................................................................................................................
Notes
• An erased file cannot be restored.
• If the ERASE button is not pressed within the 8 seconds after “FILE ERASE?” or “ALL ERASE?” starts
flashing, the recorder will revert to stop status.
• Completion of erasing may take about 10 seconds. Never do the following during this period. Doing so may
damage the data or card.
-Removing the battery.
-Detaching/attaching the AC adapter (whether or not the recorder is powered on).
-Open the card cover .
2,3
Press the ERASE button once more
when “ALL ERASE?” is flashing.
3
The display changes to “ALL ERASE!” and
erasing will start.
“ERASE DONE” is displayed when the files
are erased. Locked files are reassigned file
numbers in ascending order.
4
Erasing
{
29
Page 30
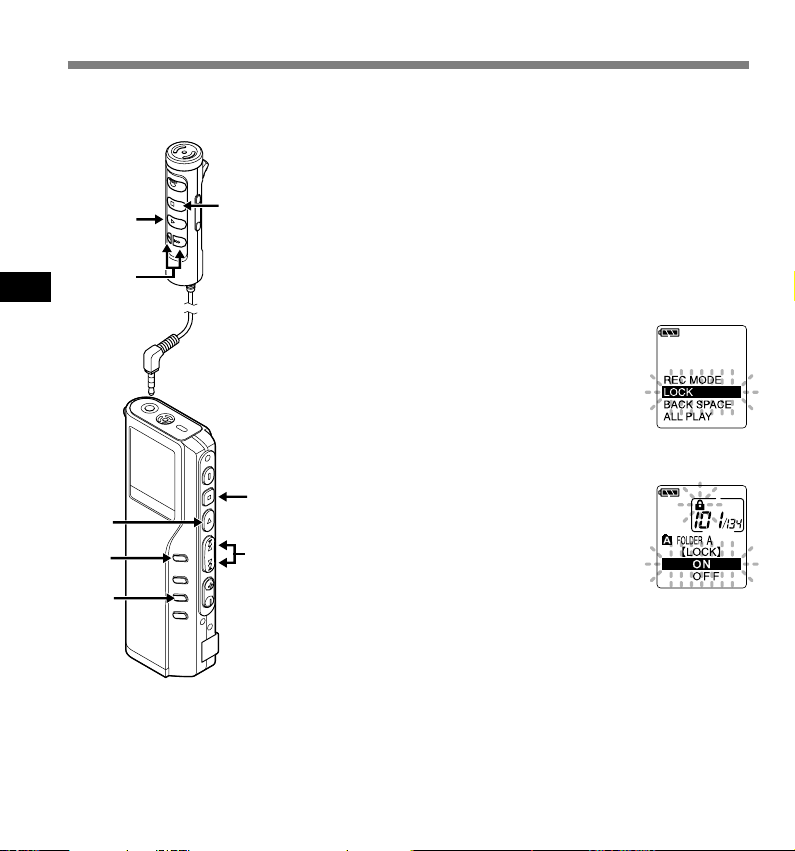
Locking Files (LOCK)
Locking a file keeps important data from being accidentally erased.
Locked files are not erased when you choose to erase all files from a folder (☞ P.29).
Press the FOLDER button to
choose a folder.
1
Press the FF or REW button to
choose the file you want to lock.
2
Press and hold the MENU button
for 1 second or longer.
3
The menu opens (☞ P.39).
Press the FF or REW button until
“LOCK” flashes on the display.
4
Press the PLAY button.
The file locking setup process begins.
5
Press the FF or REW button to
choose between ON and OFF.
6
ON : Locks the file and prevents it from
being erased.
OFF: Unlocks the file and allows it to be
erased.
Press the PLAY button to complete
the setup screen.
7
Press the STOP button to close the
menu.
8
5,7
4
2,4,6
Locking Files (LOCK)
5,7
3
1
8
8
2,4,6
30
Page 31

Index Marks
Index marks can be placed in a file during recording or playback to provide and quick and easy
way of keeping track of important sections in the file.
Setting an Index Mark
Press the INDEX button during
recording or playback to set an index
1
mark.
An index number appears on the display.
1
4
2
Locating an Index Mark
Hold the FF or REW button while playing
a file.
2
The recorder stops for 1 second when it reaches
the index mark.
Clearing an Index Mark
Locate the index mark you want to clear.
3
Press the ERASE button while the index
number appears for approximately 2
4
seconds on the display.
The index mark is erased.
.....................................................................................................................
Notes
• Up to 16 index marks can be set in a file. Attempting to set more index
marks will cause “INDEX FULL” to appear on the display.
• Index marks cannot be set or cleared in a locked file (☞ P.30).
• In case of WMA files, index marks can only be placed in files recorded
with Olympus recorders.
4
Index Marks
31
Page 32

Alarm Playback Function (ALARM)
The alarm playback function can be set to play a selected file at a pre-set time.
Press the FOLDER button to
choose a folder.
1
Press the FF or REW button to
5,7
choose the file to be played when
2
the alarm sounds.
2,4,6
4
Alarm Playback Function (ALARM)
5,7
3
1
32
3
4
5
6
2,4,6
7
Press and hold the MENU button
for 1 second or longer.
The menu opens (☞ P.39).
Press the FF or REW button until
“ALARM” flashes on the display.
Press the PLAY button.
The alarm playback setup process begins.
Press the FF or REW button to
choose between ON and OFF.
ON : Enables alarm playback.
OFF: Disables alarm playback.
Press the PLAY button to complete
the setup screen.
When you choose ON, the hour indicator
flashes.
When you choose OFF, the alarm indicator
disappears and finishes with step 12.
Page 33

Press the FF or REW button to set
the hour.
8
9,11
12
8,10
12
9,11
8,10
.............................................................................................................................................................................
Notes
• The alarm playback function can be set for only one file at a time.
• The alarm will sound at the scheduled time every day unless the alarm playback setting is cleared.
• If you wish to change the file for alarm play, first turn the alarm settings “OFF”, then make any desired new
alarm settings.
• The alarm will sound for 5 minutes and then stop.
• If the recorder is in use at the scheduled time, the alarm will sound after the operation is finished.
• The alarm will sound at the scheduled time even if the recorder is set to hold. The recorder begins to play
the file associated with the alarm when you press any button.
• The alarm playback setting is cleared if the selected file is erased.
Press the PLAY button to accept
the hour.
9
The minute indicator flashes.
Press the FF or REW button to set
the minute.
10
Press the PLAY button to accept
the minute.
11
Press the STOP button to close
the menu.
12
An alarm tone will sound at the scheduled time. Press any
button while the alarm sounds to play the file you associated
with the alarm.
To enable alarm sound only
To set an alarm without audio playback, set the alarm while
an empty folder is selected.
• Start setting from step 3 (☞ P.32) of “Alarm Playback
Function”.
• When alarm sound goes at the preset time, pressing any
button stops the sound.
4
Alarm Playback Function (ALARM)
33
Page 34

LCD Display Information
The LCD screen on the recorder can display 6 different formats of information by pressing the
DISPLAY button. This helps review and confirm different recorder settings and file information.
Press the DISPLAY button.
1
4
LCD Display Information
The LCD display views will switch every time the DISPLAY
1
button is pressed.
While in stop or playback mode
When pressing Display, the recorder will cycle through 1 to
6. If there is no file, 5 and 6 will display alternately.
1 File length
Shows how long a file is.
}
{
2 Time stamp
Shows the year, month, and
date that the file was recorded.
{
3 Time stamp
Shows the time that the file was
recorded.
{
* If a comment contains many characters, it will scroll horizontally to display the complete comment.
6 Current time and date
Shows the current time and
date. (During playback, the
“TIME & DATE” or the counter
appears.)
{
5 Memory remaining
Shows remaining recording
time.
{
4 File comment*
Shows comment added to a
file. (If there is no comment, “--
--” will appear.)
34
Page 35

While in record mode
Displays 1 and 2 alternately.
1 Recording level meter
Displays the sound input level graphically and the remaining time available for
recording in count-down mode.
2 Remaining memory bars
Displays the remaining time available for recording in bar mode and countdown mode.
While recording in VCVA mode
Displays 1 and 2 alternately.
1 VCVA recording level meter
Displays the sound input level graphically and the remaining time available for
recording in count-down mode. (“STANDBY” appears if the VCVA actuation
level isn't reached.)
4
LCD Display Information
2 Remaining memory bars
Displays the remaining time available for recording in bar mode and countdown mode.
35
Page 36

Hold
Setting the HOLD switch to the HOLD position.
If you set the recorder to HOLD status by sliding
the HOLD switch in the direction of the arrow, the
current conditions will be preserved, and all buttons
and switches except the HOLD switch will be
disabled. This feature is useful when the recorder
has to be carried in a bag or pocket.
Remember to reset the HOLD switch when using
the recorder.
Running state when HOLD is set
4
Hold
1: State of the recorder, 2: HOLD of the recorder, 3: HOLD of the remote controller, 4: Button
operation on the recorder, 5: Button operation on remote controller
On
On
Off
On
On
Off
2
3
Not
connected
Off
On
Not
connected
Off
On
4
The display goes off after the
indication of the current time and
date blinks for 2 seconds.*
The display goes off after the
indication of the current time and
date blinks for 2 seconds.*
Normal operation
If HOLD is applied during playback
(recording), operation is disabled with the
playback (recording) state unchanged.*
If HOLD is applied during playback
(recording), operation is disabled with the
playback (recording) state unchanged.*
Normal operation
1
1
2
2
5
Normal operation. If the recorder
stops after button operation, the
display goes out 20 seconds later.
Button operation on the remote controller
is invalid.
Normal operation. If the recorder
stops after button operation, the
display goes out 20 seconds later.
Button operation on the remote controller
is invalid. However, the REC lamp is lit
while the recorder is recording.
1
STOPS
Running
*1: Pressing any button makes clock display blink for 2 seconds but the recorder does not start.
*2: The recorder stops when playback completes or recording terminates due to no memory space.
Note
The alarm will sound at the scheduled time even if the recorder is set to hold. The recorder begins to play the
file associated with the alarm when you press any button.
36
Page 37

Formatting the Card (FORMAT)
Formatting prepares cards for recording. Cards that have been used on non-Olympus devices,
or that can’t be accessed by this unit, require formatting. The card that comes with this unit and
Olympus xD-Picture Cards are preformatted and can be used immediately following purchase.
Press and hold the MENU button
for 1 second or longer.
1
The menu opens (☞ P.39).
3,5
Press the FF or REW button until
“FORMAT” flashes on the display.
2
2,4,6
Press the PLAY button.
The formatting process is selected.
3
Press the FF or REW button to
choose “START”.
4
Press the PLAY button.
“DATA WILL BE CLEARED” appears for
3,5
5
approximately 2 seconds.
4
Formatting the Card (FORMAT)
1
2,4,6
6
Press the FF or REW button again
to choose “START”.
37
Page 38

Formatting the Card (FORMAT)
Press the PLAY button again.
Formatting begins and an indicator flashes
7
on the display.
7
“FORMAT DONE” displays when formatting
ends.
{
4
Formatting the Card (FORMAT)
.......................................................................................................
Notes
• Completion of Formatting may take about 1 minute. Never do the
following during this period. Doing so may damage the data or card.
-Removing the battery.
7
-Detaching/attaching the AC adapter (whether or not the recorder is
powered on).
-Open the card cover.
• When the recorder is formatted, all the stored data, including locked
files, are erased.
• If an unformatted card is inserted, the recorder automatically displays
the menu to format the card.
38
Page 39

Menu List
Press and hold the MENU button for 1 second or longer.
REC MODE
LOCK
BACK SPACE
ALL PLAY
TIME&DATE
FORMAT
CONTRAST
BEEP
BACKLIGHT
EXT.INPUT
COMMENT
FOLDER NAME
ALARM
VCVA
Selection from HQ, SP and LP modes (☞P.20).
Locking files setting (☞P.30). Selection
between ON (locked) and OFF (unlocked).
Back space setting. Selection from OFF, 1
SEC SKIP and 2 SEC SKIP.
Continuous playback setting. Selection
between ON (enabled) and OFF (disabled).
Time/Date setting. In order of hour, minute,
year, month and day (☞P.12).
Recorder formatting (☞P.37).
LCD contrast adjustment. Adjust the level from
1 to 12.
System sounds setting. Selection between ON
(enabled) and OFF (disabled).
Backlight setting. Selection between ON
(enabled) and OFF (disabled).
EXT.INPUT setting. Selection from AUTO
SELECT, STEREO INPUT and MONAURAL
INPUT.
Assigning file comments.
Folder naming.
Alarm playback setting (☞P.32). Selection
between ON (enabled) and OFF (disabled).
VCVA setting (☞P.18). Switch between ON
(enabled) and OFF (disabled).
Press the FF button
or REW button.
Notes
• If you press the STOP button
or the REC button, during a
menu setup operation, the
recorder will stop and apply
the items that were set to that
point.
• The recorder will stop if you
leave it idle for 3 minutes during
a menu setup operation, when
a selected item is not applied.
4
Menu List
39
Page 40

Using DSS Player Software
The DSS Player Software can be used to do the following:
• Playback voice files on your PC and on the recorder when connected via USB. Download files
from the recorder to the PC or upload files from the PC to the recorder.
Precautions on using the recorder connected to a PC
● When you are downloading a file from
the recorder or uploading a file to the
recorder, do not remove the USB cable
even if the screen is indicating you can.
Data is still being transferred while the
record/play indicator lamp is blinking.
5
If the USB cable is removed before the
drive is stopped, data may not be
Using DSS Player Software
successfully transferred.
● Do NOT format the card using your PC. If
you do, the recorder will not be able to
recognize the card. Only format the cards
using either the recorder or the Olympus
CAMEDIA digital camera (☞ P.37).
● Folder (directory) names displayed by
file management tools such as Explorer
attached to Microsoft Windows and
Finder attached to Mac OS are different
from the folder names settable with the
recorder or DSS player.
● If folders or files stored on the recorder
are moved or renamed by using a file
management tool such as Explorer or
Finder, the order of files may be
changed or files may become
unrecognizable.
● Data can be written or uploaded to the
recorder even though the attribute of the
recorder drive is shown as Read-only
by the operating system of the PC.
● As the noise may cause adverse effects
on electronics devices nearby the
recorder, unplug the earphone and
remote controller when you connect the
recorder to a PC.
40
Page 41

Operating Environment
Windows
PC:
Operating
System:
CPU:
RAM:
Hard drive
space:
Drive:
Sound card:
Browser:
Display:
USB port:
Audio I/O
terminals:
..........................................................................
Note
USB ports are not supported on PCs running
Windows 95 or that have been upgraded from
Windows 95 to any other OS.
IBM PC/AT compatible PC
Microsoft Windows 98/ 98SE/
Me/ 2000 Professional/ XP
Professional,Home Edition
Intel Pentium II class 333 MHz
processor or more (Processor
500 MHz or more is
recommended)
64 MB or more (128 MB or
more is recommended)
10 MB or more
2x or faster CD-ROM drive
Creative Labs Sound Blaster 16
or 100% compatible sound card
Microsoft Internet Explorer
4.01 SP2 or later
800 x 600 pixels or more, 256
colors or more
One or more free ports
Microphone input and earphone output or speaker
Macintosh
PC:
Operating
System:
RAM:
Hard drive
space:
Drive:
Display:
USB port:
Audio I/O
terminals:
Power Mac G3 233 MHz class
processor or faster
iMac/ iBook/ eMac/ Power Mac/
PowerBook(The computer
must support a standard USB
port.)
Mac OS 9.0-9.2.2/10.1-10.3
64 MB or more (128 MB or
more is recommended)
50 MB or more
2x or faster CD-ROM, CD-R,
CD-RW, DVD-ROM drive
800 x 600 pixels or more, 256
colors or more
One or more free ports
Earphone output or speakers
5
Operating Environment
41
Page 42

Installing DSS Player Software
Before you connect your recorder to your PC, you must first install the DSS Player software.
Make sure to exit all running applications, eject the floppy disk if you are using one, and logon as
administrator if you are running Windows2000/XP (Professional only) or Mac OS X on the network.
Windows
Insert Olympus DSS Player CD into
the CD-ROM drive.
1
The installation program will start
automatically.
If the installation program does not start
automatically, browse your CD-ROM drive
and execute “setup.exe”.
5
The installation Language Selection
Installing DSS Player Software
dialog box appears.
2
Select the desired language.
Register user information.
Enter your name, company name, and
3
license ID number (serial number).
The license ID number is printed on the
license ID card included inside the recorder
package.
Click the [Next] button. A confirmation dialog
box appears, click the [Yes] button.
Proceed with the installation
according to the instructions on the
4
screen.
.................................................................................................................................................................
Note
Never install DSS Player in Mac OS 9.x system, when using DSS Player with Mac OS X. The device connected
when using Classic environment may not be recognized.
Macintosh
Insert Olympus DSS Player CD into
the CD-ROM drive.
1
Double-click CD icon.
Select the folders named “Mac OS 9.x” and
2
“Mac OS X” and start up your OS.
Double-click the following icon.
(OS X)
3
DSS Player for Mac OS X Installer
(OS 9.x)
Select the folder of which the language is
to be installed, and execute the installation
program in the folder.
Proceed with the installation
according to the instructions on the
4
screen.
42
Page 43

Using Online Help
For information on the DSS Player usage and features, refer to the online help.
To start online Help:
Windows
• Click the [Start] button, then select [All Programs], [Olympus
DSS Player Pro], [Dictation Help].
• While DSS Player is running, select the [Help] menu,
[Contents] .
• While DSS Player is running, press F1 on the keyboard.
Macintosh
• While DSS Player is running, choose [DSS Player for Mac
Help] from the [Help] menu.
5
Using Online Help
.................................................................................................................................................................
Note
Online Help is available after the DSS Player is installed.
43
Page 44

Connecting to Your PC
Be sure to install the DSS Player software before connecting the recorder to the PC.
However, if you do connect the recorder before or during the software installation, the
“Add New Hardware Wizard” appears, cancel the wizard by pressing the [Cancel] button
in the Wizard screen and then install or continue the installation of DSS Player software.
Connecting to your PC using the USB cable
Insert the card into the card slot
until it stops with a click, and close
1
the card cover.
5
Connecting to Your PC
Release the HOLD switch.
2
Insert end A of the USB cable to
your PC's USB port or USB hub.
3
Confirm that the recorder is not in
use before attaching end b of the
4
USB cable to the terminal port of
the recorder.
“REMOTE” is displayed on recorder if the
USB cable is connected.
REMOTE
.................................................................................................................................................................
Notes
• NEVER remove the card or disconnect the USB cable while the record/play indicator lamp is flashing.
If you do, the data on the card will be destroyed.
• Refer to the user's manual for your PC regarding the USB port or USB hub on your PC.
• Be sure that you connect the USB cable either directly to the USB port on your PC or the self-power
(AC adapter connection) USB hub.
• Be sure to push the cable connector all the way in. Otherwise, the recorder may not operate properly.
• Release the HOLD switch.
• When the recorder is connected to a PC, the power will be supplied from the USB cable.
44
Page 45

Connecting to your PC using the cradle
Place the recorder on the cradle
Insert end A of the USB cable to your PC's
USB port or USB hub.
1
Connect the end b of the USB cable to the
cradle.
2
Make sure that the recorder is in the Stop
mode, and place it in the cradle.
3
1 Set the recorder vertically.
2 While pushing down the top of the recorder, set
the recorder on the cradle. In this case, make sure
that concavity on the rear of the recorder fits
convexity of PC.
“REMOTE” is displayed on recorder if the USB cable
is connected.
Remove the recorder from the cradle
Make sure that the recorder's record/play
indicator lamp isn't flashing, and remove the
1
recorder from the cradle.
Hold the cradle with your hand, and raise the recorder
from the top end to remove it from the hook, as shown
in the illustration.
.....................................................................................
Notes
• Do not touch the connection point on the front of the
cradle (at the low end), as that may cause bad
connection.
• The cradle does not have the recharging function.
2
1
5
Connecting to Your PC
45
Page 46

Running DSS Player
Windows
By default, connecting the recorder to your PC, will start the application automatically.
Disabling automatic start
Right click the Device Detector icon in the System Tray in the lower right-hand
corner of the screen, then select “Select startup application”.
1
Cick [DSS Player].
The check mark on [DSS Player Pro] disappears.
2
Manual start
5
Start Windows.
Running DSS Player
1
Click the [Start] button, then select [All
Programs].
2
All program menu will be displayed.
Select [Olympus DSS Player Pro], then
click [Dictation Module].
3
2 3
.................................................................................................................................................................
Note
If you connect the recorder before installing DSS Player, the “Add New Hardware Wizard” dialog box will
open. If this happens, click [Cancel] to exit the wizard, then install DSS Player software.
46
Page 47

Macintosh
Start your Macintosh.
1
Connect the recorder to your PC.
For cable connection instructions, see
2
“Connecting to Your PC” (☞ P.44).
Double-click the DSS Player for
Mac folder.
3
The DSS Player for Mac folder opens.
Double-click DSS Player.
DSS Player for Mac launches.
4
................................................................................................................................................................
Note
DSS Player for Mac does not have the automatic start function.
3
4
5
Running DSS Player
47
Page 48

Window Names
1
2
*Main screen is displayed
when DSS Player is started
4
3
5
Window Names
48
(Windows)
1 Play Control Bar
Control buttons to play and stop voice files.
2 Dictation Folder Window
Displays the directory structure of the DSS,
WMA, WAVE (Windows only) and AIFF
(Macintosh only)-format files stored on your
PC's hard disk.
1
2
3
(Macintosh)
4
3 Device Manager Window
Displays the directory structure of the folders in
the recorder.
4 Voice File List Box
Displays the voice files in the folder selected in
2 and 3.
Page 49

Download Voice Files from the Recorder
There are 3 download options to transfer voice files from the recorder to the PC:
• Download Selected Files
• Download Folders
• Download All
The following is an explanation of “Download Selected Files”. For explanations of “Download
Folders” and “Download All”, refer to Online Help.
Download one or several voice files to your PC.
Download all the voice files in one folder.
Click the icon and download all the voice files stored in the recorder to your PC.
Download Selected Files
Select the folder.
From the Device Manager window, select the folder
1
that contains the voice file you would like to download.
The illustration shows that FOLDER A has been
selected.
Select the voice file.
Select the voice file you would like to
2
download from the Voice File List Box. To
select more than one file, hold either the
[Ctrl] or [Shift] key and select files. The
illustration shows that one voice file is
selected.
5
Download Voice Files from the Recorder
1
2
49
Page 50

Download Voice Files from the Recorder
Download the voice file.
From the [Download] menu, click
3
[Download Selected Files].
3
5
Download Voice Files from the Recorder
Download complete.
Do not disconnect the USB cable while the
4
record/play indicator LED on the recorder
is flashing. Disconnecting the USB cable
when the recorder LED is flashing will result
in data loss or corruption.
................................................................................................................................................................
Notes
• NEVER remove the card or disconnect the USB cable while the record/play indicator lamp is flashing. If you
do, the data on the card will be destroyed.
• Depending on the size of the voice file and your PC, it may take some time to download the files.
• The downloaded files will be stored in the download tray folder that corresponds to the folder in the recorder.
(Example: A voice file downloaded from Folder A will be stored in download tray A on your PC.)
• If a voice file already exists on your PC with the same name, date and time recorded, the new file will not be
downloaded.
50
Page 51

Play a Voice File
Select the folder.
Select the folder that contains the
1
voice file you would like to play.
Select the voice file.
Select the voice file to play from the
2
Voice File List Box.
Play the voice file.
Click the (play) button of the
3
Play Control Bar.
Other playback control such as Rewind, Fast
Forward, Stop, Speed Control, Volume
Control, Time Axis and Index Skip are
available from the Play Control Bar.
File name
File names are assigned in the following manner:
DS22 0004.dss
Extension
File number ...... A serial number automatically assigned by a Digital Voice Recorder.
Author ID...The ID that has been set on the recorder. The default ID is “DS2200”. The Author ID
can be modified with DSS Player.
21 3
5
Play a Voice File
51
Page 52

Upload Voice Files to the Recorder
DSS Player has a feature to enable you to upload voice files from your PC to the recorder.
Select the folder.
Select the folder that contains the voice file to
1
upload from the Dictation Folder window.
Select the voice file.
Select the voice file to upload from the Voice File
2
List Box.
Select the folder to upload.
From the [Download] menu select [Upload Files]
3
or click the Upload icon. Once the folder list box
where the file is to be uploaded is displayed,
5
select the folder from which the file is to be
uploaded.
Upload Voice Files to the Recorder
Upload the voice file.
The voice file is uploaded to the recorder.
4
Upload complete.
Once the transmission screen closes and the record/play indicator lamp on the recorder is
5
OFF, upload is completed.*
* In general, it will take more than 5 seconds (more than 12 seconds with Windows 2000/XP) after the
transmission screen closes before uploading is completed.
You can also drag and drop files from the Voice File List Box to the Device Manager window.
................................................................................................................................................................
Notes
• NEVER remove the card or disconnect the USB cable while the record/play indicator lamp is flashing. If you
do, the data on the card will be destroyed.
• In case of WMA files, only the files recorded with this recorder or Olympus Digital Voice Recorders can be
21
52
Page 53

Using the Recorder as a Reader/Writer
With the recorder connected to your PC, you can download data from the card to your PC and
upload data stored on your PC to the Card.
• You will need to install the Olympus DSS Player Software if you are using Windows 98/ 98SE.
Example: Copying Data from PC to Card using Explorer or Finder
Start Windows.
1
Connecting the recorder to your PC.
For the connection procedure, refer to “Connecting to Your PC using the USB cable” (☞ P.44).
2
Open the Explorer or Finder window.
The recorder will appear as a removable drive icon.
3
Copy the data.
While the data are being written or copied, the record/play indicator lamp on the recorder will
4
flash.
................................................................................................................................................................
Notes
• NEVER remove the card or disconnect the USB cable while the record/play indicator lamp is flashing. If you
do, the data on the card will be destroyed.
• Only the WMA file that are recorded with the Olympus Digital Voice Recorder can be copied to a voice file
of this recorder and played.
6
Using the Recorder as a Reader/Writer
53
Page 54

Alarm Message List
Message
BATTERY LOW
LOCK ON
INDEX FULL
FOLDER FULL
OVER-FLOW
CARD ERROR
7
MEMORY FULL
Alarm Message List
PLEASE
DOWNLOAD
FILES
MAXIMUM REC
TIME
Meaning
Low battery
power
Erase-locked
Index full
Folder full
Maximum number
Too many
characters input
Incompatible card
Zero remaining
memory
Please download
voice files to a PC
Maximum
recording time
Explanation
Battery power is getting low.
Tried to delete a locked file.
The file is full of index marks
(maximum of 16 marks).
The folder is full of files
(maximum of 199 files).
The destination folder already
has the maximum number of
files (199).
Exceeds the maximum number
of characters that can be
registered.
An incompatible card was
inserted.
The card has no remaining
memory.
The memory of the card is full.
You need to transfer the voice
files to a PC.
In HQ and LP modes, when the
recording time reaches to the
maximum recording time per file,
the recorder stops recording.
Action
Replace with new batteries
(☞ P.10).
Unlock the file (☞ P.30).
Erase index marks that are no
longer required (☞ P.31).
Erase unnecessary files (☞ P.28).
Erase unnecessary files (☞ P.28).
Reduce the number of characters
within the limit. Up to 12
characters can be used for a
folder name.
Up to 100 characters can be used
for a file comment.
Insert a compatible the card.
Erase files that are no longer
required or insert another card.
Connect the recorder to a PC and
transfer the files to the PC. Then,
delete the files on the recorder
using the DSS Player.
If the card has remaining
memory, pressing the REC button
starts recording again.
54
Page 55

Message
NO FILE
FORMAT
ERROR
SAME FILE
SYSTEM
ERROR
INSERT CARD
CARD COVER
OPEN
Meaning
No file
Formatting error
Same named file
System error
No card
Card cover is
opened
Explanation
No files were found in the
folder.
There was an error while
formatting the card.
Tried to create or store a file
that has same name as a file
in the folder.
System error detected in the
recorder.
There is no card inserted.
The card cover is not closed.
Action
Select another folder.
Reformat the card (☞ P.37).
Change the file name.
This is a malfunction. Contact
the place of purchase or
Olympus Service Center for
repair.
Insert a card (☞ P.14).
Close the card cover securely
until it click (☞ P.14).
7
Alarm Message List
55
Page 56

Troubleshooting
Symptom
Nothing appears
on the display
Won’t start
Unable to record
No playback tone
heard
Unable to erase
Noise heard
during playback
7
Troubleshooting
Recording level
too low
Unable to set
index marks
Won’t work with
AC adapter
Cannot find the
recorded voice
Probable cause
The batteries are not loaded properly.
The batteries are dead.
The recorder is in HOLD mode.
The recorder is in HOLD mode.
The batteries are dead.
The card does not have enough memory.
The card is unformatted.
The maximum number of files has been
reached.
The earphone is connected.
The VOLUME button is set to 0.
The file is locked.
The recorder was shaken during recording.
The recorder was placed near a cell phone
or fluorescent lamp while recording or
during playback.
The microphone sensitivity is too low.
The maximum number of index marks (16)
has been reached.
The file is locked.
A non-standard AC adapter is being used.
Wrong folder.
Action
Verify polarity is correct.
Replace with new batteries (☞ P.10).
Release the recorder from HOLD
(☞ P.36).
Release the recorder from HOLD
(☞ P.36).
Replace with new batteries (☞ P.10).
Erase unnecessary files or insert
another card.
Format the card (☞ P.37).
Check another folder.
Unplug the earphones to use the
internal speaker.
Adjust the VOLUME button.
Unlock the file (☞ P.30).
Move the recorder.
Set the microphone sensitivity to
CONF mode and try again (☞ P.21).
Erase unnecessary index marks
(☞ P.31).
Unlock the file (☞ P.30).
Use the Olympus A321 (for US,
Canada) or A322 (for Europe except
U.K) AC adapter (Optional).
Switch to the right folder.
56
Page 57

Accessories (optional)
xD-Picture Cards of 16, 32, 64, 128, 256 and 512 MB:M-XD16/32/64/128/256/512
Olympus CAMEDIA digital camera series xD-Picture Cards can be used.
PC Transcription kit: AS-3000
The AS-3000 transcription kit provides you with a PC-footswitch, a headset and DSS Player Pro
Transcription Module for easy transcription of DSS recordings.
Stereo Microphone: ME50S/ME51S
To create stereo recordings in WMA format with clear sound and reduced noise.
Noise-Cancellation microphone: ME12
(Dictation microphone)
Used to get crisp recordings of your own voice by reducing the effects of ambient noise.
AC adapter: A321 (US and Canada) or A322 (Europe except U.K.)
Ni-MH Rechargeable Battery Charger: BU-400
Charger for AA batteries (1 to 4) or 1 to 2 AAA batteries.
Ni-MH Rechargeable Battery: BR401
High-efficiency rechargeable long life batteries.
Connecting cord: KA232*
Use to connect the microphone jack of this unit to a radio or other sound source.
Plug adapter: PA3
A mini plug adapter to connect 2.5 mm mini-plug devices such as microphone to the recorder
3.5 mm mini-jack.
USB Reader/Writer : MAUSB-10 (Dual-Slot xD-Picture Card & SmartMedia)
Allows data to be transferred to and from a PC.
USB Reader/Writer : MAUSB-100 (xD-Picture Card)
Allows data to be transferred to and from a PC.
7
Accessories (optional)
PC Card adapter : MAPC-10 (xD-Picture Card/SmartMedia)
Allows data to be transferred to and from a PC that has a PC card slot.
* Use this accessory with the PA3 plug adapter.
57
Page 58

Specifications
Recording format
DSS (Digital Speech Standard)
WMA (Windows Media Audio)
Recording media
xD-Picture Card: 16 to 512 MB
Input level –70 dBv
Sampling frequency
SHQ mode: 44.1 kHz
HQ mode: 44.1 kHz
SP mode: 12 kHz
LP mode: 8 kHz
Overall frequency response
SHQ mode: 300 to 8,000 Hz
HQ mode: 300 to 7,000 Hz
SP mode: 300 to 5,000 Hz
LP mode: 300 to 3,000 Hz
Recording time (128 MB Card)
SHQ mode: 4 hours 20 minutes
HQ mode: 8 hours 45 minutes
SP mode: 20 hours 55 minutes
7
Specifications
LP mode: 44 hours 45 minutes
Alkaline battery life
Recording: Approx. 16 hours
Playback: Approx. 9 hours
Ni-MH Rechargeable Battery life
Recording: Approx. 12 hours
Playback: Approx. 8 hours
Speaker
Built-in ø23 mm round dynamic speaker
MIC/EAR/REMOTE jack
ø3.5 mm mini-jack, impedance MIC 2 kΩ,
EAR 8 Ω or more
Maximum working output (3 V DC)
180 mW or more (8 Ω speaker)
Input power requirement
Rated voltage: 3 V
Batteries: Two AAA batteries (LR03 or
R03) or Two Ni-MH rechargeable
batteries
External power supply: AC adapter
External dimensions
109.5 x 39.5 x 15 mm
(without protrusions)
Weight
85 g (including alkaline batteries)
* Specifications and design are subject to
change without notice.
* Battery life is measured by Olympus. It
varies greatly according to the type of
batteries used and the conditions of use.
58
Page 59

Technical Assistance and Support
DS-2200 is part of the Olympus Professional Dictation System. Your dealer is trained to troubleshoot
and fix many common problems that you may be having with this system. If you encounter problems
using your DS-2200, we recommend that you contact your Olympus Professional Dealer that sold
you the system. If your dealer cannot fix your problem, please call our technical hotline number or
send E-mail.
◆ For customers in the U.S. and Canada
Phone: 1-888-553-4448
E-mail: distec@olympus.com
◆ For customers in Europe
E-mail : dss.support@olympus-europa.com
7
Technical Assistance and Support
59
Page 60

Page 61

DIGITAL VOICE
RECORDER
DS-2200
MODE D’EMPLOI
Merci d’avoir porté votre choix sur cet
enregistreur vocal numérique.
Lisez ce mode d’emploi pour les informations
concernant l’emploi correct et sûr de l’appareil.
Conservez-le à portée de la main pour toute référence
ultérieure.
Nous vous recommandons de tester la fonction
d’enregistrement et
le volume avant l’utilisation pour obtenir de bons
enregistrements.
FR
Page 62

Table des matières
Table des matières .................................... 2
Pour un emploi sûr et correct .................... 4
Précautions générales ............................... 4
1Préparatifs
Caractéristiques principales ...................... 6
Description de la carte .............................. 7
Identification des éléments ........................ 8
Insertion des piles ................................... 10
Utilisation de l’adaptateur secteur ........... 11
Réglage de l’heure/date (TIME&DATE) ....
Insertion et éjection des cartes ............... 14
12
2 A propos de l’enregistrement
Enregistrement ........................................ 16
Utilisation d’un VCVA
(Variable Control Voice Actuator) ...... 18
Modes d’enregistrement (REC MODE)... 20
Sensibilité du microphone ....................... 21
3 A propos de la lecture
Lecture ..................................................... 22
Fonction de suppression du bruit ............ 25
Lecture à répétition .................................. 26
4 Autre fonction
Effacement ............................................... 28
Verrouillage de fichiers (LOCK) .............. 30
Marques index ......................................... 31
Fonction de lecture d’alarme (ALARM) ... 32
Informations de l’écran ACL .................... 34
Maintien ................................................... 36
Formatage de la carte (FORMAT) ...........
Liste de menus ........................................ 39
5
Gestion des fichiers sur votre PC
Utilisation du logiciel DSS Player ............ 40
Environnement d’exploitation .................. 41
Installation du logiciel DSS Player .......... 42
Utiliser l’aide en ligne DSS Player Software ....
Connecter l’enregistreur à votre PC ....... 44
Mise en marche du DSS Player .............. 46
Noms des fenêtres .................................. 48
Télécharger des fichiers vocaux depuis
l’enregistreur..................................... 49
Lire un fichier vocal ................................. 51
Télécharger des fichiers vocaux vers
l’enregistreur ..................................... 52
37
43
2
Page 63

6 Utilisation de l’enregistreur
pour la lecture/l’écriture
Utilisation de l’enregistreur pour la
lecture/l’écriture ................................ 54
7 Autres informations
Liste des messages d’alarme .................. 54
Dépannage .............................................. 56
Accessoires (options) .............................. 57
Spécifications .......................................... 58
Assistance technique et soutien ............. 59
Utilisation du manuel en ligne
Quand vous installez le DSS Player Pro dans
votre PC à partir du CD-ROM, vous pouvez
utiliser la version complète en ligne de ce
mode d’emploi, qui vous permet d’en savoir
plus sur l’enregistreur vocal numérique.
Si le DSS Player est installé, double-cliquez sur
le bouton [démarrer], sélectionnez [Tous les
programmes], puis [OLYMPUS DSS Player
Pro], et enfin cliquez sur [Instructions de DS2200]. Vous pouvez obtenir plus d’informations
sur les rubriques énumérées ci-dessous.
Enregistrement à l’aide d’un microphone
externe .............................................. 20
Ecoute pendant l’enregistrement audio
(contrôle de l’enregistrement) ........... 21
Enregistrer à partir d’un autre appareil audio ...
Lecture continue (ALL PLAY) ................. 29
Retour arrière automatique (BACK SPACE) .....
Réglage du contraste de
l’écran ACL (CONTRAST) ................ 40
Rétroéclairage (BACKLIGHT) ................. 41
Assignations de noms de
dossier (FOLDER NAME) ................. 42
Assignation de commentaires de fichier
(COMMENT) ..................................... 45
Déplacement de fichiers d’un
dossier à l’autre ................................. 46
Avertissements sonores (BEEP) ............. 47
Désinstaller un logiciel DSS Player ........ 57
Modification de l’ID utilisateur (ID auteur) .....
Modification du nom de dossier .............. 69
Affichage des commentaires de fichiers .... 69
Modification d’un modèle ........................ 70
Envoyer des fichiers vocaux par e-mail ..... 71
Installation et activation de la fonction courrier ..
24
30
68
72
1
2
3
4
5
6
7
3
Page 64

Pour un emploi sûr
Précautions générales
et correct
Avant d’utiliser votre nouvel enregistreur,
lisez attentivement ce manuel pour savoir
comment l’utiliser de manière sû re et
correcte. Conservez ce manuel à un
endroit facilement accessible pour toute
référence ultérieure.
• Les symboles avertissement indiquent des
informations importantes liées à la sécurité.
Pour vous protéger vous-même et les
autres contre les blessures ou contre les
dégâts matériels, il est essentiel que vous
preniez toujours en compte les
avertissements et informations fournis.
● Ne laissez pas le lecteur dans un endroit
chaud, humide comme dans une voiture
fermée en plein soleil ou sur une plage
en été.
● Ne rangez pas l’enregistreur dans un
endroit trop exposé à l’humidité ou à la
poussière.
● N’utilisez pas de solvant organique, tel
qu’alcool ou diluant pour vernis, pour
nettoyer l’appareil.
● Ne placez pas l’enregistreur sur ou près
d’un autre appareil électrique tel que
téléviseur ou réfrigérateur.
● Evitez d’effectuer un enregistrement ou
une lecture près d’ un té l é phone
cellulaire ou de tout autre appareil sans
fil, car ils risquent de provoquer des
interférences et des parasites. En cas
de parasites, installez-vous ailleurs, ou
éloignez davantage l’enregistreur de
ces appareils.
● Evitez le sable ou la saleté. Ils peuvent
causer des dommages irréparables.
● Evitez les vibrations ou chocs violents.
● Ne démontez pas, ne réparez pas et ne
modifiez pas cet appareil vous-même.
● N’utilisez pas cet appareil pendant la
conduite d’un vé hicule (tel que
bicyclette, motocyclette ou poussette).
● Conservez l’appareil hors de portée des
enfants.
4
Page 65

<Avertissement relatif aux pertes de
données>
Les données enregistré es dans la
mémoire risquent d’être détruites ou
effacées en cas d’erreur de procédure,
d’anomalie de l’appareil, ou pendant des
travaux de réparation.
Nous vous recommandons d’enregistrer
et de sauvegarder toutes les données
importantes sur un autre support, par
exemple un disque.
Piles
Avertissement
• Les piles ne doivent jamais être
exposées à une flamme, chauffé es,
court-circuitées ou démontées.
• N’essayez pas de recharger des piles
alcalines, au lithium ou autres piles nonrechargeables.
• N’utilisez jamais une pile à couvercle
extérieur éventré ou fissuré.
• Conservez les piles hors de portée des
enfants.
• Si vous notez quelque chose d’inhabituel
à l’utilisation de ce produit, par exemple
un bruit anormal, de la chaleur, de la
fumée ou une odeur de brûlé:
1 retirez immédiatement les piles en
prenant garde de ne pas vous brûler, et
2 appelez votre revendeur ou le
représentant Olympus local pour une
révision.
Adaptateur secteur
Avertissement
• N’essayez pas de démonter, réparer ou
modifier l’adaptateur secteur de quelque
manière que ce soit.
• Evitez la pénétration de matiè res
extérieures, telles qu’eau, métal ou
substances inflammables, dans le produit.
• Ne mouillez pas l’adaptateur secteur, ne
le touchez pas avec des mains mouillées.
• N’utilisez pas l’adaptateur secteur près
d’un gaz inflammable (tel que de l’essence,
du benzine ou d’un diluant pour vernis).
Dans le cas où ....
•
...les pièces internes de l’adaptateur secteur
sont exposées parce qu’il est tombé ou a
été endommagé d’une autre manière:
• ...l’adaptateur secteur tombe dans l’eau,
ou si de l’eau, un objet métallique ou une
substance inflammable ou d’autres
matières exté rieures pé n è trent à
l’intérieur:
• ...vous notez quelque chose d’inhabituel
à l’emploi de l’adaptateur secteur, tel que
bruit anormal, chaleur, fumée ou odeur
de brûlé:
1 ne touchez aucune pièce exposée;
2 déconnectez immédiatement la fiche
d’alimentation de la prise, et;
3 appelez votre revendeur ou le
représentant Olympus local pour la
révision. Continuer à utiliser l’adaptateur
secteur dans ces conditions pourrait
engendrer une décharge électrique, un
feu ou des blessures.
5
Page 66

Caractéristiques principales
●
L’enregistreur stocke des messages vocaux
1
dans les formats très compressés DSS et
WMA sur une carte xD-Picture Card.*
Caractéristiques principales
● L’ enregistreur supporte trois modes
d’enregistrement, le mode HQ (haute
qualité), mode SP (lecture standard) et
mode LP (lecture longue). Si vous utilisez
un microphone stéréo (optionnel), vous
pouvez bénéficier de l’enregistrement en
mode SHQ (haute qualité stéréo) (☞ P.20).
● Les cinq dossiers peuvent contenir 199
fichiers chacun, soit un total de 995
enregistrements (☞ P.16).
● Vous pouvez assigner vos propres noms
aux dossiers.
● Les fichiers enregistrés peuvent être
déplacés d’un dossier à l’autre.
● Possède une fonction intégrée Variable
Control Voice Actuator (VCVA) (☞ P.18).
● Vous pouvez insérer ou effacer des
marques d’index (☞ P.31).*
● Vous pouvez entrer des commentaires
dans vos fichiers.*
2
2
● Il possède des fonctions de lecture rapide
et de lecture au ralenti pour contrôler la
vitesse de lecture (☞ P.23).
● L’écran rétroéclairé LCD de grande taille
est facilement lisible, même dans
l’obscurité.
● L’enregistreur possède une fonction de
suppression du bruit (☞ P.25).
● Une prise de l’enregistreur peut reconnaître
une télécommande, un écouteur ou un
écouteur de sorte que la commutation est
faite automatiquement en fonction de
l’application.
6
1
●
Lorsqu’elle est connectée à l’enregistreur,
la télécommande fonctionne aussi comme
microphone pour l’enregistrement .
● Livré avec le logiciel DSS Player (☞ P.40).
● Un support et un câble USB sont fournis
avec l’enregistreur. Si vous connectez le
support à votre ordinateur à l’aide du câble
USB l’enregistreur peut y transférer des
données (☞ P.44).
● L’enregistreur peut aussi être utilisé en tant
que lecteur/enregistreur externe de
mémoire (☞ P.53).
*1: Format DSS en modes d’enregistrement SP et LP, et
format WMA en modes d’enregistrement SHQ et HQ.
*2: En ce qui concerne les fichiers WMA, ces fonctions ne
sont uniquement disponibles que pour les fichiers
enregistrés avec cet enregistreur ou les enregistreurs
IC d’Olympus.
................................................................................
IBM et PC/AT sont des marques de fabrique ou des
marques de fabrique déposées par International
Business Machines Corporation.
Microsoft, Windows et Windows Meadia sont des
marques de fabrique déposées par Microsoft Corporation.
Apple, Macintosh, iMac, eMac, Mac et PowerMac sont
des marques de fabrique ou des marques de fabrique
déposées de Apple Computer, Inc.
Intel et Pentium sont des marques de fabrique déposées
par Intel Corporation.
Adobe et Acrobat Reader sont des marques déposées
de Adobe Systems Incorporated.
CORTOLOGIC est une marque de fabrique déposée de
Ruwisch & Kollegen GmbH.
Les autres noms de produits et de marques indiqués ici
peuvent être des marques de fabrique ou des marques
de fabrique déposées de leurs propriétaires respectifs.
Page 67

Description de la carte
La xD-Picture Card est un support d'enregistrement amovible. Le terme “carte” dans ce manuel
désigne une xD-Picture Card.
Cartes compatibles
La carte amovible peut servir à enregistrer plusieurs
sortes de données. Comme elle a une capacité
supérieure à une disquette, elle peut servir à transférer
des données entre des ordinateurs. L'enregistreur
accepte des cartes de capacité allant de 16 à 512 MO.
Tailles de mémoire des cartes et temps de lecture approximatifs*
Taille de mémoire Mode SHQ*
16 MO 30 min. 1 h. 05 min. 2 h. 35 min. 5 h. 30 min.
32 MO 1 h. 05 min. 2 h. 10 min. 5 h. 10 min. 11 h. 05 min.
64 MO 2 h. 10 min. 4 h. 20 min. 10 h. 25 min. 22 h. 20 min.
128 MO 4 h. 20 min. 8 h. 45 min. 20 h. 55 min. 44 h. 45 min.
256 MO 8 h. 50 min. 17 h. 45 min. 42 h. 00 min. 89 h. 40 min.
512 MO 17 h. 45 min. 35 h. 30 min.*
*1: Temps d’enregistrement disponible pour un fichier unique continu. Le temps d’enregistrement disponible peut être plus
court si vous effectuez un grand nombre de petits enregistrements.
*2: L’enregistrement en mode SHQ n’est possible que lorsque vous utilisez un microphone stéréo. Lorsque vous utilisez le
microphone stéréo, seul le mode SHQ est disponible.
*3: Duré e d’enregistrement totale de deux fichiers. La durée maximale d’enregistrement est de 26 heures 40 minutes par
fichier en mode HQ et de 99 heures 59 minutes en mode LP.
Remarques
• Lors de l'initialisation (formatage) d'une carte, vérifiez que des données indispensables ne s'y
trouvent pas avant. L'initialisation efface complètement les données de la carte.
•
Les cartes utilisées dans un enregistreur doivent être formatées d'abord avec le même enregistreur
à moins qu'elles ne soient formatées avec un appareil photo numérique Olympus de la série CAMEDIA.
Une carte peut ne pas se comporter correctement lorsqu’elle a été formatée sur un appareil différent.
• La carte a une durée de vie limitée. Lorsqu'elle arrive en fin de vie, l'écriture ou l'effacement des données
sur la carte devient impossible. Dans ce cas, remplacez-la.
• Si vous utilisez un adaptateur PC pour carte compatible avec la carte pour y enregistrer ou détruire des
données, la durée d'enregistrement maximale de la carte peut s'en trouver réduite. Pour revenir à la durée
d'enregistrement originale, initialisez/formatez la carte dans l'enregistreur.
• Olympus ne peut être tenu pour responsable pour la corruption ou la perte de données à cause d'un
mauvais usage de la carte.
2
Mode HQ Mode SP Mode LP
1
1 Zone index
Vous pouvez y
inscrire le contenu
de la carte.
3
84 h. 05 min. 179 h. 30 min.*
2
2 Zone de contact
Est en contact avec
les dispositifs de
lecture de signal de
l’appareil Recorder.
1
3
1
Description de la carte
7
Page 68

Identification des éléments
1
Identification des
^
éléments
%
$
#
@
1 Prise pour EAR/MIC/REMOTE
2 Microphone intégré
3 Témoin d’enregistrement/lecture
4 Touche REC (enregistrement)
5 Touche STOP
6 Touche PLAY
7 Touche FF (avance rapide)
8 Touche REW (recul rapide)
9Touche VOL (+)
0 Touche VOL (–)
! Terminal PC (USB)
@ Touche ERASE
# Touche FOLDER/REPEAT
1
2
8
3
4
5
6
7
8
9
0
!
=
-
e
w
q
*
(
)
$ Touche INDEX
% Touche DISPLAY/MENU
^ Affichage (panneau LCD)
& oeillet de courroie
* Prise d’alimentation
(
Verrou du couvercle du compartiment
de la carte
)
Couvercle du compartiment de la carte
- Couvercle du logement piles
= Point de fixation du support
q Commutateur MICSENS (sensibilité
du microphone)
w Commutateur HOLD
e Haut-parleur intégré
&
Page 69

Affichage (panneau LCD)
0
9
!
54
1
2
3
6
7
8
9
0
Télécommande Microphone:
MR12
1
8
7
6
5
2
3
4
1
Identification des
éléments
1 Indicateur de capacité des piles
2 Témoin VCVA
3 Témoin d’alarme
4 Indicateur de sensibilité du
microphone
5 Indicateur de mode d’enregistrement
6 Affichage de répétition, AutoDJ
7 Affichage de verrouillage
8 Numéro du fichier actuel
9 Nombre total de fichiers
enregistrés dans le dossier
0 Affichage des informations en
caractères
1 Microphone intégré
2 Touche VOL (+)
3 Touche VOL (–)
4 Touche FF (avance rapide)
5 Touche REW (recul rapide)
6 Touche PLAY
7 Touche STOP
8 Touche REC (enregistrement)/
Témoin REC
9 Pince
0 Commutateur HOLD
! Prise EAR (écouteur)
9
Page 70

Insertion des piles
1
1
Insertion des piles
Appuyez légèrement sur la flèche et faites
coulisser le couvercle des piles pour l’ouvrir.
1
Insérez deux piles alcalines AAA en respectant
les polarités.
2
Refermez correctement le couvercle du logement
piles.
3
2
3
.................................................................................................................................................................
Remarques
• Vous devez arrêter l’enregistreur avant de remplacer les piles. Le fait de décharger les batteries
lorsque l’enregistreur fonctionne peut corrompre les fichiers. Si les piles sont épuisées pendant que vous
enregistrez un fichier, vous perdrez votre fichier actuel parce que l’en-tête du fichier ne pourra pas se
fermer. Il est donc de toute première importance que vous remplaciez les piles lorsqu’il ne reste plus qu’un
repère dans l’icône des piles.
• Remplacez les deux piles en même temps.
• Ne mélangez jamais des piles neuves et anciennes, ou des piles de type et/ou marque différents.
• Si le remplacement des piles épuisées prend plus d’une minute, il vous faudra peut-être remettre l’appareil
à l’heure au chargement des nouvelles piles (☞ P.12).
• Retirez les piles si l’enregistreur doit rester inutilisé pendant une période prolongée.
Remplacement des piles
L’indicateur de capacité des piles sur l’affichage change avec
la perte de capacité des piles.
→ → →
Quand s’affiche, remplacez les piles le plus tôt possible.
Quand les piles sont trop faibles, l’enregistreur se coupe et
“BATTERY LOW” s’affiche. Des piles alcalines AAA sont
recommandées.
Vous pouvez aussi utiliser une batterie optionnelle
rechargeable Olympus pour l’enregistreur (☞ P.57).
10
Page 71

Utilisation de
l’adaptateur secteur
Branchez l’adaptateur secteur (Olympus
modèle A321 ou A322) dans une prise murale
et raccordez la fiche d’alimentation au
connecteur d’alimentation de l’enregistreur
(DC 3V) comme indiqué sur l’illustration.
Arrêtez toujours l’enregistrement avant la
connexion. Sinon la lecture des données
vocales enregistrées pourrait être impossible.
Avertissement
• Arrêtez toujours l’enregistrement avant
la connexion ou la déconnexion.
• Quand l’enregistreur n’est pas utilisé,
dé connectez toujours l’ adaptateur
secteur de la prise murale. Utilisez
uniquement la tension d’alimentation
correcte, indiquée sur l’adaptateur.
• Arrêtez l’ enregistreur avant de
déconnecter l’adaptateur secteur.
• N’utilisez pas l’adaptateur secteur pour
le raccordement de l’enregistreur au port
USB.
1
Utilisation de l
’adaptateur secteur
11
Page 72

Réglage de l’heure/date (TIME&DATE)
Si vous avez réglé l’heure et la date, les informations concernant l’enregistrement du fichier
audio sont automatiquement mémorisées dans ce fichier. L’heure et la date doivent être réglées
1
pour faciliter les travaux de gestion des fichiers audio. Le réglage d’heure et de date est aussi
Réglage de l’heure/date (TIME&DATE)
requis pour la fonction de lecture d’alarme (☞ P.32).
L’affichage de l’heure clignote automatiquement lorsque vous insérez des piles avant
la première utilisation de l’enregistreur, ou si vous ne vous en êtes pas servi depuis
longtemps. Continuez avec l’étape 1.
Réglage de l’heure.
1 Appuyez sur la touche FF ou REW
1
Touche PLAY
Touche
FF/REW
Touche PLAY
(accepte un choix
et passe à l’article
suivant)
Touche
MENU
(commuter sur
l’affichage des
données)
Lorsque le microphone(options) de la
télécommande est branché, les touches portant
des noms identiques à ceux de l’enregistreur
fonctionnent d’une manière semblable.
Touche STOP
12
Touche
STOP
(Quitte le menu)
Touche
FF/REW
(modifie un
choix)
pour régler l’heure.
2 Appuyez sur la touche PLAY pour
accepter le choix.
• Vous pouvez choisir l’affichage de 12
heures ou de 24 heures en appuyant sur
la touche MENUpendant que vous
réglez les heures et les minutes.
Exemple: 5: 45 P. M. (P.M. = après-midi)
(Réglage initial)
Réglage de la minute.
1 Appuyez sur la touche FF ou REW
2
pour régler la minute.
2 Appuyez sur la touche PLAY pour
accepter le choix.
Réglage de l’année.
1 Appuyez sur la touche FF ou REW
3
pour régler l’année.
2 Appuyez sur la touche PLAY pour
accepter le choix.
• Vous pouvez choisir l’ordre de l’année,
du mois et du jour en appuyant sur la
touche MENU pendant que vous les
réglez.
5:45 PM ←→ 17:45
Page 73

Exemple: Mars 14, 2004
3M 14D 2004Y (Réglage initial)
↓
14D 3M 2004Y
↓
2004Y 3M 14D
Réglage du mois.
1 Appuyez sur la touche FF ou REW
4
pour régler le mois.
2 Appuyez sur la touche PLAY pour
accepter le choix.
Modifier l’heure/date
1
4
3
2
1
2
3
4
Réglage de la date.
1 Appuyez sur la touche FF ou REW
5
pour régler la date.
2 Appuyez sur la touche PLAY pour
accepter le choix.
..........................................................................
Remarque
Si la touche STOP est pressée pendant l’opération
de réglage, l’horloge utilisera les articles réglés à
ce point.
Maintenez la touche MENU
pressée 1 seconde au moins.
Le menu s’ouvre (☞ P.39).
Appuyez sur la touche FF ou REW
jusqu’à ce que “TIME&DATE”
clignote sur l’affichage.
Appuyez sur la touche PLAY.
Heure/date où l’écran apparaî t.
L’indication de l’heure clignote, indiquant
le début de la procédure de réglage de
l’heure/date.
Les étapes suivantes sont les mêmes que
celles commençant à l’étape 1 du chapitre
“Réglage de l’heure/date” (☞ P.12).
Appuyez sur la touche STOP pour
refermer le menu.
1
Réglage de l’heure/date (TIME&DATE)
13
Page 74

Insertion et éjection des cartes
Insertion d’une carte
1
Insertion et éjection des cartes
1
2
3
14
Faites glisser le couvercle du compartiment de
la carte dans la direction indiquée par la flèche.
1
Le couvercle du compartiment de la carte est déverrouillé
et le message “CARD COVER OPEN” s’affiche. Lorsque
ce message s’affiche, l’alimentation est coupée.
Présentez la carte de manière correcte et
introduisez-la dans la fente comme indiqué
2
sur l'illustration.
• Introduisez la carte en la maintenant droite.
• La carte s’arrê te avec un dé clic lorsqu'elle est
complètement enfoncée.
• L’introduction de la carte d’une mauvaise manière ou en
l’inclinant peut endommager la zone de contact ou coincer
la carte.
• Si la carte n’est pas complètement enfoncée, les données
pourraient ne pas s’y inscrire.
Fermez bien le couvercle du compartiment de
la carte.
3
La carte est complètement introduite dans la fente
L’enregistreur émet des bips* et le message “PLEASE WAIT”
clignote brièvement sur l'affichage.
La carte n’est pas complètement introduite
dans la fente
Lorsque le couvercle du compartiment de la carte est fermé, le
message “INSERT CARD” clignote brièvement sur l’affichage.
Lorsque l’enregistreur est dans cette situation, le fait d’appuyer
sur n’importe quelle touche déclenche des bips* et fait clignoter
à nouveau le message “INSERT CARD”.
* Lorsque les sons du système sont activés.
................................................................................................
Remarques
• Si une carte non formatée est introduite, l’enregistreur affiche
automatiquement le menu pour la formater (☞ P.37).
N’utilisez jamais d'autres cartes que celles formatées sur cet appareil ou
•
un appareil photo numérique Olympus de la série CAMEDIA ( ☞ P.37).
Page 75

Ejection de la carte
1
2
3
Faites glisser le couvercle du compartiment de
la carte dans la direction indiquée par la flèche.
1
Le couvercle du compartiment de la carte est
déverrouillé et le message “CARD COVER OPEN”
s’affiche. Lorsque ce message s’affiche, l’alimentation
est coupée.
Poussez la carte à fond pour la déverrouiller
et laisser-la sortir lentement.
2
La carte est légèrement éjectée puis s’arrête.
Tenez la carte droite et tirez-la.
3
................................................................................................
Remarque
Le fait de retirer brusquement le doigt après avoir complètement
enfoncé la carte peut la faire s’éjecter violemment hors de la fente.
1
Insertion et éjection des cartes
15
Page 76

b
a
c
f
e
d
Enregistrement
L’enregistreur possède cinq dossiers, A, B, C, D et E et chaque message enregistré dans un
dossier est sauvegardé comme fichier Digital Speech Standard (DSS) ou Windows Media Audio
(WMA). Vous pouvez utiliser ces cinq dossiers sélectivement pour différencier les types
d’enregistrements ; par exemple, vous pouvez utiliser le dossier A pour enregistrer des informations
d’ordre privé et le dossier B pour des informations professionnelles. Jusqu’à 199 messages sont
2
enregistrables par dossier.
Enregistrement
Microphone
intégré
2
3
Microphone
intégré
2
3
Appuyez sur la touche FOLDER
pour choisir un dossier.
1
Le nom du dossier s’affiche.
a Nombre total de fichiers enregistrés dans
le dossier
b Numéro du fichier actuel
c Dossier actuel
Appuyez sur la touche REC pour
démarrer l’enregistrement.
2
Le témoin d’enregistrement/lecture s’allume
en rouge. Dirigez le microphone vers la
source sonore.
Lorsque vous utilisez le microphone de la
télécommande pour enregistrer, le voyant et
le microphone de l’enregistreur s’éteignent.
d Mode d’enregistrement actuel
e Temps d’enregistrement
f Temps d’enregistrement restant
Appuyez sur la touche STOP pour
arrêter l’enregistrement.
3
1
16
Page 77

Remarques
• Un bip retentira quand le temps restant atteint 60
secondes, 30 secondes et 10 secondes pendant
l’enregistrement.
•“MEMORY FULL” ou “FOLDER FULL” s’affichent
lorsque la mémoire ou le fichier sont saturés.
Effacez les fichiers inutiles avant de continuer à
enregistrer (☞ P.28) ou transférez les fichiers
vocaux sur votre ordinateur à l’aide du logiciel
DSS Player (☞ P.49).
• Lorsque la durée d'enregistrement atteint la durée
maximale d'enregistrement par fichier dans les
modes HQ et LP, l'enregistreur arrê te
l'enregistrement et affiche “MAXIMUM REC
TIME”.
S’ il reste de la mé moire sur la carte,
l’enregistrement reprend en appuyant sur la
touche REC.
Fonctions d’enregistrement
Pause d’enregistrement
Pause
Appuyez sur la touche REC pendant
l’enregistrement.
➥ “REC PAUSE” clignotera sur l’affichage.
Reprise de l’enregistrement
Appuyez à nouveau sur la touche REC.
➥ L’enregistrement reprend à partir du
point d’interruption.
Remarque
L’enregistreur s’arrête d’enregistrer s’il est laissé
en pause 10 minutes ou plus.
2
Enregistrement
17
Page 78

Utilisation d’un VCVA (Variable Control Voice Actuator)
Quand le microphone perçoit que les sons ont atteint le niveau préréglé, le VCVA (Variable
Control Voice Actuator) intégré démarre automatiquement l’enregistrement , et s’arrête quand le
volume baisse.
Particulièrement utile pour l’enregistrement prolongé, le VCVA non seulement économise la
mémoire en coupant l’enregistrement pendant les périodes de silence, mais rend aussi
2
l’enregistrement plus efficace et commode.
Utilisation d’un VCVA (Variable Control Voice Actuator)
Maintenez la touche MENU pressée
1 seconde au moins.
1
Le menu s’ouvre (☞ P.39).
3,5
6
Appuyez sur la touche FF ou REW
jusqu’à ce que “VCVA” clignote sur
2
l’affichage.
2,4
Appuyez sur la touche PLAY.
La procédure de configuration VCVA
3
commence.
Appuyez sur FF ou REW pour choisir
ON ou OFF.
4
ON : Enregistrement dans le mode VCVA.
OFF : L’enregistrement se poursuit dans le
mode normal.
6
3,5
1
2,4
Appuyez sur la touche PLAY pour
fermer l’écran de configuration.
5
Appuyez sur la touche STOP pour
refermer le menu.
6
Lorsque ON est sélectionné, VCVA s’affiche
sur l’écran.
18
Page 79

Appuyez sur la touche REC pour
a
b
démarrer l’enregistrement.
7
Lorsque le volume est inférieur au niveau de
déclenchement préréglé, l’enregistrement
7
s’arrête automatiquement après 1 seconde
environ, et l’affichage “STANDBY” clignote sur
l’écran. Le témoin d’enregistrement/lecture
s’allume quand l’enregistrement démarre et
clignote en cas de pause d’enregistrement.
* Lorsque la télécommande est branchée, le témoin
REC de cette dernière s’allume mais le témoin
d’ enregistrement/lecture de l’enregistreur ne
s’allume pas en rouge.
2
Utilisation d’un VCVA (Variable Control Voice Actuator)
Ajustement du niveau
d’activation de démarrage/arrêt
Appuyez sur les touches FF ou REW pour
régler le niveau sonore de la pause
pendant l’enregistrement.
7
Vous pouvez régler le niveau de déclenchement
sur l’une des 15 valeurs disponibles. Plus la valeur
est élevée, plus la sensibilité sonore est élevée.
Si vous réglez le niveau de déclenchement sur la
valeur la plus élevée, un bruit infime suffira pour
activer l’enregistrement.
Le niveau de déclenchement VCVA peut être
ajusté en fonction des bruits de fond.
a Barre de volume d’enregistrement (change en fonction
du volume sonore pendant l’enregistrement)
b Niveau de démarrage (se déplace vers la gauche
ou vers la droite en fonction du niveau spécifié)
................................................................................................................
Remarques
• Le niveau d’activation de démarrage/arrêt varie aussi selon le mode de
sensibilité du microphone sélectionné (☞ P.21).
• Pour garantir de bons enregistrements, des enregistrements d’essai et
ajustement du niveau d’activation de démarrage/arrêt sont recommandés.
19
Page 80

Modes d’enregistrement (REC MODE)
Vous avez le choix entre trois modes d’enregistrement: mode HQ (haute qualité), mode SP
(lecture standard) et mode LP (lecture longue).
Si vous utilisez un microphone stéréo optionnel, vous ne pouvez enregistrer qu’en mode SHQ
(haute qualité stéréo).
2
Modes d’enregistrement (REC MODE)
2,4
3
2,4
5
5
Maintenez la touche MENU
pressée 1 seconde au moins.
1
“REC MODE” est affiché à l’écran
(☞ P.39).
Appuyez sur la touche PLAY.
Le processus de réglage du mode
2
d’enregistrement commence.
Appuyez sur les touches FF ou
REW pour choisir HQ, SP ou LP.
3
Appuyez sur la touche PLAY pour
fermer l’écran de configuration.
4
Appuyez sur la touche STOP pour
refermer le menu.
5
20
1
3
.......................................................................................................
Remarque
Choisissez le mode SHQ/HQ ou SP pour enregistrer des réunions ou
des conférences avec une grande netteté.
Page 81

Sensibilité du microphone
La sensibilité du microphone est ajustable en fonction des besoins d’enregistrement.
Avec le commutateur MICSENS, choisissez entre les
positions CONF et DICT.
CONF:
Mode haute sensibilité qui
enregistre les sons dans
toutes les directions.
2
Sensibilité du microphone
CONF
DICT
DICT: Mode basse sensibilité
adapté à la dictée.
................................................................................................
Remarques
• Si vous souhaitez enregistrer une dictée claire et intelligible,
passez au mode DICT et rapprochez (5 ou 10 cm) le microphone
interne du haut-parleur.
• Si le bruit ambiant (bruit de fond) est si fort qu’il est impossible
de réaliser un enregistrement clair, même dans le mode DICT,
nous vous conseillons d’utiliser un microphone unidirectionnel
ME12 (vendu séparément).
21
Page 82

Lecture
b
a
3
Lecture
3
1
5
3
2
4
5
2
4
Appuyez sur la touche FOLDER
pour choisir un dossier.
1
Appuyez sur la touche FF ou REW
pour choisir le fichier que vous
2
souhaitez lire.
Si vous maintenez la touche FF ou REW
pressée en mode d’arrêt, l’enregistreur
saute automatiquement au début des
fichiers.
Appuyez sur la touche PLAY pour
démarrer la lecture.
3
Le témoin d’ enregistrement/lecture
s’allume en vert.
a Temps de lecture actuel
b Temps d’enregistrement total du fichier
en cours de lecture
Appuyez sur les touches VOL (+)
ou VOL (–) pour choisir le volume
4
sonore qui convient.
L’affichage montre le niveau du volume.
Vous pouvez choisir de 0 à 30.
Appuyez sur la touche STOP au
point où vous souhaitez arrêter la
5
lecture.
Reprenez la lecture en appuyant à
nouveau sur la touche PLAY.
22
Page 83

Fonctions
Opération
Comment annuler
de lecture
Lecture
rapide
(F.PLAY)
Lecture au
ralenti
(S.PLAY)
Repérage
(CUE)
Revue
(REVIEW)
Saut au
début d’un
fichier*
*1: Tout comme en lecture normale, il est possible d’effectuer des opérations telles que l’arrêt de la lecture, le repérage de
fichier, et l’insertion de marque d’index (☞ P.31) en lecture rapide ou en lecture lente.
*2: Si vous maintenez la touche FF ou REW pressée en mode d’arrêt, l’enregistreur saute automatiquement au début des
fichiers (F.SKIP/B.SKIP).
*3: Si une marque index est rencontré e en route, la lecture commence à cette position.
Appuyez une fois sur la touche PLAY pendant la
lecture d’un fichier.*
1
➥ L’enregistreur lit environ 50% plus vite que la
vitesse normale.
Appuyez une fois sur la touche PLAY pendant la
lecture rapide.*
1
➥ L’enregistreur lit environ 25% plus lentement que
la vitesse normale.
Maintenez la touche FF pressée pendant la lecture
d’un fichier.
➥ L’enregistreur s’arrête quand il atteint la fin du fichier.
Continuez à appuyer sur la touche FF pour effectuer
le repérage à partir du début du fichier suivant.
Maintenez la touche REW pressée pendant la lecture
d’un fichier.
➥ L’enregistreur s’arrête quand il atteint le début du fichier.
Continuez à presser la touche REW pour passer au
repérage à partir de la fin du fichier précédent.
Appuyez sur la touche FF pendant la lecture, lecture
rapide ou lecture lente.*
2
➥ Le fichier suivant est repéré et la lecture démarre à
3
la vitesse d’origine.
Appuyez sur la touche REW pendant la lecture,
lecture rapide ou lecture lente.*
3
➥ Le fichier à lire est repéré et la lecture démarre à la
vitesse d’origine.
Appuyez 2 fois sur la touche PLAY
pendant la lecture rapide.
➥ La lecture revient à la vitesse
normale.
Appuyez une fois sur la touche
PLAY pendant la lecture au ralenti.
➥ La lecture revient à la vitesse
normale.
Relâchez la touche FF.
➥ Lecture à la vitesse d’origine.
Relâchez la touche REW.
➥ Lecture à la vitesse d’origine.
Remarques
• Si vous réglez la suppression du bruit sur “LOW” ou “HIGH”, vous ne pourrez pas utiliser les fonctions de
lecture rapide ni de lecture au ralenti.
• Dans le cas de fichiers WMA, seuls les fichiers enregistrés avec cet enregistreur ou les enregistreurs IC
Olympus peuvent être lus.
• La fonction de lecture rapide ou de lecture lente lit un fichier SHQ en mono.
3
Lecture
23
Page 84

Lecture
Utilisation d’un écouteur
3
Lecture
Vous pouvez écouter grâce à un écouteur
branché sur la prise de l’enregistreur. Si
vous avez branché une télécommande,
branchez l’écouteur sur la prise EAR de
cette dernière.
Lorsque l’écouteur est branché, le hautparleur est désactivé.
Remarques
• Lors de l’utilisation d’un écouteur pendant la
lecture, veillez à ne pas trop augmenter le volume
sonore. Vous pourriez être victime de troubles de
l’ audition ou d’une perte de sensibilité de
l’audition.
• Lorsque vous lisez un fichier sur l’enregistreur, le
son est diffusé des deux côtés même s’il s’agit
d’un enregistrement mono.
• Lorsque vous utilisez un haut-parleur externe ou
un écouteur à volume réglable, branchez le sur
la prise EAR de la télécommande. Si vous le
branchez directement sur la prise de
l’enregistreur, il se peut qu’il ne fonctionne pas.
Lorsque vous enregistrez du son avec un autre
appareil, branchez la prise EAR sur la
télécommande et la prise du microphone sur
l’autre appareil.
24
Page 85

Fonction de suppression du bruit
Si vous avez du mal à entendre le son enregistré en raison du bruit ambiant, ajustez le niveau
de réglage de la suppression du bruit. Le bruit sera réduit pendant la lecture du fichier, ce qui
donnera un son clair et intelligible.
Maintenez la touche MENU
pressée 1 seconde ou plus
1
pendant la lecture du fichier.
Le niveau actuel de la suppression du bruit
s’affiche.
Appuyez à nouveau sur la touche
MENU pour choisir le niveau de
1,2
2
suppression du bruit.
Les niveaux défilent dans l’ordre suivant :
“OFF”, “LOW”, “HIGH”.
Si l’affichage est déjà réglé sur Suppression
du bruit, commencez à l’étape 2.
Modifiez le niveau de suppression du bruit
dans les 2 secondes, sinon le niveau se règle
au niveau affiché et l’affichage revient à
l’écran d’origine.
.......................................................................................................
Remarques
• Si vous le réglez sur “LOW” ou “HIGH”, le niveau de suppression du
bruit clignote environ 2 secondes lors de la lecture d’un fichier.
• Si vous réglez la suppression du bruit sur “LOW” ou “HIGH”, le réglage
reste activé jusqu’à ce que vous le régliez sur “OFF”.
• Si vous réglez la Suppression du Bruit sur “LOW” ou “HIGH”, vous
ne pouvez pas utiliser les fonctions de lecture rapide et de lecture
lente.
• Si la suppression de bruit est activée pour un fichier en mode SHQ,
la lecture de ce fichier se fait en mono.
3
Fonction de suppression du bruit
25
Page 86

Lecture à répétition
Cette fonction vous permet de relire une partie du fichier en cours de lecture. Si elle est utilisée
avec la fonction de lecture en continu, vous pouvez lire de manière répétitive deux fichiers ou
davantage tant que ces derniers se trouvent dans le même dossier.
Choisissez le fichier que vous
souhaitez lire de manière répétitive
1
3
Lecture à répétition
1
1
et appuyez sur la touche PLAY.
La lecture débute.
Appuyez brièvement sur la touche
REPEAT pour spécifier le moment
2
du début de lecture à répétition.
“REPEAT END?” clignote jusqu’à ce que
vous ayez spécifié le moment de la fin de
la lecture à répétition.
Appuyez de nouveau brièvement
sur la touche REPEAT au moment
3
où vous souhaitez arrêter la lecture
à répétition.
L’enregistreur lit de manière répétitive la
section comprise entre les positions de
début et de fin jusqu’à ce que vous
annuliez la lecture à répétition.
Si la lecture en continu est réglée sur ON,
la position finale peut être réglée sur la fin
du dernier fichier du dossier.
26
2,3
Page 87

4
Appuyez sur la touche STOP.
La lecture à répétition est annulée.
4
Vous pouvez utiliser les fonctions de lecture rapide et de lecture
lente, insérer et détruire des marques d’index et utiliser la
fonction de suppression de bruit.
.......................................................................................................
Remarques
• Si vous ne spécifiez pas de position finale, la fin du fichier est
considérée automatiquement comme telle. Si le mode de lecture en
continu est réglé sur “ON”, la fin du dernier fichier du dossier est
considéré e comme la position finale et la lecture à répétition
commence.
• Si vous dépassez les positions de début ou de fin en appuyant sur
les boutons REW ou FF, la lecture à répétition est annulée.
• Pour utiliser cette fonction, appuyez brièvement sur la touche
REPEAT. Si vous la maintenez enfoncée 1 seconde ou davantage,
l’écran Déplacement de Fichiers apparaît.
4
3
Lecture à répétition
27
Page 88

a
Effacement
Effacement d’un fichier à la fois
Un fichier sélectionné peut être effacé d’un dossier.
1
2
4
Effacement
2
3
4
2
“ERASE DONE” s’affiche lorsque le fichier a
1
été effacé. Les numéros de fichiers seront
réaffectés automatiquement.
3,4
Appuyez sur la touche FOLDER
pour choisir un dossier.
Appuyez sur la touche FF ou REW
pour choisir le fichier à effacer.
a Fichier à effacer
Appuyez sur la touche ERASE.
“FILE ERASE?” clignote environ 8
secondes sur l’affichage.
Appuyez encore une fois sur la
touche ERASE lorsque “FILE
ERASE?” clignote.
L’affichage passe à “FILE ERASE!” et
l’effacement commence.
{
28
Page 89

a
Effacement de tous les fichiers d’un dossier
Tous les fichiers d’un dossier peuvent être effacés simultanément, sauf les fichiers verrouillés
(☞ P.30).
Appuyez sur la touche FOLDER
pour choisir le dossier dont vous
1
souhaitez effacer tous les fichiers.
a Dossier dont les fichiers doivent être
effacés
Appuyez au moins 3 secondes sur
la touche ERASE.
2
“ALL ERASE?” clignote sur l’affichage
pendant environ 8 secondes.
4
Effacement
1
.................................................................................................................................................................
Remarques
• Un fichier effacé ne peut pas être rétabli.
• Si vous n’appuyez pas sur la touche ERASE dans les 8 secondes à compter du clignotement de “FILE
ERASE?” ou “ALL ERASE?”, l’enregistreur revient au mode Arrêt.
• L’effacement peut prendre jusqu’à 10 secondes. Ne faites rien de ce qui suit pendant cette période. Sinon
vous pourriez endommager les données ou la carte.
-Enlever la batterie.
-Brancher/débrancher l’adaptateur secteur (que l’enregistreur soit alimenté ou non).
-Ouvrir le couvercle du compartiment de la carte.
2,3
Appuyez encore une fois sur la
touche ERASE lorsque “ALL
3
ERASE?” clignote.
L’affichage passe à “ALL ERASE!” et
l’effacement commence.
“ERASE DONE” s’affiche à l’effacement des
fichiers. Des numéros sont réassignés aux
fichiers verrouillés en ordre ascendant.
{
29
Page 90

Verrouillage de fichiers (LOCK)
Le verrouillage d’un fichier empêche l’effacement accidentel des données importantes.
Les fichiers verrouillés ne sont pas effacés quand vous décidez d’effacer tous les fichiers d’un
dossier (☞ P.29).
Appuyez sur la touche FOLDER
pour choisir un fichier.
1
Appuyez sur la touche FF ou REW
pour choisir le fichier que vous
5,7
4
Verrouillage de fichiers (LOCK)
2,4,6
5,7
3
1
8
8
2,4,6
2
souhaitez verrouiller.
Maintenez la touche MENU
pressée 1 seconde au moins.
3
Le menu s’ouvre (☞ P.39).
Appuyez sur la touche FF ou REW
jusqu’à ce que “LOCK” clignote
4
sur l’affichage.
Appuyez sur la touche PLAY.
Le réglage de verrouillage du fichier
5
commence.
Appuyez sur la touche FF ou REW
pour choisir entre ON et OFF.
6
ON : Verrouille le fichier et évite son
effacement.
OFF: Déverrouille le fichier et permet son
effacement.
Appuyez sur la touche PLAY pour
fermer l’écran de configuration.
7
Appuyez sur la touche STOP pour
refermer le menu.
8
30
Page 91

Marques index
Des marques index peuvent être incorporées dans un fichier pendant l’enregistrement ou la
lecture pour faciliter la localisation d’une information intéressante.
Réglage d’une marque index
Appuyez sur la touche INDEX pendant
l’enregistrement ou la lecture pour
1
poser une marque index.
Un numéro d’index s’affiche à l’écran.
2
Repérage d’une marque index
1
4
Maintenez la touche FF ou REW pressée
pendant la lecture du fichier.
2
L’enregistreur s’arrête 1 seconde lorsqu’il arrive
à une marque index.
Effacement d’une marque index
Repérez la marque index que vous
souhaitez effacer.
3
Appuyez environ 2 secondes sur la
touche ERASE pendant l’affichage du
4
numéro d’index.
La marque index est effacée.
4
Marques index
.....................................................................................................................
Remarques
• Jusqu’à 16 marques index peuvent être posées dans un fichier. “INDEX
FULL” s’affichera si vous essayez d’entrer plus de marques index.
• Des marques index ne peuvent pas être posées ou effacées dans un
fichier verrouillé (☞ P.30).
• Dans le cas des fichiers WMA, vous ne pouvez appliquer des marques
d’index qu’à des fichiers enregistrés avec des enregistreurs Olympus.
31
Page 92

Fonction de lecture d’alarme (ALARM)
La fonction de lecture d’alarme peut être réglée pour lire un fichier sélectionné à une heure
préréglée.
Appuyez sur le bouton FOLDER
pour choisir un dossier.
1
5,7
2,4,6
4
Fonction de lecture d
Appuyez sur la touche FF ou REW
pour choisir le fichier à lire quand
2
une tonalité d’alarme retentit.
Maintenez la touche MENU
pressée 1 seconde au moins.
3
Le menu s’ouvre (☞ P.39).
Appuyez sur la touche FF ou REW
jusqu’à ce que “ALARM” clignote
4
sur l’affichage.
’alarme (ALARM)
5,7
3
1
32
5
2,4,6
6
7
Appuyez sur la touche PLAY.
Le réglage de la lecture d’ alarme
commence.
Appuyez sur la touche FF ou REW
pour choisir entre ON et OFF.
ON : Valide la lecture d’alarme.
OFF: Invalide la lecture d’alarme.
Appuyez sur la touche PLAY pour
terminer la procédure de réglage.
Lorsque vous choisissez ON,
l’indicateur des heures clignote.
Lorsque vous choisissez OFF,
l’indicateur d’alarme disparaît et finit
avec l’étape 12.
Page 93

Appuyez sur la touche FF ou
REW pour régler les heures.
8
9,11
12
8,10
12
9,11
8,10
.............................................................................................................................................................................
Remarques
• La fonction lecture d’alarme peut être réglée seulement pour un fichier à la fois.
• L’alarme retentira à l’heure programmée chaque jour, à moins que le réglage de lecture d’alarme soit effacé.
•
Si vous souhaitez utiliser un autre fichier d’alarme, réglez tout d’abord l’alarme sur “OFF”, puis modifiez les réglages de l’alarme.
• Si vous utilisez l’enregistreur au moment de l’heure que vous avez programmée, l’alarme se déclenchera après la fin
de l’opération.
• Si vous utilisez l’enregistreur à l’heure programmée, l’alarme retentira par la suite.
• L’alarme retentira à l’heure programmée même si l’enregistreur est réglé à HOLD. Il commencera à lire le fichier
associé à l’alarme à la pression d’une touche quelconque.
• Le réglage de lecture d’alarme est effacé si vous effacez le fichier sélectionné.
Appuyez sur la touche PLAY pour
accepter les heures.
9
L’indicateur des minutes clignote.
Appuyez sur la touche FF ou
REW pour régler les minutes.
10
Appuyez sur la touche PLAY pour
accepter les minutes.
11
Appuyez sur la touche STOP
pour refermer le menu.
12
Une tonalité d’alarme retentira à l’heure programmée.
Appuyez sur une touche quelconque pendant le
retentissement de l’alarme pour lire le fichier que vous avez
associé à l’alarme.
Pour activer uniquement l’alarme sonore
Pour activer uniquement l’alarme sonore à l’heure programmée,
réglez le nombre de fichiers du dossier sélectionné sur 0.
• Commencez les réglages à partir de l’étape 3 (☞ P.32) de “Fonction
de lecture d’alarme”.
• Lorsque l’alarme se déclenche à l’heure programmée, il suffit
d’appuyer sur n’importe quelle touche pour l’arrêter.
4
Fonction de lecture d
’alarme (ALARM)
33
Page 94

Informations de l’écran ACL
L’écran ACL de l’enregistreur peut afficher 6 formats différents d’informations en appuyant sur la
touche DISPLAY. Si vous appuyez sur la touche DISPLAY pendant l’arrêt ou la lecture, l’écran
ACL change et vous pouvez confirmer les informations du fichier ainsi que les différents réglages
de l’enregistreur.
Appuyez sur la touche DISPLAY.
1
L’affichage de l’écran ACL change chaque fois que vous
1
appuyez sur la touche DISPLAY.
4
Informations de l
1 Longueur de fichier
Indique la longueur du fichier.
’écran
ACL
2 Horodateur
Indique l’année, le mois et la
date d’enregistrement du
fichier.
3 Horodateur
Indique l’heure d’enregistrement
du fichier.
* Si le commentaire comprend un grand nombre de caractères, il défile horizontalement de façon à être
affiché en entier.
34
L’appareil répète le cycle de 1 à 6. S’il n’y a pas de fichier,
5 et 6 s’affichent alternativement.
6 Heure et date actuelles
Affiche l’heure et la date
}
{
{
{
{
{
actuelles. (Lors de la lecture,
“TIME & DATE” ou le compteur
s’affichent.)
5 Mémoire libre
Affiche la durée d’enregistrement
disponible.
4 Commentaire de fichier*
Affiche les commentaires
ajoutés à un fichier. (S’il n’y a
pas de commentaire, “----”
s’affiche.)
Pendant l’arrêt ou la lecture
Page 95

Lors du mode d’enregistrement
Affiche alternativement 1 et 2.
1 Barre de volume du niveau d’enregistrement
Affiche graphiquement le niveau sonore d’enregistrement et la durée
d’enregistrement disponible sous la forme d’un compte à rebours.
2 Barres de mémoire libre
Affiche la durée d’enregistrement disponible sous forme d’un graphique à barres
et un compte à rebours.
4
Informations de l
’écran
Lors d’un enregistrement en mode VCVA
Affiche alternativement 1 et 2.
1 Barre de volume de niveau d’enregistrement VCVA
Affiche graphiquement le début et le niveau sonore d’enregistrement et la durée
d’enregistrement disponible sous la forme d’un compte à rebours. (“STANDBY”
s’affiche si le niveau d’activation du VCVA n’est pas atteint.)
2 Barres de mémoire libre
Affiche la durée d’enregistrement disponible sous forme d’un graphique à barres
et un compte à rebours.
ACL
35
Page 96

Maintien
Réglage du commutateur HOLD à la position
HOLD.
Si vous réglez l’enregistreur dans la position HOLD
en faisant glisser la touche HOLD dans le sens de
la flèche, les réglages actuels sont conservés et
toutes les touches et commutateurs sont désactivés,
sauf la touche HOLD. Cette caractéristique est utile
quand l’enregistreur doit être transporté dans un sac
ou une poche.
N’oubliez pas de régler le commutateur HOLD
4
Maintien
Etat de marche en fonction du réglage de HOLD
1: Etat de l’enregistreur, 2: HOLD sur l’enregistreur, 3: HOLD sur la télécommande, 4: Action sur
les touches de l’enregistreur, 5: Action sur les touches de la télécommande
1
Arrêt
Marche
*1: Si vous appuyez sur n’importe quelle touche, l’ affichage de l’horloge clignote pendant 2 secondes mais l’enregistreur ne
démarre pas.
*2: L’enregistreur s’arrête lorsque la lecture est finie ou lorsque l’enregistrement s’arrête faute de mémoire libre.
Remarque
L’alarme retentira à l’heure programmée même si l’enregistreur est réglé à HOLD. Il commencera à lire le
fichier associé à l’alarme à la pression d’une touche quelconque.
36
2
Marche
Marche
Arrêt
Marche
Marche
Arrêt
3
Pas
connecté
Arrêt
Marche
Pas
connecté
Arrêt
Marche
L’affichage disparaît après que heure et
date ait clignoté pendant 2 secondes.*
L’affichage disparaît après que heure et
date ait clignoté pendant 2 secondes.*
Action normale
Si HOLD est appliqué pendant la lecture
(l’enregistrement), l’action est annulée
tout en laissant l’état de lecture
(enregistrement) inchangé.*
Si HOLD est appliqué pendant la lecture
(l’enregistrement), l’action est annulée
tout en laissant l’état de lecture
(enregistrement) inchangé.*
Action normale
pour réutiliser l’enregistreur.
4
1
Action normale. Si l’enregistreur s’arrête
1
après une action sur une touche, l’affichage
disparaît 20 secondes plus tard.
Une action à partir d’une touche de la
télécommande n’est pas autorisée.
2
Action normale. Si l’enregistreur s’arrête
après une action sur une touche, l’affichage
2
disparaît 20 secondes plus tard.
Une action à partir d’une touche de la
télécommande n’est pas autorisée.
Cependant, le témoin REC s’allume
lorsque l’appareil enregistre.
5
Page 97

Formatage de la carte (FORMAT)
Les cartes qui ont été utilisées sur des dispositifs non-Olympus ou qui ne peuvent être reconnues
par l'enregistreur doivent être formatée avant de pouvoir être utilisées avec l'enregistreur. La xDPicture Card fournie avec l'enregitreur est préformatée et prête à l'usage. Pour vous familiariser
avec le formatage, lisez les étapes suivantes.
Maintenez la touche MENU
pressée 1 seconde au moins.
1
Le menu s’ouvre (☞ P.39).
3,5
Appuyez sur la touche FF ou REW
jusqu’à ce que “FORMAT” clignote
2
sur l’affichage.
2,4,6
Appuyez sur la touche PLAY.
Le formatage est sélectionné.
3
Appuyez sur la touche FF ou REW
pour choisir “START”.
4
4
Formatage de la carte (FORMAT)
1
3,5
5
2,4,6
6
Appuyez sur la touche PLAY.
“DATA WILL BE CLEARED” (Données
effacées) s’affiche pendant environ 2
secondes.
Appuyez de nouveau sur les
touches FF ou REW pour choisir
“START”.
37
Page 98

Formatage de la carte (FORMAT)
7
4
Formatage de la carte (FORMAT)
7
Appuyez à nouveau sur la touche
PLAY.
7
Le formatage commence et l’indicateur
clignote sur l’affichage.
{
“FORMAT DONE” s’affiche à la fin du formatage.
.......................................................................................................
Remarques
• Le formatage peut prendre jusqu’à 1minute. Ne faites rien de ce qui
suit pendant cette période. Sinon vous pourriez endommager les
données ou la carte.
-Enlever la batterie.
-Brancher/débrancher l’adaptateur secteur (que l’enregistreur soit
alimenté ou non).
-Ouvrir le couvercle du compartiment de la carte.
• Lorsque l’enregistreur est formaté, toutes les données stockées, y
compris les fichiers protégés, sont effacées.
• Si vous introduisez une carte non formatée, l’enregistreur affiche
automatiquement le menu pour la formater.
38
Page 99

Liste de menus
Maintenez la touche MENU pressée 1 seconde au moins.
REC MODE
LOCK
BACK SPACE
ALL PLAY
TIME&DATE
FORMAT
CONTRAST
BEEP
BACKLIGHT
EXT.INPUT
COMMENT
FOLDER NAME
ALARM
VCVA
Sélection du mode HQ, SP ou LP (☞P.20).
Réglage des fichiers verrouillé s (☞P.30).
Sélection entre ON (activé) et OFF (désactivé).
Réglage de BACK SPACE. Sélection entre
OFF, 1 SEC SKIP et 2 SEC SKIP.
Réglage de lecture continue. Sélection entre ON
(activé) et OFF (désactivé).
Réglage de l’heure/date. Dans l’ordre des
heures, minutes, année, mois et jour (☞P.12).
Formatage de l’enregistreur (☞P.37).
Ajustement du contraste de l’écran ACL.
Ajustement du niveau de 1 à 12.
Réglage des avertissements sonores.
Sélection entre ON (activé) et OFF.
Réglage du rétroéclairage. Sélection entre ON
(activé) et OFF (désactivé).
Réglage de EXT.INPUT. Sélection entre AUTO
SELECT, STEREO INPUT et MONAURAL
INPUT.
Assignation d’un commentaire de fichier.
Assignation d’un nom de dossier.
Réglage de lecture d’alarme (☞P.32). Sélection
entre ON (activé) et OFF (désactivé).
Réglage VCVA (☞P.18). Commutation entre
ON (activé) et OFF (désactivé).
Appuyez sur la
touche FF ou REW.
Remarques
• Si vous appuyez sur la touche
STOP ou sur la touche REC
pendant une opération de
réglage de menu, l’enregistreur
s’arrêtera et les articles réglés
à ce point seront appliqués.
• L’enregistreur s’arrêtera si vous
le laissez inactif pendant 3
minutes pendant une opération
de réglage de menu, quand un
article sélectionné n’est pas
appliqué.
4
Liste de menus
39
Page 100

Utilisation du logiciel DSS Player
La connexion de l’enregistreur à votre PC vous permettra d’utiliser le logiciel DSS Player aux
fins suivantes :
• Faire des copies des fichiers audio de l’enregistreur sur votre ordinateur, et transférer par la
suite les fichiers de votre ordinateur vers l’enregistreur.
Précautions à prendre lorsque vous utilisez l’enregistreur
connecté à un ordinateur
● Lorsque vous téléchargez un fichier
depuis/vers l’enregistreur, ne
débranchez pas le câble USB même si
l’écran vous indique que vous le
5
pouvez. Les données sont en cours de
transfert tant que le voyant de lecture/
Utilisation du logiciel DSS Player
enregistrement clignote. Si vous
débranchez le câble USB avant que la
mémoire n’ait fini, les données risquent
de ne pas avoir ét é transfé r é es
correctement.
● Ne formatez pas une carte avec votre PC.
Sinon l’enregistreur ne pourra pas la
reconnaître. Formatez les cartes
uniquement soit avec l’enregistreur soit
avec l’appareil photo numérique
CAMEDIA Olympus (☞ P.37).
●
Les noms de dossiers (répertoires)
affichés par des gestionnaires de
fichiers tels qu’Explorer, fourni avec
Microsoft Windows, et Finder, fourni
avec Mac OS, sont différents des noms
de dossiers réglables avec l’enregistreur
ou le DSS Player.
40
● Si vous déplacez ou renommez les
dossiers ou les fichiers de l’enregistreur
en utilisant un utilitaire de gestion de
fichiers tel que Explorateur ou Finder,
l’ordre des fichiers peut s’en trouvé
modifié ou les fichiers peuvent ne plus
être reconnus.
● Veuillez remarquer que des données
peuvent être écrites et lues sur
l’enregistreur même si l’attribut de la
mémoire de l’enregistreur est réglé sur
lecture seule lors d’un travail sur
ordinateur.
● Pour éviter les effets indésirables dus au
bruit sur des équipements électroniques
situés à proximité de l’enregistreur,
débranchez l’écouteur et la
télécommande lorsque vous connectez
l’enregistreur à un ordinateur.
 Loading...