

Page 1
DIGITAL VOICE
RECORDER
DS-20
INSTRUCTIONS
EN
RU
CN
TW
Thank you for purchasing an Olympus
Digital Voice Recorder.
Please read these instructions for information
about using the product correctly and safely.
Keep the instructions handy for future reference.
To ensure successful recordings, we
recommend that you test the record function
and volume before use.
E
N
Page 2

Table of Contents
Table of Contents ...................................... 2
Safe and Proper Usage ............................. 4
General Precautions .................................. 5
1 Getting Started
Main Features ............................................ 6
Identification of Parts ................................. 9
Inserting Batteries ................................... 11
Hold ..........................................................12
Setting Time/Date (TIME&DATE) ............ 13
2 Menu Setting
Menu List ................................................. 15
3 About Recording
Recording ................................................ 17
Recording Modes (REC MODE) ............. 19
Using the Variable Control
Voice Actuator (VCVA) ...................... 20
Microphone Sensitivity (MIC SENSE) ..... 22
4 About Playback
Playing ..................................................... 23
Repeat Playback ..................................... 28
Noise Cancel Function ............................ 30
5 Other functions
Erasing ..................................................... 31
Index Marks ............................................. 35
LCD Display Information ......................... 37
Formatting the Recorder (FORMAT)....... 39
6 Preparation Before Using
DSS Player
Using DSS Player Software .................... 41
Operating Environment ........................... 42
Installing Software ................................... 43
Using Online Help ................................... 45
Connecting to Your PC ............................ 46
Running DSS Player ............................... 50
2
Page 3

7 DSS Player Expanded
Functions
1
Upgrade Function .................................... 51
8 Other Practical Use Methods
Using as External Memory
of the Computer ................................ 53
9 Other Information
Alarm Message List .................................54
Troubleshooting .......................................56
Accessories (optional) ............................. 58
Specifications .......................................... 59
Technical Assistance and Support .......... 60
2
3
4
5
6
7
8
9
10
3
Page 4

Safe and Proper Usage
Before using your new recorder, read this
manual carefully to ensure that you know
how to operate it safely and correctly.
Keep this manual in an easily accessible
location for future reference.
• The warning symbols indicate important safety
related information. To protect yourself and
others from personal injury or damage to
property, it is essential that you always read the
warnings and information provided.
Using the Online
Manual
When you install the DSS Player on your PC
from the CD-ROM, you can use an online
expanded version of this instruction manual,
allowing you to learn more about the digital
voice recorder.
If the DSS Player is installed, click on the
[Start] button, select [All Programs], then
[OLYMPUS DSS Player], then click on [DS20 ONLINE INSTRUCTIONS]. You can read
more about the items listed below.
Power Supply .............................................. 12
Menu Setting Method .................................. 16
Recording from External Microphone
or Other Devices ................................... 26
Timer Recording (TIMER REC) .................. 28
Listening While Audio is Recorded
(Recording Monitor) .............................. 32
Changing the Playback Speed
(PLAY SPEED) ..................................... 39
Continuous Playback (ALL PLAY) .............. 41
Auto Backspace review
(BACK SPACE)..................................... 44
Skip Interval Setting (SKIP SPACE) ........... 45
Alarm Playback Function (ALARM) ............ 48
Locking Files (LOCK) .................................. 55
LCD Contrast Adjustment
(CONTRAST) ........................................ 58
Backlight (BACKLIGHT) .............................. 59
System Sounds (BEEP) .............................. 60
Assigning Folder Names
(FOLDER NAME) ................................. 61
Assigning File Comments
(COMMENT) ......................................... 64
Moving Files Across Folders ....................... 65
Uninstalling Software .................................. 74
Window Names (DSS Player) ..................... 81
Download Voice Files
from the Recorder ................................. 82
Play a Voice File .......................................... 84
Upload Voice Files to the Recorder ............ 85
Send Voice Files with E-mail....................... 87
Changing User ID ........................................ 87
Changing a Folder Name ............................ 88
Editing File Comments ................................ 88
Editing a Template ....................................... 89
USB Microphone/USB Speaker .................. 90
Joining Files ................................................. 94
Splitting Files ............................................... 96
Menu Setting of this Recorder .................... 98
Changing the USB Class
(USB CLASS) ....................................... 99
4
Page 5
General Precautions
● Do not leave the recorder in hot,
humid locations such as inside a
closed automobile under direct
sunlight or on the beach in the
summer.
● Do not store the recorder in places
exposed to excessive moisture or
dust.
● Do not use organic solvents such as
alcohol and lacquer thinner to clean
the unit.
● Do not place the recorder on top of
or near electric appliances such as
TVs or refrigerators.
● Avoid recording or playing back near
cellular phones or other wireless
equipment, as they may cause
interference and noise. If you
experience noise, move to another
place, or move the recorder further
away from such equipment.
● Avoid sand or dirt. These can cause
irreparable damage.
● Avoid strong vibrations or shocks.
● Do not disassemble, repair or modify
the unit yourself.
● Do not operate the unit while
operating a vehicle (such as a
bicycle, motorcycle, or go-cart).
● Keep the unit out of the reach of
children.
<Warning regarding data loss>
Recorded content in memory may be
destroyed or erased by operating
mistakes, unit malfunction, or during
repair work.
It is recommended to back up and save
important content to other media such as
a computer hard disk.
Batteries
Warning
• Batteries should never be exposed to
flame, heated, short-circuited or
disassembled.
• Do not attempt to recharge alkaline,
lithium or any other non-rechargeable
batteries.
• Never use any battery with a torn or
cracked outer cover.
• Keep batteries out of the reach of
children.
• If you notice anything unusual when
using this product such as abnormal
noise, heat, smoke, or a burning odor:
1 remove the batteries immediately
while being careful not to burn
yourself, and;
2 call your dealer or local Olympus
representative for service.
5
Page 6
1 Getting Started
Main Features
1
Main Features
This product is equipped with the following
features.
● Connect the cradle and the USB
connection cable to this recorder, and high
speed data transfer to a computer can be
performed. (☞ P.46)
● This recorder can also be utilized as
external memory of a computer. (☞ P.53)
• By connecting the computer with the USB,
pictures, text data, etc. can be saved, and
utilized to carry data.
● It has a large backlight full-dot display
(LCD display screen).
• The screen displays information about
recorded voice files and easily understood
operational messages.
● The recorder stores highly compressed
DSS and WMA format voice messages in
internal flash memory.*
1
● By using the built-in stereo microphone, 2
types of stereo recording modes, which
are Stereo HQ (stereo high quality sound
recording) and Stereo SP (stereo standard
recording) and 3 types of monaural
recording modes, which are HQ (high
quality sound recording), SP (standard
recording), and LP (long-term recording)
can be selected.*1(☞ P.19)
Recording time
STEREO HQ mode : 2 hours 10 minutes
STEREO SP mode : 4 hours 20 minutes
HQ mode : 8 hours 45 minutes
SP mode : 20 hours 55 minutes
LP mode : 44 hours 45 minutes
• Available recording time for one continuous
file. Available recording time may be shorter if
many short recordings are made. (The
displayed available recording time and
recorded time are approximate indications.)
● You may assign your own names to
folders.
6
Page 7

● The five folders can hold 199 files each,
for the maximum of 995 recordings.
(☞ P.17)
● It has a built-in Variable Control Voice
Actuator (VCVA) function. (☞ P.20)
● A timer recording function is built-in, which
can record at a set time.
● You can input file comments.*
• You can add comments of up to 100 characters
to each recorded file.
• This recorder has 10 pre-set comment
templates.
2
● The recorder has a Noise Cancel Function.*
(☞ P.30)
• Ruwisch & Kollegen GmbH Noise Suppression
Technology reduces noise in files and enables
clear sound playback.
● Recorded files may be moved from one
folder to another.
● You can insert or delete index marks. *
(☞ P.35)
• If you insert index marks during recording or
playback, you will later be able to quickly find
the recording you want to hear.
● The playback speed can be controlled as
preferred.
● Fast forward and rewind are possible at a
set interval.
● Comes with DSS Player software. (☞ P.41)
• If you transfer voice files recorded with the
recorder to a PC, you can easily play back,
organize, and edit the files.
• If you connect the recorder to a computer, you
can use it as a USB microphone or USB
speaker.
● The “DSS Player” can be upgraded to a
2
“DSS Player Plus”, which is equipped with
a enhanced functionality (Option). (☞ P.51)
• In addition to the “DSS Player” functions,
joining and splitting of the files and configuring
the menu settings of this recorder, etc. can be
performed.
2
Plus
The “DSS Player” can be upgraded
to “DSS Player Plus”, which is
equipped with enhanced functionality
(paid option). (☞P.51)
1
Main Features
7
Page 8
Main Features
*1: DSS format in SP and LP mode recording, and
1
WMA format in stereo HQ and stereo SP and
HQ mode recording.
Main Features
*2: For WMA files, these functions are only
available for files recorded with this recorder
or the IC recorders from Olympus.
IBM and PC/AT are the trademarks or registered
trademarks of International Business Machines
Corporation.
Microsoft, Windows and Windows Media are
registered trademarks of Microsoft Corporation.
Intel and Pentium are registered trademarks of Intel
Corporation.
CORTOLOGIC is a registered trademark of
Ruwisch & Kollegen GmbH.
Other product and brand names mentioned herein
may be the trademarks or registered trademarks
of their respective owners.
8
Page 9
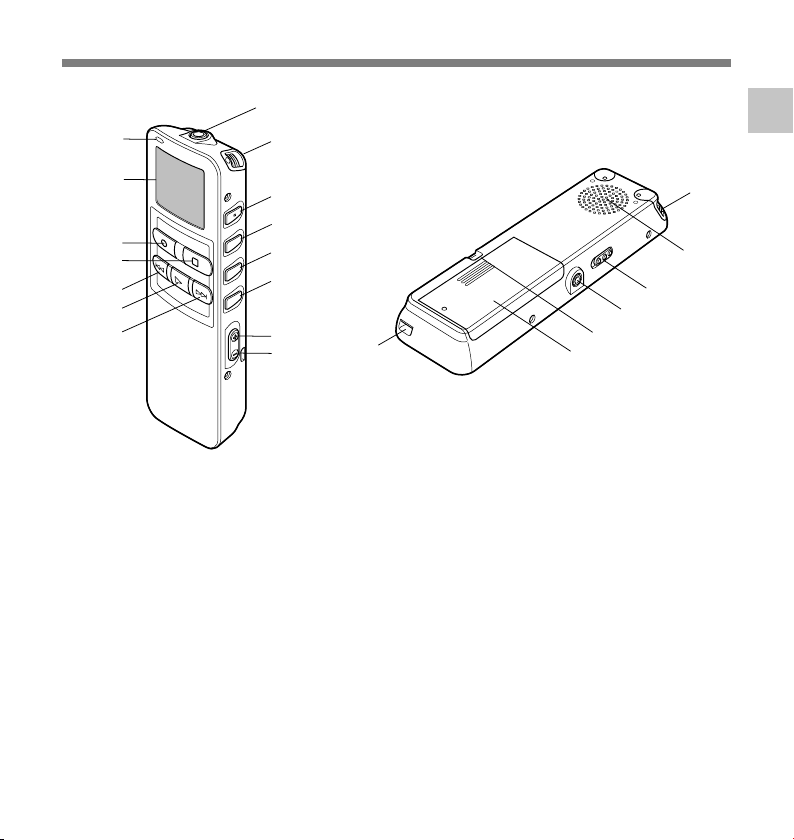
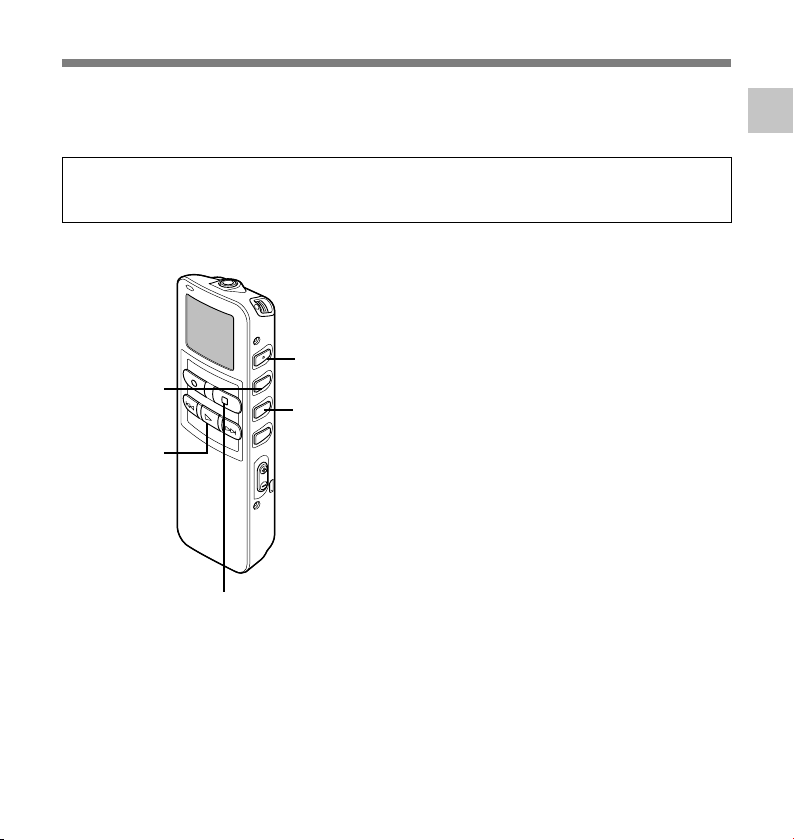
Identification of Parts
1
%
$
#
@
!
0
9
1 MIC (Microphone) jack
2 Built-in stereo microphone
3 INDEX/2 button
4 DISPLAY/MENU/SET button
5 FOLDER/REPEAT/3 button
6 ERASE button
7 VOL (+) button
8 VOL (–) button
9 FF (Fast Forward) button
0 PLAY button
! REW (Rewind) button
2
3
4
5
6
7
8
-
@ STOP button
# REC (Record) button
$ Display (LCD panel)
% Record/Play indicator lamp
^ Built-in speaker
& HOLD switch
* EAR (Earphone) jack
( Strap Hole
) Battery cover
- Cradle attachment point/PC (USB)
terminal
(
)
1
Identification of Parts
2
^
&
*
9
Page 10
Identification of Parts
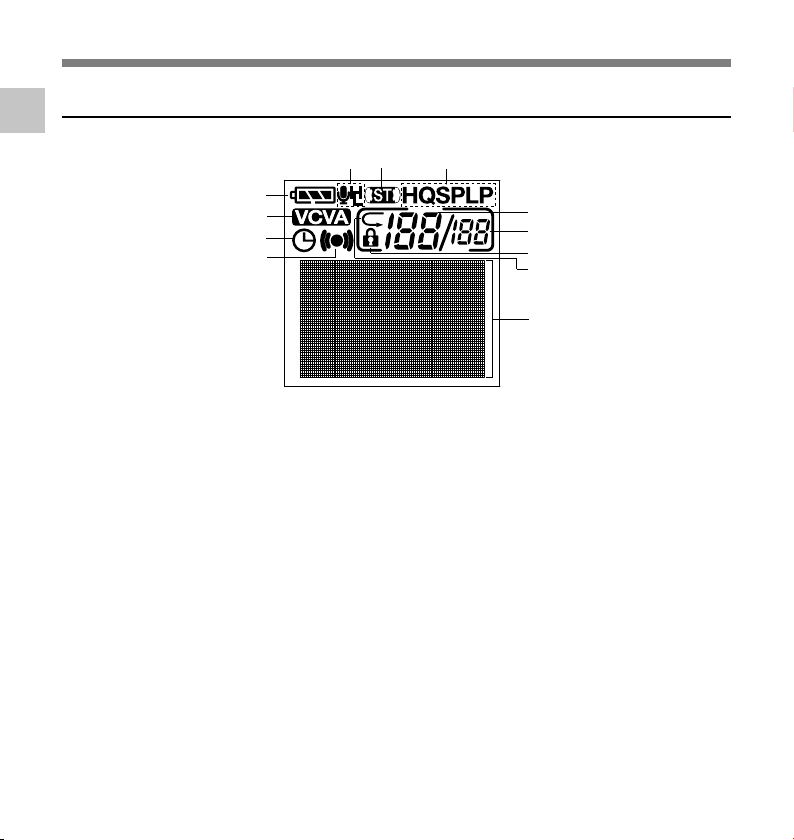
Display (LCD Panel)
1
Identification of Parts
6 7
5
1
2
3
4
1 Battery indicator
2 VCVA (Variable Control Voice Actuator)
indicator
3 Timer recording display
4 Alarm indicator
5 Microphone sensitivity display
6 Stereo display
7 Record mode indicator
8 Current file number
9 Total number of recorded files in the folder
0 Erase lock indicator
! Repeat play indicator
@ Character Information display
8
9
0
!
@
10
Page 11
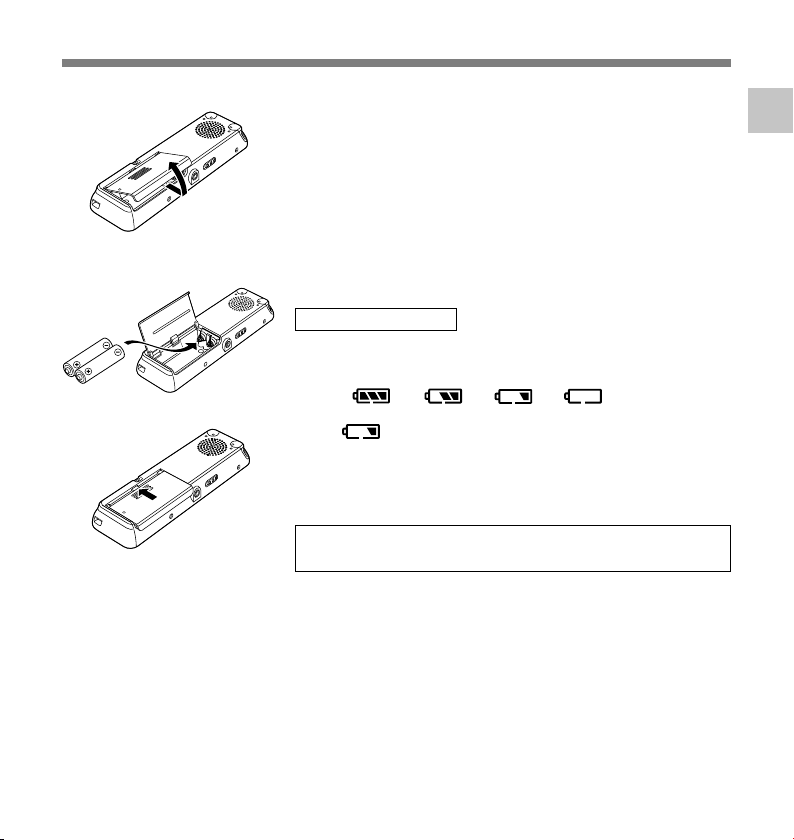
Inserting Batteries
Lightly press down on the arrow and slide the
battery cover open.
1
1
Insert two AAA alkaline batteries, observing the
correct polarity.
2
Close the battery cover completely.
3
2
Replacing batteries
The battery indicator on the display changes as the batteries
lose power.
➜ ➜ ➜
When appears on the display, replace the batteries as
3
....................................................................................................................................................
Notes
• Be sure to stop the recorder before replacing the batteries. Unloading the batteries while the recorder is
in use may corrupt the file. If you are recording into a file and the batteries run out, you will lose your
currently recorded file because the file header will not be able to close. It is crucial to change the batteries
once you see only one Hash mark in the battery icon.
• Be sure to replace both batteries at the same time.
• Never mix old and new batteries, or batteries of different types and/or brands.
• If it takes longer than 1 minute to replace dead batteries, you may have to reset the time when you load
fresh batteries (☞ P.13).
• Remove the batteries if you are not going to use the recorder for an extended period of time.
soon as possible.
When the batteries are too weak, the recorder shuts down
and “BATTERY LOW” appears on the display. AAA alkaline
batteries are recommended.
An optional Ni-MH Rechargeable Battery from Olympus
can be used for the recorder (☞ P.58).
1
Inserting Batteries
11
Page 12
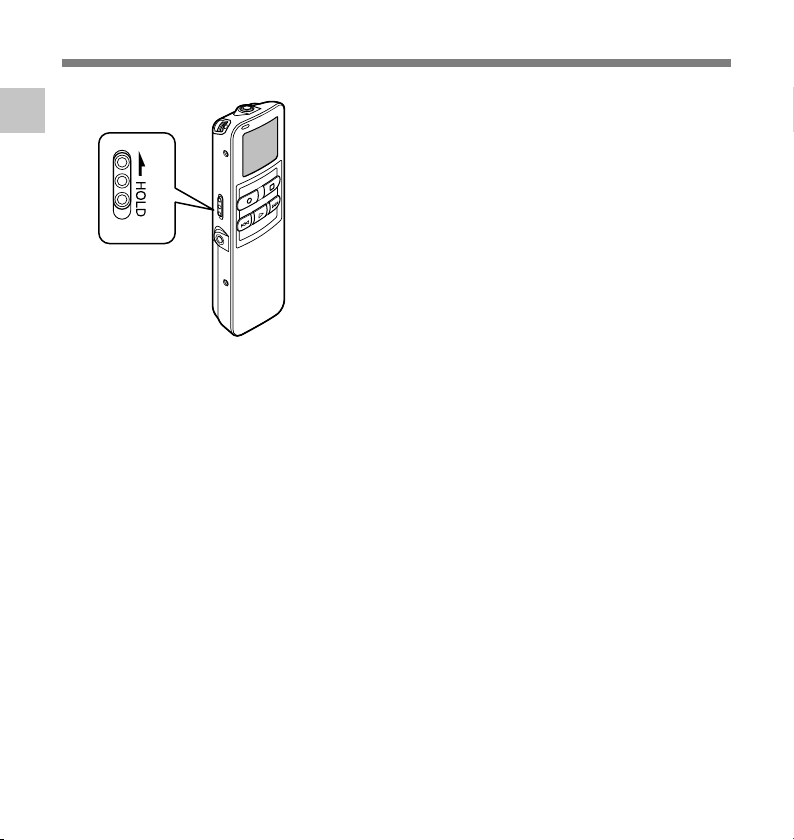
Hold
1
Hold
If you set the recorder to HOLD status by sliding the
HOLD switch in the direction of the arrow, the current
conditions will be preserved, and all buttons and switches
except the HOLD switch will be disabled. This feature is
useful when the recorder has to be carried in a bag or
pocket.
Remember to reset the HOLD switch when
using the recorder.
....................................................................................................................................................
Notes
• The display will flash if the switch is moved to hold in the stop status. At this time, if any button is pressed
the clock display will flash for about 2 seconds, but will not operate.
• If the switch is moved to hold during playback (or recording), the playback (recording) status will stay and
cannot be operated.
(When playback has ended and the recording has ended due the remaining memory being used up, it will
be in the stop state.)
• The alarm will sound at the scheduled time even if the recorder is set to hold. The recorder begins to play
the file associated with the alarm when you press any button.
• Recording will start when the set time of the timer recording comes even while in hold.
Setting the HOLD switch to the HOLD position.
12
Page 13
Setting Time/Date (TIME&DATE)
If you have set the time and date, information as to when an audio file is recorded is stored
automatically with that file. The time and date should be set to ease file management tasks.
Also, it is required when performing timer recording and alarm playback.
The hour indicator will flash automatically when you load batteries before using the
recorder for the first time, or after the recorder hasn’t been used for a long time.
Proceed from step 1.
Set the hour.
1 Press the 3 button or 2 button to set
1
the hour.
2 Press the MENU/SET button to accept
MENU/SET
button
(Accepts a choice
and moves on to
the next item)
PLAY button
(Switching the
data displayed.)
STOP button
(Exits the menu)
2 button
(Alters a choice)
3 button
(Alters a choice)
the hour.
• You can choose between 12 and 24 hour
display by pressing the PLAY button while
setting the hour and minute.
Example: 5:45 P.M.
Set the minute.
1 Press the 3 button or 2 button to set
2
the minute.
2 Press the MENU/SET button to accept
the minute.
Set the year.
1 Press the 3 button or 2 button to set
3
the year.
2 Press the MENU/SET button to accept
the year.
• You can choose the order of the year,
month, day by pressing the PLAY button
while setting them.
5:45 PM ←→ 17:45
(Initial setting)
1
Setting Time/Date (TIME&DATE)
13
Page 14
Setting Time/Date (TIME&DATE)
Example: January 14, 2005
1
Setting Time/Date (TIME&DATE)
1M 14D 2005Y
(Initial setting)
↓
14D 1M 2005Y
↓
2005Y 1M 14D
Set the month.
1 Press the 3 button or 2 button to set
4
the month.
2 Press the MENU/SET button to accept
the month.
Set the date.
1 Press the 3 button or 2 button to set
5
the date.
2 Press the MENU/SET button to accept
the date.
Changing the Time/Date
2
1
Press the STOP button to close the
menu.
6
When the date is confirmed, the recorder’s
clock will start to move. Set the time
according to the time signal and press the
MENU/SET button.
........................................................................
Note
If you press the STOP button during the setup
operation, the recorder will save the items that
were set to that point.
Press the 3 or 2 button in the sub
menu screen, and select the
1
“TIME&DATE”.
See ☞ P.16 regarding the sub menu.
Press the MENU/SET button.
Time/Date screen appears. The hour
2
indicator flashes, indicating the start of the
Time/Date setup process.
14
Follow the same steps starting at step 1 in “Setting Time/Date”
(☞ P.13).
Page 15
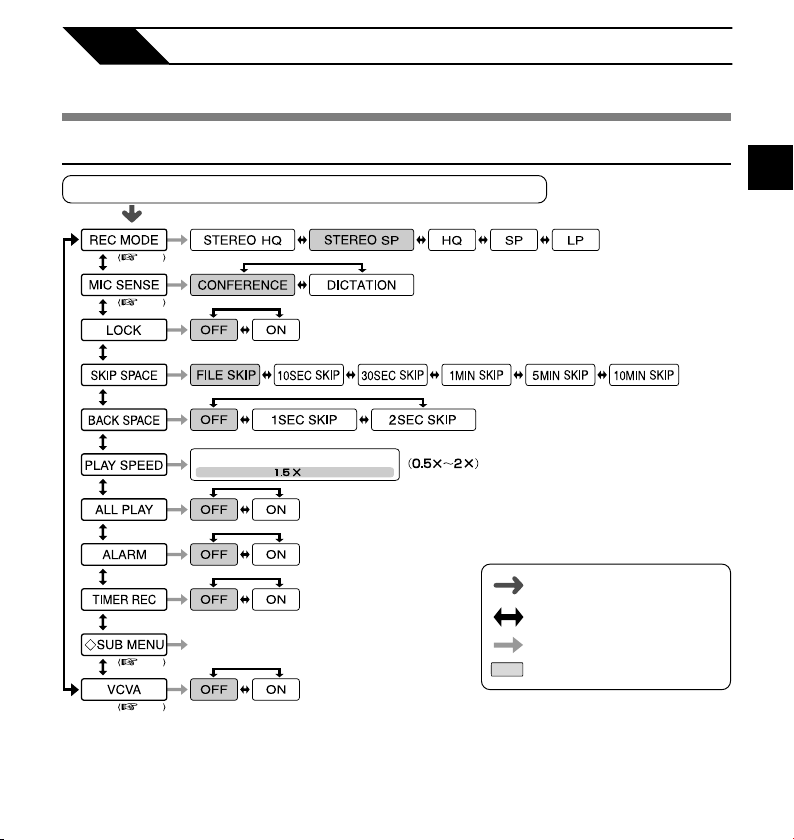
2 Menu Setting
Menu List
Main Menu
Press and hold the MENU/SET button for 1secomd or longer.
P.1 9
P.2 2
Playback Speed Setting Screen
Switches to the sub menu.
P.1 6
Press and hold the MENU/SET
button for 1 second or longer.
Press the 3 or 2 button.
Press the MENU/SET button.
Initial setting
2
Menu List
....................................................................................................................................................
Notes
• If you press the STOP button or the REC button, during a menu setup operation, the recorder will stop and
apply the items that were set to that point. The set contents of the timer recording will be set, and goes to OFF.
• The recorder will stop if you leave it idle for 3 minutes during a menu setup operation, when a selected
item is not applied.
P.2 0
15
Page 16
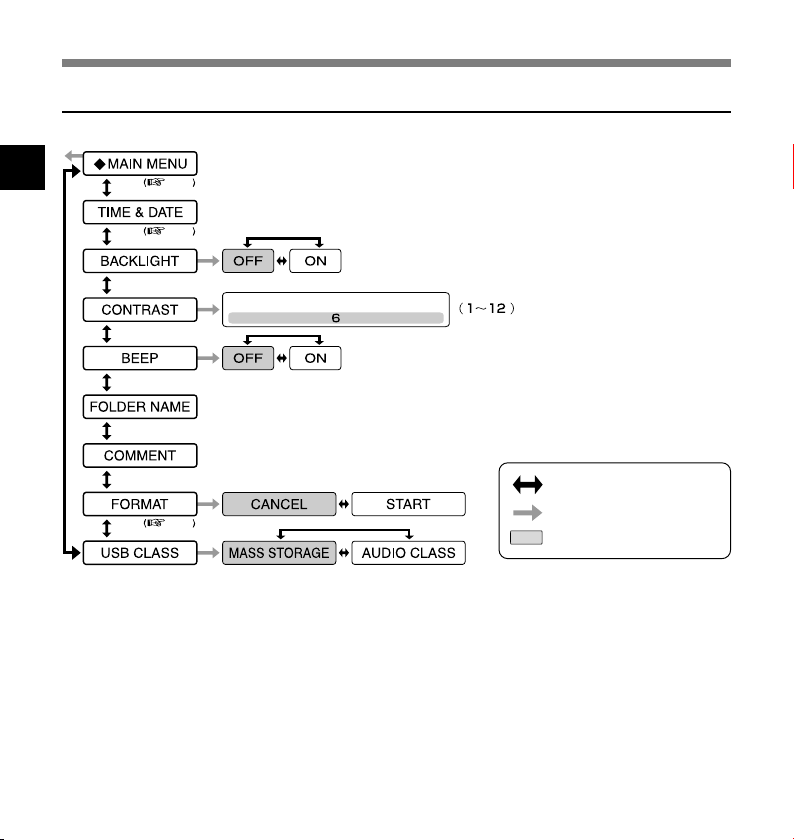
Menu List
Sub Menu
2
Menu List
Switches to the main menu.
P.15
Time/Date setting.
In order of hour, minute, year, month and day.
P.13
LCD contrast adjustment
Folder naming.
Assigning file comments.
P.39
Press the 3 or 2 button.
Press the MENU/SET button.
Initial setting
....................................................................................................................................................
Notes
• If you press the STOP button or the REC button, during a sub menu setup operation, the recorder will stop
and apply the items that were set to that point.
• The recorder will stop if you leave it idle for 3 minutes during a sub menu setup operation, when a
selected item is not applied.
16
Page 17
3 About Recording
Recording
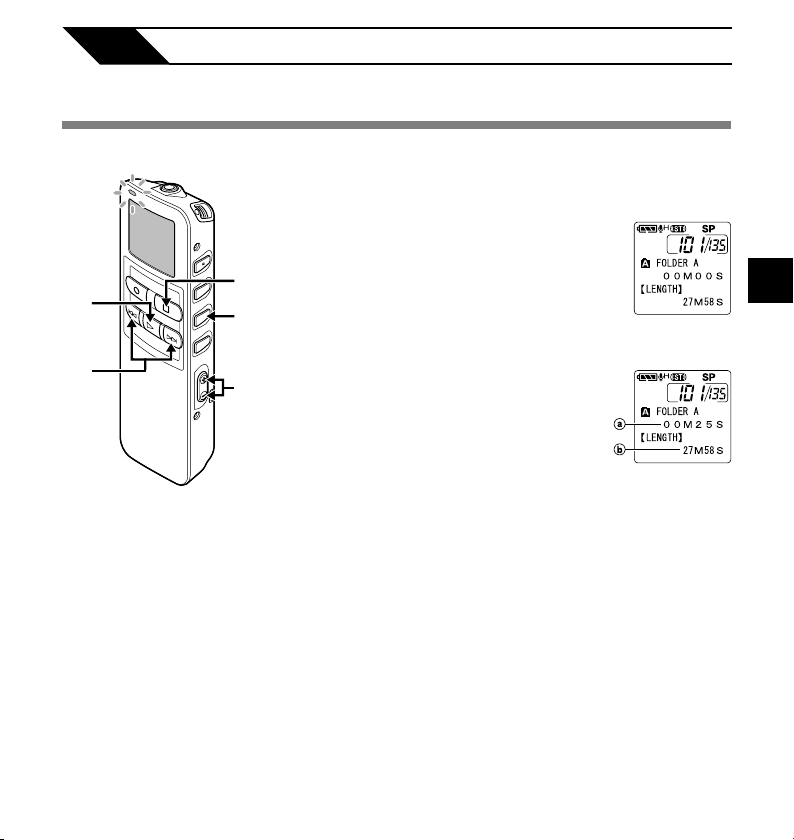
The recorder provides five folders, A, B, C, D and E, and each message recorded in a
folder is saved as a Digital Speech Standard (DSS) file or a Windows Media Audio (WMA) file.
These five folders can be selectively used to distinguish the kind of recording; for example,
Folder A might be used to store private information, while Folder B might be dedicated to
holding business information. Up to 199 messages can be recorded per folder.
Stereo recording is possible, only when set to stereo HQ and stereo SP mode.
3
Recording
2
3
Built-in stereo
microphone
1
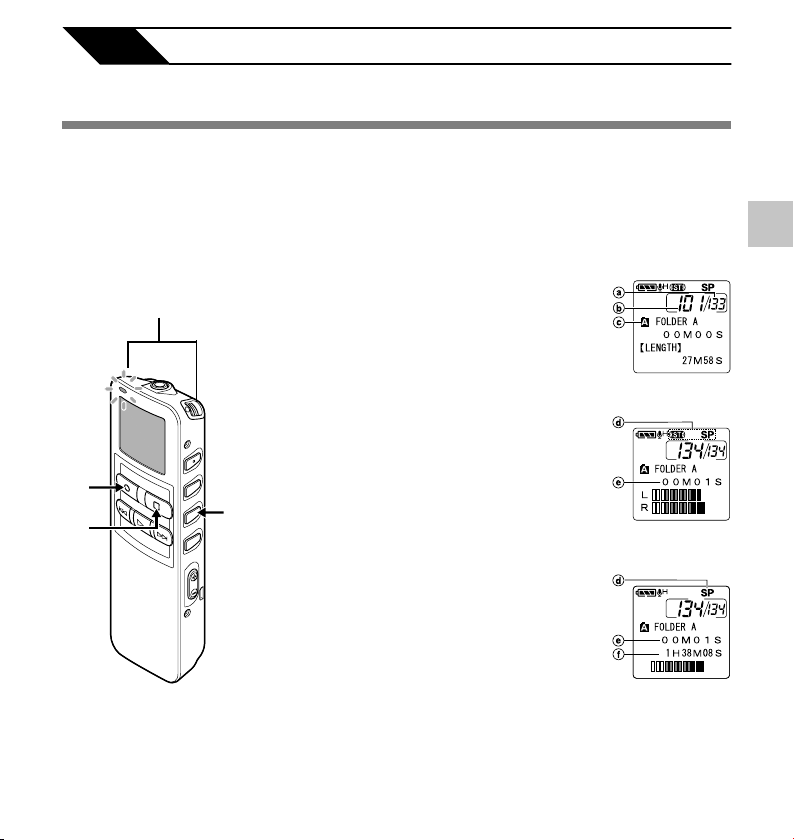
Press the FOLDER button to
choose a folder.
1
The folder name is displayed.
a Total number of recorded files in the
folder
b Current file number
c Current folder
Press the REC button to start
recording.
2
The record/play indicator lamp glows red.
Turn the built-in stereo microphone in the
direction to be recorded. The display
changes depending on the recording
mode (☞ P.19).
d Current recording mode
e Recording time
f Remaining recording time
Press the STOP button to stop
recording.
3
Display in the
stereo recording
mode
Display in the
monaural
recording
17
Page 18
Recording
Notes
• To ensure recording from the beginning, start
speaking after you see the red record/play
indicator lamp on.
• A beep will sound when remaining recording time
reaches 60 seconds, 30 seconds, and 10
seconds while recording.
•“MEMORY FULL” or “FOLDER FULL” will be
3
displayed when the memory or folder capacity is
Recording
full. Delete any unnecessary files before
recording any further (☞ P.31) or transfer voice
files to your computer using DSS Player
Software.
• DSS format in SP and LP mode recording, and
WMA format in stereo HQ and stereo SP and
HQ mode recording.
• While recording, pressing the PLAY button stops
recording and plays back the current file.
Recording functions
Pause
Press the REC button while recording.
“REC PAUSE” will flash on the display.
➥
• The recorder will time out after 2 hours when left
in “REC PAUSE”.
Resume Recording
Press the REC button again.
Recording will resume at the point of
➥
interruption.
18
Page 19
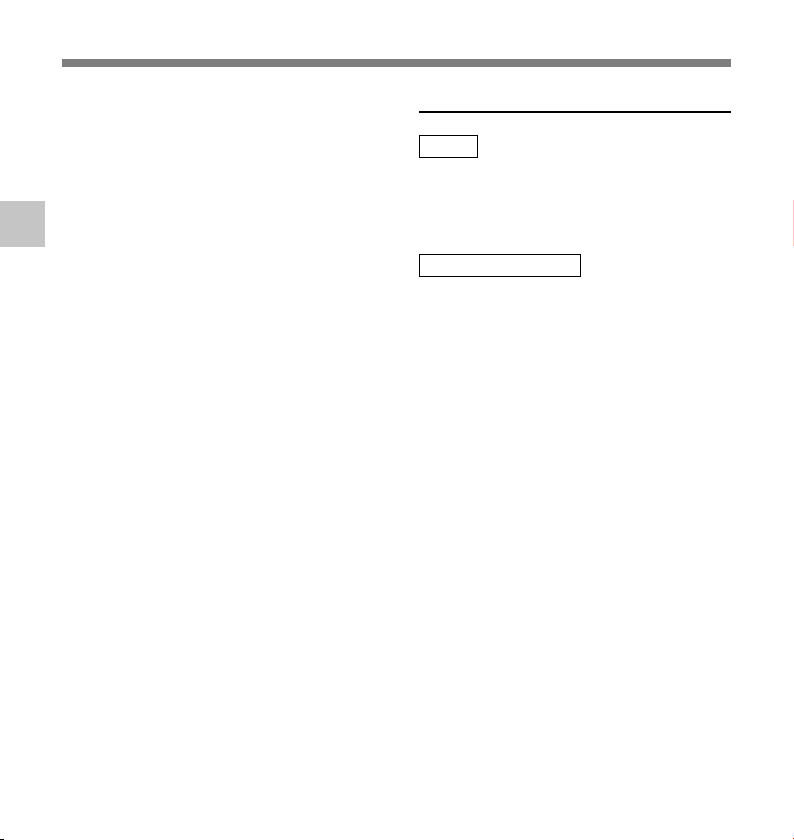
Recording Modes (REC MODE)
The recording mode can be chosen from Stereo HQ (stereo high quality sound recording) and
Stereo SP (stereo standard recording), HQ (high quality sound recording), SP (standard
recording), and LP (long-term recording).
Press and hold the MENU/SET
button for 1 second or longer.
1
“REC MODE” will be displayed on the
screen (☞ P.15).
3
Recording Modes (REC MODE)
1,2,4
3
5
....................................................................................................................................................
Note
When a meeting and lecture is to be recorded clearly, set other than LP mode to record.
Press the MENU/SET button.
The recording mode setup process
2
begins.
Press the 3 or 2 button to
choose from “STEREO HQ”,
3
“STEREO SP”, “HQ”, “SP” and
“LP”.
Press the MENU/SET button to
complete the setup screen.
4
Press the STOP button to close
the main menu.
5
19
Page 20
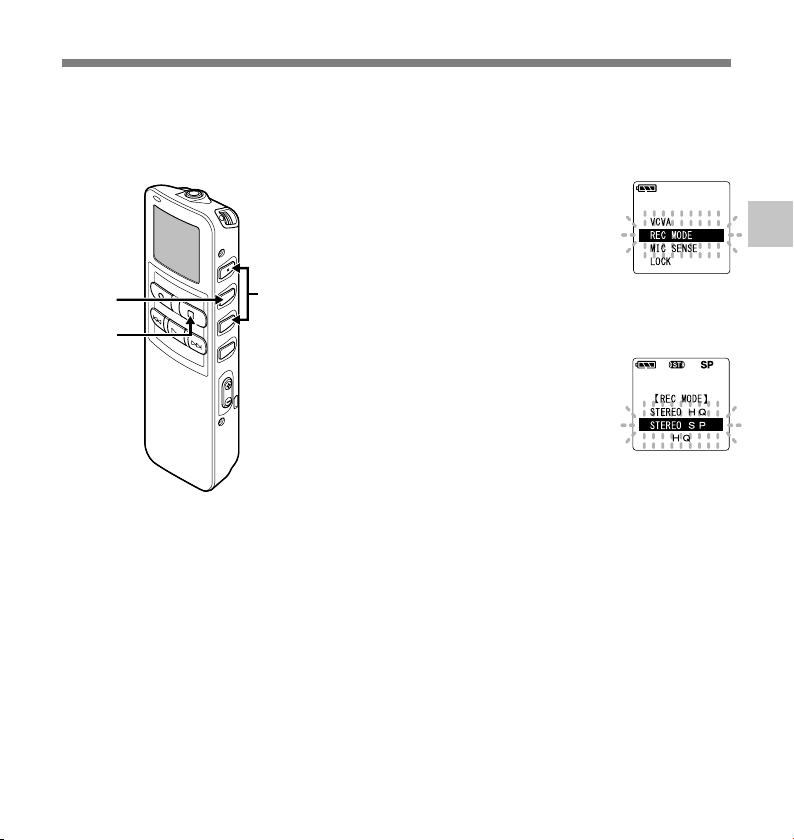
Using the Variable Control Voice Actuator (VCVA)
When the microphone senses that sounds have reached a preset threshold volume level, the
built-in Variable Control Voice Actuator (VCVA) starts recording automatically, and stops when
the volume drops below the threshold level.
The VCVA feature extend recording time and conserve memory by turning off recording during
silent periods. This helps make the playback, with no lulls or dead space, more efficient and
convenient.
3
Using the Variable Control Voice Actuator (VCVA)
1,3,5
6
2,4
Press and hold the MENU/SET
button for 1 second or longer.
1
The main menu opens (☞ P.15).
Press the 3 or 2 button to choose
“VCVA”.
2
Press the MENU/SET button.
The VCVA setup process begins.
3
Press the 3 or 2 button to choose
between “ON” and “OFF”.
4
ON: Will start recording in VCVA
mode.
OFF: Will resume recording in normal
mode.
Press the MENU/SET button to
complete the setup screen.
5
Press the STOP button to close
the main menu.
6
When “ON” is selected, a VCVA
indication will be displayed on the
screen.
20
Page 21
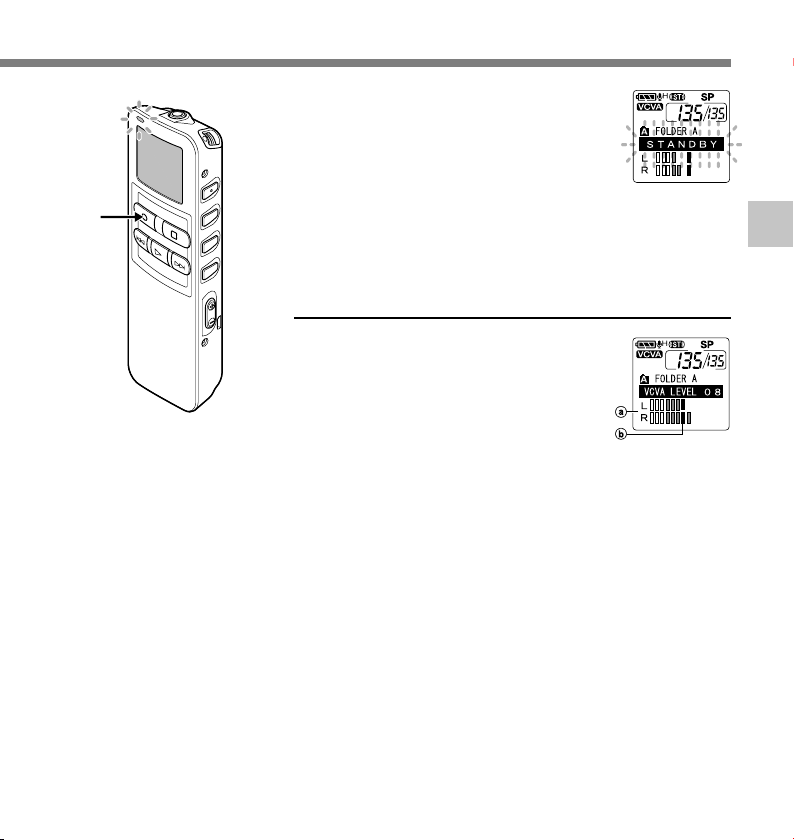
Press the REC button to start
recording.
7
When the sound volume is lower than
the preset threshold sound level,
recording automatically stops after 1
sec approximately, and “STANDBY”
7
flashes on the display. The record/play
indicator lamp glows when recording
starts and flashes when recording
pauses.
Adjust the start/stop actuation level
Press the FF or REW button to
adjust the pause sound level during
recording.
The VCVA level can be set to any of 15
different values. The higher the value, the
more sensitive the recorder to sounds. At
the highest value, even the faintest sound
will activate recording.
The VCVA pause sound level can be
adjusted according to the ambient
(background) noise.
a Level meter (varies according to the
sound volume being recorded)
b Start level (moves to the right/left
according to the set level)
....................................................................................................................................................
Notes
• The start/stop actuation level also varies depending on the selected microphone sensitivity mode (☞ P.22).
• If the starting level is not adjusted within 5 seconds, the display will return to the previous.
• If the surrounding noise is loud, the starting sensitivity of the VCVA can be adjusted according to the
recording situation.
• To ensure successful recordings, prior testing and adjustment of the start/stop actuation level is
recommended.
3
Using the Variable Control Voice Actuator (VCVA)
21
Page 22

Microphone Sensitivity (MIC SENSE)
Microphone sensitivity is adjustable to meet recording needs.
Press and hold the MENU/SET
button for 1 second or longer.
1
The main menu opens (☞ P.15).
3
Microphone Sensitivity (MIC SENSE)
1,3,5
2,4
Press the 3 or 2 button to choose
“MIC SENSE”.
2
6
....................................................................................................................................................
Note
When the speakers voice is to be recorded clearly, set to dictation mode and move the built-in stereo
microphone close to the speaker’s mouth (5 to 10 cm) and record.
22
Press the MENU/SET button.
The microphone sensitivity setup
3
process begins.
Press the 3 or 2 button to choose
between “CONFERENCE” and
4
“DICTATION”.
CONFERENCE:
High-sensitivity mode that
records sounds in all directions.
DICTATION:
Low-sensitivity mode suited for
dictation.
Press the MENU/SET button to
complete the setup screen.
5
Press the STOP button to close
the main menu.
6
Page 23
4 About Playback
Playing
3
2
5
1
4
Press the FOLDER button to
choose folder.
1
Press the FF or REW button to
choose the file that you want to
2
play.
If you keep pressing the FF or REW
button in stop mode, the recorder
continuously skips to the beginnings of
files.
Press the PLAY button to start
playback.
3
The record/play indicator lamp glows
green.
a Current playback time
b Total recording time of the file being
played
Press the VOL (+) or VOL (–)
button to select the proper
4
sound volume.
The display shows the volume level.
You can choose between 0 to 30.
Press the STOP button at any
point you want to stop the
5
playback.
Resume playback by pressing PLAY
button again.
4
Playing
23
Page 24
Playing
Save Function of the Playback End Position
When the STOP button is pressed during playback and it stops in the middle
of the file, the stop position is memorized automatically. Even when it moves
to other files with the FF or REW button, playback can be resumed from the
place which was interrupted previously and returns to the memorized stop
position easily with the FF or REW button. When it returns to the stop position
with the FF or the REW button, “PREVIOUS STOP POINT” will be displayed
in the display.
And the file playback and stopping changes the end position and memorize
the stop position as new end position.
4
Playing
File A Head
Position
File A File B File C
File B Head
Position
▲
Cuing
is
possible
....................................................................................................................................................
Note
The playback ending position will be canceled, if recording, PC connection, changing folders, file deletion
and battery removal are executed.
End Position
File C Head
Position
▲▲
Cuing
is
possible
▲
Cuing
is
possible
Cuing
is
possible
24
Page 25

Playback
functions
Fast
Playback
Slow
Playback
Cue
(CUE)
Review
Skipping to
beginning
4
of a file*
Fast
forward*
rewind*6 *
within a set
time
Operation
Press the PLAY button once while playing a file.*
➥ The recorder plays at a set speed. The playback speed can be
set from 0.5 to 2 times.
Hold the FF button while playing a file.*
2
➥ The recorder stops when it reaches the end of the file. Continue
pressing the FF button to proceed with the cue from the
beginning of the next file.*
3
Hold the REW button while playing a file.*
➥ The recorder stops when it reaches the beginning of the file.
Continue pressing the REW button to proceed with the review
from the end of the previous file.*
3
Press the FF button during playback, fast playback, or slow
playback.
➥ The next file is cued and playback starts at the original speed.*
Press the REW button during playback, fast playback, or slow
playback.
➥ The file being played is cued and playback starts at the original
speed.*
5
Press the REW button 2 times during playback, for fast playback or
slow playback.
➥ The previous file is cued, and playback starts at the original
Press the FF button during playback, fast playback, or slow
6
playback.
7
➥ The file during playback fast forwards for the set time, and
speed.*
5
playback starts at the original speed.*
Press the REW button during playback, fast playback, or slow
playback.
➥ The file during playback rewinds for the set time, and playback
starts at the original speed.*8 *
9
1
2
8
How to Cancel
Press the PLAY
button.
➥ Playback
returns to
normal rate.
Release the FF
button.
➥ Replays at the
original speed.
Release the REW
button.
➥ Replays at the
original speed.
5
4
Playing
25
Page 26

Playing
1 The above-mentioned playback functions and the insertion of index mark (☞P.35) are also enabled
*
during fast/slow playback as well as normal playback.
2 When pressing the FF or REW button continuously while stopped, the cue of the file start position and
*
previous file end position (
3
When the index mark is shown in the middle of a file, it will stop temporarily in the position of the index mark.
*
4
When the skip interval is set to file skip in the menu setting. It is set to file skip in the initial setting.
*
5 When the index mark is shown in the middle of a file, playback starts at the position of the index mark.
*
6 When the skip interval is set at other than file skip in the menu setting.
*
7 When playback was set to “OFF” previously in the menu setting.
*
8
When the index mark is shown before the set time the playback will start in the position of the index mark.
*
4
9 If both of the skip interval and the previous playback are set, the time setting for previous playback
*
Playing
overrides the time setting for skip interval.
....................................................................................................................................................
Notes
• When the noise cancel function (☞ P.30) is set to “LOW” or “HIGH”, the playback speed cannot be set.
• When the previous playback is set, the FF button is disabled and will not skip to the cue of the file start
position or the index mark position.
☞
P.24) will be executed continuously (skip/reverse skip).
26
Page 27
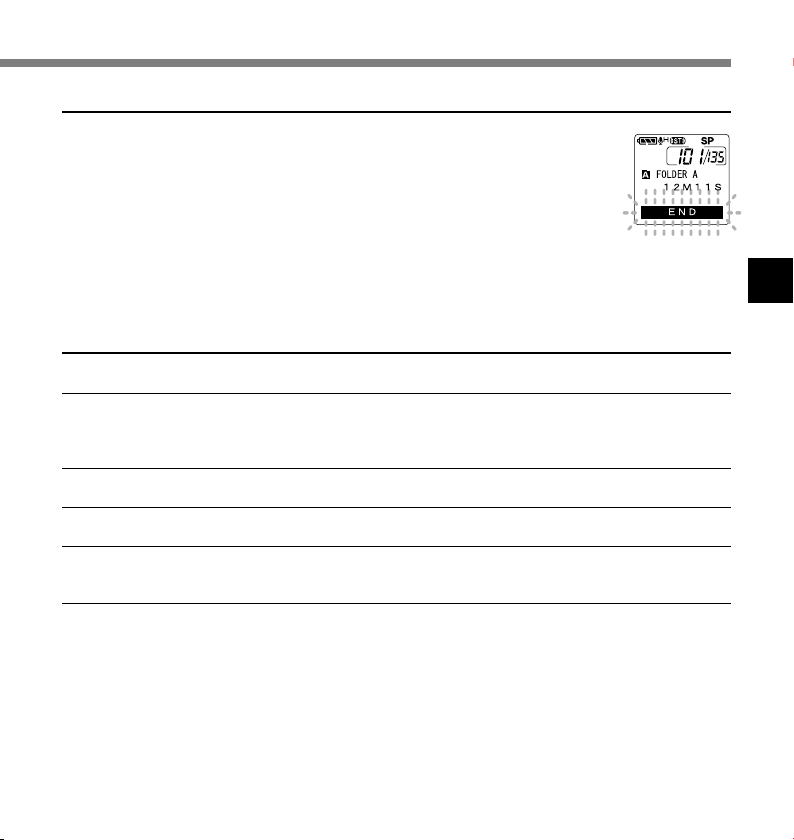
Last File End
When the following operation is executed and it reaches to the end of the
last file during playback, “END” will be displayed and flashing for 5 seconds
in the display.
• Press the FF button (skip)
• Press the FF button continuously (CUE)
• Playback last file
Operating the FF or REW button while “END” is displayed and flashing, the following operation
can be executed.
Operation
Press the REW button continuously.
➥ Continuously rewind (REVIEW) from the last file end (☞ P.25).
Set other than file skip in the skip interval or, press the REW button when the previous playback is set to
ON.
➥ The nearest of the set time interval or index mark, or only the return time of the previous playback,
will start the playback in reverse skip.
Set the file skip in the skip interval or, press the REW button when the previous playback is set to OFF.
➥ The playback will start in reverse skip; either at the nearest last file start position or the index mark.
Press the FF button.
➥ Skips to the starting position of the head file, and stops.
Press the FF button continuously.
➥ It skips continuously from the starting position of the head file, and it will stop if the FF button is
released.
Note
After “END” is displayed for 5 seconds and flashing, it returns to the start position of the last file and stop.
4
Playing
27
Page 28
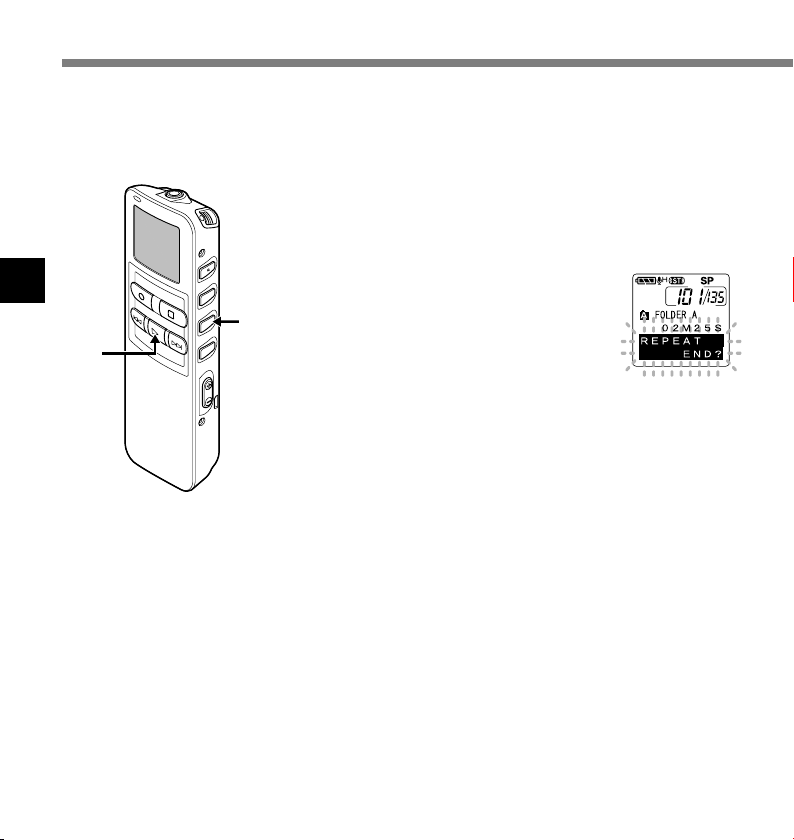
Repeat Playback
This function enables repeated playback of part of the file being played. If the continuous
playback function is used together, two or more files can be repeatedly replayed as long as
they are in the same folder.
Choose the file for Repeat
Playback, and press the PLAY
1
button.
File playback begins.
4
Repeat Playback
2
1
Press the REPEAT button
briefly at the point you want to
2
start Repeat Playback.
“REPEAT END?” flashes until you
designate the end point.
Even while “REPEAT END?” is
flashing, changing the playback
speed, fast forward, rewind and cue
(☞P.25) can be executed the same
as during normal playback, and it can
be advanced quickly to the end
position. Also, when it reaches to the
end of the file, which will become the
end position, then repeat playback
will start.
28
Page 29
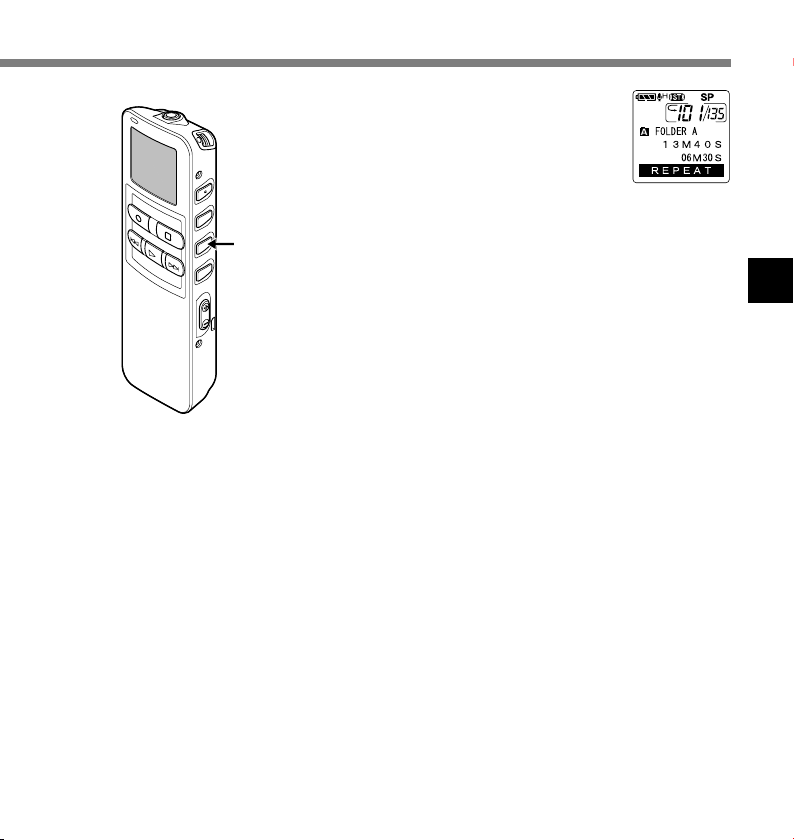
Press the REPEAT button briefly
again at the position you want
3
Repeat Playback to end.
The recorder repeatedly plays back the
section between the start and the end
positions until you cancel Repeat
Playback.
If continuous playback is set to ON,
3
....................................................................................................................................................
Note
To use this function, briefly press the REPEAT button. If you hold it 1 second or longer, the Moving Files
screen appears.
the end position can be set to the
extent of the last file in the folder.
The playback speed, index mark
insertion/removal, and noise cancellation
can be set during continuous playback
as well as normal playback.
Cancel the continuous playback
function.
4
• Pressing the REPEAT button briefly
will return to the normal playback.
• Pressing the STOP button will cancel
the continuous playback function and
stop the playback.
4
Repeat Playback
29
Page 30

Noise Cancel Function
If recorded audio is difficult to understand because of noisy surroundings, adjust the Noise
Cancel setting level. Noise will be reduced in the file when its played back for better sound
quality.
Press and hold the MENU/SET
button for 1 second or longer
1
while the file is playing.
Displays currently set Noise Cancel
level.
4
Noise Cancel Function
....................................................................................................................................................
Notes
• If you set it to “LOW” or “HIGH”, the display flashes the Noise Cancel level for about 5 seconds when a file
is played back.
• If you set Noise Cancel to “LOW” or “HIGH”, the setting remains valid until it’s set to “OFF”.
• Noise cancel cannot be used during fast playback/slow playback (☞ P.25).
• If the noise cancel is set to the file recorded in Stereo HQ or Stereo SP mode, it will be played back in
monaural.
1,2
Press the MENU/SET button
again to choose a noise cancel
2
level.
The levels switch in the following
rotation, “OFF” “LOW” “HIGH”.
If the Noise Cancel level is set to “LOW”
or “HIGH”, the level setting is displayed
for 5 seconds when a file is played back.
To change the Noise Cancel level setting,
press the MENU/SET button while the
level setting is displayed.
30
Page 31
5 Other functions
Erasing
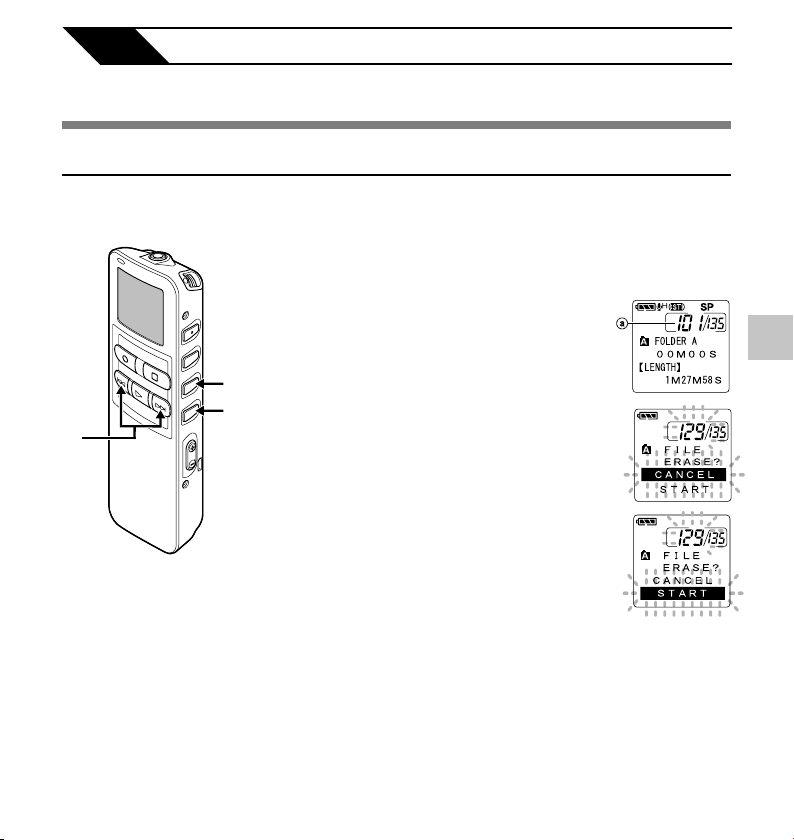
Erasing One File at a Time
A selected file can be erased from a folder.
Press the FOLDER button to
choose a folder.
1
Press the FF or REW button to
choose the file you want to erase.
2
a File to be erased
1,4
3
2
Press the ERASE button.
“CANCEL” is flashing.
3
Press the 3 button to choose the
“START”.
4
“START” is flashing. When the 2 button
is pressed, it will return to the flashing
display of “CANCEL”.
5
Erasing
31
Page 32

Erasing
Press the MENU/SET button
while “START” flashing.
5
The display changes to “FILE ERASE!”
and erasing will start.
5
“ERASE DONE” is displayed when the file
is erased. File numbers will be reassigned
automatically.
5
Erasing
....................................................................................................................................................
Notes
• An erased file cannot be restored.
• The file set to erase lock will not be erased.
• If operation is not executed for 8 seconds during the setting, it will return to the stop status.
• Completion of erasing may take 10 seconds. Never do anything during this period because data may be
corrupted. Removing or setting batteries is not permissible, whether or not the batteries are set in the
recorder.
{
32
Page 33

Erase All Files from a Folder
All files in a folder can be erased simultaneously, except for locked files.
Press the FOLDER button to
choose the folder you want to
1
erase all files.
a Folder from which to erase files
1,3
2
Press the ERASE button for 3
seconds or longer.
2
“CANCEL” is flashing.
Press the 3 button to choose the
“START”.
3
“START” is flashing. When the 2 button
is pressed, it will return to the flashing
display of “CANCEL”.
5
Erasing
33
Page 34

Erasing
Press the MENU/SET button
while “START” flashing.
4
The display changes to “ALL ERASE!”
and erasing will start.
4
“ERASE DONE” is displayed when the files
are erased. Locked files are reassigned file
numbers in ascending order.
5
Erasing
....................................................................................................................................................
Notes
• An erased file cannot be restored.
• The file set to erase lock will not be erased.
• If operation is not executed for 8 seconds during the setting, it will return to the stop status.
• Completion of erasing may take 10 seconds. Never do anything during this period because data may be
corrupted. Battery removal setting/removal are not permissible, whether or not the battery is set in the
recorder.
{
34
Page 35

Index Marks
Index marks can be placed in a file during recording or playback to provide and quick and easy
way of keeping track of important sections in the file.
Setting an Index Mark
Press the INDEX button during
recording or playback to set an
1
1
index mark.
An index number appears on the
display.
2
4
Locating an Index Mark
Hold the FF or REW button
while playing a file.
2
The recorder stops for 1 second when
it reaches the index mark.
Clearing an Index Mark
Locate the index mark you
want to clear.
3
Press the ERASE button while
the index number appears for
4
approximately 2 seconds on
the display.
The index mark is erased.
5
Index Marks
35
Page 36

Index Marks
Notes
• Up to 16 index marks can be set in a file. Attempting to set more index marks will cause “INDEX FULL” to
appear on the display.
• Index marks cannot be set or cleared in a locked file.
• In case of WMA files, index marks can only be placed in files recorded with Olympus recorders.
• If the REW button is pressed in the set status of “1 SEC SKIP” or “2 SEC SKIP” in the previous playback,
it will reverse skip for only the set time.
5
Index Marks
36
Page 37

LCD Display Information
The LCD screen on the recorder can display 6 different format of information by pressing the
DISPLAY button. This help review and confirm different recorder settings and file information.
Press the DISPLAY button.
The LCD display views will switch every time the DISPLAY
1
button is pressed.
While in stop or playback mode
When pressing Display, the recorder will cycle through 1 to
1
6. If there is no file, 5 and 6 will display alternately.
1 File length
Shows how long a file is.
{
6 Current time and date
Shows the current time and
date. (During playback, the
“TIME & DATE” or the
counter appears.)
5
LCD Display Information
2 Time stamp
Shows the year, month, and
date that the file was
recorded.
3 Time stamp
Shows the time that the file
was recorded.
{
{
{
5 Memory remaining
Shows remaining recording
time.
{
4 File comment*
Shows comment added to
{
* If a comment contains many characters, it will
scroll horizontally to display the complete
comment.
a file. (If there is no
comment, “----” will appear.)
37
Page 38

LCD Display Information
While in record mode
Displays 1 and 2 alternately.
1
Recording level meter
Displays the audio input level
in graphics. The display of the
audio input level is different
depending on stereo recording
Display in the
stereo recording
mode
or monaural recording.
5
LCD Display Information
Display in the
monaural
recording
2
Remaining memory bars
Displays the remaining time
available for recording in bar
mode and count-down mode.
While recording in VCVA mode
Displays 1 and 2 alternately.
1
VCVA recording level
meter
Displays the audio input level
and start level in graphics.
(Displays in “Waiting” if it has
Display in the
stereo recording
mode
Display in the
monaural
recording
not reached to the VCVA start
level).
The display of the audio input
level is different depending on
stereo recording or monaural
recording.
2
Remaining memory bars
Displays the remaining time
available for recording in bar
mode and count-down mode.
38
Page 39

Formatting the Recorder (FORMAT)
If you format the recorder, all function settings will return to their defaults*.
All files** stored in the recorder will be deleted.
If you have important files that you want to save, connect the recorder to a computer and
transfer those files from the recorder to the computer before formatting the device.
* Date and time settings will not be cleared, so you won’t need to set them again.
** Locked files will also be deleted.
Press and hold the MENU/SET
button for 1 second or longer.
1
The main menu opens (☞ P.15).
1,3,
5,7
2,4
6
Press the 3 or 2 button to
◊
choose “
2
Press the MENU/SET button.
The sub menu opens (☞ P.16).
3
Press the 3 or 2 button to choose
“FORMAT”.
4
Press the MENU/SET button.
“CANCEL” is flashing.
5
Press the 3 button to choose
“START”.
6
“START” is flashing. When the 2 button
is pressed, it will return to the flashing
display of “CANCEL”.
SUB MENU”.
5
Formatting the Recorder (FORMAT)
Press the MENU/SET button.
After “DATA WILL BE CLEARED” turns
7
on for about 2 seconds, “CANCEL” will
flash.
39
Page 40

Formatting the Recorder (FORMAT)
Press the 3 button again to
choose “START”.
8
“START” is flashing. When the 2button
is pressed, it will return to the flashing
display of “CANCEL”.
9
8
5
Formatting the Recorder (FORMAT)
....................................................................................................................................................
Notes
• Never format the recorder from a PC.
• When the recorder is formatted, all the stored data, including locked files, are erased.
• After formatting, the first file name is 0001.
• While formatting, do not remove the batteries. It may take 10 seconds or more for the erasing to end.
Press the MENU/SET button
again.
9
Formatting begins and an indicator
flashes on the display.
“FORMAT DONE” displays when formatting
ends.
{
40
Page 41

6 Preparation Before Using DSS Player
Using DSS Player Software
The DSS Player Software can be used to do the following:
• Playback voice files on your PC and on the recorder when connected via USB. Download
files from the recorder to the PC or upload files from the PC to the recorder.
• If an upgrade (Option) to DSS Player Plus is executed, various additional functions can be
utilized (☞P.51).
Precautions on using the recorder connected to a PC
● When you are downloading a file from
the recorder or uploading a file to the
recorder, do not remove the USB cable
even if the screen is indicating you can.
Data is still being transferred while the
record/play indicator lamp is blinking.
When removing the USB cable, be sure
to follow the description in Online
Instructions. If the USB cable is
removed before the drive is stopped,
data may not be successfully
transferred.
● On a PC, do not format the drive of the
recorder. Initialization is not successfully
achieved on a PC. For initialization,
follow the instructions in the menu
screen of the recorder (☞ P.16).
● Folder (directory) names displayed by
file management tools such as Explorer
attached to Microsoft Windows is
different from the folder names settable
with the recorder or DSS player.
● If folders or files stored on the recorder are
moved or renamed by using a file
management tool such as Explorer, the
order of files may be changed or files may
become unrecognizable.
● Data can be written or uploaded to the
recorder even though the attribute of
the recorder drive is shown as Readonly by the operating system of the PC.
● As the noise may cause adverse effects
on electronics devices nearby the
recorder, unplug the earphone when
you connect the recorder to a PC.
6
Using DSS Player Software
41
Page 42

Operating Environment
Basic Operating Environment of DSS Player
PC:
Operating
System:
CPU:
RAM:
Hard drive
space:
Drive:
Sound card:
Browser:
Display:
6
Operating Environment
USB port:
Audio I/O
terminals:
Others:
IBM PC/AT compatible PC
Microsoft Windows Me/ 2000 Professional/XP Professional,Home Edition
Intel Pentium II class 333 MHz processor or more (If recording to a hard disk
directly with the WMA format, please use in the range of 500MHz or more)
128MB or more (256MB or more is recommended)
50MB or more
2x or faster CD-ROM, CD-R, CD-RW, DVD-ROM drive
Creative Labs Sound Blaster 16 or 100% compatible sound card
Microsoft Internet Explorer 4.01 SP2 or later
800 x 600 pixels or more, 256 colors or more
One free port
Earphone output or speakers
• The mouse or similar to a pointing device.
• Environment where the Internet can be utilized.
42
Page 43

Installing Software
Before you connect the recorder to your PC and use it, you must first install the DSS player
software from the included Software CD.
Applications included with “DSS Player”
• DSS Player: Recorded voice files can be downloaded to the PC for complete file management and playback
solution.
• Acrobat Reader is installed on your PC. It is required to view the accompanying manual in PDF format.
Be sure to confirm the following before installation:
• Exit all running applications.
• Eject the floppy disk if you are using one.
• If you are running Windows2000/XP on the network, you need to log on as an Administrator.
Insert DSS Player into the CDROM drive.
1
The installation program will start
automatically. Once the program starts,
jump to step 4. If it does not, follow the
procedures in steps 2 and 3.
Click the [start] button and select
[Run].
2
Enter “D:\setup.exe” in the [Open]
field and click [OK] .
3
This is assuming the CD-ROM drive is
D.
The installation Language
Selection dialog box opens.
4
Click the desired language to select it.
6
Installing Software
43
Page 44

Connecting to Your PC
Installing DSS Player
Register user information.
Enter your name, company name and
5
serial number. For the serial number,
see the label attached to the CD-ROM
package provided with DSS Player.
When entered, click [Next]. When the
confirmation dialog appears, click
[Yes].
Confirm your acceptance of the
terms of the Licensing
6
Agreement.
You must accept the terms of the
Licensing Agreement to install DSS
6
Installing Software
Player. If you accept them, click [Yes].
Select where to install DSS
Player.
7
This lets you specify the folder in which
to install DSS Player. Click [Browse]
to find the desired installation folder.
To accept the default folder, click
[Next].
Note
If the installation folder does not exist, a
confirmation dialog box opens to get your
permission to create a folder for this
purpose. Click [Yes].
Select a program menu folder.
You may change the program menu
8
folder to another one, such as [Start
Up]. To accept the default folder, click
[Next].
Authorizing the start of file
copying.
9
Confirm all “Current Settings”. To
accept them, click [Next].
Note
To change the program menu folder or
installation folder, click [Back].
Copy files.
Wait until DSS Player is installed on
10
your PC, then click [Finish].
The screen returns to the opening
screen automatically.
Installing the Device Driver
Connect the recorder to your
PC, referring to “Connecting to
11
Your PC” (☞ P.46).
When you connect the recorder to your
PC for the first time after installing DSS
Player, the recorder’s driver will be
installed automatically. If the driver is
installed properly, DSS Player will start
automatically.
(For details about operation for DSS
Player see pages from P.50)
44
Page 45

Using Online Help
To open Online Help, you have the following options.
• Click the [start] button, select [All Programs], then [Olympus DSS Player], then click [Help].
• While DSS Player is running, choose [Contents] from the [Help] menu.
• While DSS Player is running, press [F1] on the keyboard.
Search by Contents
Once the Online Help screen appears, click
the Contents tab.
1
Double-click the icon of the desired
topic heading.
2
The title of the topic is displayed.
Double-click the icon of the desired topic.
An explanation of the topic is displayed.
3
Search by Key word
Once the Online Help screen appears, click
the Index tab.
1
Enter text.
Matching keywords are located automatically.
2
Choose a topic, then click [Display].
An explanation of the topic is displayed.
3
1
2
3
1
2
6
Using Online Help
3
....................................................................................................................................................
Note
For more information on menus and operations, refer to Online Help. You will be able to use Online Help
after DSS Player is installed.
45
Page 46

Connecting to Your PC
Be sure to finish installing DSS Player before connecting the recorder.
Connecting to your PC using the
USB cable
Release the HOLD switch.
1
Connect the USB connection
cable to the USB port or the
2
USB hub of the PC.
Confirm that the recorder has
stopped, and connect the USB
6
Connecting to Your PC
3
cable to the connection port
on the bottom of the recorder.
Please connect the USB connection
cable mark to match the mark
of the recorder connection port.
“STORAGE REMOTE” is displayed
on recorder if the USB cable is
connected.
When the recorder is connected and “My Computer” is
opened, a removable disk drive is displayed. If “Add New
Hardware Wizard” appears, cancel the wizard by pressing
the [Cancel] button and then install DSS Player.
....................................................................................................................................................
Notes
• When connecting this recorder with the PC and utilize DSS Player, in the menu setting of this recorder set
the USB class to the “MASS STORAGE” class. If connected by “AUDIO CLASS”, this recorder will not be
recognized as a removable disk drive.
• Be sure to use the attached dedicated cable for the USB connecting cable. If any other company’s cable
is used, it will be the cause trouble. Also, please do not connect this dedicated cable to any other company’s
product.
46
Page 47

Disconnecting from Your PC
Click the on the task bar
located at the lower-right corner
1
of the screen. Click [Safely
Remove Hardware].
It will read [Stop USB Disk-Drive] for
Windows Me. The drive letter will differ
depending on the PC being used.
Disconnect the USB cable.
2
1
....................................................................................................................................................
Notes
• NEVER disconnect the USB cable while the record/play indicator lamp is flashing. If you do, the data will
be destroyed.
• When the recorder is connected to a PC, the power will be supplied from the USB cable.
• Refer to the user’s manual for your PC regarding the USB port or USB hub on your PC.
• Be sure that you connect the USB cable either directly to the USB port on your PC or the self-power (AC
adapter connection) USB hub.
• Be sure to push the cable connector all the way in. Otherwise, the recorder may not operate properly.
• Release the HOLD switch.
6
Connecting to Your PC
47
Page 48

Connecting to Your PC
Connecting to your PC using the cradle
Place the recorder on the cradle
Connect the USB connection
cable to the USB port or the USB
1
hub of the PC.
Connect the USB connection
cable to the cradle.
2
Connect the mark of the USB
connection cable facing up to match the
mark of the cradle connection port.
6
Connecting to Your PC
PC I/F
Make sure that the recorder is in
the Stop mode, and place it in the
3
cradle.
“STORAGE REMOTE” is displayed on
recorder if the USB cable is connected.
48
Page 49

Remove the recorder from the cradle
Follow step 1 in “Disconnecting from Your PC” (☞ P.47).
To prevent damage or loss of the data, confirm that the
recording/playback indicator lamp of this recorder is not on,
and remove this recorder and USB connection cable from
the cradle.
....................................................................................................................................................
Notes
• When connecting this recorder with the computer and utilize DSS Player, in the menu setting of this
recorder set the USB class to the “MASS STORAGE” class. If connected by “AUDIO CLASS”, this recorder
will not be recognized as a removable disk drive.
• Be sure that you connect the USB cable either directly to the USB port on your PC or the self-power (AC
adapter connection) USB hub.
6
Connecting to Your PC
49
Page 50

Running DSS Player
By connecting the recorder to your PC, you can automatically start the application.
Disabling automatic start
Right click on the of the taskbar on the
lower right of the screen, and select
1
[Setting].
The application which enables setting will be displayed
by dialog.
Click the of the [DSS Player Version 6].
The check mark on [DSS Player Version 6]
2
disappears. For automatic start, select and click DSS
Player to reinstate again.
6
Running DSS Player
Manual start
Start Windows.
2
2
1
Click the [start] button, select [All
Programs], then [Olympus DSS
2
Player].
Click [Olympus DSS Player].
3
3
2
..............................................................................................................................................................
Note
You cannot run more than one DSS Player program or multiple copies of the same program simultaneously.
50
Page 51

7 DSS Player Expanded Functions
Plus
The “DSS Player” enables upgrades (options) to the “DSS Player Plus” which is equipped with
more functions. In addition to the DSS Player functions, it provides more advanced functions
such as joining files, dividing a file, and setting the menu of this recorder.
Upgrade Function
Purchase and Upgrade
To purchase “DSS Player Plus” and upgrading from “DSS Player” is operated in the following
procedures.
Start the DSS Player.
Please see ☞ P.50 for the starting method.
1
Click the button or select [Purchase
a new license for DSS Player Plus] in
2
the [Help] menu.
The web browser will start and the purchase
site of the DSS Player Plus will be displayed.
Please operate according to guidance on the
screen.
When the purchase procedure is completed, the
license number will be issued by mail.
2
Upgrade Function
7
51
Page 52

Upgrade Function
Select [Upgrade to DSS Player Plus]
from the [Help] menu.
3
The “Upgrade to DSS Player Plus” dialog will
be displayed.
Upgrade Function
In the [Upgrade to DSS Player Plus]
dialog, enter the license number of your
4
purchase, and click the [OK] button.
When starting the application next time, DSS
Player will be upgraded to DSS Player Plus.
7
Upgrading to DSS Player Plus
When upgraded, the title of the main menu changes to [DSS Player Plus]. Also, you can confirm
the upgrade by selecting [About DSS Player] from the [Help] menu on the tool bar. In the
[About DSS Player] window, the [DSS Player Plus] should be displayed.
....................................................................................................................................................
Notes
• To purchase the license number, it requires an environment where the Internet can be utilized.
• Please see the details in the website regarding the purchase of the license number.
52
3
Page 53

8 Other Practical Use Methods
Using as External Memory of the Computer
With the recorder connected to your PC, you can download data from the memory to your PC
and upload data stored on your PC to the memory.
Example: Copying Data from PC to Recorder using Explorer
Start Windows.
1
Connecting the recorder to your PC.
For the connection procedure, refer to “Connecting to Your PC using the USB cable” (☞ P.46).
2
Open the Explorer window.
The recorder will appear as a removable drive icon.
3
Copy the data.
While the data are being written or copied, the record/play indicator lamp on the recorder
4
will flash.
Before disconnecting the recorder from your PC, refer to “Disconnecting from Your PC” (☞ P.47).
....................................................................................................................................................
Note
NEVER disconnect the USB cable while the record/play indicator lamp is flashing. If you do, the data will be
destroyed.
Using as External Memory of the Computer
8
53
Page 54

9 Other Information
Alarm Message List
Message
BATTERY LOW
FILE
PROTECTED
INDEX FULL
INDEX CAN’T
BE ENTERED
FOLDER FULL
Alarm Message List
OVER-FLOW
COMMENT
9
CAN’T BE
ENTERED
MEMORY
ERROR
Meaning
Low battery
power
Erase-locked
Index full
File not
supporting
index
Folder full
Maximum
number
Too many
characters
input
File not
supporting
comment
Error in the
internal
memory
Explanation
Battery power is getting low.
Tried to delete a locked file.
The file is full of index marks
(maximum of 16 marks).
Tried to incorporate WMA file
index marks into the music
files or the files not recorded
with the recorder.
The folder is full of files
(maximum of 199 files).
The destination folder
already has the maximum
number of files (199).
Exceeds the maximum
number of characters that
can be registered.
Tried to incorporate
comments into WMA files.
Error in the internal memory.
Action
Replace with new batteries (☞ P.11).
Unlock the file.
Erase index marks that are no
longer required (☞ P.35).
You can incorporate index marks
into the voice files recorded with the
recorder or IC recorders from
Olympus only.
Erase unnecessary files (☞ P.31).
Erase unnecessary files (☞ P.31).
Reduce the number of characters within
the limit. Up to 12 characters can be
used for a folder name.
Up to 100 characters can be used
for a file comment.
You can incorporate comments into
the voice files recorded with the
recorder or IC recorders from
Olympus only.
This is a malfunction, so go to the
store where you purchased the
recorder or an Olympus service
station for repair.
54
Page 55

Message
MEMORY
TROUBLE
MEMORY FULL
MEMORY FULL,
CONTINUE?
Meaning
Trouble in the
internal
memory
Zero
remaining
memory
Memory full,
continue?
Explanation
Trouble in the internal
memory.
No remaining internal
memory.
There is no remaining
memory for recording with
reserved time.
Action
This is a malfunction, so go to the
store where you purchased the
recorder or an Olympus service
station for repair.
Erase unnecessary files (☞ P.31).
Reset by selecting “YES” or “NO”.
If “NO” is selected, reset again after
erasing the unnecessary file and
securing the required remaining
memory.
Alarm Message List
START/END
TIME SETTING
CAN'T BE THE
SAME
NO FILE
FORMAT
ERROR
SAME NAME
FILE EXISTS
SYSTEM
ERROR
Start/end
time setting
can’t be the
same.
No file
Formatting
error
Same named
file
System error
This time, start/end have set
as same.
No files were found in the
folder.
There was an error while
formatting the recorder’s
memory.
Tried to create or store a file
that has same name as a file
in the folder.
System error detected in the
recorder.
Set the start/end again.
Select another folder.
Reformat the memory (☞ P.39).
9
Change the file name.
This is a malfunction. Contact the
place of purchase or Olympus
Service Center for repair.
55
Page 56

Troubleshooting
Symptom
Nothing appears
on the display
Won’t start
Unable to
record
No playback
tone heard
Does not
reverse skip in
Troubleshooting
the set skip
interval
Unable to erase
Noise heard
during playback
Recording level
9
too low
Unable to set
index marks
Probable cause
The batteries are not loaded properly.
The batteries are dead.
The recorder is in HOLD mode.
The recorder is in HOLD mode.
The batteries are dead.
Low remaining internal memory.
The maximum number of files has been
reached.
The earphone is connected.
The VOL button is set to 0.
The auto backspace review is set to “1
SEC SKIP” or “2 SEC SKIP”.
The file is locked.
The recorder was shaken during
recording.
The recorder was placed near a cell
phone or fluorescent lamp while
recording or during playback.
The microphone sensitivity is too low.
The maximum number of index marks
(16) has been reached.
The file is locked.
Action
Verify polarity is correct.
Replace with new batteries (☞ P.11).
Release the recorder from HOLD
(☞ P.12).
Release the recorder from HOLD
(☞ P.12).
Replace with new batteries (☞ P.11).
Erase unnecessary files (☞ P.31).
Check another folder.
Unplug the earphones to use the internal
speaker.
Adjust the VOL button.
Set the auto backspace review to “OFF”
in the menu setting.
Unlock the file.
Move the recorder.
Set the microphone sensitivity to
CONFERENCE mode and try again
(☞ P.22).
Erase unnecessary index marks
(☞ P.35).
Unlock the file.
56
Page 57

Symptom
Cannot find the
recorded voice
The playback
speed does not
change
Can not connect
to the computer
using the cradle
Probable cause
Wrong folder.
The noise cancellation function is set at
“LOW” or “HIGH”.
The setting of the USB class is “AUDIO
CLASS”.
Action
Switch to the right folder.
Set the noise cancellation function to
“OFF” or return to normal playback
(☞ P.30).
Set the USB Class to “MASS
STORAGE” in the menu setting of this
recorder.
Troubleshooting
9
57
Page 58

Accessories (optional)
Stereo microphone: ME51S
To create stereo recordings in WMA format with clear sound and reduced noise.
Noise-Cancellation monaural microphone: ME12
(Dictation microphone)
Used to get crisp recordings of your own voice by reducing the effects of ambient noise.
Ni-MH Rechargeable Battery: BR401
High-efficiency rechargeable long life batteries.
Connecting cord: KA333
Use to connect the microphone jack of this unit to a radio or other sound source.
Plug adapter: PA3
A mini plug adapter to connect 2.5 mm mini-plug devices such as microphone to the recorder
3.5 mm mini-jack.
Accessories (optional)
PC Transcription kit : AS-2300
The AS-2300 transcription kit provides you with a PC-footswitch, a headset and DSS Player
software for easy transcription of DSS/WMA recordings.
9
58
Page 59

Specifications
Recording format
DSS (Digital Speech Standard)
WMA (Windows Media Audio)
Input level
–70 dBv
Sampling frequency
STEREO HQ mode: 44.1 kHz
STEREO SP mode: 44.1 kHz
HQ mode: 44.1 kHz
SP mode: 12 kHz
LP mode: 8 kHz
Overall frequency response
STEREO HQ mode: 100 to 17,000 Hz
STEREO SP mode: 100 to 8,000 Hz
HQ mode: 100 to 7,000 Hz
SP mode: 200 to 5,000 Hz
LP mode: 200 to 3,000 Hz
Recording time
STEREO HQ mode: 2 hours 10 minutes
STEREO SP mode: 4 hours 20 minutes
HQ mode: 8 hours 45 minutes
SP mode: 20 hours 55 minutes
LP mode: 44 hours 45 minutes
Alkaline battery life
Recording:
Approx.15 hours (Stereo)
Approx.18 hours (Monaural)
Playback:
Approx. 10 hours (Stereo)
Approx. 11 hours (Monaural)
Ni-MH Rechargeable Battery (BR-401) life
Recording:
Approx.12 hours (Stereo)
Approx.14 hours (Monaural)
Playback:
Approx. 8 hours (Stereo)
Approx. 9 hours (Monaural)
Recording medium
Internal memory: 128 MB
Speaker
Built-in ø23 mm round dynamic speaker
MIC jack
ø3.5 mm mini-jack, impedance 2kΩ or more
EAR jack
ø3.5 mm mini-jack, impedance 8Ω or
more
Maximum working output (3 V DC)
200 mW or more (8 Ω speaker)
Input power requirement
Rated voltage: 3 V
Batteries: Two AAA batteries (LR03 or
External dimensions
122.5 x 37.5 x 17.5 mm
(without protrusions)
Weight
80 g (including alkaline batteries)
* Specifications and design are subject to change
without notice.
* Battery life is measured by Olympus. It varies
greatly according to the type of batteries used
and the conditions of use.
R03) or Two Ni-MH
rechargeable batteries
Specifications
9
59
Page 60

Technical Assistance And Support
The following are contact information for technical support for Olympus recorders and software
only.
◆ Technical Hotline Number in the U.S. and Canada
1-888-553-4448
◆ User Support E-mail address in the U.S. and Canada
distec@olympus.com
◆ Technical Hotline Number in Europe
Toll free number
00800 67 10 83 00
available for Austria, Belgium, Denmark, Finland, France, Germany, Italy, Luxemburg,
Netherlands, Norway, Portugal, Spain, Sweden, Switzerland, United Kingdom
Charged numbers for the Rest of Europe
+49 180 567 1083
+49 40 23773 899
◆ User Support E-mail address in Europe
dss.support@olympus-europa.com
9
60
Page 61

DIGITAL VOICE
RECORDER
DS-20
ИНСТРУКЦИЯ
Благодарим Вас за покупку ЦИФРОВОГО
ДИКТОФОНА OLYMPUS.
Внимательно прочтите эту инструкцию, содержащую
информацию о правильном и безопасном
использовании диктофона.
Храните инструкцию в доступном месте,
чтобы в будущем Вы могли легко ее найти.
Для обеспечения хорошей записи рекомендуем
проверить функцию записи и звук перед
использованием.
RU
Page 62

Содержание
Содержание .............................................. 2
Для безопасного и правильного
использования ................................... 4
Общие указания ...................................... 5
1 Начало работы
Основные функции .................................. 6
Названия составных частей................... 9
Установка батареек .............................. 11
Переключатель (HOLD) ........................ 12
Установка времени/даты (TIME&DATE) ... 13
2 Установка меню
Список позиций меню ........................... 15
3 О записи
Запись ..................................................... 17
Режимы записи (REC MODE) ............... 19
Использование функции голосовой
активации записи (VCVA) ............... 20
Чувствительность микрофона
(MIC SENSE) .................................... 22
4 О воспроизведении
Воспроизведение................................... 23
Повторное воспроизведение ............... 28
Функция подавления шумов................. 30
5 Прочие функции
Удаление ................................................ 31
Индексные пометки .............................. 35
Информация на ЖКИ-дисплее ............ 37
Форматирование диктофона
(FORMAT) ......................................... 39
6
Подготовка перед
использованием программного
пакета DSS Player
Использование программного пакета
DSS Player ........................................ 41
Операционная среда ............................. 42
Инсталляция программного пакета ..... 43
Использование интерактивной справки .....
Подсоединение к компьютеру ............. 46
Работа программ DSS Player ................ 50
45
2
Page 63

7 Расширенные функции
DSS Player
1
Функция Обновления ............................ 51
8
Другие способы практического
применения
Использование в качестве внешней
памяти компьютера ........................ 53
9 Прочая информация
Список оповещающих сообщений ....... 54
Устранение возможных неполадок ..... 56
Аксессуары (опционные) ...................... 58
Спецификации ....................................... 59
Техническая помощь и обслуживание
........................................................... 60
2
3
4
5
6
7
8
9
10
3
Page 64

Для безопасного и
правильного
использования
Перед использованием нового диктофона
внимательно прочтите эту инструкцию и
удостоверьтесь, что Вы знаете, как
безопасно и правильно пользоваться
диктофоном. Чтобы в будущем обращаться
к инструкции за информацией, держите ее
в доступном месте.
• Знаками внимания отмечена важная
информация о безопасном пользовании. Во
избежание травм и порчи имущества важно
всегда соблюдать указания по пользованию
диктофоном и безопасности.
Использование
онлайнового руководства
Если Вы инсталлируете программный
пакет DSS Player на Ваш персональный
компьютер с CD-ROM, Вы можете
использовать онлайновую расширенную
версию данного руководства по
эксплуатации, позволяющую Вам изучать
более подробную информацию о
цифровом диктофоне.
Если программный пакет DSS Player уже
инсталлирован, щелкните по кнопке
[Start], выберите опцию [All Programs],
затем опцию [OLYMPUS DSS Player], затем
щелкните по опции [DS-20 ONLINE
INSTRUCTIONS]. Вы можете прочесть
более подробную информацию о
перечисленных ниже пунктах.
Источник питания...................................... 12
Метод установки меню ............................. 16
4
Запись с внешнего микрофона или
других устройст‚ .................................. 26
Запись по таймеру (TIMER REC) ............. 28
Прослушивание во время записи аудио
сигнала (Контроль записи) .................... 32
Изменение скорости воспроизведения
(PLAY SPEED) ..................................... 39
Непрерывное воспроизведение .............. 41
Автовозврат на шаг (BACK SPACE) ........ 44
Установка интервала перехода
(SKIP SPACE) ....................................... 45
Функция сигнальногов оспроизведения
(ALARM) ............................................... 48
Защита файлов (LOCK) ............................ 55
Настройка контрастности
ЖКИ-дисплея (CONTRAST) .............. 58
Подсветка дисплея (BACKLIGHT) ........... 59
Системные звуковые сигналы (BEEP) .... 60
Присвоение имени папке (FOLDER NAME) ....
Создание комментария к файлу (COMMENT) ...
Перемещение файлов из
одной папки в другую ........................ 65
Деинсталляция программного обеспечения ....
Названия окон (DSS Player) ..................... 81
Импортирование голосовых
файлов в компьютер .......................... 82
Воспроизведение голосового файла ...... 84
Загрузка голосовых файлов в диктофон ..... 85
Отправка голосовых файлов по
электронной почте .......................... 87
Изменение ID-кода пользователя ........... 87
Изменение имени папки ........................... 88
Редактирование комментариев к файлам ......
Редактирование шаблона ........................ 89
Микрофон USB/Динамик USB .................. 90
Объединение файло‚ ................................ 94
Разделение файло‚ ................................... 96
Установка меню диктофона .................... 98
Изменение класса USB
(USB CLASS) ....................................... 99
61
64
74
88
Page 65

Общие указания
Не оставляйте диктофон в нагретой
●
влажной среде, например, в
автомобиле под прямыми солнечными
лучами или на пляже летом.
● Не храните диктофон в местах с
повышенной запыленностью или
влажностью.
● Не применяйте органические и
химические растворители, такие
как спирт и средства полировки,
для чистки данного устройства.
●
Не кладите диктофон на
электроприборы, такие как
холодильник и телевизор, или вблизи их.
●
Не производите запись и
воспроизведение вблизи мобильных
телефонов и других беспроводных
устройств, так как они могут
создавать помехи и шум. Если Вы
слышите шум, переместитесь в другое
место или передвиньте диктофон
дальше от указанных устройств.
● Берегите диктофон от попадания
песка или грязи. Это может привести
к невосстановимым повреждениям.
● Не допускайте сильных вибраций
и ударов.
● Не разбирайте, не чините и не
вносите модификаций в диктофон
самостоятельно.
●
Не пользуйтесь диктофоном, когда
управляете транспортным средством
(таким как велосипед, мотоцикл).
● Держите диктофон в месте,
недоступном для детей.
<Предупреждение относительно
возможной утраты данных>
Запись, хранящаяся в памяти, может быть
повреждена или уничтожена в результате
ошибок управления, ошибок в работе или
во время работы по ремонту аппарата.
Рекомендуется создавать базу данных
поддержки и сохранять важные записи на
других носителях, таких как жесткий диск
компьютера.
Батарейки
Внимание!
•
Никогда не подвергайте батарейки
воздействию огня, нагреванию или
короткому замыканию, не разбирайте их.
•Не пытайтесь перезаряжать
щелочные, литиевые и другие не
перезаряжающиеся батарейки.
•Не используйте батарейки с
трещинами или повреждениями на
внешней оболочке.
•Держите батарейки в месте,
недоступном для детей.
•
Если Вы заметите что-либо необычное
при использовании диктофона,
например, необычный шум, выделение
тепла, дым или запах горелого:
1 немедленно выньте батарейки –
будьте осторожны, чтобы не
обжечься;
2 позвоните дилеру или местному
представителю Olympus для
сервисного обслуживания.
5
Page 66

1 Начало работы
Основные функции
1
Основные функции
Данное изделие оснащено следующими
функциями.
● Подсоедините приставку и соединительный
кабель USB к данному диктофону, и Вы
сможете осуществить высокоскоростную
передачу данных на компьютер. (☞ стр. 46)
● Данный диктофон может также
использоваться как устройство внешней
памяти компьютера. (☞ стр.53)
•Посредством подсоединения к компьютеру
с помощью USB изображения, текстовые
данные и т.п. могут быть сохранены и
использованы для переноса данных.
● Диктофон имеет большой полноточечный
дисплей с подсветкой (экран ЖКИдисплея).
•На экране отображается информация о
записываемых голосовых файлах и
несложные для понимания оперативные
сообщения.
● Голосовые сообщения формата DSS и
WMA сохраняются во флэш-памяти.*
●
Благодаря использованию встроенного
стереофонического микрофона может быть
выбрано 2 типа режима стереофонической
записи: стерео HQ (стереофоническая
запись звука высокого качества) и стерео
SP (стереофоническая стандартная
запись), и 3 типа режимов монофонической
записи: HQ (запись звука высокого
качества), SP (стандартная запись) и LP
(длительная запись).*1 (☞ стр.19)
Время записи
Режим STEREO HQ : 2 ч. 10 мин.
Режим STEREO SP : 4 ч. 20 мин.
Режим HQ : 8 ч. 45 мин.
Режим SP : 20 ч. 55 мин.
Режим LP : 44 ч. 45 мин.
•Чистое время записи для одного
непрерывного файла. Чистое время записи
может быть меньше, если записано много
коротких файлов. (Оставшееся время
1
записи и продолжительность записанного
файла, которые выводятся на дисплей,
являются приблизительными.)
● Вы можете переименовывать папки.
● Пять папок диктофона вмещают до 199
файлов каждая. Максимальное
количество записей – 995. (☞ стр.17)
6
Page 67

● Диктофон имеет встроенную функцию
голосовой активации записи (VCVA).
(☞ стр. 20)
● Встроена функция записи по таймеру,
позволяющая выполнять запись в
установленное время.
● Вы можете вставлять комментарии
в файлы.*
• Вы можете добавлять комментарии длиной до
100 символов к каждому записанному файлу.
• Данный диктофон имеет 10 предварительно
установленных шаблонов комментариев.
2
● Имеется функция подавления шумов.*
(☞ стр. 30)
•Технология подавления шумов Ruwisch &
Kollegen GmbH позволяет уменьшить
помехи в файлах и обеспечивает чистое
воспроизведение звука.
● Записанные файлы могут перемещаться
из одной папки в другую.
● Вы можете вставлять и удалять
индексные пометки.*2 (☞ стр. 35)
•Если Вы вставите индексные пометки во
время записи или воспроизведения, позже
Вы сможете быстро найти запись, которую
Вы хотите услышать.
● Скорость воспроизведения может
управляться по Вашему усмотрению.
● Ускоренная перемотка вперед и
ускоренная перемотка назад возможны
в установленном интервале.
● Прилагается программный пакет DSS
Player. (☞ стр. 41)
•Если Вы перенесете голосовые файлы,
записанные диктофоном, на персональный
компьютер, Вы сможете легко
воспроизводить, упорядочивать и
редактировать файлы.
•Если Вы подсоедините диктофон к
компьютеру, Вы сможете использовать его
в качестве микрофона USB или динамика
2
USB.
● Программное обеспечение “DSS Player”
можно обновить до версии “DSS Player
Plus”, которое имеет расширенные
функциональные возможности
(приобретается отдельно). (☞ стр. 51)
•Дополнительно к функциям программного
обеспечения “DSS Player” возможно
объединение и разделение файлов,
конфигурация установок меню данного
диктофона и т.п.
Программу “DSS Player” можно
обновить до версии “DSS Player
Plus
Plus”, имеющей расширенные
возможности (дополнительная
платная услуга) (см. ☞стр. 51)
1
Основные функции
7
Page 68

Основные функции
*1: Формат DSS при режиме записи SP и LP, а
1
формат WMA при режиме записи стерео HQ
и стерео SP и HQ.
Основные функции
*2: Для файлов WMA данные функции доступны
только для файлов, записанных данным
диктофоном или диктофонами IC фирмы
Olympus.
IBM и PC/AT являются торговыми марками или
зарегистрированными торговыми марками
International Business Machines Corporation.
Microsoft, Windows и Windows Media являются
зарегистрированными торговыми марками
Microsoft Corporation.
Intel и Pentium являются зарегистрированными
торговыми марками Intel Corporation.
CORTOLOGIC является зарегистрированной
торговой маркой Ruwisch & Kollegen GmbH.
Остальные продукты и марки, упомянутые
здесь, могут быть торговыми марками или
зарегистрированными торговыми марками
соответствующих владельцев.
8
Page 69

Названия составных частей
1
%
$
#
@
!
0
9
2
3
4
5
6
7
8
-
1
Названия составных частей
2
^
&
*
(
)
1 Гнездо MIC (внешний микрофон)
2 Встроенный стереофонический
микрофон
3 Кнопка INDEX/2
4 Кнопка DISPLAY/MENU/SET
5 Кнопка FOLDER/REPEAT/3
6 Кнопка ERASE
7 Кнопка VOL (+) (повышение
громкости)
8 Кнопка VOL (–) (понижение
громкости)
9 Кнопка FF (ускоренная
перемотка вперед)
0 Кнопка PLAY
! Кнопка REW (ускоренная
перемотка назад)
@ Кнопка STOP
# Кнопка REC (запись)
$ Дисплей (ЖКИ-экран)
% Лампа-индикатор записи/
воспроизведения
^ Встроенный динамик
& Переключатель HOLD
(блокировка органов
управления)
* Гнездо EAR (наушники)
( Пpopeзь для peмeшка
) Крышка отделения батареек
- Гнездо для приставки/
Компьютерный терминал (USB)
9
Page 70

Названия составных частей
Дисплей (ЖКИ-экран)
1
Названия составных частей
6 7
5
1
2
3
4
1 Индикатор батареек
2 Индикатор VCVA (голосовая активация
записи)
3 Дисплей записи по таймеру
4 Индикатор сигнала оповещения
5 Индикация чувствительности микрофона
6 Дисплей стерео
7 Индикатор режима записи
8 Номер текущего файла
9 Общее количество записанных файлов в
папке
0 Индикатор защиты от удаления
! Индикатор повторного воспроизведения
@ Зона для текстовой информации
8
9
0
!
@
10
Page 71

Установка батареек
Отодвиньте крышку отделения батареек
легким нажатием, как указывает стрелка.
1
1
Вставьте две батарейки типа AAA, соблюдая
правильную полярность.
2
Закройте крышку до упора.
3
2
3
..............................................................................................................................................................
Примечания
• Перед заменой батареек убедитесь, что диктофон выключен. Удаление батареек во время
использования диктофона может повредить файл. Если при записи файла заряд батареек
заканчивается, Вы потеряете записываемый файл, т.к. заголовок файла не будет закрыт. Поэтому
важно заменить батарейки, когда появится первый индикатор понижения заряда батареек.
• Обязательно заменяйте обе батарейки.
• Никогда не используйте вместе новые и старые батарейки, батарейки разного типа и разных марок.
• Если замена батареек занимает более 1 минуты, может потребоваться переустановка времени
после установки новых батареек (☞ стр. 13).
• Выньте батарейки, если Вы не собираетесь использовать диктофон длительное время.
Замена батареек
Индикатор батареек на дисплее изменится, когда заряд
батареек станет низким.
➜ ➜ ➜
Когда на дисплее появится знак , замените
батарейки как можно скорее.
Когда заряд батареек станет слишком низким, диктофон
отключится, и на дисплее появится сообщение “BATTERY
LOW”. Рекомендуются щелочные батарейки типа AAA.
Для диктофона могут также использоваться
опционные никель-металлогидридные
аккумуляторы фирмы Olympus (☞ стр. 58).
1
Установка батареек
11
Page 72

Переключатель (HOLD)
1
Переключатель (HOLD)
положение HOLD.
Если Вы установите диктофон в положение HOLD,
передвинув тумблер HOLD в направлении,
указанном стрелкой, все текущие установки
сохраняться, а все кнопки и переключатели, кроме
переключателя HOLD, будут неактивны. Эта
функция полезна, если диктофон переносится в
сумке или кармане.
Не забудьте отменить блокировку
переключателем HOLD, прежде чем
пользоваться диктофоном.
....................................................................................................................................................
Примечания
• Экран будет мигать, если переключатель будет перемещен в положение HOLD в состоянии
остановки. Если в это время будет нажата какая-либо кнопка, примерно на 2 секунды появится
мигающий индикатор часов, но диктофон работать не будет.
• Если переключатель будет перемещен в положение HOLD во время воспроизведения (или записи),
состояние воспроизведения (записи) сохранится и не будет управляться.
(Когда закончится воспроизведение или запись займет всю свободную память, диктофон
остановится).
• Оповещающий сигнал будет звучать в установленное время даже в состоянии HOLD. Диктофон
начнет воспроизведение файла, ассоциированного с сигналом, после нажатия любой кнопки.
• Запись начнется, когда придет установленное время записи по таймеру, даже если диктофон
находится в режиме HOLD.
Установка переключателя HOLD в активное
12
Page 73

Установка времени/даты (TIME&DATE)
Если Вы установили дату и время, информация о времени создания файла будет
автоматически записываться в этот файл. Время и дата должны быть установлены
для облегчения задач управления файлами. Также она необходима при выполнении
записи по таймеру и сигнального воспроизведения.
Индикатор часов будет мигать автоматически после установки новых батареек
перед первым использованием диктофона и после длительного перерыва в
работе диктофона. В этом случае начинайте с шага 1.
Установка часов.
Кнопка
MENU/SET
(подтверждение
выбранной
установки
и переход к
следующей
позиции)
Кнопка
PLAY
(изменение
формата
данных)
Кнопка STOP
(Выход из меню)
Кнопка 2
(изменение
параметра)
Кнопка 3
(изменение
параметра)
1 Нажимайте кнопку 3 или кнопку 2
1
для установки часа.
2 Нажмите кнопку MENU/SET для
подтверждения установки часа.
• Вы можете выбрать 12- или 24часовую систему нажатием кнопки
PLAY во время установки часов и
минут.
Пример: 5:45 P.M.
Установка минут.
1 Нажимайте кнопку 3 или кнопку 2
2
для установки минут.
2 Нажмите кнопку MENU/SET для
подтверждения установки минут.
Установка года.
1 Нажимайте кнопку 3 или кнопку 2
3
для установки года.
2 Нажмите кнопку MENU/SET для
подтверждения установки года.
• Вы можете выбрать порядок
следования года, месяца и числа
нажатием кнопки PLAY во время
установки этих параметров.
5:45 PM ←→ 17:45
(исходная установка)
1
Установка времени/даты (TIME&DATE)
13
Page 74

Установка времени/даты (TIME&DATE)
Пример: Январь 14, 2005
1
Установка времени/даты (TIME&DATE)
1M 14D 2005Y
(
исходная установка
↓
14D 1M 2005Y
↓
2005Y 1M 14D
Установка месяца.
1 Нажимайте кнопку 3 или кнопку 2
4
для установки месяца.
2 Нажмите кнопку MENU/SET для
подтверждения установки месяца.
Установка даты.
1 Нажимайте кнопку 3 или кнопку 2
5
для установки даты.
2 Нажмите кнопку MENU/SET для
подтверждения установки даты.
)
Изменение установки времени/даты
Нажмите кнопку 3 или 2 на
экране субменю и выберите
1
позицию “TIME&DATE”.
См. ☞ стр. 16 относительно субменю.
Нажмите кнопку MENU/SET.
Появится экран времени/даты. Индикатор
2
часа будет мигать, обозначая начало
процесса установки времени/даты.
2
1
Закройте меню нажатием
кнопки STOP.
6
После подтверждения даты часы
диктофона начнут работать. Установите
время в соответствии с сигналом точного
времени и нажмите кнопку MENU/SET.
........................................................................
Примечание
Если нажать кнопку STOP в процессе установки,
время будет установлено соответственно
значениям, введенным на тот момент.
14
Выполните такие же шаги, как в разделе “Установка
времени/даты” (☞ стр. 13), начиная с шага 1.
Page 75

2 Установка меню
Список позиций меню
главное меню
Нажмите и удерживайте кнопку MENU/SET в течение 1 секунды или дольше.
P.1 9
P.2 2
Экран установки скорости воспроизведения.
Нажмите и удерживайте кнопку MENU/
SET в течение 1 секунды или дольше.
Нажмите кнопку 3 или 2.
Переключается на субменю.
P.1 6
....................................................................................................................................................
Примечания
• Если Вы нажмете кнопку STOP или REC во время работы с меню, диктофон остановится и применит
параметры, установленные на тот момент. Установки записи по таймеру будут сохранены, функция
перейдет в положение OFF.
• Диктофон остановится, если Вы не произведете никаких операций в течение 3-х минут во время
работы с меню, а выбранный Вами параметр не будет введен.
P.2 0
Нажмите кнопку MENU/SET.
исходная установка.
2
Список позиций меню
15
Page 76

Список позиций меню
субменю
Переключается на главное меню.
2
Список позиций меню
....................................................................................................................................................
Примечания
• Если Вы нажмете кнопку STOP или REC во время работы с меню, диктофон остановится и
применит параметры, установленные на тот момент.
• Диктофон остановится, если Вы не произведете никаких операций в течение 3-х минут во время
работы с меню, а выбранный Вами параметр не будет введен.
P.15
Установка времени/даты.
Порядок: часы, минуты, год, месяц, число.
P.13
Настройка контрастности ЖКИ-дисплея.
Присвоение имени папке.
Создание комментария к файлу.
P.39
Нажмите кнопку 3 или 2.
Нажмите кнопку MENU/SET.
исходная установка.
16
Page 77

3 О записи
Запись
Диктофон имеет пять папок, A, B, C, D и E, и каждое сообщение, записанное в
папку, сохраняется в формате DSS (цифровой стандарт речи) или WMA (Windows-медиааудио). Эти папки могут использоваться для разделения записей по их характеру;
например, ПапкаAможет быть использована для хранения частной информации, в то
время как папка B может быть использована для помещения в нее деловой
информации. Bкаждую папку может быть записано до 199 сообщений.
Стереофоническая запись возможна, только когда диктофон установлен в режим стерео
HQ или стерео SP.
3
Запись
Встроенный
стереофонический
микрофон
2
3
1
Нажатием кнопки FOLDER
выберите папку.
1
Появится имя папки.
a Общее количество записанных
файлов в папке
b Номер текущего файла
c Текущая папка
Нажмите кнопку REC для
начала записи.
2
Лампа-индикатор записи/воспроизведения
загорится красным цветом. Поверните
встроенный микрофон в направлении для
записи. Дисплей изменится в зависимости
от режима записи (☞ стр.19).
d Текущий режим записи
e Время записи
f Остающееся время записи
Остановите запись нажатием
кнопки STOP.
3
Дисплей в
режиме
стереофонической
записи
Дисплей в
режиме
монофонической
записи
17
Page 78

Запись
Примечания
• Для обеспечения записи с самого начала
начните говорить после того, как Вы увидите
включенной красную лампу-индикатор
записи/воспроизведения.
• Когда оставшееся время записи достигнет 60,
30 и 10 секунд, прозвучит сигнал.
• Сообщения “MEMORY FULL” или “FOLDER
3
FULL” появятся, когда память, отведенная
Запись
под файлы, будет заполнена. Удалите
ненужные файлы перед продолжением
записи (☞ стр. 31) или перенесите файлы в
компьютер с помощью программного
обеспечения DSS Player.
• Формат DSS при режиме записи SP и LP, а
формат WMA при режиме записи стерео HQ
и стерео SP и HQ.
•
При нажатии кнопки PLAY во время записи
запись остановится, и начнется воспроизведение
текущего файла.
Функции записи
Пауза
Нажмите кнопку REC во время записи.
На дисплее появится мигающее
➥
сообщение “REC PAUSE”.
• Если оставить диктофон в режиме паузы на
120 и более минут, произойдет остановка
записи.
Возобновление записи
Снова нажмите кнопку REC.
Запись продолжится с момента, в
➥
который была прервана.
18
Page 79

Режимы записи (REC MODE)
Вы можете выбрать режим стерео HQ (стереофоническая запись звука высокого
качества) и стерео SP (стереофоническая стандартная запись), HQ (запись звука
высокого качества), SP (стандартная запись) и LP (длительная запись).
Нажмите и удерживайте
кнопку MENU/SET в течение 1
1
секунды или дольше.
На дисплее появится сообщение
“REC MODE” (☞ стр.15).
1,2,4
5
....................................................................................................................................................
Примечание
Если встреча или лекция должна быть записана четко, не используйте режим LP.
3
Нажмите кнопку MENU/SET.
Начнется процесс установки
2
режима записи.
Нажатием кнопки 3 или 2
выберите “STEREO HQ”,
3
“STEREO SP”, “HQ”, “SP” или
“LP”.
Нажатием кнопки MENU/
SETзавершите установку.
4
Нажмите кнопку STOP, чтобы
закрыть главное меню.
5
3
Режимы записи (REC MODE)
19
Page 80

Использование функции голосовой
активации записи (VCVA)
Когда микрофон определяет, что уровень звука достиг предварительно установленного
уровня, встроенная функция голосовой активации записи (VCVA) автоматически начнет
запись и остановит ее, когда уровень звука станет ниже.
Особенно полезная при длительной записи функция VCVA не только экономит память,
выключая диктофон в периоды молчания, но и делает воспроизведение более
эффективным и удобным.
3
Использование функции голосовой активации записи (VCVA)
1,3,5
2,4
Нажмите и удерживайте кнопку
MENU/SET в течение 1 секунды
1
или дольше.
Откроется главное меню (☞ стр.15).
Нажатием кнопки 3 или 2
выберите позицию “VCVA”.
2
6
Нажмите кнопку MENU/SET.
Начнется процесс установки VCVA.
3
Нажатием кнопки 3 или 2
выберите позицию “ON”
4
(включено) или “OFF”
(выключено).
ON: Начнет запись в режиме VCVA.
OFF: Продолжит запись в
нормальном режиме.
Нажатием кнопки MENU/SET
завершите установку.
5
Нажмите кнопку STOP, чтобы
закрыть главное меню.
6
Если была выбрана позиция “ON”, на
дисплее появится индикатор VCVA.
20
Page 81

Нажмите кнопку REC, чтобы начать запись.
Когда уровень звука станет ниже
7
установленного значения, запись
автоматически перейдет в режим паузы
приблизительно через 1 секунду, и на
дисплее появится сообщение “STANDBY”
(ожидание). Лампа-индикатор записи/
7
воспроизведения загорится при начале
записи и будет мигать в режиме паузы.
Настройка уровня активации начала/
остановки записи
Нажатием кнопки FF или REW во
время записи Вы можете изменить
уровень звука, при котором будет
активироваться режим паузы.
Уровень звука для паузы может
устанавливаться на 15 различных значений.
Чем больше это значение, тем выше
чувствительность к звуку. При самом большом
значении запись начнется даже при очень
слабом звуке.
Уровень звука для паузы в функции VCVA может настраиваться в
соответствии с уровнем окружающих (фоновых) шумов.
a Измеритель уровня (изменяется в соответствии с громкостью
записываемого звука)
b Стартовый уровень (перемещается вправо/влево в
соответствии с установленным уровнем)
....................................................................................................................................................
Примечания
• Уровень звука активации начала/окончания записи также зависит от выбранной чувствительности
микрофона (☞ стр. 22).
•
Если уровень активации не будет отрегулирован в течение 5 секунд, дисплей вернется к предыдущему уровню.
•
Если окружающим шум слишком громкий, чувствительность VCVA можно настроить в соответствии с ситуацией записи.
• Рекомендуется предварительно проверить работу функции и настроить уровень звука активации
для обеспечения успешной записи.
3
Использование функции голосовой активации записи (VCVA)
21
Page 82

Чувствительность микрофона (MIC SENSE)
Чувствительность микрофона может изменяться в соответствии с потребностями
записи.
Нажмите и удерживайте
кнопку MENU/SET в течение 1
1
секунды или дольше.
Откроется главное меню (☞ стр. 15).
3
Чувствительность микрофона (MIC SENSE)
1,3,5
2,4
Нажатием кнопки 3 или 2
выберите позицию “MIC SENSE”.
2
6
Нажмите кнопку MENU/SET.
Начнется процесс установки
3
чувствительности микрофона.
Нажатием кнопки 3 или 2
выберите позицию
4
“CONFERENCE” или “DICTATION”.
CONFERENCE:
режим высокой
чувствительности, звук
записывается из всех
направлений.
DICTATION:
режим низкой чувствительности,
предназначенный для диктовки.
Нажатием кнопки MENU/SET
завершите установку.
5
Нажмите кнопку STOP, чтобы
закрыть главное меню.
6
....................................................................................................................................................
Примечание
Если голос говорящего должен быть записан четко, установите диктофон в режим диктовки,
придвиньте встроенный стереофонический микрофон поближе ко рту говорящего (5-10 см) и
выполните запись.
22
Page 83

4 О воспроизведении
Воспроизведение
Нажатием кнопки FOLDER
выберите папку.
1
Нажатием кнопки FF или REW
выберите файл, который
2
хотите воспроизведения.
Если Вы удерживаете нажатой
кнопку FF или REW в режиме
остановки, диктофон будет
непрерывно быстро переходить к
началам файлов.
Нажмите кнопку PLAY, чтобы
начать воспроизведение.
3
Лампа-индикатор записи/
воспроизведения загорится
зеленым.
a Текущее время воспроизведения
b Общая продолжительность
Нажмите кнопку VOL (+) или
VOL (–) для выбора
4
надлежащей громкости звука.
Дисплей показывает уровень
громкости. Вы можете выбирать в
пределах от 0 до 30.
В любой нужный момент
нажмите кнопку STOP чтобы
5
остановить воспроизведение.
Возобновить воспроизведение
можно, снова нажав кнопку PLAY.
3
2
5
1
4
4
Воспроизведение
воспроизводимого файла
23
Page 84

Воспроизведение
Функция сохранения конечного положения воспроизведения
Если кнопка STOP нажата во время воспроизведения файла, и
диктофон останавливается посередине файла, положение остановки
будет автоматически занесено в память. Даже при перемещении к
другим файлам с помощью кнопок FF или REW воспроизведение может
быть возобновлено с места предыдущего прерывания и легко может
быть возвращено к положению занесенной в память остановки с
помощью кнопок FF или REW. При возвращении к положению
остановки с помощью кнопок FF или REW, на дисплее будет
отображаться индикация “PREVIOUS STOP POINT”.
4
Воспроизведение и остановка файла изменяет конечное положение,
Воспроизведение
и положение остановки заносится в память как новое конечное
положение.
Конечное положение
Начало
файла A
▲
Возможно
начало
воспроизведения
файл A файл B файл C
воспроизведения
Начало
файла B
▲▲
Возможно
начало
▲
Возможно
начало
воспроизведения
Начало
файла C
Возможно
начало
воспроизведения
....................................................................................................................................................
Примечание
Воспроизведение с места последней остановки будет отменено при выполнении записи, соединении
с компьютером, переходе к другой папке, удалении файла или извлечении батареек.
24
Page 85

Функция
воспроизведения
Ускоренное
воспроизведение
Медленное
воспроизведение
Перемотка
вперед
(CUE)
Перемотка
назад
Быстрый
переход в
начало
4
файла*
Ускоренная
перемотка
6
вперед*
и
6 *7
назад*
на
установленный
интервал
Операция
Один раз нажмите кнопку PLAY во время воспроизведения
1
файла.*
➥ Диктофон выполняет воспроизведение на установленной
скорости. Скорость может быть от 0,5 до 2 раз выше
обычной.
Нажмите и удерживайте кнопку FF во время
воспроизведения файла.*
➥ Диктофон остановится, когда достигнет конца файла.
Продолжайте удерживать кнопку FF, чтобы продолжить
перемотку с начала следующего файла.*
Нажмите и удерживайте кнопку REW во время
воспроизведения файла.*
➥ Диктофон остановится, когда достигнет начала файла.
Продолжайте удерживать кнопку REW, чтобы продолжить
обратную перемотку с конца предыдущего файла.*
Нажмите кнопку FF во время воспроизведения, ускоренного
воспроизведения или медленного воспроизведения.
➥ Диктофон перейдет в начало следующего файла и начнет
его воспроизведение с прежней скоростью.*
Нажмите кнопку REW во время воспроизведения, ускоренного
воспроизведения или медленного воспроизведения.
➥ Диктофон перейдет в начало воспроизводимого файла и
начнет его воспроизведение с прежней скоростью.*
Нажмите кнопку REW 2 раза во время воспроизведения для
ускоренного воспроизведения или медленного воспроизведения.
➥ Диктофон перейдет в начало предыдущего файла, и
начнется его воспроизведение с прежней скоростью.*
Нажмите кнопку FF во время воспроизведения, ускоренного
воспроизведения или медленного воспроизведения.
➥ При воспроизведении файла осуществляется его быстрая
перемотка вперед на установленный интервал, и
начинается воспроизведение с прежней скоростью.*
Нажмите кнопку REW во время воспроизведения, ускоренного
воспроизведения или медленного воспроизведения.
➥ При воспроизведении файла осуществляется его быстрая
перемотка назад на установленный интервал, и
начинается воспроизведение с прежней скоростью.*8 *
2
3
2
3
5
5
5
8
9
Как отменить
Нажмите кнопку
PLAY.
Воспроизведение
➥
продолжится с
нормальной
скоростью.
Отпустите кнопку
FF.
➥
Воспроизведение
продолжится с
прежней
скоростью.
Отпустите кнопку
REW.
➥
Воспроизведение
продолжится с
прежней
скоростью.
4
Воспроизведение
25
Page 86

Воспроизведение
1 Указанные выше функции воспроизведения и вставка индексных пометок (☞ стр.35) также
*
активны во время ускоренного, замедленного и обычного воспроизведения.
2 При непрерывном нажатии кнопки FF или REW во время остановки будет непрерывно
*
осуществляться переход к началам следующих или окончаниям предыдущих файлов (☞ стр. 24)
(переход/обратный переход).
3 Если индексная пометка указана посередине файла, диктофон на короткое время остановится
*
в положении индексной пометки.
4 Если в меню интервал перехода установлен на начало файла. Переход на начало файла - это
*
исходная установка интервала перехода.
5 Если индексная пометка указана посередине файла, воспроизведение начнется с индексной
*
4
пометки.
6 Если в меню интервал перехода не установлен на начало файла.
*
Воспроизведение
7 Если в меню воспроизведение было предварительно установлено в позицию “OFF”.
*
8 Если индексная пометка встретится во время перемотки на установленный интервал,
*
воспроизведение начнется с индексной пометки.
9 Если установлены интервал перехода и воспроизведение предыдущего фрагмента, установка
*
воспроизведения предыдущего фрагмента отменит установку интервала перехода.
....................................................................................................................................................
Примечания
• Если функция подавления шумов (☞ стр.30) установлена на значение “LOW” или “HIGH”, скорость
воспроизведения изменить нельзя.
• Если установлено воспроизведение предыдущего фрагмента, кнопка FF отключится и переход к
началу файла или к индексной пометке не будет выполнен.
26
Page 87

Конец последнего файла
Если при выполнении следующей операции диктофон достигнет конца
последнего файла во время воспроизведения, на дисплее в течение
5 секунд появится мигающий индикатор “END”.
• Нажмите кнопку FF (Быстрый переход)
• Нажмите и удерживайте кнопку FF (CUE)
• Задайте воспроизведение последнего файла
С помощью кнопки FF или REW, мигает индикатор “END”, может быть выполнена
следующая операция.
Операция
Непрерывное нажатие кнопки REW.
➥ Непрерывная ускоренная перемотка назад (REVIEW) с конца последнего файла (☞ стр. 25).
Установите интервал перехода, отличный от перехода на начало файла, или нажмите кнопку
REW, если воспроизведение предыдущего фрагмента установлено в позицию ON.
➥ Диктофон вернется на ближайшую позицию (установленный интервал перехода или
индексную пометку) или на начало предыдущего фрагмента и начнет воспроизведение.
Установите переход на начало файла в качестве интервала перехода, или нажмите кнопку REW,
если воспроизведение предыдущего фрагмента установлено в позицию OFF.
➥ Диктофон вернется назад и начнет воспроизведение с ближайшей позиции (начала
последнего файла или индексной пометки).
Нажмите кнопку FF.
➥ Диктофон перейдет к началу первого файла первого файла и остановится.
Непрерывное нажатие кнопки FF.
➥ Диктофон будет непрерывно переходить к началам файлов, начиная с первого, и
остановится, если кнопка FF будет отпущена.
Примечание
После мигания в течение 5 секунд индикации “END” диктофон вернется к началу последнего файла
и остановится.
4
Воспроизведение
27
Page 88

Повторное воспроизведение
Функция повторно воспроизводит фрагмент файла, который проигрывается. Если
одновременно используется функция непрерывного воспроизведения, два или более
файлов могут воспроизводиться повторно, если они находятся в одной папке.
Выберите файл для
повторного воспроизведения
1
и нажмите кнопку PLAY.
Начнется воспроизведение файла.
4
Повторное воспроизведение
2
1
Коротко нажмите кнопку REPEAT
в месте, с которого хотите начать
2
повторное воспроизведение.
Сообщение “REPEAT END?” (окончание
повтора?) будет мигать, пока Вы не
укажете место окончания повтора.
Даже если мигает индикация “REPEAT
END?”, операции изменения скорости
воспроизведения, ускоренной перемотки
вперед, ускоренной перемотки назад и
перехода на начало воспроизведения (☞
стр. 25) могут быть выполнены так же,
как и при нормальном воспроизведении,
и может быть осуществлен быстрый
переход вперед к конечному положению.
Также после достижения конца файла,
который становится конечным
положением, начнется повторное
воспроизведение.
28
Page 89

Снова коротко нажмите кнопку
REPEAT в том месте записи, где Вы
3
хотите закончить повторное
воспроизведение.
Диктофон будет повторно воспроизводить
фрагмент между отметками начала и
окончания, пока Вы не отмените повторное
3
....................................................................................................................................................
Примечание
Для использования этой функции нажимайте кнопку REPEAT коротко. Если Вы будете удерживать
ее нажатой дольше 1 секунды, появится окно перемещения файлов.
воспроизведение.
Если функция непрерывного
воспроизведения установлена в позицию
ON, место окончания может быть
установлено где угодно, вплоть до
последнего файла в папке.
Установка скорости воспроизведения,
вставка и удаление индексных пометок и
функция подавления шума могут
выполнятьс как во время непрерывного
воспроизведения, так и во время
нормального.
Отмените функцию непрерывного
воспроизведения.
4
• При кратковременном нажатии кнопки
REPEAT диктофон вернется к
нормальному воспроизведению.
• При нажатии кнопки STOP будет
отменена функция непрерывного
воспроизведения и воспроизведение
остановится.
4
Повторное воспроизведение
29
Page 90

Функция подавления шумов
Если записываемый звук плохо слышен из-за шумной обстановки, отрегулируйте
установку уровня подавления шумов. Шум будет снижен и качество звука файла будет
улучшено.
Нажмите и удерживайте
кнопку MENU/SET в течение 1
1
секунды или более во время
воспроизведения файла.
Появится текущий уровень
4
Функция подавления шумов
1,2
подавления шумов.
Выберите нужный уровень
подавления шумов с
2
помощью кнопки MENU/SET.
Уровни будут переключаться в
следующей очередности, “OFF”
“LOW” “HIGH”.
Если уровень подавления шумов установлен в позицию
“LOW” или “HIGH”, установка уровня будет отображаться в
течение 5 секунд при воспроизведении файла.
Для изменения установки уровня подавления шумов
нажмите кнопку MENU/SET во время отображения
установки уровня.
....................................................................................................................................................
Примечания
• Если Вы выбрали установку “LOW” или “HIGH”, на дисплее появятся мигающее значение уровня
подавления шумов примерно 5 секунды во время воспроизведения файла.
• Если Вы выбрали установку “LOW” или“HIGH”, она останется активной до установки в позицию
“OFF”.
• Подавление шумов не может использоваться во время ускоренного воспроизведения/медленного
воспроизведения (☞ стр. 25).
• Если подавление шумов установлено на файл, записанный в режиме стерео HQ или стерео SP, он
будет воспроизводиться в монофоническом режиме.
30
Page 91

5 Прочие функции
Удаление
Удаление отдельных файлов
Выбранный файл может быть удален из папки.
Выберите папку нажатием
кнопки FOLDER.
1
Нажатием кнопки FF или REW
выберите файл, который хотите
2
удалить.
1,4
a Файл, который должен быть удален
5
Удаление
2
3
Нажмите кнопку ERASE.
Начнет мигать индикация “CANCEL” .
3
Нажатием кнопки 3 выберите
позицию “START”.
4
Начнет мигать индикация “START”. При
нажатии кнопки 2 снова начнет
мигать индикатор “CANCEL” .
31
Page 92

Удаление
Нажмите кнопку MENU/SET, пока
мигает индикация “START”.
5
На дисплее появится сообщение “FILE
ERASE!” (удаление файла!), и
начнется удаление.
5
После удаления файла появится индикация
“ERASE DONE”. Номера файлов будут
автоматически скорректированы.
5
Удаление
....................................................................................................................................................
Примечания
• Удаленный файл не восстанавливается.
• Файл, для которого установлена защита от удаления, не будет удален.
• Если операция не будет выполнена в течение 8 секунд во время установки, диктофон будет
возвращен в состояние остановки.
• Завершение удаления может занять 10 секунд. Никогда ничего не делайте в это время поскольку
данные могут быть повреждены. Извлечение или установка батареек не допускается, независимо
от того, установлена ли батарейка в диктофон.
{
32
Page 93

Удаление всех файлов в папке
Все файлы, кроме защищенных, могут удаляться из папки одновременно.
Нажатием кнопки FOLDER
выберите папку, в которой
1
хотите удалить все файлы.
a Папка, из которой будут удаляться
файлы
1,3
2
Нажмите кнопку ERASE и
удерживайте дольше 3 секунд.
2
Начнет мигать индикация “CANCEL” .
Нажатием кнопки 3 выберите
позицию “START”.
3
Начнет мигать индикация “START”. При
нажатии кнопки 2 снова начнет
мигать индикатор “CANCEL” .
5
Удаление
33
Page 94

Удаление
Нажмите кнопку MENU/SET, пока
мигает индикация “START”.
4
На дисплее появится сообщение “ALL
ERASE!” (удалить все!), и начнется
удаление.
4
После удаления файлов появится
сообщение“ERASE DONE” (удаление
окончено). Защищенным файлам будут
присвоены номера в порядке
возрастания.
5
Удаление
....................................................................................................................................................
Примечания
• Удаленный файл не восстанавливается.
• Файл, для которого установлена защита от удаления, не будет удален.
• Если операция не будет выполнена в течение 8 секунд во время установки, диктофон будет
возвращен в состояние остановки.
• Завершение удаления может занять 10 секунд. Никогда ничего не делайте в это время, поскольку
данные могут быть повреждены. Извлечение или установка батареек не допускается, независимо
от того, установлена ли батарейка в диктофон.
{
34
Page 95

Индексные пометки
Индексные пометки могут вставляться в файл во время записи или воспроизведения
для быстрого обнаружения важной информации.
Создание индексной пометки
Нажмите кнопку INDEX во
время записи или
1
1
4
воспроизведения для
создания индексной пометки.
Номер индекса появится на
дисплее.
Обнаружение индексной пометки
2
Удерживайте кнопу FF или
REW во время
2
воспроизведения файла.
Диктофон остановится на 1
секунду, когда дойдет до
индексной пометки.
Удаление индексной пометки
Найдите пометку, которую
хотите удалить.
3
Нажмите кнопку ERASE,
когда на дисплее в течение
4
около 2 секунд появится
номер индекса.
Индексная пометка будет стерта.
5
Индексные пометки
35
Page 96

Индексные пометки
Примечания
• В одном файле Вы можете установить до 16 индексных пометок. При попытке установить большее
количество пометок на дисплее появится сообщение “INDEX FULL”.
• В защищенных файлах создание и удаление индексных пометок невозможно.
• В файлы WMA индексные метки можно устанавливать, только если они записаны с помощью
диктофонов фирмы Olympus.
• Если кнопка REW нажимается в состоянии, когда обратный переход установлен на “1 SEC SKIP”
или “2 SEC SKIP”, будет осуществлен обратный переход только на установленное время.
5
Индексные пометки
36
Page 97

Информация на ЖКИ-дисплее
Информация может отображаться на ЖКИ-дисплее в 6 разных форматах после нажатия кнопки
DISPLAY. Это позволяет просмотреть информацию о файле и другие установки диктофона.
Нажмите кнопку DISPLAY.
Показания ЖКИ-дисплея будут изменяться каждый раз
1
после нажатия кнопки DISPLAY.
В режиме остановки и воспроизведения
1
Будут по очереди появляться показания с 1 по 6. Если
файл отсутствует, будут поочередно выводиться
показания 5 и 6.
1 Продолжительность
файла
Показывается время
файла.
2 Временной код
Показывается год, месяц
и число, когда создан
файл.
3 Временной код
Показывается год, месяц,
число, час и минута, когда
создан файл.
{
{
{
{
{
{
6 Текущее время и дата
Показывается текущее
время и дата. (При
воспроизведении
появляется “TIME&DATE”
(время и дата) или
счетчик времени.)
5 Оставшийся объем
памяти
Показывается
оставшееся время
записи.
4
Комментарий к файлу*
Показывается
комментарий,
приложенный к файлу.
(Если комментария нет,
появится знак“----”.)
5
Информация на ЖКИ-дисплее
* Если в комментарии много знаков, он будет
смещаться в сторону по экрану, пока не будет
показан весь.
37
Page 98

Информация на ЖКИ-дисплее
В режиме записи
Поочередно выводятся показания 1 и 2.
1
Уровень записи
Показывается уровень
звука на входе в
графическом виде.
Показания при
стереофонической и
Дисплей в
режиме
стереофонической
записи
5
Информация на ЖКИ-дисплее
Дисплей в
режиме
монофонической
записи
монофонической записи
отличаются.
2
Индикатор оставшегося
объема памяти
Показывается оставшееся
время, доступное для
записи, в форме
горизонтальных полосок и
счетчика с обратным
отсчетом.
В режиме записи с голосовой
активацией (VCVA)
Поочередно выводятся показания 1 и 2.
1
Уровень записи в
режиме VCVA
Показывается уровень звука
на входе и стартовый
уровень в графическом виде.
Дисплей в
режиме
стереофонической
записи
Дисплей в
режиме
монофонической
записи
(Выводится сообщение
“Waiting”, если не достигнут
стартовый уровень VCVA).
Показания при
стереофонической и
монофонической записи
отличаются.
2
Индикатор оставшегося
объема памяти
Показывается оставшееся
время, доступное для
записи, в форме
горизонтальных полосок и
счетчика с обратным
отсчетом.
38
Page 99

Форматирование диктофона (FORMAT)
При форматировании диктофона все функциональные установки возвращаются к
первоначальному виду*.
Все файлы**, хранящиеся в диктофоне, удаляются.
Если у Вас имеются важные файлы, которые Вы хотите сохранить, подсоедините диктофон
к компьютеру и перенесите эти файлы в компьютер перед форматированием диктофона.
* Установки даты и времени не будут стерты, поэтому Вам не нужно устанавливать их заново.
** Защищенные файлы будут также удалены.
Нажмите и удерживайте кнопку
MENU/SET в течение 1 секунды
1
или дольше.
Откроется главное меню (☞ стр.15).
1,3,
5,7
2,4
6
Нажатием кнопки 3 или 2
выберите позицию “
2
Нажмите кнопку MENU/SET.
Откроется субменю (☞ стр.16).
3
Нажатием кнопки 3 или 2
выберите позицию “FORMAT”.
4
Нажмите кнопку MENU/SET.
Начнет мигать индикация “CANCEL” .
5
Нажатием кнопки 3 выберите
позицию “START”(начать).
6
Начнет мигать индикация “START”.
При нажатии кнопки 2снова начнет
мигать индикатор “CANCEL” .
◊
SUB MENU”.
5
Форматирование диктофона (FORMAT)
Нажмите кнопку MENU/SET.
Примерно на 2 секунды появится
7
сообщение “DATA WILL BE CLEARED”,
после чего начнет мигать индикация
“CANCEL” .
39
Page 100

Форматирование диктофона (FORMAT)
Нажмите кнопку 3 еще раз для
выбора позиции “START”.
8
Начнет мигать индикация “START”.
При нажатии кнопки 2снова начнет
мигать индикатор “CANCEL” .
9
8
5
Форматирование диктофона (FORMAT)
....................................................................................................................................................
Примечания
• Никогда не форматируйте диктофон с персонального компьютера.
• При форматировании диктофона удаляются все сохраненные данные, в том числе защищенные
файлы.
• После форматирования первое имя файла будет 0001.
• Не извлекайте батарейки во время форматирования. Может потребоваться 10 секунд или более
для полного удаления.
Снова нажмите кнопку MENU/SET.
Начнется форматирование, и на
9
дисплее будет мигать индикатор.
После окончания форматирования
появится сообщение “FORMAT DONE”.
{
40
 Loading...