

Page 1

T572 Inst DS-150-E.Q33J 1999/4/26 0:57 PM y[W 1
San-Ei Building, 22-2, Nishi Shinjuku 1-chome, Shinjuku-ku, Tokyo, Japan. Tel. 03-3340-2211
Two Corporate Center Drive, Melville, NY 11747-3157, U.S.A. Tel. 516-844-5000/1-800-622-6372
(Premises/Goods delivery) Wendenstrasse 14-16, 20097 Hamburg, Germany. Tel. 040-237730
2-8 Honduras Street, London EC1Y0TX, United Kingdom. Tel. 0171-253-2772
“CE” mark indicates that this product complies with the European requirements for safety,
health, environment and customer protection.
L’ indication “CE” signifie que ce produit est conforme aux exigences concernant la sécurité,
la santé, l’environnement et la protection du consommateur.
Das “CE” Zeichen bestätigt die übereinstimmung mit den Europäischen Bestimmungen für
Betriebssicherheit und Umweltschutz.
Il marchio “CE” indica che questo prodotto è conforme alle norme della comunità europea
per quanto riguarda la sicurezza, la salute, l’ambiente e la protezione del consumatore.
La marca “CE” indica que este producto se encuentra de conformidad con las exigencias
europeas sobre seguridad, salud, medio ambiente y protección al consumidor.
OLYMPUS OPTICAL CO.,LTD.
OLYMPUS AMERICA INC.
OLYMPUS OPTICAL CO.(EUROPA) GMBH.
(Letters) Postfach 10 49 08, 20034 Hamburg, Germany.
OLYMPUS OPTICAL CO.(U.K.) LTD.
DIGITAL VOICE RECORDER
DS-150
Operation Manual
To avoid problems during recording, always do a test recording first.
E1-2594-01
Page 2
T572 Inst DS-150-E.Q33J 1999/4/26 0:57 PM y[W 2
FOR SAFE AND CORRECT USAGE
Thank you for purchasing the Olympus Digital Voice Recorder DS-150. Before using your new
recorder, read this manual carefully to ensure that you know how to operate it safely and correctly.
Keep this manual in an easily accessible location for future reference.
• The following symbols indicate important safety related information. To protect yourself and others
from personal injury or damage to property, it is essential that you always heed the warnings and
information provided.
• The symbols are defined below.
Warning
This symbol warns of actions which carry a risk of death or serious injury in the event of incorrect
operation.
Caution
This symbol warns of actions which carry a risk of personal injury or physical damage in the
event of incorrect operation.
This symbol warns of prohibited actions. The prohibited action is clearly explained by a diagram
or text.
This symbol or diagram indicates required actions.
BATTERIES
Warning Use only specified batteries with this recorder.
Do not attempt to recharge alkaline, lithium or any other non-rechargeable batteries.
Batteries should never be exposed to flame, heated, short-circuited or disassembled.
Never mix old and new batteries, or batteries of different types and/or brands.
Position the batteries with plus and minus polarity correctly aligned.
Batteries may can cause problems such as fluid leakage, heat generation, fire
ignition or explosion.
• Never use any battery with a torn or cracked outer cover.
• Remove the batteries if you are not going to use the recorder for an extended
period of time.
• When a battery is depleted, insulate it by covering the contacts with strips of
tape and dispose of it according to local regulations.
Warning Keep batteries out of the reach of children.
Small children may put a battery in their mouths or swallow it. Should a child
swallow a battery, contact a physician immediately.
Warning If you notice anything unusual when using this product such as abnormal
noise, heat, smoke, or a burning odor:
1remove the batteries immediately while being careful not to burn yourself,and;
2 call your dealer or local Olympus representative for servicing. Continued use of
the product under these circumstances could result in electric shock, fire or
injury.
AC Adapter
Warning Do not attempt to disassemble, repair or modify the AC adapter in any way.
Warning Keep foreign objects including water, metal, or flammable substances from
2 3
Doing so could result in electric shock or injury.
getting inside the product.
These could cause a fire or electric shock.
Page 3
T572 Inst DS-150-E.Q33J 1999/4/26 0:57 PM y[W 4
Warning Do not use the AC adapter in the vicinity of flammable gas (including gasoline,
benzine and lacquer thinner).
Doing so could result in an explosion, fire or electric shock.
Warning If the internal parts of the AC adapter are exposed because it has been dropped
or otherwise damaged:
1 do not touch any of the exposed parts;
2 immediately disconnect the power supply plug from the power outlet, and;
3 call your dealer or local Olympus representative for servicing. Continued use of
the AC adapter under these circumstances could result in electric shock, fire or
injury.
Warning If the AC adapter is dropped in water, or if water, metal, flammable substances or
other foreign objects get inside it:
1 immediately disconnect the power supply plug from the power outlet, and;
2 call your dealer or local Olympus representative for servicing.
Continued use of the AC adapter under these circumstances could result in
electric shock, fire or injury.
Warning If you notice anything unusual when using the AC adapter such as abnormal
noise, heat, smoke, or a burning odor:
1 immediately disconnect the power supply plug from the power outlet while
being careful not to burn yourself, and;
2 call your dealer or local Olympus representative for servicing.
Continued use of the AC adapter under these circumstances could result in
electric shock, fire or injury.
Caution Do not moisten the AC adapter or touch it with a wet hand.
This could cause an electric shock.
Caution Use only the correct power supply voltage as indicated on the adapter.
Do not insert a dusty or dirty power supply plug into a power outlet.
Make sure the power supply plug is fully inserted into the power outlet.
When the AC adapter is not in use, disconnect the power supply plug from the
power outlet.
Do not damage the power cord.
• Do not disconnect the power supply plug from the power outlet by pulling on the
cord.
• Do not place a heavy object on the power cord.
• Keep the power cord away from heating equipment.
• Do not bend or pull the power cord with excessive force.
This could cause a fire or electric shock.
RECORDER
Warning Do not attempt to disassemble, repair or modify the recorder in any way.
This could cause a fire or injury.
Warning Do not increase the volume level before starting operation.
If the volume is too high, you may get ringing in your ears or impair your hearing.
Never use this recorder while riding a bicycle or operating a motor vehicle.
Warning Keep this recorder out of the reach of children.
When using this recorder with children nearby, be extra careful not to leave the
recorder unattended. Children cannot understand the safety warnings and cautions. Other potential dangers include:
- strangulation by putting the earphone cord around the neck;
- injury or electric shock accident due to incorrect operation.
Warning If the recorder is dropped in water, or if water, metal, flammable substances or
other foreign objects get inside it:
1 immediately remove the batteries or disconnect the Ac adapter’s power supply
plug from the power outlet, and;
2 call your dealer or local Olympus representative for servicing.
Continued use of the recorder under these circumstances could result in electric shock or fire.
Warning Do not use the recorder where use of this type of equipment is prohibited such as
in the airplane and hospital. Doing so could cause electronic equipment and medical electric equipment to malfunction. In case you have to use the recorder in an
medical establishment, please follow the instructions from each establishment.
54
Page 4

T572 Inst DS-150-E.Q33J 1999/4/26 0:57 PM y[W 6
CONTENTS
PRODUCT OVERVIEW
MAIN FEATURES ccccccccccccccccccccccccccccccccc 8
GENERAL PRECAUTIONS ccccccccccccccccccccccccccccc 9
BEFORE RECORDING
NAMES OF PARTS cccccccccccccccccccccccccccccccc 10
LIQUID CRYSTAL DISPLAY (LCD) PANEL cccccccccccccccccccccc 11
INSTALLING THE BATTERIES ccccccccccccccccccccccccccc 11
REPLACING THE BATTERIES ccccccccccccccccccccccccccc 12
USING THE AC ADAPTER ccccccccccccccccccccccccccccc 12
SETTING THE CLOCK AND ID NUMBER cccccccccccccccccccccc 13
BASIC OPERATION
RECORDING ccccccccccccccccccccccccccccccccccc 15
RECORD PAUSE ccccccccccccccccccccccccccccccccc 16
PLAYBACK cccccccccccccccccccccccccccccccccccc 18
FAST PLAYBACK ccccccccccccccccccccccccccccccccc 19
FAST FORWARD ccccccccccccccccccccccccccccccccc 19
CUE ccccccccccccccccccccccccccccccccccccccc 19
FAST REVERSE ccccccccccccccccccccccccccccccccc 19
REVIEW ccccccccccccccccccccccccccccccccccccc 20
FORWARD SKIP ccccccccccccccccccccccccccccccccc 20
REVERSE SKIP cccccccccccccccccccccccccccccccccc 21
ERASURE cccccccccccccccccccccccccccccccccccc 22
CONVENIENT FEATURES
VARIABLE CONTROL VOICE ACTUATOR (VCVA) RECORDING cccccccccccc 24
RECORDING INDEX SIGNALS ccccccccccccccccccccccccccc 25
DETECTING INDEX SIGNALS ccccccccccccccccccccccccccc 25
EDITING MESSAGES ccccccccccccccccccccccccccccccc 26
ALARMS ccccccccccccccccccccccccccccccccccccc 28
MENU OPERATION cccccccccccccccccccccccccccccccc 29
HOLD cccccccccccccccccccccccccccccccccccccc 31
OTHER
RESET cccccccccccccccccccccccccccccccccccccc 32
TRANSFERRING DATA TO A PC cccccccccccccccccccccccccc 32
DICTATION MODE BUTTON cccccccccccccccccccccccccccc 33
TROUBLESHOOTING ccccccccccccccccccccccccccccccc 33
ACCESSORIES (OPTIONAL) cccccccccccccccccccccccccccc 34
SPECIFICATIONS ccccccccccccccccccccccccccccccccc 34
76
Page 5
THINNER
T572 Inst DS-150-E.Q33J 1999/4/26 0:57 PM y[W 8
PRODUCT OVERVIEW
MAIN FEATURES
This recorder has the following features.
XThis digital voice recorder converts voice to digital data, applies high-efficiency compression, and
records the compressed data in flash memory.
XTwo recording modes can be selected; the standard play (SP) mode allows recording of about 75
minutes (1 message continuous recording) of voice data which can later be used in dictation, and
the long play (LP) mode allows long recording of about 160 minutes* (1 message continuous
recording).
XOverwrite recording, insertion recording and partial erasure functions make it easy to correct and
edit recordings.
XTwo folders (99 messages/folder) are available for different kinds of recording.
XThe Variable Control Voice Actuator (VCVA) function saves memory space.
XThe LCD panel includes a dot matrix display and clearly displays message numbers, a real-time
counter, time remaining, current time and date, operating mode, warnings and other information.
XA PC transfer accessory is available for transferring recorded voice data to a PC. In combination
with IBM's Via Voice voice recognition software (optionally available, but provided if you have
bought the DS-150 Via Voice kit), the voice data can be accurately converted text.
XThe recording time available may be shorter than specified if a large number of short recordings are
made. (Use the remaining time and recorded time only as references.)
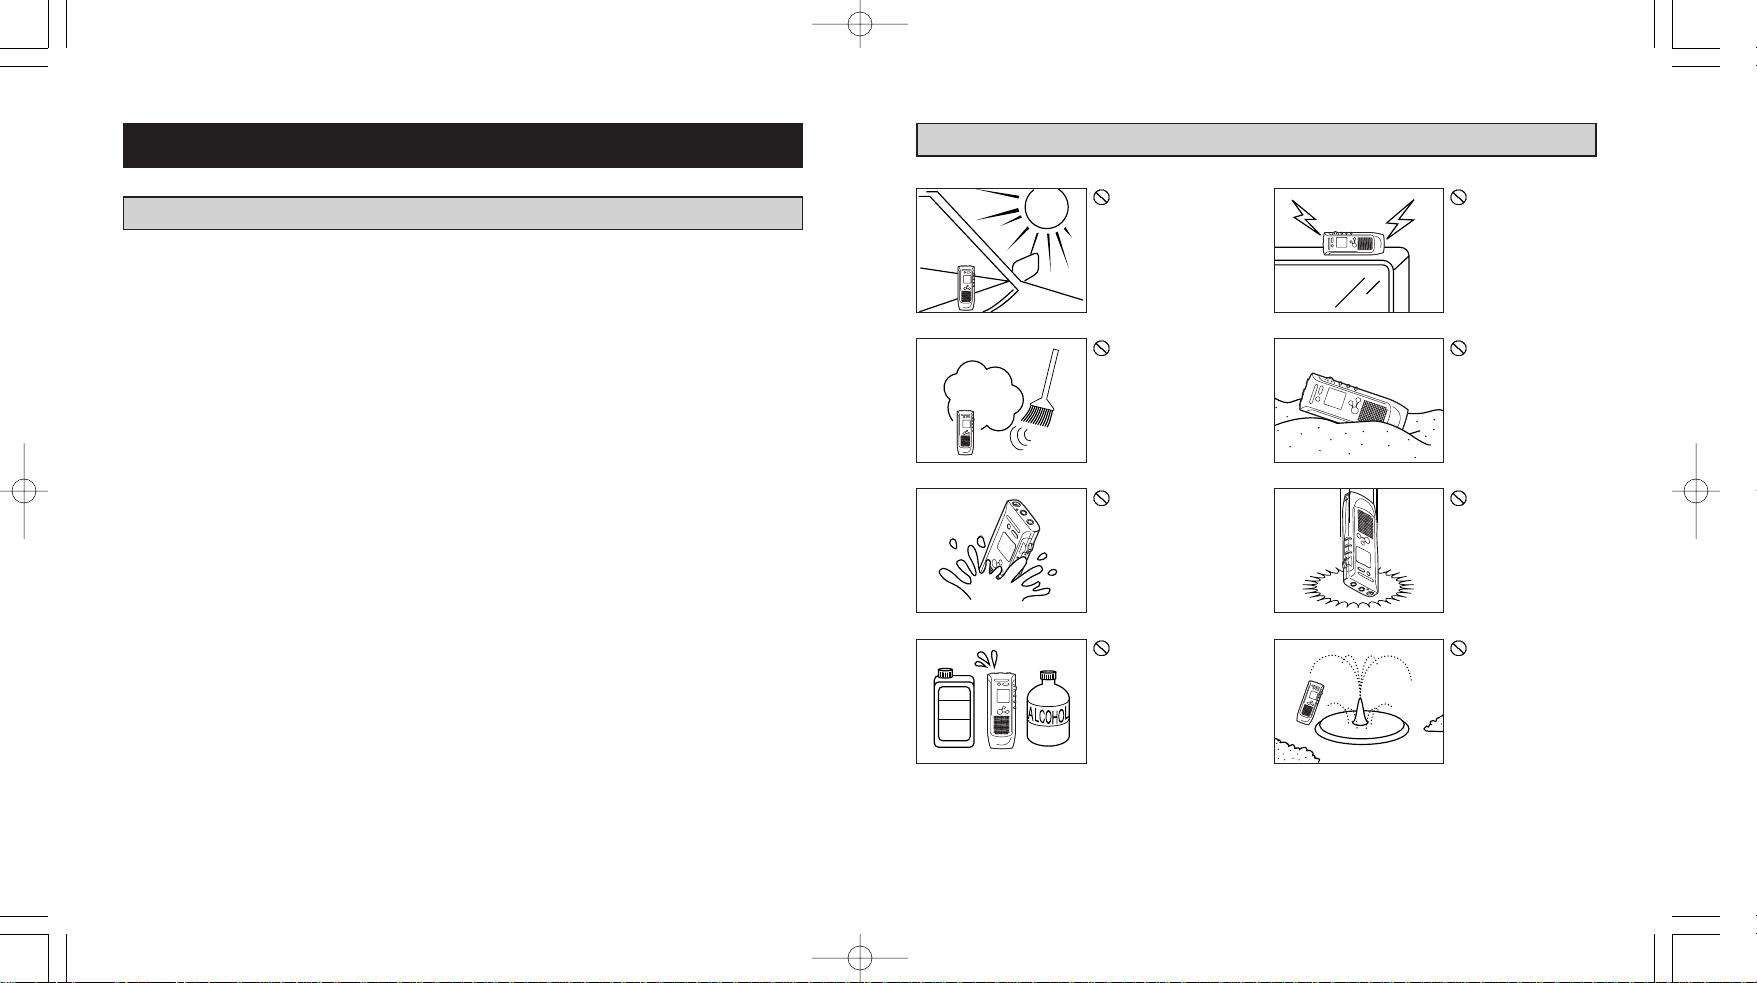
GENERAL PRECAUTIONS
Do not leave the
recorder in hot,
humid locations
such as inside a
closed automobile
under direct sunlight or on the
beach in the summer.
Do not store the
recorder in places
exposed to
excessive moisture or dust.
Immediately wipe
off any moisture
with a dry cloth.
Salt water in particular should be
avoided.
Do not use organic solvents such
as alcohol and
lacquer thinner to
clean the unit.
Do not place the
recorder on top of
or near electric
appliances such
as TVs or refrigerators.
Avoid sand or dirt.
These can cause
irreparable damage.
Avoid strong vibrations or shocks.
Do not operate
the recorder in
places exposed to
excessive moisture.
98
Page 6
T572 Inst DS-150-E.Q33J 1999/4/26 0:57 PM y[W 10
BEFORE RECORDING
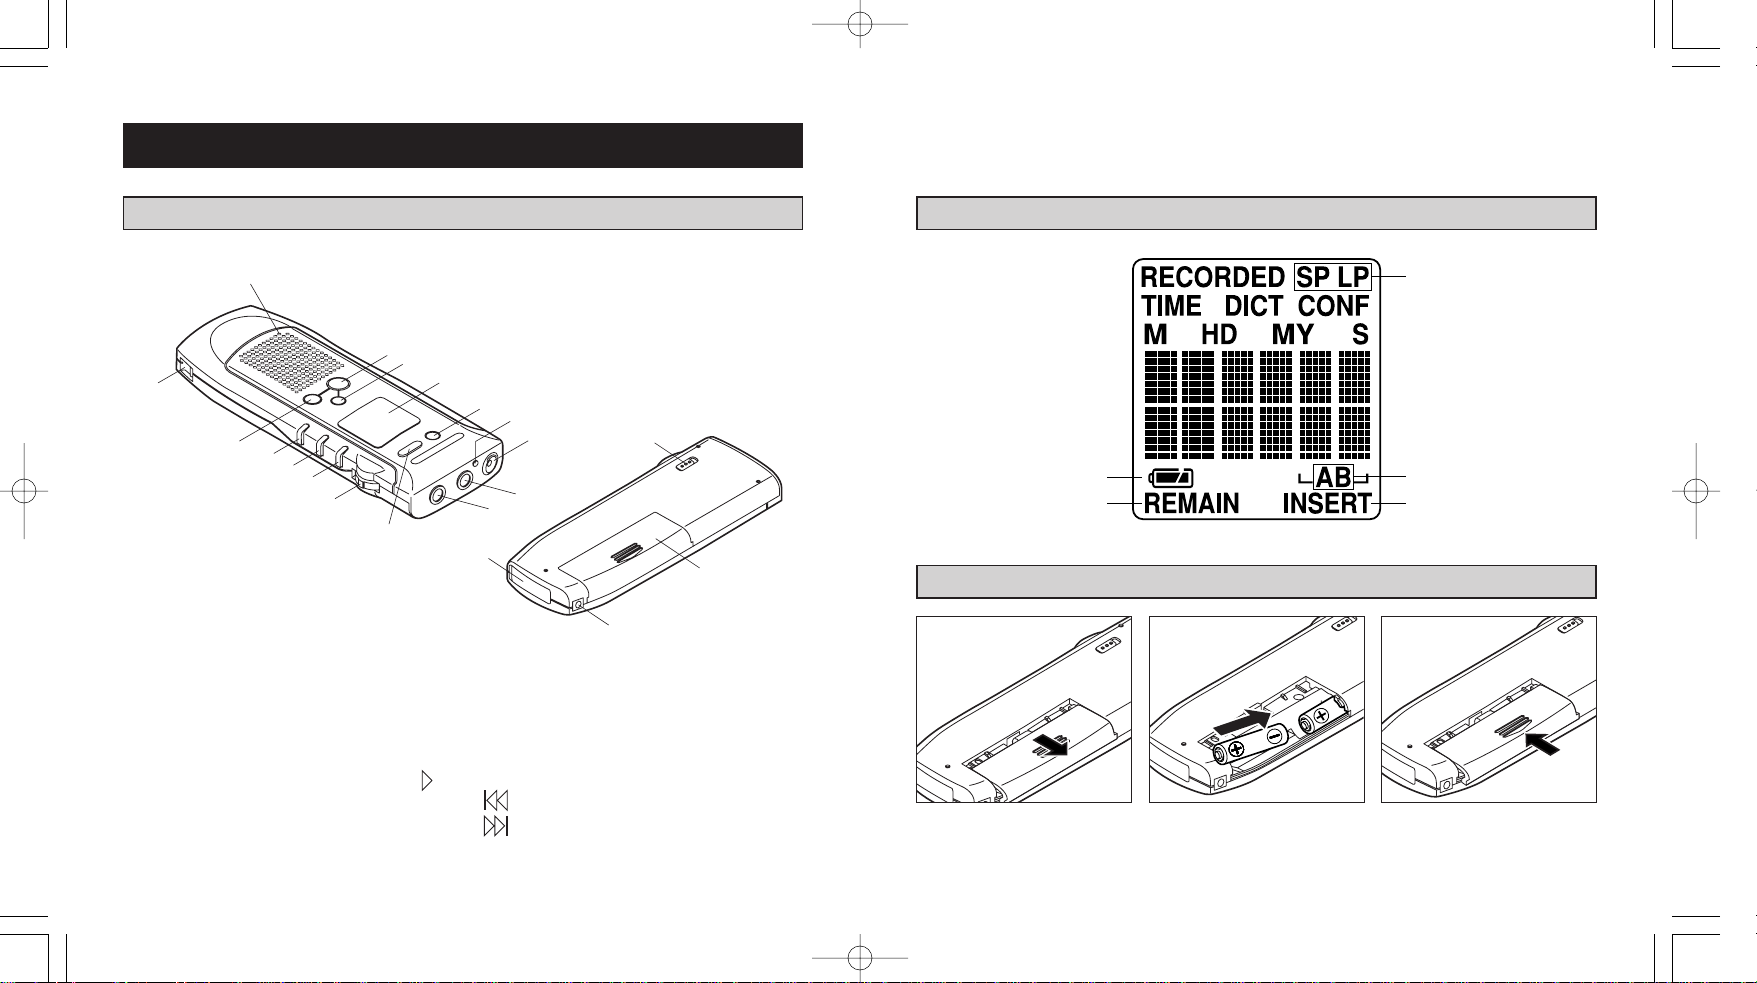
NAMES OF PARTS
P
O
N
M
L
1
REC (Record) button
2
INDEX/FOLDER button
3
LCD (Liquid Crystal
Display) panel
4
ERASE button
5
Indicator LED
6
Microphone
7
EAR (Earphone) jack
1
2
K
J
9
8
MIC (Microphone) jack
9
SP DICT button
J
MENU switch, up/down
control
K
Play ( ) button
L Fast Reverse ( ) button
M Fast Forward ( ) button
N
STOP button
LIQUID CRYSTAL DISPLAY (LCD)
Recording time/date
3
4
5
6
7
8
T
Q
R
S
O
Strap hook
P
Speaker
Q
HOLD switch
R
Battery cover
S
Power jack
T
PC I/F (interface) connector
Remaining battery power
Remaining time indicator
INSTALLING THE BATTERIES
1
Slide the battery cover Rin the
1
direction of the arrow to open it.
2 3
2Place an “AAA”-size (LR06,
R06 or SUM-4) battery in the
lower position then place
another on top.
Recording mode
Microphone sensitivity
Date/Time indicators
Current folder indicators
Insertion recording indicator
Make sure that the polarity of
3
each battery is correctly aligned
as indicated, then slide the battery cover completely closed.
1110
Page 7

ERASE SP DICT
REC STOP
INDEX/
FOLDER
ERASE SP DICT
MENU
T572 Inst DS-150-E.Q33J 1999/4/26 0:57 PM y[W 12
REPLACING THE BATTERIES
When starts blinking on the LCD panel, replace the batteries as soon as possible.
If [BATT] and light on the LCD panel, operation will stop. Replace the batteries immediately.
If the recorder does not function normally after the batteries have been replaced, see “RESET” on
page 32.
USING THE AC ADAPTER
Plug the optional AC adapter into a household power outlet and connect the power plug
to the recorder’s power connector (DC 3 V)
S
as shown in the illustration. Do not connect the AC adapter to the recorder during
recording. Always stop recording before connection. Otherwise it may not be possible to
play back the voice data being recorded.
Warning
Misuse of the AC adapter can result in damage, fire or electric shock. Always use the dedicated
AC adapter. Never use an adapter with different polarity or output voltage.
Stop the recorder before disconnecting the AC adapter.
When not using the recorder, always disconnect the AC adapter from the power outlet.
SETTING THE CLOCK AND ID NUMBER
Once the clock and the user’s ID number have been set, the user ID of the person creating the message and the time of the day are automatically recorded in the message header. To ease management of recorded messages, it is recommended that the clock and a 4-digit ID number be set beforehand.
Follow the procedure below to set the clock:
1 2 3 4
ERASE SP DICT
ERASE SP DICT
MENU
5 6 7
ERASE SP DICT
In the Stop mode, press and hold the MENU switch Jfor at least 2 seconds. The menu will be dis-
1
played on the LCD panel
Turn the MENU switch's up/down control
2
[Date] and [Time].
Press the MENU switch again. The cursor will blink in the year position.
3
Press the MENU switch's up/down control to change [Year].
4
When the correct year is displayed, press the MENU switch. The blinking cursor moves to the
5
[Month] position.
Follow the same procedure to set [Day], [Hour] and [Minute]. When the clock setting is completed,
6
press the MENU switch to enter the ID number setting mode. (To set only the ID number, see page
MENU
INDEX/
14.)
If ID number setting is not required, press the STOP button
7
clock setting. This completes menu setting and restores the Stop mode. (When the STOP button is
ERASE SP DICT
3
.
MENU
INDEX/
J
in the up direction within 4 seconds to display the
N
instead of the MENU switch after
pressed, the clock starts counting seconds.)
All settings are automatically canceled after three minutes if no further operation takes place.
X
MENU
INDEX/
INDEX/
FOLDER
REC STOP
1312
Page 8

MENU
ERASE SP DICT
ERASE SP DICT
INDEX/
FOLDER
MENU
REC STOP
INDEX/
FOLDER
T572 Inst DS-150-E.Q33J 1999/4/26 0:57 PM y[W 14
Follow the procedure below to set the user ID number:
1
In the Stop mode, press and hold the MENU switch
1
2
J
for at least 2 seconds. The menu will be dis-
3 4
ERASE SP DICT
FOLDER
played on the LCD panel 3.
twice the MENU switch's up/down control in the down direction to display [ID AAA] (when in the ini-
2
tial setting). The cursor will start blinking at the first digit's position.
Turn the MENU switch's up/down control in the up direction to change the character displayed: [A]
3
R [B] R [C] ……[X] R [Y] R [Z] R [0] R [1] R [2] R……[7] R [8] R [9] R [A] R [B]
When the desired character is displayed, press the MENU switch to set it. The blinking cursor
4
moves to the next position.
Follow the same procedure to set each character. When ID setting is complete, press the MENU
5
switch to enter the Format mode. (See page 31.)
Pressing the STOP button instead of the MENU switch after ID setting ends menu setting and
6
restores the Stop mode.
If the Format mode is entered in 5but you do not need to format the built-in memory, press the
X
STOP button. This ends menu setting and restores the Stop mode.
INDEX/
MENU
……
BASIC OPERATION
RECORDING
1
Remaining
memory time
Make sure [NEW], memory remaining time, and the message number are displayed on the LCD
1
Message No.
panel. Ensure there is sufficient remaining time available for your message and select the folder
([A] or [B]), microphone sensitivity ([DICT] or [CONF]) and recording mode ([SP] and [LP]).
To change the folder, press the INDEX/FOLDER button 2to move to the position after the last
2
recording in the other folder. To change the microphone sensitivity or recording mode, use the
menu (see page 29 for the change procedure).
Press the REC button 1to start recording. The LED 5lights and recording starts.
3
Press the STOP button to stop recording and enter the Stop mode.
4
You can monitor what is being recorded through an earphone plugged into the EAR jack
5
(recording monitor).
If [NEW] is not displayed when you press the REC button, insertion recording will start. This over-
X
writes the previous recording so be sure you always check the display before pressing the REC
button.
If [FULL] is displayed on the LCD panel, additional recording is not possible. In this case, erase
X
unnecessary messages to free up more memory. If there are any messages that you want to preserve, transfer the voice data to a PC using the PC transfer kit (available as a standard or optional
accessory).
Do not connect or disconnect the AC adapter plug during recording. Always enter the Stop mode
X
before plugging or unplugging the adapter. Otherwise, you will not be able to play back the message being recorded.
The recording monitor volume cannot be adjusted.
X
Always use the SP mode if you want to record high-quality voice data suitable for transfer to a PC
X
for use in voice recognition operations.
(For more about voice recognition, see page 33.)
2 3 4
7
1514
Page 9

T572 Inst DS-150-E.Q33J 1999/4/26 0:57 PM y[W 16
RECORD PAUSE
1
To pause recording, press the REC button once.
1
Recording is temporarily interrupted. The LCD panel and LED blink for as long as the unit is in the
2
2
3
Record-Pause mode.
To resume recording, press the REC button again.
3
Pressing the STOP button during Record-Pause ends the current recording session and engages
4
the Stop mode.
X If the unit is left in the Record-Pause mode for three minutes, the Standby mode (Power-Save
mode) is automatically engaged and the LCD panel goes out.
X When any of the REC, STOP, play, fast-forward and fast-reverse buttons or the MENU switch is
pressed in the Standby mode, the Standby mode will be canceled and the Record Pause mode will
be engaged. When the REC button is pressed subsequently, recording will resume within the same
message number.
XVoice data recorded on this unit and stored in the built-in memory is referred to as a message. Each
message consists of all voice data recorded from the start of recording to the point where the
STOP button is pressed (see below). (Up to 99 messages can be stored per folder.) Pressing the
REC button once during recording pauses recording and pressing it again resumes recording within
the same message.
Pressing
REC
button
Pressing
STOP
button once
HHH H
Message No. 1
Pressing
REC
button
Pressing
REC
button once
Message No. 2 Message No. 2
Pressing
REC
button
H H
G
Pressing
STOP
button once
Pressing
REC
button
Pressing
STOP
button once
H H
Message No. 3
Record Pause
1716
Page 10

ERASE SP DICT
REC STOP
INDEX/
FOLDER
MENU
T572 Inst DS-150-E.Q33J 1999/4/26 0:57 PM y[W 18
PLAYBACK
3 4 5
1 In the Stop mode, press the INDEX/FOLDER button to select the folder containing the message
you want to play back.
2 Press the Up/Down control (Forward Skip and Reverse Skip) on the MENU switch until the number
of the message you want to listen is displayed on the LCD panel.
(For information on Forward Skip and Reverse Skip, see pages 20 and 21.)
3 Press the Play button K.
4 Adjust the playback volume with the Up/Down control on the MENU switch. Volume levels from 0 to
30 are displayed on the LCD panel.
5 At the beginning of each recorded message, the time and date of the recording is displayed on the
LCD panel for 2 seconds.
6 Press the STOP button to end playback and stop the recorder.
7 Connect the earphone to the EAR jack to listen to playback through the earphone.
8 The recorder will stop automatically when a message has been played back to the end. Press the
Play button to start playback of the next message. A warning alarm will sound if you have reached
the end of the recorded messages in the folder.
9 Press and hold the REC button for less than a second during playback to enter the Playback-
Pause mode.
10Press and hold the REC button for less than a second in the Playback-Pause mode to resume
playback.
Volume max.
Volume min.
Time/date of
recording is
displayed for 2 sec.
FAST PLAYBACK
1 Press and hold the Play button Kduring playback for more than a second to activate fast playback
at 1.5 times normal playback.
2 Press and hold the Play button during playback for more than a second to return to normal play-
back speed.
FAST FORWARD
1 Press the Fast-Forward button Min the Stop mode to fast-forward through a message.
2 Press the STOP button when the target location is reached. The recorder will automatically stop at
the end of the message if the STOP button is not pressed beforehand.
CUE
1 Press and hold the Fast-Forward button during playback to activate the Cue mode. As long as you
keep the button is pressed, you will be able to hear the message while it is fast-forwarded.
2 When the Fast-Forward button is released, normal playback starts automatically. The recorder will
stop automatically when the end of the message is reached.
FAST REVERSE
1 Press the Fast Reverse button Lin the Stop mode to fast reverse the message.
2 Press the STOP button when the target location is reached. The recorder will automatically stop at
the end of the message if the STOP button is not pressed beforehand.
1918
Page 11

T572 Inst DS-150-E.Q33J 1999/4/26 0:57 PM y[W 20
REVIEW
1 Press and hold the Fast Reverse button during recording or playback to activate the Review mode.
As long as you keep the button is pressed, you will be able to hear the message while it is fast
reversed.
2 When the Fast Reverse button is released or the beginning of the message is reached, normal
playback starts automatically.
FORWARD SKIP
1 Press the Fast-Forward button during fast-forwarding to skip to the beginning of the next message.
2 If the Fast-Forward button is pressed again within 2 seconds of a forward skip, the recorder will
skip to the beginning of the next message and stop.
3 If forward skip is executed at the last message, a new message number and [NEW] will appear on
the LCD panel. The recorder is ready record a new message.
XForward skip can also be initiated in the Stop mode using the Up/Down control on the MENU switch
(in the up direction).
Stop
mode
H
Message No. 1 Message No. 2 Message No. 3
Pressing fast
forward button
E
Fast
forward
Pressing fast
forward but-
ton during
fast forward
E
Forward skip and
stop
Pressing
fast forward
button within
2 sec.
Non-recorded
E
Skip and stop
NEW displayed
on LCD
section
REVERSE SKIP
1 Press the Fast Reverse button during fast reversing to skip to the beginning of the current mes-
sage.
2 If the Fast Reverse button is pressed again within 2 seconds of a reverse skip, the recorder will
skip to the beginning of the previous message and stop.
XReverse skip can also be initiated in the Stop mode using the Up/Down control on the MENU switch
(in the down direction).
Stop mode
Message No. 2 Message No. 3
F
Reverse
skip and
stop
sec.
F
Reverse skip
and stop
Pressing fast
reverse but-
ton within 2
F
reverse
Pressing fast
reverse but-
ton during
fast reverse
Fast
H
Pressing fast
reverse
button
Non-recorded
section
2120
Page 12

ERASE SP DICT
INDEX/
MENU
ERASE SP DICT
MENU
T572 Inst DS-150-E.Q33J 1999/4/26 0:57 PM y[W 22
ERASE
1. ERASING A MESSAGE
1 2 3
ERASE SP DICT
MENU
1 Select the folder containing the message you want to erase, display the desired message number,
then press and hold the ERASE button 4for more than one second. The displayed message
number will blink.
2 Press the ERASE button again within 4 seconds. [ERASE] blinks on the LCD panel . Erasure of
the selected message starts.
3 When the message has been erased, [OK] appears on the LCD panel.
XWhen a message is erased, the message numbers of all subsequent messages will be automatical-
ly adjusted.
XIf any button except the ERASE button is pressed during message erasure or if the ERASE button
is not pressed within 4 seconds message erasure will be canceled and the normal display will be
restored.
ERASE SP DICT
MENU
2. ERASE ALL (ERASURE OF ALL MESSAGES IN A FOLDER)
2 3 4
ERASE SP DICT
1 In the Stop mode, select the folder to be erased by pressing the INDEX/FOLDER button.
2 Press the MENU switch once (for less than 2 seconds), then press the Up/Down control until
ERASE ALL is displayed (the word [ALL] will be blinking).
3 Within 4 seconds, press and hold the ERASE button for more than a second. Erasure of all the
messages in the selected folder will start.
4 When all messages are erased, [OK] is displayed on the LCD panel for 2 seconds and is then
replaced by [NEW].
XIf any button except the ERASE button is pressed during message erasure or if the ERASE button
is not pressed within 4 seconds following the appearance of the ERASE ALL warning display,
ERASE ALL will be canceled and the normal display will be restored.
STANDBY MODE
XWhen three minutes have passed in the Stop, Record-Pause or Playback-Pause mode, the
recorder enters the Standby (energy saving) mode and the LCD goes out.
XTo cancel the Standby mode and return to the previous mode, press any of the REC, STOP, play,
fast-forward and fast-reverse buttons or the MENU switch.
MENU
INDEX/
2322
Page 13

ERASE SP DICT
REC STOP
INDEX/
FOLDER
MENU
ERASE SP DICT
MENU
T572 Inst DS-150-E.Q33J 1999/4/26 0:57 PM y[W 24
CONVENIENT FEATURES
VARIABLE CONTROL VOICE ACTUATOR (VCVA) RECORDING
In order to improve performance in long recordings, this recorder is equipped with a voice activated
recording function (called VCVA by Olympus). This function helps save memory capacity and extends
recording time with very little loss of voice data at the moment of activation.
1 2 3
1 Press the MENU switch once (for less than 2 seconds) to display [R-TIME] and [SP] or [LP]. Then
adjust the Up/Down control to display [VCVA] and [ON] or [OFF] (see page 29). Pressing the
MENU switch within 4 seconds allows you to switch between [ON] and [OFF]. The VCVA function
is activated when the STOP button is pressed or if no operation has been performed for 4 seconds
after [ON] is displayed.
2 When the built-in microphone detects a voice sound, recording will start automatically. When voice
input stops for 2 seconds, recording will pause. The LED lights when recording begins and blinks
during Record-Pause.
3 The recording activation level can be adjusted during VCVA recording with the Up/Down control on
the MENU switch. Perform a test recording and adjust the level between 1 and 30 to match the
recording environment.
RECORDING INDEX SIGNALS
You can record index signals at important points during recording for instant access to those points
during playback.
1 Press the Index button during recording or Record-Pause.
[INDX] is displayed on the LCD panel for 2 seconds together
with the total number of index signals recorded.
2 The LED blinks during index signal recording.
XRecording of the next index signal will not be accepted during the
2-second interval while an index signal is being recorded and the
LED is blinking
XUp to 16 index signals can be recorded in each message.
DETECTING INDEX SIGNALS
1 When an index signal is detected during playback, [INDX] lights on the LCD panel.
2 If the Index button is pressed during playback, the recorder will skip to the next index signal in the
same message and then resume playback.
3 If the index button is pressed during fast forward, the recorder will forward skip to the next index
signal in the same message and stop.
4 If the index button is pressed during fast reverse, the recording will reverse skip to the previous
index signal in the same message and stop.
XThe skip operation will not occur if no index signal has been recorded before or after the current
position in the same message.
XThe VCVA activation level differs depending on the sensitivity of the microphone. See page 30 for
details on the microphone sensitivity setting.
2524
Page 14

ERASE SP DICT
REC STOP
INDEX/
FOLDER
MENU
ERASE SP DICT
REC STOP
INDEX/
FOLDER
MENU
T572 Inst DS-150-E.Q33J 1999/4/26 0:57 PM y[W 26
EDITING MESSAGES
1. OVERWRITE RECORDING
When the REC button is pressed in the middle of a message while in the Stop mode or in the
Playback-Pause mode, overwrite recording starts from that point.
XOverwrite recording is possible only within a single message.
XOverwrite recording can be continued for an extended period as long as sufficient memory remains.
2. INSERT RECORDING
3 4 5
ERASE SP DICT
REC STOP
FOLDER
MENU
INDEX/
1 Stop playback at the point you want to insert a recording.
2 In the Stop mode, press the MENU switch once (for less than 2 seconds) to display the menu on
the LCD panel (the first menu displayed is the R-TIME setting menu).
3 Press the Up/Down control on the MENU switch to display the Recording Mode menu ([MODE] is
shown on the LCD panel). The LCD panel should also show the current status ([OVER-W] or
[INSERT]).
4 Pressing the MENU switch within 4 seconds allows you to switch between [OVER-W] (overwrite
recording mode) and [INSERT] (insert recording mode). The Insert Recording mode starts when
the STOP button is pressed or when no operation is performed for 4 seconds while [INSERT] is
displayed.
5 Make the recording.
6 Press the STOP button to end insert recording.
XInsert recording is possible only once after mode setting. The insert recording mode is canceled as
soon as any other operation (playback, etc.) is started after mode setting. To use insert recording
again, repeat steps 1 to 6.
XInsert recording is not possible if there is no memory remaining.
ERASE SP DICT
REC STOP
FOLDER
3. PARTIAL ERASURE
3 4 5
ERASE SP DICT
REC STOP
INDEX/
FOLDER
MENU
1 Stop playback at the start of the section you want to erase.
2 In the Stop mode, press the MENU switch once (for less than 2 seconds) to display the menu on
the LCD panel (the first menu displayed is the R-TIME setting menu).
MENU
3 Press the Up/Down control on the MENU switch to display the Partial Erasure menu ([ERSE]) is
shown on the LCD panel together with the current position.
4 Press the MENU switch to start playback. Press the MENU switch again at the point where you
INDEX/
want to stop erasing. (The Partial Erasure display starts blinking.)
5 Within 4 seconds, press and hold the ERASE button for more than 1 second. The selected part of
the message is erased and [OK] appears on the LCD. The Stop mode is restored.
XThe Partial Erasure mode is canceled when a button other than the ERASE button is pressed or if
the ERASE button is not pressed within 4 seconds after the Partial Erasure display starts blinking.
ERASE SP DICT
REC STOP
FOLDER
MENU
INDEX/
2726
Page 15

M-SENS
R-TIME
R-MODE
Stop mode
VCVA
ERASE
ALL
ERASE
MOVE
More than
2 seconds
*Flow in Down direction
M-SENS
R-TIME
R-MODE
Stop mode
VCVA
ERASE
ALL
ERASE
MOVE
More than
2 seconds
*Flow in Up direction
Stop mode
More than
2 seconds
*Flow in Down direction
Stop mode
More than
2 seconds
*Flow in Up direction
Time/date
ALARM
I D
FORMAT
Time/date
ALARM
I D
FORMAT
Down direction operation
Up direction operation
Push operation
Menu switch operation
* When the STOP button is
pressed either in the first or
second menu, the recorder will
return to the Stop mode.
T572 Inst DS-150-E.Q33J 1999/4/26 0:57 PM y[W 28
ALARMS
This recorder is preset to automatically generate the following alarms. You can cancel any alarm with
a simple setting operation.
1.Record end alarm
Sound: Beep, long beep,...beep, long beep....
Condition: Sounds when the recorder runs out of remaining memory during recording.
2.Record pre-end alarm
Sound: Long beep every 15 seconds.
Condition: Sounds when the remaining memory drops below 90 seconds during recording.
3.Message end alarm
Sound: Low-pitched beep.
Condition: Sounds when the end or beginning of a message is reached.
4.Operation alarm
Sound: Beep
Condition: Sounds when the press of the REC button is accepted.
XWhen the earphone is plugged in, the built-in speaker does not generate alarms.
(Alarm setting change procedure)
1 In the Stop mode, press and hold the MENU switch for more than 2 seconds to display the alarm
setting menu ([ALARM] and [ON] or [OFF]) appears on the LCD panel.
2 Pressing the MENU switch within 4 seconds allows you to switch the alarm setting between[ON]
and [OFF]. The selected alarm setting is set when the STOP button is pressed or when no operation is performed for 4 seconds while the desired alarm setting is displayed.
MENU OPERATION
When the MENU switch is pressed (for less than 2 seconds), the LCD panel displays the first menu.
(In the first menu the LCD panel initially displays [R-TIME] and [SP] or [LP] as described in "1.
Recording mode".) Using the Up/Down control on the MENU switch allows you to change the settings
of "2 Microphone Sensitivity", "3. VCVA setting", "4. Insert recording mode", "5. Partial erasure", "6.
Moving messages between folders" and "7. ERASE ALL" as described below. When the MENU
switch is kept pressed (for more than 2 seconds), the LCD panel displays the second menu. (In the
second menu the LCD panel initially displays "1. Alarm setting (ON/OFF)".) Adjusting the Up/Down
control and pushing the MENU switch allows you to change the settings of "2. Time/date setting", "3.
ID number setting" and "4. Formatting" as described below.
First menu
Second menu
2928
Page 16

T572 Inst DS-150-E.Q33J 1999/4/26 0:57 PM y[W 30
v First menu
1.Recording mode (SP/LP)
1 In the Stop mode, press the MENU switch once (for less than 2 seconds) to display the menu
on the LCD panel ([R-TIME] and [SP] or [LP]).
2 Pressing the MENU switch within 4 seconds allows you to switch between [SP] (Standard Play
mode capable of voice recognition) and [LP] (Long Play mode). The selected recording mode is
set when the STOP button is pressed or when no operation is performed for 4 seconds while
the selected mode is displayed.
X Recording time is about 75 minutes in the SP mode and about 160 minutes in the LP mode. (1
message continuous recording: The recording time available may be shorter than specified if a
large number of short recordings are made. Use the remaining time only as a reference.)
X The recording mode cannot be changed within the same message.
2. Microphone sensitivity
1 In the Stop mode, press the MENU switch once (for less than 2 seconds) to display the menu
on the LCD panel (the first menu displayed is the R-TIME setting menu).
2 Press the Up/Down control on the MENU switch to display the Microphone Sensitivity setting
menu ([M-SENS] is displayed on the LCD panel).
3 Pressing the MENU switch within 4 seconds allows you to switch between [DICT] (suitable for
voice recognition) and [CONF] (high sensitivity mode that makes the microphone capable of
recording ambient sound as well). The selected microphone sensitivity is set when the STOP
button is pressed or when no operation is performed for 4 seconds while the selected sensitivity
level is displayed.
XThe actuation level for VCVA will vary depending on the microphone sensitivity setting
3. VCVA setting
See page 24.
4. Insert recording mode
See page 26.
5. Partial erasure (specification and execution)
See page 27.
6. Moving messages between folders
1 In the Stop mode, press the MENU switch once (for less than 2 seconds) to display the menu
on the LCD panel (the first menu displayed is the R-TIME setting menu).
2 Press the Up/Down control on the MENU switch to display the Move Message menu ([MOVE]
is displayed together with [ARB] or [BRA]).
3 Press the MENU switch within 4 seconds. The messages in the current folder (A or B) will be
moved to the other folder, the LCD panel will display word [OK] and the recorder will return to
the Stop mode. The Move Message mode is canceled when the STOP button is pressed or
when no operation is performed for 4 seconds after the Move Message menu is displayed.
7. ERASE ALL (execution)
See page 23.
u Second menu
1.Alarm setting (ON/OFF) : See page 28.
2. Time/date setting : See page 13.
3. ID number setting : See page 14.
4. Formatting
Under normal use, it is not usually necessary to format the built-in flash memory since it is formatted before shipment from the factory.
To restore the memory to its original condition, follow the procedure below to format the memory.
1 In the Stop mode, press the Up/Down control on the MENU switch or press the MENU switch
once (for less than 2 seconds) to display the menu on the LCD panel.
2 Press the Up/Down control on the MENU switch to display the Formatting (Warning) menu
([FORM] is displayed together with a blinking [YES?]).
3 Press the MENU switch within 4 seconds. The memory will be formatted, the LCD panel will
display [OK] and the recorder will enter the Stop mode. The formatting mode is canceled if the
STOP button is pressed or if no operation is performed for 4 seconds after the formatting display starts blinking.
X Remember that formatting erases all data (including recorded voice data, time/date and ID
number data) in memory. Be careful.
HOLD
Setting the HOLD switch Qto the HOLD (upper) position locks the recorder in the current mode. All
operation buttons are disabled. This is convenient when carrying the recorder in a bag or pocket since
it prevents any operational errors due that could be caused by the accidental press of a button.
XWhen the HOLD switch is set to the HOLD (upper) position in the Stop mode, the LCD will go out
and the recorder will enter the Standby mode.
3130
Page 17

ERASE SP DICT
INDEX/
MENU
T572 Inst DS-150-E.Q33J 1999/4/26 0:57 PM y[W 32
OTHER
RESET
If an LCD panel display or operational error occurs, gently press the reset button inside the battery
compartment with a slender object such as the tip of a ball-point pen. Do not remove the batteries.
XPreviously recorded messages will not be erased.
XPressing the reset button may alter the clock time slightly
(because the clock stops temporarily when the battery
compartment is opened).
XDo not press the reset button with a sharp object.
TRANSFERRING DATA TO A PC
This recorder is equipped with a PC/IF connector Tto enable recorded voice data to be transferred
to a PC. For more details on how to transfer data and voice recognition software, refer to the instruction manual provided with the DS-150 Via Voice kit (if you have purchased it).
DICTATION MODE BUTTON
For optimum results in voice recognition and voice-text conversion, press the DICTATION MODE button 9. All settings are
automatically adjusted to ensure best results.
• Recording mode setting: Standard Play (SP) mode
• Microphone sensitivity setting: Dictation (DICT) mode
• Alarm setting: The alarms are set to OFF.
XVoice data recorded in the long play (LP) mode cannot be used
in voice recognition.
TROUBLESHOOTING (Questions and Answers)
Q-1: No display on the LCD panel.
A-1: Are the batteries correctly installed? Are the batteries dead? Is the HOLD switch set to
HOLD position? Is the Standby mode engaged?
Q-2: No operation accepted.
A-2: Is the HOLD switch set to HOLD? Are the batteries dead? Is the battery cover open?
Q-3: Recording is not possible.
A-3: Is the remaining memory at zero?
Q-4: The indicator LED does not light during recording.
A-4: Is there any memory remaining? Is the HOLD switch set to HOLD?
Q-5: An alarm sounds during recording.
A-5: Is the remaining memory low or at zero?
Q-6: No sound during playback or playback volume is low.
A-6: Is the volume set to an optimum level?
Q-7: Index signals are not being recorded?
A-7: Have 16 index signals already been recorded?
Q-8: The clock and ID number have been reset.
A-8: Was the memory formatted?
Q-9: The clock time has changed.
A-9: Did you take a long time to open the battery cover and the batteries? Set the clock again if
you want the correct time.
Q-10: The AC adapter does not work.
A-10: Are you using optical adapter?
3332
Page 18

T572 Inst DS-150-E.Q33J 1999/4/26 0:57 PM y[W 34
ACCESSORIES (OPTIONAL)
• AC adapter (A321: US and Canada, A322: Europe (except U.K.))
• PC data transfer kit
• USB-compatible PC transfer adapter (RA5)
• Noise canceling external microphone (ME12)
SPECIFICATIONS
Recording format Digital recording in accordance with IVA digital speech standard
Recording medium Built-in flash memory
Specified input level –70 dBv
Overall frequency response SP mode: 300 to 5,000 Hz. LP mode: 300 to 3,000 Hz.
Recording time SP mode: Approx. 75 min. (1 message continuous recording)
LP mode: Approx. 160 min. (1 message continuous recording)
Speaker Built-in 28 mm round dynamic speaker
Microphone jack 3.5 mm mini-jack, impedance 2 kΩ
Earphone jack 3.5 mm mini-jack, impedance 8 Ω
Maximum output (3 V DC) 100 mW or more ( 8 Ω speaker)
Power supply Rated voltage: 3 V DC
Batteries: Two “AAA”-size batteries (LR03 or R03)
External power supply: AC adapter
Battery life (recording) Approx. 10 hours (according to Olympus tests using alkaline batter-
ies)
Size 116(H) × 43(W) × 14.5(D) mm (without protrusions)
Weight 74 grams (including batteries)
Declaration of Conformity
Model Number: DS-150
Trade Name: DIGITAL VOICE RECORDER
Responsible Party: OLYMPUS AMERICA INC.
Address: Tow Corporate Center Drive, Melville, NY 11747-3157, U.S.A.
Telephone Number: 516-844-5000/800-622-6372
This device Complies with Part 15 of the FCC Rules, Operation is subject to the following two
conditions: (1) This device may not cause harmful interference, and (2) this device must
accept any interference received, including interference that may cause undesired operation.
Canadian RFI
This digital apparatus does not exceed the Class B limits for radio noise emissions from digital apparatus as set out in the Radio Interference Regulations of the Canadian Department of
Communications.
Cet apparail numerique ne depasse pas les limits de Categorie B pour les emissions de gruit radio
emanant d’appareils numeriques, tel que prevu dans les Reglements sur l’Interference Radio du
Department Canadian des Communications.
* Specifications, design and accessories are subject to change without any notice or obligation on the
part of the manufacturer.
3534
 Loading...