

Page 1
VOICE RECORDER
Recording
Recording
NOTE CORDER
EN
INSTRUCTIONS
Thank you for purchasing an Olympus Digital Voice Recorder.
Please read these instructions for information
about using the product correctly and safely.
Keep the instructions handy for future reference.
To ensure successful recordings, we recommend that
you test the record function and volume before use.
Shinjuku Monolith, 3-1 Nishi-Shinjuku 2-chome, Shinjuku-ku, Tokyo 163-0914, Japan.
3500 Corporate Parkway, P.O. Box 610, Center Valley, PA18034-0610, U.S.A.
For customers in North and South America:
Declaration of Conformity
Model Number: DP-10
Trade Name: DIGITAL VOICE RECORDER
Responsible Party: OLYMPUS IMAGING AMERICA INC.
Address: 3500 Corporate Parkway, P.O. Box 610, Center Valley,
PA 18034 - 0 610,U.S. A .
Telephone Number: 1-888-553-4 448
This device Complies with Part 15 of the FCC Rules. Operation is subject to the
following two conditions: (1) This device may not cause harmful interference,
and (2) this device must accept any interference received, including interference that may cause undesired operation.
Tel. +81 (0)3-3340-2111
http://www.olympus.com
Tel. 1-888-553-4448
http://www.olympusamerica.com
DP-10
Tested To Comply
With FCC Standards
FOR HOME OR OFFICE USE
Canadian RFI:
This digital apparatus does not exceed the Class B limits for radio noise emissions
from digital apparatus as set out in the Radio Interference Regulations of the
Canadian Department of Communications.
Cet appareil numérique ne dépasse pas les limites de la Catégorie B pour
les émissions de bruit radio émanant d’appareils numériques, tel que prévu
dans les Règlements sur l’Interférence Radio du Département Canadien des
Communications.
Introduction
• The contents of this document may be changed in the future without advanced
notice. Contact our Customer Support Center for the latest information relating
to product names and model numbers.
• The screen and re corder illustrations shown in this man ual were produced during
the developm ent stages and may dif fer from the actual p roduct. The utmos t care
has been taken to ensure the integrity of the contents of this document. In the
un li kel y ev en t th at a que st io nab le i te m, e rr or, or o mis si on i s f oun d, p le as e co nta ct
our Customer Support Center.
• Any liabilit y for passive damages or damag e of any kind occurred due to data l oss
incurred by a defect of the product, repair performed by the third party other
than Olympus or an Olympus authorized service station, or any other reason is
excluded.
U1-BS0596-01
AP1007
Page 2
Getting started
Recording
Recording
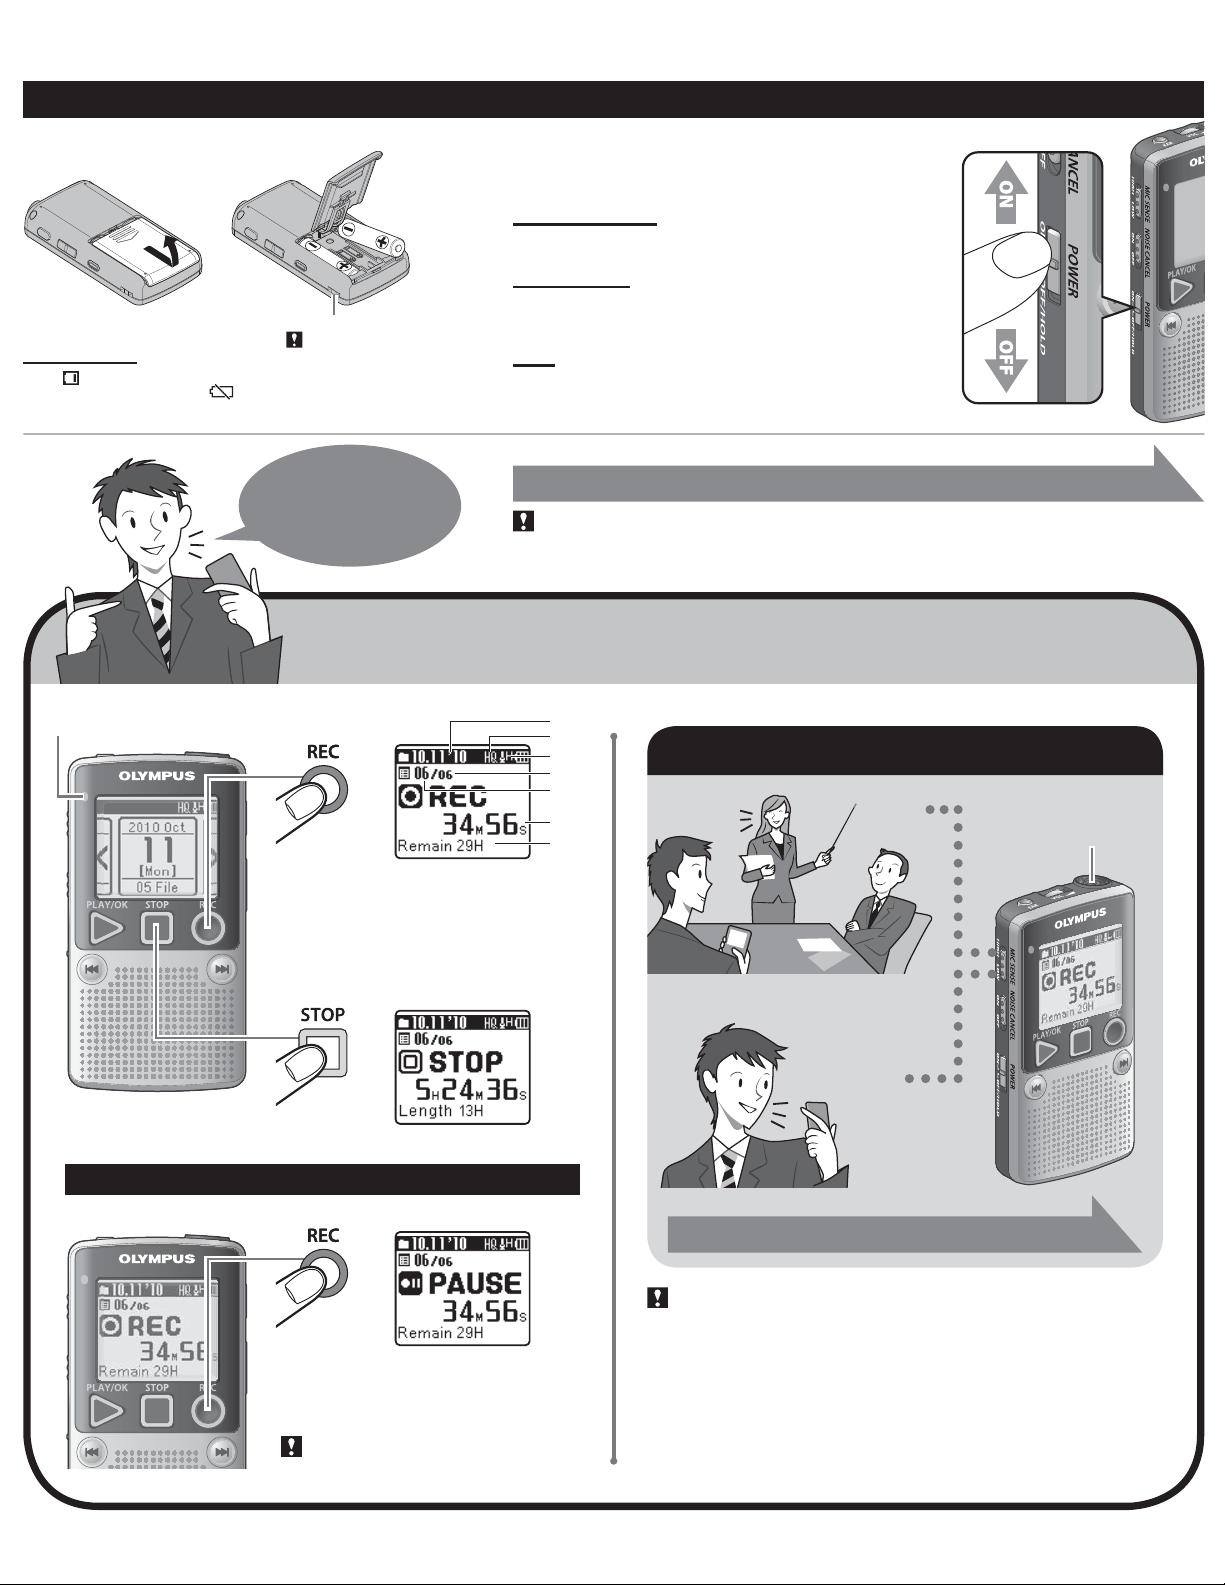
1 Inserting batteries 2 Turning on the power
Slide the POWER switch to the [ON] position.
Turning off the power:
While the recorder is in stop mode, slide the POWER switch to the
[OFF/HOLD] position.
```
Strap hole
Battery indicator:
When [
] appears o n the display, replace the ba tteries as soon as po ssible.
When the bat teries are too weak, [
display and the recorder shuts down .
] and [Bat tery Low] appea rs on the
• Strap is not supplied.
Power save mode:
If the recorder is on and stops for 10 minutes or longer, the display
shuts off and it goes into power save mode. To exit power save mode,
press any button.
HOLD:
If you slide the POWER switch to the [OFF/HOLD] position, the
current conditions will be preserved, and all buttons and switches
will be disabled.
also change
the recording
Recording indicator light is lit whil e recording.
You can
mode!
```
First, set the time and date.
• When you use this recorder for the fi rst time after purchasing, or when you switch it on after removing the batteries for more than
• If the time and date are not se t, the fi le is saved using def ault time and date.
Recording
Recording
Current date
a
Recording mode indicator
b
Microphone sensitivity indicator
c
Total number of recorded fi les
d
for the date
Current fi le number
e
Elapsed recording time
f
Remaining recording time
g
“Setting time and date” (Verso)
30 minutes when exchanging batteries etc, the time will return to the default setting and the [Set Time & Date] will appear.
a
b
c
d
e
f
g
This is a high ly sensitive mode whic h can record
surround ing noises. (
Microphone sensitivity
High
AH)
Turn the microphone in
the direc tion of the source
to be recorde d.
Pause
If the record er is in recording mode a nd the REC (x)
button is p ressed, recording pauses. If th e REC (x)
button is p ressed again, record ing resumes.
• The recorder will t ime out after 60 minutes
when lef t in [PAUSE] .
Low
This is the st andard
level of microphone
sensitivity. (
Set the recor ding mode to match the surro unding conditions.
“Changing the recording mode” (Verso)
• To ensure successful recor dings, we recommend tha t you test the record func tion and
volume bef ore use.
• To ensure recording from th e beginning, star t recording after yo u see the recording
indicator li ght on.
• Recorder will not be ab le to record anymore when [ Memory Full] or [Maximum File
Size is reached] appears. D elete any unnecessar y fi les before recordi ng any further.
• If the recorder is place d directly on a tabl e when recording a conference, etc. , the
vibratio ns of the table are likely to b e recorded. To obtain a clear r ecording, place a
notebook o r handkerchief betw een the recorder and the t able to prevent the vibrations
from being recorded.
• When remaining recor ding time is less than 60 se conds, the recording in dicator light
starts fl ash ing. When the recordin g time is decreasing to 30 or 10 seco nds, the light
fl ashes faster.
AL)
Page 3

High
Low
Playback
Playback
Playback
Playback
Recorded files are
grouped by date.
a
b
Changing the playback speed
```
Recording date
a
Current fi le number
b
Elapsed playback time
c
Playback position bar indicator
d
Approximate fi le length
e
Forwarding and Rewinding
Press and hold
s
If the 0 or 9 button is pressed and held while the recorder is in playback
mode, the fi le advances with sound.
s
If the 0 or 9 button is pressed while the recorder is in stop mode, the
recorder moves to the beginning of the fi le.
s
Fast forwarding and rewinding are possible beyond the date.
c
d
Fast
Playback sp eed can be
changed to th e following
settings: 0.5x, 0.75x, normal,
1.2 5x, and 1.5x.
Slow
Noise cancel
e
On
Noise will b e reduced in
the file w hen it’s played
back for be tter sound
quality.
Noise Cancel indicator
• When the NOISE CANCEL switch is set to [ON], playback
speed ret urns to normal playback .
Low
Off
The file is played back as it
was recorded.
When the ear phone is used, the reco rder speaker will be
switched -off. Playback is in m onaural.
Volume
To avoid irritatio n to the ear, insert the
High
earphone a fter turning down the vo lume
level. When you listen with the earphone
during play back, do not raise the vo lume
too much. It may c ause hearing impairment and a dec rease in hearing abil ity.
• Earphone is not supplied.
File search
Search for files
by the date they
were recorded.
Recorder status
indicator
: Durin g playback
M
M
: During fast playback
F
M
: During slo w playback
S
s
When searching for a fi le recorded on October 15.
``` ``` ```
The date display
appears.
Select O ctober 15. The fir st file is
played back.
If the file is skipped,
the recorder
switches to the
next file.
While the recorder is in
stop mode, p ress and
hold the STOP (z) but-
ton to display the [ Time &
Date] and [Remain].
Page 4

Erase
Erase
Erase
Erase
Select the file you want to delete and stop playback ahead of time.
Erase in Date
To delete all fil es of
the displaye d date, use
the SEARCH/MENU
button to switch the
date display.
``` ``` ``` ```
File Erase
Cancel
If [Cancel] is selected and
the PLAY/OK (y) button is
pressed, the recorde r returns
to stop status.
File Erase Erase in Date
Select
Set
An erased
file cannot be
restored. Take care
when deleting
files.
The numbe r of the file to
be deleted flashes.
`
After deletion, the file
number moves up and
the recorder stops at the
beginning of the next file.
The date to be deleted
flashes.
`
After del etion, the
next date w ith a file is
displayed.
• If an action is not selec ted within 8 seconds, the recorde r will return to stop status.
• It may take over 10 seconds to complete pro cessing. Never remove bat teries
during this time because data may be corrupted . In addition, caref ully check the
remaining batter y level in order to ensure th at the battery will n ot run out while
processing.
Page 5
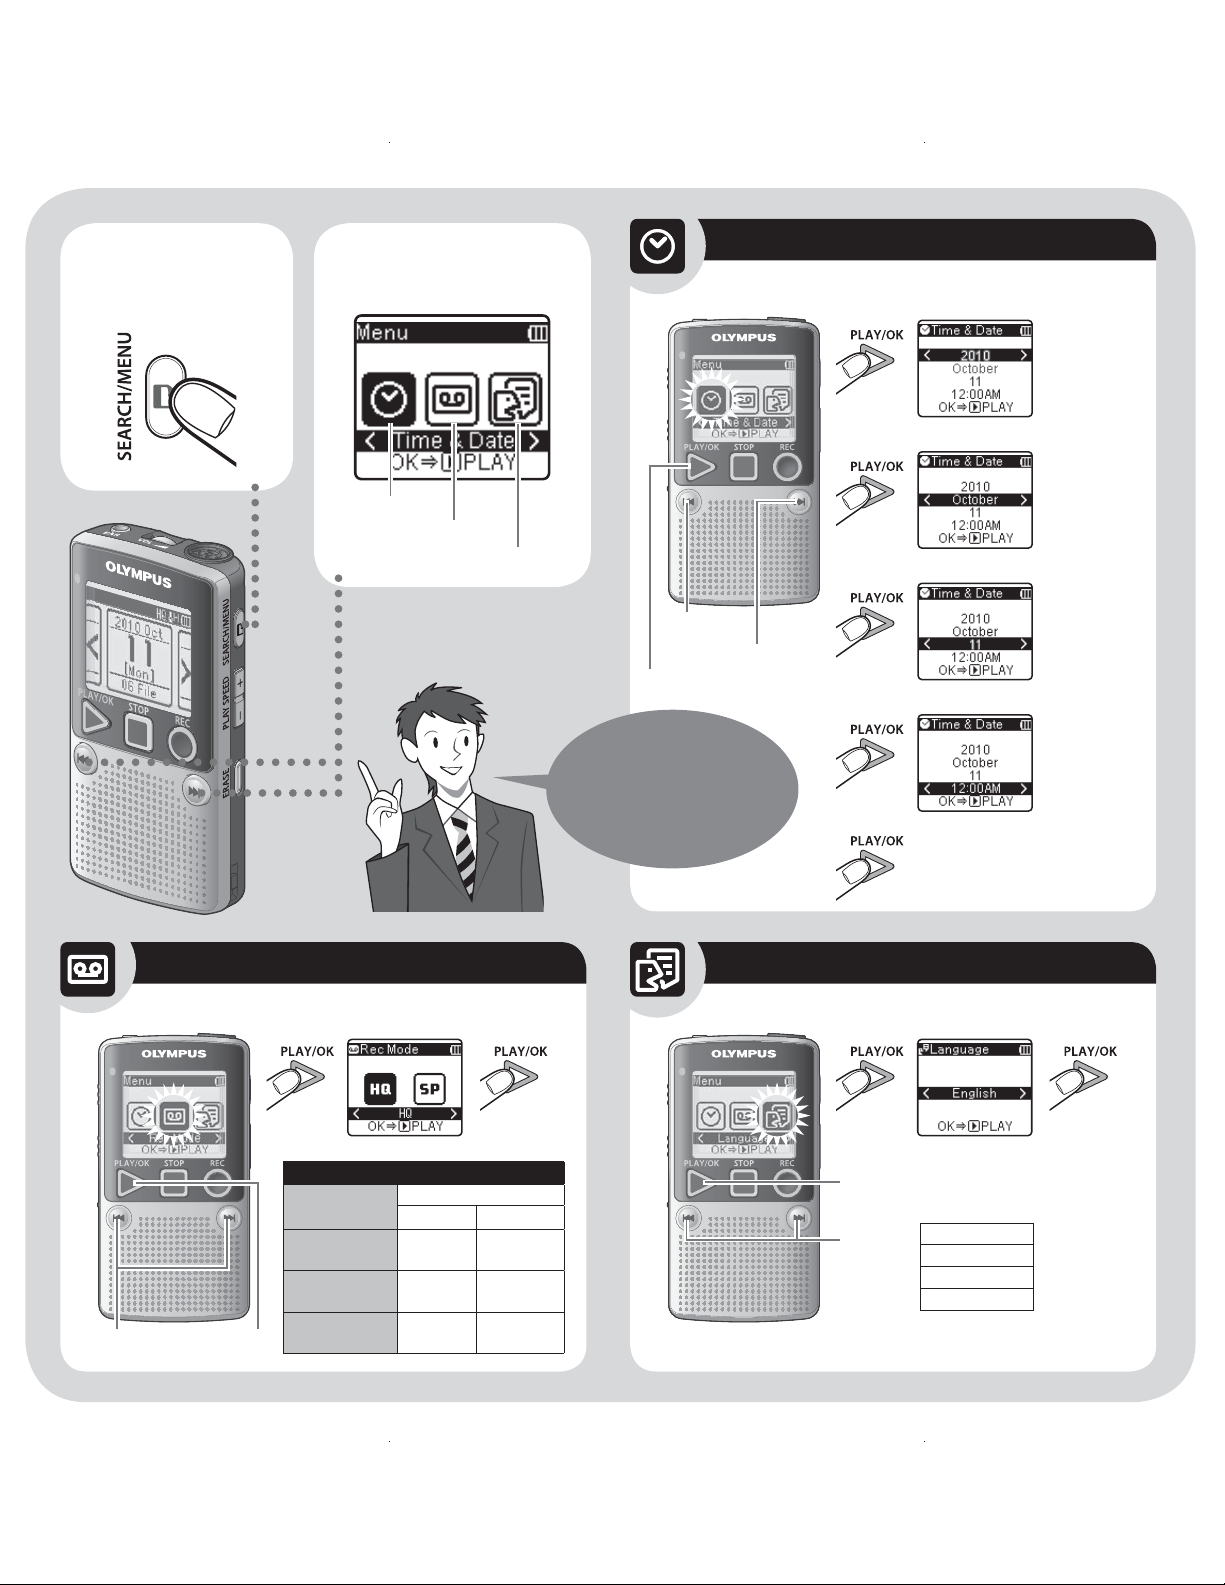
1 Press the SEARCH/
MENU button
for 1 second or
longer.
2 Press the 0 or 9
button to move the
item you want to set.
Time & Date
Rec Mode
Language
Previous
Next
Set
Setting the time and
date beforehand
enables easier file
management.
Setting time and date
s
Use the 0 or 9 button to change the date.
``` ``` ``` ``
s
The clock will start from the set date and
time. Press the PLAY/OK (y) button
according to the time signal.
Changing the recording mode
Select Set
```
Recommended settings by recording condition
Recording
condition
Dictation with a lot of
background noise.
Recordings for lessons
and meetings.
Lengthy recordings.
Recommended settings
Rec Mode MIC SENSE
[HQ]
(high quality
sound recording)
[HQ]
(high quality
sound recording)
[SP]
(standard
recording)
[LOW]
[HIGH]
[HIGH]
Changing the display language
```
s
You can select the display language for
Set
Select
this recorder.
English
Français
Español
Português (BR)
Page 6

Safe and proper usage
Troubleshooting
General precautions
• Do n ot leave the recorder in hot , humid locations such as inside
a closed auto mobile under direct sunlight or on the beach in the
summer.
• Do n ot store the recorder in places exposed to excessive moistu re or
dust.
• Do n ot use organic solvent s such as alcohol and lacquer thinner to
clean the unit.
• Do n ot place the recorder on to p of or near electric appliances such
as TVs or refrigerators.
• Avoid recording o r playing back near cellular phon es or other
wireless e quipment, as they may cause interference and noise. If
you exper ience noise, move to another place, or move the recorder
further away from such equipment.
• Avoid sand or dir t. These can cause irreparable dama ge.
• Avoid strong vibrations or shock s.
• Do n ot disassemble, rep air or modify the unit yourself.
• Do n ot operate the unit while operating a vehicle (such as a bic ycle,
motorcycle, or go- cart).
• Keep the unit out of the reach of children.
<Warning regarding data loss>
• Re corded content in memory may be destroyed or erased by
operating mistakes, unit mal function, or during repair work.
• For import ant recorded content, we re commend you to write it down
some where.
• Any liabilit y for passive damages o r damage of any kind occurred due
to data loss incurred by a de fect of the produc t, repair perfo rmed by
the third party other than Olympus or an O lympus authorize d service
station, or any other re asons is excluded fro m Olympus’s liabilit y.
Batteries
Danger:
f
• Batteries should never be exposed to flame, heat, short-circuited or
disassembled.
• Never store bat teries where they wil l be exposed to direc t sunlight,
or subjec ted to high temperatures in a hot vehicle, near a heat
source, etc.
Warning:
f
• Do n ot solder lead wires or terminals directly onto a battery or
modify it.
• Do n ot connect the = and - terminals together. This may cause fire,
overheating or electric shock.
• Wh en carrying or storing the batteries, be sure to pu t them in the
provided case to protec t their terminals. Do not carry or store the
batteri es with any metal objec ts (such as key rings).
If this war ning is not followed, f ire, overheating or electric shock may
occur.
• Do n ot insert the batteries with their = and - ter minals reversed.
• If a ny liquid from a batter y gets into your eyes, promptly wash it off
with clean water and consult your doctor at once.
• Do n ot attempt to recharge alkaline, li thium or any other nonrechargeable batteries.
• Never use any batteries with a to rn or cracked outer cover.
• Keep batteries out of the reach of children.
• If you notice any thing unusual when using this pro duct such as
abnormal noise, heat, smoke, or a burning o dor:
1 remove the bat teries immediatel y while being careful not to burn
yourself, and;
2 c all your dealer or loc al Olympus represe ntative for service.
• Do n ot expose the batter ies to water. Do not allow water to contact
the terminals.
• Do n ot remove or damage the batteries i nsulating sheet.
• Do n ot use the batteries i f you find somethin g wrong with them such
as leakage, color change or deformity.
• Unplug the charger if the charging is still incomplete after the
specified time it should take.
• Should any bat teries liquid get on skin or clothing, pro mptly wash it
off with clean water.
• Kee p batteries away from f ire.
Caution:
f
• Do n ot subject batteries to stron g shocks.
• Wh en using rechargeable batter ies that have not been used for a
while, be sure to recharge them before use.
• Re chargeable batteries have a limited lifetime. When the operating
time becomes shorter even if the rechargeable battery is fully
charged un der the specifie d condition, replace it with a new one.
Q1: The power cannot be turned on.
A1: • The batteries may be depleted.
• The batteries may be inserted incorrectly.
Check = and - before inserting new batteries.
• Are the terminals of the batteries soiled?
If so, clean them with a dry cloth.
Q2: Nothing happens when a button is pressed.
A2: • The POWER switch may be set to [OFF/HOLD]
position.
Slide the POWER switch to the [ON] position.
Q3: No sound or quiet sound is heard from the speaker
while playing back.
A3: The earphone plug may be plugged into the
recorder.
The volume may be set to the minimum level.
Q4: Noise is audible through the recording monitor.
A4: Acoustic feedback is occurring. Conduct adjustments
like separating the earphones from the microphone
further, do not point the microphone at the earphones, lower the volume on the recording monitor,
and so on.
Q5: Recording is not possible.
A5: By pressing the
REC
(x) button:
• Check if the display shows [Memory Full].
• Check if the display shows [Maximum File Size is
reached].
Delete any unnecessary files before recording any
further. A maximum of 99 files can be recorded
within a single day.
Q6: The playback speed is too fast (slow).
A6: The recorder may be set to fast (slow) Playback.
Use the PLAY SPEED button to set to normal play-
back.
Specifications
Recording medium: Built-in flash memory (1GB)
Overall frequency: HQ mode: 70 to 13,000 Hz
SP mode: 70 to 8,000 Hz
Guide to recording times: HQ mode: Approx. 67 h.
SP mode: Approx. 131 h.
Microphone: Electret Condenser Microphone (monaural)
Speaker: Built-in ø 36 mm round dynamic speaker
Maximum power: 200 mW
Earphone jack (monaural):
ø 3.5 mm diameter, impedance 8 Ω or more
Power supply:
Two AAA (LR03) batteries or Two Ni-MH rechargeable batteries
Continuous battery: Guide to alkaline battery life
Recording mode HQ SP
During recording mode approx. 51 h. approx. 63 h.
During playback mode
(Built-in speakers)
During playback mode
(Earphone)
approx. 21 h. approx. 21 h.
approx. 69 h. approx. 69 h.
Dimensions: 95 (L) mm x 50 (W) mm x 18.2 (T) mm
(without protrusions)
Weigh t: 78 g (including battery)
Operating temperature: 0°C - 42°C
• The above-noted recording times indicate times after deletion of the
manual data stored in the recorder.
• Battery life is measured by Olympus. It varies greatly according to the
type of batteries used and the conditions of use.
• Your recorded contents are for your personal use or pleasure only. It is
prohibited to record copyrighted material without permission of the
copyright holders according to copyright law.
• Specifi cations and design are subject to change without notice for
improvement of performance.
Accessories (optional)
s Ni-MH rechargeable battery and charger set: BC400
(For Europe)
s Ni-MH rechargeable battery: BR401
 Loading...