

Olympus D-550 ZOOM Reference Manual

DIGITAL CAMERA
C-300 ZOOM
D-550 ZOOM
REFERENCE MANUAL
<Click Here>
CAMERA OPERATION MANUAL
Explanation of digital camera functions and operating instructions.
DIGITAL CAMERA - PC CONNECTION
OPERATION MANUAL
Explanation of how to download images between your digital camera and PC.

DIGITAL CAMERA
C-300 ZOOM
C-300 ZOOM
C-300 ZOOMC-300 ZOOM
D-550 ZOOM
D-550 ZOOM
D-550 ZOOMD-550 ZOOM
REFERENCE MANUAL
Thank you for purchasing an Olympus digital camera. Before you
start to use your new camera, please read these instructions
carefully to enjoy optimum performance and a longer service life.
Keep this manual in a safe place for future reference.
We recommend that you take test shots to get accustomed to your
camera before taking important photographs.

For customers in Europe
“CE” mark indicates that this product complies with the European
requirements for safety, health, environment and customer protection.
“CE” mark cameras are intended for sales in Europe.
For customers in North and South America
For customers in USA
Declaration of Conformity
Model Number : C-300 ZOOM/D-550 ZOOM
Trade Name : OLYMPUS
Responsible Party : Olympus America Inc.
Address : 2 Corporate Center Drive, Melville, New York
Telephone Number : 631-844-5000
Tested To Comply With FCC Standards
FOR HOME OR OFFICE USE
This device complies with Part 15 of the FCC rules. Operation is subject to
the following two conditions:
(1) This device may not cause harmful interference.
(2) This device must accept any interference received, including interference
that may cause undesired operation.
11747-3157 U.S.A.
For customers in Canada
This Class B digital apparatus meets all requirements of the Canadian
Interference-Causing Equipment Regulations.
Trademarks
• IBM is a registered trademark of International Business Machines Corporation.
• Microsoft and Windows are registered trademarks of Microsoft Corporation.
• Macintosh is a trademark of Apple Computer Inc.
• All other company and product names are registered trademarks and/or
trademarks of their respective owners.
• The standards for camera file systems referred to in this manual are the “Design
Rule for Camera File System/DCF” standards stipulated by the Japan Electronics
and Information Technology Industries Association (JEITA).
2

INDEX
Contents . . . . . . . . . . . . . . . . . . . . . . . . . . . . . . . . . . . . . . . . . . . . . .4
Chapter 1
Getting started . . . . . . . . . . . . . . . . . . . . . . . . . . . . 8
Chapter 2
Shooting basics . . . . . . . . . . . . . . . . . . . . . . . . . . 36
Chapter 3
Advanced shooting . . . . . . . . . . . . . . . . . . . . . . . 57
Chapter 4
Adjusting the image quality and exposure . . . . 68
Chapter 5
Playback . . . . . . . . . . . . . . . . . . . . . . . . . . . . . . . . 83
Chapter 6
Useful functions . . . . . . . . . . . . . . . . . . . . . . . . . 106
Chapter 7
Print settings . . . . . . . . . . . . . . . . . . . . . . . . . . . 117
Chapter 8
Troubleshooting . . . . . . . . . . . . . . . . . . . . . . . . . 127
Specifications . . . . . . . . . . . . . . . . . . . . . . . . . . . . . . . . . . . . . . .140
Index . . . . . . . . . . . . . . . . . . . . . . . . . . . . . . . . . . . . . . . . . . . . . . .142
3

Contents
INDEX . . . . . . . . . . . . . . . . . . . . . . . . . . . . . . . . . . . . . . . . . . . . . . . . . .3
Contents 4
Chapter 1
Chapter 2
Getting started 8
Names of parts . . . . . . . . . . . . . . . . . . . . . . . . . . . . . . . . . . . . . . . . . . . . 8
Monitor indications . . . . . . . . . . . . . . . . . . . . . . . . . . . . . . . . . . . . . . . .10
Memory gauge . . . . . . . . . . . . . . . . . . . . . . . . . . . . . . . . . . . . . . . 12
Battery check . . . . . . . . . . . . . . . . . . . . . . . . . . . . . . . . . . . . . . . . 12
Attaching the strap . . . . . . . . . . . . . . . . . . . . . . . . . . . . . . . . . . . . . . . .13
Loading the batteries . . . . . . . . . . . . . . . . . . . . . . . . . . . . . . . . . . . . . .14
Selecting batteries or the optional AC adapter . . . . . . . . . . . . . . .16
Inserting the card (SmartMedia). . . . . . . . . . . . . . . . . . . . . . . . . . . . . .18
Turning the power on/off . . . . . . . . . . . . . . . . . . . . . . . . . . . . . . . . . . .21
What to do if the CARD SETUP screen is displayed . . . . . . . . . .23
Setting the date and time . . . . . . . . . . . . . . . . . . . . . . . . . . . . . . . . . . .24
Adjusting the viewfinder . . . . . . . . . . . . . . . . . . . . . . . . . . . . . . . . . . . .26
Using the menus and tabs . . . . . . . . . . . . . . . . . . . . . . . . . . . . . . . . . .27
How to use the menus . . . . . . . . . . . . . . . . . . . . . . . . . . . . . . . . .28
Shortcut menus. . . . . . . . . . . . . . . . . . . . . . . . . . . . . . . . . . . . . . .30
Mode menus . . . . . . . . . . . . . . . . . . . . . . . . . . . . . . . . . . . . . . . . . 32
Shooting basics 36
Holding the camera . . . . . . . . . . . . . . . . . . . . . . . . . . . . . . . . . . . . . . .36
Shooting modes . . . . . . . . . . . . . . . . . . . . . . . . . . . . . . . . . . . . . . . . . .37
Taking still pictures. . . . . . . . . . . . . . . . . . . . . . . . . . . . . . . . . . . . . . . .40
Taking still pictures using the viewfinder . . . . . . . . . . . . . . . . . . .40
Taking still pictures using the monitor. . . . . . . . . . . . . . . . . . . . . .41
Comparison of the viewfinder & monitor. . . . . . . . . . . . . . . . . . . .43
If correct focus cannot be obtained . . . . . . . . . . . . . . . . . . . . . . . . . . .44
Determine the position of the subject after focusing
Focusing on distant subjects (
Subjects that are difficult to focus on . . . . . . . . . . . . . . . . . . . . . .46
(Focus Lock) . . . . . . . . . . .44
Quick Focus) . . . . . . . . . . . . .45
4

Contents
Night scene mode . . . . . . . . . . . . . . . . . . . . . . . . . . . . . . . . . . . . . . . .47
Recording movies . . . . . . . . . . . . . . . . . . . . . . . . . . . . . . . . . . . . . . . .49
Zooming in on a subject (Optical zoom/Digital zoom) . . . . . . . . . . . . .51
Using the optical zoom . . . . . . . . . . . . . . . . . . . . . . . . . . . . . . . . .51
Using the digital zoom . . . . . . . . . . . . . . . . . . . . . . . . . . . . . . . . .52
Using the flash . . . . . . . . . . . . . . . . . . . . . . . . . . . . . . . . . . . . . . . . . . .54
Chapter 3 Advanced shooting 57
Taking close-up pictures (Macro mode). . . . . . . . . . . . . . . . . . . . . . . .57
Using the self-timer . . . . . . . . . . . . . . . . . . . . . . . . . . . . . . . . . . . . . . .59
Selecting the metering area (Spot metering) . . . . . . . . . . . . . . . . . . . .61
Shooting pictures sequentially (Sequential shooting/AF Sequential
shooting) . . . . . . . . . . . . . . . . . . . . . . . . . . . . . . . . . . . . . . . . . . . . . . . 62
Panorama shooting . . . . . . . . . . . . . . . . . . . . . . . . . . . . . . . . . . . . . . .64
Taking two-in-one pictures . . . . . . . . . . . . . . . . . . . . . . . . . . . . . . . . . .66
Chapter 4
Adjusting the image quality and exposure 68
Selecting the image quality and size (Record mode). . . . . . . . . . . . . .68
Selecting the ISO sensitivity. . . . . . . . . . . . . . . . . . . . . . . . . . . . . . . . .73
Varying the image brightness (Exposure compensation). . . . . . . . . . .75
Adjusting the color tone (White balance) . . . . . . . . . . . . . . . . . . . . . . .77
Adjusting the sharpness . . . . . . . . . . . . . . . . . . . . . . . . . . . . . . . . . . . .79
Adjusting the contrast. . . . . . . . . . . . . . . . . . . . . . . . . . . . . . . . . . . . . .81
Chapter 5 Playback 83
Playing back still pictures . . . . . . . . . . . . . . . . . . . . . . . . . . . . . . . . . . .83
Quick View (Double-click playback) . . . . . . . . . . . . . . . . . . . . . . . 84
Close-up playback . . . . . . . . . . . . . . . . . . . . . . . . . . . . . . . . . . . .84
Index display. . . . . . . . . . . . . . . . . . . . . . . . . . . . . . . . . . . . . . . . .85
Slideshow . . . . . . . . . . . . . . . . . . . . . . . . . . . . . . . . . . . . . . . . . . . 87
Playing back pictures on a TV . . . . . . . . . . . . . . . . . . . . . . . . . . .88
Playing back movies . . . . . . . . . . . . . . . . . . . . . . . . . . . . . . . . . . . . . .90
Protecting pictures (Protect). . . . . . . . . . . . . . . . . . . . . . . . . . . . . . . . .92
5

Contents
Erasing pictures . . . . . . . . . . . . . . . . . . . . . . . . . . . . . . . . . . . . . . . . . . 94
Single-frame erase . . . . . . . . . . . . . . . . . . . . . . . . . . . . . . . . . . . . 94
All-frame erase . . . . . . . . . . . . . . . . . . . . . . . . . . . . . . . . . . . . . . . 95
Editing still pictures . . . . . . . . . . . . . . . . . . . . . . . . . . . . . . . . . . . . . . .96
Creating black and white pictures . . . . . . . . . . . . . . . . . . . . . . . . . 96
Creating sepia-toned pictures. . . . . . . . . . . . . . . . . . . . . . . . . . . .97
Resizing pictures . . . . . . . . . . . . . . . . . . . . . . . . . . . . . . . . . . . . .98
Trimming pictures . . . . . . . . . . . . . . . . . . . . . . . . . . . . . . . . . . . . .99
Editing movies . . . . . . . . . . . . . . . . . . . . . . . . . . . . . . . . . . . . . . . . . .102
Creating an index . . . . . . . . . . . . . . . . . . . . . . . . . . . . . . . . . . . .102
Editing movies . . . . . . . . . . . . . . . . . . . . . . . . . . . . . . . . . . . . . .104
Chapter 6 Useful functions 106
Turning the beep sound off (Beep sound) . . . . . . . . . . . . . . . . . . . . .106
Formatting (Card setup) . . . . . . . . . . . . . . . . . . . . . . . . . . . . . . . . . . .107
Viewing a picture immediately after shooting (Rec View) . . . . . . . . .109
Saving the settings (All Reset) . . . . . . . . . . . . . . . . . . . . . . . . . . . . . .110
Displaying shooting information . . . . . . . . . . . . . . . . . . . . . . . . . . . . . 112
Adjusting the monitor brightness . . . . . . . . . . . . . . . . . . . . . . . . . . . .113
File name . . . . . . . . . . . . . . . . . . . . . . . . . . . . . . . . . . . . . . . . . . . . . .114
Pixel mapping. . . . . . . . . . . . . . . . . . . . . . . . . . . . . . . . . . . . . . . . . . .116
Chapter 7 Print settings 117
How to print pictures . . . . . . . . . . . . . . . . . . . . . . . . . . . . . . . . . . . . .117
All-frame reservation . . . . . . . . . . . . . . . . . . . . . . . . . . . . . . . . . . . . .119
Single-frame reservation . . . . . . . . . . . . . . . . . . . . . . . . . . . . . . . . . .121
Trimming . . . . . . . . . . . . . . . . . . . . . . . . . . . . . . . . . . . . . . . . . . . . . .124
Resetting the print reservation data . . . . . . . . . . . . . . . . . . . . . . . . . .126
6
Contents
Chapter 8 Troubleshooting 127
Error codes. . . . . . . . . . . . . . . . . . . . . . . . . . . . . . . . . . . . . . . . . . . . .127
Troubleshooting . . . . . . . . . . . . . . . . . . . . . . . . . . . . . . . . . . . . . . . . .129
If an operation does not work . . . . . . . . . . . . . . . . . . . . . . . . . . .129
If the image quality is poor . . . . . . . . . . . . . . . . . . . . . . . . . . . . .132
List of menus . . . . . . . . . . . . . . . . . . . . . . . . . . . . . . . . . . . . . . . . . . . 134
List of factory default settings. . . . . . . . . . . . . . . . . . . . . . . . . . . . . . .138
List of items by shooting mode. . . . . . . . . . . . . . . . . . . . . . . . . . . . . .139
Specifications 140
Index 142
Indications used in this manual
l
Important information on factors which may lead to a
malfunction or operational problems. Also warns of
operations that should be absolutely avoided.
Useful information and hints that will help you get the most
out of your camera.
Reference pages describing details or associated
information.
7
Chapter 1
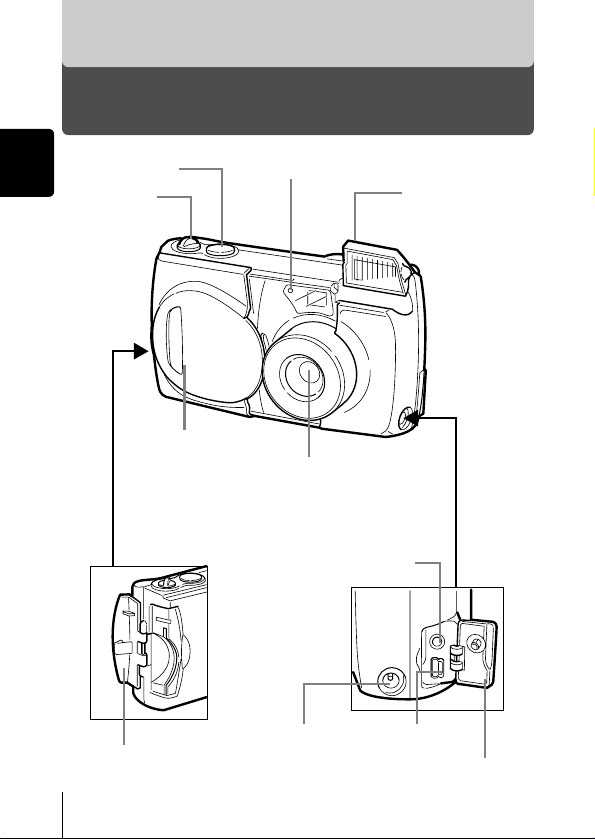
Names of parts
1
Shutter button
Zoom lever
Getting started
Lens barrier
Turns the camera on
and off in the shooting
mode.
Getting started
Self-timer lamp
Lens
Extends automatically
when you open the lens
barrier.
VIDEO OUT jack
Flash
Pops up when
you open the
lens barrier.
8
Card cover
DC-IN jack
USB connector
Connector cover
Arrow pad
Names of parts
AF button
Shooting mode
button
Diopter
adjustment
dial
Viewfinder
Monitor
Battery compartment
lock
Viewfinder
Battery
compartment cover
AF target mark
Flash mode button
Self-timer button
Arrow pad
(OK/Menu)
button
(Monitor) button
Turns the camera on and
off in the playback mode.
Turns the monitor on and
off in the shooting mode.
Tripod socket
Orange lamp
Green lamp
1
Getting started
9
1
36"
Getting started
10
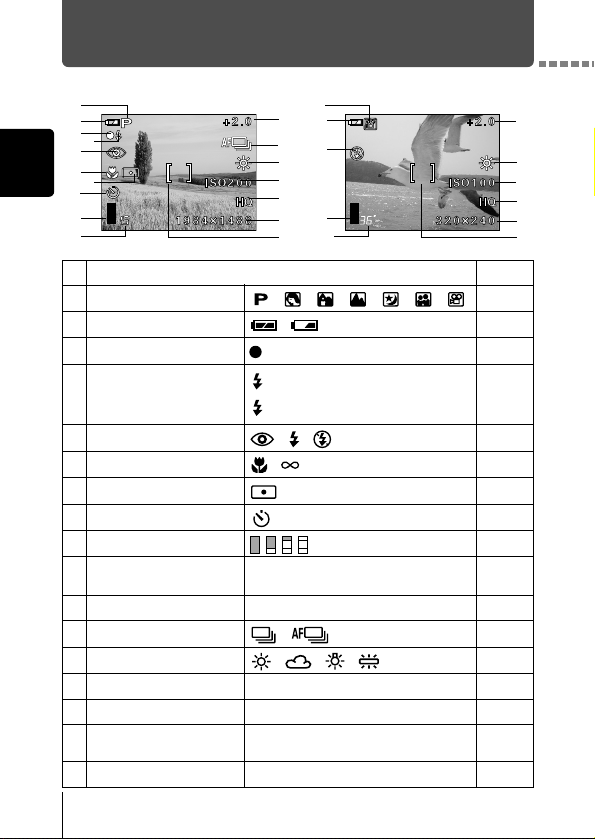
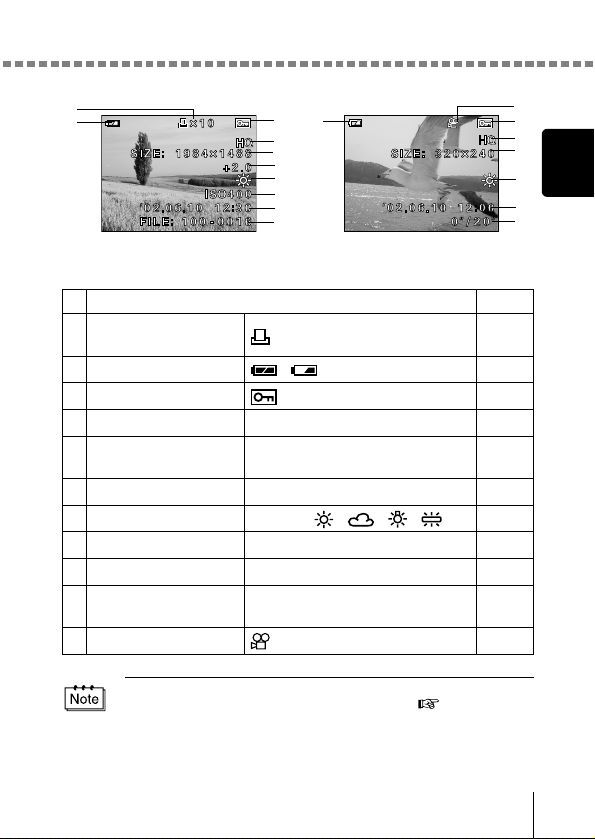
Monitor indications
Shooting mode
1
2
3
4
5
6
7
8
9
10
1
2
3
4
5
6
7
8
9
10
11
12
13
14
15
16
17
Still picture
Shooting mode , , , , , , p.37
Battery check , p.12
Green lamp p.41
Flash stand-by
Camera movement warning/
Flash charge
Flash mode , , p.54
AF , p.45,57
Spot metering p.61
Self-timer p.59
Memory gauge p.12
Number of storable still
pictures/Seconds remaining
Exposure compensation -2.0, -1.5, -1.0, -0.5, +0.5, +1.0, +1.5, +2.0 p.75
Sequential shooting , p.62
White balance , , , p.77
ISO ISO100, ISO200, ISO400 p.73
Record mode 3:2, SHQ, HQ, SQ, TIFF p.68
Number of pixels
AF target mark [ ] p.41
16/16" p.41,49
1984×1488, 1984×1312, 1600×1200,
1280×960, 1024×768, 640×480
1
11
2
12
5
13
14
15
9
16
17
Indication Ref. Page
(Lights up)
(Blinks)
36"
10
Movie
p.41
p.68
11
13
14
15
16
17
Monitor indications
Playback mode
1
2
3
2
4
5
6
7
8
9
10
Still picture Movie
Indication Ref. Page
Print reservation,
1
Number of prints
Battery check , p.12
2
Protect p.92
3
Record mode 3:2, SHQ, HQ, SQ, TIFF p.68
4
Number of pixels
5
Exposure compensation -2.0, -1.5, -1.0, -0.5, +0.5, +1.0, +1.5, +2.0 p.75
6
White balance WB AUTO, , , , p.77
7
ISO ISO100, ISO200, ISO400 p.73
8
Date and time '02.06.10 12:30 p.24
9
File number,
10
Frame number/Playing time
Movie mode p.90
11
× 2 p.117
1984×1488, 1984×1312, 1600×1200,
1280×960, 1024×768, 640×480
100-0016, 0"/20" –
p.68
11
3
4
5
1
7
Getting started
9
10
You can view shooting information details of the recorded picture in the
playback mode. “Displaying shooting information” ( p.112)
11
Monitor indications
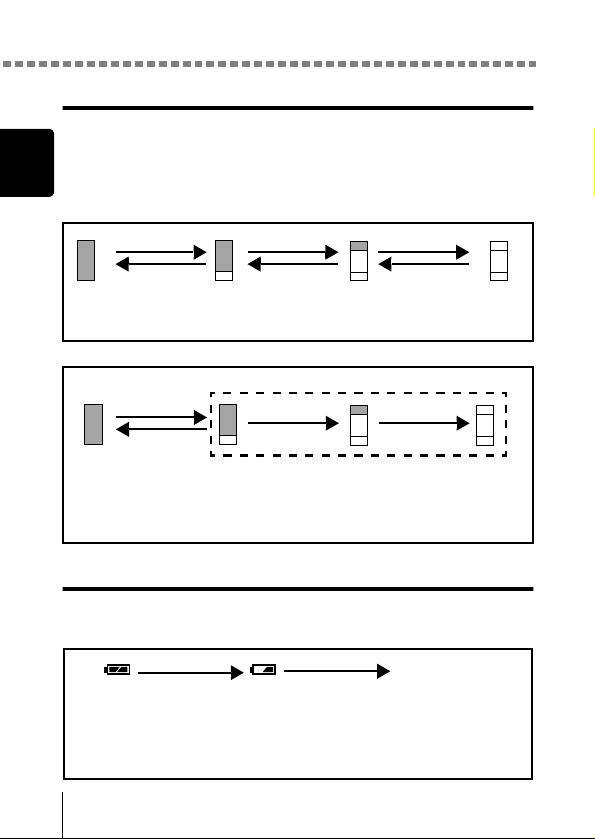
Memory gauge
The memory gauge lights up when you take a picture. While the gauge is lit,
the camera is storing the picture on the card. The memory gauge indication
1
changes as shown below depending on the shooting status. When the
memory gauge is full, wait a few moments before taking the next shot.
Getting started
When taking still pictures
Shoot Shoot Shoot
Wait
Before
shooting
(Gauge is off)
One picture
taken
(Lit)
More than
two taken
(Lit)
No more
pictures can be
taken (Fully Lit)
When recording movies
If you continue shooting
Shoot
Wait
Before shooting
(Gauge is off)
During shooting (Lit)
• Shooting is not possible until the lit area goes off
completely.
• Movie recording ends automatically when the memory
gauge is full.
Battery check
If the remaining battery power is low, the battery check indication on the
monitor changes as follows while the camera is turned on.
Lights up (Green) Green lamp and orange
Remaining power
level: high
Lights up (Red)
Remaining power level: low
Replace with a new battery.
No indication
lamp on the right of the
viewfinder blink
Remaining power level:
exhausted
Replace with a new battery.
12

Attaching the strap
Thread the short end of the
1
strap through the strap
eyelet.
1
Thread the long end of the
2
strap through the loop that
has already gone through the
eyelet.
Pull the strap tight, making
3
sure that it is securely
fastened and does not come
loose.
• Be careful with the strap when you carry the camera, as it can easily
catch on stray objects, causing serious damage.
• Attach the strap correctly as shown above so that the camera does
not fall off. If the strap is attached incorrectly and the camera falls off,
Olympus is not responsible for any damages.
Getting started
Strap
eyelet
13
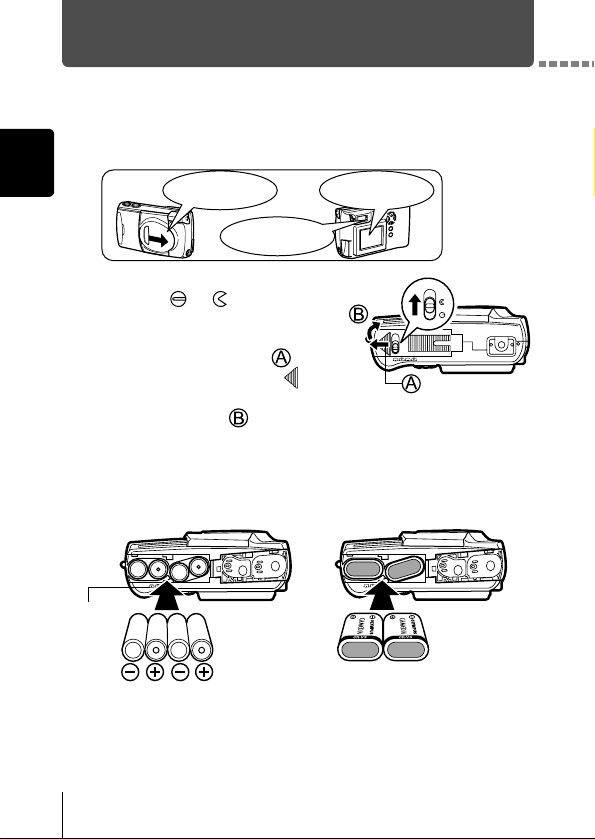
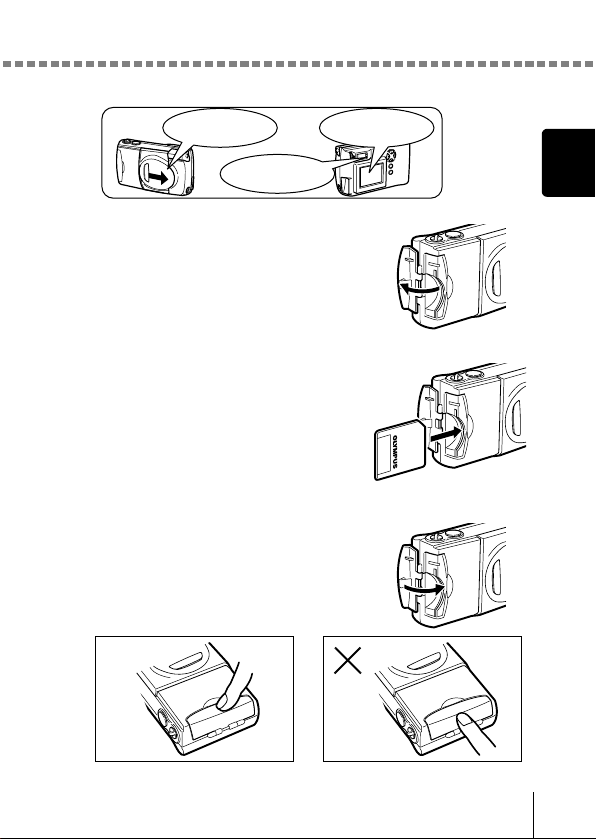
Loading the batteries
This camera uses two CR-V3 lithium battery packs or four AA (R6) NiMH
batteries, NiCd batteries, alkaline batteries or lithium batteries.
Make sure that:
1
1
The lens barrier
Getting started
Slide the battery compartment
2
lock from to .
Slide the battery compartment
3
cover in the direction of (the
direction indicated by the
mark on the cover), and lift it up
in the direction of .
Insert the batteries, making sure that they are correctly
4
oriented as shown in the illustration.
When using AA (R6) batteries When using CR-V3 lithium
Battery
insertion
direction
mark
is closed.
The lamp on the right
of the viewfinder is off.
The monitor is
off.
battery packs
14
There is a mark showing the
correct way to insert the AA
batteries on the bottom of the
camera.
When using lithium battery
packs, insert them so that the
“CAMEDIA” label on each
battery is facing the lens side of
the camera.
Close the battery compartment
5
cover in the direction of .
While pressing the mark,
slide the cover in the direction of
.
If the battery compartment cover
seems hard to close, do not force it.
With the battery compartment cover
shut, press the mark firmly and
push in the direction shown in the
illustration.
Slide the battery compartment lock from to .
6
If the camera is left for about 1 hour with the batteries removed, the
date and time settings will revert to the factory default settings.
Loading the batteries
1
Getting started
15

Loading the batteries
Selecting batteries or the optional AC adapter
In addition to the batteries provided, this camera can use the following types
of battery or AC adapter. You are recommended to choose the power source
1
best suited to the situation.
Getting started
CR-V3 lithium battery packs (Not rechargeable)
Since the CR-V3 lithium battery pack has a long service life, it is convenient
when traveling.
Do not peel off the label on a CR-V3 lithium battery pack.
NiMH batteries (Rechargeable)
Olympus NiMH batteries are rechargeable and economical. Their lowtemperature resistance makes them a good choice for cold areas.
AA (R6) alkaline batteries
When you need batteries in a hurry, you can use AA (R6) alkaline batteries,
which are easy to get anywhere. However, the number of pictures that you
can store in the camera may vary considerably with AA batteries, depending
on the battery manufacturer, camera shooting conditions, etc. Turn off the
monitor whenever possible to save power.
AC adapter
The optional Olympus AC adapter
allows you to power your camera
from a household electrical outlet.
Use an AC adapter designed to
operate on the AC voltage in the
area the camera is being used.
Consult your nearest Olympus
dealer or service center for details.
The power will be drawn from the AC
adapter even if there are batteries in the camera. The batteries in the camera
will not be recharged.
Camera
Electrical outlet
AC adapter
16

Loading the batteries
• Manganese (zinc-carbon) batteries cannot be used.
• If the batteries become exhausted when the camera is connected to a
PC for a long time while powered by the batteries and you are
downloading images from the camera, the image data may be lost or
damaged. You are therefore recommended to use the optional AC
adapter. However, do not connect or disconnect the AC adapter while
the camera is connected to the PC.
• Do not remove or load the batteries or connect or disconnect the AC
adapter while the camera is turned on. This may affect the camera’s
internal settings or functions.
• The life of battery packs may vary according to the type of battery,
manufacturer, camera shooting conditions, etc.
• Power is consumed continuously during the conditions below. This
could reduce the number of pictures that can be taken.
• When the monitor is turned on.
• When the monitor is in the playback mode for an extended
period of time.
• Repeated zooming of lens.
• Repeated auto-focus by depressing the shutter button halfway.
• When the camera is connected to a PC.
1
Getting started
17
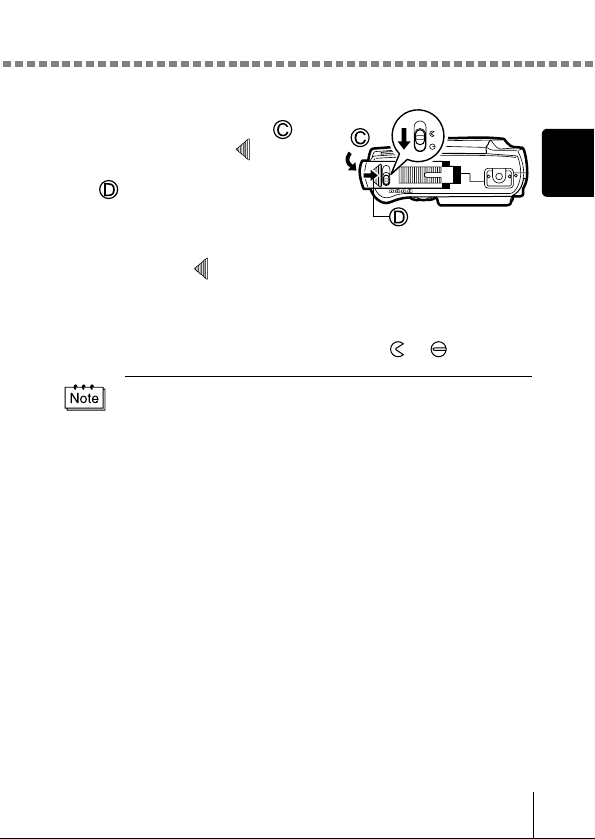
Inserting the card (SmartMedia)
This reference manual uses the term “card” when referring to SmartMedia.
The pictures you have taken are stored on the card.
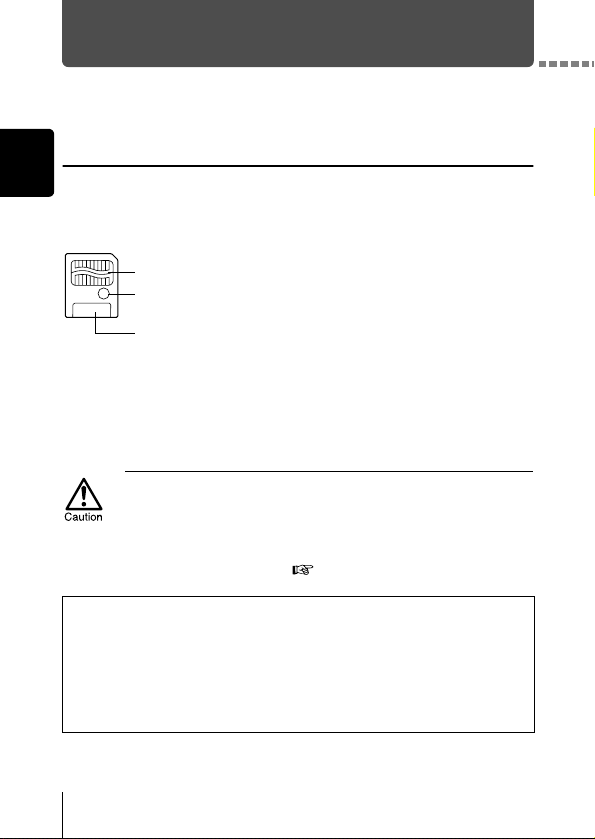
Card basics
1
The card corresponds to normal camera film for recording the pictures you
Getting started
have taken. Pictures recorded and stored on the card can easily be erased,
overwritten, and/or edited on a PC.
Contact area
c
Comes into contact with the camera’s signal read contacts.
c
Write-protect area
d
d
Attach the provided write-protect seal when you want to protect
your data from accidental erasure or overwriting.
e
Index area
e
Use the provided index label to indicate the card’s contents.
The following cards can be used:
• Provided standard card
• Optional Olympus CAMEDIA-brand cards (4 MB - 128 MB)
• Commercially available 3 V (3.3 V) cards (4 MB - 128 MB)
• 2 MB cards cannot be used.
• Commercially available 5 V cards cannot be used.
• This camera may not recognize a non-Olympus card (such as a 3 V
(3.3 V)), or a card that was formatted on another device (such as a
PC, etc.). Before use, be sure to format the card on this camera.
“Formatting (Card setup)” ( p.107)
Handling precautions
• Operating temperature: 0°C to 55°C (32°F to 131°F); Storing temperature:
-20°C to 65°C (-4°F to 149°F); Humidity: up to 95%
• Put the card into its anti-electrostatic case for storage or transportation.
• Do not bend, drop or apply any physical shock to the card.
• Do not touch the contact area of the card.
• Do not reuse the write-protect seal.
• Read the provided SmartMedia instruction manual carefully.
18
Make sure that:
1
The lens barrier
is closed.
The lamp on the right
of the viewfinder is off.
Open the card cover.
2
Insert the card as far as it will go in
3
the direction shown in the
illustration.
There is an arrow inside the card cover,
indicating the direction in which the card
should be inserted.
Close the card cover securely until
4
it clicks.
Press the card cover from the front of the
camera to close. The card cover cannot
be closed by pressing from the side.
Inserting the card (SmartMedia)
The monitor is
off.
1
Getting started
9
Correct Incorrect
19

Inserting the card (SmartMedia)
Removing the card
Hold the card with your fingertips and pull it out
in the direction of the arrow.
1
Getting started
Never open the card cover, or remove the card or the batteries while
the camera is turned on. Doing so could destroy all data on the card.
Destroyed data cannot be restored.
20
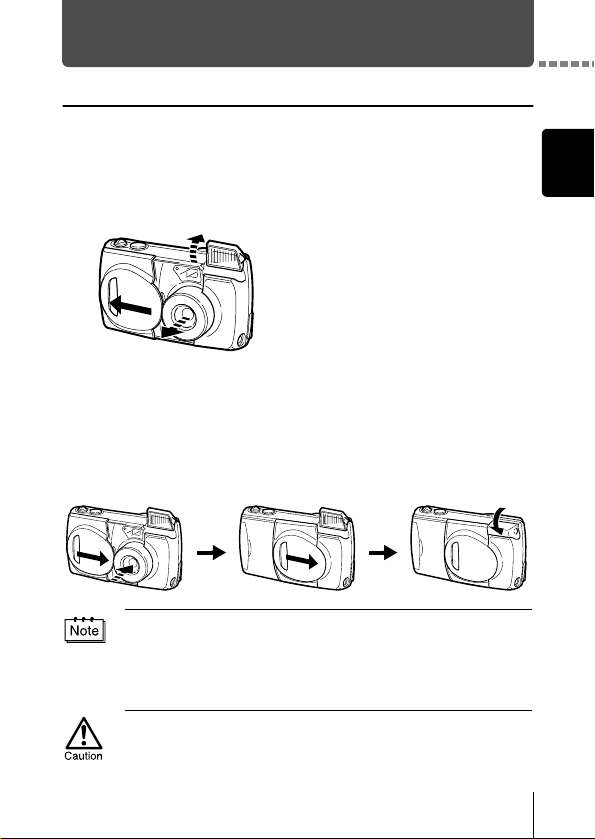
Turning the power on/off
When shooting pictures
Power on: Open the lens barrier fully.
The camera turns on in the shooting mode. The lens extends
and the flash pops up.
If the lens does not extend when the lens barrier is opened, there
is a possibility that the cover is stuck in the first click position.
Open the lens barrier until it clicks.
Power off: Close the lens barrier slightly until it almost touches the
lens barrel.
The lens barrier stops just before it touches the lens and the lens
retracts. Wait until the lens is fully retracted before closing the
lens barrier completely.
The camera turns off. (The monitor also turns off.)
Press the flash down until it locks into place to close it.
To save battery power, the camera automatically enters the sleep mode
after about 3 minutes of non-operation. If the monitor is on, it will
automatically turn off. The camera activates again as soon as you
lightly press the shutter button or zoom lever. Whenever possible, turn
the camera off when you do not intend to take any pictures for a while.
1
Getting started
Do not push the lens barrier forcefully against the lens as this may
damage the lens or cause it to malfunction.
21
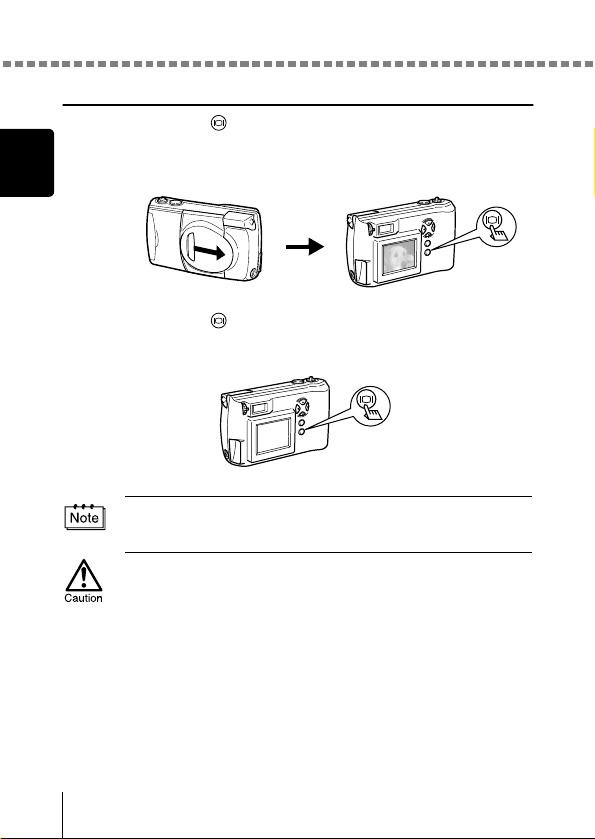
Turning the power on/off
When playing back pictures
Power on: Press the (monitor) button with the lens barrier closed.
The camera turns on in the playback mode. The monitor turns
1
Getting started
Power off: Press the (monitor) button.
on and the last picture taken is displayed.
The monitor and the camera turn off.
When the camera turns on, the monitor may light up for an instant and
a picture appear after a short time. This is not a malfunction.
Never open the card cover, remove the card or the batteries, or connect
or disconnect the AC adapter while the camera is turned on. Doing so
could destroy all data on the card. Destroyed data cannot be restored.
When changing the card, be sure to turn the camera off before opening
the card cover.
22
Turning the power on/off
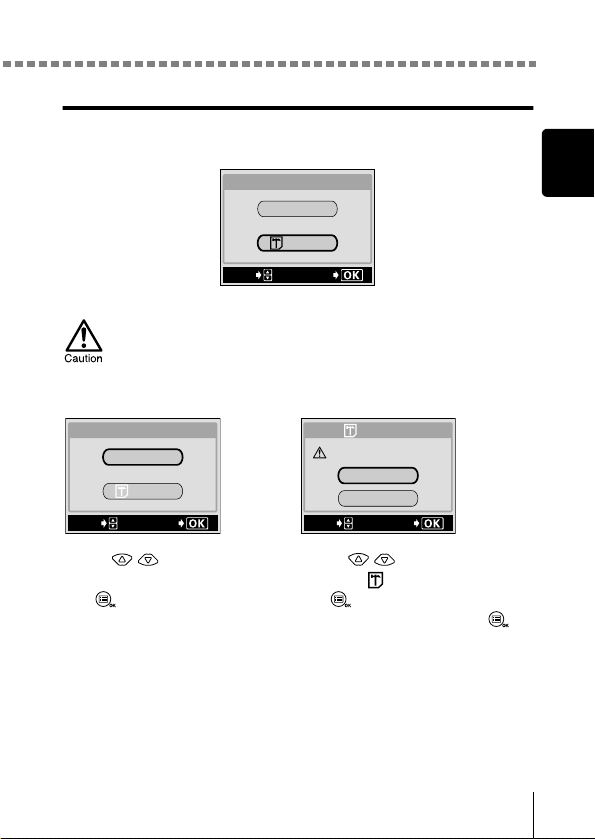
What to do if the CARD SETUP screen is displayed
When the power is turned on, the camera checks the card automatically. If the
card in the camera has to be formatted, the following screen appears.
CARD%SEtUP
POWER%OFF
FORMAt
SELECt
Note that all existing data stored on the card is erased when the
card is formatted.
To turn the camera off To format the card
GO
1
Getting started
CARD%SEtUP
POWER%OFF
FORMAt
SELECt
GO
Press on the arrow pad to
select POWER OFF, then press
the (OK/Menu) button.
The camera turns off.
FORMAt
CAUtION ERASING%ALL
YES
NO
SELECt
GO
Press on the arrow pad
to select FORMAT and press
the (OK/Menu) button.
Then select YES and press
again to start formatting.
Formatting starts. If the card was
successfully formatted, the camera
is ready to take pictures.
23
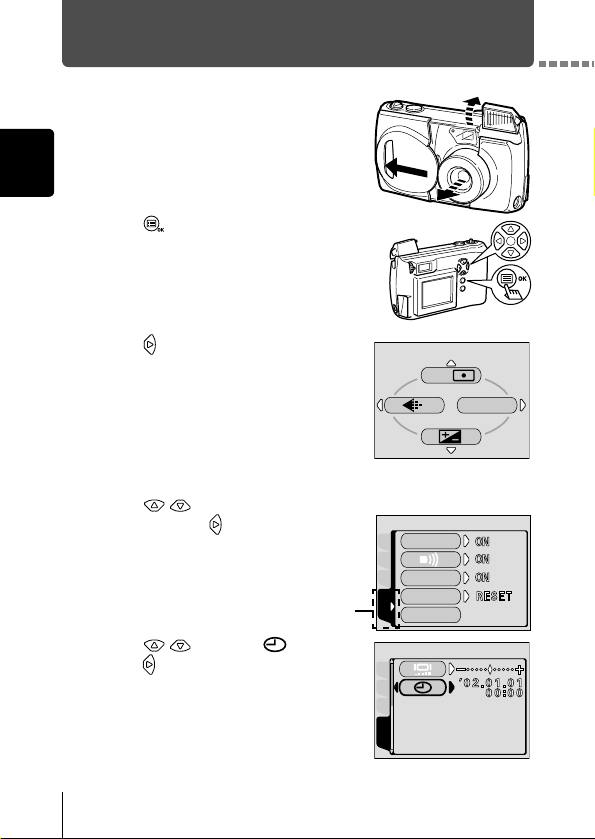
Setting the date and time
Open the lens barrier fully.
1
1
Getting started
Press .
2
The shooting mode top menu is displayed.
Press on the arrow pad to select
3
MODE MENU.
Press to select the SETUP
4
tab, then press .
Press to select , then
5
press .
The green frame moves to the selected
item.
SETUP tab
ESP/
Top menu
ALL RESEt
CAM
PIC
REC VIEW
CARD
FILE NAME
SEtUP
PIXEL MAPPING
CAM
PIC
CARD
SEtUP
MODE MENU
24
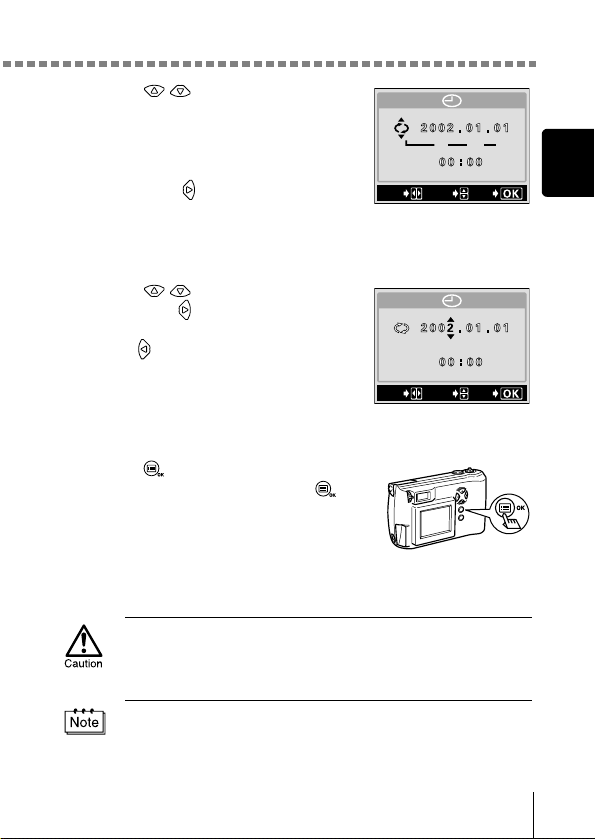
Setting the date and time
Press to select one of the
6
following date formats:
Y-M-D (Year/Month/Day)
M-D-Y (Month/Day/Year)
D-M-Y (Day/Month/Year)
Then press .
The cursor moves to the next setting field.
The following steps show the procedure used when the date and time
settings are set to Y-M-D.
Press to set the first field,
7
then press to move to the next
field.
Press to move back to the previous
setting field.
The first two digits of the “Y” are fixed.
Repeat the above steps until the date
8
and time are completely set.
Press .
9
For a more accurate setting, press
when the clock hits 00 seconds. The clock
starts when you press the button.
Close the lens barrier.
10
The camera turns off.
Y M D
SELECt
SEt
SELECt
SEt
GO
GO
1
Getting started
If the camera is left for about 1 hour with the batteries removed, or if the
battery power is exhausted, the date and time settings may be
canceled or become incorrect. Before taking important pictures, check
that the date and time settings are correct.
The date and time can also be set by the same procedure in the
playback mode.
25
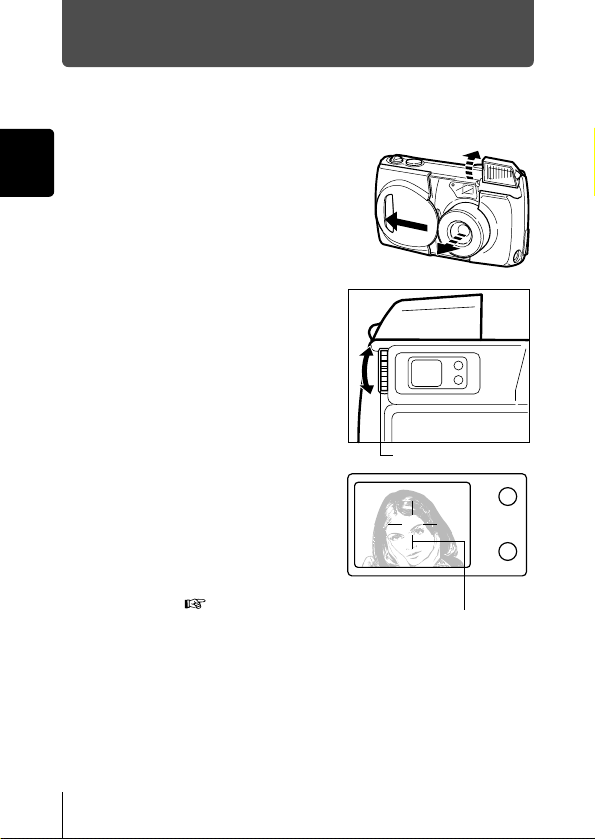
Adjusting the viewfinder
To make the camera easier to use, adjust the viewfinder to match the eyesight
(visual acuity) of the person who will be using the camera.
Open the lens barrier fully.
1
1
The flash pops up and the lens extends.
Getting started
While looking through the
2
viewfinder, slowly turn the
diopter adjustment dial.
Diopter adjustment dial
Stop turning the dial when the AF
3
target mark is clearly visible.
26
You are ready to take pictures. “Taking
still pictures” ( p.40)
Viewfinder
AF target mark
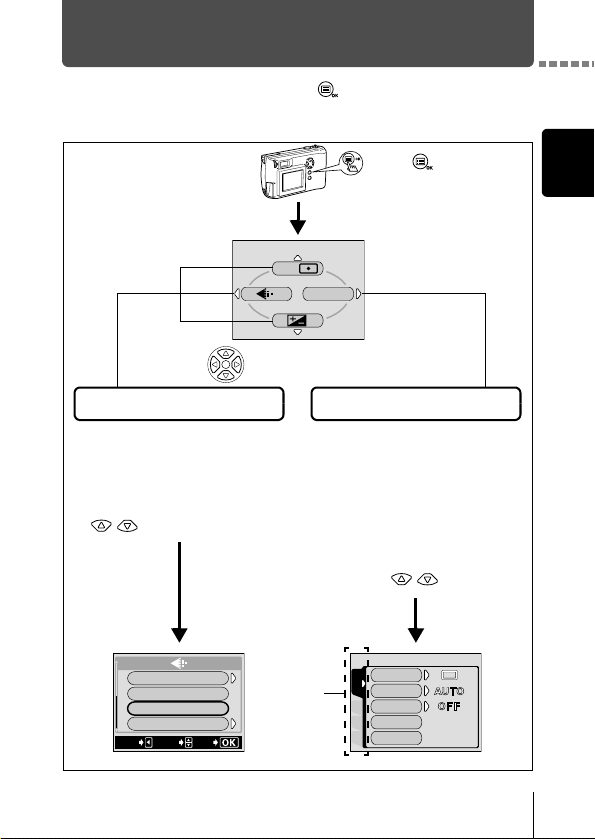
Using the menus and tabs
When you turn on the camera and press , the top menu is displayed on
the monitor. The functions of this camera are set from the menus. This
chapter explains how the menus work, using the shooting mode screens.
Select each menu using
the arrow pad.
Shortcut Menus
• Let you quickly access the most
frequently used menu settings.
• Display operational buttons at
the bottom of the screen, and let
you select items by pressing
.
3:2 1984*1312
SHQ 1984*1488
HQ 1984*1488
SQ 1024*768
CANCEL
SELECt
GO
Press .
The top menu is displayed.
ESP/
MODE MENU
Mode Menu
• Lets you access the menu
selections to set the ISO
sensitivity, white balance, etc.
• Categorizes the settings into 4
tabs.
• Displays the CAMERA, PICTURE,
CARD and SETUP tabs. Select the
desired tab on the left of the screen
by pressing .
DRIVE
CAMERA
Tabs
ISO
DIGItAL ZOOM
PANORAMA
CARDSEt PIC
2 IN 1
1
Getting started
27
Using the menus and tabs
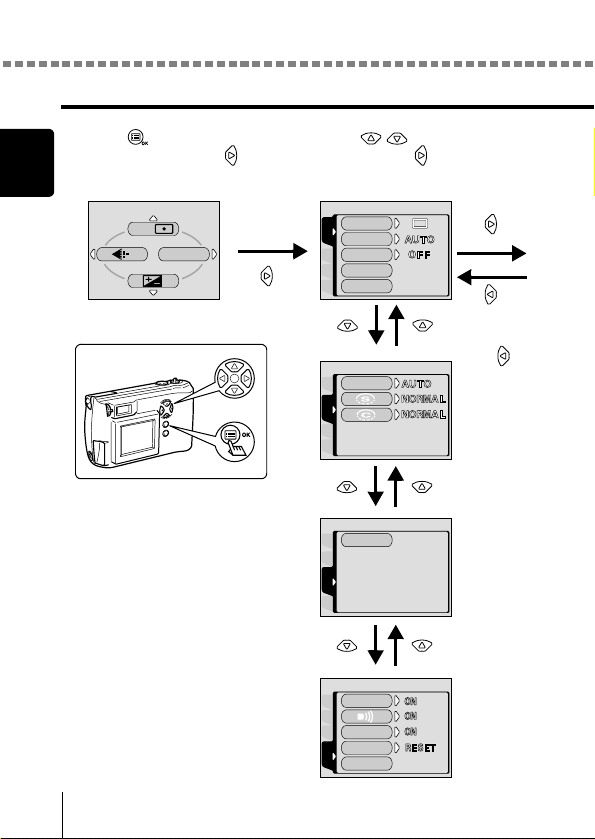
How to use the menus
1
Press to display the
top menu, then press .
1
Top menu CAMERA tab
Getting started
ESP/
MODE MENU
2
Press to select a
tab, then press to
display the menu.
DRIVE
CAMERA
ISO
DIGItAL ZOOM
PANORAMA
CARDSEt PIC
2 IN 1
PICTURE tab
WB
CAM
PICtURE
CARDSEt
CARD tab
CARD%SEtUP
CAM
PIC
CARD
SEt
SETUP tab
ALL RESEt
CAM
PIC
REC VIEW
CARD
FILE NAME
SEtUP
PIXEL MAPPING
To return to
select a tab,
press .
28
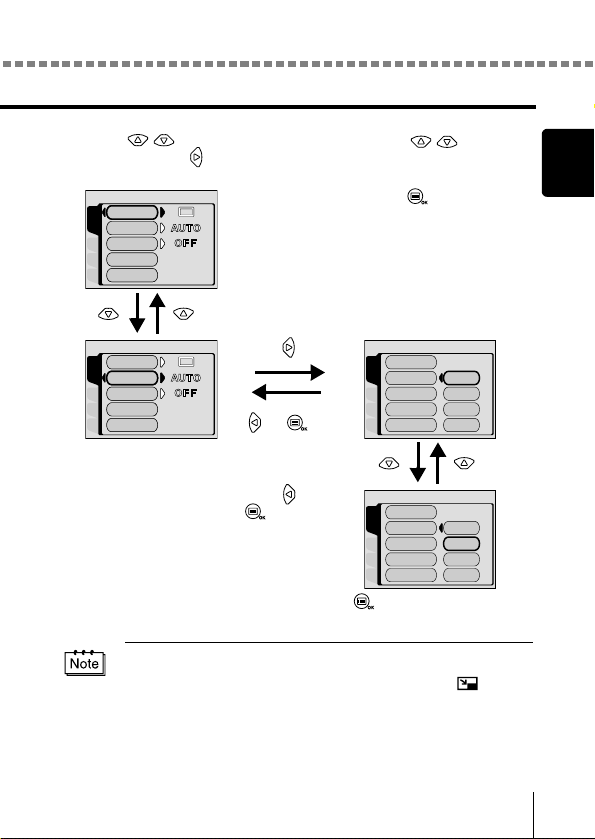
Press to select the desired
3
item, then press to display the
available setting selections.
DRIVE
CAMERA
ISO
DIGItAL ZOOM
PANORAMA
CARDSEt PIC
2 IN 1
Using the menus and tabs
Press to select
4
the setting.
To complete setting,
press .
1
Getting started
DRIVE
CAMERA
ISO
DIGItAL ZOOM
PANORAMA
CARDSEt PIC
2 IN 1
The green frame
moves to the selected
item.
or
To return to
select an item,
press or
.
DRIVE
CAMERA
ISO
DIGItAL ZOOM
PANORAMA
CARDSEt PIC
2 IN 1
DRIVE
CAMERA
ISO
DIGItAL ZOOM
PANORAMA
CARDSEt PIC
2 IN 1
Press to complete setting, and
press again to close the menu.
• Not all items can be selected depending on the status of the camera
and the settings performed. For example, when the movie mode is
selected, you cannot select SEPIA, BLACK&WHITE or in the
EDIT tab category.
• By pressing the shutter button to take a picture while the menu is
displayed, you can take pictures with the currently selected settings.
• If you want to save the settings after the camera is turned off, set ALL
RESET to OFF.
AUtO
100
200
400
AUtO
100
200
400
29
 Loading...