

Page 1

DIGITAL CAMERA/APPAREIL PHOTO NUMÉRIQUE
DIGITALKAMERA/CAMERA DIGITAL/ 數碼相機
C-100/D-370
ENGLISH
BASIC MANUAL/MANUEL DE BASE
KURZANLEITUNG/MANUAL BÁSICO/ 基本手冊
FRANÇAIS
DEUTSCH
ESPAÑOL
中文
■ Before using your camera, read this manual carefully to ensure correct use.
■ We recommend that you take test shots to get accustomed to your camera before taking important
photographs.
■ These instructions are only a basic manual. For more details on the functions described here, refer to
the software CD’s reference manual on CD-ROM. The CD-ROM reference manual also includes
instructions for connecting the camera to a PC.
■ Avant d’utiliser votre appareil photo, veuillez lire attentivement ce mode d’emploi, de manière à obtenir
les meilleurs résultats possibles.
■ Avant d’effectuer des prises de vues importantes, nous vous conseillons par ailleurs de faire quelques
essais afin de vous familiariser avec le maniement de l’appareil photo.
■ Ces instructions ne sont qu’un manuel de base. Pour plus de détails sur les fonctions décrites ici, se
référer aux manuel de référence du CD logiciel sur le CD-ROM. Le manuel de référence compris dans
le CD-ROM comprend aussi des instructions pour la connexion à un ordinateur.
■ Bitte lesen Sie vor dem Gebrauch dieser Kamera sorgfältig diese Bedienungsanleitung, um optimale
Ergebnisse beim Fotografieren zu erzielen.
■ Wir empfehlen, vor wichtigen Aufnahmen Probeaufnahmen durchzuführen, um sich mit der
Bedienung und den Funktionen der Kamera vertraut zu machen.
■ Die vorliegende Broschüre stellt nur eine einfache Anleitung dar. Falls Sie ausführlichere Angaben zu
den hier beschriebenen Funktionen benötigen, steht Ihnen die KURZANLEITUNG auf der CD-ROM
zur Verfügung. Das CD-ROM Nachschlage-Handbuch enthält auch Anweisungen für den Anschluss
der Kamera an einen PC.
■ Antes de usar su cámara lea este manual detalladamente para asegurar el uso correcto.
■ Nosotros le recomendamos que tome fotografías de prueba para familiarizarse con su cámara antes
de tomar fotografías importantes.
■ Estas instrucciones constituyen sólo un manual básico. Para más detalles de las funciones descritas
aquí, refiérase a las manual de consultas del software CD en el CD-ROM. En el manual de consulta
de CD-ROM también se incluyen las instrucciones para conectar la cámara a un PC.
■ 在使用本相機之前,請仔細閱讀本手冊以掌握正確之用法。
■ 在進行重要的拍攝之前,最好先試拍數次以熟悉本相機之性能。
■ 本手冊僅為基本手冊。本手冊中所提到的功能之詳細說明,請參閱 CD-ROM 上的軟體 CD 參考手冊。CD-ROM
參考手冊中也包括相機與個人電腦連接的說明。
Page 2

■ Introduction
About this manual
● The information contained in this manual may be subject to change without
notice. For the latest information on the product names, model numbers,
etc., plaese contact Olympus representative.
● The information contained in this manual has been compiled by taking all
possible measures to ensure its accuracy. However, if you find any errors
or incomplete information, please contact Olympus representative.
● It is prohibited by copyright laws to duplicate in part or in whole the
information contained in this manual, except for personal use. Reproduction
without permission of the copyright owner is prohibited.
● Olympus will not assume any liability for damages, loss of profit or claim
from a third party due to improper use of this product.
● Olympus will not assume any liability for damages and loss of profit due to
loss of image data resulting from servicing by a third party who is not
designated by Olympus or from other causes.
● The quality of the images shot with this product differs from that of the
images shot with ordinary film-based cameras.
Copyright
Radio and Television Interference
Change or modifications not expressly approved by the manufacturer may
void the user’s authority to operate this equipment. This equipment has been
tested and found to comply with the limits for a Class B digital device, pursuant
to Part 15 of the FCC Rules. These limits are designed to provide reasonable
protection against harmful interference in a residential installation. This
equipment generates, uses, and can radiate radio frequency energy and, if
not installed and used in accordance with the instructions, may cause harmful
interference to radio communications.
However, there is no guarantee that interference will not occur in a particular
installation. If this equipment does cause harmful interference to radio or
television reception, which can be determined by turning the equipment off
and on, the user is encouraged to try to correct the interference by one or
more of the following measures:
• Adjust or relocate the receiving antenna.
• Increase the distance between the camera and receiver.
• Connect the equipment to an outlet on a circuit different from that to which
the receiver is connected.
Only the included USB cable should be used to connect the camera to a
personal computer (PC).
©
2001 OLYMPUS OPTICAL CO., LTD.
2 En
Page 3

Declaration of conformity
Model Number: C-100/D-370
Trade Name: OLYMPUS
Responsible Party: Olympus America Inc.
Address: 2 Corporate Center Drive, Melville, New York
Telephone Number: 631-844-5000
This device complies with Part 15 of the FCC rules. Operation is subject
to the following two conditions:
(1) This device may not cause harmful interference, and
(2) This device must accept any interference received, including
interference that may cause undesired operation.
This Class B digital apparatus meets all requirements of the Canadian
Interference-Causing Equipment Regulations
“CE” mark indicates that this product complies with the European
requirements for safety, health, environment and customer
protection.
11747-3157 USA
Trademarks
● Microsoft products, such as Windows and Internet Explorer, are registered
trademarks or trademarks of Microsoft Corporation in the United States of
America and in other countries.
● Macintosh and Apple are registered trademarks of Apple Computers, Inc.
● Other brand names and product names mentioned in this manual are
trademarks or registered trademarks of their respective owners.
About the camera file system
The DCF (Design rule for Camera File system) is a standard established by
JEITA (Japan Electronics and Information Technology Association).
3En
Page 4

■CONTENTS
PREPARATIONS 5
Names of parts ................................ 5
Attaching the strap ........................... 6
Loading the batteries ....................... 6
Using a smartmedia card (optional) ....
Tur ning the camera on/off ................ 8
Adjusting the date and time ............. 9
TAKING PICTURES 11
Taking pictures ............................... 11
Using the flash ............................... 12
Macro mode ................................... 13
Selftimer ......................................... 13
Digital Tele mode............................ 14
Sequence mode ............................. 14
Exposure compensation ................ 15
White balance ................................ 16
Image quality .................................. 17
Spot metering mode ...................... 18
PLAYING BACK PICTURES 19
Playing back an image ................... 19
Index playback ............................... 19
Auto playback................................. 20
Close-up playback.......................... 20
Erasing an image ........................... 21
Erasing all images .......................... 22
Protecting important images .......... 22
OTHER FUNCTIONS 24
Recording a moving image ............ 24
Playing back moving images.......... 24
Rec view ........................................ 25
Beep sound .................................... 25
7
Adjusting the monitor brightness .... 25
Card format/memory setup ............ 26
Memory back-up ............................ 27
Displaying image information ......... 27
ERROR MESSAGES 29
Error codes .................................... 29
Specifications 30
4 En
Page 5
P
REPARATIONS
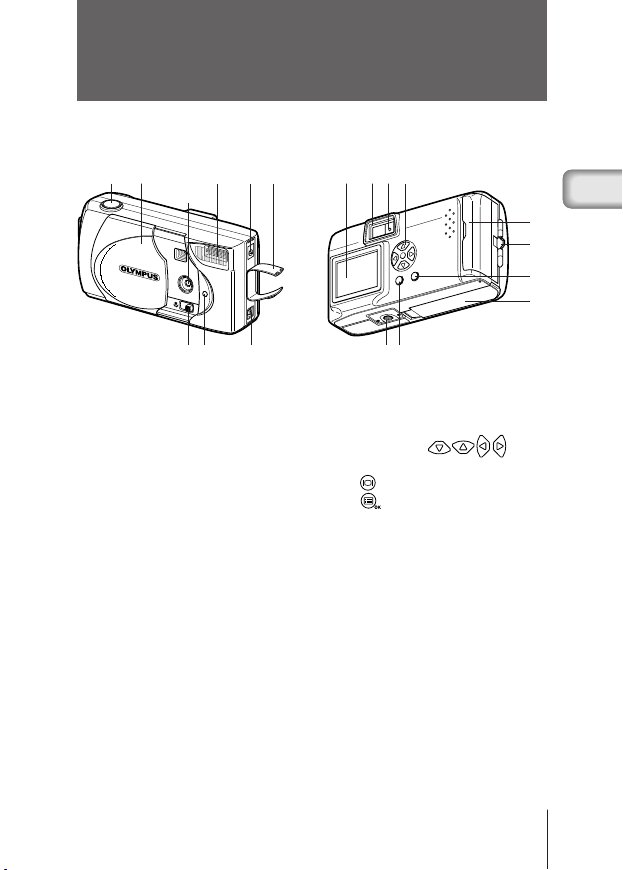
■ NAMES OF PARTS
1
3
1 Shutter button
2 Lens barrier
3 Lens
4 Flash
5 Macro lever
6 Selftimer lamp
7 DC-IN jack
8 Connector cover
9 USB connector
458 0 ABC
72
96
EFD
0 Monitor
A Viewfinder
B Green lamp
C Arrow pad
D Tripod socket
E
(Monitor) button
F
(OK/Menu) button
G Card cover
H Strap eyelet
I Battery compartment cover
G
H
I
5En
Page 6

■ ATTACHING THE STRAP
1 Pass the short end of the strap through the
strap eyelet.
2
Pass the long end of the strap through the loop.
3 Pull tight and check that the strap is securely
attached.
■ LOADING THE BATTERIES
This camera uses four AA alkaline (included), NiMH, lithium or NiCD batteries,
or two CR-V3 lithium battery packs.
1 Check that the lens barrier is closed and both the monitor and the
green lamp are off.
2 Pull the battery compartment cover
toward A and pull up in the direction
of B.
3 Insert the batteries as shown, making
sure that they are correctly oriented.
4 Pull down the battery compartment
cover in the direction of C and close
firmly by pressing the
in the direction of D.
mark
A
B
D
C
Caution
6 En
• If the batter y compartment cover is difficult to close, press on the
mark and [OPEN] mark on the cover with your both thumbs without applying
unreasonable force.
• If the camera is left without batteries for about one hour, all the settings will be
reset to the default settings.
• When powering the camera by batteries, if the batteries star t to run low, the
red battery status will be displayed. When the batteries are close to exhaustion,
the LCD monitor turns off and the green lamp blinks.
Page 7

■
USING A SMARTMEDIA CARD (OPTIONAL)
A SmartMedia card should be used if you need to store more pictures
than the internal memory can hold. (Please see the chart on the following
page.) SmartMedia is not included with this camera, it must be purchased
separately.
This camera accepts only SmartMedia removable memory. If you insert
a SmartMedia card, the image will be stored on the card and you can
playback the image with the card. If you remove the card from the camera,
the image will be stored on the internal memory and you can playback
the image with the internal memory.
➜➜➜
Card
insertion mark
1 Make sure that the camera is turned off.
Close the lens barrier and check that both the monitor and the green
lamp are off.
2 Open the card cover.
3 Insert the SmartMedia card correctly as shown.
There is a mark showing the correct orientation of the card on the inside
of the card cover.
To remove the card, grasp it with your fingertips and pull it out in the
direction shown.
4 Close the card cover until it clicks.
Non-Olympus or non-Lexar cards, or cards formatted on other equipment, such
Note
as a PC, may not be recognized by the camera. Format the card with the camera
before using it. See “Card format/Memory setup” ( p.26).
• Never open the card cover or remove the SmartMedia card or batteries when
Caution
the camera is turned on. The data on the card may be lost, and once lost, it
cannot be restored.
•
The SmartMedia card is a precision instrument. Do not subject it to unreasonable
force or impact. Do not touch the gold-colored metal area of the card.
7En
Page 8

• Some of the camera function are ignored if a write-protect seal is affixed to
Caution
the SmartMedia card. When you use these functions, remove the seal from
the card.
Write-protect seal
Approx. number of recordable images
Card memory
capacity
Internal memory Approx. 1 3 4 7
Image
quality
SHQ HQ SQ1 SQ2
4 MB 6 12 16 29
8 MB 12 24 33 58
16 MB 25 49 66 110
32 MB 51 99 132 221
64 MB 102 199 265 442
128 MB 204 399 532 887
■ TURNING THE CAMERA ON/OFF
WHEN TAKING PICTURES
Turning the camera on.... Open the lens barrier.
Turning the camera off ... Close the lens barrier.
Camera turns on
• When the lens barr ier is opened with no card inserted, “NO CARD” will be
Note
displayed on the monitor. This is not a malfunction. Use the internal memory
of the camera to take pictures.
• The camera’s mode will change to power save mode if you do not carry out
any operation for 3 minutes. To take pictures, turn the camera on.
8 En
The camera will turn on in Record mode.
The camera will turn off.
Camera turns off
Page 9

WHEN PLAYING BACK PICTURES
Turning the monitor on ... Press the button with the lens barrier
Turning the monitor off ... Press the
Camera with
the lens barrier
closed
The camera’s mode will change to power save mode if you do not carry out any
Note
operation for 3 minutes. To play back pictures, turn the camera on.
closed.
The camera will turn on in Play mode and the
monitor will turn on.
The camera and the monitor will turn off.
Monitor turns on
button.
Monitor turns off
lights up goes off
■ ADJUSTING THE DATE AND TIME
1 Press the button.
The monitor will turn on.
2 Press the button.
The menu will be displayed.
3 Select [SETUP] using the / buttons and
press the
4 Select [ ] using the / buttons and
press the
button.
button.
5 Select the date format [Y-M-D (Year-Month-
Day), M-D-Y (Month-Day-Year) or D-M-Y (DayMonth-Year)] using the
press the
The date adjustment screen will be displayed.
button.
/ buttons, and
9En
Page 10

6 Set the first item using the / buttons
and press the
Move to the next item.
button.
7 Repeat until the date and time settings are
adjusted.
8 Press the button when the time reaches
00 seconds.
Setting of the date and time is completed.
9 Press the button again.
The date and time adjustment menu will be
completed.
10 Press the button to turn the monitor off.
The date and time settings will be erased or become incorrect if the camera is
left without batteries or the batteries are exhausted. Make sure that the date and
Caution
time settings are correct before taking an important picture.
The date and time can be adjusted both in Record mode and Play mode using
Note
the same procedure.
10 En
Page 11

T
aking pictures
■ TAKING PICTURES
TAKING PICTURES USING THE VIEWFINDER
1 Slide the lens barrier open until it clicks.
2 Position the subject in the viewfinder using the Target mark.
To take pictures at a distance of less than 60cm (2ft.), see “Macro mode”
(
p.13).
3 Press the Shutter button halfway.
The green lamp next to the viewfinder
lights.
The exposure is locked while the Shutter
button is pressed halfway.
4 Press the Shutter button fully.
The picture is taken.
TAKING PICTURES USING THE MONITOR
1 Open the lens barrier.
2 Press the button.
The monitor will turn on. Press the
3 Compose the picture by looking at the subject in the monitor.
4 Take the picture in the same way as you would when using the
viewfinder.
• If the green lamp blinks when the Shutter button is pressed halfway, the flash
Note
is not fully charged. The green lamp blinks while the camera is recording the
picture taken. Wait for 2 to 40 seconds untill the green lamp stops blinking.
• When the memor y gauge is full, no more images can be taken. Wait a few
seconds until the memory gauge goes off before taking any more pictures.
• When a picture is taken in bright light, such as sunlight, vertical lines may
appear on the monitor. This is not a malfunction.
• The monitor is for checking the composition only. Check the hand jitter, focus
and exposure accuracy afterwards by displaying the image on a PC.
• It will take longer to record a picture when the monitor is used.
button again to turn the monitor off.
11En
Page 12

• Press the Shutter button gently. Pressing the button down hard will cause the
Caution
camera to move, resulting in a blurred picture.
• Never remove the battery or AC adapter, open the card cover while the green
lamp is blinking. The picture you have just taken may not be recorded and
previous pictures may be destroyed.
■ USING THE FLASH
The flash automatically fires in lowlight and backlight conditions, but the flash
mode can be selected to suit various conditions.
1 Open the lens barrier and press the button.
2 Select [CAMERA] using the / buttons and press the button.
3 Select [ ] using the / buttons and press the button.
4 Select the flash mode using the / buttons and press the
button.
FLASH MODE SETTINGS
Auto (no display) : Flash fires automatically in low light or backlit conditions
Red-eye ( ) : Reduces the phenomenon of a subject's eyes appearing
Flash on ( ) : Fires in any circumstances
Flash off ( ) : Does not fire regardless of the light conditions
Night view ( ) : Use this mode when taking night views
Night view/Red-eye
• To comfirm the current flash mode setting, press the button with the lens
Note
Caution
barrier open.
Press the button after the confirmation to change the flash mode setting.
• Range of flash: ~ 2.5m/8ft.
• All the flash mode settings except for Red-eye ( ) will return to Auto mode
(default setting) when the lens barrier is closed.
• The green lamp blinks while the flash is charging and the shutter button will
not be pressed. Wait until the green lamp goes off.
• When taking pictures at close range using the flash, the appropriate br ightness
may not be achieved and there may be pronounced shadows as a result.
Olympus recommends that you check the picture on the camera’s LCD monitor.
• The flash cannot be used in Sequence mode, Panorama mode and Movie
mode.
(default setting)
red in the resulting picture
( ) : Use this mode when taking people against a night view
12 En
Page 13

■ MACRO MODE
Use this mode to take close-up pictures at a distance of less than 25-60cm (10"-2ft.).
1 Open the lens barrier and slide the Macro lever across.
The monitor will turn on automatically and the
To cancel Macro mode, slide the macro lever back to its original position.
symbol will be displayed.
2 Take the picture.
Macro mode is automatically cancelled when the camera is turned off.
Macro mode is canceled when the lens barrier is closed.
Note
• Make sure to slide the macro lever completely.
• When using the Macro mode, keep the distance between the camera and the
Caution
subject at a distance of more than 25cm (10'').
• If you tr y to take a picture at a distance of less than 25cm (10''), the autofocus
will not work properly even though the Shutter button is released.
• If you use the flash in Macro mode, the brightness may not be correct and
there may be pronounced shadows as a result. Olympus recommends that
you check the picture on the camera’s monitor.
■ SELFTIMER
1 Open the lens barrier and press the button.
2 Select [CAMERA] from the Camera menu screen using the /
buttons and press the button.
3 Select [DRIVE] using the / buttons and press the button.
4 Select [ SELF-TIMER] using the / buttons and press the
button.
The Selftimer is now set. Press the
5 Compose the picture on the monitor or in the viewfinder and press
the Shutter button.
The Selftimer lamp on the front of the camera lights for 10 sec. and then
blinks for 2 sec. before the picture is taken.
The Selftimer automatically goes off after the picture is taken.
button again to exit the menu.
• The Selftimer is canceled automatically after the picture is taken.
Note
• To cancel the Selftimer after the Shutter button has been pressed, shut the
lens barrier off.
13En
Page 14

■ DIGITAL TELE MODE
This mode enables you to enlarge the image digitally to magnifications 1.6×,
2×, 3.2× and 4×.
1 Open the lens barrier and press the or button.
2 The magnification changes in the sequence [1.6× → 2.0× → 3.2× →
4.0×] each time the
The magnification changes in the sequence [3.2× → 2.0× → 1.6× → No
display (1.0)] each time the
button is pressed.
button is pressed.
3 Take the picture.
· Press the
mode.
· When the magnification is set to 3.2× or 4×, set the Quality mode to
SQ2.
• Press the button to turn the monitor off and cancel Digital Tele mode.
Note
• The pictures taken in Digital Tele mode may become coarser.
button to turn the monitor off and cancel the Digital Tele
■ SEQUENCE MODE
1 Open the lens barrier and press the button.
2 Select [CAMERA] from the Camera menu screen using the /
buttons, and press the button.
3 Select [DRIVE] using the / buttons, and press the button.
4 Select [ SEQUENCE] using the / buttons and press the
button.
Sequence mode is now set. Press the
5 Press the Shutter button and keep it pressed.
Picture-taking will continue while the Shutter button is pressed and stop
when the button is released.
To return to normal recording mode, close the lens barrier and then reopen
it.
button again to exit the menu.
14 En
Page 15
• Sequence mode is canceled when the lens barr ier is closed.
Note
• The flash cannot be used in this mode.
• Since the shutter speed is set to the maximum 1/30 sec. to prevent hand jitter,
the resulting picture may be darker than usual.
• It takes a while to record the images taken in this mode.
• The number of recordable pictures will vary depending on the image quality
mode and whether a SmartMedia card is used.
If you intend to take a lot of pictures, a SmartMedia card is recommended.
■ EXPOSURE COMPENSATION
This mode enables you to change the brightness of the image.
1 Press the button with the lens barrier open.
2 Select [CAMERA] from the Camera menu screen using the /
buttons and press the button.
3 Select [ ] using the / buttons and press the button.
4 Adjust the exposure compensation setting by pressing the
button to make the image darker and the button to make it lighter,
and press the
The exposure compensation is now set. Press the
the menu.
5 Take the picture.
You can continue taking pictures with the selected exposure compensation
setting. Close the lens barrier to cancel the exposure compensation setting.
• The setting of exposure compensation will be returned to ±0.0 (default setting)
Note
Caution
when the lens barrier is closed.
• When you adjust the exposure compensation, the image displayed on the
monitor changes to the relevant brightness setting. If it is hard to see any
difference because the subject is dark, display the recorded image on the
camera’s monitor to check the brightness.
• The desired br ightness (exposure compensation) may not be obtained if the
flash is used.
• The exposure compensation values may be inadequate if the subject is in
extremely bright or extremely dark surroundings.
button.
button again to exit
15En
Page 16

■ WHITE BALANCE
This camera uses automatic white balance to shoot the subject in a naturallooking tone. However, it may sometimes be difficult to get satisfactory results
automatically due to lighting or weather conditions. In such cases, change
the white balance settings.
1 Press the button with the lens barrier open.
2 Select [PICTURE] from the Camera menu screen using the /
buttons and press the button.
3 Select [ ] using the / buttons and press the button.
4 Select the white balance setting and press the button.
Tne white balance is now set. Press the
5 Take the picture.
You can continue taking photos with the selected white balance setting.
Close the lens barrier to cancel the white balance setting.
White balance settings
Auto (no display) : Automatically adjusts the white balance to ensure natural
Daylight ( ) : Ensures natural colors outside in full daylight (sunny
Cloudy ( ) : Ensures natural colors outside in overcast daylight (cloudy
Tungsten Light ( ) : Ensures natural colors in tungsten light.
Fluorescent Light ( ) : Ensures natural colors in fluorescent light.
• The white balance setting will return to [AUTO] (default setting) when the lens
Note
Caution
barrier is closed.
• Natural colors are hard to obtain under a mixture of artificial and natural lighting
or under fluorescent lights, etc.
• Select [ ] to obtain colors close to those under tungsten light.
• The white balance may not function under special lighting.
• Check that the setting is the optimum setting by displaying the image on the
monitor and checking the colors.
• To determine if the selected setting is the best choice, always check the
recorded image by playing it back on the camera’s monitor.
colors (default setting).
weather).
weather).
button again to exit the menu.
16 En
Page 17
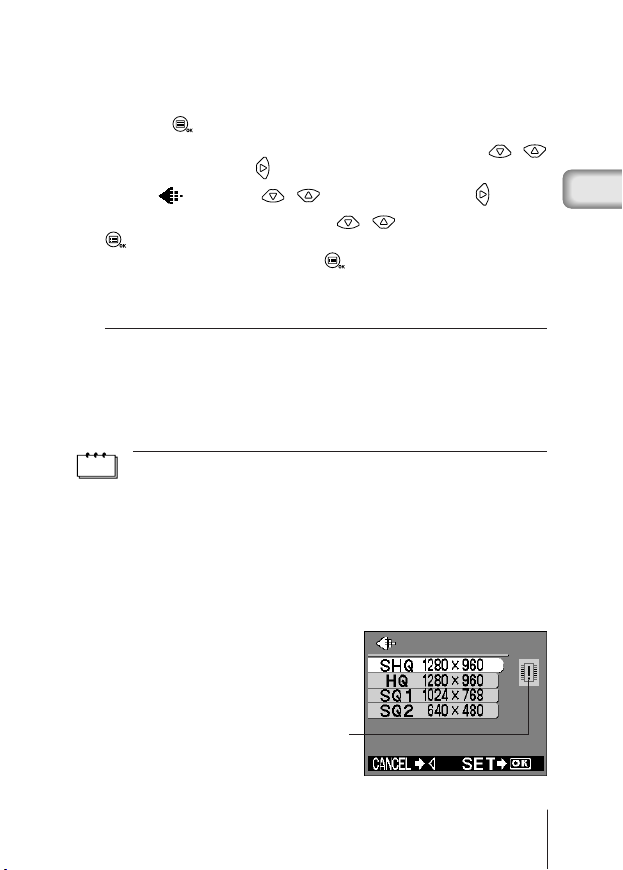
■ IMAGE QUALITY
There are 4 kinds of image quality: SHQ, HQ, SQ1 and SQ2.
1 Press the button with the lens barrier open.
2 Select [PICTURE] from the Camera menu screen using the /
buttons and press the button.
3 Select [ ] using the / buttons and press the button.
4 Select the image quality using the / buttons and press the
button.
Image quality is now set. Press the
5 Take the picture.
You can continue taking photos in the selected image quality mode.
Image Quality modes
SHQ 1280 × 960 Pixels (For clear prints)
HQ 1280 × 960 Pixels (For viewing images on a PC)
SQ1 1024 × 768 Pixels (For e-mail attachments)
SQ2 640 × 480 Pixels (For taking a lot of pictures)
The Image Quality setting remains when the lens barrier is closed.
• The image quality setting will remain even when the lens barrier is closed.
Note
• The number of recordable images varies depending on the image quality setting
and the storage method used. (The camera’s internal memory capacity is
1MB, SmartMedia cards are currently available in 8MB to 128 MB capacities.)
• The number of pixels is the same for HQ and SHQ, but the compression rate
is lower for SHQ, resulting in a clearer image when enlarged. SHQ also requires
more time to record and play back images than HQ.
• When you change to a high image quality and the remaining recordable image
count is low, the internal memory or SmartMedia card warning mark may be
displayed. This indicates that there is insufficient memor y space. If this happens,
select a different image quality.
button again to exit the menu.
Warning mark
17En
Page 18

■ SPOT METERING MODE
If a shot is backlit, ordinary photometric settings (Digital ESP Metering) will
make the subject appear too dark. To compensate for this, switch the camera
to Spot Metering Mode. This feature is used to obtain the right exposure
regardless of backlighting.
1 Open the lens barrier and press the button.
2 Select [CAMERA] from the Camera menu screen using the /
buttons and press the button.
3 Select [ ] using the / buttons and press the button.
4 Select [ SPOT] using the / buttons and press the
button.
Setting of spot metering is completed. Press the
the menu.
5 Press the Shutter button.
You can continue recording images in the selected metering mode.
The metering mode will return to ESP mode when the lens barrier is
closed and then reopened.
The metering mode will return to ESP mode (default setting) when the lens
Note
barrier is closed.
button again to exit
18 En
Page 19

P
LAYING BACK PICTURES
■ PLAYING BACK AN IMAGE
This mode is for displaying images one at a time on the monitor.
1 Press the button with the lens
barrier closed.
The camera will turn on in Play mode.
The last recorded image will be displayed
on the monitor.
2 Press the / buttons.
Press the
previous image and the
display the next image.
button to display the
button to
3 Press the button.
The monitor will go off and the camera will turn off.
• If the button is pressed quickly twice (double-clicked) when the camera is
Note
in Record mode, the camera’s mode will change to Play mode.
• After the camera is turned on, the monitor may light momentarily and an image
will be displayed after a short while. This is not a malfunction.
■ INDEX PLAYBACK
This mode is for displaying images in index mode from single-image playback
mode.
1 Press the button with the lens barrier closed.
2 Press the button.
3 Press the button to move the green frame to the next image and
the
button to move the frame to the previous image.
4 Press the button.
The image in the green frame will be displayed.
Changing the number of images in the index playback
Select the number of images in the index playback from 4, 9 or 16.
1 Press the button with the lens barrier closed.
19En
Page 20

2 Press the button to display the Play menu screen.
3 Select [PLAY] using the / buttons and press the button.
4 Select [ ] using the / buttons and press the button.
5 Select the number of images [4], [9] or [16] using the / buttons
and press the
Setting of the number of images in the index display is completed.
Press the button again to exit the menu.
button.
■ AUTO PLAYBACK
In this mode all the images are automatically displayed one after another.
1 Press the button with the lens barrier closed.
2 Press the button to display the Play menu screen.
3 Select [PLAY] using the / buttons and press the button.
4 Select [ ] using the / buttons and press the button.
5 Select [START] using the / buttons and press the button.
Auto Playback will start. Each image will be played back for 3 seconds
starting from the image after the one currently displayed.
To cancel Auto Playback, press the
If you display the Play menu while an image marked by the Moving Image ( )
Note
symbol is being played, you cannot select [ ]. Display a still picture first.
button.
■ CLOSE-UP PLAYBACK
Images can be played back in 4 stages of magnification: 1.5×, 2×, 2.5× and
3×.
1 Press the button with the lens barrier closed.
2 Press the button.
The image will be magnified in the sequence [1.5×] → [2.0×] → [2.5×] →
[3.0×] each time the
3 Press the button.
Scroll mode will be enabled. Scroll up or down, left or right, using the
/ / / buttons to display the area you want to see.
Press the
button again to exit scroll mode.
button is pressed.
20 En
Page 21

4 Press the button after exiting scroll mode to return to the 1×
single-image playback screen.
The above operation cannot be performed while an image marked by the Moving
Note
Image ( ) symbol is displayed. Display a still picture first.
■ ERASING AN IMAGE
1 Press the button with the lens barrier closed.
2 Display the image you want to erase and press the button.
3 Select [PLAY] using the /
buttons and press the button.
4 Select [ ] using the /
buttons and press the button.
5 Select [ ] using the /
buttons and press the button.
The image will be erased.
21En
Page 22

• You can also move to the erase menu by keeping the button pressed for
Caution
at least 1 second while the image you want to erase is displayed.
• If the image you want to erase is protected or a write-protect seal is affixed to
the SmartMedia card, the image cannot be erased. Unprotect the image or
remove the write-protect seal on the SmartMedia card before attempting to
erase the image.
• Erased images cannot be restored. Before erasing an image, be sure that you
are not erasing important data.
■ ERASING ALL IMAGES
You can erase all the images in the internal memory or on the SmartMedia card.
• When erasing images in the internal memory, do not inser t a SmartMedia
Caution
1 Press the button with the lens barrier closed.
2 Press the button to display the Play menu screen.
3 Select [SETUP] using the / buttons and press the button.
4 Select [ ] or [ ] using the / buttons and press the
5 Select [ ALL ERASE] using the / buttons and press the
6 Select [ ] using the / buttons and press the button.
Caution
card.
• When erasing images on a Smar tMedia card, insert the card first.
button.
button.
All the images will be erased.
• Protected images will not be erased.
• If a write-protect seal is affixed to the SmartMedia card, the images on the
card cannot be erased.
• Erased images cannot be restored. Before erasing, make sure that you are
not erasing important data.
■ PROTECTING IMPORTANT IMAGES
1 Press the button with the lens barrier closed.
2 Display the image you want to protect.
3 Press the button to display the Play menu screen.
22 En
Page 23

4 Select [PLAY] using the /
buttons and press the button.
5 Select [ ] using the /
buttons and press the button.
6 Select [ON] using the /
buttons and press the button.
The image will be protected.
To cancel the protect setting, select
[OFF].
• You can also protect an image by keeping the button pressed for at least
Note
Caution
1 second while the image you want to protect is displayed.
• The protected image is indicated by a symbol.
• The protect setting is saved when the camera is turned off.
• Protected images cannot be erased by [Erasing an image] or [Erasing all
images], but will be erased by formatting the card.
• Images on a card with a wr ite-protect seal cannot be protected.
23En
Page 24

O
THER FUNCTIONS
■ RECORDING A MOVING IMAGE
In addition to still pictures, this camera has the ability to take movie pictures.
1 Press the button with the lens barrier open.
2 Select [CAMERA] using the / buttons and press the button.
3 Select [DRIVE] using the / buttons and press the button.
4 Select [ MOVIE] using the / buttons and press the
button.
Movie mode is now set and the monitor will automatically turn on. Press
the
button again to exit the menu.
5 Take the picture.
Press the Shutter button to start recording moving images. Recording
stops when the Shutter button is pressed again.
• Movie mode is canceled when the monitor is turned off by pressing the
Note
button.
• The flash cannot be used in Movie mode.
• It takes a while to record the images taken in this mode.
• The recordable time will vary depending on whether a SmartMedia card is
used.
• Sound cannot be recorded.
■ PLAYING BACK MOVING IMAGES
1 Press the button with the lens barrier closed and display the
desired image with the
2 Press the button to display the Play menu screen.
3 Select [PLAY] using the / buttons and press the button.
4 Select [ ] using the / buttons and press the button.
5 Select [START] using the / buttons and press the button.
The moving image will be displayed.
symbol indicated.
24 En
Page 25

■ REC VIEW
This function enables you to check an image by displaying it immediately after
it is taken.
1 Open the lens barrier and press the button.
2 Select [SETUP] using the / buttons and press the button.
3 Select [REC VIEW] using the / buttons and press the
button.
4 Select [ON] using the / buttons and press the button.
ON: The last image taken is played back after shooting is completed.
OFF: The screen for shooting the next image is played back immediately
after shooting is completed.
Setting of the Rec View is completed.
Press the
Note
button again to exit the menu.
The Rec View mode is saved when the camera is turned off.
■ BEEP SOUND
This function enables you to turn the warning beep sound off.
1 Open the lens barrier and press the button.
2 Select [SETUP] using the / buttons and press the button.
3 Select [ ] using the / buttons and press the button.
4 Select [OFF] using the / buttons and press the button.
The beep sound will be turned off.
Press the
Note
button again to exit the menu.
• The beep sound setting is not cancelled when the camera is turned off.
• You can also set the beep sound from the Play menu.
■
ADJUSTING THE MONITOR BRIGHTNESS
1 Open the lens barrier and press the button.
2 Select [SETUP] using the / buttons and press the button.
25En
Page 26

3 Select [ ] using the / buttons and press the button.
4 Adjust the brightness of the monitor using the / buttons
and press the
Press the
make it darker.
button.
button to make the monitor brighter and the button to
5 Press the button again.
Setting of monitor brightness is now completed.
Press the
Note
button again to exit the menu.
• The setting is not cancelled when the lens barrier is closed.
• You can also set the monitor brightness from the Play menu.
■ CARD FORMAT/MEMORY SETUP
This function enables you to format the SmartMedia card or internal memory.
Any images on the card or in the memory will be erased when the card or
memory is formatted.
• When formatting the inter nal memory, do not inser t a SmartMedia card.
• When formatting a Smar tMedia card, insert the card first.
Caution
• Before using a non-Olympus SmartMedia card or a card formatted on a PC,
format the card on the camera first. Olympus CAMEDIA brand SmartMedia
cards do not require formatting.
1 Press the button with the lens barrier closed.
2 Press the button.
3 Select [SETUP] using the / buttons and press the button.
4 If you format the card, select [ ] using the / buttons and
press the
If you format the internal memory, select [
buttons and press the button.
5 Select [ FORMAT] using the / buttons and press the
button.
6 Select [ FORMAT] using the / buttons and press the
button.
The card or internal memory will be formatted.
button.
] using the /
Note
26 En
You can also format a card or the internal memory from the Camera menu.
Page 27

• All protected images will be erased. Once formatted, the SmartMedia card or
Caution
internal memory cannot be restored.
• Cards with a wr ite-protect seal affixed to them cannot be formatted. Remove
the seal before formatting the card. Do not re-use seals.
■ MEMORY BACK-UP
This function enables you to copy all image data recorded in the internal
memory onto a SmartMedia card. Insert the card before following the procedure
below.
1 Insert the SmartMedia card.
2 Press the button with the lens barrier closed.
3 Press the button.
4 Select [SETUP] using the / buttons and press the button.
5 Select [ ] using the / buttons and press the button.
6 Select [ BACKUP] using the / buttons and press the
button.
All the images in the internal memory will be copied onto the card.
■
DISPLAYING IMAGE INFORMATION
This function enables you to set display or non-display of image information
on the monitor while the image is played back. If you enable this function,
these information is displayed for 5 seconds.
Image data display ON Image data display OFF
27En
Page 28

1 Press the button with the lens barrier closed.
2 Press the button.
3 Select [PLAY] using the / buttons and press the button.
4 Select [INFO] using the / buttons and press the button.
5 Select [ON] using the / buttons and press the button.
The image information will be displayed on the display screen.
Press the
Note
button again to exit the menu.
The image information setting will return to OFF (default setting) when the camera
is turned off.
28 En
Page 29

E
RROR MESSAGES
■ ERROR CODES
Monitor display Error
No card has been inserted or
card is not detected.
Remedy
Insert or reinsert card.
Failure to record, display or
erase.
Card is write-protected.
Smartmedia card is full. No
more images can be recorded.
Internal memory is full. No
more images can be recorded.
No images can be displayed.
No images can be displayed.
Selected image cannot be
displayed.
Failure to record, display or erase
Wipe the card terminal with cleaning
paper and reformat. If unable to format,
use another card.
To record, remove the protect seal.
For details, refer to the instruction
manual for the SmartMedia card.
Insert another card or erase
unwanted images.
Use a SmartMedia card or erase
unwanted images.
There are no images in the card.
Take pictures and then playback.
There are no images in the internal
memory.Take pictures and then
playback.
Images on a card recorded with
another brand of camera or images
transferred from a PC cannot be
displayed.
29En
Page 30

S
PECIFICATIONS
Product type: Digital camera (for recording and displaying)
Recording system: Digital recording, compatible with JPEG
Recording media: Internal memory 1MB, SmartMedia card
No. of recordable frames: SHQ/Approx. 1, HQ/Approx. 3,
Sequence mode: 1.3 frames/second, 8 or more (HQ)
Erase: Single-frame erase/All frames erase
Image pickup element: 1/3.2 inch CCD solid-state image pickup
Recording image: 1280 × 960 pixels (SHQ/HQ mode)
White balance: Full auto TTL
Lens: Olympus lens 4.5mm, F4, 5 elements,
Photometric system: Digital ESP metering system with imager,
Exposure control system: Programmed auto exposure
Aperture: f4, f8
Shutter*: 1 ~ 1/2000 sec. (used with mechanical shutter)
Shooting range: 0.6m ~ ∞/2ft ~ infinity (Standard mode)
Viewfinder: Optical real image viewfinder (Target mark),
LCD monitor: 1.5 inch TFT color LCD display
No. of pixels: Approx. 114,000 pixels
On-screen display: Date/Time, frame number, protect, image
(based on DCF) and DPOF
(4MB, 8MB, 16MB, 32MB, 64MB, 128MB)
SQ1/Approx. 4, SQ2/Approx. 7
(When using internal memory)
1,310,000 pixels (gross)
1024 × 768 pixels (SQ1 mode)
640 × 480 pixels (SQ2 mode)
Preset (daylight, overcast, tungsten light,
fluorescent light)
5 groups
(equivalent to 35mm lens on 35mm camera)
Spot Metering
*Manual setting not available
0.25m ~ ∞/10" ~ infinity (Macro mode)
LCD monitor
quality, battery level, file number, print service,
menu, etc.
30 En
Page 31

Flash charging time: Less than approx. 6 sec. (at normal
Flash charging time: Less than approx. 6 sec. (at normal
Flash shooting range: ~ 2.5m/8ft.
Flash modes: Auto (automatic flash activation in low light
Focus: Pan-focus
Selftimer: Approx. 12 sec. delay
External connector: DC input terminal, USB interface (storage-
Date and time: Recorded with image data simultaneously
Automatic calendar function:
Calendar power source: Backup by built-in capacitor
Card function: DPOF-compatible print service,
Operating environment
Temperature: 0 ~ 40°C/32 ~ 104°F (operation)
Humidity: 30 ~ 90% (operation)
Power supply: Four AA alkaline batteries, AA nickel metal
Dimensions: 123(W) × 65(H) × 44.5(D) mm
Weight: 190g/0.4lb (without batteries/card)
temperature with new battery)
temperature with new battery)
and backlight), red-eye reduction, flash off,
flash on, night view, night view/red-eye
class) Auto-connect
Automatic adjustment in range of 1981 ~ 2031
Panorama assembly (Olympus CAMEDIA
brand only)
–20 ~ 60°C/–4 ~ 140°F (storage)
10 ~ 90% (storage)
hydride batteries or AA NiCd batteries. Or two
CR-V3 lithium battery packs (LB-01
manufactured by Olympus), or optional AC
adapter.
AA manganese batteries cannot be used.
(4.8"(W) × 2.6"(H) × 1.8"(D))
(not including protrusions)
Design and specifications are subject to change without notice or obligation
on the part of the manufacturer.
31En
Page 32

■ INTRODOCTION
À propos de ce manuel
● Les informations contenues dans ce manuel peuvent être modifiées sans
préavis. Pour les informations les plus récentes sur les noms de produit,
les numéros de modèle, etc., veuillez consulter le représentant Olympus
local.
● Les informations contenues dans ce manuel ont été élaborées avec le plus
grand soin pour assurer leur justesse. Cependant, si vous releviez des
erreurs ou des omissions, veuillez contacter le représentant Olympus local.
● Il est interdit de reproduire en partie ou intégralement les informations
contenues dans ce manuel, sauf pour un usage personnel.La reproduction
sans autorisation du détenteur des droits d’auteur est interdite.
● Olympus décline toute responsabilité pour les pertes subies et les bénéfices
manqués, de même que pour les créances de tiers en découlant, consécutifs
à une utilisation incorrecte de ce produit.
● Olympus décline toute responsabilité pour les pertes subies et les bénéfices
manqués consécutifs à l’effacement de données d’image suite à un
dépannage par des tiers non agréés par Olympus ou à d’autres causes.
● La qualité des images prises avec ce produit diffère de celle des images
prises avec des appareils photo utilisant un film ordinaire.
©
Copyright
Interférences radio et télévision
Toute modification qui ne serait pas expressément autorisée par le fabricant
peut annuler la permission accordée à l’utilisateur de se servir de ce matériel.
Cet appareil a fait l’objet de divers essais et il a été reconnu qu’il se conforme
aux limites concernant un appareillage numérique de la classe B,
correspondant à la partie 15 des règles de la FCC. Ces limites sont conçues
pour garantir une protection raisonnable contre des interférences nuisibles
dans une installation résidentielle. Cet appareil génère, utilise et peut émettre
de l’énergie des fréquences radio et, s’il n’est pas installé et utilisé selon les
instructions, peut causer des interférences nuisibles en communications radio.
Cependant, il ne peut pas être garanti que des interférences ne se produiront
pas dans certaines installations particulières. Si cet appareil provoque des
interférences avec la réception radio ou télévision, ce qui peut être vérifié en
alimentant l’appareil et en coupant son alimentation, nous conseillons
l’utilisateur d’essayer d’éliminer ces interférences par l’une ou plusieurs des
mesures suivantes:
• Réorienter ou déplacer l’antenne de réception.
• Augmenter la distance entre l’appareil photo et le récepteur.
• Brancher le matériel sur une prise de courant d’un circuit différent de celui
sur lequel le récepteur est branché.
Uniquement le câble USB doit être utilisé pour raccorder l’appareil photo à un
ordinateur personnel.
2001 OLYMPUS CO., LTD.
2 Fr
Page 33

Déclaration de conformité
Numéro de modèle: C-100/D-370
Nom de marque: OLYMPUS
Partie responsable: Olympus America Inc.
Adresse: 2 Corporate Center Drive, Melville, New York
Numéro de téléphone: 631-844-5000
Cet appareil satisfait aux termes de la partie 15 des directives FCC. Son
utilisation est soumise aux deux conditions suivantes:
(1) Cet appareil ne doit pas causer de brouillage radioélectrique, et
(2) Cet appareil doit pouvoir résister à toutes les interférences, y compris
celles susceptibles d’entraver son bon fonctionnement.
Cet appareil numérique de la catégorie B est conforme à la législation
canadienne sur les appareils générateurs de parasites.
La marque “CE” indique que ce produit est conforme avec les
exigences européennes en matière de sécurité, santé,
environnement et protection du consommateur.
11747-3157 USA
Marques commerciales
● Les produits Microsoft, tels que Windows et Internet Explorer sont des
marques commerciales déposées ou des marques commerciales de
Microsoft Corporation aux États-Unis et dans d’autres pays.
● Macintosh et Apple sont des marques commerciales déposées de Apple
Computers, Inc.
● Les autres noms de marque ou de produit mentionnés dans ce manuel
sont des marques commerciales ou des marques commerciales déposées
de leurs propriétaires respectifs.
À propos du système de fichier de l’appareil
Le DCF (Design rule for Camera File system) est un standard stipulé par
l’association JEITA (Japan Electronics and Information Technology
Association).
3Fr
Page 34

■ TABLE DES MATIÈRES
PRÉPARATION 5
Nomenclature ............................... 5
Fixation de la bandoulière ............ 6
Mise en place des piles ................ 6
Utilisation d’une carte smartmedia
(Optionnelle) ............................ 7
Mise sous/hors tension de l’appareil
................................................. 8
Réglage de la date et de
l’heure ...................................... 9
PRISE DE VUE 11
Prise de vue ............................... 11
Utilisation du flash ...................... 12
Mode macro ............................... 13
Retardateur ................................ 13
Mode téléobjectif numérique ...... 14
Mode de prise de vue en rafale .... 14
Compensation de l’exposition .... 15
Balance des blancs .................... 16
Qualité de l’image ...................... 17
Mode de mesure spot ................ 18
LECTURE DES IMAGES 19
Lecture d’une image .................. 19
Lecture d’index ........................... 19
Lecture automatique .................. 20
Lecture avec gros plan ............... 20
Effacement d’une image ............ 21
Effacement de toutes les
images ................................... 22
Protection des images
importantes ............................ 23
AUTRES FONCTIONS 24
Mode d’images animées ............ 24
Affichage des images animées .. 24
Vérification immédiate ................ 25
Bip sonore .................................. 25
Ajustement de la luminosité
de l’écran ACL ....................... 25
Formatage de la carte ou de
la mémoire ............................. 26
Sauvegarde de la mémoire ........ 27
Affichage des informations
des images ............................ 27
MESSAGES D’ERREUR 29
Codes d’erreur ........................... 29
Spécifications 30
4 Fr
Page 35

P
RÉPARATION
■ NOMENCLATURE
1
458 0 ABC
3
72
G
H
I
96
1 Déclencheur
2 Capot de protection de
l’objectif
3 Objectif
4 Flash
5 Levier gros plan
6 Voyant du retardateur
7 Prise d’entrée CC (DC-IN)
8 Couvercle de connecteur
9 Connecteur USB
EFD
0 Écran ACL
A Viseur
B Voyant vert
C Touches fléchées
D Embase filetée de trépied
E Touche d’écran
F Touche OK/Menu
G Couvercle du logement de la
carte
H Œillet de bandoulière
I Couvercle du compartiment à
piles
5Fr
Page 36

■ FIXATION DE LA BANDOULIÈRE
1 Passez l’extrémité la plus courte de
la bandoulière à travers l’œillet de
bandoulière.
2 Passez l’extrémité la plus longue de
la bandoulière dans la boucle.
3 Tirez fermement et vérifiez que la
bandoulière est fixée correctement.
■ MISE EN PLACE DES PILES
Cet appareil utilise 4 piles alcalines AA (fournies), NiMH, lithium ou NiCD ou
deux bloc-piles au lithium CR-V3.
1 Vérifiez que le capot de protection de l’objectif est fermé et que
l’écran ACL et le voyant vert sont éteints.
2 Faites glisser le couvercle du
compartiment des piles dans la
direction de la flèche A puis ouvrez
le couvercle dans la direction de la
flèche B.
3 Insérez les piles de la façon montrée
sur l’illustration en vous assurant
qu’elles sont orientées correctement.
4 Refermez le couvercle du
compartiment des piles dans la
direction de la flèche C puis faites-le
glisser dans la direction de la flèche
D en faisant pression sur la marque
.
A
B
D
C
Attention
6 Fr
• Si le couvercle du compartiment à piles est difficile à fermer, appuyez sur la
marque et [OPEN] sur le couvercle avec vos deux pouces sans
appliquer trop de force.
• Si l’appareil est laissé sans piles pendant environ une heure, tous les réglages
sont réinitialisés aux réglages par défaut.
Page 37

• Lors de l’alimentation de l’appareil avec des piles, si les piles deviennent faibles,
Attention
■
Utilisez une carte SmartMedia si vous avez besoin de mémoriser un nombre
d’images plus important que la mémoire interne peut contenir. (Veuillez vous
référer au tableau de la page suivante.) Aucune carte SmartMedia n’est
fournie avec cet appareil. Elle doit être achetée séparément.
Cet appareil accepte uniquement la mémoire amovible SmartMedia. Si vous
insérez une carte SmartMedia, l’image est enregistrée sur la carte et vous
pouvez la reproduire à partir de la carte. Si vous retirez la carte de l’appareil,
l’image est enregistrée dans la mémoire interne et vous pouvez la reproduire
à partir de la mémoire interne.
le symbole de pile rouge apparaît. Quand les piles sont presque épuisées,
l’écran ACL se met hors service et le voyant vert clignote.
UTILISATION D’UNE CARTE SMARTMEDIA (OPTIONNELLE)
➜➜➜
Marque d’insertion de la carte
1 Assurez-vous que l’appareil est hors tension.
Refermez le capot de protection de l’objectif et vérifiez que l’écran ACL
est hors service et que le voyant vert est éteint.
2 Ouvrez le couvercle du logement de la carte.
3 Insérez la carte SmartMedia correctement comme le montre
l’illustration.
Il y a une marque montrant le sens correct d’insertion de la carte à
l’intérieur du couvercle du logement de la carte.
Pour retirer la carte, tenez-la par le bout des doigts et tirez-la dans la
direction indiquée.
4 Refermez le couvercle du logement de la carte jusqu’à ce que vous
entendiez un clic.
Les cartes non-Olympus ou non-Lexar, ou les cartes formatées sur un autre
Remarque
appareil, comme sur un ordinateur peuvent ne pas être reconnues. For matez
les cartes avec cet appareil avant de les utiliser. Reportez-vous à “Formatage
de la carte ou de la mémoire” ( p. 26).
• N’ouvrez jamais le couvercle de logement de la carte ni ne retirez la carte
Attention
SmartMedia ou les piles quand l’appareil est sous tension. Les données sur
la carte risqueraient d’être perdues. Et une fois perdues, elles ne peuvent pas
être récupérées.
7Fr
Page 38

• La car te SmartMedia est un matériel de précision. Ne la soumettez pas à une
Attention
force non raisonnable ni à des chocs. Ne touchez pas les contacts en métal
doré sur la carte.
• Cer taines des fonctions de l’appareil sont
ignorées si l’autocollant de protection en
écriture est collé sur la carte SmartMedia.
Pour utiliser ces fonctions, retirez l’autocollant
de la carte.
Autocollant de
protection en
écriture
Nombre approximatif d’images enregistrables
Capacité
mémoire de
la carte
Mémoire interne Env. 1 3 4 7
■
Qualité de
l’image
SHQ HQ SQ1 SQ2
4 MB 6 12 16 29
8 MB 12 24 32 58
16 MB 25 49 66 110
32 MB 51 99 132 221
64 MB 102 199 265 442
128 MB 204 399 532 887
MISE SOUS/HORS TENSION DE L’APPAREIL
LORS DE LA PRISE DE VUE
Mise sous tension de l’appareil ...
Mise hors tension de l’appareil ...
L’appareil se met sous tension.
Ouvrez le capot de protection d’objectif.
L’appareil se met sous tension en mode
d’enregistrement.
Refermez le capot de protection d’objectif.
L’appareil se met hors tension.
L’appareil se met hors tension.
8 Fr
• Quand le capot de protection de l’objectif est ouvert et qu’aucune carte n’est
Remarque
insérée, “NO CARD” est affiché sur l’écran ACL. Ce n’est pas un mauvais
fonctionnement. Utilisez la mémoire interne de l’appareil pour prendre des
photos.
• Le mode de l’appareil passe en mode d’économie d’énergie si vous ne faites
aucune opération pendant plus de 3 minutes. Pour prendre des photos, mettre
l’appareil sous tension.
Page 39

LORS DE LECTURE D’IMAGES
Mise en service de l’écran ACL ...
Mise hors service de l’écran ACL
Appareil avec le
capot de protection
d’objectif fermé
Le mode de l’appareil passe en mode d’économie d’énergie si vous ne faites
Remarque
aucune opération pendant plus de 3 minutes. Pour reproduire des images, mettre
l’appareil sous tension.
L’
écran ACL
Appuyez sur la touche quand le capot
de protection d’objectif est fermé.
L’appareil se met sous tension en mode de
lecture et l’écran ACL se met en service.
Appuyez sur la touche .
Le moniteur se met hors service et l’appareil
se met hors tension.
se met en service.
S’allume.
L’écran ACL se met hors service.
S’éteint.
■ RÉGLAGE DE LA DATE ET DE L’HEURE
1 Appuyez sur la touche .
L’écran ACL se met en service.
2 Appuyez sur la touche .
Le menu est affiché.
3 Choisissez [SETUP] en utilisant les touches
/ et appuyez sur la touche .
4 Choisissez [ ] en utilisant les touches /
et appuyez sur la touche .
5 Choisissez le format de la date [Y-M-D (Année-
Mois-Jour), M-D-Y (Mois-Jour-Année) ou D-MY (Jour-Mois-Année)] en utilisant les touches
/ et appuyez sur la touche .
L’écran d’ajustement de la date et de l’heure est
affiché.
9Fr
Page 40

6 Réglez le premier nombre en utilisant les
touches
Passez au nombre suivant.
/ et appuyez sur la touche .
7 Répétez la procédure ci-dessus jusqu’à ce que
le réglage de la date et de l’heure soit terminé.
8 Appuyez sur la touche quand l’heure
atteint 00 seconde.
Le réglage de la date et de l’heure est terminé.
9 Appuyez de nouveau sur la touche .
Le menu d’ajustement de la date et de l’heure
disparaît.
10 Appuyez sur la touche pour mettre l’écran
ACL hors service.
Le réglage de la date est effacé ou devient incorrect si l’appareil est laissé sans
pile ou si les piles sont épuisées. Assurez-vous que le réglage de la date et de
Attention
l’heure est correct avant de prendre des photos importantes.
La date et l’heure peuvent être ajustées aussi bien en mode d’enregistrement
Remarque
qu’en mode de lecture en utilisant la même procédure.
10 Fr
Page 41

P
RISE DE VUE
■ PRISE DE VUE
PRISE DE VUE EN UTILISANT LE VISEUR
1 Ouvrez le capot de protection de l’objectif jusqu’à ce que vous
entendiez un clic.
2 Positionnez le sujet dans le viseur en utilisant la marque de cible.
Pour prendre des photos à une distance de moins de 60cm, reportezvous au “Mode macro” (
3 Appuyez sur le déclencheur jusqu’à mi-course.
Le voyant vert à côté du viseur s’allume.
Le réglage de l’exposition est verrouillé quand le
déclencheur est maintenu pressé à mi-course.
4 Appuyez à fond sur le déclencheur.
La photo est prise.
PRISE DE VUE EN UTILISANT L’ÉCRAN ACL
1 Ouvrez le capot de protection de l’objectif.
2 Et appuyez sur la touche .
L’écran ACL se met en service.
Appuyez de nouveau sur la touche
service.
3 Composez l’image en regardant le sujet sur l’écran ACL.
4 Prenez la photo de la même façon que vous l’auriez fait en utilisant
le viseur.
p.13).
pour mettre l’écran ACL hors
Remarque
•
Si le voyant vert clignote quand le déclencheur est pressé à mi-course, c’est que
le flash n’est pas complètement chargé.
l’appareil enregistrement l’image qui vient d’être prise. Attendez de 2 à 40
secondes que le voyant vert s’arrête de clignoter.
• Quand le niveau de la mémoire indique que celle-ci est pleine, aucune image
ne peut plus être prise. Attendez quelques secondes jusqu’à ce que la jauge
se vide avant de prendre de nouvelles photos.
Le voyant vert clignote pendant que
11Fr
Page 42

Remarque
• Quand une photo est prise sous une lumière importante, telle que la lumière
du soleil, des lignes verticales peuvent apparaître sur l’écran ACL. Ce n’est
pas un mauvais fonctionnement.
• L’écran ACL sert à vérifier la composition. Vérifiez les floues, la mise au point
et l’exposition plus tard en affichant l’image sur un ordinateur.
• Il faut plus de temps pour enregistrer une image quand l’écran ACL est utilisé.
• Appuyez délicatement sur le déclencheur. Appuyer trop fort sur le déclencheur
Attention
peut faire bouger l’appareil et rendre la photo floue.
• Ne retirez jamais la pile ni l’adaptateur secteur quand le voyant vert clignote.
La photo que vous venez de prendre ne sera pas enregistrée et toutes les
photos précédentes risquent d’être détruites.
■ UTILISATION DU FLASH
Le flash se déclenche automatiquement par basse lumière et dans des
conditions de contre-jour, mais le mode de flash peut être choisi en fonction
de diverses situations.
1
Ouvrez le capot de protection de l’objectif et appuyez sur la touche .
2 Choisissez [CAMERA] en utilisant les touches / et appuyez
sur la touche
3
Choisissez [ ] en utilisant les touches / et appuyez sur la touche .
4 Choisissez le mode de flash en utilisant les touches / et
appuyez sur la touche
RÉGLAGES DU MODE DE FLASH
Automatique (pas d’affichage)
Réducteur des yeux rouges
Flash forcé ( ) : Se déclenche dans n’importe quelle circonstance.
Flash débrayé ( ) : Ne se déclenche pas quelles que soient les conditions
Scène de nuit ( ) : Utilisez ce mode pour prendre des scènes de nuit.
Scène de nuit/Réducteur : Utilisez ce mode pour prendre en photo des personnes
des yeux rouges( ) devant une scène de nuit.
Remarque
• Pour vérifier le mode de flash actuel, appuyez sur la touche quand le capot
de protection de l’objectif est ouvert.
Appuyez sur la touche après la vér ification pour changer le réglage du
mode de flash.
• Plage du flash: ~ 2,5m
• Tous les réglages de mode de flash à l’exception du réducteur des yeux rouges
( ) retournent au mode automatique (réglage par défaut) quand le capot de
protection de l’objectif est fermé.
• Le voyant vert clignote pendant la charge du flash et aucune photo ne peut
Attention
12 Fr
être prise. Attendez que le voyant ver t s’éteigne.
.
.
: Se déclenche automatiquement dans des conditions de
faible éclairage et de contre jour (réglage par défaut).
( ) : Réduit le phénomène qui fait apparaître en rouge les
yeux des sujets sur la photo.
d’éclairage.
Page 43

• Lors de pr ises de vue en gros plan avec le flash, il peut être impossible d’obtenir
Attention
la luminosité correcte et les ombres peuvent être accentuées. Olympus
recommande que vous vérifiiez l’image sur l’écran ACL de l’appareil.
• Le flash ne peut pas être utilisé en mode de prise de vue en rafale, en mode
panoramique ni en mode d’images animées.
■ MODE MACRO
Utilisez ce mode pour prendre des photos en gros plan à une distance de
moins de 25 – 60cm.
1 Ouvrez le capot de protection de l’objectif et faites glisser le levier
Gros plan macro sur le côté.
L’écran ACL se met en service automatiquement et le symbole
Pour annuler le mode macro, remettez le levier gros plan macro dans sa
position d’origine.
apparaît
2 Prenez la photo.
Le mode macro est annulé automatiquement quand l’appareil est mis hors tension.
Remarque
Le mode macro est annulé quand le capot de protection de l’objectif est fermé.
• Assurez-vous de glisser le levier Gros plan complètement.
• Lors de l’utilisation du mode macro, restez à une distance de plus de 25 cm
Attention
du sujet.
• Si vous prenez une photo à une distance de moins de 25cm, l’autofocus ne
fonctionne pas correctement bien que la photo puisse être prise.
• Si vous utilisez le flash en mode macro, la luminosité peut ne pas être correcte
et des ombres prononcées peuvent apparaître. Olympus recommande que
vous vérifiiez l’image sur l’écran ACL de l’appareil.
■ RETARDATEUR
1
Ouvrez le capot de protection de l’objectif et appuyez sur la touche
2 Choisissez [CAMERA] à partir de l’écran de menu de l’appareil en
utilisant les touches
/ et appuyez sur la touche .
3 Choisissez [DRIVE] en utilisant les touches / et appuyez sur
la touche
.
4 Choisissez [ SELF-TIMER] en utilisant les touches / et
appuyez sur la touche
Le retardateur est en service. Appuyez de nouveau sur la touche
pour quitter le menu.
button.
5 Composez l’image sur l’écran ACL ou dans le viseur et appuyez sur
le déclencheur.
Le voyant du retardateur à l’avant de l’appareil s’allume pendant 10 secondes
puis clignote pendant 2 secondes avant que la photo ne soit prise.
Le déclencheur est mis hors service automatiquement une fois que la
photo a été prise.
.
13Fr
Page 44

Remarque
• Le déclencheur est annulé automatiquement une fois que la photo a été prise.
• Pour annuler le retardateur après avoir appuyé sur le déclencheur, fermez le
capot de protection de l’objectif.
■ MODE TÉLÉOBJECTIF NUMÉRIQUE
Ce mode vous permet d’agrandir numériquement l’image avec un rapport de
1,6×, 2×, 3,2× et 4×.
1 Ouvrez le capot de protection de l’objectif et appuyez sur la touche
o .
2 Le rapport d’agrandissement change dans l’ordre [1.6× → 2.0× →
3.2× → 4.0×] chaque fois que vous appuyez sur la touche
Le rapport d’agrandissement change dans l’ordre [3.2× → 2.0× → 1.6× →
Pas d’affichage (1.0)] chaque fois que vous appuyez sur la touche
3 Prenez la photo.
• Appuyez sur la touche
annuler le mode de téléobjectif numérique.
• Quand le rapport d’agrandissement est réglé sur 3,2× ou 4×, réglez la
qualité de l’image sur SQ2.
Remarque
• Appuyez sur la touche pour mettre l’écran ACL hors service et annuler le
mode téléobjectif numérique.
• Les photos prises en mode de téléobjectif numérique peuvent être plus
grossières.
pour mettre l’écran ACL hors service et
■ MODE DE PRISE DE VUE EN RAFALE
1
Ouvrez le capot de protection de l’objectif et appuyez sur la touche .
2 Choisissez [CAMERA] à partir de l’écran de menu de l’appareil en
utilisant les touches
3 Choisissez [DRIVE] en utilisant les touches / et appuyez sur
la touche
.
4 Choisissez [ SEQUENCE] en utilisant les touches / et
appuyez sur la touche
Le mode de prise de vue en rafale est en service. Appuyez de nouveau
sur la touche pour quitter le menu.
5 Appuyez sur le déclencheur et maintenez-le pressé.
La prise de vue continue tant que le déclencheur est maintenu pressé et
s’arrête quand il est relâché.
Pour retournez au mode d’enregistrement normal, fermez le capot de
protection de l’objectif et ouvrez-le à nouveau.
14 Fr
/ et appuyez sur la touche .
.
.
.
Page 45

Remarque
• Le mode de prise de vue en rafale est annulé quand le capot de protection de
l’objectif est fermé.
• Le flash ne peut pas être utilisé dans ce mode.
• Comme la vitesse d’obturation est réglée sur un maximum de 1/30 sec. pour
éviter les risques de bougé, l’image obtenue peut apparaître plus sombre
qu’habituellement.
• Il faut un certain temps pour enregistrer les images prises dans ce mode.
• Le nombre d’images enregistrables varie en fonction du mode de qualité de
l’image et si une carte SmartMedia est utilisée ou non.
Si vous avez l’intention de prendre un grand nombre de photos, nous vous
recommandons d’utiliser une carte SmartMedia.
■ COMPENSATION DE L’EXPOSITION
Ce mode vous permet de changer la luminosité de l’image.
1 Appuyez sur la touche alors que le capot de protection de
l’objectif est ouvert.
2 Choisissez [CAMERA] à partir du menu d’enregistrement en utilisant
les touches
3 Choisissez [ ] en utilisant les touches / et appuyez sur
la touche
4 Ajustez le réglage de compensation d’exposition en appuyant sur la
touche
pour rendre l’image plus claire, et appuyez ensuite sur la touche .
La compensation d’exposition est en service.
pour quitter le menu.
5 Prenez la photo.
Vous pouvez continuer à prendre des photos avec le réglage de
compensation d’exposition choisi. Refermez le capot de protection de
l’objectif pour annuler le réglage de compensation d’exposition.
• Le réglage de compensation d’exposition retourne à ±0,0 (défaut) quand le
Remarque
Attention
capot de protection de l’objectif est fermé.
• Quand vous réglez la compensation d’exposition, l’image affichée sur l’écran
ACL change sur le réglage de luminosité associé. S’il est difficile de voir la
différence parce que le sujet est sombre, affichez l’image enregistrée sur
l’écran ACL de l’appareil pour vérifier la luminosité.
• La luminosité souhaitée (compensation d’exposition) peut ne pas être obtenue
si le flash est utilisé.
• La valeur de la compensation d’exposition peut ne pas être correcte si le sujet
se trouve dans un environnement extrêmement lumineux ou sombre.
/ et appuyez sur la touche .
.
pour rendre l’image plus sombre et sur la touche
Appuyez de nouveau sur la touche
15Fr
Page 46

■ BALANCE DES BLANCS
Cet appareil utilise un réglage automatique de la balance des blancs pour
prendre un sujet dans un ton naturel. Cependant, il peut être difficile d’obtenir
automatiquement des résultats satisfaisants à cause des conditions d’éclairage
ou météo. Dans ces cas, changez le réglage de la balance des blancs.
1 Appuyez sur la touche alors que le capot de protection de
l’objectif est ouvert.
2 Choisissez [PICTURE] à partir de l’écran de menu de l’appareil en
utilisant les touches
3 Choisissez [ ] en utilisant les touches / et appuyez sur
la touche
4
Choisissez le réglage de la balance des blancs et appuyez sur la touche .
La balance des blancs est réglée. Appuyez sur la touche pour quitter le menu.
.
5 Prenez la photo.
Vous pouvez continuer à prendre des photos avec le réglage de la balance
des blancs choisi.
Refermez le capot de protection de l’objectif pour annuler le réglage de
la balance des blancs.
Réglages de la balance des blancs
Automatique (pas d’affichage)
Lumière du jour ( ) : Permet d’obtenir des couleurs naturelles en extérieur, par
Nuageux ( ) : Permet d’obtenir des couleurs naturelles en extérieur, par
Éclairage au tungstène
Éclairage fluorescent
• Le réglage de la balance des blancs retourne sur [AUTO] (réglage par défaut)
Remarque
• Les couleurs naturelles sont difficiles à obtenir sous un éclairage mixte de
• Choisissez [ ] pour obtenir des couleurs proches de celles sous un éclairage
• La balance des blancs peut ne pas fonctionner sous certains éclairages
Attention
• Vérifiez que le réglage choisi est le meilleur réglage en affichant l’image sur
• Pour déterminer si le réglage choisi est le meilleur choix, vérifiez toujours
( ):Permet d’obtenir des couleurs naturelles sous un éclairage
( ) : Permet d’obtenir des couleurs naturelles sous un éclairage
quand le capot de protection de l’objectif est fermé.
lumière artificielle et naturelle ou sous un éclairage fluorescent, etc.
tungstène.
spéciaux.
l’écran ACL et en vérifiant les couleurs.
l’image enregistrée en la reproduisant sur l’écran ACL de l’appareil photo.
/ et appuyez sur la touche .
: Le réglage est réalisé automatiquement afin d’obtenir des
couleurs naturelles (réglage par défaut).
beau temps.
temps couvert.
au tungstène.
fluorescent.
16 Fr
Page 47

■ QUALITÉ DE L’IMAGE
Il y a 4 qualités d’image différentes: SHQ, HQ, SQ1 et SQ2.
1 Appuyez sur la touche alors que le capot de protection de
l’objectif est ouvert.
2 Choisissez [PICTURE] à partir de l’écran de menu de l’appareil en
utilisant les touches
3 Choisissez [ ] en utilisant les touches / et appuyez sur
la touche
.
4 Choisissez la qualité de l’image en utilisant les touches / et
appuyez sur la touche
La qualité de l’image est réglée. Appuyez de nouveau sur la touche
pour quitter le menu.
5 Prenez la photo.
Vous pouvez continuer à prendre des photos dans le mode de qualité
d’image choisi.
Modes de qualité d’image
SHQ 1280 × 960 Pixels (Pour des tirages clairs)
HQ 1280 × 960 Pixels (Pour voir les images sur un ordinateur)
SQ1 1024 × 768 Pixels (Pour attacher l’image à message électronique)
SQ2 640 × 480 Pixels (Pour prendre beaucoup de photos)
Le réglage de qualité d’image reste en service quand le capot de protection de
l’objectif est fermé.
Remarque
• Le réglage de la qualité de l’image reste en service même quand le capot de
protection de l’objectif est fermé.
• Le nombre d’images enregistrables varie en fonction du réglage de la qualité
d’image et la méthode de stockage utilisée. (La capacité de la mémoire interne
de l’appareil est de 1Mo, les cartes SmartMedia sont normalement disponibles
aux capacités de 8Mo à 128Mo.).
• Le nombre de pixels est le même pour HQ et SHQ, mais le taux de compression
est plus faible pour SHQ, permettant d’obtenir une image claire lorsqu’elle est
agrandie. Le format SHQ demande aussi plus de temps pour être enregistré
et reproduit que le format HQ.
• Quand vous passez à une grande
qualité d’image alors que le nombre
d’images enregistrables restant est
faible, la marque d’avertissement pour
la mémoire interne ou la carte
SmartMedia peut apparaître. Cela
indique que l’espace mémoire est
insuffisant. Si cela se produit, choisissez
une qualité d’image différente.
/ et appuyez sur la touche .
.
La marque d’avertissement
17Fr
Page 48

■ MODE DE MESURE SPOT
Si une vue est en contre-jour, le réglage photométrique ordinaire (mesure
numérique ESP) fera apparaître le sujet trop sombre. Pour compenser ce
problème, réglez l’appareil en mode de mesure Spot. Cela vous permettra
d’obtenir une exposition correcte même en cas de contre-jour.
1
Ouvrez le capot de protection de l’objectif et appuyez sur la touche
2 Choisissez [CAMERA] à partir du menu d’enregistrement en utilisant
les touches
/ et appuyez sur la touche .
3 Choisissez [ ] en utilisant les touches / et appuyez sur
la touche
.
4 Choisissez [ SPOT] en utilisant les touches / et appuyez
sur la touche
Le réglage de la mesure “spot” est terminé. Appuyez de nouveau sur la
touche pour quitter le menu.
.
5 Appuyez sur le déclencheur.
Vous pouvez continuer à enregistrer des images dans le mode de mesure choisi.
Le mode de mesure retourne au mode ESP quand le capot de protection de
l’objectif est fermé puis ouvert à nouveau.
Remarque
Le mode de mesure retourne au mode ESP (réglage par défaut) quand le capot
de protection de l’objectif est fermé.
.
18 Fr
Page 49

L
ECTURE DES IMAGES
■ LECTURE D’UNE IMAGE
Ce mode permet d’afficher une image à la fois sur l’écran ACL.
1 Appuyez sur la touche alors que le
capot de protection de l’objectif est
fermé.
L’appareil se met sous tension en mode
de lecture. La dernière image enregistrée
est affichée sur l’écran ACL.
2 Appuyez sur les touches / .
Appuyez sur la touche
l’image précédente et sur la touche
pour afficher l’image suivante.
pour afficher
3 Appuyez sur la touche .
L’écran ACL se met hors service et l’appareil se met hors tension.
Remarque
• Si vous appuyez deux fois rapidement sur la touche (double-clic) quand
l’appareil est en mode d’enregistrement, l’appareil passe en mode de lecture.
• Après avoir mis l’appareil sous tension, l’écran ACL peut se mettre en service
momentanément et l’image être affichée seulement un moment plus tard. Ce
n’est pas un mauvais fonctionnement.
■ LECTURE D’INDEX
Ce mode permet d’afficher les images en mode d’index à partir du mode
d’affichage d’une seule image.
1 Appuyez sur la touche alors que le capot de protection de l’objectif
est fermé.
2 Appuyez sur la touche en mode d’affichage.
3 Appuyez sur la touche pour déplacer le cadre vert sur l’image
suivante et sur la touche
précédente.
4 Appuyez sur la touche .
L’image marquée par le cadre vert est affichée.
pour déplacer le cadre vert sur l’image
19Fr
Page 50

Modification du nombre d’images de l’affichage d’index
Choisissez le nombre d’images de l’index parmi 4, 9 ou 16.
1
Appuyez sur la touche alors que le capot de protection de l’objectif est fermé.
2 Appuyez sur la touche pour afficher l’écran du menu de lecture.
3 Choisissez [PLAY] en utilisant les touches / et appuyez sur
la touche
4 Choisissez [ ] en utilisant les touches / et appuyez sur
la touche
.
.
5 Choisissez le nombre d’images [4], [9] ou [16] en utilisant les touches
/ et appuyez sur la touche .
Le réglage du nombre d’images de l’affiche de l’index est terminé.
Appuyez de nouveau sur la touche
pour quitter le menu.
■ LECTURE AUTOMATIQUE
Dans ce mode toutes les images sont affichées automatiquement l’une après l’autre.
1
Appuyez sur la touche alors que le capot de protection de l’objectif est fermé.
2 Appuyez sur la touche pour afficher l’écran du menu de lecture.
3 Choisissez [PLAY] en utilisant les touches / et appuyez sur
la touche
4 Choisissez [ ] en utilisant les touches / et appuyez sur
la touche
5 Choisissez [START] en utilisant les touches / et appuyez
sur la touche
La lecture automatique démarre. Chaque image est reproduite pendant 3
secondes, en commençant par l’image qui suit l’image affichée actuellement.
Pour annuler la lecture automatique, appuyez sur la touche .
Remarque
.
.
.
Si vous affichez le menu d’affichage quand une image marquée par le symbole
d’image animée ( ) est reproduite, vous ne pouvez pas choisir [ ]. Affichez
d’abord une image fixe.
■ LECTURE AVEC GROS PLAN
Les images peuvent être affichées avec 4 rapports d’agrandissement: 1,5×,
2,0×, 2,5× et 3,0×.
1
Appuyez sur la touche alors que le capot de protection de l’objectif est fermé.
2 Appuyez sur la touche e.
L’image est agrandie dans l’ordre [1.5×] → [2.0×] → [2.5×] → [3.0×] chaque
fois que vous appuyez sur la touche
20 Fr
.
Page 51

3 Appuyez sur la touche .
Le mode de défilement est en service. Faites défiler la zone agrandie
vers le haut ou le bas, vers la gauche ou la droite, en utilisant les touches
/ / / pour afficher la zone que vous souhaitez voir.
Appuyez de nouveau sur la touche
pour sortir du mode de défilement.
4 Appuyez sur la touche après avoir quitté le mode de défilement
pour retourner à l’écran de lecteur d’image unique 1×.
Remarque
Les opérations ci-dessus ne peuvent pas être réalisées quand une image portant
le symbole d’image animée ( ) est affichée. Affichez d’abord une image fixe.
■ EFFACEMENT D’UNE IMAGE
1
Appuyez sur la touche alors que le capot de protection de l’objectif est fermé.
2
Affichez l’image que vous souhaitez effacer et appuyez sur la touche .
3 Choisissez [PLAY] en utilisant les
touches
touche
4 Choisissez [ ] en utilisant les
touches
touche
5 Choisissez [ ] en utilisant les
touches
touche
L’image est effacée.
/ et appuyez sur la
.
/ et appuyez sur la
.
/ et appuyez sur la
.
21Fr
Page 52

• Vous pouvez passer au menu d’effacement en maintenant pressée la touche
Attention
pendant au moins une seconde quand l’image que vous souhaitez effacée
est affichée.
• Si l’image que vous souhaitez effacer est protégée ou si un autocollant de
protection en écriture est collé sur la carte SmartMedia, l’image ne peut pas
être effacée. Déprotégez l’image ou retirez l’autocollant de protection en
écriture avant d’essayer d’effacer l’image.
• Les images effacées ne peuvent pas être récupérées. Avant d’effacer une
image, assurez-vous que vous n’allez pas effacer des données importantes.
■ EFFACEMENT DE TOUTES LES IMAGES
Vous pouvez effacer toutes les images de la mémoire interne ou de la car te
SmartMedia.
• Lors de l’ effacement des images de la mémoire interne, n’insérez pas de
Attention
1
2 Appuyez sur la touche pour afficher l’écran du menu de lecture.
3 Choisissez [SETUP] en utilisant les touches / et appuyez
4 Choisissez [ ] ou [ ]en utilisant les touches / et appuyez
5 Choisissez [ ALL ERASE] en utilisant les touches / et
6 Choisissez [ ] en utilisant les touches / et appuyez sur
Attention
carte SmartMedia.
• Lors de l’effacement des images sur une carte Smar tMedia, insérez la carte
d’abord.
Appuyez sur la touche alors que le capot de protection de l’objectif est fermé.
sur la touche
sur la touche
appuyez sur la touche
la touche
Toutes les images sont effacées.
• Les images protégées ne sont pas effacées.
• Si un autocollant de protection en écriture est collé sur la carte SmartMedia,
les images de la carte ne pourront pas être effacées.
• Les images effacées ne peuvent pas être récupérées. Avant d’effacer, assurez-
vous que vous n’allez pas effacer des données importantes.
.
.
.
.
22 Fr
Page 53

■
PROTECTION DES IMAGES IMPORTANTES
1 Appuyez sur la touche alors que le capot de protection de l’objectif
est fermé.
2 Affichez l’image que vous souhaitez protéger.
3 Appuyez sur la touche pour afficher l’écran du menu de lecture.
4 Choisissez [PLAY] en utilisant les
touches
touche
/ et appuyez sur la
.
5 Choisissez [ ] en utilisant les
touches
touche
/ et appuyez sur la
.
6 Choisissez [ON] en utilisant les
touches
touche
L’image est protégée.
Pour annuler le réglage de protection,
choisissez [OFF].
Remarque
Attention
/ et appuyez sur la
.
• Vous pouvez aussi protéger une image en maintenant pressée la touche
pendant 1 seconde au moins quand l’image que vous souhaitez protéger est
reproduite.
• L’image protégée est indiquée par le symbole .
• Le réglage de protection est enregistré quand l’appareil est hors ser vice.
• Les images protégées ne peuvent pas être effacées à l’aide de la procédure
d’ [Effacement d’une image] ou d’ [Effacement de toutes les images], mais
seront effacées si la carte est formatée.
• Les images sur une car te portant un autocollant de protection en écriture ne
peuvent pas être protégées.
23Fr
Page 54

A
UTRES FONCTIONS
■ MODE D’IMAGES ANIMÉES
En plus des images fixes, cet appareil peut prendre des images animées.
1 Appuyez sur la touche alors que le capot de protection de
l’objectif est ouvert.
2 Choisissez [CAMERA] en utilisant les touches / et appuyez
sur la touche
3 Choisissez [DRIVE] en utilisant les touches / et appuyez sur
la touche
.
.
4 Choisissez [ MOVIE ] en utilisant les touches / et appuyez
sur la touche
Le mode d’images animées est en service. Appuyez de nouveau sur la
touche
.
pour quitter le menu.
5 Prenez la photo.
Appuyez sur le déclencheur pour démarrer l’enregistrement d’images
animées. L’enregistrement s’arrête quand vous appuyez de nouveau sur
le déclencheur.
Remarque
• Le mode d’images animées est annulé quand l’écran ACL est mis en service
en appuyant sur la touche .
• Le flash ne peut pas être utilisé en mode d’images animées.
• Il faut un certain temps pour enregistrer les images prises dans ce mode.
• La durée d’enregistrement varie en fonction de la présence d’une carte
SmartMedia.
• Le son ne peut pas être enregistré.
■ AFFICHAGE DES IMAGES ANIMÉES
1 Appuyer sur la touche quand le capot de protection de l’affichage
est fermé et affichez une image portant le symbole .
2 Appuyez sur la touche pour afficher l’écran du menu de lecture.
3 Choisissez [PLAY] en utilisant les touches / et appuyez sur
la touche
4 Choisissez [ ] en utilisant les touches / et appuyez sur la
touche
.
.
24 Fr
Page 55

5 Choisissez [START] en utilisant les touches / et appuyez
sur la touche
Les images animées sont affichées.
.
■ VÉRIFICATION IMMÉDIATE
Cette fonction vous permet de vérifier une image en l’affichant immédiatement
après qu’elle a été prise.
1
Ouvrez le capot de protection de l’objectif et appuyez sur la touche .
2
Choisissez [SETUP] en utilisant les touches / et appuyez sur la touche .
3 Choisissez [REC VIEW] en utilisant les touches / et appuyez
sur la touche
4
Choisissez [ON] en utilisant les touches / et appuyez sur la touche .
ON: La dernière image prise est reproduite une fois que la prise de vue
est terminée.
OFF : L’écran permettant la prise de vue suivante est reproduit
immédiatement une fois que la prise de vue est terminée.
Appuyez de nouveau sur la touche
Le réglage du mode de vérification immédiate est enregistré quand l’appareil
Remarque
est mis hors tension.
.
pour quitter le menu.
■ BIP SONORE
Cette fonction vous permet de mettre hors service le bip sonore d’avertissement.
1
Ouvrez le capot de protection de l’objectif et appuyez sur la touche .
2 Choisissez [SETUP] en utilisant les touches / et appuyez
sur la touche .
3
Choisissez [ ] en utilisant les touches / et appuyez sur la touche .
4
Choisissez [OFF] en utilisant les touches / et appuyez sur la touche .
Appuyez de nouveau sur la touche pour quitter le menu.
• Le réglage du bip sonore n’est pas annulé quand l’appareil est mis hors tension.
Remarque
• Vous pouvez aussi régler le bip sonore à partir du menu de lecture.
■
AJUSTEMENT DE LA LUMINOSITÉ DE L’ÉCRAN ACL
1
Ouvrez le capot de protection de l’objectif et appuyez sur la touche .
2 Choisissez [SETUP] en utilisant les touches / et appuyez
sur la touche
.
25Fr
Page 56

3
Choisissez [ ] en utilisant les touches / et appuyez sur la touche .
4 Ajustez la luminosité de l’écran ACL en utilisant les touches /
et appuyez sur la touche .
Appuyez sur la touche
appuyez sur la touche
pour rendre l’écran ACL plus lumineux et
pour le rendre plus sombre.
5 Appuyez de nouveau sur la touche .
Le réglage de la luminosité de l’écran ACL est terminé. Appuyez de
nouveau sur la touche pour quitter le menu.
• Le réglage n’est pas annulé quand le capot de protection de l’objectif est
Remarque
■
Cette fonction vous permet de formater la carte SmartMedia ou la mémoire
interne. Toutes les images sur la carte ou dans la mémoire sont effacées
quand la carte ou la mémoire est initialisée.
Attention
ferm é.
• Vous pouvez aussi régler la luminosité de l’écran ACL à partir du menu de
lecture.
FORMATAGE DE LA CARTE OU DE LA MÉMOIRE
• Lors du for matage de la mémoire interne, n’insérez pas de carte SmartMedia.
•
Lors du formatage d’une carte SmartMedia, insérez la carte d’abord.
• Avant d’utiliser une car te SmartMedia non Olympus ou une carte formatée
sur un ordinateur, formatez d’abord la carte sur l’appareil. Cartes SmartMedia
de marque Olympus CAMEDIA n’ont pas besoin d’être formatées.
1 Appuyez sur la touche alors que le capot de protection de l’objectif
est fermé.
2 Appuyez sur la touche .
3 Choisissez [SETUP] en utilisant les touches / et appuyez
sur la touche
.
4 Pour formater la carte, choisissez [ ] en utilisant les touches /
et appuyez sur la touche .
Pour formater la mémoire interne, choisissez [
touches
/ et appuyez sur la touche .
] en utilisant les
5 Choisissez [ FORMAT] en utilisant les touches / et appuyez
sur la touche
.
6 Choisissez [ FORMAT] en utilisant les touches / et appuyez
sur la touche
La carte ou la mémoire interne est initialisée.
.
26 Fr
Page 57

Vous pouvez aussi formater une carte ou la mémoire interne à partir du menu
Remarque
de l’appareil.
• Toutes les images protégées sont effacées. Une fois formatée, la carte
Attention
SmartMedia ou la mémoire interne ne peut plus être récupérée.
• Les car tes portant un autocollant de protection en écriture ne peuvent pas
être formatées. Retirez l’autocollant avant de formater la carte. Ne réutilisez
pas l’autocollant.
■ SAUVEGARDE DE LA MÉMOIRE
Cette fonction vous permet de copier toutes les données d’images enregistrées
dans la mémoire interne sur une carte SmartMedia. Insérez la carte avant de
suivre la procédure ci-dessous.
1 Insérez la carte SmartMedia.
2 Appuyez sur la touche alors que le capot de protection de l’objectif
est fermé.
3 Appuyez sur la touche .
4 Choisissez [SETUP] en utilisant les touches / et appuyez
sur la touche
5 Choisissez [ ] en utilisant les touches / et appuyez
sur la touche
6 Choisissez [ BACKUP] en utilisant les touches / et
appuyez sur la touche
Toutes les images de la mémoire interne sont copiées sur la carte.
■
AFFICHAGE DES INFORMATIONS DES IMAGES
Cette fonction vous permet de choisir d’afficher ou de ne pas afficher les
informations des images sur l’écran ACL lors de la lecture des images. Si
vous mettez en service cette fonction, ces informations seront affichées
pendant 5 secondes.
.
.
.
27Fr
Page 58

Affichage des informations des
images en service (ON)
1
Appuyez sur la touche alors que le capot de protection de l’objectif est fermé.
Affichage des informations des
images hors service (OFF)
2 Appuyez sur la touche .
3 Choisissez [PLAY] en utilisant les touches / et appuyez sur
la touche
.
4 Choisissez [INFO] en utilisant les touches / et appuyez sur
la touche
.
5 Choisissez [ON] en utilisant les touches / et appuyez sur la
touche
Les informations des images sont affichées sur l’écran de lecture.
Appuyez de nouveau sur la touche
Remarque
.
pour quitter le menu.
Le réglage d’information des images retourne sur OFF (réglage par défaut)
quand l’appareil est hors tension.
28 Fr
Page 59

M
ESSAGES D’ERREUR
■ CODES D’ERREUR
Affichage de l’écran ACL
Erreur
Aucune carte n’est insérée
ou la carte n’est pas détectée.
Remède
Insérez ou réinsérez la carte.
Échec de l’enregistrement,
de l’affichage ou de
l’effacement.
La carte est protégée en
écriture.
La carte SmartMedia™ est
pleine. Plus aucune image ne
peut être enregistrée.
La mémoire interne est pleine.
Plus aucune image ne peut
être enregistrée.
Aucune image ne peut être
affichée.
Aucune image ne peut être
affichée.
L’image choisie ne peut pas
être affichée.
Essuyez les contacts de la carte
avec un papier de nettoyage et
reformatez-la. Si vous ne pouvez
pas la reformater, utilisez une
autre carte.
Pour enregistrer, retirez l’autocollant
de protection. Pour plus d’information,
reportez-vous au manuel d’instruction
de la carte SmartMedia.
Insérez une autre carte ou effacez
les images inutiles.
Utilisez une carte SmartMedia ou
effacez les images inutiles.
Il n’y a pas d’images dans la carte.
Prenez des photos et reproduisezles.
Il n’y a pas d’images dans la
mémoire interne. Prenez des
photos et reproduisez-les.
Les images sur une carte, enregistrées
avec un appareil photo d’un autre fabricant
ou les images transférée à partir d’un
ordinateur ne peuvent pas être affichées.
29Fr
Page 60

S
PÉCIFICATIONS
Type de produit:
Système d’enregistrement:
Support d’enregistrement:
Nb. d’images enregistrables:
Mode de prise de vue en rafale:
Effacement: Effacement d’une seule image/Effacement de
Élément capteur d’images:
Enregistrement des images:
Balance des blancs: TTL complètement automatique
Objectif: Objectif Olympus 4,5mm, F4, 5 éléments,
Système photométrique: Système de mesure numérique ESP avec
Système de commande de l’exposition:
Ouverture: f4, f8
Obturateur*:
Plage de prise de vue: 0,6m – ∞ (Mode standard)
Viseur:
Écran ACL: Affichage à cristaux liquides couleur à matrice
Nb. de pixels: Env. 114 000 pixels
Appareil photo numérique (pour l’enregistrement
et la lecture)
Enregistrement numérique, compatible JPEG
(basé sur le système DCF) et DPOF
Mémoire interne 1Mo, carte SmartMedia
(4Mo, 8Mo, 16Mo, 32Mo, 64Mo, 128Mo)
SHQ/mode 1, HQ/mode 3,
SQ1/mode 4, SQ2/mode 7
(lors de l’utilisation de la mémoire interne)
1,3 images/secondes, 8 ou plus (HQ)
toutes les images
CCD 1/3,2 pouces, capteur d’image CCD à l’état
solide
1 310 000 pixels (brut)
1280 × 960 pixels (mode SHQ/HQ)
1024 × 768 pixels (mode SQ1)
640 × 480 pixels (mode SQ2)
Préréglage (lumière du jour, nuageux, éclairage
tungstène, éclairage fluorescent)
5 groupes
(équivalent à un objectif 35mm sur un appareil 35mm)
imageur/mesure spot
Exposition automatique programmée
1 – 1/2000 sec. (utilisé avec un obturateur mécanique)
*Réglage manuel non disponible
0,25m – ∞ (Mode macro)
Viseur d’image optique réel (Marque de cible),
Écran ACL
active de 1,5 pouces
30 Fr
Page 61

Affichage sur l’écran: Date/heure, numéro d’image, protection, qualité
Durée de charge du flash: Environ moins de 6 sec. (à température normale
Plage de fonctionnement du flash:
Modes de flash: Automatique (déclenchement automatique par
Focus: Pan-focus
Retardateur: Délai d’environ 12 sec.
Connecteur externe: Prise d’entrée CC, connexion automatique à
Date et heure: Enregistrées simultanément avec les données
Fonction de calendrier automatique:
Alimentation du calendrier:
Fonction de carte: Services d’impression compatibles DPOF,
Environnement de fonctionnement
Température: 0 – 40°C (fonctionnement)
Humidité: 30 – 90% (fonctionnement)
Alimentation: Quatre piles alcalines AA, piles à l’hydrure
Dimensions: 123(L) × 65(H) × 44,5(P) mm
Poids: 190 g (sans les piles/carte)
de l’image, niveau des piles, numéro de fichier,
service d’impression, menu, etc.
avec des piles neuves)
~ 2,5m
faible éclairage et contre-jour), réducteur des
yeux rouges, débrayé, forcé, scène de nuit,
scène de nuit/réducteur des yeux rouges
l’interface USB (classe de mémorisation)
d’image
Ajustement automatique dans la plage de 1981
à 2031
Capaciteur intégré de sauvegarde
Fusion en images panoramiques (Marque
Olympus CAMEDIA uniquement)
–20 – 60°C (stockage)
10 – 90% (stockage)
métallique de nickel AA ou piles NiCd AA. Ou
deux bloc-piles au lithium CR-V3 (LB-01 fabriqué
par Olympus), adaptateur secteur optionnel.
Les piles manganèses AA ne peuvent pas être
utilisées.
(non compris les parties en saillie)
La conception et les spécifications sont sujettes à changement sans notification
ou obligation de la par du fabricant.
31Fr
Page 62

■ EINLEITUNG
Zu dieser Bedienungsanleitung
● Änderungen der in dieser Anleitung enthaltenen Angaben sind ohne
Vorankündigung vorbehalten. Informationen zu aktuellen Produktnamen,
Modellnummern etc. erhalten Sie bei Ihrem Olympus Fachhändler.
● Die in dieser Anleitung enthaltenen Angaben wurden mit der größtmöglichen
Sorgfalt erstellt, um die Richtigkeit dieser Angaben zu gewährleisten. Falls
Sie dennoch unzutreffende oder unvollständige Angaben feststellen,
wenden Sie sich bitte an Ihren Olympus Fachhändler.
● Die in dieser Anleitung enthaltenen Angaben sind urheberrechtlich geschützt
und dürfen nicht — weder vollständig noch auszugsweise — kopiert werden.
Hiervon ausgenommen sind Kopien, die ausschließlich zum persönlichen
Gebrauch vorgesehen sind. Die Reproduktion ohne ausdrückliche
Genehmigung des Urheberrechtsinhabers ist nicht gestattet.
● Olympus haftet nicht für Schäden, Gewinnausfall oder Forderungen Dritter,
die aus dem unsachgemäßen Gebrauch dieses Produktes herrühren.
● Olympus haftet nicht für Schäden oder Gewinnausfall infolge des Verlustes
von Bilddaten, der aus der Dienstleistung von nicht durch Olympus
autorisierten Dritten oder aus anderen Ursachen herrührt.
● Die Qualität von mit diesem Produkt hergestellten Bildern weicht von der
Qualität von Bildern ab, die mit einer herkömmlichen Fotofilmkamera
angefertigt werden.
©
Copyright
Störeinstreuungen bei Rundfunk- und Fernsehempfängern
Werden an diesem Gerät Änderungen und Umbauten ohne ausdrückliche
Genehmigung des Herstellers vorgenommen, erlischt die Betriebserlaubnis
für dieses Gerät. Die Typenüberprüfung ergab, dass dieses Gerät die Auflagen
für Digitalgeräte der Klassifizierung B, gemäß Abschnitt 15 der FCCBestimmungen, erfüllt. Die Einhaltung dieser Bestimmungen gewährleistet
ausreichenden Schutz gegen Störeinstreuungen in Wohngebieten. Dieses
Gerät erzeugt, arbeitet mit und strahlt Funkfrequenzenergie ab und kann bei
nicht sachgemäßer Installation und Nutzung, dies bedeutet bei Nichtbeachtung
der vom Hersteller vorgeschriebenen Anweisungen zur Installation und
Nutzung, Störeinstreuungen bei Rundfunk- und Fernsehempfänger
verursachen.
Es kann nicht ausgeschlossen werden, dass in einzelnen Fällen auch bei
sachgemäßem Gebrauch dieses Geräts Störeinstreuungen verursacht werden.
Falls dieses Gerät bei Rundfunk- und Fernsehempfängern Störeinstreuungen,
welche durch das Ein- und Ausschalten des Geräts nachgewiesen werden
können, verursacht, ist der Benutzer aufgefordert, eine oder mehrere der
nachfolgend aufgelisteten Abhilfemaßnahmen durchzuführen:
• Die Empfangsantenne neu ausrichten oder an anderer Stelle installieren.
• Den Abstand zwischen Empfänger und Gerät vergrößern.
• Das Gerät nicht an die gleiche Netzleitung, die den Empfänger versorgt,
anschließen.
2 De
2001 OLYMPUS CO., LTD.
Page 63

Zum Anschluss der Kamera an einen Personal Computer (PC) ausschließlich
das USB-Kabel verwenden.
Betriebserlaubnis
Modellnummer: C-100/D-370
Markenname: OLYMPUS
Haftende juristische Person:
Anschrift: 2 Corporate Center Drive, Melville, New York
Telefon: 631-844-5000
Dieses Gerät erfüllt die Auflagen unter Abschnitt 15 der FCCBestimmungen. Das Betreiben dieses Geräts ist zulässig, wenn die
nachfolgend genannten Auflagen erfüllt werden:
(1) Von diesem Gerät dürfen keine schädlichen Störeinstreuungen
ausgehen, und
(2) Dieses Gerät muss die Einwirkung von Störeinstreuungen zulassen.
Dies schließt Störeinstreuungen ein, welche Beeinträchtigungen der
Funktionsweise oder Betriebsstörungen verursachen können.
Dieses Gerät wurde als Digitalgerät der Klasse B in Übereinstimmung
mit den Bestimmungen der “Canadian Interference-Causing Equipment
Regulations“ klassifiziert.
Das “CE”-Zeichen bestätigt, dass dieses Produkt mit den
europäischen Bestimmungen für Sicherheit, Gesundheit,
Umweltschutz und Personenschutz übereinstimmt.
Olympus America Inc.
11747-3157 USA
Warenzeichen
● Produkte der Firma Microsoft, wie Windows und Internet Explorer, sind
eingetragene Warenzeichen oder Warenzeichen der Microsoft Corporation
in den Vereinigten Staaten von Amerika und in anderen Ländern.
● Macintosh und Apple sind eingetragene Warenzeichen der Apple
Computers, Inc.
● Alle weiteren in dieser Anleitung enthaltenen Hersteller- und Produktnamen
sind Warenzeichen oder eingetragene Warenzeichen ihrer jeweiligen
Inhaber.
Hinweis zum Kamera-dateisystem
DCF (Design rule for Camera File system) ist eine von der JEITA (Japan
Electronics and Information Technology Association) eingeführte Norm.
3De
Page 64

■ INHALT
VORBEREITUNGEN 5
Bezeichnung der Teile ...................... 5
Anbringen der Handschlaufe ........... 6
Einlegen der Batterien ..................... 6
Verwendung von SmartMedia-Karten
(sonderzubhör) ............................ 7
Ein-/Ausschalten der Kamera .......... 8
Einstellen von Datum und Uhrzeit .... 9
FOTOGRAFIEREN 11
Bildaufnahme ................................. 11
Blitzbenutzung ............................... 12
Makro-Modus ................................. 13
Selbstauslöser ............................... 13
Digital-Tele-Modus ......................... 14
Serienaufnahmemodus .................. 14
Belichtungskorrektur ...................... 15
Weissabgleich ................................ 16
Bildqualität ..................................... 17
Spotmessmodus ............................ 18
BILDWIEDERGABE 19
Wiedergabe von Bildern ................. 19
Indexanzeige .................................. 19
Automatische Bildvorführung ......... 20
Zoomanzeige ................................. 20
Löschen einzelner Bilder ................ 21
Löschen aller Bilder ....................... 22
Schützen wichtiger Bilder ............... 23
SONSTIGE FUNKTIONEN 24
Laufbildaufnahmemodus ................ 24
Laufbildwiedergabe ........................ 24
Aufnahmekontrolle ......................... 25
Signalton ........................................ 25
Helligkeits-Einstellung des LCD-
Monitors .................................... 25
Kartenformatierung/
Speichereinrichtung .................. 26
Speichersicherung ......................... 27
Anzeigen von Bilddaten ................. 27
FEHLERMELDUNGEN 29
Fehlercodes ................................... 29
TECHNISCHE DATEN 30
4 De
Page 65

V
ORBEREITUNGEN
■ BEZEICHNUNG DER TEILE
1
1 Auslöser
2 Objektivschutzschieber
3 Objektiv
4 Blitz
5 Makrohebel
6 Selbstauslöser-LED
7 Gleichspannungseingang
8
Anschlussbuchsenabdeckung
9 USB-Buchse
0 LCD-Monitor
458 0 ABC
3
72
96
G
H
I
EFD
A Sucher
B Grüne LED
C Pfeiltaste
D Stativgewinde
E LCD-Monitor-Taste
F OK/Menü-Taste
G Kartenfachabdeckung
H Schlaufenöse
I Batteriefachdeckel
5De
Page 66

■ ANBRINGEN DER HANDSCHLAUFE
1 Führen Sie das kurze Ende der Handschlaufe
durch die Schlaufenöse.
2 Führen Sie das lange Ende der Handschlaufe
durch die Schleife.
3 Ziehen Sie die Handschlaufe straff, um
sicherzugehen, dass sie einwandfrei
angebracht ist.
■ EINLEGEN DER BATTERIEN
Diese Kamera kann mit jeweils vier AA-Alkalibatterien (mitgeliefert), NiMHAkkus, Lithium- oder NiCD-Akkus oder mit zwei Lithiumbatterien CR-V3
betrieben werden.
1 Vergewissern Sie sich, dass der Objektivschutzschieber
geschlossen ist, und sowohl der LCD-Monitor als auch die grüne
LED erloschen ist.
2 Schieben Sie den Batteriefachdeckel
in Richtung A, und ziehen Sie ihn in
Richtung B hoch.
3 Legen Sie die Batterien so ein, dass
sie wie in der Abbildung gezeigt
korrekt ausgerichtet sind.
A
B
4 Drücken Sie den Batteriefachdeckel in
Richtung C , und schließen Sie in
einwandfrei, indem Sie die Markierung
in Richtung D schieben.
• Falls der Batteriefachdeckel schwer zu schließen ist, drücken Sie mit beiden
Vorsicht
6 De
Daumen sachte auf das Symbol und die Markierung [OPEN] auf dem
Deckel, ohne übermäßigen Druck auszuüben.
D
C
Page 67

• Bleibt die Kamera etwa eine Stunde lang ohne Batteriestromversorgung,
Vorsicht
■
Verwenden Sie eine SmartMedia-Karte, wenn Sie mehr Bilder speichern
müssen, als der interne Speicher fassen kann. (Bitte beachten Sie die Tabelle
auf der folgenden Seite.) SmartMedia-Karten sind nicht im Lieferumfang
dieser Kamera enthalten und müssen zusätzlich gekauft werden.
Diese Kamera akzeptiert nur SmartMedia als Wechseldatenträger. Wenn
Sie eine SmartMedia-Karte einsetzen, werden die Bilder auf der Karte
gespeichert, und Sie können die Bilder von der Karte wiedergeben. Wenn
Sie die Karte aus der Kamera herausnehmen, werden die Bilder im internen
Speicher gespeichert, und Sie können die Bilder von dort wiedergeben.
werden alle Einstellungen auf die Vorgaben zurückgesetzt.
•
Falls die Batteriespannung bei Batteriebetrieb der Kamera nachzulassen beginnt,
wird das rote Batteriesymbol angezeigt. Wenn die Batterien nahezu erschöpft
sind, schaltet sich der LCD-Monitor aus, und die grüne LED beginnt zu blinken.
VERWENDUNG VON SMARTMEDIA-KARTEN (SONDERZUBHÖR)
➜➜➜
Einschubrichtungsmarke
1 Vergewissern Sie sich, dass die Kamera ausgeschaltet ist.
Schließen Sie den Objektivschutzschieber, und vergewissern Sie sich,
dass der LCD-Monitor ausgeschaltet und die grüne LED erloschen ist.
2 Öffnen Sie die Kartenfachabdeckung.
3
Schieben Sie die SmartMedia-Karte korrekt ein, wie in der Abbildung gezeigt.
Eine Marke auf der Innenseite der Kartenfachabdeckung zeigt die korrekte
Einschubrichtung der Karte an.
Um die Karte zu entnehmen, halten Sie sie mit den Fingerspitzen und
ziehen sie in der gezeigten Richtung heraus.
4 Schließen Sie die Kartenfachabdeckung, bis sie mit einem Klicken
einrastet.
Karten anderer Hersteller als Olympus oder Lexar, oder Karten, die mit anderen
Geräten, wie z.B. einem PC, formatiert wurden, werden eventuell nicht von der
Kamera akzeptiert. Formatieren Sie die Karte vor Gebrauch mit der Kamera.
Siehe [Kartenformatierung/Speichereinrichtung] ( S. 26).
•
Karten anderer Marken als Olympus, oder Karten, die mit anderen Geräten, wie
Vorsicht
z.B. einem PC, formatiert wurden, werden eventuell nicht von der Kamera akzeptiert.
Die auf der Karte gespeicherten Daten können sonst unwiederbringlich verloren
gehen.
7De
Page 68

• Die Smar tMedia-Karte ist ein Präzisionsteil. Setzen Sie die Karte keinem
Vorsicht
Ungefähre Anzahl von Aufnahmen
Speicherkapazität
der Karte
übermäßigen Druck oder Stoßeinwirkung aus. Vermeiden Sie eine Berührung
des goldfarbenen Metallteils der Karte.
• Bestimmte Kamerafunktionen werden ignorier t, wenn ein
Schreibschutzaufkleber an der SmartMedia-Karte
angebracht ist. Um diese Funktionen zu benutzen, muss
der Aufkleber von der Karte entfernt werden.
Bildqualität
SHQ HQ SQ1 SQ2
Schreibschutzaufkleber
Interner Speicher ca. 1 3 4 7
4 MB 6 12 16 29
8 MB 12 24 33 58
16 MB 25 49 66 110
32 MB 51 99 132 221
64 MB 102 199 265 442
128 MB 204 399 532 887
■ EIN-/AUSSCHALTEN DER KAMERA
ZUR AUFNAHME VON BILDERN
Einschalten der Kamera .... Offnen Sie den Objektivschutzschieber.
Ausschalten der Kamera ...Schließen Sie den Objektivschutzschieber.
Kamera schaltet sich ein
Die Kamera wird im Aufnahmemodus eingeschaltet.
Die Kamera wird ausgeschaltet.
Kamera schaltet sich aus
8 De
• Wird der Objektivschutzschieber geöffnet, ohne dass eine Karte eingesetzt
ist, wird “NO CARD” auf dem LCD-Monitor angezeigt. Dies ist keine
Funktionsstörung. Benutzen Sie den internen Speicher der Kamera zum
Aufnehmen von Bildern.
• Wenn 3 Minuten lang kein Bedienungsvorgang erfolgt, schaltet die Kamera
auf den Stromsparmodus um. Zur Aufnahme von Bildern muss die Kamera
wieder eingeschaltet werden.
Page 69

ZUR WIEDERGABE VON BILDERN
Einschalten des LCD-Monitors ... Drücken Sie die Taste bei
Ausschalten des LCD-Monitors .. Drücken Sie die Taste
Kamera bei
geschlossenem
Objektivschutzschieber
LCD-Monitor schaltet sich ein
Wenn 3 Minuten lang kein Bedienungsvorgang erfolgt, schaltet die Kamera auf
den Stromsparmodus um. Zur Wiedergabe von Bildern muss die Kamera wieder
eingeschaltet werden.
geschlossenem
Objektivschutzschieber.
Kamera und LCD-Monitor werden im
Wiedergabemodus eingeschaltet.
Kamera und LCD-Monitor werden
ausgeschaltet.
LCD-Monitor schaltet sich aus
leuchtet auf erlischt
.
■ EINSTELLEN VON DATUM UND UHRZEIT
1 Drücken Sie die Taste .
Der LCD-Monitor schaltet sich ein.
2 Drücken Sie die Taste .
Das Wiedergabemenü wird angezeigt.
3 Wählen Sie [SETUP] mit den Tasten / ,
und drücken Sie die Taste
.
4 Wählen Sie [ ] mit den Tasten / ,
und drücken Sie die Taste
.
5 Wählen Sie das Datumsformat [Y-M-D (Jahr-
Monat-Tag), M-D-Y (Monat-Tag-Jahr) oder D-MY (Tag-Monat-Jahr)] mit den Tasten
und drücken Sie die Taste
Die Datumseinstellanzeige erscheint.
.
/ ,
9De
Page 70

6 Stellen Sie den ersten Posten mit den Tasten
/ ein, und drücken Sie die Taste .
Gehen Sie zum nächsten Posten weiter.
7 Wiederholen Sie den Vorgang, bis alle Datums-
und Uhrzeiteinstellungen komplett sind.
8 Drücken Sie die Taste , wenn die Uhr 00
Sekunden erreicht.
Damit ist die Einstellung von Datum und Uhrzeit
beendet.
9 Drücken Sie die Taste erneut.
Das Datums- und Uhrzeit-Einstellmenü wird
abgeschaltet.
10 Drücken Sie die Taste , um den LCD-Monitor
auszuschalten.
Wenn die Batterien aus der Kamera herausgenommen werden oder erschöpft
Vorsicht
sind, wird die Datum/Uhrzeit-Einstellung gelöscht oder verfälscht. Vergewissern
Sie sich vor der Aufnahme von wichtigen Bildern, dass Datum und Uhrzeit korrekt
eingestellt sind.
Datum und Uhrzeit können sowohl im Aufnahmemodus als auch im
Wiedergabemodus nach dem gleichen Verfahren eingestellt werden.
10 De
Page 71

F
OTOGRAFIEREN
■ BILDAUFNAHME
FOTOGRAFIEREN MIT DEM SUCHER
1 Öffnen Sie den Objektivschutzschieber bis zum Klicken.
2 Richten Sie die AF-Markierung im Sucher auf das Motiv.
Um Bilder aus einem Abstand von weniger als 60 cm aufzunehmen, siehe
[Makro-Modus] (
3 Drücken Sie den Auslöser halb nieder.
Die grüne LED neben dem Sucher leuchtet auf.
Die Belichtung wird gespeichert, während der
Auslöser halb niedergedrückt wird.
4 Drücken Sie den Auslöser ganz durch.
Das Bild wird aufgenommen.
FOTOGRAFIEREN MIT DEM LCD-MONITOR
1 Öffnen Sie den Objektivschutzschieber.
2 Drücken Sie die Taste .
Der LCD-Monitor schaltet sich ein. Drücken Sie die Taste
den LCD-Monitor auszuschalten.
3 Bestimmen Sie den Bildausschnitt durch Betrachten des LCD-
Monitors.
4 Das übrige Aufnahmeverfahren ist das gleiche wie bei Verwendung
des Suchers.
S. 13).
erneut, um
• Falls die grüne LED bei halb niedergedrücktem Auslöser blinkt, ist der Blitz
nicht voll aufgeladen. Die grüne LED blinkt, während die Kamera das
aufgenommene Bild speichert. Warten Sie 2 bis 40 Sekunden, bis die grüne
LED aufhört zu blinken.
• Wenn die Speicheranzeige voll ist, können keine weiteren Bilder aufgenommen
werden. Warten Sie ein paar Sekunden, bis sich die Speicheranzeige
verkleinert, bevor Sie weitere Bilder aufnehmen.
• Wenn ein Bild bei hellem Licht, wie z.B. Sonnenlicht, aufgenommen wird,
können vertikale Streifen auf dem LCD-Monitor erscheinen. Dies ist keine
Funktionsstörung.
11De
Page 72

• Der LCD-Monitor dient lediglich zur Überprüfung der Bildkomposition.
Überprüfen Sie Verwacklung, Schärfe und Belichtungsgenauigkeit später durch
Wiedergabe des Bildes auf einem PC.
• Bei eingeschaltetem LCD-Monitor dauert die Aufzeichnung eines Bildes länger.
• Drücken Sie sachte auf den Auslöser. Ruckartiges Drücken des Auslösers
Vorsicht
führt zu Verwackeln der Kamera, was ein unscharfes Bild zur Folge hat.
• Unterlassen Sie das Entfernen der Batterie oder des Netzgerätes, oder das
Öffnen der kartenfachabdeckung, während die grüne LED blinkt. Anderenfalls
besteht die Gefahr, dass das soeben aufgenommene Bild nicht gespeichert
wird, oder die bereits gespeicherten Bilder zerstört werden.
■ BLITZBENUTZUNG
Bei schwacher Beleuchtung oder Gegenlicht wird der Blitz automatisch ausgelöst,
aber der Blitzmodus kann an verschiedene Bedingungen angepasst werden.
1
Öffnen Sie den Objektivschutzschieber, und drücken Sie die Taste .
2 Wählen Sie [CAMERA] mit den Tasten / , und drücken Sie
die Taste
3
Wählen Sie [ ] mit den Tasten / , und drücken Sie die Taste .
4 Wählen Sie den Blitzmodus mit den Tasten / , und drücken
Sie die Taste
BLITZMODUS-EINSTELLUNGEN
Automatik (keine Anzeige) : Der Blitz wird bei schwacher Beleuchtung oder
Rote-Augen-Reduzierung
Zwangsblitz ( ) : Der Blitz wird immer ausgelöst
Blitzsperre ( ) : Der Blitz wird nicht ausgelöst, ungeachtet der
Nachtszene ( ) : Benutzen Sie diesen Modus für Nachtaufnahmen
Nachtszene/Rotaugen- : Benutzen Sie diesen Modus zum Fotografieren von
Reduzierung ( ) Personen vor einer Nachtszene
12 De
.
.
Gegenlicht automatisch ausgelöst (Vorgabe)
( ) : Der Effekt, dass die Augen von Personen im Bild rot
erscheinen, wird reduziert
Lichtverhältnisse
• Um die aktuelle Blitzmodus-Einstellung zu überprüfen, drücken Sie die Taste
bei offenem Objektivschutzschieber.
Drücken Sie die Taste nach der Überprüfung, um die BlitzmodusEinstellung zu ändern.
• Blitzreichweite: ~ 2,5 m
• Durch Schließ en des Objektivschutzschiebers werden alle Blitzmodus-
Einstellungen außer Rotaugen-Reduzierung ( ) auf den Automatik-Modus
(Vorgabe) zurückgestellt.
Page 73

• Die grüne LED blinkt, während der Blitz geladen wird, so dass sich der Auslöser
Vorsicht
nicht drücken lässt. Warten Sie, bis die grüne LED erlischt.
• Wenn Sie Nahaufnahmen mit Blitz machen, besteht die Gefahr, dass keine
korrekte Belichtung erzielt wird und starke Schatten erzeugt werden. Olympus
empfiehlt die Überprüfung des Bildes auf dem LCD-Monitor der Kamera.
• Der Blitz kann im Serienaufnahmemodus, Panoramamodus und
Laufbildaufnahmemodus nicht benutzt werden.
■ MAKRO-MODUS
Benutzen Sie diesen Modus, um Nahaufnahmen aus einer Entfernung von
weniger als 25 cm – 60 cm zu machen.
1 Öffnen Sie den Objektivschutzschieber, und schieben Sie den
Macrohebel vor.
Der LCD-Monitor schaltet sich automatisch ein und zeigt das Symbol an.
Um den Makro-Modus aufzuheben, schieben Sie den Makrohebel auf
seine Ausgangsstellung zurück.
2 Fotografieren Sie.
Der Makro-Modus wird automatisch aufgehoben, wenn die Kamera
ausgeschaltet wird.
Durch Schließen des Objektivschutzschiebers wird der Macro-Modus
aufgehoben.
• Schieben Sie den Macrohebel bis zum Anschlag.
• Halten Sie bei Verwendung des Makro-Modus einen Abstand von mehr als 25
Vorsicht
cm zwischen Kamera und Motiv ein.
• Falls Sie versuchen, aus einer Entfernung von weniger als 25 cm aufzunehmen,
wird der Verschluss ausgelöst, obwohl das Bild unscharf ist.
• Falls Sie den Blitz im Macro-Modus benutzen, die Belichtung kann falsch sein,
und es können deutliche Schatten entstehen. Olympus empfiehlt die
Überprüfung des Bildes auf dem LCD-Monitor der Kamera.
■ SELBSTAUSLÖSER
1
Öffnen Sie den Objektivschutzschieber, und drücken Sie die Taste .
2 Wählen Sie [CAMERA] auf dem Kameramenü-Bildschirm mit den
Tasten
3
Wählen Sie [DRIVE] mit den Tasten / , und drücken Sie die Taste
4
Wählen Sie [ SELF-TIMER] mit den Tasten / , und drücken Sie
die Taste
Der Selbstauslöser ist nun eingestellt. Drücken Sie die Taste erneut,
um das Menü zu verlassen.
/
, und drücken Sie die Taste .
.
.
13De
Page 74

5 Bestimmen Sie den Bildausschnitt auf dem LCD-Monitor oder im
Sucher, und drücken Sie den Auslöser.
Die Selbstauslöser-LED an der Vorderseite der Kamera leuchtet erst 10 Sekunden
lang und blinkt dann 2 Sekunden lang, bevor der Verschluss ausgelöst wird.
Der Selbstauslöser wird nach der Aufnahme automatisch deaktiviert.
• Der Selbstauslöser wird nach der Aufnahme automatisch deaktiviert.
• Um den Selbstauslöserbetr ieb nach dem Drücken des Auslösers abzubrechen,
schließen Sie den Objektivschutzschieber.
■ DIGITAL-TELE-MODUS
Dieser Modus ermöglicht die digitale Vergrößerung des Bildes um die Faktoren
1,6-fach; 2-fach; 3,2-fach und 4-fach.
1 Öffnen Sie den Objektivschutzschieber, und drücken Sie die Taste
oder .
2 Mit jedem Drücken der Taste ändert sich die Vergrößerung in
der Reihenfolge [1,6× → 2,0× → 3,2× → 4,0×].
Mit jedem Drücken der Taste
Reihenfolge [3,2× → 2,0× → 1,6× → Keine Anzeige (1.0)].
ändert sich die Vergrößerung in der
3 Fotografieren Sie.
• Drücken Sie die
Digital-Tele-Modus aufzuheben.
• Wenn Sie den Vergrößerungsfaktor 3,2-fach oder 4-fach verwenden,
wählen Sie den Bildqualitätsmodus SQ2.
• Drücken Sie die Taste , um den LCD-Monitor auszuschalten und den DigitalTele-Modus aufzuheben.
• Bilder, die im Digital-Tele-Modus aufgenommen werden, können gröber
erscheinen.
-Taste, um den LCD-Monitor auszuschalten und den
■ SERIE¨¡UFNAHMEMODUS
1
Öffnen Sie den Objektivschutzschieber, und drücken Sie die Taste
2 Wählen Sie [CAMERA] auf dem Kameramenü-Bildschirm mit den
Tasten
3 Wählen Sie [DRIVE] mit den Tasten / , und drücken Sie die
Taste
4 Wählen Sie [ SEQUENCE] mit den Tasten / , und drücken
Sie die Taste
Der Serienaufnahmemodus ist nun eingestellt. Drücken Sie die Taste
erneut, um das Menü zu verlassen.
14 De
/ , und drücken Sie die Taste .
.
.
.
Page 75

5 Halten Sie den Auslöser gedrückt.
Die Aufnahme wird fortgesetzt, solange der Auslöser gedrückt gehalten
wird, und stoppt, sobald der Auslöser losgelassen wird.
Durch Schließen und erneutes Öffnen des Objektivschutzschiebers
können Sie auf den normalen Aufnahmemodus zurückschalten.
• Durch Schließen des Objektivschutzschiebers wird der Ser ienaufnahmemodus
aufgehoben.
• Der Blitz kann in diesem Modus nicht benutzt werden.
• Da die Verschlusszeit zur Kompensierung von Handzittern auf den Maximalwert
von 1/30 Sekunde eingestellt wird, können die aufgenommenen Bilder dunkler
als normal erscheinen.
• Die Bildaufzeichnung dauert in diesem Modus länger als sonst.
• Die Anzahl der speicherbaren Bilder hä ngt von dem gewählten
Bildqualitätsmodus und davon ab, ob eine SmartMedia-Karte verwendet wird
oder nicht. Wenn Sie vorhaben, viele Bilder aufzunehmen, ist die Verwendung
einer SmartMedia-Karte zu empfehlen.
■ BELICHTUNGSKORREKTUR
Diese Funktion ermöglicht eine Beeinflussung der Bildhelligkeit.
1 Drücken Sie die Taste bei offenem Objektivschutzschieber.
2 Wählen Sie [CAMERA] im Aufnahmemenü mit den Tasten / ,
und drücken Sie die Taste
3 Wählen Sie [ ] mit den Tasten / , und drücken Sie die
.
Taste
4 Drücken Sie zur Einstellung des Belichtungskorrekturwertes die
Taste
aufzuhellen, und drücken Sie die Taste
Damit ist die Einstellung der Belichtungskorrektur beendet. Drücken Sie
die Taste
, um das Bild abzudunkeln oder die Taste , um das Bild
erneut, um das Menü zu verlassen.
5 Fotografieren Sie.
Die gewählte Belichtungskorrektur-Einstellung bleibt für die weiteren
Aufnahmen erhalten. Schließen Sie den Objektivschutzschieber, um die
Belichtungskorrektur-Einstellung aufzuheben.
• Durch Schließen des Objektivschutzschiebers wird der Belichtungskorrekturwer t
wieder auf ±0,0 (Vorgabe) zurückgestellt.
• Wenn Sie die Belichtungskorrektur einstellen, ändert sich die Helligkeit des
auf dem LCD-Monitor angezeigten Bildes entsprechend. Falls der Unterschied
schwer feststellbar ist, weil das Motiv dunkel ist, zeigen Sie das aufgenommene
Bild auf dem LCD-Monitor an, um die Helligkeit zu überprüfen.
.
.
15De
Page 76

• Bei Blitzbenutzung wird die gewünschte Helligkeit (Belichtungskorrektur)
Vorsicht
eventuell nicht erzielt.
• Die Belichtungskorrekturwerte sind eventuell unzulänglich, wenn sich das Motiv
in einer sehr hellen oder dunklen Umgebung befindet.
■ WEISSABGLEICH
Diese Kamera verwendet einen automatischen Weißabgleich, um Aufnahmen mit natürlich
wirkenden Farbtönen zu erzielen. Bei bestimmten Beleuchtungsverhältnissen oder
Wetterbedingungen kann es jedoch schwierig sein, mit der Automatik zufriedenstellende
Ergebnisse zu erzielen. Ändern Sie in solchen Fällen die Weißabgleich-Einstellung.
1 Drücken Sie die Taste bei offenem Objektivschutzschieber.
2 Wählen Sie [PICTURE] auf dem Kameramenü-Bildschirm mit den
Tasten
3 Wählen Sie [ ] mit den Tasten / , und drücken Sie die Taste .
4
Wählen Sie die Weißabgleich-Einstellung, und drücken Sie die Taste .
Der Weißabgleich ist nun eingestellt. Drücken Sie die Taste , um das Menü zu verlassen.
5 Fotografieren Sie.
Die gewählte Weißabgleich-Einstellung bleibt für die weiteren Aufnahmen erhalten.
Schließen Sie den Objektivschutzschieber, um die Weißabgleich-Einstellung
aufzuheben.
Weißabgleich-Einstellungen
Automatik (AUTO) :
Tageslicht ( ) : Liefert natürliche Farben bei Außenaufnahmen bei
Bewölkung ( ) : Liefert natürliche Farben bei Außenaufnahmen bei
Glühlampenlicht ( ) : Liefert natürliche Farben unter Glühlampenlicht.
Leuchtstofflampenlicht ( ):
Vorsicht
16 De
/ , und drücken Sie die Taste .
Es erscheint keine Anzeige auf dem LCD-Monitor.
Liefert automatisch natürliche Farben (Vorgabe).
vollem Tageslicht (klarer Himmel).
gedämpftem Tageslicht (bewölkter Himmel).
Liefert natürliche Farben unter Leuchtstofflampenlicht.
• Durch Schließen des Objektivschutzschiebers wird der Weißabgleichmodus
wieder auf [AUTO] (Vorgabe) zurückgestellt.
• Bei einem Gemisch aus künstlichem und natürlichem Licht oder unter
Leuchtstofflampenlicht sind natürlich wirkende Farben schwer zu erzielen.
• Wählen Sie [ ], um Farben zu erhalten, die denen unter Glühlampenlicht
am nächsten kommen.
• Bei besonderen Beleuchtungsverhältnissen liefert der Weißabgleich eventuell
nicht das gewünschte Ergebnis.
• Ermitteln Sie die optimale Einstellung, indem Sie das aufgenommene Bild
auf dem LCD-Monitor anzeigen und die Farben überprüfen.
• Um festzustellen, ob die gewählte Einstellung die beste Wahl ist, überprüfen
Sie das aufgenommene Bild stets durch Anzeigen auf dem LCD-Monitor der
Kamera.
Page 77

■ BILDQUALITÄT
Die Kamera verfügt über 4 verschiedene Bildqualitätsmodi: SHQ, HQ, SQ1 und SQ2.
1 Drücken Sie die Taste bei offenem Objektivschutzschieber.
2 Wählen Sie [PICTURE] auf dem Kameramenü-Bildschirm mit den
Tasten
3 Wählen Sie [ ] mit den Tasten / , und drücken Sie die
Taste
4 Wählen Sie die Bildqualität mit den Tasten / , und drücken
Sie die Taste
Die Bildqualität ist nun eingestellt. Drücken Sie die Taste
das Menü zu verlassen.
5 Fotografieren Sie.
Der gewählte Bildqualitätsmodus bleibt für die weiteren Aufnahmen
erhalten.
Bildqualitätsmodi
/ , und drücken Sie die Taste .
.
.
erneut, um
SHQ 1.280 × 960 Pixel (Für scharfe Abzüge)
HQ 1.280 × 960 Pixel (Für Bildwiedergabe auf einem PC)
SQ1 1.024 × 768 Pixel (Für E-Mail-Anhang)
SQ2 640 × 480 Pixel (Für die Aufnahme einer großen Bilderzahl)
Die Bildqualitäts-Einstellung bleibt auch nach dem Schließ en des
Objektivschutzschiebers erhalten.
• Die Bildqualitä ts-Einstellung bleibt auch nach dem Schließen des
Objektivschutzschiebers erhalten.
• Die Anzahl der speicherbaren Bilder hä ngt von dem gewählten
Bildqualitätsmodus und der verwendeten Speichermethode ab. (Die Kapazität
des internen Speichers der Kamera beträgt 1 MB; SmartMedia-Karten sind
gegenwärtig in Kapazitäten von 8 MB bis 128 MB erhältlich.)
• Zwar ist die Anzahl der Pixel für HQ und SHQ gleich, jedoch ist die
Komprimierungsrate für SHQ niedriger, was sich bei der Vergrößerung in einer
höheren Bildschärfe äußert. SHQ benötigt auch mehr Zeit für die Aufzeichnung
und Wiedergabe von Bildern als HQ.
• Wenn Sie bei knapper Speicherkapazität
auf eine hohe Bildqualität umschalten,
kann das Warnsymbol für den internen
Speicher oder die SmartMedia-Karte
angezeigt werden. Dies bedeutet, dass
nicht genügend Speicherplatz vorhanden
ist. Wählen Sie in diesem Fall eine
niedrigere Bildqualität.
Warnsymbol
17De
Page 78

■ SPOTMESSMODUS
Bei Gegenlichtaufnahmen lassen gewöhnliche Lichtmessungs-Einstellungen
(digitale ESP-Messung) das Motiv zu dunkel erscheinen. Um diesen Mangel
auszugleichen, schalten Sie die Kamera auf den Spotmessmodus um. Diese
Funktion wird verwendet, um eine korrekte Belichtung bei Gegenlicht zu erzielen.
1 Öffnen Sie den Objektivschutzschieber, und drücken Sie die Taste
.
2 Wählen Sie [CAMERA] im Aufnahmemenü mit den Tasten / ,
und drücken Sie die Taste
3 Wählen Sie [ ] mit den Tasten / , und drücken Sie die
Taste
.
4 Wählen Sie [ SPOT] mit den Tasten / , und drücken Sie
die Taste
Damit ist die Einstellung der Spotmessung beendet. Drücken Sie die Taste
erneut, um das Menü zu verlassen.
.
5 Drücken Sie den Auslöser.
Der gewählte Messmodus bleibt für die weiteren Aufnahmen erhalten.
Durch Schließen und erneutes Öffnen des Objektivschutzschiebers wird
der Messmodus auf den ESP-Modus zurückgestellt.
Durch Schließen des Objektivschutzschiebers wird der Lichtmessmodus wieder
auf ESP-Messung (Vorgabe) zurückgestellt.
.
18 De
Page 79

B
ILDWIEDERGABE
■ WIEDERGABE VON BILDERN
Mit dieser Funktion können Sie jeweils ein Bild auf dem LCD-Monitor anzeigen.
1
Drücken Sie die Taste bei geschlossenem
Objektivschutzschieber.
Die Kamera wird im Wiedergabemodus
eingeschaltet.
Das zuletzt aufgenommene Bild wird auf
dem LCD-Monitor angezeigt.
2 Drücken Sie die Tasten / .
Drücken Sie die Tasten
jeweils das vorherige bzw. das nächste
Bild anzuzeigen.
und , um
3 Drücken Sie die Taste .
LCD-Monitor und Kamera werden ausgeschaltet.
• Wird die Taste im Aufnahmemodus zweimal in rascher Folge gedrückt
(Doppelklick), wird die Kamera auf den Wiedergabemodus umgeschaltet.
• Nach dem Einschalten der Kamera kann es vorkommen, dass der LCD-Monitor
kurzzeitig aufleuchtet und nach einer kurzen Weile ein Bild anzeigt. Dies ist
keine Funktionsstörung.
■ INDEXANZEIGE
Mit dieser Funktion können Sie vom Einzelbild-Anzeigemodus auf den
Indexmodus umschalten.
1 Drücken Sie die Taste bei geschlossenem Objektivschutzschieber.
2 Drücken Sie die Taste im Wiedergabemodus.
3 Mit der Taste wird der grüne Rahmen zum nächsten Bild, und mit
der Taste
4 Drücken Sie die Taste .
Das Bild im grünen Rahmen wird angezeigt.
zum vorherigen Bild verschoben.
19De
Page 80

Ändern der Bilderzahl für die Indexanzeige
Die Anzahl der Bilder für die Indexanzeige kann unter 4, 9 und 16 ausgewählt
werden.
1 Drücken Sie die Taste bei geschlossenem Objektivschutzschieber.
2 Drücken Sie die Taste , um den Wiedergabemenü-Bildschirm
aufzurufen.
3 Wählen Sie [PLAY] mit den Tasten / , und drücken Sie die
Taste
.
4 Wählen Sie [ ] mit den Tasten / , und drücken Sie die
.
Taste
5 Wählen Sie die Anzahl der Bilder [4], [9] und [16] mit den Tasten /
, und drücken Sie die Taste .
Damit ist die Einstellung der Bilderzahl für die Indexanzeige beendet.
Drücken Sie die Taste
erneut, um das Menü zu verlassen.
■ AUTOMATISCHE BILDVORFÜHRUNG
In diesem Modus werden alle Bilder automatisch nacheinander angezeigt.
1 Drücken Sie die Taste bei geschlossenem Objektivschutzschieber.
2 Drücken Sie die Taste , um den Wiedergabemenü-Bildschirm
aufzurufen.
3 Wählen Sie [PLAY] mit den Tasten / , und drücken Sie die
4 Wählen Sie [ ] mit den Tasten / , und drücken Sie die
5 Wählen Sie [START] mit den Tasten / , und drücken Sie die
.
Taste
Taste
.
Taste
Die automatische Bildvorführung beginnt. Die einzelnen Bilder werden
ab dem gegenwärtig angezeigten Bild jeweils 3 Sekunden lang angezeigt.
Um die automatische Bildvorführung aufzuheben, drücken Sie die Taste
.
.
Wenn Sie das Wiedergabemenü anzeigen, während ein mit dem Laufbildsymbol
( ) markier tes Bild wiedergegeben wird, können Sie [ ] nicht wählen.
Zeigen Sie zuerst ein Standbild an.
■ ZOOMANZEIGE
Sie können Bilder mit 4 Vergrößerungsfaktoren anzeigen: 1,5-fach; 2-fach; 2,5fach und 3-fach.
1 Drücken Sie die Taste bei geschlossenem Objektivschutzschieber.
20 De
Page 81

2 Drücken Sie die Taste .
Mit jedem Drücken der Taste
→ [2.0×] → [2.5×] → [3.0×] vergrößert.
wird das Bild in der Reihenfolge [1.5×]
3 Drücken Sie die Taste .
Der Scrollmodus wird aktiviert. Mit Hilfe der Tasten
können Sie das Bild nach oben, unten, links oder rechts verschieben, um
den gewünschten Ausschnitt anzuzeigen.
Drücken Sie die Taste
erneut, um den Scrollmodus aufzuheben.
/ / /
4 Drücken Sie die Taste nach dem Beenden des Scrollmodus, um
auf den Bildschirm für 1×-Einzelbild-Wiedergabe zurückzuschalten.
Der obige Vorgang kann nicht durchgefü hrt werden, während ein mit dem
Laufbildsymbol ( ) markier tes Bild wiedergegeben wird. Zeigen Sie zuerst
ein Standbild an.
■ LÖSCHEN EINZELNER BILDER
1 Drücken Sie die Taste bei geschlossenem Objektivschutzschieber.
2 Zeigen Sie das zu löschende Bild an, und drücken Sie die Taste .
3 Wählen Sie [PLAY] mit den Tasten
/ , und drücken Sie die Taste .
4 Wählen Sie [ ] mit den Tasten /
, und drücken Sie die Taste .
5 Wählen Sie [ ] mit den Tasten /
, und drücken Sie die Taste .
Das Bild wird gelöscht.
21De
Page 82

• Sie kö nnen das Löschmenü auch aufrufen, indem Sie die Taste
Vorsicht
mindestens 1 Sekunde lang gedrückt halten, während das zu löschende Bild
angezeigt wird.
• Falls das zu löschende Bild geschützt ist, oder ein Schreibschutzaufkleber an
der SmartMedia-Karte angebracht ist, kann das Bild nicht gelöscht werden.
Heben Sie die Schutzeinstellung auf, oder entfernen Sie den
Schreibschutzaufkleber von der SmartMedia-Karte, bevor Sie versuchen, das
Bild zu löschen.
• Gelöschte Bilder können nicht wiederhergestellt werden. Vergewissern Sie
sich vor dem Löschen von Bildern, dass Sie keine wichtigen Daten löschen.
■ LÖSCHEN ALLER BILDER
Sie können alle Bilder im internen Speicher oder auf einer SmartMedia-Karte
löschen.
• Um Bilder im inter nen Speicher zu löschen, darf keine SmartMedia-Karte
Vorsicht
1 Drücken Sie die Taste bei geschlossenem Objektivschutzschieber.
2 Drücken Sie die Taste , um den Wiedergabemenü-Bildschirm
3 Wählen Sie [SETUP] mit den Tasten / , und drücken Sie die
4 Wählen Sie [ ] oder [ ] mit den Tasten / , und drücken
5 Wählen Sie [ ALL ERASE] mit den Tasten / , und drücken
6 Wählen Sie [ ] mit den Tasten / , und drücken Sie die
eingesetzt sein.
• Um auf einer Smar tMedia-Karte gespeicherte Bilder zu löschen, müssen Sie
zuerst die Karte einsetzen.
aufzurufen.
Taste
.
Sie die Taste
Sie die Taste
Taste
Alle Bilder werden gelöscht.
.
.
.
Vorsicht
22 De
• Geschützte Bilder werden nicht gelöscht.
• Falls ein Schreibschutzaufkleber an der SmartMedia-Kar te angebracht ist,
können die auf der Karte gespeicherten Bilder nicht gelöscht werden.
• Gelöschte Bilder können nicht wiederhergestellt werden. Vergewissern Sie
sich vor dem Löschen, dass Sie keine wichtigen Daten löschen.
Page 83

■ SCHÜTZEN WICHTIGER BILDER
1 Drücken Sie die Taste bei geschlossenem Objektivschutzschieber.
2 Zeigen Sie das zu schützende Bild.
3 Drücken Sie die Taste , um den Wiedergabemenü-Bildschirm
aufzurufen.
4 Wählen Sie [PLAY] mit den Tasten /
, und drücken Sie die Taste .
5 Wählen Sie [ ] mit den Tasten /
, und drücken Sie die Taste .
6 Wählen Sie [ON] mit den Tasten /
, und drücken Sie die Taste .
Das Bild wird geschützt.
Um die Schutzeinstellung zu annullieren,
wählen Sie [OFF].
• Sie können ein Bild auch schützen, indem Sie die Taste mindestens 1
Sekunde lang gedrückt halten, während das zu schützende Bild angezeigt
wird.
• Geschützte Bilder werden durch das Symbol gekennzeichnet.
• Die Schutzeinstellung bleibt beim Ausschalten der Kamera erhalten.
• Geschützte Bilder können nicht durch [Löschen einzelner Bilder] oder [Löschen
Vorsicht
aller Bilder] gelöscht werden, aber durch Formatieren werden alle Bilder auf
der Karte gelöscht.
• Bilder auf einer Kar te, die mit einem Schreibschutzaufkleber versehen ist,
können nicht geschützt werden.
23De
Page 84

S
ONSTIGE FUNKTIONEN
■ LAUFBILDAUFNAHMEMODUS
Mit dieser Kamera können Sie nicht nur Standbilder, sondern auch Laufbilder
aufnehmen.
1 Drücken Sie die Taste bei offenem Objektivschutzschieber.
2 Wählen Sie [CAMERA] mit den Tasten / , und drücken Sie die
Taste
.
3 Wählen Sie [DRIVE] mit den Tasten / , und drücken Sie die
.
Taste
4 Wählen Sie [ MOVIE] mit den Tasten / , und drücken Sie
die Taste
Der Laufbildaufnahmemodus ist nun eingestellt. Drücken Sie die Taste
erneut, um das Menü zu verlassen.
.
5 Fotografieren Sie.
Drücken Sie den Auslöser zum Starten der Laufbildaufnahme. Durch
erneutes Drücken des Auslösers wird die Aufnahme gestoppt.
• Der Laufbildaufnahmemodus wird aufgehoben, wenn der LCD-Monitor durch
Drücken der Taste ausgeschaltet wird.
• Der Blitz kann im Laufbildaufnahmemodus nicht benutzt werden.
• Die Bildaufzeichnung dauert in diesem Modus länger als sonst.
• Die verfügbare Aufnahmezeit ist unterschiedlich, je nachdem, ob eine
SmartMedia-Karte verwendet wird oder nicht.
• Tonaufnahme ist nicht möglich.
■ LAUFBILDWIEDERGABE
1 Drücken Sie die Taste bei geschlossenem Objektivschutzschieber,
und zeigen Sie das gewünschte Bild mit dem Symbol
2 Drücken Sie die Taste , um den Wiedergabemenü-Bildschirm
aufzurufen.
3 Wählen Sie [PLAY] mit den Tasten / , und drücken Sie die
Taste
.
4
Wählen Sie [ ] mit den Tasten / , und drücken Sie die Taste .
5 Wählen Sie [START] mit den Tasten / , und drücken Sie die
Taste
Die Laufbildwiedergabe wird gestartet.
24 De
.
an.
Page 85

■ AUFNAHMEKONTROLLE
Diese Funktion ermöglicht das Überprüfen eines Bildes durch Anzeigen
unmittelbar nach der Aufnahme.
1
Öffnen Sie den Objektivschutzschieber, und drücken Sie die Taste .
2
Wählen Sie [SETUP] mit den Tasten / , und drücken Sie die Taste .
3 Wählen Sie [REC VIEW] mit den Tasten / , und drücken Sie
die Taste
4
Wählen Sie [ON] mit den Tasten / , und drücken Sie die Taste .
ON: Das zuletzt aufgenommene Bild wird nach Abschluss der Aufnahme
OFF: Der Bildschirm zum Aufnehmen des nächsten Bildes wird unmittelbar
Damit ist die Einstellung von Rec View beendet.
Drücken Sie die Taste
.
angezeigt.
nach dem Abschluss der Aufnahme angezeigt.
erneut, um das Menü zu verlassen.
Der eingestellte Aufnahmekontrollmodus bleibt beim Ausschalten der Kamera
erhalten.
■ SIGNALTON
Diese Funktion ermöglicht das Ausschalten des Signaltons.
1
Öffnen Sie den Objektivschutzschieber, und drücken Sie die Taste .
2
Wählen Sie [SETUP] mit den Tasten / , und drücken Sie die Taste .
3
Wählen Sie [ ] mit den Tasten / , und drücken Sie die Taste .
4
Wählen Sie [OFF] mit den Tasten / , und drücken Sie die Taste .
Der Signalton wird ausgeschaltet.
Drücken Sie die Taste
• Die Signalton-Einstellung bleibt beim Ausschalten der Kamera erhalten.
• Die Signalton-Einstellung kann auch im Wiedergabemenü vorgenommen
werden.
erneut, um das Menü zu verlassen.
■
HELLIGKEITS-EINSTELLUNG DES LCD-MONITORS
1
Öffnen Sie den Objektivschutzschieber, und drücken Sie die Taste .
2
Wählen Sie [SETUP] mit den Tasten / , und drücken Sie die Taste .
3
Wählen Sie [ ] mit den Tasten / , und drücken Sie die Taste .
25De
Page 86

4 Stellen Sie die Helligkeit des LCD-Monitors mit den Tasten /
ein, und drücken Sie die Taste .
Mit der Taste
er dunkler.
wird der LCD-Monitor heller, und mit der Taste wird
5 Drücken Sie die Taste .
Damit ist die Helligkeitseinstellung des LCD-Monitors beendet.
Drücken Sie die Taste erneut, um das Menü zu verlassen.
• Die Einstellung wird beim Schließen des Objektivschutzschiebers gespeicher t.
• Die Helligkeitseinstellung des LCD-Monitors kann auch im Wiedergabemenü
vorgenommen werden.
■
KARTENFORMATIERUNG/SPEICHEREINRICHTUNG
Diese Funktion ermöglicht das Formatieren einer SmartMedia-Karte oder des
internen Speichers. Bei diesem Vorgang werden alle Bilder auf der Karte oder
im internen Speicher gelöscht.
• Um den internen Speicher zu formatieren, darf keine SmartMedia-Karte
Vorsicht
eingesetzt sein.
• Um eine SmartMedia-Karte zu formatieren, setzen Sie zuerst die Karte ein.
• Bevor Sie eine markenfremde oder in einem PC formatierte Smar tMedia-Karte
benutzen, müssen Sie die Karte in der Kamera formatieren. Getrennt erhältliche
SmartMedia-Karten der Marke Olympus CAMEDIA bedürfen keiner
Formatierung.
1 Drücken Sie die Taste bei geschlossenem Objektivschutzschieber.
2 Drücken Sie die Taste .
3 Wählen Sie [SETUP] mit den Tasten / , und drücken Sie die
.
Taste
4 Um die Karte zu formatieren, wählen Sie [ ] mit den Tasten /
, und drücken Sie die Taste .
Um den internen Speicher zu formatieren, wählen Sie [
Tasten
/ , und drücken Sie die Taste .
] mit den
5 Wählen Sie [ FORMAT] mit den Tasten / , und drücken Sie
die Taste
.
6 Wählen Sie [ FORMAT] mit den Tasten / , und drücken Sie
die Taste
Die Karte bzw. der interne Speicher wird formatiert.
.
26 De
Sie können eine Karte oder den internen Speicher auch vom Kameramenü aus
formatieren.
Page 87

• Alle geschützten Bilder werden gelöscht. Die Formatierung einer Smar tMedia-
Vorsicht
Karte oder des internen Speichers kann nicht wieder rückgängig gemacht
werden.
• Mit einem Schreibschutzaufkleber versehene Kar ten können nicht formatiert
werden. Entfernen Sie den Aufkleber vor dem Formatieren der Kar te.
Schreibschutzaufkleber sollten nicht wiederverwendet werden.
■ SPEICHERSICHERUNG
Diese Funktion ermöglicht es Ihnen, alle im internen Speicher aufgezeichneten
Bilddaten auf eine SmartMedia-Karte zu kopieren. Setzen Sie eine Karte ein,
bevor Sie die folgenden Schritte ausführen.
1 Setzen Sie die SmartMedia-Karte ein.
2 Drücken Sie die Taste bei geschlossenem Objektivschutzschieber.
3 Drücken Sie die Taste .
4 Wählen Sie [SETUP] mit den Tasten / , und drücken Sie die
.
Taste
5 Wählen Sie [ ] mit den Tasten / , und drücken Sie die
Taste
.
6 Wählen Sie [ BACKUP] mit den Tasten / , und drücken
Sie die Taste
Alle Bilder im internen Speicher werden auf die Karte kopiert.
.
■ ANZEIGEN VON BILDDATEN
Diese Funktion ermöglicht es Ihnen, die Anzeige von Bilddaten auf dem LCDMonitor während der Bildwiedergabe ein- und auszuschalten. Wird diese
Funktion aktiviert, werden diese Daten 5 Sekunden lang angezeigt.
Bilddatenanzeige EIN Bilddatenanzeige AUS
27De
Page 88

1 Drücken Sie die Taste bei geschlossenem Objektivschutzschieber.
2 Drücken Sie die Taste .
3 Wählen Sie [PLAY] mit den Tasten / , und drücken Sie die
Taste
.
4 Wählen Sie [INFO] mit den Tasten / , und drücken Sie die
Taste
.
5 Wählen Sie [ON] mit den Tasten / , und drücken Sie die Taste
.
Die Bilddaten werden auf dem Wiedergabe-Bildschirm angezeigt.
Drücken Sie die Taste
Die Bilddaten-Einstellung wird beim Ausschalten der Kamera auf OFF (Vorgabe)
zurückgestellt.
erneut, um das Menü zu verlassen.
28 De
Page 89

F
EHLERMELDUNGEN
■ FEHLERCODES
Monitoranzeige
Fehler
Es ist keine Karte eingesetzt,
oder die Karte wird nicht
erkannt.
Abhilfemaßnahme
Schieben Sie eine Karte korrekt
ein.
Aufnahme, Wiedergabe oder
Löschung nicht möglich.
Die Karte ist schreibgeschützt.
Die SmartMedia™-Karte ist
voll. Keine weitere Aufnahme
möglich.
Der interne Speicher ist voll.
Keine weitere Aufnahme
möglich.
Keine Bildwiedergabe.
Keine Bildwiedergabe.
Ausgewähltes Bild wird nicht
angezeigt.
Wischen Sie die Kartenkontakte mit
Reinigungspapier sauber und nehmen
Sie eine erneute Formatierung vor.
Falls sich die Karte nicht formatieren
lässt, verwenden Sie eine andere Karte.
Entfernen Sie den Schreibschutzaufkleber,
um die Karte benutzen zu können.
Einzelheiten entnehmen Sie bitte der
Gebrauchsanweisung der SmartMedia™Karte.
Setzen Sie eine andere Karte ein,
oder löschen Sie unerwünschte
Bilder.
Verwenden Sie eine SmartMediaKarte, oder löschen Sie
unerwünschte Bilder.
Die Karte enthält keine Bilddaten.
Um Bilder wiedergeben zu
können, müssen erst welche
aufgenommen werden.
Es sind keine Bilder im internen
Speicher vorhanden. Um Bilder
wiedergeben zu können, müssen
erst welche aufgenommen werden.
Bilder auf einer Karte, die mit einer
markenfremden Kamera aufgenommen
oder von einem PC übertragen wurden,
können nicht angezeigt werden.
29De
Page 90

T
ECHNISCHE DATEN
Produkttyp: Digitalkamera (für Aufnahme und Wiedergabe)
Aufnahmesystem: Digitale Aufnahme, kompatibel mit JPEG (auf
Speichermedium: Interner Speicher, 1 MB, SmartMedia-Karte,
Anzahl der speicherbaren SHQ-Modus 1, HQ-Modus 3,
Bilder: SQ1-Modus 4, SQ2-Modus 7
Serienaufnahmemodus: 1,3 Bilder/Sekunde, 8 oder mehr (HQ)
Löschen: Einzelbildlöschung/Gesamtbildlöschung
Bildabtastelement: 1/3,2-Zoll-CCD-Festkörper-Bildabtastelement
Bildauflösung: 1280 × 960 Pixel (Modus SHQ/HQ)
Weißabgleich: Vollautomatische TTL-Messung
Objektiv: Olympus-Objektiv 4,5 mm, F4, 5 Elemente in
Belichtungsmessung: Digitale ESP-Messung mit Bildelement,
Belichtungsregelung: Programmierte Belichtungsautomatik
Blende: f4, f8
Verschlusszeiten*: 1 ~ 1/2000 s (mit mechanischem Verschluss)
Aufnahmebereich: 0.6m ~ ∞ (Standardmodus)
Sucher: Optischer Echtbildsucher (AF-Markierung),
LCD-Monitor: 1,5-Zoll-TFT-Flüssigkristall-Farbdisplay
Anzahl der Pixel: ca. 114.000 Pixel
DCF-Basis) und DPOF
(4MB, 8MB, 16MB, 32MB, 64MB, 128MB)
(Bei Verwendung des internen Speichers)
1.310.000 Pixel (brutto)
1024 × 768 Pixel (Modus SQ1)
640 × 480 Pixel (Modus SQ2)
Vorgabe (Tageslicht, Bewölkung,
Leuchtstofflampenlicht, Glühlampenlicht)
5 Gruppen
(entspricht 35-mm-Objektiv von
Kleinbildkamera)
Spotmessung
*Manuelle Einstellung nicht möglich
0.25m ~ ∞ (Macro-Modus)
LCD-Monitor
30 De
Page 91

Bildschirmanzeigen: Datum/Uhrzeit, Bildnummer, Schreibschutz,
Blitzladezeit: Weniger als etwa 6 Sekunden (bei
Blitzreichweite: ~ 2,5 m
Blitzmodi: Automatik (automatische Blitzauslösung bei
Fokus: Pan-Fokus
Erkennungssystem: Kontrasterkennungssystem
Selbstauslöser: ca. 12 Sekunden Verzögerung
Externe Anschlüsse: Gleichstrom-Eingangsbuchse, USB-
Datum und Uhrzeit: Gleichzeitige Aufzeichnung mit Bilddaten
Automatische Automatische Einstellung im Bereich von
Kalenderfunktion: 1981~ 2031
Kalender-Stromversorgung: Pufferung durch eingebauten Kondensator
Kartenfunktionen: DPOF-kompatibler Druckservice,
Betriebsumgebung
Temperatur: 0 ~ 40°C (Betrieb)
Luftfeuchtigkeit: 30 ~ 90 % (Betrieb)
Stromversorgung: Vier AA-Alkalibatterien, AA-Nickel-Hydrid-
Abmessungen: 123(B) × 65(H) × 44,5(T) mm
Gewicht: 190 g (ohne Batterien/Karte)
Bildqualität, Batteriespannung,
Dateinummer, Druckservice, Menüs usw.
Normaltemperatur mit neuer Batterie)
schwacher Beleuchtung und Gegenlicht),
Rotaugen-Reduzierung, Blitzsperre,
Zwangsblitz, Nachtszene, Nachtszene/
Rotaugen-Reduzierung
Schnittstelle (Speicherklasse)
Anschlussautomatik
Panoramamontage (Nur Marke Olympus
CAMEDIA)
–20 ~ 60°C (Lagerung)
10 ~ 90 % (Lagerung)
Akkus oder AA-NiCd-Batterien. Oder zwei
Lithiumbatterien CR-V3 (LB-01 von
Olympus), oder ein gesonderten Netzgerät.
AA-Manganbatterien können nicht
verwendet werden.
(ohne Vorsprünge)
Die äußere Aufmachung und die technischen Daten unterliegen Änderung
ohne Vorankündigung oder Verpflichtung seitens des Herstellers.
31De
Page 92

■ INTRODUCCIÓN
Acerca de este manual
● El contenido de este manual se encuentra sujeto a cambios sin previo
aviso. Con respecto a la información de último momento sobre los nombres
de productos, números de modelo, etc., sírvase ponerse en contacto con
su representante Olympus local.
● Hemos puesto el máximo empeño en asegurar la exactitud de la información
contenida en este manual. Sin embargo, si descubre errores o informaciones
incompletas, sírvase ponerse en contacto con su representante Olympus
local.
● La información contenida en este manual está protegida por la ley de
copyright. Se prohibe su reproducción, total o parcial, excepto para uso
personal. Se prohibe la reproducción sin el consentimiento del titular del
copyright.
● Olympus no asume responsabilidad alguna por los daños, pérdidas de
ganancias o reclamos de terceras partes debido al uso inadecuado de
este producto.
● Olympus no asume responsabilidad alguna por los daños o pérdidas de
ganancias debido a pérdida de datos de imagen resultante del servicio
realizado por terceras partes no designadas por Olympus o de otras causas.
● La calidad de las imágenes capturadas con este producto será distinta de
las capturadas con las cámaras de películas convencionales.
©
Copyright
Interferencias de Radio y Televisión
Los cambios o modificaciones no aprobados expresamente por el fabricante
podría anular la autoridad del usuario para utilizar este equipo. Este equipo
ha sido sometido a pruebas y se ha determinado que cumple con los límites
establecidos para los dispositivos digitales de Clase B, de conformidad con la
Parte 15 de las reglas de la FCC. Estos límites han sido establecidos para
proporcionar una protección razonable contra interferencias perjudiciales
cuando se utilice el equipo en instalaciones residenciales. Este equipo genera,
utiliza, y puede producir energía de radiofrecuencia y, si no se instala ni utiliza
de acuerdo con el manual de instrucciones, puede causar interferencias
perjudiciales en las radiocomunicaciones.
Sin embargo, no se garantiza que estas interferencias no se produzcan en
una instalación determinada. Si este equipo ocasiona interferencias en la
recepción de radio o televisión, lo cual puede determinarse fácilmente con
sólo apagar y volver a encender el equipo, intente corregir el problema
mediante uno o una combinación de los siguientes métodos:
• Cambie la orientación o el sitio de instalación de la antena receptora.
• Aumente la separación entre la cámara y el receptor.
• Enchufe el equipo a un tomacorriente situado en un circuito distinto del
2 Es
2001 OLYMPUS CO., LTD.
receptor.
Page 93

Sólo se deberá utilizar el cable USB para conectar la cámara a una
computadora personal (PC).
Declaración de conformidad
Número de modelo: C-100/D-370
Nombre comercial: OLYMPUS
Parte responsable: Olympus America Inc.
Dirección: 2 Corporate Center Drive, Melville, Nueva York
Número de teléfono: 631-844-5000
Este equipo cumple con la Parte 15 de las reglas de la FCC. La operación
se encuentra sujeta a las dos condiciones siguientes:
(1) Este dispositivo no producirá interferencias perjudiciales, y
(2) Este dispositivo debe aceptar cualquier interferencia recibida,
incluyendo las que puedan producir una operación indeseable.
Este aparato digital de clase B cumple con todos los requerimientos
establecidos por los Reglamentos Canadienses sobre Equipos
Causantes de Interferencias.
La marca “CE” indica que este producto cumple con los requisitos
europeos sobre seguridad, salud, medio ambiente y protección
del cliente.
11747-3157 EE.UU.
Marcas comerciales
● Los productos Microsoft, tales como Windows e Internet Explorer, son
marcas comerciales registradas o marcas comerciales de Microsoft
Corporation en los Estados Unidos de América y otros países.
● Macintosh y Apple son marcas registradas de Apple Computer Inc.
● Todas las otras marcas y nombres de productos son marcas registradas
de sus propietarios respectivos.
Acerca del sistema de archivos de la cámara
El reglamento DCF (Normas de Diseño para Sistema de Archivos de Cámara),
es una norma establecida por la JEIDA (Japan Electronics and Information
Technology Association).
3Es
Page 94

■ CONTENIDO
PREPARATIVOS 5
Nomenclatura ................................... 5
Fijación de la correa ......................... 6
Colocación de las pilas .................... 6
Utilización de una tarjeta SmartMedia
(opcional) .................................... 7
Encendido/apagado de la cámara ... 8
Ajuste de fecha y hora ..................... 9
FUNCIONES DE GRABACIÓN
Toma de fotografías ....................... 11
Uso del flash .................................. 12
Modo Macro ................................... 13
Autodisparador ............................... 13
Modo tele digital ............................. 14
Modo secuencial ............................ 14
Compensación de la exposición .... 15
Balance de blancos ........................ 16
Calidad de imagen ......................... 17
Modo de medición puntual ............. 18
REPRODUCCIÓN DE IMÁGENES
Reproducción de una imagen ........ 19
Reproducción de índice ................. 19
Reproducción automática .............. 20
Reproducción de primeros planos . 20
Borrado de una imagen ................. 21
Borrado de todas las imágenes ..... 22
Protección de imágenes importantes ..
11
19
OTRAS FUNCIONES 24
Modo vídeo .................................... 24
Reproducción de imágenes en
movimiento ................................ 24
Rec View ........................................ 25
Tono de pitido ................................. 25
Ajuste del brillo del monitor ............ 25
Formateo de la tarjeta/Configuración
de la memoria ........................... 26
Respaldo de la memoria ................ 27
Visualización de información sobre la
imagen en el monitor ................. 27
CÓDIGOS DE ERROR 29
Códigos de error ............................ 29
Especificaciones 30
22
4 Es
Page 95

P
REPARATIVOS
■ NOMENCLATURA
2
1
3
458
7
A
B
0
C
G
H
I
96
1 Botón disparador
2 Cubreobjetivo
3 Objetivo
4 Flash
5 Palanca Macro
6 Luz del autodisparador
7 Jack DC-IN
8 Tapa del conector
9 Conector USB
EFD
0 Monitor
A Visor
B Lámpara verde
C Pad selector
D Rosca para el trípode
E Botón del monitor
F Botón OK/Menú
G Tapa de la tarjeta
H Enganche para correa
I
Tapa del compar timiento de las pilas
5Es
Page 96

■ FIJACIÓN DE LA CORREA
1 Haga pasar el extremo corto de la correa
a través del enganche para correa.
2 Haga pasar el extremo largo de la correa
a través del lazo.
3 Tire de la correa con fuerza y compruebe
que haya quedado firmemente colocada.
■ COLOCACIÓN DE LAS PILAS
Esta cámara utiliza cuatro pilas alcalinas AA (suministradas), de NiMH, de
litio, o de NiCd. También funciona con dos paquetes de pilas de litio CR-V3.
1 Compruebe que el cubreobjetivo esté cerrado y que el monitor y la
lámpara verde se encuentren apagados.
2 Empuje la tapa del compartimiento de
las pilas hacia A y levántela en la
dirección B.
3 Inserte las pilas tal como se indica en
la ilustración, asegurándose de que
estén correctamente orientadas.
4 Levante la tapa del compartimiento de
las pilas en la dirección C y ciérrela
firmemente presionando la marca
en la dirección D.
• Si encuentra dificultades en cerrar la tapa del compar timiento de las pilas,
Precaución
6 Es
presione sobre la marca y la marca [OPEN] de la tapa con ambos
pulgares, cuidando de no aplicar una fuerza indebida.
• Si deja la cá mara con las pilas retiradas durante aproximadamente una
semana, todos los ajustes volverán a sus valores de ajuste por omisión.
• Si se debilitan las pilas mientras está alimentando la cámara mediante las
mismas, el símbolo de batería se iluminará en rojo. Cuando se estén por
descargar, se apagará el monitor LCD y parpadeará la lámpara verde.
A
B
D
C
Page 97

■
UTILIZACIÓN DE UNA TARJETA SMARTMEDIA (OPCIONAL)
Si desea almacenar más imágenes que las que puede guardar la memoria
interna, deberá utilizar una tarjeta SmartMedia. (Por favor consulte el
cuadro de la página siguiente). Como la tarjeta SmartMedia no se entrega
con esta cámara, deberá adquirirla por separado.
Esta cámara acepta sólo memoria removible SmartMedia. Si inserta una
tarjeta SmartMedia, la imagen será guardada en la tarjeta y podrá
reproducir la imagen con la tarjeta. Si retira la tarjeta de la cámara, la
imagen será almacenada en la memoria interna, y podrá reproducir la
imagen con la memoria interna.
➜➜➜
Marca de inserción de la tarjeta
1 Asegúrese de que la cámara esté apagada.
Cierre el cubreobjetivo y verifique que el monitor y la lámpara verde se
encuentren apagados.
2 Abra la tapa de la tarjeta.
3 Inserte correctamente la tarjeta SmartMedia™, tal como se observa
en la ilustración.
En el interior de la tapa de la tarjeta, se provee una marca indicando la
orientación correcta de la tarjeta.
Para sacar la tarjeta, sujétela con la punta de los dedos y extráigala en la
dirección indicada.
4 Cierre la tapa de la tarjeta hasta que encaje con un chasquido.
Nota
Es posible que la cámara no pueda reconocer tarjetas que no sean de Olympus
ni de Lexar, o tarjetas formateadas con otros equipos, como un PC.
Formatee la tarjeta con la cámara antes de utilizarla. Véase [For mateo de la
tarjeta/Configuración de la memoria] ( pág. 26).
• No abra nunca la tapa de la tarjeta ni retire la tarjeta Smar tMedia o las pilas
Precaución
mientras la cámara se encuentre activada. Los datos de la tarjeta se podrían
perder, y no las podrá recuperar.
• La tarjeta Smar tMedia es un elemento de precisión. No la someta a golpes ni
fuerzas indebidas. No toque el área de metal de color dorado de la tarjeta.
7Es
Page 98

• Si la tarjeta Smar tMedia lleva el sello de protección contra escritura, alguna
Precaución
de las funciones de la cámara
serán ignoradas. Cuando utilice
estas funciones, retire el sello de
la tarjeta.
Sello de protección
contra escritura
Número aprox. de imágenes que se pueden grabar
Capacidad de la
memoria de la tarjeta
Memoria interna Aprox. 1 3 4 7
Calidad de
imagen
SHQ HQ SQ1 SQ2
4 MB 6 12 16 29
8 MB 12 24 33 58
16 MB 25 49 66 110
32 MB 51 99 132 221
64 MB 102 199 265 442
128 MB 204 399 532 887
■ ENCENDIDO/APAGADO DE LA CÁMARA
PARA REALIZAR LAS TOMAS
Encender la cámara ... Abra el cubreobjetivo.
Apagar la cámara ....... Cierre el cubreobjetivo.
La cámara se enciende
La cámara se enciende en el modo de grabación.
La cámara se apaga.
La cámara se apaga
8 Es
• Cuando abra el cubreobjetivo sin haber insertado una tarjeta, se visualizará
Nota
“NO CARD” en el monitor. Esto no es una anomalía. Para realizar las tomas,
utilice la memoria interna de la cámara.
• El modo de la cámara cambiará al de ahorro de energía tras un período de
inactividad de 3 minutos. Para realizar las tomas, encienda la cámara.
Page 99

PARA REPRODUCIR LAS IMÁGENES
Encender el monitor ..
Apagar el monitor ...... Presione el botón
Cámara con el
cubreobjetivo
cerrado
El modo de la cámara cambiará al de ahorro de energía tras un período de
Nota
inactividad de 3 minutos. Para reproducir las imágenes, encienda la cámara.
Presione el botón
La cámara se encenderá en el modo de reproducción
y el monitor se enciende.
La cámara y el monitor se apagan.
El monitor se enciende
(se enciende) (se apaga)
con el cubreobjetivo cerrado.
.
El monitor se apaga
■ AJUSTE DE FECHA Y HORA
1 Presione el botón .
El monitor se enciende.
2 Presione el botón .
Aparecerá el menú de reproducción.
3 Seleccione [SETUP] utilizando los botones
/ y presione el botón .
4 Seleccione [ ] utilizando los botones /
y presione el botón .
5 Utilizando los botones / , seleccione el
formato de fecha [Y-M-D (Año-Mes-Día), M-DY (Mes-Día-Año) o D-M-Y (Día-Mes-Año)] y
presione el botón
Aparecerá la pantalla de ajuste de la fecha.
.
9Es
Page 100

6 Ajuste el primer ítem utilizando los
botones
.
Avance al ítem siguiente.
/ , y presione el botón
7 Repita el proceso hasta que la fecha
y la hora queden ajustadas.
8 Presione el botón cuando el reloj marque
00 segundo.
El ajuste de fecha y hora ha finalizado.
9 Presione de nuevo el botón .
Con esto finalizará el menú de ajuste de fecha y hora.
10 Presione el botón para apagar el monitor.
Si se deja la cámara con las pilas retiradas o con las pilas descargadas, la
configuración de la fecha será borrada o quedará mal ajustada. Antes de realizar
Precaución
tomas importantes, asegúrese de haber realizado correctamente el ajuste de
fecha y hora.
Utilizando el mismo procedimiento, la fecha y la hora también se pueden ajustar
Nota
en el modo de grabación y en el mode de reproducción.
10 Es
 Loading...