

Olympus CAMEDIA D-510 ZOOM, CAMEDIA C-200 ZOOM QUICK START GUIDE
Confirm the Picture You’ve Just Taken
OK
HARD
NORMAL
SOFT
CANCEL SET
OK
OK
WBPIC
[
AUTO
]
[
HQ
]
[
NORMAL
]
[
NORMAL
]
SETCANCEL
OK
WB
CAM
PIC
CARD
SET
[ HQ ]
[
NORMAL
]
[
NORMAL
]
[
AUTO
]
SETEXIT OK
HQ
2001-01-23
2
HQ
C-200 ZOOM
FILE
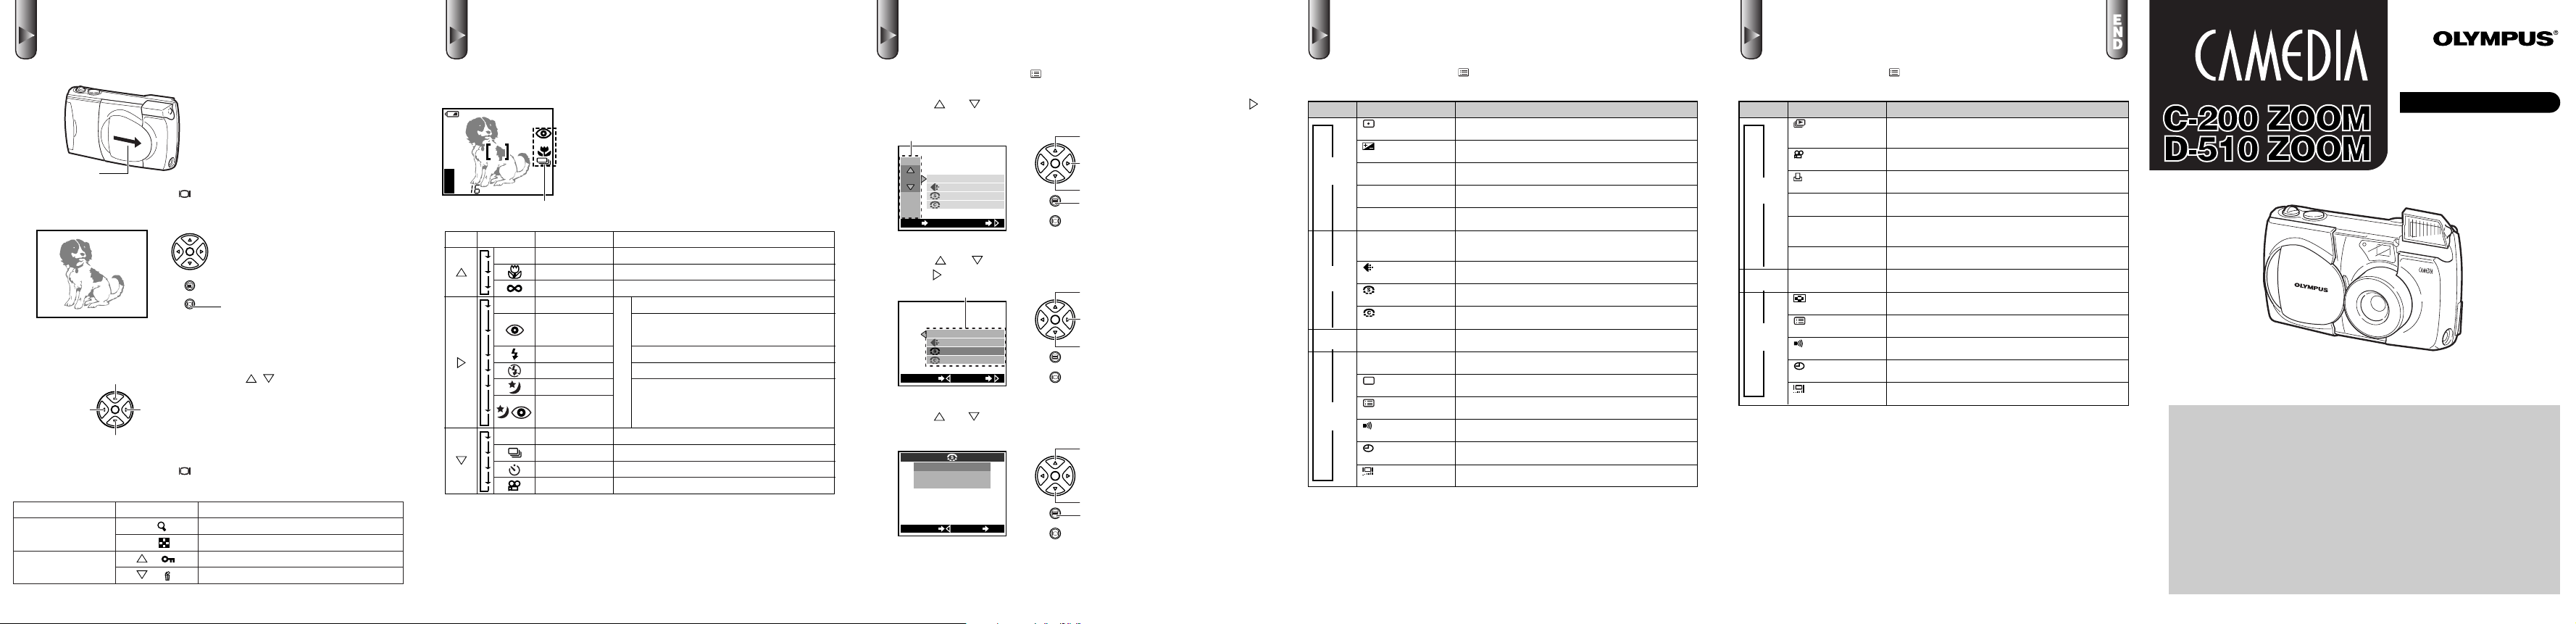
Use the CAMEDIA’s Convenient Functions Menu
Use the Menu Functions
Shooting Menu
Playback Menu
1. Make sure the lens barrier is closed.
Lens barrier
2. Press the monitor button ( ) to playback the picture.
Monitor
The camera will turn on in playback mode.
Power on/off
3. If you’ve already taken more than one picture , you can use the arro w
pad to play back a different picture.
Displays 10th image back
Displays
previous
image
Displays
the next
image
Press rapidly.
Displays 10th image ahead
4. Press the monitor button ( ) again to turn the power off.
● Convenient Playback Mode Functions
Button/lever
Zoom lever
Arrow pad (Pressing
for over 1 second)
Printed in Japan
Icon
T ( )
W ( )
()
()
Enlarges images during playback
Plays back multiple images simultaneously
Lock images so they cannot be erased
Deletes the image currently being played back
Function
VT256902
Monitor
In the shooting mode (with the lens barrier
open), use the arrow pad buttons to display the
mark indicating the current function on the monitor. Pressing these buttons lets you scroll
through the available functions until the one you
want to use is displayed.
Mark
Button
Mark Function
Descriptions
Auto focus Suitable for ordinary shots (80 cm ~ infinite).
Macro
Quick focus
Taking close-up pictures (about 20 ~ 80 cm).
Fixing a far-distance focus.
Auto-flash Flash automatically fires when required.
Red-eye
reduction
Fill-in flash
No flash
Night scenes
Night scenes +
Red-eye reduction
Single frame
Sequence
Selftimer
Movie
For more details on the functions described here, refer to the camera’s Reference
Manual on the software CD.
Significantly reduces the red-eye
phenomenon.
Flash always fires.
Flash does not fire.
Flash
Suitable for taking pictures of subjects
against nighttime backgrounds.
Taking pictures one by one.
Taking a series of shots.
Using the 10-second selftimer functions.
Shooting movies.
1. Press the menu button ( ) to display the menu.
2. Press or on the arrow pad to select the group, and press
on the arrow pad to display the next screen.
Group
Up
Set
Down
Display the menu
3. Press or on the arrow pad to select the selection item, and
press on the arrow pad to display the next screen.
Items for selection
Up
Set
Down
4. Press or on the arrow pad to select the setting, and press the
OK button to confirm the setting.
Up
Down
Set
5. Press the OK button several times until the menu disappears.
Pressing the menu button ( ) when in the shooting mode displays the
shooting menu on the monitor.
Group Item Purpose
Spot metering mode
➞
Exposure compensation
ISO
CAM
➞
PIC
➞
CARD
(Card)
➞
SET
ISO sensitivity
DIGITAL ZOOM
Digital zoom
PANORAMA
Panorama shooting
WB
White balance
Record mode
Sharpness
Contrast
CARD SETUP
Card setup
REC VIEW
Rec view
File naming
Clear settings
Beep sound
Date & time
Monitor adjustment
(Shooting)
(Image)
(Settings)
For more details on the functions described here, refer to the camera’s Reference
Manual on the software CD.
Exposure is measured at only the center of the subject.
Adjusting image brightness.
By setting the ISO sensitivity, you can adjust the camera’s
sensitivity to light.
Allows up to 9x zoom shooting.
Allows panoramic shots to be taken.
CAMEDIA Master software is required.
Canceling automatic color balance adjustment, and adjusting the setting to suit daylight, overcast, incandescent or fluorescent lighting conditions.
Selecting picture size and image resolution, as well as
increasing or decreasing the number of storable pictures.
Sharpens the distinctness and strength of the contours of
the subject.
Allows a harder contrast (more distinction between lighter
and darker areas) for pictures to be selected.
Formats (initializes) SmartMedia cards.
Displays the picture just taken even while it is still being written to the SmartMedia card.
Selecting how files are named.
Retaining settings in memory even after power is turned off.
Setting the camera warning beep sound on or off.
Allows the date and time to be set.
Allows the brightness of the monitor to be adjusted.
Pressing the menu button ( ) when in the playback mode displays the
playback menu on the monitor.
Group Item Purpose
Automatic playback*
(Slide show)
Movie playback**
➞
Print reserve
PLAY
(Playback)
(Settings)
* Appears in the playback menu only when still pictures are being played back on the
** Appears in the playback menu only when movie pictures are being played back on
For more details on the functions described here, refer to the camera’s Reference
Manual on the software CD.
ROTATE
Rotated playback
INFO
Image information
display
EDIT
➞
Edit
CARD SETUP
CARD
Card setup
(Card)
Index display
➞
Clear settings
SET
Beep sound
Date & time
Monitor adjustment
monitor.
the monitor.
Allows images to be played back in order automatically.
Allows movie pictures to be played back.
Allows image printing to be set before taking the
SmartMedia card to a DPOF-equipped photo lab.
Allows individual images taken with the camera on its side
to be rotated so that they are played back vertically.
Selects whether or not to display image information set
during shooting on the monitor.
Changes the image color or reduces the image size.
Allows all stored images to be erased, and/or reformat
(initialize) SmartMedia cards.
Allows the number of pictures displayed on the monitor at
one time to be changed during multiple image playback.
Retaining all settings in memory even after power is turned
off.
Selects whether or not to have the camera use beeping
sounds to indicate alerts.
Allows setting of date and time information.
Allows the monitor brightness to be adjusted.
DIGITAL CAMERA
START HERE
Quick Start Guide
This is all you need to take great pictures!
For first-time users
San-Ei Building, 22-2, Nishi Shinjuku 1-chome, Shinjuku-ku, Tokyo, Japan.
Two Corporate Center Drive, Melville, NY 11747-3157, U.S.A. Tel. 631-844-5000
(Technical support) Tel. 1-888-553-4448 (Toll-free for within 30 days of purchase.)
(Premises/Goods delivery) Wendenstraße 14-18, 20097 Hamburg, Germany. Tel. 040-237730
OLYMPUS OPTICAL CO., LTD.
(Customer support) Tel. 0426-42-7499 Tokyo
http://www.olympus.co.jp
OLYMPUS AMERICA INC.
Tel. 1-631-844-5520 (After 30 days of purchase, contact this
distec@olympus.com
http://www.olympus.com
OLYMPUS OPTICAL CO. (EUROPA) GMBH.
(Letters) Postfach 10 49 08, 20034 Hamburg, Germany.
http://www.olympus-europa.com
number.)
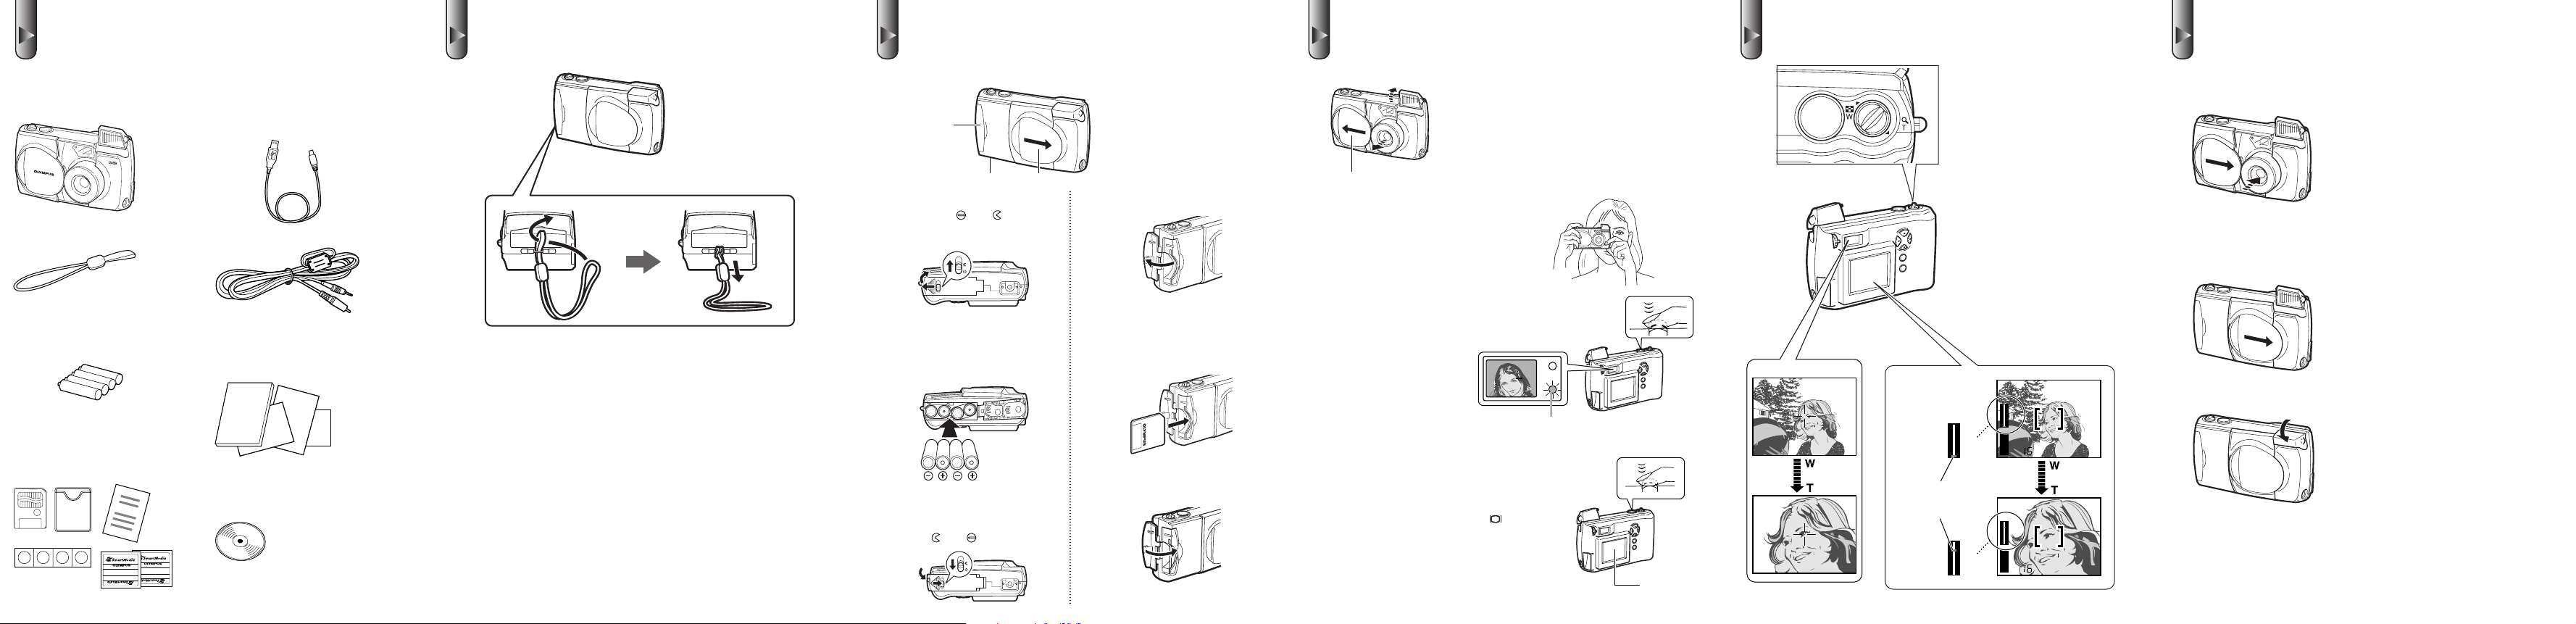
Confirm the Contents
C-200 ZO
OM
Made in Japan
Made in Japan
HQ
T
W
T
W
T
W
HQ
Zoom status
(Displayed during
zoom lever operation.)
Zoom bar
T
W
Monitor
Attach the Strap
Insert the Batteries and SmartMedia Card
Shoot the Picture
Enlarge Your Shots Turn the Power Off
Please check the contents of the box to confirm that you have all of the
accessories shown below. If any of these are missing or damaged,
please contact your point of purchase.
Camera
Strap Video cable
Four AA (R6) alkaline batteries Basic manual,
SmartMedia card,
Anti-static card case, Labels (2),
Write-protect adhesive seals (4),
Instructions
Dedicated USB
(Universal Serial Bus) cable
Quick Start Guide, Warranty,
User card (not included for
some regions)
Software CD-ROMs
(including reference manual,
the USB driver and other
necessary software)
Attach the strap to the camera as shown in the diagram.
1.Make sure the lens barrier is closed.
Card cover
Battery
compartment cover
2. Slide the battery compartment
lock from to . Slide the
battery compartment cover to
the side and lift it up to open.
3. Insert the batteries into the
camera as shown in the diagram, making sure that the
negative and positive poles
are correctly aligned.
Lens barrier
5. Open the card cover.
6. Insert the SmartMedia card
7.
4. Close the battery compart-
ment cover, and slide the
battery compartment lock
from to .
into the camera as shown in
the diagram, making sure
that it is pushed all the way
in.
Close the card cover so it
clicks into place.
1. Slide the lens barrier open until clicks.
The lens extends and the flash pops up.
When the lens does not extend, the lens barrier is not fully opened.
Slide the lens barrier open until it clicks.
Lens barrier
2. Bring the camera into position and
look through the viewfinder.
3. Press the shutter but-
ton gently, and confirm
the green lamp next to
the viewfinder is illuminating.
If the green lamp is blinking, it means the subject
is out of focus. If this is
the case, gently press
the shutter button again.
Green Lamp
4. Full-press the shutter button.
NOTE
Pressing the monitor button ( ) turns the
monitor on.
It is also possible to take pictures while
looking at the monitor.
Monitor
Push the zoom lever toward W
(Wide angle) to shoot wideangle shots.
Pull the zoom lever toward T
(Telephoto) to zoom in.
1. Close the lens barrier halfway. Just before the lens barrier
comes in contact with the lens, it will make a click that you can
feel with your fingers.
The lens will recess into the camera.
Do not push the lens barrier against the lens.
2. Wait until the lens fully retracts, and then close the lens barrier
the rest of the way to turn the power off.
3. Close the flash.
 Loading...