

Page 1

B. DISASSEMBLY AND ASSEMBLY PROCEDURE C-5000ZOOM
B. DISASSEMBLY AND ASSEMBLY
PROCEDURE
[1] REMOVAL OF CABINET BACK, CABINET FRONT .............................................. B-2
[2] REMOVAL OF LCD AND OPERATION UNIT ......................................................... B-3
[3] REMOVAL OF GRIP AND FLASH# ........................................................................ B-3
[4] REMOVAL OF MAIN BOARD, FINDER AND LENS#............................................. B-4
[5] REMOVAL OF POWER BOARD, HOOD SCREW AND TRIPOD FRAME ............. B-5
B-1 Ver.1
Page 2
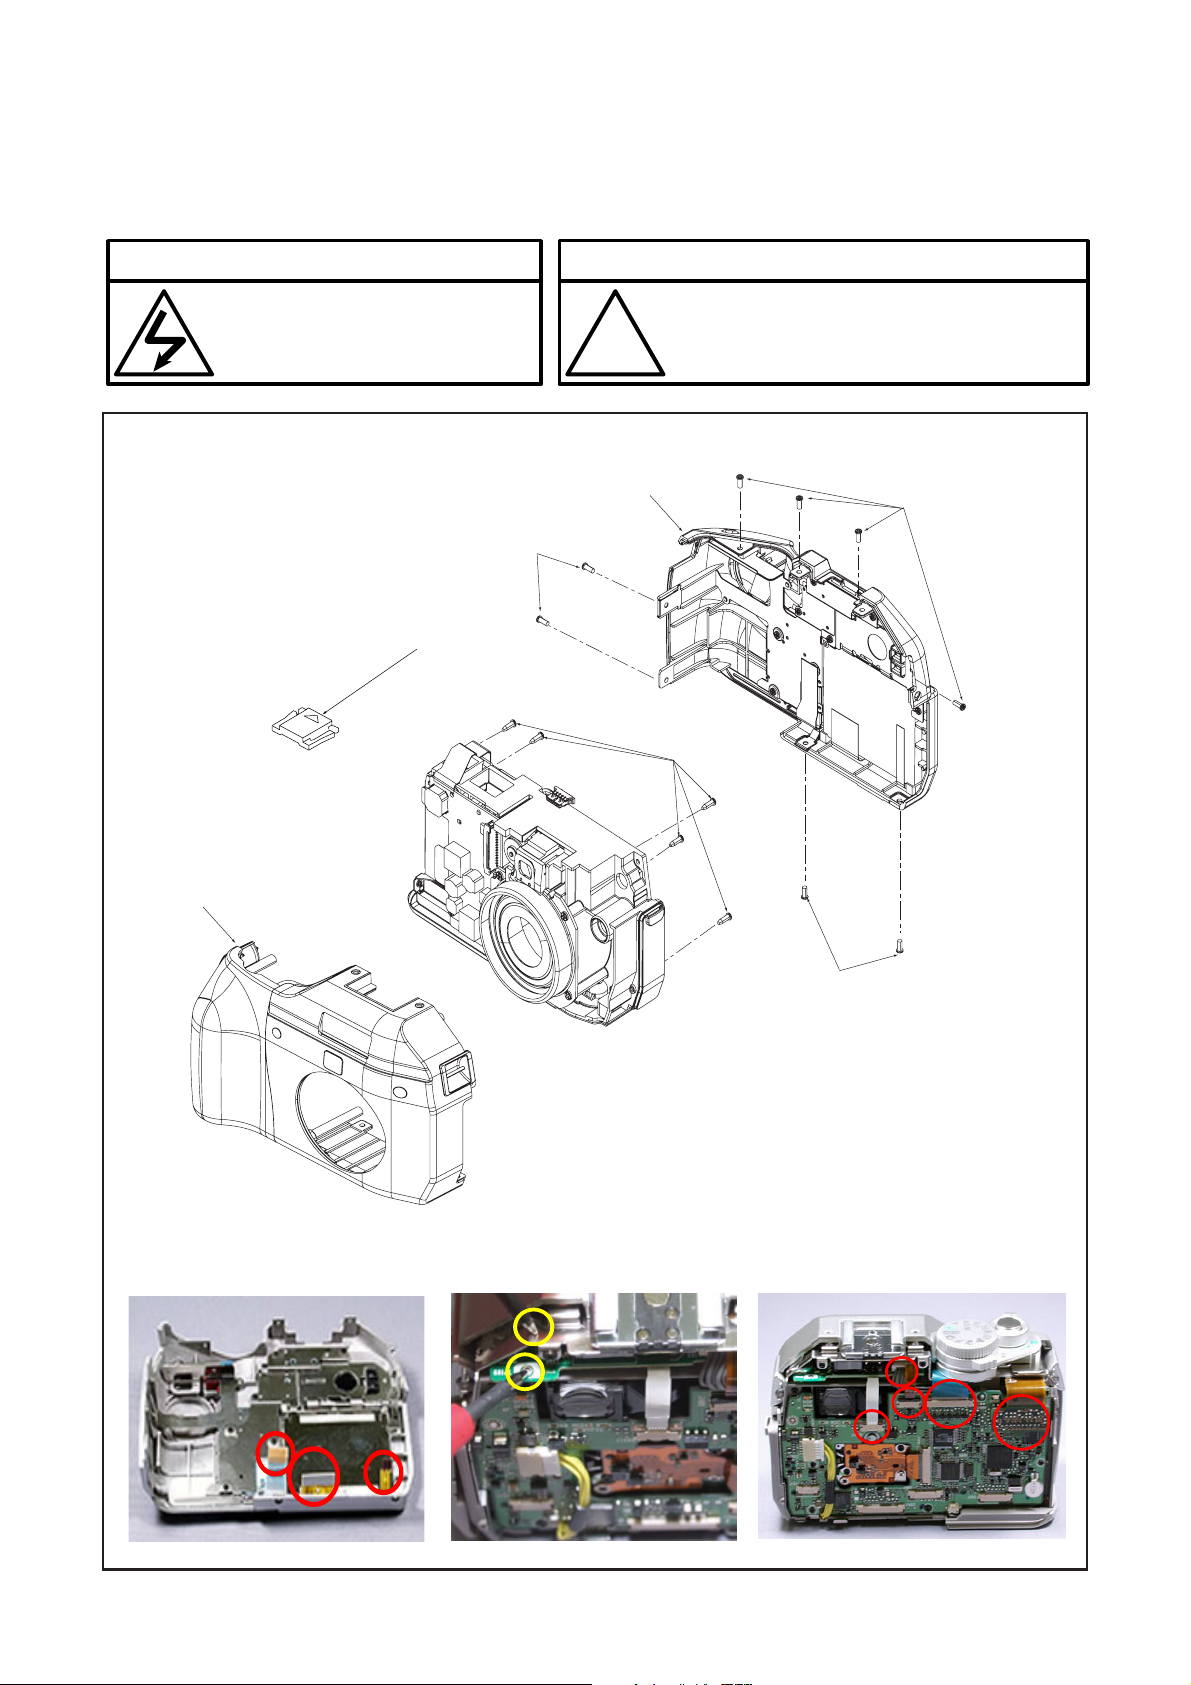
[1] REMOVAL OF CABINET BACK, CABINET FRONT
Disassembly perform as follows and assembly perform by reversing the disassembly steps.
Be sure to discharge the main capacitor, then continue to disassembling.
C-5000ZOOMB. DISASSEMBLY AND ASSEMBLY PROCEDURE
! Beware of electric shock
Danger of electric shock.
Use a discharging tool to remove
the electrical charge before working.
1
Notice
The lead free solder is applied to this product.
!
2
Use the lead free solder in working.
4
7
2
8
3:Connector
2
1.Shoe Cover
2.Eight Screws
3.Connector
4.Rear Cover
5.Discharge(TP109-GND)
6.Connector
7.Five Screws
8.Front Cover#
5:Discharege place 6:Connector
B-2 Ver.1
Page 3

C-5000ZOOM B. DISASSEMBLY AND ASSEMBLY PROCEDURE
[2] REMOVAL OF LCD AND OPERATION UNIT
12
11
10
8
4
5
7
2
1
3
6
9
1.Three Screws
2.Rear Flame
3.LCD
4.Eye Cap
5.Eye Cap Panel
6.Focus Panel
7.Six Screws
8.Operation#
9.Operation Knob
10.Access LED Panel
11.Quiq view knob
12.RearCase
[3] REMOVAL OF GRIP AND FLASH #
2
5
2
3
4
6
1
1.Three Screws
2.Top Angle#
3.LCD
4.Two Screws
5.Grip
6.Front Cover
B-3 Ver.1
Page 4

[4] REMOVAL OF MAIN BOARD ,FINDER AND LENS #
11
12
8
9
C-5000ZOOMB. DISASSEMBLY AND ASSEMBLY PROCEDURE
1
7
6
P
U
S
M
Y
L
L
E
O
N
S
Z
O
8
.
O
4
-
M
8
.
2
:
.
8
1
-
m
23
m
.
4
2:Connector
10
4
3
5
10:LPF
Lens Side
Blue-coating
(Lens-Side)
The field by which blue-coating is carried out is a lens side.
(CCD-Side)
1:Two Screws
2:Connector
3.Main board
4.Three Screws
5.Connector(Lens-Power)
6.Lens
7.Two Screws
8.CCD #
9.CCD Rubber
10.LPF
11.Screw
12.Finder
B-4 Ver.1
Page 5

C-5000ZOOM B. DISASSEMBLY AND ASSEMBLY PROCEDURE
[5] REMOVAL OF POWER CIRCUIT BOARD , HOOD SCREW AND TRIPOD FRAME
16
13
14
12
5
4
1
3
2
10
8
7
6
15
9
1.Four Screws
2.Hood Screw
3.Camera Sheet
4.Screw
5.Power Board
6.Battrey Cover
7.Two Screws
8.Screw
9.Tripod Frame#
10.ESD Angle
11ESD Plate
12.Battery Plate
13.Battery Spring
14.Eject Spring
15.Eject Knob
16.Base Frame
11
B-5 Ver.1
 Loading...